

Page 1

KDS-8F Quick Start
P/N:
2 9 0 0 - 3 0 1 2 1 6 QS
Rev:
1
Scan for full manual
KDS-8F Quick Start Guide
This guide helps you install and use your KDS-8F for the first time.
Go to www.kramerav.com/downloads/KDS-8F to download the latest user manual and check if firmware
upgrades are available.
Step 1: Check what’s in the box
KDS-8F 4K SDVoETM Fiber Transceiver
12V DC power adapter
4 rubber feet
1 SFP+ module
Quick start guide
#
Feature
Function
1
POWER LED
Lights when the device is powered ON.
2
T/R LED
Encoder mode: Lights green.
Decoder mode: Lights amber.
3
SOURCE LED
Encoder/Decoder mode: Lights green when the HDMITM input is live and selected.
Encoder/Decoder mode: Lights ORANGE when the DP input is live and selected.
Encoder mode: Light is off when SFP+ source is selected.
4
USB Connectors
Decoder mode: Connect to keyboard, camera, and mouse (KVM).
5
LAN LED
Lights when the 1GbE LAN connection is active.
6
VIDEO LED
Encoder mode: Lights when HDMI input signal is detected.
Decoder mode: Genlock mode – Lights when streaming video is detected.
FastSwitch mode – Lights constantly.
7
LINK Tx and Rx LEDs
Lights to indicate data transmission and reception activity over the SPF+ 10GbE streaming connection.
8
USB LED
Lights constantly when USB connection is active and synced.
9
OSD
Navigation
Buttons
MENU
Press to enter the OSD menu, or to exit menu items.
+
When in OSD: Press to move up or
adjust selections.
When not in OSD:
• Press and hold both buttons simultaneously for 10
seconds to change the mode from encoder to decoder
or decoder to encoder.
• Decoder mode: Press one of the buttons to toggle the
video source between SFP+, HDMI IN or DP IN.
-
When in OSD: Press to move down
or adjust selections.
INFO/
ENTER
When in OSD: Press to confirm a selection or to go deeper into a menu item.
When not in OSD: Press to activate the Information OSD.
10
HDMI OUT Connector
Encoder mode: Connect to a video acceptor for local viewing of the video source connected to HDMI IN.
Decoder mode: Connect to a video acceptor for viewing the video streamed from the encoder.
11
HDMI IN Connector
Encoder mode: Connect to a video source for streaming.
Decoder mode: Connect to a video source for a local video input.
12
DP IN Connector
Encoder mode: Connect to a DisplayPort video source for streaming.
Decoder mode: Connect to a DisplayPort video source for a local video input.
13
SFP+ Connector
Connect via a fiber optic cable to another SDVoETM unit or to another device for streaming video.
14
1GbE LAN RJ-45
Connector
Connect to a 1G device.
15
AUDIO 3.5mm Jack
Encoder mode: Connect to an unbalanced analog audio source for embedding audio in the streaming signal.
Decoder mode: Connect to an unbalanced analog audio acceptor for de-embedding audio from the
streaming signal.
16
IR OUT 3.5mm Jack
Connect to a 38kHz IR transmitter for transmitting the IR signal that was extended via the streaming line. For
example, connect to an IR transmitter to control a display.
17
IR IN 3.5mm Jack
Connect to a 38kHz IR sensor for extending the IR signal via the streaming line.
18
SERVICE Mini USB
Connector
Encoder mode: Connect to host (PC).
KDS-8F 4K SDVoE Fiber Transce iver
POWER T/R SOURCE LAN VIDEO Tx Rx
LINK
MENU
-
+
INFO/ENTER
TM
USB
1 98765432
Tx Rx G
AUDIO IR OUT IR IN RS-232
SERVICE
1GbE LAN
HDMI OUT HDM I IN
TM
TM
DP IN
SFP+
10 1514131211 2019181716
Step 2: Get to know your KDS-8F
Page 2
#
Feature
Function
19
RS-232 3-Pin Terminal
Block
Connect to a serial controller or serial controlled device for extending the serial control signal via the
streaming line to control an external device.
20
12V DC Connector
Connect to the power adapter.
Mount to a flat surface using the attached mounting brackets or attach the rubber feet and place on a flat surface.
• Ensure that the environment (e.g., maximum ambient temperature & air flow) is compatible for the device.
• Avoi d uneven mechanical loading.
• Appropriate consideration of equipment nameplate ratings should be used for avoiding overloading of the circuits.
• Reli able earthing of rack-mounted equipment should be maintained.
Safety Instructions (See www.kramerav.com for updated safety information)
Caution:
• F or products with relay terminals and GPI\O ports, please refer to the permitted rating for an external connection, located next to the terminal or in the User Manual.
• T here are no operator serviceable parts inside the unit.
Warning:
• Use only the power cord that is supplied with the unit.
• Di sconnect the power and unplug the unit from the wall before installing.
If DHCP is not available on your network, an APIPA (Automatic Private IP Addressing) address is assigned.
HDMI
Media Player
Audio
Amplifier
Audio Source
HDMI
4K Display
IR Controller
IR
Display
Audio
4K Display
HDMI
IR
RS-232
RS-232
PC Controller
KDS-8F as encoder
KDS-8F as decoder
10Gbit/s LAN
1G Device
Eth
1G Device
Eth
TxRx G
AUDIO IR OUT IR IN RS-232
SERVICE1GbE LANHDMI OUT HDMI IN
TM
TM
DP IN
SFP+
Fiber
Tx Rx G
AUDIO IR OUT IR IN RS-232
SERVICE1GbE LANHDMI OUT HDMI IN
TM TM
DP IN
SFP+
Host
Computer
Back
USB
KDS-8F 4K SDVoE Fiber Transceiver
POWER T/R SOURCE LAN VIDEO Tx Rx
LINK
MENU
-
+
INFO/ENTER
TM
USB
Camera
Mouse
Keyboard
Front
USB
USB
USB
The terms HDMI, HDMI High-Definition Multimedia Interface, and the HDMI Logo are trademarks or registered trademarks of HDMI Licensing Administrator, Inc.
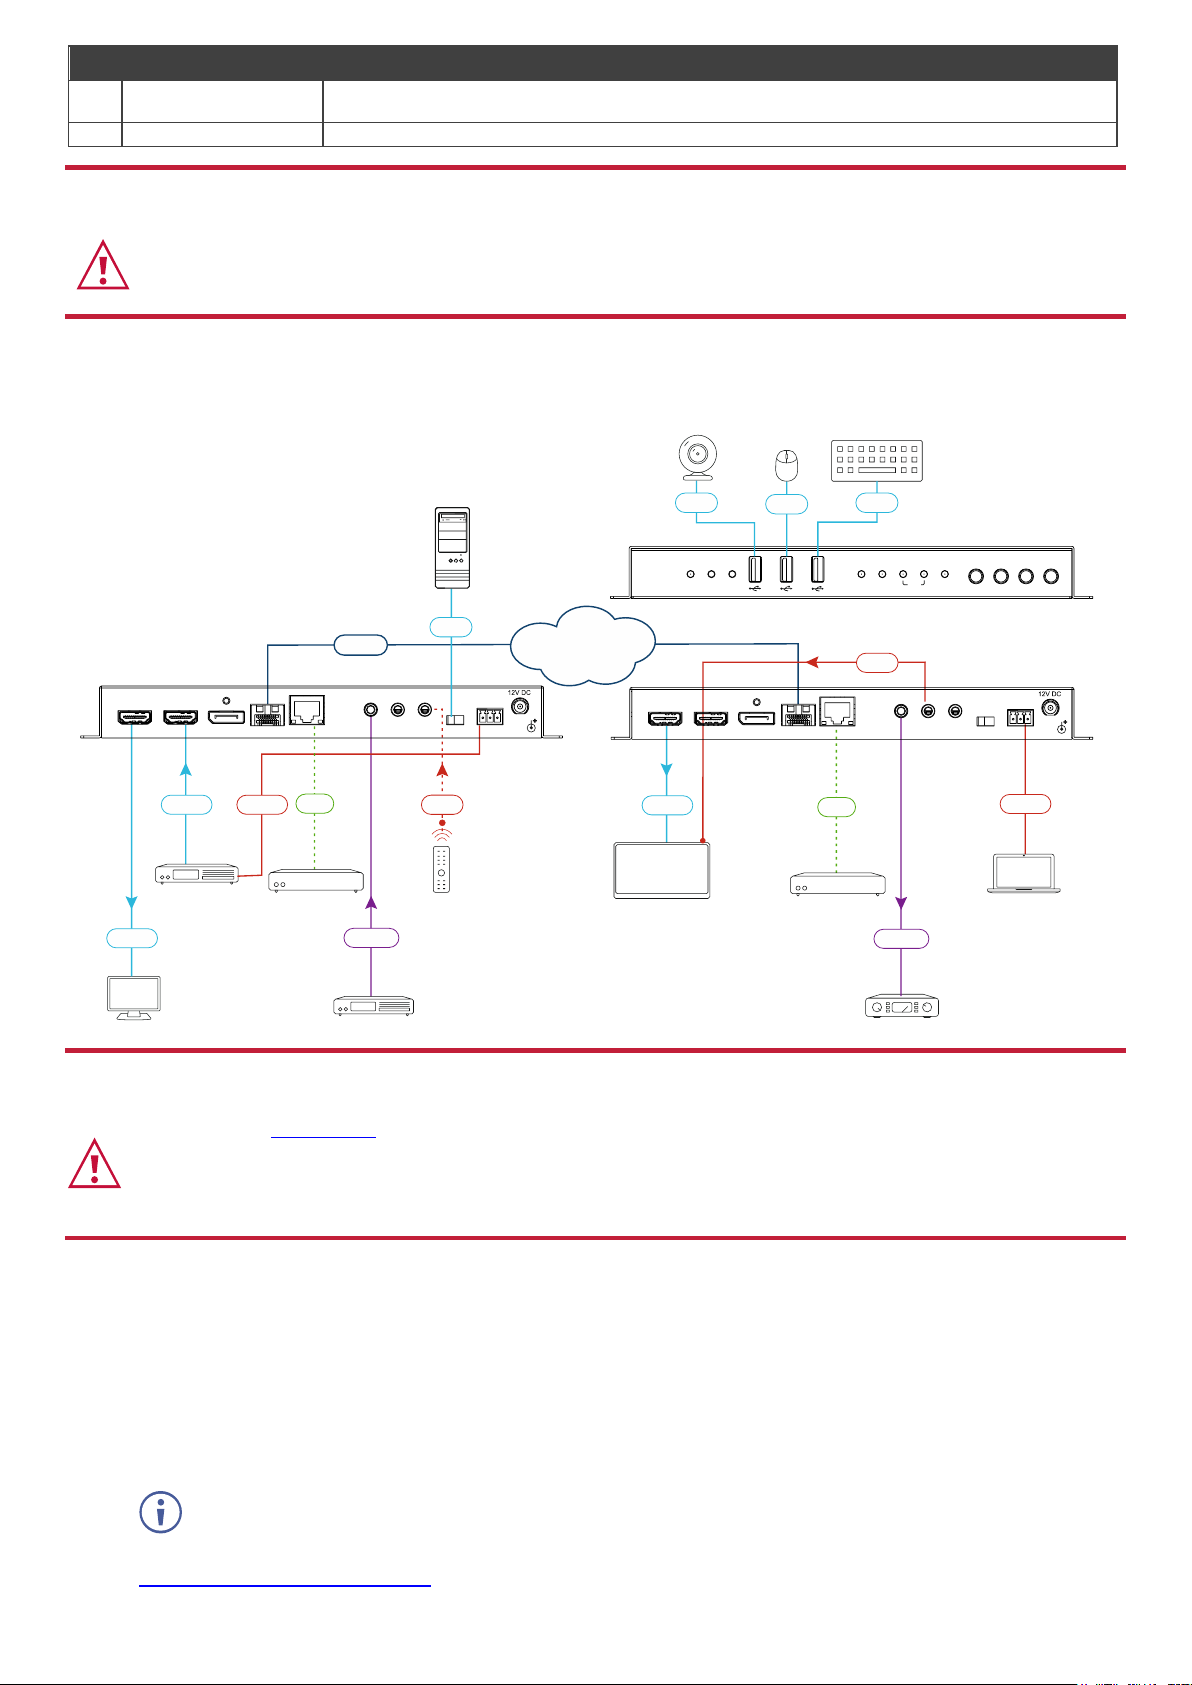
Step 3: Install the KDS-8F
Step 4: Connect the inputs and outputs
Always switch OFF the power on each device before connecting it to your KDS-8F. For best results, we recommend that you
always use Kramer high-performance cables to connect AV equipment to KDS-8F.
Step 5: Connect the power
Connect the power cord to KDS-8F and plug it into the mains electricity.
Step 6: Operate the KDS-8F
Change the encoder / decoder mode:
The unit is defined as an encoder by default.
• Press and hold the + (plus) and – (minus) buttons simultaneously for 10 seconds.
The encoder / decoder mode changes.
Stream Video:
1. Connect a unit in encoder mode and a unit in decoder mode to the same 10G Ethernet switch. KDS-8F is plug-andplay with DHCP enabled.
2. Subscribe the decoder to the encoder source using Kramer Network Enterprise Management Platform (go to
www.kramerav.com/product/KDS-8F for more information).
 Loading...