

Page 1
www.kramerAV.com
info@kramerel.com
User Guide
MODEL:
K-Bar
Communication Bar
P/N:
29 00 - 30 15 33 QS
Rev:
1
SAFETY WARNING
Disconnect the unit from the power supply before opening and servicing
For the latest information on our products and a list of Kramer distributors, visit our
Web site where updates to these installation instructions may be found.
We welcome your questions, comments, and feedback.
Page 2

2
K-Bar Communication Bar
K-Bar Communication Bar
Congratulations on purchasing your Kramer K-Bar Communication Bar. K-Bar provides a 3 in 1 compact design,
including a camera, a speaker, and a microphone. Control K-Bar via the IR remote controller.
Get to know your K-Bar
#
Feature
Function
1
Camera
High quality Camera.
2
On/OFF Push Button
Press to toggle microphone on/off.
3
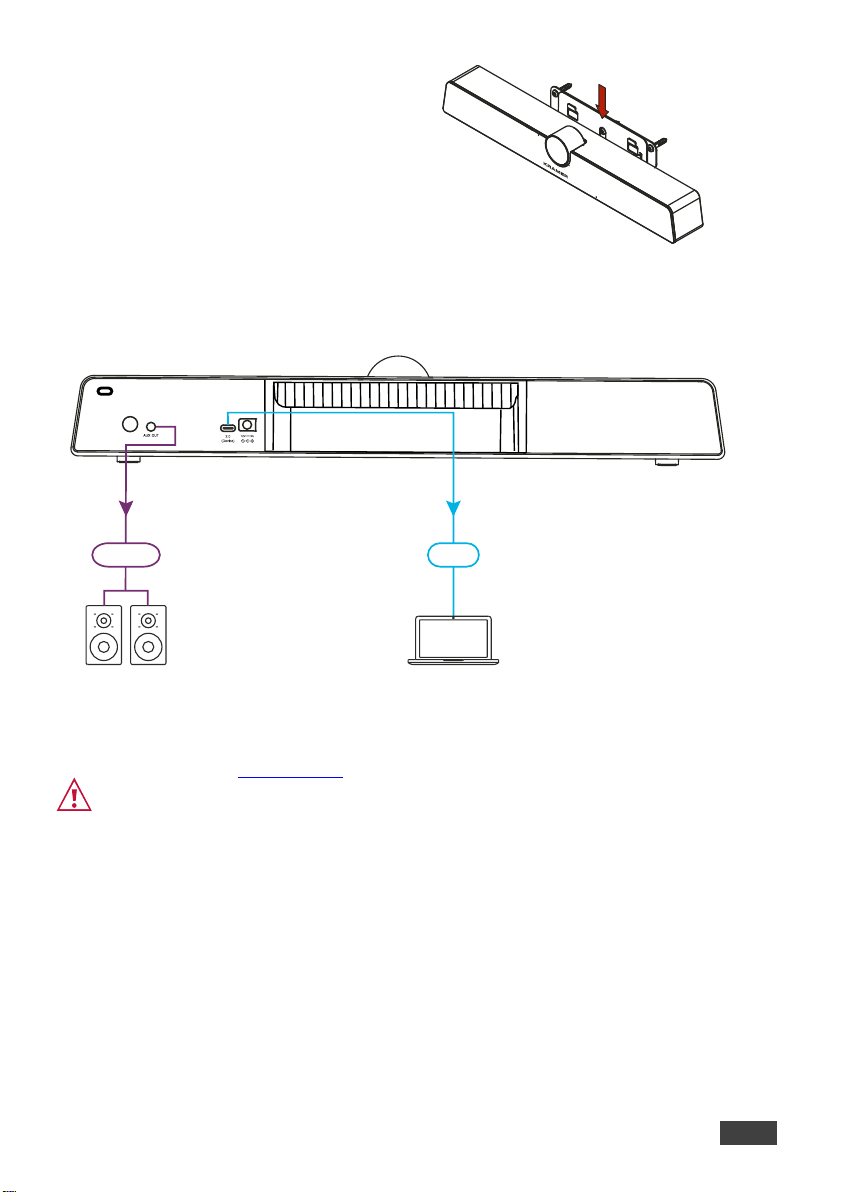
AUX OUT 3.5mm Mini Jack
Connect to an audio acceptor.
4
DEVICE USB-C 2.0 Port
Connect to a computer.
5
12V, 2A Input
Connect to the power adapter.
Mounting K-Bar
You can place your K-Bar on a surface, mount it on the wall or on top of the display (using the special TV mount,
purchased separately).
To attach K-Bar onto a wall:
1. Find the correct location on the wall.
2. In the desired location, Drill 3 holes (using a
6mm drill-bit).
3. Attach the wall bracket to the wall using the 3
supplied screws.
4. Attach the device bracket to the K-Bar using
smaller size screw.
• Ensure that the environment (e.g., dust, maximum ambient temperature, humidity & air flow) is compatible
for the device.
• Avoid exposing the product to direct sunlight or any other heat source.
• Keep away from children – product includes small accessories and components.
• Avoid uneven mechanical loading.
• Do not insert any sharp objects into the product.
• Avoid dropping or hitting the product to avoid damaging the product.
• For maintenance, call tech support.
Page 3
Installation Instructions
3
5. Slide the fixed device bracket onto the wall
bracket.
Connecting the K-Bar
Always switch OFF the power on each device before connecting it to your K-Bar.
Connect the power cord to the K-Bar and plug it into the mains electricity.
Safety Instructions (See www.kramerav.com for updated safety information)
Caution:
• There are no operator serviceable parts inside the unit.
Warning:
• Use only the power cord that is supplied with the unit.
• Disconnect the power and unplug the unit from the wall before installing.
• Do not open the unit. High voltages can cause electrical shock! Servicing by qualified personnel only.
• To ensure continuous risk protection, replace fuses only according to the rating specified on the product label which
located on the bottom of the unit.
Page 4

4
K-Bar Communication Bar
Controlling K-Bar
You can operate K-Bar via the remote IR, or via your PC, as follows:
#
Feature
Function
1
Auto framing
Press to enable/disable auto-framing feature.
2
Mute Button
Press to turn Mic on or off.
3
Arrows Button
Press, after zooming, to move the camera
direction.
4
OK
Button
Press to restore camera image to original
settings.
5
Start Call Button
Press to start a Microsoft Teams® call.
6
End Call Button
Press to end a Microsoft Teams® call.
7
Volume Button
Press to increase/decrease volume level.
8
Zoom Button
Press zoom camera in or out.
9
Presets Button
Press and hold a number (1 or 2) to save the
current view settings (including zoom level and
viewing angle information).
Available only when camera is on, and autoframing is disabled.
Technical Specifications
Ports
1 USB-C 2.0
On a USB-C connector
AUX OUT
On a 3.5mm mini jack
Camera
Pixel
12M Max. Field of View (FOV)
120° (D)
Adjustable Angle (Manual)
±15° (Up/Down)
Focus Mode
Fixed focus
Focus Distance
2m
Resolution and Frame Rate
H.264/MJPG: 3840x2160; 2560x1440; 1920x1080; 1280x720; 1024x576;
960x540; 800x600; 640x480; 640x360; 480x270; 352x288; 320x240
YUY2: 640x480; 640x360; 480x270; 352x288; 320x240
Output Format
MJPG/YUY2/H.264
Sound
Reinforcement
Sound Channel 1.0
Sound Channel 1.0
Output Power 1x8W
Output Power 1x8W
Microphone
Quantity
6 Voice Pickup Distance
Up to 8 meters
Controls
Remote control
Power
Consumption
12V DC, 1A max.
Source
12V DC, 2A
Standby Power
≤0.5W
Environmental
Conditions
Operating Temperature
0° to +40°C (32° to 104°F)
Storage Temperature
-20° to +60°C (-4° to 140°F)
Humidity
10% to 90%, RHL non-condensing
Altitude
Below 5000 meters
Regulatory
Compliance
Safety
CE, FCC
Environmental
RoHs WEEE
Enclosure
Type
Aluminum and plastic
General
Net Dimensions (W, D, H)
46cm x 9.7cm x 7.3cm (18.1" x 3.8" x 2.9")
Shipping Dimensions (W, D, H)
53cm x 16.5cm x 15.7cm (20.8" x 6.5" x 6.2")
Net Weight
1.05kg (2.3lbs) approx.
Shipping Weight
2.3kg (5.1lbs) approx.
Accessories
Included
1 USB-C cable, remote control, power cord and adapter, lens cover, wall
bracket kit, screws set
Specifications are subject to change without notice at www.kramerav.com
 Loading...