

Page 1

KRAMER ELECTRONICS LTD.
USER MANUAL
MODEL:
K-Able/XL Box
Cable Retractor
P/N: 2900-300441 Rev 3
Page 2

K-Able/XL Box – Contents
i
Contents
1 Introduction 1
2 Getting Started 2
2.1 T-Bus Compatibility 2
2.2 Recycling Kramer Products 2
3 Overview 3
3.1 Component Identification 3
4 Defining the K-Able/XL Box Cable Retractor 5
5 Mounting the K-Able/XL Box 6
5.1 Mounting the K-Able/XL Box Vertically 6
5.2 Mounting Multiple K-Able/XL Box Units Vertically 8
5.3 Mounting the K-Able/XL Box Horizontally 9
6 Using the K-Able/XL Box 11
6.1 Extending the Cable 11
6.2 Retracting the Cable 11
7 Technical Specifications 12
Figures
Figure 1: K-Able/XL Box Cable Retractor Front Panel 5
Figure 2: Mounting a Single K-Able/XL Box Vertically in a TBUS Unit 6
Figure 3: Hinged Top Shown Open 7
Figure 4: Mounting Multiple K-Able/XL Box Units Vertically 8
Figure 5: Space between Adjacent K-Able/XL Box Units 9
Figure 6: Mounting the K-Able/XL Box Horizontally 10
Figure 7: Mounting Lug 10
Page 3

K-Able/XL Box - Introduction
1
1
1 Introduction
Welcome to Kramer Electronics! Since 1981, Kramer Electronics has been
providing a world of unique, creative, and affordable solutions to the vast range of
problems that confront video, audio, presentation, and broadcasting professionals
on a daily basis. In recent years, we have redesigned and upgraded most of our
line, making the best even better!
Our 1,000-plus different models now appear in 14 groups that are clearly defined
by function: GROUP 1: Distribution Amplifiers; GROUP 2: Switchers and Routers;
GROUP 3: Control Systems; GROUP 4: Format/Standards Converters; GROUP
5: Range Extenders and Repeaters; GROUP 6: Specialty AV Products; GROUP
7: Scan Converters and Scalers; GROUP 8: Cables and Connectors; GROUP 9:
Room Connectivity; GROUP 10: Accessories and Rack Adapters and GROUP 11:
Sierra Video Products; GROUP 12: Digital Signage; and GROUP 13: Audio, and
GROUP 14: Collaboration.
Congratulations on purchasing your Kramer Desktop K-Able/XL Box Cable
Retractor which is ideal for the following typical applications:
Boardrooms
Conference rooms
Training rooms
Bring-your-own laptop environments
Page 4

2
K-Able/XL Box - Getting Started
2 Getting Started
We recommend that you:
Unpack the equipment carefully and save the original box and packaging
materials for possible future shipment
Review the contents of this user manual
2.1 T-Bus Compatibility
The K-Able/XL Box can be used in conjunction with the following Kramer table
mounting units:
TBUS-1A
TBUS-3
TBUS-4
TBUS-5
TBUS-6
TBUS-10
2.2 Recycling Kramer Products
The Waste Electrical and Electronic Equipment (WEEE) Directive 2002/96/EC
aims to reduce the amount of WEEE sent for disposal to landfill or incineration by
requiring it to be collected and recycled. To comply with the WEEE Directive,
Kramer Electronics has made arrangements with the European Advanced
Recycling Network (EARN) and will cover any costs of treatment, recycling and
recovery of waste Kramer Electronics branded equipment on arrival at the EARN
facility.
Page 5

K-Able/XL Box - Overview
3
3
3 Overview
The K-Able/XL Box is a furniture-mounted cable extender and retractor that is
easily installed underneath a table-top or in a podium. The K-Able/XL Box is
available with of the following cable types:
VGA
Audio
VGA and audio
HDMI
USB-A
LAN
DisplayPort
The K-Able/XL Box can be mounted:
Vertically within the Kramer TBUS range of products
Horizontally underneath a table or shelf
Note: The HDMI cable version is used throughout this manual as an example.
Exactly the same principles apply to all other cable types.
3.1 Component Identification
The following table lists the components that are supplied with the K-Able/XL Box
and their descriptions.
Page 6

4
K-Able/XL Box - Overview
Item
Qty
Description
1
K-Able/XL Box
3
M3 x 8mm
countersunk
machine screws
4
#4 x ½” countersunk
wood screws
4
M3 washers
Page 7

K-Able/XL Box - Defining the K-Able/XL Box Cable Retractor
5
5
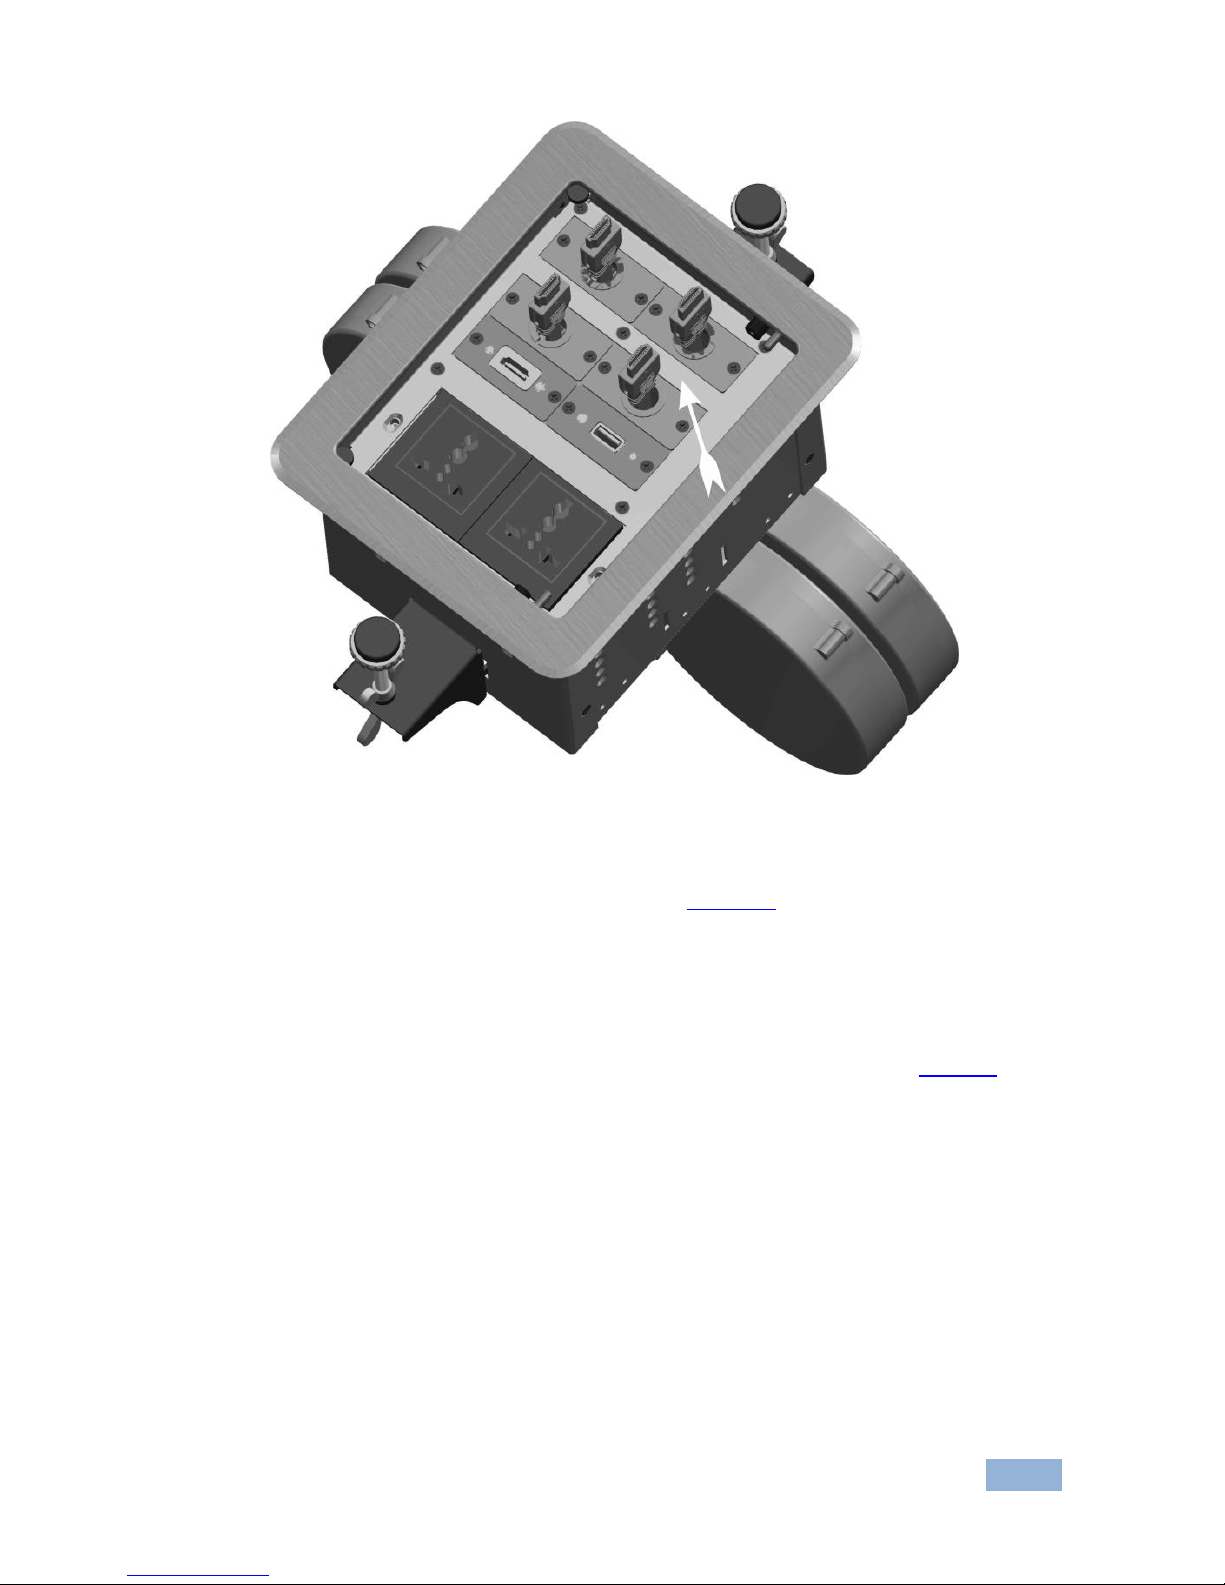
4 Defining the K-Able/XL Box Cable Retractor
Figure 1 defines the front panel of the K-Able/XL Box.
Figure 1: K-Able/XL Box Cable Retractor Front Panel
#
Feature
Function
1
Cable—Extendable
End
Connect to the mobile user device, for example, a laptop
2
Hinged Top
Press the clip (5) to unlock the hinged top when necessary to
facilitate manipulating the device into a TBUS housing
3
Main Body
Contains the cable and retraction mechanism
4
Cable—Fixed End
Connect to room wiring infrastructure, for example, leading to a
switcher or projector
5
Hinged Top Clip
Used to latch the top closed
Page 8

6
K-Able/XL Box - Mounting the K-Able/XL Box
5 Mounting the K-Able/XL Box
This chapter comprises:
Mounting the K-Able/XL Box vertically in a TBUS, (see Section 5.1)
Mounting multiple K-Able/XL Box units vertically in a TBUS, (see
Section 5.2)
Mounting the K-Able/XL Box horizontally, (see Section 5.3)
5.1 Mounting the K-Able/XL Box Vertically
Figure 2 shows a single K-Able/XL Box mounted vertically inside a TBUS unit.
Figure 2: Mounting a Single K-Able/XL Box Vertically in a TBUS Unit
Page 9

K-Able/XL Box - Mounting the K-Able/XL Box
7
7
To mount a single K-Able/XL Box vertically in a TBUS unit as illustrated in the
example in Figure 2:
1. Remove the blanking plate from the required position in the TBUS unit.
2. From the underneath of the TBUS unit, insert the extendable cable end of
the K-Able/XL Box and align it with the mounting holes in the TBUS unit
plate. Where conditions dictate, unlock the hinged top of the K-Able/XL Box
(as shown in Figure 3) to make it easier to manipulate the K-Able/XL Box
into position.
Figure 3: Hinged Top Shown Open
3. Secure the K-Able/XL Box to the TBUS plate using the two countersunk,
machine screws supplied.
Page 10

8
K-Able/XL Box - Mounting the K-Able/XL Box
5.2 Mounting Multiple K-Able/XL Box Units Vertically
You can mount multiple K-Able/XL Box units vertically in a TBUS unit as shown
in Figure 4. The maximum number of K-Able/XL Box units depends on the
specific TBUS unit and also on what other items are installed in the TBUS unit.
Figure 4: Mounting Multiple K-Able/XL Box Units Vertically
Note: Each K-Able/XL Box unit occupies slightly more than the width of a single
slot in a TBUS unit, therefore two K-Able/XL Box units cannot be mounted in two
adjacent slots unless there is a space in between as shown in Figure 5.
Page 11
K-Able/XL Box - Mounting the K-Able/XL Box
9
9
Figure 5: Space between Adjacent K-Able/XL Box Units
The procedure for mounting multiple K-Able/XL Box units is the same as for
mounting a single unit. For instructions, see Section 6.
5.3 Mounting the K-Able/XL Box Horizontally
The K-Able/XL Box can be mounted horizontally to the underneath of a surface,
(such as, a table) using the three supplied wood screws as shown in Figure 6.
Page 12

10
K-Able/XL Box - Mounting the K-Able/XL Box
Figure 6: Mounting the K-Able/XL Box Horizontally
To mount the K-Able/XL Box horizontally as illustrated in Figure 6:
Position the K-Able/XL Box relative to the edge of the table and secure it
using the three wood screws and washers supplied. The screws and
washers are inserted into the mounting lugs as shown in Figure 7.
Figure 7: Mounting Lug
Page 13

K-Able/XL Box - Using the K-Able/XL Box
11
11
6 Using the K-Able/XL Box
6.1 Extending the Cable
To extend the cable:
1. Extend the free end of the cable until the required length is exposed.
2. Extend the cable a short distance further.
3. Release the cable.
The lock engages and prevents the cable from retracting.
6.2 Retracting the Cable
To retract the cable:
1. Extend the cable a short distance until the cable lock clicks.
The lock is disengaged.
2. Allow the cable to retract keeping it under a light tension.
When the lock disengages do not let go of the cable and allow it to
retract unrestrained or the mechanism/cable may be damaged.
In the event that there is a problem with getting the cable to retract, extend the
cable fully and the mechanism will disengage.
!
Page 14
12
K-Able/XL Box - Technical Specifications
7 Technical Specifications
DIMENSIONS:
25.0cm x 13.5cm x 3.3cm (9.84" x 5.31" x 1.3")
DEVICE WEIGHT:
0.29kg (0.64lbs) approx.
SHIPPING WEIGHT:
0.35kg (0.77lbs) approx.
EXTENDED USABLE
CABLE LENGTH:
1.5m (4.9ft)
PIGTAIL LENGTH:
38cm (15in)
TOTAL CABLE LENGTH:
2.7m (8.9ft)
ACCESSORIES:
3 x M3 x 8mm vertical mounting countersunk head machine screws
4 x #4 x ½” horizontal mounting countersunk head screws
4 x M3 washers
Page 15
13
Page 16

SAFETY WARNING
Disconnect the unit from the power
supply before opening and servicing
P/N:
2900-300441
Rev:
3
!
 Loading...