

Page 1
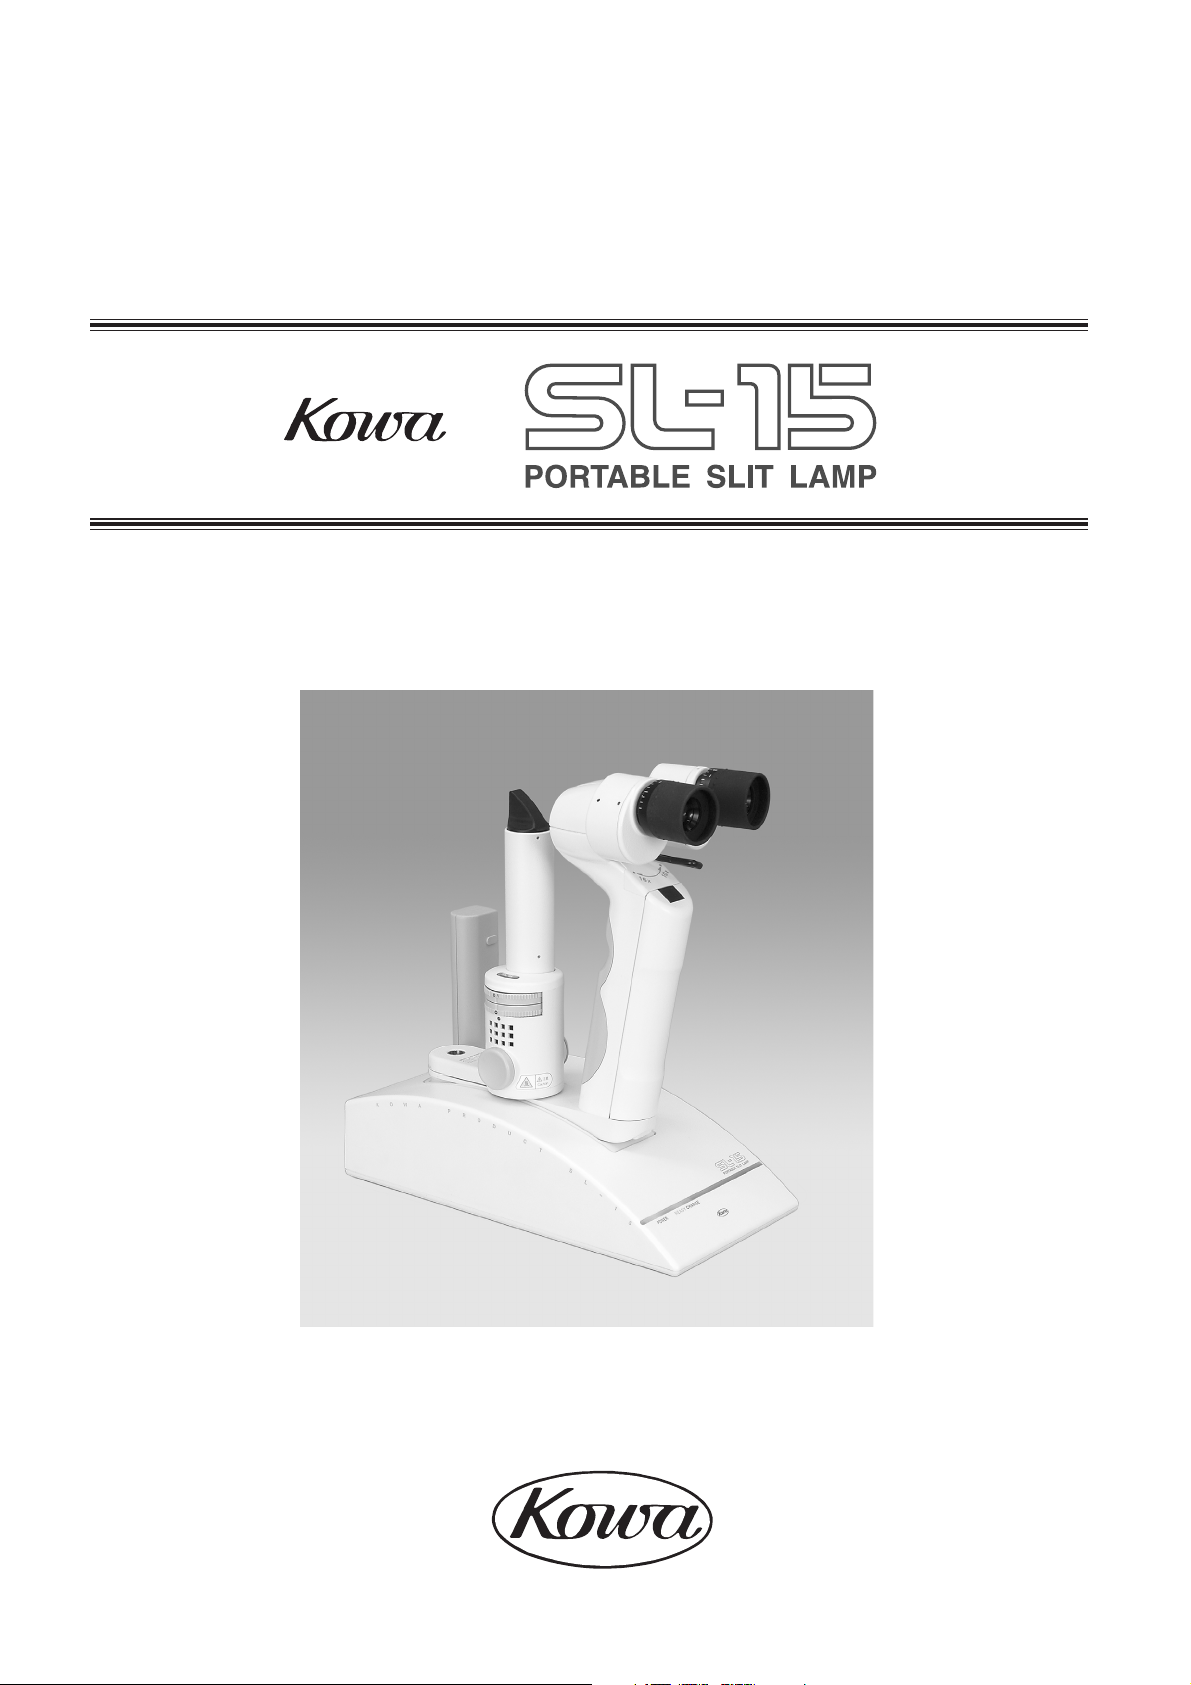
PORTABLE SLIT-LAMP
INSTRUCTION MANUAL
Kowa SL-15
Page 2
Warning
INTRODUCTION
Accept our congratulations on your purchase of Kowa's Portable Slit-lamp. This manual provides a description of the
operating procedure of this unit along with important precautions to be observed during its use. Please read this entire
manual carefully to assure that the instrument can demonstrate its full capabilities and be used effectively. After you have
finished reading it, please keep it in an easily accessible location near the instrument for future reference.
Operational Considerations for Safety and Accident Prevention
This manual describes important precautions to be observed during its use to assure that the instrument can be used
safely without causing any damage to the body and property of its purchaser and other persons. The designations and
their pictorial symbols have the following meanings. These should be fully comprehended before reading the text of this
manual.
■ Meanings of designations
Danger
Danger
If the instrument should be operated wrongly, there may occur an imminent danger of causing death or serious injury.
Warning
Warning
If the instrument should be operated wrongly, there may occur a danger of causing death or serious injury.
Caution
Caution
If the instrument should be operated wrongly, there may result an injury to the body (not so serious as to cause death
though) *1 or damage to property only *2.
*1 : An injury to the body means any injury, burn, electrical shock and so forth that will not necessitate hospitalization or
long-term outpatient treatment.
*2: Damage to property means an extensive damage to the house and household goods as well as the domestic animal
and pet.
■ Meanings of symbols
Indication of any danger (including warning and caution) .What is warned is explicitly and pictorially indicated by a picture
or its associated message on or near a pictorial symbol.
Graphical indication of prohibited operation (prohibitive item) What is prohibited is explicitly and pictorially indicated by a
picture or its associated message on or near a pictorial symbol.
Indication of mandatory action (obligatory item) What must always be done is explicitly and pictorially indicated by a
pictureor its associated message on or near a pictorial symbol.
■ Exclusion
Kowa is not responsible for:
• Any damage caused by fire, earthquake, third party's action, any other accident or user's intentional or unintentional
error, abuse or use under abnormal conditions;
• Any damage resulting from use of the product or its malfunction (e.g., operating loss, shutdown, change/loss of
stored data and so forth);
• Any damage resulting from disobedience of what is described in the instruction manual; and
• Any damage resulting from, for instance, malfunctioning of the instrument caused by a combination of connected
devices.
P - 1
Page 3
Unplug
Unplug
Obligatory
Obligatory
Obligatory
Prohibitory
Disassembly prohibited
WARNINGWARNING
If any abnormal smell or sound, or overheating or smoke should be detected, turn off the instrument immediately
and then unplug it.
If it should continue in use, a fire may break out on the instrument resulting in its malfunctioning. Contact the
Kowa dealer where you purchased it or your nearest repair shop for inspection.
When replacing the fuse, make sure the instrument is turned off and unplugged from the socket. If the fuse
holder cover is removed with the instrument unplugged, there may occur electrical shock.
Make sure that the power plug or AC adapter is properly inserted into the outlet.
If not, there may occur a fire or electrical shock.
Use a fuse provided as accessories or a designated one.
Otherwise, the instrument may malfunction or a fire may break out.
Make sure that the instrument is properly grounded to protect the body.
Put the plug in the three-core socket with ground wire.
Otherwise, there may occur electrical shock.
Install at a location away from, for instance, a cup containing liquid. If liquid should be spilled into the instrument,
there may occur electrical shock. If so, turn off the instrument and then unplug it from the outlet. Contact the
Kowa dealer where you purchased it or your nearest repair shop for inspection.
Do not disassemble, modify or repair the instrument yourself.
Otherwise, there may occur a fire, electrical shock, instrument malfunctioning or any injury to the body.
Contact your Kowa dealer where you purchased the instrument for repair.
The product assembled by yourself will not get warranty or any other service.
Prohibitory
Prohibitory
Obligatory
Obligatory
Prohibitory
The outlet or plug board must not be loaded in excess of its rated capacity.
If the main power cord should share an outlet with many other devices, there may occur a fire or electrical shock.
Inserting or guiding into the interior of any metallic object through an air vent slot or opening may cause a fire or
electrical shock resulting in malfunctioning.
Do not damage the power supply cable.
If the power supply cable is damaged,it becomes the cause of a fire or an electric shock.
Do not modify the power supply cable.
Do not carry a heavy thing on the power supply cable and do not pull it.
Do not bring the power supply cable close to a heat equipment and do not make it to overheat.
Use a lamp provided as accessories or a designated one.
Otherwise, there may result malfunctioning or a fire.
Do not short-circuit the terminals of the main unit's charger or a power pack charger. Keep each charging board
away from any metallic object such as any clip and nail to avoid a fire or electrical shock.
P - 2
Page 4

Prohibitory
Prohibitory
Prohibitory
Prohibitory
Prohibitory
Prohibitory
Prohibitory
Caution
Caution
For unplugging from the outlet, pull the power cord out of it while holding the plug with your hands.
Otherwise, there may occur a fire or electrical shock.
Do not put in, or pull out of, the outlet, the plug with your wet hands to avoid electrical shock.
Do not install the instrument unstable locations, for instance, on a shaky base or a tilting surface. Otherwise, if it
should drop off or fall over, the body may be injured.
Do not replace the illumination lamp by the new one immediately after its service.
Otherwise, you may burn your fingers due to its high temperature. Allow 30 minutes or so to cool it off before
replacement.
The air vent must not be obstructed. Such obstruction will cause internal temperature to increase resulting in
occurrences of breakdown, malfunction or a fire.
When in use, keep the instrument away from any high-level source of moisture, dust, soot or steam.
Otherwise, there may result a fire or electrical shock.
Do not touch the instrument or power pack with your wet hands.
Otherwise, there may occur electrical shock.
Unplug
Prohibitory
Prohibitory
Prohibitory
Prohibitory
Prohibitory
Prohibitory
If there is no need to use the instrument for a long period of time, unplug the power cable and power pack for
storage. Otherwise, there may result a fire.
Properly mount the power pack in place.
Otherwise, if it should accidentally drop off, you may get injured.
Do not touch by hand a power pack while charging it, or the power source for a long time, because its temperature
may increase. If the skin should keep touching the power pack or power source for a long time, it may get burned
at a relatively low temperature though.
Keep your fingers off the gap between the rotary arm and the coupled arm.
Otherwise, the fingers may be pinched and injured.
Keep your fingers off the gap around the prism box.
Otherwise, when adjusting eye-to-eye distance, they may be pinched and injured.
Before operating or carrying it around with you, fix the main unit holding it with your hand securely.
Otherwise, if it should accidentally drop off, you may get injured.
Do not keep the lamp operating for a long time to avoid a burn your may suffer from a hot lamp-house.
Prohibitory
When operating the forehead rest fixed with locking screws, tightly fasten them beforehand, to keep them from
slackening during operation.
Otherwise, the forehead rest may accidentally jerk toward you to get you injured.
P - 3
Page 5
Operational precautions for safety and accident prevention in use
of battery
Kowa's SL-15 uses a lithium ion battery in its power pack. Always take the following precautions to avoid a serious injury
or burn caused by fluid leakage, heat build-up, ignition and explosion as well as occurrence of a fire.
If any irregularity or fluid leakage should occur:
● Immediately move the battery further away from fire. Otherwise, leaked fluid or gas may catch fire and explode.
● If battery fluid got into your eye, rinse it off with clean water and see your doctor at once.
● If your body or clothes should be contaminated with battery fluid, wash it out.
Danger
Danger
Do not put into fire, short-circuit or disassemble the battery. Do not heat it in a microwave oven or conventional
oven. Do not carry with you, or store, the battery together with metallic objects such as coin, hairpin and necklace
Prohibitory
Prohibitory
Prohibitory
to avoid short-circuiting.
Do not leave behind, or charge, the battery, for instance, near a fire, under a burning sun or in a car reaching a high
temperature.
Do not charge the power pack with an other than designated battery charger.
Do not charge an other than designated power pack.
Prohibitory
Prohibitory
Prohibitory
Prohibitory
Obligatory
Obligatory
Do not use or charge, the power battery wet with fluid such as freshwater, salt water, milk, refreshing drinks and
soapsuds.
WARNINGWARNING
Because the protective circuit for preventing any danger inside of the power pack may accidentally break down,
do not leave behind, or charge, the power pack, for instance, near a fire, under a burning sun or in a car reaching
a high temperature.
Do not shock the power pack hard, for instance, knocking with a hammer, stamping underfoot or letting it drop
off.
Do not moisten the power pack with fluid such as fresh water, salt water, refreshing drinks and.
Caution
Caution
Mount the power pack on the instrument or battery charger, in a proper direction.
If , when it is exhausted, there is no need to use it for a long period of time, remove it from the instrument.
Recommended practice of battery disposal:
A lithium ion battery can be recycled. If a power battery you have will not be used any longer, it is
recommendable to cover its contacts with insulating tape (for instance, cellophane tape) before taking it to Kowa, Kowa's dealer where you purchased it or any recycling operator.
P - 4
Page 6

Operational precautions
● The instrument should be installed and/or stored in a dust free place free from high temperatures, high humidity and
direct sunlight. The environmental conditions described below should be observed strictly.
In operation In storage
Environmental temperature 10˚C to 40˚C -15˚C to 60˚C
Relative humidity 30% to 75% 10% to 95%
● Be careful about where the instrument is to be installed, to keep it from accidentally being unplugged during operation. If it should be unplugged, be sure to turn off the power switch before plugging again.
[ Operation ]
● Handle the instrument carefully so that the instrument will not be shocked hard. When the instrument was shocked
hard, dropped off or damaged in any degree, do not operate the power source or the main unit before taking measures.
● When the main unit is not in use, be sure to always cover the instrument for protection.
● Set all the dials and knobs with click(s) at their proper click positions.
● Do not operate lamp .continuously. Make it a rule to operate it for about two minutes immediately followed by at least
three minutes of turn-off.
[ Power source/charging ]
● Charge a designated power pack only, to avoid a danger of trouble. Any other battery may explode to injure the body
and articles around it.
● The line voltage should be within ±10% of the rated value.
● Do not turn on and off the power switch consecutively, but at an interval of at least five seconds instead.
● Plug and unplug with the power switch off.
[ Cautions in miscellaneous matters ]
● Kowa is not responsible for product failure and damage caused by modification, maintenance or repair rendered by
an other than designated service operator.
● Kowa is not responsible for product failure and damage caused by modification, maintenance or repair rendered
using other than designated parts as expressed and implied in the warranty certificate.
● Since this instrument uses precision parts which will require special tool for adjustment, never disassemble or adjust
it yourself.
P - 5
Page 7

Operational Considerations for Hospital Grade Electrical
Equipment (Safety and Accident Prevention)
This section describes general precautions concerning the use of medical electrical instrument based on Notification No.
495 of the Pharmaceutical Affairs Bureau of the Ministry of Health and Welfare dated June 1, 1972.
1. Only qualified personnel should operate this instrument.
2. The following items shall be considered when installing instrument.
(1) Install at a location away from water or accidental splashing.
(2) Install at a location which will not be adversely affected by atmospheric pressure, temperature, humidity, ventilation,
sunlight, dust, air containing salt, sulfur and other substances, and the like.
(3) Take care to guard against tilt, vibration and strong impacts, for instance, during transportation.
(4) Equipment must not be installed at locations where chemicals are stored or gasses are generated.
(5) Be careful with the radio frequencies, voltages and allowable amperes (power consumption) of the power supply.
(6) Make sure that all batteries are installed properly and in good working order (discharging curve, polarity, and so forth).
(7) Properly connect ground wires.
3. The following items shall be considered when using the instrument.
(1) Make sure that instrument activates properly after checking switch contact. Polarity, dial setting and meters and so forth
(2) Make sure that the instrument is properly grounded.
(3) Make sure that all cords are properly connected and secured.
(4) Use of other instruments and appliances on the same power circuit is liable to cause errors and incorrect flash output
resulting in incorrect diagnosis or hazards.
(5) External circuits and connectors that may come in direct contact with the patient must be checked frequently for signs
of wear.
(6) Before operations, make sure that the camera back battery is sufficiently charged.
4. The following items shall be considered when using the instrument.
(1) Be sure to minimize the time and quantity required for diagnosis and treatment.
(2) Always assure that the instrument and patient are in good condition.
(3) When an abnormality is found on the instrument, take proper measures, for instance, to stop the operation of the
instrument while assuring the patient's safety.
(4) Do not allow the patient to touch any of the instrument controls.
5. The following items shall be considered after using the instrument.
(1) Turn off the instrument after setting control switches, dials and so forth to their initial statuses following with a specified
procedure.
(2) Do not pull cords for removal because an excessive force is exerted on them.
(3) The following shall be considered regarding storage location.
(a) Store the instrument at locations free from splashes of water.
(b) Store at a location which will not be adversely affected by atmospheric pressure, temperature, humidity, ventilation,
sunlight, dust, air containing salt, sulfur and other substances, and the like.
(c) Take care to guard against tilt, vibration and strong impacts, for instance, during transportation.
(d) Equipment must not be stored at locations where chemicals are stored or gasses are generated.
(4) Clean and rearrange accessories, cords, cord restraints and the like.
(5) The instrument must be cleaned prior to use so that there will be no problem when using it again.
6. If it has some trouble, a label describing the trouble should be affixed on the instrument and contact a
repair shop for repair.
7. Equipment shall not be modified.
8. Maintenance
(1) Periodically check the instrument and its components for any abnormality.
(2) When using again the instrument that has not been used for a while, it must be checked beforehand to assure that it is
in normal condition and operates safely.
P - 6
Page 8

Accessories
Power cable:1 pc. Fuse:2 pc. Lump:1 pc
Dust cover:1 pc. Instruction manual:1 pc.
P - 7
Page 9

Contents
Introduction ............................................................................................................. 1
Operational Considerations for Safety and Accident Prevention............................ 1
Precautions in use of battery (safety/accident prevention
and recommended practices of battery disposal) .................................................... 4
Operational precautions........................................................................................... 5
Operational Considerations for Hospital Grade Electrical Equipment
(Safety and Accident Prevention) ............................................................................ 6
Accessories ............................................................................................................ 7
Contents .................................................................................................................. 8
1 Name and function of each part ...................... 9
2 Preparation ..................................................... 12
2-1 Setting ........................................................................................................ 12
2-2 Charging the power pack inside of the main unit ........................................ 12
2-3 Charging a single power pack independently of the main unit .................... 13
2-4 How to fit an optional items (forehead rest) ................................................. 13
2-5 Charge time and service time of power pack .............................................. 14
3 How to use the power pack ........................... 15
3-1 How to hold slit-lamp .................................................................................. 15
3-2 Adjusting each part ...................................................................................... 15
3-3 How to use magnification selector, slit disk and filter disk .......................... 16
4 Troubleshooting............................................... 17
5 Maintenance and inspection ........................... 18
5-1 Daily inspection ........................................................................................... 18
P - 8
5-2 Replacing lamp ............................................................................................ 18
5-3 Replacing fuse ............................................................................................. 19
6 Specifications.................................................. 20
Page 10

1.
Name and function of each part
Main unit (slit-lamp)
3 Objective lens
An image 10 times as large as a subject
can be recorded.
An image 16 times as large as a subject
can be recorded by advancing the lens.
5 Slit-disk
1 Prism box
For adjusting the eye-to-eye distance, bend
and stretch this part both ways.
2 Ocular
With rubber attachment for compensating the diopter of the laterally biased eye either way.
6 Main lever (ON/OFF select switch)
Press the lever with its grip being held by hand, to
energize the lamp.
Release the lever to turn it off.
7 Upper cover
Remove the insert-type cap in the center to fit
optional items.
For selecting a desired slit
width from the range of spot,
0.1 mm, 0.2 mm and 0.8 mm.
8 Filter disk
For selecting light intensity
and use/nonuse of blue filter.
Select a desired light intensity from the range of full, 1/
4 and 1/16.
C Lamp cap
To be removed when replacing a lamp, which is located on
the left-hand side as viewed by
the examiner.
4 Angular graduations of arm's swing
For indicating the angle of illumination lamp's
swing
D Magnifying power
select lever
Turn the lever in the directions of
nifying power of 16 or 10.
Magnifying powers in between the range cannot be
selected.
9 Grip cover
For covering the built-in
power pack inside of the instrument
0 Coupled arm
To be frontally inserted into the
power source's receptacle for
A Grip
B Lamphouse
For housing a lamp inside. Do not touch
it bare-handed because it reaches a high
temperature.
charging the main unit
to select a mag-
P - 9
Page 11

1. Name and function of each part
Picture of power source as viewed from above
F Main unit's charger indicating lamp
When the power pack inside of the main unit, which is set
at the main unit's charger, is being charged, the indicating
lamp comes on to emit orange light. When charging is
complete, it comes on to emit green light.
E Power source indicating lamp
When the power switch is turned on, the
indicating lamp comes on to emit blue light.
(The figure seen from the top)
G Main unit's charger (also serving as a base
for holding slit-lamp)
With the power switch turned on, push the slit-lamp deep
into the receptacle, to enable the power pack inside of
the main unit, to be charged.
H Inlet
To be connected to the power cable
I Power switch
For turning on/off the
power source.
J Power pack charger
For charging the power pack taken out from the main unit
or a spare power pack.
(The figure seen from the bottom)
K Power pack charger indicating lamp
When the power pack set at the power pack
charger is being charged, the indicating lamp
comes on to emit orange light. When charging is
complete, the indicating lamp comes on to emit
green light.
L Fuseholder
Replace a blown-out fuse by a designated new one.
P - 10
Page 12

Battery (power pack)
M Battery connector
When it is set at the main unit or power pack charger, set the
battery connector such that it can be in proper contact with the
charger.
Option (forehead rest)
N Forehead rest
Fix the forehead rest such that the examined
patient's forehead can rest against it.
1. Name and function of each part
Q Fixed plate
Fit the fixed plate on the main unit.
P Arm
The arm will expand or contract depending on how hard the forehead
rest is pressed.
O Locking screw
Arm's motion can be fixed to a desired extent depending on how tight
the arm is fastened with the locking
screws.
P - 11
Page 13

2.
Preparation
2-1 Setting
Place the power source on a stable table and connect the power cable to the inlet on the back of the power source.
Connecting the power cable
IN
2-2 Charging the power pack inside of the main unit
1 Open the grip cover by pulling it out toward you while depressing the rubber portion of grip cover downward.
2 Make sure the power pack is orientated in a right direction before mounting it on the main unit.
3 Hook the claw located at the lower portion of grip cover to close the grip cover.
1 Open the grip cover 2 Mount the power pack 3 Close the grip cover
4 Insert the power cable deep into the inlet at the back of power source while holding the main unit tightly.
5 Turn on the power switch to start charging.
Make sure the power source indicating lamp is on emitting blue light and the main unit's charger indicating lamp is on
emitting orange light.
When charging is complete, light which the indicating lamp emits will switch to a green one.
After inserting the power cable into the main unit, make sure the indicating lamps are on emitting light of specified
color.
4 Insert the main unit 5
Make sure the indicating the lamp works normally.
P - 12
Page 14

2-3 Charging a single power pack independently of the main unit
2-3 Charging a single power pack independently of the main unit
1 Insert the power pack deep into the power pack charger while holding it in the direction of photo.
2 Make sure the power pack charger indicating lamp is on emitting orange light. When charging is complete, light which
the indicating lamp emits will switch to a green one.
1 Insert the power pack. 2
Do not short-circuit the terminals of the main unit's charger or a power pack charger. Keep
each charging board away from any metallic object such as any clip and nail to avoid a fire
or electrical shock.
Make sure the indicating lamp works normally.
Caution
Caution
2-4 How to fit optional item (forehead rest)
1 Open the cover located on an upper portion of the main unit by a pointed stick.
2 Tighten screws by an object such as a piece of coin to fit the forehead rest.
1 Open the cover 2 Tighten screws.
Caution
Caution
When operating the forehead rest fixed with locking screws, tightly fasten them
beforehand, to keep them from slackening during operation.
Otherwise, the forehead rest may accidentally jerk toward you to get you injured.
3Rotating and loosening the lock-
ing screw springs the forehead
rest back and forth.
P - 13
Page 15

2. Preparation
Caution
Caution
Caution
2-5 Charge time and service time of power pack
1 The reference charge time spent in fully charging an exhausted battery at a room temperature of 25˚C is indicated
below:
Charge time
With main unit charger About 90 minutes
With power pack charger About 120 minutes
Keep in mind that charge time will vary depending on what condition the power source is placed under, how high its
ambient temperature is, and how often it is used for charging.
Generally, charge time will increase with the frequency of use because of power pack's degradation.
2 Service time of power pack
Service time About 40 minutes at a time
Caution
Caution
Do not keep the lamp operating for a long time to avoid a burn your may suffer from a hot
lamp-house.
Keep in mind that power pack's service time will vary depending on how high its ambient temperature is, and how
often it was charged.
Generally, the power pack 's service time will decrease with its frequency of use because of its deterioration.
3 Power pack's service lifetime (as a standard to determine when the power pack in service should be replaced by a
new one).
The power pack's service time after about 500 cycles of charging and discharging at an ambient temperature of 20
Åé is approximately 20 minutes (as a standard to determine how long the service time will be).
If the service time seems to be shorter, replace it by a new one.
If, the power pack should be left unused after charging fully, its performance will gradually decrease even if it will not
be used at all.
If you have spare power packs, periodically, utilize all your power packs by turns to keep their performance as high
as possible.
P - 14
Page 16

3.
How to use
3-1 How to hold the slit-lamp
1 Hold the slit-lamp's main body. securely grabbing its grip by your right (or left) hand.
2 Place the other hand's thumb on the side of upper-end of the slit-lamp's main body.
3 Stabilize slit width indication by adjusting the distance between the examined eye and the objective lens, depending
on how wide the opening is between the thumb and the fingers when put on the patient's forehead.
(If optional forehead rest is used, it is much easier to fix the main body.)
How to hold the slit-lamp
3-2 Adjusting each part
1 Adjusting eye-to-eye distance
Adjust the eye width to the examined eye by binding and stretching both prism boxes both ways while holding them
by hand, to have an adequately round field of vision as viewed through the ocular lens.
2 With the ocular lens turned to its full plus(+) range, look into the viewfinder with each eye while slowly turning it
clockwise. When the line of sight comes into clear sight, stop turning. It is recommended that a patent wearing eyeglasses should use the viewfinder with its rubber eye piece collar folded forward.
1 Adjusting eye-to-eye distance
2 Adjusting ocular diopter value
P - 15
Page 17

3. How to use
3-3
How to use magnifying power select lever, slit-disk and filter-disk.
1 Turn the magnifying power select lever clockwise as indicated by arrow-head to select a magnifying power of 16.
Turn it counterclockwise to select a magnifying power of 10.
2 Slit-disk
Turn the slit-disk as far as it is set at one of the four click stops, which will cover three types of slit widths (0.1 mm, 0.2 mm
and 0.8 mm). The point marking "O" indicates "spot." Slit-width will be indicated at a point marking a red circle "●".
3 Filter-disk
For selecting to a desired light intensity from four types (full, 1/4 and 1/16). If "B" is selected, blue filter will be applied.
1 Magnifying power selection 2 Switching by disk
P - 16
Page 18

4.
●
●
●
●
●
●
●
●
Troubleshooting
This section describes how to take action against any irregularity which occurred on the instrument. If any irregularity
should occur on the instrument, check if the following faults are observed, before contacting Kowa's dealer where you
purchased the instrument for repair.
Be sure to turn off the power source before repairing.
P - 17
Page 19

5.
Caution
Maintenance and inspection
5-1 Daily inspection
1 If you do not operate the instrument any longer for the day, be sure to turn off the power switch and put a cover on it.
2 Care must be used to keep the objective lens free from dust and dirt, fingerprints, tear-drops and so forth.
3 Clean fouled main unit, power source and power pack with a piece of soft cloth. If dirt is stubborn, apply diluted
detergent to it. Do not apply chemicals or solvents such as thinner and benzene to avoid deterioration, deformation or
paint peel-off.
4 If there is no need to use it for a long period of time, remove the power pack from the main unit and unplug the power
cable from the outlet.
5-2 Replacing the lamp
1 Make sure that the lamp has cooled down before replacement.
2 Remove its cap before removing the lamp.
3 After fitting a new lamp, replace the cap back in place.
1 Remove the lamp cap 2 Replacing the lamp
Insert the lamp deep into its lamp socket for fitting.
Do not touch the lamp bare-handed to prevent hand's fat from transferring to the lamp surface. Hot lamp surface
may burn the fat resulting in a shorter lifetime.
The lamp is exclusive use of SL-15.It can not be used for SL-14.
Caution
Caution
Use a lamp provided as accessories, or a designated one.
If an other than designated lamp is in use, there may result malfunctioning or occurrence
of a fire.
Do not replace the lamp immediately after use.
Because the lamp in use is scorching hot, you may burn your hand on it.
Allow thirty minutes or so to cool it off before replacement.
P - 18
Page 20

5-3 Replacing fuse
5-3 Replacing fuse
1 With the power switch turned off, unplug the power cable from the outlet.
2 Unscrew the power source's fuse holder cover by turning minus (-) screw driver counterclockwise to take out the fuse
from within.
3 Make sure a new fuse to be used, is a designated capacity and type. Then replace the fuse by a new one and tight-
screw the fuse holder cover.
Caution
Caution
Before replacing the fuse, turn off the power switch and unplug the power cable
from the outlet.
Do not remove the fuse holder cover with the power cable unplugged, there may
occur electrical shock.
Use a fuse provided as accessories or a designated one.
If an other than designated fuse should be used, there may result malfunctioning or
occurrence of a fire.
P - 19
Page 21

6.
Specifications
Main unit (slit-lamp)
[Microscope]
Type : Binocular-stereoscopic-orthoscopic microscope
Inward angle : 13˚
Magnifying power : 10/16
Objective lens' working distance : About 80 mm (when a magnifying power of 16 is selected)
Practical field of view : Ø 10 mm (when a magnifying power of 16 is selected)
Reticle : Double-eye pieces
Eye-to-eye distance : 50 mm /70 mm
Ocular diopter : -8 to + 4D
[Slit-projector]
About 100 mm (when a magnifying power of 10 is selected)
Ø 15 mm (when a magnifying power of 10 is selected)
2-magnifying power selectable/moving objective lens type
Slit type : Turret-type switching
Slit length : 12 mm fixed
Slit width : 0.1 mm, 0.2 mm, 0.8 mm, and Ø12 mm spot
Light intensity adjusting : Full, 1/4, 1/16 (three stages)
Slit's illuminating angle : ± 60° with respect to its horizontal outer periphery
Filter : Built-in blue filter
Continuous lamp operating time : About 40 minutes
[Electrical ratings]
According to the type of protection against electric shock :
According to the degree of protection against electric shock
Electromagnetic compatibility : IEC 60601-1-2 (1993)
Line voltage : 8.4 V d.c. (special purpose battery)
Power consumption : 15 W
Main unit-External dimensions/Weight : 221 mm (W)_106 mm (D)_214 mm (H)/790 grams
Power source (charger)
[Type and electrical ratings]
Internally powered equipment
: type B Applied part
P - 20
Type : Also servicing as a base for holding a slit-lamp)
Output terminal : For changing a built-in power pack and a single one.
Line voltage : 100 V a.c. 50 Hz or 60 Hz
Line source : 90 VA
According to the type of protection against electric shock :
According to the degree of protection against electric shock :
Electromagnetic compatibility : IEC 60601-1-2 (1993)
Power source/Weight : 124 mm (W)_253 mm (D)_68 mm (H)/1250 grams
Class I equipment
Nothing
Page 22

Life Science Division
No. 4-14, 3-chome, Nihonbashi-Honcho, Chuo-ku, Tokyo 103-8433, Japan
Phone: 81(3) 3279-7331
Facsimile: 81(3) 5255-7516
Immermannstrasse 65A
40210 Düsseldorf F.R. Germany
Phone: 49(211) 35-3444/45/46
Facsimile: 49(211) 161952
20001 So. Vermont Ave. Torrance,
CA 90502, U.S.A.
Phone: 1(310) 327-1913
Facsimile : 1(310) 327-4177
Printed on recycled paper.
Printed in Japan SL 150 V1.1 E 030701 MS
 Loading...