

Page 1
The next generation remote control
FIIRE REMOTE CONTROL UNIT
User Manual
Page 2

Table Of Contents
Introduction . . . . . . . . . . . . . . . . . . . . . . 2
Battery Installation and Information . . . 2
Battery Saver . . . . . . . . . . . . . . . . . . . . . 2
Gyro Operation . . . . . . . . . . . . . . . . . . . 3-4
Product Diagram. . . . . . . . . . . . . .. . . . . . 5
Button Cluster Locations. . . . . . . . . . . . . 5
RCU Mode Selection. . . . . . . . . . . . . . . . 5
Transport Control . . . . . . . . . . . . . . . . . . 6
Menu Navigation . . . . . . . . . . . . . . . . . . . 7
Fiire Menu, Media Control, Ligths and
Volume, Gyro Activation . . . . . . . . . . . . . 7
Channel/Volume Control, Mute Volume,
Gyro Stop . . . . . . . . . . . . . . . . . . . . . . . .8
Fiire Shortcut Buttons . . . . . . . . . . . . . . .9
Numeric Keypad . . . . . . . .. . . . . . . . . . . 9
Follow me, Info&Help, Connect, Input, Av
Menu . . . . . . . . . . . . . . . . . . . . 9
Backlighting . . . . . . . . . . . . . . . . . .. . . . 10
ON/OFF Switch . . . . . . . . . . . . . . . . . . . 10
Receiver Installation . . . . . . . . . .. . . . . . 10
Setting Up and Synchronizing a Gyration
Go mouse or keyboard and the
Transceiver . . . . . . . . . . . . . . . . . . . . . 11
Programming Methods . . . . . . . . . . . . . . 11
Using Automatic Code Search . . . . . . . 11
Using Direct Entry . . . . . . . . . . . . . . . 12
Using the Remote to Control Your
Components . . . . . . . . . . . . . . . . 12
Volume Punch Through . . . . . . . . . . .. . . 12
Learning . . . . . . . . . . . . . . . . . . . . . . . . . 13
Learning Tips . . . . . . . . . . . . . . . . . . . . . 13
Code Learning . . . . . . . . . . . . . . . . . . . . 13
Learning Commands . . . . . . . . . . . . . . . 13
Clearing an Individual Learned
Function . . . . . . . . . . . . . . . . . 14
Deleting All Learned Functions . . . . . . . 14
Troubleshooting . . . . . . . . . . . . . . . . . . . 14
Remote Code List . . . . . . . . . . . . . . 15-19
Introduction
This users’ manual describes the operation of the Fiire Chief -- Remote Control Unit
(RCU) 4-in-1 (3 IR devices + 1 RF device). The RCU contains an embedded micro
gyro for motion sensing and in-air control of oating cursor. This RCU features IR code
database and IR learning capabilities to universally control standard home theater
devices such as TVs, VCRs, Digital Video Recorders (DVR), DVD players, CD players,
cable/SAT boxes, etc.
The RCU is also equipped with a 2.4 GHz RF transceiver to send cursor movement
information and other commands to the Fiire System via a USB transceiver. The radio
frequency (RF) transceiver delivers a range of up to 100 feet with no line-of-sight
requirement. The 800 possible channels of the RF transceiver provide high resistance to
interference from other radio devices.
Before using the Fiire Chief press the connect button on the remote to bind it to the
closest USB dongle. Do not press the connect button on the dongle.
Battery Installation and Information
The Fiire Chief RCU requires two AA Alkaline batteries. To install the batteries:
1. Remove the battery compartment cover.
2. Insert the batteries, matching the batteries to the (+) and (-) marks inside the battery
compartment.
3. Replace the battery compartment cover and snap it into place.
Note: Reprogramming may be required after batteries are replaced.
Battery Saver
The RCU saves battery power by automatically going into a low-power state if no button
is pressed after a few seconds.
Product Registration Information
Keep your sales receipt to obtain warranty parts and service and for proof of purchase.
Attach it here and record the serial number in case you need it. The serial number is
located on the product.
Model Number _______________________________
Serial Number ______________________ Purchase Date _____________
Dealer/Address/Phone ________________________________________
2
Page 3
Gyro Operation
The RCU provides in-air control of the
Fiire system’s cursor via patented
gyroscopic motion sensing technology.
This means mouse-like cursor control,
from anywhere in the room, without the
need of a at surface.
The FiireChief controls both the
FiireEngine and FiireStation using
RF wireless. There is no line-of-sight
requirement so you don’t have to point
the RCU at the Fiire system you are
controlling. Remember the following
things when using the in-air cursor
control feature of the RCU:
• You can control every device in your
home using only the 3 buttons in the
middle and simple gestural motions.
The right button is for lights & volume.
Press it and wave the remote up and
down to move the cursor into the yellow
arrows to adjust the lights, or move left
and right into the blue arrows to adjust
the volume. Tap OK when the volume is
at the desired level.
Or press and hold the button, and don’t
let go while you move into the blue
arrows and keep the button held down
for absolute positioning. Now moving
your hand 45 degrees to the left is
mute, and 45 degrees to the right is full
blast. Let go of the button when it’s at
the desired level.
The left button replaces all your media
control. Press it and move up and down
for the ‘skip’ action, such as changing
channels while watching TV, tracks on a
CD, or chapters on a DVD. The faster
you move, the faster the media skips,
with your guide data and chapter list
presented visually.
Move left and right for the speed control,
like fast forward and rewind. You can
tap and release the button while you
move left and right for relative control,
meaning the further you move your
hand, the faster the speed changes.
When the pointer is in the middle of
the screen the media is paused. The
further you move to the right the faster
it goes, starting with slow motion and
going to very fast 400x forward. Move
the cursor to the left of center to make
the media go backwards, the further left
3
Page 4
the faster it goes. Or press and hold the
button, and don’t let go while you move into
the blue arrows and keep the button held
down for absolute positioning.
Now moving your hand 45 degrees to the
left is the beginning of the media, and 45
degrees right is the end. Move back and
forth until you nd the part you want and
then let go of the button to resume normal
playback.
• When in LinuxMCE the OK button selects
whatever object is highlighted on screen,
and the X button makes whatever menu is
on screen go away.
When in a PC application, like KDE, the OK
button is the same as a left-mouse click,
and the X button is the same as a rightmouse click.
• When you press one of the 3 gyro buttons
the gyro is activated and the on-screen
pointer is enabled. To reposition your hand
press and hold the gyro ‘stop’ button
to freeze the pointer. Double-click it to
de-activate the gyro. Then press it again,
or press one of the 3 gyro buttons, to reactivate it.
• Move the cursor by exing your wrist, not
your arm or body, much as you would with
a ashlight; side to side and up and down.
Placing your arm on an armrest or on your
lap will make this motion more comfortable.
• The RF Transmit LED indicates when gyro
motion or other information is being sent
independent of which mode is selected on
the RCU.
• A few moments after the Fiire Station starts
to boot up a descending sequence of tones
will be heard from the inside Fiire system.
Then you can press the ‘AV menu’ button
on the bottom of Fiire Chief a few times,
until you hear a conrmation beep, which
indicates that the AV Wizard will start.
The AV Wizard default video settings are
640x480 on VGA port. When these settings
are applied a melody beep will be heard. If
you don’t use a VGA video connector and
4
you see nothing on the screen,
press these shortcuts:
Note: As soon as you choose one
option below, wait few seconds to
nish applying the new settings.
For a succesful resolution apply
an melody beep will be heard. If
you see nothing on the screen
(i.e. black screen) and you still
hear the melody beep, it means
that you have to try another
shortcut until you get video on the
screen.
1 is for 640x480 on DVI port
2 is for 640x480 on VGA port
3 is for 640x480 on Component
4 is for 640x480 on S-video
5 is for 640x480 on Composite
As soon as you get video on
the screen, select and press
‘Continue’.
Page 5
Product Diagram
Button Cluster Locations
A
B
C
D
E
F
G
H
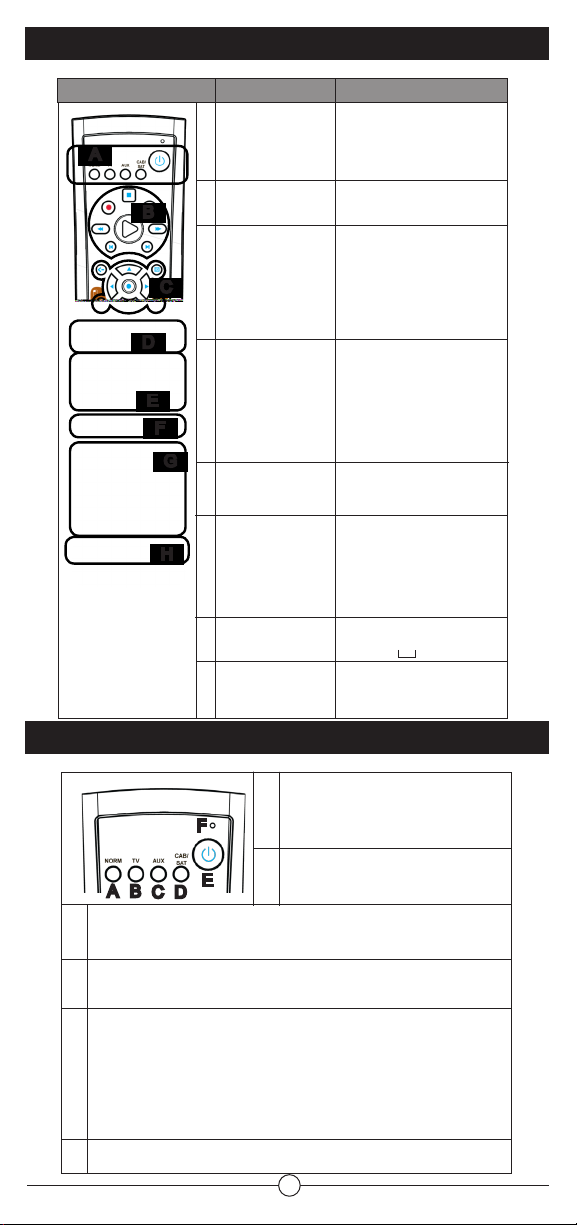
Button Cluster Function
Remote Control Unit
A
mode selection and power
Transport control
B
Menu navigation and
C
mouse buttons
Fiire main menu, Media
D
control, Volume and Ligths
control, Activate Gyro
Volume and Channel
E
control and Mute
Shortcuts
F
Alphanumeric keypad
G
Setup and Device Control
H
Selects device mode (PC, TV,
CAB/SAT, AUX). Powers
on/off selected device.
AV control for selected transport or for
Fiire System
Menu navigation: UP, DOWN, LEFT,
RIGHT and SELECT (similar to OK
button). Includes standard LEFT and
RIGHT mouse buttons, OK and X,
BACK and TV GUIDE.
Center button brings the MAIN MENU
of Fiire. The right button is for LIGHTS
& VOLUME. The left button replaces
all your MEDIA control. Each one of
these buttons also activates the gyro.
VOLUME up and down, CHANNEL up
and down. Volume mute.
Shortcuts buttons include:
RECORDED TV,
Each of these lists can be scrolled by
waving the hand up and down.
0-9 keys with alpha characters,
plus * and #, CLEAR and ENTER
FOLLOW ME, INFO&HELP,
CONNECT, INPUT, AV MENU
PICTURES,
MUSIC and VIDEOS.
RCU Mode Selection
F
C D
E
A B
Puts RCU into AUX control mode for communicating with additional learned device via IR
C
protocol.
Puts RCU into CAB/SAT control mode for communicating with cable or satellite set-top box
D
via IR protocol.
PC, TV, AUX or CAB/SAT mode: Powers on/off the selected device.
E
PC Mode: If the Fiire system is active, the rst button press issues a go to Power menu and
the second button press issues a power down command.
If the system is in inactive mode, a button press may awaken.
Transmit LED indicator for RF transmission
F
Puts RCU into PC control mode for
A
communicating with Fiire via RF protocol.
Puts RCU into TV control mode for
B
communicating with TV via IR protocol.
5
Page 6
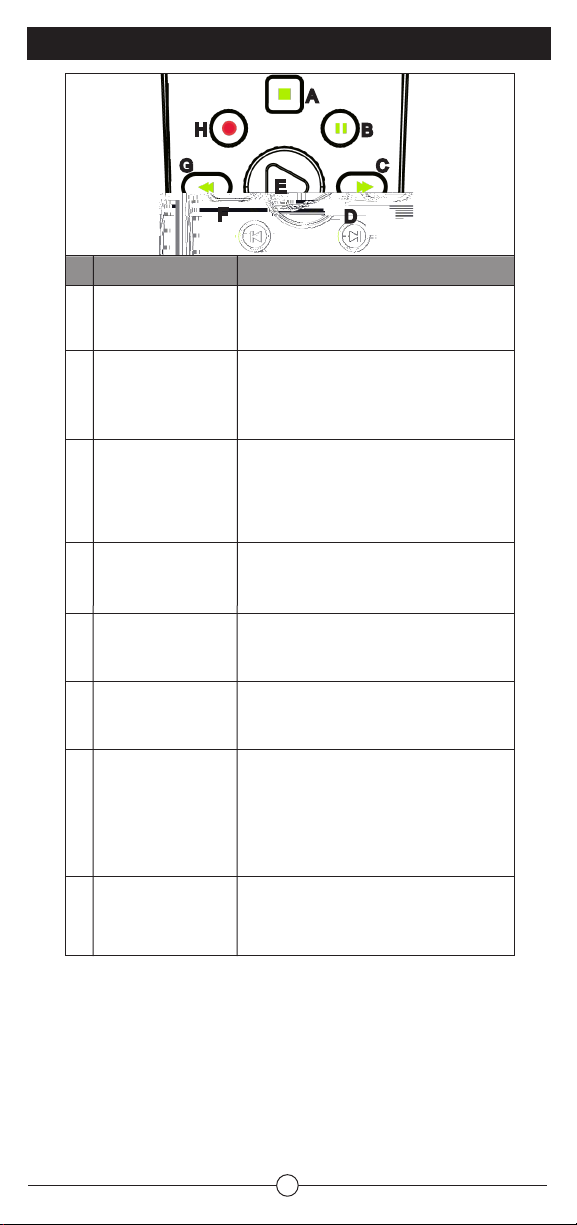
Transport Control
A
H
B
G
TV, AUX orCAB/SATmode
Puts selected device
A
into Stop mode, if
supported
Puts selected device
B
into Pause mode, if
supported
Puts selected device
C
into Fast Forward mode,
if supported
Skip command, if
D
supported by selected
device
Puts selected device
E
into Play mode, if
supported
Replay command, if
F
supported by selected
device
G
Puts selected device
into Rewind mode, if
supported
C
E
F
Stops media playback and brings the main
menu in front
First button press pauses the media at present
position. Subsequent button presses toggles
between pause and playback at present
position pointer.
First press speeds up the time base of the
media stream to the rst FF value (2X).
Subsequent button presses cycle through the
FF speed values looping through 1X (normal
speed) 4X, 6X, 8X, 16X, 32X, 64X.
Skips ahead an increment: CD and Playlists
skip to next song. DVD skips to next chapter.
Start (if paused, continue) playback of media at
present position.
Move back the position an increment:
CD and Playlist: skips back to previous song.
DVD: skips back to previous chapter.
First press speeds up the time base and
reverses direction of the media stream to the
rst rewind value (2X).
Second press cycles through the RWD speed
values looping through 1X (normal speed) 4X,
6X, 8X, 16X, 32X, 64X.
D
Fiire Mode
H
Puts selected device
into Record mode, if
supported
Records the TV show to disk. Starts recording
at the beginning of the show as dened by
on-screen TV program guide.
6
Page 7

Menu Navigation
No action, or as
A
dened by selected
device
No action, or as
B
dened by selected
device
No action, or as
C
dened by selected
device
No action, or as
D
dened by selected
device
E
Menu Navigation Up
Menu Navigation
F
Right
Menu Navigation
G
Down
Menu Navigation Left
H
Performs action
I
indicated by focus
point
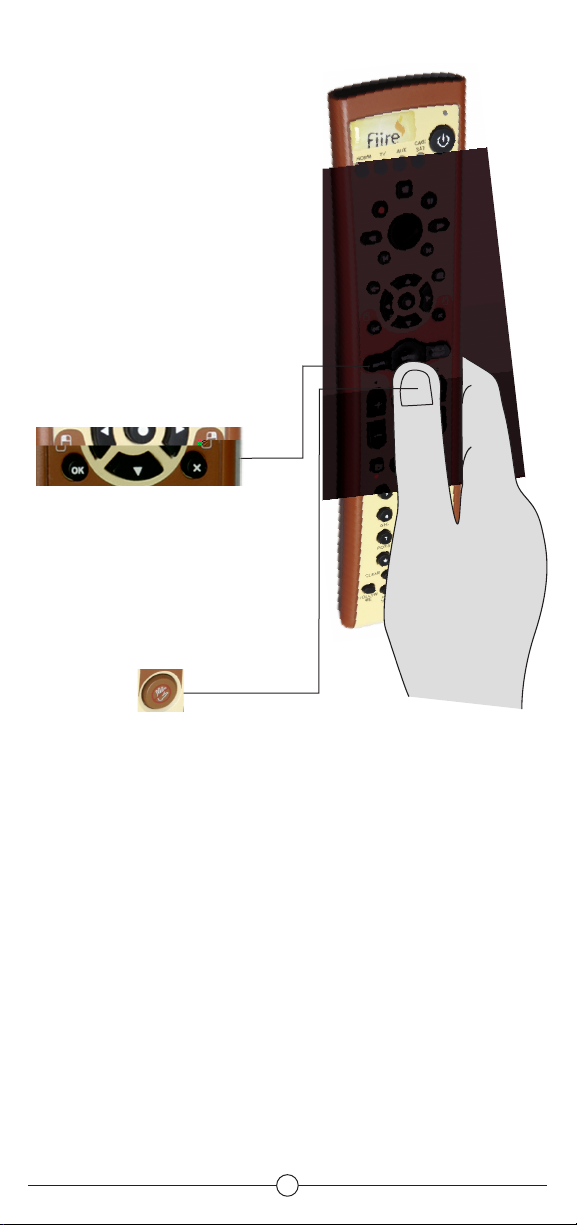
A
H
C
B
E
F
D
G
Goes back one screen to previous location
Invokes the on-screen TV program guide
Simulates a left-mouse button-click; OK
button selects whatever object is highlighted
on screen;
Simulates a right-mouse button-click; Cancel
button makes whatever menu go away;
Moves the focus point (highlights another
object) up one location
Moves focus point right one position
Moves the focus point down one location
Moves focus point left one position
Performs action indicated by focus point; Select
whatever object is highlighted on screen
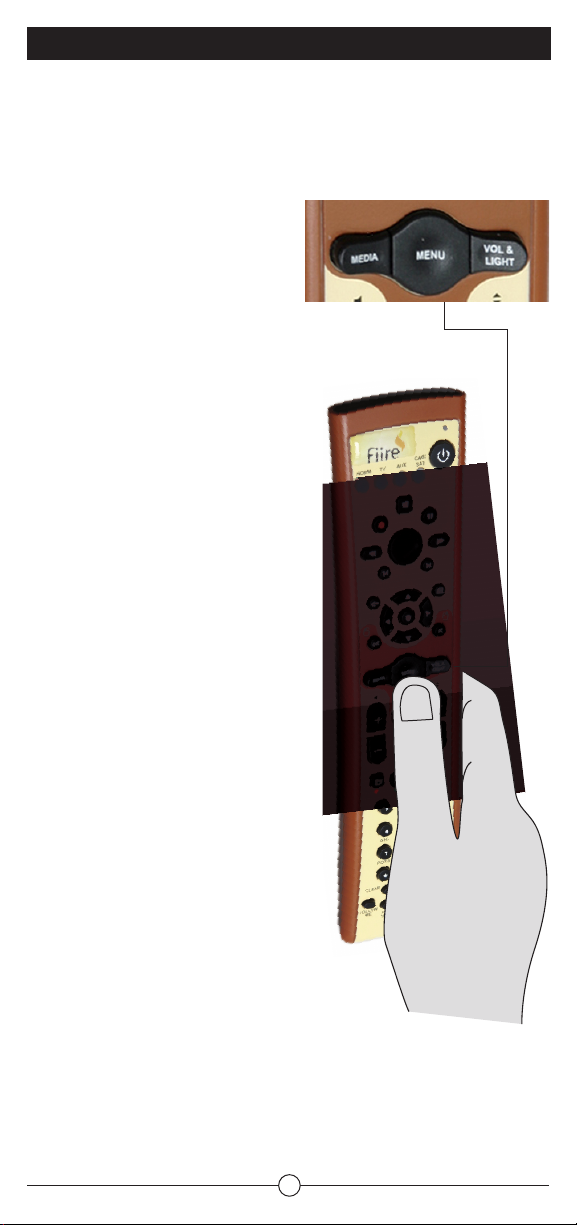
Media button
A
B
Volume&Lights button
C
Menu button
A
7
C
B
Page 8

Channel/Volume Control, Mute Volume
Gyro stop
TV, AUX orCAB/SATmode
Gyro stop
A
Increment the current
B
channel by 1
Decrement the
C
current channel by 1
Mute selected
D
device, if applicable
Decrement the
E
current volume by
1 unit
Increment the current
F
volume by 1 unit
F
B
A
E
C
D
Fiire Mode
To reposition your hand press and hold the
gyro ‘stop’ button to freeze the pointer.
Double-click it to de-activate the gyro.
Then press it again, or press one of the 3
gyro buttons, to re-activate it.
Increment the current channel by 1. Move
one position up in playlist.
Decrement the current channel by 1. Move
one position down in playlist.
Mute the volume, toggle mute state.
Decrement the current volume by 1 unit.
If muted, un-mute the volume rst.
Increment the current volume by 1 unit.
If muted, un-mute the volume rst.
8
Page 9

Fiire Shortcut Buttons
A
B C
D
Numeric Keypad
A
Acts as a shortcut to the “Pictures”
B
Acts as a shortcut to the “Recorded TV”
C
Acts as a shortcut to the “Music”
D
Acts as a shortcut to the “Videos”
A
B
TV, AUX orCAB/SATmode
Standard 1-9, alphanumeric
A
Inserts a * symbol, if supported by
B
the selected device
C
Inserts a # symbol, if supported by
the selected device
Clear, if supported by the selected
D
device
Enter, if supported by the selected
E
device
D
C
E
Fiire Mode
Standard 1-9, alphanumeric
*
#
Clear
Enter
Follow me, Info&Help, Connect, Input and AV Menu
A
Follow me
Press this button when you want to control
another Fiire system (like a Fiire Station).
You need to have an USB Dongle connected
to that Fiire Station too.
A
B
C
E
D
If you were watching a movie in previous
room, the movie will follow you.
B
Info & Help
C
Synchronizes the RF remote with the RF
receiver
D
Toggles between TV inputs
E
Brings up the Audio / Video Wizard.
When the Fiire System starts (boots up)
press this button when you hear a melody
beep.
9
Page 10

Backlighting
The RCU Mode Selection buttons are backlit. One of these buttons lights up
whenever a button is pressed on the remote to indicate which Control Mode the
remote is in; PC, TV, AUX, or CAB/SAT. If the backlighting seems dim, the batteries
may need to be replaced. There is no backlighting on any other buttons.
ON/OFF Switch
This switch turns the selected device on or off. The device is selected with the RCU
Mode Switches; PC, TV, AUX and CAB/SAT.
In the PC mode, this button issues a Go to Power Menu. On the screen you have
options for powering off the whole house or only a particular device. At this time the
system is in not powering off, it waits for another command. Another press of the
Power button will turn the Fiire system off.
If the PC is in powered off, any button pressed on the RCU may wake up the PC.
Receiver Installation
The RCU requires a USB RF transceiver be plugged into a USB port in the Fiire box
in order to access RF and gyro functions. The USB extension cable can be used to
maximize the range of the RCU by placing the USB RF transceiver away from other
electrical components. A USB RF transceiver does not need to be plugged in to use
the IR remote functions. See the diagram below.
10
Page 11

Setting Up and Synchronizing a Gyration GO
Mouse or Keyboard and the transceiver
The same transceiver that you used with the Fiire Chief can be used with gyration mouse
or keyboard.
The connect button on the transceiver is only used to connect a gyration mouse or
keyboard. Don’t use the connect button to connect the Fiire Chief. The Fiire chief does an
‘one way’ connection so you only press the connect button on the Chief and not on the
transceiver.
1. Plug the USB RF transceiver into the PC if it hasn’t already been done. See the
previous section of this document.
2.
Press and release the connect button on the USB transceiver. The CONNECT light on the
transceiver will ash.
3. Press the CONNECT button on the mouse or keyboard. The CONNECT light on the
USB transceiver will stop ashing. They are now connected to your Fiire system.
The green STATUS light on the USB transceiver indicates when RF signals are being
received from the RCU.
The RCU can be programmed to operate many brands of remote-controllable components such as TVs, VCRs, CD players, DVD players, cable boxes, satellite receivers and
other components via the IR functions of the RCU.
The AUX button can be programmed to operate most brands of remote-controllable
components: satellite receivers, cable boxes, CDs DVDs, VCRs, DVRs, and other components via the IR functions of the RCU.
To determine whether the universal remote needs to be programmed to operate one of
the components connected to your Fiire system, such as TV, do the following:
1. Turn on the component (in this example, a TV).
2. Point the remote at the TV.
3. Press the corresponding component button (in this example, TV).
4. Press ON•OFF to see if the TV responds. If the TV doesn’t respond, you must program
the remote to operate it.
Programming Methods
There are two ways to program the remote control to operate other components:
Automatic Code Search and Direct Entry.
Using Automatic Code Search
The following instructions can be used to program the RCU to operate each of your
components. If you want to stop the automatic code search without programming any of
your components, press and hold CLEAR (*) until the indicator on the RCU turns off.
1. Turn on the component you want to operate (TV, DVD player, etc.)
2. Press and hold the component button you want to program (TV, AUX, etc.). While
holding the component button, press and hold ON/OFF button until the component
button on the RCU turns on, then release both buttons.
3. Point the remote at the component.
4. Press and release PLAY, then wait 5 seconds or until the component button stops
ashing. At this point the RCU is searching for the correct code to program. If, after 5
seconds, the component you want to operate does not turn off, press PLAY again to tell
the RCU to search the next set of codes. Continue pressing and releasing PLAY until
the component turns off or you have searched through all of the codes. The component
buttons ash when all codes have been searched, the component button turns off, and
the RCU exits the Automatic Code Search mode.
If the component you want to control does turn off:
1. Press and release REVERSE, then wait 2 seconds. Repeat this step until the
component turns back on.
2. To nish, press and hold STOP until the component button on the RCU turns off. The
RCU will automatically exit the Automatic Code Search mode.
11
Page 12

Programming Methods
Using Direct Entry
1. Turn on the device you want to operate (TV, DVD player, etc.)
2. Look up the brand and code number(s) for the device in the Remote Code List at the
end of this booklet.
3. Press and hold the device button you want to program on the RCU.
4. Enter the 4-digit code from the Remote Code List. If all the mode buttons ash, you
have either entered an invalid code or the button isn’t programmable.Using Direct
Entry
5. Release the device button, point the RCU at the device, and then press the ON/OFF
button to see if the device responds to the command. If it doesn’t, try pressing the
component button and then ON/OFF again.
• If you get no response, repeat these steps using the next code listed for your brand,
until the device responds to the remote commands.
• If you try all the codes for your device brand and none work, try the automatic code
search method. If automatic code search doesn’t nd the code, the remote is not
compatible with your component.
Because the RCU controls more than one component, you must rst “tell” it which
component you wish to operate. For example, if you wish to operate the TV, you must
rst press the TV mode button on the RCU to put it in the TV mode.
The RCU stays in the chosen mode until you change it. If the RCU is in the TV mode,
you must change the mode in order to operate other components. For example, if you
are in the TV mode and you wish to turn off the Cable Box, you must rst press the CAB/
SAT button then the On/Off button. Return to the TV mode by pressing the TV mode
button.
Learning
Volume Punch Through allows the VOL+, VOL-, and MUTE keys, when pressed in
the TV, AUX, or CAB/SAT modes, to “punch through” to the TV or other device audio,
whichever was accessed last. The Volume Punch Through occurs automatically and
allows you to control the volume without exiting the current mode.
12
Page 13

Learning
The RCU has the ability to learn the commands of other remote
control units, such as TV remotes or VCR remotes. This allows
the most-used commands on those remotes to be combined on the
RCU. These original remote control units are also known as source
remotes. Learning is not active in the PC mode.
Learning Tips
1. All learned functions for a mode can be erased if you program a
different device to that mode.
2. Perform the learning process in low-light areas because too much
ambient light might cause interference with the infrared (IR) signals
of the remotes.
3. Use fresh batteries in both the Media Center and PC RCU and the
original remote.
Code Learning
Codes from the Remote Code List include basic functionality for each
component they control. Once you have programmed in the code for
your specic component (using either the Automatic Code Search or
Direct Entry method), you can customize the RCU to perform certain
functions from your original remote(s) that were not embedded in the
preset code. The RCU has the ability to learn and store commands
from your original remote(s) under the mode(s) of your choice.
Learning Commands
For the following section, the TV remote control unit will be used as
an example. Learning from other types of remotes will be done in a
similar way.
1) First press and hold the mode button on the RCU for the
component remote you are learning from (the TV button on the
RCU, for example) then press and hold the RECORD button on
the RCU.
2) Keep pressing both buttons until the device mode button light turns
off, ashes, and turns off. Release both buttons.
3) On the RCU, press and release the button where you want to store
the new function (the component button turns off and then back on;
a short ash).
Note: If you press an invalid button on the remote, the device mode
button ashes 4 times to alert you. You’ll have to repeat step 3.
4) Position the source remote facing the bottom of the RCU no more
than 2 inches apart. Press and hold the button of the source remote
that has the functionality you are recording. Keep pressing the
button until the RCU device mode button light turns off and back on
(the source function has been saved to the TV mode on the RCU).
Note: If all device mode buttons ash 4 times, the function wasn’t
learned. Try again starting with Step 3.
5) The RCU remains in the “learning mode” so you can continue
adding functions to different buttons by repeating steps 3 and 4.
6) Press CLEAR to exit the learning mode.
Remotes
should
not be
more than
2 inches
apart
13
Page 14

Clearing an Individual Learned Function
To delete a learned button function, use the procedure below.
1. Press and hold the component mode button (the component button lights). Then press
and hold the CLEAR button for 3 seconds. Hold both buttons depressed until the
component mode button ashes.
2. Release both buttons. The component mode button turns on indicating that the RCU is
now in the Clear Learned Function mode for that component.
3. Press and release the button where learning is to be cleared. The component mode
button blinks off then back on indicating that the function was cleared successfully.
4. Repeat Steps 1 through 3 until all the buttons’ learned functions have been cleared.
Note: If an invalid button is pressed, the component mode button ashes 4 times, the
selected component button stays on, and the RCU remains in Clear Learned Function
mode. Repeat Step 3 to continue the clearing process.
5. Press the CLEAR button to return the RCU to normal operation.
Deleting All Learned Functions
To delete all learned functions as once, use the procedure below.
1. Press and hold the CLEAR button (the current component button lights). Then press
and hold the ON/OFF button (component button light turns off for 3 seconds, ashes,
turns on and off) while continuing to hold the CLEAR button.
2. Release both buttons (current component button turns on).
3. Press any component button to delete all learned functions in all modes. The RCU
automatically exits this clearing mode.
Note: Pressing the CLEAR button while in this mode will not delete the learning functions,
but it will exit this delete mode.
Troubleshooting
If the IR functions on your RCU don’t work properly...
• Something might be between the RCU and the remote sensor on the component. Make
sure there is a clear path.
• The RCU may not be aimed directly at the component (TV or VCR) that you’re trying to
operate.
• The RCU might not be in the correct mode for operating that component. Try pressing
the corresponding mode switch (TV, AUX, etc.) then try operating the component with
the RCU.
• The batteries in the RCU might be weak, dead, or installed incorrectly. If batteries are
weak, the backlighting will be weak on the device mode buttons. In this case, put new
batteries in the remote. (Note: if you remove the batteries, you may have to reprogram
the remote to operate other components.)
• When using the Learning feature, do the learning process in low light areas to prevent
natural light and uorescent light from interfering with the infrared signals.
If the RF or gyro functions on your RCU don’t work properly...
• If the RCU does not appear to be working at all, it may not be connected or
synchronized with the USB RF transceiver. Repeat the Setting Up and Synchronizing
the Remote and the Transceiver procedure above.
• If, when using the RCU as an in-air cursor control, the cursor is visible on the screen,
but shows no movement, the gyro may not be activated. See the Gyro Operation
section above to activate the gyro and in-air cursor control.
• If the cursor movement is choppy or erratic, there may be radio interference. Move the
USB transceiver away from other electronic devices such as monitor speaker or radios.
• The batteries in the RCU might be weak, dead, or installed incorrectly. If batteries are
weak, the backlighting will be weak on the device mode buttons. In this case, put new
batteries in the remote. (Note: if you remove the batteries, you may have to reprogram
the remote to operate other components.)
14
Page 15

Remote Code List
TV
Brand Codes
AOC 1005
---------------------------------------------------------------------------------------------------------------------------------------Candle 1005
---------------------------------------------------------------------------------------------------------------------------------------Citizen 1005
---------------------------------------------------------------------------------------------------------------------------------------Colortyme 1005
---------------------------------------------------------------------------------------------------------------------------------------Concerto 1005
---------------------------------------------------------------------------------------------------------------------------------------Curtis Mathes 1001 1005
---------------------------------------------------------------------------------------------------------------------------------------Daewoo 1005
---------------------------------------------------------------------------------------------------------------------------------------Daytron 1005
---------------------------------------------------------------------------------------------------------------------------------------Dell 1116 1117
---------------------------------------------------------------------------------------------------------------------------------------Dimensia 1001
---------------------------------------------------------------------------------------------------------------------------------------Dumont 1014
---------------------------------------------------------------------------------------------------------------------------------------Electrohome 1005
---------------------------------------------------------------------------------------------------------------------------------------Emerson 1005 1018
---------------------------------------------------------------------------------------------------------------------------------------Envision 1005
---------------------------------------------------------------------------------------------------------------------------------------Fujitsu 1077 1078 1079
---------------------------------------------------------------------------------------------------------------------------------------Gateway 1085
---------------------------------------------------------------------------------------------------------------------------------------GE 1001 1005 1095
---------------------------------------------------------------------------------------------------------------------------------------Gibralter 1014
---------------------------------------------------------------------------------------------------------------------------------------Goldstar 1005
---------------------------------------------------------------------------------------------------------------------------------------Hallmark 1005
---------------------------------------------------------------------------------------------------------------------------------------Hitachi 1005 1011 1016 1086 1087 1101 1104 1106 1107
1111 1114
---------------------------------------------------------------------------------------------------------------------------------------JC Penney 1001 1005
---------------------------------------------------------------------------------------------------------------------------------------Jensen 1005 1058
---------------------------------------------------------------------------------------------------------------------------------------JVC 1007 1112
---------------------------------------------------------------------------------------------------------------------------------------Kawasho 1005
---------------------------------------------------------------------------------------------------------------------------------------Kenwood 1005
---------------------------------------------------------------------------------------------------------------------------------------LG 1010 1088
---------------------------------------------------------------------------------------------------------------------------------------Luxman 1005
---------------------------------------------------------------------------------------------------------------------------------------LXI 1001 1005
---------------------------------------------------------------------------------------------------------------------------------------Magnavox 1005 1032 1048 1110
---------------------------------------------------------------------------------------------------------------------------------------Marantz 1005
---------------------------------------------------------------------------------------------------------------------------------------Megatron 1005
---------------------------------------------------------------------------------------------------------------------------------------Memorex 1005
---------------------------------------------------------------------------------------------------------------------------------------MGA 1005
---------------------------------------------------------------------------------------------------------------------------------------Midland 1014
---------------------------------------------------------------------------------------------------------------------------------------Mitsubishi 1005 1067 1070 1098
---------------------------------------------------------------------------------------------------------------------------------------MTC 1005
---------------------------------------------------------------------------------------------------------------------------------------NAD 1005
---------------------------------------------------------------------------------------------------------------------------------------NEC 1005 1080
---------------------------------------------------------------------------------------------------------------------------------------Nikko 1005
---------------------------------------------------------------------------------------------------------------------------------------Orion 1018
---------------------------------------------------------------------------------------------------------------------------------------Panasonic 1013 1033 1035 1036 1065 1066 1089 1100 1115
---------------------------------------------------------------------------------------------------------------------------------------Philco 1005
---------------------------------------------------------------------------------------------------------------------------------------Philips 1022 1031 1034 1040 1046 1050 1059 1062 1109
---------------------------------------------------------------------------------------------------------------------------------------Pioneer 1005 1021 1023 1060 1090
---------------------------------------------------------------------------------------------------------------------------------------Polaroid 1047 1055 1056 1057 1058
---------------------------------------------------------------------------------------------------------------------------------------Portland 1005
---------------------------------------------------------------------------------------------------------------------------------------Proscan 1001 1095
---------------------------------------------------------------------------------------------------------------------------------------Proton 1005
---------------------------------------------------------------------------------------------------------------------------------------Pulsar 1014
---------------------------------------------------------------------------------------------------------------------------------------Radio Shack/Realistic 1001 1005
15
Page 16

Remote Code List
TV
Brand Codes
---------------------------------------------------------------------------------------------------------------------------------------RCA 1000 1001 1005 1009 1082 1095
---------------------------------------------------------------------------------------------------------------------------------------Runco 1014
---------------------------------------------------------------------------------------------------------------------------------------Sampo 1005
---------------------------------------------------------------------------------------------------------------------------------------Samsung 1005 1026 1027 1028 1030 1052 1053 1073 1076
1091 1092 1103 1108
---------------------------------------------------------------------------------------------------------------------------------------Sansui 1018
---------------------------------------------------------------------------------------------------------------------------------------Scotch 1005
---------------------------------------------------------------------------------------------------------------------------------------Scott 1005
---------------------------------------------------------------------------------------------------------------------------------------Sears 1001 1005
---------------------------------------------------------------------------------------------------------------------------------------Sharp 1005 1006 1012 1017 1029 1039 1069 1074
---------------------------------------------------------------------------------------------------------------------------------------Sony 1015 1019 1025 1037 1041 1045 1049 1054 1061
1063 1064 1068 1071 1072 1083 1084 1096 1113
---------------------------------------------------------------------------------------------------------------------------------------Soundesign 1005
---------------------------------------------------------------------------------------------------------------------------------------Sylvania 1005
---------------------------------------------------------------------------------------------------------------------------------------Techwood 1005
---------------------------------------------------------------------------------------------------------------------------------------Teknika 1005
---------------------------------------------------------------------------------------------------------------------------------------TMK 1005
---------------------------------------------------------------------------------------------------------------------------------------Toshiba 1024 1042 1043 1051 1080 1081 1097 1099 1102
1105
---------------------------------------------------------------------------------------------------------------------------------------Vidtech 1005
---------------------------------------------------------------------------------------------------------------------------------------Wards 1001 1005
---------------------------------------------------------------------------------------------------------------------------------------Yamaha 1005
---------------------------------------------------------------------------------------------------------------------------------------Zenith 1002 1003 1004 1008 1014 1020 1038 1044 1075
1093 1094
VCR
Akai 2030
---------------------------------------------------------------------------------------------------------------------------------------American High 2009
---------------------------------------------------------------------------------------------------------------------------------------Canon 2009
---------------------------------------------------------------------------------------------------------------------------------------Curtis Mathes 2009
---------------------------------------------------------------------------------------------------------------------------------------Emerson 2009 2030
---------------------------------------------------------------------------------------------------------------------------------------Fuji 2009
---------------------------------------------------------------------------------------------------------------------------------------GE 2009
---------------------------------------------------------------------------------------------------------------------------------------Hitachi 2016
---------------------------------------------------------------------------------------------------------------------------------------Instant Replay 2009
---------------------------------------------------------------------------------------------------------------------------------------JC Penney 2009 2016
---------------------------------------------------------------------------------------------------------------------------------------JCL 2009
---------------------------------------------------------------------------------------------------------------------------------------Jensen 2016
---------------------------------------------------------------------------------------------------------------------------------------JVC 2010 2012 2018 2020 2023
---------------------------------------------------------------------------------------------------------------------------------------Kodak 2009
---------------------------------------------------------------------------------------------------------------------------------------Magnavox 2009 2026
---------------------------------------------------------------------------------------------------------------------------------------Marantz 2009
---------------------------------------------------------------------------------------------------------------------------------------Matsushita 2009
---------------------------------------------------------------------------------------------------------------------------------------MEI 2009
---------------------------------------------------------------------------------------------------------------------------------------Memorex 2009
---------------------------------------------------------------------------------------------------------------------------------------MGA 2030
---------------------------------------------------------------------------------------------------------------------------------------Minolta 2016
---------------------------------------------------------------------------------------------------------------------------------------Mitsubishi 2016 2017 2030
---------------------------------------------------------------------------------------------------------------------------------------Motorola 2009
---------------------------------------------------------------------------------------------------------------------------------------Olympus 2009
---------------------------------------------------------------------------------------------------------------------------------------Panasonic 2004 2005 2008 2009 2014 2025
---------------------------------------------------------------------------------------------------------------------------------------Pentax 2016
---------------------------------------------------------------------------------------------------------------------------------------Philco 2009
16
Page 17

Remote Code List
VCR
Brand Codes
---------------------------------------------------------------------------------------------------------------------------------------Philips 2009 2015
---------------------------------------------------------------------------------------------------------------------------------------Philips Magnavox 2015
---------------------------------------------------------------------------------------------------------------------------------------Pioneer 2016
---------------------------------------------------------------------------------------------------------------------------------------Quasar 2009
---------------------------------------------------------------------------------------------------------------------------------------Radio Shack/Realistic
---------------------------------------------------------------------------------------------------------------------------------------RCA 2000 2006 2009 2016 2031
---------------------------------------------------------------------------------------------------------------------------------------Realistic 2009
---------------------------------------------------------------------------------------------------------------------------------------Sears 2009 2016
---------------------------------------------------------------------------------------------------------------------------------------Sharp 2003 2013 2021 2022
---------------------------------------------------------------------------------------------------------------------------------------Singer 2009
---------------------------------------------------------------------------------------------------------------------------------------Sony 2001 2007 2012 2019 2024
---------------------------------------------------------------------------------------------------------------------------------------STS 2009
---------------------------------------------------------------------------------------------------------------------------------------Sylvania 2009
---------------------------------------------------------------------------------------------------------------------------------------Technics 2009
---------------------------------------------------------------------------------------------------------------------------------------Teknika 2009
---------------------------------------------------------------------------------------------------------------------------------------Toshiba 2002 2016 2027 2028 2030
---------------------------------------------------------------------------------------------------------------------------------------Video Concepts 2030
---------------------------------------------------------------------------------------------------------------------------------------Wards 2009 2016
---------------------------------------------------------------------------------------------------------------------------------------XR-1000 2009
---------------------------------------------------------------------------------------------------------------------------------------Zenith 2011 2029
DVD
Denon 3045 3050 3036
---------------------------------------------------------------------------------------------------------------------------------------Go Video 3018 3024
---------------------------------------------------------------------------------------------------------------------------------------JBL 3000
---------------------------------------------------------------------------------------------------------------------------------------JVC 3042
---------------------------------------------------------------------------------------------------------------------------------------LG 3049 3054
---------------------------------------------------------------------------------------------------------------------------------------Magnavox 3016 3052
---------------------------------------------------------------------------------------------------------------------------------------Nakamichi 3003
---------------------------------------------------------------------------------------------------------------------------------------Onkyo 3047 3048 3055
---------------------------------------------------------------------------------------------------------------------------------------Panasonic 3008 3012 3017 3036 3037
---------------------------------------------------------------------------------------------------------------------------------------Philips 3006 3015 3019 3027
---------------------------------------------------------------------------------------------------------------------------------------Pioneer 3011 3013 3014 3031 3044
---------------------------------------------------------------------------------------------------------------------------------------RCA 3004 3028 3038
---------------------------------------------------------------------------------------------------------------------------------------Samsung 3025 3040
---------------------------------------------------------------------------------------------------------------------------------------Sony 3001 3002 3005 3007 3009 3020 3021 3022 3029
3033 3034 3035 3039 3041 3043 3046 3051
---------------------------------------------------------------------------------------------------------------------------------------Toshiba 3010 3023 3026 3030 3032 3053
---------------------------------------------------------------------------------------------------------------------------------------Zenith 3049
DVR
Panasonic 3060
---------------------------------------------------------------------------------------------------------------------------------------Philips 3058
---------------------------------------------------------------------------------------------------------------------------------------RCA 3056
---------------------------------------------------------------------------------------------------------------------------------------Replay 3059 3062
---------------------------------------------------------------------------------------------------------------------------------------Sony 3057
---------------------------------------------------------------------------------------------------------------------------------------Tivo 3056 3061
2009
17
Page 18

Remote Code List
AUDIO
Brand Codes
Aiwa 4044 4052
---------------------------------------------------------------------------------------------------------------------------------------Apex 4105
---------------------------------------------------------------------------------------------------------------------------------------BOSE 4100
---------------------------------------------------------------------------------------------------------------------------------------Denon 4028 4036 4048 4049 4053 4055 4064 4065 4066
4068 4069 4072 4073 4074 4078 4080 4081 4088
4090 4091 4092 4093 4094 4096 4097
---------------------------------------------------------------------------------------------------------------------------------------Harman/Kardon
---------------------------------------------------------------------------------------------------------------------------------------JBL 4063
---------------------------------------------------------------------------------------------------------------------------------------JVC 4031 4033
---------------------------------------------------------------------------------------------------------------------------------------Kenwood 4014 4015 4016 4019 4021 4026 4030 4046
---------------------------------------------------------------------------------------------------------------------------------------Koss 4103
---------------------------------------------------------------------------------------------------------------------------------------LG 4099
---------------------------------------------------------------------------------------------------------------------------------------Magnavox 4101
---------------------------------------------------------------------------------------------------------------------------------------Marantz 4095
---------------------------------------------------------------------------------------------------------------------------------------Onkyo 4020 4023 4027 4039 4043 4045 4050 4051 4060
4067 4070 4075 4076 4077 4079 4082 4083 4084
4085 4087 4089 4098 4106
---------------------------------------------------------------------------------------------------------------------------------------Panasonic 4056
---------------------------------------------------------------------------------------------------------------------------------------Philips 4059 4062
---------------------------------------------------------------------------------------------------------------------------------------Pioneer 4004 4007 4013 4022 4024
---------------------------------------------------------------------------------------------------------------------------------------Polaroid 4061
---------------------------------------------------------------------------------------------------------------------------------------RCA 4034
---------------------------------------------------------------------------------------------------------------------------------------Samsung 4102
---------------------------------------------------------------------------------------------------------------------------------------Sony 4000 4001 4002 4003 4005 4006 4008 4010 4011
4012 4018 4032 4035 4041 4058
---------------------------------------------------------------------------------------------------------------------------------------Technics 4009 4037 4038 4042 4054 4057
---------------------------------------------------------------------------------------------------------------------------------------Toshiba 4086
---------------------------------------------------------------------------------------------------------------------------------------Yamaha 4017 4025 4029 4040 4047
---------------------------------------------------------------------------------------------------------------------------------------Zenith 4104
SATELLITE DISH
DirecTV 5014
---------------------------------------------------------------------------------------------------------------------------------------DISH Network 5021
---------------------------------------------------------------------------------------------------------------------------------------Express Vu 5004
---------------------------------------------------------------------------------------------------------------------------------------GE 5001 5002 5018
---------------------------------------------------------------------------------------------------------------------------------------Hughes 5008 5030
---------------------------------------------------------------------------------------------------------------------------------------JVC 5003
---------------------------------------------------------------------------------------------------------------------------------------Mitsubishi 5006
---------------------------------------------------------------------------------------------------------------------------------------Panasonic 5007 5027
---------------------------------------------------------------------------------------------------------------------------------------Philips 5013 5020 5030
---------------------------------------------------------------------------------------------------------------------------------------Pioneer 5028
---------------------------------------------------------------------------------------------------------------------------------------Proscan 5001 5002
---------------------------------------------------------------------------------------------------------------------------------------RCA 5000 5001 5002 5016 5024 5025 5029 5030
---------------------------------------------------------------------------------------------------------------------------------------Samsung 5010 5026 5030
---------------------------------------------------------------------------------------------------------------------------------------Sony 5009 5015 5019 5022 5023
---------------------------------------------------------------------------------------------------------------------------------------Star Choice 5005
---------------------------------------------------------------------------------------------------------------------------------------Toshiba 5011 5018
---------------------------------------------------------------------------------------------------------------------------------------Zenith 5012 5017
4071
18
Page 19

Remote Code List
CABLE
Brand Codes
ABC 5035
---------------------------------------------------------------------------------------------------------------------------------------Comcast 5039
---------------------------------------------------------------------------------------------------------------------------------------Contec 5034
---------------------------------------------------------------------------------------------------------------------------------------GE 5035
---------------------------------------------------------------------------------------------------------------------------------------Gemini 5033
---------------------------------------------------------------------------------------------------------------------------------------General Instrument 5042
---------------------------------------------------------------------------------------------------------------------------------------General Instruments 5032 5035
---------------------------------------------------------------------------------------------------------------------------------------Hamlin 5031
---------------------------------------------------------------------------------------------------------------------------------------Hitachi 5035
---------------------------------------------------------------------------------------------------------------------------------------Jerrold 5032 5035
---------------------------------------------------------------------------------------------------------------------------------------Motorola 5038 5039 5043 5044
---------------------------------------------------------------------------------------------------------------------------------------Oak 5034
---------------------------------------------------------------------------------------------------------------------------------------Philips 5033
---------------------------------------------------------------------------------------------------------------------------------------Proscan 5035
---------------------------------------------------------------------------------------------------------------------------------------RCA 5032
---------------------------------------------------------------------------------------------------------------------------------------Rembrandt 5035
----------------------------------------------------------------------------------------------------------------------------------------
Scientic Atlanta
---------------------------------------------------------------------------------------------------------------------------------------Signature 5035
---------------------------------------------------------------------------------------------------------------------------------------Sony 5041
---------------------------------------------------------------------------------------------------------------------------------------Time Warner 5045
---------------------------------------------------------------------------------------------------------------------------------------View Star 5034
HDTV TUNER
Panasonic 7001
---------------------------------------------------------------------------------------------------------------------------------------RCA 7000
5036 5037 5040
19
Page 20

Phone: Toll-free (U.S. only): (877) on-ire
Los Angeles, CA, USA: +1 (213) 325-266
Email address: info@ire.com
U.S. Patent Numbers: 5,440,326; 5,898,421; 5,825,350 and other pending patents.
GYR3201US - DL02829-001 Rev. B - Made in China.
 Loading...