

Page 1

Page 2

Table of contents
Owner’s manual
Main features .............................................. 4
Front and side panels ................................. 4
Front panel .................................................................. 4
Side panel .................................................................... 6
Attaching the strap .................................................... 6
Preparations................................................7
Connections................................................................. 7
Turning the power on ................................................ 8
Demo performance .................................... 9
Selecting and playing a program .............. 9
Selecting a program................................................... 9
Modifying the sound ............................................... 10
Playing arpeggios .....................................................13
Shift functions .......................................... 14
Velocity curve ............................................................ 14
Long ribbon velocity ................................................15
Global MIDI channel ................................................ 15
Long ribbon MIDI channel ...................................... 15
Transpose ................................................................... 15
Power save function ................................................. 16
Battery type and remaining power .......................16
Auto power o function .......................................... 16
MIDI ...........................................................17
Using the RK-100S with other MIDI devices (MIDI)
.....................................................................................17
Trouble shooting ...................................... 18
Specications ............................................19
Appendices ...............................................74
Voice Name List .........................................................75
MIDI Implementaton Chart .................................... 77
Page 3
Precautions
Precautions
Location
Using the unit in the following locations can result in a
malfunction.
• In direct sunlight
• Locations of extreme temperature or humidity
• Excessively dusty or dirty locations
• Locations of excessive vibration
• Close to magnetic elds
Power supply
Please connect the designated AC adapter to an AC outlet
of the correct voltage. Do not connect it to an AC outlet of
voltage other than that for which your unit is intended.
Interference with other electrical
devices
Radios and televisions placed nearby may experience
reception interference. Operate this unit at a suitable
distance from radios and televisions.
Handling
To avoid breakage, do not apply excessive force to the
switches or controls.
Care
If the exterior becomes dirty, wipe it with a clean, dry cloth.
Do not use liquid cleaners such as benzene or thinner, or
cleaning compounds or ammable polishes.
Keep this manual
Aer reading this manual, please keep it for later reference.
Keeping foreign matter out of your
equipment
Never set any container with liquid in it near this
equipment. If liquid gets into the equipment, it could cause
a breakdown, re, or electrical shock.
Be careful not to let metal objects get into the equipment.
If something does slip into the equipment, unplug the AC
adapter from the wall outlet. Then contact your nearest Korg
dealer or the store where the equipment was purchased
DECLARATION OF CONFORMITY (for USA)
Responsible Party : KORG USA INC.
Address : 316 SOUTH SERVICE ROAD, MELVILLE
Telephone : 1-631-390-6500
Equipment Type : Keytar
Model : RK-100S
This device complies with Part 15 of FCC Rules. Operation
is subject to the following two conditions:
(1) This device may not cause harmful interference,and (2)
this device must accept any interference received, including
interference that may cause undesired operation.
.
THE FCC REGULATION WARNING (for USA)
NOTE: This equipment has been tested and found to comply
with the limits for a Class B digital device, pursuant to Part
15 of the FCC Rules. These limits are designed to provide
reasonable protection against harmful interference in a
residential installation. This equipment generates, uses, and
can radiate radio frequency energy and, if not installed and
used in accordance with the instructions, may cause harmful
interference to radio communications. However, there is
no guarantee that interference will not occur in a particular
installation. If this equipment does cause harmful interference
to radio or television reception, which can be determined by
turning the equipment o and on, the user is encouraged to
try to correct the interference by one or more of the following
measures:
• Reorient or relocate the receiving antenna.
•
Increase the separation between the equipment and receiver.
• Connect the equipment into an outlet on a circuit dierent
from that to which the receiver is connected.
•
Consult the dealer or an experienced radio/TV technician
for help.
If items such as cables are included with this equipment, you
must use those included items.
Unauthorized changes or modication to this system can void
the user’s authority to operate this equipment.
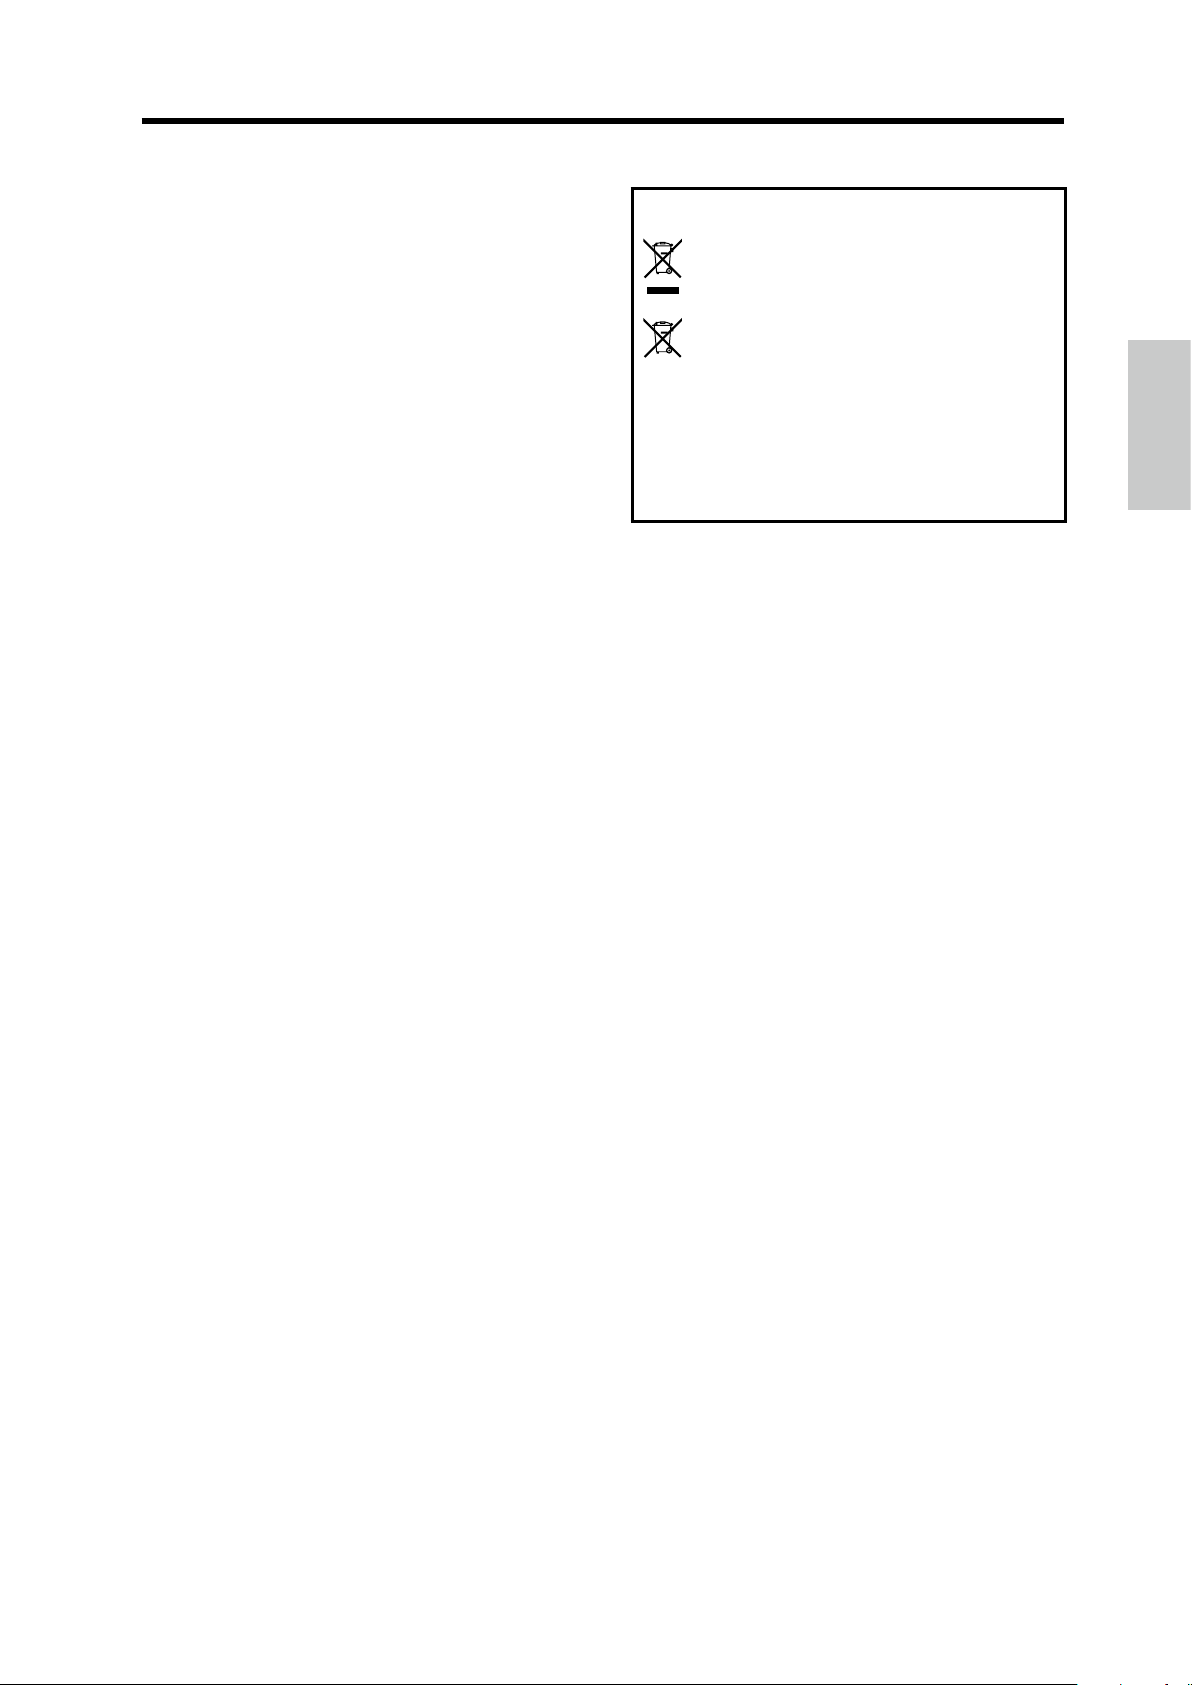
Notice regarding disposal (EU only)
When this “crossed-out wheeled bin” symbol is
displayed on the product, owner’s manual, baery, or
baery package, it signies that when you wish to
dispose of this product, manual, package or baery
you must do so in an approved manner. Do not discard
this product, manual, package or baery along with
ordinary household waste. Disposing in the correct
manner will prevent harm to human health and
potential damage to the environment. Since the correct method
of disposal will depend on the applicable laws and regulations
in your locality, please contact your local administrative body
for details. If the baery contains heavy metals in excess of the
regulated amount, a chemical symbol is displayed below the
“crossed-out wheeled bin” symbol on the baery or baery
package.
Precautions for the RK-100S
As with a common electric guitar, the body of this device
is made with painted wood.
Aer use, wipe the body with a clean, so and dry cloth.
•
Use a commercially available guitar polish.
Do not expose this device to rapid temperature changes,
•
such as extremely high or low temperatures. Bringing the
device from a cold location directly to a heated room may
cause cracks to form in the painted body. In addition, it
is extremely dangerous to leave the device in the trunk
of a car, where it will be exposed to high temperatures,
for example, in the summer.
• Since the body paint is delicate, even a slight shock may
cause it to peel o or crack. While playing or transporting,
handle the device very carefully to avoid hiing it.
*
All product names and company names are the
trademarks or registered trademarks of their respective
owners.
3
Page 4
RK-100S Owner's manual
Thank you for purchasing the Korg RK-100S KEYTAR.
To help you get the most out of your new instrument,
please read this manual carefully.
Main features
The RK-100S is a stylish shoulder keyboard that’s equipped
with a synthesizer and the classic tones of a piano or organ,
allowing you to play a wide-variety of sounds with the
ribbon controllers.
Taking advantage of the baery power, you can enjoy
playing in various locations.
200 programs through MMT analog modeling
200 programs that are compatible with various music
genres are available through the MMT sound generation
system. These are provided with a broad range of oscillator
algorithms, including the sawtooth waves and square
waves, typical of analog synthesizers, as well as formant
waveforms, noise and PCM/DWGS waveforms.
Ribbon controllers
A long ribbon controller and a short ribbon controller are
available for controlling the pitch and lter, etc.
The long ribbon controller can be used to control the pitch
and lter of sounds, and it can also be used to play scales
and the range of notes specied with the sound editor
soware.
Only a ngertip should be used to control. You
shouldn’t use anything hard or pointed and you
shouldn’t be wearing gloves.
Arpeggiator
The built-in arpeggiator can automatically generate an
arpeggio when you hold down a chord.
You can choose from six types of arpeggios. Notes can
also be individually switched on/o for up to eight steps,
allowing you to vary the rhythm for an even wider range
of possibilities.
There are also two master eects for each program, allowing
you to add nal touches to your sound. You can choose one
of seventeen types for each eect.
Sound editor software
By connecting the RK-100S to a computer with a USB
cable and the using sound editor soware, you can edit
parameters, such as the sounds and the arpeggio paerns
of the RK-100S, from your computer.
You can download the sound editor free of charge from
the Korg website.
hp://www.korg.com/
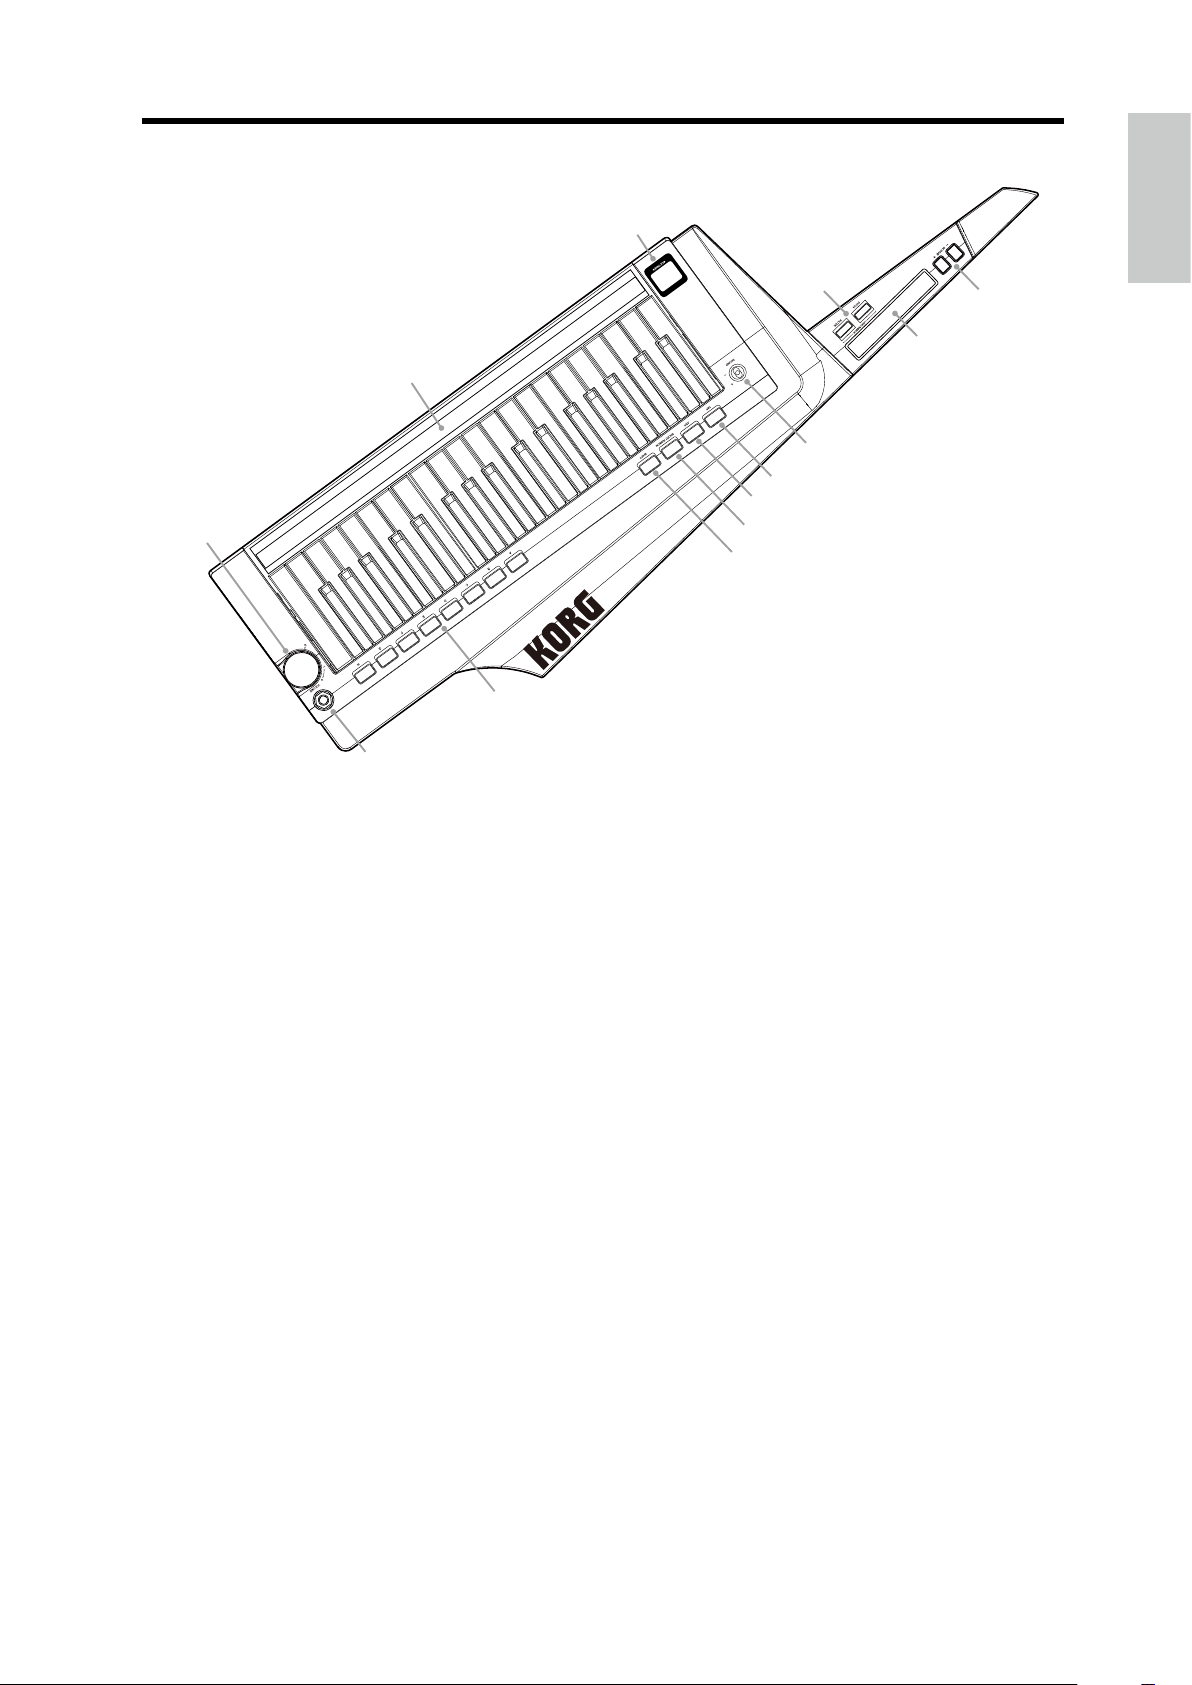
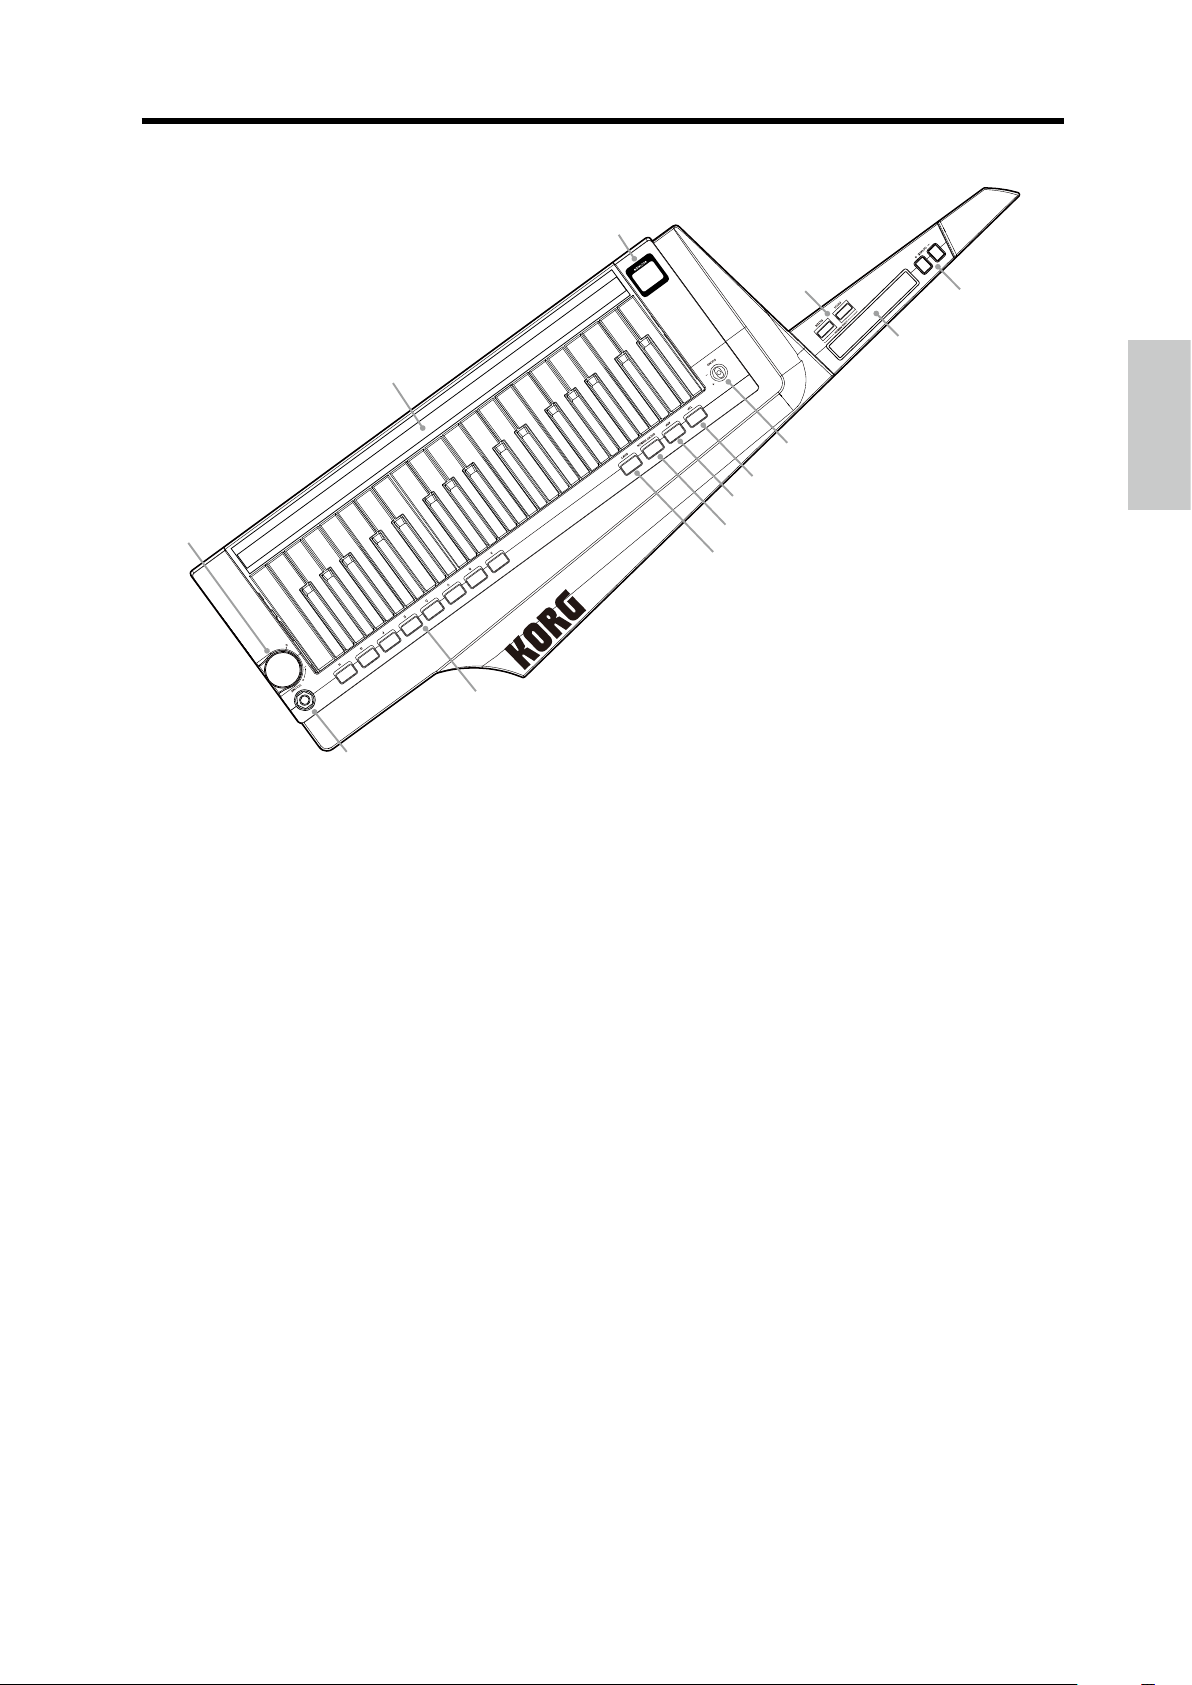
Front and side panels
Front panel
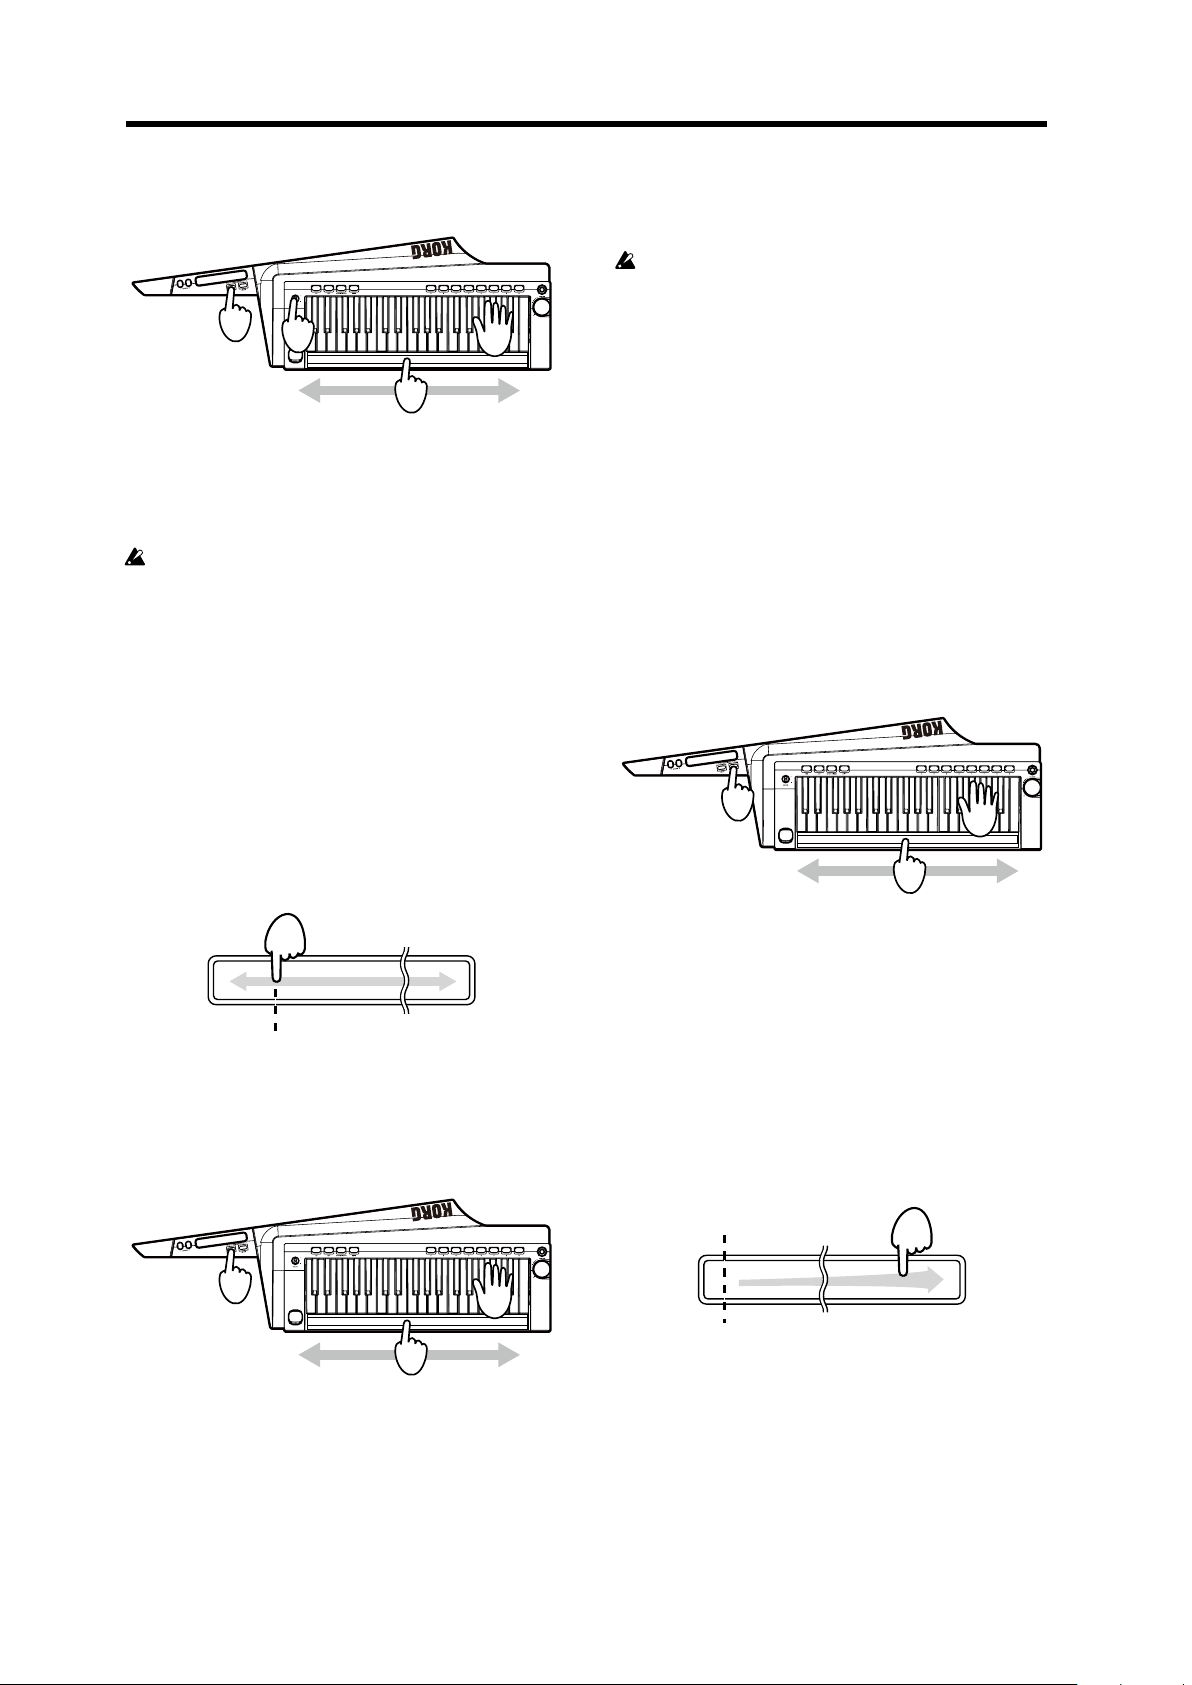
1. OCTAVE +/- buttons
This shis the range of notes assigned to the keyboard and
long ribbon controller upward or downward in one-octave
steps over a range of 3 octaves.
Tip: These buons can also be used to specify seings for
the shi functions.
2. Short ribbon controller
This controls the pitch and modulation of sounds.
Press the SHORT RIBBON buon to switch between pitch
and modulation.
3. LONG RIBBON
PITCH button
Press this buon to control the pitch with the long
ribbon controller.
FILTER button
Press this buon to control the lter with the long ribbon
controller.
Vocoder functionality
The RK-100S comes equipped with a vocoder function
that will let you use your voice via a mic to process the
sound of the oscillator, producing the impression that the
instrument is “talking.”
Virtual Patch functionality
Controllers such as EG, LFO, keyboard tracking, and the
ribbons can be virtually connected to parameters such as
pitch or cuto, allowing you to modulate these parameters
and create sounds with a high degree of freedom.
Equalizer and eects add a nal polish to
your sounds
Each timbre provides a two-band equalizer for additional
sound-creating potential.
4
4. Display
The number of the program that’s currently selected and
the seings for the shi functions are shown here.
In addition, the octave specied with the OCTAVE +/buons will be indicated (see 10 page “Switching the octave
with the OCTAVE buons”).
5. Long ribbon controller
This is used to play scales (monophonic) and control the
pitch and lter of sounds.
Press the LONG RIBBON PITCH and FILTER buons to
select the parameter to be controlled.
6. VOLUME knob
This adjusts the volume of the Output jack.
Page 5
Front and side panels
6
13
4
5
12
7. SOUND lever
This selects the program. Move the lever to the + or -
direction to switch to the next or previous program.
Tip: The SOUND lever can also be used to specify seings
for the shi functions.
8. TAP button
This species the tempo (speed) of the arpeggiator, LFO
or delay eect.
The tempo is specied according to the number of times the
buon is pressed. The LED will blink in synchronization
with the tempo.
In addition, hold down the SHIFT buon and press
this buon to play the demo song (see 9 page “Demo
performance”).
9. ARP button
This turns the arpeggiator on/o (see 13 page “Playing
arpeggios”).
In addition, hold down the SHIFT buon and press this
buon to change the seings of the arpeggiator.
3
1
2
7
8
9
10
11
SHORT RIBBON buon, the audio input signal from the INPUT
jack will be sent from the Output jack without modication.
11. SHIFT button
Hold down this buon and press the corresponding buon
to play the demo song or specify seings for the shi
functions.
12. Favorites buttons A – H
Your favorite programs can be assigned to these buons.
The program can be quickly recalled by pressing the
corresponding buon.
See page 9 “Favorites function”
In addition, hold down the SHIFT buon and press one of
the favorites buons (A – H) to enter a shi function and
change the seings for the function.
13. Output jacks [stereo jack]
You can connect powered monitors, a stereo amp, mixer,
or headphones to these jacks.
10. SHORT RIBBON button
This switches the parameter that’s controlled by the short
ribbon controller.
When the buon is lit up in red, the pitch of the sound can
be controlled.
When the buon is lit up in green, the modulation of the
sound can be controlled.
In addition, if you hold down the SHIFT buon and press the
5
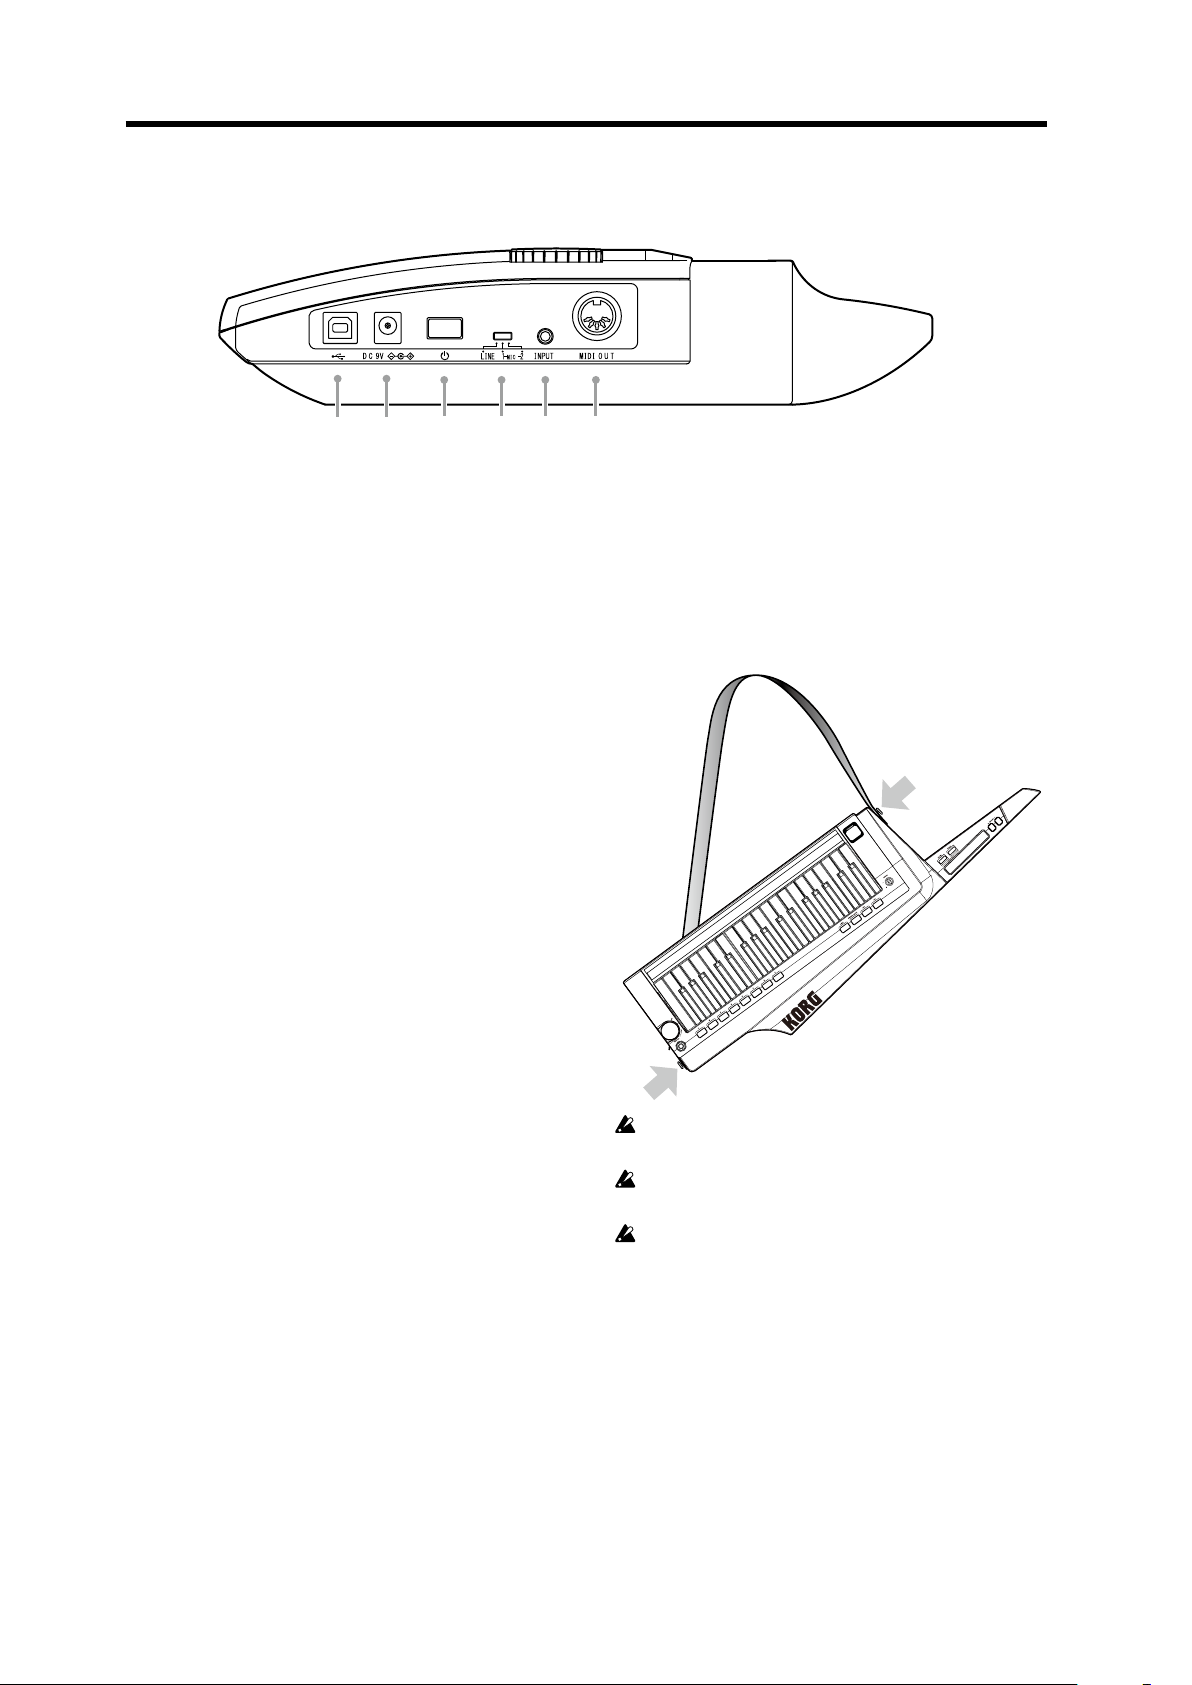
Page 6
RK-100S Owner's manual
1
65 4
2
3
Side panel
1. MIDI OUT connector
This connector transmits MIDI data to the external MIDI
device that’s connected to the RK-100S.
2. INPUT jack
Connect the headset/mic (monaural, not plug-in powered)
or other audio equipment to this jack.
When a headset/mic is connected, the input can be used as
an audio signal for the modulator in a vocoder program.
When audio equipment is connected, this jack will be used
as an AUX IN jack. The sound from the connected device
will be output from the RK-100S. (See page 7 “Connecting
an audio player”)
3. Input select switch
Set this switch according to the device that’s connected to
the INPUT jack.
MIC 1 or MIC2: When a mic is connected
LINE: When audio equipment is connected
When an audio device is connected to the INPUT
jack, be sure to set the Input select switch to LINE.
Otherwise, the connected device may be damaged.
Attaching the strap
Aach the strap to the RK-100S as described below.
1.
Attach the strap to the two strap pins at the locations
shown in the illustration.
4. Power switch
This turns the power on/o.
5. DC 9V connector
Connect the optional AC adapter here.
Connect the AC adapter to the RK-100S before you plug it
into an AC outlet.
6. USB connector
Connect the RK-100S to a computer and use sound editor
soware to edit parameters, such as sounds and arpeggio
paerns of the RK-100S.
In order to use a USB connection, you’ll need to
Note:
install the Korg USB-MIDI driver in your computer. You
can download the “Korg USB-MIDI driver” from the Korg
website, and install it as described in the accompanying
documentation.
6
Aer aaching the strap, verify that it is rmly secured
with the pins.
Never loosen the screws mounting the strap pins.
In order to prevent the strap from accidentally
becoming disconnected, we recommend using
commercially available guitar strap locks.
Page 7
Preparations
Preparations
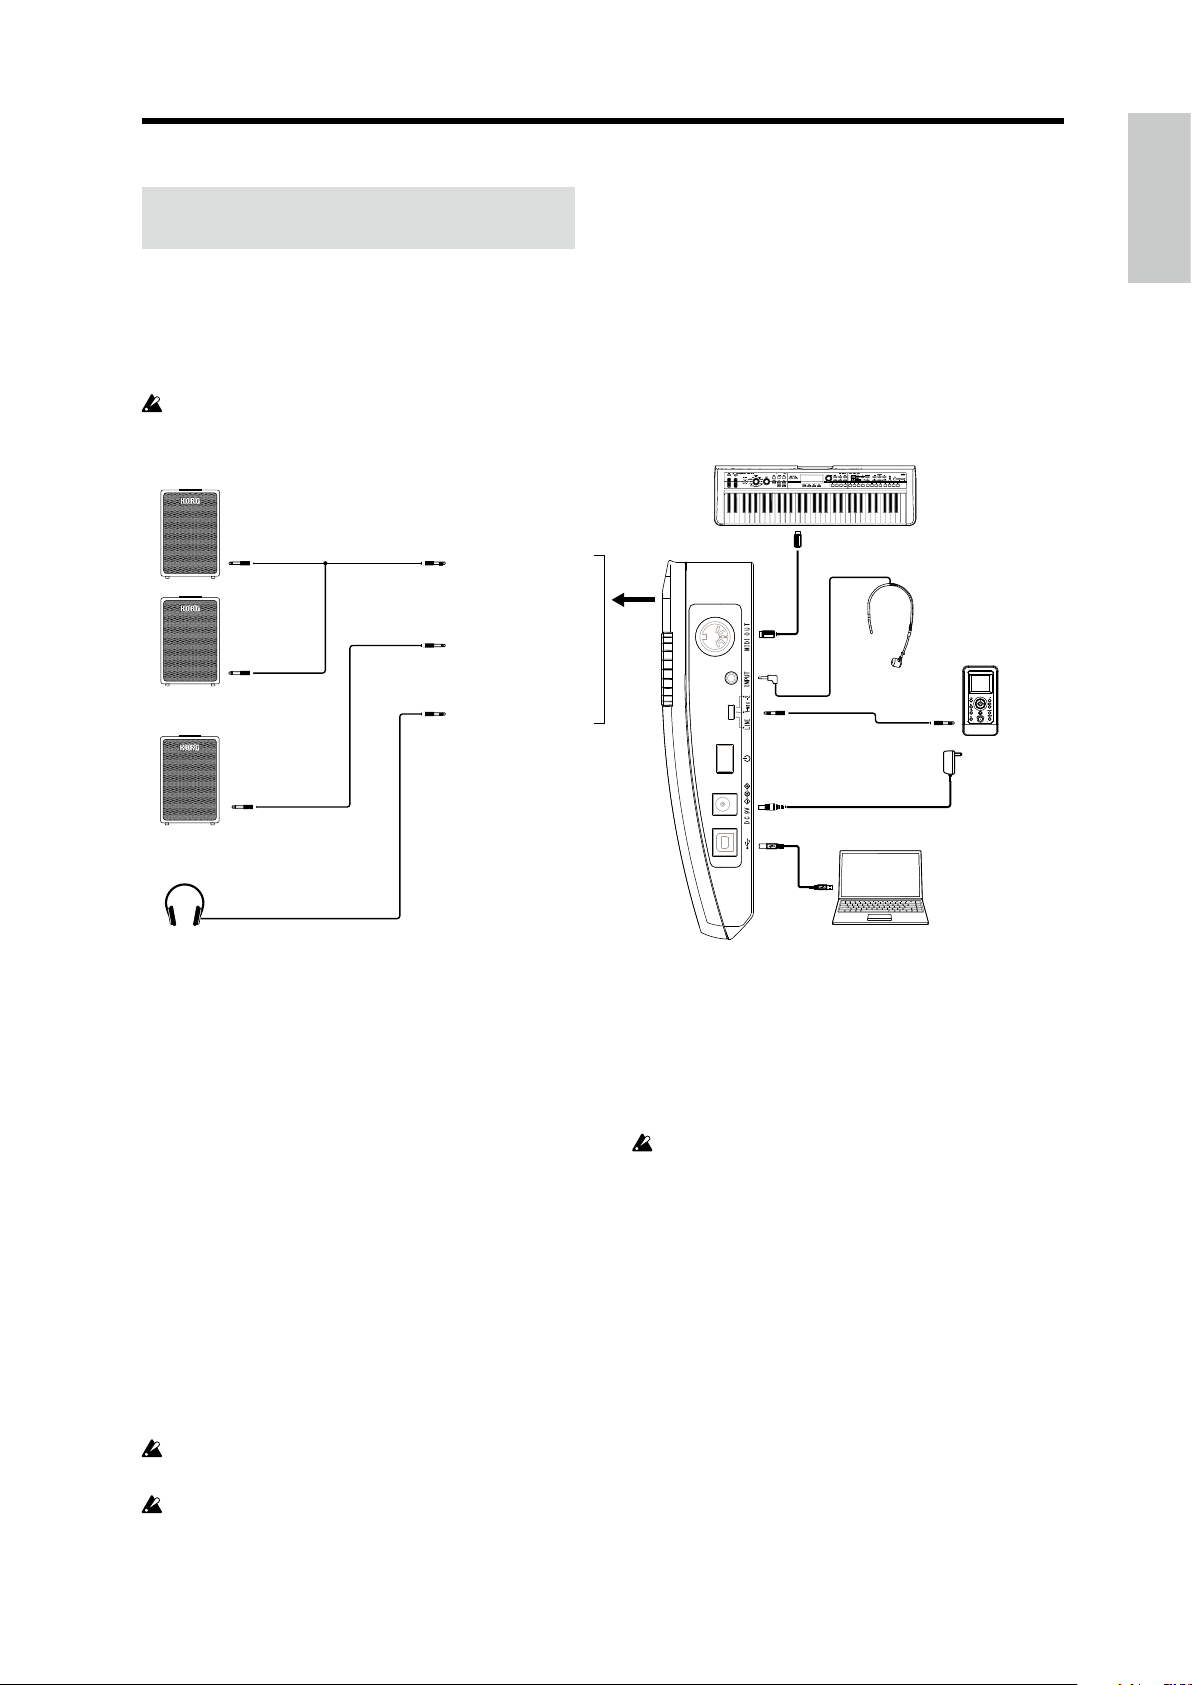
Connections
The illustration below shows a typical example of connections for the RK-100S. Connect your equipment as appropriate for
your needs.
You must connect all devices with the power turned o. Failure to observe this precaution may cause malfunctions or
damage to your speaker system.
INPUT
Mono plug
INPUT
Mono plug
INPUT
Mono plug
Monitor amplier etc.
headphones
Stereo plug
Mono plug
For a stereo output
For a monaural output
(left channel output only)
When using headphones
Connect your monitor amp or mixer
to the output jack
Connect the RK-100S’s Output jack to the input jacks of
your mixer or powered monitor speakers.
Note: We recommend that you output in stereo in order to
take full advantage of the RK-100S’s sound. When a cable
with standard mono plugs is used, only sound from the
le channel will be output.
Output jack
MIDI IN
MIDI cable
Stereo plug
AC adapter (Separately sold)
USB cable
External tone generator
Headset mic
Digital audio player etc.
Computer
Connecting an audio player
The RK-100S’s INPUT jack can be used as an AUX IN jack.
1.
Set the Input select switch (on the side panel) to LINE.
When an audio device is connected to the INPUT
jack, be sure to set the Input select switch to LINE.
Otherwise, the connected device may be damaged.
2. Connect the audio device to the INPUT jack.
Connecting the mic
To use the RK-100S as a vocoder, connect the headset/mic
(not plug-in powered) to the INPUT jack, and then use
your voice as the modulator signal (see 10 page “Playing a
vocoder program”).
Note: The INPUT jack is monaural.
Do not use excessive force when connecting or
disconnecting the mic.
Be careful of the mic output level when connecting a
mic.
Hold down the SHIFT button and press the SHORT
3.
RIBBON button.
The RK-100S will enter the Audio In Through mode,
where the audio signal that’s input to the INPUT jack is
simply output directly from the Output jack.
When there is an input at the INPUT jack, the SHIFT
buon is lit up. If the input is overloaded, the buon
is lit up in red.
Note:
The INPUT jack is compatible with a stereo plug,
but the audio signal that is output from the Output jack
is monaural.
7
Page 8
RK-100S Owner's manual
4.
Adjust the volume of the connected audio device
until the SHIFT button is not lit up in red.
Connecting a MIDI device or a computer to
the MIDI OUT connector or USB connector
If the MIDI OUT connector of the RK-100S is connected
to the MIDI IN connector of an external MIDI device, the
external MIDI device can be controlled with the RK-100S’s
keyboard or controllers.
If the USB connector of the RK-100S is connected to a
computer, sound editor soware can be used to edit
parameters, such as sounds and arpeggio paerns of the
RK-100S, or sequencer soware, for example, can be used
to play the RK-100S’s sound generator.
Turning the power on
The RK-100S can be powered by an AC adapter or baeries.
Due to cable routing considerations during live performances,
we recommend using baeries.
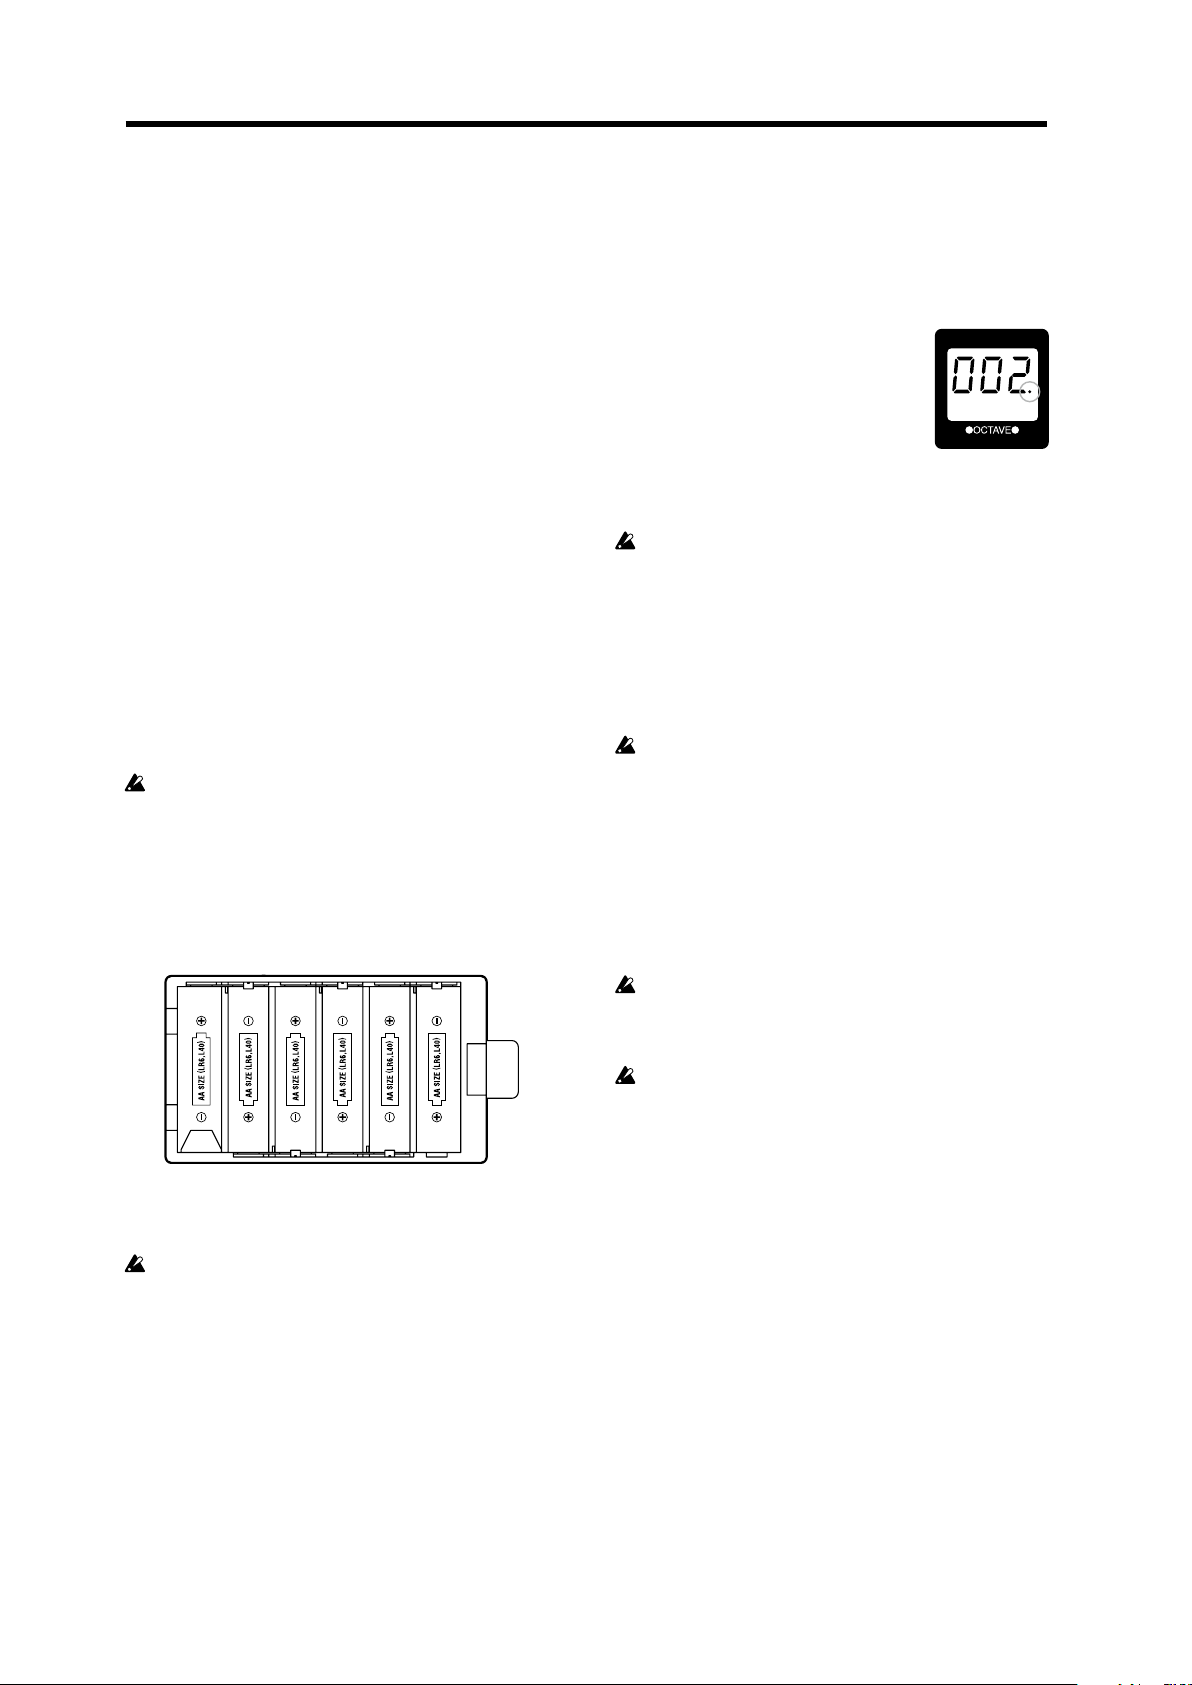
About the empty battery indicator
Hold down the SHIFT buon and press the favorites G
buon to show the remaining baery power using the eight
favorites buons (A – H) as level indicators. The number
of lit buons may be lower depending on the baery
capacity.
In addition, when the baery capacity
runs down, the dot at the right side of the
display will blink. If you continue to use
the unit, the blinking will become faster.
If you continue to use the unit in this
state, the indicator will begin blinking.
We recommend that you replace the baeries as soon as
possible, or connect the AC adapter.
Depleted baeries should be immediately removed
from the RK-100S. Leaving depleted baeries installed
may cause malfunctions (such as leakage of the baery
electrolyte). You should also remove the baeries if
you won’t be using the RK-100S for an extended period
of time.
Connecting the AC adapter
Before you turn on the power
Make sure that the power switch is o before you
connect the power supply.
Using batteries
1. Open the battery cover that’s located on the bottom
of the RK-100S.
2.
Insert six AA alkaline or nickel-metal hydride batteries
(separately sold).
Make sure that the baeries are oriented correctly.
3. Close the battery cover.
In order to get the most accurate readings of the
4.
remaining battery power, please refer to the “Battery
type and remaining power” section on page 16 and
select the type of battery that’s being used.
Only use the specied AC adapter. Using any other
AC adapter may cause malfunctions.
1. Make sure that the RK-100S is powered-o.
Connect the optional AC adapter to the DC9V
2.
connector, located on the side panel.
See page 7 “Connections”
3. Plug the AC adapter into an AC outlet.
Use an AC outlet of the correct voltage.
Turning the power on
Before you power-on the RK-100S, you must power-
o any external output device such as your powered
monitor speakers.
1. Turn the RK-100S’s VOLUME knob all the way to the
left.
Hold down the power switch until the indicators
2.
appear in the display.
When the indicators appear in the display, release the
switch.
Aer a while, the program number will appear in the
display.
3.
Lower the volume of your powered monitors or other
external output equipment.
4. Turn the RK-100S’s VOLUME knob to an appropriate
position.
8
Adjust the volume of your external output equipment.
5.
Page 9

Turning the power o
4
3
1
2
1.
Lower the volume of your powered monitor speakers
or other external output device, and then turn o
their power.
Turn the VOLUME knob of the RK-100S all the way
2.
toward the left, and then press and hold down the
power switch until the display indicates that you can
safely turn o the power.
If the AC adapter is being used, do not unplug it while
the RK-100S is powering o. The RK-100S is saving
seings for the favorites buons and for the various
other parameters while it is powering o.
Auto power o function
If there is no user input for approx. 4 hours the auto power
o function will automatically turn o the RK 100S.
With the factory seings, the auto power o func-
Note:
tion is enabled.
This function can be disabled so that the RK-100S will not
be automatically turned o.
See page 16 “Auto power o function”
Demo performance
The RK-100S contains demo songs that show o its sounds.
See page 75 “Voice Name List”
Demo performance
Selecting and
playing a program
Selecting a program
The RK-100S contains 200 programs that can be used with
various genres.
Using the SOUND lever
Use the SOUND lever on the front panel to select a program.
1. Move the SOUND lever to the + or - direction.
The program is switched. The
number of the selected program
appears in the display.
Each time the lever is moved, the
program is switched incrementally.
See page 75 “Voice Name List”
2. Adjust the VOLUME knob to the appropriate level.
3. Play the keyboard to check the sound.
1
1,3
2
1.
Hold down the SHIFT button and press the TAP
button.
The demo performance will begin.
2.
Use the OCTAVE +/- buttons or the Sound lever to
select the demo song.
Press the SHIFT button to end the demo performance.
3.
4. Press the OCTAVE button to change the pitch range
assigned to the keyboard.
See page 10 “Switching the octave with the OCTAVE
buons”
Favorites function
The RK-100S is equipped with the favorites function,
which allows you to assign your favorite programs to the
eight favorites buons. A total of 40 programs (5 banks × 8
buons) can be stored.
Using the favorites buttons
Programs have already been assigned to these favorites
buons. Those programs can be immediately recalled by
pressing the corresponding buon.
1
1.
While holding down the SHIFT button, move the lever
1
2
9
Page 10
RK-100S Owner's manual
3
to select a favorites bank.
There are ve favorites banks. When switching between
the banks, the number of the selected bank appears in
the display.
Note: The program is not switched if only a bank is select-
ed. Switch the program by then pressing a favorites buon.
2. Press one of the eight favorites buttons.
The program that’s assigned to the pressed buon is
selected.
Tip: The program assigned to the buon can be changed
to a dierent program.
Assigning programs to favorites buttons
Here’s how to change the program that’s assigned to a
favorites buon to your favorite program.
1,2
1.
Select the program to be assigned to a favorites
button.
While holding down the SHIFT button, move the lever
2.
to select the favorites bank where the program is to
be assigned.
The favorites bank is switched. The number of the
selected bank appears in the display.
3. Hold down the favorites button where you wish to
assign a program.
Aer all of the favorites buons are lit up at the same time,
the favorites buon where the program is to be assigned
is lit up, indicating that the program has been assigned.
2
3
1. Connect the mic to the INPUT jack on the side panel,
and then set the Input select switch to MIC2.
Hold down the SHIFT button and press the SHORT
2.
RIBBON button.
The audio input signal from the INPUT jack will be
sent from the Output jack without modication (Audio
In Thru).
The SHIFT buon will light up if a signal is being input
to the INPUT jack. It will light up in red if an input
overload occurs.
3. Vocalize into the mic. If the SHIFT button is lit up in
red, set the Input select switch to MIC1.
4. To return to the normal state, hold down the SHIFT
button and press the SHORT RIBBON button once
again.
5. Select a vocoder program.
See page 75 “Voice Name List”
6. While vocalizing into the mic, play the keyboard.
To hear dierent vocoder eects, try vocalizing in
dierent ways and changing the chord you play.
Tip:
Some vocoder programs will produce sound when
you simply play the keyboard; there’s no need to vocalize
into the mic.
Modifying the sound
To make your performance more expressive, you can
modify the sounds of the RK-100S by using the short ribbon
controller, the long ribbon controller, and also by how you
play the keyboard.
Try out various ways to play each program you select.
Playing a vocoder program
A vocoder modies the signal from an oscillator or
other source (the “carrier”) by applying the spectral
characteristics of an external input source such as a human
voice (the “modulator”).
The most common way to use a vocoder is to produce a
“talking instrument” eect by taking the input signal of
your voice from the mic while you hold down a chord on the
keyboard. However you can also obtain interesting results
by using audio input sources other than a human voice,
such as rhythm sounds or anything else you like.
Here’s how to connect a mic and try out the vocoder.
2, 4
2, 4
6
10
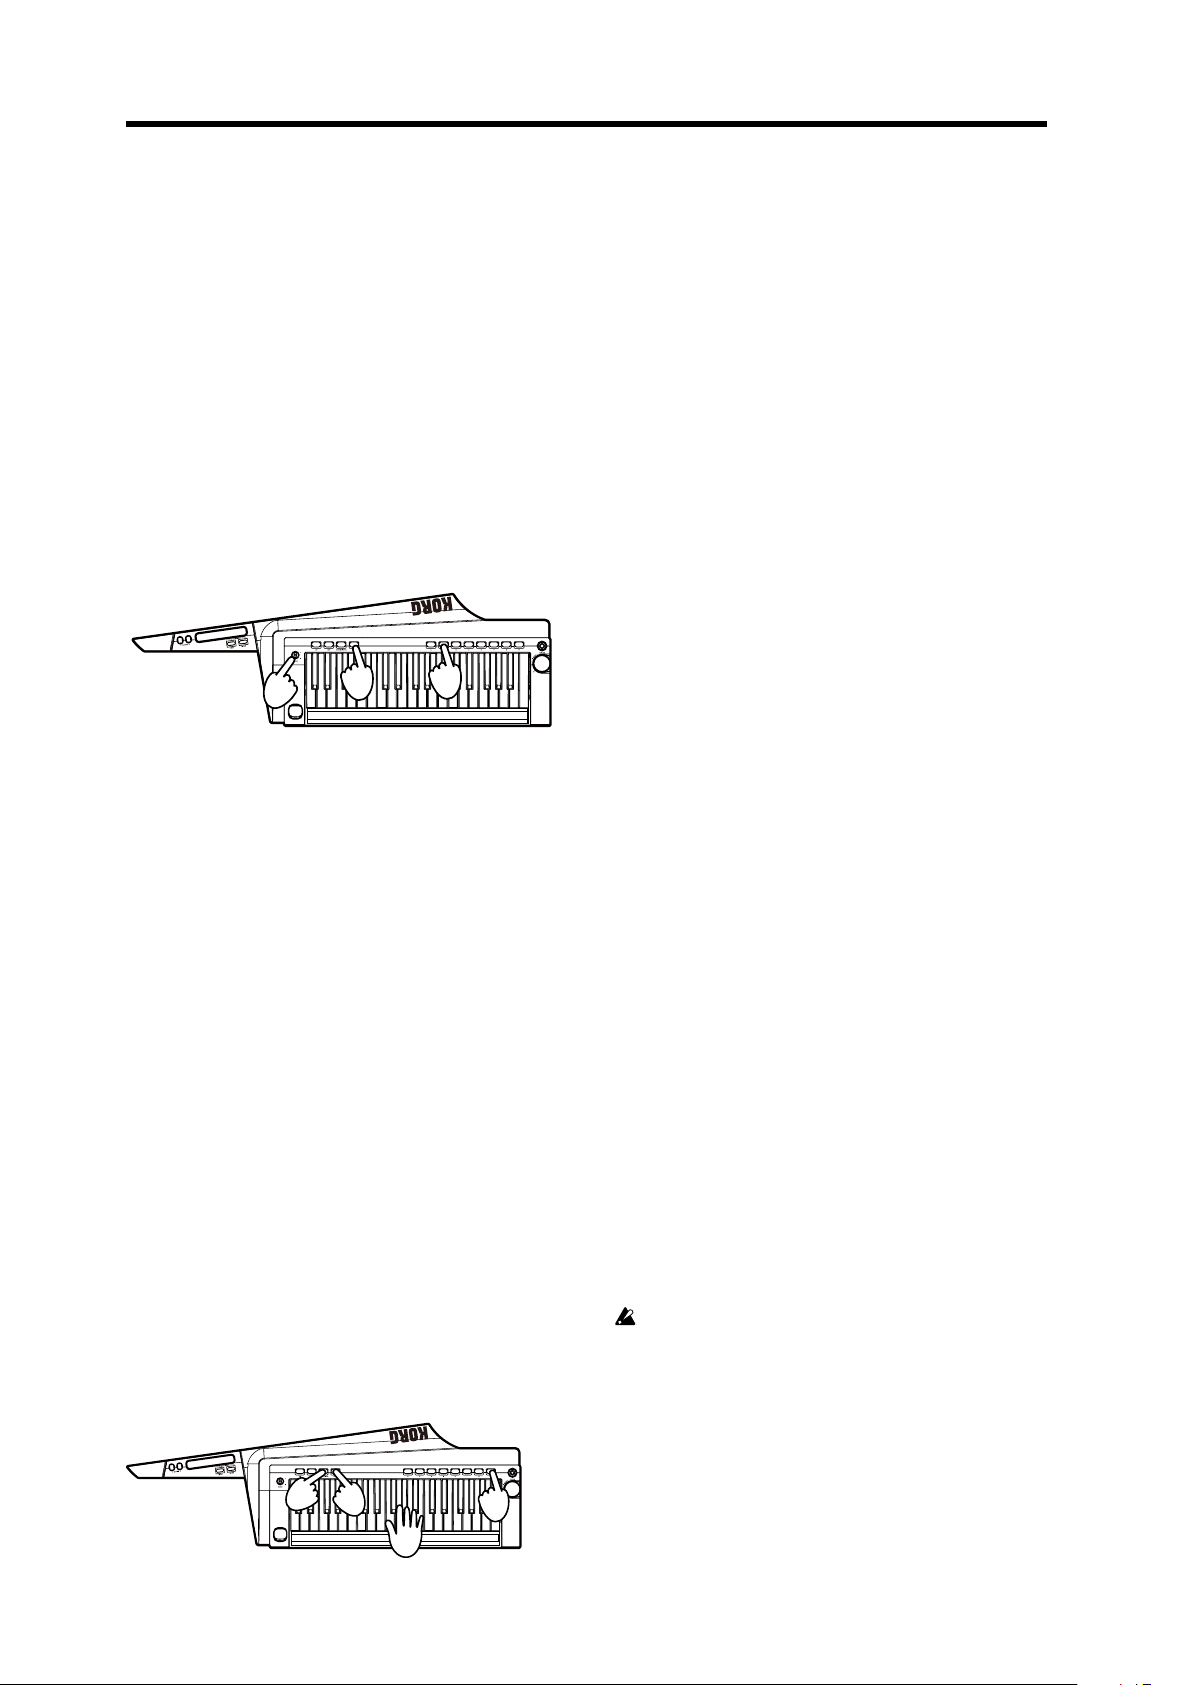
Using the keyboard to modify the
sound - Velocity
The eect will vary depending on the amount of force that
you use to play the keys. Normally, the force of your strike
will aect the tone or volume.
Tip: During a performance, the eight favorites buons (A
– H) light up like a level meter, according to the keyboard
velocity.
The RK-100S’s keyboard does not support aertouch.
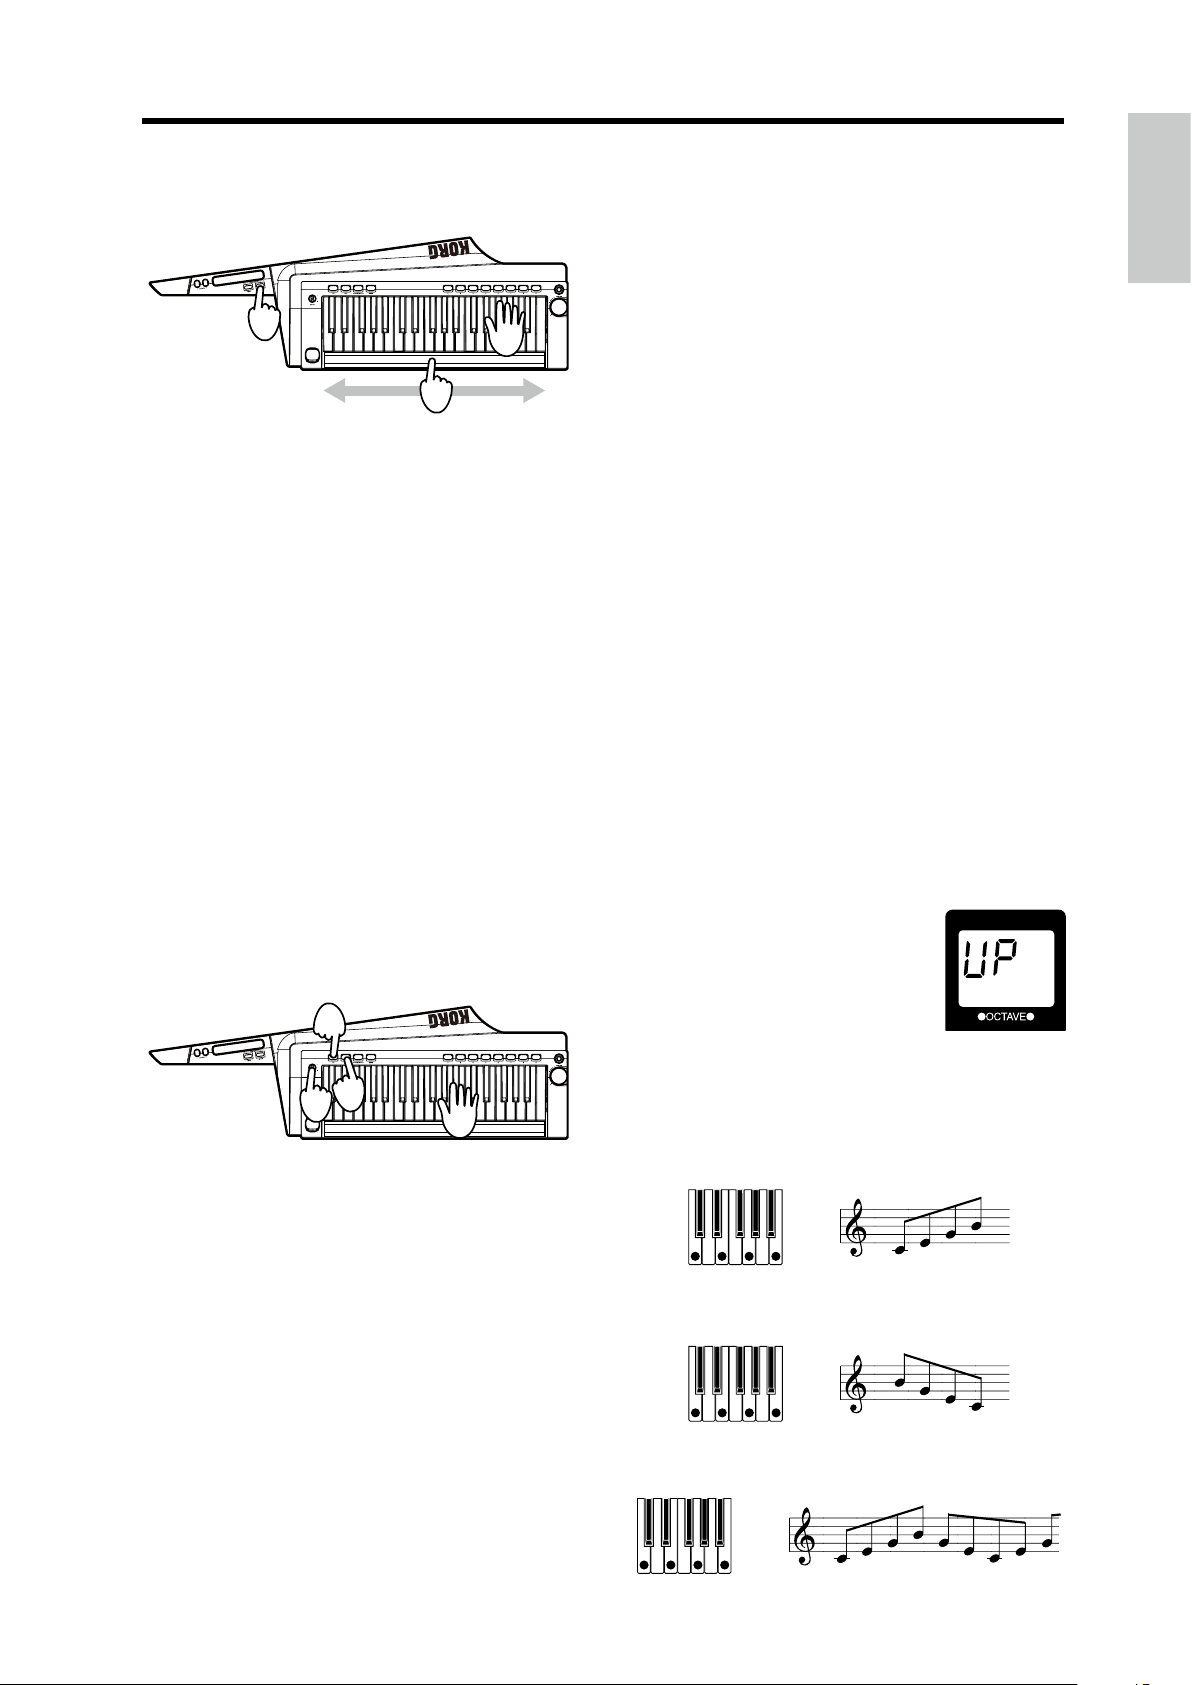
Switching the octave with the OCTAVE
buttons
The pitch range assigned to the long ribbon controller
while playing the keyboard or scales can be changed in
1,
5
one-octave increments over a range of ±3 octaves.
Page 11
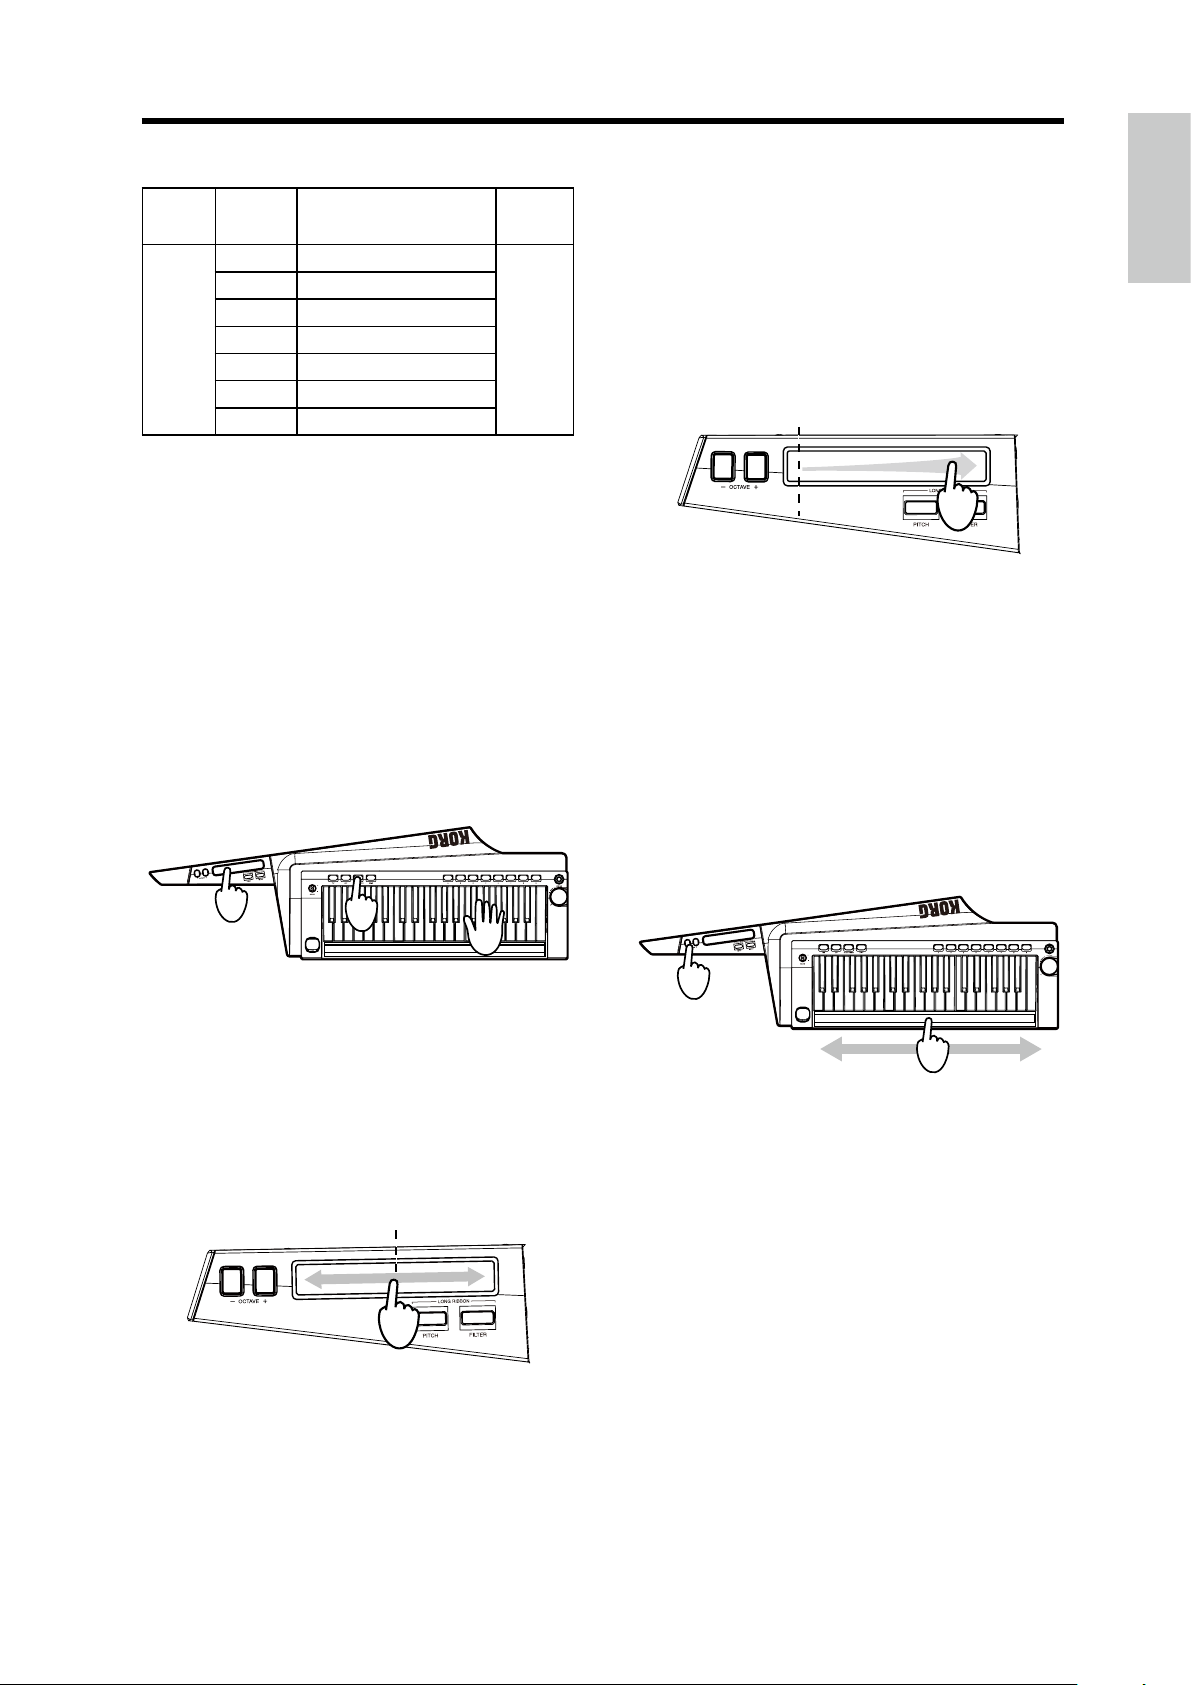
Selecting and playing a program
Original pitch
Original sound
↓
↓
↓
↓
↓
↓
↓
Keyboard
and ribbon
range
C6–C9 LED on right side lit up in red
C5–C8
C4–C7
C3–C6
C2–C5
C1–C4
C0–C3
VE LED in the display
OCTA
LED on right side lit up in orange
LED on right side lit up in green
Dark
LED on le side lit up in green
LED on le side lit up in orange
LED on le side lit up in red
Press the -
buon
Simultaneously press the OCTAVE +/- buons to return
to ±0.
Press the +
buon
↑
↑
↑
↑
↑
↑
↑
Using the short ribbon controller
The short ribbon controller can be used to control the pitch
and modulation of sounds.
The parameter being controlled can be switched with the
SHORT RIBBON buon.
The sound editor soware (when the RK-100S is
Tip:
connected to a computer via USB) can be used to specify
whether pitch or modulation is controlled with the short
ribbon controller when the program is switched.
Controlling the pitch
controller.
Slide your nger to the le and right along the ribbon
controller. With the original sound at the le end of the
ribbon, apply modulation by moving your nger to the
other end. Removing your nger from the ribbon will
return the sound to the original seing. Depending
on the selected program, the vibrato depth will be
varied or the tone will be modied by changing the
cuto frequency.
Using the long ribbon controller
The long ribbon controller can be used to play scales and
to control the pitch and lter of sounds.
The tone, range of notes and direction in which the
Tip:
eect is applied with the long ribbon controller diers
depending on the program. In addition, these seings
can be specied with the sound editor soware (when the
RK-100S is connected to a computer via USB).
2
1
2
1.
Press the SHORT RIBBON button so that it is lit up in red.
2.
While playing the keyboard, use the short ribbon
controller.
Slide your nger to the le and right along the ribbon
controller. With the original pitch at the center of the
ribbon, raise and lower the pitch by moving your
nger in either direction. Removing your nger from
the ribbon will return the pitch to the original seing.
Applying modulation
Playing scales
Single notes of the previously specied scale can be played.
2
1
1.
With the LONG RIBBON PITCH and FILTER buttons
turned o, use the long ribbon controller.
Slide your nger to the le and right along the ribbon
controller. The specied scale can be played.
The notes produced with the ribbon controller are
monophonic (single notes). In addition, higher pitched
notes (ribbon position) will take priority when played.
Tip: The specied scale to be played can be changed with
the sound editor soware (when the RK-100S is connected
to a computer via USB).
2. The octave range can be switched with the OCTAVE
+/- buttons while playing.
1.
Press the SHORT RIBBON button so that it is lit up
in green.
While playing the keyboard, use the short ribbon
2.
Controlling the pitch
There are two control methods.
The range and direction in which the pitch is adjusted
Tip:
with the long ribbon controller can be specied with the
sound editor soware (when the RK-100S is connected to
a computer via USB).
11
Page 12
RK-100S Owner's manual
Original pitch
Controlling the pitch of the continuant
2
1
2
3
1. Select the program.
In this case, select a program where the sound does
not immediately decay to silence aer a keyboard key
is pressed.
There may be no eect with a program where the
sound immediately decays to silence aer a keyboard
key is pressed
2.
While a sound is being produced, hold down the
LONG RIBBON PITCH button.
The PITCH buon is lit up. Sound continues to be
produced while the buon is held down.
3. Use the ribbon to control the pitch.
Slide your nger to the le and right along the ribbon
controller. With the original pitch at the location rst
touched in the ribbon, raise and lower the pitch by
moving your nger in either direction.
Removing your nger from the ribbon will return the
pitch to the original seing.
3. Use the ribbon to control the pitch.
See page 12 “Controlling the pitch of the continuant”
If the pitch was raised with the OCTAVE buon, the
sound may be dicult to hear, depending on the area
used on the ribbon.
4. Press the PITCH button again to turn o the button
and stop the continuant.
Controlling the lter
As with pitch control, there are two control methods.
The eects that can be controlled with the long ribbon
Tip:
controller can be specied with the sound editor soware
(when the RK-100S is connected to a computer via USB).
The ltering eect can be adjusted in the Long Ribbon section
of the sound editor soware. In the Virtual Patch section, set
“Source” to “Long Ribbon”, and use “Destination” to specify
the parameters to be controlled. The parameters to be con-
trolled can also be specied with Fx Long Ribbon assignments.
Controlling the lter of the continuant
1
2
1
4.
Remove your nger from the button to stop the
continuant.
Controlling the pitch with your left hand free
1
3
1.
While no sound is being produced, hold down the
SHIFT button and press the LONG RIBBON PITCH
button.
The PITCH buon is lit up.
1.
While a sound is being produced, hold down the
LONG RIBBON FILTER button.
The FILTER buon is lit up.
Sound continues to be produced while the buon is
held down.
2. Use the ribbon.
Slide your nger to the le and right along the ribbon
controller. With the original sound at the le end of the
ribbon, apply modulation by moving your nger to the
other end. Removing your nger from the ribbon will
return the sound to the original seing.
2
Original sound
Note: The changes in the eect parameters dier depending on the seings.
3.
Remove your nger from the button to stop the
continuant.
12
2. Play the keyboard.
Sound continues to be produced.
Page 13
Selecting and playing a program
Controlling the lter with your left hand free
1
2
3
1.
While no sound is being produced, hold down the
SHIFT button and pressthe LONG RIBBON FILTER
button.
The FILTER buon is lit up.
2. Play the keyboard.
Sound continues to be produced.
3. Use the ribbon.
See page 12 “Controlling the lter of the continuant”
Tip:
The direction where the eect is applied when the rib-
bon is used can be changed with the sound editor soware
(when the RK-100S is connected to a computer via USB).
4. Press the FILTER button again to turn o the button
and stop the continuant.
5. Press the ARP button so that the LED is turned o.
The arpeggio stops playing.
Continuing playing with your hand o
the keyboard (latch)
The operation of the arpeggiator when you take your hand
o the keyboard can be specied.
1. Hold down the ARP button until it is lit up in green.
When the ARP buon is lit up in green, the latch is
turned on, and the arpeggiator will continue to play
even aer you take your hand o the keyboard.
Note:
Regardless of whether the arpeggiator is turned on or
o, holding down the ARP buon will turn on the arpeggiator as well as the latch.
2. Press the ARP button to turn o the arpeggiator.
The latch is turned o at the same time that the
arpeggiator is turned o.
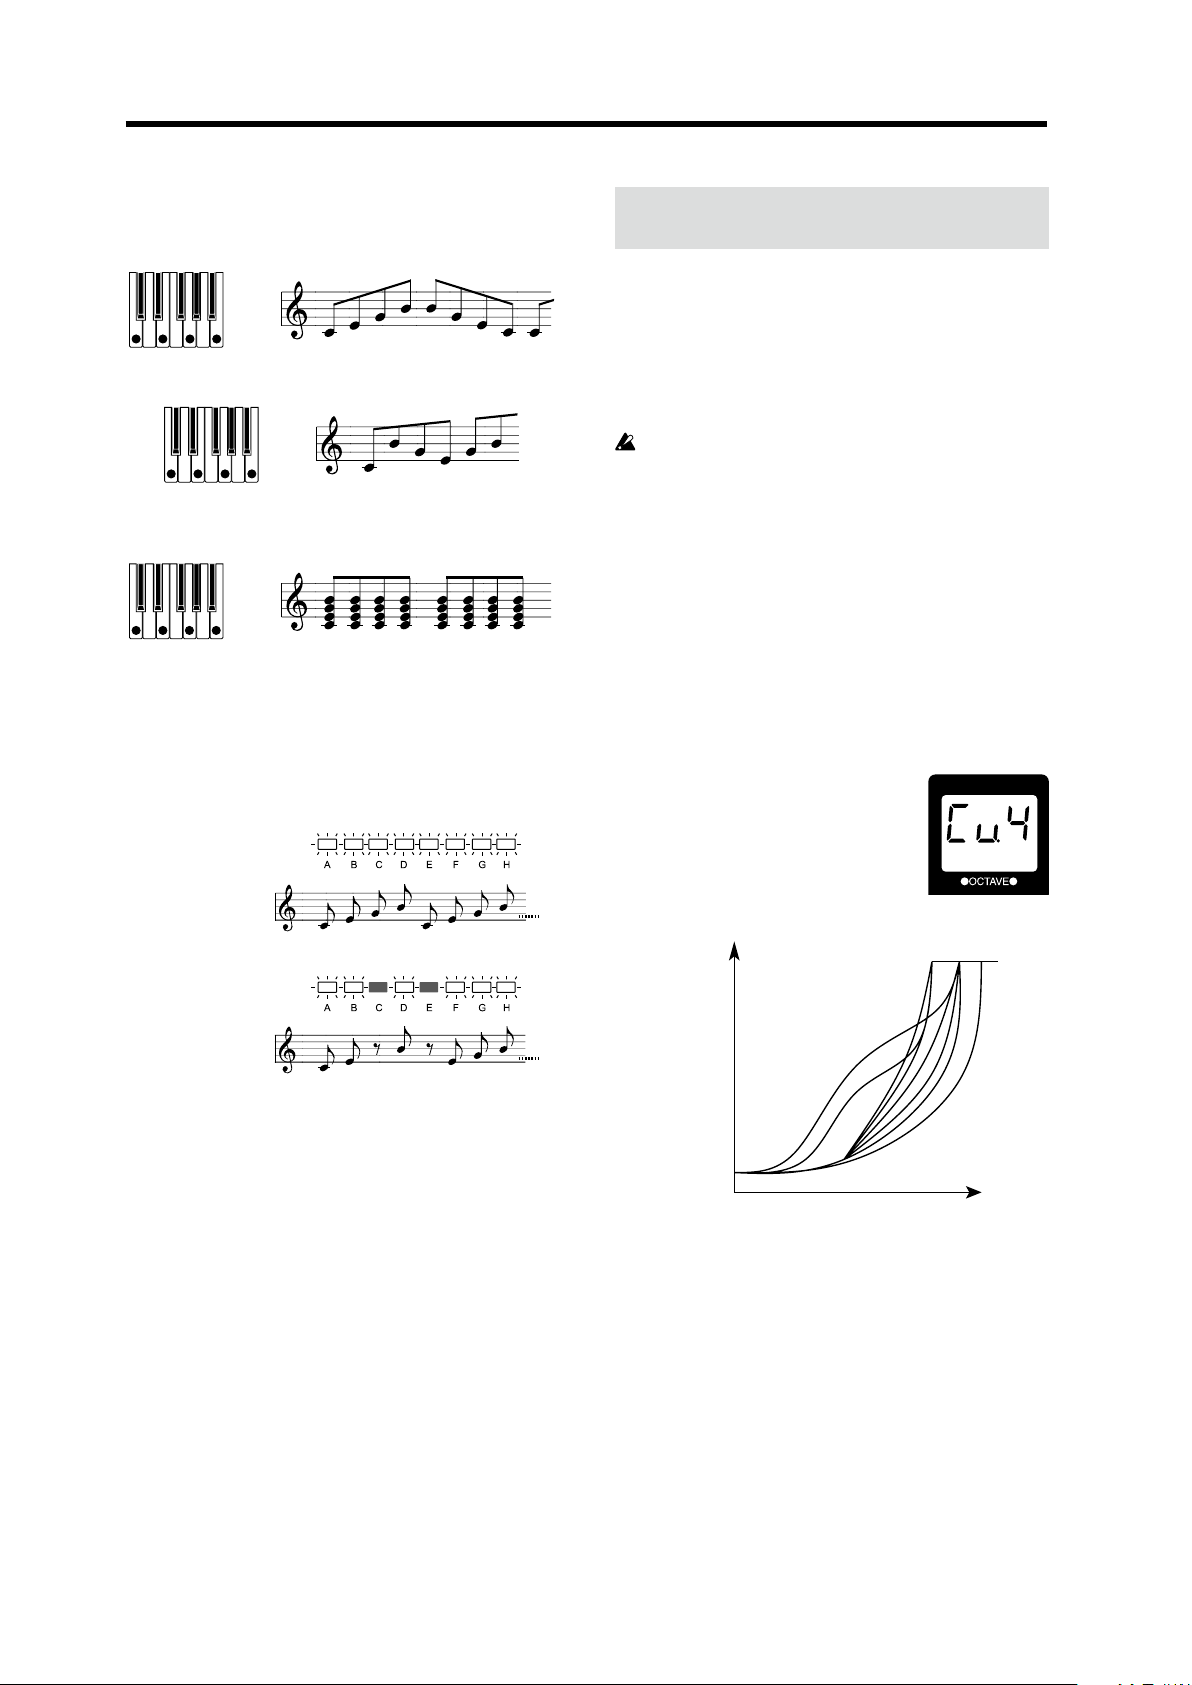
Arpeggio pattern settings
This allows you to select the type of arpeggio produced when
the arpeggiator is on and a keyboard key is pressed.
In addition, notes within the selected arpeggio paern can
be turned on/o.
Playing arpeggios
The arpeggiator is a function that automatically plays a
broken chord (arpeggio) when you hold down a chord on
the keyboard.
4
2,5
1
1. Select a synthesizer program.
The arpeggiator can also be used with the vocoder
program; however, a beer eect can be achieved with
a synthesizer program. In addition, we
sound with a short sustain.
2. Press the ARP button so that the LED is lit up.
The arpeggiator is turned on.
The ARP buon is lit up, and the favorites buons A –H
are sequentially lit up.
3. Hold down a chord in the keyboard.
An arpeggio will start playing.
The arpeggio paern that is played can be changed (see
13 page “Arpeggio paern seings”).
3
recommend a
1.
Hold down the SHIFT button and press the ARP
button.
The arpeggio paern seing
appears in the display.
With the favorites buons A – H
used as the arpeggiator step keys,
only the buons corresponding to
the enabled steps are lit up (note
one).
2. Use the OCTAVE +/- buttons or the SOUND lever to
specify the arpeggio pattern.
UP: Notes will be played consecutively from low pitches
to high.
dn (Down): Notes will be played consecutively from
high pitches to low.
AL.1: Up and Down will be alternated. (The highest and
lowest notes will be played once.)
4. Press the TAP button to adjust the tempo.
The TAP buon is lit in green, and the tempo appears
in the display.
13
Page 14
RK-100S Owner's manual
TYPE: UP
Velocity
AL.2: Up and Down will be alternated. (The highest and
lowest notes will be played twice, once on the way up,
and once on the way down.)
rnd (Random): Notes will be played randomly.
trG (Trigger): The notes you are holding down will be
played simultaneously at the current tempo.
If you are holding down more notes than the maximum
polyphony, the lowest pitches you are holding down will
be played, up to the maximum polyphony.
Shift functions
The shi functions are used to specify various seings for
the RK-100S. To change a seing, hold down the SHIFT
buon and press the appropriate buon.
To exit the shi function, press the SHIFT buon. In
addition, if no buon is pressed for a set length of time, the
shi function will automatically be exited, and the RK-100S
will return to a condition where a program can be selected.
The programs assigned to the favorites buons and
the seings of the shi functions are saved when the
RK-100S is powered o. If the baeries are nearing
the end of their service life and favorites buon A is
blinking (refer to “Baery type and remaining power”
on page 16), these seings cannot be saved. If you have
an AC adapter (optional), connect it.
Velocity curve
This allows you to specify the way that the volume and
tone changes according to the keyboard velocity (force
used to strike keys).
3.
Press the favorites buttons A – H to turn o the button
(note o) and change the note corresponding to the
step to a rest.
4. Press the SHIFT button to exit the arpeggio pattern
settings.
1. Hold down the SHIFT button and press the favorites
A button.
The velocity curve seing appears
in the display.
2. Use the OCTAVE +/- buttons or
the SOUND lever to specify the
velocity curve.
MAX
(127)
5
4
3
8
7
6
MIN (1)
ppp
(1) (127)
Cu.1 This curve requires you to play strongly in
order to produce an eect.
Cu.2, 3 |
Cu.4 This is the typical curve.
Cu.5 |
Cu.6 This curve produces an eect without requiring
you to play very strongly.
Cu.7 This curve produces a fairly steady eect with
lile change for medium-strength playing.
Cu.8 This curve produces a fairly steady eect with
lile change for medium-strength playing (a
aer curve than 7).
Strength
(MIDI Velocity)
2
1
f
14
Page 15
Shift functions
127 All notes will sound at maximum velocity
(127). This seing mimics the behavior of early
analog synths.
Cu.7 and 8 produce lile change for medium-strength
playing. However, these curves will produce a great
deal of change with soly played notes, so they may be
more dicult to control. Choose the curve that is most
appropriate for your playing dynamics or for the eect
you want to obtain.
3. Press the SHIFT button to exit the shift function.
Long ribbon velocity
This allows you to specify the velocity when using the long
ribbon controller to play scales.
1. Hold down the SHIFT button and press the favorites
B button.
The velocity seing appears in
the display.
2. Use the OCTAVE +/- buttons or
the SOUND lever to specify the
velocity setting.
The velocity seing range is 1 – 127.
If oFF is selected, no sound is produced when the long
ribbon controller is used.
3. Press the SHIFT button to exit the shift function.
Long ribbon MIDI channel
This allows you to specify the MIDI channel when using
the long ribbon controller to play.
Specify a seing when using a program with sound
generation set to Multi (Voice mode: Multi) or when the
external MIDI device that’s connected to the MIDI OUT jack
is being played using the long ribbon controller, instead of
the keyboard.
When the seing is changed, sound from the RK-100S
can no longer be produced with the long ribbon
controller.
1. Hold down the SHIFT button and press the favorites
D button.
The number of the long ribbon
MIDI channel appears in the
display.
2. Use the OCTAVE +/- buttons or
the SOUND lever to specify the
MIDI channel.
GLb: The MIDI channel will match the global MIDI
channel (see “Global MIDI channel“) .
r.01...r.16: 1ch..16ch
Tip: When using the long ribbon controller to control an
external MIDI device that’s connected to the MIDI OUT
jack, specify the same MIDI channel that’s specied on the
external MIDI device.
Global MIDI channel
In order to exchange data with a connected external MIDI
device, you must set the RK-100S’s Global MIDI channel
to match the MIDI channel of the external MIDI device.
1. Hold down the SHIFT button and press the favorites
C button.
The number of the Global MIDI
channel appears in the display.
2. Use the OCTAVE +/- buttons or
the SOUND lever to specify the
Global MIDI channel.
3. Press the SHIFT button to exit the shift function.
4. Set the MIDI channel of the connected external MIDI
device.
Note:
For details on how to set the MIDI channel of the
external MIDI device, refer to the owner’s manual of the
connected device.
3. Press the SHIFT button to exit the shift function.
Note:
When the arpeggiator is turned on, note messages
are transmied from the MIDI OUT jack with the global
MIDI channel.
Transpose
This allows you to specify overall pitch in steps of a
semitone (100 cents). Use this when you want to transpose
to suit the song you are playing over a range of one octave
up or down.
1. Hold down the SHIFT button and press the favorites
E button.
The transpose seing appears in
the display.
2. Use the OCTAVE +/- buttons or
the SOUND lever to specify the
transpose setting.
The transpose seing range is
(-12 - 12)
.
3. Press the SHIFT button to exit the shift function.
one octave up or down
15
Page 16
RK-100S Owner's manual
Power save function
When the RK-100S is being powered by baeries, the power
save function will automatically turn o the display and
LEDs depending on the remaining baery power level.
With the factory seings, the power save function
Note:
is O.
1. Hold down the SHIFT button and press the favorites
F button.
The seing for the power save
function appears in the display.
2. Use the OCTAVE +/- buttons or
the SOUND lever to select the
setting.
on: Enabled
oFF: Disabled
3. Press the SHIFT button to exit the shift function.
Battery type and remaining power
This allows you to select the type of baery to be used.
In addition, the remaining power level of the baeries
currently being used can be checked.
If the selected type is dierent from the type of baeries
being used, the remaining amount of baery power
will not be correctly indicated.
Auto power o function
The RK-100S is equipped with an auto power o function.
With this function, the RK-100S automatically turns o
(low power consumption state) if there is no use for
approximately four hours.
If the RK-100S has been automatically turned o with the
auto power o function, it cannot be turned on by pressing
a buon or keyboard key or using a ribbon controller. Turn
the RK-100S on again.
With the factory seings, the auto power o func-
Note:
tion is enabled.
1. Hold down the SHIFT button and press the favorites
H button.
The seing for the auto power o
function appears in the display.
2. Use the OCTAVE +/- buttons or
the SOUND lever to select the
setting.
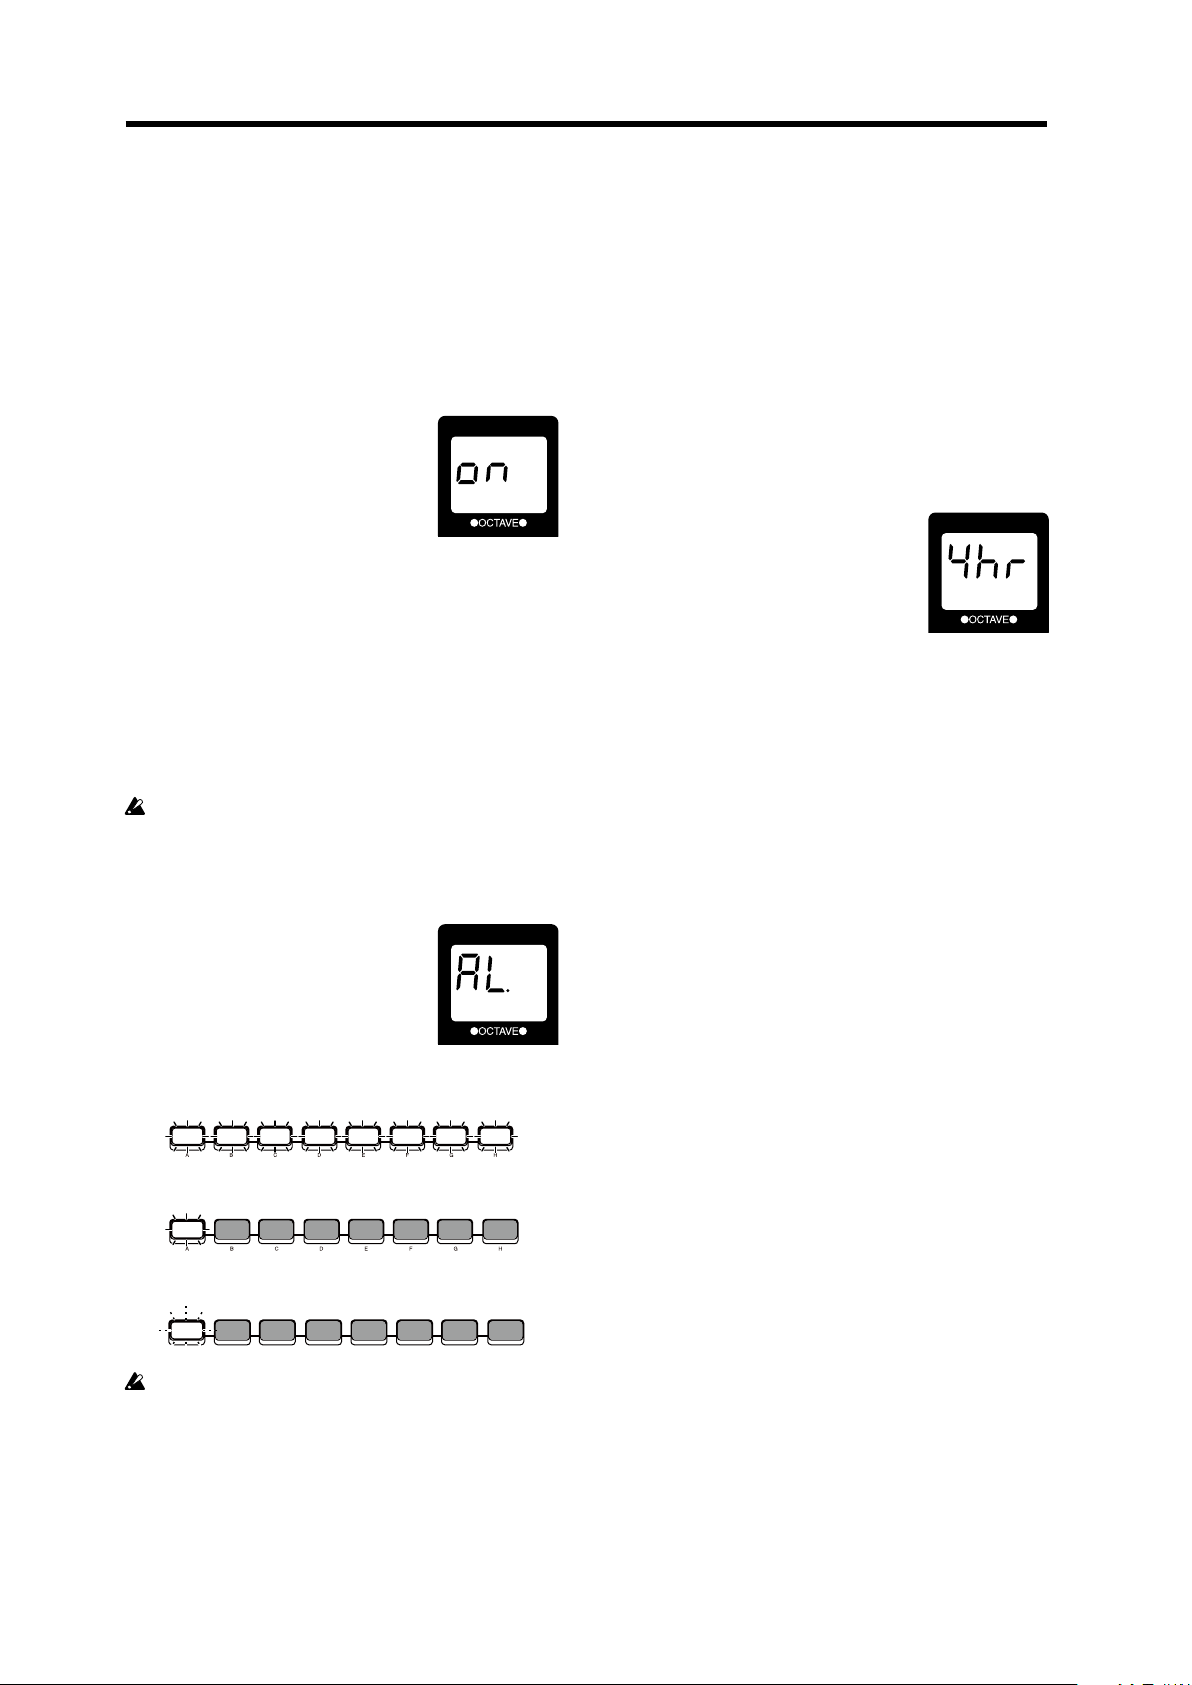
4hr: Enabled
diS: Disabled
3. Press the SHIFT button to exit the shift function.
1. Hold down the SHIFT button and press the favorites
G button.
The baery type appears in the
display.
The eight favorites buons (A
– H) are lit up to indicate the
remaining baery power level.
The number of lit buons may be
lower depending on the baery capacity.
New baeries: All buons lit
Low remaining baery power level: Only buon A lit
Time to replace baeries: Buon A blinks
When the AC adapter is connected, all buons are
turned o.
2. Use the OCTAVE +/- buttons or the SOUND lever to
select the battery type.
AL.: Alkaline baeries
ni.H: Nickel-metal hydride baeries
3. Press the SHIFT button to exit the shift function.
16
Page 17
MIDI
MIDI keyboard
MIDI OUT
RK-100S
MIDI patchbay
Computer
Using the RK-100S with other MIDI devices (MIDI)
MIDI stands for Musical Instrument Digital Interface, and
is a world-wide standard for exchanging various types of
musical data between electronic musical instruments and
computers.
When MIDI cables are used to connect two or more MIDI
devices, performance data can be exchanged between the
devices, even if they were made by dierent manufacturers.
The RK-100S lets you assign control change numbers to the
major parameters that aect the sound, and control these
parameters from an external MIDI sequencer while you
play the tone generator.
You can also use the assigned ribbons or buons to transmit
these control changes to control an external MIDI device.
MIDI
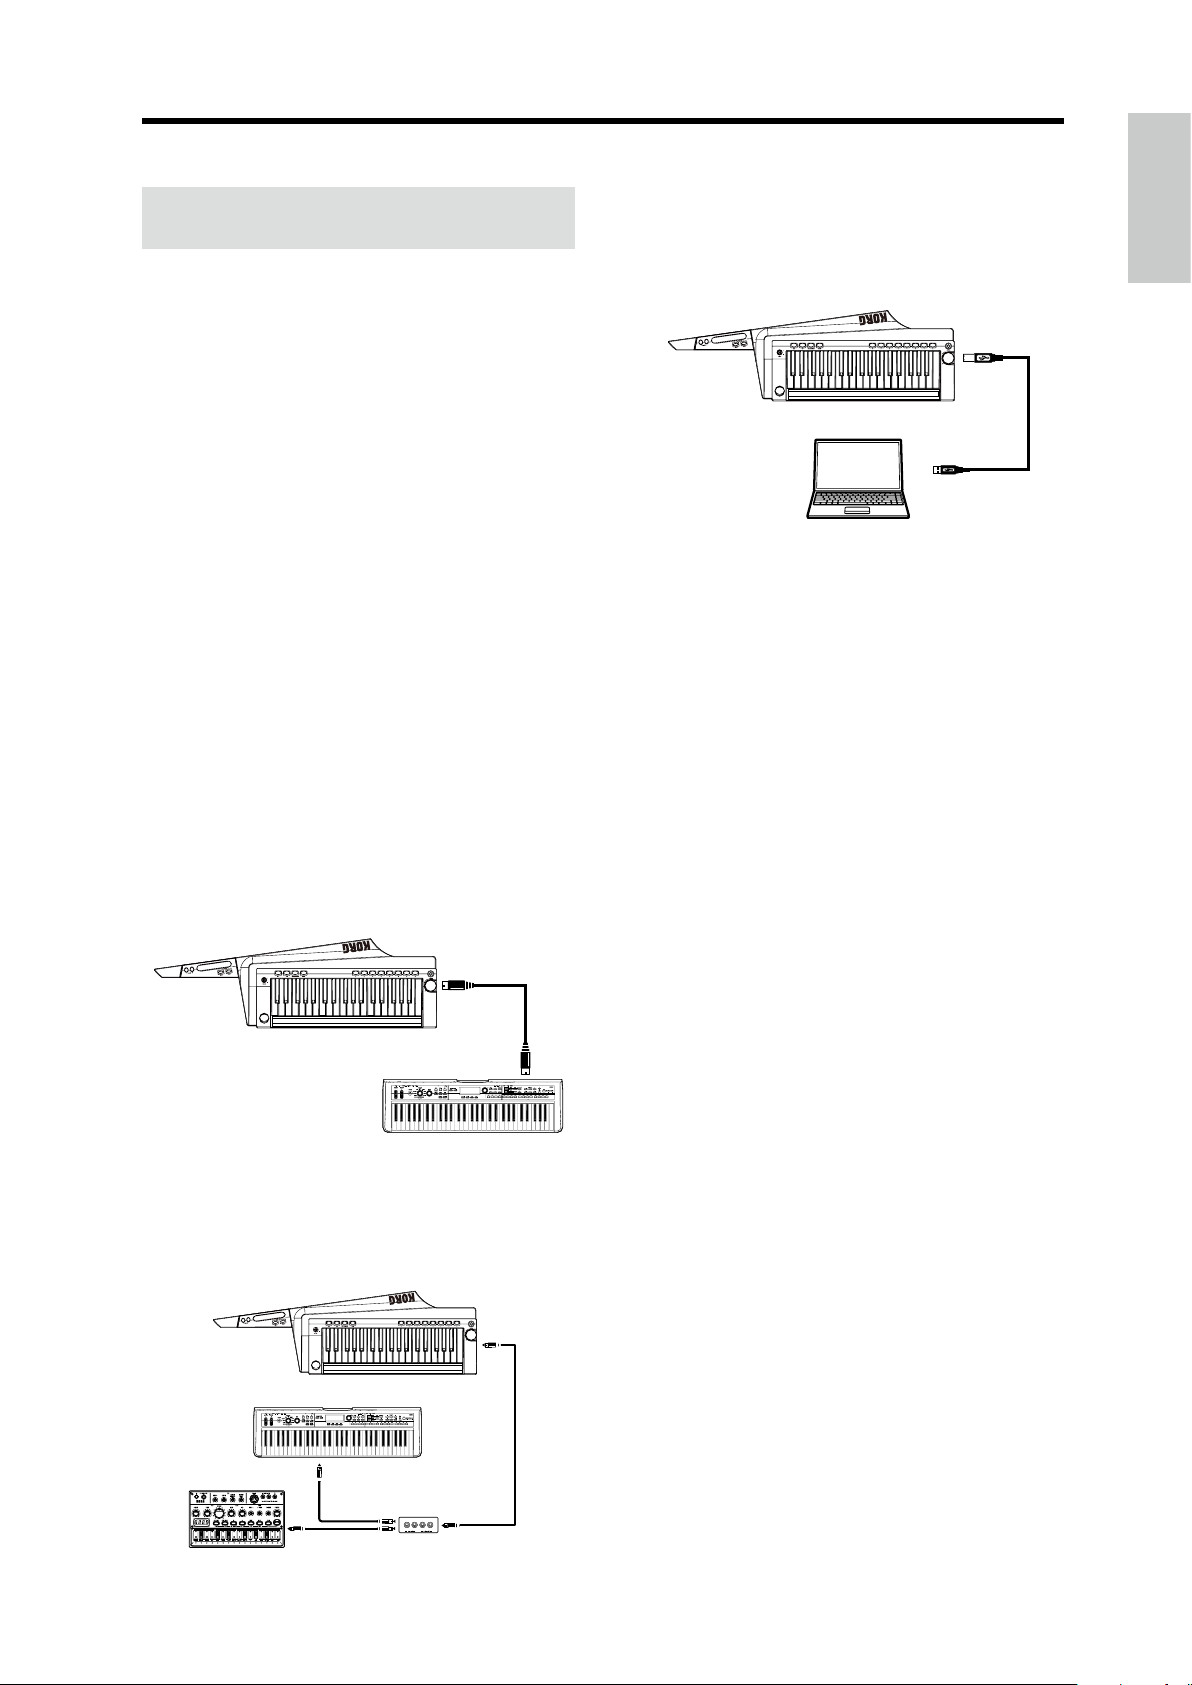
Connecting the RK-100S to your computer
via USB
Connect a USB cable to the USB connector of the RK-100S
and the computer.
USB
RK-100S
USB cable
Note: In order to use a USB connection, you must install
the Korg USB-MIDI driver in your computer. Download
the Korg USB-MIDI driver from the Korg website, and
install it as directed by the accompanying documentation.
Connecting MIDI devices/computers
Controlling an external MIDI tone generator
from the RK-100S
When you want to use the RK-100S’s keyboard, controllers,
and arpeggiator. to play an external MIDI tone generator,
use a MIDI cable to connect the RK-100S’s MIDI OUT
connector to the MIDI IN connector of the external MIDI
tone generator.
MIDI OUT
RK-100S
Controlling two or more external MIDI tone
generators from the RK-100S
You can also use a MIDI patch bay to control multiple
MIDI devices.
MIDI tone generator
MIDI Keyboard
MIDI IN
MIDI OUT
MIDI IN
MIDI-related settings
MIDI channel setting
In order to exchange data with a connected external MIDI
device, you must set the RK-100S’s MIDI channel to match
the MIDI channel of the external MIDI device.
Refer to the “Global MIDI channel” section on page 15, and
specify the Global MIDI channel.
Recording the MIDI output from the
RK-100S’s arpeggiator onto an external MIDI
sequencer or computer
Connect and setting
Connect the RK-100S’s MIDI OUT connector to the MIDI
IN connector of your external MIDI sequencer.
Recording the note data from the arpeggiator onto
an external MIDI sequencer
Turn on the RK-100S’s arpeggiator (ARP buon lit up), play
the keyboard, and record the note data on your external
MIDI sequencer.
Synchronizing the arpeggiator
For information on synchronization-related seings of your
external MIDI device, refer to the manual of your device.
In order to use the RK-100S as master and the external MIDI
device as slave, connect the RK-100S’s MIDI OUT connector
to your external MIDI device’s MIDI IN connector.
Set your external MIDI device to receive incoming MIDI
clock messages. The external MIDI device (e.g., sequencer
or rhythm machine) will operate at the tempo specied by
the RK-100S’s TEMPO buon.
MIDI IN
MIDI OUT
17
Page 18

RK-100S Owner's manual
Trouble shooting
If you suspect a malfunction, please check the following
points. If this does not resolve the problem, please contact
a nearby dealer.
Power does not turn on
• Is the AC adapter connected to an AC outlet? (See page
7 “Connections”)
• Are the baeries depleted?
Hold down the SHIFT buon and press the G buon
to check the remaining baery power level (See page 16
“Baery type and remaining power”).
Have the baeries been inserted with the correct
•
orientation? (See page 8 “Using baeries”)
Automatically turns o
•
Has the auto power o function been enabled? (See page
16 “Auto power o function”)
No sound produced from an external MIDI sound
generator that’s connected with a MIDI cable
•
Is the MIDI cable connected correctly? (See page 7
“Connections”)
Does the MIDI channel of the external MIDI device match
•
the MIDI channel of the RK-100S? (See page 15 “Global
MIDI channel”)
No sound
•
Are your powered monitors or headphones connected to the
jack correctly ? (See page 7 “Connections”)
• Is the connected monitor system powered-on, and is the
volume raised?
• Is the VOLUME knob set to a position where sound will
be output?
Nothing happens when the OCTAVE UP or DOWN
button is pressed.
• Is a shi function being set?
Press the SHIFT buon to exit the shi function.
Cannot input sound
•
Has the mic that will be used as the modulator with
the vocoder program been correctly connected to the
INPUT jack?
• Has the Input select switch been set appropriately?
Arpeggiator will not start
• Is the arpeggiator on (ARP buon lit up)?
No sound is produced when the RK-100S is controlled
with the long ribbon controller
• Have the shi functions been used to change the long
ribbon velocity to oFF?
Select any seing other than oFF. (See page 15 “Long
ribbon velocity”)
• Have the shi functions been used to change the long
ribbon MIDI channel?
Specify the same MIDI channel for producing sound.
(See page 15 “Long ribbon MIDI channel”)
18
Page 19
Specications
Specications
Keyboard 37-note (SlimKey, velocity sensitive, no aertouch)
Sound generation system MMT (Multiple Modeling Technology)
Programs: Can be edited with sound editor soware when a computer is connected.
Number of timbres Maximum 2 (when using Layer, Split, or Multi)
Polyphony 8 voices (up to 4 when the vocoder is selected)
Synth 2 oscillator + noise generator
Oscillator 1
Waveform SAW, PULSE, TRIANGLE, SINE, FORMANT, NOISE, PCM/DWGS, AUDIO IN
Modulation WAVEFORM, CROSS, UNISON, VPM
Oscillator 2
Waveform SAW, PULSE, TRIANGLE, SINE
Modulation RING, SYNC, RING+SYNC
Wave shaping
WS type DRIVE , DECIMATOR, HARDCLIP, OCT SAW, MULTI TRI, MULTI SIN, SUB OSC SAW,
SUB OSC SQU, SUB OSC TRI, SUB OSC SIN, LEVEL BOOST
Multi-mode lters
Filter 1 -24 dB/oct LPF– -12 dB/oct LPF–HPF–BPF–Thru
Filter 2 LPF, HPF, BPF
Vocoder 16-band vocoder, adjustable level and pan for each band, Formant Shi function, Formant
Hold function
Eects
Timbre 2-band EQ
Master Master eects (17 eect algorithms)
Arpeggiator UP, DOWN, ALT1/2, Random, Trigger (6 types), Step Arpeggiator function
Programs 200 programs
Input/output
Input
INPUT jack
Connectors 1/8” mono mini jacks
Input select switch MIC1: Mic input [low gain] (not plug-in powered)
MIC2: Mic input [high gain] (not plug-in powered)
LINE: Line input (monaural [Lch] input)
Output
Output jack
Connectors 1/4” stereo phone jack
Maximum output level 25mW + 25mW @ 33 ohm load
MIDI OUT
USB connector B type
Display 7-segment LEDs, 3 digits
Power supply Six AA baeries (alkaline or nickel-metal hydride) or AC adapter ( DC9V
Baery life Approximately 8 hours (alkaline baery)
Dimensions (W x D x H) 830 x 263 x 68 mm / 32.68 x 10.35 x2.68 inches
Weight 3.4 kg / 7.50 lbs (includeing the baery)
Included items Six AA baeries, strap, owner's manual, so case
Options (separately sold) AC adapter ( DC9V
)
)
* Specications and appearance are subject to change without notice for improvement.
19
Page 20

Table des matière
Manuel d’utilisation
Fonctions principales ............................... 22
Panneau avant et panneau latéral .......... 22
Panneau avant .........................................................22
Panneau latéral ......................................................... 24
Fixer la sangle ............................................................24
Préparatifs ................................................. 25
Connexions ................................................................ 25
Alimentation .............................................................26
Démonstration ..........................................27
Sélectionner et essayer un Program .......27
Sélectionner un Program ........................................ 27
Travailler le son ......................................................... 28
Jouer des arpèges ....................................................31
Fonctions Shift .......................................... 32
Courbe de toucher ...................................................32
Toucher du long ruban ............................................ 33
Canal MIDI global ..................................................... 33
Canal MIDI du long ruban ....................................... 33
Transposition .............................................................34
Fonction d’économie d’énergie ............................. 34
Type de piles et autonomie restante .................... 34
Fonction de mise hors tension automatique ...... 34
MIDI ...........................................................35
Utiliser le RK-100S avec d’autres dispositifs MIDI
.....................................................................................35
Dépannage ................................................36
Fiche technique ........................................37
Appendices ...............................................74
Voice Name List .........................................................75
MIDI Implementaton Chart .................................... 77
Page 21
Précautions
Précautions
Emplacement
L’utilisation de cet instrument dans les endroits suivants
peut en entraîner le mauvais fonctionnement.
• En plein soleil
• Endroits très chauds ou très humides
• Endroits sales ou fort poussiéreux
• Endroits soumis à de fortes vibrations
• A proximité de champs magnétiques
Alimentation
Branchez l’adaptateur secteur mentionné à une prise secteur
de tension appropriée. Evitez de brancher l’adaptateur à
une prise de courant dont la tension ne correspond pas à
celle pour laquelle l’appareil est conçu.
Interférences avec d’autres
appareils électriques
Les postes de radio et de télévision situés à proximité
peuvent par conséquent sourir d’interférences à la
réception. Veuillez dès lors faire fonctionner cet appareil à
une distance raisonnable de postes de radio et de télévision.
Maniement
Pour éviter de les endommager, manipulez les commandes
et les boutons de cet instrument avec soin.
Entretien
Lorsque l’instrument se salit, neoyez-le avec un chion
propre et sec. Ne vous servez pas d’agents de neoyage
liquides tels que du benzène ou du diluant, voire des
produits inammables.
Note concernant les dispositions (Seulement EU)
Quand un symbole avec une poubelle barrée d’une
croix apparait sur le produit, le mode d’emploi, les
piles ou le pack de piles, cela signie que ce produit,
manuel ou piles doit être déposé chez un représentant
compétent, et non pas dans une poubelle ou toute autre
décheerie conventionnelle.
Disposer de cee manière, de prévenir les dommages
pour la santé humaine et les dommages potentiels pour
l’environnement. La bonne méthode d’élimination dépendra
des lois et règlements applicables dans votre localité, s’il vous
plaît, contactez votre organisme administratif pour plus de
détails. Si la pile contient des métaux lourds au-delà du seuil
réglementé, un symbole chimique est aché en dessous du
symbole de la poubelle barrée d’une croix sur la pile ou le
pack de piles.
Précautions relatives au RK-100S
Tout comme une guitare électrique conventionnelle, le
corps de cet instrument est en bois peint.
Après utilisation, essuyez la surface de l’instrument
•
avec un chion sec, doux et propre. Pour neoyer
l’instrument, utilisez un produit d’entretien pour guitare
disponible dans le commerce.
• N’exposez pas l’instrument à de brusques changements
de température, et évitez tout particulièrement les
variations extrêmes de température. Le passage de
l’instrument d’un environnement froid à une pièce
chauée pourrait provoquer l’apparition de craquelures
sur les surfaces peintes de l’instrument. En outre, il est
extrêmement dangereux de laisser l’instrument dans le
core d’une voiture, car cela l’expose à des températures
très élevées, comme en été par exemple.
• La nition de l’instrument est délicate ; aussi, un choc
même léger peut provoquer des écaillures ou craquelures.
Sur scène comme durant le transport, manipulez donc
toujours l’instrument avec soin, en veillant à ne jamais
l’exposer à des chocs.
Conservez ce manuel
Après avoir lu ce manuel, veuillez le conserver
soigneusement pour toute référence ultérieure.
Evitez toute intrusion d’objets ou
de liquide
Ne placez jamais de récipient contenant du liquide près
de l’instrument. Si le liquide se renverse ou coule, il risque
de provoquer des dommages, un court-circuit ou une
électrocution.
Veillez à ne pas laisser tomber des objets métalliques dans le
boîtier (trombones, par ex.). Si cela se produit, débranchez
l’alimentation de la prise de courant et contactez votre
revendeur korg le plus proche ou la surface où vous avez
acheté l’instrument.
*
Tous les noms de produits et de sociétés sont des marques
commerciales ou déposées de leur détenteur respectif.
21
Page 22
RK-100S Manuel d’utilisation
Nous vous remercions d’avoir choisi le RK-100S
KEYTAR de Korg. Pour proter au mieux de votre
nouvel instrument, veuillez lire aentivement ce manuel
et suivre ses consignes.
Fonctions principales
Le RK-100S est un superbe clavier de type bandoulière
(un ‘Keytar’) doté d’un synthétiseur, de sons classiques de
piano et d’orgue ainsi que de rubans permeant de jouer
et piloter une grande variété de sons.
L’instrument peut être alimenté sur piles pour une
portabilité optimale.
200 Programs produits par modélisation
analogique MMT
Grâce à son moteur sonore MMT, l’instrument propose
200 Programs adaptés à une palee de genres musicaux.
Ces sons disposent d’une grande variété d’algorithmes
d’oscillateur, dont notamment des ondes en dents de scie
et ondes carrées, typiques des synthés analogiques, mais
aussi des formes d’ondes à formant ainsi que des formes
d’ondes de bruit et PCM/DWGS.
Rubans
L’instrument est doté d’un long ruban et d’un court ruban
pour piloter la hauteur, le ltre, etc.
Le long ruban sert au pilotage de la hauteur et du ltre des
sons, mais il permet aussi de jouer des gammes et la plage
de notes dénies avec le logiciel d’édition sonore.
N’utilisez qu’un doigt pour contrôler. N’utilisez rien
de dur ou de pointu et ne portez pas de gants.
Chaque Program comporte aussi deux eets maîtres pour
apporter la touche nale à votre son. Vous avez le choix
entre 17 types pour chacun de ces eets.
Logiciel d’édition sonore
En reliant le RK-100S à un ordinateur via USB et en utilisant
le logiciel d’édition sonore, vous pouvez modier les
paramètres (comme par exemple les sons et les motifs
d’arpège du RK-100S) depuis votre ordinateur.
Le logiciel d’édition sonore peut être téléchargé gratuitement sur le site internet de Korg.
hp://www.korg.com/
Panneau avant et
panneau latéral
Panneau avant
1. Boutons OCTAVE +/-
Ces boutons transposent la plage de hauteur assignée au
clavier et au long ruban par pas d’une octave sur une plage
de +/-3 octaves.
Astuce: Ces boutons servent aussi à régler les paramètres
des fonctions Shi.
2. Ruban court
Ce ruban permet de contrôler la hauteur et la modulation
des sons. Appuyez sur le bouton SHORT RIBBON pour
alterner entre le contrôle de hauteur et de modulation.
Arpégiateur
L’arpégiateur intégré génère automatiquement un arpège
sur base de l’accord que vous jouez et maintenez.
Vous avez le choix entre six types d’arpèges. Vous pouvez
activer/désactiver individuellement les notes d’un nombre
maximum de huit pas et varier ainsi le rythme pour encore
plus de possibilités.
Fonction ‘Vocoder’
Le RK-100S ore une fonction Vocoder vous permeant de
traiter le son de l’oscillateur avec votre voix (via un micro)
et de produire l’impression que votre synthé “parle”.
Connexions virtuelles
Cee fonction permet de connecter virtuellement des
contrôleurs tels que l’enveloppe, le LFO, la fonction Keyboard
Track ainsi que les rubans à des paramètres comme la hauteur
ou la fréquence du ltre an de moduler ces paramètres et
d’obtenir un degré inédit de création sonore.
Égaliseur et eets: pour apporter la touche
nale à vos sons
Chaque Timbre dispose d’un égaliseur à 2 bandes pour un
plus grand potentiel de créativité sonore.
3. LONG RIBBON
Bouton PITCH
Appuyez sur ce bouton pour contrôler la hauteur des
notes avec le long ruban.
Bouton FILTER
Appuyez sur ce bouton pour contrôler le ltre avec le
long ruban.
4. Écran
Ache le numéro du Program actif et les réglages des
fonctions Shi.
Il ache aussi le réglage d’octave choisi avec les boutons
OCTAVE +/- (voir “Changer d’octave avec les boutons
OCTAVE” à la page 29).
5. Long ruban
Permet de jouer des gammes (jeu monophonique) et de
contrôler la hauteur et le ltre des sons.
Choisissez le paramètre à contrôler avec les boutons LONG
RIBBON PITCH et FILTER.
6. Commande VOLUME
Règle le niveau du signal transmis à la prise de sortie.
22
Page 23
Panneau avant et panneau latéral
6
13
4
3
1
2
5
7
8
9
10
11
12
7. Levier SOUND
Permet de sélectionner le Program. Déplacez ce levier dans
la direction + ou - pour choisir respectivement le Program
suivant ou précédent.
Astuce: Le levier SOUND servent aussi à régler les para-
mètres des fonctions Shi.
8. Bouton TAP
Permet de dénir le tempo (la vitesse) de l’arpégiateur, du
LFO ou de l’eet Delay.
Vous réglez le tempo en appuyant plusieurs fois sur ce bouton
au tempo désiré. Le témoin clignote sur le tempo “tapé”.
Vous pouvez aussi maintenir le bouton SHIFT enfoncé
et appuyer sur le bouton TAP pour jouer le morceau de
démonstration (voir “Démonstration” à la page 27).
9. Bouton ARP
Active et coupe l’arpégiateur (voir “Jouer des arpèges” à
la page 31).
Vous pouvez aussi maintenir le bouton SHIFT enfoncé
et appuyer sur le bouton ARP pour modier les réglages
d’arpégiateur.
10. Bouton SHORT RIBBON
Permet de changer le paramètre piloté via le ruban court.
Quand ce bouton est allumé en rouge, le ruban court pilote
la hauteur du son.
Quand ce bouton est allumé en vert, le ruban court pilote
la modulation du son.
En outre, vous pouvez maintenir le bouton SHIFT enfoncé et
appuyer sur le bouton SHORT RIBBON pour contourner les
circuits de l’instrument: le signal reçu via la prise INPUT est alors
transmis tel quel à la prise de sortie sans le moindre traitement.
11. Bouton SHIFT
Maintenez ce bouton enfoncé et appuyez sur le bouton
correspondant pour jouer le morceau de démonstration
ou régler les paramètres des fonctions Shi.
12. Boutons Favorites A – H
Vous pouvez assigner vos Programs préférés (‘favorite’)
à ces boutons.
Une simple pression sur le bouton correspondant permet
de rappeler le Program voulu.
Voir “Fonction Favorites” à la page 27.
En outre, vous pouvez maintenir le bouton SHIFT enfoncé
et appuyer sur un des boutons Favorites (A – H) pour
activer la fonction Shi correspondante et modier ses
paramètres.
13. Prises de sortie [stéréo]
Ces prises permeent de relier l’instrument à des enceintes
actives, un amplicateur, une console de mixage ou un
casque stéréo.
23
Page 24
RK-100S Manuel d’utilisation
1
65 4
2
3
Panneau latéral
1. Prise MIDI OUT
Transmet les messages MIDI au dispositif MIDI externe
connecté au RK-100S.
2. Prise INPUT
Permet de brancher un microcasque/micro (mono, non
alimentée via plug-in) ou un autre dispositif audio
disponible dans le commerce.
Quand un microcasque/micro est branché, son signal
peut être utilisé comme modulateur pour un Program de
Vocoder.
Si vous branchez un dispositif audio, cee prise fait oce de
prise AUX IN. Le son du dispositif connecté est reproduit
par le RK-100S. (
Voir “Brancher un lecteur audio” à la page 25
)
3. Sélecteur d’entrée
Choisissez la position de ce sélecteur correspondant au
dispositif branché à la prise INPUT.
MIC1 ou MIC2: Si vous avez branché un micro
LINE: Si vous avez branché un dispositif audio
Il est primordial de régler ce sélecteur sur la position LINE
si vous avez branché un dispositif audio à la prise INPUT.
Sans cela, vous risquez d’endommager l’équipement en
question.
4. Interrupteur d’alimentation
Permet de mere l’instrument sous tension et hors tension.
5. Prise DC 9V
Branchez-y l’adaptateur secteur en option.
Branchez l’adaptateur secteur au RK-100S avant de le rac-
corder à une prise de courant.
Fixer la sangle
Fixez la sangle au RK-100S comme décrit ci-dessous.
1. Fixez la sangle aux deux chevilles prévues à cet eet
aux emplacements indiqués sur l’illustration.
Après avoir xé la sangle, assurez-vous qu’elle est
fermement maintenue par les chevilles.
Ne desserrez jamais les vis de montage des chevilles
de sangle.
Pour éviter que la sangle ne se détache accidentellement,
nous vous conseillons d’utiliser un système de
verrouillage pour sangle de guitare disponible dans
le commerce.
6. Port USB
Permet de relier le RK-100S à un ordinateur et d’éditer les
paramètres de l’instrument (comme par exemple ses sons
et ses motifs d’arpège) avec le logiciel d’édition sonore.
Remarque:
trument, vous devez au préalable installer le pilote USB-MIDI
de Korg sur votre ordinateur. Téléchargez ce pilote (le “Korg
USB-MIDI driver”) sur le site internet de Korg et installez-le en
suivant les instructions de la documentation fournie.
Pour pouvoir utiliser la fonctionnalité USB de l’ins-
24
Page 25

Préparatifs
Préparatifs
Connexions
L’illustration ci-dessous montre un exemple typique de connexions pour le RK-100S. Eectuez les connexions en fonction
de votre équipement et de vos besoins spéciques.
Veillez à eectuer tous les branchements uniquement quand les dispositifs sont hors tension. Le non-respect de cee
précaution pourrait provoquer des dysfonctionnements ou endommager vos moniteurs.
INPUT
Fiche mono
INPUT
Fiche mono
INPUT
Fiche mono
Amplicateur pour système d’écoute, etc.
Casque
Fiche stéréo
Fiche mono
Pour un signal stéréo
Pour un signal mono
(signal du canal gauche
uniquement)
Si vous utilisez un casque
Reliez la sortie de l’instrument à l’amplicateur de vos moniteurs ou à la
console de mixage.
Reliez la prise de sortie du RK-100S aux prises d’entrée de
votre console de mixage ou moniteurs actifs.
Remarque:
connexion stéréo pour proter pleinement du fantastique
son de votre RK-100S. Si vous branchez un câble à ches
mono standard, seul le son du canal gauche est reproduit.
Nous vous conseillons d’eectuer une
Prise de sortie
MIDI IN
Fiche stéréo
Câble USB
Générateur de sons externe
Câble MIDI
Adaptateur secteur
(disponible dans le commerce)
Microcasque
Ordinateur
Lecteur audio numérique, etc.
Brancher un lecteur audio
La prise INPUT du RK-100S peut aussi faire oce d’entrée
auxiliaire (AUX IN).
1. Placez le sélecteur d’entrée (du panneau latéral) sur
la position LINE.
Il est primordial de régler ce sélecteur sur la position
LINE si vous avez branché un dispositif audio à la
prise INPUT. Sans cela, vous risquez d’endommager
l’équipement en question.
Brancher un micro
Pour utiliser la fonction Vocoder du RK-100S, branchez un
microcasque/micro (non alimentée via plug-in) à la prise
INPUT, puis parlez/chantez pour utiliser votre voix comme
signal modulateur (voir “Jouer un Program de Vocoder”
à la page 28).
Remarque: La prise INPUT est une entrée mono.
Veillez à ne jamais appliquer de force excessive lorsque
vous branchez et débranchez le micro.
Vériez le niveau de sortie du micro avant d’eectuer
la connexion.
2. Branchez le dispositif audio à la prise INPUT.
3. Maintenez le bouton SHIFT enfoncé et appuyez sur
le bouton SHORT RIBBON.
Le RK-100S active alors son mode de contournement
(‘Audio In Through’): cela signie que le signal reçu à
la prise INPUT de l’instrument est transféré sans aucun
traitement à sa prise de sortie.
En présence d’un signal à la prise d’entrée INPUT, le
bouton SHIFT s’allume. Si le signal est saturé (de niveau
trop élevé), ce bouton s’allume en rouge.
Remarque:
Vous pouvez brancher une che stéréo à la
prise d’entrée INPUT, mais le signal audio présent à la
prise de sortie est mono.
25
Page 26

RK-100S Manuel d’utilisation
4.
Réglez le volume de sortie sur le dispositif audio
connecté de sorte que le bouton SHIFT ne s’allume
pas en rouge.
Brancher un dispositif MIDI ou un ordinateur à la prise MIDI OUT ou au port USB
Vous pouvez relier la prise MIDI OUT du RK-100S à la
prise MIDI IN d’un dispositif MIDI externe an de piloter
ce dernier avec le clavier et les fonctions de jeu du RK-100S.
Une fois le RK-100S connecté à un ordinateur via USB, vous
pouvez utiliser le logiciel d’édition sonore pour modier
les paramètres de l’instrument, comme par exemple les
sons et motifs d’arpège du RK-100S. En outre, vous pouvez
utiliser un séquenceur logiciel pour, par exemple, piloter
le générateur de sons du RK-100S.
Alimentation
Le RK-100S peut être alimenté avec son adaptateur secteur
ou sur piles.
Nous recommandons bien entendu l’alimentation sur piles
pour la scène, histoire de ne pas se “mêler les câbles”.
Avant la mise sous tension
Assurez-vous que l’interrupteur d’alimentation est
coupé avant de brancher l’instrument au secteur.
À propos du témoin de piles plates
Maintenez enfoncé le bouton SHIFT et appuyez sur bouton
Favorites G pour vérier l’autonomie restante des piles: les
huit boutons Favorites (A – H) servent alors de témoins
d’autonomie. Le nombre de boutons allumés indique
l’autonomie restante des piles.
En outre, quand les piles sont presque
épuisées, le point sur la droite de l’achage commence à clignoter. Si vous
continuez d’utiliser l’instrument dans cet
état, le clignotement du point accélère.
Si vous continuez alors d’utiliser l’instrument, l’indication
se met à clignoter. Dans ce cas il est impératif de remplacer
les piles sans tarder ou de brancher l’adaptateur secteur.
Une fois que les piles sont épuisées, retirez-les
immédiatement du RK-100S. Laisser des piles
plates dans l’instrument risque de provoquer des
dysfonctionnements (les piles risquent par exemple
de couler). De même, retirez les piles de l’instrument
si vous n’avez pas l’intention d’utiliser le RK-100S
pendant une période prolongée.
Brancher l’adaptateur secteur
Utilisez exclusivement l’adaptateur secteur indiqué.
L’utilisation de tout autre adaptateur secteur pourrait
provoquer des dysfonctionnements.
1. Vériez que le RK-100S est hors tension.
Alimentation sur piles
1.
Ouvrez le couvercle du compartiment des piles au
dos du RK-100S.
2.
Logez six piles AA alcalines ou au nickel-hydrure
métallique (disponibles dans le commerce).
Logez les piles en respectant les indications de polarité.
3. Refermez le couvercle du compartiment des piles.
Pour garantir la meilleure estimation possible de
4.
l’autonomie restante des piles, lisez la section “Type
de piles et autonomie restante” à la page 34 et spéciez
le type de piles que vous utilisez.
Branchez l’adaptateur secteur en option à la prise
2.
DC9V du panneau latéral.
Voir “Connexions” à la page 25.
3.
Branchez l’adaptateur secteur à une prise de courant.
Assurez-vous que la prise de courant fournit le courant
approprié.
Mettre l’instrument sous tension
Avant de mere le RK-100S sous tension, meez tout
dispositif d’écoute externe (comme des moniteurs
actifs, par exemple) hors tension.
1.
Tournez la commande VOLUME du RK-100S à fond
à gauche.
Maintenez l’interrupteur d’alimentation enfoncé
2.
jusqu’à ce que les témoins s’achent à l’écran.
Une fois que les témoins aparaissent à l’écran, relâchez
l’interrupteur d’alimentation.
Après un bref instant, le numéro de Program s’ache
à l’écran.
3. Baissez le volume de vos moniteurs actifs ou de tout
autre dispositif d’écoute externe.
26
Placez la commande VOLUME du RK-100S sur la
4.
position voulue.
Page 27

5.
4
3
1
2
Réglez le volume sur votre dispositif d’écoute externe.
Démonstration
Sélectionner et essayer
Mettre l’instrument hors tension
1.
Baissez le volume de vos moniteurs actifs (ou de tout
autre système d’écoute externe), puis mettez-les
hors tension.
2. Tournez la commande VOLUME du RK-100S à fond à
gauche puis appuyez sur l’interrupteur d’alimentation
jusqu’à ce que l’écran indique que l’instrument peut
être mis hors tension.
Si l’instrument est alimenté via son adaptateur secteur,
ne débranchez pas ce dernier avant que le RK-100S soit
complètement hors tension. En eet, pendant la mise
hors tension, le RK-100S sauvegarde les réglages de ses
boutons Favorites ainsi que divers autres paramètres.
Fonction de mise hors tension automatique
Quand le RK 100S n’est pas utilisé pendant environ 4
heures, sa fonction de mise hors tension automatique coupe
l’alimentation de l’instrument.
Remarque: La fonction de mise hors tension automatique
est activée à la sortie d’usine.
Vous pouvez désactiver cee fonction de sorte que l’alimentation du RK-100S ne se coupe pas automatiquement.
Voir “Fonction de mise hors tension automatique” à la
page 34.
un Program
Sélectionner un Program
Le RK-100S propose 200 Programs adaptés à une grande
variété de genres musicaux.
Sélection avec le levier SOUND
Le levier SOUND du panneau avant peut être utilisé pour
sélectionner un Program.
1. Déplacez le levier SOUND dans la direction + ou -.
L’instrument change de Program. Le numéro du Program activé apparaît à l’écran.
Chaque manipulation du levier
active le Program suivant (+) ou
précédent (-).
Voir “Voice Name List (Liste des
voix)” à la page 75.
2.
Réglez la commande VOLUME sur un niveau
approprié.
Démonstration
Le RK-100S propose des morceaux de démonstration pour
découvrir ses sons fantastiques.
Voir “Voice Name List (Liste des voix)” à la page 75.
1
1,3
2
1. Maintenez le bouton SHIFT enfoncé et appuyez sur
le bouton TAP.
La lecture du morceau de démonstration commence.
2.
Choisissez le morceau de démonstration avec les
boutons OCTAVE +/- ou le levier SOUND.
3. Appuyez sur le bouton SHIFT pour arrêter la lecture
du morceau de démonstration.
3. Jouez sur le clavier et testez le son du Program.
Appuyez sur le bouton OCTAVE pour transposer la
4.
plage de notes assignée au clavier.
Voir “Changer d’octave avec les boutons OCTAVE” à
la page 29.
Fonction Favorites
La fonction ‘Favorites’ du RK-100S vous permet d’assigner vos
Programs préférés aux huit boutons Favorites. Vous pouvez
mémoriser jusqu’à 40 Programs (5 banques × 8 boutons).
Sélection avec les boutons Favorites
Des Programs ont été assignés à ces boutons Favorites à
l’usine. Une simple pression sur le bouton correspondant
permet de rappeler instantanément le Program voulu.
1
1
2
27
Page 28

RK-100S Manuel d’utilisation
3
1.
Maintenez le bouton SHIFT enfoncé tout en
actionnant le levier SOUND pour choisir une banque
de Programs ‘Favorites’.
L’instrument propose cinq banques ‘Favorites’. Quand
vous changez de banque, le numéro de la banque sélec-
tionnée s’ache à l’écran.
Remarque: Le simple choix d’une banque ne produit pas
de changement de Program. Pour changer de Program,
choisissez la banque puis enfoncez un bouton Favorites.
2. Appuyez sur un des boutons Favorites.
Le Program assigné au bouton en question est alors
activé.
Astuce:
autre Program pour chaque bouton.
Assigner des Programs aux boutons Favorites
Voici comment remplacer un Program assigné à un bouton
Favorites par un autre Program plus à votre goût.
Vous pouvez changer l’assignation et choisir un
2, 4
2, 4
6
1.
Branchez le micro à la prise INPUT du panneau latéral,
puis réglez le sélecteur d’entrée sur la position MIC2.
2. Maintenez le bouton SHIFT enfoncé et appuyez sur
le bouton SHORT RIBBON.
Le signal reçu à la prise d’entrée INPUT est transmis tel
quel à la prise de sortie (contournement, alias ‘Audio
In Thru’).
Le bouton SHIFT s’allume en présence d’un signal à la
prise INPUT. Si le signal d’entrée est saturé (de niveau
trop élevé), ce bouton s’allume en rouge.
3. Chantez devant le micro. Si le bouton SHIFT s’allume
en rouge, réglez le sélecteur d’entrée sur la position
MIC1.
1,
5
1,2
1. Choisissez le Program que vous voulez assigner à un
bouton Favorites.
Maintenez le bouton SHIFT enfoncé tout en
2.
actionnant le levier SOUND pour choisir la banque de
Programs ‘Favorites’ à laquelle vous voulez assigner
le Program.
L’instrument change de banque Favorites. Le numéro
de la banque sélectionnée apparaît à l’écran.
3.
Maintenez enfoncé le bouton Favorites dont vous
voulez remplacer le Program.
Tous les boutons Favorites s’allument brièvement, puis
le bouton Favorites de destination pour le Program
choisi s’allume, conrmant l’assignation du Program.
2
3
Jouer un Program de Vocoder
Le Vocoder est une fonction qui modie le signal d’un
oscillateur ou d’une autre source (l’onde porteuse) en le
modulant avec les caractéristiques spectrales d’une source
externe comme par exemple la voix humaine.
L’exemple le plus courant d’utilisation du Vocoder est cet
eet d’instrument ‘parlant’ produit en modulant le signal
d’un accord joué sur le clavier avec un signal de voix capté
via micro. Toutefois les possibilités de cet eet ne s’arrê
tent pas à la voix humaine: vous pouvez moduler le son
du clavier avec d’autres sources, comme par exemple des
sons de percussions, des bruitages - bref tout ce qui vous
passe par la tête!
Voyons maintenant comment brancher un micro et tester
l’eet Vocoder.
-
4.
Pour désactiver l’eet Vocoder, maintenez à nouveau le
bouton SHIFT enfoncé et appuyez sur le bouton SHORT
RIBBON.
5. Choisissez un Program de Vocoder.
Voir “Voice Name List (Liste des voix)” à la page 75.
6.
Jouez sur le clavier tout en parlant/chantant dans
le micro.
Pour varier l’eet Vocoder, changez la manière dont vous
parlez/chantez et jouez d’autres accords.
Astuce:
‘parlants’ quand vous jouez sur le clavier - vous ne devez
même pas utiliser le micro!
Certains Programs de Vocoder produisent des sons
Travailler le son
Pour conférer plus d’expression à votre jeu, vous pouvez
modier les sons du RK-100S avec ses fonctions de jeu
(le ruban court et le ruban long) mais aussi en variant la
manière dont vous jouez sur son clavier.
Sélectionnez divers Programs et essayez les diérentes
manières de modier le son.
Modier le son avec la force de jeu - Velocity
Ici, l’eet change selon l’intensité du toucher - la force avec
laquelle vous enfoncez les touches du clavier. En principe,
le toucher inuence le timbre ou le volume.
Astuce: Quand vous jouez sur le clavier, les huit boutons
Favorites (A – H) font oce de VU-mètre et indiquent la
force de votre toucher.
Le clavier du RK-100S ne prend pas en charge la
fonction Aertouch (pression après enfoncement des
touches).
28
Page 29

Sélectionner et essayer un Program
Hauteur originale
Son original
Changer d’octave avec les boutons
OCTAVE
Ces boutons permeent de décaler la plage de hauteur
assignée au long ruban ou des gammes jouées par pas
d’une octave sur une plage de +/-3 octaves.
Pression
sur le
bouton
Appuyez simultanément sur les boutons OCTAVE +/- pour
retourner au réglage ±0.
↓
↓
↓
↓
↓
↓
↓
Plage de
clavier et du
ruban
C6–C9
C5–C8
C4–C7
C3–C6
C2–C5
C1–C4
C0–C3
Témoin OCTAVE à l’écran
Le témoin de droite s’allume en rouge.
Le témoin de droite s’allume en orange.
Le témoin de droite s’allume en vert.
Éteint
Le témoin de gauche s’allume en vert.
Le témoin de gauche s’allume en orange.
Le témoin de gauche s’allume en rouge.
Pression sur
le bouton +
↑
↑
↑
↑
↑
↑
↑
Jouer avec le ruban court
Le ruban court est une fonction de jeu qui permet
de contrôler la hauteur des sons et d’appliquer de la
modulation à ces sons.
Le bouton SHORT RIBBON permet de changer le paramètre
piloté via cee fonction de jeu.
Astuce:
la connexion de l’instrument à un ordinateur via USB) de
choisir le paramètre -hauteur ou modulation- piloté avec
le ruban court quand vous changez de Program.
Contrôler la hauteur
Le logiciel d’édition sonore permet (moyennant
Ajout de modulation
1. Appuyez sur le bouton SHORT RIBBON de sorte qu’il
s’allume en vert.
2. Jouez sur le clavier et utilisez le ruban court.
Glissez un doigt d’un côté à l’autre du ruban. Le bord
gauche du ruban correspond au son original; glissez le
doigt vers la droite pour ajouter de la modulation. Dès
que vous retirez le doigt du ruban, la modulation cesse
d’être appliquée au son. Selon le Program sélectionné,
le ruban modie l’intensité de l’eet vibrato ou modie
le timbre en changeant la fréquence de coupure.
Jouer avec le long ruban
Le long ruban permet de jouer des gammes et de piloter la
hauteur et le ltre des sons.
Astuce:
appliqué avec le long ruban varient en fonction du Program
sélectionné. En outre, ces réglages peuvent être dénis avec
le logiciel d’édition sonore (moyennant la connexion du
RK-100S à un ordinateur via USB).
Jouer des gammes
Cee fonction permet de jouer une note à la fois la gamme
prédénie.
Le timbre, la plage de notes et la direction de l’eet
1.
2. Jouez sur le clavier et utilisez le ruban court.
2
1
2
Appuyez sur le bouton SHORT RIBBON de sorte qu’il
s’allume en rouge.
Glissez un doigt d’un côté à l’autre du ruban. Le centre
du ruban correspond à la hauteur originale; augmentez
la hauteur en glissant le doigt vers la droite et abaissez
la hauteur en glissant le doigt vers la gauche. Dès que
vous retirez le doigt du ruban, les notes retrouvent leur
hauteur originale..
2
1
1. Glissez le doigt sur le long ruban quand les boutons
LONG RIBBON PITCH et FILTER sont éteints.
Glissez un doigt d’un côté à l’autre du ruban. Vous pou-
vez ainsi jouer des notes de la gamme dénie.
Le ruban permet de jouer des gammes une note à la fois
(jeu monophonique). En outre, l’instrument accorde la
priorité aux notes plus aigues.
Astuce:
connexion du RK-100S à un ordinateur via USB) de dénir
la gamme jouée via le ruban.
2.
ogiciel d’édition sonore permet (moyennant la
Les boutons OCTAVE +/- permettent de transposer
la gamme jouée par par d’une octave.
29
Page 30

RK-100S Manuel d’utilisation
Hauteur originale
Contrôler la hauteur
Il existe deux méthodes de contrôle de hauteur.
Astuce:
via le long ruban peuvent être dénies avec le logiciel
d’édition sonore (moyennant la connexion du RK-100S à
un ordinateur via USB).
Contrôler la hauteur du son après le relâchement
des touches
1. Sélectionnez un Program.
La plage et la direction de contrôle de hauteur
2
1
2
3
Pour cee application, choisissez un Program dont le
son n’est pas coupé abruptement quand vous relâchez
les touches du clavier.
Il se pourrait que cee fonction ne produise aucun
résultat dans le cas d’un Program dont le son est
immédiatement coupé après le relâchement des touches
Contrôler la hauteur en gardant la main gauche libre
1
2
3
1. Maintenez le bouton SHIFT enfoncé et appuyez sur
le bouton LONG RIBBON PITCH quand l’instrument
ne produit aucun son.
Le bouton PITCH s’allume.
2. Jouez sur le clavier.
Le son continue d’être produit.
3. Contrôlez la hauteur avec le ruban.
Voir “Contrôler la hauteur du son après le relâchement
des touches” à la page 30.
Si vous avez transposé vers le haut la hauteur du
clavier avec le bouton OCTAVE, il se pourrait que le
son soit inaudible ou dicilement audible selon la
zone du ruban utilisée.
2. Jouez sur le clavier et maintenez enfoncé le bouton
LONG RIBBON PITCH.
Le bouton PITCH s’allume. Le son continue d’être
produit tant que vous maintenez ce bouton enfoncé.
3. Contrôlez la hauteur avec le ruban.
Glissez un doigt d’un côté à l’autre du ruban. Le point
où vous posez le doigt correspond à la hauteur originale;
augmentez la hauteur en glissant le doigt vers la droite
et abaissez la hauteur en glissant le doigt vers la gauche.
Dès que vous retirez le doigt du ruban, les notes retrouvent leur hauteur originale.
4. Relâchez le bouton pour couper le son.
4.
Appuyez à nouveau sur le bouton PITCH pour
désactiver la fonction et couper le son.
Contrôler le ltre
Comme pour le contrôle de la hauteur, l’instrument
propose deux méthodes de contrôle pour le ltre.
Astuce: Le logiciel d’édition sonore permet (moyennant la
connexion du RK-100S à un ordinateur via USB) de dénir les
eets pilotés via le long ruban.L’eet du ltre peut être réglé
via la section long ruban (‘Long Ribbon’) du logiciel d’édition
sonore. Dans la section ‘Virtual Patch’, réglez “Source” sur
“Long Ribbon” et choisissez les paramètres à contrôler avec
“Destination”. Vous pouvez aussi choisir les paramètres à
contrôler avec les assignations ‘Fx Long Ribbon’.
Contrôler le ltre après le relâchement des touches
1
2
1
30
1. Jouez sur le clavier et maintenez enfoncé le bouton
LONG RIBBON FILTER..
Le bouton FILTER s’allume.
Le son continue d’être produit tant que vous maintenez
ce bouton enfoncé.
2. Utilisez le ruban.
Page 31

Sélectionner et essayer un Program
Glissez un doigt d’un côté à l’autre du ruban. Le bord
gauche du ruban correspond au son original; glissez
le doigt vers la droite pour ajouter de la modulation.
Dès que vous retirez le doigt du ruban, la modulation
cesse d’être appliquée au son.
Son original
Remarque: Les changements produits sur les paramètres
d’eet varient selon les réglages.
3. Relâchez le bouton pour couper le son.
Contrôler le ltre en gardant la main gauche libre
1
2
Bien que vous puissiez aussi utiliser l’arpégiateur avec
le Program de Vocoder, vous obtiendrez de meilleurs
résultats avec un Program de synthé. Nous vous
conseillons en outre de choisir un son de maintien
court (s’estompant rapidement).
2.
Appuyez sur le bouton ARP de sorte que le témoin
s’allume.
L’arpégiateur est activé.
Le bouton ARP s’allume et les boutons Favorites A –H
s’allument l’un après l’autre.
3.
Jouez un accord sur le clavier et maintenez les
touches enfoncées.
L’instrument joue un arpège.
Vous pouvez changer la manière dont le motif d’arpège
est joué (voir “Réglages de motif d’arpège” à la page 31).
4.
Appuyez plusieurs fois sur le bouton TAP pour
imprimer le tempo voulu.
Le bouton TAP s’allume en vert et le tempo s’ache
à l’écran.
5. Appuyez sur le bouton ARP de sorte que le témoin
s’éteigne.
Le jeu de l’arpège s’arrête.
3
1. Maintenez le bouton SHIFT enfoncé et appuyez sur
le bouton LONG RIBBON FILTER quand l’instrument
ne produit aucun son.
Le bouton FILTER s’allume.
2. Jouez sur le clavier.
Le son continue d’être produit.
3. Utilisez le ruban.
Voir “Contrôler le ltre après le relâchement des
touches” à la page 30.
Astuce: La direction de l’eet appliqué via le long ruban
peut être dénie avec le logiciel d’édition sonore (moyen-
nant la connexion du RK-100S à un ordinateur via USB).
4.
Appuyez à nouveau sur le bouton FILTER pour
désactiver la fonction et couper le son.
Jouer des arpèges
La fonction arpégiateur génère automatiquement des
arpèges quand vous maintenez un accord sur le clavier.
4
Continuer le jeu de l’arpège après le relâchement des touches (fonction Latch)
Cee fonction dénit le fonctionnement de l’arpégiateur
quand vous relâchez les touches du clavier.
1.
Maintenez enfoncé le bouton ARP jusqu’à ce qu’il
s’allume en vert.
Une fois que le bouton ARP est allumé en vert, la fonction Latch est active: l’arpégiateur continue de jouer
même après que vous ayez relâché les touches du clavier.
Remarque:
pégiateur, le fait de maintenir enfoncé le bouton ARP active
l’arpégiateur et la fonction Latch.
2.
Indépendamment du statut actif/coupé de l’ar-
Appuyez sur le bouton ARP pour désactiver
l’arpégiateur.
La fonction Latch est désactivée en même temps que
l’arpégiateur.
Réglages de motif d’arpège
Cee fonction dénit le type (‘motif’) d’arpège produit
quand l’arpégiateur est actif et que vous jouez un accord
sur le clavier.
En outre, vous pouvez activer et couper individuellement
les notes du motif d’arpège.
2,5
1
3
1. Choisissez un Program de synthétiseur.
1. Maintenez le bouton SHIFT enfoncé et appuyez sur
le bouton ARP.
Le réglage de motif d’arpège
s’ache à l’écran.
Les boutons Favorites A – H
servent à l’activation des pas
31
Page 32

RK-100S Manuel d’utilisation
TYPE: UP
(notes) de l’arpégiateur: seuls les boutons des pas actifs
sont allumés (message d’activation de note).
2.
Choisissez le motif d’arpège avec les boutons OCTAVE
+/- ou le levier SOUND.
UP: Les notes sont jouées l’une à la suite de l’autre, de
la plus basse à la plus aigue.
dn (Down): Les notes sont jouées l’une à la suite de
l’autre, de la plus aigue à la plus basse.
4.
Appuyez sur le bouton SHIFT pour quitter les réglages
de motif d’arpège.
AL.1: L’arpégiateur alterne entre les motifs Up et Down.
(La note la plus aigue et la note la plus grave sont jouées
une seule fois.)
AL.2: L’arpégiateur alterne entre les motifs Up et Down.
(La note la plus aigue et la note la plus grave sont jouées
deux fois: du bas vers le haut du clavier, puis du haut
vers le bas.)
rnd (Random): L’arpégiateur joue les notes de façon
aléatoire.
trG (Trigger): Les notes maintenues sont jouées simultanément au tempo actuel.
Si vous maintenez plus de touches que la polyphonie maximum, l’instrument accorde la priorité aux notes les plus
basses, jusqu’au nombre limite de notes.
3.
Utilisez les boutons Favorites A – H pour désactiver les
pas voulus. Les boutons correspondants s’éteignent
et vous obtenez une pause pour les pas en question
(message de coupure de note).
Fonctions Shift
Les fonctions Shi permeent de régler divers paramètres
du RK-100S. Pour changer un paramètre, maintenez enfoncé
le bouton SHIFT et appuyez sur le bouton correspondant
au paramètre en question.
Pour quier la fonction Shi, appuyez sur le bouton SHIFT.
En outre, si vous n’enfoncez aucun bouton pendant un certain temps, le RK-100S coupe automatiquement la fonction
Shi et retourne en mode de sélection de Program.
Les assignations des Programs aux boutons Favorites
et les paramètres des fonctions Shi sont mémorisés
à la mise hors tension du RK-100S. Si les piles sont
presque plates et que le bouton Favorites A clignote
(voir “Type de piles et autonomie restante” à la page
34), ces réglages ne peuvent pas être mémorisés. Si vous
possédez un adaptateur secteur (disponible en option),
branchez-le à l’instrument.
Courbe de toucher
Cee fonction permet d’adapter la réponse du clavier
(volume et timbre) à votre toucher.
1. Maintenez le bouton SHIFT enfoncé et appuyez sur
le bouton Favorites A.
Le réglage de courbe de toucher
s’ache à l’écran.
2.
Choisissez la courbe de toucher
avec les boutons OCTAVE +/- ou
le levier SOUND.
32
Page 33

Vélocité
MAX
(1) (127)
(127)
Fonctions Shift
3.
Appuyez sur le bouton SHIFT pour quitter la fonction
Shift.
5
4
3
8
7
6
MIN (1)
ppp
Cu.1 Avec cee courbe, il faut enfoncer les touches assez
fort pour produire un eet.
Cu.2, 3 |
Cu.4 Cee courbe est la plus couramment utilisée.
Cu.5 |
Cu.6 Cee courbe permet de produire un eet sans
devoir enfoncer les touches avec force.
Cu.7 Cee courbe produit un eet assez constant et
peu de changement pour un toucher de force
moyenne.
Cu.8 Cee courbe produit un eet assez constant et
peu de changement pour un toucher de force
moyenne (mais est plus plane que la courbe 7).
127
Les courbes 7 et 8 produisent peu de changement pour
un toucher de force moyenne. En revanche, elles produisent un changement marqué en réponse à un toucher
léger et peuvent donc se révéler plus diciles à contrôler. Choisissez donc une courbe adaptée à votre toucher
ainsi qu’à l’eet recherché.
3.
Appuyez sur le bouton SHIFT pour quitter la fonction
Toutes les notes ont la valeur de toucher maximum (127). Cee courbe réplique le fonctionnement des premiers synthés analogiques.
Force
(MIDI Vélocité)
2
1
f
Shift.
Canal MIDI global
Pour que le RK-100S puisse échanger des messages MIDI avec
un dispositif MIDI connecté, vous devez le régler sur le même
canal MIDI global que celui du dispositif MIDI connecté.
1. Maintenez le bouton SHIFT enfoncé et appuyez sur
le bouton Favorites C.
Le numéro du canal MIDI global
apparaît à l’écran.
2. Choisissez le canal MIDI global
avec les boutons OCTAVE +/- ou
le levier SOUND.
Appuyez sur le bouton SHIFT pour quitter la fonction
3.
Shift.
4. Réglez le canal MIDI sur le dispositif MIDI connecté.
Remarque: Pour savoir comment régler le canal MIDI sur
le dispositif MIDI externe, consultez son mode d’emploi.
Canal MIDI du long ruban
Cee fonction dénit le canal MIDI utilisé quand vous
utilisez le long ruban pour modier le jeu.
Eectuez ce réglage quand vous utilisez un Program dont
le mode de génération de son est réglé sur ‘Multi’ (‘Voice
Mode’ sur ‘Multi’) ou quand vous pilotez le son du dispositif MIDI externe branché à la prise MIDI OUT avec le long
ruban au lieu du clavier.
Quand vous changez ce réglage, le long ruban du
RK-100S ne permet plus de produire les sons de
l’instrument.
1. Maintenez le bouton SHIFT enfoncé et appuyez sur
le bouton Favorites D.
Le numéro du canal MIDI du long
ruban apparaît à l’écran.
Toucher du long ruban
Cee fonction dénit le volume des notes produites quand
vous jouez des gammes via le long ruban.
1. Maintenez le bouton SHIFT enfoncé et appuyez sur
le bouton Favorites B.
Le réglage de dynamique (toucher)
s’ache à l’écran.
2. Choisissez le réglage de
dynamique voulu avec les
boutons OCTAVE +/- ou le
levier SOUND.
La plage de dynamique s’étend de 1 à 127.
Si “oFF” est sélectionné, l’instrument ne produit aucun
son quand vous utilisez le long ruban.
2.
Choisissez le canal MIDI avec les
boutons OCTAVE +/- ou le levier
SOUND.
GLb: Le canal MIDI du long ruban correspond au canal
MIDI global (voir “Canal MIDI global”) .
r.01...r.16: 1ch..16ch
Astuce:
un dispositif MIDI externe branché à la prise MIDI OUT,
choisissez le même canal MIDI que celui déni sur le dispositif en question.
3.
Quand vous utilisez le long ruban pour piloter
Appuyez sur le bouton SHIFT pour quitter la fonction
Shift.
Remarque: Quand l’arpégiateur est actif, les messages de
note sont transmis à la prise MIDI OUT via le canal MIDI
global.
33
Page 34

RK-100S Manuel d’utilisation
Transposition
Cee fonction permet de décaler la hauteur de l’instrument
par pas de demi-ton (100 cents). Utilisez cee fonction pour
jouer un morceau dans une tonalité inhabituelle; vous
pouvez transposer la hauteur du clavier sur une plage
d’une octave vers le haut ou vers le bas.
1. Maintenez le bouton SHIFT enfoncé et appuyez sur
le bouton Favorites E.
Le réglage de transposition s’af-
che à l’écran.
2.
Choisissez le réglage de
transposition voulu avec les
boutons OCTAVE +/- ou le levier
SOUND.
La plage de transposition s’étend d’une octave vers le
haut ou vers le bas (-12 à 12).
3.
Appuyez sur le bouton SHIFT pour quitter la fonction
Shift.
Fonction d’économie d’énergie
Quand vous alimentez le RK-100S sur piles, la fonction
d’économie d’énergie coupe automatiquement l’achage
de l’écran et les témoins en fonction de l’autonomie restante
des piles.
Remarque: La fonction d’économie d’énergie est désactivée à la sortie d’usine.
1. Maintenez le bouton SHIFT enfoncé et appuyez sur
le bouton Favorites F.
Le réglage de la fonction d'économie d'énergie s'ache à l'écran.
2.
Choisissez le réglage voulu avec
les boutons OCTAVE +/- ou le
levier SOUND.
on: fonction active
oFF: fonction coupée
3.
Appuyez sur le bouton SHIFT pour quitter la fonction
Shift.
Type de piles et autonomie restante
Cee fonction permet de spécier le type de piles utilisées.
Elle permet en outre de vérier l’autonomie restante des
piles dans l’instrument.
Veillez à ce que le réglage du type de piles corresponde
bien aux piles dans l’instrument, faute de quoi
l’indication d’autonomie restante ne sera pas able.
1. Maintenez le bouton SHIFT enfoncé et appuyez sur
le bouton Favorites G.
Le réglage de type de piles
s'affiche à l'écran.
Les huit boutons Favorites (A – H) servent alors d’indi-
cateurs d’autonomie restante des piles. Le nombre de
boutons allumés indique l’autonomie restante des
piles.
Piles neuves: Tous les boutons sont allumés
Piles presque plates: Seul le bouton A est allumé
Changement des piles nécessaire: Le bouton A clignote
Quand vous branchez l’adaptateur secteur, tous les
boutons s’éteignent.
2. Choisissez le type de piles avec les boutons OCTAVE
+/- ou le levier SOUND.
AL.: piles alcalines
ni.H: piles au nickel-hydrure métallique
3.
Appuyez sur le bouton SHIFT pour quitter la fonction
Shift.
Fonction de mise hors tension automatique
Le RK-100S est doté d’une fonction de mise hors tension
automatique. Cee fonction met automatiquement le RK-
100S hors tension (l’instrument consomme alors très peu
d’énergie) si aucune manipulation n’est eectuée pendant
environ 4 heures.
Une fois que le RK-100S a été mis hors tension automati-
quement par cee fonction, les touches, rubans et boutons
de l’instrument ne permeent pas de le remere sous
tension. Meez-le à nouveau sous tension en suivant la
procédure habituelle.
Remarque:
est activée à la sortie d’usine.
1. Maintenez le bouton SHIFT enfoncé et appuyez sur
2.
3.
La fonction de mise hors tension automatique
le bouton Favorites H.
Le réglage de la fonction de
mise hors tension automatique
s'affiche à l'écran.
Choisissez le réglage voulu avec
les boutons OCTAVE +/- ou le
levier SOUND.
4hn: fonction active
diS: fonction coupée
Appuyez sur le bouton SHIFT pour quitter la fonction
Shift.
34
Page 35

MIDI
Clavier MIDI
RK-100S
Prise MIDI OUT
Générateur de sons MIDI
Patchbay MIDI
Ordinateur
MIDI
Utiliser le RK-100S avec d’autres dispositifs MIDI
MIDI est l’acronyme anglais de «Musical Instrument
Digital Interface» (interface numérique pour instruments
de musique) et désigne une norme utilisée par les fabricants
du monde entier pour l’échange de données musicales
entre instruments de musique électronique et ordinateurs.
La connexion de plusieurs dispositifs MIDI via des câbles MIDI
permet l’échange de messages MIDI (données de jeu) entre les
appareils, même si ceux-ci sont de fabricants diérents.
Le RK-100S vous permet d’assigner des commandes de
contrôle aux principaux paramètres forgeant le son et de
contrôler ces paramètres sur un séquenceur MIDI externe
tout en jouant le générateur de sons du RK-100S.
Vous pouvez en outre utiliser les rubans et boutons de
l’instrument pour transmere les commandes de contrôle
assignées à un dispositif MIDI connecté.
Brancher un dispositif MIDI/ordinateur
Piloter un générateur de sons MIDI externe
avec le RK-100S
Si vous voulez déclencher les sons d’un générateur de
sons MIDI externe via le clavier, les fonctions de jeu et
l’arpégiateur du RK-100S, reliez la prise MIDI OUT du
RK-100S à la prise MIDI IN du générateur de sons MIDI
externe avec un câble MIDI.
Brancher le RK-100S à un ordinateur via USB
Reliez le port USB du RK-100S et de votre ordinateur avec
un câble USB.
Remarque: Pour pouvoir utiliser la fonctionnalité USB de
l’instrument, vous devez au préalable installer le pilote
USB-MIDI de Korg sur votre ordinateur. Téléchargez le
pilote «Korg USB-MIDI driver» sur le site internet de Korg
et installez-le en suivant les instructions de la documentation fournie.
Clavier MIDI
Prise MIDI IN
RK-100S
Prise MIDI IN
MIDI OUT
MIDI OUT
USB
Câble USB
Prise MIDI OUT
RK-100S
Prise MIDI IN
Piloter plusieurs générateurs de sons MIDI
externes avec le RK-100S
Vous pouvez aussi piloter simultanément plusieurs dispositifs
MIDI en les reliant à un ‘patchbay’ (baie de connexion) MIDI.
Réglages MIDI
Réglage du canal MIDI
Pour que le RK-100S puisse échanger des messages MIDI
avec un dispositif MIDI connecté, vous devez le régler sur
le même canal MIDI que celui du dispositif MIDI connecté.
Lisez “Canal MIDI grobal” à la page 33 et spéciez le canal
MIDI.
Enregistrer les messages MIDI de l’arpégiateur
du RK-100S avec un séquenceur MIDI externe
ou un ordinateur
Branchements et réglages
Reliez la prise MIDI OUT du RK-100S à la prise MIDI IN
du séquenceur MIDI externe.
Enregistrer les données de note générées par
l’arpégiateur sur un séquenceur MIDI externe
Activez l’arpégiateur du RK-100S (le bouton ARP s’allume),
jouez sur le clavier et enregistrez les données de note sur
votre séquenceur MIDI externe.
35
Page 36

RK-100S Manuel d’utilisation
Synchroniser l’arpégiateur
Pour en savoir plus sur les paramètres de synchronisation
de votre dispositif MIDI externe, consultez son mode
d’emploi.
Pour utiliser le RK-100S comme instrument maître et piloter
un instrument (‘esclave’) MIDI externe, reliez la prise MIDI
OUT du RK-100S à la prise MIDI IN du dispositif MIDI
externe.
Réglez le dispositif MIDI externe pour permere la
réception de messages d’horloge MIDI. Le dispositif MIDI
externe (comme par exemple un séquenceur ou une boîte
à rythmes) s’aligne sur le tempo imprimé avec le bouton
TAP du RK-100S.
Dépannage
Si l’instrument semble ne pas fonctionner correctement,
vériez les points suivants. Si les suggestions ne permeent
pas de résoudre le problème, adressez-vous à votre
revendeur.
Impossible de mettre l’instrument sous tension
•
L'adaptateur secteur est-il branché à une prise de
courant? (Voir “Connexions” à la page 25.)
• Les piles ne sont-elles pas plates?
Maintenez enfoncé le bouton SHIFT et appuyez sur le
bouton ** pour vérier l’autonomie restante des piles
(voir “Type de piles et autonomie restante” à la page 34).
•
Les piles sont-elles insérées correctement? (Voir
“Alimentation sur piles” à la page 26.)
L’arpégiateur ne démarre pas
•
Avez-vous activé l’arpégiateur (auquel cas le bouton
ARP est allumé)?
L’action du long ruban ne produit aucun eet sur le
son du RK-100S
•
Avez-vous désactivé (“oFF”) la dynamique du long
ruban avec les fonctions Shi?
Choisissez tout réglage autre que “oFF”. (Voir “Toucher
du long ruban” à la page 33.)
• Avez-vous changé le canal MIDI du long ruban avec les
fonctions Shi?
Choisissez le canal MIDI permeant la production de
son. (Voir “Canal MIDI du long ruban” à la page 33.)
Le générateur de sons MIDI externe relié avec un
câble MIDI ne produit aucun son
•
Le câble MIDI est-il correctement connecté? (Voir
“Connexions” à la page 25.)
• Le dispositif MIDI externe et le RK-100S sont-ils réglés
sur le même canal MIDI? (Voir “Canal MIDI global” à
la page 33.)
L’instrument se met automatiquement hors tension
• N’avez-vous pas activé la fonction de mise hors tension
automatique? (Voir “Fonction de mise hors tension
automatique” à la page 34.)
Pas de son
•
Avez-vous correctement branché vos moniteurs actifs ou
votre casque? (Voir “Connexions” à la page 25.)
•
Le système d’écoute connecté est-il alimenté et son
réglage de volume est-il susant?
La commande VOLUME est-elle sur un niveau susant
•
pour que le son soit audible?
L’utilisation du bouton OCTAVE UP ou DOWN ne
produit aucun résultat
• Avez-vous activé une fonction Shi?
Appuyez sur le bouton SHIFT pour quier la fonction
Shi.
L’instrument ne reçoit pas le signal externe.
• Le micro que vous comptez utiliser comme modulateur
avec le Program de Vocoder est-il correctement branché
à la prise INPUT?
• Le réglage du sélecteur d’entrée est-il correct?
36
Page 37

Fiche technique
Fiche technique
Clavier 37 touches (type ‘SlimKey’, sensible au toucher, sans fonction Aertouch)
Système de génération de sons MMT (‘Multiple Modeling Technology’, c.-à-d. à plusieurs modélisations)
Programs: Peuvent être édités avec le logiciel d’édition sonore moyennant la connexion à un ordinateur.
Nombre de Timbres 2 Timbres maximum (en modes Layer, Split ou Multi)
Polyphonie maximum 8 voix (4 voix quand la fonction Vocoder est active)
Synthé 2 oscillateurs + générateurs de bruitOscillator 1
Oscillateur 1
Formes d’onde SAW, PULSE, TRIANGLE, SINE, FORMANT, NOISE, PCM/DWGS, AUDIO IN
Modulation WAVEFORM, CROSS, UNISON, VPM
Oscillateur 2
Formes d’onde SAW, PULSE, TRIANGLE, SINE
Modulation RING, SYNC, RING+SYNC
Synthèse Waveshaping
Types WS DRIVE , DECIMATOR, HARDCLIP, OCT SAW, MULTI TRI, MULTI SIN, SUB OSC SAW,
SUB OSC SQU, SUB OSC TRI, SUB OSC SIN, LEVEL BOOST
Filtres multimodes
Filtre 1 -24 dB/oct LPF– -12 dB/oct LPF–HPF–BPF–Thru
Filtre 2 LPF, HPF, BPF
Vocoder Vocoder à 16 bandes avec niveau et panoramique réglables pour chaque bande, fonction
Formant Shi et fonction Formant Hold
Eets
Timbre Égaliseur 2 bandes
Master Eets maîtres (17 algorithmes d’eets)
Arpégiateur UP, DOWN, ALT1/2, Random, Trigger (6 types), fonction Step Arpeggiator
Programs 200 Programs
Entrée/sortie
Entrée
Prise INPUT
Prises Type minack mono
Sélecteur d’entrée MIC1: Entrée micro [de faible gain] (non alimentée via plug-in)
MIC2: Entrée micro [de gain élevé] (non alimentée via plug-in)
LINE: Entrée ligne (mono [canal G])
Sortie
Prise de sortie
Prises Type jack stéréo de 6,35mm
Niveau de sortie maximum 25mW + 25mW @ charge de 33 ohms
MIDI OUT
Port USB Type B
Écran À diodes à 7 segments, 3 caractères
Alimentation Six piles AA (alcalines ou au nickel-hydrure métallique) ou Adaptateur secteur (DC9V
)
Autonomie des piles Environ 8 heures (alcalines)
Dimensions (L x P x H) 830 x 263 x 68 mm
Poids 3.4 kg (pile comprise)
Accessoires fournis Six piles AA, sangle, Manuel d’utilisation, Étui souple
Options Adaptateur secteur (DC9V
* Les caractéristiques et l’aspect du produit sont susceptibles d’être modiés sans avis préalable en vue d’une amélioration.
)
37
Page 38

Inhaltsübersicht
Bedienungsanleitung
Die wichtigsten Funktionen ....................40
Vorder- und Unterseite ............................40
Vorderseite ............................................................... 40
Unterseite ..................................................................42
Den Gurt befestigen ................................................ 42
Vorbereitungen ........................................43
Anschlüsse ................................................................. 43
Einschalten ................................................................44
Demo-Wiedergabe ...................................45
Programme auswählen und spielen .......45
Ein Programm auswählen ....................................... 45
Modizieren von Sounds ........................................ 46
Spielen von Arpeggien ............................................ 49
Shift-Funktionen ......................................50
Anschlagkurve .......................................................... 51
Velocity des langen Ribbon-Controllers .............. 51
Globaler MIDI-Kanal ................................................. 51
MIDI-Kanal des langen Ribbon-Controllers .........51
Transposition .............................................................52
Batterieschonfunktion ............................................52
Batterietyp und Ladezustand ................................ 52
Energiesparfunktion ................................................ 53
MIDI ...........................................................53
Verwendung des RK-100S mit anderen
MIDI-Geräten (MIDI) .................................................53
Fehlersuche ............................................... 54
Technische Daten ......................................55
Appendices ...............................................74
Voice Name List .........................................................75
MIDI Implementaton Chart .................................... 77
Page 39

Vorsichtsmaßnahmen
Vorsichtsmaßnahmen
Aufstellungsort
Vermeiden Sie das Aufstellen des Geräts an Orten, an denen
• es direkter Sonneneinstrahlung ausgesetzt ist;
hohe Feutigkeit oder Extremtemperaturen aureten
•
können;
Staub oder Smutz in großen Mengen vorhanden sind;
•
• das Gerät Ersüerungen ausgesetzt sein kann.
• in der Nähe eines Magnetfeldes.
Stromversorgung
Sließen Sie das optionale Netzteil nur an eine geeignete
Stedose an. Verbinden Sie es niemals mit einer Stedose
einer anderen Spannung.
Störeinüsse auf andere
Elektrogeräte
Dieser kann bei in der Nähe aufgestellten Rundfunkempfängern oder Fernsehgeräten Empfangsstörungen
hervorrufen. Betreiben Sie sole Geräte nur in einem
geeigneten Abstand von diesem Erzeugnis.
Hinweis zur Entsorgung (Nur EU)
Wenn Sie das Symbol mit der „durgekreuzten
Mülltonne“ auf Ihrem Produkt, der dazugehörigen
Bedienungsanleitung, der Baerie oder dem
Baeriefa sehen, müssen Sie das Produkt in der
vorgesriebenen Art und Weise entsorgen. Dies
bedeutet, dass dieses Produkt mit elektrisen und
elektronisen Komponenten nit mit dem normalen
Hausmüll entsorgt werden darf. Für Produkte dieser
Art existiert ein separates, gesetzli festgelegtes
Entsorgungssystem. Gebraute elektrise und elektronise
Geräte müssen separat entsorgt werden, um ein
umweltgeretes Recycling sierzustellen. Diese Produkte
müssen bei benannten Sammelstellen abgegeben werden. Die
Entsorgung ist für den Endverbrauer kostenfrei! Bie
erkundigen sie si bei ihrer zuständigen Behörde, wo sie diese
Produkte zur fagereten Entsorgung abgeben können.
Falls ihr Produkt mit Baerien oder Akkumulatoren ausgerüstet
ist, müssen sie diese vor Abgabe des Produktes entfernen und
separat entsorgen (siehe oben). Die Abgabe dieses Produktes
bei einer zuständigen Stelle hil ihnen, dass das Produkt
umweltgeret entsorgt wird. Damit leisten sie persönli
einen nit unerheblien Beitrag zum Sutz der Umwelt
und der menslien Gesundheit vor möglien negativen
Eekten dur unsagemäße Entsorgung von Müll. Baerien
oder Akkus, die Sadstoe enthalten, sind au mit dem
Symbol einer durgekreuzten Mülltonne gekennzeinet. In
der Nähe zum Mülltonnensymbol bendet si die emise
Bezeinung des Sadstoes.
Cd oder NiCd steht für Cadmium, Pb für Blei und Hg für
Quesilber
.
Bedienung
Vermeiden Sie bei der Bedienung von Saltern und
Reglern unangemessenen Kraaufwand.
Reinigung
Bei auretender Versmutzung können Sie das
Gehäuse mit einem troenen, sauberen Tu abwisen.
Verwenden Sie keinerlei Flüssigreiniger wie beispielsweise
Reinigungsbenzin, Verdünnungs- oder Spülmiel.
Verwenden Sie niemals brennbare Reiniger.
Bedienungsanleitung
Bewahren Sie diese Bedienungsanleitung gut auf, falls Sie
sie später no einmal benötigen.
Flüssigkeiten und Fremdkörper
Stellen Sie niemals Behältnisse mit Flüssigkeiten in der
Nähe des Geräts auf. Wenn Flüssigkeit in das Gerät gelangt,
können Besädigung des Geräts, Feuer oder ein elektriser Slag die Folge sein.
Beaten Sie, daß keinerlei Fremdkörper in das Gerät
gelangen. Sollte ein Fremdkörper in das Gerät gelangt
sein, so trennen Sie es sofort vom Netz. Wenden Sie si
dann an Ihren korg-Fahändler.
Vorsichtsmaßnahmen beim Umgang
mit dem RK-100S
Wie bei handelsüblien E-Gitarren besteht der Korpus
dieses Instruments aus laiertem Holz.
• Wisen Sie na dem Gebrau den Korpus mit einem
sauberen, weien und troenen Tu ab. Verwenden
Sie dabei ein handelsüblies Poliermiel für Gitarren.
Setzen Sie dieses Instrument weder plötzlien
•
Temperaturweseln aus, no extrem hohen oder tiefen
Temperaturen. Falls das Instrument aus der Kälte direkt
in einen geheizten Raum gebrat wird, kann dies Risse
in der Laierung verursaen. Es ist zudem nit ratsam,
das Instrument im Koerraum eines Autos zu lassen,
wo es beispielsweise im Sommer hohen Temperaturen
ausgesetzt wird.
•
Die Laierung ist empndli – bereits leite Stöße
können zu einem Abspliern oder zu Rissen im La
führen. Gehen Sie beim Spielen und Transportieren stets
sorgsam mit dem Instrument um und vermeiden Sie Stöße.
*
Alle Produkt- und Firmennamen sind Warenzeien oder
eingetragene Warenzeien der betreenden Eigentümer.
39
Page 40

RK-100S Bedienungsanleitung
Vielen Dank, dass Sie si für einen Korg RK-100S
KEYTAR entsieden haben. Bie lesen Sie diese
Anleitung sorgsam dur, um das Beste aus Ihrem
neuen Instrument herausholen zu können.
Die wichtigsten Funktionen
Der RK-100S ist ein stylishes Keyboard zum Umhängen.
Sein interner Synthesizer und seine klassisen Pianooder Orgelsounds bieten Ihnen eine große Klangvielfalt,
die beiden Ribbon-Controller erlauben Ihnen, Ihr Spiel
ausdrusreier zu gestalten.
Dank der optionalen Versorgung dur Baerien können
Sie das Instrument au netzunabhängig nutzen.
200 Programme durch MMT analog modeling
Die MMT Klangerzeugung bietet Ihnen 200 Programme
mit Sounds für die untersiedlisten Musikstile.
Dafür sorgen diverse Oszillatoralgorithmen inklusive
den für analoge Synthesizer typisen Sägezahn- und
Retewellen sowie formante Wellenformen, Rausen
und PCM/DWGS Wellenformen.
Equalizer und Eekte - damit geben Sie
Ihren Sounds den letzten Schli
Jedes Timbre kann über einen Zweiband-Equalizer
klangli bearbeitet werden.
Zudem stehen Ihnen für jedes Programm zwei MasterEekte zur Verfügung, mit denen Sie Ihren Sounds den
letzten Sli verleihen können. Für jeden Eekt stehen
Ihnen siebzehn Eekypen zur Auswahl.
Sound Editor-Software
Wenn Sie den RK-100S mit einem USB-Kabel mit Ihrem
Computer verbinden, können Sie mit Ihrer Sound Editor
Soware Parameter wie Sounds und Arpeggiopaern des
RK-100S ändern.
Sie können den Sound Editor kostenlos von der Korg
Website herunterladen.
hp://www.korg.com/
Vorder- und Unterseite
Vorderseite
Die Ribbon-Controller
Mit dem langen und dem kurzen Ribbon-Controller
können Sie Tonhöhe, Filter und andere Parameter steuern.
Der lange Ribbon-Controller dient zum Steuern der
Tonhöhe und der Klanglter. Mit ihm können au
Tonleitern und von der Sound Editor Soware festgelegte
Notenbereie gespielt werden.
Bedienen Sie den Value nur mit der Spitze eines
Fingers. Verwenden Sie keine spitzen oder harten
Gegenstände und tragen Sie keine Handsuhe.
Arpeggiator
Der interne Arpeggiator kann automatis ein Arpeggio
generieren, wenn Sie einen Akkord spielen.
Sie können unter ses Arpeggioarten auswählen. Sie
können zudem in bis zu at Srien einzelne Noten
ein- oder aussalten und dadur auf vielfältige Weise
den Rhythmus des Arpeggios variieren.
Vocoder
Der RK-100S verfügt über eine Vocoder-Funktion, die Ihnen
erlaubt, mit Ihrer Stimme über ein Mikrofon den Klang des
Oszillators zu ändern. So können Sie gewissermaßen Ihren
Synthie spreen lassen.
Virtuelles Patching
Controller wie Hüllkurvengenerator, LFO, Tastaturskalierung
und die Ribbons können virtuell mit Parametern wie Pit
oder Cuto verbinden werden. Dadur können Sie diese
Parameter modulieren, was Ihnen eine no exiblere
Soundgestaltung ermöglit.
1. OCTAVE +/- Tasten
Zum Versieben der der Tastatur und dem langen RibbonController zugewiesenen Tonumfang in Oktavensrien
na oben oder unten über einen Berei von 3 Oktaven.
Mit diesen Tasten können Sie au die Einstellungen
Tipp:
der Shi-Funktionen festlegen.
2. Kurzer Ribbon-Controller
Zur Steuerung von Tonhöhe und Modulation der Sounds.
Drüen Sie die SHORT RIBBON-Taste, um zwisen
Tonhöhe und Modulation umzusalten.
3. LONG RIBBON
PITCH-Taste
Dur Drüen dieser Taste steuern Sie die Tonhöhe des
langen Ribbon-Controllers.
FILTER-Taste
Dur Drüen dieser Taste steuern Sie den Filter des
langen Ribbon-Controllers.
4. Display
Hier werden die Nummer des aktuell gewählten
Programms sowie die Einstellungen der Shi-Funktionen
angezeigt. Zusätzli wird die mit den OCTAVE +/- Tasten
festgelegte Oktave angezeigt (siehe S. 47 „Umsalten der
Oktave mit den OCTAVE-Tasten“).
5. Langer Ribbon-Controller
Zum Spielen von Tonleitern (mono) und zur Steuerung
von Tonhöhe und Filter der Sounds.
Dur Drüen der LONG RIBBON PITCH und FILTERTasten wählen Sie die entspreenden Parameter aus.
40
Page 41

Vorder- und Unterseite
6
13
4
3
1
2
5
7
8
9
10
11
12
6. Lautstärkeregler
Regelt die Lautstärke der Ausgangsbuse.
7. SOUND-Hebel
Zur Programmauswahl. Indem Sie den Hebel in Ritung +
oder - bewegen, können Sie zum nästen oder vorherigen
Programm umsalten.
Tipp: Der SOUND-Hebel können Sie au die Einstellungen der Shi-Funktionen festlegen.
8. TAP-Taste
Zur Einstellung des Tempos des Arpeggiators, LFOs oder
Delay-Eekts.
Das Tempo wird dur mehrmaliges rhythmises Drüen
der Taste bestimmt. Die LED blinkt synron zum Tempo.
Wenn Sie die SHIFT-Taste gedrüt halten und diese Taste
drüen, starten Sie die Wiedergabe des Demosongs (siehe
S. 45 „Demo-Wiedergabe“).
9. ARP-Taste
Zum Ein- und Aussalten des Arpeggiators (siehe S.
49„Spielen von Arpeggien“).
Wenn Sie gleizeitig die SHIFT-Taste gedrüt halten,
können Sie mit dieser Taste die Einstellungen des
Arpeggiators ändern.
10. SHORT RIBBON-Taste
Zur Auswahl des Parameters, der vom kurzen Ribbon-
Controller gesteuert wird.
Wenn die Taste rot leutet, kann die Tonhöhe des Sounds
gesteuert werden.
Wenn die Taste grün leutet, kann die Modulation des
Sounds gesteuert werden.
Wenn Sie die SHIFT-Taste gedrüt halten und die
SHORT RIBBON-Taste drüen, wird das an der INPUTBuse eingehende Audiosignal unverändert an die
Ausgangsbuse übertragen.
11. SHIFT-Taste
Halten Sie diese Taste gedrüt und drüen Sie die
entspreende Taste, um den Demosong wiederzugeben
oder Einstellungen der Shi-Funktionen vorzunehmen.
12. Favoritentasten A - H
Sie können diesen Tasten Ihre Lieblingsprogramme
zuweisen. Dur Drüen der entspreenden Taste kann
das jeweilige Programm snell wieder aufgerufen werden.
Siehe S.45 „Favoritenfunktion“
Wenn Sie die SHIFT-Taste gedrüt halten und eine der
Favoritentasten (A – H) drüen, können Sie eine ShiFunktion eingeben und entspreende Einstellungen
verändern.
13. Ausgangsbuchse [Stereoklinke]
Zum Ansluss von Aktivmonitoren, Hi-Fi-Verstärkern,
Mispulten oder Kopörern.
41
Page 42

RK-100S Bedienungsanleitung
1
65 4
2
3
Unterseite
1. MIDI OUT Anschluss
Dieser Ansluss überträgt MIDI-Daten an ein an den RK100S angeslossenes externes MIDI-Gerät.
2. INPUT-Buchse
Zum Ansluss ein Headset (Mono-Mikrofon, ohne Phantomspeisung) oder anderen Audiogeräten.
Falls Sie hier ein Headset angeslossen haben, können
Sie über das Mikrofon den Modulator eines Vocoder-
Programms steuern.
Falls ein Audiogerät angeslossen ist, dient diese Buse
als AUX IN-Buse. Die Audiosignale des angeslossenen
Geräts liegen dann am Ausgang des RK-100S an.
Siehe S. 43 „Ansluss eines Audioplayers“
3. Eingangswahlschalte
Hiermit passen Sie den Eingang an das an die INPUT-
Buse angeslossene Gerät an.
MIC1 oder MIC2: Beim Ansluss eines Mikrofons
LINE: Beim Ansluss eines Audiogeräts
Aten Sie darauf, dass dieser Wahlsalter vor dem
Ansluss eines Audiogeräts an die INPUT-Buse auf
LINE steht. Andernfalls kann das angeslossene Gerät
besädigt werden.
Den Gurt befestigen
Befestigen Sie den Gurt des RK-100S wie im Folgenden
besrieben.
1.
Befestigen Sie den Gurt an den beiden Gurtstiften
wie in der Abbildung illustriert.
4. Netzschalter
Hiermit salten Sie das Gerät ein und aus.
5. DC 9V-Anschluss
Zum Ansluss des AC-Netzteils (Separat erhältli).
Verbinden Sie das Netzteil immer zuerst mit dem RK-100S
und dana mit einer Stedose.
6. USB-Anschluss
Zum Ansluss des RK-100S an einen Computer, damit Sie
mit der Sound Editor Soware Parameter wie Sound und
Arpeggiomuster des RK-100S editieren können.
Hinweis: Um den USB-Ansluss zu verwenden, müssen
Sie in Ihrem Computer den Korg USB-MIDI Treiber installieren. Sie können diesen als „Korg USB-MIDI driver“ auf
der Korg Website herunterladen und gemäß der beiliegenden Besreibung installieren.
42
Überprüfen Sie ansließend, ob der Gurt ritig
festsitzt.
Lösen Sie niemals die Montagesrauben der
Gurtstie.
Um ein unbeabsitigtes Lösen des Gurtes zu
verhindern, empfehlen wir die Verwendung im
Fahandel erhältlier Gurtsierungen für Gitarren.
Page 43

Vorbereitungen
Vorbereitungen
Anschlüsse
Die Abbildung unten zeigt ein typises Beispiel der Anslüsse des RK-100S. Sließen Sie Ihre Geräte Ihren Bedürfnissen
entspreend an.
Sließen Sie alle Peripheriegeräte bei ausgesaltetem Instrument an. Ansonsten kann es zu Fehlfunktionen oder
Säden an Lautspreer oder Verstärkern kommen.
INPUT
Mono-Klinke
INPUT
Mono-Klinke
INPUT
Mono-Klinke
Monitor, Verstärker etc.
Kopfhörer
Stereo-Klinke
Mono-Klinke
Für Stereo-Ausgang
Für Mono-Ausgang
(Nur linker Kanal)
Bei Verwendung eines
Kopfhörers
Schließen Sie Ihren Monitoramp oder Ihr
Mischpult an die Ausgangsbuchse an.
Verbinden Sie die Ausgangsbuse des RK-100s mit den
Eingängen ihres Mispults oder Ihres Aktivmonitors.
Hinweis: Wir empfehlen die Verwendung eines Stereoka-
bels, um alle klanglien Vorzüge des RK-100S zu genießen.
Bei Verwendung eines Kabels mit Mono-Klinken wird nur
der Klang des linken Kanals wiedergegeben.
Anschluss eines Mikrofons
Um den RK-100S als Vocoder zu nutzen, sließen Sie ein
Headset (ohne Phantomspeisung) an die INPUT-Buse
an. Nun können Ihre Stimme als Modulationssignal nutzen
(siehe S. 46 „Vocoderprogramme spielen“).
Hinweis: Die INPUT-Buse ist mono.
Verwenden Sie keine Gewalt beim Ansluss und
Entfernen eines Mikrofons.
Stellen Sie beim Ansluss eines Mikrofons den
geeigneten Mikrofonausgangspegel ein.
Ausgangsbuchse
MIDI IN
Stereo-Klinke
USB-Kabel
MIDI-Kabel
AC-Netzteil
(separat erhältlich)
Externe Klangerzeugung
Headset
Digitaler Audioplayer etc.
Computer
Anschluss eines Audioplayers
Die INPUT-Buse des RK-100S dient au als AUX INBuse.
1. Stellen Sie hierzu den Eingangswahlschalter (an der
Unterseite) auf LINE.
Aten Sie darauf, dass dieser Wahlsalter vor dem
Ansluss eines Audiogeräts an die INPUT-Buse
auf LINE steht. Andernfalls kann das angeslossene
Gerät besädigt werden.
2.
Schließen Sie das Audiogerät an die INPUT-Buchse an.
3. Halten Sie die SHIFT-Taste gedrückt und drücken Sie
die SHORT RIBBON-Taste.
DER RK-100S weselt in den Audio In Through-Modus,
d. h. das an der INPUT-Buse eingehende Signal wird
direkt zur Ausgangsbuse übertragen.
Liegt an der INPUT-Buse ein Signal an, leutet die
SHIFT-Taste. Ist das Signal zu ho (Übersteuerung),
leutet die Taste rot.
43
Page 44

RK-100S Bedienungsanleitung
Hinweis:
tibel, das an der Ausgangsbuse anliegende Audiosignal
hingegen ist mono.
4.
Die INPUT Buse ist mit Stereosteern kompa-
Regeln Sie die Lautstärke am angeschlossenen Gerät,
bis die SHIFT-Taste nicht mehr rot leuchtet.
Anschluss eines MIDI-Geräts oder
Computers an den MIDI OUT-Anschluss oder den USB-Anschluss.
Wenn Sie den MIDI OUT-Ansluss des RK-100S mit dem
MIDI IN-Ansluss eines externen MIDI-Geräts verbinden,
können Sie dieses über Tastatur und Controller des RK-
100S steuern.
Falls Sie den RK-100S über USB an einen Computer
angeslossen haben, können Sie über Sound Editor
Soware Parameter wie Sound und Arpeggiomuster
des RK-100S steuern oder beispielsweise mit Soware-
Sequencern die Klangerzeugung des RK-100S triggern.
Einschalten
Der RK-100S kann mit einem AC-Netzteil oder mit Baerien
betrieben werden.
Um bei Liveaurien Kabelsalat zu vermeiden, raten wir
zur Verwendung von Baerien.
Vor dem Einschalten
Aten Sie darauf, dass der Netzsalter ausgesaltet
ist, bevor Sie das Netzteil ansließen.
Hinweise zur Ladezustandsanzeige
Halten Sie die SHIFT-Taste gedrüt und drüen Sie die
Taste Favoritentaste G, um die verbleibende Baerieladung
über die at Favoritentasten (A-H) als Pegelanzeige zu
sehen. Die Zahl der leutenden Tasten kann je na
Baeriekapazität geringer ausfallen.
Zusätzli blinkt bei sinkender
Baeriekapazität der Punkt rets im
Display. Wenn Sie das Gerät weiterhin
verwenden, wird das Blinken immer
sneller.
Falls Sie in diesem Fall das Gerät weiterverwenden, beginnt
die Anzeige zu blinken. Wir raten Ihnen, die Baerien
snellstmögli zu ersetzen oder das AC-Netzteil
anzusließen.
Entfernen Sie leere Baerien umgehend aus dem
RK-100S. Verbleiben leere Baerien im Gerät, kann
dies zu Fehlfunktionen führen (dur Auslaufen des
Baerie-Elektrolyten). Wir raten Ihnen, bei längerer
Nitverwendung des RK-100S ebenfalls die Baerien
zu entfernen.
Anschluss des AC-Netzteils
Verwenden Sie nur das spezizierte AC-Netzteil
(Separat erhältli). Die Verwendung anderer Netzteile
kann zu Fehlfunktionen führen.
1.
Stellen Sie sicher, dass der RK-100S ausgeschaltet ist.
2.
Schließen Sie das AC-Netzteil (Separat erhältlich) an
der DC9V-Buchse auf der Unterseite an.
Siehe S. 43 „Anslüsse“
Batteriebetrieb
1.
Önen Sie den Deckel des Batteriefachs auf der
Rückseite des RK-100S.
2.
Legen Sie sechs AA Alkalibatterien oder NickelMetallhydrid Akkus ein (im Fachhandel erhältlich).
Aten Sie auf die ritige Polung der Baerien.
3. Schließen Sie den Deckel des Batteriefachs.
4.
Um möglichst genaue Angaben über die
verbleibende Batterieladung zu haben, lesen Sie bitte
den Abschnitt „Batterietyp und Ladezustand“ auf
Seite 52 und stellen Sie die demgemäß den gewählten
Batterietyp ein.
3. Stecken Sie den Netzstecker des AC-Netzteils in eine
Steckdose.
Aten Sie hierbei auf die korrekte Spannung.
Einschalten
Bevor sie den RK-100S einsalten, sollen Sie alle
angeslossenen Wiedergabegeräte, beispielsweise
Aktivmonitore, aussalten.
1.
Drehen Sie den VOLUME-Regler des RK-100S auf
Linksanschlag.
2. Halten Sie den Netzschalter gedrückt, bis im Display
eine Anzeige erscheint.
Nun können Sie den Netzsalter wieder loslassen.
Na kurzer Zeit erseint im Display die Programm-
nummer.
3. Regeln Sie die Lautstärke Ihrer Aktivmonitoren oder
anderer angeschlossener Wiedergabegeräte herab.
4.
Drehen Sie den VOLUME-Regler des RK-100S auf eine
geeignete Position.
5.
Regeln Sie anschließend die Laustärke Ihres externen
Wiedergabegeräts.
44
Page 45

Ausschalten
4
3
1
2
1. Regeln Sie die Lautstärke Ihres Aktivmonitors oder
externen Wiedergabegeräts herab und schalten sie
diese aus.
Drehen Sie den VOLUME-Regler des RK-100S auf
2.
Linksanschlag und halten Sie den Netzschalter
gedrückt, bis im Display angezeigt wird, dass sie
das Gerät sicher ausschalten können.
Falls Sie ein AC-Netzteil verwenden, entfernen Sie
dieses nit, solange der RK-100S no herunterfährt.
Der RK-100S speiert beim Herunterfahren die
Einstellungen der Favoritentasten sowie diverser
anderer Parameter.
Energiesparfunktion
Falls na etwa 4 Stunden keinerlei Eingaben erfolgen,
wird die Energiesparfunktion aktiviert, die den RK-100S
automatis aussaltet.
Hinweis:
Sie können diese Funktion deaktivieren, damit si der
RK-100s nit automatis aussaltet.
Siehe S. 45 „Energiesparfunktion“
Werksseitig ist die Energiesparfunktion aktiviert.
Demo-Wiedergabe
Der RK-100S enthält Demosongs mit diversen Soundbeispielen.
Siehe S. 75 „Voice Name List“
Demo-Wiedergabe
Programme auswählen
und spielen
Ein Programm auswählen
Der RK-100S bietet Ihnen 200 interne Programme für
diverse Musikgenres.
Bedienung des SOUND-Hebels
Der SOUND-Hebel auf der Vorderseite dient der Auswahl
eines Programms.
1. Bewegen Sie den SOUND-Hebel in Richtung + oder -.
Das Programm wird umgesaltet.
Die Nummer des gewählten Pro-
gramms erseint im Display.
Mit jeder Bewegung des Hebels wird
das jeweils näste oder vorherige
Programm gewählt.
Siehe S. 75 „Voice Name List“
2. Stellen Sie mit dem VOLUME-Regler die gewünschte
Lautstärke ein.
1
1,3
2
1. Halten Sie die SHIFT-Taste gedrückt und drücken Sie
die TAP-Taste.
Die Wiedergabe der Demosongs beginnt.
2.
Wählen Sie mit den OCTAVE +/- Tasten oder dem
Soundhebel den Demosong aus.S
Drücken Sie die SHIFT-Taste zum Beenden der Demo-
3.
Wiedergabe.
Spielen Sie die Tastatur, um den Sound zu überprüfen.
3.
4. Drücken Sie die OCTAVE-Taste, um den Tonumfang
der Tastatur zu verändern.
Siehe S. 47 „Umsalten der Oktave mit den OCTAVE-
Tasten“
Favoritenfunktion
Das RK-100S ist mit einer Favoritenfunktion ausgestaet, mit
der Sie ihre Lieblingsprogramme den at Favoritentasten
zuweisen können. Insgesamt lassen si 40 Programme (5
Bänke x 8 Tasten) speiern.
Verwenden der Favoritentasten
Diesen ist jeweils bereits ein Programm zugewiesen
worden. Dur Drüen der entspreenden Taste kann
das jeweilige Programm snell wieder aufgerufen werden.
1
1
2
45
Page 46

RK-100S Bedienungsanleitung
3
1. 1. Halten Sie die SHIFT-Taste gedrückt und bewegen
Sie den Hebel, um eine Favoritenbank auszusuchen.
Es gibt fünf Favoritenbänke. Beim Weseln zwisen
den Bänken erseint die Nummer der ausgewählten
Bank im Display.
Hinweis:
nur eine neue Bank ausgewählt wurde. Zum Umsalten
des Programms müssen Sie ansließend eine Favoritentaste drüen.
2. Drücken Sie eine der acht Favoritentasten.
Tipp: Sie können den Tasten natürli andere Programme
zuweisen.
Programme den Favoritentasten zuweisen
Im Folgenden sehen Sie, wie Sie einer Favoritentaste Ihren
Vorlieben gemäß ein anderes Programm zuweisen können.
1.
2.
3. Halten Sie nun die Favoritentaste gedrückt, der Sie
Das Programm wird nit umgesaltet, wenn
Das der Taste zugewiesene Programm wird ausgewählt.
1,2
Wählen Sie das Programm aus, dass Sie einer
bestimmten Favoritentaste zuweisen wollen.
Halten Sie die SHIFT-Taste gedrückt und bewegen Sie
den Hebel, um die Favoritenbank auszuwählen, der
das Programm zugewiesen werden soll.
Die Favoritenbank ist umgesaltet. Die Nummer der
gewählten Bank erseint im Display.
dieses Programm zuweisen wollen.
Nadem alle Favoritentasten gleizeitig aueuten,
leutet die Taste, der das Programm zugewiesen
werden soll und zeigt Ihnen an, dass dies nun erfolgt ist.
2
3
2, 4
2, 4
6
1.
Schließen Sie das Mikrofon an die INPUTBuchse auf der Unterseite an und stellen Sie den
Eingangswahlschalter auf MIC2.
2. Halten Sie die SHIFT-Taste gedrückt und drücken Sie
die SHORT RIBBON-Taste.
Das an der INPUT-Buse eingehende Audiosignal
wird unverändert an die Ausgangsbuse übertragen
(Audio In Thru).
Liegt ein Signal an der INPUT-Buse an, leutet die
SHIFT-Taste auf. Bei einer Übersteuerung des Eingangs
leutet die Taste rot.
3.
Sprechen oder Singen Sie ins Mikrophon. Falls
die SHIFT-Taste rot leuchtet, stellen Sie den
Eingangswahlschalter auf MIC1.
4.
Um in den Normalzustand zurückzukehren, halten
Sie die SHIFT-Taste gedrückt und drücken Sie erneut
die SHORT RIBBON-Taste.
5. Ein Vocoderprogramm auswählen.
Siehe S. 75 „Voice Name List“
6.
Spielen Sie beim Sprechen oder Singen ins Mikrofon
die Tastatur.
Experimentieren Sie mit Stimme und Akkorden, um
versiedene Vocoder-Eekte auszuprobieren.
Tipp:
Mane Vocoderprogramme werden allein son
vom Spielen der Tastatur aktiviert, ohne dass Sie dabei ins
Mikro spreen oder singen müssen.
1,
5
Vocoderprogramme spielen
Ein Vocoder verändert das Signal eins Oszillators oder einer
anderen Quelle (den „Träger“), indem diesem die spektralen
Charakteristiken einer externen Klangquelle, beispielsweise
der menslien Stimme (des „Modulators“) zugewiesen
werden.
Die typise Verwendungsweise eines Vocoders ist der
Eekt eines „spreenden Instruments“, indem mit Sie
über ein Mikrofon spreen oder singen und gleizeitig
Tasten der Tastatur spielen. Interessante Resultate erhalten
Sie aber au bei Verwendung anderer Audioquellen als
der menslien Stimme, beispielsweise mit rhythmisen
Klängen - Ihrer Experimentierfreude sind hier keine
Grenzen gesetzt.
So sließen Sie ein Mikrofon an, um den Vocoder
auszuprobieren.
46
Modizieren von Sounds
Um Ihr Spiel ausdrusreier zu gestalten, können Sie die
Sounds des RK-100S mit den kurzen und langen Ribbon-
Controllern sowie über Ihre Spielweise auf der Tastatur
modizieren.
Probieren Sie aus, wie si dies auf die Sounds der diversen
Programme auswirkt.
Modizieren des Sounds über die
Tastatur - Velocity
Dieser Eekt reagiert auf Ihre Anslagsdynamik. Je na
Stärke des Tastenanslags wirkt si dies auf Klangfarbe
oder Lautstärke aus.
Beim Spiel dienen die at Favoritentasten (A-H)
Tipp:
als Pegelanzeige und zeigen dur Aueuten die Anslagstärke an.
Page 47

Die Tastatur des RK-100S unterstützt keinen Aer-
Originale Tonhöhe
Originaler Sound
tou.
Umschalten der Oktave mit den
OCTAVE-Tasten
Sie können den Tonumfang des langen Ribbon-Controllers
und der Tastatur in Oktavensrien im Berei von ±3
Oktaven verändern.
Drüen
Sie die -
Taste
Drüen Sie gleizeitig die OCTAVE +/- Tasten, um auf
±0 zurüzukehren.
↓
↓
↓
↓
↓
↓
↓
Tonumfang
von Tastatur
und Ribbon
C6–C9 LED rets leutet rot
C5–C8
C4–C7
C3–C6
C2–C5
C1–C4
C0–C3
OCTAVE-LED im Display
LED rets leutet orange
LED rets leutet grün
Dunkel
LED links leutet grün
LED links leutet orange
LED links leutet rot
Drüen Sie
die + Taste
↑
↑
↑
↑
↑
↑
↑
Verwenden des kurzen Ribbon-Controllers
Mit dem kurzen Ribbon-Controller können Sie Tonhöhe
und Modulation der Sounds steuern.
Sie können den jeweiligen Parameter mit der SHORT
RIBBON-Taste umsalten.
Tipp: Mit der Sound Editor Soware (wenn Ihr RK-100S
über USB mit einem Computer verbunden ist) können Sie
festlegen, ob mit dem kurzen Ribbon-Controller Tonhöhe
oder Modulation gesteuert werden, wenn das Programm
umgesaltet wird.
Tonhöhe steuern
2
1
2
Programme auswählen und spielen
Modulation zuweisen
1.
Drücken Sie die SHORT RIBBON-Taste, damit diese
grün leuchtet.
2. Sie können nun mit dem kurzen Ribbon-Controller
die auf der Tastatur gespielten Noten modulieren.
Versieben Sie dazu einen Finger auf dem RibbonController na links und rets, während Sie die
Tastatur spielen. Am linken Ende des Controllers ist
der Originalsound lokalisiert, je weiter rets davon
Sie Ihren Finger bewegen, desto höher die Modulation.
Wenn Sie Ihren Finger vom Controller nehmen, nimmt
der Klang wieder die ursprünglien Einstellungen
an. Je na ausgewähltem Programm wird die Tiefe
des Vibratos variiert oder der Ton dur Ändern der
Cuto-Frequenz moduliert.
Verwenden des langen Ribbon-Controllers
Mit dem langen Ribbon-Controller können Sie Tonleitern
spielen sowie Tonhöhe und Filter der Sounds steuern.
Klangfarbe, Tonumfang und dem Eekt zugewiesene
Tipp:
Ritung auf dem langen Ribbon-Controller sind programmabhängig. Sie können diese Einstellungen zudem mit der
Sound Editor Soware festlegen (wenn der RK-100S über
USB mit einem Computer verbunden ist).
1.
Drücken Sie die SHORT RIBBON-Taste, damit diese
rot leuchtet.
2.
Sie können nun mit dem kurzen Ribbon-Controller die
Tonhöhe der auf der Tastatur gespielten Noten verändern.
Versieben Sie dazu einen Finger auf dem RibbonController na links und rets, während Sie die
Tastatur spielen. Je weiter Sie Ihren Finger vom Zentrum
des Controllers weg bewegen, desto größer ist der
Tonhöhenuntersied na oben oder unten. Wenn Sie
Ihren Finger vom Controller nehmen, nimmt der Klang
wieder die ursprüngli eingestellte Tonhöhe an.
Tonleitern spielen
Sie können auf dem langen Ribbon-Controller einzelne
Noten einer im Voraus festgelegten Tonleiter spielen.
2
1
47
Page 48

RK-100S Bedienungsanleitung
Originale Tonhöhe
1.
Schalten Sie dazu vorher die LONG RIBBON PITCHund FILTER-Tasten aus.
Versieben Sie einen Finger auf dem Ribbon-Controller
na links und rets. Sie können nun die Töne der
festgelegten Tonleiter spielen.
Mit dem Ribbon-Controller werden nur Mono-Noten
(Einzelnoten) generiert. Zudem haben höhere Noten
(Position auf Ribbon-Controller) beim Spielen Priorität.
Tipp:
Sie können die zugewiesene Tonleiter mit der Sound
Editor Soware verändern (wenn der RK-100S über USB
mit einem Computer verbunden ist).
2. Der Oktavenbereich kann während des Spielens mit
den OCTAVE +/- Tasten umgeschaltet werden.
4.
Nehmen Sie Ihren Finger von der Taste, um den
Dauerklang zu beenden.
Die Tonhöhe mit Ihrer freien linken Hand steuern.
Tonhöhe steuern
Es gibt zwei Methoden der Tonhöhensteuerung.
Tipp: Sie können den Berei und die Ritung, über den
die Tonhöhe mit dem langen Ribbon-Controller variiert
wird, mit der Sound Editor Soware festlegen (wenn der
RK-100S über USB mit einem Computer verbunden ist).
Tonhöhe eines Dauerklangs steuern
2
1. Wählen Sie ein Programm aus.
Aten Sie darauf, dass es si um ein Programm
handelt, bei dem der Klang na dem Loslassen einer
Tastaturtaste nit sofort ausklingt.
Ansonsten ist dieser Eekt möglierweise nit zu
hören, weil die Note zu snell ausklingt.
2.
Halten Sie während der Wiedergabe eines Klangs die
LONG RIBBON PITCH-Taste gedrückt.
Die PITCH-Taste leutet. Der Sound klingt so lange
weiter, wie die Taste gedrüt gehalten wird.
3. Steuerung der Tonhöhe mit dem Ribbon-Controller.
Versieben Sie einen Finger auf dem Ribbon-Controller
na links und rets. Die Originaltonhöhe wird der
ersten Position zugewiesen, die Ihr Finger auf dem
Controller einnimmt – je weiter Sie den Finger nun davon
weg bewegen, desto größer ist der Tonhöhenuntersied
na oben oder unten.
Wenn Sie Ihren Finger vom Controller nehmen, nimmt der
Klang wieder die ursprüngli eingestellte Tonhöhe an.
1
2
3
1
2
3
1. Halten Sie die SHIFT-Taste gedrückt und drücken Sie
die LONG RIBBON PITCH-Taste gedrückt, ohne dass
ein Klang wiedergegeben wird.
Die PITCH-Taste leutet.
2. Spielen Sie nun die Tastatur.
Es wird ein dauerhaer Klang produziert.
3.
Steuern Sie dessen Tonhöhe mit dem Ribbon-Controller.
Siehe S. 48 „Tonhöhe eines Dauerklangs steuern“
Falls Sie die Tonhöhe mit der OCTAVE-Taste na oben
versoben haben, ist möglierweise je na Berei
des Ribbon-Controllers der Klang nur swer hörbar.
4.
Drücken Sie die PITCH-Taste erneut, um diese
auszuschalten und den Dauerklang zu beenden.
Den Filter steuern
Wie bei der Tonhöhe gibt es au hier zwei Steuerungsmethoden.
Sie können die dem langen Ribbon-Controller zuge
Tipp:
wiesenen Eekte mit der Sound Editor Soware einstellen
(wenn der RK-100S über USB mit einem Computer verbunden ist). Sie können den Filtereekt in der Long RibbonSektion der Soundeditor-Soware einstellen. Setzen Sie
in der Virtual Pat-Sektion „Source“ auf „Long Ribbon“
und bestimmen Sie mit „Destination“ die zu steuernden
Parameter. Die zu steuernden Parameter können au mit
den FX Long Ribbon-Zuweisungen eingestellt werden.
-
48
Page 49

Den Filter eines Dauerklangs steuern
1
2
1.
Halten Sie während der Wiedergabe eines Klangs die
LONG RIBBON FILTER-Taste gedrückt.
Die FILTER-Taste leutet.
Der Sound klingt so lange weiter, wie die Taste
gedrüt gehalten wird.
Programme auswählen und spielen
Tipp:
Sie können die Ritung, über die Sie mit dem langen
Ribbon-Controller einen Eekt zuweisen, mit der Sound
Editor Soware einstellen (wenn der RK-100S über USB
mit einem Computer verbunden ist).
4.
Drücken Sie die FILTER-Taste erneut, um diese
1
auszuschalten und den Dauerklang zu beenden.
Spielen von Arpeggien
Ein Arpeggiator spielt automatis einen gebroenen
Akkord (Arpeggio), wenn Sie auf der Tastatur einen
Akkord drüen.
4
2. Spielen Sie den Ribbon-Controller.
Versieben Sie dazu einen Finger auf dem RibbonController na links und rets, während Sie die
Tastatur spielen. Am linken Ende des Controllers ist
der Originalsound lokalisiert, je weiter rets davon
Sie Ihren Finger bewegen, desto höher die Modulation.
Wenn Sie Ihren Finger vom Controller nehmen, nimmt
der Klang wieder die ursprünglien Einstellungen an.
Originaler Sound
Hinweis:
na Einstellungen untersiedli aus.
3.
Die Änderungen der Eektparameter fallen je
Nehmen Sie Ihren Finger von der Taste, um den
Dauerton zu beenden.
Den Filter mit Ihrer freien linken Hand steuern
2,5
1
3
1. Wählen Sie ein Synthesizerprogramm aus.
Sie können den Arpeggiator au bei einem
Vocoderprogramm verwenden – der Eekt ist jedo
deutlier bei Synthesizerprogrammen. Wir empfehlen
zudem die Auswahl von Sounds mit kurzem Sustain.
2. Drücken Sie die ARP-Taste, damit die LED aueuchet.
Der Arpeggiator ist nun eingesaltet.
Die ARP-Taste leutet und die Favoritentasten A-H
leuten hintereinander auf.
3. Halten Sie einen Akkord auf der Tastatur gedrückt.
Das Arpeggio wird nun abgespielt.
Das abgespielte Arpeggiomuster kann verändert
werden (siehe S. 50 „Arpeggiomuster-Einstellungen“).
4.
Drücken Sie die TAP-Taste, um das Tempo einzustellen.
Die TAP-Taste leutet grün und im Display erseint
das Tempo.
5. Drücken Sie die ARP-Taste, damit die LED erlischt.
Die Arpeggiowiedergabe endet.
1
2
3
1. Halten Sie die SHIFT-Taste gedrückt und drücken Sie
die LONG RIBBON FILTER-Taste gedrückt, ohne dass
ein Klang wiedergegeben wird.
Die FILTER-Taste leutet.
2. Spielen Sie nun die Tastatur.
Es wird ein dauerhaer Klang produziert.
3. Spielen Sie den Ribbon-Controller.
Siehe S. 49 „Den Filter eines Dauerklangs steuern“
Weiterspielen ohne Hand auf der
Tastatur (Latch)
Sie können festlegen, wie der Arpeggiator si verhält,
wenn Sie die Hand von der Tastatur nehmen.
1.
Halten Sie die ARP-Taste gedrückt, bis diese grün
leuchtet.
Wenn die ARP-Taste grün leutet, ist Lat eingesaltet
und der Arpeggiator spielt weiter, selbst wenn Sie die
Hand von der Tastatur genommen haben.
Hinweis: Es ist egal, ob hierbei der Arpeggiator ein- oder
ausgesaltet ist. Wenn Sie die ARP-Taste gedrüt halten, werden immer Arpeggiator und Lat gleizeitig
eingesaltet.
49
Page 50

RK-100S Bedienungsanleitung
TYP: UP
2.
Drücken Sie die ARP-Taste, um den Arpeggiator
auszuschalten.
Lat und Arpeggiator werden gemeinsam ausgesaltet.
Arpeggiomuster-Einstellungen
Hiermit können Sie die Art des Arpeggios auswählen, die
bei eingesaltetem Arpeggiator dur Drüen einer Taste
der Tastatur produziert wird.
Sie können zusätzli einzelne Noten des ausgewählten
Arpeggiomusters ein- oder aussalten.
1. Halten Sie die SHIFT-Taste gedrückt und drücken Sie
die ARP-Taste.
Das eingestellte Arpeggiomuster
wird im Display angezeigt.
Die Favoritentasten A – H dienen nun
als Anzeige der Arpeggiatorsrie,
wobei nur die Tasten aueuten,
die den aktivierten Notensrien
entspreen (Note on).
2.
Wählen Sie mit den OCTAVE +/- Tasten oder dem
SOUND-hebel das Arpeggiomuster aus.
UP: Es werden kontinuierli höhere Noten abgespielt.
trG (Trigger): Die gedrüten Noten werden im
aktuellen Tempo simultan abgespielt.
Falls Sie mehr Noten gedrüt halten, als die maximale
Polyphonie zulässt, werden aufsteigend von der tiefsten
Note nur so viele Noten abgespielt, wie die maximale
Polyphonie zulässt.
3. Drücken Sie eine der Favoritentasten A—H, um die
der Taste entsprechende Note im Arpeggioverlauf
stumm zu schalten (Note o).
dn (Down): Es werden kontinuierli tiefere Noten
abgespielt.
AL.1: Wesel zwisen Up und Down. (Die hösten
und tiefsten Noten warden nur einmal abgespielt).
AL.2: Wesel zwisen Up und Down. (Die hösten
und tiefsten Noten werden zweimal abgespielt. Erst
beim Lauf na oben, dann beim Lauf na unten).
Rnd (Random): Die Noten werden zufällig abgespielt.
4.
Drücken Sie die SHIFT-Taste zum Verlassen der
Arpeggiomuster-Einstellungen.
Shift-Funktionen
Mit den Shi-Funktionen können Sie weitere Einstellungen
am RK-100S vornehmen. Um eine sole Einstellung zu
ändern, halten Sie die SHIFT-Taste gedrüt und drüen
Sie die entspreende Taste.
Um die Shi-Funktion wieder zu verlassen, drüen Sie
die SHIFT-Taste erneut. Falls über einen längeren Zeitraum
hinweg keine Taste gedrüt wurde, verlässt der RK-100S
automatis die Shi-Funktion und kehrt in den normalen
Betriebszustand zur Programmauswahl zurü.
Die den Favoritentasten zugewiesenen Programme
und die Einstellungen der Shi-Funktionen werden
beim Aussalten des RK-100S gespeiert. Wenn die
Baerien das Ende ihrer Lebensdauer erreit haben
und die Favoritentaste A blinkt (siehe „Baerietypen
und Ladezustandsanzeige“ auf Seite 52), können diese
Einstellungen nit gespeiert werden. Sließen Sie
in diesem Fall – sofern vorhanden – ein AC-Netzteil
an (separat erhältli).
50
Page 51

Shift-Funktionen
(MIDI-Anschlagdynamik)
Anschlagdynamik
(1) (127)
Anschlagkurve
Hier regeln Sie die Anslagsdynamik fest, also die Art
und Weise, wie die Stärke Ihres Tastaturanslags si auf
Lautstärke und Klangfarbe auswirkt.
1. Halten Sie die SHIFT-Taste gedrückt und drücken Sie
Favoritentaste A.
Das eingestellte Anslagkurve
wird im Display angezeigt.
2.
Wählen Sie mit den OCTAVE +/Tasten oder dem SOUND-hebel die Anschlagkurve
aus.
MAX
(127)
5
4
3
8
7
6
2
1
Velocity des langen Ribbon-Controllers
Hier können Sie die Velocity des langen Ribbon-Controllers
beim Spielen von Tonleitern einstellen.
1. Halten Sie die SHIFT-Taste gedrückt und drücken Sie
Favoritentaste B.
Die eingestellte Velocity wird im
Display angezeigt.
2.
Wählen Sie mit den OCTAVE +/Tasten oder dem SOUND-hebel
die Velocity aus.
Der Einstellungsberei der Velocity reit von 1 bis
127.
Falls oFF ausgewählt wurde, wird bei Bedienung des
langen Ribbon-Controllers kein Klang wiedergegeben.
3. Drücken Sie die SHIFT-Taste zum Verlassen der ShiftFunktion.
Globaler MIDI-Kanal
Zum Datenaustaus mit einem angeslossenen externen
MIDI-Gerät müssen Sie den globalen MIDI-Kanal des RK-
100S passend zum MIDI-Kanal des externen MIDI-Geräts
einstellen.
MIN (1)
ppp
Cu.1 Bei dieser Kurve tri ein Eekt erst bei starkem
Tastaturanslag auf.
Cu.2, 3 |
Cu.4 Typise Anslagkurve.
Cu.5 |
Cu.6 Bei dieser Kurve tri der Eekt bereits bei
leiten Änderungen des Tastaturanslags
auf.
Cu.7 Bei dieser Kurve wird ein relativ gleimäßiger
Eekt erreit mit minimalen Änderungen bei
mielstarken Anslägen.
Cu.8
127 Alle Noten ertönen mit maximaler Velocity
Cu. 7 und 8 erzeugen nur geringe Veränderungen bei
mielstarken Anslägen. Bei leiter gespielten Noten
hingegen fallen die Änderungen besonders groß aus,
was eventuell swieriger zu steuern ist. Wählen Sie
die Kurve, die Ihrer Anslagsdynamik am ehesten
entsprit oder si am besten für den gewünsten
Eekt eignet.
Bei dieser Kurve wird ein relativ gleimäßiger
Eekt erreit mit minimalen Änderungen bei
mielstarken Anslägen (aere Kurve als 7).
(127). Diese Einstellung emuliert das Verhalten
früherer Analogsynthesizer.
Stärke
f
3. Drücken Sie die SHIFT-Taste zum Verlassen der ShiftFunktion.
1. Halten Sie die SHIFT-Taste gedrückt und drücken Sie
Favoritentaste C.
Die Nummer des globalen MIDI-
Kanals erseint im Display.
2.
Wählen Sie mit den OCTAVE +/Tasten oder dem SOUND-hebel
den globalen MIDI-Kanal aus.
3. Drücken Sie die SHIFT-Taste zum Verlassen der ShiftFunktion.
Stellen Sie am angeschlossenen externen MIDI-Gerät
4.
denselben MIDI-Kanal ein.
Hinweis:
Geräts ändern, steht in der Bedienungsanleitung des ent-
spreenden Gerätes.
Wie Sie den MIDI-Kanal Ihres externen MIDI-
MIDI-Kanal des langen Ribbon-Controllers
Hier können Sie den MIDI-Kanal des langen RibbonControllers einstellen.
Geben Sie hier einen Kanal an, wenn Sie ein Programm
verwenden, dessen Klangerzeuger auf Multi eingestellt
ist (Voice-Modus: Multi) oder wenn das an die MIDI
OUT-Buse angeslossene externe MIDI-Gerät über den
langen Ribbon-Controller sta über die Tastatur gespielt
werden soll.
Wurde diese Einstellung geändert, können Sie mit dem
langen Ribbon-Controller keine Sounds des RK-100S
spielen.
51
Page 52

RK-100S Bedienungsanleitung
1. Halten Sie die SHIFT-Taste gedrückt und drücken Sie
Favoritentaste D.
Die Nummer des MIDI-Kanals des
langen Ribbon-Controllers erseint
im Display.
2.
Wählen Sie mit den OCTAVE +/Tasten oder dem SOUND-hebel
den MIDI-Kanal aus.
GLb: Der MIDI-Kanal entsprit dem globalen MIDI-
Kanal (siehe „Globaler MIDI-Kanal“).
r.01...r.16: 1..16
Tipp:
Wenn Sie mit dem langen Ríbbon-Controller ein
externes, an die MIDI OUT-Buse angeslossenes MIDI-
Gerät steuern wollen, geben Sie denselben MIDI-Kanal an,
der am externen MIDI-Gerät eingestellt ist.
3. Drücken Sie die SHIFT-Taste zum Verlassen der ShiftFunktion.
Hinweis: Wenn der Arpeggiator eingesaltet ist, werden
Notennariten aus der MIDI OUT-Buse über den
globalen MIDI-Kanal übermielt.
Transposition
Hiermit bestimmen Sie die Gesamonhöhe in
Halbtonsrien (100 Cents). Sie können damit die
Tonhöhe über eine Oktave na oben oder unten verändern
und somit an Ihre Bedürfnisse anpassen.
2.
Wählen Sie mit den OCTAVE +/- Tasten oder dem
SOUND-hebel die Einstellung aus.
on: Aktiviert
oFF: Deaktiviert
3. Drücken Sie die SHIFT-Taste zum Verlassen der ShiftFunktion.
Batterietyp und Ladezustand
Hiermit können Sie den Baerietyp auswählen, mit dem
das Gerät betrieben wird.
Zusätzli können Sie den Ladezustand der Baerie
überprüfen.
Fall der eingestellte Baerietyp vom tatsäli
verwendeten Baerietyp abweit, wird der
Ladezustand nit korrekt angezeigt.
1. Halten Sie die SHIFT-Taste gedrückt und drücken Sie
Favoritentaste G.
Der Baerietyp wird im Display
angezeigt.
Die at Favoritentasten (A – H)
dienen als Ladezustandsanzeige
und leuten entspreend dem
Ladezustand auf. Die Zahl der
leutenden Tasten kann je na Baeriekapazität
geringer ausfallen.
Neu Baerien. Alle Tasten leuten
1. Halten Sie die SHIFT-Taste gedrückt und drücken Sie
Favoritentaste E.
Die eingestellte Transposition wird
im Display angezeigt.
2.
Wählen Sie mit den OCTAVE +/Tasten oder dem SOUND-hebel
die gewünschte Transposition aus.
Der Berei der Transposition reit von einer Oktave
na unten bis zu einer Oktave na oben (-12 bis 12).
3. Drücken Sie die SHIFT-Taste zum Verlassen der ShiftFunktion.
Batterieschonfunktion
Bei Baeriebetrieb saltet die Baeriesonfunktion das
Display und die LEDs des RK-100s automatis aus, wenn
die verbleibende Baerieleistung nalässt.
Hinweis: Werksseitig ist die Baeriesonfunktion deak-
tiviert.
1. Halten Sie die SHIFT-Taste gedrückt und drücken Sie
Favoritentaste F.
Im Display erscheint die Einstellung
der Batterieschonfunktion.
Swae restlie Baeriekapazität: Nur Taste A
leutet
Es ist Zeit, die Baerien zu weseln: Taste A blinkt
Wird ein AC-Netzteil angeslossen, erlist die
Beleutung der Tasten.
2.
Wählen Sie mit den OCTAVE +/- Tasten oder dem
SOUND-hebel den Batterietyp aus.
AL.: Alkali-Baerien
ni.H: Niel-Metallhdyryd-Akkus
3. Drücken Sie die SHIFT-Taste zum Verlassen der ShiftFunktion.
52
Page 53

MIDI
MIDI Keyboard
MIDI OUT
RK-100S
MIDI-Patchbay
Computer
Energiesparfunktion
Der RK-100S verfügt über eine automatise Energiesparfunktion. Die Energiesparfunktion saltet den RK-100S
automatis aus (Energiesparzustand), wenn über etwa
vier Stunden hinweg kein Bediensri erfolgt.
Falls der RK-100S von der Energiesparfunktion automatis
ausgesaltet wurde, lässt er si nit dur Drüen einer
Taste, der Tastatur oder Bedienung des Ribbon-Controllers
einsalten. Salten Sie in diesem Fall den RK-100S erneut
ein.
Hinweis:
1. Halten Sie die SHIFT-Taste gedrückt und drücken Sie
2.
3. Drücken Sie die SHIFT-Taste zum Verlassen der Shift-
Werksseitig ist die Energiesparfunktion aktiviert.
Favoritentaste H.
Im Display erscheint die Einstellung
der Energiesparfunktion.
Wählen Sie mit den OCTAVE +/Tasten oder dem SOUND-hebel
die Einstellung aus.
4hr: Aktiviert
diS: Deaktiviert
Funktion.
der MIDI IN-Buse des externen MIDI-Klangerzeugers -
verwenden Sie hierzu stets ein MIDI-Kabel.
MIDI OUT
RK-100S
MIDI IN
Steuerung zweier oder mehrerer externer
MIDI-Klangerzeuger mit dem RK-100S
Sie können au eine MIDI-Patbay verwenden und so
mehrere MIDI-Geräte steuern.
MIDI Keyboard
MIDI
Verwendung des RK-100S mit anderen MIDI-Geräten (MIDI)
MIDI ist die Abkürzung für Musical Instrument Digital
Interface (Digitale Musikinstrumenten-Snistelle),
einem weltweiten Standard zum Datenaustaus zwisen
elektronisen Musikinstrumenten und Computern.
Wenn zwei oder mehr MIDI-Geräte über MIDI-Kabel
miteinander verbunden sind, können diese Daten
untereinander austausen, selbst wenn sie von
untersiedlien Herstellern stammen.
Der RK-100S erlaubt Ihnen die Zuweisung von
Control Change-Nummern für die witigsten Sound-
Parameter und die Steuerung dieser Parameter sowie der
Klangerzeugung über einen externen MIDI-Sequenzer.
Sie können zudem mit den Ribbon-Controllern oder Tasten
Control Change Befehle zur Steuerung externe MIDIGeräte senden.
Anschluss von MIDI-Geräten/Computern
Steuerung eines externen MIDI-Klangerzeugers
mit dem RK-100S
Wenn Sie mit Tastatur, Controllern und Arpeggiator des
RK-100S einen externe MIDI-Klangerzeuger spielen wollen,
verbinden Sie die MIDI OUT-Buse des RK-100S mit
MIDI IN
MIDI IN
MIDI OUT
MIDI OUT
MIDI-Klangerzeuger
Den RK-100S über USB mit Ihrem Computer
verbinden
Verbinden Sie die USB-Anslüsse des RK-100S und Ihres
Computers mit einem USB-Kabel.
USB
RK-100S
USB-Kabel
Hinweis:
Sie in Ihrem Computer den Korg USB-MIDI Treiber installieren. Laden Sie hierzu den KORG USB-MIDI Treiber von
der Korg Website herunter und installieren Sie ihn gemäß
der beigefügten Anleitung.
Um den US-Ansluss zu verwenden, müssen
53
Page 54

RK-100S Bedienungsanleitung
MIDI-Einstellungen
MIDI-Kanal einstellen
Zum Datenaustaus mit einem angeslossenen externen
MIDI-Gerät müssen Sie den MIDI-Kanal des RK-100S
passend zum MIDI-Kanal des externen MIDI-Geräts
einstellen.
Slagen Sie hierzu im Absni „Globaler MIDI-Kanal“
auf Seite 51 na und legen Sie den globalen MIDI-Kanal fest.
Den MIDI-Ausgang des Arpeggiators des RK100S auf einem externen MIDI-Sequencer
der Controller aufnehmen.
Anschlüsse und Einstellungen
Verbinden Sie die MIDI OUT-Buse des RK-100S mit der
MIDI IN-Buse des externen MIDI-Sequencers.
Die Notendaten des Arpeggiators auf einem externen
MIDI-Sequencer aufnehmen
Salten Sie den Arpeggiator des RK-100S ein (ARP-Taste
leutet), spielen Sie die Tastatur und nehmen Sie die so
erzeugten Notendaten auf Ihrem externen MIDI-Sequencer
auf.
Synchronisation des Arpeggiators
Hinweise zu den für eine Synronisation erforderlien
Einstellungen Ihres externen MIDI-Geräts nden Sie in
dessen Bedienungsanleitung.
Um den RK-100S als Master und das externe MIDI-Gerät
als Slave zu verwenden, verbinden Sie die MIDI OUT-
Buse des RK-100S mit der MIDI IN-Buse Ihres externen
MIDI-Geräts.
Stellen Sie Ihr externens MIDI-Gerät so ein, dass es
eingehende MIDI Clo-Nariten empfängt. Das externe
MIDI-Gerät (z.B. ein Sequencer oder ein Drumcomputer)
arbeiten nun im von der TEMPO-Taste des RK-100S
vorgegebenen Tempo.
Fehlersuche
Das Gerät schaltet sich automatisch aus
•
Wurde die Energiesparfunktion aktiviert? (Siehe S. 53
„Energiesparfunktion“)
Es ist kein Klang zu hören
•
Sind Ihre Aktivmonitore oder Ihr Kopörer korrekt
verbunden? (Siehe S. 43 „Anslüsse“)
•
Ist das angeslossene Monitorsystem eingesaltet und
ist dort die Lautstärke aufgedreht?
Ist der VOLUME-Regler genügend weit aufgedreht, um
•
ein Signal auszugeben?
Ich drücke die OCTAVE UP oder DOWN-Taste, doch
es passiert nichts.
• Ist eine Shi-Funktion ausgewählt?
Drüen Sie die SHIFT-Taste zum Verlassen der Shi-
Funktion.
Der Eingang scheint nicht zu funktionieren
•
Wurde das Mikrofon, das als Modulator des
Vocoderprogramms dienen soll, korrekt an die INPUT-
Buse angeslossen?
Steht der Eingangswahlsalter auf der ritigen
•
Position?
Der Arpeggiator startet nicht
•
Haben Sie den Arpeggiator aktiviert (ARP-Taste
leutet)?
Es wird kein Klang wiedergegeben, wenn ich den
RK-100S mit dem langen Ribbon-Controller steuere.
•
Wurde über die Shi-Funktionen die Velocity des langen
Ribbon-Controllers auf oFF gesaltet?
Wählen Sie eine beliebige andere Einstellung als oFF.
(Siehe S. 51 „Velocity des langen Ribbon-Controllers“)
• Wurde über die Shi-Funktionen der Kanal des langen
Ribbon-Controllers geändert?
Stellen Sie zur Klangerzeugung denselben MIDIKanal ein. (Siehe S. 51 „MIDI-Kanal des langen RibbonControllers“)
Falls eine Fehlfunktion aureten sollte, überprüfen Sie bie
die folgenden Punkte. Sollte dies das Problem nit lösen,
kontaktieren Sie bie den nästgelegenen Vertragshändler.
Das Gerät kann nicht eingeschaltet werden
•
Haben Sie das AC-Netzteil an eine Stedose angeslossen? (Siehe S. 43 „Anslüsse“)
• Sind die Baerien möglierweise entladen?
Halten Sie die SHIFT-Taste gedrüt und drüen Sie die
G-Taste, um den Ladezustand der Baerien anzuzeigen
(Siehe S. 16 „Baerietyp und Ladezustand“).
Wurden die Baerien mit der ritigen Polung eingesetzt?
•
(Siehe S. 52 „Baeriebetrieb“)
54
Ein externer MIDI-Klangerzeuger ist mit einem MIDIKabel angeschlossen, doch es ist nichts zu hören.
• Wurde das MIDI-Kabel korrekt angeslossen? (Siehe
S. 43 „Anslüsse“)
Stimmen der MIDI-Kanal des externen MIDI-Geräts
•
und der MIDI-Kanal des RK-100S überein? (Siehe S.
51„Globaler MIDI-Kanal“)
Page 55

Technische Daten
Technische Daten
Tastatur 37-Noten (SlimKey, anslagsdynamis, kein Aertou)
Klangerzeugung MMT (Multiple Modeling Tenology)
Programme Editierbar über Sound Editor Soware, wenn ein Computer angeslossen ist.
Anzahl der Timbres Max. 2 (bei Verwendung von Layer, Split oder Multi)
Polyphonie 8 Stimmen (bis zu 4 wenn Vocoder ausgewählt ist)
Synthie 2 Oszillatoren + Rausgenerator
Oszillator 1
Wellenform SAW, PULSE, TRIANGLE, SINE, FORMANT, NOISE, PCM/DWGS, AUDIO IN
Modulation WAVEFORM, CRO, UNISON, VPM
Oszillator 2
Wellenform SAW, PULSE, TRIANGLE, SINE
Modulation RING, SYNC, RING+SYNC
Wave Shaping (Hüllkurven)
WS-Typ DRIVE , DECIMATOR, HARDCLIP, OCT SAW, MULTI TRI, MULTI SIN, SUB OSC SAW,
SUB OSC SQU, SUB OSC TRI, SUB OSC SIN, LEVEL BOOST
Multi-Mode-Filter
Filter 1 -24 dB/oct LPF– -12 dB/oct LPF–HPF–BPF–Thru
Filter 2 LPF, HPF, BPF
Vocoder 16-Band Vocoder, für jedes Band regelbarer Pegel und Pan, Formant Shi-Funktion, Formant
Hold-Funktion
Eekte
Timbre 2-Band EQ
Master Mastereekte (17 Eektalgorithmen)
Arpeggiator UP, DOWN, ALT1/2, Random, Trigger (6 Typen), Step Arpeggiator-Funktion
Programme 200 Programme
Eingang/Ausgang
Eingang
INPUT-Buse
Anslüsse Mono-Miniklinken
Eingangswahlsalte MIC1: Mikrofoneingang [low gain] (ohne Phantomspeisung)
MIC2: Mikrofoneingang [high gain] (ohne Phantomspeisung)
LINE: Line-Eingang (Mono-Eingang [L])
Ausgang
Ausgangsbuse
Anslüsse 1/4" Stereo-Klinkenbuse
Max. Ausgangspegel 25mW + 25mW @ 33 Ohm Last
MIDI OUT
USB-Ansluss Typ B
Display 7-Segment LEDs, 3-stellig
Stromversorgung
Baerielebensdauer Ungefähr 8 Stunden (
Abmessungen (B x T x H) 830 x 262 x 68 mm
Gewit 3.4 kg (mit baerie)
Lieferumfang Ses AA-Baerien, Gurt, Bedienungsanleitung, Socase
Zubehör (separat erhältli)
Ses AA-Baerien (Alkali oder Niel-Metallhydrid) order AC-Netzteil (DC 9 V )
Alkalibaerien)
AC-Netzteil (DC 9 V )
* Änderungen der tenisen Daten und des Designs ohne vorherige Ankündigung vorbehalten.
55
Page 56

Contenido
Manual de usuario
Características generales ......................... 58
Paneles frontal y lateral ........................... 58
Panel frontal .............................................................. 58
Panel lateral ............................................................... 60
Colocación de la correa ...........................................60
Preparativos .............................................. 61
Conexiones ................................................................ 61
Activación del equipo ..............................................62
Interpretación de demostración .............63
Selección y reproducción de un programa
....................................................................63
Selección de un programa ...................................... 63
Modicación del sonido .......................................... 64
Reproducción de arpegios ......................................67
Funciones de cambio ................................68
Curva de velocidad...................................................68
Velocidad de cinta larga .......................................... 69
Canal MIDI global ..................................................... 69
Canal MIDI de cinta larga ........................................ 69
Transposición ............................................................70
Función de ahorro de energía ................................ 70
Tipo de pilas y energía restante ............................. 70
Función de desactivación automática ..................70
MIDI ...........................................................71
Uso del RK-100S con otros dispositivos
MIDI (MIDI) .................................................................71
Solución de problemas ............................72
Especicaciones ........................................73
Appendices ...............................................74
Voice Name List .........................................................75
MIDI Implementaton Chart .................................... 77
Page 57

Precauciones
Precauciones
Ubicación
El uso de la unidad en las siguientes ubicaciones puede
dar como resultado un mal funcionamiento:
• Expuesto a la luz directa del sol
• Zonas de extremada temperatura o humedad
• Zonas con exceso de suciedad o polvo
• Zonas con excesiva vibración
• Cercano a campos magnéticos
Fuente de alimentación
Por favor, conecte el adaptador de corriente designado
a una toma de corriente con el voltaje adecuado. No lo
conecte a una toma de corriente con voltaje diferente al
indicado.
Interferencias con otros aparatos
Las radios y televisores situados cerca pueden experimentar
interferencias en la recepción. Opere este dispositivo a una
distancia prudencial de radios y televisores.
Manejo
Para evitar una rotura, no aplique excesiva fuerza a los
conmutadores o controles.
Cuidado
Si exterior se ensucia, límpiese con un trapo seco. No use
líquidos limpiadores como disolvente, ni compuestos
inamables.
Nota respecto a residuos y deshechos (solo UE)
Cuando aparezca el símbolo del cubo de basura
tachado sobre un producto, su manual de usuario, la
batería, o el embalaje de cualquiera de éstos, signica
que cuando quiere tire dichos artículos a la basura, ha
de hacerlo en acuerdo con la normativa vigente de la
Unión Europea. No debe verter dichos artículos junto
con la basura de casa. Verter este producto de manera
adecuada ayudará a evitar daños a su salud pública y
posibles daños al medioambiente. Cada país tiene una
normativa especíca acerca de cómo verter productos
potencialmente tóxicos, por tanto le rogamos que se ponga en
contacto con su ocina o ministerio de medioambiente para
más detalles. Si la batería contiene metales pesados por encima
del límite permitido, habrá un símbolo de un material químico,
debajo del símbolo del cubo de basura tachado.
Precauciones para el RK-100S
Al igual que en una guitarra eléctrica normal, el cuerpo de
este dispositivo está fabricado con madera pintada.
• Después del uso, limpie el cuerpo con un paño limpio,
suave y seco. Utilice un abrillantador para guitarras de
venta en establecimientos comerciales.
No exponga el dispositivo a cambios de temperatura
•
rápidos, como temperaturas extremadamente altas o
bajas. El traslado del dispositivo de una ubicación fría
directamente a una sala con calefacción puede provocar
la formación de grietas en el cuerpo pintado. Además,
es extremadamente peligroso dejar el dispositivo en
el maletero de un coche, donde se verá expuesto a
temperaturas altas, por ejemplo, durante el verano.
• Debido a que la pintura del cuerpo es delicada, incluso
un golpe suave puede provocar que se desprenda o se
agriete. Al tocar o durante el transporte, manipule el
dispositivo con mucho cuidado para evitar golpearlo.
Guarde este manual
Después de leer este manual, guárdelo para futuras
consultas.
Mantenga los elementos externos
alejados del equipo
Nunca coloque ningún recipiente con líquido cerca de este
equipo, podría causar un cortocircuito, fuero o descarga
eléctrica. Cuide de que no caiga ningún objeto metálico
dentro del equipo.
*
Tous les noms de produits et de sociétés sont des marques
commerciales ou déposées de leur détenteur respectif.
57
Page 58

RK-100S Manual de usuario
Gracias por adquirir el Korg RK-100S KEYTAR.
Para ayudarle a sacar el máximo partido de su nuevo
instrumento, lea detenidamente este manual.
Características generales
El RK-100S es un moderno teclado para colgar equipado
con un sintetizador y los tonos clásicos de un piano o
un órgano, que le permite tocar una amplia variedad de
sonidos con los controladores de cinta.
Gracias a la alimentación con pilas, puede disfrutar tocando
en distintos lugares.
200 programas mediante la tecnología MMT
de modelado analógico
Hay disponibles 200 programas compatibles con diversos
géneros musicales mediante el sistema de generación de
sonido MMT. Se proporcionan con una amplia gama de
algoritmos de oscilador, como las ondas de diente de sierra
y cuadradas que se suelen encontrar en sintetizadores
analógicos, así como las ondas formantes, el ruido y las
ondas PCM/DWGS.
El ecualizador y los efectos incorporan un
acabado nal a los sonidos
Cada timbre proporciona un ecualizador de dos bandas
para mejorar el potencial de creación de sonido.
Cada programa también incluye dos efectos maestros para
añadir los toques nales al sonido. Puede elegir entre
diecisiete tipos para cada efecto.
Software de editor de sonido
Si conecta el RK-100S a un ordenador con un cable USB
y utiliza el soware de editor de sonido, puede editar
parámetros, como los sonidos y los patrones de arpegio
del RK-100S, desde su ordenador.
Puede descargar el editor de sonido de forma gratuita
desde el sitio web de Korg.
hp://www.korg.com/
Paneles frontal y lateral
Panel frontal
Controladores de cinta
Hay disponibles un controlador de cinta larga y uno de
cinta corta para controlar la intensidad y el ltro, entre
otros valores. El controlador de cinta larga se utiliza
para controlar la intensidad y el ltro de los sonidos, y
también se puede usar para tocar escalas y la gama de notas
especicada con el soware de editor de sonido.
Para controlar el valor solamente deberá utilizarse la
punta de un dedo. No deberá utilizar nada duro ni
puntiagudo, ni tampoco llevar guantes.
Arpegiador
El arpegiador integrado puede generar automáticamente
un arpegio cuando mantiene pulsado un acorde.
Puede elegir entre seis tipos de arpegios. También puede
activar/desactivar individualmente un máximo de ocho
pasos, lo que le permite variar el ritmo para disfrutar de
una gama aún más amplia de posibilidades.
Función de vocoder
El RK-100S incluye una función de vocoder que le permitirá
usar su voz a través de un micrófono para procesar el
sonido del oscilador, produciendo un efecto como si el
instrumento estuviera “hablando”.
Función de patch virtual
Los controladores como EG, LFO, el seguimiento del teclado
y las cintas se pueden conectar virtualmente a parámetros
como intensidad o corte, lo que hace posible modular estos
parámetros y crear sonidos con mayor libertad.
1. Botones OCTAVE +/-
Permiten cambiar la gama de las notas asignadas al teclado
y al controlador de cinta larga en sentido ascendente o
descendente en pasos de una octava en una gama de 3
octavas.
Consejo:
cicar ajustes para las funciones de cambio.
Estos botones también se pueden usar para espe-
2. Controlador de cinta corta
Permite controlar la intensidad y la modulación de los
sonidos. Pulse el botón SHORT RIBBON para cambiar
entre la intensidad y la modulación.
3. LONG RIBBON
Botón PITCH
Pulse este botón para controlar la intensidad con el
controlador de cinta larga.
Botón FILTER
Pulse este botón para controlar el ltro con el controlador
de cinta larga.
4. Pantalla
El número del programa seleccionado actualmente y los
ajustes para las funciones de cambio se muestran aquí.
Además, se indicará la octava especicada con los botones
OCTAVE +/- (consulte la página 65, “Cambio de la octava con
los botones OCTAVE”).
5. Controlador de cinta larga
Se utiliza para tocar escalas (monofónicas) y controlar la
intensidad y el ltro de sonidos.
Pulse los botones LONG RIBBON PITCH y FILTER para
seleccionar el parámetro que se desea controlar.
58
Page 59

Paneles frontal y lateral
6
13
4
3
1
2
5
7
8
9
10
11
12
6. Mando VOLUME
Permite ajustar el volumen del jack de salida.
7. Palanca SOUND
Permite seleccionar el programa. Mueva la palanca en
la dirección + o - para cambiar al programa siguiente o
anterior.
Consejo:
especicar ajustes para las funciones de cambio.
La palanca SOUND también se pueden usar para
8. Botón TAP
Permite especicar el tempo (velocidad) del arpegiador, el
LFO o el efecto de retardo.
El tempo se especica en función del número de veces
que se pulsa el botón. EL LED parpadeará sincronizado
con el tempo.
También puede mantener pulsado el botón SHIFT y pulsar
este botón para reproducir una canción de demostración
(consulte la página 63, “Interpretación de demostración”).
9. Botón ARP
Permite activar/desactivar el arpegio (consulte la página 67,
“Reproducción de arpegios”).
También puede mantener pulsado el botón SHIFT y pulsar
este botón para cambiar los ajustes del arpegiador.
Cuando el botón está iluminado en rojo, se puede controlar
la intensidad del sonido.
Cuando el botón está iluminado en verde, se puede
controlar la modulación del sonido.
Además, si mantiene pulsado el botón SHIFT y pulsa
el botón SHORT RIBBON, la señal de entrada de audio
procedente del jack INPUT se enviará al jack de salida sin
modicar.
11. Botón SHIFT
Mantenga pulsado este botón y pulse el botón correspondiente para reproducir la canción de demostración o
especicar ajustes para las funciones de cambio.
12. Botones de favoritos A – H
Puede asignar sus programas favoritos a estos botones.
El programa se puede recuperar con rapidez pulsando el
botón correspondiente.
Consulte la página 63, “Función Favorites”.
También puede pulsar el botón SHIFT y uno de los botones
de favoritos (A – H) para acceder a la función de cambio y
cambiar los ajustes de la función.
13. Jack de salida [jack estéreo]
Puede conectar monitores autoalimentados, un amplicador
estéreo, un mezclador o auriculares a estos jacks.
10. Botón SHORT RIBBON
Permite cambiar el parámetro controlado por el controlador
de cinta corta.
59
Page 60

RK-100S Manual de usuario
1
65 4
2
3
Panel lateral
1. Conector MIDI OUT
Este conector transmite datos MIDI al dispositivo MIDI
externo conectado al RK-100S.
2. Jack INPUT
Conecte los auriculares con micrófono (mono, complemento
no conectado) u otro equipo, que se venden por separado,
a este jack.
Si hay unos auriculares con micrófono conectados, la
entrada se puede utilizar como una señal de audio para el
modulador en un programa de vocoder.
Si hay equipo de audio conectado, este jack se utilizará
como un jack AUX IN. El sonido del dispositivo conectado
se emitirá desde el RK-100S.
Consulte la página 61, “Conexión de un reproductor de
audio”.
Para utilizar una conexión USB, deberá instalar el
Nota:
controlador MIDI USB de Korg en su ordenador. Puede
descargar el “controlador MIDI USB de Korg” desde el
sitio web de Korg e instalarlo como se describe en la do-
cumentación incluida.
Colocación de la correa
Coloque la correa en el RK-100S como se describe a
continuación.
1. Coloque la correa en los dos enganches para correa
en las posiciones que se muestran en la ilustración.
3. Conmutador de selección de entrada
Ajuste este conmutador en función del dispositivo
conectado al jack INPUT.
MIC1 o MIC2: cuando hay un micrófono conectado
LINE: cuando hay equipo de audio conectado
Si hay un dispositivo de audio conectado al jack INPUT,
asegúrese de ajustar el conmutador de selección
de entrada en LINE. De lo contrario, el dispositivo
conectado puede resultar dañado.
4. Conmutador de alimentación
Permite activar/desactivar la alimentación.
5. Conector DC 9V
Conecte el adaptador de CA (se venden por separado) aquí.
Conecte el adaptador de CA al RK-100S antes de enchufarlo
en una toma de CA.
6. Conector USB
Conecte el RK-100S a un ordenador y utilice el soware de
editor de sonido para editar parámetros, como los sonidos
y los patrones de arpegio del RK-100S.
Tras colocar la correa, compruebe que esté bien jada
con los enganches.
Nunca aoje los tornillos de montaje de los enganches
para correa.
Para evitar que la correa se suelte accidentalmente,
le recomendamos que utilice cierres de correa para
guitarra de venta en establecimientos comerciales.
60
Page 61

Preparativos
Preparativos
Conexiones
En la ilustración siguiente se muestra un ejemplo típico de conexiones para el RK-100S. Conecte el equipo en función de sus
necesidades especícas.
Debe conectar todos los dispositivos con la alimentación apagada. Si no se cumple esta precaución, pueden producirse
fallos de funcionamiento o daños en el sistema de altavoces.
INPUT
Conector mono
INPUT
Conector mono
INPUT
Conector mono
Amplicador de monitor, etc.
Auriculares
Conector estéreo
Conector mono
Para una salida estéreo
Para una salida mono
(solo salida de canal
izquierdo)
Si se usan auriculares
Conexión del amplicador de monitor
o el mezclador al jack de salida
Conecte el jack de salida del RK-100S a los jacks de entrada
del mezclador o a los altavoces de monitor autoalimentado.
Nota: Le recomendamos que emita en estéreo para aprovechar al máximo el sonido del RK-100S. Si se utiliza un
cable con conectores mono estándar, solo se emitirá sonido
por el canal izquierdo.
Conexión del micrófono
Para utilizar el RK-100S como un vocoder, conecte los
auriculares con micrófono (complemento no conectado), al
jack INPUT y utilice su voz como la señal del modulador
(consulte la página 64, “Reproducción de un programa de
vocoder”).
Nota: El jack INPUT es mono.
No ejerza una fuerza excesiva al conectar o desconectar
el micrófono.
Compruebe el nivel de salida del micrófono durante
la conexión.
Jack de salida
MIDI IN
Conector estéreo
Cable USB
Cable MIDI
Adaptador de CA
(se venden por separado)
Generador de tonos externo
Auriculares con micrófono
Reproductor de audio digital, etc.
Ordenador
Conexión de un reproductor de audio
El jack INPUT del RK-100S se puede utilizar como un jack
AUX IN.
1. Ajuste el conmutador de selección de entrada (en el
panel lateral) en LINE.
Si hay un dispositivo de audio conectado al jack INPUT,
asegúrese de ajustar el conmutador de selección
de entrada en LINE. De lo contrario, el dispositivo
conectado puede resultar dañado.
2. Conecte el dispositivo de audio al jack INPUT.
3. Mantenga pulsado el botón SHIFT y pulse el botón
SHORT RIBBON.
El RK-100S accederá al modo de entrada directa de
audio, en el que la señal de audio que se introduce
en el jack INPUT simplemente se emite directamente
desde el jack de salida. Si existe una entrada en el jack
INPUT, el botón SHIFT está iluminado. Si la entrada está
sobrecargada, el botón se ilumina en rojo.
Nota:
El jack INPUT es compatible con un conector estéreo,
pero la señal de audio que se emite desde el jack de salida
es mono.
61
Page 62

RK-100S Manual de usuario
4.
Ajuste el volumen del dispositivo de audio conectado
hasta que el botón SHIFT deje de estar iluminado
en rojo.
Conexión de un dispositivo MIDI o un
ordenador al conector MIDI OUT o al
conector USB
Si el conector MIDI OUT del RK-100S está conectado
al conector MIDI IN de un dispositivo MIDI externo,
dicho dispositivo se puede controlar con el teclado o los
controladores del RK-100S.
Si el conector USB del RK-100S está conectado a un
ordenador, el soware de edición de sonido se puede
utilizar para editar parámetros, como los sonidos y los
patrones de arpegio del RK-100S; por su parte, el soware
de secuenciador, por ejemplo, se puede utilizar para
reproducir el generador de sonidos del RK-100S.
Acerca del indicador de pilas agotadas
Mantenga pulsado el botón SHIFT y pulse el botón de
favoritos G para ver la energía restante de las pilas con los
ocho botones de favoritos (A – H) como indicadores de
nivel. El número de botones encendidos puede ser menor
en función de la capacidad de las pilas.
Además, cuando la capacidad de las
pilas se agote, el punto en el lado derecho
de la pantalla parpadeará. Si continúa
utilizando la unidad, el parpadeo se
acelerará.
Si continúa utilizando el equipo en este estado, el indicador
comenzará a parpadear. Le recomendamos que cambie las
pilas cuanto antes o que conecte el adaptador de CA.
Las pilas agotadas deben extraerse inmediatamente
del RK-100S. Dejar las pilas agotadas en el interior
del equipo puede provocar fallos de funcionamiento
(como la fuga del electrólito de las pilas). También debe
extraer las pilas si no va a utilizar el RK-100S durante
un periodo prolongado.
Activación del equipo
El RK-100S se puede activar con un adaptador de CA o
pilas.
Debido a posibles complicaciones por el recorrido del
cable durante actuaciones en directo, se recomienda el
uso de pilas.
Antes de activar el equipo
Asegúrese de que el conmutador de alimentación
esté desactivado antes de conectar la fuente de
alimentación.
Uso de las pilas
1. Abra la tapa de las pilas que está en la parte inferior
del RK-100S.
Conexión del adaptador de CA
Utilice únicamente el adaptador de CA especicado. El
uso de cualquier otro adaptador de CA puede provocar
fallos de funcionamiento.
1. Asegúrese de que el RK-100S esté apagado.
2. Conecte el adaptador de CA opcional al conector DC
9V ubicado en el panel lateral.
Consulte la página 61, “Conexiones”.
3. Enchufe el adaptador de CA en una toma de CA.
Utilice una toma de CA con el voltaje adecuado.
Activación del equipo
Antes de activar el RK-100S, debe desactivar los
dispositivos de salida externa, como los altavoces de
monitor autoalimentado.
1.
Gire el mando VOLUME del RK-100S completamente
hacia la izquierda.
2.
Inserte seis pilas alcalinas o de níquel-hidruro
metálico AA (se venden por separado).
Asegúrese de que las pilas están colocadas en la
posición correcta.
3. Cierre la tapa de las pilas.
4. Para obtener las lecturas más precisas de la energía
restante de las pilas, consulte la sección “Tipo de pilas
y energía restante” en la página 70 y seleccione el tipo
de pilas que se utiliza.
62
2. Mantenga pulsado el conmutador de alimentación
hasta que los indicadores aparezcan en la pantalla.
Cuando los indicadores aparezcan en la pantalla, suelte
el conmutador.
Transcurridos unos segundos, el número de programa
aparecerá en la pantalla.
3.
Baje el volumen de los monitores autoalimentados o
de cualquier otro equipo de salida externa.
Gire el mando VOLUME del RK-100S hasta la posición
4.
adecuada.
5. Ajuste el volumen del equipo de salida externa.
Page 63

Desactivación del equipo
4
3
1
2
1.
Baje el volumen de los altavoces de monitor
autoalimentado o de cualquier otro dispositivo de
salida externa, y luego desactívelos.
Gire el mando VOLUME del RK-100S completamente
2.
hacia la izquierda y, a continuación, mantenga
pulsado el conmutador de alimentación hasta que
la pantalla indique que puede desactivar el equipo
de forma segura.
Si se utiliza el adaptador de CA, no lo desenchufe
durante la desactivación del RK-100S. El RK-100S
guarda ajustes para los botones de favoritos y para
otros parámetros durante la desactivación.
Función de desactivación automática
Si el usuario no realiza ninguna operación durante unas
4 horas, la función de desactivación automática apagará
automáticamente el RK 100S.
Con los ajustes de fábrica, la función de desactivación
Nota:
automática está activada.
Esta función se puede desactivar para que el RK-100S no
se apague automáticamente.
Consulte la página 70, “Función de desactivación automática”.
Interpretación de
Interpretación de demostración
Selección y reproducción
de un programa
Selección de un programa
El RK-100S contiene 200 programas que se pueden utilizar
con distintos géneros.
Uso de la palanca SOUND
Utilice la palanca SOUND del panel frontal para seleccionar
un programa.
1. Mueva la palanca SOUND en la dirección + o -.
El programa cambiará. El número
del programa seleccionado aparece
en la pantalla.
Cada vez que se mueva la palanca,
el número de programa aumentará.
Consulte la página 75, “Voice
Name List (Lista de nombres de
voz)”.
demostración
El RK-100S contiene canciones de demostración para
exhibir sus sonidos.
Consulte la página 75, “Voice Name List (Lista de nombres
de voz)”.
1
1,3
2
1. Mantenga pulsado el botón SHIFT y pulse el botón
TA P.
La interpretación de demostración comenzará.
2. Utilice los botones OCTAVE +/- o la palanca SOUND
para seleccionar la canción de demostración.
3. Pulse el botón SHIFT para nalizar la interpretación
de demostración.
2. Ajuste el mando VOLUME en el nivel adecuado.
3. Toque el teclado para comprobar el sonido.
Pulse el botón OCTAVE para cambiar la gama de
4.
intensidad asignada al teclado.
Consulte la página 65, “Cambio de la octava con los
botones OCTAVE”.
Función Favorites
El RK-100S está equipado con la función Favorites, que le
permite asignar sus programas favoritos a los ocho botones
de favoritos. Se puede almacenar un total de 40 programas
(5 bancos × 8 botones).
Uso de los botones de favoritos
Ya hay programas asignados a estos botones de favoritos.
Estos programas se pueden recuperar inmediatamente
pulsando el botón correspondiente.
1
1
2
63
Page 64

RK-100S Manual de usuario
3
1. Con el botón SHIFT pulsado, mueva la palanca para
seleccionar un banco de favoritos.
Hay cinco bancos de favoritos. Al cambiar de banco, el
número del banco seleccionado aparece en la pantalla.
Nota:
El programa no se cambia si solo se selecciona un
banco. Cambie el programa pulsando un botón de favoritos.
2, 4
2, 4
1,
5
6
2. Pulse uno de los ocho botones de favoritos.
Se seleccionará el programa asignado al botón pulsado.
Consejo:
a otro programa.
El programa asignado al botón se puede cambiar
Asignación de programas a los botones de
favoritos
A continuación se describe cómo cambiar el programa
que está asignado a un botón de favoritos a su programa
favorito.
1,2
1.
Seleccione el programa que se desea asignar a un
botón de favoritos.
2. Con el botón SHIFT pulsado, mueva la palanca para
seleccionar el banco de favoritos en el que se va a
asignar el programa.
El banco de favoritos se cambia. El número del banco
seleccionado aparece en la pantalla.
3.
Mantenga pulsado el botón de favoritos al que desea
asignar un programa.
Una vez que todos los botones de favoritos se iluminen
al mismo tiempo, se ilumina el botón de favoritos al
que se va a asignar el programa, lo que indica que el
programa se ha asignado.
2
3
1.
Conecte el micrófono al jack INPUT en el panel lateral
y establezca el conmutador de selección de entrada
en MIC2.
2. Mantenga pulsado el botón SHIFT y pulse el botón
SHORT RIBBON.
La señal de entrada de audio del jack INPUT se enviará
desde el jack de salida sin modicar (entrada directa
de audio).
El botón SHIFT se iluminará si se introduce una señal
en el jack INPUT. Se iluminará en rojo si se produce una
sobrecarga de entrada.
3.
Vocalice a través del micrófono. Si el botón SHIFT
se ilumina en rojo, establezca el conmutador de
selección de entrada en MIC1.
4. Para regresar al estado normal, mantenga pulsado el botón
SHIFT y vuelva a pulsar el botón SHORT RIBBON.
5. Seleccione un programa de vocoder.
Consulte la página 75, “Voice Name List (Lista de
nombres de voz)”.
6.
Toque el teclado mientras vocaliza a través del
micrófono.
Para escuchar distintos efectos de vocoder, pruebe a
vocalizar de formas distintas y a cambiar el acorde
que toca.
Consejo:
do simplemente al tocar el teclado; no es necesario vocalizar
a través del micrófono.
Algunos programas de vocoder producirán soni-
Reproducción de un programa de vocoder
Un vocoder modica la señal de un oscilador o de otra
fuente (el “portador”) aplicando las características
espectrales de una fuente de entrada externa como una
voz humana (el “modulador”).
La forma más habitual de usar un vocoder es producir un
efecto de “instrumento que habla” tomando la señal de
entrada de su voz desde el micrófono mientras mantiene
pulsado un acorde en el teclado. Sin embargo, también
puede obtener resultados interesantes utilizando fuentes
de entrada de audio que no sean una voz humana, como
sonidos rítmicos o cualquier otro sonido que le guste.
A continuación se muestra cómo conectar un micrófono y
probar el vocoder.
64
Modicación del sonido
Para que su interpretación sea más expresiva, puede
modicar los sonidos del RK-100S utilizando el controlador
de cinta corta, el controlador de cinta larga, y también
según la forma de tocar el teclado.
Pruebe distintos modos de tocar cada programa que
seleccione.
Uso del teclado para modicar el sonido:
velocidad
El efecto variará en función de la cantidad de fuerza que
utilice para tocar las teclas. Por lo general, la fuerza de la
pulsación afectará al tono o al volumen.
Consejo: Durante una interpretación, los ocho botones de
favoritos (A – H) se iluminan como un medidor de nivel,
en función de la velocidad del teclado.
Page 65

Selección y reproducción de un programa
Intensidad original
Sonido original
El teclado del RK-100S no admite el aertouch.
Cambio de la octava con los botones
OCTAVE
La gama de intensidad asignada al controlador de cinta
larga cuando se toca el teclado o se tocan escalas se puede
modicar en incrementos de una octava en una gama de
±3 octavas.
Pulse el
botón -
Pulse simultáneamente los botones OCTAVE +/- para
volver a ±0.
Gama de
cinta y
teclado
C6–C9
↓
C5–C8
↓
C4–C7
↓
C3–C6
↓
C2–C5
↓
C1–C4
↓
C0–C3
↓
LED OCTAVE en la pantalla
LED del lado derecho iluminado en rojo
LED del lado derecho iluminado en naranja
LED del lado derecho iluminado en verde
Oscurecido
LED del lado izquierdo iluminado en verde
LED del lado izquierdo iluminado en naranja
LED del lado izquierdo iluminado en rojo
Pulse el
botón +
↑
↑
↑
↑
↑
↑
↑
Aplicación de modulación
1.
Pulse el botón SHORT RIBBON para que se ilumine
en verde.
Al tocar el teclado, utilice el controlador de cinta
2.
corta.
Deslice el dedo a izquierda y derecha a lo largo del
controlador de cinta. Con el sonido original en el
extremo izquierdo de la cinta, aplique modulación
moviendo el dedo hacia el otro extremo. Al quitar el
dedo de la cinta el sonido volverá al ajuste original.
En función del programa seleccionado, la profundidad
del vibrato variará o el tono se modicará cambiando
la frecuencia de corte.
Uso del controlador de cinta corta
El controlador de cinta corta se puede utilizar para controlar
la intensidad y la modulación de los sonidos.
El parámetro que se controla se puede cambiar con el botón
SHORT RIBBON.
Consejo: El soware de editor de sonido (cuando el RK-
100S está conectado a un ordenador por USB) se puede
utilizar para especicar si la intensidad o la modulación
se controlan con el controlador de cinta corta cuando se
cambia el programa.
Control de la intensidad
1.
Pulse el botón SHORT RIBBON para que se ilumine en
rojo.
2.
Al tocar el teclado, utilice el controlador de cinta
corta.
Deslice el dedo a izquierda y derecha a lo largo del
controlador de cinta. Con la intensidad original en el
centro de la cinta, suba y baje la intensidad moviendo
el dedo en una de las direcciones. Al quitar el dedo de
la cinta la intensidad volverá al ajuste original.
2
1
2
Uso del controlador de cinta larga
El controlador de cinta larga se puede utilizar para tocar
escalas y para controlar la intensidad y el ltro de sonidos.
Consejo: El tono, la gama de notas y la dirección en la que
se aplica el efecto con el controlador de cinta larga varían
en función del programa. Además, estos ajustes se pueden
especicar con el soware de editor de sonido (cuando el
RK-100S está conectado a un ordenador por USB).
Reproducción de escalas
Se pueden tocar notas individuales de la escala especicada
anteriormente.
2
1
1.
Con los botones LONG RIBBON PITCH y FILTER
desactivados, utilice el controlador de cinta larga.
Deslice el dedo a izquierda y derecha a lo largo
del controlador de cinta. Se puede tocar la escala
especicada.
65
Page 66

RK-100S Manual de usuario
Intensidad original
Las notas producidas con el controlador de cinta son
monofónicas (notas individuales). Además, las notas
de intensidad superior (posición de la cinta) tendrán
prioridad cuando se toquen.
Consejo: La escala especicada que se va a tocar se puede
cambiar con el soware de editor de sonido (cuando el
RK-100S está conectado a un ordenador por USB).
2.
La gama de octavas se puede cambiar con los botones
OCTAVE +/- mientras se toca.
Control de la intensidad
Existen dos métodos de control.
Consejo:
sidad con el controlador de cinta larga se pueden especicar
con el soware de editor de sonido (cuando el RK-100S está
conectado a un ordenador por USB).
Control de la intensidad del continuante
La gama y la dirección en la que se ajusta la inten-
2
1
2
3
4.
Retire el dedo del botón para detener el continuante.
Control de la intensidad con la mano ligera libre
1
2
3
1.
Sin producir ningún sonido, Mantenga pulsado el
botón SHIFT y pulse el botón LONG RIBBON PITCH.
El botón PITCH se ilumina.
2. Toque el teclado.
El sonido continúa produciéndose.
3. Utilice la cinta para controlar la intensidad.
Consulte la página 66, “Control de la intensidad del
continuante”.
Si la intensidad se eleva con el botón OCTAVE, puede
que sea difícil escuchar el sonido, en función de la zona
usada en la cinta.
4.
Vuelva a pulsar el botón PITCH para desactivar el
botón y detener el continuante.
1. Seleccione el programa.
En este caso, seleccione un programa en el que el sonido
no se silencie por completo inmediatamente después de
pulsar una tecla del teclado.
Es posible que no se produzca ningún efecto con un
programa en el que el sonido se silencie por completo
inmediatamente después de pulsar una tecla del
teclado.
2. Mientras se produce un sonido, mantenga pulsado
el botón LONG RIBBON PITCH.
El botón PITCH se ilumina. El sonido seguirá
produciéndose mientras el botón esté pulsado.
3. Utilice la cinta para controlar la intensidad.
Deslice el dedo a izquierda y derecha a lo largo del
controlador de cinta. Con la intensidad original en la
ubicación que primero se ha tocado en la cinta, suba
y baje la intensidad moviendo el dedo en una de las
direcciones.
Al quitar el dedo de la cinta la intensidad volverá al
ajuste original.
Control del ltro
Al igual que con el control de intensidad, existen dos
métodos de control.
Consejo:
lador de cinta larga se pueden especicar con el soware
de editor de sonido (cuando el RK-100S está conectado
a un ordenador por USB). El efecto de ltrado se puede
ajustar en la sección de cinta larga del soware de editor de
sonido. En la sección de patch virtual, establezca “Source”
en “Long Ribbon” y utilice “Destination” para especicar
los parámetros que se van a controlar. Los parámetros
que se van a controlar también se pueden especicar con
asignaciones de cinta larga Fx.
Control del ltro del continuante
Los efectos que se pueden controlar con el contro-
1
1
2
66
1. Mientras se produce un sonido, mantenga pulsado
el botón LONG RIBBON FILTER.
El botón FILTER se ilumina.
Page 67

Selección y reproducción de un programa
El sonido seguirá produciéndose mientras el botón
esté pulsado.
2. Utilice la cinta.
Deslice el dedo a izquierda y derecha a lo largo del
controlador de cinta. Con el sonido original en el
extremo izquierdo de la cinta, aplique modulación
moviendo el dedo hacia el otro extremo. Al quitar el
dedo de la cinta el sonido volverá al ajuste original.
Sonido original
Nota:
Los cambios en los parámetros de efectos dieren en
función de los ajustes.
3.
Retire el dedo del botón para detener el continuante.
Control del ltro con la mano ligera libre
1
2
Reproducción de arpegios
El arpegiador es una función que reproduce automáticamente un acorde “roto” (arpegio) cuando mantiene pulsado
un acorde en el teclado.
4
2,5
1
1. Seleccione un programa de sintetizador.
El arpegiador también se puede utilizar con el
programa de vocoder; sin embargo, se logra un efecto
mejor con un programa de sintetizador. Además, se
recomienda un sonido con un sustain corto.
2. Pulse el botón ARP para que se ilumine el LED.
El arpegiador se activa.
El botón ARP se ilumina y los botones de favoritos A
–H se iluminan secuencialmente.
3. Mantenga pulsado un acorde en el teclado.
Comenzará a reproducirse un arpegio.
El patrón de arpegio que se reproduce se puede
cambiar (consulte la página 68, “Ajustes de patrones
de arpegio”).
3
3
1.
in producir ningún sonido, Mantenga pulsado el
botón SHIFT y pulse el botón LONG RIBBON FILTER.
El botón FILTER se ilumina.
2. Toque el teclado.
El sonido continúa produciéndose.
3. Utilice la cinta.
Consulte la página 66, “Control del ltro del continuante”.
Consejo: La dirección en la que se aplica el efecto cuando
se utiliza la cinta se puede cambiar con el soware de
editor de sonido (cuando el RK-100S está conectado a un
ordenador por USB).
4.
Vuelva a pulsar el botón FILTER para desactivar el
botón y detener el continuante.
4. Pulse el botón TAP para ajustar el tempo.
El botón TAP se ilumina en verde y el tempo aparece
en la pantalla.
5. Pulse el botón ARP para que se apague el LED.
El arpegio deja de reproducirse.
Cómo continuar tocando sin tocar el
teclado (retención)
Se puede especicar el funcionamiento del arpegiador al
dejar de tocar el teclado.
1.
Mantenga pulsado el botón ARP hasta que se ilumine
en verde.
Con el botón ARP iluminado en verde, la retención
se activa y el arpegiador continuará reproduciéndose
aunque el usuario no esté tocando el teclado.
Nota:
Independientemente de si el arpegiador está acti-
vado o desactivado, al mantener pulsado el botón ARP se
activará el arpegiador y la retención.
2. Pulse el botón ARP para desactivar el arpegiador.
La retención se desactiva al mismo tiempo que el
arpegiador.
67
Page 68

RK-100S Manual de usuario
TYPE: UP
Ajustes de patrones de arpegio
Esta función le permite seleccionar el tipo de arpegio
producido cuando el arpegiador está activado y se ha
pulsado una tecla del teclado.
Además, las notas del patrón de arpegio seleccionado se
pueden activar y desactivar.
1. Mantenga pulsado el botón SHIFT y pulse el botón
ARP.
El ajuste de patrones de arpegio
aparece en la pantalla.
Con los botones de favoritos A –
H utilizados como las teclas de
paso del arpegiador, únicamente
están iluminados los botones
correspondientes a los pasos activados (nota uno).
2. Utilice los botones OCTAVE +/- o la palanca SOUND
para especicar el patrón de arpegio.
UP: las notas se reproducirán de forma consecutiva de
intensidades bajas a altas.
Si mantiene pulsadas más notas que la polifonía
máxima, se reproducirán las intensidades más bajas
de las notas que mantiene pulsadas, hasta alcanzar la
polifonía máxima.
3.
Pulse los botones de favoritos A – H para desactivar el
botón (nal de nota) y cambie la nota correspondiente
al paso a un silencio.
dn (abajo): las notas se reproducirán de forma
consecutiva de intensidades altas a bajas.
AL.1: se alternarán los sonidos de arriba y abajo. (Las
notas más alta y más baja se reproducirán una vez).
AL.2: se alternarán los sonidos de arriba y abajo. (Las
notas más alta y más baja se reproducirán dos veces, una
en sentido ascendente y una en sentido descendente).
rnd (aleatorio): las notas se reproducirán aleatoriamente.
4.
Pulse el botón SHIFT para salir de los ajustes de
patrones de arpegio.
Funciones de cambio
Las funciones de cambio se utilizan para especicar diversos
ajustes para el RK-100S. Para cambiar un ajuste, mantenga
pulsado el botón SHIFT y pulse el botón correspondiente.
Para salir de la función de cambio, pulse el botón SHIFT.
Además, si no se pulsa ningún botón durante un periodo
de tiempo especicado, se saldrá de la función de cambio
automáticamente y el RK-100S volverá a un estado en el
que se puede seleccionar un programa.
Los programas asignados a los botones de favoritos
y los ajustes de las funciones de cambio se guardan
cuando el RK-100S se desactiva. Si las pilas están
llegando al nal de su vida útil y el botón de favoritos
A parpadea (consulte “Tipo de pilas y energía restante”
en la página 106), estos ajustes no se guardan. Si tiene
un adaptador de CA (opcional), conéctelo.
Curva de velocidad
Esta función le permite especicar la forma en que el
volumen y el tono cambian en función de la velocidad del
teclado (fuerza utilizada para pulsar las teclas).
68
trG (disparador): las notas que mantiene pulsadas se
reproducirán simultáneamente en el tempo actual.
1. Mantenga pulsado el botón SHIFT y pulse el botón
de favoritos A.
El ajuste de curva de velocidad
aparece en la pantalla.
Page 69

Funciones de cambio
Sonoridad
(1) (127)
2. Utilice los botones OCTAVE +/- o la palanca SOUND
para especicar la curva de velocidad.
MAX
(127)
5
4
3
8
7
6
MIN (1)
ppp
Cu.1 Esta curva requiere que toque con fuerza para
producir un efecto.
Cu.2, 3 |
Cu.4 Esta es la curva típica.
Cu.5 |
Cu.6 Esta curva produce un efecto sin necesidad de
tocar con mucha fuerza.
Cu.7 Esta curva produce un efecto bastante estable
con pocos cambios para la reproducción de
fuerza media.
Cu.8 Esta curva produce un efecto bastante estable
con pocos cambios para la reproducción de
fuerza media (una curva más plana que 7).
127 Todas las notas sonarán a la velocidad máxima
(127). Este ajuste imita el comportamiento de
sintetizadores analógicos antiguos.
Cu.7 y 8 producen pocos cambios para la reproducción
de fuerza media. Sin embargo, estas curvas producirán
un gran cambio con notas tocadas con suavidad, por lo
que pueden resultar más difíciles de controlar. Ela la
curva que sea más adecuada para su dinámica al tocar
o para el efecto que desea obtener.
Intensidad
(MIDI-Sonoridad)
2
1
f
Si se selecciona oFF, no se emite ningún sonido cuando
se utiliza el controlador de cinta larga.
3.
Pulse el botón SHIFT para salir de la función de
cambio.
Canal MIDI global
Para intercambiar datos con un dispositivo MIDI externo
conectado, debe ajustar el canal MIDI global del RK-100S
para que coincida con el canal MIDI del dispositivo MIDI
externo.
1. Mantenga pulsado el botón SHIFT y pulse el botón
de favoritos C.
El número del canal MIDI global
aparece en la pantalla.
2.
Utilice los botones OCTAVE +/- o la
palanca SOUND para especicar el
canal MIDI global.
Pulse el botón SHIFT para salir de la función de
3.
cambio.
Ajuste el canal MIDI del dispositivo MIDI externo
4.
conectado.
Nota:
Para ver información detallada sobre cómo ajustar
el canal MIDI del dispositivo MIDI externo, consulte el
manual de usuario del dispositivo conectado.
Canal MIDI de cinta larga
Esta función le permite especicar el canal MIDI cuando
utiliza el controlador de cinta larga para tocar.
Especique un ajuste cuando utilice un programa con la
generación de sonido ajustada en Multi (modo de voz:
Multi) o cuando el dispositivo MIDI externo que está
conectado al jack MIDI OUT se esté reproduciendo con el
controlador de cinta larga, en vez de con el teclado.
Al cambiar el ajuste, el sonido del RK-100S dejará de
producirse con el controlador de cinta larga.
3.
Pulse el botón SHIFT para salir de la función de
cambio.
Velocidad de cinta larga
Esta función le permite especicar la velocidad cuando
utiliza el controlador de cinta larga para tocar escalas.
1. Mantenga pulsado el botón SHIFT y pulse el botón
de favoritos B.
El ajuste de velocidad aparece en
la pantalla.
2.
Utilice los botones OCTAVE +/- o la
palanca SOUND para especicar el
ajuste de velocidad.
La gama del ajuste de velocidad es 1 – 127.
1. Mantenga pulsado el botón SHIFT y pulse el botón
de favoritos D.
El número del canal MIDI de cinta
larga aparece en la pantalla.
2.
Utilice los botones OCTAVE +/- o la
palanca SOUND para especicar el
canal MIDI.
GLb: el canal MIDI coincidirá con el canal MIDI global
(consulte “Canal MIDI global”).
r.01...r.16: 1ch..16ch
Consejo:
controlar un dispositivo MIDI externo conectado al jack
MIDI OUT, especique el mismo canal MIDI que se ha
especicado en el dispositivo MIDI externo.
Cuando utilice el controlador de cinta larga para
69
Page 70

RK-100S Manual de usuario
3.
Pulse el botón SHIFT para salir de la función de
cambio.
Nota: Si el arpegiador está activado, los mensajes de nota
se transmiten del jack MIDI OUT con el canal MIDI global.
Transposición
Esta función le permite especicar la intensidad general en
pasos de un semitono (100 centésimas). Utilícela cuando
desee realizar la transposición para adaptar la canción que
está tocando en una gama de una octava arriba o abajo.
1. Mantenga pulsado el botón SHIFT y pulse el botón
de favoritos E.
El ajuste de transposición aparece
en la pantalla.
2.
Utilice los botones OCTAVE +/- o la
palanca SOUND para especicar el
ajuste de transposición.
La gama del ajuste de transposición es una octava arriba
o abajo (-12 - 12).
1. Mantenga pulsado el botón SHIFT y pulse el botón
de favoritos G.
El tipo de pilas aparece en la
pantalla.
Los ocho botones de favoritos (A –
H) se iluminan para indicar el nivel
de energía restante de las pilas. El
número de botones encendidos
puede ser menor en función de la
capacidad de las pilas.
Pilas nuevas: todos los botones encendidos
Nivel bajo de energía restante de las pilas: solo el botón
A encendido
Hora de cambiar las pilas: el botón A parpadea
3.
Pulse el botón SHIFT para salir de la función de
cambio.
Función de ahorro de energía
Cuando el RK-100S está alimentado con pilas, la función de
ahorro de energía desactivará automáticamente la pantalla y
los LED en función del nivel de energía restante de las pilas.
Nota: Con los ajustes de fábrica, la función de ahorro de
energía está desactivada.
1. Mantenga pulsado el botón SHIFT y pulse el botón
de favoritos F.
El ajuste para la función de ahorro
de energía aparece en la pantalla.
2.
Utilice los botones OCTAVE +/- o la
palanca SOUND para seleccionar
el ajuste.
on: activado
oFF: desactivado
3.
Pulse el botón SHIFT para salir de la función de
cambio.
Tipo de pilas y energía restante
Esta función le permite seleccionar el tipo de pilas que se
van a usar.
Además, se puede comprobar el nivel de energía restante
de las pilas que se utilizan en ese momento.
Si el tipo seleccionado diere del tipo de pilas que se
utilizan, la cantidad restante de energía de las pilas no
se indicará correctamente.
Cuando el adaptador de CA está conectado, todos los
botones están desactivados.
2. Utilice los botones OCTAVE +/- o la palanca SOUND
para seleccionar el tipo de pilas.
AL.: pilas alcalinas
ni.H: pilas de níquel-hidruro metálico
3.
Pulse el botón SHIFT para salir de la función de
cambio.
Función de desactivación automática
El RK-100S está equipado con una función de desactivación
automática. Con esta función, el RK-100S se desactiva
automáticamente (estado de consumo de energía bajo) si
el usuario no realiza ninguna acción durante unas cuatro
horas.
Si el RK-100S se ha desactivado automáticamente con la
función de desactivación automática, no se puede activar
pulsando un botón o una tecla del teclado ni utilizando un
controlador de cinta. Vuelva a activar el RK-100S.
Con los ajustes de fábrica, la función de desactivación
Nota:
automática está activada.
1. Mantenga pulsado el botón SHIFT y pulse el botón
de favoritos H.
El ajuste para la función de
desactivación automática aparece
en la pantalla.
70
Page 71

MIDI
Teclado MIDI
MIDI OUT
RK-100S
Generador de tonos MIDI
Ordenador
2. Utilice los botones OCTAVE +/- o la palanca SOUND
para seleccionar el ajuste.
4hr: activado
diS: desactivado
3.
Pulse el botón SHIFT para salir de la función de
cambio.
MIDI
Uso del RK-100S con otros dispositivos MIDI (MIDI)
MIDI signica “interfaz digital de instrumentos musicales”
y se trata de un estándar mundial para intercambiar
distintos tipos de datos musicales entre instrumentos
musicales electrónicos y ordenadores.
Cuando se utilizan cables MIDI para conectar dos o
más dispositivos MIDI, los datos de interpretación se
pueden intercambiar entre los dispositivos, aunque estos
pertenezcan a distintos fabricantes.
El RK-100S le permite asignar números de cambio de
control a los principales parámetros que afectan al sonido,
y controlar estos parámetros desde un secuenciador MIDI
externo mientras toca el generador de tonos.
También puede utilizar las cintas o botones asignados para
transmitir estos cambios de control con el n de controlar
un dispositivo MIDI externo.
Control de dos o más generadores de tonos
MIDI externos desde el RK-100S
También puede utilizar un tablero de patch MIDI para
controlar varios dispositivos MIDI.
MIDI Keyboard
MIDI IN
MIDI OUT
MIDI IN
MIDI OUT
Tablero de patch MIDI
Conexión del RK-100S al ordenador por USB
Conecte un cable USB al conector USB del RK-100S y al
ordenador.
USB
RK-100S
Conexión de dispositivos MIDI/ordenadores
Control de un generador de tonos MIDI
externo desde el RK-100S
Cuando desee utilizar el teclado, los controles y el
arpegiador del RK-100S para tocar un generador de tonos
MIDI externo, utilice un cable MIDI para conectar el
conector MIDI OUT del RK-100S al conector MIDI IN del
generador de tonos MIDI externo.
RK-100S
MIDI OUT
MIDI IN
Cable USB
Nota: Para utilizar una conexión USB, debe instalar el con-
trolador MIDI USB de Korg en su ordenador. Descargue el
controlador MIDI USB de Korg del sitio web de Korg e ins-
tálelo según las instrucciones de la documentación incluida.
Ajustes relacionados con MIDI
Ajuste de canales MIDI
Para intercambiar datos con un dispositivo MIDI externo
conectado, debe ajustar el canal MIDI del RK-100S para que
coincida con el canal MIDI del dispositivo MIDI externo.
Consulte la sección “Canal MIDI global” en la página 69 y
especique el canal MIDI global.
Grabación de la salida MIDI del arpegiador
del RK-100S a un secuenciador MIDI externo
o un ordenador
Conexión y ajuste
Conecte el conector MIDI OUT del RK-100S al conector
MIDI IN del secuenciador MIDI externo.
71
Page 72

RK-100S Manual de usuario
Grabación de los datos de notas del arpegiador a un secuenciador MIDI externo
Active el arpegiador del RK-100S (botón ARP iluminado),
toque el teclado y grabe los datos de notas en su
secuenciador MIDI externo.
Sincronización del arpegiador
Para obtener información sobre los ajustes relacionados con
la sincronización de su dispositivo MIDI externo, consulte
el manual de su dispositivo.
Para utilizar el RK-100S como maestro y el dispositivo
MIDI externo como secundario, conecte el conector MIDI
OUT del RK-100S al conector MIDI IN de su dispositivo
MIDI externo.
Ajuste el dispositivo MIDI externo para recibir mensajes
de reloj MIDI entrantes. El dispositivo MIDI externo (p.
ej., un secuenciador o una caja de ritmos) funcionará con
el tempo especicado por el botón TEMPO del RK-100S.
Solución de problemas
Si cree que existe un fallo de funcionamiento, compruebe
los puntos siguientes. Si esta operación no soluciona el
problema, póngase en contacto con un distribuidor cercano.
La alimentación no se enciende
• ¿Está el adaptador de CA conectado a una toma de CA?
(Consulte la página 61, “Conexiones”).
• ¿Se han agotado las pilas?
Mantenga pulsado el botón SHIFT y pulse el botón **
para comprobar el nivel de energía restante de las pilas
(consulte la página 70, “Tipo de pilas y energía restante”).
• ¿Se han insertado las pilas con la orientación correcta?
(Consulte la página 62, “Uso de las pilas”).
No funciona la entrada de sonido
•
¿Se ha conectado correctamente el micrófono que se
utilizará como el modulador con el programa de vocoder
al jack INPUT?
¿Se ha ajustado adecuadamente el conmutador de
•
selección de entrada?
El arpegiador no se inicia
• ¿Está el arpegiador activado (botón ARP iluminado)?
No se produce ningún sonido cuando el RK-100S se
controla con el controlador de cinta larga
• ¿Se han utilizado las funciones de cambio para cambiar
la velocidad de cinta larga a oFF?
Seleccione cualquier ajuste que no sea oFF. (Consulte la
página 69, “Velocidad de cinta larga”).
• ¿Se han utilizado las funciones de cambio para cambiar
el canal MIDI de cinta larga?
Especique el mismo canal MIDI para producir sonido
(Consulte la página 69, “Canal MIDI de cinta larga”).
No se produce ningún sonido desde un generador
de sonidos MIDI externo que está conectado con un
cable MIDI
•
¿Se ha conectado correctamente el cable MIDI? (Consulte
la página 61, “Conexiones”).
¿Coincide el canal MIDI del dispositivo MIDI externo
•
con el canal MIDI del RK-100S? (Consulte la página 69,
“Canal MIDI global”).
Se desactiva automáticamente
• ¿Se ha activado la función de desactivación automática?
(Consulte la página 70, “Función de desactivación
automática”).
No hay Sonido
•
¿Están los monitores autoalimentados o los auriculares
conectados al jack correctamente? (Consulte la página 61,
“Conexiones”).
¿Está el sistema de monitor conectado encendido? ¿Está
•
subido el volumen?
¿Está el mando VOLUME ajustado en una posición en la que
•
se emitirá sonido?
No pasa nada cuando se pulsa el botón OCTAVE UP
o DOWN
• ¿Se ha ajustado una función de cambio?
Pulse el botón SHIFT para salir de la función de cambio.
72
Page 73

Especicaciones
Especicaciones
Teclado 37 notas (teclado delgado, sensible a la velocidad, sin aertouch)
Sistema de generación de sonido MMT (Multiple Modeling Technology)
Programas: se pueden editar con el soware de editor de sonido cuando se conecta un ordenador.
Número de timbres 2 como máximo (cuando se utiliza Layer, Split o Multi)
Polifonía 8 voces (hasta 4 cuando se selecciona el vocoder)
Sintetizador 2 osciladores + generador de ruido
Oscilador 1
Onda SAW, PULSE, TRIANGLE, SINE, FORMANT, NOISE, PCM/DWGS, AUDIO IN
Modulación WAVEFORM, CROSS, UNISON, VPM
Oscilador 2
Onda SAW, PULSE, TRIANGLE, SINE
Modulación RING, SYNC, RING+SYNC
Forma de onda
Tipo WS DRIVE, DECIMATOR, HARDCLIP, OCT SAW, MULTI TRI, MULTI SIN, SUB OSC SAW,
SUB OSC SQU, SUB OSC TRI, SUB OSC SIN, LEVEL BOOST
Filtros de varios modos
Filtro 1 -24 dB/oct LPF– -12 dB/oct LPF–HPF–BPF–Thru
Filtro 2 LPF, HPF, BPF
Vocoder Vocoder de 16 bandas, panoramización y nivel ajustables para cada banda, función de
cambio de formante, función de mantenimiento de formante
Efectos
Timbre EQ de 2 bandas
Maestro Efectos maestros (17 algoritmos de efectos)
Arpegiador UP, DOWN, ALT1/2, aleatorio, disparador (6 tipos), función de arpegiador de pasos
Programas 200 programas
Entrada/salida
Entrada
Jack INPUT
Conmutador de selección de entrada MIC1: entrada de micrófono [ganancia baja] (complemento no conectado)
MIC2: entrada de micrófono [ganancia alta] (complemento no conectado)
LINE: entrada de línea (entrada mono [Lch])
Conectores Jacks mini mono
Salida
Jack de salida
Conectores Jack phone estéreo de 1/4”
Nivel máximo de salida 25mW + 25mW a 33 ohmios de carga
MIDI OUT
Conector USB Tipo B
Pantalla LED de 7 segmentos, 3 dígitos
Alimentación
Duración de las pilas Aproximadamente 8 horas (
Dimensiones (anchura x profundidad x altura) 830 x 263 x 68 mm
Peso 3.4 kg (incluidos las pilas)
Elementos incluidos Seis pilas AA, correa, manual de usuario, Carcasa blanda
Opcional (se vende por separado)
Seis pilas AA (alcalinas o de níquel-hidruro metálico) o Adaptador de CA (CC 9 V )
pilas alcalinas)
Adaptador de CA (CC 9 V )
* Las especicaciones y el aspecto están sujetos a cambios sin previo aviso por mejora.
73
Page 74

Appendices
Page 75

Voice Name List
Program
No. Program Name Category Arp SW Voice Mode
1 Stab Saw Synth Hard O Single
2 OB Pad Synth Hard O Single
3 Saw Pad Synth Hard O Single
4 Needle Synth Hard O Single
5 Detuned Poly Synth Hard O Single
6 Unison Poly Synth Hard O Single
7 Simple Synth Hard O Single
8 Sep Wave Synth Hard O Single
9 Poly Line Synth Hard O Single
10 P5 Comp Synth Hard O Single
11 TRANCER Synth Hard O Single
12 Detune Pad Synth Hard O Single
13 PhasePad Synth Hard O Single
14 FILLER Synth Hard O Single
15 Bright Pad Synth Hard O Single
16 Sweep Pad Synth Hard O Single
17 Poly-400 Synth Hard O Single
18 Square Comp Synth Hard O Single
19 Backin Lead Synth Hard O Single
20 Poly Saw 1 Synth Hard O Single
21 Poly Saw 2 Synth Hard O Single
22 Edge Saw Synth Hard O Single
23 ANALOG Synth Hard O Single
24 Fun Lead Synth Hard O Single
25 TIKTOK Synth Hard O Single
26 Final Brass Synth Brass O Single
27 Brass 99 Synth Brass O Layer
28 Super Brass Synth Brass O Single
29 Synth Brass Synth Brass O Single
30 Fat Brass Synth Brass O Single
31 Slow Brass Synth Brass O Single
32 Soft Brass Synth Brass O Single
33 VPM Brass Synth Brass O Single
34 Synth Tp Synth Brass O Single
35 Brass Ens Synth Brass O Layer
36 Saw Simple Wave O Single
37 Square Simple Wave O Single
38 Pulse Simple Wave O Single
39 8bit Tri Simple Wave O Single
40 Sine Simple Wave O Single
41 Saw Bass Bass O Single
42 Simple Bass Bass O Single
43 MG Bass Bass O Single
44 Detune Bass Bass O Single
45 NuWave Bass Bass O Single
46 Line Rez Bass Bass O Single
47 Line Bass Bass O Single
48 Oddsy Bass Bass O Single
49 Krash Bass Bass O Single
50 Magnum Bass Bass O Single
51 Bakin’ Bass Bass O Single
Voice Name List
52 MS-101 Bass O Single
53 Acid Ring Bass Bass O Single
54 Boost Bass Bass O Single
55 Jami Bass Bass O Single
56 Ring Bass Bass O Single
57 Knock Bass Bass O Single
58 Sub Bass Bass O Single
59 80’s Bass Bass O Single
60 Mini Bass Bass O Single
61 Pulse Bass Bass O Single
62 VPM Bass 1 Bass O Single
63 VPM Bass 2 Bass O Single
64 Hybrid Bass Bass O Layer
65 VOX Bass Bass O Single
66 DW8000 Lead Lead O Single
67 Fusion Lead Lead O Single
68 5th Saw Lead Lead O Single
69 Dukey Lead Lead O Single
70 Mini KORG Lead O Single
71 Pocket Lead Lead O Single
72 Turn Lead Lead O Single
73 Unison Squ Lead Lead O Single
74 Glider Lead Lead O Single
75 3OSC Lead Lead O Single
76 Old Lead Lead O Layer
77 MG Square Lead Lead O Single
78 Cheep Lead Lead O Single
79 Phunky Lead Lead O Single
80 70’s Fun Lead O Single
81 Rez Lead Lead O Single
82 Vintage Lead Lead O Single
83 Da Lead Lead O Single
84 Super Lead Lead O Layer
85 Wired Lead Lead O Single
86 Velo Sync Lead Lead O Single
87 Sync Lead Lead O Single
88 Robo Sync Lead Lead O Single
89 High Voltage Lead Lead O Single
90 Piano & Lead Lead O Layer
91 PWM Strings Strings/Pad O Single
92 Syn Strings Strings/Pad O Single
93 Strings Machine Strings/Pad O Single
94 Solin Strings Strings/Pad O Multi
95 Str Ensemble Strings/Pad O Single
96 Low Pad Strings/Pad O Single
97 Ana Strings Strings/Pad O Single
98 Royal Pad Strings/Pad O Single
99 Warm Pad Strings/Pad O Multi
100 Pulse Pad Strings/Pad O Single
101 Xtal Pad Strings/Pad O Multi
102 E.P Pad Strings/Pad O Multi
103 Vox Pad Strings/Pad O Layer
104 IDM Pad Strings/Pad O Single
105 Pan Tran Strings/Pad O Single
106 Oct Pad Synth Soft O Single
107 Solemn Brass Synth Soft O Single
108 Golden Synth Synth Soft O Single
109 Stream Pad Synth Soft O Single
75
Page 76

RK-100S Owner’s manual
110 BPF Sweep Synth Soft O Single
111 Tremolos Synth Soft O Single
112 Arp Pad Synth Soft On Layer
113 Ambi Pad Synth Soft O Single
114 Syn Choir Synth Soft O Single
115 Voice /A/ Synth Soft O Single
116 Ens Bell Bell/Decay O Layer
117 VPM Bell Bell/Decay O Layer
118 Magic Bell Bell/Decay O Layer
119 Syn Bell Bell/Decay O Layer
120 M1 Bell Bell/Decay O Layer
121 Ice Field Bell/Decay O Single
122 IDM 5100 Bell/Decay O Single
123 Deep Bell Bell/Decay O Single
124 EL Pizzo Bell/Decay O Single
125 Poly Shot Bell/Decay O Single
126 Pizz Corn Bell/Decay O Single
127 Dry Plan Bell/Decay O Single
128 JPT8 DCY Bell/Decay O Multi
129 Synth Pizz Bell/Decay O Layer
130 Brett Piano Bell/Decay On Single
131 M1 Piano Keyboard O Single
132 Toy Piano Keyboard O Single
133 Synth E.Piano1 Keyboard O Single
134 Synth E.Piano2 Keyboard O Single
135 P5 Clav Keyboard O Single
136 PW Clav Keyboard O Single
137 HARPSIN Keyboard O Single
138 M1 Organ Keyboard O Single
139 DW Organ Keyboard O Single
140 VOX Organ 1 Keyboard O Single
141 VOX Organ 2 Keyboard O Single
142 Wet Reed Keyboard O Single
143 Key Flute Keyboard O Single
144 Reed Key 1 Keyboard O Single
145 Reed Key 2 Keyboard O Single
146 Z-Field Arp/Seq On Single
147 Analog Bell Arp/Seq On Single
148 Pop Pizz Arp/Seq On Layer
149 Tiny Mallet Arp/Seq On Layer
150 Synth Harp Arp/Seq On Single
151 Auto Bass Arp/Seq On Layer
152 Time Line Arp/Seq On Single
153 RHYZMICA Arp/Seq On Single
154 Builder Arp/Seq O Single
155 Min.Deal Arp/Seq On Layer
156 S&H Sign Arp/Seq On Single
157 TLKVOXER Arp/Seq On Single
158 Move Pad Arp/Seq On Layer
159 RIBBON 1 Arp/Seq On Layer
160 RIBBON 2 Arp/Seq On Layer
161 PHAZKIT Arp/Seq On Multi
162 Eskay Two Arp/Seq On Single
163 Chip Tune Arp/Seq On Layer
164 Filter House Arp/Seq O Layer
165 SPUTNIK Arp/Seq O Layer
166 Sweeping Motion O Layer
167 Water Edge Motion On Layer
168 Stairs Pad Motion On Layer
169 Blue & White Motion On Layer
170 S&H Pad Motion O Multi
171 TRIPCYCL Motion O Single
172 DWGS Wave Motion O Single
173 IZDISA Motion O Single
174 CPU Talk Motion O Single
175 PSYCHETR Motion On Layer
176 DJ Horn Hit/Drum O Layer
177 2 Many OSC Hit/Drum O Layer
178 Domin8or Hit/Drum O Single
179 Major Chord Hit/Drum O Layer
180 Artcore Chord Hit/Drum O Layer
181 4OSC m7 Hit/Drum O Layer
182 Sweep Chord Hit/Drum O Single
183 Noisy Hit Hit/Drum O Layer
184 Chord Hit Hit/Drum O Layer
185 P6 Chord Hit/Drum O Layer
186 Gated Chord S.E O Single
187 8bit Gal S.E O Split
188 Invaders S.E On Single
189 Growl FX S.E O Single
190 Windstorm S.E O Single
191 Thunder S.E O Single
192 Jungle S.E On Layer
193 Siren 1 S.E O Single
194 Siren 2 S.E O Single
195 Bomb Drop S.E O Split
196 Vocoder Pulse Vocoder O Single
197 Vocoder Ensemble Vocoder O Multi
198 Robot Vocoder Vocoder O Single
199 Voice Changer Vocoder O Single
200 Audio In Audio In On Single
Note:
The sounds 196-200 are programs that use the mic input
(audio input). In order to play these sounds, you must connect a
mic or external audio device to the RK-100S and play the keyboard
while sound is being input.
Note: With the factory seings, the Timbre 2 MIDI channel is set
to “9” for programs whose Voice Mode is set to Multi.
Demo songs
S001: Asteroid belt
S002: Let’s go RK
S003: Science payload
S001 and S003: Composed and performed by Yasushi.K
S002: Composed and performed by KORG Inc.
All demo songs © 2014 KORG Inc. all rights reserved.
For more information about Yasushi.K visit
http://www.net-yk.org
https://www.facebook.com/yasushik1977
76
Page 77

[ KEYTAR ]
Consult your local Korg distributor for more information on MIDI IMPLEMENTATION.
RK-100S
Date : 2014. 2. 18
MIDI Implementation Chart
Function Transmitted Recognized Remarks
MIDI Implementaton
Basic
Channel
Mode
Note
Number:
Velocity
Aftertouch
Pitch Bend
Control
Change
Default
Changed
Memorized
Messages
Altered
True Voice
Note On
Note Off
Polyphonic (Key)
Monophonic (Channel)
0 – 95, 102 – 119
Chart
0, 32
1
6
7,10
11
12, 13
64
65
70 – 76
98, 99
120, 121
1 – 16
1 – 16
0 – 127
9n, V=1 – 127 9n, V=1 – 127
8n, V=64
1 – 16
1 – 16
3
0 – 127
0 – 127
*M
Memorized
Bank Select (MSB, LSB)
Modulation wheel
Data Entry (MSB)
Volume, Pan
Expression
Effect control 1, 2 *C
Damper
Portamento
Sound controller
NRPN (LSB, MSB) *C
Panel controls *1, *C
All Sound Off, Reset All Controllers *C
*B
*P
*C
*C
*C
*C
*C
*C
*C
Program
Change
System Exclusive
System
Common
System
Real Time
Aux
Messages
Remarks
*M: Can only be received from USB connector.
*P, *C, *B: Transmitted and received if the MIDI Filter setting (PROG CHG, CTRL CHG, P.BEND) is Enable.
*1: Transmitted and received on the number specified by MIDI CC#.
*2:
In addition to Korg exclusive messages, also supports inquiry messages, master volume, and master fine tune.
*3:
Transmitted and not received if MIDI “CLOCK” is set to INTERNAL. Not transmitted when receiving “CLOCK” in the “AUTO” mode.
Mode 1: OMNI ON, POLY Mode 2: OMNI ON, MONO : Yes
Variable Range
Song Position
Song Select
Tune
Clock
Command
Local On/Off
All Notes Off
Active Sense
Reset
0 – 127
0 – 127
0 – 127
123 – 127
*P
*2
*3
Mode 3: OMNI OFF, POLY Mode 4: OMNI OFF, MONO : No
77
Page 78

 Loading...