

Page 1

OWNER’S MANUAL
MANUEL D’UTILISATION
BEDIENUNGSANLEITUNG
Page 2

Precautions
Location
Using the unit in the following locations can result in a
malfunction.
•In direct sunlight
•Locations of extreme temperature or humidity
•Excessively dusty or dirty locations
•Locations of excessive vibration
•Close to magnetic fields
Power supply
Please connect the designated AC adapter to an AC outlet of the correct voltage. Do not connect it to an AC outlet of voltage other than that for which your unit is intended.
Interference with other electrical devices
Radios and televisions placed nearby may experience reception interference. Operate this unit at a suitable distance from radios and televisions.
Handling
To avoid breakage, do not apply excessive force to the
switches or controls.
Care
If the exterior becomes dirty, wipe it with a clean, dry
cloth. Do not use liquid cleaners such as benzene or thinner, or cleaning compounds or flammable polishes.
Keep this manual
After reading this manual, please keep it for later reference.
Keeping foreign matter out of your
equipment
Never set any container with liquid in it near this equipment. If liquid gets into the equipment, it could cause a
breakdown, fire, or electrical shock.
Be careful not to let metal objects get into the equipment.
If something does slip into the equipment, unplug the
AC adapter from the wall outlet. Then contact your
nearest Korg dealer or the store where the equipment
was purchased.
THE FCC REGULATION WARNING (for
U.S.A.)
This equipment has been tested and found to comply
with the limits for a Class B digital device, pursuant to
Part 15 of the FCC Rules. These limits are designed to
provide reasonable protection against harmful interference in a residential installation. This equipment generates, uses, and can radiate radio frequency energy and, if
not installed and used in accordance with the instructions, may cause harmful interference to radio communications. However, there is no guarantee that interference will not occur in a particular installation. If this
equipment does cause harmful interference to radio or
television reception, which can be determined by turning the equipment off and on, the user is encouraged to
try to correct the interference by one or more of the following measures:
Reorient or relocate the receiving antenna.
Increase the separation between the equipment and receiver.
Connect the equipment into an outlet on a circuit different from that to which the receiver is connected.
Consult the dealer or an experienced radio/TV technician for help.
Unauthorized changes or modification to this system
can void the user’s authority to operate this equipment.
CE mark for European Harmonized Standards
CE mark which is attached to our company’s products of
AC mains operated apparatus until December 31, 1996
means it conforms to EMC Directive (89/336/EEC) and
CE mark Directive (93/68/EEC).
And, CE mark which is attached after January 1, 1997
means it conforms to EMC Directive (89/336/EEC), CE
mark Directive (93/68/EEC) and Low Voltage Directive
(73/23/EEC).
Also, CE mark which is attached to our company’s products of Battery operated apparatus means it conforms to
EMC Directive (89/336/EEC) and CE mark Directive
(93/68/EEC).
IMPORTANT NOTICE TO CONSUMERS
This product has been manufactured according to strict
specifications and voltage requirements that are applicable in the country in which it is intended that this
product should be used. If you have purchased this
product via the internet, through mail order, and/or via
a telephone sale, you must verify that this product is intended to be used in the country in which you reside.
WARNING: Use of this product in any country other
than that for which it is intended could be dangerous
and could invalidate the manufacturer’s or distributor's
warranty.
Please also retain your receipt as proof of purchase otherwise your product may be disqualified from the
manufacturer’s or distributor's warranty.
Page 3
Introduction
Thank you for purchasing the KP2 KAOSS PAD dynamic effect/controller. For trouble-free enjoyment of the KP2’s fullest potential, please read this manual carefully and use the product
correctly.
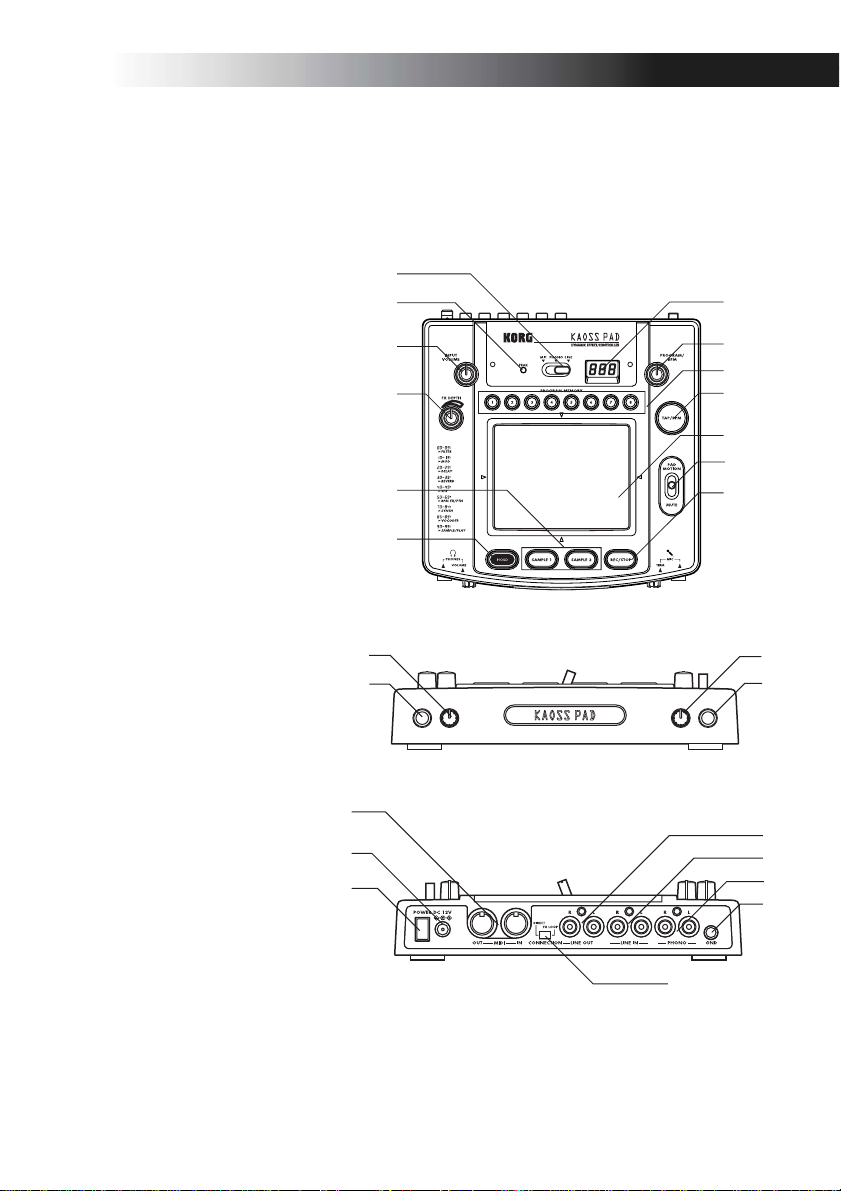
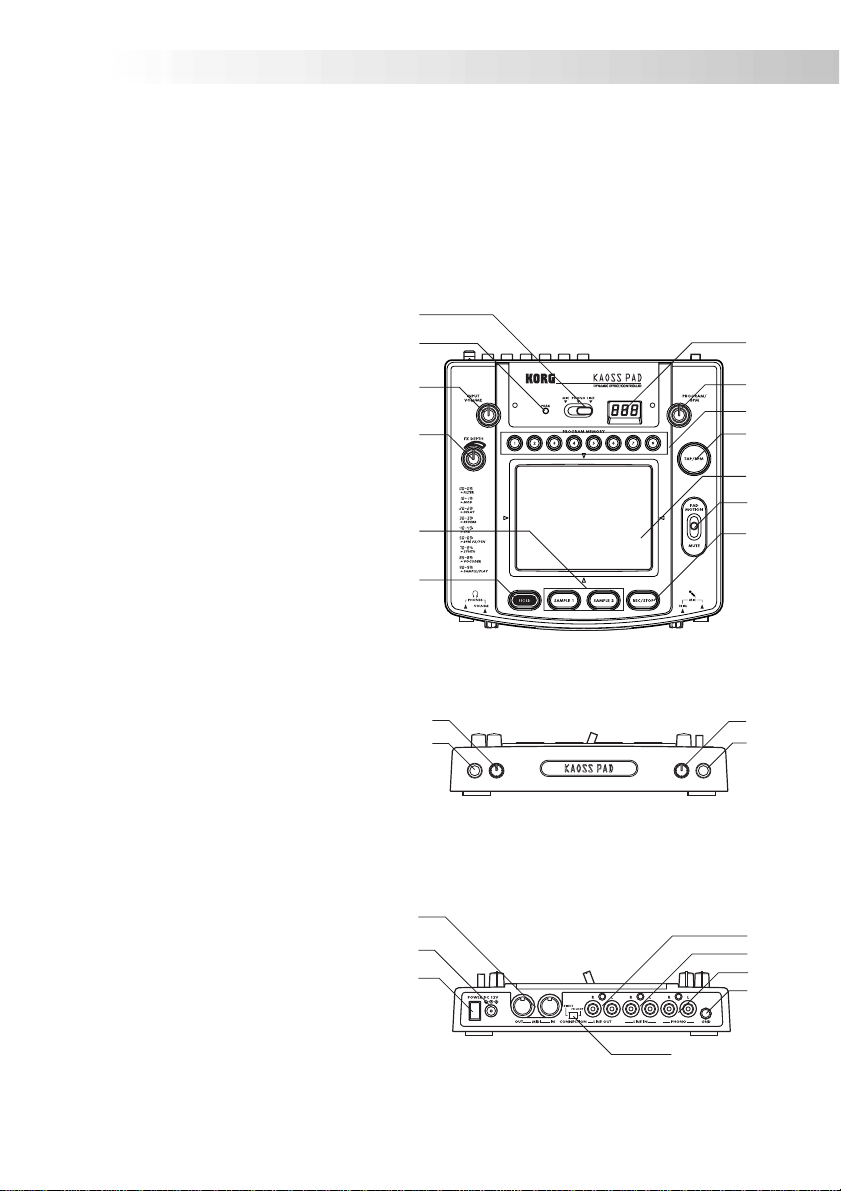
Parts of the KP2 and their functions
Top panel
1. [INPUT SELECT] switch
2. [PEAK] indicator
3. [INPUT VOLUME] knob
4. [FX DEPTH] knob
5. [PROGRAM/BPM] display
6. [PROGRAM/BPM] knob
7. [PROGRAM MEMORY 1–8] keys
8. [TAP/BPM] key
9. Touch pad
10. [PAD MOTION/MUTE] lever
11. [REC/STOP] key
12. [SAMPLE 1, 2] keys
13. [HOLD] key
Front panel
1. [PHONES VOLUME] knob
2. [PHONES] output jack
3. [MIC TRIM] knob
4. [MIC] input jack
1
2
3
4
10
12
13
11
1
2
5
6
7
8
9
3
4
Rear panel
1. [GROUND] connector
2. [PHONO IN] jacks
3. [LINE IN] jacks
4. [LINE OUT] jacks
5. [CONNECTION] switch
6. [MIDI IN], [MIDI OUT] connectors
7. DC 12V jack
8. [POWER] switch
6
4
7
8
3
2
1
5
1
Page 4
Connections
Basic connections
Use these connections when you want to apply effects to the sound from a device connected to
the KP2’s input jacks, and output the processed sound from the Line Out jacks. The KP2 has
three types of input jacks. Use the jacks that are appropriate for your situation.
MAIN OUTS
TAPE
TAPE
STEREO AUX RETURNS
AUX SEND
MIC
4
MIC
6
MIC
3
MIC
5
MIC
2
MIC
CD PLAYER
TURNTABLE
PHONO IN
LINE IN
LINE OUT DC12V
1
BAL
OR
UNBAL
LINE IN 2
LINE IN 1
LOW CUT
75Hz
18dB/OCT
B
d
V
0
0
1
1
-
-
G
A
I
C
C
N
I
I
M
M
U
U
10
10
60
+
10dB
+
10dB
-40dB
TRIM
TRIM
U
U
AUX
1
MON/
EFX
+15
+15
U
U
2
EFX
+15
+15
U
U
EQ
HI
12kHz
-15
+15
-15
+15
U
U
MID
2.5kHz
-12
-12
+12
+12
U
U
LOW
80Hz
+15
+15
-15
-15
PAN
L
L
R
R
1
2
MUTE
MUTE
ALT 3–4
ALT 3–4
dB
dB
10
10
SOLO
5
5
U
U
5
5
10
10
20
20
30
30
40
40
50
50
60
60
BAL
BAL
BAL
BAL
OR
OR
OR
OR
UNBAL
UNBAL
UNBAL
UNBAL
LINE IN 4
LINE IN 3
LINE IN 5
LOW CUT
LOW CUT
LOW CUT
LOW CUT
75Hz
75Hz
75Hz
75Hz
18dB/OCT
18dB/OCT
18dB/OCT
18dB/OCT
B
d
V
0
B
B
d
d
B
V
V
d
V
1
0
0
-
1
1
-
-
G
A
G
G
A
A
G
I
C
A
N
I
I
I
C
C
I
N
N
N
I
I
M
M
M
U
U
U
10
60
10
10
60
60
60
+
10dB
-40dB
+
10dB
+
10dB
-40dB
-40dB
-40dB
TRIM
TRIM
TRIM
U
U
U
AUX
AUX
AUX
AUX
1
1
1
1
MON/
MON/
MON/
MON/
EFX
EFX
EFX
EFX
+15
+15
+15
U
U
U
2
2
2
2
EFX
EFX
EFX
EFX
+15
+15
+15
U
U
U
EQ
EQ
EQ
EQ
HI
HI
HI
HI
12kHz
12kHz
12kHz
12kHz
-15
+15
-15
+15
-15
+15
U
U
U
MID
MID
MID
MID
2.5kHz
2.5kHz
2.5kHz
2.5kHz
-12
-12
+12
+12
-12
+12
U
U
U
LOW
LOW
LOW
LOW
80Hz
80Hz
80Hz
80Hz
+15
+15
-15
-15
+15
-15
PAN
PAN
PAN
PAN
L
L
R
R
L
R
4
5
3
MUTE
MUTE
MUTE
ALT 3–4
ALT 3–4
ALT 3–4
dB
dB
dB
10
10
10
SOLO
SOLO
SOLO
SOLO
5
5
5
U
U
U
5
5
5
10
10
10
20
20
20
30
30
30
40
40
40
50
50
50
60
60
60
MIXER, DJ MIXER
AC ADAPTER
OUTPUT
INPUT
L
1
1
MICRO SERIES 1402-VLZ
L
14-CHANNEL MIC/LINE MIXER
2
R
2
R
BAL/UNBAL
ALL BAL/UNBAL
LEFT
(1/MONO)
RIGHT
BAL
MONO
MONO
MONO
MONO
OR
UNBAL
L
L
L
L
LINE IN 6
BAL
BAL
BAL
BAL
OR
OR
LOW CUT
OR
OR
75Hz
UNBAL
UNBAL
UNBAL
UNBAL
18dB/OCT
B
d
V
0
1
-
R
R
R
R
G
A
I
C
N
I
M
U
LEVEL
LEVEL
LEVEL
LEVEL
+4
+4
+4
+4
PHONES
10
60
-10
-10
-10
-10
+
10dB
-40dB
LINE IN 7-8
LINE IN 13-14
LINE IN 9-10
LINE IN 11-12
TRIM
U
U
U
U
U
U
U
AUX
AUX
AUX
AUX
AUX
1
1
1
1
1
MON/
MON/
MON/
MON/
MON/
EFX
EFX
EFX
EFX
EFX
1
+20
+10
+15
+15
+15
+15
+15
NORMALLED
U
U
U
U
U
U
AUX 1 MASTER
2
PRE
2
2
2
2
2
POST
EFX
EFX
EFX
EFX
EFX
AUX
EFX TO
AUX 1
+20
MONITOR
+15
+15
SELECT
+15
+15
+15
RETURNS
U
U
U
U
U
SOURCE
EQ
EQ
EQ
EQ
EQ
LEFT RIGHT
HI
HI
HI
HI
HI
MAIN
CLIP+28
12kHz
12kHz
12kHz
12kHz
12kHz
MIX
+10
-15
+15
-15
+15
-15
-15
+15
+15
-15
+15
+7
U
U
U
U
U
ALT
+4
3-4
MID
MID
MID
MID
MID
2.5kHz
2.5kHz
2.5kHz
2.5kHz
2.5kHz
+2
-12
+12
-12
-12
-12
+12
+12
+12
-12
+12
0
TAPE
U
U
U
U
U
-2
LOW
LOW
LOW
LOW
LOW
80Hz
80Hz
80Hz
80Hz
80Hz
-4
+15
+15
-15
+15
+15
-15
-15
-15
+15
-15
-7
ASSIGN
PAN
PAN
PAN
PAN
PAN
-10
TO MAIN MIX
-20
NORMAL(AFL)
-30
LEVEL SET(PFL)
L
R
L
L
L
R
R
R
L
R
SOLO
0dB=0dBu
MODE
9–10
13–14
11–12
6
7–8
MUTE
MUTE
MUTE
MUTE
MUTE
POWER
RUDE SOLO LIGHT
PHANTOM
ALT 3–4
ALT 3–4
ALT 3–4
ALT 3–4
ALT 3–4
CONTROL
/ PHONES
MAIN MIX
ROOM
dB
dB
dB
dB
dB
dB
dB
10
10
10
10
10
10
10
SOLO
SOLO
SOLO
SOLO
SOLO
5
5
5
5
5
5
5
U
U
U
U
U
U
U
5
5
5
5
5
5
5
10
10
10
10
10
10
10
20
20
20
20
20
20
20
30
30
30
30
30
30
30
40
40
40
40
40
40
40
50
50
50
50
50
50
50
60
60
60
60
60
60
60
AC
Care of the touch pad
Never press the touch pad with excessive
force, or place heavy objects on it. It may
crack or break if handled roughly. Press the
touch pad only with your finger, since rubbing or pressing the touch pad with a sharp
object will scratch it. To clean the touch pad,
wipe it lightly with a soft dry cloth. Do not
use solvents such as thinner, since this may
cause deformation.
2
Page 5
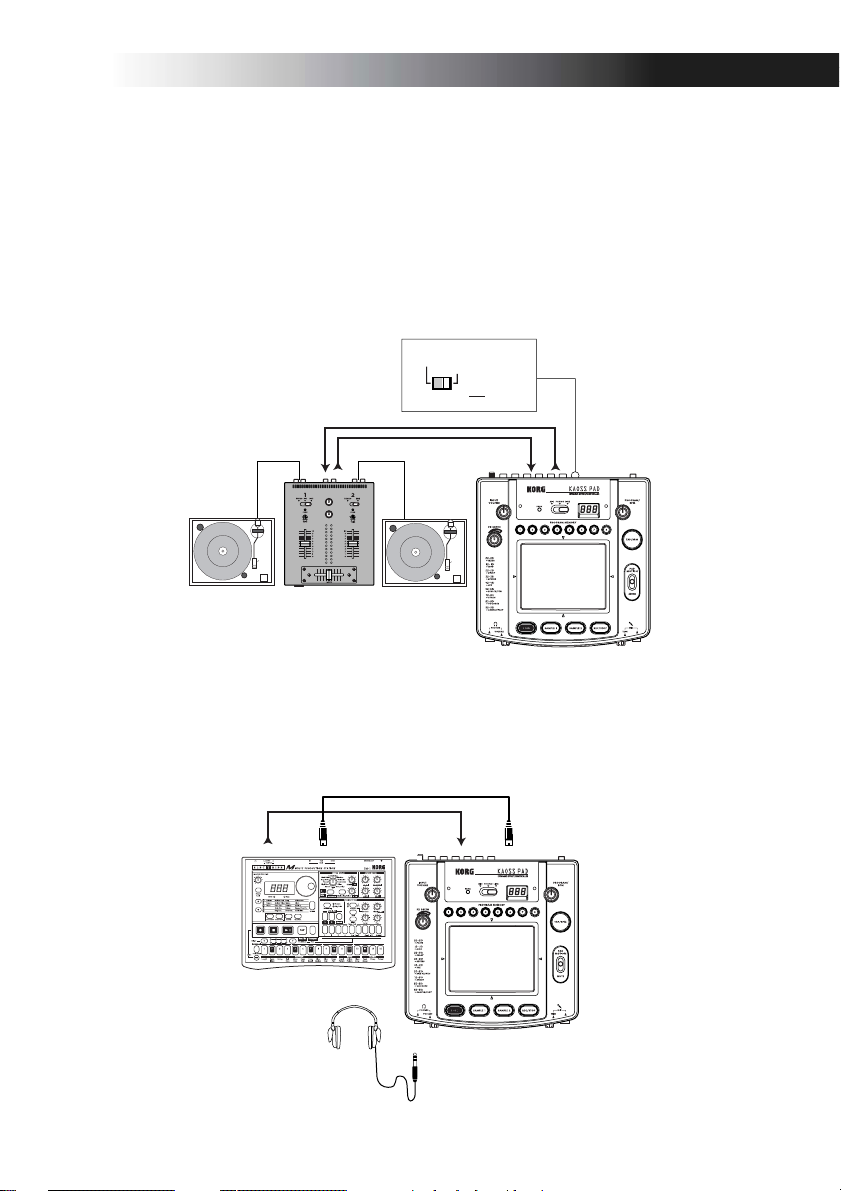
DJ mixer connections
To use the KP2 as an external effect processor, connect the effect send jack of your DJ mixer etc.
to the Line In jacks of the KP2, and connect the Line Out jacks of the KP2 to the effect return
jacks of your mixer.
When using a connection via the effect send/return jacks
Set theKP2’s Connection switch to FX LOOP. With this setting, the output signal from the KP2’s
Line Out jacks will consist only of the sound processed by the KP2, and will not include the
original sound that is being input to the KP2.
If you want to use the KP2’s FX/Depth knob to adjust the effect depth during use, set this
switch to the DIRECT position.
DIRECT
FX LOOP
CONNECTION LINE OUT
RETURN
SEND
LINE OUT
LINE IN
TURNTABLE
TURNTABLEDJ MIXER
MIDI connections
Use these connections when you want to connect MIDI devices to the KP2 and use it along with
sequence data.
LINE IN MIDI INMIDI OUTOUTPUT
KORG EM-1
3
Page 6
Operation
1. Turning on the power
(1) Connect the KP2 to your other equipment as shown in the diagram, and connect
the AC adapter to an electrical outlet.
(2) Press the Power switch to turn it on. The
Program/BPM display will light.
To turn off the power, press the Power
switch once again to turn it off.
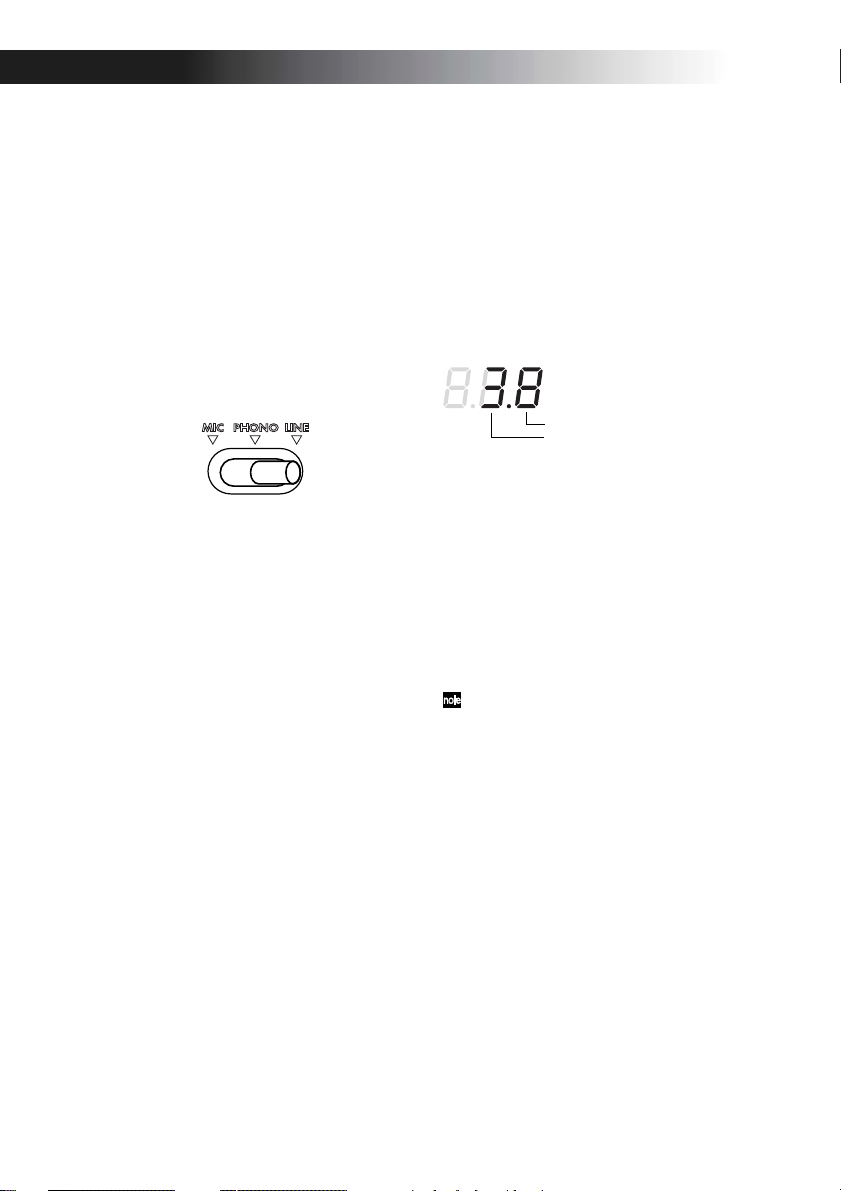
2. Inputting audio
(1) Use the Input Select switch to select the
input jacks of the connected device to which
you want to apply an effect.
MIC: The effect will be applied to the mic
input.
PHONO: The effect will be applied to the
phono inputs.
LINE: The effect will be applied to the line
inputs.
3. Adjusting the volume
(1) Adjust the input level.
While outputting audio from the connected
device, use the Input Volume knob to adjust
the input level so that the peak indicator
does not light red.
If you are using the mic jack, adjust the
MIC Trim knob as appropriate for the sensitivity of the mic, so that the sound is not distorted.
(2) If you are using headphones, use the
Phones Volume knob to adjust the level.
4. Selecting a program
(1) The Program/BPM display will indicate
the number of the currently selected program.
Use the Program/BPM knob to select a program (00–99).
(2) Use the FX/Depth knob to adjust the
depth of the effect.
No effect will be applied if the knob is
turned to the far left, and the maximum effect will be applied if the knob is turned to
the far right.
About the Program/BPM display
This display shows the number of the currently selected program, the specified BPM,
and the point (position) at which you are
touching the touch pad.
While you are operating the touch pad:
The display will indicate the position at
which you are touching the pad (1.1–9.9; 5.5
is the center).
Ver tical position (1–9)
Horizontal position (1–9)
When selecting programs: The display will
show the program number (00–99).
When setting the BPM: When you are
pressing the Tap/BPM key to set the BPM,
the display will indicate the BPM value. In
Auto BPM mode, three dots will light.
MIDI Edit mode: The display will show the
MIDI channel or control number, etc.
5. Operating the touch pad
(1) Control the sound by rubbing your finger across the touch pad or tapping it.
Use the included protective sheet.
(2) If you turn on the Hold key while operating the touch pad, the KP2 will hold the
effect sound as it was the moment before
you took your finger away from the pad.
6. The Mute function
If you move the Pad Motion/Mute lever to
MUTE (toward yourself), the input signal,
sample sound, or synth/drum sound will
be silenced. When using delay or reverb,
this lets you output only the effect sound
(i.e., the delayed sound or reverberation).
transformer
By using the Pad Motion/Mute lever to rapidly
switch MUTE on/off, you can create rhythms
using a sustained input sound. This is a DJ technique known as “transformer.”
4
Page 7

7. Pad motion
The KP2 lets you record your touch pad operations, and move the the Pad Motion/
Mute lever to the PAD MOTION position to
play back these operations.
Recording
Recording will begin when you hold the the
Pad Motion/Mute lever in the PAD MOTION position and touch the touch pad.
Even when you take your finger away from
the touch pad, this state will continue to be
recorded as part of your operation. This
means that you can also record operations
that include tapping on the touch pad. Recording will end when you move thethe
Pad Motion/Mute lever back to its original
position. Recording will also end when you
reach the maximum recording time (approximately 3.2 seconds).
Playback
If you have recorded a pad motion, move
the the Pad Motion/Mute lever to the PAD
MOTION position, and the recorded motion will play back. As long as you leave the
the Pad Motion/Mute lever in the PAD
MOTION position, the same motion will be
played back repeatedly as long as you do
not touch the touch pad.
If you touch the touch pad during playback,
recording will begin. Recording will be reset if
you change programs.
The Hold key on/off state is not recorded as
part of the pad motion. Also, if you turn on the
Hold key and play back a pad motion, the motion
will be held at the point where you stopped playback.
8. Specifying the BPM
If you specify the BPM, you will be able to
apply effects in synchronization to the BPM
when an effect program from the “BPM FX/
PTN” group is selected. For details on the
effect parameter to which this effect will be
applied, refer to the effect program list
(☞separate sheet).
What is BPM?
BPM (Beats Per Minute) is the tempo of the
song expressed as the number of beats (quarter
notes) that occur in one minute. A higher BPM
value means a faster tempo.
To set the BPM
If you know the BPM, press the Tap/BPM
key and use the Program/BPM knob to set
the value. The normal display will reappear
if ten seconds pass without any operation
being performed.
Tap Tempo function
If you do not know the BPM, press the Tap/
BPM key twice or more in rhythm with the
beat of the song. The beat will be detected,
and the BPM will appear in the Program/
BPM display.
Auto BPM function
If you press and hold down the Tap/BPM
key for an extended time, three dots will appear in the Program/BPM display, and the
beat of the audio input will be detected automatically. (Auto BPM mode)
While the Program/BPM display is blinking, the BPM is being detected.
Press the Tap/BPM key once again to end
automatic detection.
You can set the BPM in a range of 80–160.
MIDI Sync function
The BPM of the KP2 can be specified by
MIDI Timing Clock messages from an external MIDI device. Connect the [MIDI IN]
connector of the KP2 to the [MIDI OUT]
connector of the external MIDI device (such
as a sequencer) that is transmitting the timing clock messages.
This function does not synchronize sequence data with the KP2's rhythm pattern programs. If you want to synchronize to sequence
data, you will either have to insert a Touch Pad
On message into the beginning of each measure
of your sequence data, or touch the touch pad at
the beginning of each KP2 phrase to start the
pattern.
If you want the KP2 to receive Timing
Clock and Touch Pad On messages, go to MIDI
5
Page 8

Edit mode (☞ p.8), and make “MIDI message
transmission/reception settings” (☞ p.8) so that
these messages will be received.
You can not use the Tap Tempo or Auto
BPM functions while the KP2 is receiving Timing Clock from an external MIDI device
9. Storing settings in the Program
Memory key
The current state of the KAOSS PAD can be
stored in one of the Program Memory 1–8
keys, so that it can be instantly recalled
whenever you want.
Stored contents
— Effect program
— On/off state of the Hold key and the held
position (coordinates)
— FX/Depth knob setting
— For the “BPM FX/PTN” group, the specified BPM value
— For the “SAMPLE/PLAY” group, the
Sample 1, 2 key used
Effect programs 60 and 90–99 do not store
the state of the Hold key.
To store settings
(1) Press the Program Memory 1–8 key that
you want to assign.
(2) Use the Program/BPM knob to select
the effect program that you want to assign.
If you want to store the setting of the Hold
key, select the program and then turn on the
Hold key and touch the touch pad to specify the
position. If you want to store other settings,
make them at this time.
(3) Press and hold down the Program
Memory 1–8 key you selected in step (1) for
approximately two seconds, and the settings will be stored.
When the settings have been stored, the
Program/BPM display will stop blinking.
To recall settings
(1) Press a Program Memory 1–8 key, and
the settings stored in that key will be recalled.
10. Sampling and playing back
a phrase
A phrase from the audio input can be recorded into one of the Sample 1, 2 keys.
Then when you have selected a program
from the “SAMPLE/PLAY” group (programs 90–99), you can play back the sample
while using the touch pad to control the
playback speed or reverse-playback. If you
have selected a program from other than the
“SAMPLE/PLAY” group, pressing the
Sample 1, 2 keys will play back the phrase
that was recorded in that key.
You can record for approximately six seconds in each of the two keys.
The recorded phrases will be lost when the
power is turned off. It is not possible to save the
recorded phrases.
Recording
(1) Press the Rec/Stop key, and the Rec/
Stop key LED will blink to indicate that you
are in record-ready mode.
(2) Press the Sample 1, 2 key into which you
want to record. At this time, you will not
hear the playback sound.
(3) When you press the Rec/Stop key, the
Rec/Stop key LED will light, and recording
will begin. Recording will stop when you
press the Rec/Stop key once again.
Recording will stop automatically when
you reach the maximum recording time.
For programs of other than the “SAMPLE/
PLAY” group, you can operate the touch pad
while you record, and the sound processed by the
effect will be recorded.
Auto recording (AUTO REC)
You can cause recording to begin automatically when audio is input. This is convenient when recording voice from a mic.
(1) In step (2) of the Recording procedure,
hold down the Sample 1, 2 key to which you
want to record, and press the Rec/Stop key.
The Rec/Stop key and Sample 1, 2 key
LEDs will blink simultaneously, indicating
that you are in record-ready mode.
(2) Recording will begin automatically
6
Page 9

when audio is input. Recording will stop
when you press the Rec/Stop key once
again.
Playback
The playback method will differ depending
on the effect program that you have selected.
For a program from the “SAMPLE/
PLAY” group
(1) Select a program from the “SAMPLE/
PLAY” group (90–99).
(2) Press the Sample 1, 2 key that you want
to play. The playback will not yet be output
at this time.
(3) When you touch the touch pad, the
sound will play back according to the position that you touch.
The way in which the phrase plays will depend on the program. (☞separate sheet: Effect program list)
(4) Use the FX Depth knob to adjust the
playback volume.
When the FX Depth knob is positioned in
the center, the playback sound and the input sound will be output in a 1:1 proportion. When the knob is at the maximum position, only the sample sound will be output
during playback, and you will not hear the
input sound.
For a program from other than the
“SAMPLE/PLAY” group
(1) Select a program from other than the
“SAMPLE/PLAY” group.
(2) Press a Sample 1, 2 key, and the recorded
phrase will play at normal speed. If you
continue pressing the key, the phrase will
play back as a loop.
To adjust the volume, continue pressing the
Sample 1, 2 key and use the FX Depth knob
to make adjustments.
You can apply effects to the playback by operating the touch pad while the sound plays
back.
If you press the Hold key while pressing the
Sample 1, 2 key, the playback will be held. Hold
will be cancelled when you press the Sample 1, 2
key once again.
MIDI functions
What is MIDI?
MIDI stands for Musical Instrument Digital
Interface, and is a world-wide standard for exchanging a variety of performance-related information between electronic musical instruments
and computers.
MIDI connections
Commercially available MIDI cables are used
to transmit and receive MIDI messages. Connect these cables between the MIDI connectors of the KP2 and the MIDI connectors of
the external MIDI device with which you
want to transfer data.
MIDI IN connector: This connector receives MIDI messages from another MIDI
device. Connect it to the MIDI OUT connector of the external device.
MIDI OUT connector: This connector
transmits messages from the KP2. Connect
it to the MIDI IN connector of the external
device.
Using MIDI
In addition to using the KP2 as an effect processor, you can transmit MIDI messages
from the KP2 to use it as a realtime controller for a synthesizer or other external MIDI
device.
You can also connect the KP2 to a MIDI sequencer, and record the MIDI messages that
are transmitted when you operate the touch
pad. By playing back the recorded MIDI
messages you can reproduce your touch
pad operations.
About MIDI channels
In order to independently transmit information to multiple MIDI devices over a single
MIDI cable, MIDI uses sixteen channels (1–
16). If the transmitting device is set to MIDI
channel “1,” the MIDI messages will not be
received unless the receiving device is also
set to MIDI channel “1.”
7
Page 10

About the MIDI implementation chart
The owner’s manual of each MIDI device includes a “MIDI implementation chart.” This
chart lets you check the types of MIDI message that can be transmitted or received.
When you use two (or more) MIDI devices together, compare their MIDI implementation
charts to see which types of MIDI message
they are able to transmit and receive between
themselves.
* Details on the MIDI functionality are provided
in the separate MIDI implementation. To obtain
the MIDI implementation, please contact Korg
distributor.
MIDI Edit mode
Hold down the Tap/BPM key and press the
Rec/Stop key. After approximately one second, you will enter MIDI Edit mode, and
the MIDI channel will be displayed blinking
in the Program/BPM display.
Setting the MIDI channel
In MIDI Edit mode, the Program/BPM display will show the MIDI channel. At this
time you can use the Program/BPM knob to
change the MIDI channel.
MIDI message transmission/
reception settings
Transmission and reception of each type of
MIDI message can be turned on/off by
pressing one of the keys listed below. Transmission and reception are enabled when the
corresponding LED is lit. Transmission and
reception are disabled when the LED is
dark.
(☞p.9: Messages that can be transmitted
and received)
Some parameters can only be transmitted,
and others can only be received.
Changing the control number
By holding down one of the Program
Memory 3–8 keys and turning the Program/BPM knob, you can change the control number setting. Although it is possible
to select a control number that is already in
use, it is not possible to simultaneously turn
on transmission and reception for MIDI
8
messages of the same control number.
The MIDI messages transmitted and received
by the KP2 can be changed in the range of CC#1–
CC#31 and CC#64–CC#95.
To store the settings you modified
In MIDI Edit mode, press and hold the Rec/
Stop key for one second or longer, and the
MIDI settings you modified will be stored.
If you turn off the power without storing
the modified settings, they will revert to
their previous state.
To exit MIDI Edit mode
You will return to the normal state if you
touch the touch pad or leave the KP2 for ten
seconds without performing any operation.
Saving your settings
You can save the contents of program
memory and the control number settings of
MIDI edit mode by transmitting them as exclusive messages, and saving them on an
external MIDI device.
For details on the exclusive messages that
the KP2 can transmit and receive, refer to
the separate MIDI implementation.
Page 11
Messages that can be transmitted and received
With the factory settings, the following MIDI messages can be transmitted and received.
Data operations transmitted
Touch pad X-axis Effect control 1 (CC#12) *1, *2 Program Memory 4
Touch pad Y-axis Modulation depth 1 (CC#1) Y=5–9 Program Memory 1
Touch pad X+Y-axis Effect depth 3 (CC#93) *1 Program Memory 3
Touch pad on/off Effect depth 2 (CC#92) *1, *2 Program Memory 6
FX DEPTH Effect depth 4 (CC# 94) *1, *2 Program Memory 7
MUTE Effect depth 5 (CC# 95) *1, *2 Program Memory 8
Program change Program change (00–99) *2 Hold
MIDI messages transmitted
Modulation depth 2 (CC#2) Y=5–1 Program Memory 2
Effect control 2 (CC#13) *1, *2 Program Memory 5
ON/OFF key settings transmitted
Data operations received
Touch pad X-axis Effect control 1 (CC#12) *1, *2 Program Memory 4
Touch pad Y-axis Effect control 2 (CC#13) *1, *2 Program Memory 5
Touch pad on/off Effect depth 2 (CC#92) *1, *2 Program Memory 6
FX DEPTH Effect depth 4 (CC# 94) *1, *2 Program Memory 7
MUTE Effect depth 5 (CC# 95) *1, *2 Program Memory 8
Program change Program change (00–99) *2 Hold
BPM Timing clock Sample 1
MIDI messages received
ON/OFF key settings received
*1: The MIDI messages transmitted and received can be changed in a range of CC#1–CC#31,
CC#64–CC#95, and PITCH BEND. ( ) is the factory setting.
*2: Ena/Dis and CC# settings are the same for both transmission and reception.
The control changes for touch pad Y-axis Y-5–9 and Y-5–1, and for touch pad X+Y axis can be transmitted but not received. For this reason when you record control changes into a sequencer, use MIDI Edit
mode to turn PROGRAM MEMORY 1–3 off, so that unnecessary MIDI messages are not transmitted.
Previously-specified control numbers cannot be specified again elsewhere.
Specifications
Number of programs: 100
Input: Mic input jack / monaural phone jack, Phono input jacks / RCA phono jacks, Line input
jacks / RCA phono jacks
Output: Line output jacks / RCA phono jacks, Headphone jack / stereo phone jack
MIDI: IN, OUT
Power supply: DC 12V, 700 mA
Included items: AC adapter, touch pad protection sheet
Weight: 1.1kg
Dimensions: 204(W) X 207(D) X 48(H)mm
— Appearance and specifications are subject to change without notice for improvement.
9
Page 12

Précautions
Emplacement
L’utilisation de cet instrument dans les endroits suivants
peut en entraîner le mauvais fonctionnement.
• En plein soleil
• Endroits très chauds ou très humides
• Endroits sales ou fort poussiéreux
• Endroits soumis à de fortes vibrations
• A proximité de champs magnétiques
Alimentation
Branchez l’adaptateur secteur fourni à une prise secteur
de tension appropriée. Evitez de brancher l’adaptateur à
une prise de courant dont la tension ne correspond pas à
celle pour laquelle l'appareil est conçu.
Interférences avec d’autres appareils
électriques
Les postes de radio et de télévision situés à proximité
peuvent par conséquent souffrir d’interférences à la réception. Veuillez dès lors faire fonctionner cet appareil à
une distance raisonnable de postes de radio et de télévision.
Maniement
Pour éviter de les endommager, manipulez les commandes et les boutons de cet instrument avec soin.
Entretien
Lorsque l’instrument se salit, nettoyez-le avec un chiffon
propre et sec. Ne vous servez pas d’agents de nettoyage
liquides tels que du benzène ou du diluant, voire des
produits inflammables.
Marque CE pour les normes européennes
harmonisées
La marque CE apposée sur tous les produits de notre
firme fonctionnant sur secteur jusqu'au 31 décembre
1996 signifie que ces appareils répondent à la Directive
EMC (89/336/EEC) et à la Directive concernant la marque CE (93/68/EEC).
La marque CE apposée après le 1 janvier 1997 signifie
que ces appareils sont conformes à la Directive EMC
(89/336/EEC), à la Directive concernant la marque CE
(93/68/EEC) ainsi qu'à la Directive Basse Tension (73/
23/EEC).
La marque CE apposée sur tous les produits de notre
firme fonctionnant sur piles signifie que ces appareils répondent à la Directive EMC (89/336/EEC) et à la Directive concernant la marque CE (93/68/EEC).
REMARQUE IMPORTANTE POUR LES
CLIENTS
Ce produit a été fabriqué suivant des spécifications sévères et des besoins en tension applicables dans le pays où
ce produit doit être utilisé. Si vous avez acheté ce produit
via l’internet, par vente par correspondance ou/et vente
par téléphone, vous devez vérifier que ce produit est
bien utilisable dans le pays où vous résidez.
ATTENTION: L’utilisation de ce produit dans un pays
autre que celui pour lequel il a été conçu peut être dangereuse et annulera la garantie du fabricant ou du distributeur. Conservez bien votre récépissé qui est la preuve
de votre achat, faute de quoi votre produit ne risque de
ne plus être couvert par la garantie du fabricant ou du
distributeur.
Conservez ce manuel
Après avoir lu ce manuel, veuillez le conserver soigneusement pour toute référence ultérieure.
Evitez toute intrusion d’objets ou de liquide
Ne placez jamais de récipient contenant du liquide près
de l’instrument. Si le liquide se renverse ou coule, il risque de provoquer des dommages, un court-circuit ou
une électrocution.
Veillez à ne pas laisser tomber des objets métalliques
dans le boîtier (trombones, par ex.). Si cela se produit,
débranchez l’alimentation de la prise de courant et contactez votre revendeur korg le plus proche ou la surface
où vous avez acheté l’instrument.
Page 13
Introduction
Merci d’avoir fait l’acquisition du CONTRÔLEUR D’EFFETS DYNAMIQUE KP2 KAOSS PAD.
Afin de pouvoir en profiter longtemps sans problèmes et de tirer le meilleur parti de toutes ses
possibilités, nous vous conseillons de lire attentivement la présente notice et de toujours utiliser
le KP2 correctement.
Eléments du KP2 et leurs fonctions
Panneau supérieur
1. Interrupteur [INPUT SELECT]
(Sélecteur d’entrée)
2. Témoin [PEAK] (Crête)
3. Bouton [INPUT VOLUME]
(volume entrant)
4. Bouton [FX DEPTH]
(Intensité de l’effet)
5. Affichage [PROGRAM/BPM]
6. Bouton [PROGRAM/BPM]
7. Touches [PROGRAM MEMORY 1 ~ 8]
(mémoires de programmes)
8. Touche [TAP/BPM]
9. Panneau sensible au toucher
10. Levier [PAD MOTION/MUTE]
(
déplacement sur le panneau/assourdissement
11. Touche [REC/STOP]
(Enregistrement/arrêt)
12. Touches [SAMPLE 1, 2](Echantillons)
13. Touche [HOLD]
1
2
3
4
12
13
)
5
6
7
8
9
10
11
Face avant
1. Bouton [PHONES VOLUME]
(volume du casque d’écoute)
2. Prise de sortie [PHONES]
(prise pour casque d’écoute)
3. Bouton [MIC TRIM]
(épuration des sons)
4. Prise d’entrée [MIC]
(prise pour micro)
Face arrière
1. Borne [GROUND] (terre)
2. Bornes [PHONO IN]
(entrée pour tourne-disque)
3. Bornes [LINE IN](entrée de ligne)
4. Bornes [LINE OUT] (sortie de ligne)
5. Interrupteur [CONNECTION]
6. Bornes [MIDI IN], [MIDI OUT]
7. Prise DC 12V
8. Interrupteur d’alimentation [POWER]
1
2
3
4
6
7
8
4
3
2
1
5
1
Page 14

Connexions
Connexions de base
Utiliser ces connexions pour appliquer des effets au son d’un appareil raccordé aux bornes d’entrée du KP2 et diffuser ainsi le son avec effet par les bornes de sortie [LINE OUT]. Le KP2 est doté
de trois types de bornes d’entrée. Utiliser celles qui conviennent le mieux à la situation souhaitée.
MAIN OUTS
TAPE
TAPE
STEREO AUX RETURNS
AUX SEND
MIC
4
MIC
6
MIC
3
MIC
5
MIC
2
MIC
LECTEUR CD
TOURNE-DISQUE
PHONO IN
LINE IN
LINE OUT DC12V
1
BAL
OR
UNBAL
LINE IN 2
LINE IN 1
LOW CUT
75Hz
18dB/OCT
B
d
V
0
1
-
G
A
I
C
N
I
M
U
U
10
60
+
10dB
-40dB
TRIM
U
AUX
1
MON/
EFX
15
+
U
2
EFX
15
+
U
EQ
HI
12kHz
-15
+15
-15
U
MID
2.5kHz
-12
-12
+12
U
LOW
80Hz
+15
-15
-15
PAN
L
R
1
MUTE
MUTE
ALT 3–4
ALT 3–4
dB
dB
10
10
SOLO
5
5
U
U
5
5
10
10
20
20
30
30
40
40
50
50
60
60
1
2
LEFT
(1/MONO)
BAL
BAL
BAL
BAL
BAL
MONO
OR
OR
OR
OR
OR
UNBAL
UNBAL
UNBAL
UNBAL
UNBAL
LINE IN 4
LINE IN 6
LINE IN 3
LINE IN 5
LOW CUT
LOW CUT
LOW CUT
LOW CUT
LOW CUT
75Hz
75Hz
75Hz
75Hz
75Hz
18dB/OCT
18dB/OCT
18dB/OCT
18dB/OCT
18dB/OCT
B
d
V
0
B
B
B
d
d
d
V
B
V
V
d
0
V
1
0
0
0
1
-
1
1
1
-
-
-
-
G
A
G
A
G
G
A
A
G
I
C
A
N
I
I
C
I
I
C
C
I
N
C
N
N
I
N
I
I
I
M
M
M
M
M
U
U
U
U
LEVEL
10
60
10
10
10
60
10
60
60
60
+
10dB
-40dB
+
10dB
+
10dB
+
10dB
-40dB
-40dB
-40dB
+
10dB
-40dB
TRIM
LINE IN 7-8
TRIM
TRIM
TRIM
TRIM
U
U
U
U
U
U
AUX
AUX
AUX
AUX
AUX
1
1
1
1
1
MON/
MON/
MON/
MON/
MON/
EFX
EFX
EFX
EFX
EFX
+15
15
+
15
+
15
+
15
+
15
+
U
U
U
U
U
U
2
2
2
2
2
EFX
EFX
EFX
EFX
EFX
15
+
15
+
15
+
15
+
15
+
+15
U
U
U
U
U
U
EQ
EQ
EQ
EQ
EQ
HI
HI
HI
HI
HI
12kHz
12kHz
12kHz
12kHz
12kHz
-15
+15
-15
-15
+15
+15
-15
+15
-15
+15
+15
U
U
U
U
U
U
MID
MID
MID
MID
MID
2.5kHz
2.5kHz
2.5kHz
2.5kHz
2.5kHz
-12
+12
-12
-12
-12
+12
+12
+12
-12
+12
+12
U
U
U
U
U
U
LOW
LOW
LOW
LOW
LOW
80Hz
80Hz
80Hz
80Hz
80Hz
+15
-15
+15
+15
+15
-15
-15
-15
+15
+15
-15
PAN
PAN
PAN
PAN
PAN
L
R
L
L
L
R
R
R
L
L
R
R
6
7–8
4
5
3
2
MUTE
MUTE
MUTE
MUTE
MUTE
ALT 3–4
ALT 3–4
ALT 3–4
ALT 3–4
ALT 3–4
dB
dB
dB
dB
dB
10
10
10
10
10
SOLO
SOLO
SOLO
SOLO
SOLO
SOLO
5
5
5
5
5
U
U
U
U
U
5
5
5
5
5
10
10
10
10
10
20
20
20
20
20
30
30
30
30
30
40
40
40
40
40
50
50
50
50
50
60
60
60
60
60
MIXER, DJ MIXER
AC
ADAPTATEUR SECTEUR
OUTPUT
INPUT
L
1
MICRO SERIES 1402-VLZ
L
14-CHANNEL MIC/LINE MIXER
2
R
R
BAL/UNBAL
ALL BAL/UNBAL
RIGHT
MONO
MONO
MONO
L
L
L
L
BAL
BAL
BAL
BAL
OR
OR
OR
OR
UNBAL
UNBAL
UNBAL
UNBAL
R
R
R
R
LEVEL
LEVEL
LEVEL
+4
+4
+4
+4
PHONES
-10
-10
-10
-10
LINE IN 13-14
LINE IN 9-10
LINE IN 11-12
U
U
U
U
U
AUX
AUX
AUX
AUX
1
1
1
1
MON/
MON/
MON/
MON/
EFX
EFX
EFX
EFX
1
20
+
+10
15
+
+15
15
+
NORMALLED
U
U
U
U
AUX 1 MASTER
2
PRE
2
2
2
2
POST
EFX
EFX
EFX
EFX
AUX
EFX TO
AUX 1
20
+
MONITOR
15
+
+15
SELECT
15
+
RETURNS
U
U
U
SOURCE
EQ
EQ
EQ
EQ
LEFT RIGHT
HI
HI
HI
HI
MAIN
CLIP+28
12kHz
12kHz
12kHz
12kHz
MIX
+10
-15
+15
-15
+15
-15
+15
+7
U
U
U
ALT
+4
3-4
MID
MID
MID
MID
2.5kHz
2.5kHz
2.5kHz
2.5kHz
+2
-12
-12
+12
-12
+12
+12
0
TAPE
U
U
U
-2
LOW
LOW
LOW
LOW
80Hz
80Hz
80Hz
80Hz
-4
+15
+15
-15
+15
-15
-15
-7
ASSIGN
PAN
PAN
PAN
PAN
-10
TO MAIN MIX
-20
NORMAL(AFL)
-30
LEVEL SET(PFL)
L
R
L
L
R
R
SOLO
0dB=0dBu
MODE
9–10
13–14
11–12
MUTE
MUTE
MUTE
POWER
RUDE SOLO LIGHT
PHANTOM
ALT 3–4
ALT 3–4
ALT 3–4
CONTROL
/ PHONES
MAIN MIX
ROOM
dB
dB
dB
dB
dB
10
10
10
10
10
SOLO
SOLO
SOLO
5
5
5
5
5
U
U
U
U
U
5
5
5
5
5
10
10
10
10
10
20
20
20
20
20
30
30
30
30
30
40
40
40
40
40
50
50
50
50
50
60
60
60
60
60
Manipulations du panneau sensible au
toucher
Ne jamais appuyer trop fort sur le panneau
sensible ni placer d’objet lourd dessus. Des
gestes trop brutaux pourraient en effet endommager le panneau ou provoquer des fissures. Ne jamais frotter ou appuyer sur le
panneau sensible avec un objet pointu car
vous risqueriez de le griffer: toujours utiliser
son doigt uniquement pour le faire fonctionner. Si le panneau doit être nettoyé, l’essuyer
simplement avec un chiffon doux et sec.
L’utilisation de solvants ou de diluants risque
en effet de déformer la surface du panneau.
2
Page 15

Connexions d’un mélangeur pour DJ Connexions d’un mélangeur
pour DJ
Pour utiliser le KP2 comme processeur d’effets externe, raccorder la borne d’envoi d’effets du
mélangeur pour DJ, etc. aux bornes d’entrée de ligne du KP2 et raccorder les bornes de sortie de
ligne du KP2 aux bornes de retour d’effets du mélangeur.
Lors de l’utilisation d’une connexion passant par les bornes d’envoi/de retour d’effets
Régler l’interrupteur Connection du KP2 sur FX LOOP. Avec ce réglage, le signal diffusé par les
bornes de sortie de ligne du KP2 ne comprendra que le son traité par le KP2 (et non le son original qui lui a été envoyé).
Pour pouvoir utiliser le bouton FX/Depth du KP2 en vue de régler l’intensité de l’effet pendant
le jeu, cet interrupteur doit se trouver sur la position DIRECT.
DIRECT
FX LOOP
CONNECTION LINE OUT
RETOUR
ENVOI
LINE OUT
LINE IN
TOURNE-DISQUE
TOURNE-DISQUEMELANGEUR POUR DJ
Connexions MIDI
Utiliser ces connexions pour raccorder des dispositifs MIDI au KP2 et le faire fonctionner avec
des séquences de données.
LINE IN MIDI INMIDI OUTOUTPUT
KORG EM-1
3
Page 16

Fonctionnement
1. Mise sous tension
(1) Raccordez le KP2 à vos autres équipements comme illustré sur le schéma puis
branchez l’adaptateur secteur dans une prise
de courant.
(2) Appuyez sur l’interrupteur d’alimentation pour mettre la KP2 sous tension.
L’affichage Program/BPM s’allume.
Pour mettre l’appareil hors tension,
réappuyez sur l’interrupteur d’alimentation.
2. Entrée de données audio
(1) Utilisez l’interrupteur Input Select pour
sélectionner les bornes d’entrée de l’appareil
raccordé auxquelles vous souhaitez appliquer un effet.
MIC: L’effet est appliqué à l’entrée du micro.
PHONO: L’effet est appliqué aux entrées
pour tourne-disque PHONO.
LINE: L’effet est appliqué aux entrées de ligne.
3. Réglage du volume
(1) Réglez le niveau d’entrée.
Lors de la diffusion de données audio provenant de l’appareil connecté, utilisez le bouton
Input Volume pour régler le niveau d’entrée
de sorte que le témoin de crête rouge ne s’allume pas.
En cas d’utilisation de la borne pour micro,
réglez le bouton MIC Trim en fonction de la
sensibilité de votre micro, afin d’éviter toute
distorsion sonore.
(2) En cas d’utilisation d’un casque d’écoute,
utilisez le bouton Phones Volume pour régler
le niveau.
4
4. Sélection d’un programme
(1) L’affichage Program/BPM indique le numéro du programme sélectionné.
Utilisez le bouton Program/BPM pour sélectionner un autre programme (00~99).
(2) Utilisez le bouton FX/Depth pour régler
l’intensité de l’effet.
Aucun effet n’est appliqué lorsque le bouton
est tourné à fond vers la gauche; par contre,
le niveau maximum de l’effet est appliqué
lorsque le bouton est tourné à fond vers la
droite.
A propos de l’affichage Program/BPM
Cet affichage indique le numéro du programme actuellement sélectionné, le nombre
de battements par minute (BPM) spécifié et le
point (emplacement) du panneau sensible
touché.
Lors de l’utilisation du panneau sensible au
toucher: L’affichage indique l’emplacement
touché (1.1 à 9.9 avec 5.5 qui correspond au
centre).
Position verticale (1~9)
Position horizontale (1~9)
Lors de la sélection de programmes: L’affichage indique le numéro du programme
(00~99).
Lors du réglage du tempo (BPM): Lorsque
vous appuyez sur la touche Tap/BPM pour
régler le tempo, l’affichage indique la valeur
des battements par minute (BPM). En mode
Auto BPM, trois points apparaissent sur l'affichage.
Mode d’édition MIDI: L’affichage indique le
numéro du canal MIDI ou de commande
MIDI, etc.
5. Utilisation du panneau
sensible au toucher
(1) Permet de contrôler le son en frottant son
doigt sur le panneau ou en le tapotant.
Remarque
Utiliser la feuille de protection fournie.
Page 17

(2) Si vous activez la touche Hold pendant
l’utilisation du panneau sensible au toucher,
le KP2 conservera le son de l’effet tel qu’il
était juste avant que vous ne retiriez votre
doigt du panneau.
6. Fonction d’assourdissement
(Mute)
Si vous déplacez le levier Pad Motion/Mute
vers la fonction MUTE (vers vous), le signal
d’entrée, le son de l'échantillon ou le son de
synthé/de batterie sera assourdi (coupé).
Lors de l‘utilisation du retard ou de la réverbération, cela permet de ne diffuser que le
son de l’effet (c’est-à-dire le son retardé ou la
réverbération).
Transformer
En utilisant le levier Pad Motion/Mute pour
activer/désactiver rapidement l’interrupteur
MUTE, vous pouvez créer des rythmes qui
font appel à un son d’entrée soutenu. Il s’agit
là d’une technique de DJ connue sous le nom
de “transformer.”
7. Dé-placements sur le
panneau sensible
Le KP2 permet d’enregistrer les opérations
effectuées sur le panneau sensible au toucher
puis de déplacer le levier Pad Motion/Mute
vers la position PAD MOTION pour reproduire ces opérations.
Enregistrement
L’enregistrement commence lorsque vous
maintenez le levier Pad Motion/Mute sur la
position PAD MOTION et que vous touchez
le panneau sensible.
Même lorsque vous retirez votre doigt du
panneau sensible, l’enregistrement continue
et fait partie de l’opération.
Cela signifie que vous pouvez également
enregistrer des opérations qui comprennent
des tapotements du panneau sensible. L’enregistrement s’arrête lorsque vous remettez
le levier Pad Motion/Mute sur sa position
d’origine ou lorsque vous atteignez le temps
d’enregistrement maximum (environ 3,2 secondes).
Reproduction
Si vous avez enregistré un mouvement sur le
panneau sensible, déplacez le levier Pad
Motion/Mute sur la position PAD MOTION
pour reproduire le mouvement enregistré. Si
vous laissez le levier Pad Motion/Mute sur
la position PAD MOTION, le même mouvement jouera de manière répétitive jusqu’à ce
que vous touchiez le panneau sensible.
Si vous touchez le panneau sensible pendant la reproduction, l’enregistrement démarre.
L’enregistrement s’efface en cas de changement
de programme.
L’état activé/désactivé de la touche Hold
n’est pas enregistré comme faisant partie du
mouvement sur le panneau. De même, si vous
activez la touche Hold et que vous reproduisez
un mouvement sur le panneau, le mouvement
sera conservé au point où vous avez arrêté la reproduction.
8. Spécification des BPM
(battements par minute)
La définition des BPM vous permet d’appliquer des effets synchronisés sur les BPM lors
de la sélection d’un programme d’effets du
groupe “BPM FX/PTN”. Pour plus de détails
sur le paramètre d’effet auquel cet effet s’applique, voir la liste des programmes d’effets
(feuillet séparé).
Qu’est-ce que les BPM?
Les BPM (Battements Par Minute) représentent le tempo d’un morceau exprimé en nombre de battements (noires) produits en une
minute. Une valeur de BPM plus élevée signifie un tempo plus rapide.
Réglage des BPM
Si vous connaissez le nombre de BPM, appuyez sur la touche Tap/BPM et utilisez le
bouton Program/BPM pour définir la valeur.
L’affichage normal réapparaîtra dix secondes
plus tard si vous n’effectuez aucune opération.
5
Page 18

Fonction Tap Tempo
Si vous ne connaissez pas le nombre de BPM,
appuyez deux fois ou plus en rythme au
temps du morceau sur la touche Tap/BPM.
Le KP2 identifiera le nombre de battements
et les BPM apparaîtront sur l’affichage
Program/BPM.
Fonction Auto BPM
Si vous appuyez sur la touche Tap/BPM et
que vous la maintenez enfoncée pendant un
certain temps, trois points apparaîtront sur
l’affichage Program/BPM et l’appareil détectera automatiquement le rythme (battement)
de l’entrée audio. (Mode Auto BPM)
La détection des BPM a lieu tant que l’affichage Program/BPM clignote.
Réappuyez sur la touche Tap/BPM pour
mettre fin à la détection automatique.
Il est possible de régler les BPM sur une
plage allant de 80 à 160.
Fonction de synchronisation MIDI
(MIDI Sync)
Il est possible de spécifier les BPM du KP2
par l’envoi de messages d’horloge de synchronisation MIDI provenant d’un dispositif
MIDI externe. Branchez la borne [MIDI IN]
du KP2 dans la borne [MIDI OUT] du dispositif MIDI externe (comme un séquenceur)
qui transmet des messages d'horloge pour la
synchronisation.
Cette fonction ne synchronise pas des séquences de données avec les programmes de motifs rythmiques du KP2. Pour une synchronisation sur des séquences de données, vous devrez
soit insérer un message d’activation du panneau
sensible au toucher (Touch Pad On) au début de
chacune des mesures de vos séquences de données, soit toucher le panneau sensible au début
de chacune des phrases du KP2 pour démarrer le
motif.
Pour que le KP2 puisse recevoir des messages de synchronisation et d’activation du panneau sensible au toucher, accédez au mode d’édition MIDI (☞p.9) et effectuez les “Réglages de
transmission/réception de messages MIDI”
(☞p.9) de sorte qu’il puisse recevoir ces messages.
6
Vous ne pouvez pas utiliser les fonctions
Tap Tempo ou Auto BPM lorsque le KP2 reçoit
des messages de synchronisation d'un appareil
MIDI externe.
9. Sauvegarde des réglages
dans le programme Touche
Mémoire
Il est possible de sauvegarder l’état actuel du
KP2 sous une des touches Program Memory
(mémoires de programmes) 1 à 8 afin de pouvoir les rappeler instantanément chaque fois
que vous le souhaitez.
Contenus mémorisés
— Programme d’effet
— Etat activé/désactivé de la touche Hold et
la position conservée (coordonnées)
— Réglage du bouton FX/Depth
— Pour le groupe “BPM FX/PTN”, la valeur
BPM spécifiée
— Pour le groupe “SAMPLE/PLAY” , la touche utilisée pour l’échantillon 1, 2
Les programmes d’effets 60 et 90~99 ne mémorisent pas l'état de la touche [HOLD].
Pour mémoriser les réglages
(1) Appuyez sur la touche Program Memory
1–8 à laquelle vous voulez attribuer les données.
(2) Utilisez le bouton Program/BPM pour
sélectionner le programme d’effets à attribuer.
Pour mémoriser le réglage de la touche
Hold, sélectionnez le programme puis activez la
touche Hold et touchez le panneau sensible pour
préciser la position. Si vous souhaitez mémoriser
d’autres réglages, vous devez les définir à ce
stade.
(3) Appuyez sur la touche Program Memory
1–8 sélectionnée au point (1) et maintenez-la
enfoncée pendant environ deux secondes
pour mémoriser les réglages.
Lorsque les réglages sont sauvegardés, l’affichage Program/BPM arrête de clignoter.
Page 19

Pour rappeler les réglages
(1) Appuyez sur une touche Program
Memory 1~8 pour rappeler les réglages mémorisés sous cette touche.
10. Echantillonnage et
reproduction d’une phrase
Il est possible d’enregistrer une phrase de
l’entrée audio sous une des touches Sample
1, 2.
Ensuite, lorsque vous aurez sélectionné un
programme dans le groupe “SAMPLE/
PLAY” (programmes 90~99), vous pourrez
reproduire l’échantillon en utilisant le panneau sensible au toucher pour contrôler la
vitesse de reproduction ou la reproduction
inversée.
Si vous avez sélectionné un programme d'un
autre groupe que “SAMPLE/PLAY”, le fait
d’appuyer sur les touches Sample 1, 2 permettra de reproduire la phrase enregistrée
sous cette touche.
Vous pouvez ainsi enregistrer des phrases
d’environ six secondes sous chacune des
deux touches.
Les phrases enregistrées s’effacent à la mise
hors tension et il n’est pas possible de les sauvegarder.
Enregistrement
(1) Appuyez sur la touche Rec/Stop. Le témoin de la touche clignote afin d’indiquer
que vous avez accédé au mode d'attente
d’enregistrement.
(2) Appuyez sur la touche Sample 1, 2 sous
laquelle vous souhaitez enregistrer les données. A ce stade, vous n’entendrez pas le son
reproduit.
(3) Lorsque vous appuyez sur la touche Rec/
Stop, le témoin de la touche s’allume et l’enregistrement commence. L’enregistrement
s’arrête lorsque vous réappuyez sur la touche
Rec/Stop.
L’enregistrement s’arrête automatiquement
lorsque vous atteignez le temps d'enregistrement maximum.
Pour les programmes ne faisant pas partie
du groupe “SAMPLE/PLAY”, vous pouvez utiliser le panneau sensible au toucher pendant
l’enregistrement; le son traité avec l’effet sera enregistré.
Enregistrement automatique (AUTO
REC)
Vous pouvez programmer le démarrage de
l’enregistrement dès l’entrée de données
audio. Cette fonction s’avère particulièrement pratique en cas d’enregistrement de
voix provenant d’un micro.
(1) Au point (2) de la procédure d’enregistrement, maintenez enfoncée la touche Sample
1, 2 sous laquelle vous souhaitez enregistrer
puis appuyez sur la touche Rec/Stop.
Les témoins des touches Rec/Stop et Sample
1, 2 clignoteront simultanément pour indiquer que vous avez accédé au mode d'attente
d'enregistrement.
(2) L’enregistrement commencera automatiquement dès l’entrée de données audio. Il
s’arrêtera lorsque vous réappuierez sur la
touche Rec/Stop.
Reproduction
La méthode de reproduction diffère en fonction du programme d'effets sélectionné.
Pour un programme du groupe
“SAMPLE/PLAY”
(1) Sélectionnez un programme du groupe
“SAMPLE/PLAY” (90~99).
(2) Appuyez sur la touche Sample 1, 2 dont
vous voulez lire les données. La reproduction
ne commencera pas encore.
(3) Lorsque vous toucherez le panneau sensible, le son sera reproduit en fonction de la
position touchée.
La manière de jouer de la phrase dépendra
du programme. (feuillet séparé: Liste des
programmes d’effets)
(4) Utilisez le bouton FX Depth pour régler le
volume de reproduction.
Lorsque ce bouton FX Depth est positionné
au centre, le son de la reproduction et le son
entrant sont diffusés selon un rapport 1:1.
Lorsque le bouton est placé sur la position
7
Page 20

maximum, seul le son de l’échantillon est
audible pendant la reproduction et vous
n’entendez pas le son entrant.
Pour un programme n’appartenant pas
au groupe“SAMPLE/PLAY”
(1) Sélectionnez un programme d’un groupe
autre que “SAMPLE/PLAY”.
(2) Appuyez sur une des touches Sample 1,
2 pour que la phrase enregistrée soit reproduite à la vitesse normale.
Si vous continuez d’appuyer sur la touche, la
phrase est reproduite en boucle.
Pour régler le volume, continuez d’appuyer
sur la touche Sample 1, 2 et utilisez le bouton
FX Depth pour effectuer les réglages.
Vous pouvez appliquer des effets à la reproduction en touchant le panneau sensible pendant
la reproduction du son.
Si vous appuyez sur la touche Hold pendant que vous appuyez sur la touche Sample 1,
2, la reproduction sera conservée. La fonction
Hold s'annule lorsque vous appuyez à nouveau
sur la touche Sample 1, 2.
Fonctions MIDI
Qu’est-ce que le système MIDI?
Le terme MIDI vient de l’anglais Musical Instrument Digital Interface (interface numérique pour instruments de musique) et il s'agit
d’une norme internationale permettant
l’échange d’informations liées aux interprétations entre des instruments de musique
électroniques et des ordinateurs.
Connexions MIDI
Des câbles MIDI disponibles dans le commerce sont utilisés pour transmettre et recevoir des messages MIDI Raccordez ces câbles
entre les bornes MIDI du KP2 et les bornes
MIDI du dispositif MIDI externe avec lequel
vous souhaitez échanger des données.
Borne MIDI IN : Cette borne permet de recevoir des messages MIDI provenant d'un
autre dispositif MIDI. Pour ce faire, raccordez-la à la borne MIDI OUT du dispositif
externe.
Borne MIDI OUT : Cette borne permet de
8
transmettre des messages provenant du KP2.
Pour ce faire, raccordez-la à la borne MIDI IN
du dispositif externe.
Utilisation du système MIDI
Le KP2 n’est pas qu’un simple processeur
d’effets: il permet également de transmettre
des messages MIDI pour l’utiliser comme
contrôleur en temps réel d’un synthétiseur
ou d’un autre appareil MIDI externe.
Vous pouvez également raccorder le KP2 à
un séquenceur MIDI et enregistrer les messages MIDI transmis lors du toucher du panneau sensible. La reproduction des messages
MIDI enregistrés permet ainsi de reproduire
les opérations effectuées sur le panneau sensible.
A propos des canaux MIDI
Afin de pouvoir transmettre indépendamment des informations aux différents appareils MIDI, par le biais d'un seul câble MIDI,
le système MIDI utilise seize canaux (1~16).
Si l'appareil de transmission est réglé sur le
canal MIDI “1,” les messages MIDI ne seront
reçus que si l’appareil récepteur est également réglé sur le canal MIDI “1.”
A propos du tableau d'implémentation
MIDI
Le manuel d’utilisation de chaque appareil
MIDI comprend un “Tableau d’implémentation MIDI.”
Ce tableau permet de vérifier les types de
messages MIDI pouvant être transmis ou
reçus.
Lorsque vous raccordez deux ou davantage
d’appareils MIDI, comparez leurs tableaux
d’implémentation MIDI pour voir quels types de messages MIDI ils peuvent transmettre et recevoir entre eux.
* Vous trouverez de plus amples détails sur
les fonctions MIDI dans la brochure d'implémentation MIDI. Pour obtenir ce document,
veuillez prendre contact avec votre revendeur Korg.
Page 21

Mode d’édition MIDI
Maintenez la touche Tap/BPM enfoncée et
appuyez sur la touche Rec/Stop. Après environ une seconde, vous accéderez au mode
d’édition MIDI et le canal MIDI apparaîtra en
clignotant sur l’affichage Program/BPM.
Configuration du canal MIDI
Dans le mode d’édition MIDI, l’affichage
Program/BPM indique le canal MIDI. A ce
stade, vous pouvez utiliser le bouton
Program/BPM pour changer de canal MIDI.
Réglages de transmission/
réception de messages MIDI
Il est possible d’activer/de désactiver la
transmission et la réception de chaque type
de message MIDI en appuyant sur une des
touches indiquées ci-dessous.
La transmission et la réception sont activées
lorsque le témoin correspondant est allumé.
La transmission et la réception sont désactivées lorsque le témoin correspondant est
éteint. (☞p.11: Messages transmis et reçus)
Certains paramètres peuvent uniquement
être transmis, d'autres peuvent uniquement être
reçus.
Changement de numéro de commande
En maintenant enfoncée une des touches
Program Memory 3~8 et en tournant le bouton Program/BPM, vous pouvez modifier le
réglage du numéro de commande. Même s'il
est possible de sélectionner un numéro de
commande déjà utilisé, il n’est pas possible
d’activer simultanément la transmission et la
réception pour les messages MIDI correspondants à un même numéro de commande.
Il est possible de changer les messages
MIDI transmis et reçus par le KP2 sur une plage
allant du numéro CC#1 à CC#31et du numéro
CC#64 à CC#95.
Sauvegarde des réglages modifiés
Dans le mode d’édition MIDI, appuyez sur la
touche Rec/Stop et maintenez-la enfoncée
pendant au moins une seconde pour sauvegarder les réglages MIDI modifiés. Si vous
mettez le KP2 hors tension sans avoir sauvegardé les réglages, ceux-ci seront remplacés
par les réglages d’origine.
Pour quitter le mode d’édition
MIDI
Le KP2 revient à son état normal si vous touchez le panneau sensible ou si vous n’effectuez aucune opération pendant dix secondes.
Sauvegarde de vos réglages
Vous pouvez sauvegarder le contenu de la
mémoire de programmes et les réglages de
numéros de commandes du mode d’édition
MIDI en les transmettant sous forme de messages exclusifs pour les enregistrer sur un
dispositif MIDI externe.
Pour plus de détails sur les messages exclusifs que le KP2 peut transmettre et recevoir,
consultez les informations d’implémentation
MIDI séparées.
9
Page 22

Messages pouvant être transmis ou reçus
Les réglages d’usine permettent de transmettre ou de recevoir les messages MIDI suivants.
Opérations de données transmises
Panneau sensible au toucher Axe X
Panneau sensible au toucher Axe Y
Panneau sensible au toucher
Axe X+Y
Activation/désactivation
du panneau sensible au toucher
FX DEPTH Intensité de l’effet 4 (CC# 94) *1, *2 Mémoire de programmes 7
MUTE Intensité de l’effet 5 (CC# 95) *1, *2 Mémoire de programmes 8
Changement de programme Changement de programme (00~99) *2 Hold
Messages MIDI transmis
Commande d’effet 1 (CC#12) *1, *2 Mémoire de programme 4
Intensité de la modulation 1 (CC#1) Y=5~9 Mémoire de programmes 1
Intensité de la modulation 2 (CC#2) Y=5~1 Mémoire de programmes 2
Commande de l’effet 2 (CC#13) *1, *2 Mémoire de programmes 5
Intensité de l’effet 3 (CC#93) *1 Mémoire de programmes 3
Intensité de l’effet 2 (CC#92) *1, *2 Mémoire de programmes 6
Réglages de touches ON/OFF transmis
Opérations de données reçues
Panneau sensible au toucher axe X
Panneau sensible au toucher axe Y
Activation/désactivation
du panneau sensible au toucher
FX DEPTH Intensité de l’effet 4 (CC# 94) *1, *2 Mémoire de programmes 7
MUTE Intensité de l’effet 5 (CC# 95) *1, *2 Mémoire de programmes 8
Changement de programme Changement de programme (00~99) *2 Hold
BPM Horloge de synchronisation Echantillon 1
Messages MIDI reçus
Commande de l’effet 1 (CC#12) *1, *2 Mémoire de programmes 4
Commande de l’effet 2 (CC#13) *1, *2 Mémoire de programmes 5
Intensité de l’effet 2 (CC#92) *1, *2 Mémoire de programmes 6
Réglages de touches ON/OFF reçus
*1: Il est possible de modifier les messages MIDI transmis et reçus pour les CC#1à CC#31, CC#64
à CC#95 et pour le PITCH BEND. Les données entre parenthèses correspondent au réglage
d’usine.
*2: Les réglages d’activation/désactivation et de numéro de CC# sont les mêmes pour la transmission et la réception.
Les changements de commande pour les emplacements Y-5~9 et Y-5~1 de l’axe Y ainsi que pour l’axe X+Y du
panneau sensible au toucher peuvent être transmis mais non reçus. Pour cette raison, lors de l’enregistrement de
changements de commandes sur un séquenceur, utilisez le mode d’édition MIDI pour désactiver les touches
PROGRAM MEMORY 1~3 afin de ne pas transmettre de messages MIDI inutiles.
Les numéros de commandes spécifiés antérieurement ne peuvent pas être spécifiés à nouveau à un autre endroit.
Spécifications techniques
Nombre de programmes: 100
Entrées: Entrée Mic / borne phone mono, Entrées Phono / Bornes phono RCA , Entrées Line /
Bornes phono RCA
Sorties: Sorties Line / Bornes phono RCA , prise pour casque d’écoute / borne phone stéréo
MIDI: IN, OUT
Alimentation: DC 12V, 700 mA
Accessoires inclus: Adaptateur secteur, feuillet de protection pour panneau sensible au toucher
Poids: 1.1kg
Dimensions: 204(L) X 207(P) X 48(H) mm
— La finition et les spécifications techniques peuvent être sujettes à modifications sans avis préalable,
dans un but d’amélioration du produit.
10
Page 23

11
Page 24

Vorsichtsmaßnahmen
Aufstellungsort
Vermeiden Sie das Aufstellen des Geräts an Orten, an
denen
•es direkter Sonneneinstrahlung ausgesetzt ist;
•hohe Feuchtigkeit oder Extremtemperaturen auftre-
ten können;
•Staub oder Schmutz in großen Mengen vorhanden
sind;
•das Gerät Erschütterungen ausgesetzt sein kann.
•in der Nähe eines Magnetfeldes.
Stromversorgung
Schließen Sie das beiliegende Netzteil nur an eine geeignete Steckdose an. Verbinden Sie es niemals mit einer
Steckdose einer anderen Spannung.
Störeinflüsse auf andere Elektrogeräte
Dieser kann bei in der Nähe aufgestellten Rundfunkempfängern oder Fernsehgeräten Empfangsstörungen hervorrufen. Betreiben Sie solche Geräte nur in einem geeigneten Abstand von diesem Erzeugnis.
Bedienung
Vermeiden Sie bei der Bedienung von Schaltern und
Reglern unangemessenen Kraftaufwand.
Reinigung
Bei auftretender Verschmutzung können Sie das Gehäuse mit einem trockenen, sauberen Tuch abwischen. Verwenden Sie keinerlei Flüssigreiniger wie beispielsweise
Reinigungsbenzin, Verdünnungs- oder Spülmittel. Verwenden Sie niemals brennbare Reiniger.
Vor dem 31.12.1996 vergebene CE-Zeichen auf unseren
Das CE-Zeichen
netzgespeisten Geräten zeigen an, daß diese Geräte gemäß der EMC-Richtlinie (89/336/EWG) und der CERichtlinie (93/68/EWG) der EU arbeiten.
Nach dem 01.01.1997 vergebene CE-Zeichen auf unseren netzgespeisten Geräten zeigen an, daß diese Geräte
gemäß der EMC-Richtlinie (89/336/EWG), der CERichtlinie (93/68/EWG) und der Niederspannungsstromrichtlinie (73/23/EWG) der EU arbeiten.
Die CE-Zeichen auf unseren batteriegespeisten Geräten
zeigen an, daß diese Geräte gemäß der EMC-Richtlinie
(89/336/EWG) und der CE-Richtlinie (93/68/EWG) der
EU arbeiten.
WICHTIGER HINWEIS FÜR KUNDEN
Dieses Produkt wurde unter strenger Beachtung von
Spezifikationen und Spannungsanforderungen hergestellt, die im Bestimmungsland gelten. Wenn Sie dieses
Produkt über das Internet, per Postversand und/oder
mit telefonischer Bestellung gekauft haben, müssen Sie
bestätigen, dass dieses Produkt für Ihr Wohngebiet ausgelegt ist.
WARNUNG: Verwendung dieses Produkts in einem anderen Land als dem, für das es bestimmt ist, verwendet
wird, kann gefährlich sein und die Garantie des Herstellers oder Importeurs hinfällig lassen werden. Bitte bewahren Sie diese Quittung als Kaufbeleg auf, da andernfalls das Produkt von der Garantie des Herstellers oder
Importeurs ausgeschlossen werden kann.
Bedienungsanleitung
Bewahren Sie diese Bedienungsanleitung gut auf, falls
Sie sie später noch einmal benötigen.
Flüssigkeiten und Fremdkörper
Stellen Sie niemals Behältnisse mit Flüssigkeiten in der
Nähe des Geräts auf. Wenn Flüssigkeit in das Gerät gelangt, können Beschädigung des Geräts, Feuer oder ein
elek-trischer Schlag die Folge sein.
Beachten Sie, daß keinerlei Fremdkörper in das Gerät
gelangen. Sollte ein Fremdkörper in das Gerät gelangt
sein, so trennen Sie es sofort vom Netz. Wenden Sie sich
dann an Ihren KORG-Fachhändler.
Page 25

Einleitung
Vielen Dank für den Erwerb des dynamischen Effektgerätes und Controllers KP2 KAOSS
PAD. Für den störungsfreien Betrieb des KP2 und zur Ausnutzung aller Möglichkeiten lesen
Sie bitte diese Anleitung sorgfältig durch und bedienen Sie das Gerät in der geforderten
Weise.
Bedienungselemente und Anschlüsse des KP2 und deren
Funktionen
Oberes Bedienfeld
1. Eingangswahlschalter [INPUT
SELECT]
2. Spitzenpegelanzeige [PEAK]
3. Eingangsregler [INPUT VOLUME]
4. Effektregler [FX DEPTH]
5. Programm-/Tempoanzeige [PRO-
GRAM/BPM]
6. Programm-/Temporegler [PRO-
GRAM/BPM]
7. Programmspeichertasten [PROGRAM
MEMORY 1–8]
8. Taste [TAP/BPM]
9. Touch Pad
10. Hebel [PAD MOTION/MUTE]
11. Aufnahme-/Stopptaste [REC/STOP]
12. Sample-Tasten [SAMPLE 1, 2]
13. [HOLD]-Taste
Vorderes Bedienfeld
1. Kopfhörerregler [PHONES VOLUME]
2. Kopfhörerbuchse [PHONES]
3. Mikrofonregler [MIC TRIM]
4. Mikrofoneingangsbuchse [MIC]
Rückseite
1. Masseanschluss [GROUND]
2. Plattenspieler-Eingangsbuchsen
[PHONO IN]
3. Line-Eingangsbuchsen [LINE IN]
4. Line-Ausgangsbuchsen [LINE OUT]
5. Verbindungsschalter [CONNECTION]
6. Anschlüsse [MIDI IN], [MIDI OUT]
7. Stromversorgungsbuchse DC 12 V
8. Netzschalter [POWER]
1
2
3
4
12
13
6
7
8
5
6
7
8
9
10
11
1
2
5
3
4
4
3
2
1
1
Page 26

Anschlüsse
Wichtigste Anschlüsse
Stellen Sie diese Verbindungen her, wenn Sie das Tonsignal eines an den Eingangsbuchsen
des KP2 angeschlossenen Gerätes mit Effekten versehen und das bearbeitete Signal an den
Line-Ausgangsbuchsen [LINE OUT] ausgeben möchten. Das KP2 hat drei verschiedene Arten
von Eingängen. Benutzen Sie die Eingangsbuchsen, die in Ihrer Situation am besten geeignet
sind.
MAIN OUTS
TAPE
TAPE
STEREO AUX RETURNS
AUX SEND
MIC
4
MIC
6
MIC
3
MIC
5
MIC
2
MIC
CD-SPIELER
PLATTENSPIELER
PHONO IN
LINE IN
LINE OUT DC12V
1
BAL
OR
UNBAL
LINE IN 2
LINE IN 1
LOW CUT
75Hz
18dB/OCT
B
d
V
0
1
-
G
A
I
C
N
I
M
U
U
10
10
60
+
10dB
+
10dB
-40dB
TRIM
U
U
AUX
1
MON/
EFX
+15
U
U
2
EFX
+15
U
U
EQ
HI
12kHz
-15
+15
-15
U
U
MID
2.5kHz
-12
-12
+12
U
U
LOW
80Hz
+15
-15
-15
PAN
L
L
R
1
2
MUTE
MUTE
ALT 3–4
ALT 3–4
dB
dB
10
10
SOLO
5
5
U
U
5
5
10
10
20
20
30
30
40
40
50
50
60
60
BAL
BAL
BAL
BAL
OR
OR
OR
OR
UNBAL
UNBAL
UNBAL
UNBAL
LINE IN 4
LINE IN 3
LINE IN 5
LOW CUT
LOW CUT
LOW CUT
LOW CUT
75Hz
75Hz
75Hz
75Hz
18dB/OCT
18dB/OCT
18dB/OCT
18dB/OCT
B
d
V
0
B
B
d
d
B
V
V
d
V
1
0
0
0
-
1
1
1
-
-
-
G
A
G
G
A
A
G
I
C
A
N
I
I
I
C
C
I
C
N
N
N
I
I
I
M
M
M
M
U
U
U
10
60
10
10
60
60
60
+
10dB
-40dB
+
10dB
+
10dB
-40dB
-40dB
-40dB
TRIM
TRIM
TRIM
TRIM
U
U
U
AUX
AUX
AUX
AUX
1
1
1
1
MON/
MON/
MON/
MON/
EFX
EFX
EFX
EFX
+15
+15
+15
+15
U
U
U
2
2
2
2
EFX
EFX
EFX
EFX
+15
+15
+15
+15
U
U
U
EQ
EQ
EQ
EQ
HI
HI
HI
HI
12kHz
12kHz
12kHz
12kHz
-15
+15
-15
+15
-15
+15
+15
U
U
U
MID
MID
MID
MID
2.5kHz
2.5kHz
2.5kHz
2.5kHz
-12
-12
+12
+12
-12
+12
+12
U
U
U
LOW
LOW
LOW
LOW
80Hz
80Hz
80Hz
80Hz
+15
+15
-15
-15
+15
+15
-15
PAN
PAN
PAN
PAN
L
L
R
R
L
R
R
4
5
3
MUTE
MUTE
MUTE
ALT 3–4
ALT 3–4
ALT 3–4
dB
dB
dB
10
10
10
SOLO
SOLO
SOLO
SOLO
5
5
5
U
U
U
5
5
5
10
10
10
20
20
20
30
30
30
40
40
40
50
50
50
60
60
60
MIXER, DJ MIXER
STECKERNETZTEIL
OUTPUT
INPUT
L
1
1
MICRO SERIES 1402-VLZ
L
14-CHANNEL MIC/LINE MIXER
2
R
2
R
BAL/UNBAL
ALL BAL/UNBAL
LEFT
(1/MONO)
RIGHT
BAL
MONO
MONO
MONO
MONO
OR
UNBAL
L
L
L
L
LINE IN 6
BAL
BAL
BAL
BAL
OR
OR
LOW CUT
OR
OR
75Hz
UNBAL
UNBAL
UNBAL
UNBAL
18dB/OCT
B
d
V
0
1
-
R
R
R
R
G
A
I
C
N
I
M
U
LEVEL
LEVEL
LEVEL
LEVEL
+4
+4
+4
+4
PHONES
10
60
-10
-10
-10
-10
+
10dB
-40dB
LINE IN 7-8
LINE IN 13-14
LINE IN 9-10
LINE IN 11-12
TRIM
U
U
U
U
U
U
U
AUX
AUX
AUX
AUX
AUX
1
1
1
1
1
MON/
MON/
MON/
MON/
MON/
EFX
EFX
EFX
EFX
EFX
1
+20
+10
+15
+15
+15
+15
+15
NORMALLED
U
U
U
U
U
U
AUX 1 MASTER
2
PRE
2
2
2
2
2
POST
EFX
EFX
EFX
EFX
EFX
AUX
EFX TO
AUX 1
+20
MONITOR
+15
+15
SELECT
+15
+15
+15
RETURNS
U
U
U
U
U
SOURCE
EQ
EQ
EQ
EQ
EQ
LEFT RIGHT
HI
HI
HI
HI
HI
MAIN
CLIP+28
12kHz
12kHz
12kHz
12kHz
12kHz
MIX
+10
-15
+15
-15
+15
-15
-15
+15
+15
-15
+15
+7
U
U
U
U
U
ALT
+4
3-4
MID
MID
MID
MID
MID
2.5kHz
2.5kHz
2.5kHz
2.5kHz
2.5kHz
+2
-12
-12
+12
-12
-12
+12
+12
+12
-12
+12
0
TAPE
U
U
U
U
U
-2
LOW
LOW
LOW
LOW
LOW
80Hz
80Hz
80Hz
80Hz
80Hz
-4
+15
+15
-15
+15
+15
-15
-15
-15
+15
-15
-7
ASSIGN
PAN
PAN
PAN
PAN
PAN
-10
TO MAIN MIX
-20
NORMAL(AFL)
-30
LEVEL SET(PFL)
L
R
L
L
L
R
R
R
L
R
SOLO
0dB=0dBu
MODE
9–10
13–14
11–12
6
7–8
MUTE
MUTE
MUTE
MUTE
MUTE
POWER
RUDE SOLO LIGHT
PHANTOM
ALT 3–4
ALT 3–4
ALT 3–4
ALT 3–4
ALT 3–4
CONTROL
/ PHONES
MAIN MIX
ROOM
dB
dB
dB
dB
dB
dB
dB
10
10
10
10
10
10
10
SOLO
SOLO
SOLO
SOLO
SOLO
5
5
5
5
5
5
5
U
U
U
U
U
U
U
5
5
5
5
5
5
5
10
10
10
10
10
10
10
20
20
20
20
20
20
20
30
30
30
30
30
30
30
40
40
40
40
40
40
40
50
50
50
50
50
50
50
60
60
60
60
60
60
60
AC
Behandlung und Pflege des
Touch Pad
Drücken oder schlagen Sie niemals mit
übermäßiger Kraft auf das Touch Pad, und
stellen Sie keine schweren Gegenstände
darauf ab. Das Pad kann zerbrechen, wenn
zu hart darauf geschlagen wird. Betätigen
Sie das Touch Pad nur mit Ihren Fingern,
wenn Sie mit einem harten Gegenstand
darauf drücken oder darüber fahren, kann
das Pad Kratzer bekommen. Benutzen Sie
zur Reinigung des Touch Pads ein weiches,
trockenes Tuch. Benutzen Sie keine
Lösungsmittel wie Nitroverdünnung oder
Benzin, da sich das Pad dadurch verformen könnte.
2
Page 27

Anschluss an ein DJ-Mischpult
Wenn Sie das KP2 als externes Effektgerät verwenden möchten, verbinden Sie die EffectSend-Buchse Ihres DJ-Mischpults (o. ä.) mit den Line-Eingangsbuchsen des KP2, und
verbinden Sie die Line-Ausgangsbuchsen des KP2s mit den Effect-Return-Buchsen (o. ä.)
Ihres Mischpults.
Bei Anschluss über die Buchsen Effect Send/Return
Stellen Sie den Verbindungsschalter [CONNECTION] des KP2 auf „FX LOOP“. In dieser
Einstellung besteht das Ausgangssignal von den Line-Ausgangsbuchsen des KP2 nur aus
dem bearbeiteten Effektsignal des KP2s; ohne jeglichen Anteil vom Originalsignal, das zum
KP2 geschickt wurde.
Wenn Sie den Effektregler [FX DEPTH] des KP2s zum Einstellen des Effektanteils verwenden
möchten, stellen Sie diesen Schalter in die Stellung „DIRECT“.
DIRECT
FX LOOP
CONNECTION LINE OUT
RETURN
SEND
LINE OUT
LINE IN
PLATTENSPIELER
PLATTENSPIELERDJ-MISCHPULT
MIDI-Verbindungen
Stellen Sie diese Verbindungen her, wenn Sie MIDI-Geräte am KP2 anschließen möchten, um
z. B. Sequenzerprogramme usw. zu nutzen.
LINE IN MIDI INMIDI OUTOUTPUT
KORG EM-1
3
Page 28

Bedienung
1. Einschalten
(1) Schließen Sie das KP2 an die anderen
Geräte an, wie in der Abbildung gezeigt,
und stecken Sie den Netzadapter in eine
Wandsteckdose.
(2) Schalten Sie das Gerät am Netzschalter
[POWER] ein.
Die Programm-/Tempoanzeige [PROGRAM/BPM] leuchtet auf.
Zum Ausschalten drücken Sie den
Netzschalter [POWER] nochmals.
2. Eingabe eines Audiosignals
(1) Benutzen Sie den Eingangswahlschalter
[INPUT SELECT] zur Auswahl der
Eingangsbuchsen an denen das Gerät
angeschlossen ist, dem Sie einen Effekt
zumischen möchten.
MIC: Der Effekt wird auf den Mikrofoneingang angewendet.
PHONO: Der Effekt wird auf den
Plattenspielereingang angewendet.
LINE: Der Effekt wird auf die LineEingangsbuchsen angewendet.
4. Auswählen eines Programms
(1) Auf der Programm-/Tempoanzeige
[PROGRAM/BPM] wird die Nummer des
momentan ausgewählten Programmes
angezeigt.
Benutzen Sie den Programm-/Temporegler
[PROGRAM/BPM] zur Auswahl eines
Programms (00–99).
(2) Mit dem Effektregler [FX DEPTH]
können Sie den Effektanteil einstellen.
Es wird kein Effekt angewendet, wenn der
Regler ganz nach links gedreht wird, und
es wird der maximale
Effektanteil zugemischt, wenn der Regler
an den Rechtsanschlag gedreht wird.
Informationen zur Programm-/
Tempoanzeige [PROGRAM/BPM]
Hier wird die Nummer des momentan
ausgewählten Programmes angezeigt, der
eingestellte BPM-Wert sowie die Position,
an der Sie das Touch Pad berühren.
Bei Betätigung des Touch Pads:
Die Anzeige zeigt die Position an, an der
Sie das Pad berühren (1.1–9.9; 5.5 bedeutet
„Mitte“).
Ver tikale Position (1–9)
Horizontale Position (1–9)
3. Einstellen der Lautstärke
(1) Stellen Sie den Eingangspegel ein.
Während ein Audiosignal am angeschlossenen Gerät wiedergegeben wird, stellen
Sie am Eingangsregler [INPUT VOLUME]
den Eingangspegel so ein, dass die
Spitzenpegelanzeige nicht rot aufleuchtet.
Wenn Sie den Mikrofoneingang verwenden, stellen Sie den Mikrofonregler [MIC
TRIM] auf die Empfindlichkeit des
Mikrofons ein, so dass das Signal nicht
verzerrt ist.
(2) Wenn Sie Kopfhörer benutzen, stellen
Sie die gewünschte Hörlautstärke am
Kopfhörerregler [PHONES VOLUME] ein.
4
Bei der Programmwahl: Die Anzeige zeigt
die Programmnummer an (00–99).
Beim Einstellen des BPM-Wertes: Wenn
Sie die Taste [TAP/BPM] drücken, um den
BPM-Wert einzustellen, zeigt die Anzeige
den BPM-Wert an. Im Auto-BPM-Modus
leuchten drei Punkte auf.
Bei der MIDI-Bearbeitung: Die Anzeige
zeigt den MIDI-Kanal, die ControllerNummer oder andere Datenwerte an.
5. Bedienung des Touch Pad
(1) Steuern Sie den Sound, indem Sie mit
dem Finger über das Touch Pad gleiten
oder es antippen.
Page 29

Benutzen Sie die mitgelieferte Schutzfolie.
(2) Wenn Sie während Sie der Betätigung
des Touch Pad die [HOLD]-Taste drücken,
hält das KP2 den Effekt-Sound, der in dem
Moment aktiv ist, in dem Sie das Touch
Pad loslassen .
6. Stummschaltung (MUTE)
Wenn Sie den Hebel [PAD MOTION/
MUTE] zu sich hin ziehen (Stellung
„MUTE“), wird das Eingangssignal, der
Sample oder der Synth-/SchlagzeugSound stummgeschaltet. Wenn Sie einen
Delay- oder Halleffekt benutzen, wird ab
diesem Moment nur der Effektklang
ausgegeben (d. h. das Echo oder der Hall).
Transformer
Durch schnelle Bewegungen mit dem
Hebel [PAD MOTION/MUTE] können Sie
die Stummschaltung schnell ein- und
ausschalten und so aus einem dauerhaft
anliegenden Eingangssignal Rhythmen
erzeugen. Diese DJ-Technik wird z. T. als
„Transformer“ bezeichnet.
7. Pad-Bewegungen (Pad
Motion)
Mit dem KP2 könne Sie Ihre Touch-PadBewegungen aufzeichnen, und indem Sie
den Hebel [PAD MOTION/MUTE] in die
Stellung „PAD MOTION“ stellen, können
Sie die Bewegungen abspielen.
Aufnahme von Pad-Bewegungen
Die Aufnahme beginnt, sobald Sie den
Hebel [PAD MOTION/MUTE] in der
Stellung „PAD MOTION” festhalten und
dabei das Touch Pad berühren.
Auch dann, wenn Sie den Finger vom
Touch Pad abheben, wird der nachfolgende
Zustand weiterhin als Teil Ihrer Bedienung
interpretiert und aufgezeichnet.
Daher können Sie auch Aktionen auf dem
Touch Pad aufnehmen, bei denen Sie in
Abständen darauf tippen. Die Aufnahme
endet, wenn Sie den Hebel [PAD MOTION/MUTE] in die Grundstellung (MUTE)
bewegen.
Die Aufnahme endet ebenfalls, sobald die
maximale Aufnahmedauer (etwa 3,3
Sekunden) erreicht ist.
Wiedergabe von Pad-Bewegungen
Wenn Sie eine Pad-Bewegung aufgenommen haben, schieben Sie den Hebel [PAD
MOTION/MUTE] in die Stellung „PAD
MOTION“ (ohne das Touch Pad zu
berühren), und die aufgenommenen
Bewegungen werden abgespielt. Solange
Sie den Hebel [PAD MOTION/MUTE] in
der Stellung „PAD MOTION“ lassen und
das Touch Pad nicht berühren, wird
wiederholt die gleiche Bewegung
abgespielt.
Wenn Sie das T ouch Pad während der W iedergabe berühren, beginnt eine neue Aufnahme.
Die Aufnahme wird ausgesetzt, wenn Sie auf
ein anderes Programm umschalten.
Der Ein-/Ausschaltzustand der [HOLD]Taste wird nicht als T eil der Pad-Bewegungen
aufgezeichnet. W enn Sie die [HOLD]-T aste
drücken und eine Pad-Bewegung abspielen,
wird die Bewegung ab der Stelle angehalten, an
der Sie die W iedergabe gestoppt hatten.
8. Eingabe des BPM-Wertes
Wenn Sie einen BPM-Wert angeben,
können Sie die Effekte mit dem Tempo
synchronisieren, wenn ein Effektprogramm
der Gruppe „BPM FX/PTN“ ausgewählt
ist. Einzelheiten zu dem jeweiligen
Effektparameter, für den der BPM-Wert
gilt, erfahren Sie aud der Liste der
Effektprogramme (Tabelle auf separatem
Blatt).
Was ist der BPM-Wert?
BPM (Beats Per Minute = Schläge pro
Minute) ist das Tempo des Titels, angegeben in der Anzahl von Schlägen (Viertelnoten), die in einer Minute gezählt werden.
Ein höherer BPM-Wert bezeichnet ein
schnelleres Tempo.
Einstellen des BPM-Wertes
Wenn Sie die BPM kennen, drücken Sie die
Taste [TAP/BPM] und stellen Sie den Wert
mit dem Programm-/Temporegler
5
Page 30

[PROGRAM/BPM] ein. Nach zehn
Sekunden ohne weitere Änderungen
erscheint wieder die normale Anzeige.
Tap-Tempo-Funktion
Wenn Sie den BPM-Wert nicht kennen,
drücken Sie die Taste [TAP/BPM] zweioder mehrmals im Rhythmus des
laufenden Titels. Ihr „getipptes“ Tempo
wird erkannt, und der BPM-Wert erscheint
in der Programm-/Tempoanzeige
[PROGRAM/BPM].
Auto-BPM-Funktion
Wenn Sie die Taste [TAP/BPM] für längere
Zeit drücken, erscheinen drei Punkte in der
Programm-/Tempoanzeige, und der
Rhythmus des ankommenden
Audiosignals wird automatisch erkannt
(Auto-BPM-Modus).
Während die Programm-/Tempoanzeige
[PROGRAM/BPM] blinkt, läuft die
Erkennung des BPM-Wertes. Drücken Sie
die Taste [TAP/BPM] erneut, um die
automatische Erkennung auszuschalten.
Sie können BPM auf einen W ert zwischen
80 und 160 einstellen.
MIDI-Sync-Funktion
Der BPM-Wert des KP2 kann auch aus der
MIDI Clock eines externen MIDI-Gerätes
gewonnen werden. Verbinden Sie die
Buchse [MIDI IN] des KP2 mit der MIDIAusgangsbuchse des externen MIDIGerätes (wie einem Sequenzer), das die
MIDI Clock senden kann.
Diese Funktion erlaubt keine Synchronisation der Sequenzdaten mit den Rhythmen
des KP2. Wenn Sie zu Sequenzdaten
synchronisieren möchten, müssen Sie
entweder eine Touch-Pad-On-Meldung an
den Anfang jedes Taktes Ihrer Sequenzdaten einfügen, oder das Touch Pad am
Anfang jeder Phrase des KP2 antippen, um
das Pattern zu starten.
Wenn Sie möchten, dass der KP2 die MIDI
Clock und T ouch-Pad-On-Meldungen empfangen soll, schalten Sie in den MIDIBearbeitungsmodus ( ☞ Seite 9) ein, und sorgen
Sie in den „Einstellungen für Übertragung und
6
Empfang von MIDI-Meldungen“ ( ☞ Seite 9)
dafür , dass diese Meldungen empfangen werden.
Sie können die Funktionen „T ap T empo“
oder „Auto BPM“ nicht benutzen, während der
KP2 MIDI-Clock-Daten von einem externen
MIDI-Gerät empfängt.
9. Speichern von Einstellungen
mit den
Programmspeichertasten
Der momentane Einstellungszustand des
KP2 kann unter einer der Programmspeichertasten [PROGRAM MEMORY 1–8]
abgelegt werden, so dass dieser Zustand
jederzeit abrufbar ist.
Gespeicherte Daten
— Effektprogramm
— Ein-/Ausschaltzustand der [HOLD]Taste sowie die Halteposition (Koordinaten)
— Einstellung des Effektreglers FX/
DEPTH
— In der Gruppe „BPM FX/PTN“: der
eingestellte BPM-Wert
— In der Gruppe „SAMPLE/PLAY“: die
verwendeten Sample-Tasten 1 und 2
Die Ef fektprogramme 60 und 90–99 speichern nicht den Zustand der [HOLD]-T aste.
Speichern der Daten
(1) Drücken Sie die Programmspeichertaste
[PROGRAM MEMORY 1–8], der Sie die
momentane Einstellung zuweisen
möchten.
(2) Mit dem Programm-/Temporegler
[PROGRAM/BPM] können Sie das
Effektprogramm auswählen, das beim
Drücken der Taste aktiviert werden soll.
Wenn Sie den Zustand der [HOLD]-T aste
speichern möchten, wählen Sie das Programm,
schalten Sie die [HOLD]-T aste ein, und berühren Sie das T ouch Pad, um die Position anzugeben. W enn Sie weitere Einstellungen vornehmen möchten, tun Sie dieses jetzt.
(3) Drücken und halten Sie die in Schritt (1)
gewählte Programmspeichertaste etwa 2
Sekunden lang – die Einstellungen wurden
gespeichert.
Page 31

Sobald die Einstellungen gespeichert sind,
hört die Programm-/Tempoanzeige
[PROGRAM/BPM] auf zu blinken.
Abruf gespeicherter Einstellungen
(1) Drücken Sie eine der Programmspeichertasten 1-8 – die unter dieser Taste
gespeicherten Einstellungen werden
abgerufen.
10. Sampeln und Wiedergeben
einer Phrase
Eine Phrase des eingehenden Audiosignals
kann unter einer der beiden Sample-Tasten
[SAMPLE 1, 2] aufgenommen werden.
Wenn Sie daraufhin ein Programm der
Gruppe „SAMPLE/PLAY“ auswählen
(Programme Nrn. 90–99), können Sie den
Sample abspielen und mit dem Touch Pad
die Wiedergabegeschwindigkeit oder die
Rückwärtswiedergabe steuern.
Wenn Sie ein Programm aus der Gruppe
„SAMPLE/PLAY“ gewählt haben, wird
durch Drücken einer der beiden SampleTasten die unter dieser Taste aufgenommene Phrase abgespielt.
Für jede Taste können Sie etwa sechs
Sekunden lang aufnehmen.
Die aufgenommenen Phrasen gehen verloren, wenn das Gerät ausgeschaltet wird. Die
aufgenommenen Phrasen können nicht gespeichert werden.
Aufnahme (Sampeln)
(1) Drücken Sie die Aufnahme-/Stopptaste
[REC/STOP], und die LED dieser Taste
zeigt durch Blinken an, dass das Gerät
aufnahmebereit ist.
(2) Drücken Sie die Sample-Taste 1 oder 2,
für die Sie einen Sample aufnehmen
möchten. Dabei wird nicht der dort
gespeicherte Sample abgespielt.
(3) Wenn Sie die Aufnahme-/Stopptaste
[REC/STOP] drücken, leuchtet deren LED,
und die Aufnahme beginnt. Die Aufnahme
stoppt, wenn Sie die gleiche Taste
nochmals drücken.
Die Aufnahme stoppt automatisch, sobald
die maximale Aufnahmezeit erreicht ist.
Bei Programmen, die nicht aus der Gruppe
„SAMPLE/PLA Y“ stammen, können Sie während der Aufnahme das T ouch Pad betätigen,
und der durch den Ef fekt bearbeitete Sound wird
aufgenommen.
Automatische Aufnahme (AUTO REC)
Sie können das Gerät so einstellen, dass die
Aufnahme automatisch beginnt, sobald ein
Audiosignal empfangen wird. Dies ist
dann praktisch, wenn Sie eine Stimme per
Mikrofon aufnehmen.
(1) Halten Sie in Schritt (2) des Aufnahmevorgangs (s. o.) die gewünschte SampleTaste 1 oder 2 gedrückt, und drücken Sie
die Aufnahme-/Stopptaste [REC/STOP].
Die LEDs dieser und der entsprechenden
Sample-Taste 1 oder 2 blinken gleichzeitig,
um die Aufnahmebereitschaft anzuzeigen.
(2) Die Aufnahme beginnt automatisch,
sobald ein Audiosignal erkannt wird. Die
Aufnahme stoppt, wenn Sie die Aufnahme-/Stopptaste nochmals drücken.
Wiedergabe (Sample abspielen)
Die Art der Wiedergabe hängt ganz davon
ab, welches Effektprogramm Sie ausgewählt haben.
Bei einem Programm aus der Gruppe
„SAMPLE/PLAY“:
(1) Wählen Sie ein Programm aus der
Gruppe „SAMPLE/PLAY“ (Nrn. 90–99).
(2) Drücken Sie die Sample-Taste 1 oder 2,
deren Sample Sie spielen möchten. Es
erfolgt noch keine Wiedergabe.
(3) Wenn Sie das Touch Pad berühren, wird
der Sample entsprechend der angetippten
Position abgespielt.
Die Art und Weise, wie die Phrase gespielt
wird, hängt vom Programm ab (separates
Blatt: Liste der Effektprogramme).
(4) Mit dem Effektregler [FX DEPTH]
bestimmen Sie die Wiedergabelautstärke
des Samples.
In der Mittelstellung dieses Reglers wird
der Sample genauso laut ausgegeben, wie
er aufgenommen wurde (1:1).
In Maximalstellung ist während der
7
Page 32

Sample-Wiedergabe nur das Sample-Signal
zu hören (kein Eingangssignal).
Bei einem Programm aus anderen
Gruppen (nicht „SAMPLE/PLAY“):
(1) Wählen Sie ein Programm aus einer
anderen Gruppe als „SAMPLE/PLAY“.
(2) Drücken Sie eine der Sample-Tasten 1
oder 2, und die aufgenommene Phrase
läuft mit normalem Tempo.
Wenn Sie die Taste weiterhin gedrückt
halten, läuft die Phrase als Loop (im Kreis).
Um die Lautstärke einzustellen, halten Sie
die jeweilige Sample-Taste 1 oder 2
gedrückt und drehen Sie am Effektregler
FX DEPTH.
Während der Sample-W iedergabe können
Sie mit dem T ouch Pad Ef fekte erzeugen.
Wenn Sie bei gehaltener Sample-T aste die
[HOLD]-T aste drücken, wird die W iedergabe
fortgesetzt, so als ob Sie die Sample-T aste weiter hin gedrückt hielten.
Die Haltefunktion (HOLD) wird ausgeschaltet,
indem Sie die entsprechende Sample-T aste 1 oder
2 nochmals drücken.
MIDI-Funktionen
Was ist MIDI?
MIDI steht für Musical Instrument Digital
Interface und ist ein weltweiter Standard
für die Übertragung einer Vielzahl
verschiedener Spielinformationen und
anderer Daten zwischen elektronisch
Musikinstrumenten und Computern.
MIDI-Verbindungen
Für die Übertragung und den Empfang
von MIDI-Meldungen werden spezielle
MIDI-Kabel verwendet. Verbinden Sie die
MIDI-Buchsen am KP2 mit den MIDIAnschlüssen des externen MIDI-Gerätes,
mit dem Sie MIDI-Daten austauschen
möchten.
Buchse MIDI IN: An dieser Buchse
werden MIDI-Meldungen von anderen
MIDI-Geräten empfangen. Verbinden Sie
diese Buchse mit dem MIDI OUTAnschluss des externen Gerätes.
8
Buchse MIDI OUT: An dieser Buchse
werden MIDI-Meldungen vom KP2
gesendet. Verbinden Sie diese Buchse mit
dem MIDI IN-Anschluss des externen
Gerätes.
Benutzung von MIDI
Neben dem Einsatz des KP2 als Effektgerät
können Sie MIDI-Befehle vom KP2 aus
senden und es als „Realtime Controller“
(Steuergerät) für einen Synthesizer oder
andere externe MIDI-Geräte verwenden.
Sie können das KP2 auch an einen MIDISequenzer anschließen und die bei
Betätigung des Touch Pad gesendeten
MIDI-Befehle aufzeichnen. Wenn Sie die
aufgenommenen MIDI-Meldungen dort
wieder abspielen, werden Ihre Bedienungsvorgänge am Touch Pad wiedergegeben.
Informationen zu MIDI-Kanälen
Um Informationen unabhängig voneinander an mehrere MIDI-Geräte über ein
einziges Kabel übertragen zu können,
besitzen MIDI-Datenpakete einen von 16
Kanälen (1–16). Wenn das sendende Gerät
auf MIDI-Kanal „1“ eingestellt ist, werden
die MIDI-Meldungen empfangsseitig
ignoriert, wenn das empfangende Gerät
nicht ebenfalls auf MIDI-Kanal “1” steht.
Informationen zur MIDIImplementationstabelle
Die Bedienungsanleitungen vieler MIDIGeräte enhalten eine so genannte „MIDIImplementationstabelle“.
In dieser Tabelle sind alle Arten von MIDIBefehlen aufgeführt, die von diesem Gerät
gesendet oder empfangen werden können.
Wenn Sie zwei (oder mehrere) MIDI-Geräte
benutzen, vergleichen Sie deren MIDIImplementationstabellen, um zu erfahren,
welche MIDI-Meldungen diese Geräte
untereinander austauschen können.
* Einzelheiten über alle MIDI-Funktionen erhalten Sie in der separaten MIDI-Implementationstabelle.
Wenden Sie sich diesbezüglich an Ihren KorgHändler .
Page 33

Bearbeitung von MIDI-Daten (MIDI
Edit)
Halten Sie die Taste [TAP/BPM] gedrückt
und drücken Sie die Aufnahme-/
Stopptaste [REC/STOP]. Nach etwa einer
Sekunde gelangen Sie in den MIDIBearbeitungsmodus, und der MIDI-Kanal
blinkt in der Programm-/Tempoanzeige
[PROGRAM/BPM].
Einstellen des MIDI-Kanals
Im MIDI-Bearbeitungsmodus zeigt die
Programm-/Tempoanzeige [PROGRAM/
BPM] den MIDI-Kanal an. Sie können den
Programm-/Temporegler [PROGRAM/
BPM] benutzen, um den MIDI-Kanal
einzustellen.
Einstellungen für Übertragung und
Empfang von MIDI-Meldungen
Übertragung und Empfang jeder Art von
MIDI-Nachricht kann mit einer der unten
aufgeführten Tasten ein- und ausgeschaltet
werden (MIDI-Filterfunktion).
Übertragung und Empfang sind aktiviert,
wenn die entsprechende LED leuchtet.
Übertragung und Empfang sind
deaktiviert, wenn die LED nicht leuchtet.
(Seite 10: Meldungen, die gesendet und
empfangen werden können)
Einige Parameter können nur gesendet, andere nur empfangen werden.
Ändern von Controller-Nummern
Wenn Sie eine der Programmspeichertasten
[PROGRAM MEMORY 3–8] gedrückt
halten und den Programm-/Temporegler
[PROGRAM/BPM] drehen, können Sie
Controller-Nummern ändern. Obwohl Sie
hier eine bereits verwendete ControllerNummer auswählen können, ist der
gleichzeitige Empfang und die Übertragung von MIDI-Meldungen mit gleicher
Controller-Nummer nicht möglich.
Die vom KP2 gesendeten und empfangenen
MIDI-Meldungen können auf die Controller Nummern 1–31 und 64–95 eingestellt werden.
Speichern der veränderten
Einstellungen
Drücken und halten Sie im MIDIBearbeitungsmodus die Aufnahme-/
Stopptaste [REC/STOP] für mindestens
eine Sekunde — die geänderten MIDIEinstellungen wurden gespeichert. Wenn
Sie das Gerät ausschalten, ohne zu
speichern, bleiben alle Einstellungen im
ursprünglichen Zustand.
Verlassen des MIDIBearbeitungsmodus
Sie kehren in den normalen Bedienungsstatus zurück, sobald Sie das Touch Pad
berühren oder indem Sie einfach zehn
Sekunden lang nichts ändern.
Speichern Ihrer Einstellungen
Sie können die Inhalte Ihrer Programme
und die Einstellungen der ControllerNummern des MIDI-Bearbeitungsmodus’
speichern, indem Sie diese als so genannte
„SysEx”-Meldungen (systemexklusive
Meldungen) an ein externes MIDI-Gerät
senden und diese dort speichern. Näheres
über die SysEx-Meldungen, die das KP2
sendet und empfängt, erfahren Sie in der
separaten MIDI-Implementationstabelle.
9
Page 34

Meldungen, die gesendet und empfangen werden können
Mit den Werkseinstellungen können die folgenden MIDI-Meldungen übertragen und
empfangen werden.
Durch Bedienungsvorgänge
gesendete Daten
Touch Pad X-Achse
Touch Pad Y-Achse
Touch Pad X+Y-Achse Effektanteil 3 (Controller-Nr. 93) *1 Programmspeicher 3
Touch Pad ein/aus Effektanteil 2 (Controller-Nr. 92) *1, *2 Programmspeicher 6
FX DEPTH Effektanteil 4 (Controller-Nr. 94) *1, *2 Programmspeicher 7
MUTE Effektanteil 5 (Controller-Nr. 95) *1, *2 Programmspeicher 8
Programmwechsel Programmwechsel (00–99) *2 HOLD (Halten)
Gesendete MIDI-Befehle (EIN/AUS)
Effektparameter 1 (Controller-Nr. 12) *1, *2
Modulationstiefe 1 (Controller-Nr. 1) Y=5–9
Modulationstiefe 2 (Controller-Nr. 2) Y=5–1
Effektparameter 2 (Controller-Nr. 13) *1, *2
Gesendete Tastenzustände
Programmspeicher 4
Programmspeicher 1
Programmspeicher 2
Programmspeicher 5
Für Bedienungsvorgänge
empfangene Daten
Touch pad X-Achse
Touch pad Y-Achse
Touch Pad ein/aus Effektanteil 2 (Controller-Nr. 92) *1, *2 Programmspeicher 6
FX DEPTH Effektanteil 4 (Controller-Nr. 94) *1, *2 Programmspeicher 7
MUTE Effektanteil 5 (Controller-Nr. 95) *1, *2 Programmspeicher 8
Programmwechsel Programmwechsel (00–99) *2 HOLD (Halten)
BPM-Wert MIDI Clock Sample 1
Empfangene MIDI-Befehle (EIN/AUS)
Effektparameter 1 (Controller-Nr. 12) *1, *2
Effektparameter 2 (Controller-Nr. 13) *1, *2
Empfangene Tastenzustände
Programmspeicher 4
Programmspeicher 5
*1: Die gesendeten und empfangenen MIDI-Meldungen können auf die Controller -Nummern 1–31 und
64–95 sowie PITCH BEND eingestellt werden. ( ) ist werksseitig so eingestellt.
*2: Die Einstellungen „Ena“/„Dis“ (Aktivieren/Deakt.) und „CC#“ (Controller -Nummer) sind für
Übertragung und Empfang immer gleich.
Die Controller -Änderungen fürdie T ouch-Pad-Y -Achse Y -5–9 und Y -5–1 sowie für die T ouch-PadX+Y Achse können gesendet, jedoch nicht empfangen werden. Schalten Sie daher bei der Aufnahme von
Controller -Änderungen in einem Sequenzer die Programmspeichertasten 1–3 aus, so dass keine überflüssigen MIDI-Meldungen übertragen werden.
Einmal eingestellte Controller -Nummern lassen sich nicht an anderer Stelle ändern.
Technische Daten
Anzahl der Programme: 100
Eingänge: Mikrofoneingang/Klinkenbuchse (mono), Plattenspielereingang/Cinch-Buchsen,
Line-Eingang/Cinch-Buchsen
Ausgänge: Line-Ausgang/Cinch-Buchsen, Kopfhörerausgang/Klinkenbuchse (stereo)
MIDI: IN, OUT
Stromversorgung: 12 V Gleichspannung, 700 mA
Mitgeliefertes Zubehör: Netzadapter, Schutzfolie für das Touch Pad
Gewicht: 1,1 kg
Abmessungen: 204(B) X 207(T) X 48(H) mm
— Die T echnischen Daten sowie das äußere Erscheinungsbild können sich im Zuge der Fortentwicklung jederzeit ändern.
10
Page 35

11
Page 36

安全上のご注意
ご使用になる前に必ずお読 みください
ここに記 載した注意事項は、製品を安全に正しくご使用いただき、あなたや
他の方々への危害や損害を未然に防ぐためのものです。
注意事項は誤った取り扱いで生じる危害や損害の大きさ、または切迫の
程度によって、内容を「警告」、「注意」の2つに分けています。これらは、
あなたや他の方々の安全や機器の保全に関わる重 要な内容ですので、よ
く理解した上で必ずお守りください。
火災・感電・人身障害の危険を防止するには
図記号の例
記号は、注意(危険、警告を含む)を示し ていま す。 記
号の中には、具体的は注意内容が描かれています。左の
図は「一般的な注意、警告、危険」を表していま す。
記号は、禁止(してはいけないこ と)を示し ています。記
号の中には、具体的な注意内容が描かれることがありま
す。左の図は「分解禁止」を表して いま す。
記号は、強制(必ず行うこと)を示しています。
記号の中には、具体的な注意内容が描かれることがあり
ます。 左の図は「電源プラグをコンセントから抜くこと」 を表
しています。
以下の指示を守ってください
警告
この注意事項を無視した取り扱いをすると、死亡や
重傷を負う可能性が予想されます
・ACアダプターのプラグは、必ずAC100Vの電源コンセント
に差し込む。
・ACアダプターのプラグにほこり が付着している場合は、ほこ
りを拭き取る。
感電やショートの恐れがあります。
・本製品はコンセントの近くに設置し、ACア ダプターのプラ グ
へ容易に手が届くようにする。
・次のような場合には、直ちに電源を切ってACアダプターの
プラグをコンセン トから抜く。
○ACアダプターが破損したとき
○異物が内部に入ったとき
○製品に異常や故障が生じた とき
修理が必要なとき は 、お買い上げの販売店、最寄りのコルグ営業
所、またはサービス・センターへ修理を依頼してください。
・本製品を分解したり改造したりしない。
・修理/部品の交換などで、取扱説明書に書かれている以外の
ことは絶対にしない。
・ACアダプターのコードを無理に曲げた り、発熱する機器に近
づけない。また、ACアダ プターのコードの上に重いものを乗
せない。
コードが破損 し、感電や火災の原因になります。
・大音量や不快な程度の音量で長時間使用しない。
万一、聴力低下や耳鳴りを感じたら専門の医師に相談してく
ださい。
・ 本製品に異物(燃えやすいもの、硬貨、針金など)を入れな
い。
・温度が極端に高い場所(直射日光の当たる場所、暖房機器の
近く、発熱する機器の上など)で使用や保管はしない。
・ 振動の多い場所で使用や保管はしない。
・ホコリの多い場所で使用や保管はしない。
・風呂場、シャワー室で使用や保管はしない。
・雨天時の野外などのような湿気の多い場所で、使用や保管は
しない。
・ 本製品の上に液体の入ったもの(水や薬品等)を置かない。
・本製品に液体をこぼさない。
・濡れた手で本製品を使用しない。
注意
この注意事項を無視した取り扱いをすると、傷害を負う可能性
または物理的損害が発生する可能性があります
・正常な通気が妨げられない所に設置して使用する。
・ラジオ、テレビ、電子機器などから十分に離して使用する。
ラジオやテレビ等に接近して使用すると、本製品が雑音を受
けて誤動作する場合があります。また、ラジオ、テレビ等に雑
音が入ることがあり ま す。
・ 外装のお手入れは、乾いた柔らかい布を使って軽く拭く。
・ACアダプターをコンセントから 抜き差しすると きは、必ずプ
ラグを持つ。
・長時間使用しな いときは、ACア ダプターをコンセン トから抜
く。
・他の電気機器の電源コードと一緒にタコ足配線をしない。
本製品の定格消費電力に合 ったコンセントに接続し てください。
・スイッチやツマミなどに必要以上の力を加えない。
故障の原因になります。
・外装のお手入れに、ベンジンやシンナー系の液体、コンパウ
ンド質、 強燃性のポリッシャーは使用しない。
・不安定な場所に置かない。
本製品が転倒してお客様がけがをし たり、本製品が故障する
恐れがあります。
アフターサービスに ついてのご質問、ご相談は、お買い上げの販売店、最
寄りのコルグ営 業 所 、または サービス ・センターへ お問い合わせく ださい 。
商品のお取り扱いに関するご質問、ご相談は、お客様相談窓口へお問
い合わせください。
●サービス・センター:〒143-0001 東京都大田区東海5-4-1明正大井5号営業所コ
● 名古屋営業所: 〒466-0825名古屋市昭和区八事本町100-51
● 大阪営業所: 〒531-0072大阪市北区豊崎3-2-1 淀川5番館7F
● 福岡営業所: 〒810-0012福岡市中央区白金1-3-25第2池田ビル1F
*MIDI は社団法人音楽電子事業協会(AMEI)の登録商標です。
*掲載されている会社名、製品名、規格名などは、それぞれ各社の商標ま
たは登録商標です。
アフターサービス
お客様相談窓口 TEL03(3799)9086
ルグ物 流セン ター内 TEL03(3799)9085
TEL052(832)1419
TEL06(6374)0691
TEL092(531)0166
Page 37

はじめに
このたびは、DYNAMICEFFECT/CONTROLLERKAOSSPADKP2をお買い上げい
ただきまして誠にありがとうございま す。本機を末永くご愛用いただくためにも、この取扱説明
書をよくお読みになって正しい方法でご使用ください。
各部の機能と名称
トップ ・パネル
1.[INPUTSELECT]スイッチ
2.[PEAK]インジケーター
3.[INPUTVOLUME]ノブ
4.[FXDEPTH]ノブ
5.[PROGRAM/BPM]ディスプレイ
6.[PROGRAM/BPM]ノブ
7.[PROGRAMMEMORY1 〜8]キー
8.[TAP/BPM]キー
9.タッチ・パッド
10.[PADMOTION/MUTE]レバー
11.[REC/STOP]キー
12.[SAMPLE1、2]キー
13.[HOLD]キー
フロント・パネル
1.[PHONESVOLUME]ノブ
2.[PHONES]出力端子
3.[MICTRIM]ノブ
4.[MIC]入力端子
1
2
3
4
12
13
1
2
5
6
7
8
9
10
11
3
4
リア ・ パネル
1.[GND]端子
2.[PHONOIN]端子
3.[LINEIN]端子
4.[LINEOUT]端子
5.[CONNECTION]スイッチ
6.[MIDIIN]、[MIDIOUT]端子
7.[DC12V]端子
8.[POWER]スイッチ
6
7
8
4
3
2
1
5
1
Page 38

接続
基本の接続
本機の入力端子に接続した機器の音声にエフェクトをかけて[LINEOUT]端子から出力して
使用する場合の接続です。本機には入力端子が3系統あります。接続する機器によって使い分
けてください。
MAIN OUTS
TAPE
TAPE
STEREO AUX RETURNS
AUX SEND
MIC
4
MIC
6
MIC
3
MIC
5
MIC
2
MIC
CD PLAYER
TURNTABLE
PHONO IN
LINE IN
LINE OUT DC12V
1
BAL
OR
UNBAL
LINE IN 2
LINE IN 1
LOW CUT
75Hz
18dB/OCT
B
d
V
0
0
1
1
-
-
G
A
I
C
C
N
I
I
M
M
U
U
10
10
60
+
10dB
+
10dB
-40dB
TRIM
TRIM
U
U
AUX
1
MON/
EFX
+15
+15
U
U
2
EFX
+15
+15
U
U
EQ
HI
12kHz
-15
+15
-15
+15
U
U
MID
2.5kHz
-12
-12
+12
+12
U
U
LOW
80Hz
+15
+15
-15
-15
PAN
L
L
R
R
1
2
MUTE
MUTE
ALT 3–4
ALT 3–4
dB
dB
10
10
SOLO
5
5
U
U
5
5
10
10
20
20
30
30
40
40
50
50
60
60
BAL
BAL
BAL
BAL
OR
OR
OR
OR
UNBAL
UNBAL
UNBAL
UNBAL
LINE IN 4
LINE IN 3
LINE IN 5
LOW CUT
LOW CUT
LOW CUT
LOW CUT
75Hz
75Hz
75Hz
75Hz
18dB/OCT
18dB/OCT
18dB/OCT
18dB/OCT
B
d
V
0
B
B
d
d
B
V
V
d
V
1
0
0
-
1
1
-
-
G
A
G
G
A
A
G
I
C
A
N
I
I
I
C
C
I
N
N
N
I
I
M
M
M
U
U
U
10
60
10
10
60
60
60
+
10dB
-40dB
+
10dB
+
10dB
-40dB
-40dB
-40dB
TRIM
TRIM
TRIM
U
U
U
AUX
AUX
AUX
AUX
1
1
1
1
MON/
MON/
MON/
MON/
EFX
EFX
EFX
EFX
+15
+15
+15
U
U
U
2
2
2
2
EFX
EFX
EFX
EFX
+15
+15
+15
U
U
U
EQ
EQ
EQ
EQ
HI
HI
HI
HI
12kHz
12kHz
12kHz
12kHz
-15
+15
-15
+15
-15
+15
U
U
U
MID
MID
MID
MID
2.5kHz
2.5kHz
2.5kHz
2.5kHz
-12
-12
+12
+12
-12
+12
U
U
U
LOW
LOW
LOW
LOW
80Hz
80Hz
80Hz
80Hz
+15
+15
-15
-15
+15
-15
PAN
PAN
PAN
PAN
L
L
R
R
L
R
4
5
3
MUTE
MUTE
MUTE
ALT 3–4
ALT 3–4
ALT 3–4
dB
dB
dB
10
10
10
SOLO
SOLO
SOLO
SOLO
5
5
5
U
U
U
5
5
5
10
10
10
20
20
20
30
30
30
40
40
40
50
50
50
60
60
60
MIXER, DJ MIXER
AC ADAPTER
OUTPUT
INPUT
L
1
1
MICRO SERIES 1402-VLZ
L
14-CHANNEL MIC/LINE MIXER
2
R
2
R
BAL/UNBAL
ALL BAL/UNBAL
LEFT
(1/MONO)
RIGHT
BAL
MONO
MONO
MONO
MONO
OR
UNBAL
L
L
L
L
LINE IN 6
BAL
BAL
BAL
BAL
OR
OR
LOW CUT
OR
OR
75Hz
UNBAL
UNBAL
UNBAL
UNBAL
18dB/OCT
B
d
V
0
1
-
R
R
R
R
G
A
I
C
N
I
M
U
LEVEL
LEVEL
LEVEL
LEVEL
+4
+4
+4
+4
PHONES
10
60
-10
-10
-10
-10
+
10dB
-40dB
LINE IN 7-8
LINE IN 13-14
LINE IN 9-10
LINE IN 11-12
TRIM
U
U
U
U
U
U
U
AUX
AUX
AUX
AUX
AUX
1
1
1
1
1
MON/
MON/
MON/
MON/
MON/
EFX
EFX
EFX
EFX
EFX
1
+20
+10
+15
+15
+15
+15
+15
NORMALLED
U
U
U
U
U
U
AUX 1 MASTER
2
PRE
2
2
2
2
2
POST
EFX
EFX
EFX
EFX
EFX
AUX
EFX TO
AUX 1
+20
MONITOR
+15
+15
SELECT
+15
+15
+15
RETURNS
U
U
U
U
U
SOURCE
EQ
EQ
EQ
EQ
EQ
LEFT RIGHT
HI
HI
HI
HI
HI
MAIN
CLIP+28
12kHz
12kHz
12kHz
12kHz
12kHz
MIX
+10
-15
+15
-15
+15
-15
-15
+15
+15
-15
+15
+7
U
U
U
U
U
ALT
+4
3-4
MID
MID
MID
MID
MID
2.5kHz
2.5kHz
2.5kHz
2.5kHz
2.5kHz
+2
-12
+12
-12
-12
-12
+12
+12
+12
-12
+12
0
TAPE
U
U
U
U
U
-2
LOW
LOW
LOW
LOW
LOW
80Hz
80Hz
80Hz
80Hz
80Hz
-4
+15
+15
-15
+15
+15
-15
-15
-15
+15
-15
-7
ASSIGN
PAN
PAN
PAN
PAN
PAN
-10
TO MAIN MIX
-20
NORMAL(AFL)
-30
LEVEL SET(PFL)
L
R
L
L
L
R
R
R
L
R
0dB=0dBu
SOLO
MODE
9–10
13–14
11–12
6
7–8
MUTE
MUTE
MUTE
MUTE
MUTE
POWER
RUDE SOLO LIGHT
PHANTOM
ALT 3–4
ALT 3–4
ALT 3–4
ALT 3–4
ALT 3–4
CONTROL
/ PHONES
MAIN MIX
ROOM
dB
dB
dB
dB
dB
dB
dB
10
10
10
10
10
10
10
SOLO
SOLO
SOLO
SOLO
SOLO
5
5
5
5
5
5
5
U
U
U
U
U
U
U
5
5
5
5
5
5
5
10
10
10
10
10
10
10
20
20
20
20
20
20
20
30
30
30
30
30
30
30
40
40
40
40
40
40
40
50
50
50
50
50
50
50
60
60
60
60
60
60
60
AC
タッチ・ パッドの取り扱いについて
タッチ・パッ ドは強く 押したり、重いものを乗せた
り絶対にしないでく ださい。乱暴に扱う と タッチ・
パッ ドに ヒ ビが入ったり、割れるこ と があり ます。
また、表面を とがっ たもので こ すったり、押したり
するとキズがつきますので、必ず指先で操作し て
ください。お手入れは、必ず乾いた柔らかい布で
軽く拭いてください。シンナーなどの有機溶剤は
変形の恐れがあ りますので、使用 しな いでくださ
い。
2
Page 39

DJミキサーの接続
ご使用になっているDJミキサー等のエフェクト・センド端子と本機の[LINEIN]端子を接続し、
本機の[LINEOUT]端子とミキサーのエフェクト・リターン端子を接続して本機を外部エフェ
クターとして使うことができます。
エフェクト・セン ド/リターン端子に接続して使用するときは
本機の[CONNECTION]スイッチをFXLOOPに設定 します。これにより本機の[LINEOUT]
端子からの出力音には、本機に入力した音がカットされたエフェクト音のみが出力されます。
本機の[FX/DEPTH]ノブでエフェクトのかかり具合を調節しながら使用するときはDIRECT
で使用します。
DIRECT
FX LOOP
CONNECTION LINE OUT
RETURN
SEND
LINE OUT
LINE IN
TURNTABLE
TURNTABLEDJ MIXER
MIDIの接続
MIDIを搭載している機器と接続し、シーケンス・データに合わせて、操作する場合の接続です。
LINE IN MIDI INMIDI OUTOUTPUT
KORG EM-1
3
Page 40

操作方法
)
)
1.電源をオンする
① 接続例を参考に使用する機材を接続し、
ACアダプターをコンセントに差し込みます。
② [POWER]スイッチを押して、オンにしま
す。[PROGRAM/BPM]ディスプレイの表
示が点灯します。
電源をオ フにするときは、再度[POWER]ス
イッチを 押して 、 オフにします。
2.音声を入力する
①エフェクトをかける機材を接続した入力
端子を[INPUTSELECT]スイッチで選びま
す。
MIC:マイク入力にエ フェクトがかかります。
PHONO:フ ォノ入力にエフェクトがかかり ます。
LINE:ライ ン入力にエフェクトがかかります。
3.音量を調節する
①入力レベルを調節します。
接続 した機材から音声を出力し、ピーク・イン
ジケーターが赤く点灯 しないよ う に、[INPUT
VOLUME]ノブで入力レベルを調節します。
マイク端子を使用するときは、マイクの感度
に合せて、音声がひずまないように[MIC
TRIM]ノブを調整します。
② ヘッ ドホンを使用するときは、[PHONES
VOLUME]ノブで音量を調整します。
4.プログラムを選ぶ
① [PROGRAM/BPM]ディスプレイに現在
選ばれているプログラムの番号が表示され
ます。
[PROGRAM/BPM]ノブでプログラム(00
〜99)を選びます。
② [FX/DEPTH]ノブでエフェクトのかかり
具合を調節します。
左に回 しきる とエ フ ェクトのかからない音に
なり、右に回しきるともっともエフェク トがか
かった音になります。
[FX/DEPTH]ノブでエフェクトのかかり具
合を調節して使用する ときは[CONNECTION]
スイッチをDIRECTで使用します。
[PROGRAM/BPM]ディスプレイの表示
について
現在選ばれている プ ロ グ ラ ムの番号や、設定され
ているBPM、タッチ・パッ ドに触ったポイ ントの位
置(ポジション) が表示されます。
タッチ・パッド操作時:触っているポジシ ョン(1.1
〜9.9、5.5でセンター)が表示されます。
縦方向の位置(1〜9
プログラム切り替え時:プログラム・ナンバー(00
〜99)が表示されます。
BPM設定時:[TAP/BPM]キーを押して、BPM
を設定する ときは、BPM値が表示されます。オー
トBPMモード中は、3つのドットが点灯し ます。
MIDIエディットモード時:MIDIチャン ネル、コント
ロール・ナンバー等が表示されます。
横方向の位置(1〜9
5.タッチ・パッドを操作する
①タッチ・パッドを指でこすったり、タッピン
グ(軽く叩く)して、音色を操作します。
付属の保護シートをタッチ・パ ッドに貼って
ご使用ください。
② [HOLD]キーをオンにすると、タッチ・パッ
ドから指を離す直前のポジションの エフェク
トの音色が保持されます。
6.ミュート機能
[PADMOTION/MUTE]レバーをMUTE
(手前側)に倒すと、入力している信号やサ
ンプリング音、シンセ/ ドラム音がカットされ
ます。ディレイや リバーブの残響音などエフェ
クト 音 の み を出力することができます。
トランスフ ォーマー
[PADMOTION/MUTE]レバーでMUTEのオ
ン/オフを素早く繰り返すと、DJテクニックの1
4
Page 41

つである「トランスフォーマー」と同じ よ う に、入
力された持続音で リ ズムを作 り 出す こ とができま
す。
7.パッド・モーション
タッチ・ パッ ドの操作を記録し、[PADMOTION/MUTE]レバーをPADMOTIONに
倒すことで操作を再生することができます。
記録
[PAD MOTION/MUTE]レバー をPAD
MOTIONに倒しているときに、タッチ ・パッ
ドに触れると記録を始めます。
タッチ・パッドから指を離している状態も、操
作と して記録されているので、タッピング (軽
くパッドを叩く)等の操作も記録することが
できます。[PADMOTION/MUTE]レバー
を戻すか、最大記録時間(約3.2秒)を超え
ると記録を終了します。
再生
記録した 後[PAD MOTION/MUTE]レ
バーをPADMOTIONに倒すと記録した操
作が再生されます。[PAD MOTION/
MUTE]レバーをPADMOTIONに倒して
いるときに、タッチ ・パッ ドに触れなければ、
同じ動きを繰り返し再生すること ができます。
再生中にタッチ・パッ ドに触れると記録が始
まってしまいます。また、プログラムを変更する と
記録はリセットされます。
[HOLD]キーのオン/オフはパッド・モーショ
ンに記録されません。また、[HOLD]キーをオン
にして パッ ド・モーションを再生 すると、 再生を止
めたと ころの位置でホールドされます。
8.BPMを設定する
BPMを設定することでBPMFX、BPM
PTNグループのエフェクト・プログラム(50
〜69)を選択したとき、BPMに同期してエ
フェク ト効果をかけることができます。効果
のかかるエフェクト・パ ラメー タ ーについて
はエフェクト・プログラム・リス ト(→別紙)を
参照してください。
BPMとは?
BPM(BeatsPerMinute)は曲のテンポの速
さを1分間の拍数(4分音符何個分)で表してい
ます。BPMの数字が 大きいほど早いテンポの曲
になります。
BPMを設定するときは
BPMがわかるときは[TAP/BPM]キーを押
し、[PROGRAM/BPM]ノブで合わせます。
10秒間操作を行わないと通常の状態に戻
ります。
タップ ・テンポ機 能
BPMがわからないときは、曲のビートに合
わせて[TAP/BPM]キ ーを2 回以上押す
と、そのビートを検出して[PROGRAM/
BPM]ディスプレイにBPMが表示されます。
オート BPM機能
[TAP/BPM]キ ーを長押しすると、
[PROGRAM/BPM]ディスプレイに3つの
ドッ ト表示が点灯し、入力音声のビートを自
動的に検出することができます。
[PROGRAM/BPM]ディスプレイが点滅し
ている間はBPMを検出中です。
再度、[TAP/BPM]キーを押すと自動検出
を終了します。
検出可能なBPMは80〜160です。
MIDIシンク機能
外部MIDI機器からのMIDIタイミング・クロッ
クに合わせてBPMが設定することができま
す。シーケンサーなどタイミング・クロックを
送信する外部MIDI機器の[MIDIOUT]端子
と本機の[MIDIIN]端子を接続しお使いくだ
さい。
この機能は シ ーケ ン ス・データと本機の リズ
ムパターン・プログラムな どと同期させる機能で
はありません。シーケンス・データに同期させる
には、シーケンス・データの小節の頭 ごとにタッチ・
パッ ド・オン ・メッセ ージを書 き込んでお くか、本機
のフレーズの頭に合わせてタッチ・パッ ドに触れて
パターンを開始するように演奏して ください。
5
Page 42

タイミング・クロック、タッチ・パッ ド・オン ・メッ
セージを受信するには、MIDIエディット・モード(→
p.8)に入り「MIDIメッセージの送受信設定(→
p.9)」で、各メ ッセージを受信可能な状態にして
ください。
外部MIDI機器からタイミング・クロ ッ クを受
信して動作しているときは、タップ ・テンポ、オー
トBPMは使用できません。
9.[PROGRAMMEMORY]
キーへ設定を記憶する
[PROGRAMMEMORY1〜8]キーにあ
らかじめ設定しておいた状態を記憶し、瞬時
にその設定を呼び出すことができます。
記憶される内容
・エフェクト・プログラム
・[HOLD]キーのオン/オフ状態とそのポジショ
ン(座標)
・[FX/DEPTH]ノブの設定
・BPMFXグループでは、設定されている
BPM値
・SAMPLE/PLAYグループでは、使用する
[SAMPLE1、2]キー
エフェクト・プログラム60、90〜99 は
[HOLD]キーの状態を記憶しません。
記憶
① 割り当てる[PROGRAMMEMORY1
〜8]キーを押します。
②割り当てるエフェクト・プ ログラムを
[PROGRAM/BPM]ノブで選びます。
[HOLD]キーの設定を記憶するとき は、プロ
グラムを選択した後[HOLD]キーをオンにし、
タッチ・パッ ドに触ってポジ ションを設 定します。そ
の他の記憶する状態もここで設定します。
③①で選んだ[PROGRAMMEMORY1
〜8]キーを約2秒 間 押しつづけると記憶さ
れます。
記憶が完了すると[PROGRAM/BPM]ディ
スプレイの点滅が終了します。
呼び出し
① [PROGRAMMEMORY1〜8]キーを
押すと、そのキーに記憶されていた各設定
が呼び出されます。
6
10.フレーズをサンプリングし
て再生する
入力 したフレーズを[SAMPLE1、2]キーの
それぞれに録音し、SAMPLE/PLAY グ
ループのプロ グ ラ ム(90〜99)を選択した
ときは、再生スピードや逆再生などをタッチ・
パッ ドでコントロールしながら再生できます。
SAMPLE/PLAYグループ以外のプログ
ラムを選択したときは、[SAMPLE1 、2]
キーを押すとそれぞれに録音したフレーズ
を再生することができます。
2つのキーにそれぞれ約6秒間のモノラル
録音ができます。
電源をオ フ にす る と 録音したフ レー ズは失わ
れます。録音したフレーズを保存する ことはでき
ません。
録音
① [REC/STOP]キ ーを押すと、[REC/
STOP]キーのLEDが点滅し録音待機にな
ります。
②録音したい[SAMPLE1、2]キーを押し
ます。このときは再生音はでません。
③ [REC/STOP]キー を押 す と [REC/
STOP]キーのLEDが点灯し録音が開始し
ます。再度[REC/STOP]キーを押すと録音
が終了します。
最大録音時間まで録音すると 自動 的 に 録音
が終了します。
SAMPLE/PLAYグループ以外のプロ
グラムで、タッチ ・パッ ド操作しなが ら録音すると
エフェ クトのかか っ た音で録音されます。
オート・レック(AUTOREC)
音声を入力したときに自動的に録音を開始
させることができます。マイ ク で音声を録音
するときなどに便利です。
①録音の②の手順で録音 し た い[SAMPLE
1、2]キーを押しながら[REC/STOP]キー
を押すと 、[REC/STOP]キーと[SAMPLE
1、2]キーのLEDが同時に点滅し録音待機
状態になります。
②音声を入力すると、自動的に録音が開始
されます。もう一度[REC/STOP]キーを押
すと、録音が終了します。
Page 43

再生
再生方法は選択した エフェクト・プログラム
によっ て異なります。
SAMPLE/PLAY グループのプログ
ラムの場合
①SAMPLE/PLAYグループのプログ
ラム(90〜 99)を選択します。
②再生したい[SAMPLE1、2]キーを押し
ます。このときは再生音はでません。
③タッチ・パッドを触ると、そのポジショ ンに
応じた再生が行われます。
フレーズの再生方法は プ ログラムによって違いま
す。(→別紙:エフェクト・プログラ ム・リスト)
④再生音の音量を[FXDEPTH]ノブで調
節します。
[FXDEPTH]ノブをセンターに合わせると
再生音と 入 力音 が 1:1で出力されます。ノブ
を最大にすると再生時はサンプル音だけが
出力され、入力音は聞こえません。
SAMPLE/PLAY グループ以外のプ
ログラムの場合
①SAMPLE/PLAYグループ以外のプ
ログラムを選択します。
② [SAMPLE1、2]キーを押すと、録音し
たフレーズが等倍のスピ ードで再生しま す。
そのまま押しているとループ(繰り返し)再
生します。
音量を調整するときは
を押 しながら[FXDEPTH]ノブで調整します。
再生し ながらタッ チ・パッドを操作する と、再
生音にエフェクトをかける ことができます。
[SAMPLE1、2]キ ー を 押し なが ら
[HOLD]キーを押すと再生がホールドされます。
再度、[SAMPLE1、2]キーを押すと 、ホール ドは
解除されます。
[SAMPLE1、2]キー
MIDIの機能
MIDIとは
MIDIとは(MusicalInstrumentDigital
Interface)の略で、電子楽器やコンピュー
タの間で、演奏に関するさまざまな情報をや
りとりするための世界共通の規格です。
MIDIの接続
MIDI 情報を送受信するには、市販の MIDI
ケーブルを使います。本機のMIDI端子と情
報をやりとりする外部MIDI 機器のMIDI端
子に接続します。
MIDIIN端子:他のMIDI機器からMIDIメッ
セージを受け取ります。外部機 器のMIDI
OUT 端子と接続します。
MIDIOUT端子:本機からMIDIメッセージ
を送 ります。外部機器のMIDIIN端子と接続
します。
MIDI を使う
本機はエフェクターとして使用する他に、本
機から送信するMIDIメッセージで、シンセサ
イザーなどの外部MIDI機器のリアルタイム・
コントローラーとして使用できます。
また、本機とMIDIシーケンサーを接続し、タッ
チ・パッドを操作することによって送信され
るMIDIメッセージを記録することで、タッチ ・
パッ ドの操作を再現することができます。
MIDI チャンネルについて
MIDIでは、複数のMIDI機器にそれぞれ違った情
報を1本のMIDIケーブルで伝えるため、MIDI
チャンネルという1〜16までのチャンネルがあ
ります。 送信側のMIDIチャンネルが1のとき
には、受信側のMIDIチャンネルを1に設定 し
ておかないと、MIDIメッセ ージは伝わりません。
MIDIインプリメンテーション・チャートに
ついて
MIDI機器の取扱説明書には、MIDIインプリ
メンテーショ ン ・チャートが付属しています。
このチャ ートは、送受信できるMIDIメッセー
ジについて確認できるようになっています。
MIDI機器を使うときには、それぞれのMIDI
インプリメンテーション・ チャートを比較し、
7
Page 44

対応しているMIDIメッセージを確認してく
ださい。
※詳細なMIDIの仕様 については、別冊のMIDIイ
ンプリ メ ンテーションに記載され ています。MIDI
インプリメンテーショ ンの配布については、コルグ
お客様窓口へお問い合わせください。
MIDI エディット・モード
[TAP/BPM]キー を押しながら、[REC/
STOP]キーを押します。約1秒後にMIDIエ
ディ ット・モードになり、[PROGRAM/BPM]
ディスプ レイにMIDIチャンネルが点滅表示
されます。
MIDI チャンネルの設定
MIDIエディット・モ ード では[PROGRAM/
BPM]ディスプレイに MIDIチャンネルが表
示されます。このとき[PROGRAM/BPM]
ノブでMIDIチャンネルを変更することがで
きます。
MIDIメッセージの送受信設定
各MIDIメッセージの送受信はそれぞれの
MIDIメッセージが割り当てられた各キーを
押してオン/オフを設定します。 LEDが点灯
時は送受信が可能で、消灯時は送受信しませ
ん。(→ p.9:送受信するメッセージ)
パラメーターによっ ては送信のみ、または受
信のみしかできないものもあ ります。
コン トロール ・ナンバーの変更について
[PROGRAMMEMORY3〜8]キーのいずれ
かのキーを押しなが ら [PROGRAM/BPM]ノブ
をまわすと、そのキーに割り当てられたコン ト
ロール・ナンバーの設定を変 更 で きます。すでに
設定済みのコントロール・ナンバーを重複して設
定する こともできま すが、同じコン トロール・ナン
バーのMIDIメッセージの 送受信を同時にオン に
するこ と はできません。
本機では送受信するMIDIメッセージを
CC#1〜CC#31、CC#64〜CC#95および
PITCHBENDの範囲で変更できます。
変更した設定を記憶するには
MIDIエディット・モードで[REC/STOP]キー
を1秒以上押すと、変更したMIDIの設定が
記憶されます。設定の記憶を行わないで電
源をオフにする と、設定前の状態にな ります 。
MIDIエディット・モードを終了するには
タッチ・ パッ ドに触るか、10秒間操作を行わ
ないと通常の状態に戻ります。
各設定の保存について
PROGRAMMEMORYの内容やMIDI エ
ディ ット・モ ード の コ ント ロ ー ル・ナ ン バ ー 等
の設定をエクスクルーシブ・メッセージとし
て送信し外部MIDI機器に保存することがで
きます。
送受信可能なエクスクルーシブ・メッセ ージ
の詳細については、別冊の MIDIインプリメ
ンテーションをご覧ください。
8
Page 45

送受信するメッセージ
工場出荷時には、下のようなMIDIメッセージを受信することができます。
送信するデータ操作 送信するMIDIメッセージ 送信オン/オフ設定 キー
タッチ・パッ ドX方向
タッチ・パッ ドY方向
タッチ・パッ ドX+Y方向 エフェクト・デプス3(CC#93)*1 PROGRAMMEMORY3
タッチ・パッ ドON/OFF エフェクト・デプス2(CC#92)*1,*2 PROGRAMMEMORY6
FXDEPTH エフ ェクト・デプス4(CC#94)*1,*2 PROGRAMMEMORY7
MUTE エフェクト・デプス5(CC#95)*1,*2 PROGRAMMEMORY8
プログラム・チェンジ プログラム・チェンジ(0〜99)*2 HOLD
受信するデータ操作 受信するMIDIメッセージ 受信オン/オフ設定 キー
タッチ・パッ ドX方向
タッチ・パッ ドY方向
タッチ・パッ ドON/OFF エフェクト・デプス2(CC#92)*1,*2 PROGRAMMEMORY6
FXDEPTH エフ ェクト・デプス4(CC#94)*1,*2 PROGRAMMEMORY7
MUTE エフェクト・デプス5(CC#95)*1,*2 PROGRAMMEMORY8
プログラム・チェンジ プログラム・チェンジ(0〜99)*2 HOLD
BPM タイミング・クロック SAMPLE1
*1:送受信するMIDIメッセージをCC#1〜CC#31、CC#64〜CC#95及びPITCHBENDの範囲で
変更可。()は工場出荷時。
*2:オン/オフ、CC#等の設定は送信と受信で同じになりま す。
タッチ・パッ ドY方向(Y=5〜9、Y=5〜1)、タッチ・パッ ドX+Y方向のコントロール・チェンジは送信
できますが受信しません。そのため、シーケンサーにコ ントロール・チェンジを記憶させるとき は、MIDIエ
ディ ット・モードで[PROGRAMMEMORY1〜3]をオフにして、不要なMIDIメッセージを送信 しないよ
うにして使用します。
設定済みのコントロール・ナンバーは重複して設定できません。
エフェ クト・コントロール1(CC#12)*1,*2
モジュ レーション・デプス
モジュ レーション・デプス
エフェ クト・コントロール2(CC#13)*1,*2
エフェ クト・コントロール1(CC#12)*1,*2
エフェ クト・コントロール2(CC#13)*1,*2
1(CC#1)Y=5〜9 PROGRAMMEMORY1
2(CC#2)Y=5〜1 PROGRAMMEMORY2
PROGRAMMEMORY4
PROGRAMMEMORY5
PROGRAMMEMORY4
PROGRAMMEMORY5
仕様
○プログラム数:100
○入力:マイク・インプッ ト端子/モノラル・フォーン ・ ジャ ック
フォノ・インプッ ト端子/ステレオ・ピン・ジャッ ク、GND
ライン・インプッ ト端子/ステレオ・ピン ・ジャック
○出力:ライ ン・アウトプット端子 /ステレオ・ピン・ジャック
ヘッドホン端子/ステレオ・フォーン ・ジャ ック
○MIDI:IN、OUT
○電源:DC12V700mA
○付属品:ACアダプター 、タッチ・ パッ ド保護シート
○重量:1.1kg
○外形寸法:204(W)X207(D)X48(H)mm
※ 製品の外観および仕様は予告なく変更することがあり ます。
9
 Loading...