

Page 1

Owner’s Manual
Manuel d’utilisation
Bedienungsanleitung
取扱説明書
Page 2

Table of Contents
Precautions............................................................................ 3
Introduction ........................................................................... 4
Main Features...........................................................................................4
Controllers and their Functions ................................................................4
Setup ...................................................................................... 7
Installing the MIDI driver and softwares ...................................................7
Making connections and turning on the power.........................................8
About the K-Series and the driver ports .................................................10
About K-Series’ MIDI OUT connector.....................................................10
Restoring the factory preset programs ...................................................11
Operation ............................................................................. 12
Keyboard ................................................................................................12
ClickPoint................................................................................................12
KNOB1 and KNOB2 ...............................................................................12
SW1 and SW2........................................................................................13
OCTAVE SHIFT UP / OCTAVE SHIFT DOWN .......................................13
PITCH wheel ..........................................................................................13
MOD wheel.............................................................................................14
SLIDER ..................................................................................................14
PEDAL....................................................................................................14
Using the K61P’s Internal Sounds ..................................... 15
Selecting a sound...................................................................................15
Effects.....................................................................................................15
Setting mode ..........................................................................................16
Program change enable/disable.............................................................20
Troubleshooting .................................................................. 22
Specifications...................................................................... 23
Page 3
Owner’s Manual
Precautions
Location
Using the unit in the following locations can result
in a malfunction.
• In direct sunlight
• Locations of extreme temperature or humidity
• Excessively dusty or dir ty locations
• Locations of excessive vibration
• Close to magnetic fields
Power supply
Please connect the designated AC adapter to an
AC outlet of the correct voltage. Do not connect it
to an AC outlet of voltage other than that for which
your unit is intended.
Interference with other electrical devices
Radios and televisions placed nearby may e xperience reception interference. Oper ate this unit at a
suitable distance from radios and televisions.
Handling
To avoid breakage, do not apply excessive force
to the switches or controls.
Care
If the exterior becomes dirty, wipe it with a clean,
dry cloth. Do not use liquid cleaners such as benzene or thinner, or cleaning compounds or flammable polishes.
Keep this manual
After reading this manual, please keep it for later
reference.
Keeping foreign matter out of your
equipment
Never set any container with liquid in it near this
equipment. If liquid gets into the equipment, it could
cause a breakdown, fire, or electrical shock.
Be careful not to let metal objects get into the
equipment. If something does slip into the equipment, unplug the AC adapter from the wall outlet.
Then contact your nearest Korg dealer or the store
where the equipment was purchased.
THE FCC REGULATION WARNING (for
U.S.A.)
This equipment has been tested and found to comply with the limits for a Class B digital device, pursuant to Part 15 of the FCC Rules. These limits
are designed to provide reasonable protection
against harmful interference in a residential installation. This equipment generates, uses, and can
radiate radio frequency energy and, if not installed
and used in accordance with the instructions, may
cause harmful interference to radio communications. However, there is no guarantee that interference will not occur in a particular installation. If
this equipment does cause harmful interference
to radio or television reception, which can be determined by turning the equipment off and on, the
user is encouraged to try to correct the interference by one or more of the following measures:
• Reorient or relocate the receiving antenna.
• Increase the separation between the equipment and receiver.
• Connect the equipment into an outlet on a circuit different from that to which the receiver is
connected.
• Consult the dealer or an experienced radio/
TV technician for help.
Unauthorized changes or modification to this system can void the user’s authority to operate this
equipment.
CE mark for European Harmonized
Standards
CE mark which is attached to our company’s products of AC mains operated apparatus until December 31, 1996 means it conforms to EMC Directive (89/336/EEC) and CE mark Directive (93/
68/EEC).
And, CE mark which is attached after January 1,
1997 means it conforms to EMC Directive (89/336/
EEC), CE mark Directive (93/68/EEC) and Low
Voltage Directive (73/23/EEC).
Also, CE mark which is attached to our company’ s
products of Battery operated apparatus means it
conforms to EMC Directive (89/336/EEC) and CE
mark Directive (93/68/EEC).
IMPORTANT NOTICE TO CONSUMERS
This product has been manufactured according
to strict specifications and voltage requirements
that are applicable in the country in which it is intended that this product should be used. If you
have purchased this product via the internet,
through mail order, and/or via a telephone sale,
you must verify that this product is intended to be
used in the country in which you reside.
WARNING: Use of this product in any country
other than that for which it is intended could be
dangerous and could invalidate the manufacturer’ s
or distributor’s warranty.
Please also retain your receipt as proof of purchase otherwise your product may be disqualified
from the manufacturer’ s or distributor’s warranty.
Company names, product names, and names of
formats etc. are the trademarks or registered trademarks of their respective owners.
* Company names, product names, and names
of formats etc. are the trademarks or registered trademarks of their respective owners.
3
Page 4
Introduction
Thank you for purchasing this K-Series USB/MIDI Studio Controller. For trouble-free
enjoyment of this controller, please read this manual carefully and use the product
only as directed. K eep this manual in a saf e place where you can easily ref er to it in the
future. This manual applies to the K25, K49, and K61. There is a special section that
covers the additional features of the K61P.
Main Features
❏ Equipped with a variety of expressive and powerful controllers.
❏ ClickPoint provides two simultaneous controllers (X and Y), and also serves as a
mouse for your software applications.
❏ Korg’s M1 Le softw are synthesizer is included with your K-Series controller, so you
can enjoy playing and creating high quality sounds immediately.
❏ The K61P contains an internal sound engine (borrowed form Korg’s digital piano
series) capable of producing 24 high fidelity sounds - including piano, electric piano, organs and more.
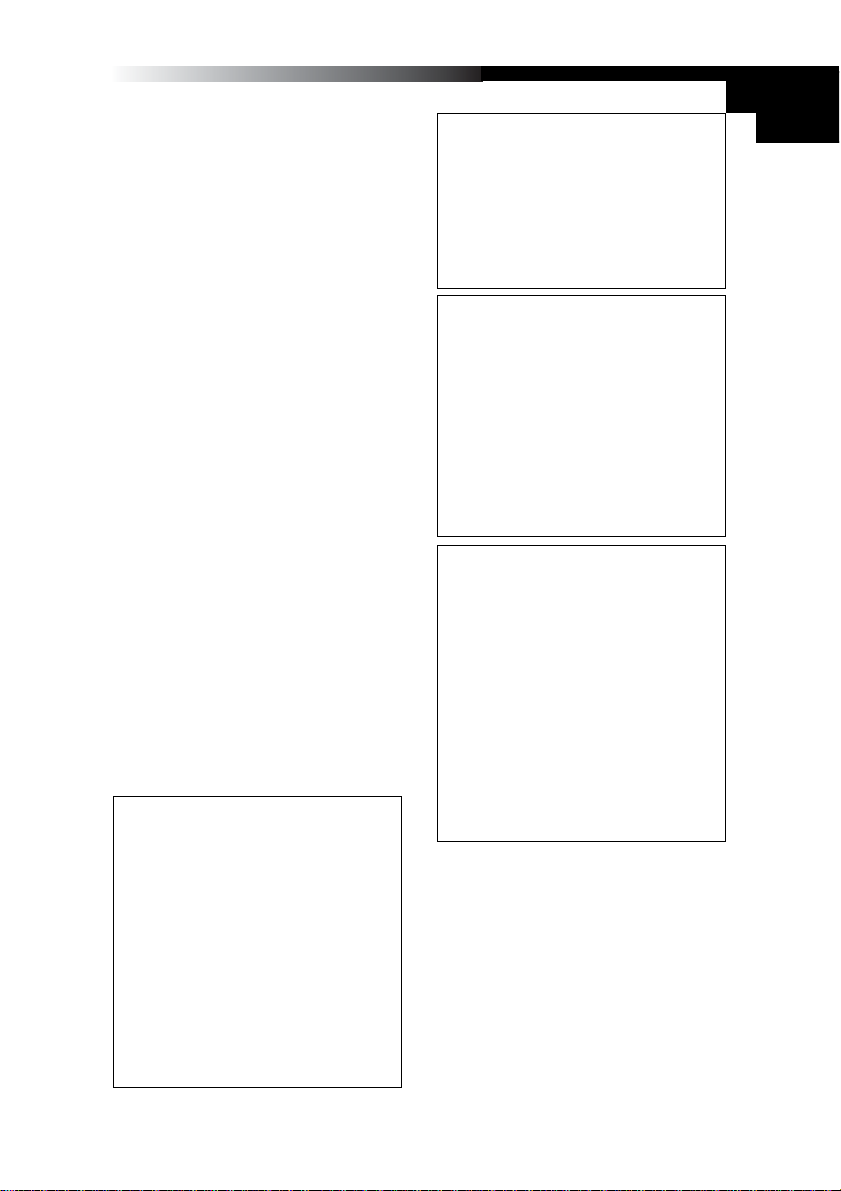
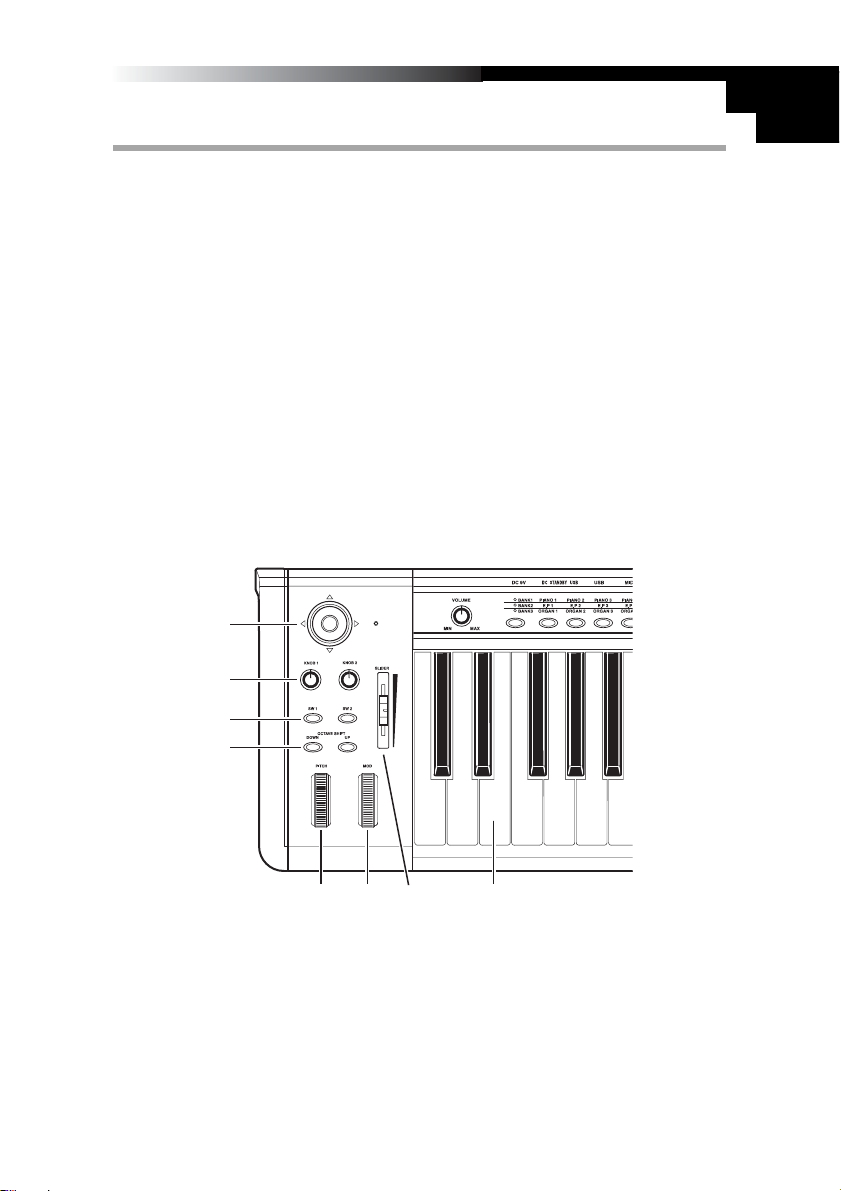
Controllers and their Functions
2
3
4
5
6
8
7
K61P
1
Controller
4
Page 5
Owner’s Manual
1. Keyboard
The keyboard features full-size, velocity-sensing keys.
2. ClickPoint
Two modes allow the Clic kP oint controller to behav e as an X - Y realtime controller,
or as a clickable cursor/mouse when working with Softsynths or DAW software
running on a computer.
3. KNOB1 / KNOB2
With MIDI control assignment, KNOB1/KNOB2 can be used to operate connected
external MIDI equipment and software synthesizer such as DAW running on PC.
4. SW1 / SW2
These two assignable switches can be assigned independently to an y MIDI control
change number, allowing y ou to control other MIDI devices or music software programs. They can also be used as Up 1 and Down 1 buttons when selecting programs (Program Change).
5. OCTAVE SHIFT UP / OCTAVE SHIFT DOWN
The octave buttons shift the pitch up and down in units of one octave.
6. PITCH wheel
The Pitch Bend Wheel provides a smooth, continuous up or down change in pitch,
that can be controlled in realtime.
7. MOD wheel
The Modulation Wheel can be assigned to any MIDI control change number, allowing you to control other MIDI devices or music software programs.
8. SLIDER
The Slider can be assigned to any MIDI control change number, allowing you to
control other MIDI devices or music software programs , and is especially handy for
functions such as volume and expression.
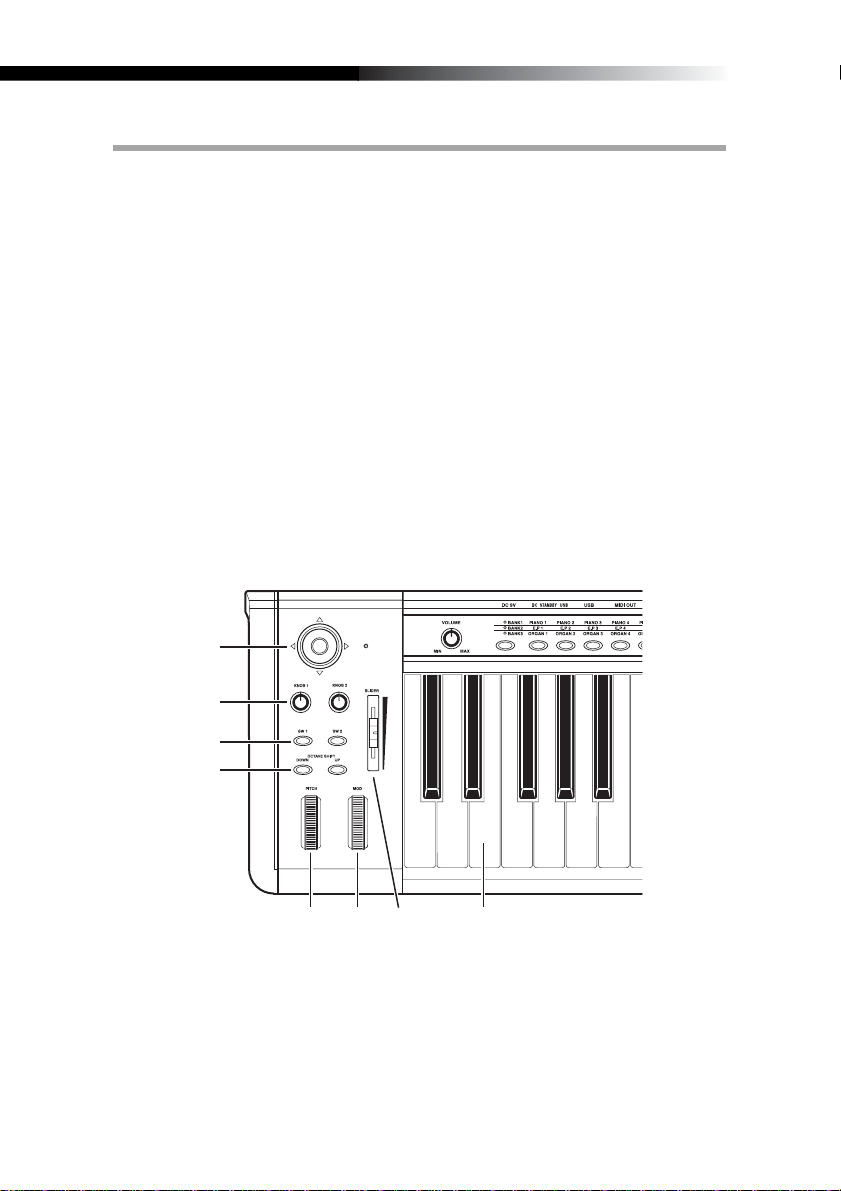
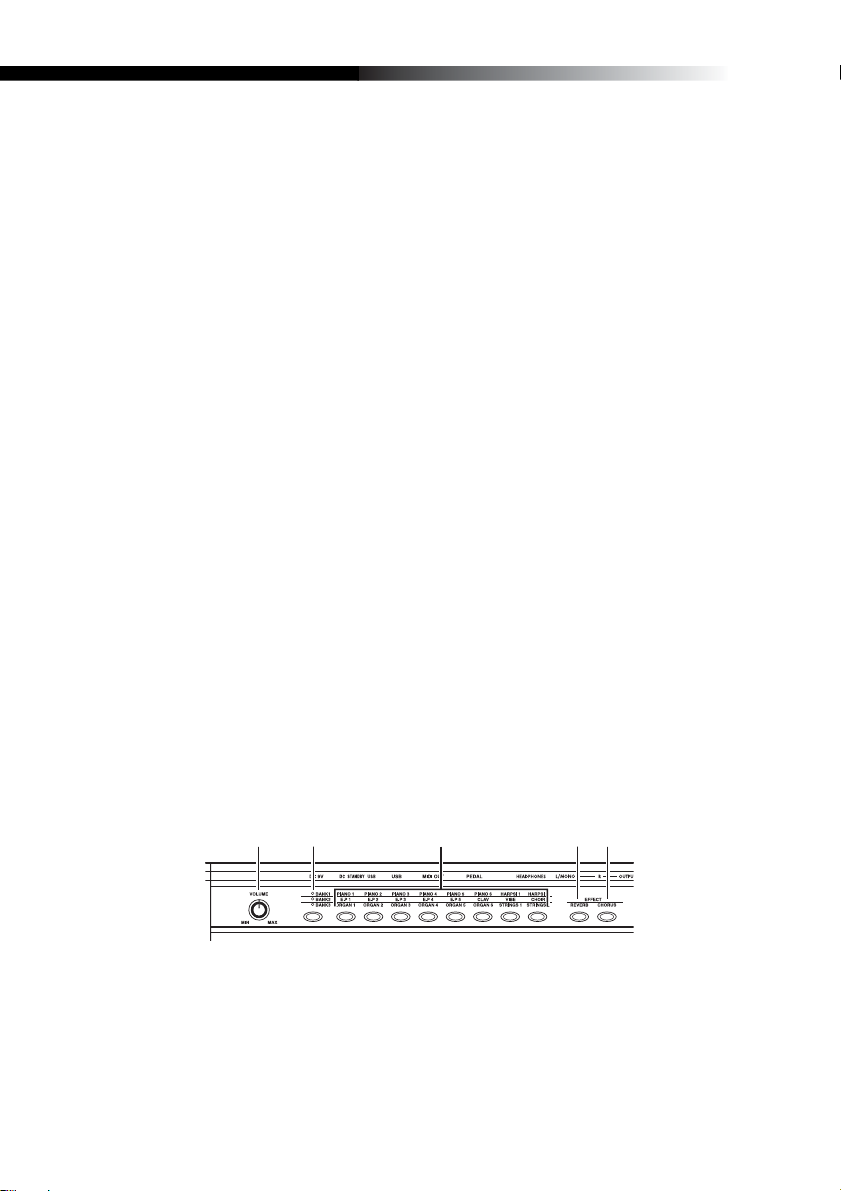
Sound Generator(K61P)
2 34
1
1. VOLUME knob
This knob controls the volume of the internal sound engine. This sound is sent
from the OUTPUT jacks (L/MONO,R) and the HEADPHONE jack.
2. BANK button
The 24 internal sounds are arranged in three banks, each containing eight sounds.
This button selects the current bank.
5
5
Page 6
3. PROGRAM buttons
Use one of these buttons to select a sound from within the current bank.
4. REVERB button
This button is used to select the depth of the reverb eff ect, and to turn it on and off.
5. CHORUS button
This button is used to select the depth of the chorus effect, and to turn it on and off.
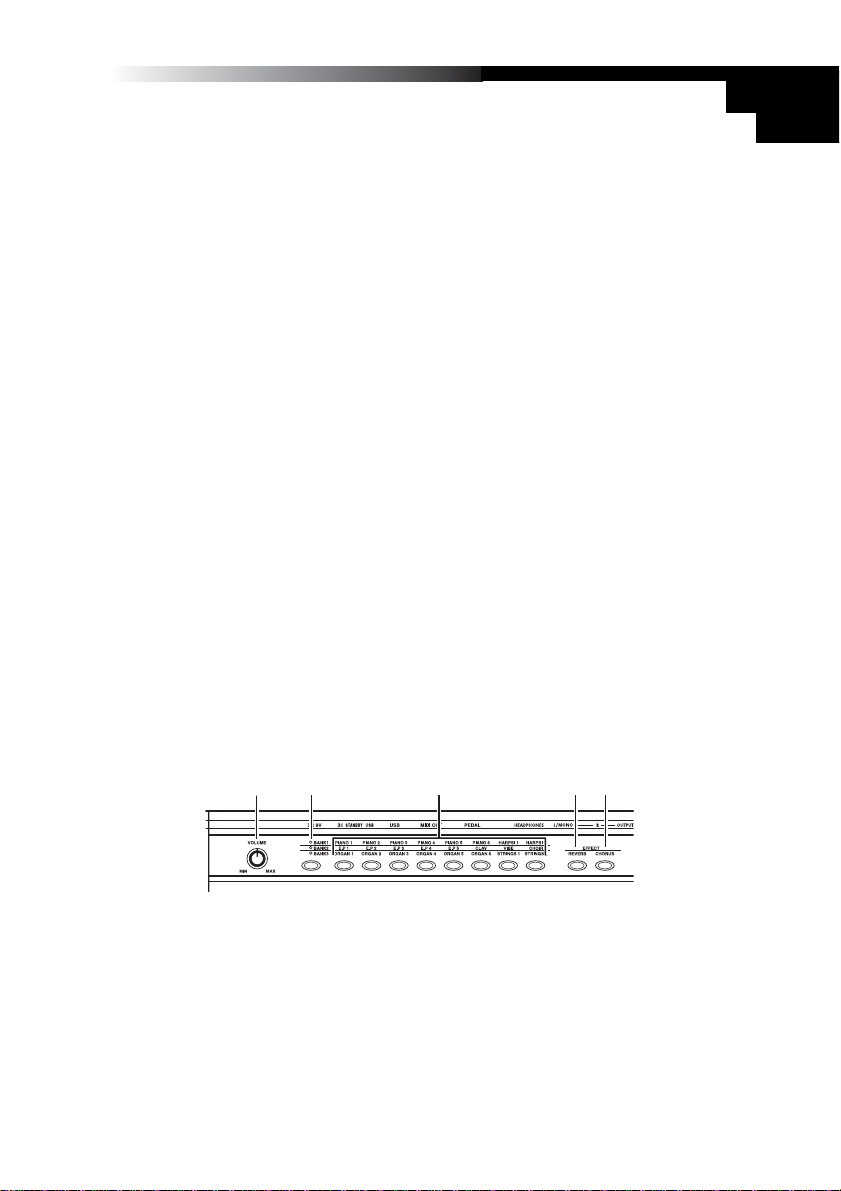
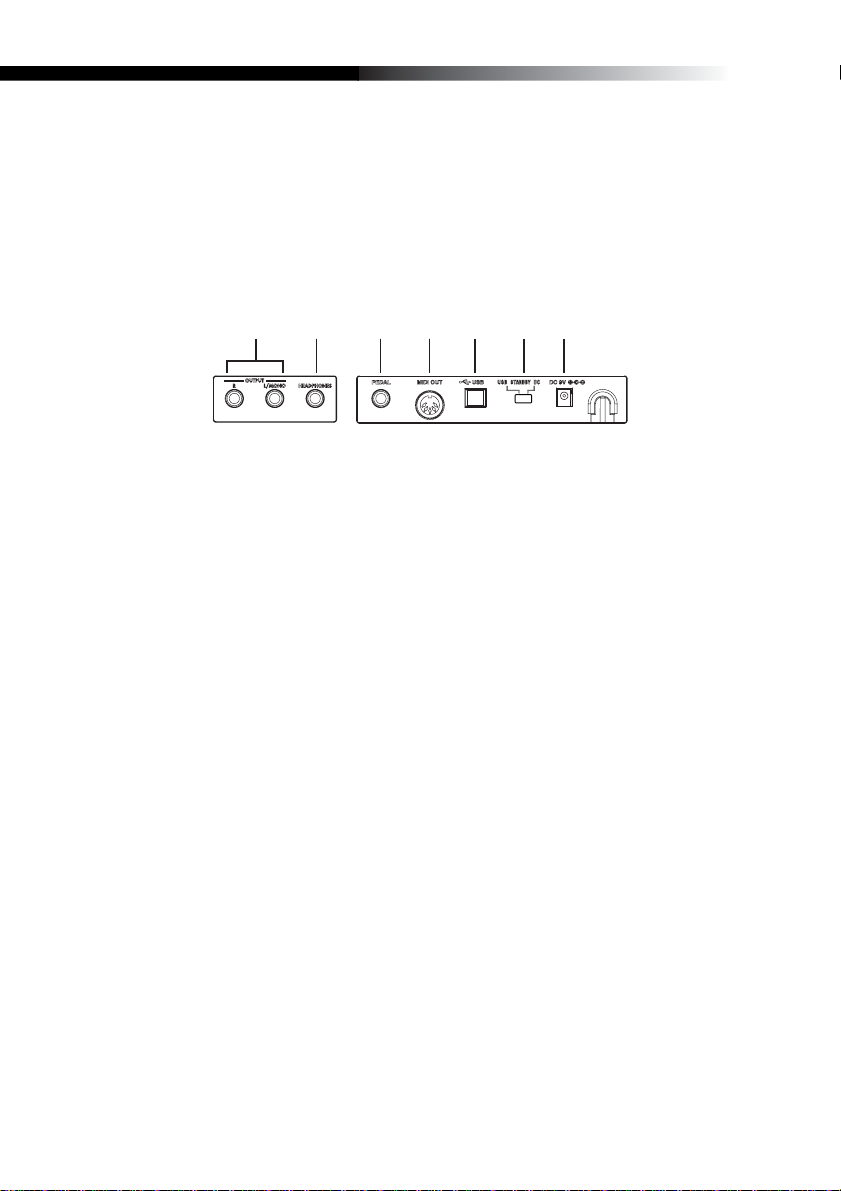
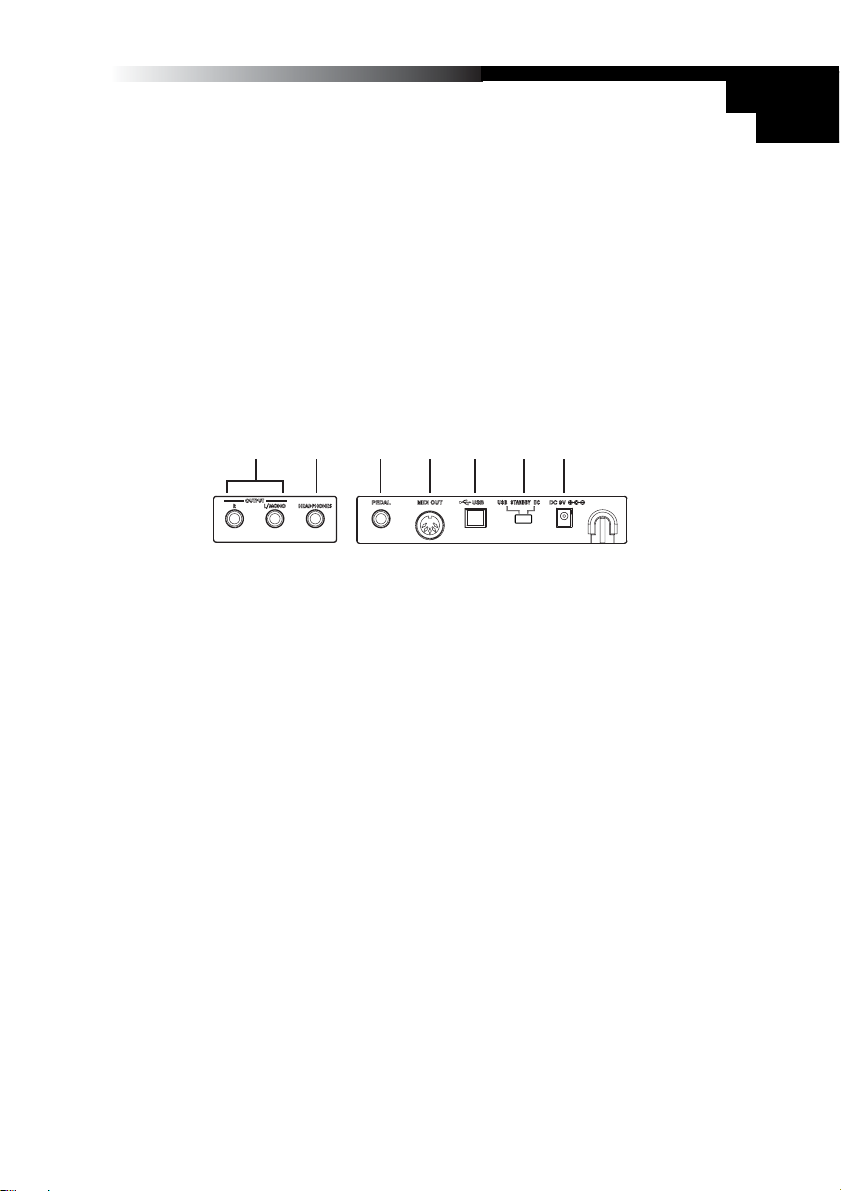
Rear panel
1
2
Illustration shows the rear panel of K61P.
3 4 5 6 7
1. OUTPUT jacks (K61P only)
These are the output jacks of internal sound engine. These can be connected to an
amplifier, audio monitoring system, or to an audio recording device.
2. HEADPHONES jack (K61P only)
This jack is provided so that you can listen to the internal sound engine through a
set of stereo headphone (standard plug).
3. PEDAL jack
An optional momentary pedal (such as the Korg PS-2 pedal switch) can be connected to the pedal jack. The K-Series will automatically detect the polarity of the
pedal when the power is turned on.
4. MIDI OUT connector
The MIDI out jack provides direct control of other MIDI equipped sound modules or
audio devices. (P.10 “About the K-Series’ MIDI OUT connector”)
5. USB connector
The USB connector allows your K-Series controller to communicate directly with
your computer.
6. Power switch
This switch turns the K-Series on by selecting either DC(Adapter) or USB
power.When not in use, this switch places the K-Series in the standby mode. (p.8
“Making connections and turning on the power”)
7. Power supply connector
Connect the optional AC adapter here. For ultimate convenience, the K-Series
controllers can be powered directly from the USB bus - in most cases. In situations
using an unpowered USB hub, or when controlling a MIDI module, y ou ma y wish to
use an AC adapter.
6
Page 7

Owner’s Manual
Setup
Installing the MIDI driver and softwares
Contents of the CD-ROM
The included CD-ROM contains the follwing.
❏ K-Series editor
❏ KORG M1 Le software synthesizer
❏ KORG USB-MIDI driver
❏ Installation guide
❏ K-Series editor owner’s manual
❏ M1 Le software synthesizer owner’s manual
❏ Software license
Operating requirements
■ Mac OS X users
Computer
Apple Macintosh computer with a USB port that satisfies the operating requirements of Mac OS X
Supported operating systems
Mac OS X ver.10.3 or later
■ Windows XP users
Computer
A computer with a USB port, that satisfies the operating requirements of Microsoft
Windows XP (USB chipset made by Intel Corporation is recommended)
Supported operating systems
Microsoft Windows XP Home Edition/Professional Ser vice pack 1 or later
Install
On the CD-ROM included with your K-Series controller, please refer to the installation
instructions regarding the installation of the KORG USB-MIDI Driver , the K-Series Editor, and the M1 Le software synthesizer.
Please read before use
❏ Copyright to all software pertaining to this product is the property of Korg Corpora-
tion.
❏
A license agreement for the software pertaining to this product is included separately.
You must read this license agreement before y ou install the software. Your installation
of the software will be taken to indicate your acceptance of the agreement.
❏ Apple, Macintosh and Mac OS are registered trademarks of Apple Computer, Inc.
❏ Windows XP is a registered trademark of Microsoft Corporation in the U.S. and
other countries.
❏ All other product and company names are trademarks or registered trademarks of
their respective holders.
7
Page 8
Making connections and turning on the power
Be sure all your equipment is turned off BEFORE you begin hooking everything up . Y ou
must excercise caution, otherwise you may damage your speaker system or cause
other malfunctions.
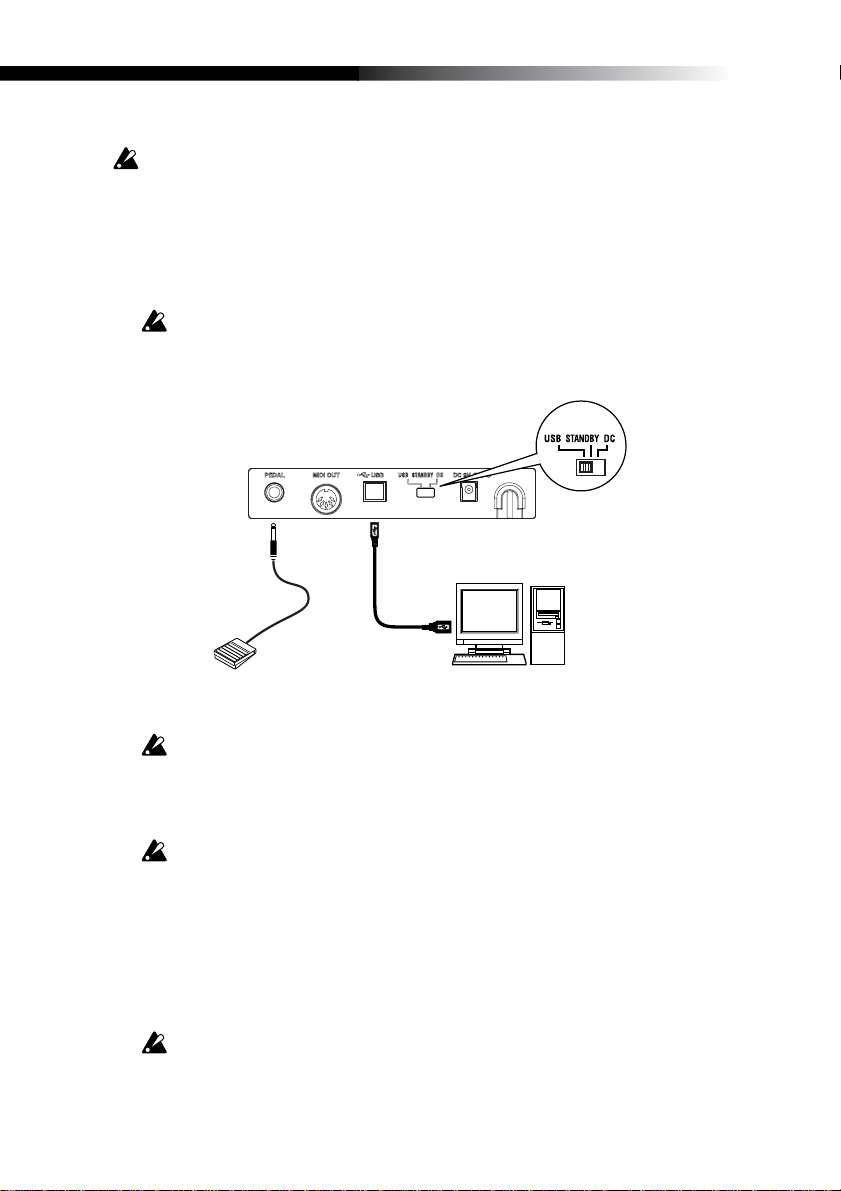
Connections using USB
1 Use a USB cable to connect the K-Series to the USB connector of your computer.
2 If you want to use a pedal, connect it to the PEDAL jack.
The K-Series will detect the polarity of the pedal when the power is turned on.
Therefore, if a pedal is connected, do not hold it down while you turn the pow er on.
3 To turn on the power, set the K-Series’ power switch to the USB position.
Power switch position
PEDAL jack
Pedal switch
USB connector
USB cable
Computer
4 When you are ready to turn off the power, set the power switch to STANDBY.
If you’re using a USB connection, you generally don’t need to use an AC adapter.
However if y our computer is low-pow ered, or if you are using a hub that is only b uspowered (rather than self-powered), sufficient power ma y not be supplied to the KSeries. In this case, use the optional AC adapter and set the power switch to the
DC position.
When USB is connected, MIDI OUT jack does not send out MIDI messages from
the K-Series’ keyboard and controller.
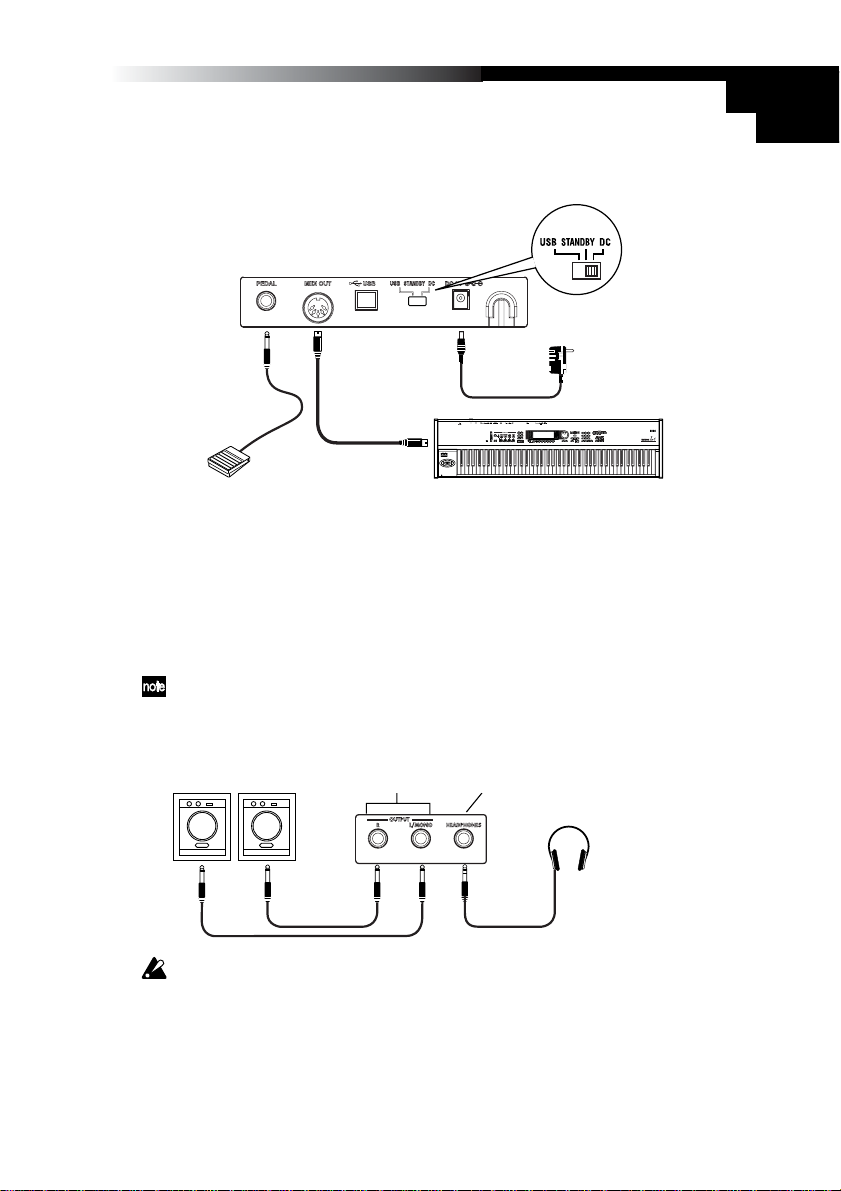
Connections using MIDI
1 Connect the plug of the optional AC adapter to the K-Series’ power connector, and
plug the adapter into an AC outlet.
2 Use a MIDI cable to connect the K-Series to your external MIDI sound module.
3 If you want to use an optional pedal, connect it to the pedal jack.
The K-Series will detect the polarity of the pedal when the power is turned on.
Therefore, if a pedal is connected, do not hold it down while you turn the power on.
8
Page 9
Owner’s Manual
4 Set the power switch to the DC position. The power LED will light. When the power
is turned on, the most recently saved settings will be recalled automatically.
5 Turn on any external MIDI sound modules connected to your K-Series controller.
Power switch position
PEDAL jack
Pedal switch
MIDI OUT
MIDI cable
MIDI IN
6 When you are ready to turn off the power, turn off any external MIDI sound mod-
ules first, and then set the K-Series power switch to STANDBY.
Using the internal sound engine [K61P only]
1 Using standard instrument cables with 1/4” plugs, connect the output jacks on the
K61P to the inputs of your audio monitor system or audio recorder. When connecting only one output, use the L/MONO jack only.
Use the volume knob to adjust the level of the OUTPUT jacks.
2 Turn on the power of the K61P. The power LED will light.
3 Turn on your connected audio monitoring system.
Power supply connector
Plug the AC
adaptor into
an AC outlet
External MIDI sound module
Amplified speakers
INPUT
Depending on your computer, you may hear noise in the sound of the internal
sound generator when using a USB connection. If this occurs, use a separately
sold AC adaptor and set the power switch to the DC position.
OUTPUT jack
HEADPHONES jack
Headphones
9
Page 10
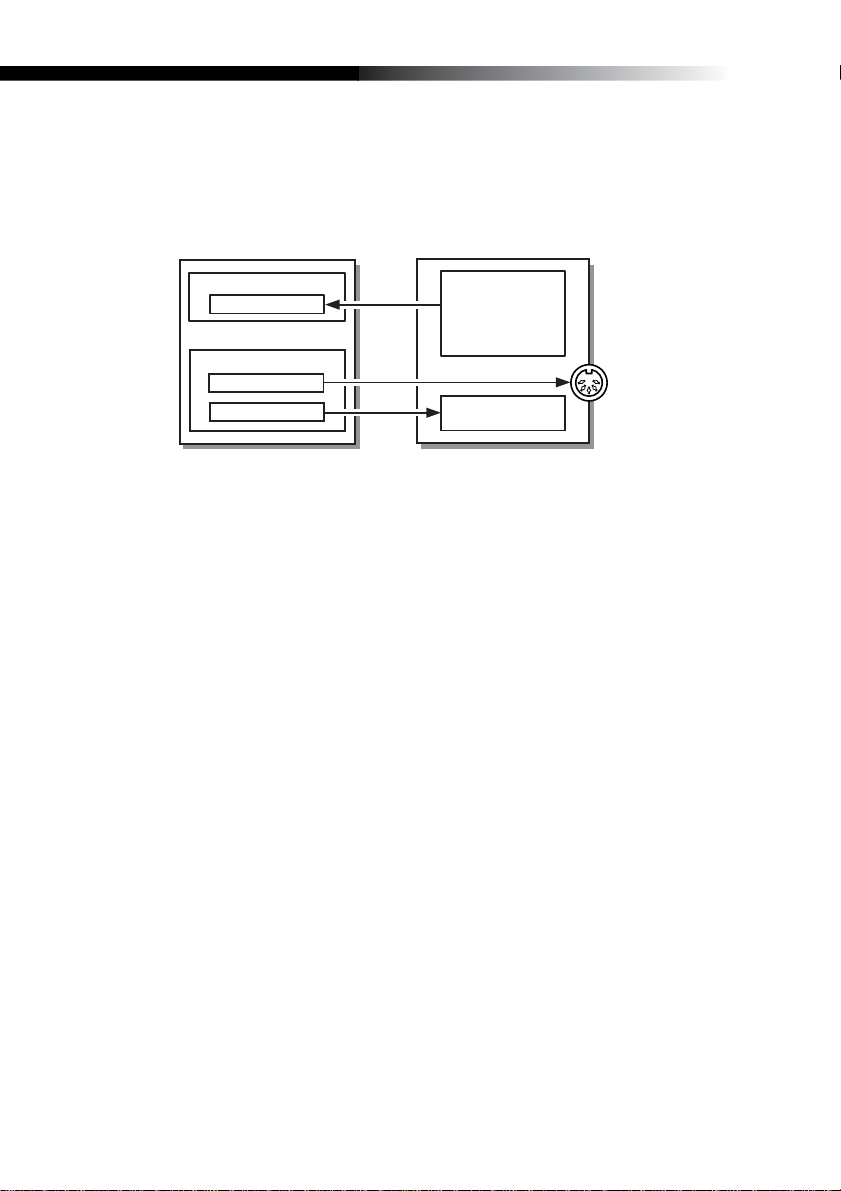
About the K-Series and the driver ports
From the computer’s point-of-vie w , the K-Series provides 1 USB-MIDI port and 2 USBMIDI out ports.
The driver of the application
on a computer
K-Series
MIDI IN device
KBD/KNOB
MIDI OUT device
MIDI OUT
SOUND/CTRL *1
*1 K25/49/61 is CTRL
*2 K61P only
Keyboard/Slider/
Pitch,Mod wheel/
SW1/SW2/Pedal/
ClickPoint/
Dump data
Dump data
Sound generator *2
MIDI OUT juck
MIDI IN device
KBD / KNOB
This is used to receive MIDI messages from the keyboard and the various controllers
on the K-Series. When operating a computer application from the K-Series , select this
port as the application’s MIDI input. KBD/KNOB is also used to receive scene data.
Select this port as the K-Series Editor’s MIDI input.
MIDI OUT device
MIDI OUT
MIDI OUT transmits software MIDI OUT messages to K-Series' MIDI OUT jack, i.e
transmits MIDI messages from a computer application to external MIDI equipment. When
the K-Series is used as a USB-MIDI controller, select this port for computer application’s
MIDI output.
SOUND / CTRL (CTRL if K25/K49/K61)
SOUND/CTRL is used to receive scene data from the computer. Select this port as the
K-Series Editor’s MIDI input. In addition, this port is used to play notes on internal
sound engine of the K61P.
10
About K-Series’ MIDI OUT connector
When USB is not connected
Sends MIDI messages from K-Series’ keyboard and controller.
When USB is connected
Sends MIDI messages from computer’s MIDI OUT port. It will not send MIDI messages
from K-Series’ keyboard and controller.
Page 11
Owner’s Manual
Restoring the factory preset programs
To restore the K-Series to the original factory settings, hold down SW1 and SW2 while
turning on the power.
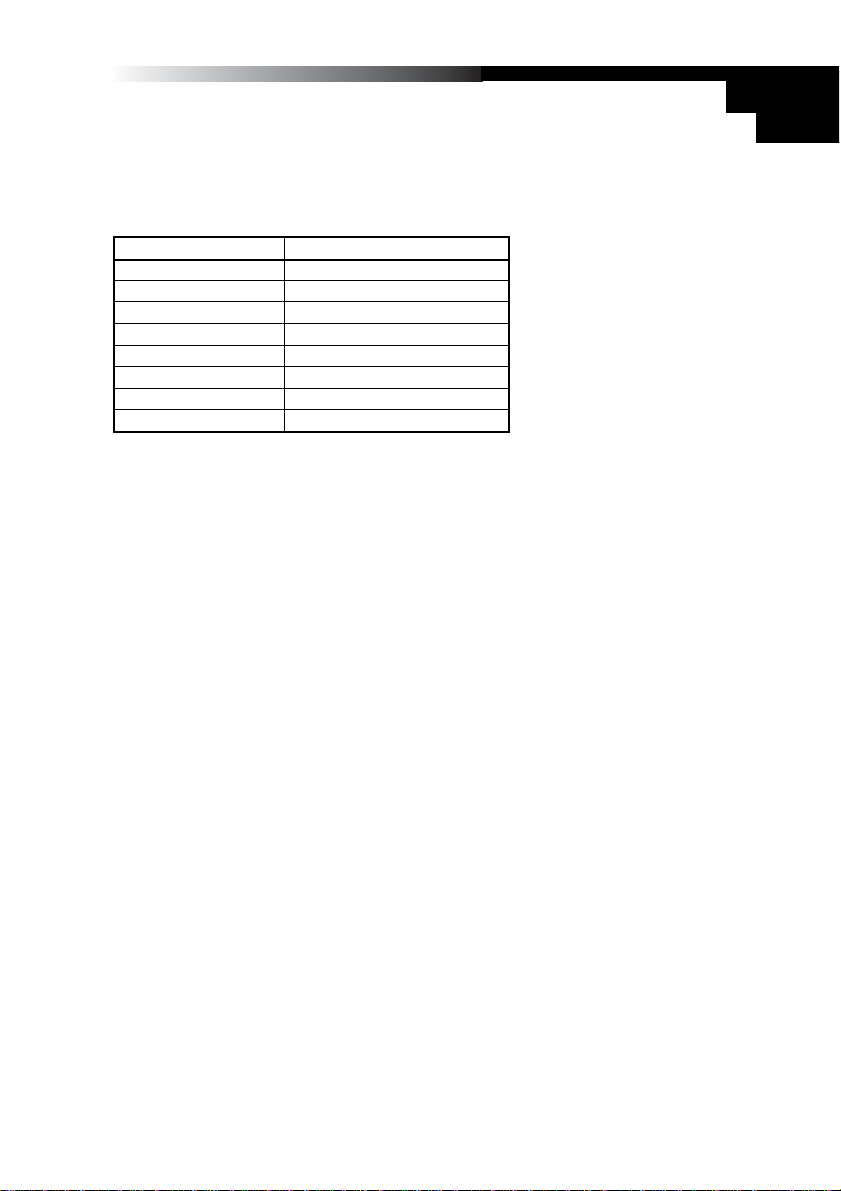
The controllers setting when factory is shipped
Controller Function
SW1 / SW2 Program change (-1/+1)
KNOB1 CC#074 (Cutoff)
KNOB2 CC#079 (EG Intensity)
SLIDER CC#007 (Volume)
PITCH wheel Fixed (Pitch Bend)
MOD wheel CC#001 (Modulation)
PEDAL CC#064 (Damper)
ClickPoint Mouse mode
* The parameters shown inside the brackets relate to the M1 Le.
11
Page 12
Operation
The K-Series editor software (included on the CD-ROM) is used to assign the controller settings and certain parameter values.
MIDI messages are sent using global MIDI channel.
○○○○○○○○○○○○○○○○○○○○○○○○○○○○○○○○○○○○○○○
Keyboard
Note messages are sent from the keyboard.
Three velocity curves (and a constant 127 velocity) allow the ke yboard response to be
tailored to the performer’s playing style.
The keyboard may be transposed by semitones into any musical key.
○○○○○○○○○○○○○○○○○○○○○○○○○○○○○○○○○○○○○○○
ClickPoint
MIDI control changes can be assigned individually to the “X” direction (left/right) and
the “Y” direction (up/down) to simultaneously control two parameters. In addition, the
ClickPoint can be used as a computer mouse.
The assignable values are “No Assign/Control Change/Mouse”.
No Assign
No MIDI information is sent from this controller.
Control Change [0...127]
Moving the ClickPoint controller will change the value of the parameters assigned to
the X and Y axis
The ClickPoint controller will return to the center position when it’ s released. To lock the
X and Y par ameters at their current values , press down (Z axis) on the center s witch of
the ClickPoint. Press it again to unlock the X and Y values.
Mouse Mode
When set to “Mouse” mode , the ClickP oint can be operates as a mouse and will control
the cursor on computer screen. The ClickPoint switch functions as the mouse.
The Mouse Mode is only operative when the connected to a computer via USB.
12
○○○○○○○○○○○○○○○○○○○○○○○○○○○○○○○○○○○○○○○
KNOB1 and KNOB2
By assigning MIDI control changes, these knobs can be used to operate external MIDI
equipment and control musical software applications. Each knob can be assigned individually.
The assignable values are “No Assign/Control Change”.
No Assign
No MIDI information is sent from this controller.
Control Change [0...127]
Turning the knob will change the value of the assigned parameter.
Page 13
Owner’s Manual
○○○○○○○○○○○○○○○○○○○○○○○○○○○○○○○○○○○○○○○
SW1 and SW2
These two switches can be assigned individually to send a specific value to a specific
MIDI control change parameter. In fact, both an “on” and “off ” value can be set. The
switch type can be set to Momentary or Toggle.
The assignable values on SW1 and SW2 are “No Assign/Program Change/Control
Change”.
No Assign
No MIDI information is sent from this controller.
Program Change
Every time [SW1] is pressed, the program change number is decreased by 1.
Every time [SW2] is pressed, the program change number is increased by 1.
In addition, a program change message of “0” is sent if [SW1] are [SW2] are pressed
simultaneously.
Control Change [0...127]
SW1 and SW2 can be assigned MIDI control change parameters; Toggle or Momentary mode; plus an On Value and a Release Value.
In “Toggle” mode, each time a s witch is pressed, a MIDI control message is sent; each
press will alternate between the On Value and the Release Value.
In “Momentary” mode, the On Value MIDI control message is sent when the switch is
pressed down, and a Off Value MIDI control message is sent when the switch is released.
○○○○○○○○○○○○○○○○○○○○○○○○○○○○○○○○○○○○○○○
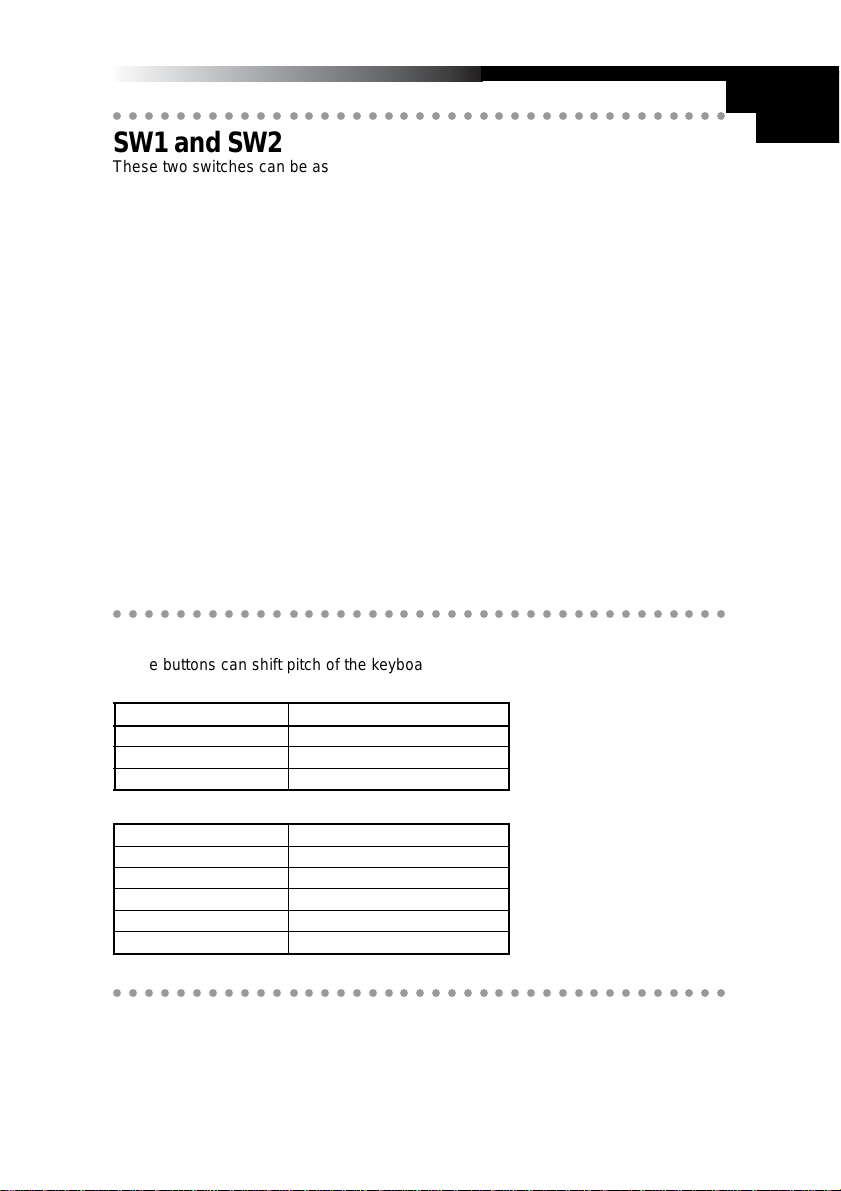
OCTAVE SHIFT UP / OCTAVE SHIFT DOWN
These buttons can shift pitch of the keyboard in one octave units.
The octave shift range is different depending on the keyboard length.
K-Series’ type Octave ranges
K25 -4...+4
K49 -4...+4
K61/K61P -3...+3
Key lights(status) Octave setting
Dark ±0 octave
Green +1 / -1octave
Orange +2 / -2octave
Red +3 / -3octave
Red Flashing +4 / -4octave(K25/K49 only)
○○○○○○○○○○○○○○○○○○○○○○○○○○○○○○○○○○○○○○○
PITCH wheel
Use the Pitch Bend Wheel to send MIDI pitch bend messages.
13
Page 14
○○○○○○○○○○○○○○○○○○○○○○○○○○○○○○○○○○○○○○○
MOD wheel
By assigning a MIDI control change number, the Modulation Wheel can be used to
operate external MIDI equipment and control musical software applications.
The assignable values are “No Assign/Control Change/After touch”.
No Assign
No MIDI information is sent from this controller.
Control Change [0...127]
Use the Mod Wheel to smoothly change the value of the assigned MIDI control change
parameter.
After Touch
Use the Mod Wheel to send channel AFTERTOUCH messages.
○○○○○○○○○○○○○○○○○○○○○○○○○○○○○○○○○○○○○○○
SLIDER
By assigning a MIDI control change number, the Modulation Wheel can be used to
operate external MIDI equipment and control musical software applications.
The assignable values are “No Assign/Control Change”.
No Assign
No MIDI information is sent from this controller.
Control Change [0...127]
Use the slider to smoothly change the value of the assigned MIDI control change parameter.
○○○○○○○○○○○○○○○○○○○○○○○○○○○○○○○○○○○○○○○
14
PEDAL
An optional pedal switch can be assigned to send a specific value to a specific MIDI
control change parameter. In fact, both an “on” and “off ” value can be set. The switch
type can be set to Momentary or Toggle.
The assignable values are “No Assign/Control Change”.
No Assign
No MIDI information is sent from this controller.
Control Change [0...127]
The pedal is assigned to MIDI controls with Toggle/Momentary mode selection, On
Value and Off Value.
In “Toggle” mode e very time press the pedal, MIDI control message with parameter On
Value and Off Value will be sent in turn.
In “Momentary” mode every time press the pedal, MIDI control message with parameter On V alue will be sent when press do wn and MIDI control message with parameter
Off Value will be sent when releas up.
Page 15
Owner’s Manual
Using the K61P’s Internal Sounds
○○○○○○○○○○○○○○○○○○○○○○○○○○○○○○○○○○○○○○○
Selecting a sound
The 24 Internal sounds of the K61P are organized into three banks each containing
eight sounds. To select a particular sound, you need to select a program button and a
bank. For example, to select the Clavi sound, press the sixth program button from the
left (the key will light). Then press the bank button to select BANK2.
1 Press the program key corresponding to the sound you want to select.
2 Press the bank button to select one of the three banks.
Every time the bank key is pressed, the selected bank will switch from BANK1,
BANK2 or BANK3. The selected bank will be shown by the bank lights.
For example, to select the Cla vi sound, press the sixth program k ey from the left to
turn on the key light. Then press the bank key to select BANK2.
Sound List
[PROGRAM] key
[PIANO 1]
[PIANO 2]
[PIANO 3]
[PIANO 4]
[PIANO 5]
[PIANO 6]
[HARPSI 1]
[HARPSI 2]
* [PROGRAM] key is BANK1’s label.
* Indicates the number of oscillators used to produce the voice.
Bank1
Grand Piano 1
Grand Piano 2
Standard Piano
Bright Piano
Honky T onk Piano
Mellow Piano
Harpsichord 1
Harpsichord 2
Osc#
2
2
1
1
2
1
1
2
Bank2
E. Piano 1
E. Piano 2
Soft E.P.
Vintage E.P.
E.P. Pad
Clavi
Vibraphone
Choir
Osc#
1
1
1
1
2
1
1
1
Bank3
Jazz Organ 1
Jazz Organ 2
Jazz Organ 3
Church Organ 1
Church Organ 2
Church Organ 3
Strings
Slow Strings
Osc#
2
2
2
3
1
1
1
2
○○○○○○○○○○○○○○○○○○○○○○○○○○○○○○○○○○○○○○○
Effects
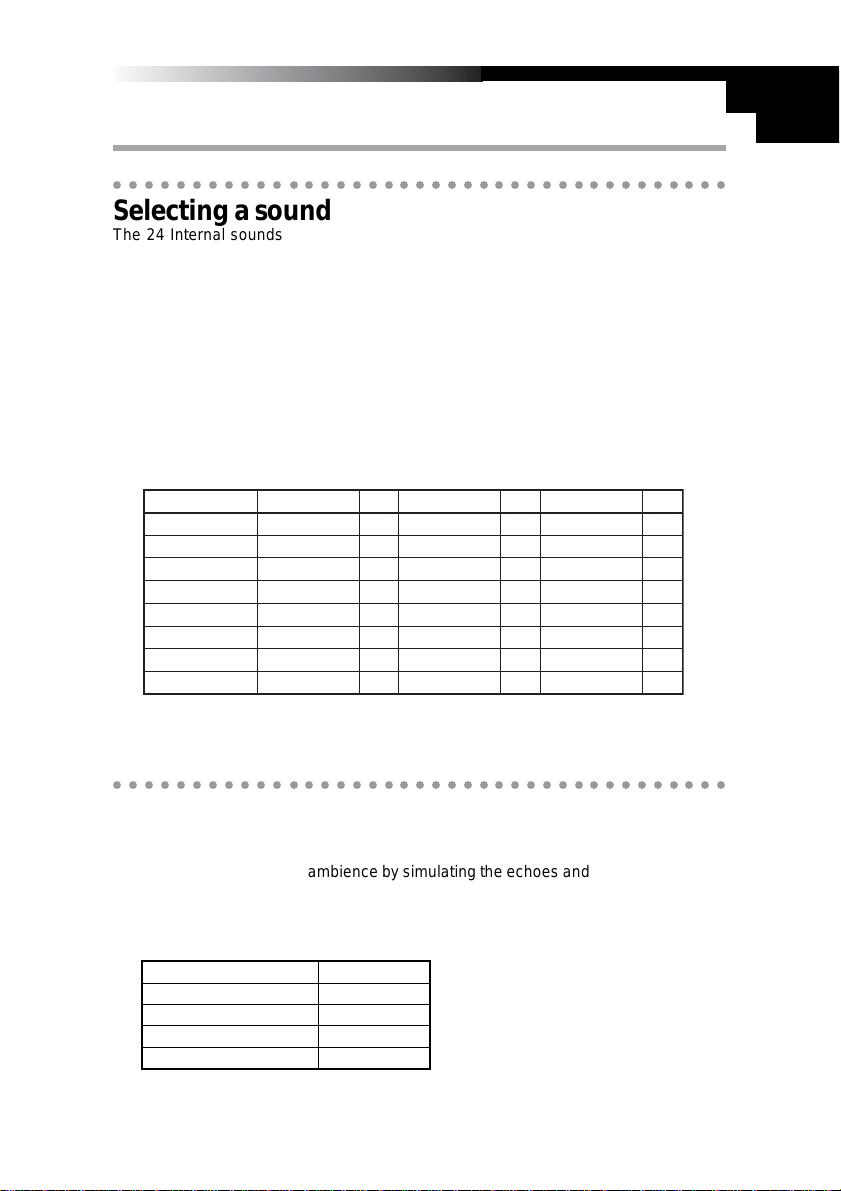
Reverb
Reverb adds a concert hall ambience by simulating the echoes and sound reflection of
such an environment.
1 Press the [REVERB] button to select one of the three reverb depths. The selected
setting will be shown by the color of the [REVERB] button.
[REVERB] button lights Reverb depth
Dark Off
Green Light
Orange Standerd
Red Deep
15
Page 16
Chorus
Chorus adds a sense of depth and motion to the sound
1 Press the [CHORUS] button to select the depth of the chorus effect. The selected
setting will be shown by the color of the [CHORUS] button.
[CHORUS] key Chorus depth
Dark Off
Green Light
Orange Standerd
Red Deep
○○○○○○○○○○○○○○○○○○○○○○○○○○○○○○○○○○○○○○○
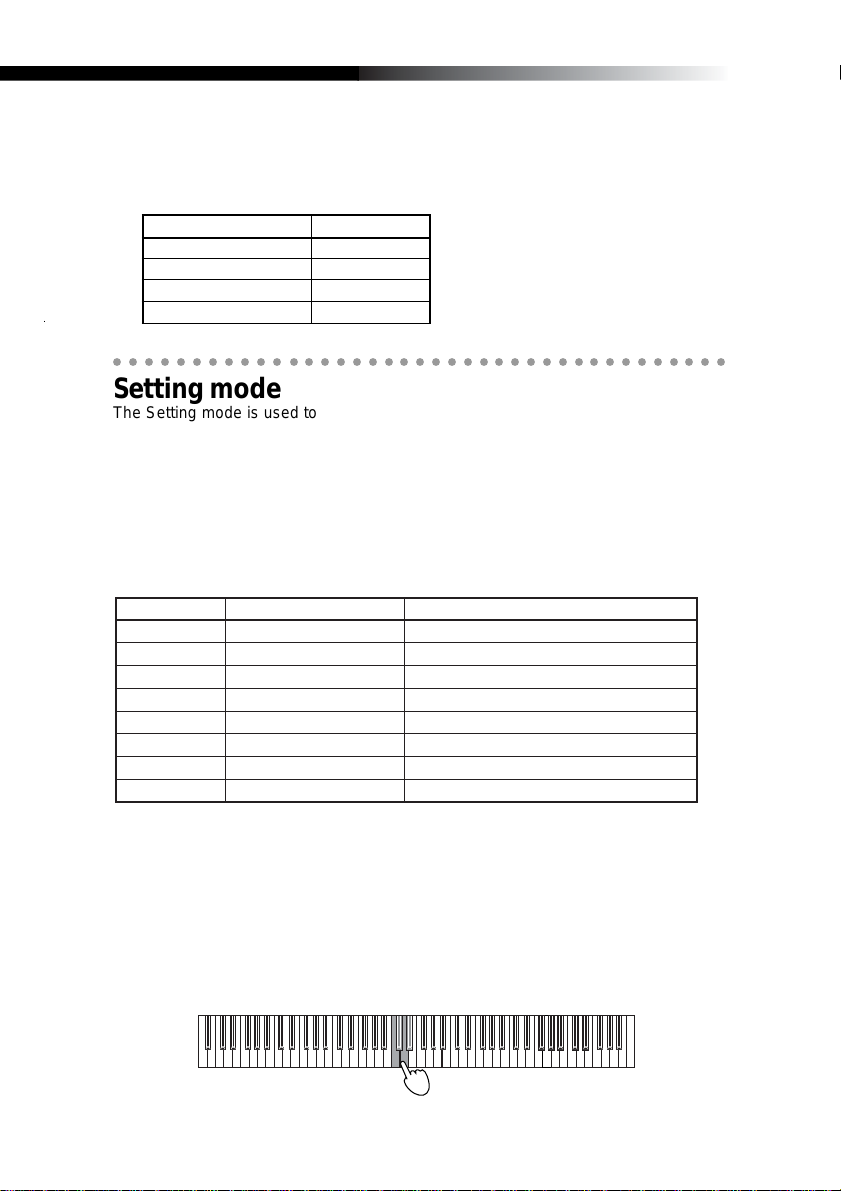
Setting mode
The Setting mode is used to access and change the settings of other features on the
K61P. To enter the Setting mode, hold down the Bank b utton. The [BANK] b utton selection LED and the [PROGRAM] button of the currently selected item will blink. Select
the item that you want to set, and then press the assigned key that corresponds to the
desired setting for the item. When you've finished making settings, press the [BANK]
button to exit Setting mode and return to the normal playing condition. Then press the
note on the keyboard to set the value.
When you are done, press the [BANK] button to exit the Setting mode.
The eight items available in the Setting mode are shown below:
16
[PROGRAM] keys
[PIANO 1]
[PIANO 2]
[PIANO 3]
[PIANO 4]
[PIANO 5]
[PIANO 6]
[HARPSI 1]
[HARPSI 2]
*
[PROGRAM] key is BANK 1’s lablel.
Function
Velocity curve
Transpose
Pitch
Temperament
Global MIDI channel
Local control
Program Change Setting
Volume message filter
Contents
Velocity Curve Setting
Transposing the Keyboard
Adjusting the Pitch
Selecting a Temperament
Changing the Global MIDI Channel Setting
The Local Control On/Off Setting
Enabling or Disabling Program Changes
Enabling or Disabling Volume Message Filter
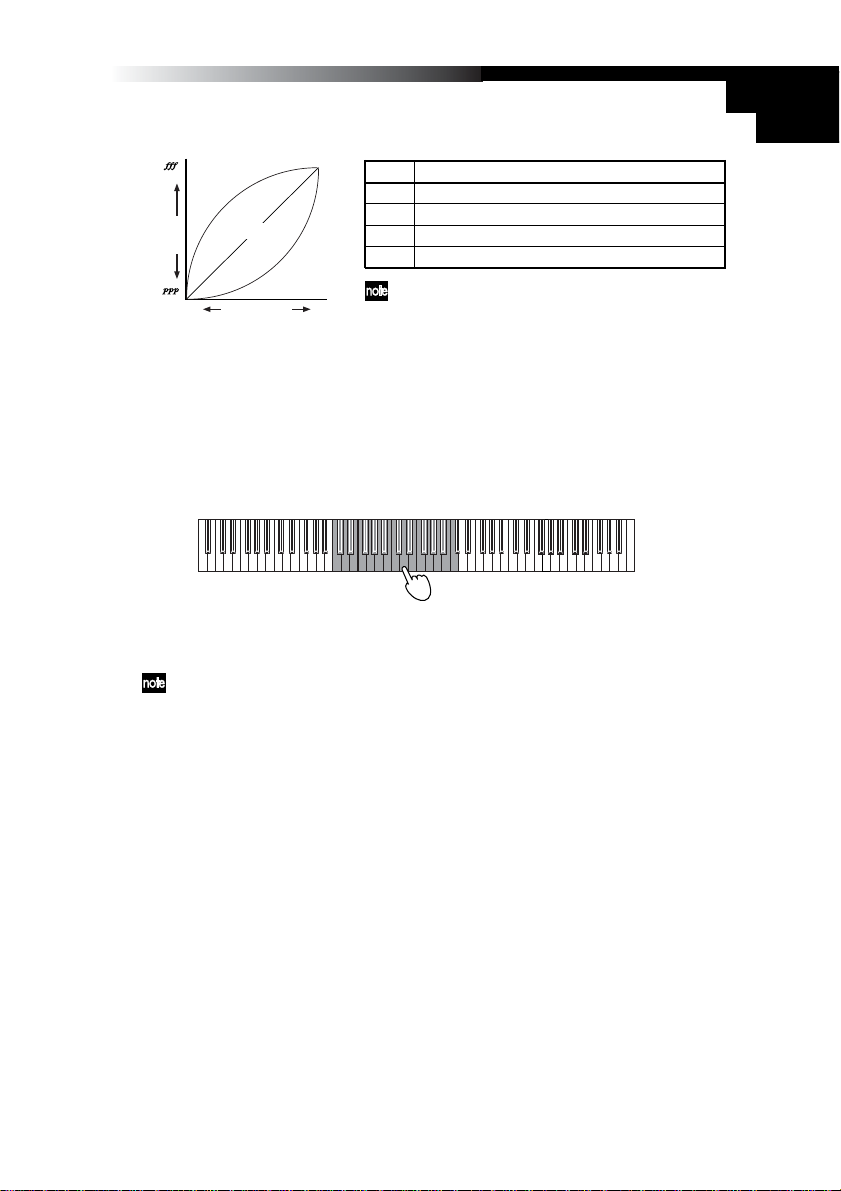
Velocity curve
There are 3 velocity curves and a constant (127) velocity setting. You can select any
one of them to match your performance or playing style.
1 Hold down [BANK] button until the K-Series enters the Setting mode.
2 Press the Program 1 [PIANO 1/E.P. 1/ORGAN 1] button (the button will flash).
3 To select the curve, press C4 for (soft), C#4 (standard), D4 (hard),or D#4 (const).
C8C7C6C5C4C3C2C1
Page 17
4 Press the [BANK] button to exit the Setting mode.
Owner’s Manual
Loud ( )
Output
Level
Soft ( )
Gentle
Light
Normal
Key Force
Heavy
Strong
Note Touch, control change setting
C4 Light (less force is required to play loudly)
C#4 Standard(general piano intensity)
D4 Heavy (gently struck notes are played softer)
D#4 CONST(all notes play with a velocity of 127)
Velocity Curve setting is used by controller and
sound generator.
Transpose
By transposing the keyboard, you can play a song in a different musical key without
changing your fingering.
Transpose is set in semitone, ranges within ±1 octave(-12...12).
1 Hold down [BANK] button until the K-Series enters the Setting mode.
2 Press the Program 2 [PIANO 2/E.P. 2/ORGAN 2] button (the button will flash).
Press one of the notes between C3...C5 to select the transpose setting.
-12
Press note C4 to cancel the transpose function.
+120
C8C7C6C5C4C3C2C1
3 Press the [BANK] button to exit the Setting mode.
Transpose setting is used by controller and sound generator.
17
Page 18
4 Press the [BANK] button to exit the Setting mode.
The pitch setting reverts to standard A4=440Hz if the power is cut off
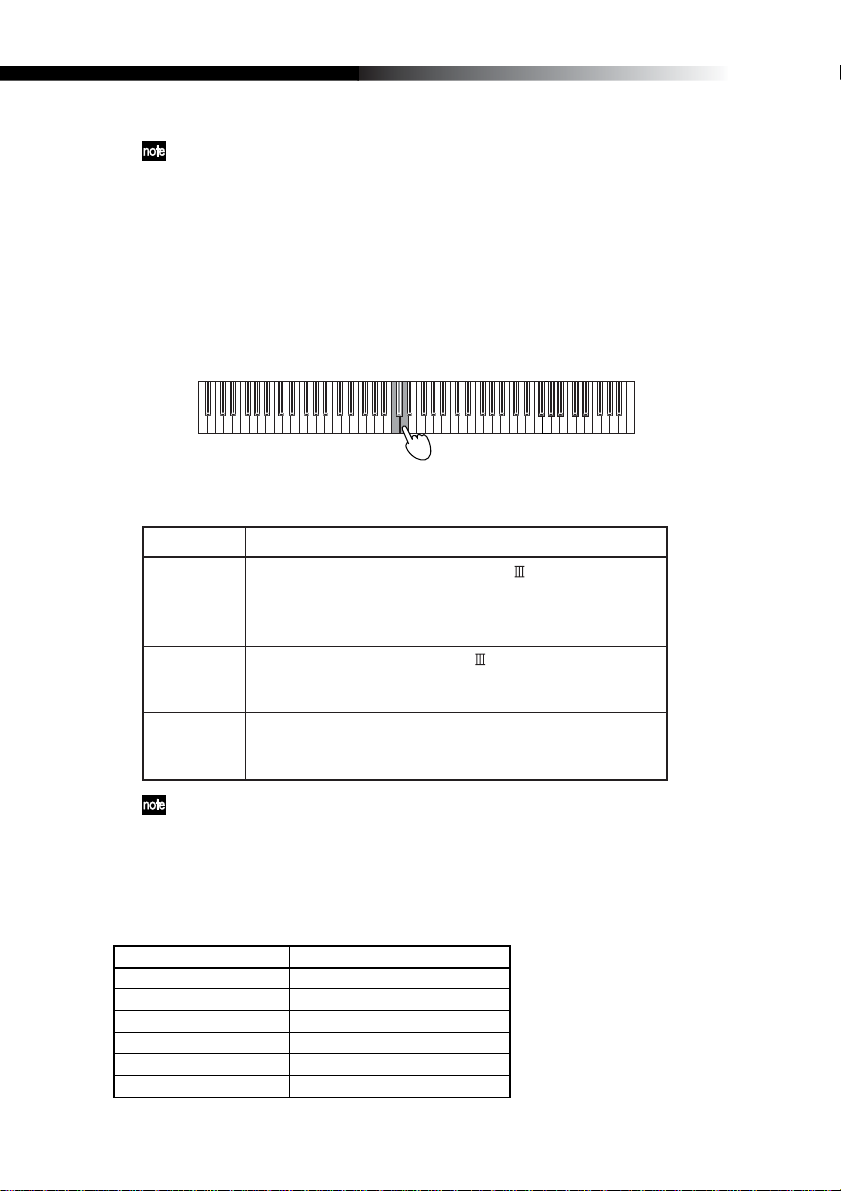
Temperament
Temperaments are different tuning systems, mainly used in the baroque and classical
periods. In addition to the standard equal tuning, the K61P provides historical Kirnberger
and Werckmeister temperaments.
1 Hold down [BANK] button until the K-Series enters the Setting mode.
2 Press the Program 4 [PIANO 4/E.P. 4/ORGAN 4] button (the button will flash).
3 To select a temperament, press C4 for Weckmeister, C#4 for Kirnberger, or D4 f or
Equal tuning.
C8C7C6C5C4C3C2C1
4 Press the [BANK] button to exit the Setting mode.
Note
C4
C#4
D4
The termperament setting is set to equal temperament if power cut off.
Werckmeister: Uses the Werckmeister scale proposed in
the late Baroque period by organist and musicologist Andreas
Werckmeister, with the intention of enabling relatively
unrestricted play in multiple keys.
Kirnberger: Uses the Kirnberger scale proposed in the
Johann Philip Kirnberger in the early 18th century. This
temperament is mainly used for tuning harpsichords.
Equal temperament: The temperament used on almost all
modern keyboard instruments. This temperament uses equal
semitone increments, so that scales sound identical in all keys.
Temperament
A Note About “Stretch Tuning”
Stretch tuning is used to obtain a more natural sound. Lo w diapason notes use a lower
pitch setting, and high diapason notes use a higher pitch setting. This is the most often
used method when tuning an acoustic piano. There are 6 instrument sounds in the
K61P that use stretch tuning:
[PROGRAM] keys BANK 1
[PIANO1] Grand Piano 1
[PIANO2] Grand Piano 2
[PIANO3] Standard Piano
[PIANO4] Bright Piano
[PIANO5] Honky T onk Piano
[PIANO6] Mellow Piano
18
Page 19
Owner’s Manual
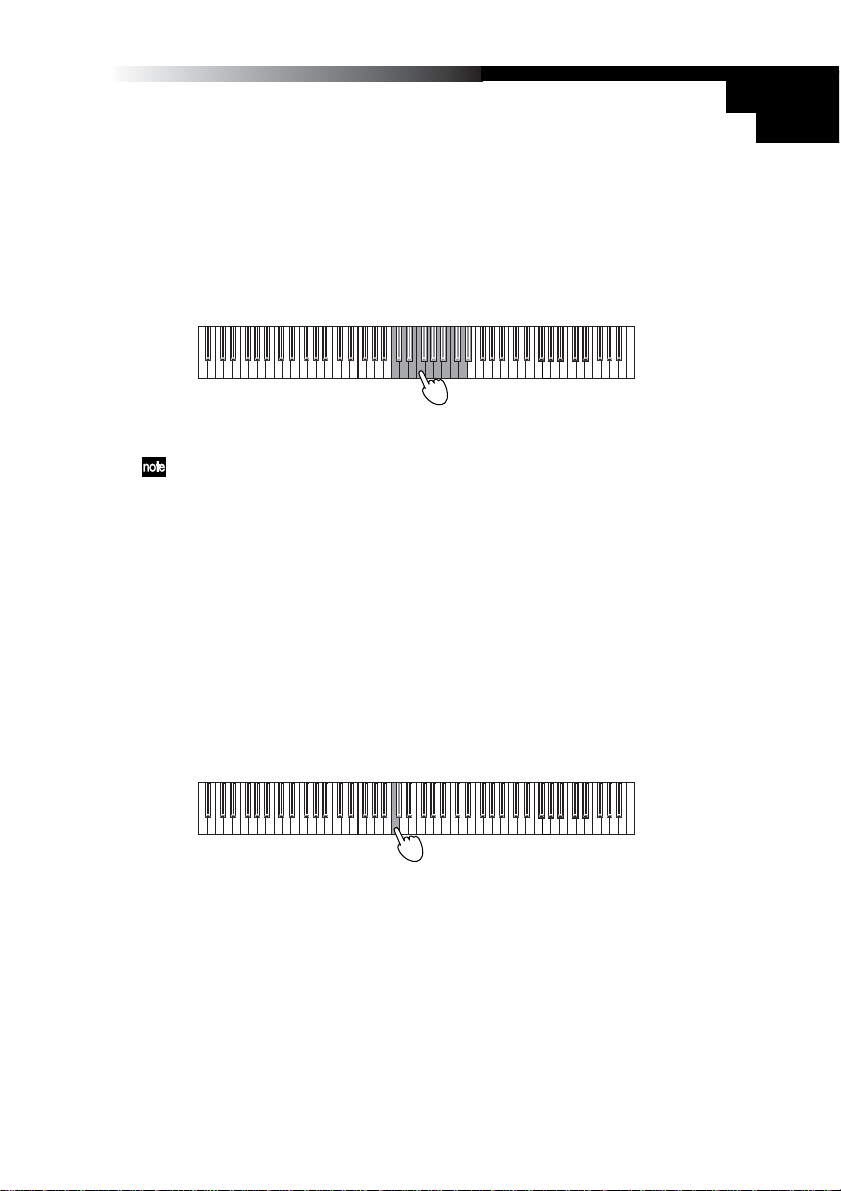
MIDI channel setting
You can set the K61P to the same MIDI channel as the connected MIDI equipment.
MIDI channel is 1-16.
1 Hold down [BANK] button until the K-Series enters the Setting mode.
2 Press the Program 5 [PIANO 5/E.P. 5/ORGAN 5] button (the button will flash).
3 Press one of the notes between C4~D#5.
The MIDI channel assignments are as the followings.
C4 = 1ch, C#4=2ch, D4=3ch…D#5= 16ch
C8C7C6C5C4C3C2C1
4 Press the [BANK] button to exit the Setting mode.
MIDI channel setting is used by controller and sound generator.
The Local control on/off setting
The Local setting separates the K61P’s ke yboard from the internal sound engine. When
local is on, the keyboard will play the internal sound engine, as well as any other
connected devices. When using the K61P with a sequencer, you would normally set
the local control to off, to prev ent messages being sent to the computer from triggering
notes a second time. This setting will depend on the “echo back” setting of the sequencer.
Generally, set local on, and the K61P will play sounds from the internal engine when
notes are played on the keyboard.
1 Hold down [BANK] button until the K-Series enters the Setting mode.
2 Press the Program 6 [PIANO 6/CLAVE/ORGAN 6] button (the button will flash).
3 Press note C4(On) or C#4(Off) to select the setting.
4 Press the [BANK] button to exit the Setting mode.
C8C7C6C5C4C3C2C1
19
Page 20
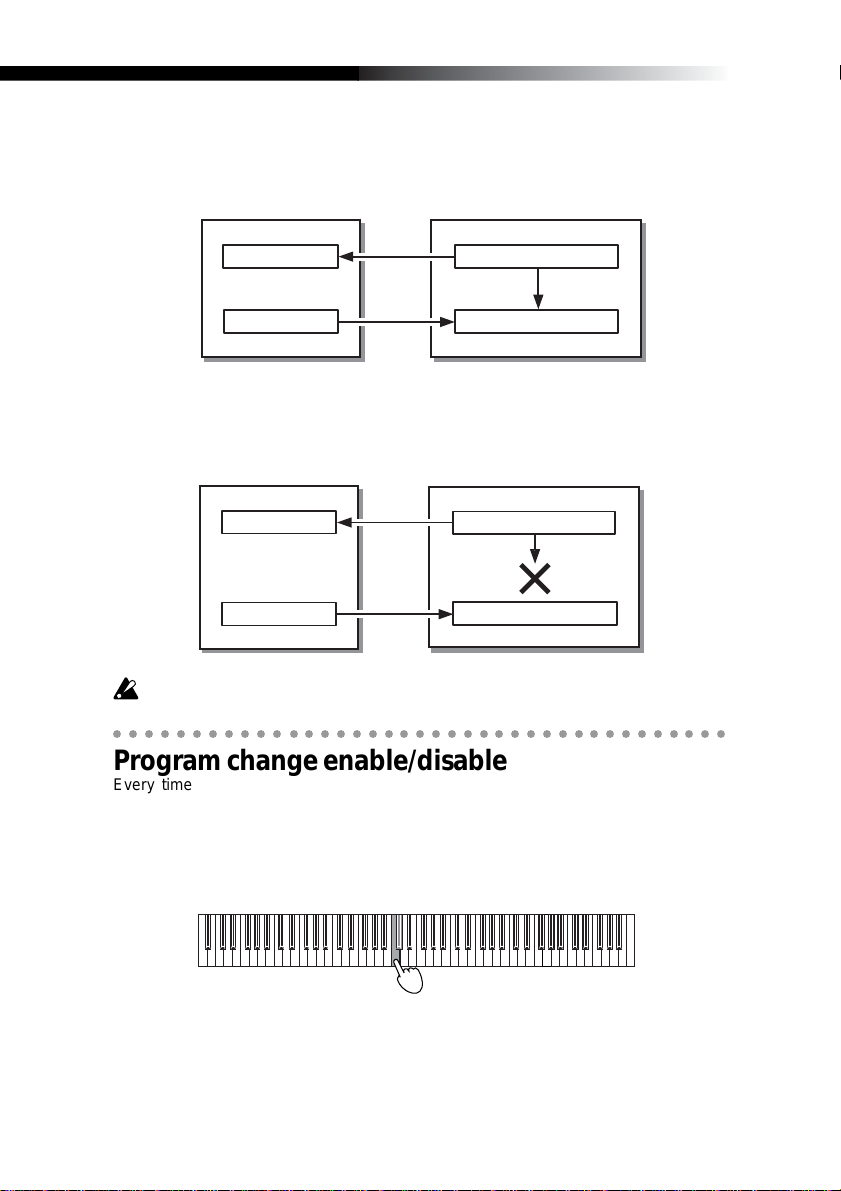
The local control setting
Local control on
Computer
K61P
KBD/KNOB
SOUND/CTRL
Keyboard/Each controllers
Tone generator
Local control off
Computer
KBD/KNOB
SOUND/CTRL
The local on/off setting is set to local on if power cut off.
○○○○○○○○○○○○○○○○○○○○○○○○○○○○○○○○○○○○○○○
K61P
Keyboard/Each controllers
Tone generator
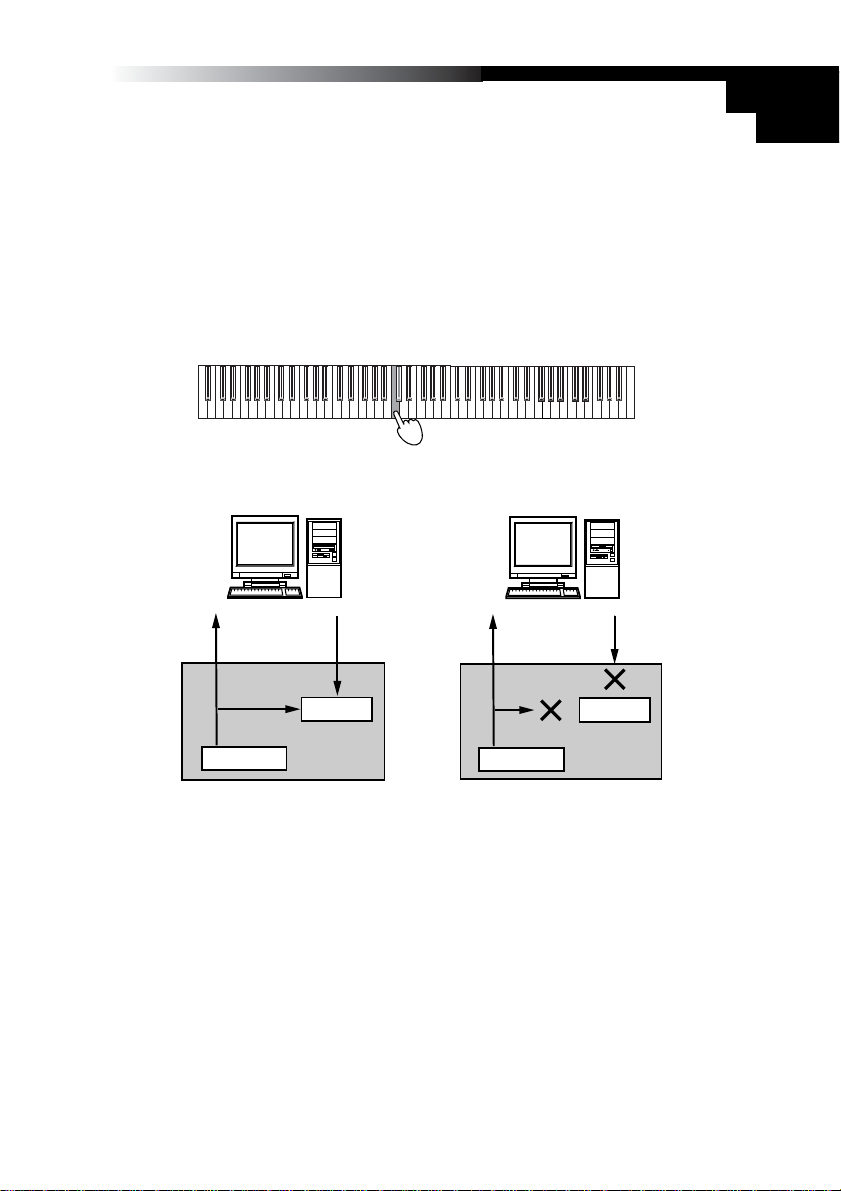
Program change enable/disable
Every time you select one of the K61P’s internal sounds, a MIDI program change
message is also sent to any connected MIDI equipment. This feature allows you to
prevent program change messages from being sent to your other MIDI devices.
1 Hold down [BANK] button until the K-Series enters the Setting mode.
2 Press the Program 7 [HARPSI 1/VIBE/STRINGS 1] button (the button will flash).
20
C8C7C6C5C4C3C2C1
3 Press note C4(enable) or C#4(disable) to select the setting.
4 Press the [BANK] button to exit the Setting mode.
Page 21
Owner’s Manual
Volume message filter
You can prevent the internal sound engine from receiving volume change messages.
If the Volume message filter is set to “On”, the K61P’s internal sound generator will
accept volume(07) message from Knob1, Knob2 and the Slider if they are assigned
control change cc#07.
If it’s set to “Off”, the K61P’s internal sound generator will reject volume(07) message
from Knob1, Knob2 and the Slider even if they are assigned control change cc#07.
1 Hold down [BANK] button until the K-Series enters the Setting mode.
2 Press the Program 8 [HARPSI 2/CHOIR/STRINGS 2] button (the button will flash).
3 Press note C4(On) or C#4(Off) to select the setting.
C8C7C6C5C4C3C2C1
CC#07 flow chart
ON
Computer
SG
Controller
K61P
4 Press [BANK] key to quit setting mode.
OFF
Computer
SG
Controller
K61P
* SG: Sound Generator
SG's volume knob controls
SG's volume level.
21
Page 22

Troubleshooting
❏ Power does not turn on
• Is the power switch set to the correct position? (p.8 “Making connections and
turning on the power”)
•
Is the K-Series be connected to your computer via a hub? If so, try using the AC adapter.
❏ Driver setup failure
• There is a defalut driver installed for Windows. Use the new driver installer to
setup driver.
• Make sure the CD-ROM is inserted correctly into the CD drive.
• Make sure the lens of CD drive is not dirty.
❏ Software does not respond
• Is the USB cable connected correctly?
• Has the K-Series been recognized by the connected computer?
Depending on the hardware setup of your computer, it may not be possible for
the K-Series to b e recognized via a USB connection.
• It may be that the connected device or software does not support the function
you’re attempting to use. Refer to the owner’s manual of the connected device or
software, and make sure that the function is supported.
❏ No sound(K61P)
• Make sure the K-Series’ volume is not set to “0”.
Please turn the volume to an appropriate position.
❏ Notes are dropping out or being cut off before playing to completion
• You may be exceeding the K61P’s polyphony limit.
About Maximum Polyphony
Maximum polyphony is the maximum number of notes that the internal sound
engine is capable of producing at a single time. If you try to play more than this
limit, the K61P automatically switches off older notes so that it can sound the
newer notes. If you exceed the limit, therefore, you may notice that notes are
dropping out or that they are ending prematurely.
The maximum available polyphony varies according to the number of oscillators
and effects used to produce the sound. The internal sound generator creates a
note using either one or two oscillators. Maximum av ailable polyphon y for 1-oscillator sounds (such as the HARPSI/VIBES sounds) is 60 notes, while maximum
polyphony for 2-oscillator sounds (such as Grand Piano 1 [PIANO 1, Bank A] and
Grand Piano 2 [PIANO 2, Bank A]) is 30 notes. The reverb effect, when used,
counts as ten 1-oscillator notes, while the chorus counts as three.
22
❏ Noise is heard
• Depending on your computer, you may hear noise in the sound of the internal
sound generator when using a USB connection. If this occurs, use a separately
sold AC adaptor and set the power switch to the DC position.
Page 23

Owner’s Manual
Specifications
❏ Controllors
• Keyboard: 25 keys / 49 keys / 61 keys; Full-size, velocity-sensing keys
• ClickPoint controller
• Assignable Knob × 2
• Assignable Switch × 2
• Octave shift up / down keys
• Pitch bend wheel
• Assignable Modulation wheel
• Slider × 1
❏ Internal sound generator(K61P)
• Sound generator Stereo sampling
• Polyphony 60 (Maximum)
• Sounds 24 (3 banks of 8)
• Keyboard pitch Transposition, Fine tuning
• Temperaments Equal, Kirnberger, Werckmeister
• Effects Reverb, Chorus (3 depths each)
❏ Connectors
• Pedal jack
• MIDI OUT connector
• USB connector
• Power supply jack (DC9V)
• Outoputs (L/MONO, R) (K61P only)
• Headphones jack (K61P only)
❏ Power supply
• USB BUS power mode (when using the USB connector)
• DC9V, AC adapter (optional)
❏ Current consumption
K25/K49/K61: When using USB bus power 110 mA
When using DC9V adapter 120 mA
K61P: When using USB bus power 300 mA
When using DC9V adapter 320 mA
❏ Dimensions (W × H × D)
K25: 489 × 211 × 69 mm / 19.3 × 8.3 × 2.7 inches
K49: 818 × 211 × 69 mm / 32.2 × 8.3 × 2.7 inches
K61/K61P: 982 × 211 × 69 mm / 38.7 × 8.3 × 2.7 inches
❏ Weight
K25: 1.5 kg / 3.3 lbs.
K49: 2.5 kg / 5.5 lbs.
K61: 3.0 kg / 6.6 lbs.
K61P: 3.2 kg / 7.1 lbs.
23
Page 24

❏ Included items
• USB cable
• CD-ROM (containing M1 Le software synthsizer , K-Series Editor software, Driver ,
Setup Wizard etc.)
• Owner’s manual
• MIDI Implementation chart
• Software license agreement
❏ Computer operating requirements
Macintosh
Operating system: Mac OS X ver.10.3 or later
Computer: Apple Macintosh computer with a USB port, satisfying the operating
Windows
Operating system: Microsoft Windows XP Home Edition/Professional
Computer: Computer with a USB port, satisfying the operating requirements of
requirements of Mac OS X
Windows XP (USB chipset made by Intel Corporation is recommended)
❏ Options
• AC adapter
• Pedal switch PS-1
Appearance and specifications of the product are subject to change without notice. (Current as
of December 2005)
24
Page 25

Sommaire
Précautions.......................................................................... 26
Introduction ......................................................................... 27
Fonctions Principales .............................................................................27
Nom des parties .....................................................................................27
Installation ........................................................................... 30
Installation des drivers MIDI et des logiciels ..........................................30
Connexions et mise sous tension...........................................................31
A propos de la série K et des drivers de ports........................................33
A propos de la connection MIDI OUT de la série K................................33
Restoration des programmes d’usine.....................................................34
Manuel d’opérations ........................................................... 35
Clavier ....................................................................................................35
ClickPoint................................................................................................35
POTENTIOMÈTRE1 / POTENTIOMÈTRE2 ...........................................35
Boutons [SW1]/[SW2].............................................................................36
Bouton [Octave superieur]/[OCTAVE inferieur].......................................36
Molette de PITCH ...................................................................................36
Molette de MODULATION ......................................................................37
CURSEUR..............................................................................................37
PEDALE .................................................................................................37
Jouer avec le générateur de sons (K61P)......................... 38
Selectionner un son (Program change)..................................................38
Effets ......................................................................................................38
mode de paramétrage ............................................................................39
Program change activé/désactivé ..........................................................43
Messages d’erreur .............................................................. 45
Caractéristiques .................................................................. 46
Page 26

Précautions
Location
L’utilisation de cet instrument dans les endroits
suivants peut en entraîner le mauvais
fonctionnement.
• En plein soleil
• Endroits très chauds ou très humides
• Endroits sales ou fort poussiéreux
• Endroits soumis à de fortes vibrations
•A proximité de champs magnétiques
Alimentation
Veuillez brancher l’adaptateur secteur spécifié sur
une prise secteur à la tension appropriée. Ne
branchez pas l’adaptateur sur une prise de courant dont la tension ne correspond pas à celle pour
laquelle l’appareil a été conçu.
Interférences avec d’autres appareils
électriques
Les postes de radio et de télévision situés à
proximité peuvent souffrir d’interférences à la
réception. Faites fonctionner cet appareil à une
distance raisonnable des postes de radio et de
télévision.
Maniement
Pour éviter de les endommager, manipulez les
commandes et les boutons de cet instrument sans
appliquer de force excessive.
Entretien
Lorsque l’extérieur est sale, essuyez-le avec un
chiffon propre et sec. Ne v ous servez pas d’agents
de nettoyage liquides comme du benzène ou du
diluant, des produits de nettoyage ou des vernis
inflammables.
Conservez ce manuel
Après avoir lu ce manuel, veuillez le conserver
soigneusement pour référence ultérieure.
Évitez toute intrusion d’objets ou de
liquide
Ne placez jamais de récipient contenant du liquide
près de l’instrument. Si le liquide pénètre dans
l’appareil, il risque de provoquer des dommages,
un incendie ou une électrocution.
Veillez à ne pas laisser tomber d’objets métalliques
dans le boîtier. Si cela se produisait, débranchez
l’adaptateur secteur de la prise de courant et
contactez votre revendeur Korg le plus proche ou
le magasin où vous avez acheté l’instrument.
Marque CE pour les normes
européennes harmonisées
La marque CE apposée sur tous les produits de
notre firme fonctionnant sur secteur jusqu’au 31
décembre 1996 signifie que ces appareils
répondent à la Directive EMC (89/336/CEE) et à
la Directive concernant la marque CE (93/68/
CEE).
La marque CE apposée après le 1 janvier 1997
signifie que ces appareils sont conformes à la
Directive EMC (89/336/CEE), à la Directive
concernant la marque CE (93/68/CEE) ainsi qu’à
la Directive Basse Tension (73/23/CEE).
La marque CE apposée sur tous les produits de
notre firme fonctionnant sur piles signifie que ces
appareils répondent à la Directive EMC (89/336/
CEE) et à la Directive concernant la marque CE
(93/68/CEE).
REMARQUE IMPORTANTE POUR LES
CLIENTS
Ce produit a été fabriqué suivant des spécifications
sévères et des besoins en tension applicables
dans le pays où ce produit doit être utilisé. Si v ous
avez acheté ce produit sur internet, par
correspondance ou/et au téléphone, vous devez
vérifier que ce produit est bien utilisable dans votre
pays de résidence.
ATTENTION: L’utilisation de ce produit dans un
pays autre que celui pour lequel il a été conçu
peut être dangereuse et annulera la garantie du
fabricant ou du distributeur.
Veuillez aussi conserver votre récépissé qui est
la preuve de votre achat, faute de quoi v otre produit
risque de ne plus être couvert par la garantie du
fabricant ou du distributeur.
* Les noms de societes, nomsm de produits et
noms de formats, etc. dans ce manuel sont
des marques de fabrique ou des mar-ques
deposees de leurs proprietaires respectifs.
26
Page 27
Manuel d’utilisation
Introduction
Nous vous remercions pour votre achat d’un contrôleur K25/K49/K61/K61P(produit
disponible ultérieurement). Afin d’emplo yer ce produit efficacement, lisez svp ce manuel
soigneusement et employez le produit d’une manière appropriée. Maintenez ce manuel
dans un endroit sûr.
Fonctions Principales
❏ Equippé de 9 contrôleurs puissants.
❏ Track point X/Y avec pitchbend et mode ClickPoint. curseur/souris
❏ Utilisez le logiciel de synthèse fourni M1 Le avec le clavier de la série K, vous
pourrez entendre des sons de très haute qualité immédiatement.
❏ Les 24 sons du K61P’s sont issus des pianos numériques K org. Vous pouvez jouer
des sons de pianos et d’orgue de très haute qualité.
Nom des parties
Contrôleur
2
3
4
5
6
8
7
K61P
1
27
Page 28
1. Clavier
Le clavier possède des touchesstandard sensibles à la vélocité.
2. ClickPoint
Assigné en MIDI, le ClickPoint peut être utilisé pour contrôler des appareils e xternes
branchés en MIDI, et des logiciels de synthèses comme des séquenceurs tournant
sur PC. Le ClickPoint peut être utilisé aussi comme une souris.
3. POTENTIOMETRE 1 / POTENTIOMETRE 2
Assigné en MIDI, les potentiomètres 1 & 2 peuvent être utilisés pour contrôler des
appareils externes branchés en MIDI, et des logiciels de synthèses comme des
séquenceurs tournant sur PC.
4. Boutons [SW1] / [SW2]
Les boutons [SW1]/[SW2] sont utilisés pour les changements de programme.
Avec les assignations de contrôle MIDI, ils peuvent être utilisés pour contrôler des
appareils externes branchés en MIDI, et des logiciels de synthèses comme des
séquenceurs tournant sur PC.
5. Boutons [OCTAVE SUPERIEUR] / [OCTAVE INFERIEUR]
Réglez l’échelle d’octave du clavier.
6. Molette de PITCH
Change le pitch vers le haut ou vers le bas.
7. Molette de MODULATION
Assigné en MIDI, la molette de modulation peut être utilisé pour contrôler des
appareils externes branchés en MIDI, et des logiciels de synthèses comme des
séquenceurs tournant sur PC. Le ClickPoint peut être utilisé aussi comme une
souris.
8. CURSEUR
Assigné en MIDI, le curseur peut être utilisé pour contrôler des appareils externes
branchés en MIDI, et des logiciels de synthèses comme des séquenceurs tournant
sur PC. Le ClickPoint peut être utilisé aussi comme une souris.
28
Générateur sonore (K61P)
2
1
1. Potentiomètre [VOLUME]
Contrôle le volume du générateur sonore interne. Ceci ajuste le volume qui est
routé ves les sorties OUTPUT et la sortie casque.
34
5
Page 29
Manuel d’utilisation
2. Bouton [BANK]
3 sons sont assignés à chaque bouton programme. Pressez (BANK)
poursélectionner l’un d’entre eux.
3. Bouton [PROGRAM]
Selectioonne les sons assignés aux boutons.
4. Bouton [REVERB]
Ce bouton réglé pour enclencher ou éteidre l’effet echo, et la profondeur de la
réverbération.
5. Bouton [CHORUS]
Ce bouton est réglé pour enclencher ou éteidre l’partiel, et la profondeur de l’effet
chorus.
Panneau Arrière
1
2
Illustration shows the rear panel of K61P.
3 4 5 6 7
1. Jacks de sortie (seulement K61P)
Permet la connection à un amplificateur afin d’écouter les sons internes.
2. Sortie casque (seulement K61P)
Chaque jack peut être connecté à un casque avec connection standard.
3. Jack pour PEDALE
Une pédale à action momentanée telle que le commutateur pédale PS-1 (chacun
vendu séparément) peut être raccordée à la prise de pédale. La Serie Kdéterminera
automatiquement la polarité de la pédale quand l’appareil est alimenté.
4. Connecteur MIDI OUT
Connectez un appareil externe MIDI. La prise MIDI OUT fonctionne différemment
suivant les connections.
5. Connecteur USB
Utilisez un cable USB pour connecter la série K à votre ordinateur afin que les
messages MIDI soient transmis et reçus.
6. Bouton d’alimentation
Ce switch permet de mettre la serie K sous tension en utilisant l’adaptateur secteur
ou le cable USB.
7. Connecteur d’alimentation
Connectez l’adaptateur secteur optionnel ici.
29
Page 30

Installation
Installation des drivers MIDI et des logiciels
Contenu du CD-ROM
❏ Editeur de la série K
❏ Logiciel de synthèse KORG M1 Le
❏ KORG USB-MIDI driver
❏ Guide d’installation
❏ Mode d’emploi de la série K
❏ Manuel d’utilisation du logiciel de synthèse M1 Le software
❏ Licence de logiciel
Recommandation de systèmes
■ Pour Mac OS X
Ordinateur
Apple Macintosh avec port USB cela satisfait les exigences d’exploitation de Mac
OS X
Système d’exploitation recommandé
Mac OS X ver.10.3 ou supèrieur
■ Pour Windows XP
Ordinateur
Un ordinateur avec un port USB celà satisfait les exigences d’e xploitation de Microsoft
Windows XP (le chipset USB fabriqué par Intel Corporation est recommandé)
Système d’exploitation recommandé
Microsoft Windows XP Home Edition/Professional Service pack 1 ou superieur
30
Installation
S’il vous plait, lisez les instructions d’installation situées sur le CD-ROM fourni pour
l’installation du driver MIDI-USB, le logiciel d’édition de la série K et le logiciel de
synthèse M1 Le.
Lire avant utilisation s’il vous plait
❏ Le copyright de tout le logiciel concernant ce produit est la propriété de Korg Cor-
poration.
❏ L’accord de licence pour le logiciel concernant ce produit est inclus séparément.
Vous devez lire cet accord de licence avant que vous installiez le logiciel. Votre
installation du logiciel sera prise pour indiquer votre acceptation de l’accord.
❏ Apple, Macintosh et mac os sont les marques déposées enregistrées de l’ordinateur
Apple, inc..
❏ Windows XP est une marque déposée enregistrée de Microsoft Corporation aux
ETATS-UNIS et à d’autres pays.
❏ Tous autres nom de produit et de compagnie sont des marques déposées ou des
marques déposées enregistrées de leurs supports respectifs.
Page 31

Manuel d’utilisation
Connexions et mise sous tension
Vérifiez que tous vos équipements soient éteints avant de commentcer quoique ce soit.
Vous devez faire attention lors de l’écoute, sinon vous pouvez endommager votre
système de haut-parleur ou causer d’autres défauts de fonctionnement.
Connexion USB
1 Employez un câble USB pour relier la K-Série au connecteur USB de votre
ordinateur. Si vous voulez employer une pédale, reliez la à la prise PÉDALE.
2 Pour établir le courant, placez le commutateur de puissance des K-Séri dans la
position USB.
La K-Série détecte la polarité de la pédale quand le courant est établi. Si une
pédale est reliée, ne la maintenez pas tant que vous n’avez pas allumé le clavier
de la série K.
Power switch position
PEDAL jack
USB connector
USB cable
Pedal switch
Computer
3 Quand vous êtes prêt à couper le courant, placez le commutateur de puissance
sur STANDBY.
Si vous employez un raccordement Usb, vous n’avez pas besoin d’utiliser un
adapteur secteur.Cependant si votre ordinateur est sous alimenté, ou si vous
employez un hub USB qui est alimenté uniquement par le port (plutôt
qu’autoalimenté), la puissance ne peut être assurée à la série K. Dans ce cas-ci,
utilisez l’adapteur secteur optionnel et placez le commutateur de puissance sur la
position DC.
Quand l’USB est connectée, la borne MIDI out ne transmettra aucun message au
clavier de contrôle.
Connexions MIDI et de I’adaptateur CA
1 Reliez la prise d’adapteursecteur optionnel au connecteur de l’alimentation des
séries K et branchez l’adapteur à une sortie électrique.
2 Employez un câble MIDI pour relier la Série K à votre module externe MIDI. Si
vous voulez employer une pédale facultative, reliez la prise de pédale.
31
Page 32

3 Commutez l’alimentation, la LED s’allumera. À ce moment, les réglages sauvés
seront lus automatiquement.
4 Allumez vos appareils externes.
La K-Série détecte la polarité de la pédale quand le courant est établi. Si une
pédale est reliée, ne la maintenez pas tant que vous n’av ez pas allumé la série K.
Power switch position
PEDAL jack
Pedal switch
MIDI OUT
MIDI cable
MIDI IN
Power supply connector
Plug the AC
adaptor into
an AC outlet
External MIDI sound module
5 Quand vous êtes prêt à couper le courant, éteignez les appareils sonores externes
connectés en MIDI. Puis réglez le s witch d’alimentation de la série K sur STANDBY.
Générateur de sons interne
1 Reliez chaque câble à la prise d’entrée correspondante sur l’appareil externe.
Employez des câbles mono 6, 35mm. Quand v ous connectez seulement un produit,
employez la prise L/mono.
Utilisez le bouton de volume pour ajuster le niveau de sortie des sorties OUTPUT .
2 Mettez le K61P sous tension. La led d’alimentations’allume.
3 Allumez votre système d’amplification.
Amplified speakers
OUTPUT jack
HEADPHONES jack
32
INPUT
Headphones
Suivant l'ordinateur utilisé, vous risquez d'entendre du bruit dans le son produit par
le générateur de son interne quand vous utilisez une liaison USB. dans ce cas,
utilisez un adaptateur d'alimentation secteur vendu séparément et réglez le
commutateur d'alimentation sur la position DC.
Page 33

Manuel d’utilisation
A propos de la série K et des drivers de ports.
La série K dispose de 1 port USB-MIDI In et 2 por ts USB-MIDI OUT.
The driver of the application
on a computer
K-Series
MIDI IN device
KBD/KNOB
MIDI OUT device
MIDI OUT
SOUND/CTRL *1
*1 K25/49/61 is CTRL
*2 K61P only
Keyboard/Slider/
Pitch,Mod wheel/
SW1/SW2/Pedal/
ClickPoint/
Dump data
Dump data
Sound generator *2
MIDI OUT juck
MIDI IN
KBD / KNOB
KBD/KNOB est utilisé pour recevoir des messages MIDI de la série K et des contrôleurs.
Quand vous utilisez votre application informatique à partir de la série K, sélectionnez
ce port pour les entrées MIDI de votre application.
KBD/KNOB est utilisé aussi pour recevoir des données de scène. Sélectionnez ce port
pour l’entrée MIDI de l’éditeur de la série K.
MIDI OUT
MIDI OUT
MIDI OUT transmet des messages MIDI OUT du logiciel à la série K. par exemple la
transmission de messages MIDI de l’ordinateur aux instruments MIDI. Quand la série
K est utilisée comme un port USB-MIDI, selectionnez ce por t pour les pour les port
MIDI OUT de vos applications.
SOUND / CTRL (CTRL si K25/K49/K61)
SOUND/CTRL est utilisé pour recevoir des données de scène venant de l’ordinateur.
Sélectionnez ce port pour les entrées MIDI de la série K. De plus, ce port permet au K
61P de jouer des notes du générateur de son interne.
A propos de la connection MIDI OUT de la série K
Quand l’USB n’est pas connecté
Envoi des messages MIDI venant du clavier et du contrôleur.
Quand l’USB est connecté
Envoi des messages MIDI venant du MIDI OUT de l’ordinateur. Il n’envoi pas de messages MIDI venant du clavier et du contrôleur.
33
Page 34

Restoration des programmes d’usine
Allumez le clavier en maintenant les touchesSW1 et SW2.
Réglages des contrôleurs quand l’appareil est déballé
Contrôleurss Fonction
SW1 / SW2 Changement de programme (-1/+1)
KNOB1 CC#074 (Cutoff)
KNOB2 CC#079 (EG Intensity)
SLIDER CC#007 (Volume)
PITCH wheel Fixed (Pitch Bend)
MOD wheel CC#001 (Modulation)
PEDAL CC#064 (Damper)
ClickPoint Mode voice
* Les paramètres montrés à l'intérieur des parenthèses concernent le M1 Le.
34
Page 35

Manuel d’utilisation
Manuel d’opérations
Utilisez l’éditeur de la série K pour paramétrer celui ci.
Les messages MIDI sont envoyés en utilisant le canal MIDI global.
○○○○○○○○○○○○○○○○○○○○○○○○○○○○○○○○○○○○○○○
Clavier
Envoi des messages de notes.
3 courbes de vélocité et une constante (127) peuvent être paramétrées afin d’avoir la
réaction adéquate.
La touche de transposition peut être réglé par 1/2 ton jusqu’à ±1 octave(-12...12).
○○○○○○○○○○○○○○○○○○○○○○○○○○○○○○○○○○○○○○○
ClickPoint
Le changement de contrôle MIDI peut être assigné individuellement à la direction X
(gauche /droit) et à la direction Y (haut/bas) pour obtenir deux paramètres. En outre,
ClickPoint peut être emplo yé comme souris d’ordinateur . Les valeurs assignables sont
“pas d’assignation/ changement de contrôle /souris”.
Pas d’assignation
Si le ClickPoint n’est pas assigné au contrôle MIDI, les messagesseront non transmis .
Changement de contrôle [0...127]
Le contrôle MIDI a été assigné. Changez le par amètre de direction X et Y en changeant
la position. ClickPoint sera de nouveau à la position centrale quand il est relaché, les
paramètres x et y peuvent rester à la position quand le bouton de clic est enclenché.
Appuyez sur le buton de clic encore pour ouvrir les paramètres de x et de y.
Souris
S’il est assigné au mode “souris”, le ClickPoint peut être actionné comme souris et
commander l’indicateur de souris sur l’écran de l’ordinateur. Le bouton de clic de vient
le bouton de clic en mode souris.
Quand le MIDI OUT est relié, ClickP oint ne peut pas être employé comme souris même
si il est assigné en mode souris.
○○○○○○○○○○○○○○○○○○○○○○○○○○○○○○○○○○○○○○○
POTENTIOMÈTRE1 / POTENTIOMÈTRE2
Avec l’assignation de contrôle MIDI, knob1/knob2 peut être employé pour piloter
l’équipement MIDI externe ou le logiciel de synthèse fonctionnant sur ordinateur. Les
valeurs assignables sont “aucun changement d’Assignation/Changement de Control”.
Pas d’assignation
Si knob1/knob2 n’ont aucune assignation de commande MIDI, les messages MIDI ne
seront pas envoyés.
Changement de contrôle [0...127]
KNOB1/KNOB2 sont utilisés pour changer les paramètres des contrôles MIDI.
35
Page 36

○○○○○○○○○○○○○○○○○○○○○○○○○○○○○○○○○○○○○○○
Boutons [SW1]/[SW2]
Appuyes sur [SW1]/[SW2] pour envoyer des messages d’assignation de commande
MIDI.
Les valeurs assignables sur SW1 et SW2 sont “pas d’assignation/changement du
programme/Changement de contrôle”.
Pas d’assignation
Si le SW1/SW2 n’’est pas assigné au contrôle MIDI, les messagesseront non transmis .
Changement de programme
Quand [SW1] est sélectionné,le changement de programme décroit de 1.
Quand [SW] est sélectionné,le changement de programme augmente de 1.
De plus, Le changement de programme est réglé à 0 si [SW1]/[SW2] sont sélectionnés
ensemble.
Changement de contrôle [0...127]
[SW1]/[SW2] sont assignés aux contrôles MIDI avec une sélection de mode Toggle/
Momentary, et valeur de ouvertures et de fermetures.
En mode “Toggle” appuyez chaque fois [SW1]/[SW2] les touches, message de
commande du MIDI avec le paramètre OnValue et Off Value sera envoyé. En mode
“Momentary” appuyez chaque fois les touches [SW1]/[SW2], le message de contrôle
MIDI avec le paramètre OnValue sera envoyé quand il est appuyé et le message de
commande du MIDI avec le paramètre OffValue sera envoyé quand il sera seletionné
vers le haut.
○○○○○○○○○○○○○○○○○○○○○○○○○○○○○○○○○○○○○○○
Bouton [Octave superieur]/[OCTAVE inferieur]
Réglez le sélecteur d’octave. L’échelle d’octave du clavier a plusieurs paramètres.
K-Series’ Octaves
K25 -4...+4
K49 -4...+4
K61/K61P -3...+3
36
Key leds (état) réglage d’Octave
Sombre ±0 octave
Vert +1 / -1octave
Orange +2 / -2octave
Rouge +3 / -3octave
Red clignotant +4 / -4octave(K25/K49 seulement)
○○○○○○○○○○○○○○○○○○○○○○○○○○○○○○○○○○○○○○○
Molette de PITCH
Utilisez Le la molette vers le haut/bas pour envo yer des messages MIDI de changement
de pitch.
Page 37

Manuel d’utilisation
○○○○○○○○○○○○○○○○○○○○○○○○○○○○○○○○○○○○○○○
Molette de MODULATION
Avec l’assignation du contrôle MIDI, la molette de modulation peut être utilisée pour
piloter l’équipement MIDI externe ou le synthétiseur logiciel fonctionnant sur l’ordinateur .
Les valeurs assignables sont “pas d’assignation/Changement de contrôle/aftertouch”.
Pas d’assignation
Si la molette de modulation n’’est pas assigné au contrôle MIDI, les messages seront
non transmis.
Changement de contrôle [0...127]
Utilisez la molette de modulation pour changer le paramètre du contrôle MIDI assigné.
After Touch
Utilisez la molette de modulation pour envoyer un message d’AfterTouch au canal.
○○○○○○○○○○○○○○○○○○○○○○○○○○○○○○○○○○○○○○○
CURSEUR
Avec l’assignation du contrôle MIDI, le curseur peut être utilisé pour piloter l’équipement
MIDI externe et le synthétiseurlogiciel tournant sur l’ordinateur. Les v aleurs assignables
sont “Pas d’assignation/Changement de Control”.
Pas d’assignation
si le curseur n’a pas d’assignation de contrôle MIDI, aucun message transmis.
Changement de contrôle [0...127]
Utilisez le curseur pour changer le paramètre assigné au changement de contrôle
MIDI.
○○○○○○○○○○○○○○○○○○○○○○○○○○○○○○○○○○○○○○○
PEDALE
Le changement de contrôle MIDI peut être assigné à la prise pédale relié et à une
pédale de sustain. Les valeurs assignables sont “Pas d’assignation/Changement de
Control”.
Pas d’assignation
Si la pédale n’a pas d’assignation de contrôle MIDI, pas de messages transmis.
Changement de contrôle [0...127]
La pédale est assignée aux commandes MIDI avec le choix entre le mode Toggle/
Momentary, et les les valeurs OnValue et OffValue.
En mode “Toggle” chaque fois que vous appuyez sur la pédale, le message de
commande MIDI avec le paramètre OnValue et OffValue sera envoyé. En mode “Momentary” chaque fois que vous appuy ez sur la pédale, le message de commande MIDI
avec le paramètre OnValue sera envoyé quand appuyez et message de commande
MIDI avec le paramètre OffValue sera envoyé quand vous relacherez la pédale.
37
Page 38

Jouer avec le génér ateur de sons
(K61P)
○○○○○○○○○○○○○○○○○○○○○○○○○○○○○○○○○○○○○○○
Selectionner un son (Program change)
1 Sélectionnez le son désiré en utilisant les boutons de sélection.
2 Appuyez sur le bouton de banque jusqu’à ce que vous choisissiez une des trois.
Chaque fois que le boutonf de banque enfoncé, la banque choisie commutera de
BANK1, de BANK2 ou de BANK3. La banque choisie sera montrée par les leds.
Par exemple, pour choisir le son de Clavi, appuyez sur la sixième touche de
programme de la gauchepour allumer la led principale. Appuyez alors sur la touche de banque pour choisir BANK2.
Sound List
[PROGRAM] key
[PIANO 1]
[PIANO 2]
[PIANO 3]
[PIANO 4]
[PIANO 5]
[PIANO 6]
[HARPSI 1]
[HARPSI 2]
* [PROGRAM] key is BANK1’s label.
* Indicates the number of oscillators used to produce the voice.
Bank1
Grand Piano 1
Grand Piano 2
Standard Piano
Bright Piano
Honky T onk Piano
Mellow Piano
Harpsichord 1
Harpsichord 2
Osc#
2
2
1
1
2
1
1
2
Bank2
E. Piano 1
E. Piano 2
Soft E.P.
Vintage E.P.
E.P. Pad
Clavi
Vibraphone
Choir
Osc#
1
1
1
1
2
1
1
1
Bank3
Jazz Organ 1
Jazz Organ 2
Jazz Organ 3
Church Organ 1
Church Organ 2
Church Organ 3
Strings
Slow Strings
Osc#
2
2
2
3
1
1
1
2
38
○○○○○○○○○○○○○○○○○○○○○○○○○○○○○○○○○○○○○○○
Effets
Reverbération
Ajoutez l’effet d’écho avec la profondeur spécifique à un bruit peut simuler des effets
soniques comme jouer sur la scène d’une salle de concert. Ceci s’appelle l’effet de
reverbération.
1 Appuyez sur le bouton [REVERB] pour sélectionner une des trois profondeurs de
réverbération. Les réglages seront indiqués par des Leds.
[Led REVERB] profondeur de Reverb
Eteint éteint
Vert Légère
Orange Standard
Rouge Profond
Page 39

Manuel d’utilisation
Chorus
Ajoutez des sons décalés pour avoir un eff et riche et profond. Ce s’appelle l’effet de chorus.
1 Appuyez sur la touche [CHORUS], choisissez une des trois profondeurs de cho-
rus. L’e paramétrage choisi est montré par la led principale.
Bouton [CHORUS] Profondeur de Chorus
Eteint éteint
Vert Léger
Orange Standard
Rouge profond
○○○○○○○○○○○○○○○○○○○○○○○○○○○○○○○○○○○○○○○
mode de paramétrage
Appuyez sur le bouton [BANK] jusqu’à ce qu’elle place la série K en mode réglage. La
diode de sélection de touche [BANK] et la touche [PROGRAM] correspondant à la
fonction actuellement sélectionnée clignoteront. Sélectionnez la fonction que vous
souhaitez régler, puis appuyez sur la touche à laquelle a été assigné le réglage que
vous souhaitez appliquer à cette fonction.
Quand vous avez effectué les réglages, appuyez sur la touche [BANK] pour quitter le
mode de réglage et revenir au mode de fontionnement normal. Appuez alors sur la
note du clavier pour placer la valeur choisie. Après avoir fini le réglage, appuyez sur la
touche [BANK] pour quitter le mode.
En mode réglage, il y a 8 paramètres de réglage comme suit:
[PROGRAM] keys
[PIANO 1]
[PIANO 2]
[PIANO 3]
[PIANO 4]
[PIANO 5]
[PIANO 6]
[HARPSI 1]
[HARPSI 2]
*
[PROGRAM] key is BANK 1’s lablel.
Function
Velocity curve
Transpose
Pitch
Temperament
Global MIDI channel
Local control
Program Change Setting
Volume message filter
Contents
Velocity Curve Setting
Transposing the Keyboard
Adjusting the Pitch
Selecting a Temperament
Changing the Global MIDI Channel Setting
The Local Control On/Off Setting
Enabling or Disabling Program Changes
Enabling or Disabling Volume Message Filter
Courbe de vélocité
Il y a 3 courbes de vélocité et 1 constante (127) Choisissez une d’elles selon votre besoin.
1
Appuyez sur le bouton [BANK] jusqu’à ce que le cla vier se mette en mode paramétr age.
2 Pressez le Programme 1 [PIANO 1/E.P. 1/ORGAN 1] pour allumer la Led.
3 Presez une de ces notes C4(léger), C#4(standard), D4(dur), D#4(const) pour
sélectionner la courbe.
C8C7C6C5C4C3C2C1
39
Page 40

4 Pressez [BANK] pour quitter le mode de paramétrage.
Loud ( )
Output
Level
Soft ( )
Gentle
Light
Normal
Key Force
Heavy
Strong
Note Touch, control change setting
C4 Son doux avec courbe dure même jouée doucement)
C#4 Intensité de piano Standard (general)
D4 Son fort avec courbe douce si joué doucement
D#4 CONST(son avec intensité fixe (velocity=127))
Le paramétrage de le courbe de vélocité est utilisée par
le contrôleur et le générateur de sons.
Transposition
En utilisant le transpose vous pouvez jouer la chanson av ec s moins de touches noires,
aussi bien que jouer des chansons avec des positions familières de doigt. Le transpose est réglé par demi ton, ±1 octave (-12... 12).
1 Appuyez sur [BANK] jusqu’à ce que le clavier soit en mode réglage.
2 Pressez Program 2 [PIANO 2/E.P. 2/ORGAN 2] pour allumer la led
Pressez une des notes entre C3...C5 pour selectionner les réglages.
-12
Appuyez sur la note C4 pour annuler la transposition.
+120
C8C7C6C5C4C3C2C1
3 Pressez le bouton [BANK] pour quitter le mode de paramètres.
Les réglages de transposition sont utilisés par le contrôleur et le générateur sonore.
Pitch
1 Appuyez sur [BANK] jusqu’à ce que le clavier soit en mode réglage.
2 Pressez Program 3 [PIANO 3/E.P. 3 ORGAN 3]pour allumer la led.
3 Pressez la note C4 pour augmenter le pitch, chaque fois que la note C4 est préssée
le pitchaugmente d’environ 0.5Hz.
Pressez la note B3 pour déscendre le pitch, chaque fois que la note B3 est enfoncée,
le pitch diminue d’environ 0.5Hz.
40
C8C7C6C5C4C3C2C1
Pressez les notes B3 etC 4ensembles pour revenir au pitch standard A4=440Hz.
4 Pressez [BANK] pour quitter le mode de réglage.
le réglage de pitch est réglé en standard sur A4=440Hzsi l’appareil est éteint.
Page 41

Manuel d’utilisation
Tempérament
Sélectionne le tempérament de la musique.
Il y a quelques morceaux de musique classique qui emploient le temperament classique.
Afin de jouer les notes avec ce temperament, la K-Série possède ceux classique appelés
Kirnberger et Werckmeister, et le temperament égal le plus largement utilisé par les
instruments actuels.
1 Appuyez sur [BANK] jusqu’à ce que le clavier soit en mode réglage.
2 Pressez Program 4 [PIANO 4/E.P. 4/ORGAN 4] pour éclairer les Led.
3 Pressez une des notes C4(Weckmeister), C#4(Kirnberger), D4(Euqal) pour
sélectionner le temperament.
C8C7C6C5C4C3C2C1
4 Pressez [BANK] pour quitter le mode de réglage.
Note
C4
C#4
D4
Le tempérament par défaut à l’exctinction est le réglage équal.
Werckmeister: Uses the Werckmeister scale proposed in
the late Baroque period by organist and musicologist Andreas
Werckmeister, with the intention of enabling relatively
unrestricted play in multiple keys.
Kirnberger: Uses the Kirnberger scale proposed in the
Johann Philip Kirnberger in the early 18th century. This
temperament is mainly used for tuning harpsichords.
Equal temperament: The temperament used on almost all
modern keyboard instruments. This temperament uses equal
semitone increments, so that scales sound identical in all keys.
Temperament
Note à propos du “Stretch Tuning”
Le “Stretch tuning” est employé pour obtenir un bruit plus naturel. Les notes basses
du diapason utilisent des réglages de pitch plus bas, et les notes élevées de diapason
utilisent un réglages de pitch plus haut. C’est la méthode d’accord le plus souvent
utilisée dans le piano. Il y a 6 instruments dans le générateur de sons de la série K en
utilisant le stretch tuning, comme suit.
[PROGRAM] BANK 1
[PIANO1] Grand Piano 1
[PIANO2] Grand Piano 2
[PIANO3] Standard Piano
[PIANO4] Bright Piano
[PIANO5] Honky T onk Piano
[PIANO6] Mellow Piano
41
Page 42

Réglage du canal MIDI
Régler le canal MIDI de votre clavier sur le même canal que votre équipement MIDI
externe.
Canaux MIDI 1 à 16.
1 Appuyez sur [BANK] jusqu’à ce que le clavier soit en mode réglage.
2 Pressez Program 5 [PIANO 5/E.P. 5/ORGAN 5] pour éclairer la Led.
3 Pressez une des notes entre C4~D#5.
Le réglage du canal MIDI est le suivant.
C4=1ch, C#4=2ch, D4=3ch…D#5=16ch
C8C7C6C5C4C3C2C1
4 Pressez [BANK] pour quitter le mode réglage.
Le réglage du canal MIDI est utilisé par le contrôleur et le générateur sonore.
Réglage du contrôle Local on/off
Sélectionner le mode Local Off pour désactiver le générateur de son interne de la
série K. Le son du générateur sonore e xterne sera audible. S’il est relié au séquenceur
avec réglage d’écho back, réglez la série KS sur local off pour empêcher le renvoi de
message de notes et causer des double notes. D’une f açon générale, placez local on,
quand vous jouez les sons de la série K.
1 Appuyez sur [BANK] jusqu’à ce que le clavier soit en mode réglage.
2 Pressez Program 6 [PIANO 6/CLAVE/ORGAN 6] pour allumer la led
3 Pressez la note C4(On) ouC#4(Off) pour sélectionner les réglages.
42
C8C7C6C5C4C3C2C1
4 Pressez [BANK] pour quitter le mode réglage.
Page 43

Les réglages du contrôle local
Local control on
Computer
Manuel d’utilisation
K61P
KBD/KNOB
SOUND/CTRL
Keyboard/Each controllers
Tone generator
Local control off
Computer
KBD/KNOB
SOUND/CTRL
Le réglage du local on/off est sur local on quand l’appareil est éteint.
○○○○○○○○○○○○○○○○○○○○○○○○○○○○○○○○○○○○○○○
K61P
Keyboard/Each controllers
Tone generator
Program change activé/désactivé
Cancel program change if you don’t want program change message sent to connected
equipment, otherwise you can enable it.
1 Appuyez sur [BANK] jusqu’à ce que le clavier soit en mode réglage.
2 Pressez Program 7 [HARPSI 1/VIBE/STRINGS 1] pour allumer la Led.
C8C7C6C5C4C3C2C1
3 Pressez la note C4(activé or C#4(désactivé) pour sélectionner le réglage.
4 Pressez [BANK] pour quitter le mode paramètres.
43
Page 44

Message de filtre de volume
lLe message de chnagementd e contrôle MIDI cc#07(volume) du générateur de son
interne peut être éffacé.
Si il est réglé sur “On”, le générateur sonore de la sérieK acceptera le message de
volume (07) des potentiomètres1/potentiomètres 2 and curseur si ils sont assignés au
changement de contrôle cc#07.
Si il est réglé sur “Off”, le générateur sonore de la série K refusera le message de
volume (07) des potentiomètres1/potentiomètres 2 and curseur même si ils sont
assignés au changement de contrôle cc#07.
1 Appuyez sur [BANK] jusqu’à ce que le clavier soit en mode réglage.
2 Pressez Program 8 [HARPSI 2/CHOIR/STRINGS 2] pour allumer la Led.
3 Pressez la note C4(On) or C#4(Off)pour sélectionner les réglages.
C8C7C6C5C4C3C2C1
CC#07 tableau de flux
44
ON
Computer
SG
Controller
K61P
OFF
Controller
* SG: Sound Generator
SG's volume knob controls
SG's volume level.
4 Pressez [BANK] pour quitter le mode de paramèters.
Computer
SG
K61P
Page 45

Manuel d’utilisation
Messages d’erreur
❏ L’appareil ne peut pas s’allumer
• Est ce que le bouton d’alimentation est sur la bonne position? (p.31 “Connexions
et mise sous tension”)
• La série K peut elle être connectée à votre ordinateur via un hub USB?
❏ Échec de réglage de votre driver
• Il y a un driver installé par défaut pour Windows . utiliser le nouvel installateur pour
paramétrer le driver.
• Vérifiez que le CD-ROM est correctement insérré dans le lecteur.
• Vérifiez que la lentille du lecteur de Cd n’est pas sale.
Utiliser un produit compatible et spécialisé pour nettoyer la lentille.
❏ Le logiciel ne répond pas
• Est ce que le cable USB est correctement installé ?
• Est ce que la série K est reconnue par l’ordinateur connecté?
Selon l’installation de matériel de votre ordinateur, il se peut que la série K ne
soit pas reconnue par l’intermédiaire d’une connection USB.
• Il se peut que le dispositif ou le logiciel relié n’accepte pas la fonction que vous
essayez d’utiliser. Référez-vous au manuel du propriétaire de l’appareil ou du
logiciel relié, et assurez-vous que la fonction soit compatible.
❏ Pas de sons (K61P)
• Vérifiez que le volume du clavier ne soit pas sur “0”.
Tourner le potentiomètre jusqu’à la position appropriée.
❏ Les notes sont découpées ou étouffées
• Vous excedez la limite de polyphonie de l’appareil
A propos de la polyphonie maximum
La polyphonie maximum est le nombre maximum de notes que le piano est capable de
reproduire en même temps. Si vous essayez de jouer au delà de cette limite, le piano
coupe automatiquement des notes plus anciennes de sorte qu’il puisse jouer les notes
plus récentes. Si vous dépassez la limite, donc, vous pouvez noter que les sons sont
découpés ou étouffés. La polyphonie disponible maximum change selon le nombre
d’oscillateurs et d’effets employés pour produire le son. Le piano produit chaque son en
utilisant l’un ou l’autre des oscillateurs. La polyphonie disponible maximum pour des
sons de 1 oscillateur (tels que les sons de HARPSI/vibes) est 60 notes, alors que la
polyphonie maximum pour 2 oscillateurs (comme piano à queue 1 [ PIANO 1, A ] et piano
à queue 2 [ le PIANO 2, encaissent A ]) est de 30 notes. L’effet de reverb, une fois utilisé,
compte en tant que dix notes 1-oscillator, alors que le chorus compte en tant que trois.
❏ Vous entendez du bruit
• Suivant l'ordinateur utilisé, vous risquez d'entendre du bruit dans le son produit
par le générateur de son interne quand vous utilisez une liaison USB. dans ce
cas, utilisez un adaptateur d'alimentation secteur vendu séparément et réglez le
commutateur d'alimentation sur la position DC.
45
Page 46

Caractéristiques
❏ Contrôleurs
• Clavier: 25 notes / 49 notes, 61 notes toucher clavier standard avec vélocité.
• ClickPoint
• Potentiomètres Assignables × 2
• Boutons Assignables × 2
• Changement d’octave superieur/inferieur
• Molette de Pitch bend
• Molette de Modulation Assignable
• Curseurr × 1
❏ Générateur de sons interne(K61P)
• Generateur sonore Echantillonnage Stereo
• Polyphonie 60 (Maximum)
• Sons 24 (3 banques def 8)
• Accord du clavier Transposition, Fine tuning
• Tempéraments Equal, Kirnberger, Werckmeister
• Effets Reverb, Chorus (3 réglages de profondeur chacun)
❏ Connecteurs
• Jack Pédale
• Connecteur MIDI OUT
• Port USB
• Prise pour adaptateur secteur (DC9V)
• Sorties (L/MONO, R) (K61P seulement)
• Prise casque (K61P seulement)
❏ Alimentation
• Port USB en mode alimentation (en utilisant le connecteur USB
• Adaptateur secteur DC9V, AC (optionel)
46
❏ Consommations de courant
K25/K49/K61: En utilisant le port USB 110 mA
En utilisant l’adaptateur secteur 120 mA
K61P: En utilisant le port USB 300 mA
En utilisant l’adaptateur secteur 320 mA
❏ Dimensions (L × P × H)
K25: 489 × 221 × 69 mm
K49: 818 × 221 × 69 mm
K61/K61P: 982 × 221 × 69 mm
❏ Poids
K25: 1.5 kg
K49: 2.5 kg
K61: 3.0 kg
K61P: 3.2 kg
Page 47

Manuel d’utilisation
❏ Articles inclus
• Cable USB
• CD-ROM (contenant le logiciel de synthèse M1 Le, Logiciel d’édition de la série
K, Driver, Aide à l’installation)
• Mode d’emploi
• Tableau d’implémentation MIDI
• Accord de licence de logiciel
❏ Ressources ordinateur recommandées
Macintosh
Système d’exploitation: Mac OS X ver.10.3 ou supperieur
Ordinateur: Apple Macintosh avec un port USB satisfaisant au cahier des
Windows
Système d’exploitation: Microsoft Windows XP Home Edition/Professional
Computer: Ordinateur avec un port USB , satisfaisant au système
❏ Options
• Adaptateur secteur
• Pédale switch PS-1
L’apparence et les caractéristiques de ce produit sont sujettes à modifications sans préavis.
charges de Mac OS X
d’exploitation Windows XP (USB chipset fabriqué par Intel
Corporation recommendé)
47
Page 48

Inhalt
Vorsichtsmaßregeln ............................................................ 49
Einleitung............................................................................. 50
Die wichtigsten Funktionen ....................................................................50
Bedienelemente und ihre Funktionen.....................................................50
Vorbereitung ........................................................................ 53
Installieren des MIDI-Treibers und der Software ....................................53
Anschlüsse und Einschalten ..................................................................54
Die K-Serie und die Treiber-Ports...........................................................56
Die MIDI OUT-Buchse der K-Serie .........................................................56
Wiederherstellen der Werksvorgaben ....................................................57
Bedienung............................................................................ 58
Tastatur (Keyboard) ................................................................................58
ClickPoint................................................................................................58
KNOB1 und KNOB2 ...............................................................................58
SW1- & SW2-Taster ...............................................................................59
[OCTAVE SHIFT UP]- & [OCTAVE SHIFT DOWN]-Taster......................59
PITCH-Rad.............................................................................................59
MOD-Rad ...............................................................................................60
SLIDER ..................................................................................................60
PEDAL....................................................................................................60
Verwendung der Klangerzeugung (K61P) ........................ 61
Anwählen von Klängen...........................................................................61
Effekte ....................................................................................................61
Einstellungen ..........................................................................................62
Aktivieren/Filtern von Programmwechseln .............................................66
Fehlersuche ......................................................................... 68
Technische Daten................................................................ 69
Page 49

Bedienungsanleitung
Vorsichtsmaßregeln
Verwendungsort
Bei Verwendung des Geräts an den folgenden
Orten kann eine Fehlfunktion auftreten.
• Im direkten Sonnenlicht
• An Orten mit extremer Temperatur oder
Luftfeuchtigkeit
• An sehr staubigen oder schmutzigen Or ten
• An Orten mit starker Vibration
• In der Nähe von Magnetfeldern
Stromversorgung
Schließen Sie das spezielle Netzteil an eine
Netzsteckdose mit der richtigen Netzspannung an.
Schließen Sie es nicht an eine Steckdose mit einer
anderen Spannung als der für das Gerät
geeigneten an.
Störungen mit anderen elektrischen
Geräten
In der Nähe aufgestellte Radio- oder
Fernsehgeräte können Empfangsstörungen
aufweisen. Betreiben Sie dieses Gerät immer in
einem geeigneten Abstand von Radio-oder
Fernsehgeräten.
Behandlung
Um Beschädigungen zu vermeiden, betätigen Sie
Schalter oder Bedienungselement nicht mit
Gewalt.
Pflege
Wenn das Äußere schmutzig wird, mit einem
sauberen, trockenen Lappen abwischen.
Verwenden Sie keine flüchtigen organischen
Lösungsmittel wird Benzol, Terpentin,
Reinigungslösungen oder entflammbare
Poliermittel.
Die Anleitung aufbewahren
Nach dem Lesen dieser Anleitung bewahren Sie
sie bitte zum Nachschlagen auf.
Fremdkörper aus dem Gerät halten
Stellen Sie niemals Behälter mit Flüssigkeiten in
der Nähe des Geräts ab. Wenn Flüssigkeit in das
Gerät eindringt, kann ein Geräteausfall, Brand oder
elektrischer Schlag verursacht werden.
Achten Sie darauf, keine Metallobjekte in das Gerät
kommen zu lassen. Falls ein Gegenstand in das
Gerät eindringt, ziehen Sie das Netzteil von der
Steckdose ab. Dann wenden Sie sich an Ihren
Korg-Fachhändler oder an des Geschäft, in dem
das Gerät gekauft wurde.
Das nach dem 1. Januar 1997 angebrachte CEKennzeichen weist auf Übereinstimmung mit der
EMV-Richtlinie (89/336/EWG), CE-K ennzeichenRichtlinie (93/68/EWG) und
Niederspannungsrichtlinie (73/23/EWG) hin.
Außerdem zeigt das CE-Kennzeichen, dass an
den mit Batteriestrom betriebenen Produkten
unserer Firma angebracht ist, an dass das
betreffende Gerät mit der EMV -Richtlinie (89/336/
EWG) und der CE-Kennzeichen-Richtlinie (93/68/
EWG) übereinstimmt.
WICHTIGER HINWEIS FÜR KUNDEN
Dieses Produkt wurde unter strenger Beachtung
von Spezifikationen und
Spannungsanforderungen hergestellt, die im
Bestimmungsland gelten. Wenn Sie dieses
Produkt über das Internet, per Postversand und/
oder mit telefonischer Bestellung gekauft haben,
müssen Sie bestätigen, dass dieses Produkt für
Ihr Wohngebiet ausgelegt ist.
WARNUNG: Verwendung dieses Produkts in
einem anderen Land als dem, für das es bestimmt
ist, verwendet wird, kann gefährlich sein und die
Garantie des Herstellers oder Importeurs hinfällig
lassen werden.
Bitte bewahren Sie diese Quittung als Kaufbeleg
auf, da andernfalls das Produkt von der Garantie
des Herstellers oder Importeurs ausgeschlossen
werden kann.
*Die ubrigen in dieser Bedienungsanleitung
erwahnten Firmen-, Produkt-, Formatnamen
usw. sind Warenzeichen oder eingetra-gene
Warenzeichen der rechtlichen Eigentumer und
werden ausdrucklich anerkannt.
CE-Kennzeichen für europäische
harmonisierte Standards
Das CE-Kennzeichen, dass an den mit Netzstrom
betriebenen Produkten unserer Firma, hergestellt
bis zum 31. Dezember 1996, angebracht ist, z eigt
an, dass das betreffende Gerät mit der EMVRichtlinie (89/336/EWG) und der CEKennzeichen-Richtlinie (93/68/EWG)
übereinstimmt.
49
Page 50

Einleitung
Vielen Dank für Ihre Entscheidung zu einem USB/MIDI Studio Controller der „K-Serie“.
Bitte lesen Sie sich diese Anleitung vollständig durch und benutzen Sie das Produkt
nur in der angegebenen Weise. Bewahren Sie diese Bedienungsanleitung für die spätere Bezugnahme an einem sicheren Ort auf. Diese Bedienungsanleitung bezieht sich
auf folgende Geräte: K25, K49, K61 sowie K61P (dem ein separater Abschnitt gewidmet ist).
Die wichtigsten Funktionen
❏ Mehrere flexibel einsetzbare Steuerquellen.
❏ ClickPoint-Funktion für die Sim ultansteuerung zweier Parameter („X“- und „Y“-Achse.
Sie kann auch für die Cursor-/Maussteuerung eines Programms genutzt werden.
❏ Nach der Installation des beiliegenden M1 Le Soft-Synthis können Sie mit Ihrem
„K“-Keyboard sofort Musik machen.
❏ Das K61P enthält 24 Klänge, deren Qualität jener der Digital-Pianos von KORG
entspricht. Es stehen Piano-, E. Piano- und Orgelklänge zur Verfügung.
Bedienelemente und ihre Funktionen
2
3
50
4
5
6
8
7
K61P
1
Page 51

Bedienungsanleitung
1. Tastatur
Hierbei handelt es sich um eine anschlagdynamische „Standard“-Tastatur.
2. ClickPoint
Der ClickPoint-Funktion können zwei (einer für die „X“- und einer für die „Y“-Achse) MIDI-Steuerbefehle (CC) zugeordnet werden, was sich z.B. für die Fernbedienung von Software-Synthesizern oder Recording-Programmen („DAWs“) eignet,
die Sie auf Ihrem PC installieren. Sie kann zudem als Computermaus missbraucht
werden.
3. KNOB1/KNOB2
Diesen Reglern können separate MIDI-Steuerbefehle (CC) zugeordnet werden,
was sich z.B. für die Fernbedienung von MIDI-Geräten und Software eignet.
4. SW1- & SW2-Taster
Diesen Tastern können beliebige MIDI-Steuerbefehle zwecks Fernbedienung externer Geräte oder Programme zugeordnet werden. Außerdem kann man sie zum
Senden von Programmwechseln (voriger/nächster Speicher) nutzen.
5. OCTAVE SHIFT UP & OCTAVE SHIFT DOWN
Hiermit kann die Tonhöhe in Oktavschritten geändert werden.
6. PITCH-Rad
Erlaubt das zeitweilige Anheben/Absenken („Beugen“) der Tonhöhe.
7. MOD-Rad
Dem Modulationsrad kann man einen beliebigen Steuerbefehl (CC) zuordnen und
somit Software-Synthesizer oder eine „DAW“ auf dem PC fernbedienen.
8. SLIDER
Diesem Regler kann ein Steuerbefehl zwecks Fernbedienung eines Softw are-Synthesizers oder einer „DA W“ zugeordnet werden. Er eignet sich besonders als Lautstärke- oder Expression-Regler.
Klangerzeugung (K61P)
2 34
1
1. VOLUME-Regler
Hiermit kann die Lautstärke der internen Klangerzeugung eingestellt werden. Deren Signale werden über die OUTPUT-Buchsen (L/MONO, R) und den HEADPHONES-Anschluss ausgegeben.
2. BANK-Taster
Mit jedem Klangwahltaster können drei Klänge gewählt werden (es gibt 3 Bänke
mit je 8 Klängen). Mit dem [BANK]-Taster wählen Sie die benötigte Bank.
5
51
Page 52

3. PROGRAM-Taster
Hiermit wählen Sie den gewünschten Klang innerhalb der aktuellen Bank.
4. REVERB-Taster
Mit diesem Taster kann der Halleffekt ein-/ausgeschaltet werden. Außerdem lässt
sich hiermit der Hallanteil einstellen.
5. CHORUS-Taster
Mit diesem Taster kann der Chorus-Effekt ein-/ausgeschaltet werden. Außerdem
lässt sich hiermit der Effektanteil einstellen.
Rückseite
1
2
3 4 5 6 7
Abbildung: Rückseite des K61P.
1. OUTPUT-Buchsen (nur auf dem K61P)
Dies sind die Audio-Ausgänge der internen Klangerzeugung. Verbinden Sie sie mit
den Eingängen eines Mischpults, einer Stereoanlage, eines Verstärkers usw.
2. HEADPHONES-Buchse (nur auf dem K61P)
An diese Buchse kann ein Stereo-Kopfhörer (mit 1/4”-Klinke) angeschlossen werden.
3. PEDAL-Buchse
Ein Momentary-Pedal, wie der PS-1 Pedalschalter (beide getrennt erhältlich), kann an
die Pedal-Buchse angeschlossen werden. Die K-Serie ermittelt beim Einschalten
automatisch die Polarität des angeschlossenen Pedals.
4. MIDI OUT-Buchse
Verbinden Sie diese Buchse mit einem externen MIDI-Gerät, wenn Sie es direkt
ansteuern möchten. („Die MIDI OUT-Buchse der K-Serie“, S. 56)
5. USB-Port
Über diesen Port kann das „K“-Keyboard mit dem USB-Port des Computers verbunden werden.
6. Netzschalter
Schieben Sie diesen Schalter zu „DC“ (Netzteil) oder „USB“, um das Keyboard
einzuschalten. Nach getaner Arbeit müssen Sie ihn in die „STANDBY“-Position
schieben. („Anschlüsse und Einschalten“, S. 54)
7. Netzteilanschluss
Schließen Sie hier ein optionales Netzteil an. Solange Sie Ihr „K“ mit einem Computer verwenden, kann die Speisung über den USB-Bus erfolgen. Dafür benötigen
Sie folglich kein Netzteil. Allerdings dürfen Sie dann keinen passiven Hub v erwenden und kein MIDI-Modul o.ä. anschließen.
52
Page 53

Bedienungsanleitung
Vorbereitung
Installieren des MIDI-Treibers und der Software
Inhalt der CD-ROM
Die beiliegende CD-ROM enthält folgende Dinge.
❏ „Editor“ für die K-Serie
❏ KORG M1 Le Software-Synthesizer
❏ KORG USB-MIDI-Treiber
❏ Installationshandbuch
❏ Bedienungsanleitung des „K-Series Editor“
❏ Bedienungsanleitung des M1 Le Software-Synthesizers
❏ Lizenzvereinbarung
Systemanforderungen
■ MacOS X-Anwender
Rechner
Apple Macintosh mit USB-Port, der die Anforderungen von Mac OS X erfüllt
Unterstützte Betriebssysteme
Mac OS X V.10.3 oder neuer
■ Windows XP-Anwender
Rechner
Rechner mit USB-Port, der die Anforderungen von Microsoft Windows XP erfüllt
(ein USB-Chipsatz der Intel Corporation wird empfohlen)
Unterstützte Betriebssysteme
Microsoft Windows XP Home Edition/Professional mit Ser vice Pack 1 oder neuer
Installation
Hinweise für die Installation des KORG USB-MIDI-Treibers, von „K-Series Editor“ und dem
„M1 Le“ Software-Synthesizer finden Sie auf der beiliegenden CD-ROM.
Bitte lesen Sie sie sorgfältig durch
❏ Das Urheberrecht an allen Programmen, die sich auf dieses Produkt beziehen,
liegt bei der Korg Corporation.
❏ Die Lizenzvereinbarung für die beiliegende Software finden Sie in einem separaten
Dokument. Lesen Sie sich die Lizenzv ereinbarung genau durch, bev or Sie die Software installieren. Bereits durch die bloße Installation der Software geben Sie zu
verstehen, dass Sie mit den Bestimmungen einverstanden sind.
❏ Apple, Macintosh und MacOS sind eingetragene Warenzeichen der Apple Com-
puter, Inc.
❏ Windows XP ist in den USA und anderen Ländern ein eingetragenes W arenzeichen
der Microsoft Corporation.
❏ Alle anderen erwähnten Firmen- und Produktnamen sind Warenzeichen oder
eingetragene Warenzeichen der betreffenden Eigentümer.
53
Page 54

Anschlüsse und Einschalten
Schalten Sie alle beteiligten Geräte V OR Herstellen der V erbindungen A US . Gehen Sie
mit Bedacht vor, um w eder Ihre Lautsprecher, noch die übrigen Geräte zu beschädigen.
Verbindung per USB
1 Verbinden Sie die K-Serie über ein USB-Kabel mit dem USB-P ort des Computers.
2
Wenn Sie ein P edal v erwenden möchten, schließen Sie es an die PEDAL-Buchse an.
Die K-Serie ermittelt beim Einschalten automatisch die Polarität des angeschlossenen Pedals. Wenn Sie ein P edal angeschlossen haben, dürfen Sie es beim Einschalten auf keinen Fall drücken.
3 Schalten Sie das „K“-Keyboard ein, indem Sie den Netzschalter in die „USB“-Posi-
tion schieben.
Einstellung des
PEDAL-Buchse
Fußtaster
USB-Port
USB-Kabel
Computer
Netzschalters
54
4 Stellen Sie den Netzschalter zum Ausschalten des Geräts auf „STANDBY“.
Bei Verwendung der USB-Verbindung benötigen Sie in der Regel kein Netzteil.
Wenn Ihr Rechner aber nicht genügend Strom abgibt bzw. wenn Sie einen passiven Hub (ohne Stromversorgung) verwenden, reicht die Spannung eventuell nicht
aus. Dann m üssen Sie sich ein optionales Netzteil besorgen und den Netzschalter
auf „DC“ stellen.
Bei Verwendung der USB-Verbindung sendet die MIDI OUT-Buchse des „K“-Keyboards keine Befehle.
Verbindung via MIDI
1 Verbinden Sie das Netzteil zuerst mit dem betreffenden Anschluss des „K“-Key-
boards und anschließend mit einer Steckdose.
2 Verbinden Sie das „K“-Keyboard über ein MIDI-Kabel mit dem externen Modul
usw.
Page 55

Bedienungsanleitung
3
Wenn Sie ein P edal v erwenden möchten, schließen Sie es an die PEDAL-Buchse an.
Die K-Serie ermittelt beim Einschalten automatisch die Polarität des angeschlossenen Pedals. Wenn Sie ein Pedal angeschlossen haben, dürfen Sie es beim Einschalten auf keinen Fall drücken.
4 Stellen Sie den Netzschalter auf „DC“. Die POWER-Diode leuchtet. Nun werden
automatisch die zuletzt gespeicherten Einstellungen geladen.
5 Schalten Sie das externe MIDI-Modul ein.
Einstellung des
PEDAL-Buchse
Fußtaster
MIDI OUT
MIDI-Kabel
MIDI IN
Anschluss für Netzteil
Externes MIDI-Modul
6 Nach getaner Arbeit müssen Sie zuerst das externe MIDI-Modul und danach das
„K“-Keyboard ausschalten („STANDBY“-Position).
Netzschalters
Das Netzteil an
eine Steckdose
anschließen.
Verwendung der internen Klangerzeugung (K61P)
1 Verbinden Sie die Ausgänge mit den Eingängen des Verstärkers usw. Hierfür be-
nötigen Sie Mono-Kabel (mit 1/4”-Klinken). Für den Mono-Einsatz brauchen Sie
nur die L/MONO-Buchse anzuschließen.
Stellen Sie mit dem VOLUME-Regler den Ausgangspegel der OUTPUT-Buchsen ein.
2 Schalten Sieden K61P ein. Die POWER-Diode leuchtet.
3 Schalten Sie den verwendeten Verstärker usw. ein.
Aktivlautsprecher
INPUT
Je nach Ihrem Computer kann Rauschen im Sound vom internen Soundgenerator
auftreten, wenn eine USB-Verbindung verwendet wird. Verwenden Sie in diesem
Fall das optional erhältliche Netzteil und stellen Sie den Stromschalter auf die Position DC ein.
OUTPUT-Buchsen
HEADPHONES-Buchse
Kopfhörer
55
Page 56

Die K-Serie und die Treiber-Ports
Die „K“-Keyboards unterstützen 1 USB-MIDI-Eingangsport und 2 Ausgangsports.
Treiber eines auf dem Computer
laufenden Programms
„K“-Serie
MIDI IN-Gerät
KBD/KNOB
MIDI OUT-Gerät
MIDI OUT
SOUND/CTRL *1
*1 „CTRL“ beim K25/49/61
*2 Nur K61P
Tastatur/-Regler/
Pitch-,Mod-Rad/
SW1/SW2/Pedal/
ClickPoint/
MIDI-Dumps
MIDI-Dumps
Klangerzeuger *2
MIDI OUT-Buchse
MIDI IN-Gerät
KBD/KNOB
„KBD/KNOB“ dient für die Übertragung der von der Tastatur und den Bedienelementen erzeugten
MIDI-Befehle. Wenn Sie ein Programm mit dem „K“-Keyboard fernbedienen möchten, müssen Sie
diesen Port als MIDI-Eingang jenes Programms definieren. Außerdem dient „KBD/KNOB“ für die
Übertragung von Szenendaten. Dafür müssen Sie diesen Port als MIDI-Eingang für den „KSeriesEditor“ definieren.
MIDI OUT-Gerät
MIDI OUT
„MIDI OUT“ dient für die Übertragung der vom Programm erzeugten MIDI-Befehle zur MIDI OUTBuchse des „K“-Keyboards. Somit können jene Befehle auch an andere MIDI-Geräte weitergeleitet
werden. Wenn Sie das „K“-Keyboard im USB-MIDI-Betrieb verwenden, aktivieren Sie hiermit demnach die Ausgabe des verwendeten Programms.
SOUND/CTRL („CTRL“ beim K25/K49/K61)
„SOUND/CTRL“ kümmert sich um den Empfang der vom Computer gesendeten Szenendaten. Dafür
müssen Sie diesen Port als MIDI-Ausgang für den „K-SeriesEditor“ definieren. Im Falle des K61P
dient dieser Port außerdem zum Ansteuern seiner internen Klangerzeugung.
56
Die MIDI OUT-Buchse der K-Serie
Bei fehlender USB-Verbindung
Es werden die auf der Tastatur und mit den Bedienelementen erzeugten MIDI-Befehle gesendet.
Bei vorhandener USB-Verbindung
Es werden die auf dem Computer erzeugten MIDI-Befehle (über den dort gewählten „MIDI OUT“Port) gesendet. Die auf der Tastatur und mit den Bedienelementen des „K“-Keyboards erzeugten
MIDI-Befehle werden jedoch nicht gesendet.
Page 57

Bedienungsanleitung
Wiederherstellen der Werksvorgaben
Halten Sie bei Bedarf SW1 und SW2 gedrückt, während Sie das Keyboard einschalten,
um wieder die Werkseinstellungen zu laden.
Die Controller Einstellungen des Werkszustands
Controller Funktion
SW1 / SW2 Program change (-1/+1)
KNOB1 CC#074 (Cutoff)
KNOB2 CC#079 (EG Intensity)
SLIDER CC#007 (Volume)
PITCH wheel Fixed (Pitch Bend)
MOD wheel CC#001 (Modulation)
PEDAL CC#064 (Damper)
ClickPoint Mouse mode
* Die Angaben in den Klammern beziehen sich auf M1 Le.
57
Page 58

Bedienung
Die Einrichtung des „K“-Keyboards muss mit dem beiliegenden „K-SeriesEditor“-Programm erfolgen.
Die MIDI-Befehle werden auf dem Global-Kanal gesendet.
○○○○○○○○○○○○○○○○○○○○○○○○○○○○○○○○○○○○○○○
Tastatur (Keyboard)
De Tastatur sendet Notenbefehle.
Das Anschlagverhalten kann anhand dreier Kurven bzw. als Fixwert (127) definiert
werden.Außerdem lässt sich die Tonhöhe höher und tiefer transponieren.
○○○○○○○○○○○○○○○○○○○○○○○○○○○○○○○○○○○○○○○
ClickPoint
Der „X“- (links/rechts) und „Y“-Achse (auf/ab) können separate MIDI-Steuerbefehle
zugeordnet werden. Mithin lassen sich zwei P arameter ansteuern. Die ClickP oint-Funktion kann alternativ als Computermaus fungieren.
Die Möglichkeiten lauten „No Assign/Control Change/Mouse“.
No Assign
Es werden keine Daten gesendet.
Control Change [0...127]
Wählen Sie die Steuerbefehlsnummern (CC). Die entsprechenden MIDI-Parameter
werden beim Auslenken in „X“- bzw. „Y“-Richtung angesteuert.
Nach der Freigabe kehrt die ClickPoint-Funktion zurück zur Mitte. Sie können die zuletzt gewählte „X“-/„Y“-Einstellung aber verriegeln, indem Sie den Taster drücken. Drücken Sie den Taster erneut, um die Parameterwerte zur ückzustellen.
Mouse Mode
Wenn Sie hier „Mouse“ wählen, fungiert die ClickPoint-Funktion als Maus-Fernbedienung Ihres PCs. Mit dem Taster können Sie folglich Symbole anklicken.
Die ClickPoint-Funktion kann nur als Maus verwendet werden, wenn Sie eine USBVerbindung herstellen.
58
○○○○○○○○○○○○○○○○○○○○○○○○○○○○○○○○○○○○○○○
KNOB1 und KNOB2
Den Reglern 1 & 2 können MIDI-Steuerbefehle (CC) zugeordnet werden, was sich z.B.
für die Fernbedienung von Software-Synthesizern oder „DAWs“ eignet, die Sie auf
Ihrem PC installieren.
Die Möglichkeiten lauten „No Assign/Control Change“.
No Assign
Es werden keine Daten gesendet.
Control Change [0...127]
KNOB1 und KNOB2 erlauben das Ansteuern der zugeordneten Parameter.
Page 59

Bedienungsanleitung
○○○○○○○○○○○○○○○○○○○○○○○○○○○○○○○○○○○○○○○
SW1- & SW2-Taster
Bei Drücken des [SW1]- oder [SW2]-Tasters wird der zugeordnete MIDI-Befehl abwechselnd als „An“- und „Aus“-Wert gesendet. Die Möglichkeiten für SW1 und SW2
lauten „No Assign/Program Change/Control Change“.
No Assign
Es werden keine Daten gesendet.
Program Change
Mit [SW1] kann die Programmnummer um jeweils 1 Einheit verringert werden. Mit [SW2]
kann die Programmnummer um jeweils 1 Einheit erhöht werden. Drücken Sie [SW1]
und [SW2] gemeinsam, um die Programmnummer „0“ zu senden.
Control Change [0...127]
[SW1] und [SW2] sind einem Steuerbefehl mit Schaltfunktion zugeordnet und senden
folglich „An“- und „Aus“-Befehle.
Im „Toggle“-Modus müssen Sie [SW1] bzw. [SW2] wiederholt drücken, um den angesteuerten Parameter abwechselnd ein- und auszuschalten.
Im „Momentary“-Modus sendet [SW1] bzw. [SW2] so lange den „An“-Wert, bis Sie den
Taster wieder freigeben. Bei der Freigabe wird der „Aus“-Wert gesendet.
○○○○○○○○○○○○○○○○○○○○○○○○○○○○○○○○○○○○○○○
[OCTAVE SHIFT UP]- & [OCTAVE SHIFT DOWN]-Taster
Hiermit kann die T astatur in Okta vschritten transponiert werden. Der Einstellbereich ist
nicht für alle Ausführungen gleich.
„K“-Keyboard Oktavbereich
K25 –4…+4
K49 –4…+4
K61/K61P –3…+3
Leuchtstatus Oktavierung
Aus ±0 Oktaven
Grün +1/–1 Oktave
Orange +2/–2 Oktaven
Rot +3/–3 Oktaven
Rotes Blinken +4/–4 Oktaven (nur beim K25/K49)
○○○○○○○○○○○○○○○○○○○○○○○○○○○○○○○○○○○○○○○
PITCH-Rad
Bewegen Sie dieses Rad auf oder ab, um Pitch Bend-Befehle (Tonhöhenbeugung) zu
senden.
59
Page 60

○○○○○○○○○○○○○○○○○○○○○○○○○○○○○○○○○○○○○○○
MOD-Rad
Dem Modulationsrad kann man bei Bedarf einen beliebigen Steuerbefehl (CC) zuordnen, was sich z.B. für die Fernbedienung von Software-Synthesizern und HardwareGeräten eignet.
Die Möglichkeiten lauten „No Assign/Control Change/Aftertouch“.
No Assign
Es werden keine Daten gesendet.
Control Change [0...127]
Mit dem MOD-Rad kann die gewählte Funktion stufenlos angesteuert werden.
After Touch
Bei Auslenken des MOD-Rades werden Aftertouch-Befehle gesendet.
○○○○○○○○○○○○○○○○○○○○○○○○○○○○○○○○○○○○○○○
SLIDER
Diesem Regler kann ein Steuerbefehl zwecks F ernbedienung eines Software-Synthesizers oder einer „DAW“ zugeordnet werden.
Die Möglichkeiten lauten „No Assign/Control Change“.
No Assign
Es werden keine Daten gesendet.
Control Change [0...127]
Mit dem SLIDER kann die gewählte Funktion angesteuert werden.
○○○○○○○○○○○○○○○○○○○○○○○○○○○○○○○○○○○○○○○
PEDAL
Auch dem an die PEDAL-Buchse angeschlossenen Fußtaster kann ein beliebiger MIDIBefehl zugeordnet werden (er muss also nicht unbedingt als Haltepedal fungieren).
Die Möglichkeiten lauten „No Assign/Control Change“.
No Assign
Es werden keine Daten gesendet.
Control Change [0...127]
Der Fußtaster ist einem Steuerbefehl mit Schaltfunktion zugeordnet und sendet folglich „An“- und „Aus“-Befehle.
Im „T oggle“-Modus müssen Sie den Fußtaster wiederholt betätigen, um den angesteuerten Parameter abwechselnd ein- und auszuschalten.
Im „Momentary“-Modus sendet der Fußtaster so lange einen „An“-Wert, bis Sie ihn
wieder freigeben. Bei der Freigabe wird der „Aus“-Wert gesendet.
60
Page 61

Bedienungsanleitung
Verwendung der Klangerzeugung (K61P)
○○○○○○○○○○○○○○○○○○○○○○○○○○○○○○○○○○○○○○○
Anwählen von Klängen
Mit den 8 Programmtastern können 24 verschiedene (8 x 3) Klänge gewählt werden.
Folglich müssen Sie auch die benötigte Bank wählen. Um z.B. den „Clav“-Klang zu
wählen, müssen Sie zuerst den sechsten Programmtaster von links drücken (damit er
leuchtet). Wählen Sie anschließend „BANK2“.
1 Drücken Sie den Taster des gewünschten Klangs.
2 Wählen Sie mit dem BANK-Taster die benötigte Bank.
Durch wiederholtes Drücken wählen Sie der Reihe nach BANK1, BANK2 und
BANK3. Die Diode der gewählten Bank leuchtet jeweils.
Klangübersicht
[PROGRAM]
[PIANO 1]
[PIANO 2]
[PIANO 3]
[PIANO 4]
[PIANO 5]
[PIANO 6]
[HARPSI 1]
[HARPSI 2]
* [PROGRAM]-Taster= Name der „BANK 1“-Klänge.
* Anzahl der Oszillatoren, die für jede Note benötigt werden.
-Taster
Bank1
Grand Piano 1
Grand Piano 2
Standard Piano
Bright Piano
Honky T onk Piano
Mellow Piano
Harpsichord 1
Harpsichord 2
Osz.
2
2
1
1
2
1
1
2
Bank2
E. Piano 1
E. Piano 2
Soft E.P.
Vintage E.P.
E.P. Pad
Clavi
Vibraphone
Choir
Osz.
1
1
1
1
2
1
1
1
Bank3
Jazz Organ 1
Jazz Organ 2
Jazz Organ 3
Church Organ 1
Church Organ 2
Church Organ 3
Strings
Slow Strings
Osz.
2
2
2
3
1
1
1
2
○○○○○○○○○○○○○○○○○○○○○○○○○○○○○○○○○○○○○○○
Effekte
Reverb (Hall)
Mit diesem Effekt erwecken Sie den Eindruc k, dass Sie in einem Konzertsaal o.ä. spielen.
Auf Englisch nennt man diesen Halleffekt „Reverb“.
1 Wählen Sie mit dem [REVERB]-Taster den Hallanteil (Effektlautstärke). Die Farbe
der Tasterbeleuchtung informiert Sie über die gewählte Einstellung.
Farbe des [REVERB]-Tasters Hallanteil
Aus Aus
Grün Ein wenig
Orange Normal
Rot Viel
61
Page 62

Chorus
Mit diesem Effekt erwecken Sie den Eindruck, dass ein Part von mehreren Musikern
gleichzeitig gespielt wird.
1
Drücken Sie den [CHORUS]-Taster wiederholt, um den gewünschten Chorus-Anteil zu wählen. Die Farbe der Tasterbeleuchtung informiert Sie über die gewählte Einstellung.
[CHORUS]-Taster Chorus-Anteil
Aus Aus
Grün En wenig
Orange Normal
Rot Viel
○○○○○○○○○○○○○○○○○○○○○○○○○○○○○○○○○○○○○○○
Einstellungen
Den Einstellungsmodus des K61P wählt man, indem man den [BANK]-Taster des „K“Keyboards längere Zeit gedrückt hält. Die [BANK]-Tasten Wahl-LED und die [PROGRAM]-T aste des aktuell gew ählten Gegenstands blinken. Wählen Sie den einzustellen
gewünschten Gegenstand und drücken Sie die zugewiesene Taste, die der gewünschten
Einstellung für den Gegenstand entspricht. Wenn die Einstellungen vorgenommen sind,
drücken Sie die [BANK]-Taste, um den Einstellmodus zu verlassen und auf normale
Spieleinstellung zurückzuschalten. Bestätigen Sie Ihre Eingabe durch erneutes Drücken
des [BANK]-Tasters. Damit verlassen Sie dann auch den Einstellungsmodus.
Der Einstellungsmodus umfasst die folgenden Parameter:
[PROGRAM]-Taster
[PIANO 1]
[PIANO 2]
[PIANO 3]
[PIANO 4]
[PIANO 5]
[PIANO 6]
[HARPSI 1]
[HARPSI 2]
* [PROGRAM]-Taster= Name der „BANK 1“-Klänge.
Funktion
Anschlagkurve
Transposition
Stimmung
Stimmungssystem
Global-Kanal (MIDI)
Local-Funktion
Programmwechselfilter
Lautstärkefilter
Anwahl der Tastaturansprache
Anwahl einer anderen „Tonart" für die Tastatur
Stimmen des Instruments
Anwahl eines Stimmungssystems
Festlegen des Übertragungs-/Empfangskanals
Verbindung mit der Klangerzeugung
Aktivieren/Deaktivieren von Programmwechseln
Aktivieren/Deaktivieren von Lautstärkeänderungen
Bedeutung
62
Anschlagkurve
Es stehen 3 Anschlagkurven sowie eine Fixeinstellung (mit dem Wert „127“) zur Verfügung. Wählen Sie die für Sie praktischste Einstellung.
1 Halten Sie den [BANK]-Taster gedrückt, um den Einstellungsmodus des „K“-Key-
boards zu aktivieren.
2 Drücken Sie den 1 [PIANO 1/E.P. 1/ORGAN 1]-Taster (er beginnt zu blinken).
3 Betätigen Sie die Taste der gewünschten Einstellung: C4 (leicht), C#4 (normal),
D4 (hart) oder D#4 (fester Anschlagwert).
C8C7C6C5C4C3C2C1
Page 63

Bedienungsanleitung
4 Drücken Sie den [BANK]-Taster, um den Einstellungsmodus zu verlassen.
Laut ( )
Ausgangs-
pegel
Leise ( )
Die Wahl der Anschlagkurve gilt sowohl für die gesendeten MIDI-Befehle als auch für
die interne Klangerzeugung.
Leicht
Leicht
Normal
Hart
Anschlag
Transposition
Wenn Sie die Tastatur transponieren, können Sie Stücke in schwierigen Tonarten mit
einem leichteren/dem gewohnten Fingersatz spielen.
Die Tastatur kann ±1 Oktave (–12…12) höher oder tiefer transponiert werden.
1 Halten Sie den [BANK]-Taster gedrückt, um den Einstellungsmodus des „K“-Key-
boards zu aktivieren.
2 Drücken Sie den 2 [PIANO 2/E.P. 2/ORGAN 2]-Taster (er beginnt zu blinken).
Wählen Sie mit den Tasten C3~C5 die gewünschte Einstellung.
Note Bedeutung
C4 Leicht (selbst mit relativ leichtem Anschlag
werden schon laute Noten erzielt)
C#4 Normal (Ansprache wie auf einem Klavier)
D4 Hart (für laute Noten muss man härter
hinlangen)
D#4 Fest (alle Noten haben den Wert „127“)
Hart
-12
+120
C8C7C6C5C4C3C2C1
Mit der Taste C4 wird die Transposition ausgeschaltet.
3 Drücken Sie den [BANK]-Taster, um den Einstellungsmodus zu verlassen.
Das gewählte Transpositionsinter vall gilt sowohl für die gesendeten MIDI-Befehle
als auch für die interne Klangerzeugung.
Stimmung
Bei Bedarf können Sie die Stimmung des K61P (das ja eine Klangerzeugung enthält)
an jene anderer Instrumente oder Stücke angleichen.
1 Halten Sie den [BANK]-Taster gedrückt, um den Einstellungsmodus des „K“-Key-
boards zu aktivieren.
2 Drücken Sie den 3 [PIANO 3/E.P. 3 ORGAN 3]-Taster (er beginnt zu blinken).
3 Drücken Sie die Taste C4 wiederholt, um die Tonhöhe um jeweils 0,5Hz anzuhe-
ben. Drücken Sie die Taste B3 wiederholt, um die Tonhöhe um jeweils 0,5Hz
abzusenken.
C8C7C6C5C4C3C2C1
63
Page 64

Drücken Sie die Tasten B3 und C4 gleichzeitig, um die Kammertonfrequenz wieder
auf A4= 440Hz zu stellen.
4 Drücken Sie den [BANK]-Taster, um den Einstellungsmodus zu verlassen.
Beim Ausschalten wird die Stimmung wieder auf A4= 440Hz gestellt.
Stimmungssystem
Hiermit können Sie ein anderes Stimmungssystem wählen. Die Wahl eines anderen
Stimmungssystems eignet sich vor allem für klassische Barockmusik. Das K61P bietet
drei Stimmungssysteme: Kirnberger, Werckmeister und die gleichschwebende
Temperierung (die in der westlichen Welt fast ausnahmslos verwendet wird).
1 Halten Sie den [BANK]-Taster gedrückt, um den Einstellungsmodus des „K“-Key-
boards zu aktivieren.
2 Drücken Sie den 4 [PIANO 4/E.P. 4/ORGAN 4]-Taster (er beginnt zu blinken).
3 Betätigen Sie die Taste des gewünschten Stimmungssystems: C4 (W erckmeister),
C#4 (Kirnberger) oder D4 (gleichschwebend).
C8C7C6C5C4C3C2C1
4 Drücken Sie den [BANK]-Taster, um den Einstellungsmodus zu verlassen.
64
Note
C4
C#4
D4
Beim Ausschalten wird wieder die gleichschwebende Stimmung gewählt.
Werckmeister: Die „Werckmeister “-Stimmung, die im
Spätbarock vom Musikwissenschaftler und Organisten
Andreas Werckmeister entwickelt wurde, um in unterschiedlichen Tonarten spielen zu können.
Kirnberger: Die „Kirnberger “-Stimmung von Johann Philip
Kirnberger (frühes 18. Jahrhundert). Diese Stimmung wird vor
allem für Cembali verwendet.
Gleichschwebende Stimmung:
verbreitete Stimmung. Der Abstand zwischen allen Noten beträgt
exakt einen Halbton. Somit ist die Tonart völlig unerheblich
Stimmung
Die heutzutage am weitesten
.
Ein Wort zum „Stretch Tuning“-Verfahren
Mit dieser leicht gedehnten Stimmung erzielt man oftmals einen wärmeren Klang. Hier
werden die Noten im Bass etwas zu tief und jene im Diskant etwas zu hoch gestimmt.
So etwas eignet sich vor allem für Klavierklänge. 6 Klänge des „K“-Keyboards verwenden dieses Stimmungssystem:
Page 65

Bedienungsanleitung
Programmtaster BANK 1
[PIANO1] Grand Piano 1
[PIANO2] Grand Piano 2
[PIANO3] Standard Piano
[PIANO4] Bright Piano
[PIANO5] Honky T onk Piano
[PIANO6] Mellow Piano
Einstellen des MIDI-Kanals
Die MIDI-Kommunikation funktioniert nur, wenn das „K“-K eyboard und das Empf ängergerät denselben MIDI-Kanal verwenden.
Der Einstellbereich für den MIDI-Kanal lautet 1~16.
1 Halten Sie den [BANK]-Taster gedrückt, um den Einstellungsmodus des „K“-Key-
boards zu aktivieren.
2 Drücken Sie den 5 [PIANO 5/E.P. 5/ORGAN 5]-Taster (er beginnt zu blinken).
3 Drücken Sie eine Taste im Bereich C4~D#5.
Die Tasten sind folgenden MIDI-Kanälen zugeordnet:
C4= Kan. 1, C#4= Kan. 2, D4= Kan. 3… D#5= Kan. 16
C8C7C6C5C4C3C2C1
4 Drücken Sie den [BANK]-Taster, um den Einstellungsmodus zu verlassen.
Der gewählte MIDI-Kanal gilt sowohl für die gesendeten MIDI-Bef ehle als auch für
die interne Klangerzeugung.
‘Local’-Funktion
Diesen Parameter brauchen Sie nur, wenn Sie die Verbindung zwischen der Tastatur
sowie den Spielhilfen einerseits und der internen Klangerzeugung des K61P andererseits lösen möchten, um nur noch externe Klangerzeuger anzusteuern. Bei Verwendung eines Sequenzers mit „MIDI Echo“-Funktion (oder ähnlich) verhindern Sie hiermit, dass jede Note doppelt ausgegeben wird.
Solange die „Local“-Funktion aktiv ist, gibt die interne Klangerzeugung die gespielten
Noten ebenfalls wieder.
1 Halten Sie den [BANK]-Taster gedrückt, um den Einstellungsmodus des „K“-Key-
boards zu aktivieren.
2 Drücken Sie den 6 [PIANO 6/CLAVE/ORGAN 6]-Taster (er beginnt zu blinken).
3 Drücken Sie die Taste C4, um die Funktion einzuschalten. Mit dem C#4 deaktivieren
Sie sie.
C8C7C6C5C4C3C2C1
65
Page 66

4 Drücken Sie den [BANK]-Taster, um den Einstellungsmodus zu verlassen.
‘Local’-Einstellung
„Local“-Funktion an
Computer
K61P
KBD/KNOB
SOUND/CTRL
Tastatur/Bedienelemente
Klangerzeugung
„Local“-Funktion aus
Computer
KBD/KNOB
SOUND/CTRL
Beim Ausschalten wird der „Local“-Parameter wieder aktiviert.
○○○○○○○○○○○○○○○○○○○○○○○○○○○○○○○○○○○○○○○
K61P
Tastatur/Bedienelemente
Klangerzeugung
Aktivieren/Filtern von Programmwechseln
Bei Anwahl eines anderen Klangs auf dem K61P wird die entsprechende MIDIProgrammnummer gesendet. Wenn solche MIDI-Programmwechsel Ihnen die Arbeit
eher erschweren als erleichtern, können Sie ihre Ausgabe unterdrücken.
1 Halten Sie den [BANK]-Taster gedrückt, um den Einstellungsmodus des „K“-Key-
boards zu aktivieren.
2 Drücken Sie den 7 [HARPSI 1/VIBE/STRINGS 1]-Taster (er beginnt zu blinken).
66
C8C7C6C5C4C3C2C1
3 Drücken Sie die Taste C4, um die Funktion einzuschalten. Mit dem C#4 deaktivieren
Sie sie.
Page 67

Bedienungsanleitung
4 Drücken Sie den [BANK]-Taster, um den Einstellungsmodus zu verlassen.
Filtern von Lautstärkebefehlen
Auch die Steuerbefehle (CC07) für Lautstärkeänderungen der internen Klangerzeugung
können gefiltert werden. W enn dieser P ar ameter aktiv ist, reagiert die interne Klangerzeugung auf CC07-Befehle, die (nach der entsprechenden Zuordnung) von KNOB1/
KNOB2 oder dem SLIDER gesendet werden.
Wenn dieser Parameter aus ist, reagiert die interne Klangerzeugung nicht auf CC07Befehle, die (nach der entsprechenden Zuordnung) von KNOB1/KNOB2 oder SLIDER
gesendet werden.
1 Halten Sie den [BANK]-Taster gedrückt, um den Einstellungsmodus des „K“-Key-
boards zu aktivieren.
2 Drücken Sie den 8 [HARPSI 2/CHOIR/STRINGS 2]-Taster (er beginnt zu blinken).
C8C7C6C5C4C3C2C1
3 Drücken Sie die Taste C4, um die Funktion einzuschalten. Mit dem C#4 deaktivieren
Sie sie.
Verhalten der CC07-Befehle
AN
Computer
KE
Spielhilfen
K61P
AUS
Computer
KE
Spielhilfen
K61P
* KE: Klangerzeuger
Lautstärkeregelug des KEs
Lautstärke des KEs.
4 Drücken Sie den [BANK]-Taster, um den Einstellungsmodus zu verlassen.
67
Page 68

Fehlersuche
❏ Das Gerät kann nicht eingeschaltet werden
• Befindet sich der Netzschalter in der richtigen Position? („Anschlüsse und
Einschalten“, S. 54)
• Haben Sie das „K“-Keyboard über einen Hub mit Ihrem Computer verbunden?
Wenn ja, sollten Sie ein Netzteil verwenden.
❏ Der Treiber kann nicht eingerichtet werden
•Wahrscheinlich wird der Vorgabetreiber von Windows verwendet. Installieren Sie
den beiliegenden Treiber.
• Legen Sie die beiliegende CD-ROM ordnungsgemäß in das CD-Laufwerk.
• Reinigen Sie bei Bedarf den Lesekopf des CD-Laufwerks.
Verwenden Sie zur Säuberung einen handelsüblichen CD-Reiniger.
❏ Die Software reagiert nicht
• Haben Sie das USB-Kabel ordnungsgemäß angeschlossen?
• Wird das „K“-Keyboard überhaupt vom Computer erkannt?
Bestimmte Hardware-Einstellungen können die USB-Anmeldung des „K“-Ke yboards
unmöglich machen.
• Vielleicht unterstützt das angeschlossene Gerät bzw. das verw endete Programm
den gesendeten Befehl nicht. Siehe die Bedienungsanleitung des Geräts/Programms, um in Erfahrung zu bringen, ob der betreffende Befehl unterstützt wird.
❏ Sie hören nichts (K61P)
• Vielleicht haben Sie die Lautstärke ja auf „0“ gestellt.
Erhöhen Sie die Lautstärke.
❏ Die gespielten Noten werden zu früh ausgeschaltet
•Wahrscheinlich überfordern Sie die Polyphonie Ihres K61P.
Apropos Polyphoniestimmen
Mit „Polyphoniestimmen“ ist im Gr unde die Anzahl der Noten gemeint, die ein Instrument simultan wiedergeben kann. Wenn Sie mehr Noten zu spielen v ersuchen, werden
die zuerst gespielten ausgeschaltet, um Platz zu machen für neuere Noten. Das
führt dazu, dass bestimmte Noten entweder gar nicht oder viel zu kurz hörbar sind.
Die Polyphonie des K61P richtet sich nach der Anzahl der gebotenen Oszillatoren
sowie der verwendeten Effekte. Bei bestimmten Klängen werden für jede Note
außerdem zwei Oszillatoren benötigt. Die maximale Polyphonie für Klänge, die nur 1
Oszillator je Note benötigen (z.B. HARPSI/VIBES) beträgt 60 Noten. Klänge, die 2
Oszillatoren beanspruchen (darunter Grand Piano 1 [PIANO 1, Bank A] und Grand
Piano 2 [PIANO 2, Bank A]), erlauben hingegen das Spielen von jeweils 30 Noten.
Für den Halleffekt werden 10 Oszillatoren benötigt. Der Chorus-Effekt begnügt sich
mit deren 3 (die also nicht mehr zum Spielen von Noten zur Verfügung stehen).
❏ Rauschen wird gehört
•
Je nach Ihrem Computer kann Rauschen im Sound vom internen Soundgenerator auftreten,
wenn eine USB-Verbindung verwendet wird. Verwenden Sie in diesem Fall das optional
erhältliche Netzteil und stellen Sie den Stromschalter auf die Position DC ein.
68
Page 69

Bedienungsanleitung
Technische Daten
❏ Bedienelemente
•Tastatur: 25, 49, 61 anschlagdynamische Tasten (normale Größe)
• ClickPoint-Funktion
• Definierbare Regler × 2
• Definierbare Taster × 2
• Oktavierungstaster (auf/ab)
• Pitch Bend-Rad
• Definierbares Modulationsrad
• Schieberegler × 1
❏ Interne Klangerzeugung (K61P)
• Klangerzeugung Stereo-Sampling
•Polyphonie 60 (maximal)
• Klänge 24 (3 Bänke × 8)
•Tonhöhenfunktionen Transposition, Feinstimmung
• Stimmungssysteme Gleichschwebend, Kirnberger, Werckmeister
• Effekte Hall, Chorus (jeweils 3 Pegelstufen)
❏ Anschlüsse
•Pedalbuchse
• MIDI OUT-Buchse
• USB-Buchse
• Buchse für Netzteil (DC9V)
•Ausgänge (L/MONO, R, nur beim K61P)
•Kopfhöreranschluss (nur beim K61P)
❏ Stromversorgung
• Stromversorgung über den USB-Bus (bei Verwendung des USB-Ports)
• DC9V-Netzteil (Sonderzubehör)
❏ Stromverbrauch
K25/K49/K61: Speisung über USB-Bus 110mA
Bei Verwendung eines DC9V-Netzteils 120mA
K61P: Speisung über USB-Bus 300mA
Bei Verwendung eines DC9V-Netzteils 320mA
❏ Abmessungen (B × T × H)
K25: 489 × 221 × 69 mm
K49: 818 × 221 × 69 mm
K61/K61P: 982 × 221 × 69 mm
❏ Gewicht
K25: 1.5 kg
K49: 2.5 kg
K61: 3.0 kg
K61P: 3.2 kg
69
Page 70

❏ Lieferumfang
• USB-Kabel
• CD-ROM (mit M1 Le Software-Synthesiz er, K-Series Editor, Treiber, InstallationsWizard usw.)
• Bedienungsanleitung
• MIDI-Implementierungstabelle
• Software-Lizenzvereinbarung
❏ Systemanforderungen
Macintosh
Betriebssystem: Mac OS X V.10.3 oder neuer
Rechner: Apple Macintosh mit USB-Port, der die Anforderungen von Mac OS X
Windows
Betriebssystem: Microsoft Windows XP Home Edition/Professional
Rechner: Rechner mit USB-Port, der die Anforderungen von Windo ws XP erfüllt
erfüllt
(ein USB-Chipsatz der Intel Corporation wird empfohlen)
❏ Sonderzubehör
• Netzteil
• Fußtaster/Pedal PS-1
Änderungen der technischen Daten und Funktionen ohne vorherige Ankündigung vorbehalten.
(Stand: Dezember 2005)
70
Page 71

目 次
はじめに ................................................................................................73
おもな特長.................................................................................................................. 73
各部の名称 ................................................................................................................. 73
セッ トアップ ..........................................................................................76
MIDIドライバとソフトウェアのインストール ............................................................. 76
接続と電源の入れ方 .................................................................................................. 77
K-Seriesとドライバのポートについて ..................................................................... 79
K-SeriesのMIDIOUT端子について ..................................................................... 79
工場出荷時の状態に戻す方法................................................................................... 80
操作編 ..................................................................................................81
キーボード .................................................................................................................. 81
クリッカブル・ ポイ ンター ............................................................................................ 81
KNOB1/KNOB2...................................................................................................81
[SW1]/[SW2]キー................................................................................................ 82
[OCTAVESHIFTUP]/[OCTAVESHIFTDOWN]キー ................................ 82
PITCHホイール ......................................................................................................... 82
MODホイール............................................................................................................ 83
SLIDER ...................................................................................................................... 83
ペダル ......................................................................................................................... 83
音源部の操作(K61Pの場合)..........................................................84
音色を選ぶ(プロ グラム・チェンジ)..........................................................................84
エフェク ト .................................................................................................................... 84
Settingモード ........................................................................................................... 85
プログラム・チェンジの有効/無効 .......................................................................... 89
故障とお思いになる前に .....................................................................91
仕 様 ...................................................................................................92
Page 72

安全上のご注意
ご使用になる前に必ずお読みください
ここに記載した注意事項は、製品を安全に 正しくご使用いただき、
あなたや他の方々への危害や損害を未然に防ぐための ものです 。
注意事項は誤った取り扱いで生じる危害や損害の大きさ、または
切迫の程度によって、内容を「警告」、「注意」の2つに分けていま
す。これ らは、あなたや他の方々の安全や機器の保全に関わる重
要な内容ですので、よく理解した上で必ずお守りください。
火災・感電・人身障害の危険を防止するには
図記号の例
記号は、注意(危険、警告を含む)を示してい ます。記
号の中に は、具体的な注意内容が描かれていま す。 左の図
は「一般的な注意、警告、危険」を表して います。
記号は、禁止(してはいけないこと)を示 していま す。記
号の中には、具体的な注意内容が描かれることがありま
す。左の図は「分解禁止」を表 して いま す。
記号は、強制(必ず行うこと)を示してい ます。 記号の中
には、具体的な注意内容が描かれることがあります 。左の図
は「電源プラグをコンセントから抜くこと」 を表していま す。
以下の指示を守ってください
警告
この注意事項を無視し た取り扱い をす ると、死亡や重傷を負う
可能性が予想されます
・ACアダプ ターの プラグは、必ずAC100Vの電源コ ン セ ン
トに差し込む。
・ACアダプ ターの プ ラグにほこり が付着している場合は、ほ
こりを 拭き取る。
感電やショートの恐れがあ ります。
・本製品はコンセ ントの近く に 設置し、ACアダプ ターのプ ラ
グへ容易に手が届く ように する 。
・次のような場合には、直ちに電源を切っ てACアダ プターの
プラグをコンセントから抜く。
○ACアダプターが破損したとき
○異物が内部に入った と き
○製品に異常や故障が生じ たとき
修理が必要なと きは 、コルグ・サービス・センターへ依頼し
てください。
・本製品を分解し たり 改造したりしない。
・修理、部品の交換な ど で、取扱説明書に書かれてる こと以外
は絶対にしない。
・ACアダプ ターの コードを無理に曲げたり、発熱する機器に
近づけない。また、ACアダプ ターの コードの上に重いもの
をのせない。
コードが破損し、感電や火災の原因になります。
・大 音量や不快な程度の音量で長時間使用し ない。
万一、聴力低下や耳鳴りを感 じたら、専門の医師に相談 してください。
・
本製品に異物(燃えやすいもの、硬貨、針金など )を入れない。
・温 度が極端に高い場所(直射日光の当たる場所、暖房機器
の近く、発熱する機器の上など)で使用や保管はしない。
・振動の多い場所 で使用や保管はしない。
・ホコリの多い場所で使用や保管はし ない。
・風呂場、シャワー室で使用や保管はし ない。
・
雨天時の野外のように、湿気の多い場所や水滴のかかる場所
で、使用や保管はしない。
・本製品の上に、花瓶のような液体が入 っ た ものを置かない。
・本製品に液体をこぼさない。
・濡 れ た手で本製品を使用しない。
注意
この注意事項を無視し た取り扱い をす ると、傷害を負う可能
性、または物理的損害が発生する可能性があります
・正常な通気が妨げられない所に設置して使用する。
・ラジオ、テレビ、電子機器などから十分に離して使用する。
ラジオやテレビ等に接近して使用する と、本製品が雑音を
受けて誤動作する場合があ ります。また、ラジオ、テレビ等
に雑音が入ることがありま す。
・外装のお手入れは、乾いた柔 ら かい布を 使って軽く拭く。
・A C ア ダプターをコン セ ント から抜き差しするときは、必ず
プラグを持つ。
・
長時間使用し ないと き は、ACアダ プ ター をコンセントから 抜 く 。
・指定のACアダプター 以外は 使用しない。
・他 の電気機器の電源コードと一緒にタコ足配線 をしない。
本製品の定格消費電力に合った コンセントに接続してく ださい。
・スイッチやツマミなどに必要以上の力を加え ない。
故障の原因になります。
・外装のお手入れに、ベンジンやシ ンナー系の液体、コンパウ
ンド質、 強燃性のポリッシャーは使用 しない。
・不安定な場所に置かない。
本製品が転倒 してお客様がけがをしたり、本製品が故障す
る恐れがあります。
・本製品の上に乗ったり、重いものをのせたりしない 。
本製品が転倒または損傷してお客様がけがをしたり、本製
品が故障する恐れがあ ります。
本製品のお取り扱いについて
・本製品に振動、衝撃を与えないでください。製品内部を損傷する
などの、故障の原因になります。
冬季の屋外や夏季の直射日光に当たる場所のよう に、極端に温度
・
の低いまた は高い場所で、使用や保管をしないでくだ さい。また、
温度差が激し い場所へ、本製品を移動すること は避けてください。
温度差が生じ た場合、製品内部に、水滴がつ くことがあ ります。そ
のまま使用すると故障の原因となりますので、数時間放置してか
ら使用を開始してく ださい。
・極端に湿度の高い場所では使用、保管しないでください。
・ほこりや煙が多い場所では使用、保管しないでください。
操作ミ ス等により 万一異常な動作をしたとき に、メモリ内容が消えて
しまうことがありますの で、大切なデータはMIDIデ ータ・ファイラーな
どに保存 しておいてください。またデータの消失によ る 損害 に ついて
は、当社は一切の責任を負いかねますのでご了承ください。
本体のスイッチ類の表記は、[]で括っています。
(p.■■):参照ページを表 します。
データについて
取扱説明書の表記について
:使用時の注意や補足を表します。
:使用時のヒントなどを表します。
72
Page 73

取扱説明書
はじめに
このたびは、MIDIスタジオ・コントローラーK25/K49/K61/K61P(以後、K-Seriesと
略して記述)をお買い上げいただきまして誠にありがとうございます 。本製品を末永 くご愛
用いただくためにも、この取扱説明書をよくお読みになって正しい方法でご使用ください。
また、取扱説明書は大切に保管してください。
おもな特長
❏ コンパク ト&シンプルなボデ ィ に、9種類の充実したコ ントローラーを装 備しています。
❏ ホール ド機能付きX/Yジョイスティック、または1ボタン・マウスの2種類 の操作モー
ドを持ったユニーク なクリ ッカブル・ポイ ンタ ーを装備し ています。
❏ M1Leソフトウェア・シンセサイザーをバン ドルしてい ますので、買っ たその日から ハ
イクオ リティーなサウン ドを楽しむことができます。
❏ K61Pには、コルグ・デジタル ・ピアノで定評のある24音色の音源を搭載していま
す。本体をアンプなどに接続す るだけ で本格的な ピアノ やオルガン・サウン ドなどで
演奏することが可能です。
各部の名称
コントローラー部
2
3
4
5
6
イラストは、K61Pのコントローラー部です。
8
7
1
73
Page 74

1. キーボード
ベロシテ ィ付き標準鍵盤です。
2. クリッカブル・ポインター
MIDIメッセージを割り当てて、接続した外部MIDI機器や コンピューター上のソフト・シンセ、DAW
等を操作したり、コンピューターのマウスとして使用することができます。
3. KNOB1/KNOB2
MIDIメッセージを割り当てて、接続した外部MIDI機器や コンピューター上のソフト・シンセ、DAW
等を操作することができます。
4. [SW1]/[SW2]キー
プログラム・チェンジをおこなったり、MIDIメッセージを割り当てて、接続した外部MIDI機器やコ ン
ピューター上のソフト・シンセ、DAW等を操作することができます。
5. [OCTAVESHIFTUP]/[OCTAVESHIFTDOWN]キー
キーボードのオクターブを設定し ます。
6. PITCHホイール
UP / DOWN方向 へ 操作する ことに より、ピッチベ ンド ・メッセージを送信します 。
7. MODホイール
MIDIメッセージを割り当てて、接続した外部MIDI機器や コンピューター上のソフト・シンセ、DAW
等を操作することができます。
8. SLIDE R
MIDIメッセージを割り当てて、接続した外部MIDI機器や コンピューター上のソフト・シンセ、DAW
等を操作することができます。
音源部(K61Pの場合)
74
2 34
1
1. [VOLUME]ツマミ
内部音源から出る音量を調整 します。OUTPUT端子(L/MONO、R)、HEADPHONES端子への
出力調整ができま す 。
2. [BANK]キー
1つ の [ PROGRAM]キーには3種類の音色が割り当てられています。[BANK]キーを押して3種類
の中から選びます。
3. [PROGRAM]キー
8つのキーから音色を選びます。
4. [REV ERB]キー
音に残響を加えるリバーブ効果の深さを選びます。
5. [CHORUS]キー
音に広がりを与えるコー ラス効果の深さを選びます。
5
Page 75

リア・パ ネル
取扱説明書
1
1. OUTPUT端子(K61Pのみ)
内部音源の出力端子です。パワード・モニターなどのインプット端子に接続し て音を出し ま す。モノ
ラル標準プラグのケーブルを接続します。
2. HEADPHONES端子(K61Pのみ)
ステレオ・ヘッ ドホン(標準プラグ)を接続します。
3. PEDAL端子
別売りのPS-1ペダル・スイッチを接続します。 接続したペダルを操作すること によ り、接続した外部
MIDI機器やコンピューター上のソフト・シンセ、DAW等を操作することができま す 。本機は電源ON
時にペダルの極性を決める仕様にな っています。
4. MIDIOUT端子
外部MIDI機器を接続し、MIDIメッセージを送信しま す 。接続方法 に よって動作が異な ります。(p.79
「K-SeriesのMIDIOUT端子について」)
5. USB端子
USBケーブルでコ ン ピューターと 接続 し 、MIDIメッセージを送受信します。
6. 電源スイッチ
電源をオン、またはオフに し ます。接続方法によっ て スイッチを切り替えます。(p.77「接続と電源の
入れ方」)
7. 電源端子
別売りのACアダプターを接続します。
コンピュ ーターによっ ては、バス電源方式で電源が供給できない場合があり ます。そのとき
はセルフ・パ ワ ー (外部から電源を供給できるタ イプ)のハブ、または別売りのACアダプター
を使用してください。
2
イラストは、K61Pのリア・パネルです。
3 4 5 6 7
75
Page 76

セットアップ
MIDIドライバとソフトウェアのインストール
CD-ROMの内容
同梱されているCD-ROMには、以下のものが収められていま す。
❏ K-SeriesEditor
❏ MILeソフトウェア・シンセサイザー
❏ KORGUSB-MIDIDriver
❏ インス トール ・ ガイド(PDF)
❏ K-SeriesEditor取扱説明書(PDF )
❏ MILeソフトウェア・シンセサイザー取扱説明書(PDF)
❏ ソフ トウェア使用許諾契約(PDF)
動作環境
■MacOSXをお使いの場合
対応コンピューター
MacOSXの動作環境を満たすUSBポート搭載のAppleMacintosh
対応 OS
MacOSXver.10.3以降
■WindowsXPをお使いの 場合
対応コンピューター
MicrosoftWindowsXPの動作環境を満たすUSBポート搭載のコ ンピュータ ー(USBchipset
はIntel社製を推奨)
対応 OS
MicrosoftWindowsXPHomeEdition/ProfessionalServicepack1以降
76
インストール方法
KORGUSB-MIDIDriver、K-SeriesEditorやM1Leソフトウェア・シンセサイザーのインストール
方法は、付属のCD-ROMに収録されているインストール・ガイド(InstallGuideJ)をご覧ください。
ご使用前の注意
❏ 本製品のソフトウェアの著作権は、すべて(株)コルグが所有しています。
❏ 本製品のソフトウェアの使用許諾契約が別途に付属されています。ソフトウ ェアをインス トールする
前に、必ずこの使用許諾契約をお読みください。ソフトウ ェアをイ ンストールすると、この契約にご
同意いただいたことになります。
❏ MIDIは社団法人音楽電子事業協会(AMEI)の登録商標です。
❏ AppleおよびMacならびにMacOSは、AppleComputer,Inc.の登録商標です。
❏ WindowsXPは、MicrosoftCorporation の 登録商標です。
❏ その他の製品名および会社名は、各社 の商標または登録商標です。
Page 77

取扱説明書
置
接続と電源の入れ方
接続は、必ずすべての機器の電源を切った状態で行ってください。不注意な操作を行うと、スピー
カー・システム等を破壊したり、誤動作を起こす原因となりますので、十分に注意してください。
USB端子接続の場合
1
USBケーブルでコンピ ューターのUSB端子と接続します。ペダルを接続する場合は、PEDAL端子
にペダルを接続します。
2
本機の電源スイッチをUSBにします。
電源が入り、パワーLEDが点灯 します。このとき、保存されている設定が自動的に読み込まれます 。
本機は、電源ON時にペダルの極性を決める仕様になっ ています。ペダルを接続し電源を入
れるときは、ペダルを押さないで ください。
電源スイッチ の 位
PEDAL端子
ペダル ・スイ ッチ
USB端子
USBケーブル
コンピューター
3
電源スイッチをSTANDBYにすると電源がオフにな ります。
USB接続をした場合は、ACアダプターを使用する必要はありません。
ただし、小電力のコンピ ューターやバス電源のみのハブを使用して複数の機器を接続してい
るときなどに、安定した電源供給ができない場合があります。このような場合は別売りのAC
アダプターを使用し、電源スイッチをDCにします。
USBケーブルでコンピューターと接続しているときは、MIDIOUT端子から本機の鍵盤情
報、および コントローラーなどのMIDIメッセージは出力しません。
MIDI端子接続の場合
USB接続しない場合は、MIDIOUT端子から鍵盤情報、および コ ントローラー等のMIDIメッ
セージをすべて出力します。
1
本機の電源端子に別売りのACアダプターを接続してからコンセントに差 し込みます。
2
MIDIケーブルで外部MIDI機器と本機のMIDIOUT端子を接続します。
また、ペダルを接続する場合はPEDAL端子にペダルを接続します。
77
Page 78

電源スイッチ の 位 置
ン
PEDAL端子
ペダル ・スイ ッチ
3
本機の電源スイッチをDCにします。
電源が入り、パワーLEDが点灯し ます。このとき、保存されている設定が自動的に読み込 まれます。
本機は、電源ON時にペダルの極性を決める仕様になっています。ペダルを接続し電源を入
れるときは、ペダルを押さないで ください。
4
接続 した外部MIDI音源の電源を入れます。
5
電源を切るときは 、接続した外部MIDI機器の電源を切ってから本機の電源スイッチをSTANDBY
にします。
MIDIOUT
MIDIケーブル
MIDIIN
電源端子
ACアダプター
コンセントへ
MIDI外部音源
78
内部音源を使って演奏する場合(
1
本機のOUTPUT端子とパ ワード・モニターなどのINPUT端子をモノラル標準プラグのケーブルで
接続します。モノラルで接続する場合は、L/MONO側に接続します。
OUTPUT端子からの出力レベルは、[VOLUME]ツマミで調整 します。
2
本機の電源を入れます。電源が入り、パワーLEDが点灯 し ます。
3
パワード・モニターなどの電源を入れます。
パワード・アンプなど
INPUT
コンピューターによってはUSB接続した場合に、内部音源のサウンドにノイズが入ることが
あります。このような場合は別売りのACアダプターを使用し、電源スイッチをDCにします。
K61P
OUTPUT端子
のみ)
HEADPHONES端子
ヘッドホ
Page 79

取扱説明書
K-Seriesとド ライ バのポートについて
K-SeriesのUSB-MIDIは、コンピューター側から見ると1IN-2OUTになります 。
コンピューター上の
アプリケーション
K-Series
MIDIINデバイス
KBD/KNOB
MIDIOUTデバイス
MIDIOUT
SOUND/CTRL*1
*1K25/49/61ではCTRL
*2K61Pのみ
鍵盤/スライダー/ノブ1/
ノブ2 / Pitch、Modホイール/
SW1/SW2/ペダル/
クイ ッカブ ル・ポインター/
ダンプ・データ
ダンプ・データ
内蔵音源*2
MIDIOUT端子
MIDIINデバイス
KBD/KNOB
K-Seriesの各コントローラーからのMIDIメッセージが入力されます。コンピュ ーターのアプ リ ケーショ
ンをK-Seriesで操作する場合に、アプリケーショ ンのMIDI入力設定でこのポートを選択 してください。
また、コンピューターへのダンプ・データの送信でも使用 します。K-SeriesEditorのMIDI入力設定で
このポートを選択してください。
MIDIOUTデバイス
MIDIOUT
ソフ トウェアが出力 し たMIDIメッセージをそのままK-SeriesのMIDIOUT端子へ送信し ま す。コンピュー
ターのアプリ ケーシ ョンのMIDIメッセージを外部MIDI機器に送信するなど、K-SeriesをUSB-MIDIイン
ターフェイスとして使用する場合に、アプリケーションの M I D I 出 力 設 定 でこのポートを選択 し て く ださい。
SOUND/CTRL(K25/K49/K61ではCTRL)
ダンプ・データの コ ン ピューターからの受信で使用しま す。K-Seri es EditorのMIDI出力設定でこのポ ー
トを選択してください。また、K61Pでは内部音源を鳴らすときもこのポートを使用しま す。
K-SeriesのMIDI OUT端子について
USB接続されていないとき
K-Seriesの各コントローラーを操作したときにMIDIメ ッセージを送信します。
USB接続されているとき
コンピューターのMIDIOUTポートから送信したMIDIメッセージをそのまま送信します。K-Seriesの
各コントローラーを操作してもMIDIメッ セージを送信しません。
79
Page 80

工場出荷時の状態に戻す方法
SW1とSW2を押 しながら電源を入れる と、保存されている設定が工場出荷時の状態に戻ります。
工場出荷時のコントローラーの設定
コン トローラー 機 能
SW1/SW2 プログラム・チェンジ(-1/+1)
KNOB1 CC#074(Cutoff)
KNOB2 CC#079(EGIntensity)
SLIDER CC#007(Volume)
PITCHホイール 固定(PitchBend)
MODホイール CC#001(Modulation)
PEDAL CC# 064(Damper)
クリッカブル ・ ポインター マウス・モード
*括弧内は、M1Leの対応パラメータ ー名です。
80
Page 81

取扱説明書
操作編
本機のパラメーターの設定は、付属のK-SeriesEditorで設定します。
MIDIメッセージは、グローバルMIDIチャンネルで送信されます。
○○○○○○○○○○○○○○○○○○○○○○○○○○○○○○○○○○○○○○
キーボード
ノー ト・メッセージを送信します。
3種類のベロシティ・カーブ、または固定(ベロシティ 値 = 127)の設定が可能です。自分の打鍵の強さや
得たい効果によって使い分けること ができます。
キー・トランスポーズの設定ができます。半音単位で可変し 、-12〜+12(±1オクターブ)の範囲で選択
できます。
○○○○○○○○○○○○○○○○○○○○○○○○○○○○○○○○○○○○○○
クリ ッカブル・ポインター
X方向(左右)/Y方向(前後)それぞれにMIDIメッセージを割り当てて、2つのパラメ ーターを直感的に
操作することができます。
また、コンピューターのマウス として使用す ることもできます。
No Assign
クリッカブル ・ポイ ンターにはMIDIメッセージは 割り当て られません。MIDIメッセージは 送信されません。
Control Change [0...127]
コントロール・チェンジを割り当てます。
コントロール・チェンジを割り当てているときは、クリッカブル ・ポインターを押すことによりX/Y方向の
値をホールドするこ と が可能です。
クリッカブル ・ポイ ンターは手を離すとセンタ ー に戻 ります。クリ ッカブル ・ポインターを押すと押した時点
での値をホールドし、クリッカブル・ポイ ンターから手を離してもパラメーターの値を保つことができ ます。
ホールド状態を解除したい場合は、もう1 度押すことで解除されます。
Mouse
Mouseに設定す ると、マウスのよ う に使用するこ とができ、クリッカブル・ポイ ンターでコンピューター画
面上のマウス・ポインターを操作することができます。
また、クリッカブル・ポイ ンターを押すことによ りマウスのクリックとして使用する ことができます。
MIDI 接続 時は、Mouseに設定してもコンピューターのマウスとしては使用できません。
○○○○○○○○○○○○○○○○○○○○○○○○○○○○○○○○○○○○○○
KNOB1 / KNOB2
MIDIメッセージを割り当てて、接続した外部MIDI機器やコンピュ ーター上のソフト・シンセ、DAW等を
ノブで操作することができます。
No Assign
KNOB1、またはKNOB2にはMIDIメッセージ が割り当てられません。MIDIメッセージは送信されません。
Control Change [0...127]
ノブを操作することにより割 り当てられたコントロール・チェンジ ・ナンバーのパラメーターを操作するこ
とができます。
81
Page 82

○○○○○○○○○○○○○○○○○○○○○○○○○○○○○○○○○○○○○○
[SW1] / [SW2]キー
[SW1]/[SW2]キーを操作することにより、割り当てられているMIDIメッセージを送信します。
No Assign
[SW1]/[SW2]キーにはMIDIメッ セージが割り当てられません。MIDIメッセージは送信さ れません。
Program Change
[SW1]/[SW2]キーをセットでプロ グ ラム・ナンバー・チェンジとして使用します。[SW1]キーがプログ
ラム・ナンバー・ダウン、[SW2]キーがプロ グラム・ナンバー・アップとなります。
また、[SW1]キーと[SW2]キーを同時に押 すことにより、プログラム・ナンバー1へ一気に戻すことがで
きます。
Control Change [0...127]
[SW1]/[SW2]キーへそれぞれにコントロール・チェンジを割り当てます。コン トロール ・チェンジに設定
した場合、[SW1]/[SW2]キーそれぞれへToggle/Momentaryの選択、キーをONにしたときに送信
するコントロール・チェンジの値(OnValue)とOFFにしたときの値(OffValue)を設定します。
「Toggle」の場合、[SW1]/[SW2]キーを押すたびに割り当てられたMIDIメッセージの設定したOn
ValueとOffValueを交互に送信します 。
「Momentary」の場合、[SW1]/[SW2]キーを押した ときに割り当て られたMIDIメッセージのOnValue
を、離したときにOffValueを送信します。
○○○○○○○○○○○○○○○○○○○○○○○○○○○○○○○○○○○○○○
[OCTAVE SHIFT UP] / [OCTAVE SHIFT DOWN]キー
キーボードのオクターブを設定し ます。
設定できる範囲は以下のようになります。
機種 オクターブ・シフト範囲
K25 -4...+4
K49 -4...+4
K61/K61P -3...+3
UPキーを押すたびに、音域が1オクターブずつ上にシフトします。また、DOWNキーを押すたびに、音
域が1オクタ ーブずつ下に シフトします。
現在の設定をキーの点灯する色で表示します。
キーの点灯色(状態) オクターブ・シフト状態
無灯 ±0オクターブ
緑 +1/-1オクターブ
オレンジ +2/-2オクターブ
赤 +3/-3オクターブ
赤点滅 +4/-4オクターブ(K25/K49のみ)
82
○○○○○○○○○○○○○○○○○○○○○○○○○○○○○○○○○○○○○○
PITCHホイール
UP / DOWN方向 へ 操作する ことに より、ピッチベ ンド ・メッセージを送信します 。
Page 83

取扱説明書
○○○○○○○○○○○○○○○○○○○○○○○○○○○○○○○○○○○○○○
MODホイール
MIDIメッセージを割り当 てて、接続した外部MIDI機器やコンピュータ ー上のソフト・シンセ、DAWなど
をModホイールで操作することができます。
No Assign
ModホイールにはMIDIメッセージが 割り当てられません。MIDIメッセージは送信されません。
Control Change [0...127]
Modホイールを操作する ことに より、割り当てられたコン トロール ・チェンジ・ナンバーのパラメーターを
操作することができます。
After Touch
Modホイールを操作することにより、チャンネル ・アフタータッチ・メッセ ージを送信 します。
○○○○○○○○○○○○○○○○○○○○○○○○○○○○○○○○○○○○○○
SLIDER
MIDIメッセージを割り当てて、接続した外部MIDI機器やコンピュ ーター上のソフト・シンセ、DAW等を
操作することができます。
No Assign
SliderにはMIDIメッセージが 割り当てられません。MIDIメッセージは送信されません。
Control Change [0...127]
Sliderを操作するこ とにより、割り当てられたコン トロール ・チェンジ・ナンバーのパラメーターを操作す
ることができます。
○○○○○○○○○○○○○○○○○○○○○○○○○○○○○○○○○○○○○○
ペダル
リア ・パネルのPEDAL端子に接続したペダルへ、MIDIメッセージを割り当てることができ ます。
No Assign
ペダルにはMIDIメッ セージが割り当てられません。MIDIメッセージは送信されません。
Control Change [0...127]
ペダルを操作することにより、割り当てられたコン トロール・チェンジ ・ナンバーのパラメーターを操作す
ることができます。コントロール・チェンジに設定した場合、Toggle/Momentaryの選択、ペダルをON
にしたときに送信する コ ントロール・チェンジの値(OnValue)とOFFにしたときの値(OffValue)を
設定します。
「Toggle」の場合、ペダルを踏むたびに割り当てられたMIDIメッセージの設定したOnValue とOff
Valueを交互に送信します。
「Momentary」の場合、ペダルを踏んだときに割り当てられたMIDIメッセージのOnValueを、離した
ときにOffValueを送信し ます。
電源投入時、PEDAL端子に接続したペダルの正しい極性を自動的に認識します。ペダルを押 し
た状態で電源を入れることで、極性を逆に設定することも可能です。
83
Page 84

音源部の操作(K61Pの場合)
○○○○○○○○○○○○○○○○○○○○○○○○○○○○○○○○○○○○○○
音色を選ぶ(プログラム・チェンジ)
8個の[PROGRAM]キーと[BANK]キーを組み合わせて、24(8×3バンク)音色が選択できます。
1
弾きたい音色の[PROGRAM]キーを1つ選びます。
2
[BANK]キーを押して3種類の中から音色を選びます 。
[BANK]キーを押すたびに、バンク1➡ バンク2➡ バンク3へ切 り 替 りかわり ます。現在選ばれてい
るバンクは点灯しているLEDで確認することができます。
たとえば、Claviの音色を選ぶには、左から6番目の[PROGRAM]キーを押してキーを点灯させま
す。そのあと、[BANK]キーでバンク2へ切り替え るとClavi の音色になります。
音色一覧
[PROGRAM]キー
[PIANO1]
[PIANO2]
[PIANO3]
[PIANO4]
[PIANO5]
[PIANO6]
[HARPSI1]
[HARPSI2]
※[PROGRAM]キー名はバンク1の表記です。
※Osc#の数値は使用オ シレーター数です。
バンク1
GrandPiano1
GrandPiano2
StandardPiano
BrightPiano
HonkyTonkPiano
MellowPiano
Harpsichord1
Harpsichord2
Osc#
2
2
1
1
2
1
1
2
バンク2
E.Piano1
E.Piano2
SoftE.P.
VintageE.P.
E.P.Pad
Clavi
Vibraphone
Choir
Osc#
1
1
1
1
2
1
1
1
バンク3
JazzOrgan1
JazzOrgan2
JazzOrgan3
ChurchOrgan1
ChurchOrgan2
ChurchOrgan3
Strings
SlowStrings
Osc#
2
2
2
3
1
1
1
2
84
○○○○○○○○○○○○○○○○○○○○○○○○○○○○○○○○○○○○○○
エフ ェ クト
リバーブやコーラスを使った場合は、最大同時発音数が少なくなります。(p.91「最大同時発音
数について」)
リバーブ
音に残響と深みを加え、コンサート・ホールで演奏しているよ うな臨場感のあるサウンドに します。
これをリバーブ効果といいます。
1
[REVERB]キーを押すたびに3種類のリバーブの深さを選ぶことができます。
現在の設定をキーの点灯する色で表示します。
[REVERB]キー リバーブ効果
無灯 オフ
緑浅い
オレンジ 標準
赤深い
Page 85

取扱説明書
コーラス
音にうねりを加え、広がりある豊かなサウンドにします。これをコーラス効果といいます。
1
[CHORUS]キーを押すたびに3種類のコーラスの深さを選ぶこ とができます 。
現在の設定をキーの点灯する色で表示します。
[CHORUS]キー コーラス効果
無灯 オフ
緑浅い
オレンジ 標準
赤深い
○○○○○○○○○○○○○○○○○○○○○○○○○○○○○○○○○○○○○○
Settingモード
[BANK]キーを長押しするこ とで、Settingモードに切り替わります。
[BANK]キーの選択LEDと現在選択されている項目の[PROGRAM]キーが点滅します。設定 したい項
目を選択し、それぞれ設定が割り振られた鍵盤を押 さえることにより値 を設定します。
設定が終わ ったら、[BANK]キーを押すことによりSettingモードをぬけて演奏できる状態に戻ります。
Settingモードでは、以下の8つの設定が可能 です。
[PROGRAM]キー
[PIANO1]
[PIANO2]
[PIANO3]
[PIANO4]
[PIANO5]
[PIANO6]
[HARPSI1]
[HARPSI2]
※
[PROGRAM]キー
機 能
ベロシテ ィ・カーブ
トランスポーズ
ピッチ
音律
グローバルMIDIチャンネル
ローカル・コントロール
プログラム ・チェンジ設定
ボリューム ・メッセージ ・フィルター
名はバンク1の表記です。
設定内容
ベロシティ・カーブの設定
キーを変更する(移調)
音の高さ(ピッ チ)を調整する
音律を選ぶ
グローバルMIDIチャンネルの変更
ローカル・コントロールのオン/オフ
プログラム・チェンジの有効/無効
ボリューム ・メッセ ー ジ・フィルターの有効/無効
ベロシティ・カ ーブ
鍵盤を弾く強さによる 音の強弱の変化の度合いを設定します。
3種類のベロシティ・カーブと固定値(ベロシティ=127)の設定が可能で、自分の打鍵の強さや得たい
効果によって使い分けることができます。
1
[BANK]キーを長押しして、Settingモードに入ります。
2
[PROGRAM]キーの[PIANO1/E.P.1/ORGAN1]を押し、キーを点滅させま す。
3
C4(軽め)、C#4(標準)、D4(重め)、D#4(固定)のうち、1つ を押してタッチ感を選びます。
C8C7C6C5C4C3C2C1
85
Page 86

4
[BANK]キーを押してSettingモードを抜けます。
弱
強
音
の
強
弱
弱
軽め
標準
打鍵の強さ
重め
強
鍵盤の位置 タッチ・コントロールの設定
C4 軽め(弱く弾いても強音が出せるタッチ)
C#4 標準(普通のピアノ・タッチ)
D4 重め(強く弾かないと強音が出せないタッ チ)
D#4 固定(ベロシテ ィ値=127で発音)
ベロシティ・カーブの設定値は、外部音源をコントロールす
る場合と内部音源を鳴らす場合で共通の設定となります。
トランスポーズ
キーを変える(移調する)ことによって、黒鍵をあまり 使わない指使いで演奏 し たり、覚えたそのままの指
使いで他の楽器に演奏を合わせることができます。
半音単位で可変し、-12...+12(±1オクターブ)の範囲で選択できます。
1
[BANK]キーを長押しして、Settingモードに入ります。
2
[PROGRAM]キーの[PIANO2/E.P.2/ORGAN2]を押し、キーを点滅させます。
C3...C5の中から移調するキーの鍵盤を押します。
C3:-12...C4:±0...C5:+12
-12
トランスポーズを解除するときは、C4の鍵盤を押します。
3
[BANK]キーを押してSettingモードを抜けます。
トランスポーズの設定値は、外部音源をコントロールする場合と内部音源を鳴らす場合で共
通の設定となります。
+120
C8C7C6C5C4C3C2C1
86
ピッチ
ピッチ (音の高さ)の微調整をおこないます。
他の楽器と合奏をするときなど、楽器間の微妙なピッチのずれを調整します。
±12.5Hz(427.5Hz...452. 5Hz)までずらすことができます。基準ピッ チはA4=440Hzです。
1
[BANK]キーを長押しして、Settingモードに入ります。
2
[PROGRAM]キーの[PIANO3/E.P.3/ORGAN3]を押し、キーを点滅させます。
3
ピッチを上げる ときは、C4の鍵盤を押します。一回押す た びに約0.5Hzずつピッチが高くなります。
ピッチを下げる ときは、B3の鍵盤を押します。一回押す た びに約0.5Hzずつピッチが低くなります。
C8C7C6C5C4C3C2C1
Page 87

取扱説明書
もとのピッ チ(A4=440Hz)に戻すには、B3とC4の鍵盤を同時に押します。
4
[BANK]キーを押してSettingモードを抜けます。
電源を切ると設定はリセットされ、基準ピッチ(A4=440Hz)に設定されます。
音律
音律が選択できます。
クラシック音 楽には、古典的な調律法によって作曲された作品が数多く残っています。
これらの曲の持つ本来の響きを再現するために、キルンベルガ ーとヴェルクマイスターという古典調律
と、現在鍵盤楽器で広く用いられている平均律の3種類の音律が選択できます。
1
[BANK]キーを長押しして、Settingモードに入ります。
2
[PROGRAM]キーの[PIANO4/E.P.4/ORGAN4]を押し、キーを点滅させま す。
3
C4(ヴェ ルクマ イ スター)、C#4(キルンベルガー)、D4(平均律)のうち、1つを 押して音律を選びま
す。
C8C7C6C5C4C3C2C1
4
[BANK]キーを押してSettingモードを抜けます。
鍵盤の位置
C4
C#4
D4
電源を切ると設定はリセットされ、音律は平均律に設定されます。
音 律
ヴェルクマイスター:ド イツ 人のオルガニスト で音楽評論家のア
ンドリア ス・ヴェルクマイスターによる、ヴェルクマイスター ス
ケールです。これはバロック時代後期に比較的自由な移調を目
的として考案されたものです。
キルンベルガー:18世紀初めに、ヨハン ・フィリップ・キルンベ
ルガーが考案したキルンベルガー スケールです。これは主に
ハープシコードのチューニングに使用されています。
平均律:現在の鍵盤楽器のほとんどすべてがこの平均律を用
いています。これは、半音階が均等に配列されているため、どの
調に対しても均一のスケールで演奏することができます。
ストレッチ・チューニングにつ いて
ストレッチ ・チューニングは、より自然 な響きを得るために、平均律のピッチに対して低音域は低く高音域
は高くピッチを調節したものです。これは、アコースティック ・ピアノ で通常調律される 方法です 。本機で
ストレッチ ・チューニングを用いているのは以下の6つの音色です。
87
Page 88

[PROGRAM]キー バンク1
[PIANO1] GrandPiano1
[PIANO2] GrandPiano2
[PIANO3] StandardPiano
[PIANO4] BrightPiano
[PIANO5] HonkyTonkPiano
[PIANO6] MellowPiano
※[PROGRAM]キー名は、バンク1の表記
MIDIチャンネルの設定
本機と接 続するMIDI機器のMIDIチャンネルを同じ番号 に設定します。
MIDIチャンネルには1...16があります。
1
[BANK]キーを長押しして、Settingモードに入ります。
2
[PROGRAM]キーの[PIANO5/E.P.5/ORGAN5]を押し、キーを点滅させます。
3
選ぶチャンネルが割り当てられた鍵盤C4...D#5の1つを押します。
C4=1ch、C#4=2ch、D4=3ch...D#5=16chの順に割り当てられています。
4
[BANK]キーを押してSettingモードを抜けます。
MIDIチャンネルは、外部音源をコントロールする場合と内部音源を鳴らす場合で共通の設
定となり ます。
C8C7C6C5C4C3C2C1
88
ローカル・コントロール・オン/オフの設定
本機の鍵盤を弾いたときに、内部音源は鳴らさないでMIDIやUSBで接続している 外部の音源だけを鳴
らす場合や、シーケンサーを接続してシーケンサー側でエコーバッ ク(シーケンサーが受信したデータを
送り返す動作)を設定したときに戻ってきた情報で二重に鳴るのを防ぐ場合は、本機をローカル・オフに
設定します。
通常はローカル・オンに設定 し、鍵盤を弾いたときに本機の音が鳴るようにします。
1
[BANK]キーを長押しして、Settingモードに入ります。
2
[PROGRAM]キーの[PIANO6/CLAVE/ORGAN6]を押し、キーを点滅させます。
3
C4(オン)、C#4(オフ)のうち、1つ を 押して選びます。
C8C7C6C5C4C3C2C1
4
[BANK]キーを押してSettingモードを抜けます。
Page 89

ローカル・コントロールの設定
ローカル・コントロール・オン
コンピューター
KBD/KNOB
取扱説明書
K61P
鍵盤/各コントローラー
SOUND/CTRL
ローカル・コントロール・オフ
コンピューター
KBD/KNOB
SOUND/CTRL
電源を切ると設定はリセットされ、ローカル・コントロール・オンに設定されます。
○○○○○○○○○○○○○○○○○○○○○○○○○○○○○○○○○○○○○○
内部音源
K61P
鍵盤/各コントローラー
内部音源
プログラム・チェンジの有効/無効
接続したMIDI機器に、プログラム・チェンジの情報を送受信する(有効)、またはしない(無効)のいずれ
かを設定します。
1
[BANK]キーを長押しして、Settingモードに入ります。
2
[PROGRAM]キーの[HARPSI1/VIBE/STRINGS1]を押し、キーを点滅させます。
C4(送受信する)、C#4(送受信しない)のうち、1つ を 押して選びます。
3
[BANK]キーを押してSettingモードを抜けます。
C8C7C6C5C4C3C2C1
89
Page 90

ボリ ューム・メッセージ・フィルタ ー
内部音源がコントロール・チェンジ7番のボリ ューム ・メッセ ージを受信しないよう に設定する ことがで き
ます。
ボリューム ・メッセージ・フィルターをオンにすると、内部音源はボリューム・メッセージを受信しなくなりま
す。オフにすると、コン トローラー部のKNOB1/KNOB2やSLIDERにコントロール・チェンジ7番のボ
リューム ・メッセ ージが割り振られている場合、KNOB1/KNOB2やSLIDERを操作す ると内部 音源 は そ
れらのメ ッセージを受信してレベルが変化してしまいます。
ボリューム ・メッセージ・フィルターをオンにすることで、本機コントローラー部のKNOB1/KNOB2や
SLIDERで内部音源のレベルが変化しなくなります。
1
[BANK]キーを長押しして、Settingモードに入ります。
2
[PROGRAM]キーの[HARPSI2/CHOIR/STRINGS2]を押 し、キーを点滅させます。
C4(オン)、C#4(オフ)のうち、1つ を 押して選びます。
C8C7C6C5C4C3C2C1
CC#07メッセージの流れ
オフの場合
コンピューター
内部音源
コン トローラー部
K61P
3
[BANK]キーを押してSettingモードを抜けます。
オンの場合
コンピューター
内部音源
コン トローラー部
※音源部のVolumeノブでのみ、
K61P
内部音源のレベルを調整でき
ます。
90
Page 91

取扱説明書
故障 とお思いになる前に
■電源が入らない
・ 電源スイッチが正しい位置に設定されていますか?(p.77「接続と電源の入れ方」)
・ 本機とコンピューターをハブを経由して接続していませんか?
電力不足なので別売りのACアダプターを使用してください。
■ドライバがインストールできない
・ Windowsの場合は、最初にドライバのインストーラーがインストールされます。このインストー
ラーを使ってドライバのインス トールを行ってください。
・ 付属のCD-ROMがCDドライブに正しく入っていますか?
付属のCD-ROMが正しく入っていることを確認してください。
・ CDドライブのレンズが汚れていませんか?
市販のレンズ・クリーナー でクリーニングしてください。
■ソフトウェアが反応しない
・ USBケーブルが正しく接続されていますか?
・ 接続したコン ピューターに本機は認識されていますか?
WindowsXPの場合は、コントロール・パネルの「サウンドとオーディオ・デバイスのプロパ
ティ」 、ハードウェアで確認してください。
ご使用になるコンピューターのハー ドウェア環境によっては、USB接続で本機を認識でき
ないことがあります。
・ 接続している機器やソフトウェアが、その機能に対応していない場合があります。接続している
機器またはソフトウェアの取扱説明書を参照し、確認してください。
■音が出ない(K61Pの場合)
・ 本機のボリュームが0になっていないか確認してください。
適切なレベルまでボリュームを上げてく ださい。
■音がとぎれる(K61Pの場合)
・ 最大同時発音数を越えています。
◎最大同時発音数について
本機は先に鳴っている音を消して、後で押さえた音を優先的にならす仕組みになっているため、
最大同時発音数を越えると音が切れてしまいます。本機の音色の中には1つの音色でも2つ以
上のオシレーター(音源回路の1音分)から、構成されている音色もあります。オシレーターが1
つで構成されている[HARPSI/VIBES]などの音色は最大同時発音数が60音です。オシレー
ターが2つで構成されている音色は最大同時発音数が30音です。また、エフェ クトを使用した
ときは、発音数がリバーブで10音、コーラスで3音ほど少なくな り ます。
■ノイズが入る(K61Pの場合)
・ コンピュ ーターによっ てはUSB接続した場合に、内部音源のサウン ドに ノイズが入ることがあり
ます。このような場合は別売りのACアダプ ターを使用し、電源スイッチを DCにします。
91
Page 92

仕 様
■コントローラー
・ キーボード:25鍵、49鍵、61 鍵ベロシティ対応標準鍵盤
・クリッカブル ・ ポインター
・ アサイナブル・ノブ×2
・ アサイナブル・キ ー × 2
・ オクターブ・シフ トア ップ/ダウン・キ ー
・ピッチ・ベンド・ホイール
・ アサイナブル・モジュレーシ ョン・ホイール
・ スライダー×1
■内部音源(K61Pの場合)
・ 音源 ステレオ・サンプリング音源
・ 同時発音数 60(最大)
・ 音色 24(8×3バンク)
・ピッチ トラン スポーズ、ファイン・チューニング
・ 音律 平均律、キルンベルガー、ヴェルクマイスター
・ エフェクトリバーブ、コーラス(各3 段階)
■接続端子
・ ペダル端子
・ MIDIOUT端子
・ USB端子
・ 電源端子(DC9V )
・ アウトプット端子(L/MONO、R)(K61Pのみ)
・ ヘッ ドホン端子(K61Pのみ)
■電源
・ USBバス電源方式(USB端子使用時)
・ DC9V、ACアダプター(別売り)
92
■消費電流
K25/K49/K61: USB バス電源使用時 約110mA
ACアダプター使用時 約120mA
K61P: USBバス電源使用時 約 300mA
ACアダプター使用時 約320mA
■外形寸法(W×D×H)
K25: 489mm×221mm×69mm
K49: 818mm×221mm×69mm
K61/K61P: 982mm×221mm×69mm
Page 93

取扱説明書
■本体重量
K25: 1.5kg
K49: 2.5kg
K61: 3.0kg
K61P: 3.2kg
■付属品
・ USBケーブル
・ CD-ROM(M1Leソフトウェア、K-SeriesEditor、ドライバ、インス トール・ ガイドなど収録)
・ 取扱説明書
・ MIDIインプリメンテーション・チャート
・ソフ トウェ ア使用許諾契約
■コンピューターに接続する場合の動作環境
Macintosh
対応OS: MacOSXver.10.3以降
対応コンピューター: MacOSXの動作環境を満たすUSBポート搭載のAppleMacintosh
Windows
対応OS: MicrosoftWindowsXPHomeEdition/Professional
対応コンピューター: WindowsXPの動作環境を満たすUSBポート搭載のコンピューター
(USBchipsetはIntel社製を推奨)
■オプション(別売り)
・ DC9VACアダプター
・ ペダル・スイ ッチ PS-1
製品の外観および仕様は予告なく変更することがあ ります。(2005年12月現在)
93
Page 94

MIDI Implementation Chart
Date : 2006. 1. 10
K25/K49/K61
Basic
Channel
Default
Changed
Aftertouch
Pitch Bend
Polyphonic (Key)
Monophonic (Channel)
Velocity
Note On
Note Off
Note
Number:
True Voice
Mode
Memorized
Messages
Altered
0 – 127
1 – 127
64
Memorized
[MIDI STUDIO CONTROLLER]
MOD wheel
PITCH wheel
Control
Change
0–127
1 – 16
1 – 16
Function Transmitted Recognized Remarks
*1
Controllers (KNOB1/2, SW1/2, Slider,
ClickPoint, MOD wheel, Pedal)
Page 95

Program
Change Variable Range
System
Real Time
Clock
Command
System Exclusive
System
Common
Song Position
Song Select
Tune
Mode 1: OMNI ON, POLY Mode 2: OMNI ON, MONO : Yes
Mode 3: OMNI OFF, POLY Mode 4: OMNI OFF, MONO : No
Aux
Messages
Local On/Off
All Notes Off
Active Sense
Reset
0 – 127
*
1
*
1
Notes
*1: Transmitting by allocating it to the controller becomes possible.
*2: It corresponds to Device Inquiry message besides KORG System Exclusive message.
*2
Page 96

MIDI Implementation Chart
Date : 2006. 6. 26
K61P
Basic
Channel
Default
Changed
Aftertouch
Pitch Bend
Polyphonic (Key)
Monophonic (Channel)
Velocity
Note On
Note Off
Note
Number:
True Voice
Mode
Memorized
Messages
Altered
0 – 127
1 – 127
64
Memorized
[MIDI STUDIO CONTROLLER]
MOD wheel
PITCH wheel
Control
Change
1
7
11
64
66
67
1 – 16
1 – 16
Function Transmitted Recognized Remarks
*1
Modulation wheel
Volume *2
Expression
Damper
Sostenuto
Soft Pedal
1 – 16
1 – 16
3
0 – 127
0 – 127
1 – 127
Page 97

Program
Change Variable Range
System
Real Time
Clock
Command
System Exclusive
System
Common
Song Position
Song Select
Tune
Mode 1: OMNI ON, POLY Mode 2: OMNI ON, MONO : Yes
Mode 3: OMNI OFF, POLY Mode 4: OMNI OFF, MONO : No
Aux
Messages
Local On/Off
All Notes Off
Active Sense
Reset
0 – 127
*
1
*
1
Notes
*1: Transmitting by allocating it to the controller becomes possible.
*2: It receives it when the setting of Volume message filer is off.
*3: It sends and receives it when enable/disable setting of the program change is enable.
*4: It corresponds to Device Inquiry message besides KORG System Exclusive message.
120
121
0-127
*4
All Sound Off
Reset All Controllers
Controllers (KNOB1/2, SW1/2, Slider,
ClickPoint, MOD wheel, Pedal)
0 – 23
0-23
123 – 127
*3
–
Page 98

*掲載されている会社名、製品名、規格名などは 、そ
れぞれ各社の商標または登録商標です。
* AppleおよびMacならびにMacOSは、Apple
Computer,Inc. の 登録商標です。
* BuiltforMacOSXグラフィックは、Apple
Computer,Inc. の商標です。
* WindowsXPは、MicrosoftCorporationの
登録商標です。
*製品の仕様や外観は、予告なく変更することがあ
ります。
保証規定(必ずお読みく ださい)
本保証書は、保証期間中に本製品を保証するも
ので、付属品類(ヘッドホンなど)は保証の対象
にな りません。保証期間内に本製品が故障した
場合は 、保証規定によって無償修理いたします。
1.本保証書の有効期間はお買い上げ日より 1ケ
年です。
2.次の修理等は保証期間内であっても有料修理
となります。
・消耗部品(電池、スピーカー、真空管、フェー
ダーなど)の交換。
・お 取 扱い 方 法が不適当の ために生じた故
障。
・天災(火災、浸水等)によっ て生じた故障。
・故障の原因が本製品以外の他の機器にある
場合。
・不当な改造、調整、部品交換などにより生じ
た故障または損傷。
保証書にお買い上げ日、販売 店名が未記入の
・
場合、または字句が書き替えられている場合。
・本保証書の提示がない場合。
尚、当社が修理した部分が再度故障した場合
は、保証期間外であっても、修理した日より3
ケ月以内に限り無償修理いたします。
3.本保証書は日本国内においてのみ有効です。
ThiswarrantyisvalidonlyinJapan.
4.お客様が保証期間中に移転された場合でも、保
証は引き続きお使いいただけます。詳しくは、
サービス・センターまでお問い合わせく ださい。
5.修理、運送費用が製品の価格より高くなること
があ りますので、あらかじめサービス ・センター
へご相談く ださい。発送にかかる費用は、お客
様の負担とさせていただきます。
6.修理中の代替品、商品の貸し出し等は、いかな
る場合においても一切行っておりません。
本製品の故障、または使用上生じたお客様の直
接、間接の損傷につ きましては、弊社はいっさい
の責任を 負いかねますの でご了承ください 。
本保証書は、保証規定により無料修理をお約
束するためのもので、これより お客様の法律
上の権利を制限するものではありません。
■お願い
1.保証書に販売年月日等の記入がない場合は無
効となり ます。記入できないときは、お買い上
げ年月日を証明できる領収書等と一緒に保管
してく ださい。
2.保証書は再発行致しませんので、紛失しないよ
うに大切に保管してください。
コルグK-Series 保証書
本保証書は、上記の保証規定により無料修
理をお約束するものです。
お買い上げ日 年 月 日
販売店名
アフターサービス
アフターサービスについてのご質問、ご相談は、
サー ビス・センターへお問い合わせください。商
品のお取り扱いについてのご質問、ご相談は、お
客様相談窓口へお問い合わせください。
お客様相談窓口
●サービス・センター:
〒143-0001 東京都大田区東海5-4-1
明正大井5号営業所コルグ物流センター内
TEL03(3799)9085
TEL03(3799)9086
98
Page 99

C 2006 KORG INC.
4015-2 Yanokuchi, Inagi-city, Tokyo 206-0812 Japan
 Loading...