

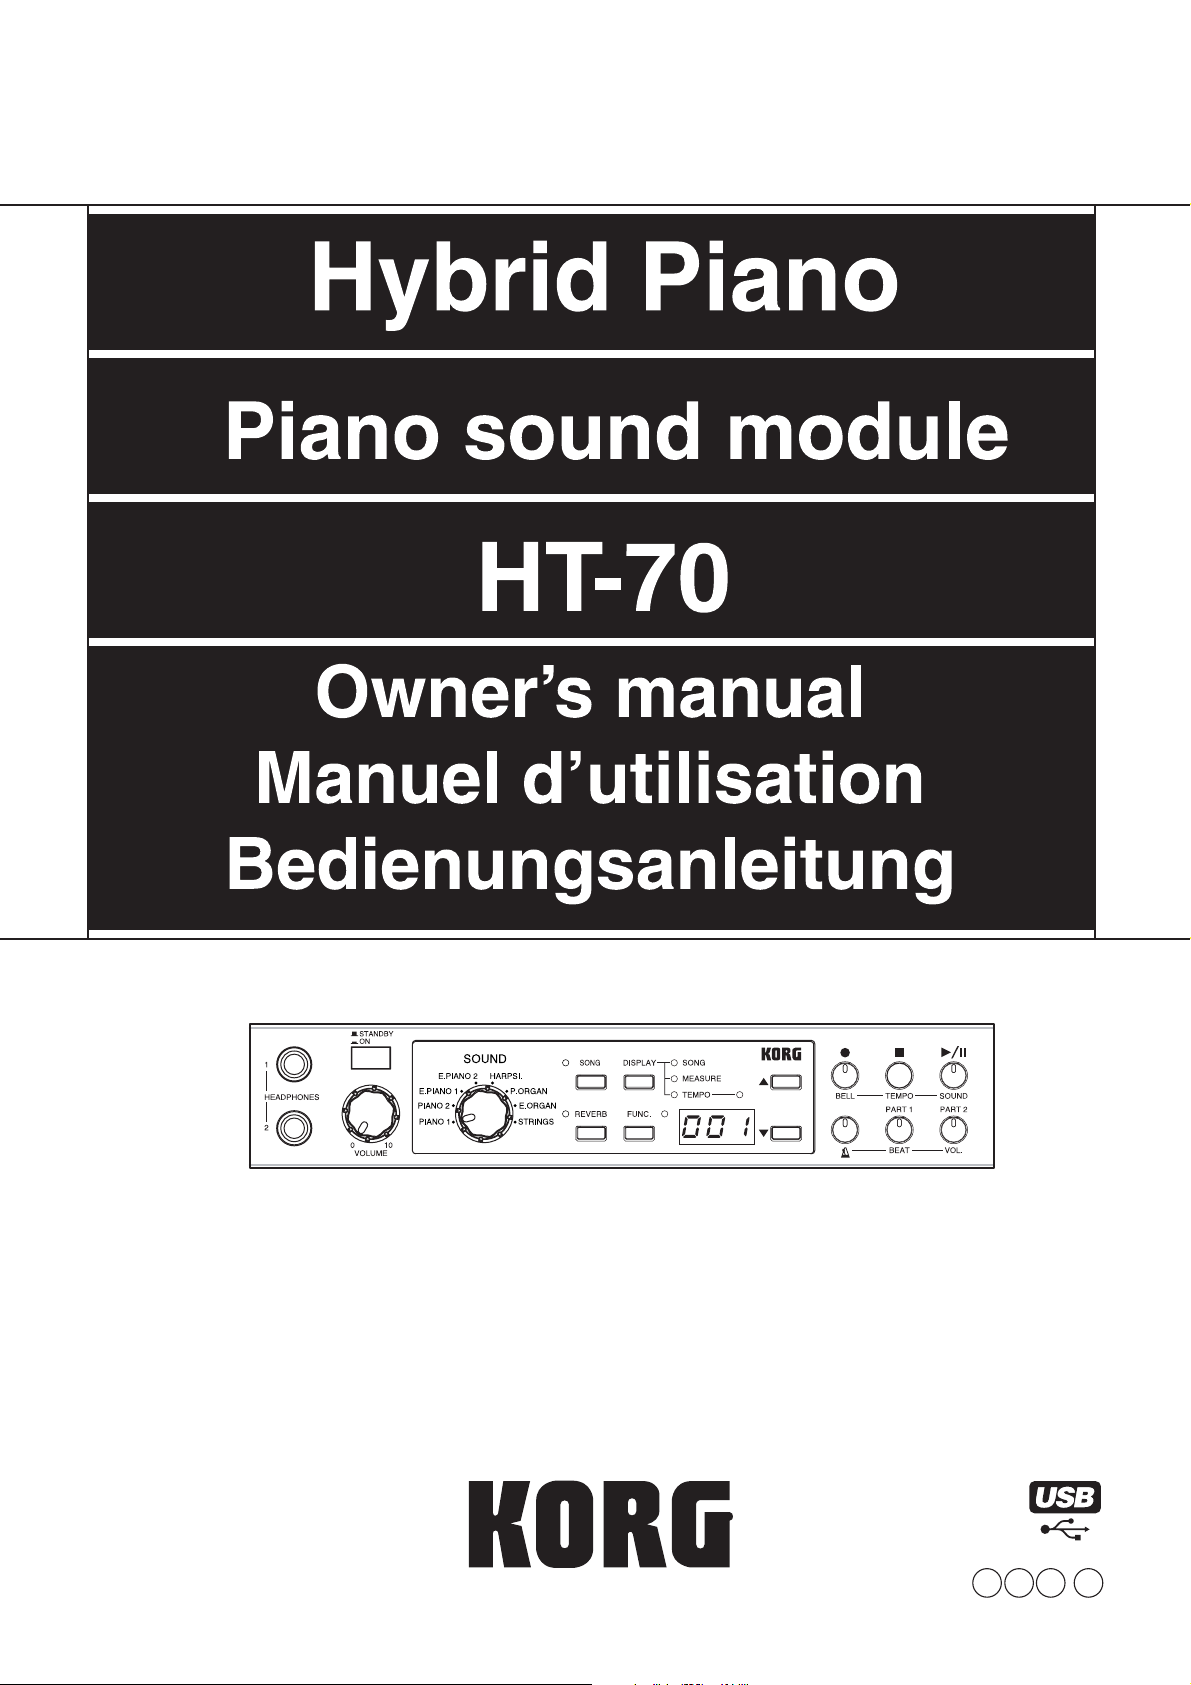
Korg HT-70 Owner's Manual
E
F G
2
Precautions
Location
Using the unit in the following locations can result in a
malfunction.
• In direct sunlight
• Locations of extreme temperature or humidity
• Excessively dusty or dirty locations
• Locations of excessive vibration
• Close to magnetic fields
Power supply
Please connect the designated AC adapter to an AC
outlet of the correct voltage. Do not connect it to an
AC outlet of voltage other than that for which your
unit is intended.
Interference with other electrical devices
Radios and televisions placed nearby may experience
reception interference. Operate this unit at a suitable
distance from radios and televisions.
Handling
To avoid breakage, do not apply excessive force to the
switches or controls.
Care
If the exterior becomes dirty, wipe it with a clean, dry
cloth. Do not use liquid cleaners such as benzene or
thinner, or cleaning compounds or flammable polishes.
Keep this manual
After reading this manual, please keep it for later reference.
Keeping foreign matter out of your
equipment
Never set any container with liquid in it near this
equipment. If liquid gets into the equipment, it could
cause a breakdown, fire, or electrical shock.
Be careful not to let metal objects get into the equipment. If something does slip into the equipment,
unplug the AC adapter from the wall outlet. Then contact your dealer or qualified installation technician for
assistance.
THE FCC REGULATION WARNING (for USA)
This equipment has been tested and found to comply with the
limits for a Class B digital device, pursuant to Part 15 of the FCC
Rules. These limits are designed to provide reasonable protection
against harmful interference in a residential installation. This
equipment generates, uses, and can radiate radio frequency
energy and, if not installed and used in accordance with the
instructions, may cause harmful interference to radio communications. However, there is no guarantee that interference will not
occur in a particular installation. If this equipment does cause
harmful interference to radio or television reception, which can
be determined by turning the equipment off and on, the user is
encouraged to try to correct the interference by one or more of
the following measures:
• Reorient or relocate the receiving antenna.
• Increase the separation between the equipment and receiver.
• Connect the equipment into an outlet on a circuit different
from that to which the receiver is connected.
• Consult the dealer or an experienced radio/TV technician for
help.
Unauthorized changes or modification to this system can void
the user’s authority to operate this equipment.
Notice regarding disposal (EU only)
When this “crossed-out wheeled bin” symbol is displayed on the product, owner’s manual, battery, or
battery package, it signifies that when you wish to dispose of this product, manual, package or battery you
must do so in an approved manner. Do not discard this
product, manual, package or battery along with ordinary household waste. Disposing in the correct man-
ner will prevent harm to human health and potential
damage to the environment. Since the correct method of disposal
will depend on the applicable laws and regulations in your locality, please contact your local administrative body for details. If
the battery contains heavy metals in excess of the regulated
amount, a chemical symbol is displayed below the “crossed-out
wheeled bin” symbol on the battery or battery package.
IMPORTANT NOTICE TO CONSUMERS
This product has been manufactured according to strict specifications and voltage requirements that are applicable in the country in which it is intended that this product should be used. If
you have purchased this product via the internet, through mail
order, and/or via a telephone sale, you must verify that this
product is intended to be used in the country in which you
reside.
WARNING: Use of this product in any country other than that
for which it is intended could be dangerous and could invalidate
the manufacturer’s or distributor’s warranty.
Please also retain your receipt as proof of purchase otherwise
your product may be disqualified from the manufacturer’s or
distributor’s warranty.
* All product names and company names are the trademarks or
registered trademarks of their respective owners.
2

Table of Contents
Introduction ................................................ 4
Main features .........................................................4
Parts and their function............................. 5
Operating panel .....................................................5
Rear panel .............................................................6
Getting ready to play and demo song...... 7
Getting ready to play..............................................7
Connecting the power............................................... 7
Silencing the acoustic piano sound .......................... 7
Headphones ............................................................. 7
If You Have Trouble Seeing the Control Panel......... 8
Turning the power on................................................ 8
Adjusting the volume ................................................ 8
Listening to the Sound Demos...............................8
Listening to the sound demos................................... 8
Playing the HT-70..................................... 10
Selecting a sound ................................................10
Using the pedals ..................................................10
Adding reverberation to the sound (Reverb)........11
Playing along with the metronome.......................12
To sound the metronome........................................ 12
Changing the Metronome Settings .........................12
Additional Features ..............................................14
Recording and
playing back your performance ......... 15
Recording your performance ...............................15
❏ Quick Recording (Recording a New Song) ......... 15
❏ Recording a Performance ................................... 15
❏ Saving a Recorded Song .................................... 16
❏ Deleting a Song................................................... 16
❏ Deleting a Part ....................................................16
❏ To See How Much
More Data Can Be Recorded............................ 16
Playing Songs ......................................................17
❏ Selecting a Song................................................. 17
❏ Pausing Song Play.............................................. 17
❏ Restarting a Playing Song................................... 17
❏ Changing the Tempo of a Playing Song .............17
❏ Moving to a Different Position (Measure)............ 17
❏ To Repeat Play of a
Specified Song Segment (“AB Repeat”) ........... 17
Additional Features ................................. 18
Changing the sensitivity of the keyboard ............ 19
Changing the key (Transpose)............................ 19
❏ To play the song a semitone higher.....................19
❏ The song is in the key of Bb but you want
to play it using the fingering of the key of G.......19
Restoring the factory settings.............................. 19
MIDI ........................................................... 20
What is MIDI?...................................................... 20
Making MIDI connections.................................... 20
MIDI channels ..................................................... 20
Using the HT-70
as a multi-timbral sound module .................... 20
Local on/off setting.............................................. 20
Program changes................................................ 21
USB ........................................................... 22
Using MIDI through a USB Connection............... 22
USB Mode........................................................... 23
Appendix................................................... 24
Troubleshooting .................................................. 24
Using the HT-70
without silencing the acoustic piano............... 25
Error Messages................................................... 25
Specifications...................................................... 25
Feature List ......................................................... 74
Metronome Functions............................................. 74
General Functions #1 ............................................. 74
General Functions #2 ............................................. 74
General Functions #3 ............................................. 74
MIDI implementation chart .................................. 75
Conventions in this owner's manual
Switches
Switches on the HT-70 are enclosed in square brackets
[ ]
(☞p.■):Indicates a reference page.
: Indicates a function for the model with speak-
ers.
: Indicates a caution when using the HT-70.
: Indicates a hint when using the HT-70.
Adjusting the Pitch ...............................................18
Choosing a temperament.....................................18
Adjusting
the brightness of the sound (Brilliance)...........18
3

Introduction
Main features
• Diverse array of sounds (☞p.10)
Choose from eight high-quality sounds available only from Korg, including a concert grand piano.
Stereo sampling is used, letting you enjoy a pleasant spaciousness in addition to the rich expressiveness of a concert grand piano.
•Ten sound demos (☞p.8)
Ten built-in demo songs showcase the distinctive qualities of each sound.
• Effect functions (☞p.11, p.18)
Reverb and brilliance effects are included. You can set the reverb to any of three levels (depths) for
each voice. Use the brilliance settings to adjust the brightness of the sound.
•Pedal effects (☞p.10)
The piano pedals can be used to affect the HT-70’s internal sounds, with similar functionality.
•Metronome function (☞p.12)
The built-in metronome is widely adjustable—you can freely set the time signature, the tempo, the
volume, and the sound, and you can add a bell tone or digital tone for the accents.
•Touch Control function (☞p.19)
Keyboard dynamic response is one of the most important aspects of a piano, and the HT-70 lets you
choose from three different types of dynamic response.
• Adjustable pitch (☞p.18, p.19)
The built-in pitch controller lets you make fine adjustments to the pitch. The transpose feature lets
you change the performance key to match the key of another instrument or of a specific musical
piece.
•Temperament (☞p.18)
In addition to the standard equal temperament, you can choose from two classical temperaments
(Werckmeister and Kirnberger) for historically accurate performances.
• Recorder function (☞p.15)
The HT-70’s built-in recorder lets you record and play back your own performances.
• Connectors (☞p.6, p.20, p.22)
LINE OUT, MIDI, and USB connectors are provided, letting you connect the HT-70 to audio equipment, other MIDI equipment, or a computer.
4
Parts and their function
Operating panel
2
1
3
4
1. Headphone jacks
You can connect stereo headphones (phone plug) to
these jacks. Two stereo headphones can be connected simultaneously.
If you’re using the model with speakers and have
connected the included speakers, the included
speakers will not sound if you’ve connected headphones.
2. [POWER] switch
This switch toggles power between two states, ON
(multidisplay illuminated) and OFF (standby).
The instrument continues to receive trace power
while in standby state. If you wish to shut the power
completely off, unplug the AC adapter’s power cord
from the wall outlet.
3. [VOLUME] knob
This controls the volume of the signal that is sent
from the headphones and line out jacks (☞p.8).
On models with speakers, this also controls the volume of the speakers.
4. Sound selector
Use this to select sounds (☞p.10).
You can choose from eight sounds: PIANO 1, 2,
E.PIANO (electric piano) 1, 2, HARPSI. (harpsichord), P.ORGAN (pipe organ), E.ORGAN (electric
organ), and STRINGS (strings).
5. [SONG] switch and LED
Use this switch to select a song to be played or
recorded. Press this switch together with the
[REVERB] switch to play one of the built-in sound
demos (☞p.8).
6. [DISPLAY] switch and LEDs
Changes the content of the multidisplay. The illuminated LED indicates the current content.
12
8
13 14
5
6
10
9
7
11
When the instrument is set to Function mode, you
use this switch to change the value of a setting(☞p.74)
7. TEMPO LED
Flashes in time with the song during playback and
recording.
8. Recorder section
Use these buttons to start, pause, resume, and stop
playback or recording (☞p.15).
When the [ ] switch is flashing, you use these buttons to set the metronome’s features: the bell accent,
the tempo, and the metronome sound.
9. [REVERB] switch and LED
Sets the reverb effect (☞p.11). Also used together
with the [SONG] switch to play any of the built-in
sound demos (☞p.8 ).
10.[FUNC.] switch and LED
Sets the instrument into Function mode, so that you
can carry out various non-performance settings and
actions (save or delete a song, select temperament,
make MIDI settings, etc.) (☞p.74).
11.Multidisplay
Displays one of several types of information, as
identified by the illuminated [DISPLAY] LED. May
show metronome tempo, recorder tempo, recorded
song number, measure within the song, etc.
Examples
During song play…
Song No.
Measure
(location in song)
Tempo
During memory writing…
(Cycling display)
During AB repeat…
Dot On / Flashing / Off
On / On (out of range) / Off
5
12.[▲] and [▼] switches
Use these to adjust the metronome and recorder
tempos, and to select values for various settings.
13.[ ] switch
Turns the metronome ON or OFF. Hold the switch
down if you wish to change the metronome settings
(☞p.12).
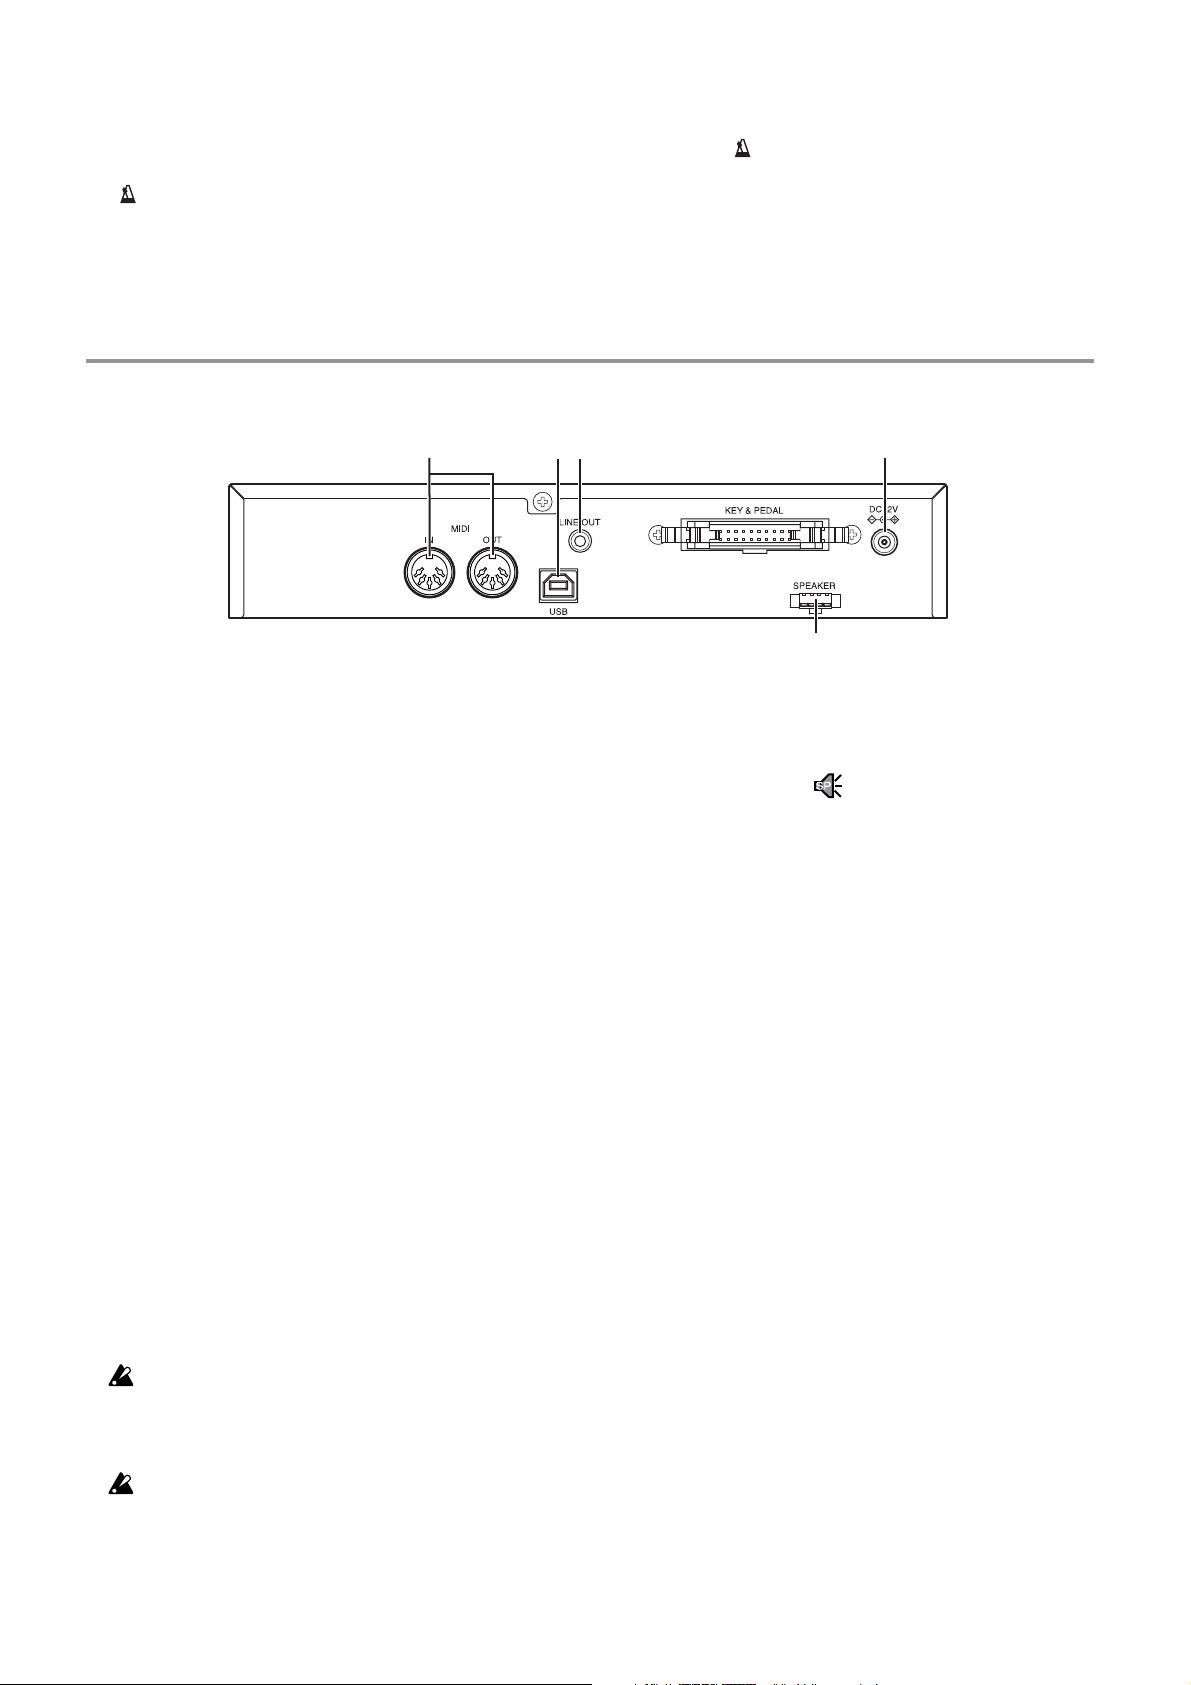
Rear panel
14.[PART 1] and [PART 2] switches
Selects the part for recording or playback (☞p.15).
When the [ ] switch is flashing, you use these buttons to set the volume, time signature, and other
settings.
1
1. MIDI connectors
You can connect these connectors to MIDI devices
such as synthesizers, sequencers, or rhythm
machines in order to send and receive data (☞p.20).
IN
This connector receives MIDI messages. Connect
this to the MIDI OUT connector of the external
MIDI device that will be controlling the HT-70.
OUT
This connector transmits MIDI messages. Connect
this to the MIDI IN connector of the external MIDI
device that the HT-70 will be controlling.
243
5
4. DC12V jack
Connect the included AC adapter here (☞p.7).
5. Speaker connector:
Connects to the dedicated speakers.
2. USB port
You can use a USB cable from this port to connect
the HT-70 directly to your computer in order to
transfer data (☞p.22).
3. LINE OUT jack
You can connect this jack to the input jack of your
amplified speaker system and listen to the HT-70
through your system, or connect it to your recording device and record the sound of the HT-70. Use a
stereo mini-plug cable.
You must make all connections with the power
turned off. Careless operation may damage the HT70 or the device to which it’s connected, or may
cause malfunctions.
Connection cables are sold separately. You will need
to obtain the appropriate commercially-available
cables for your equipment.
6
Getting ready to play and demo song
Getting ready to play
Connecting the power
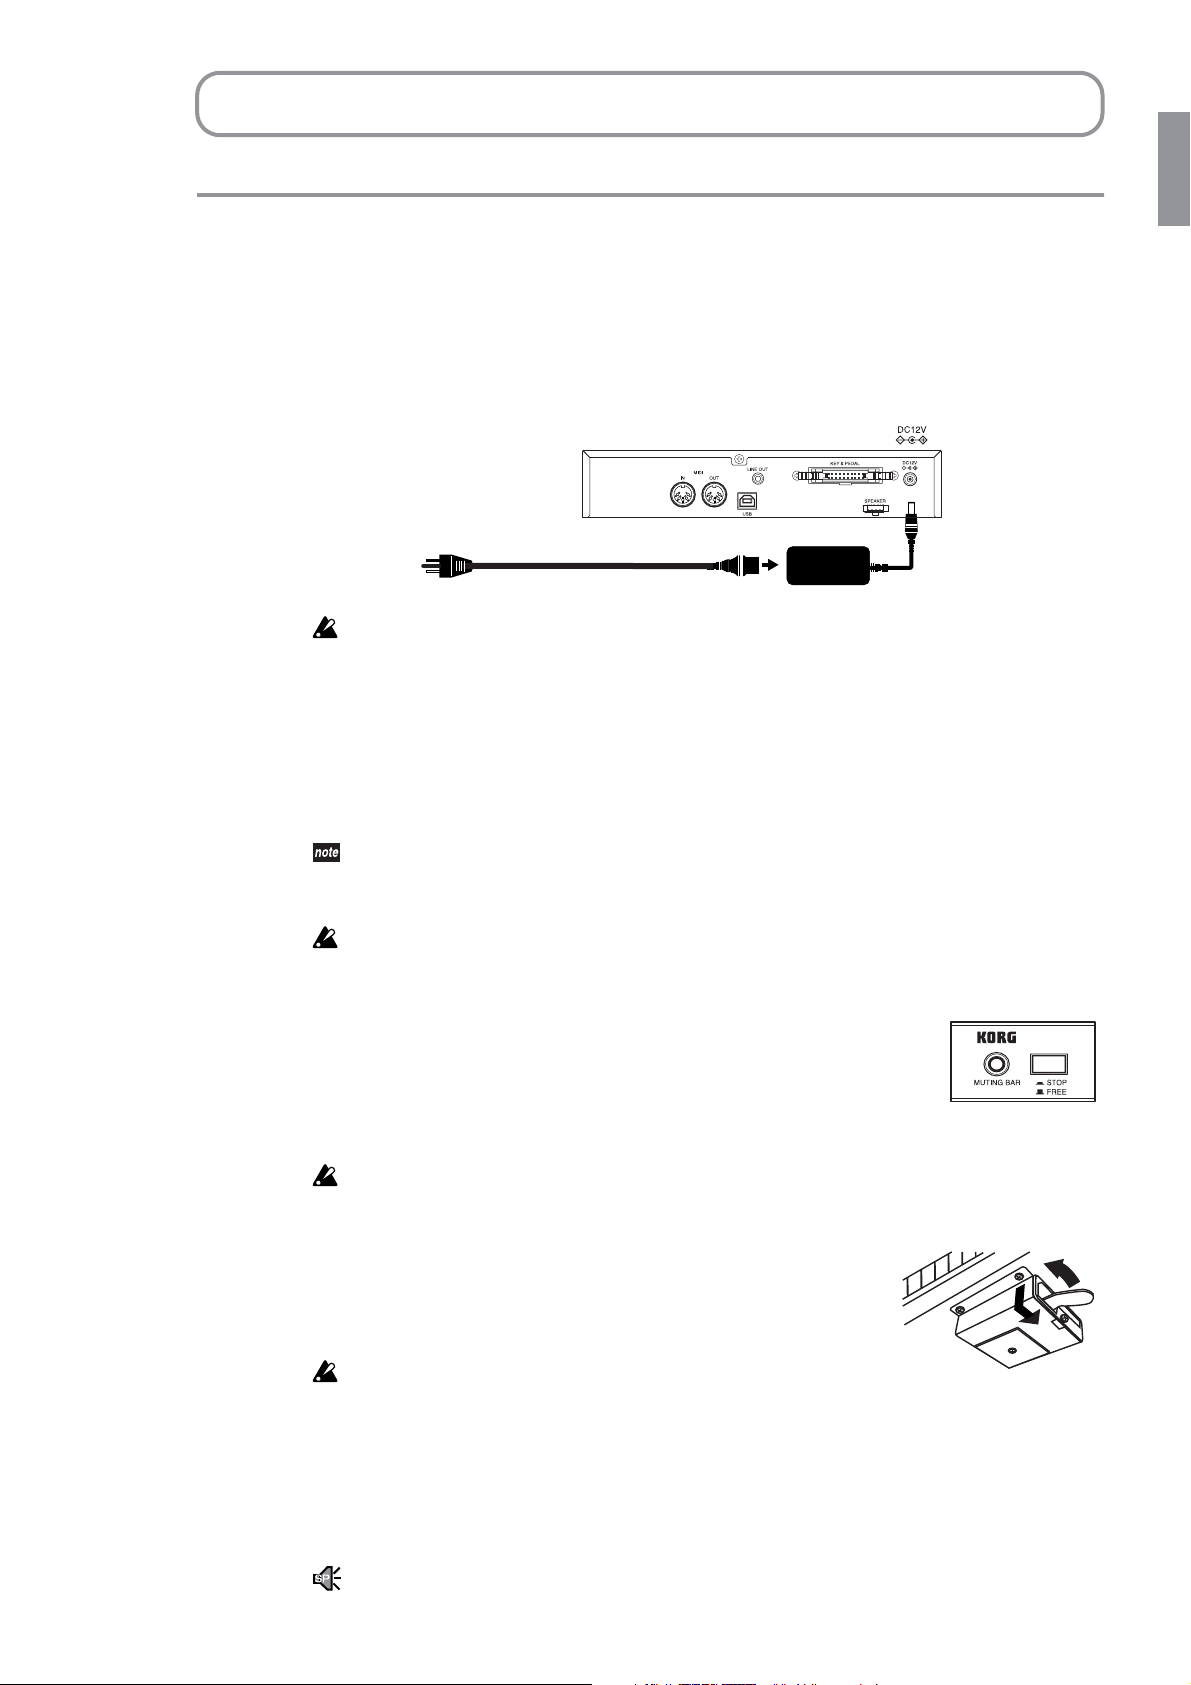
1. Be sure that the HT-70 power is off.
2. Connect the included power cord to the included AC adapter, and plug the adapter’s
DC plug into the DC12V connector on the HT-70.
Fig.1
to an AC outlet
Use the supplied AC adapter only. Use of another AC adapter may result in damage to the unit.
Bottom panel of piano (HT-70 rear panel)
Power cable for AC adapter
Silencing the acoustic piano sound
Use the muting unit to set or release the mute for the acoustic piano. Your muting unit
may be either electric (Fig. 2.1) or manual (Fig. 2.2). If the muting unit on your instrument
does not match either of these figures, please consult your dealer or a qualified service
agent for usage instructions.
All the functions of the HT-70 are available regardless of whether the acoustic piano is silenced.
The section “Using the HT-70 without silencing the acoustic piano” on page 25 describes some
ways to use the HT-70 together with the acoustic piano sound.
Even if the piano is silenced, there may be some leakage of the acoustic piano sound if you play
a chord strongly.
If you have an electric muting unit...
To silence the piano, press in the switch on the muting unit located at
the base of the piano (Fig. 2.1), so that the switch is in the STOP position. The “MUTING BAR” LED will light up to indicate that muting
is ON. To return to acoustic piano sound, press the switch again, so
that it pops out to the FREE position and the LED goes off.
AC adapter
DC plug
Fig. 2.1
Don’t operate while you’re playing.
If you have a manual muting unit...
As shown in Fig. 2.2, pull the lever of the mute unit located on
the bottom panel of the piano toward yourself, and lower the
lever to lock it into place. To go back to playing the acoustic
piano conventionally, return the lever to its original position.
Don't operate this lever while you're playing
Headphones
Headphone jacks are located on the front of the sound units (☞ p.5). These jacks accept
standard stereo headphone plugs.
Since there are two headphone jacks, two people can enjoy the sound of the piano.
On the model with speakers, plugging in headphones will mute the included speakers. Use headphones if the sound might be an annoyance to those nearby, such as when practicing at night.
Fig. 2.2
7
If your headphones use a “mini → phone” adapter plug, grasp the adapter plug when connect-
Fig.4
Softer
Louder
ing or disconnecting your headphones.
When using headphones, you should protect your ears by avoiding extended listening at high volume.
If You Have Trouble Seeing the Control Panel
You can adjust the angle to improve the view. Simply loosen the bolt and screw on each
side (left and right), adjust the angle as desired, and then retighten.
Be sure to retighten securely after making the adjustment.
Fig.3
Tu rning the power on
Press [POWER] to turn the power on. The multidisplay comes on when the power is
turned on. To turn the power off, press [POWER] again, so that the multidisplay goes dark.
When you turn the power off, all settings other than those stored in nonvolatile memory return
to their factory defaults. Recorded performance data remains in memory and is not lost.
Adjusting the volume
Turn the [VOLUME] knob to adjust the volume. (See figure 4.)
This controls the volume that is output from the headphone
jacks. Turn the knob toward the left to decrease the volume, or
toward the right to increase the volume.
On the model with speakers, this also controls the volume that is output from the speakers. For
some sounds, the sound from the speakers may be distorted if you set the volume to the maximum position.
Underside of Piano
Screw
Bolt
Listening to the Sound Demos
The HT-70 includes ten demo songs designed to highlight the features of its eight different sounds.
Listening to the sound demos
List of sound demos
No. Sound Song title Composer
1 PIANO1 La Campanella F.Liszt
2 PIANO1 The Path Of Truth Jordan Rudess
3 PIANO1 Rhapsody in Blue G.Gershwin
4 PIANO2 Someone To Watch Over Me G.Gershwin
5 E.PIANO1 Ramble M.Sakaguchi
6 E.PIANO2 KORG Original KORG
7 HARPSI. Invention No.8 J.S.Bach
8P.ORGAN Toccata in D moll J.S.Bach
9 E.ORGAN KORG Original KORG
10 STRINGS First Snow M.Sakaguchi
8
1, 4
2
1
2
2
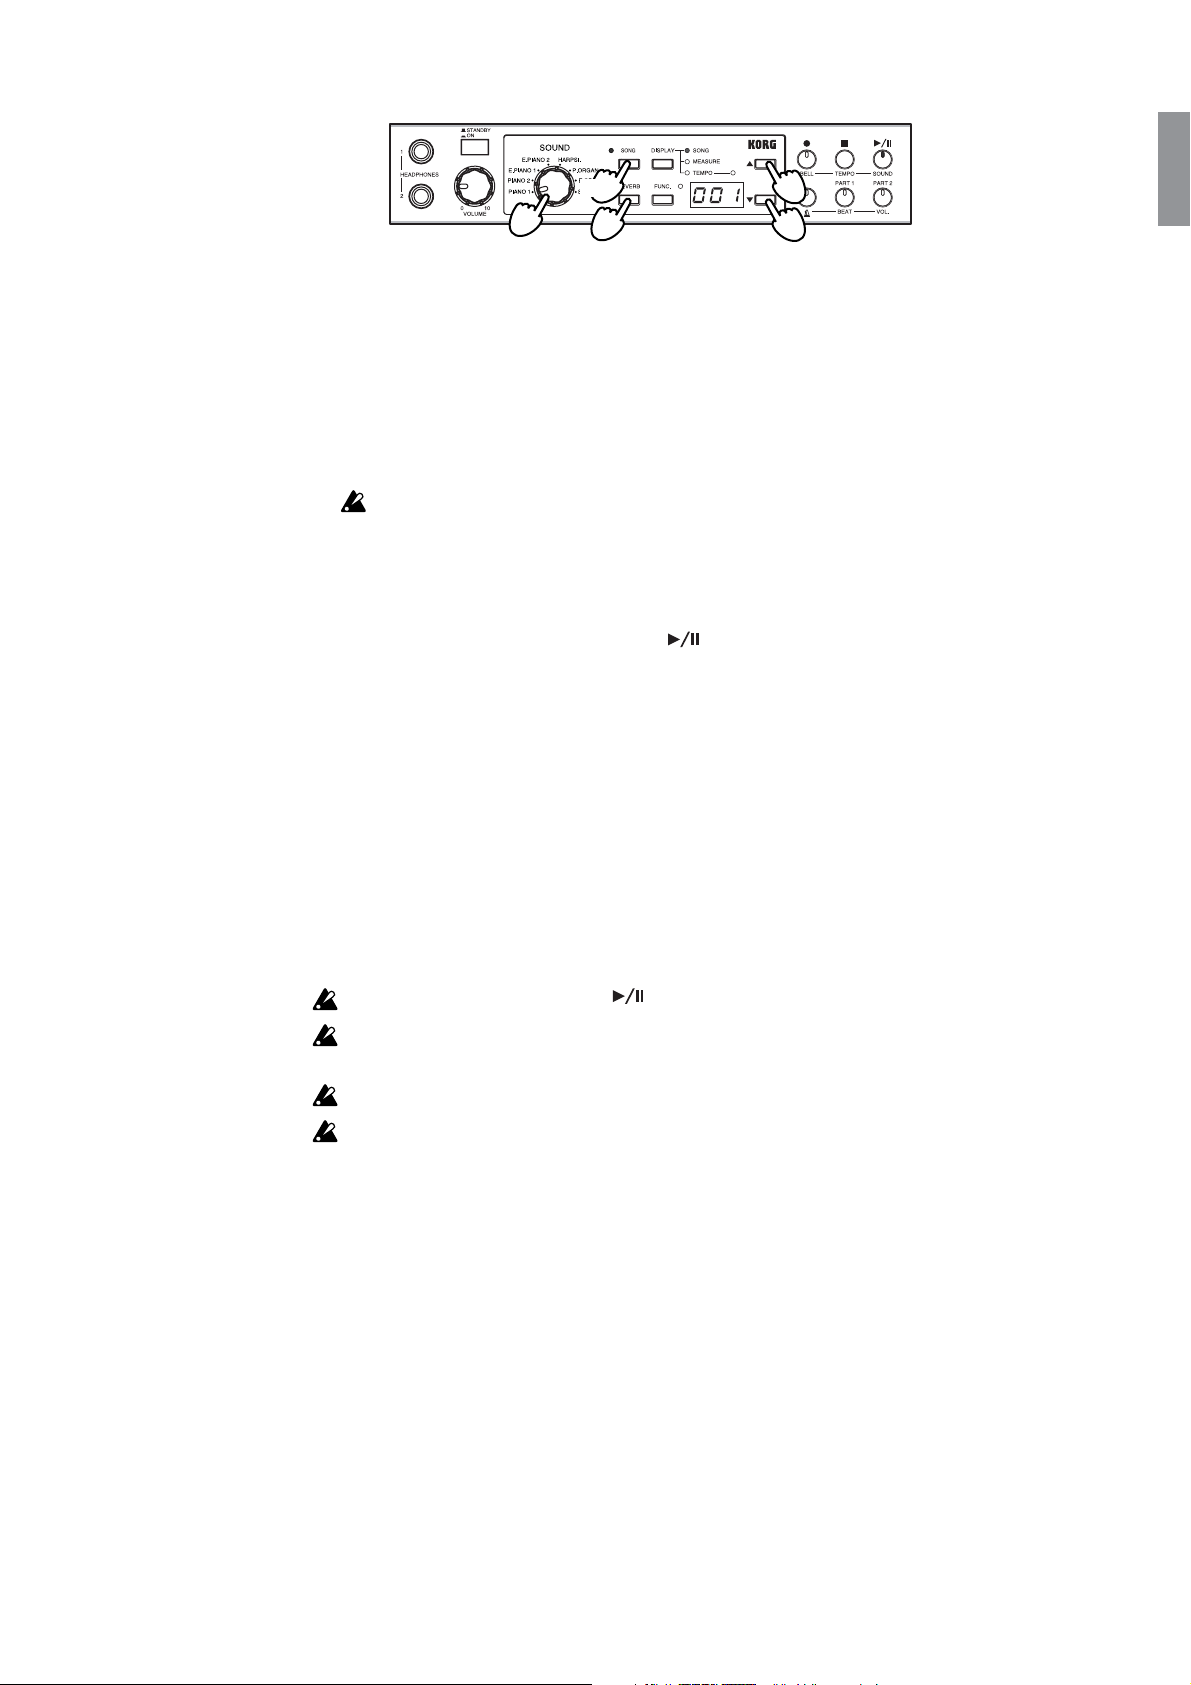
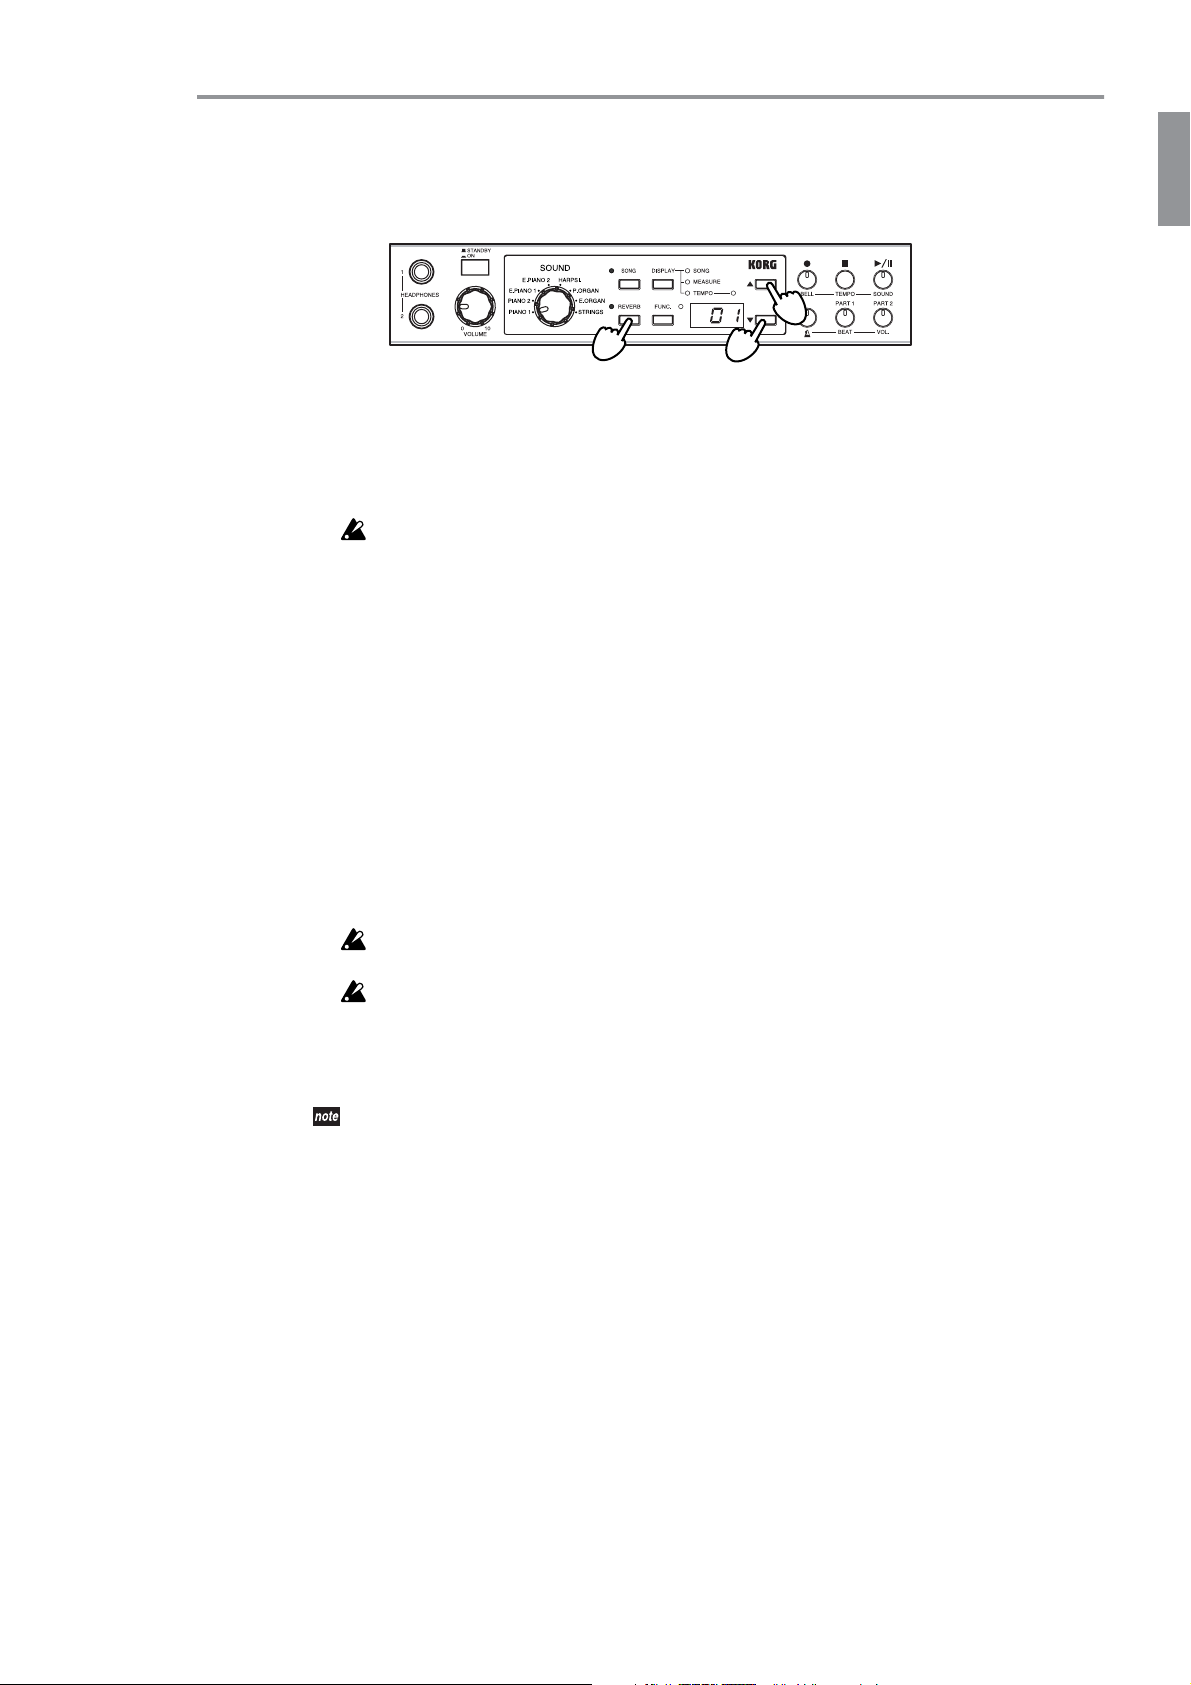
1. Simultaneously press the [SONG] switch and [REVERB] switch.
The [SONG] switch’s LED begins flashing.
2. Use the sound selector to choose the song you want to hear from the above list; the
selected demo song will begin playing.
If you don’t select a song within three seconds, the songs will begin playing consecutively, starting with sound demo number 1. When sound demo number 10 has finished
playing, playback will return to sound demo number 1 and will continue.
To select demo 2 or demo 3, turn the selector to Piano 1 and then press [▲] or [▼] as necessary.
3. When the sound demo you selected has finished playing, playback will continue in succession to the next song.
4. During demo play, you can use the [ ] switch to pause and resume playback. (The
switch lamp comes on solid during play, and flashes during pause.) Pressing the [■]
switch will stop playback and reset the position to the beginning of the demo.
5. To stop playback, press the [SONG] switch.
The [SONG] switch will go dark, playback will stop.
• If you want to switch to a different sound demo, use the sound selector to switch the
demo song.
For example if sound demo number 1 is playing, but you want to switch to number 10,
simply turn the sound selector to STRINGS. The sound demo playback will switch to
number 10 and continue playing. Alternatively, you can press the [▲][▼] switches to
select a song. In this case, the position of the sound selector is ignored.
Demo play starts automatically ([ ] lights up) when you change the selection.
While a sound demo is playing, you can play the keyboard to play the same sound, but you
can’t switch to a different sound.
You can’t change the reverb setting while a sound demo is playing.
You can’t change the tempo of a sound demo.
9
Playing the HT-70
Selecting a sound
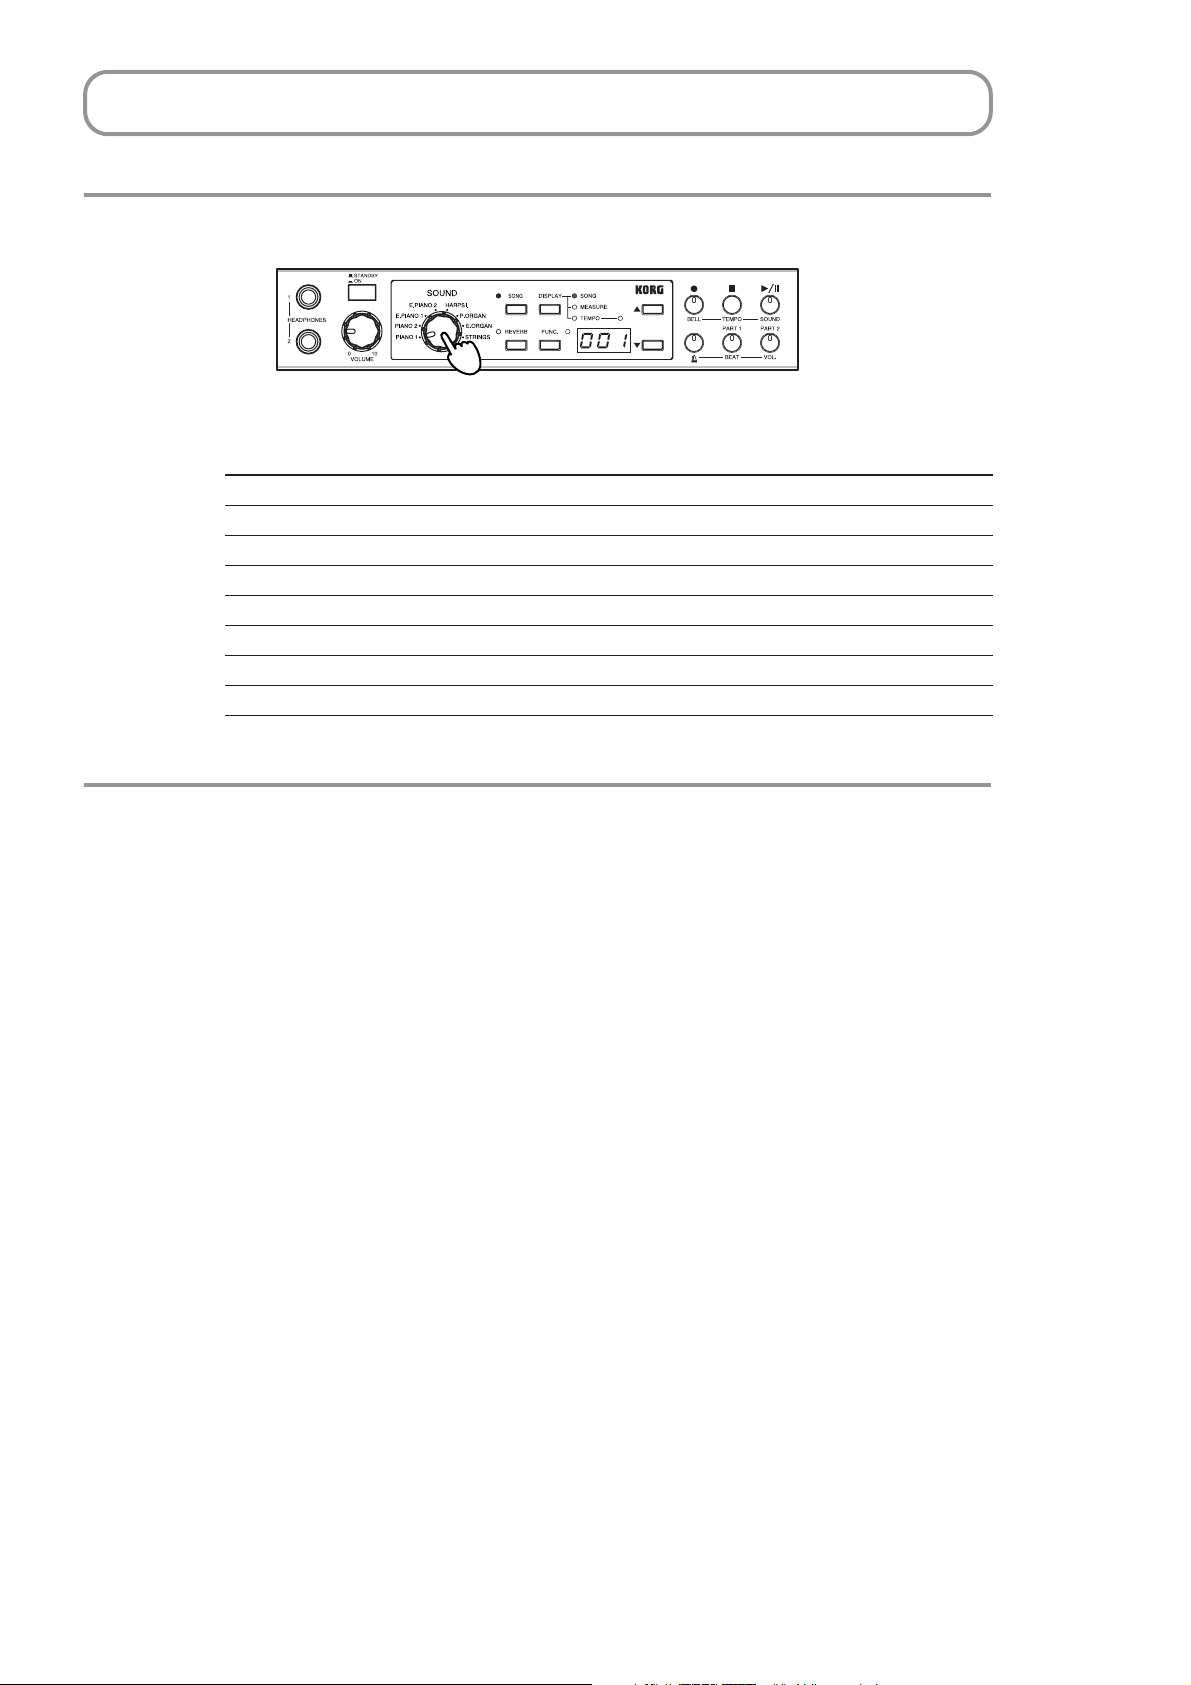
•Turn the sound selector to select a sound.
Sound Description
PIANO1 A top-quality grand piano sound with superb presence
PIANO2 A concert grand sound, with rich bass notes
E.PIANO1 A light and clear electric piano sound
E.PIANO2 A crisp electric piano sound with a nice attack
HARPSI. A classical and realistic harpsichord sound
P.ORGAN A solemn pipe organ sound
E.ORGAN A funky jazz organ sound
STRINGS An ensemble sound with violin and other bowed strings
Using the pedals
Damper pedal, Sostenuto pedal and Soft pedal can be applied to the HT-70’s sounds.
You can use the pedals of the acoustic piano to make your performance more expressive.
Damper pedal
The notes will be sustained while you hold down the pedal, creating a rich resonance.
The depth to which you press the pedal will control the amount of damper that is
applied (half-pedal effect).
Sostenuto pedal
Use this pedal to sustain specific notes only. Stepping on the pedal sustains all the
notes that you are currently pressing on the keyboard; additional notes that you play
while the pedal is already down are not sustained.
Soft pedal
The sound will be softer and milder while you hold down the pedal. The depth to
which you press the pedal will control the amount of soft-pedal that is applied (halfpedal effect).
10
Adding reverberation to the sound (Reverb)
You can add reverberation (reverb) to the sound to create the spacious ambience typical
of a performance in a concert hall.
• Reverb will be alternately turned on or off each time you press the [REVERB]
switch.
When you change the setting, the HT-70 will write the new setting to memory. During
this time, the multidisplay will indicate that writing is in progress (☞p.5).
Do not turn the HT-70 power off while writing is in progress. Doing so may cause loss or
corruption of memorized settings and song data.
Setting the Reverb Depth
1. Hold down [REVERB] for about one second.
The switch’s LED begins flashing.
2.
Press [▲] or [▼] to select the desired depth. The multidisplay shows the current setting.
The display shows “01” (shallow), “02” (standard), or “03” (deep).
3. When you have made the setting, press [REVERB] again to return to the original display.
When you change the setting, the HT-70 will write the new setting to memory. During
this time, the multidisplay will indicate that writing is in progress (☞p.5 ). Once writing is completed, the [REVERB] LED will either light up or go dark to indicate whether
reverb is currently on or off for the sound selected by the sound selector.
Do not turn the HT-70 power off while writing is in progress. Doing so may cause loss or
corruption of memorized settings and song data.
If you switch to a different sound or turn the power off before writing the new depth setting
into memory, the reverb depth will return to its original setting.
You can specify the reverb on/off and depth settings independently for each sound. With
the factory settings, they are set to the settings typical for each sound.
Since the Piano 1 sound simulate the string resonance of an acoustic piano, a small amount of
reverb will remain even if you turn reverb off.
11
Playing along with the metronome
It’s convenient to use the metronome when you want to play to an accurate tempo.
To sound the metronome
1, 2
1. Press the [ ] switch.
The [ ] switch will light.
2. To stop the metronome, press the [ ] switch once again.
The [ ] switch will go dark.
Changing the Metronome Settings
Settings described here (with the exception of tempo and time signature) are retained even
while the power is off. When you press [ ] after making each change, the HT-70 automatically
writes the new value into nonvolatile memory. During this time, the multidisplay will indicate
that writing is in progress (
☞p.5 ).
Do not turn the HT-70 power off while writing is in progress. Doing so may cause loss or corruption of memorized settings and song data.
Changing the Tempo Setting
3
2
3
1. Hold down [ ] for at least one second.
The switch begins flashing.
2. The TEMPO indicator LED (next to the [DISPLAY] switch) comes on, and the multidisplay shows the current tempo setting.
If the TEMPO indicator LED does not come on, press [TEMPO (■)].
3. Use [▲] or [▼] to set the desired tempo.
Press briefly to change the value by 1, or hold the switch down to change continuously.
If you wish to reset the tempo to its factory default, press [▲] and [▼] at the same time.
The available range is ( =) 4 to 250.
4. When you have made set the value, press [ ] again.
The HT-70 returns to its previous state. The [ ] switch stops flashing (either goes off
or else comes on solid).
1, 4
12
Changing the Loudness
3
3
1, 4
2
1. Hold down [ ] for at least one second.
The switch begins flashing.
2. Press the [VOL. (PART 2)] switch.
The switch lights up, and the multidisplay shows the current volume setting.
3. Use [▲] or [▼] to set the desired level.
Press briefly to change the value by 1, or hold the switch down to change continuously.
The available range is 0 to 127.
4. When you have set the value, press [ ] again.
The HT-70 returns to its previous state. The [ ] switch stops flashing (either goes off
or else comes on solid).
Changing the time signature
3
1, 4
3
2
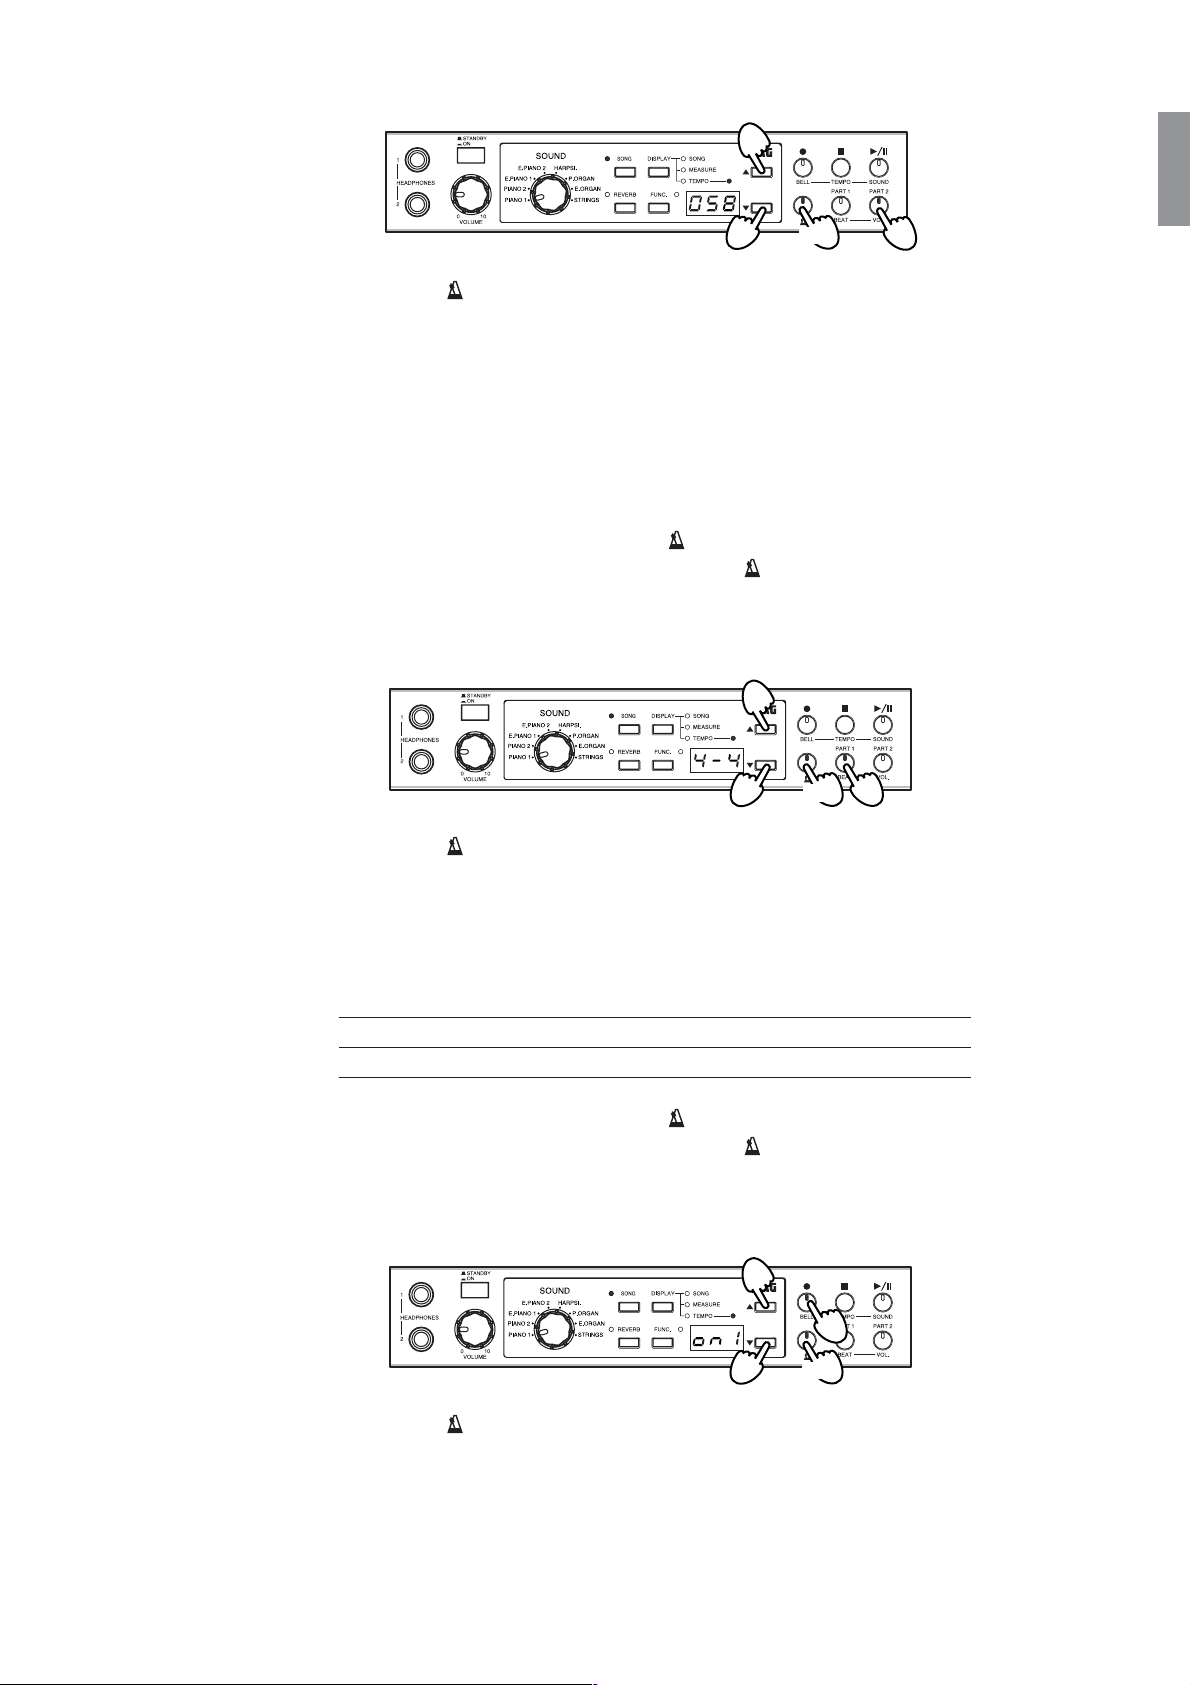
1. Hold down [ ] for at least one second.
The switch begins flashing.
2. Press the [BEAT (PART 1)] switch.
The switch lights up, and the multidisplay shows the current time signature.
3. Use [▲] or [▼] to set the desired time signature.
Display 1-2 2-2 1-4 2-4 3-4 4-4 6-8
Time signature 1/2 2/2 1/4 2/4 3/4 4/4 6/8
4. When you have set the value, press [ ] again.
The HT-70 returns to its previous state. The [ ] switch stops flashing (either goes off
or else comes on solid).
Changing the Accent
3
2
3
1. Hold down [ ] for at least one second.
The switch begins flashing.
1, 4
2. Press the [BELL(●)] switch.
The switch lights up, and the multidisplay shows the current accent sound.
13
3. Use [▲] or [▼] to set the desired accent sound.
Display oFF on1 on2
Accent sound None Standard Bell or digital tone*
*A bell tone is produced if you have set the metronome to sound like a pendulum; a
digital tone is produced if you have set the metronome to have a digital sound (see
“Changing the Metronome Sound” on page 14, below).
4. When you have set the value, press [ ] again.
The HT-70 returns to its previous state. The [ ] switch stops flashing (either goes off
or else comes on solid).
Changing the Metronome Sound
3
2
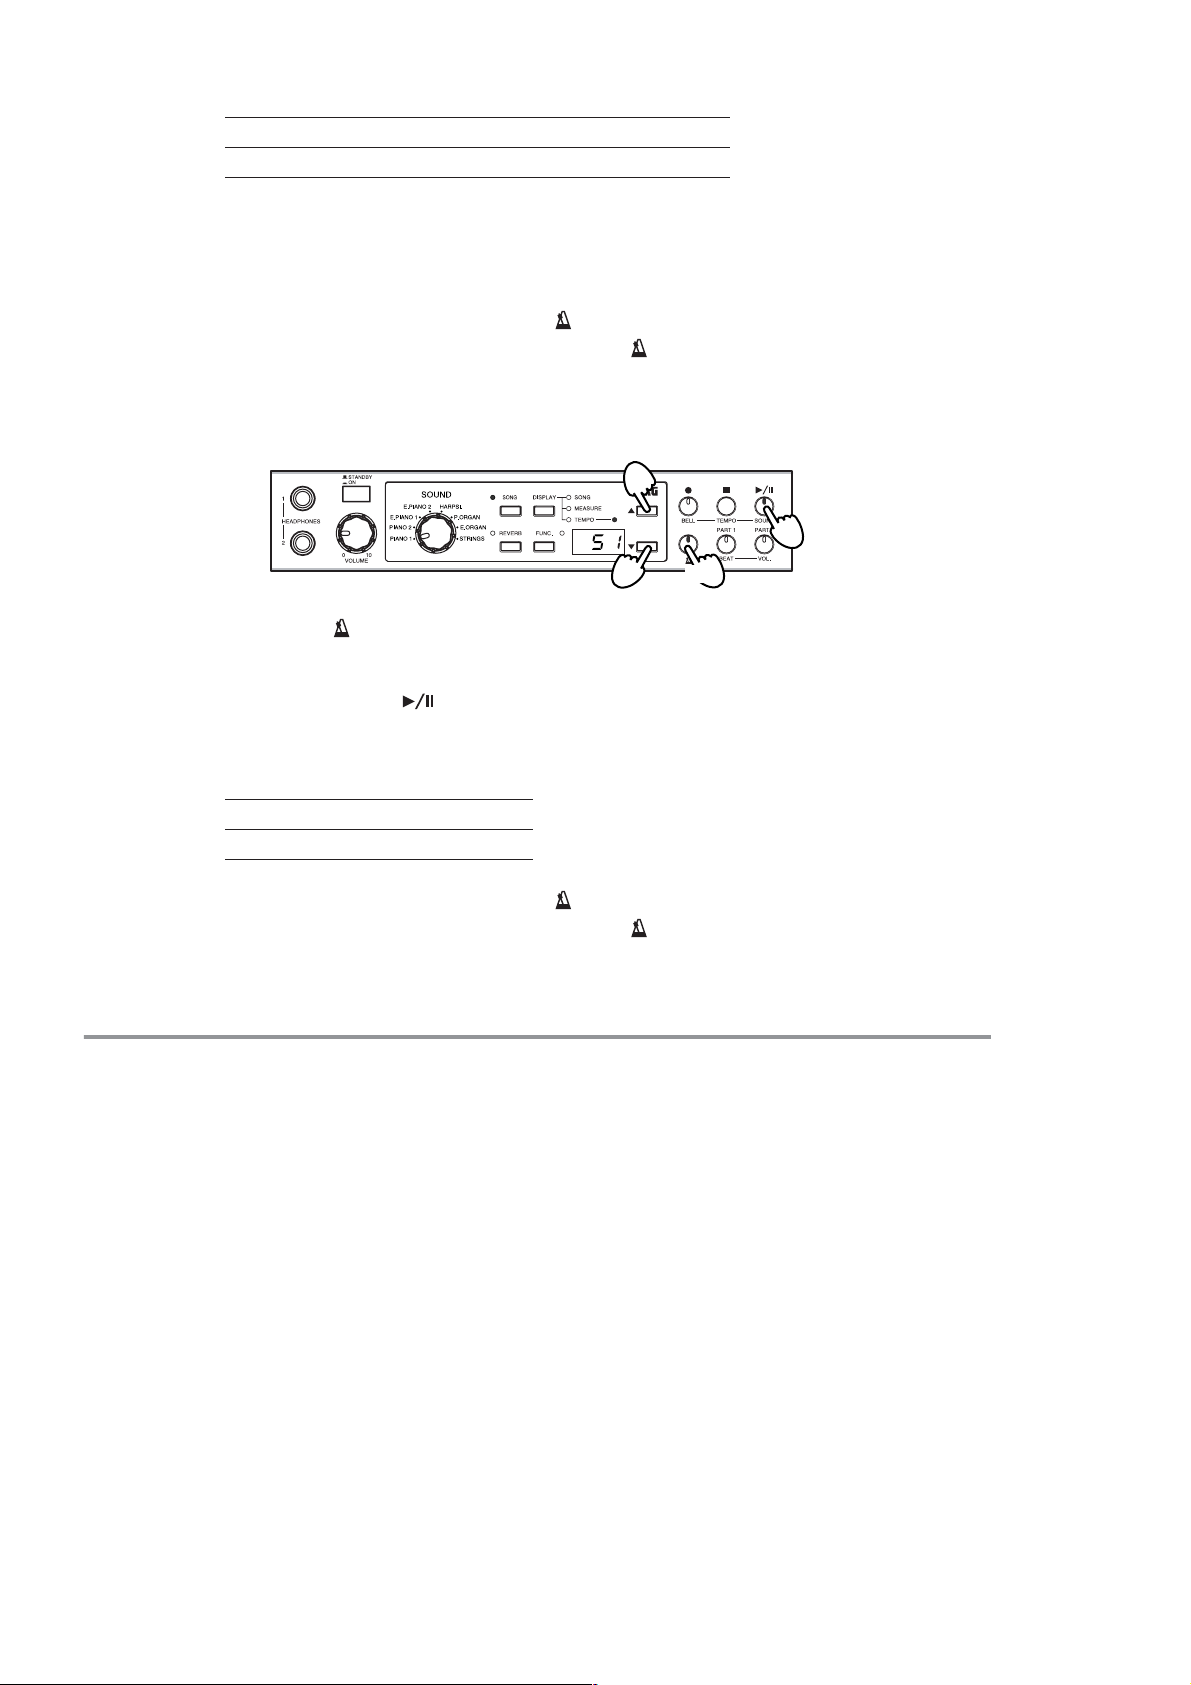
1. Hold down [ ] for at least one second.
The switch begins flashing.
2. Press the [SOUND( )] switch.
The switch lights up, and the multidisplay shows the current sound.
3. Use [▲] or [▼] to set the desired sound.
Display S1 S2
Sound Pendulum Digital
4. When you have set the value, press [ ] again.
The HT-70 returns to its previous state. The [ ] switch stops flashing (either goes off
or else comes on solid).
Additional Features
In addition to the capabilities presented above, your HT-70 also provides a number of
other useful performance-related features. For information, refer to the indicated pages.
3
1, 4
14
• Pitch control: refer to “Adjusting the Pitch” on page 18.
• Te mperament: refer to “Choosing a temperament” on page 18.
• Brilliance: refer to “Adjusting the brightness of the sound (Brilliance)” on page 18.
• Touch Control: refer to “Changing the sensitivity of the keyboard” on page 19.
• Transpose: refer to “Changing the key (Transpose)” on page 19.
• Restoring the factory settings: refer to “Restoring the factory settings” on page 19.
Recording and playing back your performance
The HT-70 provides a recorder that can record and play back your keyboard performance as easily as when using a tape recorder.
There are two recording parts. You can use these to record separate
songs, or use them to separately record the right- and left-hand parts of
the same song and then play back both parts simultaneously.
Recording your performance
When you complete a recording or editing session, please wait for
the HT-70 to finish writing the new data to nonvolatile memory
before turning the power off. Turning the power off while writing is
in progress may result in loss or corruption of recorded songs, data,
and settings.
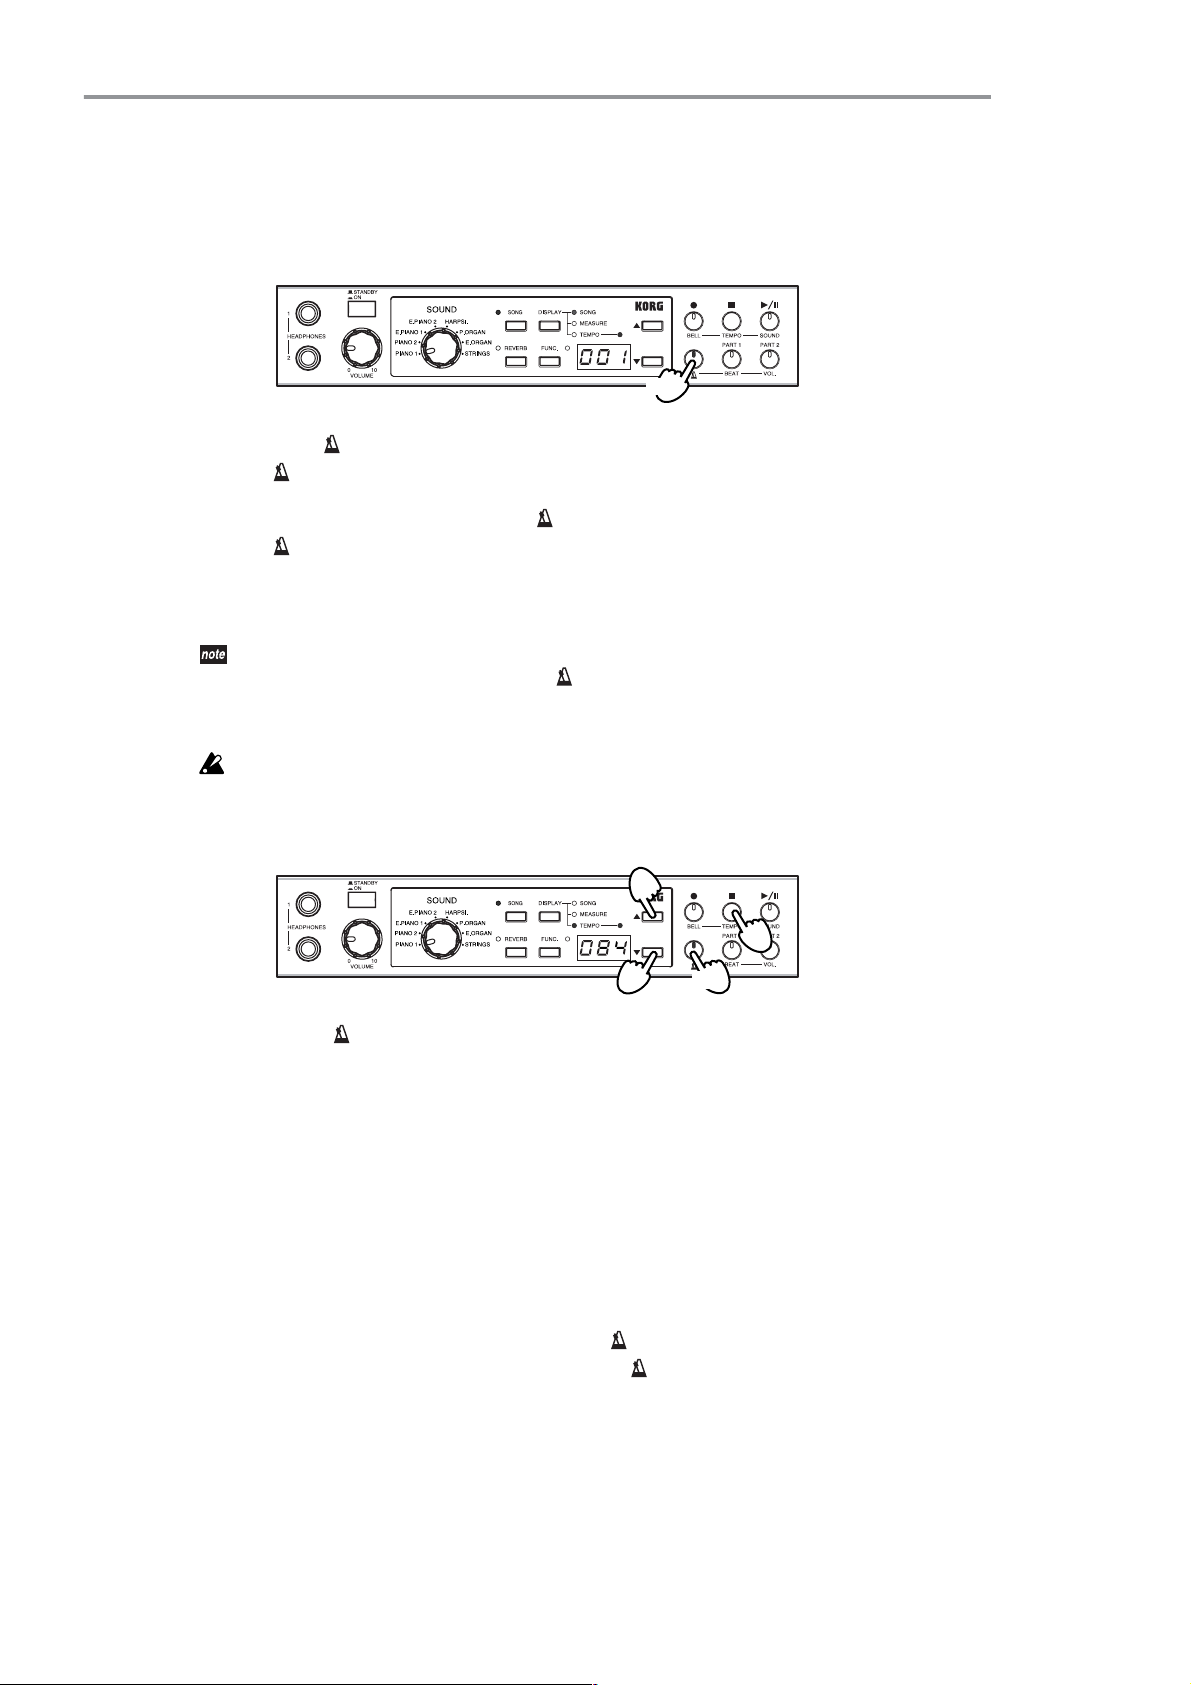
❏ Quick Recording (Recording a New Song)
The onboard recorder is very easy to use. Let’s start by making a “quick
recording.”
1. Turn the sound selector to select the sound to be recorded.
2. Press [●] and [ ] at the same time.
[●] switch lights up, and [PART 1] and [PART 2] start flashing.
3. A currently empty user song number appears, flashing, on the multidisplay.
If there are no more free song numbers available, the already used
number “U01” appears, solid, in the display.
4. If you wish to save the recording to a different song number, press
[▲] or [▼] as necessary. You may choose any number from U01 to
U99.
Song numbers that are currently empty will appear flashing on
the multidisplay. Numbers that are already in use will appear
solid.
If you select a song number that is already in use, the new
recording will overwrite the existing recorded song.
5. To start recording, hit a key on the keyboard or else press [ ].
You can also start recording by sending a MIDI message to the
selected MIDI channel (
If you want to record in time with the metronome, hold down
[] (so that it lights up) and press [ ]. The HT-70 will count
out a two-measure pick-up and then automatically start recording. (For information about how to set the time signature,
tempo, and other metronome features, see “Changing the Metronome Settings” on page 12.)
6. To end the recording, press [■], [ ], or [●].
The [PART 1] switch goes dark, and [PART 2] lights up solid.
When you end the recording, the HT-70 automatically writes the new
data into nonvolatile song memory. During this time, the multidisplay will indicate that writing is in progress.
To Add Performance Data to Song Recorded by Quick
Recording
If you have changed the song selection after making your quick
recording, you must first change the selection back again before
you can add to the recording. To change back to the song, carry out
steps 1 to 4 under “To Add Performance Data to a Recorded Song,”
below.
1. Press [●].
The [●] switch lights up.
2. If necessary, turn the sound selector to select the sound to be
recorded.
3. Press [PART 1] one or more times, until it starts flashing.
☞p.20).
When you record onto a previously-recorded part, the previous data will
be erased and overwritten by the newly-recorded performance. Before
you continue, make sure that you don’t mind losing the previouslyrecorded performance.
You can continue to save recorded performances until the memory
becomes full.
4. To start recording, hit a key on the keyboard or else press [ ].
5. To end the recording, press [■], [ ], or [●].
The [PART 1] switch lights up solid, and the HT-70 automatically
writes the recorded data into nonvolatile song memory. During write
processing, the multidisplay will indicate that writing is in progress.
❏ Recording a Performance
To Create and Record to a New Song
Yo u can start a quick recording by pressing [●] and [ ] at the same
time (see page 15 “❏ Quick Recording (Recording a New Song)” ).
If no user songs are currently in memory, you can also start quick recording by pressing [●] by itself.
An “E07” will appear on the multidisplay if user song memory
becomes full. If you wish to save more recorded data, you must first
delete one or more existing user songs (☞p.16).
To Record to an Existing Song
The onboard recorder holds two parts for each song.
When you make a quick recording without pressing either the [PART 1]
or the [PART 2] switch, the recording automatically records to Part 2.
This means that you can later record additional performance data into
Part 1 for that song.
In general, you may have numerous user songs where only one part is
recorded. You are always free to record more data into the empty parts of
these songs.
You may also have numerous two-part songs recorded. Again, you are
free to over-record either part at any time, or to delete either part
(☞p.16) and then record it again later.
The status of each part is indicated by the indicator lamp in the corresponding PART switch, as follows.
[PART 1] / [PART 2] Switch Status of Part
Dark The part is empty or muted.
This part is not ready to record.
Lit solid The part contains recorded data.
This part is not ready to record.
Flashing This part is ready to record.
To Add Performance Data to a Recorded Song
1. Press [SONG].
The [SONG] LED lights up.
2. Press [▲] or [▼] as necessary to select the user song to record to.
To help make your selection, you can audition each selected song by
pressing [ ].
3. Press [SONG] again.
The [SONG] LED goes dark.
4. Press [●].
The [●] switch lights up.
The PART switch for the already recorded part will be lit solid. Press
the dark PART switch one or more times, until it starts flashing.
15

If both parts of the song are recorded, you need to erase one of
the parts before you can record more data to the song (refer to
“❏ Deleting a Part” on page 16).
5. If you wish to save the recording to a different song number, press
[▲] or [▼] as necessary. You may choose any number from U01 to
U99.
Song numbers that are currently empty will appear flashing on
the multidisplay. Numbers that are already in use will appear
solid.
If you select a song number that is already in use, the new
recording will overwrite the existing recorded song.
6. To start recording, hit a key on the keyboard or else press [ ].
7. To end the recording, press [■], [ ], or [●].
When you end the recording, the HT-70 automatically writes the new
data into nonvolatile song memory. During this time, the multidisplay will indicate that writing is in progress.
Important Information about Recording
• When you record new performance data to the empty part of a
recorded song, the resulting song length (in measures) will be the
length of the longer part.
• The performance is recorded using the sound selected by the sound
selector while recording is in progress (while the [●] switch is lit
solid). You can use the selector to change the sound during the pickup or any time during actual recording (while the PART switch is
flashing and the [●] switch is lit solid).
If you save into a song number that is already used for another
song, that song will be overwritten and lost. Be careful to avoid
overwriting songs that you wish to keep.
4. Press [●].
The HT-70 writes the song data into memory. The multidisplay
shows the writing is in progress.
5. When the song has been saved (when the multidisplay no longer
shows that writing is in progress), press [FUNC.] again.
The [FUNC.] LED goes dark and the HT-70 returns to its previous
state.
❏ Deleting a Song
1. With the recorder stopped, press [FUNC.].
The [FUNC.] LED lights up.
2. Press [DISPLAY] one or more times, until “dEL” appears on the multidisplay.
When you release the switch, the multidisplay shows the current
user song number.
3. Press [▲] or [▼] as necessary to select the song you wish to delete.
4. Press [●] to delete the song.
The multidisplay indicates that writing is in progress as the song is
deleted.
5. When deletion is completed (when the multidisplay no longer shows
that writing is in progress), press [FUNC.] again.
The [FUNC.] LED goes dark, and the HT-70 returns to its previous
state.
• If you change the tempo while recording is in progress, the tempo
change is included in the recording.
•To change the tempo during recording: Press [DISPLAY] as necessary
until the TEMPO LED lights up, and then use [▲] or [▼] to change
the tempo value shown on the multidisplay.
•You can record a time signature, but you cannot change this time signature after the song has been recorded. If you are adding to an existing recording, you can use a different time signature for the
additional part.
•To set the start measure for a recording: Before beginning the recording, press [DISPLAY] as necessary until the MEASURE LED lights
up, and then use [▲] or [▼] to change the measure number on the
multidisplay.
❏ Saving a Recorded Song
When you complete a recording, the HT-70 automatically saves the
recorded performance data into a user song. For the song name, the
HT-70 uses the number selected when recording was started.
The HT-70 can save up to 99 user songs. Each song can hold up
to 999 measures, and up to 45,000 notes.
Copying a Song
The HT-70 automatically stores the recorded data into the song number
selected at the time of recording. You cannot select a different song number when recording is finished. If you wish, however, you may copy the
stored song into a different location (song number).
1. With the recorder stopped, press [FUNC.].
The [FUNC.] LED lights up.
2. Press [DISPLAY], so that “SAv” appears on the multidisplay.
When you release the switch, the multidisplay will show the destination song number.
3. Press [▲] or [▼] as necessary to select the desired destination song
number.
The multidisplay shows the selected song number. Currently unassigned numbers are shown flashing; numbers that are already in use
for another song are shown solid.
❏ Deleting a Part
1. With the recorder stopped, press [FUNC.].
The [FUNC.] LED lights up.
2. Press [DISPLAY] several times, until “P.dL” appears on the multidisplay.
When you release the switch, the multidisplay shows part information.
Display ALL P1 P2
Part(s) Both parts Part 2 Part 2
3. Press [▲] or [▼] as necessary to select the part(s) to be deleted.
4. Press [●] to delete the part(s).
The multidisplay indicates that writing is in progress as the song is
deleted.
5. When deletion is completed (when the multidisplay no longer shows
that writing is in progress), press [FUNC.] again.
The [FUNC.] LED goes dark, and the HT-70 returns to its previous
state.
❏
To See How Much More Data Can Be Recorded
If you press [FUNC.] while recording or while standing by to record
(that is, whenever the [●] LED is lit), the multidisplay will show the percentage of space still remaining. The display will remain visible for
about five seconds.
If 100% of space is still available, you have room to record approximately
45,000 notes within as many as 999 measures.
If you wish to retain performance data over the long term, it is recommended that you use a USB connection to save and manage your data
(☞p.23).
16
Playing Songs
❏ Selecting a Song
1. Press [SONG].
The [SONG] switch and the [DISPLAY] switch’s SONG LED light up.
The multidisplay shows the user song number.
• The first time you press [SONG] following power-on, the multidisplay shows the lowest song number that contains a song.
• If you have already selected one or more songs during the current
session, the multidisplay shows the song number of the most
recently selected song.
• If no user songs exist in memory, the multidisplay shows “---”.
2. Press [▲] or [▼] as necessary to select the desired song number on
the multidisplay.
3. Press [ ] to start play.
The HT-70 starts play of the selected song.
Playing of Song Parts
When you select a song to play, one or both PART switches will light up,
indicating that the corresponding part contains performance data. If a
PA RT switch stays dark, this means that the part is empty. During play,
you can fully or partially mute the playback from a non-empty part by
pressing the corresponding PART button (so that the PART switch goes
dark).
How to Set the Sound Level for a Muted Part
1. With the [SONG] LED lit, press [FUNC.].
The [FUNC.] LED lights up.
2. Press the PART switch for the part you wish to mute.
The switch goes dark.
3. Press [DISPLAY] several times, until “P.Lv” appears on the multid-
isplay.
When you release the switch, the multidisplay shows the current
level setting. (The factory setting is 30.)
4. Press [▲] or [▼] as necessary to set the desired level.
You can set the value from 00 (full mute) to 90.
5. Press [FUNC.] again to complete the setting.
The [FUNC.] LED goes dark.
❏ Pausing Song Play
1. Press [ ] during song play to pause the playback.
The switch starts flashing.
2. Press [ ] again to resume playback.
The switch comes on solid, and the TEMPO LED flashes in sync with
the tempo.
❏ Restarting a Playing Song
1. Press [■] during song play to stop the song.
The song position returns to the beginning of the song.
2. Press [ ] to start song play from the beginning.
❏ Changing the Tempo of a Playing Song
1. Press [DISPLAY] several times, until the TEMPO LED lights up.
The multidisplay shows the current tempo value.
2. Press [▲] or [▼] as necessary to adjust the tempo.
Press briefly to change the value by 1, or hold the switch down to
change continuously. The available range is ( =) 4 to 250.
❏ Moving to a Different Position (Measure)
1. Press [DISPLAY] several times, until the MEASURE LED lights up.
The multidisplay shows the current measure number.
2. Press [▲] or [▼] as necessary to select a different measure.
3. If you move to a different measure while playback is stopped, the
song state will change from stopped to paused (and ( ) will start
flashing). You can then start play from the new position pressing
().
You can return to the start position of user a song (measure 001) by
pressing [▲] and [▼] at the same time.
❏ To Repeat Play of a Specified Song
Segment (“AB Repeat”)
You can set up repeated play of a specified segment of the song. You
define the segment by its start measure and end measure. Proceed as follows.
1. With the [SONG] LED lit, press [FUNC.].
The [FUNC.] LED lights up.
2. Press [DISPLAY] several times, until “Ab.r” appears on the multidisplay.
When you release the switch, the multidisplay shows the repeat ON/
OFF setting. (The factory setting is “oFF”.)
3. Press [▲] or [▼] to turn the repeat feature “on”.
A dot appears at the bottom right corner of the multidisplay.
4. Press [DISPLAY] again, so that “A.” appears on the multidisplay.
When you release the switch, the multidisplay shows the current
start measure. (The factory setting is 001.)
5. Press [▲] or [▼] as necessary to select the desired start measure.
6. Press [DISPLAY] again, so that “b” appears on the multidisplay.
When you release the switch, the multidisplay shows the current end
measure. (The factory setting is 001.)
7. Press [▲] or [▼] as necessary to select the desired end measure.
8. Press [FUNC.] to complete the setting.
The [FUNC.] LED goes dark.
9. Press [ ] to start repeat play. Play will start at the start measure,
continue to the end measure, and then return to the start measure
and continue looping.
The dot at the bottom right of the multidisplay stays on solid while
playback is within the AB repeat range, and flashes if playback is
moved outside of that range.
10.To cancel repeat play, press [▲] or [▼] (see Step 3) to turn the feature off.
The dot disappears from the multidisplay.
During AB repeat play, the dot at the lower right of the multidisplay remains visible while the display is showing tempo, song
number, or measure (☞p.5). The dot is also visible while you are
setting up song features (☞p.74).
The repeat feature turns off automatically (and start and end measures
both return to 001) when you select a different song, begin recording, or
start some other type of operation.
17
Additional Features
As an electronic piano, the HT-70 offers numerous convenient features
that you can easily use to adjust the instrument’s sound, characteristics,
and operation.
Adjusting the Pitch
The built-in pitch control function allows you to make fine adjustments
to the HT-70’s pitch. You can use this feature, for example, to adjust the
HT-70 so that it is in tune with other instruments.
You can adjust the pitch by up to ±25.0 Hz, in 0.5Hz increments. Adjustment is made with respect to note A4, which has standard pitch of 440.0
Hz and can be adjusted over the range 415.0 Hz to 465.0.Hz.
1. Be sure that the [SONG] LED is off, and press [FUNC.].
The [FUNC.] LED lights up.
2. Press [DISPLAY] several times, until “tUn” appears on the multidisplay.
When you release the switch, the multidisplay shows the last three
digits of the current pitch setting. (The factory setting is 40.0.)
Choosing a temperament
The HT-70 lets you choose from several temperaments (scale tunings).
Many classical compositions were composed in historical eras in which
the notes of a keyboard scale were tuned somewhat differently than the
“equal temperament” commonly used today. For historically authentic
performances of such music, the HT-70 lets you choose the Werckmeister
or Kirnberger historical temperaments as well as the equal temperament
used on most modern keyboard instruments.
•Werckmeister
III
This is the Werckmeister
music theoretician Andreas Werckmeister. This temperament was
created in the late Baroque era to allow relatively free modulation
between keys.
• Kirnberger
This is the Kirnberger
the early 18th century. This temperament is used mainly for tuning
harpsichords.
• Equal temperament
This is the temperament used by virtually all modern keyboard
instruments. In this temperament, every semitone is an equal distance apart, allowing you to play consistently in any key.
scale created by the German organist and
III
scale created by Johann Phillip Kirnberger in
3. Press [▲] or [▼] as necessary to change the setting.
Display 15.0 ... 39.5 40.0 40.5 ... 65.0
Pitch (Hz) 415.0 ... 439.5 440.0 440.5 ... 465.0
4. Press [FUNC.] to complete the setting.
The setting is stored and the [FUNC.] LED goes dark.
This setting is retained even while the power is off. When you press
[FUNC.] after changing the setting, the HT-70 automatically writes
the new setting into nonvolatile memory. During the write, the
multidisplay will indicate that writing is in progress.
Do not turn the HT-70 power off while writing is in progress. Doing
so may cause loss or corruption of memorized settings and song
data.
1. Be sure that the [SONG] LED is off, and press [FUNC.].
The [FUNC.] LED lights up.
2. Press [DISPLAY] several times, until “ScL” appears on the multidisplay.
When you release the switch, the multidisplay shows the current
temperament setting. (The factory setting is 00.)
3. Press [▲] or [▼] as necessary to change the setting.
Display 00 01 02
Setting Equal temperament Werckmeister Kirnberger
4. Press [FUNC.] to complete the setting.
The setting is stored and the [FUNC.] LED goes dark.
This setting reverts to its factory default (equal temperament) when
you change the position of the sound selector and when you turn
the power off.
The Piano 1 and Piano 2 sounds use “stretched tuning.” In comparison to the equal tempered pitched, stretched tuning slightly lowers
the pitch of the low notes and slightly raises the pitch of the high
notes in order to create a more natural-sounding resonance.
Adjusting the brightness of the sound (Brilliance)
Use this feature to select the brightness of the sound.
1. Be sure that the [SONG] LED is off, and press [FUNC.].
The [FUNC.] LED lights up.
2. Press [DISPLAY] several times, until “brL” appears on the multidisplay.
When you release the switch, the multidisplay shows the current brilliance setting. (The factory setting is 02.)
This setting is retained even while the power is off. When you press
[FUNC.] after changing the setting, the HT-70 automatically writes
the new setting into nonvolatile memory. During the write, the
18
3. Press [▲] or [▼] as necessary to change the setting.
Display 01 02 03
Setting Mellow sound with
decreased brightness
4. Press [FUNC.] to complete the setting.
The setting is stored and the [FUNC.] LED goes dark.
multidisplay will indicate that writing is in progress.
Normal
brightness
Brighter
sound
Do not turn the HT-70 power off while writing is in progress. Doing
so may cause loss or corruption of memorized settings and song
data.
Changing the sensitivity of the keyboard
You can change the way in which the dynamics of the sound respond to
the strength of your playing. This is called the Touch Control function.
When you turn the power on, the normal (standard) touch setting is
selected.
1. Hold down [FUNC.] for about one second.
The [FUNC.] LED begins flashing
2. Press [DISPLAY] several times, until “tch” appears on the multidisplay.
When you release the switch, the multidisplay shows the current sensitivity setting. (The factory setting is 02).
.
Changing the key (Transpose)
By changing the HT-70’s key (transposing) you can play along with
another instrument or vocal using an easier key (e.g., one that has fewer
black keys) or the key in which you learned the song. This is called the
Transpose function.
You can transpose the pitch over a range of eleven semitones.
1. Hold down [FUNC.] for about one second.
The [FUNC.] LED begins flashing
2. Press [DISPLAY] several times, until “trS” appears on the multidisplay.
When you release the switch, the multidisplay shows the current
transpose setting. (The factory setting is 00).
3. Press [▲] or [▼] as necessary to change the setting.
.
3. Press [▲] or [▼] as necessary to change the setting.
Display 01 02 03
Touch
Control
setting
4. Press [FUNC.] to complete the setting.
The setting is stored and the [FUNC.] LED goes dark.
The setting returns to 02 when the power is turned off.
Light
(even light playing can produce
loud sounds)
Normal
(the piano
touch of a
typical piano)
Heavy
(you’ll need to play
strongly to produce loud sounds)
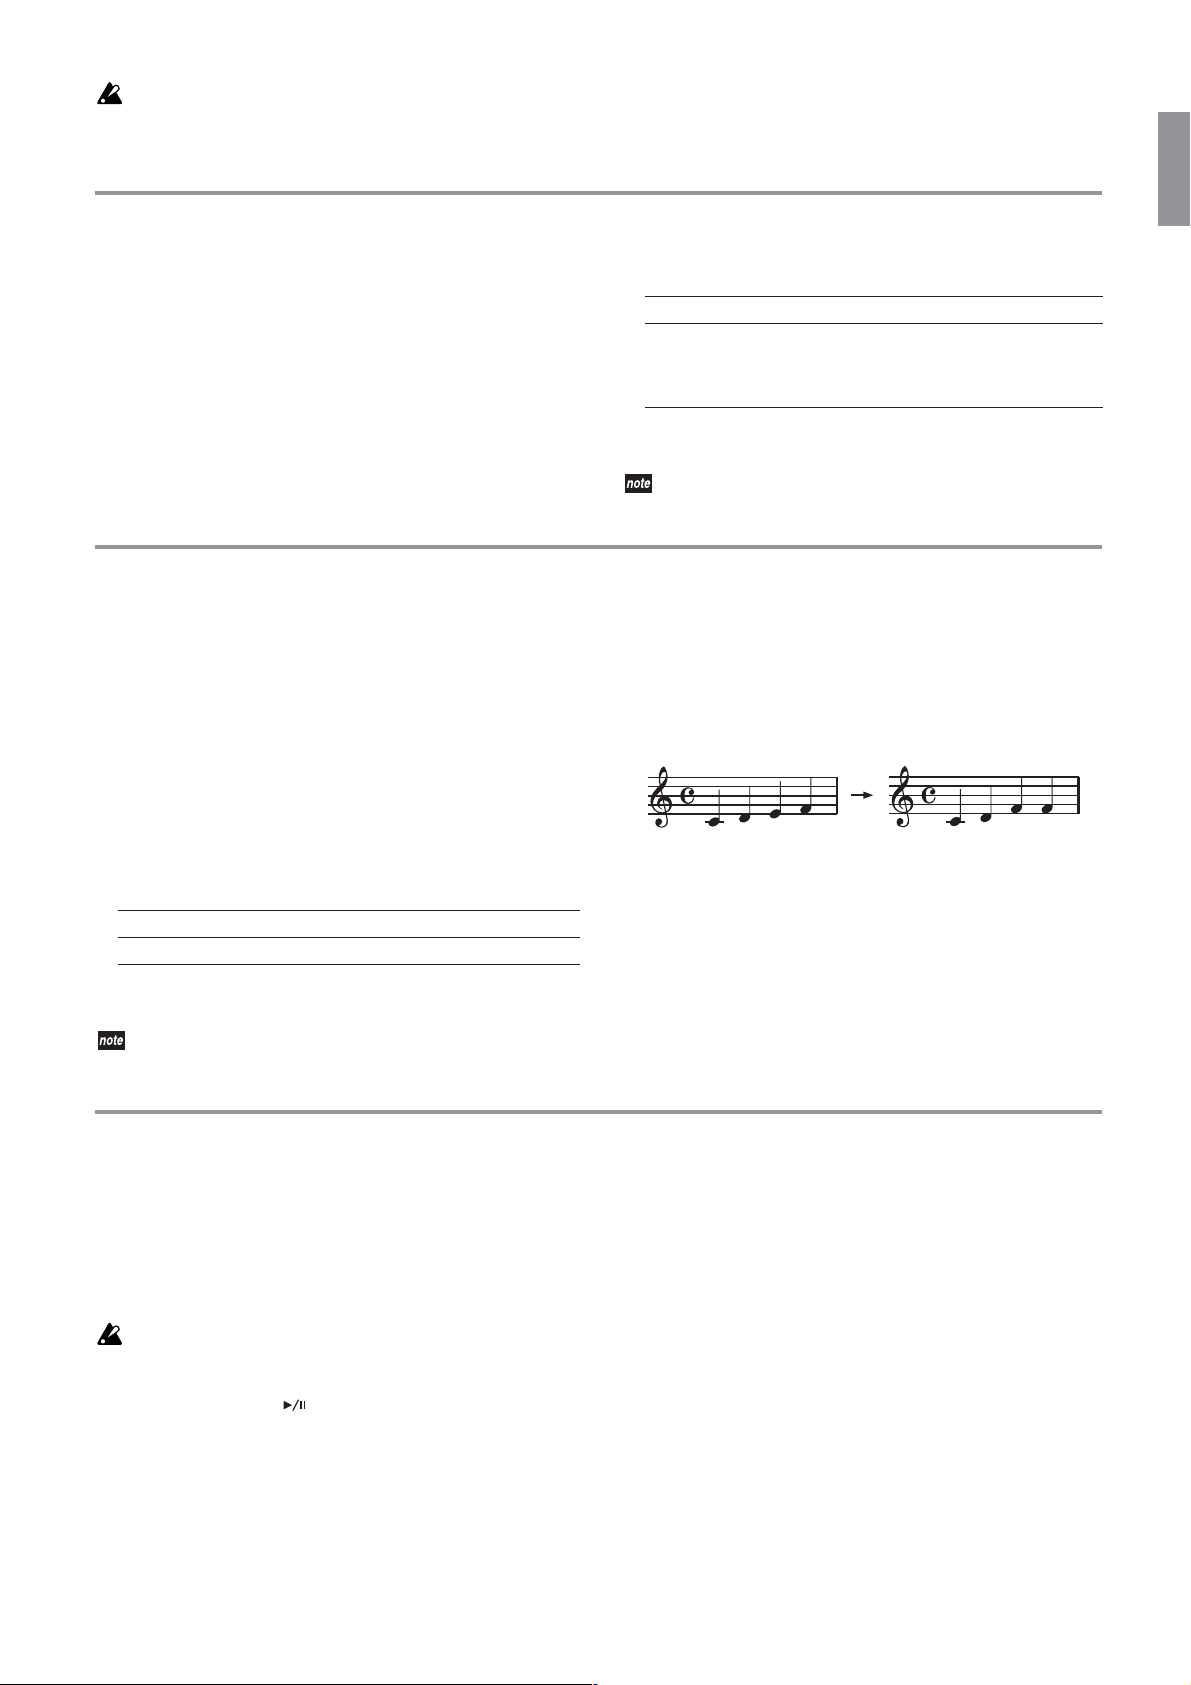
❏ To play the song a semitone higher
You want the C pitch to sound when you play the C key.
Set the key to C
The result: When you play of the keyboard notes shown at left, the
HT-70 produces the notes shown at right.
(“01” on the multidisplay).
Display -11 ... -03 -02 -01 00 01 02 03 ... 11
key C
4. Press [FUNC.] to complete the setting.
The setting is stored and the [FUNC.] LED goes dark.
The setting returns to 00 when the power is turned off.
... A ABCCDD... B
Restoring the factory settings
If you’ve been selecting sounds and changing their settings, but would
like to restore the HT-70 to its factory-set values, proceed as follows.
This procedure will not clear the performance data you’ve recorded but
will return all other settings to their factory-set condition. If you want to
erase the performance data you’ve recorded, refer to “❏ Deleting a
Song” on page 16.
Before you continue, make sure that you really want to restore the
factory settings.
1. Turn off the power.
2. While holding down the [ ] switch, turn on the power.
“LFd” appears on the multidisplay, and all settings return to their
factory defaults.
❏ The song is in the key of B but you want to
play it using the fingering of the key of G
The pitch of B is a minor third (three semitones) above G. This means
that you want the D
you press the C key.
Set the key to D
pitch (three semitones higher) to sound when
(“03” on the multidisplay).
19
MIDI
What is MIDI?
MIDI (Musical Instrument Digital Interface) is a world-wide standard
for exchanging performance-related data between electronic musical
instruments and computers.
You can use the HT-70 to play other MIDI-equipped instruments. When
you do so, your sound selections and damper pedal operations etc. will
also be transmitted as control data.
You can also use another MIDI keyboard or sequencer (automatic playback device) to control the HT-70 and play its internal tone generator. By
combining multiple MIDI instruments you can enjoy creating more
sophisticated ensembles. You can also save the HT-70’s recorder data on
an external storage device via MIDI.
This section explains the MIDI-related operations and functions of the
HT-70. If you would like to learn more about MIDI, please consult one of
the many available introductory books on this subject.
Making MIDI connections
Commercially available MIDI cables are used to transfer MIDI data.
Connect these cables from the MIDI connectors of the HT-70 to the MIDI
connectors of the external MIDI device with which you want to
exchange data. There are two types of MIDI connector.
MIDI IN connector
This connector receives MIDI messages.
The MIDI IN connector lets you play the HT-70’s sounds from an external MIDI device (e.g., MIDI keyboard or sequencer). Use a MIDI cable to
connect the HT-70’s MIDI IN connector to your external MIDI device’s
MIDI OUT connector.
MIDI OUT connector
This connector transmits MIDI messages.
The MIDI OUT connector lets you control an external MIDI device using
the MIDI messages transmitted from the HT-70. Use a MIDI cable to connect the HT-70’s MIDI OUT connector to your external MIDI device’s
MIDI IN connector.
Using the HT-70 as a multi-timbral sound module
When you turn on the power of the HT-70, its internal sound generator
is operating as a 16-part multi-timbral sound module that can be played
from an external MIDI device.
1. Use a MIDI cable to connect the HT-70’s MIDI IN to the MIDI OUT of
your sequencer or similar device.
2. Receive MIDI messages from the connected sequencer etc.
For details on how to transmit data from the sequencer you’ve connected, refer to the owner’s manual for the equipment you’re using.
If the HT-70 is receiving program change messages together with performance data, it will change the sound (timbre) to accord with incoming
program numbers as the performance proceeds. Note that this can occur
only if the program change filter is off for the relevant MIDI channel.
Note, however, that the selected MIDI channel (☞p.20) ignores program
changes.
Filtering resets to OFF when the HT-70 power is turned on.
1. Hold down [FUNC.] for about one second.
The switch’s LED begins flashing.
2. Press [DISPLAY] several times, until “16t” appears on the multidisplay.
When you release the switch, the multidisplay shows the current setting. (The factory setting is on).
3. Press [▲] or [▼] as necessary to change the setting.
Display on oFF
Multi timbra on off
4. Press [FUNC.] to complete the setting.
The setting is stored and the [FUNC.] LED goes dark.
The sound selector cannot be used to change sounds while the HT70 is playing externally supplied MIDI data. But note that it is possible for the selected MIDI channel (☞p.20).
MIDI channels
When you’ve finished making connections, set the HT-70 to the same
MIDI channel as the MIDI device to which you’ve connected it. There
are sixteen MIDI channels, numbered 1–16.
The channel setting returns to “C01” when the power is turned on.
FUNC.
1. Hold down [
The switch’s LED begins flashing.
2. Press [DISPLAY] several times, until “Ch” appears on the multidisplay.
When you release the switch, the multidisplay shows the current setting. (The factory setting is C01).
3. Press [▲] or [▼] as necessary to change the setting.
Display C01 ... C16
Channel 1 ... 16
4. Press [FUNC.] to complete the setting.
The setting is stored and the [FUNC.] LED goes dark.
The HT-70 can record MIDI data coming in over the selected MIDI channel.
] for about one second.
Local on/off setting
You should turn the HT-70’s Local setting “off” if you want the keyboard
of the acoustic piano to which the HT-70 to play only an external MIDIconnected sound module and not the HT-70’s internal sound generator,
or to prevent duplicate notes from sounding when you’ve connected the
HT-70 to a sequencer that echoes-back (re-transmits) the incoming data
back to the HT-70.
Normally you will leave the HT-70’s Local setting “on” so that it will
produce sound when you play the keyboard.
Immediately after the power is turned on, the Local setting will
automatically be turned on.
1. Hold down [FUNC.] for about one second.
The switch’s LED begins flashing.
2. Press [DISPLAY] several times, until “L.ct” appears on the multidisplay.
When you release the switch, the multidisplay shows the current setting. (The factory setting is on).
3. Press [▲] or [▼] as necessary to change the setting.
Display on oFF
Local on off
4. Press [FUNC.] to complete the setting.
The setting is stored and the [FUNC.] LED goes dark.
20
Program changes
These messages can be sent by the HT-70 to select program numbers on
an external MIDI device, or received from a connected MIDI device to
switch program numbers on the HT-70.
Transmitting program changes
Program numbers on a connected external MIDI device can be switched
from the HT-70.
• When you change the setting of the sound selector, the HT-70 will
send out the corresponding program change number. The correspondences are shown in the table in the next section.
Receiving program changes
When the HT-70 receives a program change number from an external
device, its multi-timbral sound generator will change programs as
shown in the table below.
Note, however, that the selected MIDI channel (☞p.20) ignores program
changes.
The HT-70 will change sounds (timbres) in accordance with received
program change numbers indicated in the table below. If the remote
MIDI devices send the HT-70 a program change number not included in
the list below, the HT-70 will stop generating MIDI sound.
Single Bank# PC# Sound
00 00 PIANO1
01 00 PIANO2
00 04 E.PIANO1
00 05 E.PIANO2
00 06 HARPSI.
00 19 P.ORGAN
00 16 E.ORGAN
00 48 STRINGS
Control Change Filter
Control change messages send information that is used to set the operation of controllers such as the damper pedal. External MIDI devices use
these messages to control the operation on the HT-70, and the HT-70
uses them to control the operation on external MIDI devices.
Set the filter OFF if you wish to enable sending and receiving of control
change messages. Set the filter ON if you wish to disable transmission of
this information.
Filtering resets to OFF for all MIDI channels when the power is
turned on.
1. Hold down [REVERB] for about one second.
The switch’s LED begins flashing.
2. Press [DISPLAY] several times, until “CC” appears on the multidisplay.
When you release the switch, the multidisplay shows the current setting. (The factory setting is oFF).
3. Press [▲] or [▼] as necessary to change the setting.
Display on oFF
Contorl change filter on off
4. Press [FUNC.] to complete the setting.
The setting is stored and the [FUNC.] LED goes dark.
Program Change Filter
Set the filter ON if you wish to disable sending and receiving of program
change information. Set the filter OFF if you wish to enable transmission
of this information.
Filtering resets to OFF for all MIDI channels when the power is
turned on.
1. Hold down [FUNC.] for about one second.
The switch’s LED begins flashing.
2. Press [DISPLAY] several times, until “PC” appears on the multidisplay.
When you release the switch, the multidisplay shows the current setting. (The factory setting is oFF).
3. Press [▲] or [▼] as necessary to change the setting.
Display on oFF
Program change filter on off
4. Press [FUNC.] to complete the setting.
The setting is stored and the [FUNC.] LED goes dark.
21
USB
Using MIDI through a USB Connection
The HT-70 allows you to carry out MIDI communications with a computer directly through a USB connection. This eliminates the need for
using MIDI cable and a separate MIDI interface device to make the connection. Once the connection has been made, you can use the HT-70, for
example, as a MIDI sound generator or MIDI keyboard.
Connecting to a Computer
Where possible, you should use the KORG USB-MIDI Driver when connecting to a computer by USB. Specifically, you should use the driver
whenever connecting to a computer that provides the necessary support.
Computer environments that support the KORG USBMIDI Driver are as follows.
Windows:
Computer:
Must have an onboard USB port, and must run Microsoft Windows
XP or Microsoft Windows Vista.
Operating System:
Microsoft Windows XP / Vista
(Note: The Korg USB-MIDI Driver x64 editions is available in beta
version only.)
Macintosh:
Computer:
Apple Macintosh with onboard USB port, running Mac OS X.
Operating System:
Mac OS X 10.3 or above
Please be aware that meeting the above conditions does not guarantee that your computer will work with the HT-70. Some computers
may not be usable for this purpose even though meeting the above
requirements.
Please Note the Following Before Starting Use
Copyright to all software supplied with this product is owned by
Korg Inc.
A software license agreement is provided separately. Please read the
license before installing this software. Your installation of this software indicates your acceptance of this agreement.
Installing the KORG USB-MIDI Driver for Windows
1. Install the KORG USB-MIDI Driver Tools as described above.
2. Restart the computer, turn on the power to the HT-70, and then connect the computer and the HT-70 by USB cable.
The KORG USB-MIDI driver must be installed separately for
each USB port you use it with. If you later decided to connect
the HT-70 to a different USB port, you must repeat this procedure to install the driver for that port as well.
3. Select the following command from the taskbar to open the installation instructions: Start → All Programs → KORG → KORG USB-MIDI
Driver Tools → Installation Manual.
4. Follow the installation instructions on our screen to install the driver.
Driver Ports
Keyboard Port:
Used by the computer application to receive MIDI messages (keyboard data and controller data) from the HT-70.
Sound Port:
Used by the computer application to send MIDI messages that drive
the production of sound by the HT-70’s internal tone generator.
Mac OS X: Installing the KORG USB-MIDI Driver
Where possible, you should use the KORG USB-MIDI Driver when
connecting to a computer by USB. Specifically, you should use the
driver whenever connecting to a computer that provides the necessary support.
Installing the KORG USB-MIDI Driver
1. Insert the included CD-ROM into your computer’s CD-ROM drive.
2. Open the CD-ROM’s “KORG USB-MIDI Driver” folder, and doubleclick “KORG USB-MIDI Driver.pkg” to start the installer. Then follow
the instructions on your screen.
Driver Ports
Keyboard Port:
Used by the computer application to receive MIDI messages (keyboard data and controller data) from the HT-70.
Sound Port:
Used by the computer application to send MIDI messages that drive
the production of sound by the HT-70’s internal tone generator.
Windows XP and Vista:
Installing the KORG USB-MIDI Driver
Please do not connect the HT-70 to the computer by USB cable until you
have first installed the KORG USB-MIDI Driver Tools. Proceed as follows.
1. Insert the included CD-ROM into your computer’s CD-ROM drive.
In most cases, the KORG Digital Piano Application Installer will start
automatically when you insert the CD-ROM.
If your computer setup has disabled automatic start, please start the
program by navigating to the CD-ROM and double-clicking “KorgSetup.exe”.
2. Follow the instructions on your screen.
The installer will also install the KORG MIDI Data Filer. The
Data Filer is not used by the HT-70.
3. Turn on the HT-70 power, and connect the HT-70 to the computer by
USB cable. The computer will then automatically install the Windows
standard USB MIDI driver.
You must now proceed to install the KORG USB-MIDI Driver for the
USB port that you are using.
22
USB Mode
The HT-70 supports transfer of data between its internal memory and an
external computer. A USB connection is the most effective way of making such transfers. This capability is supported by Windows ME, Windows 2000, and all subsequent Windows versions, and by Mac OS 9.0.4
and above.
Before entering USB mode to transfer data to or from the HT-70,
please be sure to close all MIDI applications at the computer side.
Leaving a MIDI application running while USB transfer is in
progress may result in corruption of data at the HT-70.
The HT-70 automatically restarts when you exit USB mode (by setting the mode “oFF” at the HT-70 side, by disconnecting the USB
cable, by cutting the connection from the computer side, etc.). This
means that any data and settings that have not yet been saved will
be lost. Before entering USB mode, be sure to save all data and settings.
The USB connection cannot be used for MIDI communication while
USB mode is being used for data transfer.
1. Connect the HT-70 and the computer with a USB cable.
2. Hold down [FUNC.] for about one second.
The switch’s LED begins flashing.
3. Press [DISPLAY] several times, until “USb” appears on the multidisplay.
When you release the switch, the multidisplay shows the current setting. (USB mode is set to “oFF” when the power first comes on.)
While USB mode is on, most other operations are disabled. Only
the following operations remain available: turning USB mode
off, turning reverb on/off, turning metronome on/off, and use
of the keyboard to play notes.
4. Press [▲] or [▼] to change the setting.
6. When you have completed the data transfer, remove or delete the
USB drive from the computer desktop. For the details, refer to the
computer’s instruction manual.
If you are using Windows XP: When you remove or delete the USB
drive, the HT-70 automatically returns to its initial (power-on) screen.
(If you are using Windows Vista, after removing the USB drive at the
computer side you must then press the switch at the HT-70 to return
to the initial screen.
If you are using a Mac OS: When you move “KORG SSD” into the
Trash (or remove “KORG SSD”), the HT-70 automatically returns to
its initial (power-on) screen.
Playing MIDI Files
The HT-70 can recognize and play songs stored in the “UserSong” folder,
provided that these songs are stored in standard MIDI format and that
the filename consists of a “U” followed by two numerical digits (“01” to
“99”) followed by the “.mid” file extension.
Examples: “U07.mid”, “U34.mid”
The HT-70 may not be able to correctly play standard MIDI files
that use a time signature that cannot be set by the HT-70 itself.
Display on oFF
USB Mode ON (Mass storage) OFF (USB MIDI)
The HT-70 will automatically restart when you turn USB MODE
off.
Exiting USB mode while USB data transfer is in progress (by
setting the mode off at the HT-70 side, by disconnecting the USB
cable, etc.) may cause corruption of data at the HT-70 side and
may cause damage at the computer side.
Do not turn the HT-70 power off while USB mode is on. Doing
so may cause corruption of data at the HT-70 side and may
cause damage at the computer side.
5. Once you have set USB mode on, you can use the HT-70 just as any
other external USB drive. You can move files into it and out of it, and
you can use it to back up and restore your data.
HT-70 data is stored within subfolders under the “KORG USER”
folder. Files within these folders may be given names of up to 128
characters.
Folder Content
GLOBAL Global (common) settings
PRESET Sound presets
UserSong Songs recorded at the HT-70, and songs created at
external sequencers. Any song that has been stored
in standard MIDI format (file extension “.MID”) may be
copied into this folder.
23
 Loading...