

Page 1
HDIK-2
Pa3X HD Installation Kit
Thank you for purchasing the Hard Disk Installation Kit for the Korg Pa3X Professional
Arranger! This kit allows you to install a standard internal 2.5” SATA hard disk drive in your
Pa3X. The hard disk drive is not supplied with the kit, so you should purchase it separately.
Wa rn i n g : Korg is not responsible for any damage or injury caused by incorrect installation of
this kit.
Félicitations et merci d'avoir acheté le kit d'installation du disque dur pour Korg Pa3X Professional Arranger. Ce kit permet d'installer dans le Pa3X un disque dur SATA de 2,5 pouce. Le disque
dur n'est pas fourni dans le kit, il faut l'acheter séparément. Attention : Korg décline toutes res-
ponsabilités envers des dommages aux personnes et aux choses provoqués par l'installation du kit.
Vielen Dank dafür, dass Sie sich für den Bausatz zur Installation einer Festplatte in Ihrem Korg Pa3X Professional Arranger entschieden haben. Hiermit können Sie eine 2,5" SATA-Festplatte in das Pa3X einbauen. Die Festplatte wird ohne Einbausatz
geliefert; dieser muss separat gekauft werden. Achtung: Korg übernimmt keine Haftung für Sach- oder Personenschäden bei
Installation des Bausatzes durch nicht autorisierte Personen.
Grazie per avere acquistato il kit di installazione dell’hard disk per il Korg Pa3X Professional Arranger. Questo kit permette di installare nel Pa3X un hard disk interno SATA da 2,5”. L’hard disk non è fornito con il kit, e va acquistato a parte. Attenzione: Korg non
si assume responsabilità per danni a cose o persone causati dall’installazione del kit da parte di personale non autorizzato.
LIST OF PARTS / CONTENU DE L’EMBALLAGE / LIEFERUMFANG / ELENCO DELLE PARTI
Before beginning with the installation, be sure to have all the parts listed in the following table. You also need a cross-point
screwdriver (not supplied).
Avant de procéder à l'installation, vérifier de posséder tous les éléments listés ci-dessous. Pour le montage, il faut disposer d'un tournevis à lame cruciforme.
Versichern Sie sich vor Beginn der Installation, dass alle nachfolgend aufgeführten Teile vorhanden sind. Für die Montage ist ein
Kreuzschlitzschraubenzieher erforderlich.
Prima di iniziare l’installazione, assicuratevi di essere in possesso delle parti elencate di seguito. Per il montaggio è richiesto un cacciavite a croce.
a HDD interface
b HDD support
c M3x6 TC screws
m M3x4 TC screws
Interface HDD HDD-Schnittstelle Interfaccia HDD
Fixation pour disque dur Festplattensockel Supporto HDD
Vis M3x6 TC M3x6 TC-Schrauben Viti M3x6 TC
Vis M3x4 TC M3x4 TC-Schrauben Viti M3x4 TC
× 1
× 1
× 6
× 2
PRECAUTIONS / PRÉCAUTIONS / VORSICHTSMAßNAHMEN / PRECAUZIONI
• Installation of the kit is done at the user’s own risk. Korg will assume no responsibility for any damage or injury resulting from
its improper installation or use.
• Be sure to disconnect the instrument from the AC plug, before opening it.
• To prevent your body’s static electricity from damaging the board’s components, touch an unpainted metallic component
before proceeding with the installation.
• L’installation du kit est effectuée aux risques et périls de l’utilisateur. Korg décline toute responsabilité pour tout dommage ou blessure résultant d’une mauvaise installation ou utilisation.
• Débranchez l’instrument de la prise de courant avant de l’ouvrir.
• Pour éviter que l’électricité statique de votre corps n’endommage les composants des circuits, touchez un composant métallique non
peint avant d’effectuer l’installation.
• Der Einbau des Sockels geschieht auf eigenes Risiko. Korg haftet nicht für Schäden oder Verletzungen, die sich aus einem
unsachgemäßen Einbau bzw. einer falschen Bedienung ergeben.
• Lösen Sie vor dem Öffnen des Gehäuses unbedingt den Netzanschluss.
• Um zu verhindern, dass statische Entladungen Ihres Körpers die Komponenten beschädigen, müssen Sie vor dem Einbau einen
Metallgegenstand berühren.
• L’utente si assume l’intero rischio per l’installazione del kit di montaggio. Korg non potrà essere in alcun caso ritenuta responsabile
per qualsiasi danno a cose o persone derivante da un non corretto uso del kit o dalla sua errata installazione.
1
Page 2

• Assicuratevi di staccare lo strumento dalla presa di corrente elettrica prima di aprirlo.
• Per prevenire danni ai componenti interni da parte dell’elettricità statica naturalmente presente nel corpo umano, toccate un componente metallico non verniciato prima di procedere con la sostituzione.
BACKUP / ARCHIVAGE DES DONNÉES / DATENARCHIVIERUNG / COPIA DI SICUREZZA
Before installing or replacing the hard disk, please bakup or save your User data to an USB storage device. If you do not know
how to do, please read the relevant instructions contained in the “Media” chapter of the User’s Manual.
Avant d’installer ou de remplacer le disque dur, songez à archiver vos données utilisateur sur un support USB. Si vous avez des doutes
quant à la façon de vous y prendre, voyez le chapitre “Media” dans le mode d’emploi.
Vor dem Einbau bzw. dem Austauschen der Festplatte sollten Sie alle Anwenderdaten auf einem USB-Datenträger archivieren.
Im Kapitel “Media” der Bedienungsanleitung wird erklärt, wie man das macht.
Prima di installare o sostituire l’hard disk, eseguite il backup o salvate i dati User in un dispositivo di memorizzazione USB. Se non
sapete come eseguire queste operazioni, vi preghiamo di consultare il capitolo “Media” del Manuale di istruzioni.
2
Page 3
INSTALLATION / INSTALLATION / INSTALLATION / INSTALLAZIONE
1. Extract the hard disk kit from its package, being careful not to
touch any component on its surface with your fingers.
Retirez le disque dur de son emballage en veillant à ne toucher aucun composant de sa surface avec les doigts.
Packen Sie den Sockel aus, aber berühren Sie auf keinen
Fall die Leiterplatte bzw. die darauf befindlichen Komponenten.
Estraete il kit dell’hard disk dalla confezione, prestando
attenzione a non toccare alcun componente della superficie
con le dita.
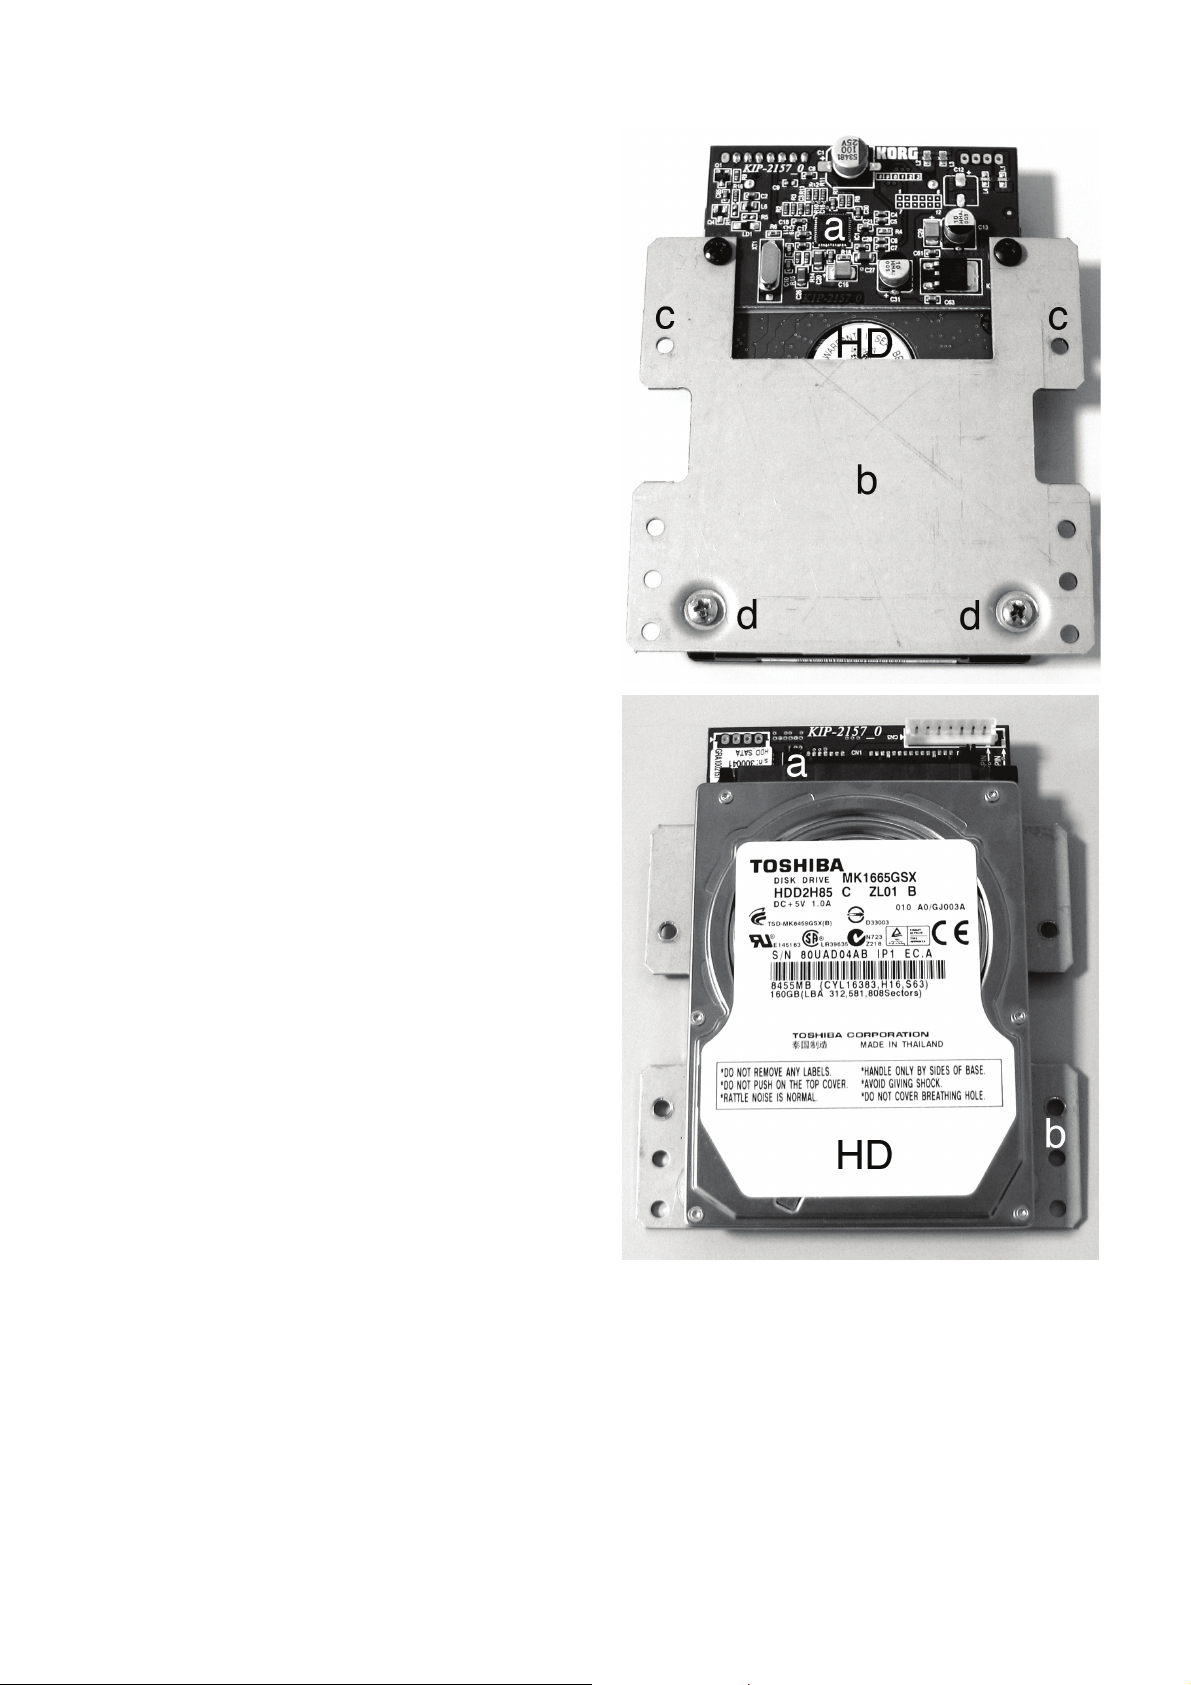
2. Use two screws (c) each to attach the hard disk (not supplied
with the kit) to the interface board (a) and the metal support
(b), as shown in the illustration. Use the two screws (d) to
secure the hard disk to the support (b).
Utilisez 2 vis (c) pour fixer le disque dur (non fourni avec le
kit) à la carte d’interface (a) et à la fixation métallique (b).
Voyez l’illustration. Utilisez les deux vis (d) pour attacher le
disque dur à la fixation (b).
Befestigen Sie die Festplatte (Sonderzubehör) mit Hilfe von
2 Schrauben (c) an der Schnittstellenplatine (a) und dem
Metallsockel (b). Siehe Abbildung. Verwenden Sie die
Schrauben (d) zum Befestigen der Festplatte am Sockel (b).
Utilizzate due coppie di viti (c) per unire l’hard disk (non fornito insieme al kit) alla scheda di interfaccia (a) e al supporto
in metallo (b), come mostrato in figura. Utilizzate due viti
(d) per assicurare l’hard disk al supporto (b).
3
Page 4

3. From the bottom of the instrument, remove the six fixing
screws (e) and the three flat head fixing screws (f), and keep
them apart. Open the cover (g) to gain access to the inside of
the video board compartment, and keep the cover apart.
Sur le dessous de l’instrument, retirez les six vis de fixation (e)
et les trois vis de fixation à tête plate (f) et mettez-les de côté.
Ouvrez le couvercle (g) pour accéder à l’intérieur du compartiment de la carte vidéo et conservez le couvercle.
Entfernen Sie die 6 Schrauben (e) sowie die 3 Flachkopfschrauben (f) an der Unterseite des Instruments und
bewahren Sie sie an einem sicheren Ort auf. Öffnen Sie die
Blende (g), um Zugang zum Fach zu bekommen, indem
auch die Videoplatine eingebaut werden kann. Bewahren
Sie die Blende an einem sicheren Ort.
Sul fondo dello strumento, rimuovete le sei viti di tenuta (e) e
le tre viti a testa piatta (f), e conservatele da parte
e tenete da parte la parte la placca di copertura (g) per accedere
al vano della scheda video.
4. Disconnect the USB key (h) from the cable (i), and remove the
board (h) by unscrewing the two fixing screws (j).
. Rimuovete
Débranchez le câble (i) du dispositif de mémoire USB. Dévissez les deux vis de fixation (j) et retirez la carte du dispositif
de mémoire (h).
Lösen Sie die Verbindung des Kabels (i) mit dem USBDatenträger. Lösen Sie die beiden Schrauben (j) und entfernen Sie die Datenträgerplatine (h).
Scollegate la chiave USB (h) dal cavo (i), e rimuovete la
scheda (h) togliendo le due viti di tenuta (j).
5. Place the previously assembled hard drive over the four dedi-
cated spacers inside the instrument (the drive can only be
installed in a way). Fix it with the last four screws (c) found in
the installation kit. Connect the hard drive to the cable (i) you
previously disconnected from the USB key.
Installez le kit (sur lequel le disque dur a été monté au préalable) sur les 4 pieds situés dans l’instrument (le kit ne peut
être installé que dans un sens). Fixez le kit avec les 4 dernières
vis (c) fournies avec le kit d’installation. Branchez le câble (i)
(que vous avez débranché du dispositif de mémoire USB) au
disque dur.
Legen Sie den Festplattensockel (mitsamt der installierten
Festplatte) auf die 4 Abstandhülsen im Instrument (der
Sockel kann nur in einer Richtung installiert werden).
Befestigen Sie den Sockel mit den 4 beiliegenden Schrauben (c). Schließen Sie das zuvor gelöste Kabel (i) (das Sie
vom USB-Datenträger entfernt haben) an die Festplatte an.
Posizionate l’hard drive precedentemente assemblato sopra i quattro spaziatori dedicati all’interno dello strumento (il drive può
essere orientato solo in un verso). Fissatelo con le ultime quattro viti (c) incluse con il kit di montaggio. Collegate l’hard drive al
cavo (i) precedentemente scollegato dalla chiave USB.
4
Page 5

6. Place the cover (g) to close the instrument, being careful not to
damage the cable, by following in reversal the opening instructions.
Replacez le couvercle (g) sur l’instrument en veillant à ne pas
endommager le câble. Inversez les opérations effectuées pour
l’ouvrir.
Bringen Sie die Blende (g) wieder behutsam am Instrument
an. Achten Sie beim Festschrauben darauf, dass sie auf keinen Fall das Kabel abklemmt und beschädigt.
Prestando attenzione a non danneggiare il cavo, ricollocate in
sede la placca di copertura (g) per chiudere il vano, eseguendo
al contrario la procedura descritta per la rimozione.
7. When the installation is finished, please connect the power
cord, and turn the instrument on again. You must now format
the hard disk, before accessing it for data storage.
Branchez le câble d’alimentation à l’instrument et mettez ce dernier sous tension. Le disque dur installé doit être formaté avant
de pouvoir être utilisé.
Schließen Sie das Netzkabel wieder an das Instrument an und schalten Sie dieses ein. Die soeben installierte Festplatte muss
jetzt zuerst formatiert werden.
Al termine dell’installazione, ricollegate il cavo di alimentazione elettrica e accendete lo strumento. Prima di poter utilizzare
l’hard disk, sarà necessario formattarlo.
5
Page 6

FORMATTING THE HARD DISK AND INSTALLING THE OPERATING SYSTEM / FORMATER LE DISQUE DUR ET INSTALLER LE
SYSTÈME D’EXPLOITATION / FORMATIERUNG DER FESTPLATTE UND INSTALLIEREN DAS BETRIEBSSYSTEM /
FORMATTARE L’HARD DISK ED INSTALLARE IL SISTEMA OPERATIVO
When the installation is finished, you must format the
hard disk and install the
operating system.
1. Copy the “Pa3X_RES.pkg”
operating system file to the
root of an USB storage
device. The file can be found
on our web site
(www.korgpa.com).
Please note that the name of
the file should not be
changed.
2. Connect the power cord
and turn the instrument on
by pressing the POWER,
then the STANDBY button.
3. After a few seconds, the
“Touch Panel Calibration”
page appears. Execute the
calibration of the display by
following the onscreen
instructions, then confirm
by touching the Save button
in the display.
Lorsque l'installation est terminée, il faut formater le
disque dur et installer le système d’exploitation.
1. Copiez le fichier
“Pa3X_RES.pkg” du système
d’exploitation vers le dossier
principal d’un support USB.
Vous trouverez ce fichier sur
notre site web (www.korgpa.com).
Evitez de changer le nom de
ce fichier.
2. Connectez le câble d’ali-
mentation et mettez l’instrument sous tension en
appuyant d’abord sur
POWER puis sur le bouton
STANDBY.
3. Au bout de quelques
secondes, la page “Touch
Panel Calibration” apparaît.
Calibrez l’écran en suivant les
instructions affichées, puis
confirmez en touchant le bouton [Save] à l’écran.
Nach dem Einbau müssen
Sie die Festplatte formatieren
und das Betriebssystem installieren.
1. Kopieren Sie die Systemdatei „Pa3X_RES.pkg“ zum
Stammverzeichnis eines
USB-Datenträgers. Diese
Datei finden Sie auf unserer
We bp a g e
(www.korgpa.com).
Der Name der Datei darf auf
keinen Fall geändert werden.
2. Schließen Sie das Netzkabel an und drücken Sie
zuerst den POWER- und
anschließend den
STANDBY-Taster, um das
Instrument einzuschalten.
3. Nach ein paar Sekunden
erscheint die Seite „Touch
Panel Calibration“. Kalibrieren Sie das Display, indem
Sie die angezeigten Hinweise befolgen. Bestätigen
Sie anschließend mit dem
[Save-Button im Display.
Al termine dell’installazione, occorre formattare
l’hard disk ed installare il
sistema operativo.
1. Copiate il file del sistema
operativo “Pa3X_RES.pkg”
nella ‘root’ (directory principale) di un dispositivo di
memorizzazione USB. Il file
può essere prelevato dal
nostro sito web
(www.korgpa.com).
Il nome del file non deve
essere modificato!
2. Collegate il cavo di alimentazione ed accendete lo
strumento premendo prima
il tasto POWER, poi il tasto
STANDBY.
3. Dopo alcuni secondi
appare la pagina “Touch
Panel Calibration”. Eseguite
la calibrazione del display
seguendo le istruzioni a
schermo, poi confermate le
impostazioni toccando il pulsante Save nel display.
4. The following message
appears, warning that this
operation will delete all data
from the hard disk. Touch
the OK button to continue.
4. Le message suivant appa-
raît pour vous signaler que
toutes les données se trouvant
sur le disque dur seront effacées. Touchez le bouton [OK]
pour continuer.
4. Es erscheint folgende Meldung, die Sie darauf hinweist, dass alle Daten der
Festplatte gelöscht werden.
Drücken Sie den [OK]-Button, um fortzufahren.
6
4. Appare il seguente messaggio, che avverte che l’operazione cancellerà tutti i dati
presenti nell’hard disk. Toccate il pulsante OK per proseguire.
Page 7

5. After confirming, the following message appears, asking you to connect the USB
storage device containing the
operating system. Connect
the USB storage device to the
Front HOST USB port of
your Pa3X.
5. Au terme d’une conforma-
tion, l’écran affiche un message vous invitant à brancher
le support USB contenant le
système d’exploitation.
Connectez le support USB au
port HOST USB en façade du
Pa3X.
5. Wenn S i e be stäti g en,
erscheint die Aufforderung,
den USB-Datenträger mit
dem Betriebssystem anzuschließen. Verbinden Sie den
USB-Datenträger mit dem
HOST USB-Port auf der
Vorderseite des Pa3X.
5. Una volta data conferma, il
seguente messaggio chiede di
collegare il dispositivo di
memorizzazione USB contenente il sistema operativo.
Collegate il dispositivo di
memorizzazione USB alla
porta HOST USB situata
nella parte frontale della
Pa3X.
6. When the USB storage
device containing the operating system has been connected, touch the OK button
to confirm.
In case the operating system
file is not found in the USB
storage device, the “Package
not found” dialog box
appears, warning you of the
missing file. Touch the OK
button to close the dialog
box.
If the USB storage device
contains both the
“Pa3X_OS.pkg” and the
“Pa3X_RES.pkg” files, the
following message appears.
Please select the
“Pa3X_RES.pkg” file and
touch OK.
6. Une fois le support USB
connecté, touchez le bouton
[OK].
Si le fichier du système
d’exploitation semble introuvable sur le support USB, le
message “Package not found”
vous signale ce problème.
Touchez le bouton [OK] pour
refermer la fenêtre de dialogue.
Si le support USB contient
aussi bien un fichier
“Pa3X_OS.pkg” que
“Pa3X_RES.pkg”, le message
suivant apparaît. Sélectionnez
alors le fichier
“Pa3X_RES.pkg” et touchez
[OK].
6. Drücken Sie nach
Anschließen des USBDatenträgers den [OK]-Button.
Wenn das Betriebssystem
nicht auf dem USB-Datenträger gefunden wird,
erscheint die „Package not
found“-Meldung. Drücken
Sie den [OK]-Button, um
das Dialogfenster zu schließen.
Wenn der USB-Datenträger
eine Datei namens
„Pa3X_OS.pkg“ und eine
weitere mit dem Namen
„Pa3X_RES.pkg“ enthält,
erscheint folgende Meldung.
Wählen Sie die
„Pa3X_RES.pkg“-Datei und
drücken Sie [OK].
6. Una volta collegato il
dispositivo di memorizzazione USB contenente il
sistema operativo, toccate il
pulsante OK per confermare.
Se il file del sistema operativo
non viene trovato nel dispositivo di memorizzazione USB,
appare la finestra di dialogo
“Package not found”, che
avverte della mancanza del
file. Toccate il pulsante OK
per chiudere la finestra di
dialogo.
Se il dispositivo di memorizzazione USB contiene
entrambi i file
“Pa3X_OS.pkg” e
“Pa3X_RES.pkg”, appare il
seguente messaggio. Selezionate il file “Pa3X_RES.pkg” e
toccate il pulsante OK.
7
Page 8

7. The “Wait Please” message
appears while formatting the
hard disk. While the operating system file is being
loaded, a progress bar
appears, showing the
advancement of loading.
7. Pendant le formatage du
disque dur, le message “Wait
Please” apparaît. Une barre
indique l’avancement du
chargement des données.
7. Die Meldung „Wait Please“ erscheint und die Festplatte wird formatiert. Ein
Balken informiert Sie über
den Ladevorgang des
Betriebssystems.
7. Durante la formattazione
dell’hard disk appare il messaggio “Wait Please”. Poi,
durante il caricamento del
sistema operativo appare una
barra di avanzamento, che
mostra lo stato del caricamento in corso.
8. When the formatting and
loading procedure ends, the
“Updated Completed!” message appears, inviting you to
restart the instrument.
8. Au terme du formatage et
lorsque les données sont chargées, le message “Updated
Completed!” est affiché, vous
invitant à redémarrer l’instrument.
8. Wenn die Festplatte formatiert ist und alle Daten
geladen wurden, erscheint
die Meldung „Updated Completed!“ mit der Aufforderung, das Gerät
neuzustarten.
8. Al termine della procedura
di formattazione e caricamento, appare il messaggio
“Updated Completed!”, che
invita a riavviare lo strumento.
8
Page 9

9. Turn the Pa3X off, and
then on again, by using the
POWER button on the back
of the instrument.
9. Mettez le Pa3X hors ten-
sion, puis rallumez-le avec le
bouton POWER en face
arrière.
9. Schalten Sie das Pa3X aus
und wieder ein, indem Sie
den POWER-Taster auf der
Rückseite drücken.
9. Spegnete la Pa3X, poi riaccendetela con l’interruttore
POWER situato sul retro
dello strumento.
Then make it come out of
the standby status by pressing the STANDBY button.
The Pa3X will ask you again
for a new Touch Panel Calibration.
Appuyez ensuite sur le bouton
STANDBY.
Le Pa3X vous invite de nouveau à calibrer l’écran tactile.
Aktivieren Sie anschließend
den STANDBY-Taster.
Das Pa3X fordert Sie jetzt
auf, das berührungsempfindliche Display erneut zu
formatieren.
Poi fate uscire lo strumento
dallo stato di standby premendo il pulsante STANDBY.
A questo punto, la Pa3X
chiede nuovamente di procedere con la calibrazione del
display (pagina “Touch Panel
Calibration”).
© 2011 Korg Italy. Printed in Italy.
9
Page 10

10
 Loading...