

Page 1
h SBS MARS
h MARS Product Manual
Document Revision: 0.4_preliminary
Page 2

MARS User´s Guide
Table of Contents
................................................................................................ 3 1. USER INFORMATION
...................................................................................... 3 1.1 About This Manual
......................................................................................... 3 1.2 Copyright Notice
................................................................................................ 3 1.3 Trademarks
................................................................................................. 4 1.4 Standards
................................................................................................... 4 1.5 Warranty
....................................................................................... 4 1.6 Technical Support
...................................................................................................... 5 2. INTRODUCTION
.......................................................................... 5 2.1 Smart Battery System MARS
.................................................................................. 5 2.2 MARS Documentation
................................................................................... 5 2.3 SBS MARS Highlights
................................................................................................... 10 3. SPECIFICATIONS
...................................................................................10 3.1 System components
.............................................................................10 3.2 Mechanical Specification
.........................................................................................................10 3.2.1 Size
...............................................................................10 3.3 Elektrical Specification
............................................................................................10 3.3.1 Input voltage
..............................................................................................10 3.3.2 Input power
.........................................................................................10 3.3.3 Smart Batteries
.........................................................................................11 3.3.4 Output voltages
.......................................................................11 3.4 Environmental Spezifications
.............................................................................................11 3.4.1 Temperature
..................................................................................................11 3.4.2 Humidity
.................................................................................... 12 4. POWER FLOW OF SBS MARS
.......................................................................... 13 5. SMART BATTERY SYSTEM MANAGER
...............................................................................13 5.1 Possible Configurations
..............................................................................................13 5.1.1 LOPWR TRIP
.................................................................................................14 5.1.2 VLIM TRIP
.....................................................15 5.1.3 Activation and Deactivation of the Charger
.........................................................15 5.1.4 Sequentiell Discharging of the Batteries
.............................................................................. 16 6. INPUT BUCK-BOOST CONVERTER
...............................................................................16 6.1 Possible Configurations
.....................................................16 6.1.1 Feed-in with 12V from an ATX power supply
.......................................................16 6.1.2 Feed-in with 5V from an ATX power supply
............................................................................17 6.1.3 Feed-in with 5V up to 28V
...................................................17 6.1.4 Activation and Deactivation of the Converter
Table of Contents i
Page 3

MARS User´s Guide
...................................17 6.2 Cases where no Input Buck-Boost Converter is necessary
........................................................................................17 6.2.1 Basic Conditions
.......................................................................17 6.2.2 How to bypasse the converter
............................................................................ 18 7. OUTPUT BUCK-BOOST CONVERTER
...................................18 7.1 Case where no Output buck-boost converter is necessary
........................................................................................18 7.1.1 Basic Conditions
.......................................................................18 7.1.2 How to bypass the converter?
......................................................................................... 19 8. DUAL BUCK CONVERTER
...............................................................................19 8.1 Possible Configurations
........................................................................19 8.1.1 Adjustment of the frequency
............................................................19 8.2 Dual buck converter without 12V path
........................................................................................19 8.2.1 Basic Conditions
......................................20 8.2.2 How to bypass the 12V path of the dual buck converter
....................................................................... 21 9. USAGE WITHOUT OUTPUT CONVERTER
............................................................................................ 21 10. OTHER ATX VOLTAGES
..................................................... 22 11. ACTIVATING AND DEACTIVATING OF THE SBS MARS
.........................................................................................22 11.1 Standby Mode 1
.........................................................................................22 11.2 Standby Mode 0
.............................................................................................23 11.3 Control LEDs
...................................................................................... 24 12. OUTPUT OF THE SBS MARS
...........................................................................24 12.1 ATX Connector (24 pin) X6
..........................................................25 12.2 HDD Power Connectors (4 pin) X7 + X13
.................................................................................26 12.3 Feature Connector X9
.................................................................................. 28 APPENDIX A: SBS MARS PINOUTS
..............................................................................28 Connector and Testpoint Locations
..............................................................................29 Smart Battery Connector X1 und X2
....................................................................... 32 APPENDIX C: POSSIBLE SMART BATTERIES
................................................................... 34 APPENDIX E: DOCUMENT-REVISION HISTORY
............................................................. 30 APPENDIX B: INTERFACE TO OPERATING SYSTEMS
................................................................. 33 APPENDIX D: COMPATIBLE KONTRON BOARDS
Table of Contents ii
Page 4

MARS User´s Guide
1. User Information
1.1 About This Manual
This document provides information about products from Kontron Embedded Computers AG and/or
its subsidiaries. No warranty of suitability, purpose, or fitness is implied. While every attempt has
been made to ensure that the information in this document is accurate, the information contained
within is supplied “as-is” and is subject to change without notice.
For the circuits, descriptions and tables indicated, Kontron assumes no responsibility as far as
patents or other rights of third parties are concerned.
1.2 Copyright Notice
Copyright © 2003-2006 Kontron Embedded Modules GmbH
All rights reserved. No part of this document may be reproduced, transmitted, transcribed, stored
in a retrieval system, or translated into any language or computer language, in any form or by any
means (electronic, mechanical, photocopying, recording, or otherwise), without the express
written permission of Kontron Embedded Modules GmbH.
DIMM-PC®, PISA®, ETX®, ETXexpress® , X-board®, DIMM-IO® and DIMM-BUS® are trademarks or
registered trademarks of Kontron Embedded Modules GmbH. Kontron is trademark or registered
trademark of Kontron AG.
1.3 Trademarks
All products and trademarks mentioned in this manual are trademarks of their respective owners.
User Information
3
Page 5

MARS User´s Guide
1.4 Standards
Kontron Embedded Modules is certified to ISO 9000 standards.
1.5 Warranty
This Kontron Embedded Modules product is warranted against defects in material and workmanship
for the warranty period from the date of shipment. During the warranty period, Kontron Embedded
Modules will at its discretion decide to repair or replace defective products.
Within the warranty period, the repair of products is free of charge as long as warranty conditions
are observed.
The warranty does not apply to defects resulting from improper or inadequate maintenance or
handling by the buyer, unauthorized modification or misuse, operation outside of the product’s
environmental specifications or improper installation or maintenance.
Kontron Embedded Modules will not be responsible for any defects or damages to other products
not supplied by Kontron Embedded Modules that are caused by a faulty Kontron Embedded
Modules product.
1.6 Technical Support
Technicians and engineers from Kontron Embedded Modules and/or its subsidiaries are available
for technical support. We are committed to making our product easy to use and will help you use
our products in your systems.
Before contacting Kontron Embedded Modules technical support, please consult our Web site at
http://www.kontron-emea.com/emd for the latest product documentation, utilities, and
drivers. If the information does not help solve the problem, contact us by telephone or email.
Asia Europe North/South America
Kontron Asia Inc.
4F, No.415, Ti-Ding Blvd.,
NeiHu District,
Taipei 114, Taiwan
Tel: +886 2 2799 2789
Fax: + 886 2 2799 7399
mailto:sales@kontron.com.tw mailto:sales-kem@kontron.com mailto:sales@us-
Kontron Embedded Modules GmbH Kontron America
Brunnwiesenstr. 16 14118 Stowe Drive
94469 Deggendorf – Germany Poway, CA 92064-7147
Tel: +49 (0) 991-37024-0 Tel: +1 (888) 294 4558
Fax: +49 (0) 991-37024-333 Fax: +1 (858) 677 0898
kontron.com
User Information
4
Page 6

MARS User´s Guide
2. Introduction
2.1 Smart Battery System MARS
MARS is a Smart Battery System, which is able to controle 2 Smart batteries.
The Core of the SBS MARS is a dual Smart Battery System Manager.
Additionally the system contains a buck-boost converter at the input side, a dual buck converter
and a buck-boost converter at the output side.
There is also a CPLD used in MARS to get the functionality of an ATX power supply and for additional
tasks.
MARS = Mobile Application platform for Rechargeable Systems
2.2 MARS Documentation
This Manual is a general guide for a SBS Design. It documents the specification and functions of
the SBS MARS
SBS MARS is based on the SBS Specification of the SBS-forum.org.
2.3 SBS MARS Highlights
Smart Battery Systems have the ability to communicate with the application. Therefore the user
gets information about the current state of each battery. The interface for this communication is
the System Management Bus (abbr: SM-bus). Standard Smart Batteries have a specified 5 pin
header, connecting the power lines and additionally this SM-bus. This standardisation allows using
all available kinds of standard Smart Batteries, which also applies to the SBS MARS. (see also
APPENDIX C:
Possible Smart Batteries)
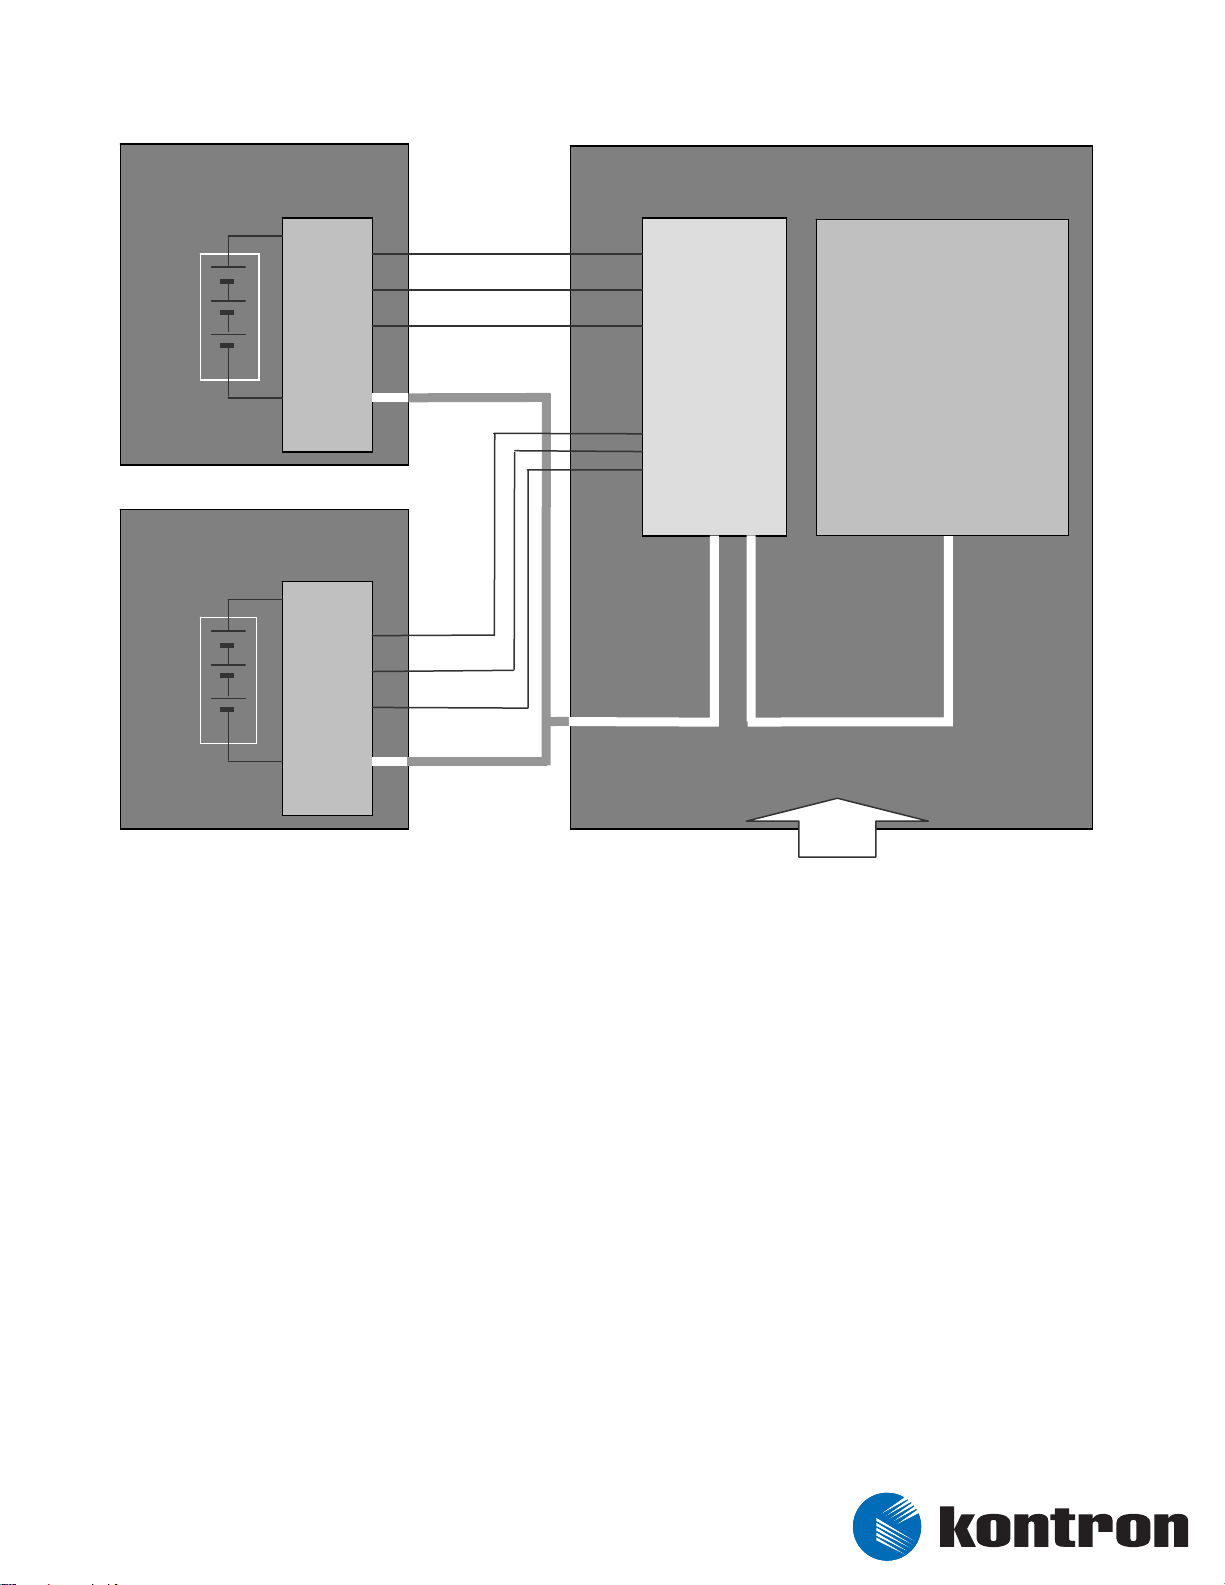
A typical SBS consists of a Smart Battery System Manager and a charger, which can communicate
with the chipset using the SM-bus.
Fig. 1 shows the typical setup of a SBS, where the SBS hardware can also be part of the PC
hardware.
Introduction
5
Page 7
MARS User´s Guide
Smart Battery #1
e.g.
Li-Ion
LiPo
NiMH
NiCd
Smart Battery #2
e. g.
Li-Ion
LiPo
NiMH
NiCd
SBS-
Hard-
ware
SBS-
Hard-
ware
Vbatt1+
Vbatt1-
Thermistor1
Vbatt2+
Vbatt2-
Thermistor2
Hardware
Manager +
SM-Bus
SBS-
(System
Charger)
PC-Hardware
Prozessor and
Chipset
SM-Bus
Power
Fig. 1: principle setup of a Smart Battery System
The SBS MARS is a reference design, which enables developers to find an easy and fast solution to
provide an application with mobile energy or to impelement an uninterruptible power supply. Also
the SBS MARS could be used as finished solution, with no further changes.
If there is no possibility to connect the SBS MARS to the SM-bus then the system is able to run in a
stand alone mode with reduced functionality, too.
The SBS MARS was designed for the purpose to cover the widest spectrum of possible applications
of mobile systems. Therefore it has a wide input voltage range of 5V to 28V. The input voltage can
be supplied with an ATX power supply as well as any other power supply. The necessary connectors
are available on the SBS Mars.
Additionally different kinds of Smart Batteries can be used. That means different battery chemistry
and cell configurations up to 10S1P (= 10 cells in series and 1 parallel) at NiMH/NiCd or up to 4S3P
at LiIon/LiPo are possible. But it must be ensured to use standard Smart Batteries, which meet the
SM-Bus standard. Because of the mechanical placement of the Smart Battery connectors it is not
possible to use Smart Batteries with a greater width than 90 mm. The usage of those would be
possible, if either the connectors are placed in another way or a Smart Battery lead is used (e. g.
Introduction
6
Page 8

MARS User´s Guide
the 5 way Smart Battery connecting lead of Moltech – part number: 629010). In the Appendices
you can find a list of possible Smart Batteries.
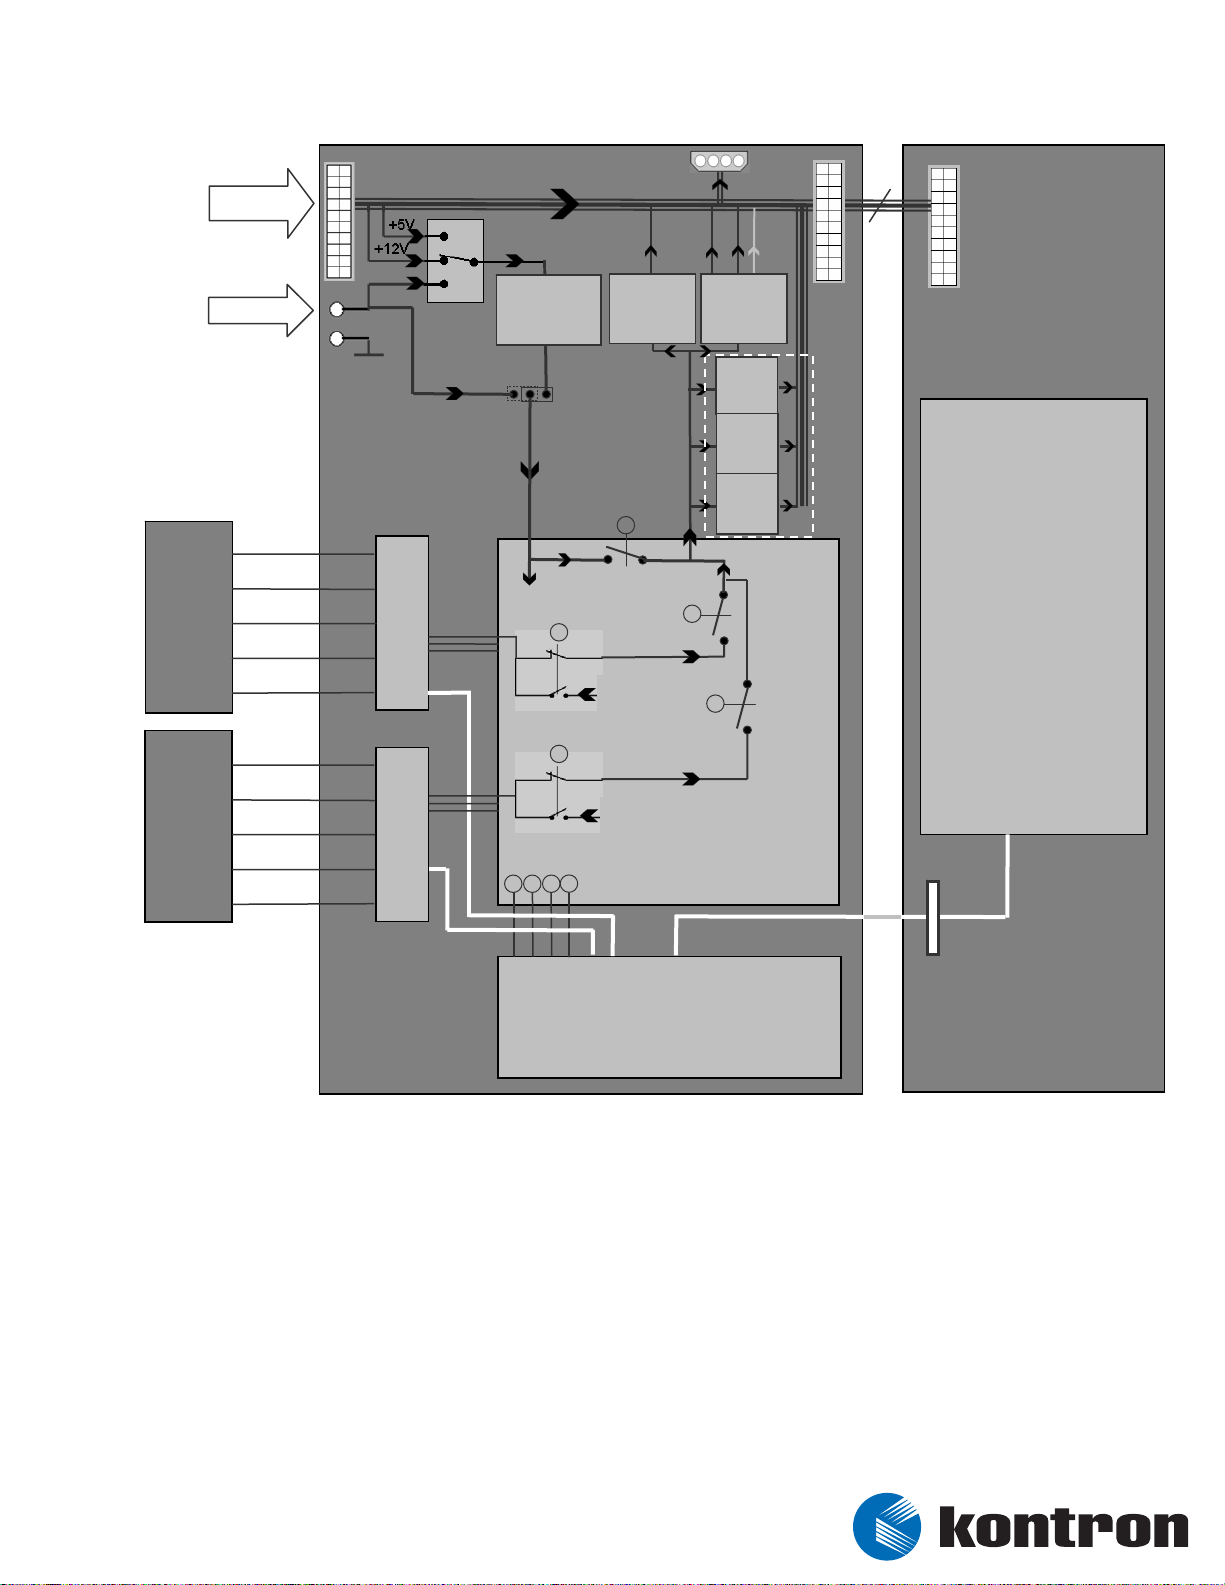
The modular setup of SBS MARS is a guideline for the devoloper and the user to configure and set
up the System, as necessary. (fig. 2 and fig. 3)
The buck-boost converter at the input side controls the input voltage to 19V, to get a sufficient
high charging voltage, even when the batteries needs voltages up to 17V. If input voltages of 19V
to 28V are used, this device is not necessary. Then it can be omitted or bypassed.
The buck-boost converter at the output side is used, when there is a Smart Battery which voltage
could drop lower than 12V. If there are only batteries with higher voltages than 12V then the dual
buck converter is enough. In this case the buck-boost converter at the output side can be omitted
or bypassed.
The SBS MARS acts like an ATX power supply. In Standby mode only the 5V SBY are supplied.
Parallel discharging of both Smart Batteries allows, due to reduced temperatures a longer
powersupply than in serial mode. The higher voltages lead to lower currents and that to less heat
which gives the battery longer lifetime. This effect is like an extension of the size of the Smart
Battery System. To use this effect both batteries need to have the same chemistry and the same
cell configuration. Then you could charge both batteries in parallel which leads to a faster charging
procedure.
The SBS MARS is able to choose automatically the best suited powersupply for the system.
A current supervision is implemented at each IC. As the output current of each converter is
controlled, is the charging current, too. Additionally a hardware fuse for each battery to give the
user the highest amount of safety.
The variable voltage input is not protected by hardware against overcurrent. This should be done in
the powersupply.
The connection to the SM-Bus of the baseboard is done by the feature connector which could be
found on most of KONTRON’s backplanes with the same pinning. The SM-bus enables the user to
get information from the Smart Battery Manager and from the Smart Batteries. (Please refer to
Appendix B: Interface to Operating Systems.)
Introduction
7
Page 9
MARS User´s Guide
,
,
A
(
)
r
alternativ
5 - 28V
SB#1
Li-Ion
(4S3P)
Typ.
14,4 V
11,6V –
8 V
16
TX
Vbatt1+
Vbatt1-
Therm.1
SMBDAT
SMBCLK
SB-Connector
if ≥ 19V
HDD POWER
Buck-Boost
Converter 1
19V
±10%
charge max. 28V
voltage
1
discharge
charge
voltage
12V
Buck-Boost
Converter 2
12V (±5%)
9V 28V
4
+
12V
3
Dual Buck
Converter
5V & 12V
(±5%)
+3,3V
Con-
verte
-5V
Con-
verter
-12V
Con-
verter
3
max.
60W
5V
SBY
(3)
select
battery
20
or
24
ATX_POWER
optional
Prozessor
and
Chipset
SB#2
NiMH
(10S1P)
Typ.
12 V
9V –
4 V
14
Vbatt2+
Vbatt2-
Therm.2
SMBDAT
SMBCLK
SB-Connector
2
discharge
charge
voltage
4
2 3
1
-
Smart Battery
System Manager
SBS
LTC1760
„MARS“
Fig. 2: Block diagram of SBS MARS
SBS
Power
Hardware
SM-Bus
FeatureConnector
Backplane
(ETX or ETXexpress)
Introduction
8
Page 10
MARS User´s Guide
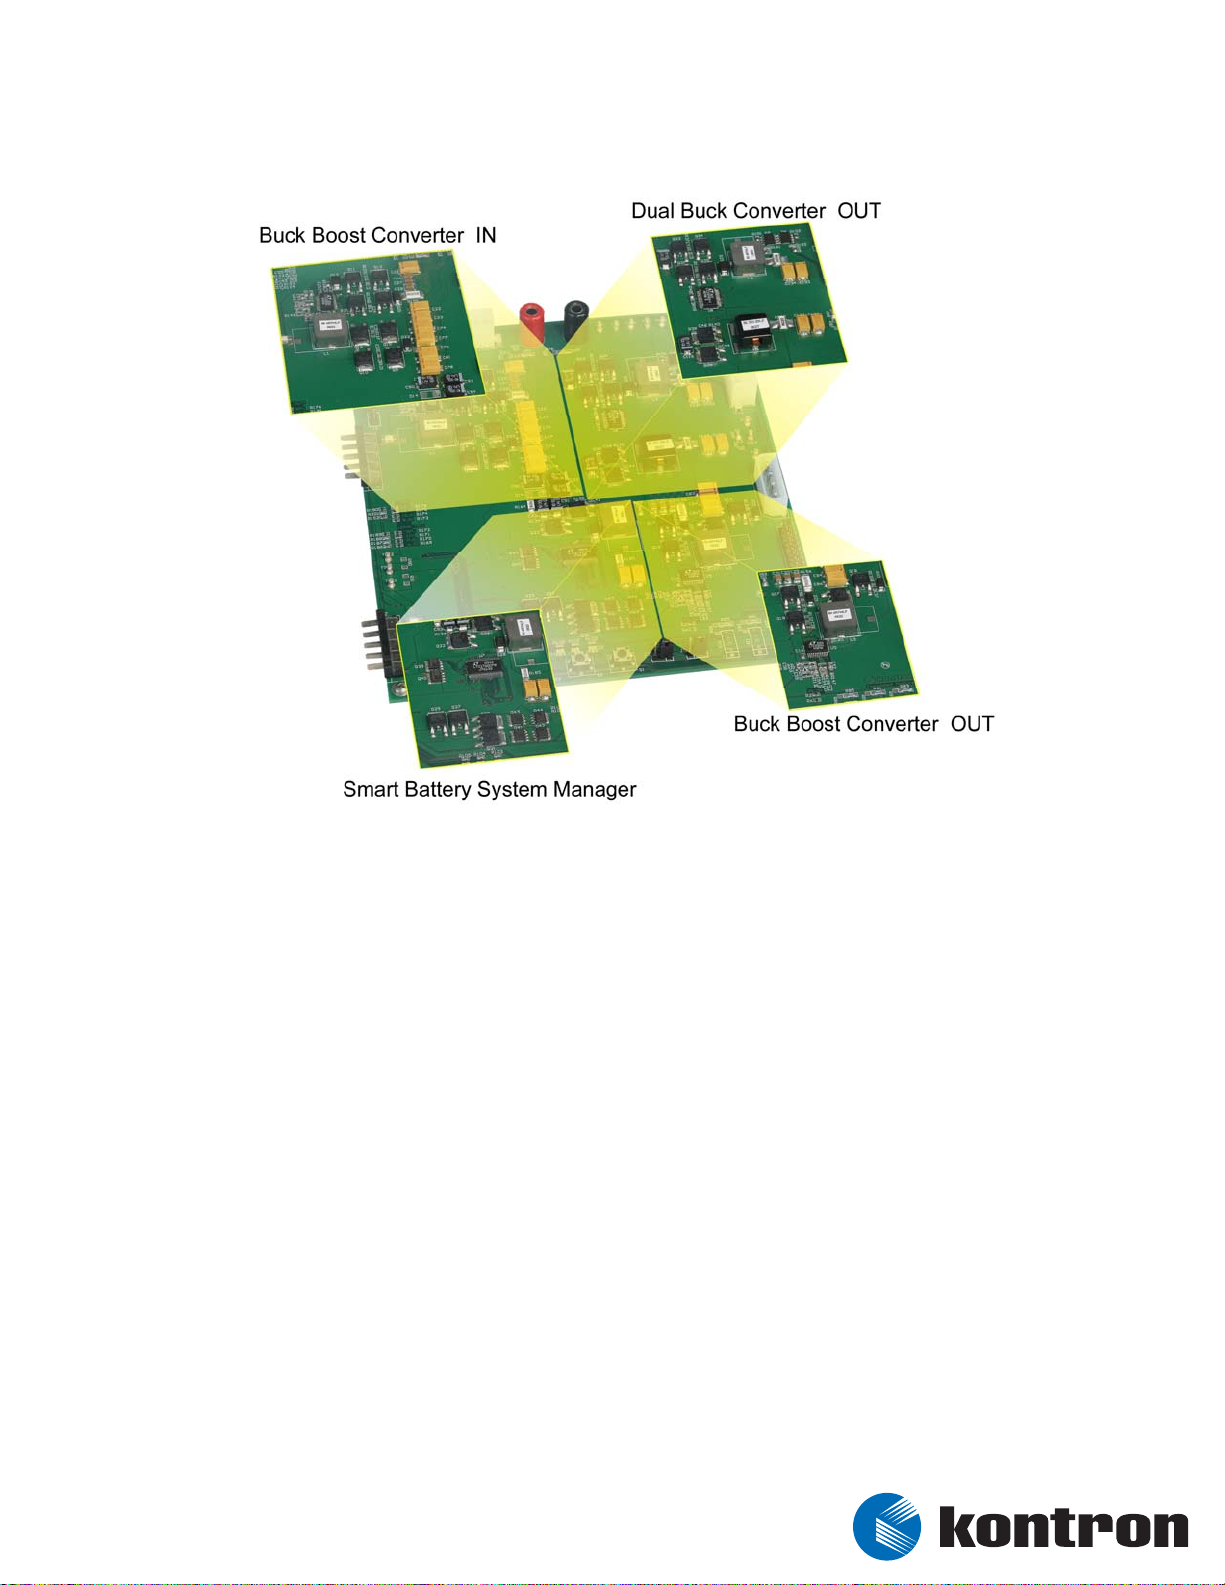
Fig. 3: Modular setup of SBS MARS
The SBS MARS was the result of the diploma thesis titled „Smart Battery Systeme in mobilen
embedded Applikationen” which was handed in at the University of Applied Sciences in Landshut
in cooperation with Kontron Embedded Modules.
Furthermore we had cooperation with Linear Technologies, whos converter ICs we have used at the
SBS MARS. The experience of LT’s engineers was a great help, especially during layout to develop
such a high efficient system.
Introduction
9
Page 11

MARS User´s Guide
3. Specifications
3.1 System components
h Smart Battery System Manager and Charger
• LTC 1760: Dual Smart Battery System Manager
h Buck-boost converter (at input and output each)
• LTC 3760
h Dual buck converter at output side
• LTC 3727
h CPLD
• Xilinx XC9536XL
3.2 Mechanical Specification
3.2.1 Size
h 185.0 mm x 160.0 mm (7.28” x 6.3”)
h Hight: 24 mm TBD
3.3 Elektrical Specification
3.3.1 Input voltage
h 5V DC to 28 V DC
3.3.2 Input power
h TBD
3.3.3 Smart Batteries
h NiMH and NiCd up to 10S1P
eg. 9S1P (10.8V), 10S1P (12V)
h LiIon and LiPo up to 4S3P:
eg. 2S2P (7.2V), 3S3P (10.8V), 4S3P (14.4V)
Specifications
10
Page 12

MARS User´s Guide
3.3.4 Output voltages
h 12V DC (max. 60W)
h 5V SBY
h 5V (+ 5V STBY max. 60W)
h Optional voltages for 3,3V, -5V, -12V (s. chapter
Note:
60W output power is the maximum total amount, i. e. either on 12V or on 5V+5V_SBY. The power
can also be splitted to the output voltages.
3.4 Environmental Spezifications
3.4.1 Temperature
h 0°C to 70°C
h TBD after approval tests
3.4.2 Humidity
h Operating: 10% to 90% (non condensing)
h Non operating: 5% to 95% (non condensing)
h TBD
9.)
Specifications
11
Page 13

MARS User´s Guide
4. Power Flow of SBS MARS
The SBS MARS consist of four power modules. (See fig. 4)
The system is sourced by the buck-boost converter 1 or directly, when the buck-boost converter 1 is
bypassed. The SBS circuit controls the charging and discharging of the batteries and sources the
output with the available voltages. The dual buck converter creates the 5V Standby, the 5V and the
12V. When there are batteries in use that could drop there voltage lower then 12V, then a second
Buck Boost Converter must be used.
Fig. 4: Power Flow of SBS MARS
Power Flow of SBS MARS
12
Page 14

MARS User´s Guide
5. Smart Battery System Manager
(Abbr.: SBS Manager)
The SBS Manager in the SBS MARS is realised by the LTC1760 from Linear Technologies.
This IC has following characteristics:
• SMBus Charger/Selector for Two Smart Batteries*
• Voltage and Current Accuracy within 0.2% of Value
Reported by Battery
• Includes All SMBus Charger V1.1 Safety Features
• Supports Autonomous Operation without a Host
• Allows Both Batteries to Discharge Simultaneously
into Single Load with Low Loss (Ideal Diode)
The LTC1760 Smart Battery System Manager is a highly integrated level 3 battery charger and
selector intended for products using dual smart batteries. Three SMBus interfaces allow the
LTC1760 to servo to the internal voltage and currents measured by the batteries while allowing an
SMBus Host to monitor either battery’s status. Charging accuracy is determined by the battery’s
internal voltage and current measurement, typically better than ±0.2%.
A proprietary PowerPathTM architecture supports simultaneous charging or discharging of both
batteries. Typical battery run times are extended by up to 10%, while charging times are reduced
by up to 50%. The LTC1760 automatically switches between power sources in less than 10μs to
prevent power interruption upon battery or wall adapter removal.
The LTC1760 implements all elements of a version 1.1 “Smart Battery System Manager” except for
the generation of composite battery information. An internal multiplexer cleanly switches the
SMBus Host to either of the two attached Smart Batteries without generating partial messages to
batteries or SMBus Host. Thermistors on both batteries are automatically monitored for
temperature and disconnection information (SafetySignal).
Hardware programmable limits for maximum charge current and voltage improve the safety of the
complete system.
5.1 Possible Configurations
5.1.1 LOPWR TRIP
The threshold voltage controls the voltage which source the system. When the voltage of the active
source drops below this threshold, then the currently best voltage source is selected.
This Threshold voltage is configurable with the following jumper resistors (0Ω):
Smart Battery System Manager
13
Page 15

MARS User´s Guide
h R169 Æ 5,5 V
(recommendable at e.g 2S2P LiIon Smart Batteries)
h R170 Æ 8,2 V
(recommendable at e.g 3S3P LiIon Smart Batteries)
h R171 Æ 11,0 V
(recommendable at e.g 4S3P LiIon Smart Batteries)
h Another resistor at the voltage devider at R189 can be used optionally to select a
different threshold voltage. Following formula calculates R189 and 0Ω resistor at R172
activates this special threshold voltage
Trip
V19,1
−
V19,1U
= k300
189R
h Without any jumper resistor and without R167 the threshold voltage is deactivated.
Additionally the LOPWR Pin of the LTC1760 should be connected to VCC.
Ω⋅
5.1.2 VLIM TRIP
The maximum charging voltage is also controlable by jumper resistors. (Charger Output Voltage
Limit).
The value of an external resistor connected from the VLIMIT pin to GND determines one of five
voltage limits that are applied to the charger output value. See Table below. These limits provide a
measure of safety with a hardware restriction on charging voltage, which cannot be overridden by
software. This voltage sets the limit that will be applied to the battery as reported by battery. Since
the battery internal voltage monitor point is the actual cell voltage, you may see higher voltages,
up to 512mV higher, at the external charger terminals due to the voltage servo loop action. (See
Operations section 3.6 in the datasheet of the LTC1760 for more information on the voltage servo
system.)
Selectable thresholds for the charging voltage:
0Ω-Jumper bei V
MAX
R173 Up to 8,4V
R174 Up to 12,6V
R175 Up to 16,8V
R175 Optional
The optional value can be e. g. 21V if R190 = 100kΩ.
(for more information see datasheet of the LTC1760)
Smart Battery System Manager
14
Page 16

MARS User´s Guide
The threshold can be deactivated by not using any of the 0Ω jumpers. The threshold has then the
maximum possible voltage.
5.1.3 Activation and Deactivation of the Charger
The charging voltage can be deactivated by using the jumper J3 in it’s OFF position. In position ON
the charging voltage is activated. This allows control for certain tests.
5.1.4 Sequentiell Discharging of the Batteries
A sequentiell discharging of the battery makes no sense from the energetical point of view. With a
parallel discharging the battery has less power loss, due to a lower current from each battery. This
works only when Smart Batteries are used with identical cell configuration and chemistry. (e.g.
4S3P with LiIon)
Despite these facts, if an application needs a sequentiell discharging, then there are 2 ways to
realise it.
One possibility is to use different batteries with different cell configuration or chemistry, which
leads to different battery voltages. In this case there will be always a sequentiell discharging done,
because the system always use the battery with the highest voltage. Only if the batteries have an
nearly similar voltage, then they are discharged equally.
Another possibility is an extension of the circuit of the SBS Manager. You can order an application
note for this topic from Kontron.
Smart Battery System Manager
15
Page 17

MARS User´s Guide
6. Input Buck-Boost Converter
(Abbr.: BBin)
The input buck-boost converter allows both low and high input voltages. This assures that the
charging voltage is always higher as battery voltage and a charging process is possible.
The LTC3780 from Linear Technologies is used in the SBS MARS for this function.
The characteristics of the IC are:
• Single Inductor Architecture Allows VIN above, below or equal to V
• Synchronous Rectification: Up to 98% Efficiency
• Current Mode Control
• Output Overvoltage Protection
The LTC3780 is a high performance buck-boost switching regulator controller that operates from
input voltages above, below or equal to the output voltage. The constant frequency current mode
architecture allows a phaselockable frequency of up to 400 kHz. With a wide 4V to 30V (36V
maximum) input and output range and seamless transfers between operating modes, the LTC3780
is ideal for automotive, telecom and battery-powered systems.
This converter also has the option to control the output current. For this reason it is possible to
increase the safety of the system.
OUT
6.1 Possible Configurations
6.1.1 Feed-in with 12V from an ATX power supply
This way of power supply offers the user the test possibility to check the behaviour in a surrounding
where 12V is available.
The 12V ATX power line for the buck-boost converter can be used, when a suitable power jumper on
R79 is populated and the jumper R211 and R80 are not connected.
You can use as a power jumpter e.g. an LRZ1206 from TT electronics.
6.1.2 Feed-in with 5V from an ATX power supply
This way of power supply offers the user the test possibility to check the behaviour in a surrounding
where 5V is available.
The 5V ATX power line for the buck-boost converter can be used, when a suitable power jumper on
R211 is populated and the jumper R79 and R80 are not connected.
You can use as a power jumpter e.g. an LRZ1206 from TT electronics.
Input Buck-Boost Converter
16
Page 18

MARS User´s Guide
6.1.3 Feed-in with 5V up to 28V
This feature offers the widest spectrum of possible input voltages, because almost all common
supply voltages are in this area of 5V to 28V. The power source can be connected to connector X3.
This configuration for the buck-boost converter (connection to connector X3) can be used, when a
suitable power jumper on R80 is populated and the jumper R79 and R211 are not connected.
You can use as a power jumpter e.g. an LRZ1206 from TT electronics.
6.1.4 Activation and Deactivation of the Converter
There is the possiblity to deactivate and active the input buck-boost converter, to allow certain test
and controle scenarious.
Jumpter J2 can be swithed to ON and OFF to use this function.
6.2 Cases where no Input Buck-Boost Converter is necessary
6.2.1 Basic Conditions
There are two cases in which the input buck-boost converter is not necessary.
The first is, if only voltages between 19V and 28V are connected at the input.
The other possible case is, when batteries are used, which voltages don’t exceed a defined range.
It must be ensured, that the input voltage is always sufficiently higher than this voltage range.
In these cases the input buck-boost converter can be omitted or bypassed.
In all other cases, the input buck-boost converter is necessary.
6.2.2 How to bypasse the converter
h Setting the bypass Æ alter Power Jumper from R77 to R78
h Don’t use R80, R211 and R79. Additionally the whole circuit of the input buck-boost
converter can be omitted.
h Set DCIN_GD to „always true“ Æ alter R20 to R17 (both bottom side)
If there are only batteries which need a lower charging voltage than 19V the input buck-boost
converter can be omitted like it is described above.
The output voltage of the input converter can be changed, if the batteries allow this and the input
Note:
voltage would be not high enough. The voltage devider (R18||R142 + R153||R22) controls this output
voltage according to the formula:
BBin_out
+⋅=
142R||18R
)1(V8,0V
22R||153R
Input Buck-Boost Converter
17
Page 19

MARS User´s Guide
7. Output buck-boost converter
(Abbr.: BBout)
The output buck-boost converter is necessary to convert from higher and also lower voltages to
12V at the output side. It secures the 12V, even if there are batteries used with voltages lower than
12V.
The LTC3780 from Linear Technologies is used in the SBS MARS for this function. (see description
in chapter 6.)
7.1 Case where no Output buck-boost converter is necessary
7.1.1 Basic Conditions
If batteries are used, which voltage will always stay higher than 12V, then the control of the output
voltage can be done by the 2nd path of the dual buck converter and the output buck-boost
converter can be omitted.
If it is possible that the voltage of the batteries drop below 12V, then the output buck-boost
converter must be used.
7.1.2 How to bypass the converter?
h Connect +V12_OUT to +V12_out_DB Æ alter Power Jumper from R87 to R88
h Don’t use R89 to avoid losses in the circuits of the converter. Alternativly the whole
circuit of the input buck-boost converter can be omitted.
h Populate R59 (bottom side) to activate the 2nd path of the dual buck converter
h Don’t use R160 (bottom side).
Output buck-boost converter
18
Page 20

MARS User´s Guide
8. Dual Buck Converter
(Abbr.: DB)
The dual buck converter is used, to generate the 12V and 5V at the output of SBS MARS, to source
the system. It must be able to convert the high battery voltages to 12V and 5V.
The LTC3727 from Linear Technologies is used in the SBS MARS for this function.
The characteristics of the IC are:
• Out-of-phase controllers reduce required input capacitance and power
supply induced noise
• OPTI-LOOP® compensation minimizes C
• Phase-lockable fixed frequency 250kHz to 550kHz
• ±1% output voltage accuracy
• Output overvoltage protection
The LTC3727 is a high performance dual step-down switching regulator controller that drives all Nchannel synchronous power MOSFET stages. A constant frequency current mode architecture allows
phaselockable frequency of up to 550kHz. Power loss and noise due to the ESR of the input
capacitors are minimized by operating the two controller output stages out of phase.
OUT
OPTI-LOOP compensation allows the transient response to be optimized over a wide range of
output capacitance and ESR values. There is a precision 0.8V reference and a power good output
indicator. A wide 4V to 30V (36V maximum) input supply range encompasses all battery
chemistries.
This converter also has the option to control the output current of both paths. For this reason it is
possible to increase the safety of the system.
8.1 Possible Configurations
8.1.1 Adjustment of the frequency
A 0Ω resistor controls the frequency of the dual buck converter. A populated R48 switch the
freqnency to 530 kHz, a populated R49 to 255 kHz.
If lower power is necessary and a different dimensioning of the converter must be done the lower
frequency has an advantage. The converter gets more efficient and the radiation (EMR) will
decrease.
8.2 Dual buck converter without 12V path
8.2.1 Basic Conditions
If the battery voltage can drop below 12V it must be sourced by the output buck-boost converter
and the 12V path of the dual buck converter is obsolete.
Dual Buck Converter
19
Page 21

MARS User´s Guide
8.2.2 How to bypass the 12V path of the dual buck converter
h Connect +V12_OUT to +V12_out_BB Æ alter Power Jumper from R88 to R87
h Populate R89 to connect the input voltage to the output dual buck converter
h Populate R160 and remove R59 (both bottom side) to deactivate the 12V path of the
dual buck converter. The circuit of the dual buck converter could be omitted in this
case.
Dual Buck Converter
20
Page 22

MARS User´s Guide
9. Usage without Output Converter
If there is a computer system sourced, which allows a variable input voltage, then the output
converter is not necessary.
The output voltage of the Smart Battery System Manager (V_DCOUT) can be directly used and it can
be conntected at the terminal X4. The range of that voltage starts at the lowest possible voltage of
the batteries and ends at the highest input voltage (=28V) or the output voltage of the input buckboost converter, when used (=19V).
10. Other ATX Voltages
There is an interface for the user on the SBS MARS to implement the missing ATX voltages when
necessary. A suitable converter can be used here to create the regarding voltages.
Additionally the external converter can be enabled by an enable signal from the CPLD to create the
behaviour of a standard ATX power supply.
The connector X10 offers the possibility to connect a converter for +3.3V. If such a converter is
used, the power jumper must be changed from R85 to R86.
The connector X11 offers the possibility to connect a converter for –5V. If such a converter is used,
the power jumper must be changed from R81 to R82.
The connector X12 offers the possibility to connect a converter for –12V. If such a converter is
used, the power jumper must be changed from R83 to R84.
The pining of the converter:
Pin Name Beschreibung
1
2
3
4
5
The connectors X10, X11 and X12 have a size of 2.54 mm.
Vin Input voltage for the converter
EN enable signal from CPLD
GND ground
PGOOD Power good Signal to the CPLD
Vout Regarding output voltage
If there are no seperated converts for this voltages and power jumpers are not changed like
described above then the voltage of +3.3V, -5V and -12V are connected to the output of the used
ATX power supply at the input side of the SBS MARS.
The output of 5V standby, 5V and 12V is in most applications sufficient, especially when a
baseboard from Kontron is used.
Usage without Output Converter
21
Page 23

MARS User´s Guide
11. Activating and Deactivating of the SBS
MARS
Pressing the ON/OFF button at the SBS MARS switches on the CPLD and the SBS Manager und the
voltages at the output are sourced.
Pressing the ON/OFF button for more than 4 seconds deactivates the SBS MARS.
There are 2 different standby modes to give a wide flexibility and as much energy safing as
possible. Jumper J1 changes these modes.
11.1 Standby Mode 1
This mode is completly similar to the behaviour of an ATX power supply. I. e. an inactive PS_ON
signal leads to a single supply with the 5V standby voltage at the output of SBS MARS. After
pressing the power button on the backplane all other voltages will be switched on.
Pressing the power button on the backplane more then 4 seconds (i. e. PS_ON# = 0) will switch off
all voltages, except the 5V standby.
When SBS MARS is activated and there is already an active PS_ON signal then the 5V standby is
supplied imediatelly and after a short period of time the rest of the voltages will follow.
This mode of the SBS MARS allows the usage of all common ACPI S-modes which needs either only
the 5V Standby, like S3 cold and S5 (suspend to RAM and soft off), or need a full supply of the
system, like S0 or S3 hot.
11.2 Standby Mode 0
This mode has the purpose to safe as much energy as possible. It has been created to meet the
demands of a mobile system.
In case of just the batteries are connected to the SBS MARS and the PS_ON# signal is inactive, it
will also switch off the 5V Standby to give the batteries the lowest power loss and therefore the
longest life time. In this case no voltages at all will be generated.
To return to the state where first the 5V standby is switched on and after a defined short period of
time the rest of the voltages are enabled, the ON button must be pressed and after that the PS_ON#
signal has to go active (e.g. by pressing the power button).
ACPI S-modes, which need a 5V standby like S1 to S3, are not possible in this mode of SBS MARS.
Activating and Deactivating of the SBS MARS
22
Page 24

MARS User´s Guide
Note:
If the resistor R2 is changed to R6 the PS_ON signal is always active. I. e. that all voltages
generated by the SBS MARS are available at the output continuous.
11.3 Control LEDs
The SBS MARS offers the possibility to show the user the state of all output voltages by LEDs.
Pressing the “LED on” button S2 will activate the LEDs when the output voltages are switched on:
h D11 for 12V
h D10 for 5V
h D9 for 5V Standby
The LEDs are only active when the S2 button is pressed. To save power while running the system is
not switching on the LEDs continuously.
Activating and Deactivating of the SBS MARS
23
Page 25

MARS User´s Guide
12. Output of the SBS MARS
There are 2 possible connectors to grip the output voltages and a feature connector to connect the
SBS MARS to a COM backplane.
12.1 ATX Connector (24 pin) X6
The ATX connector X6 has the pining as described in the ATX specification version 2.2.
Fig. 5: ATX Connector at the output side
The cables that are delivered together with our SBS MARS can be used to connect the SBS MARS to
the ATX plug of any computer, especially to the COM baseboards of Kontron.
There is a 20 pin ATX connector cable as well as a 24 pin cable, which could both be used on the 24
pin output connector of the SBS MARS.
Note:
The power good (PG) line of this output ATX-connector is asserted high (5V) when +12VDC and
+5VDC are available at the output. In other cases the PG-signal is low.
Output of the SBS MARS
24
Page 26

MARS User´s Guide
12.2 HDD Power Connectors (4 pin) X7 + X13
This connector can be used to connect devices which need 5V and/or 12V. E. g. harddisks can be
directly connected and powered by SBS MARS together with the host computer.
This connector can also be used to source the 4 pin 12V DC connector with the specific adapter.
This is necessary if e. g. a ETXexpress backplane should be supplied.
The connector has the pining of a standard HDD power connector.
Fig. 6: Pining of the harddisk connector X7 or X13
A power cable for harddisks and one for the 12V connector (ATX12V 2.1 Spec or higher) is enclosed
in the SBS MARS Starter-Kit.
Output of the SBS MARS
25
Page 27

MARS User´s Guide
12.3 Feature Connector X9
The feature connector is used to connect the SM-Bus and additional other signals from the SBS
MARS to the powered computer system.
Pinout Feature Connector
Pin Pin on SBS MARS Beschreibung
1 n. c.
2 n. c.
3 BATLOW# Not used with current design
4 n. c.
5 n. c.
6 n. c.
7 n. c.
8 n. c.
9 n. c.
10 SMBALRT#_OUT Interrupt of SMBus
11 n. c.
12 SMBDAT_OUT Dataline of SMBus
13 SMBCLK_OUT Clock of SMBUS
14 n. c.
15 n. c.
16 V_BAT_RTC Power for the RTC
17 n. c.
18 GND ground
19 ATX_PG# high when all voltages are active
20 GND ground
21 PWRBTN# low when powerbutton is pressed
22 GND ground
23 n. c.
24 n. c.
Pin 10: SMBALRT#_OUT:
This signal creates an interrupt when there is a change of the sourcing voltages of the SBS MARS. I.
e. when a battery or the power supply of the SBS MARS is connected or disconnected a low active
interrupt is triggered and after readout of the Alert Response Address (ARA) the interrupt is
cleared. The interrupt is also activated when a Power ON Reset is generated.
The 0Ω resistor R218 can be used to connect the interrupt line from the feature connector. If this
signal is needed. Till now there all programs that are available are polling the states of the Smart
Battery System regularly so that a reaction on a interrupt signal was not necessary yet.
Output of the SBS MARS
26
Page 28

MARS User´s Guide
Pin 16: V_BAT_RTC:
The Pin V_BAT_RTC allows the SBS MARS to source the RTC voltage to the powered system.
Following devices must be additionally populated to use this feature:
h Diode D3 e.g. a BAT54A
h Resistor R12 with a 0Ω resistor to connect the voltage
Pin 19: ATX_PG#:
This signal is already available on the ATX connector on the output side. Additionally it can be
connected to the feature connector.
To use this function please populate:
h Resistor R12 with a 0Ω resistor.
Pin 21: PWRBTN#
The power button of the backplane can be connected to the power button of the SBS MARS to have
one single power button in the system. (TBD)
To use this function please populate:
h Diode D4 with e.g. BAT54A
h Resistor R16 with a 0Ω resistor.
The 24pin flatfoil cable which is part of the evaluation kit of the SBS MARS can be used to connect
the PCB of the SBS MARS with the COM baseboard from Kontron to use the above described
functions.
Output of the SBS MARS 27
Page 29

MARS User´s Guide
Appendix A: SBS MARS Pinouts
Connector and Testpoint Locations
Abb. 7: Silkscreen of SBS MARS
Appendix A: SBS MARS Pinouts 28
Page 30

MARS User´s Guide
Smart Battery Connector X1 und X2
This connectors are used to connect the Smart batteries to the SBS MARS.
1 V_BAT
2 SMBCLK
3 SMB DAT
4 Thermistor
5 BATGND
Fig. 8: Connector for Smart Batteries
Appendix A: SBS MARS Pinouts 29
Page 31

MARS User´s Guide
Appendix B: Interface to Operating Systems
There is a Windows application available which allows to watch all information of the batteries and
the SBS manager.
This demo software is available from Kontron and it can supply the information of the SBS MARS by
a graphical GUI (Fig. 9).
Abb. 9: Screenshot of the SBS MARS Interface software
Appendix B:
Interface to Operating Systems 30
Page 32

MARS User´s Guide
In the following the most important information is shown, that can be read out of the SBS Manager
and the both batteries.
SBS Manager: SM-Bus address 14h (look also datasheet of LTC1760)
h Information of the system status
• Which battery is present, is charged/discharged, sends a calibrate request
• If AC is present
• If power is good
• A calibration is in process
Smart Batteries: SM-Bus address 16h (look also datasheet of the used Smart Battery)
Note:
• Remaining Capacity Alarm
• Remaining Time Alarm
• Temperature
• Voltage
• Current
• Relative State of Charge
• Absolute State of Charge
• Remaining Capacity
• Full Charge Capacity
• Run Time to Empty
h
It is possible to get only information of one battery at one time. After this the SM-Bus must be
connected to the other battery. This should be done by sending the hexadecimal word 1000h
(battery 1) or 2000h (battery 2) at command Code 01h to address 14h via the SM-Bus. (default:
battery 1)
• Average Time to Empty
• Average Time to Full
• Charging Current
• Charging Voltage
• Battery Status (fully charged, over charged,
over temperature alarm)
• Cycle count
• Design Capacity
• Design Voltage
Appendix B:
Interface to Operating Systems 31
Page 33

MARS User´s Guide
APPENDIX C: Possible Smart Batteries
Generally all different kinds of Smart Batteries can be used. That means different battery chemistry
and cell configurations up to 10S1P (= 10 cells in series and 1 parallel) at NiMH/NiCd or up to 4S3P
at LiIon/LiPo are possible. But it must be ensured to use standard Smart Batteries, which meet the
SM-Bus standard. Because of the mechanical placement of the Smart Battery connectors it is not
possible to use Smart Batteries with a greater width than 90 mm. The usage of those would be
possible, if either the connectors are placed in another way or a Smart Battery lead is used (e. g.
the 5 way Smart Battery connecting lead of Moltech – part number: 629010).
Battery Manufacturer:
http://www.moltechpower.co.uk/smart_standard_range.htm
e. g. NH2054HD, NL2044HD22, NL2054HD22, NJ1020AVP
http://www.inspired-energy.com/Standard_Products/standard_products.htm
http://www.emergingpower.com/oem/oem_standardpacks.htm
http://www.gpbatteries.com.hk/html/techinfo/notebook.asp
http://www.molienergy.com/marketin.htm
APPENDIX C:
Possible Smart Batteries 32
Page 34

MARS User´s Guide
APPENDIX D: Compatible Kontron Boards
TBD
APPENDIX D:
Compatible Kontron Boards 33
Page 35

MARS User´s Guide
APPENDIX E: DOCUMENT-REVISION HISTORY
Revision Date Edited by Changes
0.1 23.08.2006 SDA Created preliminary manual.
0.2 20.10.2006 SDA Added the appendices
0.3 27.10.2006 UMA Translated to english
0.4 30.10.2006 SDA Changes in appendix B, Fig. 4, Chapter 12.2 and small changes in the text
APPENDIX E: DOCUMENT-REVISION HISTORY 34
 Loading...