

Page 1
If it's embedded, it's Kontron.
» Kontron User's Guide «
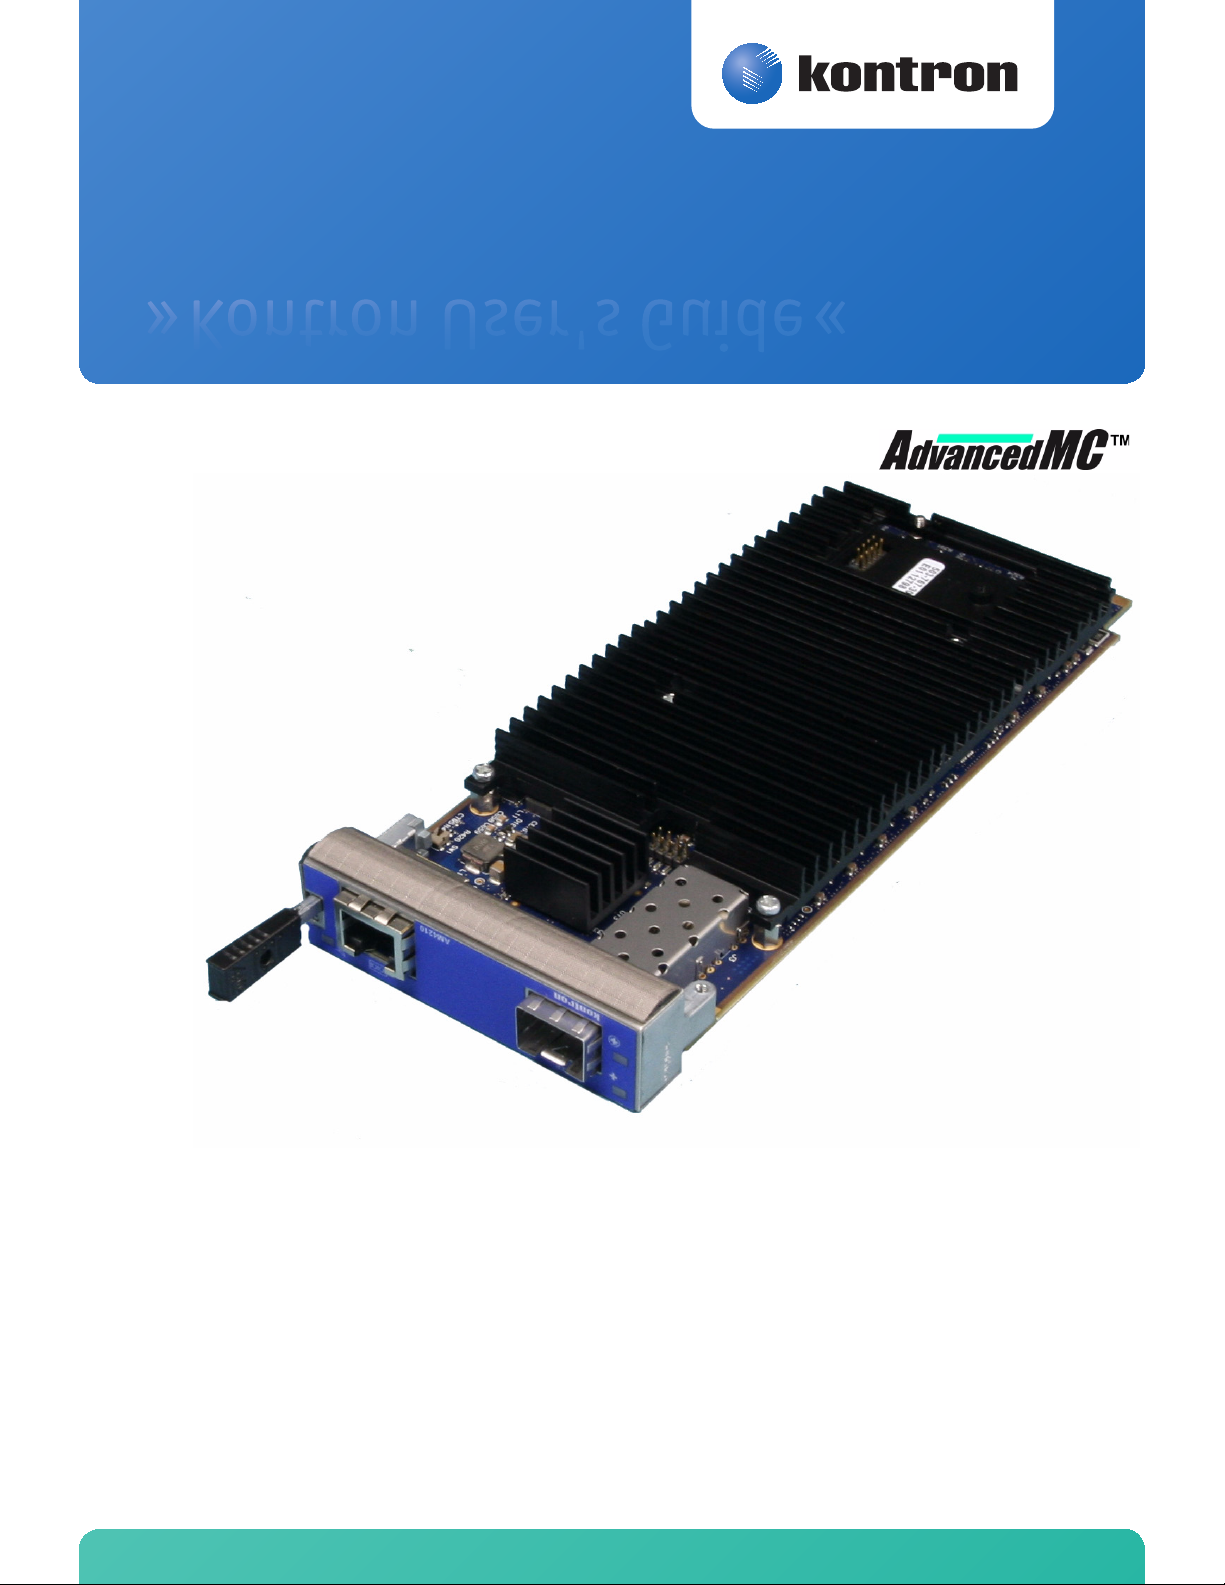
AM4210
Document Revision 1.2
May 2010
Page 2

www.kontron.com
Revision History
Rev. Index Brief Description of Changes Date of Issue
1.0 First Release September 2009
1.1 Second Release December 2009
1.2 Third Release, rework on chapter 4 and 5 May 2010
Customer Service
Contact Information: Kontron Canada, Inc.
4555 Ambroise-Lafortune
Boisbriand, Québec, Canada
J7H 0A4
Tel: (450) 437-5682
(800) 354-4223
Fax: (450) 437-8053
E-mail: support@ca.kontron.com
Visit our site at: www.kontron.com
© 2010 Kontron, an International Corporation. All rights reserved.
The information in this user's guide is provided for reference only. Kontron does not assume any
liability arising out of the application or use of the information or products described herein. This
user's guide may contain or reference information and products protected by copyrights or patents
and does not convey any license under the patent rights of Kontron, nor the rights of others.
Kontron is a registered trademark of Kontron. All trademarks, registered trademarks, and trade
names used in this user's guide are the property of their respective owners. All rights reserved.
Printed in Canada. This user's guide contains information proprietary to Kontron. Customers may
reprint and use this user's guide in other publications. Customers may alter this user's guide and
publish it only after they remove the Kontron name, cover, and logo.
Kontron Modular Computer GMBH
Sudetenstrasse 7
87600 Kaufbeuren
Germany
+49 (0) 8341 803 333
+49 (0) 8341 803 339
support-kom@kontron.com
Kontron reserves the right to make changes without notice in product or component design as
warranted by evolution in user needs or progress in engineering or manufacturing technology.
Changes that affect the operation of the unit will be documented in the next revision of this user's
guide.
iAM4210
Page 3

www.kontron.com
Table of Contents
Safety Instructions . . . . . . . . . . . . . . . . . . . . . . . . . . . . . . . . . . . . . . . . . . . . . . . . . . . . . . vii
Before You Begin . . . . . . . . . . . . . . . . . . . . . . . . . . . . . . . . . . . . . . . . . . . . . . . . . . . . . . . . . . . . . . .vii
Preventing Electrostatic Discharge . . . . . . . . . . . . . . . . . . . . . . . . . . . . . . . . . . . . . . . . . . . . . . . . viii
Safety Requirements . . . . . . . . . . . . . . . . . . . . . . . . . . . . . . . . . . . . . . . . . . . . . . . . . . . . . . . . . . . . ix
Preface . . . . . . . . . . . . . . . . . . . . . . . . . . . . . . . . . . . . . . . . . . . . . . . . . . . . . . . . . . . . . . . . . x
How to Use This Guide . . . . . . . . . . . . . . . . . . . . . . . . . . . . . . . . . . . . . . . . . . . . . . . . . . . . . . . . . .x
Customer Comments. . . . . . . . . . . . . . . . . . . . . . . . . . . . . . . . . . . . . . . . . . . . . . . . . . . . . . . . . . . . . .x
Advisory Conventions . . . . . . . . . . . . . . . . . . . . . . . . . . . . . . . . . . . . . . . . . . . . . . . . . . . . . . . . . . . . xi
Unpacking . . . . . . . . . . . . . . . . . . . . . . . . . . . . . . . . . . . . . . . . . . . . . . . . . . . . . . . . . . . . . . . . . . . . xii
Regulatory Compliance Statements . . . . . . . . . . . . . . . . . . . . . . . . . . . . . . . . . . . . . . . . . . . . . . . . xiii
Table of Contents
Limited Warranty . . . . . . . . . . . . . . . . . . . . . . . . . . . . . . . . . . . . . . . . . . . . . . . . . . . . . . . . . . . . . . xiv
1. Product Description . . . . . . . . . . . . . . . . . . . . . . . . . . . . . . . . . . . . . . . . . . . . . . . . . . . . . . . 2
1.1 Product Overview. . . . . . . . . . . . . . . . . . . . . . . . . . . . . . . . . . . . . . . . . . . . . . . . . . . . . . . . . . . . . 2
1.2 What’s Included. . . . . . . . . . . . . . . . . . . . . . . . . . . . . . . . . . . . . . . . . . . . . . . . . . . . . . . . . . . . . . 3
1.3 Board Specifications . . . . . . . . . . . . . . . . . . . . . . . . . . . . . . . . . . . . . . . . . . . . . . . . . . . . . . . . . . 3
1.4 Hot Swap Capability. . . . . . . . . . . . . . . . . . . . . . . . . . . . . . . . . . . . . . . . . . . . . . . . . . . . . . . . . . . 5
1.5 Software Support. . . . . . . . . . . . . . . . . . . . . . . . . . . . . . . . . . . . . . . . . . . . . . . . . . . . . . . . . . . . . 6
2. Board Features. . . . . . . . . . . . . . . . . . . . . . . . . . . . . . . . . . . . . . . . . . . . . . . . . . . . . . . . . . . 8
2.1 Block Diagram . . . . . . . . . . . . . . . . . . . . . . . . . . . . . . . . . . . . . . . . . . . . . . . . . . . . . . . . . . . . . . . 8
2.2 System Core . . . . . . . . . . . . . . . . . . . . . . . . . . . . . . . . . . . . . . . . . . . . . . . . . . . . . . . . . . . . . . . . . 9
2.2.1 Cavium OCTEON Plus 5650. . . . . . . . . . . . . . . . . . . . . . . . . . . . . . . . . . . . . . . . . . . . . . . . . . .9
2.3 USB Flash Module . . . . . . . . . . . . . . . . . . . . . . . . . . . . . . . . . . . . . . . . . . . . . . . . . . . . . . . . . . . . 9
2.4 SFP+ Front IO . . . . . . . . . . . . . . . . . . . . . . . . . . . . . . . . . . . . . . . . . . . . . . . . . . . . . . . . . . . . . . . 10
2.5 Dual Gigabit Ethernet Controller. . . . . . . . . . . . . . . . . . . . . . . . . . . . . . . . . . . . . . . . . . . . . . . . 10
2.6 RS232 Management Interface. . . . . . . . . . . . . . . . . . . . . . . . . . . . . . . . . . . . . . . . . . . . . . . . . . 10
2.7 IPMI . . . . . . . . . . . . . . . . . . . . . . . . . . . . . . . . . . . . . . . . . . . . . . . . . . . . . . . . . . . . . . . . . . . . . . 11
2.8 Power Supply . . . . . . . . . . . . . . . . . . . . . . . . . . . . . . . . . . . . . . . . . . . . . . . . . . . . . . . . . . . . . . . 11
2.9 AMC Connector. . . . . . . . . . . . . . . . . . . . . . . . . . . . . . . . . . . . . . . . . . . . . . . . . . . . . . . . . . . . . . 12
2.10 Front Panel LEDs . . . . . . . . . . . . . . . . . . . . . . . . . . . . . . . . . . . . . . . . . . . . . . . . . . . . . . . . . . . . 13
2.10.1 Hot Swap LED (Blue LED) . . . . . . . . . . . . . . . . . . . . . . . . . . . . . . . . . . . . . . . . . . . . . . . . . .13
2.10.2 Out-Of-Service (OOS) LED (LED1) . . . . . . . . . . . . . . . . . . . . . . . . . . . . . . . . . . . . . . . . . . . .13
2.10.3 Health LED (LED2) . . . . . . . . . . . . . . . . . . . . . . . . . . . . . . . . . . . . . . . . . . . . . . . . . . . . . . .13
ii AM4210
Page 4

Table of Contents
www.kontron.com
3. Installing the Board. . . . . . . . . . . . . . . . . . . . . . . . . . . . . . . . . . . . . . . . . . . . . . . . . . . . . . 15
3.1 Hot Swap Insertion Procedures. . . . . . . . . . . . . . . . . . . . . . . . . . . . . . . . . . . . . . . . . . . . . . . . . 15
3.2 Hot Swap Extraction Procedures . . . . . . . . . . . . . . . . . . . . . . . . . . . . . . . . . . . . . . . . . . . . . . . . 16
3.3 Software. . . . . . . . . . . . . . . . . . . . . . . . . . . . . . . . . . . . . . . . . . . . . . . . . . . . . . . . . . . . . . . . . . . 17
3.4 System access . . . . . . . . . . . . . . . . . . . . . . . . . . . . . . . . . . . . . . . . . . . . . . . . . . . . . . . . . . . . . . 17
3.4.1 Front port serial connection . . . . . . . . . . . . . . . . . . . . . . . . . . . . . . . . . . . . . . . . . . . . . . . .17
3.4.2 RTM serial connection. . . . . . . . . . . . . . . . . . . . . . . . . . . . . . . . . . . . . . . . . . . . . . . . . . . . .18
3.4.3 Access via Front panel Ethernet Interface. . . . . . . . . . . . . . . . . . . . . . . . . . . . . . . . . . . . . .19
3.4.4 Using SoL over AMC Port 0 on AM4210 . . . . . . . . . . . . . . . . . . . . . . . . . . . . . . . . . . . . . . . .19
3.5 Using the cfgtool . . . . . . . . . . . . . . . . . . . . . . . . . . . . . . . . . . . . . . . . . . . . . . . . . . . . . . . . . . . . 23
3.5.1 Usage . . . . . . . . . . . . . . . . . . . . . . . . . . . . . . . . . . . . . . . . . . . . . . . . . . . . . . . . . . . . . . . . .24
4. Thermal Considerations . . . . . . . . . . . . . . . . . . . . . . . . . . . . . . . . . . . . . . . . . . . . . . . . . . . 27
4.1 Thermal Monitoring. . . . . . . . . . . . . . . . . . . . . . . . . . . . . . . . . . . . . . . . . . . . . . . . . . . . . . . . . . 27
4.2 External Thermal Regulation. . . . . . . . . . . . . . . . . . . . . . . . . . . . . . . . . . . . . . . . . . . . . . . . . . . 28
4.2.1 Forced Airflow. . . . . . . . . . . . . . . . . . . . . . . . . . . . . . . . . . . . . . . . . . . . . . . . . . . . . . . . . . .28
4.2.2 Thermal Characteristic Graphs . . . . . . . . . . . . . . . . . . . . . . . . . . . . . . . . . . . . . . . . . . . . . .28
4.2.3 Airflow Impedance . . . . . . . . . . . . . . . . . . . . . . . . . . . . . . . . . . . . . . . . . . . . . . . . . . . . . . .30
4.2.4 Airflow Paths . . . . . . . . . . . . . . . . . . . . . . . . . . . . . . . . . . . . . . . . . . . . . . . . . . . . . . . . . . .30
5. Software Setup. . . . . . . . . . . . . . . . . . . . . . . . . . . . . . . . . . . . . . . . . . . . . . . . . . . . . . . . . . 33
5.1 MMC Firmware . . . . . . . . . . . . . . . . . . . . . . . . . . . . . . . . . . . . . . . . . . . . . . . . . . . . . . . . . . . . . . 33
5.1.1 Related Documentation . . . . . . . . . . . . . . . . . . . . . . . . . . . . . . . . . . . . . . . . . . . . . . . . . . .33
5.1.2 IPMI Sensors. . . . . . . . . . . . . . . . . . . . . . . . . . . . . . . . . . . . . . . . . . . . . . . . . . . . . . . . . . . .34
5.1.3 OEM commands. . . . . . . . . . . . . . . . . . . . . . . . . . . . . . . . . . . . . . . . . . . . . . . . . . . . . . . . . .42
5.1.4 Field Replaceable Unit (FRU) Information . . . . . . . . . . . . . . . . . . . . . . . . . . . . . . . . . . . . .45
5.1.5 E-Keying . . . . . . . . . . . . . . . . . . . . . . . . . . . . . . . . . . . . . . . . . . . . . . . . . . . . . . . . . . . . . . .45
5.1.6 Watchdog . . . . . . . . . . . . . . . . . . . . . . . . . . . . . . . . . . . . . . . . . . . . . . . . . . . . . . . . . . . . . .46
5.1.7 MMC Firmware Code . . . . . . . . . . . . . . . . . . . . . . . . . . . . . . . . . . . . . . . . . . . . . . . . . . . . . .46
5.1.8 Updating MMC Firmware . . . . . . . . . . . . . . . . . . . . . . . . . . . . . . . . . . . . . . . . . . . . . . . . . . .46
5.1.9 MMC Firmware Update using kex-flashimage . . . . . . . . . . . . . . . . . . . . . . . . . . . . . . . . . . .47
5.2 Bootloader . . . . . . . . . . . . . . . . . . . . . . . . . . . . . . . . . . . . . . . . . . . . . . . . . . . . . . . . . . . . . . . . . 48
5.2.1 Power On Self Test. . . . . . . . . . . . . . . . . . . . . . . . . . . . . . . . . . . . . . . . . . . . . . . . . . . . . . . .48
5.2.2 Bootloader shell and options . . . . . . . . . . . . . . . . . . . . . . . . . . . . . . . . . . . . . . . . . . . . . . .49
5.2.3 Bootloader Update . . . . . . . . . . . . . . . . . . . . . . . . . . . . . . . . . . . . . . . . . . . . . . . . . . . . . . .52
iii AM4210
Page 5

Table of Contents
www.kontron.com
5.3 Board Firmware . . . . . . . . . . . . . . . . . . . . . . . . . . . . . . . . . . . . . . . . . . . . . . . . . . . . . . . . . . . . . 54
5.3.1 Switching between Firmware Images . . . . . . . . . . . . . . . . . . . . . . . . . . . . . . . . . . . . . . . . .55
5.3.2 Updating Firmware . . . . . . . . . . . . . . . . . . . . . . . . . . . . . . . . . . . . . . . . . . . . . . . . . . . . . . .56
5.3.3 Cavium Linux BSP . . . . . . . . . . . . . . . . . . . . . . . . . . . . . . . . . . . . . . . . . . . . . . . . . . . . . . . .57
5.3.4 WindRiver Linux BSP. . . . . . . . . . . . . . . . . . . . . . . . . . . . . . . . . . . . . . . . . . . . . . . . . . . . . .60
5.3.5 Simple executive applications . . . . . . . . . . . . . . . . . . . . . . . . . . . . . . . . . . . . . . . . . . . . . .63
5.3.6 Using the NFS Root FS. . . . . . . . . . . . . . . . . . . . . . . . . . . . . . . . . . . . . . . . . . . . . . . . . . . . .63
A. Connectors Pinouts. . . . . . . . . . . . . . . . . . . . . . . . . . . . . . . . . . . . . . . . . . . . . . . . . . . . . . .A-1
A.1 USB SSD Flash Module . . . . . . . . . . . . . . . . . . . . . . . . . . . . . . . . . . . . . . . . . . . . . . . . . . . . . . . . . 1
A.2 SFP+ Front IO . . . . . . . . . . . . . . . . . . . . . . . . . . . . . . . . . . . . . . . . . . . . . . . . . . . . . . . . . . . . . . . . 1
A.3 Serial Port Pinout . . . . . . . . . . . . . . . . . . . . . . . . . . . . . . . . . . . . . . . . . . . . . . . . . . . . . . . . . . . . 2
A.4 Serial console terminal cable interface: RJ45 Female to DB9 Female . . . . . . . . . . . . . . . . . . . . 2
B. Getting Help. . . . . . . . . . . . . . . . . . . . . . . . . . . . . . . . . . . . . . . . . . . . . . . . . . . . . . . . . . . .B-1
B.1 Returning Defective Merchandise. . . . . . . . . . . . . . . . . . . . . . . . . . . . . . . . . . . . . . . . . . . . . . . . 2
B.2 When Returning a Unit . . . . . . . . . . . . . . . . . . . . . . . . . . . . . . . . . . . . . . . . . . . . . . . . . . . . . . .B-3
C. Glossary . . . . . . . . . . . . . . . . . . . . . . . . . . . . . . . . . . . . . . . . . . . . . . . . . . . . . . . . . . . . . . .C-1
iv AM4210
Page 6

List of Figures
www.kontron.com
List of Figures
Figure 2-1: Block Diagram . . . . . . . . . . . . . . . . . . . . . . . . . . . . . . . . . . . . . . . . . . . . . . . . . . . . . . . . . . . . . .8
Figure 2-2: Front Panel of AM4210 . . . . . . . . . . . . . . . . . . . . . . . . . . . . . . . . . . . . . . . . . . . . . . . . . . . . . .13
Figure 4-1: Temperature Sensor Locations (AM4210 Top View, heat sinks not shown) . . . . . . . . . . . . . . . .27
Figure 4-2: Operational Limits for the AM4210 . . . . . . . . . . . . . . . . . . . . . . . . . . . . . . . . . . . . . . . . . . . . .29
Figure 4-3: AM4210 Impedance Curve . . . . . . . . . . . . . . . . . . . . . . . . . . . . . . . . . . . . . . . . . . . . . . . . . . . .30
Figure 4-4: Thermal Zones of the AM4210 . . . . . . . . . . . . . . . . . . . . . . . . . . . . . . . . . . . . . . . . . . . . . . . . .30
Figure 5-1: Kontron diagnostic status sensor . . . . . . . . . . . . . . . . . . . . . . . . . . . . . . . . . . . . . . . . . . . . . . .40
vAM4210
Page 7

List of Tables
www.kontron.com
List of Tables
Table 1-1 Board Specifications. . . . . . . . . . . . . . . . . . . . . . . . . . . . . . . . . . . . . . . . . . . . . . . . . . . . . . . . . . 3
Table 1-2 AM4210 Software Specification . . . . . . . . . . . . . . . . . . . . . . . . . . . . . . . . . . . . . . . . . . . . . . . . . 6
Table 2-1 SFP+ Connection. . . . . . . . . . . . . . . . . . . . . . . . . . . . . . . . . . . . . . . . . . . . . . . . . . . . . . . . . . . . 10
Table 2-2 SFP+ LED Significations . . . . . . . . . . . . . . . . . . . . . . . . . . . . . . . . . . . . . . . . . . . . . . . . . . . . . . 10
Table 2-3 AMC Connector . . . . . . . . . . . . . . . . . . . . . . . . . . . . . . . . . . . . . . . . . . . . . . . . . . . . . . . . . . . . . 12
Table 2-4 Hot Swap LED . . . . . . . . . . . . . . . . . . . . . . . . . . . . . . . . . . . . . . . . . . . . . . . . . . . . . . . . . . . . . . 13
Table 2-5 Red LED . . . . . . . . . . . . . . . . . . . . . . . . . . . . . . . . . . . . . . . . . . . . . . . . . . . . . . . . . . . . . . . . . . 13
Table 2-6 Amber/Green LED . . . . . . . . . . . . . . . . . . . . . . . . . . . . . . . . . . . . . . . . . . . . . . . . . . . . . . . . . . . 13
Table 4-1 MMC Temperature Sensors Thresholds . . . . . . . . . . . . . . . . . . . . . . . . . . . . . . . . . . . . . . . . . . . . 28
Table 4-2 Deviation of the Airflow Rate on the AM4210 . . . . . . . . . . . . . . . . . . . . . . . . . . . . . . . . . . . . . . 31
Table 5-1 Sensor list . . . . . . . . . . . . . . . . . . . . . . . . . . . . . . . . . . . . . . . . . . . . . . . . . . . . . . . . . . . . . . . . . 34
Table 5-2 Kontron FRU info agent sensor . . . . . . . . . . . . . . . . . . . . . . . . . . . . . . . . . . . . . . . . . . . . . . . . . 38
Table 5-3 Kontron IPMB-L Link sensor . . . . . . . . . . . . . . . . . . . . . . . . . . . . . . . . . . . . . . . . . . . . . . . . . . . 39
Table 5-4 Kontron MMC FW upgrade status sensor . . . . . . . . . . . . . . . . . . . . . . . . . . . . . . . . . . . . . . . . . . 39
Table 5-5 Kontron reset sensor . . . . . . . . . . . . . . . . . . . . . . . . . . . . . . . . . . . . . . . . . . . . . . . . . . . . . . . . . 40
Table 5-6 Kontron POST code value sensor . . . . . . . . . . . . . . . . . . . . . . . . . . . . . . . . . . . . . . . . . . . . . . . . 40
Table 5-7 Kontron user SW upgrade status sensor. . . . . . . . . . . . . . . . . . . . . . . . . . . . . . . . . . . . . . . . . . . 41
Table 5-8 Voltage sensor thresholds . . . . . . . . . . . . . . . . . . . . . . . . . . . . . . . . . . . . . . . . . . . . . . . . . . . . . 41
Table 5-9 Power On Self Tests . . . . . . . . . . . . . . . . . . . . . . . . . . . . . . . . . . . . . . . . . . . . . . . . . . . . . . . . . . 48
Table 5-10 Bootloader POST Code values . . . . . . . . . . . . . . . . . . . . . . . . . . . . . . . . . . . . . . . . . . . . . . . . . 49
Table 5-11 Bootloader environment variables . . . . . . . . . . . . . . . . . . . . . . . . . . . . . . . . . . . . . . . . . . . . . 49
Table 5-12 Fabric Default Flash Sector to Image Association . . . . . . . . . . . . . . . . . . . . . . . . . . . . . . . . . . 54
Table 5-13 Swapped Flash Sector to Image Association . . . . . . . . . . . . . . . . . . . . . . . . . . . . . . . . . . . . . . 54
Table 5-14 On-board 128 MB NOR Flash layout . . . . . . . . . . . . . . . . . . . . . . . . . . . . . . . . . . . . . . . . . . . . . 54
vi AM4210
Page 8

www.kontron.com
Safety Instructions
Before You Begin
Before handling the board, read the instructions and safety guidelines on the following pages to prevent
damage to the product and to ensure your own personal safety. Refer to the "Advisory Convention" section
in the Preface for advisory conventions used in this user's guide, including the distinction between
Warnings, Cautions, Important Notes, and Notes.
• Always use caution when handling/operating the computer. Only qualified, experienced,
authorized electronics service personnel should access the interior of the computer. The power
supplies produce high voltages and energy hazards, which can cause bodily harm.
• Use extreme caution when installing or removing components. Refer to the installation
instructions in this user's guide for precautions and procedures. If you have any questions, please
contact Kontron Technical Support
WARNING
High voltages are present inside the chassis when the unit's power cord is plugged
into an electrical outlet. Turn off system power, turn off the power supply, and then
disconnect the power cord from its source before removing the chassis cover. Turning
off the system power switch does not remove power to components.
vii AM4210
Page 9

www.kontron.com
Preventing Electrostatic Discharge
Static electricity can harm system boards. Perform service at an ESD workstation and follow proper ESD
procedure to reduce the risk of damage to components. Kontron strongly encourages you to follow proper
ESD procedure, which can include wrist straps and smocks, when servicing equipment.
Take the following steps to prevent damage from electrostatic discharge (ESD):
• When unpacking a static-sensitive component from its shipping carton, do not remove the
component's antistatic packing material until you are ready to install the component in a
computer. Just before unwrapping the antistatic packaging, be sure you are at an ESD workstation
or grounded. This will discharge any static electricity that may have built up in your body.
• When transporting a sensitive component, first place it in an antistatic container or packaging.
• Handle all sensitive components at an ESD workstation. If possible, use antistatic floor pads and
workbench pads.
• Handle components and boards with care. Don't touch the components or contacts on a board.
Hold a board by its edges.
• Do not handle or store system boards near strong electrostatic, electromagnetic, magnetic, or
radioactive fields.
viii AM4210
Page 10

www.kontron.com
Safety Requirements
The following safety precautions must be observed when installing or operating the AM4210. Kontron
assumes no responsibility for any damage resulting from failure to comply with these requirements.
WARNING
Due care should be exercised when handling the board due to the fact that the heat
sink can get very hot. Do not touch the heat sink when installing or removing the
board.
In addition, the board should not be placed on any surface or in any form of storage
container until such time as the board and heat sink have cooled down to room
temperature.
ESD Equipment
This AMC board contains electrostatically sensitive devices. Please observe the necessary
precautions to avoid damage to your board:
• Discharge your clothing before touching the assembly. Tools must be discharged before use.
• Do not touch components, connector-pins or traces.
• If working at an anti-static workbench with professional discharging equipment, please do
not omit to use it.
WARNING
This product has gold conductive fingers which are susceptible to contamination.
Take care not to touch the gold conductive fingers of the AMC Card-edge connector
when handling the board.
Failure to comply with the instruction above may cause damage to the board or result
in improper system operation.
CAUTION
Laser light from fiber-optic transmission cables and components can damage your
eyes. The laser components plugged into the switch are Class 1 laser components.
Class 1 laser is considered incapable of producing damaging radiation levels during
normal operation or maintenance.
To avoid damaging your eyes and to continue safe operation in case of abnormal
circumstances:
• Never look directly into the outlets of fiber-optic transmission components or
fiber-optic cables with unprotected eyes.
• Never allow fiber-optic transmission path to operate until all the connections
have been made.
Always fit protective plugs to any unused ports of the switch.
WARNING
Be careful when inserting or removing the AM4204AM4210. The SFP+ cage has sharp
edges which might lead to injuries.
ix AM4210
Page 11

www.kontron.com
Preface
How to Use This Guide
This user's guide is designed to be used as step-by-step instructions for installation, and as a reference for
operation, troubleshooting, and upgrades.
For the circuits, descriptions and tables indicated, Kontron assumes no responsibility as far as patents or
other rights of third parties are concerned.
The following is a summary of chapter contents:
• Chapter 1, Product Description
• Chapter 2, Board Features
• Chapter 3, Installing the board
• Chapter 4, Thermal
• Chapter 5, Software Setup
• Appendix A, Software Update & Drivers
• Appendix B, Troubleshooting
• Appendix C, Getting Help
• Appendix D, Glossary
Customer Comments
If you have any difficulties using this user's guide, discover an error, or just want to provide some feedback,
please send a message to: Tech.Writer@ca.kontron.com
or problems as soon as possible and post the revised user's guide on our Web site. Thank you.
. Detail any errors you find. We will correct the errors
xAM4210
Page 12
www.kontron.com
Advisory Conventions
Seven types of advisories are used throughout the user guides to provide helpful information or to alert you
to the potential for hardware damage or personal injury. They are Note, Signal Paths, Jumpers Settings, BIOS
Settings, Software Usage, Cautions, and Warnings. The following is an example of each type of advisory. Use
caution when servicing electrical components.
Note:
Indicates information that is important for you to know.
Signal Path:
Indicates the places where you can find the signal on the board.
Jumper Settings:
Indicate the jumpers that are related to this sections.
BIOS Settings:
Indicates where you can set this option in the BIOS.
Software Usage:
Indicates how you can access this feature through software.
CAUTION
Indicates potential damage to hardware and tells you how to avoid the problem.
WARNING
Indicates potential for bodily harm and tells you how to avoid the problem.
ESD Sensitive Device:
This symbol and title inform that electronic boards and their components are sensitive to static
electricity. Therefore, care must be taken during all handling operations and inspections of this
product, in order to ensure product integrity at all times.
Please read also the section "Special Handling and Unpacking Instructions".
CE Conformity:
This symbol indicates that the product described in this manual is in compliance with all applied CE
standards. Please refer also to the section "Regulatory Compliance Statements" in this manual.
Disclaimer: We have tried to identify all situations that may pose a warning or a caution condition in this
user's guide. However, Kontron does not claim to have covered all situations that might require the use of a
Caution or a Warning.
xi AM4210
Page 13

www.kontron.com
Unpacking
Follow these recommendations while unpacking:
• Remove all items from the box. If any items listed on the purchase order are missing, notify
Kontron customer service immediately.
• Inspect the product for damage. If there is damage, notify Kontron customer service immediately.
• Save the box and packing material for possible future shipment.
xii AM4210
Page 14

www.kontron.com
Regulatory Compliance Statements
FCC Compliance Statement for Class B Devices
This equipment has been tested and found to comply with the limits for a Class B digital device,
pursuant to Part 15 of the FCC Rules. These limits are designed to provide reasonable protection
against harmful interference in a residential installation. This equipment generated, uses and can
radiate radio frequency energy and, if not installed and used in accordance with the instructions
may cause harmful interference to radio communications. However, there is no guarantee that
interference will not occur in a particular installation. If this equipment does cause harmful
interference to radio or television reception, which can be determined by turning the equipment
off and on, the user is encouraged to try to correct the interference by one or more of the following
measures:
• Reorient or relocate the receiving antenna.
• Increase the separation between the equipment and receiver.
• Connect the equipment into an outlet on a circuit different from that to which the receiver is
connected.
• Consult the dealer or an experience radio/TV technician for help.
WARNING
This is a Class B product. If not installed in a properly shielded enclosure and used in
accordance with this User's Guide, this product may cause radio interference in
which case users may need to take additional measures at their own expense.
Safety Certification
All Kontron equipment meets or exceeds safety requirements based on the IEC/EN/UL/CSA 609501 family of standards entitled, "Safety of information technology equipment." All components are
chosen to reduce fire hazards and provide insulation and protection where necessary. Testing and
reports when required are performed under the international IECEE CB Scheme. Please consult the
"Kontron Safety Conformity Policy Guide" for more information.
CE Certification
The product(s) described in this user's guide complies with all applicable European Union (CE)
directives if it has a CE marking. For computer systems to remain CE compliant, only CE-compliant
parts may be used. Maintaining CE compliance also requires proper cable and cabling techniques.
Although Kontron offers accessories, the customer must ensure that these products are installed
with proper shielding to maintain CE compliance. Kontron does not offer engineering services for
designing cabling systems. In addition, Kontron will not retest or recertify systems or components
that have been reconfigured by customers.
xiii AM4210
Page 15

www.kontron.com
Limited Warranty
Kontron grants the original purchaser of Kontron's products a TWO YEAR LIMITED HARDWARE WARRANTY as
described in the following. However, no other warranties that may be granted or implied by anyone on behalf
of Kontron are valid unless the consumer has the express written consent of Kontron.
Kontron warrants their own products, excluding software, to be free from manufacturing and material
defects for a period of 24 consecutive months from the date of purchase. This warranty is not transferable nor
extendible to cover any other users or long- term storage of the product. It does not cover products which
have been modified, altered or repaired by any other party than Kontron or their authorized agents.
Furthermore, any product which has been, or is suspected of being damaged as a result of negligence,
improper use, incorrect handling, servicing or maintenance, or which has been damaged as a result of
excessive current/voltage or temperature, or which has had its serial number(s), any other markings or parts
thereof altered, defaced or removed will also be excluded from this warranty.
If the customer's eligibility for warranty has not been voided, in the event of any claim, he may return the
product at the earliest possible convenience to the original place of purchase, together with a copy of the
original document of purchase, a full description of the application the product is used on and a description
of the defect. Pack the product in such a way as to ensure safe transportation.
Kontron provides for repair or replacement of any part, assembly or sub-assembly at their own discretion, or
to refund the original cost of purchase, if appropriate. In the event of repair, refunding or replacement of
any part, the ownership of the removed or replaced parts reverts to Kontron, and the remaining part of the
original guarantee, or any new guarantee to cover the repaired or replaced items, will be transferred to cover
the new or repaired items. Any extensions to the original guarantee are considered gestures of goodwill, and
will be defined in the "Repair Report" issued by Kontron with the repaired or replaced item.
Kontron will not accept liability for any further claims resulting directly or indirectly from any warranty claim,
other than the above specified repair, replacement or refunding. In particular, all claims for damage to any
system or process in which the product was employed, or any loss incurred as a result of the product not
functioning at any given time, are excluded. The extent of Kontron liability to the customer shall not exceed
the original purchase price of the item for which the claim exists.
Kontron issues no warranty or representation, either explicit or implicit, with respect to its products
reliability, fitness, quality, marketability or ability to fulfil any particular application or purpose. As a result,
the products are sold "as is," and the responsibility to ensure their suitability for any given task remains that
of the purchaser. In no event will Kontron be liable for direct, indirect or consequential damages resulting
from the use of our hardware or software products, or documentation, even if Kontron were advised of the
possibility of such claims prior to the purchase of the product or during any period since the date of its
purchase.
Please remember that no Kontron employee, dealer or agent is authorized to make any modification or
addition to the above specified terms, either verbally or in any other form, written or electronically
transmitted, without the company's consent.
xiv AM4210
Page 16

Chapter 1
Product Description
www.kontron.com
1.1 Product Overview....................................................2
1.2 What’s Included .....................................................3
1.3 Board Specifications ...............................................3
1.4 Hot Swap Capability ................................................5
1.5 Software Support....................................................6
Page 17

www.kontron.com
1. Product Description
1.1 Product Overview
The AM4210 is an Advanced Mezzanine Card (AMC) from Kontron supporting both multi-core processor and
10GbE technologies enabling intelligent network services. The AM4210 AMC is cost competitive with other
AdvancedMC cards, optimized for layer 4 to 7 data and security processing, targeting access and service
providers with 3G/4G BTS, RNC, xGSN and Media Gateways.
The AM4210 provides 1x 10GbE port to the front and x4 PCIe on ports 4-7 and 1x 10GbE or 4x 1Gbe on ports
8-11 to the fabric side. AMC GbE on Ports 0 and 1 are connected to a Dual GbE controller (Intel 82571EB)
driven by the processor for boot support and management.
2AM4210
Page 18

www.kontron.com
1.2 What’s Included
This board is shipped with the following items:
• One AM4210 AMC board
• One DB9 to RJ45 adaptor
• One Documentation & Drivers disk
If any item is missing or damaged, contact the supplier.
1.3 Board Specifications
Table 1-1: Board Specifications
Features Description
Multicore Processor Unit
Memory
Flash Memory
USB SSD Flash Module
Dual Gigabit Ethernet
Controller
IPMI
I/O Interfaces
• Cavium Octeon Plus CN5650-600 BG1217-NSP-G
• Socketless
• 2 or 4 Gigabyte DDR2 Memory support with ECC (2GB standard)
• 18 JEDEC standard 60ball FBGA (x8) DDR2 SRAM Devices
• 800MHz data rate
• Socketless
• 128MB Flash Memory
• Boot sector protection
• NAND flash memory.
• Single Port USB 2.0 interface
• Capacities: 4GB and 16GB
• Package: Low Profile Package
• Dual Gigabit Ethernet Controller Intel 82571EB
• PCIe x4 interface to processor
• 2 1000Base-BX (Serdes) interfaces to AMC connector
• Serial-over-LAN Support via SMB
• IPMI 1.5 compliant
• Voltage and Temperature Sensors
• ATCA LED control
• FRU data storage for AMC
• Firmware Update handling for field upgrades, rollbacks and watchdog functions
• Front: 1 SFP+ cage to support multi-rate fiber SFP+ modules
• Front: RJ45 for RS232 access to Processor
• AMC TCLKA support
• AMC FCLKA input with 100MHZ without SSC
• AMC Port 0 and Port 1: 1000Base-BX
• AMC Port 4 to Port 7: Configurable x4 PCIe Root Complex or target mode
• AMC port 8 to port 11 : Configurable 1x 10GbE or 4x GbE
• AMC Port 15: RS232 (proprietary mapping)
3AM4210
Page 19

www.kontron.com
Features Description
• This board is compatible to the following standards:
• AMC.0 R2.0 Advance Mezzanine Card Base Specification
• AMC.1 R2.0 PCI Express and Advance Switching
Standards Compliance
Mechanical
Characteristics
Operating Voltages
Operation Power
Temperature
Humidity
Altitude
Vibration
• AMC.1 Type 4
• AMC.2 R2.0 Type 4 and Type 5
• IPMI v1.5.
• IEEE 802.3
• The AM4210 is RoHS compliant.
• 4HP single Mid-size AMC Module
• Board is compliant with AMC.0 R2.0
• Management: 3.3V +/-0.3V
• Payload: 10VDC to 14VDC
• Management: 500mW max., 400mW typ.
• Payload: 38.4W max., 29W typ.
• This board is designed for operation from 5°C to 70°C ambient air temperature with forced
convection.
• Operating @ 10 CFM: 5°C to 45°C
• Operating @ 15 CFM: 5°C to 65°C
• Short term operating @ 25 CFM: -5°C to 75°C
• Non-Operating: -40°C to 70°C
• The board is designed to meet Bellcore GR63, Section 4.1
• Operating: 15%-90% (non-condensing) at 55°C
• Non-Operating: 5%-95% (non-condensing) at 40°C
• The board is designed to meet the following requirements according to Belcore GR-63, section
4.1.3:
• Operating: 4000 m (13123 ft) (GR63 4.1.3), may require
additional cooling above 1800m (5905ft)
• Non-Operating: 15000 m (49212 ft)
• The board is designed to meet the following requirements according to EN 300 019, Telcore GR63 and IEC 60068:
• Operating:
• Non-Operating (packaged enclosure):
• 5 Hz to 200Hz 0.2G, 5mm/s (sinusoidal)
• 5 Hz to 100Hz: 0.1G @ 0.1 Octave/minute (sinusoidal)
• 5 Hz to 100Hz: 1G @0.1 Octave/minute (sinusoidal)
• 0,02 m²/s³ ASD, 5-10Hz +12dB/oct, 10-50Hz 0dB/oct, 50-100Hz -12dB/oct (random)
• 5 Hz to 200Hz 2G, 5mm/s (sinusoidal)
• 0,02 m²/s³ ASD, 5-10Hz +12dB/oct, 10-50Hz 0dB/oct, 50-100Hz -12dB/oct (random)
• 5 Hz to 20 Hz: 0.01g²/Hz (random)
• 20 Hz to 200 Hz: -3dB/octave (random)
4AM4210
Page 20

www.kontron.com
Features Description
• The board is designed to meet the following requirements according to EN 300 019, Telcore GR63 and IEC 60068:
• Operating:
Shock
Safety
Electromagnetic
Compatibility
ETSI/NEBS requirements • This board is designed to meet NEBS Level 3, Earthquake Zone 4
• 3G, 11ms Shock
• Non-Operating
• 18G, 6ms Shock
• 1000mm/all edges and corners Free Fall (packaged)
• 100mm/all edges and corners Free Fall (unpackaged)
• CB report to IEC 60950-1, complies with EN/CSA/ UL 60950-1.
• The board is designed to meet the following flammability requirement (as specified in Telcordia
GR-63-CORE):
• UL 94V-0/1 with Oxygen index of 28% or greater material
• The board is designed to meet or exceed of the following specifications/requirements (assuming
an adequate carrier/chassis):
• FCC 47 CFR Part 15, (USA)
• EMC Directive 89/336/EEC (Europe)
• EN55022 (Europe)
• EN55024 (Europe)
•CISPR22
• VCCI (Voluntary Japan Electromagnetic Compatibility requirement)
• EN 300 386, Electro-Magnetic Compatibility (EMC) Requirements for Public Telecommunication
Network Equipment; Electromagnetic Compatibility (EMC) Requirements
• Telcordia GR-1098
1.4 Hot Swap Capability
The AMC supports Full Hot Swap capability as required by AMC.0 R2.0. It can be removed from or installed in
the system while it is on (without powering-down the system). Please refer to the AMC.0 R2.0 specification
for additional details.
5AM4210
Page 21

www.kontron.com
1.5 Software Support
The following table contains information related to software supported by the AM4210.
Table 1-2: AM4210 Software Specification
Specifications
• The system supports IPMI version 1.5 for board level management (AMC.0).
• Support for accessing serial interfaces of Octeon with Serial Over LAN (SOL) as per IPMI version 2.0
• Support for IPMI over LAN (IoL) on e1000 Ethernet port
General
Bootloader
Operation System
• Support for onboard IPMI event log (SEL)
• Reliable field upgrades for all software components, including boot loader and IPMI firmware
• Optional Dual boot images with roll-back capability.
• Software development kit based on Cavium cnusers SDK
• Offline Diagnostic software for running diagnostics tests
U-Boot
• Power On Self Test
• multi image support
• loadable bootimage via e1000 and Octeon Ethernet ports (bootp/tftp)
• loadable boot image via PCI Express (boot from RAM)
• loadable boot image from onboard flash and flash disk connected via USB (boot from flash, boot from
filesystem)
• reliable field upgradable
• KCS interface to MMC
• serial console support
• Linux Operating system on Octeon processor
• Wind River Platform for Network Equipment 2.0 (PNE 2.0) Linux Edition board support package
6AM4210
Page 22

Chapter 2
Board Features
www.kontron.com
2.1 Block Diagram ........................................................ 8
2.2 System Core ........................................................... 9
2.3 USB Flash Module.................................................... 9
2.4 SFP+ Front IO.......................................................... 10
2.5 Dual Gigabit Ethernet Controller................................. 10
2.6 RS232 Management Interface .................................... 10
2.7 IPMI ..................................................................... 11
2.8 Power Supply.......................................................... 11
2.9 AMC Connector ....................................................... 12
2.10 Front Panel LEDs ..................................................... 13
Page 23
www.kontron.com
2. Board Features
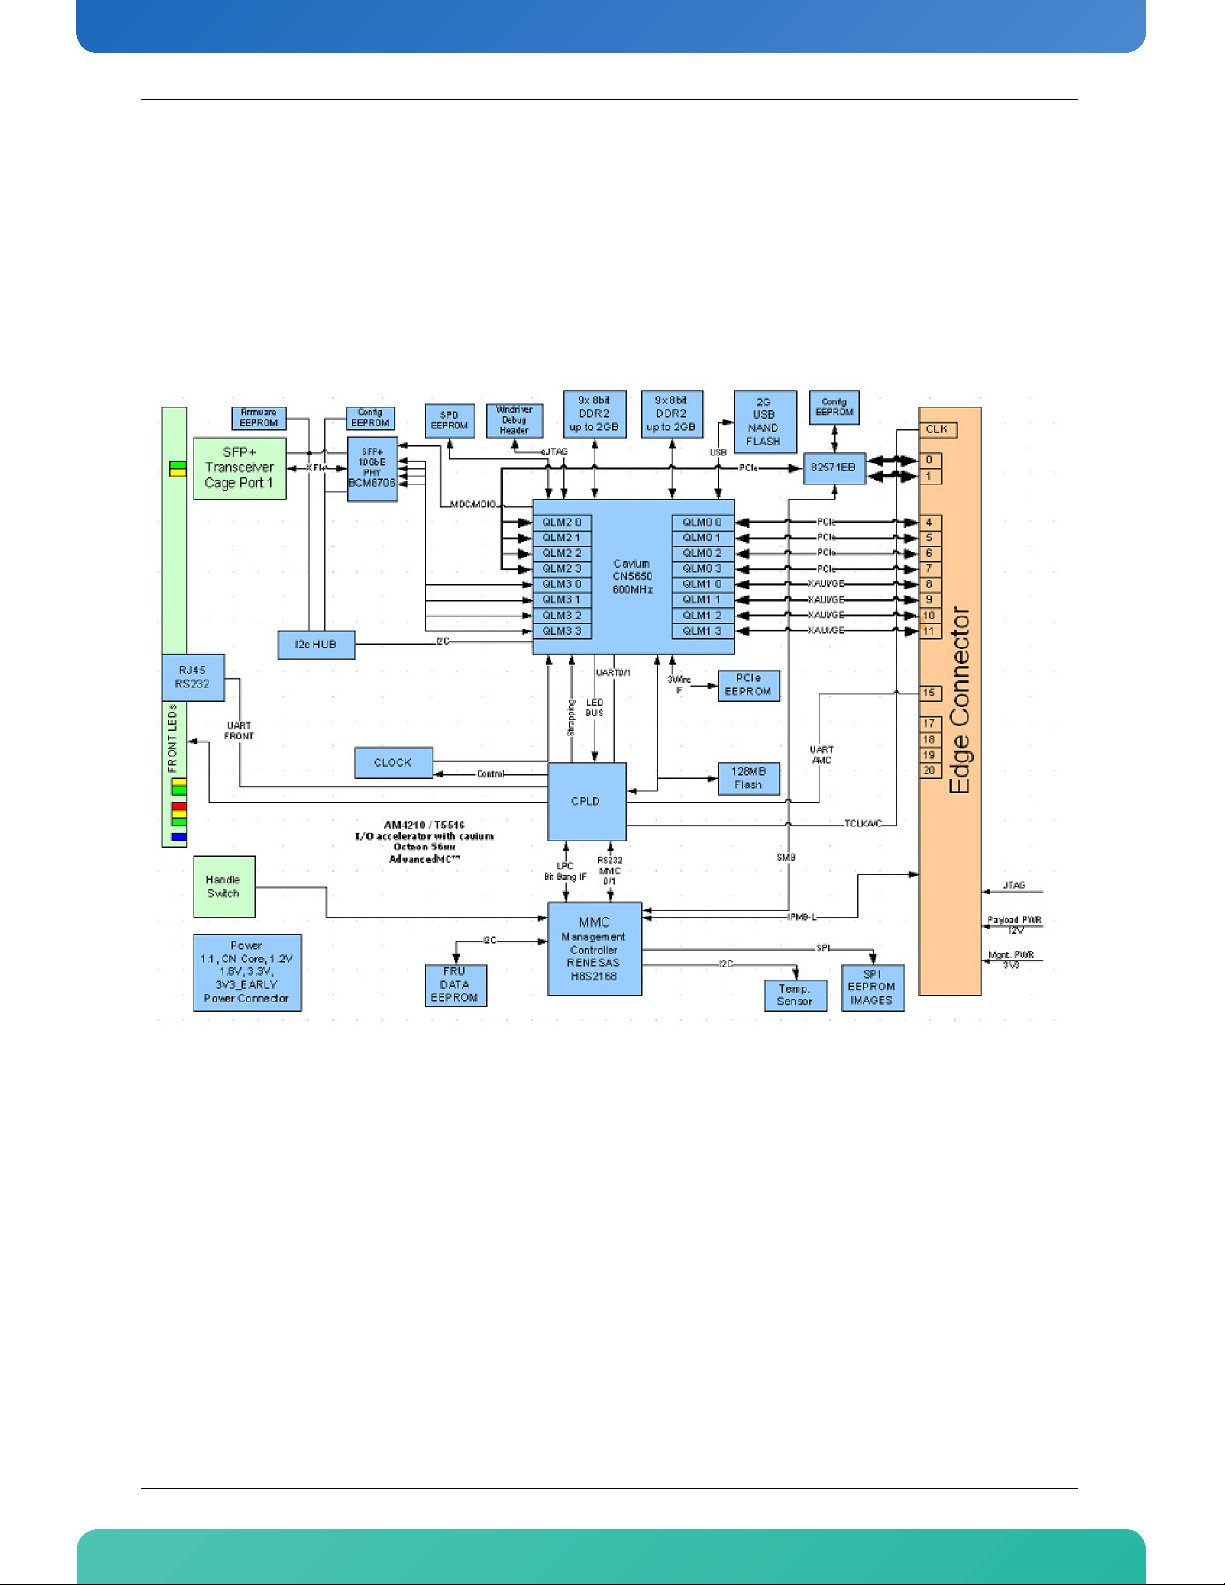
2.1 Block Diagram
Figure 2-1: Block Diagram
8AM4210
Page 24

www.kontron.com
2.2 System Core
2.2.1 Cavium OCTEON Plus 5650
• 12x MIPS64 R2 Cores; 600Mhz
• Up to 14.4 Billion MIPS64 instructions per second• 16 high-speed SERDES, flexibly configured in blocks
of 4
• Flexible combinations of PCI Express x4, x8, XAUI (10GE), SGMII (GbE/2GbE)
• Integrated coprocessors for application acceleration, including: Packet I/O processing, QoS, TCP
Acceleration; Support for IPsec, SSL, SRTP, WLAN and 3G/UMB/LTE security (includes DES, 3DES, AESGCM, AES up to 256, SHA1, SHA-2 up to SHA-512, RSA up to 8192, DH, KASUMI); and Compression/
Decompression with up to 10Gbps throughput and highest compression ratios.
2.3 USB Flash Module
The AM4210 supports Solid State Drive. It is a NAND flash disk module with a USB 2.0 interface. The module is
socketed on a 2x5 header attached to the AM4210 PCB. Here are the main features:
• Many available sizes
• Mean-Time Between Failures (MTBF) of 5 millions hours
• 5 Years Useful Life under specific conditions
• Read throughput of 28MB/second
• Write throughput of 20MB/second
• I/O Operations per second of 100 (4KB random 2 Read + 1 Write)
• 5V operating voltage
• 0 to 70 Celsius operating temperature
Signal Path:
USB Flash Module Connector is located into the heatsink.
9AM4210
Page 25

www.kontron.com
2.4 SFP+ Front IO
The front SFP+ cage support multi-rate fiber SFP+ module.
Table 2-1: SFP+ Connection
SFP+ Connection
1 10 GbE XAUI0
SFP+ module is not provided with the AM4210 and have to be obtained separately. The SFP+ uplink port is
compliant to the Enhanced 8.5 and 10 Gigabit Small Form Factor Pluggable Module “SFP+” MultiSource
Agreement (MSA), February 16th 2007, and the Improved Pluggable Formfactor MSA, February 26th 2007.
An application note with a list of SFP+ modules successfully operated by Kontron in the AM4210 is available
upon request.
CAUTION LASER LIGHT!
Do not look into the laser beam!
The SFP+ module is fitted with a class 1 or 1M laser. To avoid possible exposure to
hazardous levels of invisible laser radiation, do not exceed maximum ratings.
The SFP+ port has a bi-color green/amber LED with the following signification:
Table 2-2: SFP+ LED Significations
LED Signification
Green on Link 10Gbit
Green blink Activity 10Gbit
Amber on Link 1000Mbit
Amber blink Activity 1000Mbit
2.5 Dual Gigabit Ethernet Controller
A dual Gigabit Ethernet controller is connected to PCIe port 2 of the Octeon Processor. The two GbE lines are
connected to ports 0 and 1 of the AMC connector.
Signal Path:
The two GbE lines are connected to ports 0 and 1 of the AMC connector.
2.6 RS232 Management Interface
The RS232 interface of the Octeon is connected to the front panel RJ45 connector and to the AMC port 15
(RTM connection). If a terminal is connected to the front port, the RTM connection is disabled.
10 AM 4210
Page 26

www.kontron.com
External connection is established with a straight through Ethernet cable and a RJ45 (female) to SubD
(female) adapter if required. The adapter is described in the Appendix A.
Signal Path:
The serial port is available through the AMC faceplate.
2.7 IPMI
The AM4210 supports an intelligent hardware management system based on the Intelligent Platform
Management Interface (IPMI) Specification 1.5. It provides the ability to manage the power, cooling and
interconnect needs of intelligent devices, to monitor events and to log events to a central repository.
The MMC (“Module Management Controller”) controls all hotswap and E-Keying processes required by ATCA.
It activates the board power supply and enables communication with the AMC carrier and the RTM. The MMC
manages the Ethernet switch E-Keying and the baseboard ATCA feature. The controller is connected to the
IPMC of the ATCA carrier board via IPMB-L bus.
All voltages and currents on the base board are monitored by the MMC, including the management and AMC
supply. Three temperature sensors on the board make sure that thermal conditions are met:
• Temp CPU (Cavium Internal Sensor)
• Temp Dual GE (i82571EB Ethernet Controller Internal Sensor)
• Temp Outlet
For more information on the thermal design and management, consult the “Thermal Consideration” section.
2.8 Power Supply
• Payload input voltage range from 10V to 14V
• Management input voltage range from 3.3V +/- 0.3V
• PoL converter 5.0V, 3.3V early, 3.3V, 1.8V, VTT, 1.2V, 1.1V, 1.0V
• Power up/down sequence controlled by CPLD
11 A M42 10
Page 27

www.kontron.com
2.9 AMC Connector
Table 2-3: AMC Connector
Port Region Connection
0 GbE GbE eth0
1 GbE GbE eth1
2 Storage -
3 Storage -
4 Fat Pipe PCIe Port 0 (Lane 0)
5 Fat Pipe PCIe Port 0 (Lane 1)
6 Fat Pipe PCIe Port 0 (Lane 2)
7 Fat Pipe PCIe Port 0 (Lane 3)
8 Fat Pipe 10 GbE xaui0 (Lane 0) or GbE eth2/octeth0
9 Fat Pipe 10 GbE xaui0 (Lane 1) or GbE eth3/octeth1
10 Fat Pipe 10 GbE xaui0 (Lane 2) or GbE eth4/octeth2
11 Fat Pipe 10 GbE xaui0 (Lane 3) or GbE eth5/octeth3
12 Extended -
13 Extended -
14 Extended -
15 Extended RS232
17 Extended -
18 Extended -
19 Extended -
20 Extended -
TCLKA Clock From Backplane
TCLKB Clock -
TCLKC Clock -
TCLKD Clock -
FCLKA Clock PCIe Reference Clock
Note:
The GbE interfaces on ports 8 to 11 are named eth2 to eth5 in the operating system and octeth0 to
octeth3 in the bootloader.
12 AM4210
Page 28

www.kontron.com
2.10 Front Panel LEDs
Figure 2-2: Front Panel of AM4210
2.10.1 Hot Swap LED (Blue LED)
The AM4210 board supports a blue Hot Swap LED mounted on the front panel. This LED indicates when it is
safe to remove the Module. The on-board MMC drives this LED to indicate the hot swap state but is controlled
by the carriers IPMC or the MicroTCA carrier manager. The following states are possible:
Table 2-4: Hot Swap LED
LED state Description
OFF Module is in M3 or M4 state, normal state when module is in operation.
ON Module is ready for hot swap
Short blink Module is in M5 state (Deactivation Request) or in M6 state (Deactivation in progress)
Long blink Activation in progress.
2.10.2 Out-Of-Service (OOS) LED (LED1)
Table 2-5: Red LED
LED state Description
1) The bootup handshake between FUM and MMC is not finished or failed
ON
Blinking The FUM is programming the MMC due to a f irmware update or a rollback
OFF The MMC is operational
2) The firmware update is in progress and the new MMC firmware image is copied to the FUM
3) power denied from ShMgr
2.10.3 Health LED (LED2)
Table 2-6: Amber/Green LED
LED state Description
OFF Payload power down
Green Health OK
Amber Health Error (Critical)
Application
Defined
May be controlled by application using PICMG API
13 AM4210
Page 29

Chapter 3
Chapter 3
Installing the Board
www.kontron.com
3.1 Hot Swap Insertion Procedures................................... 15
3.2 Hot Swap Extraction Procedures ................................. 16
3.3 Software................................................................ 17
3.4 System access ......................................................... 17
3.5 Using the cfgtool..................................................... 23
Page 30

www.kontron.com
3. Installing the Board
3.1 Hot Swap Insertion Procedures
The AM4210 is designed for hot swap operation. Hot swapping allows the coordinated insertion and
extraction of modules without disrupting other operational elements within the system. This allows for
identified faulty elements to be removed and replaced without taking the carrier card out of service that will
typically be hosting others modules.
The following procedures are applicable when inserting the AM4210 in a running system.
1 Ensure that the safety requirements are observed.
WARNING
Failure to comply with the instruction below may cause damage to the board or result
in improper system operation.
2 Ensure that the board is properly configured for operation in accordance with application requirements
before installing.
WARNING
Care must be taken when applying the procedures below to ensure that neither the
AM4210 nor other system boards are physically damaged by the application of these
procedures.
3 To install the AM4210 perform the following:
1 Carefully insert the board into the slot designated by the application requirements for the board
until it makes contact with the AMC Card-edge connector located on the carrier or backplane.
2 Connect all external interfacing cables to the board as required.
3 Using the handle on the front panel, engage the board with the carrier or backplane. When the
handle is locked, the board is engaged and the following steps occur:
1 The BLUE HS LED turns on.
If the carrier recognizes that the AM4210 is fully seated, the carrier then enables the
management power for the AM4210 and the BLUE HS LED turns on.
2 Long blinks of the BLUE HS LED.
If the carrier IPMI controller detects the AM4210, it sends a command to the AM4210 to
perform long blinks of the BLUE HS LED.
3 The BLUE HS LED turns off.
The Intelligent Platform Management Controller on the carrier reads the Module Current
Requirements record and the AMC Point-to-Point Connectivity record. If the Module FRU
information is valid and the carrier can provide the necessary payload power, the BLUE HS
15 AM4210
Page 31

www.kontron.com
LED will be turned off. If the module FRU information is invalid or the carrier cannot provide
the necessary payload power, the insertion process is stopped and the BLUE HS LED keeps
blinking. Should this problem occur, please contact Kontron’s Technical Support.
4 Short blinks of the Module Management LEDs and the User-Specific LEDs.
The carrier enables the payload power for the AM4210, and the Module Management LEDs and the
User-Specific LEDs emit a short blink.
5 Ensure that the board and all required interfacing cables are properly secured.
4 The AM4210 is now ready for operation. For operation of the AM4210, refer to appropriate AM4210-
specific software, application, and system documentation.
3.2 Hot Swap Extraction Procedures
To extract the board proceed as follows:
1 Ensure that the safety requirements indicated in section 2.1 are observed. Particular attention must be
paid to the warning regarding the heat sink!
2 Pull the handle on the AM4210’s front panel initiating the deactivation. This changes the state of the
handle to open. Now, the following steps occur:
1 Short blinks of the BLUE HS LED
• When the carrier IPMI controller receives the handle opened event, the carrier sends a
command to the MMC with a request to perform short blinks of the BLUE HS LED. This indicates
to the operator that the AM4210 is waiting to be deactivated.
• Now the AM4210 waits for a permission from higher level management (Shelf Manager or
System Manager) to proceed with its deactivation.
• Once the AM4210 receives the permission to continue the deactivation, all used ports are
disabled.
• The Intelligent Platform Management Controller on the Carrier disables the AM4210's Payload
Power.
2 The BLUE HS LED turns on
Now the AM4210 is ready to be safely extracted.
3 Disconnect any interfacing cables that may be connected to the AM4210.
4 Pull the AM4210 out of the slot. Now the carrier disables the management power for the AM4210.
WARNING
Due care should be exercised when handling the board due to the fact that the heat
sink can get very hot. Do not touch the heat sink when changing the board.
16 AM 4210
Page 32

www.kontron.com
3.3 Software
The AM4210 comes as a pre-installed system with all necessary OS, Filesystem, drivers and applications
factory-installed with default configurations.
Updating the Software with new Operating System or applications or new versions is provided by a dedicated
update mechanism, which is described in “Firmware Administration”.
3.4 System access
This section gives instructions for accessing the AM4210 using either
• Serial port via front plate connector
• Serial port over an appropriate ATCA carrier board and RTM
• Telnet over Fast Ethernet accessible from the Eth0
3.4.1 Front port serial connection
The Octeon processor’s serial console can be accessed directly via the front port connector with the
appropriate cabling. The corresponding procedure is described in the following.
1 Connect to serial port on AM4210 front plate using the RS232 adapter, consult “RS232 Management
Interface” section for more details .
Port settings are:
• 115 200 bps
• 8 bit, no parity, 1 stop bit (8N1)
• no flow control
2 Ensure that the boards are powered up.
3 Wait for boot process to complete. Login is not required by default:
BusyBox v1.2.1 (2008.09.15-08:10+0000) Built-in shell (ash)
Enter 'help' for a list of built-in commands.
~ #
17 A M4210
Page 33

www.kontron.com
3.4.2 RTM serial connection
The serial console of the AM4210 can be accessed via RTM. The RTM to be used depends on the carrier board.
Refer to the corresponding Kontron front board documentation to find information on the appropriate RTM.
As an example, the procedure for connecting to an AM4204 used in AMC slot B1 of an AT8404 via the
RTM8030 is described in the following.
1 Connect to the RTM serial port as described in the RTM8030 manual (using a RJ45 straight cable).
Port settings are:
• 115200 bps
• 8 bit, no parity, 1 stop bit (8N1)
• no flow control
2 Enable serial connection of the AT8404 for usage with an RTM8030.
Access the AT8404 carrier shell (type “CTRL-v” from the CLI prompt and then “!”, enter root password
“root” (default) and use the command “serialcfg” to route the RTM‘s serial port to the AMC slot which
hosts the AM4210.
(AT8404 Ethernet Fabric) #
Disconnected from Base Fabric console
b - connect Base Fabric console
c - connect Custom Application console
! - shell escape
r - reset system
Starting shell
Give root password for system maintenance
(or type Control-D for normal startup):
System Maintenance Mode
BusyBox v1.4.1 (2009-07-23 18:10:23 CEST) Built-in shell (ash)
Enter 'help' for a list of built-in commands.
# serialcfg
usage: serialcfg fru1/fru2/fru3/fru4
Enable T5516 serial line for FRU1-4, i.e. AMCB1-B4
usage: serialcfg FILENAME
Enable serial line with portstate config file FILENAME
# serialcfg fru1
Serial AMCB1 to RTM rotary switch channel 4
Enabling ports for FRU 1
3 Set the RTM’s rotary switch as indicated by the serialcfg tool output (in this example switch channel 4).
4 Close AM4210 handle or power up.
5 Wait for boot process to complete. Login is not required by default:
18 AM4210
Page 34

www.kontron.com
BusyBox v1.2.1 (2008.09.15-08:10+0000) Built-in shell (ash)
Enter 'help' for a list of built-in commands.
~ #
3.4.3 Access via Front panel Ethernet Interface
The AM4210 can be accessed by using the Ethernet Interface port0 (eth0).
By default, DHCP is configured for this Interface.
There is also a possibility to access the AM4210 using the SFP+ on the front plate. This interface is not
configured by default and must be setup accordingly by editing the file /mnt/etc/rc.local.
3.4.4 Using SoL over AMC Port 0 on AM4210
3.4.4.1 Requirements
•AM4210
• ATCA carrier or uTCA System providing access to AMC connector port 0
• Linux host with Ethernet interface
• SFP+ module (optical or copper) for Ethernet connection to the Linux host
• ipmitool v1.8.9 ( http://ipmitool.sourceforge.net/
)
3.4.4.2 Configure IOL (IPMI over LAN)
Connect to the AM4210 via telnet
Check board information (optional)
~ # /mnt/bin/ipmitool mc info
Device ID : 6
Device Revision : 0
Firmware Revision : 5.24
IPMI Version : 1.5
Manufacturer ID : 15000
Manufacturer Name : Kontron
Product ID : 5516 (0x158c)
Device Available : yes
Provides Device SDRs : yes
Additional Device Support :
Sensor Device
FRU Inventory Device
IPMB Event Receiver
IPMB Event Generator
Chassis Device
Aux Firmware Rev Info :
0x00
19 AM4210
Page 35

www.kontron.com
0x00
0x00
0x00
~ #
Check LAN settings on the Ethernet interface to be configured for IOL (optional). Default settings are shown
below:
~ # /mnt/bin/ipmitool lan print 1
Set in Progress : Set Complete
Auth Type Support : NONE PASSWORD
Auth Type Enable : Callback :
: User : NONE PASSWORD
: Operator : PASSWORD
: Admin : PASSWORD
: OEM :
IP Address Source : Static Address
IP Address : 0.0.0.0
Subnet Mask : 0.0.0.0
MAC Address : 00:a0:a5:5d:23:9e
IP Header : TTL=0x40 Flags=0x40 Precedence=0x00 TOS=0x10
BMC ARP Control : ARP Responses Enabled, Gratuitous ARP Enabled
Gratituous ARP Intrvl : 8.0 seconds
Default Gateway IP : 0.0.0.0
Default Gateway MAC : 00:00:00:00:00:00
RMCP+ Cipher Suites : 0,1,2,3
Cipher Suite Priv Max : uaaaXXXXXXXXXXX
: X=Cipher Suite Unused
: c=CALLBACK
: u=USER
: o=OPERATOR
: a=ADMIN
: O=OEM
~ #
Configure LAN IOL IP parameters of the Ethernet interface eth0. The address given below is an example. The
actual address must fit the existing network configuration:
~ # /mnt/bin/ipmitool lan set 1 ipaddr 10.0.1.145
Setting LAN IP Address to 10.0.1.145
~ #
~ # /mnt/bin/ipmitool lan set 1 netmask 255.255.255.0
Setting LAN Subnet Mask to 255.255.255.0
Configure LAN IOL gateway parameters of eth0. They describe the gateway connected to AMC port 0. The IP
and MAC addresses given below are examples and must be replaced by the actual values:
~ # /mnt/bin/ipmitool lan set 1 defgw ipaddr 10.0.1.1
Setting LAN Default Gateway IP to 10.0.1.1
~ #
~ # /mnt/bin/ipmitool lan set 1 defgw macaddr 00:15:C5:60:74:AE
Setting LAN Default Gateway MAC to 00:15:c5:60:74:ae
Enable IOL interface on eth0:
~ # /mnt/bin/ipmitool lan set 1 access on
~ #
Now all configurations required for IOL connection from an external host via eth0 are done.
20 AM4210
Page 36

www.kontron.com
3.4.4.3 Configure SoL
The Linux host must now be configured to connect to eth0 (AMC port 0) of the AM4210. This is dependant on
the actual network topology.
Ipmitool executed on the external Linux host to check connectivity to AM4210 via the previously configured
IOL interface (optional). Following parameters have to be provided:
• -H <IoL IP address as configured above>
• -U <username>
default: admin
•-P <password>
default: admin
[root@router01 ipmitool-1.8.9]# ipmitool -I lanplus -H 10.0.1.145 -U admin -P admin mc info
Device ID : 6
Device Revision : 0
Firmware Revision : 5.24
IPMI Version : 1.5
Manufacturer ID : 15000
Manufacturer Name : Kontron
Product ID : 5516 (0x158c)
Device Available : yes
Provides Device SDRs : yes
Additional Device Support :
Sensor Device
FRU Inventory Device
IPMB Event Receiver
IPMB Event Generator
Chassis Device
Aux Firmware Rev Info :
0x00
0x00
0x00
0x00
Show SoL settings (optional):
[root@router01 ipmitool-1.8.9]# src/ipmitool -I lanplus -H 10.0.1.145 -U admin -P admin sol
info
Set in progress : set-complete
Enabled : true
Force Encryption : false
Force Authentication : false
Privilege Level : USER
Character Accumulate Level (ms) : 50
Character Send Threshold : 30
Retry Count : 0
Retry Interval (ms) : 100
Volatile Bit Rate (kbps) : 19.2
Non-Volatile Bit Rate (kbps) : 19.2
Payload Channel : 1 (0x01)
Payload Port : 623
21 AM4210
Page 37

www.kontron.com
Adjust serial baud-rate to 115.2 kBaud (required):
[root@router01 ipmitool-1.8.9]# src/ipmitool -I lanplus -H 10.0.1.145 -U admin -P admin sol
set non-volatile-bit-rate 115.2
Connect to AM4210 serial interface via SOL:
[root@router01 ipmitool-1.8.9]# src/ipmitool -I lanplus -H 10.0.1.145 -U admin -P admin sol
activate
[SOL Session operational. Use ~? for help]
~ #
Check board information (optional).:
~ # /mnt/bin/ipmitool fru
FRU Device Description : Builtin FRU Device (ID 0)
Board Mfg : Kontron
Board Product : AM4210
Board Serial : 1000749470
Board Part Number : T5516AB##
Board Extra : MAC=00:A0:A5:5D:23:9E/10
Product Manufacturer : Kontron
Product Name : AM4210
Product Part Number : T5516AB##
Product Version : 00
Product Serial : 1000749470
Product Asset Tag : 0000000000
~ #
The following example shows parts of a serial output of the boot process:
~ #
~ # reboot
The system is going down NOW !!
Jan 1 00:30:36 (none) daemon.info init: The system is going down NOW !!
Sending SIGTERM to all processes.
Jan 1 00:30:36 (none) daemon.info init: Sending SIGTERM to all processes.
Jan 1 00:30:36 (none) syslog.info System log daemon exiting.
Requesting system reboot.
128)
Restarting system.
U-Boot 1.1.1 (Development build) (Build time: Jun 5 2008 - 17:05:55)
Measured DDR clock 399.96 MHz
CUST_KONTRON_T5516 board revision major:0, minor:0, serial #:
OCTEON CN5750-SSP pass 1.1, Core clock: 600 MHz, DDR clock: 400 MHz (800 Mhz data rate)
PLD version: 4 Board Type: 0 Board Option: 2 Board Revision: 0
Performing MMC handshake ...done
Reset Type: 00 warm reset, Source: 08 Software Initiated
DRAM: 2048 MB
Flash: 128 MB
[...]
22 AM4210
Page 38

www.kontron.com
/sbin/rc starting
Updating module dependencies
Loading IPv6 module
Mounting file systems
Setting up loopback
Starting syslogd
Jan 1 00:00:06 (none) syslog.info syslogd started: BusyBox v1.2.1
Starting telnetd
Mounting /dev/mtd4 to /mnt
Execute /mnt/etc/rc.local
cavium-ethernet: Cavium Networks Octeon SDK version 1.8.1, build 244
Interface 0 has 4 ports (SGMII)
Interface 1 has 4 ports (SGMII)
Interface 3 has 4 ports (LOOP)
Configure eth6 / SFP0 for IP 192.168.0.100/24
Start DHCP client on eth0 / AMC Port 0
udhcpc (v1.2.1) started
[...]
adding dns 192.168.50.2
/sbin/rc Jan 1 00:00:09 (none) daemon.info init: Starting pid 904, console /dev/ttyS0: '/
bin/sh'
BusyBox v1.2.1 (2008.06.05-14:58+0000) Built-in shell (ash)
Enter 'help' for a list of built-in commands.
~ #
The connection is terminated by pressing the escape character sequence “~.” (without quotes).
Note:
SoL over AMC port 0 (Intel 82571EB) will only work with AT8050, AT8030, AT8404, AT8402 and
AT890xM, using an AT8010 or AT8020 it will not work, since there is no GbE on Port 0 available.
3.5 Using the cfgtool
A tool to configure the CPU settings will be provided. This tool shall configure the strapping options, apply
the changes to the MMC and update the E-keying information in the Multi-Record section of the FRU data.
The MMC is responsible for saving and restoring these settings.
• The cfgtool allows to configure the PCIe settings.
• The cfgtool allows to configure the QLM 1 and QLM 3 settings.
• The cfgtool allows to perform a validly check before setting the new configuration.
• The cfgtool allows to update the e-keying information related to the performed changes.
• The cfgtool allows to update the e-keying information to meat the “multi flavor” settings.
• The cfgtool allows to change the multirecord area when updating the e-keying information.
• The cfgtool allows to configure PCIe clock source
23 AM4210
Page 39

www.kontron.com
3.5.1 Usage
cfgtool [--help|-h][--status|-t][--interface|-i][--pcie|-p][--clock|-k][--set|-s][--cycle|c][--nofru|-n][--debug|-d]
The following options are recognized:
-h show possible settings available for this board
-t show current running configuration
-i <num> Interface setting
-p <num> PCIe setting
-k <num> clock setting
-s set configuration (change HW setting and update ekeying info)
-c perform power cycle of payload power to activate settings
-n no FRU data modification
-d debug flag
Detailed description of these options:
• -h | --help
This option shows a list of possible settings.
•-t | --status
This option shows the present configuration stored in NV ram of the MMC. This setting will take affect
after invoking a “Chassis Control Power cycle” command or after a complete hotswap cycle with remove
and reinsertion of the module.
• -I | --interface <INTF>
This option checks if the setting <INTF> is possible for this board. To set this setting the [–s|--set]
options has to be appended.
• -p | --pcie <PCIE>
This option checks if the setting <PCIE> is possible for this board. To set this setting the [–s|--set]
options has to be appended.
• -k | --clock <CLOCK>
This option checks if the setting <CLOCK> is possible for this board. To set this setting the [-s|--set]
options has to be appended.
• -s | --set
This option set the configuration in the MMCs NV ram, updates the FRU data multirecord and performs a
MMC reset (IPMI Cold Reset).
• -c | --cycle
This option send the IPMI command “Chassis control Power cycle” to the MMC to perform a payload power
cycle. During the power cycle the configuration will be enabled. This option is allowed without any other
options or when a valid PCIe or Interface setting is configured and activated with the [–s|--set] option.
24 AM4210
Page 40

www.kontron.com
• -n | --nofru
This option prevent FRU data update when changing an interface, pcie, or clock setting (obsolete)
• -d | --debug
This option sets the debug level. If this option is used twice the debug level is increased.
In case there is no possibility to boot over PCIe, the customer should check settings before doing a power
cycle to avoid boot problems:
cfgtool -s -p 2
Verify with :
cfgtool -t
and if OK:
cfgtool -c
25 AM4210
Page 41

Chapter 4
Thermal Considerations
www.kontron.com
4.1 Thermal Monitoring .................................................. 27
4.2 External Thermal Regulation....................................... 28
Page 42

www.kontron.com
4. Thermal Considerations
4.1 Thermal Monitoring
To ensure optimal operation and long-term reliability of the AM4210, all onboard components must remain
within the maximum temperature specifications. The most critical components on the AM4210 are the
processor and the Dual GE Phy. Operating the AM4210 above the maximum operating limits will result in
permanent damage to the board. To ensure functionality at the maximum temperature, the Module
Management Controller supports several temperature monitoring and control features.
The AM4210 includes three temperature sensors that are accessible via the Module Management Controller.
Although temperature sensing information is made available to the MMC, the AM4210 itself does not provide
any active means of temperature regulation.
Figure 4-1:Temperature Sensor Locations (AM4210 Top View, heat sinks not shown)
The Temp CPU and the Temp Dual GE sensors are on-chip sensors which measure the die temperature of the
Octeon Processor and the Dual GE PHY. The Temp Air Out sensor is a separate sensor measuring the
temperature in the slipstream of the processor. This is the spot with the highest outlet air temperature. The
Dual 10 GE Phy does not have a sensor. Simulations show that its temperature remains uncritical under
operating conditions compared to the processor. The separate heat sink on the 10 GE Phy ensures thermal
decoupling from the processor.
The following table shows the temperature thresholds of all three sensors.
27 AM4210
Page 43

www.kontron.com
Table 4-1:MMC Temperature Sensors Thresholds
Sensor Lower Non
Recoverable
Temp Air Out - 10°C - 5°C + 0°C + 85°C + 90°C + 95°C
Temp CPU - 10°C - 5°C + 0°C + 105 °C + 110°C + 115°C
Temp Dual GE - 10°C - 5°C + 0°C + 105 °C + 110°C + 115°C
Lower Critical Lower Non
Critical
Upper Non
Critical
Upper Critical Upper Non
Recoverable
Temperature values are measured with an accuracy of 1°C.
4.2 External Thermal Regulation
The external thermal regulation of the AM4210 is realized using a dedicated heat sink design in conjunction
with a system chassis that provides thermal supervision, controlled system airflow and thermal protection,
such as increased airflow, reduced ambient air temperature, or power removal.
The main heat sink provided on the AM4210 has been specifically designed to ensure the best possible basis
for operational stability and long-term reliability. The physical size, shape, and construction of the heat sink
ensure the lowest possible thermal resistance. In addition, it has been specifically designed to efficiently
support forced airflow concepts as found in modern AMC carriers and MicroTCA systems.
4.2.1 Forced Airflow
When developing applications using the AM4210, the system integrator must be aware of the overall system
thermal requirements. All system chassis requirements must be provided to make sure they satisfy these
requirements. As an aid to the system integrator, characteristics graphs are provided for the AM4210.
WARNING
As Kontron assumes no responsibility for any damage to the AM4210 or other
equipment resulting from overheating any of the components, it is highly
recommended that system integrators as well as end users confirm that the
operational environment of the AM4210 complies with the thermal considerations
set forth in this document.
4.2.2 Thermal Characteristic Graphs
The thermal characteristic graph shown on the following pages illustrates the maximum ambient air
temperature as a function of the linear airflow rate for the power consumption indicated. The diagram is
intended to serve as guidance for reconciling board and system considering the thermal aspect. When
operating below the indicated curves, the AMC runs steadily without any intervention of thermal supervision.
When operated above the indicated curves, various thermal protection mechanisms may take effect
eventually resulting in an emergency stop in order to protect the AMC from thermal destruction. In real
applications this means that the board can be operated temporarily at a higher ambient temperature or at a
reduced flow rate and still provide some margin for temporarily requested peak performance before thermal
protection will be activated.
28 AM4210
Page 44

www.kontron.com
4.2.2.1 How to read the diagram
-20,00
-10,00
0,00
10,00
20,00
30,00
40,00
50,00
60,00
70,00
80,00
90,00
0 1 00 20 0 300 4 00 50 0 6 00
FLOW (LFM)
MAX. INLET T EMP. (° C)
0,00 0,50 1,00 1,50 2,00 2,50 3,00
FLOW (m/s)
100% TDP 80% TDP
The diagram contains one curve for 80% thermal load and one for 100%. Full thermal load is not expected to
be reached under real operating conditions. For a given flow rate there is a maximum airflow input
temperature (= ambient temperature) provided. Below this operating point, a safe operation is guaranteed.
Above this operating point, the chassis thermal management must become active and take the necessary
steps to protect the AMC from thermal destruction.
4.2.2.2 Airflow
At a given cross-sectional area and a required flow rate, an average, homogeneous airflow speed can be
calculated using the following formula:
Airflow = Volumetric flow rate / area.
The airflow is specified in m/s = meter-per-second or in LFM = linear-feet-per-minute, respectively.
Conversion: 1 LFM = 0.00508 m/s; 1 m/s = 196.85 LFM
The following figure illustrates the operational limits of the AM4210 taking into consideration power
consumption vs. ambient air temperature vs. airflow rate. The values are based on simulation data taking
into account the actual power values of all components.
WARNING
In all situations, the maximum specified case temperature of the components must
be kept below the maximum allowable temperature.
Figure 4-2:Operational Limits for the AM4210
29 AM4210
Page 45

www.kontron.com
4.2.3 Airflow Impedance
0,0000
0,0500
0,1000
0,1500
0,2000
0,2500
0 100 200 30 0 400 500 600 700 800
FLO W ( L F M)
PRE SSUR E DR OP (I nch H2 O)
0
10
20
30
40
50
60
0, 00 0 ,5 0 1,0 0 1,5 0 2,0 0 2, 50 3, 00 3, 50 4 ,0 0
FLOW (m/s)
PRESSU RE DROP (Pa )
In order to determine the cooling requirements of the AM4210, the airflow impedance of the module has
been determined via simulation. No card guides or struts have been used for the simulations because the
resulting airflow impedance depends on individual configuration of the AMC carrier or MicroTCA system.
Figure 4-3:AM4210 Impedance Curve
4.2.4 Airflow Paths
The area between the front panel and the AMC Card-edge connector is divided into five zones, one I/O zone
and four uniform thermal zones, A, B, C, and D. The PICMG AMC.0 Specification states that the uniformity of
the airflow paths' resistance should provide an impedance on the A, B, C, and D zones that is within ± 25% of
the average value of the four thermal zones.
Figure 4-4:Thermal Zones of the AM4210
30 AM4210
Page 46

www.kontron.com
Table 4-2:Deviation of the Airflow Rate on the AM4210
Inlet Velocity Deviation (%)
CFM m/s LFM ZONE A ZONE B ZONE C ZONE D
5 0.57 112.8 -11.71 8.25 6.16 -2.70
10 1.15 225.7 -9.46 6.64 5.03 -2.21
15 1.72 338.5 -8.85 5.63 5.09 -1.88
20 2.29 451.4 -8.14 5.13 4.72 -1.71
25 2.87 564.2 -7.72 4.82 4.50 -1.61
30 3.44 677.1 -7.17 4.62 4.35 -1.81
Note:
The Mid-size AM4210 module has an airflow rate deviation of max. ± 11.7 % of the average value of
the four thermal zones (max. ± 25% is allowed).
Positive deviation means increased airflow.
Negative deviation means decreased airflow.
31 AM4210
Page 47

Chapter 5
Chapter 5
Software Setup
www.kontron.com
5.1 MMC Firmware......................................................... 33
5.2 Bootloader............................................................. 48
5.3 Board Firmware....................................................... 54
Page 48

www.kontron.com
5. Software Setup
Software on the AM4210 includes the following parts:
• Bootloader
• OS (rootFS, kernel)
• MMC FW
5.1 MMC Firmware
The Module Management Controller (MMC) is a crucial component of any AMC module. Besides acting as a
regular IPMI management controller (sensor monitoring, event generation, etc.), it also provides an
interface to all necessary data related to module power requirements and implemented interfaces (EKeying). Further, it plays an active role in the module hot swap state management. The carrier IPMI
Controller (IPMC) communicates with the MMC using the local IPMB (IPMB-L) bus. In an ATCA/AMC
environment, it is the IPMC that actually turns on/off module (payload) power. However, before the IPMC
enables the module payload power, various criteria must be satisfied by both the carrier and the module,
including handle switch state, power requirements and capabilities, matching interfaces, current module hot
swap state, and any other special conditions as specified by the Shelf Manager policy.
5.1.1 Related Documentation
IPMI specifications: (http://www.intel.com/design/servers/ipmi/spec.htm)
• IPMI-Intelligent Platform Management Interface Specification. Second Generation v2.0, February 12,
2004 (part)
• IPMI- Platform Management FRU Information Storage Definition v1.0, Document Revision 1.1,
September 1999
PICMG specifications: http://www.picmg.org
• PICMG® AMC.0 R2.0 - Advanced Mezzanine Card Base Specification
• PICMG® AMC.1 R1.0 - PCI Express and Advanced Switching on AdvancedMC
• PICMG® AMC.2 R1.0 – AMC Gigabit Ethernet/10 Gigabit XAUI Ethernet
Open tools documentation
• Ipmitool documentation: http://ipmitool.sourceforge.net
• OpenIPMI documentation: http://www.openipmi.sourceforge.net
The AM4210 is built in accordance to the AMC.0 R2.0 specification, and is also AMC.1 and AMC.2 compliant
and is easily managed via IPMI v1.5/v2.0.
33 AM4210
Page 49

www.kontron.com
5.1.2 IPMI Sensors
The MMC includes many sensors for voltage or temperature monitoring and various others for pass/fail type
signal monitoring.
Every sensor is associated with a Sensor Data Record (SDR). Sensor Data Records contain information about
the sensors identification such as sensor type, sensor name and sensor unit. SDRs also contain the
configuration of a specific sensor such as threshold/hystheresis, event generation capabilities that specifies
sensor behavior. Some field of the sensor SDR are configurable through IPMI v1.5 command and are set to
built-in initial values. Finally one field which is the sensor owner must reflect the module addresses that
allow the AMC Carrier to identify the owner of the SDR when it is scanned from the module management
controller and merged within the AMC Carrier Device SDR repository.
From an IPMI perspective, the MMC is set up as a satellite management controller (SMC). It does support
sensor devices, and uses the IPMI static sensor population feature of IPMI v1.5. All SDRs can be queried using
Device SDR commands to the MMC.
The sensor name in its SDR has a name prefix which after module insertion is automatically adapted to the
physical position of the module in a carrier or in a μTCA chassis. The format of this prefix is:
• in AMC bay 1…8 or μTCA slot 1…8: ‘A1:’, ‘A2:’, ‘A3:’, ‘A4:’, ‘B1:’, ‘B2:’, ‘B3:’, ‘B4:’.
•in μTCA slot 9…12: 'C1:', 'C2:', 'C3:', 'C4:'.
Please note that in the case that the module is installed elsewhere, then the IPMB-L address of the module is
unknown and the interface is off.
Module sensors that have been implemented are listed in the sensor list below.
Table 5-1:Sensor list
SDR IDName Sensor Type Code Reading Type Code Description Event Offset
1 B1:IPMI Info-1
2 B1:IPMI Info-2
3 B1:FRU Agent
B1:ModuleHotSwa
4
p
C0h
(OEM Kontron)
C0h
(OEM Kontron)
C5h
(OEM Kontron FRU
Info Agent State)
F2h
(Module Hot
Swap)
6Fh
(Sensor Specific)
6Fh
(Sensor Specific)
0Ah
(Discrete)
6Fh
(Sensor Specific)
Firmware Debug
sensor
Firmware Debug
sensor
For additional
information, refer
to section Kontron
FRU Info Agent
Refer to AMC.0
specification.
Offset 6: transition to
Degraded
Offset 8: Install Error
Offset 0: Module Handle
Closed
Offset 1: Module Handle
Opened
Offset 2: Quiesced
Offset 3: Backend Power
Failure
Offset 4: Backend Power
Shutdown
Refer to AMC.0 R2.0 Section
3.6.6 Module Hot Swap
Sensor.
34 AM4210
Page 50

www.kontron.com
SDR IDName Sensor Type Code Reading Type Code Description Event Offset
5 B1:IPMBL State
6 B1:MMC Stor Err
7 B1:MMC Reboot
8 B1:MMC FwUp
9 B1:Ver change
C3h
(OEM Kontron)
28h
(Management
Subsystem
Health)
24h
(Platform Alert)
CAh
(OEM Kontron
External
Component
Firmware Upgrade
Status)
2Bh
(Version Change)
6Fh
(Sensor Specific)
6Fh
(Sensor Specific)
03h
(Generic Discrete)
6Fh
(Sensor Specific)
6Fh
(Sensor Specific)
For additional
information, refer
to section Kontron
IPMB-L Link
Generates an event
when a local
EEPROM storage
error is detected.
Generates an event
when MMC reboot is
detected.
Generates event
after IPMI F irmware
upgrade process is
finished.
Generates an event
when the IPMI FW
changes
Offset 0: IPMB-L disabled
Offset 1: IPMB-L enabled
Offset 2: IPMB-L disabled
Offset 3: IPMB-L enabled
See IPMI v1.5 table 36.3,
Sensor type code 28h for
sensor definition
Offset 0: State Deasserted
Offset 1: State Asserted
Offset 0: Firmware upgrade in
progress (no event)
Offset 1: Firmware upgrade
succeeded
Offset 2: Firmware upgrade
failed
Offset 1: IPMI Firmware
changed
See IPMI v1.5 table 36.3,
Sensor type code 23h
(Watchdog 2) for sensor
definition and event trigger
10 B1:IPMI Watchdog
11 B1:CPU Reset
23h
(Watchdog 2)
CFh
(OEM Kontron
Reset)
6Fh
(Sensor Specific)
03h
(Sensor Specific)
Generates event
when IPMI
watchdog bites. For
closer information
refer to IPMI v1.5
specification.
Generates an event
when CPU is
released from reset.
The reset type and
reset source is
encode in the event
data.
Event Data 1:
[7:6] – 11b sensor specific
ext. code in byte 2
[5:4] – 00b unspecified
[3:0] – Offset
0h
1h
2h
4-7h
8h
Event Data 2:
[7:4] – interrupt type
[3:0] – timer use at expiration
0h – reserved
1h – BIOS/FRB2
2h – BIOS/POST
3h – OS Load
4h – SMS/OS
5h - OEM
Event Data 3: always FFh
For additional information,
refer to section Kontron Reset
35 AM4210
Page 51

www.kontron.com
SDR IDName Sensor Type Code Reading Type Code Description Event Offset
12 B1:Temp Air Out
13 B1:Temp CPU
14 B1:Temp Dual GE
15 B1:Vcc 1.0V
16 B1:Vcc 1.0V BCM
17 B1:Vcc 1.1V
18 B1:Vcc 1.2V
19 B1:Vcc 1.8V
20 B1:Vcc 3.3V
21 B1:Vcc 3.3V SUS
23 B1:Vcc 12V
24 B1:Health Error
25 B1:Pres SFP-1
26 B1:Pres SFP-2
01h
(Temperature)
01h
(Temperature)
01h
(Temperature)
02h
(Voltage)
02h
(Voltage)
02h
(Voltage)
02h
(Voltage)
02h
(Voltage)
02h
(Voltage)
02h
(Voltage)
02h
(Voltage)
24h
(Platform Alert)
25h
(Entity Present)
25h
(Entity Present)
01h
(Threshold Based)
01h
(Threshold Based)
01h
(Threshold Based)
01h
(Threshold Based)
01h
(Threshold Based)
01h
(Threshold Based)
01h
(Threshold Based)
01h
(Threshold Based)
01h
(Threshold Based)
01h
(Threshold Based)
01h
(Threshold Based)
03h
(Generic Discrete)
6Fh
(Sensor specific)
6Fh
(Sensor specific)
Temperature Sensor
of the outlet region
Temperature Sensor
of the CPU
Temperature Sensor
of the dual GE
device (i82571EB
Ethernet
Controller)
Voltage on 1.0v
board power supply
Voltage on 1.0v
board power supply
Voltage on 1.1v
board power supply
Voltage on 1.2v
board power supply
Voltage on 1.8v
board power supply
Voltage on 3.3v
board power supply
Voltage on 3.3v
suspend
(management)
power supply
Volt age on 12v
board power supply
The sensor is an
aggregation of
analog sensors and
shows the healthy
state of the
module. If the
sensor is asserted,
the health LED lit
on amber
The sensor shows
presents or absents
of SFP. No event is
generated.
The sensor shows
presents or absents
of SFP. No event is
generated.
Sensor is only readable when
Payload Power is on
Sensor is only readable when
Payload Power is on
Sensor is only readable when
Payload Power is on.
Sensor is only readable when
Payload Power is on.
Sensor is only readable when
Payload Power is on.
(only valid for AM4220)
Sensor is only readable when
Payload Power is on.
Sensor is only readable when
Payload Power is on.
Sensor is only readable when
Payload Power is on.
Sensor is only readable when
Payload Power is on.
Sensor is only readable when
Payload Power is on.
(only valid for AM4204)
Sensor is only readable when
Payload Power is on.
Offset 0: no critical sensors
asserted
Offset 1: one or multiple
critical sensors are asserted
See table: Health Sensor list
for details.
Offset 0: Entity Present
Offset 1: Entity Absent
Offset 2: Entity Disabled
Sensor is only readable when
Payload Power is on.
(available for AM42xx)
Offset 0: Entity Present
Offset 1: Entity Absent
Offset 2: Entity Disabled
Sensor is only readable when
Payload Power is on.
(only available for AM4204
and AM4220)
36 AM4210
Page 52

www.kontron.com
SDR IDName Sensor Type Code Reading Type Code Description Event Offset
Offset 0: Entity Present
Offset 1: Entity Absent
Offset 2: Entity Disabled
Sensor is only readable when
Payload Power is on.
(only available for AM4204)
Offset 0: Entity Present
Offset 1: Entity Absent
Offset 2: Entity Disabled
Sensor is only readable when
Payload Power is on.
(only available for AM4204)
Offset 14:
Event Data 2: <POST Value>
Event Data 3: 00h undef
Offset 0: event data 2: 00h
(unspecified): event tr igger, A
Boot monitor POST failure
Offset 0:
Offset 3:
Offset 0: Diagnostic Started
Offset 1: Diagnostic PASS
Offset 2: Diagnostic FAIL
Offset 0: Firmware upgrade in
progress (no event)
Offset 1: Firmware upgrade
succeeded
Offset 2: Firmware upgrade
failed
27 B1:Pres SFP-3
28 B1:Pres SFP-4
29 B1:Post Value
30 B1:Post Error
31 B1:Boot Error
32 B1:Diag Status
33 B1:Fwupg Status
25h
(Entity Present)
25h
(Entity Present)
C6h
(OEM Kontron
Post Value)
0Fh
(System Firmware
Progress)
1Eh
(Boot Error)
C9h
(OEM Kontron )
CAh
(OEM Kontron
External
Component
Firmware Upgrade
Status)
6Fh
(Sensor specific)
6Fh
(Sensor specific)
6Fh
(Sensor specific)
6Fh
(Sensor specific)
6Fh
(Sensor specific)
6Fh
(Sensor specific)
6Fh
(Sensor specific)
The sensor shows
presents or absents
of SFP. No event is
generated.
The sensor shows
presents or absents
of SFP. No event is
generated.
When bootloader
postvalue is not 0
the sensor shows
the result value
code.
Generates an event
when a POST error
occurred
Generates an event
when an system
boot error is
detected
Generates an event
when Diagnostic is
finished.
Generates event in
case of passed or
failed User SW
upgrade process.
37 AM4210
Page 53

www.kontron.com
5.1.2.1 OEM sensor description
5.1.2.1.1 Kontron FRU Info Agent
Table 5-2:Kontron FRU info agent sensor
Event/Reading type
code
0Ah
Sensor type Sensor specific offset Event trigger
06h
C5h
OEM Kontron FRU
Info Agent
08h
Transition to degraded
Event Data 2 is used a bit flag error
Bit 7: unspecifiedError
Bit 6: notPresentError
Bit 5: multirecHeaderError
Bit 4: multirecDataError
Bit 3: timeout error
Bit 2: ipmcError
Bit 1: fruDataError
Bit 0: commonHeaderError
Event Data 3 is used a bit flag error
Bit 7: reserved
Bit 6: reserved
Bit 5: SetPortState Not Supported
Bit 4: SetPortState Error
Bit 3: reserved
Bit 2: reserved
Bit 1: reserved
Bit 0: Match Error, Not in single link matches
Install Error
Event Data 2 is used a bit flag error
Bit 7: unspecifiedError
Bit 6: notPresentError
Bit 5: multirecHeaderError
Bit 4: multirecDataError
Bit 3: timeout error
Bit 2: ipmcError
Bit 1: fruDataError
Bit 0: commonHeaderError
Event Data 3 is used a bit flag error
Bit 7: SetClockState Not Supported
Bit 6: SetClockState Error
Bit 5: SetPortState Not Supported
Bit 4: SetPortState Error
Bit 3: Clock Internal Mismatch
Bit 2: Clock Match Error, Not a single clock matches
Bit 1: Internal mismatch
Bit 0: Match Error, Not in single link matches
38 AM4210
Page 54

www.kontron.com
5.1.2.1.2 Kontron IPMB-L Link
Table 5-3:Kontron IPMB-L Link sensor
Event/Reading type
code
6Fh
Sensor type Sensor specific offset Event trigger
02h
C3h
OEM Kontron
IPMB-L Link
03h
IPMB-L Disable
Event Data 2: always 0
Event Data 3:
bit[7:3]: always 0
bit [2:0]:
0h = no failure
1h = Unable to drive clock HI
2h = Unable to drive data HI
3h = Unable to drive clock LO
4h = Unable to drive data LO
5h = clock low timeout
6h = Under test (the IPM Controller is attempting to
determine who is causing a bus hang)
7h = Undiagnosed Communication Failure
IPMB-L Enable
Event Data 2: always 0
Event Data 3:
bit[7:3]: always 0
bit [2:0]:
0h = no failure
1h = Unable to drive clock HI
2h = Unable to drive data HI
3h = Unable to drive clock LO
4h = Unable to drive data LO
5h = clock low timeout
6h = Under test (the IPM Controller is attempting to
determine who is causing a bus hang)
7h = Undiagnosed Communication Failure
5.1.2.1.3 Kontron MMC Firmware Upgrade Status
Table 5-4:Kontron MMC FW upgrade status sensor
Event/Reading type
code
6Fh
Sensor type Sensor specific offset Event trigger
CAh
OEM Kontron
External
Component
Firmware Upgrade
Status
00h Firmware Upgrade in Progress (no event)
01h Firmware upgrade succeeded
02h Firmware upgrade failed
39 AM4210
Page 55

www.kontron.com
5.1.2.1.4 Kontron Reset
Table 5-5:Kontron reset sensor
Event/Reading type
code
03h
Sensor type Sensor specific offset Event trigger
CFh
OEM Kontron
RESET
00h
01h
State Asserted /
State Deasserted
Event Data 2: Reset Type
00h: Warm reset
01h: Cold reset
02h: Forced Cold [Warm reset reverted to Cold]
03h: Soft reset [Software jump]
Event Data 3: Reset Source
00h: IPMI Watchdog [cold, warm or forced cold]
(IPMI Watchdog2 sensors gives dditional details)
01h: IPMI commands cold, warm or forced cold]
(chassis control, fru control)
02h: Processor internal checkstop
03h: Processor internal reset request
04h: Reset button [warm or forced cold]
05h: Power up [cold]
06h: Legacy Initial Watchdog / Warm Reset Loop Detection
* [cold reset]
07h: Legacy Programmable Watchdog [cold, warm or forced
cold]
08h: Software Initiated [soft, cold, warm of forced cold]
09h: Setup Reset [Software Initiated Cold]
FFh: Unknown
5.1.2.1.5 Kontron POST Code Value
Table 5-6:Kontron POST code value sensor
Event/Reading type
code
6Fh
Sensor type Sensor specific offset Event trigger
C6h
OEM Kontron POST
Code Value
14h
5.1.2.1.6 Kontron Diagnostic Status
Figure 5-1:Kontron diagnostic status sensor
Event/Reading type
code
6Fh
Sensor type Sensor specific offset Event trigger
C9h
OEM Kontron
Diagnostic Status
00h Diagnostic Started
01h Diagnostic PASS
02h Diagnostic FAIL
POST Code Error Event Trigger
Event Data 2: POST Low
Event Data 3: POST High (always 00h)
40 AM4210
Page 56

www.kontron.com
5.1.2.1.7 Kontron User SW upgradeStatus
Table 5-7:Kontron user SW upgrade status sensor
Event/Reading type
code
6Fh
Sensor type Sensor specific offset Event trigger
CAh
OEM Kontron
External
Component
Firmware Upgrade
Status
00h Firmware Upgrade in Progress (no event)
01h Firmware upgrade succeeded
02h Firmware upgrade failed
5.1.2.2 Sensor Thresholds
Following table shows sensor thresholds for voltages
Table 5-8:Voltage sensor thresholds
SENSOR Number / ID string Lower Non-Re-
coverable
ID=15: Vcc 1.0V na 1.01 V 1.03 V 1.18 V 1.294 V na
ID=16: Vcc 1.0V BCM (AM4220
and AM4210 only)
ID=17: Vcc 1.1V na 1.01 V 1.02 V 1.18 V 1.67 V na
ID=18: Vcc 1.2V na 1.10 V 1.13 V 1.28 V 1.29 V na
ID=19: Vcc 1.8V na 1.65 V 1.68 V 1.92 V 2.06 V na
ID=20: Vcc 3.3v na 3.05 V 3.06 V 3.55 V 3.56 V na
ID=21: Vcc 3.3V SUS na 2.92 V 2.93 V 3.69 V 3.70 V na
ID=23: Vcc 12v na 8.36 V 9.7 V 14.45 V 15.52 V na
na 0.88 V 0.93 V 1.08 V 1.465 V na
Lower critical
Lower non
critical
Upper non
critical
Upper critical
Upper Non-Recoverable
5.1.2.3 Health Error
The Health Error is asserted if one of the sensors mentioned in Table 5-8 on page 41 (Voltage sensor
thresholds) exceeds UC, UNR, LC or LNR or one of the sensors mentioned in Table 4-1 (Temperature Sensor
Thresholds) in Chapter 4.1 exceeds UC or UNR.
41 AM 421 0
Page 57

www.kontron.com
5.1.3 OEM commands
5.1.3.1 OEM Get Firmware SysUpTime
Command Name LUN NetFn Command Number
OEM Get Firmware SysUpTime 3 0x3E 0x03
Byte Num Data Field / Byte Raw
Request Data 1...4 0xBA 0x90 0x91 0x8B
Response Data 1 Completion Code
2...5 System Up-Time in Seconds
5.1.3.2 OEM Get Serial Configuration
Command Name LUN NetFn Command Number
OemApGetSerialconfig 3 0x30 0x05
Byte Num Data Field / Byte Raw
Request Data 1...5 0xAB 0xCA 0xCA 0xCE 0xC9
Response Data 1 Completion Code
2 MUX setting
3 UART0 config
4 UART1 config
5 MMC SPI config
6 Reser ved
Setting [reg.config] – UART0 [reg.config] – UART1 [reg.config] – MMC
0 [3/4] – CableDetect/SOL [0] – not connected -
1 [0] – not connected [3/4] – CableDetect/SOL -
2 [3] – CableDetect [4] – SOL -
3 [4] – SOL [3] – CableDetect -
4 [1] – Front [2/4] – Rear/SOL (AM4220 only) -
5 [2/4] – Rear/SOL [1] – Front (AM4220 only) -
6 [1/4] – Front/SOL [2] – Rear (AM4220 only) -
7 [2] – Rear [1/4] – Front/SOL (AM4220 only) -
8 [4] – SOL [0] – not connected [2] – Rear
9 [4] – SOL [0] – not connected [1] – Front
Example: Using onboard
ipmitool –l 3 raw 0x30 0x5 0xab 0xca 0xca 0xce 0xc9
42 AM4210
Page 58

www.kontron.com
5.1.3.3 OEM Set Serial Configuration
Command Name LUN NetFn Command Number
OemApSetSerialconfig 3 0x30 0x06
Byte Num Data Field / Byte Raw
Request Data 1...5 0xAB 0xCA 0xCA 0xCE 0xC9
6 MUX setting
Response Data 1 Completion Code
Example: Using onboard
ipmitool –l 3 raw 0x30 0x06 0xab 0xca 0xca 0xce 0xc9 <setting>
5.1.3.4 OEM Set Control State
• The MMC shall support the following Control Ids
• The MMC shall save and restore these settings.
• The MMC shall immediately restart the payload of the module on change of the “interface settings”.
Command Name LUN NetFn Command Number
CmdSetControlState 0 0x3E 0x20h
43 AM4210
Page 59

www.kontron.com
Request Data 1
Byte Num Data Field
Control ID
0 – Boot Image Selection
1 – Interface Settings
2 – PCIe Settings
3 – Image Swap Reset Threshold
Control State
Control Number 0: Boot Image Selection
0 – Image0
1 – Image1
Control Number 1: Interface Settings
0 – AM4204 front x4 GE, p8..11 x4 GE
1 – AM4204 front x4 GE, p8..11 x1 XAUI
2 – AM4220 front x2 XAUI
3 – AM4220 front x2 1GE
4 – AM4210 front x1 XAUI, p8..11 x4 GE
5 – AM4210 front x1 XAUI, p8..11 x1 XAUI
6 – AM4210 front x1 GE, p8..11 x4 GE
2
7 – AM4210 front x1 GE, p8..11 x1 XAUI
Control Number 2: PCIe Settings
0 – PCIe disabled (default)
1 – PCIe Host Mode
2 – PCIe Target Mode (Boot from Bootbus/onboard Flash)
3 – PCIe Target Mode (Boot from PCIe)
Control Number 3: Image Swap Reset Threshold
N – count of detected resets before image swap
0,1 = invalid values (will be rejected)
255 = disable logic
Control Number 4:
0 – local PCIe clock enabled
1 – FCLKA support enabled
Response Data 1 Completion Code
Example: Using onboard
# ipmitool raw 0x3e 0x20 <ID> <STATE>
Example: Using ipmitool on Kontron AMC carrier (e.g. AT8404):
# ipmitool –t 0x80 –b 7 raw 0x3e 0x20 <ID> <STATE>
Example: Using Kontron carrier manager (AM4904/AM4910):
# clicm Kontron boot set <FRUID> <ID> <STATE>
Example: Using PigeonPoint ShMC:
# clia sendamc 9a 80 0x3e 0x20 <ID> <STATE>
44 AM4210
Page 60

www.kontron.com
Note:
When changing settings with this command a power cycle is required to allow changes take effect!
5.1.3.5 OEM Get Control State
Command Name LUN NetFn Command Number
CmdGetControlState 0 0x3E 0x21
Byte Num Data Field
Control Number
Request Data 1
6 MUX setting
Response Data 1 Completion Code
2 See “OEM Set Control State” command
Example:
ipmitool –l 0 raw 0x3e 0x21 0x00
0 – Boot Image Selection
1 – Interface Settings
2 – PCIe Settings
5.1.4 Field Replaceable Unit (FRU) Information
This FRU information contains the IPMI defined Board and Product Information areas that hold the part
number and serial number of the board and the Multirecord Information Area that contains the PICMG
defined Module Current Requirement Record, the AMC Point-to-Point Connectivity Record and the Clock
Configuration Record.
The Internal Use Area is pre-allocated to 384 bytes and is free for customer use.
This FRU information responds to FRU ID #0, which is the ID for the MMC.
5.1.5 E-Keying
E-Keying has been defined in the AMC.0 Specification to prevent board damage, prevent wrong operation,
and verify fabric compatibility. The FRU data contains the AMC Point-to-Point Connectivity record as
described in Section 3.9 of the AMC.0 R2.0 specification.
When the Module is inserted in an ATCA AMC carrier or MicroTCA system, the carrier manager reads in the AMC
Point-to-Point Connectivity record from FRU and determines whether the Board can enable the ports to the
AMC connector. Set/Get AMC Port State IPMI commands defined by the AMC.0 specification are used for
either granting or rejecting the E-keys.
45 AM4210
Page 61

www.kontron.com
5.1.6 Watchdog
The complete startup and execution process is guarded using external watchdog timers implemented by the
hardware management subsystem IPMC. There are 4 distinct watchdog timers running during
• boot initialization and early boot monitor execution
• boot monitor execution and preparation for OS loading
• OS execution and initialization
The watchdog timers will trigger a specific action when expired. The action is dependent on previous resets
and on watchdog type.
The standard IPMI watchdog as implemented by the Wind River Linux IPMI driver supports different actions
on watchdog timer expiry and a configurable watchdog pre-timeout.
This pre-timeout period is configurable from 1 second up. The pre-timeout allows application software to
take actions just before the watchdog bites and causes a reset or error-halt-state. The pre-timeout action can
either be configured to trigger a Linux kernel panic, where appropriate panic-handlers can collect data, or to
inform a user-space application of the pre-timeout event.
The watchdog can be disabled for debug reasons by an appropriate jumper setting (consult the Quick
Reference Sheet).
5.1.7 MMC Firmware Code
MMC firmware code is organized into boot code and operational code, both of which are stored in a flash
module. Upon an MMC reset, the MMC executes the boot code and performs the following:
• Self test to verify the status of its hardware and memory.
• Calculates a checksum of the operational code.
Upon successful verification of the operational code checksum, the firmware will jump to the operational
code.
5.1.8 Updating MMC Firmware
Updating the MMC is possible in 4 different ways depending on the operating system running on the module.
Those are:
• using ipmitool from the Linux shell
•using kex-flashimage from the Linux shell
• using an IPMI over LAN (IOL) session
• using the ‘download ipmifw’ command from a AT8404 carrier
46 AM4210
Page 62

www.kontron.com
5.1.8.1 MMC Firmware Update using ipmitool
Prerequisites: a working TFTP server, DHCP server and network connectivity to the DHCP and TFTP server.
WindRiver Linux BSP or Cavium Linux BSP must be running on the board.
The MMC Firmware is updated using the following commands:
# tftp -r am42xx-fw-mmc-GA-2.01.hpm -g 10.0.114.1
#
#
#
#
ipmitool hpm check am42xx-fw-mmc-GA-2.01.hpm
PICMG HPM.1 Upgrade Agent 1.0.2:
Validating firmware image integrity...OK
Performing preparation stage...OK
Comparing Target & Image File version
----------------------------------------|ID | Name | Versions |
| | | Active| Backup| File |
----------------------------------------| 1 |MMC | 5.24 | 5.24 | 5.24 |
----------------------------------------#
ipmitool hpm upgrade am42xx-fw-mmc-GA-2.01.hpm all activate
PICMG HPM.1 Upgrade Agent 1.0.2:
Validating firmware image integrity...OK
Performing preparation stage...OK
Performing upgrade stage:
------------------------------------------------------------------------------|ID | Name | Versions | Upload Progress | Upload| Image |
| | | Active| Backup| File |0% 50% 100%| Time | Size |
|---|-----------|-------|-------|-------||----+----+----+----||-------|-------|
| 1 |MMC | 5.24 | 5.24 | 5.24 ||...................|| 01.17 | 30f02 |
------------------------------------------------------------------------------Performing activation stage:
Waiting firmware activation...OK
Note:
1. It is necessary to repeat the upgrade command above to ensure that both firmware images of the
MMC are updated. Otherwise, the MMC will fall back to its old firmware in case of a rollback
condition.
2. The MMC firmware image is stored in the flash file system and should be deleted after the update
procedure has finished successfully
5.1.9 MMC Firmware Update using kex-flashimage
Updating the MMC firmware using the kex-flashimage tool is done as part of the WindRiver BSP update
described in chapter 5.3.4.2. This is only possible in case that the WindRiver BSP is installed.
47 A M4210
Page 63

www.kontron.com
5.1.9.1 MMC Firmware Update using IOL Session
To setup an IOL session, please refer to chapter 3.4.3.2. The update will be done using ipmitool or kexflashimage as described in chapter 5.1.8.1 and chapter 5.1.9.
5.1.9.2 MMC Firmware Update from AT8404 Carrier
Prerequisites: a working TFTP server, DHCP server and network connectivity to the DHCP and TFTP server. The
board must be located in an AT8404 carrier with firmware GA 2.04 or higher. It is not required, that Linux is
running on the board.
A HPM.1 compliant MMC firmware image file must be available on the TFTP server. Given the board is plugged
into slot AMC B4 of the carrier, the MMC firmware can be downloaded using the following command:
(Ethernet Fabric) # download ipmifw tftp://10.0.111.1/tftpboot/am42xx-fw-mmc-GA-2.05 amcb4
5.2 Bootloader
On the AM4210 Advanced Mezzanine Card (AMC), the bootloader ‘u-boot‘ (universal bootloader) is used. The
bootloader initializes the main components of the board like CPU, DDR2 RAM, serial lines etc. for operation
and performs a power on self test (POST). After these steps have been finished, Linux kernel and application
are started from flash.
5.2.1 Power On Self Test
Upon power on or system reset, the bootloader performs the following power on self tests (POST):
Table 5-9:Power On Self Tests
Test Description
Cavium BIST Several CPU checks as defined in lib_mips/lib_octeon.c file
DDR RAM (fast) Simple memory write/read test. Testing a 1MB memory chunk every 16 MB.
DDR RAM (full) Simple memory write/read test allover the full memory area.
In the case that a POST fails, a POST error code is written into the postcode register of the onboard CPLD. The
postcode register is also accessible by the MMC which can report error codes to a separate management
instance.
The following table shows the POST code values written into the CPLDs postcode register in case of a POST
error.
48 AM4210
Page 64

www.kontron.com
Table 5-10:Bootloader POST Code values
POST Code Value Description
0x00 All POST were successful
0x10 Cavium BIST failed
0x20 Memory data line POST failed
0x40 Memory address line POST failed
0x80 Memory device cells POST failed
5.2.2 Bootloader shell and options
The boot process can be interrupted by entering the bootstopkey phrase “stop”. This will open a bootloader
command line interface.
Entering “?” provides a list of possible built-in commands, “printenv” provides a list of current environment
settings. The bootloader shell can be used to customize boot options and system startup by changing some of
its environment variables. A list of available environment variables and its description can be seen in the
table below.
Table 5-11: Bootloader environment variables
Name Type Description
Contains the default base MAC address for the Octeon plus Ethernet interfaces. This
variable is automatically set by the bootloader when the MAC address was read from
boardmacaddr Var
bootcmd Script
bootcmddata0a Script
bootcmddata0b Script
bootcmdnet Script Contains the standard startup script for loading OS image from network
bootcmdprd Script Contains the standard startup script for use during board production
bootdelay Var
bootsource Var
the MMC/KCS interfaces. This should only be set manually when disable_kcs=yes or
ignore_kcserr=yes to provide a “fallback” MAC address, when the KCS/MMC
interface is not available or fails
This variable defines a command string that is automatically executed when the
initial countdown is not interrupted.
This command is only executed when the variable bootdelay is also defined!
Contains the standard startup script for loading OS image from flash partition
mtd4, which is a raw partition. The image is started using bootoctlinux command.
Contains the standard startup script for loading OS image from flash partition
mtd5, which is a JFFS2 partition by default. The image is started using a
combination of fsload/bootoctlinux command.
After reset, U-Boot will wait this number of seconds before it executes the
contents of the bootcmd variable. If the bootstopkey phrase is typed
during this time, the bootloader command line interface is entered.
Set this variable to 0 boots without delay. Be careful: depending on the
contents of your bootcmd variable, this can prevent you from entering
interactive commands again forever!
Set this variable to -1 to disable autoboot.
default: 5 for flash based bootloader, -1 for RAM resident bootloader
When the standard boot sequence is used, contains the boot source, either data0a,
data0b, net, prd to select the respective boot sequence to activate. It is only used
when bootcmd contains the default startup script, which may be overridden by the
user.
default: data0a
49 AM4210
Page 65

www.kontron.com
Name Type Description
dataXa_flash_update Script
dataXb_flash_update Script
dataXa_backup_flash_update Script
dataXb_backup_flash_update Script
disable_kcs Var
disable_pci Var
ethact Var
ignore_kcserr Var
linuxcores Var
linuxmem Var
loadaddr Var
netretry Var
net_retry_vlan Var
net_retry_if Var
Command script to flash a binary image transferred with tftpboot to the active
image flash partition data0a
Command script to flash a binary image transferred with tftpboot to the active
image flash partition data0b
Command script to flash a binary image transferred with tftpboot to the backup
image flash partition data1a
Command script to flash a binary image transferred with tftpboot to the backup
image flash partition data1b
yes – completely disable all IPMI KCS access from bootloader
<not set> - use KCS interface to retrieve MAC address and program watchdog et al
(default)
yes – disable any PCI Express initialization in bootloader (default)
<not set> - initialize and enumerate PCI Express port 1 (connected to onboard
e1000 dual GbE MAC)
Default network interface used by network commands (bootp, tftpboot et al)
default: e1000_eth0
yes – do not retry KCS accesses from bootloader indefinitely. This may lead to a
situation where the MAC address of the board is not correctly setup
<not set> - retry KCS access for getting MAC address et al forever (default)
Contains the number of CPU cores to allocate to the Linux kernel booted by the
default boot commands
default: 12
Contains the amount of RAM in MB to allocate for the Linux kernel booted by the
default boot comands
default: 2048 (with a 2 Gig) 4096 (with a 4 Gig)
Default load address for network transfers. This is used as a temporary storage for
netbooting and firmware updates.
default: 0x20000000
<not set> – retry a failed netboot command infinitely with the interface defined by
‘ethact’ environment variable.
no – do not retry failed net boot commands (bootp, tftpboot et al) using all
available interfaces (default)
yes – retry a failed netboot command by iterating through all available interfaces
rotate – retry a failed netboot command by iterating through all interfaces defined
by ‘net_retry_if’ variable. This setting is done automatically if ‘net_retry_if’ or
‘net_retry_vlan’ have been defined.
locked – a BOOTP/DHCP request has been completed successfully. Subsequent
commands use the VLAN and interface settings of the successful request. This
setting is done automatically if ‘net_retry_if’ or ‘net_retry_vlan’ have been
defined.
Defines a comma-separated list of possible VLAN IDs. Up to 8 VLAN IDs can be used.
<not set> – the VLAN ID used is defined only by the ‘vlan’ environment variable.
N1,N2,N3… – the VLAN IDs N1, N2, N3 are used in turn when using the boot
commands (bootp, tftpboot). Frames will be sent and accepted with IEEE 802.1Q
VLAN tag only, except for special VLAN ID 0, which means untagged.
This variable will implicitly set the ‘vlan’ and ‘netretry’ variables on each iteration
Defines a comma-separated list of possible interfaces for network commands. A
maximum of 128 characters is allowed for the complete list.
<not set> – if ‘net_retry_vlan’ is not set, retry is defined by the setting of the
‘netretry’ variable.
E1,E2,E3 – do retry only E1 E2 and E3 interfaces in turn when using the boot
commands.
This variable will implicitly set the ‘netretry’ variable on each iteration
50 AM4210
Page 66

www.kontron.com
Name Type Description
nuke_data0a Script Command script to erase in the active image the onboard flash partition data0a
nuke_data0b Script Command script to erase in the active image the onboard flash partition data0b
nuke_env Script
nuke_env_backup Script Command script to erase the U-Boot environment for the backup bootloader
pci_console_active Var
pci_console_count Var Number of PCI consoles to set up. default: 1
pci_console_size Var Size of PCI console buffer in bytes, minimum 128. default: 1024
serial_rtscts Var
uboot_backup_flash_update Script
uboot_flash_update Script
vlan Var
watchdogboot Var
watchdogos Var
ignoreposterr Var
postresult Var
memtest Var
bootstopkey Var
dhcp_client_id Var
e1000_flu Var
Command script (use with “run nuke_cmd”) that erases the U-Boot environment
for the active image
When set, enables the Octeon PCI console instead of serial console in U-Boot
(default: not set for flash based bootloader, set for RAM resident bootloader)
yes – use hardware flow control when transmitting serial data through UART0/
UART1 in bootloader and simple executive applications (default)
<not set> - do not use hardware flow control
Command script to flash a U-Boot binary image transferred with tftpboot to the
backup image bootloader
Command script to flash a U-Boot binary image transferred with tftpboot to the
active image bootloader
<not set> - send and accept only untagged frames
N – sent all frames as IEEE 802.1Q tagged frames using VLAN ID N and default
priority. Also accept IEEE 802.1Q tagged frames when they match VLAN ID N
0 – disable boot monitor watchdog (default)
5...n – timeout in seconds before boot monitor watchdog fires
Note: This is the pBMWD watchdog
0 – disable OS load watchdog (default)
15...n – timeout in seconds before load OS watchdog fires
Note: This is the pOSWD watchdog
0 – stop boot process if power on self test errors are detected
1 – continue boot in the presence of power on self test errors (default)
Contains the power on self tests results:
0 - POST successful (default),
1 - POST failed
0 = no DRAM test during POST
1 - quick DRAM test (default)
2 - full DRAM test
string to wait for during startup. If this string is entered, U-Boot will interrupt the
boot process, stop the watchdog and will start its internal command line interface.
default: “stop”
0 – do not include DHCP option 61 client identifier (default)
1 – do include DHCP option 61 client identifier variant 1
1 - forces E1000 link up, using this setting fixes autonegotiation problems with
some 'bootp' and 'tftpboot' hosts
All others: standard behaviour as originally implemented in driver
There are 3 different types of bootloader environment variables:
• Script: The variable is a set of consecutive (more simple) bootloader commands to perform a
specific task. A command script is invoked using the ‘run <script>’ syntax. E.g. the ‘run clear_env’
command would erase the bootloader environment sectors causing the bootloader to use its
default environment upon next restart.
51 A M4 210
Page 67

www.kontron.com
• Var: The variable controls a specific behavior of the bootloader startup sequence. E.g. the
‘bootdelay’ variable controls the time u-boot waits before execution of the bootcmd which
normally loads and starts the Linux kernel.
• Auto: The variable is automatically set during bootloader startup sequence. E.g. the ‘postresult’
variable stores the result of the POST.
It is possible to modify environment variables and start the pre-defined scripts from the bootloader shell. It
is strongly recommended not to modify the pre-defined script variables. However, definition and execution
of user-defined script variables can be done.
CAUTION
Changing bootloader environment variables must be taken very carefully. It will
change system behavior and can lead to a non-booting system
For additional information about u-boot, refer to http://sourceforge.net/projects/u-boot/
Modification of bootloader environment variables is done using the ‘setenv’ and ‘saveenv’ bootloader CLI
commands. In the following example, first, the new environment script variable ‘bootcmdmyscript’ is
defined. After that, the ‘bootsource’ is set to <myscript> causing the bootloader to execute
<bootcmdmyscript> upon next restart. In addition, bootdelay is increased to 10. Finally, all changes are
stored into flash environment sector.
T5516# setenv bootcmdmyscript ‘bootp; tftpboot ${loadaddr} myimg.multi; bootm ${loadaddr}’
T5516#
T5516# setenv bootdelay 10
T5516# saveenv
setenv bootsource myscript
Environment changes are stored in one of the redundant bootloader environment sectors. In case of failure
(e.g. power loss), the settings of the redundant sector are still available. However, the fabric default setting
is running with environment sectors erased. In this case the following startup message is displayed:
Using default environment
Any changes of the environment can be cleared using the ‘nuke_env’ script (provided that ‘nuke_env’ itself
was not changed):
T5516# run nuke_env
5.2.3 Bootloader Update
To update the bootloader, the new U-boot binary is transferred to the board using TFTP. After that, this
binary is written into the onboard flash. The onboard E1000 NIC is used for network connection.
Prerequisites: a working TFTP server, DHCP server and network connectivity to the DHCP and TFTP server. The
new bootloader image has to be stored on the TFTP server. No jumper settings are required on the AM4210.
There are 2 possible ways to update Image 0 and image 1 bootloaders:
• Using the predefined update scripts from the bootloader CLI
• Using the kex-flashimage tool which is provided with the Kontron WindRiver BSP.
52 AM4210
Page 68

www.kontron.com
5.2.3.1 Update from Bootloader CLI
The following procedure defines the update of the image 0 bootloader:
• Start system and connect to serial console
• Connect to bootloader shell by entering the bootloader bootstop phrase ‘stop’
U-Boot 1.1.1 FIXES 2.04 (Build time: Feb 10 2010 - 04:27:51)
OCTEON CN5650-NSP pass 2.1, Core clock: 600 MHz, DDR clock: 400 MHz (800 Mhz data rate)
CUST_KONTRON_T5516 PLD version: 12 Board Type: 1 Option: 3 Revision: 1
Reset Type: 01 cold reset, Source: 08 Software Initiated
DRAM: 2048 MB
Flash: 128 MB
Calculating bootloader CRC checksum.....finished
Testing DRAM (fast), testpattern 5555555555555555
(fast), testpattern aaaaaaaaaaaaaaaa
2048MB - ok
Clearing DRAM........ done
Using default environment
KCS: Reading boot image number : Image 0
KCS: Reading interface settings: Front x2 XAUI
KCS: Reading PCIe settings : Disabled
KCS: Reading PCIe clock source : local
KCS: Reading ethaddr : 00:a0:a5:63:22:e2
KCS: Reading serial# : 9010004184
BIST check passed.
Starting PCIE
PCIe: Waiting for port 1 link
PCIe: Port 1 link active, 4 lanes
PCIe: port=1, first_bus=0, last_bus=0
Net: e1000: 00:a0:a5:63:22:e2
e1000: 00:a0:a5:63:22:e2
e1000_eth0, e1000_eth1, octeth0, octeth1, octeth2, octeth3, octeth4, octeth5, octeth6, octeth7
autoboot in 5 seconds...
press 'bootstopkey' phrase to abort
MMC watchdog stopped
Kontron T5516#
<==== Enter ‘stop’ now
• Get proper network settings
Kontron T5516# bootp
• Set the TFTP server IP
Kontron T5516# setenv serverip <IP_addr>
• Download the bootloader image from the TFTP server
Kontron T5516# tftpboot $loadaddr <bootloader.bin>
• Execute the predefined update script
Kontron T5516# run uboot_flash_update
To update the backup bootloader image, the predefined script uboot_backup_flash_update is used instead.
53 AM4210
Page 69

www.kontron.com
5.2.3.2 Update from WindRiver Linux Shell
To update the boardloader along with the Linux kernel BSP using the kex-flashimage tool the sequence
described in chapter 5.3.4.2:
5.3 Board Firmware
The system is delivered with a bootloader and Linux OS preinstalled on the on-board 128MB NOR flash. The
system will boot by default from this flash, which is directly connected to the bootbus of the Cavium Octeon
CPU. In addition to the on-board flash the board supports a mounted USB flash drive that can be used for
application data. This USB flash drive is not used for booting in the default configuration.
The on-board flash is logically divided into two 64MB sections each consisting of 512 flash sectors. They are
referred to as image0 and image1. The table 5-13 shows the physical addresses and associated flash sectors
for each image once the board has booted on image 0.
Table 5-12:Fabric Default Flash Sector to Image Association
Physical Address Range Linux MTD Partitions Flash Sectors Logical Image
0x17C00000 – 0x1BBFFFFF mtd0 – mtd4 0 – 511 Image0
0x1BC00000 – 0x1FBFFFFF mtd5 – mtd9 512 – 1023 Image1
Image0 and image1 can be swapped by a simple IPMI command. Physically, the uppermost address line of the
flash device is inverted in this case. Flash sector to logical image association remains the same; however
physical address to logical image association will be swapped as shown below
Table 5-13:Swapped Flash Sector to Image Association
Physical Address Range Linux MTD Partitions Flash Sectors Logical Image
0x17C00000 – 0x1BBFFFFF mtd0 – mtd4 512 – 1023 Image1
0x1BC00000 – 0x1FBFFFFF mtd5 – mtd9 0 – 511 Image0
As the Octeon CPU always starts booting from the first physical address in the flash, image0 system is started
in the first case and image1 in the second.
After Linux startup, the flash is divided into 10 partitions (mtd0-mtd9) associated to the physical addresses
as shown in the AM4210 partition scheme below. Note that association of MTD partitions to image depends
on the started image as shown above.
Table 5-14:On-board 128 MB NOR Flash layout
Physical address Offset in flash Size Linux parti-
tion
0x17C00000 0 51 2K iB mtd0 uboot0 Active bootloader image
0x17C80000 0x80000 128KiB mtd1 env0a Redundant bootloader environment
0x17CA0000 0xA0000 128KiB mtd2 env0b Redundant bootloader environment
0x17CC0000 0xC0000 32384KiB mtd3 data0a
Designation Description
First data par tition (typically read-only
OS)
54 AM4210
Page 70

www.kontron.com
Physical address Offset in flash Size Linux parti-
tion
0x19C60000 0x2060000 32384KiB mtd4 data0b
0x1BC00000 0x4000000 51 2K iB mtd5 uboot1 Secondary bootloader image
0x1BC80000 0x4080000 128KiB mtd6 env1a
0x1BCA0000 0x40A0000 128KiB mtd7 env1b
0x1BCC0000 0x40C0000 32384KiB mtd8 data1a
0x1DC60000 0x6060000 32384KiB mtd9 data1b
Designation Description
Second data partition (typically
writable data), configured as JFFS2
partition in bootloader
Secondary Redundant bootloader
environment
Secondary Redundant bootloader
environment
Secondary First data partition
(typically read-only OS)
Second data partition (typically
writable data), configured as JFFS2
partition in bootloader
When shipped from factory, image0 and image1 contain identical bootloader and firmware images and
image0 system is booted by default. Image1 serves as a backup system which is started in case that image0
fails for some reason. It is recommended to always boot and work from image0 and leave image1 firmware
untouched. This allows easy activation of the original firmware in case of any errors or corruption in the
active image.
5.3.1 Switching between Firmware Images
The IPMI command used for image swap can be executed either from the bootloader shell with a predefined
script command or with a specific ‘ipmitool’ command either from the board itself, from an ATCA carrier or
from an external server.
5.3.1.1 Image swap using bootloader predefined commands
The current firmware image is displayed during startup. It can be changed from the bootloader. Below are the
available commands to change boot image. Those commands can be used in the U-Boot.
• Change to image 0
Kontron T5516# run activate_image0
• Change to image 1
Kontron T5516# run activate_image1
Using one of these commands, the board will immediately boot the selected image.
55 AM4210
Page 71

www.kontron.com
5.3.1.2 Image swap using ipmitool
Image swap can also be achieved using the ipmitool from the Linux shell of the board. The following
command syntax must be used (IMAGE: 0 or 1):
~ # ipmitool raw 0x3e 0x20 0x00 <IMAGE>
It is possible to invoke the ipmitool with the same parameters from the AMC carrier that holds the AM4210 or
even from external server provided that the ipmitool installed supports the Kontron OEM extensions.
However, the command must be invoked with appropriate bridging parameters set. E.g. on an AT8404 carrier
with the AM4210 inside Bay 4, the syntax would be:
# ipmitool -b 7 -t 0x80 kontron boot set 0 0
Note:
In case that no ipmitool is available on a carrier or host server and image 0 has been corrupted, the
board will perform an image swap automatically triggered by the system watchdog. Image swap is
performed every 2nd power cycle by the MMC if no watchdog is triggered.
5.3.2 Updating Firmware
Updating firmware includes updating bootloader, system software (Linux kernel and root FS) and MMC
firmware. It is recommended to always update firmware of the active image. In case of a failure, it is possible
to restore the board using the still unchanged redundant image. After the updated firmware is running
properly, the redundant image can be updated to the same version, only if it is required.
Under WindRiver BSP, there are several ways to update the different parts of the board firmware. Update can
be done with the predefined bootloader update commands as well as using the kex-flashimage tool from the
Linux shell. For a Cavium Linux BSP, only updating from the bootloader CLI is possible.
Please refer to the following chapters for information and procedures on how to update the different parts of
the System:
• See “Bootloader Update” on page 52. for the bootloader update
• See “Updating MMC Firmware” on page 46. for the MMC firmware update
• See “Updating Cavium Linux BSP” on page 58. for Cavium Linux update
• See “Updating WindRiver Linux BSP” on page 61. for WindRiver Linux
56 AM4210
Page 72

www.kontron.com
5.3.3 Cavium Linux BSP
5.3.3.1 Rebuilding the Cavium Linux BSP
Cavium Networks provides a SDK that includes Linux kernel and root file system along with the necessary
toolchain, library and extensions for the Octeon CPUs. Kontron has added some patches for the SDK to
support the AM4210 AMC module properly. These patches are supplied with each software release and
areavailable for different versions of the SDK. Thus, the user can add his own extensions and rebuild the
Cavium Networks Linux for the AM4210 easily.
Prerequisites: Either the CNUSERS SDK or the Cavium Networks SDK from Cavium Networks must be installed.
The CNUSERS SDK allows rebuild of kernel and root file system, the Cavium Networks SDK has additional
support for simple executive application development.
The patches supplied in uniformed diff format. A “series” file specifies the names and order of the patch set.
The optional tool ‘quilt’ may be used to apply the patches. Thus it is recommended to install ‘quilt’ on the
build host. For additional information about quilt, see http://savannah.nongnu.org/projects/quilt
Installation of the patches described below can be done with quilt with one single command.
However it is also possible to apply the patches one after another using the ‘patch’ tool. In addition the
‘fakeroot’ RPM must be installed. This is necessary to build the target root filesystem with proper root
permissions.
.
Note:
In case the CNUSERS SDK is used, the user has to delete the ‘examples-passthrough’ entry from the
series file after unpacking the patches. Otherwise, applying the patches will break because the
examples directory will not be found.
Rebuilding the Cavium Linux BSP for the AM4210 can be done with the following procedure:
• Install the SDK delivered from Cavium Networks
# rpm --prefix /usr/local/cavium/ -iv OCTEON-SDK-1.8.1-294.i386.rpm
• Install the Linux package delivered from Cavium Networks
# rpm --prefix /usr/local/cavium/sdk-1.8.1 -iv OCTEON-LINUX-1.8.1.i386.rpm
• Make a local copy of the SDK on your home directory
# cp -rp /usr/local/cavium/sdk-1.8.1/OCTEON-SDK /home/<username>
• Unpack the patches provided by Kontron into your home directory
# tar xzf am42xx-patches-OCTEON-SDK-1.8.1-GA-2.05.tar.gz -C OCTEON-SDK
• Apply the patches to your local copy of the Cavium Networks SDK
# cd OCTEON-SDK
# quilt push -a
57 AM 4210
Page 73

www.kontron.com
In case ‘quilt’ is not installed, use ‘patch’ instead:
# for i in `cat patches/series`; do patch -p 1 < patches/$i; done
Please note, the last line in the “series”-file (# pcinic-pcie.patch) must be changed, depending on whether
pci host driver package is installed or not.
• Setup the SDK environment
# source ./env-setup --runtime-model OCTEON_CN56XX_PASS2
• Build the Linux kernel
# make –C linux kernel
This will build the Linux kernel and root file system including all necessary libraries. Using ‘make –C linux
kernel-deb’ builds only the kernel without the root file system. After building has finished, a kernel and
rootfs image ‘linux/kernel_2.6/linux/vmlinux.64’ will be made. Before using it with the ‘bootoctlinux’
command, the file should be stripped.
Please refer to the online documentation provided with the Cavium Networks SDK for more detail.
5.3.3.2 Updating Cavium Linux BSP
Note:
The following description assumes that image 0 is activated either using the ‘activate_image0’
bootloader command or the appropriate ipmitool command as described above. If image1 would be
active, the upper and lower halves of the flash address space are swapped. In this case, the
‘data1a_backup_flash_update’ command would not update image1 kernel and root FS partition as
intended but image0 instead.
A new Cavium Linux BSP, either rebuilt as described above or delivered as part of an AM4210 software
release, is installed from the bootloader CLI. The BSP is stored in Linux MTD partitions mtd3 (image 0) and
mtd8 (image 1). Generally, the active image (image0) is updated first. If the update worked and the board
started successfully, image1 can also be updated.
Prerequisites: a working TFTP server, DHCP server and network connectivity to the DHCP and TFTP server.
• Start system and connect to serial console
• Stop boot process at the bootloader command line
U-Boot 1.1.1 GA 2.04 (Build time: Dec 9 2009 - 13:59:54)
OCTEON CN5650-NSP pass 2.1, Core clock: 600 MHz, DDR clock: 400 MHz (800 Mhz data rate)
CUST_KONTRON_T5516 PLD version: 12 Board Type: 2 Option: 10 Revision: 0
Reset Type: 01 cold reset, Source: 08 Software Initiated
DRAM: 2048 MB
Flash: 128 MB
Calculating bootloader CRC checksum.....finished
Testing DRAM (fast), testpattern 5555555555555555
(fast), testpattern aaaaaaaaaaaaaaaa
2048MB - ok
Clearing DRAM........ done
Using default environment
58 AM4210
Page 74

www.kontron.com
KCS: Reading boot image number : Image 0
KCS: Reading interface settings: front x1 XAUI, p8..11 x4 GE
KCS: Reading PCIe settings : Disabled
KCS: Reading PCIe clock source : local
KCS: Reading ethaddr : 00:a0:a5:63:d4:0a
KCS: Reading serial# : 9010006140
BIST check passed.
Starting PCIE
PCIe: Waiting for port 1 link
PCIe: Port 1 link active, 4 lanes
PCIe: port=1, first_bus=0, last_bus=0
Net: e1000_eth0, e1000_eth1, octeth0, octeth1, octeth2, octeth3, octeth4
autoboot in 5 seconds...
press 'bootstopkey' phrase to abort
MMC watchdog stopped
Kontron T5516#
ß Enter ‘stop’ here
• Get proper network settings
Kontron T5516# bootp
• Set the TFTP server IP
Kontron T5516# setenv serverip <IP_addr>
• Unprotect flash memory
Kontron T5516# protect off all
Un-Protect Flash Bank # 1
Kontron T5516#
• Flash new Linux kernel/rootfs binary
Kontron T5516# run data1a_flash_update
...........................................................................................
...........................................................................................
....................................................................... done
Erased 253 sectors
Copy to Flash... done
Kontron T5516#
• Check the updated image
Kontron T5516# run activate_image0
In case the updated image boots properly, image1 can be updated as described above using the same image
file with the following commands:
• run data1a_backup_flash_update
• run activate_image1
Note:
The data1a_backup_flash_update command will update image0 when image1 has been booted!
59 AM4210
Page 75

www.kontron.com
5.3.3.3 Updating JFFS2 partition
Note:
The following description assumes that image 0 is activated either using the ‘activate_image0’
bootloader command or the appropriate ipmitool command as described above. If image1 would be
active, the upper and lower halves of the flash address space are swapped. In this case, the
‘data1b_backup_flash_update’ command would not update image1 JFFS2 partition as intended but
image0 instead.
There are two Linux MTD partitions (mtd4 for image 0 and mtd9 for image 1) available that allow customers to
generate their own specific Linux environments. The JFFS2 flash file system is installed on these partitions
allowing mounting them on the Linux shell to /mnt. These partitions include a Linux kernel and some tools as
well as simple executive example applications, but do not include a root filesystem. The bootloader can be
configured to boot the kernel stored here. To get this working, a root filesystem must be installed
additionally.
The two JFFS2 partitions can also be updated. The update procedure is described in the previous section.
Generally, the image0 JFFS2 partition is updated first. After the updated JFFS2 partition can be mounted
properly by the Linux kernel, image1 JFFS2 partition mtd9 is also updated.
5.3.4 WindRiver Linux BSP
5.3.4.1 Rebuilding the WindRiver Linux BSP
In addition to the Cavium Linux BSP, Kontron also provides a WindRiver Linux BSP for the AM4210. The BSP
itself is available with each software release, however modification and rebuilding of the WindRiver BSP
requires obtaining a development license from WindRiver. In this case the BSP for the AM4210 can be rebuilt
on an x86 host with the following steps:
• Unpack the patches provided by Kontron into your WindRiver working directory
# tar xzf bsp-kontron_t5516-wrlinux-2.0-GA-2.05.tar.gz
• Configure the WindRiver system to build the Kontron AM4210 BSP
# /opt/WindRiver/wrlinux-2.0/wrlinux/configure --with-layer=kontron_t5516 --enable-board=kontron_t5516 --en-
able-rootfs=glibc_small --enable-kernel=standard+squashfs
• Build WindRiver kernel and root file system
# make build-all
Note that depending on your build host, building the system completely can take quite a long time (a few
hours).
60 AM4210
Page 76

www.kontron.com
After the build process has been finished, the (stripped) kernel image is stored in the export directory
‘kontron_t5516-vmlinux-stripped-WR2.0ap_standard’
• Install root file system into bootable image
# make boot-image-create BOOTIMAGE_FSTYPE=squashfs BOOTIMAGE_TYPE=flash BOOTIMAGE_ARGS=-be
BOOTIMAGE_RAM0SIZE=64000
• Create bootloader multi image
# /opt/WindRiver/wrlinux-2.0/wrlinux/host-tools/bin/mkimage -A mips -O linux -T multi -C none -a 0 -e 0 -n
"kontron_t5516" -d export/kontron_t5516-vmlinux-stripped-WR2.0ap_standard:export/kontron_t5516-squashfs
kontron_t5516.multi
This command takes kernel and root file system images created before and stores them in the
‘kontron_t5516.multi’ file along with an appropriate u-boot header.
The final image may be downloaded via tftp and started using the ‘bootoctlinux’ command as defined in the
‘bootcmdprd’ environment script. It can also be copied into flash and started from here.
Please refer to the documentation provided with the appropriate WindRiver PNE distribution for more details
how to build and modify the kernel and/or the root file system.
5.3.4.2 Updating WindRiver Linux BSP
Note:
The following description assumes that image 0 is activated either using the ‘activate_image0’
bootloader command or the appropriate ipmitool command as described above. If image1 would be
active, the upper and lower halves of the flash address space are swapped. In this case, the
‘data1a_backup_flash_update’ command would not update image1 kernel and root FS partition as
intended but image0 instead.
A WindRiver Linux BSP installed on the AM4210 module is updated using the kex-flashimage tool which is
part of the WindRiver Linux BSP installation.
A new WindRiver Linux BSP, either rebuilt as described above or delivered as part of an AM4210 software
release, is installed from the bootloader CLI. The BSP is stored in Linux MTD partitions mtd3 (image 0) and
mtd9 (image 1). Generally, the backup image (image1) is updated first. When the backup image has been
updated and started successfully, image0 will also be updated.
Prerequisites: a working NFS server, which can provide the update package file to the AM4210 module.
• Boot to WindRiver Linux prompt and mount NFS file system to AM4210 directory tree
# portmap
# mkdir /mnt/nfs
# mount <server_ip>:<exported_fs> /mnt/nfs
• Install update package to image1 (backup image)
# kex-flashimage --verify --update --image backup --file /mnt/nfs/am42xx-wr-GA-2.05.pkg
61 A M4 210
Page 77

www.kontron.com
This will update flash image1 firmware, MMC firmware and FRU data in case that the old version is GA 2.04 or
higher. Please refer to 5.3.4.3 for updating from GA 2.03 or earlier versions.
• Activate image1 and reboot to WindRiver Linux prompt
# ipmitool raw 0x3e 0x20 0 1
# reboot
• Mount NFS file system to AM4210 directory tree
# portmap
# mkdir /mnt/nfs
# mount <server_ip>:<exported_fs> /mnt/nfs
• Install update package to image0
# kex-flashimage --verify --update --image backup --file /mnt/nfs/am42xx-wr-GA-2.05.pkg
Note that this is the same command which has been used to update image1 before. The reason is that an
image swap was performed before reboot. Thus, image1 is now active and image0 is the backup image which
is updated using the same command.
• Activate image0 and reboot to WindRiver Linux prompt
# ipmitool raw 0x3e 0x20 0 0
# reboot
Now, flash image0 and image1 firmware, MMC firmware and FRU data are updated to the new release. The
image0 and image1 JFFS2 config partitions are deleted and will be re-initialized upon next restart of the
respective image.
5.3.4.3 Updating older versions
The kex-flashimage tool installed on GA 2.03 or lower is not capable to update MMC firmware and the boards
FRU data. Thus an additional installation step is necessary before following the update procedure described
in chapter 5.3.4.2.
Contradictory to the standard update procedure, updating older versions starts from image1 (backup image)
prompt.
• Activate image1 and reboot to WindRiver Linux prompt
# ipmitool raw 0x3e 0x20 0 1
# reboot
• Boot to WindRiver Linux prompt and mount NFS file system to AM4210 directory tree
# portmap
# mkdir /mnt/nfs
# mount <server_ip>:<exported_fs> /mnt/nfs
• Install update package to image0 (backup image now)
# kex-flashimage --verify --update --image backup --file /mnt/nfs/am42xx-wr-GA-2.05.pkg
62 AM4210
Page 78

www.kontron.com
This will update flash image0 firmware to GA 2.05, but not MMC firmware and FRU data of the board. However,
after rebooting to image0, the update procedure is continued with all the steps described for the standard
update procedure and the new kex-flashimage tool installed in the previous step will also update MMC
firmware and FRU data.
• Activate image0 and reboot to WindRiver Linux prompt
# ipmitool raw 0x3e 0x20 0 0
# reboot
• Proceed with the update procedure as described in chapter 5.3.4.2.
5.3.5 Simple executive applications
Building simple executive applications requires the availability of the Cavium Networks SDK which must be
obtained from Cavium Networks directly. The CNUSERS SDK which can be downloaded at
http://www.cnuser.org
The Cavium Networks SDK includes Octeon Executive Library as well as documentation and examples for
Octeon simple executive development. The Octeon Executive Library provides runtime support, hardware
abstraction, memory management, and synchronization routines for the Octeon processor. It is composed of
the libcvmx.a library as well as header files that provide a lot of functionality with inline functions. The
Executive is designed to provide an efficient environment for developing data plane code for Octeon. It
supports a single thread of execution per cnMIPS core.
does not include support for SE application development.
Simple executive applications can be used without the support of an OS, however, memory TLBs for each core
must have been set up correctly before starting a SE. This is done by the bootloader ‘bootoct’ command which
is part of the Octeon u-boot port.
Please refer to the online documentation provided with the Cavium Networks SDK for more detail.
Refer to section 5.3.3.1 for the procedure to install the SDK.
• Build the ‘passthrough’ sample application
# make –C examples/passthrough
5.3.6 Using the NFS Root FS
For development purposes, a NFS mounted root filesystem is often more convenient than a flash or ramdisk
based one. Changes can be applied quickly on the development host and tested on the target. Below the
setup necessary to use a NFS root file system is described.
Prerequisites: Development host with DHCP and TFTP protocols enabled and a NFS exported tree including
the root file system to mount.
• Rebuild the Cavium Linux or WindRiver Linux BSP including kernel and root filesystem as described
above
63 AM4210
Page 79

www.kontron.com
• Copy the kernel built in step 1 into the tftpboot directory of the development host. E.g. the kernel for
the WindRiver Linux BSP is located in the build/export directory of the WindRiver Linux BSP
(kontron_t5516-vmlinux-stripped-WR2.0ap_standard).
• Copy the root file system built in step 1 into the NFS exported file tree. E.g. the root file system for the
WindRiver Linux BSP is located in the build/export/dist directory of the WindRiver Linux BSP. In the
following, it is assumed that the root filesystem has been copied into /export/T5516/nfsroot on the
development host.
• Reset the AM4210 and enter the bootloader CLI using the bootstop phrase ‘stop’
• Setup the bootloader environment variables for booting a NFS root filesystem.
Kontron T5516# setenv rootpath ’/export/T5516/nfsroot’
Kontron T5516# setenv bootargsnfs ’setenv bootargs root=/dev/nfs rw nfsroot=${serverip}:${rootpath} ip=${ipad-
dr}:${serverip}:${gatewayip}:${netmask}:${hostname}::off’
Kontron T5516# setenv bootcmdnfs ’run bootargsnfs ; bootp && tftpboot ${loadaddr} ${bootfile} && bootoctlinux
${loadaddr} numcores=${linuxcores} mem=${linuxmem} console=ttyS0,${baudrate}n8r ${mtdparts} ${bootargs}’
Kontron T5516# setenv bootfile t5516-vmlinux-stripped-WR2.0ap_standard
Kontron T5516# save
• Boot the Linux kernel from the bootloader CLI
Kontron T5516# run bootcmdnfs
The kernel is loaded via tftp and mounts its root filesystem via NFS. Note that the standard kernel delivered
by Kontron mounts an overlay JFFS2 file system located in the mtd4 flash partition to /. All files available on
the NFS server are still available on the AM4210 system. However, if a file is changed from the target, the
changes are stored in the local JFFS2 partition and cannot be seen from the development host. This allows
providing one single root filesystem exported via NFS on the development host for several AM4210 target
boards. Changes for a specific target system are stored only on the targets JFFS2 partition and apply not for
other targets. This allows to setup different targets in a different way without the need to provide more root
filesystem trees on the development host.
64 AM4210
Page 80

www.kontron.com
A. Connectors Pinouts
A.1 USB SSD Flash Module
Signal Pin Number Signal Pin Number
V_5V 1 NC 2
USB DATA (-) 3 NC 4
USB DATA (+) 5 NC 6
GND 7 NC 8
NC (KEY) 9 NC 10
A.2 SFP+ Front IO
Pin Number Signal Pin Number Signal
20 VeeT 1 Ve eT
19 TD- 2 Tx Fault
18 TD+ 3 Tx Disable
17 VeeT 4 SDA
16 VccT 5 SCL
15 VccR 6 MODABS
14 VeeR 7 Rate Select 0
13 RD+ 8 LOS
12 RD- 9 Rate Select 1
11 VeeR 10 VeeR
A-1 AM4210
Page 81

www.kontron.com
A.3 Serial Port Pinout
Signal Pin
RTS 1
DTR 2
TXD 3
GND 4
GND 5
RXD 6
DSR 7
CTS 8
A.4 Serial console terminal cable interface:
RJ45 Female to DB9 Female
RJ45 Pin Number Signal Connected Description DB9 Pin Number
1 RTS Y Request To Send 8
2 DTR Y Data Terminal Ready 6
3 TXD Y Tra nsm it 2
4 GND N Ground -
5 GND Y Ground 5
6 RXD Y Receive 3
7 DSR Y Data Set Ready 4
8 CTS N Clear To Send 7
- RI N Ring Indicator (Not Used) 9
- CD N Carrier Detect (Not Used) 1
A-2 AM4210
Page 82

www.kontron.com
B. Getting Help
If, at any time, you encounter difficulties with your application or with any of our products, or if you simply
need guidance on system setups and capabilities, contact our Technical Support at:
North America EMEA
Tel.: (450) 437-5682 Tel.: +49 (0) 8341 803 333
Fax: (450) 437-8053 Fax: +49 (0) 8341 803 339
If you have any questions about Kontron, our products, or services, visit our Web site at: www.kontron.com
You also can contact us by E-mail at:
North America: support@ca.kontron.com
EMEA: support-kom@kontron.com
Or at the following address:
North America EMEA
Kontron Canada, Inc. Kontron Modular Computers GmbH
4555, Ambroise-Lafortune Sudetenstrasse 7
Boisbriand, Québec 87600 Kaufbeuren
J7H 0A4 Canada Germany
B-1 AM4210
Page 83

www.kontron.com
B.1 Returning Defective Merchandise
Before returning any merchandise please do one of the following:
• Call
1 Call our Technical Support department in North America at (450) 437-5682 and in EMEA at +49
(0) 8341 803 333. Make sure you have the following on hand: our Invoice #, your Purchase Order
#, and the Serial Number of the defective unit.
2 Provide the serial number found on the back of the unit and explain the nature of your problem
to a service technician.
3 The technician will instruct you on the return procedure if the problem cannot be solved over
the telephone.
4 Make sure you receive an RMA # from our Technical Support before returning any merchandise.
•E-mail
1 Send us an e-mail at: RMA@ca.kontron.com
orderprocessing@kontron-modular.com
your company name, your address, your city, your postal/zip code, your phone number, and
your e-mail. You must also include the serial number of the defective product and a description
of the problem.
in North America and at:
in EMEA. In the e-mail, you must include your name,
B-2 AM4210
Page 84

www.kontron.com
B.2 When Returning a Unit
• In the box, you must include the name and telephone number of a contact person, in case
further explanations are required. Where applicable, always include all duty papers and
invoice(s) associated with the item(s) in question.
• Ensure that the unit is properly packed. Pack it in a rigid cardboard box.
• Clearly write or mark the RMA number on the outside of the package you are returning.
• Ship prepaid. We take care of insuring incoming units.
North America EMEA
Kontron Canada, Inc. Kontron Modular Computers GmbH
4555, Ambroise-Lafortune Sudetenstrasse 7
Boisbriand, Québec 87600 Kaufbeuren
J7H 0A4 Canada Germany
B-3 AM4210
Page 85

www.kontron.com
C. Glossary
Acronyms Descriptions
ACL Access Control List. IP Access Control List.
ACPI Advanced Configuration & Power Interface
AdvancedMC (Same as AMC). Advanced Mezzanine Card.
AMC (Same as AdvancedMC). Advanced Mezzanine Card.
AMC.0 Advanced Mezzanine Card Base Specification.
AMC.1
AMC.2
AMC.3
API Application Programming Interface
APIC Advanced Programmable Interrupt Controller
APM Advanced Power Management
ARMD ATAPI Removable Media Device
ARP Address Resolution Protocol
ASCII
ASF
ATC A Advanced Telecommunications Computing Architecture
BCD Binary-Coded Decimal
BER Bit Error Ratio
BI Base Interface. Backplane connectivity defined by the ATCA.
BMC Base Management Controller
BT Block Transfer. An optional IPMI system management interface.
CB Certification Body
CCB Core Complex Bus (Inside PowerQuicc III CPU)
CFM Cubic Foot per Minute
CLI Command-Line Interface
CLK1 AdvancedTCA bused resource Synch clock group 1
CLK1A AdvancedTCA bused resource Synch clock group 1, bus A
CLK1B AdvancedTCA bused resource Synch clock group 1, bus A
CLK2 AdvancedTCA bused resource Synch clock group 2
CLK2A AdvancedTCA bused resource Synch clock group 2, bus A
CLK2B AdvancedTCA bused resource Synch clock group 2, bus B
CLK3 AdvancedTCA bused resource Synch clock group 3
CLK3A AdvancedTCA bused resource Synch clock group 3 , bus A
CLK3B AdvancedTCA bused resource Synch clock group 3 , bus B
CPLD Complex Programmable Logic Device
CP-TA Communications Platforms Trade Association
PCI Express and Advanced Switching on AdvancedMC. A subsidiary specification to the Advanced
Mezzanine Card Base Specification (AMC.0).
Ethernet Advanced Mezzanine Card Specification. A subsidiary specification to the Advanced
Mezzanine Card Base Specification (AMC.0).
Advanced Mezzanine Card Specification for Storage. A subsidiary specification to the Advanced
Mezzanine Card Base Specification (AMC.0).
American Standard Code for Information Interchange. ASCII codes represent text in computers,
communications equipment, and other devices that work with text.
Alert Standard Format. A standard for how alerting and remote-control capabilities on network
controllers work.
C-1 AM4210
Page 86

www.kontron.com
Acronyms Descriptions
CRC Cyclic Redundancy Check
CS1 Components Side 1 as describes in PICMG3.0.
CS2 Components Side 2 as describes in PICMG3.0.
CTCA Compact Telecom Computing Architecture
CTS Clear To Send
DDR2
DHCP Dynamic Host Configuration Protocol
DIMM Dual In-line Memory Module
DIN Deutsches Institut für Normung. German Institute for Standardization.
DMA Direct Memory Access
DMI Desktop Management Interface
DPLL Digital Phase-Locked Loop
DRAM Dynamic Random Access Memory
DTC Data Transfer Controller
DTR Data Terminal Ready
DTS Digital Thermal Sensor in IA32 processors.
ECC Error Checking and Correction
EEPROM Electrically Erasable Programmable Read-Only Memory
EFI Extensible Firmware Interface
EFT Electric Fast Transient
EHCI Enhanced Host Controller Interface. Specification for Universal Serial Bus specification, revision 2.0.
EIA Electronic Industries Alliance
EISA Extended Industry Standard Architecture. Superset of ISA, 32-bit bus architecture.
EIST (Same as SpeedStep). Enhanced Intel SpeedStep Technology
EMC ElectroMagnetic Compatibility
EMI ElectroMagnetic Interference
EMTTM Turbo mode and enhanced Multi Threaded Thermal Management
ERM Electromagnetic compatibility and Radio spectrum Matters
ESD ElectroStatic Discharge
ESI Enterprise South bridge Interface. Interface to the I/O legacy bridge component of the Intel ICHx.
ETH Same as Ethernet.
ETSI European Telecommunications Standards Institute
FADT Fixed ACPI Description Table
FC Fibre Channel
FC-AL Fibre Channel-Arbitrated Loop
FI Fabric Interface. Backplane connectivity defined by the ATCA.
FML Fast Management Link
FPGA Field-Programmable Gate Array
FPL
(Same as DDR-II). DDR2 SDRAM or Double-Data-Rate two (2) Synchronous Dynamic Random Access
Memory.
FPGA-to-PLD Link. FPL is a 20 MHz serial link that exchange 32-bit of data in each direction between
the FPGA and a companion PLD. Comes from Kontron Canada.
C-2 AM4210
Page 87

www.kontron.com
Acronyms Descriptions
FRBx
FRB2 Fault-Resilient Booting, Level 2.
FRT Free-Running Timer
FRU
FTP File Transfer Protocol
FW FirmWare
FWH FirmWare Hub. Boot flash connected to the LPC bus containing BIOS FW.
GARP Generic Attribute Registration Protocol
Gb Gigabit
GB (Same as GByte) GigaByte.
GByte (Same as GB) GigaByte.
GbE Gigabit Ethernet
GHz GigaHertz
GMRP GARP Multicast Registration Protocol
GND GrouND
GPCM General-Purpose Chip select Machine
GPI General Purpose Input
GPIO General Purpose Input Output
GPO General Purpose Output
GRUB GRand Unified Bootloader
GUID Globally Unique Identifier
GVRP GARP VLAN Registration Protocol
HFM High Frequency Mode. The highest operating speed for the processor.
HMS Hardware Management System
HPM PICMG Hardware Platform Management specification family
HPM.1 Hardware Platform Management IPM Controller Firmware Upgrade Specification
HW HardWare
I2C Inter Integrated Circuit bus
IICH Integrated I/O Controller Hub. Sub-part of the MICH chipset.
INT INTerrupt
IMCH Integrated Memory Controller Hub. Sub-part of the MICH chipset.
IMVP-6
IO (Same as I/O). Input Output
IOAPIC (Same as IO-APIC). IO Advanced Programmable Interrupt Controller
IOH I/O Hub
IO-APIC (Same as IOAPIC). IO Advanced Programmable Interrupt Controller
IOL IPMI-Over-LAN
IP Internet Protocol
Fault-Resilient Booting level [1-3]. A term used to describe system features and algorithms that
improve the likelihood of the detection of, and recovery from, processor failures in a multiprocessor
system.
Field Replaceable Unit. Any entity that can be replaced by a user in the field. Not all FRUs are hot
swappable.
Intel Mobile Voltage Positioning. The Intel Mobile Voltage Positioning specification for the Intel®
Core™ Duo Processor. It is a DC-DC converter module that supplies the required voltage and current to
a single processor.
C-3 AM4210
Page 88

www.kontron.com
Acronyms Descriptions
IPM Intelligent Platform Management
IPMB Intelligent Platform Management Bus
IPMB-0 Intelligent Platform Management Bus Channel 0, the logical aggregation of IPMB-A and IPMB-B.
IPMB-A Intelligent Platform Management Bus A
IPMB-B Intelligent Platform Management Bus B
IPMB-L Intelligent Platform Management Bus Local
IPMC Intelligent Platform Management Controller
IPMI Intelligent Platform Management Interface
IPMIFWU Intelligent Platform Management Interface FirmWare Update
IPv6 Internet Protocol version 6
IRQ Interrupt ReQuest
ISA Industry Standard Architecture. 16-bit (XT) bus architecture.
ISE Xilinx electronic design automation (EDA) tools for use with its devices.
ISO International Organization for Standardization
ITU International Telecommunication Union
ITU-T ITU Telecommunication standardization sector. ITU is International Telecommunication Union.
JTAG Joint Test Action Group
KB KiloByte
KHz KiloHertz
LAN Local Area Network
LBA Logical Block Addressing
LBC Local Bus Controller (On PowerQuicc III CPU)
LED Light-Emitting Diode
LFM Low Frequency Mode. The lowest operating speed for the processor.
LIP
LSB Least Signif icant Byte
LUN Logical Unit Number
LV Low Voltage
LVCMOS Low-Voltage Complementary Metal Oxide Semiconductor
LVDS Low-Voltage Differential Signaling
MAC Media Access Controller address of a computer networking device.
MB MegaByte
MC Management Controller
MCH Memory Controller Hub
MemBIST
MDn Message Digest algorithm (n=2, 5)
MDI Medium Dependent Interface. MDI port or uplink port.
MHz MegaHertz
MMC Module Management Controller. MMCs are linked to the IPMC.
MMIO Memory-Mapped IO
Loop Initialization Primitive. Related to FC arbitrated loop topology (an initial message needed for
learning the loop addresses and acquiring one).
(same as MBIST). Memory Built-In Selft-Test. Chipset feature for out-of-band memory testing and
intialization.
C-4 AM4210
Page 89

www.kontron.com
Acronyms Descriptions
MP MultiProcessor
MPS MultiProcessor Specification
MRC
MSB Most Significant Byte
MSI Message Signaled Interrupts
MSR Model Specific Register inside IA32 processors.
MTBF Mean Time Between Failures
MTRR Memory Type Range Register. CPU cache control registers.
NAND Type of Flash Memory, used for mass storage.
NC Not Connected
NDA Non-Disclosure Agreement
NEBS Network Equipment-Building System
NEDS Network Equipment Development Standard
NMI Non-Maskable Interrupt
O&M (Same as OAM/OA&M). Operations and Maintenance
OAM (Same as OA&M/O&M). Operations, Administration and Maintenance
OA&M (Same as OAM/O&M). Operations, Administration and Maintenance
OEM Original Equipment Manufacturer
OMU Operations and maintenance Unit
OOS Out Of Service
OS Operating System
OSI Open Source Initiative
PCB Printed Circuit Board
PCIe (Same as PCI-E). PCI-Express. Next generation I/O standard
PCI-E (Same as PCIe). PCI-Express. Next generation I/O standard.
PERR Parity ERRor. A signal on the PCI bus that indicates a parity error on the bus.
PHY
PICMG PCI Industrial Computer Manufacturers Group
PICMG® PCI Industrial Computer Manufacturers Group
PIR Product Issue Report
PIU Plug-In Unit
PLCC Plastic Leaded Chip Carrier
PLD Programmable Logic Device
PLL Phase Lock Loop
PMM POST Memory Manager
PNE Platform for Network Equipment. A Carrier Grade Linux (4.0) platform.
POR Power-On Reset
POST Power-On Self-Test
PXE Preboot eXecution Environment
RAM Random Access Memory
Memory Reference Code. Chipset specific code provided by the manufacturer and integrated into the
BIOS to test and intialize the system memory.
PHYsical layer. Generic electronics term referring to a special electronic integrated circuit or
functional block of a circuit that takes care of encoding and decoding between a pure digital domain
(on-off) and a modulation in the analog domain.
C-5 AM4210
Page 90

www.kontron.com
Acronyms Descriptions
RHEL Red Hat Enterprise Linux
RMS Root Mean Square
RoHS Restriction of the Use of Certain Hazardous Substances
ROM
RS-232 (Same as RS232). Recommended Standard 232.
RS232 (Same as RS-232). Recommended Standard 232.
RTC Real Time Clock
RTM Rear Transition Module
RTS Request To Send
S0 ACPI OS System State 0. Indicates fully on operating state.
S5 ACPI OS System State 5. Indicates Soft Off operating state.
SBC Single Board Computer
SBE Single Bit Error
SCI System Control Interrupt
SCL Serial CLock
SDR Sensor Data Record
SDRAM Synchronous Dynamic Random Access Memory
SEC Single-bit Error Correct
SEEPROM Serial EEPROM
SEL System Event Log
SERDES
SERIRQ Serial IRQ
SERR System ERRor. A signal on the PCI bus that indicates a ‘fatal’ error on the bus.
SGMII
ShMC Shelf Management Controller
SMB (Same as SMBus/SMBUS). System Management Bus.
SMBIOS System Management BIOS
SMBUS (Same as SMB/SMBus). System Management Bus.
SMBus (Same as SMB/SMBUS). System Management Bus.
SMI System Management Interrupt
SMM System Management Mode
SMP
SOL Serial Over LAN
SONET Synchronous Optical NETworking
SPD
SPI Serial Peripheral Interface
SSE2 Streaming SIMD Extension 2. SIMD is "Single Instruction, Multiple Data".
SSE3 Streaming SIMD Extension 3. SIMD is "Single Instruction, Multiple Data".
Read Only Memory. Also refers to option ROM or expansion ROM code used during POST to provide
services for specific controllers, such as boot capabilities.
SERializer/DESerializer. Pair of functional blocks commonly used in high speed communications.
These blocks convert data between serial data and parallel interfaces in each direction.
Serial Gigabit Media Independent Interface. Standard interface used to connect a Gigabit Ethernet
MAC-block to a PHY.
Symmetric MultiProcessing. SMP systems allow any processor to work on any task no matter where the
data for that task are located in memory; with proper operating system support, SMP systems can
easily move tasks between processors to balance the workload efficiently.
Serial Presence Detect. A standardized way to automatically access information about a computer
memory module.
C-6 AM4210
Page 91

www.kontron.com
Acronyms Descriptions
SSH
TCLKA Telecom CLocK A. AMC Clock Interface.
TCLKB Telecom CLocK B. AMC Clock Interface.
TCLKC Telecom CLocK C. AMC Clock Interface.
TCLKD Telecom CLocK D. AMC Clock Interface.
TPM Trusted Platform Module
TX Tra nsm it
TXD Tr ansmit
UART Universal Asynchronous Receiver Transmitter
UL Underwriters Laboratories inc
USB Universal Serial Bus
VLAN Virtual Local Area Network
WD WatchDog
WDT WatchDog Timer
XAUI
XDP eXtended Debug Port
Secure SHell. A network protocol that allows data to be exchanged over a secure channel between two
computers.
X (meaning ten) Attachement Unit Interface. A standard for connecting 10 Gigabit Ethernet (10GbE)
ports.
C-7 AM4210
 Loading...