

Page 1
» User Guide «
AM4024(E)
Doc. ID: 1056-0032, Rev. 1.0
Date: July 18, 2014
D R A F T — F O R I N T E R N A L U S E O N L Y
The pulse of innovation
Page 2

User Guide
AM4024(E)
Revision History
Revision Brief Description of Changes Date of Issue
1.0 Initial issue 18-Jul-2014
Imprint
Kontron Europe GmbH may be contacted via the following:
MAILING ADDRESS TELEPHONE AND E-MAIL
Kontron Europe GmbH +49 (0) 800-SALESKONTRON
Lise-Meitner-Straße 3-5 sales@kontron.com
86156 Augsburg, Germany
For further information concerning other Kontron products, please visit our Internet website:
www.kontron.com.
Disclaimer
Copyright © 2014 Kontron AG. All rights reserved. All data is for information purposes only and not
guaranteed for legal purposes. Information has been carefully checked and is believed to be accurate;
however, no responsibility is assumed for inaccuracies. Kontron and the Kontron logo and all other
trademarks or registered trademarks are the property of their respective owners and are recognized.
Specifications are subject to change without notice.
www.kontron.com
D R A F T — F O R I N T E R N A L U S E O N L Y
2
Page 3

User Guide
AM4024(E)
Warranty
This Kontron product is warranted against defects in material and workmanship for the warranty period
from the date of shipment. During the warranty period, Kontron will at its discretion decide to repair
or replace defective products.
Within the warranty period, the repair of products is free of charge as long as warranty conditions are
observed.
The warranty does not apply to defects resulting from improper or inadequate maintenance or handling
by the buyer, unauthorized modification or misuse, operation outside of the product’s environmental
specifications or improper installation or maintenance.
Kontron will not be responsible for any defects or damages to other products not supplied by Kontron
that are caused by a faulty Kontron product.
Proprietary Note
This document contains information proprietary to Kontron. It may not be copied or transmitted by any
means, disclosed to others, or stored in any retrieval system or media without the prior written consent
of Kontron or one of its authorized agents.
The information contained in this document is, to the best of our knowledge, entirely correct. However, Kontron cannot accept liability for any inaccuracies or the consequences thereof, or for any liability
arising from the use or application of any circuit, product, or example shown in this document.
Kontron reserves the right to change, modify, or improve this document or the product described herein, as seen fit by Kontron without further notice.
Trademarks
This document may include names, company logos and trademarks, which are registered trademarks
and, therefore, proprietary to their respective owners.
Environmental Protection Statement
This product has been manufactured to satisfy environmental protection requirements where possible.
Many of the components used (structural parts, printed circuit boards, connectors, batteries, etc.) are
capable of being recycled.
Final disposition of this product after its service life must be accomplished in accordance with applicable country, state, or local laws or regulations.
www.kontron.com
D R A F T — F O R I N T E R N A L U S E O N L Y
3
Page 4

User Guide
AM4024(E)
Contents
Revision History ..........................................................................................................2
Imprint .....................................................................................................................2
Disclaimer ..................................................................................................................2
Warranty ....................................................................................................................3
Proprietary Note ..........................................................................................................3
Trademarks ................................................................................................................3
Environmental Protection Statement ................................................................................3
Contents ....................................................................................................................4
Tables .......................................................................................................................8
Figures .................................................................................................................... 10
1 Introduction ...................................................................................... 11
1.1 Board Overview .......................................................................................... 11
1.2 System Expansion Capabilities ....................................................................... 11
1.2.1 SATA Flash Module (Optional) ........................................................................ 11
1.2.2 RTC Backup Battery Module (Optional) ............................................................. 11
1.3 System Relevant Information......................................................................... 12
1.4 Board Diagrams.......................................................................................... 12
1.4.1 Functional Block Diagrams ............................................................................ 13
1.4.2 Front Panel ............................................................................................... 15
1.4.3 Board Layout ............................................................................................. 16
1.5 Technical Specification ................................................................................ 17
1.6 Standards ................................................................................................. 21
1.7 Related Publications.................................................................................... 22
2 Functional Description ......................................................................... 23
2.1 Processor and Chipset.................................................................................. 23
2.1.1 Integrated Processor Graphics Controller ......................................................... 24
2.2 Memory .................................................................................................... 24
2.3 Watchdog Timer.......................................................................................... 24
2.4 Battery..................................................................................................... 24
2.5 Flash Memory............................................................................................. 25
2.5.1 SPI Boot Flash for uEFI BIOS .......................................................................... 25
2.5.2 SATA Flash Module ...................................................................................... 25
2.6 Trusted Platform Module 1.2.......................................................................... 25
2.7 Board Interfaces......................................................................................... 25
2.7.1 Front Panel LEDs......................................................................................... 25
2.7.1.1 Module Management LEDs and Hot Swap LED .................................................... 25
2.7.1.2 User-Specific LEDs...................................................................................... 26
2.7.2 Module Handle ........................................................................................... 27
D R A F T — F O R I N T E R N A L U S E O N L Y
www.kontron.com
4
Page 5

User Guide
AM4024(E)
2.7.3 Debug Interface ......................................................................................... 28
2.7.4 USB Interface ............................................................................................ 28
2.7.5 Serial Ports ............................................................................................... 29
2.7.6 Mini DisplayPort ......................................................................................... 30
2.7.7 SATA Interfaces .......................................................................................... 30
2.7.8 PCI Express ............................................................................................... 30
2.7.9 Gigabit Ethernet Interfaces .......................................................................... 30
2.8 AMC Interconnection ................................................................................... 31
2.8.1 Fabric Interface.......................................................................................... 31
2.8.2 Synchronization Clock Interface ..................................................................... 34
2.8.3 System Management Interface ....................................................................... 34
2.8.4 JTAG Interface ........................................................................................... 34
2.8.5 Module Power Interface................................................................................ 34
2.8.6 AMC Card-edge Connector J1 ......................................................................... 34
2.8.6.1 Pinout of AMC Card-edge Connector J1 on the AM4024 ........................................ 35
2.8.6.2 Pinout of AMC Card-edge Connector J1 on the AM4024E ...................................... 38
3 Configuration..................................................................................... 41
3.1 DIP Switch Configuration.............................................................................. 41
3.1.1 DIP Switch SW2 .......................................................................................... 41
3.2 System Write Protection ............................................................................... 42
3.3 AM4024(E)-Specific Registers........................................................................ 42
3.3.1 Write Protection Register (WPROT) .................................................................. 42
3.3.2 Reset Status Register (RSTAT) ........................................................................ 43
3.3.3 Board ID High-Byte Register (BIDH)................................................................ 44
3.3.4 Geographic Addressing Register (GEOAD) ......................................................... 44
3.3.5 Watchdog Timer Control Register (WTIM) ......................................................... 45
3.3.6 Board ID Low-Byte Register (BIDL) ................................................................. 46
3.3.7 LED Configuration Register (LCFG) .................................................................. 46
3.3.8 LED Control Register (LCTRL) ......................................................................... 47
3.3.9 General Purpose Output Register (GPOUT)......................................................... 48
4 Power Considerations .......................................................................... 49
4.1 AM4024(E) Voltage Ranges ........................................................................... 49
4.2 Carrier Power Requirements .......................................................................... 49
4.2.1 Module Management Power ........................................................................... 49
4.2.2 Payload Power............................................................................................ 49
4.2.3 Power Sequencing for Unmanaged Systems ....................................................... 50
4.3 Power Consumption..................................................................................... 50
4.4 Payload Power Consumption of Accessories ....................................................... 52
4.5 IPMI FRU Payload Power Consumption ............................................................. 52
D R A F T — F O R I N T E R N A L U S E O N L Y
5 Thermal Considerations ........................................................................ 53
5.1 Operational Limits for the AM4024(E).............................................................. 54
5.1.1 Airflow Impedance ...................................................................................... 56
5.1.2 Airflow Paths ............................................................................................. 57
www.kontron.com
5
Page 6

User Guide
AM4024(E)
6 SATA Flash Module............................................................................... 59
6.1 Technical Specifications ............................................................................... 59
6.2 SATA Flash Module Layout............................................................................. 59
7 RTC Backup Battery Module ................................................................... 60
7.1 Technical Specifications ............................................................................... 60
7.2 RTC Backup Battery Module Layout.................................................................. 60
8 Installation ....................................................................................... 61
8.1 Safety ...................................................................................................... 61
8.2 General Instructions on Usage ....................................................................... 61
8.3 Board Installation ...................................................................................... 62
8.3.1 Hot Swap Insertion ..................................................................................... 62
8.3.2 Hot Swap Removal ...................................................................................... 63
8.4 Installation of Peripheral Devices ................................................................... 64
8.4.1 SATA Flash Module Installation ...................................................................... 64
8.4.2 RTC Backup Battery Module Installation ........................................................... 64
9 uEFI BIOS .......................................................................................... 65
9.1 Starting the uEFI BIOS ................................................................................. 65
9.2 Setup Menus.............................................................................................. 66
9.2.1 Main Setup Menu ........................................................................................ 66
9.2.2 Advanced Setup Menu .................................................................................. 67
9.2.3 Security Setup Menu .................................................................................... 67
9.2.3.1 Remember the Password ............................................................................... 68
9.2.4 Boot Setup Menu ........................................................................................ 68
9.2.5 Exit Setup Menu ......................................................................................... 68
9.3 The uEFI Shell ............................................................................................ 69
9.3.1 Introduction, Basic Operation ....................................................................... 69
9.3.1.1 Entering the uEFI Shell ................................................................................ 69
9.3.1.2 Exiting the uEFI Shell .................................................................................. 69
9.3.2 Kontron-Specific uEFI Shell Commands ............................................................ 70
9.4 uEFI Shell Scripting..................................................................................... 71
9.4.1 Startup Scripting ........................................................................................ 71
9.4.2 Create a Startup Script ................................................................................. 71
9.4.3 Examples of Startup Scripts........................................................................... 72
9.4.3.1 Execute Shell Script on Other Harddrive ........................................................... 72
9.4.3.2 Enable Watchdog ........................................................................................ 72
9.4.3.3 Handling the Startup Script in the SPI Boot Flash ............................................... 72
9.5 Firmware Update ........................................................................................ 73
9.5.1 Updating the uEFI BIOS ................................................................................ 73
9.5.1.1 uEFI BIOS Fail-Over Mechanism ...................................................................... 73
9.5.1.2 Updating Procedure .................................................................................... 73
9.5.1.3 uEFI BIOS Recovery ..................................................................................... 74
9.5.1.4 Determining the Active Flash......................................................................... 74
9.5.2 Updating the IPMI Firmware .......................................................................... 74
D R A F T — F O R I N T E R N A L U S E O N L Y
www.kontron.com
6
Page 7

User Guide
AM4024(E)
9.5.2.1 IPMI Rollback Mechanism ............................................................................. 74
9.5.2.2 Determining the Active IPMI Firmware Image .................................................... 74
9.5.2.3 Updating Procedure .................................................................................... 74
10 IPMI Firmware .................................................................................... 75
10.1 Overview................................................................................................... 75
10.2 IPMI Firmware and KCS Interface Configuration ................................................. 75
10.3 Supported IPMI and ATCA Commands ............................................................... 76
10.3.1 Standard IPMI Commands ............................................................................ 76
10.3.2 AdvancedTCA and AMC Commands ................................................................... 79
10.4 Firmware Identification................................................................................ 80
10.4.1 Get Device ID Command ............................................................................... 80
10.5 Board Control Extensions ............................................................................. 81
10.5.1 SPI Boot Flash Selection—uEFI BIOS Failover Control .......................................... 81
10.5.2 uEFI BIOS Boot Order Selection ...................................................................... 81
10.5.3 Set Control State (SPI Boot Flash Selection, Boot Order Selection) ......................... 82
10.5.4 Get Control State (SPI Boot Flash Selection, Boot Order Selection)......................... 83
10.6 Sensors Implemented on the AM4024(E) .......................................................... 83
10.6.1 Sensor List ................................................................................................ 84
10.7 Sensor Thresholds....................................................................................... 86
10.8 OEM Event/Reading Types ............................................................................. 87
10.9 IPMI Firmware Code..................................................................................... 88
10.9.1 Firmware Upgrade....................................................................................... 88
10.9.2 IPMI Firmware and FRU Data Write Protection .................................................... 88
10.10 LAN Functions............................................................................................ 89
10.11 E-Keying................................................................................................... 89
10.11.1 AMC Module Configuration Options ................................................................. 89
10.11.1.1 Default of AMC Configuration Settings ............................................................. 90
10.11.1.2 Forced AMC Port Activation/ Deactivation......................................................... 90
10.11.1.3 PCI Express Speed Selection .......................................................................... 90
10.11.1.4 Forced FCLKA/ PCI Express Reference Clock Configuration .................................... 91
10.11.1.5 Fail-Safe Mode ........................................................................................... 91
www.kontron.com
D R A F T — F O R I N T E R N A L U S E O N L Y
7
Page 8

User Guide
AM4024(E)
Tables
1 System Relevant Information ................................................................................ 12
2 AM4024(E) Main Specifications ............................................................................. 17
3 Standards ........................................................................................................ 21
4 Related Publications ........................................................................................... 22
5 Features of the Processors Supported on the AM4024(E) ............................................. 23
7 User-Specific LEDs’ Functions ............................................................................... 26
6 Module Management and Hot Swap LEDs’ Functions ................................................... 26
8 POST Code Sequence ........................................................................................... 27
9 POST Code Example ............................................................................................. 27
10 Module Handle Positions ..................................................................................... 28
11 Serial Port Connector J11 (COMA) Pinout ................................................................. 29
12 Gigabit Ethernet Controller Port Mapping for the AM4024 ............................................ 31
13 Gigabit Ethernet Controller Port Mapping for the AM4024E .......................................... 31
14 Pinout of AMC Card-edge Connector J1 on the AM4024 ................................................ 35
15 Reserved Pin’s Description ................................................................................... 37
16 Extended Options Region Single-Ended Pins’ Description ............................................ 37
17 Single-Ended GPO Pins’ Description ........................................................................ 37
18 Pinout of AMC Card-edge Connector J1 on the AM4024E .............................................. 38
19 Reserved Pin’s Description ................................................................................... 40
20 Extended Options Region Single-Ended Pins’ Description ............................................ 40
21 Single-Ended GPO Pins’ Description ........................................................................ 40
22 DIP Switch SW2 Functionality ................................................................................ 41
23 Fail-Safe AMC Fabric Configuration ......................................................................... 41
24 AM4024(E)-Specific Registers ............................................................................... 42
25 Write Protection Register (WPROT) ......................................................................... 42
26 Reset Status Register (RSTAT) ............................................................................... 43
27 Board ID High-Byte Register (BIDH) ....................................................................... 44
28 Geographic Addressing Register (GEOAD) ................................................................ 44
29 Watchdog Timer Control Register (WTIM) ................................................................. 45
30 Board ID Low-Byte Register (BIDL) ........................................................................ 46
31 LED Configuration Register (LCFG) ......................................................................... 46
32 LED Control Register (LCTRL) ................................................................................ 47
33 General Purpose Output Register (GPOUT) ................................................................ 48
34 DC Operational Input Voltage Range ....................................................................... 49
35 AM4024(E) Power Consumption ............................................................................. 51
36 Power Consumption of AM4024(E) Accessories .......................................................... 52
37 IPMI FRU Payload Power Consumption ..................................................................... 52
38 AM4024(E) Airflow Impedance by Zone [N/m²] ......................................................... 57
39 AM4024(E) Airflow Impedance by Zone [inches H2O] .................................................. 57
40 Deviation of the Airflow Rate on the AM4024(E) ........................................................ 58
41 SATA Flash Module Main Specifications ................................................................... 59
42 RTC Backup Battery Module Main Specifications ........................................................ 60
43 Navigation ....................................................................................................... 65
44 Main Setup Menu Sub-Screens and Functions ............................................................ 66
45 Advanced Setup Menu Sub-Screens and Functions ..................................................... 67
D R A F T — F O R I N T E R N A L U S E O N L Y
www.kontron.com
8
Page 9

User Guide
AM4024(E)
46 Security Setup Menu Functions .............................................................................. 67
47 TPM Configuration Sub-Screen .............................................................................. 67
48 Boot Priority Order ............................................................................................. 68
49 Exit Setup Menu Functions ................................................................................... 68
50 Kontron-Specific uEFI Shell Commands ................................................................... 70
www.kontron.com
D R A F T — F O R I N T E R N A L U S E O N L Y
9
Page 10

User Guide
AM4024(E)
Figures
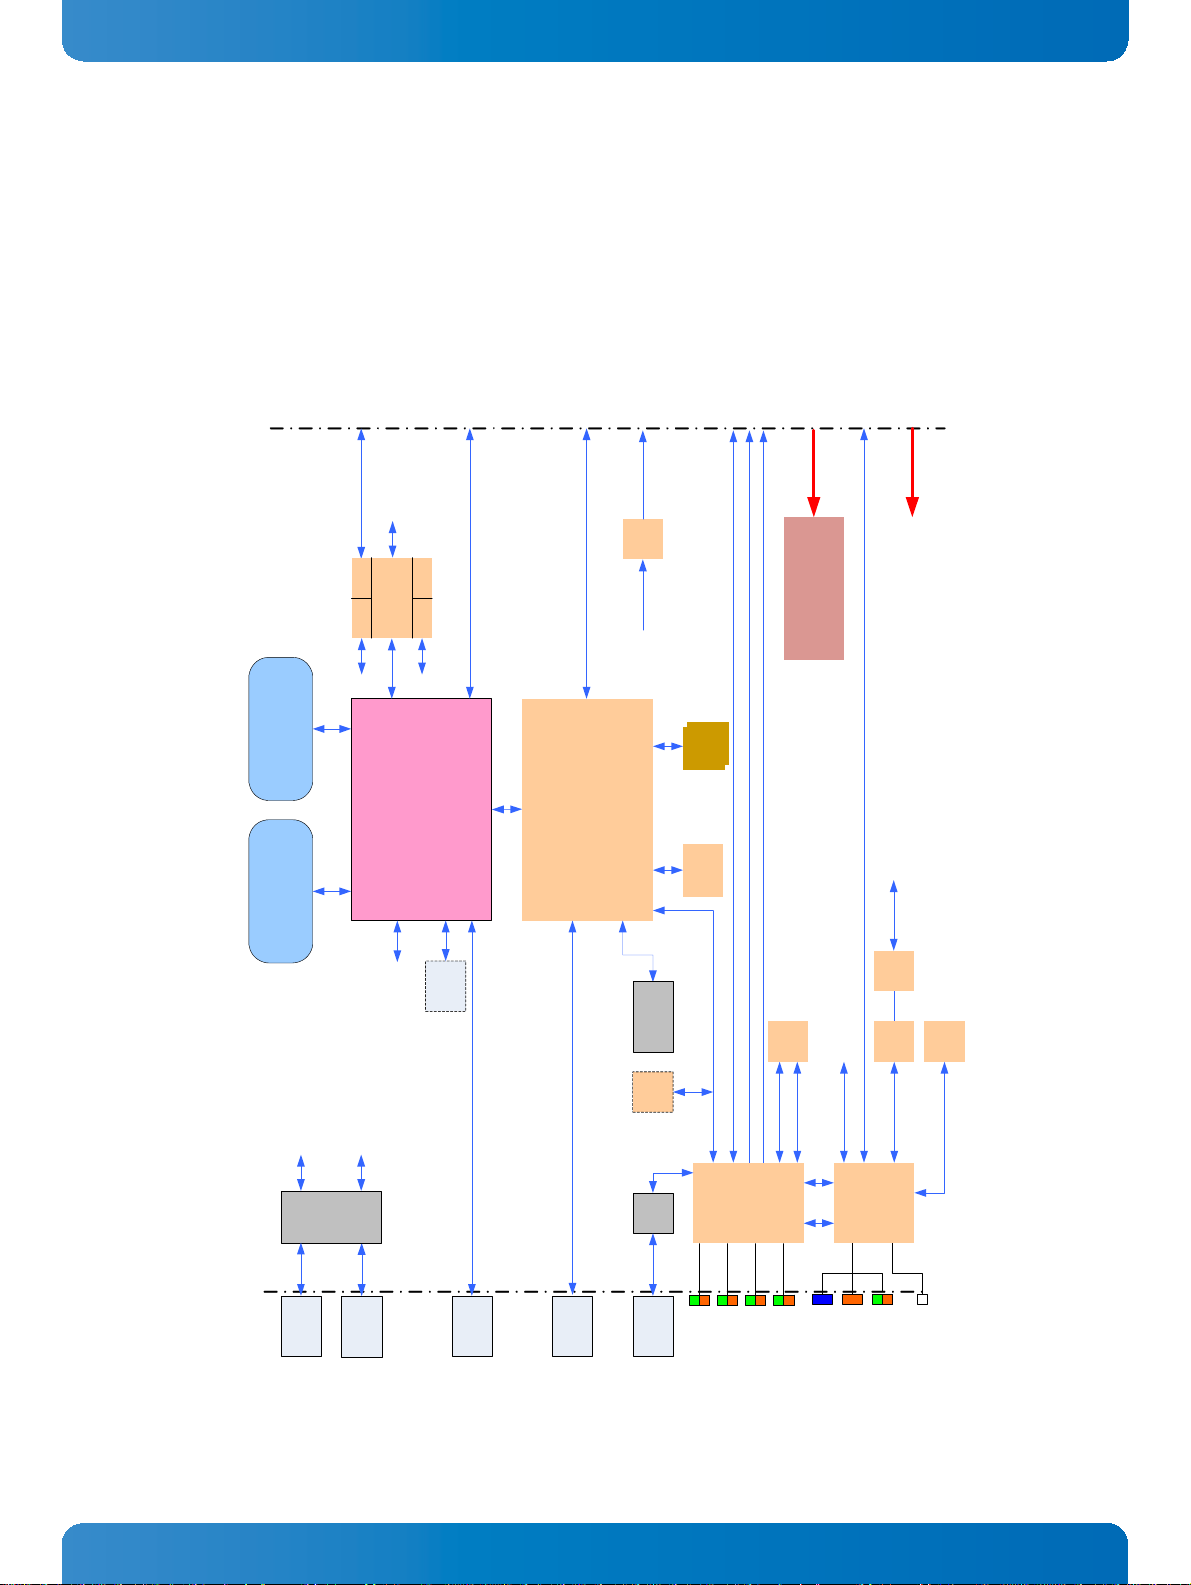
1 AM4024 Functional Block Diagram ........................................................................ 13
2 AM4024E Functional Block Diagram ....................................................................... 14
3 AM4024(E) Front Panel ...................................................................................... 15
4 AM4024 Board Layout (Top View) .......................................................................... 16
5 AM4024E Board Layout (Top View) ........................................................................ 16
6 AM4024(E) Board Layout (Bottom View) ................................................................. 16
7 Module Handle Positions .................................................................................... 27
8 Adapter for Mini USB Type A to USB Type A Connector ................................................ 29
9 Serial Port Connector J11 (COMA) ......................................................................... 29
10 AM4024(E) Port Mapping .................................................................................... 33
11 AM4024(E) with i7-4860EQ (SV), 1.8 GHz ............................................................... 54
12 AM4024(E) with i7-4700EQ (SV), 2.4 GHz ............................................................... 54
13 AM4024(E) with i5-4402EQ (LV), 1.6 GHz ............................................................... 55
14 AM4024(E) Airflow Impedance ............................................................................. 56
15 Thermal Zones of the AM4024(E) Module ................................................................ 57
16 SATA Flash Module Layout (Bottom View) ............................................................... 59
17 RTC Backup Battery Module Layout (Top and Bottom Views) ........................................ 60
www.kontron.com
D R A F T — F O R I N T E R N A L U S E O N L Y
10
Page 11

1 Introduction
1.1 Board Overview
User Guide
AM4024(E)
The AM4024(E) is a highly integrated CPU board implemented as a Single Mid-size Advanced Mezzanine
Card (AMC) for ATCA and MicroTCA applications. The design is based on the 4
i5/i7 processor platform combined with the mobile Intel® QM87 Chipset.
The AM4024(E) supports up to 16 GB dual-channel Double Data Rate (DDR3) memory with Error Checking and Correction (ECC) running at 1600 MHz. Up to two Intel® I350 Quad Gigabit Ethernet controllers
(providing up to 8 GbE ports) are directly connected to the processor via x4 PCI Express 3.0 interfaces,
thus ensuring a maximum data throughput between processor and memory. The AM4024(E) can be optionally equipped with up to 64 GB of SLC NAND flash memory via a SATA Flash module.
The AM4024(E) supports a comprehensive set of interconnecting capabilities. On the front panel, the
AM4024(E) comes with a broad set of I/O interfaces, such as 2x Gigabit Ethernet, DisplayPort, COM, and
USB, allowing for a convenient bring-up process during the application development process. A variety
of high-speed interconnect ports to the backplane, such as up to 8 Gigabit Ethernet ports, PCI Express,
and SATA, ensures a wide range of possible application use cases for the AM4024(E).
The processor and the memory are soldered on the AM4024(E) which results in a higher MTBF value and
a significant advantage for the cooling concept. The careful design and selection of high-temperatureresistant components together with the elaborated heat sink design ensure high product reliability.
A front panel design according to the PICMG® MTCA.1 specification (on project request) provides shock
and vibration resistance in demanding environmental conditions.
th
generation Intel® Core™
The AM4024(E) is an ideal platform for high-performance computing and multi-processor systems in
general. In the communication market the AM4024(E) perfectly serves for media server, gateway applications as well as in test solutions for networking equipment. In particular, the Core™ i7 with integrated Intel® HD Graphics 4600/5200 provides a significant performance boost for video streaming/
transcoding and IPTV applications.
The AM4024(E) is offered with various Board Support Packages including Windows, VxWorks and Linux
operating systems. For further information concerning the operating systems available for the
AM4024(E), please contact Kontron.
1.2 System Expansion Capabilities
1.2.1 SATA Flash Module (Optional)
The SATA Flash module provides up to 64 GB of SLC NAND flash memory. For further information on the
SATA Flash module, refer to Chapter 6.
1.2.2 RTC Backup Battery Module (Optional)
The RTC Backup Battery module provides backup-power for the RTC via two soldered, parallel-connected 3V lithium batteries. For further information on the RTC Backup Battery module, refer to Chapter 7.
D R A F T — F O R I N T E R N A L U S E O N L Y
www.kontron.com
11
Page 12

User Guide
AM4024(E)
1.3 System Relevant Information
The following system relevant information is general in nature but should still be considered when developing applications using the AM4024(E).
Table 1: System Relevant Information
SUBJECT INFORMATION
Hardware Requirements The AM4024(E) can be installed on any AMC-supporting carrier board or MicroTCA
backplane with the following AMC Card-edge connector port mapping:
AM4024:
» Common Options Region ports 0-1:
» Two Gigabit Ethernet SerDes ports
» Common Options Region ports 2-3:
» Two Serial ATA ports
» Fat Pipes Region ports 4-7:
» One x4 PCI Express interface
» Extended Options Region port 14-16:
» One Serial port
» One Debug port
»Two GPOs
»Clock:
» PCI Express reference clock, FCLKA
AM4024E:
» Common Options Region ports 0-1:
» Two Gigabit Ethernet SerDes ports
» Common Options Region ports 2-3:
» Two Serial ATA ports
» Fat Pipes Region ports 4-7:
» One x4 PCI Express interface
» Fat Pipes Region ports 8-11:
» Four Gigabit Ethernet SerDes ports
» Extended Options Region port 14-16:
» One Serial port
» One Debug port
»Two GPOs
»Clock:
» PCI Express reference clock, FCLKA
PCI Express Configuration The AM4024(E) supports the PCI Express root complex configuration.
Operating Systems The AM4024(E) is offered with various Board Support Packages including Windows,
VxWorks and Linux operating systems. For further information concerning the operat-
ing systems available for the AM4024(E), please contact Kontron.
1.4 Board Diagrams
The following diagrams provide additional information concerning board functionality and component
layout.
www.kontron.com
12
D R A F T — F O R I N T E R N A L U S E O N L Y
Page 13
1.4.1 Functional Block Diagrams
Intel®
4
th
Core™ i7
Intel®
QM87
Front Panel
Health
Hot Swap
Out-of-Service
POST Code /
Debug
Front Panel LEDs
FPGA
Board
Control
MMC
Temp.
Sense
AMC
Connector
Port No.
0 - 1
12V payload
14
IPMB-L
COMA
COMA
COMA
COMA
Ext. Opt. R e g .
SPI
SFF
XDP
Debug
EEP
64 kB
I
2
C
I
2
C
2 - 3
15
I
2
C
Debug
Debug
3.3V management
power
LPC
Hot Swap Switch
DDR3L
Bank A soldered
DDR3L
Bank B soldered
DDR3 DDR3
DMI
Single
UART
USB 2.0
DMI
LPC SMBus SPI
USB 2.0
PCIe
RS-
232
2x 1 GbE SerDes
2x SATA 6 Gb/s
SATA
x4 PCIe
Mini
Display
Port
Display
Port
DDI
xBus
NC-SI
NC-SI
To GbE controller
SATA
Flash
4 MB
SPI
LPC
SATA
Flash
Module
Onboard Power Supplies
DC/DC etc.
16
GPO
GPO
TPM
PECI
Quad GbE
Intel® I350
SERDES
SERDES
COPPER
COPPER
GbE
Dual
Mag.
GbE
RJ-45
RJ-45
x4 PCIe
Fat Pipe Reg.4 - 7
PCIe
Clock
Mux
FCLKA
PCIe clk
PCIe
Micro-
USB
Mini-USB
type-A
AMC temp. sensor
AMC temp. sensor
PECI
Common Opt. Reg.
Common Opt. Reg.
SPI Boot
Flashes
(standard/
recovery)
XDP
Intel® I350 (c opper)
Intel® I350 (c opper)
GbE
(front)
User
EE-PROM
Figure 1: AM4024 Functional Block Diagram
User Guide
AM4024(E)
www.kontron.com
D R A F T — F O R I N T E R N A L U S E O N L Y
13
Page 14
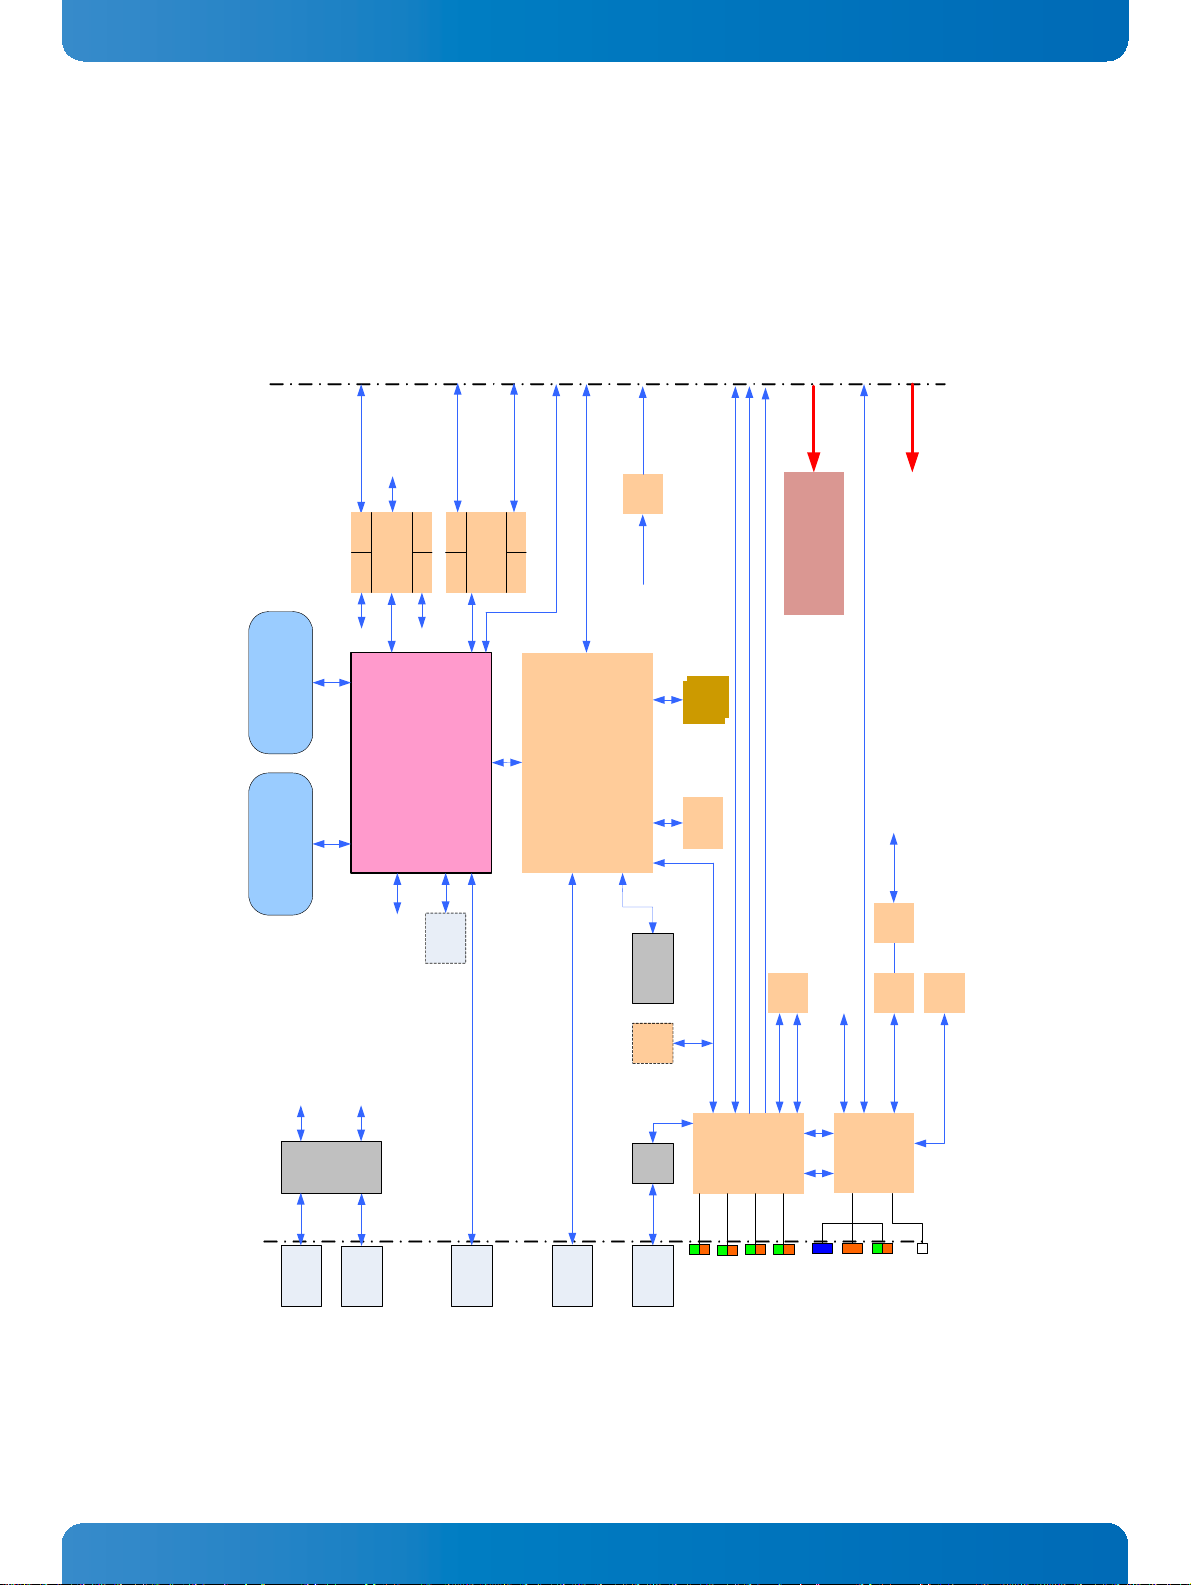
Figure 2: AM4024E Functional Block Diagram
Intel®
4
th
Core™ i7
Intel®
QM87
Front Panel
Health
Hot Swap
Out-of-Service
POST Code /
Debug
Front Panel LEDs
FPGA
Board
Control
MMC
Temp.
Sense
AMC
Connector
Port No.
0 - 1
12V payload
14
IPMB-L
COMA
Fat Pipe Reg.
COMA
COMA
COMA
Ext. Opt. Reg.
SPI
SFF
XDP
Debug
EEP
64 kB
I
2
C
I
2
C
2 - 3
15
I
2
C
Debug
Debug
3.3V management
power
LPC
Hot Swap Switch
DDR3L
Bank A soldered
DDR3L
Bank B soldered
DDR3
PCIe
DDR3
DMI
Single
UART
USB 2.0
DMI
LPC SMBus SPI
USB 2.0
PCIe
RS-
232
2x 1 GbE SerDes
2x SATA 6 Gb/s
SATA
x4 PCIe
8 - 9
Mini
Display
Port
Display
Port
DDI
xBus
NC-SI
NC-SI
To GbE controller
SATA
Flash
4 MB
SPI
LPC
SATA
Flash
Module
Onboard Power Supplies
DC/DC etc.
TPM
x4 PCIe
PECI
Quad GbE
Intel® I350
SERDES
SERDES
COPPER
COPPER
Quad GbE
Intel® I350
SERDES
SERDES
COPPER
COPPER
2x 1 GbE SerDes
2x 1 GbE SerDes
10 - 11 Fat Pipe Reg.
GbE
Dual
Mag.
GbE
RJ-45
RJ-45
x4 PCIe
Fat Pipe Reg.4 - 7
PCIe
Clock
Mux
FCLKA
PCIe clk
PCIe
Micro-
USB
Mini-USB
type-A
AMC temp. sensor
AMC temp. sensor
PECI
Common Opt. Reg.
Common Opt. Reg.
SPI Boot
Flashes
(standard/
recovery)
XDP
Intel® I350 (copper)
Intel® I350 (copper)
GbE
(front)
GPO
GPO
16
User
EE-PROM
User Guide
AM4024(E)
www.kontron.com
D R A F T — F O R I N T E R N A L U S E O N L Y
14
Page 15
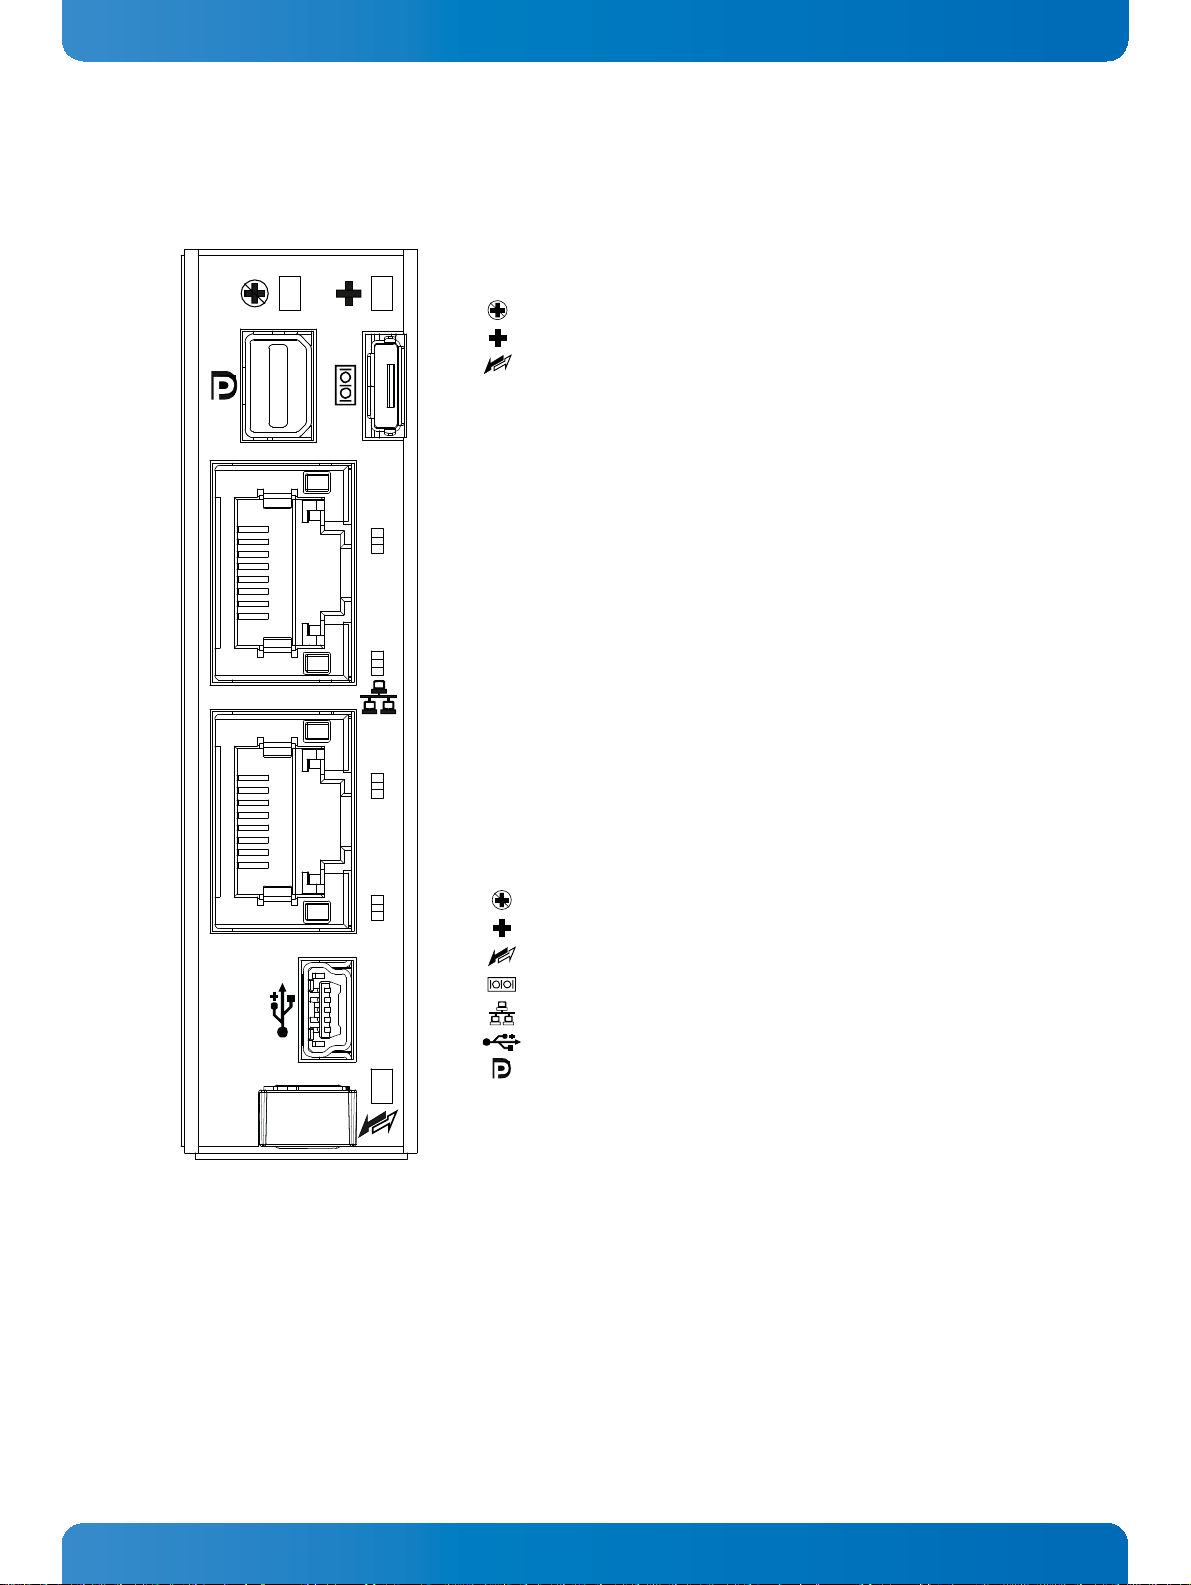
1.4.2 Front Panel
SPEED
A
3
2
1
0
AM4024
B
SPEED
ACT
ACT
Module Management LEDs
LED1 (red): Out-of-Service LED
LED2 (red/green/amber): Health LED
HS (blue): Hot Swap LED
User-Specific LEDs
ULED3 (red/green): AMC port 0 Ethernet link status
(green) + POST Code
ULED2 (red/green): AMC port 1 Ethernet link status
(green) + POST Code
ULED1 (red/green): SATA channels active (green) + POST
Code
ULED0 (red/green): POST Code
Note: If the ULEDs3..0 are blinking red or remain lit,
a failure is indicated.
Integral Ethernet LEDs
ACT (green): Network Link/Activity
SPEED (green): Network Speed
Legend
Out-of-Service LED
Health LED
Hot Swap LED
Serial Port Connector
Gigabit Ethernet Connector
USB Connector
DisplayPort Connector
Figure 3: AM4024(E) Front Panel
User Guide
AM4024(E)
www.kontron.com
D R A F T — F O R I N T E R N A L U S E O N L Y
15
Page 16
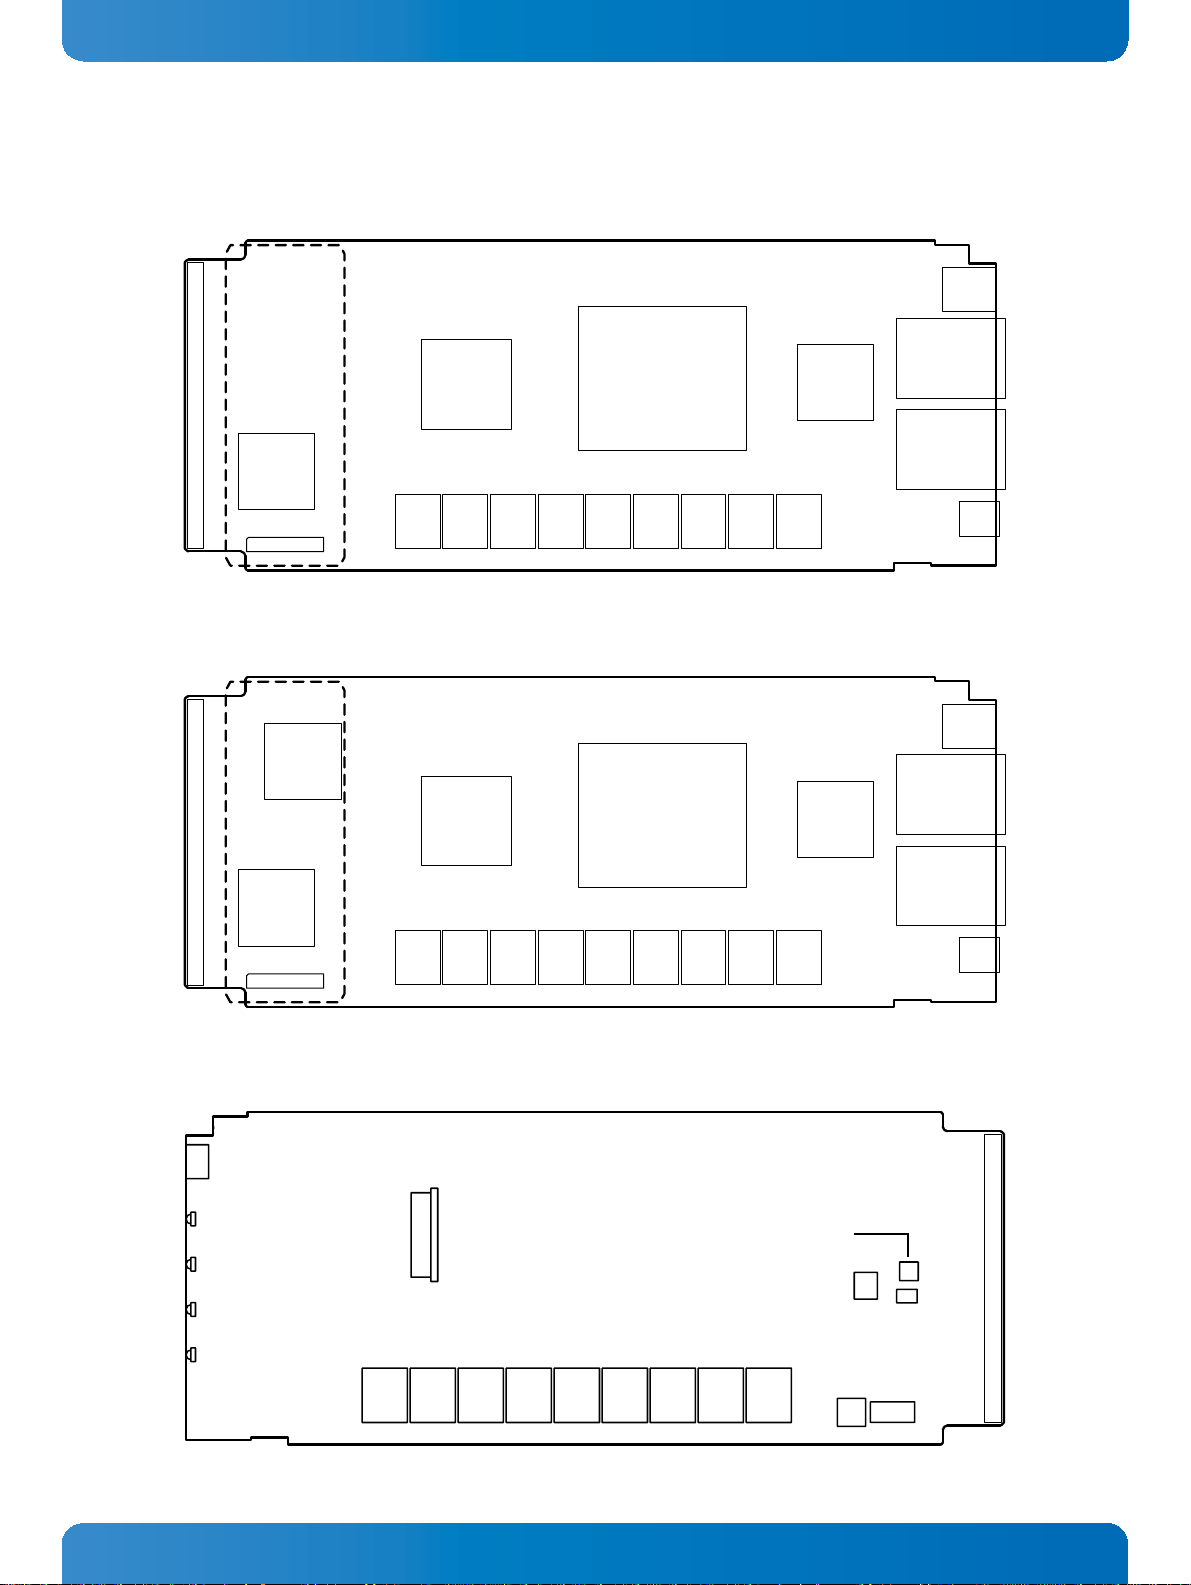
1.4.3 Board Layout
Intel® Core™ i7
Intel®
QM87
85
1
33
34
1
2
J1
J5
J4
J2
J3
J7
Logic
DDR3L Memory
Intel®
I350
SATA Flash
Module/
Battery Module
Intel® Core™ i7
Intel®
QM87
85
1
33
34
1
2
J1
J5
J4
J2
J3
J7
Logic
DDR3L Memory
Intel®
I350
(2nd)
Intel®
I350
(1st)
SATA Flash
Module/
Battery Module
86
170
J1
ULED 0
ULED 1
ULED 2
ULED 3
J11
J10
4321
ON
SW2
Air Temperature Sensor
DDR3L Memory
1
Figure 4: AM4024 Board Layout (Top View)
User Guide
AM4024(E)
Figure 5: AM4024E Board Layout (Top View)
Figure 6: AM4024(E) Board Layout (Bottom View)
www.kontron.com
D R A F T — F O R I N T E R N A L U S E O N L Y
16
Page 17

1.5 Technical Specification
Table 2: AM4024(E) Main Specifications
FEATURES SPECIFICATIONS
CPU
Processor & Chipset
Graphics Controller High-performance 3D graphics controller integrated in the processor
PCH Intel® QM87 Chipset
Main Memory Up to 16 GB, dual-channel DDR3L SDRAM memory with ECC running at 1600 MHz
Flash Memory Two 16 MB SPI boot flash chips for two separate uEFI BIOS images
Memory
EEPROM EEPROM with 64 kbit
Gigabit Ethernet Up to two Intel® I350 Quad Gigabit Ethernet PCI Express bus controllers with
The AM4024(E) supports the following 4
» Quad-core Intel® Core™ i7-4860EQ (SV), 1.8 GHz, 6 MB L3 cache, GT3e, Intel®
Iris™ Pro Graphics 5200
» Quad-core Intel® Core™ i7-4700EQ (SV), 2.4 GHz, 6 MB L3 cache, GT2, Intel®
HD Graphics 4600
» Dual-core Intel® Core™ i5-4402EQ (LV), 1.6 GHz, 3 MB L3 cache, GT2, Intel®
HD Graphics 4600
(soldered)
Up to 64 GB SLC NAND flash via an onboard SATA Flash module (SSD)
advanced management features such as serial redirection over LAN:
AM4024:
» Two interfaces routed to the front I/O connectors
» Two interfaces routed to the AMC Card-edge connector
th
generation processors:
User Guide
AM4024(E)
AM4024E:
» Two interfaces routed to the front I/O connectors
Onboard Controller
Serial One 16550-compatible UART routed either to the front I/O (RS-232 signaling) or
Gigabit Ethernet Common Options Region ports 0-1:
Serial ATA Common Options Region ports 2-3:
PCI Express Fat Pipes Region ports 4-7:
Debug Interface Extended Options Region port 14:
AMC Interconnection
Serial Interface Extended Options Region port 15:
GPO Extended Options Region port 16:
Clock Clock (FCLKA):
» Six interfaces routed to the AMC Card-edge connector
the AMC Card-edge connector (TTL level)
» Two Gigabit Ethernet SerDes ports
Fat Pipes Region ports 8-11 (AM4024E):
» Four Gigabit Ethernet SerDes ports
» Two Serial ATA ports (6 Gb/s)
» One x4 PCI Express interface conf igured as root complex only and operating
up to 8.0 GT/s
» One Debug port
» One Serial port (COMA, TTL signaling)
»Two GPOs
» PCI Express clock reference output to the host system
D R A F T — F O R I N T E R N A L U S E O N L Y
www.kontron.com
17
Page 18

Table 2: AM4024(E) Main Specifications (Continued)
FEATURES SPECIFICATIONS
DIP Switch One DIP switch, SW2, for board configuration
Hot Swap One Hot Swap switch
Switches
Front Panel Connectors
Onboard Connector One extension connector, J7, for either a Serial ATA Flash module or an RTC Backup
Connectors
AMC Card-edge Connector One 170-pin AMC Card-edge connector
Module Management LEDs
User-Specific LEDs
LEDs
Ethernet LEDs
Watchdog Timer Software-configurable, two-stage Watchdog with programmable timeout ranging
System Timer The Intel® QM87 Chipset contains three 8254-style counters which have fixed uses
Timer
Thermal Management CPU and board overtemperature protection is provided by:
Sys. Management
One Serial port (COMA) with RS-232 signal level on a 5-pin micro-AB USB connector, J11
One 20-pin mini DisplayPort connector, J5
Two Gigabit Ethernet ports on RJ-45 connectors with integrated magnetics, J3 and J4
One USB 2.0 port on a 5-pin, mini USB type A connector, J2
Battery module
» LED1 (red): Out-of-Service LED
» LED2 (red/green/amber): Health LED
» HS LED (blue): Hot swap LED
» ULED3 (red/green): AMC port 0 Ethernet link status,
» ULED2 (red/green): AMC port 1 Ethernet link status,
» ULED1 (red/green): SATA channels active (green) + POST code
» ULED0 (red/green): POST code
» Act (green): Network Link / Activity
» Speed (green/yellow): Network speed
from 125 ms to 4096 s in 16 steps
Serves for generating IRQ or hardware reset
In addition to the three 8254-style counters, the Intel® QM87 Chipset includes
eight individual high-precision event timers that may be used by the operating
system. They are implemented as a single counter each with its own comparator
and value register.
» Temperature sensors integrated in the 4
» Up to four digital thermal sensors for monitoring the processor cores, one
sensor for each core
» One digital thermal sensor for monitoring the graphics core
» One digital thermal sensor for monitoring the package die temperature
» One onboard air temperature sensor for monitoring the board temperature
» Specially designed heat sink
(green) + POST code
(green) + POST code
th
gen. Intel® Core™ i7/i5 processor:
User Guide
AM4024(E)
www.kontron.com
D R A F T — F O R I N T E R N A L U S E O N L Y
18
Page 19

Table 2: AM4024(E) Main Specifications (Continued)
FEATURES SPECIFICATIONS
Module Management
Controller
IPMI
Hot Swap The AM4024(E) has full hot swap capability.
TPM Trusted Platform Module (TPM) 1.2 for enhanced hardware- and software-based
Security
uEFI BIOS Phoenix SecureCore Tiano™ (SCT) BIOS firmware based on the uEFI Specification and
IPMI Firmware IPMI firmware providing the following features:
Software
Operating Systems There are various operating systems available for the AM4024(E). For further
NXP® ARM7 microcontroller with 512 kB firmware flash and automatic rollback
strategy
The MMC carries out IPMI commands such as monitoring several onboard tempera-
ture conditions, board voltages and the power supply status, and managing hot
swap operations.
The MMC is accessible via a local IPMB (IPMB-L) and one host Keyboard Controller
Style Interface (KCS)
One MMC system EEPROM for FRU data and f irmware private data
data and system security
the Intel Platform Innovation Framework for EFI:
» Serial console redirection via serial port
» LAN boot capability for diskless systems (standard PXE)
» Automatic fail-safe recovery in case of a damaged image
» Non-volatile storage of setting in the SPI boot flash (battery only required for
the RTC)
» Compatibility Support Module (CSM) providing legacy BIOS compatibility
based on Phoenix SCT3
» Command shell for diagnostics and configuration
» uEFI Shell commands executable from mass storage device in a pre-OS envi-
ronment (open interface)
» MMC support in the command shell
» Keyboard Controller Style (KCS) interface
» IPMB-L interface for out-of-band management and sensor monitoring
» IPMI over LAN (IOL) and Serial over LAN (SOL) support
» Sensor Device functionality with configurable thresholds for monitoring
board voltages, CPU state, board reset, etc.
» FRU Inventory functionality
» IPMI Watchdog functionality (power-cycle, reset)
» Board monitoring and control extensions:
» Graceful shutdown support
» uEFI BIOS fail-over control: selection of the SPI boot flash (standard/re-
covery)
» Field-upgradable IPMI firmware:
» via the KCS, IPMB or IOL interfaces
» Download of firmware does not break the currently running firmware or
payload activities
» Two flash banks with rollback capability: manual rollback or automatic in case
of upgrade failure
» E-Keying (AMC ports and clock in accordance with the AMC.0 R2.0 specifica-
tion)
information, please contact Kontron.
User Guide
AM4024(E)
D R A F T — F O R I N T E R N A L U S E O N L Y
www.kontron.com
19
Page 20

Table 2: AM4024(E) Main Specifications (Continued)
FEATURES SPECIFICATIONS
Power Consumption See Chapter 4 for details.
Temperature Range Operational: -5°C to +55°C Standard (depending on processor version and air-
Storage: -40°C to +70°C Without hard disk and without battery
Note: When the RTC Backup Battery Module is installed, refer to the opera-
tional specifications of this module as this determines the storage tem-
perature of the AM4024(E). (See "RTC Backup Battery Module" below.)
Note: When additional components are installed, refer to their operational
specifications as this will influence the operational and storage tem-
perature of the AM4024(E).
RTC Backup Battery Mod-
General
ule (on request)
Climatic Humidity 93% RH at 40 °C, non-condensing (acc. to IEC 60068-2-78)
Dimensions Dimensions of the AM4024(E) without retention screws on front panel:
Board Weight 280 grams
Special battery mezzanine module with up to two batteries connected in parallel;
uses the J7 connector for interfacing with the AM4024(E)
Temperature ranges:
Operational: - 5°C to + 55°C
Storage: -30°C to + 60°C
Mid-size: 181.5 mm x 73.5 mm x 18.96 mm
The above-mentioned board weight refers to the AM4024(E) without extension
modules such as the SATA Flash module or the RTC Backup Battery module.
User Guide
AM4024(E)
flow in the system)
www.kontron.com
D R A F T — F O R I N T E R N A L U S E O N L Y
20
Page 21

1.6 Standards
The AM4024(E) complies with the requirements of the following standards.
Table 3: Standards
TYPE ASPECT STANDARD TEST LEVEL
CE Emission EN55022, EN61000-6-3, EN300386 --
Immission EN55024, EN61000-6-2, EN300386 --
Electrical Safety EN60950-1 --
Mechanical Mechanical Dimensions IEEE 1101.10 --
Environmental and
Health Aspects
Climatic Humidity IEC60068-2-78 93% RH at 40 °C,
non-condensing
(see note below)
WEEE Directive 2002/96/EC Waste electrical and electronic
equipment
RoHS 2 Directive 2011/65/EU Restriction of the use of certain
hazardous substances in electri-
cal and electronic equipment
Vibration
(sinusoidal, operating)
Shock (operating) EN300019-2-3
GR-63-CORE
EN300019-2-3
IEC61131- 2
IEC60068-2-6
IEC61131- 2
IEC60068-2-27
5-150 [Hz] frequency range
1 [g] acceleration
1 [oct/min] sweep rate
10 sweeps/axis
3 directions: x, y, z
15 [g] acceleration
11 [ms] pulse duration
3 shocks per direction
5 [s] recovery time
6 directions, ±x, ±y, ±z
User Guide
AM4024(E)
Note: Boards without conformal coating must not be exposed to a change of temperature which
can lead to condensation. Condensation may cause irreversible damage, especially when
the board is powered up again.
Kontron does not accept any responsibility for damage to products resulting from destructive environmental testing.
Please contact Kontron for assistance prior to performing further environmental testing of
the AM4024(E).
www.kontron.com
21
D R A F T — F O R I N T E R N A L U S E O N L Y
Page 22

User Guide
AM4024(E)
1.7 Related Publications
The following publications contain information relating to this product.
Table 4: Related Publications
PRODUCT PUBLICATION
ATCA PICMG® 3.0 R3.0, AdvancedTCA® Base Specification, March 24, 2008
MicroTCA PICMG® MTCA.0 R1.0, Micro Telecommunications Computing Architecture Base Specifica-
tion, July 6, 2006
PICMG® MTCA.1 R1.0, Air Cooled Rugged MicroTCA Specification, March 19, 2009
AMC PICMG® AMC.0 R2.0, Advanced Mezzanine Card Base Specification, Nov. 15, 2006
PICMG® AMC.1 R2.0, PCI Express™ on AdvancedMC™, Oct. 8, 2008
PICMG® AMC.2 R1.0, Ethernet Advanced Mezzanine Card Specification, March 1, 2007
PICMG® AMC.3 R1.0, Advanced Mezzanine Card Specification for Storage, Aug. 25, 2005
IPMI IPMI - Intelligent Platform Management Interface Specification, v2.0 Document Revision
1.0, February 12, 2004
Platform Firmware Unified Extensible Firmware Interface (uEFI) specification, version 2.1
All Kontron Products Product Safety and Implementation Guide, ID 1021-9142
www.kontron.com
D R A F T — F O R I N T E R N A L U S E O N L Y
22
Page 23

User Guide
AM4024(E)
2 Functional Description
2.1 Processor and Chipset
The AM4024(E) supports the Intel® Core™ i7-4860EQ, the Intel® Core™ i7-4700EQ (SV), and the Intel®
Core™ i5-4402EQ processors in combination with the mobile Intel® QM87 Chipset.
Table 5: Features of the Processors Supported on the AM4024(E)
FEATURE Intel® Core™ i7-4860EQ
(SV), 1.8 GHz
Processor Cores four four two
Processor Base Frequency (HFM) 1.8 GHz 2.4 GHz / 1.7 GHz 1.6 GHz
Maximum Turbo Frequency 3.2 GHz 3.4 GHz 2.7 GHz
LFM 800 MHz 800 MHz 800 MHz
Hyper-Threading supported supported supported
SpeedStep® supported supported supported
L1 cache per core 64 kB 64 kB 64 kB
L2 cache per core 256 kB 256 kB 256 kB
L3 cache 6 MB 6 MB 3 MB
On-package cache up to 128 MB -- --
DDR3L Memory up to 16 GB / 1600 MHz up to 16 GB / 1600 MHz up to 16 GB / 1600 MHz
Graphics Intel® Iris™
Pro Graphics 5200
Graphics Base Frequency 750 MHz 400 MHz 400 MHz
Graphics Max. Dynamic Frequency 1.0 GHz 1.0 GHz 900 MHz
Graphics Execution Units 40 20 20
Configurable Thermal Design Power -- cTDP --
Power Limit Reduction Power Limit Reduction -- Power Limit Reduction
Thermal Design Power 47 W 47 W / 37 W 25 W
Intel® Core™ i7-4700EQ
(SV), 2.4 GHz
Intel® HD Graphics 4600 Intel® HD Graphics 4600
Intel® Core™ i5-4402EQ
(LV), 1.6 GHz
Note: The Intel® Core™ i7-4700EQ processor supports the cTDP-Down mode to 37 W. The maxi-
mum power consumption of the Intel® Core™ i7-4860EQ and Intel® Core™ i5-4402EQ processors can be reduced to approx. 10 W using the Power Limit Reduction feature. This
feature can be configured via the kBoardConfig uEFI Shell command. For information on
this command, refer to the Chapter 9, uEFI BIOS.
For further information about the processors used on the AM4024(E), please visit the Intel website.
For further information concerning the suitability of other Intel processors for use with the
AM4024(E), please contact Kontron.
www.kontron.com
23
D R A F T — F O R I N T E R N A L U S E O N L Y
Page 24

User Guide
AM4024(E)
2.1.1 Integrated Processor Graphics Controller
th
The 4
with up to 40 execution units delivering high-performance 3D, 2D graphics capabilities. The
AM4024(E) uses one display interface of the integrated processor graphics controller and supports resolutions up to 3840 x 1160 pixels @ 60 Hz through DisplayPort and up to 1920 x 1200 pixels @ 60 Hz
using DVI.
gen. Intel® Core™ i7/i5 processor includes a highly integrated processor graphics controller
2.2 Memory
The AM4024(E) supports a soldered, dual-channel (144-bit), Double Data Rate (DDR3) memory with Error Checking and Correcting (ECC) running at 1600 MHz (memory error detection and reporting of 1bit and 2-bit errors and correction of 1-bit failures). The available memory configuration can be either
8 GB or 16 GB.
However, when the internal graphics controller is enabled, the amount of memory available to applications is less than the total physical memory in the system. For example, the chipset’s Dynamic Video
Memory Technology dynamically allocates the proper amount of system memory required by the operating system and the application.
2.3 Watchdog Timer
The AM4024(E) provides a Watchdog timer that is programmable for a timeout period ranging from 125 ms
to 4096 s in 16 steps.
The Watchdog timer provides the following modes of operation:
»Timer-only mode
» Reset mode
» Interrupt mode
» Dual-stage mode
In dual-stage mode, a combination of both interrupt and reset is generated if the Watchdog is not serviced.
2.4 Battery
The AM4024(E) does not have any provisions for an onboard battery for backup of the RTC. There is,
however, an optional mezzanine module available which does provide battery-powered backup for the
RTC. The RTC Backup Battery module uses the J7 connector for interfacing with the AM4024(E). If this
module is required, the J7 interface is not available for the SATA Flash module. Refer to Chapter 7 for
further information on this module.
www.kontron.com
D R A F T — F O R I N T E R N A L U S E O N L Y
24
Page 25

User Guide
AM4024(E)
2.5 Flash Memory
The AM4024(E) provides flash interfaces for the uEFI BIOS and the SATA Flash module.
2.5.1 SPI Boot Flash for uEFI BIOS
The AM4024(E) provides two 16 MB SPI boot flashes for two separate uEFI BIOS images, a standard SPI
boot flash and a recovery SPI boot flash. The fail-over mechanism for the uEFI BIOS recovery can be
controlled via the DIP switch SW2, switch 2. The SPI boot flash includes hardware write protection functionality, which can be configured via the uEFI BIOS. If write protection is enabled, the SPI boot flash
cannot be written to.
Note: The uEFI BIOS code and settings are stored in the SPI boot flashes. Changes made to the
uEFI BIOS settings are available only in the currently selected SPI boot flash. Thus, switching over to the other SPI boot flash may result in operation with different uEFI BIOS code
and settings.
2.5.2 SATA Flash Module
The AM4024(E) supports up to 64 GB flash memory in combination with an optional SATA Flash module.
The SATA Flash module uses the J7 connector for interfacing with the AM4024(E). If this module is required, the J7 interface is not available for the The RTC Backup Battery module. Refer to Chapter 6 for
further information on this module.
2.6 Trusted Platform Module 1.2
The AM4024(E) supports the Trusted Platform Module (TPM) 1.2. TPM1.2 is a security chip specifically
designed to provide enhanced hardware- and software-based data and system security. TPM1.2 is
based on the Atmel AT97SC3204 security controller and stores sensitive data such as encryption and
signature keys, certificates and passwords, and is able to withstand software attacks to protect the
stored information.
2.7 Board Interfaces
2.7.1 Front Panel LEDs
T
he
AM4024(E)
Specific LEDs can be configured via two onboard registers (see Chapter 3.3.7, LED Configuration Register, and Chapter 3.3.8, LED Control Register).
is equipped with three Module Management LEDs and four User-Specific LEDs. The User-
2.7.1.1 Module Management LEDs and Hot Swap LED
The Module Management LEDs (LED0 and LED1) show the software status of the MMC. The Hot Swap LED
(HS LED) indicates when the board may be extracted. It can be switched on or off by software and may
be used, for example, to indicate that the shutdown process is finished and the board is ready for extraction.
www.kontron.com
25
D R A F T — F O R I N T E R N A L U S E O N L Y
Page 26

Table 6: Module Management and Hot Swap LEDs’ Functions
LED COLOR STATE FUNCTION
LED1
(Out-of-
Service LED)
LED2
(Health
LED)
HS LED Blue Off Module in normal operation
Red Off MMC running (default)
On MMC out of service or in reset state
Blinking MMC firmware upgrade
Green/
Amber/Red
Off Payload is off; module is not powered
Green Module is healthy (normal operation) and all related sensors are within
the specified range
Amber Payload is on and at least one sensor is out of range
Red Reserved
Do not extract the module.
Blinking Module hot swap in progress
Module is not ready for extraction.
On a) Module ready for hot swap extraction, or
b) Module has just been inserted in a powered system
User Guide
AM4024(E)
Note: The status of the Module Management LEDs may be temporarily overwritten by the PICMG-
defined “Set FRU LED State” command to implement, for example, a lamp test.
2.7.1.2 User-Specific LEDs
Table 7: User-Specific LEDs’ Functions
LED COLOR FUNCTION
DURING POWER-UP
ULED3 Red Power failure -- Processor overtemperature
Green -- uEFI BIOS POST bit 3 and bit 7 AMC port 0 Ethernet link
ULED2 Red Clock failure Processor overtemperature
Green -- uEFI BIOS POST bit 2 and bit 6 AMC port 1 Ethernet link
ULED1 Red Hardware reset -- Processor overtemperature
Green -- uEFI BIOS POST bit 1 and bit 5 SATA channels active
ULED0 Red uEFI BIOS boot failure -- Processor overtemperature
Green -- uEFI BIOS POST bit 0 and bit 4 --
FUNCTION DURING BOOT-UP
(POST code enabled)
FUNCTION
AFTER BOOT-UP
above 125°C (blinking) /
Processor overtemperature
above 100°C (on)
signal status
above 125°C (blinking)
signal status
above 125°C (blinking)
above 125°C (blinking)
D R A F T — F O R I N T E R N A L U S E O N L Y
www.kontron.com
26
Page 27
User Guide
Locked
Hot Swap
Unlocked
AM4024(E)
How to Read the 8-Bit POST Code
Due to the fact that only 4 LEDs are available and 8 bits must be displayed, the POST code output is
multiplexed on the User-Specific LEDs.
Table 8: POST Code Sequence
STATE GENERAL PURPOSE LEDs
0 All ULEDs are OFF; start of POST sequence
1 High nibble
2 Low nibble; state 2 is followed by state 0
The following is an example of the User-Specific LEDs’ operation with POST configuration enabled (see
also Table 8).
Table 9: POST Code Example
ULED3 ULED2 ULED1 ULED0 RESULT
HIGH NIBBLE off (0) on (1) off (0) off (0) 0x4
LOW NIBBLE off (0) off (0) off (0) on (1) 0x1
POST CODE 0x41
Note: Under normal operating conditions, the User-Specific LEDs should not remain lit during
boot-up. They are intended to be used only for debugging purposes. In the event that a
User-Specific LED lights up during boot-up and the AM4024(E) does not boot, please contact Kontron.
If all User-Specific LEDs flash red on and off at regular intervals, they indicate that the
processor junction temperature has reached a level beyond which permanent silicon damage may occur. Once activated, the overtemperature event remains latched until a cold restart of the AM4024(E) is undertaken (all power off and then on again).
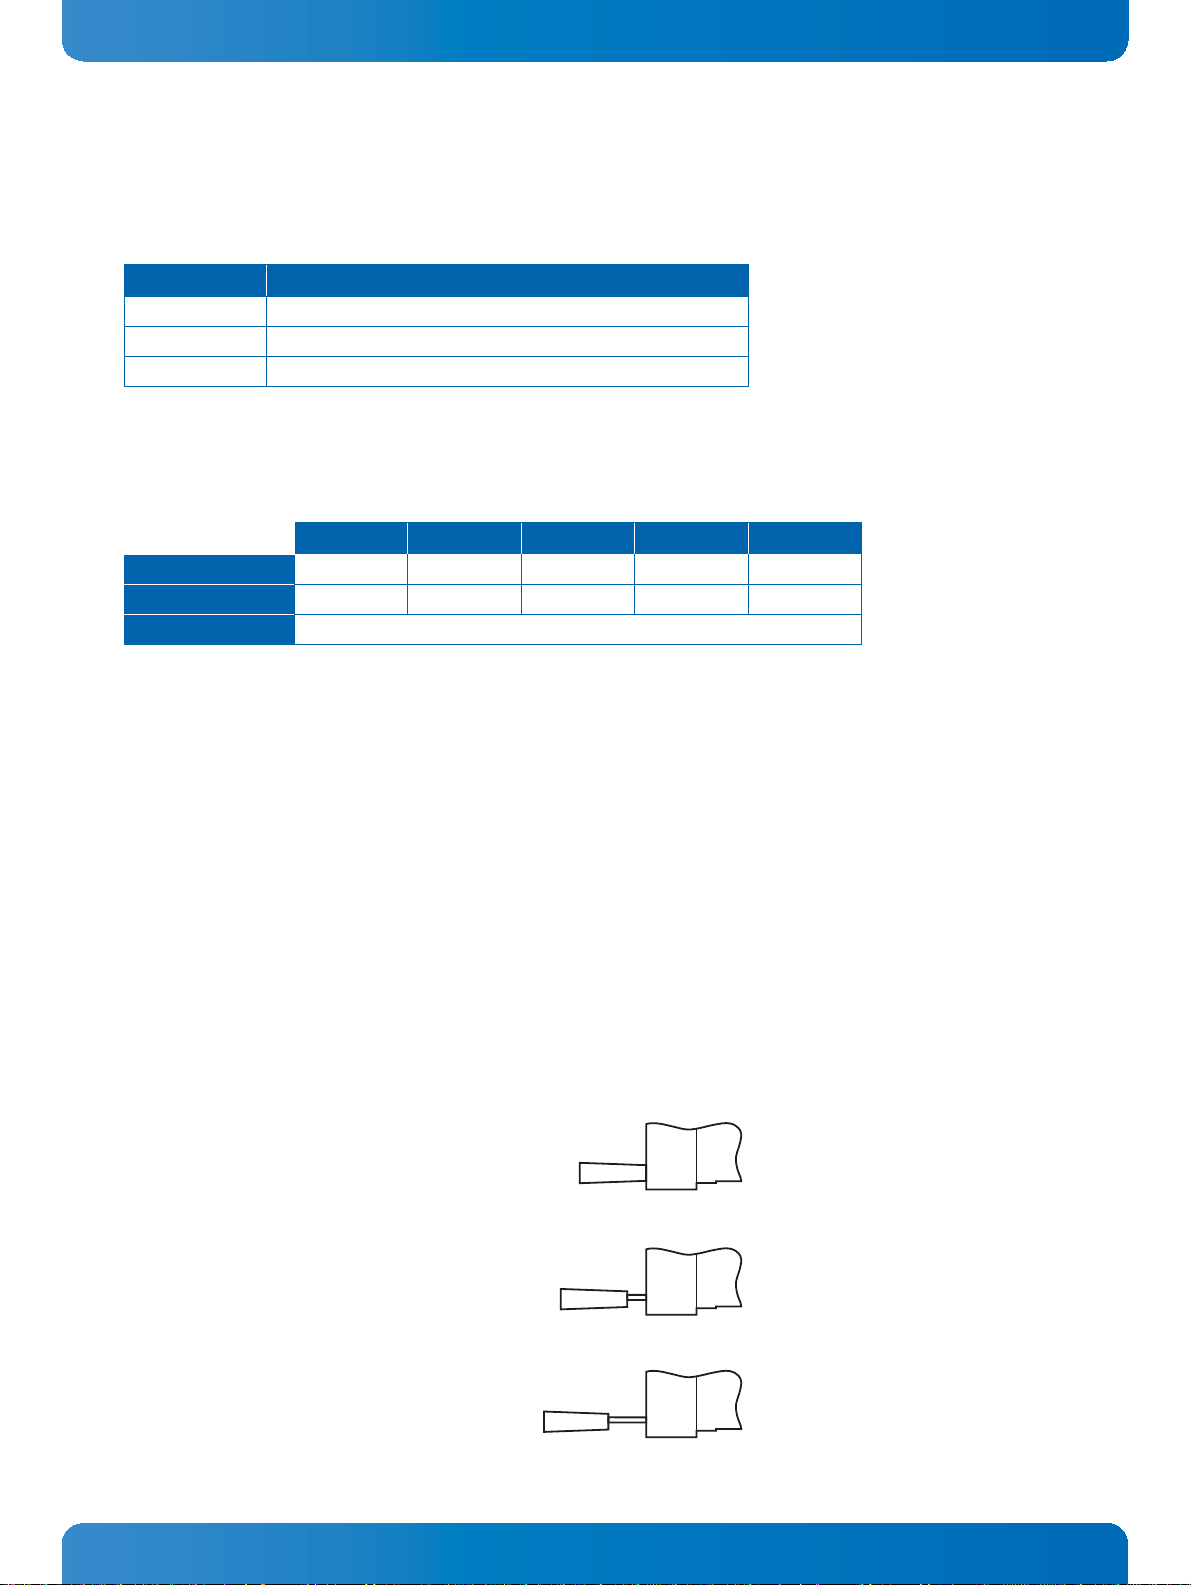
2.7.2 Module Handle
At the front panel, the AM4024(E) provides a handle for module extraction as well as for securing the
module in the carrier/ chassis and actuating the hot swap switch. The module handle supports a threeposition operation.
Figure 7: Module Handle Positions
www.kontron.com
D R A F T — F O R I N T E R N A L U S E O N L Y
27
Page 28

User Guide
AM4024(E)
Table 10: Module Handle Positions
MODULE HANDLE POSITION FUNCTION
Locked When the AM4024(E) is installed, the module handle is pushed in the “Locked” posi-
tion and the following actions result:
» The module is locked in the carrier /chassis.
» The hot swap switch is actuated.
Hot Swap When an extraction process of the AM4024(E) is initiated, the module handle is pulled
in the “Hot Swap” position and the following actions result:
» The module is locked in the carrier /chassis.
» The hot swap switch is deactuated.
Unlocked When the module handle is pulled to the “Unlocked” position, the AM4024(E) can be
fully extracted and the following actions result:
» The module is unlocked in the carrier /chassis.
» The hot swap switch is deactuated.
Note: For normal operation, the module handle must be in the “Locked” position.
2.7.3 Debug Interface
The AM4024(E) provides several onboard options for hardware and software debugging, such as:
» Four bicolor debug ULEDs for signaling hardware failures and uEFI BIOS POST code
» One optional, small form factor extended debug port (SFF XDP processor JTAG) connector,
J10, to facilitate debug and uEFI BIOS software development
» One JTAG interface connected to the AMC Card-edge connector for debugging and manufac-
turing purposes
2.7.4 USB Interface
The AM4024(E) provides one
high-speed, full-speed and low-speed capable
USB 2.0 host port implemented as one standard, 5-pin, Mini USB, type A connector, J2, on the front panel. This connector allows standard USB peripheral devices to be connected to the AM4024(E) via an adapter for Mini USB
type A to USB type A connectors.
The following figure illustrates the adapter required for connecting standard USB devices to the
AM4024(E). For further technical or ordering information on this adapter, please contact Kontron.
www.kontron.com
D R A F T — F O R I N T E R N A L U S E O N L Y
28
Page 29

Figure 8: Adapter for Mini USB Type A to USB Type A Connector
Figure 9: Serial Port Con. J11 (COMA)
5
1
Table 11: Serial Port Con. J11 (COMA) Pinout
PIN SIGNAL FUNCTION I/O
1 RTS# Request to send O
2RXD Receive data I
3TXD Transmit data O
4 CTS# Clear to send I
5 GND Signal ground --
User Guide
AM4024(E)
2.7.5 Serial Ports
The AM4024(E) supports one serial port, COMA, fully compatible with the 16550 UART controller. COMA
is implemented as a serial RS-232 interface available on a 5-pin USB Micro-AB connector, J11, on the
front panel.
The COMA interface includes receive and transmit signals as well as additional signals for handshaking
mode. Data transfer rates up to 115.2 kB/s are supported.
The COMA interface can be routed to the AMC port 15 in the Extended Options Region of the AMC Cardedge Connector as TTL 3.3 V signal level. In this event, the COMA port includes only receive and transmit signals.
The following figure and table provide pinout information on the serial port connector J11.
To connect standard serial devices to the AM4024(E)
is required. For further technical or ordering information on this adapter, please contact Kontron.
www.kontron.com
,
a specially designed serial adapter from Kontron
D R A F T — F O R I N T E R N A L U S E O N L Y
29
Page 30

User Guide
AM4024(E)
2.7.6 Mini DisplayPort
The AM4024(E) provides one DisplayPort interface implemented as a 20-pin standard Mini DisplayPort
connector, J5, on the front panel for connection to a DisplayPort/DVI monitor. To connect a monitor
with standard DisplayPort connector or a standard DVI connector to the AM4024(E), an adapter is required.
2.7.7 SATA Interfaces
The AM4024(E) provides three SATA ports:
» One SATA 6 Gb/s port routed to the J7 connector, which is used to connect the SATA Flash
module
» Two SATA 6 Gb/s ports connected to the AMC ports 2-3 in the Common Options Region of the
AMC Card-edge Connector
2.7.8 PCI Express
The AM4024(E) provides one x4 PCI Express 3.0 interface operating at up to 8.0 GT/s. The PCI Express
interface operates as root complex only and is routed to the AMC interconnection, Fat Pipes Region,
ports 4-7.
2.7.9 Gigabit Ethernet Interfaces
The AM4024 provides four Gigabit Ethernet interfaces using one Intel® I350 Gigabit Ethernet controller. Two Gigabit Ethernet copper ports (1000BASE-TX) are connected to the RJ-45 front panel connectors, J3 and J4, and two Gigabit Ethernet SerDes ports are routed to the AMC ports 0-1 in the Common
Options Region of the AMC Card-edge Connector. On the AM4024, the two Gigabit Ethernet copper ports
and the two Gigabit Ethernet ports in the Common Options Region (AMC ports 0 and 1) support IPMI
over LAN (IOL) and Serial over LAN (SOL) via the Intel® I350 Gigabit Ethernet controller which is connected to the Network Controller Sideband Interface (NC-SI).
The AM4024E provides eight Gigabit Ethernet interfaces using two Intel® I350 Gigabit Ethernet controllers. Two Gigabit Ethernet copper ports (1000BASE-TX) are connected to the RJ-45 front panel connectors, J3 and J4, two Gigabit Ethernet SerDes ports are routed to the AMC ports 0-1 in the Common
Options Region, and four Gigabit Ethernet SerDes ports are routed to the AMC ports 8-11 in the Fat Pipes
Region of the AMC Card-edge Connector. On the AM4024E, the two Gigabit Ethernet copper ports and
the two Gigabit Ethernet ports in the Common Options Region (AMC ports 0 and 1) support IPMI over
LAN (IOL) and Serial over LAN (SOL) via the 1st Intel® I350 Gigabit Ethernet controller which is connected to the Network Controller Sideband Interface (NC-SI).
The Boot from LAN feature is also supported on all Ethernet ports.
www.kontron.com
D R A F T — F O R I N T E R N A L U S E O N L Y
30
Page 31

Table 12: Gigabit Ethernet Controller Port Mapping for the AM4024
ETHERNET CONTROLLER PORT MAPPING IPMI Channel (IOL/SOL)
1st Intel® I350, port 0 AMC port 0 1
1st Intel® I350, port 1 AMC port 1 2
1st Intel® I350, port 2 Front I/O connector J3 (GbE B) 3
1st Intel® I350, port 3 Front I/O connector J4 (GbE A) 4
Table 13: Gigabit Ethernet Controller Port Mapping for the AM4024E
ETHERNET CONTROLLER PORT MAPPING IPMI Channel (IOL/SOL)
1st Intel® I350, port 0 AMC port 0 1
1st Intel® I350, port 1 AMC port 1 2
1st Intel® I350, port 2 Front I/O connector J3 (GbE B) 3
1st Intel® I350, port 3 Front I/O connector J4 (GbE A) 4
2nd Intel® I350, port 0 AMC port 8 --
2nd Intel® I350, port 1 AMC port 9 --
2nd Intel® I350, port 2 AMC port 10 --
2nd Intel® I350, port 3 AMC port 11 --
User Guide
AM4024(E)
2.8 AMC Interconnection
The AM4024(E) communicates with the carrier board or the MicroTCA backplane via the AMC Card-edge
connector, which is a serial interface optimized for high-speed interconnects. The AMC Card-edge connector supports a variety of fabric topologies divided into five functional groups:
» Fabric interface
» Synchronization clock interface
» System management interface
» JTAG interface
» Module power interface
The following sections provide detailed information on these interfaces.
2.8.1 Fabric Interface
The Fabric interface is the real communication path and comprises 20 high-speed ports providing
point-to-point connectivity for module-to-carrier and module-to-module implementations. The highspeed ports are separated in three logical regions as follows:
» Common Options Region
» Fat Pipes Region
» Extended Options Region
D R A F T — F O R I N T E R N A L U S E O N L Y
The AM4024(E) port mapping is described below and illustrated in Figure 10.
www.kontron.com
31
Page 32

AM4024:
» Common Options Region:
» Ports 0-1: Two Gigabit Ethernet SerDes ports
» Ports 2-3: Two Serial ATA ports
» Fat Pipes Region:
» Ports 4-7: One x4 PCI Express interface operating as root-complex only
» Extended Options Region:
» Port 14: One debug port
» Port 15: One serial port
» Port 16: Two GPOs
AM4024E:
» Common Options Region:
User Guide
AM4024(E)
» Ports 0-1: Two Gigabit Ethernet SerDes ports
» Ports 2-3: Two Serial ATA ports
» Fat Pipes Region:
» Ports 4-7: One x4 PCI Express interface operating as root-complex only
» Ports 8-11: Four Gigabit Ethernet SerDes ports
» Extended Options Region:
» Port 14: One debug port
» Port 15: One serial port
» Port 16: Two GPOs
www.kontron.com
D R A F T — F O R I N T E R N A L U S E O N L Y
32
Page 33

Figure 10: AM4024(E) Port Mapping
User Guide
AM4024(E)
Port No.
TCLKA
TCLKB not used not used
FCLKA PCIe Reference Clock (output) PCIe Reference Clock (output)
0
1
2
3
Basic Connector
Extended Connector
4
5
6
7
8
9
10
11
12
13
14
15
TCLKC/D TCLKC / 2 x GPO TCLKC/ 2 x GPO
17
18
19
20
Standard Port Mapping
AMC
Clocks
Common
Options
Region
Fat
Pipes
Region
Extended Options
Region
AM4024
Port Mapping
TCLKA (input) TCLKA (input)
GbE-0 GbE-0
GbE-1 GbE-1
SATA-A (6Gb/s) SATA-A (6Gb/s)
SATA-B (6Gb/s) SATA-B (6Gb/s)
1 x4 PCIe 1 x4 PCIe
not used
not used not used
not used not used
Debug / not used Debug / not used
Serial (COMA) Serial (COMA)
not used not used
not used not used
not used not used
not used not used
AM4024E
Port Mapping
GbE-8
GbE-9
GbE-10
GbE-11
www.kontron.com
D R A F T — F O R I N T E R N A L U S E O N L Y
33
Page 34

User Guide
AM4024(E)
2.8.2 Synchronization Clock Interface
On the AM4024(E), two PCI Express reference clock configurations are supported in accordance with
the PCI Express Base Specification Revision 3.0 as follows:
» AM4024(E) uses local PCI Express reference clock, and AMC (input) clock (FCLKA) is disabled.
In this configuration, the clock spread spectrum modulation must be disabled.
» AM4024(E) uses local PCI Express reference clock, and AM4024(E) generates PCI Express ref-
erence clock to the AMC Card-edge connector (FCLKA)
The PCI Express reference clock configurations can be set via the uEFI BIOS kBoardConfig command,
option AMCFclka.
2.8.3 System Management Interface
The system management interface is a port from the module to the carrier via the Local Intelligent Platform Management Bus (IPMB-L). The Module Management Controller uses this port for the communication with the carrier Intelligent Platform Management Controller (IPMC). The IPMB-L is a multimaster I²C bus.
2.8.4 JTAG Interface
JTAG support is provided on the AMC Card-edge connector. The JTAG interface is supported for vendor
product test and logic update.
On the AM4024(E), the FPGA JTAG port is connected to the AMC JTAG port.
2.8.5 Module Power Interface
The module power interface provides the management power (MP) and payload power (PWR). These two
supply voltages must have power-good indicators so that the system management can detect boot sequence events and nominal operating conditions.
The AM4024(E) operates with payload power in the range of 10.8 V to 13.2 V, and with management
power of 3.3 V ± 5%.
The board supports removal and insertion in a powered slot as required by the AMC.0 specification.
2.8.6 AMC Card-edge Connector J1
The AMC Card-edge connector is a high-speed serial interface with 170 pins. The following table provides the pinout of the AMC Card-edge connector J1. The shaded table cells indicate signals that are
not used on the AM4024(E).
D R A F T — F O R I N T E R N A L U S E O N L Y
Note: When handling the board, take care not to touch the gold conductive fingers of the AMC
Card-edge connector. Failure to comply with the instruction above may cause damage to
the board or result in improper system operation.
www.kontron.com
34
Page 35

User Guide
AM4024(E)
2.8.6.1 Pinout of AMC Card-edge Connector J1 on the AM4024
Table 14: Pinout of AMC Card-edge Connector J1 on the AM4024
BASIC SIDE (COMPONENT SIDE 1) EXTENDED SIDE (COMPONENT SIDE 2)
PIN SIGNAL FUNCTION DRIVEN BY PIN SIGNAL FUNCTION DRIVEN BY
1 GND Logic Ground - 170 GND Logic Ground -
2 PWR Payload Power Carrier 169 TDI JTAG Test Data Input Carrier
3 PS1# Presence 1 AMC 168 TDO JTAG Test Data Output AMC
4 MP Management Power Carrier 167 TRST# JTAG Test Reset Input Carrier
5 GA0 Geographic Address 0 Carrier 166 TMS JTAG Test Mode Select In Carrier
6 RSV Reserved (Optional PCIe
Reset Output)
7 GND Logic Ground - 164 GND Logic Ground -
8RSVReserved -
9 PWR Payload Power Carrier
10 GND Logic Ground - 161 GND Logic Ground -
11 Tx0+ GbE-0 Transmitter + AMC
12 Tx0- GbE-0 Transmitter - AMC
13 GND Logic Ground - 158 GND Logic Ground -
14 Rx0+ GbE-0 Receiver + Carrier
15 Rx0- GbE-0 Receiver Carrier
16 GND Logic Ground - 155 GND Logic Ground -
17 GA1 Geographic Address 1 Carrier
18 PWR Payload Power Carrier
19 GND Logic Ground - 152 GND Logic Ground -
20 Tx1+ GbE-1 Transmitter + AMC
21 Tx1- GbE-1 Transmitter - AMC
22 GND Logic Ground - 149 GND Logic Ground -
23 Rx1+ GbE-1 Receiver + Carrier
24 Rx1- GbE-1 Receiver - Carrier
25 GND Logic Ground - 146 GND Logic Ground -
26 GA2 Geographic Address 2 Carrier
27 PWR Payload Power Carrier
28 GND Logic Ground - 143 GND Logic Ground -
29 Tx2+ SATA-A Transmitter + AMC
30 Tx2- SATA-A Transmitter - AMC
31 GND Logic Ground - 140 GND Logic Ground -
32 Rx2+ SATA-A Receiver + Carrier 139 Tx16+ GPO1 AMC
33 Rx2- SATA-A Receiver - Carrier 138 Tx16- GPO2 AMC
34 GND Logic Ground - 137 GND Logic Ground -
35 Tx3+ SATA-B Transmitter + AMC 136 Rx16+ Telecom Clock C+ Carrier
36 Tx3- SATA-B Transmitter - AMC 135 Rx16- Telecom Clock C- Carrier
37 GND Logic Ground - 134 GND Logic Ground -
38 Rx3+ SATA-B Receiver + Carrier 133 Tx15+ COMA Serial Port Transmit AMC
39 Rx3- SATA-B Receiver - Carrier 132 Tx15- COMA Serial Port Receive Carrier
AMC 165 TCK JTAG Test Clock Input Carrier
163 Tx20+ Not Connected AMC
162 Tx20- Not Connected AMC
160 Rx20+ Not Connected Carrier
159 Rx20- Not Connected Carrier
157 Tx19+ Not Connected AMC
156 Tx19- Not Connected AMC
154 Rx19+ Not Connected Carrier
153 Rx19- Not Connected Carrier
151 Tx18+ Not Connected AMC
150 Tx18- Not Connected AMC
148 Rx18+ Not Connected Carrier
147 Rx18- Not Connected Carrier
145 Tx17+ Not Connected AMC
144 Tx17- Not Connected AMC
142 Rx17+ Not Connected Carrier
141 Rx17- Not Connected Carrier
D R A F T — F O R I N T E R N A L U S E O N L Y
www.kontron.com
35
Page 36

User Guide
AM4024(E)
Table 14: Pinout of AMC Card-edge Connector J1 on the AM4024 (Continued)
BASIC SIDE (COMPONENT SIDE 1) EXTENDED SIDE (COMPONENT SIDE 2)
PIN SIGNAL FUNCTION DRIVEN BY PIN SIGNAL FUNCTION DRIVEN BY
40 GND Logic Ground - 131 GND Logic Ground -
41 ENABLE# AMC Enable Carrier
42 PWR Payload Power Carrier
43 GND Logic Ground - 128 GND Logic Ground -
44 Tx4+ PCIe-0 Transmitter + AMC 127 Tx14+ Debug serial data output AMC
45 Tx4- PCIe-0 Transmitter - AMC 126 Tx14- Debug serial clock output AMC
46 GND Logic Ground - 125 GND Logic Ground -
47 Rx4+ PCIe-0 Receiver + Carrier
48 Rx4- PCIe-0 Receiver - Carrier
49 GND Logic Ground - 122 GND Logic Ground -
50 Tx5+ PCIe-1 Transmitter + AMC
51 Tx5- PCIe-1 Transmitter - AMC
52 GND Logic Ground - 119 GND Logic Ground -
53 Rx5+ PCIe-1 Receiver + Carrier
54 Rx5- PCIe-1 Receiver - Carrier
55 GND Logic Ground - 116 GND Logic Ground -
56 SCL_L IPMB-L Clock IPMI
Agent
57 PWR Payload Power Carrier 114 Tx12- Not Connected AMC
58 GND Logic Ground - 113 GND Logic Ground -
59 Tx6+ PCIe-2 Transmitter + AMC
60 Tx6- PCIe-2 Transmitter - AMC
61 GND Logic Ground - 110 GND Logic Ground -
62 Rx6+ PCIe-2 Receiver + Carrier
63 Rx6- PCIe-2 Receiver - Carrier
64 GND Logic Ground - 107 GND Logic Ground -
65 Tx7+ PCIe-3 Transmitter + AMC
66 Tx7- PCIe-3 Transmitter - AMC
67 GND Logic Ground - 104 GND Logic Ground -
68 Rx7+ PCIe-3 Receiver + Carrier
69 Rx7- PCIe-3 Receiver - Carrier
70 GND Logic Ground - 101 GND Logic Ground -
71 SDA_L IPMB-L Data IPMI
Agent
72 PWR Payload Power Carrier
73 GND Logic Ground - 98 GND Logic Ground -
74 TCLKA+ Telecom Clock A+ Carrier
75 TCLKA- Telecom Clock A- Carrier
76 GND Logic Ground - 95 GND Logic Ground -
77 TCLKB+ Not Connected AMC 94 Rx9+ Not Connected Carrier
78 TCLKB- Not Connected AMC 93 Rx9- Not Connected Carrier
130 Rx15+ Not Connected Carrier
129 Rx15- Not Connected Carrier
124 Rx14+ Not Connected Carrier
123 Rx14- Not Connected Carrier
121 Tx13+ Not Connected AMC
120 Tx13- Not Connected AMC
118 Rx13+ Not Connected Carrier
117 Rx13- Not Connected Carrier
115 Tx12+ Not Connected AMC
112 Rx12+ Not Connected Carrier
111 Rx12- Not Connected Carrier
109 Tx11+ Not Connected AMC
108 Tx11- Not Connected AMC
106 Rx11+ Not Connected Carrier
105 Rx11- Not Connected Carrier
103 Tx10+ Not Connected AMC
102 Tx10- Not Connected AMC
100 Rx10+ Not Connected Carrier
99 Rx10- Not Connected Carrier
97 Tx9+ Not Connected AMC
96 Tx9- Not Connected AMC
D R A F T — F O R I N T E R N A L U S E O N L Y
www.kontron.com
36
Page 37

User Guide
AM4024(E)
Table 14: Pinout of AMC Card-edge Connector J1 on the AM4024 (Continued)
BASIC SIDE (COMPONENT SIDE 1) EXTENDED SIDE (COMPONENT SIDE 2)
PIN SIGNAL FUNCTION DRIVEN BY PIN SIGNAL FUNCTION DRIVEN BY
79 GND Logic Ground - 92 GND Logic Ground -
80 FCLKA+ PCIe Reference Clock + Carrier
81 FCLKA- PCIe Reference Clock - Carrier
82 GND Logic Ground - 89 GND Logic Ground -
83 PS0# Presence 0 Carrier
84 PWR Payload Power Carrier
85 GND Logic Ground - 86 GND Logic Ground -
91 Tx8+ Not Connected AMC
90 Tx8- Not Connected AMC
88 Rx8+ Not Connected Carrier
87 Rx8- Not Connected Carrier
The following table indicates the reserved pin which must not be connected to external circuitry.
Table 15: Reserved Pin’s Description
AMC PIN AMC PORT FUNCTION I/O SIGNALING VOLTAGE
6 -- Optional PCI Express reset output O 3.3V TTL level
Note: The reserved pin indicated above is reserved for optional use and must not be connected
to external circuitry. Failure to comply with the instruction above may cause damage to the
board or result in improper system operation.
The following table lists the Extended Options Region pins with no differential signals:
Table 16: Extended Options Region Single-Ended Pins’ Description
AMC PIN AMC PORT FUNCTION I/O SIGNALING VOLTAGE
133 15 Tx serial port (COMA) O 3.3V TTL level
132 15 Rx serial port (COMA) I 3.3V TTL level
127 14 Debug serial data output O 3.3V TTL level
126 14 Debug serial clock output O 3.3V TTL level
Note: The Extended Options Region pins listed above do not have differential signals. They have
3.3V TTL signaling voltage.
The following table lists the single-ended GPO pins:
Table 17: Single-Ended GPO Pins’ Description
AMC PIN AMC PORT FUNCTION I/O SIGNALING VOLTAGE
139 16 General purpose output: GPO1 O 3.3V TTL level
138 16 General purpose output: GPO2 O 3.3V TTL level
www.kontron.com
D R A F T — F O R I N T E R N A L U S E O N L Y
37
Page 38

User Guide
AM4024(E)
2.8.6.2 Pinout of AMC Card-edge Connector J1 on the AM4024E
Table 18: Pinout of AMC Card-edge Connector J1 on the AM4024E
BASIC SIDE (COMPONENT SIDE 1) EXTENDED SIDE (COMPONENT SIDE 2)
PIN SIGNAL FUNCTION DRIVEN BY PIN SIGNAL FUNCTION DRIVEN BY
1 GND Logic Ground - 170 GND Logic Ground -
2 PWR Payload Power Carrier 169 TDI JTAG Test Data Input Carrier
3 PS1# Presence 1 AMC 168 TDO JTAG Test Data Output AMC
4 MP Management Power Carrier 167 TRST# JTAG Test Reset Input Carrier
5 GA0 Geographic Address 0 Carrier 166 TMS JTAG Test Mode Select In Carrier
6 RSV Reserved (Optional PCIe
Reset Output)
7 GND Logic Ground - 164 GND Logic Ground -
8RSVReserved -
9 PWR Payload Power Carrier
10 GND Logic Ground - 161 GND Logic Ground -
11 Tx0+ GbE-0 Transmitter + AMC
12 Tx0- GbE-0 Transmitter - AMC
13 GND Logic Ground - 158 GND Logic Ground -
14 Rx0+ GbE-0 Receiver + Carrier
15 Rx0- GbE-0 Receiver Carrier
16 GND Logic Ground - 155 GND Logic Ground -
17 GA1 Geographic Address 1 Carrier
18 PWR Payload Power Carrier
19 GND Logic Ground - 152 GND Logic Ground -
20 Tx1+ GbE-1 Transmitter + AMC
21 Tx1- GbE-1 Transmitter - AMC
22 GND Logic Ground - 149 GND Logic Ground -
23 Rx1+ GbE-1 Receiver + Carrier
24 Rx1- GbE-1 Receiver - Carrier
25 GND Logic Ground - 146 GND Logic Ground -
26 GA2 Geographic Address 2 Carrier
27 PWR Payload Power Carrier
28 GND Logic Ground - 143 GND Logic Ground -
29 Tx2+ SATA-A Transmitter + AMC
30 Tx2- SATA-A Transmitter - AMC
31 GND Logic Ground - 140 GND Logic Ground -
32 Rx2+ SATA-A Receiver + Carrier 139 Tx16+ GPO1 AMC
33 Rx2- SATA-A Receiver - Carrier 138 Tx16- GPO2 AMC
34 GND Logic Ground - 137 GND Logic Ground -
35 Tx3+ SATA-B Transmitter + AMC 136 Rx16+ Telecom Clock C+ Carrier
36 Tx3- SATA-B Transmitter - AMC 135 Rx16- Telecom Clock C- Carrier
37 GND Logic Ground - 134 GND Logic Ground -
38 Rx3+ SATA-B Receiver + Carrier 133 Tx15+ COMA Serial Port Transmit AMC
AMC 165 TCK JTAG Test Clock Input Carrier
163 Tx20+ Not Connected AMC
162 Tx20- Not Connected AMC
160 Rx20+ Not Connected Carrier
159 Rx20- Not Connected Carrier
157 Tx19+ Not Connected AMC
156 Tx19- Not Connected AMC
154 Rx19+ Not Connected Carrier
153 Rx19- Not Connected Carrier
151 Tx18+ Not Connected AMC
150 Tx18- Not Connected AMC
148 Rx18+ Not Connected Carrier
147 Rx18- Not Connected Carrier
145 Tx17+ Not Connected AMC
144 Tx17- Not Connected AMC
142 Rx17+ Not Connected Carrier
141 Rx17- Not Connected Carrier
D R A F T — F O R I N T E R N A L U S E O N L Y
www.kontron.com
38
Page 39

User Guide
AM4024(E)
Table 18: Pinout of AMC Card-edge Connector J1 on the AM4024E (Continued)
BASIC SIDE (COMPONENT SIDE 1) EXTENDED SIDE (COMPONENT SIDE 2)
PIN SIGNAL FUNCTION DRIVEN BY PIN SIGNAL FUNCTION DRIVEN BY
39 Rx3- SATA-B Receiver - Carrier 132 Tx15- COMA Serial Port Receive Carrier
40 GND Logic Ground - 131 GND Logic Ground -
41 ENABLE# AMC Enable Carrier
42 PWR Payload Power Carrier
43 GND Logic Ground - 128 GND Logic Ground -
44 Tx4+ PCIe-0 Transmitter + AMC 127 Tx14+ Debug serial data output AMC
45 Tx4- PCIe-0 Transmitter - AMC 126 Tx14- Debug serial clock output AMC
46 GND Logic Ground - 125 GND Logic Ground -
47 Rx4+ PCIe-0 Receiver + Carrier
48 Rx4- PCIe-0 Receiver - Carrier
49 GND Logic Ground - 122 GND Logic Ground -
50 Tx5+ PCIe-1 Transmitter + AMC
51 Tx5- PCIe-1 Transmitter - AMC
52 GND Logic Ground - 119 GND Logic Ground -
53 Rx5+ PCIe-1 Receiver + Carrier
54 Rx5- PCIe-1 Receiver - Carrier
55 GND Logic Ground - 116 GND Logic Ground -
56 SCL_L IPMB-L Clock IPMI
Agent
57 PWR Payload Power Carrier 114 Tx12- Not Connected AMC
58 GND Logic Ground - 113 GND Logic Ground -
59 Tx6+ PCIe-2 Transmitter + AMC 112 Rx12+ Not Connected Carrier
60 Tx6- PCIe-2 Transmitter - AMC
61 GND Logic Ground - 110 GND Logic Ground -
62 Rx6+ PCIe-2 Receiver + Carrier 109 Tx11+ GbE-11 Transmitter + AMC
63 Rx6- PCIe-2 Receiver - Carrier 108 Tx11- GbE-11 Transmitter - AMC
64 GND Logic Ground - 107 GND Logic Ground -
65 Tx7+ PCIe-3 Transmitter + AMC 106 Rx11+ GbE-11 Receiver + Carrier
66 Tx7- PCIe-3 Transmitter - AMC 105 Rx11- GbE-11 Receiver - Carrier
67 GND Logic Ground - 104 GND Logic Ground -
68 Rx7+ PCIe-3 Receiver + Carrier 103 Tx10+ GbE-10 Transmitter + AMC
69 Rx7- PCIe-3 Receiver - Carrier 102 Tx10- GbE-10 Transmitter - AMC
70 GND Logic Ground - 101 GND Logic Ground -
71 SDA_L IPMB-L Data IPMI
Agent
72 PWR Payload Power Carrier 99 Rx10- GbE-10 Receiver - Carrier
73 GND Logic Ground - 98 GND Logic Ground -
74 TCLKA+ Telecom Clock A+ Carrier 97 Tx9+ GbE-9 Transmitter + AMC
75 TCLKA- Telecom Clock A- Carrier 96 Tx9- GbE-9 Transmitter - AMC
76 GND Logic Ground - 95 GND Logic Ground -
77 TCLKB+ Not Connected AMC 94 Rx9+ GbE-9 Receiver + Carrier
130 Rx15+ Not Connected Carrier
129 Rx15- Not Connected Carrier
124 Rx14+ Not Connected Carrier
123 Rx14- Not Connected Carrier
121 Tx13+ Not Connected AMC
120 Tx13- Not Connected AMC
118 Rx13+ Not Connected Carrier
117 Rx13- Not Connected Carrier
115 Tx12+ Not Connected AMC
111 Rx12- Not Connected Carrier
100 Rx10+ GbE-10 Receiver + Carrier
D R A F T — F O R I N T E R N A L U S E O N L Y
www.kontron.com
39
Page 40
User Guide
AM4024(E)
Table 18: Pinout of AMC Card-edge Connector J1 on the AM4024E (Continued)
BASIC SIDE (COMPONENT SIDE 1) EXTENDED SIDE (COMPONENT SIDE 2)
PIN SIGNAL FUNCTION DRIVEN BY PIN SIGNAL FUNCTION DRIVEN BY
78 TCLKB- Not Connected AMC 93 Rx9- GbE-9 Receiver - Carrier
79 GND Logic Ground - 92 GND Logic Ground -
80 FCLKA+ PCIe Reference Clock + Carrier 91 Tx8+ GbE-8 Transmitter + AMC
81 FCLKA- PCIe Reference Clock - Carrier 90 Tx8- GbE-8 Transmitter - AMC
82 GND Logic Ground - 89 GND Logic Ground -
83 PS0# Presence 0 Carrier 88 Rx8+ GbE-8 Receiver + Carr ier
84 PWR Payload Power Carrier 87 Rx8- GbE-8 Receiver - Carrier
85 GND Logic Ground - 86 GND Logic Ground -
The following table indicates the reserved pin which must not be connected to external circuitry.
Table 19: Reserved Pin’s Description
AMC PIN AMC PORT FUNCTION I/O SIGNALING VOLTAGE
6 -- Optional PCI Express reset output O 3.3V TTL level
Note: The reserved pin indicated above is reserved for optional use and must not be connected
to external circuitry. Failure to comply with the instruction above may cause damage to the
board or result in improper system operation.
The following table lists the Extended Options Region pins with no differential signals:
Table 20: Extended Options Region Single-Ended Pins’ Description
AMC PIN AMC PORT FUNCTION I/O SIGNALING VOLTAGE
133 15 Tx serial port (COMA) O 3.3V TTL level
132 15 Rx serial port (COMA) I 3.3V TTL level
127 14 Debug serial data output O 3.3V TTL level
126 14 Debug serial clock output O 3.3V TTL level
Note: The Extended Options Region pins listed above do not have differential signals. They have
3.3V TTL signaling voltage.
The following table lists the single-ended GPO pins:
Table 21: Single-Ended GPO Pins’ Description
AMC PIN AMC PORT FUNCTION I/O SIGNALING VOLTAGE
139 16 General purpose output: GPO1 O 3.3V TTL level
138 16 General purpose output: GPO2 O 3.3V TTL level
D R A F T — F O R I N T E R N A L U S E O N L Y
www.kontron.com
40
Page 41
3 Configuration
3.1 DIP Switch Configuration
3.1.1 DIP Switch SW2
The DIP switch SW2 serves for general board configuration.
Table 22: DIP Switch SW2 Functionality
SWITCH SETTING FUNCTIONALITY
1 OFF Use AMC fabric port assignment configured in the MMC and indicated in
the E-Keying data
This configuration can be changed via the AMC conf iguration options in
the uEFI BIOS kBoardConfig command.
ON Load and work with fail-safe AMC fabric configuration
For further information on the fail-safe AMC fabric configuration refer to
Table 23, Fail-Safe AMC Fabric Configuration.
2 OFF Boot from the standard SPI boot flash
ON Boot from the recovery SPI boot flash
3 OFF Non-volatile memory write protection disabled
(if no other write protection sources are enabled)
ON Non-volatile memory write protection enabled
4 OFF Boot using the currently saved uEFI BIOS settings
ON Clear the uEFI BIOS settings and use the default values
User Guide
AM4024(E)
The default setting is indicated by using italic bold.
To clear the uEFI BIOS settings and the passwords, proceed as follows:
1. Set DIP switch SW2, switch 4, to the ON position.
2. Apply power to the system.
3. Wait 30 seconds and then remove power from the system. During this time period no messages are displayed.
4. Set DIP switch SW2, switch 4, to the OFF position.
Table 23: Fail-Safe AMC Fabric Configuration
PORT FUNCTION CONFIGURATION OF DIP SWITCH SW2 SWITCH 1, IF SET TO “ON”
Port 2 SATA Off
Port 3 SATA Off
Ports 4 - 7 PCI Express Off
Ports 8 - 11 Gigabit Ethernet Off
Port 16 Debug On
FCLKA PCI Express reference clock FCLKA to AMC Card-edge connector disabled
D R A F T — F O R I N T E R N A L U S E O N L Y
www.kontron.com
41
Page 42

User Guide
AM4024(E)
3.2 System Write Protection
The AM4024(E) provides write protection for non-volatile memories via the DIP switch SW2, switch 3,
the uEFI Shell and a backplane pin. If one of these sources is enabled, the system is write protected.
Please contact Kontron for further information before using these functions.
3.3 AM4024(E)-Specific Registers
Table 24: AM4024(E)-Specific Registers
ADDRESS DEVICE
0x284 Write Protection Register (WPROT)
0x285 Reset Status Register (RSTAT)
0x288 Board ID High-Byte Register (BIDH)
0x28A Geographic Addressing Register (GEOAD)
0x28C Watchdog Timer Control Register (WTIM)
0x28D Board ID Low-Byte Register (BIDL)
0x290 LED Configuration Register (LCFG)
0x291 LED Control Register (LCTRL)
0x292 General Purpose Output Register (GPOUT)
3.3.1 Write Protection Register (WPROT)
The Write Protection Register holds the write protect signals for non-volatile devices.
Table 25: Write Protection Register (WPROT)
ADDRESS 0x284
BIT 7 6 5 4 3 2 1 0
NAME SWP Reserved
ACCESS
RESET 0 000 0 0 0 0
BITFIELD DESCRIPTION
7 SWP System write protection status:
3SFWPReserved
2 DSWP This bit reflects the state of the system write protection via DIP switch SW2, switch 3:
1 BSWP This bit reflects the state of the system write protection via backplane (SYS_WP#):
0 SSWP This bit reflects the state of the system write protection via software:
R
0 = Onboard non-volatile memory devices not write protected
1 = Onboard non-volatile memory devices write protected
0 = System not write protected via DIP switch
1 = System write protected
0 = System not write protected via backplane
1 = System write protected
0 = System devices not write protected via software
1 = System write protected
If this bit is programmed once, it cannot be reprogrammed.
R R/W R R R/W
SFWP DSWP
BSWP SSWP
D R A F T — F O R I N T E R N A L U S E O N L Y
www.kontron.com
42
Page 43

3.3.2 Reset Status Register (RSTAT)
The Reset Status Register is used to determine the host’s reset source.
Table 26: Reset Status Register (RSTAT)
ADDRESS 0x285
BIT 7 6 5 4 3 2 1 0
NAME PORS Reserved
ACCESS
RESET N/A 0
BITFIELD DESCRIPTION
7 PORS Power-on reset status:
5 SRST Software reset status:
3 IPRS MMC reset status:
0 WTRS Watchdog timer reset status:
R/W
R
0 = System reset generated by warm reset
1 = System reset generated by power-on (cold) reset
Writing a ’1’ to this bit clears the bit.
0 = Reset is logged by the MMC
1 = Reset is not logged by MMC
The uEFI BIOS/ software sets this bit to inform the MMC that the next reset should not be
logged.
0 = System reset not generated by MMC
1 = System reset generated by MMC
Writing a ’1’ to this bit clears the bit.
0 = System reset generated by Watchdog timer
1 = System reset generated by Watchdog timer
Writing a ’1’ to this bit clears the bit.
SRST
R/W
0
Reserved
R
0
IPRS
R/W
0
Reserved Reserved WTRS
R R R/W
0 0 0
User Guide
AM4024(E)
Note: The Reset Status Register is set to default values by power-on (cold) reset, not by a warm
reset.
www.kontron.com
43
D R A F T — F O R I N T E R N A L U S E O N L Y
Page 44
User Guide
AM4024(E)
3.3.3 Board ID High-Byte Register (BIDH)
Table 27: Board ID High-Byte Register (BIDH)
ADDRESS 0x288
BIT 7 6 5 4 3 2 1 0
NAME BIDH
ACCESS
RESET 0xB4
BITFIELD DESCRIPTION
7 BIDH Board identification:
AM4024: 0xB410
AM4024E: 0xB412
R
3.3.4 Geographic Addressing Register (GEOAD)
The Geographic Addressing Register holds the AMC geographic address (site number) used to assign
the Intelligent Platform Management Bus (IPMB-L) address to the AM4024(E).
Table 28: Geographic Addressing Register (GEOAD)
ADDRESS 0x28A
BIT 7 6 5 4 3 2 1 0
NAME Reserved
ACCESS
RESET 000 N/A
BITFIELD DESCRIPTION
7..5 Res. Reserved
4..0 GA Geographic address
R
GA
R
Note: The Geographic Addressing Register is set to default values by power-on (cold) reset, not
by a warm reset.
www.kontron.com
D R A F T — F O R I N T E R N A L U S E O N L Y
44
Page 45

3.3.5 Watchdog Timer Control Register (WTIM)
Table 29: Watchdog Timer Control Register (WTIM)
ADDRESS 0x28C
BIT 7 6 5 4 3 2 1 0
NAME WTE WMD
ACCESS
RESET 0 00 0 0000
BITFIELD DESCRIPTION
7
6..5 WMD Watchdog mode:
4 WEN/WTR Watchdog enable/ Watchdog trigger control bit:
3..0 WTM Watchdog timeout settings:
R/W
WTE
R/W R/W R/W
Watchdog timer expired status bit:
0 = Watchdog timer has not expired
1 = Watchdog timer has expired.
Writing a ’1’ to this bit resets it to 0.
00 = Timer only mode
01 = Reset mode
10 = Interrupt mode
11 = Cascaded mode (dual-stage mode)
0 = Watchdog timer not enabled
Prior to the Watchdog being enabled, this bit is known as WEN. After the Watchdog is
enabled, it is known as WTR. Once the Watchdog timer has been enabled, this bit can-
not be reset to 0. As long as the Watchdog timer is enabled, it will indicate a ’1’.
1 = Watchdog timer enabled
Writing a ’1’ to this bit causes the Watchdog to be retriggered to the timer value indicated
by bits WTM[3..0].
0000 = 0.125 s 1000 = 32 s
0001 = 0.25 s 1001 = 64 s
0010 = 0.5 s 1010 = 128 s
0011 = 1 s 1011 = 256 s
0100 = 2 s 1100 = 512 s
0101 = 4 s 1101 = 1024 s
0110 = 8 s 1110 = 2048 s
0111 = 16 s 1111 = 4096 s
WEN/WTR
WTM
User Guide
AM4024(E)
www.kontron.com
D R A F T — F O R I N T E R N A L U S E O N L Y
45
Page 46

User Guide
AM4024(E)
3.3.6 Board ID Low-Byte Register (BIDL)
Table 30: Board ID Low-Byte Register (BIDL)
ADDRESS 0x28D
BIT 7 6 5 4 3 2 1 0
NAME BIDL
ACCESS
RESET 0x10 (AM4024) / 0x12 (AM4024E)
BITFIELD DESCRIPTION
7 BIDL Board identification:
AM4024: 0xB410
AM4024E: 0xB412
R
3.3.7 LED Configuration Register (LCFG)
The LED Configuration Register holds a series of bits defining the onboard configuration for the front
panel User-Specific LEDs.
Table 31: LED Configuration Register (LCFG)
ADDRESS 0x290
BIT 7 6 5 4 3 2 1 0
NAME Reserved LCON
ACCESS
RESET 0000 0000
BITFIELD DESCRIPTION
3..0
LCON
User-Specific LED Configuration:
0000 = POST (ULEDs build a binary vector to display Port 80 signals)
0001 = Mode A (LEDs are controlled via the LCTRL register)
0010 = Mode B (default mode, function after boot-up)
0011 - 1111 = Reserved
R
R/W
Regardless of the selected configuration, the User-Specific LEDs are used to signal a number of fatal
onboard hardware errors, such as:
ULED3: Power failure (red)
ULED2: Clock failure (red)
ULED1: Hardware reset (red)
ULED0: uEFI BIOS boot failure (red)
In POST mode, the ULED3..0 fulfill a basic debug function during the boot-up phase as long as the first
access to Port 80 is processed. For further information on reading the 8-bit uEFI BIOS POST Code, refer
to Chapter 2.7.1.2, User-Specific LEDs.
In Mode A, the ULEDs can be individually configured according to the application requirements (see
Chapter 3.3.8, LED Control Register).
www.kontron.com
46
D R A F T — F O R I N T E R N A L U S E O N L Y
Page 47

User Guide
AM4024(E)
Configured for Mode B, the User-Specific LEDs are dedicated to functions as follows:
ULED3: Ethernet Link Status of AMC Gigabit Ethernet channel A, AMC port 0 (green)
ULED2: Ethernet Link Status of AMC Gigabit Ethernet channel B, AMC port 1 (green)
ULED1: SATA channels active (green)
ULED0: --
Note: If the ULED3 is lit red, the processor temperature is above 100° C.
If all ULEDs are blinking red, the processor temperature is above 125°C.
3.3.8 LED Control Register (LCTRL)
The LED Control Register enables the user to switch on and off the front panel User-Specific LEDs.
Table 32: LED Control Register (LCTRL)
ADDRESS 0x291
BIT 7 6 5 4 3 2 1 0
NAME LCMD LCOL
ACCESS
RESET 0000 0000
BITFIELD DESCRIPTION
7..4
3..0
LCMD
LCOL
User-Specific LED command:
0000 = Get ULED0 1000 = Set ULED0
0001 = Get ULED1 1001 = Set ULED1
0010 = Get ULED2 1010 = Set ULED2
0011 = Get ULED3 1011 = Set ULED3
0100 - 0111 = Reser ved 1100 - 1111 = Reser ved
User-Specific LED color:
0000 = Off
0001 = Green
0010 = Red
0011 = Red+Green
0100 - 1111 = Reserved
R/W
R/W
Note: The LED Control Register can only be used if the User-Specific LEDs indicated in the LED
Configuration Register (Chapter 3.3.7) are configured in Mode A.
www.kontron.com
47
D R A F T — F O R I N T E R N A L U S E O N L Y
Page 48
User Guide
AM4024(E)
3.3.9 General Purpose Output Register (GPOUT)
The General Purpose Output Register holds the general purpose output signals of the AMC Card-edge
connector.
Table 33: General Purpose Output Register (GPOUT)
ADDRESS 0x292
BIT 7 6 5 4 3 2 1 0
NAME Reserved GPO1 GPO0
ACCESS
RESET 0000 0 00
BITFIELD DESCRIPTION
1..0 GPO1..0 General purpose output signals:
0 = Output low
1 = Output high
R
R/W R/W
www.kontron.com
D R A F T — F O R I N T E R N A L U S E O N L Y
48
Page 49

User Guide
AM4024(E)
4 Power Considerations
4.1 AM4024(E) Voltage Ranges
The AM4024(E) has been designed for optimal power input and distribution. Still it is necessary to observe certain criteria essential for application stability and reliability.
The AM4024(E) requires two power sources, the module management power for the MMC (nominal:
3.3V DC) and a single payload power (nominal: 12V DC) for the module components.
The following table specifies the ranges for the input power voltage within which the board is functional.
Table 34: DC Operational Input Voltage Range
INPUT SUPPLY VOLTAGE OPERATING RANGE OPERATING RANGE
Payload Power (nominal: 12V DC) 10.0 V min. to 14.0 V max. 10.8 V min. to 13.2 V max.
Module Management Power (nominal: 3.3V DC) 3.0 V min. to 3.6 V. max. 3.135 V min. to 3.465 V max. (±5%)
Note: Failure to comply with the instructions above may result in damage to the board or improp-
er operation.
4.2 Carrier Power Requirements
4.2.1 Module Management Power
The module management power is used only for the Module Management Controller (MMC), which has
a very low power consumption. The management power voltage measured on the AMC at the connector
shall be 3.3 V ± 5% and the maximum current is 150 mA (see Table 34, DC Operational Input Voltage
Ranges).
The module management power is below 0.45 W and it has therefore not been taken into consideration
during the measurements.
4.2.2 Payload Power
Payload power is the power provided to the module from the carrier or the backplane for the main function of the module. The payload power voltage should be selected at the higher end of the specified
voltage range. The maximum continuous current limit value is based on the AMC module's power limit
of 80 W. At the minimum supply voltage of 10.8 V, the 80 W requires approximately 7.4 A.
The payload power voltage shall be at least 10.8 V and not more than 13.2 V at the module contacts
during normal conditions under all loads (see Table 34, DC Operational Input Voltage Ranges). The
bandwidth-limited periodic noise due to switching power supplies or any other source shall not exceed
200 mV peak to peak.
www.kontron.com
49
D R A F T — F O R I N T E R N A L U S E O N L Y
Page 50

User Guide
AM4024(E)
4.2.3 Power Sequencing for Unmanaged Systems
If the AM4024(E) is installed in an unmanaged system, the module management power must be stable and in
regulation before the payload power starts to ramp up.
4.3 Power Consumption
The goal of this description is to provide a method to calculate the power consumption for the
AM4024(E) baseboard and for additional configurations. The processor and the memory dissipate the
majority of the thermal power.
The power consumption measurements were carried out using the following testing parameters:
» Ethernet ports connected
» Mini DisplayPort connected
» Front mini USB 2.0 port connected
» 8 GB DDR3 SDRAM in dual-channel mode
» +12V main supply voltage
»2.5 m/s airflow
The operating systems used were uEFI Shell and Windows® 7, 64-bit. All measurements were conducted
at an ambient temperature of 25 °C. The power consumption values indicated in the tables below can
vary depending on the ambient temperature. This can result in deviations of the power consumption
values of up to 15%.
The following AMC fabric interfaces were active during the measurements:
» AMC Common Options Region, ports 0-1
» AMC Fat Pipes Region, ports 4-7
www.kontron.com
D R A F T — F O R I N T E R N A L U S E O N L Y
50
Page 51

User Guide
AM4024(E)
The power consumption was measured using the following the 4
th
generation processors:
» Quad-core Intel® Core™ i7-4860EQ (SV), 1.8 GHz, 6 MB L3 cache, GT3e, Intel® Iris™ Pro
Graphics 5200
» Quad-core Intel® Core™ i7-4700EQ (SV), 2.4 GHz, 6 MB L3 cache, GT2, Intel® HD Graphics
4600
» Dual-core Intel® Core™ i5-4402EQ (LV), 1.6 GHz, 3 MB L3 cache, GT2, Intel® HD Graphics
4600
The power consumption was measured using the following configurations:
» Work Load: uEFI shell
For this measurement the processor cores were active, the graphics controller was in idle
state (no application running) and Intel® Turbo Boost Technology was enabled.
»Work Load: Idle
For this measurement all processor cores and the graphics controller were in idle state (no
application running) and Intel® Turbo Boost Technology was enabled.
» Work Load: Typical
For this measurement all processor cores were operating at maximum work load and the
graphics controller was off or performing basic operation (e.g. dual screen output configuration with no 3D graphics application running) while Intel® Turbo Boost Technology was
disabled. These values represent the power dissipation reached under realistic, OS-controlled applications with the processor operating at maximum performance.
» Work Load: Maximum
These values represent the maximum power dissipation achieved through the use of specific
tools to heat up the processor cores and graphics controller. For this measurement Intel®
Turbo Boost Technology was enabled. These values are unlikely to be reached in real applications.
Table 35: AM4024(E) Power Consumption
WORK
LOAD
uEFI Shell on 21.55 W 22.61 W 16.65 W
Idle on 17.15 W 15.81 W 13.59 W
Typical off 32.39 W 44.53 W 20.12 W
Maximum on 63.28 W 68.67 W 37.74 W
TURBO
BOOST
Intel® Core™
i7-4860EQ (SV)
1.8 GHz
Intel® Core™
i7-4700EQ (SV)
2.4 GHz
Intel® Core™
i5-4402EQ (LV)
1.6 GHz
Note: The Intel® Core™ i7-4700EQ (SV),2.4 GHz, processor provides a software-configurable
Thermal Design Power (TDP) that allows for reduction of the power consumption by up to
10 W. TDP can be configured via the kboardconfig uEFI Shell command. For information on
this command, refer to the Chapter 9, uEFI BIOS.
D R A F T — F O R I N T E R N A L U S E O N L Y
www.kontron.com
51
Page 52

4.4 Payload Power Consumption of Accessories
The following table indicates the payload power consumption of AM4024(E) accessories.
Table 36: Power Consumption of AM4024(E) Accessories
MODULE PAYLOAD POWER
SATA Flash module approx. 1.0 W
Gigabit Ethernet port connected on the front panel (per interface) approx. 0.5 W
4.5 IPMI FRU Payload Power Consumption
The following table indicates the IPMI FRU payload power consumption.
Table 37: IPMI FRU Payload Power Consumption
User Guide
AM4024(E)
AM4024(E) with Intel® Core™
i7-4860EQ (SV), 1.8 GHz
65 W65 W40 W
AM4024(E) with Intel® Core™
i7-4700EQ (SV), 2.4 GHz
AM4024(E) with Intel® Core™
i5-4402EQ (LV), 1.6 GHz
www.kontron.com
D R A F T — F O R I N T E R N A L U S E O N L Y
52
Page 53

User Guide
AM4024(E)
5 Thermal Considerations
The thermal characteristic graphs shown in the following sections are intended to serve as guidance
for reconciling the required computing power with the necessary system volumetric airflow over the
ambient temperature. The graphs contain two curves representing upper level working points based on
different levels of average CPU utilization. When operating below the corresponding curve, the CPU
runs without any intervention of thermal supervision (the CPU is below 100°C). When operated above
the corresponding curve, various thermal protection mechanisms may take effect resulting in temporarily reduced CPU performance or finally in an emergency stop (the CPU is at 125°C) in order to protect
the CPU and the chipset from thermal destruction. In real applications this means that the board can
be operated temporarily at a higher ambient temperature or at a reduced flow rate and still provide
some margin for temporarily requested peak performance before thermal protection will be activated.
An airflow of 20 cfm is a typical value for a standard Kontron MicroTCA system. For other systems the
available airflow will differ. The maximum ambient operating temperature must be determined for such
environments.
How to read the diagram
Select a specific CPU and choose a specific working point. For a given flow rate there is a maximum airflow input temperature (= ambient temperature) provided. Below this operating point, thermal supervision will not be activated. Above this operating point, thermal supervision will become active
protecting the CPU from thermal destruction. The minimum flow rate provided must be more than the
value specified in the diagram.
Volumetric flow rate
The volumetric flow rate refers to an airflow through a fixed cross-sectional area (i.e. slot width x
depth. The volumetric flow rate is specified in m³/s (cubic-meter-per-second) or cfm (cubic-feet-perminute) respectively.
Conversion:
1 cfm = 0.47 x 10
1 m
³/s = 3600 m³/h = 2118.9 cfm
The following figures illustrate the operational limits of the AM4024(E) taking into consideration power consumption vs. ambient air temperature vs. airflow rate. The maximum airflow input temperature
was measured at the bottom of the AMC module just before the air flowed over the board.
-
³ m³/s = 1.7 m³/h
Note: The AM4024(E) must be operated within the thermal operational limits indicated below.
www.kontron.com
D R A F T — F O R I N T E R N A L U S E O N L Y
53
Page 54

5.1 Operational Limits for the AM4024(E)
20
25
30
35
40
45
50
55
60
65
70
0 0.002 0.004 0.006 0.008 0.01 0.012 0.014 0.016 0.018
20
25
30
35
40
45
50
55
60
65
70
0 2.5 5 7.5 10 12.5 15 17.5 20 22.5 25 27.5 30 32.5 35 37.5 40
VOLUMETRIC FLOW RATE (m3/s)
MAX. AIRFLOW INPUT TEMP. (°C)
VOLUMETRIC FLOW RATE (CFM)
AM4024 (E) - i7-4860EQ - 1.8 GHz
SYSTEM
Minimum
20
25
30
35
40
45
50
55
60
65
70
0 0.002 0.004 0.006 0.008 0.01 0.012 0.014 0.016 0.018
20
25
30
35
40
45
50
55
60
65
70
0 2.5 5 7.5 10 12.5 15 17.5 20 22.5 25 27.5 30 32.5 35 37.5 40
VOLUMETRIC FLOW RATE (m3/s)
MAX. AIRFLOW INPUT TEMP. (°C)
VOLUMETRIC FLOW RATE (CFM)
AM4024 (E) - i7-4700EQ - 2.4 GHz
SYSTEM
Minimum
Figure 11: AM4024(E) with i7-4860EQ (SV), 1.8 GHz
User Guide
AM4024(E)
Figure 12: AM4024(E) with i7-4700EQ (SV), 2.4 GHz
D R A F T — F O R I N T E R N A L U S E O N L Y
www.kontron.com
54
Page 55
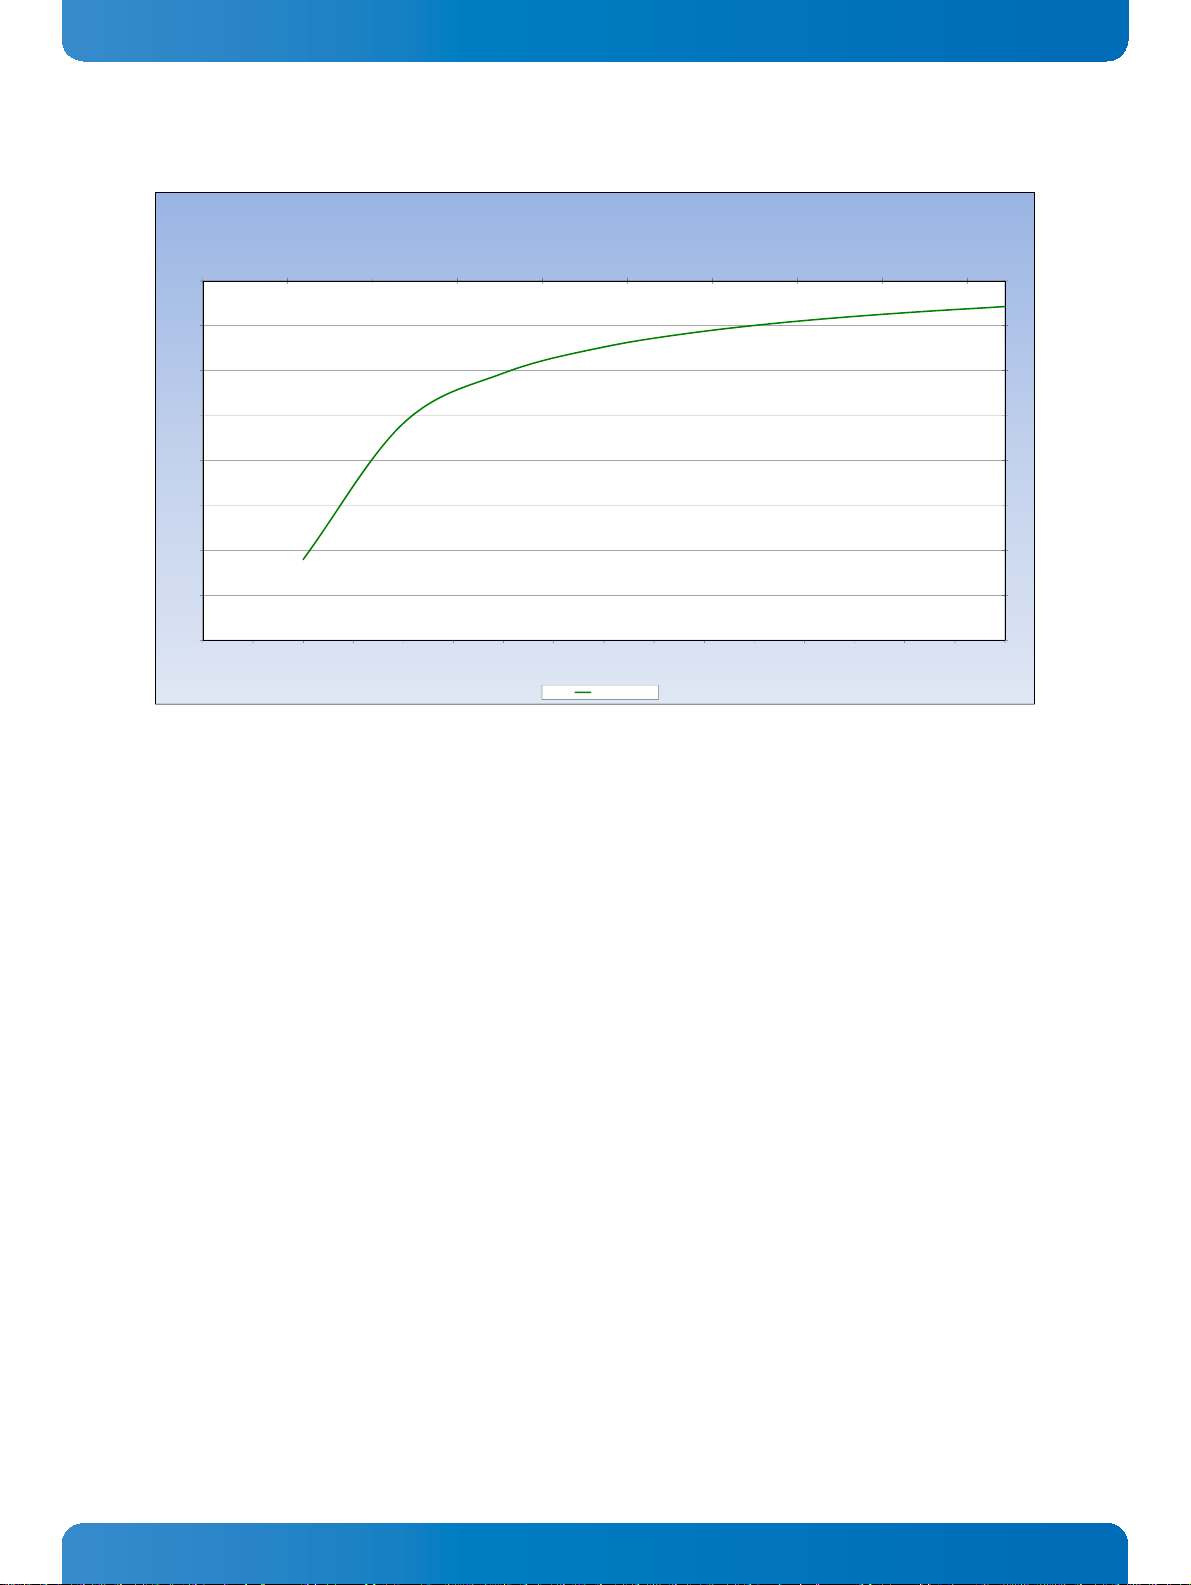
Figure 13: AM4024(E) with i5-4402EQ (LV), 1.6 GHz
40
45
50
55
60
65
70
75
80
0 0.002 0.004 0.006 0.008 0.01 0.012 0.014 0.016 0.018
40
45
50
55
60
65
70
75
80
0 2.5 5 7.5 10 12.5 15 17.5 20 22.5 25 27.5 30 32.5 35 37.5 40
VOLUMETRIC FLOW RATE (m3/s)
MAX. AIRFLOW INPUT TEMP. (°C)
VOLUMETRIC FLOW RATE (CFM)
AM4024 - i5-4402EQ - 1.6 GHz
SYSTEM
User Guide
AM4024(E)
www.kontron.com
D R A F T — F O R I N T E R N A L U S E O N L Y
55
Page 56
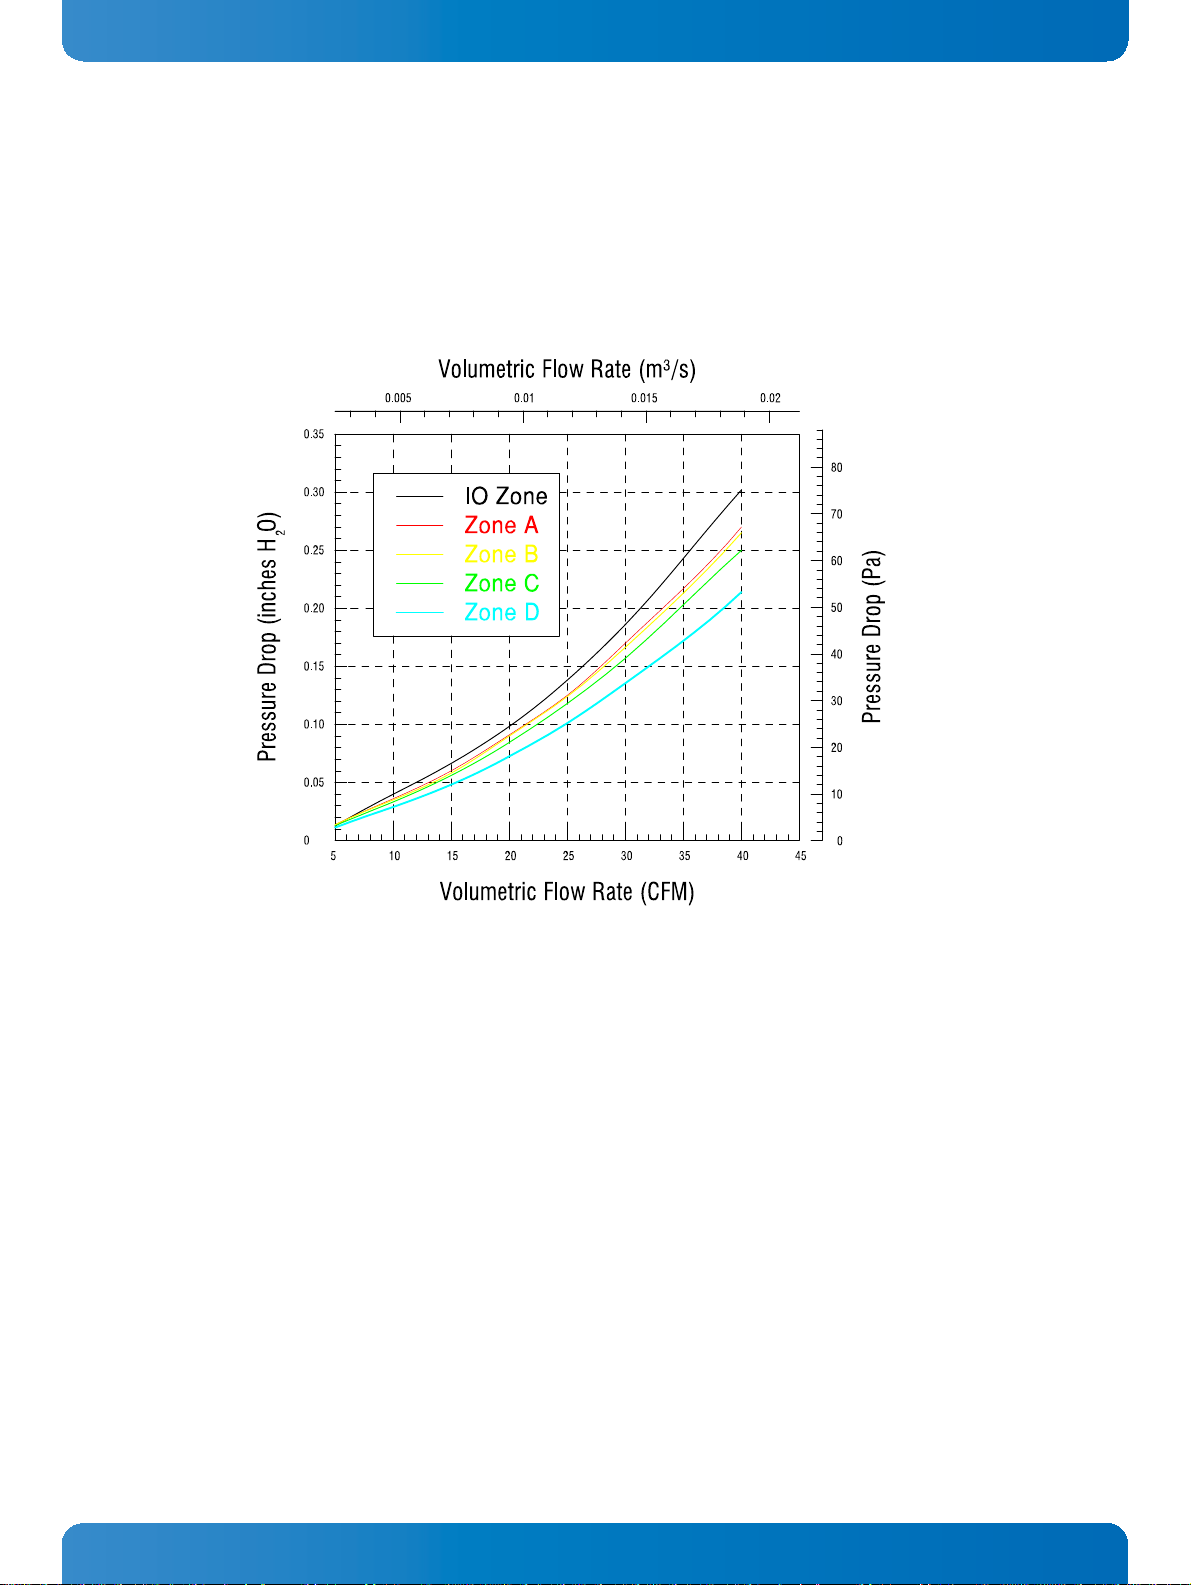
User Guide
AM4024(E)
5.1.1 Airflow Impedance
The following figure shows the airflow impedance curves of the AM4024(E) module.
No card guides or struts have been used for the measurements because the resulting airflow impedance
depends on individual configuration of the AMC carrier or MicroTCA system.
Figure 14: AM4024(E) Airflow Impedance
The following table indicates the pressure drop ranging from 5 to 40 cfm volumetric flow rates.
D R A F T — F O R I N T E R N A L U S E O N L Y
www.kontron.com
56
Page 57

Table 38: AM4024(E) Airflow Impedance by Zone [N/m²]
I/O ZONE
ZONE A ZONE B ZONE C ZONE D
32.8 mm 34 mm 34 mm 34 mm 34 mm
PCB
component
envelope
component
envelope
User Guide
AM4024(E)
VOLUMETRIC
FLOW RATE [CFM]
5 3.5 3.4 3.4 3.2 2.8
10 9.5 9.0 8.9 8.3 7.2
15 15.7 14.9 14.6 13.8 11.9
20 24.7 22.7 22.4 21.0 18.0
25 34.5 31.2 30.8 29.3 25.2
30 46.4 42.4 41.4 39.1 33.7
35 60.4 54.1 53.1 50.4 42.8
40 75.2 67.2 65.8 62.5 53.1
I/O ZONE ZONE A ZONE B ZONE C ZONE D
PRESSURE DROP [N/m²]
Table 39: AM4024(E) Airflow Impedance by Zone [inches H2O]
VOLUMETRIC
FLOW RATE [CFM]
5 0.01 0.01 0.01 0.01 0.01
10 0.04 0.04 0.04 0.03 0.03
15 0.06 0.06 0.06 0.06 0.05
20 0.10 0.09 0.09 0.08 0.07
25 0.14 0.13 0.12 0.12 0.10
30 0.19 0.17 0.17 0.16 0.14
35 0.24 0.22 0.21 0.20 0.17
40 0.30 0.27 0.26 0.25 0.21
I/O ZONE ZONE A ZONE B ZONE C ZONE D
PRESSURE DROP [inches H2O]
5.1.2 Airflow Paths
The area between the front panel and the AMC Card-edge connector is divided into five zones, one I/O
zone and four uniform thermal zones, A, B, C, and D. The PICMG AMC.0 Specification states that the
uniformity of the airflow paths’ resistance should provide an impedance on the A, B, C, and D zones
that is within ± 25% of the average value of the four thermal zones.
The following figure shows the thermal zones of the AM4024(E).
Figure 15: Thermal Zones of the AM4024(E) Module
D R A F T — F O R I N T E R N A L U S E O N L Y
www.kontron.com
57
Page 58

The following table indicates the deviation of the airflow rate on the AM4024(E) module.
Table 40: Deviation of the Airflow Rate on the AM4024(E)
User Guide
AM4024(E)
VOLUMETRIC
FLOW RATE [CFM]
5 -1.6% -2.5% -0.7% 4.7%
10 -0.9% -2.2% -0.9% 4.0%
15 -0.6% -2.1% -1.2% 3.9%
20 -0.6% -1.9% -1.0% 3.5%
25 -0.5% -1.9% -1.2% 3.6%
30 -0.4% -1.9% -1.2% 3.5%
35 -0.3% -1.9% -1.2% 3.4%
40 -0.3% -1.8% -1.3% 3.3%
ZONE A ZONE B ZONE C ZONE D
PRESSURE DROP [N/m²]
Note: The AM4024(E) module has an airflow rate deviation of max. ± 5.0% of the average value
of the four thermal zones (max. ± 25% is allowed).
Positive deviation means increased airflow.
Negative deviation means decreased airflow.
Note: The AM4024(E) module provides an open area of 40%. According to the PICMG AMC.0 Spec-
ification, an open area of 20 to 70% perpendicular to the airflow path is recommended.
.
D R A F T — F O R I N T E R N A L U S E O N L Y
www.kontron.com
58
Page 59

User Guide
J2
NAND
Flash
NAND
Flash
AM4024(E)
6 SATA Flash Module
The AM4024(E) provides an optional SATA Flash module with up to 64 GB NAND flash memory. The SATA
Flash module is connected to the AM4024(E) via the board-to-board connectors J7 located on the
AM4024(E) and J2 located on the SATA Flash module. The SATA Flash module has been optimized for
embedded systems providing high performance, reliability and security.
Note: If the SATA Flash module is installed, the J7 interface is not available for the RTC Backup
Battery module.
6.1 Technical Specifications
Table 41: SATA Flash Module Main Specifications
FEATURES SPECIFICATIONS
Board-to-Board
Connector
Interface
Memory Up to 64 GB SLC-based NAND flash memory
Memory
Power Consumption typ. 1.0 W; 3.3 V supply
Temperature Range Operational: 0°C to +60°C Standard
General
Climatic Humidity 93% RH at 40°C, non-condensing (acc. to IEC 60068-2-78)
Dimensions 70 mm x 28 mm
Board Weight ca. 14 grams
One 34-pin, male, board-to-board connector, J2, for interfacing with the AM4024(E)
» Built-in full hard disk emulation
» Up to 100 MB/s read rate
» Up to 90 MB/s write rate
-40°C to +70°C Extended (on request)
Storage: -40°C to +85°C
Note: Write protection is available for this module. Contact Kontron for further assistance if
write protection is required.
6.2 SATA Flash Module Layout
Figure 16: SATA Flash Module Layout (Bottom View)
D R A F T — F O R I N T E R N A L U S E O N L Y
www.kontron.com
59
Page 60

User Guide
J1
BT1
BT2
AM4024(E)
7 RTC Backup Battery Module
This optional battery mezzanine module is provided for applications requiring backup power for the
RTC. It is supplied with up to two parallel-connected 3V lithium batteries. The module is field replaceable. The batteries themselves are not replaceable. The RTC Backup Battery module utilizes the J7 connector for interfacing with the AMC module.
Note: If the RTC Backup Battery module is installed, the J7 interface is not available for the SATA
Flash module.
7.1 Technical Specifications
Table 42: RTC Backup Battery Module Main Specifications
FEATURES SPECIFICATIONS
Board-to-Board
Connector
Interface
Battery Up to two 3.0V lithium batteries
Battery
Temperature Range Operational: - 5°C to + 55°C
Climatic Humidity 93% RH at 40°C, non-condensing (acc. to IEC 60068-2-78)
General
Dimensions 70 mm x 28 mm
Board Weight ca. 14 grams
One 34-pin, male, board-to-board connector, J1, for interfacing with the AM4024(E)
UL-approved
Storage: -30°C to + 60°C
7.2 RTC Backup Battery Module Layout
Figure 17: RTC Backup Battery Module Layout (Top and Bottom Views)
D R A F T — F O R I N T E R N A L U S E O N L Y
www.kontron.com
60
Page 61

User Guide
AM4024(E)
8 Installation
This chapter is oriented towards an application environment. Some aspects may, however, be applicable to a development environment.
8.1 Safety
To ensure personnel safety and correct operation of this product, the following safety precautions
must be observed:
» All operations involving the AM4024(E) require that personnel be familiar with system
equipment, safety requirements and the AM4024(E).
» This product contains electrostatically sensitive components which can be seriously dam-
aged by electrical static discharge (ESD). Therefore, proper handling must be ensured at all
times.
» Whenever possible, unpack or pack this product only at EOS/ESD safe work stations. Where a
safe work station is not guaranteed, it is important for the user to be electrically discharged
before touching the product with his/her hands or tools. This is most easily done by touching
a metal part of your system housing.
» Do not handle this product out of its protective enclosure while it is not used for operational
purposes unless it is otherwise protected.
» Do not touch components, connector-pins or traces.
Kontron assumes no liability for any damage resulting from failure to comply with these requirements.
8.2 General Instructions on Usage
In order to maintain Kontron’s product warranty, this product must not be altered or modified in any
way. Changes or modifications to the device, which are not explicitly approved by Kontron and described in this manual or received from Kontron’s Technical Support as a special handling instruction,
will void your warranty.
This device should only be installed in or connected to systems that fulfill all necessary technical and
specific environmental requirements. This applies also to the operational temperature range of the
specific board version, which must not be exceeded. If batteries are present, their temperature restrictions must be taken into account.
D R A F T — F O R I N T E R N A L U S E O N L Y
www.kontron.com
61
Page 62

User Guide
AM4024(E)
8.3 Board Installation
The AM4024(E) is designed for hot swap operation. Hot swapping allows the coordinated insertion and
extraction of modules without disrupting other operational elements within the system.
8.3.1 Hot Swap Insertion
Prior to following the steps below, ensure that the safety requirements are met.
To insert the AM4024(E) in a running system proceed as follows:
1. Ensure that module handle is in the “Unlocked” position (see Figure 7, Module Handle Positions).
2. Using the front panel as a grip, carefully insert the module into the slot designated by the
application requirements until it makes contact with the carrier/backplane connector.
3. Apply pressure to the front panel until the module is properly seated in the carrier/backplane
connector. This may require a considerable amount of force. Apply pressure only to the front
panel, not the module handle. During seating in the connector, there is a noticeable “snapping” of the module into the connector. When the board is seated, it should be flush with the
carrier or system front panel.
4. The blue HS LED turns on.
When the module is seated, the module management power is applied and the blue HS LED
turns on. (No payload power is applied at this time).
5. Connect all external interfacing cables to the module as required and ensure that they are
properly secured.
6. Push the module handle in the “Locked” position.
Now the module is locked and the hot swap switch is actuated.
7. The blue HS LED displays long blinks.
When the carrier IPMI controller detects the module, it sends a command to the module to
perform long blinks of the blue HS LED.
8. The blue HS LED turns off indicating that the AM4024(E) is operating.
The Intelligent Platform Management Controller on the carrier reads the Module Current Re-
quirements record and the AMC Point-to-Point Connectivity record. If the module FRU information is valid and the carrier can provide the necessary payload power, the blue HS LED will
be turned off. The carrier now enables the payload power for the module.
Note: If the module FRU information is invalid or the carrier cannot provide the necessary pay-
load power, the blue HS LED stops blinking and remains lit. Should this problem occur,
please contact Kontron.
D R A F T — F O R I N T E R N A L U S E O N L Y
www.kontron.com
62
Page 63

User Guide
AM4024(E)
8.3.2 Hot Swap Removal
Prior to following the steps below, ensure that the safety requirements are met. When removing a
board from the system, particular attention must be paid to the components that may be hot, such as
heat sink, etc.
To remove the AM4024(E) from a running system proceed as follows:
1. Pull the module handle in the “Hot Swap” position to initiate the extraction process of the
module Figure “Module Handle Positions”).
2. The blue HS LED displays short blinks.
When the carrier/ chassis IPMI controller receives the handle opened event, it sends a com-
mand to the MMC with a request to perform short blinks of the blue HS LED. This indicates
that the module is waiting to be deactivated.
Now the module waits for a permission from the higher level management (Shelf Manager or
System Manager) to proceed with its deactivation.
Once the module receives the permission to continue the deactivation, all used ports are disabled.
3. The blue HS LED turns on.
The Intelligent Platform Management Controller on the carrier / chassis disables the mod-
ule's payload power and the blue HS LED is turned on. Now the module is ready to be safely
extracted.
4. Pull the module handle in the “Unlocked” position.
5. Disconnect any interfacing cables that may be connected to the module.
6. Disengage the module from the carrier/backplane connector by pulling on the module handle. This may require a considerable amount of force.
7. Using the front panel as a grip, remove the module from the carrier/ chassis.
8. Dispose of the module as required.
www.kontron.com
D R A F T — F O R I N T E R N A L U S E O N L Y
63
Page 64

User Guide
AM4024(E)
8.4 Installation of Peripheral Devices
The AM4024(E) is designed to accommodate a SATA Flash Module or an RTC Backup Battery Module.
Prior to installation of a peripheral device, ensure that the safety requirements are met. Special attention must be paid to avoid touching any components that may be hot, such as heat sink, etc.
8.4.1 SATA Flash Module Installation
Serial ATA Extension Module with up to 64 GB SATA NAND Flash Memory may be connected to the
A
AM4024(E)
This optionally available module must be physically installed on the AM4024(E) prior to installation of
the AM4024(E) in a system. During installation it is necessary to ensure that the SATA Flash module is
properly seated in the onboard connector J7, i.e. the pins are aligned correctly and not bent.
Before putting the AM4024(E) into operation, ensure that the boot priority is configured as required
for the application.
via the onboard connector J7.
Note: If the RTC Backup Battery module is installed, the J7 interface is not available for the SATA
Flash module.
Note: Only qualified SATA Flash modules from Kontron are authorized for use with the
AM4024(E). Failure to comply with the above will void the warranty and may result in damage to the board or the system.
8.4.2 RTC Backup Battery Module Installation
A
n RTC Backup Battery module is available and may be connected to the
nector J7.
This optionally available module must be physically installed on the AM4024(E) prior to installation of
the AM4024(E) in a system.
During installation it is necessary to ensure that the module is properly seated in the onboard connector J7, i.e. the pins are aligned correctly and not bent.
Note: If the RTC Backup Battery module is installed, the J7 interface is not available for the SATA
Flash module.
AM4024(E)
via the onboard con-
www.kontron.com
D R A F T — F O R I N T E R N A L U S E O N L Y
64
Page 65

User Guide
AM4024(E)
9 uEFI BIOS
9.1 Starting the uEFI BIOS
The AM4024(E) is provided with a Kontron-customized, pre-installed and configured version of SecureCore Tiano™ (referred to as uEFI BIOS in this manual), Phoenix BIOS firmware based on the Unified
Extensible Firmware Interface (uEFI) specification and the Intel® Platform Innovation Framework for
EFI. This uEFI BIOS provides a variety of new and enhanced functions specifically tailored to the hardware features of the AM4024(E).
The uEFI BIOS comes with a Setup program which provides quick and easy access to the individual function settings for control or modification of the uEFI BIOS configuration. The Setup program allows the
accessing of various menus which provide functions or access to sub-menus with more specific functions of their own.
To start the uEFI BIOS Setup program, follow the steps below:
1. Power on the board.
2. Wait until the first characters appear on the screen (POST messages or splash screen).
3. Press the <F2> key.
4. If the uEFI BIOS is password-protected, a request for password will appear.
Enter either the User Password or the Supervisor Password (see Security Setup menu), press
<RETURN>, and proceed with step 5.
5. A Setup menu will appear.
The AM4024(E) uEFI BIOS Setup program uses a hot key-based navigation system. A hot key legend bar
is located on the bottom of the Setup screens. The following table provides information concerning the
usage of these hot keys.
Table 43: Navigation
HOT KEY DESCRIPTION
<F1> The <F1> key is used to invoke the General Help window.
<F5> or <-> The <F5> key or the <Minus> key is used to select the next lower value within a f ield.
<F6> or <+> The <F6> key or the <Plus> key is used to select the next higher value within a field.
<F9> The <F9> key is used to load the standard default values.
<F10> The <F10> key is used to save the current settings and exit the uEFI BIOS Setup.
><> The <Left/Right> arrows are used to select major Setup menus on the menu bar.
<
For example: Main screen, Advanced screen, Security screen, etc.
<
><> The <Up/Down> arrows are used to select fields in current menu, for example a Setup function or a
sub-screen.
<ESC> The <ESC> key is used to exit a major Setup menu and enter the Exit Setup menu.
Pressing the <ESC> key in a sub-menu causes the next higher menu level to be displayed.
<RETURN> The <RETURN> key is used to execute a command or select a submenu.
D R A F T — F O R I N T E R N A L U S E O N L Y
www.kontron.com
65
Page 66

User Guide
AM4024(E)
9.2 Setup Menus
The Setup utility features four menus listed in the selection bar at the top of the screen:
»Main
»Advanced
»Security
»Boot
»Exit
The Setup menus are selected via the left and right arrow keys. The currently active menu and the currently active uEFI BIOS Setup item are highlighted in white.
Each Setup menu provides two main frames. The left frame displays all available functions. Functions
that can be configured are displayed in blue. Functions displayed in gray provide information about
the status or the operational configuration. The right frame displays an Item Specific Help window providing an explanation of the respective function.
9.2.1 Main Setup Menu
Upon entering the uEFI BIOS Setup program, the Main Setup menu is displayed. This screen lists the
Main Setup menu sub-screens and provides basic system information as well as functions for setting
the system time and date.
Table 44: Main Setup Menu Sub-Screens and Functions
SUB-SCREEN FUNCTION DESCRIPTION
System Information BIOS Version, Build
Time, etc.
Boot Features CSM Support Enables/Disables Compatibility Support Module
Quick Boot Enables/Disables time-optimized POST, causing certain preconfigured
USB Legacy Enables/Disables support for USB devices including mouse, keyboard,
Console Redirection Enables/Disables console redirection over serial port.
Terminal Type Selects the terminal type to be emulated.
Baudrate Selects the baud rate of the serial port.
Flow Control Specif ies the type of flow control to be used for the serial port.
Continue C.R. after
POST
Read-only field.
Displays information about the system BIOS, processor, memory, etc.
OEM optimizations to be made when the system boots.
mass storage, and so on.
Enables/Disables console redirection after the operating system has
loaded.
www.kontron.com
D R A F T — F O R I N T E R N A L U S E O N L Y
66
Page 67

User Guide
AM4024(E)
9.2.2 Advanced Setup Menu
The Advanced Setup menu provides sub-screens and functions for advanced configuration.
Note: Setting items on this screen to incorrect values may cause the system to malfunction.
Table 45: Advanced Setup Menu Sub-Screens and Functions
SUB-SCREEN FUNCTION DESCRIPTION
Processor Configu-
ration
ME Configuration ME FW Downgrade Enables/Disables ME FW Downgrade function.
CPU Flex Ratio Override Enables/Disables CPU Flex Ratio Programming.
CPU Flex Ratio Settings CPU Flex Ratio Settings: This value must be between Max. Efficiency
Ratio (LFM) and Maximum non-turbo ratio set by Hardware (HFM).
See Table 5, Features of the Processors Supported on the
AM4024(E), for possible LFM/HFM values. The active nominal CPU
frequency is Ratio*100MHz.
9.2.3 Security Setup Menu
The Security Setup menu provides information about the passwords and functions for specifying the
security settings. The passwords are case-sensitive. The AM4024(E) provides no factory-set passwords.
Table 46: Security Setup Menu Functions
FUNCTION DESCRIPTION
Supervisor Password is: Read-only field.
User Password is: Read-only field.
Set Supervisor Password Sets or clears the Supervisor Password.
Supervisor Hint String Press “Enter” to specify a hint string for the Supervisor Password.
Set User Password Sets or clears the User Password.
User Hint String Press “Enter” to specify a hint string for the User Password.
Min. password length Specifies the minimum password length.
Authenticate User on Boot Enables the user authentication prompt on the boot.
HDD Password Select Specif ies whether to enable User-only support for HDD or User and Master support.
HDD00 Password State Read-only field.
Set HDD00 User Password Specif ies and confirms the HDD User Password.
TPM Support Enables/Disables TPM support.
Note: If there is already a password installed, the system asks for this first. To clear a password,
simply enter nothing and acknowledge by pressing <RETURN>. To set a password, enter it
twice and acknowledge by pressing <RETURN>.
Table 47: TPM Configuration Sub-Screen
FUNCTION DESCRIPTION
Current TPM State Read-only field.
TPM Action Enacts TPM Action.
Note: Most TPM actions require TPM to be Enabled to take effect.
Omit Boot Measurements Enabling this option causes the system to omit recording boot device attempts in PCR[4].
www.kontron.com
D R A F T — F O R I N T E R N A L U S E O N L Y
67
Page 68
User Guide
AM4024(E)
9.2.3.1 Remember the Password
It is highly recommended to keep a record of all passwords in a safe place. Forgotten passwords may
lead to being completely locked out of the system.
If the system cannot be booted because neither the User Password nor the Supervisor Password are
known, refer to the Chapter 3.1, DIP Switch Configuration, for information about clearing the uEFI
BIOS settings, or contact Kontron for further assistance.
Note: The HDD security passwords cannot be cleared using the above method.
9.2.4 Boot Setup Menu
The Boot Setup menu lists the for boot device priority order, which is dynamically generated.
Table 48: Boot Priority Order
FUNCTION DESCRIPTION
Boot Priority Order 1. Internal Shell Keys used to view or configure devices:
2. USB FDD:
3. USB CD:
4. ATAPI CD:
5. USB HDD:
6. ATA HDD0:
7. ATA HDD1:
8. ATA HDD2:
9. ATA HDD3:
10. ATA HDD4:
11. ATA HDD5:
12. Other HDD:
13. PCI LAN:
< > and <> arrows select a device.
<+> and <-> move the device up or down.
<Shift + 1> enables or disables a device.
<Del> deletes an unprotected device.
9.2.5 Exit Setup Menu
The Exit Setup menu provides functions for handling changes made to the uEFI BIOS settings and the
exiting of the Setup program.
Table 49: Exit Setup Menu Functions
FUNCTION DESCRIPTION
Exit Saving Changes Equal to F10, save all changes of all menus, then exit the uEFI BIOS Setup. Finally,
resets the system automatically.
Exit Discarding Changes Never save changes, then exit the uEFI BIOS Setup.
Load Setup Defaults Equal to F9. Load standard default values.
Discard Changes Load the original value of this boot time, not the default Setup value.
Save Changes Save all changes of all menus, but do not reset system.
www.kontron.com
68
D R A F T — F O R I N T E R N A L U S E O N L Y
Page 69

User Guide
AM4024(E)
9.3 The uEFI Shell
The Kontron uEFI BIOS features a built-in and enhanced version of the uEFI Shell. For a detailed description of the available standard shell scripting refer to the EFI Shell User’s Guide. For a detailed description of the available standard shell commands, refer to the EFI Shell Command Manual. Both
documents can be downloaded from the EFI and Framework Open Source Community homepage (http:/
/sourceforge.net/projects/efi-shell/files/documents/).
Please note that not all shell commands described in the EFI Shell Command Manual are provided by
the Kontron uEFI BIOS.
9.3.1 Introduction, Basic Operation
The uEFI Shell forms an entry into the uEFI boot order and is the first boot option by default.
9.3.1.1 Entering the uEFI Shell
To enter the uEFI Shell, follow the steps below:
1. Power on the board.
2. Ignore the message: “Press the <F2> key”.
3. Press the ESC key within 5 seconds after a message such as the one below appears:
EFI Shell version 2.31 [4660.22136]
Current running mode 1.1.2
Device mapping table
blk0 :Removable HardDisk - Alias hd33b0b0b fs0
Acpi(PNP0A03,0)/Pci(1D|7)/Usb(1, 0)/Usb(1, 0)/HD(Part1,Sig17731773)
...
Press the ESC key within 5 seconds to skip startup.nsh, and any other key to
continue.
The output produced by the device mapping table can vary depending on the board’s configuration.
If the ESC key is pressed before the 5-second timeout has elapsed, the shell prompt is shown:
Shell>
9.3.1.2 Exiting the uEFI Shell
To exit the uEFI Shell, follow one of the steps below:
1. Invoke the exit uEFI Shell command to select the boot device in the boot menu for the OS to
boot from.
2. Reset the board using the reset uEFI Shell command.
www.kontron.com
D R A F T — F O R I N T E R N A L U S E O N L Y
69
Page 70

User Guide
AM4024(E)
9.3.2 Kontron-Specific uEFI Shell Commands
The Kontron uEFI implementation provides the following additional commands related to the specific
HW features of the Kontron system.
Table 50: Kontron-Specific uEFI Shell Commands
COMMAND DESCRIPTION
kBoardConfig Configures non-volatile board settings, such as:
»Pxe
»PrimaryDisplay
»SataMode
» SataSpeed
»Sata0Hotplug
(SATA0 in the uEFI BIOS corresponds to port SATA-A in the port mapping)
»Sata1Hotplug
(SATA1 in the uEFI BIOS corresponds to port SATA-B in the port mapping)
»IntelVT
»IntelHT
» SpeedStep
»CpuTurbo
»cTDP
»C3State
»C6State
»C7State
» AMC configuration options (e.g. “AMCBaseCfg”, “AMCPort<n>”, “AMCFclka”, etc.)
»WrProtSystem
» AutoUpdate
If AutoUpdate is enabled, an automatic update procedure from the connected mass storage
device is initiated after a reset. The update status is indicated in the log file located in the
directory where the firmware images are stored.
Note: The parameters of the kBoardConfig command are not case-sensitive.
kBoardInfo Shows a summary of board-specific data and displays/checks various parameters such as the
current uEFI BIOS revision, etc.
kBootScript Manages the flash-stored startup script
If the shell is launched by the boot process, it executes a shell script stored in the flash. If the
shell script terminates, the shell will continue the boot process. However, the shell script can
also contain any other boot command.
kFlash Programs and verifies the SPI boot flashes holding the uEFI BIOS code
uEFI BIOS binary f iles must be available from connected mass storage devices, such as USB
flash drive or harddisk.
kIpmi Executes a comprehensive set of IPMI functions from the uEFI Shell using the KCS interface and
upgrades the IPMI firmware.
kJtag Programs an onboard device via the JTAG interface
kNvram Manages the NVRAM to restore the system’s default settings
Since all uEFI settings are stored inside the NVRAM, the default settings are loaded after invok-
ing this command.
D R A F T — F O R I N T E R N A L U S E O N L Y
www.kontron.com
70
Page 71

Table 50: Kontron-Specific uEFI Shell Commands
COMMAND DESCRIPTION
kPassword Controls uEFI Setup and Shell passwords
This command is used to determine the status of both passwords (set or not set) and to set or
clear the uEFI Shell and Setup passwords. Both user and superuser (Supervisor) passwords can
be controlled with this command.
Call without options to get current password status.
Entering an empty password clears the password.
kRamdisk Creates and manages RAMdisks
This command is used to perform file operations when no real filesystem is connected to the
system.
kUpdate Controls the Kontron common update tool
When using the kUpdate command, the structure of the ZIP archive must not be altered. kUp-
date automatically starts the update procedure via kUpdate -u. If a certain image is intended
to be used, enter kUpdate -s to select the respective image.
kWatchdog Configures the Kontron onboard Watchdog
This command is used to enable the Kontron onboard Watchdog with reset target before OS
boot. This can be used to detect if the OS fails to boot and react by reset.
User Guide
AM4024(E)
The uEFI Shell commands are not case-sensitive. Each uEFI Shell command is provided with a detailed
online help that can be invoked by entering “<cmd> <space> <-?>” in the command line. To display the
uEFI Shell command list, enter <help> or <?> in the command line.
9.4 uEFI Shell Scripting
9.4.1 Startup Scripting
If the ESC key is not pressed and the timeout is run out, the uEFI Shell tries to execute some startup
scripts automatically. It searches for scripts and executes them in the following order:
1. Kontron flash-stored startup script
2. If there is no Kontron flash-stored startup script present, the uEFI-specified startup.nsh
script is used. This script must be located on the root of any of the attached FAT formatted
disk drive.
3. If none of the startup scripts is present or the startup script terminates, the default boot order is continued.
9.4.2 Create a Startup Script
Startup scripts can be created using the uEFI Shell built-in editor edit or under any OS with a plain text
editor of your choice. To create a startup shell script, simply save the script on the root of any FAT-formatted drive attached to the system. To copy the startup script to the flash use the kBootScript uEFI
Shell command.
In case there is no mass storage device attached, the startup script can be generated in a RAM disk and
stored in the SPI boot flash using the kRamdisk uEFI Shell command.
www.kontron.com
71
D R A F T — F O R I N T E R N A L U S E O N L Y
Page 72

User Guide
AM4024(E)
9.4.3 Examples of Startup Scripts
9.4.3.1 Execute Shell Script on Other Harddrive
This example (startup.nsh) executes the shell script named bootme.nsh located in the root of
the first detected disc drive (fs0).
fs0:
bootme.nsh
9.4.3.2 Enable Watchdog
The uEFI Shell provides an environment variable used to control the execution flow. The following sample start-up script shows the uEFI Shell environment variable wdt_enable used to control the
Watchdog.
echo -off
echo “Executing sample startup.nsh...”
if %wdt_enable% == “on” then
kwatchdog -t 15
echo “Watchdog enabled”
endif
To create a uEFI Shell environment variable, use the set uEFI Shell command as shown below:
Shell> set wdt_enable on
Shell> set
wdt_enable : on
Shell> reset
9.4.3.3 Handling the Startup Script in the SPI Boot Flash
In case there is no mass storage device attached, the startup script can be generated in a RAM disk and
stored in the SPI boot flash using the following instructions:
1. Press <ESC> during power-up to log into the uEFI Shell.
2. Create a RAM disk and set the proper working directory as shown below:
Shell> kramdisk -s 3 -c -m myramdisk
Shell> myramdisk:
3. Enter the sample start-up script mentioned above in this section using the edit uEFI Shell
command.
D R A F T — F O R I N T E R N A L U S E O N L Y
myramdisk:\> edit boot.nsh
www.kontron.com
72
Page 73

User Guide
AM4024(E)
4. Save the start-up script to the SPI boot flash using the kBootScript uEFI Shell command.
myramdisk:\> kbootscript -p boot.nsh
5. Reset the board to execute the newly installed script using the reset uEFI Shell command.
myramdisk:\> reset
6. If a script is already installed, it can be edited using the following kBootScript uEFI Shell
commands.
myramdisk:\> kbootscript -g boot.nsh
myramdisk:\> edit boot.nsh
9.5 Firmware Update
Firmware updates are typically delivered as a ZIP archive containing only the firmware images. The content of the archive with the directory structure must be copied on a data storage device with FAT partition. If the command kBoardConfig AutoUpdate has been enabled, the images are automatically
detected during boot-up and an update of the uEFI BIOS or the IPMI firmware is carried out.
9.5.1 Updating the uEFI BIOS
9.5.1.1 uEFI BIOS Fail-Over Mechanism
The AM4024(E) has two SPI boot flashes programmed with the uEFI BIOS, a standard SPI boot flash and
a recovery SPI boot flash. The basic idea behind that is to always have at least one working uEFI BIOS
flash available regardless if there have been any flashing errors or not.
9.5.1.2 Updating Procedure
The standard SPI boot flash can be updated with the latest uEFI BIOS from the ZIP archive using the
kUpdate -u or the kFlash -p uEFI Shell command. When using the kUpdate command, the directory
structure of ZIP archive must not be altered. The update status is indicated in the log file located in the
directory where the firmware images are stored.
www.kontron.com
D R A F T — F O R I N T E R N A L U S E O N L Y
73
Page 74

User Guide
AM4024(E)
9.5.1.3 uEFI BIOS Recovery
In case of the standard SPI boot flash being corrupted and therefore the board not starting up, the
board can be booted from the recovery SPI boot flash if the DIP switch SW2, switch 2 is set to ON. For
further information, refer to the Chapter 3.1, DIP Switch Configuration.
Note: The uEFI BIOS code and settings are stored in the SPI boot flashes. Changes made to the
uEFI BIOS settings are available only in the currently selected SPI boot flash. Thus, switching over to the other SPI boot flash may result in operation with different uEFI BIOS code
and settings.
9.5.1.4 Determining the Active Flash
Sometimes it may be necessary to check which flash is active. On the uEFI BIOS, this information is
available via the kBoardInfo uEFI Shell command.
9.5.2 Updating the IPMI Firmware
9.5.2.1 IPMI Rollback Mechanism
The AM4024(E)’s IPMI controller has an internal flash, where the boot block or the active IPMI firmware
is running from, as well as an external flash, where two IPMI firmware images are stored, namely:
» a copy of the currently active image, and
» the previously good image or the newly downloaded image.
During firmware upgrade, the previously good image in the external flash is replaced by the newly
downloaded image. Then the boot block activates the new image by copying it to the internal flash. If
the newly downloaded image was successfully activated, its copy in the external flash is now the active
image. The copy of the old active image becomes the previously good image.
Manual rollback is also possible via the kIpmi hpm rollback uEFI Shell command.
9.5.2.2 Determining the Active IPMI Firmware Image
To determine the active IPMI firmware image, use the kIpmi info command.
9.5.2.3 Updating Procedure
The active IPMI firmware image can be updated with the latest HPM.1 file from the ZIP archive using
the kUpdate -u or the kIpmi hpm upgrade uEFI Shell command. When using the kUpdate command,
the structure of ZIP archive must not be altered.
www.kontron.com
D R A F T — F O R I N T E R N A L U S E O N L Y
74
Page 75

User Guide
AM4024(E)
10 IPMI Firmware
10.1 Overview
The AM4024(E) provides an IPMI controller (NXP® ARM7) with 512 kB of internal firmware flash as well
as external firmware flash for firmware upgrade and rollback. The IPMI controller (Module Management
Controller - MMC) carries out IPMI commands such as monitoring several onboard temperature conditions, board voltages and the power supply status, and managing hot swap operations. The MMC is accessible via one IPMB-L interface, one host Keyboard Controller Style (KCS) interface and up to four
Gigabit Ethernet interfaces (IOL).
The AM4024(E) is fully compliant with the IPMI - Intelligent Platform Management Interface v2.0 and
the PICMG 2.9 R1.0 specifications.
The following are key features of the AM4024(E)’s IPMI firmware:
» Keyboard Controller Style (KCS) interface
» IPMB-L interface for out-of-band management and sensor monitoring
» IPMI over LAN (IOL) and Serial over LAN (SOL) support
» Sensor Device functionality with configurable thresholds for monitoring board voltages, CPU
state, board reset, etc.
» FRU Inventory functionality
» IPMI Watchdog functionality (power-cycle, reset)
» Board monitoring and control extensions:
» Graceful shutdown support
» uEFI BIOS fail-over control: selection of the SPI boot flash (standard/recovery)
» Field-upgradable IPMI firmware:
» via the KCS, IPMB-L or IOL interfaces
» Download of firmware does not break the currently running firmware or payload activities
» Two flash banks with rollback capability: manual rollback or automatic in case of upgrade
failure
» E-Keying (AMC ports and clock in accordance with the AMC.0 R2.0 specification)
For general information on the Kontron IPMI Firmware, refer to the IPMI Firmware User Guide.
10.2 IPMI Firmware and KCS Interface Configuration
Initially the default configuration of the IPMI firmware (KCS interface) is:
» IRQ = 11
If this is the required configuration, no further action is required. If the configuration must be modified, the kIpmi uEFI Shell command is used to modify the configuration as required, e.g. “kIpmi irq
[0|11]”. For information on the kIpmi uEFI Shell command, refer to Chapter 9, uEFI BIOS.
www.kontron.com
75
D R A F T — F O R I N T E R N A L U S E O N L Y
Page 76

User Guide
AM4024(E)
The KCS interface serves for the communication between the AM4024(E)’s payload and the MMC. The
OS requires the KCS interface configuration during their loading time. The KCS interface configuration
is available in the “IPMI Device Information Record” included in the SMBIOS table.
10.3 Supported IPMI and ATCA Commands
10.3.1 Standard IPMI Commands
The following table shows an excerpt from the command list specified in the IPMI specification 2.0. The
shaded table cells indicate commands not supported by the AM4024(E) IPMI firmware.
M = mandatory, O = optional
Table 51: Standard IPMI Commands
COMMAND IPMI 2.0 SPEC.
SECTION
IPM DEVICE “GLOBAL” COMMANDS
Get Device ID 20.1 App 01h M / Yes
Cold Reset 20.2 App 02h O / Yes
Warm Reset 20.3 App 03h O / No
Get Self Test Results 20.4 App 04h O / Yes
Manufacturing Test On 20.5 App 05h O / Yes
Set ACPI Power State 20.6 App 06h O / No
Get ACPI Power State 20.7 App 07h O / No
Get Device GUID 20.8 App 08h O / No
Broadcast “Get Device ID” 20.9 App 01h M / Yes
BMC WATCHDOG TIMER COMMANDS
Reset Watchdog Timer 27.5 App 22h O / Yes
Set Watchdog Timer 27.6 App 24h O / Yes
Get Watchdog Timer 27.7 App 25h O / Yes
BMC DEVICE AND MESSAGING COMMANDS
Set BMC Global Enables 22.1 App 2Eh O / Yes
Get BMC Global Enables 22.2 App 2Fh O / Yes
Clear Message Flags 22.3 App 30h O / Yes
Get Message Flags 22.4 App 31h O / Yes
Enable Message Channel Receive 22.5 App 32h O / Yes
Get Message 22.6 App 33h O / Yes
Send Message 22.7 App 34h O / Yes
Read Event Message Buffer 22.8 App 35h O / Yes
Get BT Interface Capabilities 22.9 App 36h O / No
Get System GUID 22.14 App 37h O / No
Get Channel Authentication Capabilities 22.13 App 38h O / Yes
Session Control 22.15 to 22.20 App 39h to 3Dh O / Yes
Get AuthCode 22.21 App 3Fh O / No
NETFN CMD KONTRON SUPPORT
ON MMC
M
O
O
D R A F T — F O R I N T E R N A L U S E O N L Y
www.kontron.com
76
Page 77

Table 51: Standard IPMI Commands (Continued)
User Guide
AM4024(E)
COMMAND IPMI 2.0 SPEC.
SECTION
Channel Commands 22.22 to 22.30 App 40h to 47h O / Yes
User Commands 24.1 to 24.9 App 48h to 4Fh O / Yes
Get Channel OEM Payload Info 24.10 App 50h O / No
Master Write-Read 22.11 App 52h O / Yes
Get Channel Cipher Suites 22.15 App 54h O / No
Suspend/Resume Payload Encryption 24.3 App 55h O / Yes
Set Channel Security Keys 22.25 App 56h O / No
Get System Interface Capabilities 22.9 App 57h O / No
CHASSIS DEVICE COMMANDS
Get Chassis Capabilities 28.1 Chassis 00h O / Yes
Get Chassis Status 28.2 Chassis 01h O / Yes
Chassis Control 28.3 Chassis 02h O / Yes
Extended Chassis Control Commands 28.4 to 28.8 Chassis 03h, 04h, 0Ah,
Set Power Cycle Interval 28.9 Chassis 0Bh O / Yes
Extended Chassis Control Commands 28.11 to 28.13 Chassis 07h to 09h O / No
Get POH Counter 28.14 Chassis 0Fh O / Yes
EVENT COMMANDS
Set Event Receiver 29.1 S/E 00h M / Yes
Get Event Receiver 29.2 S/E 01h M / Yes
Platform Event (a.k.a. “Event Message”) 29.3 S/E 02h M / Yes
PEF AND ALERTING COMMANDS 30.1 to 30.8 S/E 10h to 17h O / No
SENSOR DEVICE COMMANDS
Get Device SDR Info 35.2 S/E 20h M / Yes
Get Device SDR 35.3 S/E 21h M / Yes
Reserve Device SDR Repository 35.4 S/E 22h M / Yes
Get Sensor Reading Factors 35.5 S/E 23h O / No
Set Sensor Hysteresis 35.6 S/E 24h O / Yes
Get Sensor Hysteresis 35.7 S/E 25h O / Yes
Set Sensor Threshold 35.8 S/E 26h O / Yes
Get Sensor Threshold 35.9 S/E 27h O / Yes
Set Sensor Event Enable 35.10 S/E 28h O / Yes
Get Sensor Event Enable 35.11 S/E 29h O / Yes
Re-arm Sensor Events 35.12 S/E 2Ah O / No
Get Sensor Event Status 35.13 S/E 2Bh O / No
Get Sensor Reading 35.14 S/E 2Dh M / Yes
Set Sensor Type 35.15 S/E 2Eh O / No
Get Sensor Type 35.16 S/E 2Fh O / No
Set Sensor Reading and Event Status 35.17 S/E 30h O / No
NETFN CMD KONTRON SUPPORT
ON MMC
O
O / No
05h, 06h
M
M
D R A F T — F O R I N T E R N A L U S E O N L Y
www.kontron.com
77
Page 78

Table 51: Standard IPMI Commands (Continued)
User Guide
AM4024(E)
COMMAND IPMI 2.0 SPEC.
SECTION
FRU DEVICE COMMANDS
Get FRU Inventory Area Info 34.1 Storage 10h M / Yes
Read FRU Data 34.2 Storage 11h M / Yes
Write FRU Data 34.3 Storage 12h M / Yes
SDR DEVICE COMMANDS 33.9 to 33.21 Storage 20h to 2Ch O / No
SEL DEVICE COMMANDS 40.2 to 40.13 Storage 40h to 5Bh O / No
LAN DEVICE COMMANDS
Set LAN Configuration Parameters 23.1 Transport 01h O / Yes
Get LAN Conf iguration Parameters 23.2 Transport 02h O / Yes
Suspend BMC ARPs 23.3 Transport 03h O / No
Get IP/UDP/RMCP Statistics 23.4 Transport 04h O / Yes
SERIAL/MODEM DEVICE COMMANDS 25.1 to 25.12 Transport 10h to 1Bh O / No
SOL COMMANDS
SOL Activating 26.1 Transport 20h O / Yes
Set SOL Configuration Parameters 26.2 Transport 21h O / Yes
Get SOL Configuration Parameters 26.3 Transport 22h O / Yes
BRIDGE MANAGEMENT COMMANDS (ICMB) [ICMB] Bridge 00h to 0Ch O / No
DISCOVERY COMMANDS (ICMB) [ICMB] Bridge 10h t o 14h O / No
BRIDGING COMMANDS (ICMB) [ICMB] Bridge 20h and 21h O / No
EVENT COMMANDS (ICMB) [ICMB] Bridge 30h to 35h O / No
OEM COMMANDS FOR BRIDGE NETFN [ICMB] Bridge C0h to FEh O / No
OTHER BRIDGE COMMANDS (Error Report) [ICMB] Bridge FFh O / No
NETFN CMD KONTRON SUPPORT
ON MMC
M
O
0
www.kontron.com
D R A F T — F O R I N T E R N A L U S E O N L Y
78
Page 79

User Guide
AM4024(E)
10.3.2 AdvancedTCA and AMC Commands
The following table shows an excerpt from the command list specified in the PICMG 3.0 R 2.0 AdvancedTCA Base Specification and the PICMG AMC.0 Advanced Mezzanine Card Specification, R 1.0. The
shaded table cells indicate commands not supported by the IPMI firmware.
M = mandatory
Table 52: AdvancedTCA and AMC Commands
COMMAND SPEC. TABLE NETFN CMD KONTRON SUPPORT
ON MMC
AdvancedTCA
Get PICMG Properties 3-9 PICMG 00h M / Yes
FRU Control 3-22 PICMG 04h M / Yes [1]
Get FRU LED Properties 3-29 PICMG 05h M / Yes
Get LED Color Capabilities 3-25 PICMG 06h M / Yes
Set FRU LED State 3-26 PICMG 07h M / Yes
Get FRU LED State 3-27 PICMG 08h M / Yes
Get Device Locator Record ID 3-29 PICMG 0Dh M / Yes
AMC
Set AMC Port State 3-27 PICMG 19h O / Yes
Get AMC Port State 3-28 PICMG 1Ah O / Yes
Set Clock State 3-44 PICMG 2Ch O / Yes
Get Clock State 3-45 PICMG 2Dh O / Yes
PICMG 3.0 TABLE
AMC.0 TABLE
M
O
[1] Only “FRU Control - Cold Reset” and “FRU Control Quiesce” are supported.
www.kontron.com
D R A F T — F O R I N T E R N A L U S E O N L Y
79
Page 80

10.4 Firmware Identification
10.4.1 Get Device ID Command
Table 53: Get Device ID Command
COMMAND LUN NetFn CMD
Get Device ID
REQUEST DATA
Byte Data Field
-- --
RESPONSE DATA
Byte Data Field
1 Completion code
2 10h Device ID
3 80h Device Revision
4 02h Firmware Revision 1: Major Firmware Revision
(varies depending on firmware revision)
5 00h Firmware Revision 2: Minor Firmware Revision, BCD encoded
(varies depending on firmware revision)
6 51h IPMI Version, holds IPMI command specification version, BCD encoded
7 B9h Additional Device Support
8..10 98h 3Ah 00h Manufacturer ID, LSB first
03A98h = 15000 = Kontron
11..12 10h B4h Product ID, LSB first
B410h = Identifies the board/family f irmware
13* Release number of the IPMI firmware (varies depending on firmware revision):
10h for R10
11h for R11
14* Module geographical address (site number):
1 … 8 = Module in AMC bay A1, A2, A3, A4, B1, B2, B3, B4
or in μTCA slot 1 … 8 with bus addresses
72h, 74h, 76h, 78h, 7ah, 7ch, 7eh, 80h
9 …12 = Module in μTCA slot 9 … 12 = Bay C1, C2, C3, C4
with bus addresses 82h, 84h, 86h,88h
0, > 12 = Module position is not in range. The IPMB-L bus is
switched off
15..16* Reserved
00h App = 06h 01h
User Guide
AM4024(E)
* Bytes 13 through 16 are optional and defined by Kontron.
www.kontron.com
D R A F T — F O R I N T E R N A L U S E O N L Y
80
Page 81

User Guide
AM4024(E)
10.5 Board Control Extensions
10.5.1 SPI Boot Flash Selection—uEFI BIOS Failover Control
The uEFI BIOS code is stored in two different SPI boot flash devices designated as the standard SPI boot
flash and the recovery SPI boot flash.
By default, the uEFI BIOS code stored in the standard SPI boot flash is executed first. If this fails, the
uEFI BIOS code in the recovery SPI boot flash is then executed.
During boot-up, the uEFI BIOS reports its operational status to the MMC within a given time. If the status is "failed" or not reported within the given time, the MMC selects the recovery SPI boot flash, resets
the board's processor, and waits for the status report from the uEFI BIOS again.
In the event the recovery boot operation fails, the MMC reports it, but takes no further action of its
own.
When a boot operation fails, a "Boot Error - Invalid boot sector" event is asserted for the related sensor:
» "FWH0 Boot Err" sensor indicates the standard SPI boot flash has failed
» "FWH1 Boot Err" sensor indicates the recovery SPI boot flash has failed
10.5.2 uEFI BIOS Boot Order Selection
Normally the uEFI BIOS will apply the boot order which was selected in the uEFI BIOS menu “uEFI Boot/
Boot Option Priorities”. But there is another alternative boot order which is stored in the MMC's nonvolatile memory. This boot order can be set and read by IPMI OEM commands. At payload start the MMC
writes this boot order into a register where the uEFI BIOS can read it. If this MMC's boot order has a
non-zero value, the uEFI BIOS will use it instead of its own boot order.
www.kontron.com
D R A F T — F O R I N T E R N A L U S E O N L Y
81
Page 82

User Guide
AM4024(E)
10.5.3 Set Control State (SPI Boot Flash Selection, Boot Order Selection)
Table 54: Set Control State
COMMAND LUN NetFn CMD
Set Control State (SPI Boot Flash, Boot Order) 00h OEM = 3Eh 20h
REQUEST DATA
Byte Data Field
1 Control ID:
00h = SPI boot flash selection
9Dh = uEFI BIOS boot order configuration
2 Control state for SPI boot flash selection (00h):
00h = Standard SPI boot flash is selected (default)
01h = Recovery SPI boot flash is selected
Note: The DIP switch SW2, switch 2, may overwrite the above selection.
Control state for uEFI BIOS boot order configuration (9Dh):
00h = Boot order is according to uEFI BIOS setup (default)
01h = Next boot device is: Floppy
02h = Next boot device is: HDD
03h = Next boot device is: CD
04h = Next boot device is: Network
05h = Next boot device is: USB Floppy
06h = Next boot device is: USB HDD
07h = Next boot device is: USB CD-ROM
RESPONSE DATA
Byte Data Field
1 Completion code
Note: The settings mentioned above are stored in EEPROM and applied (to logic) each time the
MMC detects power-on.
D R A F T — F O R I N T E R N A L U S E O N L Y
www.kontron.com
82
Page 83

User Guide
AM4024(E)
10.5.4 Get Control State (SPI Boot Flash Selection, Boot Order Selection)
This command is used to read out the SPI boot flash and boot order settings.
Table 55: Get Control State
COMMAND LUN NetFn CMD
Get Control State (SPI Boot Flash, Boot Order) 00h OEM = 3Eh 21h
REQUEST DATA
Byte Data Field
1 Control ID:
00h = SPI boot flash selection
9Dh = uEFI BIOS boot order configuration
RESPONSE DATA
Byte Data Field
1 Completion code
4 Current control state (see Chapter 10.5.3, Set Control State)
00h .. 01h for control ID = SPI boot flash selection
00h .. FFh for control ID = uEFI BIOS boot order configuration
10.6 Sensors Implemented on the AM4024(E)
The MMC includes several sensors for voltage or temperature monitoring and various others for pass/
fail type signal monitoring. Every sensor is associated with a Sensor Data Record (SDR). Sensor Data
Records contain information about the sensors identification such as sensor type, sensor name, sensor
unit. SDRs also contain the configuration of a specific sensor such as threshold, hysteresis or event
generation capabilities that specify sensor's behavior. Some fields of the sensor SDR are configurable
using IPMI commands others are always set to built-in default values.
Finally, one field, which is the sensor owner, must reflect the module addresses that allow the AMC carrier to identify the owner of the sensor when it is scanned and merged into the AMC Carrier's SDR repository.
From the IPMI perspective, the MMC is set up as a satellite management controller (SMC). The MMC supports sensor devices IPMI commands and uses the static sensor population feature of IPMI. All Sensor
Data Records can be queried using Device SDR commands.
Each sensor has a name field in its SDR. The sensor name has a prefix, which is automatically adapted,
dependent on the physical position of the module in a carrier or in a μTCA chassis.
The following prefixes are used for all sensors of an AMC module:
Table 56: Sensor Name Prefix
AMC Bay 12345678- - - -
μTCA slot 123456789101112
Sensor Name Prefix A1: A2: A3: A4: B1: B2: B3: B4: C1: C2: C3: C4:
www.kontron.com
83
D R A F T — F O R I N T E R N A L U S E O N L Y
Page 84

User Guide
AM4024(E)
10.6.1 Sensor List
The following table indicates all sensors available on the AM4024(E). For further information on Kontron’s OEM specific sensor types and sensor event type codes presented in the following table, refer to
Chapter 10.8, OEM Event/Reading Types.
Table 57: Sensor List
SENSOR NUMBER /
ID STRING
00h /
A1:IPMI Info-1
01h /
A1:IPMI Info-2
02h /
A1:IPMI Watchdog
03h /
A1:FRU Agent
04h /
A1:Health Error
05h /
A1:MMC Reboot
06h /
A1:Module-
HotSwap
07h /
A1:IPMBL State
08h /
A1: MMC Stor Err
09h /
A1: MMC FwUp
0Ah /
A1: Ver change
0Ch /
A1:Board Reset
0Dh /
A1:Temp CPU
0Eh /
A1:Temp PCH
0Fh /
A1:Temp Air
10h /
A1:Board 3.3vIPM
11h /
A1:Board 12.0v
SENSOR TYPE (CODE) /
EVENT/READING TYPE (CODE)
OEM Firmware Info 1 (C0h) /
OEM (70h)
OEM Firmware Info 2 (C0h) /
OEM (71h)
Watchdog (23h) /
Sensor-specific (6Fh)
OEM (C5h) /
Discrete (0Ah)
Platform Alert (24h) /
Digital discrete (03h)
Platform Alert (24h) /
Digital discrete (03h)
OEM (F2h) /
Sensor-specific (6Fh)
OEM (C3h) /
Sensor-specific (6Fh)
Mgmt. Subsyst. Health (28h)
/ Sensor-specific (6Fh)
Firmware Upgrade Manager
(C7h) / Sensor specific (6Fh)
Version Change (2Bh) / Sen-
sor specific (6Fh)
OEM (C4h) /
Sensor-specific (6Fh)
Temperature (01h) /
Threshold (01h)
Temperature (01h) /
Threshold (01h)
Temperature (01h) /
Threshold (01h)
Voltage (02h) /
Threshold (01h)
Voltage (02h) /
Threshold (01h)
Assertion Mask /
Deassertion Mask/
Reading Mask
0003h / 0000h /
7FFFh
0003h / 0000h /
7FFFh
010Fh / 0000h /
010Fh
0140h / 0000h /
0147h
0000h / 0000h /
0003h
0002h / 0000h /
0003h
001Fh / 0000h /
001Fh
0007h / 0000h /
000Fh
0002h / 0000h /
0003h
010Fh / 0000h /
010Fh
0002h / 0000h /
0002h
04DEh / 0000h /
04DEh
1A81h / 7A81h /
3939h
0A80h / 7A80h /
3838h
7A95h / 7A95h /
3F3Fh
2204h / 2204h /
1212h
2204h / 2204h /
1212h
DESCRIPTION Health LED
Shows Error
For internal use only N
For internal use only N
Watchdog 2 Y
FRU agent N
Aggregate states (power, tem-
perature, etc.). Visualization
by the Health LED.
MMC reboot active state. Is
asserted during boot time.
Hot swap sensor N
State of IPMB-L bus N
Storage error N
Status of Firmware Upgrade
Manager
MMC firmware upgrade detec-
tion
Board reset event Y
CPU die temperature Y
PCH temperature Y
Air temperature near AMC
edge-connector
AMC Management Power (MP)
3.3V
AMC Payload Power (PWR) 12V Y
Y
N
N
N
Y
Y
D R A F T — F O R I N T E R N A L U S E O N L Y
www.kontron.com
84
Page 85

Table 57: Sensor List (Continued)
User Guide
AM4024(E)
SENSOR NUMBER /
ID STRING
12h /
A1:Board 5.0V
13h /
A1:Board 3.3V
14h /
A1:Pwr Good
15h /
A1:Pwr Good Evt
16h /
A1:CPU status
17h /
A1:FWH0 Boot Err
18h /
A1:FWH1 Boot Err
19h /
A1:POST Value
1Ah /
A1:Link-GbE-A
1Bh /
A1:Link-GbE-B
1Ch /
A1:Link-AMC-0
1Dh /
A1:Link-AMC-1
1Eh /
A1:Link-AMC-8
(AM4024E)
1Fh /
A1:Link-AMC-9
(AM4024E)
20h /
A1:Link-AMC-10
(AM4024E)
21h /
A1:Link-AMC-11
(AM4024E)
SENSOR TYPE (CODE) /
EVENT/READING TYPE (CODE)
Voltage (02h) /
Threshold (01h)
Voltage (02h) /
Threshold (01h)
Power supply (08h) /
OEM (77h)
Power supply (08h) /
OEM (77h)
Processor (07h) /
Sensor-specific (6Fh)
Boot Error (1Eh) /
Sensor-specific (6Fh)
Boot Error (1Eh) /
Sensor-specific (6Fh)
OEM Post Value (C6h) /
OEM (78h)
LAN (27h) /
Sensor-specific (6Fh)
LAN (27h) /
Sensor-specific (6Fh)
LAN (27h) /
Sensor-specific (6Fh)
LAN (27h) /
Sensor-specific (6Fh)
LAN (27h) /
Sensor-specific (6Fh)
LAN (27h) /
Sensor-specific (6Fh)
LAN (27h) /
Sensor-specific (6Fh)
LAN (27h) /
Sensor-specific (6Fh)
Assertion Mask /
Deassertion Mask/
Reading Mask
2204h / 2204h /
1212h
2204h / 2204h /
1212h
0000h / 0000h /
0887h
0000h / 0887h /
0887h
0463h / 0400h /
04E3h
0008h / 0008h /
0008h
0008h / 0008h /
0008h
0000h / 0000h /
00FFh
0000h / 0000h /
0003h
0000h / 0000h /
0003h
0000h / 0000h /
0003h
0000h / 0000h /
0003h
0000h / 0000h /
0003h
0000h / 0000h /
0003h
0000h / 0000h /
0003h
0000h / 0000h /
0003h
DESCRIPTION Health LED
Shows Error
Board 5V supply Y
Board 3.3V supply Y
States of all power lines N
Power fail events for all power
lines
CPU aggregate status Y
Firmware Hub 0 boot error Y
Firmware Hub 1 boot error Y
POST Value (from host I/O port
80h)
LAN link status –
Front port GbE-A (upper)
LAN link status –
Front port GbE-B (lower)
LAN link status –
AMC port 0
LAN link status –
AMC port 1
LAN link status –
AMC port 8
LAN link status –
AMC port 9
LAN link status –
AMC port 10
LAN link status –
AMC port 11
Y
N
N
N
N
N
N
N
N
N
D R A F T — F O R I N T E R N A L U S E O N L Y
www.kontron.com
85
Page 86

10.7 Sensor Thresholds
Table 58: Thresholds - Standard and Extended Temperature Range
User Guide
AM4024(E)
Sensor Number /
ID String
Upper non-recoverable
Upper critical
Upper non-critical
Normal max.
Nominal
Normal min.
Lower non-critical
Lower critical
Lower non-recoverable
0Dh /
NNN: Temp CPU
115 °C 118 °C 100 °C
105 °C 108 °C 90 °C
95 °C 98 °C 80 °C
90 °C 93 °C 75 °C
80 °C 83 °C 65 °C
3 °C 3 °C 0 °C
1 °C n.a. - 5 °C
n.a. n.a. - 7 °C
n.a. n.a. - 10 °C
Table 59: Voltage Sensor Thresholds
Sensor Number /
ID String
Upper non-recoverable
Upper critical
Upper non-critical
Normal max.
Nominal
Normal min.
Lower non-critical
Lower critical
Lower non-recoverable
NNN: Board 3.3vIPM
10h /
n.a. n.a. n.a. n.a.
3.50 V 13.4 V 5.36 V 3.50 V
n.a. n.a. n.a. n.a.
3.47 V 13.2 V 5.31 V 3.47 V
3.30 V 12.0 V 5.00 V 3.30 V
3.14 V 10.8 V 4.70 V 3.14 V
n.a. n.a. n.a. n.a.
3.11 V 10.8 V 4.66 V 3.11 V
n.a. n.a. n.a. n.a.
0Eh /
NNN: Temp PCH
11h /
NNN: Board 12.0v
0Fh /
NNN: Temp Air
12h /
NNN: Board 5.0V
13h /
NNN: Board 3.3V
www.kontron.com
D R A F T — F O R I N T E R N A L U S E O N L Y
86
Page 87

10.8 OEM Event/Reading Types
OEM (Kontron) specific sensor types and codes are presented in the following table.
Table 60: OEM Event/Reading Types
User Guide
AM4024(E)
OEM SENSOR
TYPE (CODE)
Firmware Info 1 (C0h) 70h Internal Diagnostic Data
Firmware Info 2 (C0h) 71h Internal Diagnostic Data
Board Reset (C4h) 6Fh
IPMBL State (C3h) 6Fh
Post Value (C6h) 6Fh
Firmware Upgrade
Manager (C7h)
OEM EVENT/
READING TYPE (CODE)
(sensor type specific)
(sensor type specific)
(sensor type specific)
6Fh
(sensor type specific)
Sensor-specific Offset Event
00h Reserved
01h HwPowerReset
02h PCIReset
03h HwWatchDogReset
04h SoftReset
05h Reserved
06h ColdReset
07h IPMICommand
08h Reserved
09h Reserved
0Ah BMCWatchdog
Sensor discrete State Meaning
04h IPMB-L running
others IPMB-L not running
Sensor discrete State Meaning
Bits [7:0] Post Value (read from host I/O port
Bits [15:8] Reserved
Sensor-specific Offset Event
0h First Boot after upgrade
1h First Boot after rollback (error)
2h First Boot after errors (watchdog)
3h First Boot after manual rollback
4h Reserved
5h Reserved
6h Reserved
7h Reserved
8h Firmware Watchdog Bite, reset occurred
DESCRIPTION
80h)
www.kontron.com
D R A F T — F O R I N T E R N A L U S E O N L Y
87
Page 88

Table 60: OEM Event/Reading Types (Continued)
User Guide
AM4024(E)
OEM SENSOR
TYPE (CODE)
Power Supply (08h)
i.e. for
Power Good /
Power Good Event
Hot Swap Sensor (F2h) 6Fh
READING TYPE (CODE)
77h
(OEM)
(sensor type specific)
OEM EVENT/
DESCRIPTION
Sensor-specific Offset Event
0h 12V good (PWR)
1h 5V good
2h 3V3 good
3h Reserved
4h Reserved
5h Reserved
6h Reserved
7h vccCore good
8h Reserved
9h Reserved
Ah Reserved
Bh 3V3IPMI good (MP)
Ch Reserved
Sensor-specific Offset Event
00h Handle close
01h Handle open
02h Quiesced
03h Backend Power Failure
04h Backend Power Shutdown
10.9 IPMI Firmware Code
10.9.1 Firmware Upgrade
The IPMI's operational code can be upgraded via the open-source tool “ipmitool” or via uEFI BIOS commands. The upgrade tool/commands allow download and activation of new operational code and also
rollback to the “last known good” operational code. For further information on the IPMI firmware upgrade, refer to the Chapter 9, uEFI BIOS, and the IPMI Firmware User Guide.
10.9.2 IPMI Firmware and FRU Data Write Protection
Write protection of the AM4024(E) is enabled if the DIP Switch SW2, switch 3, is set to ON. If the board
is write-protected, neither the IPMI firmware or the FRU data can be updated or reprogrammed. The
IPMI firmware stores the write protect state in it’s local NV-RAM.
Note: The write protection mode is still active when the payload is off even if the IPMI firmware re-
boots. To disable the write protection mode, set the DIP Switch SW2, switch 3, to OFF and
switch on the payload.
D R A F T — F O R I N T E R N A L U S E O N L Y
www.kontron.com
88
Page 89

User Guide
AM4024(E)
10.10 LAN Functions
Four Gigabit Ethernet channels on the board support IPMI over LAN (IOL) and Serial over LAN (SOL).
While IOL serves to transport IPMI commands and their responses via Gigabit Ethernet, SOL serves to
transport any serial data via Gigabit Ethernet.
Please note that IOL and SOL need the Ethernet device to be powered. Therefore, the board (payload)
must be fully powered. For information on the assignment of the IOL/SOL channels, refer to Chapter
2.7.9, Gigabit Ethernet Interfaces.
10.11 E-Keying
E-Keying has been defined in the AMC.0 R2.0 Specification to prevent module damage and malfunctions and to verify the bay connection compatibility. Therefore, the FRU data of an AMC module contains PICMG-defined records which describe the module’s AMC interoperability:
» Module Current Requirements Record: indicates the maximum power consumption of the
AM4024(E)
» Clock Configuration Record: configures the PCI Express reference clock (FCLKA on AMC Card-
edge connector)
» AMC Point-to-point Record: indicates the AMC port capabilities of the AM4024(E), i.e. the
supported AMC fabric interface types of the current board configuration
Depending on the current board configuration (i.e. the module’s description in the FRU data records),
the carriers’s IPMC (in an ATCA system) or the MCH (of a MicroTCA system) decides during E-Keying
which AMC fabric interfaces are activated. Therefore, the IPMI commands Set AMC Port State
and Get AMC Port Sta te defined by the AMC.0 specification are used for either granting or rejecting the E-Keys (i.e. enabling or disabling of AMC ports during E-Keying).
10.11.1 AMC Module Configuration Options
The board configuration for E-Keying is done via the kBoardConfig uEFI Shell command. For further
information on the kBoardConfig uEFI Shell command, refer to Chapter 9, uEFI BIOS.
For information on the AMC interconnection capabilities and the fabric interfaces supported for an AMC
base configuration, refer to Chapter 2.8, AMC Interconnection.
The following table indicates the fabric interfaces available and which board configuration options can
be applied to the module and its AMC base configuration.
Table 61: Overview of Board Configuration Options
AMC PORT MAPPING AND BASE CONFIGURATIONS FURTHER BOARD CONFIGURATION OPTIONS
AMC PORT AMCTclka
AMCBaseCfg
default GbE GbE SATA SATA PCIE
0 1 2 3 4 - 7 8 - 11
www.kontron.com
RC x4
AMCTclkc
-- in/
disable
and
AMCFclka AMCPcie-
Speed
auto/
out/
local
gen1/
gen2/
gen3
D R A F T — F O R I N T E R N A L U S E O N L Y
89
Page 90

User Guide
AM4024(E)
10.11.1.1 Default of AMC Configuration Settings
The AMC configuration is set to default via the kBoardConfig AMCBaseCfg default uEFI Shell command. The default values are indicated in the following table:
Table 62: AMC Configuration Default Values
kBoardConfig
OPTION
AMCPort<n> auto Enable or disable an AMC port.
AMCPcieSpeed gen 3 Select the maximum speed for the PCIe interfaces on the AMC connector.
AMCFclka auto Select the PCIe clock source (Fabric Clock A).
AMCTclka in Disable Telecom Clock A (input).
AMCTclkc in Disable Telecom Clock C (input).
DEFAULT DESCRIPTION
10.11.1.2 Forced AMC Port Activation/ Deactivation
The configuration options to forcibly activate or deactivate an AMC port may be useful during system
setup and testing, and are available for each AMC base configuration.
The current setting can be shown or changed using the kBoardConfig uEFI Shell command, option
AMCport<n>.
Note: When a base configuration is selected via the kBoardConfig uEFI Shell command, option
AMCBaseCfg, the configuration options for the AMC ports 2, 3, 4-7 and 8-11 are set to
their default values (auto = E-Keying).
10.11.1.3 PCI Express Speed Selection
The configuration options to set the maximum PCI Express speed may be useful during system setup
and testing. The value set is the maximum speed which is used for PCI Express communication, the “real” speed is handled out by HW during link-training.
The current setting can be shown or changed using the kBoardConfig uEFI Shell command, option
AMCPcieSpeed.
Note: When a base configuration is selected via the kBoardConfig uEFI Shell command, option
AMCBaseCfg, the configuration options for the PCI Express speed setting is set to its de-
fault value (gen3).
D R A F T — F O R I N T E R N A L U S E O N L Y
www.kontron.com
90
Page 91

User Guide
AM4024(E)
10.11.1.4 Forced FCLKA / PCI Express Reference Clock Configuration
The configuration option to forcibly set the FCLKA (ignoring E-Keying) may be useful during system
setup and testing and is available for each AMC base configuration providing a PCI Express interface.
The current setting can be shown or changed using the kBoardConfig uEFI Shell command, option
AMCFclka.
Note: When a base configuration is selected via the kBoardConfig uEFI Shell command, option
AMCBaseCfg, the configuration option for the FCLKA is set to its default value (auto = E-
Keying).
10.11.1.5 Fail-Safe Mode
If the fail-safe mode is active, all AMC configuration options in kBoardConfig are ignored. The fail-safe
mode is activated by setting the DIP Switch SW2, switch 1, to ON. For further information on the failsafe AMC fabric configuration, refer to Chapter 3.1.1, DIP Switch SW2.
www.kontron.com
D R A F T — F O R I N T E R N A L U S E O N L Y
91
Page 92

User Guide
AM4024(E)
CORPORATE OFFICES
Europe, Middle East & Africa
Oskar-von-Miller-Str. 1
85386 Eching / Munich
Germany
Tel.: + 49 (0) 8165 / 77 777
Fax: + 49 (0) 8165 / 77 219
info@kontron.com
www.kontron.com
North America
14118 Stowe Drive
Poway, CA 92064-7147
USA
Tel.: + 1 888 294 4558
Fax: + 1 858 677 0898
info@us.kontron.com
D R A F T — F O R I N T E R N A L U S E O N L Y
Asia Pacific
17 Building,Block #1, ABP.
188 Southern West 4th Ring Road
Beijing 100070, P.R.China
Tel.: + 86 10 63751188
Fax: + 86 10 83682438
info@kontron.cn
92
 Loading...