

Page 1

x
Table of contents
Page 2

Page 3

Table of contents
1 Machine information
1.1 Installation space .............................................................................. 1-3
1.2 Machine configuration ..................................................................... 1-5
1.2.1 SD-501 Saddle Stitcher ................................................................. 1-5
1.2.2 Standard/Optional equipment ........................................................ 1-7
1.3
Inserting a new staple cartridge into SD-501 Saddle Stitcher
1.4 Cleaning conveyance belt of saddle stitcher tray ....................... 1-10
1.5 Empty dust box of SD-501 Saddle Stitcher .................................. 1-13
1.6 If “Trim Receiver Exchange” message is displayed .................... 1-15
1.7 Paper information ........................................................................... 1-16
1.8 Specifications ................................................................................. 1-19
2 Copy operations
2.1 Copy conditions incompatible with saddle stitcher ...................... 2-3
2.2 Adjusting position of copy image (Image shift) ............................. 2-7
2.3 Selecting an output tray ................................................................. 2-11
2.4 Making folded booklet (Fold&Staple / Trimming) ........................ 2-13
2.5 Folding a copied set (Multi Centre / Multi Letter) ........................ 2-17
..................... 1-8
3Adjustment
3.1 Finisher adjustment outlines ........................................................... 3-3
3.2 05 Saddle Stitcher Adjustment ........................................................ 3-4
3.2.1 01 Stapling Centre Adjustment ...................................................... 3-4
3.2.2 02 Stapling Paper Width Adjustment ............................................. 3-6
3.2.3 03 Staple Pitch Adjustment ........................................................... 3-9
3.2.4 04 Folding Position Adjustment ................................................... 3-12
3.2.5 05 Three-Fold Position Adjustment ............................................. 3-15
3.2.6 06 Fold Paper Width Adjustment ................................................. 3-19
3.2.7 07 Trimming Adjustment .............................................................. 3-21
SD-501 Saddle Stitcher x-3
Page 4

bizhub PRO 1050 Additional information - SD-501 Saddle Stitcher -
SD-501 Saddle Stitcher is an optional device newly added to the configuration of bizhub PRO 1050 options.
Please refer to this guide for the operation and safety information on the saddle stitcher, and keep this guide inside the user’s guide of the main body,
readily available for reference.
Also, be sure to read "Safety Information" of the bizhub PRO 1050 user manual - main body.
x-4 SD-501 Saddle Stitcher
Page 5

1
Machine information
Page 6

Page 7
Machine information
1 Machine information
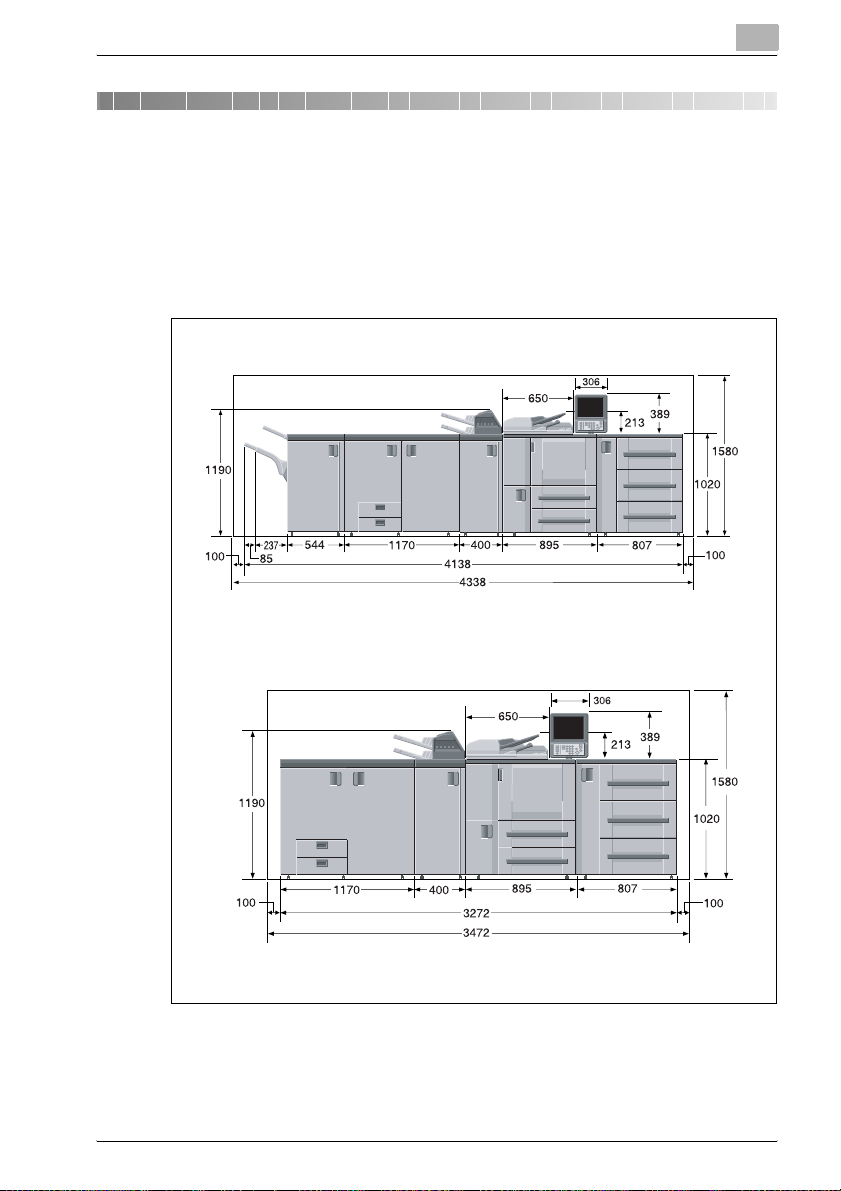
1.1 Installation space
Allow sufficient space for facilitating copy operation, changing parts, and periodic inspection. Leave an adequate space behind the machine to let hot air
out from the rear fan.
bizhub PRO 1050 + DF-603 + PF-701 + FD-501 + SD-501 + FS-503
1
Unit:mm
Unit:mm
bizhub PRO 1050 + DF-603 + PF-701 + FD-501 + SD-501
SD-501 Saddle Stitcher 1-3
Page 8
1
Machine information
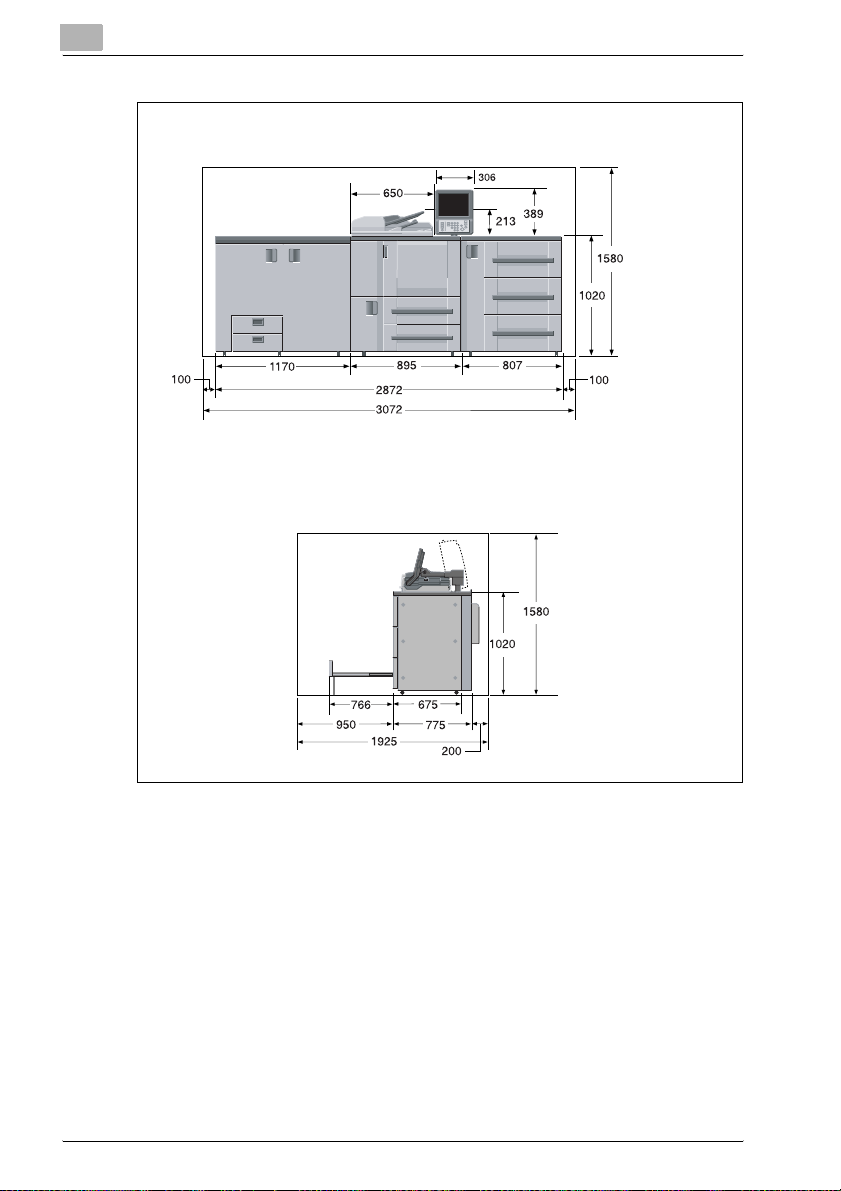
Unit:mm
bizhub PRO 1050 + DF-603 + PF-701 + SD-501
Unit:mm
!
Details
The whole machine may weigh approx. 945 kg at maximum, depending
on the combination of options. Be sure to choose a level and solid floor
for the installation place.
1-4 SD-501 Saddle Stitcher
Page 9
Machine information
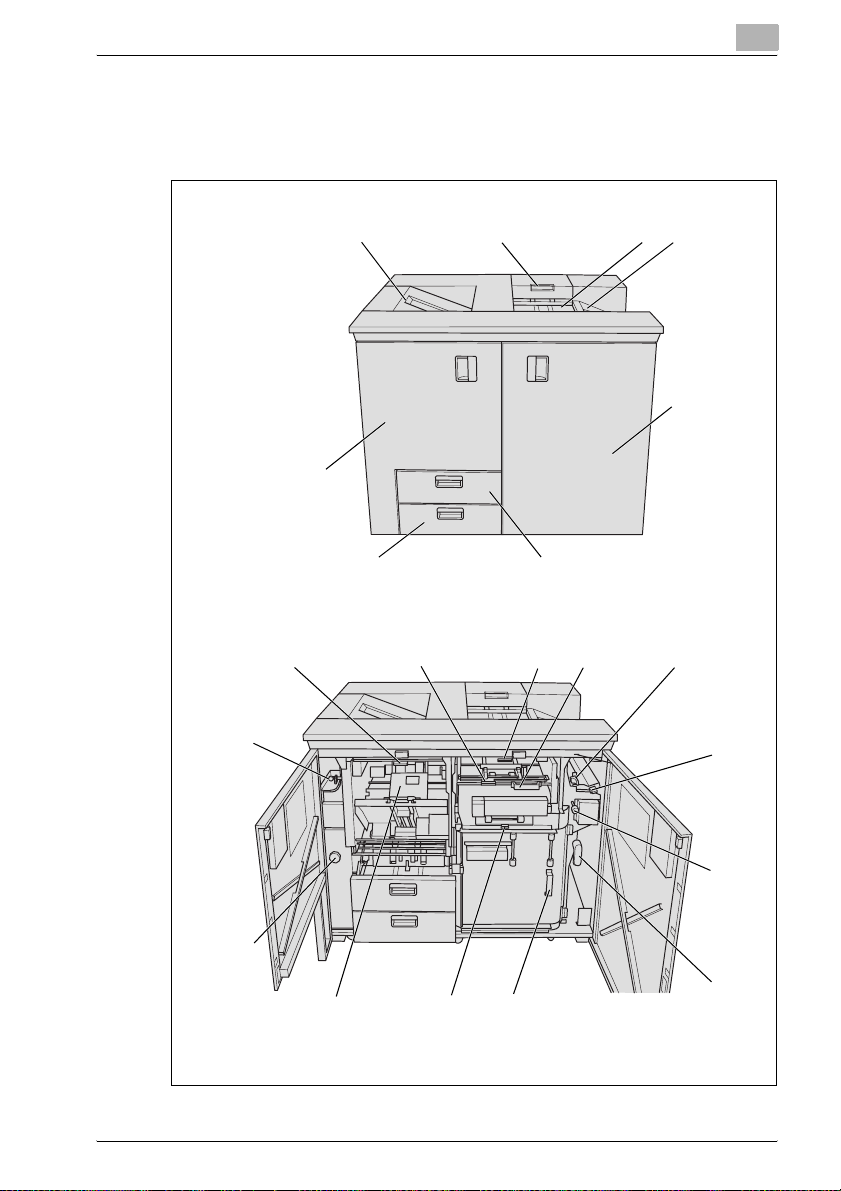
1.2 Machine configuration
1.2.1 SD-501 Saddle Stitcher
1
12
13
1
8
1
23
67
2
3
4
5
4
5
6
11
7
9
10
8
SD-501 Saddle Stitcher 1-5
Page 10
1
Machine information
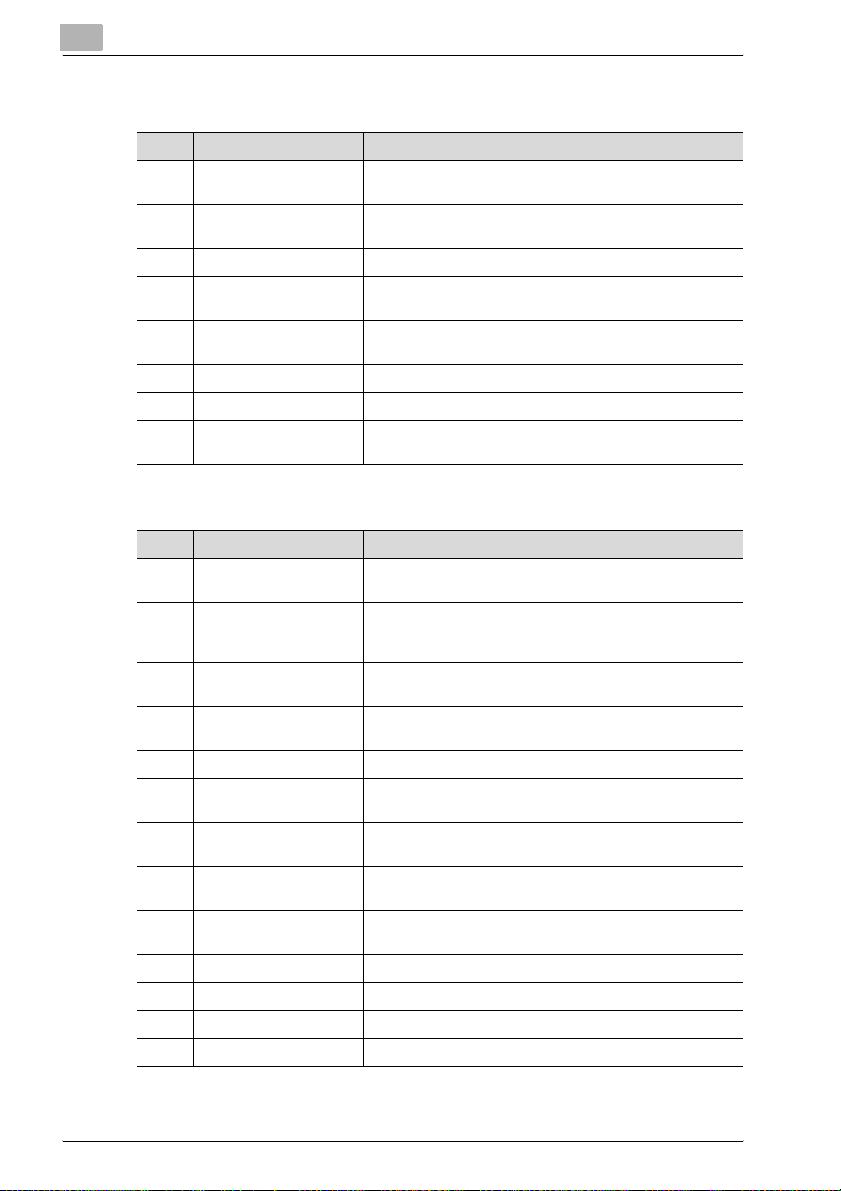
External view
Pos. Part name Description
1 Secondary (Sub) tray of
SD-501 Saddle Stitcher
2 Multi-folding mode out-
let cover handle
3 Multi-folding mode tray holds sets output in multi-folding mode.
4 Secondary (Sub) tray holds non-sorted sets output from the machine on the right
5 Right side door of SD-
501 Saddle Stitcher
6 Saddle Stitcher tray is withdrawn when using Fold&Staple mode.
7 Dust box is withdrawn to remove waste paper.
8 Left side door of SD-501
Saddle Stitcher
holds non-sorted sets output from Saddle Stitcher.
opens the cover to remove paper misfed when using multifolding mode.
side of the Saddle Stitcher.
opens to remove mishandled paper.
opens for staple supply or to remove mishandled paper.
Internal view
Pos. Part name Description
1 Upper cover lever of
Folding unit
2 Secondary (Sub) tray
conveyance lever (middle)
3 Folding unit drawer han-
dle
4 Secondary (Sub) tray
conveyance lever (right)
5 Inlet lever o opens leftward to remove mishandled paper.
6 Feeding knob can be turned clockwise to feed mishandled paper to the
7 Folding unit conveyance
lever
8 Folding unit conveyance
cover handle
9 Folding unit front cover
lever
10 Stapling unit staples folded sets.
11 Stapling unit knob can be turned clockwise to feed mishandled paper.
12 Outlet lever opens leftward to remove mishandled paper.
13 Outlet conveyance lever opens downward to remove mishandled paper.
opens the upper cover to remove paper misfed inside the
Folding unit.
opens downward to remove mishandled paper.
opens the drawer to remove paper misfed inside the Folding unit.
opens upward to remove mishandled paper.
Folding unit.
opens rightward to remove mishandled paper.
opens the cover to remove mishandled paper.
opens upward to remove mishandled paper.
1-6 SD-501 Saddle Stitcher
Page 11

Machine information
1.2.2 Standard/Optional equipment
SD-501 Saddle Stitcher
1
EM-701 Expanded Memory
for printer controller (option)
PS-502 Adobe PostScript 3
expansion kit
SD-501 Saddle Stitcher
+ FD-501 Folding Unit
FS-503 Finisher + SD-501 Saddle Stitcher
+ FD-501 Folding Unit
Main Body
+ PF-701 Paper Feeder Unit
+ DF-603 Reverse Automatic
Document Feeder
SD-501 Saddle Stitcher 1-7
Page 12
1
Machine information
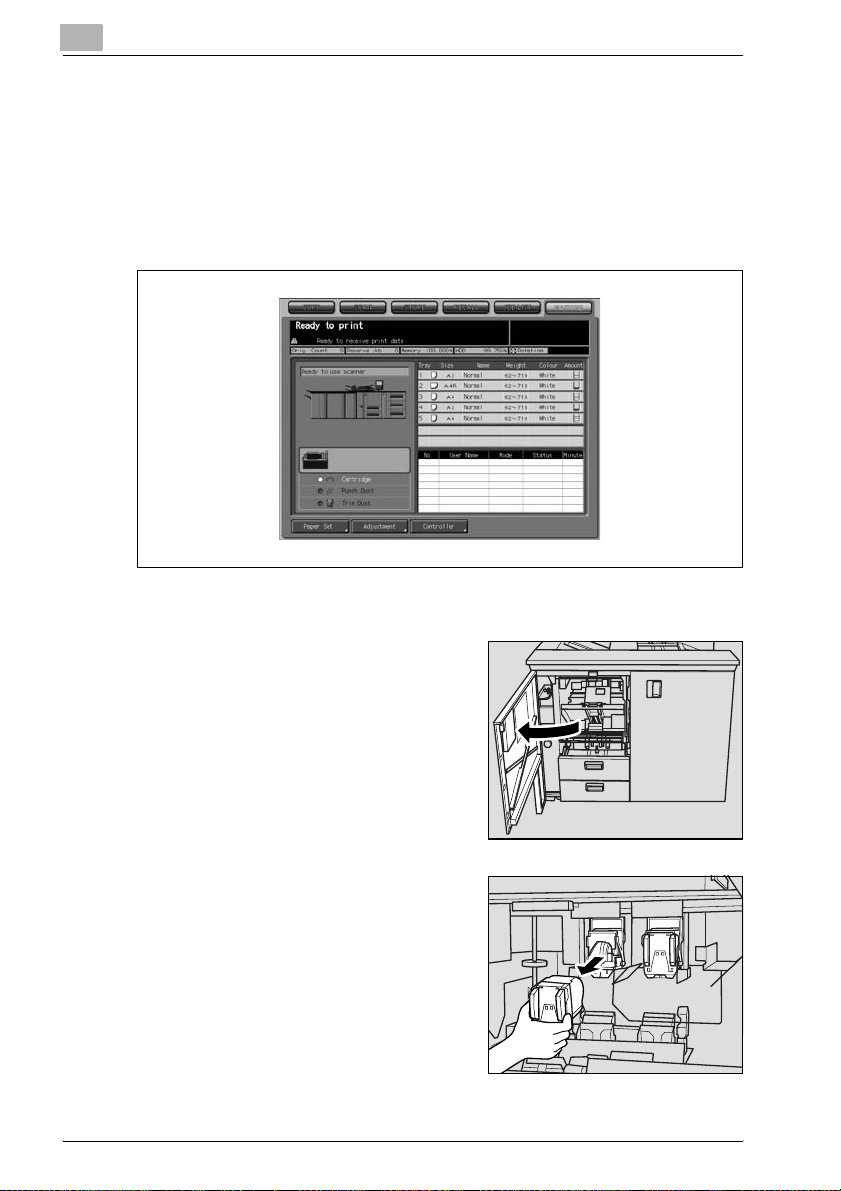
1.3 Inserting a new staple cartridge into SD-501 Saddle Stitcher
When the staple cartridge of the SD-501 Saddle Stitcher is empty, the cartridge indicator lights in red in the option status area of the machine status
screen.
If printing job is in progress, a message will be displayed on the copy screen.
Follow the procedure below to replace the staple cartridge.
1 Open the left side door of the saddle
stitcher.
2 Remove the empty cartridge.
- Hold both left and right sides of
the staple cartridge, then draw it
forward.
1-8 SD-501 Saddle Stitcher
Page 13
Machine information
!
Details
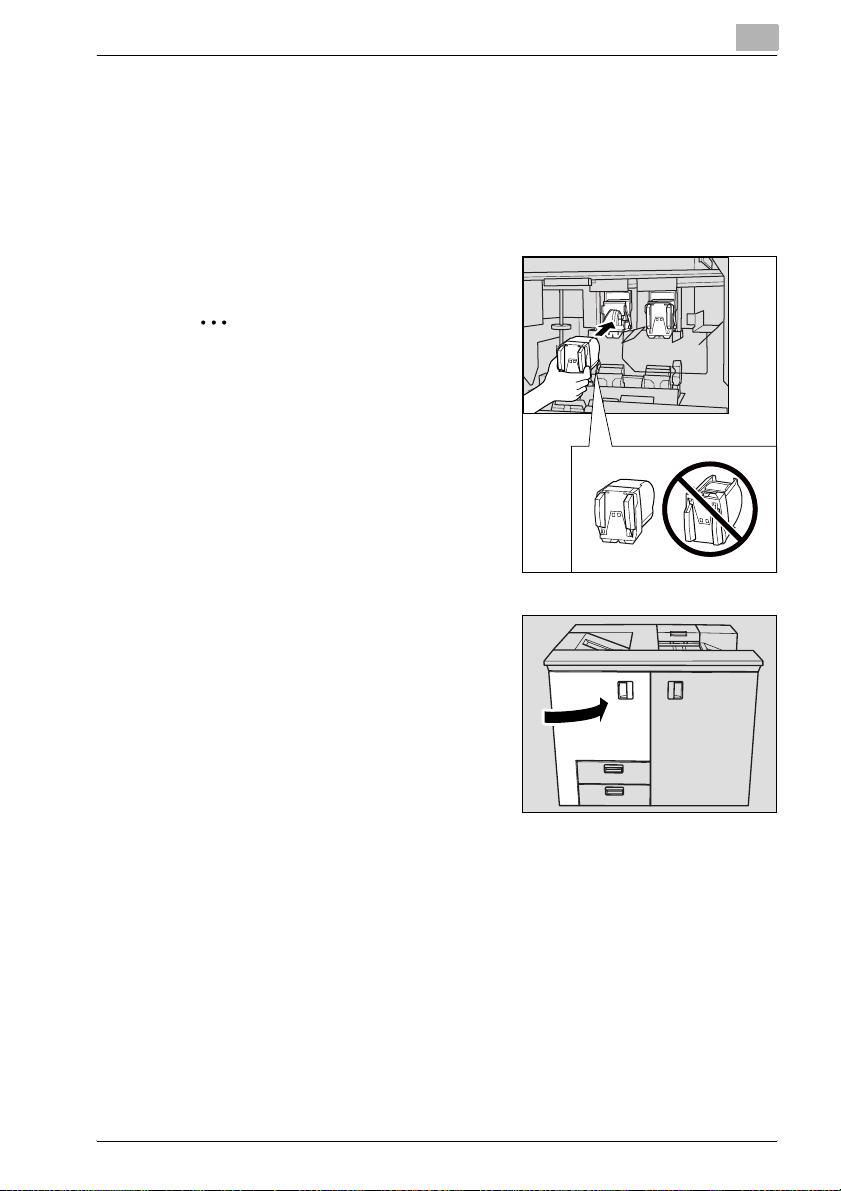
The machine is mounted with two staple cartridges. Be sure to remove
the empty one.
3 Set the new cartridge.
2
Reminder
Check that the top side of the staple
cartridge is up, otherwise it cannot be
inserted.
1
4 Close the left side door of the saddle
stitcher.
SD-501 Saddle Stitcher 1-9
Page 14
1
Machine information
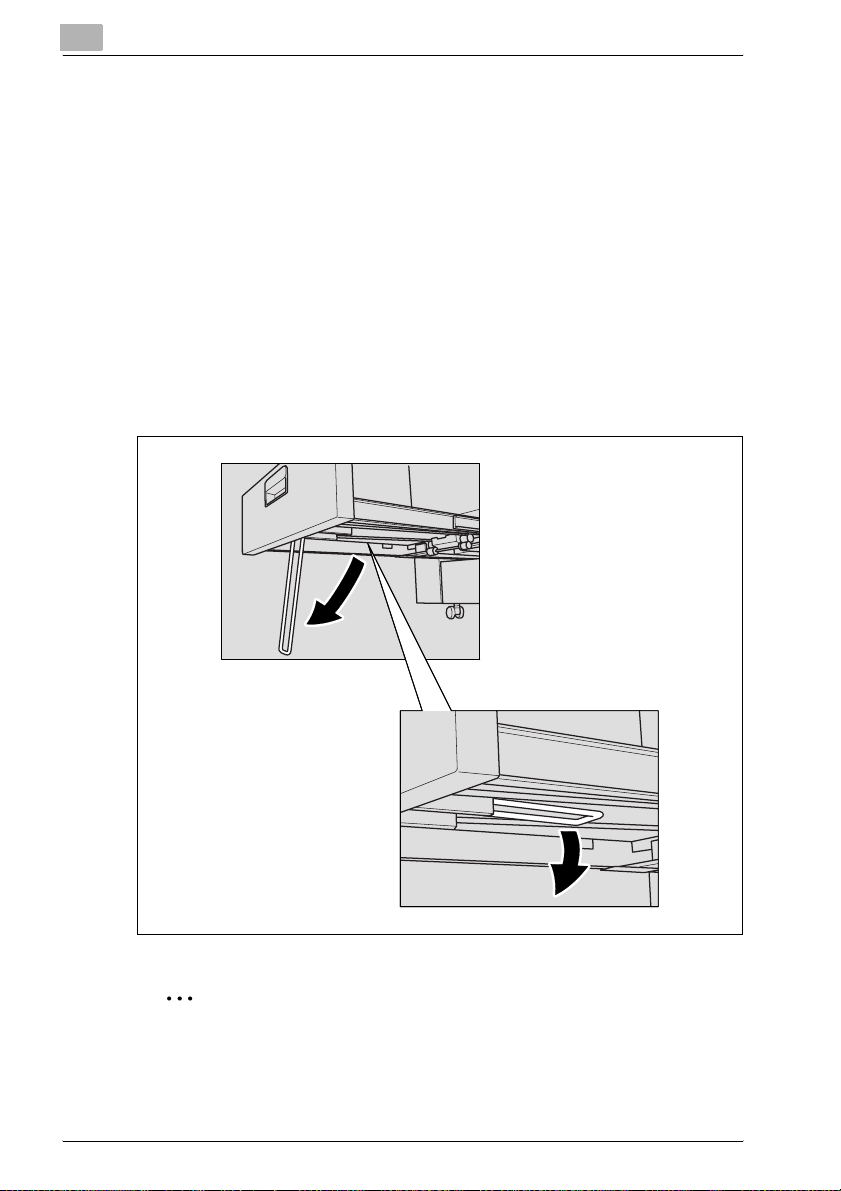
1.4 Cleaning conveyance belt of saddle stitcher tray
The conveyance belt of saddle stitcher tray should be kept clean, otherwise
soil marks may be copied. Follow the procedure below to clean the conveyance belt.
In order to maintain optimum copy quality, we recommend to clean it every
time before using the saddle stitcher tray.
!
Details
If any soil marks are found while printing, perform this cleaning procedure
immediately.
1 Fully withdraw the saddle stitcher tray, then open the tray stand.
2
Reminder
Never fail to open the tray stand, otherwise the machine may be damaged.
1-10 SD-501 Saddle Stitcher
Page 15
Machine information
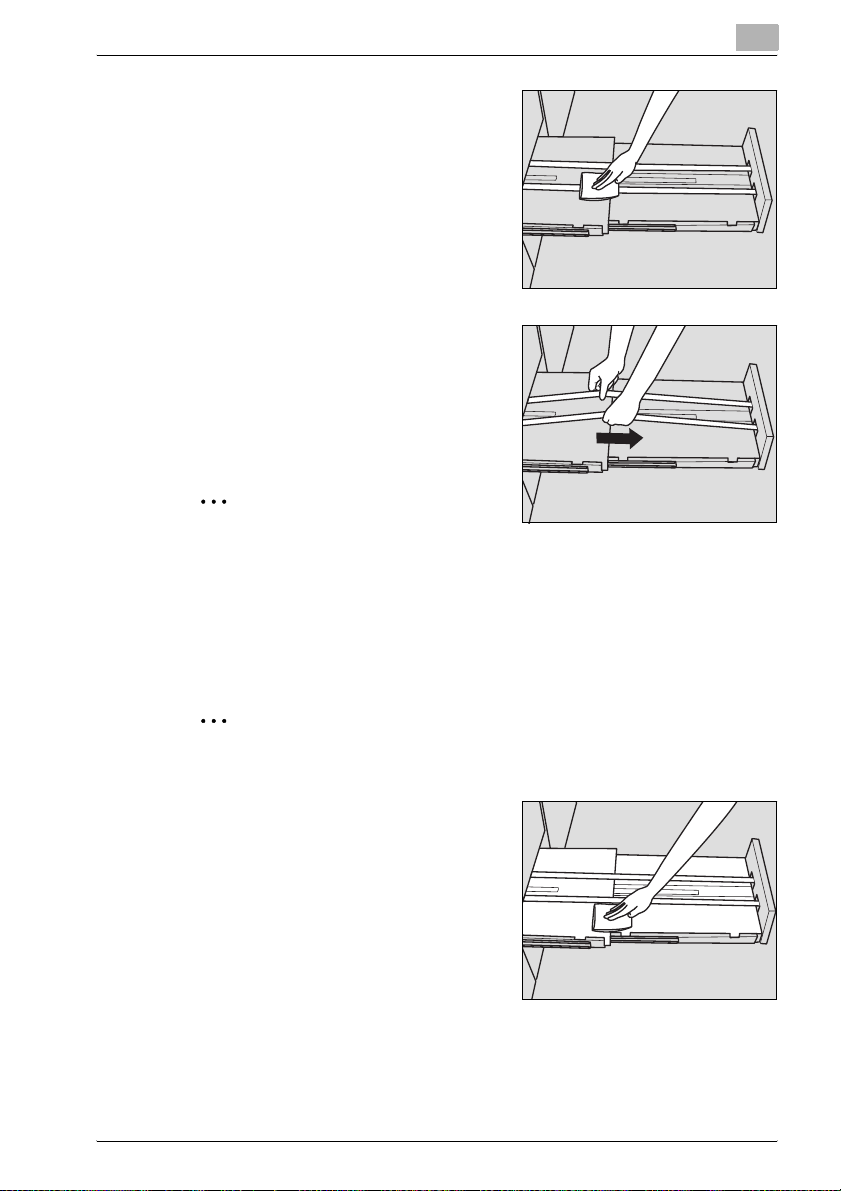
2 Clean the surface of the two convey-
ance belts with a soft cloth dampened slightly with alcohol (cleaner).
3 Move the conveyance belt to clean
the whole length.
- Raise the two belts lightly, then
pull them both frontward at the
same time in order to show the
hidden parts.
2
Reminder
Do not raise the belt higher than need be, or never fail to pull the two belts
at the same time; otherwise machine trouble may be caused.
- Clean the belts in the same way as above, using a soft cloth dampened with alcohol.
- Repeat steps 2 and 3 (about three times) to clean the whole round
of the belt.
1
2
Reminder
Be sure to clean the whole round of the conveyance belt.
4 Clean the bottom plate of the saddle
stitcher tray.
- Wipe the whole surface of the
bottom plate with a soft cloth
slightly dampened with alcohol
(cleaner).
SD-501 Saddle Stitcher 1-11
Page 16

1
Machine information
5 Return the tray stand to its original position, then return the saddle
stitcher tray.
2
Reminder
Never return the saddle stitcher tray to its original position with the tray
stand opened.
1-12 SD-501 Saddle Stitcher
Page 17
Machine information
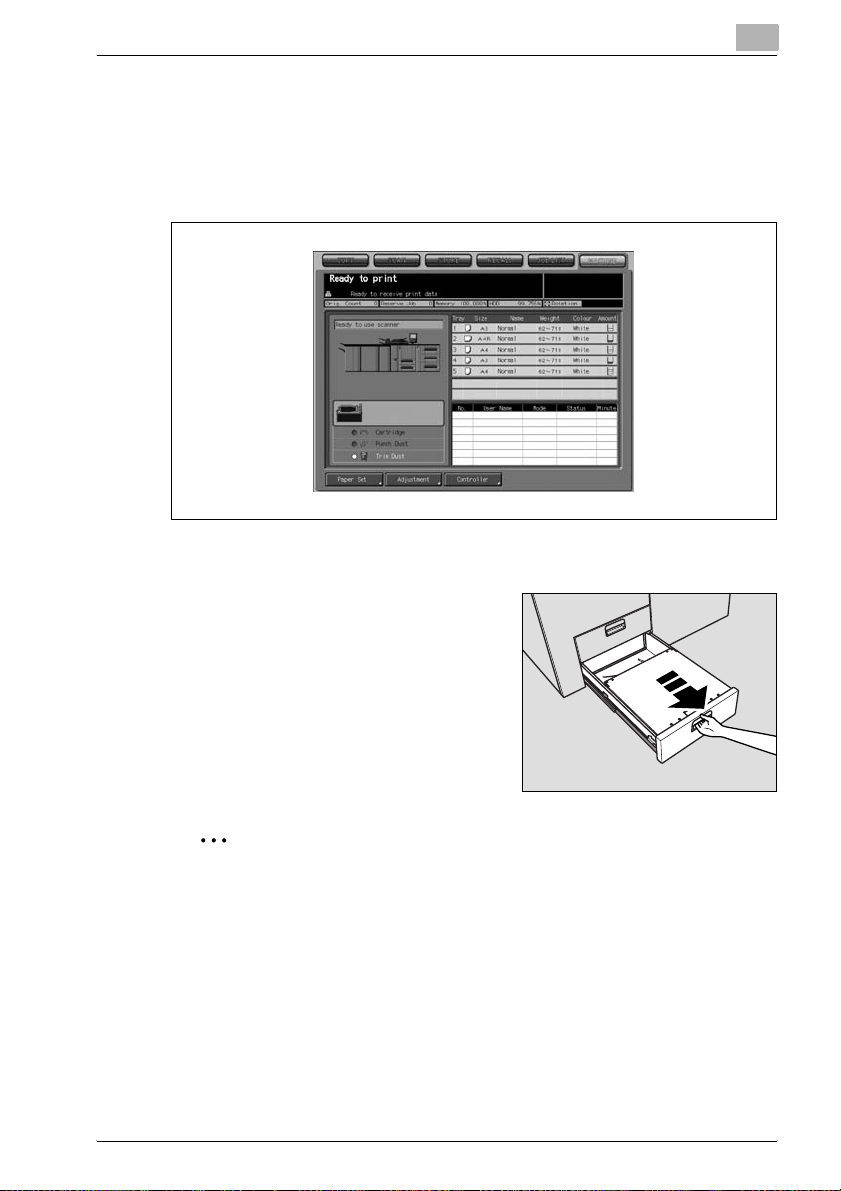
1.5 Empty dust box of SD-501 Saddle Stitcher
When the dust box of the SD-501 Saddle Stitcher becomes full, the trim dust
indicator lights in red in the option status area of the machine status screen.
If printing job is in progress, a message will be displayed on the copy screen.
Follow the procedure below to empty the dust box.
1 Withdraw the dust box.
1
2
Reminder
The dust box cannot be withdrawn while machine operation is in
progress. Be sure to confirm that the machine has stopped its operation
before withdrawing the dust box.
SD-501 Saddle Stitcher 1-13
Page 18
1
Machine information
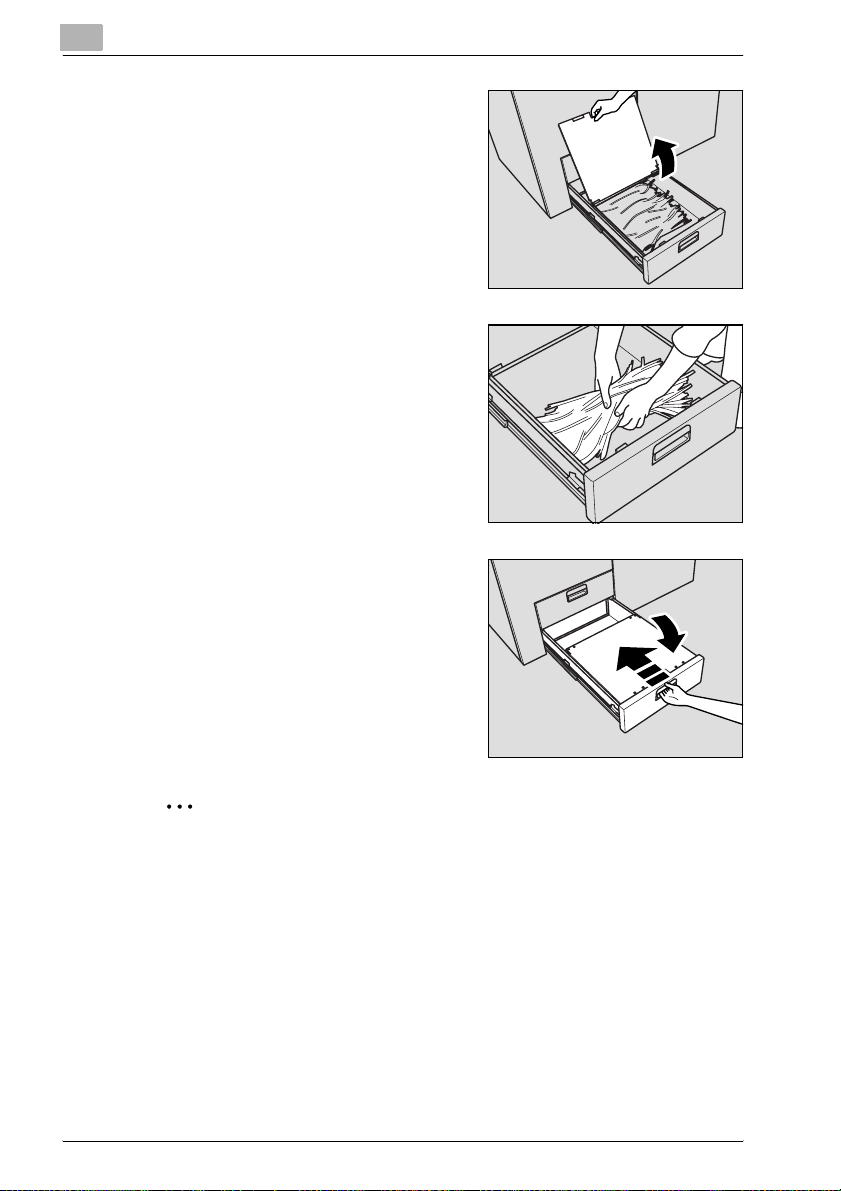
2 Open the top cover of the dust box.
3 Take waste paper out of the dust
box.
4 Close the top cover of the dust box,
then return it to its original position.
2
Reminder
Be sure to return the dust box to its original position, otherwise the trimming function cannot be performed.
1-14 SD-501 Saddle Stitcher
Page 19
Machine information
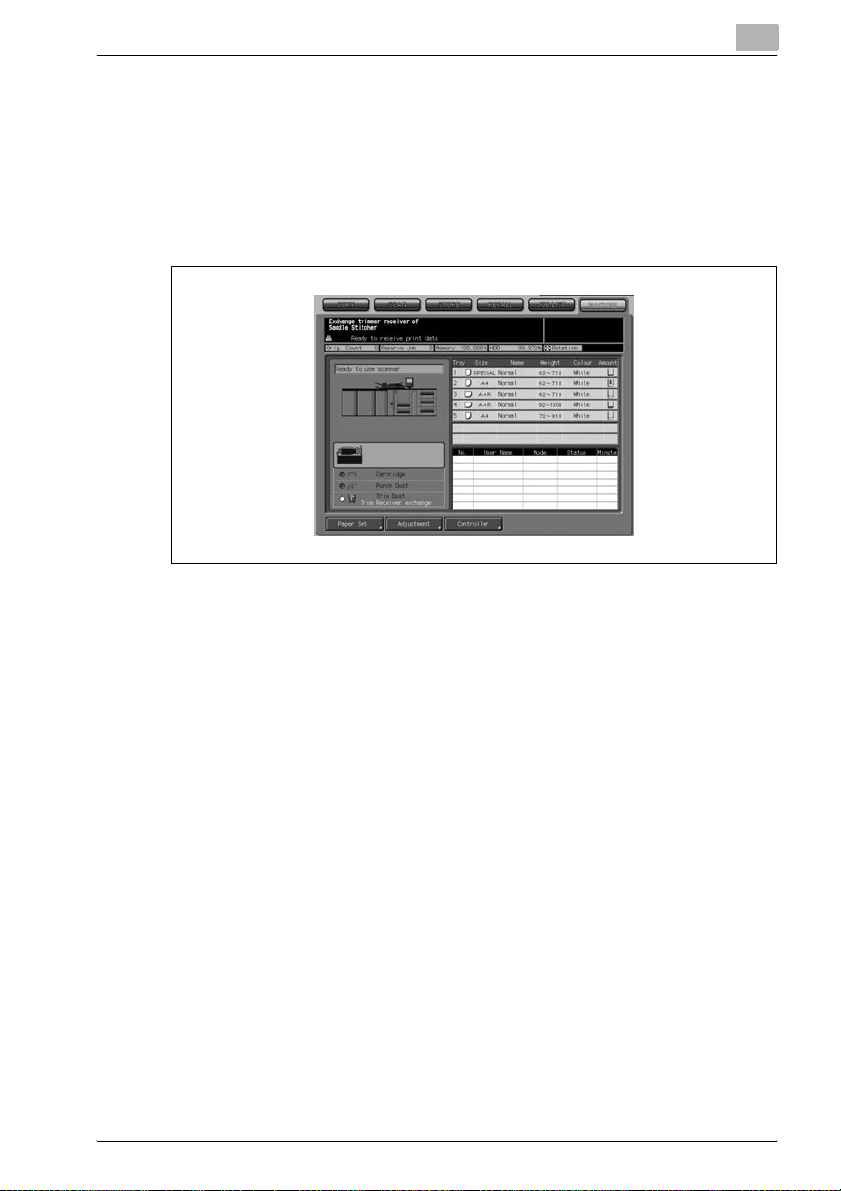
1.6 If “Trim Receiver Exchange” message is displayed
This machine trims the printed sets using a cutting blade and its receiver,
which may require replacement in a long period of use.
When replacement is due, a “Trim Receiver exchange” message appears under the trim dust indicator in the option status area of the machine status
screen.
If the above message is displayed, please contact your service representative.
1
!
Details
The machine manager can call for service using the utility setting (06 Machine Manager Setting>06 System Connection>01 User Call). See chapter 17 "Machine Manager Setting" of the bizhub PRO 1050 user manual.
In this case, you don’t have to make a call for preventive maintenance,
because your machine has been monitored automatically by your service
representative.
SD-501 Saddle Stitcher 1-15
Page 20
1
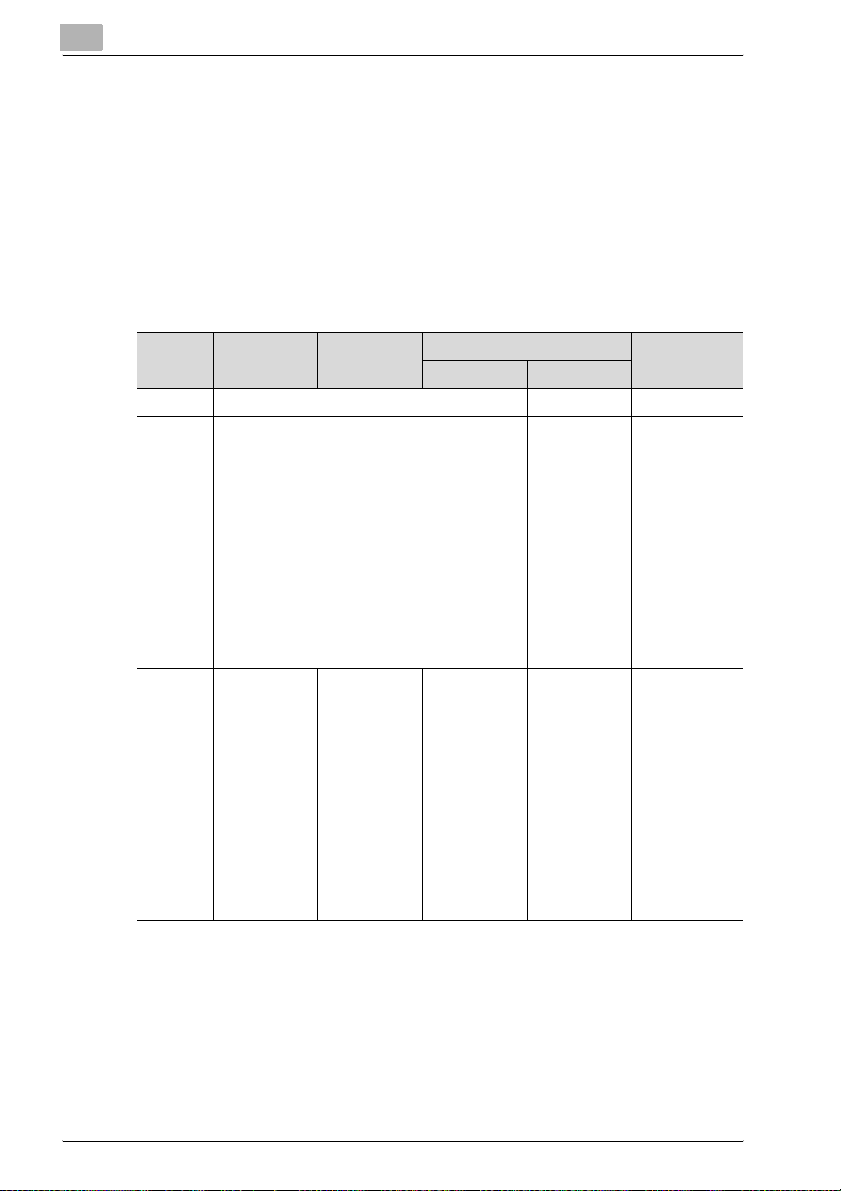
1.7 Paper information
SD-501 Saddle Stitcher provides the following functions.
- Fold & Staple
- Trimming
- Multi-Folding (Multi Centre, Multi Letter)
- Straight delivery
Each function is limited in paper weight, size, quantity and tray capacity as
described below.
Machine information
Fold & Staple Trimming Multi-Folding function Straight deliv-
Multi Centre Multi Letter
Weight 50 ~ 244 g/m
Size A3, B4, A4R, B5R, F4*, 12×18, 11×17, 8.5×14,
Quantity See the table
* F4 indicates the following four sizes: 8.5×13, 8.125×13.25, 8×13, 8.25×13.
8.5×11R, 8K, 16KR, Wide size paper (max. 324
mm × 460 mm)
below and
“Paper weight
and number
of folded and
stapled
sheets” on
page 1-17 for
the maximum
number of
folded & stapled sheets
and tray capacity.
2
Max. trimmed
sheets:
50 (80g/m
2
{49 (80g/m
1 (200g/m
× 2
Tray capacity
is the same as
Fold & Staple
mode.
2
) ×
2
+
2
)}
Max. folded
sheets:
5 sheets
2
(80 g/m
)
Tray capacity:
30 sets
50 ~ 91 g/m250 ~ 300 g/m
A4R, 8.5×11R A3, B4, A4,
Max. folded
sheets:
5 sheets
2
(80 g/m
)
Tray capacity
1-sheet-folded set: 40 sets
or more,
2~3-sheetfolded set: 30
sets or more,
4~5-sheetfolded set: 20
sets or more
ery
A4R, B5, B5R,
A5, A5R, B6R,
F4, 12×18,
11×17, 8.5×14,
8.5×11,
8.5×11R,
5.5×8.5,
5.5×8.5R, 8K,
16K, 16KR,
Tab paper,
Wide size paper (max. 324
mm × 460 mm)
200 sheets
2
!
Details
Maximum number of folded and stapled sheets varies according to the
paper weight. See the table below.
1-16 SD-501 Saddle Stitcher
Page 21

Machine information
Paper weight and number of folded and stapled sheets
Paper weight Maximum number of folded&stapled sheets
50 ~ 81 g/m
82 ~ 91 g/m
92 ~ 130 g/m
131 ~ 161 g/m
162 ~ 209 g/m
210 ~ 244 g/m
- Some types of fine paper (50 ~ 91 g/m
29 sheets + 1 (200 g/m
details.
- Fine (vertically laid) paper (62 ~ 91 g/m
limited to 30 sheets or 29 sheets + 1 (200 g/m
- For using coated paper, heed the following limit.
Paper weight Maximum number of folded&stapled sheets
50 ~ 81 g/m
82 ~ 91 g/m
92 ~ 130 g/m
131 ~ 161 g/m
1
2
2
2
2
2
2
2
2
2
2
50 sheets or 49 sheets + 1 (200 g/m2 paper)
30 sheets or 29 sheets + 1 (200 g/m2 paper)
20 sheets or 19 sheets + 1 (200 g/m2 paper)
15 sheets or 14 sheets + 1 (200 g/m2 paper)
10 sheets
5 sheets
2
2
paper). Contact your service representative for
25 sheets or 24 sheets + 1 (200 g/m2 paper)
15 sheets or 14 sheets + 1 (200 g/m2 paper)
10 sheets or 9 sheets + 1 (200 g/m2 paper)
5 sheets or 4 sheets + 1 (200 g/m2 paper)
) may be limited to 30 sheets or
2
) 300 mm or less in length will be
2
paper).
!
Details
When using Fold&Staple mode, saddle stitcher tray capacity depends on
the number of folded and stapled sheets finished as a set. Heed the limits
by referring to the table below.
The saddle stitcher tray should be fully withdrawn in order to accommodate the maximum number.
Number of sheets (1 set) Saddle stitcher tray capacity
2 ~ 10 50 sets
11 ~ 20 30 sets
21 ~ 40 20 sets
41 ~ 50 15 sets
SD-501 Saddle Stitcher 1-17
Page 22

1
Machine information
!
Details
Height of the folded and stapled booklet
The following table shows the standard height of folded and stapled
booklet according to the number of sheets and paper size.
Number of
sheets (1
set)
2 ~ 5 35 mm 40 mm 45 mm Not specified
6 ~ 15 45 mm 50 mm Not specified Not specified
16 ~ 30 50 mm 55 mm Not specified Not specified
31 ~ 50 60 mm 65 mm Not specified Not specified
Paper size
A3, 12×18, 11×17
(401mm or more)
B4, 8.5×14, 8K
(301 ~ 400mm)
A4R, 8.5×11R,
16KR (261 ~
300mm)
B5R (260mm or
less)
1-18 SD-501 Saddle Stitcher
Page 23

Machine information
1.8 Specifications
These specifications are subject to change without notice.
SD-501 Saddle Stitcher
Specifications
Functions Multi-folding (Multi Centre, Multi Letter), Fold&Staple, Trimming,
Processing capability 105 sheets per minute at maximum
Types of paper 50 to 244 g/m
Paper sizes Multi Centre, Fold&Staple, and Trimming; A3, B4, A4R, B5R, F4,
Staple position Available to be changed (90 ~ 165 mm)
Number of sheets (1 set) Multi Centre, Multi Letter 5 sheets (50 to 81 g/m
Stack capacity 30 sets max. (Multi Centre, Multi Letter)
Saddle stitcher tray capaci-tySee “Paper weight and number of folded and stapled sheets” on
Dimensions 1170 (W) × 775 (D) × 1020 (H) mm
Weight Approx. 263 kg
Power source Internal battery
Straight delivery
2
paper (Multi Centre, Fold&Staple,Trimming)
2
50 to 91 g/m
12"×18", 11"×17", 8.5"×14", 8.5"×11"R, 8K, 16KR, Wide size paper (max.324mm × 460mm)
Multi Letter; A4R, 8.5"×11"R
3 sheets (82 to 91 g/m
Fold&Staple; see table on p. 1-15.
Trimming; 50 sheets (80 g/m
{49 sheets (80 g/m
page 1-17.
1441(D) mm with Saddle stitcher tray fully withdrawn
paper (Multi Letter)
2
paper)
2
2
) + 1 sheet (200 g/m2)} × 2
paper) × 2, or
2
paper)
1
SD-501 Saddle Stitcher 1-19
Page 24

1
Machine information
1-20 SD-501 Saddle Stitcher
Page 25

2
Copy operations
Page 26

Page 27

Copy operations
2 Copy operations
2.1 Copy conditions incompatible with saddle stitcher
Output Application
Copy conditions incompatible with settings using saddle
stitcher
Original
setting
Output
application
Mixed OriginalЧЧЧЧЧ
Z-Folded Original
Custom Size
Custom Size (Full
Area)
Tab Paper
Collated (Offset) ooooo
Uncollated ooooo
Collated (Rotation)-----
Uncollated (Rotation)
1 Stapling (Upper
Left)
1 Stapling (Upper
Right)
2 Stapling (Top) ooooo
2 Stapling (Left) ooooo
2 Stapling (Right) ooooo
Fold&Staple ooo
Multi Centre o ooo
Multi Letter (Inside
Print)
Multi Letter (Outside
Print)
Trimming (*1) ooo
Fold&Sta
ple
-----
ooooo
ooooo
oo oo
ooo o
Multi
Centre
Multi Letter
(Inside
Print)
Multi Letter
(Outside
Print)
Trimming (*1)
2
SD-501 Saddle Stitcher 2-3
Page 28

2
Copy conditions incompatible with settings using saddle
stitcher
Output
application
Z-Fold ooooo
Folding (Inside Print) ooooo
Folding (Outside
Print)
Letter Fold-in (Iniside Print)
Letter Fold-in (Outside Print)
Letter Fold-out (Inside Print)
Letter Fold-out
(Outside Print)
Double Parallel (Inside Print)
Double Parallel
(Outside Print)
Gate (Inside Print) ooooo
Gate (Outside Print) ooooo
Hole-Punch (Left) ooooo
Hole-Punch (Top) ooooo
Face Up ЧЧЧЧЧ
Face Down
1 to N
N to 1 ЧЧЧЧЧ
Right & Left Binding
Upper Binding
HDD (*2)
Copy operations
Output Application
Fold&Sta
ple
ooooo
ooooo
ooooo
ooooo
ooooo
ooooo
ooooo
Multi
Centre
Multi Letter
(Inside
Print)
Multi Letter
(Outside
Print)
Trimming (*1)
None: Compatible
× Grayed out (including automatic release)
o Released automatically
*1
Released automatically if using secondary tray for output.
*2
Limited for Job Store function in Copy mode.
2-4 SD-501 Saddle Stitcher
Page 29

Copy operations
Copy Conditions Incompatible with Settings Using Saddle Stitcher
Application /
File Edit
2
Output Application
Fold&Sta
ple
Program Job (First
job)
Sheet Insertion
Insertion using PI
Front Cover
Back Cover
Front PI (Upper/
Lower)
Back PI (Upper/
Lower)
Chapter
Chapter (Print Insertion)
Combination × ×
Booklet × ×
Adhesive Binding××××
OHP InterleaveЧЧЧЧЧ
Image Insert *4
Book Copy *4 *4 × × *4
××××-
*3 *3 *3 *3
*3 *3 *3 *3
Multi
Centre
Multi Letter
(Inside
Print)
Multi Letter
(Outside
Print)
Trimming (*1)
SD-501 Saddle Stitcher 2-5
Page 30

2
Copy Conditions Incompatible with Settings Using Saddle Stitcher
Application /
Image
Edit
Neg. Pos. ReverseЧЧЧЧЧ
Repeat × ×
Repeat (Auto) (*5) × ×
Repeat (2/4/8 Repeat)
Frame Erasure
Fold Erasure
Image Centring
Image Shift
Reduce & Shift
Non-Image Area
Erase
All-Image Area
Erase
Stamp
Page Numbering
Set Numbering
Date
Watermark
Watermark/Numbering
Overlay Memory
Overlay (*3) × ×
Output Application
Fold&Sta
ple
Multi
Centre
Copy operations
Multi Letter
(Inside
Print)
××
Multi Letter
(Outside
Print)
Trimming (*1)
None: Compatible
× Grayed out (including automatic release)
*1
Released automatically if using secondary tray for output.
*2
Limited for Job Store function in Copy mode.
*3
Back cover using cover paper is unavailable
*4
Available only when Booklet is selected.
*5
Selecting Auto in Repeat, Non-Image Area Erase will also be selected automatically and
connot be released.
*6
Overlay cannot be selected in Program Job.
2-6 SD-501 Saddle Stitcher
Page 31

Copy operations
2.2 Adjusting position of copy image (Image shift)
Use image shift to adjust the position of copy images, e.g. for the purpose of
creating a new binding margin on originals to make it easier for filing purposes.
Page space function is available only when Booklet or 2 Repeat mode of Repeat has been already selected. Use this function to make the desired
amount of blank space between the two images on a page. See the illustration on p. 2-5 for details.
If image loss is likely, select the Reduce & Shift mode instead of regular Image shift. Refer to chapter 8.19 "Reducing Images to Create Binding Margin
(Reduce&Shift)" of the user manual (copier).
Specifications for image shift
- Shift amount: 0 to 250 mm in 1 mm increments
- Setting in 0.1 mm increments using up/down arrow key is also available.
This setting change can be made on the utility menu screen.
Right
Up
2
Down
Left
Up
Down
Original Copies
Right
Left
1 Select the copy mode and paper size from the copy screen, as re-
quired.
SD-501 Saddle Stitcher 2-7
Page 32

2
Copy operations
2 Touch [Application] on the copy screen.
2
Reminder
When starting a new copying job, be sure to close the ADF securely, then
press [Reset].
3 Touch [Image Shift] on the application popup menu.
4 Touch [Image Shift] on the Image shift screen, then specify the shift di-
rection and amount.
- Touch [Front] or [Back] to specify the shift direction and amount individually; or touch [Both Sides] to specify collectively. The [Back]
and [Both Sides] keys function only for duplex copying.
2-8 SD-501 Saddle Stitcher
Page 33

Copy operations
2
- Touch to highlight the desired shift direction key in the upper right
area, then use the touch panel keypad or up/down arrow key to enter the desired shift amount, from 0 to 250 mm in 1 mm increments.
- The image display on the screen allows you to view the shift direction and amount to be created on the printed sheets.
- When Booklet or 2 Repeat mode of Repeat has been already selected, the [Creep Adj.] or [Page Space] key appears clear on the
screen to show its availability.
- Touch [Creep Adj.] to make space between left and right pages of
a booklet.
- Or, touch [Page Space] to highlight it, then enter the desired
amount of the space between the two repeated images using the
touch panel keypad or up/down arrow key.
5 Touch [OK].
The application popup menu will be restored.
6 Touch [OK] on the application popup menu.
The copy screen will be restored.
SD-501 Saddle Stitcher 2-9
Page 34

2
Copy operations
Creep adj. and page space
Booklet
Original
2 Repeat in Repeat
Original
Creep adj.
Page space
Page space
2-10 SD-501 Saddle Stitcher
Page 35

Copy operations
2.3 Selecting an output tray
This section describes how to select an output tray of the saddle stitcher.
To select an output tray of any other optional equipment, refer to chapter 9.2
"Selecting an Output Tray" of the user manual (copier).
1 Touch [Output Application] on the copy screen.
The output application screen appears.
2
Trays that can output paper will be have keys on the front image of the
machine, and the tray that is currently set to output paper is shown with
a depressed key.
2 Touch [Output Tray].
An output tray selection screen reflecting the combination of optional
devices will appear.
SD-501 Saddle Stitcher 2-11
Page 36

2
Copy operations
3 Select the desired output tray.
- Touch the desired tray position key [ ] to select it.
4 Touch [OK] on the output tray selection screen.
It will return to the output application screen.
The output tray location is indicated by a depressed key on the front
image of the machine.
5 Touch [OK] on the output application screen.
It will return to the copy screen.
6 Be sure to fully withdraw the saddle
stitcher tray, if selected as an output
tray.
2
Reminder
Be careful not to exceed the tray capacity when selecting the print quantity, otherwise unexpected trouble may be caused.
2-12 SD-501 Saddle Stitcher
Page 37

Copy operations
2.4 Making folded booklet (Fold&Staple / Trimming)
Use Fold & Staple mode in combination with booklet feature to make twosided signature booklet, folded and stapled at two positions (saddle stitched)
in the centre.
Use trimming mode to trim the edge that opens the booklet, if desired.
2
Specifications for Fold&Staple / Trimming
- Paper weight: 50 ~ 244 g/m
- Paper size: A3, B4, A4R, B5R, F4, 12×18, 11×17, 8.5×14, 8.5×11R, 8K,
16KR, Wide size paper (max. 324 mm × 460 mm)
- Max. number of folded & stapled sheets: Varies according to the paper
weight to be used. For details, refer to “Paper information” on page 1-16.
- Saddle stitcher tray capacity: Varies according to the number of folded &
stapled sheets. For details, refer to “Paper weight and number of folded
and stapled sheets” on page 1-17.
- Staple position: Variable (90 ~ 165 mm)
- Stapling method: Inline clinch
- Trimming width: 2 ~ 10 mm
Fold & Staple Fold & Staple and Trimming
2
SD-501 Saddle Stitcher 2-13
Page 38

2
Copy operations
1 Touch [Output Application] on the copy screen.
The output application screen appears.
2 Touch [Fold&Staple], then select to use trimming or not.
The Fold&Staple screen will be displayed.
- Touch [Trimming] or [Non Trimming] to select it.
2-14 SD-501 Saddle Stitcher
Page 39

Copy operations
3 Touch [OK].
!
Details
If you touch [Cancel], the previous setting will be restored.
Touching [Function Off] will deselect the Fold&Staple (and Trimming)
mode, however, the specified setting will be kept in memory.
4 Touch [OK] on the output application screen.
5 Withdraw the saddle stitcher tray.
2
The output application screen will be restored.
The output icon of the selected output mode will be displayed on the
copy screen.
Booklet function in the application setting has been selected automatically.
- Open the tray stand when fully withdrawn.
SD-501 Saddle Stitcher 2-15
Page 40

2
Copy operations
!
Details
The folded and stapled (and trimmed) sets will be delivered into the saddle stitcher tray. If the tray is not fully withdrawn, the machine will detect
that the tray is filled up, even with less number of finished sets than that
specified in specifications.
2
Reminder
Never return the saddle stitcher tray to its original position with the tray
stand opened.
2-16 SD-501 Saddle Stitcher
Page 41

Copy operations
2.5 Folding a copied set (Multi Centre / Multi Letter)
Use Multi Centre mode to double-fold up to 5 sheets of copied set, or use
Multi Letter to fold it inside in three.
Using Multi Letter, the print side can be specified on the screen.
2
Specifications for Multi Centre / Multi Letter
- Paper weight: Multi Centre 50 ~ 244 g/m
- Paper size: Multi Centre A3, B4, A4R, B5R, F4, 12×18, 11×17, 8.5×14,
8.5x11R, 8K, 16KR, Wide size paper (max. 324 mm × 460 mm)
- Multi Letter A4R, 8.5×11R
- Max. number of folded sheets: 5 sheets max. (80 g/m
- Tray capacity: Multi Centre (Saddle stitcher tray) 30 sets
- Multi Letter (Multi-folding tray) 30 sets
Multi Centre Multi Letter
2
, Multi Letter 50 ~ 91 g/m
2
)
2
SD-501 Saddle Stitcher 2-17
Page 42

2
Copy operations
1 Touch [Output Application] on the copy screen.
The output application screen appears.
2 Touch [Multi Centre] or [Multi Letter] to select it.
If Multi Letter is selected, the Multi Letter screen will be displayed to
specify the print side.
- Touch [Outside Print] or [Inside Print] to select it.
- Touch [OK]. The output application screen will be restored.
!
Details
If you touch [Cancel], the previous setting will be restored.
Touching [Function Off] will deselect the mode, however, the specified
setting will be kept in memory.
2-18 SD-501 Saddle Stitcher
Page 43

Copy operations
3 Touch [OK] on the output application screen.
4 If Multi Centre is selected, withdraw the saddle stitcher tray.
2
The output icon of the selected output mode will be displayed on the
copy screen.
With Multi Centre selected, booklet function in the application setting
has been selected automatically.
- Open the tray stand when fully withdrawn.
!
Details
The double-folded sets will be delivered into the saddle stitcher tray. If
the tray is not fully withdrawn, the machine will detect that the tray is filled
up, even with less number of finished sets than that specified in specifications.
The triple-folded sets will be delivered into the multi-folding tray.
SD-501 Saddle Stitcher 2-19
Page 44

2
Copy operations
2
Reminder
Never return the saddle stitcher tray to its original position with the tray
stand opened.
2-20 SD-501 Saddle Stitcher
Page 45

3
Adjustment
Page 46

Page 47

Adjustment
3Adjustment
3.1 Finisher adjustment outlines
Use this function to make the following fine adjustments on SD-501 Saddle
Stitcher.
!
Details
See bizhub 1050 user manual for the adjustment on finishing options other than the saddle stitcher.
The target adjustment items vary depending upon the configuration of installed options.
- 01 Stapling Centre Adjustment
Adjust the dislocation of the centre position of staples.
- 02 Stapling Paper Width Adjustment
Adjust the dislocation of sheets in the stapled set.
- 03 Staple Pitch Adjustment
Adjust the pitch between two staples.
- 04 Folding Position Adjustment
Adjust the double-folding position.
- 05 Three-Fold Position Adjustment
Adjust the three-folding position.
- 06 Fold Paper Width Adjustment
Adjust the dislocation between sheets.
- 07 Trimming Adjustment
Adjust the trim width.
3
SD-501 Saddle Stitcher 3-3
Page 48

3
3.2 05 Saddle Stitcher Adjustment
3.2.1 01 Stapling Centre Adjustment
Perform this adjustment for the centre (folding) position of copied/printed
sheets and of staples processed by the SD-501 Saddle Stitcher.
The paper width adjustment (06) and folding position adjustment (04) are
supposed to be completed before this adjustment.
Adjustment
3-4 SD-501 Saddle Stitcher
Page 49

Adjustment
Procedure
1 Touch [Adjustment] - [02 Finisher Adjustment] - [05 Saddle Stitcher
2 Touch [01 Stapling Centre Adjustment] to display the stapling centre
3 Touch the [COPY] tab to display the copy screen.
4 Select the Fold&Staple mode, then press [Start]. A sample copy will be
5 Check misalignment (a) of the folded line and stapling position.
3
Adj.].
position adjustment screen.
output.
[1]
a
[2]
6 If the test desired result cannot be obtained, touch the [ADJUSTMENT]
tab.
7 Use the touch panel keypad to enter the desired adjustment value, then
touch [Set].
Available range: -20 (forward) to +20 (backward), 1 step = 0.1 mm
8 Repeat the adjustment steps from 3 to 7 until the desired result is ob-
tained.
9 Touch [Return] to restore the saddle stitcher adjustment mode menu
screen.
SD-501 Saddle Stitcher 3-5
Page 50

3
3.2.2 02 Stapling Paper Width Adjustment
Perform this adjustment if stapled sheets are not aligned neatly processed
by the SD-501 Saddle Stitcher.
Adjustment
3-6 SD-501 Saddle Stitcher
Page 51

Adjustment
Procedure
1 Touch [Adjustment] - [02 Finisher Adjustment] - [05 Saddle Stitcher
2 Touch [02 Stapling Paper Width Adjustment] to display the staple pa-
3 Touch the [COPY] tab to display the copy screen.
4 Load the desired size of paper to be adjusted on a tray, select
5 Check misalignment (a), in which misalignment occurs if the paper
3
Adj.].
per width adjustment screen.
Fold&Staple and then press [Start]. A sample pattern (No. 16) will be
output.
width setting is larger than the actual width, or paper curving (b), in
which a sample set is curved if the paper width setting is smaller than
the actual width has occurred.
a
b
6 If the desired result cannot be obtained, touch the [ADJUSTMENT] tab.
7 Touch [Next] or [Back] to select the paper size to be adjusted.
Touching [Next] continuously will change the paper size as follows.
All Size - 11×17 - A3 - B4 - 8.5x14 - A4R - 8.5×11R - B5R - 8×13 -
8.12×13.2 - 8.5×13 - 8.25×13 - 8K - 16KR - 12×18 - A3W - B4W -
A4WR - B5WR - 12×18W - 11×17W - 8.5×11WR - Special
8 Use the touch panel keypad to enter the desired adjustment value, then
touch [Set].
Available range: -20 (wide) to +20 (narrow), 1 step = 0.1 mm
SD-501 Saddle Stitcher 3-7
Page 52

3
Adjustment
!
Details
The following limitation is put on the paper width setting according to the
actual paper width.
Actual paper width Minimum value Maximum value
~ 222 mm 91 mm Acutal width minus 91 mm
222 mm ~ 290 mm Not limited Not limited
290 mm ~ Not limited 165 mm
Using paper size of which actual width is less than 222 mm such as A4R, the
staple pitch will be set to 91 mm automatically even if the value shorter than
91 mm of staple pitch is entered.
9 Repeat the adjustment steps from 3 to 8 until the desired result is ob-
tained.
10 If adjustment in any other paper size is required, repeat steps from 3 to
8.
11 Touch [Return] to restore the saddle stitcher adjustment mode menu
screen.
3-8 SD-501 Saddle Stitcher
Page 53

Adjustment
3.2.3 03 Staple Pitch Adjustment
Perform this adjustment for the staple pitch processed by SD-501 Saddle
Stitcher.
3
SD-501 Saddle Stitcher 3-9
Page 54

3
Adjustment
Procedure
1 Touch [Adjustment] - [02 Finisher Adjustment] - [05 Saddle Stitcher
Adj.].
2 Touch [03 Staple Pitch Adjustment] to display the staple pitch adjust-
ment screen.
3 Touch the [COPY] tab to display the copy screen.
4 Load the desired size of paper to be adjusted on a tray, specify
Fold&Staple, then press [Start]. A sample pattern (No. 16) will be output.
5 Check the staple pitch (a) of the sample sheet.
a
6 If the desired result cannot be obtained, touch the [ADJUSTMENT] tab.
7 Touch [Next] or [Back] to select the paper size to be adjusted.
Touching [Next] continuously will change the paper size as follows.
All Size - 11×17 - A3 - B4 - 8.5×14 - A4R - 8.5×11R - B5R - 8×13 -
8.12×13.2 - 8.5×13 - 8.25×13 - 8K - 16KR - 12×18 - A3W - B4W A4WR - B5WR - 12x18W - 11×17W - 8.5×11WR - Special
8 Use the touch panel keypad to enter the desired adjustment value, then
touch [Set.].
Available range: -20 (wide) to +20 (narrow), 1 step = 1 mm
9 Repeat the adjustment steps from 3 to 8 until the desired result is ob-
tained.
3-10 SD-501 Saddle Stitcher
Page 55

Adjustment
10 If adjustment in any other paper size is required, repeat steps from 3 to
11 Touch [Return] to restore the Saddle Stitcher Adjustment Mode Menu
3
8.
Screen.
SD-501 Saddle Stitcher 3-11
Page 56

3
3.2.4 04 Folding Position Adjustment
Perform this adjustment for the double-folding position processed by the
SD-501 Saddle Stitcher.
Adjustment
3-12 SD-501 Saddle Stitcher
Page 57

Adjustment
Procedure
1 Touch [Adjustment] - [02 Finisher Adjustment] - [05 Saddle Stitcher
2 Touch [04 Folding Position Adjustment] to display the folding position
3 Touch the [COPY] tab to display the copy screen.
4 Load the desired size of paper to be adjusted on a tray, specify Multi
5 Check the misalignment (a) of the edge of the feeding sheets.
3
Adj.].
adjustment screen.
Centre, then press [Start]. A sample pattern (No. 16) will be output.
a
Paper feed direction
6 If the desired result cannot be obtained, touch the [ADJUSTMENT] tab.
7 Touch [Next] or [Back] to select the paper size to be adjusted.
Touching [Next] continuously will change the paper size as follows:
All Size - 11×17 - A3 - B4 - 8.5×14 - A4R - 8.5×11R - B5R - 8×13 -
8.12×13.2 - 8.5×13 - 8.25×13 - 8K - 16KR - 12×18 - A3W - B4W -
A4WR - B5WR - 12×18W - 11×17W - 8.5×11WR - Special
8 Use the touch panel keypad to enter the desired adjustment value, then
touch [Set].
Available range: -20 to +20, 1 step = 0.1 mm
2
Note
When misalignment (a) of step 5 has occurred, enter the "+" value.
9 Repeat the adjustment steps from 3 to 8 until the desired result is ob-
tained.
SD-501 Saddle Stitcher 3-13
Page 58

3
Adjustment
10 If adjustment in any other size is required, repeat steps 3 to 8.
11 Touch [Return] to restore the saddle stitcher adjustment mode menu
screen.
3-14 SD-501 Saddle Stitcher
Page 59

Adjustment
3.2.5 05 Three-Fold Position Adjustment
Perform this adjustment for the three-folding positions processed by the SD501 Saddle Stitcher.
2
Reminder
When adjusting both single fold and double fold, be sure to start with the
double fold adjustment.
The baseline of single fold is calculated from the edge of the sheet, while
that of double fold is calculated from the position of the first fold line,
therefore a distance (b) in step 5 will be altered by changing the position
of either single fold or double fold.
3
SD-501 Saddle Stitcher 3-15
Page 60

3
Adjustment
3-16 SD-501 Saddle Stitcher
Page 61

Adjustment
Procedure
1 Touch [Adjustment] - [02 Finisher Adjustment] - [05 Saddle Stitcher
2 Touch [05 Three-Fold Position Adjustment] to display the three-folding
3 Touch the [COPY] tab to display the copy screen.
4 Load the desired size of paper to be adjusted on a tray, specify Multi
5 Check a distance (a) and distance (b) on the output sheet.
3
Adj.].
position adjustment screen.
Letter, then press [Start]. A sample pattern (No. 16) will be output.
a
[2]
[1]
b
Paper feed direction
6 If the desired result cannot be obtained, touch the [ADJUSTMENT] tab.
7 Touch [Next] or [Back] to select the paper size to be adjusted.
Touching [Next] continuously will change the paper size as follows:All
Size - A4R - 8.5×11R
8 Touch [Double Fold].
9 Use the touch panel keypad to enter the desired adjustment value, then
touch [Set].
Available range: -50 to +50, 1 step = 0.1 mm
2
Note
The distance (a) in step 5 will increase when the "+" value is entered, and
decrease when the "-" value is entered.
SD-501 Saddle Stitcher 3-17
Page 62

3
Adjustment
10 Touch [Single Fold]. Repeat step 9.
2
Note
The distance (b) in step 5 will increase when the "+" value is entered, and
decrease when the "-" value is entered.
11 Repeat steps 3 to 10 until the desired result is obtained.
12 If adjustment in any other size is required, repeat steps 3 to 10.
13 Touch [Return] to restore the saddle stitcher adjustment mode menu
screen.
3-18 SD-501 Saddle Stitcher
Page 63

Adjustment
3.2.6 06 Fold Paper Width Adjustment
Perform this adjustment if folding position processed by the SD-501 Saddle
Stitcher dislocates in the folded set.
3
SD-501 Saddle Stitcher 3-19
Page 64

3
Adjustment
Procedure
1 Touch [Adjustment] - [02 Finisher Adjustment] - [05 Saddle Stitcher
Adj.].
2 Touch [06 Fold Paper Width Adjustment] to display the fold paper
width adjustment screen.
3 Touch the [COPY] tab to display the copy screen.
4 Load the desired size of paper to be adjusted on a tray, specify the
number of sheets to 5, then press [Start]. A sample pattern will be output.
5 Check that any dislocation is found in the output set.
6 If the desired result cannot be obtained, touch the [ADJUSTMENT] tab.
7 Touch [Next] or [Back] to select the paper size to be adjusted.
Touching [Next] continuously will change the paper size as follows.
All Size - 11×17 - A3 - B4 - 8.5×14 - A4R - 8.5×11R - B5R - 8×13 -
8.12×13.2 - 8.5×13 - 8.25×13 - 8K - 16KR - 12×18 - A3W - B4W A4WR - B5WR - 12×18W - 11×17W - 8.5×11WR - Special
8 Use the touch panel keypad to enter the desired adjustment value, then
touch [Set].
Available range: -20 (wide) to +20 (narrow), 1 step = 0.1 mm
2
Note
If the setting is too wide, the distance of misalignment may be larger.
9 Repeat the adjustment steps from 3 to 8 until the desired result is ob-
tained.
10 If adjustment in any other size is required, repeat steps 3 to 8.
11 Touch [Return] to restore the saddle stitcher adjustment mode menu
screen.
3-20 SD-501 Saddle Stitcher
Page 65

Adjustment
3.2.7 07 Trimming Adjustment
Perform this adjustment for the position of punch holes to the direction of paper feed.
3
SD-501 Saddle Stitcher 3-21
Page 66

3
Adjustment
Procedure
1 Touch [Adjustment] - [02 Finisher Adjustment] - [05 Saddle Stitcher
Adj.].
2 Touch [07 Trimming Adjustment] to display the trimming adjustment
screen.
3 Touch the [COPY] tab to display the copy screen.
4 Load the desired size of paper to be adjusted on a tray, specify
Fold&Staple, then press [Start]. A sample pattern (No. 16) will be output.
5 Check the trimmed width (a) from the edge of the feeding sheet.
a
2.0 mm or more
6 If the desired result cannot be obtained, touch the [ADJUSTMENT] tab.
7 Touch [Next] or [Back] to select the paper size to be adjusted.
Touching [Next] continuously will change the paper size as follows.
All Size - 11×17 - A3 - B4 - 8.5×14 - A4R - 8.5×11R - B5R - 8×13 -
8.12×13.2 - 8.5×13 - 8.25×13 - 8K - 16KR - 12×18 - A3W - B4W A4WR - B5WR - 12×18W - 11×17W - 8.5×11WR - Special
8 Use the touch panel keypad to enter the desired adjustment value, then
touch [Set].
Available range: -400 (wide) to +400 (narrow), 1 step = 0.1 mm
9 Repeat the adjustment steps from 3 to 8 until the desired result is ob-
tained.
10 If adjustment in any other paper size is required, repeat steps from 3 to
8.
3-22 SD-501 Saddle Stitcher
Page 67

Adjustment
11 Touch [Return] to restore the saddle stitcher adjustment mode menu
12 Enter the value so that the cover should be cut more than 2.0 mm.
13 If “All Size” is selected as paper size, the entered adjustment value will
3
screen.
be applied to all sizes. If specific paper size is selected, adjustment value will be the sum of the entered value and the value previously specified for “All Size”.
SD-501 Saddle Stitcher 3-23
Page 68

3
Adjustment
3-24 SD-501 Saddle Stitcher
Page 69

1 Machine information
1.1 Installation space .............................................................................. 1-3
1.2 Machine configuration ..................................................................... 1-5
1.2.1 SD-501 Saddle Stitcher ................................................................. 1-5
1.2.2 Standard/Optional equipment ........................................................ 1-7
Inserting a new staple cartridge into SD-501 Saddle Stitcher
1.3
1.4 Cleaning conveyance belt of saddle stitcher tray ....................... 1-10
1.5 Empty dust box of SD-501 Saddle Stitcher .................................. 1-13
1.6 If “Trim Receiver Exchange” message is displayed .................... 1-15
1.7 Paper information ........................................................................... 1-16
1.8 Specifications ................................................................................. 1-19
..................... 1-8
2 Copy operations
2.1 Copy conditions incompatible with saddle stitcher ...................... 2-3
2.2 Adjusting position of copy image (Image shift) ............................. 2-7
2.3 Selecting an output tray ................................................................. 2-11
2.4 Making folded booklet (Fold&Staple / Trimming) ........................ 2-13
2.5 Folding a copied set (Multi Centre / Multi Letter) ........................ 2-17
3 Adjustment
3.1 Finisher adjustment outlines ........................................................... 3-3
3.2 05 Saddle Stitcher Adjustment ........................................................ 3-4
3.2.1 01 Stapling Centre Adjustment ...................................................... 3-4
3.2.2 02 Stapling Paper Width Adjustment ............................................. 3-6
3.2.3 03 Staple Pitch Adjustment ........................................................... 3-9
3.2.4 04 Folding Position Adjustment ................................................... 3-12
3.2.5 05 Three-Fold Position Adjustment ............................................. 3-15
3.2.6 06 Fold Paper Width Adjustment ................................................. 3-19
3.2.7 07 Trimming Adjustment .............................................................. 3-21
SD-501 Saddle Stitcher 1-1
Page 70

1-2 bizhub PRO 1050
 Loading...