

Page 1

PageScope Cabinet Pro
User Manual
Page 2

Page 3

Table of Contents
1 Introduction
1.1 Welcome to Minolta ...................................................................... 1-1
1.2 Roadmap of this Manual...............................................................1-2
Where to find what in this User’s Manual........................................1-2
Brief Explanation of Special Type Styles and
Method of Presentation ...................................................................1-3
2 About PageScope Cabinet
2.1 Software Features.........................................................................2-1
3 Installation
3.1 System Requirements ..................................................................3-1
3.2 Installing the Software..................................................................3-2
3.3 Uninstalling the Software .............................................................3-4
4 First Steps
4.1 Starting and Closing the Application ..........................................4-1
Starting PageScope Cabinet...........................................................4-1
Closing PageScope Cabinet ...........................................................4-2
4.2 Overview of the Main Window .....................................................4-2
4.3 Setting System Environment .......................................................4-3
Open the “SetUp“ Dialog.................................................................4-3
System Index card .......................................................................... 4-4
Interval Time Setting for Auto-Detection Folders / Interval Time ....4-4
Auto-Detection Drive for the Management Object Folder...............4-5
Location Setting for the Folders / Location...................................... 4-5
Maximum Times of Undo for Marker...............................................4-5
Residual Disk Capacity for Caution.................................................4-5
View Thumbnail...............................................................................4-6
FTP Index card................................................................................4-6
Setting up the FTP Server...............................................................4-6
OCR Index card ..............................................................................4-8
Do character recognition with TWAIN Aquire..................................4-8
Perform OCR processing on virtually merged files .........................4-8
Launch Application Index card........................................................4-9
Registering applications..................................................................4-9
PageScope Cabinet TOC-1
Page 4

Removing applications ................................................................. 4-10
Stamp Index Card......................................................................... 4-10
Registering stamps ....................................................................... 4-10
Cancelling the registration of a stamp .......................................... 4-11
4.4 Setting up and Cancelling a Management Object Folder .......4-12
Designating a Folder as a Management Object Folder................4-12
Designating from an Existing Folder............................................. 4-12
Designating from a New Folder.................................................... 4-13
Renaming a Management Object Folder...................................... 4-15
Cancelling the Management Object Folder Status....................... 4-16
Cancelling by Using the Menu Bar............................................... 4-16
Cancelling by Drag and Drop ....................................................... 4-16
Deleting a Folder ......................................................................... 4-17
4.5 Opening a Management Object Folder ..................................... 4-18
Thumbnail View............................................................................ 4-18
List View ....................................................................................... 4-19
Sorting Document Files ................................................................ 4-20
4.6 Thumbnails .................................................................................4-21
Creating Thumbnails .................................................................... 4-21
Updating Thumbnails....................................................................4-23
Changing the Display Size of Thumbnails....................................4-23
Rotating Thumbnails..................................................................... 4-24
5 Managing Document Files
5.1 Registering, Renaming and Deleting Document Files .............. 5-1
Adding a New Document File with Windows Explorer....................5-1
Adding a New Document File Using PageScope Cabinet.............. 5-3
Renaming Document Files............................................................. 5-5
Deleting Document Files ................................................................ 5-6
5.2 Document File Properties and Details ........................................ 5-7
Displaying the Document File Properties ....................................... 5-7
Displaying the Document File Details using PageScope Cabinet
DocViewer ...................................................................................... 5-8
Opening a document file using a registered application............... 5-10
5.3 Virtual Merge............................................................................... 5-11
Virtually Merging Document Files using Drag and Drop............... 5-11
Virtually Merging Document Files from the menu......................... 5-12
Thumbnail Scrolling of a Virtual Merge Mode............................... 5-12
Removing A Document File from a “Virtual Merge“ Mode............ 5-12
Removing all Files from a “Virtual Merge“ Mode .......................... 5-13
Slide Show.................................................................................... 5-14
Starting a Slide Show ................................................................... 5-14
Buttons and Displays in the Slide Show Window ......................... 5-15
TOC-2 PageScope Cabinet
Page 5

5.4 Actual Merge................................................................................5-16
Converting a “Virtual Merge“ Mode into a PDF File
or into a Multiple-Page TIFF File...................................................5-16
5.5 Document File Formats ..............................................................5-17
Applicable File Formats.................................................................5-17
How to Transform File Formats.....................................................5-18
5.6 Working With Markers ................................................................5-20
Setting up Markers ........................................................................5-20
Setting up Lines or Symbols .........................................................5-20
Setting up stamps .........................................................................5-21
Selecting markers .........................................................................5-22
Copying Markers........................................................................... 5-22
Moving Markers.............................................................................5-23
Deleting Markers ...........................................................................5-23
Changing the Order of Markers.....................................................5-23
Sending a Part of the Image to the Clipboard...............................5-24
5.7 Working with Keywords .............................................................5-25
Setting up Keyword Sets............................................................... 5-25
Creating a Keyword Set ................................................................5-25
Renaming a Keyword Set .............................................................5-26
Deleting a Keyword Set.................................................................5-27
Assigning Keywords to Document Files........................................ 5-28
5.8 Working with Tags ......................................................................5-30
Assigning Tags to Document Files................................................5-30
Deleting Tags from Document Files..............................................5-31
5.9 Registering searchable text .......................................................5-31
Import from a text file ....................................................................5-31
OCR processing during a TWAIN Aquire...................................... 5-31
Extracting characters from a selected image file ..........................5-32
6 Searching for Document Files
6.1 Opening the Search Dialog ..........................................................6-1
6.2 Search Conditions ........................................................................6-2
Searching by File Name..................................................................6-2
Searching by Modification Date ......................................................6-3
Searching by Tags ..........................................................................6-4
Searching by Keywords ..................................................................6-5
Searching by Markers .....................................................................6-6
Searching by Text ...........................................................................6-7
Compound Search..........................................................................6-8
Saving, Retrieving and Deleting Search Conditions .......................6-9
Saving a Search Condition..............................................................6-9
PageScope Cabinet TOC-3
Page 6

Retrieving a Search Condition........................................................ 6-9
Saving a Search Condition under Another Name......................... 6-10
Deleting a Search Condition......................................................... 6-10
7Printing
7.1 Setting up the Printer ................................................................... 7-1
7.2 Printing Document Files .............................................................. 7-1
Printing an Overview of Thumbnails............................................... 7-1
Printing a Document File ................................................................ 7-2
Printing Images with Markers ......................................................... 7-3
8 Using a TWAIN Interface
8.1 Selecting a TWAIN Device ........................................................... 8-1
8.2 Importing an Image from the TWAIN Device.............................. 8-2
9 Distributing Document Files
9.1 Attaching Document Files to E-Mail Messages.........................9-1
9.2 FTP Server Function .................................................................... 9-2
Security........................................................................................... 9-2
10 Appendix
10.1 Glossary ...................................................................................... 10-1
10.2 Index ............................................................................................ 10-3
TOC-4 PageScope Cabinet
Page 7

Introduction
1 Introduction
1.1 Welcome to Minolta
Thank you for your decision to purchase the Minolta PageScope Cabinet
software.
Read this User’s Manual carefully before using this software for the first
time, and always keep the manual within easy reach.
These documents may not be reproduced, transmitted, transcribed,
stored in an archive system or translated without the express prior written
consent of Minolta Co. Ltd.
We reserve the right to make changes to the content of this manual.
Trademarks
Microsoft, Windows, WindowsNT and PowerPoint are either registered
trademarks or trademarks of the Microsoft Corporation.
Acrobat and Acrobat Reader are registered trademarks of Adobe Systems
Inc.
All other names of products and brand-names are trademarks or
registered trademarks of their respective proprietors.
1
PageScope Cabinet 1-1
Page 8

1
1.2 Roadmap of this Manual
Where to Find What in this User's Manual
You don't know exactly where to find the information you need? The
following table is designed to help you.
To find information on a specific problem quickly and precisely, please
refer to the index at the end of the User's Manual.
No. Title of chapter Content of chapter
1 Introduction Introductory remarks and information on how to use
2 About PageScope Cabinet This chapter contains general information on the
3 Installation This chapter contains information on how to install
4 First Steps This chapter provides information on how to start
5 Managing Document Files This chapter provides information on the software
6 Searching for Document
Files
7 Printing This chapter provides information on how to print
8 Using a TWAIN Interface This chapter provides information on how to import
9 Distributing Document Files This chapter provides information on how to send
10 Appendix This chapter provides helpful additional information,
this User’s Manual.
software.
and uninstall the software.
PageScope Cabinet, how the main window looks like
and how to configure basic program settings.
functions for a comfortable document handling.
This chapter provides information on how to search
files in management object folders using file names,
modification date, keywords, tags and markers.
thumbnails and/or document files with PageScope
Cabinet.
an image from a TWAIN device, convert it into
various formats and save it.
files to e-mail and on how to set up the FTP
functionality.
e.g.:
• glossary
• index of keywords
Introduction
✎
Note
For further information on the software please refer to the readme file.
1-2 PageScope Cabinet
Page 9
Introduction
Brief Explanation of Special Type Styles and Method of Presentation
Special type styles and methods of presentation are used in this User’s
Manual to highlight various circumstances. The following examples will
help you to recognize and deal with the most important of these.
CAUTION
This is a warning!
A warning alerts you to problem that may occur due to improper usage of
the software (e.g. loss of data).
➜ The arrow gives you a hint how to prevent a situation which you did not
[MENU] key on the control panel / button on the printer driver with
➜ Single action to be performed (there are no other steps)
1 Step 1 of a series of actions.
2 Step 2 of a series of actions, etc.
intend.
the description “Menu“
Help is available here.
?
➜ The approach that is suggested
here is sure to get you to your
desired result.
Here you can see a
corresponding screenshot.
1
✎
This is a helpful tip
Text passages that are identified in this manner provide you with tricks
and handy tips to make it even easier to work with the software.
PageScope Cabinet 1-3
Page 10

1
Introduction
1-4 PageScope Cabinet
Page 11

About PageScope Cabinet
2 About PageScope Cabinet
This chapter contains general information on the software.
2.1 Software Features
The PageScope Cabinet software
G helps effective utilization of documents in electronic formats,
G makes a thumbnail for each existing document file in order to facilitate
identifying documents,
G allows you to add keywords and/or memo pads to facilitate document
search. For image files, you can add a marker which allows you to
search image files by the marker,
G can convert any characters contained in images into editable text data
(OCR processing),
G registers searchable text corresponding to document files. It also can
register character strings extraced from images through OCR
processing,
G enables virtual merging of multiple files so that you can use the files as
if they are merged in a single file,
G allows you to combine various image files into a single PDF file or a
single multiple-page format TIFF file (Actual Merge),
G allows you to import and manage images from TWAIN devices,
G allows you to attach document files managed by the software to e-mail
messages, and
G provides FTP server functionalities
(The FTP server function of PageSope Cabinet only allows for
receiving files from Minolta Multifunctional Products with limited FTP
commands).
2
Please read this manual carefully before you start installing and working
with this software.
PageScope Cabinet 2-1
Page 12

2
About PageScope Cabinet
2-2 PageScope Cabinet
Page 13

Installation
3Installation
This Chapter contains information on how to install and uninstall
PageScope Cabinet.
3.1 System Requirements
The system requirements for operating PageScope Cabinet are as
follows:
G OS: Windows 95, Windows 98, Windows Me, Windows NT4.0 Work
Station, or Windows 2000 Professional.
G Memory: 64MB required for Windows 95/98, 96MB required for
Windows Me/NT4.0 Work Station/2000 Professional.
G Web browser: Internet Explorer version 4.01 or a later.
G Monitor resolution: Higher than 800 × 600 pixels, 16 bit colors.
G Network: TCP/IP
G In order to display PDF files, Acrobat Reader must be installed on your
computer.
G In order to create thumbnails and/or to display details of the document
files, each application software, such as Microsoft Word or Microsoft
Excel, which has been used to create the files must be installed on
your computer.
G In order to create thumbnails from PDF files, Acrobat 4.0 must be
installed on your computer.
3
✎
Note
The full length of the path name for document files should not exceed
200 letters.
Example:
C:\Program Files\Minolta\PageScope Cabinet\Default\abcde.bmp
1
= 60 letters
10
20
PageScope Cabinet 3-1
30
40 50 60
Page 14
3
3.2 Installing the Software
CAUTION
Data loss!
An eventual data loss can be prevented.
➜ Please close all open files and exit all the programs before running the
Setup Program.
✎
Note
If an earlier version of PageScope Cabinet is installed on your
computer, you have to uninstall it first. The newer version of
PageScope Cabinet can use all keywords, tags and markers added
using an earlier version of PageScope Cabinet.
If the installation location of PageScope Cabinet has been changed,
the old Management Object Folder may not be displayed. By
redefining the old folder as Management Object Folder again,
keywords, tags, markers added with an earlier version of PagesCope
Cabinet can all be used.
Installation
1 Insert the PageScope Cabinet CD into your CD drive.
2 Open “My Computer“ and double click on the CD drive icon where you
have inserted the PageScope Cabinet CD.
3 Double click on the [P_SCOPE\CABINET\PSCSETUP.EXE] icon.
The InstallShield Wizard starts and prepares files needed for
installation.
4 When the End User License Agreement is shown, read it carefully.
❍ Click on [YES] to accept the terms and conditions of the License
Agreement.
5 Follow the instructions displayed on the screen.
3-2 PageScope Cabinet
Page 15

Installation
6 If you wish to install the program into a different drive and/or folder,
click on the [BROWSE] button and enter the name of the destination
folder.
❍ If you do not wish to change the destination folder, just click on the
[NEXT] button.
7 Select the program group where the program files in the “Start“ menu
should be displayed.
8 Follow the instructions on the screen to complete the installation.
Does an error message pop up during installation?
?
An uncritical error occurred.
➜ Click on the [REBOOT] button and the installation will continue.
Once the installation is completed, reboot your computer. This procedure
will solve the problem and install PageScopeCabinet correctly even if the
error message is displayed.
✎
Note
Installation may fail if you interrupt the installation of PageScope
Cabinet and attempt to re-install PageScope Cabinet before
InstallShield Wizard has completely finished.
3
PageScope Cabinet 3-3
Page 16
3
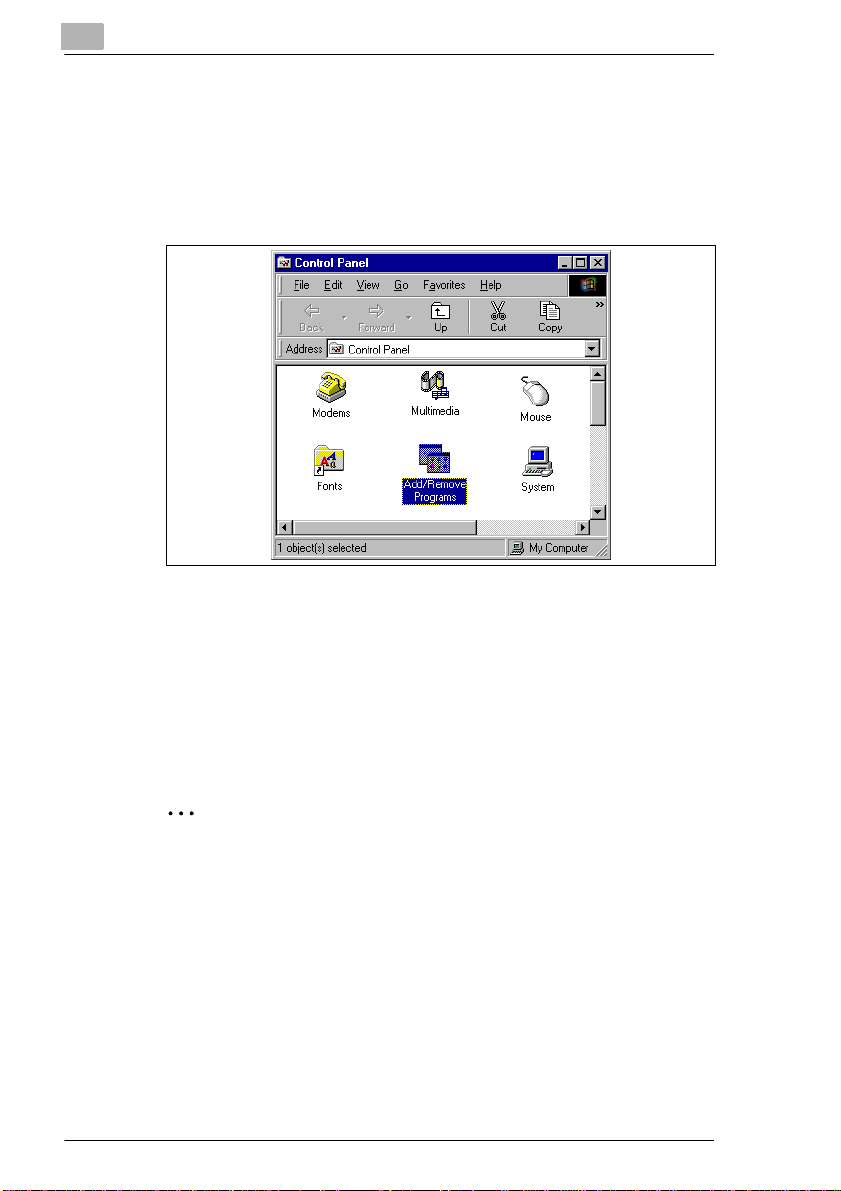
3.3 Uninstalling the Software
1 Select “Settings“ > “Control Panel“ from the “Start“ menu.
2 In the control panel, double click on the [ADD/REMOVE PROGRAMS]
icon.
3 Select “PageScope Cabinet“ from the list.
Installation
4 Click on the [ADD/REMOVE] button.
5 When the “Confirm File Deletion“ dialog box appears, click on the [OK]
button.
6 Follow the instructions on the screen to complete the process.
✎
Note
When uninstalling, PageScope Cabinet will not automatically delete
folders which are created when the program is installed. Please delete
the folders manually if necessary.
3-4 PageScope Cabinet
Page 17
First Steps
4 First Steps
This chapter provides information on how to start PageScope Cabinet,
how the main window looks like and how to configure basic program
settings.
4.1 Starting and Closing the Application
Starting PageScope Cabinet
➜ Select “PageScope Cabinet“ from the “Start“ menu.
or
Double click on the “PageScope Cabinet“ icon on the desktop.
The main window of PageScope Cabinet is displayed.
4
✎
Note
If the program could not find the default folder to be managed, the
“Browse for Folder“ window will pop up to re-define a default folder to
be managed.
PageScope Cabinet 4-1
Page 18
4
Closing PageScope Cabinet
➜ Either select “Exit“ from the “File“ menu or click on the [X] button of the
main frame.
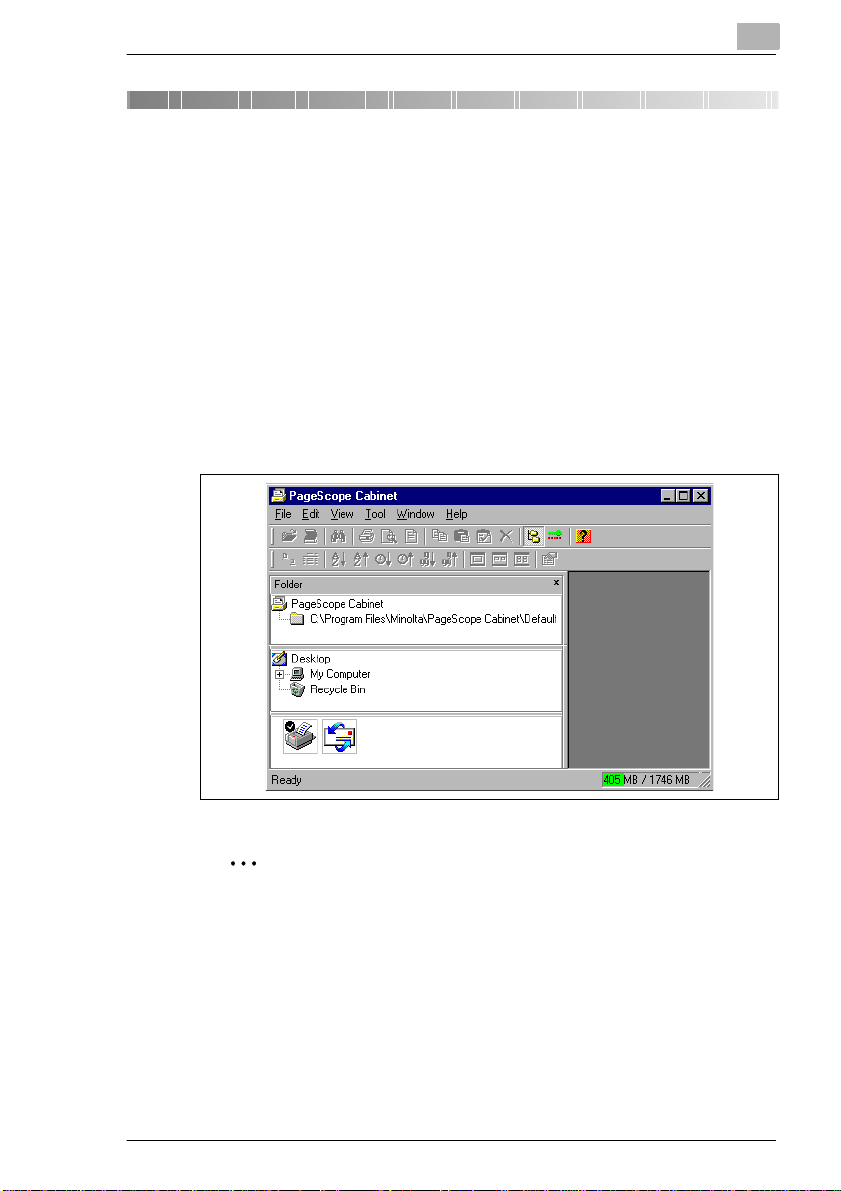
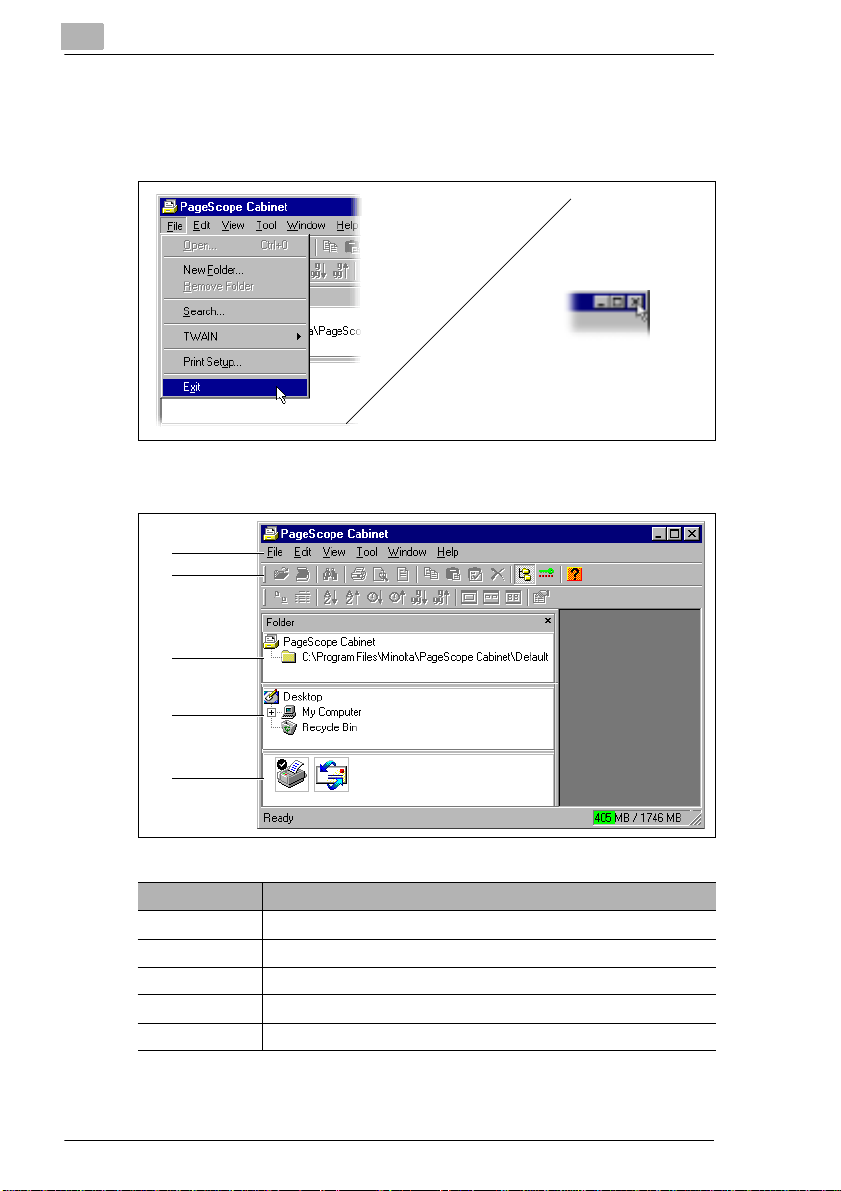
4.2 Overview of the Main Window
1
2
First Steps
3
4
5
No. Name
1 menu bar
2 icon bars
3 “Folder Tree“ window
4 “Explorer-look tree“ window
5 “Application Launch“ window
4-2 PageScope Cabinet
Page 19
First Steps
4.3 Setting System Environment
You can configure PageScope Cabinet by setting the system
environment.
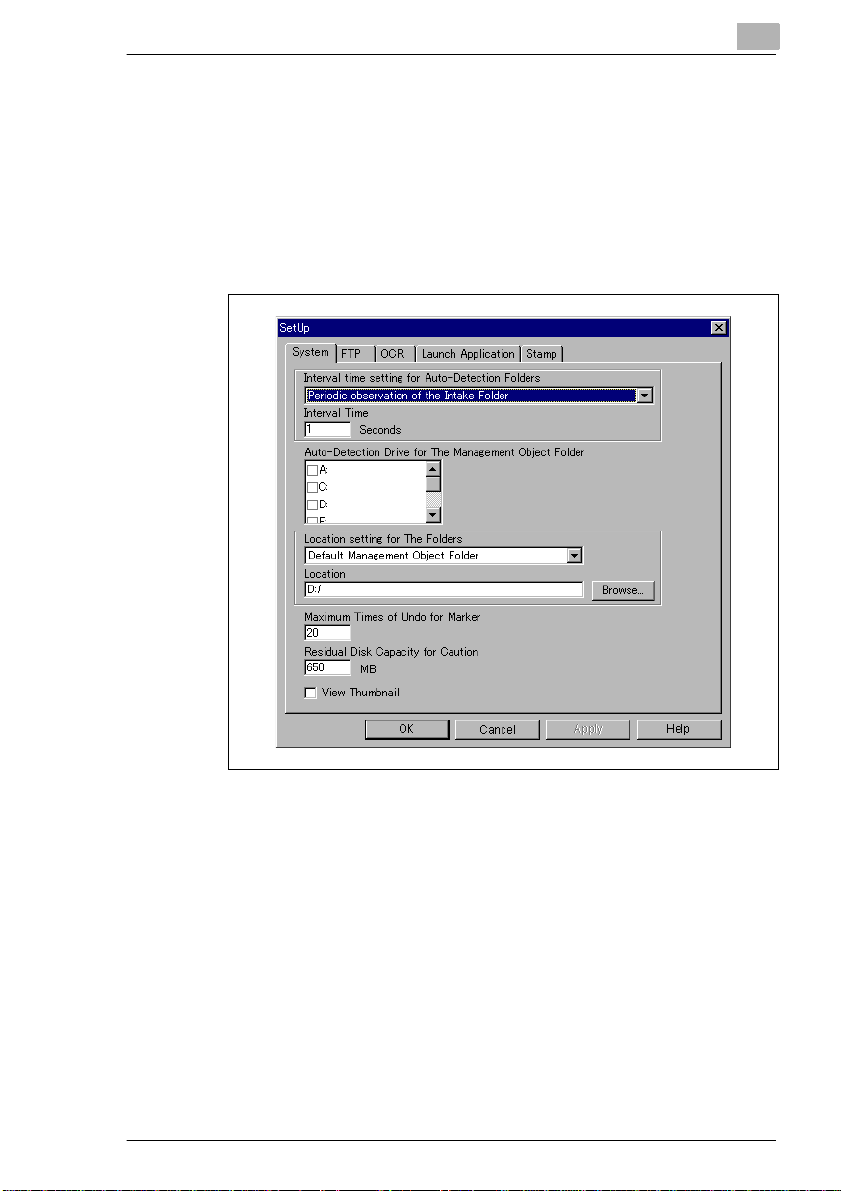
Open the “SetUp“ Dialog
➜ Select “Setup“ from the “Tool“ menu.
The SetUp window is displayed.
4
The SetUp dialog contains the following index cards:
G System:
Here you can make general system settings.
G FTP:
Here you can setup the FTP server.
G OCR:
Here you can make settings for OCR processing.
G Launch Application:
Here you can register applications launched automatically.
G Stamp:
Here you can register stamps.
PageScope Cabinet 4-3
Page 20
4
First Steps
Changing any of the settings will enable the [APPLY] button. Clicking on
the [APPLY] button will save the changes made. Clicking on the [OK]
button will save the changes made and close the SetUp Window. Clicking
on the [CANCEL] button will cancel the changes made and close the
SetUp window.
System Index card
In the following the different settings which can be made in the “System“
index card are explained.
Interval Time Setting for Auto-Detection Folders / Interval Time
Determine the interval for the check up of the management object folders
(in seconds) in the Interval time text box.
These settings will take effect immediately. You can set intervals for:
➜ Periodic observation of the Intake Folder
PageScope Cabinet observes the Auto-Intake Folder at regular
intervals. If you enter "0" in the Interval Time text box, Page Scope
Cabinet will not observe the Auto-Intake Folder.
➜ Auto-Detection and Periodic Observation for specified drives.
PageScope Cabinet observes the Management Object Folder at
regular intervals. It is not possible to enter "0" in the Interval Time text
box.
4-4 PageScope Cabinet
Page 21

First Steps
4
Auto-Detection Drive for the Management Object Folder
This setting specifies the management object folder search drive. The
drives with a check mark in the checkbox are searched for Management
Object Folders. This setting will take effect immediately.
➜ Select the drive desired.
Location Setting for the Folders / Location
With this setting you assign the corresponding directory to the three
monitoring functions. The specified folders must exist.
➜ Default Management Object Folder
This setting determines the Default Management Object Folder in the
Location text box. This setting will take effect immediately.
➜ Auto-Intake Folder
This setting specifies the target folder for automatic intake. This setting
will take effect immediately.
✎
Note
Document files with the extension "pdf", "tif" or "tiff" located in the AutoIntake Folder will automatically be transferred to the Default
Management Object Folder. Be careful not to assign a folder including
files which must not be transferred to the Auto-Intake Folder.
✎
Note
When you set the Auto-Intake Folder, please select different folders
for different users.
Maximum Times of Undo for Marker
The changes you have made will take effect next time you open the
PageScope Cabinet DocViewer.
➜ Specify the maximum undo allowance for marker operation.
Residual Disk Capacity for Caution
When the empty space within the hard disk drive where the Auto-Intake
Folder is located falls below the set value, the indicator on the status bar
will turn red for warning. This setting will take effect immediately.
➜ Enter an appropriate value which is adapted to your system
environment.
PageScope Cabinet 4-5
Page 22
4
First Steps
View Thumbnail
➜ Check the “View Thumbnail“ box if you wish to see thumbnails when
opening a Management Object folder. If you uncheck the “View
Thumbnail“ box, only icons will be displayed.
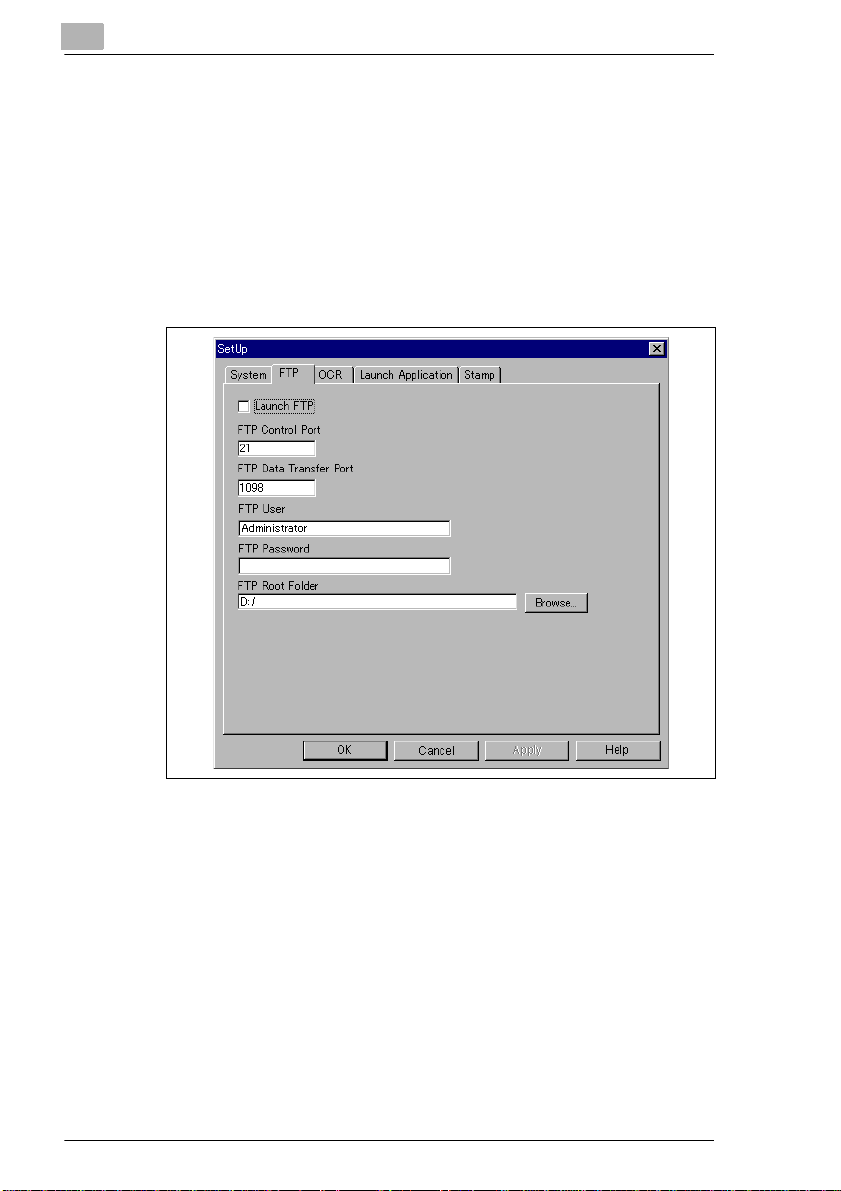
FTP Index card
PageScope Cabinet offers a function to become an FTP server. Thus, it
can receive document files from the devices connected to a network and
take in data from Minolta Mulifunctional Products.
.
Setting up the FTP Server
To set up PageScope Cabinet as a FTP server, follow the steps
mentioned below.
7 Activate the Launch FTP checkbox.
The FTP server will automatically be started when PageScope
Cabinet is started.
8 Change the port value in the FTP Control Port field only under
exceptional conditions.
The default FTP control port is 21.
4-6 PageScope Cabinet
Page 23
First Steps
4
9 Change the port value in the FTP Data Transfer Port field only if the
device specifies it.
10 Enter the user login name into the FTP User field.
Only this login name will later enable you to login to the FTP server.
11 Enter the password into the FTP Password field.
12 Define the FTP Root folder in the FTP Root Folder field.
This setting specifies the permitted FTP login folder. This setting will
take effect the next time you login to FTP.
13 Click on the [OK] button.
This will register the setting.
14 Adapt the setting of the “Auto-Intake“ folder to your demands.
15 In order to validate the settings, exit and restart PageScope Cabinet.
The FTP server is set up and started as shown by the symbol in the
Windows task bar.
PageScope Cabinet 4-7
Page 24
4
First Steps
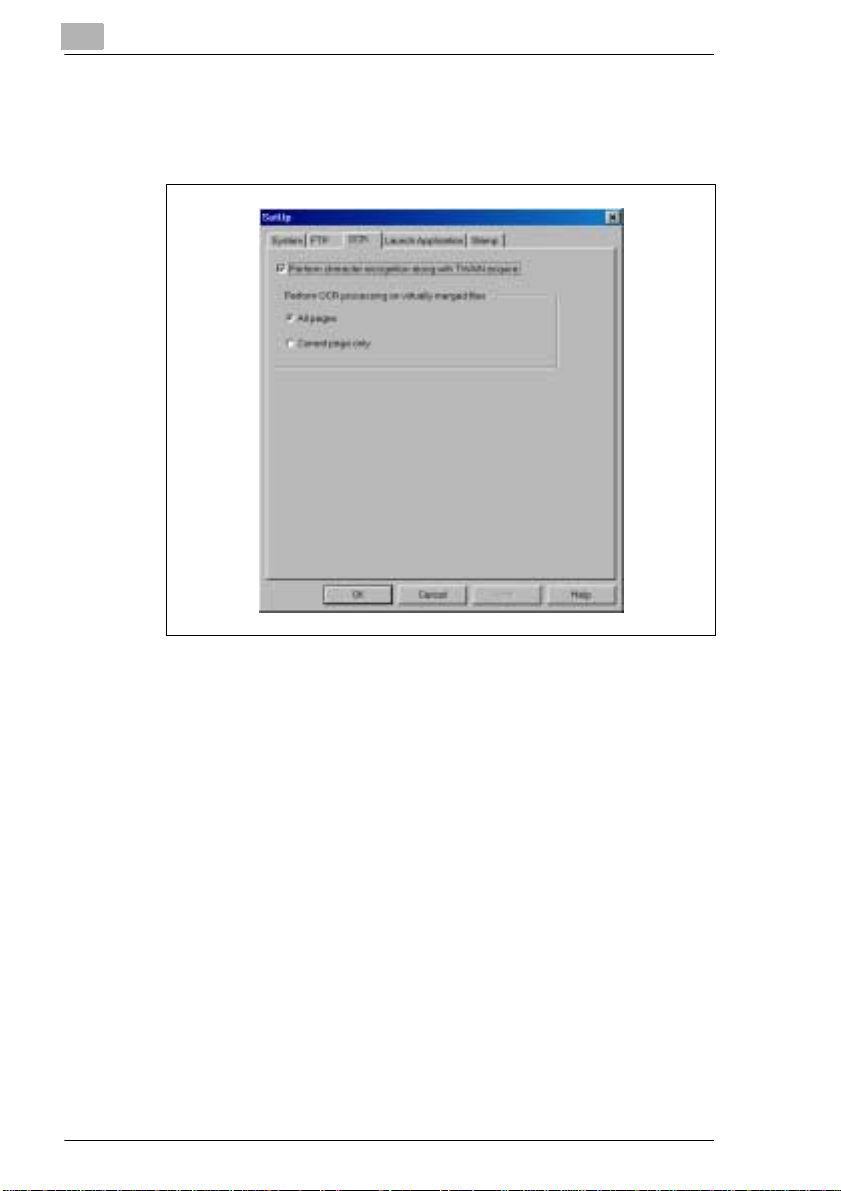
OCR Index card
In the following the different settings which can be made in the “OCR“
index card are explained
.
Do character recognition with TWAIN Aquire
➜ Check the “Do character recognition with TWAIN Aquire“checkbox if
you wish OCR processing to be performed with TWAIN aquire.
When “Do character recognition with TWAIN Aquire“ is checked, the
“Do character recognition“ box in the “TWAIN Aquire“ window will also
be checked, when the window is displayed.
Perform OCR processing on virtually merged files
Determines which files of a virtual merge mode are selected for OCR
processing.
➜ Check “All pages“ if you wish OCR processing to be performed on all
merged files.
➜ Check “Current page only“ if you wish OCR processing to be
performed on the file currently displayed.
4-8 PageScope Cabinet
Page 25
First Steps
4
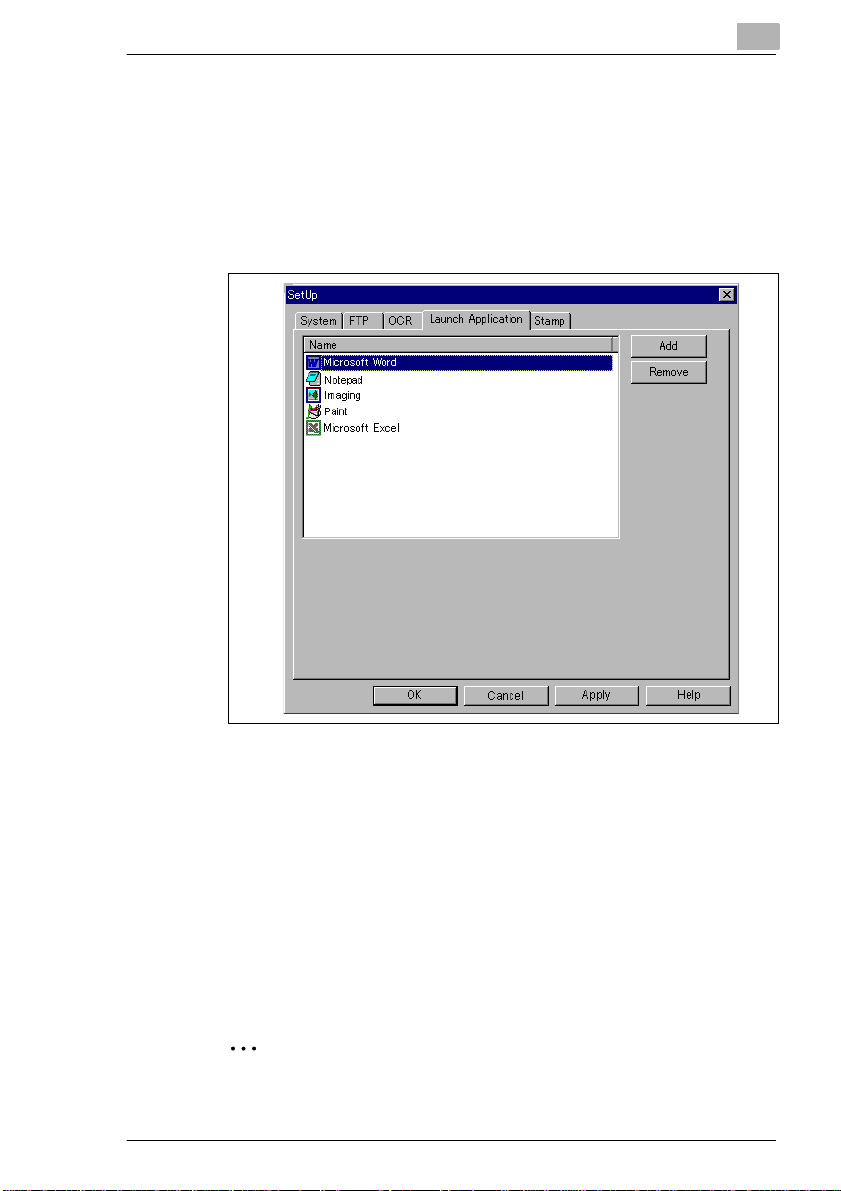
Launch Application Index card
PageScope Cabinet has the ability to register a certain number of
applications. Registered applications are shown in the “Application
Launch“ window. If a printer or email software is specified for standard use
on your computer, it will be automatically displayed in the “Application
Launch“ window (see "Overview of the Main Window" on page 4-2). A
maximum number of ten applications can be registered.
.
Registering applications
1 Click on the [ADD] button.
The file selection window is displayed
2 Select the application you would like to register and click on the
[OPEN] button.
3 Click on the [APPLY] button.
The registered applications are shown in the “Application Launch“
window
✎
Note
You can also open the “Application Registration“ window by right
PageScope Cabinet 4-9
Page 26
4
First Steps
clicking into the "Application Launch" window.
Removing applications
➜ Click on the [REMOVE] button in order to remove an application.
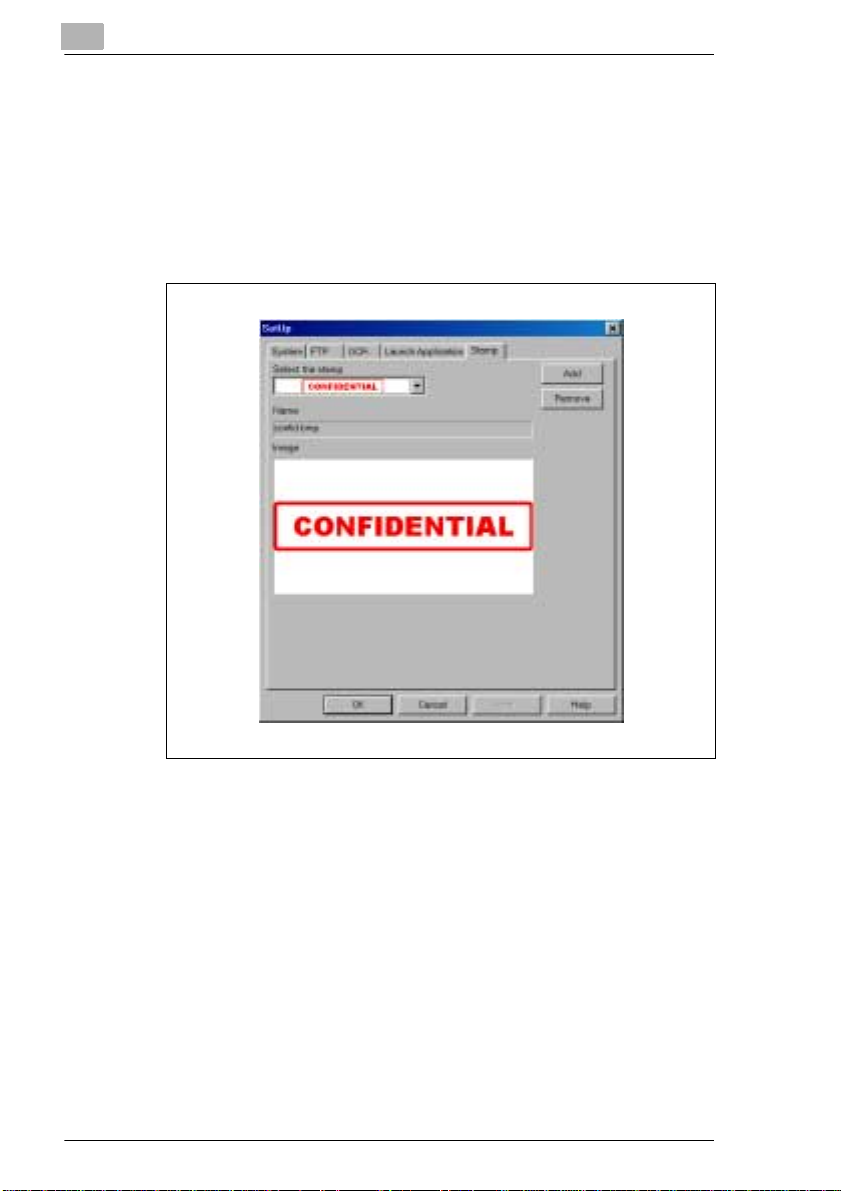
Stamp Index Card
Here you can register stamps appended to image files.
Registering stamps
1 Click on the [ADD] button.
A file selection window is displayed
2 Open the BMP file to be registered.
The content of the BMP file is displayed in the image area.
3 Click on the [APPLY] button.
4-10 PageScope Cabinet
Page 27

First Steps
4
Cancelling the registration of a stamp
1 In the Select the Stamp combo box, select the stamp of which the
registration is to be canceled.
2 Click on the [REMOVE] button.
3 Click on the [APPLY] button.
PageScope Cabinet 4-11
Page 28
4
First Steps
4.4 Setting up and Cancelling a Management Object Folder
In order to use the PageScope Cabinet software, you have to designate a
management object folder from an existing folder or create a new
management object folder.
The folder “...\PageScope Cabinet\Default“ is a management object folder
by default and cannot be deleted. If you wish to delete this folder, change
the default management object folder setting in the “SetUp“ dialog (see
"Setting System Environment" on page 4-3).
Designating a Folder as a Management Object Folder
Designating from an Existing Folder
In order to designate an existing folder as management object folder,
follow the steps mentioned below.
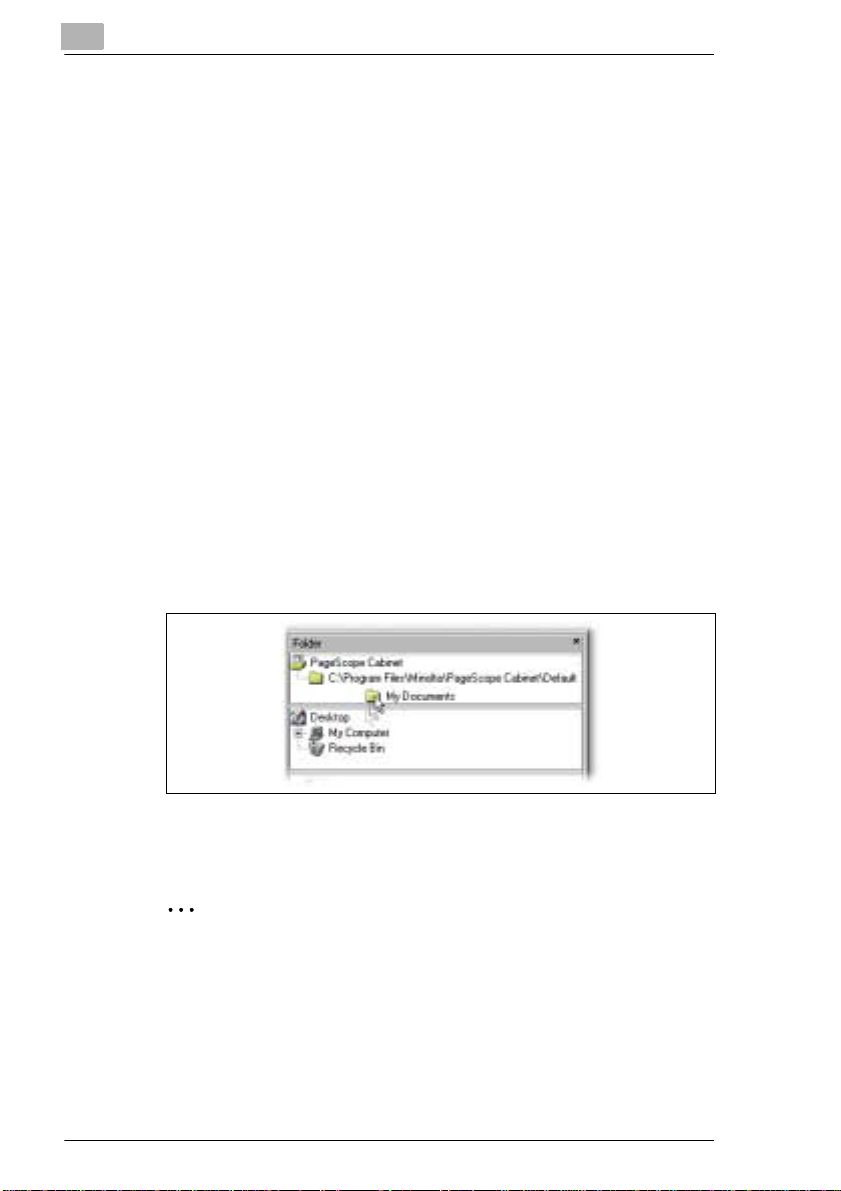
1 Select “Folder“ from the “View“ menu to open the “Folder Tree“
window.
2 Drag a folder from the “Explorer-look tree“ window and drop it into the
“Folder Tree“ window.
3 The folder you have dropped will be pasted and become a
management object folder.
✎
Note
Folders in the sub-directory of the management object folder will
automatically become management object folders.
4-12 PageScope Cabinet
Page 29
First Steps
4
CAUTION
Changes of Management Information not possible for write-
protected folders.
If you save the Management Object Folder on a CD-ROM and copy it back
to a harddisk or if you change the folder attribute to "read only" the
Management Information File in the Mangement Object Folder will also
become "read only". For such a folder, operations involving changes of
Management Information - such as adding keywords or creating
thumbnails - cannot be performed and will result in an error.
➜ Open the properties of the document file using the Microsoft Explorer
and uncheck "read only".
Designating from a New Folder
In order to create a new folder and designate it as a management object
folder, follow the steps mentioned below.
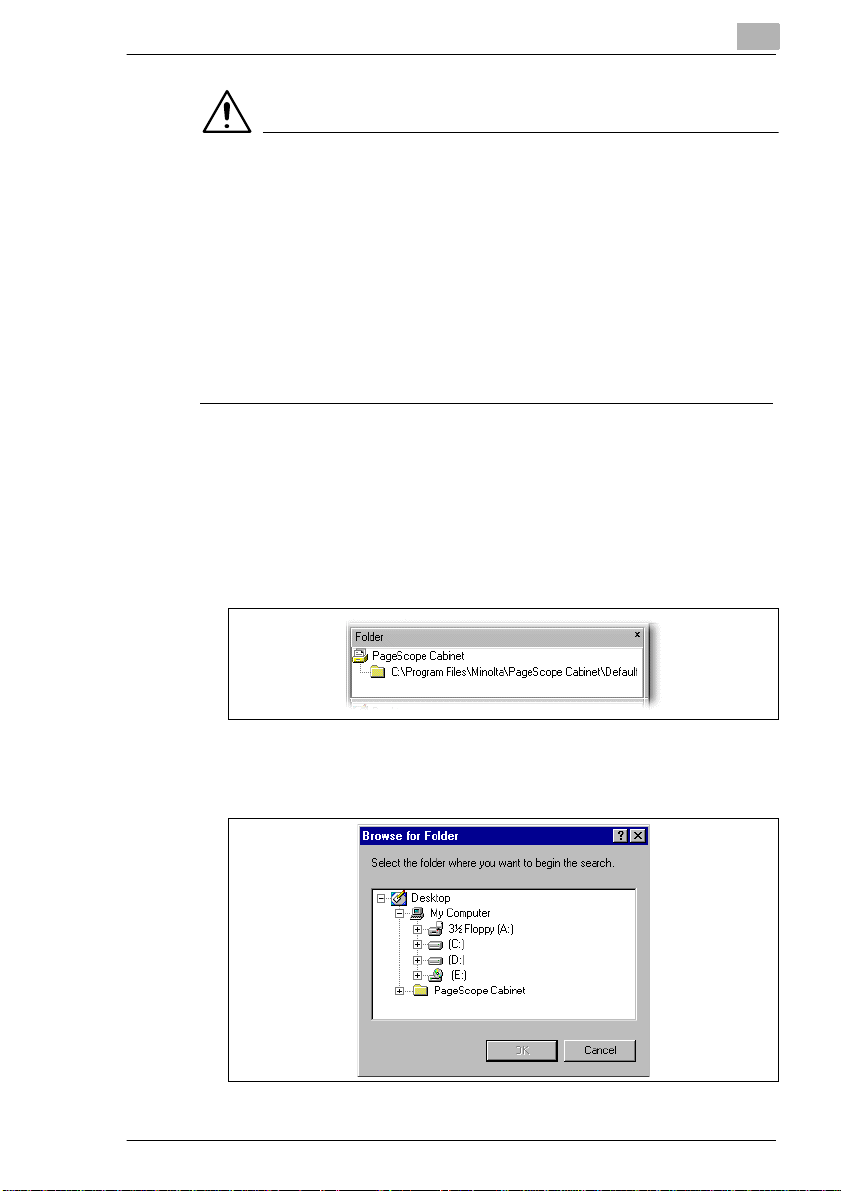
1 Select the top cluster of the management object folder tree in the
“Folder Tree“ window.
2 Select “New Folder...“ from the “File“ menu or “Context“ menu.
The Browse for Folder window is displayed.
PageScope Cabinet 4-13
Page 30

4
First Steps
3 Select the destination folder and click on the [OK] button.
A new folder will be created in the specified destination and will
automatically become a management object folder.
4-14 PageScope Cabinet
Page 31

First Steps
4
Renaming a Management Object Folder
In order to rename a management object folder, follow the steps
mentioned below.
1 Select the folder to be renamed in the “Folder Tree“ window.
2 Select “Rename“ from the “Edit“ menu.
This will access the edit mode.
3 Rename the folder.
4 Press [ENTER].
✎
Note
If you wish to cancel the operation press the [Escape] key.
CAUTION
Loss of file information and management object folder status.
If you rename a management object folder in the "Explorer look tree"
window or on Windows Explorer, the management object folder will not be
shown in the "Folder Tree" window anymore.
➜ Rename a folder which is designated as a management object folder
in the “Folder Tree“ window of PageScope Cabinet only.
✎
Notes
If any of the files in the folder is opened, you cannot rename the folder.
Close all the files and try it again.
You can also rename any other folder as well as management object
folders of the tree in the “Explorer-look tree“ window.
PageScope Cabinet 4-15
Page 32

4
First Steps
Cancelling the Management Object Folder Status
Cancelling by Using the Menu Bar
In order to cancel the management object folder status, follow the steps
mentioned below.
1 Select the folder to be cancelled in the “Folder Tree“ window.
2 Select “Remove Folder“ from the “File“ menu or “Context“ menu.
The selected folder will disappear from the tree and the management
object status will be cancelled.
✎
Notes
Sub-directories in a management object folder will categorically
become management object folders. Therefore the management
object folder status of the Default Mangement object folder and its subdirectories cannot be cancelled. If you wish to change it, change the
default management object folder setting in the “SetUp“ dialog (see
"Setting System Environment" on page 4-3).
Cancelling by Drag and Drop
In order to cancel the management object folder status by drag and drop,
follow the steps mentioned below.
1 Select the folder to be cancelled from the “Management Object Folder“
tree in the “Folder Tree“ window.
2 Drag and drop it into the “Explorer-look tree“ window.
3 The selected folder will disappear from the “Folder Tree“ window and
the management object folder status will be cancelled.
✎
Note
Sub-directories in a management object folder cannot be cancelled.
Therefore, selecting such a folder will not have any effect on this
operation.
4-16 PageScope Cabinet
Page 33

First Steps
4
Deleting a Folder
CAUTION
You cannot recover a deleted folder.
➜ Operate this procedure with caution.
In order to delete a folder, follow the steps mentioned below.
1 Select the folder to be deleted from the “Explorer-look tree“ window.
2 Select “Delete“ from the “Edit“ menu or “Context“ menu.
The computer will ask you if you really want to delete the folder.
3 Click on the [YES] button.
The folder will be deleted.
✎
Notes
If any of the files in the folder is opened, you cannot delete the folder.
Close all the files and try it again.
For each folder opened by PageScope Cabinet, an information
management file called “.mpsc.mpscinfo.ldb“ will be automatically
generated. This file will be deleted once the folder is closed.
PageScope Cabinet 4-17
Page 34

4
4.5 Opening a Management Object Folder
When you open a management object folder, an overview of the
documents managed in this folder is displayed.
Thumbnail View
In thumbnail view, the document files contained in the management object
folder are dislayed in minimized preview.
1 Select a management object folder from the “Folder Tree“ window.
2 Select “Open“ from the “File“ menu or “Context“ menu.
A window with thumbnails of the document files of the specified
management object folder will be displayed.
First Steps
✎
Note
The thumbnail view is displayed by default.
4-18 PageScope Cabinet
Page 35

First Steps
4
List View
In list view, a list of the document files contained in the management
object folder is displayed. It can show more information about the files
than thumbnail view.
In order to display the list view, first follow the steps on "Thumbnail View"
on page 4-18.
➜ When the thumbnail view is displayed, select “List“ from the “View“
menu.
Now, the window displays a detailed overview of the document files.
The following document file information is displayed:
Item Description
Name The icon and the file name of a document file are displayed
Num The number of combined files is displayed (“Virtual Merg e“
Date The date of the last modification is displayed
Size The size of the document file is displayed
Tag The tags setted up to the document file are displayed
Keyword The keywords assigned to the document file are displayed
(in “Virtual Merge“ mode, the icon and file name of the first
document are displayed).
mode).
(in “Virtual Merge“ mode, the date of the first document file is
displayed).
(in “Virtual Merge“ mode, the size of the first document file is
displayed).
(in “Virtual Merge“ mode, the tags of the first document file are
displayed).
(in “Virtual Merge“ mode, the keywords of the first document file
are displayed).
PageScope Cabinet 4-19
Page 36

4
First Steps
Item Description
Marker The markers assigned to the document file are displayed
(in “Virtual Merge“ mode, the markers of the first document file
are displayed).
Sorting Document Files
You can determine the order in which the document files are displayed in
a thumbnail view or list view.
To do so, you can choose between different sorting criteria: name, date
and size as well as between ascending and descending sort.
In order to display the document files in the order desired, follow the step
mentioned below.
➜ Select “Sort“ and the sorting criterion desired from the “View“ menu.
The document files are now displayed in the order selected.
4-20 PageScope Cabinet
Page 37

First Steps
4.6 Thumbnails
Document files in management object folders can be displayed in
minimized preview as thumbnails by PageScope Cabinet, see "Thumbnail
View" on page 4-18.
Creating Thumbnails
When you open a management object folder for the first time, document
files will be displayed as icons. If PageScope Cabinet is able to identify the
file type of the document, a thumbnail will automatically be created and
displayed. By selecting a text file and creating a thumbnail, the contents
of the text file is registered as searchabe text.
If the thumbnails are not displayed automatically, the “Auto Create“ option
for the individual management object folder is disabled.
In order to create thumbnails automatically and to specify their size, follow
the steps mentioned below. You can make this setting for each
management object folder individually.
1 Select an individual management object folder in the “Folder Tree“
window.
2 Select “Thumbnail Resolution...“ from the “Tools“ menu.
The Thumbnail Resolution dialog box is displayed.
4
3 Activate the Auto Create checkbox.
4 Enter a number in the Pixcels list box to specify the resolution of the
thumbnails.
The setting you have made will take effect next time you open a
management object folder. It is not effective on the windows already
displayed on the screen.
PageScope Cabinet 4-21
Page 38

4
Only the icon of a document file is displayed?
?
➜ Select "Setup" from the "Tool" menu and click on the “System“
index card. Make sure the “View thumbnail“ box is checked.
➜ If the thumbnail does not need to be displayed, click on the
“System tab“ in the Setup menu and uncheck the “Display
thumbnail“ box. Instead of the thumbnail the the icon will be
displayed.
✎
Note
Increasing the value in the Pixcels list box will improve the image
quality of thumbnails, but the required disk space will also increase.
First Steps
4-22 PageScope Cabinet
Page 39

First Steps
4
Updating Thumbnails
If the Auto Create option for the individual management object folder is
activated, the program will detect any modifications in a file and
automatically update the thumbnails. Depending on the sequence of the
thumbnail creation, the current creation could be delayed for a specific file.
In order to update the thumbnails automatically, follow the steps
mentioned below.
1 Select the thumbnails you wish to update.
❍ Click on the arrow buttons of a “Virtual Merge“ mode until the
document file desired is displayed, see "Thumbnail Scrolling of a
Virtual Merge Mode" on page 5-12.
2 Select “Create Thumbnails“ from the “View“ menu or “Context“ menu.
The thumbnails will be updated.
Changing the Display Size of Thumbnails
Thumbnails can be displayed in three different sizes.
In order to change the display size, follow the steps mentioned below:
1 Select the “Thumbnails Display“ window to change the size.
2 From the “View“ menu or “Context“ menu, select “Thumbnail size“.
3 Choose either “Small“, “Medium“ or “Large“.
PageScope Cabinet 4-23
Page 40

4
First Steps
Rotating Thumbnails
The rotating function is only effective when the document is an image file.
It will not only rotate the thumbnails, but will also change the contents of
the document files. This may increase the file size of non-reversible
compressed file types such as JPEG. This is due to expanding the
compressed file first and then rotating the image in order to minimize
degradation of the image quality.
In order to rotate image files, follow the steps mentioned below:
1 Select one or several thumbnails to be rotated in the thumbnail view.
❍ Click on the arrow buttons of a “Virtual Merge“ mode until the
document file desired is displayed, see "Thumbnail Scrolling of a
Virtual Merge Mode" on page 5-12.
2 Select “Rotate“ from the “View“ menu or “Context“ menu.
❍ Choose either “90°(Right)“, “90°(Left)“ or “180°“.
The selected thumbnails will rotate. If the selected file contains
multiple pages of images, all the pages will be rotated.
When you try to rotate a document file containing marker(s), a warning will
be displayed.
➜ Click on the [YES] button if you want to delete the marker information
and rotate the image.
➜ Click on the [NO] button if you want to cancel the operation.
✎
Notes
If you select multiple files, the execution of the function will rotate all
the applicable document files selected. Clicking on the [NO] button in
the “Marker Deletion Warning“ dialog box will proceed to a next file.
Even if multiple files are selected and if no applicable files are
selected, this operation is not valid.
4-24 PageScope Cabinet
Page 41

Managing Document Files
5 Managing Document Files
This chapter provides information on the software functions for a
comfortable document handling and information on the file formats which
can be managed by means of PageScope Cabinet.
5.1 Registering, Renaming and Deleting Document Files
PageScope Cabinet allows you to add and delete document files in a
management object folder. You can also rename files of a management
object folder.
Adding a New Document File with Windows Explorer
From the menu bar:
1 In the Windows Explorer, copy the desired file to the clipboard.
2 Select a management object folder within the “Folder Tree“ window to
add the document file.
❍ Alternatively select the thumbnail view or the list view of a
management object folder.
5
3 Select “Paste“ from the “Edit“ menu or “Context“ menu.
The document file is added to the specified management object folder.
If you wish to add keywords, tags, and marker information at the same
time, see "Adding a New Document File Using PageScope Cabinet" on
page 5-3.
PageScope Cabinet 5-1
Page 42

5
Managing Document Files
By drag and drop:
1 Drag a document file while pressing the [CONTROL] key from the
Windows Explorer.
2 Release the left mouse button in a management object folder in the
“Folder Tree“ window, alternatively in the thumbnail view or list view.
The document file is added to the specified management object folder.
Did you operate the drag and drop function without pressing the
?
[CONTROL] key within the same disk drive?
The document file will be moved.
➜ Press the [CONTROL] key during drag and drop to make sure that
the file is copied.
✎
Note
In case there is a file with the same name in the destination folder, if
the origin and destination folders are different, the computer will ask
you to confirm it and overwrite it. If the origin and destination folders
are the same, the new file will be renamed and added.
This operation is identical to the one used in the Windows Explorer.
5-2 PageScope Cabinet
Page 43

Managing Document Files
Adding a New Document File Using PageScope Cabinet
From the menu bar:
1 Select a document file or a “Virtual Merge“ mode to be copied from the
thumbnail view or list view.
❍ The thumbnail view or list view from search results can also be
used for this purpose.
2 Select “Copy“ from the “Edit“ menu or “Context“ menu.
3 Select a management object folder within the “Folder Tree“ window to
add the document file.
❍ Alternatively select a thumbnail view or list view.
4 Select “Paste“ from the “Edit“ menu or “Context“ menu.
The document file or the “Virtual Merge“ mode is added to the
management object folder.
By drag and drop:
1 Drag the document file or the “Virtual Merge“ mode to be copied from
a thumbnail view or list view while pressing the [CONTROL] key.
❍ The thumbnail view or list view from search results cannot be used
for drag and drop.
5
2 Release the left mouse button in a management object folder in the
“Folder Tree“ window, alternatively in a thumbnail view or list view.
The document file or the “Virtual Merge“ mode is added to the
management object folder.
Did you operate the drag and drop function without pressing the
?
[CONTROL] key within the same disk drive?
The document file will be moved. Operating the drag and drop
function without pressing the [CONTROL] key within the same
Window will result in a “Virtual Merge“ mode, therefore, the file will
not be added.
➜ Press the [CONTROL] key during drag and drop to make sure that
the file is copied.
If you wish to add keywords, tags, and marker information at the same
time, you have to add the new document file to a management object
folder using PageScope Cabinet.
PageScope Cabinet 5-3
Page 44

5
Managing Document Files
Copying a “Virtual Merge“ mode will also copy the actual files.
Copying a “Virtual Merge“ mode with overwriting the actual files will cancel
the “Virtual Merge“ mode status.
✎
Note
In case there is a file with the same name in the destination folder, if
the origin and destination folders are different, the computer will ask
you to confirm it and overwrite it. If the origin and destination folders
are the same, the new file will be renamed and added. This operation
is identical to the one used in the Windows Explorer.
5-4 PageScope Cabinet
Page 45

Managing Document Files
Renaming Document Files
CAUTION
If you rename a document file using other applications than
PageScope Cabinet, keywords, tags and marker information will be
lost.
➜ We recommend to rename document files always by using
PageScope Cabinet.
1 Open the thumbnail view or list view.
❍ The thumbnail view or list view from search results can also be
used for this purpose.
2 Select the document file to be renamed.
❍ In the “Virtual Merge“ mode, click on the arrow buttons until the
document file desired is displayed.
In the list view, the target file of a “Virtual Merge“ mode will be the first
document file.
3 Select “Rename“ from the “Edit“ menu or “Context“ menu.
5
4 Rename the file.
5 Press [ENTER].
✎
Note
If you wish to cancel the operation press the [Escape] key.
✎
Note
If there is already a file with an identical name, you cannot rename the
file to the same name.
PageScope Cabinet 5-5
Page 46

5
Managing Document Files
Deleting Document Files
CAUTION
Deleted document files and "Virtual Merge" modes will be removed
permanently and cannot be recovered.
Deleted files and "Virtual Merge" mode will be removed directly without
sending them to the Recycle Bin.
➜ Operate this procedure with caution.
1 Open a thumbnail view or list view.
❍ A thumbnail view or list view from search results can also be used
for this purpose.
2 Select one document file to be deleted.
3 Select “Delete“ from the “Edit“ menu or “Context“ menu.
The program will ask you to confirm the deletion.
4 Click on the [OK] button.
The selected file will be deleted.
5-6 PageScope Cabinet
Page 47

Managing Document Files
5.2 Document File Properties and Details
Displaying the Document File Properties
In order to display the properties of a document file, follow the steps
mentioned below.
1 Select the document file desired from the thumbnail view or list view.
2 Select “Property“ from the “View“ menu or “Context“ menu.
The Property dialog will be displayed. It displays information of the
specified document file
1
2
3
4
5
No. Name
1 thumbnail field
2 tag field
3 “Document File Information“ field
4 keyword field
To set up tags and keywords for the document files, see "Assigning
Keywords to Document Files" on page 5-28 and "Working with Tags" on
page 5-30.
✎
Note
In the “Virtual Merge“ mode, the thumbnails of all files will be
displayed. Information on each document file is displayed by clicking
on it with the left mouse button.
PageScope Cabinet 5-7
Page 48

5
Managing Document Files
Displaying the Document File Details using PageScope Cabinet DocViewer
In order to display the details of a document file in the PageScope Cabinet
Doc Viewer, follow the steps mentioned below.
1 Select the document file desired from the thumbnail view or list view.
2 Select “Open“ from the “File“ menu or “Context“ menu.
The PageScope Cabinet DocViewer dialog will be displayed.
1
2
3
4
5
6
7
8
No. Name
1 menu bar
2 thumbnail field
3 “Document Displaying“ field
4 “Displaying Options“ bar
5 marker bar
6 tag field
7 “Document File Information“ field
8 keyword field
✎
Note
The PageScope Cabinet DocViewer dialog may sometimes open
behind the “PageScope Cabinet“ window.
5-8 PageScope Cabinet
Page 49

Managing Document Files
You can adjust the display size of an image file in the “Document
Displaying“ field according to your demands:
➜ Select the setting desired in the drop-down menu of the “Displaying
Options“ bar.
The PageScope Cabinet DocViewer dialog checks whether the
printout image is portrait or landscape. If the orientation of the printout
image is different from that of the paper, the image will be rotated by
90 degrees.
For multiple-page TIFF files, a file contains several images. You can
browse each image by scrolling:
➜ Click on the arrow buttons in the “Displaying Options“ bar.
The numbers indicate the image which is momentarily displayed.
When a “Virtual Merge“ mode is opened by the PageScope Cabinet
DocViewer dialog, the thumbnails of all files will be displayed. But: Only
the page currently displayed on the screen will be printed.
Information on each document file is displayed by clicking on it with the left
mouse button.
For non-image files PageScope Cabinet DocViewer dialog opens the
application which is linked to the file name extension.
Operation details for the “Document Displaying“ field are depending on
the original application, therefore we need not to explain it here.
5
✎
Note
When you try to open a Microsoft Office document file on a PC without
Microsoft Office installed, a dialog box containing “You have chosen to
download a file from this location.“ will be displayed. Click on the
[CANCEL] button for that case.
PageScope Cabinet 5-9
Page 50

5
Managing Document Files
Opening a document file using a registered application
➜ Drag & drop a document file into the icon of a registered application in
the “Application Launch“ window.
To "Drag & Drop" an image file into an icon of a registered
application in the " Application Launch " window has the same
effect as to "Drag & Drop" the original file into its original
application.
✎
Note
When you drag & drop a document file into an application registered
for displaying searchable text, the searchable text is displayed.
Microsoft Word 97/2000, Microsoft Excel 97/2000, WordPad and
Notepad can be used for displaying searchable text.
Double-clicking on a registered application icon will start the
application.
5-10 PageScope Cabinet
Page 51

Managing Document Files
5.3 Virtual Merge
PageScope Cabinet allows you to combine multiple document files into an
apparently single file. Combining related document files into a “Virtual
Merge“ mode will facilitate further handling of the files.
Virtually Merging Document Files using Drag and Drop
1 Select the document file to be combined in the thumbnail view or list
view.
❍ The thumbnail view or list view from a search result cannot be used
for this purpose.
2 While pressing the left mouse button, drag and drop it into the target
document file or into a “Virtual Merge“ mode.
5
The dropped file will be moved and added virtually to the target
document file. A “Virtual Merge“ mode is created.
✎
Note
When you drop a document file into a “Virtual Merge“ mode in the
thumbnail view or list view, this document file will be inserted before
the document file which is displayed in the “Vitual Merge“ mode.
PageScope Cabinet 5-11
Page 52

5
Managing Document Files
Virtually Merging Document Files from the menu
1 Select the document files to be virtually merged in the thumbnail view
or list view.
❍ The thumbnail view or list view from a search result cannot be used
for this purpose.
2 From the “File“ menu select “Combination/Stack Documents“.
The selected files are merged virtually in order, starting with the upper
most left file.
How to select multiple files?
?
➜ Determine the borders with the mouse and select an area. All files
contained within this area will be selected.
➜ Hold down the left mouse button and drag the mouse selecting the
area containing the desired files.
➜ To select multiple non-adjacent files, hold down the [CTRL] key
and select the desired files.
Thumbnail Scrolling of a Virtual Merge Mode
In the “Virtual Merge“ mode, the thumbnails will be displayed with a file
number and arrows
➜ Clicking on the right arrow will display the thumbnail of the next
document file.
➜ Clicking on the left arrow will display the thumbnail of the previous
document file.
Removing A Document File from a “Virtual Merge“ Mode
1 Select a “Virtual Merge“ mode in the thumbnail view.
❍ Click on the arrow buttons until the document file desired is
displayed.
5-12 PageScope Cabinet
Page 53

Managing Document Files
2 Select “Combination/Unstack Current Page“ from the “File“ menu or
“Context“ menu.
The specified file is removed from the “Virtual Merge“ mode and is
displayed in the thumbnail view.
Removing all Files from a “Virtual Merge“ Mode
1 Select a “Virtual Merge“ mode in the thumbnail view or list view.
2 Select “Combination/Unstack Document“ from the “File“ menu or
“Context“ menu.
All the files are removed from the “Virtual Merge“ mode and are
displayed as single files in the thumbnail view.
5
PageScope Cabinet 5-13
Page 54

5
Managing Document Files
Slide Show
This section provides information on how to start slide shows.
The slide show displays all the document files contained in a “Virtual
Merge“ mode automatically.
Starting a Slide Show
In order to start a slide show, follow the steps mentioned below.
1 Open a management object folder in thumbnail view or list view.
You also can use the thumbnail view from a search result.
2 Select one “Virtual Merge“ to be viewed in the slide show.
3 Select “Slide Show“ from the “Tool“ menu or “Context“ menu.
The “PageScope Cabinet Slide Show“ window is opened and the
document files of the “Virtual Merge“ file will be displayed sequentially.
5-14 PageScope Cabinet
Page 55

Managing Document Files
Buttons and Displays in the Slide Show Window
By means of the buttons you can manage and manipulate the execution
of the slide show.
➜ Choose the function desired by clicking on the corresponding button.
1 2 3 4 5 6 7 8 9
No. Button/Display Function
1 Close button to close the “Slide Show“ window
2 First image to display the first image
3 Prev image to display the previous image
4 Stop button to stop the slide show
5 Start button to start the slide show
6 Next image to display the next image
7 Last image to display the last image
8 Interval time to set the display time (in seconds) of an image
9 Image counter shows the number of the image displayed
5
By default, the slide show displays all the different images automatically.
In order to display the images manually, follow the steps mentioned
below.
1 Click on the [STOP] button during the automatic run of the slide show.
2 In order to move forward or backward, click on the corresponding
button (see table).
✎
Note
The slide show cannot display GIF files combined in a “Virtual Merge“
file.
PageScope Cabinet 5-15
Page 56

5
5.4 Actual Merge
PageScope Cabinet allows you to to transform a “Virtual Merge“ mode
into a single PDF file or into a single multiple-page TIFF file.
Only image files can be combined into a single PDF file or a single
multiple-page TIFF file .
✎
Note
When you create such a file from a “Virtual Merge“ mode, keywords,
markers, and tags will not be transferred.
Converting a “Virtual Merge“ Mode into a PDF File or into a MultiplePage TIFF File
1 Select a “Virtual Merge“ mode in the thumbnail view or list view.
2 Select “Combination/Save As Actual“ From the “File“ menu or
“Context“ menu.
The “Actual Combination“ dialog box is displayed.
Managing Document Files
3 Enter a file name in the Name text box.
4 Select either “Pdf“ or “Multipage Tiff“ in the Type drop-down menu.
❍ If you have selected “Pdf“, you can choose the quality level desired
in the Compression drop-down menu.
5 Click on the [OK] button.
The new file will be saved in the defined format. It is displayed in the
thumbnail view or list view.
✎
Note
The “Virtual Merge“ mode will remain intact.
When virtually merged files are actually merged, their searchable texts
5-16 PageScope Cabinet
Page 57

Managing Document Files
are also merged in the same order as the virtually merged files, and
are transferred to the actually merged files.
5.5 Document File Formats
Applicable File Formats
PageScope Cabinet manages all the document files which are contained
in a management object folder. To look at the document files, the program
uses the viewer. If the viewer is not able to process the file format, the
application which is linked to the file name extension is opened.
PageScope Cabinet enables you to convert different image files into
another file format. The following table gives an overview of the different
file formats.
From/To PDF BMP TIFF JPG PNG
PDF ––––
BMP ✔ ✔✔✔
TIFF ✔✔ ✔✔
JPG ✔✔✔ ✔
PNG ✔✔✔✔
5
“✔“ means that the file format can be converted into the other respectively.
“–“ means that conversion is not possible.
PageScope Cabinet 5-17
Page 58

5
Managing Document Files
How to Transform File Formats
✎
Only image files can be transformed
The transformation to another file format can be performed with image
files only.
If you perform format conversion on virtually merged files, only the
images contained in the virtually merged document files will be
converted.
In order to transform the format of a document file, follow the steps
mentioned below.
1 Select one original file to be transformed in the thumbnail view or list
view.
❍ Click on the arrow buttons of the “Virtual Merge“ files displayed on
the top until the file desired is displayed.
In the list view, the target file of the “Virtual Merge“ mode will be the
first document.
2 Select “Format Change“ from the “View“ menu or “Context“ menu.
The Format Change window is displayed.
3 Choose a target format, a color depth and a method of compression.
4 Click on the [OK] button.
A new file will be saved in the defined format.
The file name of the new format will be the same as of the original
document file with an appropriate file extension substituted.
5-18 PageScope Cabinet
Page 59

Managing Document Files
✎
Note
If the file name already exists, PageScope Cabinet will modify the new
file name in order not to overwrite the existing file. For example,
MyPic.tif shall be saved as MyPic.jpg. As MyPic.jpg already exists, a
file named MyPic.1.jpg will be created.
Keywords, tags and markers set on the original file will not be
transferred to the new file.
5
PageScope Cabinet 5-19
Page 60

5
5.6 Working With Markers
PageScope Cabinet allows you to set markers on document files. In order
to work with markers, open the PageScope Cabinet DocViewer, see
"Displaying the Document File Details using PageScope Cabinet
DocViewer" on page 5-8.
Setting up Markers
Before you start, make sure that “Show Markers“ in the “View“ menu of the
PageScope Cabinet DocViewer is activated.
You can undo the functions described below by means of the following
step:
➜ Select “Undo“ from the “Edit“ menu or “Context“ menu.
The marker status will be reset to the one before the operation.
Setting up Lines or Symbols
1 Click on the button in the marker bar as shown in the figure.
Managing Document Files
2 Select a line type or a symbol in the corresponding drop-down menu.
3 Define a line color in the drop-down menu which is black in the figure.
4 Move the mouse cursor to a desired position on the image in the
“Document Displaying“ field.
5 Press the left mouse button.
❍ If you have chosen a line type before, hold down the button, move
the cursor to a desired line end position and release the button.
A line or symbol is setted up on the image file.
5-20 PageScope Cabinet
Page 61

Managing Document Files
Setting up stamps
1 Click on the button in the marker bar as shown in the figure.
2 Select a stamp type in the drop-down menu on the right.
3 Move the mouse cursor to a desired position on the image in the
“Document Displaying“ field.
5
4 Press the left mouse button.
A stamp is setted up on the image file.
PageScope Cabinet 5-21
Page 62

5
Managing Document Files
Selecting markers
If you want to process markers, you have to select them in advance. In
order to select markers, follow the steps mentioned below.
1 Click on the button in the marker bar as shown in the figure.
2 Click on a marker using the left mouse button.
❍ If you want to select several markers at the same time, keep
pressing the control key during selection using the left mouse
button.
The marker(s) will be selected.
Copying Markers
From the menu bar:
1 Select the markers to be copied.
2 Select “Copy“ from the “Edit“ menu or “Context“ menu.
3 Select “Paste“ from the “Edit“ menu or “Context“ menu.
The markers selected are copied.
By drag and drop:
1 Select the markers to be copied.
2 Drag the markers using the left mouse button while pressing the
[CONTROL] key.
3 Release the left mouse button at the desired position.
The markers selected are copied.
5-22 PageScope Cabinet
Page 63

Managing Document Files
Moving Markers
1 Select the markers to be moved.
2 Drag the markers using the left mouse button to a desired position.
3 Release the left mouse button at the desired position.
The markers selected are moved.
Deleting Markers
1 Select the markers to be deleted.
2 Select “Delete“ from the “Edit“ menu or “Context“ menu.
The markers selected are deleted.
✎
Note
If you select “Delete all Markers“, all the markers in the document will
be deleted regardless of their selection status.
Changing the Order of Markers
Markers are displayed in a specific order. Markers may be hidden behind
another marker depending on the order of the markers. You can bring the
hidden markers to the foreground by changing the order.
5
1 Select the markers for which the order should be changed.
2 Select “To Top“ from the “Edit“ menu or “Context“ menu.
The markers selected will be displayed over the non-selected
markers.
or
Select “To Bottom“ from the “Edit“ menu or “Context“ menu.
The markers specified will be displayed under the non-selected
markers.
PageScope Cabinet 5-23
Page 64

5
Managing Document Files
Sending a Part of the Image to the Clipboard
In order to send a part of the image to the clipboard in order to paste it into
another application, follow the steps mentioned below.
1 Click on the button in the marker bar as shown in the figure.
2 Move the mouse cursor to a desired position on the image in the
“Document Displaying“ field.
3 Press the left mouse button.
❍ Hold down the button and select the section to be copied.
4 Select “Copy“ from the “Edit“ menu or “Context“ menu.
The part of the image selected is sent to the clipboard.
✎
Note
Markers will not be transferred to the clipboard even if they are in the
area of the image selected.
5-24 PageScope Cabinet
Page 65

Managing Document Files
5.7 Working with Keywords
PageScope Cabinet allows you to assign keywords to your documents.
This section will show you how to create, rename and delete keyword
sets.
Setting up Keyword Sets
The keyword sets are to be defined beforehand by the user.
PageScope Cabinet does not differentiate upper and lower case, i.e.
“AAA“ and “aaa“ are treated as an identical keyword.
Creating a Keyword Set
1 Select “Keywords“ from the “View“ menu.
The Keyword window is displayed.
5
2 Select “New Keyword“ from the “Edit“ menu or “Context“ menu.
A new keyword set will be created.
PageScope Cabinet 5-25
Page 66

5
Managing Document Files
3 Assign an expressive name to the keyword set.
4 Finally press [ENTER].
The new keyword set is created.
Renaming a Keyword Set
1 Select the keyword to be renamed in the Keyword window.
2 Select “Rename“ from the “Edit“ menu or “Context“ menu.
This will access the edit mode.
3 Rename the keyword set.
4 Finally press [ENTER].
✎
Note
If you wish to cancel the operation press the [Escape] key.
✎
Note
If there is an identical name for another keyword set already existing,
a warning will be displayed. If you click on the [YES] button, the two
keyword sets will be merged into a single keyword set. Clicking [NO]
will cancel the operation.
5-26 PageScope Cabinet
Page 67

Managing Document Files
Deleting a Keyword Set
1 Select the keyword to be deleted in the Keyword window.
2 Select “Delete“ from the “Edit“ menu or “Context“ menu.
The computer will ask you if you really want to delete the keyword.
3 Click on the [YES] button.
The selected keyword set will be deleted.
5
PageScope Cabinet 5-27
Page 68

5
Managing Document Files
Assigning Keywords to Document Files
You can set up keywords to document files to facilitate the search
function. There are several methods to set up keywords. You can create
new keyword sets in the “Property“ dialog (of a document file), but not in
the “PageScope Cabinet DocViewer“ dialog.
Assigning a Keyword from the Menu Bar:
1 Select a keyword set to be assigned in the Keyword window.
2 Select “Copy“ from the “Edit“ menu or “Context“ menu.
3 Select a document file to which keywords should be set up in a
thumbnail view or list view.
❍ In the “Virtual Merge“ mode, click on the arrow buttons until the
document file desired is displayed.
In the list view, the destination file of the “Virtual Merge“ mode will be
the first document file.
4 Select “Paste“ from the “Edit“ menu or “Context“ menu.
The keyword is assigned to the document file.
✎
Note
If you want to set up an identical keyword set to several files, select the
files and paste the keyword set.
Assigning a Keyword by Drag and Drop:
1 Select the keyword set to be assigned in the Keyword window.
2 Drag and drop it onto a document file in a thumbnail view or list view.
The keyword is assigned to the document file.
5-28 PageScope Cabinet
Page 69

Managing Document Files
Assigning a Keyword in the “Properties“ dialog of a Document File:
1 Open the “Property“ dialog of a document file in the thumbnail view or
list view, see "Displaying the Document File Properties" on page 5-7.
2 Click on the [ADD] button in the “Property“ dialog.
The Keyword window will be displayed.
3 Click on the [NEW] button if you want to create a new keyword set.
❍ Assign an expressive name to the keyword set.
5
4 Select a keyword set to be assigned.
5 Click on the [OK] button.
The keyword is assigned to the document file.
✎
Note
Click on the [Cancel] button, if you wish to cancel the operation.
✎
Note
If you select several keyword sets and click on the [OK] button, all the
selected keyword sets will be assigned.
PageScope Cabinet 5-29
Page 70

5
5.8 Working with Tags
PageScope Cabinet allows you to assign tags to your documents in order
to facilitate document search. This section will explain how to set up or
delete tags.
Assigning Tags to Document Files
1 Open the Property dialog of a document file in the thumbnail view or
list view, see "Displaying the Document File Properties" on page 5-7.
Managing Document Files
2 Insert or edit the tags in the tag field of the Property dialog.
❍ If you enter more than one word, separate them by a space.
3 Close the Property dialog by clicking on the [X] button in the upper
right corner.
or
Select another document file of a “Virtual Merge“ mode.
The tags will be updated.
✎
Note
In order to assign tags to document files, you can alternatively use the
“PageScope Cabinet DocViewer“ dialog, see "Displaying the
Document File Details using PageScope Cabinet DocViewer" on page
5-8.
5-30 PageScope Cabinet
Page 71

Managing Document Files
Deleting Tags from Document Files
1 Open the Property dialog of a document file in the thumbnail view or
list view, see "Displaying the Document File Properties" on page 5-7.
2 Delete the tags in the tag field of the Property dialog.
3 Close the Property dialog by clicking on the [X] button in the upper
right corner.
or
Select another document file of a “Virtual Merge“ mode.
The tags will be deleted.
5.9 Registering searchable text
PageScope Cabinet can register text files as searchable text. It also can
register character strings extraced from images through OCR processing.
Import from a text file
1 Select the document file to which the text is to be imported.
2 From the “File“ menu select “Import text...“.
The File import window is displayed.
5
3 Select the text file you want to register as a searchable text, and click
on the [OPEN] button.
The searchable text is registered in the document file. If the
searchable text is already registered in the document file, the
message “Replace“ is displayed.
✎
Note
Files with an extension other than “txt“ can be imported into the “File
import“ window. However, you cannot verify or edit the contents of the
extracted text.
You can import text files with a size of 260KB or less.
OCR processing during a TWAIN Aquire
➜ Check the “Do character recognition" box in the TWAIN Aquire“
window (see "Importing an Image from the TWAIN Device" on page 8-
2) and save the file.
The searchable text is registered in the document file.
PageScope Cabinet 5-31
Page 72

5
Managing Document Files
Extracting characters from a selected image file
1 Select an image file, and right click on it to bring up the context menu.
2 Select “Character Recognition“.
3 OCR is performed on the selected image, and character strings are
extracted and registered as searchable text.
✎
Note
When you extract characters from a virtually merged file containing an
image file, the extraction is possible only from the image file.
5-32 PageScope Cabinet
Page 73

Searching for Document Files
6 Searching for Document Files
This chapter provides information on how to search files in management
object folders using file names, modification date etc.
6.1 Opening the Search Dialog
1 Select the management object folder to be searched in the “Folder
Tree“ window.
❍ If you wish to search all the management object folders, select the
top cluster of the folder tree.
2 Select “Search“ from the “File“ menu or “Context“ menu.
The Search dialog will be displayed.
6
PageScope Cabinet 6-1
Page 74

6
6.2 Search Conditions
Searching by File Name
1 Activate the [FILE NAME] checkbox in the Search dialog.
2 Enter a document file name to be searched in the text box below.
❍ If you wish to specify several file names, separate the file names
using a semicolon. You can use wildcard characters.
3 Click on the [SEARCH] button.
The search starts.
The result will be displayed in the Search Result... thumbnail view or
list view.
Searching for Document Files
6-2 PageScope Cabinet
Page 75

Searching for Document Files
Searching by Modification Date
1 Activate the [DATE] checkbox in the Search dialog.
2 Set a file modification start date in the left drop-down box.
3 Set a file modification end date in the right drop-down box.
4 Click on the [SEARCH] button.
The search starts.
The result will be displayed in the Search Result... thumbnail view or
list view.
6
PageScope Cabinet 6-3
Page 76

6
Searching for Document Files
Searching by Tags
1 Activate the [TAG] checkbox in the Search dialog.
2 Enter a word to be used as search condition.
❍ If you enter more than one word, separate them by a space.
3 Select either “Any word“ or “All words“ in the drop-down box, if you
have selected more than one tag.
4 Click on the [SEARCH] button.
The search starts.
The result will be displayed in the Search Result... thumbnail view or
list view.
6-4 PageScope Cabinet
Page 77

Searching for Document Files
Searching by Keywords
1 Activate the [KEYWORD] checkbox in the Search dialog.
2 Select the keywords to be searched from the keyword list at the left
pane.
3 Click on the [ADD] button.
This will transfer the keywords to the right pane. These keywords will
be used for the search.
Do you want to remove keywords from the right pane?
?
➜ Select the keywords to be removed from the right pane and click
on the [REMOVE] button to transfer them back to the left pane.
6
4 Select either “All Keywords“ or “Any Keywords“ in the drop-down box,
if you have selected more than one keyword.
5 Click on the [SEARCH] button.
The search starts.
The result will be displayed in the Search Result... thumbnail view or
list view.
PageScope Cabinet 6-5
Page 78

6
Searching for Document Files
Searching by Markers
1 Activate the checkbox [MARKER] in the Search dialog.
2 Select the markers, their colors and/or the stamps to be searched from
the drop-down boxes.
3 Select either “All Markers“ or “Any Markers“ in the drop-down box on
the right, if you have selected more than one marker and stamp.
4 Click on the [SEARCH] button.
The search starts.
The result will be displayed in the Search Result... thumbnail view or
list view.
✎
Note
The color definition for markers can be performed using the mouse
only. The cursor keys will not work for this purpose.
6-6 PageScope Cabinet
Page 79

Searching for Document Files
Searching by Text
1 Activate the [TEXT] checkbox in the Search dialog.
2 Enter the search text.
❍ If you enter more than one word, separate them by a space.
❍ You can also perform a fuzzy search by attaching a “%“ or a “_“ to
a character string.
Example:
6
All
Abc_g
Abc%g
Abcg
Abcdg
Abcdefg
Abcvffg
Abddd
abcdg
abcdef
aaaaxx
3 Select either “Any word“ or “All words“, if there are more search words
than one.
4 Click on the [SEARCH] button.
The search starts.
The result will be displayed in the Search Result... thumbnail view or
list view.
PageScope Cabinet 6-7
Page 80

6
Searching for Document Files
Compound Search
1 Activate the checkboxes for all the items to be searched for in the
Search dialog.
2 Select the search items desired.
3 Click on the [SEARCH] button.
The search starts.
The result will be displayed in the Search Result... thumbnail view or
list view. Only files matching to all search conditions specified will be
displayed.
✎
Note
The compound search function will look up document files matching
multiple conditions. Document files will be searched by 5 independent
search items, namely file name, date, tags, keywords, and markers.
Compound search results will be given as a list of document files
matching all conditions specified.
6-8 PageScope Cabinet
Page 81

Searching for Document Files
Saving, Retrieving and Deleting Search Conditions
Saving a Search Condition
1 Activate the checkboxes for all the items to be searched for in the
Search dialog.
2 Select the search items desired.
3 Click on the [SAVE] button.
The SAVE AS dialog will be displayed, if a new set of search
conditions is created.
If the set of search conditions is already existing, the program will
overwrite it.
6
4 Enter the search condition name desired.
The search condition is saved.
Retrieving a Search Condition
➜ Select a search condition from the drop-down box in the upper left
corner of the Search dialog.
The search condition specified is retrieved and displayed.
PageScope Cabinet 6-9
Page 82

6
Searching for Document Files
Saving a Search Condition under Another Name
1 Select a saved search condition in the Search dialog, see "Retrieving
a Search Condition" on page 6-9.
2 Click on the [SAVE AS] button.
The SAVE AS dialog will be displayed.
3 Enter a new search condition name.
❍ If an identical name already exists, the program will ask you
whether you want to overwrite it.
Click on the [YES] button to overwrite.
Deleting a Search Condition
1 Select a saved search condition in the Search dialog, see "Retrieving
a Search Condition" on page 6-9.
2 Click on the [DELETE] button.
The specified search condition is deleted.
6-10 PageScope Cabinet
Page 83

Printing
7Printing
This chapter provides information on how to print thumbnails and/or
document files with PageScope Cabinet.
Document files will be printed by means of the original application with
which the document files are created. Image files can also be printed with
markers.
7.1 Setting up the Printer
1 Select “Print Setup...“ from the “File“ menu.
The Printer Setup dialog box is displayed.
2 Select the printer desired and set it up.
3 Click on the [OK] button to confirm.
The printer is now ready for printing a document by using PageScope
Cabinet.
7.2 Printing Document Files
7
Printing an Overview of Thumbnails
In order to print an overview of the thumbnails of a management object
folder, follow the steps mentioned below.
1 Open a management object folder in thumbnail view.
The thumbnail view from search results can also be used for this
purpose.
2 Select “Print Thumbnail“ / “Print...“ from the “File“ menu.
A thumbnail overview will be printed.
PageScope Cabinet 7-1
Page 84

7
Printing
Printing a Document File
In order to print a document file, follow the steps mentioned below.
1 Select the document file to be printed in the thumbnail view or list view.
The thumbnail view or list view from search results can also be used
for this purpose.
2 Select “Print Document“ from the “File“ menu or “Context“ menu.
The document file is opened in the application program which is linked
to the file name extension and then printed.
The application program window will not close automatically even
when the printing process is completed.
Is no application program opened and does an error message
?
appear instead?
The file name extension selected for printing is not linked to an
application program. Image files like PNG, JPG or GIF can be
opened by means of PageScope Cabinet DocViewer for printing.
➜ If you want to print these image files, see "Printing Images with
Markers" on page 7-3.
3 Close the application program.
✎
Note
If a document file cannot be opened for printing, install an application
which can interpret/process the file name extension.
In order to print a document file by drag and drop, follow the step
mentioned below.
➜ Drag the document file by the left mouse button and drop it onto the
printer icon in the “Application Launch“ window.
The document will be printed as described above.
✎
Notes
A document file which is not linked to an application program cannot
be printed by drag and drop.
If you use the drag and drop function to print the file by means of an
application specified by the file name extensions, markers and stamps
will not be printed.
7-2 PageScope Cabinet
Page 85

Printing
7
Printing Images with Markers
When you print out an image from the original application with which the
image was created, markers and/or stamps will not be printed. If you wish
to print markers and/or stamps on the images, do the following:
1 Select the image file to be printed with markers in the “Thumbnail
View“ window or in the “List View“ window.
2 Select “Open“ from the “File“ menu or from the “Context“ menu.
The PageScope Cabinet DocViewer window is opened.
3 If markers/stamps are not displayed, select “Show Marker“ from the
“View“ menu.
4 Eventually, select the image desired from a “Virtual Merge“ file.
5 Select “Print...“ from the “File“ menu or from the “Context“ menu.
The image file will be printed with markers/stamps.
PageScope Cabinet 7-3
Page 86

7
Printing
7-4 PageScope Cabinet
Page 87

Using a TWAIN Interface
8 Using a TWAIN Interface
This chapter provides information on how to import an image from a
TWAIN device, convert it into various formats and save it.
To operate this function, your TWAIN devices (scanner, digital camera,
etc.) must be connected correctly and an appropriate device driver
corresponding to the TWAIN device must be installed on your computer.
8.1 Selecting a TWAIN Device
Before importing an image into the PageScope Cabinet, you have to
select the import source.
In order to select the import source, follow the steps mentioned below.
1 Select a management object folder from the “Folder Tree“ window as
a destination folder for the image file.
2 Select “TWAIN/Select Source“ from the “File“ menu.
The Select Source window will be displayed.
8
3 Click on the TWAIN device you want to use in the Sources field.
4 Click on the [SELECT] button.
You have selected the TWAIN device desired.
PageScope Cabinet 8-1
Page 88

8
Using a TWAIN Interface
8.2 Importing an Image from the TWAIN Device
In order to import an image from the TWAIN device, follow the steps
mentioned below.
1 In the “Folder Tree“ window, select the management object folder in
which the image file to be imported should be saved.
2 Select “TWAIN/Select Source Aquire“ from the “File“ menu.
This will start the installed driver software for the selected TWAIN
device.
3 Import the image file according to the instructions of the TWAIN device
driver.
❍ If necessary, refer to the User's Manual provided by the TWAIN
device manufacturer.
The imported image will be displayed in the TWAIN dialog after you
have closed the TWAIN driver.
4 Enter a file name desired in the Document Name text box.
5 Select the file format for saving the imported image.
8-2 PageScope Cabinet
Page 89

Using a TWAIN Interface
6 If the file format you have selected is JPEG or PDF format, you can
specify the compression rate.
High Quality means a low compression rate, and a High
Compression rate means a low quality of the image.
7 If necessary, change the orientation of the image:
❍ Select the image.
❍ Specify a rotation angle.
❍ Click on the [ROTATION] button.
8
8 If you wish to register searchable text, check the “Do character
recognition“ checkbox.
❍ When the “Do character recognition“ box is checked, OCR
processing is performed and text is created. The text thus created
is registered as searchable text.
9 Click on the [SAVE] button.
The imported image will be saved in the specified management object
folder and the TWAIN dialog will be closed.
The image file can now be managed by means of PageScope Cabinet.
PageScope Cabinet 8-3
Page 90

8
Using a TWAIN Interface
✎
Note
If the TWAIN device driver supports the continuous import of several
image files , you can import two or more images. All the image files are
displayed in the TWAIN dialog. If you have chosen “Multiple TIFF“ as
file format, you can save all the image files in one file. If you wish to
save all image files as “Virtual Merge“ mode, activate the check box
[COMBINATION].
8-4 PageScope Cabinet
Page 91

Distributing Document Files
9 Distributing Document Files
This chapter provides information on how to attach document files to an
e-mail message and on how to set up the FTP server functionality of
PageScope Cabinet.
9.1 Attaching Document Files to E-Mail Messages
PageScope Cabinet allows you to attach document files to e-mail
messages.
In order to attach a document file to an e-mail message, follow the step
mentioned below.
➜ Drag the document file or “Virtual Merge“ mode by the left mouse
button and drop it onto the e-mail icon in the “Application Launch“
window.
The sending screen of your e-mail application will be displayed.
✎
Notes
The e-mail icon will vary depending on the e-mail software installed. If
there is no e-mail application installed on your computer, the e-mail
icon will not be displayed.
When you send a document file as an attachment to an e-mail by using
the drag and drop function to drop a file onto the mailer icon, the
document file name will be transcribed into the subject line and the
body of the message.
9
PageScope Cabinet 9-1
Page 92

9
9.2 FTP Server Function
PageScope Cabinet offers a function to become an FTP server. Thus, it
can receive document files from the devices connected to a network and
take in data from Minolta Mulifunctional Products.
The PageScope Cabinet FTP server cannot be used if another FTP server
is installed on your PC. For example, the program package “Internet
Information Server“ for Windows NT/2000 contains such a FTP server.
Security
You can prevent FTP users from accessing folders higher in the hierarchy
than a specified folder (FTP Root Folder) by setting FTP Root Folder
through System environment setting. This also enables document files to
be sent to the default management object folder through the network
when using a network compliant device by creating the Auto-Intake folder
under the FTP Root Folder, see "Location Setting for the Folders /
Location" on page 4-5.
Distributing Document Files
9-2 PageScope Cabinet
Page 93

Appendix
10 Appendix
This chapter provides a glossary as well as an index.
10.1 Glossary
The following terms often appear when using PageScope Cabinet and
when reading this User’s Manual:
Actual Merge
An operation which combines multiple documents into a single file. This
operation does not modify the original documents and generate a PDF file
or a multiple-page TIFF file.
Auto-Intake Folder
Document files with extension “pdf“, “tif“, or “tiff“ in this folder are
automatically transferred to the “Default Management Object“ folder. If a
file transferred from the “Auto-Intake“ folder to the “Default Management
Object“ folder has the same name as a file already existing in the “Default
Management Object“ folder, PageScope Cabinet will modify the file name.
For example, the target file name should be “MyPict.jpg“. As “MyPict.jpg“
is already existing a file named “MyPict.1.jpg“ will be created.
Character Recognition
Refers to the extraction of searchable character strings from document
files. Characters from an image file are extracted through OCR
processing.
Default Management Object Folder
A standard management object folder defined by default in PageScope
Cabinet. The Default Management Object Folder must exist in Page
Scope Cabinet. Documents with the extensions “pdf“, “tif“, or “tiff“ in the
Auto-Intake folder will be automatically transferred to this folder.
Document File
File formats which can be handled by this system, e.g. image formats,
PDF, Microsoft Excel, Microsoft Word, etc.
Folder
Directories in the Windows file system which are constructed in a
hierarchy.
Keyword
Sequences of strings (words) which are registered on each document in
order to classify it. They are registered by users.
Example: fun, park, company, sea...
10
PageScope Cabinet 10-1
Page 94

10
Appendix
Management Object Folder
A folder which is managed by PageScope Cabinet. If you designate a
folder as a management object folder, you can use various facilities in
PageScope Cabinet such as a thumbnail display and search function.
Marker
Generic term for symbols, lines and stamps such as ● and ▲.
You can designate a line style and colour for the markers except for
stamps.
Tag
Sequences of strings (phrases) which are added to the document by the
user.
Thumbnail
Minimized images of data on the first page of the document.
Virtual Merge mode
A mode of the merged documents combined by an operation which
hypothetically combines multiple documents in order to handle them as a
single file. This operation does not modify the original documents. This is
similar to binding paper documents using paper clips in real life so that you
can extract one of the documents or add a new document file.
OCR
Abbreviation for “Optical Character Recognition“. The software converts a
printed document imported through a scanner into an editable text file.
OCR processing
Is a concept peculiar to PageScope Cabinet. PageScope Cabinet can
generate images from an image file and can then convert any characters
contained in the images into editable text data. This process is referred to
as OCR processing.
Searchable Text
PageScope Cabinet can register searchable text corresponding to
document files. It can also register character strings extracted from
images through OCR processing as searchable text. PageScope Cabinet
can display searchable text in a text display window.
10-2 PageScope Cabinet
Page 95

Appendix
10.2 Index
A
Actual Merge ..................................................................................... 5-16
Attaching document files to e-mail messages
C
Changing the file format ......................................................................8-2
Clipboard, sending a part of an image to the clipboard
Closing PageScope Cabinet
Converting
An Actual Merge
Document formats
Image formats
D
Deleting
Document files
Keywords
Management object folder
Markers
displaying searchable text
Document file details
Document file properties
Document files
“Virtual Merge“ mode
Adding document files with PageScope Cabinet
Changing the file format
Deleting
Details
Formats
Properties
Registering with Windows Explorer
Removing from ”Virtual Merge” mode
Renaming
Sorting
DocViewer
10
.....................................9-1
.....................5-24
................................................................4-2
..........................................................................5-16
........................................................................5-17
................................................................................8-2
...............................................................................5-6
.....................................................................................5-27
...........................................................4-17
........................................................................................5-23
.................................................................5-10
...........................................................................5-8
......................................................................5-7
......................................................... 5-11, 5-12
...........................5-3
...............................................................5-18
..........................................................................................5-6
............................................................................................ 5-8
........................................................................................5-17
.......................................................................................5-7
...............................................5-1
..........................................5-12
.......................................................................................5-5
..........................................................................................4-20
........................................................................................... 5-8
E
E-mail, attaching document files to e-mail messages .........................9-1
PageScope Cabinet 10-3
Page 96

10
Appendix
F
File formats ....................................................................................... 5-17
G
Glossary ............................................................................................ 10-1
I
Installation
Installing PageScope Cabinet
Uninstalling PageScope Cabinet
....................................................... 3-2
................................................... 3-4
K
Keywords ............................................................................................ 6-5
Creating
Deleting
Renaming
Setting up document files
....................................................................................... 5-25
....................................................................................... 5-27
.................................................................................... 5-26
............................................................ 5-28
L
List view ............................................................................................ 4-19
M
Management object folder
Deleting
Designating from a new folder
Designating from an existing folder
Renaming
Markers
Changing the order
Copying
Deleting
Moving
Printing images with markers
Setting up
Modification date
....................................................................................... 4-17
..................................................... 4-13
............................................. 4-12
.................................................................................... 4-15
............................................................................................... 6-6
...................................................................... 5-23
....................................................................................... 5-22
....................................................................................... 5-23
......................................................................................... 5-23
........................................................ 7-3
.................................................................................... 5-20
................................................................................. 6-3
O
open document file ............................................................................ 5-10
10-4 PageScope Cabinet
Page 97

Appendix
10
P
PageScope Cabinet
Closing
........................................................................................... 4-2
Starting
Printing
A document file
An overview of thumbnails
Images with markers
Setting up printer
...........................................................................................4-1
..............................................................................7-2
.............................................................7-1
......................................................................7-3
............................................................................7-1
R
registered application ........................................................................5-10
Registering Applications
Registering Stamps
......................................................................4-9
...........................................................................4-10
S
Searching
By file name
By keywords
By markers
By modification date
By tags
Compound search
Delete search conditions
Opening the search dialog
Retrieve search conditions
Saving search conditions
Slide show
Starting PageScope Cabinet
System
Environment
Requirements
Settings
...................................................................................6-2
...................................................................................6-5
.....................................................................................6-6
....................................................................... 6-3
................................................................................... 6-4, 6-7
..........................................................................6-8
..............................................................6-10
.............................................................6-1
.............................................................6-9
..................................................... 6-9, 6-10
.........................................................................................5-14
...............................................................4-1
...................................................................................4-3
.................................................................................3-1
..........................................................................................4-3
T
Tags ............................................................................................. 6-4, 6-7
Assign
..........................................................................................5-30
Deleting
Thumbnail view
Thumbnails
PageScope Cabinet 10-5
........................................................................................5-31
..................................................................................4-18
........................................................................................4-21
Page 98

10
Appendix
Changing the display size
Creating
Printing an overview
Resolution
Rotating
Scrolling of ”Virtual Merge” modes
Updating
TWAIN
Importing an image
Selecting a device
Type styles
....................................................................................... 4-21
................................................................................... 4-21
....................................................................................... 4-24
...................................................................................... 4-23
.......................................................................................... 1-3
........................................................... 4-23
...................................................................... 7-1
.............................................. 5-12
........................................................................ 8-2
......................................................................... 8-1
V
Virtual Merge mode ........................................................................... 5-11
Removing all files from ”Virtual Merge” mode
Removing document files
............................................................ 5-12
............................. 5-13
10-6 PageScope Cabinet
 Loading...