

Page 1

INSTRUCTION MANUAL
PS-341
PostScript 3 for IP-421
Read this manual before printing.
Keep readily available for reference.
Page 2

Thank you very much for purchasing the Konica PS-341 (IP-421 PostScript 3 option).
This INSTRUCTION MANUAL includes instructions for making prints, handling the ma-
chine correctly, and safety precautions. Please read this manual before performing any
printing operations or using the equipment in any way.
In order to maintain satisfactory printing performance, please keep this INSTRUCTION
MANUAL readily available for reference.
Page 3

SOFTWARE LICENSE AGREEMENT
This package contains the following materials provided by Adobe Systems Incorporated (“Adobe”) and Konica Corporation (Konica): software included as part of the printing system, including PostScript® software and other Adobe software
(“Printing Software”), the digitally-encoded machine-readable outline data encoded in the special format and in the
encrypted form (“Font Programs”), other software which runs on a computer system for use in conjunction with the
Printing Software (“Host Software”), and related explanatory written materials (“Documentation”).
The term “Software” shall be used to describe Printing Software, Font Programs and/or Host Software and also
include any upgrades, modified versions, additions, and copies of the Software.
The Software is being licensed to you under the terms of this Agreement.
Konica grants to you a non-exclusive sublicense to use the Software and Documentation, provided that you agree to
the following:
1. You may use the Printing Software and accompanying Font Programs for imaging to the licensed output
device(s), solely for your own internal business purposes.
2. In addition to the license for Font Programs set forth in Section 1 (“Printing Software”) above, you may use
Roman Font Programs to reproduce weights, styles, and versions of letters, numerals, characters and symbols
(“Typefaces”) on the display or monitor for your own internal business purposes.
3. You may make one backup copy of the Host Software, provided your backup copy is not installed or used on any
computer. Notwithstanding the above restrictions, you may install the Adobe Driver Software on any number of
computers solely for use with one or more printing systems running the Printing Software.
4. You may assign its rights under this Agreement to an assignee of all of Licensee’s right and interest to such
Software and Documentation (“Assignee”) provided you transfers to Assignee all copies of such Software and
Documentation Assignee agrees to be bound by all of the terms and conditions of this Agreement.
5. You agree not to modify, adapt or translate the Software and Documentation.
6. You agree that it will not attempt to alter, disassemble, decrypt, reverse engineer or decompile the Software.
7. Title to and ownership of the Software and Documentation and any reproductions thereof shall remain with
Adobe and Konica.
8. Tr ademarks shall be used in accordance with accepted trademark practice, including identification of the trade-
mark owner’s name. Trademarks can only be used to identify printed output produced by the Software. Such use
of any trademark does not give you any rights of ownership in that trademark.
9. You may not rent, lease, sublicense, lend or transfer versions or copies of the Software Licensee does not use,
or Software contained on any unused media, except as part of the permanent transfer of all Software and
Documentation as described above
10. In no event will Konica or Adobe be liable to you for any consequential, incidental or special damages, including
any lost profits or lost saving, even if Konica has been advised of the possibility of such damages, or for any
claim by any third party. Some states or jurisdictions do not allow the exclusion or limitation of incidental,
consequential or special damages, so the above limitations may not apply to you.
11. Notice to Government End Users: The Software is a “commercial item,” as that term is defined at 48 C.F.R.
2.101, consisting of “commercial computer software” and “commercial computer software documentation,” as
such terms are used in 48 C.F.R. 12.212. Consistent with 48 C.F.R. 12.212 and 48 C.F.R. 227.7202-1 through
227.7202-4, all U.S. Government End Users acquire the Software with only those rights set forth herein.
12. You are hereby notified that Adobe Systems Incorporated, a Delaware corporation located at 345 Park Avenue,
San Jose, CA 95110-2704 (“Adobe”) is a third-party beneficiary to this Agreement to the extent that this Agreement contains provisions which relate to Licensee’s use of the Software, Font Programs, Typefaces and the
trademarks licensed hereby. Such provisions are made expressly for the benefit of Adobe and are enforceable by
Adobe in addition to Konica.
Adobe® and PostScript® are registered trademarks of Adobe Systems Incorporated.
Macintosh® is a registered trademark of Apple Computer, Inc.
Windows® is a registered trademark of Microsoft Corporation.
Page 4

CONTENTS
CONTENTS
■ Introduction ................................................................................................................. iv
About Registered Trademarks.................................................................................................... iv
Copyright ..................................................................................................................................... iv
Patent Notice ............................................................................................................................... iv
Built-in Fonts ................................................................................................................................ v
■ About Supplied Items ................................................................................................. vi
■ About this Manual ...................................................................................................... vi
■ System Requirements .............................................................................................. viii
Hard Disk (HD-103) .................................................................................................................... viii
System Memory (64 MB) ........................................................................................................... viii
Windows..................................................................................................................................... viii
Macintosh .................................................................................................................................. viii
■ Conventions Used in this Manual .............................................................................ix
Chapter 1 Overview ............................................................................ 1-1
■ Contents of this Chapter ......................................................................................... 1-2
■ Overview of the PostScript 3 option ...................................................................... 1-3
● Printing System .................................................................................................................. 1-3
● Hardware Configuration..................................................................................................... 1-3
● Memory Use ........................................................................................................................ 1-3
● How to Use the Hard Disk .................................................................................................. 1-3
● Printer Driver ...................................................................................................................... 1-4
● Page Description Language .............................................................................................. 1-4
Chapter 2 Setup .................................................................................. 2-1
■ Contents of this Chapter ......................................................................................... 2-2
■ How to Install the Konica PS Driver ....................................................................... 2-3
● Before Installation .............................................................................................................. 2-3
● Installing to Windows ......................................................................................................... 2-3
● Uninstalling the Konica PS Driver .................................................................................... 2-6
■ How to Install the Adobe PS Driver ....................................................................... 2-7
● Before Installation .............................................................................................................. 2-7
● Installing to Windows ......................................................................................................... 2-7
● Uninstalling the Adobe PS Driver ................................................................................... 2-10
● Installing to Macintosh .................................................................................................... 2-11
Chapter 3 Printer Driver ..................................................................... 3-1
■ Contents of this Chapter ......................................................................................... 3-2
■ Working Environment.............................................................................................. 3-3
● Compliant OS ...................................................................................................................... 3-3
■ Printing from Windows Applications ..................................................................... 3-3
ii Print Controller PostScript Option
Page 5

CONTENTS
● Printing ................................................................................................................................ 3-3
● Print Settings ...................................................................................................................... 3-3
■ Printing from Macintosh Applications ................................................................... 3-4
● Printing ................................................................................................................................ 3-4
■ Description of the Functions Available in
the Konica PS Driver ............................................................................................... 3-5
■ Contents of Settings Available in
the Adobe PS Driver .............................................................................................. 3-39
● Windows 95/98/Me ............................................................................................................ 3-39
● Windows NT 4.0 ................................................................................................................ 3-42
● Windows 2000 ................................................................................................................... 3-45
● Mac OS .............................................................................................................................. 3-48
■ List of Functions Available in the Adobe PS Driver ........................................... 3-49
Chapter 4 Control Panel Setup.......................................................... 4-1
■ Contents of this Chapter ........................................................................................... 4-2
■ Configuration of the Printer Setting Menu .............................................................. 4-3
■ Functions of the Printer Settings ............................................................................. 4-4
● Test Print Menu ................................................................................................................... 4-4
Appendix A Troubleshooting ........................................... Appendix A-1
■ Basic Troubleshooting .......................................................................... Appendix A-2
■ General Problems on the PS ................................................................ Appendix A-2
● Cannot get the correct outputs using the Konica PS Driver. ....................... Appendix A-2
● A PostScript Error message displays. ............................................................ Appendix A-2
● PostScript Error messages such
as “VMerror” and “limitcheck” display. ........................................................... Appendix A-2
● A PostScript Error message displays when attempting to
get a printout from a specific computer ......................................................... Appendix A-2
● A PostScript Error message displays when attempting to
get a printout from a specific application. ..................................................... Appendix A-2
● A PostScript Error message displays when attempting to
get a printout from a specific file. ................................................................... Appendix A-2
● A PostScript Error message displays up when attempting to
get a printout of a specific page. .................................................................... Appendix A-2
● Fonts cannot be downloaded. ......................................................................... Appendix A-3
Appendix B Product Specifications ............................... Appendix B-1
■ Product Specifications ............................................................................ Appendix B-2
Appendix C Font List ....................................................... Appendix C-1
■ Internal Font List ................................................................................... Appendix C-2
■ PS Demo Page ....................................................................................... Appendix C-6
INDEX ........................................................................................... Index-1
Print Controller PostScript Option iii
Page 6

Introduction
■ Introduction
The Konica PS-341 is a PostScript 3 option for the IP-421 Print Controller.
The IP-421+PS-341 Print Controller works as an interface between the copier and
a workstation, enabling PostScript 3 printing directly from the workstation.
For instruction relating to printer (copier) operations, refer the optional Print Con-
troller and the Network Interface Card, refer to their separate INSTRUCTION
MANUAL, as required.
For detailed operations of Windows 95/98/Me/NT 4.0/2000 or Mac OS, refer to the
operating manuals for each operating system.
For applications operations, refer to the operating manuals provided with each
application.
About Registered Trademarks
Microsoft, MS and MS-DOS are registered trademarks of Microsoft Corporation in
the United States.
IBM is a registered trademark of International Business Machines, Inc. in the
United States.
Windows
Apple, Macintosh and Mac are registered trademarks or trademarks of Apple
Computer, Inc.
Adobe, Adobe Logo, Acrobat, Acrobat Logo, PostScript and PostScript Logo are
registered trademarks or trademarks of Adobe Systems, Inc.
Other company names and product names written in this manual are the regis-
tered trademarks or trademarks of their respective companies.
TM
is a trademark of Microsoft Corporation.
Copyright
COPYRIGHT © 2001 Konica corporation. All rights reserved.
Patent Notice
The program of this product includes an implementation of LZW licensed
under U.S.Patent 4,558,302.
iv Print Controller PostScript Option
Page 7

Introduction
Built-in Fonts
In terms of the printer language, the IP-421+PS-341 system supports Adobe
PostScript 3 and includes the 136 built-in Adobe PostScript 3 fonts. For a
complete list, see “Appendix C Font List”.
•A part or all of this INSTRUCTION MANUAL shall not be used or copied without
permission.
•Konica shall have no liability for any damages caused by using the Konica 7020
series + IP-421+PS-341 system and this manual.
• Information written in this INSTRUCTION MANUAL is subject to change without
notice.
• Adobe Systems Incorporated and Konica Corporation shall have the copyright of
this printer driver.
• This printer driver shall not be copied except for for backup purposes.
Print Controller PostScript Option v
Page 8

Introduction
■ About Supplied Items
The following items are supplied with the PS-341:
• PS protection chip
• PS Compact Flash
• User Software CD (Including printer driver (the Konica PS Driver and the
Adobe PS Driver), Adobe Acrobat Reader, this INSTRUCTION MANUAL and
Release Note*)
*Release Note describes the latest information and limits of the system
and the user software.
■ About this Manual
This manual describes the Konica PS-341 PostScript option, which is used to
make the Konica 7020 series machine function as a PostScript 3 printer when
connected to various types of computers.
For specific instructions relating to printer (copier) operations using
the optional Print Controller and Network Interface Card, refer to the
separate INSTRUCTION MANUAL for those devices, as required.
As the printer driver, Konica PS Driver and the Adobe PS Driver are both
available.
In the following manual we deal with the two drivers separately.
We recommend using the Konica PS Driver.
vi Print Controller PostScript Option
Page 9

Introduction
This manual is composed of the following four chapters and Appendices:
Chapter 1: Overview
Chapter 1 describes the hardware for the IP-421+PS-341 Print Controller, and
discusses the features.
Chapter 2: Setup
Chapter 2 describes how to install the printer driver in the computers. It en-
ables printing from each application of the Windows-compliant computers or
the Macintosh to the Printer (Konica 7020 series) by way of a network/parallel
port.
Chapter 3: Printer Driver
Chapter 3 describes how to print from applications and various functions of
the printer driver installed in the computers.
Chapter 4: Control Panel Setup
Chapter 4 describes the layout of the Control Panel of the Printer (Konica
7020 series) and explains how to operate and set functions on the Control
Panel.
Appendices
• Appendix A describes troubleshooting tips for the PostScript 3 Option.
• Appendix B describes product specifications.
• Appendix C lists the built-in printer fonts included with the Print Controller.
Print Controller PostScript Option vii
Page 10

Introduction
■ System Requirements
Hard Disk (HD-103)
The IP-421+PS-341 system is intended for use with an additional hard disk, HD-
103.
System Memory (64 MB)
For the IP-421+PS-341 system to work, the print controller must have 64 MB of
system memory at minimum. (The system memory is upgradable to 160 MB.)
Windows
The following are required to print from Windows-compliant computers to the Print
Controller.
• Computers on which Windows 95/98/Me/NT 4.0/2000 can run
• CD-ROM drive (necessary to install the printer driver)
Using Windows 95/98/Me
• Microsoft Windows 95/98/Me
• 32 MB RAM or more
Using Windows NT 4.0
• Microsoft Windows NT 4.0 and NT Service Pack 3
• 32 MB RAM or more
Using Windows 2000
• Microsoft Windows 2000
• 32 MB RAM or more
Macintosh
The following are required to print from the Macintosh to the Print Controller.
• Computers on which Mac OS 7.1 or higher can run
• CD-ROM drive (necessary to install the printer driver)
• Network Interface Card (KN-303)
Macintosh systems do not suport the Konica PS Driver.
viii Print Controller PostScript Option
Page 11
■ Conventions Used in this Manual
• Notation of each product
The following abbreviations are used in this manual:
(1) PS-341: PS option
(2) IP-421 Print Controller: print controller
Introduction
(3) Konica 7020
(4) KN-303 Network Interface Card (option): network interface card
(5) A printing system that combines
the above (1) and (2) or (1), (2) , (3) and (4) products: printing system
(6) HD-103: Hard Disk
series
: copier
• Notational conventions used in this manual when referring to specific features
are written within quotation marks, e.g., “Chapter 1 Outline.”
• Notation of names shown on the screen are written within square brackets, e.g.,
click the [OK] button.
• Notation of cautions in this manual are shown with the caution symbol.
Each mark used in this manual has the following meaning.
Precautions and limits at the time the operating hardware or software
was written.
Hints, advice, confirming items, etc. at the time the operating hard-
ware or software was written.
• Notation of sub-folders
Sub-folders are written in a logical string: for example to e.g., “\route level
folder\sub folder 1\sub folder 2.”
For example, instructions for selecting the [ko421118e.exe] file in the [Driver]
folder in the [English] folder in the [PS3] folder of the User Software CD, are
written:
Select the [ko421118e.exe] file in the “PS3\English\Driver” folder of the User
Software CD.
Print Controller PostScript Option ix
Page 12

Chapter 1 Overview
■ Contents of this Chapter............................ 1-2
■ Overview of the PostScript 3 option ......... 1-3
● Printing System ................................................... 1-3
● Hardware Configuration ...................................... 1-3
● Memory Use ......................................................... 1-3
● How to Use the Hard Disk ...................................1-3
● Printer Driver ........................................................ 1-4
● Page Description Language ............................... 1-4
Print Controller PostScript Option 1-1
Page 13

Chapter 1 Overview
■ Contents of this Chapter
This chapter describes the overview of the printing system, which is attached to
the printer engine.
For copier functions, refer to the “Copier INSTRUCTION MANUAL”.
1-2 Print Controller PostScript Option
Page 14

■ Overview of the PostScript 3 option
● Printing System
The printing system is designed to be used as the built-in type server of the
copier.
The printing system can be used to connect the copier to computers or to a net-
work on which the copier can function as a printer/network printer from applica-
tions on Windows 95/98/Me. The optional network interface card is required for
connecting to a network.
Chapter 1 Overview
Macintosh systems do not suport the
Konica PS Driver
.
● Hardware Configuration
Basic Configuration
Configuration of the PostScript option is as follows:
• Program Memory: Flash ROM (Compact Flash)
• System memory: 64 MB minimum
(standard memory+MU-403 of 32 MB)/
160 MB maximum
(standard memory+MU-405 of 128 MB)
• Hard disk: HD-103
• Network Interface Card: KN-303
(It is necessary when Macintosh is in use)
● Memory Use
Most of the printing system memory is used for rasterizing images. Only a small
part of it is used for system operation. The E-RDH memory of the copier is used
for print processing.
The basic memory setting of the PS option is 64 MB, which allows 1 bit mode
(600 dpi) printing for all sizes of paper. The memory of the PS option can be
expanded to 160 MB maximum.
Memory Upgrading
To obtain optimum printer performance, expand memory.
Contact the nearest Konica service representative for details.
● How to Use the Hard Disk
The hard disk prepares itself for fonts used for printout.
Print Controller PostScript Option 1-3
Page 15

Chapter 1 Overview
● Printer Driver
The Print Controller works according to the conditions of the printer driver.
As the printer driver, Konica PS Driver and the Adobe PS Driver are both avail-
able.
In the following manual we deal with the two drivers separately.
The Konica PS Driver offers access to every PS printing system features.
The Adobe PS Driver does not offer all feature.
The printer driver can be used on the following OS:
• Windows 95
• Windows 98
• Windows Me
• Windows NT 4.0 and NT Service Pack 3
• Windows 2000
• Mac OS 7.1 or higher
(Macintosh systems do not suport the Konica PS Driver.)
Refer to “Chapter 2 Setup” (p. 2-1) for how to set up the printer.
Refer to “Chapter 3 Printer Driver” (p. 3-1) for detailed functions of the printer
driver.
● Page Description Language
The Page Description Language of PCL (standard) and Adobe PostScript 3 are
mounted on the printing system.
1-4 Print Controller PostScript Option
Page 16

Chapter 2 Setup
■ Contents of this Chapter ............................ 2-2
■ How to Install the Konica PS Driver .......... 2-3
● Before Installation ............................................... 2-3
● Installing to Windows .......................................... 2-3
● Uninstalling the Konica PS Driver ..................... 2-6
■ How to Install the Adobe PS Driver........... 2-7
● Before Installation ............................................... 2-7
● Installing to Windows .......................................... 2-7
● Uninstalling the Adobe PS Driver .................... 2-10
● Installing to Macintosh ...................................... 2-11
Print Controller PostScript Option 2-1
Page 17

Chapter 2 Setup
■ Contents of this Chapter
To use the printing system, connect the printing system to computers by using a
parallel port and install the printer driver of the computers.
The section describes the installation of the printer driver.
As the printer driver, Konica PS Driver and the Adobe PS Driver are both avail-
able.
In the following manual we deal with the two drivers separately.
The two printer drivers are available, each driver has its own installation proce-
dure.
Refer to “Chapter 3 Printer Driver” (p. 3-1) for how to print from applications and
functions of the printer driver.
2-2 Print Controller PostScript Option
Page 18

■ How to Install the Konica PS Driver
● Before Installation
Models and Environment of Computers
The printing system can be used with most computers, from personal comput-
ers to workstations.
The printing system includes the printer driver for Windows 95/98/Me/NT 4.0/
2000.
● Installing to Windows
Perform the following steps to install the PS option printer driver to Windows 95/
98/Me/NT 4.0/2000.
The “User Software CD” is required to install the printer driver.
1. Turn on the computer and start Windows.
Exit from all active Windows applications, if running.
Chapter 2 Setup
Using Windows NT 4.0/2000
Log on as an Administrator (or a user entitled to install printer drivers,
such as Power User, etc.).
2. Place the “User Software CD” in the CD-ROM drive.
3. Double-click the [My Computer] icon on the desktop to open the [My
Computer] window. Then double-click the CD icon (User Software CD).
Opening from the [Start] menu
Right-click the [Start] button of the task bar to click [Explore].
Then, select the CD icon (User Software CD) from [Address].
Print Controller PostScript Option 2-3
Page 19
Chapter 2 Setup
4. Double-click the [Setup.exe] file in the “\PS3 Driver\English” folder of
the “User Software CD”.
After unzipping the program files, the PostScript Driver Setup program will
run to display the [Welcome] window.
5. Check the [I accept the term of the above License Agreement] and click
the [Next] button.
To use the PS option printer driver, you are required to agree to the License.
When you agree to the license,
check the [I accept the term of the above License Agreement] to proceed to
the next step.
6. Select the printer model and the printer port, and click the [Next] but-
ton.
Select the model of the copier you use, and select the port to which the PS
printing system is connected. If a direct connection is established between
the copier and the computer on which the printer driver is being installed,
select [LPT1:] as the port. For your printer to default to the LPT1 port, put a
check next to [Make this the Default Printer].
2-4 Print Controller PostScript Option
Page 20

Chapter 2 Setup
When selecting [Network Printer]
When personal computers or workstations are connected to a net-
work and you want to print via the network, put a check next to [Add
Network Port], and select the corresponding system.
7. Determine whether the printer name is appropriate. If you are satisfied,
click the [Next] button.
If you want to change the printer name, enter a new name into the [Printer
Name] text box.
The printer name defaults to the model of the main body printer you selected
sach as [Konica 7020 PS], [Konica 7025 PS], [Konica 7030 PS] or [Konica
7035 PS].
8. Once the screen displays the printer name and the selected port, click
the [Finish] button.
The printer driver will be installed.
9. If you want to manually configure the printer, click the [Printer Setup]
button.
The [Konica 7020 PS on LTP1:] (or [Konica 7025 PS LTP1:], [Konica 7030
PS LTP1:], [Konica 7035 PS LTP1:]) window will open.
You can open the [Konica 7020 PS Properties] (or [Konica 7025 PS Proper-
ties], [Konica 7030 PS Properties], [Konica 7035 PS Properties]) window to
manipulate printer settings as the need arises.
Properties windows
The printer properties window will be different for each environment
depending on the Windows environment in which you install the
printer driver.
For more information, refer to “Chapter 3 Printer Driver” (page 3-1).
10. Click the [Exit to Windows] button.
The installation session is over and you go back to the desktop. The [Konica
7020 PS] (or [Konica 7025 PS], [Konica 7030 PS], [Konica 7035 PS]) printer
is now available for use.
You don’t need to restart the computer for the installed printer driver to take
effect.
Print Controller PostScript Option 2-5
Page 21
Chapter 2 Setup
● Uninstalling the Konica PS Driver
1. Click [Start]-[Settings]-[Control Panel].
The [Control Panel] window appears.
2. Double click the [Add/Remove Programs] icon.
The [Add/Remove Programs Properties] window appears.
3. Select the [Konica 7020 PS] (or [Konica 7025 PS], [Konica 7030 PS],
[Konica 7035 PS]) in the [Install/Uninstall] tab, click [Add/Remove]
button.
[Printer Uninstall] window appears.
4. Confirm or select the [Model] you want to delete, then click the [Next]
button.
Ready to Start Deleting window appears.
5. Confirmed your selection on the window that is the [Konica 7020 PS]
(or [Konica 7025 PS], [Konica 7030 PS], [Konica 7035 PS]) . Click the
[Finish] button.
[Uninstall Successful] window appears.
6. Click the [Restart Windows Now] button.
The Konica PS Driver uninstall then windows restart.
2-6 Print Controller PostScript Option
Page 22
■ How to Install the Adobe PS Driver
● Before Installation
Models and Environment of Computers
The printing system can be used with most computers, from personal comput-
ers to workstations.
The printing system includes the printer driver for Windows 95/98/Me/NT 4.0/
2000 and for Macintosh.
● Installing to Windows
To install the PS option printer driver to Windows 95/98/Me/NT 4.0/2000, perform
the following steps.
The “User Software CD” is required to install the printer driver.
1. Turn on the computer and start Windows.
Exit from all active Windows applications, if running.
Chapter 2 Setup
Using Windows NT 4.0/2000
Log on as an Administrator (or a user entitled to install printer drivers,
such as Power User, etc.).
2. Place the “User Software CD” in the CD-ROM drive.
3. Double-click the [My Computer] icon on the desktop to open the [My
Computer] window. Then double-click the CD icon (User Software CD).
Opening from the [Start] menu
Right-click the [Start] button of the task bar to click [Explore].
Then, select the CD icon (User Software CD) from [Address].
4. Double-click the [ko421u***.exe] file in the “\PS3 Driver\English” folder
of the “User Software CD”.
After unzipping the program files, the Adobe PostScript Driver Setup program
will display the [Welcome] window.
5. Click the [Next] button.
The [End User License Agreement] window will appear.
Print Controller PostScript Option 2-7
Page 23

Chapter 2 Setup
6. Click the [ACCEPT] button.
To use the PS option printer driver, you are required to agree to the License.
When you agree to the license, click the [ACCEPT] button to proceed to the
next step.
7. Depending on your computer environment, the [Printer Installation
Type] window will appear. In this case, select [Install a new PostScript
printer] and click the [Next] button.
The [Printer Connection Type] window will appear.
8. Select [It is directly connected to your computer (Local Printer)] and
click the [Next] button.
When the copier (printing system) is directly connected to a computer in
which the printer driver will be installed, select [Local Printer].
Clicking the [Next] button and the [Local Port Selection] window will appear.
When selecting [Network Printer]
When personal computers or workstations are connected to a net-
work and you want to print via
the network, select [Network Printer].
For a [Network Printer], type the network path or queue name and
click the [Next] button. If you don’t know its path or name, click the
[Browse] button to view available network printers. Then follow proce-
dures 10 to 16.
9. Select the port to which the PS option is connected to, then click the
[Next] button.
The [Select Printer Model] window will appear.
10. Select the [Konica IP-421 PostScript] in the [Printers] list, then click the
[Next] button.
The [Printer Information] window will appear.
Using Windows NT 4.0/2000
Click the [Next] button on the [Select Printer Model] window and the
[Sharing] window will appear. Specify the settings for printer sharing,
and click the [Next] button to open the [Printer Information] window.
2-8 Print Controller PostScript Option
Page 24

Chapter 2 Setup
11. Confirm the printer name.
To change the printer name, enter another name in the [Printer Name] text
box.
Default: [Konica IP-421 PostScript]
12. Select whether or not you will use this printer as your default printer.
Select [Yes] to specify the printer as your default, otherwise select [No].
13. Select whether you will perform the print test or not, then click the
[Next] button.
Select [Yes] (recommended) to perform the test page, while select [No] not to
perform it.
The [Setup Information] window will appear.
14. Confirm the installed components and click the [Install] button.
The [Printer Configuration] window will appear.
Using Windows 2000
After you check what you are going to install and select [Install], a
dialog box for the Microsoft digital signature comes up. Select [Yes] to
continue with the installation.
15. Select whether or not you will configure the printer, then click the [Next]
button.
Select [Yes] to setup the printer, otherwise select [No]. When you check [Yes],
the [Konica IP-421 PostScript Properties] window will appear. You can setup
the printer using the printer properties, as needed.
When you select [No], or you click the [OK] button or [Cancel] button in the
[Konica IP-421 PostScript Properties] window, the [Setup Complete] window
will appear.
Print Controller PostScript Option 2-9
Page 25

Chapter 2 Setup
Properties windows
The printer properties window will be different for each environment
depending on the Windows environment in which you install the
printer driver.
For more information, refer to “Chapter 3 Printer Driver” (page 3-1).
16. Click the [Finish] button.
Necessary files will be copied from the “User Software CD” to finish the
installation.
If you have checked [Yes, I want to view the ReadMe file.], the ReadMe file
about Adobe PostScript Driver will open after you click the [Finish] button.
If you close the ReadMe file or click the [Finish] button without checking [Yes,
I want to view the ReadMe file.], the setup will finish and return to the desk-
top window.
At that time, the PS option printer will be available.
The printer driver of the PS option is available without restarting your com-
puter.
The ReadMe file for the printing system is separately included on the
User Software CD and is called [\Windows\ReadmeE.txt].
● Uninstalling the Adobe PS Driver
1. Quit all active Windows applications.
2. Click the [Start] button of the task bar. Then, select [Settings] of the
Start menu and click [Printers] from the sub-menu.
The [Printers] window will open.
3. Right-click the [Konica IP-421 PostScript] icon.
4. Select [Delete].
5. Click the [Yes] button.
The printer driver will be uninstalled.
2-10 Print Controller PostScript Option
Page 26

Chapter 2 Setup
● Installing to Macintosh
To install the PS option printer driver to Macintosh, perform the following steps.
Please keep the “User Software CD” on hand since it is required to install the printer
driver.
To install the printer driver
1. Turn on the computer and start Macintosh.
Exit from all active Macintosh applications, if running.
2. Place the “User Software CD” in the CD-ROM drive.
3. Select the [Konica IP-421Uv***] file in the [\PS3 Driver\English\PPD file]
of the “User Software CD”, then copy the file to your [HDD] - [System
Folder] - [Extensions] - [Printer Descriptions].
4. The printer drivers vary based on your Macintosh system.
[Using PowerMacintosh]
Confirm your OS version.
[Mac OS 8.5 and higher]
Open the [AdobePS Installer] icon in the [\PS3 Driver\
English\OS8.X or 9.X] folder of the “User Software CD”.
[Mac OS 7.1 to 8.5]
Open the [AdobePS Installer] icon in the [\PS3 Driver\
English\OS7.X Installer] folder of the “User Software CD”.
The dialog will appear.
5. Click the [Continue] button.
[License] dialog will appear.
6. Click the [ACCEPT] button.
To use the PS option printer driver, you are required to agree to the License.
When you agree to the license, click the [ACCEPT] button to follow the next
step. [Adobe Driver PS Installer] dialog will appear.
7. Click the [Install] button.
The installation program will run.
A message will display when the installation is complete.
8. Click the [Finish] button.
Follow the steps for [Selecting the printer on Chooser].
(It is recommend that you restart the computer if you selected [Mac OS 7.1 to
8.5] in step 4.)
Print Controller PostScript Option 2-11
Page 27
Chapter 2 Setup
Selecting the printer in Chooser
1. Select [Chooser] from the [Apple Menu].
2. Confirm [AppleTalk] is set to [Active].
3. Click the [AdobePS].
4. Click the printer name corresponding with the PS option printer in the
list of [Select a PostScript Printer].
Refer to the Network Interface Card Status Page for relevant printer
name.
For details of the Network Status Page, refer to the “Network Interface
Card INSTRUCTION MANUAL”.
5. Click the [Create] button when you first use the PS option printer.
6. When the dialog box appears, set up additional options for the PS op-
tion printer by clicking on the [▼] button of the individual items.
Property Screen
The Property screen varies according to the Mac OS in use. For
details on this, refer to “Chapter 3 Printer Driver” (p.3-1).
7. Click the [OK] button.
Return to the [Chooser] dialog.
8. Close the [Chooser] dialog.
2-12 Print Controller PostScript Option
Page 28

Chapter 2 Setup
Screen Fonts
136 fonts are included in the [\Screenfonts\English] in the Mac folder on the
User Software CD. For a list of the types of fonts available, refer to [Appendi-
ces C Fonts List].
For details on the installation of screen fonts, refer to the ReadMe file in the
Mac or Windows folder on the User Software CD.
The User Software CD includes two ReadMe files, one in the Mac
folder, and the other in the Windows folder. They are distinguished as
follows:
ReadmeE.txt in the Windows folder
Readme(E) in the Mac folder
Screenfonts Installation procedure
A. How to install PostScript Type1 fonts under Windows 95/98/Me/NT 4.0
In order to use PostScript Type 1 fonts in Windows 95/98/Me/NT 4.0, you must
first install Adobe Type Manager (ATM), and then install the fonts through
ATM. ATM version 4.0 or higher is required for Windows 98/Me/NT and 3.02 or
higher for Windows 95.
To Install Type1 fonts in Windows95/98/Me and NT 4.0 using ATM Light 4.1:
1. Choose [Start] - [Programs] - [Adobe] - [Adobe Type Manager] - [Adobe
Type Manager 4.1].
2. In ATM, click the [Font] tab.
3. Choose [Browse For Fonts] from the [Source] pop-up menu.
4. Select to [\Screenfonts\English\PS Screen Fonts\Type1 fonts]
5. Select the fonts you want to install. You can click to select one font,
Ctrl-click to select several fonts, or Shift-click to select a contiguous
group of fonts.
6. Press the [Add] button to install the fonts.
7. Exit ATM.
B. How to install TrueType fonts under Windows 95/98/Me/NT 4.0
In order to use your TrueType fonts in Windows 95/98/Me/NT 4.0, you must
first install them, which can be done either of two ways:
Print Controller PostScript Option 2-13
Page 29

Chapter 2 Setup
1)
Move or copy the .ttf font files to your \windows\fonts directory (Windows95/98/
Me), or \winnt\fonts directory(Windows NT 4.0).
2)
1. Choose [Start] - [Setting].
2. Double-click the [Fonts] control panel.
3. Go to the [File] menu, select [Install new font].
4. In the [folders] pane at the lower left, navigate to the location
[\Screenfonts\English\PS Screen Fonts\TrueType(Core OS) fonts].
5. Click on [Select all].
6. Click on [OK].
C. How to install PostScript Type1 & TrueType fonts in Windows 2000
Windows 2000 supports PostScript Type 1 fonts at the system level just like
Tr ueType fonts.You do not need to install ATM. For both types, you can install
them either of two ways.
1)
Copy the .ttf font files at [D:\screenfonts\english\PS Screenfonts\Type1
fonts] or [\Screenfonts\English\PS Screen Fonts\TrueType(Core OS) fonts]
to your \winnt\fonts directory.
2)
1. Choose [Start] - [Setting].
2. Double-click the [Fonts] control panel.
3. Go to the [File] menu, select [Install new font].
4. In the [folders] pane at the lower left, navigate to the location
[D:\screenfonts\english\PS Screenfonts\TrueType(Core OS) fonts].
5. Click on [Select all].
6. Click on [OK].
Downloading Fonts
When downloading fonts, you need to set [2. Controller Set]-[2. Spool] to [Off]
in Printer Menu Screen on the copier control panel.
For details on the menu structure of the copier control panel as well as on
how to access Printer Menu Screen, refer to the “Print Controller INSTRUCTION MANUAL, Chapter 4 Control Panel Setup.”
For details on how to download fonts, refer to the User’s Guide that comes
with the fonts.
2-14 Print Controller PostScript Option
Page 30

Chapter 3 Printer Driver
■ Contents of this Chapter ............................ 3-2
■ Working Environment ................................. 3-3
● Compliant OS .......................................................3-3
■ Printing from Windows Applications ........ 3-3
● Printing ................................................................. 3-3
● Print Settings ....................................................... 3-3
■ Printing from Macintosh Applications ...... 3-4
● Printing ................................................................. 3-4
■ Description of the Functions
Available in the Konica PS Driver ............. 3-5
■ Contents of Settings Available
in the Adobe PS Driver ............................. 3-39
● Windows 95/98/Me .............................................3-39
● Windows NT 4.0 ................................................. 3-42
● Windows 2000 ....................................................3-45
● Mac OS................................................................3-48
■ List of Functions Available
in the Adobe PS Driver ............................. 3-49
Print Controller PostScript Option 3-1
Page 31

Chapiter 3 Printer Driver
■ Contents of this Chapter
This chapter describes how to print from applications to the printing system and
how to use the functions of the printer driver installed in computers.
As the printer driver, Konica PS Driver and the Adobe PS Driver are both avail-
able.
In the following manual we deal with the two drivers separately.
Refer to “Chapter 2 Setup” (p. 2-1) for installation of the printer driver.
3-2 Print Controller PostScript Option
Page 32
■ Working Environment
● Compliant OS
The Printer Driver can be used on the following OS:
• Windows 95
• Windows 98
• Windows Me
• Windows NT 4.0 and NT Service Pack 3
• Windows 2000
• Mac OS 7.1 or higher
(Macintosh systems do not suport the Konica PS Driver.)
Refer to “Chapter 2 Setup” (p. 2-1) for installation of the Printer Driver.
■ Printing from Windows Applications
● Printing
Chapter 3 Printer Driver
1. Click the [File] menu of each application and click [Print].
2. Check that the PS option printer’s name is shown on [Printer Name]
and click [OK].
When the PS option printer is not shown, select it from the list box.
Setting the [Print] dialog box
Refer to the user’s manual of each application.
Deselect the [Collate Printing] check box from each application.
● Print Settings
Various settings required from printouts are primarily made in the [Konica IP-421
PostScript Properties] and the [Print] dialog box. The settings made in the [Print]
dialog box of a specific application are effective only when that application is
running. The next time you launch that application, settings made in the [Konica
IP-421 PostScript Properties] are effective instead.
The windows for kinds of settings appear differently depending on the Windows
environment. For printer driver features, refer to “Description of the Functions
Available in the Konica PS Driver,” or to “List of Functions Available in the Adobe
PS Driver”
Print Controller PostScript Option 3-3
Page 33

Chapiter 3 Printer Driver
■ Printing from Macintosh Applications
● Printing
1. Click the [File] menu of each application and click [Print].
2. Confirm that the PS option printer name is displayed in the [Printer
name] box, then click [OK] button.
If the PS option printer name is not displayed, select the printer.
Setting the [Print] dialog box
Refer to the user’s manual of each application.
3-4 Print Controller PostScript Option
Page 34
Chapter 3 Printer Driver
■ Description of the Functions Available in the Konica PS Driver
The Konica PS Driver supports the typical functions, or user-definable settings,
compiled below. To set up these settings you choose [Start]-[Settings]-[Printer],
right-click [KONICA 7020 PS], and choose [Properties] in Windows 95/98/Me, or
[Document Defaults] and [Properties] in Windows NT4.0, or [Printing Preferences] in Windows 2000. Windows 98 displays tab are shown about the
explanation of each tab.
[Properties] in Windows 95/98/Me
[Properties] in Windows NT4.0 [Document Defaults] in Windows NT4.0
[Properties] in Windows 2000 [Printing Preferences] in Windows 2000
Print Controller PostScript Option 3-5
Page 35

Chapiter 3 Printer Driver
[Setup] tab
Copies
Click the [▲] or [▼] button or directly enter to type the number of copies.
Default is 1.
Orientation
This function is used to specify paper orientation.
Default is Portrait.
Original Paper
Select the Original Paper from the list shown by clicking the [▼] button.
Default is [A4].
The paper size you can select are as follows:
Original size to be selected
A3
A4
A5
B4
B5
F4
11 x 17
8.5 x14
8.5 x 11
5.5 x 8.5
8K
16K
3-6 Print Controller PostScript Option
Page 36

Chapter 3 Printer Driver
Output Paper
Select the Output Paper from the list shown by clicking the [▼] button.
The paper size you can select are as follows:
Paper size to be selected
A3
A4
A5
B4
B5
F4
11 x 17
8.5 x14
8.5 x 11
5.5 x 8.5
8K
16K
If you change the setting for [Original Paper] , the setting for [Output Paper]
automatically changes accordingly. This is accessible by choosing [Paper] on
the [Setup] tab. If the setting for [Output Paper] is different from the setting for
[Original Paper], the scaling factor in [Layout] - [Fit] automatically changes
appropriately.
Source
Select the paper source from the list shown by clicking the [▼] button.
Default is [Auto Select].
When [Auto Select] is selected, a paper tray with paper which a user specified
from an application by using [KONICA 7020 PS on (Port name) : Properties] is
automatically selected.
Paper Type
Select the paper type from the list shown by clicking the [▼] button.
Default is [Plain].
• You have no choice but to select [Plain] unless you select [Output Tray 1] for
Output Tray.
The settings you can select are as follows:
Paper type to be selected
Plain
OHT
OHT Interleaved
OHT I/L Printed
The Paper Type setting defaults to [Plain]. Remember, you cannot select
[Offset] when Paper Type other than [Plain] is selected.
Print Controller PostScript Option 3-7
Page 37

Chapiter 3 Printer Driver
Output - Output Tray
Select an output tray from the list shown by clicking the [▼] button. When the
Finisher option is not selected in [Setup] tab, or when the Finisher is not
installed, any setting other than [Printer Default] and [Output Tray 1] is ineffec-
tive.
Output - Duplex
Select the Duplex setting from the list shown by clicking the [▼] button.
The settings you can select are as follows:
[None], [Long Edge], [Short Edge]
Default is [None].
[Long Edge]
Prints paper so that heads of
both sides become upward
[Short Edge]
Prints paper so that the head
of the front becomes the foot
of the back.
Output - Staple
To select the Staple position click [Output-Staple] from the list shown by using
the [▼] button.
The settings you can select are as follows:
[None], [1 Left], [1 Right], [2 Left], [2 Right], [2 Top].
Default is [None].
However, staple settings cannot be made in the following cases:
• [Finisher] is not selected.
• OHT, OHT Interleaved or OHT I/L Printed are selected as the Paper Type.
• [Printer Default] or [Output Tray 1] is selected in the [Output Tray] setting.
• The following combination is set:
(Example: 2 Left for A3-size paper (portrait)
For details on how to position the Staple, refer to the User’s Manual of
the copier.
3-8 Print Controller PostScript Option
Page 38

Chapter 3 Printer Driver
Stapling is performed as shown for the following orientations:
2-point stapling not available with papers of A5 size and under.
1 Left (portrait) 1 Right (portrait) 2 Left (portrait) 2 Right (portrait) 2 Top (portrait)
1 Left (Landscape) 1 Right (Landscape) 2 Left (Landscape) 2 Right (Landscape) 2 Top (Landscape)
Unavailable with A5-size paper
Layout
You may want to select a layout from the icon list. User-definable settings
available depend on the layout selected. Clicking the [Advanced] button opens
the [Advanced] dialog box, allowing additionall detail setup. When [Booklet] is
selected for [Layout] and you change the layout to any other than [Poster], a
confirmation message will appear.
Layout - Normal
No layout process is engaged, so no user-definable setting is provided and
you cannot select [Advanced].
Print Controller PostScript Option 3-9
Page 39
Chapiter 3 Printer Driver
Layout - N-Up
Lets multiple pages be laid out and printed out on a single sheet, taking in the
following settings:
[2up] [4up] [6up]
[8up] [9up] [16up]
N-Up: Specifies a number of pages to be laid out on a single sheet.
You can select a number from [2], [4], [6], [8], [9] and [16].
Position: Determines a relative print position when the laying out of
pages translates into an unbalanced space.
Border: Determines whether a border is printed between laid out
pages and, if it is, which of border types to select. The default
is [None (Full Size)].
[Advanced] Dialog Box - [N-Up] Tab
Page per sheet: Determines how many pages to lay out on a single sheet.
The [N-Up] setting in [Layout] on the [Setup] tab changes
accordingly.
Scale Borders: When checked, thins the borders. This makes available wider
space for page data.
Print Page Borders: Determines whether a border is inserted between pages to
be printed on a single sheet. The [Border] setting in [Layout]
on the [Setup] tab changes accordingly.
Layout Type: Decides how to arrange pages.
3-10 Print Controller PostScript Option
Page 40
Chapter 3 Printer Driver
[Advanced] Dialog Box - [Layout] Tab
Right to Left: When checked arrange pages from right to left. When not
checked, lets pages arrange themselves from left to right.
Page Placement: Determines a relative print position when a space occurs
consequent to the laying out of pages. The [Position] setting
in [Layout] on the [Setup] tab changes accordingly.
Size/Orientation change handling: Determines how to output a sheet on which
pages with different paper size or orientation are printed.
[Advanced] Dialog Box - [Duplex] Tab
Allows you to select from [Duplex Printing], [None], [Flip On Long Edge] and
[Flip On Short Edge].
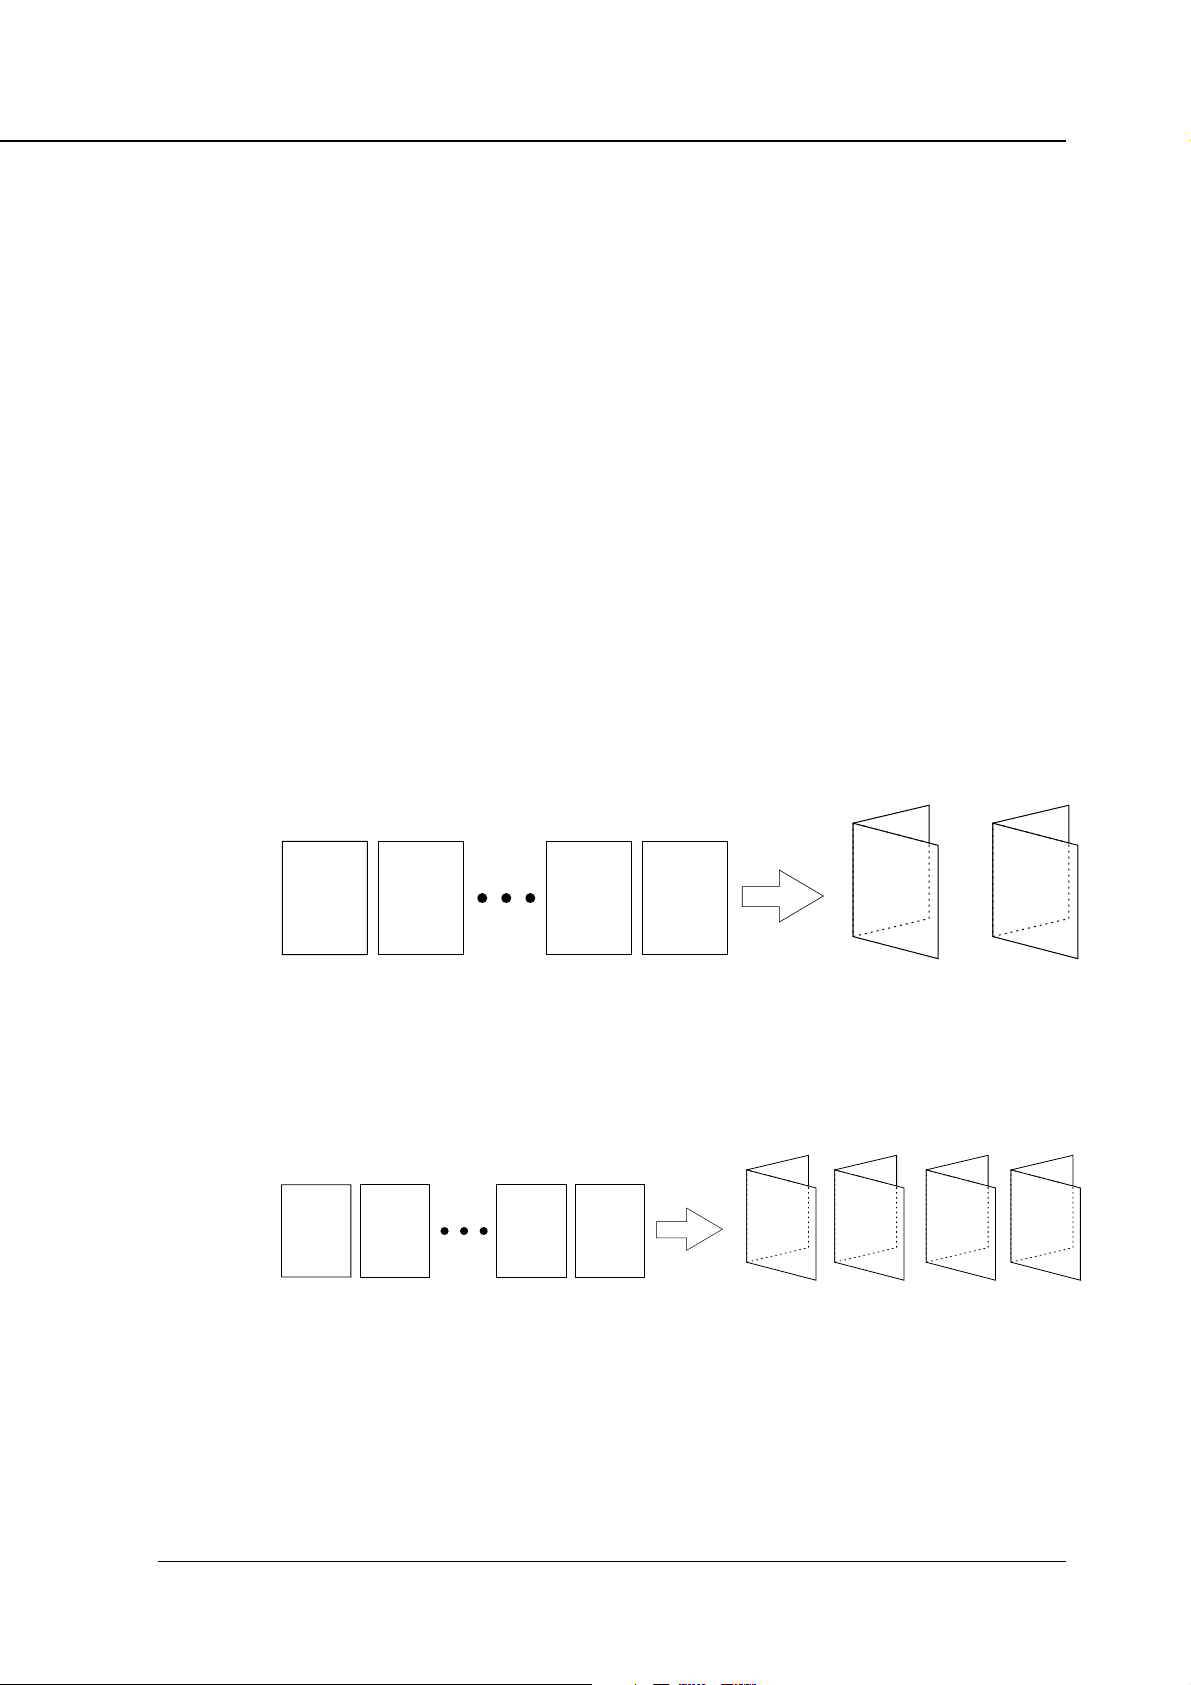
Layout - Booklet
Produces printouts that can be folded and bound into a booklet. This option
cannot be selected when:
• Staple is enabled.
• Cover/Back Cover is enabled.
[Bundle_8]
1 2 7 8
A4/B5/A5 A3/B4/A4 A3/B4/A4
[Bundle_16]
15
16
1 2 15 16
A4/B5/A5 A3/B4/A4 A3/B4/A4
1
7
8
1
2
13
14
3
2
4
11
12
5
6
A3/B4/A4
5
6
3
4
9
10
7
8
A3/B4/A4
Print Controller PostScript Option 3-11
Page 41

Chapiter 3 Printer Driver
Gutter: Allows you to set the white space between the facing pages
Bundle Size: Allows you to specify how many sheets to bind into a booklet.
[Advanced] Dialog Box - [Layout] Tab
Right to Left: When checked, arranges pages from right to left. When not
Fill Bundles: When checked, causes all sheets that follow the boundary of
as printed out in the range of 0 to 150. The default is 100.
The [Gutter] setting can further be defined by the setting for
[Creep] on the [Layout] tab.
The default [No Limit] allows you to bind all printed sheets
into a booklet.
checked, pages are arranged from left to right.
[Bundle Size] to take on the [Booklet] settings. In other
words, checking [Fill Bundles] overrides every setting except
[No Limit] for [Bundle Size] and produces the same effect as
selecting [No Limit].
[Fill Bundle_OFF]
7
8
1 2 8 9 9
A4/B5/A5 A4/B5/A5
1
2
A3/B4/A4 A3/B4/A4
5
6
3
4
[Fill Bundle_ON]
1 2 8 9
A4/B5/A5 A3/B4/A4 A3/B4/A4
1
2
3
9
4
7
8
5
A3/B4/A4
Gutter: Allows you to set the white space between the facing pages
as printed out in the range of 0 to 150. The [Gutter] setting in
[Layout] on the [Setup] tab changes accordingly.
Creep: Allows you to specify how far to expand the white space
between the facing pages printed on outer sheets, (outer
6
when bound into a booklet), in the range of 0 to 20. The
default is 0. You may want to define the [Size Units] setting to
specify how many sheets will take on the Creep setting.
Bundle Size: The size of the booklet is determined by the number of
pages. This is linked to [Lay-out] [Bundle Size] of the [Setup]
tab.
3-12 Print Controller PostScript Option
Page 42

Chapter 3 Printer Driver
Size Units: The units for the gutters and the creeps are determined by
the dpi setting. The default setting is [Match Resolution].
Size/Orientation change handling: Determines the output method when a mix-
ture of pages with different paper sizes and printing orienta-
tion is used.
[Advanced Settings] Dialog box – [Duplex] tab
Duplex Printing: The [Flip on Short Edge] setting is selected and cannot be
changed.
Layout – Fit
Enlarge or reduce the paper size set by the application to adjust it to the
actual paper size to be printed.
[Advanced Settings] Dialog box – [Fit to Page] tab
Application Page Size:The paper set is displayed by the [Original Paper] setting.
Fit to Paper Size: Determines the size of the paper to be actually printed. This
is linked to [Paper], [Output Paper] of the [Setup] tab.
[Advanced Settings] Dialog box – [Layout] tab
Size/Orientation change handling: When a mixture of pages with different paper
sizes and printing orientation is used, determine the output
method.
[Advanced Settings] Dialog box – [Duplex] tab
Duplex Printing: Select between the [None], [Flip on Long Edge] and [Flip on
Short Edge] settings.
Layout – %Scale
Perform scaled printing.
Scale Factor (%): Determines the scaling rate in the range of 25 – 400%. The
default setting is 50%.
Position: When performing scaled printing, click the [▼] button to
display a list to determine the position for printing.
[Advanced Settings] Dialog box – [Scaling] tab
Scale Factor (%): Set the scaling rate in the range of 25 – 400%. This is linked
to [Layout], [Scale Factor] of the [Setup] tag.
Print Controller PostScript Option 3-13
Page 43

Chapiter 3 Printer Driver
[Advanced Settings] Dialog box – [Layout] tab
Page Placement: Determines where to print when performing scaled printing.
Size/Orientation change handling:Determines the output method when a mixture
[Advanced Settings] Dialog box – [Duplex] tab
Duplex Printing: Select between the [None], [Flip on Long Edge] and [Flip on
Layout – Poster
Prints multiple pages at enlarged size.
Poster Style: Determines how pages are divided for enlargement.
Position: Determines where to print when performing poster style
This is linked to [Layout], [Position] of the [Setup] tab.
of pages with different paper sizes and printing orientation is
used.
Short Edge] settings.
printing.
Scale Factor: When selecting [Poster Style], [Custom], set the scale factor
in the range from 101 – 400%. The default setting is 150%.
• The Scale Factor is not available to be selected unless
you select [Custom] for Poster Style.
[Advanced Settings] Dialog box – [Poster] tab
Poster Style: Determines how pages are divided for enlargement.
Overlap: Determines the amount of overlap for the borders of the
divided page from, 0 – 150. The default setting is 100.
Scale Factor: When selecting [Poster Style], [Custom], set the scale factor
in the range from 101 – 400%. This is linked to [Layout],
[Poster Factor] of the [Setup] tab.
[Advanced Settings] Dialog box – [Layout] tab
Page Placement: Determines where to print when performing scaled printing.
This is linked to [Layout], [Position] of the [Setup] tab.
Size Units: The units for the gutters and the creeps are determined by
the dpi setting. The default setting is [Match Resolution].
Size/Orientation change handling:When a mixture of pages with different paper
sizes and printing orientation is used, determine the output
method.
3-14 Print Controller PostScript Option
Page 44

Chapter 3 Printer Driver
[Advanced Settings] Dialog box – [Duplex] tab
Duplex Printing: The [None] setting is selected and cannot be changed.
Log/Phys
Prints a different paper size without reducing/enlarging the printing size. This
enables printing of crop marks and shadows corresponding to the original
paper size.
Crop Mark: Determines presence and size of crop marks.
Position: Determines where to print on the output paper.
[Advanced Settings] Dialog box – [Log/Phys] tab
Application Page Size:Displays the determined paper size using the [Original
Paper] setting.
Target Paper Size:Sets the actual paper size to be printed. This is linked to
[Paper], [Output Paper] of the [Setup] tab.
Crop Marks: Determines presence and size of crop marks. This is linked
to [Layout], [Crop Marks] of the [Setup] tab.
[Advanced Settings] Dialog box – [Layout] tab
Page Placement: Determines where to print on the output paper. This is linked
to [Layout], [Position] of the [Setup] tab.
Size/Orientation change handling: Determines the output method when a mix-
ture of pages with different paper sizes and printing orienta-
tion is used.
[Advanced Settings] Dialog box – [Duplex] tab
Duplex Printing: Select between the [None], [Flip On Long Edge] and [Flip On
Short Edge] settings.
Print Controller PostScript Option 3-15
Page 45
Chapiter 3 Printer Driver
Security - Password
When [Password] is checked, you can use the password print function to print
confidential documentation.
With this method, both settings on computer and the operation from the LCD
touch panel are used. Default is [Off].
Refer to “Print Controller INSTRUCTION MANUAL” for password print proce-
dures.
Data saved to the copier for Password Print is automatically deleted
24 hours later if not output during this interval.
Security - Setting
Open the [Password Setting] dialog for password setting.
Enter your user ID in the [ID] text box. You can select any 5-digit number for
the User ID.
Enter your password in the [Password] text box. You can select any 8-digit
character for the Password.
If the Printer ECM feature has been set on the copier, [ID] set up in
the [Settings] dialog is recognized for a password for Printer ECM.
If a Printer ECM feature has been set on the copier, you can enter the
same number in the [ID] text box as that representing your password
for Printer ECM.
For information pertaining to the Printer ECM, refer to “Print Controller
INSTRUCTION MANUAL”.
Sorting - Collate
This function is used to specify how to output multiple pages.
Default is ON. It is recommended that you select [Collate] ON on the [Paper]
tab rather than select it for each application.
collate on collate off
3-16 Print Controller PostScript Option
Page 46
Chapter 3 Printer Driver
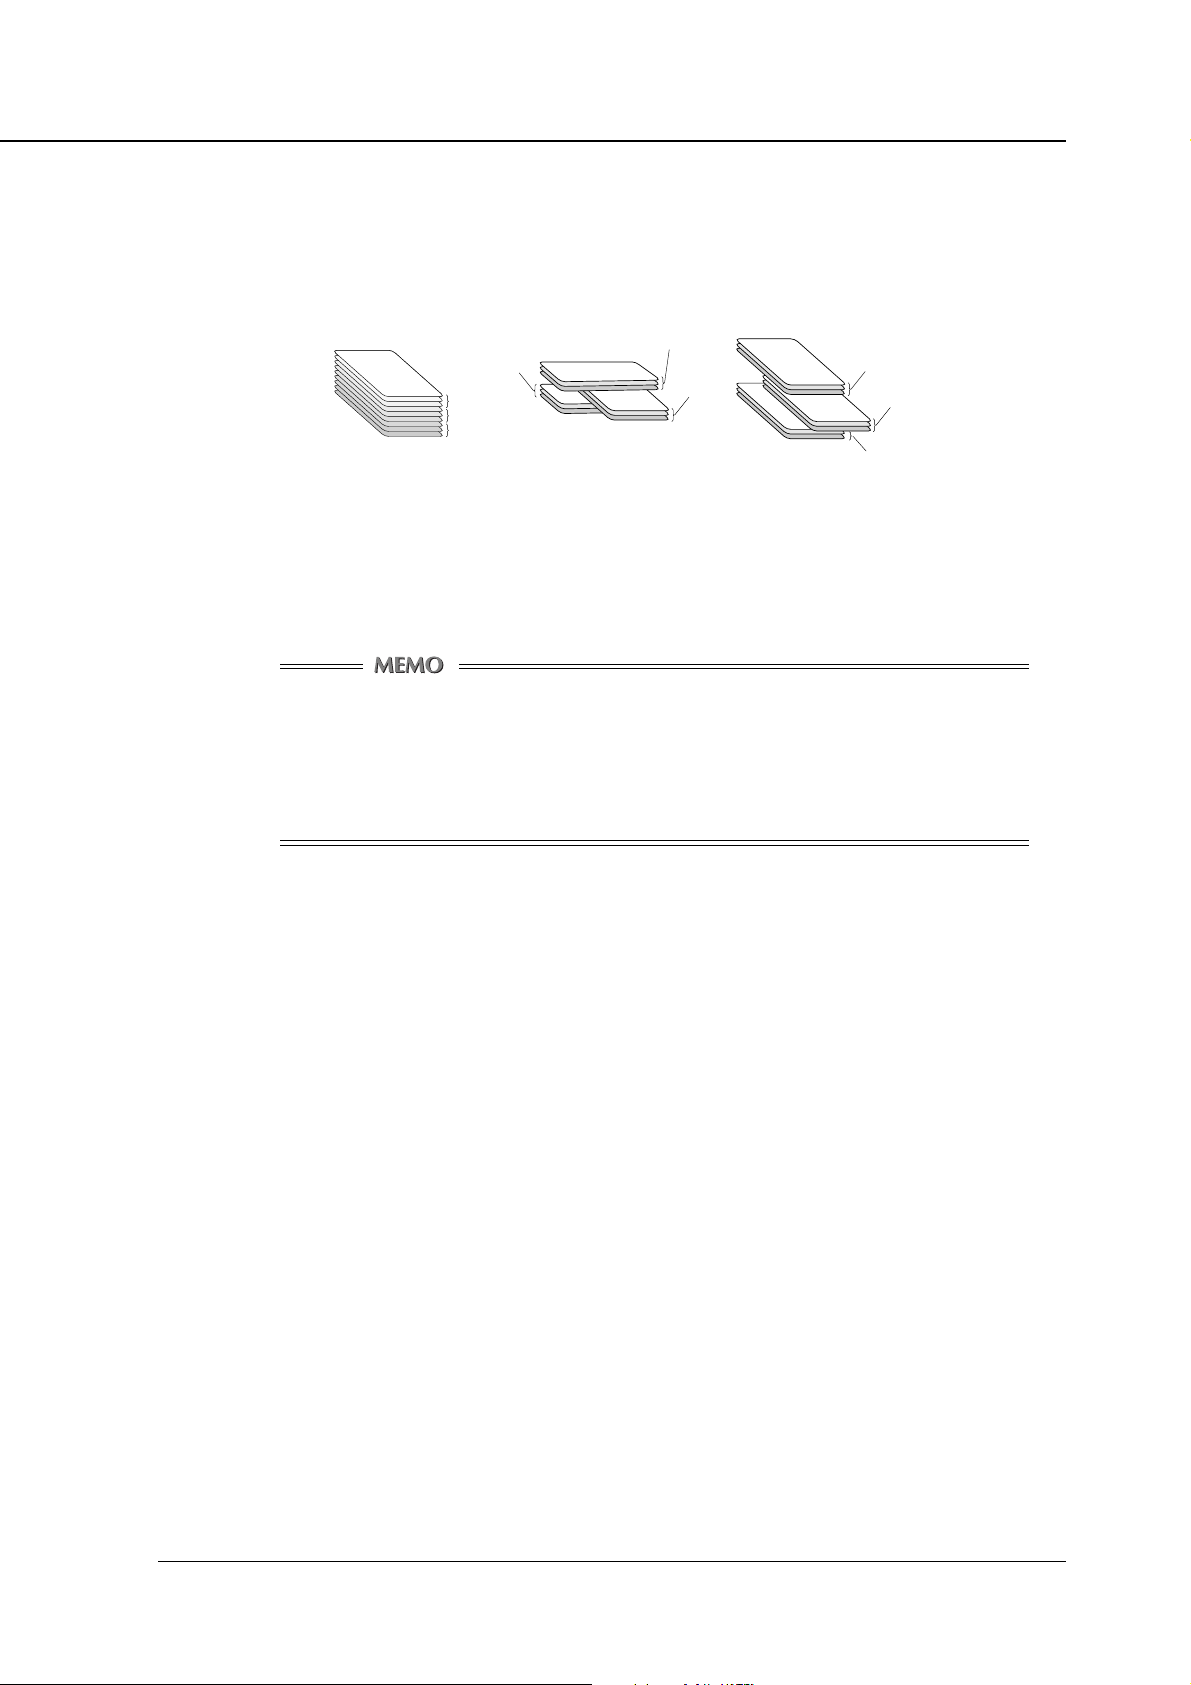
Sorting - Offset
[ON] offsets each copied set upon exit.
How to offset papers differs depending on whether the Finisher is installed or
not.
Example)
None
Three sets
Two sets
One set
Without Finisher
Three sets
Two sets
One setOne set
Two sets
Three sets
With Finisher
• When the Finisher is not installed, every set of copies is output in a direction
at right angles to the previous set of copies.
• When the Finisher is installed, every set of copies is offset upon exit.
When the Finisher is not installed, make sure to set the papers same
as printing paper size to both portrait tray and landscape tray.
(Example: A4 and A4R)
If the Finisher (FS-107) is installed, [Tray 1] is not available.
To select offset check [Sorting - Offset] check box.
Default is [Off].
About
The [About] shows system information and Printer Driver version number.
Restore Default
The function is used to restore all settings to default settings.
Print Controller PostScript Option 3-17
Page 47
Chapiter 3 Printer Driver
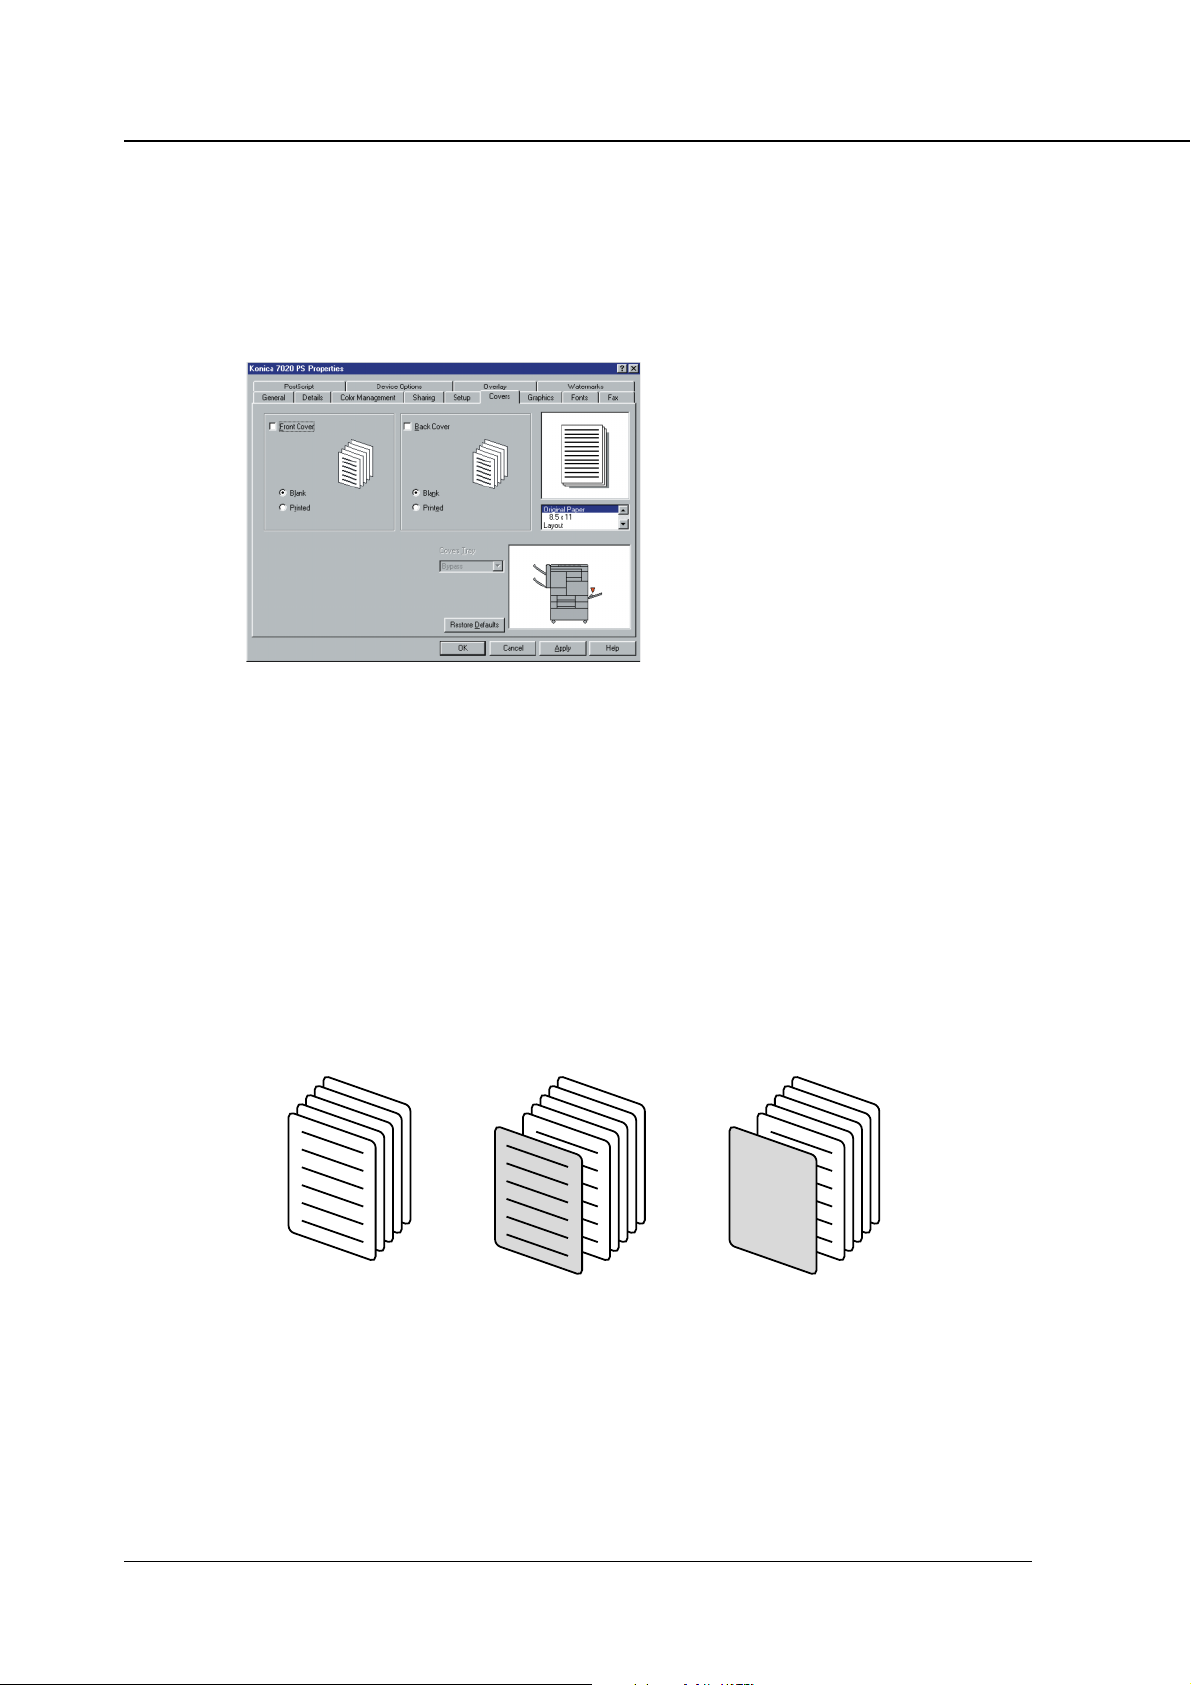
[Covers] tab
[Covers] tab performs the settings for the front and back cover. The [Setup] tab
displays current setting status, an image of the output result and the text of the
setting specifications. In addition, the option setting status of the unit selected
cover tray and the output tray are displayed graphically.
Front Cover
Checking this item inserts a cover. In the following cases, a cover cannot be
set:
• When [Booklet] is set
• When Paper Type is not set to [Plain]
• When the [Sort] setting is [OFF]
Blank: Output the front cover of the page without printing.
Printed: Output and print the front cover of the page
[Off] [Printed] [Blank]
Default is [Off].
3-18 Print Controller PostScript Option
Page 48

Chapter 3 Printer Driver
Back Cover
Checking this inserts the cover.
[Off] [Printed] [Blank]
Covers Tray
Sets the tray for the front cover/back cover. The default setting is [Bypass].
When [Paper], [Source] of the [Setup] tab is not set to [Auto Select], the same
tray cannot be selected for the item set by [Paper], [Source] of the [Setup] tab.
Restore Default
The function is used to restore all settings to default settings.
Print Controller PostScript Option 3-19
Page 49
Chapiter 3 Printer Driver
[Graphics] tab
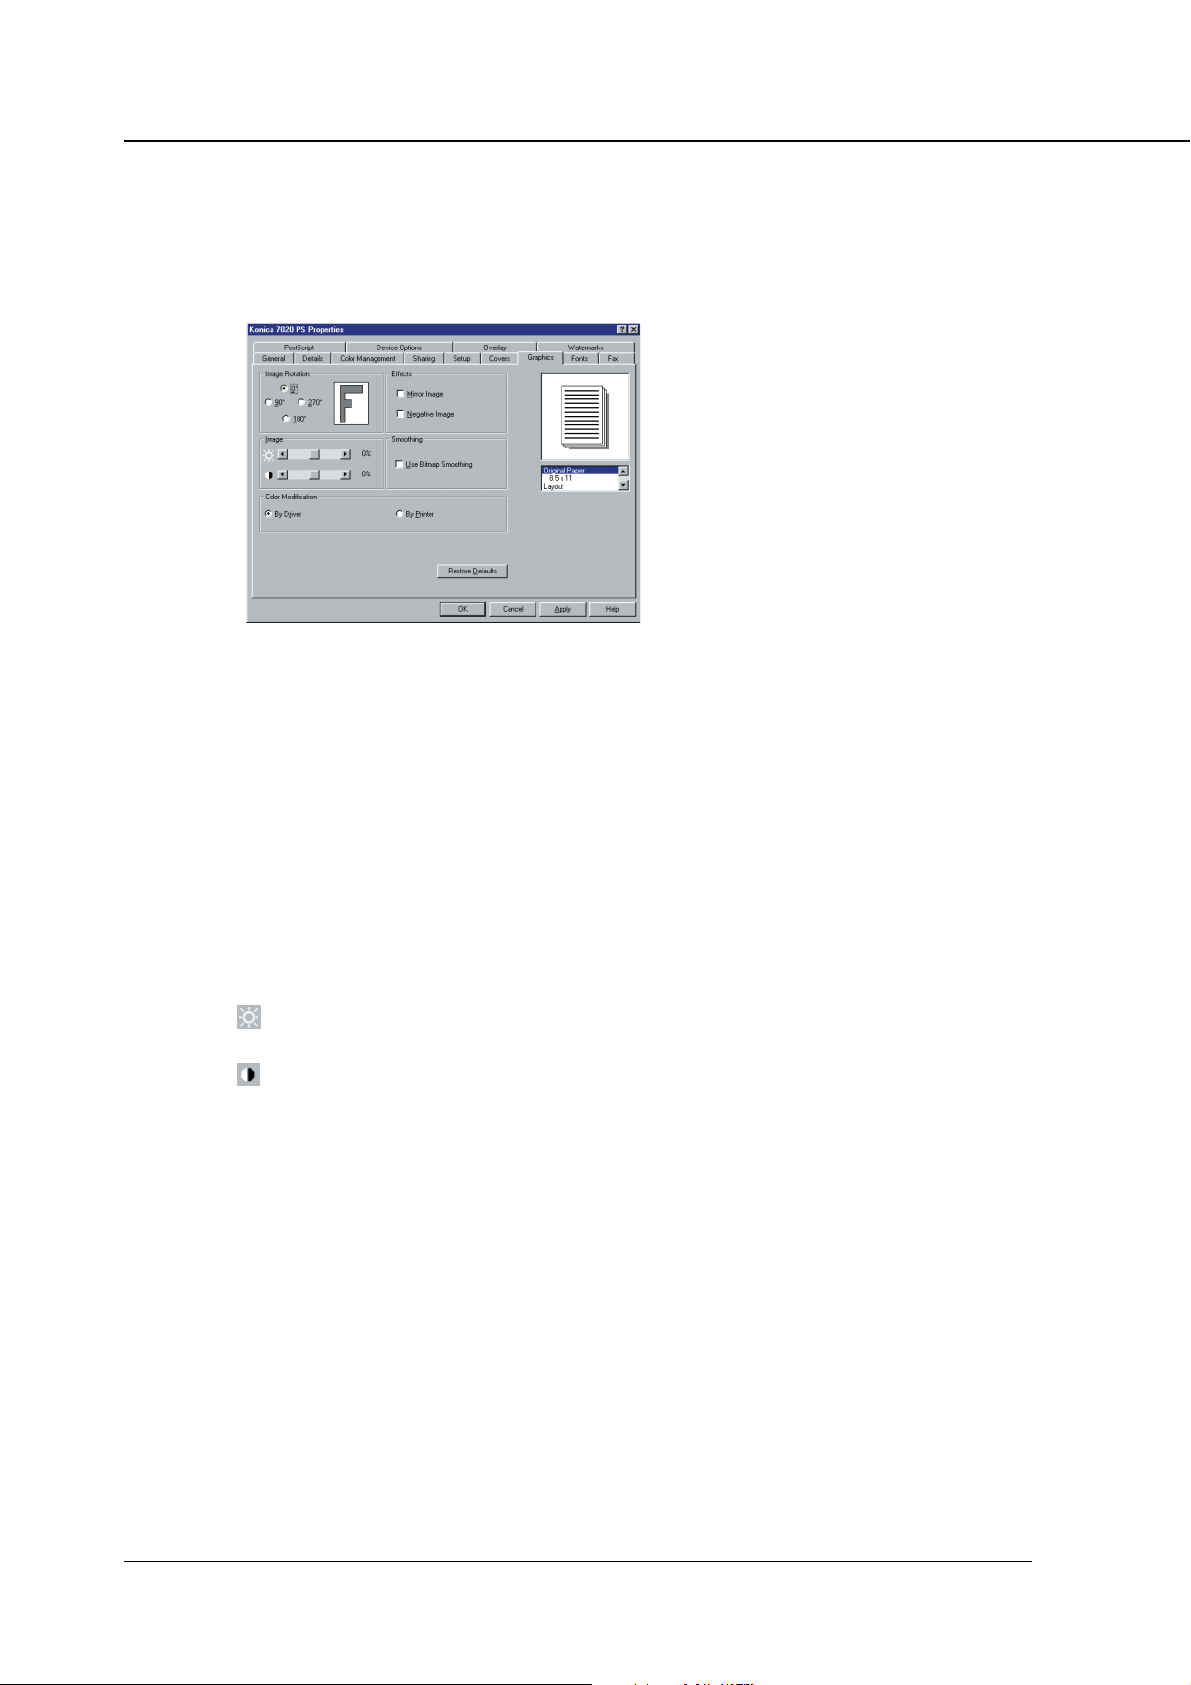
The [Graphics] tab sets image rotation, reverse image rotation, resolution, etc.
The [Setup] tab displays the current setting status and image of the output result
and the text of the setting specifications.
Image Rotation
Sets the rotation of the printing data to 0°, 90°, 180° or to 270° (counter clock-
wise).
Effects
Mirror Image:
Checking this item prints a mirror image of the printing data.
Negative Image:
Checking this item prints a negative image of the printing data.
Image
: If the graphic appears too bright, slide the brightness slider to the left.
If the graphic appears too dark, slide the brightness slider to the right.
: Decrease contrast, slide the contrast slider to the left.
Increase contrast, slide the contrast slider to the right.
Smoothing
Use Bitmap Smoothing
Checking this item enables smoothing.
Restore Default
The function is used to restore all settings to default settings.
3-20 Print Controller PostScript Option
Page 50

[Fonts] tab
The [Fonts] tab sets the font used.
Send To Print As
Selects [Adobe (Type1)], [Bitmap (Type3)], or [TrueType(Type 42)] as the
method of sending of TrueType fonts.
Chapter 3 Printer Driver
Threshold Units
Selects between [Points], [1/100inch], and [Pixels] as the setting unit for the
threshold.
For System Font
Displays a list of the TrueType fonts installed in the system.
Use Printer Font
Displays a list of printer fonts. The selected system fonts and printer fonts
indicate they can be mutually substituted, i.e. they have a substitution relation-
ship. When reselecting the printer font, printer fonts that can be substituted
are changed. Click the Default Substitution button to restore the original sub-
stitution relationship.
Use Printer Fonts For All True Type Fonts
Checking this item substitutes printer fonts for all TrueType fonts for output.
Use Substitution Table
Checking this item uses the TrueType font and printer font substitution table.
Default Substitution
Click the button to restore the TrueType font and printer font substitution rela-
tionship.
Restore Default
The function is used to restore all settings to default settings.
Print Controller PostScript Option 3-21
Page 51
Chapiter 3 Printer Driver
[Fax] tab
The PC-FAX is a function that enables you to send a fax via a printing system from
the separate client PCs on the network, in the same way as for normal printing.
For this function to be available, it is necessary that the fax kit is installed in the
copier.
● Data Flow at PC-FAX
Computer
PC-FAX Sending
Application
Printer Driver
Interface
Parallel I/F
Printer Engine
Public Circuit
Fax Kit
Print Controller
PDL Process
(Rasterizing)
E-RDH Memory
Ethernetwork I/F
Engine(Print)
3-22 Print Controller PostScript Option
PSTN
Page 52

Chapter 3 Printer Driver
● PC-FAX Features
The following describes the items available on the [Fax] tab.
Fax
From [Fax] you can choose [To Fax] or [To Printer].
Choose [To Fax] when you are going to use the PC-FAX function.
Cover Sheet
You can put a fax preceded by a cover sheet.To create a cover sheet: Check the
[Use Cover Sheet] check box and clickthe [Setup] button; then the [Coversheet
Setup] window will appear in which you can set up a cover sheet.
The following cover sheet settings are available. You can see a preview of your
cover sheet by using [Preview] at the right side of the [Coversheet Setup] win-
dow.
Recipients
Name
Check this to let the cover sheet carry the name of the recipient.
Fax No.
Check this to let the cover sheet carry the fax number of the recipient.
Company
Check this to let the cover sheet carry the name of the destination company.
Print Controller PostScript Option 3-23
Page 53

Chapiter 3 Printer Driver
Department
Check this to let the cover sheet carry the name of the destination department.
Comments
Here you can put in comments.
By seeing a print preview, start a new line where necessary.
(A line containing more than 64 characters goes off the printable area.)
Sender
Title
If you want to give the fax a title, check the check box and enter a title in
the text box at the right side of the check box.
A maximum of 64 bytes of symbols and alphanumeric characters is
available.
Company
If you want to enter the company name of the sender, check the check
box and enter it in the text box at the right side of the check box.
A maximum of 40 bytes of symbols and alphanumeric characters is
available.
Name
If you want to enter the sender name, check the check box and enter it
in the text box at the right side of the check box.
A maximum of 40 bytes of symbols and alphanumeric characters is
available.
FAX No.
If you want to enter the fax number of the sender, check the check box
and enter it in the text box at the right side of the check box.
Only up to 38 bytes of numbers, -, *, and # are available.
Phone
If you want to enter the phone number of the sender, check the check
box and enter it in the text box at the right side of the check box.
Only up to 38 bytes of numbers, -, *, and # are available.
Resolution
This lets you select resolutions for fax send.
Tw o resolutions are available for fax send: [200 dpi] (equivalent of Fine mode)
and [400 dpi] (equivalent of Super Fine mode). Default is [200 dpi].
Fax Mode
You can set the settings of [Print after send], [Delay Transmission], [Sub Ad-
dress] and [Sender ID].
[Print after send], when checked, prints out the content of a file after it has been
sent out.
[Delay Transmission], when checked, sends a fax at a predetermined time.
3-24 Print Controller PostScript Option
Page 54

Chapter 3 Printer Driver
To predetermine a time, you can either directly type it in the [Send Time] box or
can click the [▼] or [▲] button next to the [Send Time] box.
[Sub Address] and [Sender ID], when checked, lets you enter a Sub Address
and Sender ID for sending a fax with F-code.
Sub Address
A maximum of 20 bytes of numbers (0 to 9) is available.
Sender ID
A maximum of 20 bytes of numbers and symbols, 0 to 9, *, and #, is
available.
For Sub Address and Sender ID, refer to your Fax Kit User’s Guide.
Enter Recipient
You can either directly type in recipients or use a Phonebook.
If you want to directly type in recipients, do so in the [Name] and [Fax Number]
dialog boxes in the [Recipient] field. Normally, you don’t need to change the
checked/unchecked status of the check boxes for [Error Correction Mode], [Intl
Tr ansmission Mode] and [V.34 Mode].
After you have typed in a name and fax number, click the [Add to Recipients]
button to add them to [Recipients] field.
For information regarding use of Phonebook when entering recipients, refer to
“Phone Book” (page 3-28).
Name
A maximum of 40 bytes of symbols and alphanumeric characters is
available.
FAX number
Only up to 38 bytes of numbers, #, *, _ (space code), -, E, P, and T are
available.
Recipients
This displays a list of recipients.
You can delete personal information in the recipients list by selecting it and
pressing the [Remove] button.
You can register a maximum of 100 entries.
You can split a fax number with a hyphen (-) or a space. For details on
the [Error Correction Mode], [Intl Transmission Mode] and [V.34 Mode]
check boxes, refer to your Fax Kit User’s Guide.
Print Controller PostScript Option 3-25
Page 55

Chapiter 3 Printer Driver
● Sending a Fax using PC-FAX
The following describes how to send a fax using the PC-FAX feature.
General Procedure for Sending a Fax
To send a fax, perform the following steps.
You cannot access the properties dialog for PC-FAX from [Control
Panel]-[Printer] folder. To get the [Properties] window displayed, you
need to open the [Print] dialog by using a print command from the file
you are going to send, and then click the [Properties] button.
1. Click the [Fax] tab.
2. Make sure that [To Fax] is checked in the [Fax] field.
If the [To Fax] is not checked, check the [To Fax].
When you change [To Fax] from unchecked to checked and as a
result the check is removed from [To Printer], a confirmation message
appears. If this is so, click the [OK] button.
3. Set the [Resolution] to [200 dpi] or [400 dpi].
4. If you want to change the Fax Mode (for Print after send, Delay Transmis-
sion, Sub Address and Sender ID).
Details about how to set these settings are discussed under the heading of
“Fax Mode.”
5. Directly type in information about the recipient. Or use a Phone Book to
enter the necessary information.
If you want to directly type in information about the recipient, do so in the [Name]
and [Fax Number.] boxes in the [Recipients] field. Normally, there is no need to
change the checked/unchecked status of the [Error Correction Mode], [Intl Trans-
mission Mode] and [V.34 Mode] check boxes. For more on this, refer to your
Fax Kit User’s Guide.
After entering the necessary information, click the [Add to Recipients] button to
add it to the [Recipients] field.
For information regarding use of Phonebook when entering recipients, refer to
the section under the heading of “Phone Book.”
3-26 Print Controller PostScript Option
Page 56

Chapter 3 Printer Driver
6. Click the [OK] button to close the [Properties window].
7. Make other settings as required, and click the [OK] button to close the
[Print] dialog.
8. The [Fax Send Confirmation] message will appear. Then click the [OK]
button.
Your file will be sent via fax to the recipient.
● Fax Mode
The following describes how to set the Print after send, Delay Transmission, Sub
Address, and Sender ID settings.
Sending a file at a predetermined time
Checking [Delay Transmission] lets a file be sent at a predetermined time.
You can directly enter a desired time into the [Send Time] box. Or you can click
the [▼] or [▲] button next to the [Send Time] box.
When using the Delay Transmission feature, check to be sure that the
time indication on your computer coincides with the time indication on
the copier. If there is any discrepancy,the file may be held for as long
as 23 hours and 59 minutes before it is sent.
Sending a fax with F-code
Checking [Sub Address] and [Sender ID] allows you to enter a sub address and
sender ID for sending a fax with F-code.
For details on Sub Address and Sender ID, refer to your Fax Kit User’s
Guide.
Print Controller PostScript Option 3-27
Page 57

Chapiter 3 Printer Driver
● Phone Book
The Phonebook feature allows you to group information on individual persons or to
create sync transmission groups,to expedite fax sending. The following describes
how to register and delete personal information, to create sync transmission groups,
and to manage multiples Phone Book.
General Procedure for Using a Phone Book
Complete the following steps.
1. Click the [Fax] tab.
2. Click the [Phone Book] button.
The [Phonebook] dialog box will appear.
3. Select a Personal Information or a sync transmission Group, and click
the [Add Recipient] button.
The selected personal information will appear in the [Recipients] field. If you
have selected a transmission group, all of the personal information is shown.
4. If the [Recipients] display shows unnecessary personal information,
you can delete it. To do this, select the personal information you want to
delete and click [Delete] button in the [Recipient] field.
The selected personal information is deleted.
5. After confirming the recipient, click the [OK] button.
6. Send the fax as you normally would.
3-28 Print Controller PostScript Option
Page 58

Chapter 3 Printer Driver
● Registering Personal Information and Groups
Perform the following steps to register personal information and groups. The “groups”
we refer to here are not for sync transmission, but for managing personal informa-
tion.
1. Click the [Phone Book] button.
The [Phonebook] dialog box will appear.
2. If you want to enter new personal information, click the [Personal] button
in the [New] field.
The [Personal Information] dialog box will appear.
3. Enter Name, Fax No., Company and Department. Normally, there is no
need to change the checked/unchecked status of the [ECM], [Int. Tx] and
[V.34] check boxes.
4. Click the [OK] button.
The newly entered personal information is registered and is added to the list
displayed.
5. If you want to create a management group, click the [Folder] button in the
[New] field.
The [Folder Information] dialog box will appear.
6. Enter a folder name and click the [OK] button.
7. To add recipient to a group, select a group, and click the [Personal] but-
ton in the [New] field.
The [Personal Information] dialog box will appear.
8. Enter personal information the same way you would normally enter per-
sonal information, and click the [OK] button.
The personal information is registered with the selected group and is displayed
under the Folder.
9. If you want to, you can register recipient persons whose information is
already in existence with a group. To do this, select and right-click the
person whose information you want to register, and select [Copy] from
the menu that appears.
The selected personal information will be copied.
10. Select a folder with which to register the personal information, right-click
the selected folder, and select [Paste] from the menu that appears.
The personal information is registered and is displayed under the Folder.
The registration folder can be 3 layers deep.
Print Controller PostScript Option 3-29
Page 59

Chapiter 3 Printer Driver
11. If there is any personal information you find unnecessary, you can
select it and click the [Delete] button.
A confirmation message will appear. Click the [OK] button and the corre-
sponding personal information or folder will be deleted.
12. If you need to make changes to personal information, select it and click
the [Edit] button.
The corresponding [Personal Information] dialog box will appear, allowing
you to make changes to the displayed information.
● Registering Sync Transmission Groups
Sync transmission groups can be registered by completing the following steps.
10 preset sync transmission groups are available. You cannot add nor
delete groups. You can set 100 personal information fields in the sync
transmission.
1. Select a [Personal Information] to add to a sync transmission group.
2. Right-click the selected [Personal Information] and select the group you
wish to add personal information to from the menu that appears.
The personal information will be copied and added to the selected sync trans-
mission group.
3. If the sync transmission group contains personal information you find to
be unnecessary, you can delete it. To do this, select the personal informa-
tion you want to delete and click the [Delete] button.
The selected personal information will be deleted from the sync transmission
group.
3-30 Print Controller PostScript Option
Page 60

Chapter 3 Printer Driver
● Managing Phonebook
You can store Phonebook under desired names. That way, you can have several
Phonebook and switch from one to another as required. Complete the following
steps to handle Phonebook.
Phonebook is stored as CSV files. You can get data into a Phonebook
from existing data bases as well.
1. Select [Save As] from the [File] menu.
The [Save As] dialog box will appear.
2. Enter an appropriate name and click [Save] button.
You may want to enter “Phonebook Konica.csv”.
3. If you want to select a specific Phonebook, select [Open] from the [File]
menu.
The [Open] dialog box will appear.
4. Select a Phonebook and click the [Open] button.
The Phonebook you want to open may have a name like “Phonebook
Konica2.csv.”
5. The display will change to show data read off the selected Phonebook.
Print Controller PostScript Option 3-31
Page 61

Chapiter 3 Printer Driver
[PostScript] tab
The [PostScript] tab performs advanced PostScript settings. The [Setup] tab
displays the current setting, an image of the output result and the text of the
setting specifications.
Output
To Printer:
Enables to output data to the printer.
Encapsulated PostScript:
File Name:
Settings
Job Compression:
Flate Compression:
Compress Bitmap:
JPEG:
Enables to output data as a file in the EPS format.
Allows you to specify a file name when outputting data as a file in the EPS
format.
Offers a choice of [None], [LZW] or [Flate] for print job compression method.
When [Flate] is selected in [Job Compression], allows you to select Flate compression modes from [Fastest], [Fast], [Default] and [Best Compression].
Offers a choice of [None], [RLE], [JPEG] or [LZW] for bitmap compression
method.
When [JPEG] is selected in [Compress Bitmap], allows you to select JPEG
modes from [High Quality], [Fast], [Medium], [Draft] and [Custom].
Output Protocol:
Offers a choice of [Pure Binary], [ASCII], [BCP] or [TBCP] for output data
format.
3-32 Print Controller PostScript Option
Page 62

[Pure Binary] is only supported by Windows NT.
In WindowsNT 4.0, Gamma Level modulation is enabled.
Tokenised PS:
Checking this box enables Tokenised PS.
PostScript Options
Print PostScript Error Information:
Checking this box makes the error handler available. When this box is set as
checked and an error is encountered during the printing process, an error
message is printed out under the action of the error handler.
Used PostScript Pass-through:
Checking this box declares this driver as a PostScript driver. The box is checked
by default.
Compatibility:
Allows you to select PostScript for output format.
Chapter 3 Printer Driver
Page Size Policy:
Timeouts
Job Timeout (seconds):
Wait Timeout (seconds):
Send Ctrl-D To Printer:
Determines what to do if a discrepancy occurs between the choices of tray
and paper size.
Defines a maximum length of time in seconds available for the printer to complete a single print job.
Defines a maximum length of time in seconds during which the printer waits
for print data to be fed in from the computer during the printing process.
Determines how to send a [Ctrl-D] signal to the printer to notify it of the completion of the print job at hand.
Print Controller PostScript Option 3-33
Page 63
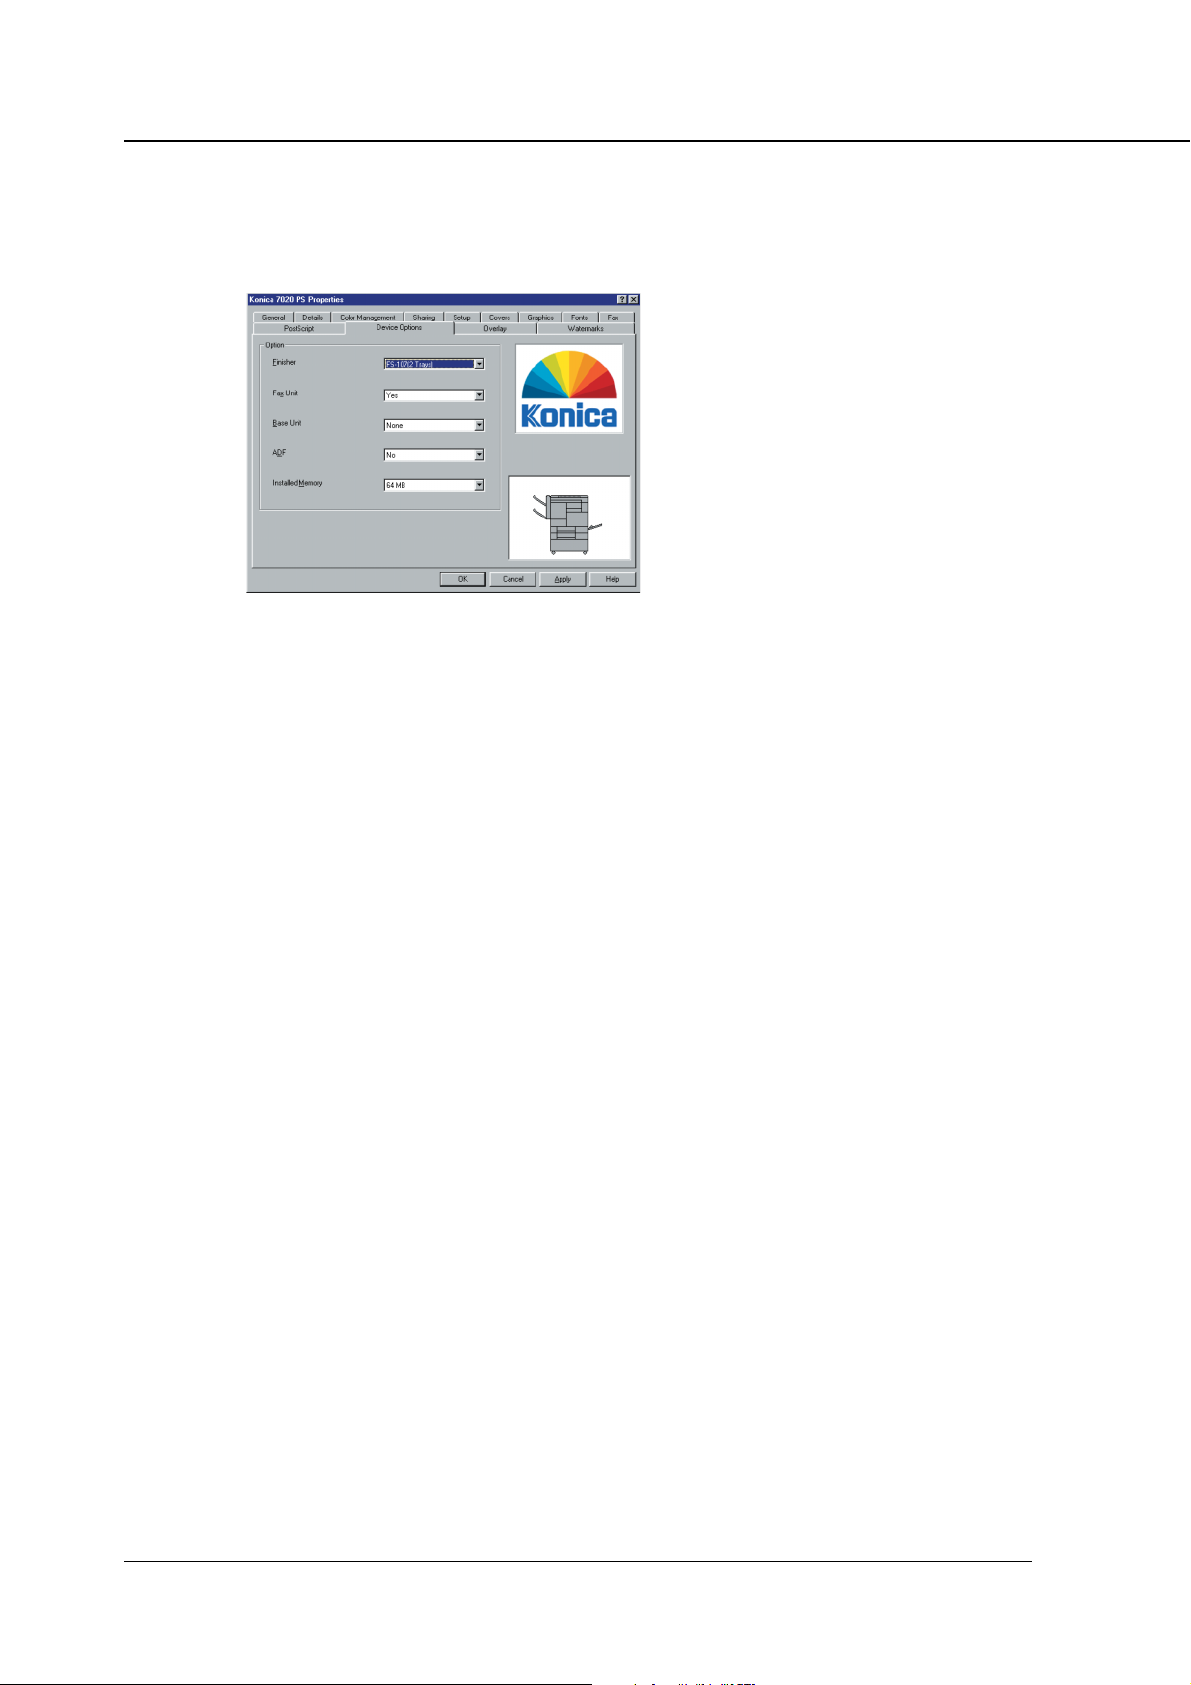
Chapiter 3 Printer Driver
[Device Options] tab
Optional products attached to the copier are set with the printer driver. The status
of the copier’s option settings are graphically displayed.
Option
Finisher: Sets whether a Finisher is present and its type
[None], [FS-107(2 Trays)], [FS-107(3 Trays)],
[FS-107(4 Trays)],[IT-101(2 Trays)].
Fax Unit: Selects [Yes] or [None].
Base Unit: Sets whether a Base Unit is present and determines its type
[None], [DB209/210], [DB409/410] .
ADF: Sets whether a Automatic Document Feeder is present.
Installed Memory: Selects [64MB], [96MB], or [160MB] for the memory that is
installed. Default is [64 MB].
3-34 Print Controller PostScript Option
Page 64

Chapter 3 Printer Driver
[Overlay] tab
The [Overlay] tab sets the overlay of the document to be printed. The [Setup] tab
displays the current setting status, an image of the output result and the text of
the setting specifications. To use overlay, the overlay data must be prepared in
advance.
Overlay Data
Printed Document
Printing result
using overlay
Overlays
Displays a list of stored overlay files.
When [None] is selected, the overlay function is disabled. For the overlay
printing procedure, refer to the [Overlay Printing Procedure].
Load Overlay
Opens the [Load Page Overlay File] dialog box. At this point, the overlay file is
selected.
Create Overlay
Opens the [Create Page Overlay] dialog box. At this point, the overlay data
that was prepared in advance is selected and the overlay file is created. For
the methods of creating overlays, refer to [To create and overlay].
Delete
Deletes the overlay file selected by [Overlay].
Print Controller PostScript Option 3-35
Page 65

Chapiter 3 Printer Driver
Check Before Print
By checking this item, overlay printing must be confirmed when printing is
executed.
Overlay File Information
Displays information about the selected overlay file.
To create and overlay
For creating overlays, perform the following procedure.
1. Create an overlay with the application in use.
2. Select [Print] from the [File] menu.
The selected menu may differ depending on the application used.
3. Select [Konica 7020 PS].
4. Click [Properties].
The property screen opens.
5. Click the [Overlay] tab.
6. Click [Create Overlay].
The [Create Page Overlay] dialog box opens.
7. Input the file name at [File Name].
Use “esp” as the extension.
8. Click [OK].
The [Create Page Overlay] dialog box closes.
9. Click [OK] to create the overlay.
The [Properties] dialog box closes.
10. Click [OK] and create the overlay.
The overlay creation confirmation dialog box appears.
11. Click [Yes].
The overlay data is stored.
Overlay Printing Procedure
When printing overlays, perform the following procedure.
1. Select [Print] from the [File] menu.
The selected menu may differ depending on the application used.
2. Select [Konica 7020 PS].
3. Click [Properties].
The property screen opens.
4. Click the [Overlay] tab.
3-36 Print Controller PostScript Option
Page 66

Chapter 3 Printer Driver
5. Select the overlay file to be printed.
6. Click [OK].
The [Properties] dialog box closes.
7. Click [OK] and create the overlay.
Along with the overlay data the document to be printed is printed on top of
the overlay data. Select [Overlay], [None] after printing has been completed.
[Watermarks] tab
Performs settings concerning the watermark. A preview of the watermark that is
selected or the watermark that is being edited is displayed.
Watermark
Selects whether a watermark is present and its type [None] / [CONFIDEN-
TIAL] / [COPY] / [DRAFT] / [FILE COPY] / [FINAL] / [PROOF] / [TOP SE-
CRET]. [None] is the default setting.
Watermark – Add
The user can add an edited watermark.
Watermark – Update
Updates a watermark while it is being edited.
Watermark – Delete
Deletes the watermark selected from the list.
Edit – Text
The selected watermark is shown and can be edited. Inputting new characters
is also possible.
Edit – Size
The watermark’s font size is set in the scroll bar.
Print Controller PostScript Option 3-37
Page 67

Chapiter 3 Printer Driver
Edit – Angle
The watermark’s rotation angle is set in the scroll bar.
Edit – Fonts
Opens the [Font] dialog box where the watermark font is set.
Edit – Color
Opens the [Color] dialog box where the watermark color is set.
Position
Determines the printing position of the watermark by dragging and dropping in
the preview or set it using the scroll bar.
inches/mm: Determines the unit of the coordinates displaying the location.
Position – Center Watermark
Arranges the watermark in the center of the page.
First Page Only
When this item is checked, a watermark is printed on the first page only.
When not checked, the watermark is printed on all pages.
Transparent Text
When this item is checked, characters are printed with a net pattern back-
ground that looks transparent. When not checked, the net pattern background
of the characters becomes white and shadow printing data are not printed.
As Outline Only
When this item is checked, only the outline of the characters of the watermark
is printed. Please note: this item is disabled if the [Transparent Text] setting is
disabled.
3-38 Print Controller PostScript Option
Page 68

Chapter 3 Printer Driver
■ Contents of Settings Available in the Adobe PS Driver
The screen displayed depends on the OS. Certain tabs may not be displayed
depending on settings. For instruction how to set the Simplified Version of the
printer driver’s individual items, refer to “List of Functions Available in the Adobe
PS Driver”.
● Windows 95/98/Me
How to Open Properties
Click [Start]-[Settings]-[Printers] so that the [Printers] window appears. Right-
click on the Printer icon in the resulting window. A menu will appear; you can
click on [Properties] to get access to the Properties window which looks like
this:
To open the [Printers] window from [My Computer]
[General] tab
Open the [Printers] window by double-clicking the [Printers] folder in the
[My Computer] window.
[Details] tab
Comment / Separator page / Print Test Page
Print to the following port / Print using the
following driver / Add Port / Delete Port / New
Driver / Capture Printer Port / End Capture /
Timeout settings / Spool Settings / Port
Settings
Print Controller PostScript Option 3-39
Page 69

Chapiter 3 Printer Driver
[Sharing] tab
Not Shared / Shared As
[Paper] tab
[Graphics] tab
Resolution / Print as a negative image / Print
as a mirror image / Layout / Scaling / Convert
gray text to PostScript gray / Convert gray
graphics to PostScript gray
Paper size / Orientation / Duplex / Paper
source / Output bin / Paper type / Margins
[Watermarks] tab
CONFIDENTIAL / COPY / DRAFT / Print
watermark
3-40 Print Controller PostScript Option
Page 70

Chapter 3 Printer Driver
[PostScript] tab
PostScript output format / Download header
with each print job / Assume header is down-
loaded and retained / Print PostScript error
information / PostScript timeout values
[Fonts] tab
Substitute printer fonts for TrueType font when
applicable / Do not use printer fonts / Add
Euro Currency Symbol to PostScript Fonts
[Device Options] tab
Available printer memory / Job Offset / Collate
Combination / Stapling / Front Cover / Back
Cover / Front/Back Cover Tray / Finisher /
Drawer Base / Memory Configuration
/
Print Controller PostScript Option 3-41
Page 71

Chapiter 3 Printer Driver
● Windows NT 4.0
How to Open Properties
Click [Start]-[Settings]-[Printers] so that the [Printers] window appears. Right-
click on the Printer icon in the resulting window.
When “(Document Default)” is shown to the right of different tab names, this
indicates that you can click on [Document Defaults] to see items on the corre-
sponding tabs.
The options [Properties] and [Document Defaults], which are available in the
menu shown when you right-click on the printer icon, bring you to different
setting windows.
A menu will appear in which you can click on [Properties] or [Document De-
faults] to get access to the Properties window which looks like this:
To open the [Printers] window from [My Computer]
[General] tab
Open the [Printers] window by double-clicking the [Printers] folder in the
[My Computer] window.
[Ports] tab
Comment / Location / Driver / New Driver /
Separator Page/ Print Processor / Print Test
Page
3-42 Print Controller PostScript Option
Add Port / Delete Port / Configure Port /
Enable bidirectional support / Enable printe
pooling
Page 72

Chapter 3 Printer Driver
[Scheduling] tab
Available / Priority / Spool print documents so
program finishes printing faster / Print directly
to the printer / Hold mismatched documents /
Print spooled documents first / Keep docu-
ments after they have printed
[Security] tab
Permissions / Auditing / Ownership
[Device Settings] tab
[Sharing] tab
Not Shared / Shared / Share Name / Alternate
Drivers
Form To Tr ay Assignment / Font Substitution
Ta ble / Available PostScript Memory / Output
Protocol / Send CTRL-D Before Each Job /
Send CTRL-D After Each Job / Add Euro
Currency Symbol to PostScript Fonts / Job
Timeout / Wait Timeout / Minimum Font Size
to Download as Outline / Maximum Font Size
to Download as Bitmap / Memory Configura-
tion / Finisher / Drawer Base
Print Controller PostScript Option 3-43
Page 73
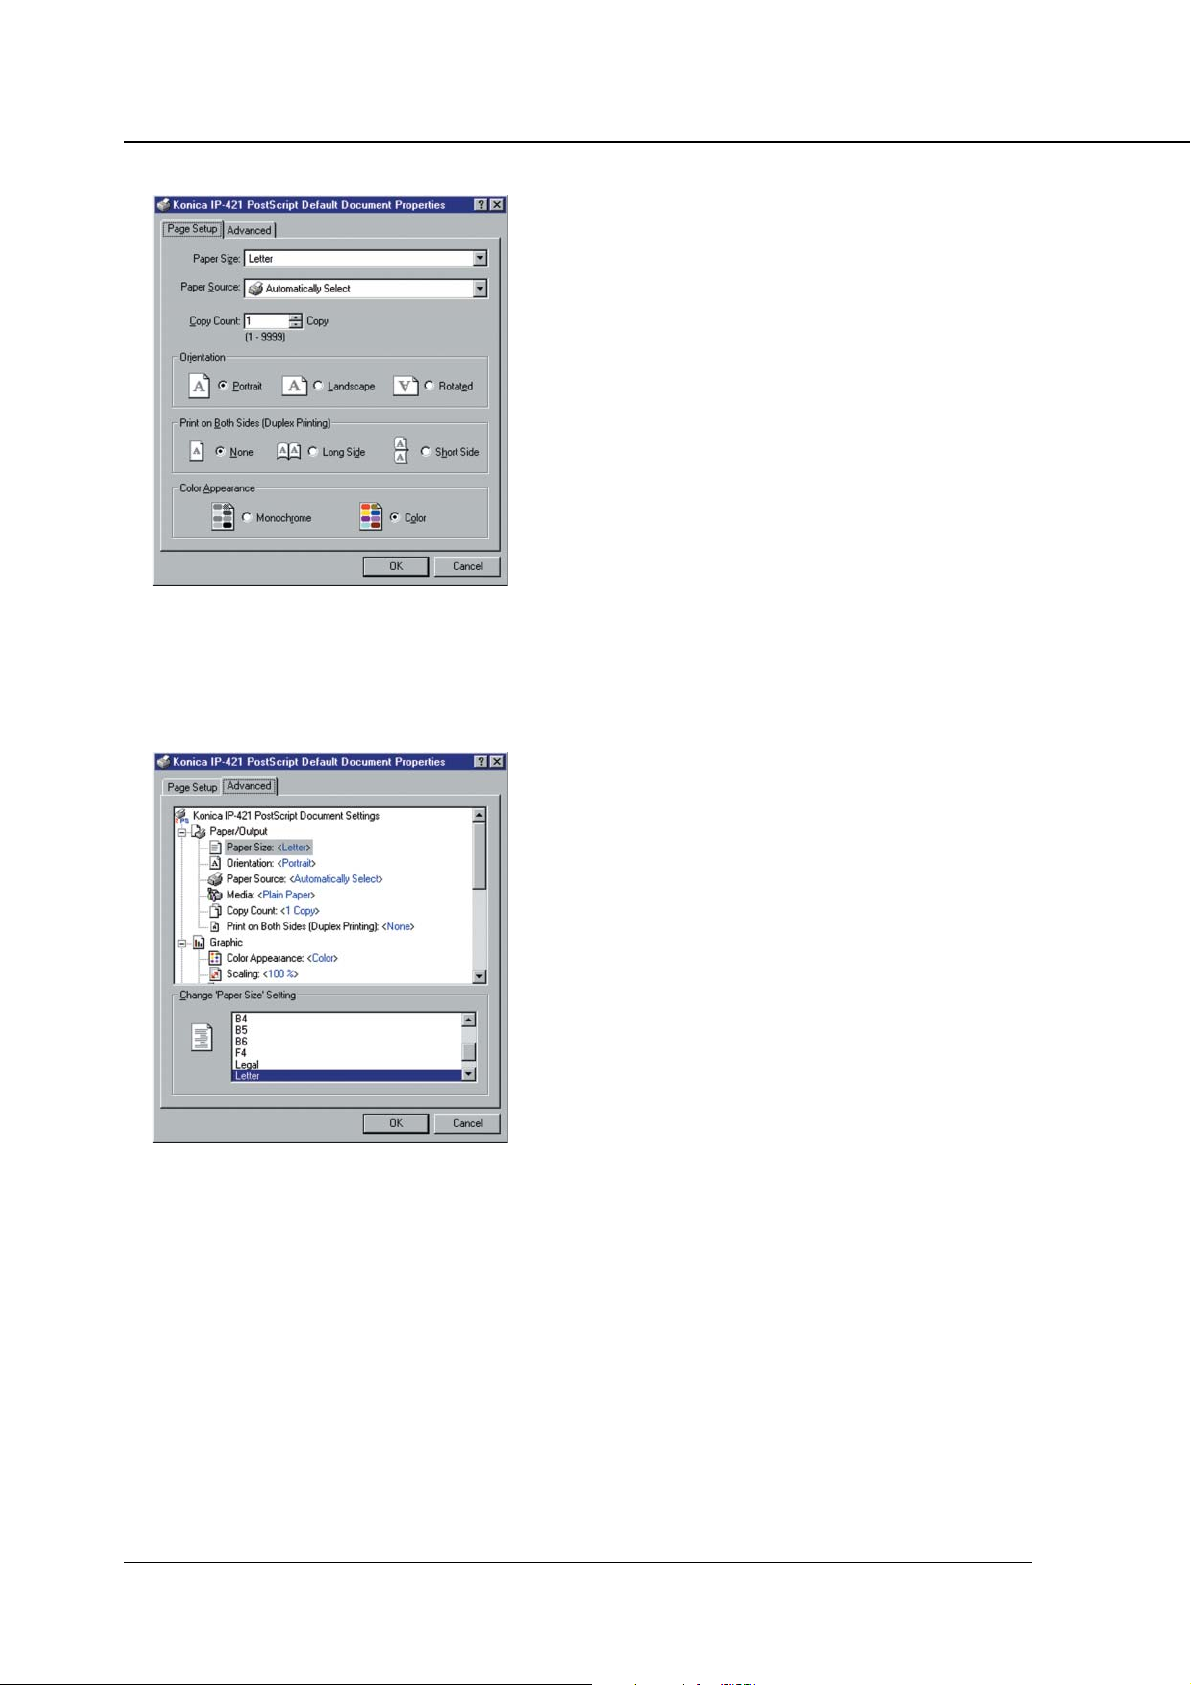
Chapiter 3 Printer Driver
[PageSetup] tab (Document Defaults)
Paper Size / Paper Source / Copy Count /
Orientation / Print on Both Sides (Duplex
Printing) / Color Appearance
[Advanced] tab (Document Defaults)
Paper Size / Orientation / Paper Source /
Media / Copy Count / Print on Both Sides /
Color Appearance / Scaling / TrueType Font /
Page Layout(N-up) Option / PostScript Output
Option / TrueType Font Download Option /
PostScript Language Level / Send PostScript
Error Handler / Mirrored Output / Negative
Output / Job Offset / Collate / Combination /
Stapling / Front Cover / Back Cover / Front/
Back Cover Tray / Output Bin
3-44 Print Controller PostScript Option
Page 74

● Windows 2000
Click [Start]-[Settings]-[Printers] so that the [Printers] window appears. Right-
click on the Printer icon in the resulting window.
When “(Printing Preferences)” is shown to the right of different tab names, it
indicates that you can click on [Printing Preferences] to see items on the
corresponding tabs.
The options [Properties] and [Printing Preferences], which are available in the
menu shown when you right-click on the printer icon, bring you to different
setting windows.
A menu will appear in which you can click on [Properties] or [Printing Prefer-
ences] to get access to the Properties window which looks like this:
To open the [Printers] window from [My Computer]
Open the [Printers] window by double-clicking the [Printers] folder in the
Chapter 3 Printer Driver
[My Computer]-[Control Panel] window.
[General] tab
Location / Comment / Printing Preferences /
Print Test Page
[Sharing] tab
Not shared / Shared as / Additional Drivers
Print Controller PostScript Option 3-45
Page 75
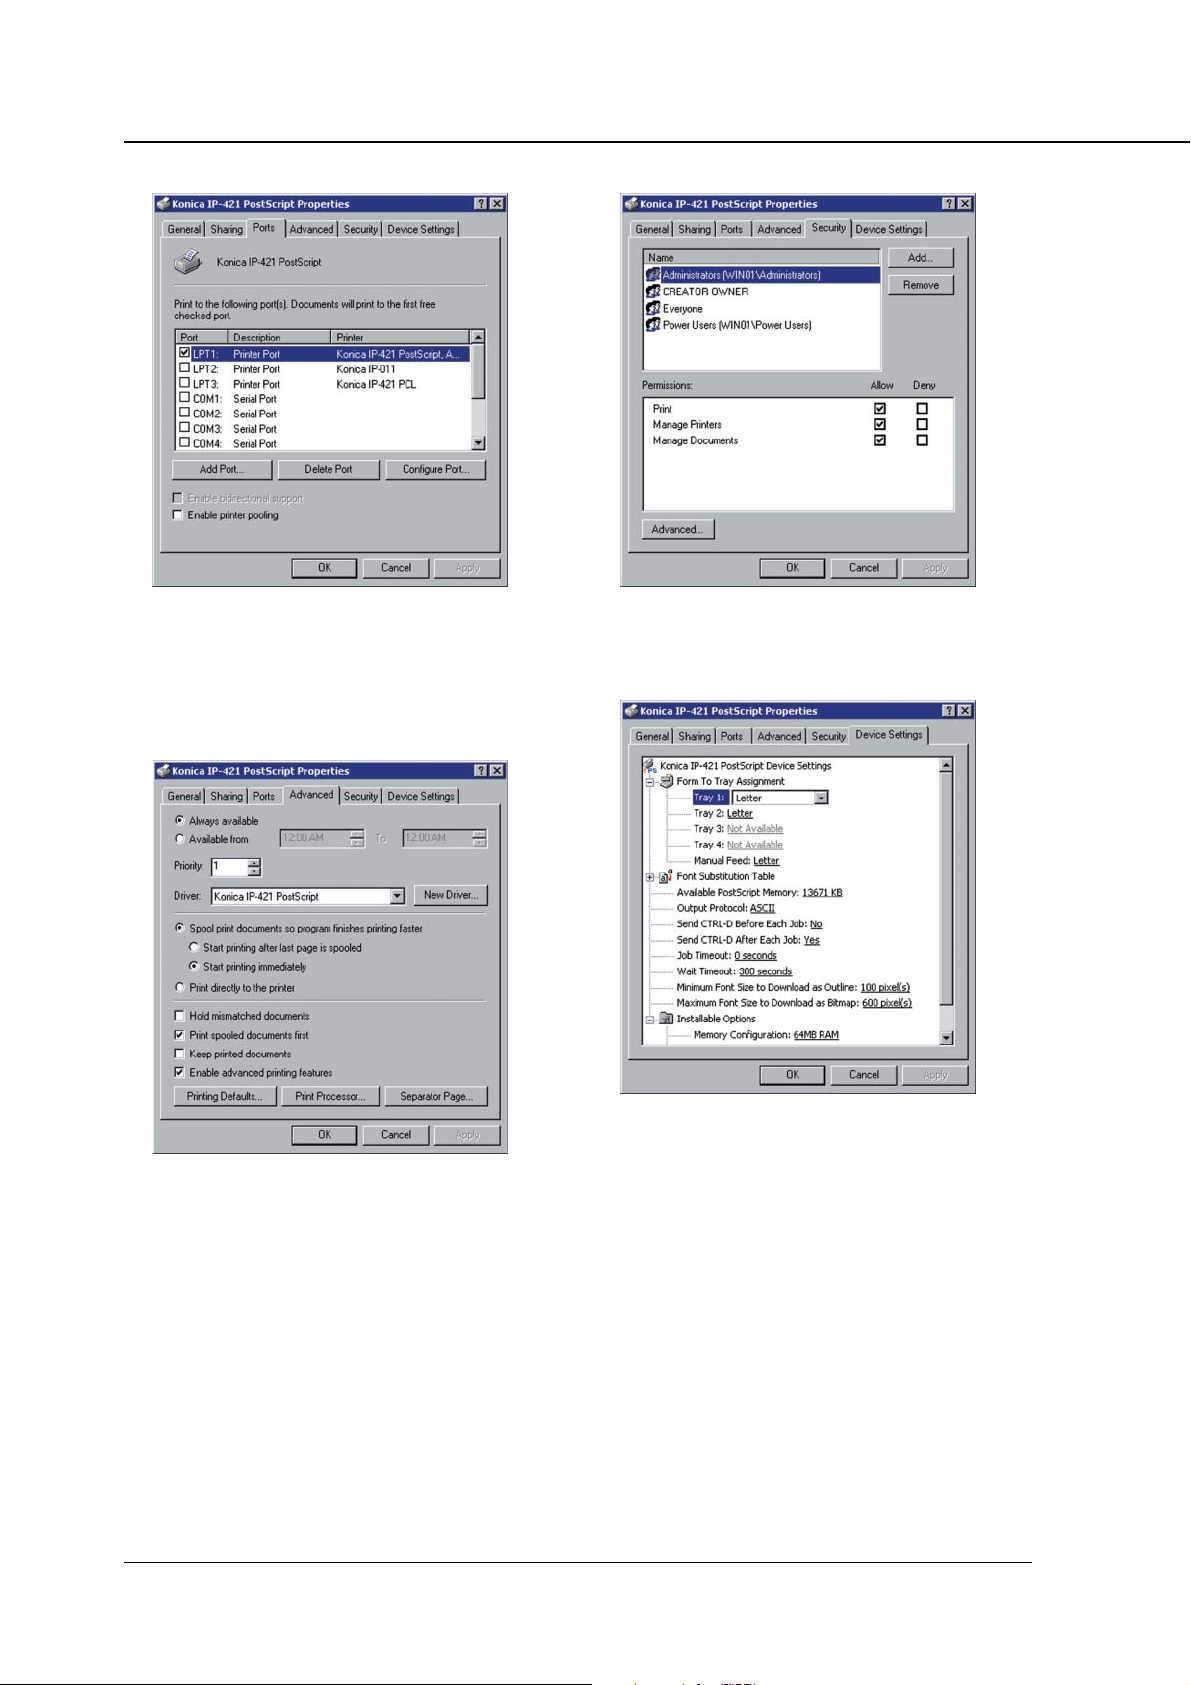
Chapiter 3 Printer Driver
[Ports] tab
Add Port / Delete Port / Configure Port /
Enable bidirectional support / Enable printer
pooling
[Advanced] tab
[Security] tab
Add / Remove / Permissions
[Device Settings] tab
Priority / Driver / New Driver / Spool print
documents so
Print directly to the printer / Hold mismatched
documents / Print spooled documents first /
Keep printed documents / Enable advanced
printing features / Print Processor / Separator
Page
3-46 Print Controller PostScript Option
program finishes printing faster
Form To Tray Assignment / Font Substitution
Ta ble / Available PostScript Memory / Output
Protocol / Send CTRL-D Before Each Job /
/
Send CTRL-D After Each Job / Job Timeout /
Wait Timeout / Minimum Font Size to Down-
load as Outline / Maximum Font Size to
Download as Bitmap / Memory Configuration /
Finisher / Drawer Base
Page 76
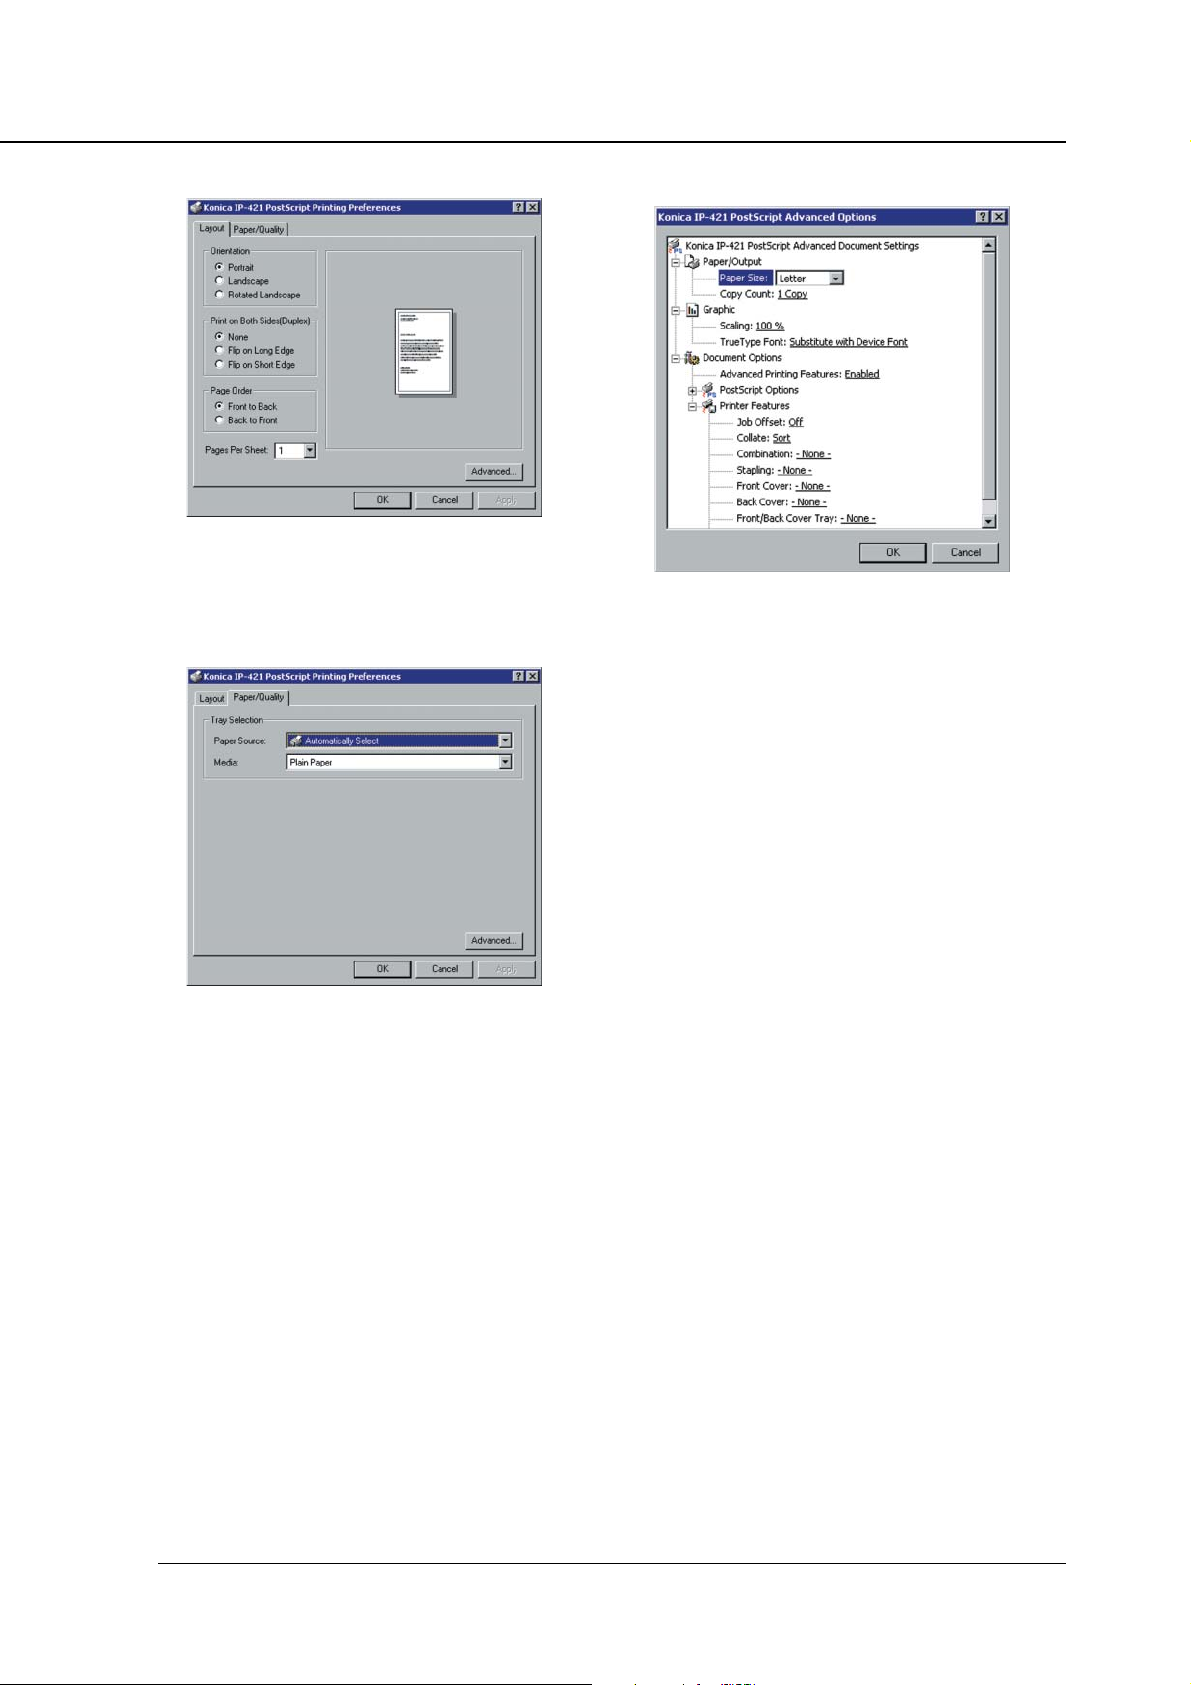
Chapter 3 Printer Driver
[Layout] tab (Printing Preferences)
Orientation /
Print on Both Sides / Page Order
Pages Per Sheet
[Paper/Quality] tab (Printing Preferences)
[Advanced Options] (Paper/Quality tab -
Advanced)
/
Paper Size / Copy Count / Scaling / TrueType
Font / Advanced Printing Features / PostScript
Output Option / TrueType Font Download
Option / PostScript Language Level / Send
PostScript Error Handler / Mirrored Output /
Negative Output / Job Offset / Collate / Com-
bination / Stapling / Front Cover / Back Cover /
Front/Back Cover Tray / Output Bin
Paper Source / Media
Print Controller PostScript Option 3-47
Page 77

Chapiter 3 Printer Driver
● Mac OS
Makes various setting required for printouts in the dialog box, accessible by click-
ing on [Print] in the [File] menu of separate applications.
Print Settings
Each application used is displayed in the print dialog box.
The following screen samples show the usual print dialog boxes.
Printer Specific Options (1)
Media Type
Printer Specific Options (2)
Error Settings
No special reporting / summarize on screen /
Print detailed report
PostScript Settings
Job Offset / Collate / Combination / Stapling /
Front Cover / Back Cover / Front/Back Cover
Tr ay / Output Bin
Layout
Pages per sheet / Layout direction / Border /
Print on Both Sides
3-48 Print Controller PostScript Option
Format / PostScript Level / Data Format / Font
Inclusion
Page 78

Chapter 3 Printer Driver
■ List of Functions Available in the Adobe PS Driver
The following table provides an overview of the primary features (setting items)
available through the printer driver of the printing system. To know where to make
specific settings, refer to “Contents of Settings Available in the Adobe PS Driver.”
The marks “o” and “-” preceding the individual Operating systems in the table
below indicate “usable” and “not usable”, respectively.
Refer to “Chapter 4 Control Panel Setup” (page 4-1) for instructions on how to
setup the printer from the Control Panel of the copier.
For details about the different function names, refer to “Description of Printer
Driver Functions” in Chapter 3 Printer Driver in “Print Controller INSTRUCTION
MANUAL”.
Printer Special Functions
smetIgnitteSeulaVteS noitpircseDetoN
:701-SFhtiW
tesffOboJ nO/ffO
etalloC puorG/troS
noitanibmoC telkooB/-enoN-
gnilpatS
revoCtnorF knalB/detnirP/-enoN-
revoCkcaB knalB/detnirP/-enoN-
kcaB/tnorF
yarTrevoC
nibtuptuO 4yarT/3yarT/2yarT/1yarT/-tluafeD-
elgniS/)tiartroP(elgniS/-enoN-
/)tiartroP(ediSelbuoD/)epacsdnaL(
poTelbuoD/)epacsdnaL(ediSelbuoD
)epacsdnaL(poTelbuoD/)tiartroP(
//2yarT/1yarT/deeFlaunaM/-enoN-
4yarT/3yarT
.gnitfihs
ehtotgnidrocca
.detceles
.dohtem
.yart
/59
89
,detcelessi]nO[nehW
ybffoteseraseipocdetalloc
]nO[nehW:701-SFtuohtiW
seipocdetalloc,detcelessi
.noitatorybffotesera
steselpitlumehtstnirP
dohtemgnipuorg/gnitros
uoy,detceles]telkooB[htiW
tahthcusstuotnirptegnac
nidedlofebylpmisnacyeht
.noihsaftelkoob,flah
ehtybtesdelpatsehtsekaM
.dohtemgninoitisopdetceles
fopotehtotteehsastresnI
tnorfasaseipocfoteshcae
.dohtemdetcelesehtybrevoc
mottobehtotteehsastresnI
asaseipocfoteshcaefo
detcelesehtybrevockcab
detcelesforepapehtsesU
revockcab/tnorfasayart
tuptuodetcelesehtotstnirP
OOOO
O- -O
OOOO
OOOO
OOOO
OOOO
OOOO
OOOO
niW
0.4TN
caM
0002
Print Controller PostScript Option 3-49
Page 79

Chapiter 3 Printer Driver
Paper / Output
smetIgnitteSeulaVteS noitpircseDetoN
/lageL/retteL/tnemetatS
eziSrepaP
noitatneirO
xelpuD
ecruosrepaP
epytrepaP
)aideM(
snigraM
seipoC
)tnuoCypoC(
redrOegaP
tuoyaL
egaptnirP
redrob
pu-61
-
K61/K8/4F/6B
/4yarT/3yarT
deeflaunaM
/repaPnialP
/)ycnerapsnarT(PHO
)tnirP(evaelretnI-PHO
thgiR/tfeL/mottoB
9999-1
/5B/4B/5A/4A/3A/diolbaT
detatoR/epacsdnaL/tiartroP
pilF/egdegnolnopilF/enoN
/enoN0.4TN(egdetrohsno
)ediStrohS/ediSgnoL
/2yarT/1yarT/yarTtceleSotuA
/)knalB(evaelretnI-PHO
/poT,)sretemilliM/sehcnI(stinU
tnorFotkcaB/kcaBottnorF
/pu-9/pu-6/pu-4/pu-2/pu-1
htiwelbaliavasi
.]epacsdnaL[
.dohtem
.yarttupni
.redro
/59
89
.ezisrepapastceleS O- --
detcelesehtotnostnirP
]detatoR[.noitceridrepap
xelpudehtsmrofreP
deificepshtiwgnitnirp
detcelesehtgnisustnirP
-PHOnehW
nidetcelessi)tnirP(evael
noitidnocehtrednustnirP
repapdetceleshcaefo
)deeFlaunaMhtiw(.epyt
s’resU.”launaM
tessnigramehthtiwstnirP
.tinudeificepsehtgnisu
forebmunehtstnirP
.deificepsseipoc
deificepsehtybstnirP
detcelesehtstnirP
.teehs1otno)s(egap
redrobegapehtstnirP
sixobkcehcehtnehw
pu-2revonidekcehc
.gnitnirp)tuoyaL(
noitpO
rofdesusiecruosrepapni
.deeflaunaMmorf
)pu-N(tuoyaLegaP:0.4TN
teehsrepegaP:0002niW
-OOO
--OO
OOOO
-retnI-PHO/)knalB(evaelretnI
deificepsyarteht,epytrepaP
defsiPHO.srepapgnivaelretni
O- -O
hcaefosgnittesepytrepaproF
stes,deeflaunaMtpecxeyart
roF.0207acinoKehtmorfpu
0207acinoK“ehtees,sliated
O- --
-OOO
--OO
OOOO
O- -O
niW
0.4TN
0002
caM
[From/To Tray Assignment] can be set on the [Device Settings] tab of
[Konica IP-421 PostScript Properties] on Windows NT 4.0/2000. Refer
to the “Copier INSTRUCTION MANUAL” for the available paper sizes
in each input tray.
3-50 Print Controller PostScript Option
Page 80

Graphics
Chapter 3 Printer Driver
smetIgnitteSeulaVteS noitpircseDetoN
noituloseR
gnilacS
asatnirP
gamievitagen
asatnirP
egamirorrim
skramretaW
ipd006
-
-
TFARD/
Installable options
smetIgnitteSeulaVteS noitpircseDetoN
rehsiniF
esaBrewarD
yromeM
noitarugifnoC
/59
89
noituloserdeificepshtiwstnirP O- --
)004-52(89/59swodniW
)0001-1(0002/0.4TNswodniW
YPOC/LAITNEDIFNOC/enoN
/)syarT2(701-SF/rehsiniFoN
/)syarT4(701-SF/)syarT3(701-SF
)syarT2(101-TI
/012/902-BD/enoN
014/904-BD
/MARBM69/MARBM46
MARBM061
.eulavdeificeps
.detnirpeb
egamitnemucodehtstnirP
ehtotdegralnerodecuder
etihwdnakcalbhtiwstnirP
.noitcelesrednuesrever
thgirdnatfelhtiwstnirP
.noitcelesrednuesrever
ehtnidetceleskramretawehT
lliwtsil]kramretawatceleS[
ehtezingocerretnirpsteL
.rehsinifdetceles
otdesusinoitcnufsihT
ecivedlanoitpoehtyficeps
.reipocehtnodellatsni
ehtezingocerretnirpsteL
elbaliavasaeulavdetceles
.yromemretnirp
OOOO
:0002niW/0.4TN
OOO-
tuptuOevitageN
:0002niW/0.4TN
OOO-
tuptuOderorriM
O- -O
/59
89
OOOO
OOOO
OOOO
niW
0.4TN
niW
0.4TN
caM
0002
caM
0002
Print Controller PostScript Option 3-51
Page 81

Chapter 4 Control Panel Setup
■ Contents of this Chapter ............................ 4-2
■ Configuration of the
Printer Setting Menu................................... 4-3
■ Functions of the Printer Settings .............. 4-4
● Test Print Menu .................................................... 4-4
Print Controller PostScript Option 4-1
Page 82

Chapter 4 Control Panel Setup
■ Contents of this Chapter
This chapter describes how to use the part of the setup menu on the Control
Panel of the copier necessary for operating the PostScript 3 Option. For all other
Control Panel features and accessible screens, refer to the “Copier INSTRUC-
TION MANUAL.”
Refer to “Chapter 3: Printer Driver” (p. 3-1) for instructions pertaining to printing
from applications and other functions of the printer driver.
4-2 Print Controller PostScript Option
Page 83
■ Configuration of the Printer Setting Menu
The blocks delineated by dotted lines indicate PostScript Option specific features.
For all others, refer to the “Print Controller INSTRUCTION MANUAL.”
1 Test Print Menu
1 PCL Demo Page
2 PCL Font List
3 PS Demo Page
4 PS Font List
5 Config. Data
Chapter 4 Control Panel Setup
2 Controller Set
1 Banner page
2 Spool
3 Job Time Out
3 Set Default
1 Default Paper
2 Duplex
3 Orientation
1 On
2 Off
1 On
2 Off
15 5309240
210 660 10 300
315 7120
420 8180
1 A3R
2 A4R
3A4
4 A5R
5 B4R
6 B5R
1 Off
2 Long Edge
3 Short Edge
1 Portrait
2 Landscape
7 B5
8 F4R
9 11 x 17R
10 8.5 x 14R
11 8.5 x 11R
12 8.5 x 11
13 5.5 x 8.5R
14 8KR
15 16KR
16 16K
4 PCL Setup
1 Courier Style
2 CR/LF Mapping
3 Input Tray
5 Format HD
1 Dark
2 Light
1 CR/LF
2 CR
1 Auto Tra y
2 Tray 1
3 Tray 2
4 Tray 3
5 Tray 4
6 Bypass Tray
Print Controller PostScript Option 4-3
Page 84

Chapter 4 Control Panel Setup
■ Functions of the Printer Settings
● Test Print Menu
Select [1. Test Print Menu] on the Printer Menu screen to display the Setup
screen.
Items on the LCD screen are as follows:
[1. PCL Demo Page]
To immediately print the PCL Demo Page that is built into the printer.
[2. PCL Font List]
To immediately print the Installed PCL Font List.
[3. PS Demo Page]
To immediately print the PS Demo Page that is built into the printer.
[4. PS Font List]
To immediately print the Installed PS Font List.
[5. Config. Data]
To immediately print the Config. Data.
Items of the Config. Data are as follows:
• Version information (System software version)
• Current settings (Resolution / Print Quality / Copy mode timeout / Default
Paper Size / Language)
• Installed Paper (Tray1 / Tray2 / Tray3 / Tray4 / Bypass Tray)
• Device status (Total RAM installed / Hard disk free space)
• Miscellaneous
4-4 Print Controller PostScript Option
Page 85

Appendix A Troubleshooting
■ Basic Troubleshooting ............. Appendix A-2
■ General Problems on the PS ... Appendix A-2
● Cannot get the correct outputs
using the Konica PS Driver............... Appendix A-2
● A PostScript Error message
displays .............................................. Appendix A-2
● PostScript Error messages
such as “VMerror” and “limitcheck”
display ................................................ Appendix A-2
● A PostScript Error message displays
when attempting to get a printout
from a specific computer .................. Appendix A-2
● A PostScript Error message displays
when attempting to get a printout
from a specific application ............... Appendix A-2
● A PostScript Error message displays
when attempting to get a printout
from a specific file .............................Appendix A-2
● A PostScript Error message displays
when attempting to get a printout
of a specific page............................... Appendix A-2
● Fonts cannot be downloaded ...........Appendix A-3
Print Controller PostScript Option Appendix A-1
Page 86

Appendix A Troubleshooting
■ Basic Troubleshooting
For basic troubleshooting, see “Appendix A: Troubleshooting” in the Print
Controller INSTRUCTION MANUAL.
■ General Problems on the PS
● Cannot get the correct outputs using the Konica PS Driver.
Tr y using the Adobe PS Driver.
● A PostScript Error message displays.
For error content, visit Adobe’s home page at http://www.adobe.com.
● PostScript Error messages such as “VMerror” and “limitcheck”
display.
The printer (copier) may be short on memory capacity. Consider upgrading the
memory.
● A PostScript Error message displays when attempting to get a
printout from a specific computer.
There may be loose connections in the printing system. Recheck all of the con-
nections involved.
● A PostScript Error message displays when attempting to get a
printout from a specific application.
Error conditions may exist in the application. Try to print out a simple test file. If
this does not succeed, reinstall the application in question.
● A PostScript Error message displays when attempting to get a
printout from a specific file.
It is possible that the print setting for the file is wrong, that graphics contained in
the file are damaged, or that bad elements are contained in the file.
Find a print setting that does not cause any PostScript Error message to appear,
and try to get a printout. If this fails, save the file under a different name.
● A PostScript Error message displays when attempting to get a
printout of a specific page.
It is possible that elements or fonts used in the page are damaged, or more
memory is required.
Tr y to print with different elements or fonts cut off or selected in sequence. If this
causes no problems, consider upgrading the memory.
Appendix A-2 Print Controller PostScript Option
Page 87

Appendix A Troubleshooting
● Fonts cannot be downloaded.
It is possible that [Spool] is set to [On] in Printer Setting Menu on the copier’s
control panel.
Set [Spool] to [Off], switch off the copier’s main power, wait 10 seconds or more,
switch it back on, and then try downloading fonts again.
For details on how to download fonts, refer to the INSTRUCTION MANUAL that
comes with the fonts.
Print Controller PostScript Option Appendix A-3
Page 88

A
ppendix B Product Specifications
■ Product Specifications ............. Appendix B-2
Print Controller PostScript Option Appendix B-1
Page 89

Appendix B Product Specifications
■ Product Specifications
Model: Konica IP-421 built-in type
Paper size: Select from the following paper sizes.
Paper type / Capacity: Same as copier
Paper size to be selected
A3
A4
A5
B4
B5
F4
11 x 17
8.5 x14
8.5 x 11
5.5 x 8.5
8K
16K
Paper Feeding and Amount
of Feeding Paper: Same as the copier
Load Output Paper: Same as copier
Mode: Dual operation of available.
(5 jobs can be processed at the maximum.)
Special Printing: Job Offset, Stapling, Combination, Front / Back
Cover Insertion, Duplex, Watermarks, etc.
Orientation: Portrait and Landscape.
Resolution: 600 dpi
Gradation: 1 bit
No. of Prints: 1 to 999 (Windows NT4.0/2000 1 to 9999)
Printable Area: Top Margin: 4.6 mm, Bottom Margin: 4.6 mm and
Right and Left Margins: 4.6 mm
Warm-up: Same as copier
Appendix B-2 Print Controller PostScript Option
Page 90

Basic Configuration
Control Board
CPU: Pentium MMX-166 MHz
Program Memory: FLASH ROM (Compact Flash)
System Memory: 64 MB SD-RAM (Standard),
Interface: Parallel port
Hard disk: HD-103
Network Interface (Option):
KN303: Ethernet (100Base-TX / 10Base-T)
Protocol: IPX/SPX (NetWare)
Appendix B Product Specifications
Expandable up to 160 MB
(Option: MU-403/MU-404/MU-405)
Centronics (IEEE 1284) / amphenol 36 pin
male connector
TCP/IP (LPD/LPR, Peer to Peer)
AppleTalk(EtherTalk)
Compliant OS: Windows 95/98
Windows NT4.0/2000
Mac OS 7.1 higher
Printer Language: PostScript 3
Printer Driver: Printer Driver for Windows 95/98/NT4.0/2000
Printer Driver for Mac OS
Compliant Host Computer: A Windows-based computer
Macintosh
Compliant Finisher: FS-107 and IT-101
Compliant DB: DB-209/210 and DB-409/410
Notice: Specifications are subject to change without notice.
Print Controller PostScript Option Appendix B-3
Page 91

Appendix C Font List
■ Internal Font List....................... Appendix C-2
■ PS Demo Page .......................... Appendix C-6
Print Controller PostScript Option Appendix C-1
Page 92

Appendix C Font LIst
■ Internal Font List
Appendix C-2 Print Controller PostScript Option
Page 93

Appendix C Font List
Print Controller PostScript Option Appendix C-3
Page 94
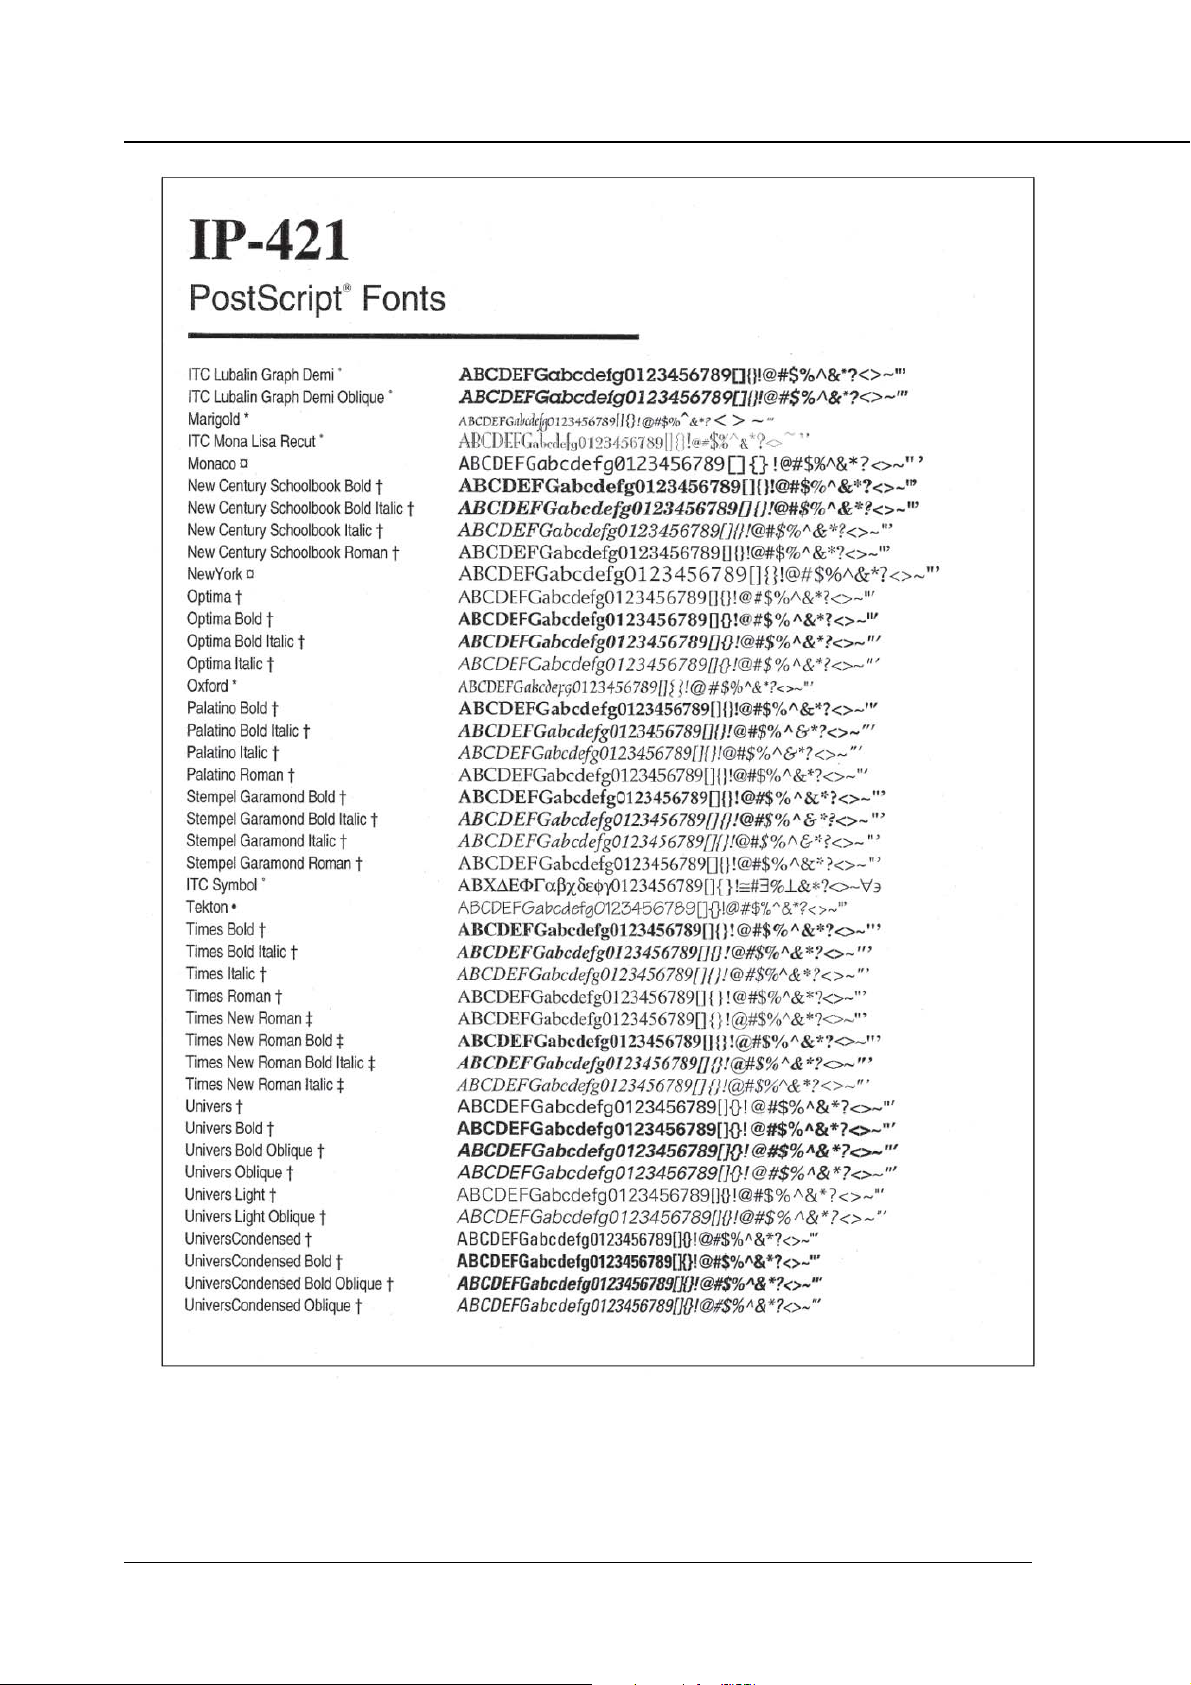
Appendix C Font LIst
Appendix C-4 Print Controller PostScript Option
Page 95

Appendix C Font List
Print Controller PostScript Option Appendix C-5
Page 96
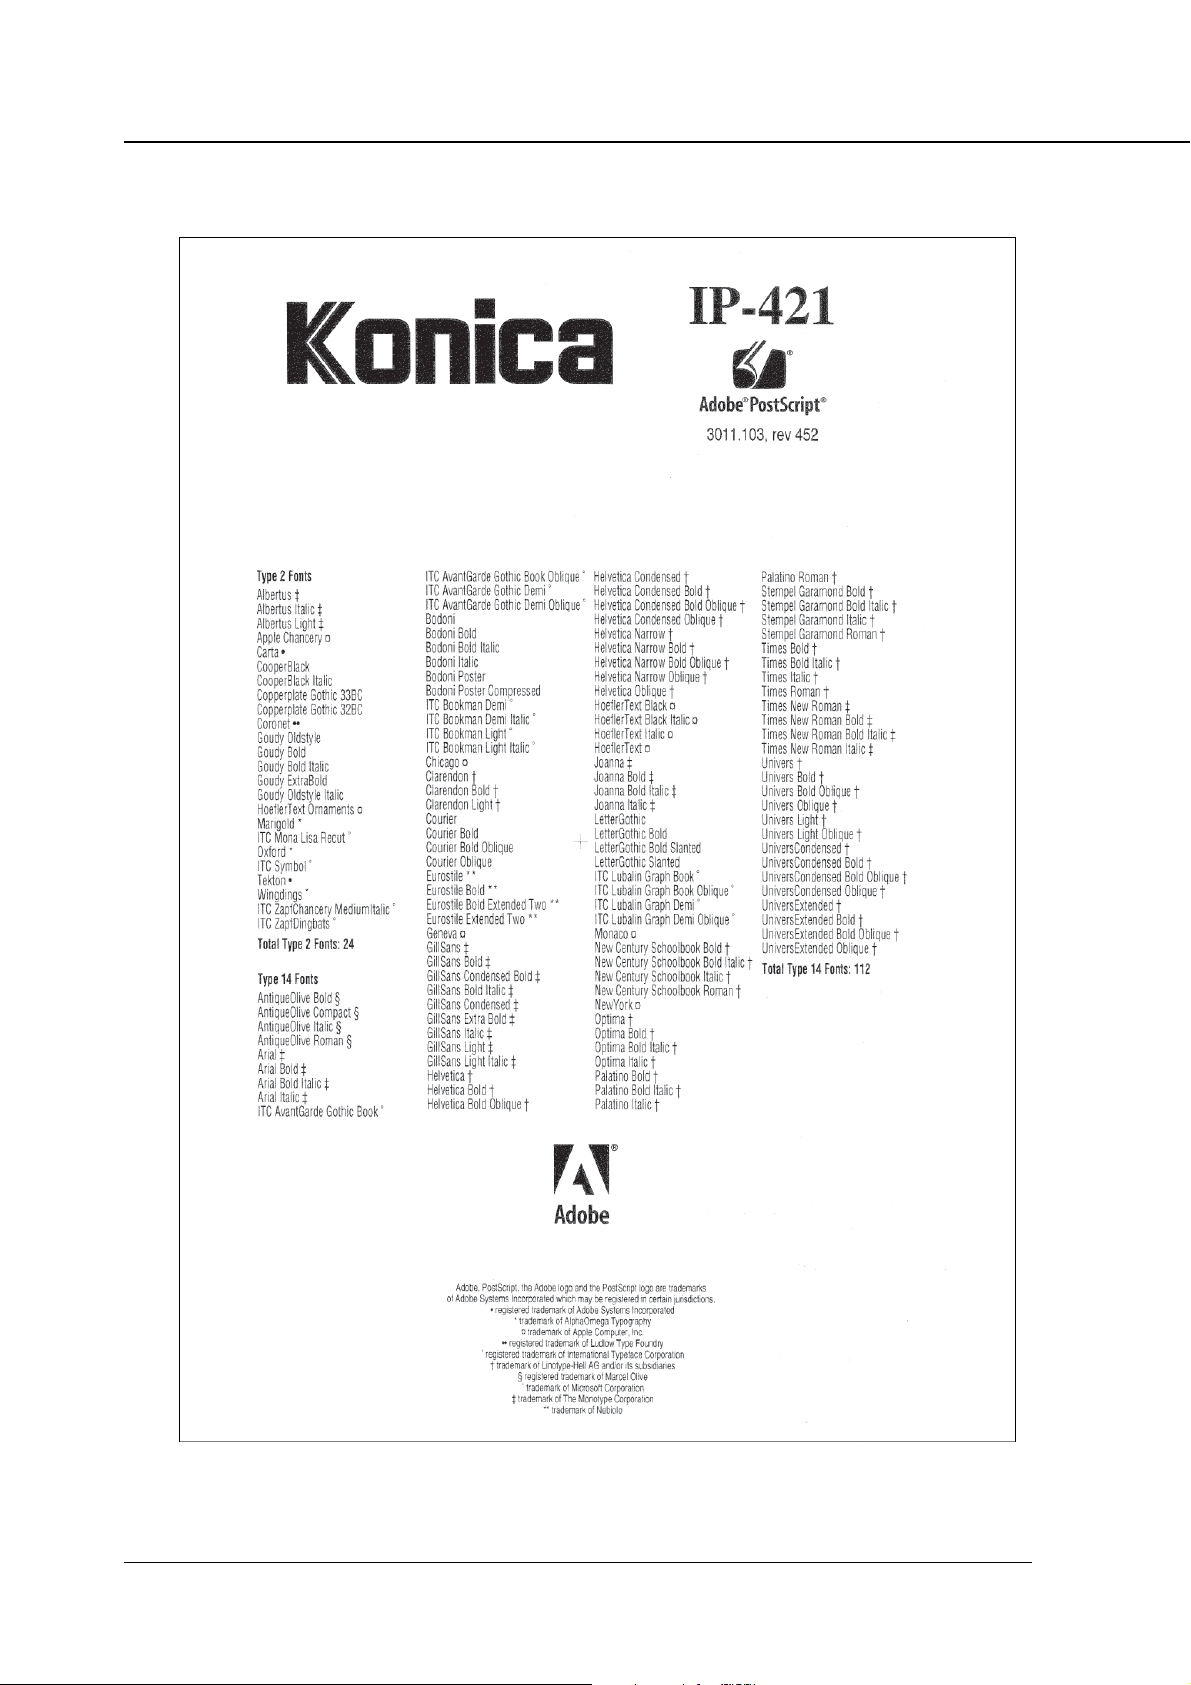
Appendix C Font LIst
■ PS Demo Page
Appendix C-6 Print Controller PostScript Option
Page 97

INDEX
INDEX
A
Adobe PS Driver ................................... 2-7, 3-39
B
Before Installation .......................................... 2-3
Built-in Fonts .................................................... vii
C
Compliant OS ................................................. 3-3
Config. Data ................................................... 4-4
[Covers] tab .................................................. 3-18
D
[Device Options] tab ..................................... 3-34
F
Font List ......................................... Appendix C-2
[Fonts] tab .................................................... 3-21
[PostScript] tab ............................................. 3-32
Printer Setting Menu ...................................... 4-3
Printer Special Functions ............................. 3-49
PS Demo Page ...................... 4-4, Appendix C-6
PS Font List.................................................... 4-4
S
Screen Fonts ................................................ 2-13
[Setup] tab ...................................................... 3-6
Specifications ................................. Appendix B-2
System Memory ................................................ ix
System Requirements ....................................... ix
T
Test Print Menu .............................................. 4-4
Troubleshooting .............................. Appendix A-2
W
[Watermarks] tab .......................................... 3-37
G
Graphics ....................................................... 3-51
[Graphics] tab ............................................... 3-20
H
Hardware Configuration ................................. 1-3
HD-103 .............................................................. ix
I
Installable options ........................................ 3-51
Installing to Macintosh.................................. 2-11
Installing to Windows.............................. 2-3, 2-7
K
Konica PS Driver ..................................... 2-3, 3-5
M
Mac OS ........................................................ 3-48
Memory .......................................................... 1-3
O
[Overlay] tab ................................................. 3-35
P
Page Description Language ........................... 1-4
Paper / Output .............................................. 3-50
PCL Demo Page ............................................ 4-4
PCL Font List ................................................. 4-4
Index-1
Page 98

MANUFACTURER
●
KONICA CORPORATION
●
TOKYO JAPAN
2001. 8
PS341_INT_v300
 Loading...