

Page 1

User Manual
Pi4700e
www.minoltaeurope.com
The essentials of imaging
Page 2

Page 3

00e
Table of Contents
Welcome ........................................................................................ X-5
Trademark Acknowledgements ..................................................... X-5
Limited Software Warranty ............................................................ X-6
Minolta Network Card Warranty .................................................... X-6
For the U.S.A. Users ...................................................................... X-7
For Canada Users.......................................................................... X-8
For European Users....................................................................... X-8
For Users of the Class B regulation’s countries ............................ X-8
For Users except the Class B regulation’s countries..................... X-8
1 Before Using the Printer Driver
1.1 Features of the Controller........................................................... 1-1
Various Printing Functions ..............................................................1-2
Administrative Functions ................................................................1-6
1.2 Connecting the Controller........................................................... 1-7
1.3 Settings Made on the Machine................................................... 1-7
Priority Device.................................................................................1-7
On Line / Ready ..............................................................................1-7
1.4 Installing the Printer Drivers ....................................................... 1-8
1.5 Contents of the CD ...................................................................... 1-9
2 Installing the Printer Driver
2.1 Windows 95/98/Me ...................................................................... 2-2
Operating Environment ...................................................................2-2
Installing (Windows 95/98/Me)........................................................2-2
Making General Settings Before Using the Printer.........................2-4
2.2 Windows 2000/XP ........................................................................ 2-5
Operating Environment ...................................................................2-5
Installing (Windows 2000/XP) .........................................................2-5
Making General Settings Before Using the Printer.........................2-7
2.3 Windows NT4.0............................................................................. 2-8
Operating Environment ...................................................................2-8
Installation (Windows NT 4.0) .........................................................2-8
Making General Settings Before Using the Printer.......................2-10
2.4 Macintosh ................................................................................... 2-11
Operating environment .................................................................2-11
Installation (Macintosh OS 7/8/9)..................................................2-12
Pi47
Page 4

00e
Installation (Mac OS X) ................................................................. 2-14
3Network Settings
3.1 Introduction...................................................................................3-1
3.2 Specifying the IP Address From the Printer’s Touch Panel ..... 3-2
Setting procedure...........................................................................3-2
3.3 Peer-to-Peer Printing with TCP/IP..............................................3-5
3.4 Peer-to-Peer Printing with IPX/SPX ...........................................3-6
3.5 LPR Printing..................................................................................3-7
3.6 IPP Printing ................................................................................... 3-8
3.7 Specifying network settings from PageScope Light.................3-9
Access............................................................................................3-9
Operation........................................................................................3-9
Logging In to the Admin Mode..................................................... 3-10
Network Tab................................................................................. 3-11
4 Properties Settings
4.1 Description of each tab (Windows).............................................4-1
4.2 Print options (Macintosh OS 7/8/9).............................................4-3
4.3 Print options (Mac OS X).............................................................. 4-5
5 Network Interface Card
5.1 Getting ready ................................................................................ 5-1
Utility software (on the CD-ROM)................................................... 5-1
System requirements .....................................................................5-2
5.2 Setting up the network card........................................................ 5-3
Connecting a network cable ..........................................................5-3
Configuring the network card.........................................................5-3
6 Scanner Mode
6.1 Outline ...........................................................................................6-1
E-Mail (Scan to E-mail)...................................................................6-2
Folder (Scan to Server)...................................................................6-3
URL................................................................................................. 6-4
Necessary Settings ........................................................................ 6-5
Necessary Devices (servers) ..........................................................6-5
7 PageScope Light
Pi47
Page 5

00e
7.1 System requirements................................................................... 7-1
7.2 Access........................................................................................... 7-2
Operation ........................................................................................7-2
Entering the password ....................................................................7-2
7.3 Screen configuration ................................................................... 7-3
8 Troubleshooting
8.1 Unable to Print ............................................................................. 8-1
Unable to Make Correct Settings / Unable to Print Exactly as Set 8-3
Pi47
Page 6

00e
Pi47
Page 7

00
X-5
Welcome
Congratulations on your selection of Minolta Pi4700e printer controller
and Network Interface Card for Pi4700e.
This User Manual explains how to install the printer driver and gives you
a short view over the most functions of the Pi4700e. For further details
please refer to the online Advanced User Manual, which comes along as
pdf-data on the CD. First read this manual carefully and thoroughly; then,
keep it close at hand so you can refer to it whenever it becomes
necessary.
Some of the screens shown in this manual may look different from what
you will view in actual applications.
Trademark Acknowledgements
Minolta is a registered trademark of MINOLTA CO., LTD. Page Scope is
a trademark of MINOLTA CO., LTD.
Apple, AppleTalk, and Macintosh are registered trademarks of Apple
Computer, Inc.
Ethernet is a registered trademark of Xerox Corporation.
PCL, HP LaserJet III, HP LaserJet IIISi, HP LaserJet 4Si, are registered
trademarks of Hewlett-Packard Company. HP UNIX is a trademark of
Hewlett-Packard Company.
Microsoft, Windows, and Windows NT are registered trademarks of
Microsoft Corporation.
Netscape Communications, the Netscape Communications logo,
Netscape Navigator, Netscape Communicator, and Netscape are
trademarks of Netscape Communications Corporation.
Novell and NetWare are registered trademarks of Novell, Inc.
PostScript is a registered trademark of Adobe Systems, Inc.
Sun and Solaris are trademarks of Sun Microsystems, Inc.
All other product names are trademarks or registered trademarks of their
respective holders.
Copyright 2003 MINOLTA CO., LTD
The information contained in this manual is subject to change without
notice.
Pi47
Page 8

X-6
00
Limited Software Warranty
l Limited Warranty
Minolta warrants that the software will perform in accordance with the
accompanying written materials for a period of (90) ninety days from the
date of purchase. Minolta does not warrant that the operation of the
program will meet your requirements. This limited warranty gives you
specific legal rights. You may have others, which vary from state/
jurisdiction to state/jurisdiction.
l Purchase Remedies
Minolta’s entire liability and your exclusive remedy with respect to the
software shall be at Minolta’s option either, repair or replacement of the
software. The software must be returned to Minolta with a copy of your
proof of purchase. The Limited Warranty is void if failure of the software
has resulted from accident, abuse, or misapplication. Any replacement
software will be warranted for the remainder of the original warranty
period or (30) thirty days, whichever is longer.
The remedies provided herein are customer’s sole and exclusive
remedies. In no event shall Minolta Corporation be liable for any lost
profits, direct, indirect, special, incidental, or consequential damages,
whether based on contract, tort, or any other legal theory.
Minolta Network Card Warranty
l Warranty Term
MinoltaNetwork Cardshave a(1) OneYear Warranty.The NetworkCard
must be returned to Minoltafor repair or replacement at Minolta’s discretion.
l Warranty Coverage
Minolta Corporation warrants thisproduct to befree from defectsin workmanship and materials for a periodof one yearfrom thedate of receiptof
the unit.If theunit fails to functionas writtenin theUser’s manual,Minolta
will repair or replace the unit atno charge.Minolta will ship at their expense an exchangeunit overnight to replacethe defective unit.
The remediesprovided hereinare thecustomer’s soleand exclusiveremedies. In no event shall Minolta Corporation be liable for any lost profits,
direct or indirect, special, incidental,or consequential damages,whether
based on contract, tort, or other legal history.
Pi47
Page 9
00
X
For the U.S.A. Users
FCC Part 15-Radio Frequency Devices
This device complies with Part 15 of the FCC Rules. Operation is subject
to the following two conditions: (1) This device may not cause harmful
interference, and (2) this device must accept any interference received,
including interference that may cause undesired operation.
NOTE
è This equipment has been tested and found to comply with the limits
for a Class A digital device, pursuant to Part 15 of the FCC Rules.
These limits are designed to provide reasonable protection against
harmful interference when the equipment is operated in a commercial
environment. This equipment generates, uses, and radiate radio
frequency energy and if not installed and used in accordance with the
instruction manual, may cause harmful interference to radio
communications.
è Operation of this equipment in a residential area is likely to cause
harmful interference in which case the user will be required to correct
the interference at his own expense.
WARNING
è The design and production of this unit conform to FCC Regulations,
and any changes or modifications must be registered with the FCC
and are subject to FCC control. Any changes made by purchaser or
user without first contacting the manufacturer will be subject to
penalty under FCC regulations.
FCC-F02
This device must be used with shielded interface cables. The use of nonshielded cables is likely to result in interference with radio
communications and is prohibited under FCC rules.
Pi47
-7
Page 10

X-8
00
For Canada Users
Interference-Causing Equipment Standard (ICES-003 Issue 3)
This Class A digital apparatus complied with Canadian ICES-003
Cet appareil numérique de la classe A est conforme à la norme NMB-003
du Canada. IC-F03
For European Users
CE Marking (Declaration of Conformity)
This product complies with the following EU directives:
89/336/EEC, 73/23/EEC and 93/68/EEC directives.
This declaration is valid for the area of the European Union.
This device must be used with shielded interface cables. The use of nonshielded cables is likely to result in interference with radio
communications and is prohibited under EU directives.
For Users of the Class B regulation’s countries
This device must be used with shielded interface cables. The use of nonshielded cables is likely to result in interference with radio
communications and is prohibited under CISPR 22 rules and local rules.
For Users except the Class B regulation’s countries
WARNING
è This is a Class A product. In a domestic environment this product may
cause radio interference in which case the user may be required to
take adequate measures.
è This device must be used with shielded interface cables. The use of
non-shielded cables is likely to result in interference with radio
communications and is prohibited under CISPR 22 rules and local
rules.
Pi47
Page 11

Before Using the Printer Driver
00e
1 Before Using the Printer Driver
1.1 Features of the Controller
The controller is an image controller designed to use the machine as a
printer, allowing you to print documents directly to the machine from a
computer to which the controller is connected. The printer driver, which
is used during printing, is equipped with various functions that make the
most out of the features of the machine. They enable you to use the same
functions as those offered by the machine. When actually running a print
cycle, you can specify various functions of the machine on your computer
screen.
NOTE
è When using the controller, be sure to set the machine to the On Line
state.
è Some functions offered by the machine cannot be combined, such as
Staple and Hole-Punch, and some others may not be used because
of a paper size involved. The functions that cannot be selected
appear dimmed.
è Further, if functions that are incompatible with each other are
specified, the Conflicts dialog box will appear, prompting you to
change the settings. When this dialog box appears, check the details
and reselect the functions to ensure function compatibility.
è Some settings, which are defied by the machine for the restricted
combinations of different functions, can at times be accepted by the
printer driver. If a print command is issued from the personal
computer with such settings made, the machine does not produce
the output correctly or abandons the job to produce nothing. Make
sure that you make correct settings.
1
Pi47
1-1
Page 12
1
00e
Before Using the Printer Driver
Various Printing Functions
l Makes prints that are sorted into complete sets of the originals or
grouped into uncollated groups, each containing prints of one
original.
l Prints two pages of originals on both front and back sides of a single
sheet of paper.
Long Edge Binding
l Enlarges or reduces the image on the original.
1-2 Pi47
Short Edge Binding
Page 13
Before Using the Printer Driver
00e
3
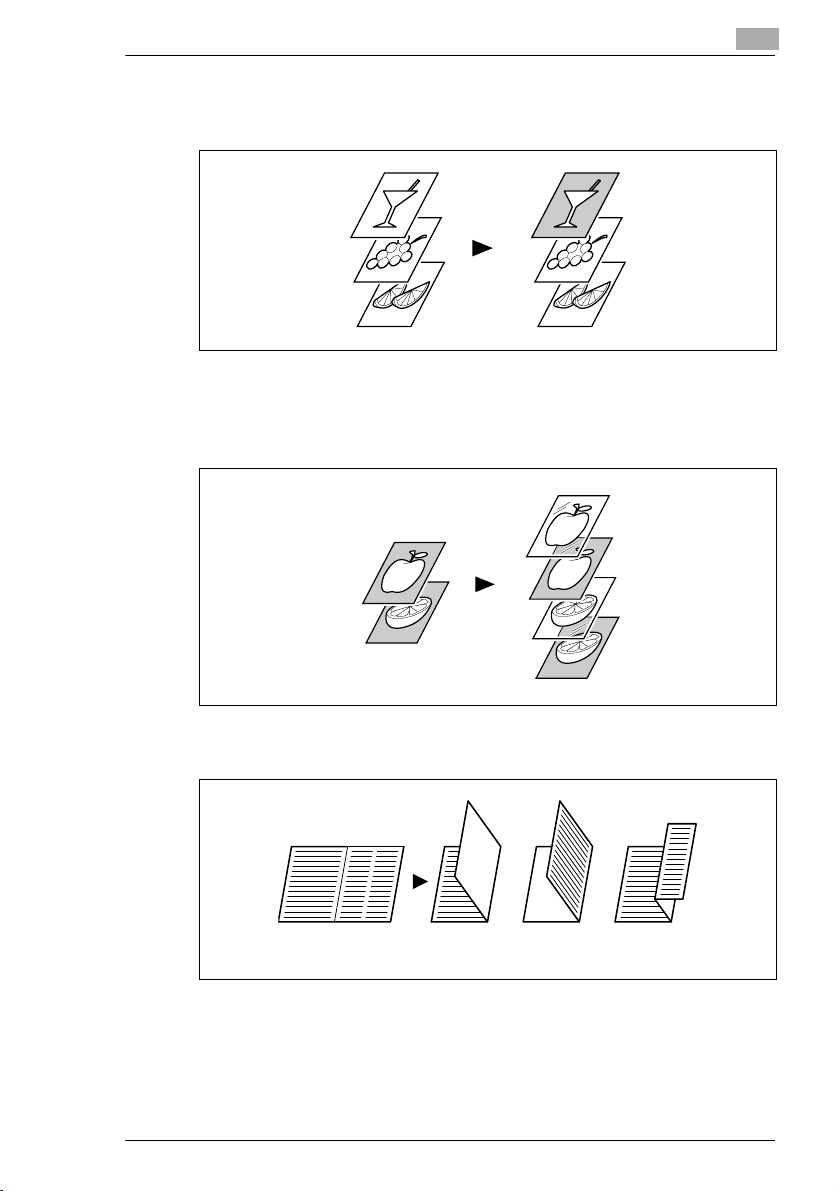
l Prints two pages or four pages of originals on a single sheet of paper.
Maximum of 16 pages of originals can be printed on a single sheet of
paper.
1
2up
l Prints four pages of originals to both front and back sides of a single
sheet of paper.
l Places text in the background.
4up
Pi47
1-
Page 14
1
00e
Before Using the Printer Driver
l Makes prints of complete sets of the originals, stapled together or
punched for filing.
By combining Collate with other finishing capabilities, you can make
complete sets of documents for immediate delivery without having to
do any further processing.
l Adds a reference number (Distribution Number) to each document set
during printing.
1-4 Pi47
Page 15
Before Using the Printer Driver
00e
5
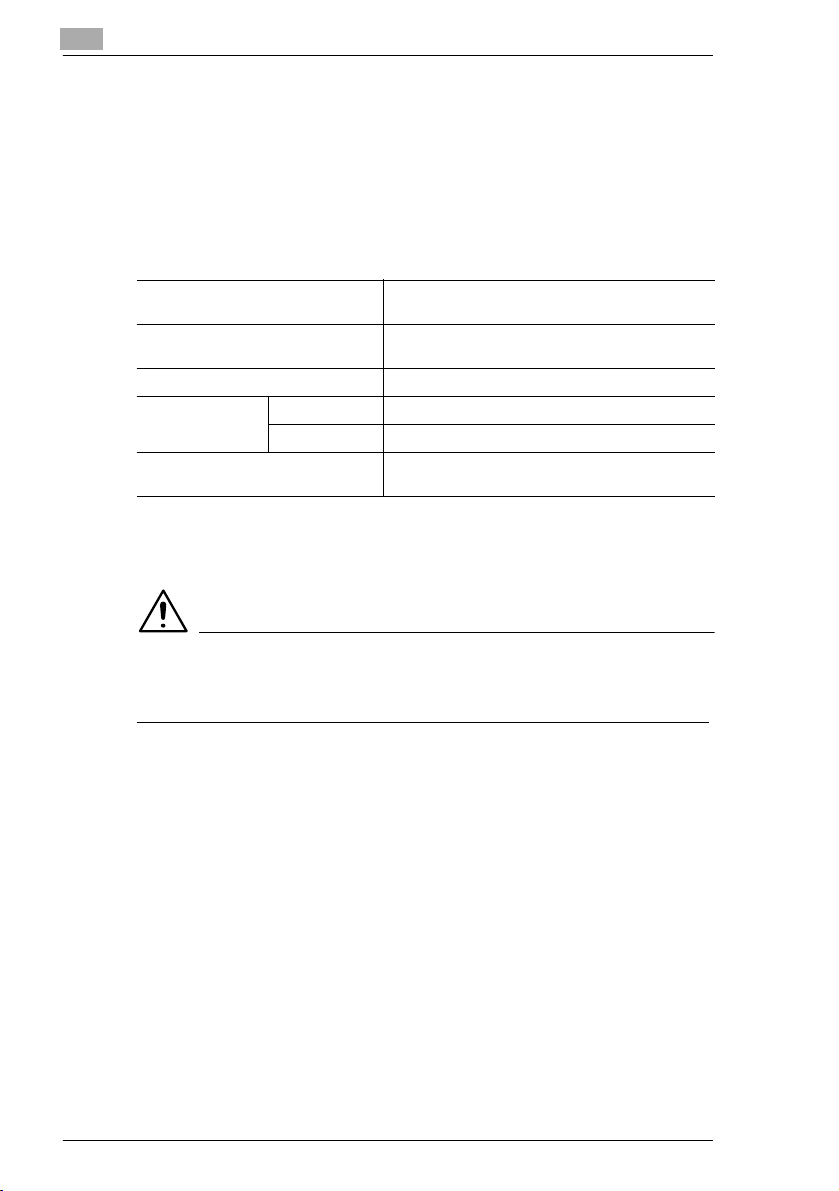
l Prints only the cover on a different type of paper (such as colored
paper).
l Capable of printing on OHP transparencies. You can also insert
interleaves, either blank or printed with the same contents as those
on the OHP transparencies.
1
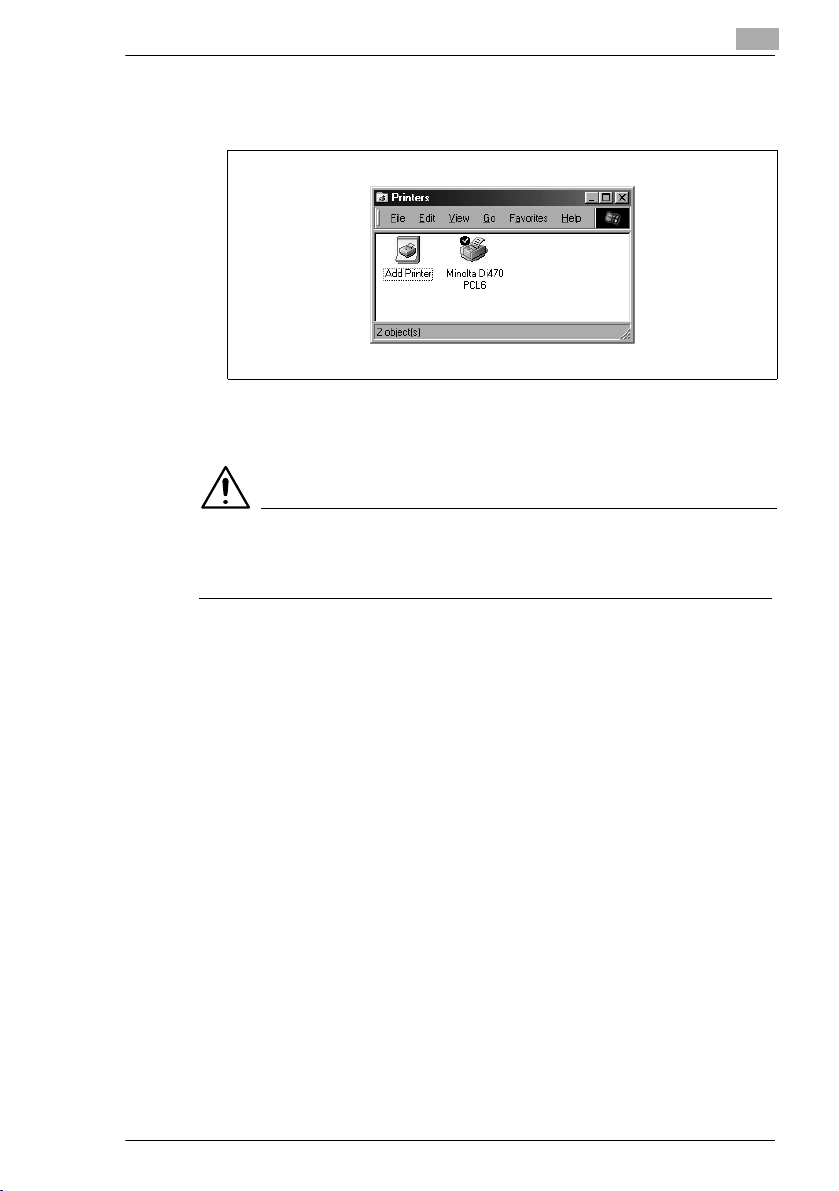
l Folds copies during finishing.
Crease Half Folding Z-Folding
Pi47
1-
Page 16

1
6
00e
Before Using the Printer Driver
Administrative Functions
l Different accounts can be managed for printing records, just as when
using the machine as a copier.
l Printing of confidential documents may be withheld until a legitimate
password is entered on the machine.
1-
Pi47
Page 17

Before Using the Printer Driver
00e
1.2 Connecting the Controller
The controller is installed inside the machine. The installation procedures
are to be performed by service personnel.
The controller is connected to the computer by a printer cable or network
cable. Power to the controller is supplied from the machine.
TIP
If you cannot print from your computer, make sure that the printer
cable or network cable is connected to the corresponding
connectors.
1.3 Settings Made on the Machine
The following functions must be set on the machine using its Utility Mode,
as they relate to the controller.
Priority Device
Select the priority use of the machine, either as a copier or printer.
l Copier: The machine is used as a copier.
l Printer: The machine is used as a printer.
1
Pi47
On Line / Ready
l On Line key
m This function is the same as that available in ordinary printers as
On Line/Off Line.
m Select On Line normally. A lit lamp indicates that the machine is in
the On Line mode.
l Ready Lamp
m Data can be transferred while this lamp stays lit up.
m The lamp remains blinking while data is being transferred.
1-7
Page 18

1
8
00e
1.4 Installing the Printer Drivers
To make 100% use of the functions offered by the machine mounted with
the controller, install the attached printer drivers in your computer. The
controller is furnished with the following printer drivers:
l PCL6 printer driver for Windows 95
l PCL6 printer driver for Windows 98/Me
l PCL6 printer drive for Windows NT4.0
l PCL6 printer driver for Windows 2000/XP
l PS printer driver for Windows 95/98/Me
l PS printer driver for Windows NT4.0
l PS printer driver for Windows 2000/XP
l PPD file for Macintosh
l PPD Plugin for Mac OS X
Install the printer driver suitable for the operating system that runs on
your computer. For installation procedures, see the relevant page as
detailed below:
l Installing the Windows printer driver:
m Windows 95/98/Me, see page p. 2-2
m Windows 2000/XP, see page p. 2-5
m Windows NT4.0, see page p. 2-8
l Installing the Macintosh PPD file and PPD Plugin file:
See “2.5 Macintosh” on page 2-15.
Before Using the Printer Driver
1-
Pi47
Page 19

Before Using the Printer Driver
00e
9
1.5 Contents of the CD
On the CD, which comes along with the controller, you can find the
following:
l All printer drivers as described before.
l The online Advanced User Manual as pdf-file (in English).
l The online User Manual for the Scanner-Mode (in different
languages).
l the online User Manual for the Microsoft Windows Driver and
Convenient Functions (in different languages).
l Acrobat Reader.
1
Pi47
1-
Page 20

1
0
00e
Before Using the Printer Driver
1-1
Pi47
Page 21

Installing the Printer Driver
00e
2 Installing the Printer Driver
This chapter describes the procedure for installing the printer driver on a
Windows operating system and Macintosh.
l Windows 95/98/Me
For the operating environment and installation procedure for the
Windows 95/98/Me printer driver, see page 2-2.
l Windows 2000/XP
For the operating environment and installation procedure for the
Windows 2000/XP printer driver, see page 2-5.
l Windows NT 4.0
For the operating environment and installation procedure for the
Windows NT 4.0 printer driver, see page 2-8.
l Macintosh
For the operating environment and installation procedure for the
Macintosh printer driver, see page 2-15.
2
Pi47
2-1
Page 22
2
00e
2.1 Windows 95/98/Me
Operating Environment
This section explains the required environment for the printer driver.
Before installing the printer driver, check that your computer meets the
following requirements. If it doesn’t, the printer driver may not function
properly.
Installing the Printer Driver
Personal computer IBM PC or compatible with Pentium 200MHz or
Operating system Windows 95 (English), Windows 98 (English) or
Memory 64MB or more
I/O interface Parallel Centronics interface (Conforming to IEEE1284)
Network 10/100BaseT (UTP)
Free space on hard disk 10MB or more (PCL6)
higher CPU
Windows Me (English)
2MB or more (PS)
Installing (Windows 95/98/Me)
NOTE
è Before starting to install the printer driver, be sure first to quit all other
applications.
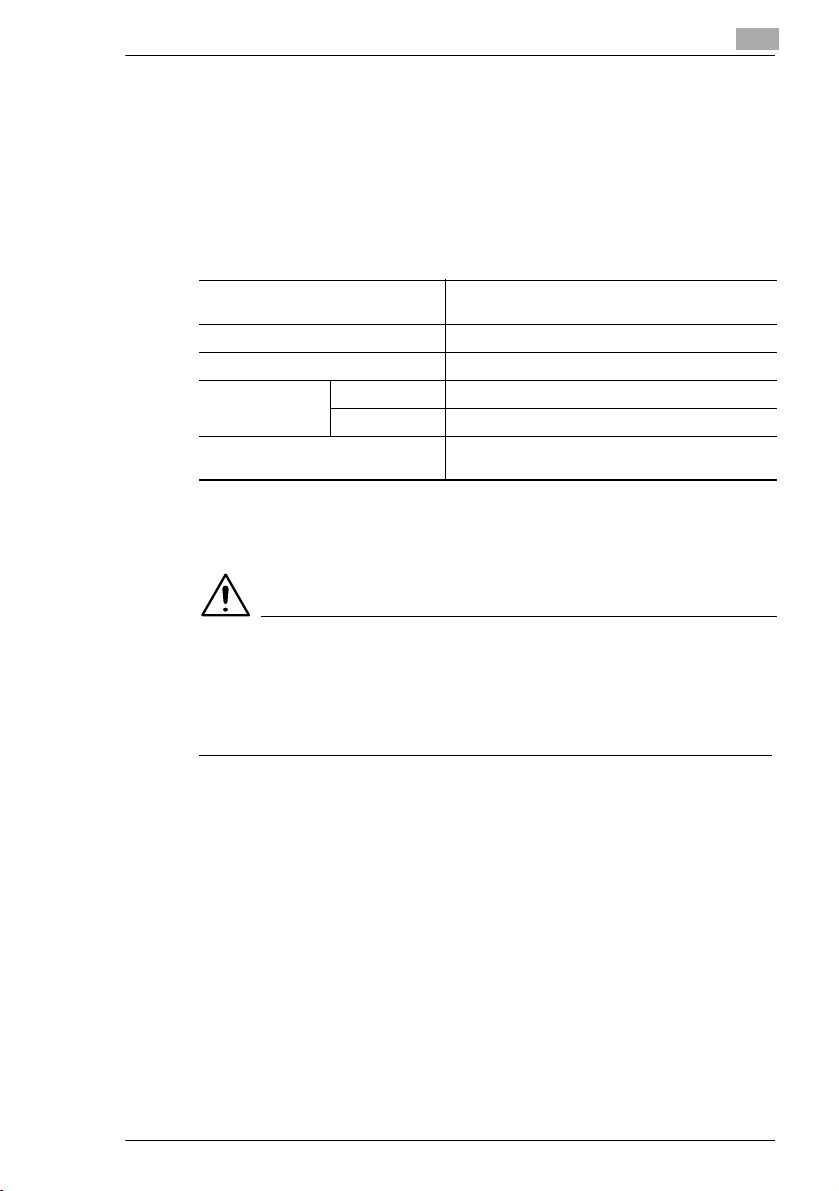
1 Clickthe Start button. From the menu that appears, select Settings,
then click Printers.
The Printers window will appear.
2 Double-click the Add Printer icon.
The Add Printer Wizard will appear.
3 Follow the instructions that appears on your computer screen and
make your choices. If you have problems during the installations,
please refer to the Advanced User Manual on the CD-ROM that is
included with the controller.
2-2 Pi47
Page 23
Installing the Printer Driver
00e
3
When all the files have been copied from the CD-ROM, the
corresponding icon will be added to the Printers window.
This completes the installation.
NOTE
è When installing the printer driver in a computer connected to the
machine via a network, be sure to consult the network administrator.
2
Pi47
2-
Page 24

2
00e
Installing the Printer Driver
Making General Settings Before Using the Printer
The printer driver requires setting of items that are common to all print
jobs, including the port to which the printer cable is connected and
optional devices configured with the machine. These settings must be
made using properties dialog box available from the Properties
command after the printer driver has been installed or whenever the
operating environment is changed.
The most common settings were made when the printer driver was
installed, meaning that you do not usually bother to change them. Some
items must, however, be changed in the following cases.
Cases where changes are necessary Applicable property tab
You want to add a comment to distinguish the printer
from others
The computer’s connecting port has been changed
You want to change the conditions for the display of
a timeout error
You want to designate a port to which the machine
is connected via a network (this setting must be
made on a computer connected to the machine via a
network)
This setting is not related to printing. Color Management
You want to share the machine with other computers
connected to the same network (this setting must be
made on the computer directly connected to the
machine)
You want to change the setting in the Minolta
Pi4700e PCL6 or PostScript Properties dialog box.
For details, see Chapter 3.
General
Details
Sharing
Setup
Paper
Quality
Device Options Setting
Job Management
Overlay
2-4 Pi47
Page 25
Installing the Printer Driver
00e
5
2.2 Windows 2000/XP
Operating Environment
This section explains the required environment for the printer driver.
Before installing the printer driver, check that your computer meets the
following requirements. If it doesn’t, the printer driver may not function
properly.
2
Personal computer IBM PC or compatible with Pentium 200MHz or
Operating system Windows 2000 (English) or Windows XP (English)
Memory 64MB or more
I/O interface Parallel Centronics interface (Conforming to IEEE1284)
Network 10/100BaseT (UTP)
Free space on hard disk 10MB or more (PCL6)
higher CPU
2MB or more (PS)
Installing (Windows 2000/XP)
NOTE
è When starting up the operating system, log in with administrator
privileges.
è Before starting to install the printer driver, be sure first to quit all other
applications.
1 For Windows XP, clickthe Start button.From the menu that appears,
click Printers and Faxes.
For Windows 2000, clickthe Start button, point toSettings, and then
click Printers.
2 For WindowsXP, thePrintersand Faxeswindowwill appear.Click the
Add a printer icon.
For Windows 2000, the Printers windowwill appear. Double-click the
Add Printer icon.
3 Click the Next> button to start the Add Printer Wizard.
Pi47
2-
Page 26

2
6
00e
Installing the Printer Driver
4 Follow the instructions thatappears on your computer screen and
make your choices.If you have problems duringthe installations,
please refer to the Advanced UserManual on the CD-ROM thatis included with thecontroller.
When all the files have been copied from the CD-ROM, the
corresponding icon will be added to the Printers window.
This completes the installation.
NOTE
è When installing the printer driver in a computer connected to the
machine via a network, be sure to consult the network administrator.
2-
Pi47
Page 27

Installing the Printer Driver
00e
Making General Settings Before Using the Printer
The printer driver requires setting of items that are common to all print
jobs, including the port to which the printer cable is connected and
optional devices configured with the machine. These settings must be
made using property sheets available from the Properties command after
the printer driver has been installed or whenever the operating
environment is changed.
The most common settings were made when the printer driver was
installed, meaning that you do not usually bother to change them. Some
items must, however, be changed in the following cases.
Cases where changes are necessary Applicable property tab
You want to add a comment to distinguish the printer
from others
You want to share the machine with other computers
connected to the same netw ork (this setting must be
made on the computer directly connected to the
machine)
The computer’s connecting port has been changed
You want to change the conditions for the display of
a timeout error
You want to designate a port to which the machine
is connected via a network (this setting must be
made on a computer connected to the machine via a
network)
You want to restrict use condition of printer.
You want to change settings in spool condition.
You want to change OS-dependent settings.
This setting is not related to printing. Color Management
You want to restrict access to the machine
You want to check the accounts of the machine
users
This setting is not related to printing. Processing
You want to make settings for optional equipment
installed on the machine.
2
General
Sharing
Ports
Advanced
Security
Device Options Setting
Pi47
2-7
Page 28

2
8
00e
2.3 Windows NT4.0
Operating Environment
This section explains the required environment for the printer driver.
Before installing the printer driver, make sure that your computer meets
the following requirements. If it doesn’t, the printer driver may not
function properly.
Installing the Printer Driver
Personal computer IBM PC or compatible with Pentium
Operating system Windows NT4.0 (English)
Memory 64MB or more
I/O interface Parallel Centronics interface (Conforming to IEEE1284)
Network 10/100BaseT (UTP)
Free space on hard disk 10MB or more (PCL6)
200MHz or higher CPU
2MB or more (PS)
Installation (Windows NT 4.0)
NOTE
è When starting up the operating system, log in with administrator
privileges.
è Before starting to install the printer driver, be sure first to quit all other
applications.
1 Clickthe Start button. From the menu that appears, select Settings,
then click Printers.
The Printers window will appear.
2 Double-click the Add Printer icon.
3 Start the Add Printer Wizard.
4 Follow the instructions that appears on your computer screen and
make your choices. If you have problems during the installations,
please refer to the Advanced User Manual on the CD-ROM that is
included with the controller.
2-
Pi47
Page 29

Installing the Printer Driver
00e
9
When all the files have been copied from the CD-ROM, the
corresponding icon will be added to the Printers window.
This completes the installation.
NOTE
è When installing the printer driver in a computer connected to the
machine via a network, be sure to consult the network administrator.
2
Pi47
2-
Page 30

2
0
00e
Installing the Printer Driver
Making General Settings Before Using the Printer
The printer driver requires setting of items that are common to all print
jobs, including the port to which the printer cable is connected and
optional devices configured with the machine. These settings must be
made using property dialog box available from the Properties command
after the printer driver has been installed or whenever the operating
environment is changed.
The most common settings were made when the printer driver was
installed, meaning that you do not usually bother to change them. Some
items must, however, be changed in the following cases.
Cases where changes are necessary Applicable property tab
You want to add a comment to distinguish the printer
from others
The computer’s connecting port has been changed
You want to change the conditions for the display of
a timeout error
You want to designate a port to which the machine
is connected via a network (this setting must be
made on a computer connected to the machine via a
network)
You want to specify a time frame for the machine
operation
You want to share the machine with other computers
connected to the same network (this setting must be
made on the computer directly connected to the
machine)
You want to restrict access to the machine
You want to check the accounts of the machine
users
This setting is not related to printing. Pressing
You want to make settings for optional equipment
installed on the machine.
General
Ports
Scheduling
Sharing
Security
Device Options Setting
2-1
Pi47
Page 31

Installing the Printer Driver
00e
2.4 Macintosh
Operating environment
Before installing the printer driver, make sure that your computer meets
the following requirements. If it doesn’t, the printer driver may not
function properly.
2
Operating system Apple Macintosh System7.5.3 or later, 8.x, 9.x or
Personal computer Apple Macintosh computer or a Macintosh-compatible
I/O interface Ethernet port
Memory 16MB or more
Disk drive CD-ROM drive is required for installation only.
Free space on hard disk 2MB or more
Recommended printer
software
Mac OS X 10.2 or later
computer
LaserWriter 8.5.1. or later, LaserWriter 8.6 or later
NOTE
è Do not use an Ethernet cable of low quality: Defective printing could
result.
Pi47
2-11
Page 32

2
00e
Installing the Printer Driver
Installation (Macintosh OS 7/8/9)
This section explains the installation procedure for the Macintosh printer
driver under Macintosh OS 7, 8 or 9.
NOTE
è For details on the procedure for installing the printer driver on a Mac
operating system X, refer to “Installation (Mac OS X)” on page 2-22.
The following procedures are concerned with Apple Macintosh
system7.5.5 and LaserWriter8.5.1.
NOTE
è When OS with other version or LaserWriter is used, procedures may
vary slightly.
è Make sure that the controller and computer are properly connected
to each other with an Ethernet cable.
1 Drag the Minolta Di****-PS.ppd file in the PPD folder from the CD-
ROM to the Printer Description folder inside the active systemfolder.
2-12 Pi47
Page 33

Installing the Printer Driver
00e
3
2 Select Chooser from the Apple menu.
3 The printer name set up with the NIC appears in the list under Select
a PostScript Printer. Select the printer and click the Create button.
4 The Select a PostScriptä Printer Description File dialog box will
appear.
Select Minolta Di470U-PS.ppd from the dialog box and click the
Select button.
5 After the installation procedures have been completed, a small printer
icon will appear to the left of the printer name.
6 Click the Setup... and then the Configure button. Make your
Configuration choices and click the OK button.
7 A printer icon will appear on the desktop. This will finish your
installation. If you have problems during the installations, please refer
to the Advanced User Manual on the CD-ROM that is included with
the controller.
2
Pi47
2-1
Page 34

2
00e
Installing the Printer Driver
Installation (Mac OS X)
This section explains the installation procedure for the Macintosh printer
driver for Mac OS X.
NOTE
è This printer driver is compatible with Mac OS X version 10.2 or later.
1 Log in with administrator privileges.
2 Install the printer controller CD-ROM in the CD-ROM drive of your
computer.
3 Copy Minolta Di470U-PS.ppd, Minolta Di470E-PS.ppd and
MinoltaPPDPlugin.dmg to the desktop from the PPD folder on the
CD-ROM.
4 Double-click MinoltaPPDPlugin.dmg to start.
5 Select the partition where the software will be installed, and then click
the Continue button.
6 Click the Install button.
The plugin for Di470PPD is installed.
7 Click the Close button.
This completes the installation of the PPD plugin. Next, install the
printer driver.
8 Start the PrintCenter. (inside Application folder and Utility folder)
9 Click the Add... button.
10 Select Other... beside Printer Model:
11 Select either Minolta Di470U-PS.ppd (for measurements in inches) or
Minolta Di470E-PS.ppd (for metric measurements). Click the Choose
button.
12 Select the appropriate printer model, and then click the Add button.
The printer driver is installed.
2-14 Pi47
Page 35

Installing the Printer Driver
00e
5
13 From the Printers menu, click Show Info.
The Printer Info property dialog box appears.
14 Select Installable Options.
15 Enter the printer settings, and then click the Apply Changes button.
16 Close the Print Center dialog box. If you have problems during the
installation, please refer to the Advanced User Manual on the CD.
2
Pi47
2-1
Page 36

2
6
00e
Installing the Printer Driver
2-1
Pi47
Page 37

Network Settings
00e
3
3 Network Settings
3.1 Introduction
Though this Network Card does not support NetBEUI protocol, it
supports TCP/IP and IPX/SPX, which provides plenty of connection
flexibility for the Windows computer.
A Windows 95/98/Me network printer can be used by going through a
Novell NetWare or Windows 2000/NT server. This Network Card,
however, can be configured with its bundled peer-to-peer printing
programs for peer-to-peer printing without a server. Peer-to-peer printing
can be performed using TCP/IP or IPX/SPX.
There are two ways you can print from Windows NT 4.0 with TCP/IP:
using the bundled IP Peer-to-Peer Printing Program, and using the
Windows NT standard LPR printing function.
There are two ways you can print from Windows 2000/XP with TCP/IP:
using the Windows 2000/XP standard LPR printing function, and using
the Windows 2000/XP standard IPP printing function.
3
Pi47
-1
Page 38

3
3
00e
Network Settings
3.2 Specifying the IP Address From the Printer’s Touch Panel
Setting procedure
1 Press the [Utility] key.
2 Touch [Administrator Mode] and input the Administrator code.
3 Touch [NetworkSet].
4 Touch [IP Address].
-2 Pi47
Page 39

Network Settings
00e
3-3
5 With the keypad in the operation panel, type in the IP address, and
then touch [Enter].
6 With the keypad in the operation panel, type in the subnet mask, and
then touch [Enter].
3
7 With the keypad in the operation panel, type in the default gateway,
and then touch [Enter].
Pi47
Page 40

3
3
00e
Network Settings
8 In order to activate the address settings, turn the printer off, then on
again.
-4 Pi47
Page 41

Network Settings
00e
3-5
3.3 Peer-to-Peer Printing with TCP/IP
Use the bundled IP Peer-to-Peer Printing Program for TCP/IP peer-topeer printing under Windows.
Digital Copier
Network Card
TCP/IP
Windows TCP/IP
IP Peer to Peer Printing Program
3
NOTE
è Refer to the Advanced User Manual on the controller CD-ROM for
details.
Peer-to-Peer Printing Program is a Windows utility that lets you output
directly to a printer from a computer on a network, without going through
a server.
Use this program for peer-to-peer printing under TCP/IP.
Requirements
l Computer must have TCP/IP installed and enabled.
l Network Card must have valid IP parameters assigned.
NOTE
è Refer to the applicable Windows documentation for information
about installing TCP/IP under Windows.
è Refer to the Advanced User Manual on the controller CD-ROM for
Pi47
Page 42

3
3-6
00e
details.
3.4 Peer-to-Peer Printing with IPX/SPX
Use the bundled IPX Peer-to-Peer Printing Program for IPX/SPX peer-topeer printing under Windows.
With IPX Peer-to-Peer Printing Program, there is no need to run NetWare
Client.
Digital Copier
Network Card
IPX/SPX
Windows 95/98/Me
IPX/SPX-compatible Protocol
IPX Peer to Peer Printing Program
Network Settings
NOTE
è Refer to the Advanced User Manual on the controller CD-ROM for
details.
Use this program for peer-to-peer printing under IPX/SPX. Just by
installing this program, you can specify an IPX-based printer on the
network as a printer port.
Requirements
l Computer must have IPX/SPX-compatible protocol installed.
NOTE
è Refer to the applicable Windows documentation for information
Pi47
Page 43

Network Settings
00e
3
about installing IPX/SPX under Windows.
è Refer to the Advanced User Manual on the controller CD-ROM for
details.
3.5 LPR Printing
This section explains how to use the Windows NT 4.0/2000/XP standard
LPR printing function.
Digital Copier
Network Card
3
TCP/IP
Windows NT 4.0/2000/XP
Microsoft TCP/IP Printing
TCP/IP
NOTE
è Refer to the Advanced User Manual on the controller CD-ROM for
details.
Requirements
l Computer must have TCP/IP installed and enabled.
l Network Card must have valid IP parameters assigned.
Pi47
-7
Page 44

3
3-8
00e
3.6 IPP Printing
This section explains how to use the Windows 2000/XP standard IPP
printing function.
Digital Copier
Network Card
Network Settings
IPP
Windows 2000/XP
TCP/IP
IPP Client
NOTE
è Refer to the Advanced User Manual on the controller CD-ROM for
details.
Requirements
l Computer must have TCP/IP installed and enabled.
l Network Card must have valid IP parameters assigned.
Pi47
Page 45

Network Settings
00e
3-9
3
3.7 Specifying network settings from PageScope Light
Access
PageScope Light for Pi4700e can be accessed directly from a Web
browser.
1 Start the Web browser.
2 In the URL field, enter the IP address of the printer controller as shown
below.
http://<IP address of printer controller>/
(Example) When the IP address of the printer controller is
192.9.200.200:
http://192.9.200.200/
3 This causes PageScope Light for Pi4700e screen to appear.
Operation
PageScope Light for Pi4700e operation is identical to that for Internet
Web pages. Clicking a hot link jumps to the link destination, and the Back
and Forward buttons scroll through pages backwards and forward.
For further details of PageScope Light, please refer to the Advanced User
Manual on the CD.
Pi47
Page 46

3
3-10
00e
Network Settings
Logging In to the Admin Mode
After you log in to PageScope Light in the Admin Mode, you can change
the configuration of the Digital Copier settings.
1 Type the administrator password into the Admin Password box. The
initial default administrator password is sysadm. See “Preference” for
information about how to change the password.
2 Click the Log-in button to log in to the Admin Mode.
3 When you want to log out, click the Log-out button.
NOTE
è Log out is performed automatically if no operation is performed for
more than 10 minutes.
è On the Network tab, a password input text box appears on each
setting screen. You must be able to input the correct password in
order to change Network tab settings. The password you should
input here is the same as the Admin Password you input on other
tabs.
Pi47
Page 47

Network Settings
00e
3
Network Tab
Use the Network tab for configuring the Pi4700e network interface.
NOTE
è On the Network tab, you must type the password into the Password
box that appears on the setting screen you select on the menu. Note,
however, that you need to input the password on the Network tab
only once per session. After you input the password, the Password
box does not appear any more on other Network tab setting screens
during the current session.
l Summary
This screen appears when you click the Summary menu on the Network
tab. Use this screen to view a summery of the network interface card.
3
Pi47
-11
Page 48

3
3
00e
Network Settings
l TCP/IP Configuration
This screen appears when you click the TCP/IP Configuration menu on
the Network tab. It lets you change a number of network interface card
TCP/IP settings.
NOTE
è Use only IP parameters that have been specified or approved by your
network administrator.
-12 Pi47
Page 49

Network Settings
00e
3-13
l NetWare Configuration
Sub-menus appear when you click the NetWare Configuration menu on
the Network tab. Use the sub-menus to display and configure the
network interface card settings for NetWare printing.
3
Pi47
Page 50

3
3
00e
Network Settings
l NetWare Status
This screen appears when you click the NetWare Status sub-menu
under the NetWare Configuration menu. Use this screen to check the
status of the file server and queue to which the network interface card is
attached.
-14 Pi47
Page 51

Network Settings
00e
3-15
l AppleTalk Configuration
This screen appears when you click the AppleTalk Configuration menu
on the Network tab. It lets you change a number of AppleTalk
environment settings.
3
Pi47
Page 52

3
3-16
00e
Network Settings
l IPP Configuration
This screen appears when you click the IPP Configuration menu on the
Network tab. It lets you change Internet Printing Protocol (IPP) settings.
You can configure the printer functions that are controlled by IPP and the
printer information that can be seen from IPP clients.
NOTE
è Standard access for IPP printing is:
http://<IP Address>:631/nic/Print
è For details about IPP printing, see “5 Network Interface Card”.
Pi47
Page 53

Network Settings
00e
3
l WINS Configuration
This screen appears when you click the WINS Configuration menu on
the Network tab. It lets you change WINS settings. WINS (Windows
Internet Name Service) makes it possible for a device, such as your
network interface card, to register a NetBIOS name (like MLT_995243)
along with its current IP address (like 192.9.200.200). A client wanting to
contact the printer uses the WINS server to match the NetBIOS name
with an IP address. Most users will find it easier to remember the
NetBIOS name for the printer rather than its IP address.
3
After you configure the NetBIOS (WINS) settings, restart the printer.
The network interface card’s status page should now show that the
network interface card is successfully registered with the WINS server.
The items labeled Primary Server Logged in and Secondary Server
Logged in on the WINS Configuration screen now indicate which WINS
server(s) the network interface card is registered with.
Under normal circumstances, your network interface card automatically
renews its registration with the WINS server before its lease expires.
Pi47
-17
Page 54

3
3-18
00e
Network Settings
l Reset
This screen appears when you click the Reset menu on t he Network tab.
Use this screen to reset the network interface card so new settings can
take effect.
Pi47
Page 55

Network Settings
00e
3-19
l Maintenance
This screen appears when you click the Maintenance menu on the
Network tab. Use this screen to restore the network interface card to its
initial factory default settings.
3
NOTE
è After performing a Reset or Maintenance, turn the digital copier off,
then on again.
Pi47
Page 56

3
3-20
00e
Network Settings
Pi47
Page 57

Properties Settings
00e
4 Properties Settings
4.1 Description of each tab (Windows)
Each tab enables you to change the settings indicated below. For a
detailed description of each function, please refer to the Advanced User
Manual on the controller CD-ROM.
4
Pi47
Property tab Outline of settings that can be changed
Setup Allows you to set the paper take-up tray and paper exit tray.Also
Paper Allows you to set basic printing items such as number of copies, paper
Quality Allows you to set general items related to graphics, such as resolution,
Device Options
Setting
Job
Management
allows you to set high level printing functions such as two-sided
printing, booklet creation, N-up printing, OHP interleaving, Watermark,
Cover Mode, Staple, Punch, and Folding.
size, print orientation and print zoom ratio.
Also allows you to set functions related to sorting.
halftone processing and image processing method.
Also allows you to set TrueType fonts.
Allows you to set option equipment installed on the machine.
Sets the copy track function.
Allows you to lock a printing job.
Also allows yo u to print the distribution number.
4-1
Page 58

4
00e
Properties Settings
Property tab Outline of settings that can be changed
PostScript (PS
driver only
– Allows you to save and read the contents of the settings on a Setup,
Allows you to make detailed settings related to PostScript.
Paper, Quality, Job Management, Device Options Setting or
PostScript tab.
NOTE
è Note that different settings must be made for each driver.
è The differences between each driver are indicated based on the PCL6
version driver for Windows 98.
4-2 Pi47
Page 59

Properties Settings
00e
3
4.2 Print options (Macintosh OS 7/8/9)
Each print option allows you to make specific settings as detailed below.
For a detailed description of each function, please refer to the Advanced
User Manual on the controller CD-ROM.
4
Print Option Available Settings
Installable Options Allows you to make settings for options installed on the
Page Attributes Allows you to make the basic settings for printing.
PostScript Options Allows you to make visual-effect and font-related settings.
General Allows you to set the pag es and the number of copies for
Background Printing Allows you to make settings for background printing.
Cover Page Allows you to print out a page of descriptive data about each
Color Matching Allows you to set color data output.
Layout Allows you to set the printing layout.
Pi47
machine.
printing.
print job.
4-
Page 60

4
00e
Properties Settings
Print Option Available Settings
Error Handling Allows you to set the handling of error information.
Save as File Allows you to make settings for saving data in files.
Printer Specific Options Allows you to make not only such basic settings, such as paper
source and exit port, but also enhanced functions, including
duplex printing, OHP interleaving, and Cover mode.
It further allows you to set finishing capabilities, including sort,
staple, punch, and folding, for those occasions when you need
to make multiple complete sets of the original document.
4-4 Pi47
Page 61

Properties Settings
00e
5
4.3 Print options (Mac OS X)
Each print option allows you to make specific settings as detailed below.
For a detailed description of each function, please refer to the User
Manual on the controller CD-ROM.
Print Option Available Settings
Copies & Pages Allows you to set the pages and the number of copies for
Layout Allows you to set the printing layout.
Error Handling Allows you to set the handling of error information.
Paper & Quality Settings Allows your to make the basic settings for printing.
Paper Source Settings Allows you to set the paper source.
Job Management Allows you to print out a page of descriptive data about each
Finishing Settings Allows you to set finishing capabilities, including sort, staple,
Summary Displays a list of the current print settings.
printing.
print job.
punch, and folding, for those occasions when you need to make
multiple complete sets of the original document.
4
NOTE
è The Copies & Pages, Layout, Output Options and Error Handling
settings are supported by Print Center. Refer to the document
corresponding to the operating system being used.
è No conflict warnings will appear, indicating that incompatible
functions are specified.
Pi47
4-
Page 62

4
6
00e
Properties Settings
4-
Pi47
Page 63

Network Interface Card
00e
5
5 Network Interface Card
5.1 Getting ready
This Network Card is a multi-protocol network card that provides
Ethernet connection for the Minolta Pi4700e printer controller and offers
the following features.
l Automatic Ethernet type detection (10BaseT, 100BaseT)
l Fully transparent AppleTalk printing support for the Macintosh,
including support for binary PostScript printing.
l Peer-to-peer printing program allows printing on a network without
going through a server
m Peer-to-Peer Printing with TCP/IP (Windows 95/98/Me/NT 4.0)
m Peer-to-Peer Printing with IPX/SPX (Windows 95/98/Me)
l Novell NetWare PSERVER support under bindery base or Novell
Directory Services (NDS)
l lpr/lpd functions under TCP/IP
l SNMP control using MIB-II and private MIB
SNMP support using standard MIB on a compatible printer or printerspecific MIB
l Onboard HTTP server allowing configuration of network function
settings using a Web browser
l Direct printing from an IPP client
l SLP (Service Location Protocol) support
5
Utility software (on the CD-ROM)
The following items are contained in the nicutlty folder on the CD-ROM
that comes with the printer controller.
l Discovery Program
m IPX/IP Management Access Program (MAP)
l Peer-to-Peer Printing Programs
See “3 Network Settings” for details.
m IP Peer-to-Peer Printing Program
m IPX Peer-to-Peer Printing Program
l BOOTP Program
m BootPL32.exe
l NetWare Setup Utility Program
m NWSetup
Pi47
-1
Page 64

5
5
00e
Network Interface Card
l Macintosh Utility Program
m NIManage (AppleTalk Utility)
l UNIX TCP/IP Utility Programs
l MIB Setting File
The ReadMe file on the CD-ROM contains the latest information about
each of the network software applications. Be sure to read the ReadMe
file before using the network software.
System requirements
The following table describes the system requirements for using the
Network Card hardware and software.
Version of Protocol or
NOS
Software Novell NetWare printingrequires NetWare Capture,NPRINT
Hardware Supportfor 10 or100 megabit Ethernet networks: 10/
Novell NetWare Version 4.x or5.x
Macintosh System 7.x,8.x, 9.x, Mac OS X
Windows,or LAN Server systems supporting lpr over TCP/IP
Red Hat Linux 6.1 or later, SuSELinux 6.3 or later, OpenLinux
2.3 or later, Turbolinux 4.0 or later.
and PCONSOLE(later than 1.0) utilities.
NWSetup requires Windows 95/98/Me/2000 orWindows NT
4.0, and the Novell 32-bitclient.
TheIP Peer-to-PeerutilityrequiresWindowsNT4.0;Windows
95/98/Me.
The IPX Peer-to-Peer utility requires Windows 95/98/Me.
The MAP utilityrequires Windows NT 4.0;Windows95/98/Me/
2000. MAP also requiresa browsersuch as Microsoft Internet
Explorer or Netscape.
TCP/IPsetupandmaintenancemaybe done withTelnet.Monitoring and maintenancewithHTTPrequiresa suitableInternet
Web browser program supportingHTML.
AppleTalkprinting requiresprinterPPD appropriateto the DigitalCopier.AppleTalkNIManageUtilityProgramisprovided for
setup and maintenance (except Mac OS X).
100BaseT(twistedpair cables) and hardware
CD-ROM drive
-2 Pi47
Page 65

Network Interface Card
00e
5-3
5.2 Setting up the network card
Connecting a network cable
1 Make sure that Digital Copier power is turned off.
2 Connect the network cable to the Network Card.
Network cable
m Insert the plug into the 10-100BaseT port on the rear panel of the
network card and press it in until you hear it click securely into
place.
5
10/100BaseT port
3 Power up the Digital Copier and check for abnormalities.
IMPORTANT!
è Use only Category 5 shielded 10/100BaseT cable.
Configuring the network card
You must first configure the Network Card and your computer before you
can print using the Network Card. The settings you need to make depend
on the configuration of your network environment.
Refer to the Advanced User Manual on the controller CD-ROM for details.
Pi47
Page 66

5
5
00e
Network Interface Card
-4 Pi47
Page 67

Scanner Mode
00e
6
6 Scanner Mode
NOTE
è In order to use the scanning function, the optional network interface
card must be installed.
6.1 Outline
There are two scan modes you can use with this machine: Use the one
appropriate to the network environment and purpose of use.
For further details of using the Scanner Mode, please refer to the Scanner
Mode Manual on the CD.
6
Pi47
-1
Page 68

6
6
00e
Scanner Mode
E-Mail (Scan to E-mail)
l Transmits scanned document as attached file with E-mail.
l Suitable for sending low-resolution data.
l Environment of Network with Mail server is necessary.
-2 Pi47
Page 69

Scanner Mode
00e
6-3
Folder (Scan to Server)
l Transmits scanned document to the folder specified by FTP server.
l Suitable for sending high-resolution data.
l Environment of Network with FTP server is necessary.
6
Pi47
Page 70

6
6
00e
Scanner Mode
URL
l Transmits scanned document to the folder specified by FTP server.
l At the same time, transmits URL of FTP server with E-Mail.
l Suitable for sending high-resolution data.
l Environment of Network with Mail server and FTP server is necessary.
NOTE
è If a key previously programmed with a destination for Scan to E-Mail
or Scan to Server is touched at the same time and the scanning is
performed, this URL operation is performed.
-4 Pi47
Page 71

Scanner Mode
00e
6-5
Necessary Settings
To use the Scanner Mode, it is necessary to perform the following
network settings first.
You use PageScope Light to make these settings. For the details of
PageScope Light, see “7 PageScope Light”.
Set Item E-mail Folder (Server)
IP Address o o
Subnet Mask o o
Default Gateway P P
SMTP Server Address o –
Reply Address o –
SMTP Connection Timeout o –
Default Compression o –
FTP Proxy Server Address – P
Proxy Port No. – P
E-mail Destination List o –
File Destination List – o
* o: Necessary, P: Necessary depending on environment, –: Not necessary
6
Necessary Devices (servers)
Set Item E-mail Folder (Server)
Network Interface Card o o
SMTP Server o –
FTP Server – o
* o: Necessary, P: Necessary depending on environment, –: Not necessary
Pi47
Page 72

6
6-6
00e
Scanner Mode
Pi47
Page 73

PageScope Light
00e
7 PageScope Light
7.1 System requirements
The following items are required to use this utility.
l Computer
m Software
Operating System Web Brow ser
Windows 95/98/Me/NT 4.0/2000 Internet Explorer 5.0 or higher
Macintosh System 7 or higher Internet Explorer 4.5 or higher
Solaris 2.5.1/2.6/7 (2.7) Netscape Navigator 4 or higher
Linux Netscape Navigator 4 or higher
m NIC (Network Interface Card)
m Ethernet
m TCP/IP Protocol
l Digital Copier
l Pi4700e Printer Controller
7
Netscape Communicator 4.7 or higher
Netscape Navigator 4 or higher
Pi47
NOTE
è If “Proxy Server” of the Web browser is set to “ON”, it may not be
possible to access PageScope Light.
7-1
Page 74

7
00e
7.2 Access
PageScope Light for Pi4700e can be accessed directly from a Web
browser.
1 Start the Web browser.
2 In the URL field, enter the IP address of the printer controller as shown
below.
http://<IP address of printer controller>/
(Example) When the IP address of the printer controller is
192.9.200.200:
http://192.9.200.200/
3 This causes PageScope Light for Pi4700e screen to appear.
Operation
PageScope Light for Pi4700e operation is identical to that for Internet
Web pages. Clicking a hot link jumps to the link destination, and the Back
and Forward buttons scroll through pages backwards and forward.
Entering the password
After you log in to PageScope Light in the Admin Mode, you can change
the configuration of the Digital Copier settings.
PageScope Light
1 Type the administrator password into the Admin Password box. The
initial default administrator password is sysadm.
2 Click the [Log-in] button to log in to the Admin Mode.
3 When you want to log out, click the [Log-out] button.
NOTE
è Log out is performed automatically if no operation is performed for
more than 10 minutes.
è On the Network tab, a password input text box appears on each
setting screen. You must be able to input the correct password in
order to change Network tab settings. The password you should
input here is the same as the Admin Password you input on other
tabs.
7-2 Pi47
Page 75

PageScope Light
00e
3
7.3 Screen configuration
The configuration of the PageScope Light for Pi4700e screen is shown
below.
NOTE
è Screen images shown in this manual may differ slightly from actual
ones. Also note that specifications are subject to change without prior
notice.
7
Minolta PageScope Light Logo
Clicking the logo jumps to the Website below.
www.minolta.com
Pi47
7-
Page 76

7
00e
PageScope Light
Status Display
The current status of the Digital Copier is indicated by both icons and
text. The message Ready appears when the Digital Copier is operating
normally.
Ready Error Caution Fatal
Tabs
Use the tabs to select the category of items you want to display. See the
following sections of this document for detailed information about each
tab.
Menus
Use the menus to select information or setting items. The menus that
appear depend on the currently selected tab.
See the following sections of this document for detailed information
about each menu.
Information and Settings Display
This display shows information or settings in accordance with the
selected menu item.
Admin Password
Inputting the admin password provides access to the Admin Mode.
7-4 Pi47
Page 77

Troubleshooting
00e
8
8 Troubleshooting
8.1 Unable to Print
This section explains about the troubleshooting procedures for possible
malfunctions. Perform the troubleshooting procedures given below in
that order when the machine is unable to print even if you execute a print
command from your computer.
Symptom Possible Cause Action
A message appears
on the computer
screen, saying
something to the
effect that “no printer
is connected”, “no
paper is loaded.” or
“LPT1 write error”.
Printing does not
start despite the
completion of
printing setup on the
computer.
An error is present in the
machine.
The printer cable or network
cable is disconnected.
An error is present in the
machine.
The printer cable or network
cable is disconnected.
The printer driver selected for
printing is not for the Pi4700e.
A print job yet to be processed
is loaded in the machine,
causing the printer to wait.
(for Linux)
File to be printed is not a PS file.
Check the control panel of the
machine: If an error is
displayed, identify the error and
take the necessary action by
referring to the User Manual.
Check that the printer cable or
network cable is connected
properly to the computer and
controller.
Check the control panel of the
machine: If an error is
displayed, identify the error and
take the necessary action by
referring to the User Manual.
Check that the printer cable or
network cable is connected
properly to the computer and
controller.
Check the printer name.
Refer to the Job List on the
machine control panel to check
for print order.
Delete job and check to see if it
is PS file.
8
Pi47
-1
Page 78

8
8
00e
Troubleshooting
Symptom Possible Cause Action
Continued from the
previous page
(Printing does not
start despite the
completion of
printing setup on the
computer.)
Multiple copy sets
are mistakenly sorted
and stapled together
as a single large set.
A large number of
copies are
mistakenly printed.
A document
containing more than
40 pages cannot be
printed.
A PS error print is
output.
The print job is locked. Refer to the Job List on the
The connection of the controller
to the network has not been
established.
The print job was canceled. Check the status on the
Machine memory space
available is not sufficient.
If the copy track function is
enabled, an illegal access
number might have been
entered.
The settings in certain DTP
software applications may
conflict with the printer driver
settings.
The settings in certain DTP
software applications may
conflict with the printer driver
settings.
The maximum number of
document pages that can be
stored in the standard memory
is 40.
Some applications allow you to
select either “Binary” or “ASCII”
mode when the PS driver is
being used. A PS error could
result if an attempt is made to
print in the “Binary” mode.
machine control panel to see if
the print job in question is
locked. If so, unlo ck it.
Consult the network
administrator.
“Incompleted Job Queue” of
“Page Scope Light”.
Add the machine memory to
expand its space.
Enter the correct access
number.
In the application, turn OFF
Collate and set the copy count
to one. In the printer driver,
make the desired Collate,
Sorting and copy count settings.
In the application, turn OFF
Collate and set the copy count
to one. In the printer driver,
make the desired Collate,
Sorting and copy count settings.
l Decrease the number of
document pages or add
memory to expand its
capacity.
l Select “Printer” for “Priority
Device” available in 6/6 of
User’s Choice on the
machine.
Select the “ASCII” mode.
If the problem persists even after these checks have been made, refer to
the documentation provided for the machine.
-2 Pi47
Page 79

Troubleshooting
00e
8-3
Unable to Make Correct Settings / Unable to Print Exactly as Set
Perform the troubleshooting procedures given below in the order when
you cannot make proper settings in the printer driver or when the print
results do not represent what has been set.
Symptom Possible Cause Action
The options are
dimmed on the
computer screen.
The “Conflicts”
dialog box is
displayed on the
computer screen.
Unable to print
exactly as set.
The watermark
cannot be printed.
Unable to specify
Staple.
An illegal combination of
functions has been made.
An illegal combination of
functions has been made.
Incorrect settings are made. Check the setting for each item
The combination of the
functions, though valid on the
printer driver, is invalid on the
machine.
The watermark is not correctly
set.
The “Darkness” setting of the
watermark is low.
(for Windows, Linux)
Staple can be specified only
when the type of Finisher you
are using is selected on the
“Device Options Setting” tab
and “Auto” is selected for
“Output Setting” on the “Setup”
tab.
(for Macintosh)
Staple can be specified only
when the type of Finisher you
are using is selected on the
“Installable Options” property
sheet and “Auto” is selected for
“Output Setting” on the “Printer
Specific Options” property
sheet.
No stapling can be effected in
the following case:
Paper size other than 182 × 182
mm to 297 × 432 mm is
specified, paper source is
manual feed port, exit port other
than Auto is selected, Booklet is
specified, OHP Interleaving is
specified, Uncollated is
specified.
Reselect functions.
(for Linux)
Certain items can be set only by
root user in “Device Options
Setting”.
Check for combination and
make a correct combination of
functions.
of the printer driver.
Check the watermark setting.
Check the “Darkness” setting of
the watermark.
Select the type of Finisher you
are using on the “Device
Options Setting” tab, and select
“Auto” for “Output Setting” on
the “Setup” tab.
Select the type of Finisher you
are using on the “Installable
Options” property sheet, and
select “Auto” for “Output
Setting” on the “Printer Specific
Options” property sheet.
Check the setting of the paper
size, paper source, exit port,
Booklet, OHP Interleaving, and
Collated.
8
Pi47
Page 80

8
8
00e
Symptom Possible Cause Action
Unable to staple
properly.
The stapling position
is opposite to what is
expected.
Unable to specify
Punch.
Unable to effect
Punch.
The hole punch
position is opposite
to what is expected.
No stapling can be effected if
the type of paper is thick paper
or OHP transparencies.
When Mailbin Finisher or Multistaple Finisher is installed, no
stapling can be effected if
number of prints to be made
exceeds 50.
When Single-staple Finisher is
installed, no stapling can be
effected if number of prints to be
made exceeds 30.
No stapling can be effected if
the num ber of pages to be
printed is 50 or more when a
Folding Finisher is mounted.
Center Staple is also disabled if
the num ber of pages to be
printed is 15 or more.
No stapling can be effected if
original document contains
pages of different sizes.
The paper direction and N-up
do not match the setting made
for Orientation.
Either a Multi-staple Finisher,
Mailbin Finisher or Folding
Finisher m ust be mounted to
enable the setting of Punch, and
“Multi-staple Finisher”, “Mailbin
Finisher” or “Folding Finisher”
must be selected from
“Installable Options” to specify
Punch.
Punch cannot be specified if
Booklet or OHP interleaving is
specified.
No holes can be made if the type
of paper is thick paper or OHP
transparencies.
Prints can at times be fed out
without being punched if the
direction of the paper loaded in
the paper source is not
appropriate.
The paper direction and N-up
do not match the setting made
for Orientation.
Check the type of paper.
Check the number of prints to
be made.
Change the setting for
Orientation.
Select “Multi-staple Finisher”
“Mailbin Finisher” or “Folding
Finisher” from “Installable
Options.”
Check the setting of Booklet
and OHP Interleaving.
Check the type of paper.
Check the direction of the
paper.
Change the setting for
Orientation.
Troubleshooting
-4 Pi47
Page 81

Troubleshooting
00e
8-5
Symptom Possible Cause Action
Folding cannot be
specified.
Folding is not
effected.
Unable to print image
properly.
Unable to specify the
exit port.
Unable to properly
feed prints out to the
specified port.
Paper is not fed from
the specified paper
source.
Watermark is not
printed.
Unable to print
exactly as set.
Error dialog box is
output instead of
Setting dialog box.
Distribution cannot
be specified.
(for Windows)
The optional Folding Finisher is
necessary for you to specify
Folding. “Folding Finisher”
must be selected on “Device
Options S etting” tab.
(for Macintosh)
The optional Folding Finisher is
necessary for you to specify
Folding. “Folding Finisher”
must be selected on “Installable
Options.”
Folding may be disabled when
Staple or Punch is specified.
Folding cannot be effected if the
type of paper is Thick Paper or
OHP.
Machine memory space
available is not sufficient.
No exit port can be specified if
the paper size is A6 or B6, or
OHP Interleaving is specified.
Prints with paper size of B6 or
smaller cannot be fed out if
paper exit port is Mailbin.
Paper may not be fed from the
specified paper source if that
paper source is loaded with
paper of a different size and
direction.
Watermark may not be printed
in graphics applications.
The paper size, paper direction,
and other settings made on the
application takes precedence
over those made in the driver.
Unusable combination of device
and settings with Eas y Set being
stored could have been
achieved by changing of device
installed.
To specify Distribution, a “Hard
Disk Drive in Copier” that is
optional on the machine is
necessary. “Hard Disk Drive in
Copier” must be specified in
“Device Options Setting.”
Select “Folding Finisher” on
“Device Options Setting” tab.
Select “Folding Finisher” on
“Installable Options.”
Check the settings made. (See
“Function combination matrix”
on the User Manual.)
Check the type of paper.
Add machine memory to
expand its space, or simplify the
image to reduce the amount of
data handled.
Check the setting of the paper
size and OHP Interleaving.
Check the paper type and paper
size.
Load the paper source with
paper of the appropriate size
and in the appropriate direction.
No watermark can be printed in
this case.
Make the correct settings on the
application.
Open file specified in the error
dialog box, delete applicable
settings.
Select “Hard Disk Drive in
Copier” on “Device Options
Setting.”
8
Pi47
Page 82

8
8-6
00e
Troubleshooting
Pi47
 Loading...