

Page 1
PrintStation ManagerÉ
Reference Manual
Version 4.52i
Page 2

2 PrintStation Manager Reference Manual
Page 3

About This Manual
Copyright 1995-1998 T/R Systems Inc.
All Rights Reserved
Reproduction, adaptation, or translation without prior written permission is prohibited, except as allowed under the
copyright laws.
Warranty
The information contained in this document is subject to change without notice. T/R Systems makes no warranty
of any kind with regard to this material, including, but not limited to, the implied warranties of
merchantability and fitness for a particular purpose. T/R Systems shall not be liable for errors contained
herein or for incidental or consequential damage in connection with the furnishing, performance, or use of this
material.
Trademark Credits
BuildGamma, Cluster Printer, Cluster Printing, ClusterServer, ColorCurve, ColorTools, ConTune, DocumentMerge, Gammatic,
HalfTune, Image Management Server, LinearMatic, MicroScan, MicroScanner, MicroSpool, MicroTicket, MicroTicket
Configuration , MicroTicket Server, MicroTiff, MPRip, MPTrap, MultiRIP, OpenPrinter, PressDirector, PrintLink, PrintStation,
PrintStation Manager, PostRip, PSM to PDF, PSM to Tiff, RipSoft, RipStation, SatellitePress, StochasticFM, and
VariableForms are trademarks of T/R Systems Inc. Other brand or product names us ed i n t hi s document are the registered trademark or
trademarks of their respective holders.
are patent pending.
Conventions
MicroPress
is a registered trademark of T/R Systems Inc., Gammatic, ConTune and HalfTune
The following marks are used in this manual:
Indicates precautions that must be observed to pr event possible per sonal injury or
damage to equipment or malfunctioning of software.
Indicates notes and memos containing additional or det ailed information.
Indicates useful tips.
T/R Systems, Incorporated
1300 Oakbrook Drive
Norcross, GA 30093
U.S.A
Phone: (770) 448-9008
Fax: (770) 448-3202
Sales and Marketing:
Phone: (770) 448-9008
Fax: (770) 448-3202
E-Mail: salesmktg@trsystems.com
Technical Support:
Phone: (770) 448-7074
Fax: (770) 453-9705
E-Mail: support@trsystems.com
Internet Access:
World Wide Web
http://www.trsystems.com
FTP
ftp://www.trsystems.com
Document Number 800-000024-05
PrintStation Manager Reference Manual 3
Page 4

4 PrintStation Manager Reference Manual
Page 5

Table of Contents
About This Manual.............................................................................................3
Table of Contents.............................................................................................. 5
What is PrintStation Manager?......................................................................... 9
Why do I need Multiple Virtual Engines............................................................................................. 9
Features..........................................................................................................................................10
Supported Paper Types.................................................................................................................. 11
PrintStation and Virtual Engine Naming Convention....................................................................... 12
The PrintStation Manager Main Screen Display............................................ 13
Job List Window.............................................................................................................................. 14
Job List Fields ............................................................................................................................ 15
Job Icons............................................................................................................................... 16
Display Jobs.................................................................................................................................... 17
PrintStation Button..........................................................................................................................19
Virtual Engine Status Bar................................................................................................................ 21
Menus............................................................................................................... 23
File.................................................................................................................................................. 23
UnArchive Job File(s)…..............................................................................................................23
Exit.............................................................................................................................................24
Virtual Engine.................................................................................................................................. 24
Pause or Resume a Virtual Engine............................................................................................. 24
Resuming a Paused Virtual Engine............................................................................................ 25
Resynch Jobs............................................................................................................................. 25
Forms… ..................................................................................................................................... 25
Multi Page Forms................................................................................................................... 26
Letterhead .............................................................................................................................26
Engine Defaults… ...................................................................................................................... 28
Virtual Engine Defaults.......................................................................................................... 29
Media Saving Features...................................................................................................... 32
Job Defaults...........................................................................................................................33
View Job Details......................................................................................................................... 36
View Job Name Only.................................................................................................................. 36
ColorTools... ............................................................................................................................... 36
B&W Engine Balance................................................................................................................. 36
Job.................................................................................................................................................. 37
Info.............................................................................................................................................37
PrintStation/PrintLink Options................................................................................................ 39
Job Settings ........................................................................................................................... 40
Finishing Options...................................................................................................................42
Finishing Rules.................................................................................................................. 43
Output Options....................................................................................................................... 44
Margin Offsets....................................................................................................................... 47
Brightness/Contrast ............................................................................................................... 48
PrintStation Manager Reference Manual 5
Page 6

Color Adjust............................................................................................................................49
ColorCurves.......................................................................................................................50
Default ColorCurves and Definitions.......................................................................................51
Job Parsing............................................................................................................................ 52
Ticket .....................................................................................................................................53
Chapters.................................................................................................................................55
Page Settings.........................................................................................................................57
Preview..................................................................................................................................59
Annotations............................................................................................................................ 61
Preview…....................................................................................................................................62
Hold/Suspend.............................................................................................................................63
Print............................................................................................................................................64
Move...........................................................................................................................................64
Delete.........................................................................................................................................65
Abort...........................................................................................................................................65
Merge…......................................................................................................................................66
Archive........................................................................................................................................68
Apply Form…..............................................................................................................................69
Mail Merge…............................................................................................................................... 71
Center Pages…..........................................................................................................................72
Imposition...................................................................................................................................74
Insert/Delete Pages….................................................................................................................75
Numbering…...............................................................................................................................78
Re-order Pages….......................................................................................................................80
Scale & Rotate… ........................................................................................................................81
Settings.......................................................................................................................................83
Tumble........................................................................................................................................84
Assign Job Ticket…....................................................................................................................85
View.................................................................................................................................................87
Toolbar........................................................................................................................................87
Status Bar...................................................................................................................................87
Sort by........................................................................................................................................87
System Events............................................................................................................................88
System Errors.........................................................................................................................89
Accounting..................................................................................................................................89
Scripting..........................................................................................................................................91
Script Toolbar..............................................................................................................................92
Script Properties and Methods ...............................................................................................94
Resolving PrintStation/PrintLink Problems................................................. 103
Resolving Problems for PrintStation 024.......................................................................................103
Viewing Printer Status Summary...............................................................................................103
Viewing Printer System Status..................................................................................................105
Jam Resolution..............................................................................................................................108
Jam Resolution PrintStation 024 System..............................................................................108
Resolving Problems for PrintStation 312.......................................................................................109
Viewing Printer Status Summary...............................................................................................109
Jam Resolution PrintStation 312 ..........................................................................................111
Viewing Printer Maintenance Information..................................................................................113
Viewing Printer Service Errors ..................................................................................................115
Viewing Printer Unit Errors........................................................................................................117
6 PrintStation Manager Reference Manual
Page 7

Viewing Miscellaneous Printer Information............................................................................... 119
Resolving Problems for PrintLink Cii............................................................................................. 122
Viewing Printer Status Summary.............................................................................................. 122
Resolving Problems for PrintStation LaserJet 5Si......................................................................... 124
Viewing Printer Status Summary.............................................................................................. 124
Resolving Problems for PrintStation DesignJet CP....................................................................... 126
Viewing Printer Status Summary.............................................................................................. 126
Resolving Problems for PrintStation 040....................................................................................... 128
Viewing Printer Status Summary.............................................................................................. 128
Viewing Printer System Status ................................................................................................. 130
Resolving Problems for PrintLink 062...........................................................................................132
Viewing Printer Status Summary.............................................................................................. 132
Viewing Printer System Status ................................................................................................. 133
Resolving Problems for PrintStation LaserJet 8000 ...................................................................... 134
Viewing Printer Status Summary.............................................................................................. 134
Gamma Calibration....................................................................................................................... 136
Window......................................................................................................................................... 137
Reset Size ................................................................................................................................ 138
Refresh.....................................................................................................................................138
Tools............................................................................................................................................. 139
Notifications….......................................................................................................................... 139
Find….......................................................................................................................................140
AutoScript................................................................................................................................. 141
Options..................................................................................................................................... 143
Help ..............................................................................................................................................143
Glossary......................................................................................................... 145
Index............................................................................................................... 147
PrintStation Manager Reference Manual 7
Page 8

8 PrintStation Manager Reference Manual
Page 9

What is PrintStation Manager?
The PrintStation Manager (PSM) is a sof t ware applicat ion which
“virtualizes” PrintStations/Print Links. Multiple PrintStations/PrintLinks
are grouped together t o appear as a single high speed printer. This
Virtual Engine (VE) system provides a means to customize print er
configurations based on printing r equirements.
The PrintStation Manager incorporates an Electronic Collator and job
parser (or job manager) t hat evenly distributes jobs between the
PrintStations defined within the Virt ual Engine.
Electronic collation provides a means by which all pages only need to
be Rasterized (RIP’ed) once. These compressed bitm aps ar e saved
so that multiple copies of the pag es m ay be print ed subsequently
utilizing the printer’s full rated speed. All of this is done electronically
by the PrintStation Manager so that the output of one PrintStation is
placed on top of another yielding a complete collated j ob set, just as
though it was printed on a single printer.
Why do I need Multiple Virtual Engines
Using multiple Virtual Engines allows printing multiple jobs at the
same time. For instance, if there are four PrintStations, the operator
can set up two PrintStations as one VE and another two PrintStations
as a second VE. This way one job can be directed to one VE and
another job can be directed to the other VE concur rently. Additionally,
one Virtual Engine may be set up to print duplex jobs and keep jobs
after they are printed while another Virtual Engine does neither.
Since a system with four, six, eight, up to twelve PrintStations can
have several VE configurations, T/R Systems ships t he
with default VE configurations. Default VE config ur ations are provided
to give you a basic collection of printers. T/R Systems has chosen
configurations that would be somewhat typical in a printing
environment and minimize the installation time.
MicroPress
PrintStation Manager Reference Manual 9
Page 10
Features
The PrintStation Manager has many built-in feat ures like dragging and
dropping files from one Vir tual Engine to another and duplexing a
simplex job with a single mouse click.
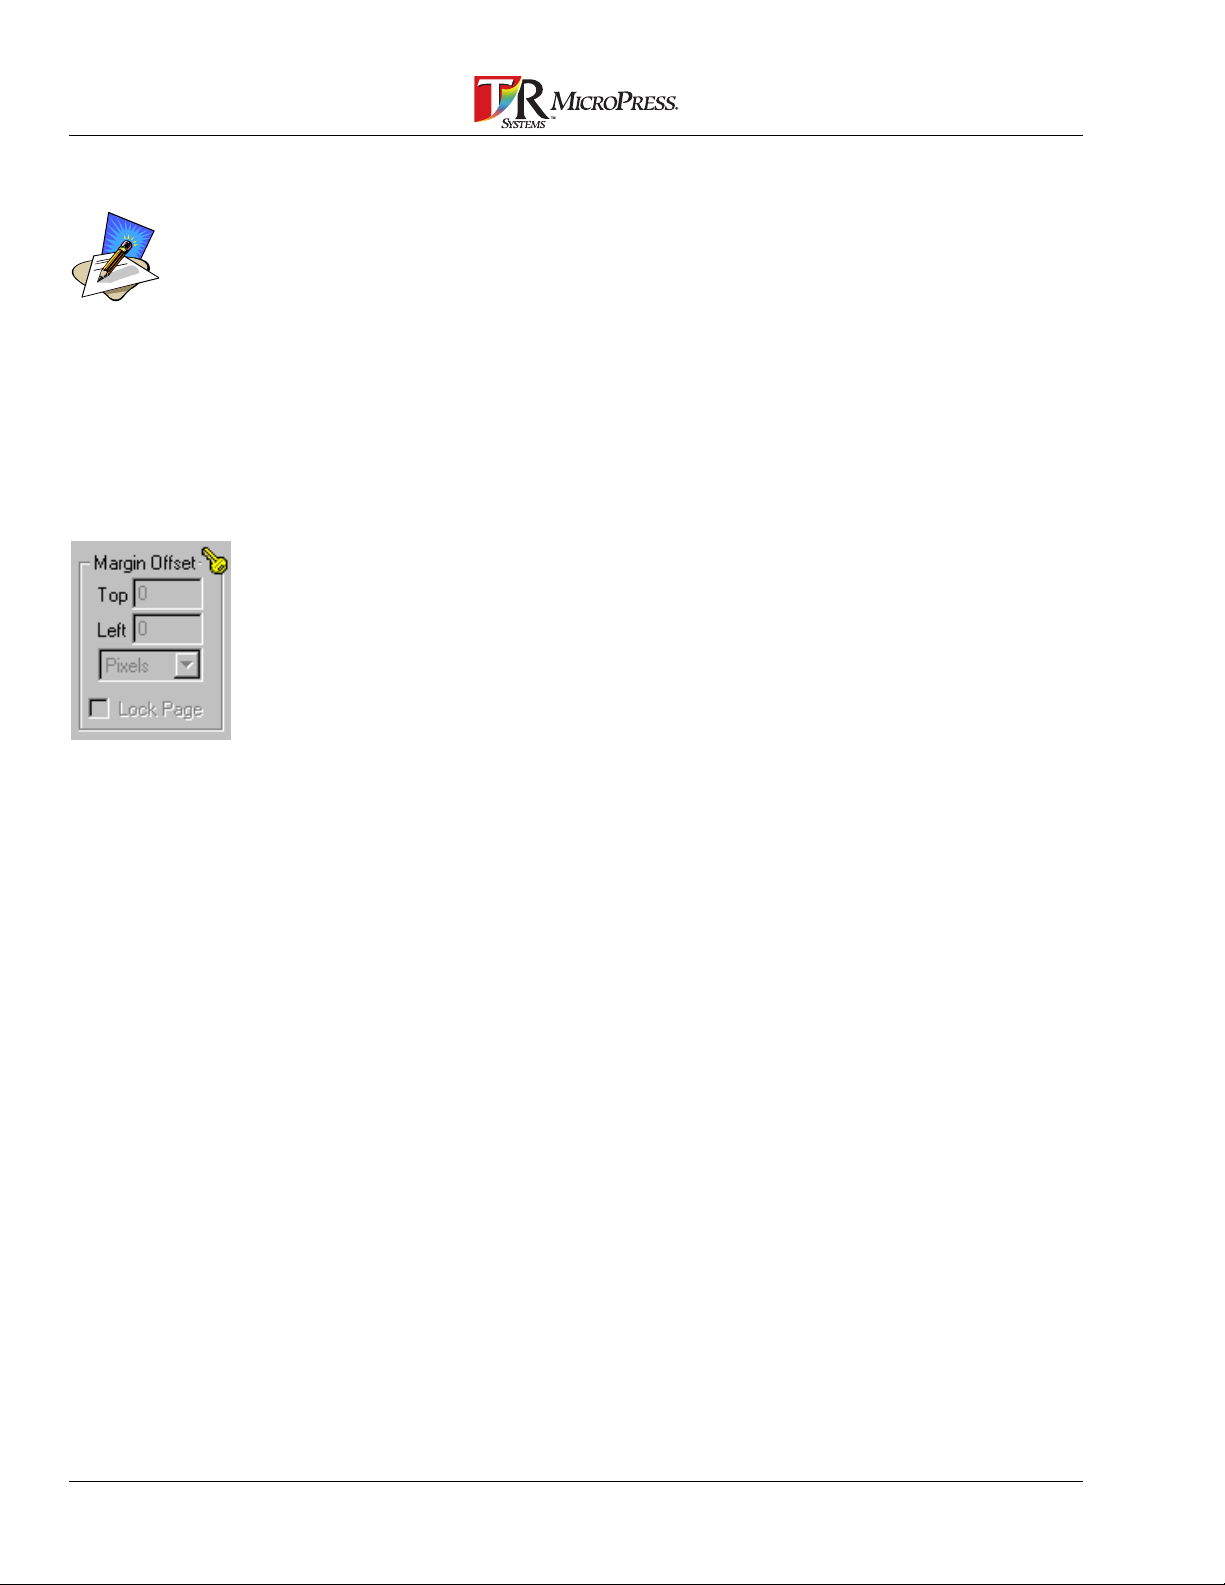
These optional features must
be purchased and a number
obtained from T/R Systems in
order to be used. If the option
has not been registered, a
small key (see the graphic
below) will be visible and the
controls will be “grayed out” or
unavailable.
Optional features include:
• Imposition: The means to position m ultiple pages of a job onto a
larger single sheet in the correct orientation for binding. This
feature is not available for the Pr intStation 312.
• Document Merge: This featur e allows the creation of new
documents by combining portions of existing documents.
• Forms: This featur e is used t o pr int data from one job as an overlay
onto another job.
• Image Manipulation - This featur e consist s of the following:
- Scaling: Adjust the size of pag es within a PSM job.
- Center Pages: center the im age on all pages of a job.
- Margin Offset: Change the margin settings for a PSM job, either
the whole job or on a page by page basis. This feat ur e is not
available for the PrintStation 312.
• ColorTools (Print Test Calibrate in prior versions): ColorTools is a
suite of Color Calibration applications, including Gammatic that
automates gamma calibration of the color capable PrintStations.
• Scripting: Run VB Scripts to perform different tasks on existing jobs
or on new jobs as they come into the PSM.
• Job Ticketing: A print pr ovider (
MicroPress
owner) provides a
custom ticket form, generated with MicroTicket Configuration, to a
client. The ticket is accessible to bot h Macintosh and PC format
computers. The client, using MicroTicket within a web browser, fills
out the characteristics of a print job. The files required to process
the job are also included. MicroTicket packages all of the required
jobs into one file that is easily transport ed t o the print provider.
• Numbering: Apply page numbers or other sequential numbers to
PSM jobs.
• Annotations: Add comments to PSM jobs. The Find t ool can be
used to locate text in the annotations.
These
MicroPress
except where noted.
10 PrintStation Manager Reference Manual
features are available for use with all PrintStations
Page 11
Supported Paper Types
PrintStation Tray Paper Sizes
312
024
Cii
LaserJet 5Si
DesignJet CP
040
062
LaserJet 8000
*=for imposition only
Internal Cassette B5, A4, Legal, Letter
Optional Cassette B5, A4, Legal, Letter
Manual Tray up to 8.5"x14"
Upper Tray B4, A4, Legal, Letter
Lower Tray A3, B4, A4, Ledger, Legal, Letter
Manual Tray up to 11.70"x17.70"
Envelope Feeder Monarch, COM-10, DL, B5, C5
Deck A3, B4, A4, Ledger, Legal, Letter
Upper Tray A4, Letter
Middle Tray A3, A4, A5 B4, B5, B6, Ledger, Legal, Letter, Statement
Lower Tray A3, Ledger
Manual Tray up to 12"x18"
Upper Tray US Letter, US Legal, A3, A4, Statement, B4, Tabloid
Lower Tray US Letter, US Legal, A3, A4, Statement, B4, Tabloid
Manual Tray US Letter, US Legal, A3, A4, Statement, B4, B5, Tabloid, Executive,
COM-10, Monarch, DL, C5, ISO B5
Deck US Letter, US Legal, A3, A4, B4
US Letter, Full Bleed US Letter, Tabloid, Full Bleed Tabloid, ANSI C,
ANSI D, ANSI E, ARCH A, ARCH B, ARCH C, ARCH D, ARCH E,
ISO A4, Full Bleed ISO A4, ISO A3, Full Bleed ISO A3, ISO A2, ISO
A1, ISO A0, Oversize A2, Oversize A1, Oversize A0, B4, B3, B2,
B1, 24" x 48", 24" x 60", 24" x 72", 24" x 84", 24" x 96", 24" x 108",
36" x 60", 36" x 72", 36" x 84", 36" x 96",
Upper Tray US Letter, US Legal, A3, A4, A5, B4, B5, Tabloid, Executive
Middle Tray US Letter, US Legal, A3, A4, A5, B4, B5, Tabloid, Executive
Lower Tray US Letter, US Legal, A3, A4, A5, B4, B5, Tabloid, Executive
Large Capacity Hopper
(LCH)
st
Drawer Tabloid
1
2nd Drawer Letter, Letter R, Legal, Tabloid, A5, A4, A4R, A3, B5, B5 R, B4,
3rd Drawer Letter
Large Capacity
Cassette (LCC)
Manual Tray Letter, Letter R, Legal, Statement
Upper Tray US Letter, US Legal, A3, A4, B4
Lower Tray US Letter, US Legal, A3, A4, B4, B5, Tabloid
Manual Tray US Letter, US Legal, *A5, B4, B5, Tabloid, Executive, Statement
Deck US Letter, US Legal, A3, A4, A5, B4, B5, Tabloid
A4, Letter
Invoice/Statement
Letter
36" x 108"
On the PrintLink Cii, Executive size paper can only be
fed from the Manual Tray.
Paper sizes B1 through B6 referred to in this manual
are JIS unless otherwise noted.
PrintStation Manager Reference Manual 11
Page 12

PrintStation and Virtual Engine Naming Convention
Beginning with
PrintStations and Virtual Engines changed from previous versions. This
change was necessary due to the number and possible combinations
of different Pr intStations supported by the
The name of the PrintStation/Virtual Engine will be a letter and a
number. The letter indicates t he PrintStation type and the number will
be an increment of 1-8 depending on the quantity of the type of
PrintStation.
A PrintStation 312
B PrintStation 024
C PrintLink Cii
D PrintStation LaserJet 5Si
E PrintStation DesignJet CP
F Pr int Station 040
G PrintLink 062
H Print Station LaserJet 8000
MicroPress
A
B3, and B4. A virtual engine using B1 and B2 would be named B12.
MicroPress
with four 024’s would have PrintStations named B1, B2,
Version 4.51, the naming convention f or t he
MicroPress
.
12 PrintStation Manager Reference Manual
Page 13
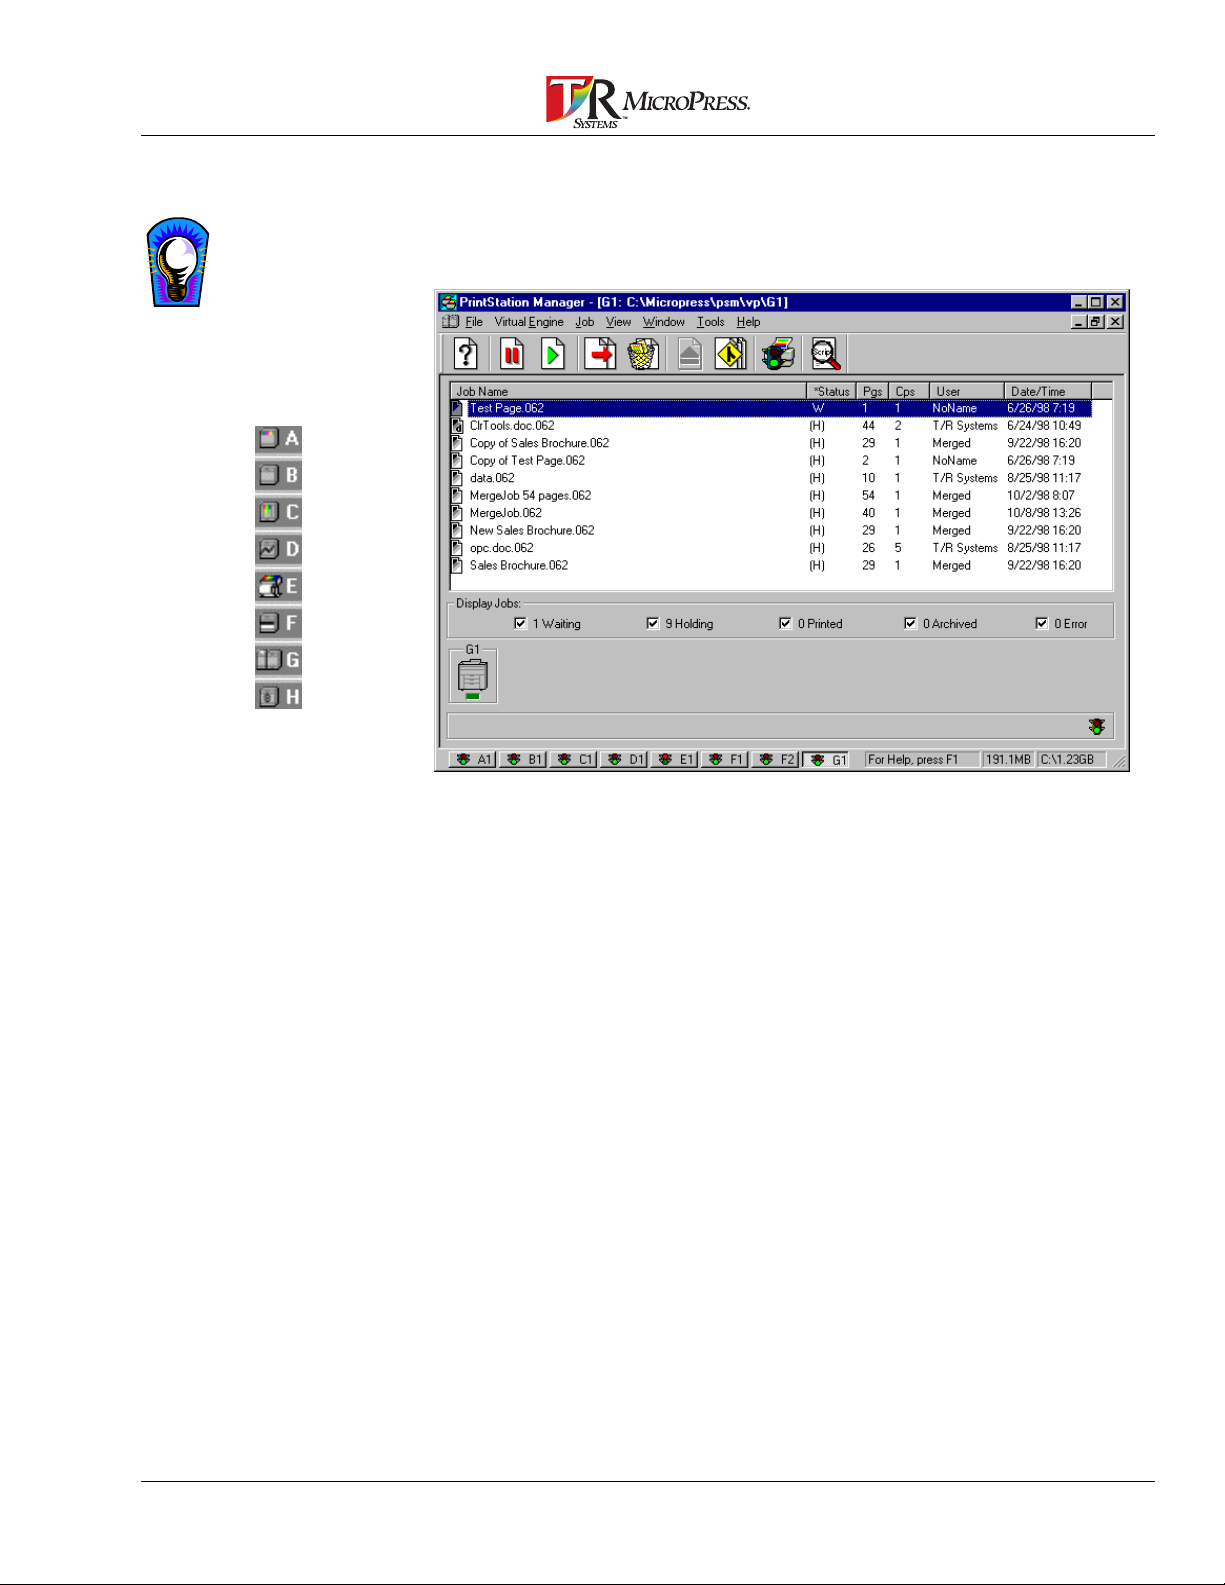
The PrintStation Manager Main Screen Display
When the Pr int St a t ion Manager is launched, it will display the main
screen.
The icon at the top left of
each Virtual Engine window
represents the type of output
device connected to the VE.
This main screen allows access to:
• The Virtual Engines within the PrintSt ation Manager.
• Print jobs and job attributes
• The Toolbar for Print St ation and job control
PrintStation Manager Reference Manual 13
Page 14
Job List Window
The field widths in the Job
List window are adjustable.
Move the cursor to the
border between two fields,
and the cursor will change
to the resize arrows.
Then, drag the field border
to the desired width. Double
clicking the field border will
automatically size the
column to fit the longest text
in the column.
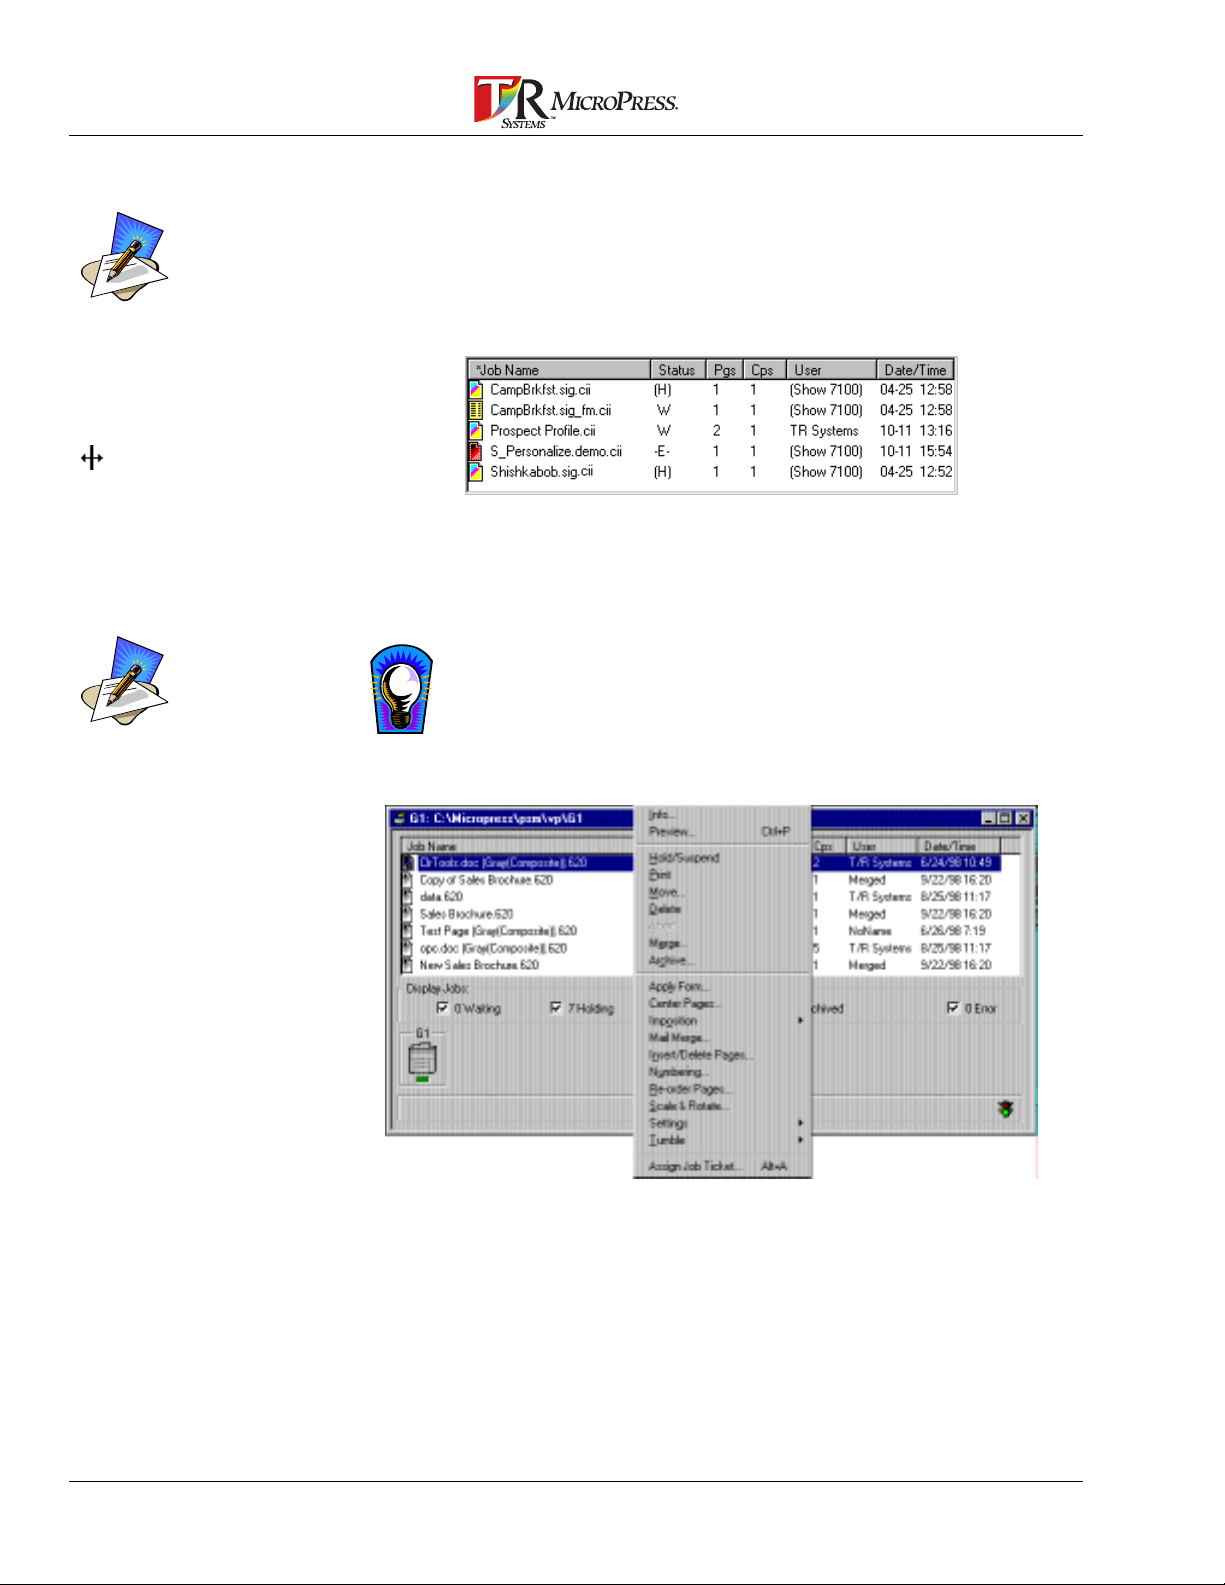
The Job List window shows the job name, status of the job, num ber of
pages, number of copies, t he nam e of the user who sent the job, and
the date/time the job was RIP’ed. Additionally, the j ob icon located to
the left of the job name will indicate whether the job is Color, B&W,
merged with a form, or if the job is set up to print duplex.
View Job Detail s
The Job List W indow can display job details (as shown above) or job
names only.
A “*” in front of the number
of pages in the job means
that the job is set to print
some sequence of pages
other than the first page to
the last all inclusive. For
example: odd pages only.
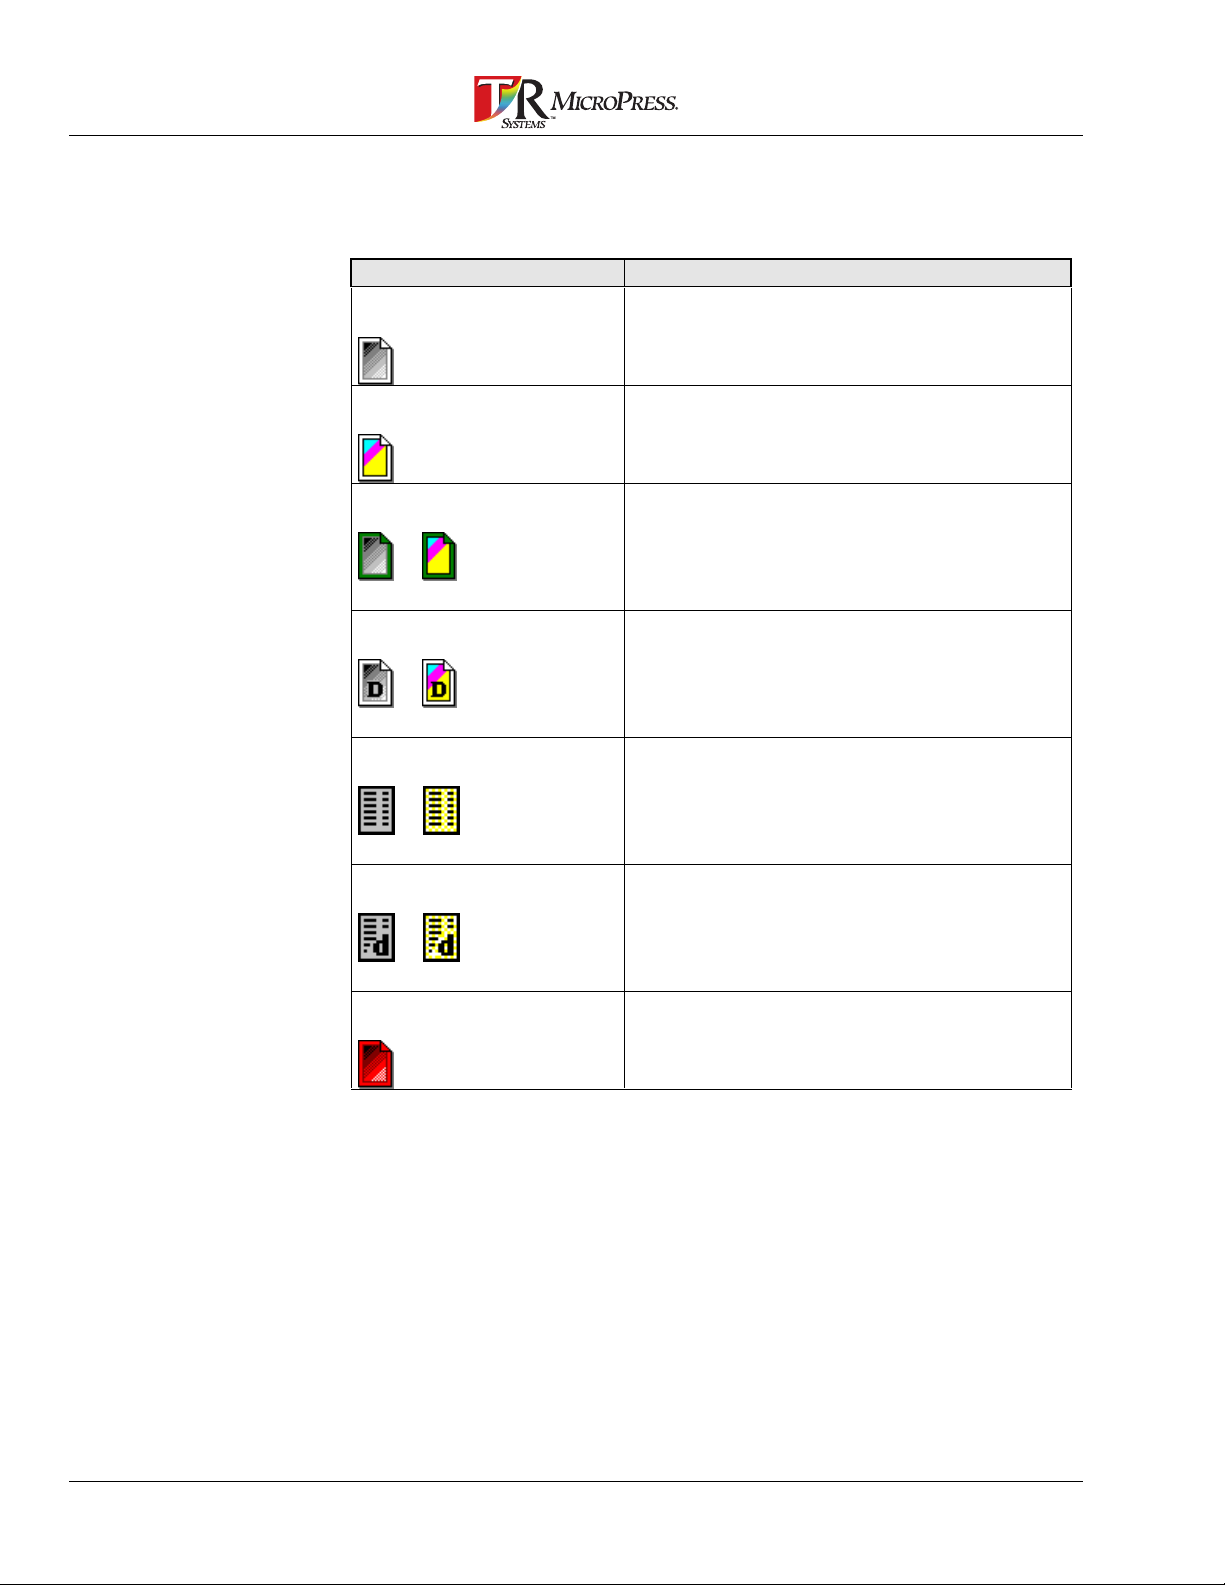
Right click within the Job List window for quick access to the Job Menu. Not
all menu items will be available unless a job is selected.
14 PrintStation Manager Reference Manual
Page 15

Job List Fields
Refer to the following table to interpret the columns in the Job List window.
An ‘*’ in any column header means the list is sorted by that field.
Field/Control Description
Job Name The name of the job to print and job icon.
Status The current state of the job. Refer to the
Display Jobs
states in which the jobs may display.
Pages The number of pages contained in the job. A
“?” will display as a job is loading into the
PrintStation Manager. The “*” in front of the
number of pages in the job means that the
job is set to print some sequence of pages
other than the first page to the last all
inclusive. For example: print odd pages only.
Copies The number of times the job will be printed.
User The user or the name of the user’s
workstation that sent the job to the printer.
Date/Time This field indicates when the PrintStation
Manager received the job.
section to interpret the different
PrintStation Manager Reference Manual 15
Page 16
Job Icons
Refer to the following table to interpret the icons.
This Job Icon Descript i on
B&W standard This icon displays for standard B&W jobs that
are in the Waiting, Holding, Suspended or
Printed state.
Color standard This icon displays for standard color jobs that
are in the Waiting, Holding Suspended or
Printed state.
Printing
or
B&W Color
Duplex
or
B&W Color
Form
or
B&W Color
Combination
or
B&W Color
Error This icon indicates a job has errored.
When a job is printing the icon is highlighted
in green.
A duplexed job.
A job that has been Merged with a Form.
This icon displays for jobs that are both
Duplex and a Form.
16 PrintStation Manager Reference Manual
Page 17
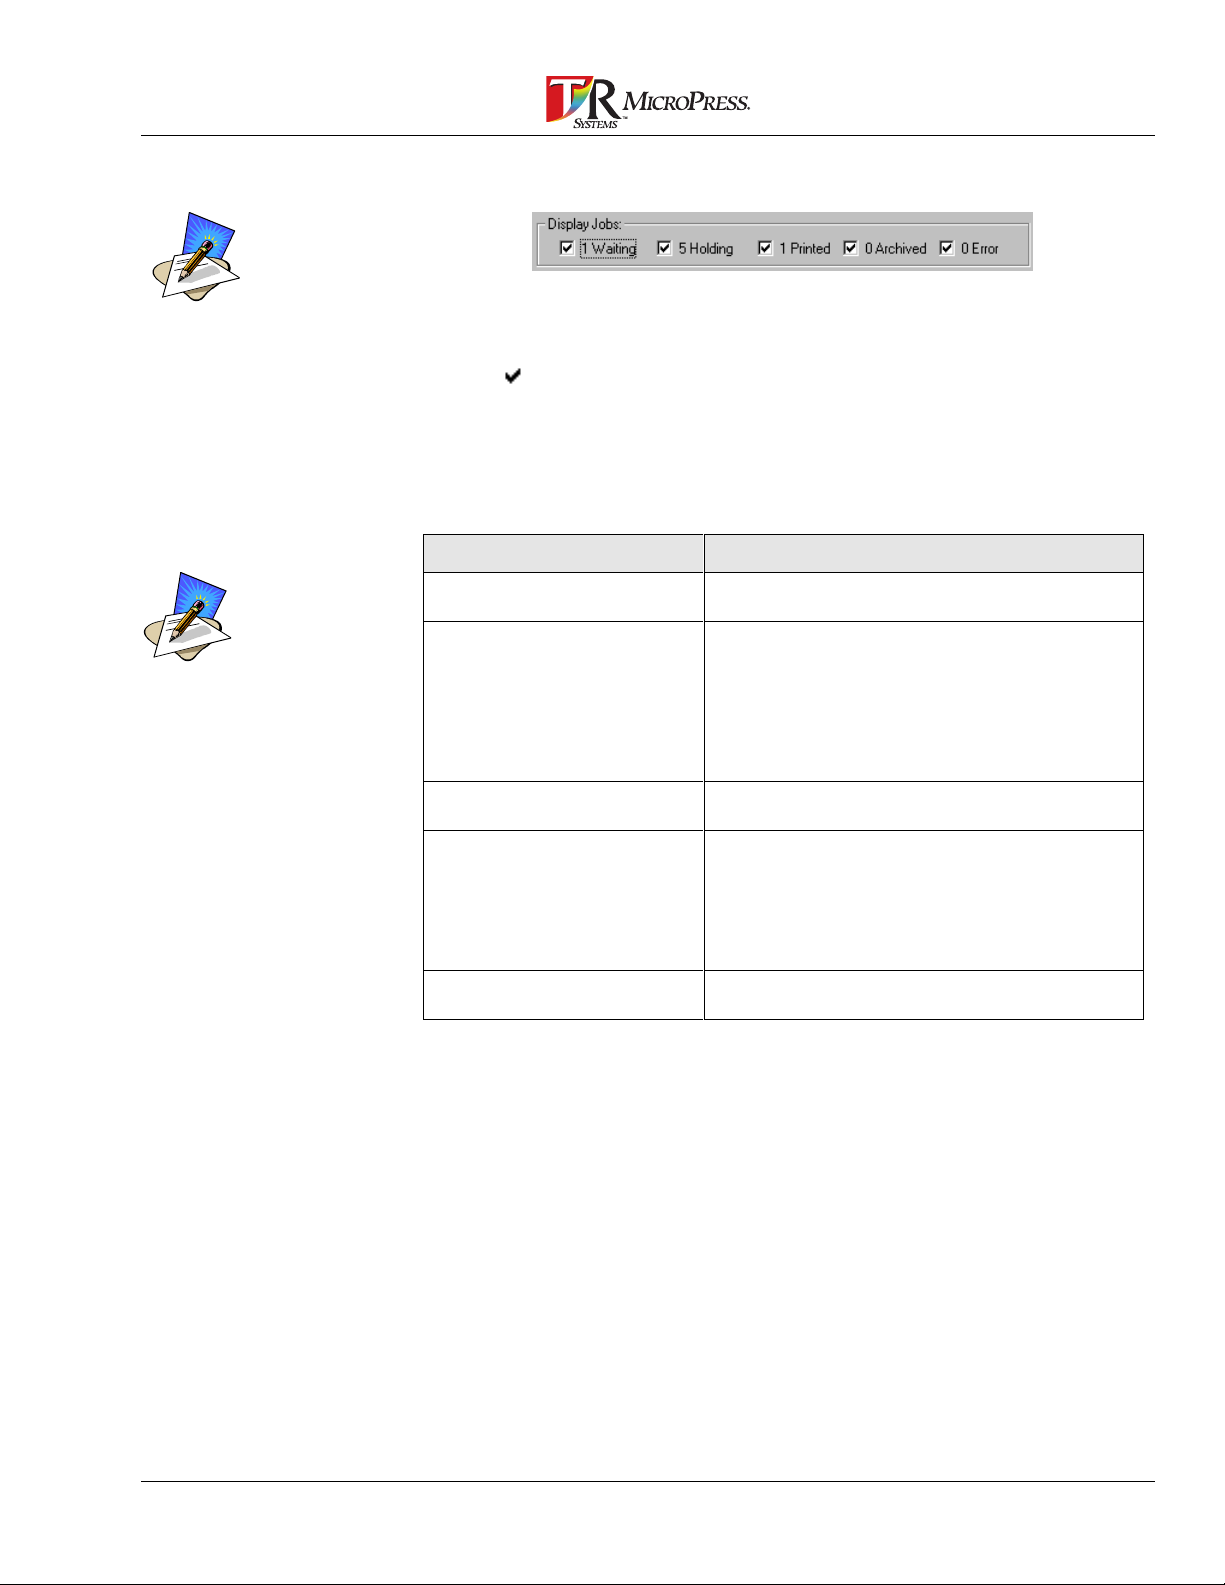
Display Jobs
The number of each current
job type will display
regardless of whether or not
the job type is selected.
The next available waiting job
becomes active when the
current print job is complete if
the Virtual Engine is not
paused.
• When a job t ype is selected, all j obs of that type will display in the
Job List Window.
• Click the box beside each job type to include it in the Job List.
• A “
“ in the box indicates selection.
• The number that displays beside each job type indicates the
number of jobs of t hat t ype.
Refer to the following table t o int erpret the different states in which
the jobs may display.
Field/Control Descript i on
Waiting Jobs that are waiting to be printed. The letter
W displays in the status column.
Holding Jobs that are retained to print at another
time. The letter H displays in the status
column. Jobs that are on hold remain in a
held state until you change them.
Printed Jobs that have been printed successfully.
The letter P displays in the status column.
Archived Jobs that have been archived with Auto
Archive display the letter A in the status
column. The file name is also appended with
the “.msm” or ".pdf" extension. See
Archive…
information.
Error Jobs in which a printing error has occurred.
The letter E displays in the status column.
in the Job menu section for more
There are additional job status indicator s that are not listed in the
Display Jobs check box area.
Refer to the f ollowing t able t o interpret the indicators.
PrintStation Manager Reference Manual 17
Page 18
Status Indicates
>>
P!
-L-
S
The status column displays “
job is in the process of printing.
The job stack has been moved to another
PrintStation. When a job is printing to a
Virtual Engine that controls two or more
PrintStations and one errors out, the job
stack is moved to an operational
PrintStation if the error is not corrected
within a specified amount of time.
Job is locked. This will display during job
archival and other processes. When the
job status displays L, the job is locked and
can not be accessed.
If a job is currently printing, pressing the
Hold/Suspend button will stop the job from
printing. An S displays in the status
column.
>>” while a
18 PrintStation Manager Reference Manual
Page 19
PrintStation Button
Cii
Right click and hold for an
error status display on an
engine displaying an error.
See the example below.
The PrintStation buttons are located inside the Virtual Engine window.
The PrintStation buttons will alert you to com m on PrintStation
conditions that may result in image def ects or print job errors.
To view the message that corresponds with the graphic
representation of the Print St ation, just click the button. Clicking on a
PrintStation button will open the PrintStation window and allow access
to PrintStation Summary or PrintStation Systems information for a
specific PrintStation. This includes information on Paper Status,
PrintStation Summary Status, Enable/Disable com mands, System
(PrintStation) Error s , Total Pages Printed and other m iscellaneous
PrintStation status. Refer to
Problems
for more details about Print St ation status.
Resolving PrintStation/PrintLink
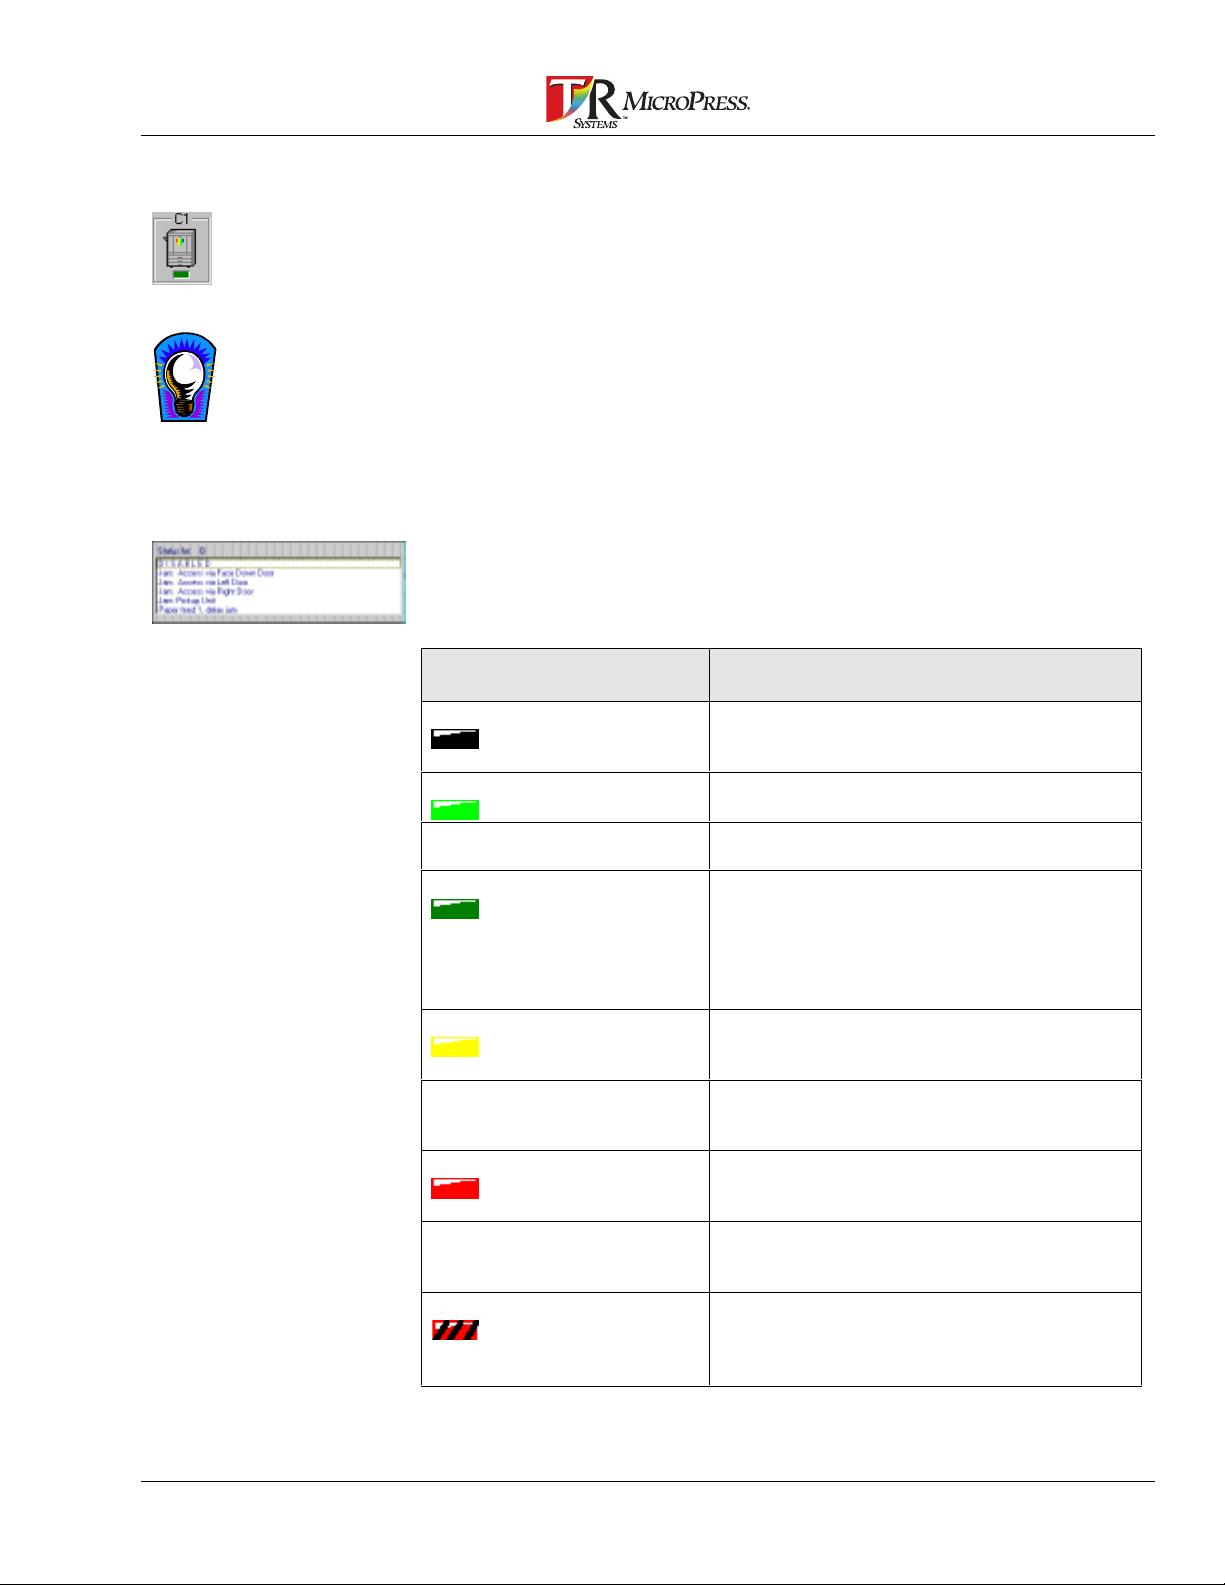
The PrintStation status is identified with lights displaying various
colors. Refer to the following table to interpret the status of the
PrintStation button.
The PrintStation Icon
When
Light Displays
Black The PSM is starting up. This is before
communication is even attempted from the
ClusterServer to the PrintStations.
Bright Green The printer is idle and ready.
Flashing Bright Green A job is in the process of printing without
error, or toner may be low.
Dark Green There is no communication between the
PSM and the PrintStation. The PrintStation
may display this color when the connection
between the PrintStation and the
HostAdapter has been broken or the
PrintStation is turned off.
Yellow A caution is indicated. Conditions may be
developing that could lead to image quality
issues.
Flashing Yellow A job is printing, but a caution is indicated.
Conditions may be developing that could
lead to image quality issues.
Red An event has occurred that requires user
intervention before the job can continue to
print.
Flashing Red The printer is paused for the user to “work
and turn” the pages for duplexing. This is
only on the PrintStation 312.
Disabled PrintStation has been disabled. Jobs
cannot be sent to a PrintStation while it is
disabled. The PrintStation will not
contribute to the output of any job.
PrintStation Manager Reference Manual 19
Page 20
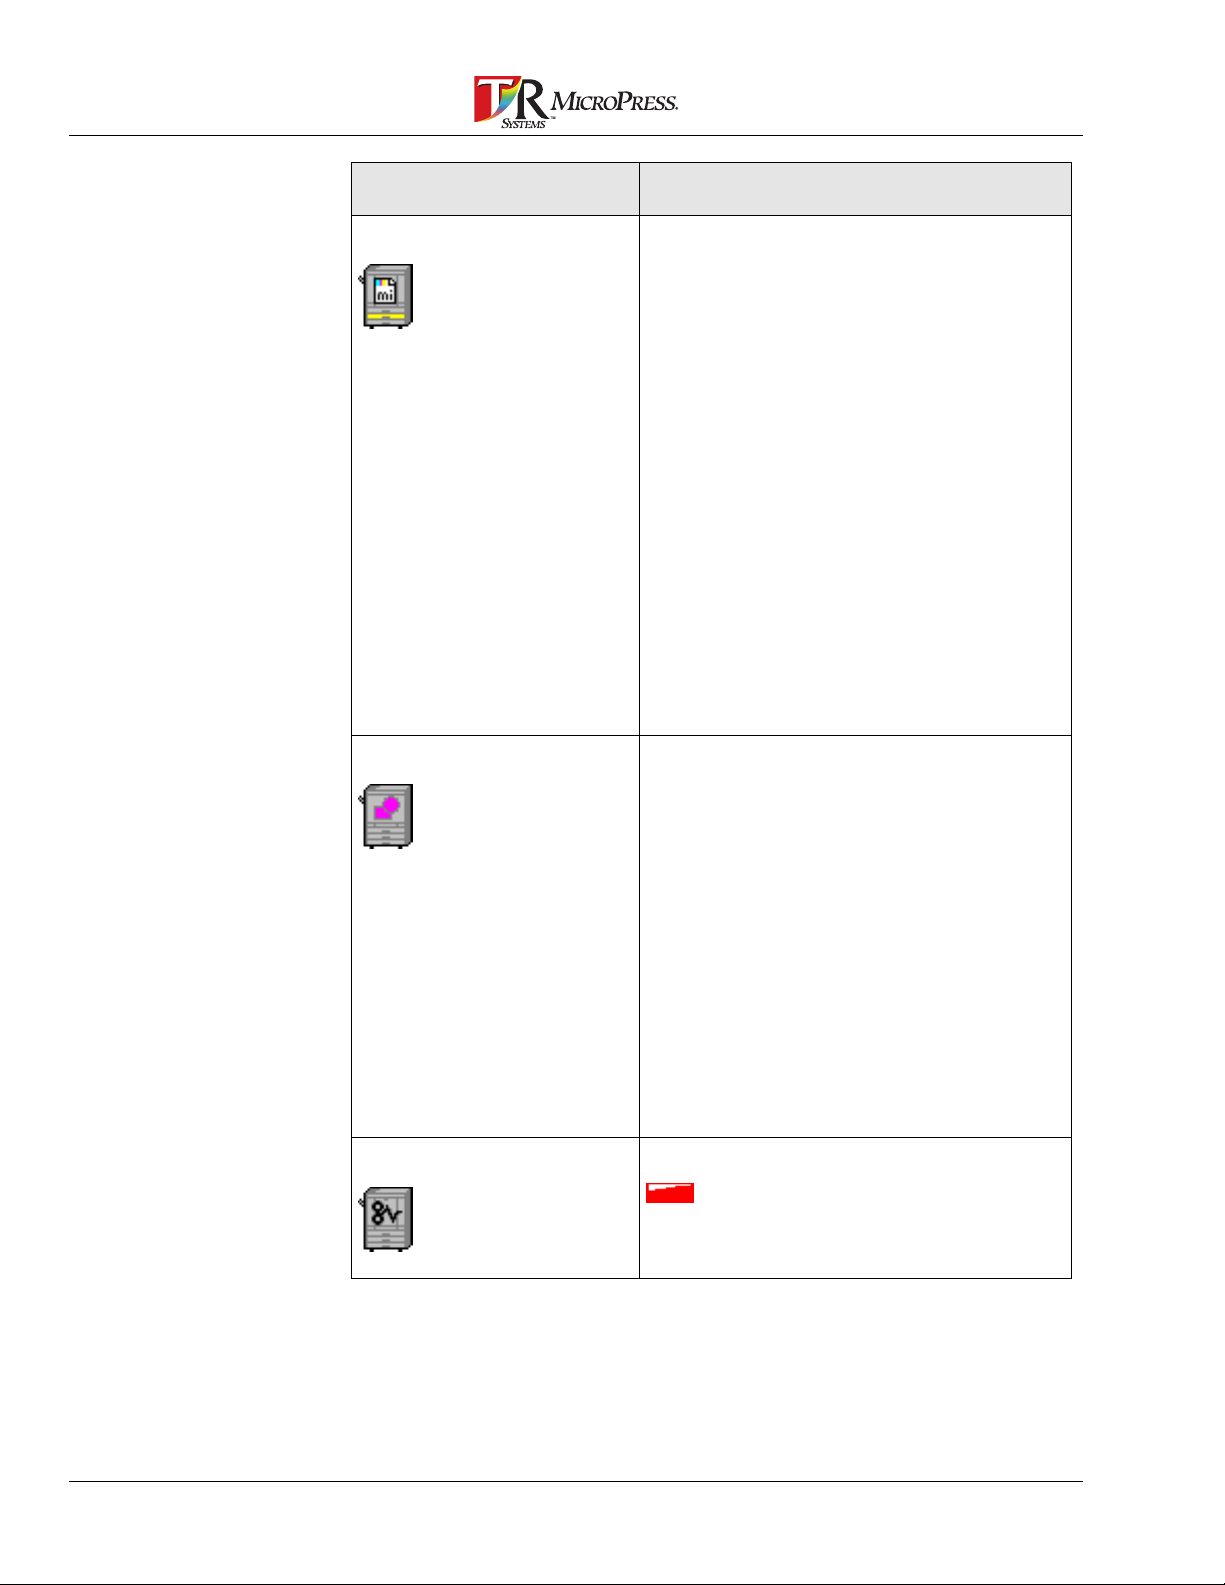
The PrintStation Icon
Light Displays
Paper Out
Cii
Toner Low/Out
Cii
Paper Jam
Cii
When
The PrintStation has used the last sheet of
paper in the selected paper source. Be
aware of the following:
• For some PrintStations, the button will
display which paper tray is empty.
• D - Paper Deck (024 only)
• e - Envelope Feeder (024 only)
• i - Internal Tray (312 only)
• L - Lower Tray (024, Cii only)
• m - Manual Tray
• mi – Middle Tray (Cii only)
• o - Optional Tray (312 only)
• u - Upper Tray (024, Cii only)
• Paper Out with Yellow Light means:
Auto Tray Switch is enabled and a
paper tray is empty; however, printing
may continue with use of another paper
tray.
• Paper Out with Red Light means that
one or all of the paper trays are empty
and printing will not continue.
A toner cartridge is low. The PrintStation
button will indicate which color toner cartridge
is low.
For PrintStation 024 engines:
• The EP (toner/drum) cartridge is low.
For PrintStation 312 and Cii engines:
• If a second toner cartridge becomes low
before the first toner is replaced, the
Engine button will continue to indicate the
first color. The PrintStation Status display
(click PrintStation button) will alert the user
that additional color toners may also be
low.
This display status should be used as an
indicator that the image quality needs to be
monitored because of low toner, not that the
toner cartridge needs to be replaced.
A printer paper jam has occurred. This
information will always display along with a
light. Click on the engine button for
information on the paper jam location and jam
resolution (except for PrintLink Cii).
20 PrintStation Manager Reference Manual
Page 21
The PrintStation button Status may also display multiple conditions that are
occurring simultaneously in the PrintStation.
For example:
indicates that the Internal Paper Tray is empty and the Magenta Toner is low.
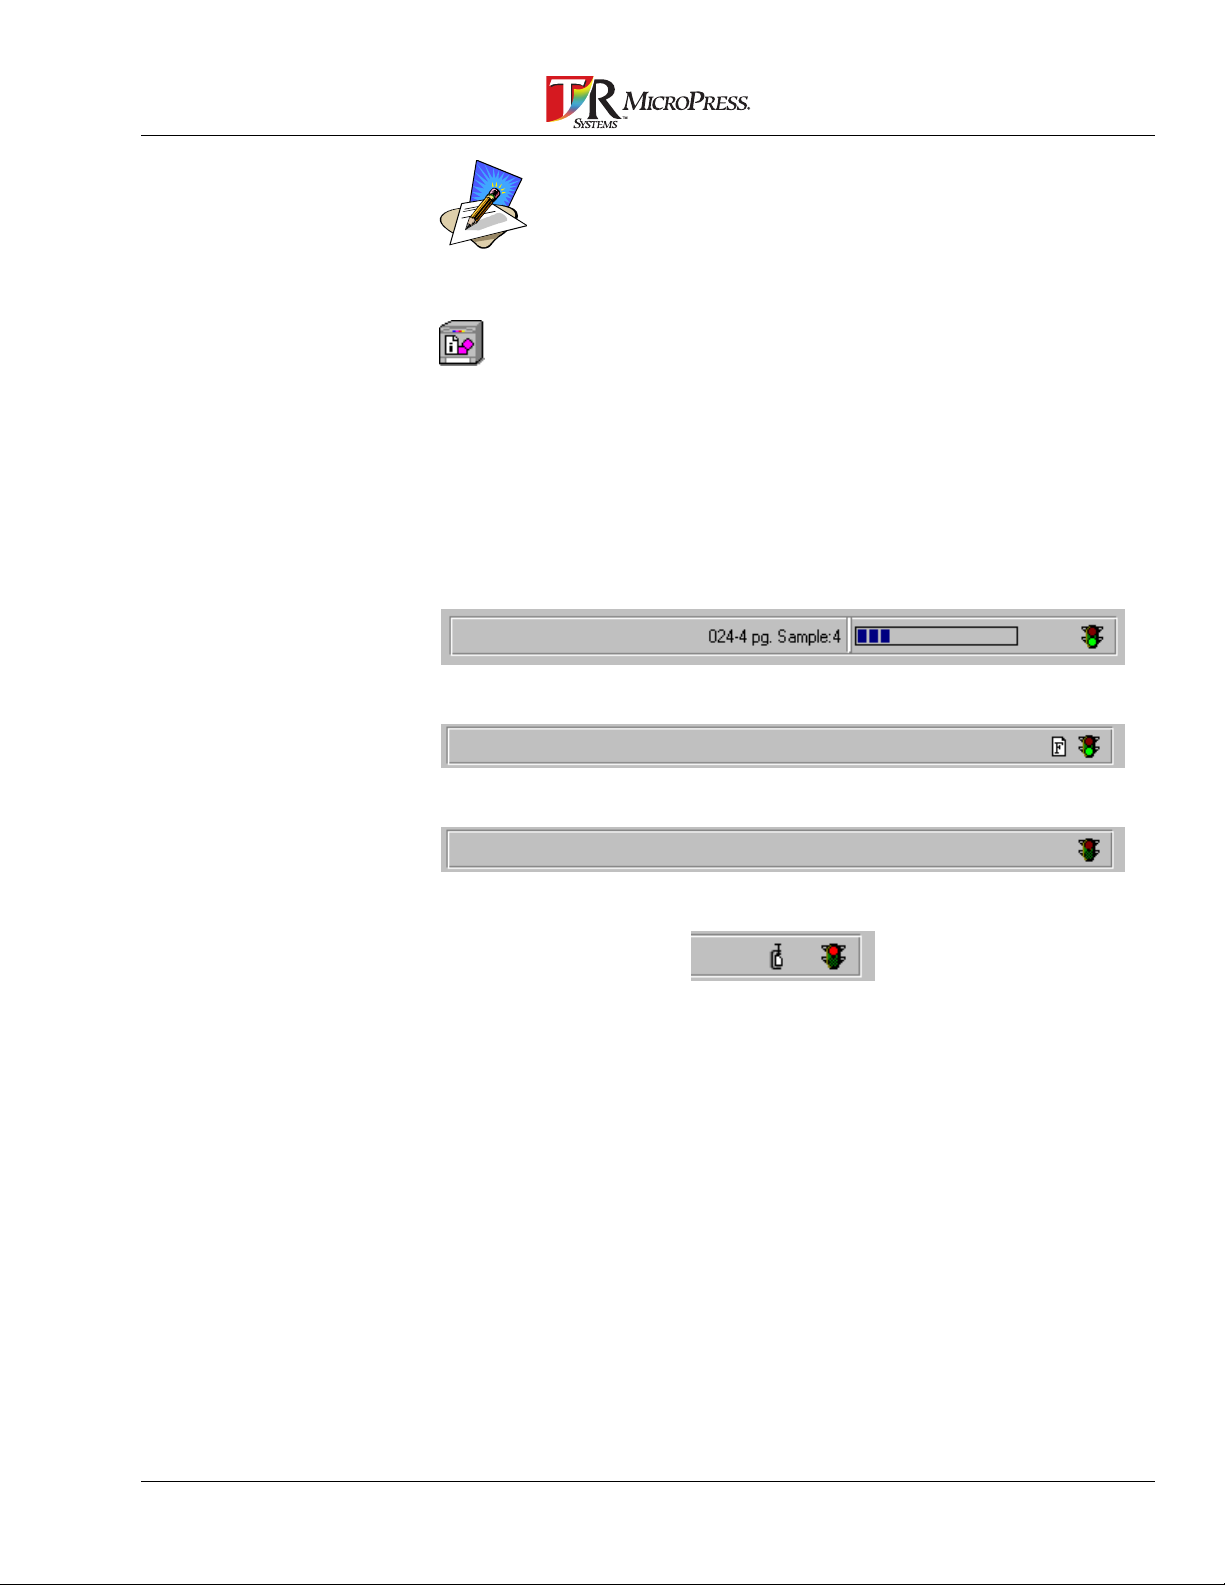
Virtual Engine Status Bar
The Virtual Engine Status Bar displays the name and pr inting status
of the job in the process of pr int ing. The Virtual Engine also has a
Pause/Resume button. There are also icons t o indicate that Forms
are on and/or that Archiving is in progr ess.
Printing
Forms
Paused
Archiving/Unarchiving
PrintStation Manager Reference Manual 21
Page 22

22 PrintStation Manager Reference Manual
Page 23
Menus
File
UnArchive Job File(s)…
Depending on the file size
decompression may take
several seconds to several
minutes to complete. Multiple
files can be selected to
unarchive simultaneously.
Beginning with
MicroPress
version 4.52, menus will contain only the
features available to the currently selected PrintStation/PrintLink type.
In previous versions the menu items that were unavailable would have
been grayed out.
Use the File menu selections to UnArchive jobs and Exit the
PrintStation Manager.
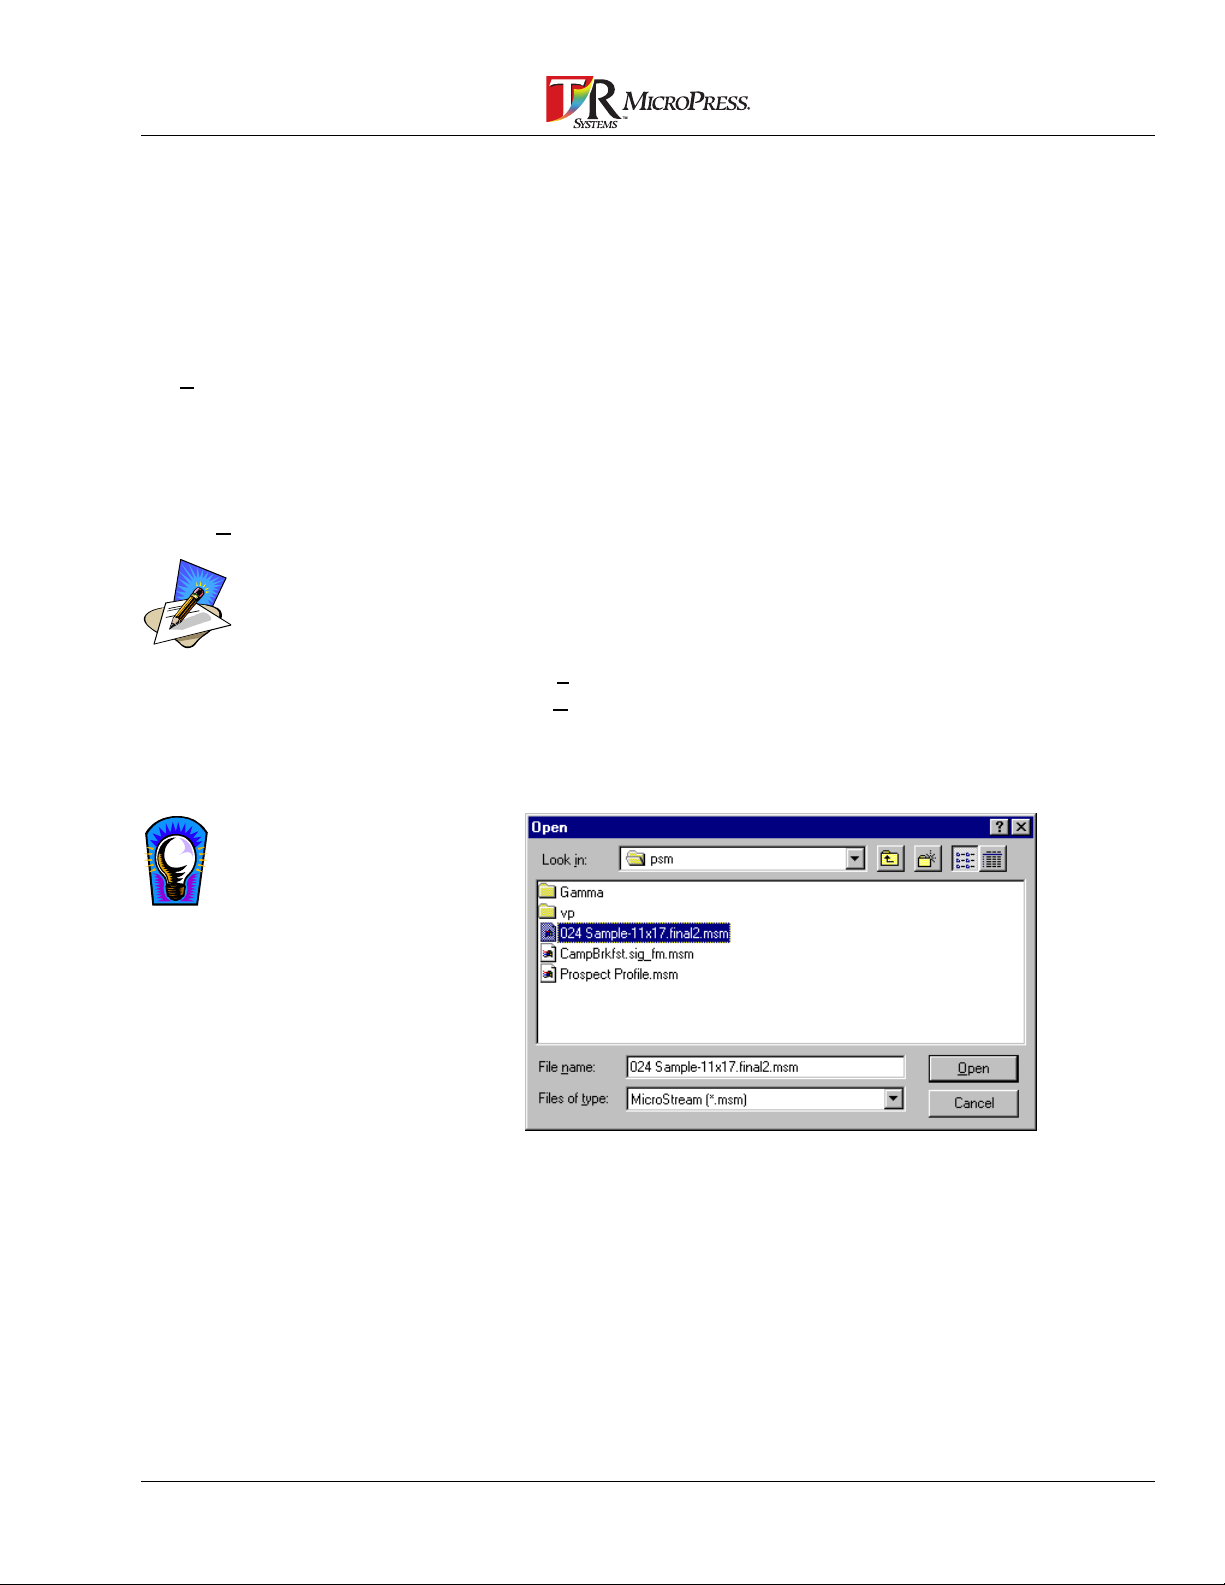
Use UnArchive Job File(s) to decompress archived files and retur n the
file to the PrintStation Manager format.
1. Select the Virtual Engine to receive the archived file.
2. Select File from the PrintStation Manager main menu and t hen
select UnArchive Job File(s) from the File Menu.
3. Select the file to be unarchived. Click OK. The file is
decompressed and placed in the active Virtual Engine Job List.
UnArchiving an older version
PSM job will update it to the
current PSM version.
Select multiple jobs by holding down the Shift or CTRL key while
selecting jobs.
PrintStation Manager Reference Manual 23
Page 24
Exit
The present session of
PrintStation Manager can be
ended by pressing [Alt]+F4.
Virtual Engine
To exit PrintStation Manager:
Select Exit from the File Menu and the present session of
PrintStation Manager will be ended.
—OR—
Click the Control Menu box ( locat ed in the top left corner of
the PSM main screen) and select Close. The present
session of PrintStation Manager will be ended.
The PrintStation Manager saves the status of the current jobs before
closing.
The Virtual Engine Menu contains functions that affect the selected
Virtual Engine. Depending on the
MicroPress
configuration, some of
these features may not be activated. Additionally, the Color Tools
feature will only be functional if t he Vir t ual Engine contains a color
capable PrintStation.
Pause or Resume a Virtual Engine
Pause or Resume a Virtual
Engine by:
• clicking the Pause button
on the Toolbar on the
PrintStation Manager
Main Screen
• clicking on the small Stop
Light display at the
bottom right of the Virtual
Engine display
• right-click on the task bar
buttons and select
Pause/Resume
The following section covers all menu selections under Virt ual Engine.
Use the Pause/Resume Virtual Engine option to pr event or start print
activity to the active Virtual Engine. Use of t his option will have no
effect on the currently printing job. When the Pause/Resume light is
green, the Virtual Printer is r eady to pr int . When the Pause/ Resum e
light is red, the Virtual Pr inter is paused and will not print. All jobs that
are selected to print, will display as a Wait (W) status in the Status
column of the Job List window until the Virtual Engine is resumed.
To Pause a Virtual Engine
1. Select a Virtual Engine. The title bar of the Virtual Engine window
will be highlighted when selected.
2. Select Virtual Engine from t he Pr int St ation Manager main menu
and then select Pause.
3. The Virtual Engine activity is halted. Even thoug h t he printer is
paused, the user may continue to send jobs that will print when
the printer is resumed.
24 PrintStation Manager Reference Manual
Page 25
Resuming a Paused Virtual Engine
To Resume a Paused Virtual Engine
1. Select a Paused Virtual Engine.
2. Select Virtual Engine from t he Pr int St ation Manager main menu
and then select Resume.
3. The Virtual Engine activity is resumed and normal print activity
will continue.
Resynch Jobs
The Resynch Jobs feature provides the user with a means of
refreshing and updating the Job List window. This is especially useful if
a job file is copied into a PrintStation Manager spool dir ect ory. The
updated job will display after Resynch Jobs has refreshed the
Refresh, located in the
Window menu, will do the
same thing as Resynch
Jobs. Pressing the <F5> key
will also Refresh the Job List
window.
PrintStation Job List window.
There is no dialog box or window for this menu item, it takes effect
immediately.
To Resynch the Job List.
1. Select a Virtual Engine.
Forms…
To learn how to apply a form
to job already RIP’ed, see the
section entitled
Apply Form
.
2. Select Virtual Engine from the PrintStation main menu and t hen
select Resynch.
3. The Job List window will be refreshed, and any jobs copied to the
Virtual Engine’s Spool Directory will be added to the display.
The Forms option is used to print data from one job as an overlay onto
another job. The Forms option provides a more efficient way of printing
multiple copies of a job that contains both common and unique text or
graphics.
For example, a business form is oft en used by many individuals for
different purposes. Frequently, the common text or gr aphics in t he
blank business form mak e up 90% or m or e of the data sent to the
printer, while the unique text may make up only 10%.
Print forms mor e efficiently by sending the form with the fixed image
information (common text and graphics) to be processed through
MicroSpool, the T/R Systems RIP, and then to the Pr intStation
Manager only once. Next, configure the job as a form for that Virt ual
Engine. Then, jobs sent t o t hat Virtual Engine will be merged with the
form information.
PrintStation Manager Reference Manual 25
Page 26
Multi Page Forms
Letterhead
The forms print opt ion can also be set from Macintosh or PC
workstations using the
MicroPress
drivers.
A form can have one or more pages and can be mer ged with unique
text documents that contain any number of pages (e.g.; ten pages of
unique text or variable data to be merged with a f ive page form.) Forms
can be repeated so that each page of t he unique text document will be
merged with the appropriate page of the form. Click t he Repeat Form
button to merge a 5 page form with a 10 page document. The
PrintStation Manager merges 1-5 of the form with pages1-5 of t he
unique text document, and then the 5 pag e form is repeated with the
next 5 pages (pages 6-10) of t he unique text document.
The Forms option also makes print ing jobs with letterhead more
efficient as it eliminates t he need to change or reload the paper
tray with pre-printed letterhead.
If the forms opt ion is turned off at the PrintStation Manager, the
print options can still be set from t he Macintosh workst ation to
override default options in PrintSta t ion Manager. However, if the
current form in the PrintStation Manager is “No Form”, a job set
this way will fail because no form has been added for use.
When using the Form feature in the PrintStation Manager, t he f ol l owing
must match to achieve the desired output:
• Bit Depth: (Contone/BiLevel/M onochrome) Bot h t he Form and the file to be
overlaid must come through the same Virtual Printer.
• Horizontal and Vertical Resoluti on Settings
If these
Job Settings
message will be generated in the system log.
Access the Form
Configuration dialog box by
selecting Engine Defaults
from the Virtual Engine Menu
and then pressing the
button in the Engine Defaults
Dialog box
—OR—
by pressing [Ctrl]+[F].
Job Settings
do not match, the job will print without the form, and an error
To use the Forms Setup option:
1. Select a Virtual Engine.
2. Select Virtual Engine from t he Pr int St ation Manager main menu
and select Forms.
3. The Form Configur ation dialog box displays.
26 PrintStation Manager Reference Manual
Page 27
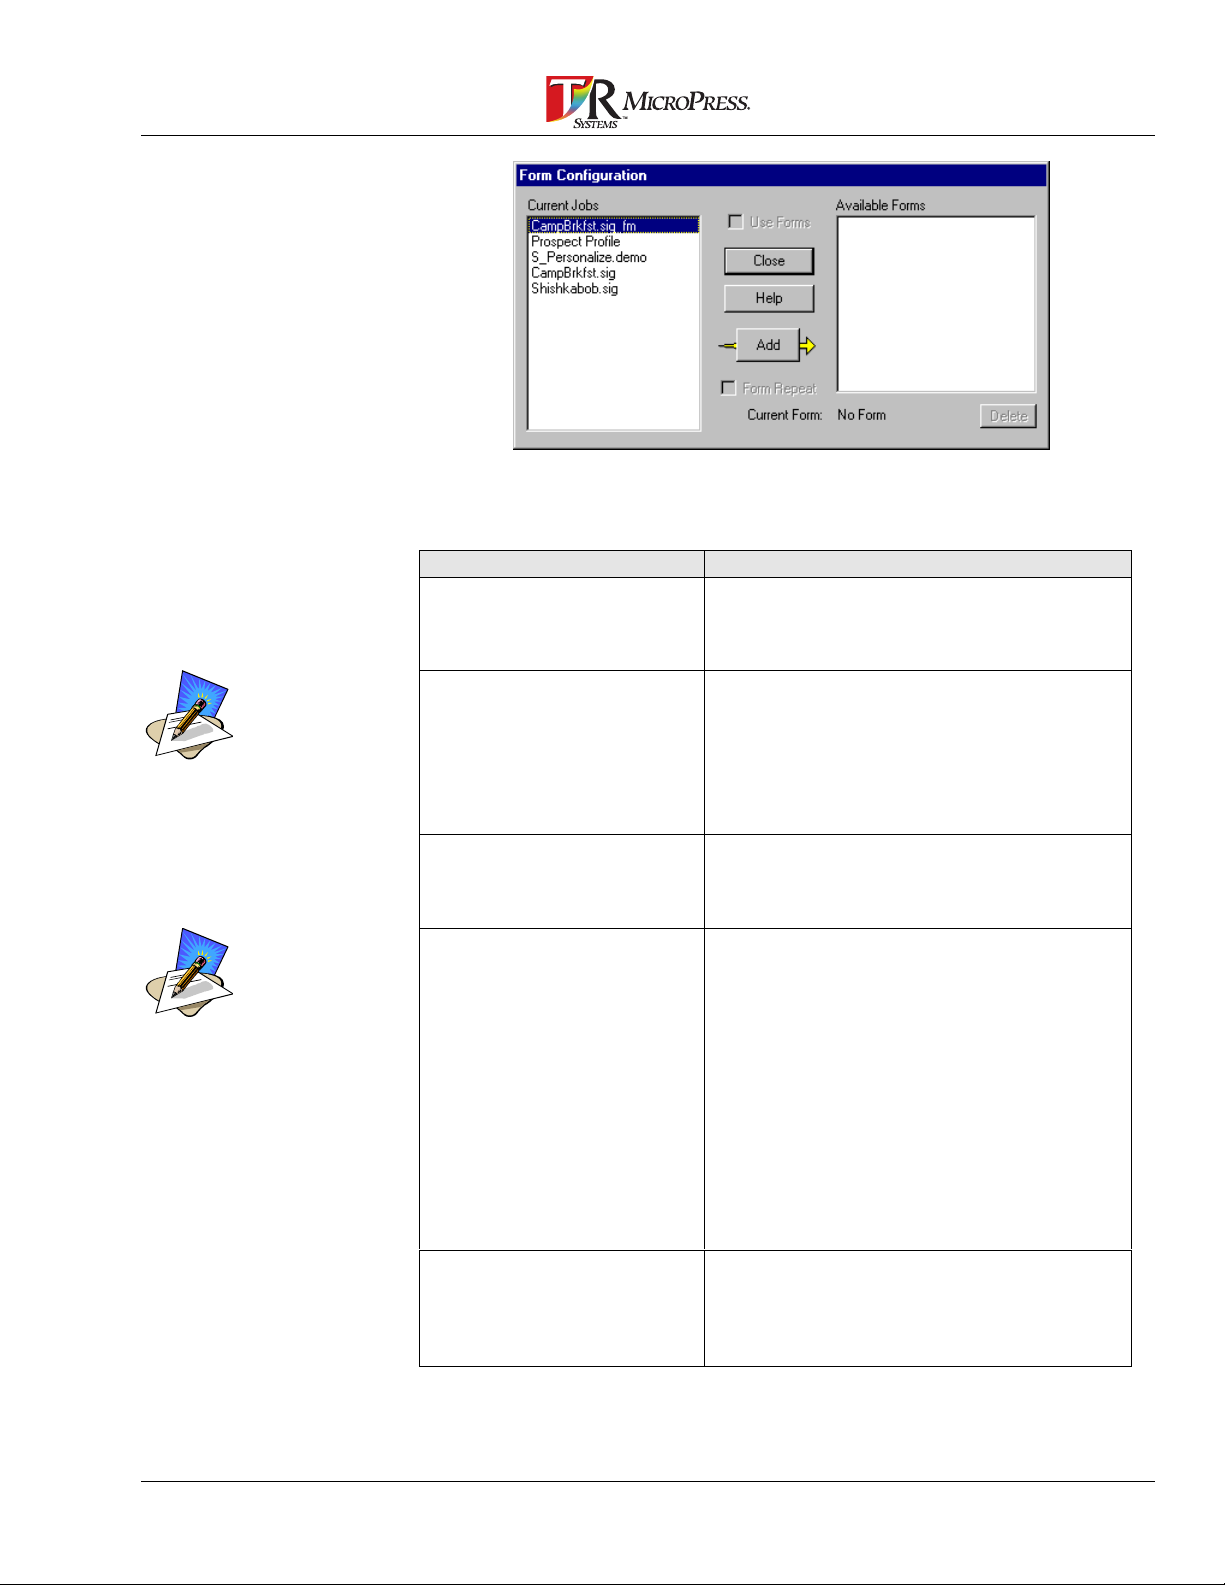
Before the “Use Forms”
option is available, a job must
first be selected to be used
as a form from the Current
Jobs field. “Add” it to the list
of Available Forms.
The Form Repeat option is
available only after the Use
Forms option is selected.
4. Refer to the f ollowing t able to interpret the Form Configuration
dialog box and available options.
Field/Control Description
Current Jobs All current jobs, whether or not they are
selected to be viewed in the Job List
Window, for the active Virtual Engine are
displayed here.
Use Forms Print the form as an overlay for every job
sent to the Virtual Engine. The form
highlighted under Available Forms and
listed next to Current Form is the current
from. If this box is not checked, the
selected form will not print unless the job
itself has specified “Use Form.”
Add Copy the job selected from the Current
Jobs field to the Available Forms field.
This option makes the selected job
available for use as a form.
Form Repeat Repeat a form so that each page of a
specific document will be merged with the
appropriate page of the form. A form can
have one or more pages and can be
merged with specific documents that
contain any number of pages. For
example, you may have a ten page job to
be merged with a five page form. Click the
Repeat Form button and the PrintStation
Manager merges pages 1-5 of the form
with pages 1-5 of the document. The form
pages 1- 5 are then repeated with the next
5 document pages to be printed (pages 6-
10).
Current Form Displays the name of the currently
selected form. This field displays
information without clicking on it. <No
Form> will display if a form has not been
selected.
PrintStation Manager Reference Manual 27
Page 28
The Use Forms option must
be selected in order to print
the chosen form as an
overlay for every job sent to
the Virtual Engine.
Engine Defaults…
Field/Control Description
Available Forms Select a form for use as a printed overlay
for every job sent to the Virtual Engine.
Highlight indicates the selected form.
Delete Remove a selected form from the
Available Forms list.
5. Click Close. The Form Setup opt ions ar e accept ed.
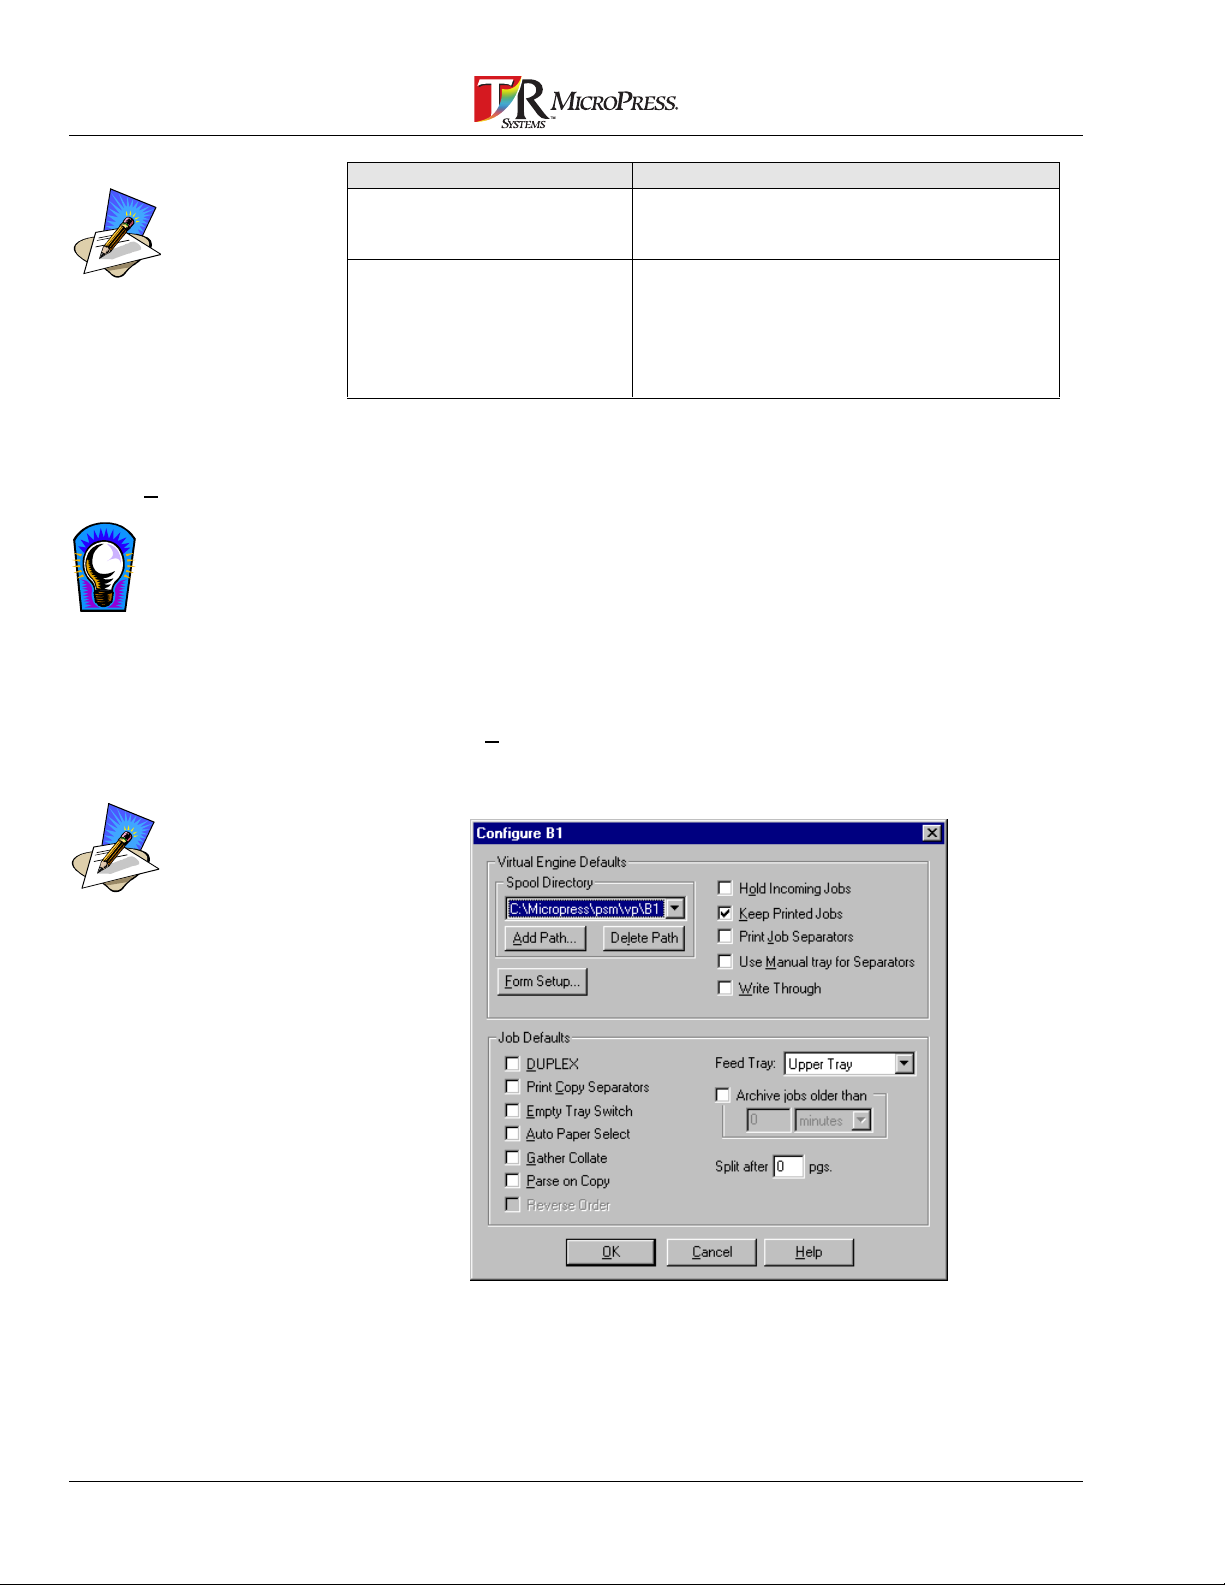
The Virtual Engine Default Set t ings dialog consists of two categories of
options; Virtual Engine Defaults and Job Defaults. Each default type is
described in the following sections.
The Virtual Engine Defaults
dialog box may also be
accessed by pressing
[ALT]+[Enter].
The various PrintStation types
may have different default
settings options. The 024 is
shown as an example only.
To access the Engine Defaults dialog box:
1. Right-click on the Virtual Engine’s task bar button on the PSM
main dialog.
2. Select Engine Defaults.
3. The Virtual Engine Default s dialog box appears.
4. Refer to the following sections,
Defaults
for both job and engine.
28 PrintStation Manager Reference Manual
PrintStation 024 Defaults dial og box
Virtual Engine Defaults
and
Job
to interpret the options in the Engine Defaults dialog box
Page 29
Virtual Engine Defaults
Virtual Engine Defaults cont r ol the behavior of all jobs printed from a
Virtual Engine and can be overridden by the workstation sending the
job. See the table following for the defaults available to each
PrintStation/PrintLink type.
ENGINE TYPE / OPTION AVAILABILITY
DesignJet Only
DesignJet Only
DesignJet Only
DesignJet Only
OPTION
Spool Directory
Form Setup
Hold Incoming Jobs
Keep Printed Jobs
Print Job Separators
Use Manual Tray for Separators
Write Through
Step and Repeat
SafePrint
Print Quality
Margin Offsets
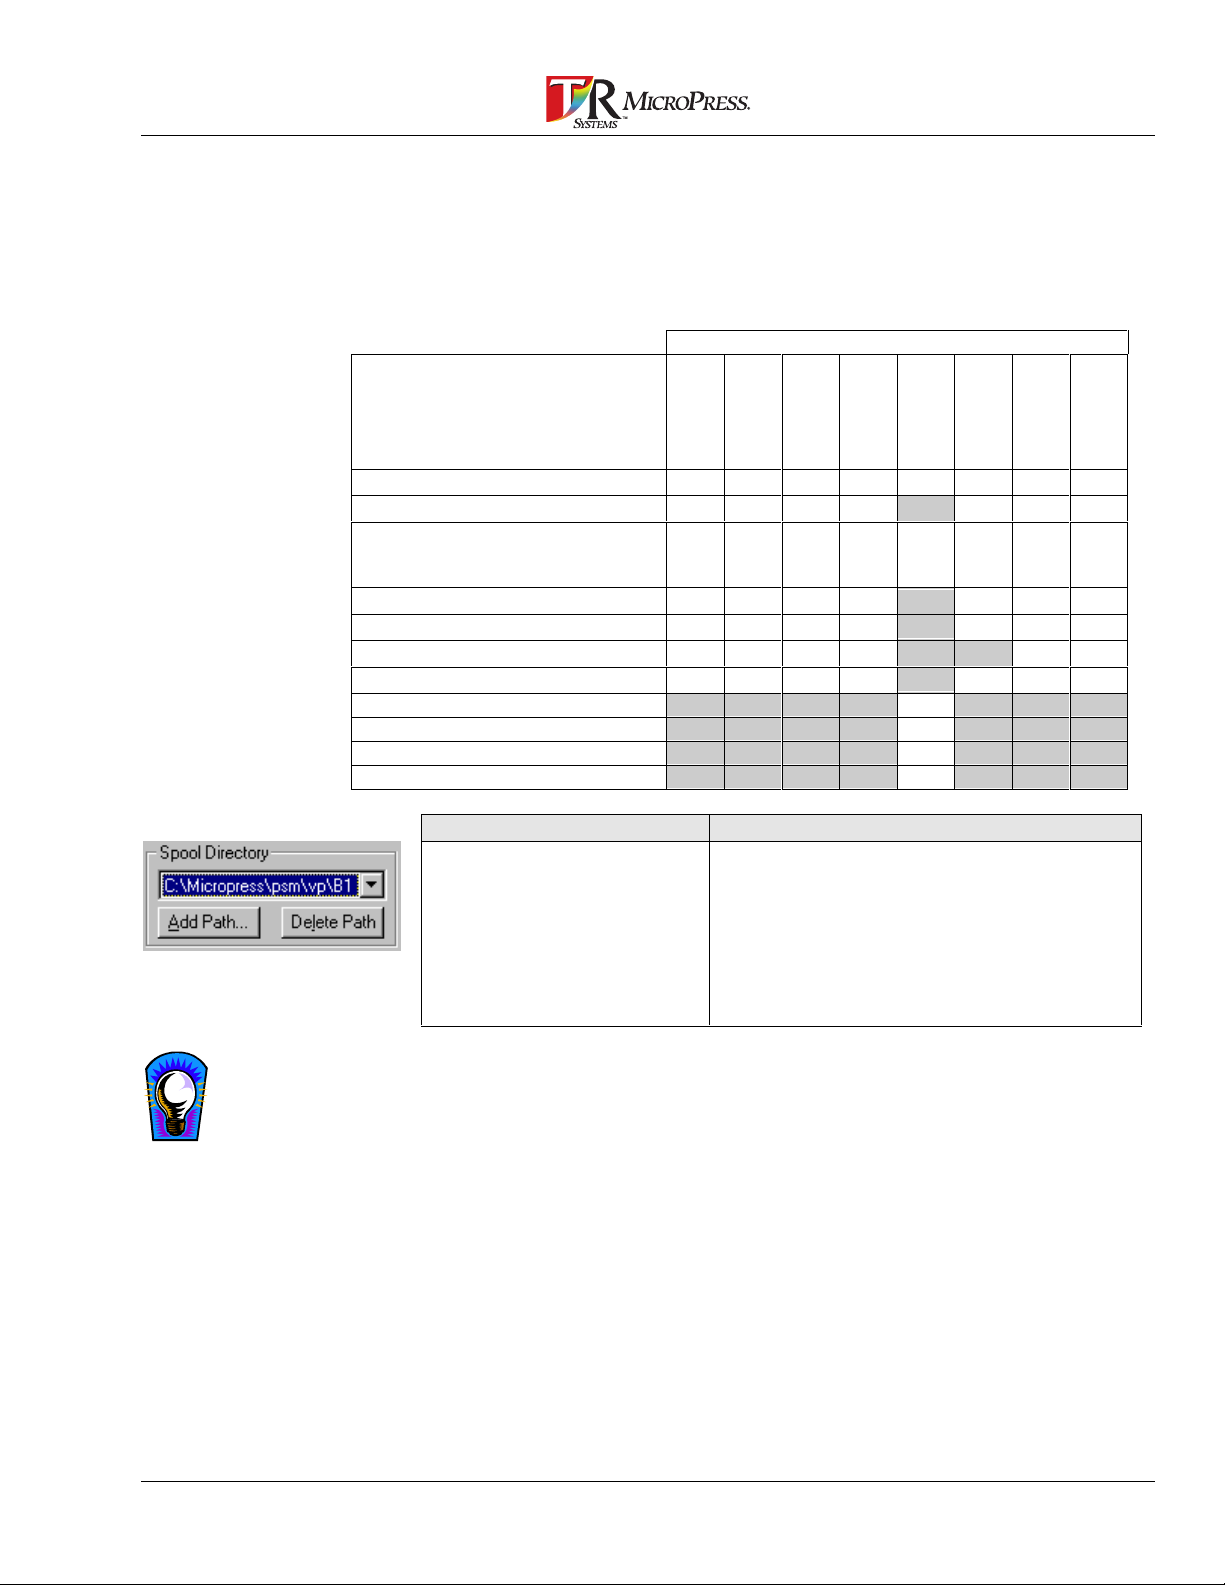
Field/Control Description
Spool Directory The directory containing the PSM job files
C-Cii
A-312
B-024
PPPPPPP
PPPP
PPPPPPPP
PPPP
PPPP
PPPP
PPPP
for the currently selected Virtual Engine. If
multiple Spool Directories are specified for
the Virtual Engine, they may be selected
from the drop down list. The currently
selected path is displayed on the Virtual
Engine title bar. See the following steps for
adding and deleting paths.
D-5Si
P
P
P
P
E-DJCP
PP
PP
PP
PP
F-040
G-062
P
8000
H- LJ
P
P
P
P
P
P
This feature is good for
organizing large numbers of
job files. Users may want to
keep jobs in different
directories so that the Job List
Window is more manageable.
To modify the Spool Director y:
Add Path
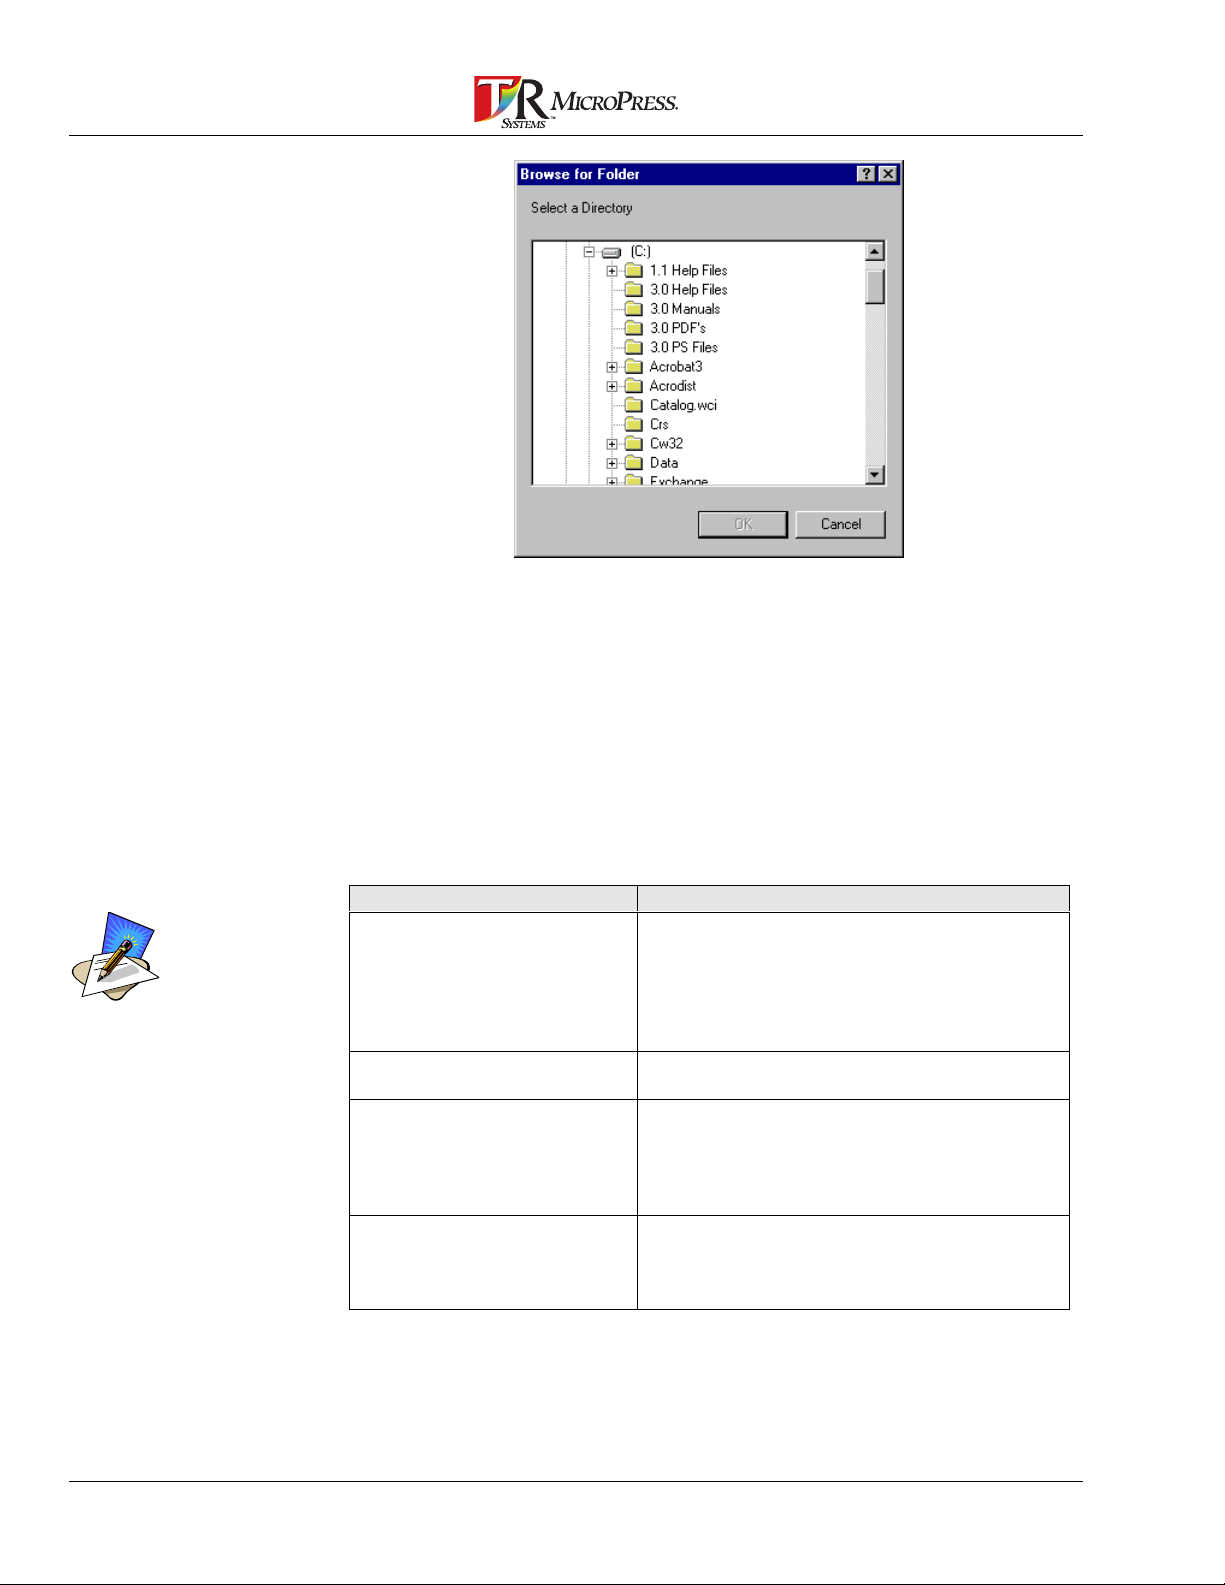
1. Click on the Add Path button.
2. Navigate to the desired directory using the dialog box shown
below.
PrintStation Manager Reference Manual 29
Page 30
For instructions on the use of
the Forms feature, refer to the
section entitled
Forms
.
3. Click on the directory to select it.
4. Click OK to add the path and ret ur n to the Virtual Engine Default s
dialog.
—OR—
Click Cancel to return to t he Virtual Engine Defaults dialog.
Delete Path
1. From the drop down list, select the path to delet e.
2. Click on the Delete Path button.
Field/Control Description
Form Setup The Forms option is used to print data from
one job as an overlay onto another job.
The Forms option provides a more efficient
way of printing multiple copies of a job that
contains both common and specific text or
graphics.
Hold Incoming Jobs All incoming jobs are held until they are
manually selected to be printed.
Keep Printed Jobs Save jobs after they have printed. The
PrintStation Manager will save jobs after
printing for quick re-printing without
resending from the workstation or
reprocessing the job through the RIP.
Print Job Separators Produce a marked separator page at the
end of each job. Select this option when
printing multiple copies of jobs to keep
them separated.
30 PrintStation Manager Reference Manual
Page 31

Note that this does not apply
to a duplex job on a
PrintStation 312 because it
would use one of the pages
from the job as a separator;
therefore, the separator will
have to come from the
manual tray
If Write Through is selected
and a job starts coming in, the
PSM will use only one
PrintStation of a Virtual
Engine to print until the entire
job has been received. This
guarantees correct collation.
This is good for fast first page
output but can reduce engine
life because the PrintStation
constantly starts and stops.
For the LaserJet 8000, if
Stapling is enabled, Write
Through will be ignored.
Field/Control Description
Use Manual Tray for
Separators
Write Through Allows an incoming job to print as the RIP
Step and Repeat Selecting this option will enable the
SafePrint SafePrint determines whether or not a
Print Quality Choose the appropriate balance of print
Margin Offsets Change the margin size and expand the
Keep paper for Separators in the Manual
Tray. Select this option to use paper of a
different size and/or color for Job and/or
Copy Separators.
separators will only come from the manual
tray. If the manual tray is empty, the
system waits until more paper is loaded or
error time out occurs.
If this option is not selected, the system
checks the manual tray first. If no paper is
loaded into the manual tray, the currently
selected input tray is used.
is processing it. The PrintStation Manager
will not wait until the job is fully processed
by the RIP before it starts printing.
DesignJet CP to place copies of a page
across the width of the media as many
times as possible. See
Features
page or job can be printed on the media
remaining in the DesignJet CP. See
Options
speed vs. quality for the DesignJet CP. See
.
.
Output Options
print area of the page reducing the amount
of media waste for the DesignJet CP. See
Margin Offsets
When using this option,
Media Saving
.
.
Output
PrintStation Manager Reference Manual 31
Page 32

P=Page
C=Copy
Media Saving Features
The features described f ollowing are as used with the DesignJet CP.
Feature Description
Step and Repeat
Use Step and Repeat to print multiple
copies of a job. Step and Repeat will place
copies of a page across the width of the
media as many times as possible. The
graphic example (left) shows 3 copies of 1
page of a job printed across wide media.
FillWidth is a feature
accessed from the
MicroPress
section
RIP. Refer to the
Page Features
Provided by T/R Systems
the
MicroPress
Reference Manual.
RIP
in
Step and Repeat with
Gather Collate
FillWidth
Step and Repeat will place copies of a
page across the width of the media as
many times as possible. Used in
conjunction with Gather Collate, the copies
of pages are kept together. The graphic
example (top left) shows 3 copies of 1
page of a job printed across wide media.
Note how Step and Repeat with Gather
Collate will handle a job with more pages
than will fit across the media in the graphic
at left bottom. The copies of the first page
finish then the copies of the next page
begin on the next "row". There will be an
area of wasted media in this situation.
Use FillWidth to print multiple page jobs.
As in the case with Step and Repeat with
Gather Collate, there may be an area of
unused media if all of the pages will not fit
across the width.
32 PrintStation Manager Reference Manual
Page 33

Job Defaults
When sending jobs from a workstation, t he specific job settings can be
chosen by the workstation operator. If the specific job settings ar e not
selected at the workstation, then t he Vir t ual Engines Job Defaults will
be applied.
For example, if Job ‘X’ is sent to Virt ual Engine A12, it will not be
affected by Virtual Engine A12’s Job Defaults because the job options
shown were already set.
If Job ‘Y’ is sent, the only attribute that will change will be the Gloss
Level. Because the attribute was not set at the workstation when the
job was sent to print, the job will pick up the Virt ual Engine A12 Job
Defaults.
See the table following for the defaults available to each
PrintStation/PrintLink type.
PrintStation Manager Reference Manual 33
Page 34

ENGINE TYPE / OPTION AVAILABILITY
OPTION
C-Cii
D-5Si
#
312 Only
312 Only
Cii Only
Gloss
Feed Tray
Duplex
Print Copy Separators
Quality Print Mode
Empty Tray Switch
Auto Paper Select
Gather Collate
Parse on Copy
Reverse Order
Split after n pages
Archive jobs older than…
A-312
B-024
Y
YYYY
YYYY
YYYY
Y
YYY*
YY
YYYYYYYY
YYYYYYYY
Y
YYYY
YYYYYYYY
Stapling
062 Only
062 Only
Punching
Folding
*=Always on, #=Always off, 1=FN-3 Finisher, 2=L-FN Finisher (limited stapling)
Field/Control Description
Gloss Level Set the job Gloss Level for the entire job.
Available Gloss Levels are as follows:
• Low: use for jobs that contain text only.
(Matte/Satin finish).
• Standard: use for jobs that contain
both text and images.
• High: use for jobs that contain images
only (Heavy sheen).
Feed Tray Select the paper tray from which the paper
will be fed.
Duplex Print double-sided pages.
For PrintStation 312: one side must be
printed first, then turn the pages 180
degrees and place the pages back in the
feed tray they came from. Put the engine
back on line by pressing the “On Line”
button on the front of the PrintStation
(Work and Turn).
Print Copy Separators Prints a slip sheet after each copy of a job
has printed. Use this option to keep
individual copies of a job separated.
F-040
E-DJCP
YYY
YYY
YYY
YY*
YY
YYY
1, 2
Y
1, 2
Y
1
Y
G-062
H-LJ
8000
#
Y
The Print Copy Separators
option is not available if
printing multiple copies of a
single page job.
34 PrintStation Manager Reference Manual
Page 35

Quality Print Mode (312 only)
will slow the output speed of
the PrintStations.
Cii Only
062 Only
062 Only
Field/Control Description
Quality Print Mode This option improves registration and gives
better image quality. Quality Print Mode option
causes the drum to make one complete
revolution before printing begins.
Empty Tray Switch Enable a print job to automatically switch
another paper feed tray when the selected tray
runs out of paper. This feature only works if
the paper size is the same in both trays. The
062 will not switch to the Manual tray when
Empty Tray Switch is on.
Auto Paper Select This feature allows the PrintStations to look in
other paper trays when the selected paper tray
contains the wrong size paper.
Example:
If there is 8.5” x 11” paper in the upper tray
and there is 11” x 17” paper in the lower paper
tray and the job coming in is 11” x 17” the
software will feed paper from the lower tray
automatically.
Gather Collate Prints all page 1’s, then all page 2’s, for off
line electronic/manual collation.
Parse on Copy Parse on Copy will keep multi-page
documents together when sent to multiple
engines. See
Reverse Order The PrintLink Cii is a “face up” printer and
stacks jobs in reverse order. This option
causes the job to be printed and stacked in
the correct order.
Split After n Pages This option splits large jobs into smaller
sections. Can be used to store large jobs on
media that might not hold an entire job in one
piece.
Archive Jobs Older Than x Set the PrintStation Manager to automatically
archive jobs after the specified amount of
time. The time increments can be set for
Days, Hours, or Minutes. When using
minutes, the shortest allowable time is 10
minutes.
Stapling Set Stapling options
Punching Toggle Punching on or off
Folding Set Folding options
Output Options
.
4. Click OK. The Default Settings are accepted. The PrintStat ion
Manager Main Screen displays.
—OR—
Click Cancel. The Default Settings are ignored. The PrintStation
Manager Main Screen displays.
PrintStation Manager Reference Manual 35
Page 36

View Job Details
View Job Name Only
To view Job Details.
1. Select a Virtual Engine.
2. Select Virtual Engine from the PrintStation Manager main menu
and select View Details.
3. The Job List W indow displays the name of print jobs, job details,
number of pages in a job, num ber of copies in a job, job status,
the name of the user that sent the job, and the date and time the
job came into the PrintStation Manager.
To view Job Names Only:
1. Select a Virtual Engine.
2. Select Virtual Engine from t he Pr int Station Manager main
menu and select View Name Only.
3. The Job List W indow displays only the job icons and job names.
ColorTools...
A Key Code is necessary to
activate this optional
functionality. Contact your
dealer or T/R Systems for
more information.
B&W Engine Balance
B&W Engine Balance and
ColorTools are available for
certain PrintStation types.
These items will display in the
Virtual Engine menu only for
the supported engine types.
ColorTools will activate the optional Gamma Calibration software and
cause a Gamma Target t o be pr int ed. For more information about t he
procedures for calibration, see the ColorTools User Guide.
1. Select the Virtual Engine.
2. Select Virtual Engine from the PrintStation Manager main menu
and then select ColorTools.
B&W Engine Balance will send the MonoTune test target to the out put
devices connected to the currently selected VE.
1. Select the Virtual Engine.
2. Select Virtual Engine from t he Pr int St ation Manager main menu
and then select B&W Engine Balance.
3. Follow the directions on the test target to make any necessary
adjustments to the PrintStation.
36 PrintStation Manager Reference Manual
Page 37

Job
The Job Menu is for access to specific job functions and attributes.
Features such as job search, job archive, and printing imposition can
be selected in this menu.
Right click within the Job List
window for quick access to
the Job Menu. Not all menu
items will be available unless
a job is selected.
Info...
Some options may not be
available for each type of
PrintStation or output
device. See
PrintStation/PrintLink
Options
options available for each
PrintStation type.
to determine the
Use the Toolbar for immediate access to the more frequently used
commands.
Since many of the menu selections can be found on the Pr intStation
Manager’s Toolbar, graphic represent at ions of the buttons are shown
where applicable.
The Job Information dialog consist s of several tab pages displaying
setup options for Job Settings, Page Settings, job parsing , and other
information. Each page is described in t he following section. The Job
Information dialog box title bar displays the j ob nam e and file size.
The Job Settings tab sheet displays inform at ion about the whole job.
You may view or change many job settings here.
When the bit dept h or job resolution is identical in either the horizontal
or vertical direction for any page in the j ob, the exact resolution will be
displayed. For example, the title bar may display (600,600). Resolution is measured in DPI (dots per inch).
If the bit depth or job r esolution differs in either the hor izontal or
vertical direction for all pag es in t he job, an asterisk will display beside
the resolution number. For example, (*, 600) m ay display when some
pages differ on the X dimension, but all pages are 600 dpi on the Y
dimension.
When the bit dept h or r esolution differ for both the horizontal and
vertical directions, two asterisks will display instead of a number in t he
title bar. For example (*,*). This indicates that the job contains two or
more pages with different r esolut ions from page to page. T o view the
individual resolution of each page, see the Page Sett ings tab.
On the Output Options dialog, options can be applied that affect how
the job is handled when printed.
Finishing Options (Folding, and Punching) are available for the 062
only. Stapling is available for the 062 and the 8000.
The Margin Offsets tab sheet permits the adjusting of mar gin offsets
for the entire job.
PrintStation Manager Reference Manual 37
Page 38

Brightness/Contrast: Image brightness and contrast can be adjusted
for the entire job.
You may also view Job
Information by clicking
the View Job Info button
from the Toolbar on the
PrintStation Manager
Main Screen.
—OR—
Double click the job in the
Job List Window.
Click Reparse only if
something is changed on
the Job Settings (e.g.,
number of copies or
available print engines).
Changes are made instantly
and cannot be canceled.
The Color Adjust page has controls for setting C, M, and Y levels,
and for choosing a ColorCurve Calibration Set.
Parsing: When a job is parsed, the PrintStation Manager divides the
pages for printing on t he available Print St ations to maximize the
efficiency of the
MicroPress
and minimize the print time. The Job
Parsing tab sheet displays a graphic that illust r ates how the job is
parsed, and how to combine the output of each Print St ation for a
collation.
On the Ticket page, information will be displayed if the job was
configured with MicroTicket Configuration.
The Chapters dialog is used to group pag es into sections.
The Page Settings tab sheet displays inform at ion about individual
pages in print jobs. You may view or change settings for a selected
page. Changes in this tab sheet affect only the selected page.
Preview: View the currently selected job.
Annotations: Add or view comments for the current job.
To open the Info window:
1. Select a job from the Job List Window of the active Virtual
Engine.
2. Select Job from the PrintStation Manager main menu and then
select Info.
3. The Job Info dialog will display.
38 PrintStation Manager Reference Manual
Page 39

PrintStation/PrintLink Options
ENGINE TYPE / OPTION AVAILABILITY
DIALOG OPTION
Job Settings
Output Options
040 only
Cii only
Cii only
312 only
312 only
DesignJet CP only
DesignJet CP only
LaserJet 8000 only
Margin Offsets YYYYY
Brightness/Contrast
Color Adjust
Parsing YYYYYYYY
Ticket YYYYYYYY
Chapters
Copies
Print Range
Pages
Reverse Order
Job Name
User Name
Toner Coverage
Feed Tray
Destination
Jog Copies
Fast Print
Manual Tray Increase Transfer
Quality Print Mode
Gloss Level
Parse on Copy
Print Inserts
Gather Collate
Duplex
Copy Separators
Empty Tray Switch
Auto Paper Select
Special Handling
Print Quality
SafePrint
Staple
Image Adjust
Black
CMYK sliders
ColorCurve Calibration Set
Edit Curve
Print Marked Chapters Only
Insert Sheet After Last Page
Simplex Page Lock
Feed Tray
Destination
Margin Offset
A-312
YYYYYYYY
YYYYYYYY
YYYYYYYY
YYYYYYYY
YYYYYYYY
YYYYYYYY
YYYY YYY
Y Y YYY
Y
Y
YYYYYYYY
YYYYYYYY
YYYYYYYY
YYYY
YYYY
YYY*
YYY
YYYYYYYY
Y Y
Y
Y Y
Y
Y
YYYY YYY
YYYY
YYYY
YYYY
Y YY
YYYY
C-Cii
B-024
Y Y
Y
Y
D-LJ 5Si
#
Y
Y
Y
F-040
E-DJCP
Y
YYY
YYY
YY*
Y
Y
Y
YYY
YYY
YYY
Y Y
G-062
H-LJ
8000
#
Y
PrintStation Manager Reference Manual 39
Page 40

ENGINE TYPE / OPTION AVAILABILITY
DIALOG OPTION
Page Settings
Preview
062 only
312 only
Page Number
Insert Sheet After This Page
Simplex Page Lock
Z-Fold on Page
Feed Tray
Destination
Gloss
Toner Calculate
Margin Offset
Lock Page
More Detail
B-024
C-Cii
D-LJ 5Si
A-312
YYYYYYYY
YYYY
YYY YYY
YYYY
Y YY
Y
YYYYYYYY
YYYYY Y
YYY YYY
YYYYYYYY
F-040
E-DJCP
YYY
YYY
Annotations YYYYYYYY
Finishing Options
Stapling
Folding
Punching
Paper Size
Offset Copies
Y
Y
Y
Y
Y
Y
1, 2
1, 2
1, 2
G-062
1
2
H-LJ
8000
*=Always on, #=Always off, 1=FN-3 Finisher, 2=L-FN Finisher (limited stapling)
Job Settings
Paper sizes B1 through B6
referred to in this manual are
JIS unless otherwise noted.
Use the Job Settings page to set up print options; such as, number of
copies, job name, etc. The document paper size is also displayed, but
cannot be selected at this time because it is set in the generating
application.
Refer to the following table t o interpret the Job Settings page.
40 PrintStation Manager Reference Manual
Page 41

Cii, 040 Only
Field/Control Description
Copies Enter the number of copies to print.
Print Range
Reverse Order Turning this option on will cause the job to
Job Name Current name for the job. This field can be
User Name Network name of the workstation that sent
Paper The paper size that the job is set to be
• All Pages- Print every page in the job.
• Page Range - Print specific pages in
the job.
• Chapters - Print the selected chapters.
• Odd + Even - Print odd AND even
pages for the specified range.
• Odd - Print odd pages only.
• Even - Print even pages only.
be printed in the opposite order that it
would normally print. For the 040, Reverse
Order is not available if Duplex (Output
Options) is on.
directly modified to change the Job Name.
the job. “NoName” will be displayed if the
user name is not indicated in the print job.
This field can be directly modified to
change User Name.
printed on will be displayed here.
The selected paper size in the workstation application may not match the paper
size in the feed tray if Auto Paper Select (Output Options, Engine Defaults) is
not on. If this happens, the job will print anyway. For example, documents that
are set up to print on Letter (8.5”x11”) will print on Legal (8.5”x14”). It is
possible to achieve a Full Bleed A4 document by putting legal size paper in the
paper tray and trimming the edges after printing.
Field/Control Description
Calculate Toner
Coverages
The Calculate Toner option in the Job Settings tab of the Job Info dialog box
displays the toner coverage for all pages within the job. When a number (#%)
displays, the toner coverage has been calculated. When “0%” displays, the
toner coverage is less than 0.5%. When “-%” displays, the toner coverage has
not been calculated.
Press Calculate in the Toner section of the
Job Settings tab to calculate the toner
coverage on all pages of the selected job.
PrintStation Manager Reference Manual 41
Page 42

Finishing Options
A job containing both long
edge feed landscape and any
orientation short edge feed
requires that the long edge
feed be tumbled (062 only).
The Finishing Options dialog displays the dif ferent features that are
available with the optional 062 Finisher. Available features may dif fer
depending on finisher type installed.
If the job contains more than
50 pages simplex (100
duplex), Stapling cannot be
selected.
Folding/Stapling Limits:
• Crease - 2-15 sheets with
stapling, 50 without
• Half - 2-10 sheets with
stapling, 50 without
• Z - 2-10 sheets with
stapling, 50 without
Refer to the Minolta Di620
Operator’s Manual for
directions to change between
2 and 3 hole punching.
Refer to the f ollowing t able to interpret the Finishing O pt ions page.
Field/Control Description
Stapling The Finisher will staple a job in the follow-
ing locations:
• None - no stapling will be applied
• Top Corner - one staple will be applied
to the upper left corner of the job
• Bottom Corner - one staple will be
applied to the bottom left corner of the
job
• Side - Two staples will be applied to
the left side of the job.
• Center - Two staples will be applied to
the center of the job.
Punching The Finisher will punch holes in the job if
desired.
• Yes - Holes will be punched along the
left side of the job.
• None - no holes will be punched
42 PrintStation Manager Reference Manual
Page 43

Finishing Rules
Field/Control Description
Folding The Finisher will fold the job several
different ways.
• None - no folding will be applied
• Z - Two folds will be made in the job to
create a tri-fold document.
• Half - The job will be folded in half.
• Crease - The job will not be completely
folded but creased.
The combining of some Finishing Options is dependent on other
options, such as paper size, Copy Separators, etc. The tables following
list the combinations of options and availability.
Options
Paper Corner LEF SEF Center LEF SEF Half Crease Z
Tabloid SEF
Letter SEF
Letter LEF
Legal SEF
Invoice SEF
A3 SEF
A4 SEF
A4 LEF
A5 SEF
B4 SEF
B5 SEF
B5 LEF
SEF=Short Edge Feed, LEF=Long Edge Feed, *=Unable to 3 hole punch on Short Edge
YNYYNYYYY
YNYYY*Y/NNYN
YYNNYNNNN
YNYYN*Y/NNNN
NNNNNNNNN
YNYYNYNNN
YNYYY*Y/NNNN
YYNNYNNNN
NNNNNNNNN
YNYYNYNNN
YNYYNYNNN
YYNNYNNNN
Staple Punch Fold
PrintStation Manager Reference Manual 43
Page 44

Output Options
Use the Output Options page to set and view job setting s, such as
paper source, duplexing, and copy separators.
Selecting Pages Differ under
Job Settings will have no
effect.
PrintStation 040 only
Increase Transfer is only
available for the Cii. The
manual tray must be selected.
Refer to the following table t o int erpret the Output Options pag e.
Field/Control Description
Feed Tray Select the paper source.
• Pages Differ - will display when pages
within a job are printed from different
trays.
• Various input sources may be available
dependent upon PrintStation type and
options.
Destination Select the output tray for the printed job.
Jog Copies When the stacker is used with multiple
copies, Jog Copies will offset each set of
copies. One set will be jogged left, the next
will be jogged right, etc.
Fast Print Fast Print enables the Cii to print at 6
pages per minute. The default setting for
this feature is ON. Fast Print works only
with Letter and A4 size paper and may not
be used with the manual feed tray, duplex
jobs, or Pages Differ.
Manual Tray Increase
Transfer
Use to modify the amount of toner applied
for getting:
• uniform toner transfer on the second
side of manual feed duplex jobs
• uniform toner transfer on single sided
jobs of heavy stock.
• increased toner density on single sided
jobs with normal paper stock.
44 PrintStation Manager Reference Manual
Page 45

The Gloss Level (also found
in the Page Settings dialog)
and Quality Print Mode
options are only available for
the 312.
When the Duplex option is
enabled, Odd+Even is the
only option available.
Field/Control Description
Quality Print Mode
Gloss Level Set the job Gloss Level for the entire job.
Parse on Copy When selected, Parse on Copy will keep
Print Inserts
Gather Collate Prints all page 1’s, then all page 2’s, for off
Duplex Print double-sided pages.
Copy Separators Prints a slip sheet after each copy of a job
This option improves registration and gives
better image quality. Quality Print Mode
option causes the drum to make one
complete revolution before printing begins.
Available Gloss Levels are as follows:
• Low: use for jobs that contain text only.
(Matte/Satin finish).
• Standard: use for jobs that contain
both text and images.
• High: use for jobs that contain images
only. (Heavy sheen).
multi-page documents together when sent
to multiple engines. An example of using
this option would be:
3 copies of a 10 page job are sent to 2
engines. Rather than 15 pages (1 1/2 of
each job) being printed on 2 engines, 2
copies would be printed on 1 engine and 1
copy would be printed on the other.
Print Inserts is used in conjunction with the
Insert Sheet After This Page option on the
Page Settings tab. After selecting where to
insert sheets within a job, Print Inserts can
be used to toggle the feature on or off. If
the check box is active with a check
displayed in it, this indicates that the job
has insert sheets, and they will be printed.
If sheets have been inserted but it is
preferable to not print them, unchecking
this box will keep the insert sheets from
printing without having to remove them
from the job. If this check box is disabled,
there are no Insert Sheets in this job to
print, so setting this options would have no
effect. By checking Insert Sheet After This
on ANY page, the job option Print
Page
Inserts will be automatically toggled on.
line electronic/manual collation.
For PrintStation 312: one side must be
printed first, then turn the pages 180 and
place the pages back in the feed tray they
came from. Put the engine back on line by
pressing the “On Line” button on the front
of the PrintStation (Work and Turn). For
the 040, Duplex is not available if Reverse
Order (Job Settings) is on.
has printed. Use this option to keep
individual copies of a job separated.
PrintStation Manager Reference Manual 45
Page 46

Be sure the paper trays are
stocked with the same paper
type and size when using the
Empty Tray Switch option.
To use Auto Paper Select
correctly, set Feed Tray to
smallest page size within the
job. If a job contains a page
larger than the size displayed
in Feed Tray, the auto switch
will cause the PrintStation to
find the proper paper size and
print on it if it is available.
SafePrint will issue a warning
if there is not enough media
remaining to print the job or
page. The initial paper length
must be set in order for
SafePrint to function correctly.
Send jobs to be stapled,
collated, separated and
stacked to the Finisher (bin
1). Set this in the Destinations
drop down list.
Field/Control Description
Empty Tray Switch Enable a print job to automatically switch
another paper feed tray when the selected
tray runs out of paper. This feature only
works if the paper size is the same in both
trays.
Auto Paper Select This feature allows the PrintStations to look in
other paper trays when the selected paper tray
contains the wrong size paper.
024 Example: If there is 8.5” x 11” paper in
the upper tray and there is 11” x 17” paper
in the lower paper tray and the job coming
in is 11” x 17” the software will feed paper
from the lower tray automatically.
Special Handling Check Special Handling if the job, for
example, requires a unique paper or a
setting made to a printer. A dialog will be
displayed when a job is selected to print
that has this setting enabled.
Print Quality Choose the appropriate print quality from
the following choices:
• Best - the highest possible quality at
the lowest speed (600X600dpi)
• Normal - good combination of image
quality and speed (300X300dpi)
• Fast - job is printed at the highest
speed with lower quality (300X300dpi)
SafePrint SafePrint determines whether or not a
page or job can be printed on the media
remaining in the DesignJet CP.
• SafePrint On Page - checks to see if
the first page of the job can be printed
• SafePrint On Job - checks to see if the
entire job can be printed
• No SafePrint - do not use SafePrint
Staple Turns Stapling on or off for the HP 8000.
Copy separators and parse on copy will be
forced active when stapling is selected and
the checkboxes will be disabled. No
physical copy separators will be ejected
from the engine, however.
Stapling is not available on the HP 8000 for
Legal size paper.
4. Click OK. The PrintStation Manager Main Screen displays.
46 PrintStation Manager Reference Manual
Page 47

Margin Offsets
Use the Margin Offset
controls on the Page Settings
tab to make adjustments for
individual pages within the
job. Margin Offsets makes
minor adjustments dependent
on paper size, image size and
the imageable area of the
PrintStation. Center Pages
should be used for larger
adjustments.
The settings on the Margin Of fsets page aff ect the placement of data
on each page for the entire j ob.
Margin Offsets is different for
the DesignJet CP. It is
possible to change the margin
size and expand the print
area of the page, reducing the
amount of media waste.
TE = Trailing Edge
LE = Leading Edge
Refer to the following table t o int erpret the Margin Off set s page.
Field/Control Description
Margin Offset
• Top and Left margin settings for Odd
and Even pages.
• Units – The units of measurement for
the margins are Pixels, Inches, and
mm.
DesignJet CP:
The margin settings vary for roll and sheet
media except for the side margins that
remain 15mm (.59").
Roll Media TE LE
Smaller 10mm 10mm
(.4") (.4")
Normal 17mm 19mm
(.67") (.75")
Extended 27mm 29mm
(1.06") (1.14")
Sheet Media TE LE
Smaller 10mm 10mm
(.4") (.4")
Normal 17mm 17mm
(.67") (.67")
Extended 27mm 27mm
(1.06") (1.06")
PrintStation Manager Reference Manual 47
Page 48

LEF=Long Edge Feed
TM=Top Margin
BM=Bottom Margin
LM=Left Margin
RM=Right Margin
Brightness/Contrast
Example 1:
A job is to be printed as portrait on an A4 pag e. The paper in the
drawer is LEF and the page was imaged as LEF. On the Margin
Offsets dialog t he paper is displayed as port r ait. The only valid margins
will be -Top and +Left. The top margin is actually the LEF right m ar gin
and the left marg in is r eally the LEF t op m argin.
To make the point more clear ; if the paper size was 297mm x 210mm
and 0.0mm was entered for the top m ar gin and 0.0mm for the left
margin the actual margins would be:
TM = 0, BM = 210
LM = 0, RM = 297
Example 2:
The paper is 297x210. -25.4mm for t he top margin and 12.7mm for the
left margin was entered, t he act ual m ar gins would be:
TM = 12.7, BM = 222.7
-25.4 was entered which means 25.4 is added to the left mar gin. The
actual margins (in pixels) would be:
LM = 25.4, RM = 322.1
If +25.4 for t he t op m ar gin were entered, this would move the right
+25.4, which is -25.4 for the lef t , which is < 0. T his is not permissible.
Image Adjust:
The contrast slider changes
contrast by the amount
selected. For example, a
contrast setting of .5 will
reduce contrast by 50%. A
setting of 1.5 will increase
contrast by 50%. A contrast
setting of 1 equates to NO
CHANGE.
The brightness slider changes
job brightness in 1%
increments. For example, a
brightness setting of +20
increases brightness by 20%.
–20 reduces brightness by
20%.
Brightness/Contrast sliders ar e used t o modify the lightness / darkness
of an entire job or a selected pag e or pages of a job (depending on the
Range selection). These controls allow changes to be made without
having to re-RIP the job, or star t over from the application soft ware.
Adjustments to a job will not effect other jobs or incoming jobs.
Adjustments are made by moving the slider contr ols or ent ering a
number directly.
Refer to the following table t o int erpret the Brightness/Contr ast page.
48 PrintStation Manager Reference Manual
Page 49

Color Adjust
The CMYK sliders change the
overall color cast or hue in 1%
increments. For example, to
increase cyan, slide the cyan
slider to the right (positive).
Various combinations can be
used to achieve the results
you want. Resetting sliders to
0 will result in no color change
(the original job color).
Field/Control Description
Image Adjust
Black
• Brightness – Adjust brightness
(lightness/darkness) by the amount
selected. Each increment is equivalent
to a 1% change.
• Contrast - Adjust contrast (the rate you
transition from black to white) by the
amount selected. Each increment
represents a 10% change.
• Include - All color planes will be
adjusted.
• Exclude - Only the Cyan, Magenta and
Yellow planes will be adjusted.
• Only - Only the Black (K) plane will be
adjusted.
Color Adjust sliders are used to modif y the color cast or hue of an
entire job or a selected page or pag es of a job (depending on the
Range selection). These controls allow changes to be made without
having to re-RIP the job, or star t over from the application soft ware.
Adjustments to a job will not effect other jobs or incoming jobs.
Adjustments are made by moving the slider contr ols or entering a
number directly.
Refer to the f ollowing t able to interpret the Color Adjust page.
PrintStation Manager Reference Manual 49
Page 50

ColorCurves
ColorCurves provide
additional color adjustment
control. Color adjustment
refers to the practice of
altering color according to
customer preference. Color
calibration (Gammatic) and
color matching (ICC Profile
Processor) should be used
prior to printing to insure the
best possible rendering
before adjustments are made.
Field/Control Description
Color Adjust Controls Adjust the amount of Cyan, Magenta, and
Yellow used for the selected job. Use the
slider controls or enter the value directly
into the box to the right of the slider.
ColorCurve Calibration Set Shows the currently selected ColorCurve
Calibration Set. ColorCurve (.CLR) files
may be chosen from this list. The job (or
selected Range) is modified according to
the shape of the ColorCurve selected.
Edit Curve Graphically Display, Edit and Save
ColorCurve Calibration Sets.
ColorCurves complete the color adjustment flexibility of PostRipped
files by allowing custom color reproduction curves to be created and
applied to a job. ColorCurves provide complete color adjustment for
any job. These curves are applied on a job or page basis, depending
on the Range selection. Using a ColorCurve on a job will not ef fect
other jobs or incoming jobs. However, once created, a ColorCurve is
available to all color jobs in the PrintStation Manager. ColorCurves can
be saved and loaded on other
MicroPress
installations.
Selecting the Edit Curve button will display the ColorCurve dialog. I f a
ColorCurve was selected in the ColorCurve Calibration Set box, the
curve will be displayed for editing. Otherwise, go t o File, Open… to
select a curve.
ColorCurve allows changes to be made to 4 curves, Cyan, Magenta,
Yellow and Black. Curves are viewed individually. The bottom axis
represents the original job color densit y (input) from 0 to 100%. The
vertical axis represents the printed job color density (output) from 0 to
100%. When a curve or a point on a cur ve has hig her out put values
than input values (the curve is above the 1:1 reference line), t he pr inted
job will increase in density according to the percentage(s). When the
curve is below the 1:1 line, the printed job density will decrease.
You change the curve shape by selecting and dragging a curve point
with the mouse.
50 PrintStation Manager Reference Manual
Page 51

Refer to the f ollowing t able to interpret the ColorCurve dialog.
Field/Control Description
Color selection Choose the color curve to display. Cyan,
Input, Output, Ratio The input, output, and ratio values display
Undo Clicking Undo will clear the last change
Status bar The status bar shows the curve being
Default ColorCurves and Definitions
ColorCurve Definition
Light 5, 10, 15, 20 Providing a successively lighter rendering,
Magenta, Yellow, and Black curves are
displayed.
the input percentage, output percentage
and the percent difference respectively
between the original and the printed job at
any given point.
made to the curves. Undo will go back to
the beginning of changes made during the
current session.
displayed/edited.
these curves are concave in shape,
meaning the midtones experience the
greatest change in lightness compared to
the extreme light and dark tones. The
number (5, 10, 15, 20) designates the
approximate percent increase in lightness
at the midtone (50% point). All CMYK
colors have the same shape.
PrintStation Manager Reference Manual 51
Page 52

ColorCurve Definition
Dark 5, 10, 15, 20 Providing a successively darker rendering,
these curves are convex in shape,
meaning the midtones experience the
greatest change in darkness compared to
the extreme light and dark tones. The
number (5, 10, 15, 20) designates the
approximate percent increase in darkness
at the midtone (50% point). All CMYK
colors have the same shape.
HighContrastS1, S2 Providing a significant increase in contrast,
these curves are “S” shaped, meaning the
midtones experience little change
compared to the extreme light and dark
tones. The number (S1, S2) designates the
increase in contrast in a relative way, with
S2 having the greatest effect. All CMYK
colors have the same shape.
LowContrastS1, S2 Providing a significant decrease in
contrast, these curves are an inverted “S”
shape, meaning the midtones experience
little change compared to the extreme light
and dark tones. The number (S1, S2)
designates the decrease in contrast in a
relative way, with S2 having the greatest
effect. All CMYK colors have the same
shape.
Job Parsing
In the event of an error while
printing, the Job Stack could
be automatically “moved” to
another PrintStation. For
more information about errors
see “System Errors”.
This dialog box will show how the pages of a job are distributed to the
PrintStations within the Virtual Engine.
MicroPress
uses the Electronic Collator to efficiently divide the print job
into Job Stacks. A Job Stack is a set of instructions for pag es
designated for a specific Pr intStation to print. Use the Job Parsing
dialog box to interpret how the job was divided across the available
PrintStations. The range of pages for each PrintStation is displayed.
The Part Info field will display where the PrintStation will pause when
duplex jobs are printing. Also displayed is whether even or odd pages
will be printed, where separator sheets will be inserted, number of
copies and errors.
If there are no Print St ations available the Part Info window will display
“No Data” and there will be no PrintStations represented in t he Job
Parsing window.
52 PrintStation Manager Reference Manual
Page 53

Job Parsing information may
be viewed by selecting a job
and then clicking the View
Job Info button from the
Toolbar on the PrintStation
Manager Main Screen and
then follow steps 1 and 2.
—OR—
Double click on the job in the
Job List Window. When the
Job Info window displays
select the Job Parsing tab.
Ticket
1. Click on a Printer to display the parsing information for that
PrintStation. The Part Info field displays the job instructions.
2. Click OK. The PrintStation Manager main screen displays.
The Ticket and More Ticket I nformation dialogs display Job Ticket
information. The information displayed here will have been provided by
a client using the MicroTicket application. The MicroTicket will have
been created by using the optional MicroTicket Conf iguration utility.
Usage information on MicroTicket and MicroTicket Configuration can
be found in the Reference Manuals for t hose applicat ions.
PrintStation Manager Reference Manual 53
Page 54

See the table following to interpret the Ticket and More Ticket
Information dialogs.
Field/Control Description
Company Name The company submitting the job.
Purchase Order Number The P.O. number issued for payment for
the job.
Submission Date The date that the Job Ticket was created.
When Needed When the submitting company requires the
finished job.
Input Method The way the job was submitted.
Assigned To This information is entered by the location
printing the job.
Imposition The methods available for positioning
multiple pages of a job onto a larger single
sheet in the correct orientation for binding.
Collation Available methods for sorting jobs.
Finishing Folding, stapling, binding, etc. available to
the submitting company.
Paper Paper options available to the submitting
company.
• Type
• Color
• Grade
• Weight
More Display the More Ticket Information dialog.
54 PrintStation Manager Reference Manual
Page 55

Chapters
Field/Control Description
Contact Information about the person to contact
regarding the job.
• Name
• Phone
• Fax
• Email
Company The address information for the company
submitting the job.
• Address
• Address(2)
• City/Town
• State/Province
• Zip/Postal
Special Instructions Any additional information required to
properly print the job.
The Chapters dialog is used to combine groups of contiguous pages
within a job. Once the groups of pag es (Chapters) are added, a
number of options may be applied to them.
Refer to the sections
Settings
more features that can be
used with Chapters.
The Chapters dialog is used
to apply changes to every
page within the chapter.
Changes made from this
dialog will override those
made from the Page Settings
dialog.
When a chapter is selected,
the displayed settings (Feed
Tray, Destination, etc.) are for
the first page in the range.
Use the Page Settings dialog
to view settings for individual
pages within a chapter.
and
Numbering…
Page
for
To set up Chapters for a job:
1. Double click on the job in the PSM Virtual Engine window.
2. Select the Chapters tab.
3. Click Add to create a Chapter.
PrintStation Manager Reference Manual 55
Page 56

Selecting multiple chapters
then changing a setting will
cause the name of the feature
to display in green. This is a
temporary indicator showing
that changes will be made
only to this setting in all the
selected chapters.
4. Change the suggested Chapter Name if necessary. Subsequent
chapter names will be "Chapter" incremented by one.
5. Select the page range to be included in the Chapt er . One chapter
may not contain a page that is also in another chapter . Click OK.
6. Repeat Steps 3-5 as needed.
Refer to the f ollowing t able for more details.
Field/Control Description
Print Marked Chapters
Only
Insert Sheet After Last
Page
Simplex Page Lock Simplex Page Lock prevents a page from
Feed Tray Select the paper tray from which the paper
Destination Select the output tray for the printed job.
Margin Offset The Top and Left margins for each page
Add Click to include a page or group of
Delete Click to remove a chapter.
Marked chapters
checking this box. Only consecutive
chapters can be printed.
A blank page sheet will be inserted after
the last page in the selected chapter.
having anything printed on its back and
from being printed on the back of another
page. Selecting the feature from this dialog
will apply the feature to all pages in the
chapter. See also
will be fed.
can be adjusted. This is useful if a
document not originally designed for
binding needs to be bound. The Units of
Measurement that can be used are Pixels,
Inches, mm.
contiguous pages as a chapter.
may be printed by
Page Settings
.
56 PrintStation Manager Reference Manual
Page 57

Page Settings
Page Settings may be
viewed by selecting a job,
clicking the View Job Info
button from the Toolbar,
and clicking on the Page
Settings tab.
—OR—
Double click the job in the
Job List Window. When the
Job Properties window
displays, select the Page
Settings tab.
Use the Page Settings dialog box to view or apply print options to
individual pages of the selected job. The Page Settings dialog box will
also display the resolution, bit depth and paper size of the selected
page.
1. Double click on a job, then click on the Page Settings tab to
display the Page Settings.
Refer to the following table to interpret the Page Settings setup
options:
PrintStation Manager Reference Manual 57
Page 58

The Gloss Level (312 only)
may be set for all pages in
a job on the Job Settings
tab.
Field/Control Description
Page Number Choose the page number for which
the print options selected will apply.
Insert Sheet After This Page Selecting this option will cause an
additional blank page to be printed
after the selected page. The blank
page will be pulled from the same
location as Job and Copy Separators. A common use of this feature
would be to insert a blank page as a
marker. The marker could then be
used to locate the position for a tab
page or some other type of chapter
or section divider.
By checking Insert Sheet After This
on ANY page, the job option
Page
Print Inserts
tab) will be automatically toggled
on. The Print Inserts
checked for any of the insert sheets
to print. If sheets have been
inserted, but it is preferable to not
print them, clearing the Print Inserts
checkbox will keep the insert sheets
from printing. They do not have to
be removed from the job.
Feed Tray Select the paper tray from which the
paper will be fed.
Destination Select the output tray for the printed
job.
Gloss Set the job Gloss Level for the
selected page. Available Gloss
Levels are as follows:
• Low: use for jobs that contain
text only. (Matte/Satin finish).
• Standard: use for jobs that
contain both text and images.
• High: use for jobs that contain
images only. (Heavy sheen).
Simplex Page Lock Simplex Page Lock prevents a
page from having anything printed
on its back and from being printed
on the back of another page.
Selecting from this dialog will apply
the feature to individual pages.
Select the page where Simplex
Page Lock should be applied.
Multiple pages may be locked but
they must be done individually. See
Chapters
also
Toner Calculate Press Calculate in the Toner
section of the Job Settings tab to
calculate the toner coverage on the
selected page of the selected job.
(on the Job Settings
option must be
.
58 PrintStation Manager Reference Manual
Page 59

Preview
The Calculate Toner option on the Job Settings dialog box displays the toner
coverage for individual pages within the job. When a number (#%) displays, the
toner coverage has been calculated. When “0%” displays, the toner coverage
is less than 0.5%. When “-%” displays, the toner coverage has not been
calculated.
Field/Control Description
Margin Offset The Top and Left margins for each
page can be adjusted. This is useful
if a document not originally
designed for binding needs to be
bound. The Units of Measurement
that can be used are Pixels, Inches,
mm.
Lock Page Select this option to prevent global
changes to the document’s margin
settings from affecting the selected
page.
2. Click OK. The PrintStation Manager main screen displays.
The Preview page will display a representation of each page in the
selected job.
PrintStation Manager Reference Manual 59
Page 60

Field/Control Description
Page Number Use this feature to see a
representation of the selected page of
a document.
More Detail
B&W PrintStations
Used in conjunction with Preview, this
feature will clean up some of the
artifacts that are present due to the
image reduction and compression.
More Detail is intended primarily for
grayscale images. Use on a color
image will produce limited improve-
ment, if any at all.
Example of More Detail used on a black and white document:
The zoom cursor will
increase or decrease
magnification of a preview
image area. Click with the left
mouse button to increase
magnification. Click with the
right button to decrease.
Before After
60 PrintStation Manager Reference Manual
Page 61

Annotations
Use the Annotations page to enter comm ents about individual pages in
a job. Using the Find featur e in t he Tools menu, a word or phrase in
any annotation can be searched for.
Use the Page Number control to view each page of the job.
PrintStation Manager Reference Manual 61
Page 62

Preview…
Use the feature to zoom
in or out on the preview
document. Clicking the left
mouse button will zoom in (+),
the right mouse button will
zoom out (-).
The example below is
zoomed in 2 steps.
Use this feature to see a represent ation of the selected page of a
document.
To use Preview:
1. Select a job in the Job List window.
2. Select Job from the PrintStation Manager main window and then
select Preview.
3. The Preview dialog is displayed.
See the table following to interpret the Preview dialog.
Field/Control Description
Feed Direction Indicates the direction that the paper will
Page If a multiple page document is being
Orientation Arrows
More Detail
B&W PrintStations
62 PrintStation Manager Reference Manual
feed into the PrintStation.
previewed, each page may be displayed by
using Page:. Type in the page number or
use the
document.
Use the
preview image to the desired orientation.
Click the More Detail button to clarify the
preview image. This is available only for
Black & White jobs. See the example
following of More Detail applied to a
Preview image.
control to page through the
controls to rotate the
Page 63

The Preview dialog may be
left open for viewing multiple
jobs. Selecting other jobs will
automatically display them in
the Preview dialog.
Hold/Suspend
More Detail
Use the Hold/Suspend option to set a selected job, t hat is not
currently printing, to a Hold st at e. The job will remain in a Hold state
until you release it manually.
A job can be placed on hold
by selecting the job and
clicking the Hold Job button
from the Toolbar on the
PrintStation Manager Main
Screen. It can also be
placed on Hold by right
clicking on the job and
scrolling down to Hold.
All incoming jobs can be put
on Hold by selecting the
Hold Incoming Jobs options
from the Virtual Engine
Defaults dialog box.
To place a job on Hold:
1. Select the Virtual Engine that lists t he job to be put on hold and
then select the job from t he Job List Window.
2. Select Job from the PrintSt at ion Manager m ain m enu and t hen
select Hold/Suspend from the Job Menu.
3. The status column of the Job List Window for the selected job
displays the letter H, and the job is held for printing at a later
time.
Select multiple jobs by holding down the Shif t or CTRL key while
selecting jobs.
If a job is currently printing , pressing the Hold/Suspend button will stop
the job from printing . This is helpful, for example, if another job needs
to be printed before the curr ent ly print ing job finishes. To finish
printing the suspended job, simply select it and press Print. The job
will remain suspended indefinitely until it is selected to finish printing.
PrintStation Manager Reference Manual 63
Page 64

Print
Send a job to the printer by
first selecting the job, then
click the Print Job button from
the Toolbar on the
PrintStation Manager main
screen. The job may also be
printed by right clicking on the
job and then selecting Print.
Move...
A job in the W aiting state will print when the PrintStations becom es
available. Use the Print Job option to take a selected job or jobs from
the Job List W indow fr om a Hold, printed or error state, and send it to
the PrintStation.
To place a job in a printing state:
1. Select the Virtual Engine that lists t he job to be printed and then
select the job from the Job List Window.
1. Select Job from the PrintStat ion Manager main menu and then
select Print from t he Job Menu.
2. The status column of the Job List Window for the selected job
displays >> if there is no other job already printing. If another job
is printing, the status column of the job the user selected will
display W; the job will print after all j obs ahead of it have printed.
Select multiple jobs by holding down the Shif t or CTRL key while
selecting jobs.
Move a job from one Virtual
Engine to another by clicking
the Move Job button from the
Toolbar on the PrintStation
Manager Main Screen.
—OR—
Move a job from one Virtual
Engine to another by dragging
and dropping it on a Virtual
Engine button on the Task
Bar. Hold down the CTRL key
and the job will be copied.
Use the Move Job option to move a selected job from one Virtual
Engine to another. Moving a job will not change the printing par ameters
for the job. For example, a job that prints Contone will not print Bi- Level
if moved.
To move a job to another Virtual Engine:
1. Select the Virtual Engine that lists t he job to be moved and then
select the job from the Job List Window.
2. Select Job from the PrintStation Manager main menu and then
select Move from the Job Menu.
3. The Move dialog box displays.
4. Select a Virtual Engine.
64 PrintStation Manager Reference Manual
Page 65

5. Click OK. The selected job moves to the chosen Virtual Engine
destination.
Dragging a job into a LaserJet
5Si VE will cause printing to
stop. When the file finishes
copying, the job will resume
printing.
Delete
A job may be removed from
the PrintStation Manager Job
List Window by selecting a
job and clicking the Delete
Job button from the Toolbar
or by right clicking on the job
and selecting Delete.
Abort
Select multiple jobs by holding down the Shift or CTRL key while
selecting jobs.
To remove a job from the Pr intStation Manager:
1. Select the Virtual Engine that lists the job to be deleted and then
select the job from the Job List Window.
2. Select Job from the PrintStation Manager main menu and then
select Delete from t he Job Menu.
3. The job will be removed from the PrintStation Manager Job List
window.
Select multiple jobs by holding down the Shift or CTRL key while
selecting jobs.
A job can be canceled by
selecting the job and clicking
the Abort Job button from the
Toolbar on the PrintStation
Manager main screen. It may
also be canceled by right
clicking the job and then
selecting Abort.
The printer may output one or two pages after the job is aborted due to PrintStat i on
limitations. It is best to wait unti l the PrintStation has stopped before proceeding.
Use the Abort Job option to cancel a job that is cur r ent ly print ing.
To cancel a print job:
1. Select the Virtual Engine that is currently printing the j ob t o be
aborted.
2. Select Job from the PrintStation Manager main menu and then
select Abort.
3. A dialog box that looks like the following is displayed.
4. The job that is currently printing is canceled and displays an Error
(E) status in the Job List Window.
PrintStation Manager Reference Manual 65
Page 66

Merge…
Use the Merge Job option to combine existing documents, in whole or
in part, to create a new job.
To merge jobs:
1. Select the Virtual Engine that has the files listed to be merged
together.
Access the Merge Documents
dialog box by clicking the
Merge button from the Toolbar
on the PrintStation Manager
Main Screen.
An active job will not appear in
this window. Double click a job
to add it to the New Document
Order.
The Page Range may be
adjusted after a job is added to
the New Document Order.
Double-click on a job in the
New Document Order list to
display the Edit Page Range
dialog.
2. Select Job from the PrintStation Manager main menu and then
select Merge from the Job Menu.
3. The Merge Documents dialog appears.
4. Select a job from the Current Jobs list . The job will be
highlighted when it is selected. Multiple jobs may be selected.
5. Type the Page Range for the selected job to be added. The
range default is the entir e j ob. If multiple jobs are selected, Page
Range will be disabled and the entire job will be added.
6. Click the Add button. The New Document Order list displays the
selected document.
7. Repeat steps 4 through 6 until all the document s that are to be
merged have been selected.
8. Select a job in the New Document Or der list . When selected, it
will be highlighted. Jobs in the New Document Order list can be
moved up and/or down to place the jobs in the order that they will
be printed. Jobs can also be removed.
9. Click Move Up. The selected document moves up in the New
Document Order and the print order will change within the new
document.
66 PrintStation Manager Reference Manual
Page 67

It is very important to arrange
the pages in the order to be
printed. Arrange the
documents either by selecting
them in order or by using the
Move Up and Move Down
buttons after the selection is
made.
If no name is typed in the New
Job Name box the default
name will be MergeJob.
—OR—
Click Move Down. The selected document moves down in the
New Document Order and print order within the new document.
—OR—
Click the Remove button. The docum ent is removed from the
New Document Order list. Multiple documents may be selected
and removed.
10. Type the name of the merged document in the New Job Name
field.
Refer to the Job Settings tab
of this User Guide to change
the number of copies to be
printed.
When a job is created as a
Merged Document, the Job
List Window User column
displays Merged.
Depending on the size of the
file, it may take seconds to
several minutes before the
Merged Document displays in
the Job List Window.
11. If the Merge As Chapters box is checked, each job added will be
treated as an individual chapter. When the Merge As Chapters
feature is used, another dialog (see example following) will be
displayed when OK is clicked. The chapter names can be edited
here if necessary. If a chapter has an odd num ber of pages, a
blank page will be printed at the end, and t he j ob will be print ed
duplex if Insert blank page after odd paged chapters for
duplexing is checked.
PrintStation Manager Reference Manual 67
Page 68

Archive...
Depending on the file size
and archive format,
compression may take
several seconds or several
minutes to complete.
12. Click OK. The merged document displays in the Job List Window
in a Waiting state unless the Hold Job box is checked.
—OR—
Click Cancel. The merged document selections are ignored. The
PrintStation Manager Main Screen displays.
Archiving allows users to compress a job to a single str eam file that
can be saved on CD, transmitted over the Internet or simply moved to
another subdirectory. Files will be given a .msm extension if ar chived
using the T/R Systems for mat, or will be converted to the Adobe PDF
format (default). When a job is archived using PDF, the filename will be
changed to include .arc (jobname.024.arc.pdf). Select Options in t he
Tools menu to display the PSM Options dialog to modify Archive
preferences.
For example, a RIP’ed file could be transmitt ed to another
MicroPress
with PrintStation Manager, unarchived, and reprinted without having to
RIP the file again.
Select multiple jobs by
holding down the Shift or
CTRL key while selecting
jobs.
The clamp icon will be
displayed on the lower righthand corner of the PSM
status bar, indicating that a
file is being archived or
unarchived.
Click on the clamp icon to
abort the archive process.
To archive a job:
1. Select the Virtual Engine that has the j ob list ed to be archived
then select the job.
2. Select Job from the PrintStat ion Manager m ain m enu and then
select Archive from the Job Menu.
3. The location for Archive File window will appear.
4. Choose a location to store the archived file. Click OK.
68 PrintStation Manager Reference Manual
Page 69

Apply Form…
5. The Location for Archive File dialog box closes and the
PrintStation Manager’s Status Bar will display a small
. The job
status will also display “L,” indicating that the file is locked until
the compression is complete. When the compression is complete,
the job will be in Hold status.
Use Apply Form to apply a form to a job that has already been RIP’ed.
To apply a form:
1. Select a job in the Virtual Engine Job List Window.
2. Right click and select Apply Form.
3. The Apply Form dialog will be displayed.
4. Select the job containing the data t hat will be merged with the
Original Job from the Form Job Name drop down list. All pages
in the Form Job will be applied to the Original Job. Check the
Custom Arrange box to manually add pages from the Form job
to the original job. When using Custom Arr ange, drag pages from
the Form Job and drop them over the pages of the Original Job.
Only one page of the Form Job can be applied to a sing le page
of the Original Job. However, a page of Form Job can be applied
to more than one Original Job pag e.
PrintStation Manager Reference Manual 69
Page 70

Form Jobs
Merged Job
Check boxes
5. In the New Job Name box, enter a name for the new job that will
be created.
6. Select OK to merge the jobs.
7. The form will be applied to the job selected in the Job List
Window unless Create New Job is selected.
See the following table to interpr e t t he Apply Form dialog.
Field/Control Description
Form Job Name The job containing the information to be
added to the Original Job. The number of
pages in the Form Job are displayed below
the job name.
Pages The number of pages in the Form Job.
Form Job Pages The number of pages contained in the
Form Job.
Original Job Name This is the job selected in the PSM VE
window.
New Job Name Name of the new job created by merging
the Form Job and Original jobs. The
number of pages in the merged job is
displayed below the job name.
Original Job Pages The number of pages contained in the
Original job.
Hold Set the job in Hold status in the PSM after
the two jobs are merged.
Create New Job Check this box to combine the jobs into a
new job and preserve the Original Job
unchanged.
Repeat Repeat will apply the Form Job to the
Original Job as many times as possible. If
the Original Job contains 10 pages and the
Form Job contains 4 pages, the Form Job
will be repeated 2 times completely and
then the first 2 pages will be repeated.
Custom Arrange Check this box to manually add pages from
the Form Job.
Remove Applied Page Select a page added to the Original Job
and click this button to remove it from the
Original Job.
70 PrintStation Manager Reference Manual
Page 71

Mail Merge…
Use the Mail Merge feature for adding variable data t o a job. One such
use would be personalizing a mailing with the recipient’s name and
address.
When doing a mail merge
and the form has an odd
number of pages, do this prior
to the mail merge:
1) go to job info on the FORM
(or source job)
2) Select Page Settings
3) Scroll to (or type in) the last
page of the job
4) Toggle Simplex page lock
ON.
5) Close the info window and
proceed with the merge as
usual.
Doing this will allow printing of
the document as simplex or
duplex, with no need to add
(or remove) blank pages on
the end of each unit of
variable data.
To use Mail Merge:
1. Right click on the job that will have the variable data merged with
it. Select Mail Merge from the m enu.
2. The Mail Merge dialog will be displayed. The name of the job
selected in Step 1 will be displayed in the Original Job Name
section of the Mail Merge dialog.
Use the arrows to select
the pages per unit of variable
data. The spinner will only
increment to numbers that will
divide evenly into the number
of pages of the variable data
job.
3. Select the job containing the variable data that will be merged
with the Original Job from t he Variable Data Job Name drop
down list. Check the Custom Arrange box to manually add
pages from the Variable Data job to the original job. When using
Custom Arrange, drag pages from the variable data job and drop
them over the pages of the original job. Only one page of variable
data can be applied to a single page of the Original Job.
However, a page of variable data can be applied to more than
one Original Job page.
4. In the New Job Name box, ent er a name for the new job that will
be created.
5. Select OK to merge the jobs.
PrintStation Manager Reference Manual 71
Page 72

If a variable page has been
applied to an original page,
and needs to be removed,
right click on the original page
and remove the variable data
page.
Variable Data Job
Merged Document
See the following table to interpr e t t he Mail Merge dialog .
Field/Control Description
Variable Data Job Name The job containing the information to be
added to the Original Job. The number of
pages in the Variable Data job are
displayed below the job name.
Pages per unit of variable
data
Variable Data Job Pages The pages contained in the Variable Data
Original Job Name This is the job selected in the PSM VE
New Job Name Name of the new job created by merging
Original Job Pages The pages contained in the Original job.
Hold Set the job in Hold status in the PSM after
Custom Arrange Check this box to manually add pages from
Remove Applied Page Select a page added to the Original Job
The number of pages in the Variable Data
job.
job.
window. The number of pages in the
Original Job are displayed below the job
name.
the Variable Data and Mail Document jobs.
The number of pages in the merged job.
the two jobs are merged.
the Variable Data job.
and click this button to remove it from the
Original Job.
Center Pages…
Use this feature to center t he im age on all pages of a job.
To use Center Pages:
1. Select a job.
2. Right click on the job and select Center Pages from the menu.
3. Make necessary changes to the information displayed.
72 PrintStation Manager Reference Manual
Page 73

After centering pages, double
click on the centered job.
Select the correct feed tray
and paper size, on the Output
Options tab, to insure that the
job prints properly.
When previewing from the
Center Pages dialog, the
Feed Direction arrow and the
Rotate buttons will not be
available.
When centering manually,
remember that "top" is the
lead edge of the paper as it
feeds through the
PrintStation.
4. Click OK.
See the table following to interpret the Center Pages dialog:
Field/Control Description
Original
Units The unit of measurement used to display
New Page Size
Low Priority Selecting Low Priority will cause the PSM
Preview Use this feature to see a representation of
Auto Center Automatically centers the image on the
Manual Center These settings are available when Manual
• Paper - current paper size the job will
be printed on
• Image - dimensions of the job image
the dimensions. Choose either inches or
millimeters.
• Paper Size - Choose the paper size to
print the job on.
• Width and Height - available when
Custom is selected
to designate less of the system’s resources
to centering the pages.
the selected page of a document. For more
information, see the section entitled
Preview…
page horizontally and vertically.
Center is selected.
• Odd - Set the image offset from top
and left for odd numbered pages.
• Even - Set the image offset from top
and left for even numbered pages.
PrintStation Manager Reference Manual 73
Page 74

Imposition
Imposition is not available for
the PrintStation 312.
Imposition (former ly known as Booklet ) features a way to position
multiple pages of a job onto a lar ger single sheet in the correct
orientation for binding. There are four page rang es suppor ted: two A5
pages positioned on a single A4 page or two 5.5x8.5 pages posit ioned
on a single 8.5x11 and two A4 pages positioned on a single A3 page or
two 8.5x11 pages positioned on a single 11x17 page. The examples
below, for a 4 page job, reflect the latter.
The Imposition choices are:
Example Description
Reader’s Spread – Pages 1 & 2 are on the
front surface of the paper and pages 3 & 4
are on the back surface.
Printer’s Spread – This is the grouping
produced when Imposition was called
Create Booklet. The 4 pages result in a
piece of paper that can be folded to make
a book.
Double Speed – When the job is finished,
cut the pages in half and place the left
stack on top of the right stack to make a
complete job.
Certain Finishing Options do
not produce desirable results
when combined with some
Imposition choices. An
example would be; Side
Staple, Z-Fold and Printer's
Spread.
Double Mint – When this job finishes, cut
the sheets in half and each stack is a
complete job.
Multiple Signatures - This Imposition style
is formatted the same as Printer's Spread.
It differs in the way it functions by allowing
the pages to be broken into sections, called
signatures. These signatures can then be
bound together, side by side, to form a
book.
To use Imposition:
1. Select the job that is to be made into a booklet.
2. Select Job from the PrintStat ion Manager m ain m enu and then
select Imposition from the Job Menu.
3. Select the type of Imposition t o apply to t he job. If Multiple
Signatures is selected, a dialog will be displayed requesting the
number of pages per signat ur e.
4. A status bar displayed will indicate the time remaining unt il the
task is complete.
74 PrintStation Manager Reference Manual
Page 75

Insert/Delete Pages…
5. A new job will display in the Virtual Engine Job List with the same
job name. The type of I m position will display as the User Name.
The Insert/Delete Pages feature is used to add or delete pages f r om a
job. Additionally, the pages are inserted or deleted from the target job
instead of creating a new job.
When applying the following
options, PSM creates a new
job:
• Imposition
• Merge
• Scale&Rotate
• Tumble
• Center Pages
• Mail Merge
Insert/Delete Pages, ReOrder Pages, and Numbering
modify existing jobs.
Apply Form gives the option
to do either.
Multiple pages may be
selected by using the CTRL
or SHIFT keys.
To Insert Pages in a job:
1. Select the Virtual Engine containing the jobs to be manipulated.
2. Select the job to have pages inserted to.
3. Select Job from the PrintStation Manager main menu and then
select Insert/Delete Pages from the Job Menu.
4. The Insert/Delete Pages dialog appear s.
Insert, replace and delete do
not take effect until The
Apply or OK button is clicked.
Clicking Cancel to exit the
Insert/Delete dialog causes
the changes to the document
to be ignored.
5. Select a job from the Insert Pages From Job drop down list.
6. Choose the pages to be inserted fr om t he Page list window.
Select All will do just that, select all of the pages t o be added t o
the job. The number of pages in the job will be displayed to the
right of this window.
7. In the right pane, select the page where the new pages should be
inserted.
PrintStation Manager Reference Manual 75
Page 76

8. Choose to insert Before or After the page selected in the
previous step.
9. Click the Insert button to add the pag e( s) to the job. The inserted
page will be displayed as:
–ORClick the Replace button to r eplace t he selected page. The
replaced page will be displayed as:
10. Repeat steps 5 through 9 until all pages have been placed into
the job. The number of pages displayed to the right of the window
will update to show the current page count.
11. Click Apply to make the changes and update the display. Click
OK to make the changes and close the dialog. The job displays
in the Job List W indow.
—OR—
Click Cancel. The selections ar e ignored and the dialog closes.
To delete pages from a job:
1. Select the Virtual Engine containing the jobs to be manipulated.
2. Select the job to delete pages f rom.
3. Select Job from the PrintStation Manager main menu and then
select Insert/Delete Pages from the Job Menu.
4. The Insert/Delete Pages dialog appear s.
76 PrintStation Manager Reference Manual
Page 77

5. In the right pane, select the page to be deleted.
6. Click the Delete Page butt on. The deleted page will be displayed
as:
See the following table to interpret the Insert/Delete Pages dialog.
Field/Control Description
Insert pages from job The job from which pages will be copied.
Insert Copies the pages selected into the job
leaving all pages intact.
Before Place new pages in front of the selected
page.
After Place new pages in behind of the selected
page.
Replace Copies the pages selected into the job
replacing the page selected under
Insertion point.
Select All Selects all of the pages in the job.
Insert Into/Delete From
Job
Delete Page Remove the selected page from the job.
Undo Delete If a page has been marked for deletion,
Undo Insert If a page has been inserted, clicking Undo
Undo Replace If a page has been replaced, clicking Undo
Preview Select a page and click Preview to see the
OK Exits the dialog and saves changes.
Cancel Exits the dialog without saving changes.
Apply Make the changes immediately.
• When inserting, pages will be placed
either before or after this page.
• If Replace is selected, this page will be
replaced by the new page(s).
• Clicking the Delete button will remove
this page.
clicking Undo Delete will un-mark it.
Insert will remove it.
Undo Replace will reverse the
replacement.
page.
Right click on a job in the Insert Into/Delete From Job window for a menu with
the commands; Delete Page, Undo Delete, Undo Insert, Undo Replace, and
Preview.
PrintStation Manager Reference Manual 77
Page 78

Numbering…
Alphanumeric numbers would
be useful, for example, to put
PO Numbers on pages in a
job. A number like
abcd-123-001 could be used
and would increment on each
page (abcd-123-001, 002,
etc.) The number must end
with a numeric digit.
The default setting of X=0,
Y=0 puts the page number in
the top left corner of the page.
Use the Numbering feature to insert page numbers in a job.
To use Numbering:
1. Select a job.
2. Right click on the job and select Numbering from the menu.
3. Make necessary changes to the information displayed.
4. Click OK to apply the page numbers
See the following table to interpr e t t he Num bering dialog.
Field/Control Description
Starting Number The number to use to start the page
numbering.
X Position Move the page number horizontally on the
page with this coordinate.
Y Position Move the page number vertically on the
page with this coordinate.
Units Use either mm or inches to position the
numbers on the page.
Font The currently selected font to be used for
numbering.
Number the First Page Check this box to start the page numbering
on the first page of the job.
Landscape Job Check this box if the job is in Landscape
orientation.
Create New Job If this box is checked (the default setting) a
new job will be created that has the pages
numbered. The original job will remain
unchanged.
Outside Edge The numbers will be placed on the outside
edge of the page.
78 PrintStation Manager Reference Manual
Page 79

Clicking Basic will hide the
Advanced options.
Field/Control Description
Advanced/Basic Clicking Advanced adds additional
functionality to the dialog.
Place multiple numbers on each page:
• Number - The number to use, as
determined by the Starting Number.
N=the Starting Number, N+1=The
Starting Number plus 1, etc.
• X Position - Move the page number
horizontally on the page with this
coordinate.
Y Position - Move the page number
vertically on the page with this
coordinate.
• Add - Multiple numbers may be added
to a page by clicking Add and adjusting
the X and Y positions.
• Delete - Remove the Page Number
information from the selected job.
• Cut and Stack - This option will cause
each number placed on a page to
increment by 1 for each subsequent
page.
Number Chapters - This feature will add, or
prefix chapter numbers to the page
numbers (1-1, 1-2, 2-1, etc.) for selected
chapters. The first page of each chapter
will start numbering at 1.
• Prefix - Edit the Prefix. The Prefix can
be, for example, a number (1 -, 2 -) a
word (Appendix, Chapter) or a combination (Introduction 1 -, Preface 1.)
• Clear Prefixes - removes prefixes
from the page numbering.
• Default Prefixes - sets the prefixes
back to 1 - (page number), 2 - (page
number), etc.
See the graphic following for an example.
Change Font Select the font used for the page number.
PrintStation Manager Reference Manual 79
Page 80

Re-order Pages…
Use this feature for arranging the printing or der of pages within PSM
jobs.
Right click within the Job List
window for quick access to
the Job Menu. Not all menu
items will be available unless
a job is selected.
To access the Re-Order Pages dialog :
1. Select a job in the Job List window.
2. Open the Job menu and select Re-Order Pages.
3. The Re-Order Pages dialog displays.
Refer to the f ollowing t able t o interpret the Page Re-O r der dialog.
80 PrintStation Manager Reference Manual
Page 81

Scale & Rotate…
Field/Control Description
Pages The pages comprising the currently
selected job. Use the arrow keys to
manually reposition pages within a job.
Auto Re-Order The features available for Auto Re-
Ordering the pages in a job are:
• Duplex Scan Order – This feature is
intended for use with MicroScan when
a duplex document is scanned as
simplex. In other words, one side of a
duplex document is scanned then the
other side. Duplex Scan Order will put
the pages into the correct order for
printing.
• Reverse – Clicking this button will put
the job’s pages in opposite order (4, 3,
2, 1).
• Reset – Changes the page order back
to its original configuration.
Preview Enabling this feature will display the
currently selected page in a job.
If a job is scaled, the User
Name in the Job List window
will be changed to Scaled.
Right click within the Job List
window for quick access to
the Job Menu. Not all menu
items will be available unless
a job is selected.
Use Scale & Rotate to adjust t he size of the pages in a PSM job.
To Scale an image:
1. Select a job in the Job List window.
2. Open the Job menu and select S
cale & Rotate. The Scaling
dialog will be displayed.
Refer to the f ollowing t able to interpret the Scaling dialog .
Field/Control Description
Original Information about the document’s current
appearance.
• Paper – the size of the paper
• Image – the size of the image on the
paper.
PrintStation Manager Reference Manual 81
Page 82

To rotate a Letter, A4, A5, or
B5 job 90 degrees, select
LetterR, A4R, A5R, or B5R
from the New Page Size
menu (062 only).
Field/Control Description
Scale by The amount, in percent, to enlarge or
reduce the image depending on paper size.
Select the percentage from the drop down
menu.
When the paper size after scaling is not an available paper type, turn Auto
Paper Select off, and select the feed tray with the appropriate paper size (062
only).
Example:
When a Lett er size imag e (8.5" x 11") is scaled to Tabloid (11" x 17"), it
is enlarged 129% making the image 11" x 14.2". Therefore, the image
size after scaling does not match T abloid.
Field/Control Description
New Page Size The paper size that the scaled job will be
printed on. The image will not be centered
if it is smaller than the paper size after
scaling. If the image is larger than the
paper size, the image will be centered.
Rotation Changes the orientation of the image on
the paper.
• Auto Rotate – The PSM will detect the
correct orientation of the image
according to the percentage scaled
and the paper size selected. This is the
default setting.
• No Rotation – The image’s orientation
will not be changed.
• Rotate 90 – Rotates the image 90
degrees in a counter-clockwise
direction
• Rotate –90 - Rotates the image 90
degrees in a clockwise direction
Center Check this box to center the image on the
page horizontally and vertically.
Low Priority Selecting Low Priority will cause the PSM
to designate less of the system’s resources
to manipulating the image. This will also
take a longer time to finish the image.
3. Make the appropriate selections and press Scale.
As the job is being processed, a status bar will be displayed on the
Scaling is not available for
QuadLevel jobs or jobs where
pages differ.
82 PrintStation Manager Reference Manual
bottom of the Scaling dialog.
Page 83

Settings
4. The User Name in the Job List window will be changed to Scaled.
This menu item displays options available for the curr ently selected
Virtual Engine type. The options are those select ed by check box on the
Output Options dialog.
Print Inserts may be checked
even though no selected jobs
have insert pages. See the
topic
Output Options
detail on Print Inserts.
for more
To view the Settings options:
1. Right click on a job in a Virtual Engine window.
2. Select Settings, then the necessary option, if available.
Availability of the options depends on the PrintStat ion type.
The menu items will be grayed out if unavailable for the selected Virtual
Engine. A checkmark beside an option indicates that it is selected. If
multiple jobs are selected, the check will be red if the option is not
selected in all jobs.
Clicking on an option with a red check will cause PSM to attempt to
apply the option to all of the selected jobs. If an option can’t be set for a
job, a dialog will be displayed indicating the job name and the reason
that the option cannot be set.
Clicking on an option with a black check will cause PSM to turn t he
option off in all of t he jobs.
The table following gives cases where options are not applicable to
jobs.
This option Is not available when
Duplex
Copy Separators
• the job is only one page
• odd or even pages only
• the job is being printed from the
manual tray on the Cii
• the job is only one page
• only one copy of the job is being
printed
PrintStation Manager Reference Manual 83
Page 84

Tumble
If a job is tumbled, the User
Name in the Job List window
will be changed to Tumbled.
This option Is not available when
Fast Print
Manual Tray Increase
Transfer
• the job is not being printed on the Cii
• the job is duplex
• the paper size is not A4 or Letter
• the job is being printed from the
manual tray
• the job is being pulled from different
trays
• the job is not being printed on the Cii
• the job is not being printed from the
manual tray
Tumble rotates selected pages 180 degrees. The choices for Tum ble
are:
• Odd – Tumbles the odd numbered pages in the selected document.
• Even - Tumbles the even numbered pages in the selected
document.
• All - Tumbles all of the pages in t he selected document.
• Pages - Tumbles the selected pages.
To use Tumble:
1. Select a job in the Job List window.
Right click within the Job List
window for quick access to
the Job Menu. Not all menu
items will be available unless
a job is selected.
To select pages 1 through 5,
enter 1-5 in the edit box. To
select pages 1 through 5, and
pages 9 and 27, enter 15,9,27 in the edit box. This is
much faster than checking
the box beside each page.
2. Open the Job menu and select T
umble.
3. Select Odd, Even, or All.
4a. The dialog box shown below will be displayed.
4b. If Pages is selected, the following dialog will be displayed.
84 PrintStation Manager Reference Manual
Page 85

There will be a check box for each page in the job. Use either the
check boxes to select pages or the edit box to enter pages or ranges of
pages.
5. The User Name in the Job List window will be changed to
Tumbled.
See the table following for examples of Tumble selected for Even
pages.
Page Size Desired Output Tumble Settings
A4 and Letter
Portrait
A4 and Letter
Portrait
A4 and Letter
Landscape
A4 and Letter
Landscape
Others
Portrait
No Tumble
Tumbled
No Tumble
Tumbled
No Tumble
Assign Job Ticket…
For more detailed information
on the use of MicroTicket
Configuration, MicroTicket,
and MicroTicket Server,
please see the documentation
for the individual applications.
Others
Portrait
Others
Landscape
Others
Landscape
Job Ticketing consists of three
MicroPress
Tumbled
No Tumble
Tumbled
applications; MicroTicket
Configuration, MicroTicket, and MicroTicket Server.
• The basic workflow of job ticketing begins with a print provider
MicroPress
(
owner) providing a custom ticket f or m , generated with
MicroTicket Configuration, to a client. The ticket is accessible t o
both Macintosh and PC format computers.
• The client, using MicroTicket within a web browser, fills out t he
characteristics of a print j ob. The files required to process t he j ob
are also included. MicroTicket packages all of the required jobs into
one file that is easily transported to t he pr int provider.
PrintStation Manager Reference Manual 85
Page 86

If there are characteristics of
the job that are unique, such
as colored paper, a warning
message will be displayed
before the job prints. The
warning message must be
acknowledged or the job will
not print and will generate an
error message.
• When the print provider receives the ticket from the client,
MicroTicket Server is used to separate the job files from the job
ticket.
• The job ticket is seamlessly submitted, unseen to the user, to the
PSM via a pipe.
• When the j ob ar r ives, t he " floating" job ticket is at tached to the job.
The information is viewable via the Assign Job Ticket comm and on
the Job menu.
The Assign Job Ticket dialog is accessed by:
1. Selecting a job in a Virtual Engine.
2. From the Job menu, selecting Assig n Job Ticket.
The Assign Job Ticket will be displayed.
Refer to the following table t o int erpret the Assign Job Ticket dialog.
Field/Control Description
Job Name The name of the currently selected job
Job Tickets Available job tickets
Assign Assign the selected ticket to the currently
selected job
AutoSet Job Attributes Automatically assign job attributes
contained in the ticket to the selected job.
The default setting is ON.
View Job Ticket Displays the information contained in the
ticket
Delete Job Ticket Removes the selected ticket from the Job
Ticket window
86 PrintStation Manager Reference Manual
Page 87

View
Toolbar
Status Bar
Items found under View are for adj usting the Virtual Engine display to a
custom view. For example, you can hide the Toolbar or Status Bar,
Sort the job list and gain access to System Events and Account ing
Information.
To display or hide the Toolbar:
1. Select View fr om t he Pr intStation Manager main menu.
2. If there is a check by Toolbar, the Toolbar will be displayed.
3. If there is no check by Toolbar, t he Toolbar will not be displayed.
To display or hide the Status Bar:
1. Select View fr om t he Pr intStation Manager main menu.
2. If there is a check by Status Bar, t he Status Bar will be
displayed.
Sort by
Sort the Job List Window by
clicking on the column
category title. For example:
sort the jobs by status by
clicking on the
button at the top of the
column. Virtual Engine View
Details must be selected.
Sorted orders set in this
manner will not be
remembered in the next
session of PrintStation
Manager.
3. If there is no check by Status Bar, t he Status Bar will not be
displayed.
To sort the Jobs Displayed in the Virtual Engine Job List window:
1. Select View fr om t he Pr intStation Manager main menu and
then select Sort By. Then choose Job Status, Job Name or
User Name. The one chosen will be highlighted when selected.
The sorting will be immediate. An “*” will appear next to the
name in the column header of the curr ent sort column.
2. Sorted orders set this way will be remembered in the next
session of PrintStation Manager.
PrintStation Manager Reference Manual 87
Page 88

System Events
View System Events by
pressing [Alt]+1.
When an error occurs, a red
exclamation point will display
on the Task Bar.
The PrintStation Manager tracks system events. Select System Events
from the View Menu to access results of error s and other events that
are noteworthy to the functionality of t he system. This information can
be used as a troubleshooting tool when errors occur.
To display system event information:
1. Select View fr om t he Pr intStation Manager main menu and then
select System Events.
2. The System Events dialog displays.
Click on the exclamation point
to open the System Events
dialog. The exclamation point
will remain until the System
Events dialog is opened and
closed. When the dialog is
closed, the exclamation point
will go away.
A time/date stamp is written to the event log each time PrintStation
Manager is started. Afterwards, each m essage is given a time stamp.
For example: “18:15:27:PSM: Configuring PrintStation support for A” is
one such message displayed above.
Refer to the f ollowing t able t o interpret the buttons in the Log Viewer.
Field/Control Description
Clear System Events Log The System Events log can be a very
helpful tool in tracking problems. By
clearing the System Events log from time
to time, it makes it easier to find the errors
when they appear.
Save As... Save the information in the Event Viewer Log
as a text file. This is especially convenient if it
becomes necessary for Technical Support to
view the errors. The information can be saved
and faxed to Technical Support.
3. Click OK to close the Log Viewer.
88 PrintStation Manager Reference Manual
Page 89

System Errors
To prevent the job stack from
moving in the event of a
PrintStation error, increase
the “Error Timeout” in the
PrintStation Manager
Configuration application.
This will lengthen the time
until the software moves the
Job Stack. You can increase
the time period to one (1)
hour but you can not prohibit
the Job Stack from moving.
If an error occurs at a Pr int St ation during printing and the PrintStation
problem is not resolved in a set amount of tim e ( s ee Pr int St ation
Manager Configuration for details on setting this error timeout per iod),
the PrintStation Manager will move the Job Stack to the first available
PrintStation. The alter native PrintStation will also belong to the same
Virtual Engine (this could be itself , if there are no other Pr int St a t ions
turned on). An Error Separator Sheet will “frame” the moved stack.
For example, PrintStation “A” and PrintStation “B” have started a 40
page job. Each PrintStation is to pr int 20 pages. After the 10th pag e
has printed on PrintStation “A”, an err or occurs which is not corrected
within the error timeout period and the Job Stack moves to PrintStation
“B”. The result will be 20 pages print ed on Pr intStation ”B”, an error
separator sheet, pages 11 - 20 (r em aining pages after error from
PrintStation “A”) and another err or separ ator sheet.
Please note that if the Job Stack has moved and that PrintStation does
not have the correct paper or is out of paper, the PrintStation will make
three attempts to print t he Job Stack, printing two error separat or
sheets for each attempt. This means that if a PrintStat ion r uns out of
paper and there are no other available PrintStations, it will print six (6)
error separator sheets.
Accounting
View specific job information
by selecting a job from the
Job List Window and
choosing Info from the Job
Menu, or by double-clicking
the job itself. The user may
view accounting information
for all jobs by pressing
[Alt]+2.
Toggle Accounting off and on
by using the PSM Options
dialog accessed from the
Tools menu.
Details on job errors may also be viewed in the job status area in the
Job Settings window under Job Info.
The PrintStation Manager maintains accounting information by tracking
all print jobs according to user, spool t im e, print time, job size, toner
coverage, and pages printed. Accounting r esults for all PrintStation
Manager jobs are stored in a tab delimited text file which may be
imported into a database or spreadsheet application.
The accounting file, ACCOUNTING.TXT, is saved as <date>. txt in the
PrintStation Manager directory at midnight . For example, a saved
accounting file may display with the name “accounting October
09,1995.txt”. This information may be viewed from the PrintStation
Manager by opening the View Menu and then selecting Accounting.
To display the Accounting inform a t ion for all jobs in the PrintStat ion
Manager:
1. Select View from the PrintStation Manager main menu and then
select Accounting.
2. The Accounting Log screen appears and displays the activity for
the day from the PrintStation Manager.
PrintStation Manager Reference Manual 89
Page 90

If the Toner Coverage has not
been turned on in Virtual
Engine Defaults or the Toner
Calculator has not been used,
the Toner Coverage % will
display as “-”.
3. Click OK when finished viewing the information. T he Log Viewer
will close.
—OR—
Click Save As... to save the information as a Tab/Delimited text
document which can be read and opened by most spreadsheet
applications. The file will be given a .act extension.
The following is an example of the accounting information saved into
an Excel spreadsheet.
90 PrintStation Manager Reference Manual
Page 91

Scripting
Following the section, Script
Toolbar, is a listing of all the
T/R Systems script properties
and methods.
In the PSM, certain aspects of a job may be script ed. For example, a
script may loop through all the jobs in a Virtual Engine and turn Duplex
off, as shown below:
Dim job
For Each job in VE.Jobs
VE.JobDuplex(job) = False
Next
Instructions are not included in this documentation for creating,
modifying VBScripts, or VBScript language constructs. There ar e many
books and resources available on this subject. An online tutor ial can be
found at the Microsoft website http://www.microsof t.com/vbs cripts. T he
tutorial can also be downloaded from this page.
There will be detail given on the lines of code that have VE attached to
the front of t hem .
VE stands for Virtual Eng ine. Everything in PSM scripting is done
through this VE object. VE has several proper t ies and m et hods
available for use and more will be added in the futur e. An example of
one of the more commonly used Properties is “ Jobs” . Jobs returns an
array of all the jobs in the Virtual Engine where the script is run. To run
the script only on the selected jobs, the property “SelectedJobs” could
be used. To run the script on the active job (meaning there is only one
job selected in the Virtual Engine), t he pr oper ty “ActiveJob” could be
used.
PrintStation Manager Reference Manual 91
Page 92

Script Toolbar
Selecting Script Toolbar from t he View menu or clicking the toolbar
button will add a toolbar to the Virtual Eng ines. This toolbar makes it
possible to apply and run Visual Basic scripts on jobs, view the
contents of scripts, and modify scripts.
A number of scripts are included with PSM. These scripts m ay be
modified for more cust om ized usage. An editor is also included with
PSM.
Refer to the following table t o int erpret the script toolbar.
Field/Control Description
Available Scripts drop
down list
Run Script Execute the selected script in the current
View Script Open a preview window to view the
Edit Script Open the script editor.
Select a script from the scripts folder,
MicroPress
Virtual Engine.
contents of the script.
\psm\scripts.
The scripts included with PSM and their function are described in the
table following.
Script Name Function
AlternateTraysOnJob
ChangeJobPrintInformation
Makes a 10 page job into a 20 page job, for
example, and alternates trays on each
page. Useful when creating a presentation.
Print a page on paper then print a page on
transparency material.
This displays all the information about a job
(duplex, collation, etc.) and allows the user
the ability to change the information. It also
asks if the user wants to archive the job.
92 PrintStation Manager Reference Manual
Page 93

Script Name Function
CreateNewJob
MergeSelectedFiles
ScriptStub
This is an extended version of the
MergeSelectedJobs script. This script goes
through the selected jobs and asks for
page ranges to merge from. For example,
if a 20 page job was selected, pages 10-15
could be inserted into the new job. The
script also prompts for a new job name.
This script will merge all the selected jobs
into one new job.
This is basically a script template.
SplitColorFromBW
This script will go through the selected job
(only one selected job allowed) and strip
out the color pages from the black and
white pages. It will create 2 new jobs
(Original job name + ".Black And White
Pages" or Original job name + ".Color
Pages").
Clicking the View Script button will display the script in a view only
dialog.
The Edit Script button will open a dialog that will perm it editing of the
script.
Existing scripts may be
modified to perform other
tasks. Use Save to make the
changes to the existing script,
or Save As to create a new
script.
PrintStation Manager Reference Manual 93
Page 94

Script Properties and Methods
Following is a listing of all script properties and m et hods that can be
used in scripting for the PSM. Examples are included f or each one.
If using the return value of a method as a parameter, the parameter(s) of the
method must be enclosed in parentheses.
Property Definition
Jobs
• Syntax - VE.Jobs [Read Only]
• Remarks - Returns an array of jobs contained in the Virtual Engine
specified by VE
• Example
Dim aJob
For Each aJob In VE.Jobs
Next
SelectedJobs
• Syntax - VE.SelectedJobs [Read Only]
• Remarks - Returns an array of the selected jobs in the Virtual Engine
specified by VE
• Example
Dim aJob
For Each aJob In VE.SelectedJobs
selected job
Next
NumberOfJobs
• Syntax - VE.NumberOfJobs [Read Only]
• Remarks - Returns the number of jobs in the Virtual engine specified by
VE.
• Example
If VE.NumberOfJobs = 0 Then
VE to run”
End If
NumberOfSelectedJobs
• Syntax - VE.NumberOfSelectedJobs [Read Only]
• Remarks - Returns an array of jobs contained in the Virtual Engine
specified by VE.
• Example
If VE.NumberOfSelectedJobs = 0 Then
selected to run”
End If
ActiveJob
• Syntax - VE.ActiveJob [Read Only]
• Remarks - Returns the active job.Active job is the first selected job.
Meaning if you have jobs 1,2, and 3 selected, job 1 is the active job.
• Example
VE.JobDuplex( VE.ActiveJob ) = True
‘aJob contains a valid job number now
‘aJob contains a valid job number of a
MsgBox “Must Have at least one job in the
MsgBox “Must Have at least one job
94 PrintStation Manager Reference Manual
Page 95

Property Definition
PagesInJob
• Syntax - VE.PagesInJob(job) [Read Only]
• Parameters - Job – the job number of a job in the Virtual Engine.
• Remarks - Returns how many pages are in job that is passed in.
• Example
If VE.PagesInJob( VE.ActiveJob ) > 10 Then
End If
JobName
• Syntax - VE.JobName(job) [= string]
• Parameters - Job (the job that you wish to change/query)
• Remarks - Sets/Gets the job name of the specified job.
• Example
Dim str
str = VE.JobName(someJob)
str = str + Now()
VE.JobName(someJob) = str
JobCopies
• Syntax - VE.JobCopies(job) [= long]
• Parameters - Job – the job that you wish to change/query
• Remarks - Sets/Gets the number of copies of the job
• Example
Dim copies
copies = VE.JobCopies(someJob)
copies = copies + 10
VE.JobCopies (copies)
JobDuplex
• Syntax - VE.JobDuplex(job) [= boolean]
• Parameters - Job (the job that you wish to change/query)
• Remarks - Sets/Gets the value of duplex for this job.
• Example
‘Turn off duplex for all jobs
Dim job
For Each job in VE.Jobs
Next
JobNumber
• Syntax - VE.JobNumber(jobName) [Read Only]
• Parameters - JobName (the string name of job that you wish to get the
number of)
• Remarks - Gets the job number for the specified job name
• Example
Dim jobNum
jobNum = VE.JobNumber(“Some Job”)
VE.JobDuplex(jobNum) = True
JobBeginPageRange
• Syntax - VE.JobBeginPageRange(job) [Read Only]
• Parameters - Job (the job that you wish to change/query)
• Remarks - Sets/Gets the value of the beginning page.
• Example
MsgBox VE.JobBeginPageRange(someJob)
JobEndPageRange
• Syntax - VE.JobEndPageRange(job) [Read Only]
• Parameters - Job (the job that you wish to change/query)
• Remarks - Sets/Gets the value of the beginning page.
• Example
MsgBox VE.JobEndPageRange(someJob)
VE.JobDuplex( VE.ActiveJob ) = True
VE.JobDuplex(job) = False
PrintStation Manager Reference Manual 95
Page 96

Property Definition
JobOdd
• Syntax - VE.JobOdd(job) [= boolean]
• Parameters - Job (the job that you wish to change/query)
• Remarks - Sets/Gets whether or not to print only the odd pages.
• Example
If VE.PagesInJob(someJob) Mod 2 Then
Else
End If
JobEven
• Syntax - VE.JobEven(job) [= boolean]
• Parameters - Job (the job that you wish to change/query)
• Remarks - Sets/Gets whether or not to print only the even pages.
• Example
If VE.PagesInJob(someJob) Mod 2 Then
Else
End If
JobEvenOdd
• Syntax - VE.JobEvenOdd(job) [= boolean]
• Parameters - Job (the job that you wish to change/query)
• Remarks - Sets/Gets whether or not to print all the pages
• Example
If VE.JobOdd(someJob) Or VE.JobEven(someJob)
Then
End If
JobGatherCollate
• Syntax - VE.JobGatherCollate(job) [= boolean]
• Parameters - Job (the job that you wish to change/query)
• Remarks - Sets/Gets whether or not collate the specified job
• Example
‘Collate the job if we are printing all pages
Dim begin, end, evenNodd
begin = (VE.JobBeginPageRange(someJob) = 1)
end = (VE.JobEndPageRange(someJob) =
VE.PagesInJob(someJob))
evenNodd = VE.JobEvenOdd(someJob)
If begin And end And evenNodd Then
End If
VE.JobOdd(someJob) = True
VE.JobOdd(someJob) = False
VE.JobEven(someJob) = False
VE.JobEven(someJob) = True
VE.JobEvenOdd(someJob) = True
VE.JobGatherCollate(someJob) = True
96 PrintStation Manager Reference Manual
Page 97

Method Definition
GetPaperTray
• Syntax - VE.GetPaperTray(job [,page_number]) as Long
• Parameters -
Job (the job that you wish to change/query)
Page_number (This is an option parameter that specifies the page
number to query)
• Remarks - Returns the paper tray that the job (or page) will print from.
• Example
Dim wholeJob, onePage
wholeJob = VE.GetPaperTray someJob
onePage = VE.GetPaperTray someJob, 10
SetPaperTray
• Syntax - VE.SetPaperTray(job, paper_tr ay [,page_number])
• Parameters -
Job (the job that you wish to change/query)
Paper_try (The paper tray)
Page_number (This is an optional parameter that specifies the
page number to query)
• Remarks - Sets the paper tray you want the job (or specified page) to
pull from
• Example
Dim wholeJob, onePage
wholeJob = 1
onePage = 2
VE.SetPaperTray someJob, wholeJob
VE.SetPaperTray someJob, onePage, 10
Property Definition
GetPaperDest
• Syntax - VE.GetPaperDest(job [,page_number]) as Long
• Parameters -
Job (the job that you wish to change/query)
Page_number (This is an option parameter that specifies the page
number to query)
• Remarks - Returns the paper destination that the job (or page) will print
from. This applies only to the 024 black and white engine. It will not
cause an error on the Cii or 312.
• Example
Dim wholeJob, onePage
wholeJob = VE.GetPaperDest someJob
onePage = VE.GetPaperDest someJob, 10
PrintStation Manager Reference Manual 97
Page 98

Property Definition
SetPaperDest
• Syntax - VE.SetPaperDest(job, paper_dest [,page_number])
• Parameters -
Job – the job that you wish to change/query
Paper_dest – The paper destination
Page_number – This is an optional parameter that specifies the
page number to query
• Remarks - Sets the paper tray you want the job ( or specified page ) to
eject at. This applies only to the 024 black and white engine. It will not
cause an error on the Cii or 312
• Example
Dim wholeJob, onePage
wholeJob = 1
onePage = 2
VE.SetPaperDest someJob, wholeJob
VE.SetPaperDest someJob, onePage, 10
Merge
• Syntax - VE.Merge(job_name, job_numbers, begin_pages,
end_pages) as Long
• Parameters -
job_name (the name of the new job to create)
Job_numbers (an array of job numbers to pull from)
begin_pages (an array of the beginning page numbers)
end_pages (an array of the ending page numbers)
• Remarks - Merges the data into a new job and returns the new job
number.Page ranges must be valid ranges in the corresponding job
number.For instance, array index 0 of job_numbers is a job that has 20
pages.This means that array index of 0 for begin_pages and
end_pages must be between 1 and 20.
• Example
See MergeSelectedJobs sample script
SetPageRanges
• Syntax - VE.SetPageRanges(job, begin_page, end_page)
• Parameters -
job (the job that is to have its page ranges modified)
begin_page (the starting page number for the specified job)
end_page (the ending page number for the specified job)
• Remarks - Sets the beginning and ending page range for the specified
job.
• Example
VE.SetPageRanges someJob, 34, 48
Update
• Syntax - VE.Update
• Remarks - Call this to update the GUI after making changes to a single
or multiple jobs. Do not call this function in a loop that works on all the
job numbers, it will invalidate the array of job numbers. See example for
what NOT to do and what TO do.
• Example
‘Make several job calls
VE.Update
98 PrintStation Manager Reference Manual
Page 99

Property Definition
IsColorPage
• Syntax - VE.IsColorPage(job, page) as boolean
• Parameters -
Job (the job that contains the page to query)
Page (the page that you want to check for color)
• Remarks - Returns True if the specified page has any color on it.
• Example
‘See SplitColorFromBW sample script
Tumble
ArchivePDF
• Syntax - VE.Tumble(job, which_pages)
• Parameters -
Job (the job that you wish to tumble)
Which_pages (tells which pages you want to tumble)
• Remarks - Copies the job specified by “Job” and tumbles the specified
pages
• Syntax - VE.ArchivePDF( job )
• Parameters -
Job – the job you wish to archive to PDF
• Remarks - Archives the specified job into PDF format. Note on some
jobs this is slower than MSM Format. Use with caution in AutoScripts.
Must call SetArchiveDest before calling this.
• Example
VE.SetArchiveDest( “C:\Temp” )
VE.ArchivePDF( VE.ActiveJob )
ArchiveMSM
• Syntax - VE.ArchiveMSM( job )
• Parameters -
Job – the job you wish to archive to MSM
• Remarks - Archives the specified job into MSM format. Note this is the
proprietary PSM archive format. You can not view this format. If you
need to view archive files, use ArchivePDF method. Must call
SetArchiveDest before calling this.
• Example
VE.SetArchiveDest( “C:\Temp” )
VE.ArchiveMSM( VE.ActiveJob )
Impose
• Syntax - VE.Impose( job, impose_type [, num_of_sigs ] )
• Parameters
Job – The job you wish to impose
impose_type – The type of imposition you wish to use
num_of_sigs – If impose type is 7 ( mutliple signatures ), this is the
number of signatures to use
• Remarks - Runs the imposition type on the specified job.
1 for Even Pages
2 for Odd Pages
3 for All Pages
-
1 = Printer Spread
7 = Multiple Signature
4 = Double Speed
5 = Double mint
6 = Readers Spread
PrintStation Manager Reference Manual 99
Page 100

Property Definition
SetArchiveDest
• Syntax - VE.SetArchiveDest( directory )
• Parameters -
Directory – specifies the directory to output archive files to.
• Example
VE.SetArchiveDest( “C:\Temp” )
VE.ArchivePDF( VE.ActiveJob )
ApplyForm
ScaleJob
SetOffsets
• Syntax - VE.ApplyForm( job, page_number, form_name )
• Parameters -
Job – the job to apply the form to
Page_number – The page in the job to apply the form to
Form_name – The name of the form. This must be in the directory
“forms” underneath \
properly.
• Remarks - Applies the specified form to the page of the job passed in.
• Syntax - VE.ScaleJob( aJob, scale_percent, rotate_by, paper_size )
• Parameters -
AJob – the job you wish to scale
Scale_percent – percentage you wish to scale by. ( 1 to 1000% )
Rotate_by – the degree by which to rotate ( 90 degrees, etc. )
Paper_size – The paper size to conform the job to.
• Example
VE.ScaleJob( VE.ActiveJob, 0, 90, 1 )
• Syntax - VE.SetOffsets( aJob, left, top, even )
• Parameters -
aJob – The job you wish to change the offsets for.
Left – The number of pixels to shift to the right
Top – the number of pixels to shift to the bottom
Even – pass in true to set offsets on even pages, false for odd
pages
• Example
If VE.Name = “M” Then
End If
MicroPress
Letter = 1
Legal = 3
Tabloid = 6
Compound = 7
Executive = 11
Postcard = 12
Statement = 17
A4 = 2
A3 = 4
B5 = 5
B4 = 10
A6 = 13
B6 = 15
A5 = 14
\psm\vp\<engine>\forms to work
For Each job In VE.Jobs
VE.SetOffsets job, 2, 2, true
Next
100 PrintStation Manager Reference Manual
 Loading...