

Page 1
Minoltafax2800/3800
User Manual
Page 2

Quick reference Minoltafax 2800/3800
Function Keys
Entering numbers
One touch
Speed dial
Group dial
Program dial
Batch transmission
Set relay box
Send
Memory transmission
Direct transmission
Default setting transmission
Timer transmission
Broadcast
Relay transmission
Polling TX
Mailbox TX
Forwarding
Closed network
Delete schedule
Reception
Default settings
Setting memory reception
Printing memory reception
Mailbox reception
Printing mailbox
Polling reception
Group polling
Setting rings
Multi page print
Reduction
[SET] + [1] + one touch
[SET] + [2] + speed dial
[SET] + [3] + one touch
[SET] + [4] + one touch
[SET] + [5] + one touch
[SET] + [6]
[START]
[SPEAKER] + [START]
[SET] + 2x [V/PIN CODE] + [1]
[FUNCTION] + [2]
[FUNCTION] + [1]
[FUNCTION] + [8]
[FUNCTION] + [6]
[FUNCTION] + [3]
[SET] + 2x [V/PIN CODE] + [3]
[SET] + 2x [V/PIN CODE] + [2]
[SCHEDULE] + [NO]
[SET] + 3x [V/PIN CODE] + [7]
[SET] + 3x [V/PIN CODE] + [1]
[FUNCTION] + [5]
[SET] + 3x [V/PIN CODE] + [5]
[FUNCTION] + [4]
[FUNCTION] + [7]
[SET] + 3x [V/PIN CODE] + [9]
[SET] + 3x [V/PIN CODE] + [2]
[SET] + 3x [V/PIN CODE] + [3]
[SET] + 3x [V/PIN CODE] + [4]
Page 3

Quick reference Minoltafax 2800/3800
Function Keys
User data
Date & time
Fax number
User name
Department number
Scanning and pr inting
Resolution
Contrast
Image density
Reduction
Recording paper size
Reports and lists
Default setting reports
Print reports
Show on display
Drum counter
Machine settings
LCD contrast
Dial method
Buzzer settings
Speaker
Remote access
Header
Footer
Power save mode
Power save timer
[SET] + 6x [V/PIN CODE] + [1]
[SET] + 6x [V/PIN CODE] + [2]
[SET] + 6x [V/PIN CODE] + [3]
[SET] + 6x [V/PIN CODE] + [4]
[SET] + [V/PIN CODE] + [1]
[SET] + [V/PIN CODE] + [2]
[SET] + [V/PIN CODE] + [3]
[SET] + [V/PIN CODE] + [4]
[SET] + [V/PIN CODE] + [5]
[SET] + 5x [V/PIN CODE] + corresponding one touch key
[REPORT] + as many times [V/PIN CODE] until the desired report displays + [YES]
[JOURNAL] + as many times [V/PIN CODE] until the desired report displays + [YES]
[SET] + 4x [V/PIN CODE] + [9]
[SET] + 4x [V/PIN CODE] + [1]
[SET] + 4x [V/PIN CODE] + [2]
[SET] + 4x [V/PIN CODE] + [3]
[SET] + 4x [V/PIN CODE] + [4]
[SET] + 4x [V/PIN CODE] + [5]
[SET] + 2x [V/PIN CODE] + [4]
[SET] + 3x [V/PIN CODE] + [8]
[SET] + 4x [V/PIN CODE] + [7]
[SET] + 4x [V/PIN CODE] + [8]
Page 4

Contents
1 Introduction
1.1 W e wa n t yo u to be sa t is fi ed c us t o me rs....... ... ..........................1 - 1
1.2 How does a fax machine work?.................................................1 - 2
1.3 Certificate for machines with CE marking................................1 - 3
CTR 21 app roval.................................. .. ... .............. ... .. .................1 - 3
1.4 Safety precautions.......................................... ................. ...........1 - 4
Laser safety...................................................................................1 - 4
Internal laser radiation...................................................................1 - 4
Ozone release warnin g.............................. ................. ................. .1 - 4
1.5 Characteristics ............................................................................1 - 6
2 Installation
2.1 Location .......................................................................................2 - 1
Environment..................................................................................2 - 2
Power supply..... .. ................. ................. .. ................. ................. ....2 - 2
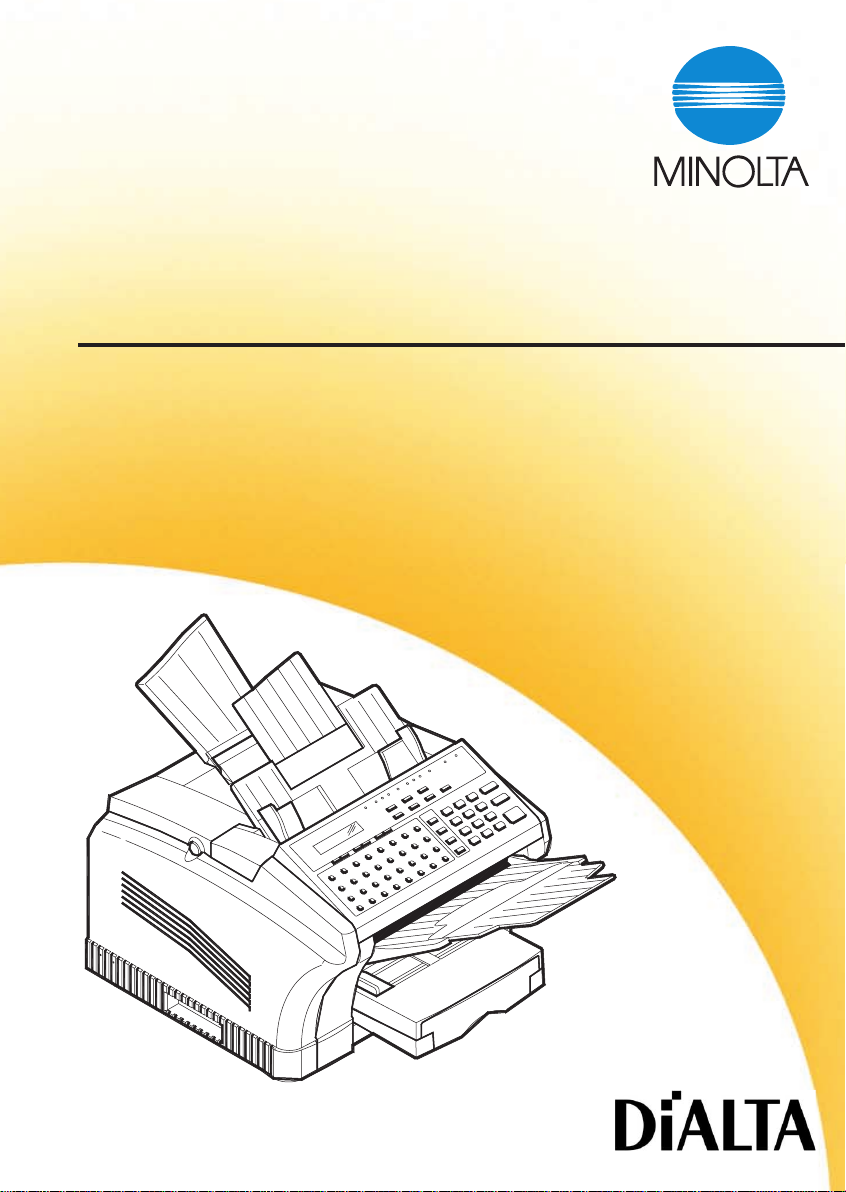
2.2 Unpacking ...................................................................................2 - 3
Installing the paper input tray .............................. .. .......................2 - 3
Installing the paper output tray .....................................................2 - 3
Installing the paper stacking tray ..................................................2 - 3
2.3 Machine layout ...........................................................................2 - 4
Minoltafax 2800/3800........... .. .......................................................2 - 4
Memory upgrade (optional accessory) . .........................................2 - 7
Printer control ler PCL5e- extension (optional accessory).............2 - 7
TWAIN interface drive r (optional accessory)...... ................. .. ........2 - 7
I-fax card upgrade (optional accessory)........................................2 - 7
2. Paper tray (optional accessory) ................................................2 - 7
Module for 2nd telephone for Minoltafax 2800
(optional acce ssory).............................. .. ............... .......................2 - 7
2.4 Co n tr o l p ane l, displa y a n d k eys ..... .. .. ........ .. ... ..................... ... ..2 - 8
2.5 Toner cartridge and drum cart ri dge........................................2 - 11
2.6 In st a lling the dr u m ca r tr id g e .................................... ... .. ..........2 - 12
2.7 Installing the toner cartridge....................................................2 - 14
2.8 Installing the 2nd paper tray (optional) ..................................2 - 16
2.9 Adding paper.............................................................................2 - 17
Minoltafax 2800/3800 I
Page 5

2.10 Connecting the cables ............................................................ 2 - 20
Connecting the ferri te cores ............... ................. ................. .. ... 2 - 20
Connecting the telephone line cable .......... ................. ...............2 - 21
Connecting the power cable ............................... ................. ...... 2 - 21
2.11 Operating the machine............................................................ 2 - 22
3 Data entry
3.1 Preparation.................................................................................. 3 - 1
3.2 Typing conventions in this manual .......................................... 3 - 1
3.3 Enter text..................................................................................... 3 - 1
Special characters........................................................................ 3 - 2
Overvi e w o f th e m a c hi n e set tin g s............................... .. ... ............. 3 - 3
3.4 Entering your fax number.......................................................... 3 - 5
3.5 Entering your company name................................................... 3 - 6
3.6 Entering date and time............................................................... 3 - 7
3.7 En t er in g dep a rtment n u m be r an d p as s wo rd ........ .. ... ....... .. ... . 3 - 8
3.8 Set phone type................. .................................. ....................... 3 - 12
Dialling mode.............................................................................. 3 - 12
PBX or PSTN...................... .. .................... .. .................... .. ..........3 - 13
3.9 Storing numbers ...................................................................... 3 - 15
Sub addressing (F CODE SUB) .............................. ..................3 - 15
What is F CODE?....................................................................... 3 - 16
Entering one-touch num bers ................. ................................ ..... 3 - 16
Entering speed dial numbers...................................................... 3 - 18
Changing one-touch- or speed dial numbers .............................3 - 19
Erasing one-touch- or speed dial numbers.............................. .. .3 - 21
Entering groups ........... ................................ ................. .............3 - 22
Changing / deleting memb ers of a group ........... ................. ......3 - 24
Deleting a whole group .............................................................. 3 - 26
3.10 Advanced settings.................................................................... 3 - 27
Buzzer volume............................................................................ 3 - 27
Header................... ................. .................................. ..................3 - 28
Footer ........................................................................................ 3 - 29
LCD Contrast ............................................................................. 3 - 30
Power save mode ...................................................................... 3 - 31
Setting the power save time ....................................................... 3 - 32
Remote diagnosis ...................................................................... 3 - 33
Setting the monitor volume......................................................... 3 - 34
II Minoltafax 280 0/3800
Page 6

3.11 2nd telephone line (optional) ..................................................3 - 35
Entering your fax number............................................................3 - 35
Selecting the line ........................................................................3 - 36
Dial mode for the 2nd line................... .. .. ....................................3 - 37
4Send
4.1 Transmission...............................................................................4 - 1
Notes on original documents.........................................................4 - 1
Using carrier film ...........................................................................4 - 2
4.2 Transmission Settings................................................................4 - 4
Default setting resolution...............................................................4 - 5
Contrast.........................................................................................4 - 6
Default contrast setting ................................................................4 - 6
Closed network ............................................................................4 - 7
Default transmission setting..........................................................4 - 8
Fax forwarding ..............................................................................4 - 9
4.3 Dialling modes...........................................................................4 - 11
Program dialling ..........................................................................4 - 12
4.4 Memory transmission ...............................................................4 - 14
4.5 Di re c t tr a ns mission ........ .. .. ...................... ... .. ...................... .. ...4 - 15
4.6 Delayed transmis sion (timer)...................................................4 - 16
Program dialling, timer transmission...........................................4 - 18
4.7 Broadcasting ............................. ................................. ..............4 - 19
Program dialling, broadcast transmission ...................................4 - 20
4.8 Relay transmission ...................................................................4 - 21
Start relay transmission ..............................................................4 - 22
Program dialling relay transmission ............................................4 - 23
Set relay boxes ...........................................................................4 - 24
4.9 Polling transmission.................................................................4 - 26
4.10 Mailbox transmission ...............................................................4 - 28
Program dialling, mailbox transmission.......................................4 - 29
4.11 Batch transmission ..................................................................4 - 30
4.12 Delete schedules ......................................................................4 - 31
Minoltafax 2800/3800 III
Page 7

5 Reception
5.1 Manual reception......... ................. .. ................. .. ................. ........ 5 - 1
5.2 Automatic reception................................. .. ................. ...............5 - 2
5.3 Memory reception during printer problem ............................. 5 - 2
5.4 Memory reception....................................................................... 5 - 3
5.5 Mailbox reception....................................................................... 5 - 5
Setting up a mailbox..................................................................... 5 - 5
Printing the content of a mailbox .................................................. 5 - 7
5.6 Polling recepti on ............. ................. .......................................... 5 - 8
Programing, polling RX............................................................... 5 - 10
5.7 Group polling ...........................................................................5 - 11
5.8 Settings for receiving a fax......................................................5 - 14
Setting the paper size................................................................. 5 - 14
Setting number of rings .............................................................. 5 - 15
Setting multiple page printing ................................................... 5 - 16
Setting reduction RX .................................................................. 5 - 17
Closed network .......................................................................... 5 - 18
Setting the image exposure ................................ ................. ......5 - 19
Selec ti ng p ape r tr a y (o p tional acc e s so r y) ... ... ............................ 5 - 20
6Copy
6.1 Copying from the document feeder.......................................... 6 - 1
6.2 Set reduction rate ...................................................................... 6 - 2
7 Connecting the fax machine to the computer
7.1 Preparation.................................................................................. 7 - 1
Placing the ferrite cores................................................................ 7 - 1
7.2 PC connection ...........................................................................7 - 2
7.3 Setting up the fax machine as a PC fax and PC scanner .......7 - 3
Modem specificati ons................ ................................................... 7 - 3
7.4 Scanner mode............................................................................. 7 - 4
Installing the TWAIN driver........................................................... 7 - 4
Scanning using the TWAIN driver ................................................ 7 - 4
Setting the scan settings .............................................................. 7 - 5
Scanning in class 1 mode............................................................. 7 - 5
7.5 Using your fax machine as a PC fax ........................................ 7 - 5
IV Minoltafax 280 0/3800
Page 8

7.6 Using your fax machine as a PC printer (optional) .................7 - 6
Print settings ................................................................................7 - 6
Installing GDI dri ver (optional) ........................... .. .......................7 - 13
Installing PCL5e printer driver (optional) ....................................7 - 14
7.7 Using your fax machine as an internet fax (optional) .......... .7 - 15
Enter in g the e- m a il s et tings .. ... .. ...................... ... .. ......................7 - 15
Entering the server settings .......................................................7 - 17
Setting the POP3 interval ...........................................................7 - 18
Entering the time-out setting ......................................................7 - 19
Setting error report .............. ................. ................. .. ................. ..7 - 20
Setting the time zone .................................................................7 - 21
Sending e-mails ......... .. ................................................ ..............7 - 22
Downloading e-mails fr om the server ............... ................. .........7 - 23
Error messages on the LCD.... .. ................. ................. .. ..............7 - 24
8 Reports and lists
8.1 Basic report settings ..................................................................8 - 2
Default settings journal .................................................................8 - 2
Default setting r eservation report ................................. ................8 - 3
Default setting t ransmission report ...............................................8 - 4
Default setting RX confirmation ....................................................8 - 5
Default setting br oadcast report ............................... ....................8 - 6
Default setting t oner order ................................ ................. ...........8 - 7
8.2 Printing reports ...........................................................................8 - 8
8.3 Displaying the transmission results ........................................8 - 9
8.4 Displaying the counter ............... .. ................. ..........................8 - 10
Drum counter .............................................................................8 - 10
9 Troubleshooting
9.1 Cleaning .......................................................................................9 - 1
Cleaning the machine ...................................................................9 - 1
Cleaning the transport rollers .......................................................9 - 1
Cleaning the scanner .............................. ................. ................. ...9 - 2
9.2 Clearing paper jams ...................................................................9 - 3
9.3 Error message s............................ ............................. ..................9 - 8
Error-LED......................................................................................9 - 8
Alarms...........................................................................................9 - 8
Error messages on the LCD.... .. ................. ................. .. ................9 - 8
9.4 Troubleshooting ........................................... .. ..........................9 - 10
Minoltafax 2800/3800 V
Page 9

10 Appendix
10.1 Specifications ........................................................................... 10 - 1
10.2 Index ..........................................................................................10 - 4
10.3 CE marking (declaration of conformity) ............................... 10 - 10
10.4 END USER LICENSE AGREEMENT ...................................... 10 - 10
VI Minoltafax 280 0/3800
Page 10

Introduction
1 Introduction
1.1 We want you to be satisfied customers
Thank you for deciding to buy a Minolta fax system. The multi-func ti onal
system described i n thi s user manual will hereafter be referred to as
Minoltafax 2800/3800.
Read this User Manual careful ly before starting up your machine and
always keep the inst ructions to hand.
To achieve the best possible r esults and eff ective use of the machine, this
User Manual provides you with information on the following subjects.
G Installation
G Entering data
G Sending/receiving/copying
G Reports and lists
G Maintenance and troubleshooting.
Additional information and help in the event of an error is available from:
G The technical ser vice of your Minolta representati ve
G our Internet Website http://www. minolta.com.uk .
Please keep the se rial number (s ee namepl ate) and the dat e of purcha se
to hand so that we can quickl y pr ovide yo u with th e right help in the eve nt
of an error.
We want you to be satisfied customers.
1
Subject to changes.
Minoltafax 2800/3800 1-1
Page 11

1
1.2 How does a fax machine work?
A fax machine can be connected to a normal telephone system without
taking any special precautions, just like a normal t elephone set. The
function of a fax machine is quite similar to that of a telephone.
The way a fax machine works is simple: Docum ents that are to be
transmitted are at first scanned. The machine does not recogni se the
letters but reads the picture, dot by dot, and marks each dot as bl ack or
white. That is why you can not onl y transmit texts but also picture s and
photos. The inform ati on is then digitised and compress ed so that the fax
machine can send it quickly over the telephone line to another fax
machine which revers es the process, reading and marking each dot as
black or white on a sheet of paper.
When you are “c alled ” by a f ax mac hine, y our tel ephone r ings as nor mal.
Therefore you cannot know whether your are receiving a fax call or a
telephone call before picking up the receiver.
At the beginning of a fax transm ission you will hear shrill sounds. Those
sounds are the so call ed “hand shaking” and function as an introduc tion
sequence before the act ual transmission, just as interlocutors - often introduce themselves at the beginning of a telephone call. In the
introductory sequence the technical features of both machines are
matched to mak e sure the transmission and the reception are conducted
to a high standard.
With your Minoltafax 2800/3800 you do not need to listen to the
introductory sequence. How to program the machine accordi ngly will be
explained later i n thi s ma nual. Furthermore you will also find information
about the set tings t hat come wi th the machine, t hat have t o be mad e when
installing, or the settings that can be made at a later stage. Most of the
features of the fa x machi ne work in depen dently , so that you can pro gram
only the settings you need for the moment and ignore all others.
By the way, the word “f ax” is a comb ination o f t he Lati n “f acere” (to make)
and “simile” (simi lar) describing the process of making a copy which is
similar to the original. This artificial word “fax” has nowadays become
widely accepted in every day language, rep lacing the older term facsimile.
A copy is therefore to be made “simila r” to the orig inal. Fax machines are
also called facsimile machines.
Now, enjoy your new fax machine.
Introduction
1-2 Minoltaf ax 2800/3800
Page 12

Introduction
1.3 Certificate for machines with CE marking
CTR 21 approval
Annex II
The equipment has been approved in accordance with Council Decision
98/482/EC for pan-European single terminal connection to the public
switched telephone network (PSTN). However, due to differences
between the indivi dual PSTNs provide d in different co untries, the appr oval
does not, by itself, give an unconditional assurance of successful
operation on every PSTN network termination point.
In cases of problems, you should contact your equipment suppl ier in the
first instance.
1
Minoltafax 2800/3800 1-3
Page 13

1
1.4 Safety precautions
Follow the safety advice to ensure safe operation of the machine.
G Only connect the machine to a suitable power point.
G Make sure the power is not tur ned off over night.
G Always pull the plug, never the wire, when you want disconnect the
machine from the power suppl y. If possible, connect the mach ine
directly to a wall outl et.
G Do not unscrew any parts, if not specific ally requested in t his manual.
If necessary contact your technical service.
G Never open the machine while it is transmitting or printing.
G Take care not to le t humidity into the machine.
G Make sure no objects fall into the machine.
G If a problem occurs that cannot be solved following the procedures
described in this man ual , make su re y ou co ntact the te chnical se rvice .
G Follow the recommended maintenance procedures regularly.
G Do not open any parts of the machine or switc h it off when the machine
is in use.
G Do not allow any magnetic objects near the machine.
G Switch the machi ne off immediately and remove the socket if t he
machine becomes unusually hot or if smoke or an unusual smell
occurs.
Used cartridges may be taken back by the technical service stati on as a
part of the maintenance procedures.
Introduction
Laser safety
This fax machine contains a page printer which operates by means of a
laser. This machine does not impose any danger as long as it is used
according to t he proce dures des cribed in t his manu al. The l as er is li mited
to the int erio r of the m achi ne. The env ironmen t is pr otect ed from t he la ser
emission by the covers of the machine.
Internal laser radiation
Medium radiation : 1. 03 (mW) wave length: 770-810 (nm)
The machine works wi th an i nvisi ble cl ass IIIb laser . The pri nter head u nit
must not be opened, cleaned or repaired by the user.
Ozone release warni ng
During printer oper ation, a small quantity of ozone is released. This
amount is not large enough to harm anyone. However, be sure the room
where the fax machi ne is bei ng used ha s adeq uate venti lation, espec ially
1-4 Minoltaf ax 2800/3800
Page 14

Introduction
if you are pr inting a high volume of material or if the fax m achine is being
used continuously over a long period.
1
Minoltafax 2800/3800 1-5
Page 15

1
1.5 Characteristics
Your new fa x ma c h in e is a com pa c t m ulti-func ti o na l device facilit a tin g
your work and reducing your fax communication times. The features of the
unit include scanning of originals into the memory for delayed
transmission , allowing simultaneous recep ti on of fax messages and vice
versa.
Type
G A4 format, G3 desktop laserfax
G Up to 33.600 bps tran sm ission speed
G MH/MR/MMR/JBIG, ECM coding
G Automatic document feeder up to 50 pages (A4)
G Double-spaced LCD with 20 characters
G 64 level grey scale.
Fax functions
G Delayed transmission
G Relay broadcast initiation
G Multi tasking operation interface
G Polling RX/TX
G Confidenti al reception/mailbox transmission.
Introduction
1-6 Minoltaf ax 2800/3800
Page 16

Installation
2Installation
2.1 Location
Please take into consideration the following recommendations.
G Avoid direct exposure to sunlight and place the machine away from
heaters.
G Avoid humid or dusty locations.
G Place the machine on an even, non-vibrating surface.
G Keep the machine away from magnetic fields (TV sets, radios).
G Avoid locations close to ventilation openings, air conditioners and
heaters.
G The machines should be easily accessible from all sides.
G Make sure no liquids can ent er the machine.
G Keep all covers closed when the machine is in standby, as this will
prevent the transmission or receipt of documents. If the cover is
opened during transmission or reception, the connecti on wil l be
interrupted.
G Avoid extreme fluctuations in temperature as this could lead to
humidity inside the machine. This could lead to incorrect document
scanning and printing.
G Ensure there is enough sp ace (approx. 40 cm clearance around the
machine), for optimum operation and easy access.
G Ensure there is a clearance of at least 150 mm between the wall and
the machine for optimum ventilation.
G Do not place any items which are heavier than 3 kg on the machine.
2
Minoltafax 2800/3800 2-1
Page 17

2
Installation
Environment
The optimum environmental conditions for your copier are:
G Temperatures between 10°C and 32°C
(with a max. fluctuation of 10°C per hour)
G Humidity le vel between 15% and 85%
(with a max. fluctuation of 20% per hour).
Power supply
The following tolerances apply:
G Voltage fluctuation: ±10%
G Frequency fluctuation: ±0,3%.
2-2 Minoltaf ax 2800/3800
Page 18
Installation
2.2 Unpacking
Installing the paper input tray
➜ Insert the pins from the
document feeder in the
appropriat e slots.
Installing the paper output tray
➜ Insert the pins from the paper
output tray in the appropriate
slots.
❍ Ensure that the t ray snaps into
place.
Installing the paper stacking tray
➜ Insert the pins from the
document cover in t he
appropriat e slots.
2
Minoltafax 2800/3800 2-3
Page 19
2
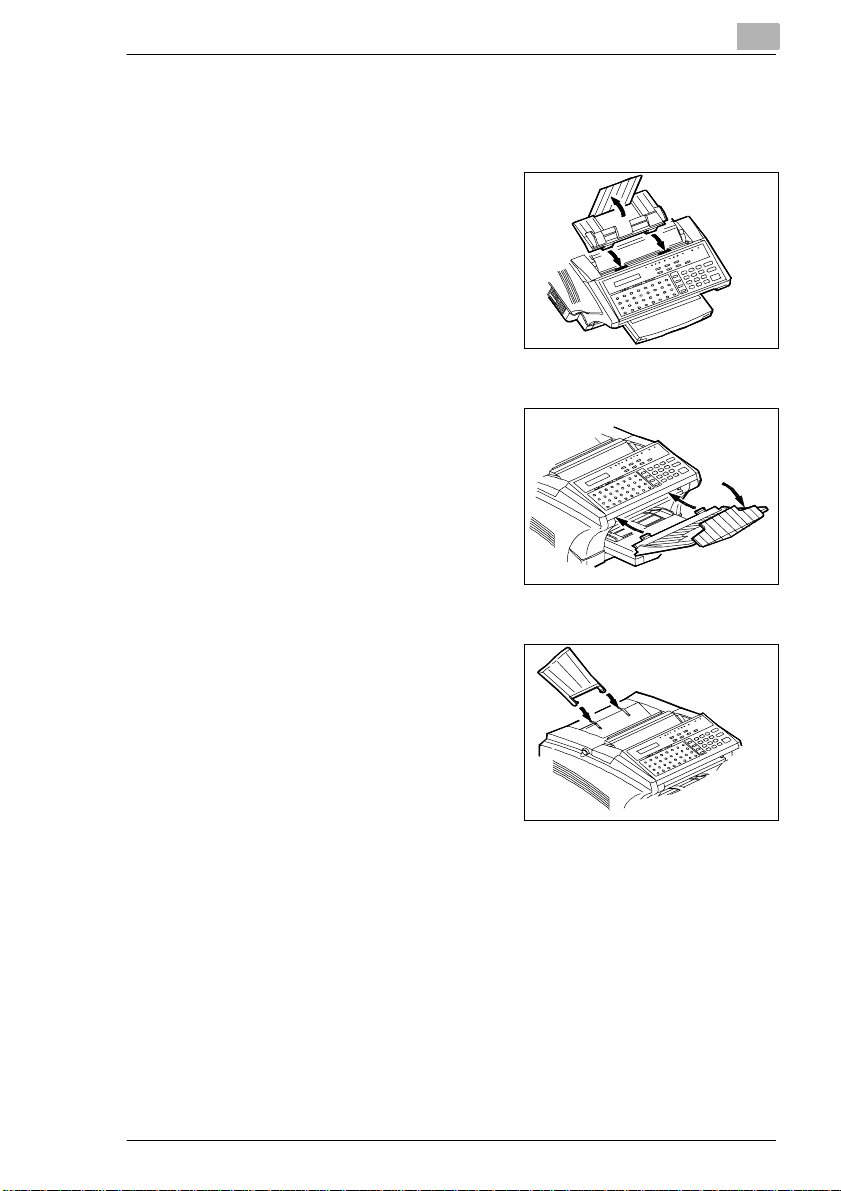
2.3 Machine layout
Minoltafax 2800/3800
Front view
Installation
123
Pos. Description Description
1 Paper stacking tray Copies printed/incoming/copied documents are stored
2 Document feeder Insert the document face down into the ADF for
3 Document guide Holds the document in the feeder in place.
4 Control panel Keys and displays used to operate the machine.
5 Document exit tray After scanning the document is fed onto this tray.
6 Manual single sheet
feeder
7 Paper tray
(1st paper tray)
here (max. 100 sheets of plain paper).
copying or fax transmission.
Takes single sheets of varying paper formats and
types which are fed manually for prinitng.
Holds up to 250 sheets of A4 paper
4
5
6
7
2-4 Minoltaf ax 2800/3800
Page 20
Installation
2
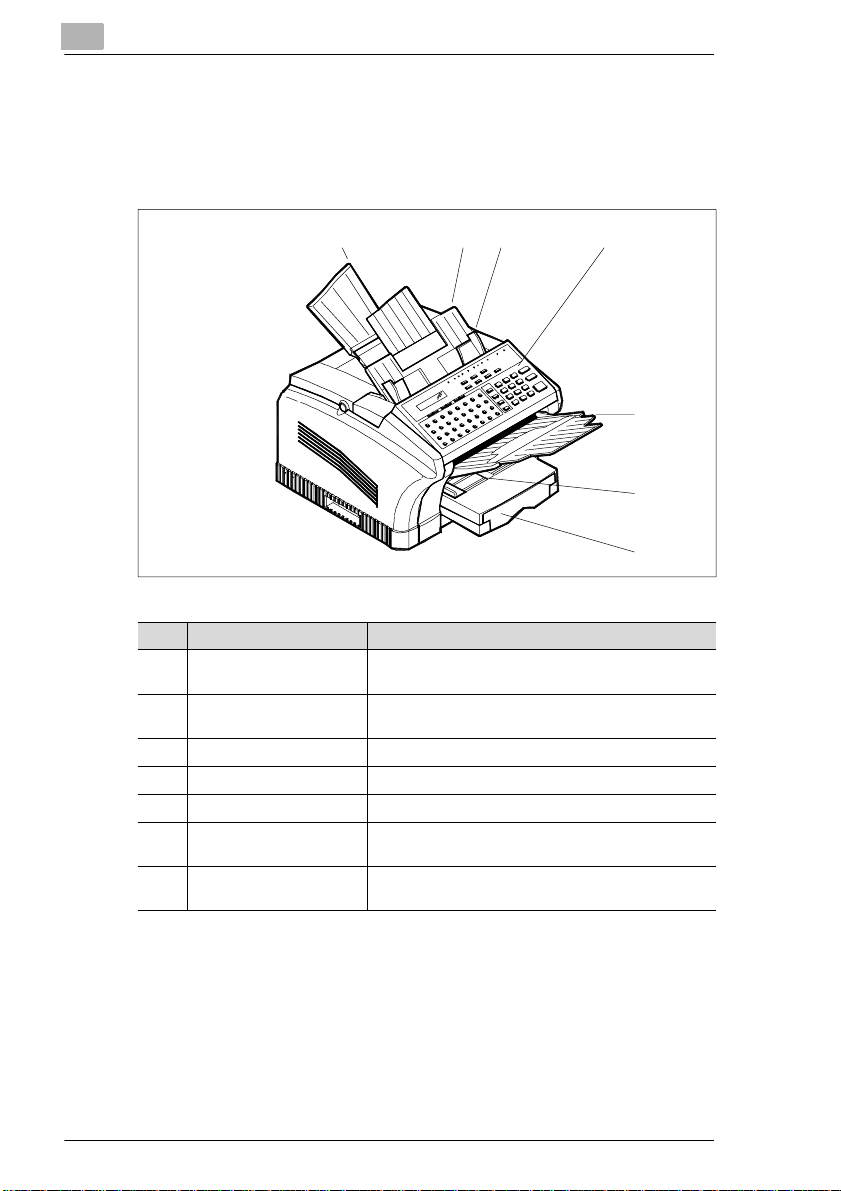
Rear view
1
2
3
4
5
7
Pos. Description Description
1 RS-232C interface Interface for sending, receiving and scanning by PC.
2 LAN interface Interface for operation in a network (only available with
3 Terminal for 2nd
telephone cable
4 Parallel interface Interface for operation as a PC printer (only available
5 Telephone terminal Terminal for the telephone cable.
6 Power terminal Terminal for the power cable.
7 Mains switch Used to switch the machine on and off.
optional accessories)
A second telephone line can be connected to this
terminal (Minoltafax 2800 only with optional
accessories).
with optional accessories).
6
Minoltafax 2800/3800 2-5
Page 21

2
Installation
Internal view
12
3
4
Pos. Description Description
1 Release buttons Press both buttons simultaneously to open the printer
2 Toner cartridge Contains the toner.
3 Drum cartridge Places the toner on the paper.
4 2. Paper tray (optional
accessory)
cover.
Holds up to 500 sheets of A4 paper.
2-6 Minoltaf ax 2800/3800
Page 22

Installation
2
Memory upgrade (optional acc essory)
Upgrades the memory cap acity of the system.
If you make a large quantity of copies which take up a lot of memory, you
should increase t he RAM of the system using the upgrade option. This
epitomizes the data fl ow.
The following memory upg rade is available:
G 8MB memory upgrade.
Printer control ler PCL5e- extension (optional accessory)
enables the system to be used as a PCL5e printer (600 dpi).
TWAIN interface driver (opt ional accessory)
Enables the copier to be used as a scanner.
I-fax card upgrade (opti onal accessory)
Allows transmissi on of E-Mai ls.
2. Paper tray (optional accessory)
Holds up to 500 sheet A4 paper.
Module for 2nd telephone for Minol tafax 2800 (optional accessory)
Allows the use of a 2nd telephone line.
Minoltafax 2800/3800 2-7
Page 23
2
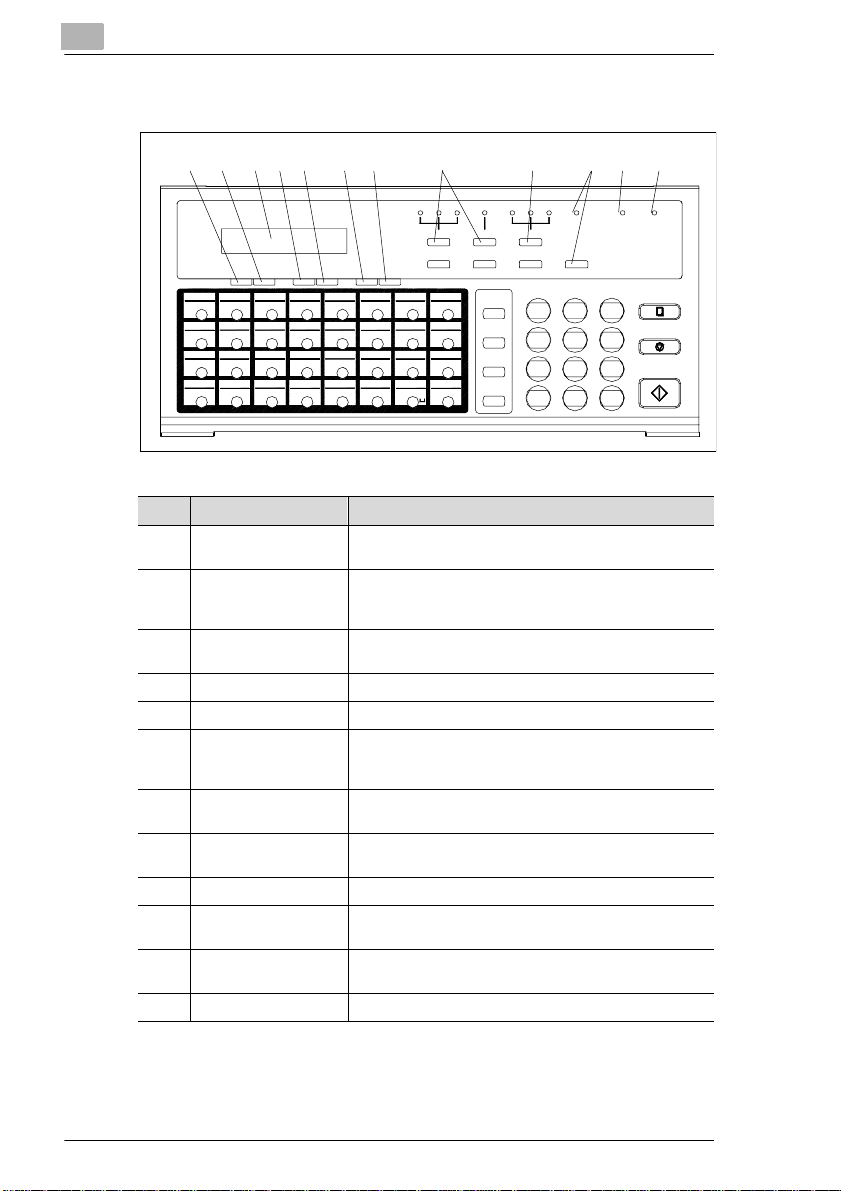
2.4 Control panel, display and keys
Installation
123456
PROGRA M
FUNCTION YES NO<PIN CODE<DELETE
SET
01
02 03 04 05 06
33
AB
09
41
I
17
49
Q
25
57
YZ
C
10
42
50
26
58
11
43K44
J
51S52
R
592760
12
2018 19
28
+/-
7
891011 12
FINE
HALF TONE
STD
EX-FINE
SCHEDULE JOURNAL REPORT WAKEUP
NORM DARK
LIGHT
SLEEP AUTO RX . E RROR
TYPE ORG.HA LF TONERESOLUTION
><
0807
38373634 35
39 40
D
13
45
L
53
T
29
61
-/&
F
E
M
U
@
G
14
15
46
N
O
2221
23 24
54
55
V
WX
30
31
62
.
MAIL
H
16
SPEED DIAL
4847
P
REDIAL
56
/PAUSE
643263
SPEAKER
CAP
ABC DEF
1
GHI
JKL5MNO
4
PQRS
TUV
7
8
¡
¯
0
COPY
32
STOP
6
WXYZ
9
START
#
No. Display/key Function
1 FUNCTION Press this key to open the menu. Select the required
2 SET Press this key to access the programming menu. Select
3 LCD
(Liquid Crystal Display)
function using the numeric keys.
the desired function using [V/CODE] or [DELETE] or the
numeric keys.
Shows the status of the machine and contains information
about the operation modes.
4 YES Press this key to confirm settings.
5 NO Press this key to interrupt an operation.
6 V/PIN CODE Press this key to enter your PIN CODE and scroll through
the function menus. Some telephone systems require a
PIN CODE for transmission.
7 DELETE Press this key to correct entries and scroll through the
8 RESOLUTION /
HALF TONE
function menus.
Press these keys to change the resolution settings.
9 TYPE ORG. Press this key to manually change the contrast settings.
10 WAKE UP Press this key to set the system in operation mode. This
11 AUTO
LED lights up, when the energy save mode is active.
LED is on when the Memory RX Mode has been set.
RX LED
12 ERROR LED This LED is on, if an error occurs.
2-8 Minoltaf ax 2800/3800
Page 24
Installation
2
SET
PROGRA M
FUNCTION YES NO<PIN CODE<DELETE
01
02 03 04 05 06
33
AB
09
41
I
17
49
Q
25
57
YZ
C
10
42
50
26
58
11
43K44
J
51S52
R
592760
12
2018 19
28
+/-
14 13
13
FINE
STD
EX-FINE
SCHEDULE JOURNAL REPORT WAKEUP
39 40
F
15
N
23 24
55
V
31
.
0807
G
H
16
4847
O
P
56
WX
643263
CAP
38373634 35
D
E
13
14
45
46
L
M
2221
53
54
T
U
29
30
61
62
@
-/&
HALF TONE
><
SPEED DIAL
SPEAKER
REDIAL
/PAUSE
16
15
NORM DARK
LIGHT
MAIL
TYPE ORG.HA LF TONERESOLUTION
1
GHI
4
PQRS
7
¡
¯
192021222324
SLEEP AUTO RX . E RROR
ABC DEF
32
JKL5MNO
6
TUV
WXYZ
9
8
0
#
17
18
COPY
STOP
START
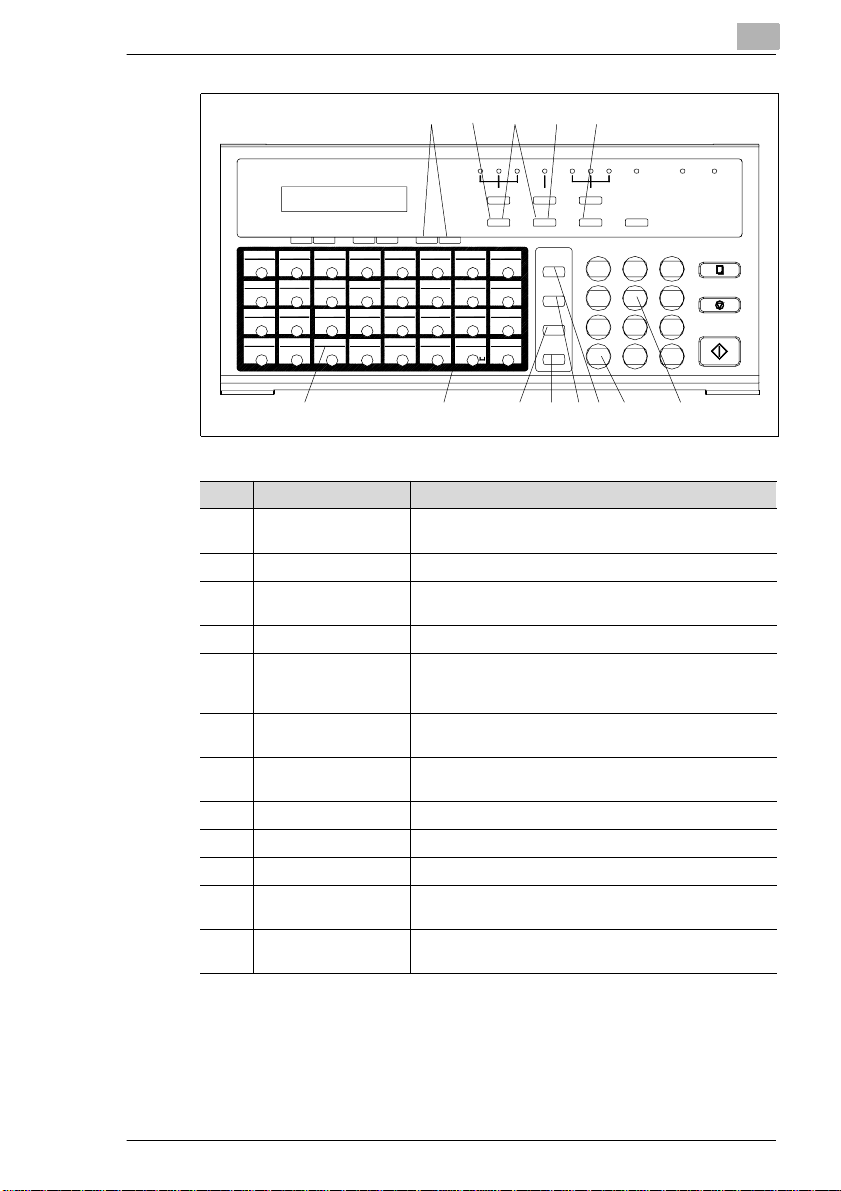
No. Display/key Function
13 Arrow keys Press this key to move the cursor through the
programming menues.
14 SCHEDULE Press this key to check the contents of the memory.
15 JOURNAL Press this key to display results from the last 60
transmissions in the display.
16 REPORT Press this key to print the different reports.
17 NUMERIC KEYS Use these keys to enter numbers and letters, eg. fax
18 * Press this key to switch from tone dialling to pulse dialling
numbers and destination names.
Telephone numbers
(only effective together with the speaker key)
19 MAIL Press this key to receive or send e-mails (only available
with optional accessory).
20 SPEED DIAL Use this key to enter a three-digit speed dial number.
21 SPEAKER Press this key to set up a connection as with a telephone.
22 REDIAL/PAUSE Use this key to either redial or to generate a pause.
23 ONE TOUCH Use this key to dial a stored number. Also you may
24 +/- Press this key to save a combination form speed dial and
program the last 8 keys for special functions.
one touch dial.
Minoltafax 2800/3800 2-9
Page 25
2
Installation
FINE
HALF TONE
><
MAIL
SPEED DIAL
REDIAL
/PAUSE
SPEAKER
NORM DARK
LIGHT
TYPE OR G.HALF TONERESOLUTION
REPORT
1
GHI
4
PQRS
7
¡
¯
SLEEP AUT O RX. ERROR
WAKEUP
ABC D EF
2
3
JKL5MNO
6
TUV
WXYZ
9
8
0
#
COPY
START
25
STOP
26
27
28
STD
EX-FINE
SCHEDULE JOURNAL
SET
FUNCTION YES NO
PROGRAM
01
02 03 04 05 06
33
B
A
10
09
41
17
49
25
57
11
42
43K44
IJ
50
51S52
Q
R
26
58
592760
YZ
C
D
12
L
2018 19
T
28
-/&
+/-
<
PIN CODE<DELETE
39 40
F
15
N
23 24
55
V
31
0807
GPH
16
4847
O
56
WX
643263
CAP.
38373634 35
E
13
14
45
46
M
2221
53
54
U
29
30
61
62
@
No. Display/key Function
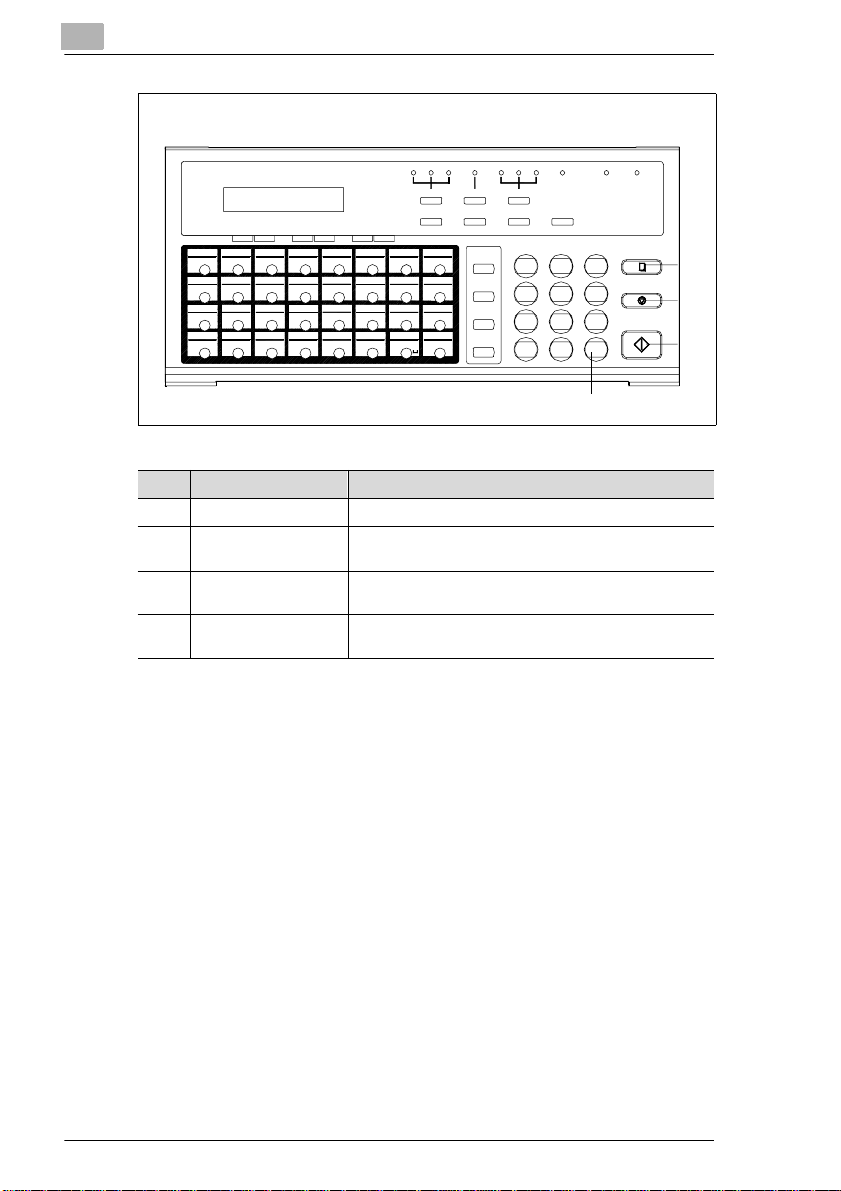
25 COPY Press this key to start the copy function.
26 STOP Press this key to interrupt copying, transmission and
reception operations.
27 START Press this key to start copying, transmission and
28 # Press this key to access an internal line or a PSTN line
reception operations.
when the machine is set for use over a PBX line.
2-10 Minoltafax 280 0/3800
Page 26

Installation
2.5 Toner cartridge and drum cartridge
This machine produces images and characters by applying the ton er
through the drum cartridge onto the page to be printed.
The drum cartridge sho uld be handled with care when installed or
replaced, to ensure proper performance at all times. Never expose the
cartridge to dire ct sunlight or any other direct light. Store the cartridge in
an environment that is not subject to extreme heat or humidity. Detail ed
information on the car e and handling of the drum cartridge can be found
in the actual packaging and operating manual.
The toner cartridge should be replaced when “toner low” is displayed.
Please consult the regulations for disposal of such pr oducts in your area.
Used cartridges may be taken back by the technical service stati on as a
part of the maintenance procedures.
✎
Note
To avoid damage by light on the drum cartridge
cover it with a cloth after removing it from the machine.
2
Minoltafax 2800/3800 2-11
Page 27
2
2.6 Installing the drum cartridge
WARNING
The heating element will be hot and could burn you!
The temperature of the heating element can reach up to 120°C.
➜ Do not touch the heating element.
WARNING
Toner cartridges can be a health ri sk!
Toner, if swallowed can be a danger to your health.
➜ If you come in contact with the ton er, remem ber to wash your hands
immediately with col d water and soap.
Only use cartridges which are specifically designed for this machine.
Original ac cessories and consumables provide opti mu m print quality and
minimum maintenance. For further information, please contact your
technical ser vice.
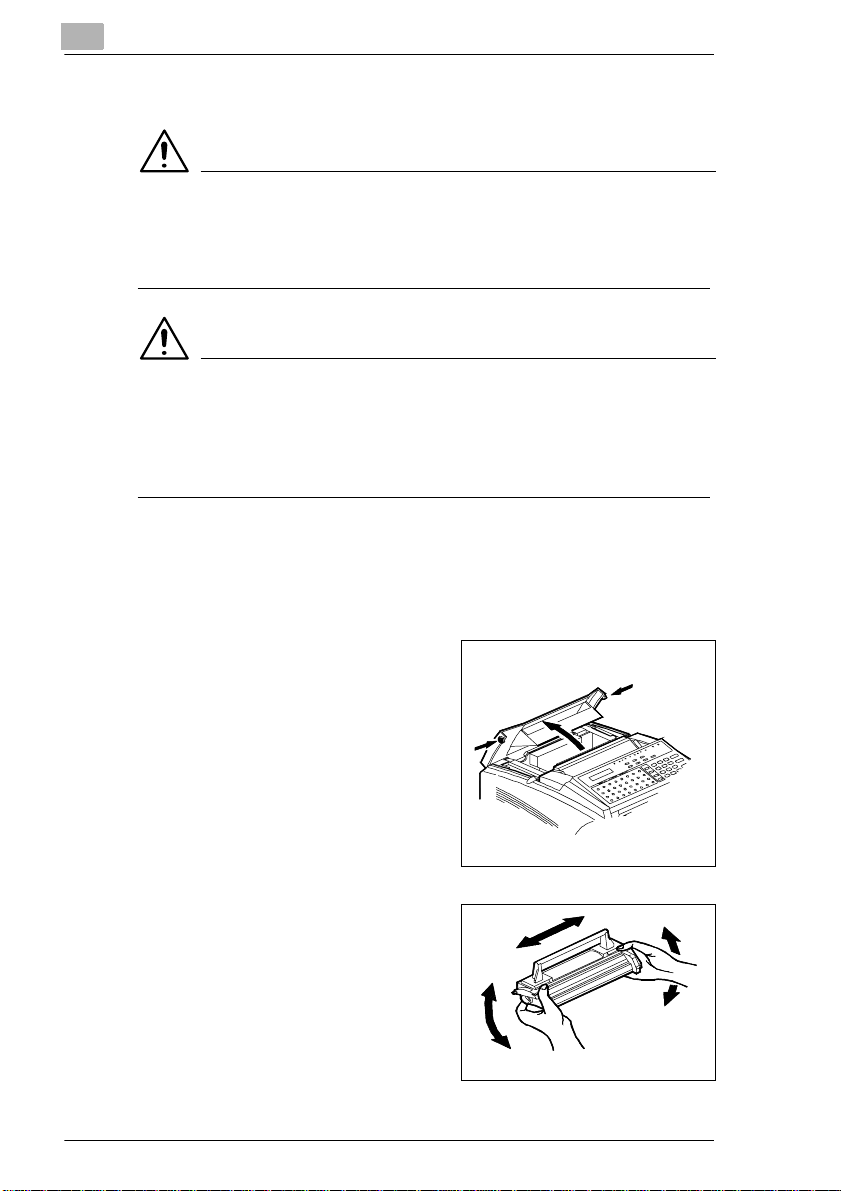
Installation
Press the release buttons on
1
both sides of the ma chine. Lift up
the upper par t of the unit as fa r as
it will go.
Hold the handle of the cartridge
2
in both hands.
2-12 Minoltafax 280 0/3800
Page 28
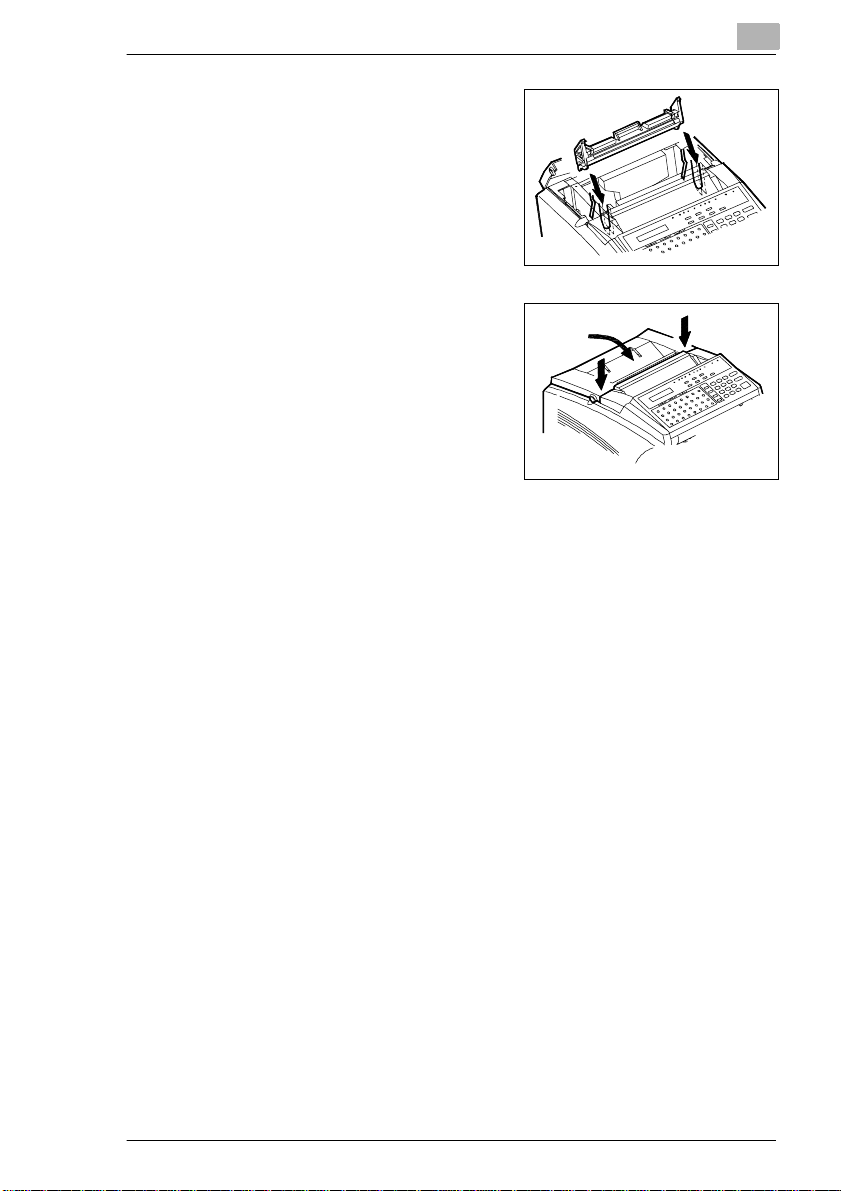
Installation
Place the drum cartridge on the
3
green guides.
Close the machine. Ensure that
4
the cover snaps into place.
2
Minoltafax 2800/3800 2-13
Page 29
2
2.7 Installing the toner cartridge
WARNING
The heating element will be hot and could burn you!
The temperature of the heating element can reach up to 120°C.
➜ Do not touch the heating element.
WARNING
Toner cartridges can be a health ri sk!
Toner, if swallowed can be a danger to your health.
➜ If you come in contact with the ton er, remem ber to wash your hands
immediately with col d water and soap.
Only use cartridges which are specifically designed for this machine.
Original ac cessories and consumables provide opti mu m print quality and
minimum maintenance. For further information, please contact your
technical ser vice.
Installation
Press the release buttons on
1
both sides of the ma chine. Lift up
the upper par t of the unit as fa r as
it will go.
Shake the new cartridge a few
2
times. This should release any
solid toner.
2-14 Minoltafax 280 0/3800
Page 30
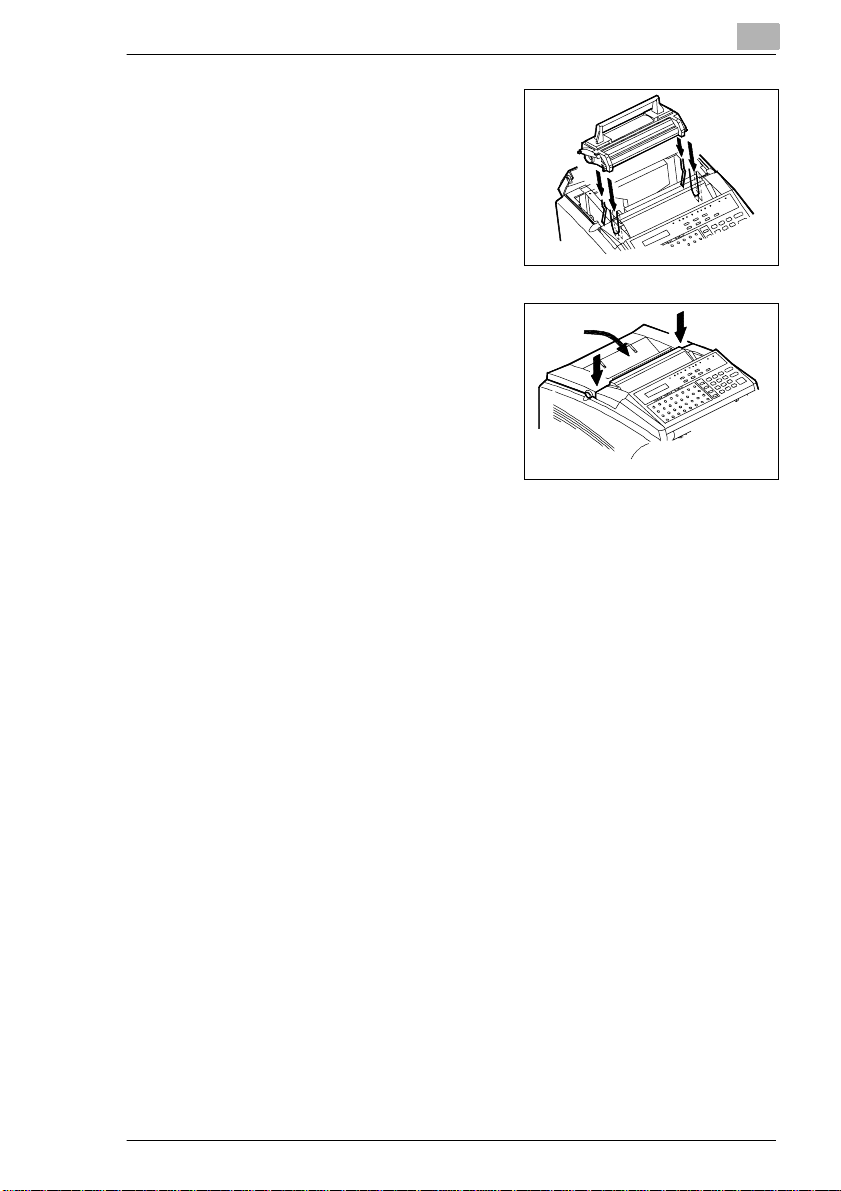
Installation
Hold the handle of the cartridge
3
in both hands. Place the drum
cartridge on the green guides.
Close the machine. Ensure that
4
the cover snaps into place.
2
Minoltafax 2800/3800 2-15
Page 31

2
2.8 Installing the 2nd paper tray (optional)
The 2nd paper tray is available as optional accessory. Holds up to 500
sheets of A4 paper.
Remove the p ackage. Make s ure
1
the fax machine is turned off.
Place the fa x machine on the 2nd
2
paper tray.
Installation
Switch the fax machine on.
3
2-16 Minoltafax 280 0/3800
Page 32

Installation
2.9 Adding paper
Standard paper tray – 250 sheets
The paper tray holds up to 250 sheets A4 paper. When filling the paper
tray, remember to re mov e any remaining paper as this may lead to
malfunctions.
Remove the transpare nt cover of
1
the paper tray.
Pull the paper guides out as far
2
as they will go.
2
Fan the paper well and align the
3
sheets.
Place the paper in the tr ay and
4
push the paper guides toward
the paper.
Minoltafax 2800/3800 2-17
Page 33

2
nd
2
paper tray – 500 sheets
This paper tray will only take A4L paper.
Pull the paper tray out of t he
1
cassette.
Push the plate in the tr ay down
2
until it locks in posi tio n .
Add the paper.
3
❍ If you use letter head paper,
place the face with the print
downwards.
Make sure the corners of the
4
paper are below the edg es.
Installation
Check that you have not
5
exceeded the maximum height
(see marking on the paper tray).
2-18 Minoltafax 280 0/3800
Page 34

Installation
Place the cover on the paper
6
tray.
Put th e 2nd paper tray back into
7
the cassette.
2
Minoltafax 2800/3800 2-19
Page 35

2
2.10 Connecting the cables
Connecting the ferrite cores
The ferrite cores avoid radio interference to dis turb the fax transmission.
Place the core on the telepho ne cable as described.
Wind the end with the jack that
1
goes into the fax machine once
around the black core, so that 2
layers of cable are inside the
core. The distance between the
jack and the core must be 1 cm.
Close the core.
2
Installation
Wind the end with the jack that goes into the fax machine three
3
times around the grey core, so that 4 layers of cabl e are inside the
core. The distance between the black core and the grey core must
be 10 cm.
Close the core.
4
2-20 Minoltafax 280 0/3800
Page 36

Installation
Connecting the telephone line cable
Plug the end of the telephone
1
cord for the standard telephone
line into the bott om terminal on
the righth and side at the back of
the machine.
Plug the end of the 2nd
2
telephone cabl e for the 2nd
telephone line into the upper
terminal on the righthand side of
the machine (Minol tafax 2800
only available with optional
accessory).
Connect the othe r ends of t he tele phone ca bles with t he telep hone
3
outlet on the wall.
2
Connecting the power cable
➜ Plug the power cable into soc ket
on the left of the machi ne. Then
connect it to the wall socket.
Minoltafax 2800/3800 2-21
Page 37

2
2.11 Operating the machine
Move the power switch to ON.
1
After approximately 30 seconds
2
the display sh own beside will
light up. The machine is now
ready for operation.
Installation
I
O
JAN. 09 13:00 100%
-SET DOC. FAC E DOWN-
2-22 Minoltafax 280 0/3800
Page 38

Data entry
3 Data entry
3.1 Preparation
Before you can operate all the functions on your fax machine, you must
enter several setti ngs. This chapter explains how to set your name, your
line type and the remote locati ons with which you may wish to
communicate.
You can always interrupt the process by pressing [STOP]. The setting will
then not be saved. If you do not press any key for mor e than 30 second s,
the procedure is interrupted and the system will return to stand by.
3.2 Typing conventions in this manual
If nothing else is r eques ted, all keys ar e t o be pr ess ed one aft er t he o ther.
This is al so the case if they are connected by a “+” to facilitate the layout.
“Press [0] + [5] + [YES]" means: Press the nume ri c key [0], then the
numeric key [5] and then the key named [YES].
3.3 Enter text
You can use the one-touch keys to enter characters. To enter special
characters, fol low the instructions given in the tables below. Press [YES]
to save the rele vant set ting. To add a space , press s peed di al key [31]. In
case of a mistake you can move the cursor with the arrow keys
[JOURNAL] and [SCHEDULE] and overwr ite the wrong te xt. Also you can
delete text with [DELETE] . Press the one touch key [32], to switch from
capital letters to small letters.
3
Minoltafax 2800/3800 3-1
Page 39

3
Data entry
Special characters
Press one touch key [28] as man y ti m es as shown in the table. You may
also scroll through the special characters. Reachi ng the end, the first
character will be shown again.
One-touch key 28 & One-touch key 28 & One-touch key 28 &
Press -/& twice & Press -/& 10 times . Press -/& 18 times $
Press -/& 3 times # Press -/& 11 times , Press -/& 19 times :
Press -/& 4 times * Press -/& 12 times ! Press -/& 20 times ;
Press -/& 5 times - Press -/& 13 times + Press -/& 21 times @
Press -/& 6 times / Press -/& 14 times = Press -/& 22 times %
Press -/& 7 times ( Press -/& 15 times < Press -/& 23 times [
Press -/& 8 times ) Press -/& 16 times > Press -/& 24 times ]
Press -/& 9 times ” Press -/& 17 times ? Press -/& 25 times ’
Press one touch key [29] as man y ti m es as shown in the table. You may
also scroll through the special characters. Reachi ng the end, the first
character will be shown again.
One-touch key 29 * One-touch key 29 * One-touch key 29 *
Press @ once Ä Press @ 9 times é Press @ 17 times ç
Press @ 2 times ä Press @10 times í Press @ 18 times Æ
Press @ 3 times Ö Press @ 11 times ó Press @ 19 times Ñ
Press @ 4 times ö Press @ 12 times ú Press @ 20 times ¿
Press @ 5 times Ü Press @ 13 times Å Press @ 21 times Ø
Press @ 6 times ü Press @ 14 times î Press @ 22 times ø
Press @ 7 times á Press @ 15 times à Press @ 23 times ß
Press @ 8 times É Press @ 16 times °
3-2 Minoltaf ax 2800/3800
Page 40

Data entry
3
Overview of the machine sett ings
Use the keys [SET] a nd [V/PIN CODE] to access the fol lowi ng functions.
Press [SET] and then [V/PIN CODE] an many times as needed to show
the desired f unctio n in the displ ay. Then p res s the num eric key accor di ng
to the desired function. Detailed descriptions of the procedure will be
provided in the corresponding chapters.
Group Function Default setti ng
Storing Numbers 1 one-touch
Scanning and
printing
Transmission setting 1 basic setting
Receiving setting 1 memory reception
Machine settings 1 LCD contrast
Reports 1 Journal
User data 1 date & time
2 speed dial
3 group dial
4 program dial
5 batch transmission
6 relay transmission off
1 resolution
2 contrast
3 Print density
4 reduce copies
5 paper size
2 closed network
3 fax retransmission
4 header
2 number of rings
3 multipage print
4 reduction
5 mailbox-RX
6 closed network
7 reception mode
8 footer
9 continuos polling
2 dial type
3 buzzer sound
4 monitor
5 remote diagnosis
6 PBX / PSTN
7 energy save mode
8 energy save timer
9 drum counter
2 Schedule report
3 TX confirmation
4 RX confirmation
5 broadcast report
6 toner replacement
2 number
3 user name
4 department number off
Standard
Norm
level 4
off
A4
Memory transmit
off
on
off
on
2
off
on
off
Auto
off
off
tone dial
low
low
off
PSTN
Timer
15 minutes
on
off
off
off
off
off
Minoltafax 2800/3800 3-3
Page 41

3
Group Function Default setti ng
Printer 1 auto Selecting the Paper
2nd telephone line 1 2. line number
internet fax 1 e-mail
Cassette
2 number of copies
3 symbol set
4 font number
5 line number
6 print font
7 PCL4
8 GDI
2 TX block
3 2nd line tone/pulse
2 server
3 POP 3 interval
4 time out setting
5 error report
6 time zone
off
1
IBM-US
1
64
not applicable
off
off
2nd line priority
tone
on, 30 minutes
3 minutes
on
Data entry
3-4 Minoltaf ax 2800/3800
Page 42

Data entry
3.4 Entering your fax number
You can place your name and f ax number in the heade r. Check the f ormat
with your telephone company. The header will appear at the top of the
faxes you send. Up to 20 charac ters can be entered.
Press speed dial [27] to ent er "+".
Press [31] to add blanks.
Press [SE T ] a nd 6 times [V/ P IN
1
CODE]
Press [2] on the numeric keypad
2
and enter your fax numb er.
Press [YES] to co nfi rm the entry
3
and [NO] to cancel the entry.
INITIAL USER DATA?
YES / or 1-4
(
=
OK=YES )
JAN. 09 13:00 100%
-SET DOC. FAC E DOWN-
3
s
t
Minoltafax 2800/3800 3-5
Page 43

3
3.5 Entering your company name
You can either enter your company name, your name or both. Up to 32
characters can be ent ered.
You can switch between capi tal and small letter by pressing one t ouch key
[32]. Press [31] to add bl anks. Enter special characters by pressing one
touch keys [28] and [29].
Refer to Section 3.3 for instructions on how to make the entries.
Press [SE T ] a nd 6 times [V/ PI N
1
CODE].
Press [3] on the numeric keypad
2
and enter your name.
Press [YES] to confi rm the entry
3
and [NO] to cancel the entry.
Data entry
INITIAL USER DATA?
YES / or 1-4
Name=
OK=YES
JAN. 09 13:00 100%
-SET DOC. FAC E DOWN-
s
t
3-6 Minoltaf ax 2800/3800
Page 44

Data entry
3.6 Entering date and t ime
The date and time appear on the display, the activity report a nd the other
fax m a ch ine’s printouts.
Press [SE T ] a nd 6 times [V/ P IN
1
CODE].
Press [1] on the numeric keypad
2
and enter the time and date
(YYMMDD).
Press [YES] to conf irm the ent ry
3
and [NO] to cancel the entry.
INITIAL USER DATA?
YES / or 1-4
14:46 ’00 05 09
SET TIME (OK=YES)
JAN. 09 13:00 100%
-SET DOC. FAC E DOWN-
3
s
t
Minoltafax 2800/3800 3-7
Page 45

3
3.7 Entering department number and password
With this function you can assign each user a department number and a
password, which must be entered in the machine bef ore a docum ent can
be sent or polled.
Setting department number and password
Press [SE T ] a nd 6 times [V/ PI N
1
CODE].
Press [4] on the numeric keypad
2
and press [YES].
Enter the department number
3
using the keypad (0-9).
Use the nume ric k eypad to enter
4
the 4 digit passw ord and press
[YES].
INITIAL USER DATA?
YES / or 1-4
SWITCH *REGISTER
-SELECT& PU SH"YES"-
DEPARTMENT NO=_
SELECT 0-9
DEPARTMENT 4 PW=
OK=YES
Data entry
s
t
Press [ST O P ] to te rminate the
5
entry.
3-8 Minoltaf ax 2800/3800
JAN. 09 13:00 100%
-SET DOC. FAC E DOWN-
Page 46

Data entry
Changing department number and password
Press [SE T ] a nd 6 times [V/ P IN
1
CODE].
Press [4] on the numeric keypad
2
and press [YES].
Enter the departm ent number
3
using the keypad (0-9).
Press [NO ] .
4
Use the nume ric k eypad to enter
5
the old 4 digit password and
press [YES].
INITIAL USER DATA?
SWITCH *REGISTER
-SELECT& PU SH"YES"-
DEPARTMENT NO=_
SELECT 0-9
OLD DEPART 4 PW=
OK=YES)
YES / or 1-4
3
s
t
Enter the new department
6
number using the keypad (0-9).
Use the nume ric k eypad to enter
7
the new 4 digit password and
press [YES].
Press [ST O P ] to te rminate the
8
entry.
Minoltafax 2800/3800 3-9
DEPARTMENT NO=_
SELECT 0-9
DEPARTMENT 4 PW=
OK=YES
JAN. 09 13:00 100%
-SET DOC. FAC E DOWN-
Page 47

3
Deleting department numbe r and password
Press [SE T ] a nd 6 times [V/ PI N
1
CODE].
Press [4] on the numeric keypad
2
and press [YES].
Enter the department number
3
using the keypad (0-9).
Press [NO ] .
4
Use the nume ric k eypad to enter
5
the old 4 digit password and
press [YES].
INITIAL USER DATA?
SWITCH *REGISTER
-SELECT& PU SH"YES"-
DEPARTMENT NO=_
OLD DEPART 4 PW=
YES / or 1-4
SELECT 0-9
OK=YES)
Data entry
s
t
Press [NO ] .
6
Press [YES].
7
Press [ST O P ] to te rminate the
8
entry.
DEPARTMENT NO=_
SELECT 0-9
STOP SETTING?
YES/CONTINUE=NO
JAN. 09 13:00 100%
-SET DOC. FAC E DOWN-
✎
Note
You can only change the password after entering the old one.
3-10 Minoltafax 280 0/3800
Page 48

Data entry
3
Using the department number
If you choose ”on” the system is locked for use rs who do not ha ve a
department number or a pas sword. If no depart ment number or pass word
is set, an error message will appear in the display. Press [STOP] and
[V/PIN CODE] and enter your pin code.
Press [SE T ] a nd 6 times [V/ P IN
1
CODE].
Press [4] on the numeric keypad
2
and press [YES].
Use the arrow keys to select the
3
desired setting and press [YES].
Press [ST O P ] to te rminate the
4
entry.
INITIAL USER DATA?
YES / or 1-4
*SW ITCH REGISTER
-SELECT &PU SH"YES"-
*ON OFF
-SELECT& PU SH"YES"-
JAN. 09 13:00 100%
-SET DOC. FAC E DOWN-
s
t
You may enter the department num ber, password and name of the staff
member in the table below.
Dep. No. Department password Name
0
1
2
3
4
5
6
7
8
9
Minoltafax 2800/3800 3-11
Page 49

3
3.8 Set phone type
Use this function to adj ust your fax machine to you r telephone conne ction.
Dialling mode
Choose the dialling mode which applies to your telephone connection.
Tone dialling (DTMF) dials the number by transmitting a combin ati on of
beeps. Pulse dialli ng dials by transmitting a number of puls es for each
dialled number.
Press [SE T ] a nd 4 times [V/ PI N
1
CODE].
Press [2] on the num eric keypa d,
2
select the req uired setting using
the arrow keys and press [YES].
Press [ST O P ] to te rminate the
3
entry.
Data entry
MACHINE OPERATIO N?
YES / or 1-9
*TO NE PULSE
-SELECT & PUSH"YES"-
JAN. 09 13:00 100%
-SET DOC. FAC E DOWN-
s
t
✎
Note
If you do not know the di alling mod e, do the f oll owing t o test it. Dial ”9”
on your telephone. If you hear clicking noises in the receiver, the
impulse dialling mode is used. If you hear a single tone, the tone
dialling mode is used.
3-12 Minoltafax 280 0/3800
Page 50

Data entry
3
PBX or PSTN
Here you set the line type the fax machine uses. If your telephone line is
directly regi stered at you tel ephone compa ny, and th ey assigned you your
telephone number, yo u are using PSTN. If your telephone has an
extension number for internal calls, you are using PBX. PBX line allows
dial numbers (prefix no.) line access.
PSTN
Press [SE T ] a nd 4 times [V/ P IN
1
CODE].
Press [6] on the numeric keypad
2
and select PSTN with the arrow
keys and press [YES].
Press [ST O P ] to te rminate the
3
entry.
MACHINE OPERATIO N?
YES / or 1-9
*PSTN PBX
-SELECT & PUSH"YES"-
JAN. 09 13:00 100%
-SET DOC. FAC E DOWN-
s
t
Minoltafax 2800/3800 3-13
Page 51

3
Data entry
PBX
If you have to dial a number for an external line, line access is achi eved
by a prefix number. The prefi x is limited to 4 digits. If you press a key fo r
outside line access t hat does not have a number, line acc ess is achi eved
by flash function.
If you are n ot famil iar with t he flash f unction for line ac cess, ple ase contact
the manufactur er or serv ice staff f or your PBX sy stem. If you don no t need
to dial a number for line ac cess, but just press a key, please ask the
manufacturer or the service staff of your PBX system for the func ti on of
line access.
Press [SE T ] a nd 4 times [V/ PI N
1
CODE].
Press [6] on the numeric keypad
2
and select PBX with the arrow
keys and press [YES].
Use the nume ric k eypad to enter
3
the prefix and press [YES].
❍ Press only [YES] to activate the
flash funct ion.
MACHINE OPERATIO N?
YES / or 1-9
PSTN *PBX
-SELECT&PUSH"YES"-
PRE-FIX NO=
OK=YES
s
t
Press [ST O P ] to te rminate the
4
entry.
JAN. 09 13:00 100%
-SET DOC. FAC E DOWN-
✎
Note
If you delete the pref ix, the sy stem changes for line access by prefix to
line access by flash function. When the flash function is used the
machine will carry out the line access automatically. To di al i nside a
PBX system, press [#] befor e the entering the fax number.
3-14 Minoltafax 280 0/3800
Page 52

Data entry
3.9 Storing numbers
Sub addressing (F CODE SUB)
When entering one- touch an d spe ed di al number s it is possi ble t o enter a
sub-address. This enables you for instance to access sub-addresses
directly from the ser ver. The sub-address is limited to 10 di gits.
Norm
ID
9999
Fax Server
If the T T I is
9999
then
56789
3
12345
34567
56789
66112
12345
With SUB
Fax Server
ID
9999
SUB
66112
Minoltafax 2800/3800 3-15
If the T T I is
9999
then
56789
34567
56789
66112
Page 53

3
Data entry
What is F CODE?
You can program your system with a confidential polling or mailbox. For
this you need the F CODE. The F CODE functions like a key and a lock.
You always have to set an F CODE to set up a box, i.e. to inst all the loc k.
Everyone wanting t o access t he box needs the co rrespon din g key, i n this
case the corresponding F CODE. Otherwise on communication is
possible. If required, you may assign an F CODE pa ssword, as a second
security measure. This way you gain maximum security for your
documents.
In various steps you wil l be asked to enter an F CODE. There are three
different F CODE settings:
G F CODE SEP (selective polling TX/RX)
Set this F CODE if you are preparing a document for confidential
polling. Only reci pients that have the same F CODE stored in their
machine can poll the docu me nt. If a partner has stored a document
using SEP, you must use the F CODE SEP to poll the document.
G F CODE SUB
Use this F CODE to address sub-addresses in a server net work
directly.
G F CODE password (PWD)
If you wish to prote ct your mai lbox wi th a secon d loc k, you can assign
an additional password. Enter the desired password as a 4 digit
number .
✎
Note
The F CODE fu nction is only available wi th fax machines t hat have this
function as well. Ask your partner, if their machine can process F
CODE transmissions.
Entering one-touch numbers
Use this function [01] - [32] ([01] – [64] for Minoltafax 3800) to store your
most frequently called fax numbers for instant recal l or to arrange call
groups (for more information, refer to “Entering Call Groups”).
You can switch between capi tal and small letter by pressing one t ouch key
[32]. Press [31] to add bl anks. Enter special characters by pressing one
touch keys [28] and [29].
The one touch keys on the Minoltafax 3800 are ass igned double functi on.
Select the second level [33] - [64] of the one touch keys by pressing the
corresponding key twice.
3-16 Minoltafax 280 0/3800
Page 54

Data entry
Press [SET].
1
Press [1] on the num eric keypa d.
2
Press the desi red one-touch key.
3
Press [YES].
4
Use the nume ric k eypad to enter
5
the desired fa x num ber and
press [YES].
❍ Press [V/PIN CODE] to enter a
sub address.
DIAL REGISTRATION?
YES / or 1-6
-SELECT REGIST. KEY-
ONE-TOUCH 01
(
=_
(
=123456_
OK=YES (SUB=
s
t
t
3
)
Enter the name and press [YES] .
6
Press the next one- touch key.
7
Continue repeating the process
8
from step 2 until all speed dial
numbers have been entered.
Press [NO] and [STOP] to
9
terminate t he entry.
Minoltafax 2800/3800 3-17
Name=MINOLTA_
OK=YES (DEL=NO)
-SELECT REGIST. KEY(COMPLETE=NO)
ONE-TOUCH 02
JAN. 09 13:00 100%
-SET DOC. FAC E DOWN-
Page 55

3
Data entry
Entering speed dial numbers
Similar to the one-t ouch keys, you can store fax numbers as speed dial
numbers. The seed dial number is a three di git number that stand for the
complete numbe r you want to dial. Up to 100 speed dial numbers can be
stored (001-100).
You can switch between capi tal and small letter by pressing one t ouch key
[32]. Press [31] to add bl anks. Enter special characters by pressing one
touch keys [28] and [29].
The one touch keys on the Minoltafax 3800 are ass igned double functi on.
Select the second level [33] - [64] of the one touch keys by pressing the
corresponding key twice.
Press [SET].
1
Press [2] on the numeric key pad.
2
Enter the desired speed dial
3
number as a three digit number
using the keypad.
DIAL REGISTRATION?
YES / or 1-6
SPEED DIAL =_
OK=YES
(
=_
OK=YES
s
t
Use the nume ric k eypad to enter
4
the desired fa x num ber and
press [YES].
❍ Press [V/PIN CODE] to enter a
sub address.
Enter the name and press [YES].
5
Continue repeating the process
6
from step 3 until all speed dial
numbers have been ent ered.
Press [NO] and [STOP] to
7
terminate t he entr y.
3-18 Minoltafax 280 0/3800
(
=123456_
OK=YES (SUB=
Name=MINOLTA_
OK=YES (DEL=NO)
SPEED DIAL=_
COMPLETE=NO
JAN. 09 13:00 100%
-SET DOC. FAC E DOWN-
t
)
Page 56

Data entry
3
Changing one-touch- or speed dial numbe rs
You can change one-touch/speed dial keys by following the pro cedure
below. The example below describes how to change a one-touch key.
Press [2] on the numeric keypad, ent er the speed dial num ber and follow
the instructions.
You can switch between capi tal and small letter by pressi ng one touch key
[32]. Press [31] to add blanks. Enter special characters by pressing one
touch keys [28] and [29].
The one touch k eys on the Mino ltaf ax 3 800 are ass igned do uble f unct ion.
Select the second level [33] - [64] of the one touch keys by pressing the
corresponding key twice.
Press [SET].
1
Press [1] on the num eric keypa d.
2
Press the desired one -t ouch key
3
and [YES].
DIAL REGISTRATION?
YES / or 1-6
-SELECT REGIST. KEY-
ONE-TOUCH 01
s
t
Press [NO ] .
4
Select ”enter” using the arrow
5
keys and press [YES].
Use the nume ric k eypad to enter
6
the number and press [YES] .
Use the nume ric k eypad to enter
7
the new sub-address if required
and press [YES].
Minoltafax 2800/3800 3-19
REGISTERED! KEEP?
OK=YES (EDIT/DEL=NO)
*ED IT DELE TE
-SELECT & PUSH"YES"-
(
=123456_
OK=YES (DEL=NO)
SUB=:_
OK=YES
Page 57

3
If necessar y, enter the n ew name
8
and press [YES].
Press the next one- touch key
9
and continue repeating the
process until all desired onetouch keys have been changed.
Press [NO] and [STOP] to
10
terminate t he entr y.
Data entry
NAME=MINOLTA_
OK=YES (DEL=NO)
-SELECT REGIST. KEY(COMPLETE=NO)
JAN. 09 13:00 100%
-SET DOC. FAC E DOWN-
3-20 Minoltafax 280 0/3800
Page 58

Data entry
3
Erasing one-touch- or speed dial num bers
You can erase one-touch or speed dial numbers by following the
procedure below. The example below describes how to delete a onetouch key. Press [2] on the numeric keypad, enter the speed dial num ber
and follow the instr uctions.
The one touch k eys on the Mino ltaf ax 3 800 are ass igned do uble f unct ion.
Select the second level [33] - [64] of the one touch keys by pressing the
corresponding key twice.
Press [SET].
1
Press [1] on the num eric keypa d.
2
Press the desired one -t ouch key
3
and [YES].
DIAL REGISTRATION?
YES / or 1-6
-SELECT REGIST. KEY-
ONE-TOUCH 01
s
t
Press [NO ] .
4
Select ”delete” using the arrow
5
keys and press [YES.]
Press the next one touch key and
6
repeat the procedure from point
3 until a ll de sired one touch k eys
are deleted.
Press [NO] and [STOP] to
7
terminate t he entry.
Minoltafax 2800/3800 3-21
REGISTERED! KEEP?
OK=YES (EDIT/DEL=NO)
EDIT *DELETE
-SELECT & PUSH"YES"-
-SELECT REGIST. KEY(COMPLETE=NO)
JAN. 09 13:00 100%
-SET DOC. FAC E DOWN-
Page 59

3
Data entry
Entering groups
Your fax machine can scan the same documen t once and then send it to
numerous other fax machines (call groups). For this function memory
transmission must be select ed (see cha pter ”Sending”) Use thi s funct ion,
if you frequently send to the same group. You can program up to 32
groups, each having up to 50 destinations (Minoltafax 3800 64 groups).
Speed dial numbers may also be enter ed. To enter a speed dial number,
press [SPEED DIAL] under point 5.
You can switch between capi tal and small letter by pressing one t ouch key
[32]. Press [31] to add bl anks. Enter special characters by pressing one
touch keys [28] and [29].
The one touch keys on the Minoltafax 3800 are ass igned double functi on.
Select the second level [33] - [64] of the one touch keys by pressing the
corresponding key twice.
Press [SET].
1
Press [3] on the num eric keypa d.
2
DIAL REGISTRATION?
YES / or 1-6
-SELECT REGIST. KEY-
s
t
Press the one-t ouch key where
3
the group is to be stored and
press [YES].
Enter the name of the group.
4
Press [YES].
5
3-22 Minoltafax 280 0/3800
ONE-TOUCH 01
GROUP NAME=_
OK=YES
NO. 009=_
Page 60

Data entry
Press the one-to uch key where
6
the fax number is st ored.
❍ Press [SPEED DIAL] and enter
the 3-digit speed dial number to
store a speed dial num ber.
Press [YES] to enter other
7
numbers.
Press the one-to uch key where
8
the fax number is st ored.
Press [ST A R T ] to te rminate the
entry.
Press [NO] to end the process.
9
Press [ST O P ] to re tu r n to th e
10
standard display.
3
NO001=Berlin
OK=YES (Fin.=START)
NO. 002=_
(Fin.=Start)
NO002=T okyo
(Fin.=Start)
- SELECT RGIST. KEY(COMP LET E= NO)
JAN. 09 13:00 100%
-SET DOC. FAC E DOWN-
✎
Note
You may also store a sub- address or a sel ective polli ng number und er
a group dial.
Minoltafax 2800/3800 3-23
Page 61

3
Data entry
Changing / deleting members of a group
Use this function to change or delete individual members of a group.
Press [SET].
1
Press [3] on the num eric keypa d.
2
Press the one-t ouch key where
3
the desired gr oup is stored and
press [YES].
Press [NO ] .
4
Select ”enter” using the arrow
5
keys and press [YES.]
DIAL REGISTRATION?
YES / or 1-6
-SELECT REGIST. KEY-
ONE-TOUCH 01
REGISTERED! KEEP?
OK=YES (EDIT/DEL=NO)
*ED IT DELE TE
-SELECT & PUSH"YES"-
s
t
Press [YES].
6
Press [NO ] to d el et e the
7
member.
Enter the destination number
8
using the one-touch key o r speed
dial and press [YES].
Press [ST A R T ] to te rminate the
9
entry.
3-24 Minoltafax 280 0/3800
GROUP NAME=Sales
OK=YES (DEL=NO)
NO.002=BERLIN
OK=YES (DEL=NO)
ZO03=Bern
OK=YES
NO.003=_
(Fin.=START)
Page 62

Data entry
Press [NO] to end the process.
10
Press [ST O P ] to re tu r n to th e
11
standard display.
3
- SELECT RGIST. KEY(COMP LET E= NO)
JAN. 09 13:00 100%
-SET DOC. FAC E DOWN-
Minoltafax 2800/3800 3-25
Page 63

3
Deleting a whole group
To delete a group proceed as fol lows:
Press [SET].
1
Press [3] on the numeric keypad
2
and then the one-to uch key
where the group is stored.
Press [NO ] .
3
Select ”delete” using the arrow
4
keys and press [YES.]
Press [NO] to end the process.
5
Data entry
DIAL REGISTRATION?
YES / or 1-6
-SELECT REGIST. KEY-
REGISTERED! KEEP?
OK=YES (EDIT/DEL=NO)
EDIT *DELETE
-SELECT & PUSH"YES"-
- SELECT RGIST. KEY(COMP LET E= NO)
s
t
Press [ST O P ] to re tu r n to th e
6
standard display.
3-26 Minoltafax 280 0/3800
JAN. 09 13:00 100%
-SET DOC. FAC E DOWN-
Page 64

Data entry
3.10 Advanced settings
You can adjust the machine to your personal requirements with the
following settings.
Buzzer volume
Use this function to set the buzzer tone, for exampl e, when an error occurs
or when keys are pressed. Foll ow the pr ocedure below:
Press [SE T ] a nd 4 times [V/ P IN
1
CODE].
Press [3] on the nu meric keyp ad.
2
Use the arrow keys to select the
3
desired setting and press [YES].
Press [ST O P ] to te rminate the
4
entry.
MACHINE OPERATIO N?
YES / or 1-9
3 BUZZER VOLUME
*HIGH LOW OFF
-SELECT& PU SH"YES"-
JAN. 09 13:00 100%
-SET DOC. FAC E DOWN-
3
s
t
Minoltafax 2800/3800 3-27
Page 65

3
Data entry
Header
Your fax number, your name, the number of page s to be transmit ted, date
and time appear in the header. This informatio n is transmitted to the other
fax machine. The fax machine takes the dat a from the user setting s for this
function.
Use this function to pr int a header on the transmitted pages at the
destination. Fol low the procedure below:
Press [SE T ] a nd 2 times [V/ PI N
1
CODE].
Press [4] on the numeric key pad.
2
Use the arrow keys to select the
3
desired setting and press [YES].
Press [ST O P ] to te rminate the
4
entry.
TX OPERATION?
YES / or 1-4
4 HEADER
*ON OFF
-SELECT& PU SH"YES"-
JAN. 09 13:00 100%
-SET DOC. FAC E DOWN-
t
s
3-28 Minoltafax 280 0/3800
Page 66

Data entry
3
Footer
The footer shows the number of pages, an ID number and the date and
time of the transmissi on. Use this functi on to print a foote r on the received
pages. Follow the procedure below:
Press [SE T ] a nd 3 times [V/ P IN
1
CODE].
Press [8] on the nu meric keyp ad.
2
Use the arrow keys to select the
3
desired setting and press [YES].
Press [ST O P ] to te rminate the
4
entry.
RX OPERATION?
YES / or 1-9
8 FOOTER
*ON OFF
-SELECT& PU SH"YES"-
JAN. 09 13:00 100%
-SET DOC. FAC E DOWN-
t
s
Minoltafax 2800/3800 3-29
Page 67

3
Data entry
LCD Contrast
Use this function to adjust the LCD contrast of the display to the lig ht
conditions on site. Follow the procedure below:
Press [SE T ] a nd 4 times [V/ PI N
1
CODE].
Press [1] on the numeric key pad.
2
Use the arrow keys to select the
3
desired setting and press [YES].
Press [ST O P ] to te rminate the
4
entry.
MACHINE OPERATIO N?
YES / or 1-9
1 LCD CONTRA ST
DARK
ä
n
-SELECT&PUSH"YES"-
JAN. 09 13:00 100%
-SET DOC. FAC E DOWN-
ü
LIGHT
s
t
3-30 Minoltafax 280 0/3800
Page 68

Data entry
3
Power save mode
The power save function reduces the power consumption of the machine
when in standby mode. The factory setting is ”Timer”. If you want to
change the setting, follow the procedure below:
Press [SE T ] a nd 4 times [V/ P IN
1
CODE].
Press [7] on the nu meric keyp ad.
2
Use the arrow keys to select the
3
desired setting and press [YES].
Set the desired start time using
4
the numeric keypad and press
[YES].
MACHINE OPERATIO N?
YES / or 1-9
7 POWER SAVE MODE
OFF *Timer
-SELECT &PU SH"YES-
ON TIME= _0:00
OK=YES
s
t
Set the desired end time using
5
the numeric keypad and press
[YES].
Press [ST O P ] to te rminate the
6
entry.
OFF TIME= _0:00
OK=YES
JAN. 09 13:00 100%
-SET DOC. FAC E DOWN-
✎
Note
If you operate the machine i n a PC mode (I-fax, PCL4, GDI, PCL5e)
press [WAKE UP] to return to the operat ing mode.
Minoltafax 2800/3800 3-31
Page 69

3
Data entry
Setting the power save time
Use this function to set the interval in which the machine shuts down
automatically, without need to program the time again. This function is
only available if the power save mode is set to ”TIMER”. If you wa nt to
change the settin g, f oll ow the procedure below:
Press [SE T ] a nd 4 times [V/ PI N
1
CODE].
Press [8] on the numeric key pad.
2
Use the nume ric k eypad to enter
3
the desired interval and press
[YES].
Press [ST O P ] to te rminate the
4
entry.
MACHINE OPERATIO N?
YES / or 1-9
8 POWER SAVE TIME
TIME=_min (1-120)
OK=YES (DEL=NO)
JAN. 09 13:00 100%
-SET DOC. FAC E DOWN-
s
t
3-32 Minoltafax 280 0/3800
Page 70

Data entry
Remote diagnosis
This function enables the technical service to check settings using the
telephone line. Ask the technical service to make this opt ion available. If
you want to change the setting, follow the procedure below:
Press [SE T ] a nd 4 times [V/ P IN
1
CODE].
Press [5] on the nu meric keyp ad.
2
Use the arrow keys to select the
3
desired setting and press [YES].
Press [ST O P ] to te rminate the
4
entry.
MACHINE OPERATIO N?
YES / or 1-9
5 REMOTE MONITO R
*ON OFF
-SELECT& PU SH"YES"-
JAN. 09 13:00 100%
-SET DOC. FAC E DOWN-
s
t
3
Minoltafax 2800/3800 3-33
Page 71

3
Data entry
Setting the monitor volume
With this function you can set the vol ume of the moni tor, t o hear the build
up of the communicatio n.
Press [SE T ] a nd 4 times [V/ PI N
1
CODE].
Press [4] on the numeric key pad.
2
Use the arrow keys to select the
3
desired setting and press [YES].
Press [ST O P ] to te rminate the
4
entry.
MACHINE OPERATIO N?
YES / or 1-9
4 LINE MONITOR
*HIGH LOW OFF
-SELECT& PU SH"YES"-
JAN. 09 13:00 100%
-SET DOC. FAC E DOWN-
s
t
3-34 Minoltafax 280 0/3800
Page 72

Data entry
3.11 2nd telephone line (optional)
The module for the 2nd telephone line is available as an option for the
Minoltafax 2800. The installation must be done by the techni cal service.
For the Minoltafax 3800 this option is standard:
Entering your fax number
You can place your name and fax number in the header. The header will
appear at the top of the faxes you send. Up to 20 characters can be
entered.
The information in the header help the receiving station to identify the
sender.
Enter the ”+” by pressing [28] 13 times.
Press [31] to add blanks.
Press [SE T ] a nd 8 times [V/ P IN
1
CODE].
Press [1] on the numeric keypad
2
and enter your fax numb er.
1 LINE 2 FAX N O .
YES / or 1- 3
(
=
OK=YES)
3
s
t
Press [YES] to co nfi rm the entry
3
and [NO] to cancel the entry.
Minoltafax 2800/3800 3-35
JAN. 09 13:00 100%
-SET DOC. FAC E DOWN-
Page 73

3
Data entry
Selecting the line
Use this function to set the pr iority for the telephone lines. Al so you can
lock one of the lines. The l ocked line is then only available for reception.
Choose from the following opti ons:
G 1. Priority TX (if possibl e messages are sent using the 1st line).
G 2. Priority TX (if possibl e messages are sent using the 2nd line).
G 1. Lock TX (1st line is locked for sending).
G 2. Lock TX (2nd line is l ocked for sending) .
Press [SE T ] a nd 8 times [V/ PI N
1
CODE].
Press [2] on the numeric key pad.
2
Select the desired setting using
3
[V/PIN CODE] or [DELETE] and
press [YES].
1 LINE 2 FAX N O .
YES / or 1- 3
LINE 1 TX PR IO R ITY
OK=YES
LINE 2 TX PR IO R ITY
OK=YES
s
t
s
t
Press [ST O P ] to te rminate the
4
entry.
3-36 Minoltafax 280 0/3800
JAN. 09 13:00 100%
-SET DOC. FAC E DOWN-
Page 74

Data entry
3
Dial mode for the 2
Choose the dialling mode which applies to your 2
dialling (DTMF) dials the n um ber by transmitting a combination of beeps.
Pulse dialling dials by transmitting a number of pulses for each dialled
number.
Press [SE T ] a nd 8 times [V/ P IN
1
CODE].
Press [3] on the nu meric keyp ad.
2
Use the arrow keys to select the
3
desired setting and press [YES].
Press [ST O P ] to te rminate the
4
entry.
nd
line
nd
telephone line. Tone
1 LINE 2 FAX N O .
YES / or 1- 3
3 LINE 2 TON E PU LSE
OK=YES
*TO NE PULSE
-SELECT & PUSH"YES"-
JAN. 09 13:00 100%
-SET DOC. FAC E DOWN-
s
t
Minoltafax 2800/3800 3-37
Page 75

3
Data entry
3-38 Minoltafax 280 0/3800
Page 76

Send
4Send
4.1 Transmission
Notes on original documents
Your new fax machine can trans mit the following do cument sizes. You can
place up to 50 sheets of A4 paper in the Automatic Document Feeder
(ADF).
G 148 mm – 280 mm width
G 128 mm – 356 mm length.
If the document is longer than 380 mm, the machine recognises a
document jam and stops scanning the document.
Use yellow, green-yellow or light blue colours for information you do not
want to be transmitted.
Make sure ink, glue, correction fluid, etc. are compl etely dry before you
send a fax.
4
CAUTION
Staples and paper clips may damage the machine.
➜ Remove all staples and paper clips befor e sending a document.
Minoltafax 2800/3800 4-1
Page 77

4
Send
Using carrier film
Documents that meet t he following charact eristics must be phot ocopied or
placed in a carry ing film before they can be sent. Make sure to insert the
closed edge of the carrying film first in the document feeder.
G paper sizes less than 128 mm wide or less than 100 mm long;
G paper lighter than 60 g/m²;
G folded, to rn, wrinkled, damp, rough or curled documents;
G chemically treated and pressure sensitive copy paper.
Placing the documents
Insert the docum ent face down
1
in the document feeder.
Place the document i n the centre
2
of the ADF and adjust the paper
guides so that th ey li ghtly touch
the edges of the document.
You can insert up to 50 page s of A4 into t he docum ent f eeder. Mak e sur e
the pages are well placed and al igned before starting the transmi ssion.
Remove any staples before placing the document in the feeder.
4-2 Minoltaf ax 2800/3800
Page 78

Send
4
If the paper is curled or page s stick together, m ore than one page at a tim e
could be fed into the machine which can lead to paper jams or faulty
transmissions. In this case you should insert the pages one by one to
ensure correct feeding of the documents.
The standard transmission memory holds approx. 192 pages of the ITU
Test Document 1 in standar d resolution (Minoltafax 3800 576 pages).
Ensure the display ed me mo ry capacity does not drop to 0 (%) during
scanning, as thi s may cancel the process.
Minoltafax 2800/3800 4-3
Page 79

4
4.2 Transmission Settings
Resolution
Insert the docum ent i nto the ADF.
1
If you send documents wit h normal print or typed documents, it is not
necessary to make any fur ther adjustments. To change the resol ution
press [RESOLUTION].
[RESOLUTION] allows three adj ustments:
Send
Standard This is the normal resolution for most typed documents and
Fine Resolution for fine print, e.g. newspaper with small letters and
S. Fine This resolution is suitable for fine print e.g. highly detailed
simple drawings (e.g. use of typewriters).
fine lines.
illustrations.
✎
Note
Additionally pr ess [HALFTONE] for transmissions that require
greyscale printing.
4-4 Minoltaf ax 2800/3800
Page 80

Send
Default setting resolution
If you set the resolution via the control panel, this setting is only kept for
the current transmission. You can change the resolution permanently.
Follow the procedure below:
Press [SE T ] a nd on c e [V /P IN
1
CODE].
Press [1] on the numeric key
2
pad, select the required setting
using the arrow keys and press
[YES].
Press [ST O P ] to te rminate the
3
entry.
SCANNING&PRINTING?
YES / or 1-5
*STD F INE EX-FINE
-SELECT&PUSH"YES"-
JAN. 09 13:00 100%
-SET DOC. FAC E DOWN-
s
t
4
Minoltafax 2800/3800 4-5
Page 81

4
Send
Contrast
Press [TYPE ORG.] on the op eration panel t o set the cont rast. If you raise
the contrast, fine differences in tone on the document are enhanced and
transmitted more clearly. However, information may be lost during this
process.
Default contrast setting
If you set the contrast via the control panel, the setting will only apply to
the current transmission. You can change the resolution permanently.
Follow the procedure below:
Press [SE T ] a nd on c e [V /P IN
1
CODE].
Press [2] on the numeric key
2
pad, select the desired setting
using the arrow keys and press
[YES].
Press [ST O P ] to te rminate the
3
entry.
SCANNING&PRINTING?
YES / or 1-5
LIGHT *NORMAL DARK
-SELECT&PUSH"YES"-
JAN. 09 13:00 100%
-SET DOC. FAC E DOWN-
s
t
4-6 Minoltaf ax 2800/3800
Page 82

Send
Closed network
This function minimises the communication with recipients which are
stored as one-touch or speed dial numbers on your machine.
Press [SE T ] a nd 2 times [V/ P IN
1
CODE].
Press [2] on the numeric key
2
pad, select the required setting
using the arrow keys and press
[YES].
Press [ST O P ] to te rminate the
3
entry.
TX OPERATION?
YES / or 1-4
*ON OFF
-SELECT& PU SH"YES"-
JAN. 09 13:00 100%
-SET DOC. FAC E DOWN-
t
4
s
Minoltafax 2800/3800 4-7
Page 83

4
Default transmission setting
This function enables you to store the memory transmissi on or direct
transmission as a default setting.
Press [SE T ] a nd 2 times [V/ PI N
1
CODE].
Press [1] on the numeric key
2
pad, select the required setting
using the arrow keys and press
[YES].
Press [ST O P ] to te rminate the
3
entry.
TX OPERATION?
YES / or 1-4
*MEM TX ADF TX
-SELECT&PUSH"YES"-
JAN. 09 13:00 100%
-SET DOC. FAC E DOWN-
t
✎
Note
For group transmiss ion, broadcast and timer transmission, memory
transmission must be active.
Send
s
4-8 Minoltaf ax 2800/3800
Page 84

Send
Fax forwarding
Use this function to pass fax messages on to a maximum of 20
destinations. You can choose whether only messages from one sender
are to be passed on, or if all incoming messages are to be forwarded.
Press [SE T ] a nd 2 times [V/ P IN
1
CODE].
Press [3] on the numeric key
2
pad.
Enter a number between 1 – 20
3
and press [YES].
Press [V/PIN CODE] to turn the
4
function on or off and press
[YES].
TX OPERATION?
YES / or 1-4
3 FAX FORWARDING
FORWA RD NO =_1
OK=YES / or 01-20
FORWA RD 01 =ON
OK=YES
t
s
4
Press [V/PIN CODE] to enter the
5
day when forwardi ng is t o start
and press [YES].
Press [V/PIN CODE] to enter the
6
day when forwardi ng is t o stop
and press [YES].
Enter th e time for transmission
7
using the numeri c key pad and
press [YES].
Enter the time to end the
8
transmission using the numeric
key pad and press [YES].
Press [V/PIN CODE] to set
9
whether the transmitted
messages are to be printed by
your machine and press [YES].
Minoltafax 2800/3800 4-9
SEL. START D AY= SU N.
OK= YES / or 0-6
SEL. STOP DAY=SUN.
OK=YES / or 0-6
START TIME=00:00
OK=YES (DEL=NO)
STOP TIME=00:00
OK=YES (DEL=NO)
PRINT AT LOCAL=ON
OK=YES
s
t
t
s
Page 85

4
Enter the complete fax nu mber of
10
the destination and press [YES].
❍ If you do not enter any number,
all incoming messages will be
forwarded.
Enter the complete fax nu mber of
11
the destination and press [YES].
If you want to program a further
12
destination, enter a new number
(1-20) and press [YES].
Press [ST O P ] to te rminate the
13
entry.
(
=123456_
OK=YES (DEL=NO)
(
=234567_
OK=YES (DEL=NO)
FORWA RD NO =_1
OK=YES / or 01-20
JAN. 09 13:00 100%
-SET DOC. FAC E DOWN-
Send
4-10 Minoltafax 280 0/3800
Page 86

Send
4.3 Dialling modes
There are six differ ent dialling methods available.
Insert the document face down into the ADF and dial with the dialling
method of your choice.
Manual dialling using the numeric key pad
➜ Enter the number using the
numeric ke y pad. You c an check
the number on the display and, if
necessary, del ete it and then
enter the new number. Then, press [START]. A maximum of 30
digits can be entered using the numeric key pad.
Automatic dialling using one-touch dialling
➜ Press one of the programmed
one-touch keys [01] - [32]
(Minoltafax 3800 [01] - [ 64]).
After scann ing the document , the
machine w ill a u to ma tically dia l th e num b er .
The one touch k eys on the Mino ltaf ax 3 800 are ass igned do uble f unct ion.
Select the second level [33] - [64] of the one touch keys by pressing the
corresponding key twice.
(
=123456_
(
=MINOL TA
4
(TX=Start)
Automatic dialling using speed dialling
Press [SPEED DIAL] and enter
1
the three-d igit speed dial number
(001-100).
The name of the remote fax
2
machine app ears on t he dis play.
Press [START]. After scanning
the document the machine will
dial automatically.
Minoltafax 2800/3800 4-11
SPEED DIAL=001
(
=TOKYO
(TX=Start)
Page 87

4
Send
Automatic call groups
➜ Press one of the one-touch keys
[01] - [32] ( Minolt afa x 3800 [01] -
[64]). If a group i s stored, its
name will appear on the display.
After scanning the document the machine will dial automatically.
Program dialling
Use the last 8 one-touch keys [25] - [32] (Minoltafax 3800 [57] - [ 64]) to
program the following functions: The one touch keys on the Minoltafax
3800 are assigned double function. Select the second level [33] - [64] of
the one touch keys by pressing the corresponding key twice.
G Timer transmission, see “Program dialling, timer transmission” on
page 4-18.
G Broadcast, see “Program dialling , broadcast transmission” on page 4-
20.
G Polling reception, see Programming polling reception on page 5-10.
G Mailbox t ransmi ssion, s ee “Program dial ling, mailbox transm ission” on
page 4-29. “Polling reception” on page 5-8.
G Relay tr ansmission, see “Pr ogram dialling relay tra nsmission” on page
4-23
.
GROU P DIAL =M INO LT A
✎
Note
The functions broadcast, polling, mailbox transmission and relay
transmission can be combined with timer transmission.
4-12 Minoltafax 280 0/3800
Page 88

Send
4
Combination dialling
You can use this functi on to dial the pre- dial nu mber you have store d in a
one-touch key or as a speed dial number . It is neces sar y that the pre-di al
number and a [+] character (e.g. 123+) are stored as one-touch number
or speed dial number. Then recall the first part of the number from memo ry
and then enter the second part manu all y.
Press the one-to uch key or
1
speed dial key where you have
stored the pre-dial number.
Press [YES].
2
Enter a further number and press
3
[START].
You can also enter the second part of the number using the onetouch keys or the speed dial numbers. It is not possible to add a
second number with a [+] to the entry.
ONE TOUCH DIAL 03=
(
=123+
(
=123456
(TX=Start)
Minoltafax 2800/3800 4-13
Page 89

4
4.4 Memory transmission
The memory tran smissi on sh ould be s elect ed as the defa ult t ransm issi on
mode. This gives the advantage, th at documents are available again after
they are fed into the memory. It is also possible t o feed doc uments into the
memory while the communication is proceeding. The documents in
memory are processed automatically. Memory transmission is safer
because pages with tr ansm ission errors are sent again automatically.
Insert the docum ent face down
1
into the ADF.
Dial the telephone number with
2
one of the one-touc h keys or
speed dial numbers.
Press [ST A R T ] to sca n th e
3
document into the memory. It will
be automatically sent from
memory.
✎
Send
(
=ENTER FAX NO.
Í
or FUNCTION
(
=123456_
(TX=Start)
*MEMORY* 100%
123456
2
1
Note
Your Minoltafax 2800/3800 is equipped with ECM (Error Correction
Mode). This func tion r epeats da ta that may ha ve been lost d ue to bad
line conditions.
4-14 Minoltafax 280 0/3800
Page 90

Send
4.5 Direct transmission
You can send directly from the ADF if not enough memory is available t o
scan all of the document you want to transmit.
Place the documen t face down in
1
the document feeder and press
[SPEAKER] on the con trol panel .
Dial the n umber with the numeric
2
key pad, one-touch or seed dial
number, wait for the re sponse of
the destination and press
[START].
(
=ENTER FAX NO.
Í
or FUNCTION
(234 567)
-PUSH START KEY-
4
Minoltafax 2800/3800 4-15
Page 91

4
4.6 Delayed transmission (timer)
This function i s used to send at a prepro grammed time, e. g. to a recip ient
on a different ti m e zone or to take advantage o f lower transmission rates
at specific times.
The timer function is only available when memory t ransmission is active.
You can use one of the one touch keys to program the delayed
transmission (see “Program dialling, timer transmission” on page 4-18).
Insert the document face down in the document feeder.
Adjust contrast and resolution if necessary.
Press [FUNCTION] and [2] on
1
the numeric key pad.
Enter the desired tr ansmission
2
time and press [YES].
Enter the call number.
3
TIMER = 00 : 00
OK=YES
TIMER = 12 : 30
OK=YES
(
=ENTER FAX NO.
Í
or FUNCTION
Send
Press [YES].
4
The machine scan s the
document into memory.
[NO] to terminate the entry.
5
Press [NO] to end the process.
6
4-16 Minoltafax 280 0/3800
(
=123456_
OK=YES (SUB=
TIMER = 12 : 30
OK=YES (COMPLETE=NO)
JAN. 09 13:00 100%
-SET DOC. FAC E DOWN-
t
)
Page 92

Send
4
If the memory become s full during the scan process, your fax will retur n to
stand-by mode. In this case repeat the programming procedure when
enough memory is available again.
✎
Note
The functions broadcast, polling, mailbox transmission and relay
transmission can be combined with timer transmission.
Minoltafax 2800/3800 4-17
Page 93

4
Send
Program dialling, timer transmission
You may also program one of the one- touch keys [25] - [32] (Minoltafax
3800 keys [57] - [64]) for the timer function.
Press [SET].
1
Press [4] on t he numeric key pa d
2
and the desired one- touch key
[25] - [32] ( Minolt afa x 3800 [57] -
[64]).
Press [2] on the numeric key
3
pad.
Enter the desired tr ansmission
4
time and press [YES].
DIAL REGISTRATION?
YES / or 1-6
-SELECT REGIST. KEY-
FUNCTION
SEL. 1 / 2 / 3 / 7 / 8
TIMER = 12 : 30
OK=YES
s
t
Enter the call number.
5
Press [YES].
6
Press [ST O P ] to te rminate the
7
entry.
(
=ENTER FAX NO.
Í
or FUNCTION
(
=123456_
OK=YES (SUB=
DIAL REGISTRATION?
YES / or 1-6
t
s
t
)
✎
Note
The functions broadcast, polling, mailbox transmission and relay
transmission can be combined with timer transmission.
4-18 Minoltafax 280 0/3800
Page 94

Send
4.7 Broadcasting
Your Minoltafax 2800 is capabl e of sending docu ments from the memory
to up to 148 recipients (Mi noltafax 3800 180 recipients ) usi ng the direct
dial, one-touch, speed and group dial. The machine dials and transm its
the document sequentially to each recipient. If one of the numbers is
engaged, your fax machine will dial the next one and finally retur n to the
engaged number and try again. After broadcasting, it will automatically
print a report and retu rn to stand-by mode. If the function reservation
report has been selec ted, a li st of t he des tinat ions will be pri nted f ollo wing
the scanning.
Insert the document face down in the document feeder.
Adjust contrast and resolution if necessary.
Press [FUNCTION] and [1] on
1
the numeric key pad.
Enter the desired number using
2
the numeric key pad, one-touch
keys or speed dial and press
[YES].
4
1 BROADCAST
NO. 001=_
OK=YES
Repeat this procedure until you
3
have entered all recipients.
Press [ST A R T ] to te rminate the
4
entry.
Press [YES] to confirm the
5
entries or press [START] to
begin the transmission.
❍ When checking the recipients,
you may confirm them by pressing [YES], erase them from the
broadcast transmission or change them by pressing [NO].
Minoltafax 2800/3800 4-19
NO. 002=234567
OK=YES
NO. 003=_
(Fin.=START)
CHECK D EST INA TION ?
OK=YES (Fin .=STA RT)
Page 95

4
Send
Program dialling, broadcast transmission
You may also program one of the one- touch keys [25] - [32] (Minoltafax
2800/3800 keys [57] - [64]) for the broadcast function.
Press [SET].
1
Press [4] on t he numeric key pa d
2
and the desired one- touch key
[25] - [32] ( Minolt afa x 3800 [57] -
[64]).
Press [1] on the numeric key
3
pad.
Enter the desired number and
4
press [YES].
DIAL REGISTRATION?
YES / or 1-6
-SELECT REGIST. KEY-
FUNCTION
SEL. 1 / 2 / 3 / 7 / 8
NO. 001=_
OK=YES
s
t
Repeat this procedure until you
5
have entered all recipients.
Press [ST A R T ] to te rminate the
6
entry.
Press [YES] to confirm the
7
entries or press [START] to
begin the transmission.
❍ When checking the rec ipi ents,
you may confirm them by pressing [YES], erase them from the
broadcast transmission or change them by pressing [NO].
Press [ST O P ] to te rminate the
8
entry.
4-20 Minoltafax 280 0/3800
NO. 002=234567
OK=YES
NO. 003=_
(Fin.=START)
CHECK DESTINATION?
OK=YES (Fin .=STA RT)
DIAL REGISTRATION?
YES / or 1-6
s
t
Page 96

Send
4.8 Relay transmission
This function takes advantage of a remote fax machine’s memory to
reduce communica tion co sts. You send a doc ument to one or severa l fax
machines and they in tur n send the document to several destinat ions. If
you use several identical machines in your com pany, you can use a treestructured distribution.
This function enables you to transmit the documents to a recipient and
inform that fax m achin e to forwar d your f axed d ocument t o the number(s )
programmed in its relay box.
4
Mach ine C
Machine D
Machine A
Document
Report
Machine B
ont-touch/
speed di al
Machine E
Machine F
✎
Note
Machines A and B mus t be compat i ble and bo th mu st have t he "relay
broadcasting” func tion, even if they are different models.
If the relay location (hub) and final destination are abroad, then you can
reach all destinat ions with only one long-distance cal l.
Minoltafax 2800/3800 4-21
Page 97

4
Send
Start relay transmission
Use this function to st art the relay transmission. The entries made must
match the entries of the relay station. The relay box in the hub is set for
transmission.
Press [FUNCTION] and [8] on
1
the numeric key pad.
Enter the number of the rel ay
2
station (hu b) usi ng the numeric
key pad, o ne- touch o r speed d ial
and press [YES].
Use the num eric ke y pad to enter
3
the four-digit relay box ID and
press [YES].
Use the num eric ke y pad to enter
4
the 4 digit passw ord, if required
and press [YES].
8 RELAY INITIATE
(
=123456_
OK=YES (DEL=NO)
RELAY BO X ID=_
OK= YES
PASSWORD=_
OK= YES
The machine sca ns the pages and auto maticall y starts trans mitting
them.
✎
Note
According to the settings of the relay station, a transmission report will
be sent back.
4-22 Minoltafax 280 0/3800
Page 98

Send
Program dialling relay transmission
You may also program one of the one- touch keys [25] - [32] (Minoltafax
2800/3800 keys [57] - [64]) for the relay function.
Press [SET].
1
Press [4] on t he numeric key pa d
2
and the desired one- touch key
[25] - [32] ( Minolt afa x 3800 [57] [64]).
Press [8] on the numeric key
3
pad.
Enter the number of the rel ay
4
station (hu b) usi ng the numeric
key pad, o ne-t ouch o r speed di al
and press [YES].
DIAL REGISTRATION?
YES / or 1-6
-SELECT REGIST. KEY-
FUNCTION
SEL. 1 / 2 / 3 / 7 / 8
(
=123456_
OK=YES (DEL=NO)
s
t
4
Use the num eric key pad to e nter
5
the four-digit relay box ID and
press [YES].
Use the num eric key pad to e nter
6
the 4 digit passw ord, if required
and press [YES].
Press [ST O P ] to te rminate the
7
entry.
Minoltafax 2800/3800 4-23
RELAY BO X ID=_
OK= YES
PASSWORD=_
OK= YES
DIAL REGISTRATION?
YES / or 1-6
s
t
Page 99

4
Send
Set relay boxes
This funct ion relates to the relay st ation (see m achine ”B” in the illustration
on page 4-21). I.e . setti ng the relay box of y our machine as a hub in a relay
transmissi on. You can configure up to 5 relay boxes. Pleas not e that the
recipient mus t be st ored in the relay station as one-touch, speed dial or
group dial numbers.
Press [SET].
1
Press [6] on the numeric key
2
pad.
Use the numeric key pad to set a
3
number (0-4) for the rel ay box.
Use the numeric key pad to enter
4
the four-digit relay box ID and
press [YES].
DIAL REGISTRATION?
YES / or 1-6
6 RELAY BOX
RELAY BO X 4 ID=_
OK=YES
Relaisbox 1 ID=1234
OK= Ja (Lösc h=Nein)
s
t
Use the numeric key pad to enter
5
the 4 digit password, if required
and press [YES].
Enter the complete number of
6
the destination of the
transmissio n report, using the
numeric key pad and press
[YES].
Enter the fax numbers of the
7
recipients using the one-touch,
speed dial or group dial.
4-24 Minoltafax 280 0/3800
RELAY BOX 1 PW=1234
OK= YES (DEL=NO)
REPORT=_
OK= YES
NO001=Berlin
OK=YES (Fin.=START)
Page 100

Send
Press [YES].
8
Repeat the procedure starting
9
with point 7 until all destinations
are set and press [START].
Press [ST O P ] to te rminate the
10
entry.
4
NO. 001=Berlin
OK=YES (Fin.=START)
NO. 002=_
(Fin.=Start)
JAN. 09 13:00 100%
-SET DOC. FAC E DOWN-
Minoltafax 2800/3800 4-25
 Loading...