

Page 1

p
User Manual
Minoltafax 1600
www.minoltaeuro
e.com
The essentials of imaging
Page 2

1 General Information..................................................... 7
1.1 Introduction..................................................................................... 7
1.2 How Does a Fax Machine Work?................................................... 8
1.3 Certificate for Machines with CE Marking .................................... 9
CTR 21 Approval............................................................................... 9
1.4 Safety Precautions........................................................................ 10
Laser Safety.................................................................................... 11
Internal Laser Radiation.................................................................. 11
Ozone Release Warning................................................................. 11
1.5 Features......................................................................................... 11
Type................................................................................................ 11
Dialling Functions............................................................................ 12
Functions......................................................................................... 12
Additional Functions........................................................................ 12
2 Installation.................................................................. 13
2.1 Unpacking...................................................................................... 13
2.2 Location......................................................................................... 14
2.3 Machine Layout............................................................................. 16
2.4 Control Panel, Displays and Keys............................................... 18
2.5 The Toner Cartridge and the Drum Cartridge............................. 20
Installing the Toner Cartridge and the Drum Cartridge................... 21
2.6 Supply Paper................................................................................. 22
Installing the Paper Input Tray........................................................ 22
Installing the Paper Tray ................................................................. 22
Installing the Document Output Tray............................................... 23
Replace Rx Paper........................................................................... 23
2.7 Connecting the Power Cable and t he Telephone Line Cable ... 24
Connecting the Interface Cables..................................................... 24
Turning the Power On..................................................................... 25
3 Entering Initial Settings............................................. 27
3.1 Typing Conventions in this Manual............................................. 27
3.2 Entering Characters...................................................................... 27
Minoltafax 1600 I
Page 3

3.3 Function of the Keys.................................................................... 28
Entering Numbers and Characters................................................. 29
Special Characters......................................................................... 29
3.4 Entering Date and Time ............................................................... 30
3.5 Entering your Fax Number .......................................................... 31
3.6 Entering Your Name..................................................................... 32
3.7 Set Phone Type............................................................................. 33
Dialling Mode.................................................................................. 33
PSTN or PBX.................................................................................. 34
Entering One-Touch Numbers........................................................ 35
Storing a Direct-Dialling-In Number in a One-Touch Key............... 36
Entering Speed Dial Numbers........................................................ 37
Storing a Direct-Dialling-In Number (Speed Dial)........................... 38
Changing One-Touch- or Speed Dial Numbers.............................. 39
Erasing One-Touch- or Speed DialNumbers................................. 40
Entering Call Groups ...................................................................... 41
Changing Group Dials .................................................................... 42
Erasing Call Groups ....................................................................... 43
Phone Book.................................................................................... 43
3.8 Advanced Settings....................................................................... 44
Power Save Mode .......................................................................... 44
LCD Contrast.................................................................................. 45
Buzzer Volume ............................................................................... 45
Setting ECM Mode (Error Correction Mode) .................................. 46
Header and Footer ......................................................................... 47
4 Sending Faxes............................................................ 49
4.1 Transmission................................................................................ 49
Notes on Original Documents......................................................... 49
Photocopy or Carrying Film............................................................ 50
........................................................................................................ 50
Inserting a Document into the ADF ................................................ 50
4.2 Settings for Sending a Fax .......................................................... 51
Resolution....................................................................................... 51
Contrast.......................................................................................... 52
Page Count..................................................................................... 53
Image/Text Recognition.................................................................. 53
II Minoltafax 1600
Page 4

4.3 Dialling Methods ........................................................................... 54
Manual Dialling Using the Numeric Keypad.................................... 54
One-Touch Dialling ......................................................................... 54
Speed Dialling................................................................................. 54
Automatic Group Dial using the One-Touch Keys 17-20.................... 55
Program Dialling.............................................................................. 55
Combination Dial............................................................................. 56
Phone Book..................................................................................... 56
4.4 Transmission Methods................................................................. 57
Memory Transmission..................................................................... 57
Direct Transmission ........................................................................ 58
Delayed Transmission..................................................................... 59
Broadcasting................................................................................... 60
Polling Transmission....................................................................... 61
Mailbox Transmission ..................................................................... 62
Password TX................................................................................... 63
Entering the Password.................................................................... 63
Setting Password TX....................................................................... 63
Delete Reservations........................................................................ 64
5 Reception. ................................................................... 65
5.1 Manual Reception......................................................................... 65
5.2 Automatic Reception.................................................................... 66
Memory Reception Mode (Confidential Reception) ........................ 66
5.3 Mailbox Reception........................................................................ 67
Programming Mailbox ID................................................................. 67
Printing the Mailbox Contents ......................................................... 67
Deleting a Mailbox ID...................................................................... 68
5.4 Polling Reception.......................................................................... 69
Password Reception....................................................................... 70
5.5 Settings for Receiving a Fax........................................................ 71
Number of Rings............................................................................. 71
Multiple Page Print.......................................................................... 72
Reduction........................................................................................ 73
Print Density.................................................................................... 73
Print Paper Size.............................................................................. 74
Minoltafax 1600 III
Page 5

6 Copying....................................................................... 75
6.1 Single Copies................................................................................ 75
6.2 Multiple Copies............................................................................. 76
Enlarge / Reduce............................................................................ 76
7 Connecting the Fax Machine to Your Computer..... 77
7.1 Use as PC-Fax, Scanner and PC-Printer.................................... 77
Modem Specifications .................................................................... 77
7.2 Setting PC Mode........................................................................... 77
Number of Rings............................................................................. 78
PC Baudrate................................................................................... 78
7.3 Scanner Mode............................................................................... 79
7.4 Fax Operation with Your Computer............................................ 79
7.5 Printing from Your Fax Machine ................................................. 79
8 Reports........................................................................ 81
8.1 Transmission Report.................................................................... 81
Automatic Print............................................................................... 81
Manual Print ................................................................................... 82
8.2 Reception Report.......................................................................... 83
Manual Print ................................................................................... 83
8.3 Activity Report.............................................................................. 84
Automatic Print............................................................................... 84
Manual Print ................................................................................... 84
8.4 Reservation Report ...................................................................... 86
8.5 Fax Number List ........................................................................... 86
8.6 Mailbox List................................................................................... 88
8.7 Key List.......................................................................................... 89
8.8 Status List..................................................................................... 90
8.9 Memory Data List.......................................................................... 92
8.10 Memory Image Print ..................................................................... 93
8.11 Power Failure Report ................................................................... 94
8.12 Memory Overflow Report............................................................. 94
8.13 Backup RAM-Error Report........................................................... 94
IV Minoltafax 1600
Page 6

9 Maintenance and Trouble-Shooting......................... 95
Cleaning the Machine ..................................................................... 95
Cleaning the Casing........................................................................ 95
Cleaning the ADF and the Scanner ................................................ 96
9.1 Replacing the Toner Cartridge..................................................... 97
Replacing the Drum Cartridge......................................................... 98
9.2 Clearing Paper Jams..................................................................... 99
Clearing Original Document Jams .................................................. 99
Clearing Printout Paper Jams ....................................................... 100
Paper Jam in the Paper Cassette................................................. 100
Paper Jam inside the Fusing Unit................................................. 100
Paper Jam at the Drum Cartridge................................................. 101
9.3 Trouble-Shooting........................................................................ 102
Error Messages............................................................................. 104
Error-LED...................................................................................... 104
Alarms........................................................................................... 104
Error Messages on the LCD.......................................................... 105
9.4 Poor print quality ........................................................................ 107
Low Contrast................................................................................. 107
Grey Background.......................................................................... 107
Black Stains .................................................................................. 108
Missing Areas................................................................................ 108
10 Specifications........................................................... 109
End User License Agreement
Minoltafax 1600 V
Page 7

VI Minoltafax 1600
Page 8

General Information
1 General Information
1.1 Introduction
Thank you for choosing this Minoltafax 1600 and showing confidence in
ourproduct. This machinehas amoderndesign andfulfils today'srequirements of a faxmachine.It combines advanced technology witha contemporary appearance.
The machine is authorised for use in the public telephone network and is
compatible to other fax m achines of the communication standard 3.
The Minoltafax 1600 was manufactured to the same high quality standards as is common for all other precision instruments made by Minolta.
This manual will assist you in becoming familiar with the machine. It containsall the necessaryinformation forthe start-up, itsfunctions and thereplacement of the consumables.
Please, always keep this manual to hand when using the machine.
1
Minoltafax 1600 1-7
Page 9

1
1.2 How Does a Fax Machine Work?
A fax machine can be connected to a normal telephone system without
taking any specialprecautions,just like a normal telephone set. Thefunction of a fax machine is quite similar to that of a telephone.
The way a fax machine works is simple: Documents are at first scanned.
Thisis done bythe scanning unit.The machinedoes not recognisethe letters but reads the picture, dot by dot, and marks each dot as black or
white. That is why you can not only transmit texts but also pictures and
photos. The information is then digitised and compressed so that the fax
machine can send it quickly over the telephone line to another fax machinewhich reverses the process,reading and markingeach dot as black
or white on a sheet of paper.
When you are "called"by a fax machine,your telephonerings as normal.
Therefore you cannot know whether your are receiving a fax call or a telephone call before picking up the receiver.
At the beginning of a fax transmission you will hear shrill sounds. Those
sounds are the so called "hand shaking" and function as an introduction
sequence before the actual transmission, just as interlocutors - often - introduce themselvesat the beginning of a telephonecall. In the introductorysequence thetechnical featuresof bothmachinesare matchedto make
surethe transmission and thereception are conductedto a high standard.
Withyour Minoltafax1600 you do notneedto listen to the introductorysequence. How to program the machine accordingly will be explained later
in this manual. Furthermore you will also find information about the settings that come with the machine, that have to be made when instal-ling,
or the settings that can be made at a later stage. Most of the features of
the fax machine work independently, so that you can program only the
settings you need for the moment and ignore all others.
By theway, the word "fax" is a combinationof the Latin "facere" (tomake)
and "simile" (similar) describing the process of making a copy which is
similar to the original. This artificial word "fax" has nowadays become
widelyaccepted in everydaylanguage, replacingthe older term facsimile.
A copy is thereforeto be made ”similar”to the original. Fax machines are
also called facsimile machines.
Now, enjoy your new fax machine.
General Information
1-8 Minoltafax 1600
Page 10

General Information
1.3 Certificate for Machines with CE Marking
CTR 21 Approval
Annex II
The equipment has been approved in accordance with Council Decision
98/482/EC for pan-European single terminal connection to the public
switched telephone network (PSTN). However, due to differences between the individual PSTNs provided in different countries, the approval
does not, or itself, give an unconditional assurance of successful operation on every PSTN network terminationpoint.
In cases of problems, you should contact your equipment supplier in the
first instance.
1
Minoltafax 1600 1-9
Page 11

1
1.4 Safety Precaut ions
l Connectthe machineonly to a200 - 240V/ 50 Hzearthed powerpoint.
l Make sure the power is not turned off over night.
l Always pull at the plug, never at the wire, when you wantdisconnect
the machine from the power supply. If possible, connect the machine
directly to a wall outlet.
l To facilitatecommunication alwayskeep themachineswitchedon and
program the correct user data. Make sure to enter the correct user
names.
l Do not unscrew any parts, if not specificallyrequested in this manual.
If necessary contact your technical service.
l Never open the machine while it is transmitting or printing.
l Take care not to let humidity into the machine.
l Make sure no objects fall into the machine.
l If any problem occurs that can not be solved by the procedures de-
scribed in this manual make sure you contact the technical service.
l Follow the recommended maintenance procedures regularly.
Used cartridges may be taken back by the technical service station as a
part of the maintenance procedures.
General Information
1-10 Minoltafax 1600
Page 12

General Information
Laser Safety
This fax machine contains a page printer which operates by means of a
laser. Thisfax machine contains a pageprinter which operates bymeans
of a laser.This machine does noti mpose any danger as longas it is used
accordingto the procedures described inthis manual. The laser is limited
to theinterior of themachine. The environmentis protectedfrom the laser
emission by the covers of the machine.
Internal Laser Radiation
Maximum radiation: 7.3 x 10-³ (W) Wave length : 770-810 (nm)
The machine workswith an invisible class IIIb laser. The printer headunit
is not field service item.
Ozone Release Warning
During printer operation, a small quantity of ozone is released. This
amount is not large enough to harm anyone. However, be sure the room
wherethe fax machineis being usedhas adequateventilation,. especially
if you are printing a high volume of material or if the fax machine is being
used continuously over a long period.
1.5 Features
1
Your new fax machine is a compact multi-functional device facilitating
yourwork andreducingyourfaxcommunication times.Thefeatures ofthe
Minoltafax1600 includescanning ofo riginals intothememory fordelayed
transmission, allowing simultaneous reception of fax messages and vice
versa.
Type
l A4 format , Group 3, desktop laser plain paper fax
l 14.400 bps transmission
l MH / MR / MMR ECM coding
l Automatic document feeder up to 10 pages
l 250 sheet paper tray
l Double-spaced LCD-displaywith 20 digits
l 64 level grey scale
Minoltafax 1600 1-11
Page 13

1
General Information
Dialling Functions
l 20 one-touch keys (for individual destinationsor as group dial
destinations)
l 100 Speed dial options
l Automatic redial / on hook dialling / group dialling
l Phone book function
Functions
l Delayed transmission
l Broadcasting (up to 100 Destinations)
l Multi-tasking operation interface
l Polling RX / TX
l Confidential reception / mailbox transmission
l Copies
Additional Functions
l RS-232C PC-interface
l Use as scanner (software optional)
l Use as PC fax (software optional)
l Use as printer (software optional)
1-12 Minoltafax 1600
Page 14
Installation
2 Installation
2.1 Unpacking
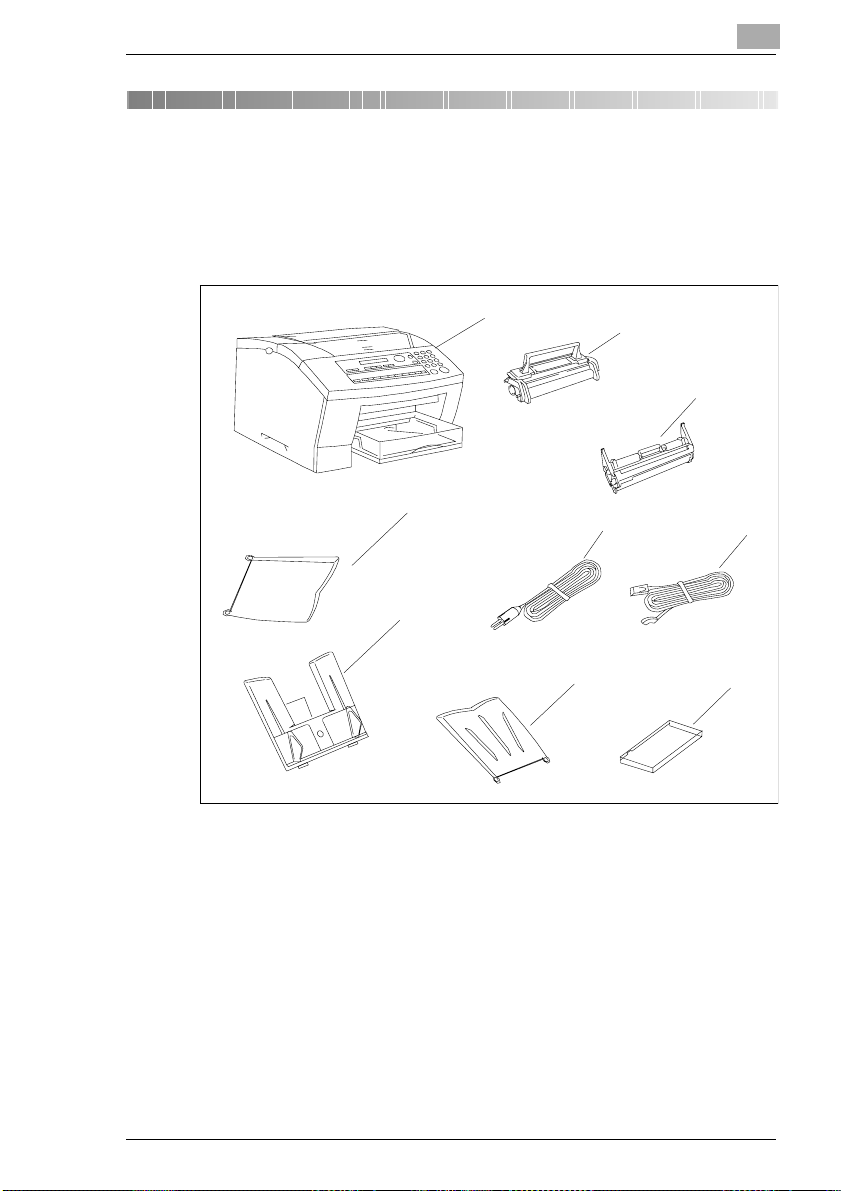
The drawing below shows what should be included in the packaging.
2
Bild aus MF 2636 einfügen
1Mainunit
2 Toner cartridge
3 Drum cartridge
4Powercord
5 Telephone line cord
6 Paper cassette cover
7 Paper tray
8 Document input tray
9 Document output tray
1
9
8
2
3
4
7
5
6
Minoltafax 1600 2-13
Page 15

2
2.2 Location
l Avoid direct exposure to sunlight and place the machine away from
heaters.
l Avoid humid or dusty locations.
l Place the machine on an even, non-vibrating surface.
l Keep the machine away from magnetic fields
(TV sets, radio).
l Avoid locations close to ventilation openings, air conditioners and
heaters.
l The machines should be easily accessible from all sides.
l Make sure no liquids can enter the machine.
l Keep all covers closed when the machine is in stand-by. If any cover
is opened no transmissionor reception is possible.
l If any cover is opened during sendingor receiving the procedure is in-
terrupted. Avoid extreme fluctuations in temperature which could
cause the humidity inside the machine to condense.
Installation
2-14 Minoltafax 1600
Page 16
Installation
2
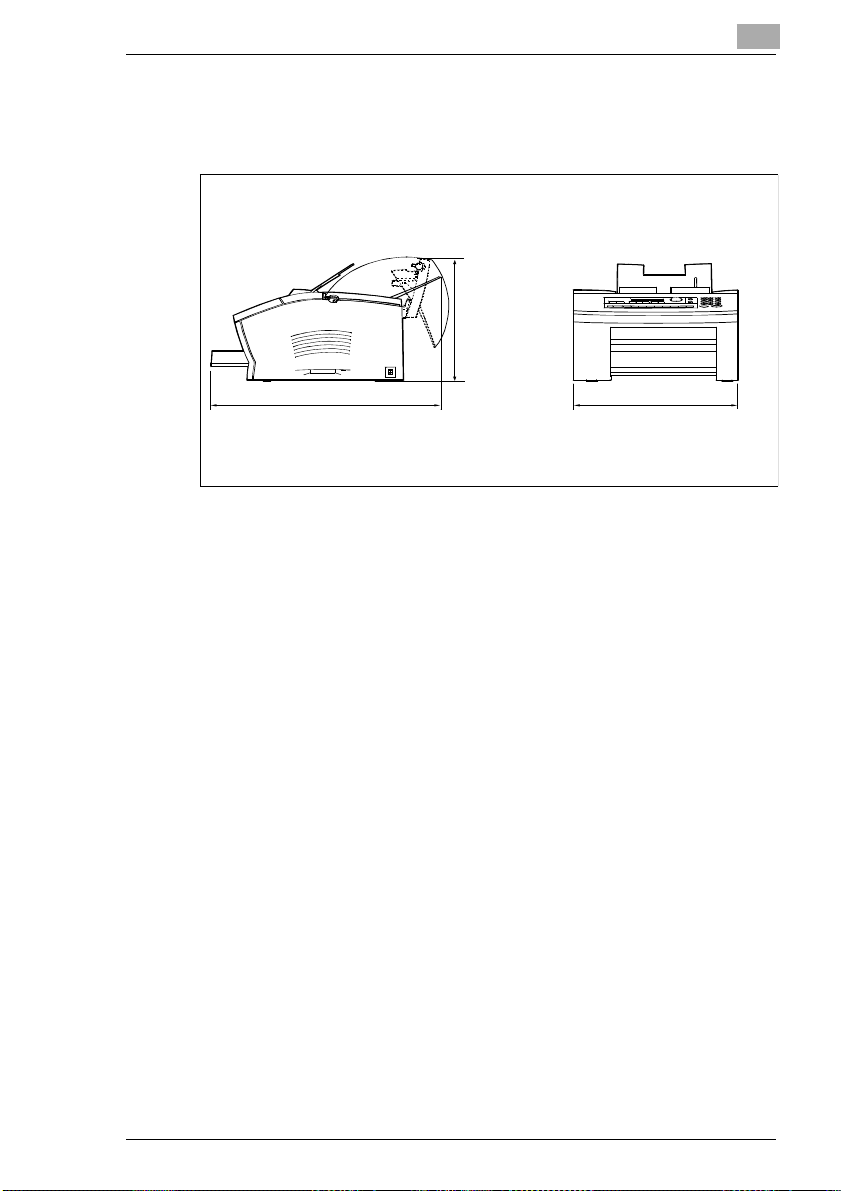
The figure below shows the space required to ensure easy access to the
machine and its proper functioning. Make sure there is enough space
around the machine (approx. 40 cm in every direction).
Bild 4503U101einfügen
612 m m
395 m m
Minoltafax 1600 2-15
Page 17
2
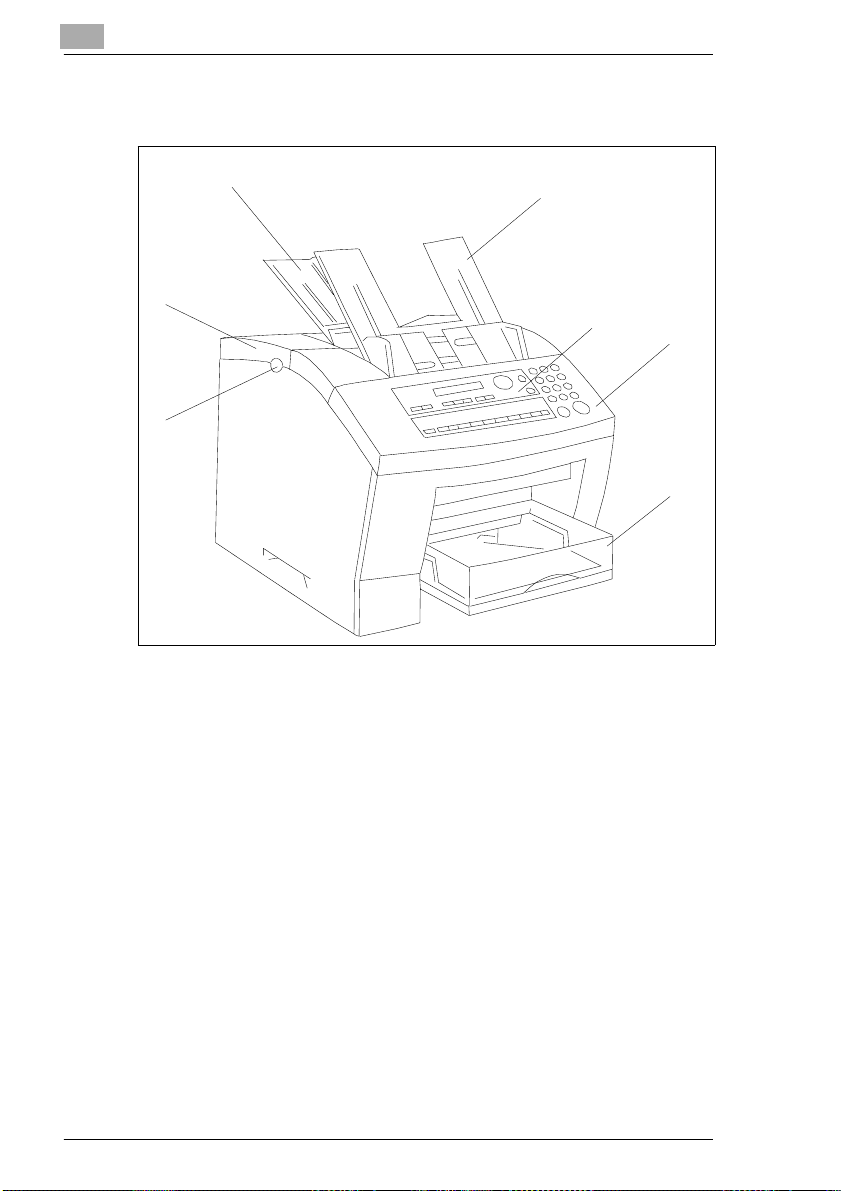
2.3 Machine Layout
Installation
3
Bild 4503u201 einfügen
2
1
1 Release buttons
2 Printer cover
3 Paper tray
4 Document input tray
5 Control panel
6 Scanner cover
7 Paper cassette
4
5
6
7
2-16 Minoltafax 1600
Page 18
Installation
2
Bild 4503u201 einfügen
4
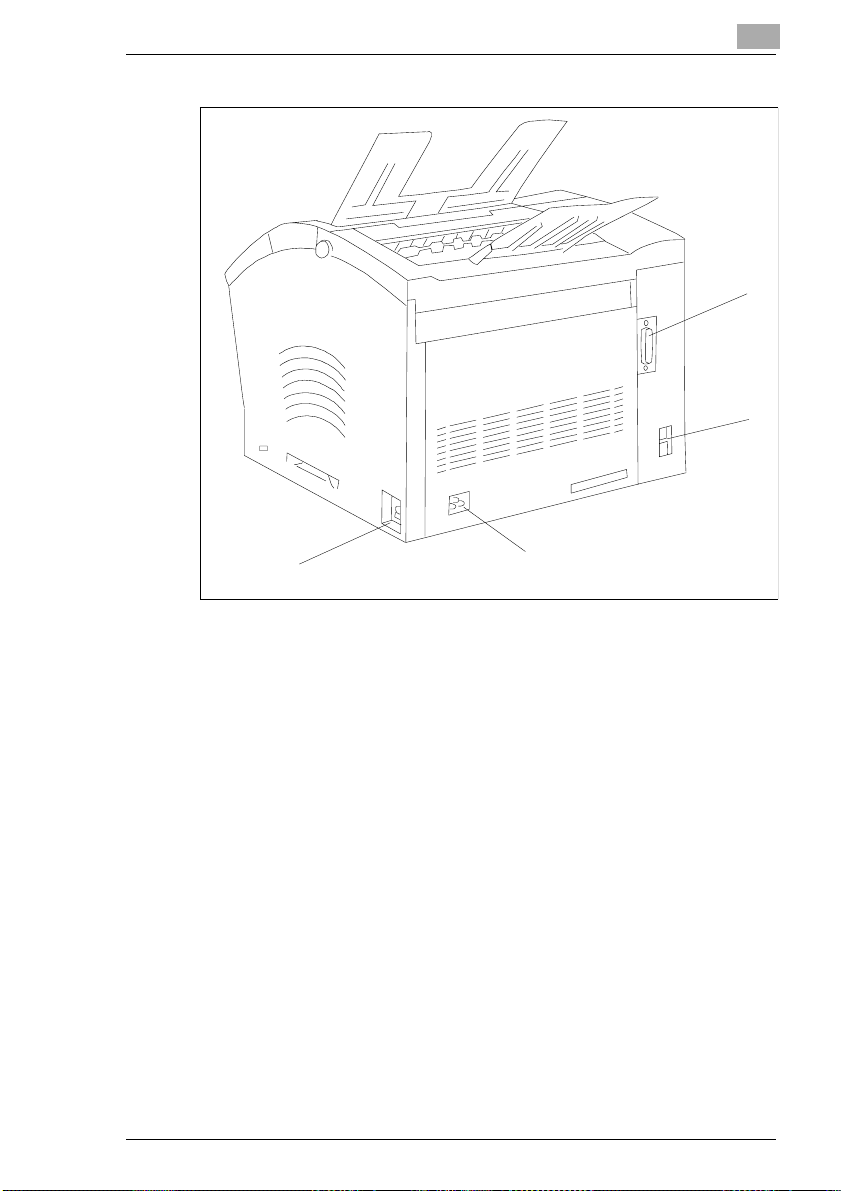
1 RS-232C interface
2Lineterminal
3 Power terminal
4 Mains switch
1
2
3
Minoltafax 1600 2-17
Page 19
2
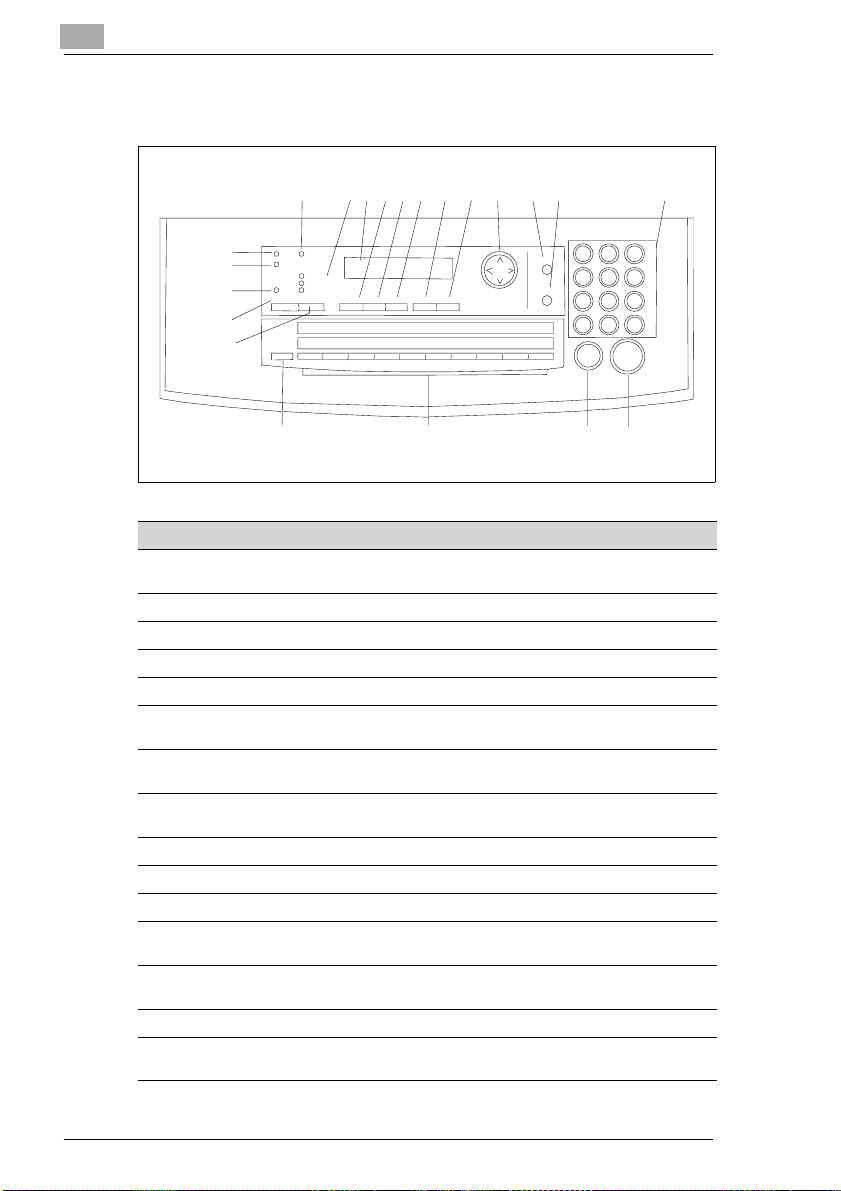
2.4 Control Panel, Displays and Keys
Installation
456789101211 1413
BILD 4503U204EINFÜGEN
3
2
1
21
20
ErrorPCManualRX
Standard
Fine
Halftone
MemoryTX Resolution
Confirm Set Function NoYes
01 02 03 04 05 06 07 08 09 10
11 12 13 14 15 16 17 18 19 20
SpeedDial
Redial/Pause
123
456
789
*
15
0#
Start7CopyStop
16171819
Num Display/Key Function
1 MEMORY LED If glowing, the machine is in the memory transmission
2 PC LED If glowing, the machine is in the PC mode.
3 ERROR T his LED is lit, if an e rror occurs.
4 MAN. RX LED If glowing, the machine is in the manualreceptionmode.
5 RESOLUTION LED Shows the current resolution.
6 LCD (LiquidCrystal
Display)
7 CONFIRM Press this key to print reports or to display the last commu-
8 SET Press this keyto open the menu.Select the desiredfunc-
9 FUNCTION Press this keyto select the various comm unication options.
10 YES Press this key to confirm the current function.
11 NO Press this key to cancel the current function.
12 ARROW KEY Scrollsthrough features and commandoptionsas shown
13 SPEED DIAL Use this key to enter a two digit speeddial number. Also
14 REDIAL/ PAUSE Use this key to eitherredial or to generate a pause.
15 NUMERIC KEYPAD Use these keys to enter numbersand letters, e.g. fax num-
mode.
Shows the statusof the machineand contains information
about the operation modes.
nications on the LCD.
tion either with the numeric keypad or the arrow keys.
on the display.
press this keyto search for a stored number.
bers and destinationnames.
2-18 Minoltafax 1600
Page 20

Installation
Num Display/Key Function
16 START/COPY Starts all functions of the machine suchas transmission,
17 STOP Stops the currentoperation.
18 ONE TOUCH Usethis key to dial a stored number. Alsouse thiskey to
19 SELECTION KEY Use this key to select the upper or the lower row of one-
20 RESOLUTION Press this key to select the desired resolution. Press this
21 MEMORY Press this key to choose between memory transmission
receiving, copying etc.
enterspaces and to delete wrong entrieswhen entering
data.
touch keys.
key to choose between:
NORMAL: Standard mode
FINE high resolution
HALFTONE: for photographs, etc.
and direct transmission.
2
Minoltafax 1600 2-19
Page 21

2
2.5 The Toner Cartridge and the Drum Cartridge
In this laser fax, characters and images are created through a process in
which the drumcartridgeapplies toner to the page in the machine's developing section.
The drum cartridge should be handled with care to ensure proper performance at all times. Be sure to avoid exposing the cartridge to direct sunlight or any other directlight.Store the cartridge in an environment that is
not subject to extreme changes intemperature(heat, cold) or humidity.
Detailedinformation on thecare and handling ofthe toner cartridgeis provided with the shipment of new cartridges.
Exchangethe cartridgewhen”toner low”appears inthe display.The drum
cartridgehas a service lifeof approx. 20000pages. Instructionshow to replace the cartridges is given in the chapter on maintenance.
Both cartridges are made of non-hazardousmaterial and may be disposed of freely.
Please consult the regulations for the disposal of such products in your
area.
Used cartridges may be taken back by the technical service station as a
part of the maintenance procedures.
Installation
Note
To avoiddamageto the drum cartridgecaused by light, cover it witha
cloth as soon as removed from the fax.
2-20 Minoltafax 1600
Page 22
Installation
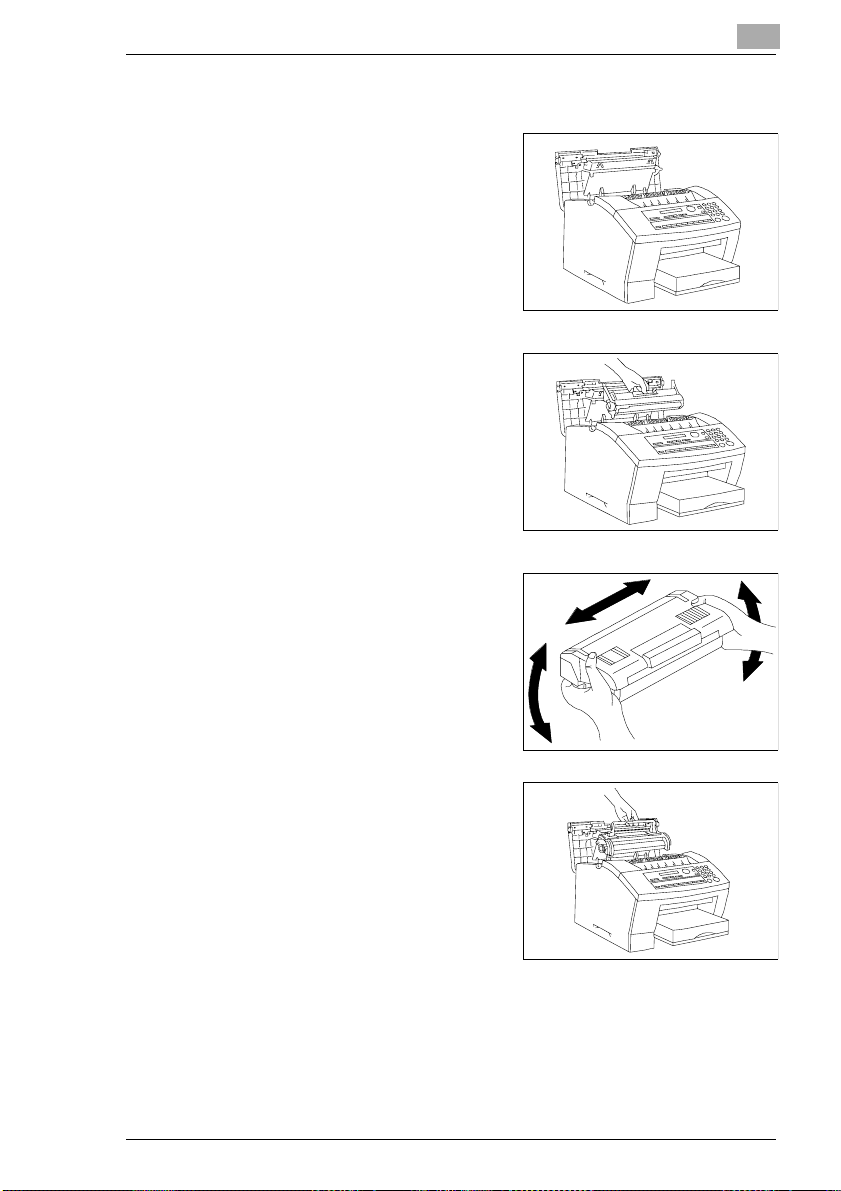
Installing the Toner Cartridge and the Drum Cartridge
1 Press the release buttons to
release the cover and open it.
Bild 4503u201 einfügen
2 Insert the drum cartridge along the
guides into the machine.
Bild 4503u201 einfügen
3 Unpack the toner cartridge.
Then, holding the cartridge with
bothhands,shakeitto distributethe
toner evenly.
eins von den
Tonerschüttelbilder
einfügen
2
4 Insert the toner cartridge along the
guides into the machine.
Bild 4503u110 einf
Minoltafax 1600 2-21
Page 23
2
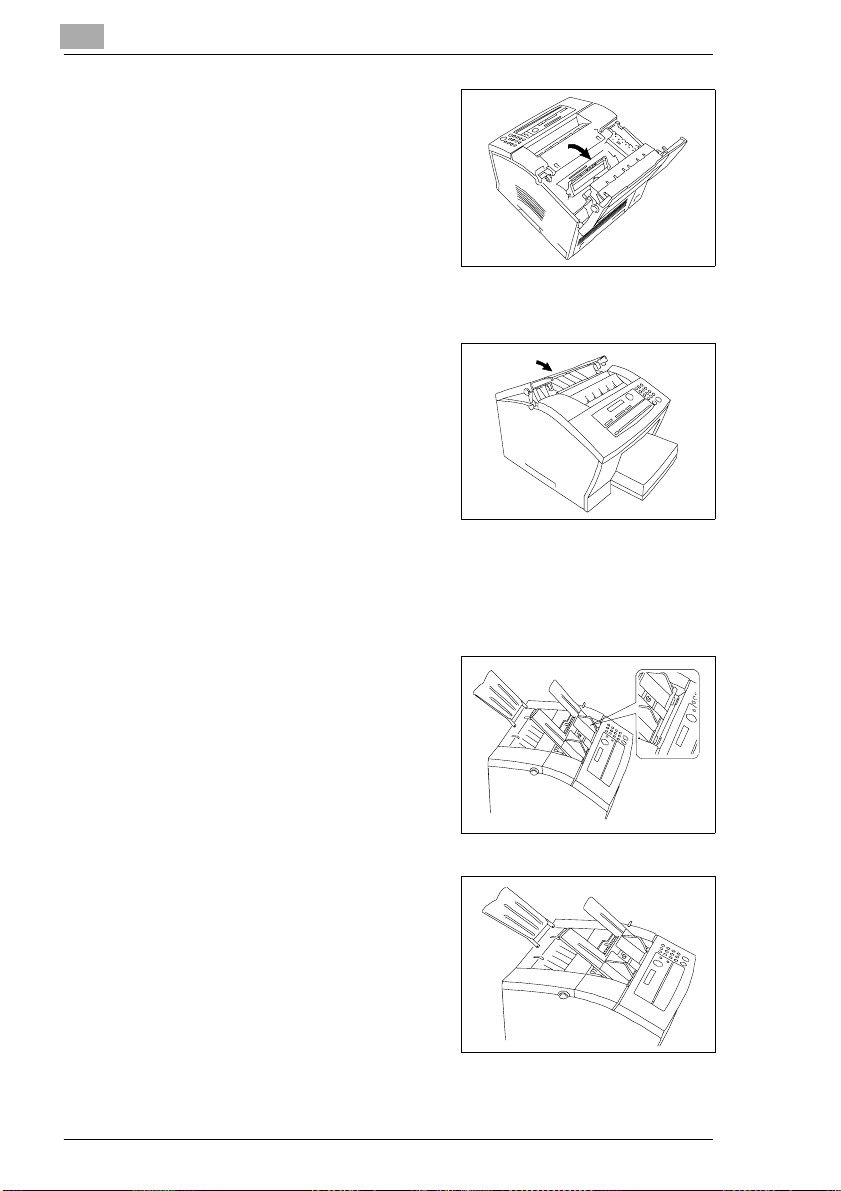
5 Press the handle of the
Toner cartridge until it locks into position.
6 To close the cover press in the di-
rection of the arrows until the cover
locks into position.
2.6 Supply Paper
Installing the Paper Input Tray
Installation
Bild 4503u201 einfügen
Bild 4503u201 einfügen
1 Insertthetwoprotrusions ofthe tray
into the appropriate holes.
Bild 4503u116 eien
Installing the Paper Tray
1 Insertthetwoprotrusions ofthe tray
into the appropriate holes.
Bild 4503u110 einf
2-22 Minoltafax 1600
Page 24
Installation
2
Installing the Document Output Tray
Insert the document output into the openings at the front of the machine.
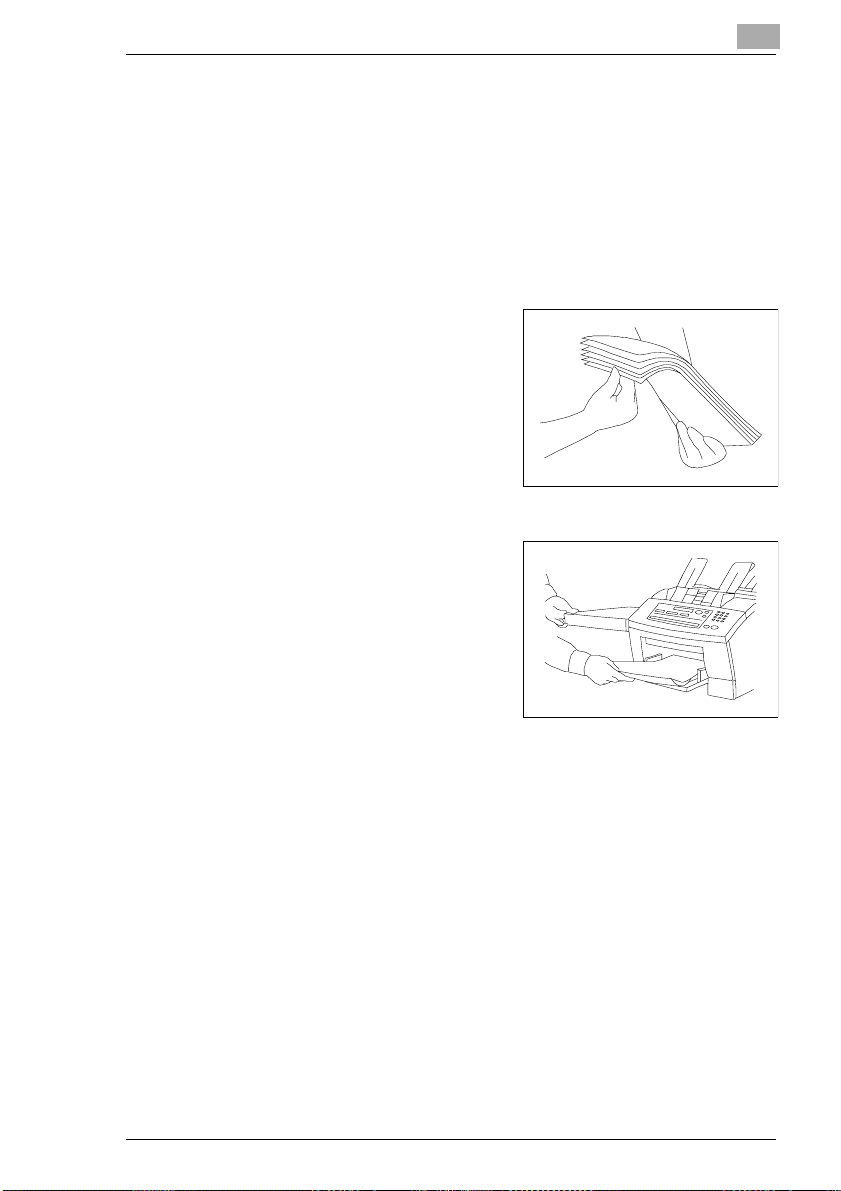
Replace Rx Paper
Your faxprintson plain paper of the followingspecifications: 60-90 g/m².
The paper cassette holds up to 250 sheets of A4-sized paper.A4, Letter,
Legal (A4 is the standard size).
1 Fan the paper welland align the
sheets.
Bild 4503u201 einfügen
2 Place the paper in the paper tray.
Bild 4503u201 einfügen
If the machine runs out of paper a corresponding messagewill appear in
thedisplay.If there is no paperin the machine receiveddocumentswill be
stored inmemory.As soon a paper is fed, the receiveddocuments will be
printed.
Minoltafax 1600 2-23
Page 25
2
Installation
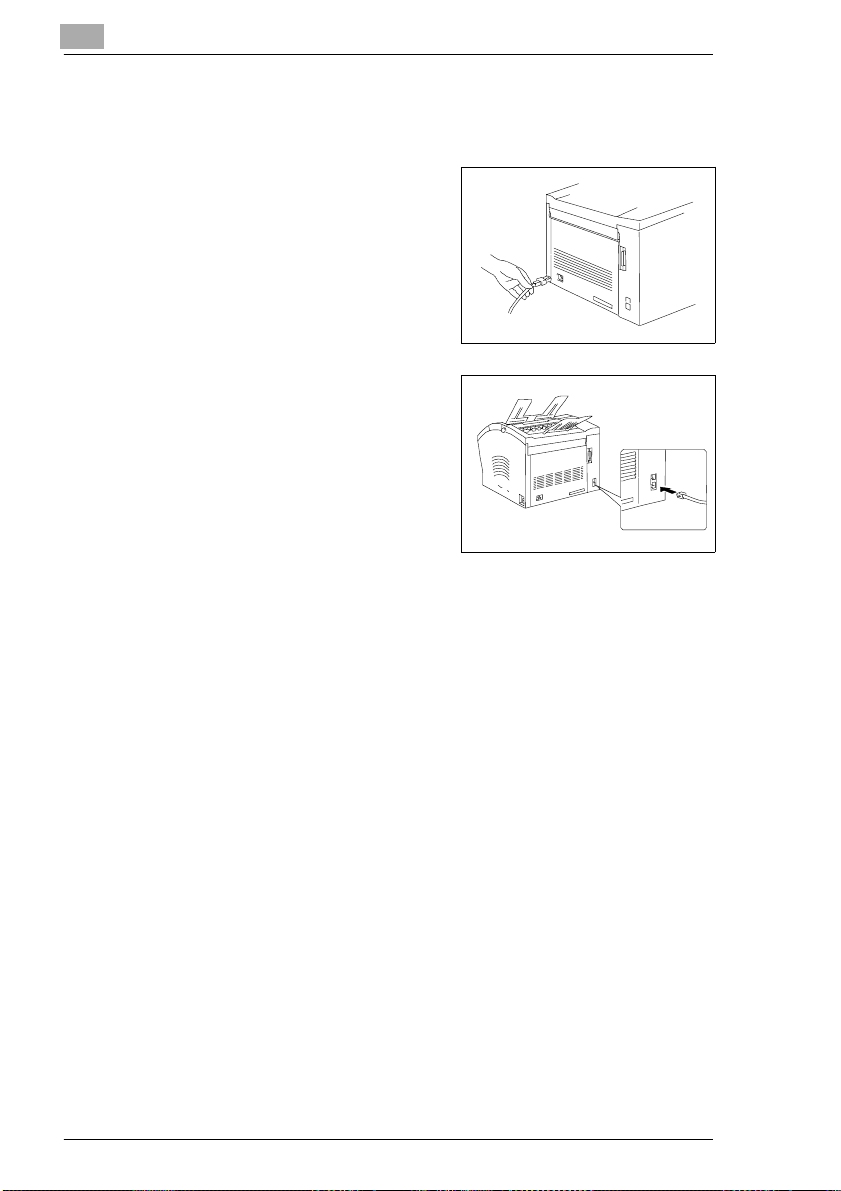
2.7 Connecting the Power Cable and the Telephone Line Cable
Plug thepowercable into socketon
1
the left of the machine. Then connect it to the wall socket. Mind the
safety notes in chapter 1
.
Bild 4503u110 einf
2 Plug the end of the telephone cord
into the terminal of the machine.
Bild 4503U101einfügen
3 Plug the wall end of the telephone cable into the wall socket.
Connecting the Interface Cables
TheRS-232Cserialinterfacecableisavailable as anoptional accessory.
Plug the interface cable into the appropriate terminal on the back of the
machine.Furtherinformationis providedin the"Connectingthe faxto your
computer" chapter.
2-24 Minoltafax 1600
Page 26

Installation
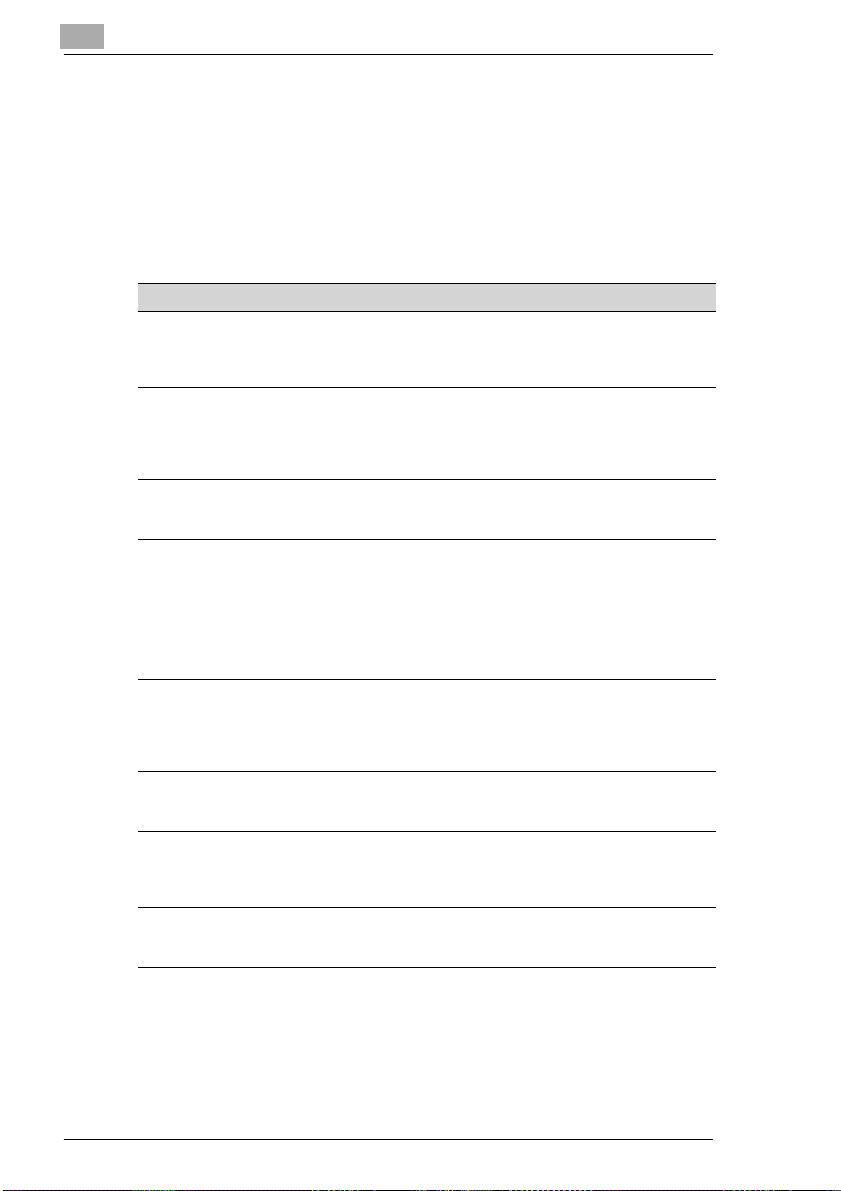
Turning the Power On
Press the power switch to turn the m achine on. It is located on the back right
hand side of the machine. Press I for
On, press O for Off.
2
Bild von Hand &
Schalter einfügen
Whenthe machine isin stand-bymode
thedisplay to theright will appear.Now
the machine is ready for operation.
Note
Alwaysleave the machine onforat least three secondsbefore turning
it off again. Otherwise it might be seriously damaged.
NOV. 19 13:30 100%
SET DOC. FACE DOWN
Minoltafax 1600 2-25
Page 27

2
Installation
2-26 Minoltafax 1600
Page 28

Entering Initial Settings
3 Entering Initial Settings
Before all features of your Minoltafax are available you are obliged to enter severalsettings. This chapterexplains howtoset your name,your line
type and the remote locations with which you may wish to communicate.
Youcan cancelthe settinganytimeby pressingSTOP.Thesetting willthen
not be saved. If you do not press any key within 30 seconds your fax machine will return to stand-by mode.
3.1 Typing C onventions in this Manual
If nothingelse is requested,all keys are tobe pressed one afterthe other.
This is also the case if they are connected by a "+" to facilitate the layout.
Press 0+5+JA" means: Pressthe numerickey 0, then the numerickey5
and then the key named “YES”.
3.2 Entering Ch aracters
Use the numeric keypad to enter letters and special characters. For details refer to the tables below. Press the arrow keys to save the setting.
Press 9 or19 to enterspaces. Ifyouhave typeda wrong characteruse the
arrow keys to move back and overwrite the text or press the one-touch
keys 10 or 20 to delete the wrong text.
3
Minoltafax 1600 3-27
Page 29
3
3.3 Function of the Keys
Use ENTER orthe arrowkeys to access thefollowingfunctions.Press EN-
or the arrowkeysrepeatedly until the desiredfunction appears in the
TER
display. Then press the numeric key according to the desired function.
The settings that are available will be shownon the display. Detailed descriptionsof the procedurewill beprovided inthe correspondingchapters.
Group Function Default setting
1 Dial registration 1 One-touch dial
2 Scanning/printing 1 Resolution
3Transmission 1 Page count
4 Reception 1 Memory TX
5 Machineoperation 1 Power save mode
6 Reports 1Journal
7Userdata 1Date&Time
8PC-Interface 1PC-Modus
2 Speed dial
3 Group dial
4 Program dial
2Scancontrast
3 I/T-recognition
4Density
5 Paper size
2 Password
3 Header
2 Number of rings
3 Multiple pageprint
4 Reduction
5Mailbox
6RXpassword
7Footer
8 Manual reception
2 LCD-contrast
3 Volume
4G3ECM
5 PSTN/ PBX
2 Reservation report
3 Tx report
2 User fax number
3 User name
4 User password
2 Number of rings
3 PC-Baudrate
Entering Initial Settings
empty
empty
empty
empty
Standard
Step 3
on
Step 4
A4
off
off
on
off
1
off
on
empty
off
off
off
on
Step 3
low
off
PSTN
on
off
on
empty
empty
empty
empty
off
1
Auto
3-28 Minoltafax 1600
Page 30
Entering Initial Settings
Entering Numbers and Characters
To enter characters press the following keys:
Numeric key 1 2 3 4 5 6 7 8 9 0
1time 1234567890
2times A D G J M P T W
3times BEHKNQUX
4times C F I L O R V Y
5times S Z
Special Characters
Press # as many times as shown in the table.
Numeric key # Numeric key # Numeric key #
1 time & 9times # . 17times # $
2 times # # 10 times # , 18 times # :
3times#
4 times # - 12 times # + 20 times # @
5 times # / 13 times # = 21 times # %
6 times # ( 14 times # < 22 times # [
7 times # ) 15 times # > 23 times # ]
8 times # ” 16 times # ? 24 times # ’
11 times # ! 19 times # ;
∗
3
Minoltafax 1600 3-29
Page 31

3
3.4 Entering Date and Time
Date and time appear on the display,the activity report and the other fax
machine's printouts.
Description Display
Entering Initial Settings
1 Press 7 times SET.
2 Press 1.
3 Enterthe date(DDMMYY)and time
(24 hour format) and press YES to
store the entry.
Note
If enter day appears in the display, enter the day of the week.
(0 = Sunday, 1 = Monday etc.).
INITIAL USER DATA? é
YES / OR 1 - 4 ê
1DATEANDTIMES
** ** ’** * **:**
- ENTER DAY-
3-30 Minoltafax 1600
Page 32

Entering Initial Settings
3.5 Entering your Fax Number
You can place your name and fax number in the header. The header will
appear at the top of the faxes you send.
Enter your name and your fax number in the header. The information in
the header help the receiving station to identify the sender.
Press
SPEED DIAL to enter the ”+”.
You can enter spaces with one-touch key 9.
Description Display
3
1 Press 7 times SET.
2 Press 2 to delete an existing
number press NO.
3 Enteryourfaxnumberasdescribed
in the text and press YES to store
the entry.
INITIAL USER DATA? é
YES / OR 1 - 4 ê
2 NUMBER
(= +49 511 212223_
OK=YES
Minoltafax 1600 3-31
Page 33

3
3.6 Entering Your Name
You can enter either your company name, your name or both. Up to 32
characters can be entered.
Refer to 3.2 for instructions on how to make the entries.
Description Display
Entering Initial Settings
1 Press 7 times SET.
2 Press 3 to delete an existing
number press NO.
3 Enter your name and press
YES to store the entry.
INITIAL USER DATA? é
YES / OR 1 - 4 ê
3NAME
NAME=MINOLTA
OK=YES
3-32 Minoltafax 1600
Page 34

Entering Initial Settings
3.7 Set Phone Type
Use this function to adjust your Minoltafax to either the public telephone
network or a private extension.
Dialling Mode
Choose the dialling mode of your preference. Tone dialling (DTMF) dials
the number by transmitting a combination of beeps. You might need it
when your fax has to transmit a set of numbers whichare codedas beeping noises, e.g.when you use the mailbox function. Pulse dialling dials by
transmitting a number of pulses for each dialled number.
The factory setting is tone dial.
Description Display
3
1 Press 5 times SET.
2 Press 3.
3 Use thearrow keysto select thede-
siredsetting andpress YES to store
the entry.
Note
Due to the CE conformity the change of the dial type must be set by
the technicalservice. This functionis only accessible afterthe change
has been set.
MACHINE OPERATION? é
YES / OR 1 -6 ê
3TONE/PULSE
*TONE PULSE
- Select& press ”YES”
Minoltafax 1600 3-33
Page 35

3
Entering Initial Settings
PSTN or PBX
Use this function to set the machine to PSTN or PBX. In PBX line dial
numbers (prefix no.) or flash line access are possible.
Description Display
1 Press 5 times SET.
2 Press 5.
3 Use thearrow keystoselect thede-
siredsettingandpressYES.
4 If you select PBX, select flash line
access or dial code access using
the arrow keys.
5 Ifyou haveselected code,enterthe
dial code. Press YES to store the
entry.
The prefix is limited to 4 digits.
Note
The line access is achieved automatically by the machine and does
not need to be done manually before dialling. If you want to call fax
machines within your own PBX system, press # before entering the
number. This suppresses the automatic line access function.
MACHINE OPERATION? é
YES / OR 1 - 5 ê
5PSTN. é
*PSTN. PBX
- Select& press ”YES”
CODE FLASH
- Select& press ”YES”
CODE=
OK=YES (MAX. 4 DIGITS)
ê
3-34 Minoltafax 1600
Page 36

Entering Initial Settings
EnteringOne-Touch Numbers
Use this function to store your most frequently called fax numbers for instant recall or to arrange call groups for broadcasting (for more information refer to "Entering Call Groups").
Besides, you can store functions like polling or delayed transmission in
one of the last 4 one-touch keys.
Description Display
3
1 Press SET and 1.
2 Press the desired one-touch key
between 01 and 20.
3 Enter the fax number
and press YES.
4 Use the numeric keypad to enter
the name and press YES.
5 Use the arrow keys to set the mo-
dem speed and press YES.
6 If you want to program further one-
touch keys, press the desired key.
Or press NO 2 times to terminate
the process.
Note
To fill in the one-touch labels facilitates later finding of the desired telephone number.
1 ONE-TOUCH
- SELECT ONE-TOUCH-
(=_
OK=YES
NAME=MINOLTA
OK=YES
*HIGH LOW
- Select& press ”YES”
NOV. 19 13:30 100%
SET DOC. FACE DOWN
Minoltafax 1600 3-35
Page 37

3
Entering Initial Settings
StoringaDirect-Dialling-InNumberinaOne-TouchKey
You can reach a PC based fax machine directly by entering a direct-dialling-in for a subaddress.
Description Display
1 Press SET and 1.
2 Press the desired one-touch key
between 01 and 20.
3 Enter the first part of the number
and press the arrow up key.
4 Enter the extension number and
press YES.
5 Use the numeric keypad to enter
thenameandpressYES.
6 Use the arrow keys to set the mo-
dem speed and press YES.
7 If you wantto program further one-
touch keys, press the desired key.
Or press NO 2 times to terminate
the process.
1 ONE-TOUCH
- SELECT ONE-TOUCH-
(=_
OK=YES (SUB=
(=: _
OK=YES
NAME=
OK=YES
*HIGH LOW
- Select& press ”YES”
NOV. 19 13:30 100%
SET DOC. FACE DOWN
é)
3-36 Minoltafax 1600
Page 38

Entering Initial Settings
Entering Speed Dial Numbers
Similar to the one-touch keys you can store fax numbers as speed dial
numbers. You dial a speed dial number by entering a two-digit identifier
code. Up to 100 speed dial numbers can be stored (00-99).
Description Display
3
1 Press SET and 2.
2 Enter the 2 digit speed dial
number's identifier code.
3 Enter the fax number and press
and press YES.
4 Use the numeric keypad to enter
the name and press YES.
5 Use the arrow keys to set the mo-
dem speed and press YES.
6 Ifyouwanttoprogramfurther
speed dial numbers, enter the desired speed dial number. Or press
NO 2 times to terminate
the process.
2 SPEED DIAL
SPEED DIAL _
(=_
OK=YES
NAME=
OK=YES
*HIGH LOW
- Select& press ”YES”
NOV. 19 13:30 100%
SET DOC. FACE DOWN
Minoltafax 1600 3-37
Page 39

3
Entering Initial Settings
Storing a Direct-Dialling-In Number (Speed Dial)
You can reach a PC based fax machine directly by entering a direct-dialling-in for a subaddress.
Description Display
1 Press SET and 2.
2 Enter the 2 digit speed dial
number's identifier code.
3 Enter the first part of the number
and press the arrow up key.
4 Enter the extension number and
press YES.
5 Use the numeric keypad to enter
thenameandpressYES.
6 Use the arrow keys to set the mo-
dem speed and press YES.
7 If you wantto program further one-
touch keys, press the desired key.
Or press NO 2 times to terminate
the process.
2 SPEED DIAL
SPEED DIAL _
(=_
OK=YES (SUB=
(=: _
OK=YES
NAME=
OK=YES
*HIGH LOW
- Select& press ”YES”
NOV. 19 13:30 100%
SET DOC. FACE DOWN
é)
3-38 Minoltafax 1600
Page 40

Entering Initial Settings
Changing One-Touch- or Speed Dial Numbers
You can change one-touch- or speed dial numbers by following the procedure below.
Description Display
3
1 Press SET and 1 or 2.
2 Press the desiredone-touch key or
enter the desired speed dial
number.
3 Press NO.
4 Select Edit using the arrow keys
and press YES.
5 Enter the new number and press
YES.
6 Enter the new name using the nu-
meric key pad and press YES.
7 Use the arrow keys to set the mo-
dem speed and press YES.
8 If you want to change further one-
touch keys, press the desired key.
Or press NO 2 times to terminate
the process.
1 ONE-TOUCH
- SELECT ONE-TOUCH-
Stored! STOP?
OK=YES (EDIT/DEL=NO)
* EDIT DELETE
- Select& press ”YES”
(=_
OK=YES (DEL=NO)
NAME=
OK=YES (DEL=NO)
*HIGH LOW
- Select& press ”YES”
NOV. 19 13:30 100%
SET DOC. FACE DOWN
Minoltafax 1600 3-39
Page 41

3
Entering Initial Settings
Erasing One-Touch- or Speed Dial Numbers
You can erase one-touch- or speed dial numbers by following the procedure below.
Description Display
1 Press SET and 1 or 2.
2 Press the desiredone-touch key or
enter the desired speed dial
number.
3 Press NO.
4 Select delete using the arrow keys
and press YES.
5 Press YES.
6 Press 2 times NO to terminate the
entry.
1 ONE-TOUCH
- SELECT ONE-TOUCH-
Stored! STOP?
OK=YES (EDIT/DEL=NO)
EDIT * DELETE
- Select& press ”YES”
ONE-TOUCH 01
Delete*
NOV. 19 13:30 100%
SET DOC. FACE DOWN
3-40 Minoltafax 1600
Page 42

Entering Initial Settings
EnteringCall Groups
You can program one of the one-touch keys
tions successively and send the same document to all destinations
(Broadcasting).Use this function, if you frequently send to the same
group. You can store up to 100 destinations in 4 groups.
Note
In order to arrange numbers as call groups, these must be stored as
one-touch- or speed dial numbers.
Description Display
3
17-20 to call several destina-
1 Press SET and 3.
2 Press the desired one-touch key
between 17 and 20.
3 Enter the desired group name and
press YES.
4 Press one of the programmed one-
touch keys or enter one of the programmed speed dial numbers or
select an entry from telephone
book and press YES.
5 Repeat this procedure until you
have stored all numbers. P ress
START +2timesNO to finish the
entry.
3 GROUP DIAL
- SELECT ONE-TOUCH-
3 GROUP NAME=_
OK=YES
NO.001=
NOV. 19 13:30 100%
SET DOC. FACE DOWN
Minoltafax 1600 3-41
Page 43

3
Entering Initial Settings
Changing Group Dials
You can change group dials by following the procedure below.
Description Display
1 Press SET and 3.
2 Press the desired one-touch key
between 17 and 20.
3 Press NO.
4 Select Edit using the arrow keys
and press YES.
5 Use the numeric keypad to enter
thenameandpressYES.
6 All membersof the groupare being
listed. Press YES to confirm the entries or press NO to delete them.
7 You can add new members when
the list is through. Press START to
finish.
8 Press 2 times NO to
terminate the process.
3 GROUP DIAL
- SELECT ONE-TOUCH-
Stored! STOP?
OK=YES (EDIT/DEL=NO)
* EDIT DELETE ALL
- Select& press ”YES”
NAME=
OK=YES (DEL=NO)
GROUP NAME=BERLIN
OK=YES (DEL=NO)
NO.009=_
(FIN.=START)
NOV. 19 13:30 100%
SET DOC. FACE DOWN
3-42 Minoltafax 1600
Page 44

Entering Initial Settings
Erasing Call Groups
You can erase group dials by following the procedure below.
Description Display
3
1 Press SET and 3.
2 Press the desired one-touch key
between17and 20 underwhichthe
desired group is stored.
3 Press NO.
4 Select delete all using the arrow
keys and press YES.
5 Press 2 times NO to
terminate the process.
Phone Book
Youdo not needto enterany datainto thephonebook. Allone-touch numbers, speed dial numbers and call groups are automatically stored in the
phone book. How to dial with the telephone book will be explained in the
"Sending faxes" chapter.
3 GROUP DIAL
- SELECT ONE-TOUCH-
Stored! STOP?
OK=YES (EDIT/DEL=NO)
EDIT * DELETEALL
- Select& press ”YES”
NOV. 19 13:30 100%
SET DOC. FACE DOWN
Minoltafax 1600 3-43
Page 45

3
3.8 Advanced Settings
Youcanadjust themachine to yourpersonal requirements withthe following settings.
Power Save Mode
The power save mode reduces the machine's power consumption in
stand-by mode. The temperature of the fusing roller is reduced until a
pageis ready forprinting.Therefore printingis delayedfor acoupleof seconds. Default setting for the power save mode is ON. If you want to
change the setting follow the procedure below:
Description Display
Entering Initial Settings
1 Press 5 times SET.
2 Press 1.
3 Use thearrow keystoselect thede-
siredsettingandpressYES.
4 If you selecttimer, enter the time at
whichthepower save modeshould
turn on and press YES.
5 Enter the time at which the power
save mode should turn off and
press YES.
6 Press NO to terminate the entry.
The power save mode is on when the timer is set from 00:00 to 00:00.
MACHINE OPERATION? é
YES / OR 1 - 5 ê
1 POWER SAVE
OFF *TIMER
- Select& press ”YES”
P-SAVE ON = 00:00
OK=YES
P-SAVE OFF = 00:00
OK=YES
NOV. 19 13:30 100%
SET DOC. FACE DOWN
3-44 Minoltafax 1600
Page 46

Entering Initial Settings
LCD Contrast
Use this function to adjust the LCD contrastto the light conditionsof your
location. Follow the procedure below to make your fax machine print the
key setting list.
Description Display
3
1 Press 5 times SET.
2 Press 2.
3 Use the arrow keys to select the
desired setting and press YES.
4 Press NO to terminate the entry.
Buzzer Volume
Use this function to set the volume of buzzer tones, for example, when
pressing a button. Followthe procedure below to make your fax machine
print the key setting list.
Description Display
1 Press 5 times SET.
2 Press 3.
MACHINE OPERATION? é
YES / OR 1 - 5 ê
2 LCD CONTRAST
DARKçoonooèLIGHT
- Select& press ”YES”
NOV. 19 13:30 100%
SET DOC. FACE DOWN
MACHINE OPERATION? é
YES / OR 1 - 5 ê
3VOLUME
3 Use the arrow keys to select the
desired setting and press YES.
4 Press NO to terminate the entry.
Minoltafax 1600 3-45
HIGH LOW OFF
- Select & press”YES”
NOV. 19 13:30 100%
SET DOC. FACE DOWN
Page 47

3
Entering Initial Settings
Setting ECM Mode (Error Correction Mode)
Usethis functionto setthe ECMmode. ECMis a communicationstandard
for group 3 fax machines. In this mode data that may be lost due to poor
line quality is sent repeatedly. This procedure reduces the number of errorsconsiderably.Althoughthetime for thetransmissionis longer,itis still
quicker than re-sending a whole page.
Description Display
1 Then press 5 times SET.
2 Press 4.
3 Select thedesired setting using the
arrow keys and press YES.
4 Press NO to terminate the entry.
MACHINE OPERATION? é
YES / OR 1 - 5 ê
4G3ECM
*ON OFF
- Select & press”YES”
NOV. 19 13:30 100%
SET DOC. FACE DOWN
3-46 Minoltafax 1600
Page 48

Entering Initial Settings
Header and Footer
Header
Yourfax number, yourname, the numberof pagestobe transmitted,date
and timeappear in theheader. This information istransmitted to theother
fax machine. For this the set uses data is used.
Use this function to print a header on the transmitted pages. Follow the
procedure below to make your fax machine print the key setting list.
Description Display
3
1 Press 3 times SET.
2 Press 3.
3 Use the arrow keys to select the
desired setting and press YES.
4 Press NO to terminate the entry.
TX OPERATION? é
YES / OR 1 -3 ê
3HEADER
ON OFF
Select & Press “YES”
NOV. 19 13:30 100%
SET DOC. FACE DOWN
Minoltafax 1600 3-47
Page 49

3
Entering Initial Settings
Footer
An ID number, a page number and date and time appear in the footer.
Use this function to print a footer on the received pages. Follow the pro-
cedure below to make your fax machine print the key setting list.
Description Display
1 Press 4 times SET.
2 Press 7.
3 Use the arrow keys to select the
desired setting and press YES.
4 Press NO to terminate the entry.
RX OPERATION? é
YES / OR 1 -3 ê
7FOOTER
*ON OFF
- Select & press ”YES”
NOV. 19 13:30 100%
SET DOC. FACE DOWN
3-48 Minoltafax 1600
Page 50

Sending Faxes
4 Sending Faxe s
4.1 Transmission
Notes on Original Documents
Your fax machine is capable of transmitting the document sizes below.
You can place up to 10 sheets of paper in the A4-formatinthe Automatic
Document Feeder (ADF).
max. width
216 mm
min. width
148 mm
effective
width
4
feeding
direction
feeding
direction
feeding
direction
Ifthe documentis longerthan500mm,themachinerecognises document
jam and stops scanning the document.
Use yellow, green-yellow or light blue colours for information you do not
want to be transmitted.
Make sure ink, glue, correction fluid etc. are completely dry before you
sendafax.
Note
Always remove staples,paper-clips etc. before you send a fax. Otherwise the machine might be seriously damaged.
Minoltafax 1600 4-49
Page 51

4
Sending Faxes
Photocopy or Carrying Film
Documentsthatmeet thefollowingcharacteristicsmust bephotocopiedor
placed in a carrying film before they can be sent:
l paper sizes less than 148 mm width or less than 100 mm length
l paper lighter than 50g/m²
l folded, torn, wrinkled, damp, rough or curled paper
l coated or pressure sensitive paper
Inserting a Document into the ADF
1 Insert the document face down in
the document feeder.
Bild 4503u321
2 Place the documentin the centre of
the ADF and adjust the paper
guides so that they lightly touch the
edges of the document.
You can insert up to 10 pages into the feeder. Make sure the pages are
well placed and aligned before starting the transmission.
If thepaper is curledor pagessticktogether morethan one pageat a time
could be drawn into the machine. This might lead to paper jams or faulty
transmissions. In this case you should insert the pages one by one to ensure a correct feeding of the documents.
The standard memory holds ca. 57 pages. Take care that the indicated
memory capacity does not drop to 0 (%) during scanning, since the process will be cancelled in this case.
4-50 Minoltafax 1600
Bild 4503u321
Page 52

Sending Faxes
Note
If this occurs repeatedly, contact your technical service for a memory
upgrade. Until then you should send largedocumentsin direct mode,
i.e. with the memory turned off.
4.2 Settings for Sending a Fax
Resolution
4
1 Insert the document into the ADF.
NOV. 19 13:30 100%
SET DOC. FACE DOWN
Ifyou senddocuments withnormal printor typeddocuments, adjustments
are not necessary. To change the resolution press RESOLUTION.
RESOLUTION allows three adjustments:
Standard This is the normal resolutionfor m ost typed documents and
Fine Fine resolutionis suitable for maps,newspaper articles etc.
Half tone Halftonemodecaptures shades in photographsand drawings.
simple drawings.
Note
GREYSCALEincreases the time and costs of the transmission.
Minoltafax 1600 4-51
Page 53

4
Sending Faxes
If you set the resolution via the control panel, this setting is only kept for
the current transmission. You can change the resolution permanently by
following the procedure below:
Description Display
1 Press 2 times SET.
2 Press 1.
3 Use the arrow keys to select the
desired setting and press YES.
4 Press NO to return to stand-by
mode.
Contrast
If you raise the contrast fine differences in tone on the document are enhanced and transmitted more clearly. However, information may be lost
during this process.
Description Display
1 Press 2 times SET.
2 Press 2.
SCAN/PRINT? é
YES / OR 1 -5 ê
1RESOLUTION
STD F *GRY.
- Select& press ”YES”
NOV. 19 13:30 100%
SET DOC. FACE DOWN
SCAN/PRINT? é
YES / OR 1 -5 ê
2 SCAN CONTRAST
3 Use the arrow keys to select the
desired setting. Press YES.
4 Press NO to return to stand-by
mode.
4-52 Minoltafax 1600
DARKçoonooèLIGHT
- Select& press ”YES”
NOV. 19 13:30 100%
SET DOC. FACE DOWN
Page 54

Sending Faxes
Page Count
This function compares the number of pages you have entered with the
number of scanned pages. If they do not match, your Minoltafax will set
off an alarm.
Description Display
4
1 Press 3 times SET.
2 Press 1.
3 Use the arrow keys to select the
desired setting and press YES.
4 Press NO to return to stand-by
mode.
Image/Text Recognition
Use this function to set greyscale mode for the image part of a document
only. This allows a high quality for documents that consist of text and images.
Description Display
1 Press2timesSET.
2 Press 3.
TX OPERATION? é
YES / OR 1 -3 ê
1 PAGE COUNT
*ON OFF
- Select & press ”YES”
NOV. 19 13:30 100%
NOV. 19 13:30 100%
SET DOC. FACE DOWN
SET DOC. FACE DOWN
SCAN/PRINT? é
YES / OR 1 -5 ê
3 I/T RECOGNITION
3 Select the desiredsetting using the
arrow keys and press YES.
4 Press NO to return to stand-by
mode.
Minoltafax 1600 4-53
*ON OFF
- Select & press ”YES”
NOV. 19 13:30 100%
SET DOC. FACE DOWN
Page 55

4
4.3 Dialling Methods
Seven different dialling methods are available.
Insert the document face down into the ADF and dial with the dialling
method of your choice.
Manual Dialling Using the Numeric Keypad
Sending Faxes
1 Dial the fax number using the nu-
meric keypad and press START.
Check the number in the display
and change it, if necessary. For
this press STOP to delete and
enter the number again. You can
also correct single digits using
the arrow keys. Max. 32 digits can be entered.
One-Touch Dialling
1 Press one of the programmed one-
touch keys 01- 20. The machine dials the number after scanning the
document.
Speed Dialling
1 Press SPEED DIAL and enter the
two digit identifier code (0-99).
2 The name of the remote side ap-
pears onthe display. Press START.
The machine begins to dial after
the document has been scanned.
(=SET Faxno.
èor FUNCTION
ONE-TOUCH 01
SPEED DIAL=
(=MINOLTA
(S = START)
(DIRECTORY.=
é)
4-54 Minoltafax 1600
Page 56

Sending Faxes
Automatic Group Dial using the One-Touch Keys 17-20
4
1 Press a one-touch key 17 - 20. If a
group is stored under this key its
name will be displayed.
The Minoltafax 1600 begins to
dial after the document has
been scanned.
Program Dialling
Use the last 4 one-touch keys 17 - 20 to p rogram the following functions:
Broadcasting (1)
Delayed transmission (Timer) (3)
Mailbox transmission (4)
Polling (7)
Description Display
1 Press SET and 4.
2 Press the desired one-touch key
17 - 20.
3 Selectthe desiredfunction fromthe
possibilities mentioned above.
GROUP NAME=MINOLTA
4 PROGRAMDIAL=
- SELECT ONE-TOUCH-
FUNCTION
Select 1/3/4/7
For details refer to the corresponding sections of this manual.
Minoltafax 1600 4-55
Page 57

4
Sending Faxes
Combination Dial
You can use thisfunctionto dial the pre-dial number you have storedin a
one-touch key or as a speed dial number.
Description Display
1 Press the one-touch key in which
youhavestoredthepre-dial
number.
2 Enter the rest of the number and
press START.
You can also enter the second part of the number using the one-touch
keys or the speed dial numbers.
Note
It is necessary that thepre-dial number and a [+] character are stored
as one-touchnumber or speed dial number.The telephone numberis
limitedto32digits.
Phone Book
The phone book lists all numbers stored in your Minoltafax.
Description Display
1 Press SPEED DIAL.
(=123
(= 123 456
(S = START)
SPEED DIAL=
(DIRECTORY.=
é)
2 Press the arrow key up.
3 Select thedesired optionand press
START.
If you selected LIST you can scroll through the phone book using the arrow keys. SEARCH enables you to search for a number or name alphabetically or numerically.
4-56 Minoltafax 1600
*LIST SEARCH
- Select & press ”YES”
*MINOLTA
OK = START
Page 58

Sending Faxes
4.4 Transmission Methods
Memory Transmission
Sending a Document from the Memory
Selectmemory transmission asa default. You should sendfaxes in direct
mode only exceptionally, e.g. if not enough memory is available. Since
yourfax machineis amulti-tasking deviceit ispossible toscan documents
while your Minoltafax is sending from memory, receiving or printing. As
soon as the current operation is finished the new document will be sent.
Memory transmissionoffersseveral advantages. Make sure the memory
LED is lit. If this is not the case, press MEMORY.
Description Display
4
1 Insert thedocumentface downinto
the ADF.
2 Dial the telephone number manual-
ly or use oneof the one-touch keys
a speed dial number.
3 Press STARTtoscanthe document.
It will be automatically sent from
memory.
Note
If the memory is exhausted during scanning the document will be deletedfrom thememory.You shouldwait untilenough memorycapacity
to scan all documents completely is available again. If this is not possible, switch to direct mode.
(=ENTER Enter
èorFUNCTION
(= 123 456
(S = START)
*Memory* 99%
123 456
21
Minoltafax 1600 4-57
Page 59

4
Sending Faxes
Direct Transmission
You can senddirectly from the ADF, if not enough memoryis available to
scan all documents you want to transmit. Make sure you have switched
MEMORY before.
off
Description Display
1 Insert thedocument face down into
the ADF. Adjust the contrast and
resolution, if necessary.
2 Dial the telephone number manual-
ly or use one ofthe one-touch keys
a speed dial number.
3 Press START to begin the
transmission.
(=ENTER Faxno.
èor FUNCTION
(= 123 456
(S = START)
(123 456)
4-58 Minoltafax 1600
Page 60

Sending Faxes
Delayed Transmission
You can use this function to take advantage of lower evening and weekend long-distance rates.
You can only use this function if date and time are stored in the machine.
Insert the document face down into the ADF.
Adjust contrast and r esolutionif necessary.
Description Display
4
1 Press FUNCTION and 3.
2 Enter the time of the transmission
using the numeric keypad
(24 hour format) and
press YES.
3 Enter thefax number and/or thede-
sired function (broadcasting, polling, relay broadcasting or mailbox
transmission) and press START.
4 The machine scans the document
into memory.
Ifnot enoughmemory isavailable duringscanning, themachine willreturn
to stand-by mode. In this case repeat the procedurewhen enough memory is available again.
3TIMER
TIMER=_ :
OK=YES
(=ENTER Faxno
èorFUNCTION
TIMER=10 : 00
OK=YES (Complete=No)
Minoltafax 1600 4-59
Page 61

4
Sending Faxes
Broadcasting
Your Minoltafax1600 is capable of sending documents from the memory
to up to 100 recipients dialling manually, by one-touch key, speed dial or
groupdial. The machine dialsandtransmitsthe document sequentiallyto
eachrecipient. Ifoneofthe numbersisengaged, yourfax machinewill dial
the next one and return to the engaged number in the end. After b roadcasting it will print a report automatically andreturn to stand-by mode. If
the functionreservation reportison, a list of the destinationsis printed before the transmission.
Insert the document face down. In the document feeder. Adjust contrast
and resolution if necessary.
Description Display
1 Press FUNCTION and 1.
2 Enter the desired fax number or
press the desired one-touch key
(e.g. 01) and YES.
3 Repeat this procedure until you
have entered all recipients.
4 Press START.
5 PressYES to confirm the entries or
press START to begin the transmission.
Ifnot enoughmemory isavailable duringscanning, themachine willreturn
to stand-by mode. In this case repeat the procedure when enough memory is available again.
1 BROADCAST
NO.001=MINOLTA
OK=YES (Fin.=START)
NO.002=MÜLLER
OK=YES (Fin.=START)
CHECK DESTINATION?
OK=YES (TX=Start)
*Memory* 99%
21
4-60 Minoltafax 1600
Page 62

Sending Faxes
Polling Transmission
You can use this function to transmit documents automatically. The recipientcan retrieve thedocument on demand.The documentcan even consist of several pages.
Insertthe documentinto the ADFin orderto scanit.Thecaller establishes
thecommunication and musthave thefunction polling receptionturned on
in his machine.
Your Minoltafax offers you a singlemode and a multiple mode. In single
mode the documentcan only be polled once. Afterwardsthe document is
automatically deleted. In multiple mode the document is scanned and
polledfrom memory.Afterthe pollingthe documentremainsinmemoryso
that several pollings are possible. Use the function “Delete reservations”
to remove a document from the memory.
Adjust contrast and r esolutionif necessary.
Description Display
4
1 Press FUNCTION and 6.
2 Select the desiredsetting using the
arrow keys and press YES.
3 The machine scans the document
into memory.
6POLLINGTX
*SINGLE MULTI
- Select & press ”YES”
*Memory* 99%
324567
21
Minoltafax 1600 4-61
Page 63

4
Sending Faxes
Mailbox Transmission
Use this function to transmit a document to a mail box. This is helpful, if
only a specific person may read the document. However, both machines
must be the same model.
The transmissionis only executed, if both mailbox ID codes are identical.
This prevents the document from being transmittedto a wrong mailbox.
Thedocumentis scannedintothe remote faxmachine'smemory andcan
only be printed if the recipient enters the correct 4 digit mailbox ID.
Description Display
1 Press FUNCTION and 4.
2 Enter the mailbox number
and press YES.
3 Enter the fax number
and press YES.
4 The machine scans the document
into memory.
4MAILBOXTX
MAILBOXNO.=_
OK=YES
(=ENTER Fax no.
*Memory* 99%
324567
21
4-62 Minoltafax 1600
Page 64

Sending Faxes
Password TX
This function limits communication to those destinations that use the
same password as you. However all destinations stored in the on-touch
keys and the speed dial numbers can be r eached.
Entering the Password
Description Display
4
1 Press 7 times SET and 4.
2 Enterthe 4digit passwordusing the
numerickeypad (0000 – 9999) and
press YES.
3 Press NO to terminate the entry.
Setting Password TX
Description Display
1 Press 3 times SET and 2.
2 Select the desiredsetting using the
arrow keys and press YES.
3 Press NO to terminate the entry.
4 PASSWORD
PASSWORD=
OK=YES
NOV. 19 13:30 100%
SET DOC. FACE DOWN
2 TX PASSWORD
*ON OFF
- Select& press ”YES”
NOV. 19 13:30 100%
SET DOC. FACE DOWN
Minoltafax 1600 4-63
Page 65

4
Sending Faxes
Delete Reservations
Use this functionto delete programmed functions.Wehave chosen timer
transmission for this example. Timer transmission.
Description Display
1 Press FUNCTION and 0.
2 Press YES.
3 Press NO to terminate the entry.
If you have programmed more than one function, you can scroll through
the menu using the arrow keys.
0 DELETE RESERV.
01 (17:00) TIMER é
DEL. = YES (INFO=è) ê
NOV. 19 13:30 100%
SET DOC. FACE DOWN
4-64 Minoltafax 1600
Page 66

Reception
5 Reception
5.1 Manual Reception
Manual reception of telephone call is only sensible, if you expect telephone calls at this extension. You should keep this in mind when you set
the reception mode. Because the machine has no telephone receiver a
separate phone must be attached to the same telephone wall outlet. Answer the call and press START.
Description Display
5
1 Press 4 times SET.
2 Press 8.
3 Use the arrow keys to select the
desired setting and press YES.
4 Press NO to terminate the entry.
RX OPERATION? é
YES / OR 1 -8 ê
8MANUALRX
*ON OFF
- Select & press”YES”
NOV. 19 13:30 100%
SET DOC. FACE DOWN
Minoltafax 1600 5-65
Page 67

5
5.2 Automatic Reception
Automatic reception is set as a default. No further settings are required.
Yourfax machinewill answercalls aftera setnumberof rings.The Default
setting is 1.
Memory Reception Mode (Confidential Reception)
When you use this function the message will be stored in the memory.
Onlyif youswitch offthe memoryreceptionmode orenter thecorrect pass
code you can print the message. Instead of a password you can also program a time at which the message is to be printed.
Description Display
Reception
1 Press 4 times SET.
2 Press 1.
3 Use thearrow keystoselect thede-
siredsettingandpressYES.
4 Enter the time at which the docu-
ments are to be printed or press
YES.
5 Enter a 4-digit number as access
code or press YES.
When the memory reception mode is on the stand-by display reads:
<<M-RX>>.
If toner, paper, etc. are used up your fax machines receives into
memory first.
As soon as you refill paper etc. the received document is printed
automatically.
RX OPERATION? é
YES / OR 1 -8 ê
1MEMORYRX
*ON OFF
- Select & press”YES”
TIME=_..:
OK=YES
PASSWORD=
OK=YES
Note
If you do not enter an access code, any user can switch off the memory reception mode.
5-66 Minoltafax 1600
Page 68

Reception
5.3 Mailbox Reception
Use this function to receive a document into a m ail box. This is helpful, if
only a specific person may read the document. However, both machines
must be the same model.
The transmissionis only executed, if both mailbox ID codes are identical.
This prevents the document from being transmitted to a wrong mailbox.
Thedocumentis scannedintothe fax machine'smemory andcanonly be
printed if the correct 4 digit mailbox ID is entered. Your Minoltafax 1600
has2 MailboxesThe documentis scannedinto thefax machine'smemory
and can only be printed if the correct 4 digit mailbox ID is entered.
Programming Mailbox ID
Description Display
5
1 Press 4 times SET and 5.
2 Set a mailbox number.
3 Enter a 4 digit ID using the numeric
keypad (0000 – 9999).
4 Press NO to terminate the entry.
Printing the Mailbox Contents
Description Display
1 Press FUNCTION and 5.
2 Enter the4 digit Mailbox ID using
the numeric keypad (0000 – 9999)
and press YES.
5MAILBOX
MAILBOXNO. =
Select1–2
MAILBOX1ID =
OK=YES
NOV. 19 13:30 100%
SET DOC. FACE DOWN
5 PRINT MAILBOX
MAILBOX1ID =
OK=YES
Your fax machine prints the message.
Minoltafax 1600 5-67
Page 69

5
Reception
Deleting a Mailbox ID
Description Display
1 Press 4 times SET and 5.
2 Enter the number of the desired
mailbox.
3 Press NO.
4 Enter the 4 digit Mailbox ID using
the numeric keypad (0000 – 9999)
and press YES.
5 Press STOP to terminate the entry.
5MAILBOX
MAILBOXNO. =
Select1–2
Stored! STOP?
OK=YES (DEL=NO)
OLD MB 1 ID =
OK=YES
NOV. 19 13:30 100%
SET DOC. FACE DOWN
5-68 Minoltafax 1600
Page 70

Reception
5.4 Polling Reception
You can use this function to poll documents from other fax machines.
Make sure the documenthas been placed in the feeder or the memory of
the remote fax machine.You can poll fromup to 100 destinationsper setting.
Description Display
5
1 Press FUNCTION and 7.
2 Enter thedesired fax numberusing
the numerickeypad, the speed dial
numbers,the one-touchkeysor the
telephone book.
Press
START.
3 Press YES to confirm the entries or
press START to begin the polling.
The machine starts polling.
7POLLINGRX
NO.001=MINOLTA
OK=YES (Fin.=START)
CHECK DESTINATION?
OK=YES (RX=Start)
Minoltafax 1600 5-69
Page 71

5
Reception
Password Reception
This function limits communication to those destinations that use the
same password as you. However all destinations stored in the on-touch
keys and the speed dial numbers can be reached.
Entering the Password
Description Display
1 Press 7 times SET and 4.
2 Enterthe 4digit passwordusingthe
numeric keypad(0000 – 9999) and
press
YES.
3 Press NO to terminate the entry.
Setting Password Reception
Description Display
1 Press 4 times SET and 6.
2 Select thedesired setting using the
arrow keys and press YES.
3 Press NO to terminate the entry.
4 PASSWORD
PASSWORD=
OK=YES
NOV. 19 13:30 100%
SET DOC. FACE DOWN
6 PASSWORDRX
*ON OFF
- Select & press ”YES”
NOV. 19 13:30 100%
SET DOC. FACE DOWN
5-70 Minoltafax 1600
Page 72

Reception
5.5 Settings for Receiving a Fax
Number of Rings
Use this function to set the number of rings the fax machine waits before
it answers an incoming call.
Description Display
5
1 Press 4 times SET.
2 Press 2.
3 Set the number of rings (1-10) and
press YES.
4 Press NO to terminate the entry.
RX OPERATION? é
YES / OR 1 -8 ê
2#OFRINGS
#OFRINGS=1
OK=YES
NOV. 19 13:30 100%
SET DOC. FACE DOWN
Minoltafax 1600 5-71
Page 73

5
Reception
Multiple Page Print
Use this function to print up to 9 copies of the received document during
reception.
Description Display
1 Press 4 times SET.
2 Press 3.
3 Select thedesired setting using the
arrow keys and press YES.
4 Set the number of copies and
press YES.
5 Press NO to terminate the entry.
If you choose ON (SORT), your Minoltafax will sort the copies when you
are receiving a document consisting of several pages (Batch sorting).
RX OPERATION? é
YES / OR 1 -8 ê
3 MULTIPAGE PRINT
*ON ON(SORT) OFF
- Select & press ”YES”
* PRINT * ................PAGE=2
OK=YES
NOV. 19 13:30 100%
SET DOC. FACE DOWN
5-72 Minoltafax 1600
Page 74

Reception
5
Reduction
Use this function to set the print mode for received documents. Select a
settingof whathappens whena receiveddocumentis longerthan thesize
of your print paper.
ON: TheMinoltafaxreduces the image verticallyup to 70% of the original
length to fit it onto the A 4 page.
OFF: The machine does not reduce the image but prints it on two pages.
Description Display
1 Press 4 times SET.
2 Press 4.
3 Select the desiredsetting using the
arrow keys and press YES.
4 Press NO to terminate the entry.
For further information please contact your dealer.
Print Density
Use this function to adjust the intensity of the printout.
Description Display
1 Press 2 times SET.
2 Press 4.
RX OPERATION? é
YES / OR 1 -8 ê
4 REDUCTION
*ON OFF
- Select& press ”YES”
NOV. 19 13:30 100%
SET DOC. FACE DOWN
SCAN/PRINT? é
YES / OR 1 -5 ê
4 PRINT DENSITY
3 Use the arrow keys to select the
desired setting.
Press YES.
4 Press NO to return to stand-by
mode.
Minoltafax 1600 5-73
DARKçoonooèLIGHT
- Select& press ”YES”
NOV. 19 13:30 100%
SET DOC. FACE DOWN
Page 75

5
Reception
Print Paper Size
Use this function to set the size of the paper. Select from A4 and Letter.
Description Display
1 Press 2 times SET.
2 Press 5.
3 Select thedesired setting using the
arrow keys and press
YES.
4 Press NO to return to stand-by
mode.
SCAN/PRINT? é
YES / OR 1 -5 ê
5 PRINT PAPER SIZE
*A4 LT
- Select & press ”YES”
NOV. 19 13:30 100%
SET DOC. FACE DOWN
5-74 Minoltafax 1600
Page 76

Copying
6 Copying
Your Minoltafax 1600iscapable ofmakingup to 99 copiesof a document.
6.1 Single Copies
Insert the document into the ADF.
Adjust contrast and r esolutionif necessary.
Description Display
6
1 Press START/COPY.
The machine scans the pages and starts copying them.
*COPY* 21
Minoltafax 1600 6-75
Page 77

6
6.2 Multiple Copies
Enlarge / Reduce
Insert the document into the ADF and adjust the paper guides.
Adjust contrast and resolution if necessary.
If you press SORT, the Minoltafax 1600 will sort the printouts. Two copies
of a double sheet original will be sorted 1,2 – 1,2.
Select from copying the same size, enlarge or reduce. If you select en-
large or reduce you can further select the ratio.
Description Display
Copying
1 Press FUNCTION and 2.
2 Select thedesired setting using the
arrow keys and press YES.
3 Select the desired ratio using the
arrow keys and press YES.
4 Enter thedesired number of copies
and press START or YES.
The machine scans the pages and starts copying them.
2COPY
IDENT. *ENL. RED.
- Select& press ”YES”
1.28 *1.41 2.00
- Select & press ”YES”
*COPY* PAGE=2
OK=START (SORT=YES)
6-76 Minoltafax 1600
Page 78

Connecting the Fax Machine to Your Computer
7 Connecting the Fax Machine to You r
Computer
7.1 Use as PC -Fax, Scanner and PC-Printer
If you haveinstalled these functions with youPC LaserFax 3.5, no further
settingsexcept fromactivating them odem are necessary.The softwareis
availableasan optional accessory. For furtherinformation pleaserefer to
the manual for the software.
If you use the machine as a PC fax machine, only the machine's modem
is in use. With the LaserFax 3.5 the achieved compatibility allows a transfer rate of up to 19200 bps between PC and the Minoltafax 1600.
Use a 9-pin RS-232C interface cable, wired 1:1 (optional).
Modem Specifications
Your Minoltafax 1600 has the following protocol specifications:
Standard: EIA-578 Class 1 Fax/Modem, no data modem included.
Speed with HDLC support 300 bps.
7
7.2 Setting PC Mode
Available settings: OFF, PC transmit and PC transmit/receive.
Description Display
1 Press 8 times SET and 1.
2 Select the desiredsetting using the
arrow keys and press YES.
3 Press NO to terminate the entry.
Minoltafax 1600 7-77
1PCMODE
*OFF TX. TX/RX
- Select& press” YES”
NOV. 19 13:30 100%
SET DOC. FACE DOWN
Page 79

7
Connecting the Fax Machine to Your Computer
Number of Rings
Use this function to set the number of rings the fax machine waits before
it answers an incoming call.
Description Display
1 Press 8 times SET and 2.
2 Enter the desired number of rings
using the numeric keypad and
press YES.
3 Press NO to terminate the entry.
PC Baudrate
Use thisfunction to set the rate for data transferbetween PC and your Minoltafax.Availablesettingsare300,2400,9600, 19200bps andautomatic
setting.
Description Display
1 Press 8 times SET and 3.
2 Select thedesired setting using the
arrow keys and press YES.
3 Press NO to terminate the entry.
2 NO. RINGS
NO. RINGS=5
OK=YES
NOV. 19 13:30 100%
SET DOC. FACE DOWN
3 PC BAUDRATE
BAUDRATE=AUTO
OK=YES
NOV. 19 13:30 100%
SET DOC. FACE DOWN
7-78 Minoltax 1600
Page 80

Connecting the Fax Machine to Your Computer
7.3 Scanner Mode
If you have a software other than LaserFax 3.5 installed on your PC, proceed as follows.
1 Set the PC mode as described above.
2 Insert the document into the ADF.
3 Enter 888 using the numeric keypad of the Minoltafax.
4 Press START.
The machine scans the documents and transfers them to the PC.
7.4 Fax Op eration with Your C omputer
Thisfunction allowsyou tosend documentsthat youhave createdon your
computer without printing them first. Also, faxes can be sent directly to
your computerfor editing. The faxwill not have to be scannedseparately.
7.5 Printing from Your Fax Machine
If you have a software other than LaserFax 3.5 installed on your PC, proceed as follows.
1 Set the PC mode as described above.
7
2 Enter 888 using the fax software.
The PC transfers the data to the Minoltafax.
Minoltafax 1600 7-79
Page 81

7
Connecting the Fax Machine to Your Computer
7-80 Minoltax 1600
Page 82

Reports
8Reports
You can view the 60 most recent communications on the LCD. For this
press BESTÄTIGUNG and select DISPL using the arrow keys. Use the
arrow keys to scroll through the entries. Print the selected entry by
pressing START.
8.1 Transmission Rep ort
You can print the transmission report either manually or automatically.
Automatic Print
Follow the procedure below to make your fax machine print the
transmission report automatically:
Description Display
8
1 Press 6 times SET.
2 Press 3.
3 Select the desiredsetting using the
arrow keys and press YES.
4 Press NO to return to standby
mode.
REPORT
YES/or1–3
3 TX RESULT REPORT
*ON OFF
- Select & press ”YES”
NOV. 19 13:30 100%
NOV. 19 13:30 100%
SET DOC. FACE DOWN
SET DOC. FACE DOWN
Minoltafax 1600 8-81
Page 83

8
Reports
Manual Print
Description Display
1 Press CONFIRM.
2 SelectREPORT using the arrow
keys and press YES.
3 Press YES.
4 Press NO to terminate the entry.
The report is printed.
NOV. 19 13:30 100%
SET DOC. FACE DOWN
DISPL. *REPORT
- Select & press ”YES”
TX RESULTREPORT
OK=YES (Cont.=INFOS)
NOV. 19 13:30 100%
SET DOC. FACE DOWN
* TX Result Report * NO.1
Date = 30. Nov. 1998
Time = 13:58
TX Result Report
FUNCTION NU M DESTINATION DATE TIME P. DUR. NUM. RESULT
P. 01 MÜLLER KG SEP.03 12:00 01
00H02'00'
G3 OK
8-82 Minoltax 1600
Page 84

Reports
8.2 Reception Report
Manual Print
Description Display
8
1 Press CONFIRM.
2 Select REPORT using the arrow
keys and press YES.
3 Press CONFIRM and YES.
4 Press NO to terminate the entry.
The report is printed.
NOV. 19 13:30 100%
SET DOC. FACE DOWN
DISPL. *REPORT
- Select & press ”YES”
RECEPTIONREPORT?
OK=YES (Cont.=INFOS)
NOV. 19 13:30 100%
SET DOC. FACE DOWN
* RX Result Report * NO.1
Date = 30. Nov. 1998
Time = 13:58
TX Report
FUNCTION N UM DESTINATION DATE TIME P. DURATION NUM. RESUL T
P. 01 MÜLLER KG SEP.03 12:00 01
00H02'00'
G3 OK
Minoltafax 1600 8-83
Page 85

8
8.3 Activity Rep o rt
You can print the activity report either manually or automatically.
Automatic Print
Follow the procedure below to make your fax m achine print the activity
report automatically after 60 transactions:
Description Display
Reports
1 Press 6 times SET.
2 Press 1.
3 Use thearrow keystoselect thede-
siredsettingandpressYES.
4 Press NO to return to standby
mode.
Manual Print
Description Display
1 Press CONFIRM.
2 SelectREPORT using the arrow
keys and press YES.
3 Press 3 times CONFIRM.
and press YES.
REPORT
YES / OR 1 – 3
1 ACTIVITY REPORT
*ON OFF
- Select & press ”YES”
NOV. 19 13:30 100%
NOV. 19 13:30 100%
SET DOC. FACE DOWN
SET DOC. FACE DOWN
NOV. 19 13:30 100%
SET DOC. FACE DOWN
DISPL. *REPORT
- Select & press ”YES”
ACTIVITY REPORT?
OK=YES (Cont.=INFOS)
4 Press NO to terminate the entry.
The machine will print the activity report at once. The entries will not be
deleted.
8-84 Minoltax 1600
NOV. 19 13:30 100%
SET DOC. FACE DOWN
Page 86

Reports
* Activity Report * No. 1
Date = 30. Nov. 1998
Time = 13:58
Activity Report
NUM COUNTER DATE TIME TX/RX DESTINATION P DURATION NUM. RES
1 T/OOOO01 2.
2 T/OOOO02 2.
3 T/OOOO03 3.
4 T/OOOO04 3.
5 T/OOOO05 4.
6 T/OOOO06 5.
7 T/OOOO07 8.
8 T/OOOO08 9.
DEC.
DEC.
DEC.
DEC.
DEC.
DEC.
DEC.
DEC.
12:25
13:45
13:20
17:25
10:30
11:15
16:10
9:45
P.
7404154 1
P
4345021 1
P
0513227279 1
TX
+495117405154
TX
+496913625893 1
TX
7404154 1
P
7404154 1
P
7404154 1
4
OHO1’16
OHO1’22
OHO1’49
OHO0’24
OHO0’18
OHO1’00
OHO1’39
OHO1’29
STD. OK
”
STD. OK
”
STD. OK
”
FINE OK
”
STD. OK
”
STD. OK
”
STD. OK
”
FINE OK
”
8
ECM
ECM
ECM
ECM
ECM
ECM
ECM
ECM
51 T/OOOO09 9.
52 T/OOOO10 9.
53 T/OOOO11 9.
54 T/OOOO12 10.
55 T/OOOO13 10.
56 T/OOOO14 10.
57 T/OOOO15 11.
58 T/OOOO16 11.
59 T/OOOO17 12.
60 T/OOOO18 12.
DEC.
DEC.
DEC.
DEC.
DEC.
DEC.
DEC.
DEC.
DEC.
DEC.
13:50
15:00
16:45
11:20
13:12
14:00
10:40
12:25
9:20
17:00
P
7404154 1
P
7404154 1
TX
7404154 1
TX
+496913625893 1
P
+496913625893 1
P
7404154 4
TX
7404154 1
TX
+495117405154 4
P
+495117405154 1
P
+495117405154 1
OHO1’21
OHO1’10
OHO0’30
OHO0’35
OHO0’40
OHO0’20
OHO0’50
OHO0’40
OHO0’20
OHO0’10
STD. OK
”
STD. OK
”
STD. OK
”
FINE OK
”
STD. OK
”
STD. OK
”
STD. OK
”
FINE OK
”
STD. OK
”
FINE OK
”
ECM
ECM
ECM
ECM
ECM
ECM
ECM
ECM
ECM
ECM
Minoltafax 1600 8-85
Page 87

8
8.4 Reservation R ep ort
Thereservationreport containsa list of reservations forbroadcasting and
polling. Proceed as follows to print a reservation report.
Description Display
Reports
1 Press 6 times SET.
2 Press 2.
3 Use thearrow keystoselect thede-
siredsettingandpressYES.
4 Press NO to return to standby
mode.
8.5 Fax Number List
The fax number list contains all speed dial numbers and one-touch keys
programmed.Follow the procedurebelow to makeyour fax machine print
the fax number list.
Description Display
1 Press CONFIRM.
REPORT é
YES / OR 1 -3 ê
2 RESERV. REPORT
*ON OFF
- Select & press ”YES”
NOV. 19 13:30 100%
NOV. 19 13:30 100%
SET DOC. FACE DOWN
SET DOC. FACE DOWN
NOV. 19 13:30 100%
SET DOC. FACE DOWN
2 SelectREPORT using the arrow
keys and press YES.
3 Press 2 times CONFIRM
and press YES.
4 Press NO to terminate the entry.
Your fax machine prints the list.
8-86 Minoltax 1600
DISPL. *REPORT
- Select & press ”YES”
FAX NUMBERLIST
OK=YES (Cont.=INFOS)
NOV. 19 13:30 100%
SET DOC. FACE DOWN
Page 88

Reports
* Fax Number List * NO.1
Date = 30. Nov. 1998
Time = 13:58
Fax Number List
** ONE TOUCH **
OT-NO. DESTINATION ID HIGH/LOW DATE
OT-03 SCHMIDT
665533 NDR 2.12.1998
8
OT-05 I 798
OT-6
OT-18
OT-19
OT-20
SD-NO DESTINA TION ID HIGH/LOW DATE
SD-01 MAX.
G 06 532+ High 3.12.1998
SUB. 5637768
Group 8.12.1998
PROGRAM 9.12.1998
Program 9.12.1998
** SPEED DIAL **
0852 9632 High 9.12.1998
High 3.12.1998
Minoltafax 1600 8-87
Page 89

8
8.6 Mailbox List
Use this function to print a list of all documents received in a mailbox.
Followthe procedurebelowto makeyour faxmachine printthe keysetting
list.
Description Display
Reports
1 Press CONFIRM.
2 SelectREPORT using the arrow
keys and press
YES.
3 Press 6 times CONFIRM
and press YES.
4 Press NO to terminate the entry.
Your fax machine prints the group dial list.
* Mailbox List * NO.1
Date = 30. Nov. 1998
Time = 13:58
NOV. 19 13:30 100%
SET DOC. FACE DOWN
DISPL. *REPORT
- Select & press ”YES”
MAILBOX LIST?
OK=YES (Cont.=INFOS)
NOV. 19 13:30 100%
SET DOC. FACE DOWN
MAILBOX LIST
BOX-NO BOX-ID DESTINATION D ATE TIME P. RESULT
1 **** 802759 5. Dec.
07:00 1 N G
8-88 Minoltax 1600
Page 90

Reports
8.7 Key List
Thislist containsall numbersstored ingroupdialand programdial. Follow
the procedure below to make your fax machine print the key setting list.
Description Display
8
1 Press CONFIRM.
2 Select REPORT using the arrow
keys and press YES.
3 Press 7 times CONFIRM
and press YES.
4 Press NO to terminate the entry.
NOV. 19 13:30 100%
SET DOC. FACE DOWN
DISPL. *REPORT
- Select & press ”YES”
KEY LIST?
OK=YES (Cont.=INFOS)
NOV. 19 13:30 100%
SET DOC. FACE DOWN
Your fax machine prints the group dial list.
* Key List * 1
Date = 30. Nov. 1998
Time = 13:58
Key List
KEY TIMER FUNCTION NUM DESTINATION DATE
OT-17
OT-18 GROUP SALES 1 OT-03 SMITH
OT-19 BROADCAST
OT-20
19:00 TIMER TX+ 632145 3.12.1998
None
2.12.1998
805698 3.12.1998
23456
Minoltafax 1600 8-89
Page 91

8
8.8 Status List
This list contains all settings stored in the machine. Follow the procedure
below to make your fax machine print the key setting list.
Description Display
Reports
1 Press CONFIRM.
2 SelectREPORT using the arrow
keys and press YES.
3 Press 8 times CONFIRM
and press YES.
4 Press NO to terminate the entry.
NOV. 19 13:30 100%
SET DOC. FACE DOWN
DISPL. *REPORT
- Select & press ”YES”
STATUS LIST?
OK=YES (Cont.=INFOS)
NOV. 19 13:30 100%
SET DOC. FACE DOWN
Your fax machine prints the group dial list.
* Status-List * NO 1
Date = 30. Nov. 1998
Time = 13:58
Status List
** Initial Uses Data **
DATE 2.12.1998
ID 49 511 968668
HEADER MINOLTA
PASSWORD 0001
** Store fax number **
ONE TOUCH 2/20 RESERVED
SPEED DIAL 1/100 RESERVED
GROUP- / PROGRAM DIAL (17) :NONE (18) :GROUP
** Scanning & printing **
RESOLUTION STANDARD
SCAN CONTRAST DARK ----------- LIGHT
IMAGE / TEXT RECOGNI-
TION
DENSITY DARK ----------- LIGHT
REC. PAPER SIZE CASS. 1:A4
(19) :PROGRAM (20) :PROGRAM
ON
8-90 Minoltax 1600
Page 92

Reports
** TX **
COUNTER OFF
TX PASSWORD ON
HEADER ON
** RX **
MEMORY RX EOM
NUMBER OF RINGS 10
MULTIPLE PRINT ON
RX REDUCE ON
SECURE MAILBOX (1) ID NONE
RX PASSWORD OFF
FOOTER ON
MANUAL RX MODE OFF
** machine operation **
POWER SAVE TIMER (ON=12:00 OFF=00:00)
LCD CONTRAST DARK ----------- LIGHT
TONE / PULSE TONE
VOLUME / BUZZER OFF
G3 ECM ON
** PC interface **
PC MODE OFF
# OF RINGS 5
PC BAUDRATE AUTO
** reports **
ACTIVITY REPORT OFF
RESERVATION REPORT OFF
TX REPORT OFF
** machine operation **
TIMER RESERVATION 0/20 RES ERVED
POLLING RESERVATION NONE
TX / RX PAGES P. 000024 RX: 000012 PRINT 000106
NOTE
TIME : NONE PASSWORD : ****
P. 9
(2) ID NONE
8
Minoltafax 1600 8-91
Page 93

8
8.9 Memory Data List
This list contains all fax transactions stored in the memory. Follow the
procedure below to make your fax machine print the key setting list.
Description Display
Reports
1 Press CONFIRM.
2 SelectREPORT using the arrow
keys and press YES.
3 Press 4 times CONFIRM
and press YES.
4 Press NO to terminate the entry.
Your fax machine prints the group dial list.
* Memory data * NO.1
Date = 30. Nov. 1998
Time = 13:58
NOV. 19 13:30 100%
SET DOC. FACE DOWN
DISPL. *REPORT
- Select & press ”YES”
MEMORY DATA?
OK=YES (Cont.=INFOS)
NOV. 19 13:30 100%
SET DOC. FACE DOWN
Memory data
JOB TIMER FUNCTION NUM DESTINATION PAGE
01 07:00
P 802759 1
8-92 Minoltax 1600
Page 94

Reports
8.10 Memory Image Print
This function allows you to print copies of all documents stored in the
memory. Follow the procedure below to make your fax machine print the
key setting list.
Description Display
8
1 Press CONFIRM.
2 Select REPORT using the arrow
keys and press
YES.
3 Press 5 times CONFIRM
and press 2 times YES.
4 Press NO to terminate the entry.
Your fax machine prints the data.
* Print memory data * No. 1
Date = 30. Nov. 1998
Time = 13:58
NOV. 19 13:30 100%
SET DOC. FACE DOWN
DISPL. *REPORT
- Select & press ”YES”
PRINT MEMORY?
OK=YES (Cont.=INFOS)
NOV. 19 13:30 100%
SET DOC. FACE DOWN
Memory Data Print
FUNCTION NUM DESTINATION DATE TIMER P. NUM.
P 802759 5. Dec.
07:00 1 STD.
Minoltafax 1600 8-93
Page 95

8
8.11 Power Failure Report
This report will be automatically printed if a power failure occurs. It
contains a list of all documents which could not be transmitted during the
power failure.
8.12 Memory Overflow Report
This reportwill be automatically printed ifnot enough memory is available
for the printer.
8.13 Backup RAM-Error Report
This reportwill be automaticallyprinted if settings could notbe saved due
to a RAM error.
Reports
8-94 Minoltax 1600
Page 96

Maintenance and Trouble-Shooting
9 Maintenance and Trouble-Shooting
Cleaning the Machine
Cleanyour Mainoltafaxif neccessary.Before cleaningthemachine switch
it off and unplug the power cable. Use a soft dam cloth to achieve good
results.
Cleaning the Casing
Clean the casing with a soft cloth a nd a small amount of mild detergent.
Bild 46
9
Minoltafax 1600 9-95
Page 97

9
Maintenance and Trouble-Shooting
Cleaning the ADF and the Scanner
CAUTION
è Never use alcohol or solvents!
è Always unplug the fax machine before you clean it!
Note
The Minolta cleaning kit (No. 8918-561) is highly recommended for
cleaning the rollers and the scanner.
1 Open the control panel and hold it
with one Hand.
Bild 47
2 Wipethe surfaceof thescannerand
the transport rollers and close the
control panel.
Bild 48
Note
Make sure the cloth does not get stuck in the machine and damages
any of the components.
Never leave anything inside the machine.
9-96 Minoltafax 1600
Page 98

Maintenance and Trouble-Shooting
9.1 Replacing the Toner Cartridge
A new toner cartridge is designed to print approx. 8300 pages of the ITUT Test Document 1 (3.6% black density). The toner cartridge included
printsapprox. 4100 pagesof the ITU-TTest Document1 (3.6% blackdensity). If the toner cartridge is exhausted, the message "Toner Empty" appears on the display.
Remove the toner cartridge from the machine, shake it well and reinstall
it. If the "Toner Empty" message appears again, follow the procedure described below.
1 Openthe topcover pressingthe two
release buttons and pull the green
handle of the toner cartridge to remove it from the machine.
2 Unpack the new toner cartridge.
Holditin both handsandshake it to
spreadthetoner insidethecartridge
evenly.
9
Bild 22 einfügen
Tonerschüttelbild einfügen
3 Insertthe cartridgealongthe guides
into the machine. Push on the cartridge to lock it into its position.
Bild 27
4 Close the top cover until it lock into
position.
Bild 30
Minoltafax 1600 9-97
Page 99

9
Maintenance and Trouble-Shooting
Replacing the Drum Cartridge
The drum cartridge has a service life of approx. 20.000 pages. Remove
the toner cartridge from the machine as described above.
1 Removethe olddrumcartridgefrom
the machine.
Bild 34
2 Unpackthedrum cartridgeandslide
it alongtheguides into themachine.
Bild 36
3 Insertthe cartridgealongthe guides
into the machine until it locks into
position. Close the top cover.
9-98 Minoltafax 1600
Bild 25
Page 100

Maintenance and Trouble-Shooting
9.2 Clearing Paper Jams
If the paper jams inside the machine either the message "ORIGINAL
DOC.JAM" or "RECORDING PAPER JAM" appears on the display.
Youcanremove paperjams by followingthe proceduresdescribed below:
Clearing Original Document Jams
1 Open the control panel.
2 Removethejammeddocument and
close the control panel.
9
Bild 49
Bild 50
Minoltafax 1600 9-99
 Loading...