

Page 1

p
User Manual
Minoltafax 1400
www.minoltaeuro
e.com
The essentials of imaging
Page 2

Contents
1 Introduction
1.1 We want you to be a satisfied customer.....................................1-1
1.2 Guide through the manual ...........................................................1-3
Where can I find what in this manual?............................................1-3
Short description of autography and symbols.................................1-4
1.3 Safe operation of your fax machine............................................1-5
Instructions for personal and operational safety.............................1-5
Approval symbol..............................................................................1-7
2 Unpacking, installation, setup
2.1 Unpacking the fax machine..........................................................2-1
Machine layout................................................................................2-2
Control panel of Minoltafax 1400 ....................................................2-4
2.2 Installing the fax machine............................................................2-6
Ambient requirements.....................................................................2-6
Location...........................................................................................2-6
Space requirement..........................................................................2-7
Storage of consumables .................................................................2-7
2.3 Setting up the fax machine..........................................................2-8
Connecting the fax machine............................................................2-8
Installing the ink cartridge...............................................................2-9
Inserting paper..............................................................................2-11
Re-aligning the printer...................................................................2-13
Setting the ringer volume..............................................................2-14
Setting the monitoring volume.......................................................2-14
3 Individual fax machine settings
3.1 Please observe!.............................................................................3-1
List of letters, symbols and digits....................................................3-1
Entering letters and digits................................................................3-2
Correcting an entered character .....................................................3-3
Setting dialling pauses....................................................................3-3
Cancelling a procedure...................................................................3-4
Setting the dialling method (MFV/IWV)...........................................3-4
3.2 Setting sender identification data...............................................3-5
3.3 Setting the date and time .............................................................3-7
Rev. 1.1.1/22.10.99 MF 1400
Page 3

3.4 Setting the one-touch keys.................. ...... ..... .............................3-8
Storing a number under a one-touch key.......................................3-9
Altering one-touch key allocation..................................................3-10
Deleting the allocation of a one-touch key....................................3-11
Printing a list of allocated one-touch keys....................................3-12
3.5 Setting up the directory .............................................................3-13
Entering numbers into the directory..............................................3-14
Altering a directory number ..........................................................3-15
Deleting a directory number .........................................................3-16
Scrolling through the directory......................................................3-16
Calling statistics of directory number............................................3-17
Directory entry search..................................................................3-17
Printing list of directory entry........................................................3-18
Transferring a directory entry to a one-touch key.........................3-19
3.6 Switching activity report on/off.................................................3-20
Switching on the activity report.....................................................3-20
Switching off the activity report.....................................................3-21
Manually started print-out of activity report...................................3-21
4 Sending documents
4.1 Please observe the following!.....................................................4-1
Characteristics of documents to be transmitted .............................4-1
Interrupting a procedure.......................................... ...... .................4-2
4.2 Inserting a document...................................................................4-3
4.3 Setting the resolution and contrast............................................4-4
Setting the resolution for present transmission ..............................4-4
Permanently setting the transmission resolution............................4-5
Setting the contrast.........................................................................4-6
4.4 Sending a document....................................................................4-7
Dialling the number via the numerical keys....................................4-7
Dialling a number via redial............................................................4-8
Dialling a number via a one-touch key...........................................4-9
Dialling a number via the directory...............................................4-10
Dialling and number and monitoring a call ...................................4-11
Setting page count function..........................................................4-12
4.5 Sending a document overseas..................................................4-13
Reducing the fax transmission speed...........................................4-13
4.6 Delayed document transmission..............................................4-14
Setting delayed document transmission.......................................4-14
Altering transmission delay time...................................................4-15
Deleting transmission delay tim e..................................................4-16
Automatic print-out of delayed transmission report......................4-17
MF 1400 Rev. 1.1.1/22.10.99
Page 4

4.7 Broadcasting of Fax Documents...............................................4-18
Set Up Immediate Broadcast........................................................4-19
Setting delayed broadcast.............................................................4-21
Cancelling Broadcast Order..........................................................4-23
Setting up automatic print of broadcast report..............................4-24
4.8 Activating redial function...........................................................4-25
Setting the quantity of redial attempts...........................................4-25
Starting manual redial function......................................................4-26
4.9 ECM ON/OFF................................................................................4-27
What does ECM mean?................................................................4-27
ECM permanently ON/OFF...........................................................4-27
ECM for one single fax transmission ON/OFF..............................4-28
5 Receiving faxes
5.1 Receiving faxes automatically.....................................................5-1
5.2 Receiving faxes manually............................................................5-2
5.3 Combination with an answering machine..................................5-3
5.4 Receiving selected faxes..............................................................5-4
5.5 Receiving and forwarding fax transmissions.............................5-5
Setting of automatic fax forwarding ................................................5-5
Setting of manual fax forwarding ....................................................5-6
Release of manual fax forwarding ..................................................5-7
5.6 Memory reception during printer problem.................................5-8
Print received fax message from memo ry......... ..... ...... ...... .............5-8
Power cut while data is stored ........................................................5-8
Data overflow with half-tone fax transmission.................................5-8
5.7 Calling a fax transmission (Polling)............................................5-9
5.8 Receiving a fax with size reduction...........................................5-10
5.9 Fax machine with external telephone.......................................5-11
6 Copying a document
6.1 Making a single copy....................................................................6-1
6.2 Production of several copies..................................................... ..6-2
6.3 Copying a document with size reduction...................................6-3
Rev. 1.1.1/22.10.99 MF 1400
Page 5

7 Use the fax machine as PC printer
7.1 Printer specifications...................................................................7-1
7.2 Preparation of fax machine and PC............................................7-2
System Requirements............................................. ...... ..... ............7-2
Cable Specification.........................................................................7-2
Installation of printer driver.............................................................7-4
7.3 Application of printer software ...................................................7-5
Application of printer driver.............................................................7-5
Application of the control programme.............................................7-5
Application of de-installation programme.......................................7-5
7.4 Printing from a DOS application in Windows............................7-6
The following is to be taken into consideration!..............................7-6
Printing from a DOS application in Windows..................................7-6
Change print settings......................................................................7-7
Printing of print file..........................................................................7-8
7.5 Printing from a pure DOS application ........................................7-9
Creation of print file........................................................................7-9
Printing of print file........................................................................7-10
Change print settings....................................................................7-11
7.6 Re-set printer after a malfunction.............................................7-12
8 Using the telephone
8.1 Making a phone call .....................................................................8-1
8.2 Receiving a telephone call.............. ................................. ...... ......8-2
8.3 Dialling a number .........................................................................8-3
Dialling a number via the numerical keys. ......................................8-3
Dialling a number via the redial function.........................................8-3
Dialling a number via a one-touch function....................................8-3
Dialling a number via the directory.................................................8-4
Searching for a number in the directory.........................................8-4
8.4 Putting a call on hold...................................................................8-5
8.5 Operator call.................................................................................8-6
Making an "operator call" immediately after sending a fax.............8-6
Making an "operator call" immediately after receiving a fax........... 8-6
MF 1400 Rev. 1.1.1/22.10.99
Page 6

9 Setting specific features
9.1 Using software switches..............................................................9-1
Setting the software switches..........................................................9-1
Printing list of software switches.....................................................9-2
List of software switches.................................................................9-3
9.2 Switching on power save mode...................................................9-5
10 Trouble-shooting
10.1 General problems..................... ...... .................................. ..... ......10-1
10.2 Problems when sending a fax....................................................10-2
10.3 Problems when receiving a fax..................................................10-2
10.4 Problems during printing...........................................................10-3
10.5 Problems with telephone handset.............................................10-3
10.6 Problems with connected telephone apparatus......................10-3
10.7 Problems with print-out quality.................................................10-4
10.8 Rectifying problems....................................................................10-5
Removing a jammed document....................................................10-5
Removing a paper jam..................................................................10-6
Renewing the ink cartridge............... ..... ...... ...... ..... .......................10-7
Re-aligning the printer (via Minoltafax 1400) ................................10-9
Re-aligning the printer (via computer)........................................10-10
Cleaning the printer head nozzles (via Minoltafax 1400)............10-11
Cleaning the printer head nozzles (via computer)......................10-12
10.9 Error codes in the printed reports ...........................................10-13
11 Annex
11.1 Features.......................................................................................11-1
11.2 Caring for the machine...............................................................11-3
Cleaning the housing....................................................................11-3
Cleaning document transport rollers 1 and 2................................11-3
11.3 Technical data.............................................................................11-5
Minoltafax 1400.............................................................................11-5
Optional accessory.......... ...... ..... ...... .................................. ..... ......11-6
11.4 CE emblem (conformity declaration) ........................................11-7
11.5 Index.............................................................................................11-8
Rev. 1.1.1/22.10.99 MF 1400
Page 7

MF 1400 Rev. 1.1.1/22.10.99
Page 8

Introduction
1 Introduction
1.1 We want you to be a satisfied customer
Thank you for purchasing a Minolta fax machine.
This fax machine is ap prove d for use in pu blic te lephon e netw orks and is
compatible to other fax machines of transmission standard 3.
This manual will enable you to achieve maximum results of your
Minoltafax 1400 because it contains detailed information to the following
subjects:
G Safe operation of your fax machine.
G Setting up your fax machine.
G Use of fax machine as PC printer.
G Sending and receiving faxes.
G C op yi ng doc um ent s.
G Trouble-shooting.
Please read this manual thoroughly before starting up your fax machine,
and always keep it readily available.
More detailed information can be obtained from:
G Your technical support partner.
G Our Internet website http://www.minolta.com
This website contains the answers to numerous problems.
Always have the serial number and delivery date of your fax machine
readily available so that we can offer you fast and sound advice in the
event of an enquiry or problem.
. . . because we want you to be a satisfied customer.
1
Rev. 1.1.1/22.10.99 MF 1400 1-1
Page 9

1
Introduction
This documentation must not be reproduced, transferred, copytyped,
stored in an archive or translated without the explicit prior permission in
writing by Minolta Co. Ltd.
The manufacturer reserves the right to modify this manual.
1-2 MF 1400 Rev. 1.1.1/22.10.99
Page 10
Introduction
1.2 Guide through the manual
Where can I find what in this manual?
If you don’t know which chapter to consult to fin d the right inform ation, the
following table will assist you.
Please use the index at the end of this manual to quickly find precise
information covering a certain topic.
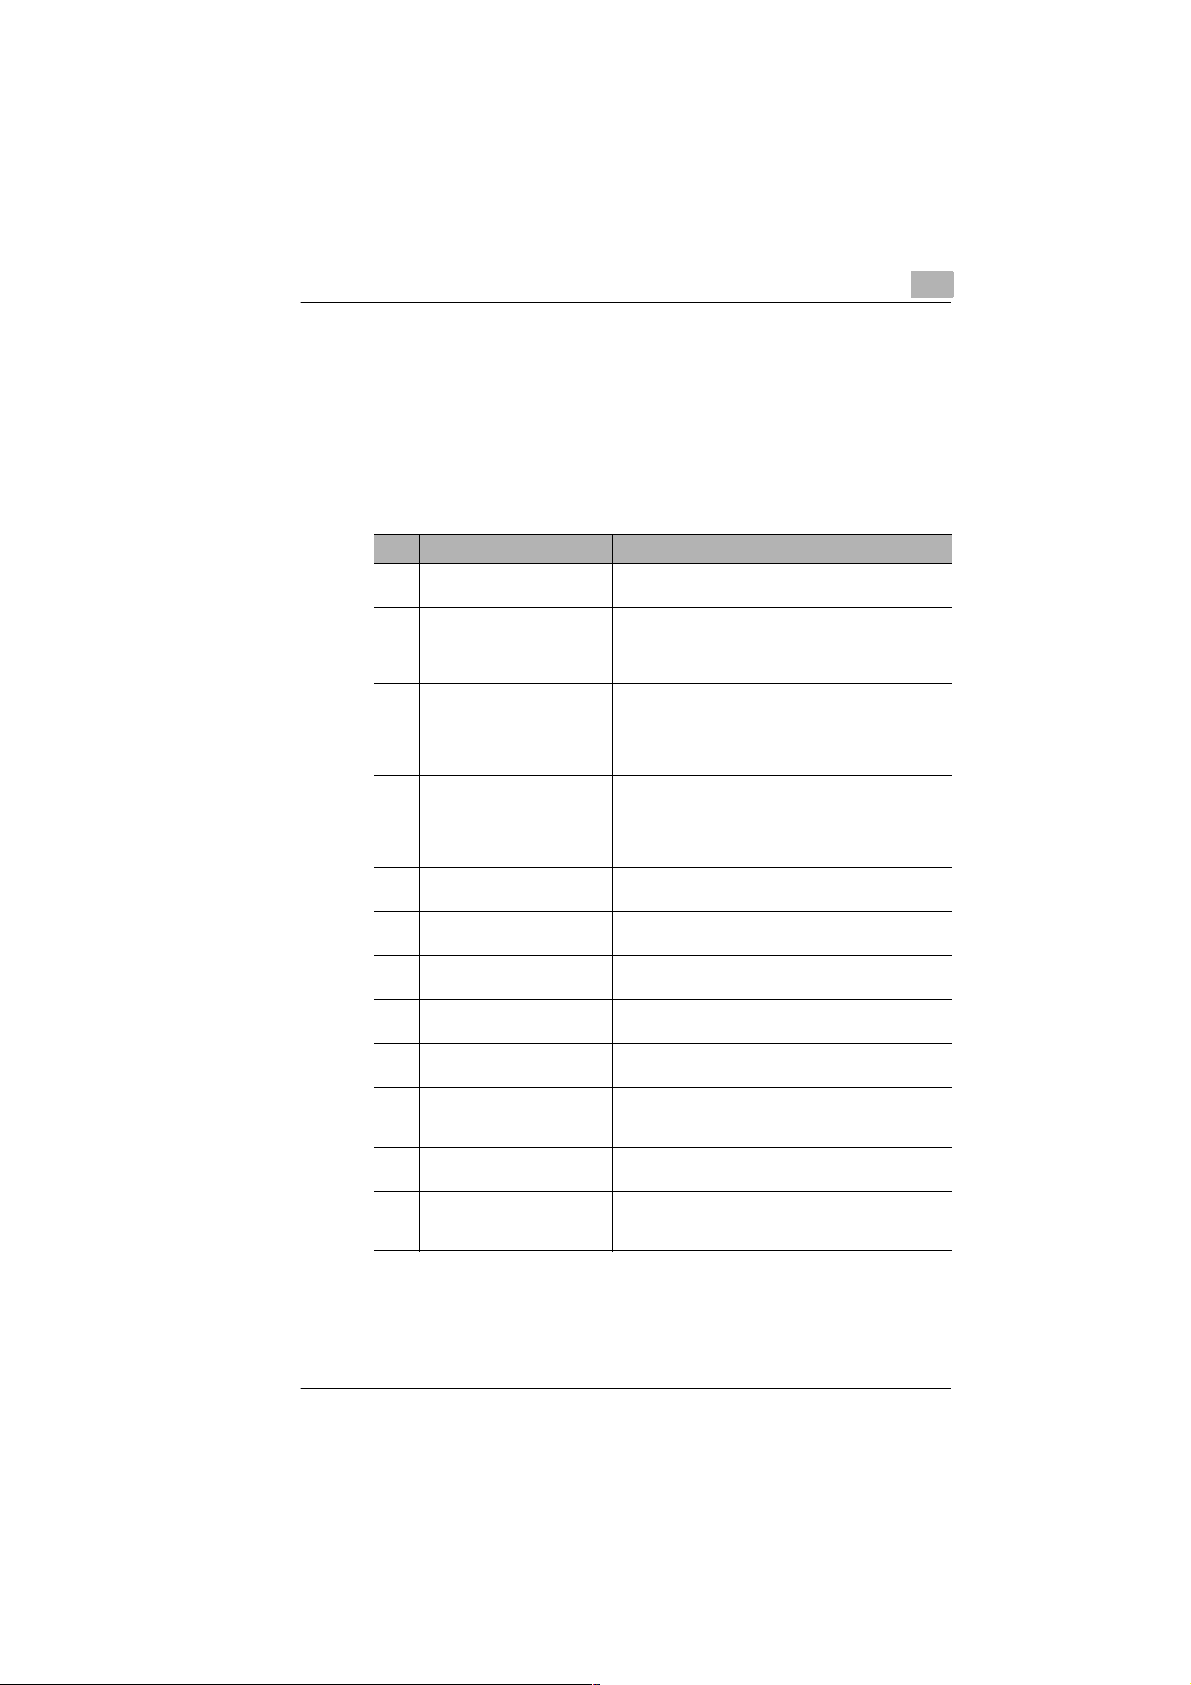
No. Chapter designation Chapter description
Contents This is where you will find a list of the chapters and
1 Introduction This is where you will find general information
2 Unpacking, installation,
setup
3 Individual fax machine setup This is where you will learn how to:
4 Sending a fax This is where you will learn various methods of
5 Receiving a fax This is where you will learn various methods of
6 Copying a document This is where you will learn how to use your fax
7 Use the fax machine as a
printer
8 Making phone calls This is where you will learn how to use the telephone
9 Specific machine settings This is where you will learn how to "tailor" the settings
10 Trouble-shooting This is where you will learn how to identify and rectify
11 Annex This is where you will find useful information, such as:
sub-chapters contained in this manual.
concerning your personal safety and that of your
machine, as well as instructions how to use this
manual.
This is where you will become familiar with all
features of your Minoltafax 1400, such as:
- Machine layout.
- Installing the fax machine.
- Setting up the fax machine.
- Program letters and figures.
- Set your station identification.
- Set the the date and time.
- Program the one-touch keys.
sending a fax.
receiving a fax.
machine as a photocopier.
This is where you will learn how to use your fax
machine as a printer.
unit.
of your Minoltafax 1400 to suit your own special
requirements.
simple problems.
- Technical data
- Index
1
Rev. 1.1.1/22.10.99 MF 1400 1-3
Page 11
1
Introduction
Short description of autography and symbols
Various autography and symbols are used in this manual to express
various situations. The examples below will enable you to identify the
various situations and handle them accordingly.
CAUTION
This is a warning!
A warning makes you aware of a hazard that can cause death, personal
injury or damage to the machine due to incorrect operation.
➜ The arrow indicates certain behaviour to prevent a dangerous
situation.
[SET] Key on keypad with the designation “Set“
ERROR Message in display showing the text "Error"
➜ Single operation step
(further steps not necessary)
Step 1 of a procedure
1
Step 2 of a procedure, etc.
2
This is where you receive help.
?
➜ Carrying out the described
operation will achieve the
required results.
This is what has to be done
✎
A useful tip
Text with this appearance will offer you tips and tricks to make you
more familiar with your fax machine.
1-4 MF 1400 Rev. 1.1.1/22.10.99
Page 12
Introduction
1.3 Safe operation of your fax machine
Instructions for personal and operational safety
Personal injury, electrical shocks or even fires can result from incorrect
operation. Before unp ac ki ng y ou r fax m ac hin e, p lea se rea d th e fo llowing
safety precautions to ensure your pe rsonal safety and also the operation al
safety of your fax machine.
CAUTION
Adhere to the following instructions!
➜ Connect the machine only to an earthed 220-240V/50-60Hz mains
socket which complies to VDE standards.
➜ Do not connect the machine to a mains mul tip le ada pte r sock et.
➜ Ensure that the plug is fully inserted in the mains socket and is easily
visible and accessible.
➜ Do not pull on the electrical cable to disconnect the plug from the
mains socket.
➜ Do not connect the machine to a tel ephone line during a thund erstorm.
➜ Do not use the fax machine / handset near explosive gases.
➜ Do not pull the plug out of the mains socket if y our hands are wet. Ris k
of electrical shock!
➜ Only move the machine after pulling the plug out the main socket.
➜ Do not place hea vy o bjects on the main s ca ble, a nd do not p ull, p in ch
or nip it.
➜ Pull the plug out the mains sock et if the cable is damaged. Info rm your
local service centre.
➜ Only use electrical extension cables that are designed for the power
rating of the machine.
➜ Do not carry out any other operations than those described in this
operating manual.
➜ Do not place heavy objects on the machine.
➜ Do not open any covers on the machine while it is transmitting or
printing.
1
Rev. 1.1.1/22.10.99 MF 1400 1-5
Page 13

1
Introduction
➜ Do not interrupt the po wer supp ly w hile th e machi ne is t ransm itting o r
printing.
➜ Do not place magnetic objects near the machine.
➜ Do not use inflammable aerosols, liquids or gases near the machine.
➜ Do not remove any safety devices, and do not alter the machine’s
design. The machine is equipped with high-voltage components!
➜ Do not insert paper c lips / tack s or sm all m etal o bjects in an y open ing
of the machine. I f this shoul d nevertheless happen, pul l the plug ou t of
the mains socket immediately and inform your local service centre.
➜ Never place drinking cups, bottles or other vessels containing liquids
on the machine. If liquid should nevertheless enter the machine, pull
the plug out of the mains socket immediately and inform your local
service centre.
➜ If your machine becomes extremely warm, generates smoke or an
unusual odour, or makes an unusual noise, pull the plug out of the
mains socket immediately and inform your local service centre.
➜ Ensure that the paper outlet is always unobstructed in order to avoid
paper jams and possible subsequent damage to the printer head.
➜ Always contact your local service centre in the event of a problem.
1-6 MF 1400 Rev. 1.1.1/22.10.99
Page 14
Introduction
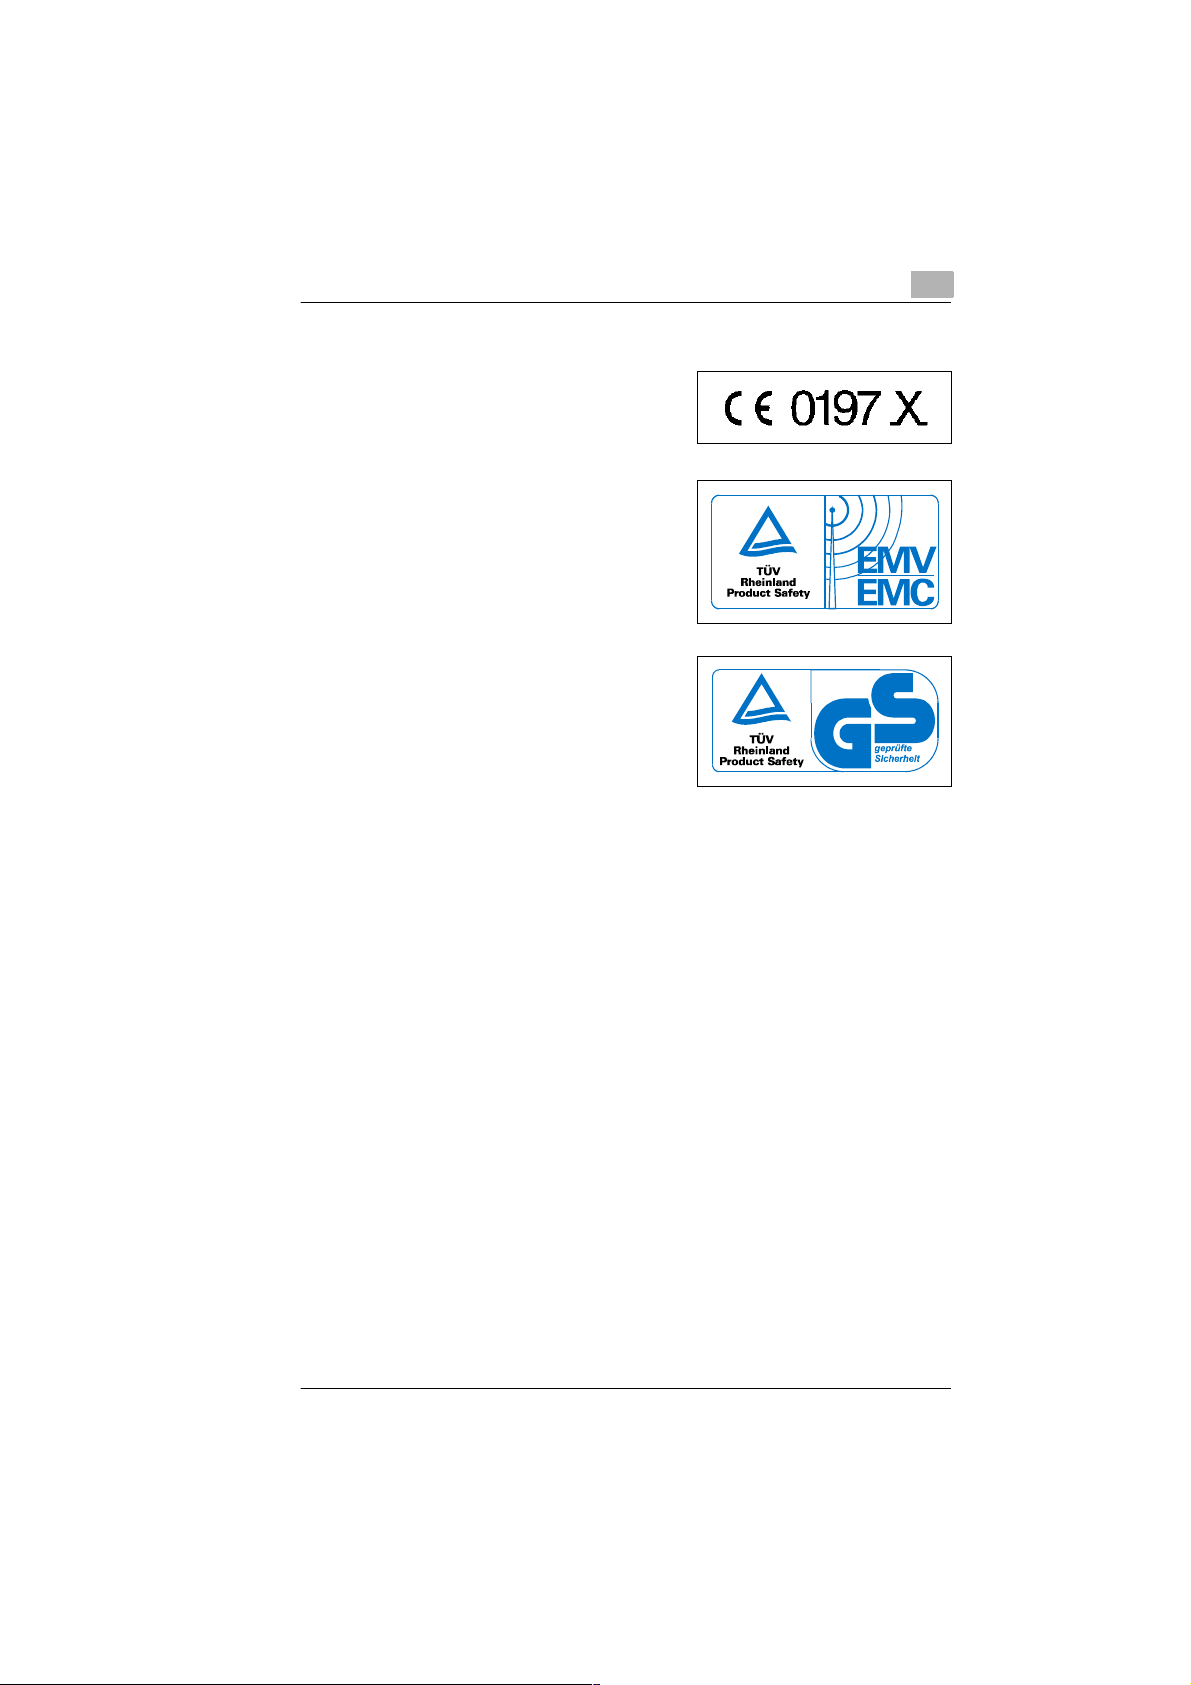
Approval symbol
The Minoltafax 1400 fulfils the fax
requirements accord ing to CT R 21 and
DTS.
The machine bears the EMV symbol as
proof that it comp lies to requirements of
EN 50081-1 and EN 50082-1.
Machines equipped with the "GS"
emblem have design approval
according t o national and international
standards.
The noise level at the place of work is 75 dB (A) or less according
to ISO 777.
1
Machines with CE approval (CTR 21 approval)
These machines fulfil the valid European requirements of the Council
Decision 98/482/EC for individual connections to public telephone
networks (PSTN)
As there are certai n d iffe ren ces i n the networks of the i ndi vi dua l m em be r
states, problems can still occur with main connections (PSTN) despite
fulfilment of all requirements. If you should encounter any difficulties,
please contact your local service centre.
Rev. 1.1.1/22.10.99 MF 1400 1-7
Page 15

1
Introduction
1-8 MF 1400 Rev. 1.1.1/22.10.99
Page 16
Unpacking, installation, setup
2 Unpacking, installation, setup
2.1 Unpacking the fax machine
CAUTION
Plastic packaging is hazardous for small children!
➜ Please keep the packaging out of reach of small children.
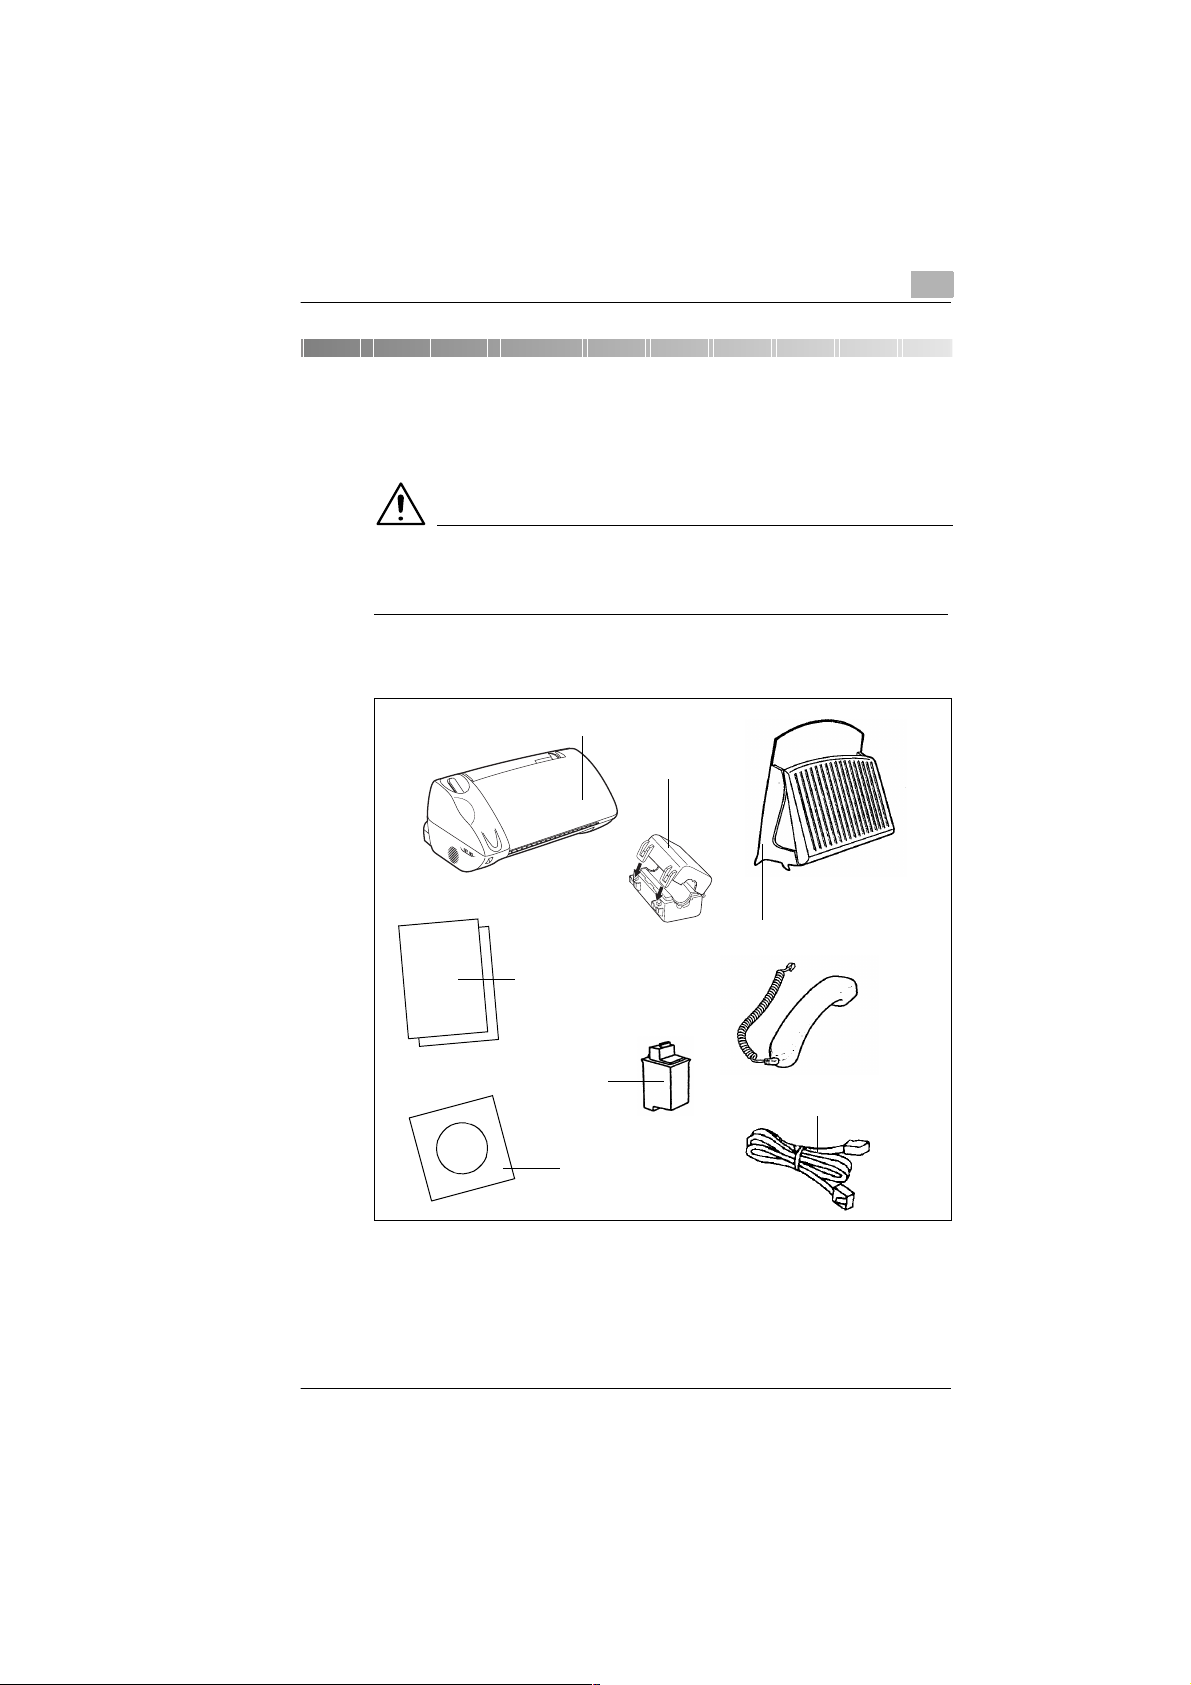
Remove the fax machine and its accessories from the carton
1
Fax machine
Ferrite core
2
Paper support
Instruction manual
Telephone handset
Ink cartridge
Telephone cable
Printer driver
(CD-ROM)
Remove the individual packaging.
2
Remove the transport retainer bands.
3
Rev. 1.1.1/22.10.99 MF 1400 2-1
Page 17
2
Unpacking, installation, setup
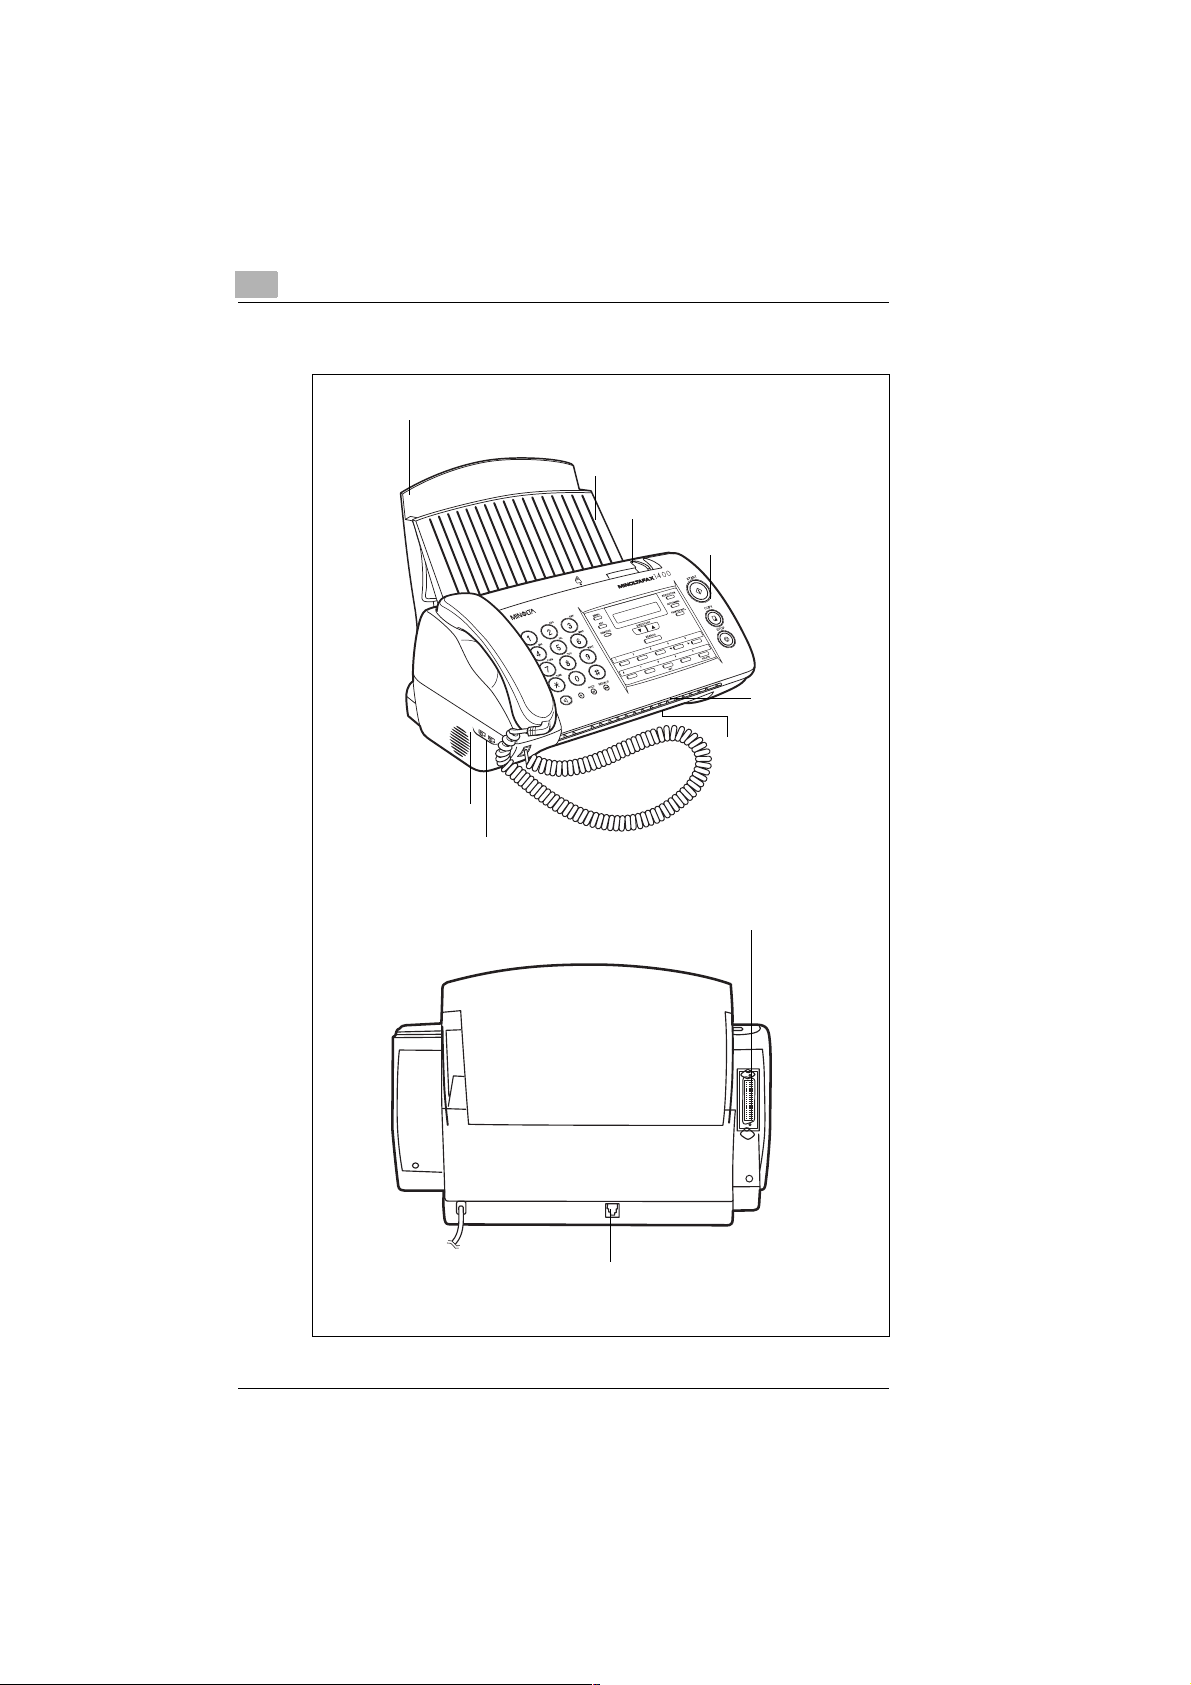
Machine layout
Paper support
Document support
Document guide
Control panel
Document output
Paper output
Ringer volume
Monitoring volume
Printer Interface
(parallel)
Telephone cable connection
2-2 MF 1400 Rev. 1.1.1/22.10.99
Page 18
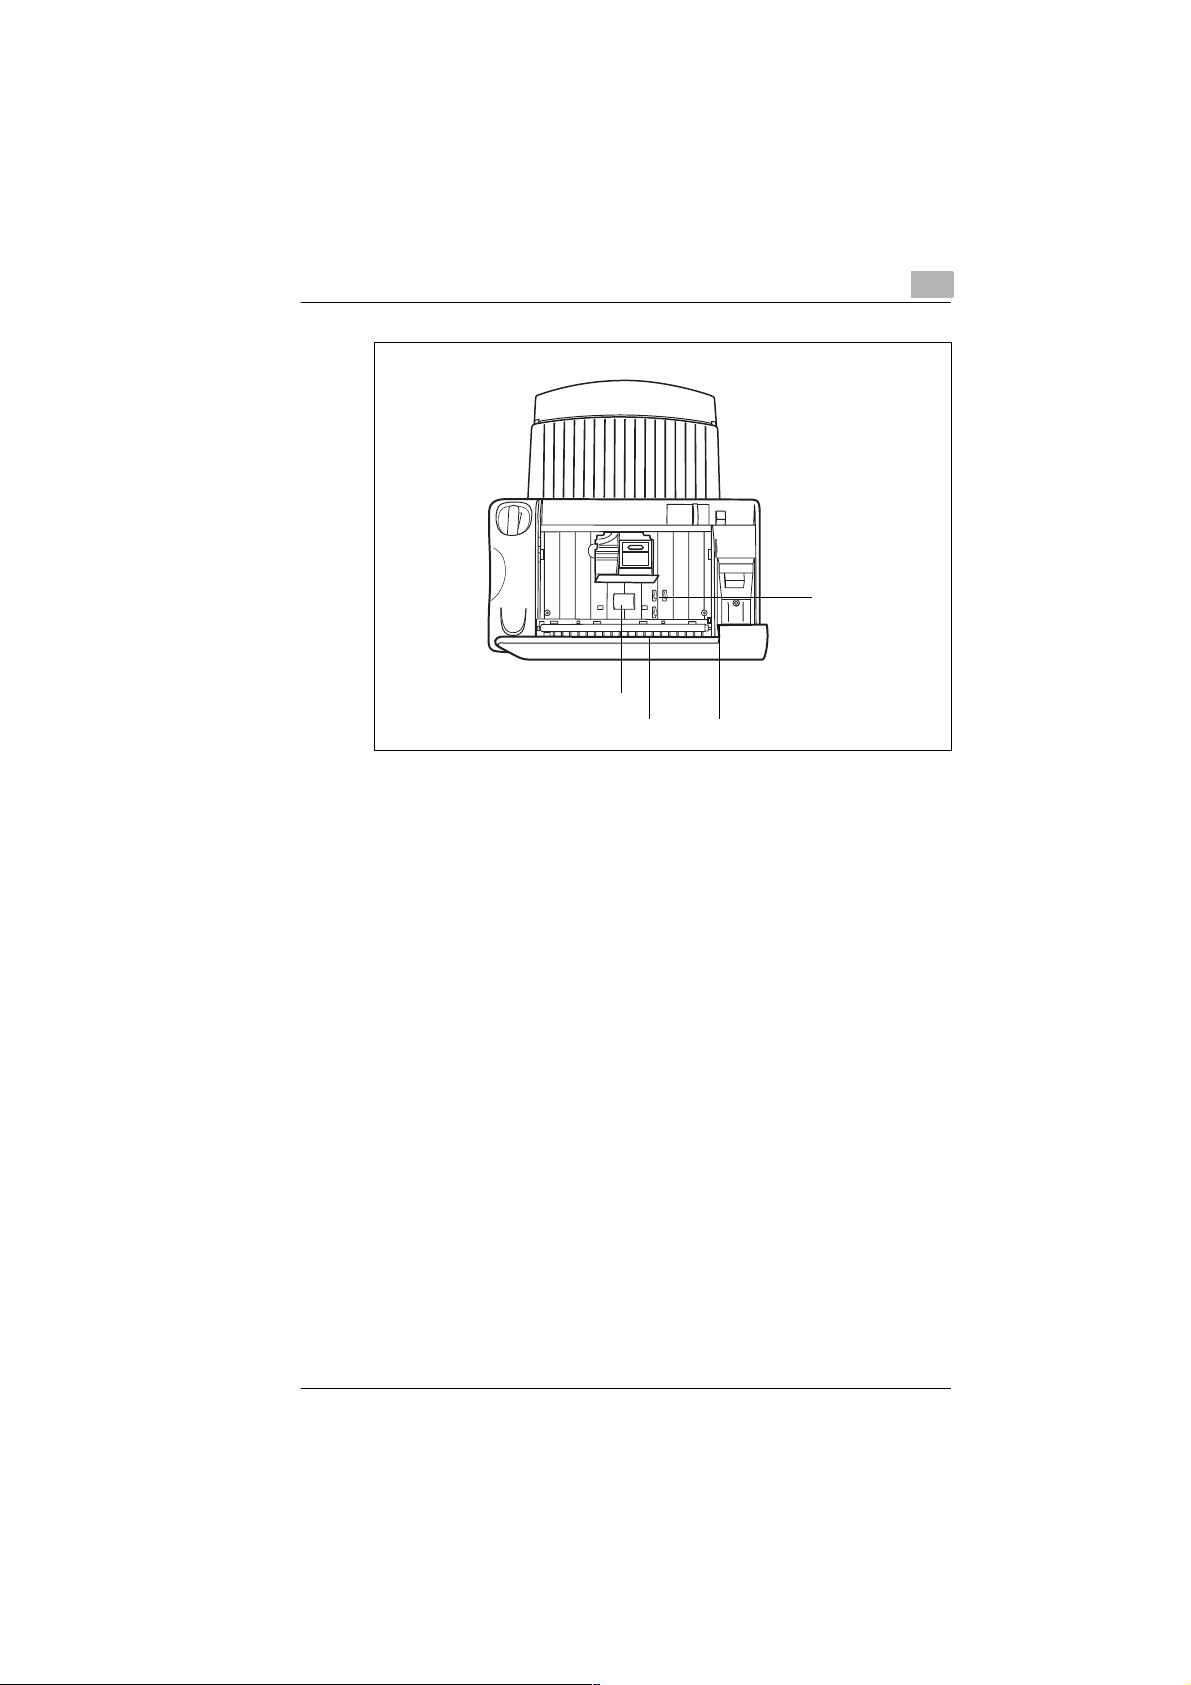
Unpacking, installation, setup
Document transport rolle r 1
Document transport roller 2
2
Document sensor
Document release lever
Rev. 1.1.1/22.10.99 MF 1400 2-3
Page 19
2
Unpacking, installation, setup
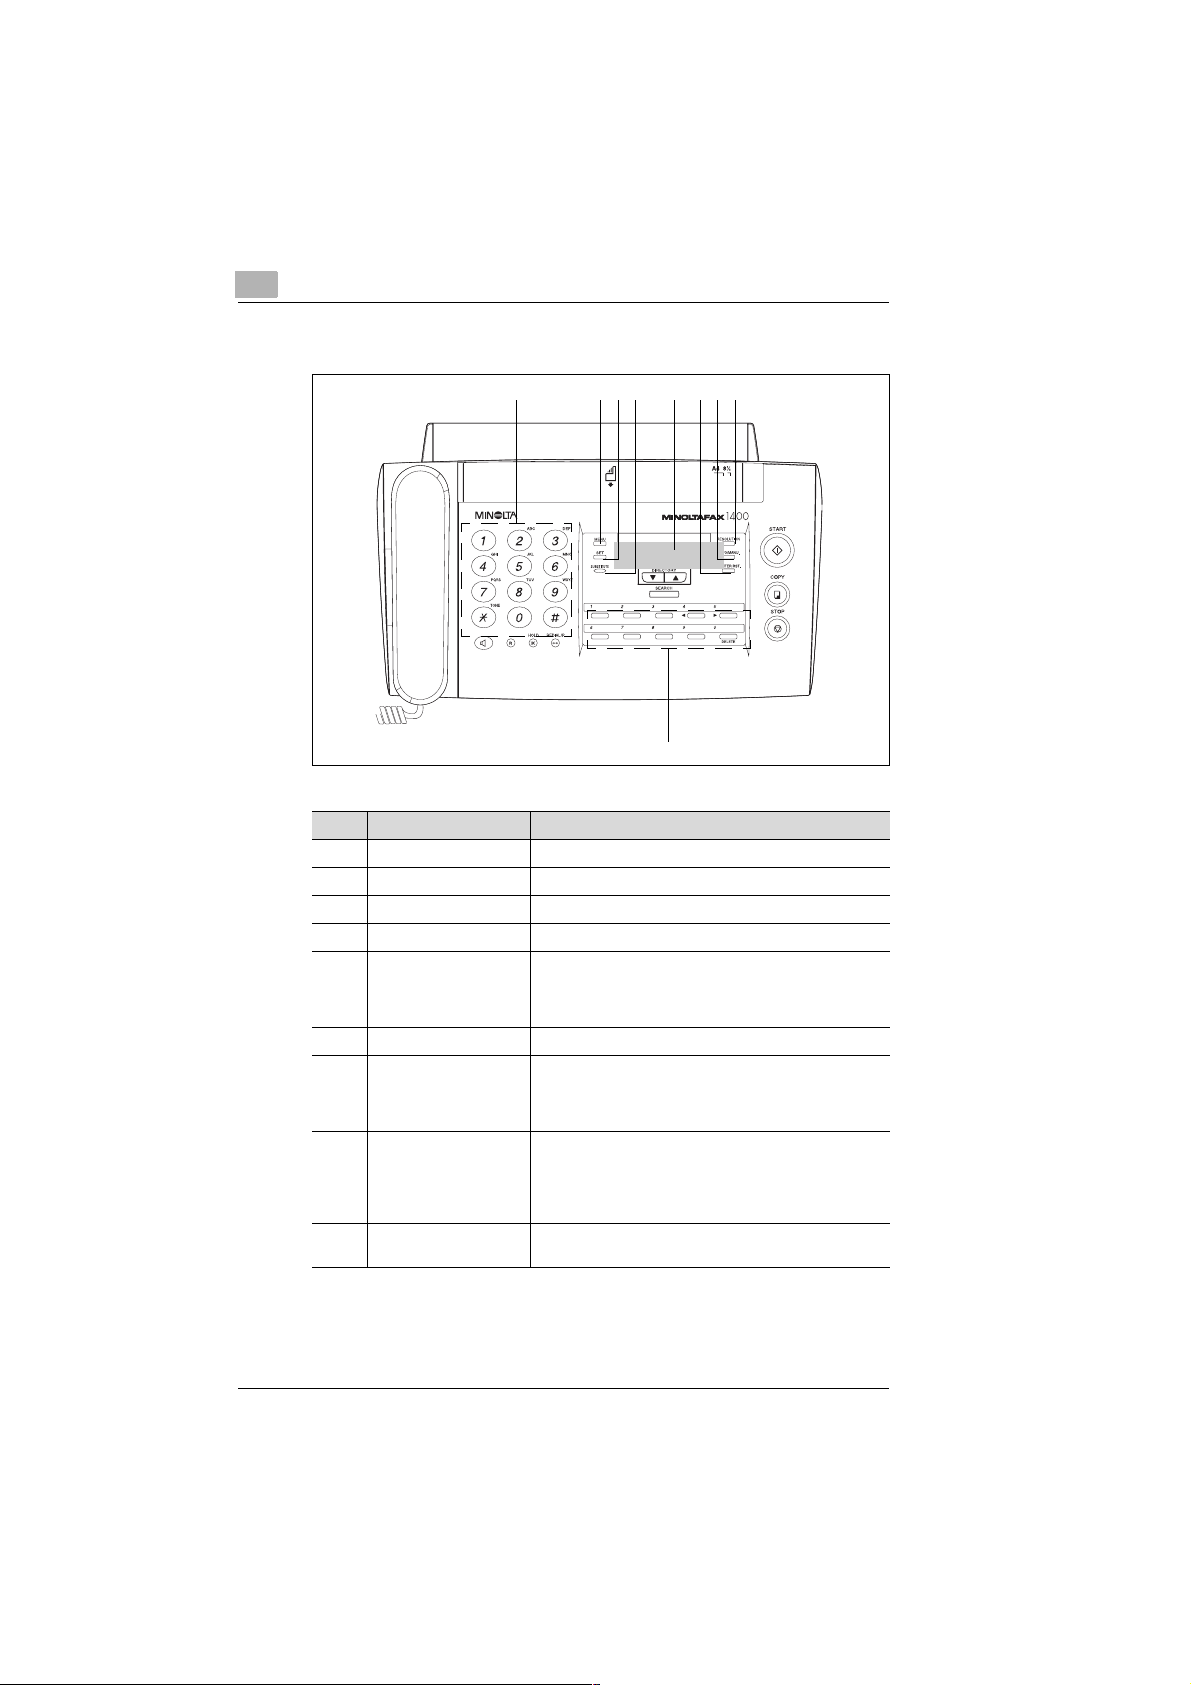
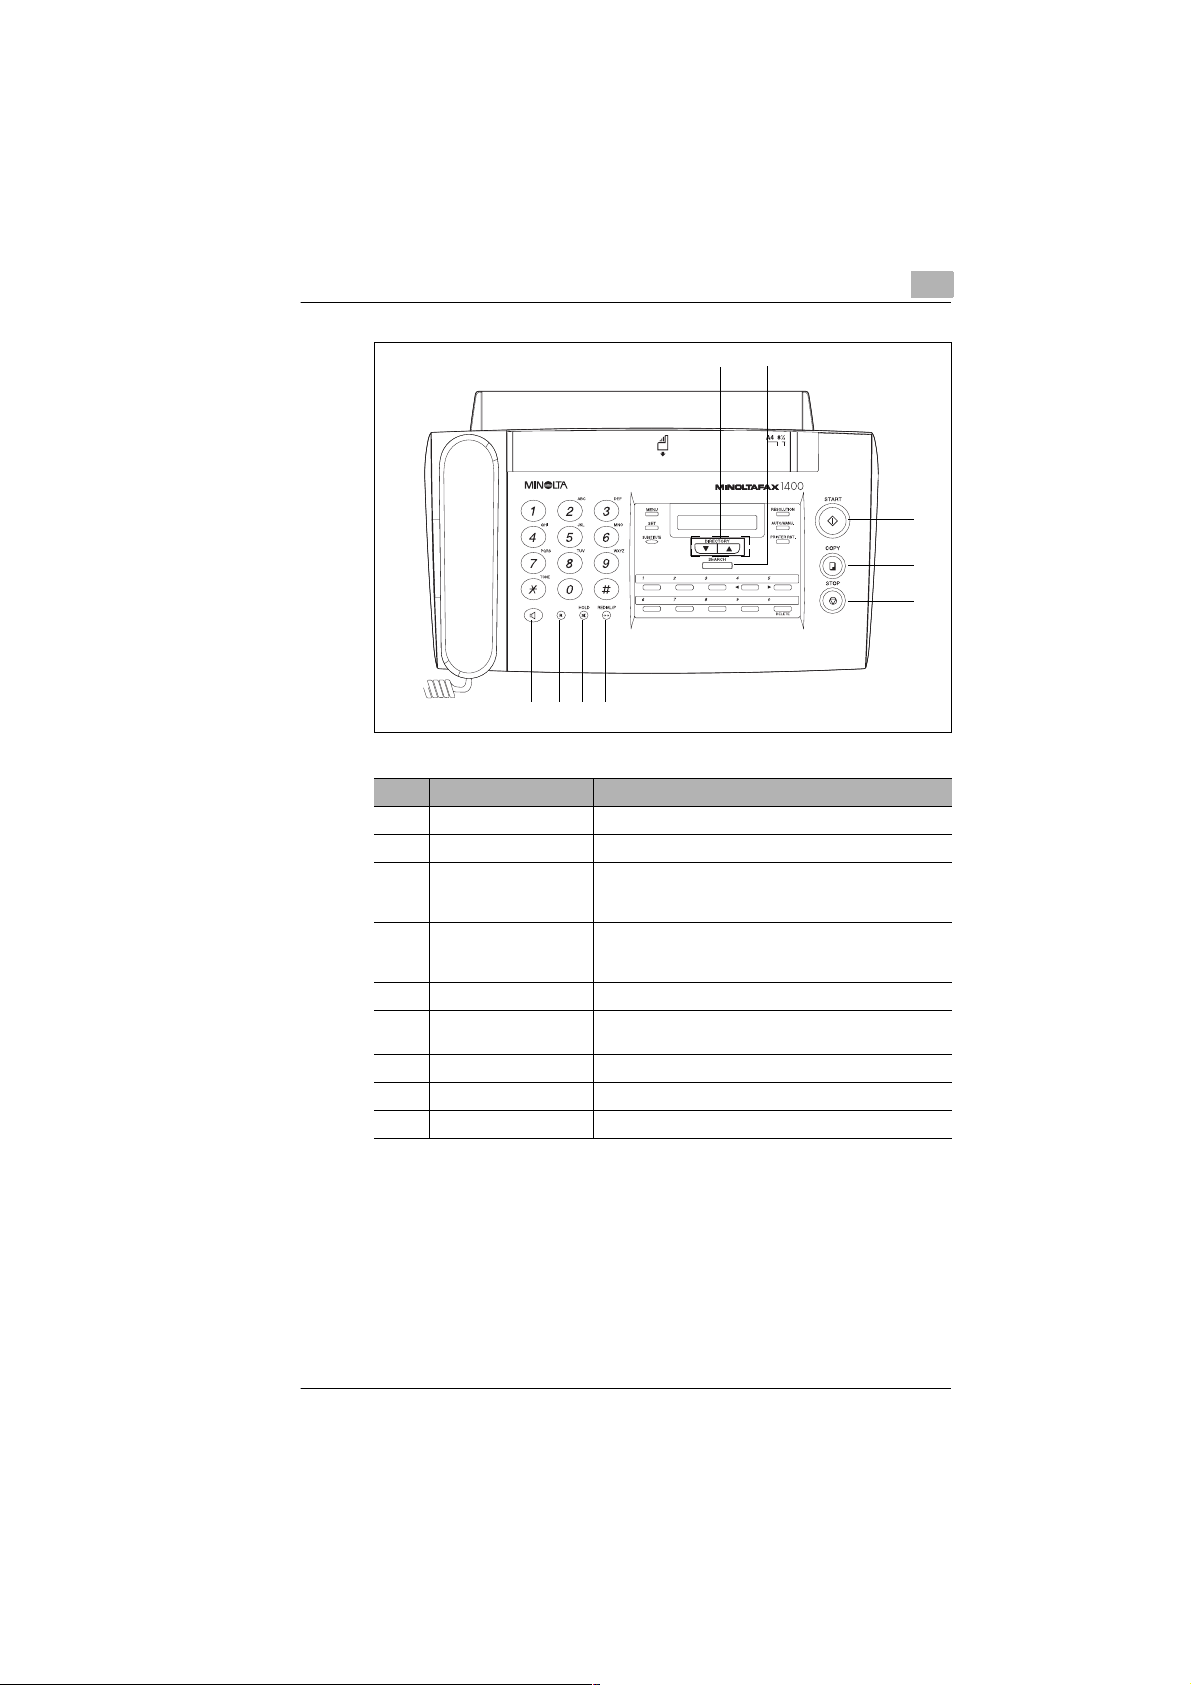
Control panel of Minoltafax 1400
1 234 5 678
9
Item Designation Function
1 NUMERIC KEYPAD To enter figures or letters
2 MENU To scroll through the various menus
3 SET To confirm data / selections in the menus
4 MEMORY Will blink when data is stored in the page memory
5 DISPLAY Shows various information:
6 PRINTER RESET To re-align the printer
7 AUTO/TAD/MAN To switch between:
8 RESOLUTION To select the transmission resolution:
9 ONE-TOUCH To directly dial numbers stored under the one-touch
- Standard display: Date and time
- Specific input requirements
- Status message
- Automatic fax reception
- Answering machine
- Manual fax reception
- Standard
-Fine
- Extra-fine
- Half-tone
keys 0 to 9.
2-4 MF 1400 Rev. 1.1.1/22.10.99
Page 20
Unpacking, installation, setup
Item Designation Function
10 DIRECTORY To scroll through the directory
11 SEARCH To search for a specific directory number
12 START To start a function:
13 COPY To start:
14 STOP To interrupt a function and eject a document
15 REDIAL/P To re-dial the number last dialled, and to insert a pause
16 HOLD To temporarily place a call on hold
17 R To call an outside line within a PBX system
18 MONITORING To acoustically monitor a call / connection
11
10
15161718
- Transmit
- Receive
- A copy function
- A list print-out
between two digits of a number
2
12
13
14
Rev. 1.1.1/22.10.99 MF 1400 2-5
Page 21
2
2.2 Installing th e fax machine
Ambient requirements
Optimum ambient requirements for the printer are:
G Temperatures between 5°C and 35°C
(Fluctuations ma x. 10°C per hour)
G Humidity between 15% and 85%
(Fluctuations max. 20% per hour).
Location
The installation location must fulfil the following requirements:
G Dry and dust-free.
G Level and vibration-free surface.
G Away from easily inflammable objects, such as curtains.
G Free of objects that could block the ventilation slots in the
machine housing.
G Easily accessible mai ns soc k et.
G Away from explosive gases.
The machine must be protected from the following:
G Splashing liquids.
G Organic gases, such as ammo nia c
G Direct sunlight.
G Excessive temperature fluctuations.
G Discharged air from heaters and air-condit ion ing units .
Unpacking, installation, setup
CAUTION
Condensation during temperature fluctuations!
Temperature fluctuations can cause the development of condensation
inside the machine.
➜ If condensation has developed, switch on the machine at least 15
minutes before it is to be used.
2-6 MF 1400 Rev. 1.1.1/22.10.99
Page 22
Unpacking, installation, setup
Space requirement
Ensure that the machine has sufficient space so that it can function
correctly and be easily accessi ble .
The machine dimensions are:
G Height: 264mm
G Width: 360mm
G Depth: 300mm.
✎
Does the fax machine have enough space?
Ensure that there is sufficient space in front of the fax machine,
otherwise the ejected document or paper could become jammed.
Storage of consumables
Store the consumables
G In their closed original packaging
G Protected from direct sunlight or heat.
G In a cool, dry and dust-free place.
G Our of the reach of small children.
A small box is located inside the Minoltafax 1400 in which a spare
ink cartridge can be stored.
2
Rev. 1.1.1/22.10.99 MF 1400 2-7
Page 23
2
2.3 Setting up the fax machine
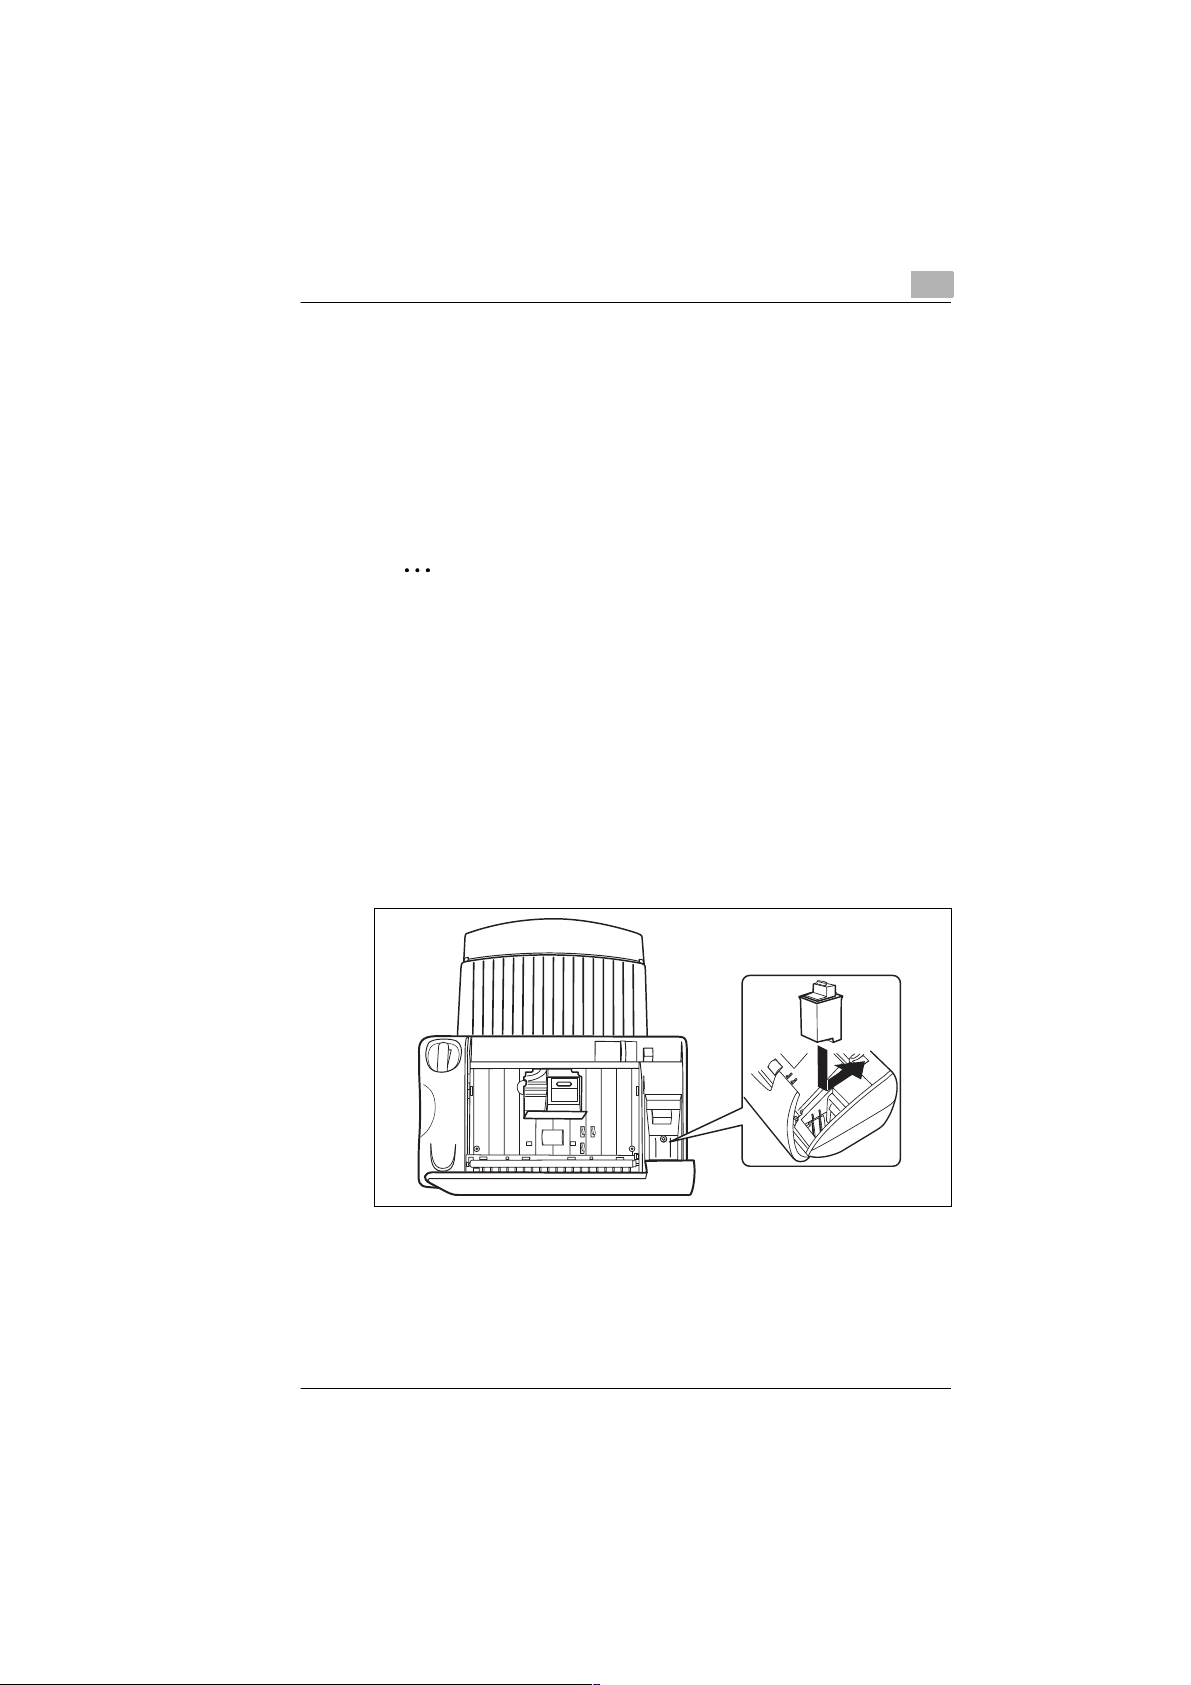
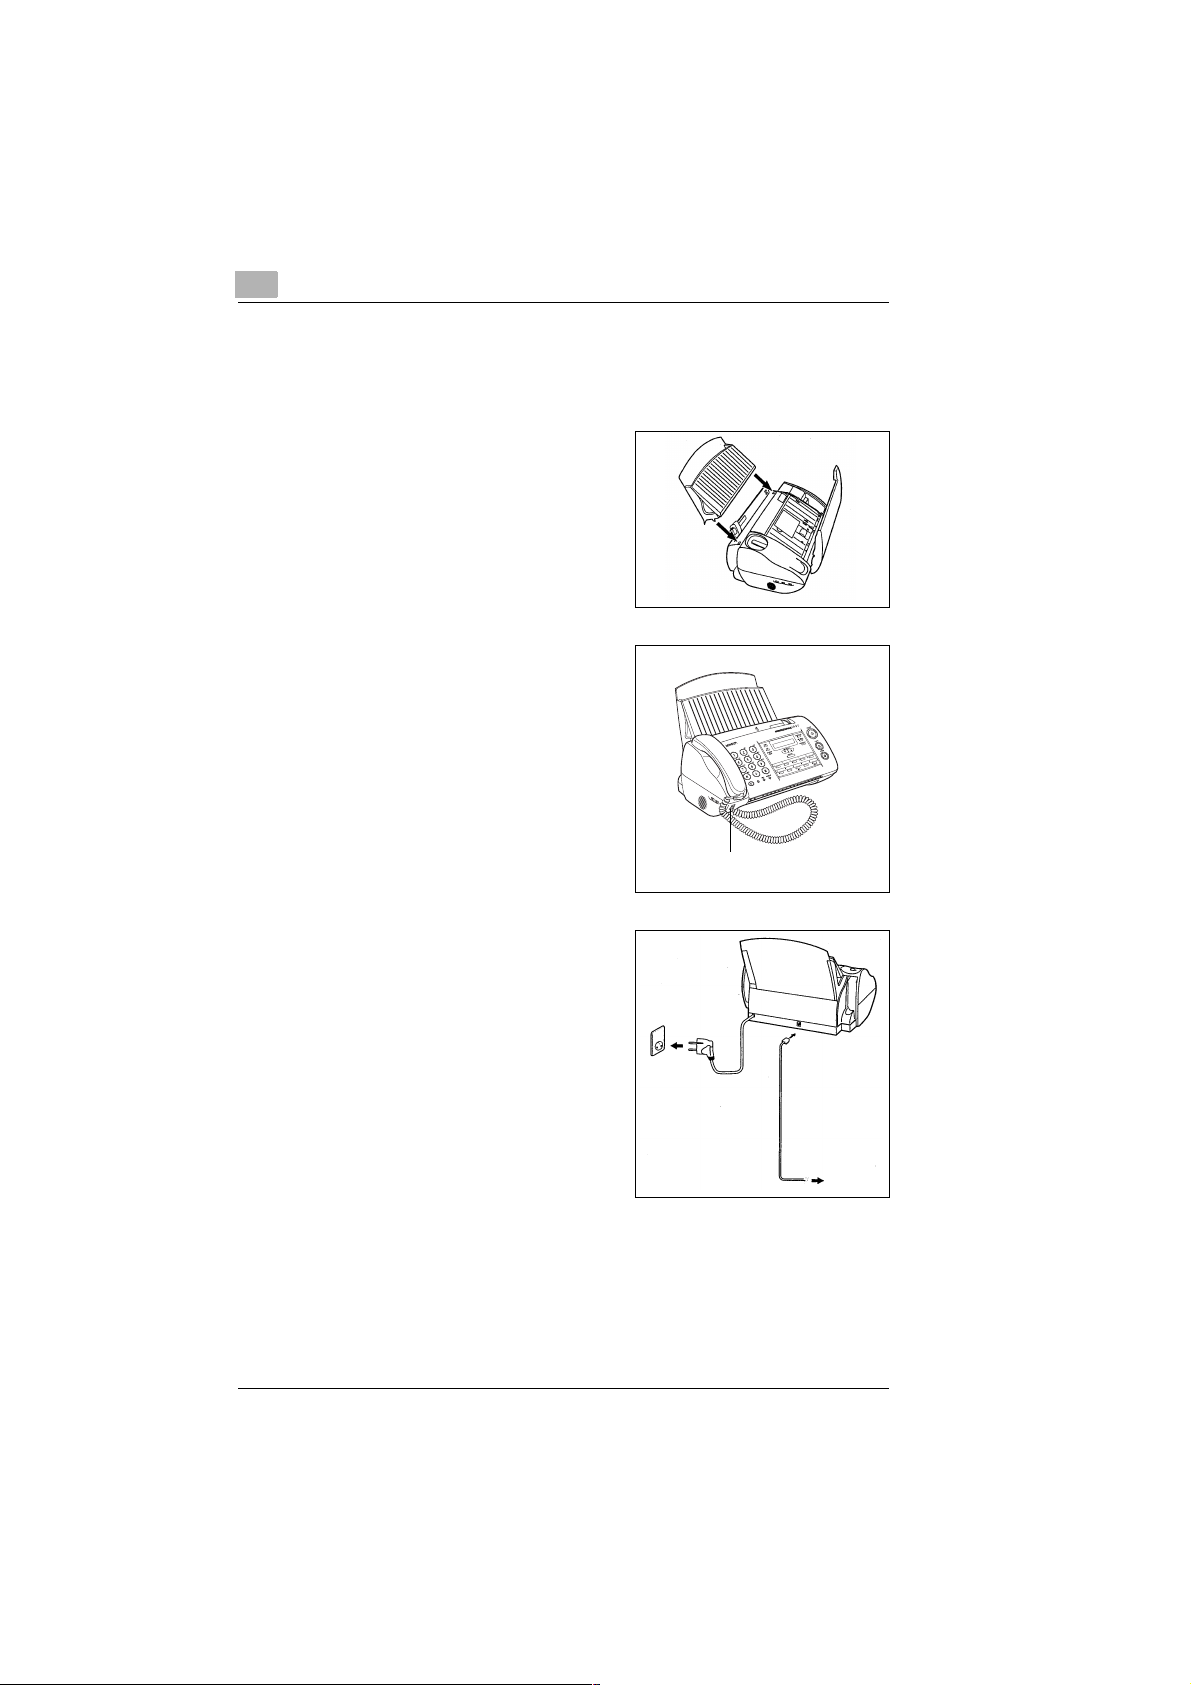
Connecting the fax machine
Slide the plastic noses on the paper
1
support in the available slot s.
Connect the handset to the
2
available connection.
Unpacking, installation, setup
Connection
for handset
Connect the fax machine to the
3
telephone connection. Use the
telephone cable for this purpose.
Insert plug into socket.
4
2-8 MF 1400 Rev. 1.1.1/22.10.99
Page 24
Unpacking, installation, setup
Installing the ink cartridge
CAUTION
Damage to ink cartridge!
If handled incorrectly, the printing head on the ink cartridge can be
damaged. The ink cartridge can then no longer be used.
➜ Only use an ink cartridge as per the following specification: black
4968-050, colour 4968-060.
➜ Do not touch the printing head on the ink cartridge.
➜ Do not place the ink cartridge on its printing head.
➜ Do not shake or take apart the ink cartridge.
➜ Store ink cartridge out of children’s reach.
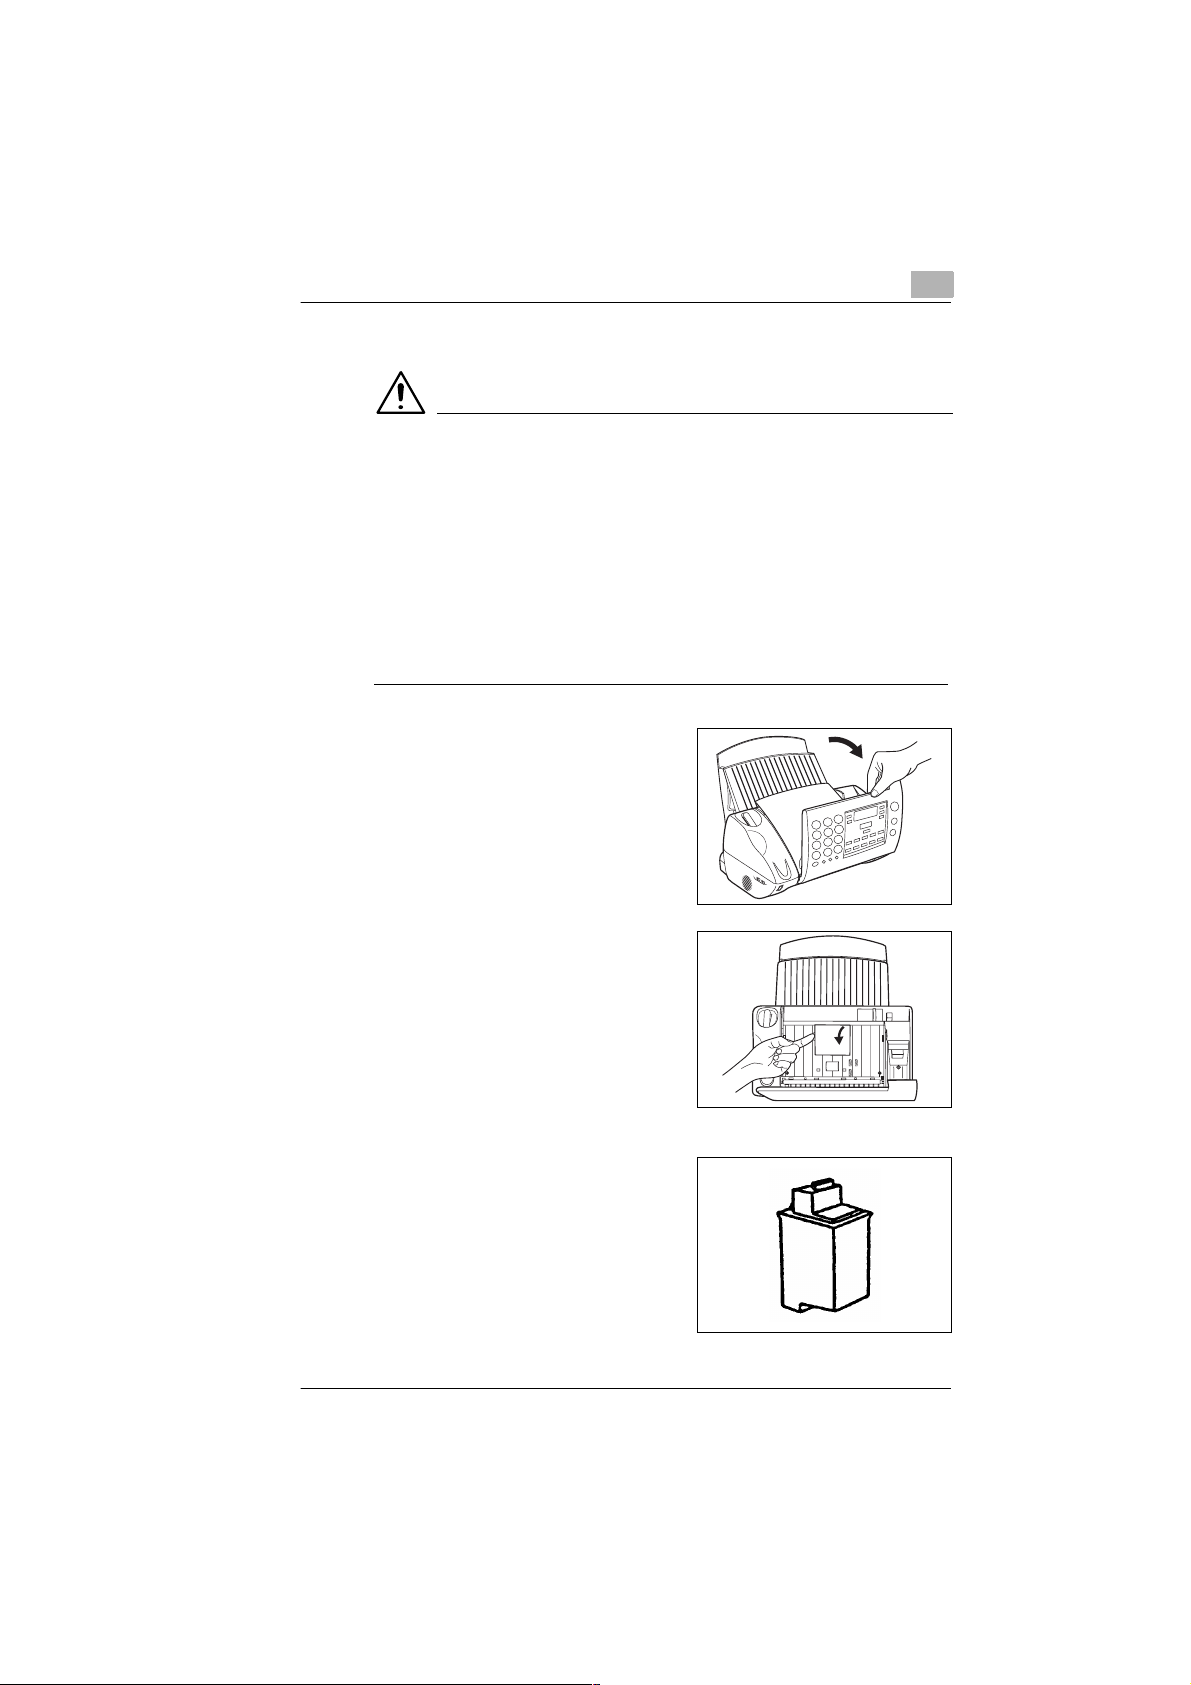
Fold the control panel forwards.
1
The cartridge holder will move to
central position.
2
Open the printer unit cover.
2
The cartridge holder is under
the cover.
If the cartridge holder is not
?
under the cover?
➜ Press the [PRINTER RESET]
key.
Remove the protection strips
3
from the ink cartridge.
Rev. 1.1.1/22.10.99 MF 1400 2-9
Page 25
2
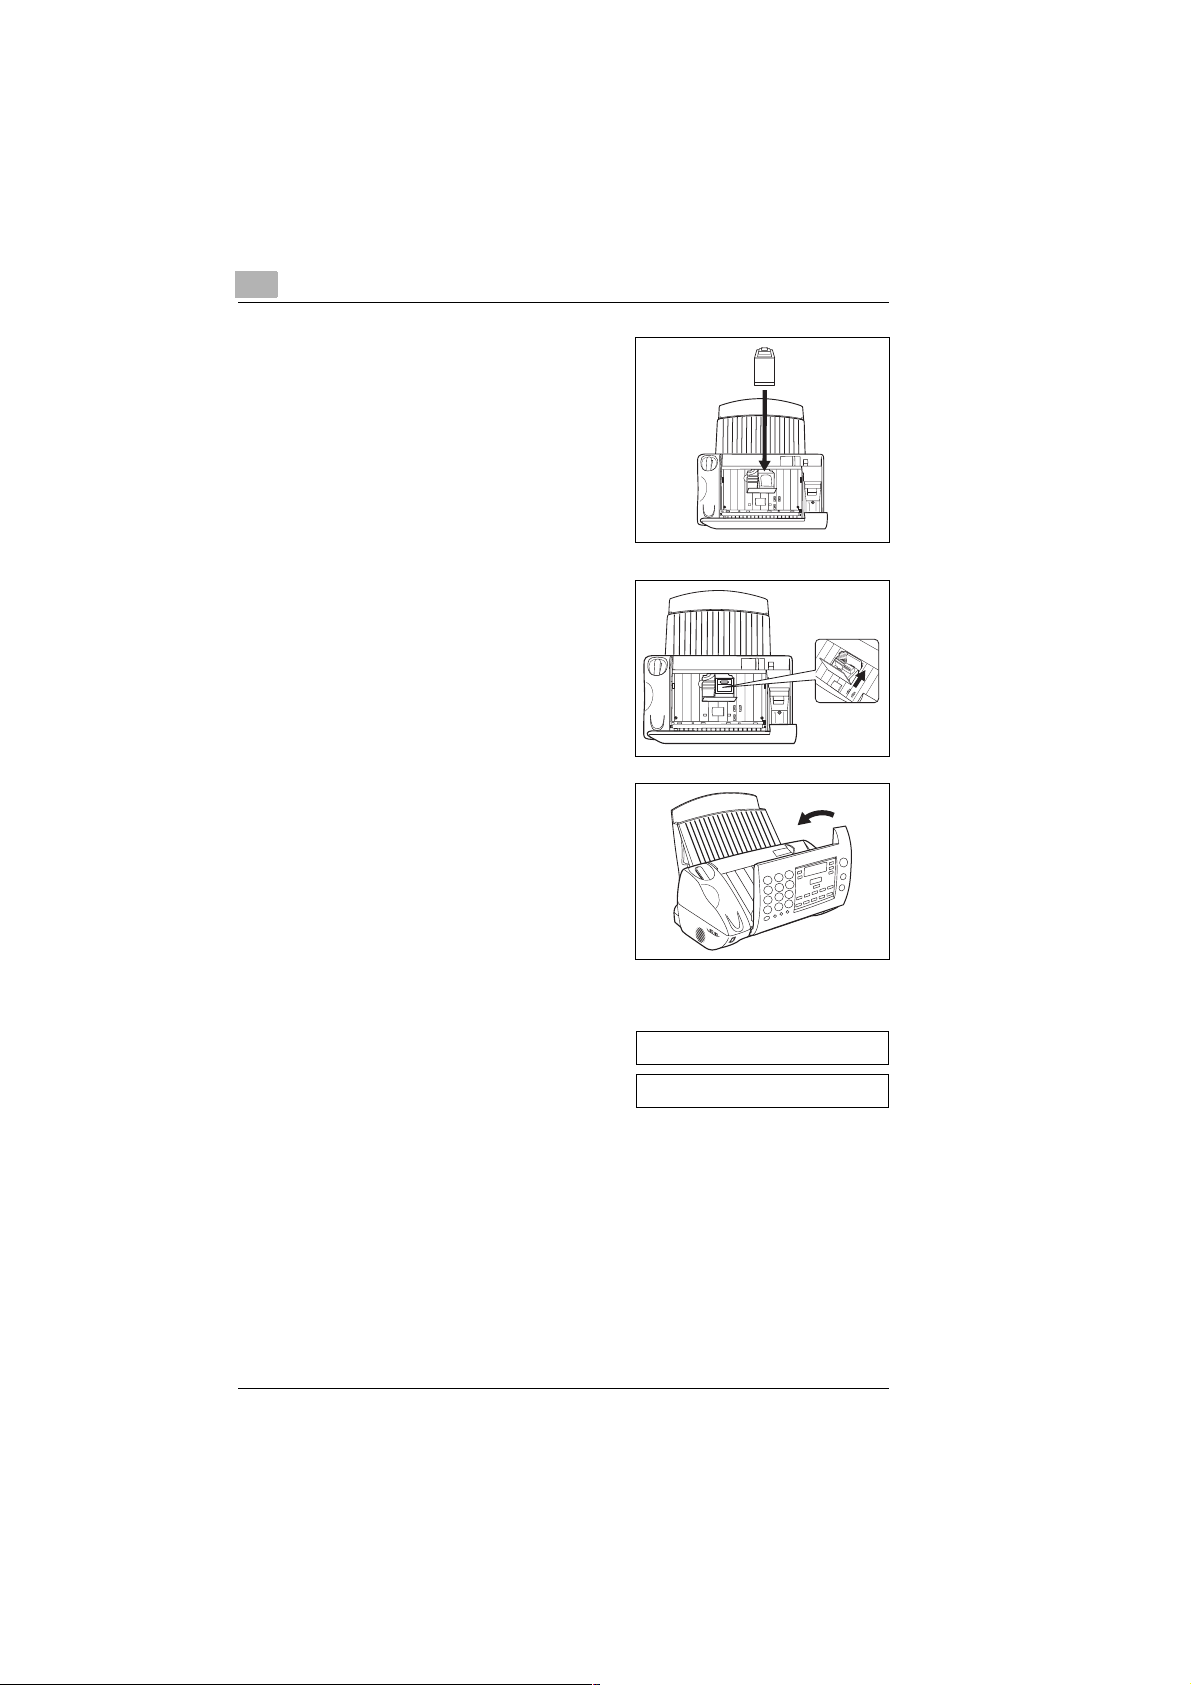
Insert the ink cartridge in the
4
cartridge holder.
Gently press the ink cartridge
5
forwards.
The ink cartridge must engage
with an audible click.
Close the control panel cover.
6
The display will show NEW
CARTRIDGE.
Unpacking, installation, setup
If NEW CARTRIDGE does not
?
appear in the display?
➜ Make sure that the cartridge
engages properly in the
cartridge holder.
Confirm by pressing the [SET]
7
key.
The standard display message
will appear.
2-10 MF 1400 Rev. 1.1.1/22.10.99
NEW CARTRIDGE ?
08 Sep. ’99 15:32
Page 26
Unpacking, installation, setup
Inserting paper
Insert up to 100 sheets of paper (75g/m
Use only good quality paper with the following qualities:
✔ Paper formats:
A4 (210×297 mm), Letter (216× 279 mm), Legal size
(216×356 mm). The default setting is A4. See page 9-1 for
other settings.
✔ Paper thickness: less than 0,2 mm
✔ Paper weight: 64 to 90g/m
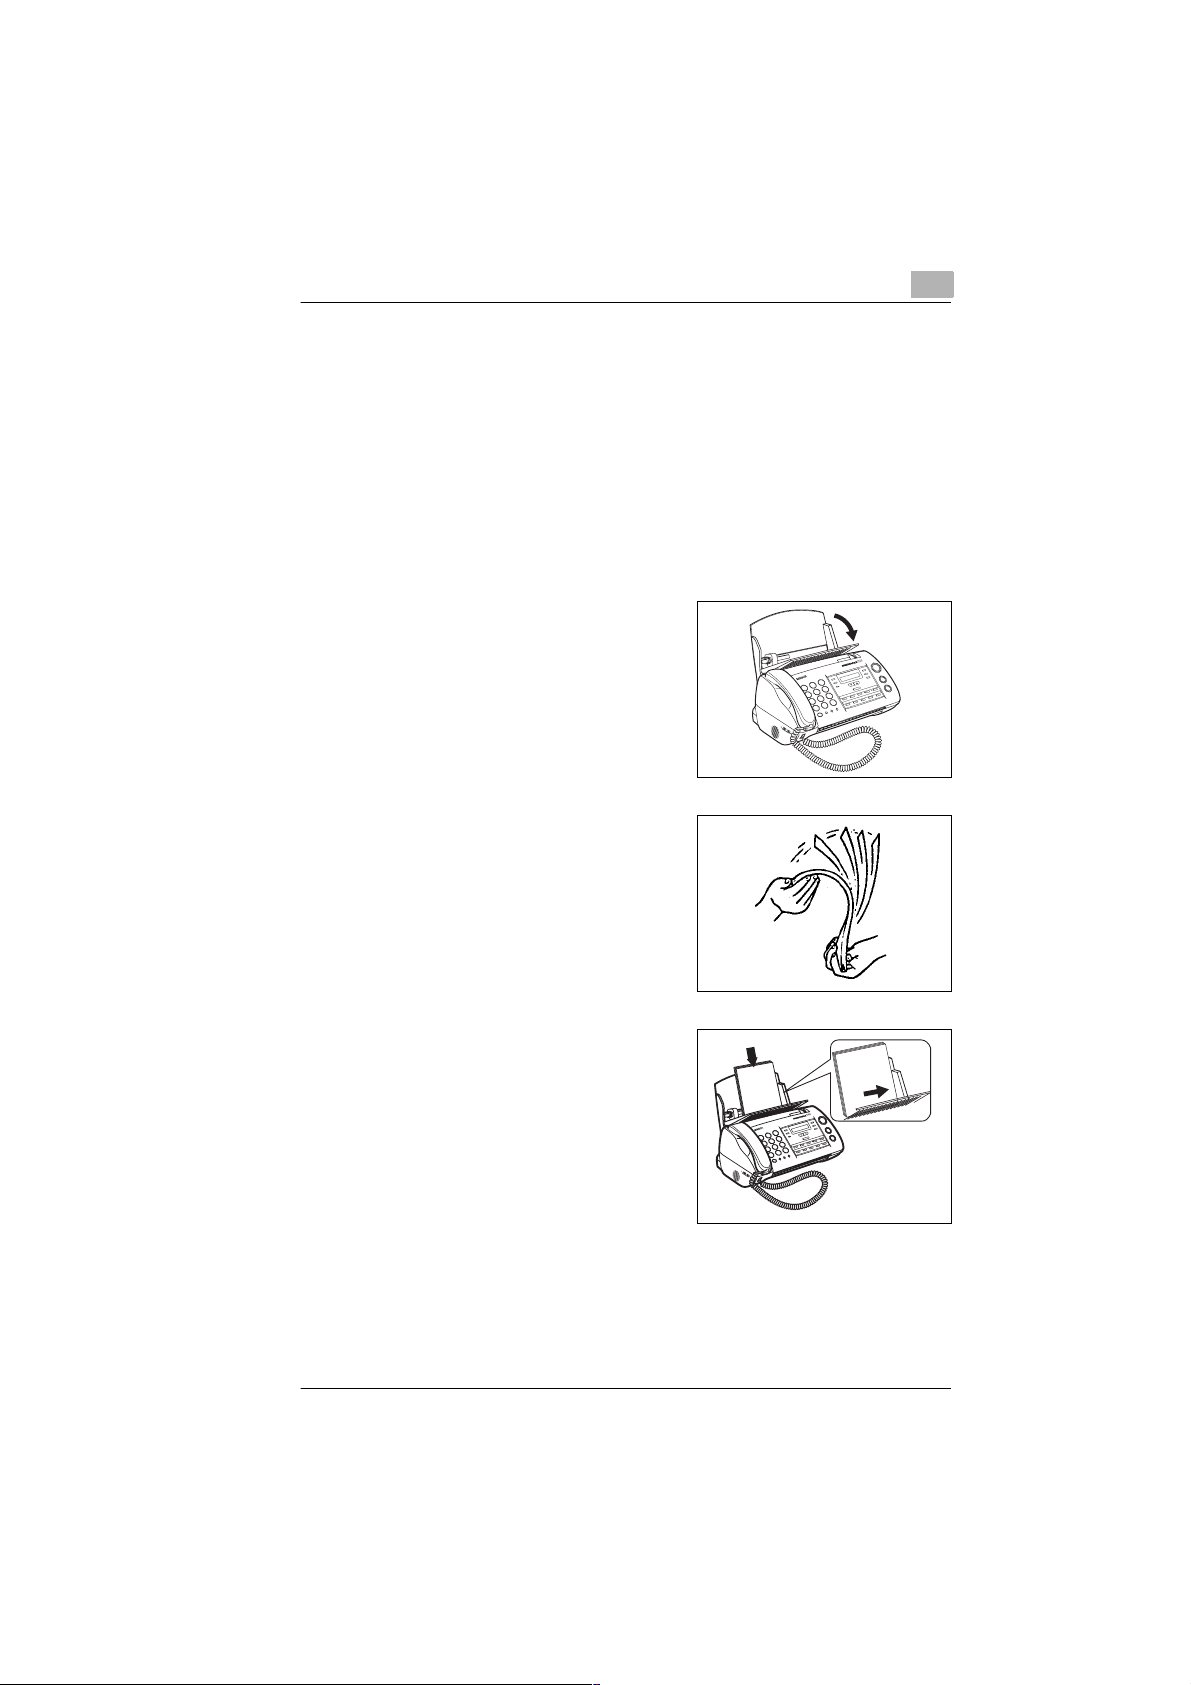
Fold the paper support forwards.
1
Fan through the paper bundle
2
before inserting it.
2
2
) in the paper feeder.
2
Align the paper at the right edge of
3
the paper feeder and slide it
downwards until it rests on the
stopper.
Rev. 1.1.1/22.10.99 MF 1400 2-11
Page 27

2
Slide the left paper guide against
4
the paper.
Close the paper support.
5
Unpacking, installation, setup
Paperguide
2-12 MF 1400 Rev. 1.1.1/22.10.99
Page 28
Unpacking, installation, setup
Re-aligning the printer
Re-align the printer.
Press the [MENU] key 9 times.
1
Confirm your choice by pressing
the [SET] key.
Press the [MENU] key. Confirm
2
your choice by pressing the [SET]
key.
A test page will be printed out.
Determine which line segment on
3
the test print is closest to being
a straight line.
Enter the code of this line segment
4
via the numerical keys. Confirm
your choice by pressing the [SET]
key.
You will hear a beep. The printer is
now re-aligned.
2
9: SET PRINTER ?
2: ALIGN ?
PRINTING
ALIGN (00-30) : 1n
Press the [STOP] key to return to
5
the standard display.
08 Sep. ’99 15:32
✎
Always after replacement of the ink cartridge!
Always re-align printer after replacement of the ink cartridge in order
to get an optimum printing result.
✎
Also re-alignable via PC!
When using your Minolta fax 1400 as PC printer, you c an also re-alig n
the printer unit by means of the control programme, see page 10-10.
Rev. 1.1.1/22.10.99 MF 1400 2-13
Page 29
2
Unpacking, installation, setup
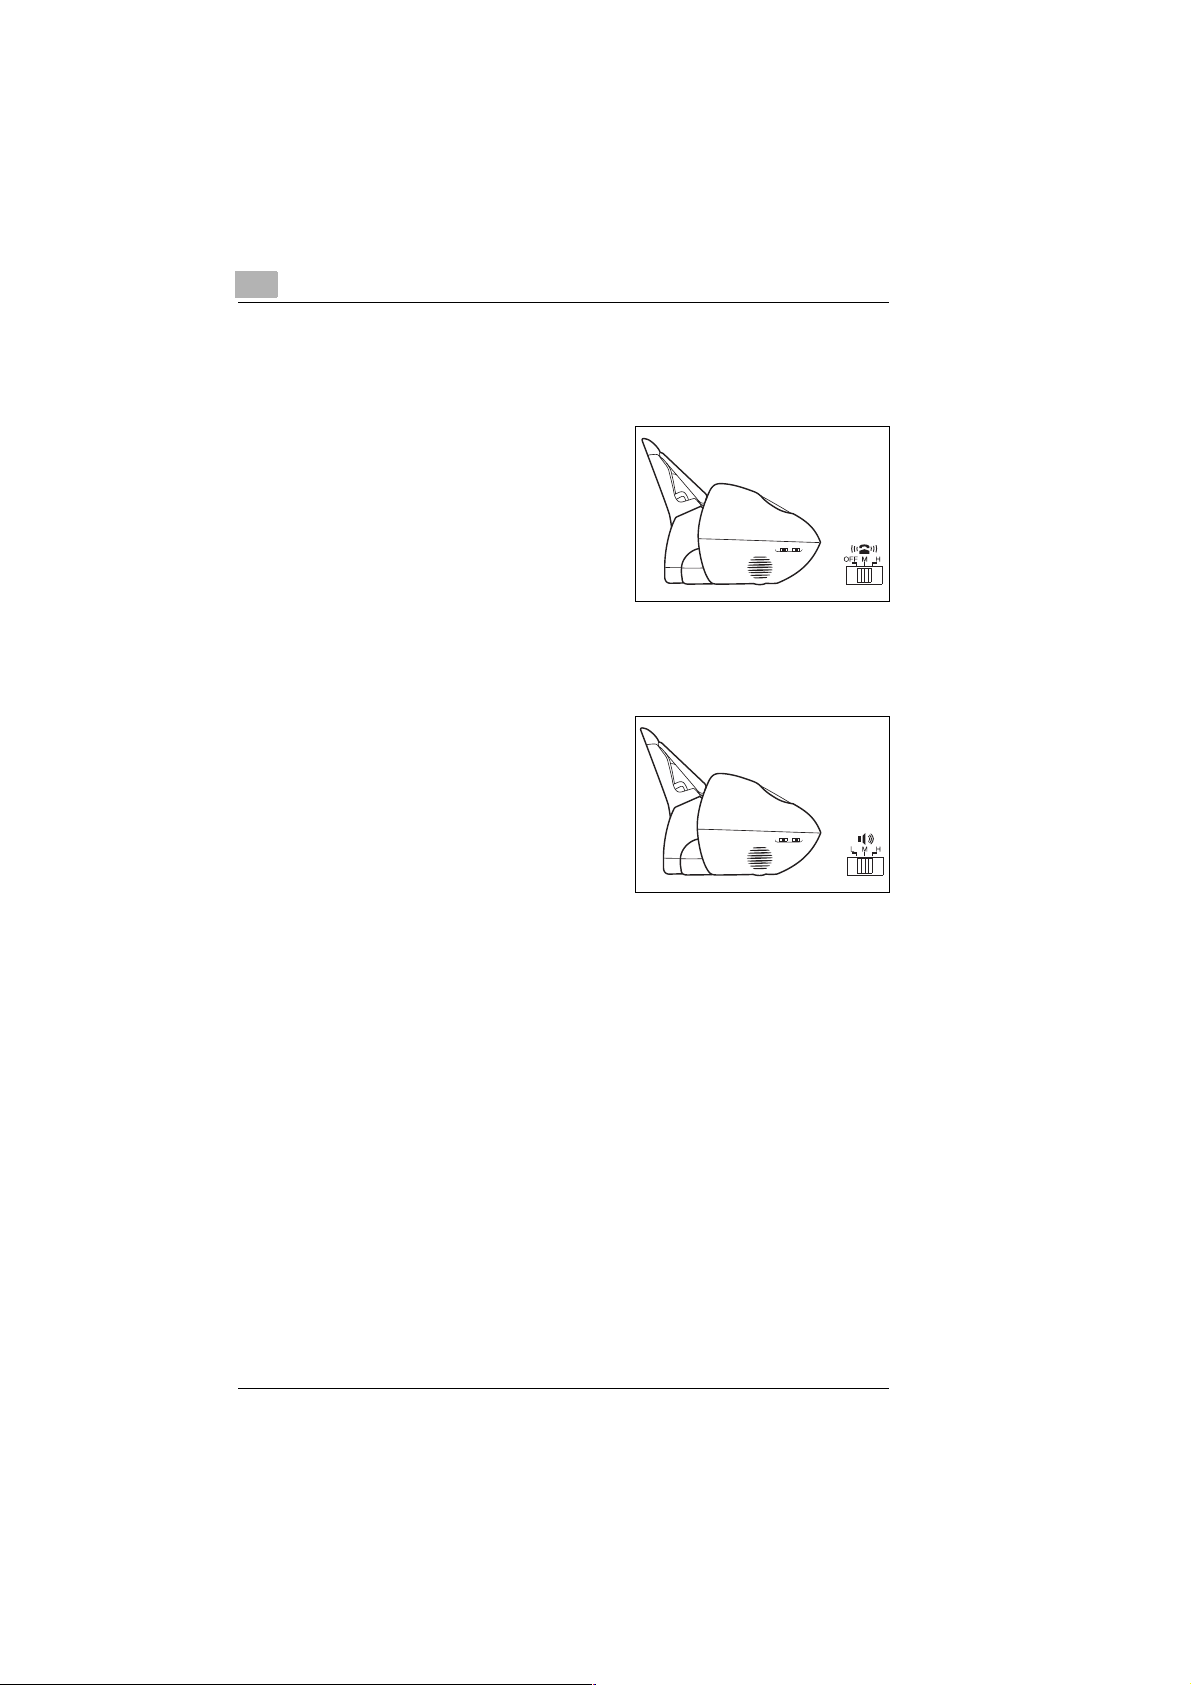
Setting the ringer volume
Set the ringer volume as required. The volume selector switch is
at the left side of the machine.
➜ Select one of the settings:
H Ringer loud
M Ringer normal
OFF Ringer silent
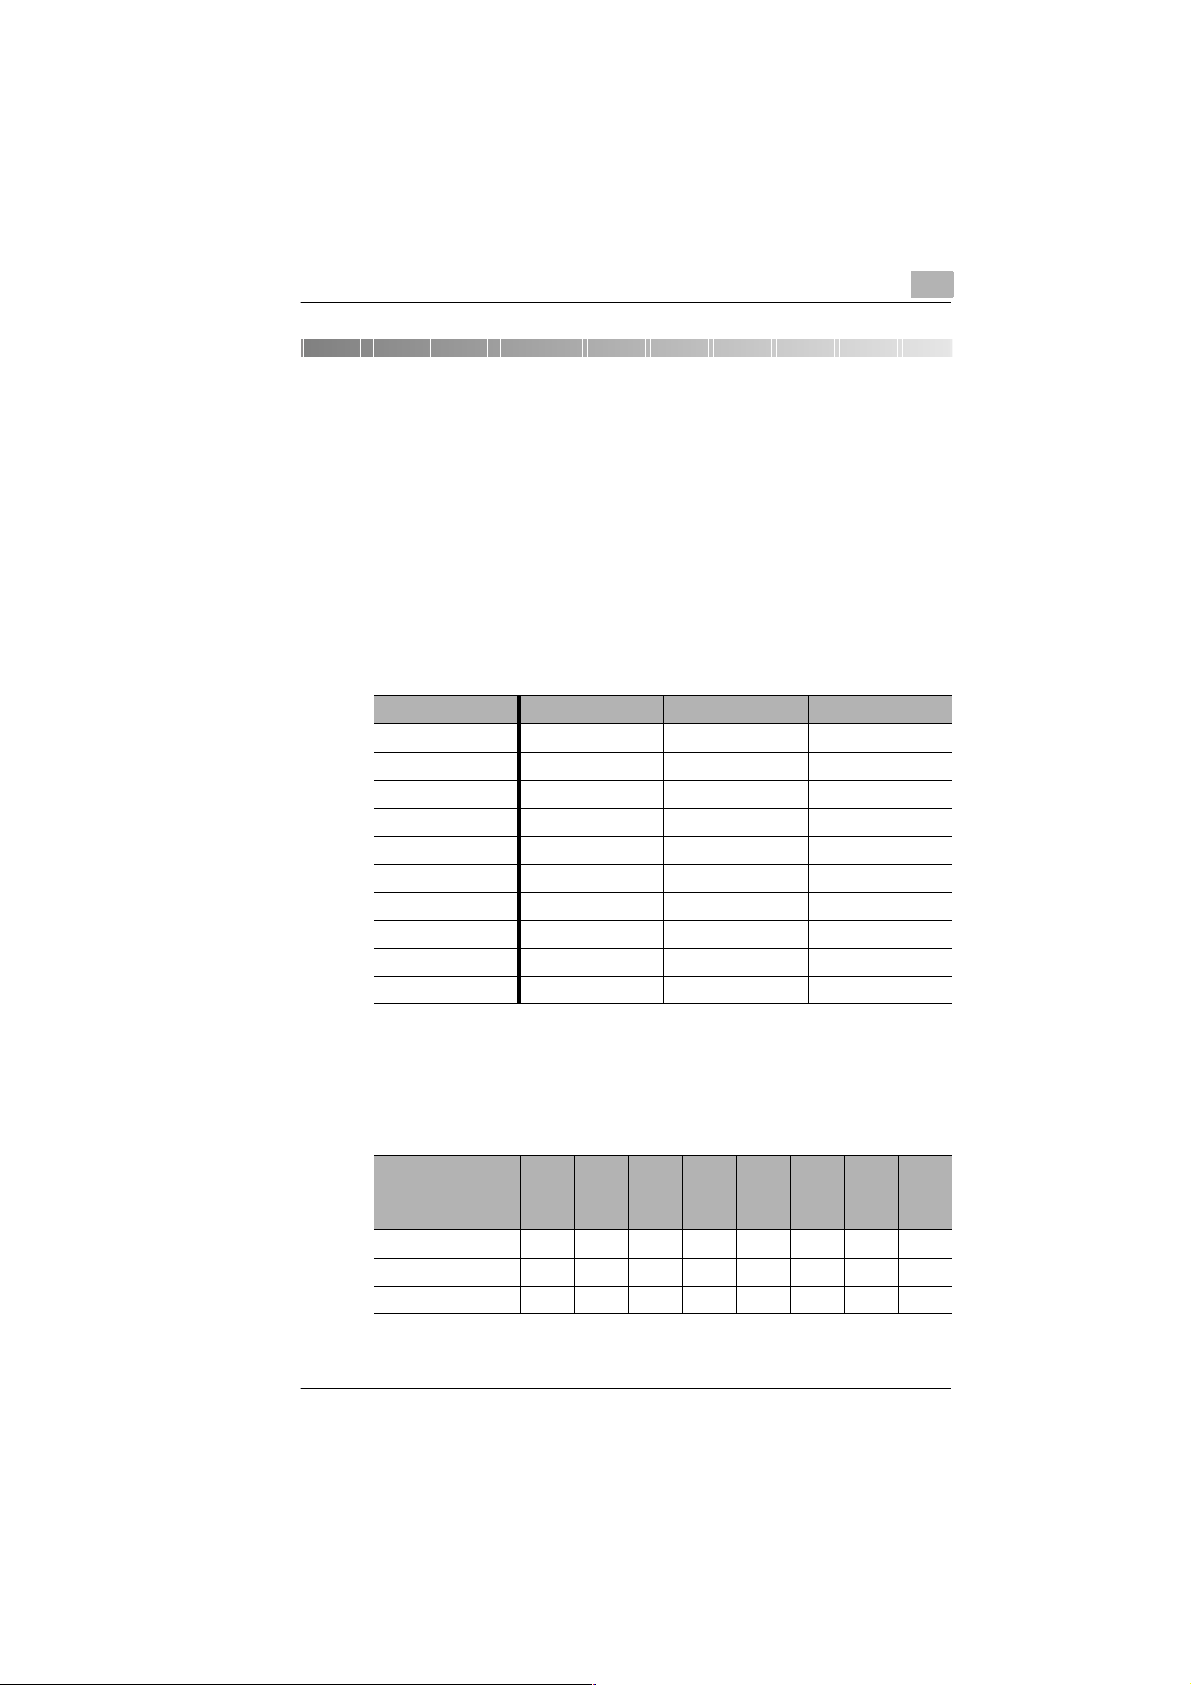
Setting the monitoring volume
Set the monitoring volume as required. The volume selector switch
is at the left side of the machine.
➜ Select one of the settings:
H Monitoring loud
M Monitoring normal
L Monitoring quiet
2-14 MF 1400 Rev. 1.1.1/22.10.99
Page 30
Individual fax machine settings
3 Individual fax machine settings
3.1 Please observe!
You should read these pages thoroughly and become familiar with your
Minoltafax 1400 in order to be able to set the machine to your individual
requirements.
List of letters, symbols and digits
Letters, symbols and digits can be entered via the numerical keys. All
characters accessible by the numerical keys are listed in three groups.
The table below shows how the characters are compiled.
Numerical key Capital letters Small letters Digits
1& ’ ( ) , - . & ’ ( ) , - . 1
2A B Ca b c2
3D E Fd e f3
4G H Ig h i4
5J K Lj k l5
6M N Om n o6
7P Q R Sp q r s7
8T U Vt u v8
9 W X Y Z w x y z 9
0 Space Space 0
3
The respective character will appear depending on how many times you
press the numerical key.
Example:
Numerical key to
call "capital letters"
4GHIGHIGetc.
8TUVTUVTetc.
9 WXYZWXYetc.
Press 1x
Press 2x
Press 3x
Press 4x
Press 5x
Press 6x
Press 7x
etc.
Rev. 1.1.1/22.10.99 MF 1400 3-1
Page 31

3
Individual fax machine settings
Entering letters and digits
When it is possible to freely select a character, a black square
containing the letter "A" will appear at the right end of the display.
Enter a name via the numerical keys.
Select the character group via the
1
[DIRECTORY] arrow key.
❍ A for capital letters
❍ a for small letters
❍ 1 for digits
Press the re spective control pa nel
2
key in order to enter the required
character; see page 3-1.
Press the one-touch key
3
[5 - CURSOR RIGHT], to
confirm your choice.
The cursor will then move to the next position.
Enter the next character.
4
n A
n a
n
n A
Mn A
Mn A
1
Repeat steps 3 and 4 until you
5
have entered all characters.
MUSTERn A
✎
One-touch keys [4], [5] and [0] have double functions!
The one-touch keys [4], [5] and [0] have double functions. For some
procedures, keys [4] and [5] are used move the cursor in the display,
while [0] is used to delete characters:
One-touch key [4] = Cursor to left
One-touch key [5] = Cursor to right
One-touch key [0] = Delete character
3-2 MF 1400 Rev. 1.1.1/22.10.99
Page 32

Individual fax machine settings
Correcting an entered character
If you enter a wrong character, it can be easily corrected as follows:
Press one-t ouch key [4 - CURSOR
1
LEFT], to position the cursor on th e
character to be corrected.
Select the correct character
2
or
press the one-touch key [0 - DELETE] to delete the wrong character.
✎
One-touch keys [4], [5] and [0] have double functions!
The one-touch keys [4], [5] and [0] have double functions. For some
procedures, keys [4] and [5] are used move the cursor in the display,
while [0] is used to delete characters:
One-touch key [4] = Cursor to left
One-touch key [5] = Cursor to right
One-touch key [0] = Delete character
3
MUnTER A
Setting dialling pauses
When storing numbers under a one-touch key or in the directory,
you should include dialling pauses when necessary.
➜ Press the [REDIAL/P] key where
you want to insert a dialling pause.
A semicolon (;) will appear in the
display where you have inserted a
dialling pause.
Rev. 1.1.1/22.10.99 MF 1400 3-3
1234;123456n
Page 33

3
Individual fax machine settings
Cancelling a procedure
Press the [STOP] key to:
G Cancel a started procedure (fax transmission, photocopy, etc.).
G Leave a menu and return to the standard display.
G Cancel a wrong entry.
G To eject an inserted document.
In order to carry out the above functions:
➜ Press the [STOP] key repeatedly when necessary.
Setting the dialling method (MFV/IWV)
The default dialling method is MF (tone) signalling. Due to European
approval legislati on, a switc h-over to i mpulse sig nalling i s not perm issible
at user operation level.
If it is necessary to change your machine to impulse dialling, please
contact your local MINOLTA service centre.
3-4 MF 1400 Rev. 1.1.1/22.10.99
Page 34

Individual fax machine settings
3.2 Setting sender identification data
Please program your sender identification. The receiver will then know
from which machine an incoming fax was transmitted.
Press the [MENU] key 8 times.
1
Confirm your choice via the [SET]
key.
Press the [MENU] key. Confirm
2
your choice via the [SET] key.
Enter your station name (max.
3
24 characters). Confirm your choice
via the [SET] key.
Enter your fax number (max. 20
4
digits). Confirm your choice via the
[SET] key.
❍ Press the [HOLD] key to enter a
"+" sign.
❍ Press the function key [9] to
enter a space.
8: FAX SET-UP ?
2: STATION CODE ?
MUSTERn A
+49 511 123456n
3
Select a PBX mode via the [ MENU]
5
key. Confirm your choice via the
[SET] key.
A beep will be h eard when selecting
OFF or FLASH. The setting is now
stored.
Rev. 1.1.1/22.10.99 MF 1400 3-5
PBX MODE OFF
PBX MODE FLASH
PBX MODE No.
Page 35

3
Individual fax machine settings
For PBX mode only
6
Enter your PBX number (max. 4
digits). Confirm your choice via the
[SET] key.
A beep will be heard. The setting is
now stored.
Press the [STOP] key to return to
7
the standard display.
CALL No. 0n
08 Sep. ’99 15:32
✎
Printing of sender identification data inside or outside the
document?
Set your sender identification data positioning inside or outside the
document via software switch 20. The fax machine is delivered with
the software switch 20 in the 01 position (outside), see page 9-1.
When printing the sen der i den tification data inside the document, the
top 10 mm are not reproduced. This space is then required for the
sender identification data.
3-6 MF 1400 Rev. 1.1.1/22.10.99
Page 36

Individual fax machine settings
3.3 Setting the date and time
The date and time are shown in the standard display of th e machine. The
date and time will also appear in the header of eve ry outg oin g fax and
generated report, as well as in the footer of every incoming fax.
Press the [MENU] key 8 times.
1
Confirm your choice via the [SET]
key.
Press the [SET] key.
2
Enter the date and time via the
3
numerical keys. Confirm your
choice via the [SET] key.
A beep will be heard. The date a nd
time are now stored.
Press the [STOP] key to return to
4
the standard display.
The standard displa y will n ow show
the entered date and time.
3
8: FAX SET-UP ?
1: SET CLOCK ?
n0 02. ’97 12:00
08 Sep. ’99 15:32
✎
Entering 2-digit date and time!
In order to enter the da te (8th June 1 999) and the time (15:32 h rs), the
following keys must be pressed in sequence: 0806991532.
Rev. 1.1.1/22.10.99 MF 1400 3-7
Page 37

3
3.4 Setting the one-touch keys
The Minoltafax 1400 is equipped with 10 one-touch keys. Each key can
be programmed with a fax or number which is frequently called.
These one-touch keys offer:
G One-touch number dialling.
G Administration of up to 10 numbers.
(newly specify, change setting, delete setting)
G Print-out of one-touch key allocation.
Individual fax machine settings
One-touch keys
✎
One-touch keys [4], [5] and [0] have double functions!
For some procedures , keys [4] and [5] are us ed move the curso r in the
display, while [0] is used to delete characters:
One-touch key [4] = Cursor to left
One-touch key [5] = Cursor to right
One-touch key [0] = Delete character
3-8 MF 1400 Rev. 1.1.1/22.10.99
Page 38

Individual fax machine settings
Storing a number under a one-touch key
Store a frequently called number under one of the one-touch keys.
You can then call this number with a single touch of the key.
Press the [MENU] key twice.
1
Confirm your choice via the [SET]
key.
Press the one-touch key [0]-[9]
2
under which you want to store a
number. Confirm your choi ce
via the [SET] key.
Enter the designation of t he number
3
(max. 16 characters). Confirm your
choice via the [SET] key.
Enter the number (max. 32 digits).
4
Confirm your choice via the [SET]
key.
A beep sound will be heard. The
number is now stored.
3
2: SET ONETOUCH ?
O.T. Key = n ?
MUSTERn A
1234 123456n
Is the fax machine connected to a PBX system?
?
➜ Before entering the phone number, press the [R] key to call an
outside line.
Repeat steps 2 to 4 in order to store
5
another number under a different
one-touch key
or
press the [STOP] key to return to
the standard display.
O.T. Key = n ?
08 Sep. ’99 15:32
✎
One-touch key labels for faster identification!
If you fill in the one-touch key lab els, you will be able to find the correct
key much faster.
Rev. 1.1.1/22.10.99 MF 1400 3-9
Page 39

3
Individual fax machine settings
Altering one-touch key allocation
The allocation of a one-touch key can be easily altered, for ex ample, when
the number or name must be changed.
Press the [MENU] key twice.
1
Confirm you r choice via the [SET]
keypage 3-3.
Press the one-touch key [0]-[9]
2
under which you want to store a
number. Confirm your choice
via the [SET] key.
Press the [SET] key.
3
Alter the designation o f the number.
4
Confirm you r choice via the [SET]
key
Alter the number. Confirm your
5
choice via the [SET] key.
A beep will be heard.
The alteration of the one-touch key
is now stored.
2: SET ONETOUCH ?
O.T. Key = n ?
MUSTER :CHANGE
MUnTER A
1234 1n3456
Repeat steps 2 to 4 in order to store
6
another number under a different
one-touch key
or
press the [STOP] key to return to
the standard display.
3-10 MF 1400 Rev. 1.1.1/22.10.99
O.T. Key = n ?
08 Sep. ’99 15:32
Page 40

Individual fax machine settings
Deleting the allocation of a one-touch key
Delete the allocation of a one-touch key if you want to store a different
number under the vacant key at a later date.
Press the [MENU] key twice.
1
Confirm your choice via the [SET]
key.
Press the one-touch key [0]-[9] of
2
the allocation you want to delete.
Confirm your choice via the [SET]
key.
Press the [MENU] key. Confirm
3
your choice by pressing the [SET]
key.
A beep will be heard. The allocation
4
of the one-touch key has been
deleted.
Repeat steps 2 to 4 in order to
5
delete the allocation of another
one-touch key
or
press the [STOP] key to return to
the standard display.
3
2: SET ONETOUCH ?
O.T. Key = n ?
nUSTER :CHANGE
nUSTER :CANCEL
CANCELLED
O.T. Key = n ?
08 Sep. ’99 15:32
Rev. 1.1.1/22.10.99 MF 1400 3-11
Page 41

3
Individual fax machine settings
Printing a list of allocated one-touch keys
Print out a list showing the detailed allocation of each one-touch key.
Press the [ME NÜ] key twice.
1
Press the [COPY] key.
2
A list of the one-touch keys
will be printed.
Press the [STOP] key to return to
3
the standard display.
2: SET ONETOUCH ?
ONETOUCH LIST
08 Sep. ’99 15:32
3-12 MF 1400 Rev. 1.1.1/22.10.99
Page 42

Individual fax machine settings
3.5 Setting up the directory
The Minoltafax-Fax is equipped with an electronic di rectory in which u p to
50 numbers can be stored.
3
*
Arrow keys
[DIRECTORY]
Search
This directory enables:
G Administration of up to 50 numbers.
(new entries, alterations, deletion)
G Printing a list of all entries in the directory.
G Transferring directory entries to one-touch keys.
G Automatic print-out of all dialled numbers.
(Activity report, either daily or after 20 activities)
G Possibility to trace the last time and how often a number
stored in the d irectory was called.
If you have not occupied all 50 storage points, the remaining vacant
storage points will be automatically administered by the machine.
If a number is dialled that is not already s tored in the directory , this number
will be automati cally adde d to the dire ctory. Aft er all vaca nt storage p oints
in the directory have been allocated, the oldest dialled number will be
automatica lly deleted the make room for the newly dialled number.
Rev. 1.1.1/22.10.99 MF 1400 3-13
Page 43

3
Individual fax machine settings
Entering numbers into the directory
You can store up to 50 entries in the electronic directory.
Press the [SEARCH] key.
1
Press the [*] key.
2
Enter the number (max. 32 digits).
3
Confirm you r choice via the [SET]
key.
Is your fax machine connected
?
to a PBX system?
➜ Before entering the number,
press the [R] key to call an
outside line.
Enter the designation of the n umber
4
(max. 16 characters). Confirm your
choice via the [SET] key.
A beep will be heard. The data is
now stored.
n
1234 123456n
MUSTERn A
SEARCH : n
Repeat steps 1 to 4 in order to add
5
another entry to the directory
or
press the [STOP] key to return to
the standard display.
3-14 MF 1400 Rev. 1.1.1/22.10.99
MUSTER
08 Sep. ’99 15:32
Page 44

Individual fax machine settings
Altering a directory number
Altering or correcting an entry in the directory.
Select the entry you wish to alter v ia
1
the [DIRECTORY] arrow keys.
Confirm your choice via the [SET]
key.
Alter the designation of the number.
2
Confirm your choice via the [SET]
key.
Your input is confirmed by a beep.
The alteration is stored.
Press the one-touch key
3
[5 - CURSOR RIGHT].
The respective directory number
will appear in the display.
Press the [SET] key.
4
3
MUSTER
MUnTER A
1234 123456
n234 123456
Alter the number. Confirm the
5
alteration via the [SET] key.
The respective designation of the
directory number will be displayed.
Press the [SET] key in order
6
to confirm the entry in the directory.
Your input is confirmed by the
sound of a beep.
The alterations to the directory entry
are stored.
Press the [STOP] key in order to
7
return to the standard display.
Rev. 1.1.1/22.10.99 MF 1400 3-15
1234 1n3456
MUNTER
08 Sep. ’99 15:32
Page 45

3
Individual fax machine settings
Deleting a directory number
Deleting stored data from the directory.
Select the [DIRECTORY] entry to
1
be deleted via the arrow keys.
Press the one-touch key
2
[0 - DELETE]. Confirm your choice
via the [SET] key.
A beep will be heard. The selected
directory entry has been deleted.
Press the [STOP] key to return to
3
the standard display.
Scrolling through the directory
The entries stored in the directory are sorted according to their dialled
frequency. Frequently dialled numbers are stored at the beginning, and
less frequently dialled numbers are stored at the end of the directory.
➜ Use the arrow keys [DIRECTORY] in order to have a look at the
entries one after the other.
MUSTER
DELETE ?
08 Sep. ’99 15:32
Does the display indicate NO ENTRY?
?
There are no entries stored in the directory.
➜ Enter a directory number in the directory, see page 3-14.
3-16 MF 1400 Rev. 1.1.1/22.10.99
Page 46

Individual fax machine settings
Calling statistics of directory number
Select the required [DIRECTORY]
1
entry via the arrow keys.
Press the one-touch key
2
[5 - CURSOR RIGHT] to call
additional directory information:
❍ Designation of number
❍ Number
❍ Dialling frequency and date
last dialled
Directory entry search
Press the [SEARCH] key.
1
Enter the first letter of the
2
designation to be searched.
Press the left [DIRECTORY]
3
arrow key.
All stored entries be ginning with the
selected letter will be displayed in
sequence.
3
MUSTER
MUSTER
1234 123456
× 5 21. Sep. 12:00
SEARCH : n
SEARCH : M
MUSTER
Rev. 1.1.1/22.10.99 MF 1400 3-17
Page 47

3
Individual fax machine settings
Printing list of directory entry
A convenient list of all entries stored in the directory can be printed.
Select a [DIRECTORY] entry
1
via the arrow keys.
Press the [COPY] key while a
2
directory entry is shown in the
display.
The directory will be printed.
Press the [STOP] key to return
3
to the standard display.
MUSTER
DIRECTORY LIST
08 Sep. ’99 15:32
3-18 MF 1400 Rev. 1.1.1/22.10.99
Page 48

Individual fax machine settings
Transferring a directory entry to a one-touch key
A directory entry can be transferred to a one-touch key. When
transferring, the directory entry will be automatically deleted
from the directory.
Select the entry to be transfer red to
1
a one-touch key via the
[DIRECTORY] arrow keys.
Press the [MENU] key.
2
Press the one-touch key [0]-[9]
3
which should receive the
transferred entry. Confirm this
choice via the [SET] key.
A beep will be heard. The ent ry has
now been deleted from the directory
and is stored under the selected
one-touch key.
3
MUSTER
O.T. LOCATION ?
O.T. Key 1 = 1 ?
Press the [STOP] key to return to
4
the standard display.
08 Sep. ’99 15:32
✎
Directory or one-touch key?
When transferring an entry from the dire cto ry to a one-t ouc h key , the
selected entry will be automatically deleted from the directory.
Rev. 1.1.1/22.10.99 MF 1400 3-19
Page 49

3
Individual fax machine settings
3.6 Switching activity report on/off
Switching on the activity r eport
An automatic print-out of the activity report can be generated. You can
choose between a daily print-out or an automatic print-out of the activity
report after every respective 20 transmissions.
Press the [MENU] key 8 times.
1
Confirm your choice via the
[SET] key.
Press the [MENU] key three times.
2
Confirm your choice via the
[SET] key.
Press the [ME NU] key repeatedly
3
until ACT. REPORT ON can be
seen in the display. Confirm your
choice via the [SET] key.
Enter the time of day when the
4
activity report sh ould be printed out.
Confirm your choice via the
[SET] key.
or
Do not enter any time of day.
Confirm you r choice via the [SET]
key. The activity report will then be
automatically pr inted out after every
respective 20 transmissions.
A beep will be heard. The activity
report function has been activated.
8: FAX SET-UP ?
4: ACT. REPORT ?
ACT. REPORT ON
PRINT TIME 16:00
PRINT TIME : n
Press the [STOP] key to return to
5
the standard menu.
08 Sep. ’99 15:32
✎
Energy saving mode deactivated
When you enter a time of day - as des cribed under item 4 - the energy
save mode will be deactivated.
3-20 MF 1400 Rev. 1.1.1/22.10.99
Page 50

Individual fax machine settings
Switching off the activity report
The automatic activity report can also be switched off.
Press the [MENU] key 8 times.
1
Confirm your choice via the
[SET] key.
Press the [MENU] key three times.
2
Confirm your choice via the
[SET] key.
Press the [MENU] key repeatedly
3
until ACT. REPORT OFF can be
seen in the display. Confirm your
choice via the [SET] key.
Press the [STOP] key to return to
4
the standard menu.
Manually started print-out of activity report
You can also manually start a print-out of the activity report. The data in
the report will not be deleted after printing.
➜ Press and hold the [SET] and
[COPY] keys simultaneously for
approximately one second.
The activity report will be printed.
3
8: FAX SET-UP ?
4: ACT. REPORT ?
ACT. REPORT OFF
08 Sep. ’99 15:32
ACTIVITY REPORT
Rev. 1.1.1/22.10.99 MF 1400 3-21
Page 51

3
Individual fax machine settings
3-22 MF 1400 Rev. 1.1.1/22.10.99
Page 52

Sending documents
4 Sending documents
4.1 Please observe the following!
Characteristics of documents to be transmitted
Up to 20 documents (with same format and thickness) can be placed
in the document feeder. The documents must not be larger or smaller than
the following dimensions:
4
Maximum document width Minimum document wid th
216mm
184mm
1500mm
Paper thickness 0,05 to 0,15mm 0,08 to 0,13mm
Feed
direction
With one document With numerous documents
148mm
Feed
direction
Actual sensing width
208mm
Feed
direction
CAUTION
Observe the following instructions!
➜ If a document is lo nge r than 1500 m m, th e fax mach ine w ill re cogni se
this as a jammed document and stop the transmission.
➜ All paper clips and staples mus t be remov ed from a doc ument be fore
inserting it into the fax machine.
➜ Ink, adhesive and correction fluid must be completely dry before
inserting a document into the fax machine.
➜ Yellow, green-yellow and light-blue text will not be transmitted.
➜ Do not insert carbon paper, or paper coated with wax or plastic.
Rev. 1.1.1/22.10.99 MF 1400 4-1
Page 53

4
Sending documents
Interrupting a procedure
Pressing the [STOP] key will:
G Stop a started procedure (fax transmission, photocopy, etc.).
G Leave the menu and return to the standard display.
G Cancel wrongly entered data.
G Eject an inserted document.
If you wish to carry out the above functions:
➜ Press the [STOP] key numerously when necessary.
4-2 MF 1400 Rev. 1.1.1/22.10.99
Page 54

Sending documents
4.2 Inserting a document
Place up to 20 sheets in the document feeder.
Use only normal paper of good quality as follows:
✔ Paper thickness:
Single document 0,05 to 0,15mm
Numerous documents 0,08 to 0,13mm (per document)
Insert the document with its face
1
downwards in the document feede r.
The document will be autom atica lly
recognised and then pulled into
the machine.
Adjust the right document
2
guide according to the width
of the document.
4
✎
Do you want to transmit more than 20 document sheets?
Quite simple! Just insert further document sheets into the document
feeder during the course of transmission.
Rev. 1.1.1/22.10.99 MF 1400 4-3
Page 55

4
4.3 Setting the resolution and contrast
The Minoltafax 1400 enables you to adjust the resolution and contrast in
numerous stages. This will allow optimum transmission quality with an
optimum transmission duration.
Setting the resolution for present transmission
The transmission resolution grade can be set as follows:
Insert the document into the
1
document feeder and adjust the
document guide accordingly.
Select the required transmission
2
quality via the [RESOLUTION] key.
❍ Standard – for standard text of good quality
❍ Fine – for text and graphics with fine lines
❍ Super-fine – for text and graphics with extremely fine lines
❍ Gray scale – for photos and graphics with Gray scales
Start the fax transmission in the
3
normal way.
STANDARD
FINE
Sending documents
4-4 MF 1400 Rev. 1.1.1/22.10.99
Page 56

Sending documents
Permanently setting the transmission resolution
The resolution of the Minoltafax 1400 in standby mode can be set
via the software switches.
Press the [MENU] key 8 times.
1
Confirm your choice via the
[SET] key.
Press the [MENU] key twice.
2
Confirm your choice via the
[SET] key.
Press the numerical ke ys [2] and [7]
3
for software switch 27. Confirm your
choice via the [SET] key.
Enter the code as required via the
4
numerical keys :
❍ 00 (Std. – for standard text)
❍ 01 (Fine – for text and graphics with fine lines)
❍ 02 (Super-fine – for text and graphics with extremely fine lines)
❍ 03 (Gray scale – for photos and graphics with Gray scales)
❍ 04 (Save last setting)
4
8: FAX SET-UP ?
3: FEATURE SW. ?
( 2 7 ) RESOLUTION
STD. ( 0 0 )
Press the [SET] key.
5
The setting is now stored.
Press the [STOP] key twice to
6
return to the standard display.
08 Sep. ’99 15:32
✎
Saving the last setting!
When entering code 04 (last setting), the fax machine will not be
returned to standby mode. The last setting which was selected
via the [RESOLUTION] key will be retained.
Rev. 1.1.1/22.10.99 MF 1400 4-5
Page 57

4
Sending documents
Setting the contrast
The contrast of a fax transmission can be set via the software switches.
Press the [MENU] key 8 times.
1
Confirm your choice via the
[SET] key.
Press the [MENU] key twice.
2
Confirm your choice via the
[SET] key.
Press the numerical ke ys [2] and [8]
3
for software switch 28. Confirm your
choice via the [SET] key.
Enter the code as required via the
4
numerical keys:
❍ 00 (for document with nor mal contrast)
❍ 01 (for very light document with very little contrast)
Press the [SET] key.
5
The setting is now stored.
8: FAX SET-UP ?
3: FEATURE SW. ?
( 2 8 ) CONTRAST
NORMAL ( 0 0 )
Press the [STOP] key twice to
6
return to the standard display.
4-6 MF 1400 Rev. 1.1.1/22.10.99
08 Sep. ’99 15:32
Page 58

Sending documents
4.4 Sending a document
Dialling the number via the numerical keys
The receiving fax machine can be dialled via the numerical keys.
Insert the document into the
1
document feeder and adjust the
document guide accordingly.
If required, select the required
2
transmission quality via the
[RESOLUTION] key.
Enter the number via the nume rical
3
keys.
Is your fax machine connected
?
to a PBX system?
➜ Before dialling the number,
press the [R] key to call an
outside line.
4
STANDARD
STANDARD
1234 123456
Press the [START] key.
4
The fax transmission will start
as soon as the receiving fax
machine sends a signal that it
is ready to receive.
The number of the receiving fax
machine will appear in the display.
Rev. 1.1.1/22.10.99 MF 1400 4-7
1234 123456
TRANSMISSION
+49 1234 123456
Page 59

4
Dialling a number via redial
The last dialled number can be redialled via redial.
Insert the document into the
1
document feeder and adjust the
document guide accordingly.
If required, select the required
2
transmission quality via the
[RESOLUTION] key.
Press the [REDIAL/P] key.
3
The fax transmission will start
as soon as the receiving fax
machine sends a signal that it
is ready to receive.
The number of the receiving fax
machine will appear in the displ ay.
STANDARD
STANDARD
1234 123456
TRANSMISSION
+49 1234 123456
Sending documents
4-8 MF 1400 Rev. 1.1.1/22.10.99
Page 60

Sending documents
Dialling a number via a one-touch key
A number can be called via a one-touch key.
Insert the document into the
1
document feeder and adjust the
document guide accordingly.
If required, select the required
2
transmission quality via the
[RESOLUTION] key.
Press the respecti ve o ne-touc h ke y
3
under which the required number
is stored.
The fax transmission will start as
soon as the receiving fax machine
sends a signal that it is ready
to receive.
The number of the receiving fax
machine will appear in the display.
✎
4
STANDARD
STANDARD
MUSTER
TRANSMISSION
+49 1234 123456
More information about the one-touch keys?
Please consult page 3-8 for detailed information how to store, alter
or delete numbers stored under a one-touch key.
Rev. 1.1.1/22.10.99 MF 1400 4-9
Page 61

4
Sending documents
Dialling a number via the directory
A number can be selected from the electronic directory for
immediate dialling.
Insert the document into the
1
document feeder and adjust the
document guide accordingly.
If required, select the required
2
transmission quality via the
[RESOLUTION] key.
Select the required number via the
3
[DIRECTORY] arrow keys.
Press the [START] key.
4
The fax transmission will start
as soon as the receiving fax
machine sends a signal that it
is ready to receive.
The number of the receiving fax
machine will appear in the displ ay.
STANDARD
STANDARD
MUSTER
1234 123456
TRANSMISSION
+49 1234 123456
✎
More information about the electronic directory?
Please consultpage 3-1 3 for detailed inform ation how to store , alter or
delete numbers stored in the electronic directory.
4-10 MF 1400 Rev. 1.1.1/22.10.99
Page 62

Sending documents
Dialling and number and monitoring a call
It is possible to dial a number and monitor the fax transmission.
Insert the document into the
1
document feeder and adjust the
document guide accordingly.
If required, select the required
2
transmission quality via the
[RESOLUTION] key.
Pick up the handset
3
or
press the [MONITOR] key.
Dial the receiving fax number:
4
❍ Manually
❍ Via one-touch key
❍ Via directory
❍ Via r edial
The fax transmission will start
as soon as the receiving fax
machine sends a signal that it
is ready to receive.
The number of the receiving fax
machine will appear in the display.
4
STANDARD
STANDARD
STANDARD
MUSTER
1234 123456
TRANSMISSION
+49 1234 123456
Was the call answered by a person?
?
The fax machine at the receiving end must be switched over
to fax operation.
➜ If fax machine si gnals can be heard c oming from the receivi ng end,
start the fax transmission via the [START] key.
✎
Hang up the handset ... and then?
After the fax transmission has started, you can hang up the handset.
The fax transmission will not be interrupted.
Rev. 1.1.1/22.10.99 MF 1400 4-11
Page 63

4
Sending documents
Setting page count function
A page count function can be activated so that numerous pages will be
received at the other end with individual page numbers.
P. 1/3
Insert the document into the
1
document feeder and adjust the
document guide accordingly.
Press the [MENU] key four times.
2
Confirm your choice via the
[SET] key.
Enter the quantity of pages to be
3
transmitted. Confirm y our choice via
the [SET] key.
A beep will be heard.
Start the fax transmission in the
4
normal way.
P. 2/3
P. 3/3
STANDARD
4: # PAGES ?
PAGE ? P. 0 n
STANDARD
✎
Entered page quantity = quantity of transmitted pages?
If the entered page quantity is not identical to the quantity of
transmitted pages, an error message will appear in the activity report
and transmission report. See page 9-3.
4-12 MF 1400 Rev. 1.1.1/22.10.99
Page 64

Sending documents
4.5 Sending a document overseas
When a fax is sent over ext remely long d istances, the transmission qu ality
can be impaired by interferenc e in the tele pho ne lin es . Interfe renc e can
be avoided by reducing the fax transmission speed.
Reducing the fax transmission speed
Insert the document into the
1
document feeder and adjust the
document guide accordingly.
Press the [MENU] key.
2
Press the [#] key.
3
A beep will be heard. The fax
transmission speed i s now reduc ed.
Start the fax transmission in the
4
normal way.
4
STANDARD
1: POLLING Rx.
4800 BPS SET
✎
Fax transmission speed permanently altered?
A change of transmission speed only applies to the present fax
transmission.
By the way! Interference caused by poor quality telephone lines can
also be avoided by reducing the fax transmission speed.
Rev. 1.1.1/22.10.99 MF 1400 4-13
Page 65

4
4.6 Delayed document transmission
Setting delayed document transmission
The timer can be programmed to send a fax at a later time.
Insert the document into the
1
document feeder and adjust the
document guide accordingly.
If required, select the required
2
transmission quality via the
[RESOLUTION] key.
Press the [MENU] key three
3
times. Confirm your choi ce via
the [SET] key.
Enter the required transmission
4
start time via the numerical keys.
Confirm your choice via the
[SET] key.
STANDARD
STANDARD
3: TIMER Tx. ?
START TIME 16:0n
Sending documents
Dial the receiving fax number:
5
❍ Manually
❍ Via one-touch key
❍ Via directory
❍ Via r edial
Press the [SET] key.
6
A beep will be heard. The timer
function is now active.
The display will repeatedly switch
over between the programmed
transmission time and resolution
grade.
PARTY ?
1235 123456
< TIMER Tx. 1 6 : 0 0 >
STANDARD
✎
Automatic print-out of transmission report !
It is possible to automatically receive a printed transmission report
after every fax transmission. See page 4-14.
4-14 MF 1400 Rev. 1.1.1/22.10.99
Page 66

Sending documents
Altering transmission delay time
The timer for a delayed fax transmission can be altered.
Press the [MENU] key three
1
times. Confirm you r choi ce via
the [SET] key.
Press the [MENU] key once.
2
Confirm your choice via the
[SET] key.
Enter the new transmission time via
3
the numerical keys. Confirm your
choice via the [SET] key.
If necessary, press the [STOP] key
4
to completely del ete the old numbe r
and then dial the new num ber of the
receiving fax machine:
❍ Manually
❍ Via one-touch key
❍ Via directory
❍ Via r edial
4
3: TIMER Tx. ?
CHANGE ?
START TIME 17:0n
PARTY ?
1234 123456
Press the [SET] key.
5
A beep will be heard. The altered
timer function is now stored.
The display will repeatedly switch
over between the programmed
transmission time and resolution
grade.
Rev. 1.1.1/22.10.99 MF 1400 4-15
< TIMER Tx. 1 7 : 0 0 >
STANDARD
Page 67

4
Sending documents
Deleting transmission delay time
The timer for a delayed fax transmission can be deleted.
Press the [MENU] key three
1
times. Confirm your choi ce via
the [SET] key.
Press the [SET] key.
2
A beep will be heard. The
transmission delay time has
now been deleted.
Press the [STOP] key to return
3
to the standard display.
The inserted document will be
automatically ejected.
3: TIMER Tx. ?
CANCEL ?
CANCELLED !
08 Jun. ’99 15:32
4-16 MF 1400 Rev. 1.1.1/22.10.99
Page 68

Sending documents
Automatic print-out of delayed transmission report
It is possible to receive a printed report of a delayed transmission. This
report will enable you to check whether the delayed transmission was
successfully carried out.
Press the [MENU] key six
1
times. Confirm you r choi ce via
the [SET] key.
Press the [MENU] key twice.
2
Confirm your choice via the
[SET] key.
Press the numerical ke ys [3] and [2]
3
for software switch 32. Confirm your
choice via the [SET] key.
Enter the required code via the
4
numerical keys :
❍ 00 (no printed report)
❍ 01 (print report after every delayed transmission)
❍ 02 (print report only after unsuccessful transmission)
4
6: FAX SET-UP ?
3: FEATURE SW. ?
( 3 2 ) TIMER REPORT
ON: ERROR ( 0 2 )
Press the [SET] key.
5
The setting is now programmed.
Press the [STOP] key twice to
6
return to the standard menu.
08 Jun. ’99 15:32
✎
Software switches are very practical!
This fax machine can be pro gramme d to you r pers ona l requ irem en ts
by means of software switches. A list of all settings and instructions
how to alter them can be seen on page 9-1.
Rev. 1.1.1/22.10.99 MF 1400 4-17
Page 69

4
4.7 Broadcasting of Fax Documents
The Minoltafax 1400 offers the possibility of automatically broadcasting
stored docume nts to several receivers in succession.
You can do the following:
G store a total of 50 pages for broadcasting,
G program up to 20 receivers per broadcast order,
G program up to 10 different broadcast orders.
Broadcast orders are automatically deleted after the broadcasting
process has been carried out successfully.
✎
Make sure to print out a list of the broadcast receivers!
When setting up a broadcast, make sure to print the list of the
broadcast receiv ers en ablin g you to ch eck a t any point of tim e t he job
number of your broadcast message and to which directory numbers
your broadcast message is sent.
Sending documents
4-18 MF 1400 Rev. 1.1.1/22.10.99
Page 70

Sending documents
Set Up Immediate Broadcast
Set up a broadcast in order to automatically send a fax document to
several rece ivers.
Insert the fax document into the
1
document feeder and adjust the
feeder guide.
If necessary, change the
2
transmission quality via the
[RESOLUTION] key in accordance
with the fax document.
Press the [START] key.
3
Has a broadcast been set up
?
already?
If a broadcast has been set
already, the mess age B/O SET?
will be displayed.
➜ Press the [SET] key in order to
set up another broadcast.
4
STANDARD
STANDARD
0 : NOW 1 : LATER
B/O SET ?
0 : NOW 1 : LATER
Press the num erical key [0].
4
Dial the first receiving party’s
5
directory number.:
❍ manually
❍ via one-touch key
❍ via directory
Press the [SET] key in order to
6
enter another directory number
or
press the [COPY] key,
if you do not want to enter another
directory number.
A list of all r eceivers of the
broadcast is printed.
Rev. 1.1.1/22.10.99 MF 1400 4-19
0 : NOW 1 : LATER
PARTY ?
1235 123456
PARTY ?
Page 71

4
Sending documents
Repeat steps 5 and 6 in order to set
7
up additional receivers of the
broadcast message.
Press the [START] key.
8
The documents to be sent will be
fed in and stored. The job number of
the broadcast order and the am ount
of pages which can probably still be
read in by the memory will be
displayed upon which broa dcasting
will start immediately.
PARTY ?
JOB : 0 LEFT : 50
< B/O 0 17 : 00 >
✎
Automatic Print of Transmission Report
The transmission report can be printed automatically after the
transmission has been finished, see page 4-14.
4-20 MF 1400 Rev. 1.1.1/22.10.99
Page 72

Sending documents
Setting delayed broadcast
Set up a broadcast in order to automatically send a fax document to
several receivers at a later time.
Insert the fax documents into the
1
document feeder and adjust the
feeder guide.
If necessary, change the
2
transmission quality via the
[RESOLUTION] key in accordance
with the fax document.
Press the [START] key..
3
Has a broadcast order been se t
?
already?
If a broadcast order has been
set already, the message B/ O
SET? is displayed.
➜ Press the [SET] key in order to
set up another broadcast.
4
STANDARD
STANDARD
0 : NOW 1 : LATER
B/O SET ?
0 : NOW 1 : LATER
Press the num erical key [1].
4
Enter the start time of th e broadcast
5
via the numerical keys. Confirm
your input by pressing the [SET]
key.
Dial the first receiving party’s
6
directory number:
❍ manually
❍ via one-touch key
❍ via directory
Rev. 1.1.1/22.10.99 MF 1400 4-21
0 : NOW 1 : LATER
START 17:0n
PARTY ?
1235 123456
Page 73

4
Press the [SET] key in order to ent er
7
the directory number of another
receiver
or
press the [COPY] key after having
entered the directory numbers of all
receivers.
A list of all r eceivers of the
broadcast message is printed.
Repeat steps 5 and 6 in order to set
8
up additional receivers of the
broadcast message.
Press the [START] key.
9
The documents to be sent will be
fed in and stored. The job number of
the broadcast order and the am ount
of pages which can probably still be
read in by the memory will be
displayed. Broadcasting will begin
at the indicated start time.
Sending documents
PARTY ?
PARTY ?
JOB : 0 LEFT : 50
< B/O 0 17 : 00 >
✎
Automatic Print of Transmission Report!
The transmission report can be printed automatically after the
transmission has been finished, see page 4-14.
4-22 MF 1400 Rev. 1.1.1/22.10.99
Page 74

Sending documents
Cancelling Broadcast Order
How to cancel a broadcast order.
Press the [START] key twice.
1
Press the [SET] key.
2
Enter the job number of the
3
broadcast order you want to ca ncel
with the numerical keys. Confirm
your input by pressing the [SET]
key.
The entry is confirmed by a beep.
The broadcast order is cancelled.
Press the [STOP] key in order to
4
return to the standard display.
✎
4
B/O CANCEL ?
JOB No. = n ?
JOB No. = 0 ?
08 Sep. ’99 15:32
Broadcast orders are automatically deleted!
A broadcast order is automatically deleted after the broadcasting job
has been finished.
Rev. 1.1.1/22.10.99 MF 1400 4-23
Page 75

4
Sending documents
Setting up automatic print of broadcast report
Have the transmission report automatically printed after the broadcast
order has been finished in order to enable you to check whether the
broadcast order has been carried out successfully.
Press the [MENU] key eight times.
1
Confirm your choi ce by pressi ng the
[SET] key.
Press the [MENU] key twice.
2
Confirm your choi ce by pressi ng the
[SET] key.
Press the numerical ke ys [3] and [5]
3
for software switch-35 ON. Confirm
your entry by pressing the [SET]
key.
Select via the following numerical
4
keys as indicated below:
❍ 00 (OFF)
❍ 01 (ON)
8: FAX SET-UP ?
3: FEATURE SW. ?
( 3 5 ) B/O REPORT
ON ( 0 1 )
Press the [SET] key.
5
The setting is stored.
Press the [STOP] key tw ice in order
6
to return to the standard display.
08 Sep. ’99 15:32
✎
Software switches are handy!
The fax machine can be individually set by means of the software
switches. What possibilities of settings are available and how to
change the settings: see page 9-1.
4-24 MF 1400 Rev. 1.1.1/22.10.99
Page 76

Sending documents
4.8 Activating redial function
If it is not possible to make a connection, the nu mber will be auto matically
redialled after 3 minutes. It is also po ssible to manuall y activate th e redial
function.
Setting the quantity of redial attempts
Setting the quantity of automatic redial attempts if the receiving fax
machine cannot be contacted. The default setting is "02 - redial 2 times".
Press the [MENU] key 8 times.
1
Confirm your choice via the
[SET] key.
Press the [MENU] key twice.
2
Confirm your choice via the
[SET] key.
Enter the required code via the
3
numerical keys :
❍ 05 (redial with programmed transmission delay)
❍ 06 (automatic redial with standard transmission)
4
8: FAX SET-UP ?
3: FEATURE SW. ?
( 0 6 ) AUTO REDIAL
Press the [SET] key.
4
Enter the required code via the
5
numerical keys :
❍ 00 (no redial attempt)
❍ 01 (1 x redial attempt)
❍ 02 (2 x redial attempts)
❍ ...etc, etc.
❍ 11 (11 x redial attempts)
Press the [SET] key.
6
The setting is now programmed.
Press the [STOP] key twice to
7
return to the standard display.
Rev. 1.1.1/22.10.99 MF 1400 4-25
2 TIMES ( 0 2 )
08 Sep. ’99 15:32
Page 77

4
Sending documents
Starting manual redial function
A redial function can be manually started.
➜ Press the [REDIAL/P] key.
The redial function will now start.
4-26 MF 1400 Rev. 1.1.1/22.10.99
Page 78

Sending documents
4.9 ECM ON/OFF
What does ECM mean?
The Minoltafax 1400 trans mits data in the IT U-T ECM (= ErrorCorrection
Mode). This is the communication standard for fax machines of group 3
(G3). With this procedure lo st data parts ar e sent rep eatedly ena bling the
transmission error rate to be reduced considerably.
The transmission time is increased when the ECM is switched on.
However, less time is req uired in total than it woul d take if one page woul d
have to be transmitted once more.
ECM permanently ON/OFF
How to select a permanent ECM setting.
Press the [MENU] key eigh t times.
1
Confirm your choi ce by pressi ng the
[SET] key.
Press the [MENU] key twice.
2
Confirm your choi ce by pressi ng the
[SET] key.
4
8: FAX SET-UP ?
3: FEATURE SW. ?
Press the numerical ke ys [2] and [4]
3
for software switch-24 ON. Confirm
your entry by pressing the [SET]
key.
Make your input via the following
4
numerical keys as indicated below:
❍ 00 (OFF)
❍ 01 (ON)
❍ 02 (NOT RETURN)
Press the [SET] key.
5
The setting is stored.
Press the [STOP] key twice i n order
6
to return to the standard display.
Rev. 1.1.1/22.10.99 MF 1400 4-27
( 2 4 ) ECM
ON ( 0 1 )
08 Sep. ’99 15:32
Page 79

4
Sending documents
ECM for one single fax transmission ON/OFF
How to select the ECM setting for one single fax transmission.
Insert the fax document into the
1
document feeder and adjust the
feeder guide.
If necessary, change the
2
transmission quality via the
[RESOLUTION] key depending on
the quality of the fax document.
Press the [MENU] key six times.
3
Confirm your choice by pressing the
[SET] key.
Select the ON or OFF setting by
4
pressing the [MENU] key. Confirm
your choice by pressing the [SET]
key.
The input is confirmed by a beep.
STANDARD
STANDARD
6: ECM ?
ECM ON ?
ECM OFF ?
STANDARD
Carry out fax transmission as usual.
5
✎
Change to permanent ECM setting!
If you wish to have the ECM permanently set, see page 4-27.
4-28 MF 1400 Rev. 1.1.1/22.10.99
Page 80

Receiving faxes
5 Receiving faxes
5.1 Receiving faxes automatically
Incoming calls will automatically be recognised as fax connections.
Switching to automatic fax receiving mode.
➜ Press the [AUTO/TAD/MAN] key
repeatedly until E-MODE = AUTO
appears in the display.
The automatic fax receiving mode is
now activated.
Is the incoming call an automatic fax transmission?
The Minoltafax 1400 will recognis e the inco ming sig nal and au tomatica lly
start receiving the fax transmission.
Is the incoming call a manual fax transmission or a voice call?
The Minoltafax 1400 will not switch over to auto fax mode, but will allow
the fax machine to ring a further sev en times. I f the incom ing call re mains
unanswered, your machine will automatically switch over to auto fax
mode.
Individual settings of the auto fax mode can be carried out via the
software swit ches:
G Software switch 07 = RINGER QUANTITY
Quantity of rings before the machine switches itself into the
telephone line.
G Software switch 09 = F-T-SWITCH
Quantity of simulated rings. W hen the fax/telephone recognition
feature is active, the voice call must be accepted by pressing the
[STOP] switch. When the fax/tele phone recognition featu re is inactive,
your fax mac hine will automatically acknowledge and receive the
incoming call as a fax transmission.
5
Rx.MODE = AUTO
✎
How do these software switches work?
For detailed information concerning the use of software switches,
please consult page 9-1.
Rev. 1.1.1/22.10.99 MF 1400 5-1
Page 81

5
5.2 Receiving faxes manually
Incoming fax transmissions will not be automatically accepted.
Activating manual reception mode.
➜ Press the [AUTO/TAD/MAN] key
repeatedly until E-MODE = MAN
appears in the display.
The manual fax receiving mode is
now activated.
Is the incoming call a voice call?
Pick up the handset and ans wer the call. If the calle r wants to immediatel y
send you a fax, press the [START] key to receive the fax transmission.
The caller can start the fax transmission when the signal from your fax
machine can be heard.
Is the incoming call an automatic fax transmission?
You will hear a fax m achine signal. Th e Minoltafax 1400 will recognise th e
incoming signal and automatically start receiving the fax transmission.
If software switch 54 has bee n se t at 00 (OFF ), yo ur fax ma ch ine will not
start automatically . The fax transmissio n must be manually sta rted via the
[START] key. The default setting of software switch 54 is 01 (ON).
Please consult page 9-1 for detailed information concerning the use of
software switches.
Receiving faxes
Rx.MODE = MANUAL
5-2 MF 1400 Rev. 1.1.1/22.10.99
Page 82

Receiving faxes
5.3 Combination with an answering machine
The Minoltafax 1400 can be operated in connection with an
answering ma chine.
If an answering machine is connected to your fax machine, please
observe the following:
G The answering machine should be programmed so that it will accept
an incoming call after 4 rings.
G Convenient features of the answering machine (call monitoring, call
recording, call counter, etc.) could be impaired because your fax
machine will automatically switch itself into the line.
G Correct function of the connected answering machine cannot be
guaranteed because this mainly depends on the quality of the phone
line connection and the features of the answering machine.
G The Minoltafax must be connected to the left slot marked as "N" and
the answering mac hine mus t be conn ected t o the right slot marked as
"N" in the TA E wall socket.
Switching on fax reception with an answering machine connected.
➜ Press the [AUTO/TAD/MAN] key
repeatedly until
E-MODE = ANSWER appears in
the display.
Rx.MODE = ANSWER
5
Is the incoming call an automatic fax transmission?
You will hear a fax m achine signal. The Minoltafax 1400 will recognise the
incoming signal and automatically start receiving the fax transmission.
Is the incoming call a voice call?
The connect answe ring machine wi ll accept the call after the progra mmed
amount of rings and send your answer message.
Your answering machine is ready to accept a message:
G The Minoltafax 1400 can receive a fax w hen the call er manually st arts
his fax machine after your answering machine message has finished.
G If no message is left withi n 6 seconds after the answ ering machine has
switched on, the Mino tafax 1400 will send a signal and receive the fax
transmission. If the voice response feature has been activated
(software switch 16), the machine will ask the ca lle r to press the
START key before emitting a CGN signal. The Minoltafax will, in any
case, receive the transmission if the calling fax machine emits a
fax signal.
Rev. 1.1.1/22.10.99 MF 1400 5-3
Page 83

5
5.4 Receiving selected faxes
Incoming faxes wi ll onl y be recei ved if the s ender num ber is prog rammed
as a one-touch number in your fax machine and the station identification
has been correctly programmed.
The number of the calling machine is not a one-touch number?
The incoming fax transmission will be automatically stopped as soon as
RECEIVE appears in the display.
The incoming fax does not have a station identification?
The incoming call will be automatically stopped.
When the software switch 26 is set at 01 (ON), faxes can be received
selectively. The default setting is software switch 16 is 00 (OFF).
Please consult page 9-1 for detailed information concerning the use of
software switches.
Receiving faxes
5-4 MF 1400 Rev. 1.1.1/22.10.99
Page 84

Receiving faxes
5.5 Receiving and forwarding fax transmissions
How to forward a received fax transmission to another fax machine. You
can forward fax transmissions automatically or manually (polling).
Setting of automatic fax forwarding
How to automatically forward fa x trans mission s from y our fax mach ine to
another fax machine.
Press the [MENU] key seven times.
1
Confirm your choi ce by pressi ng the
[SET] key.
Press the [MENU] key until
2
FORWARD : AUTO is displayed.
Confirm your choi ce by pressi ng the
[SET] key.
Dial the direct ory nu mb er o f th e f ax
3
machine to which you want to
forward your fax transmissions:
❍ manually
❍ via one-touch key
❍ via directory
7: SET FORWARD ?
FORWARD : AUTO
1235 123456
5
Press the [SET] key.
4
The automatic fax forwarding
setting is confir med by th e sound o f
a beep. The standard display
appears.
08 Sep. ’99 15:32
✎
Busy or faulty transmission?
Should the fax machine to which the transmiss io n is bei ng fo rw arde d
emit a busy tone, dialling is repeated in accordance with the current
settings, see page 4-25. If the machine still does not emit an idle ton e,
transmission is stopped.
Should a transmission error occur duri ng fax for wardi ng, the
transmission will be repeated after a period of approx. 10 minutes. In
case also this fax forwarding is faulty, transmission is interrupted.
Rev. 1.1.1/22.10.99 MF 1400 5-5
Page 85

5
Setting of manual fax forwarding
How to set manual fax forwarding.
Press the [MENU] key seven times.
1
Confirm your choice by pressing the
[SET] key.
Press the [MENU] key until
2
FORWARD : MAN. is displayed.
Confirm your choi ce by pressi ng the
[SET] key.
Enter a four-figure pas sword via the
3
numerical keys.
Press the [SET] key.
4
The manual fax forwardi ng setting is
confirmed by the sound of a beep.
The standard display appears.
Receiving faxes
7: SET FORWARD ?
FORWARD : MAN.
PASSWORD ?
PASSWORD ? 1 2 3 n
08 Sep. ’99 15:32
5-6 MF 1400 Rev. 1.1.1/22.10.99
Page 86

Receiving faxes
Release of manual fax forwarding
How to manually forward received fax messages.
Please observe the following:
✔ The fax machine from which you release manual fax forwarding, has
to be set at inband signalling.
Dial the number of your Minoltafax 1400 on the fax machine to which
1
the transmission shall be forwarded.
Press the [*] key as soon as you hear the fax signal of your fax
2
machine.
Enter the password selected for the manual fax forwarding.
3
If the password is accepted by the Minoltafax 1400, the CNG signals
4
are released.
❍ If a wrong password is entered, the ERROR signal (4) is to be
❍ If there is no fax transmission to be forwarded, the END signal (2)
❍ If there are fax transmissions for forwarding, the RELEASE signal
5
heard, followed by the PASSWORD INPUT sig nal (3). Should you
enter a wrong password three tim es after anothe r, the co nnecti on
will be interrupted.
is to be heard and the connection is interrupted.
(1) is to be heard and forwarding begins.
(1)
(2)
(3)
(4)
Rev. 1.1.1/22.10.99 MF 1400 5-7
Page 87

5
Receiving faxes
5.6 Memory reception during printer problem
If the paper runs out, or the ink cartridge becomes empty, your
Minoltafax 1400 will store the incoming transmission data.
The memory reception can store up to 34 pages, depending on the
original document.
If memory reception has stored data, th e LED for MEMORY RECEPTION
will blink and the di splay will show the respective fault message, such as
INK OUT.
Print received fax message from memory
The received pages can be printed out from the incoming data store.
Rectify the cause of the
1
respective fault.
Press the [PRINTER RESET] key.
2
The stored data will be printed.
Power cut while data is stored
In the event of a p ower cut, all stored data will be lost. The display will t hen
show the message DATA LOSS.
INK OUT
Rx. DATA PRINT
Data overflow with half-tone fax transmission
The memory reception can store up to 34 pages, depending on the
original document. If a document is tran smitted in "half-tone" resolution
mode, the memory reception capacity could become exhausted after
receiving only one page.
In this case, the respective page must be transmitted in “Standard“
resolution mode.
5-8 MF 1400 Rev. 1.1.1/22.10.99
Page 88

Receiving faxes
5.7 Calling a fax transmission (Polling)
A fax transmission can b e called from anoth er fax ma chine as long as the
other machine has been programmed accordingly.
Press the [MENU] key. Confirm
1
your choice via the [SET] key.
Dial the number of the other
2
fax machine:
❍ Manually
❍ Via one-touch key
❍ Via directory
❍ Via r edial
Press the [SET] key.
3
The transmission will start as soon
as your fax machine receives a
signal from the other fax machine.
The number of the other machine
will appear in the display.
1: POLLING Rx. ?
1234 123456
TRANSMISSION
+49 1234 123456
5
Rev. 1.1.1/22.10.99 MF 1400 5-9
Page 89

5
5.8 Receiving a fax with size reduction
If a transmitted fax is longer than the size of your paper, your
Minoltafax 1400 will normally print the incoming fax on two pages. You
can prevent this by setting your fax machine to automatically print
incoming faxes at a size reducti on rati o of 90% , 84% or 7 0%. The defaul t
setting is 90%.
Incoming faxes can be reduced in size so that they fit on one page
of paper.
Press the [MENU] key 8
1
times. Confirm your choi ce via
the [SET] key.
Press the [MENU] key twice.
2
Confirm your choice via the
[SET] key.
Enter the digits [5] and [5] for
3
software switch 55. Confirm your
choice via the [SET] key.
Enter the respective code:
4
❍ 00 (100% - no reduction)
❍ 01 (90%)
❍ 02 (84%)
❍ 03 (70%)
8: FAX SET-UP ?
3: FEATURE SW. ?
( 5 5 ) Rx. RATIO
90% ( 0 1 )
Receiving faxes
Press the [SET] key.
5
The setting in now programmed.
Press the [STOP] key twice to
6
return to the standard display.
08 Sep. ’99 15:32
✎
Setting is permanent!
This setting rema ins active u ntil it is programme d to a differ ent setting .
5-10 MF 1400 Rev. 1.1.1/22.10.99
Page 90

Receiving faxes
5.9 Fax machine with external telephone
If you are operating your Minoltafax 1400 together with an external
telephone apparatus and you an sw e r a fax m ach in e by ph on e, you must
manually transfer this fax transmission to your fax machine.
Transferring an incom ing fax transmission from your external telep hone to
your fax machine.
Please observe the following:
G You can only make us e of th is fu nct ion, i f the re ceptio n mod e is set at
MAN or AUTO.
G Forwarding of incoming fax transmissions is not possible with every
telephone model.
Press the [3] key twice on your telephone.
1
Place the telephone handset on the hook.
2
Your fax machine will now accept the transmission.
The respective code to transfer a fax transmission can be individually
programmed via software switch 08.
5
✎
Individual code setting for fax forwarding!
The code for forwarding of an incoming fax transmission can be
individually set via software switch-08.
Rev. 1.1.1/22.10.99 MF 1400 5-11
Page 91

5
Receiving faxes
5-12 MF 1400 Rev. 1.1.1/22.10.99
Page 92

Copying a document
6 Copying a document
6.1 Making a single copy
It is possible to copy a document with the Minoltafax 1400.
Insert the document with its face
1
downwards in the document feede r.
The display will show the pres ent
resolution setting.
If necessary, alter the resolution
2
grade via the [RESOLUTION] key.
Press the [COPY] key.
3
The copying function will start.
✎
Stopping a copying function!
Press the [STOP] key, frequently when necessary, to stop a started
copying function.
6
STANDARD
STANDARD
COPY
Rev. 1.1.1/22.10.99 MF 1400 6-1
Page 93

6
6.2 Production of several copies
How to produce s everal copies of fax document s with the Min oltafax 1400.
You should observe the following points:
✔ A fax document may consist of up to 67 pages, depending on the
available memory space.
✔ Up to 99 copies can be made from a fax document.
Insert the document with its face
1
downwards into the document
feeder.
The display will show the present
resolution setting.
If necessary, alter the resolution
2
grade via the [RESOLU TION] key in
accordance with the fax document.
Press the [MENU] key four times.
3
Confirm your choice by pressing the
[SET] key.
Copying a document
STANDARD
STANDARD
4:#PAGES ?
Enter the quantity of copies to be
4
made from th e original via the
numerical keys.
Press the [COPY] key.
5
The original document is
automatically fed in. The copies are
printed one after another.
PAGE ? P. 0 n
VORLAGEN : 33
PRINT : 1 SET : 3
✎
Stopping a copying function!
Press the [STOP] key, sev eral times, if nece ssary, to stop the copying
process.
6-2 MF 1400 Rev. 1.1.1/22.10.99
Page 94

Copying a document
6.3 Copying a document with size reduction
Copying a document with a copy reduction factor of up to 70%.
Press the [MENU] five times.
1
Confirm your choice via the [SET]
key.
Select the required reducti on fac tor
2
via the [MENU] key. Confirm you r
choice via the [SET] key.
A beep will be heard. The reduct ion
factor is now programmed.
Insert the document with its face
3
downwards in the document feede r.
The display will show the pres ent
resolution setting.
5: REDUCTION ?
REDUCTION OFF
REDUCTION 90 %
REDUCTION 84 %
REDUCTION 70 %
STANDARD
6
If necessary, alter the resolution
4
grade via the [RESOLUTION] key.
Press the [COPY] key.
5
The copying function will start.
STANDARD
COPY
✎
Setting is permanent!
This setting remains active until it is prog rammed to a different sett ing.
Rev. 1.1.1/22.10.99 MF 1400 6-3
Page 95

6
Copying a document
6-4 MF 1400 Rev. 1.1.1/22.10.99
Page 96

Use the fax machine as PC printer
7 Use the fax machine as PC printer
The Minoltafax 1400 is equipped with an 8 bit parallel interface and,
combined with a PC, it can be used as a printer. The possibility of freely
choosing the ink cartridge type allows for printing in black or for colour
printing.
7.1 Printer specifications
Make sure to observe the following printer specifications:
Printer
Printer type Ink jet printer
Paper feed Automatic paper feed
Paper type Standard paper, 64 to 90 g/sq.m
Paper formats A4, Letter, Legal size
Capacity of paper holder 100 sheets max.
Print format Horizontal
(foils available)
(max. thickness of paper stack: 10 mm)
a: 210 to 216 mm
b: 3.4 mm (for A4)
0.25 inch (for Letter)
Vertical
c: 279 to 297 mm
d: 3.4 mm
e: 12.7 mm
16 mm (recommended non-printing area)
7
Rev. 1.1.1/22.10.99 MF 1400 7-1
Page 97

7
Use the fax machine as PC printer
7.2 Preparation of fax machine and PC
System Requirements
The Minoltafax 1400 supports the following systems:
System Requirements
Windows 95, 98 - Parallel port
Windows 3.1 - Parallel port
Windows for Workgroups 3.11 - Parallel port
Cable Specification
The Minoltafax 1400 is equipped with an 8 bit parallel interface.
Please observe the following:
G For connection to the printer only use an IEEE 1284 compatible
parallel cable (not included in delivery volume).
G Use a cable as short as possible.
G The plug of the parallel cable must be narrower than 17 mm.
G It is imperative that the supplied
magnetic core be used, if there is
none provided on your cable.
Connect your Minoltafax 1400 to a
computer to use it as a printer.
- 16MB RAM
- 486 processor or higher
- 20MB free space on hard-disk drive
-8MB RAM
- 486 processor or higher
- 20MB free space on hard-disk drive
- 10MB RAM
- 486 processor or higher
- 20MB free space on hard-disk drive
Make sure that the Minoltafax 1400
1
and the computer are switched off.
Insert the plug of the parallel cable
2
in the parallel interface of the Minoltafax 1400.
7-2 MF 1400 Rev. 1.1.1/22.10.99
Page 98

Use the fax machine as PC printer
Secure the plug with both metal clips on the Minoltafax 1400.
3
Connect the other cable end to the pa rallel interf ace of you r computer.
4
7
> 17 mm
Rev. 1.1.1/22.10.99 MF 1400 7-3
Page 99

7
Use the fax machine as PC printer
Installation of printer driver
Install the printer driver supplied on CD-ROM in order to be able to print
documents from your computer on the Minoltafax 1400.
➜ Install the printer driver in your computer.
How is the printer driver installed in the computer?
?
➜ Help regarding correct installation of the printer driver is to be
found in the installation instructions attached to the printer driver
CD-ROM as well as in the user’s guide of your computer.
✎
Printer driver, control programme . . .
A control programme for the Minoltafax 1400 as well as a deinstallation programme for the printer software are installed in the
computer together with the printer driver.
7-4 MF 1400 Rev. 1.1.1/22.10.99
Page 100

Use the fax machine as PC printer
7.3 Application of printer software
Application of printer driver
Use the printer driver for the following:
G Alteration of basic printer settings.
G Selection of document-specific print settings.
G Selection of page orientation.
G Selection of paper formats and paper types.
G Setting of print quality.
G Reset of printer settings.
Application of the control programme
The control programme is installed with the printer driver. The control
programme is contained in the Minoltafax 1400 programme group.
Use the control programme for the following:
G Cleaning of print head.
G Ink cartridge alignment.
G Print jobs supervision.
G Supervision of ink cartridge filling level.
G Printing of test page.
G Change of DOS settings.
G Control programme supervision.
7
Application of de-installation programme
The de-installation programme is installed with the printer driver. The deinstallation programme is contained in the Minoltafax 1400 programme
group.
➜ Start the de-installation programme to de-install the printer software.
Rev. 1.1.1/22.10.99 MF 1400 7-5
 Loading...