

Page 1
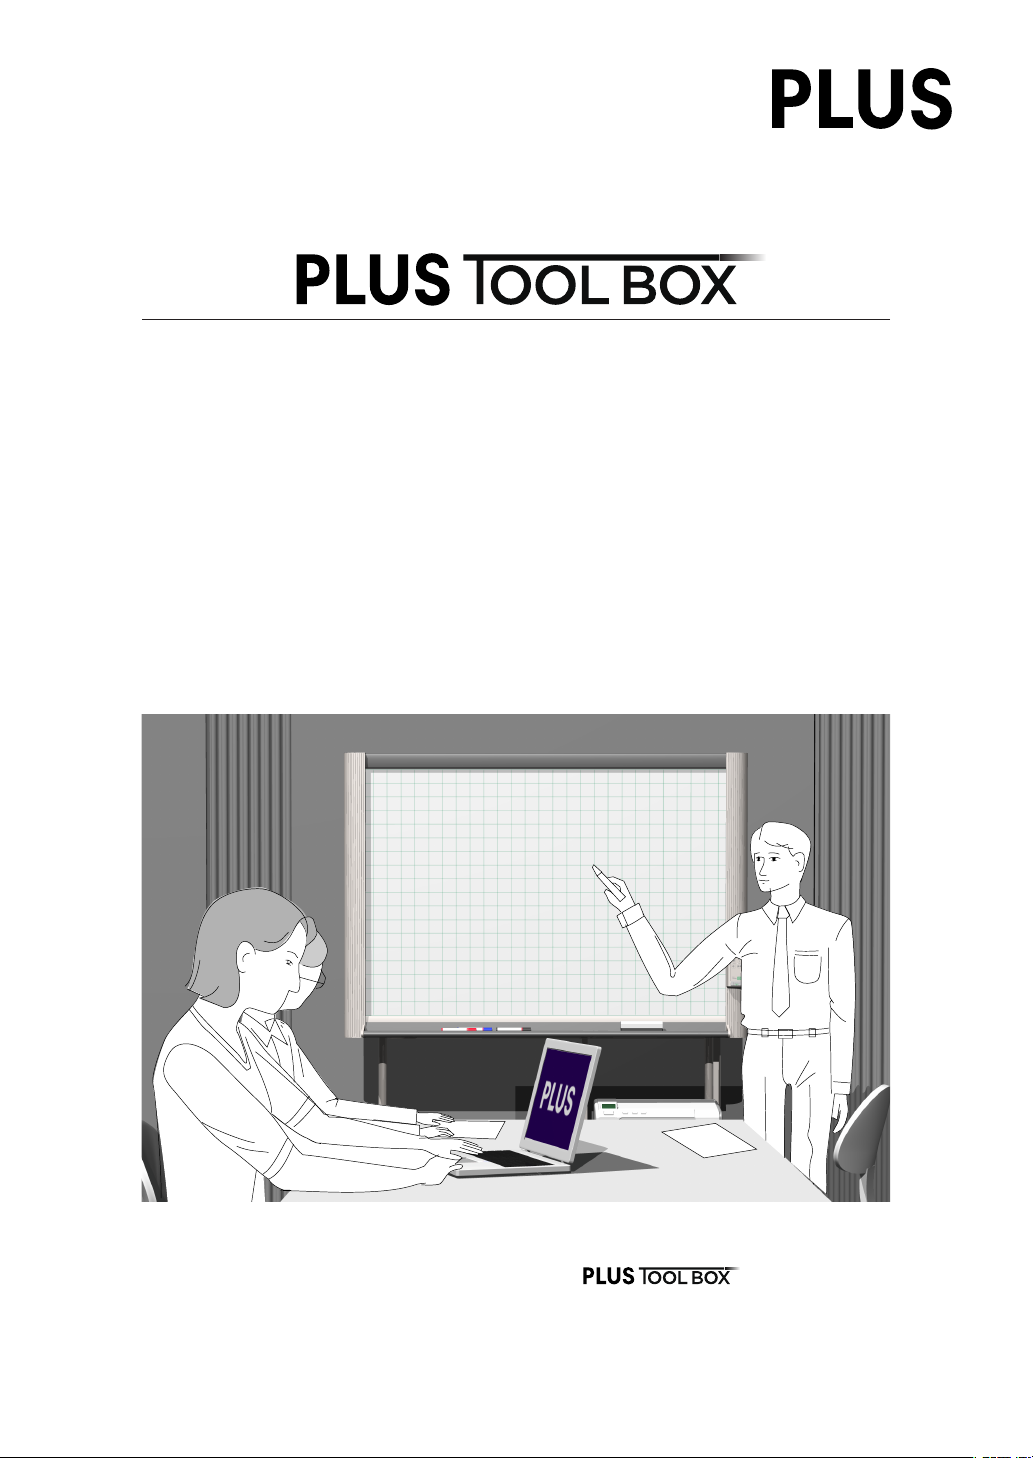
Copyboard M-12 Series
Software Operation Manual
We greatly appreciate your purchase of this PLUS Vision product.
In order to take full advantage of the features of the software supplied
with the M-12 and M-125 Copyboards, please read this software operation manual carefully
before use. After reading, be sure to keep the manual for future reference.
Page 2

E-2
Table of Contents
Introduction ............................................................................................. E-3
What is Copyboard Soft PLUS TOOLBOX? ............................................................E-3
Operating Environment ............................................................................................ E-3
Copyright and License .............................................................................................E-4
Connection to the Computer ................................................................. E-5
Description of the included CD-ROM’s menu screen (M-12 setup launcher) ..........E-5
Installation of the Software .................................................................... E-6
Check Prior to Installation ........................................................................................ E-6
Installation of the PLUS TOOLBOX ......................................................................... E-6
Uninstallation of the PLUS TOOLBOX ..................................................................... E-8
Menu Screen Names and Functions ..................................................... E-9
Operating the copyboard from the computer .................................... E-12
Hardware Setup .................................................................................... E-15
Creation and Editing of Headers/Footers .......................................... E-18
Names and Functions of the Screen Parts ...........................................................E-18
Creating a New Header/Footer .............................................................................. E-21
Updating the Internal Header/Footer Information of the Copyboard ...................... E-24
Update the Copyboard’s Internal Program ........................................ E-26
About the security settings ................................................................. E-27
Trademarks
* Microsoft and Windows are registered trademarks or trademarks of the Microsoft Corporation in the United States and other
countries.
* Adobe and Adobe Acrobat Reader are trademarks of Adobe Systems Incorporated.
Due respect will be afforded to the trademarks of the various companies and to product trademarks even when not expressly
noted.
In addition, product names and company names contained in this manual are registered trademarks or trademarks of the
respective companies.
(1) The contents of this manual may not be reprinted in part or whole without permission.
(2) The contents of this manual are subject to change without notice.
(3) Great care has been taken in the preparation of this manual; however, should any questionable points, errors, or omissions
be apparent, please contact us.
(4) Notwithstanding part (3), PLUS Vision Corp. will not be responsible for any claims or lost profits or other matters deemed to
be the result of using this unit.
(5) The separately sold printer is designed to be used as a peripheral device for a PLUS copyboard. The printer is not guaran-
teed to operate when connected directly to a computer.
(6) Manuals with incorrect collating or missing pages will be replaced.
Page 3
Introduction
What is Copyboard Soft ?
The “PLUS TOOLBOX” software is an application for connecting the copyboard directly to a computer by USB
port to allow transfer of the scanned data to the computer using a TWAIN driver so that the data can be stored
on the computer as image files. It can also be used to manage the copyboard’s operating environment and security settings from the computer.
Notice
• The security settings apply to the connection between the copyboard’s USB memory and computer. They can be set to
prohibit deleting or unauthorized setting by anyone other than the administrator. In consideration of password management, etc., please note that this security function can only be enabled after contacting PLUS Vision.
The security settings can also be made via USB memory.
Operating Environment
Supported OS: Microsoft Windows 2000 Professional (Service Pack 4 or higher) /
XP (Home Edition /Professional Edition Service Pack 2 or higher) /
Vista (32 bit version)
Supported PC: IBM PC/AT fully compatible computers that run the aforementioned OS
CPU: Pentium III 1.2GHz or greater
Memory: Windows 2000 (128 MB or greater),
Windows XP (256 MB or greater),
Windows Vista (512 MB or greater)
Connector: USB port (type A), interface compatible with USB 1.1 and USB 2.0 standards.
Available hard disk space: 40 MB or greater (not including space for storing images)
Display resolution: 800 x 600 pixels or greater
Peripheral devices: CD-ROM drive, standard USB ports
Web browser: Internet Explorer 6.0 or higher
Notice
• All operations are not guaranteed in the aforementioned operating environment.
• Windows 95, 98SE/Me, NT, 2000 Server, Server 2003, and Vista (64 bit version) are not supported.
E-3
Page 4

E-4
Introduction
Copyright and License
◆
Copyright
PLUS Vision Corp. (hereafter called We) holds the copyright of this software and related works which are protected by Japan’s Copyright Law and international treaties.
Copyright © Since 2008 PLUS Vision Corp. All rights reserved.
The PLUS TOOLBOX and header/footer software uses fonts supplied by Information-Technology Promotion
Agency, Japan. The text file of the supplied CD-ROM is a user license agreement for the use of the software.
Only use this software after carefully reading and consenting to the software user license agreement.
* Check the text file in the supplied CD-ROM: “General User’s IPA Font User License Agreement”.
◆
Disclaimer
We shall not be responsible in any way for direct or indirect damages that may arise from this software or
products derived from related software. We shall not be responsible in any way for damages as a result of the
machine or medium. Furthermore, We shall not be responsible in any way that may relate to the effects of the
results of using this software.
◆
Terms of Use and Terms of Distribution
• We shall not be responsible in any way for any kind of damages arising from the use or inoperability of this
software.
• We shall not be liable in any way for support of this software, any kind of warranty, correction of trouble or con
tinuation of version upgrades, etc.
• Provided that you consent to the aforementioned matters, you shall be permitted to use the software for nonprofit purposes for personal use and use within a company.
• When “this software” is mentioned, it refers not only to the executable file, but to all of the component files
including Help and appended text.
-
◆
Support
We call support the provision of all kinds of information including answers to questions, requests, trouble reports,
and other matters, and the scope of our support shall be limited to the functions and operation of this software.
Problems that arise in using this software cross many paths including those attributable to the personal computer, the OS, other application software, and other peripheral devices. Accordingly, we only support problems
that are attributable to this software. Also, this software is subject to version upgrades without prior notice due to
the technical advancement of hardware and software. The customer can receive and use upgraded versions of
this software through a method determined by us. Note that version upgrades will be limited to customers who
consent to the aforementioned conditions of use.
* Upon downloading this software from the PLUS Vision Web site, or installing it from the CD-ROM, the cus
tomer is deemed to have consented to each of the terms.
-
Page 5
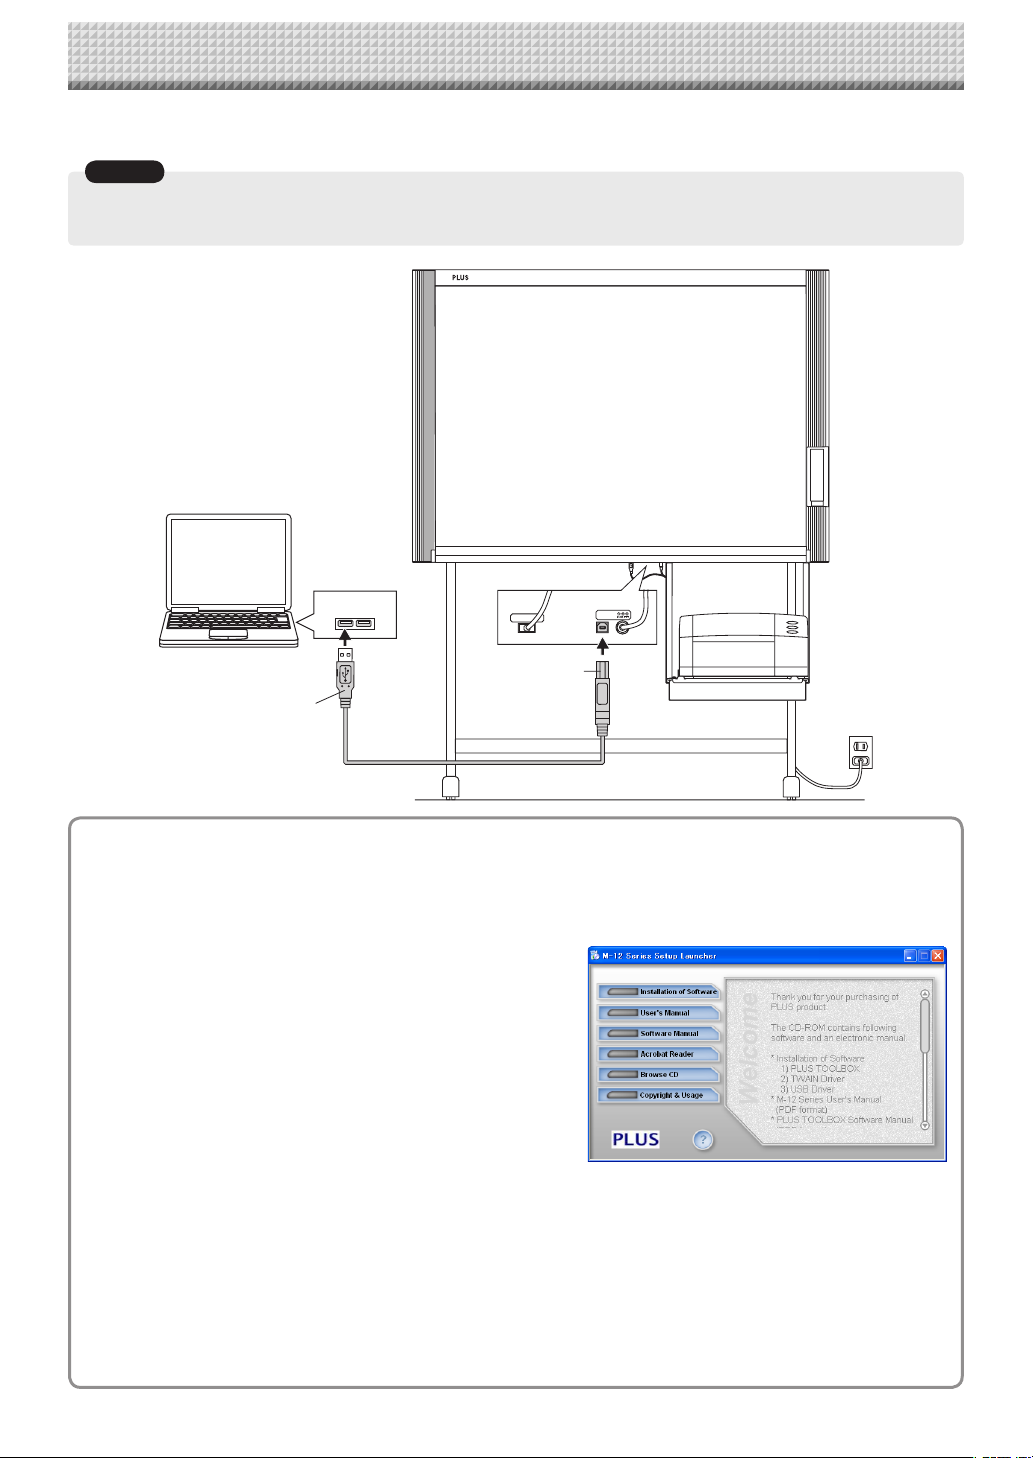
Connection to the Computer
PRINTER
PC
USB
The copyboard must be connected with a computer in order to use this software.
Notice
• Do not connect this machine to the personal computer before installing the software.
• Do not connect more than one Copyboard to one personal computer.
Copyboard
Personal Computer
To the personal
computer USB
port (Type A)
To the PC dedicated USB port
(Type B)
USB cable supplied with the unit
Description of the included CD-ROM’s menu screen (M-12 setup launcher)
The menu screen is displayed automatically when the included CD-ROM is inserted into the computer’s CDROM drive.
■ Installation of software
When clicked, the installer is launched and the “P LUS
TOOLBO X”, TWA IN dri ver and USB driver are installed
simultaneously.
■ User’s Manual
When clicked, the User’s manual (in PDF format) open.
■ Software Manual (this manual)
When clicked, the PLUS TOOLBOX software’s operating
instructions (in PDF format) open.
■ Acrobat Reader
This is an application for viewing files in PDF format.
If the PDF files cannot be opened, click “Acrobat Reader” on the menu and follow the instructions on the screen to
install.
* Browse CD
Click this to view the contents of the CD-ROM using the computer’s Explorer application.
* Copyright & Usage
Click this to open the copyright, usage conditions and other information.
E-5
Page 6
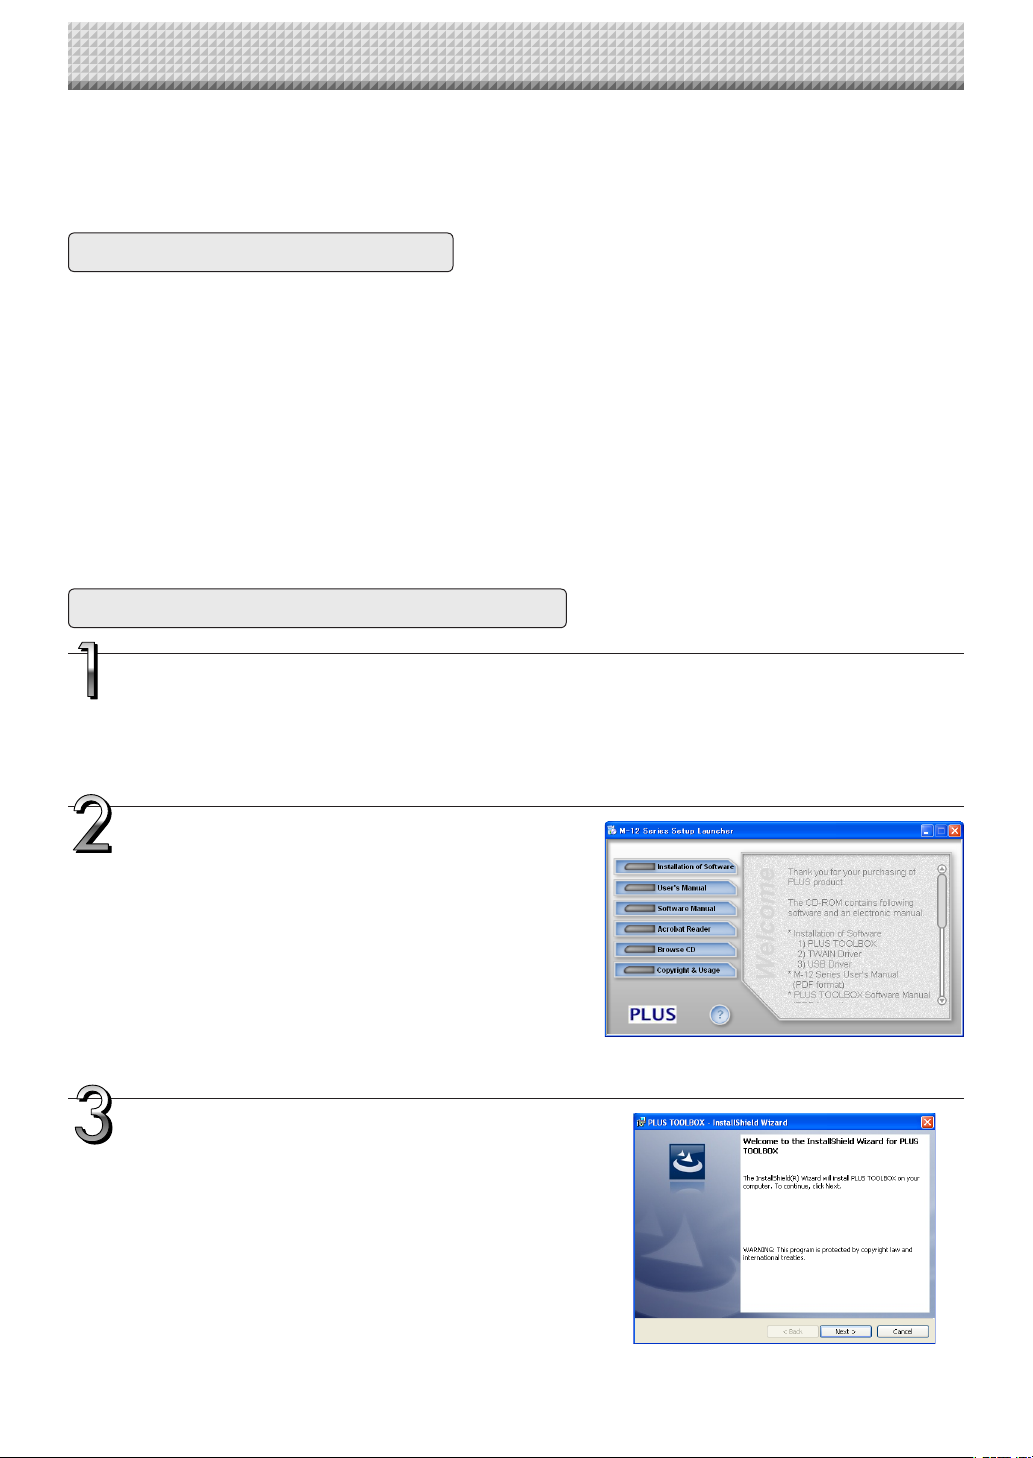
E-6
Installation of the Software
When “Install Software” on the included CD-ROM’s menu is clicked, the “PLUS TOOLBOX”, TWAIN driver and
USB driver are installed.
Check Prior to Installation
1. Check whether your personal computer satisfies the operating environment. (See page E-3)
2. Check that your personal computer is not currently connected to this machine via USB.
3. At the time of installation, install with Administrator rights (i.e., a user having administrator rights) for
Windows 2000, or with a Computer Administrator rights (account) for Windows XP/Vista.
4. Close all other applications that are running.
Installation of the PLUS TOOLBOX
Insert the supplied CD-ROM into the CDROM drive of the personal computer.
The menu screen will be displayed automatically.
If the menu screen is not displayed automatically, double
click CD-ROM icon and double click “autorun.exe”.
Click “Installation of Sofrware”.
The installer will start.
Follow the instructions of the installer and
start the installation.
The PLUS TOOLBOX, the TWAIN driver and the USB
driver will be installed at the same time.
Page 7
Installation of the Software
Note
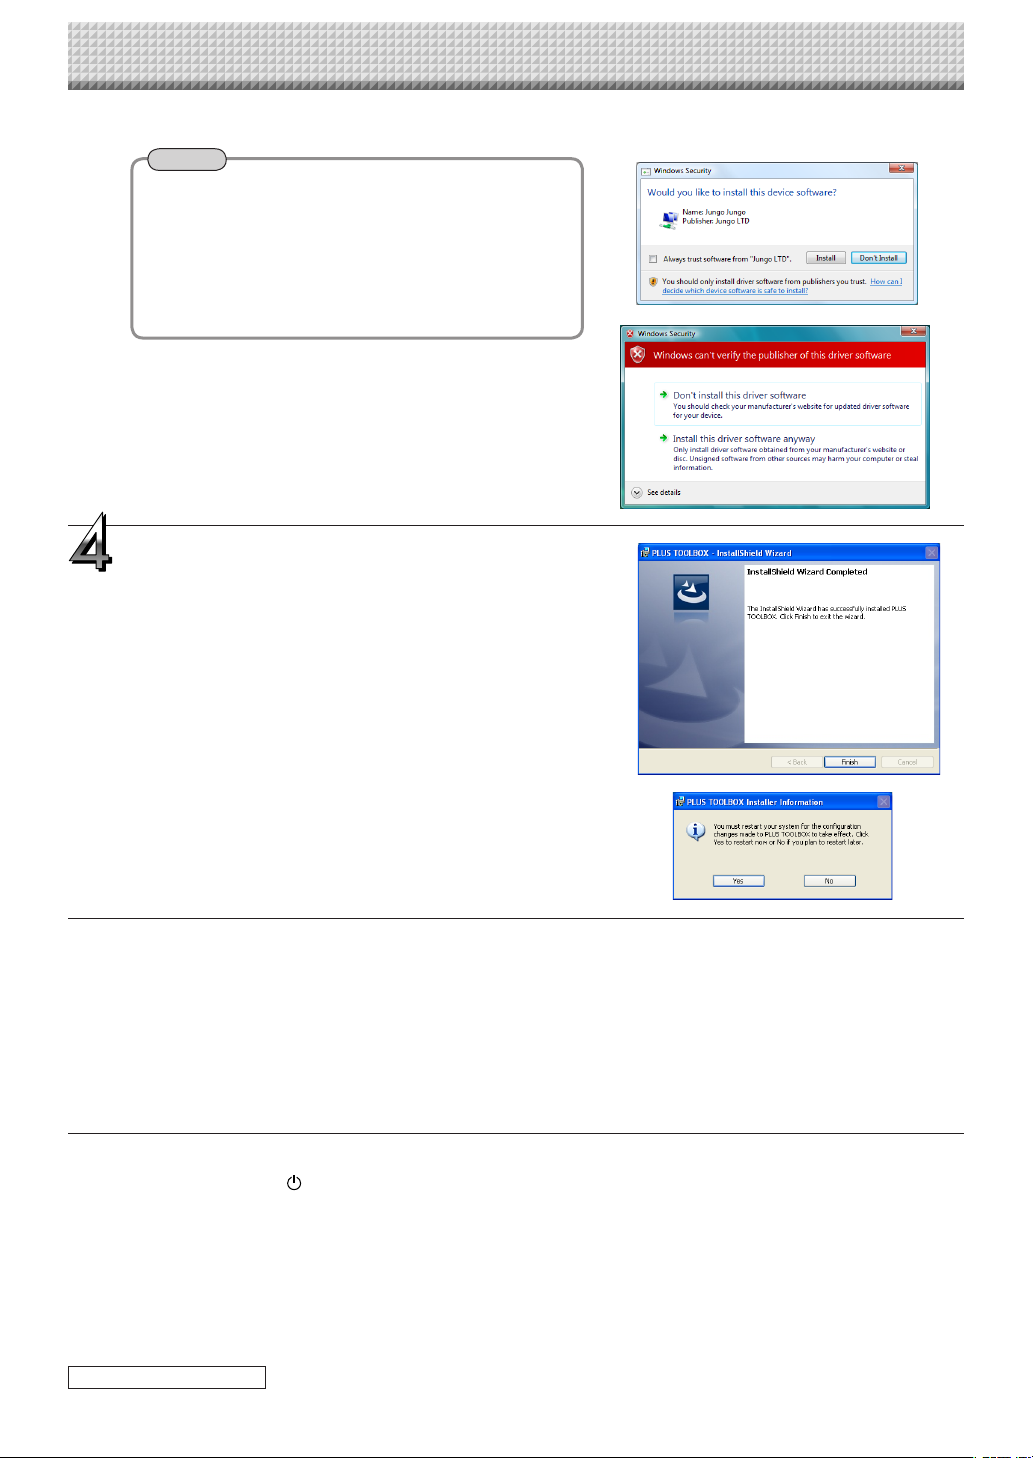
* The Windows Security dialog box will be displayed with
Windows Vista.
Select “Install this driver software (I)”.
* When using Windows Vista, each time the installer
is started, the Use r Acco unt Control dialog box is
displayed.
Select “Continue” and continue with the installation.
Click “Finish”.
The “Installer Information Dialog Box” will be displayed.
Click “Yes” and restart the personal computer.
When this software is installed on the personal computer
for the first time, continue to make the following connections and operations.
■ Installing the USB Driver
The USB driver is installed on the computer with the installer, but this does not complete association with the
USB port. In order to use PLUS TOOLBOX, install using the procedure described below with the copyboard
connected.
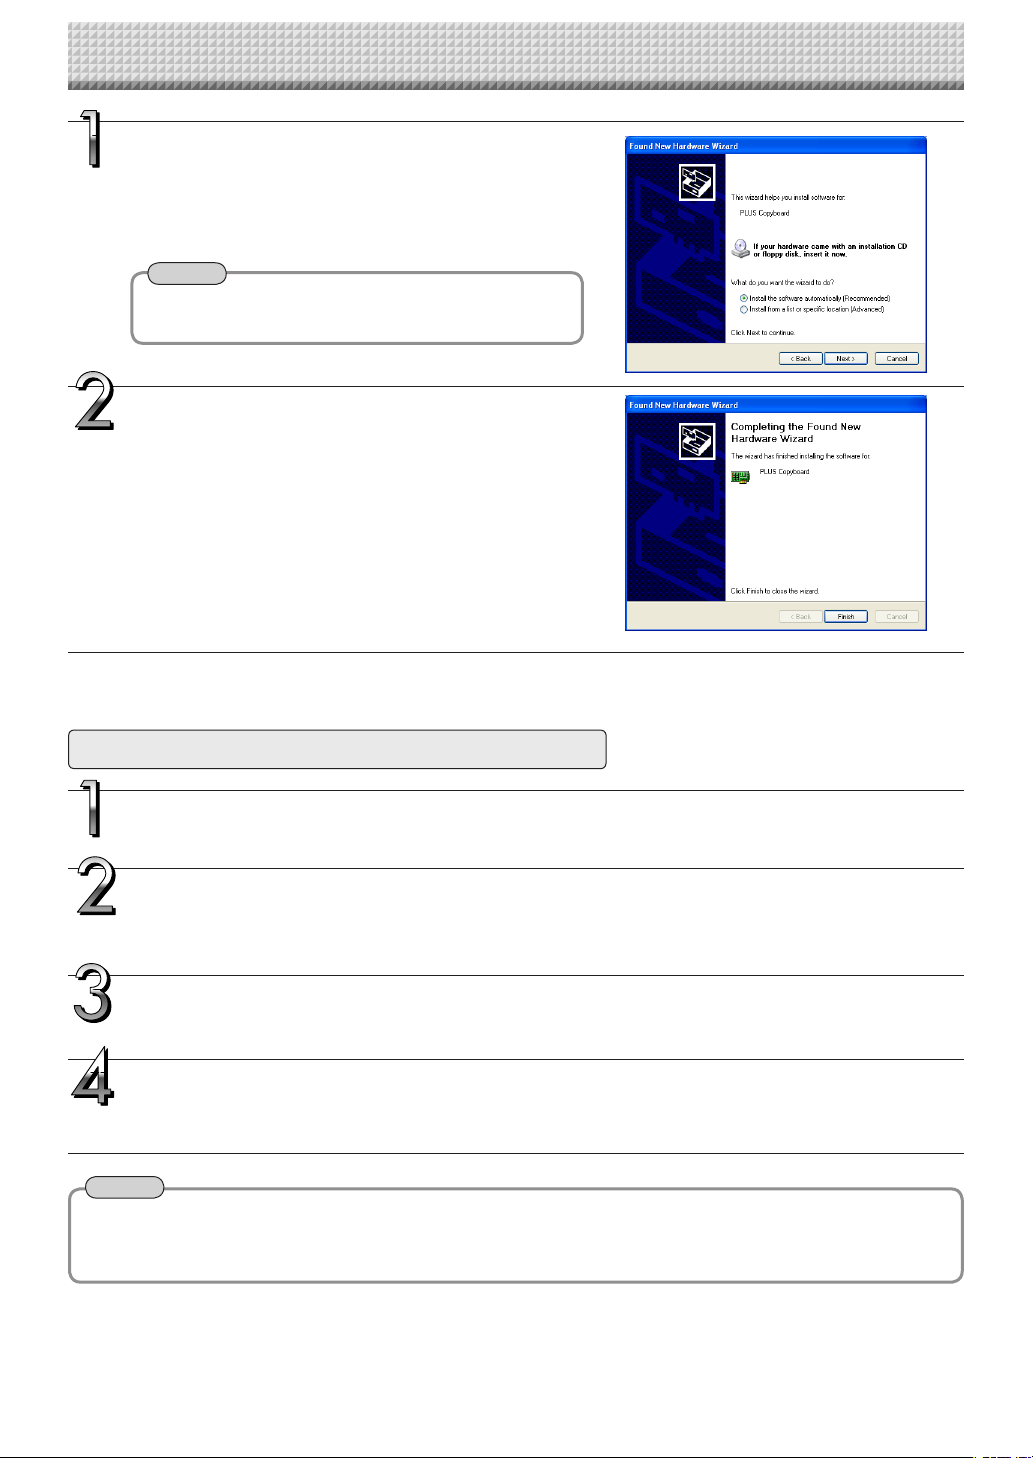
Preparation
1. Press the ON/Standby button of the Copyboard to turn on the power.
2. Use a USB cable to connect the USB port of the personal computer with the PC dedicated USB port of the
Copyboard. (See Page E-5)
The New Hardware Search Wizard will be displayed.
Install according to the New Hardware Search Wizard.
Continue on next page
E-7
Page 8
E-8
Installation of the Software
Select “Install Software Automatically
(Recommended)” and click “Next” (when
using Windows XP).
Start the installation of the USB driver.
Note
* Installation will be completed automatically with Windows
2000/Windows Vista.
Click “Finish”.
This software can now be used.
Uninstallation of the PLUS TOOLBOX
Selecting [Start] → [Control Panel] will display the Control Panel screen.
Check that your personal computer and the Copyboard are not currently connected by USB.
Double click “Add or Remove Programs or Applications” (this will differ
depending on the OS) to display the “Add or Remove Programs Properties”
screen.
Select PLUS TOOLBOX from among the list displayed and click [Change /
Remove] to display the Add or Remove wizard screen.
Selecting the [Remove] radio button of the wizard and clicking [Next] will start
the uninstallation.
Note
* “Add or Remove Programs” will be displayed for Windows XP/Vista.
* When using Windows Vista, each time the uninstaller is started, the User Account Control dialog box is displayed.
Select “Continue” and continue with the uninstallation.
Page 9
Menu Screen Names and Functions
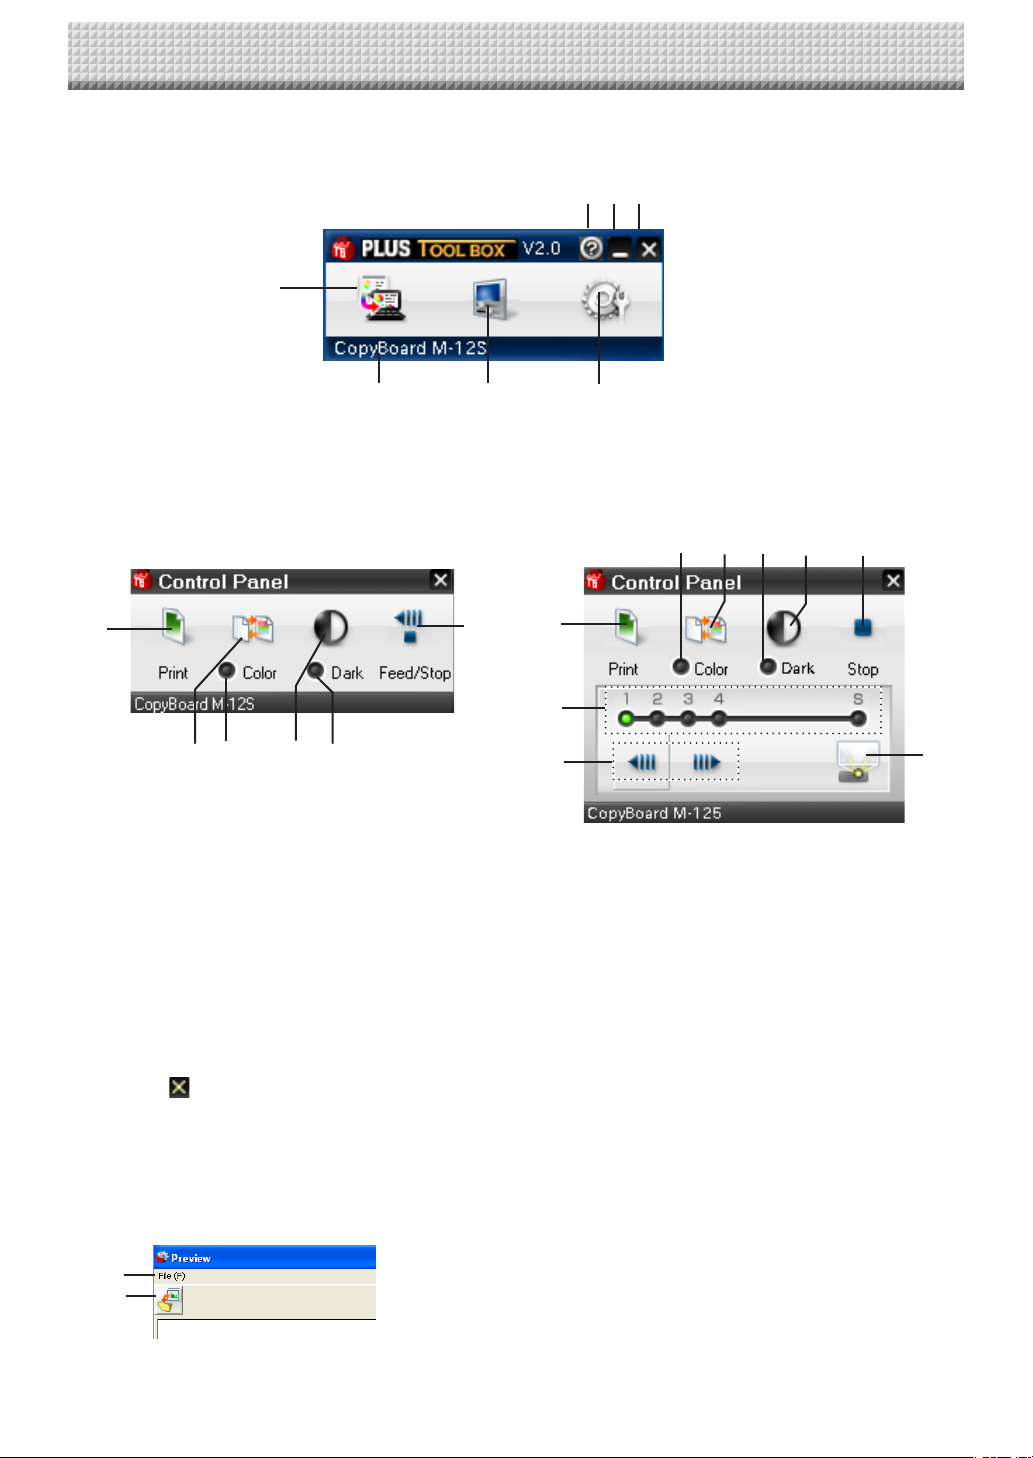
When a computer on which the “PLUS TOOLBOX” dedicated software is installed is connected to the copyboard, the “PLUS TOOLBOX” main menu appears.
Main menu
②
⑦ ① ③
①
Control panel button
Use this to operate the Copyboard from the personal computer. Click the control panel button to open a con-
trol panel that will offer the same operations as the Copyboard.
The control panel will differ depending on the Copyboard that you are using.
Model M-12S/M-12W Model M-125
(3) (2) (5) (4) (8)
④⑤⑥
(1)
(6)
(2) (3) (4) (5)
(1)
(9)
(7)
(10)
See the Copyboard User’s Manual for operating information. (Listed below are the names of the buttons and indica-
tors of the user’s manual.)
(1) Print button
This is operational when the Copyboard and
printer are connected.
(2) Color button
(3) Color mode lamp
(4) Density button
(5) Density mode lamp
Click to close the control panel.
①
Start Scan button
(6) Feed/Stop button
(7) Page change buttons
(8) Stop button (Copyboard does not have one)
Clicking this while the sheet is scrolling will stop the
scrolling at the starting position of the page.
(9) Page indicators
(10) Screen button
Click this to scan the words or diagrams drawn on the copyboard onto the computer.
The copyboard’s sheet moves, scanning of one sheet’s worth of data begins, and the data is transferred to
the computer. (Indicates the transfer conditions during the transfer.)
The preview screen is displayed when the transfer is finished. See Page E-12.
(1) File (F) Click this to save the transferred image (i.e., the image of the
(1)
(2)
(2) Save button Click this to save the transferred image (i.e., the image of the
preview display) on the personal computer, or to print it with
the printer that is connected to the personal computer. The
pull-down menu will be displayed.
preview display) on the personal computer.
E-9
Page 10

E-10
Menu Screen Names and Functions
③
Setup button
Click this to display the settings screen.
The settings screen consists of the “Hardware Setup”, “Header/footer”, “Copyboard Firmware Update” and
“Security” tabs.
Click a tab to switch to the corresponding screen.
Notice
• To set the “Security” settings, contact you nearest PLUS Vision sales office, dealer or store.
Hardware Setup:
Set the copyboard’s operating environment here.
See page E-15.
Header/Footer:
This is used for the creation or editing of headers
and footers. See Page E-18
Copyboard Firmware Update:
Use this to update the copyboard’s internal program. (See page E-26.)
Page 11

Menu Screen Names and Functions
④⑤⑥
⑦
④
(Help)
Click this to display the operating instructions.
⑤
(Minimize)
Click this to minimize the menu screen, displaying it as an icon on the task bar.
⑥
(Close)
Click this to exit the program.
⑦
Device indication
This displays the model that is currently connected.
E-11
Page 12

E-12
Operating the copyboard from the computer
This function allows you to store the words or diagrams drawn on the copyboard’s sheet surface directly onto the
computer.
The image data you have stored (in JPEG, PNG or PDF format) can be distributed to the meeting’s participants
by e-mail or used with other software to create documents of your meetings.
Model: The M-12S will be described as an example.
Turn on the copyboard’s power, start up the
computer, then make the USB connections.
The “PLUS TOOLBOX” main menu appears on the computer.
• PLUS TOOLBOX is stationed on the task bar, and the main menu
appears automatically when the copyboard is connected.
• The main menu can also be displayed by right-clicking on the PLUS
TOOLBOX icon on the task bar and selecting “Show”.
Reading the image of the current sheet surface
Click the Start Scan button.
The transfer will start from the Copyboard, and the transfer conditions bar will be displayed.
Click the [Cancel] button to stop the transfer.
• Reading another sheet surface
Click the Control Panel button.
① Click the Feed/Stop button (or the Page change buttons on
model M-125) and forward the screen that you want to read.
② Click the close icon to close the control panel, return to the main
menu, and click the Start Scan button.
The screen will change to the [Preview] screen when the
transfer is completed.
Page 13

Operating the copyboard from the computer
Click (Save) to save
• When saving for the first time, clicking will display the [Save as]
box.
Select “Save location” and “File type”. Enter the file name and
then click the [Save] button.
To select the file type, click the [▼] button and select “PNG”,
“JPG”, or “PDF”.
• The file name will be displayed automatically in the form of [Model
+ Date + Serial No.] (e.g., M12-081021_01). Change this if
necessary.
• When there is save data having the same file name, the data will
be overwritten and saved.
• To create a new folder, click the [Create new folder] icon, enter the
folder name in the newly created folder, and then click [Open file].
Next, select the file type, enter the file name, and then click the
[Save] button.
• [Overwrite] or [Save as] can be selected from [File] on the menu
bar.
This completes the saving of Copyboard sheet screen
image data.
Meeting reports and documents can be created using this saved
image.
Printing
Printing is done with a printer that is connected to the
personal computer.
①
Select [Print (P)] from [File (F)] on the menu bar.
The print setting screen of the personal computer will open.
②
Clicking the [Print] button will print the selected image.
Settings such as paper size and orientation, and quality of
color printing can be set on the screen that is displayed by
clicking the [Preferences] button.
This screen will differ depending on the printer.
Note
• Header/Footer information can be created and printed.
(See Page E-18)
• When the Copyboard and printer are connected, this
function will not allow printing from a printer that is con-
nected to the Copyboard.
E-13
Page 14

E-14
Operating the copyboard from the computer
Close
Clicking the icon of the main menu will close the
program.
This will allow the USB cable to be disconnected from the
personal computer.
Notice
When other TWAIN compatible applications are used to capture the picture data, while PLUS
TOOLBOX software is running, following procedure should be taken.
When PLUS TOOLBOX is running or its icon appears on the Windows task bar, and
the picture data is attempted to be captured using other TWAIN compatible applica-
tion software, below error message may pop up.
In this case, right-click the PLUS TOOLBOX icon on the task bar to quit the program
and start capturing procedure using other TWAIN compatible software.
Page 15

Hardware Setup
Use this procedure to set the copyboard’s operating environment from the computer. The factory defaults are
shown below.
Setting item Description Factory default
Date/time setting Set of the date and time for the time stamp Japan Standard Time
Sets the format of the images stored on the USB memory
File Format
Paper Size A4/Letter A4
Aspect Ratio
Erase Reminder Sheet rear surface erase reminder function: Disable/Enable Disable
Restrict color mode Setting for disabling printing/storing in the color mode Disable
Resolution
Header/footer (dat e/
time stamp)
device.
JPEG/PNG/PDF
Sets the aspect ratio for printed images.
Original Image/Match Paper Size Match Paper Size
Selection of resolution for images stored in the memory and
images transferred to the computer : Standard
Standard : 1/2 the vertical/horizontal size of the scanned image
High : 1/1 the vertical/horizontal size of the scanned image
Upon shipment from factory :
Writing of date/time when printing/storing : Enabled/Disabled
Original editing : Header/footer data output *
* The date/time stamp can be displayed at the user’s discretion as part of the header/footer data.
Upon shipment from the factory, only the time stamp is displayed.
PNG
Standard
Enabled
Turn on the copyboard’s power, start up the computer, then make the USB
connections.
The “PLUS TOOLBOX” main menu appears on the computer.
Click the [Setup] button.
The [Hardware Setup] screen appears.
Click the desired item to select it.
For the radio buttons, when is clicked, it
switches to (only one radio button can be
selected within each item).
• Print setting
This is operational when the Copyboard and printer are
connected.
Paper Size
Select whether to print on A4 or letter size paper.
Note
Only printer models specified by PLUS can be connected to the Copyboard.
E-15
Page 16

E-16
Hardware Setup
Aspect Ratio setting (model: M-12W)
Selection is permitted only with a Copyboard of the wide type.
Select the vertical/horizontal aspect ratio for printing.
When “Original Image” is selected, the image is printed with the same
aspect ratio as on the copyboard’s sheet surface.
When “Match Paper Size” is selected, the image is compressed in the
horizontal direction to the same aspect as the A4 or letter size printing
paper (for example, a circle will become an oval).
• Time Day
This sets the current date and time.
Loading the current time
When “Read current Date and Time” button is clicked, the display switches to the
computer’s current time. This eliminates the need to set the current time on the
copyboard.
Setting the date
1. Click [▼] at the Time Day section to display a calendar.
2. Click [◀] or [▶] on the calendar to choose the calendar for the current date (year
and month).
• When [▶] is clicked while December is displayed, the calendar switches to the
next year.
• When [◀] is clicked while January is displayed, the calendar switches to the
previous year.
3. Click today’s date.
• When clicked, the calendar closes and the current day is changed.
Setting the time
By factory default, the time is set to Japan Standard Time.
PLUS TOOLBOX uses a 24-hour time display. Click to [▲] return, to [▼] advance.
1. When the hours (20 in this example) in the time section is clicked, a gray cursor
is displayed over the hours.
2. Click [▲] or [▼] in the time section to choose the current hour.
3. Now click the minutes (15 in this example) to display a gray cursor over the
minutes.
4. Click [▲] or [▼] to choose the current minutes.
5. Now click the seconds (06 in this example) to display a gray cursor over the
seconds.
6. Click [▲] or [▼] to choose the current seconds.
Note
• The clock starts when the [Setup] button is clicked.
• Color Mode Restriction
This sets whether to read in color or black and white when reading the sheet surface. Setting Color Mode Restriction to
“Enable” will result in black and white (gray scale) printing, USB memory saving, and the transfer image to the personal
computer.
Disable: Reading will be in the color mode.
Enable: Reading will be in the black and white mode.
Page 17

Hardware Setup
• Scan Data
Resolution
This is the selection of the resolution of the images saved in USB memory, and the transfer images when there is a PC
connection.
Standard: Vertical and horizontal dimensions of the read image will be one-half size. This will be one-quarter the amount of image data as
compared to the selection of High Resolution.
High Resolution: Vertical and horizontal dimensions of the read image will be 1:1 size. This will result in an image that appears better than
with the standard selection.
File Format
Select the format of the images stored on the USB memory device, JPEG (“.jpg” extension), PNG (“.png” extension) or PDF
(“.pdf” extension). Images scanned when a computer is connected can be selected when storing acquired data.
• Aspect Ratio (Model: M-12W)
Selection is permitted only with a Copyboard of the wide type. This is the selection of the aspect ratio of the images saved
in USB memory, and the transfer images when there is a PC connection. The “Original Image” will be the same ratio as the
Copyboard sheet surface. “Match Paper Size” will compress the ratio of A4 size or letter size in the horizontal direction (e.g., a
circle will become an ellipse).
• Header/Footer
This setting determines whether or not to write the date/time stamp (the factory default), or output the header/footer informa-
tion stored in the Copyboard.
Disable: No output of header/footer information (including date/time stamp).
Enable: Outputs the header/footer information to each of printing, USB saving, and transfer images when there is a PC connection.
Note
• This inserts a title or company name, a date or other text or an image into the margin at the top and bottom of the
sheet, and the same information will be printed on any page. This is called a header (when the information is at the
top) or a footer (when the information is at the bottom). The header/footer is created with this software and stored in the
Copyboard. See “Creation and Editing of Headers/Footers” (on Page E-18) for details.
• The actual printout color may differ from the original image depending on the printer models.
• Erase Reminder
This setting issues a remind of the Erase Reminder for text or diagrams drawn on the Copyboard sheet rear surface. This is
effective for confidential meetings, etc.
Disable: The Erase Reminder function will not operate. (Factory default)
Enable: Pressing the power button and turning off the power will result in the simultaneous flashing of the display window of the
Copyboard control panel and all of the indicators. The sheet will automatically move up to a surface that has not been erased, and
then the power will be turned off. (For model M-125, the sheet will move to the start of the surface that has not been erased, and
then the power will be turned off.
Note
• Soiling of the sheet weld portion, or marker residue may result in improper operation of the Erase Reminder function.
Set the selected data.
Check the settings of the items you have changed, and
if they are OK click the [Setup] button.
• Click [Close] if you do not want to change the settings.
The changes are canceled.
• Click [Default] to return all the settings to the factory
defaults.
E-17
Page 18

E-18
Creation and Editing of Headers/Footers
This is the creation and editing of the headers/footers that print or display the company name, logo, or other
information at the top and bottom of the printing paper or acquired image.
The factory default is the registration of only the date/time stamp in the Copyboard.
Updating the header/footer information that was created with TOOLBOX and setting the header/footer function
to “Enable” permits the same information to always be printed, saved in USB memory, or displayed in the transfer images sent to the personal computer.
Creation and editing may be performed even when there is no connection with the Copyboard.
Names and Functions of the Screen Parts
Clicking [Setup] → [Header/Footer] on the TOOLBOX menu will display the “Header/Footer” screen.
Text Editor Screen
⑥
①
②
⑦
⑧
Header/Footer Editor
⑨
⑤
③
Dark blue frame: Header/footer selection cursor
④
• Header/Footer Editor
①
New button
Click this to create new headers and footers. This will open the “Header/Footer Editor”.
②
Edit button
Click this to edit the header/footer file (having an .hfd extension) that is saved in the personal computer.
Selecting the header/footer file with the “Open file” screen of the personal computer will open the “Header/Footer Editor”.
③
Header edit box / ④ Footer edit box
This inserts the text or diagrams of the headers and footers. To switch the input of the headers and footers, click a location
other than the text box or image box and the header/footer selection cursor will move.
⑤
Tool button
Save as The “Save as” screen of the personal computer will open.
Overwrite This is used to overwrite the editing content. When the pre-edited file is not open, the icon will be displayed in gray and
selection will not be possible.
Undo This returns the edited content in order from the prior operation (for up to two cycles).
Redo This executes again in order the operations that were returned with “Undo”.
Delete This deletes the selected diagram/image or text box.
Page 19

Creation and Editing of Headers/Footers
Insert text The text input screen will open. This screen is used to input text and select items such as font type and size of the text.
See “Text Editor Tool” below. Clicking the text input [OK] will position it as a text box at the upper left of the editing box.
• Double clicking the text box of the editing box will display the text input screen. Double click to correct the text.
• The text box is transparent. Images or text behind it can be seen.
• A text box can be placed multiple times.
Image Insertion and Editing
The “Open file” screen of the personal computer will open. File formats that can be inserted are BMP, JPEG, PNG, GIF,
WMF, and EMF.
Selecting and finalizing an image will place it as an image box at the upper left of the editing box.
• An image box can be placed multiple times.
• An image box is non transparent. Images or text behind it will be hidden.
Insertion of the Date and Time
Insertion can be made to one location, either the header editing box or the footer editing box. Click [▼] and select the
display format of the date and time from the pull-down menu.
Display Format Stamp Examples
YYY/M/D/ HH:MM 2008/10/5 13:25
DD-MMM-YYYY HH:MM 05-Oct-2008 13:25
MMM-DD-YYYY HH:MM Oct-05-2008 13:25
Clicking on Insertion of the Date and Time will insert a header editing box at the lower right, and a footer editing box at
the upper right.
• When an editing box has been inserted, the Date and Time insertion button will turn gray and cease to be selectable.
• The date and time will be displayed as non-transparent in the front screen.
• The font, size, and other parameters are fixed and only the placement can be adjusted.
Header and Footer Background Color Specification
Clicking this will display the background color selection menu. Clicking on the target color from among the 48 colors
will fully paint over the header editing box or the footer editing box with the selected color.
• The background color can be placed multiple times.
• When the grid lines are displayed and the entire surface of the editing box is set to the background color, the grid lines
will cease to be visible. In view of this, insert the background color after completing the placement adjustment of the
image or the text box.
Insertion of Division Lines
Click [▼] and select the (fine, medium, or broad) line width from the pull-down menu. Clicking on Insertion of Division
Lines will make an insertion for the full box width at the bottom for a header editing box, and at the top for a footer editing box.
• Division lines can be placed multiple times.
• The color of division lines cannot be changed.
Display of Grid Lines
These are grid lines for the placement of text or image boxes, etc.
• Gird lines cannot be saved.
• Grid lines are displayed at the very last.
• When an image, diagram (grid lines/background color), or text is inserted, each one forms a box and is placed in an editing box.
The size of this box can be changed, and the front-to-back order can be swapped. See Page E-20
⑥
Text Editor Tool
Setting of Character Color
Clicking this will display the text color selection menu. Clicking on the target color from among the 256 colors will
change all the text colors inside the text input box.
Specification of Font
Click [▼] and select the font from the pull-down menu. All the fonts will change inside the text input box.
Specification of Language
Click [▼] and specify the input language from the pull-down menu. All the fonts will change inside the text input box.
Caution
Changing the setting of the language during text input from “Japanese” to “Western” will result in reset-
ting of the input screen.
E-19
Page 20

E-20
xxx Corporation xxx Place of Business
xxx Corporation xxx Place of Business
Creation and Editing of Headers/Footers
Specification of Font Size
Click [▲] or [▼] and specify the size of the text.
All the sizes will change inside the text input box.
• The numbers are point sizes.
• Sizes that exceed the height of the header editing box or the footer editing box cannot be specified.
Specification of Bold
Each click toggles the selection between [Bold] and [Standard]. All the text will change inside the text input box.
Specification of Italic
Each click toggles the selection between [Italic] and [Standard]. All the text will change inside the text input box.
• Change of Size and Swapping of Front-to-Back Order
Selection of Objects
* The term object indicates an image, text, division line, background, or date and
time. When clicked, a box frame and adjustment points will be displayed around
the inserted object.
Movement of Objects
The object is dragged.
Horizontal Adjustment of Objects
Drag either the left or right point.
Vertical Adjustment of Objects
Drag either the top or bottom point.
Enlargement/Reduction of Objects
Drag any of the corner points.
Changing the Front-to-Back Order of the Objects
Insertion images are non-transparent, and text is transparent. Right-click
the object for a layered display of the underneath text, etc. The front-to-back
order menu will be displayed. Select [Move to front] or [Move to rear].
• The display order of grid lines and background color is fixed. The front-to-
back order cannot be changed.
⑦
Open File button
Displays the “Open file” screen of the personal computer.
Select the header/footer file (having an .hfd extension) to be updated in the Copyboard.
* Verify that the Copyboard and the personal computer have a USB connection, and that the power of the Copyboard is
turned on.
⑧
Transfer button
Transfers header/footer information to the Copyboard.
The transfer will start and the progress will be indicated on the transfer condition bar. During the transfer “HF” will flash in
the display window of the Copyboard.
The verification screen will be displayed when the transfer is completed. Click [OK].
Next, a press of the “Save” button will result in the display window of the Copyboard changing to indicate “H1”, and the
update will be completed.
Press any of the Copyboard operation buttons to change to the normal mode.
⑨
Close button
Closes the setting screen.
Page 21

Creation and Editing of Headers/Footers
8 mm
24 mm
257 mm
2 0 0 8 / 1 0 / 3 0 9 : 3 4
PLUS Vision Corp.
XX-0123 Product Planning Meeting
Technology Department No. 4
Creating a New Header/Footer
The description will use the following sample. Creation and editing of the header/footer may be performed even
when there is no connection with the Copyboard.
Dimensions for header editing box and printing, etc.
Text input
Logo: Insertion of the image
Text input
Dimensions for footer editing box and printing, etc.
* To make a logo, create an image with the personal computer and save it in any one of the BMP, JPEG,
PNG, GIF, WMF, or EMF image formats.
Change to the header/footer editing
screen.
When there is a USB connection with the Copyboard:
Click the [Setup] button of the “PLUS TOOLBOX” to open the
setting screen, then click the [Header/Footer] tab.
When there is no connection with the Copyboard:
Right-click the PLUS TOOLBOX icon of the task tray
and select “Settings”.
Select the model of the Copyboard that you are using
with the “Model Select” screen and click [OK].
Change to the Header/Footer Editor.
Click [New] to create new headers and footers.
Background color
Division line
Insertion of the Date and Time
Text input
Click [Edit] when a file is already saved on the personal com-
puter and corrections or other changes will be added.
The file will open and the screen will be displayed. Open the file
that has the “.hfd” extension.
E-21
Page 22

E-22
XX-0123
XX-0123
XX-0123 Product Planning Meeting
Technology Department No. 4
2 0 0 8 / 1 0 / 3 0 9 : 3 4
Planning Meeting
Technology Department No. 4
2 0 0 8 / 1 0 / 3 0 9 : 3 4
XX-0123 Product Planning Meeting
Technology Department No. 4
2 0 0 8 / 1 0 / 3 0 9 : 3 4
Technology Department No. 4
XX-0123 Product Planning Meeting
Creation and Editing of Headers/Footers
Creating Headers/Footers
When opened, the header editing box will be selected.
Click the footer editing box to create a footer. The dark blue
frame will move to the footer.
①
Click
from the “Open file” screen.
The image will be placed at the upper left of the editing
box.
Adjust the position or size. See “Change of Size and
Swapping of Front-to-Back Order” on Page E-20
②
Click
text, click (text color specification) and specify the text
color, then click [OK].
The text will be placed at the upper left of the editing
box.
Adjust the position. When the text and image overlap
and the text is hidden, the text will be brought to the
front.
See “Change of Size and Swapping of Front-to-Back
Order” on Page E-20
(Image Insertion) and select the target image
(Add text) to open the text input box, enter the
XX-0123
③
Other text will also be input and placed in the same area.
Create the respective types when changing the text size
or text color, etc.
④
Click [
▼] of (Date and Time Insertion) and click
after selecting the display format of the date and
time. This will be inserted at the lower right of the editing
box. The date and time box is always placed at the very
front and is non-transparent. Movement of the position is
possible.
When the date and time are inserted, becomes gray
to indicate that multiple placements are not possible.
⑤
Clicking
Specification) then clicking on the target color from with-
in the menu will fully paint over the header editing box or
the footer editing box with the selected color.
Adjust the size and position.
(Header and Footer Back grou nd Color
Page 23

Creation and Editing of Headers/Footers
⑥
When creating a footer, click the footer editing box and move the dark blue frame.
The footer will be created in the same area as the header.
Saving on the Personal Computer
Click (Save as).
Displays the “Save as” screen of the personal comput-
er. Set such things as the saving destination, file name,
and file type (noting that header/footer files have the
.hfd extension) and click the [Save] button.
Close
Press the [Close] button of the [Setup] screen to close the set-
ting screen, then click (Close) of the main menu to close this
software.
This completes the creation of headers/footers.
Update the header/footer information of the Copyboard.
See Page E-24
E-23
Page 24

E-24
Creation and Editing of Headers/Footers
Updating the Internal Header/Footer Information of the Copyboard
Two ways of updating the information are available. One way is to transfer the information to the Copyboard by
connecting the Copyboard and personal computer via a USB connection. The other way is to save the information in USB memory and then insert the USB memory directly in the USB port of the Copyboard.
Updating by Establishing a USB Connection between the Copyboard and the Personal Computer
Open the header/footer file
①
Establish a USB connection between the Copyboard and the personal computer. See Page E-5 for information
about the connection
②
Click the main menu [Setup] button
③
Clicking [Open file] will display the “Open file” screen of the personal computer. Select the target header/footer file
(having the .hfd extension), and click the [Open File] button of the “Open file” screen.
→ [Header/Footer] tag, and display the “Header/Footer” screen.
Transferring the header/footer file to the
Copyboard
Click the [Transfer] button.
This starts the transfer. The verification screen will be displayed
when the transfer is completed. Click [OK].
• During the transfer [HF] will flash in the display window of the
Copyboard.
Transfer to the Copyboard is completed.
When closing this software, see step 5 on page E-14.
Updating the Header/Footer Information
Press the [Save] button of the Copyboard control panel.
The flashing [HF] of the Copyboard display window will change
to the [H1] display.
This completes the update.
Press a button other than “Save” or “Feed/Stop” (“Page change”
on model M-125) on the main unit’s control panel. [H1] of the
Copyboard display window will change to the [01] display and
the normal mode will be set.
To restore the header/footer to the default setting (only the date
and time displayed), press the “Feed/Stop” button (the “Page
change” buttons on model M-125). The display will change to
the [H0] display of the Copyboard display window.
Page 25

Creation and Editing of Headers/Footers
Updating from USB Memory
①
Save the header/footer file in the USB memory.
Do not save within a folder of the USB memory. When USB
memory is inserted in the USB port of the Copyboard, the
Copyboard will search for the .hfd file. If the file has been
saved within a folder, reading of the file will not be possible.
Note also that you should save only the target file. Reading will
not be possible when multiple header/footer files exist.
②
Ins ert the saved USB memory into the USB port of the
Copyboard.
When the header/footer file has been found, [HF] will flash in
the display window of the Copyboard.
③
Press the [Save] button of the Copyboard control panel.
When the updating of the header/footer information is complet
ed, the Copyboard display window will change to display [H1].
Press a button other than “Save” or “Feed/Stop” (“Page
change” on model M-125) on the main unit’s control panel. [H1]
of the Copyboard display window will change to the [01] display
and the normal mode will be set.
-
To restore the header/footer to the default setting (only the
date and time displayed), press the “Feed/Stop” button (the
“Page change” buttons on model M-125).
The display will change to the [H0] display of the Copyboard
display window.
USB Memory
Caution
• When printing header/footer information or adding it to a transfer image, go to [Setup] and set [Header/Footer] of
[Hardware Setup] to “Enable”. (See Page E-17)
E-25
Page 26

E-26
Update the Copyboard’s Internal Program
Download the update program from the PLUS Vision website.
Preparations:
1. Download the “Copyboard Firmware Update” program (“M-12_XX_XX.zip”) from the PLUS Vision website.
2. Unzip the “M-12_XX_XX.zip” file and save the program file (“m12_XX_XX.mot”).
For model M-125, save M-125_XX_XX.mot.
3. If the copyboard’s power cord is plugged into an outlet, unplug it.
4. Plug in the copyboard’s power cord while pressing the Save button.
5. Once “UP” is displayed flashing in the display window, execute “Copyboard Firmware Update”.
Displaying the “Copyboard Firmware
Update” screen.
When a USB connection has been established between
th e pers onal c omputer and th e Copybo ard, t he
[Copyboard Firmware Update] screen will be displayed
automatically.
Open the “m12_XX_XX.mot” update
file.
①
Click “Open file” to display the screen for opening
the file.
②
Select the M-12 update file (“m12_XX_XX.mot”),
then click the “Open” button.
Click the “Update” button to start
updating.
A status bar is displayed during updating. Please wait.
When the update is completed, “ ” will be displayed
flashing in the display window of the Copyboard control
panel.
Notice
Do not perform other operations or turn off the
copyboard’s power during updating.
Doing so could damage the copyboard.
After “ ” has begun flashing in the display window of
the Copyboard, unplug the power plug from the power
outlet, and then plug it in again.
Page 27

About the security settings
Use of the M-12 security software allows Enable and Disable restrictions to be applied to your machine’s USB
memory, PC connection, and additional printing.
Registration is required to obtain the software.
For details, please refer to the PLUS Vision website.
http://www. plus-vision.com/e n/
E-27
Page 28

© 2008, PLUS Vision Corp.
23-4638-08A
 Loading...