

Page 1

Konica FS-1
www.orphancameras.com
posted 9-15-03
This camera manual library is for reference and historical purposes, all rights reserved.
This page is copyright © by mike@butkus.org, M. Butkus, NJ.
This page may not be sold or distributed without the expressed permission of the producer
I have no connection with any camera company
Back to main on-line manual page
If you find this manual useful, how about a donation of $3 to: M. Butkus, 29 Lake Ave., High Bridge, NJ 08829-
1701 and send your e-mail address so I can thank you.
Most other places would charge you $7.50 for a electronic copy or $18.00 for a hard to read Xerox copy.
This will allow me to continue to buy new manuals and pay their shipping costs.
It'll make you feel better, won't it?
If you use Pay Pal, use the link below. Use the above address for a check, M.O. or cash.
Contents
Page 2
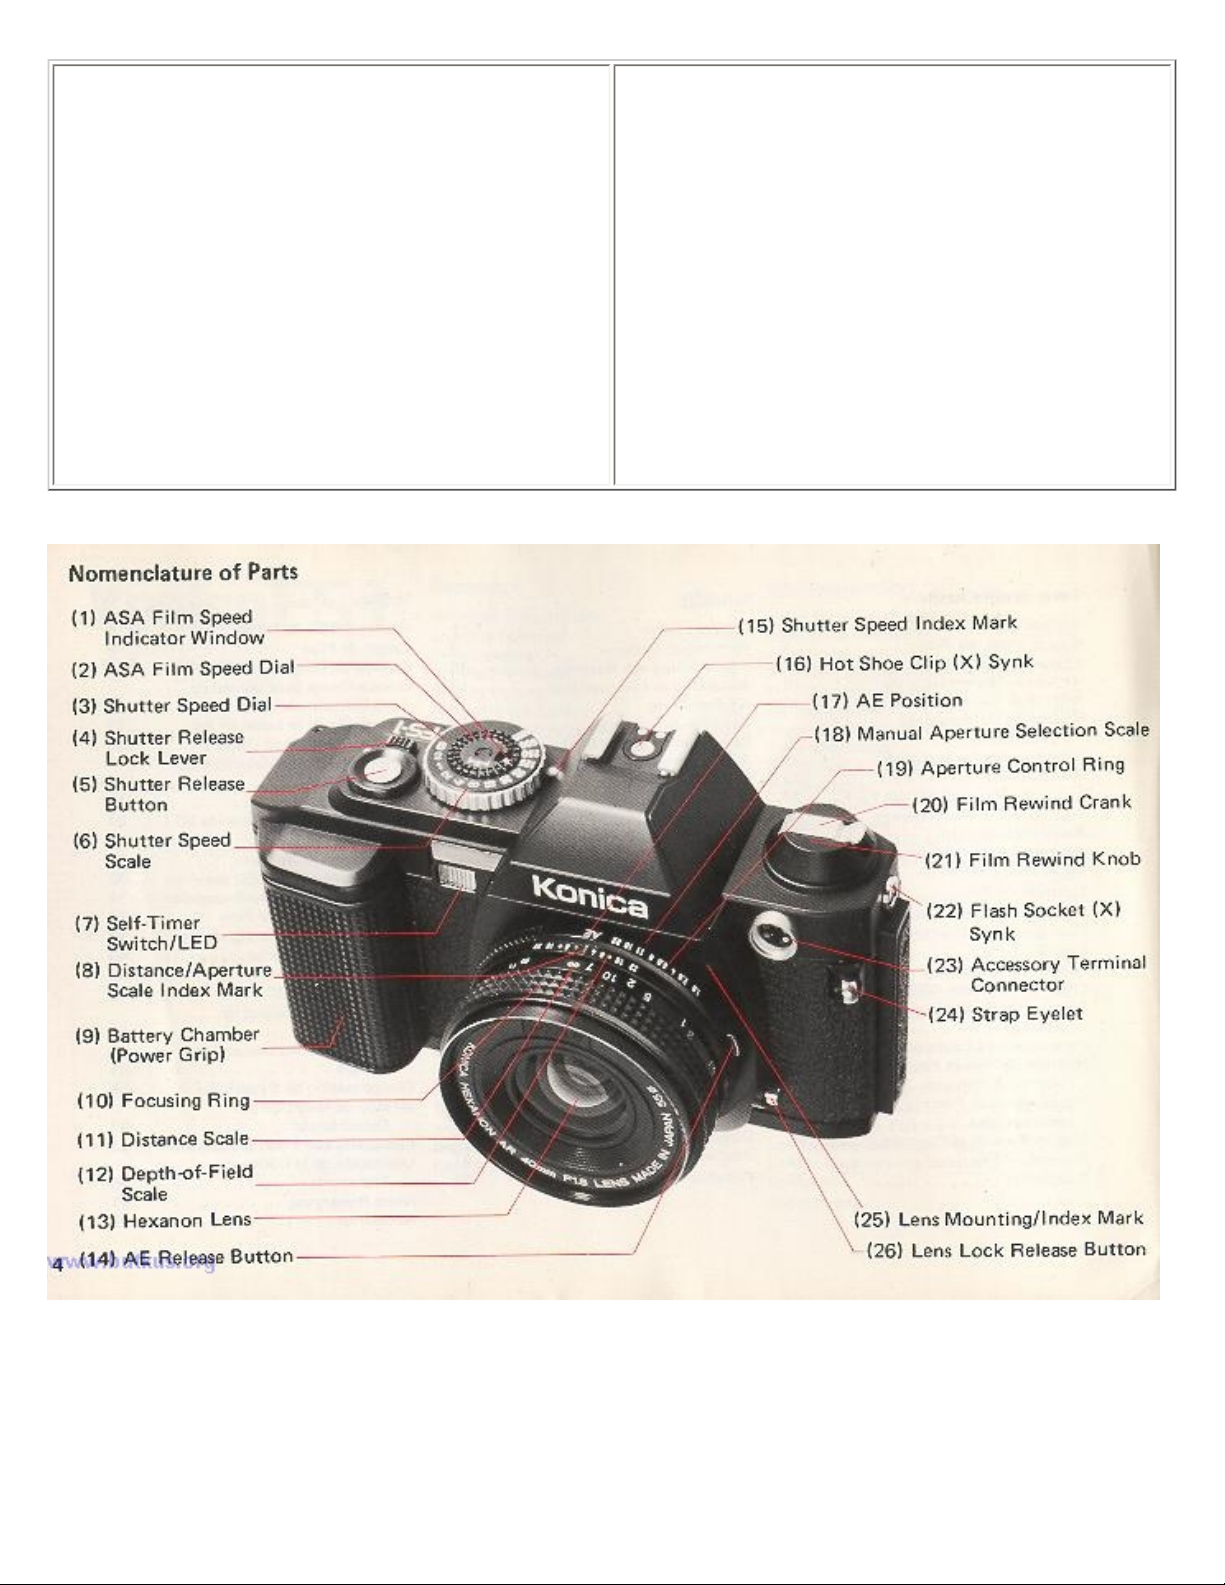
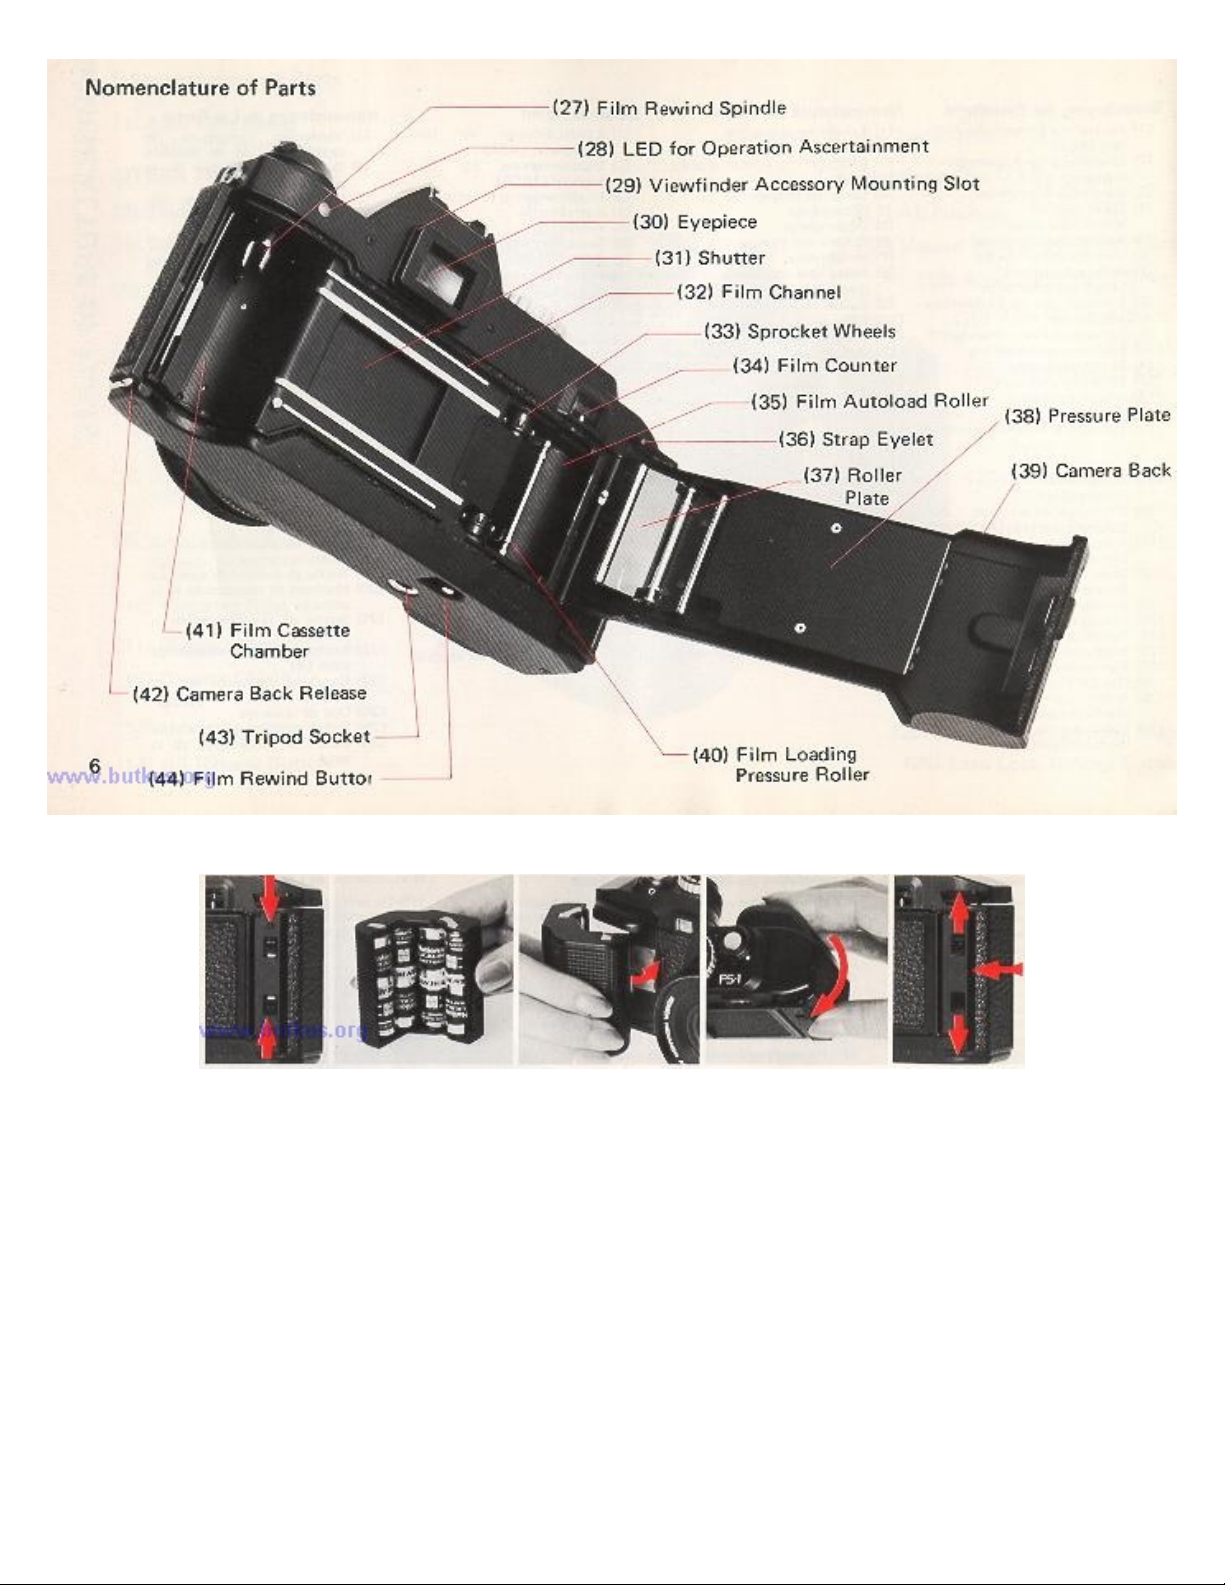
Nomenclature of Parts 4
www.orphancameras.com
Loading Batteries 8
Film Loading ........ 10
Set me Film Speed ....... 18
Setting Lens to AE 19
Release Lock Lever 20
Determination of Shutter Speed . . . 21
Focusing , 22
Aiming Your Konica FS-1 24
AE Photography 25
Film Rewind 27
LED Information in Viewfinder . . . 30
Warnings against Under- and
Over-exposures 34
Low Battery Warning Signal 35
Photography with Self Timer 38I
Interchange at Lenses 40
B (Bulb) Exposure 42
Manual Photography 44
Selection of Shutter Speed 45
Aperture vs Depth-of-Field 48
Exposure Compensation 52
Stopped-down Metering Method . . . 55
Electronic Flash Photography 58
Use of the Strap 64
Precautions for Use 67
Specifications of the Konica FS-1 . . 68
Accessories .70
Depth-of-Field Table 81
Konica Interchangeable Lenses 82
Page 3
www.orphancameras.com
(1) Loading Batteries · Nickel cadmium batteries for recharging are not usable.
1 ) Remove the battery chamber, while the two lock knobs located at the back of the battery chamber are pulled inward.
2) Use four AA Alkaline batteries available from your photo dealer and load the battery chamber. Be sure to follow the
"+" and "--" signs as shown on the diagram inside the battery chamber.
4.butkus.org
3) Attach the battery chamber to the Konica FS-1 body by first inserting the guide claw (in orange color) to the body and
sliding the lock knobs apart, with the guide claw depressed, until the green safety mark is seen.
· Take out the batteries if you do not intend to use the model for a prolonged period of time.
(2) Film Auto load System
Page 4
The Konica FS-1's autoload system is so designed that once the film is set to a
www.orphancameras.com
prescribed position and the back cover closed, the film will be automatically
transported by one frame. Film loading has been somewhat troublesome in the past,
but your Konica FS-1 enables you to do it safely and surely.
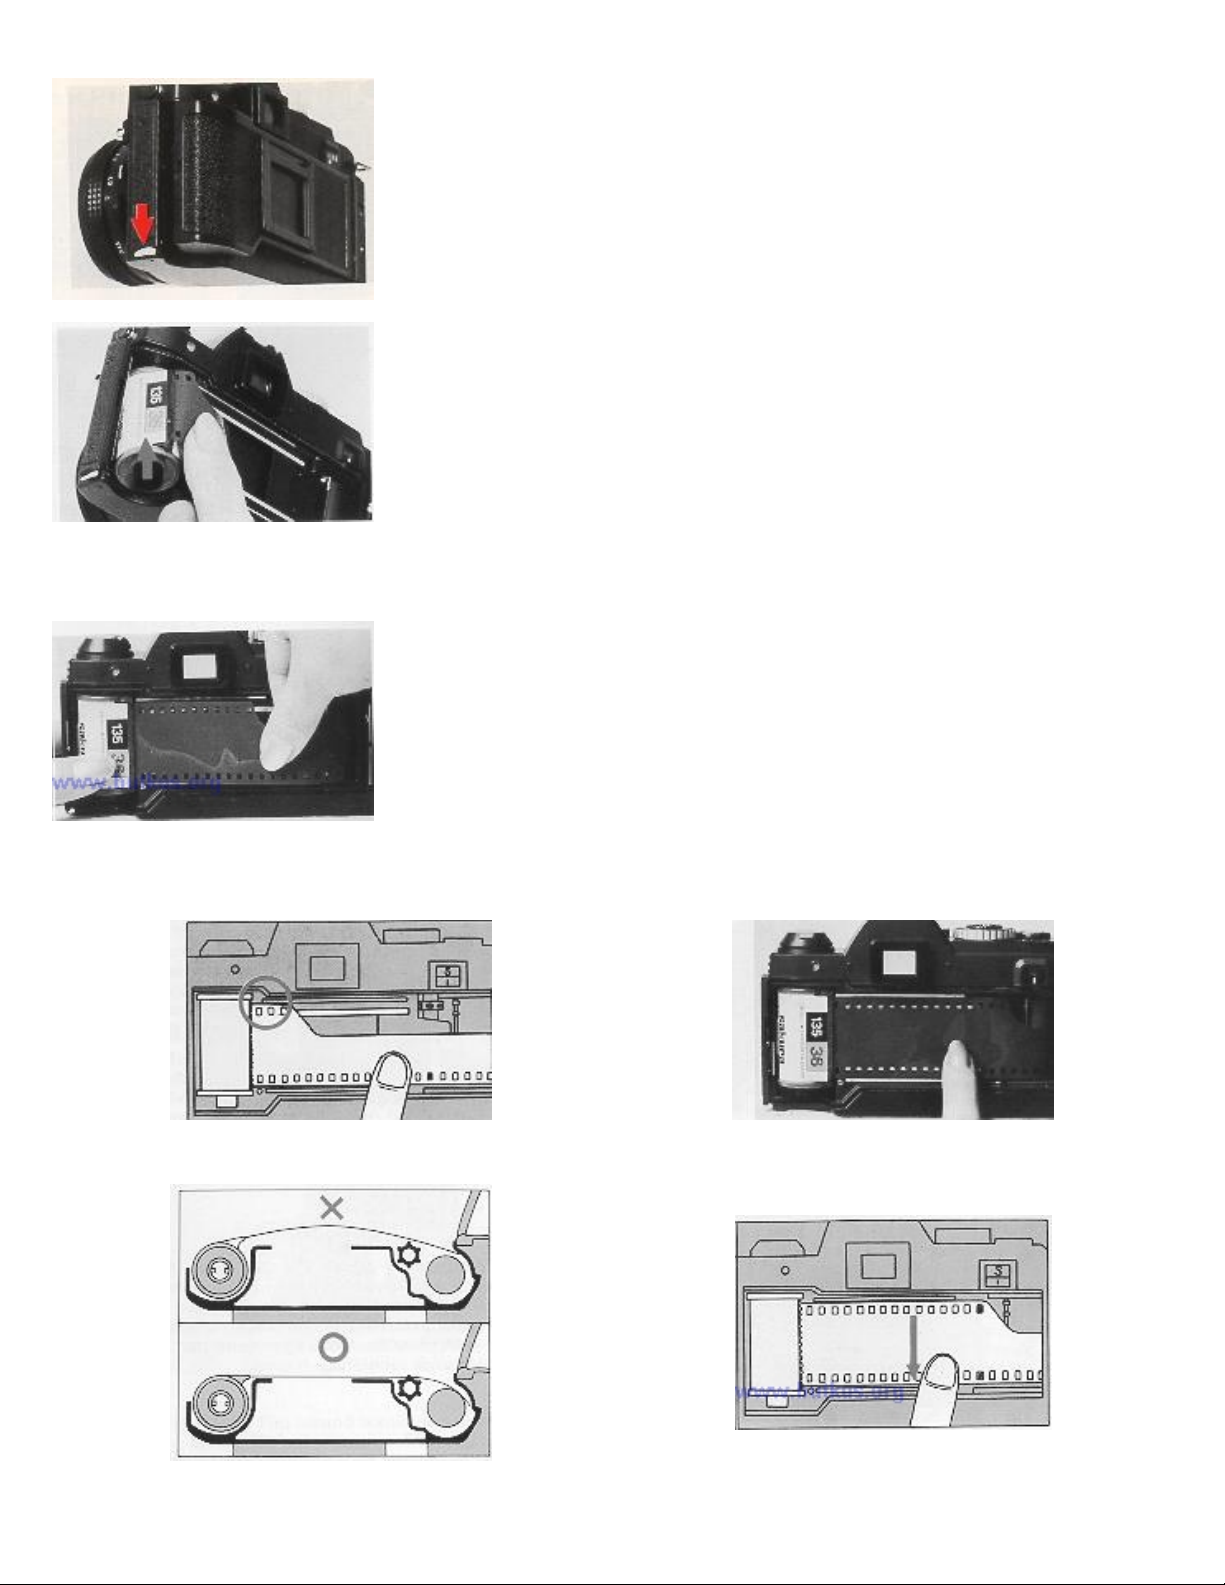
Release the lock claw of the back cover to open the back cover. Do not forcibly try
to open the back cover further when it has stopped.
Insert the 35mm film cassette into the film chamber from the cutout lower section.
While lightly holding down the film cassette, slowly put on the film.
4.butkus.org
In case the film leader is long, pull it out until the first two or three upper
perforations make their appearance.
Pull out the film and insert it into the film autoload roller until it is no longer
visible.
Snap down the back cover, and it will be closed without fail. At the same time, the autoload system will be put into
Page 5
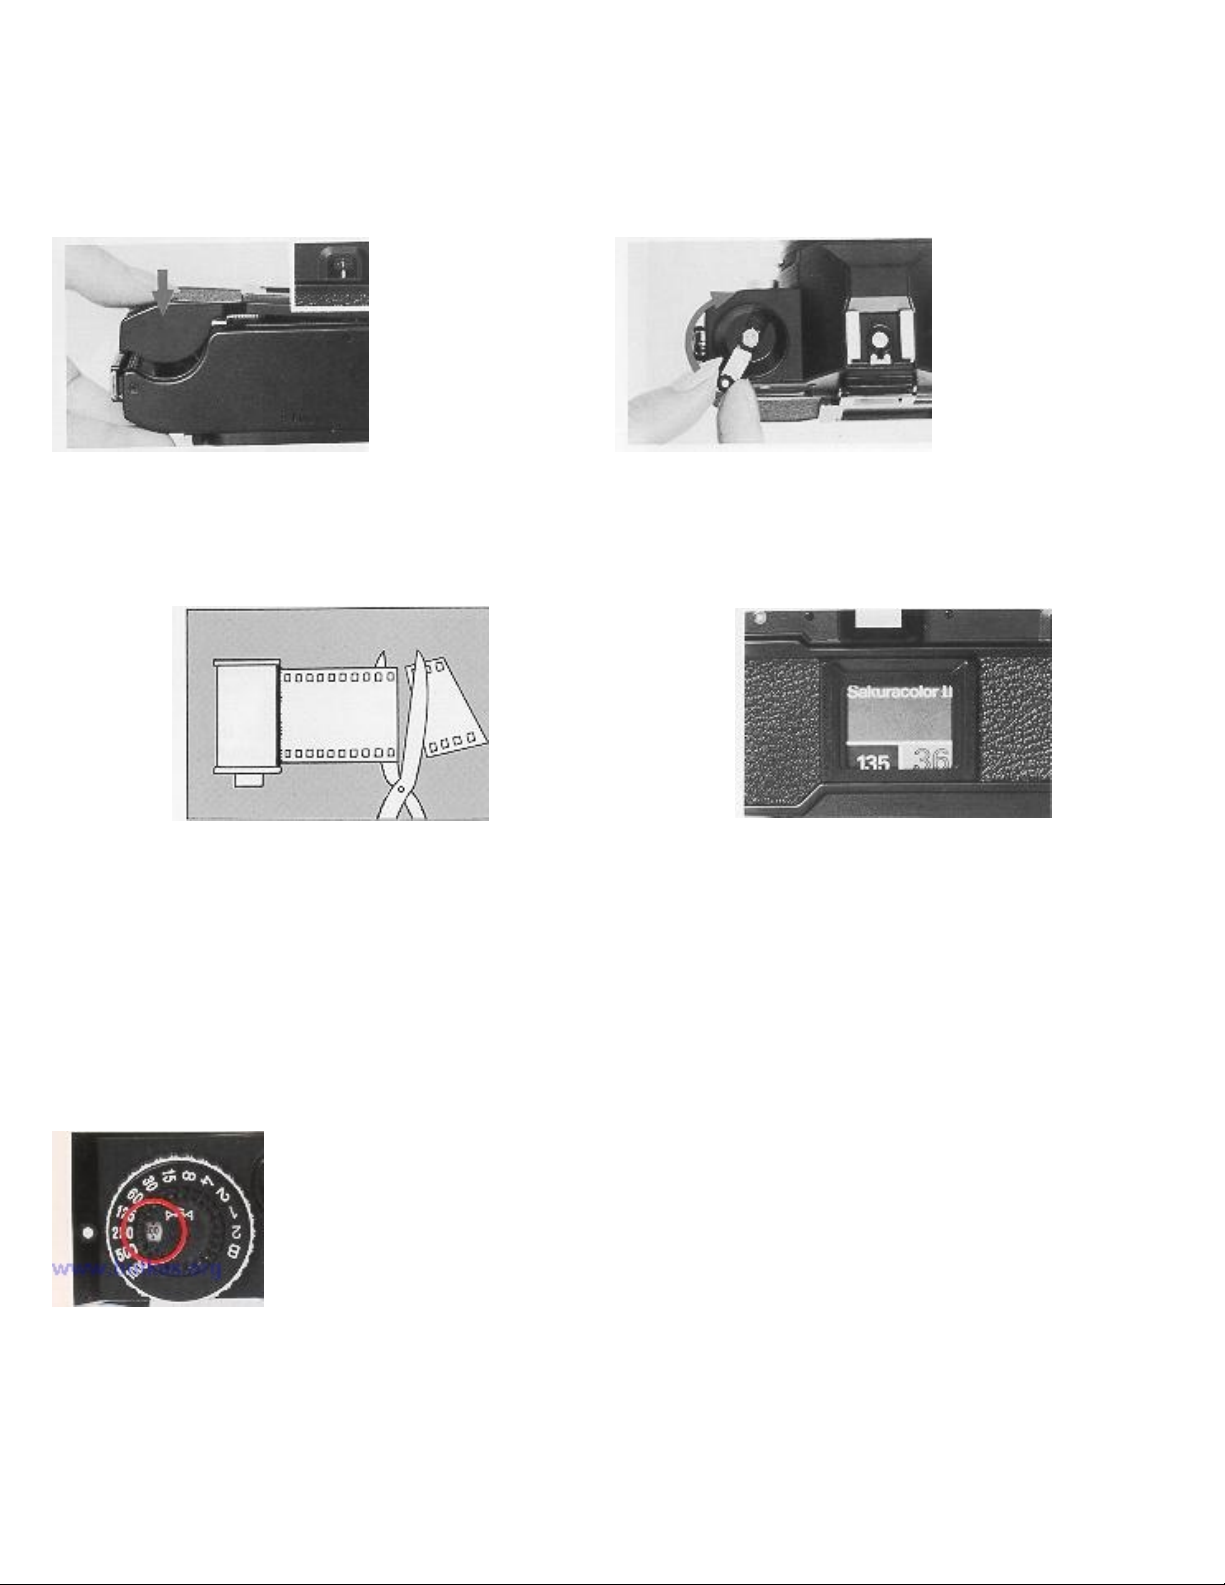
operation, automatically winding up the film until the film frame number "1" appears in the counter. You can ascertain
www.orphancameras.com
the auto-loading with a revolution of the film rewind knob.
Flip up the film rewind crank, and slowly turn it in the arrow-marked direction 360 degrees to eliminate the film slack in
the cassette.
If the auto-loading has properly been conducted, the perforations come in gear with the sprockets and a change in the
pressure on the finger may be felt. Adapt yourself to this pressure change and make it a practice to take pictures after this
ascertainment at all times.
In case you use long-footage film and feed a film cassette, the film in this cassette may be automatically loaded with its
tip cut at right angles. For this case, too, follow the above instruction for automatic loading. Correctly insert the film tip
into the film roller.
Insert the end portion of the film box into the film memo holder located on the back cover to remind you of the film type
in the camera. You may also insert a piece of white paper to write notes.
(3) Set the Film Speed
Turn the ASA set dial on top of the shutter speed dial with a finger tip so that the speed of the
film loaded in your camera may appear in the ASA film speed indicator window. Use the
chart below to set film speeds not shown on the shutter dial.
(4) Setting Lens to AE
Page 6
In AE Photography (Automatic Exposure) Turn the lens aperture ring to the AE
www.orphancameras.com
mark. A safety lock will prevent accidental change.
(5) Release Lock Lever
Move the lever around the shutter button till the white dot visible, and the shutter will be
released. When the lever is alignment with the red dot, the shutter will be locked and the
safety device to prevent an unnecessary depression of the shutter button will be activated.
· Be sure to move the lever until a click is felt at the on/off position.
4.butkus.org
(6) Determination of Shutter Speed
Turn the shutter speed dial and align the shutter speed scale with the index mark. The dial may
be manipulated by the thumb tip while the power grip is held in one hand, and it turns
endlessly. With the use of ASA 100 film, the proper shutter speed range, in broad terms, will
be 1/125 - 1/250 sec. outdoor And 1/30 -- 1/60 sec. indoor in AE photography.
(7) Focusing
Page 7

When the finder is looked into through the eyepiece, you
www.orphancameras.com
will find a split image at the center of the field of view, a
microdiaprism around the split image and a mat plane in
the remaining part of the field of view. Any of these three
parts is usable for focusing. Using the split image section,
turn the focus ring so that the vertically split images may
be viewed as a single image.
Using the microdiaprism section, turn the focus ring so
that the flickering may disappear to produce a clear-cut
image.
Using the mat section, focusing may easily be done with a close-up or telephoto lens.
(8) Aiming Your Konica FS-1
It is good practice to hold your camera with two hands as
illustrated.
Keep the elbow of the support arm against your body to maintain
stability and reduce picture shake.
* When shooting vertical pictures, be sure that you do not
depress the film rewind knob or button.!
(9) AE Photography
When the shutter button is depressed, the aperture indicator LED at the left side of
the viewfinder, will light, indicating the approximate aperture for correct exposure.
The actual lens will be set to the exact aperture required (to 1/10 f/stop accuracy) for
precise exposure.
Single-frame shooting -- A single frame may be exposed by depressing the shutter
button. Detach the finger from the button at once.
Continuous shooting --When you keep your finger on the shutter release button, you will shoot pictures in continuous
sequence at the rate of 1.5 fps. The Konica FS-1 metering system determines and adjusts for correct exposure at every
frame in continuous shooting mode.
Ascertainment of Film Transport-- You will see the film rewind knob turning, assuring you of proper film transport. The
Page 8

LED for the ascertainment of operation will also fit every time a picture is taken.4.butkus.org
www.orphancameras.com
(10) Film Rewind
· When the whole film has been exposed, the LED for the ascertainment of film
transport will be instantly lit and the auto-winding system will simultaneously
stop operating.
· If you keep shooting pictures beyond the prescribed number of exposures on one
roll of film, some of the perforations will be snapped off In some cases.
· When the film is to be rewound, make sure that the shutter button is locked to
prevent an accidental depression.
1) Press in the rewind button at the base of your Konica FS-1 camera.
4.butkus.org
2) Flip up the film rewind crank and turn it in the direction of the arrow mark, and the film will be rewound on the film
cassette spindle. Here, the film counter will move in reverse, but this reverse count does not correspond to the film length
rewound.
3) When there is a sudden drop in the pressure on the fingers, the film rewind is completed. Open the camera back,
remove the exposed 35mm cassette.
LED Information in Viewfinder
When the shutter button is lightly depressed by
the bulb of the forefinger, photographing data
will be shown in the finder. The red-colored LED
with which all data, aperture values and warnings
for the prevention of photographing errors, are so
arranged as to be readily understood, will be
turned on or flicker.
(1) Indication of the correct aperture value -- The
LED for one of the aperture values from f/1.4 to
f/22 will be turned on, indicating the correct
aperture value in AE photography.
(2) Warning against an underexposure -- The LED for f/1.0 (intermediate between M and f/1.4) will flicker.
Page 9

(3) Warning against an overexposure -- The LED for f/22 will flicker.
www.orphancameras.com
(4) Manual indication-- The LED for M will flicker and the LED for some of the aperture values between f/1.4 and f/22
will be turned on indicating the correct exposure (with the use of a Hexanon AR lens).
(5) Warning against a rundown of the cells--The LEDs for f/1.0 (intermediate between M and f/1.4) and f/22 will
alternately flicker.
(6.) Indication for stopped-down metering --The LED of f/1.0 (in between M and f/1.4) is the fixed point mark, and the
correct exposure will be assured when the mark is turned on.
(7) I Indication for completed recharge of the electronic flash unit --When the recharge of the exclusive electronic light
unit (X-24) is completed, the LED either for f/5.6 or f/11 will flicker.
· In AE photography under a fluorescent lamp, there are cases in which two LEDs for indication of the correct aperture
value are seen turned on. This phenomenon is caused by the flickering of the fluorescent lamp, so pictures can
continuously be taken.
4.butkus.org
Warnings against Under- and Over-exposures
Warning against an under-exposure -- The under-exposure warning LED will be turned on when
the shutter button is lightly pressed down. In this situation, select a slower shutter speed.
· In photography at slow shutter speeds, the camera is apt to be jarred when it is held in both
hands. The use of a tripod and the cable switch designed exclusively for this camera is advisable.
Warning against an over exposure
The over-exposure warning LED will be turned on when the shutter button is lightly depressed.
Select a faster shutter speed.
Low Battery Warning Signal
In case new AA alkali manganese dry cells are in use, 15 rolls of 36-exposure film may be taken before a warning
appears for a drop in voltage. When the AA batteries become weak, the under/ over exposure warning lamps will light in
an alternating sequence, signaling "low battery power". You might as well replace the cells with new ones as soon as
Page 10

possible. The cells may be exchanged during the course of the shooting of one roll of film.
www.orphancameras.com
There is still enough power to shoot approximately five more rolls of film, after which all system will automatically turn
off until replacement batteries are installed.
· When the battery cells are to be exchanged with new ones during the course of the shooting of one roll of film, put me
lens cap, set the reloaded battery compartment to the camera body and depress the shutter button. One frame will not be
exposed, preventing the overlapping of pictures.
· Avoid continuous shooting when the warning lamp for the battery voltage Is turned on.
· During low battery power condition, the correct exposure LED will light, and the under and over exposure warning
LED's will cycle (Pulse) at a faster rate.
· For stopped-down metering with a warning for a drop in voltage, the correct exposure will be assured the LED of f/1.0
(in between M and f/1.4) will stop flickering and will be turned on.
4.butkus.org
Photography with Self Timer
When the self timer switch is depressed the red LED will start to pulse, at an even faster
sequential rate to help the subjects determine the moment of shutter release (picture taking).
The time for self timer operation is 10 seconds.
· To obtain better exposures when using the self timer--
When the self-timer is in used or when a picture is to be taken with the eye detached from the
eyepiece, shield the eyepiece with the adjusting ring of the handstrap to prevent light from
inversely straying into the eyepiece. The correct exposure may not be assured, if light
inversely strays into the eyepiece.
1) Divide the adjusting ring of the strap into two. It will be readily detachable if you try to bend the ring at the center.
2) Insert each part into the accessory grooves of the eyepiece and cover the viewfinder windows with the camera strap.
Interchange of Lenses
Page 11

To remove the lens, hold the base of the lens and turn it counterclockwise, while the lens interchange button is kept
www.orphancameras.com
depressed. Take out the lens when the red dot of the lens comes in line with the lens mount/dismount indicator of the
camera body (red dot).
To install a lens, align the red dot of the lens with the lens mount/dis. mount indicator (red dot) of the camera body and
lightly sink the lens into the camera body. Hold the lens and turn it clockwise until it stops with a clicking sound.
B (Bulb) Exposure
The B (bulb) exposure mechanism is used for an exposure of more than three seconds.
Set the shutter speed dial to B and depress the shutter button, and the shutter will be
opened. When the finger is detached from the button, the shutter will be closed. If your
camera is set to manual and a desired shutter speed, a long-time exposure may be made.
· For a time (B) exposure, it is advisable to use a tripod and a Konica FS-1 cable switch
which are available from your photo dealer.
· Fit the cable switch into the accessory terminal connector. The accessory terminal connector is also the attachment point
for a cableless switch and intervalometer.
Manual Photography
To manually set the exposure with your Konica FS-1, merely set the lens to any aperture
other than the AE position. A red LED will pulse at the "M" mark in the viewfinder to
signify manual operation.
The Konica FS-1 through the lens (TTL)--automatic exposure (AK) system operates at all
times, even during manual operation displaying the correct exposure in the viewfinder, for
the scene, even though you have set an aperture and shutter speed combination manually.
4.butkus.org
Selection of Shutter Speed
Page 12

The shutter speeds range from B 2, 1 to 1/1000 sec. The shutter
www.orphancameras.com
speeds are calibrated on the dial. An intermediate point between
readings is not usable, so make sure that the dial clicks into position.
Your camera is equipped with a system of giving priority to shutter
speed. Depending on the brightness and movement of a subject, a
shutter speed may be optionally selected.
Basis for Shutter Speed Selection
In a broad term, the recommended shutter speed is 1/125 to 1/250 sec. for outdoor photography and 1/30 to 1/60 sec. for
outdoor shooting. For a moving subject, determine the shutter speed in the following manner:
1) If you want a moving subject to look still in a finished picture select a fast speed from a range of 1/250 to 1./;000
second.
2) If you want to stress the movement of a moving subject, select a slow speed from a range of 1/30 to 1/60 second.
Aperture vs Depth-of-Field
When the lens is focused on a subject there is a range
around the subject which will be clearly be delineated
in a finished picture. This range is known as a depth
of field.
1) The larger the aperture value (i.e., the smaller the lens aperture), 2) the longer the camera-to-subject distance, 3) the
shorter the focal length, the greater the depth of field. The depth of field is shallow for the area in front of the focal point
and deep for the area behind. The actual depth may be known by checking the depth-of-field scale.
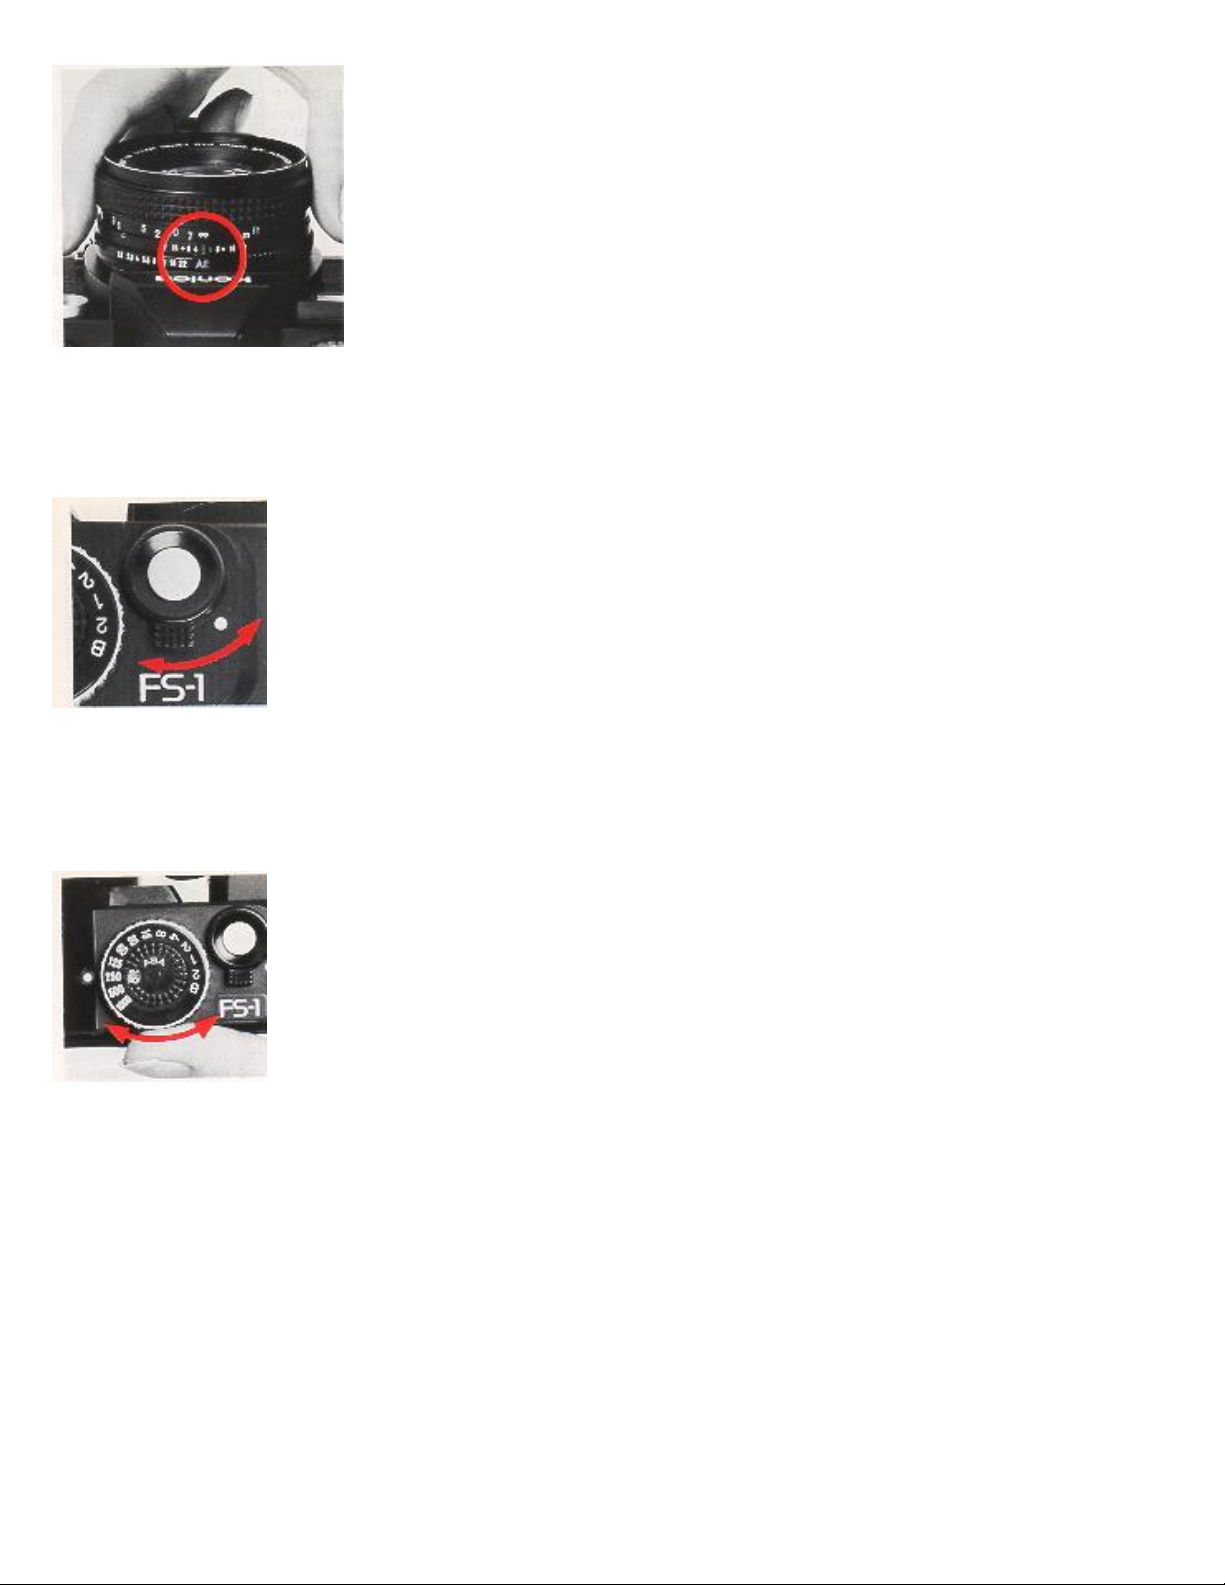
Reading of Depth of-Field Scale
For a depth-of-field scale, identical aperture readings are calibrated in parallel on both sides of the distance index mark.
The range which is sandwiched between a pair of identical aperture readings is a depth of field in which the image will
be clearly delineated in a finished picture.
Page 13

For example when the camera-to-subject distance is 7 m with a 40 mm standard lens, the depth of field will be about
www.orphancameras.com
5~10 m for f/4 and about 3 m to infinity for f/8.
The red colored "4" on the depth-of-field scale is an infrared compensation mark, which is used for a compensation of the
focal point with the use of infrared film. For example, if the camera-to-subject distance is infinity, the infinity mark will
be brought in line with the infrared compensation mark.
When priority is to be given to the determination of a lens aperture, turn the shutter speed dial while looking through the
finder, slightly press down the shutter button and change the shutter speed so that the LED will be turned on at the
reading of the desired lens aperture.
Exposure Compensation for Backlight Photography
In normal TTL-AE photography, the correct exposure
may be obtained. However, in a situation where the
subject is in backlight, where there is much difference
between the bright and dim parts of the main subject's
periphery, or where it is desirable to produce special
effects in a finished picture, the exposure may be
compensated to raise the effects.4.butkus.org
In a situation where the subject is dark against a bright background scene
The AE responds to the overall bright background and in some cases the subject may appear dark (underexposed). For
such situations:
1 ) You may change the ASA scale by half to compensate for the backlight situation and shoot in AE mode.
Example: ASA of film 400, change ASA scale to 200 or 2) You may note the aperture LED in the viewfinder and
manually set the aperture ring on the lens by one stop. For example: meter reading AE=f11, set lens manually to f8.
In a situation where the subject is bright and background dark, reverse the above instructions
1) Double the ASA number. Example: 400 to 800 or 2) You may read the aperture in the viewfinder and set the lens
manually to the next f stop. Example: meter reading f5.6--set lens manually to f8.
· After special exposure photography, be sure to reset the AE mark, and/or reset the ASA speed dial to the correct
sensitivity of the film.
Stopped-down Metering Method
With a Hexanon AR lens bearing an AE mark, the correct exposure is determined at the full opening of the lens both in
AE and manual photography, to determine the correct exposure in stopped-down metering situation.
1 ) A manual pre-set aperture ARP lens or a manual pre-set ARM lens is in use.
2) The AE cannot be used because of the use of an extension ring or bellows.
3) A lens of some other make is used on a lens mount adapter.
Page 14

Exposure Determination
www.orphancameras.com
Electronic Flash Photography
For stopped-down metering, look through the finder and turn the aperture ring or the
shutter speed dial, while the shutter button is lightly depressed.
When the LED positioned between the "M" and "f/1.4" mark glows, you have set the
correct exposure.
· Stopped-down metering tends to be affected by the rays inversely straying into the
eyepiece. Prevent the rays with an eyecup or some other device.
· Stopped-down metering is also done for microscopic photography. Adjust the shutter
speed according to the brightness of the light source.
During the night or in a dark room where AE photography is
unsuitable, the use of the Konica X-24 Auto electronic flash is
recommended. The X-24 flash was especially designed for use with the
Konica FS-1camera to eliminate complicated exposure calculations.
To use the Konica X-24 Auto Flash
1) Use four AA Alkaline or nickel cadmium rechargeable batteries to power the Konica X-24 auto flash.
2) Attach the X-24 auto flash to the hotshoe a top the Konica FS-1 camera and set the F value scale to distance green
(f5.6) or close range red (f11).
3) When the X-24 autoflash is charged --ready to shoot
a. the shutter speed will automatically change to 1/100th second flash sync speed.
b. the aperture will automatically change to f5.6 or f11 as preselected on the X-24 scale.
c. the LED in the viewfinder at f5.6 or f11 will pulse indicating that the flash is ready.
If the picture is taken before the flash is ready, the picture will be exposed in AE mode. Be sure to observe the under/over
exposure warning signals.
· With flash photography using the self timer, check that the charge is complete before depressing the self timer switch.
The range for automatic flash is:
4.butkus.org
Page 15

ASA 100 film--f5.6 0.7 - 4.3m (2.3 - 14.2 ft) f11 0.7 2.1m (2.3 - 7.0ft)
www.orphancameras.com
ASA 400 film--f5.6 1.0 - 8.6m (3.3 - 28.4 ft) f 1 1 0.7 4.3m (2.3 - 14.2 ft)
Use of Other Types of Electronic Flash Units
An electronic light with a hotshoe, such as the Konica X-28, X-20 and X-14, may be electrically connected simply by
fitting it to the hotshoe clip. With an electronic light without a hotshoe connector, insert the plug of its cord into the X
flash contact taphole of the camera body.
1) set the shutter speed to 1/60 sec. for all types electronic flash except Konica X-24 Autoflash.
2) set the lens aperture manually per the instructions of the electronic flash unit.
3) when using automatic flash units such as the Konica X-24, set the lens aperture as indicated by the autoflash.
4) for manual flash units, determine the correct aperture to set by dividing the guide number by the camera to subject
distance. Example: Using ASA 100 film with a Konica X-20 flash, you will get a guide number (GN) of 20, divided by
the distance (5 meters) results in a lens aperture of f4 (20 . 5 = 4).
Use of the Strap
The strap for the Konica FS-1 is constructed of wide, very durable nylon which can be used either as an adjustable neck
strap or functional hand strap.
· To use as Neck Strap
1) Open the lock at the tip of the suspension ring.
2) Insert the lock through the strap eyelet on the front of the camera body and close it. Make sure that the side bearing a
Konica mark faces outside.
3) Insert the other end of the strap through the eyelet on the back of the camera body and fasten the drum-shaped button
into the long cut of the strap.
4) The length of the neckstrap can be adjusted by flipping up the lever at the mid point of the strap.
· To use as a Hand Strap
1 ) The shorter strap fitted to the back is for use as a hand strap. Hold the base of the metal connector with finger tips.
2) Insert the hand strap about 3 cm, and push down the stopper pin outward.
3) Pull out the straps and separate them. Detach the longer one from the camera.
4) The adjustment ring fitted to the hand strap may be used in tightening the wrist with the strap or preventing light from
straying into the eyepiece.
Precautions for use
· At cold places where the temperature is below 0° C, the batteries will run down. Warm your camera before you use it.
· When the battery cells are to be exchanged, use AA alkali manganese dry cells. All the four cells must be replaced.
· When you know you will use the camera at a cold place, make sure that you will have spare battery cells and keep them
warm with your body or in some other means to prevent a drop in the battery performance.
Specifications of the Konica FS-1
Type: 35mm focal plane shutter TTL-AE single lens reflex camera with built-in auto-winder
Film: 35mm film in cartridge
Picture size: 24 x 36mm
Standard lens: Konica Hexanon AR 40mm f/1.8 (five groups and six elements), closest taking distance 0.45m
Mount: Bayonet-type Konica mount 11
Page 16

Aperture mechanism: AE-type fully automatic aperture with smallest aperture at f/22.
www.orphancameras.com
Shutter: Digital-controlled, vertically travel electronic metal focal plane shutter
4.butkus.org
Shutter speeds: B. 2, 1 ~ 1 /1000 sec.
Synchro: Hot shoe and X contact with synchro socket, automatically set to 1/100sec. with exclusive Konica Auto
Strobo X-24. Manually set to 2 ~ 1/60 sec. with electronic flash other than X-24. Synchronized with M. FP and MF bulbs
at 1/30 sec. and slower shutter speeds.
Self-timer: Digital-controlled electronic self-timer
Finder: Pentaprism eye-level finder, magnification X0.67 (at infinity with 40mm standard lens), field-of-view ratio 90%,
real-image alignment system with split-image, microdiaprism and mat plane
View-finder information: LED for one of the apertures in range of f/1.4 ~ 22 lights for correct exposure in AE
photography. LED for f/1.0 (intermediate between M and f/1.4) flickers for under-exposure, whereas LED for f/22
flickers for an-over-exposure. The LED for M flickers and that for one of the apertures in range of f/1.4 ~ 22 lights up (in
use of Hexanon AR lens). LEDs for f/1.0 (intermediate between M and f/1.4) and f/22 alternately flicker for a drop in
voltage. LED for f/1.0 (intermediate between M and f/1.4) lights up for stopped down metering. LED for f/5.6 or f/11
flickers for electronic light charge with exclusive X-24.
Exposure adjustment: TTL metering at full lens opening, shutter-speed priority aperture control system with galliumarsenid-phosphorus compound photocell
· AE-type fully automatic aperture lens (metering at full lens opening): Automatic aperture control system with priority
given to shutter speed selection for AE photography reading of correct aperture value coupled to film speed, shutter
speed and f-value at full lens opening
· Manual aperture lens (stopped-down metering): System of alignment with fixed point coupled to film speed, shutter
speed and lens aperture
AE coupling range: EV0 (at 2 sec. with f/1.4) ~ EV19 (at 1/1000 sec. with f/22) with ASA 100. EV 0.7 (at 2 sec. with
f/2.8) to EV19 (at f/22 with 1/1000 sec.) with f/1.8 lens,
Film speed range: ASA 25 ~ 3,200
Film loading: Konica Autoload system
Film wind: Autoadvance with motor inside takeup roller
Film rewind: Crank type with film rewind button automatically returning to original position.
Film counter: Counts number of frames exposed with auto return to start "s".
Batteries: Four 1.5V AA alkali manganese dry cells.
Others: Exclusive electronic flash Konica Auto Strobo X-24. Camera is automatically switched to electronic flash
photography with mounting of X-24.
Dimensions and weight: 146 x 90 x 73mm, 7009 (minus batteries) with f/1.8 lens, 146 x 90 x 46mm, 5609 (minus
batteries) without lens
· The descriptions in "Lower Battery Warning Signal" starting that continuous shooting may be done at a speed of 1.5
frames per second and that the use of new AA alkali manganese dry cells makes it possible to expose 15 rolls of 36-
Page 17

exposure film until the appearance of a battery rundown signal is based on Konishiroku's own specifications.
www.orphancameras.com
· The specifications and design are subject to change without notice.
o Designer Case - This smartly designed case in two tone brown/ beige simulated suede, provides superb flexibility for
use as a shoulder case or belt case. It is "designer styled" to match the Konica FS-1 future design.
O Carrying Bag - "Designer styled" in two tone beige/brown simulated suede, this functional bag holds the Konica. FS-
1 camera plus standard lens, Konica X-24 Auto flash accessory lenses and several rolls of film-- supplied with wide
shoulder strap.
4.butkus.org
O Konica X-24 Automatic Electronic Flash
This flash unit was especially created for use with the Konica FS-1 camera. It conforms to the FS-1 camera contours and
functions in collaboration with the Konica FS-1 central processing unit (CPU) for automatic flash operation.
When mounted stop the Konica FS-1 camera, you only set the automatic distance control (green f5.6 or red f11). When
the X-24 is turned on and reaches 95% of flash power, it automatically signals the Konica FS-1 camera to change shutter
speed to a fast 1/100th second, to change the lens aperture to f5.6 or f11 and displays a blinking LED signal in the
viewfinder that the flash is ready.
o Cable Switch - This switch type cable release is used in place of the conventional cable release since, the Konica FS-1
features an electromagnetic release mechanism. When this switch is connected to the terminal of the camera, it is
possible to trip the shutter by operating the hand-held switch. This switch is useful for bulb exposure and also close-ups,
telephoto shots, and also helps cancel out camera shake when using slow shutter speeds.
o Remote Control Switch - The cord is 5m in length. Operating the switch on your end of the cord, the shutter may be
released at a place away from the camera.
O Double Cable Switch - The double cable release switch for the use of Auto Bellows with an automatic aperture makes
it possible to use any Auto Bellows on the Konica FS-1.
O Interval Timer (To be put on sale)
This device allows photographs to be taken repeatedly at fixed intervals of time. When it is mounted on the camera and
the switch is turned on, the shutter is repeatedly tripped at the pre-set
o Close-up Lens - This lens permits AE close-ups simply by screwing it onto the front of the lens and mounting it in
place. This makes close-up photographs of plants and flowers as well as copies of documents and pictures easy work.
o Angle-Magnifinder - This helpful gadget makes it possible to look into the viewfinder from above the camera and it
comes in handy for when pictures are to be taken at a low level such as in copying, close-ups and micro-photography.
Furthermore, when the lever is rotated, the image in the center of the viewfinder is enlarged two-fold with the magnifying
glass and so focusing can be performed very accurately for close-ups, copying, telephoto photography and microphotography.
O Cable-less Switch (To be put on sale)
This switch is made up of a receiver, which will be fitted to the camera, and a transmitter, which will be used on your
side. The infra-red rays transmitted by the transmitter will be intercepted by the receiver, making it possible to operate
the shutter with electric signals. Only the Konica FS-1 with an automatic wind AE mechanism makes unmanned
photographing possible and fully displays its performance in taking, say, ecological pictures of animals, to which man
cannot come
 Loading...