

Page 1

Font Management Utility
User’s Guide
Page 2

Page 3

Contents
1 Introduction
1.1 Operating environment .................................................................... 1-1
1.2 Main functions .................................................................................. 1-2
2 Installing Font Management Utility
2.1 Installation ......................................................................................... 2-1
To install ......................................................................................... 2-1
2.2 Uninstallation .................................................................................... 2-2
To uninstall ..................................................................................... 2-2
3 Using Font Management Utility
3.1 Starting Font Management Utility ................................................... 3-1
To start ........................................................................................... 3-1
3.2 Quiting Font Management Utility .................................................... 3-3
To quit ............................................................................................ 3-3
3.3 Main dialog box and functions ........................................................ 3-4
List of Font/Form ............................................................................ 3-4
3.4 Selecting and adding devices .......................................................... 3-6
3.4.1 Manually adding devices ............................................................... 3-7
To add a device ............................................................................. 3-7
3.4.2 Searching for and adding devices ................................................. 3-9
To add a device ............................................................................. 3-9
3.4.3 Specifying the search range ........................................................ 3-11
To specify the search range ......................................................... 3-11
3.5 Adding and deleting fonts and forms ........................................... 3-14
To add fonts and forms ................................................................ 3-14
To delete fonts and forms ............................................................ 3-18
3.6 Saving lists as files ......................................................................... 3-20
To save a list ................................................................................ 3-20
Font Management Utility i
Page 4

About this Product
Font Management Utility is a utility that allows you to add and delete the
fonts and the forms for printing overlays of the supported devices (MFPs)
that are on a network.
You can display a list of fonts and forms that were added with Font Management Utility.
Trademarks and registered trademarks
Trademark acknowledgements
KONICA MINOLTA and the KONICA MINOLTA logo are either registered
trademarks or trademarks of KONICA MINOLTA HOLDINGS, INC.
®
Microsoft
Microsoft Corporation in the United States and/or other countries.
All other company and product names are either trademarks or registered
trademarks of their respective companies.
Dialog boxes
The dialog boxes shown in this manual are those that appear in Windows XP.
and Windows® are either registered trademarks or trademarks of
2
Note
The dialog boxes that appear in this document may differ from those that
appear on your computer, depending on the installed devices and specified settings.
2
Note
Unauthorized reproduction, translation or duplication of this document,
whether in its entirety or in part, is strictly prohibited.
The content of this document is subject to change without notice.
Copyright © 2005 KONICA MINOLTA BUSINESS TECHNOLOGIES, INC.
All rights reserved.
ii Font Management Utility
Page 5
Introduction
1 Introduction
1.1 Operating environment
The operating environment of Font Management Utility is described below.
1
Supported operating
systems
Available hard-disk
space
Supported fonts and
forms
Windows XP, Windows Server 2003, Windows 2000 (Service Pack 4 or
later)
200 MB or more (during installation)
PCL fonts PCL-compliant font data
PCL forms PCL-compliant macro data
PostScript fonts PostScript type 1 fonts (PEA or PFB)
PostScript forms PS or EPS
Font Management Utility 1-1
Page 6

1
1.2 Main functions
The main functions of Font Management Utility are described below.
- Adds and deletes the fonts and forms of the supported MFP.
- Displays the information of the added fonts and forms in a list.
- Saves files (CSV file) of the font and form list.
- Automatically detects the supported MFPs that are on a network.
- Manual connection to the supported MFPs that are on a network.
Introduction
1-2 Font Management Utility
Page 7

Installing Font Management Utility
2 Installing Font Management Utility
2.1 Installation
Install Font Management Utility by following the procedure described below.
To install
1 Double-click Setup.exe.
2 Follow the on-screen instructions to install.
2
Font Management Utility 2-1
Page 8

2
2.2 Uninstallation
Uninstall Font Management Utility by following the procedure described below.
To uninstall
1 From the Start menu, click Control Panel (for Windows 2000, Settings
— Control Panel) to open the Control Panel.
2 Double-click Add or Remove Programs (for Windows 2000, Add/Re-
move Programs).
3 From the installed programs list, select KONICAMINOLTA Font Man-
agement Utility 1.0, and then click the Remove button.
4 When the program deletion confirmation dialog box appears, click the
Yes button.
This starts the unistallation procedure.
Installing Font Management Utility
2-2 Font Management Utility
Page 9

Using Font Management Utility
3 Using Font Management Utility
3.1 Starting Font Management Utility
Start Font Management Utility by following the procedure described below.
To start
1 From the Start menu, click All Programs (for Windows 2000, Pro-
grams)—KONICA MINOLTA—Font Management Utility—Font
Management Utility.
– If a shortcut was created during the installation of Font Manage-
ment Utility, double-click the shortcut on the desktop.
The Select Device dialog box appears.
3
Font Management Utility 3-1
Page 10

3
Using Font Management Utility
2 Select the desired device from List of Devices, and then click the OK
button.
– If the administrator password or bizhub OpenAPI password has
been specified for the selected device, the dialog box for entering
the password will appear. Enter the password, and then click the
OK button.
The List of Font/Form dialog box appears.
3-2 Font Management Utility
Page 11

Using Font Management Utility
3.2 Quiting Font Management Utility
Quit the Font Management Utility by following the procedure described below.
To quit
1 From the File menu, click Exit.
The dialog box to confirm quiting Font Management Utility appears.
2 Click the Yes button.
This quits Font Management Utility.
3
Font Management Utility 3-3
Page 12

3
3.3 Main dialog box and functions
This section describes the font and form list used to add or delete fonts and
forms.
List of Font/Form
12
Using Font Management Utility
3
5
6
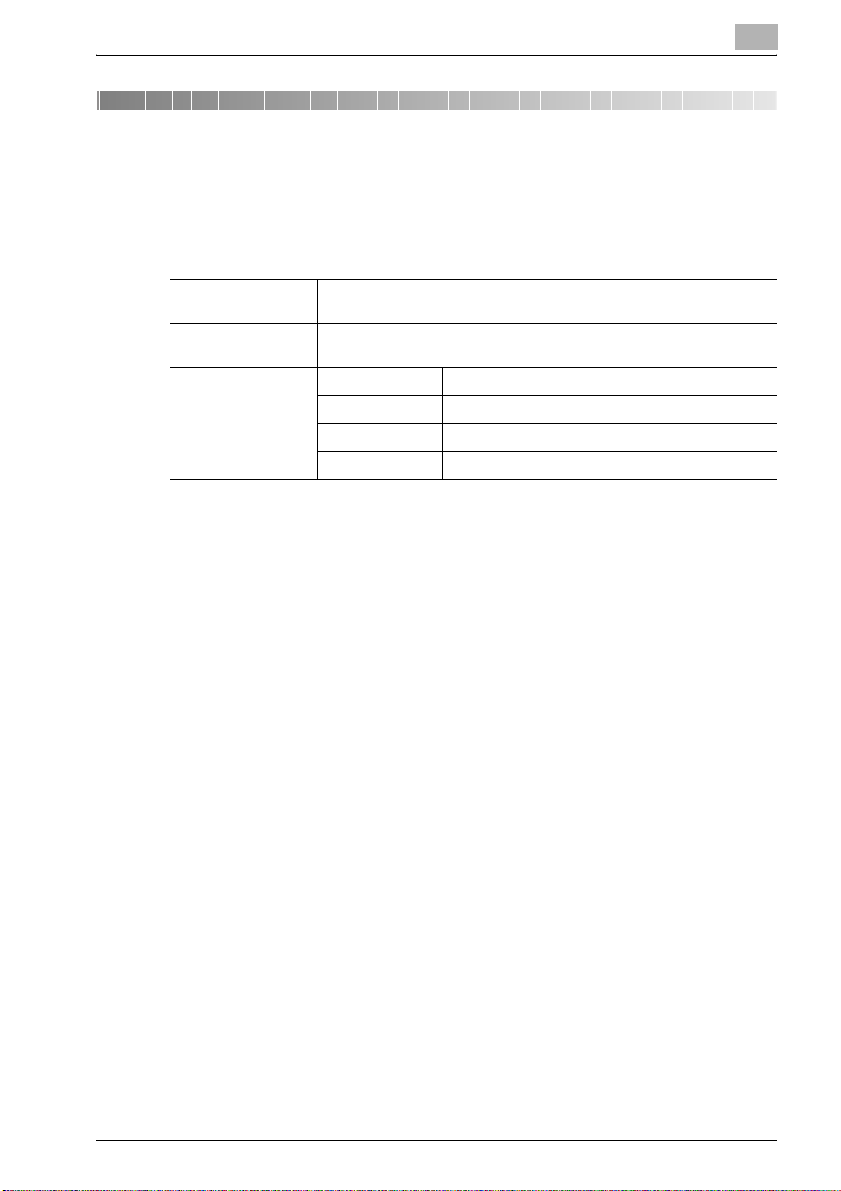
No. Name Description
1 File You can save each list as a file (CSV file) and quit Font Management Util-
2 Help You can display the Help of Font Management Utility and check the ver-
3 Device Name Displays the device names displayed in a list.
4 Change Click to display the selection dialog box of the device.
5 Font/Form You can select the font and form types displayed in a list from the drop-
ity.
For saving a list as a file, refer to “Saving lists as files” on page 3-20.
sion information.
For selecting a device, refer to “Selecting and adding devices” on
page 3-6.
down list. The types that can be selected include PCL Font List, PCL
Form List, PostScript Font List, PostScript Form List, and All.
4
7
8
9
3-4 Font Management Utility
Page 13

Using Font Management Utility
No. Name Description
6 List of Font/
Form
7 Add Click to add fonts and forms.
8 Delete Click to delete fonts and forms.
9 Refresh Click to renew (obtain) the font and form information of the device and
Displays the fonts and forms that are added to the selected device in the
list.
The list can be displayed by sorting each item.
For adding fonts and forms, refer to “Adding and deleting fonts and
forms” on page 3-14.
For deleting fonts and forms, refer to “Adding and deleting fonts and
forms” on page 3-14.
display it in a list.
3
Font Management Utility 3-5
Page 14

3
3.4 Selecting and adding devices
This section describes the procedures for selecting and adding a device that
displays the font and form information.
The two types of lists for selecting a device are described below.
Device list Method for adding devices to a list
Registered device list Enters the device name and IP address and connects manually.
Search result list Searches and detects automatically the devices on a network.
2
Note
The automatically detected device can also be added to
the registered device list.
For further details, refer to “Searching for and adding devices” on page 3-9.
Using Font Management Utility
3-6 Font Management Utility
Page 15

Using Font Management Utility
3.4.1 Manually adding devices
To manually add a device to the registered device list, follow the procedure
described below.
To add a device
1 Click the Change button on the main dialog box. The Select Device
dialog box appears.
–The Select Device dialog box also appears when Font Manage-
ment Utility is started.
3
2 Select from Registered Devices from the Selection Mode drop-
down list.
– If a device has been preregistered, from Registered Devices is
displayed when the Select Device dialog box appears.
Font Management Utility 3-7
Page 16

3
Using Font Management Utility
3 Click the Add button.
– To change the name of a registered device, select the device, and
then click the Edit button. Change the device name in the Destina-
tion Setting dialog box.
– To delete a registered device, select the device, and then click the
Delete button.
The Destination Setting dialog box appears.
4 Enter the device name to be added and the IP address or host name,
and then click the OK button.
The device is added to the Select Device dialog box.
3-8 Font Management Utility
Page 17

Using Font Management Utility
3.4.2 Searching for and adding devices
Font Management Utility can search for and automatically detect a supported device that is on a network.
Also, the detected device can be added to the registered device list.
Add a device to the registered list by following the procedure described below.
To add a device
1 Click the Change button on the main dialog box. The Select Device
dialog box appears.
–The Select Device dialog box also appears when Font Manage-
ment Utility is started.
3
Font Management Utility 3-9
Page 18

3
Using Font Management Utility
2 Select from Search Result from the Selection Mode drop-down list.
– If the device is not registered, from Search Result is displayed
when the Select Device dialog box appears.
– To renew the search results, click the Search button.
– To specify the search range of the device, click the Search Setting
button. For the search settings, refer to “Specifying the search
range” on page 3-11.
3 Check that Add this to the list of registered devices. is selected.
4 Select the device, and the click the OK button.
The device is added to the registered device list.
3-10 Font Management Utility
Page 19

Using Font Management Utility
3.4.3 Specifying the search range
You can specify the search range when searching for a device that is on a
network.
Specify the search range by following the procedure described below.
To specify the search range
1 Click the Change button on the main dialog box. The Select Device
dialog box appears.
–The Select Device dialog box also appears when Font Manage-
ment Utility is started.
3
Font Management Utility 3-11
Page 20

3
Using Font Management Utility
2 Select from Search Result from the Selection Mode drop-down list.
– If the device is not registered, from Search Result is displayed
when the Select Device dialog box appears.
3-12 Font Management Utility
Page 21

Using Font Management Utility
3 Click the Search Setting button.
The Search Setting dialog box appears.
3
4 Enter each setting value, and then click the OK button.
– SNMPv1 Setting: Specifies the community name and port number
for SNMPv1.
– SNMPv3 Setting: Specifies the user name and port number for
SNMPv3.
– Setting of Search Range: Specifies the IP address for starting and
the IP address for ending a search. To register the specified range
in the Search Range list, click the Add button. Up to 256 search
ranges can be registered. To delete a search range from the Search
Range list, select the search range you want to delete, and then
click the Delete button.
Font Management Utility 3-13
Page 22

3
Using Font Management Utility
3.5 Adding and deleting fonts and forms
This section describes the procedures for adding and deleting the fonts and
forms of a device.
To add fonts and forms
1 Click the Add button on the List of Font/Form dialog box.
The Add Font/Form dialog box appears.
3-14 Font Management Utility
Page 23

Using Font Management Utility
2 Click the Add to List button.
The Setting of Adding Font/Form dialog box appears.
3
Font Management Utility 3-15
Page 24

3
Using Font Management Utility
3 Specify each setting, and then click the OK button.
– Type: Selects the type of the font or form to be added.
– File Name: Enters the file name of the font or form to be added. You
can also specify the file by clicking the Browse button.
– ID: Specifies an ID if the font and form to be added are PCL. Selects
Auto or Manual as the setting.
– Destination: Selects HDD or RAM as the storage destination for the
fonts and forms.
The fonts and forms are added to List of Adding Font/Form.
3-16 Font Management Utility
Page 25

Using Font Management Utility
4 Click the Add to Device button.
The Add Font/Form dialog box appears.
3
5 Click the OK button.
The fonts and forms are added to the device.
2
Note
The information of the fonts and forms added to the device is not automatically added to
mation of the added fonts and forms, click the
of Font/Form
It may take some time for the information to be updated (obtained).
Font Management Utility 3-17
List of Font/Form
dialog box.
. To update the list with the infor-
Refresh
button on the
List
Page 26

3
Using Font Management Utility
To delete fonts and forms
1 Click the [Delete] button on the List of Font/Form dialog box.
The Delete Font/Form dialog box appears.
3-18 Font Management Utility
Page 27

Using Font Management Utility
2 Select the fonts and forms to be deleted, and then click the Delete but-
ton.
– To delete all fonts and forms, click the Select All button. All of the
font and forms are selected.
– To clear all of the check boxes, click the Clear All button.
The Delete Font/Form dialog box appears.
3
3 Click the OK button.
The fonts and forms are deleted from the device.
2
Note
The PostScript forms and PostScript fonts saved to RAM cannot be deleted from this utility. To delete the PostScript forms and PostScript fonts
saved to RAM, turn the power of the device off. Note that when the power
of the device is turned off, all of fonts and forms in RAM will be deleted.
2
Note
The information of the fonts and forms deleted from the device is not automatically added to
mation of the deleted fonts and forms, click the
List of Font/Form
It may take some time for the information to be updated (obtained).
Font Management Utility 3-19
List of Font/Form
dialog box.
. To update the list with the infor-
Refresh
button on the
Page 28

3
3.6 Saving lists as files
You can save the font and form list as a file (CSV file).
Save each list as a file by following the procedure described below.
To save a list
1 Select Save List from the File menu on the main dialog box, and then
click the list you want to save.
The dialog box for saving the list appears.
Using Font Management Utility
2 Specify the save location and file name, and then click the Save button.
The file is saved in the specified location.
2
Note
The saved CSV file can be viewed and printed by opening it with a
spreadsheet program such as Microsoft Excel.
3-20 Font Management Utility
Page 29

1 Introduction
1.1 Operating environment .................................................................... 1-1
1.2 Main functions .................................................................................. 1-2
2 Installing Font Management Utility
2.1 Installation ......................................................................................... 2-1
To install ......................................................................................... 2-1
2.2 Uninstallation .................................................................................... 2-2
To uninstall ..................................................................................... 2-2
3 Using Font Management Utility
3.1 Starting Font Management Utility ................................................... 3-1
To start ........................................................................................... 3-1
3.2 Quiting Font Management Utility .................................................... 3-3
To quit ............................................................................................ 3-3
3.3 Main dialog box and functions ........................................................ 3-4
List of Font/Form ............................................................................ 3-4
3.4 Selecting and adding devices .......................................................... 3-6
3.4.1 Manually adding devices ............................................................... 3-7
To add a device ............................................................................. 3-7
3.4.2 Searching for and adding devices ................................................. 3-9
To add a device ............................................................................. 3-9
3.4.3 Specifying the search range ........................................................ 3-11
To specify the search range ......................................................... 3-11
3.5 Adding and deleting fonts and forms ........................................... 3-14
To add fonts and forms ................................................................ 3-14
To delete fonts and forms ............................................................ 3-18
3.6 Saving lists as files ......................................................................... 3-20
To save a list ................................................................................ 3-20
1
 Loading...