

Page 1

Fiery X3e
COLOR GUIDE
Page 2

Page 3

Copyright © 2000 Electronics For Imaging, Inc. All rights reserved.
This publication is protected by copyright, and all rights are reserved. No part of it may be reproduced or transmitted in any form or by any means for any purpose
without express prior written consent from Electronics For Imaging, Inc., except as expressly permitted herein. Information in this document is subject to change
without notice and does not represent a commitment on the part of Electronics For Imaging, Inc.
The software described in this publication is furnished under license and may only be used or copied in accordance with the terms of such license.
Patents: 5,867,179; 5,835,788; 5,666,436; 5,553,200; 5,543,940; 5,537,516; 5,517,334; 5,506,946; 5,424,754; 5,343,311; 5,212,546; 4,941,038; 4,837,722;
4,500,919; D406,117
Trademarks
EFI, the EFI logo, Fiery, the Fiery logo, Fiery Driven, the Fiery Driven logo, EFICOLOR, ColorWise, and Rip-While-Print are trademarks registered in the U.S.
Patent and Trademark Office. Fiery ZX, Fiery X2, Fiery X3, Fiery X4, Command WorkStation, AutoCal, Starr Compression, Memory Multiplier, NetWise, and
VisualCal are trademarks of Electronics For Imaging, Inc.
Adobe, the Adobe logo, Adobe Illustrator, PostScript, Adobe Photoshop, Adobe Separator, and Adobe PageMaker are trademarks of Adobe Systems Incorporated,
registered in certain jurisdictions. EPS (Encapsulated PostScript) is a trademark of Altsys Corporation. Apple, the Apple logo, AppleShare, AppleTalk, EtherTalk,
LaserWriter, and Macintosh are registered trademarks, and MultiFinder is a trademark of Apple Computer, Inc. Microsoft, MS, MS-DOS, and Windows are
registered trademarks of Microsoft in the US and other countries. QuarkXPress is a registered trademark of Quark, Inc. Times, Helvetica, and Palatino are
trademarks of Linotype AG and/or its subsidiaries. ITC Avant Garde, ITC Bookman, ITC Zapf Chancery, and ITC Zapf Dingbats are registered trademarks of
International Typeface Corporation. Ethernet is a registered trademark of Xerox Corporation. NetWare and Novell are registered trademarks and Internetwork
Packet Exchange (IPX) is a trademark of Novell, Inc. UNIX is a registered trademark of UNIX System Laboratories, a wholly owned subsidiary of Novell, Inc.
PANTONE is a registered trademark of Pantone, Inc. Matchprint is a trademark of Imation Corp.
All other terms and product names may be trademarks or registered trademarks of their respective owners, and are hereby acknowledged.
Legal Notices
APPLE COMPUTER, INC. (“APPLE”) MAKES NO WARRANTIES, EXPRESS OR IMPLIED, INCLUDING WITHOUT LIMITATION THE
IMPLIED WARRANTIES OF MERCHANTABILITY AND FITNESS FOR A PARTICULAR PURPOSE, REGARDING THE APPLE SOFTWARE.
APPLE DOES NOT WARRANT, GUARANTEE, OR MAKE ANY REPRESENTATIONS REGARDING THE USE OR THE RESULTS OF THE USE
OF THE APPLE SOFTWARE IN TERMS OF ITS CORRECTNESS, ACCURACY, RELIABILITY, CURRENTNESS, OR OTHERWISE. THE ENTIRE
RISK AS TO THE RESULTS AND PERFORMANCE OF THE APPLE SOFTWARE IS ASSUMED BY YOU. THE EXCLUSION OF IMPLIED
WARRANTIES IS NOT PERMITTED BY SOME STATES. THE ABOVE EXCLUSION MAY NOT APPLY TO YOU.
IN NO EVENT WILL APPLE, ITS DIRECTORS, OFFICERS, EMPLOYEES OR AGENTS BE LIABLE TO YOU FOR ANY CONSEQUENTIAL,
INCIDENTAL OR INDIRECT DAMAGES (INCLUDING DAMAGES FOR LOSS OF BUSINESS PROFITS, BUSINESS INTERRUPTION, LOSS OF
BUSINESS INFORMATION, AND THE LIKE) ARISING OUT OF THE USE OR INABILITY TO USE THE APPLE SOFTWARE EVEN IF APPLE
HAS BEEN ADVISED OF THE POSSIBILITY OF SUCH DAMAGES. BECAUSE SOME STATES DO NOT ALLOW THE EXCLUSION OR
LIMITATION OF LIABILITY FOR CONSEQUENTIAL OR INCIDENTAL DAMAGES, THE ABOVE LIMITATIONS MAY NOT APPLY TO YOU.
Apple’s liability to you for actual damages from any cause whatsoever, and regardless of the form of the action (whether in contract, tort [including negligence],
product liability or otherwise), will be limited to $50.
Restricted Rights Legends
For defense agencies: Restricted Rights Legend. Use, reproduction, or disclosure is subject to restrictions set forth in subparagraph (c)(1)(ii) of the Rights in
Technical Data and Computer Software clause at 252.227.7013.
For civilian agencies: Restricted Rights Legend. Use, reproduction, or disclosure is subject to restrictions set forth in subparagraph (a) through (d) of the
commercial Computer Software Restricted Rights clause at 52.227-19 and the limitations set forth in Electronics For Imaging, Inc.’s standard commercial
agreement for this software. Unpublished rights reserved under the copyright laws of the United States.
Printed in the United States of America on recycled paper.
Part Number:
45019144
Page 4

FCC Information
Declaration of Conformity
Trade Name: Printer Controller
Model Number: Fiery X3e CF9001
Compliance Test Report Number: M00912A1
Compliance Test Report Date: September 13, 2000
Responsible Party (in USA): Electronics for Imaging, Inc.
Address: 303 Velocity Way, Foster City, CA 94404
Telephone: (650) 357-3500
This equipment has been tested and found to comply with the limits for a Class B digital device, pursuant to Part 15 of the FCC Rules. These limits are designed
to provide reasonable protection against harmful interference in a residential installation. This equipment generates, uses, and can radiate radio frequency energy
and, if not installed and used in accordance with the instructions, may cause harmful interference to radio communications. However, there is no guarantee that
interference will not occur in a particular installation.
WARNING: FCC Regulations state that any unauthorized changes or modifications to this equipment not expressly approved by the manufacturer could void
the user’s authority to operate this equipment.
Industry Canada Class B Notice
This Class B digital apparatus complies with Canadian ICES-003.
Avis de Conformation Classe B de l’Industrie Canada
Cet appareil numérique de la classe B est conforme à la norme NMB-003 du Canada.
Page 5

CE Marking (Declaration of Conformity)
We declare under our sole responsibility that the copier and options to which this declaration relates is in conformity with the specifications below. This declaration
is valid for the area of the European Union (EU) only.
Product Type Console Copier System
System Product
Name
Compliance
Report Number
Standards Safety *2 : EN 60 950/1992 (A1, A2, A3, A4 & A11)
EC Directives Safety: 73/23/EEC and 93/68/EEC
CF9001 + Fiery X3e CF9001, CF9001 Options: AFR-12, ST-103, S-105, C-101, AD-7, I/F KIT G, ADF KIT
M00913C1
(Safety of information technology equipment, including electrical business equipment)
EN 60825-1 / 1994 with A11 (Copier only)
(Radiation safety of laser products, equipment classification, requirements, and user’s guide)
EMC *1 : EN55 022 (Class B)/1994 with A1 (1995) & A2 (1997)
EN55 022 (Class B)/1998 (Printer Controller only)
(Limits and method for measurement of radio disturbance characteristics of information technology equipment (ITE))
EN61000-3-2/1995 (Electromagnetic compatibility (EMC)- Part 3: Limits, Section 2: Limits for harmonic current
emissions (equipment input current ≤16A per phase))
EN61000-3-3/1995 (Electromagnetic compatibility (EMC)- Part 3: Limits, Section 2: Limitation of voltage fluctuations
and flicker in low-voltage supply systems for equipment with rated current ≤16A)
EN55024/1998 (Information technology equipment — immunity characteristics — Limits and methods of
measurement)
EN61000-4-2/1995 : Electrostatic discharge immunity test
EN61000-4-3/1995 : Radiated electromagnetic field immunity test
EN61000-4-4/1995 : Electrical fast transient/burst immunity test
EN61000-4-5/1995 : Surge immunity test
EN61000-4-6/1996 : Immunity to conducted disturbance, induced by radio-frequency field
EN61000-4-8/1993 : Power-frequency magnetic field immunity test
EN61000-4-11: Voltage dips, short interruptions and voltage variations immunity test
Notes: *1) EMC performance: This product was designed for operation in a typical office environment.
*2) First year of labeling according to EC-directive 73/23/EEC and 93/68/EEC: 2000
3) This product was designed for operation in a typical office environment.
EMC: 89/336/EEC and 93/68/EEC
This device must be used with shielded interface cables. The use of non-shielded cable is likely to result in interference with radio communications and is
prohibited under EC Directives.
Software License Agreement
Before using the Software, please carefully read the following terms and conditions. BY USING THIS SOFTWARE, YOU SIGNIFY THAT YOU HAVE
ACCEPTED THE TERMS OF THIS AGREEMENT. If you cannot or do not accept these terms, you may return the entire package within ten (10) days to
the Distributor or Dealer from which you obtained them for a full refund.
Electronics for Imaging, Inc. grants to you a non-exclusive, non-transferable license to use the software and accompanying documentation (“Software”) included
with the Fiery X3e you have purchased, including without limitation the PostScript software provided by Adobe Systems Incorporated.
Page 6

You may:
a. use the Software solely for your own customary business purposes and solely with Fiery X3e;
b. use the digitally-encoded machine-readable outline and bitmap programs (“Font Programs”) provided with Fiery X3e in a special encrypted format (“Coded
Font Programs”) to reproduce and display designs, styles, weights, and versions of letters, numerals, characters and symbols (“Typefaces”) solely for your own
customary business purposes on the display window of the Fiery X3e or monitor used with Fiery X3e;
c. use the trademarks used by Electronics for Imaging to identify the Coded Font Programs and Typefaces reproduced therefrom (“Trademarks”); and
d. assign your rights under this Agreement to a transferee of all of your right, title and interest in and to Fiery X3e provided the transferee agrees to be bound by
all of the terms and conditions of this Agreement.
You may not:
a. make use of the Software, directly or indirectly, to print bitmap images with print resolutions of 600 dots per inch or greater, or to generate fonts or typefaces
for use other than with Fiery X3e;
b. make or have made, or permit to be made, any copies of the Software, Coded Font Programs, accompanying documentation or portions thereof, except as
necessary for use with the Fiery X3e unit purchased by you; provided, however, that under no circumstances may you make or have made, or permit to be made,
any copies of that certain portion of the Software which has been included on the Fiery X3e hard disk drive. You may not copy the documentation;
c. attempt to alter, disassemble, decrypt or reverse engineer the Software, Coded Font Programs or accompanying documentation.
d. rent or lease the Software.
Proprietary Rights
You acknowledge that the Software, Coded Font Programs, Typefaces, Trademarks and accompanying documentation are proprietary to Electronics For Imaging
and its suppliers and that title and other intellectual property rights therein remain with Electronics For Imaging and its suppliers. Except as stated above, this
Agreement does not grant you any right to patents, copyrights, trade secrets, trademarks (whether registered or unregistered), or any other rights, franchises or
licenses in respect of the Software, Coded Font Programs, Typefaces, Trademarks or accompanying documentation. You may not adapt or use any trademark or
trade name which is likely to be similar to or confusing with that of Electronics For Imaging or any of its suppliers or take any other action which impairs or
reduces the trademark rights of Electronics For Imaging or its suppliers. The trademarks may only be used to identify printed output produced by the Coded Font
Programs. At the reasonable request of Electronics For Imaging, you must supply samples of any Typeface identified with a trademark.
Confidentiality
You agree to hold the Software and Coded Font Programs in confidence, disclosing the Software and Coded Font Programs only to authorized users having a need
to use the Software and Coded Font Programs as permitted by this Agreement and to take all reasonable precautions to prevent disclosure to other parties.
Remedies
Unauthorized use, copying or disclosure of the Software, Coded Font Programs, Typefaces, Trademarks or accompanying documentation will result in automatic
termination of this license and will make available to Electronics For Imaging other legal remedies.
Limited Warranty And Disclaimer
Electronics For Imaging warrants that, for a period of ninety (90) days from the date of delivery to you, the Software under normal use will perform without
significant errors that make it unusable. Electronics For Imaging’s entire liability and your exclusive remedy under this warranty (which is subject to you returning
Fiery X3e to Electronics For Imaging or an authorized dealer) will be, at Electronics For Imaging’s option, to use reasonable commercial efforts to attempt to
correct or work around errors, to replace the Software with functionally equivalent software, or to refund the purchase price and terminate this Agreement. Some
states do not allow limitations on duration of implied warranty, so the above limitation may not apply to you.
Except for the above express limited warranty, Electronics For Imaging makes and you receive no warranties or conditions on the Products, express, implied, or
statutory, and Electronics For Imaging specifically disclaims any implied warranty or condition of merchantability or fitness for a particular purpose.
For warranty service, please contact your authorized service/support center.
EXCEPT FOR THE ABOVE EXPRESS LIMITED WARRANTY, ELECTRONICS FOR IMAGING MAKES AND YOU RECEIVE NO WARRANTIES
OR CONDITIONS ON THE SOFTWARE OR CODED FONT PROGRAMS, EXPRESS, IMPLIED, STATUTORY, OR IN ANY OTHER PROVISION
OF THIS AGREEMENT OR COMMUNICATION WITH YOU, AND ELECTRONICS FOR IMAGING SPECIFICALLY DISCLAIMS ANY IMPLIED
WARRANTY OR CONDITION OF MERCHANTABILITY OR FITNESS FOR A PARTICUL AR PURPOSE. Electronics For Imaging does not warrant that
the operation of the software will be uninterrupted or error free or that the Software will meet your specific requirements.
Page 7

Limitation Of Liability
IN NO EVENT WILL ELECTRONICS FOR IMAGING OR ITS SUPPLIERS BE LIABLE FOR ANY DAMAGES, INCLUDING LOSS OF DATA, LOST
PROFITS, COST OF COVER OR OTHER SPECIAL, INCIDENTAL, CONSEQUENTIAL OR INDIRECT DAMAGES ARISING FROM THE USE OF
THE SOFTWARE, CODED FONT PROGRAMS OR ACCOMPANYING DOCUMENTATION, HOWEVER CAUSED AND ON ANY THEORY OF
LIABILITY. THIS LIMITATION WILL APPLY EVEN IF ELECTRONICS FOR IMAGING OR ANY AUTHORIZED DEALER HAS BEEN ADVISED
OF THE POSSIBILITY OF SUCH DAMAGE. YOU ACKNOWLEDGE THAT THE PRICE OF THE UNIT REFLECTS THIS ALLOCATION OF RISK.
BECAUSE SOME STATES/JURISDICTIONS DO NOT ALLOW THE EXCLUSION OR LIMITATION OF LIABILITY FOR CONSEQUENTIAL OR
INCIDENTAL DAMAGES, THE ABOVE LIMITATION MAY NOT APPLY TO YOU.
Export Controls
You agree that you will not export or re-export the Software or Coded Font Programs in any form without the appropriate United States and foreign government
licenses. Your failure to comply with this provision is a material breach of this Agreement.
Government Use
Use, duplication or disclosure of the Software by the United States Government is subject to restrictions as set forth in subdivision (c) (1) (ii) of the Rights in
Technical Data and Computer Software clause at DFARS 252.227-7013 or in subparagraphs (c) (1) and (2) of the Commercial Computer Software—Restricted
Right Clause at 48 CFR 52.227-19, as applicable.
Third Party Beneficiary
You are hereby notified that Adobe Systems Incorporated, a California corporation located at 345 Park Avenue, San Jose, CA 95110-2704 (“Adobe”) is a thirdparty beneficiary to this Agreement to the extent that this Agreement contains provisions which relate to your use of the Fonts, the Coded Font Programs, the
Typefaces and the Trademarks licensed hereby. Such provisions are made expressly for the benefit of Adobe and are enforceable by Adobe in addition to Electronics
For Imaging.
General
This Agreement will be governed by the laws of the State of California.
This Agreement is the entire agreement held between us and supersedes any other communications or advertising with respect to the Software, Coded Font
Programs and accompanying documentation.
If any provision of this Agreement is held invalid, the remainder of this Agreement shall continue in full force and effect.
If you have any questions concerning this Agreement, please write to Electronics For Imaging, Inc., Attn: Licensing Dept. or see Electronics For Imaging’s web
site at www.efi.com.
Electronics For Imaging, Inc.
303 Velocity Way
Foster City, CA 94404
Page 8

Page 9

Contents
Introduction
About the documentation
Key features of ColorWise
Chapter 1: Fiery X3e Color Management
Managing color on the Fiery X3e
Rendering styles 1-5
RGB Source Profile 1-6
RGB Separation 1-7
CMYK Simulation Profile 1-8
CMYK Simulation Method 1-8
Output Profile 1-9
Pure Black Text/Graphics 1-9
Black Overprint 1-11
Spot Color Matching 1-12
Printer Drivers and Print Options
What a printer driver does 1-13
PostScript printer driver for Windows 95/98, Windows NT 4.0, and Windows 2000 1-14
Adobe PostScript printer driver for Mac OS 1-18
xvii
xix
1-1
1-13
Chapter 2: Simple and Advanced Workflows
Workflow concepts
Short-run printing versus color proofing 2-1
RGB, CMYK, and PANTONE colors 2-2
Desktop versus Fiery X3e color management 2-3
2-1
Page 10

x Contents
Simple workflows
Select your colors wisely 2-4
Select a short workflow 2-5
Advanced workflows
Short-run printing examples 2-8
Color proofing examples 2-12
Chapter 3: Color Calibration
Introduction
Understanding calibration
How calibration works 3-3
Scheduling calibration 3-4
Checking calibration status 3-5
Using a spectrophotometer
Setting up the spectrophotometer 3-5
Calibrating the spectrophotometer
Calibrating with ColorWise Pro Tools and DTP41
Using a densitometer
Setting up the densitometer 3-24
2-4
2-8
3-1
3-2
3-5
3-10
3-15
3-24
Calibrating the densitometer
Calibrating with ColorWise Pro Tools
Expert Mode 3-32
Calibrating from the Control Panel using AutoCal2
Removing calibration 3-36
3-26
3-27
3-34
Page 11

xi Contents
Chapter 4: ColorWise Pro Tools
Profile Manager
Setting the default profiles 4-3
Downloading profiles 4-5
Editing profiles 4-7
Managing profiles 4-7
Defining profiles 4-8
Color Editor
Editing Profiles 4-12
Undoing simulation edits 4-19
Checking edited profiles 4-21
Color Setup
Setting default ColorWise options 4-22
Chapter 5: Working with Color in Applications
Working with color
Color reference pages 5-2
Office applications
Choosing colors in office applications 5-4
PostScript applications
Choosing colors in PostScript applications 5-5
Default output profile 5-8
CMYK simulation 5-8
4-1
4-12
4-22
5-1
5-3
5-4
Page 12

xii Contents
Chapter 6: Office Applications
Working with office applications
Defining colors 6-1
Working with imported files 6-1
Selecting options when printing 6-2
Output profiles 6-2
Chapter 7: Adobe Photoshop
Photoshop 5.x
Photoshop 5.x color settings 7-1
ColorSync defaults 7-6
Defining colors 7-7
Saving files for importing into other documents 7-7
Selecting options when printing 7-9
Printing tips for advanced users 7-11
Photoshop 4.x
Defining colors 7-13
Saving files for importing into other documents 7-13
Selecting options when printing 7-15
6-1
7-1
7-13
Chapter 8: Page Layout Applications
Working with page layout applications
Defining colors 8-1
Importing images 8-2
CMYK simulation 8-3
Adobe PageMaker 6.5 for Mac OS and Windows
Importing images 8-4
Selecting options when printing 8-5
Optional Color Management from PageMaker 8-6
8-1
8-4
Page 13

xiii Contents
QuarkXPress 4.x for Mac OS and Windows
Importing images 8-7
Selecting options when printing 8-8
Optional Color Management from QuarkXPress 8-9
QuarkXPress 3.32 for Mac OS and Windows
Importing images 8-9
Selecting options when printing 8-10
Chapter 9: Illustration Applications
Working with illustration applications
Defining colors 9-1
Importing images 9-2
CMYK simulation 9-2
Adobe Illustrator 8.x for Windows and Mac OS
Defining colors 9-3
Importing images 9-3
Optional Color Management in Illustrator 9-3
Selecting options when printing 9-4
Saving files for importing into other documents 9-6
Macromedia FreeHand 8.x for Windows and Mac OS
Defining colors 9-6
Importing images 9-7
Selecting options when printing from FreeHand 9-8
Saving files for importing into other documents 9-10
Optional Color Management in FreeHand 9-10
8-7
8-9
9-1
9-3
9-6
CorelDRAW for Windows and Mac OS
Defining colors 9-10
Importing images 9-11
Selecting options when printing 9-11
Saving files for importing into other documents 9-12
Optional Color Management in CorelDRAW 9-12
9-10
Page 14

xiv Contents
Appendix A: Desktop Color Primer
The properties of color
The physics of color A-1
CIE color model A-2
Hue, saturation, and brightness A-3
Additive and subtractive color systems A-3
Printing techniques
Halftone and continuous tone devices A-6
Using color effectively
A few rules of thumb A-7
Color wheel A-7
Color and text A-8
Raster images and vector images
Optimizing files for processing and printing
Resolution of raster images A-10
Scaling A-12
A-1
A-5
A-6
A-9
A-10
Page 15

xv Contents
Appendix B: Color Management
Controlling printed color
Maintaining copier consistency B-2
Print device gamut B-2
Basics of color management
Color conversion B-4
Appendix C: Importing densitometer measurements
Simple ASCII Import File Format (SAIFF)
Example of 1D Status T density for EFI 34 patch page C-2
Example of 1D Status T density for EFI 21 patch page C-2
Example of 1D Status T density for an arbitrary page C-3
Glossary
Bibliography
Index
B-1
B-3
C-1
Page 16

Page 17

xvii About the documentation
Introduction
Welcome to the
issues associated with printing to the Fiery X3e CF9001™. It outlines key workflow
scenarios, provides information on calibration and color profiles, and contains
application notes that explain how to print to the Fiery X3e CF9001 from popular
Windows and Mac OS applications.
This manual is one book in a set of documentation that also includes manuals for users
and system administrators. All the other manuals should be available at your site—
refer to them for a complete description of your Fiery X3e CF9001.
The term “Fiery X3e” is used in this manual to refer to the Fiery X3e CF9001.
Color Guide
. This manual introduces you to the concepts and
About the documentation
The
Color Guide
color output of your Fiery X3e. Chapter 1 discusses the Fiery X3e’s print options and
how to get the best color results, and Chapter 2 describes several effective workflows.
ColorWise Pro Tools are discussed in the next two chapters. Chapter 3 covers
Calibrator and other methods used to calibrate the copier, and Chapter 4 takes you
through the features of Profile Manager, used to manage color profiles on the
Fiery X3e, and Color Editor, which lets you customize simulation and output profiles.
Succeeding chapters offer tips for printing from business and graphics applications.
Finally, the appendixes offer information about color theory and color management.
is organized to supply you with key information about managing the
Words in bold, for example,
bibliography at the end of this manual provides sources for further investigation of
color printing issues.
Color terms and concepts such as “RGB data,” “color space,” “spot color,” “gamut,”
and “source profile” are used throughout this manual. If you are new to desktop color
or if any terms are unfamiliar, be sure to read Appendixes A and B or check the
glossary.
output profile
, are terms that appear in the glossary. The
Page 18

xviii Introduction
This manual is part of a set of Fiery X3e documentation that also includes the
following manuals for users and system administrators:
• The
Configuration Guide
explains basic configuration and administration of the
Fiery X3e for the supported platforms and network environments. It also includes
guidelines for setting up UNIX, Windows NT, and NetWare servers to provide
PostScript printing services to clients.
•
Getting Started
describes how to install software to enable users to print to the
Fiery X3e. Specifically, it describes installation of PostScript printer drivers, printer
description files, and other user software provided on the User Software CD. It also
explains how to connect each user to the network.
• The
Printing Guide
describes the printing features of the Fiery X3e for users who
send jobs via remote workstations on the network.
• The
Job Management Guide
explains the functions of the Fiery X3e client utilities,
including the Command WorkStation, and how they can be used to manage jobs.
This book is intended for an operator or administrator, or a user with the necessary
access privileges, who needs to monitor and manage job flow and troubleshoot
problems that may arise.
•
Release Notes
provide last-minute product information and workarounds for some of
the problems you may encounter.
Page 19

xix Key features of ColorWise
Key features of ColorWise
ColorWise
designed to provide both casual and expert users the best color output for a variety of
purposes. The ColorWise default settings were specifically selected to provide great
out-of-box color from many applications and Windows and Mac OS platforms. This
means that casual users can get good quality output without knowing about or
changing any color settings on the Fiery X3e.
To get consistent color you should be sure that the Fiery X3e is calibrated on a regular
basis. ColorWise Pro Tools include a simple-to-use calibrator, which allows you to
calibrate using either the scanner that comes with the copier or optional densitometer
(see Chapter 3).
There are a number of features that can be used to modify printing results. Depending
on your particular needs, you can:
• Set the behavior of CMYK printing to emulate DIC, Euroscale, and SWOP offset
press standards
• Match PANTONE colors for the best match when printed using four-color press
conditions or when printed using presses with extra, custom plates
• Select a
printing. CRDs allow for rich, saturated printing of presentation graphics; smooth,
accurate printing of photographs; and relative or absolute colorimetric rendering for
specialized needs
is the
color management system
color rendering dictionary
(CMS) built into the Fiery X3e and
(CRD), also called a rendering style, for RGB
• Define the source of incoming RGB color data for better screen matching, and you
can provide for better color conversion of RGB data with no source information
• Define whether RGB data is converted into the full gamut of the copier or whether
it is first converted into the gamut of another device, such as a press standard. This
feature is very helpful for making one device behave like another. It is also useful for
evaluating the appearance of the RGB file under different printing conditions
without having to reprocess the RGB data each time.
Page 20

xx Introduction
ColorWise offers an open color architecture, letting users customize the Fiery X3e to
meet new printing needs as they arise. ColorWise supports ICC profiles, which are
industry standard color profiles that define the color behavior of a device. By
downloading ICC profiles to the Fiery X3e, it can simulate a custom press (or another
copier) as well as accurately print colors from a particular monitor or a particular
scanner. In addition, you can create customized ICC profiles for the copier.
ColorWise also lets you use any Status T densitometer by importing data in a standard
file format (see Appendix C). In this case, it is important to note that the quality of the
instrument used will determine the quality of the calibration.
Page 21

1-1 Managing color on the Fiery X3e
1
Chapter 1:
Fiery X3e Color
Management
The first part of this chapter describes the options available from the ColorWise color
management system and explains how you can customize the color settings for your
particular needs. It provides descriptions of the preset default settings of ColorWise
and covers additional options for users who need to customize ColorWise.
Beginning on page 1-13 is a detailed explanation of what a PostScript Level 2 or
PostScript 3 printer driver does, as well as information on the capabilities of various
printer drivers and instructions for setting color options with the PostScript drivers for
Windows NT 4.0, Windows 2000, Windows 95/98, and Mac OS.
Managing color on the Fiery X3e
There are three ways to modify the Fiery X3e’s printing behavior:
• You can select ColorWise options for an individual print job using menus that
appear from the printer driver.
• You can select most ColorWise options as server defaults from Fiery X3e Setup or
from the Control Panel, as described in the
apply to all subsequent print jobs unless you override them.
• You can select some ColorWise options, particularly default
and calibration options, from ColorWise Pro Tools. These options include default
Simulation Profile (see page 1-8), Appear in Driver as (see page 4-8), default Source
Profile (see page 1-6), and associated calibration set (see page 3-4).
Configuration Guide
ICC profile
. These defaults will
settings
Applications can generate color data for the Fiery X3e in many different
The most common type of color data produced from office applications is RGB, while
prepress applications generally produce CMYK data. Desktop applications can also
generate spot colors such as PANTONE colors. To complicate matters, a single page
may contain a mix of RGB, CMYK, and spot colors. The Fiery X3e lets users control
the printing of these mixed-color documents with features that apply specifically to
RGB, CMYK, or spot color data.
color spaces
.
Page 22
1-2 Fiery X3e Color Management
1
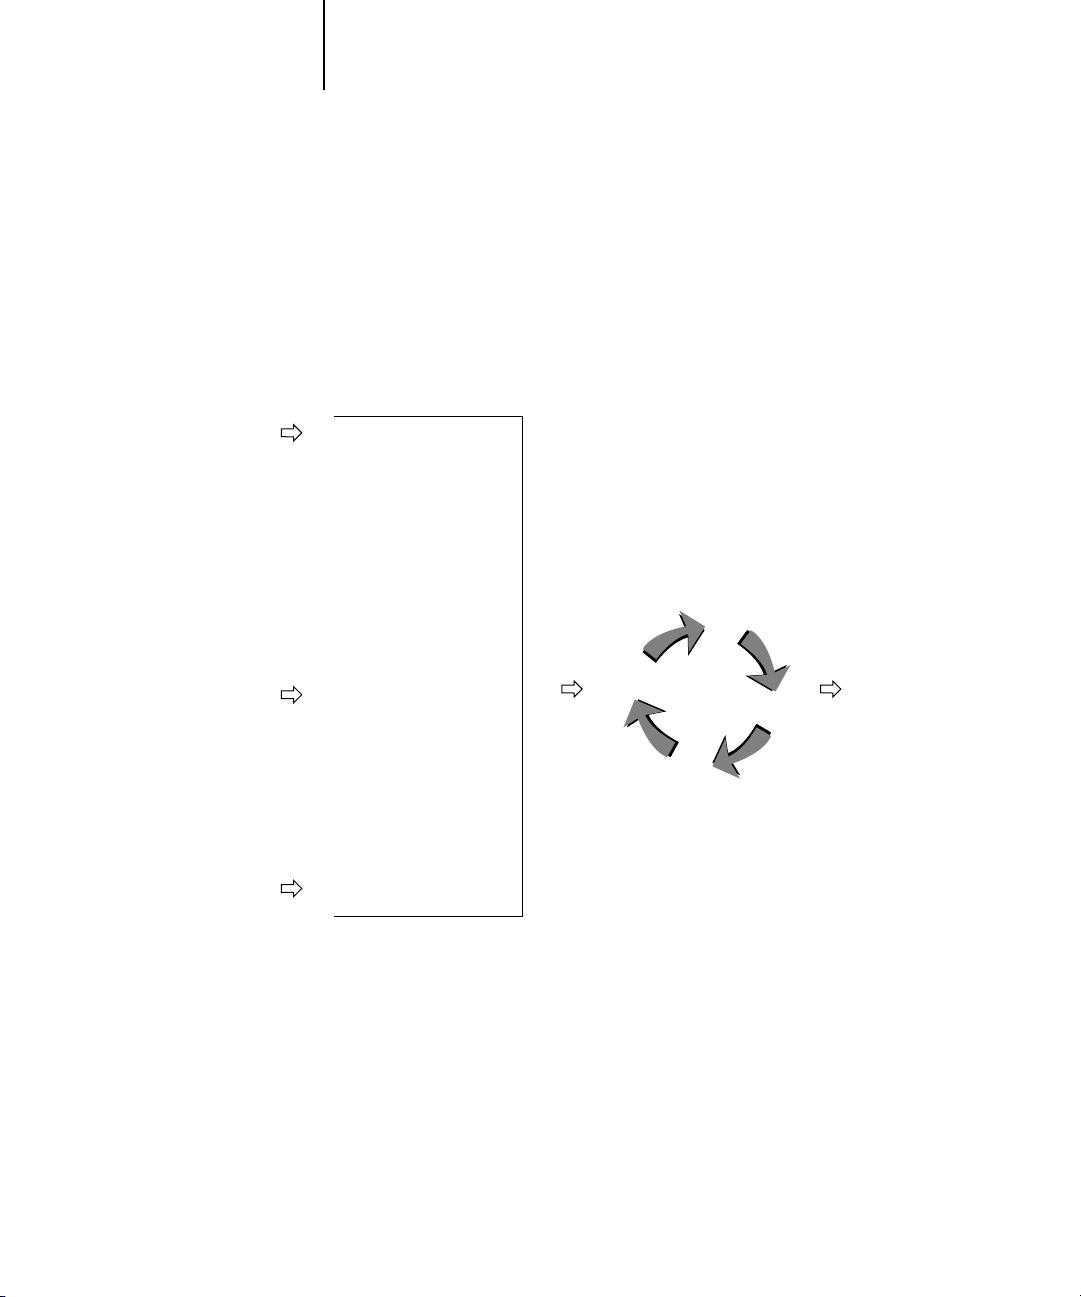
Fiery X3e color management generates CMYK data to be sent to the copier; additional
processing may then be performed before printing begins.
The diagram below illustrates the print options in the Fiery X3e color management
process that affect color data conversions. You access these print options when you
send a print job to the Fiery X3e. Most of these options and settings are described in
subsequent sections of this chapter.
RGB data
CMYK data
Spot color data
RGB Source Profile
Gamma
Phosphors
White Point
Rendering Style (CRD)
Brightness
Pure Black Text/Graphics
Black Overprint
RGB Separation
Output profile
CMYK Simulation Profile
CMYK Simulation Method
Brightness
Pure Black Text/Graphics
Black Overprint
Combine Separations
Output profile
Spot Color Matching
Fiery X3e
color
processor
Color data
sent to
copier
RGB Source Profile is the only color option that applies strictly to RGB color data.
The other options that affect RGB color also affect the more rarely used Lab, XYZ, and
other calibrated color spaces.
OTE
For users who are familiar with PostScript 3.0 color, RGB Source Profile affects
N
:
all CIEBasedABC color spaces (if the source space is RGB). Also, if you send CMYK
data to the Fiery X3e in CIEBasedDEFG format, for example, by choosing PostScript
Color Management in Adobe Photoshop, the Fiery X3e’s Rendering Style selection—
which normally affects only RGB data—will also affect this CMYK data.
Page 23

1-3 Managing color on the Fiery X3e
1
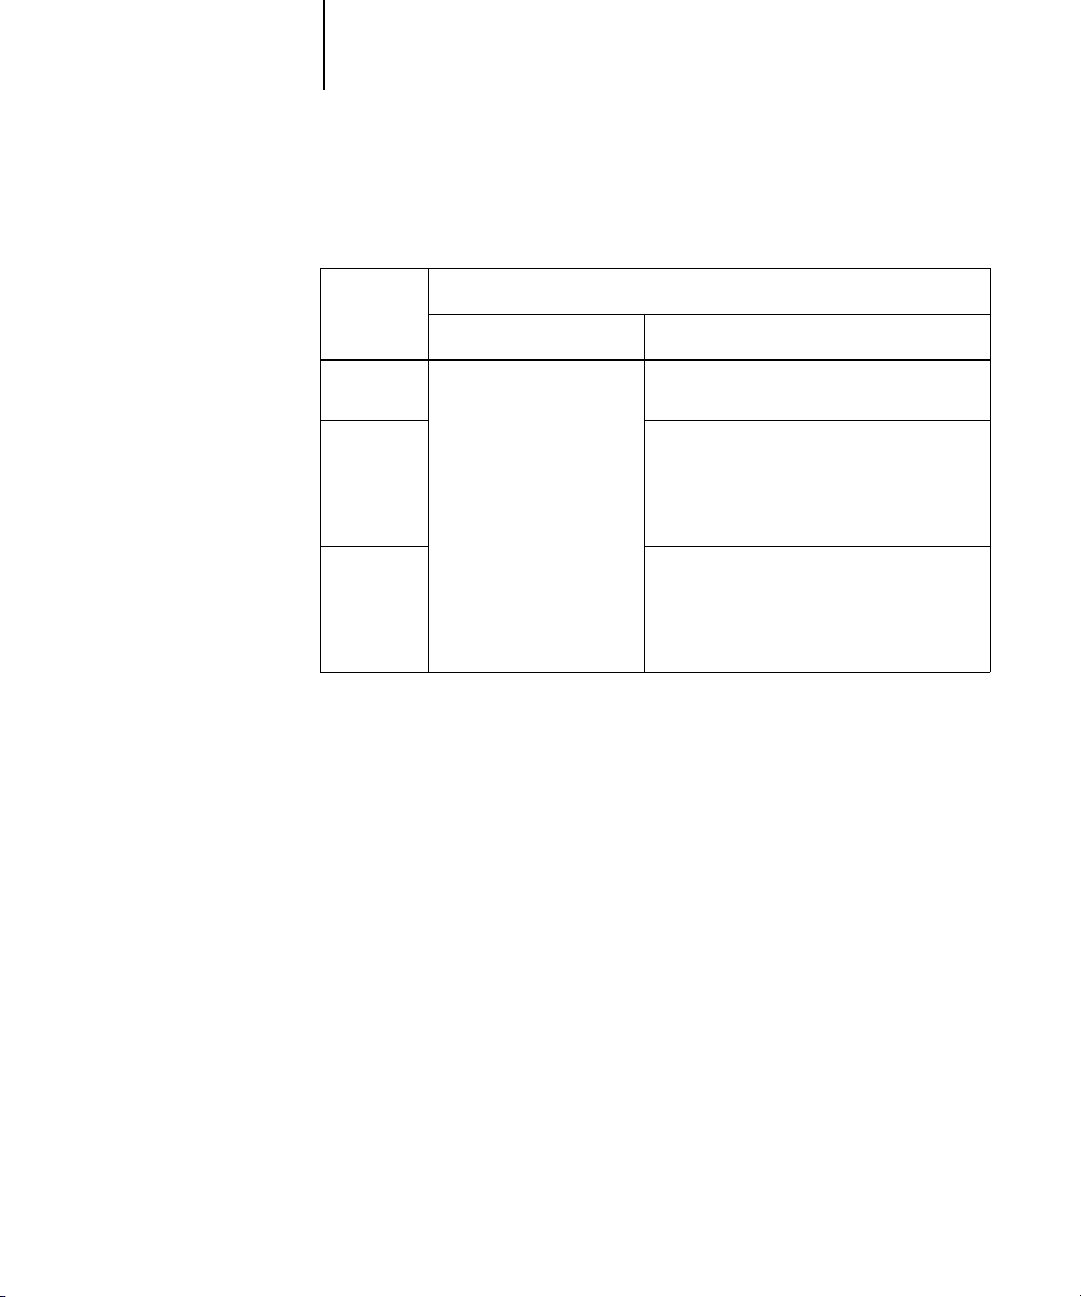
Settings for the following options can be specified via print options when you send a
job to the Fiery X3e. Some can also be set as defaults by the administrator during
Fiery X3e Setup. Settings specified via print options override the defaults.
Fiery X3e color print option: What it does:
Brightness
85% Lightest to 115% Darkest
Rendering Style
Photographic/Presentation/Relative
Colorimetric/Absolute Colorimetric
(Default set at Setup)
RGB Source Profile
EFIRGB/sRGB (PC)/Apple Standard/Other/
Source 1–10/None
(Default set at Setup or with
ColorWise Pro Tools)
(Other) Gamma
1.0/1.2/1.4/1.6/1.8/2.0/2.2/2.4/2.6/2.8/3.0
(Other) Phosphors
Hitachi EBU/Hitachi-Ikegami/NTSC/
Radius Pivot/SMPTE/Trinitron
(Other) White Point
5000 K (D50)/5500 K/6500 K (D65)/
7500 K/9300 K
RGB Separation
Output/Simulation
Performs a color adjustment on all color channels to make the printed output
lighter or darker.
Applies a Fiery X3e color rendering style (CRD) to RGB data (see page 1-5),
or to any incoming data with a PostScript source color space definition,
including CMYK.
Applies an RGB source space definition to RGB data (see page 1-6). If you
choose the Other setting, you can specify particular settings for gamma,
phosphors, and white point. See the corresponding options in this table. This
option, along with Gamma, Phosphors, and White Point, are the only
ColorWise options that affect only DeviceRGB or calibrated RGB color spaces.
Applies the specified gamma value to the RGB source space definition (see
page 1-6). To use this print option, you must choose Other as the RGB Source
setting.
Applies the specified phosphor (monitor type) information to the RGB source
space definition (see page 1-6). To use this print option, you must choose
Other as the RGB Source setting.
Applies the specified white point value to the RGB source color space
definition (see page 1-6). To use this print option, you must choose Other as
the RGB Source setting.
Determines which CMYK color space your original RGB data will be
separated into—CMYK for the copier (Output) or CMYK for a specified
simulation (Simulation) (see page 1-7). It is important to note that when RGB
Separation is set to Simulation, RGB colors are affected by CMYK Simulation
Profile and CMYK Simulation Method.
CMYK Simulation Profile
SWOP-Coated/DIC/Euroscale/Simulation
1–10/Match Copy/None
(Default set at Setup or in
ColorWise Pro Tools)
Adjusts CMYK color data to simulate an offset press standard or a custom
color gamut defined at your site. The Match Copy setting bypasses Fiery X3e
calibration to match a copy made from the copier glass. Choosing None
bypasses simulation (see page 1-8).
N
OTE: Some of the Simulation settings have slightly different names depending
on the model of copier.
Page 24

1-4 Fiery X3e Color Management
1
Fiery X3e color print option: What it does:
CMYK Simulation Method
Quick/Full
(Default set at Setup or in
ColorWise Pro Tools)
Output Profile
default output profile/Output 1–10
(Default set at Setup or in
ColorWise Pro Tools)
Pure Black Text/Graphics
On/Off
(Default set at Setup)
Black Overprint
On/Off (Default set at Setup)
Spot Color Matching
On/Off
(Default set at Setup or with
ColorWise Pro Tools)
Detailed explanations of how these and other settings affect your print jobs are
provided in subsequent sections of this chapter.
Quick simulation applies one-dimensional transfer curves that adjust output
density only. Full simulation applies colorimetric transformations that adjust
hue as well as output density (see page 1-8).
The Output Profile is applied to all data in the print job (see page 1-9). Userdefined output profiles can be downloaded to the Fiery X3e with
ColorWise Pro Tools (see Chapter 4).
The On setting optimizes the quality of black text and line art output (see
page 1-9).
The On setting overprints black text placed on colored backgrounds; it
automatically activates the Pure Black Text/Graphics option (see page 1-11).
The On setting enables Fiery X3e matching of PANTONE colors; Off
instructs the Fiery X3e to match color output to a Pantone-specified CMYK
combination (see page 1-12).
Page 25

1-5 Managing color on the Fiery X3e
1
Rendering styles
The Rendering Style option specifies a CRD for color conversions. You can modify the
Rendering Style option to control the appearance of images, such as prints from office
applications or RGB photographs from Photoshop. The Fiery X3e lets you select from
the four rendering styles currently found in industry standard ICC profiles.
Equivalent
Fiery X3e rendering style: Best used for:
ICC rendering
style:
Photographic—Typically results in less
saturated output than presentation
rendering when printing out-of-gamut
colors. It preserves tonal relationships
in images.
Presentation
but does not match printed colors
precisely to displayed colors. In-gamut
colors such as flesh tones are rendered
well, similar to the Photographic
rendering style.
Relative Colorimetric
white-point transformation between
the source and destination white
points. For example, the bluish gray of
a monitor will map to neutral gray.
You may prefer this style to avoid
visible borders when not printing fullbleed.
Absolute Colorimetric
white point transformation between
the source and destination white
points. For example, the bluish gray of
a monitor will map to a bluish gray.
—Creates saturated colors
—Provides
—Provides no
Photographs, including scans and
images from stock photography CDs.
Artwork and graphs in presentations.
In many cases it can be used for mixed
pages that contain both presentation
graphics and photographs.
Advanced use when color matching is
important but you prefer white colors
in the document to print as paper
white. It may also be used with
PostScript color management to affect
CMYK data for simulation purposes.
Situations when exact colors are
needed and visible borders are not
distracting. It may also be used with
PostScript color management to affect
CMYK data for simulation purposes.
Image,
Contrast, and
Perceptual
Saturation,
Graphics
Same
Same
Page 26

1-6 Fiery X3e Color Management
1
RGB Source Profile
The RGB Source Profile setting allows you to define the characteristics of the RGB
data in your document so that the appropriate color conversion can occur on the
Fiery X3e. Commonly used monitor color spaces are available from the driver and
from the ColorWise Pro Tools Profile Manager. In addition, for special needs you can
use ColorWise Pro Tools to download custom monitor or scanner profiles.
When you specify a setting other than None for the RGB Source Profile, the Fiery X3e
overrides source color space definitions or profiles that other color management
systems may have specified. For example, if you specified a ColorSync System Profile
on your Mac OS computer, the RGB Source Profile setting overrides it. In cases where
you do not want this setting to override another specified source color space, choose the
None setting.
When you specify a setting other than None for the RGB Source Profile—since the
color space definitions are overridden—the prints from the Fiery X3e will be consistent
across platforms. Below are the Fiery X3e’s RGB Source Profile options.
• EFIRGB specifies an EFI-defined color space recommended for users who have no
detailed information about their RGB data.
• sRGB (PC) specifies the industry standard definition for a generic Windows PC
monitor.
• Apple Standard specifies the definition of all standard Mac OS computer monitors.
• Other allows you to specify custom RGB source settings. If you choose Other as the
RGB Source setting, you can choose settings for the Gamma, Phosphors, and White
Point options.
• Sources 1-10 specify the definitions you download as RGB source profiles. (For
more information about downloading RGB source profiles, see Chapter 4.)
• None instructs the Fiery X3e to allow the RGB sources you defined elsewhere, such
as in the application, to be used. When you set RGB Source to None, the
appearance of colors will not be independent of the file type. For example, RGB EPS
files will look different from RGB TIFF files.
Page 27

1-7 Managing color on the Fiery X3e
1
With RGB Source set to None, PostScript RGB data that contains a source color
space definition is converted using the CRD specified by the Rendering Style option
(see page 1-5). NonPostScript RGB data and PostScript RGB data that does not
contain a source color space definition is converted using a general undercolor
removal conversion method.
RGB Separation
The RGB Separation option determines how RGB colors (as well as Lab and XYZ
colors) are converted to CMYK. The name of this option is meant to be descriptive,
since the option defines the color spaces that will be used by the Fiery X3e to
“separate” the RGB data into CMYK values.
The two choices available for this option determine whether RGB data is converted
into the full gamut of the copier (Output) or whether it is first converted into the
gamut of another digital printer or a press standard (Simulation). This feature is
helpful for making one device behave like another for RGB data. For example, if a
high-quality ICC profile is available for another print device, the copier can simulate
the behavior of that device.
RGB Separation is also useful for prepress applications. For example, it lets you
experiment with the appearance of an RGB scan under different press printing
conditions without having to convert the RGB data to CMYK data for each printing
condition. When the desired printing condition is found, you can then convert the file
to CMYK, if desired, using the same CMYK simulation profile that was used during
the experimentation.
NOTE: The RGB Separation print option should be used in conjunction with the
Output Profile or CMYK Simulation Profile print options.
• Output converts all RGB colors into the CMYK color space of your copier (when the
Output Profile option is set to Printer’s default), or a customized CMYK color space
for your copier (when the Output Profile option is set to Output 1-10).
• Simulation converts all RGB colors into the CMYK color space for a specified
simulation (make sure to select the desired simulation with the CMYK Simulation
Profile print option).
Page 28

1-8 Fiery X3e Color Management
1
CMYK Simulation Profile
The CMYK Simulation Profile print option allows you to print press proofs or
simulations. This setting specifies the offset press standard or other color printing
device that you want to simulate. This option affects CMYK data only.
You can view up to 10 Quick and 10 Full custom simulations from the printer driver.
The number of custom simulations is limited by the disk space on the Fiery X3e.
The CMYK Simulation Profile setting you should specify depends on the press
standard for which the CMYK data was separated.
• For images that were separated using a custom separation (such as a separation
produced with an ICC profile), choose the corresponding profile on the Fiery X3e
with the CMYK Simulation Profile setting.
• For images that were separated for SWOP, choose SWOP as the CMYK Simulation
Profile setting.
NOTE: To properly simulate a printed image that was separated through the use of an
ICC profile, the same profile must be present on the Fiery X3e. For more information
about downloading ICC profiles to the Fiery X3e, see “Downloading profiles” on
page 4-5.
• The Match Copy setting bypasses Fiery X3e calibration to simulate the color of a
copy produced by the copier. Use this setting when you print images scanned with
the Fiery Scan plug-in set to Match Copy.
CMYK Simulation Method
The CMYK Simulation Method setting specifies the quality of simulation to perform.
• Quick applies one-dimensional transfer curves that adjust output density only.
• Full provides a more complete and accurate simulation by applying colorimetric
transformations that adjust hue as well as output density. The Full Simulation
option also maintains the integrity of the black channel by adjusting it
independently. This is especially important for images separated using an optimized
black generation (UCR/GCR) setting either from a scan or from within an
application such as Photoshop.
Page 29

1-9 Managing color on the Fiery X3e
1
Output Profile
The output profile is applied to all data in the print job, so make sure the selected
profile is right for your job. The default output profile consists of both a profile for
your copier, describing its color characteristics, and a calibration target that describes
the expected behavior of the copier.
In certain cases you may wish to customize the default output profile using
ColorWise Pro Tools’ Color Editor to achieve particular color effects (see page 4-12).
If so, the new customized output profile is applied to all data in the print job.
Changing only the output profile does not affect its associated calibration target (since
the target is based on a copier model). If you wish, you can edit D-Max values of the
calibration target separately (see page 4-7).
You can also use ColorWise Pro Tools’ Profile Manager to download your own output
profile to the Fiery X3e (see page 4-5). Downloaded output profiles are at first
associated with the calibration target that is tied to the default output profile. As
mentioned above, you can edit calibration target D-Max values separately.
Pure Black Text/Graphics
The Pure Black Text/Graphics option affects the printout for black text and vector
graphics on a page. Under most circumstances it is preferable to leave this option set to
the On position. When Pure Black Text/Graphics is on, black colors generated by
applications are printed using 100 percent black-only toner (for example,
RGB = 0, 0, 0; CMYK = 0%, 0%, 0%, 100%; or K = 100%). This means the black
text and line art will not exhibit halftone artifacts and will not be misregistered, since
there is only one toner used. In addition, this setting eliminates blasting. This option
is automatically set to On when the Black Overprint option is set to On.
For some jobs it is preferable to turn this option Off, for example, if the page includes
gradient fills that use black. The table below describes the behavior of the Pure Black
Text/Graphics option with black data defined in different color spaces.
Page 30
1-10 Fiery X3e Color Management
1
NOTE: The Pure Black Text/Graphics option can be used only when printing
composites, not when printing separations.
Input
black
color:
RGB
CMYK
Prints 100% black
Spot
NOTE: PostScript applications, such as QuarkXPress, may convert elements defined as
RGB = 0, 0, 0 to four-color CMYK black before sending the job to the Fiery X3e.
These elements are not affected by the Pure Black Text/Graphics option. See the
application notes for details. Also, black text and line art defined as RGB = 0, 0, 0 in
office applications (such as Microsoft Word) are converted to single-color black
(CMYK = 0%, 0%, 0%, 100%) by the Microsoft PostScript Level 2 driver for
Windows NT 4.0. To print this single-color black at the maximum toner density of the
copier, set the Pure Black Text/Graphics option to On.
On Off
Pure Black Text/Graphics:
With the default profile, prints a rich black
using all toners.
Prints only with black toner, because CMYK
simulations preserve the black channel. The
actual amount of toner used depends on the
current simulation and the calibration state of
the copier.
Prints only with black toner, because spot
color simulations preserve the black channel.
The actual amount of toner used depends on
the current simulation and the calibration state
of the copier.
Page 31

1-11 Managing color on the Fiery X3e
1
Black Overprint
The Black Overprint option lets you specify whether or not black text, defined as
RGB = 0, 0, 0, or as CMYK = 0%, 0%, 0%, 100%, overprints colored backgrounds.
• On—Black text overprints colored backgrounds, eliminating white gaps and
reducing halo effects or misregistration of colors. Setting Black Overprint to On
automatically activates the Pure Black Text/Graphics option.
• Off—Black text knocks out colored backgrounds.
NOTE: PostScript applications may perform their own black overprint conversions
before sending the print job to the Fiery X3e.
One example of how you might use this setting is with a page that contains some black
text on a light blue background. The background blue color is CMYK = 40%, 30%,
0%, 0% and the black text is CMYK = 0%, 0%, 0%, 100%.
• With Black Overprint On, the final text portions of the page are overprinted, or
combined with the underlying colors. This results in CMYK = 40%, 30%, 0%,
100% for the color used for the text. There is no transition in the cyan and magenta
toners, and the quality of the output is improved since it will not show artifacts near
the edges of the text. The option also works with text defined in the RGB color
space, that is RGB = 0, 0, 0.
• With Black Overprint Off, the border of the text is on an edge that has cyan and
magenta toners on one side (outside the text) and black toner on the other side
(inside the text). On many devices, this transition causes visible artifacts because of
the practical limitations of the copier.
Page 32

1-12 Fiery X3e Color Management
1
Spot Color Matching
The Spot Color Matching option provides automatic matching of PANTONE colors
with their best CMYK equivalents.
• On—The Fiery X3e uses its built-in table to generate the closest CMYK matches of
PANTONE colors your copier can produce. (New tables are generated when you
add new output profiles.)
• Off—The Fiery X3e uses the CMYK equivalents defined by your application to
print PANTONE colors.
For jobs that include PANTONE spot colors, set Spot Color Matching to On unless
you are printing press simulations. In that case, set Spot Color Matching to Off and
choose the appropriate CMYK Simulation setting (see page 1-8).
NOTE: You can use the Spot Color Matching option only when printing composites,
not when printing separations.
Spot Color Matching and the PANTONE Coated Color Reference
The PANTONE Coated Color Reference (described on page 5-7) prints differently
depending on the Spot Color Matching setting.
• On—The Fiery X3e uses its built-in table to generate the best matches of the
PANTONE colors that your copier can produce. The PANTONE number is
printed below each swatch.
• Off—The Fiery X3e prints swatches using the CMYK values recommended by
Pantone (and used by applications that provide PANTONE color libraries). The
CMYK values used to generate the color, as well as the PANTONE number of the
color, are printed below each swatch. These CMYK values are printed through the
selected CMYK Simulation and Output Profile settings.
Page 33

1-13 Printer Drivers and Print Options
1
Printer Drivers and Print Options
This section describes the role of the printer driver and explains how to use Windows
and Mac OS printer drivers for Fiery X3e printing.
NOTE: The term “PostScript” by itself is used to refer to Adobe PostScript Level 2 or
later.
What a printer driver does
To take full advantage of the features of the Fiery X3e, your print jobs must be sent as
PostScript data. Since most applications cannot generate PostScript data directly, it is
the function of a printer driver to interpret instructions from the application and
convert them to PostScript data.
A PostScript printer driver also allows you to select print options specific to your
copier. To do this, the printer driver must be matched with a PostScript printer
description file (PPD) for your Fiery X3e. The PPD contains information about the
particular features supported by the Fiery X3e and the copier. The PPD can be
thought of as the lines of PostScript code in the file that are device-specific. When you
print a job, the printer driver lets you choose among features by displaying print
options.
A few PostScript applications can send PostScript data directly to the copier and
present print options within the application interface. Even these applications,
however, require that you use a PostScript printer driver.
Your Fiery X3e user software includes Adobe PostScript printer drivers for
Windows 95/98, Windows NT 4.0, and Mac OS and the Microsoft PostScript printer
driver for Windows 2000. These are the recommended printer drivers for printing to
the Fiery X3e. (See Getting Started for information on installing printer drivers.)
It is recommended that you set the print options initially in Fiery X3e Setup (see the
Configuration Guide). This provides you with a default configuration that is
appropriate for most Fiery X3e print jobs.
Page 34

1-14 Fiery X3e Color Management
1
PostScript printer driver for Windows 95/98, Windows NT 4.0,
and Windows 2000
The printer driver options described in this section can be accessed by clicking
Start\Settings\Printers, right-clicking the appropriate PPD name, and selecting
Properties (Windows 95/98), Document Defaults (Windows NT), or Printing
Preferences (Windows 2000) from the pop-up menu. These settings are also accessible
from the Print Setup or Page Setup dialog boxes of most applications.
For Window 95/98, the Fiery X3e driver interface enables you to save combinations of
settings that you can later access. Additionally, you can choose different settings for
individual jobs from the applications you use.
The printer driver writes a PostScript file containing the instructions generated by your
application and the Fiery X3e print options you selected. The printer driver sends the
PostScript file to the Fiery X3e. The Fiery X3e then performs PostScript processing
and color conversions and sends raster color data to the print device.
NOTE: The following illustrations and instructions do not apply to all applications.
Many applications, such as PageMaker, Photoshop, Illustrator, QuarkXPress, and
CorelDRAW, have other color management options in addition to those presented in
the printer driver. For information on specific applications, see Chapters 6 through 9.
Setting color management print options for Windows 95/98
This section explains how to set Fiery X3e color print options with the Adobe
PostScript printer driver version 4.3.x for Windows 95/98, PostScript 3 printer driver
that can take full advantage of the color features of the Fiery X3e. Before you proceed,
make sure you have completed the following procedures described in Getting Started:
• Install the Adobe PostScript Printer Driver version 4.3.x (Windows 95/98) and the
Fiery X3e PPD.
• Set up the Fiery X3e for printing.
Page 35

1-15 Printer Drivers and Print Options
l
1
To set print options, open the PPD as described on page 1-14. Under the Fiery
Printing tab, click the ColorWise menu to select settings for the print options
described on page 1-3.
Click the ColorWise menu
Click the Expert Settings
button to access additiona
ColorWise options
Page 36

1-16 Fiery X3e Color Management
1
Click on the Expert Settings button on the ColorWise window (above). This brings up
the Expert Color Settings flowchart window (below), which displays additional color
settings for the Fiery X3e. Each option includes a pop-up menu from which you can
select settings for your specific job.
Selecting Other for RGB Source Profile brings up the following window for specifying
custom RGB source settings (see page 1-6).
For most users, the default settings provide the right level of color control. For more
information about individual print options, see page 1-3.
Page 37

1-17 Printer Drivers and Print Options
1
Setting color management print options for Windows 2000
This section explains how to set Fiery X3e color print options with the Microsoft
PostScript Printer Driver for Windows 2000. This is a PostScript driver that can take
full advantage of the color features of the Fiery X3e. Before you proceed, make sure
you have completed the following procedures described in Getting Started:
• Install the Microsoft PostScript Printer Driver and Fiery X3e PPD.
• Set up the Fiery X3e for printing.
To set print options, open the PPD as described on page 1-14. Click the Advanced tab
in the Printing Preferences dialog box, choose settings for the print options described
on page 1-3.
Page 38

1-18 Fiery X3e Color Management
1
Adobe PostScript printer driver for Mac OS
This section explains how to set color management print options with the
AdobePS 8.6 printer driver for Mac OS, a PostScript 3 driver that takes full advantage
of the color features of the Fiery X3e and lets you save a set of print option settings.
Before you continue, make sure you have completed the following:
• Install the AdobePS printer driver and the Fiery X3e PPD as described in Getting
Started.
• Select the Fiery X3e in the Chooser and set it up with the Fiery X3e PPD.
NOTE: The following illustrations and instructions do not apply to all applications.
Many applications, such as PageMaker, Photoshop, Illustrator, QuarkXPress, and
CorelDRAW have other color management options in addition to those presented in
the printer driver. For information on specific applications, see Chapters 6 through 9.
Setting color management print options
You choose print options from the various panes of the AdobePS driver dialog box. To
access the initial AdobePS dialog box, choose Print from your application’s File menu.
NOTE: The word “pane” is used to describe the different pages that appear in the
driver’s dialog box when you make selections from the pull-down menu at the top left.
Each pane presents a particular set of print options.
The AdobePS driver includes the following Color Matching options.
• Color/Grayscale—When this setting is used to print to the Fiery X3e, ColorWise
provides all color conversions on the Fiery X3e. Typically, you should use this option
when printing to the Fiery X3e.
• PostScript Color Matching—Can be used with PostScript devices such as the
Fiery X3e. It provides for color conversion using a color rendering dictionary (CRD)
that is downloaded with the print job. This method requires that the file is saved as
an EPS with PostScript Color Management checked.
Page 39

1-19 Printer Drivers and Print Options
1
NOTE: If you use the PostScript Color Matching option, the driver may, depending on
the application you are using, attach a CMYK source definition to the CMYK data in
your document. In such a case, the CMYK data in your document is reseparated using
a Fiery X3e CRD. The destination color space for the CRD is determined by the RGB
Separation print option. By setting RGB Separation to Simulation, CMYK data is
printed according to all specified CMYK Simulation Profile and CMYK Simulation
Method settings. By setting RGB Separation to Output, CMYK data is converted to
the selected output profile’s CMYK color space.
• ColorSync Color Matching—Provides for color conversion on the host computer. This
option can be used with PostScript devices such as the Fiery X3e, but it is intended
for use with PostScript Level 1 devices. If you use this option, be sure to specify the
Fiery X3e’s ICC profile as the Printer Profile. ColorSync Color Matching is not a
suggested color matching method because it does not work in conjunction with all
applications and requires that you disable features of ColorWise on the Fiery X3e.
Setting Fiery X3e color management options
In the AdobePS Print dialog box, choose Color Matching from the pull-down menu.
Choose Color Matching from the
pull-down menu
Page 40

1
Choose Color/Grayscale
1-20 Fiery X3e Color Management
In the Color Matching pane, choose Color/Grayscale from the Print Color pop-up
menu.
In the Printer Specific Options pane, choose settings for the print options described on
page 1-3.
If these settings are ones you use regularly, click Save Settings to save them for
subsequent jobs.
Page 41

2-1 Workflow concepts
2
Chapter 2:
Simple and
Advanced
Workflows
This chapter discusses color management workflows used in short-run color printing
as well as color proofing on the Fiery X3e. It also gives examples of color management
in specific desktop applications and the interaction between those applications and
ColorWise color management.
Workflow concepts
The term “workflow” is used to describe the path a job follows from its creation in
a desktop application to final printed output. It is helpful to think of the following
categories when describing workflows:
• Short-run printing versus color proofing for eventual output on an offset press
• RGB, CMYK, and PANTONE color systems
• Desktop color management within an application versus color management on the
Fiery X3e, along with the notion that different versions of desktop applications
handle color management differently. So it is important to pay close attention to the
version of a particular application when considering the workflows in this chapter.
Short-run printing versus color proofing
Short-run color printing refers to those jobs for which the Fiery X3e is the final print
device. Printing jobs to the Fiery X3e in preparation for printing on an offset press is
referred to as color proofing. Both types of Fiery X3e print jobs use RGB, CMYK, and
PANTONE colors.
• For short-run jobs, bright, saturated colors are often desirable. These are achieved by
using the full range of colors available, referred to as the full gamut of copier, or
more simply copier CMYK. See “Advanced Workflows” on page 2-8 for short-run
printing examples.
• Offset jobs proofed on the Fiery X3e require the printed colors to match those from
another set of CMYK printing conditions. Colors that are specified for an offset
press require CMYK simulation that is optimized for proofing on the copier. See
“Advanced Workflows” on page 2-8 for color proofing examples that simulate the
gamut of another digital printer or press standard.
Page 42

2-2 Simple and Advanced Workflows
2
RGB, CMYK, and PANTONE colors
Colors can be defined in several different color models, the most common being RGB,
CMYK, and the PANTONE color matching system. Each model requires a different
color conversion at the Fiery X3e. These different color conversion workflows are
explained below.
• RGB source profiles and color rendering dictionaries are used to map RGB colors
through a device-independent color space to a destination space, either the full
copier gamut in a short-run printing workflow or CMYK simulation in a color
proofing workflow.
• CMYK colors are device-dependent. In a proofing scenario, colors specified in
prepress applications are adjusted so the gamut of the Fiery X3e copier can simulate
that of the press. In a short-run printing workflow, specifying CMYK colors
according to the calibrated copier output eliminates the need for simulation during
printing.
• PANTONE spot colors are special inks manufactured to run on an offset printing
press. Spot colors can be simulated using CMYK copier toners or process color inks.
Two basic workflows exist for printing PANTONE colors to the Fiery X3e:
Spot Color Matching On instructs the Fiery X3e to match the output of the copier
to the PANTONE spot color.
Spot Color Matching Off instructs the Fiery X3e to match the copier output to a
Pantone-specified process simulation. This CMYK combination is then printed with
the CMYK Simulation setting you choose, such as SWOP or Custom, and CMYK
Simulation Method set to Full.
Page 43

2-3 Workflow concepts
2
Desktop versus Fiery X3e color management
A desktop color management system uses ICC profiles to convert colors from one
device gamut to the next (see Appendix B). The color data is converted when it is
passed from one application to another or when the job is sent to the copier, so the
processing occurs on your computer as opposed to the Fiery X3e.
One advantage of using ColorWise color management over desktop color management
is that your computer is spared the added processing chores; delaying color conversions
until the color data reaches the Fiery X3e frees up your computer so you can continue
working, and color conversions on the Fiery X3e are in most cases much faster than
similar conversions on a host computer.
Managing most or all of your color on the Fiery X3e can also eliminate the potential
for undesirable color management-related conflicts, such as iterative color conversions
and inconsistent color. The Fiery X3e applies global corrections to specific groups of
RGB, CMYK, and PANTONE colors to avoid such conflicts.
Finally, by sending RGB files instead of larger CMYK files from applications to the
Fiery X3e, network traffic is minimized and jobs are generally printed more quickly.
ColorWise uses ICC profiles to convert colors to the copier gamut or to simulate other
devices such as an offset printing press. ColorWise manages color conversions for all
users printing to the Fiery X3e from Windows and Mac OS computers. It lets users
follow a simple workflow with minimal intervention using robust default settings,
while giving advanced users the control and precision they need.
The Fiery X3e can intelligently manage the printed appearance of RGB, CMYK, and
PANTONE colors. You can let the Fiery X3e manage color for most short-run color
printing jobs without adjusting any settings.
Page 44

2-4 Simple and Advanced Workflows
2
Simple workflows
Every time you print a document containing colors that were not chosen for your
specific copier, those colors need to be converted, which requires color management.
Colors can be defined or modified at any stage in the workflow. Since ColorWise is
compatible with most other color management systems, you can use the workflow
most familiar to you.
This section provides examples of color workflows that should meet the needs of most
Fiery X3e users. For information on specific desktop applications, see Chapters 6
through 9.
Select your colors wisely
For the colors you see on your monitor to match those on your printed output, they
must go through color management, including precise calibration of your monitor and
copier. If you are not equipped or inclined to maintain accurate monitor color
management, you may opt for an easier approach. First, determine which is more
important for you—printed colors or monitor displayed colors.
If displayed colors are more important, trust your eyes and your monitor. Visually
select colors on your monitor, but be aware that colors will be optimized only for your
monitor. When the document is opened on other monitors, the colors may look
different. And even though printed colors may not match those displayed on your
monitor, they will still print on the Fiery X3e with good results.
If printed colors are your priority, choose colors from printed samples. By using these
sample colors, your printed output will remain consistent regardless of how the colors
appear on different monitors. Print the palette of available colors from business
applications and then select colors from the printed samples. The Fiery X3e comes
with color reference files on the user software CD (see page 5-2). You can also print the
color charts from the Control Panel and select colors by numbers or by name from the
printed samples. Advanced applications let you define colors in the easier-to-control
PANTONE and CMYK color spaces. See Chapter 5 for more advice on color
selection.
Page 45

2-5 Simple workflows
r
2
No matter which workflow most closely matches your own, you should calibrate your
copier regularly (see Chapter 3).
Select a short workflow
Every time colors are converted, performance and color accuracy are affected.
Therefore, a workflow with fewer steps minimizes the risk of error.
Workflow 1 using ColorWise calibration—minimal workflow
A minimal color workflow requires that you calibrate the copier. Select from printed
colors as described above, and set the CMYK Simulation option to None, since
simulation is not needed when colors are already defined using CMYK values
optimized for your calibrated copier.
NOTE: CMYK Simulation set to None is also useful when you want to prepare an
output profile of your calibrated copier or when you use less efficient color
management from the desktop (such as ColorSync or ICM).
In this workflow, colors are modified only at the calibration stage. This is indicated by
the black box in the diagram below.
Workflow 1—Colors you define in an application Colors in output from the copie
Application
CMS
File format Printer driver
While this workflow lends some control over the color quality produced by the copier,
you should consider additional ColorWise color management, as described in the next
section.
ColorWise
CMS
ColorWise
calibration
Page 46

2-6 Simple and Advanced Workflows
r
2
Workflow 2 using ColorWise color management—standard workflow
Fiery X3e servers are highly optimized for the specific copier they drive, and
ColorWise addresses many issues unique to your copier, including screens, individual
toner response, interactions among toners, natural smoothness of blends, and the
capability to render PANTONE and custom colors. The Fiery X3e distinguishes text
and graphic from image elements, so the black channel information is preserved while
parameters used for CMYK color separations are maintained.
Conventional color management systems typically address only color conversions, and
they occupy your computer’s processor. When you use ColorWise, jobs leave your
computer faster to be processed more quickly on the Fiery X3e.
The recommended standard color workflow (indicated by the black boxes in the
diagram below) uses ColorWise calibration and color management.
Workflow 2—Colors you define in an application Colors in output from the copie
Application
CMS
File format Printer driver
The Fiery X3e comes into play near the end of the color workflow. To ensure that the
colors you have selected reach the Fiery X3e and ColorWise in a usable form, you
should bypass any color management from applications and printer drivers. Keep in
mind, however, that color management from applications and printer drivers is fully
supported by ColorWise (see “Advanced workflows” on page 2-8).
You must print with the CMYK Simulation print option set to match the CMYK
color space in your application when you selected the colors. Any CMYK Simulation
setting (except Match Copy) applies calibration, so the response of the copier will
appear to be stable.
The recommended values for CMYK Simulation are SWOP in America, Euroscale in
Europe, and DIC in Japan—choices that respect the color standard for each region. If
colors have been selected specifically for your calibrated copier, set CMYK Simulation
to None.
ColorWise
CMS
ColorWise
calibration
Page 47

2-7 Simple workflows
r
2
See the table on page 1-3 for the list and descriptions of ColorWise print options
affecting CMYK, RGB, PANTONE, and other colors.
Workflow 3 bypassing ColorWise—not recommended
Bypassing ColorWise color management, while an option, is not a recommended
workflow. When you bypass ColorWise, you must choose colors using only CMYK
formulas designed specifically for your copier, and you must print with the CMYK
Simulation option set to Match Copy. The Fiery X3e still prints pages using your
PostScript files, and drives the copier and its accessories, but it does not perform
CMYK color transformation, nor does it consider the calibration of the copier.
Calibration is needed in order to get consistent output, since the color response from
your copier varies significantly depending on wear, heat, humidity, and service.
The diagram below indicates that no modifications are made to colors in this
workflow.
Workflow 3—Colors you define in an application Colors in output from the copie
Application
CMS
File format Printer driver
Turn off color management in your application
Generally, when printing to the Fiery X3e, it is best to disable color management in
the application to ensure that the Fiery X3e receives color data properly and prints it
accurately.
Save your files using color-safe settings
There are several additional steps you can take to ensure color accuracy.
• When saving EPS files, do not include PostScript Color Management information.
This minimizes the risk conflicting data and multiple color conversions. PostScript
Color Management causes your CMYK and RGB colors to be interpreted by the
Fiery X3e as though they were supplied in the Lab color space and, as a result, to be
processed by CRDs rather than your simulation settings.
ColorWise
CMS
ColorWise
calibration
Page 48

2-8 Simple and Advanced Workflows
2
• Include ICC color information in files. ColorWise will not conflict with this
information, and such data can be useful to identify the specific color space used
by your files.
• Do not include halftone and transfer functions.
• Turn off color management in the printer driver.
On Windows machines, if the printer driver offers Image Color Matching options,
select Printer Image Color Matching.
On Mac OS computers, you should set the printer driver to include no color
management commands at print time (see page 1-18).
Advanced workflows
The following sections present advanced color management workflow examples for
three short-run printing and three color proofing situations. Each workflow example
consists of a brief description, steps for creating and manipulating the files, a list of the
ColorWise settings used in the example, and a table that summarizes the workflow.
NOTE: These examples use specific software packages to represent image-editing,
illustration, page-layout, and business/office applications; they are Adobe Photoshop,
Adobe Illustrator, QuarkXPress, and Microsoft PowerPoint, respectively.
Short-run printing examples
The following examples illustrate short-run printing on the Fiery X3e.
Photoshop RGB workflow
This short-run workflow of printing an RGB image from Photoshop is one of the
simplest Fiery X3e color workflows. In it, RGB data is sent from the application,
through the printer driver, to the Fiery X3e, and the RGB-to-CMYK conversion takes
place on the Fiery X3e using a CRD rather than in the application. Use the settings
illustrated in this workflow for printing photographs and artwork.
Page 49

2-9 Advanced workflows
2
This document could be created as follows:
• Create an RGB image in Photoshop.
• Print the file directly to the Fiery X3e.
See Chapter 7 for recommended print settings from Photoshop.
• Use ColorWise to convert the RGB image to copier CMYK, or the full gamut of
copier.
The ColorWise settings used in this example are:
• RGB Source Profile set to EFIRGB or another RGB source definition
• Rendering Style set to Photographic
• RGB Separation set to Output
The diagram below indicates the steps for this particular workflow in black.
Photoshop RGB workflow
Photoshop Printer driver
Read Embedded Profiles
Define RGB Source
Embed Source Profiles
Convert RGB to CMYK
Convert CMYK to CMYK
Select RGB Mode
Select CMYK Mode
Select Destination Profile
Save as TIFF
Save as EPS
Save as JPEG
Print
ColorSync Color Matching
PostScript Color Matching
(Mac OS-Only)
Black and White
Color/Grayscale
ColorWise
print options
Define RGB Source
Select RGB Source: None
Select Rendering Style (CRD)
Select RGB Separation: Output
Select RGB Separation: Simulation
Convert Press CMYK to Press Sim.
Convert Press CMYK to Custom Sim.
Select Copier CMYK Sim.: None
Turn Spot Color Matching On
Turn Spot Color Matching Off
Select Output Profile
Select Custom Output Profile
Page 50

2-10 Simple and Advanced Workflows
2
Photoshop RGB with Illustrator and QuarkXPress CMYK and PANTONE colors
This workflow involves short-run printing of a complex page layout with images saved
in Photoshop, illustrations created in Illustrator, and PANTONE spot colors. A
Photoshop image is saved in an RGB color space using the EPS file format. Illustrator
artwork contains objects defined as CMYK and as PANTONE spot colors selected
from printed output, and they are saved using the Illustrator EPS file format. After all
of these individual objects are imported into QuarkXPress, additional design elements
in QuarkXPress are colored using CMYK process colors or PANTONE spot colors.
Use the settings illustrated in this workflow for printing brochures, newsletters, and
other layouts.
NOTE: Anytime CMYK colors are placed in a document, they should be selected from
printed output (see page 2-4).
This document could be created as follows:
• Create an RGB image in Photoshop and save it as an EPS.
• Create a graphic in Illustrator using CMYK and PANTONE colors and save as
Illustrator EPS.
• Use CMYK colors and a PANTONE color in a QuarkXPress document.
• Import the Illustrator EPS into QuarkXPress and place the Photoshop EPS image.
• Print the QuarkXPress document to the Fiery X3e.
• Use ColorWise to convert the RGB image to copier CMYK, to adjust the process
colors for short-run printing, and to match the PANTONE spot colors using the
full copier gamut.
The ColorWise settings used in this example are:
• RGB Source Profile set to EFIRGB or another RGB source definition
• Rendering Style set to Photographic
• RGB Separation set to Output
• CMYK Simulation set to None
• Spot Color Matching set to On
Page 51

2-11 Advanced workflows
2
The diagram below indicates the steps for this particular workflow in black.
Photoshop RGB workflow with Illustrator, QuarkXPress CMYK, and PANTONE colors
Photoshop Illustrator QuarkXPress Printer driver
Read Embedded Profiles
Define RGB Source
Embed Source Profiles
Convert RGB to CMYK
Convert CMYK to CMYK
Select RGB Mode
Select CMYK Mode
Select Destination Profile
Save as TIFF
Save as EPS
Save as JPEG
Print
Read Embedded Profile
Define RGB Colors
Define CMYK Colors
Define PANTONE Colors
Convert RGB to CMYK
Convert PANTONE to CMYK
Embed Source Profile
Select Destination Profile
Export as TIFF
Save as EPS
Print
Read Embedded Profile
Define RGB Colors
Define CMYK Colors
Define PANTONE Colors
Convert RGB to CMYK
Convert CMYK to CMYK
Convert PANTONE to CMYK
Embed Source Profile
Select Destination Profile
Export as TIFF
Save as EPS
Print
Photoshop RGB with Illustrator CMYK and PANTONE and PowerPoint RGB
This workflow involves short-run printing of a complex presentation document with
images saved in Photoshop, illustrations created in Illustrator, and PANTONE spot
colors. All elements are imported into PowerPoint for output.
This document could be created as follows:
• Create an RGB image in Photoshop and save it as Photoshop EPS.
• Create a graphic in Illustrator using CMYK colors and a PANTONE spot color and
save as Illustrator EPS.
(Mac OS-Only)
Black and White
Color/Grayscale
ColorSync Color
Matching
PostScript Color
Matching
ColorWise
print options
Define RGB Source
Select RGB Source: None
Select Rendering Style (CRD)
Select RGB Separation: Output
Select RGB Separation: Simulation
Convert Press CMYK to Press Sim.
Convert Press CMYK to Custom Sim.
Select Copier CMYK Simulation: None
Turn Spot Color Matching On
Turn Spot Color Matching Off
Select Output Profile
Select Custom Output Profile
• Create a presentation in PowerPoint using RGB colors.
• Import the Illustrator EPS graphic into the PowerPoint presentation and place the
Photoshop EPS image.
• Print the PowerPoint document to the Fiery X3e.
• Use ColorWise to convert the PowerPoint RGB colors and Photoshop RGB image
to copier CMYK, to adjust the process colors for more saturated short-run printing,
and to match the PANTONE spot colors using the full copier gamut.
Page 52

2-12 Simple and Advanced Workflows
2
The ColorWise settings used in this example are:
• RGB Source Profile set to EFIRGB or another RGB source definition
• Rendering Style set to Presentation
• RGB Separation set to Output
• CMYK Simulation set to None
• Spot Color Matching set to On
The diagram below indicates the steps for this particular workflow in black.
Photoshop RGB and Illustrator CMYK and PANTONE in PowerPoint RGB workflow
Photoshop Illustrator PowerPoint Printer driver
Read Embedded Profiles
Define RGB Source
Embed Source Profiles
Convert RGB to CMYK
Convert CMYK to CMYK
Select RGB Mode
Select CMYK Mode
Select Destination Profile
Save as TIFF
Save as EPS
Save as JPEG
Print
Read Embedded Profile
Define RGB Colors
Define CMYK Colors
Define PANTONE colors
Convert RGB to CMYK
Convert PANTONE to CMYK
Embed Source Profile
Select Destination Profile
Export as TIFF
Save as EPS
Print
Define RGB Colors
Convert CMYK to RGB
Print
Color proofing examples
The following examples illustrate methods for simulating the output from another
printing system, such as an offset press. Each of the proofing examples uses an ICC
profile to describe the destination color space. While some examples use simulation
profiles built in to the Fiery X3e, others use ColorWise Pro Tools (see Chapter 4) to
download custom ICC output profiles to the Fiery X3e for use as simulation profiles.
(Mac OS-Only)
Black and White
Color/Grayscale
ColorSync Color
Matching
PostScript Color
Matching
ColorWise
print options
Define RGB Source
Select RGB Source: None
Select Rendering Style (CRD)
Select RGB Separation: Output
Select RGB Separation: Simulation
Convert Press CMYK to Press Sim.
Convert Press CMYK to Custom Sim.
Select Copier CMYK Simulation: None
Turn Spot Color Matching On
Turn Spot Color Matching Off
Select Output Profile
Select Custom Output Profile
Page 53

2-13 Advanced workflows
2
Photoshop 5.x RGB-to-CMYK conversion using a custom ICC profile
This workflow is useful for prepress environments that have integrated ICC color
management and have profiles for the presses they use. In this example, an image in
Photoshop 5.x is converted from RGB to CMYK using Photoshop’s ICC color
conversion features in the CMYK Setup option. (For more information on CMYK
Setup, see your Photoshop 5.x documentation.) Using the Simulation settings available
in ColorWise, the CMYK image is printed to the Fiery X3e, and the output is made to
appear as if it were printed on an offset press.
This document could be created as follows:
• In Photoshop 5.x, set CMYK Model in CMYK Setup to ICC.
• In the Profile menu, select an ICC profile for the desired offset press. Click OK.
• Open an RGB image. From the Image pull-down menu select Mode>CMYK Color.
• Save the image in any file format.
• Print directly to the Fiery X3e.
• Use ColorWise Pro Tools to select a simulation profile or download a custom ICC
profile to the Fiery X3e for use as a CMYK Simulation Profile.
The ColorWise settings used in this example are:
• CMYK Simulation Profile set to the desired press standard or to the corresponding
custom simulation (Simulation 1-10) if you downloaded your profile with
ColorWise Pro Tools
• CMYK Simulation Method set to Full
Page 54

2-14 Simple and Advanced Workflows
2
The diagram below indicates the steps for this particular workflow in black.
Photoshop RGB-to-CMYK workflow using ICC profile
Photoshop 5.x Printer driver
Read Embedded Profiles
Define RGB Source
Embed Source Profiles
Convert RGB to CMYK
Convert CMYK to CMYK
Select RGB Mode
Select CMYK Mode
Select Destination Profile
Save as TIFF
Save as EPS
Save as JPEG
Print
(Mac OS-Only)
Black and White
Color/Grayscale
ColorSync Color Matching
PostScript Color Matching
Select RGB Separation: Output
Select RGB Separation: Simulation
Convert Press CMYK to Press Sim.
Convert Press CMYK to Custom Sim.
Select Copier CMYK Simulation: None
ColorWise
print options
Define RGB Source
Select RGB Source: None
Select Rendering Style (CRD)
Turn Spot Color Matching On
Turn Spot Color Matching Off
Select Output Profile
Select Custom Output Profile
Photoshop 5.x Built-in RGB-to-CMYK workflow
This workflow is useful for prepress environments that have not integrated ICC color
management and do not have profiles for the presses they use. In this example, an
image is converted from RGB to CMYK using Photoshop 5.x’s Built-in color
conversion features in the CMYK Setup option. (For more information on CMYK
Setup, see your Photoshop 5.x documentation.) Using the Simulation settings available
in ColorWise, the CMYK image is printed to the Fiery X3e, and the output is made to
appear as if it were printed on an offset press.
This document could be created as follows:
• Select the Built-in radio button from CMYK Setup in Photoshop 5.x
Color Settings.
• Adjust the Ink Options and Separation Options to match your offset press.
• Select the Tables radio button in CMYK Setup and click Save.
This saves your settings as a CMYK ICC profile that you will later download to the
Fiery X3e as a custom simulation profile.
Page 55

2-15 Advanced workflows
2
• Click on the Built-in radio button in CMYK Setup again and click OK.
• Launch ColorWise Pro Tools and download your new CMYK ICC profile to the
Fiery X3e as a custom Simulation profile.
For the Appear in Driver as option in Profile Settings, select Simulation-1. (For more
information on downloading profiles, see page 4-5.)
• Open an RGB image in Photoshop 5.x. From the Image menu, select
Mode >CMYK Color. Save the image as Photoshop EPS.
• Print the image directly to the Fiery X3e and choose Simulation-1 as the CMYK
Simulation Profile setting.
The ColorWise settings used in this example are:
• CMYK Simulation Profile set to Simulation-1
• CMYK Simulation Method set to Full
The diagram below indicates the steps for this particular workflow in black.
Photoshop5.x RGB-to-CMYK workflow
Photoshop 5.x Printer driver
Read Embedded Profiles
Define RGB Source
Embed Source Profiles
Convert RGB to CMYK
Convert CMYK to CMYK
Select RGB Mode
Select CMYK Mode
Select Destination Profile
Save as TIFF
Save as EPS
Save as JPEG
Print
(Mac OS-Only)
Black and White
Color/Grayscale
ColorSync Color Matching
PostScript Color Matching
Select Rendering Style (CRD)
Select RGB Separation: Output
Select RGB Separation: Simulation
Convert Press CMYK to Press Sim.
Convert Press CMYK to Custom Sim.
Select Copier CMYK Simulation: None
Turn Spot Color Matching Off
ColorWise
print options
Define RGB Source
Select RGB Source: None
Turn Spot Color Matching On
Select Output Profile
Select Custom Output Profile
Page 56

2-16 Simple and Advanced Workflows
2
Photoshop RGB and QuarkXPress CMYK
This workflow exemplifies the use of the RGB Separation feature of ColorWise.
An RGB image, originally saved in Photoshop, is printed to the Fiery X3e from
QuarkXPress. To simulate how the RGB image would print on an offset press, the
RGB Separation feature of ColorWise is set to Simulation. This workflow—useful for
proofing brochures, newsletters, and other layouts—lets you maintain consistency by
using the source RGB file for multiple purposes.
This document could be created as follows:
• Create an RGB image in Photoshop and save it as Photoshop EPS.
• Place the EPS image in a QuarkXPress document.
• Create several process-colored page elements alongside the image and print.
• Use ColorWise to convert the RGB image to simulated press CMYK and to adjust
the process colors for proofing to the copier.
The ColorWise settings used in this example are:
• RGB Source Profile set to EFIRGB or another RGB source definition
• Rendering Style set to Photographic
• RGB Separation set to Simulation
• CMYK Simulation Profile set to SWOP
• CMYK Simulation Method set to Full
Page 57

2-17 Advanced workflows
2
The diagram below indicates the steps for this particular workflow in black.
Photoshop RGB and QuarkXPress CMYK workflow
Photoshop QuarkXPress Printer driver
Read Embedded Profiles
Define RGB Source
Embed Source Profiles
Convert RGB to CMYK
Convert CMYK to CMYK
Select RGB Mode
Select CMYK Mode
Select Destination Profile
Save as TIFF
Save as EPS
Save as JPEG
Print
Read Embedded Profile
Define RGB Colors
Define CMYK Colors
Define PANTONE Colors
Convert RGB to CMYK
Convert CMYK to CMYK
Convert PANTONE to CMYK
Embed Source Profile
Select Destination Profile
Export as TIFF
Save as EPS
Print
ColorSync Color Matching
PostScript Color Matching
(Mac OS-Only)
Black and White
Color/Grayscale
ColorWise
print options
Define RGB Source
Select RGB Source: None
Select Rendering Style (CRD)
Select RGB Separation: Output
Select RGB Separation: Simulation
Convert Press CMYK to Press Sim.
Convert Press CMYK to Custom Sim.
Select Copier CMYK Simulation: None
Turn Spot Color Matching On
Turn Spot Color Matching Off
Select Output Profile
Select Custom Output Profile
Page 58

Page 59

3-1 Introduction
3
Chapter 3:
Color Calibration
Calibrating the Fiery X3e ensures consistent, reliable color output. You can calibrate
the Fiery X3e with ColorWise Pro Tools using an X-Rite DTP41 automatic scanning
spectrophotometer (available as an option that is purchased separately) or an X-Rite
DTP32 automatic scanning densitometer (also available as an option that is purchased
separately). By connecting the spectrophotometer or densitometer to the serial port on
your computer, you can quickly measure color patches and download measurements to
the Fiery X3e. You can also obtain measurements from the copier’s built-in scanner
and calibrate using AutoCal2, which does not require the use of a densitometer and
can be run from ColorWise Pro Tools or from the Control Panel.
This chapter explains how calibration works and provides instructions for all
calibration procedures. Calibrating with ColorWise Pro Tools is described on
page 3-27; calibrating from the Fiery X3e Control Panel with AutoCal2 is described
on page 3-34.
For information on advanced calibration and simulation features available with
ColorWise Pro Tools, such as editing profiles and creating custom profiles, see
Chapter 4. A format for inputting color measurements from other densitometers is
described in Appendix C.
The procedures described in Chapters 3 and 4 are fundamentally the same for
Windows 95/98, Windows NT 4.0, Windows 2000, and Mac OS computers,
including those running Command WorkStation software. The main differences
are the interface cable and the port used to connect to the densitometer.
NOTE: The term computer is used to refer to any computer running ColorWise
Pro Tools.
Introduction
Calibration generates curves that adjust for the difference between the actual toner
densities (measurements) and the response expected by the output profile.
• Measurements represent the actual color behavior of the copier.
• Calibration sets are sets of measurements.
Page 60

3-2 Color Calibration
3
• A calibration target that describes the expected behavior of the copier is contained in
each output profile.
Once you have calibrated the Fiery X3e with ColorWise Pro Tools or with AutoCal2
from the Fiery X3e Control Panel, a calibration set is stored on the Fiery X3e. This
calibration set will be used when it is associated with an output profile. Every output
profile has an associated calibration set. If you have not specified one, the calibration
set associated with the default output profile is used.
NOTE: Changing calibration has the potential to affect all jobs for all users, so you
may want to limit the number of people authorized to perform calibration. An
Administrator password can be set from the Fiery X3e Control Panel or in Setup
from the Command WorkStation to control access to calibration.
Understanding calibration
Although most users’ needs are met by the default calibration set, the Fiery X3e
allows you to choose a calibration set to customize calibration for specialized jobs.
Calibration allows you to:
• Maximize the color reproduction capabilities of the Fiery X3e
• Ensure consistent color quality over time
• Produce consistent output across Fiery X3e servers that are connected to the same
print engine
• Achieve better color matches when reproducing spot colors such as PANTONE
colors or other named color systems
• Optimize the Fiery X3e for using ColorWise rendering styles (CRDs) and CMYK
simulations, and for using ICC profiles
Page 61

3-3 Understanding calibration
3
How calibration works
Success in obtaining satisfactory print quality from a color server such as a Fiery X3e
connected to a copier depends on many factors. Among the most important are
establishing and maintaining optimal toner densities. Density is a measure of the light
absorbed by a surface. By carefully regulating toner densities, you can obtain consistent
printed color.
Even with a calibrated system, toner density is affected by service settings, humidity,
and temperature; it also tends to drift over time. Regular measurement detects day-today variations in densities, and calibration corrects for them.
Calibration works by creating calibration curves on the Fiery X3e that compensate for
the difference between actual (measured) and desired (target) density values.
Calibration curves are the graphic equivalent of transfer functions, which are
mathematical descriptions of changes that will be made to the data you start with.
Transfer functions are often graphed as input or output curves.
The Fiery X3e generates calibration curves after comparing measured values to the
final target values for each of the four toner colors. The target values are based on the
output profile specified.
Measurements
Measurement files contain numerical values that correspond to the toner density
produced by the copier when it prints solid cyan, magenta, yellow, and black, and
graduated tints of those colors.
To create a measurement file, first print a page of color patches from ColorWise
Pro Tools. Then you measure the patches using either the X-Rite DTP41 spectrophotometer or an X-Rite DTP32 densitometer connected to a computer on the
network or the copier’s scanner. The new measurements are automatically downloaded
to the Fiery X3e.
Page 62

3-4 Color Calibration
3
Output profiles and calibration sets
Output profiles and calibration sets define desired calibration results. One or more
output profiles and one or more calibration sets are provided with the Fiery X3e.
When you calibrate the Fiery X3e, you can select the calibration set that corresponds
to the typical printing jobs at your site. This same calibration set can be associated with
one or more output profiles. (For more information on output profiles, see page 1-9.)
Scheduling calibration
In general, you should calibrate the Fiery X3e at least once a day, depending on the
volume of print jobs. If it is very important to maintain consistent color, or if the
copier is subject to wide fluctuations in temperature or humidity, calibrate every few
hours. To get the best performance, calibrate whenever there is a noticeable change in
print quality.
If you need to split a print job into two or more batches to be printed at different
times, it is especially important to calibrate before printing each batch. You should also
calibrate the Fiery X3e after copier maintenance. However, because the copier may be
less stable immediately after maintenance, wait until you have printed approximately
50 pages before you calibrate.
NOTE: Since printed output from the copier is very sensitive to changes in temperature
and humidity, the copier should not be installed near a window or in direct sunlight,
near a heater or air conditioner. Paper is sensitive to climate changes as well. It should
be stored in a cool, dry, stable environment, and reams should remain sealed until they
are needed.
Print color reference pages, such as the Color Charts (from the Control Panel or from
the Command WorkStation) and the color reference pages included with the user
software (see Getting Started). All of these pages include fully saturated color patches
and pale tints of cyan, magenta, yellow, and black. Images with skin tones offer a very
good basis for comparison. You can save and compare pages you printed at different
times. If there is a noticeable change in appearance, you should calibrate the Fiery X3e.
Page 63

3-5 Using a spectrophotometer
3
When you examine the Test Page, keep in mind that all color patches should be visible,
even though they may be very faint in the five percent and two percent range, and each
color’s patch set should show uniform gradation from patch to patch as the color
lightens from 100 percent to zero percent.
If the solid density patches (100% cyan, magenta, yellow, or black) look less saturated
with time, show the pages to your copier service technician to find out whether
adjusting the copier can improve output.
Checking calibration status
You can check whether the Fiery X3e is calibrated, which calibration set and output
profile were used, and when the copier was last calibrated:
• Print a Configuration page or Test Page from the Control Panel or the Command
WorkStation.
• When you select a calibration set in Calibrator, the last calibration and the user who
performed it are displayed.
Using a spectrophotometer
ColorWise Pro Tools Calibrator is designed to work with the X-Rite DTP41
spectrophotometer, a device that measures density and color data. The DTP41
communicates directly with the Calibrator application in ColorWise Pro Tools,
sending measurements to the Fiery X3e automatically.
Setting up the spectrophotometer
Before you calibrate the Fiery X3e, you need to connect, configure, and calibrate the
spectrophotometer to prepare for measuring the printed patches (see “Calibrating the
densitometer” on page 3-26). For additional information about setting up and using
the DPT41, see the Instrument Operator’s Manual that is included with it.
Page 64

3-6 Color Calibration
r
t
3
TO CONNECT THE X-RITE DTP41 TO THE COMPUTER:
1. Turn off the computer.
2. Unpack the X-Rite DTP41 and remove the spacer from the measurement page slot.
3. Plug the square end of the interface cable (looks like a modular phone plug) into the
serial interface connection on the side of the X-Rite DTP41.
Instrument button
Alignment mark
Measurement page slot
Calibration strip
entrance
LED indicato
Power inpu
Serial interface
connection
Page 65

3-7 Using a spectrophotometer
r
C
C
3
4. Attach the connector to the computer.
For a Windows computer, insert the 8-pin mini-DIN end of the interface cable into
the 9-pin DB9 Connector cable adapter. Insert the 9-pin end into the COM1 or
COM2 port on the computer and tighten the screws. If the available port on your
computer is 25-pin, you must use the 8-pin-to-25-pin adapter.
Unused connector
onnect to computer
onnect to adapter
Square connecto
Interface cable
Page 66

Unused connector
Connect to serial port
3-8 Color Calibration
3
For a Mac OS computer, connect the 8-pin mini-DIN plug directly into the serial port
of the computer.
NOTE: For Macintosh computers with a USB port (for example, an iMac) you need an
adapter to connect the DTP41 to your computer. See the X-Rite, Inc. web site
(www.x-rite.com) for information on supported adapters.
Page 67

AC adapter
r
3-9 Using a spectrophotometer
3
5. Use the AC adapter to provide power.
Plug the small connector on the adapter cable into the power input of the X-Rite
DTP41 and plug the AC adapter into the power cord. Plug the power cord into a wall
outlet.
Power cord
Small connecto
6. Turn on the computer.
7. Use ColorWise Pro Tools to calibrate the X-Rite DTP41 (see page 3-26).
8. Use ColorWise Pro Tools and the DTP41 to calibrate the Fiery X3e (see page 3-15).
Page 68

3-10 Color Calibration
3
Calibrating the spectrophotometer
For the best color accuracy, you should calibrate the X-Rite DTP41 spectrophotometer
every time you calibrate the Fiery X3e. You initiate the calibration sequence in
ColorWise Pro Tools Calibrator as part of the process of Fiery X3e calibration. The
computer may also prompt you that it is necessary to calibrate the spectrophotometer.
Alternately, you can initiate the DTP41 calibration process using the Instrument
button on the DTP41. See the Instrument Operator’s Manual that came with the
X-Rite DTP41 for more information on this method.
Multiple users can be connected to one Fiery X3e server with ColorWise Pro Tools,
but only one user at a time can use the Calibrator module. An error message appears if
you try to calibrate when another user is already using ColorWise Pro Tools to
calibrate.
NOTE: ColorWise Pro Tools for Windows and Mac OS computers are fundamentally
the same; differences are noted in this chapter. The screens and dialog boxes you see
illustrated here are the Windows version.
You will need the Color Reflection Reference strip included with the spectrophotometer. Remove the strip from its protective envelope, handling it only by the
edges. Keep the strip free of dust and smudges and always store it in the protective
envelope.
TO CALIBRATE THE X-RITE DTP41:
1. Connect the spectrophotometer to the computer and supply power (see page 3-6).
2. Launch ColorWise Pro Tools and connect to the Fiery X3e.
Page 69

3-11 Calibrating the spectrophotometer
3
For instructions on configuring the connection to the Fiery X3e, see Getting Started.
NOTE: If the connection to the Fiery X3e from Command WorkStation that also allows
for access to ColorWise Pro Tools is not established, you can directly launch
ColorWise Pro Tools independently of Command WorkStation.
3. Click Calibrator.
4. Select DTP41 as the measurement method.
X-Rite DTP41 should appear as a measurement method. This information is provided
to Calibrator by the Fiery X3e. If this option does not appear, make sure you are
connected to the Fiery X3e.
5. Under Get Measurements, click Measure.
Page 70

Instructions field
3-12 Color Calibration
3
6. In the Measurement Options window (below), click Measure.
7. Select the appropriate COM port for the DTP41 from the Available Ports menu.
Click Utilities
Select port for the DTP41
The Instructions field displays instructions for selecting the port.
8. Click Utilities at the bottom of the Start window (above).
Page 71

Click Calibrate DTP-41
3-13 Calibrating the spectrophotometer
3
9. In the Utilities window (below), click Calibrate DTP-41.
N
OTE: To view version and serial number information, click Show DTP-41 Info,
which brings up the Instrument Info window (below). When finished, click Done.
10. Remove the shipping spacer from the measurement page slot, if you have not already
done so.
11. Insert the end of the Color Reflection Reference strip with the arrow into the
calibration strip entrance on the DTP41, centering it below the alignment mark (see
the diagram on page 3-6).
Insert the strip about three inches, past the front idler rollers until it rests against the
rear drive rollers.
Page 72

3-14 Color Calibration
S
s
3
12. Click Read Reference
The DTP41 will pull the calibration strip through automatically.
13. Click Done.
Click Read Reference
tatus field indicates the
DTP41 was calibrated
uccessfully
Click Done
14. Close the Utilities window.
This completes DTP41 calibration.
Page 73

3
r
Prompt indicating DTP41
equires calibration
3-15 Calibrating with ColorWise Pro Tools and DTP41
When the DTP41 requires calibration, the computer prompts you with following
dialog box.
When this dialog box appears, click Calibrate Now and follow the instructions starting
with step 9 on page 3-13.
After calibrating the DTP41, proceed to calibrate the Fiery X3e (see page 3-15).
Calibrating with ColorWise Pro Tools and DTP41
Using ColorWise Pro Tools’ Calibrator application and the DTP41
spectrophotometer, you can quickly measure color patches generated by the copier and
automatically download these measurements to the Fiery X3e.
Changing the calibration has the potential to affect all jobs for all users, so you may
want to limit the number of people authorized to perform calibration. An
Administrator password can be set from the Fiery X3e Control Panel to control access
to calibration.
Multiple users can be connected to one Fiery X3e server with ColorWise Pro Tools,
but only one user at a time can use the Calibrator module. An error message appears if
you try to calibrate when another user is already using ColorWise Pro Tools to
calibrate.
NOTE: Before using ColorWise Pro Tools and the DTP41 to calibrate the Fiery X3e,
follow the instructions on page 3-26 for calibrating the DTP41 spectrophotometer.
Page 74

3-16 Color Calibration
3
TO CALIBRATE THE FIERY X3E USING THE DTP41:
1. Launch ColorWise Pro Tools and connect to the Fiery X3e.
For instructions on configuring the connection to the Fiery X3e, see Getting Started.
NOTE: If the connection to the Fiery X3e from Command WorkStation that also allows
for access to ColorWise Pro Tools is not established, you can directly launch
ColorWise Pro Tools independently of Command WorkStation.
2. Click Calibrator.
Page 75

3-17 Calibrating with ColorWise Pro Tools and DTP41
3
3. Select DTP41 as the measurement method.
X-Rite DTP41 should appear as a measurement method. This information is provided
to Calibrator by the Fiery X3e. If this option does not appear, make sure you are
connected to the Fiery X3e.
4. Under Check Print Settings, choose the desired calibration set.
Choose the appropriate calibration set for the type of media you will use most often.
NOTE: For this calibration to take effect, the calibration set must be associated with one
or more output profiles. The default calibration set is already associated with the
default output profile, so there is no need to make any new associations.
Page 76

3
Print Options window for
DTP41 calibration
method
3-18 Color Calibration
5. Under Generate Measurement Page, click Print.
6. In the Print Options dialog box that appears, choose the page type, paper size, and
input tray to use for the measurement page and click Print.
For the Page Type pop-up menu, select either 34 or 21 Sorted Patches.
In the Paper Size pop-up menu, the menu will automatically select LTR/A4 for 21
Sorted Patches or 11x17/A3 for 34 Sorted Patches.
In the Input Tray pop-up menu, specify the paper source.
Retrieve the measurement page from the copier.
7. Under Get Measurements, click Measure.
8. The selected Page Type and Paper Size options appear. Click Measure.
Page 77

Instructions field
3-19 Calibrating with ColorWise Pro Tools and DTP41
3
9. If necessary, select the appropriate COM port for the DTP41 from the Available Ports
menu.
Select port for the DTP41
The Instructions field displays instructions for selecting the port.
10. Feed the measurement page into the DTP41, starting with the cyan strip.
Align the page in the measurement page slot of the DTP41 so the appropriate color
column is centered below the alignment mark (see the diagram on page 3-6). Insert the
page about three inches, past the front idler rollers until it rests against the rear drive
rollers.
11. Click Read Strip.
Click Read Strip
Page 78

3
Status field indicates the
color was measured
successfully
3-20 Color Calibration
The DTP41 pulls the measurement page through automatically.
12. Once the measurement page is read, Calibrator instructs you to insert and align the
page again for the next color. Repeat the measurement process for the magenta,
yellow, and black strips.
Previous and Next buttons
let you advance or reverse
to repeat a measurement
A check mark appears on the circle of the color just read, and the Status field indicates
that color was measured successfully.
The Previous and Next buttons on the Measurements window can be used to reverse
or advance to another step in the measurement sequence to repeat a measurement.
Page 79

3
Click Accept Measurements
3-21 Calibrating with ColorWise Pro Tools and DTP41
13. When the Status field indicates that all four color strips have been read successfully,
click the Accept Measurements button.
14. In the Measure dialog box, click OK.
Page 80

3-22 Color Calibration
3
15. In the Calibrator window, click Apply to implement the new calibration set.
Click Apply
16. In the Information dialog box, click OK.
This completes the Fiery X3e calibration process.
Page 81

3-23 Calibrating with ColorWise Pro Tools and DTP41
C
3
TO RESTORE DEFAULT CALIBRATION MEASUREMENTS:
1. Launch ColorWise Pro Tools and click Calibrator.
lick Restore Device
2. Click Restore Device.
3. Click OK to restore the preset default calibration set.
N
OTE: Restore device applies only to the currently selected calibration set.
Page 82

3-24 Color Calibration
r
3
Using a densitometer
ColorWise Pro Tools are designed to work with the X-Rite DTP32 reflection
densitometer that feed color measurements to the Fiery X3e automatically.
NOTE: Measurements from other densitometers can be input using a simple ASCII file
format (see page C-1).
Setting up the densitometer
Before you calibrate the Fiery X3e using the X-Rite DTP32, you need to connect,
configure, and calibrate the densitometer to prepare for measuring the printed patches
(see “Calibrating the densitometer” on page 3-26). For additional information about
setting up and using the DTP32, see the separate documentation included with it.
TO CONNECT THE X-RITE DTP32 TO THE COMPUTER:
1. Turn off the computer.
2. Plug the square end of the interface cable (looks like a modular phone plug) into the
I/O port on the side of the X-Rite DTP32.
Square connecto
Page 83

3-25 Using a densitometer
r
C
C
3
3. Attach the connector to the computer.
For a Windows computer, insert the 8-pin mini-DIN end of the interface cable into
the 9-pin DB9 Connector cable adapter. Insert the 9-pin end into the COM1 or
COM2 port on the computer and tighten the screws. If the available port on your
computer is 25-pin, you must use the 8-pin-to-25-pin adapter.
Unused connector
onnect to computer
onnect to adapter
Unused connector
Connect to serial port
Square connecto
Interface cable
For a Mac OS computer, connect the 8-pin mini-DIN plug directly into the serial port
of the computer.
NOTE: For Macintosh computers with a USB port (for example, an iMac) you need an
adapter to connect the DTP32 to your computer. See the X-Rite, Inc. web site
(www.x-rite.com) for information on supported adapters.
Page 84

Small connector
AC adapter
3-26 Color Calibration
3
4. Use the AC adapter to provide power.
Plug the small connector on the adapter cable into the side of the X-Rite DTP32 and
plug the adapter into a wall outlet.
5. Turn on the computer.
6. Calibrate the densitometer (see below).
7. Use ColorWise Pro Tools to calibrate the Fiery X3e (see page 3-27).
Calibrating the densitometer
You will need the black-and-white X-Rite Auto-Cal Strip included with the
densitometer. Calibrating the densitometer does not require ColorWise Pro Tools.
TO CALIBRATE THE X-RITE DTP32:
1. Connect the densitometer to the computer and supply power (see page 3-24).
2. From the Main Menu on the X-Rite DTP32 display, press the p1 key once to reach p2.
3. Press the cal key.
Calibrating motor speed is displayed, followed by the words INSERT CAL STRIP.
Page 85

3-27 Calibrating with ColorWise Pro Tools
3
4. Insert the arrow end of the X-Rite Auto-Cal Strip into the 35mm slot on the front of
the X-Rite DTP32 until it stops or the roller starts pulling the strip.
Reading appears momentarily, followed by the density values and CALIBRATION OK.
The densitometer automatically returns to the MAIN MENU.
If UNRECOGNIZABLE STRIP appears, repeat the process or try cleaning the strip (see the
X-Rite DTP32 Operating Manual).
5. Start ColorWise Pro Tools and proceed to calibrate the Fiery X3e (see the next
section).
Recalibrate the densitometer at least once per month. For critical color, calibrate the
densitometer every time you calibrate the Fiery X3e. The densitometer may also warn
periodically that it requires calibration.
Calibrating with ColorWise Pro Tools
Using the densitometer or AutoCal2, you can quickly measure color patches and
download these measurements to the Fiery X3e using ColorWise Pro Tools Calibrator.
NOTE: Multiple users can be connected to one server with ColorWise Pro Tools, but
only one user at a time can use Calibrator. An error message appears if you try to
calibrate when another user is already using ColorWise Pro Tools to calibrate.
ColorWise Pro Tools for Windows and Mac OS computers are fundamentally the
same; differences are noted in this chapter. The windows and dialog boxes you see
illustrated are the Windows version.
NOTE: Changing the calibration has the potential to affect all jobs for all users, so
you may want to limit the number of people authorized to perform calibration. An
Administrator password can be set from the Fiery X3e Control Panel to control access
to calibration.
Page 86

3-28 Color Calibration
3
TO CALIBRATE THE COPIER USING CALIBRATOR:
1. Launch ColorWise Pro Tools and connect to the Fiery X3e.
For instructions on configuring the connection to the Fiery X3e, see Getting Started.
NOTE: If the connection to the Fiery X3e from Command WorkStation that also allows
for access to ColorWise Pro Tools is not established, you can directly launch
ColorWise Pro Tools independently of Command WorkStation.
2. Click Calibrator.
Page 87

3-29 Calibrating with ColorWise Pro Tools
3
3. Select a measurement method.
AutoCal2 and X-Rite DTP32 should appear as the measurement methods. This
information is provided to Calibrator by the Fiery X3e. If neither option appears,
make sure you are connected to the Fiery X3e.
4. Under Check Print Settings, choose the desired calibration set.
If there is more than one option, choose the appropriate calibration set for the type of
media you will use most often.
NOTE: For this calibration to take effect, the calibration set must be associated with one
or more output profiles. The default calibration set is already associated with the
default output profile, so there is no need to make any new associations.
Page 88

3-30 Color Calibration
3
5. Under Generate Measurement Page, click Print.
6. In the Print Options dialog box that appears, choose the page type, paper size, and
input tray to use for the measurement page and click Print.
For AutoCal2, the Page Type pop-up menu states AutoCal Page. For the densitometer
method, select either 34 or 21 Sorted Patches.
In the Input Tray pop-up menu, specify the paper source.
7. Retrieve the Measurement Page.
8. Under Get Measurements, click Measure.
If you chose the AutoCal2 method, follow the directions in the dialog box that appears
for placing the Gray Scale strip and measurement page on the copier glass.
Page 89

3-31 Calibrating with ColorWise Pro Tools
3
If you chose the DTP32 method, select the Page Type and Paper Size options you
selected for the measurements page, and click Measure.
9. In the Measure dialog box, click OK.
10. Follow the directions for either the AutoCal2 or densitometer measurement based on
your selection of measurement method.
11. When you are notified that the measurements were read successfully, click OK, and
then click Apply to implement the new calibration set.
TO RESTORE DEFAULT CALIBRATION MEASUREMENTS:
1. Launch ColorWise Pro Tools and click Calibrator.
2. Click Restore Device.
3. Click OK to restore the preset default calibration set.
NOTE: Restore device applies only to the currently selected calibration set.
Page 90

3-32 Color Calibration
3
Expert Mode
Expert Mode offers two additional options: Print Pages and View Measurements.
With the Print Pages option, you can print a calibration Comparison Page showing the
results of the new measurements with any profile associated with the currently selected
calibration set. You can also create a custom comparison page and save it as a
PostScript or an Encapsulated PostScript (EPS) file called CALIB.PS. Then print the
file to the Hold Queue of the Fiery X3e from your application or download it to the
Hold Queue with Fiery Downloader. An additional way to create the CALIB.PS file is
to rename any job in the Hold Queue using Command WorkStation.
Page 91

3-33 Calibrating with ColorWise Pro Tools
3
With the View Measurements option, you can view the current set of measurements as
a table or as a graph that shows both the measurements and the target curves (shown
below).
Output profile name
appears here
When more than one profile use the same target, an additional menu called Plot
Against appears at the top right of the window above. It lists all output profiles that use
that same calibration set. Selecting an output profile from this menu displays the target
curves associated with that profile. If each output profile contains a unique calibration
target, when you switch profiles, the curves displayed also change.
Page 92

3-34 Color Calibration
3
Calibrating from the Control Panel using AutoCal2
You can calibrate the Fiery X3e from the Control Panel using AutoCal2, which
calibrates the Fiery X3e using the copier’s built-in scanner as a densitometer. If an
Administrator password has been set, you will need it for calibration.
For instructions on using the Fiery X3e Control Panel, see the Configuration Guide.
For troubleshooting during the AutoCal2 procedure, see the Job Management Guide.
NOTE: To calibrate using AutoCal2, you will need the Kodak Gray Scale strip included
in the customer media pack that came with your Fiery X3e.
TO ACCESS AND USE AUTOCAL2:
1. At the Idle screen, press the Menu button to enter the Functions menu.
2. Choose Calibration, and choose Set Up Calibration.
If a password is set on the Fiery X3e, enter it and press OK.
3. For Calibration Mode, select Standard or Expert.
Expert Mode adds the option to print a Comparison Page (see page 3-32).
4. For Tray, choose the paper source for the patch page and press OK.
5. Choose Calibrate.
6. Select the calibration set.
You can choose from the list of all calibration sets on the Fiery X3e. This screen
appears only if more than one calibration set is available.
7. When prompted, select Yes to print the measurement page.
This page is comprised of swatches of color that will be measured by the copier and
then compared to the target color values. After the page is printed, the Measure Page
screen is displayed.
Page 93

3-35 Calibrating from the Control Panel using AutoCal2
3
8. Select Yes in the Measure Page screen.
9. When prompted on the Control Panel, place the Kodak Gray Scale strip face down along
the top of the copier glass.
Place the strip so that it will be centered along the top edge of the AutoCal page.
Place grayscale strip
face down
Place color measurement page
face down over grayscale strip
10. Place the color measurement page face-down over the grayscale strip.
Place the page at the upper left-hand corner of the copier glass. Slide the grayscale strip
to the top center of the color measurement page. Make sure the patches on the
grayscale strip do not overlap the color patches.
11. Close the platen glass cover, being careful not to move the grayscale strip and color
measurement page.
12. Click OK.
Status messages display the progress of scanning and calculating measurements.
13. When prompted to Print Comparison Page (Expert Mode only), select Yes to print a
preview of the selected calibration.
Select from a list of output profiles that use the same calibration set and press OK.This
option appears only in Expert Mode calibration.
14. When prompted to overwrite calibration, select Yes.
15. Select Yes to confirm.
Status messages display progress information. When calibration is complete, the LCD
screen returns to the Functions menu.
Page 94

3-36 Color Calibration
3
Removing calibration
It is also possible to remove calibration from the Fiery X3e. In general, it is not
necessary because any new calibration replaces the existing one if the same calibration
set is selected.
TO REMOVE CALIBRATION FROM THE CONTROL PANEL:
1. From the Fiery X3e Control Panel, access the Calibration menu as described on
page 3-34.
2. Choose Remove Calibration.
3. When prompted, verify that you want to proceed with removing calibration.
The current measurements are removed and a default calibration is restored.
Page 95

4-1 Profile Manager
4
Chapter 4:
ColorWise
Pro Tools
ColorWise Pro Tools are color management applications that give you flexible control
of color printing. There are four tools:
• Calibrator (see Chapter 3)
• Color Editor
• Profile Manager
• Color Setup
ColorWise Pro Tools for Windows and Mac OS computers are fundamentally the
same; differences are noted in this chapter. The windows and dialog boxes illustrated
are the Windows version. For information on installing and configuring a connection
to ColorWise Pro Tools, see Getting Started.
NOTE: If the connection to the Fiery X3e from Command WorkStation that also allows
for access to ColorWise Pro Tools is not established, you can directly launch
ColorWise Pro Tools independently of Command WorkStation.
Profile Manager
Profile Manager allows you to manage and edit ICC profiles. In the case of the
Fiery X3e, these profiles are divided into RGB Source, Simulation, and Output
profiles.
• RGB Source contains all monitor profiles resident on the Fiery X3e. RGB Source
profiles are used to define the source color space for RGB colors processed by the
Fiery X3e.
Page 96

4-2 ColorWise Pro Tools
4
NOTE: If you use Photoshop 5.x, you can upload the profile for your selected working
space to the Fiery X3e and choose that as your RGB Source profile.
• Simulation contains printer profiles used to simulate another device on the
Fiery X3e.
• Output contains copier profiles that describe the attached copier. For more
information on output profiles, see page 1-9.
NOTE: Changing the Fiery X3e default profiles affects all jobs for all users, so you
might want to limit the number of people authorized to use ColorWise Pro Tools by
setting an Administrator password.
Several profiles are provided with the Fiery X3e, and you can create additional ones as
needed by modifying the existing ones. You can also download profiles from any
workstation to the Fiery X3e. The profiles provided are:
RGB Source:
• sRGB (PC)—source color space for a generic Windows computer monitor
• Apple Standard—standard source color space for Mac OS computer monitors with
older versions of ColorSync
• EFIRGB—preset default setting for a Fiery X3e
Simulation:
• SWOP-Coated—United States press standard
• Euroscale—European press standard
• DIC—Japanese press standard
Output:
• Fiery O8C-M v1F—profile that describes the copier
Page 97

4-3 Profile Manager
4
Setting the default profiles
The default profiles are applied to all print jobs sent to the Fiery X3e, unless you
override them using print options. Therefore, the defaults should be the most
commonly used profiles.
TO SPECIFY A DEFAULT PROFILE:
1. Launch ColorWise Pro Tools and click Profile Manager.
The left side of the screen lists the ICC profiles in the default directory of your
computer. The right side lists each of the three types of profiles on the Fiery X3e.
The lock icon ( ) to the left of a profile name indicates that the profiles cannot be
deleted and can be edited only if it is saved under a new name. Only Simulation and
Output profiles can be edited.
A small icon to the left of a profile name indicates the default profile for each category
(RGB Source, Simulation, and Output). If you designate a different profile as the
default, the icon appears next to your designated profile. The icon indicating the
default RGB Source and Output profiles looks like a target ( ). The icon indicating
the default Simulation profile changes in appearance depending on whether the default
RGB Separation setting is set to Simulation ( ) or Output ( ).
Page 98

4
Profile Settings windows for
Simulation (left) and
Output (right)
4-4 ColorWise Pro Tools
2. Select the profile you want as the default for a profile type, and click Profile Settings.
3. In the Profile Settings dialog box, click Default and click Apply.
4. Click OK.
5. In the main Profile Manager window, the target icon appears next to the new default
profile you specified. Repeat steps 2 through 4 for each type of profile.
If no default is set for RGB Source, then the RGB Source print option is set to None.
If no default profile is set for Simulation, then the CMYK Simulation print option is
set to None. For more information on print options, see Chapter 1.
For Output there is always a default profile. You can change the Output default by
selecting a preset profile you want as the default and clicking Profile Settings. Or you
can create a new default under a new name by selecting a preset profile and specifying
your choice of the calibration set in the Use Calibration Set pop-up menu and a new
name in the Profile Description menu.
Page 99

4-5 Profile Manager
4
Downloading profiles
The Fiery X3e comes with default profiles. It is possible to download additional
profiles from any computer connected to the Fiery X3e.
TO DOWNLOAD A PROFILE:
1. Launch ColorWise Pro Tools and click the Profile Manager.
The left side of the main Profile Manager windows lists the ICC profiles in the default
directory of your workstation.
For Windows 95/98, the default directory is \Windows\System\Color.
For Windows NT 4.0 and Windows 2000, the default directory is
\Winnt\System32\Color.
For Mac OS, the default directory is System Folder:Preferences:ColorSyncTM Profiles
for ColorSync 2.0, and System Folder:ColorSync
or later.
2. If the desired profile does not appear, click Browse to go to a different directory.
Browse to the directory containing the profile you want to download and click OK.
TM
Profiles if you have ColorSync 2.5
Page 100

4-6 ColorWise Pro Tools
4
3. When the profile you wish to download appears in the list in the main Profile Manager
window, select it.
If the profile is compatible with the Fiery X3e, a green arrow indicates that the profile
is available for download. Only output device profiles are downloadable to Simulation
and Output. Only input device profiles are downloadable to RGB Source.
NOTE: On Windows computers, the profiles must have an extension of .icc or .icm to
be listed. On Mac OS computers, the profiles must have a file type of profile.
All ICC profiles in the selected directory on your computer are displayed in the list in
the main Profile Manager window. However, because a profile is listed does not
necessarily mean it can be downloaded to the Fiery X3e.
Simulation profiles should be only profiles of devices for which you want the Fiery X3e
to match in terms of color output characteristics. Output profiles should be only
profiles of the device to which your Fiery X3e is connected. Although CMYK printer
profiles can be downloaded as Simulation or Output, consider how they will be used.
If you want the Fiery X3e prints to look like another printer, download that profile as a
Simulation. If you have a custom profile of the copier your Fiery X3e is connected to,
download that profile as an Output profile.
4. Click the arrow to download the profile and click OK when the download is complete.
The new profile now appears on the list of profiles on the right side of the Profile
Manager main window.
This profile must be associated with one of the predefined names (Source-1 through 10
for RGB Source, Simulation-1 through 10 for Simulation, or Output-1 through 10 for
Output) or set as the default before it can be used. See “Defining profiles” on page 4-8.
NOTE: When an output profile is downloaded, it inherits the calibration target of the
current default output profile.
 Loading...