

Konica Minolta FAX 9760 User Manual
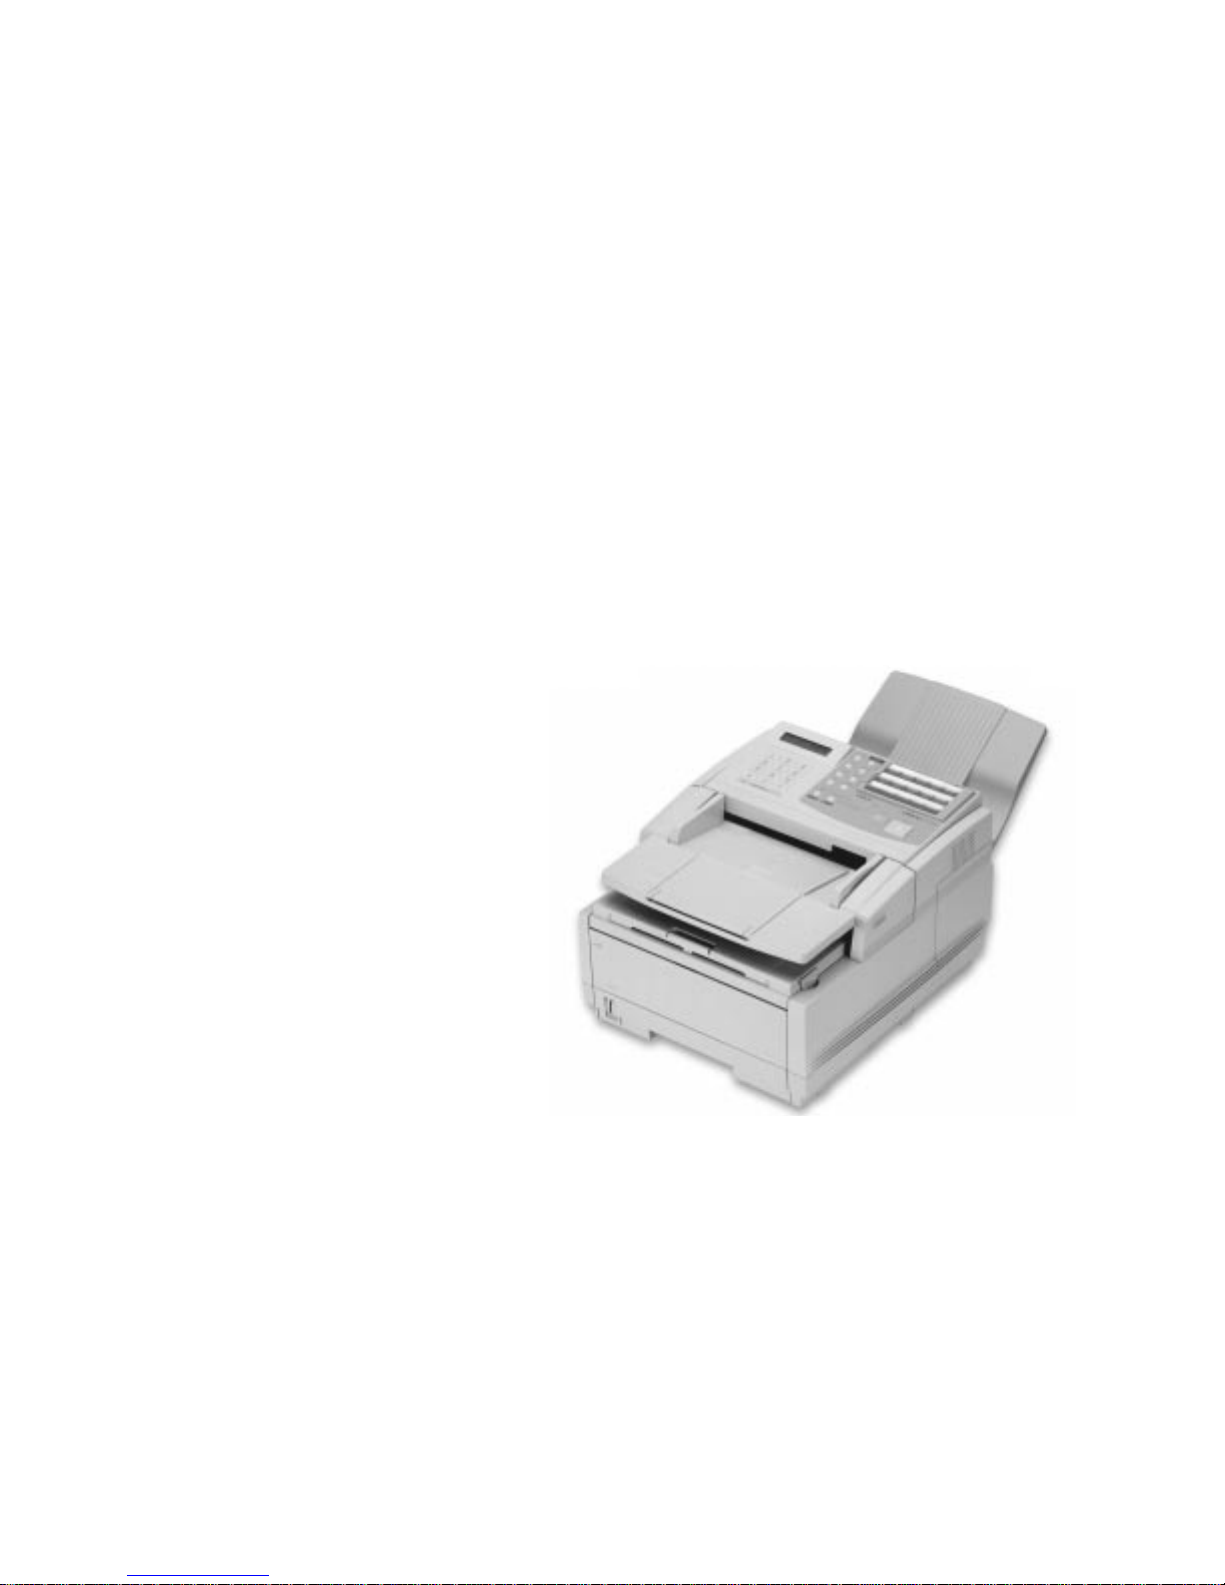
KONICA FAX 9760
User's Manual
FACSIMILE
OKIFAX
5400

2
KONICA FAX 9760
|
ENERGY STAR is a registered trademark of the United States
Environmental Protection Ag ency.
Windows is either a registered trademark or a trademark of
Microsoft Corporation in the United States and/or other
countries
As an ENERGY STAR® partner, Konica Business Technologies,
Inc. has determined that this product meets the ENERGY STAR
guidelines for energy efficiency.
Every effort has been made to ensure that the information in
this user's manual is complete, accurate, and up-to-date.
Konica Business Technologies, Inc. assumes no
responsibility for the results of errors beyond its control.
Konica Business Technologies, Inc. also cannot guarantee
that changes in software and equipment made by other
manufacturers and referred to in this user's manual will not
affect the applicability of the information in it. Mention of
software products manufactured by other companies does not
necessarily constitute endorsement by Konica Business
Technologies, Inc.
Copyright 2000 by Konica Business Technologies, Inc. All
Rights Reserved
First Edition: February, 2000
Written and produced by the Konica Business Technologies
Please address any comments on this publication by mail to:
Konica Business Technologies
Marketing Department
500 Day Hill Road
Windsor, CT 06095
Please visit Konica Business Technologies’s multilingual
web site at:
http://www.Konicabt.com

|
User's Manual 3
Contents
Introduction.............................................................. 10
Features.................................................................................10
Product Options....................................................................1 1
Installation................................................................ 13
For Y our Safety: Installation Hints .......................................13
Getting Started .....................................................................1 4
Where to Install Your Fax Machine ...................................14
Unpacking ............................................................................14
What You Should Receive ................................................. 1 4
Attaching the Document Stacker .........................................1 5
Removing the Protective Sheet............................................1 6
Installing the Toner Cartridge ..............................................1 7
Toner Cartridge and Image Drum Unit Handling ..............19
Emergency First Aid...........................................................19
Loading Paper ......................................................................2 0
Connecting the Telephone Line .......................................... 2 2
Connecting an External Telephone or Answerin g
Machine ..............................................................................2 2
Connecting The External Handset (Option)......................2 3
Connecting Power ................................................................2 4
Programming Required Information ....................................25
FCC Telephone Consumer Protection Act.........................2 5
Date and Time ....................................................................26
Fax Identification ............................................................... 26
To Program Your Fax ID: .................................................27
Getting to Know Your Fax Machine..................... 29
Component Identification .................................................... 29
Front of the Unit.................................................................29
Back of the Unit .................................................................30
Inside the Unit....................................................................31
Locating the Serial Number .................................................31
Control Panel Keys and Indicators.......................................32
The Speed Dial (One Touch) Keypad...................................37
Using the One Touch Keys for Dialing..............................37
Using the One Touch Keys for Selecting Functions
and Programming..............................................................37
List of One Touch Keys with Descriptions......................37
Signal Tones .........................................................................39
Dual Access...........................................................................40

4
KONICA FAX 9760
|
Using Your Fax with Your Computer ................... 4 1
Connect to Your Computer...................................................4 1
Setting Basic Features ............................................. 4 2
Control Panel Keys and Indicators.......................................42
Navigating Programming Levels .........................................4 3
V iewing Your Current Settings ..........................................43
User Function Settings.......................................................43
User Function Settings List .............................................44
Changing Your User Function Settings ...........................5 0
Dial Parameter Settings ......................................................51
Dial Parameter Settings List ............................................51
Changing Your Dial Parameter Settings ..........................5 2
Service Function Settings .................................................. 5 3
Service Function Settings List ........................................5 3
Changing Your Service Function Settings ......................5 3
Changing the Language ....................................................... 54
Answering Mode ..................................................................54
Setting the Answering Mode .............................................5 4
Changing the Answering Mode ......................................... 5 4
Answering Mode Options ..................................................55
Auto Receiv e Mode [FAX] ..............................................55
Manual Receive Mode [TEL]..........................................55
Telephone/Fax Automatic Switch Mode [T/F] ................55
Using Y our Fax with an An swering Machine [TAD] .......56
Memory Reception Mode [MEM] ..................................5 6
Fax Forwarding Mode [FWD]..........................................56
PC Mode [PC] ..................................................................56
Incoming Call Parameters ....................................................57
Ring Response: User Function 11 .....................................57
Incoming Ring: User Function 16 .....................................57
Distinctive Ring: User Function 12...................................5 7
Setting Distinctive Ring .................................................. 5 7
Remote Receive: User Function 17 ...................................59
PC/Fax Switch (MFP Option):
User Function 22 .................................................................59
Monitor Volume: User Function 06......................................5 9
Buzzer Volume: User Function 07........................................59
Paper Size Settings ...............................................................60
First Paper Size: User Function 13.....................................60
Using the OTHER setting, with MFP Option Installed ...60
Second Paper Size: User Function 14 ................................60
Connecting to a PBX............................................................60
Basic Faxing Operations ........................................ 62
Preparing Documents for Faxing..........................................62
Guidelines ..........................................................................62
Document Size ...................................................................62
Multiple Page Documents .................................................6 3
Loading Documents ........................................................... 6 3

|
User’s Manual 5
Sending a Fax to a Single Location .....................................64
Search Key Dialing ............................................................66
Real-Time Dialing .............................................................6 6
Redialing ...........................................................................6 6
Confirming Results ............................................................ 6 6
Stopping a Transmission ...................................................6 7
Shortcut Fax Number Programming ..................................67
Receiving Faxes ................................................................... 6 8
Receiving Faxes Manually ................................................ 68
Receiving Faxes in Memory..............................................6 9
Memory Reception Mode [MEM] ..................................6 9
No Paper Reception .........................................................69
Canceling Messages Stored in Memory ............................70
Rejecting Unsolicited (Junk) Fax Messages (Closed
Network Option) ...............................................................70
Power Failures and Memory.................................................71
Using Voice Request.............................................................72
Initiating a Voice Request ..................................................72
Answering a Voice Request................................................72
Programming Your Speed Dial Directory ........... 73
One Tou ch Faxing ................................................................ 73
Programming One Touch Keys ..........................................73
Using the One Touch Keys for Dialing ..............................76
Using the One Touch Keys for Selecting Functions
and Programming..............................................................76
List of One Touch Keys ...................................................76
Chain Dialing ..................................................................... 78
Creating a Chain Dial Number ........................................78
Using a Chain Dial Number.............................................79
Auto Dial Faxing ...............................................................79
Programming Auto Dial Numbers....................................79
Copying ..................................................................... 81
Quantity and Resolution ...................................................... 81
Making Copies ..................................................................... 81
Using the Manual Paper Feeder ...........................................82
Sending a Fax to Multiple Locations
(Broadcasting)......................................................... 8 5
Performing a Broadcast Operation .......................................85
Sending A Fax to a Group...................................... 8 7
What is a Group? ..................................................................87
Programming Groups............................................................88
Search .................................................................................88
Add.....................................................................................88
Delete .................................................................................89
Sending to a Group ............................................................89
Relay Faxing ............................................................ 9 0
What is Relay Faxing? .........................................................90
Relay Initiating Station ........................................................ 91
Relay Key Station ................................................................9 1
Relay Broadcast Report .......................................................9 1
Initiating a Relay Broadcast ................................................9 2

6
KONICA FAX 9760
|
Advanced Operations ............................................. 9 4
Sending a Fax at a Later Date and Time ..............................94
Features and Limitations ...................................................9 4
Sending a Delayed Fax from the Document Feeder ..........95
Sending a Delayed Fax from Memory ...............................96
Canceling a Delayed Transmission ...................................9 8
Confidential Faxes (Security Feature) .................................98
Creating a Personal (Confidential) Mailbox .....................9 8
Changing Your Passwor d ...................................................99
Closing (Deleting) a Mailbox......................................... 101
Sending Confidential Faxes ........................................... 102
Receiving Confidential Faxes ........................................ 10 2
Printing Confidential Messages ..................................... 103
Personal Mailboxes (Security Feature) ............................. 103
Polling ............................................................................... 104
What is Standard Polling? .............................................. 104
What is Bulletin Polling? ............................................... 104
Sending Documents Requested by Another Fax
Machine (Polling Transmission) ................................... 104
To Cancel Polling ........................................................... 1 0 5
Dialing Another Fax Machine to Request Documents
(Polling Reception) ....................................................... 105
Fax on Demand (Bulletin Polling) ................................. 106
Opening a Personal Box for Polling ............................... 10 6
Loading a Document for Polling .................................... 10 7
Transmit Preparation ......................................................... 107
What is it? ....................................................................... 107
Setting the Forwarding Number
(Call Forwarding) ............................................................. 108
Working with Dual Access ................................... 1 09
What You Can Do While Sending a Fax ........................... 109
What You Can Do While Receiving a Fax........................ 109
What You Can Do While Making Copies ......................... 1 1 0
Reports .................................................................... 1 11
Understanding Reports ...................................................... 111
Activity Report .................................................................. 111
What is it? ....................................................................... 111
What information does it provide? ................................. 11 1
How to Print .................................................................... 112
How to Interpret .............................................................. 112
Broadcast Confirmation Report (MCF) ............................ 112
What is it? ....................................................................... 112
What information does it provide? ................................. 11 2
How to Print .................................................................... 113
How to Interpret .............................................................. 113
Broadcast Entry Report ..................................................... 11 3
What is it? ....................................................................... 113
What information does it provide? ................................. 11 3
How to Print .................................................................... 113
How to Interpret .............................................................. 113

|
User’s Manual 7
Confidential Reception Report ......................................... 1 14
What is it? ....................................................................... 114
What information does it provide? ................................. 1 14
How to Print .................................................................... 114
How to Interpret .............................................................. 114
Configuration Report ........................................................ 1 14
What is It? ....................................................................... 114
What Information Does it Provide? ................................ 115
How to Print .................................................................... 115
How to Interpret .............................................................. 115
User Function Settings List .......................................... 11 5
Message Confirmation Report (MCF) .............................. 116
What is it? ....................................................................... 116
What information does it provide? ................................. 1 16
How to Print .................................................................... 117
Automatic ..................................................................... 117
On Demand (Manual) ................................................... 118
How to Interpret .............................................................. 118
Phone Directory................................................................. 118
What is it? ....................................................................... 118
What information does it provide? ................................. 1 18
How to Print .................................................................... 118
How to Interpret .............................................................. 118
Power Outage Report......................................................... 119
What is it? ....................................................................... 119
What information does it provide? ................................. 11 9
How to Print .................................................................... 119
How to Interpret .............................................................. 119
Printing Reports ................................................................ 12 0
Using 6/Repo rt Print One Touch key.............................. 12 1
Codes Used in Reports ...................................................... 1 21
Communication Codes ................................................... 1 21
Result Codes ................................................................... 1 22
Service Codes.................................................................. 122
Problem Solving ..................................................... 1 23
Clearing a Document Jam ................................................. 123
Clearing a Paper Jam ......................................................... 124
Printing a Cleaning Page ................................................... 12 7
Replacing the Toner Cartridge.......................................... 1 28
For Your Safety: Handling the Toner Cartrid ge .............. 131
Wor king with the Image Drum Cart ridge.......................... 131
For Your Safety: Handling the Image Drum.................... 132
The CHANGE DRUM SOON Message ........................... 132
When to Replace the Image Drum Cartridge .................. 133
Replacing the Image Drum Cartridge ............................. 13 3
Resetting the Drum Counter ........................................... 1 36

8
KONICA FAX 9760
|
Display Panel Messages .................................................... 13 7
Normal Display ............................................................... 137
Error Messages ................................................................ 137
Reading the Print Counters ............................................... 1 3 9
Problem Checklist ............................................................. 14 0
The display is blank. .................................................... 140
Nothing happens when you press the control
panel keys.................................................................... 140
The display tells you to replace the paper
currently loaded ............................................................ 14 1
Documents jam in the scanner. ..................................... 141
Your fax machine won’t dial. ....................................... 141
The display shows a communication error. .................. 142
You send a fax but the image received by the remote fax
machine is very poor.................................................... 14 2
You send a fax but it is received completely blank. .... 142
You continue receiving unwanted reports........................143
The image received on your fax machine is
very poor. ..................................................................... 143
You tried dialing with a One Touch key or an
Auto Dial code but nothing happened........................ 143
Your fax machine does not answer the phone
or receive faxes. ........................................................... 144
Your received documents are light or have vertical
streaks on them and you are not out of toner. ............. 144
You set your fax machine f or delayed transmission
but it did not send. ...................................................... 1 4 4
Your fax machine disconnected before you could
answer a voice request. ................................................ 144
Your fax machine will not poll a remote fax machine. 145
Someone tried to send you a confidential fax
but nothing happened. ................................................ 1 45
Your fax machine is connected to a PBX and
you cannot dial out. .................................................... 14 5
You want to answer an external telephone but your
fax machine always answers first................................. 145
Your received faxes sometimes look distorted. ............ 14 5
You are constantly receiving unsolicited
advertising on your fax machine................................. 145
Your fax machine does not immediately switch to
TEL mode when you make or receive a voice call. .... 146
You are experiencing problems communicating with
a remote location in a very noisy telephone area. ...... 146
Firmware ............................................................................ 14 7
Identifying Your Current Firmwar e Version .................... 147
Upgrading Your Firmware............................................... 147
Serial Number of Your Fax Machine ................................. 147
Security ...................................................................148
Confidential Faxes ............................................................ 1 48
Rejecting Unsolicited (Junk) Fax Messages ..................... 14 8
Closed Network Option .................................................. 148

|
User’s Manual 9
Safety....................................................................... 150
Installation Hints ............................................................... 1 50
Operation and Maintenance .............................................. 151
Handling Consumables ..................................................... 1 51
Toner Cartridge ............................................................... 151
Image Drum Cartridge..................................................... 152
Emergency First Aid .......................................................... 152
Service and Support .............................................. 15 3
Your Dealer........................................................................ 153
Konica Business Technologies, Inc. on the Internet ......... 1 5 3
Contacting Konica Business Technologies, Inc Customer
Support ............................................................................. 1 5 3
Purchasing Supplies and Options ..................................... 154
Supplies ........................................................................... 1 5 4
Options ............................................................................ 15 4
User Function Settings .......................................... 15 5
User Function Settings List ............................................... 155
Changing Your User Function Settings............................. 1 6 0
Dial Parameter Settings ........................................ 1 61
Dial Parameter Settings ..................................................... 161
Dial Parameter Settings List............................................ 161
Changing Your Dial Parameter Settings............................ 163
Service Function Settings ..................................... 1 64
Service Function Settings List .......................................... 16 4
Glossary.................................................................. 165
Index........................................................................ 1 75

Overview
10
KONICA FAX 9760
|
Introduction
• A fax forwarding feature that lets your fax machine receive
messages into memory and automatically forward the
messages to another remote fax machine
• Year 2000 compliant: all years are recorded in four digits.
• Advanced memory management: memory is freed up as
pages are sent for more efficient transmission of long
documents
• A search feature to allow you to look for pre-programmed
telephone numbers by name
• Personal boxes for confidential reception/transmission
and bulletin polling
• Automatic redial and page re-transmission when a
telephone number is busy or when problems occur in
communication
• Advanced transmission and reception features, including
delayed transmission, transmission to multiple locations,
relay broadcast initiate, and polling
Thank you for purchasing this KONICA FAX 9760 . This
machine uses advanced LED technology to transfer faxed
and copied images to plain paper, quickly and sharply. The
seperately purchased Multifunction Printer option referred to
as the MFP option or PC Interface allows the machine to
function both as a scanner and as a 600 dpi printer on your PC.
Features
• 30 One Touch keys
• 99 Auto Dial numbers.
• 20 groups
• 16 mailboxes for confidential reception
• Fax communication at up to 14,400 bits per second (bps),
or up to 33,600 bps with the optional modem upgrade
• 2.5 MB of built-in memory

|
User’s Manual 11
• Advanced memory transmission and reception features,
including automatic reception into memory.
• Reports to help you keep track of your fax machine’s
operations and settings
• High-speed scanning of original documents while dialing,
so your fax is ready to send as soon as connections are
made
• Photo (halftone) transmission in up to 64 shades of gray.
• An advanced dual access feature, which allows you to
load and prepare multiple documents for transmission
while your fax machine is sending or receiving another
message
• A manual paper tray to let you load a different type of
paper while making copies.
• A closed network feature to limit your fax transmissions
and receptions to parties of your choice
• A convenient copy fe ature for making up to 99 sorted
copies of an original document
Product Options
• Non-battery backup memory expansion cards add to
existing storage capacity.
- 2 MB card adds capacity to store up to 160 pages.
- 4 MB card provides total capacity to store up to 320
pages.
• Second Paper Tray adds an additional capacity of 500
sheets. When the main tray runs out, your fax machine
automatically switches to the second tray for
uninterrupted printing. .
• 33.6K BPS Modem Upgrade increases the transmission
speed of the fax machine.
• Multifunction Printer (MFP Option) allows the fax
machine to be used as a scanner and backup printer.

12
KONICA FAX 9760
|

|
User's Manual 13
Installation
• The TEL port on the back of the unit is only suitable for
two-wire devices. Not all standard telephones will respond
to incoming ringing when connected to an extension
socket.
• This equipment may not necessarily provide for the
effective hand-over of a call from a telephone connected
to the same line.
Getting Started
To install your new fax machine, follow the instructions from
the “Unpacking” to the “Programming Required
Information” sections of this user's manual. You must
complete these steps for your fax machine to operate
properly.
If you have purchased an option package for your fax
machine, refer to the documentation you received with that
option for installation instructions.
For Your Safety: Installation Hints
• Install your fax machine in a dust-free location away from
direct sunlight.
• Do not plug your fax machine into a power source shared
by equipment that produces electrical noise (i.e., air
conditioners, etc.).
• Leave electronic adjustments to authorized service
personnel.
• The LINE terminal connects your fax machine to a
standard telephone line. To avoid dama ge to your
telephone system or to the fax machine, do not plug your
fax machine into anything other than a standard RJ-11C
jack.
• Your fax machine is intended to be grounded electrically
and is equipped with a three-wire grounded power cord.
For your safety , do not attempt to defeat your power cord’s
grounding plug.
• The power outlet should be located near the equipment
and should be easily accessible.
14
KONICA FAX 9760
|
Unpacking
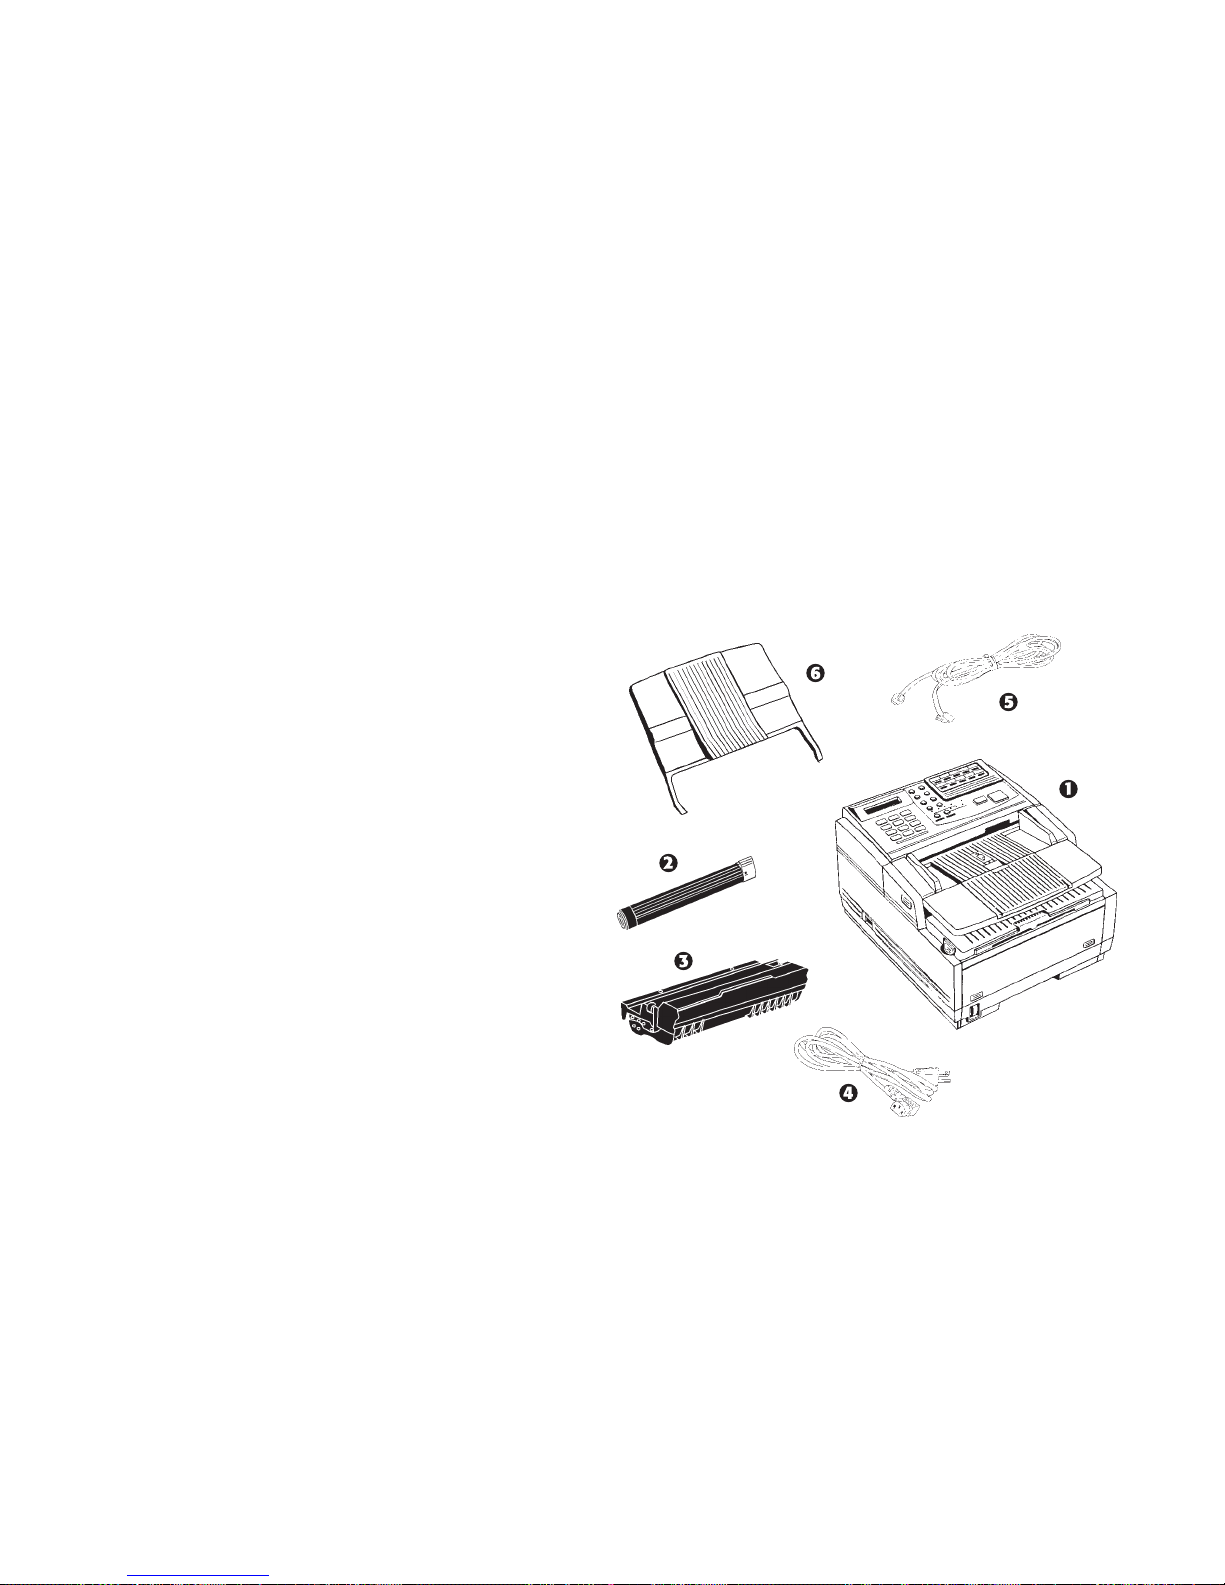
What You Should Receive
Before you begin, be sure that all the items listed below are
included in your package.
Where to Install Your Fax Machine
• Place your fax machine in a dust-free location away from
direct sunlight.
• Allow several inches of space on each side of the machine
to ensure adequate ventilation.
• Make sure that both power and telephone outlets are
available nearby.
• Choose a location where the relative humidity is between
20% and 80%, and where the temperature is between 50°F
(10°C) and 92°F (32°C).
|
User’s Manual 15
1 KONICA FAX 9760
2 Toner cart ridge ( wrapped)
3 Image drum cartridge (inside machine)
4 Power cord
5 Telephone line cord
6 Document stacker tray
7 Documentation (Not shown):
Quick Reference
User's manual
Warranty, Regulatory Information, and Specifications
Refer to the illustrations in the “Getting to Know Your Fax
Machine” section of this user's manual to identify the
components.
!
If any items are missing, contact your dealer
immediately. Keep your packing materials and carton
in case you ever need to ship or transport the unit.
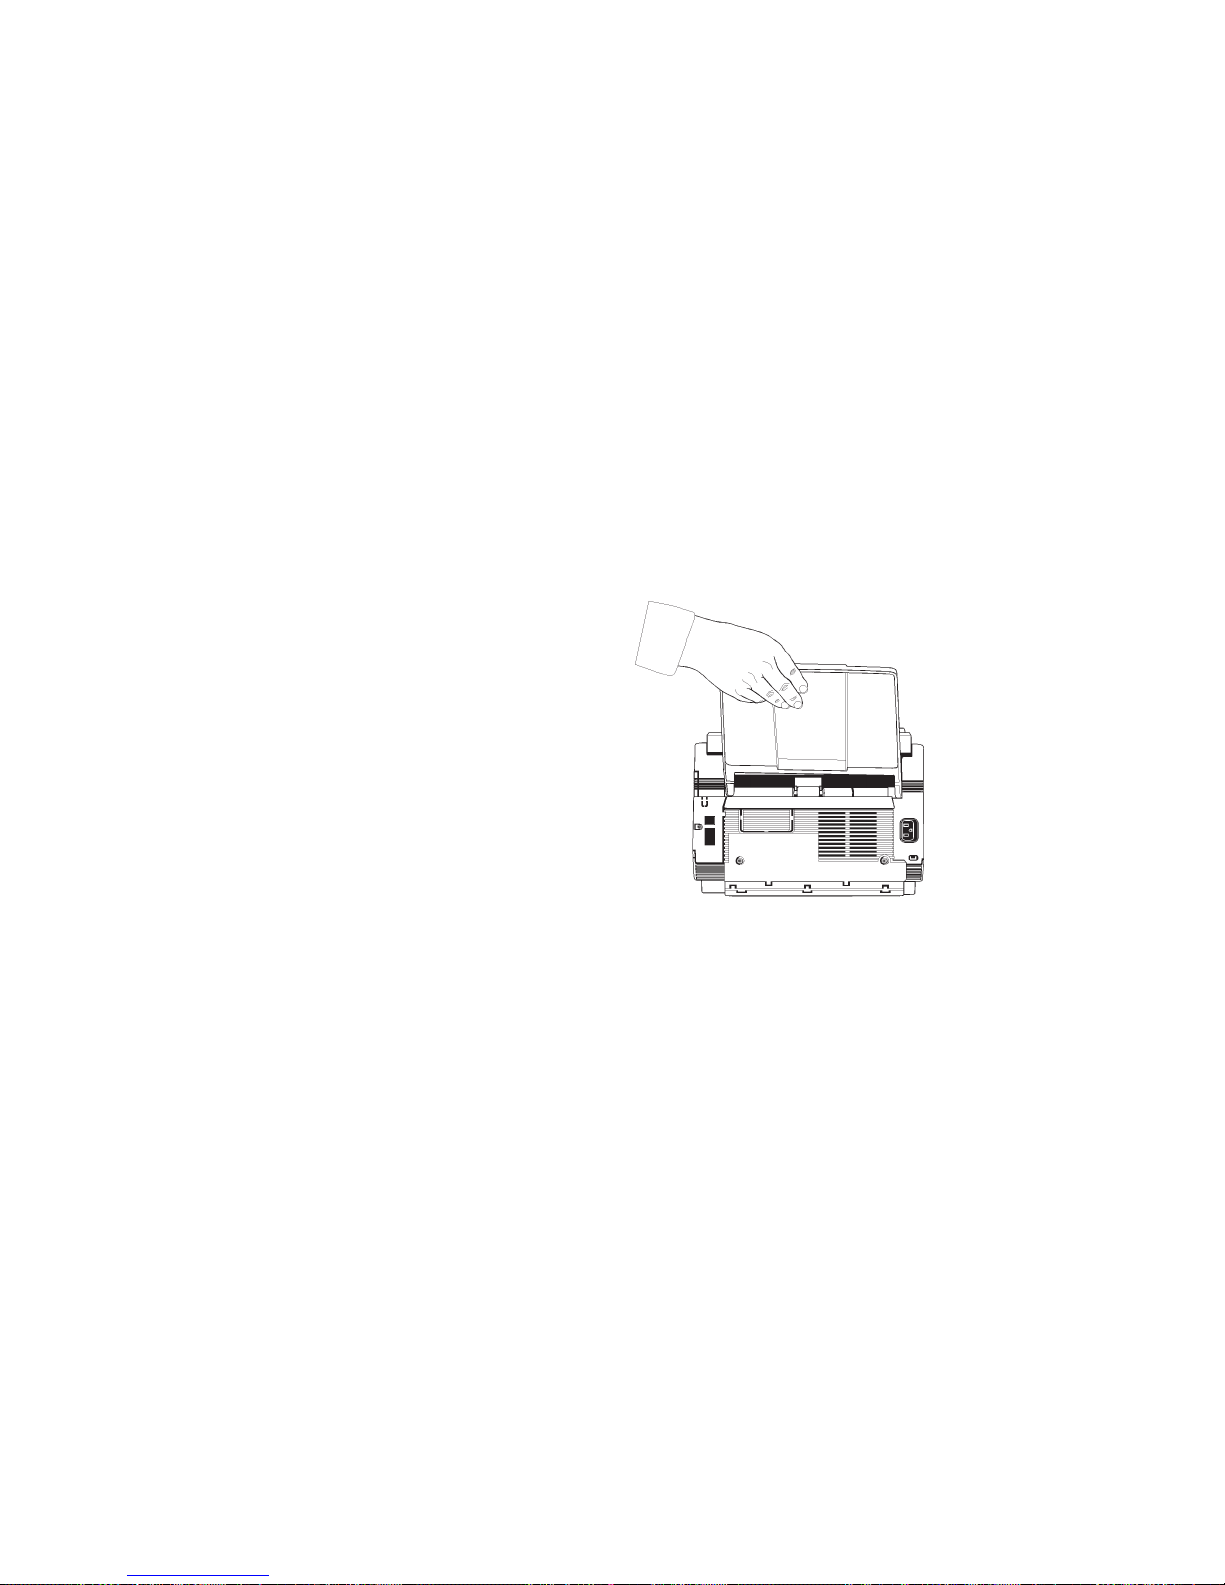
Attaching the Document Stacker
Slip the document stacker indents over the tabs on the rear of
the unit so that they click into place.
16
KONICA FAX 9760
|
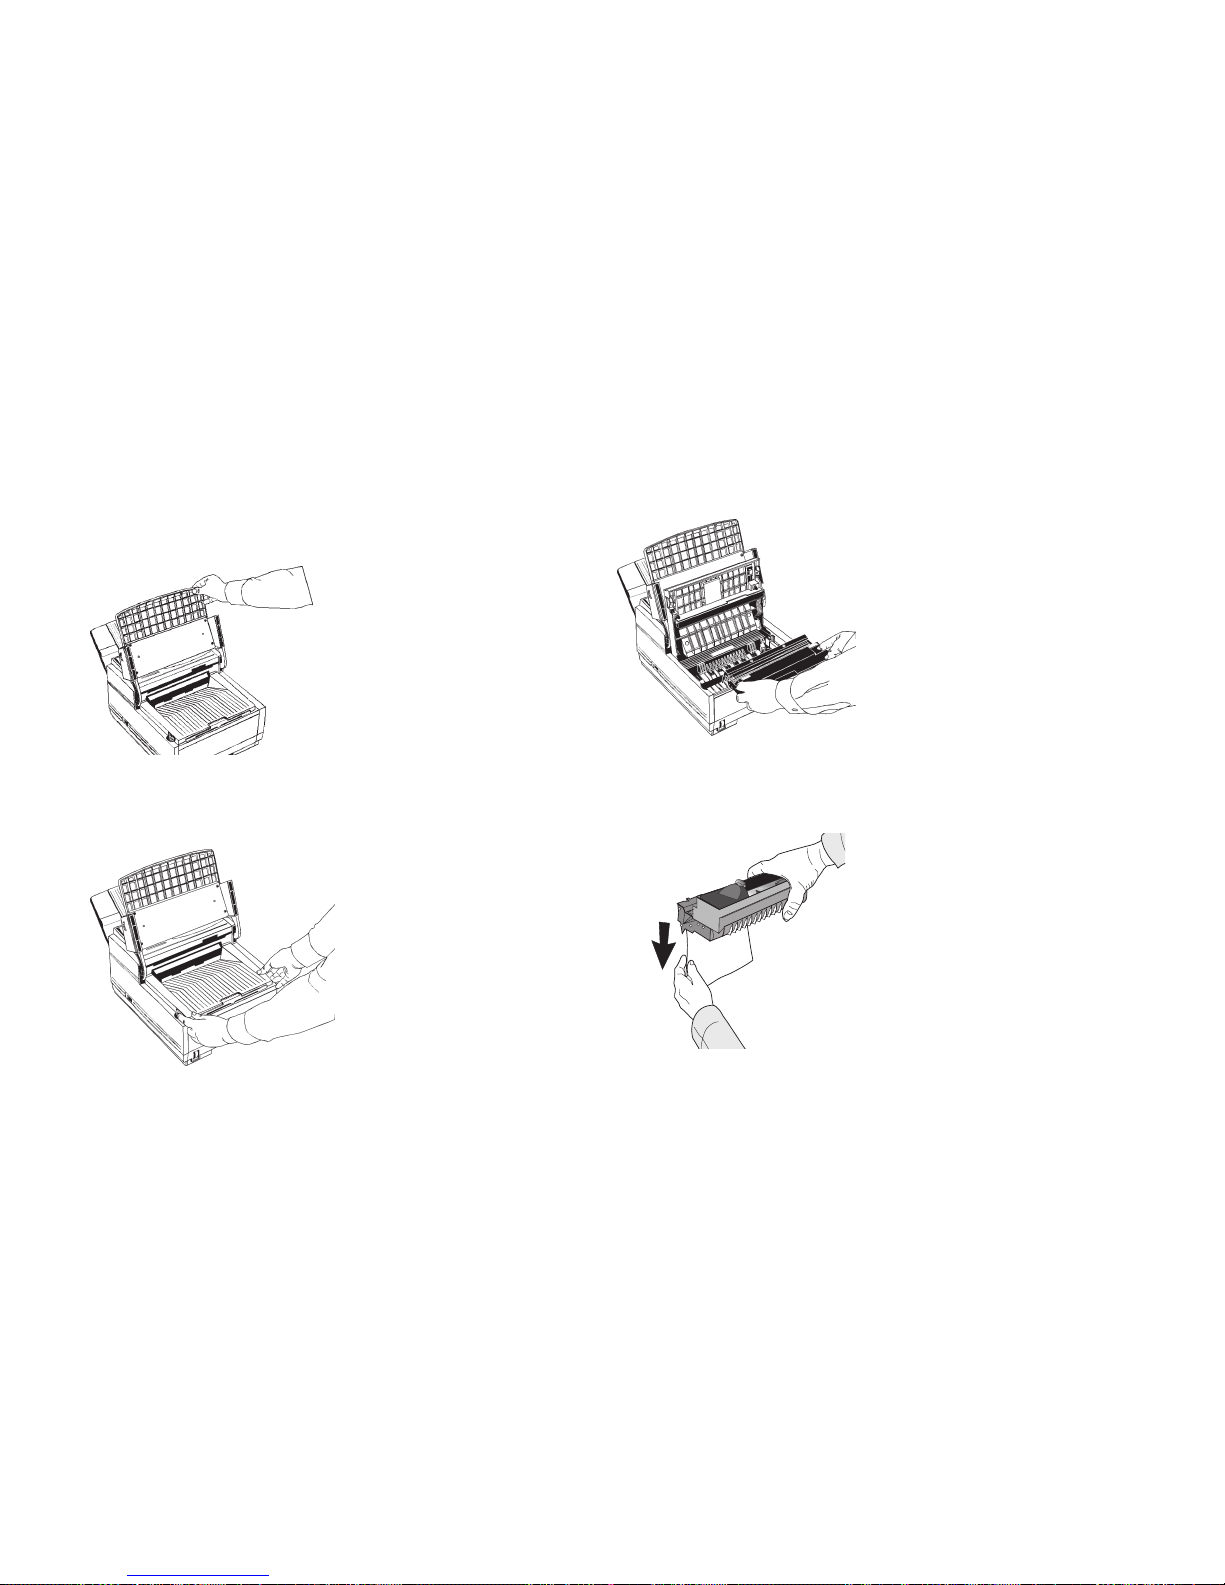
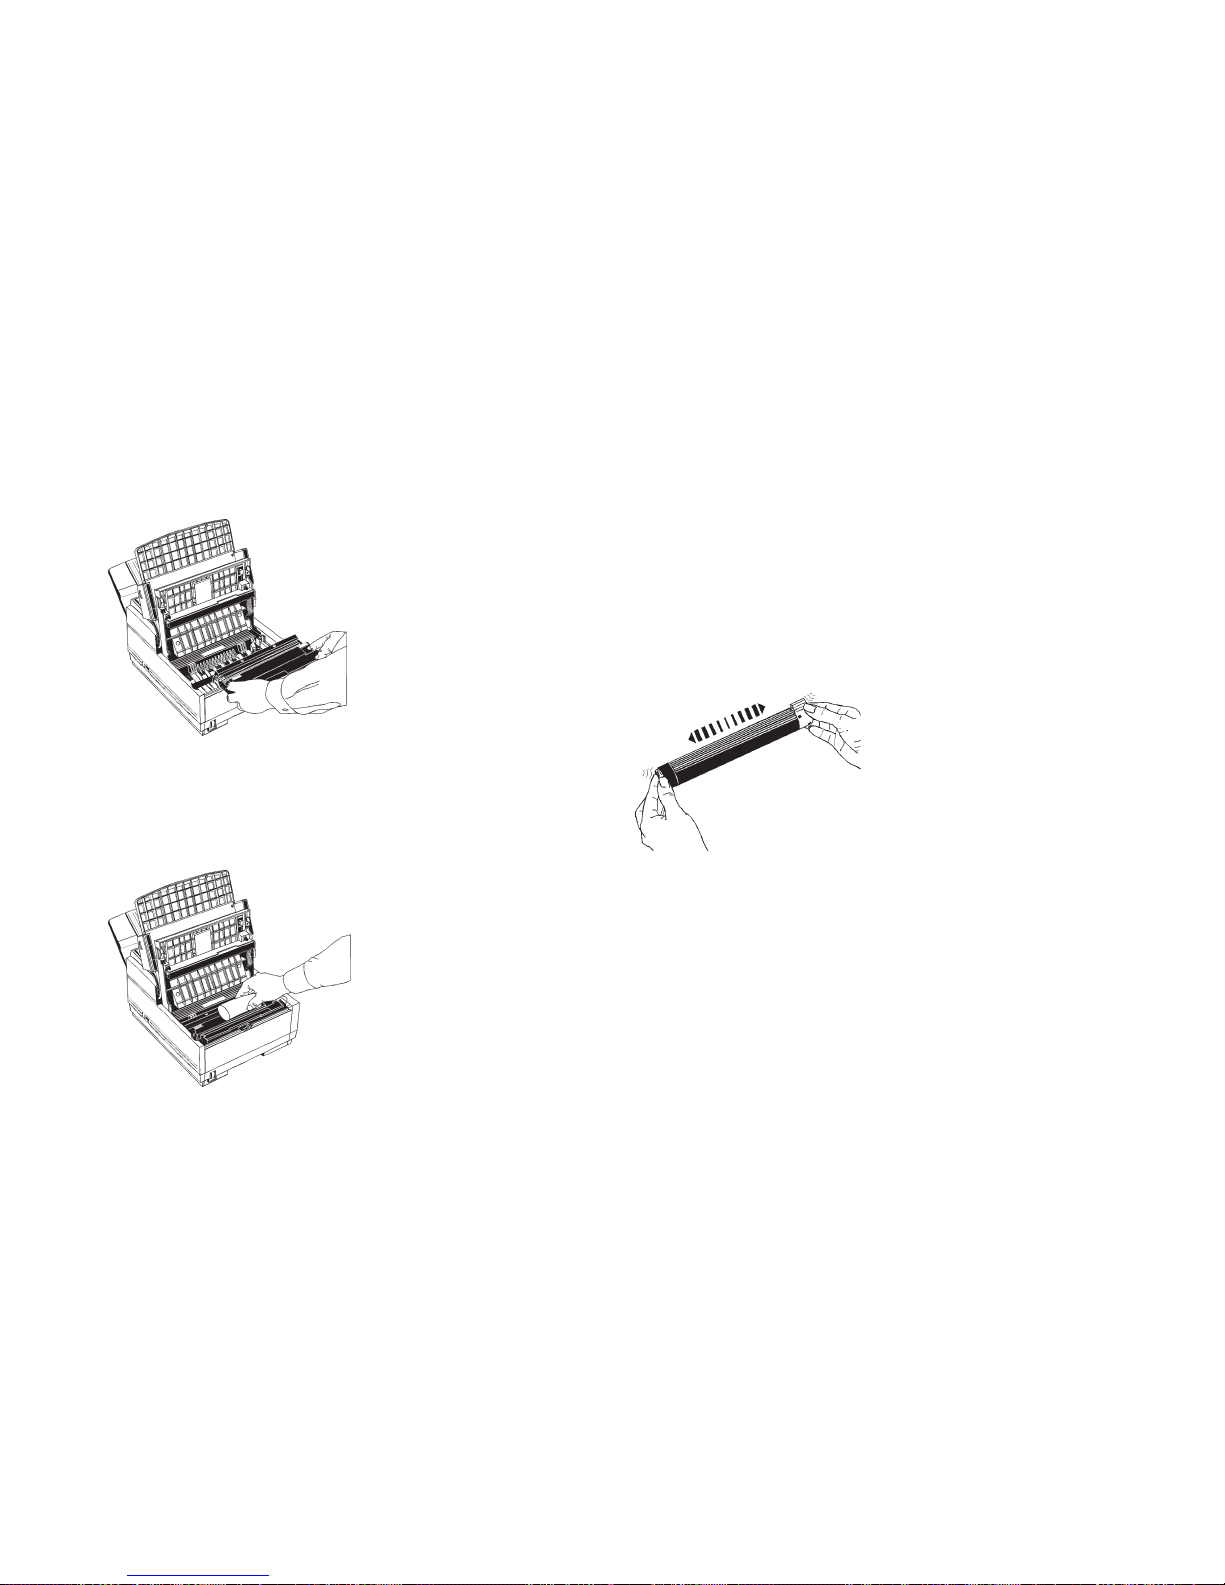
Removing the Protective Sheet
1 Lift up the document table.
2 Press in the cover release buttons on the side of the copy
stacker until it clicks open. Lift up the stacker.
3 Take out the image drum cartridge.
4 Remove the protective sheet. Be careful not to touch the
green surface of the drum.
|
User’s Manual 17
5 Replace the image drum cartridge.
Installing the Toner Car tridge
1 Remove the sponge and discard.
!
Warning: Be careful when handling the toner cartridge.
Do not let toner spill on your clothing or other porous
materials. If you experience any problems with toner,
refer to the “Safety, Handling the Consumables, Toner
Cartridge” section of this user's manual.
2 Unwrap the toner cartridge and gently shake it to
distribute the toner. Then carefully peel the tape from the
bottom of the toner cartridge.
18
KONICA FAX 9760
|
3 With the ridged side facing up and the blue lever on your
right, insert the toner cartridge into the image drum unit,
left end first.
4 Push the lever forward to secure the cartridge.
5 Close the copy stacker—push down until you hear both
sides click into place.
6 Close the document table.

|
User’s Manual 19
Toner Cartridge and Image Drum Unit
Handling
• Leave unused toner cartridges and image drum units in
their packages until needed.
• When replacing a toner cartridge or image drum unit, reuse the packaging to dispose of the old toner cartridge or
image drum unit.
• Do not expose these components to light for more than
five minutes.
• Never expose the green drum (inside the image drum unit)
to direct sunlight.
• Always hold the image drum unit by the ends, never by
the middle.
• Never touch the surface of the green drum inside the
image drum unit.
• Be careful when removing the toner cartridge. Do not let it
touch your clothing or porous materials. The toner powder
causes permanent stains.
• Small amounts of toner spilled on skin or clothing can be
readily removed with soap and cold water. Using heated
water will make removing the stain much more difficult.
Toner First Aid Measures
Emergency First Aid
EYE: Flush eyes with plenty or water. If symptoms
occur, get medical attention
• SKIN: W ash with water and mild soap
• INGESTION: W ash out mouth with water. Drink one or
two glasses of water. If symptoms occur , get medical
attention.
• INHALATION: Remo ve victim to fresh air . If
symptoms occur, get medical attention.
20
KONICA FAX 9760
|
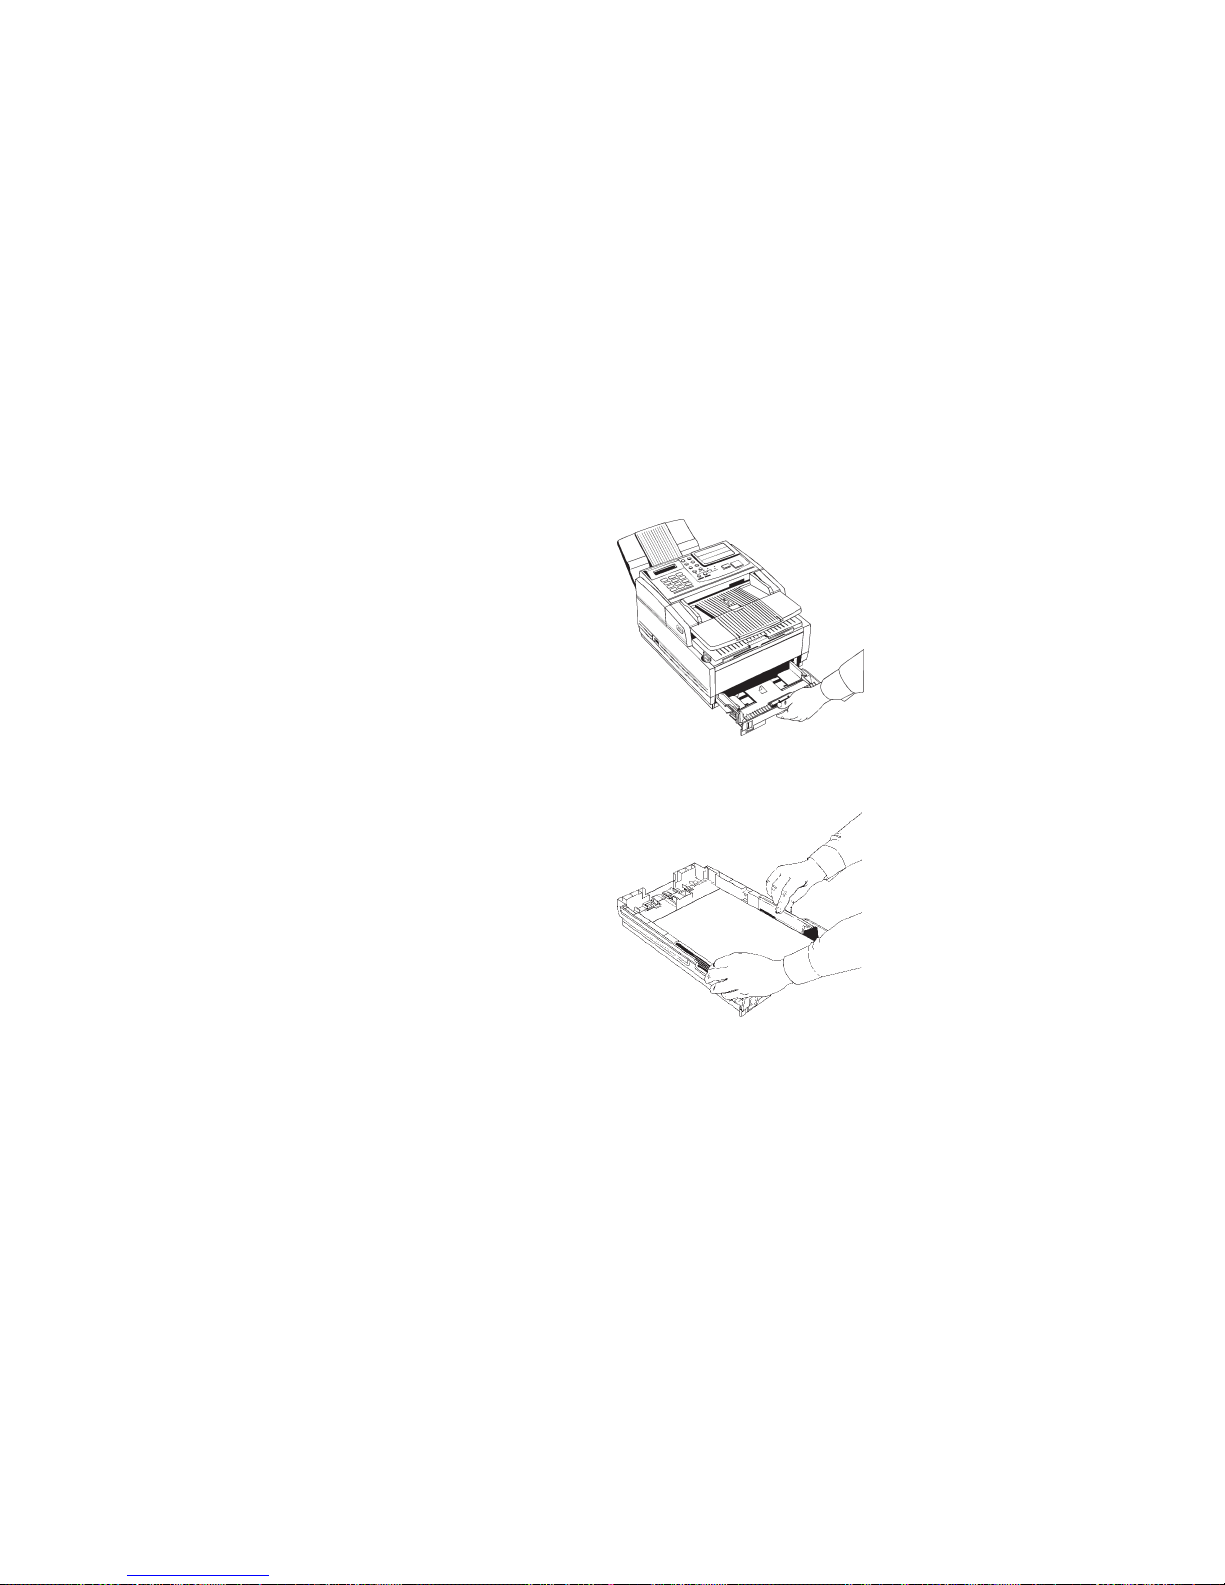
Loading Paper
Your fax machine can hold up to 250 sheets of
standardweight (20 lb .) paper. For best results, use paper
specially made for laser printers or photocopiers in letter,
legal, or A4 size.
If necessary, your fax machine automatically reduces the
vertical demension of received images down to 75% of the
original length to accommodate the currently loaded paper.
For example, if you are receiving a document created
originally on legal-size paper, your fax machine can reduce
the received pages to fit on letter or A4 paper.
!
Your fax machine is set at the factory to use letter-size
paper. To use a different paper size, change the setting
of User Function 13, 1’ST P APER SIZE to match your
new paper size. Refer to the “Setting Basic Features,
User Function Settings” section of this user's manual.
1 Pull the paper tray out of the machine.
2 Adjust the paper guides to the width of your paper.
|
User’s Manual 21
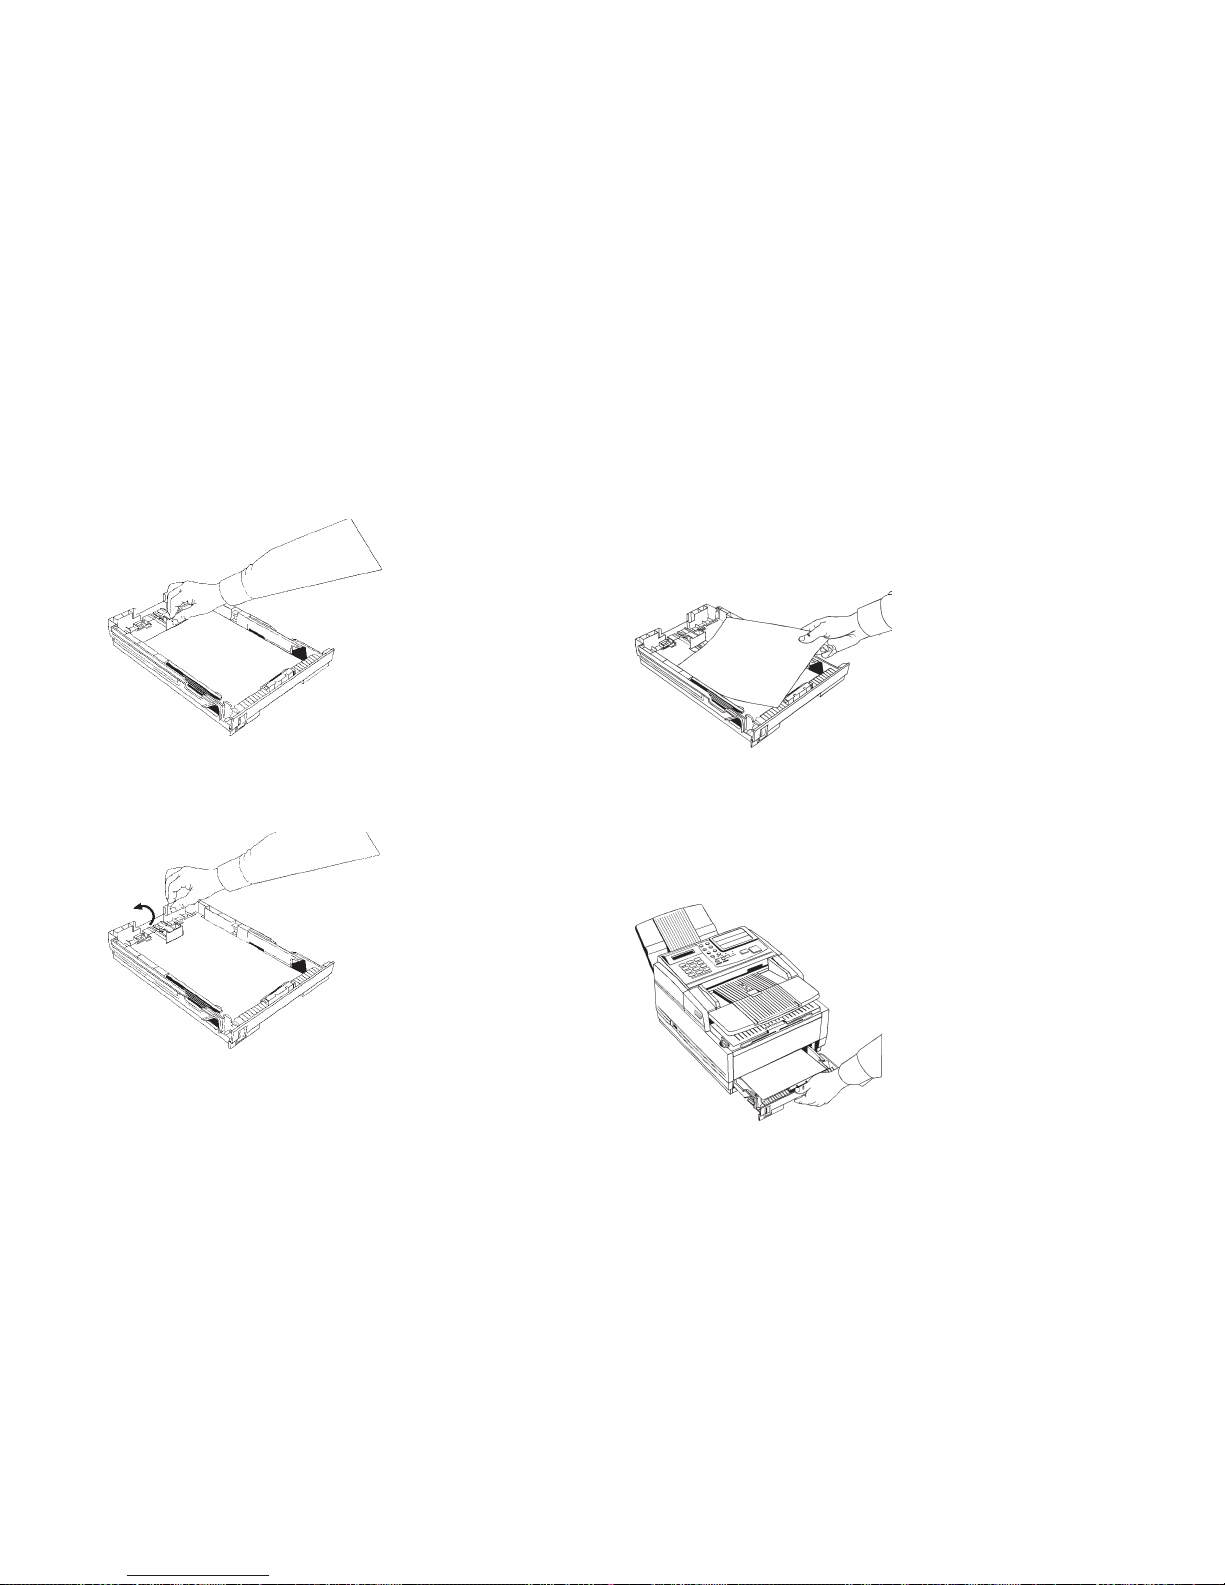
3 If necessary, lift and adjust for the length of your paper.
4 If you are using legal-size paper, pull out the extension at
the back of the paper tray.
5 Remove the paper from its wrapper (up to 250 sheets).
Note the “print side” notice printed on the label. Fan the
paper.
6 Load the paper into the paper tray, print side DOWN.
!
Be sure the paper is under the tabs on the sides of the
tray. Do not f ill past the Paper Full mark. If necessary
readjust the guides for a snug–but not tight–fit.
7 Replace the paper tray. Push it forward until it locks.

22
KONICA FAX 9760
|
Connecting the Telephone Line
Insert one end of the telephone cord into the LINE jack in the
back of the machine, and the other end into your wall
telephone jack.
!
Now, you can connect either an external telephone or
the external handset option for your fax machine. Refer
to the “Connecting an External Telephone or Answer
Machine” section of this user's manual.
Connecting an External Telephone or
Answering Machine
!
Any external telephone or answering machine
connected to the fax machine must be FCC and CSA
approved.
• Insert one end of the telephone cord into the TEL 1 or
TEL 2 jack on the back of the fax machine, and the other
end into the jack in your external device.
• To connect both an answering machine and a telephone,
first connect your answering machine to your fax machine,
then plug your external telephone’s cord into the
telephone jack on your answering machine.
|
User’s Manual 23
!
You must have the TAD mode feature turned on for an
answering machine to work with your fax machine.
Refer to the “Answering Mode, Setting the Answering
Mode” section of this user's manual.
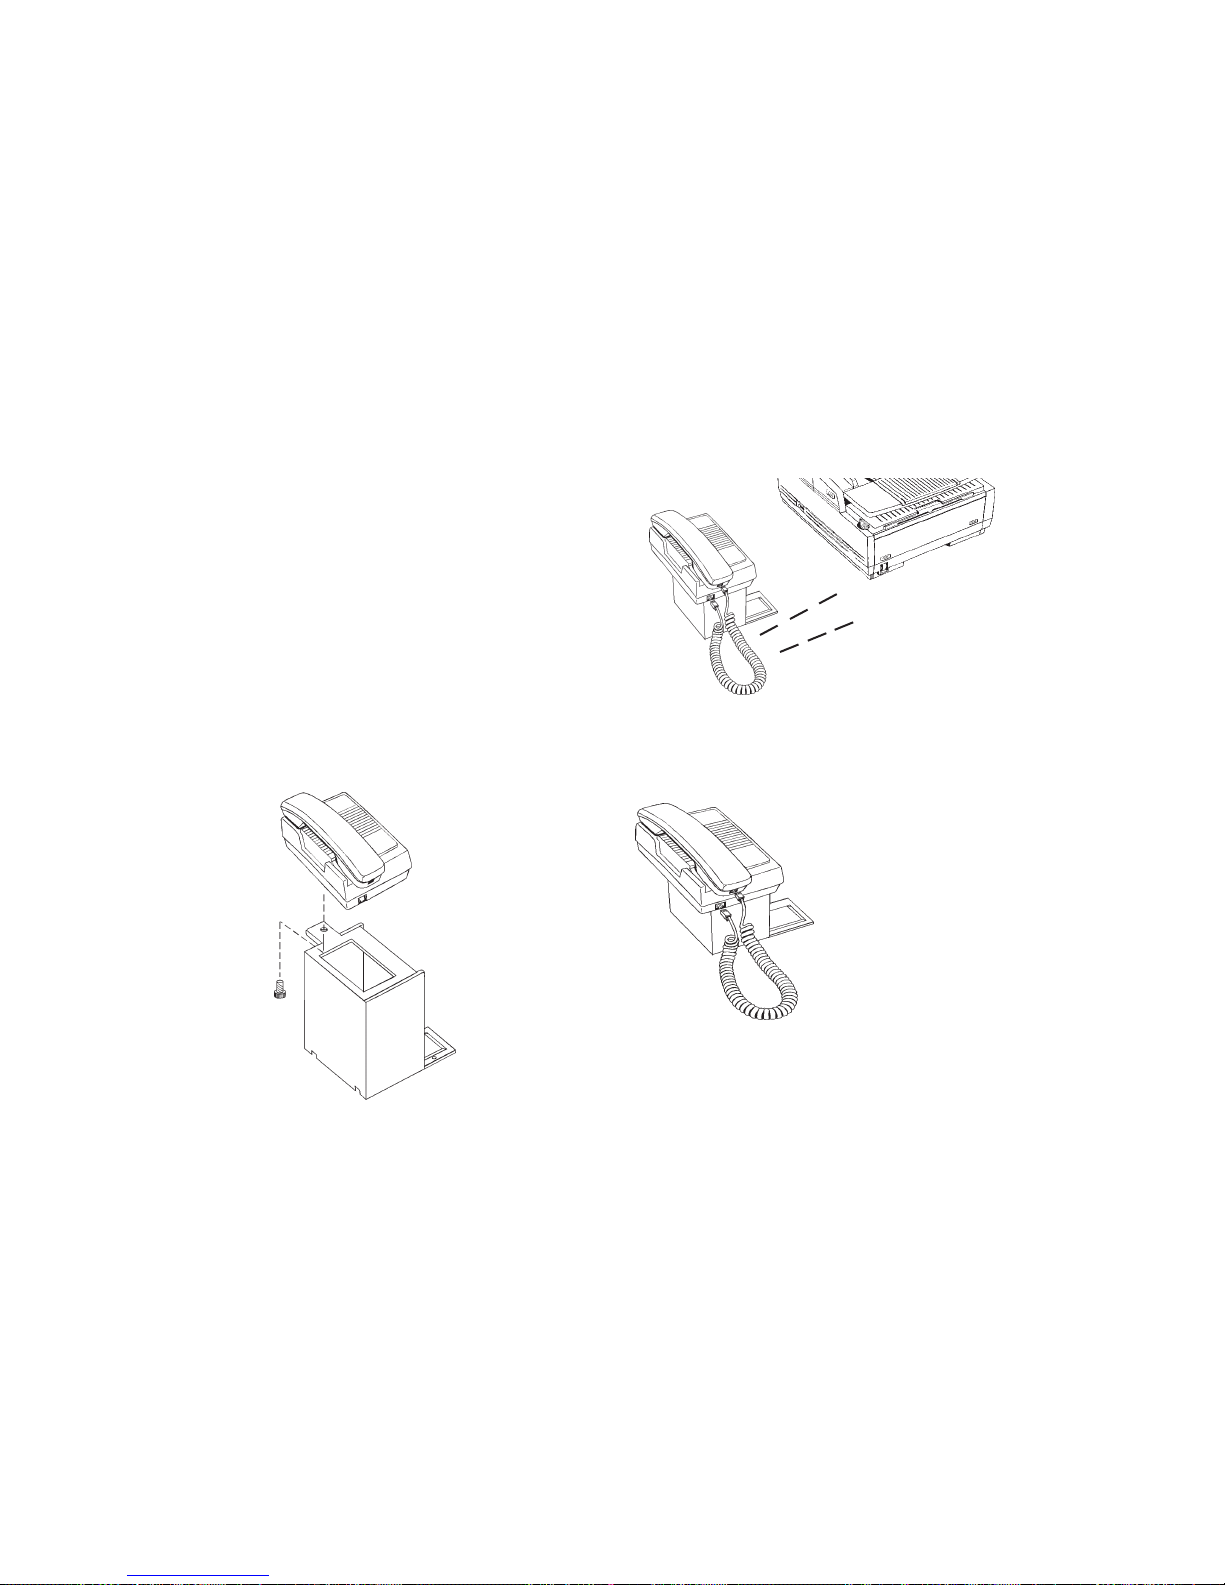
Connecting The External Handset (Option)
If you purchased the external handset option with your fax
machine, follow these instructions to install it.
1 Using the supplied screw, connect the handset cradle to its
base.
2 Position the handset cradle on the left side of the fax
machine.
3 Plug one end of the handset cord into the handset and the
other end into the jack on the front of the cradle. Place the
handset in the cradle.
4 Insert the supplied telephone cord into the jack located on
the back of the cradle.
24
KONICA FAX 9760
|
5 Feed the telephone cord from the back of the cradle
through the cable run (1) located on the back of the fax
machine.
6 Insert the end of the cord into the TEL 1 or TEL 2 jack on
the back of the fax machine.
!
The two TEL jacks are provided to allow you to connect
both an external handset and an answering machine.
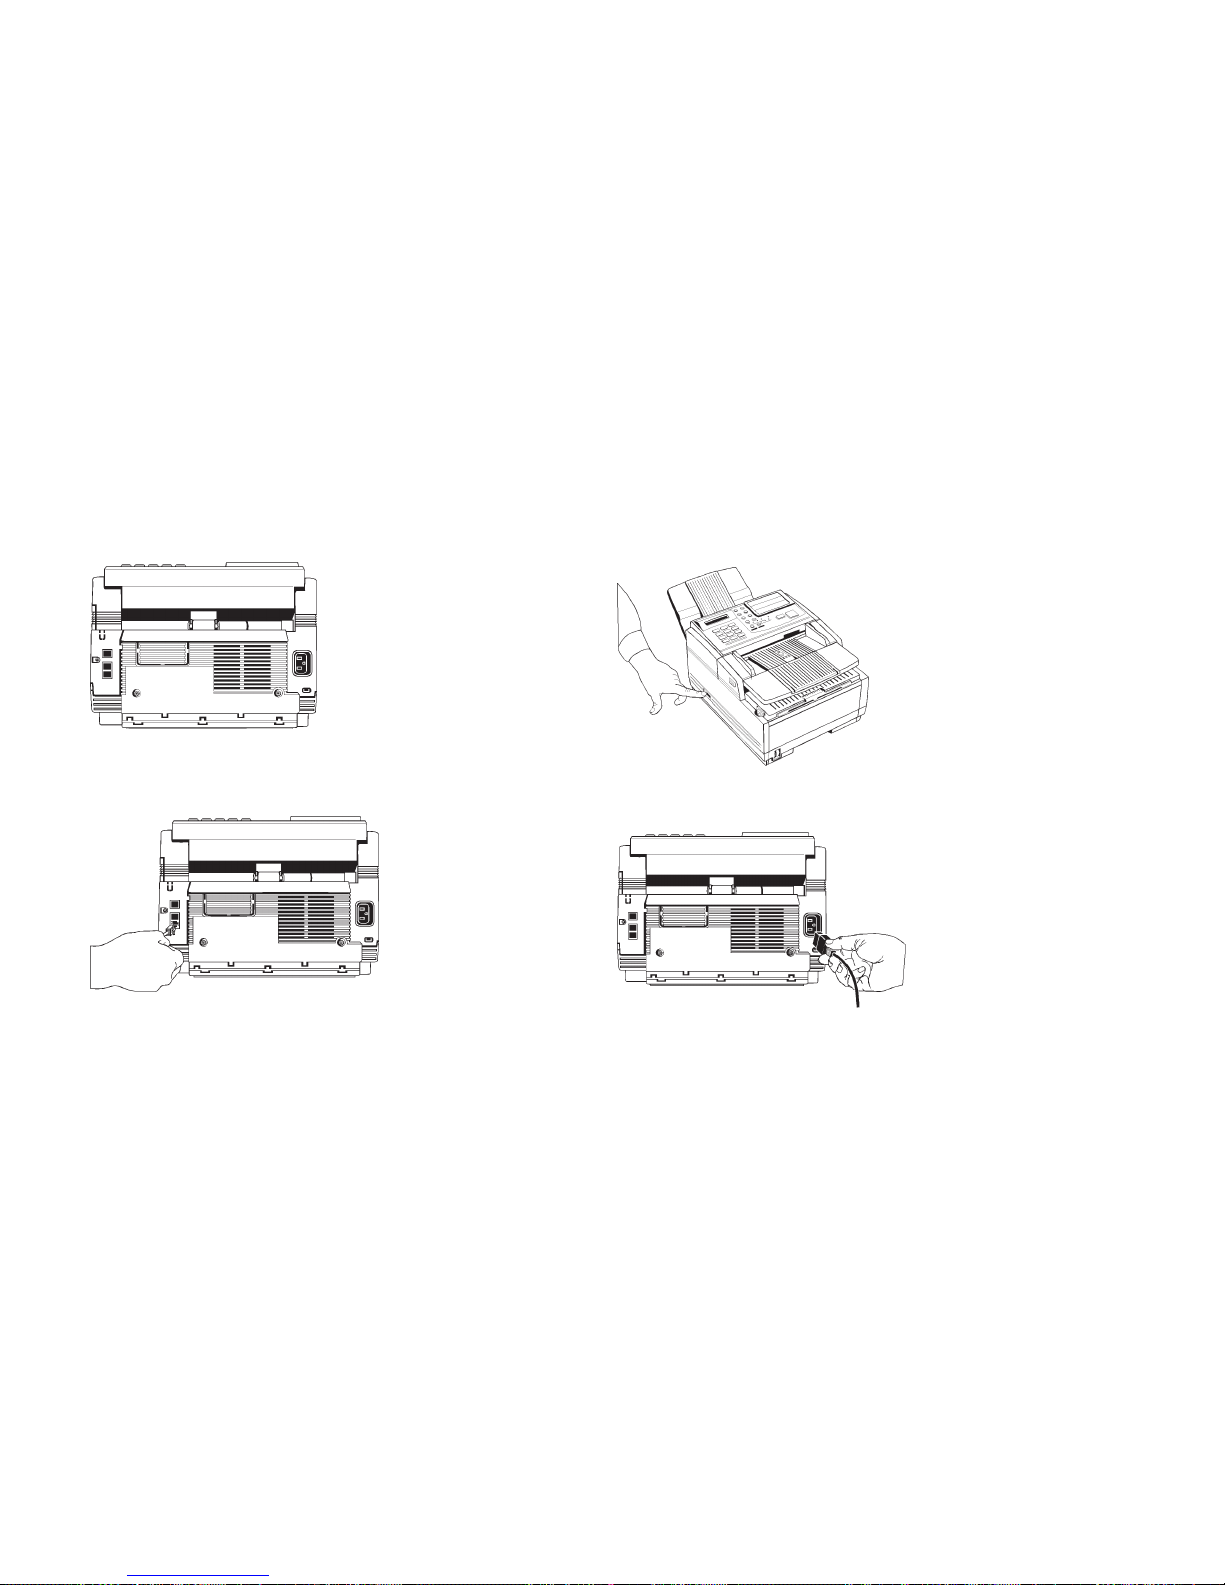
Connecting Power
1 Make sure the power switch is off.
2 Plug the power cord into the back of the unit.
3 Plug the other end into a gr ounded AC power outlet.
4 Turn on your fax machine. After the unit warms up, the time
and current answering mode appear on the display. Your fax
machine is now in standby mode, ready to send or receive faxes.

|
User’s Manual 25
Programming Required Information
FCC Telephone Consumer Protection Act
The Federal Communications Commission Telephone
Consumer Protection Act of 1991 makes it unlawful for any
person to use a computer or other electronic device to send
any message via a telephone fax machine unless such
message clearly contains in a margin at the top or bottom of
each transmitted page or on the first page of the transmission,
the date and time it is sent and an identification of the
business or other entity, or other individual sending the
message, and the telephone number of the sending machine
or such business, other entity, or individual.
To comply with this law, you must enter the following
information in your fax unit.
• Date and Time
• Fax Identification (Name and Telephone Number)
which identifies the source of your fax transmission
Refer to the following sections for instructions on how to
program this information.
Date and Time
Fax machines must accurately identify the date, time, sender
and the telephone number of the sending fax machine on
each page of every fax they send. You are required by law to
program this information into your fax machine.
1 Press the Select Function ke y.
2 Press the 9/User Program One Touch key located on the
One Touch keypad.
3 On the numeric keypad, press 3. The display shows
3:CLOCK AD JUSTMENT .
4 Press the Yes § key. The display shows the currently set
date and time.
5 Using the numeric keypad, enter the new date (month/day/
year) and time in 24-hour format. Examples: 8:00 AM is
08:00; 8:00 PM is 20:00.
6 Press the Yes § key to confirm your entry.
7 Press the Select Function key to finish.

26
KONICA FAX 9760
|
Fax Identification
Fax machines must accurately identify the date, time, sender
and the telephone number of the sending fax machine on each
page of every fax they send. You are required by law to program
this information into your fax machine.
Sender ID:
This is a descriptive title that identifies the sender—usually the
location of your fax machine or the name of your company or
off ice and the fax machine’s number. It is printed at the top of
every fax you send. You can enter up to 32 characters. The first
16 characters of your Sender ID will also be used as your
Personal ID. This Personal ID appears on the displays or reports
of other Konica fax machines with which you communicate.
TSI/CSI:
This is the telephone number of your fax machine; it appears on
the displays of other non-Konica fax machines with whic you
communicate.
Call Back Number:
This is a telephone number (not a fax number) which the
operator of the remote machine can use to reach you. If you use
the voice request function (Refer to the “Basic Faxing
Operations, Using Voice Request” section of this user's manual)
while communicating with another fax machine and no one is
there to answer, your fax machine automatically sends a cover
letter with a call back message. The message is printed on a
separate sheet with the message “Please call back” and a
telephone number where you can be reached—the number
entered here.
T o Program Your Fax ID:
1 Press the Select Function ke y.
2 Press the 9/User Program One Touch key. The display
shows
1:FUNC. PROGRAMMING.
3 On the numeric keypad, press 4. The display shows
4:SYSTEM DATA PRG.
4 Press the Yes § key. The display shows
NO=<TSI/CSI>, ID=<SENDER ID>.
5 After the display clears, enter the full telephone number of
your fax machine using the numeric keypad.

|
User’s Manual 27
!
Use the Hyphen key to enter a “+” character for
international numbers, and use the Space One T ouch
key to enter spaces.
6 Press the Start key to save your entry.
7 Enter your Sender ID. This is a descriptive title up to 32
characters long. Refer to the instructions below.
• To enter numbers, use the numeric keypad (press once)
• To enter spaces, use the 14/Space One Touch key
• To enter hyphens, use the Hyphen key
• To enter alphabet characters, locate the character you
want on the numeric keypad.
• Press that key repeatedly until the character appears on
the display.
• To enter a unique character, press the 0/Unique key
repeatedly until the character you want appears on the
display. The following characters are available: ! # & ‘ (
) * + , - . / : ; = ? · ä ß ñ ö ü Æ Å Ø æ å ø
• To enter two successive letters/numbers using the same
key, press the No © key to move to the next character.
• To move the cursor to make corrections, press the
Yes § and No © keys.
8 Press the Start key to save your entry. The display shows
NO=<CALL BACK NO.>.
9 After the display clears, use the numeric keypad to enter
the telephone number for call back messages.
Enter up to 20 characters.
!
Use the 14/Space One Touch key to enter spaces.
10 Press the Start key to save your entry.
11 Press the Select Function key to finish.

28
KONICA FAX 9760
|
|
User's Manual 29
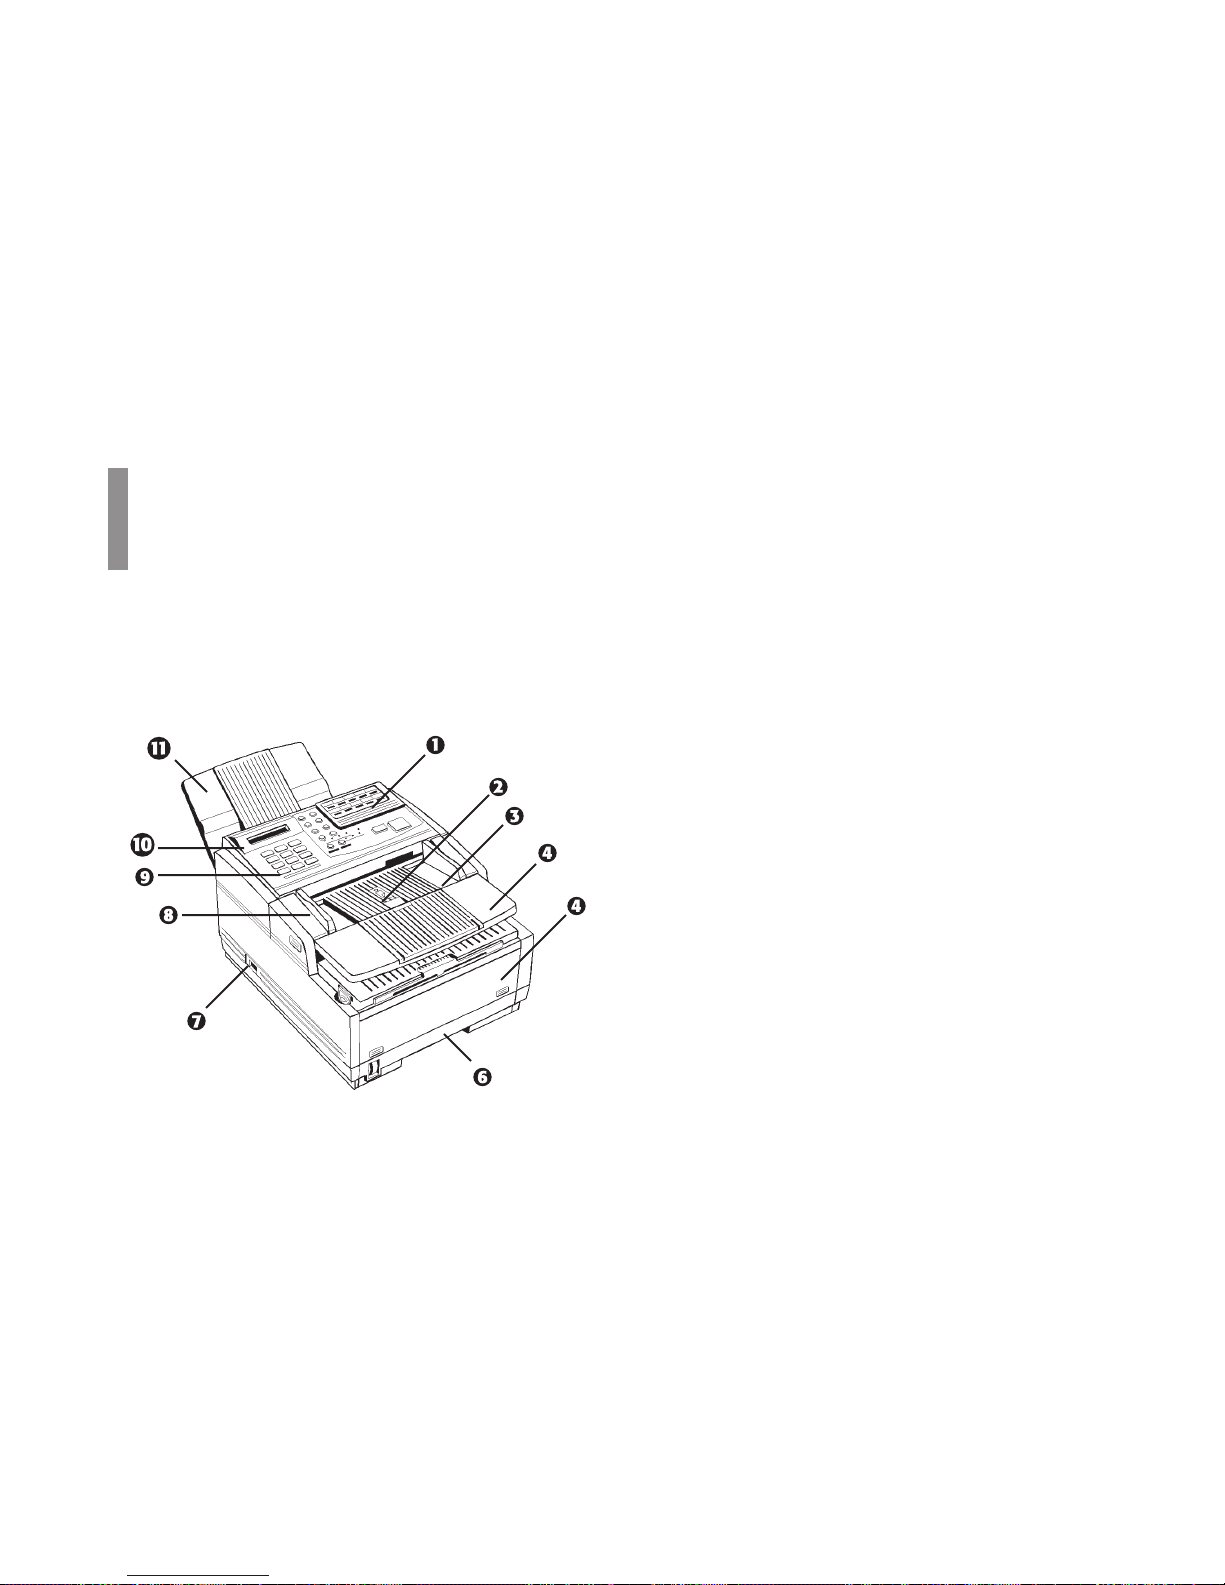
Getting to Know Your Fax Machine
Component Identification
Front of the Unit
1 One T ouch Keypad
Use for preprogrammed one touch dialing or for setting
functions.
2 Paper Path Icon
Load documents here face down.
3 Document T able
Covers the copy stacker and holds original documents to
be faces or copied.
4 Document T able Extension
Flips out to support longer documents.
5 Front Panel
Gives you access to the manual paper feeder. This allows
you to bypass the paper tray and feed a different type of
paper directly into the fax machine.
6 Paper Tray
Holds up to 250 sheets of paper.
7 Power Switch
Press I to turn on, 0 to turn off.
30
KONICA FAX 9760
|
8 Document Guides
Adjust these guides to the page width of the documents
that are to be copied or faxed.
9 Numeric Keypad
Use to enter phone numbers, auto dial numbers, or
information programmed into the fax machine.
10 Display Panel
Shows status of machine and faxes in progress
11 Document Stacker
Holds your original documents after they are faxed or
copied.
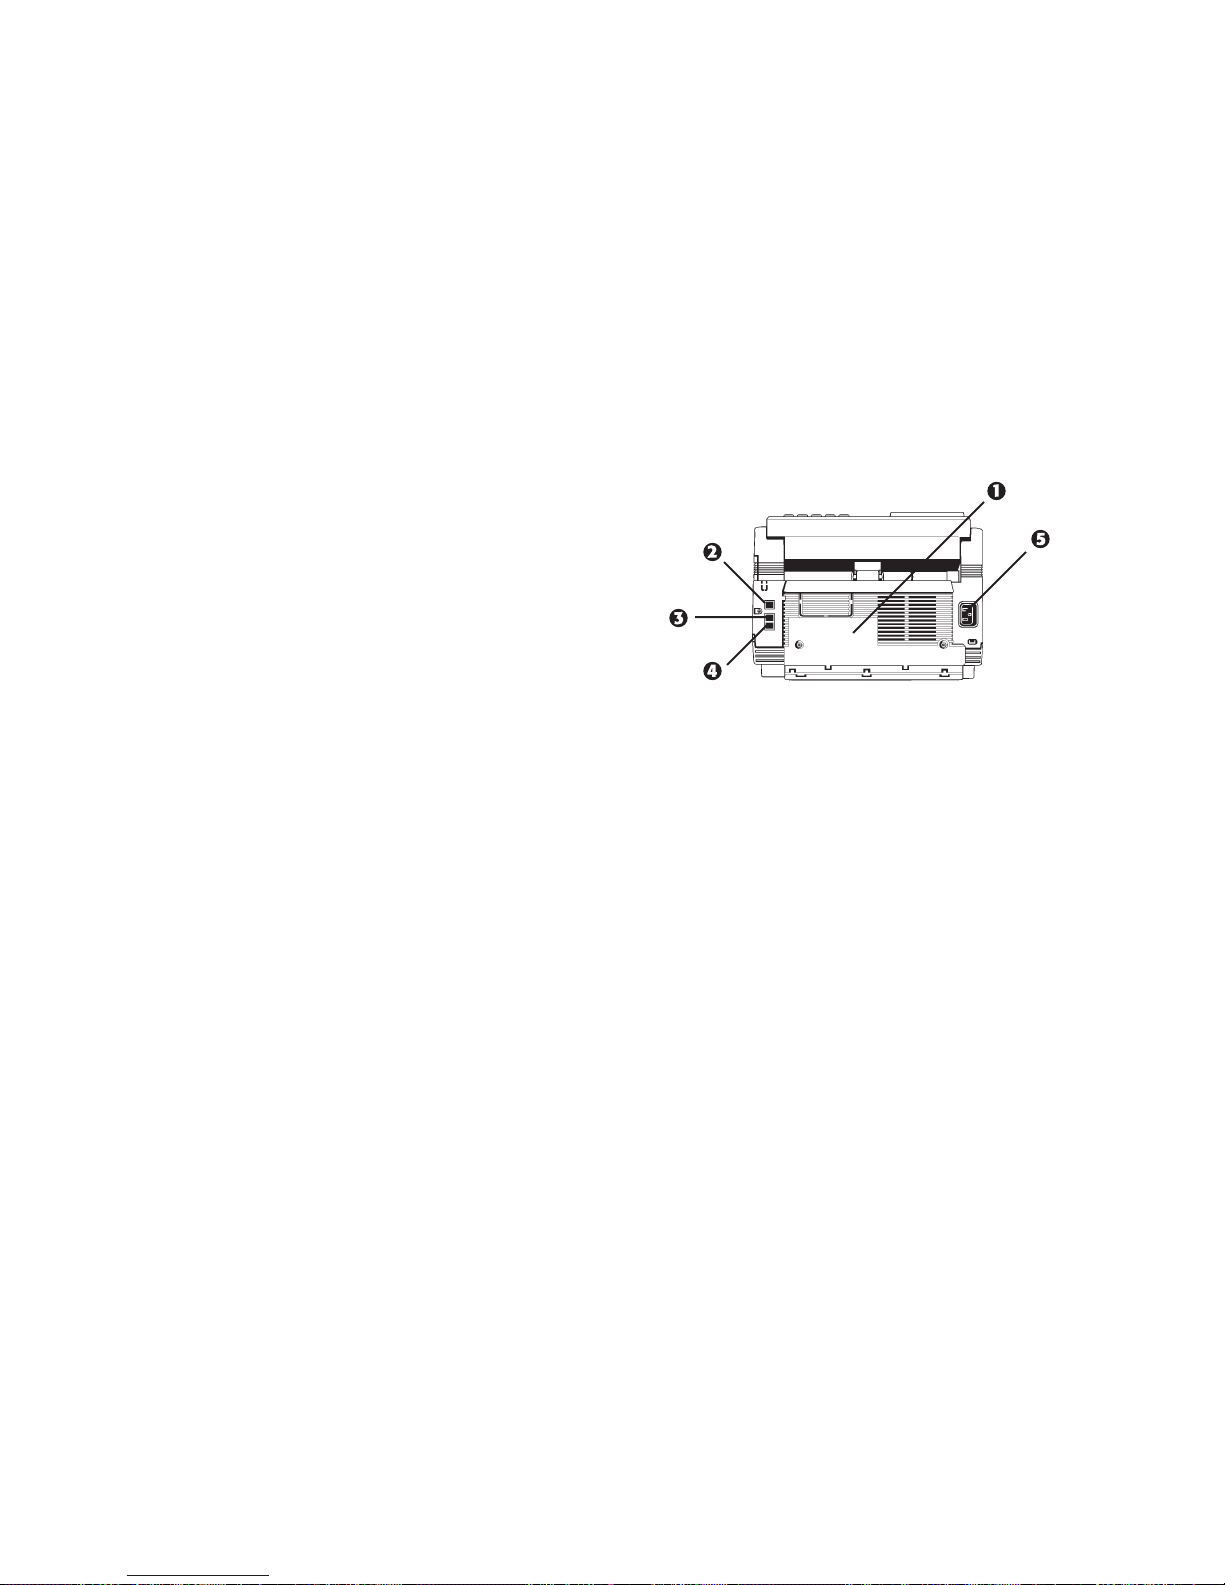
Back of the Unit
1 Back Cover
Open this cover to expose the expansion slot to install the
• optional memory expansion board
and / or
• Multifunction Printer Option (MFP, also known as the
PC interface).
2 LINE Jack
Jack for connecting to an outside telephone line.
3 TEL 1 Jack
4 TEL 2 Jack
Jacks for connecting to an optional handset, external
phone, or answering machine.
5 AC Power Inlet
Plug the supplied AC power cord into this inlet.
 Loading...