

Konica Minolta DI750PE User Manual
7664-4133-01
Di750PE
Operator’s Manual

Recycled paper is used for the inside pages of this book.
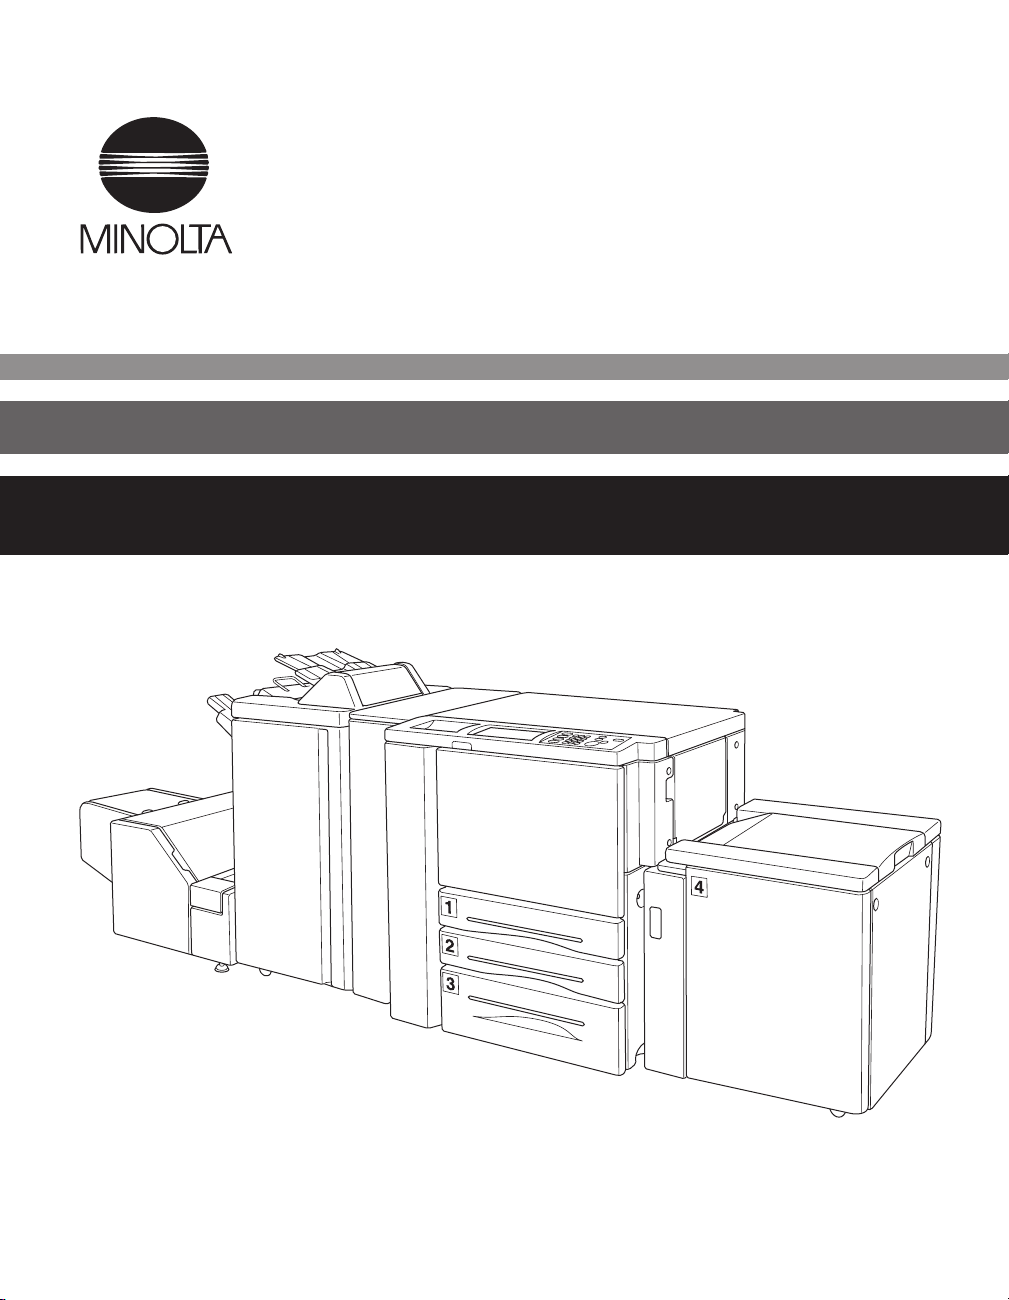
Di750PE
Network Printing System
Operator’s Manual

Thank you for choosing Minolta quality. For over 30 years Minolta has been a leader on
the forefront of office equipment technology and service. Our desire has always been to
bring you highly reliable products. We pledge to continue to provide you, our customer,
with our state of the art equipment, as well as full customer service for all our products.
We look forward to a long healthy relationship with you and our company. If you have any
questions or comments about Minolta, our product or service, please let us know. Our fax
number is 800-237-8087 (for the U.S.A. and Canada). Thank you again.
This operator’s manual explains how to operate the copier and replenish its supplies. It
also gives some troubleshooting tips as well as general precautions to be observed when
operating the copier.
To ensure the best performance and effective use of your copier, read this manual
carefully until you familiarize yourself thoroughly with the copier’s operation and features.
After you have read through the manual, keep it ready for reference.
Please use this manual as a quick and handy reference tool for immediately clarifying any
questions which may arise.

Contents
Section 1: Introduction
To the User ...................................................................................................................1-2
Features Overview........................................................................................................ 1-3
Section 2: Safety Information
User Instructions ...........................................................................................................2-2
Machine Safety Labels ................................................................................................. 2-2
Label Locations......................................................................................................2-3
Installation and Power Requirements ........................................................................... 2-5
Machine Handling and Care .........................................................................................2-7
Routine Safety .............................................................................................................. 2-8
Finisher Capacity Requirements .................................................................................. 2-9
Regulations .................................................................................................................2-11
FCC Regulations ................................................................................................. 2-11
ICES Regulations ................................................................................................ 2-11
Laser Safety.........................................................................................................2-11
Internal Laser Radiation ......................................................................................2-12
Laser Safety Label ............................................................................................... 2-15
Ozone Release ....................................................................................................2-16
Section 3: Machine Information
Di750PE Overview ........................................................................................................ 3-2
Key Operator Functions.........................................................................................3-3
Service, Repairs and Supplies .............................................................................. 3-3
Machine Labels......................................................................................................3-3
Service Settings ..................................................................................................... 3-4
External Machine ..........................................................................................................3-5
Internal Machine ........................................................................................................... 3-7
Standard Equipment .....................................................................................................3-8
Optional Equipment ...................................................................................................... 3-8
Finisher/Large Capacity Cassette ....................................................................... 3-10
Trimming Unit ......................................................................................................3-11
Punch Kit ............................................................................................................. 3-12
Site Requirements ...................................................................................................... 3-13
Specifications .............................................................................................................. 3-14

Contents
Section 4: Media Information
Main Body Trays ...........................................................................................................4-2
Large Capacity Cassette (C-305) (Option) ................................................................... 4-3
Large Capacity Cassette (C-305L) (Option) ................................................................. 4-3
Automatic Duplex Unit .................................................................................................. 4-4
Multi-Sheet Bypass Tray and Tab Sheets ....................................................................4-4
FN-104/FN-4 Finisher (Option) ..................................................................................... 4-5
Primary (Main) Tray ...............................................................................................4-5
Secondary (Sub) Tray ........................................................................................... 4-5
FN-4 Finisher Booklet Tray.................................................................................... 4-6
Cover Inserter A (Option).............................................................................................. 4-7
Paper in Punch Kit (PK-1) (Option) .............................................................................. 4-7
Paper in Trimming Unit (TMG-1) (Option) ....................................................................4-7
Paper Supply Message................................................................................................. 4-8
Paper Weight Compatibility Chart ................................................................................ 4-9
Section 5: Printing Operations
Introduction ...................................................................................................................5-2
Wake Up Screen.................................................................................................... 5-2
Warm Up Screem .................................................................................................. 5-2
Control Panel ................................................................................................................5-3
The Basic Screen ......................................................................................................... 5-3
Check Mode Message ..................................................................................................5-4
Check Mode Screen ..............................................................................................5-4
Reservation List ............................................................................................................5-5
Screen Display....................................................................................................... 5-5
Help Mode..................................................................................................................... 5-5
Change of Job Order .................................................................................................... 5-6
Job Deletion ..................................................................................................................5-7
Previous Job List .......................................................................................................... 5-8
Change Setting .............................................................................................................5-9
Print Size..................................................................................................................... 5-10
Selecting Paper Type/Size for Multi-Sheet Bypass Tray .................................... 5-10
Auto Low Power Mode................................................................................................ 5-11
The Counter List ......................................................................................................... 5-12
View the Counter List .......................................................................................... 5-12
Print the Counter List ........................................................................................... 5-12
Weekly Timer Function ...............................................................................................5-13
Timer Interrupt .....................................................................................................5-13

Contents
Section 6: Output Modes
FN-104/FN-4 Finisher Specifications............................................................................ 6-2
Finisher Type .........................................................................................................6-2
Primary (Main) Tray ...............................................................................................6-2
Secondary (Sub) Tray ........................................................................................... 6-3
Booklet Tray (FN-4 Finisher only) ......................................................................... 6-3
Cover Inserter A..................................................................................................... 6-3
Punch Kit ............................................................................................................... 6-4
Trimming Unit Tray (FN-4 Finisher only) ...............................................................6-4
Non-Sort Mode Using Primary (Main) Tray ..................................................................6-5
Sort Mode Using Primary (Main) Tray ..........................................................................6-6
Staple-Sort Mode Using Primary (Main) Tray .............................................................. 6-7
Folding, Stapling & Folding and Trimming Modes........................................................ 6-8
Punching Mode ...........................................................................................................6-10
Cover Inserter A..........................................................................................................6-11
Manual Stapling ..........................................................................................................6-12
Output Mode for Machine without Finisher.................................................................6-14
Section 7: Maintenance & Supplies
Loading Paper............................................................................................................... 7-2
Paper Indicator ...................................................................................................... 7-2
Paper Empty Indicator ...........................................................................................7-2
Using the HELP Key .............................................................................................. 7-2
Loading Paper in Tray 1, 2, and 3 .........................................................................7-3
Loading Paper in Multi-Sheet Bypass Tray ........................................................... 7-4
Loading Paper in Tray 4 (C-305/C-305L) ..............................................................7-5
Loading Tabbed Sheets in Tray 1, 2, or 3 .............................................................7-6
Loading Tabbed Sheets in Multi-Sheet Bypass Tray ............................................7-7
Loading Tabbed Sheets in Tray 4 (C-305/C-305L) ...............................................7-8
Adding Toner ................................................................................................................ 7-9
Inserting a New Staple Cartridge into FN-104/FN-4 Finisher..................................... 7-10
Empty Trash Basket of TMG-1 Trimming Unit ........................................................... 7-11
Empty Trash Basket of PK-1 Punch Kit ...................................................................... 7-12
Preventive Maintenance .............................................................................................7-13
Reading the PM Count ........................................................................................ 7-13
Printing the PM Count ......................................................................................... 7-13
Clearing Mishandled Paper ........................................................................................ 7-14
Jam Location Screen ...........................................................................................7-14
Troubleshooting Tips ...........................................................................................7-15

Contents
Section 8: Key Operator Mode
To the Key Operator ..................................................................................................... 8-2
How to Access the Key Operator Mode ................................................................ 8-3
Function Menu Map ......................................................................................................8-4
System Initial Setting [1] ...............................................................................................8-6
Date & Time Setting [1] ......................................................................................... 8-6
Language Select Setting [2] .................................................................................. 8-7
ECM (Electronic Copy Monitor) Function Setting [4].................................................... 8-8
How to Access the ECM Setting Mode ................................................................. 8-9
E.C.M. Data Edit [1] .............................................................................................8-10
E.C.M. All Count Reset [2]................................................................................... 8-14
E.C.M. Function Setting [3].................................................................................. 8-15
Paper Type / Special Size Set [6] ............................................................................... 8-16
Panel Contrast / Key Sound Adjustment [7] ...............................................................8-18
Key Operator Data Setting [8] ....................................................................................8-19
Weekly Timer [9] .........................................................................................................8-20
How to Access the Weekly Timer Setting Mode ................................................. 8-21
Weekly Timer On/Off Setting [1] .......................................................................... 8-22
Timer Setting [2] .................................................................................................. 8-23
Timer Action On/Off Setting [3] ........................................................................... 8-25
Lunch Hour Off Setting [4] ...................................................................................8-27
Timer Interrupt Password Setting [5] ................................................................... 8-28
Control Panel Adjustment [10] .................................................................................... 8-29
Tray Size Setting [11] ................................................................................................. 8-30
Energy Saver Setting [12] ........................................................................................... 8-31
Memory Switch Setting [13] ........................................................................................ 8-32
Machine Management List Print [14] ..........................................................................8-34
Side 2 Lens Adjustment [16].......................................................................................8-35
Finisher Adjustment [17] .............................................................................................8-36
Key Operator ECM Form ............................................................................................8-38
Index

Section 1: Introduction
To the User ....... 1-2
Features Overview ....... 1-3
Introduction 1-1

Introduction
To the User
Welcome to the Di750PE Network Printing System, which includes the main body
engine, the print controller, and the optional network interface card.
This Operator’s Manual describes the layout of the main body machine configured with
both standard and optional equipment and explains control panel functions and
procedures for all operations. This manual also includes basic engine specifications,
information on media requirements, maintenance, supplies, safety measures and
troubleshooting tips.
Be sure to read this manual thoroughly before operating the equipment and keep it in a
handy location for the convenience of all users.
1-2 Introduction

Introduction
Features Overview
Di750PE Network Printing System connects the Di750 main body engine to the
MicroPress Server via PrintLink 075m.
Di750PE is electronically digitized into data bits and stored into memory where the data
may be retrieved and output in various ways controlled by software. The digitized image
is represented as pixels on a screen or as dots per inch (dpi) on hard print.
• 600dpi Mode
Scans with a high resolution (600dpi).
• All-Image Area
Prints completely to the edges of the paper to avoid image loss.
• ATS - Automatic Tray Switching
Automatically switches to another tray when a tray becomes empty during a print job.
• Auto Low Power
Automatically lowers the power after a specified period of printer inactivity.
• Auto Reset
Automatically resets to auto mode defaults after a specified period of printer inactivity.
• Auto Shut-Off
Automatically shuts off the main body power after a specified period of printer inactivity.
• Duplex Mode
Selects the duplex printing mode.
• Energy Saver
Automatically reverts to nominal optimal efficiency power after a specified period of
printer inactivity. Normal power resumes after a brief warm up period by pressing the
[Energy Saver On/Off] key on the Control panel.
• Manual Shut-off
Shuts off the main power with the [POWER SAVER ON/OFF] key.
• Non STD Size for Multi-Sheet Bypass Tray
Allows you to indicate a special paper size to be loaded in the Multi-sheet bypass tray.
Introduction 1-3

Introduction
Features Overview (continued)
• Output modes with FN-104/FN-4 Finisher Installed:
Non-Sort, Sort, Staple-Sort, and Group modes using the primary (main) tray
Non-Sort Face Down exit, Non-Sort Face Up exit, Group Face Down exit, and
Group Face Up exit modes using the secondary (sub) tray
Stapling & Folding, and Folding modes using the booklet tray (FN-4 only)
• Output modes with FN-104/FN-4 Finisher and Cover Inserter A Installed:
Cover Sheet mode
Manual Staple mode
For details of each output mode, see Section 6: Output Modes.
• Punching Mode for FN-104/FN-4 Finisher with PK-1 Punch Kit Installed:
Punch three holes in output prints
• Repeat Image
Repeats the selected horizontal image area down the page as many times as permitted
by the repeat width setting (10 ~ 150mm) permits in manual or auto mode.
• Reserve
Scans subsequent print jobs while the Di750PE is busy printing or printing.
• Resolution (600dpi)
600dpi resolution mode provides optimal image quality for photos, complicated graphics
and text requiring very high compression.
• Reverse Image
Reverses the image from black-on-white to white-on-black or vice versa.
• Staple
Selects the stapling position and number of staples (3 positions).
• STD Size (Special)
Detects standard paper sizes (A4R and A5) not normally detected when loaded in a
main body tray. A5R and F4 sizes are also available from the Multi-sheet bypass tray.
• Total Paper Capacity
2,150 sheets (two 500-sheet trays/1,000-sheet tray/150-sheet MSB tray)
1-4 Introduction

Introduction
Features Overview (continued)
• Total Paper Capacity with C-305/C-305L
6,150 sheets (two 500-sheet trays/150-sheet MSB tray/1,000-sheet tray/4,000-sheet opt.
LCC)
• Trimming mode for FN-4 Finisher with TMG-1 Trimming Unit installed:
Trim the end of folded or stapled & folded booklets.
• Weekly Timer
Functions according to the needs of each work environment by turning off the main body
power daily/weekly/during lunch time/on holidays, and provides the Timer Interrupt mode
for temporary use of the machine when it is set in the daily/weekly/holiday Power Off
Mode.
Introduction 1-5


Section 2: Safety Information
User Instructions ....... 2-2
Machine Safety Labels ....... 2-2
Label Locations ......... 2-3
Installation and Power Requirements ....... 2-5
Machine Handling and Care ....... 2-7
Routine Safety ....... 2-8
Finisher Capacity Requirements ....... 2-9
Regulations ..... 2-11
FCC Regulations ....... 2-11
ICES Regulations....... 2-11
Laser Safety ....... 2-11
Internal Laser Radiation ....... 2-12
Laser Safety Label....... 2-15
Ozone Release ....... 2-16
Safety Information 2-1

Safety Information
User Instructions
The following pages include important safety information, which you must read and
understand before you attempt to operate the printer. If you have any concerns about
safety matters, please contact your service representative. Keep this manual
permanently located with the printer, so that this safety information is readily available.
Machine Safety Labels
Machine safety labels are attached to the internal area of the printer. The purpose of
safety labels is to alert you of imminent or potentially hazardous situations or conditions.
Be sure to heed all safety label information. If any safety label becomes illegible due to
soilage, etc., please contact your service representative for information about label
replacements. Sample safety labels are shown on the following page.
TO AVOID GETTING BURNED Do not touch any machine area that you are advised not
to touch by a warning or caution label.
DO NOT REMOVE WARNING OR CAUTION LABELS
Clean labels as needed to maintain legibility. If any warning or caution label is removed
or becomes illegible from soilage, please contact your service representative for
information about label replacements.
The following standard safety categories are commonly used on product labeling.
DANGER:
Danger indicates an imminent hazardous situation, which, if not avoided, will
result in death or serious injury.
Note: The DANGER category is not required for this product, and is included here for general user
information.
WARNING:
Warning indicates a potentially hazardous situation, which, if not avoided, could
result in death or serious injury.
CAUTION:
Caution indicates a potentially hazardous situation, which, if not avoided, may
result in minor or moderate bodily injury.
NOTICE: Notice provides information on the correct handling or use of the machine to prevent
breakage of the printer or some machine part, etc. It does not indicate concern for personal safety.
2-2 Safety Information
Safety Information
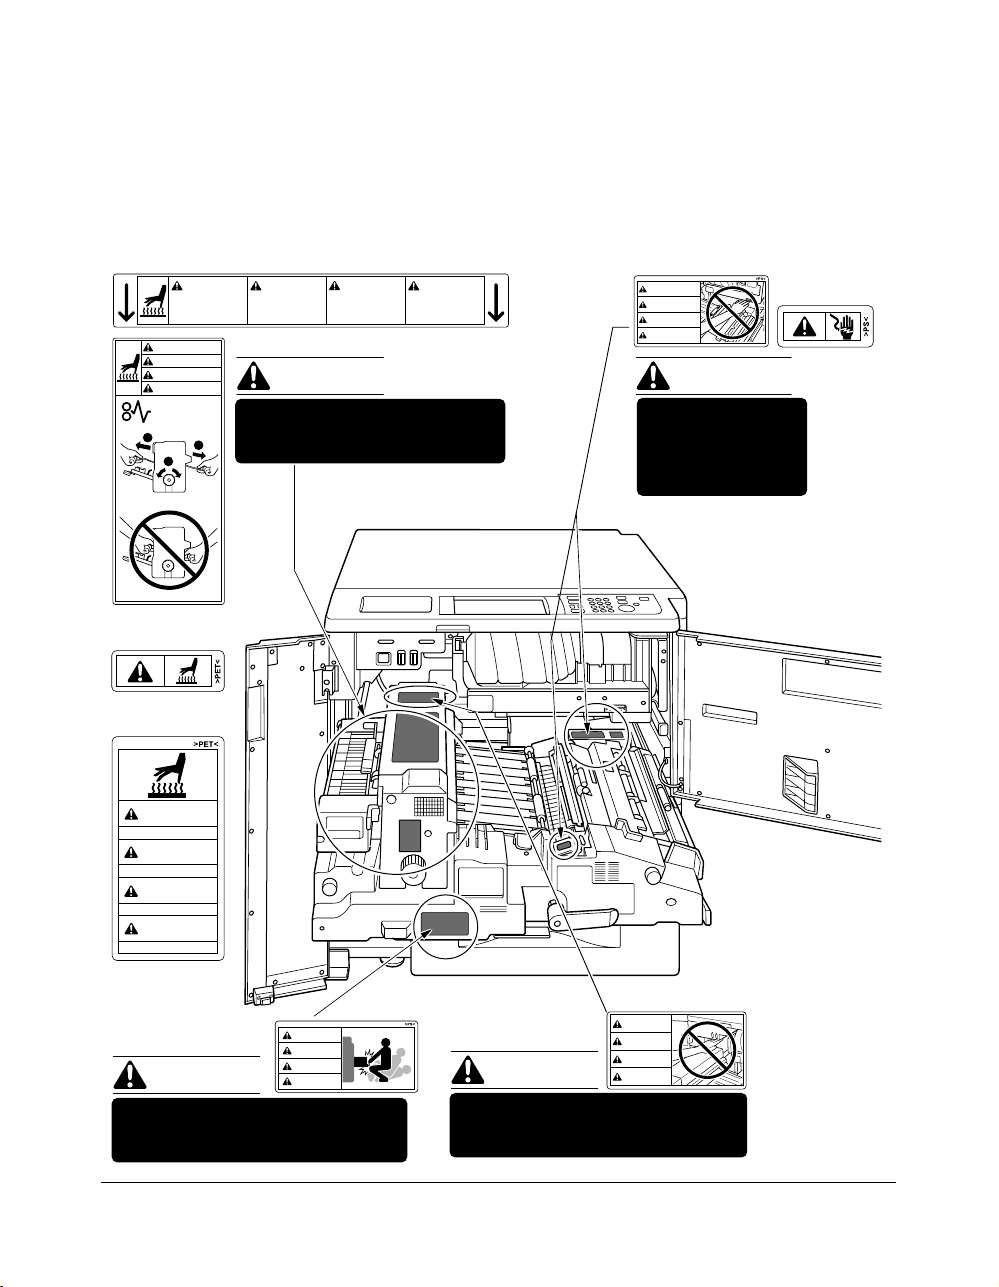
Machine Safety Labels (continued)
Label Locations
CAUTION
This internal area is very
hot. To avoid getting
burned, DO NOT TOUCH.
CAUTION
ATTENTION
PRECAUCION
CUIDADO
ATTENTION
Cette zone interne est
très chaude. Pour éviter
de se brûler, NE PAS LA
TOUCHER.
(Both sides of the fixing unit)
CAUTION
PRECAUCION
Esta zona interior está
muy caliente. Para no
quemarse NO TOCAR.
The fixing unit is very hot.
2
1
To avoid getting burned DO NOT
2
TOUCH.
(Top surface of
the fixing unit)
(Inside of
the fixing unit)
CAUTION
High temperature!
ATTENTION
Température élevée!
PRECAUCION
¡Temperatura alta!
CUIDADO
Alta temperatura!
(Front side of
the fixing unit)
CAUTION
ATTENTION
CAUTION
PRECAUCION
CUIDADO
The conveyance fixing unit is heavy.
Use care and draw it out gently;
otherwise you may be injured.
CUIDADO
Alta temperatura. NÃO
TOQUE nesta área
interior, pois há risco de
queimadura.
CAUTION
DO NOT put your hand between the
main body and developing fixing
unit; otherwise you may be injured.
WARNING
DANGER
ADVERTENCIA
ADVERTÊNCIA
WARNING
This area generates
high voltage. If
touched, electrical
shock may occur. DO
NOT TOUCH!
CAUTION
ATTENTION
PRECAUCION
CUIDADO
Safety Information 2-3
Safety Information
Machine Safety Labels (continued)
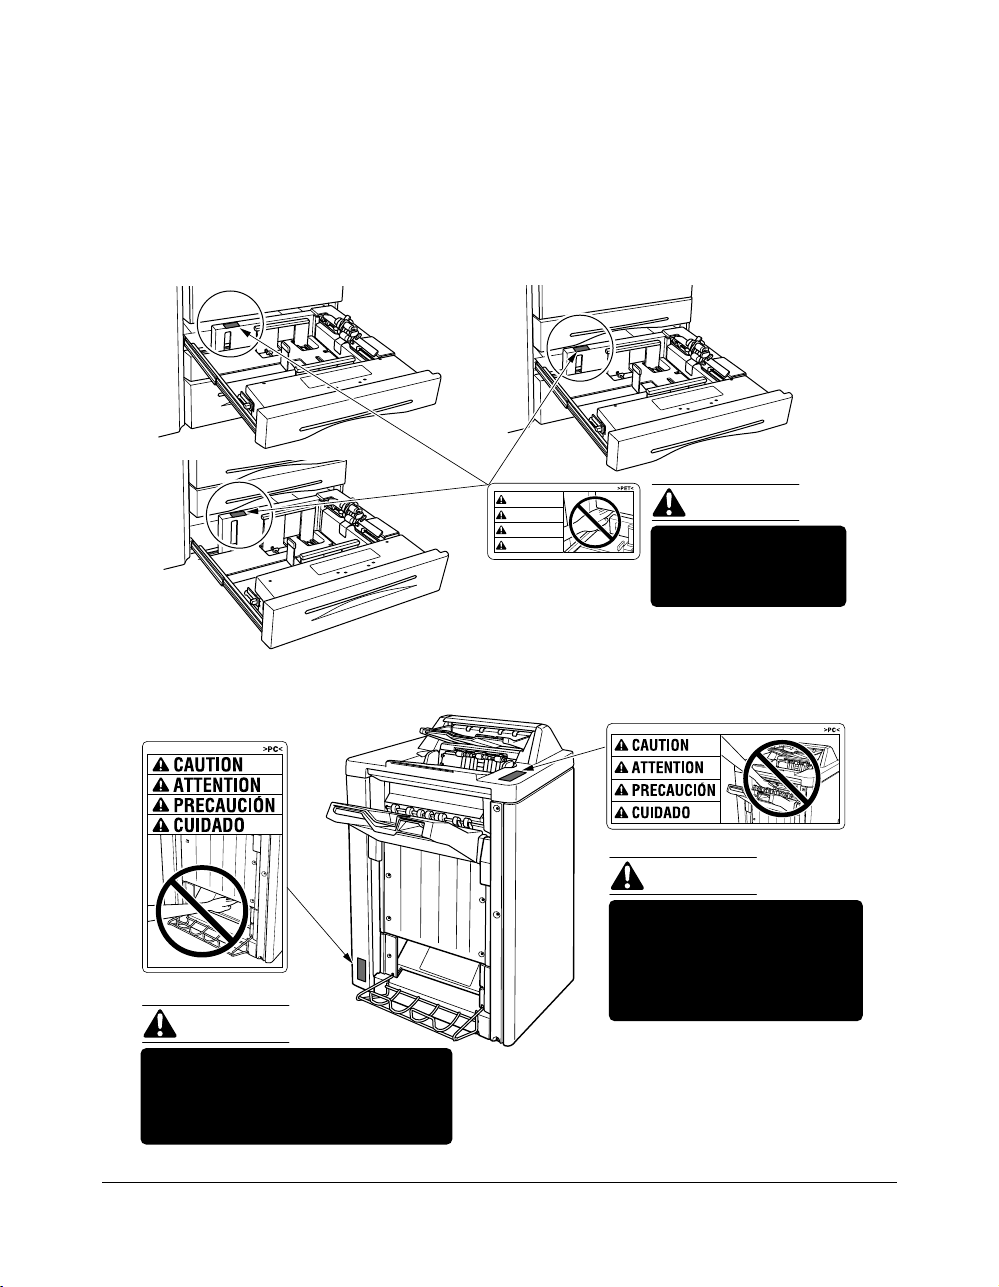
Label Locations (continued)
Tray 3
Tray 1
CAUTION
ATTENTION
PRECAUCION
CUIDADO
Tray 2
CAUTION
DO NOT put your hand
between the main body
and tray; otherwise you
may be injured.
(FN-104/FN-4)
CAUTION
(FN-4 only)
CAUTION
Inside the lower paper exit outlet
is the roller drive unit.
DO NOT put your hand into it;
otherwise you may be injured.
2-4 Safety Information
Use care after opening the
paper exit outlet. DO NOT
put your hand into it;
otherwise you may be
injured.
FN-4 Finisher
Safety Information
Installation and Power Requirements
CAUTION:
FAILURE TO HEED THE FOLLOWING CAUTIONS MAY RESULT IN BODILY INJURY AND/OR
MACHINE DAMAGE
❒ FIRE PREVENTION
Install machine away from flammable or volatile materials. Routinely check for abnormal
heat from power cord and/or plug.
❒ SHORT CIRCUIT FROM WATER DAMAGE
Do not install or operate this equipment outdoors near a lake, pond, or river, etc.; and do
not allow the machine to come in contact with splashes of rain, water, or any liquid.
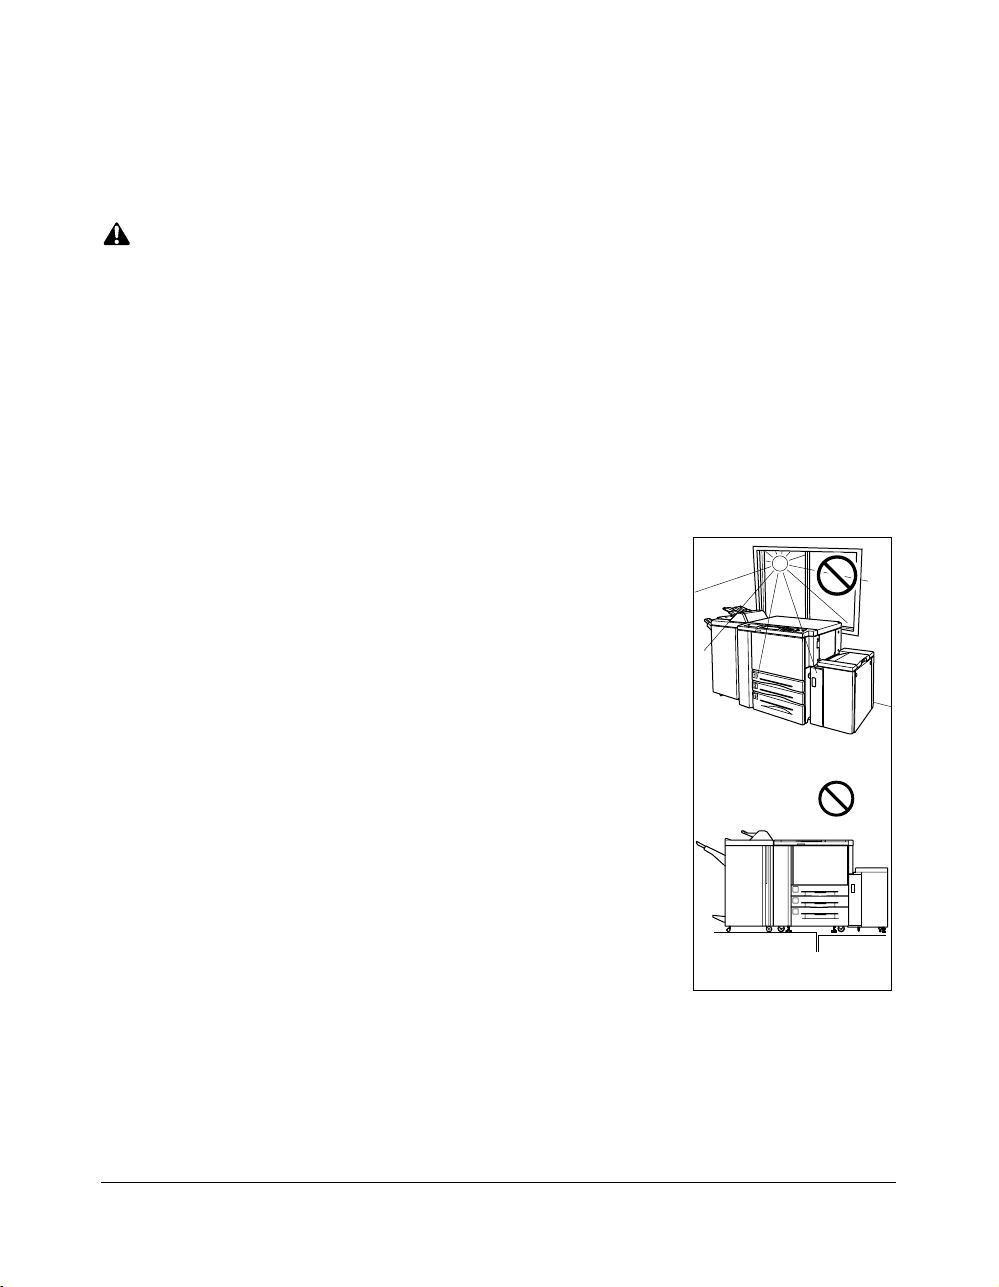
❒ TEMPERATURE AND HUMIDITY
Install the machine away from direct sunlight, heat sources
(stoves, heaters) and cold temperatures (air conditioners).
Avoid any environment that is outside 50°~86°F (10°~30°C),
with 10~80% humidity.
❒ VENTILATION
Do not allow the machine to come in contact with dust or
ammonia gas, or fumes from printing or cleaning solutions,
etc.; otherwise, image quality will be poor. Install the machine
in a well-ventilated area, for comfort; otherwise, an ozone odor
will be detected during large print runs. When in use, the
printer generates ozone in amounts too small to be hazardous
to the human body.
Temperature
❒ VIBRATIONS
If the machine is constantly vibrated or jolted, trouble may
occur. Install the machine on a level, horizontal floor, free from
vibrations.
❒ SPACE ALLOTMENT
Vibration
Install machine in an area with adequate space for performing printer operations,
replacing supply items, and conducting preventive maintenance. See Site Requirements,
Section 3.
❒ MACHINE RELOCATION
Before moving the machine to another location, contact your service representative.
Safety Information 2-5

Safety Information
Installation and Power Requirements (continued)
CAUTION:
FAILURE TO HEED THE FOLLOWING CAUTIONS MAY RESULT IN MACHINE DAMAGE,
OVERHEATING, RISK OF ELECTRICAL SHOCK, AND/OR PERSONAL INJURY
PLUG SOCKET
A plug socket is limited in capacity. Use an exclusive power source for this machine;
otherwise, overheating and/or smoking may occur. The total power consumption of the
main body, plus all peripherals, must not exceed the capacity of the main power supply.
Be sure the socket outlet is near the equipment and is easily accessible.
PLUG AND CORD (LEAD)
Unless the power plug is firmly inserted into the socket, an accident from overheating
and/or smoking may occur. Firmly insert the power cord plug into the electrical outlet
before turning on the printer power switch. If the inserted plug is loose in the socket,
disconnect it, and consult an electrician for repair; but, do not attempt to operate the
machine. Be sure the socket outlet is near the equipment and is easily accessible.
A damaged power cord may result in overheating, short circuit or fire. Do not bend,
crush, wind, kick or strike the cord with any item. Do not roll up the cord. If the main body
power cord is bent or damaged, immediately contact your service representative; do not
attempt to repair it yourself, or continue to operate the machine.
ADAPTERS AND PLURAL LOADS
Never use adapters and never connect plural loads or a branched socket to one socket
outlet; otherwise, overheating or fire may occur.
EXTENSION CORDS (LEADS)
An extension cord or lead is limited in capacity. Unless the cord or lead has adequate
capacity, smoking and overheating may occur. Should smoking and/or overheating
occur, contact an electrician immediately. If you require further information about power
requirements, power consumption, extension cords, adapters and connectors, please
contact your service representative, and consult your electrician.
2-6 Safety Information

Safety Information
Machine Handling and Care
WARNING:
FAILURE TO HEED THE FOLLOWING WARNING MAY RESULT IN DEATH OR SERIOUS INJURY AND/
OR MACHINE DAMAGE
MACHINE CONTACT
Never touch internal high voltage area indicated with a WARNING label.
Never touch the drum surface.
Never put your hand into the developing unit when removing mishandled paper.
CAUTION:
FAILURE TO HEED THE FOLLOWING CAUTIONS MAY RESULT IN MACHINE DAMAGE,
OVERHEATING, AND/OR PERSONAL INJURY
MACHINE CONTACT
Never touch internal high temperature or magnetism areas indicated with a CAUTION
label. Never insert your hand into the fixing unit when removing paper. Never touch the
inside of the main body for any purpose except moving mishandled paper or adding
toner. Use care when withdrawing the conveyance fixing unit.
MACHINE CARE
Do not drop paper clips, staples or other small metallic objects into the printer, or spill
water or any other liquid into the machine.
Do not use the machine surface to support vases, books, etc. These items will interfere
with the work space and may cause damage to the machine or to original documents.
ABNORMAL CONDITIONS
If any abnormal sound, odor, or smoke generates from the machine, immediately stop
using the printer, turn off the main power switch, disconnect the plug and contact your
service representative.
If a circuit breaker is tripped, or if a fuse blows, stop using the machine and contact an
electrician. If more detailed information is needed regarding the power source or power
consumption of this machine, contact your service representative.
MACHINE MODIFICATION
Do not modify the machine in any way or remove any part or screw. Never attempt to
perform any maintenance function that is not specifically described in this manual. Do
not connect the machine with any options other than those specified.
Safety Information 2-7

Safety Information
Routine Safety
CAUTION:
FAILURE TO HEED THE FOLLOWING CAUTIONS MAY RESULT IN MACHINE DAMAGE,
OVERHEATING, AND/OR PERSONAL INJURY
PERIODIC CHECK
Check for loose connection or excessive heat on power plug, damage to power cord
and/or plug (creased, frayed, scratched or cut, etc.). Be sure the plug is inserted fully,
and ground wire is connected correctly. If any abnormality occurs, do not continue to
operate the machine.
SERVICE MESSAGES
If a service message displays, turn the machine off, disconnect the power cord from the
outlet, and report the condition to your service representative.
TONER
Check to be sure toner in storage is out of the reach of children, or anyone who may be
incapable of handling it in a safe manner. Although toner is nontoxic, do not inhale or
swallow toner or allow it to come in contact with eyes. If toner is inhaled, consult a
physician immediately. If swallowed, drink plenty of water and consult a physician
immediately. If eye contact occurs, flush eyes with plenty of water and consult a
physician immediately.
PAPER
Check paper to be sure it is according to the specifications outlined in Section 4.
CLEANING MATERIALS
Check the type of cleaning material used on your machine to be sure it is recommended
by us. If necessary, check with your service representative. Never use cleaning
materials for purposes other than cleaning, and be sure to keep all cleaning materials
out of the reach of children or anyone who is incapable of using them safely.
ENERGY SAVER
Use Energy Saver mode for short periods of machine inactivity. When not using the
machine for long periods of time, turn power off, unless the weekly timer function is
operating.
DISPOSAL OF THE PRINTER
Dispose of this printer according to your local regulations.
2-8 Safety Information

Safety Information
Finisher Capacity Requirements
CAUTION:
FAILURE TO HEED THE FOLLOWING CAUTIONS MAY RESULT IN BODILY INJURY AND/OR
MACHINE DAMAGE
FINISHER PAPER CAPACITY
To prevent paper misfeed, do not exceed the paper capacity of the Finisher.
FN-104/FN-4 Finisher paper weight: 16 lb ~ 24 lb
When the selected print quantity exceeds the maximum paper capacity, remove sheets
as they are output from the finisher.
Paper capacities below are stated for 20 lb Bond. This Finisher also accepts the wide
orientation of regular sizes stated below.
Finisher FN-104/FN-4
Primary (Main) tray: Non-sort/Sort/Group mode
500 sheets (5.5"x8.5"R)
3,000 sheets (8.5"x11", 8.5"x11"R)
1,500 sheets (11"x17", 8.5"x14")
The Secondary (sub) tray can be unloaded while the Di750PE is running.
Set production is not limited by the capacity of the Secondary (sub) tray.
Primary (Main) tray: Staple-Sort mode
1,000 sheets* (11"x17" ~ 8.5"x11"/R)
* The maximum capacity varies according to the number of sheets to be
stapled.
Secondary (Sub) tray: Non-sort mode
200 sheets max.
Booklet tray (FN-4 only)
100 sheets max. (11"x17", 8.5"x14", 8.5"x11", A4R)
(The maximum number of sheets varies, depending on the number of pages in
the booklet and whether Folding or Stapling & Folding is selected.)
Trimming unit tray (FN-4 with TMG-1 only)
512 sheets max. (11"x17", 8.5"x14", 8.5"x11", A4R)
(The maximum number of sheets varies, depending on the number of pages in
the booklet and whether Folding or Stapling & Folding is selected. See p. 4-7.)
Safety Information 2-9

Safety Information
Finisher Capacity Requirements (continued)
CAUTION:
FAILURE TO HEED THE FOLLOWING CAUTIONS MAY RESULT IN BODILY INJURY AND/OR
MACHINE DAMAGE
FN-4 FINISHER BOOKLET MODE OUTLET
Inside the Booklet mode outlet is the roller drive unit. DO NOT put your hand into it when
removing the folded or stapled & folded sheet; otherwise you may be injured.
FN-104/FN-4 FINISHER PAPER EXIT OUTLET
To avoid injury when stapling large size prints, DO NOT put your hand into the open
Paper exit outlet.
2-10 Safety Information

Safety Information
Regulations
FCC Regulations
WARNING
This equipment has been tested and found to comply with the limits for a Class A digital
device, pursuant to Part 15 of the FCC Rules. These limits are designed to provide
reasonable protection against harmful interference when the equipment is operated in a
commercial environment. This equipment generates, uses, and can radiate ratio
frequency energy and if not installed and used in accordance with the instruction
manual, may cause harmful interference to radio communications. Operation of this
equipment in a residential area is likely to cause harmful interference in which case the
user will be required to correct the interference at his own expense.
The design and production of this unit conform to FCC Regulations, and any changes or
modifications must be registered with the FCC and are subject to FCC control. Any
changes made by the purchaser or user without first contacting the manufacturer will be
subject to penalty under FCC regulations.
This device must be used with shielded interface cables. The use of non-shielded cable
is likely to result in interference with radio communications and is prohibited under FCC
rules.
FCC-F01
ICES Regulations
This Class A digital apparatus complies with Canadian ICES-003.
Cet appareil numérique de la classe A est conforme à la norme NMB-003 du Canada.
IC-F03
Laser Safety
This is a digital machine which operates by means of a laser. There is no possibility of
danger from the laser, provided the machine is operated according to the instructions in
this manual.
Since radiation emitted by the laser is completely confined within protective housing, the
laser beam cannot escape from the machine during any phase of user operation.
This machine is certified as a Class 1 laser product. This means the machine does not
produce hazardous laser radiation.
Safety Information 2-11
Safety Information
Regulations (continued)
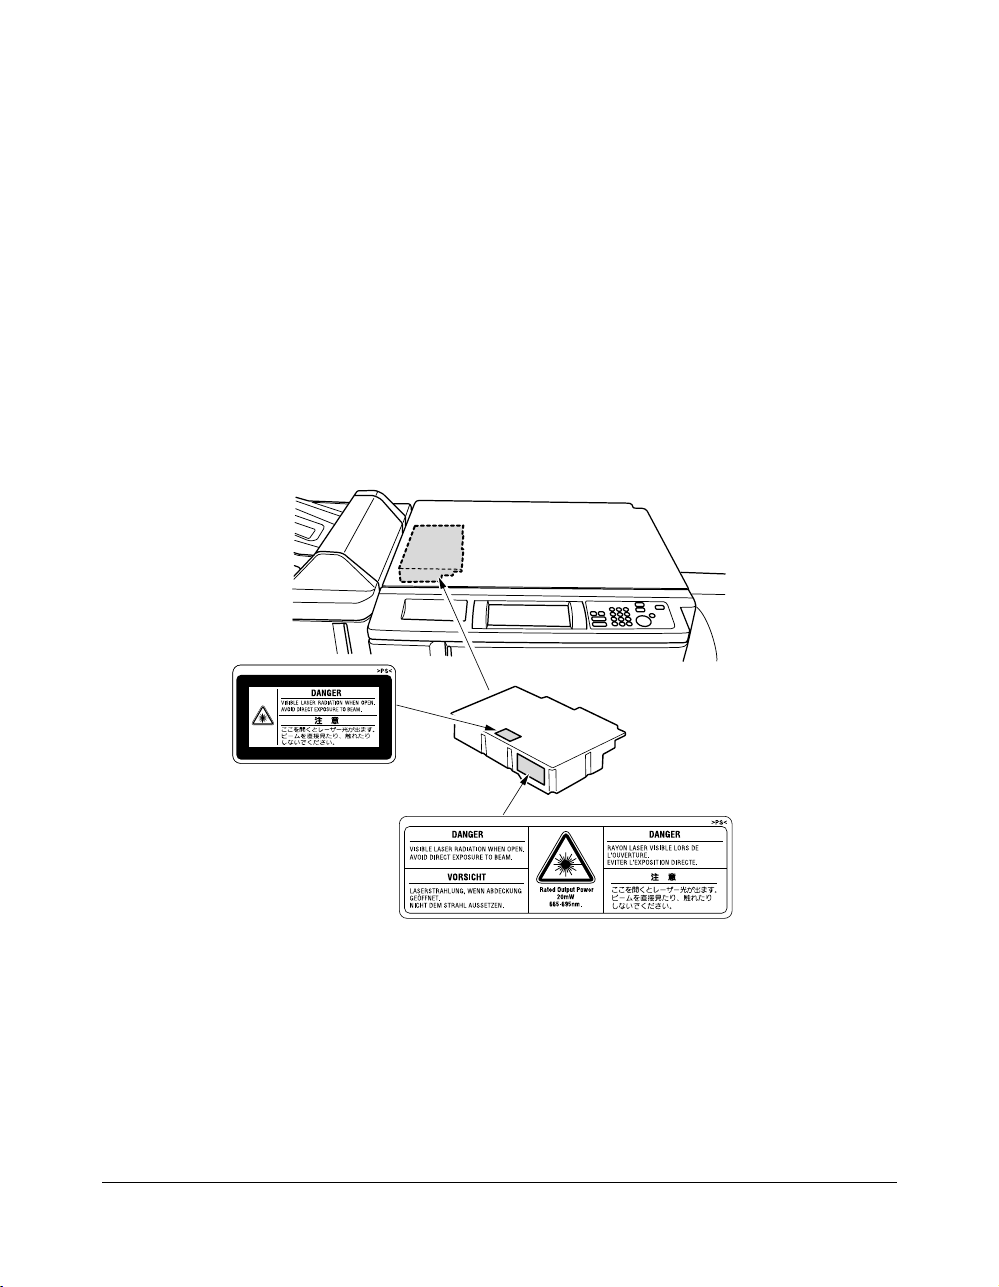
Internal Laser Radiation
Maximum Average Radiant Power: 1220 µW at the laser aperture of the print head unit.
Wavelength: 665-695 nm
This product employs a Class IIIb Laser Diode that emits an invisible laser beam.
The Laser Diode and Scanning Polygon Mirror are incorporated in the print head unit.
The print head unit is NOT A FIELD SERVICE ITEM.
Therefore, the print head unit should not be opened under any circumstances.
Printer head unit
2-12 Safety Information

Safety Information
Regulations (continued)
For the United States
CDRH regulation
This machine is certified as a Class 1 Laser product under the Radiation Performance
Standard according to the Food, Drug and Cosmetic Act of 1990. Compliance is
mandatory for Laser products marketed in the United States and is reported to the
Center for Devices and Radiological Health (CDRH) of the U.S. Food and Drug
Administration of the U.S. Department of Health and Human Services (DHHS). This
means that the device does not produces hazardous laser radiation.
The label shown on page 2-15 indicates compliance with the CDRH regulations and
must be attached to laser products marketed in the United States.
CAUTION:
Use of controls, adjustments or performance of procedures other than those specified in
this manual may result in hazardous radiation exposure.
This is a semiconductor laser. The maximum power of the laser diode is 20 mW and the
wavelength is 665-695 nm.
For European Users
CAUTION:
Use of controls, adjustments or performance of procedures other than those specified in
this manual may result in hazardous radiation exposure.
This is a semiconductor laser. The maximum power of the laser diode is 20 mW and the
wavelength is 665-695 nm.
For Denmark Users
ADVARSEL
Usynlig laserstråling ved åbning, når sikkerhedsafbrydere er ude af funktion. Undgå
udsættelse for stråling. Klasse 1 laser produkt der opfylder IEC60825 sikkerheds kravene.
Dansk: Dette er en halvlederlaser. Laserdiodens højeste styrke er 20 mW og
bølgelængden er 665-695 nm.
Safety Information 2-13

Safety Information
Regulations (continued)
For Finland, Sweden Users
LOUKAN 1 LASERLAITE
KLASS 1 LASER APPARAT
VAROITUS!
Laitteen Käyttäminen muulla kuin tässä käyttöohjeessa mainitulla tavalla saattaa
altistaa käyttäjän turvallisuusluokan 1 ylittävälle näkymättömälle lasersäteilylle.
Tämä on puolijohdelaser. Laserdiodin suurin teho on 20 mW ja aallonpituus on 665-695 nm.
VARNING!
Om apparaten används på annat sätt än i denna bruksanvisning specificerats, kan
användaren utsättas för osynlig laserstrålning, som överskrider gränsen för laserklass 1.
Det här är en halvledarlaser. Den maximala effekten för laserdioden är 20 mW och
våglängden är 665-695 nm.
VARO!
Avattaessa ja suojalukitus ohitettaessa olet alttiina näkymättömälle lasersäteilylle. Älä
katso säteeseen.
VARNING!
Osynlig laserstrålning när denna del är öppnad och spärren är urkopplad. Betrakta ej
strålen.
For Norway Users
ADVERSEL
Dersom apparatet brukes på annen måte enn spesifisert i denne bruksanvisning, kan
brukeren utsettes for unsynlig laserstråling som overskrider grensen for laser klass 1.
Dette en halvleder laser. Maksimal effekt till laserdiode er 20 mW og bølgelengde er
665-695 nm.
2-14 Safety Information
Safety Information
Regulations (continued)
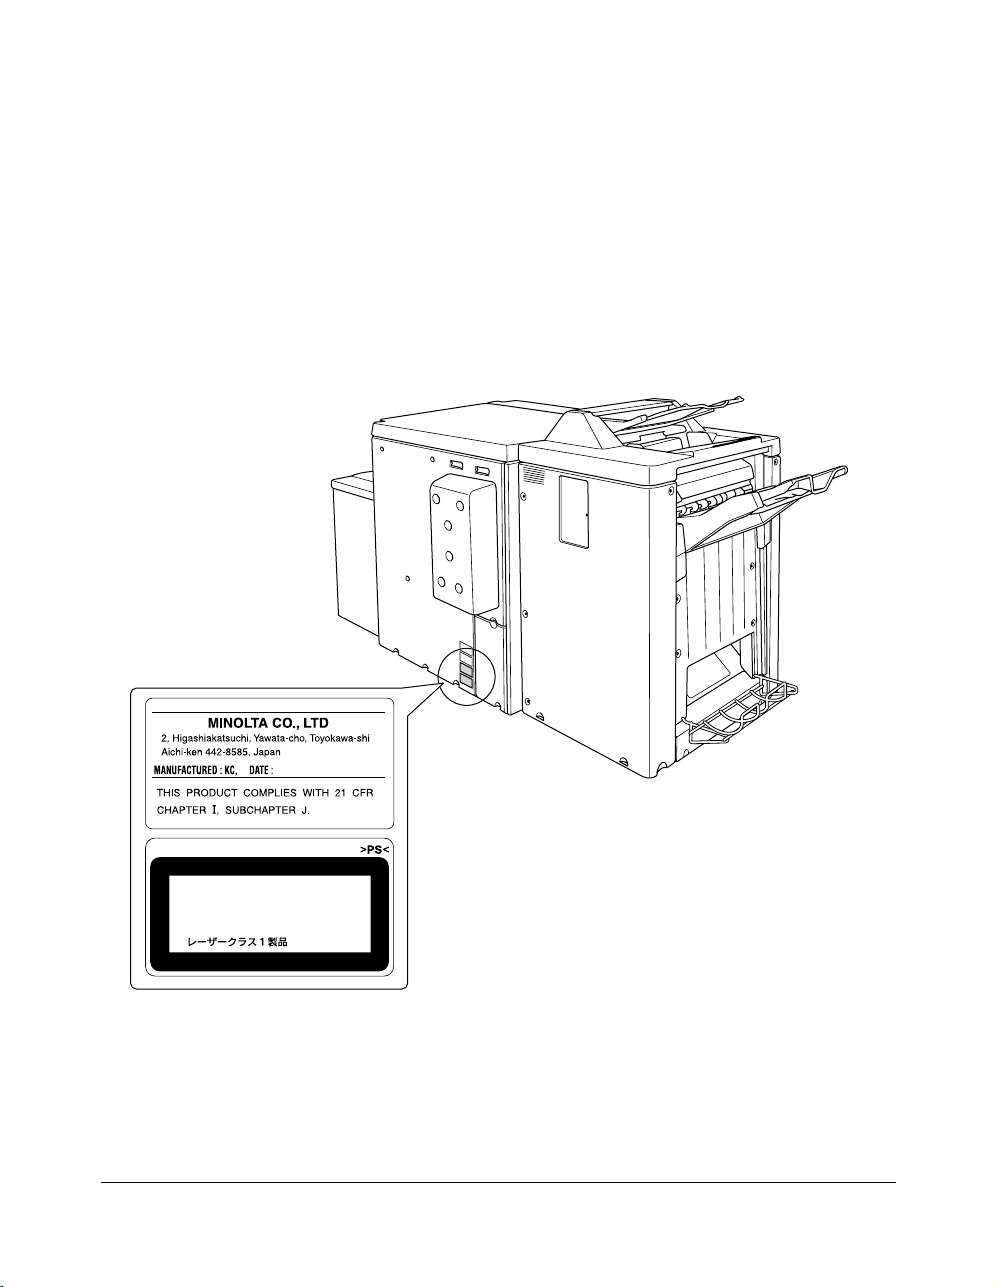
Laser Safety Label
A laser safety label is attached to the outside of the machine as shown below.
CLASS 1 LASER PRODUCT
APPAREIL A RAYONNEMENT
LASER DE CLASSE 1
LASER KLASSE 1
Safety Information 2-15

Safety Information
Regulations (continued)
Ozone Release
NOTE
= Locate the Machine in a Well Ventilated Room =
A negligible amount of ozone is generated during normal operation of this machine. An
unpleasant odor may, however, be created in poorly ventilated rooms during extensive
machine operations. For a comfortable, healthy, and safe operating environment, it is
recommended that the room well ventilated.
REMARQUE
= Placer l’appareil dans une pièce largement ventilée =
Une quantité d’ozone négligable est dégagée pendant le fonctionnement de l’appareil
quand celui-ci est utilisé normalement. Cependant, une odeur désagréable peut être
ressentie dans les pièces dont l’aération est insuffisante et lorsque une utilisation
prolongée de l’appareil est effectuée. Pour avoir la certitude de travailler dans un
environnement réunissant des conditions de confort, santé et de sécurité, il est
préférable de bien aérer la pièce ou se trouve l’appareil.
2-16 Safety Information

Section 3: Machine Information
Di750PE Overview ....... 3-2
Key Operator Functions......... 3-3
Service, Repairs and Supplies......... 3-3
Machine Labels......... 3-3
Service Settings......... 3-4
External Machine ....... 3-5
Internal Machine ....... 3-7
Standard Equipment ....... 3-8
Optional Equipment ....... 3-8
Finisher/Large Capacity Cassette....... 3-10
Trimming Unit....... 3-11
Punch Kit....... 3-12
Site Requirements ..... 3-13
Specifications ..... 3-14
Machine Information 3-1
 Loading...