

Page 1
User Manual
Finisher FN-113
for Di551/Di650
Page 2

Page 3

Contents
1. Parts Names and Their Functions
Finisher FN-113 ................................................................................................1
2. Making Output Settings
Types of Output Modes ....................................................................................2
How to Make Output Settings ...........................................................................4
Sort ............................................................................................................4
Group ........................................................................................................5
Staple .........................................................................................................6
Punch .........................................................................................................8
3. Loading the Originals
Staple .......................................................................................................10
Punch .......................................................................................................11
4. Adding Staples
Replacing the Staple Cartridge ................................... ..... ...............................12
5. When a Paper Misfeed Occurs
Misfeed Location Displays .............................................................................14
Paper Misfeed Clearing Instructions Display .................................................15
How to Clear a Paper Misfeed ........................................................................15
6. When the Number of Copies Fed into the Main Tray Reaches
the Capacity of the Tray
Tray Capacity ..................................................................................................19
Remedial Procedure ........................................................................................19
7. When a Staple Misfeed Occurs
How to Clear a Staple Misfeed .......................................................................20
8. Specifications
Finisher FN-113 ......................................................................................22
Page 4

Page 5
1. Parts Names and Their Functions
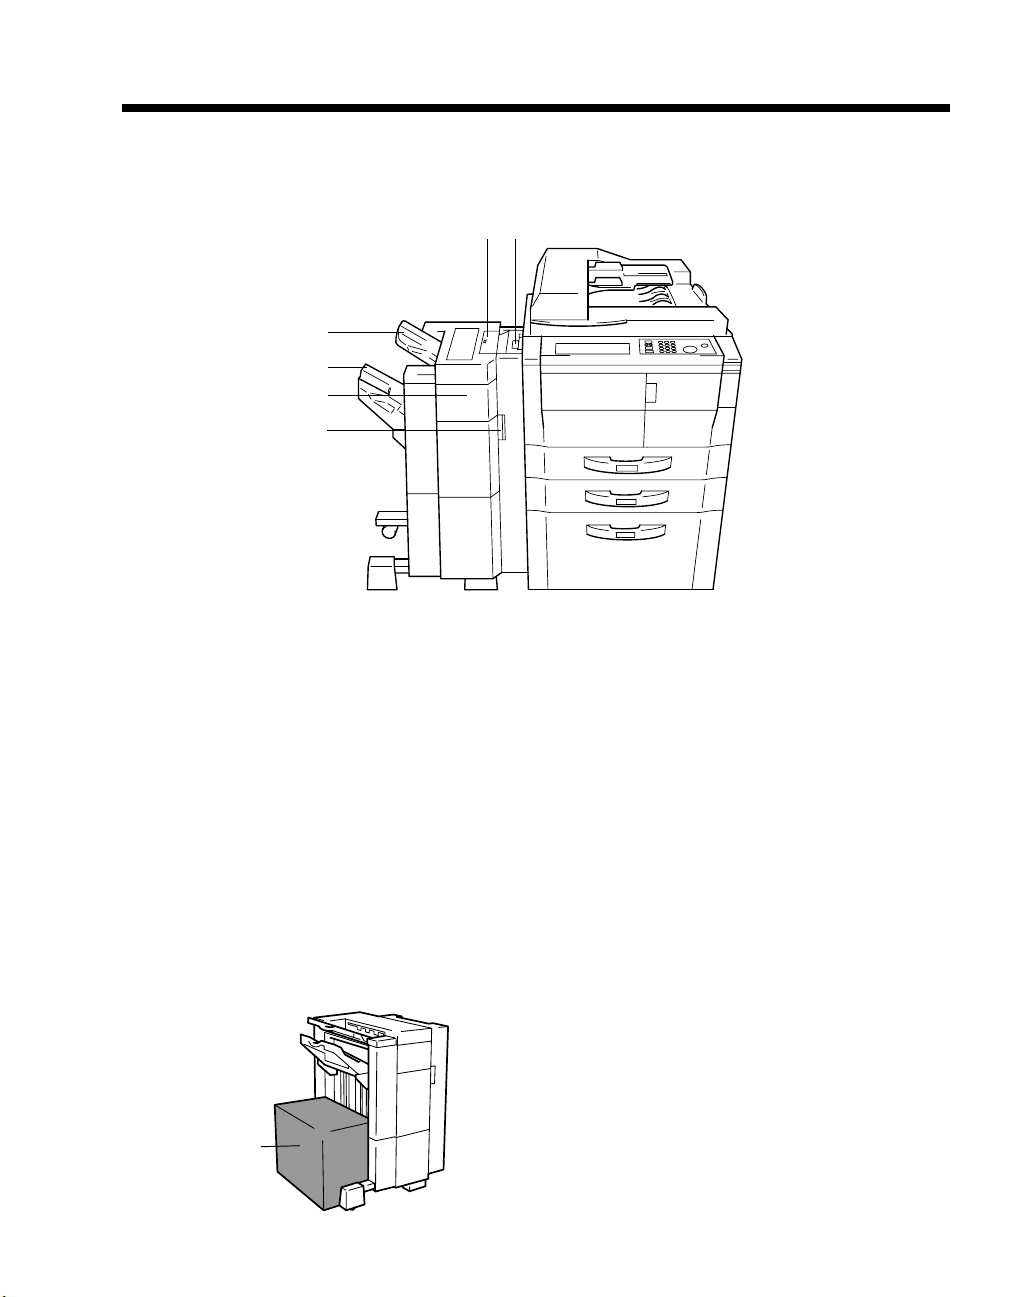
Finisher FN-113
Copies can automatically be sorted, stapled or punched.
56
4
3
2
1
1
4698O002AA
1 Right Door H3 : Open to clear misfed paper.
2 Front Door FN4 : Open to clear misfed paper.
3 Primary (Main) Tray : Receives sorted copy sets stacked in a sawtooth manner finished
through the Shift Sorting function, copies with punch holes, or stapled copies.
4 Scondary (Sub) Tray : Copies are fed onto this tray face-up or face-down in the Sort or
Group mode.
5 Top Cover FN1 : Open to clear misfed paper.
6 Grip : Hold to slide the Finisher away from the copier to clear a misfeed or
perform other service job.
Precaution When Using a Finisher
NEVER place an object under the Primary Tray.
Anything that is placed under the Primary Tray
can interfere with the tray when it lowers after a
copy has been fed onto it, which results in a
malfunction.
Do not place an
object here.
4698O032AA
Page 6
2
2. Making Output Settings
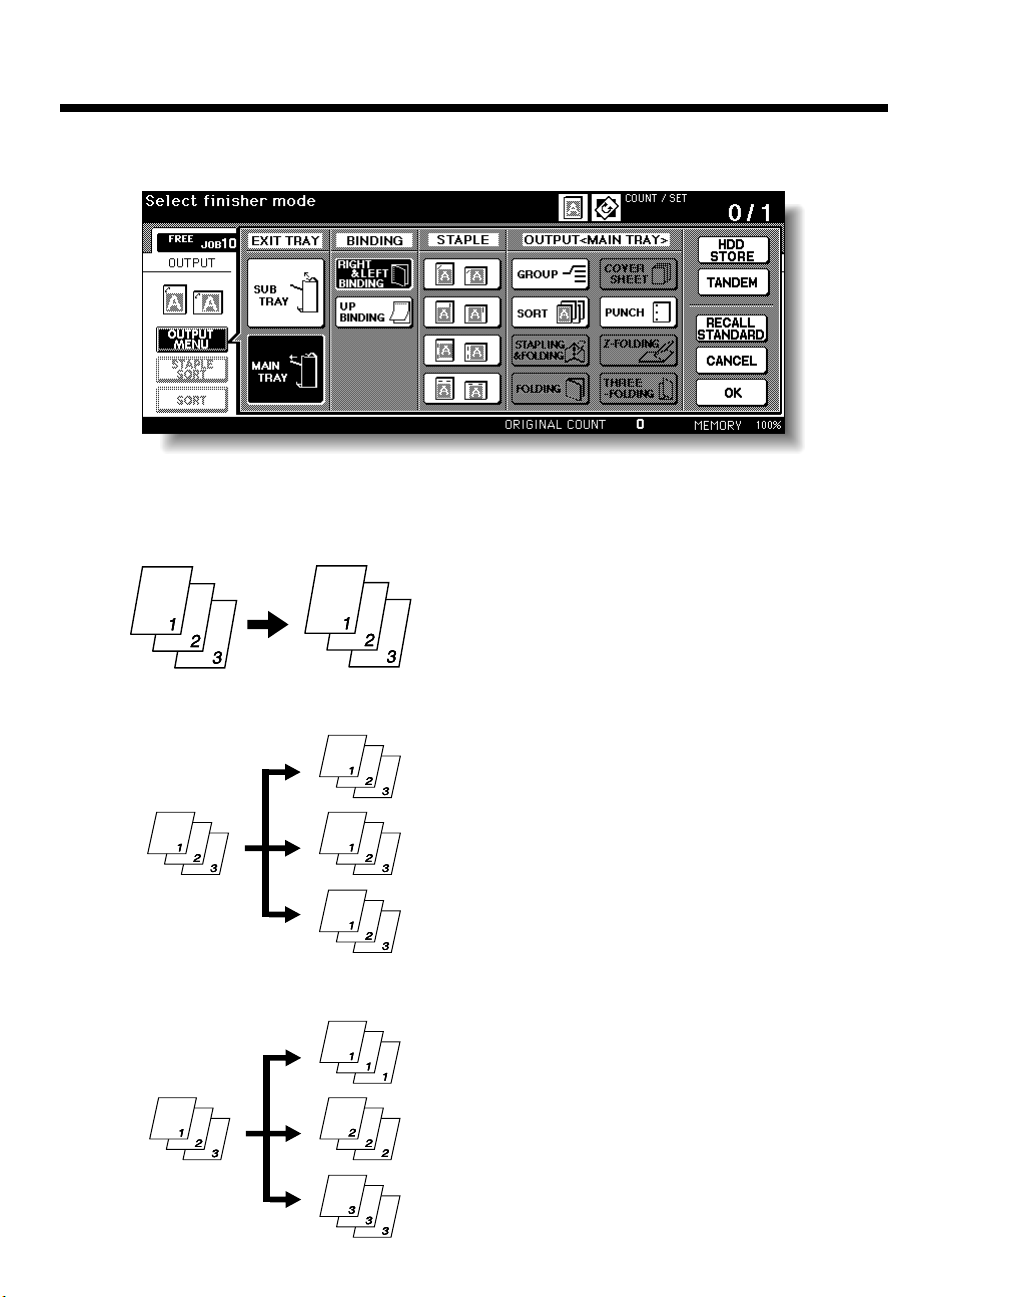
Touching [OUTPUT MENU] on the LCD Touch Screen will show a screen that allows you to make
output settings for the copies.
4698P101EA
Types of Output Modes
Non-Sort
CopyOrig.
• Non-so rt mode co pies the original set in
amounts determined by the print quantity
settings, then outputs sorted sets normally.
Sort
Group
Orig.
Orig.
4002O055AA
Copy
4002O056AA
Copy
• Touch [SORT] to cancel its selection.
• Sort mo de o utpu ts multiple copies of the
original set, having each sorted set offset by
1.25 in (30mm) upon exit.
• Touch [SORT] to select and highlight it.
• The copies made from each original are
separated into groups. Each group contains the
same num ber of copies.
• Touch [GROUP] to select and highlight it.
4002O057AA
Page 7
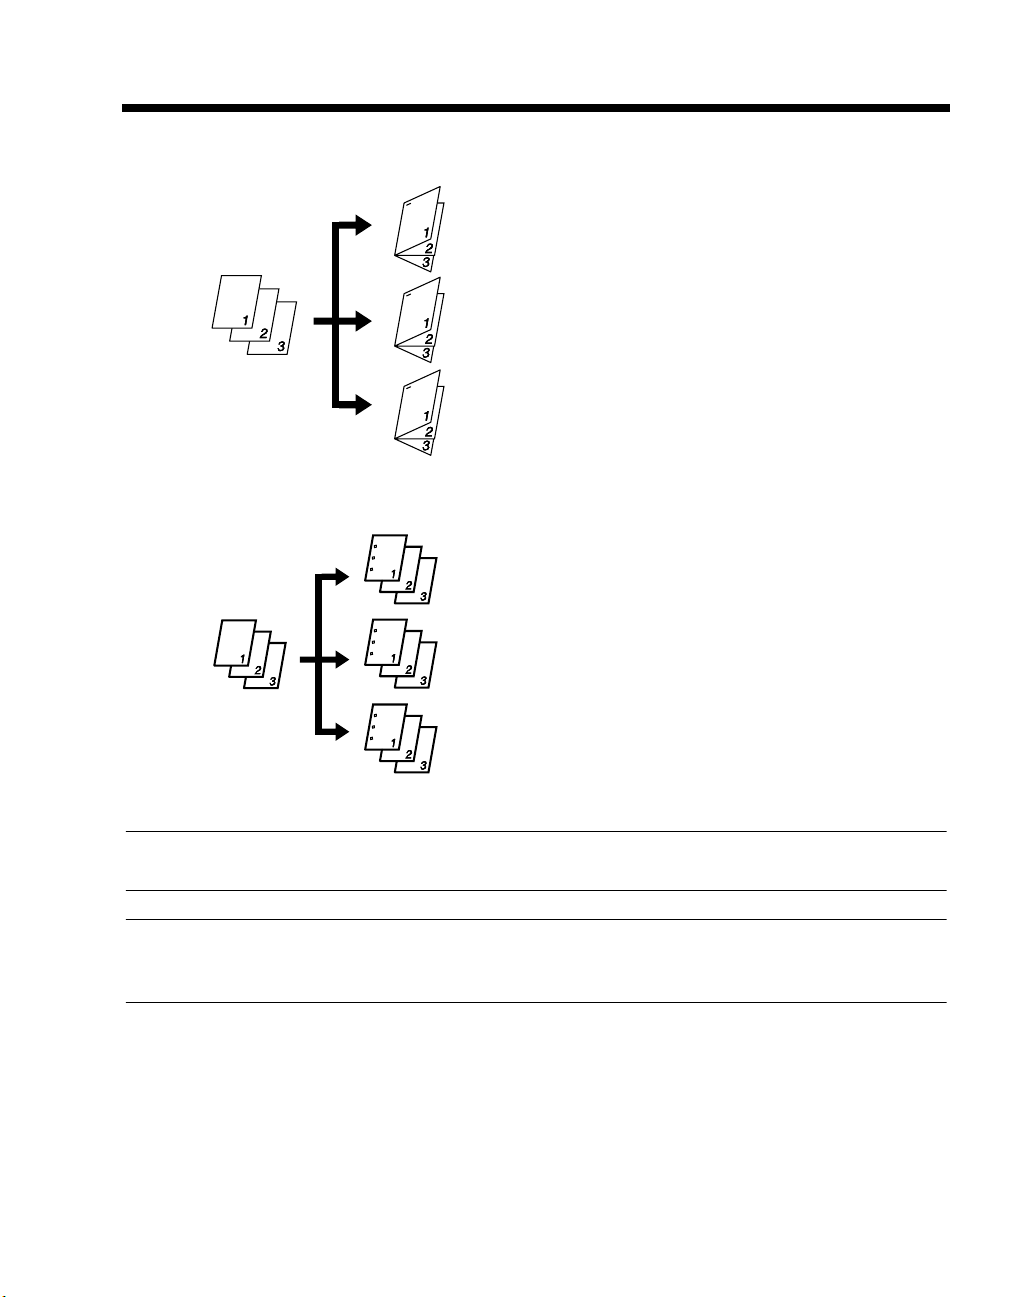
Staple-Sort
Copy
3
2. Making Output Settings
• Staple-Sort mode of fsets multiple copies of the
originalset, having each sorted and stapled set
offset by 1.25 in (30mm) upon exit.
Punch
Orig.
Orig.
Copy
• Touch [STAPLE SORT] to select and h i ghl igh t
it.
4002O058AA
• Holes are punched in the copy sets or stacks for
filing. It can be combined with Non-Sort, Sort,
Group or Staple.
• Touch [PUNCH] to select and highlight it.
4002O285EA
NOTE
Thick paper and OHP transparencies cannot be used for making copies in Staple-Sort or Punch.
Useful Tip
The default setting is face-down sorting.
This default setting can be changed. For details, see Section 13, User Manual of the copier.
Page 8
4
2. Making Output Settings
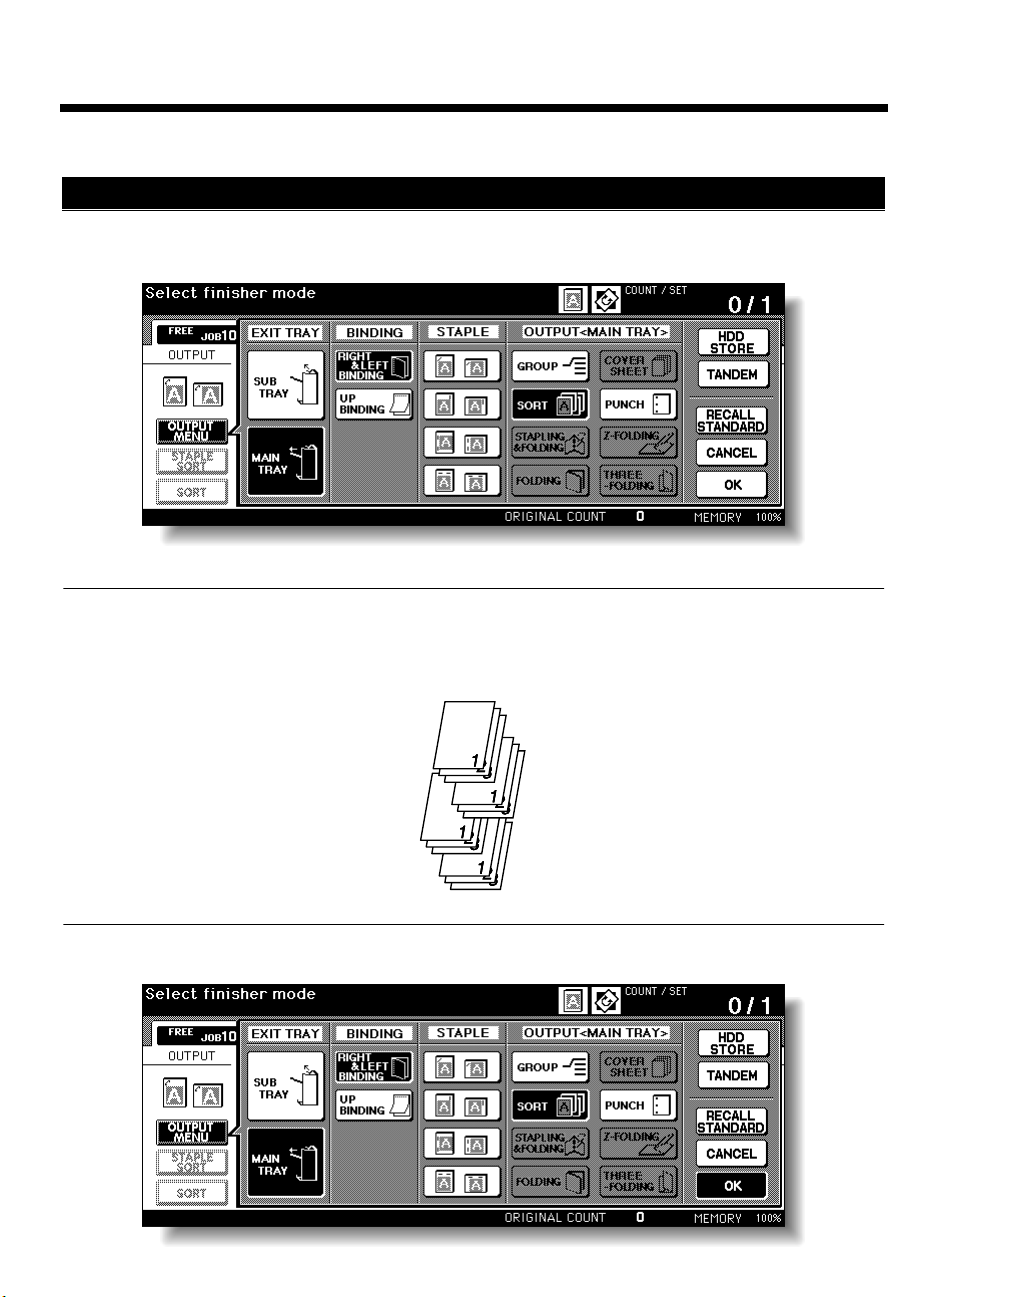
How to Make Output Settings
Sort
Touch [SORT] or [OUTPUT MENU] on the Basic Screen. Then, on the Output Mode Screen
1
that will then be displayed, touch [SORT] to select and highlight it.
4698P102EA
Useful Tip
Shift Sorting
The sorted copy sets are stacked in the same direction, but in a sawtooth manner by shifting the tray
to the front or rear for each set.
Touch [OK].
2
4002O061AB
4698P103EA
Page 9
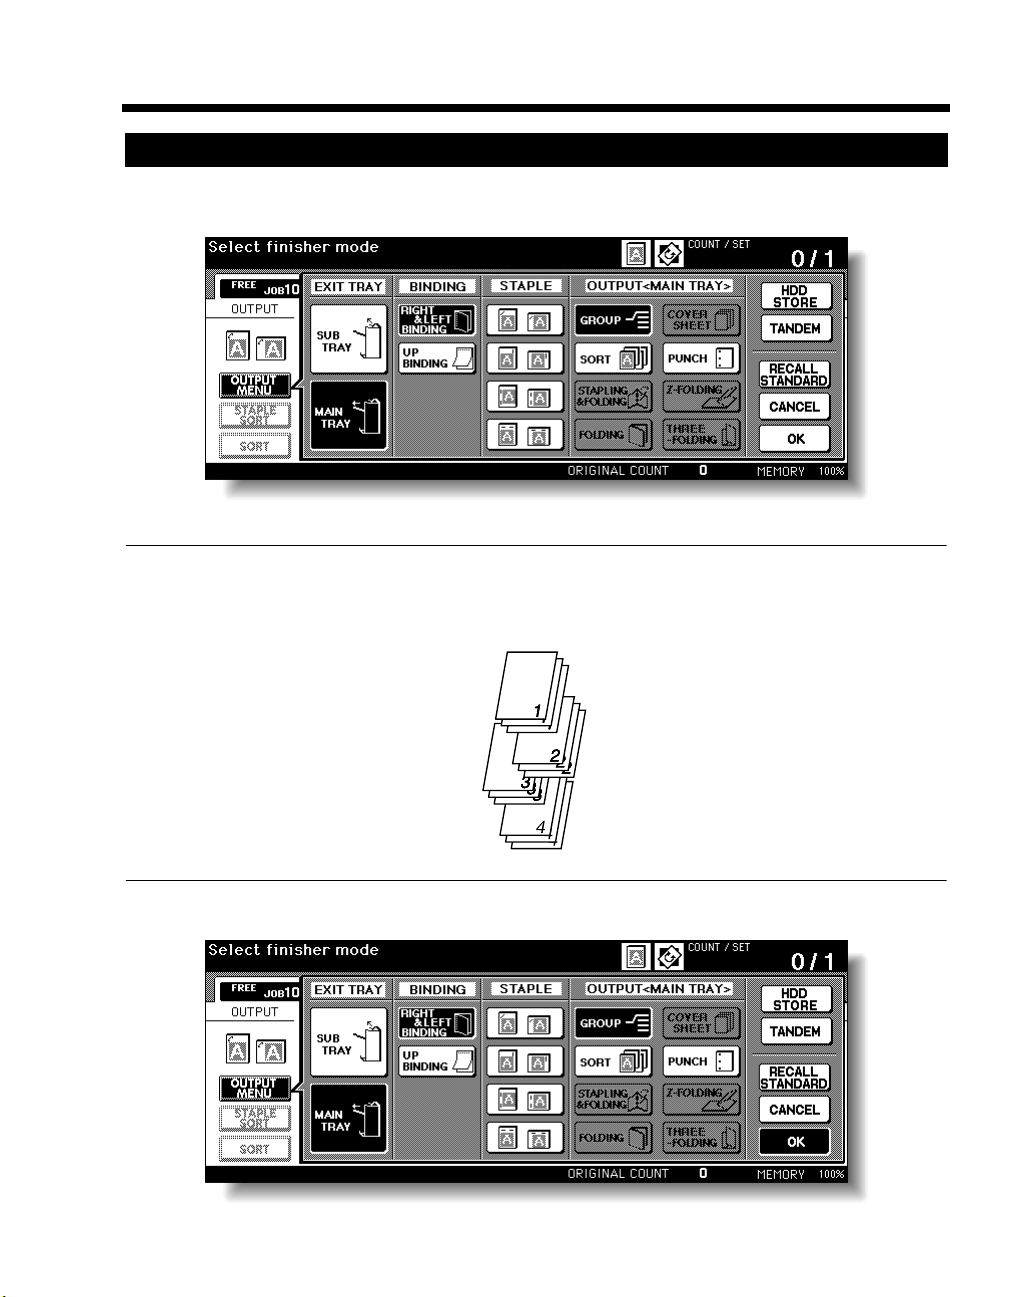
2. Making Output Settings
Group
Touch [OUTPUT MENU] and, on the Output Mode Screen that will then be displayed, touch
1
[GROUP] to select and highlight it.
4698P104EA
Useful Tip
Shift Grouping
The sorted copy stacks are stacked in the same dir ection, b ut in a sawtooth manner by shifting the tray
to the front or rear for each stack.
5
Touch [OK].
2
4002O063AB
4698P105EA
Page 10

6
2. Making Output Settings
Staple
Touch and highlight [STAPLE SORT] on the Basic Screen.
1
Touch [OUTPUT MENU] on the Basic Screen to display the Output Mode Screen.
2
4698P106EA
4698P116EA
Touch and highlight [MAIN TRAY] and then touch the desired staple position key.
3
4698P107EA
NOTE
When making copies in the Staple-Sort mode, make sure to load the originals into the EDH or place
the originals on the Platen Glass in the correct direction. ☞ p. 10
Page 11

2. Making Output Settings
Touch [OK].
4
Useful Tip
When making double-sided copies, select [RIGHT & LEFT BINDING] or [UP BINDING] under
[BINDING].
Staple position Binding mode
7
2
1
3
2
1
3
4698O015CA
3
1
2
1
2
Touch [SPECIAL ORIGINAL] on the Basic Screen and then touch and highlight the desired
5
original direction key.
3
1
2
1
2
3
3
4698P067CA
* For details of original directions, see “Specifying Original Direction,” Section 8, User Manual of
the copier.
Touch [OK].
6
Page 12

8
2. Making Output Settings
Punch
Touch [OUTPUT MENU] on the Basic Screen to display the Output Mode Screen.
1
Touch and highlight [MAIN TRAY] and then touch [P UNCH].
2
4698P101EA
4698P108EA
NOTES
•Paper size : A3, A4
• Copies are fed out onto the Primary (Main) Tray even when Punch is set in the Non-Sort mode.
• When making copies in the Punch mode, make sure to load the originals into the EDH or place the
originals on the Platen Glass in the correct direction. ☞ p. 11
Page 13

Touch and highlight the desired punch position key.
3
NOTE
2 Hold Punch Mode can be available.
Please contact your service repr esentative.
Touch [OK].
4
9
2. Making Output Settings
4698P109EA
Touch [SPECIAL ORIGINAL] on the Basic Screen and then touch and highlight the desired
5
original direction key.
4698P067CA
* For details of original directions, see “Specifying Original Direction,” Section 8, User Manual of
the copier.
Touch [OK].
6
Page 14

10
4698P018AA
4698O006AA
Stapling Position
4698P019AA
4698O036AA
Stapling Position
4698P020AA
4698O007AA
Stapling Position
4698P021AA
4698O008AA
Stapling Position
3. Loading the Originals
Staple
Note the correct direction of the originals if the copies are to be stapled in the Staple-Sort mode.
<Using the EDH> <Placing the Original on the Platen Glass>
Panel Original Placement
Stapling Position
4698P018AA
Stapling Position
Stapled at One PlaceStapled at Two Places
4698P019AA
Stapling Position
4698P020AA
Panel Original Placement
4698O003AA
Stapled at One PlaceStapled at Two Places
4698O035AA
4698O004AA
4698P021AA
Stapling Position
4698O005AA
Page 15

3. Loading the Originals
4698P122EA
4698P123EA
4698P124EA
Punch
Note the correct direction of the originals if the copies are to be punched using Punch.
<Using the EDH> <Placing the Original on the Platen Glass>
11
Panel Original Placement
Hole Positions
4698P122EA
4698O039EA
Hole Positions
4698P123EA
4698O043EA
Hole Positions
4698P124EA
4698O040EA
Panel Original Placement
Hole Positions
4698O041EA
Hole Positions
4698O044EA
Hole Positions
4698O042EA
Page 16

12
4. Adding Staples
The following message will appear when staples run out.
Replace the Staple Cartridge with a new one by following the procedure given below.
Replacing the Staple Cartridge
4698P110EA
Holding the Grip, slide the Finisher away
1
from the copier.
Open Right Door [H3].
2
H3
Open Right Door [FN7].
3
4698O017AA
4698O018AA
Turn the dial to the left to move the Staple
4
Unit toward the center.
Pull the Staple Cartridge out to the front.
5
Stapler #1
Stapler #2
4002O177AB
4002O178AA
FN7
4698O019AA
Page 17

13
10
11
4. Adding Staples
Pinch the portions of the Staple Cartridge
6
marked with “PUSH” to pop up the upper
part of the cartridge and remove the empty
staple clip.
Load a new staple clip in the Staple
7
Cartridge and return the upper part of the
cartridge back again.
Gently peel off the stopper seal.
4002O362AA
4002O363AA
Close Right Door [H3].
H3
4698O020AA
Slide the Finisher back against the copier.
4698O021AA
Insert the new Staple Cartridge until a click
8
is heard.
Close Right Door [FN7].
9
FN7
4002O182AA
4698O030AA
Page 18

14
5. When a Paper Misfeed Occurs
Misfeed Location Displays
If a paper misfeed occurs while the copier is running, the message “Mishandled paper” appears,
together with the specific location of the misfeed shown on the screen (misfeed location screen).
At this time, the Start key lights up orange, thus inhibiting the initiation of any new copy cycle until the
misfed paper is cleared properly.
4698P061CA
4698P062CA
Page 19

15
2
5. When a Paper Misfeed Occurs
Paper Misfeed Clearing Instructions Display
When a paper misfeed occurs, the corresponding misfeed location number or an arrow blinks or lights
up steadily. Touching [Illustration explanation] will display misfeed clearing instructions by means of
an illustration and messages. A blinking misfeed location number or arrow represents that the paper at
that particular location must first be cleared. Cl ear the misfed paper b y follo wing the instr uctions gi ven
by the message.
4698P063CA
How to Clear a Paper Misfeed
Holding the Grip, slide the Finisher away
1
from the copier.
4698O017AA
4698P064CA
Pull out the sheet of paper from the e xit po rt
of the copier.
4698O012AA
Page 20

16
5. When a Paper Misfeed Occurs
Opening Misfeed Clearing Guide [H1], pull
3
out the sheet of paper.
H1
Opening Misfeed Clearing Guide [H2], pull
4
out the sheet of paper.
Open Right Door [H3].
5
4698O022AA
H2
4698O023AA
Pull out the sheet of paper.
7
Close Misfeed Clearing Guide [H4].
8
4698O027AA
4698O028AA
H3
Open Misfeed Clearing Guide [H4].
6
H4
4698O018AA
4698O024AA
H4
Open Right Door [FN7].
9
4698O026AA
FN7
4698O019AA
Page 21

17
14
15
16
5. When a Paper Misfeed Occurs
Opening Misfeed Clearing Guide [FN8],
10
pull out the sheet of paper.
FN8
Close Right Door [FN7].
11
FN7
Close Right Door [H3].
12
4002O248AB
4698O030AA
Turn the two Knobs [FN5] at the same time
to feed the sheet of paper.
FN5
Close Front Door [FN4].
FN5
4002O250AB
FN4
4698O037AA
Open Top Cover [FN1].
H3
Open Front Door [FN4].
13
FN4
FN1
4698O025AA
4698O020AA
CAUTION
Metallic parts inside Misfeed Clearing
Guide [FN1] are very hot.
Do not touch anything but the paper to
prevent you from getting burned.
4002O249AB
Page 22

18
5. When a Paper Misfeed Occurs
Opening Misfeed Clearing Guide [FN2],
17
pull out the sheet of paper.
FN2
Opening Misfeed Clearing Guide [FN3],
18
pull out the sheet of paper.
FN3
4698O031AA
4698O029AA
Slide the Finisher back against the copier.
21
4698O021AA
Close Top Cover [FN1].
19
Opening Misfeed Clearing Guide [FN6],
20
pull out the sheet of paper.
FN6
FN1
4698O038AA
4002O254AB
Page 23

19
2
6. When the Number of Copies Fed into the Main T ray Reaches the Capacity of the Tray
When the number of copies fed into the Main Tray reaches the capacity of the tray, the following
message will appear and you will no longer be able to continue making copies.
4698P125EA
Tray Capacity
8.5” × 11” or smaller : Up to 3,000 copies (height : up to 14.8 in (375mm))
8.5” × 14” or larger : Up to 1,500 copies (height : up to 7.4 in (187.5mm))
NOTE
Depending on the type of paper and/or specific copying functions being used, the copier may stop
making copies even before the specified capacity is reached.
Remedial Procedure
Remove all copies from the Main Tray.
1
* This allows the copier to resume the copy
cycle.
NOTE
NEVER attempt to remove copies from the Main Tray in the middle of the current copy cycle.
If you do that, the copier may stop making copies even when the capacity of the tray is yet to be
reached.
If the copier does not restart the copy cycle,
open and close Front Door F4.
FN4
4698O051AA
Page 24

20
7. When a Staple Misfeed Occurs
How to Clear a Staple Misfeed
The following message will appear when a staple misfeed occurs.
Clear the staple misfed according to the procedure given below
4698P065CA
Holding the Grip, slide the Finisher away
1
from the copier.
Open Right Door [H3].
2
H3
4698O017AA
4698O018AA
Open Right Door [FN7].
3
FN7
Turn the dial to the left to move the Staple
4
Unit toward the center.
4698O019AA
4002O177AB
Page 25

21
9
10
11
7. When a Staple Misfeed Occurs
Pull the Staple Cartridge out to the front.
5
Stapler #1
Stapler #2
Push up the guide of the Staple Cartridge
6
and pull out one staple sheet.
Return the guide back to its original
7
position.
4002O178AA
4002O256AC
Close Right Door [FN7].
FN7
4698O030AA
Close Right Door [H3].
H3
4698O020AA
Slide the Finisher back against the copier.
Insert the Staple Cartridge until a click is
8
heard.
4002O257AB
4002O182AA
4698O021AA
NOTE
If the Finisher does not staple after clearing the
staple misfeed, call your Tech. Rep.
Page 26

22
8. Specifications
Finisher FN-113
Types of Trays Primary (Main) Tray, Secondary (Sub) Tray
Modes Non-Sort, Sort, Group, Staple-Sort, Punch
Kinds of Paper <Secondary (Sub) T ray>
Non-Sort : Plain paper (16 to 24 Ib), recycled paper
Special paper : Thick paper (24-1/4 to 53-1/4 Ib),
translucent paper, OHP transparencies
Hole Punch: Plain paper (16 to 24 Ib), recycled paper
<Primary (Main) Tray>
Sort/Group : Plain paper (16 to 53-1/4 Ib), recycled paper
Staple/Punch : Plain paper (16 to 24 Ib), recycled paper
Paper Size <Secondary (Sub) Tray>
Face-up exit : 5.5” × 8.5”, 5.5” × 8.5”R, 8.5” × 11”, 8.5” × 11”R,
7.25” × 10.5”, 7.25” × 10.5”R, 8.5” × 14”, 11” × 17”,
Wide size
Face-down exit : 8.5” × 11”, 8.5” × 11”R, 7.25” × 10.5”, 7.25” × 10.5”R,
8.5” × 14”, 11” × 17”, Wide size
*Paper of nonstandard sizes can only be fed to the Secondary (Sub) Tray.
<Primary (Main) Tray>
8.5” ×11”, 8.5” × 11”R, 7.25” × 10.5”, 7.25” × 10.5”R, 8.5” × 14”, 11” × 17”,
Wide size
Capacity <Secondary (Sub) Tray>
Plain paper (20 Ib), recycled paper : Up to 250 sheets; height up to
1.4 in (36mm)
Special paper : Thick paper 20 sheets,
translucent paper 20 sheets,
OHP transparencies 20 sheets
; height up to 1.4 in (36mm)
<Primary (Main) Tray>
Plain paper (20 Ib), recycled paper : 8.5” × 11” or smalle r, up to 3 , 00 0 s he e ts
; height up to 14.8 in (375mm)
: 8.5” × 14” or larger, up to 1,500 sheets
; height up to 7.4 in (187.5mm)
Stapling Acceptable paper size : 8.5 ” × 11”, 8.5” × 11”R, 7.25” × 10.5”,
7.25” × 10.5”R, 8.5” × 14”, 11” × 17”
Acceptable number of sheets to be stapled : 2 to 50
Punching Number of holes : 3 Hole (Default setting)
*2 Hole Punch Mode can be available .
Please contact your service representative.
Acceptable paper size : 8.5 ” × 11”, 11” × 17” (3 Hole)
8.5” × 11”R, 8.5” × 14” (2 Hole)
Amount of Shift Approx. 1.25 in (30mm)
Power Source Supplied from copier
Power Consumption 71W or less
Dimensions Width : 25.8 in (656mm) Depth : 25.1 in (637mm) Height : 37.1 in (943mm)
Weight 107 Ib (48.5kg)
Accessories Staple Cartridge : 5,000 staples/cartridge × 2 pieces
Page 27

Page 28

2001 MINOLTA CO., LTD.
The information contained in this manual
is subject to change without notice to
incorporate improvements made on the
product or products the manual covers.
Copyright
2002. 5 7664-4698-02
3-13, 2-chome, Azuchi-Machi, Chuo-ku, Osaka. 541-8556, Japan
MINOLTA CO., LTD.
 Loading...