

Page 1

7664-4692-21
Printer Driver
Pi5501
Operator's Manual
for Microsoft Windows 95
for Microsoft Windows 98
for Microsoft Windows 2000
for Microsoft Windows NT 4.0
®
®
®
®
Page 2

Welcome
Thank you for purchasing the controller.
This Operator’s Manual explains how to run print cycles on the machine, to which
the controller is connected. It also gives precautions that you should review before
attempting to actually use the controller. So, first read this manual carefully and
thoroughly; then, keep it close at hand so you can refer to it whenever it becomes
necessary.
When operating the controller and machine, follow the instructions given in this
manual and in the one for the machine. Do not attempt to touch any part that is not
covered in these manuals. Never attempt to disassemble or remodel any pieces of
equipment, either, to prevent possible hazardous conditions.
Some of the screens shown in this manual may look different from what you will
view in actual applications.
Trademark Acknowledgments
Minolta is a registered trademark of MINOLTA CO., LTD.
Apple, Macintosh and True Type are registered trademark s of Appl e Computer, Inc.
Microsoft, Windows 95, Windows 98, Windows 2000 and Windows NT 4.0 are
registered trademarks of Microsoft Corporation.
IBM and PC/AT are registered trademarks of International Business Machines
Corporation.
PCL is a registered trademark of Hewlett-Packard Company.
All other products or brand names are trademarks or registered trademarks of their
respective companies or organizations.
Adobe, Post Script and the Post Script logo are trademarks of Adobe Systems
Incorporated.
i
Page 3
ii
For the U.S.A. Users
FCC Part 15-Radio Frequency Devices
WARNING
This equipment has been tested and found to comply with the limits for a Class
A digital device, pursuant to Part 15 of the FCC Rules. These limits are
designed to provide reasonable protection against harmful interference when
the equipment is operated in a commercial environment. This equipment
generates, uses, and ra diate radio f requenc y ener gy an d if no t install ed and us ed
in accordance with the instruction manual, may cause harmful interference to
radio communications.
Operation of this equipment in a residential area is likely to cause harmful
interference in which case the user will be required to cor rect the interference at
his own expense.
The design and production of this unit conform to FCC regulations, and any
changes or modifications must be registered with the FCC and are subject to
FCC control. Any changes made by purchaser or user without first contacting
the manufacturer will be subject to penalty under FCC regulations.
FCC-F02
This device must be used with shielded interface cables. The use of nonshielded cables is likely to result in interference with radio communications and
is prohibited under FCC rules.
For Canada Users
Interference-Causing Equipment Standard (ICES-003 Issue 3)
This Class A digital apparatus complies with Canadian ICES-003.
Cet appareil numérique de la classe A est conforme à la norme NMB-003 du
Canada.
IC-F03
Page 4
Only for the area of the European Union.
CE Marking (Declaration of Conformity)
This product complies with the following EU directives:
89/336/EEC, 73/23/EEC and 93/68/EEC directives.
This declaration is valid for the area of the European Union.
This device must be used with shielded interface cables. The use of non-shielded
cables is likely to result in interference with radio communications and is
prohibited under EU directives.
Other countries
WARNING
This is a Class A product. In a domestic environment this product may cause
radio interference in which case the user may be required to take adequate
measures.
This device must be used with shielded interface cables. The use of nonshielded cables is likely to result in interference with radio communications and
is prohibited under CISPR 22 rules and local rules .
iii
Page 5

iv
Contents
Chapter1 Before Using the Controller
1. Features of the Controller
Features of the Controller ................................................ p.1-2
Administrative Functions ................................................. p.1-6
2. Configuration
Configuration ................................................................... p.1-7
3. Connecting the Controller
Connecting the Controller ................................................ p.1-8
4. Settings Made on the Machine
Priority Device ........................................... ..... ...... ........... p.1-9
On Line / Ready ............................................................... p.1-9
5. Installing th e Printer Drivers
Installing Various Printer Drivers .................................... p.1-10
Chapter2 Installing the Printer Driver
1. Windows 95/98
Operating Environment .................................................... p.2-2
Installation ........................................................................ p.2-3
Test Print ............................. ...... ..... .................................. p.2-9
Making General Settings Before Using the Printer ......... p.2-10
Displaying a Property Sheet ............................................. p.2-11
“General” Property Sheet ................................................. p.2-13
“Details” Property Sheet .................................................. p.2-14
“Color Management” Property Sheet .............................. p.2-15
“Sharing” Property Sheet ................................................. p.2-16
“--> 32-Bit SuperDriver Setup” Property Sheet .............. p.2-17
2. Windows 2000
Operating Environment .................................................... p.2-18
Installation ........................................................................ p.2-19
Test Print ............................. ...... ..... .................................. p.2-26
Making General Settings Before Using the Printer ......... p.2-27
Displaying a Property Sheet ............................................. p.2-28
“General” Property Sheet ................................................. p.2-30
“Sharing” Property Sheet ................................................. p.2-31
“Ports” Property Sheet ..................................................... p.2-32
“Advanced” Property Sheet ............................................. p.2-33
“Color Management” Property Sheet .............................. p.2-34
“Security” Property Sheet ................................................ p.2-35
“Processing” Property Sheet ............................................ p.2-36
3. Windows NT4.0
Operating Environment .................................................... p.2-37
Page 6

Installation ........................................................................ p.2-38
Test Print ............................. ...... ..... .................................. p.2-44
Making General Settings Before Using the Printer ......... p.2-45
Displaying a Property Sheet ............................................. p.2-46
“General” Property Sheet ................................................. p.2-48
“Ports” Property Sheet ..................................................... p.2-49
“Scheduling” Property Sheet ........................................... p.2-50
“Sharing” Property Sheet ................................................. p.2-51
“Security” Property Sheet ................................................ p.2-52
“Processing” Property Sheet ............................................ p.2-53
Chapter3 Property Sheets
1. Property Sheets
Description of Each Property Sheet ................................. p.3-2
2. “Device Options Setting” Property Sheet
Functions of the “Device Options Setting” Property
Sheet ................................................................................. p.3-4
“Mailbox Setting” Dialog Box ......................................... p.3-6
3. Functions that are Common to Various Property Sheets
Functions that are Common to Various Property Sheets . p.3-7
Functions of the “Save Easy Set Name” Dialog Box ...... p.3-8
4. “Setup” Property Sheet
Functions of the “Setup” Property Sheet ......................... p.3-9
Functions of the “Watermark” Dialog Box ...................... p.3-13
Functions of the “Detail of Paper Source” Dialog Box ... p.3-16
Functions of the “Detail Of Output Setting” Dialog Box p.3-18
5. “Paper ” Property Sheet
Functions of the “Paper” Property Sheet ......................... p.3-21
Functions of the “Edit Custom Paper” or “Custom Paper”
Dialog Box ....................................................................... p.3-24
6. “Quality” Property Sheet
Functions of the “Quality” Property Sheet ...................... p.3-27
Functions of the “Halftoning” Dialog Box ...................... p.3-30
7. “Job Management” Property Sheet
Functions of the “Job Management” Property Sheet ....... p.3-31
8. “PostScript” Property Sheet
Functions of the “PostScript” Property Sheet .................. p.3-33
Functions of the “Font Substitution Table” Dialog Box .. p.3-35
Functions of the “Send Fonts As” Dialog Box ................ p.3-36
Functions of the “Advanced PostScript” Dialog box ....... p.3-37
9. “Conflicts” Dialog Box
v
Contents
Page 7

vi
Contents
Functions of the “Conflicts” Dialog Box ......................... p.3-38
Chapter4 Convenient Functions
1. Convenient Functions
Convenient Functions ...................................................... p.4-2
2. Printing on Both Sides of the Paper
Overview .......................................................................... p.4-3
Procedure ......................................................................... p.4-3
3. Printing More than One Copy at a Time
Overview .......................................................................... p.4-6
Procedure ......................................................................... p.4-6
4. Specifying N-up Printing
Overview .......................................................................... p.4-8
Procedure ......................................................................... p.4-8
5. Printing in Reduced/Enlarged Size
Overview .......................................................................... p.4-10
Procedure ......................................................................... p.4-10
6. Printing Pages with Watermarks
Overview .......................................................................... p.4-13
Procedure ......................................................................... p.4-13
7. Specifying Booklet Printing
Overview .......................................................................... p.4-16
Procedure ......................................................................... p.4-16
8. Printing Pages with a Distribution Number
Overview .......................................................................... p.4-18
Procedure ......................................................................... p.4-18
9. Using the Copy Track Function
Overview .......................................................................... p.4-20
Procedure ......................................................................... p.4-20
10. Printing on OHP Transparencies
Overview .......................................................................... p.4-22
Procedure ......................................................................... p.4-22
11. Adding a Cover to Each Copy Set
Overview .......................................................................... p.4-25
Procedure ......................................................................... p.4-25
12. Using the Lock Job (Print PC Confidential) Function
Overview .......................................................................... p.4-28
Procedure on the Printer Driver Side ............................... p.4-28
Procedure on the Machine Side (Unlocking a Job) .......... p.4-30
Procedure on the Machine Side (Deleting a Job) ............. p.4-32
13. Using the Folding Function
Page 8

Overview .......................................................................... p.4-34
Procedure ......................................................................... p.4-34
14. Using the Settings Function
Overview .......................................................................... p.4-38
Procedure ......................................................................... p.4-38
15. Confirming that the data has been transferred to
the machine
Overview .......................................................................... p.4-44
Procedure ......................................................................... p.4-44
Chapter5 Troubleshooting
1. Troubleshooting
Unable to Print ................................................................. p.5-2
Unable to Make Correct Settings /
Unable to Print Exactly as Set .......................................... p.5-5
Poor Print Quality ............................................................ p.5-9
Error List .......................................................................... p.5-10
Appendix A
1. Function Combination Matrix
Function Combination Matrix .......................................... p.A-2
2. Number of registrations
Number of registrations/Usable range for Easy Set ......... p.A-5
Number of registrations/Usable range for Watermark ..... p.A-6
Number of re gistrations/Usable range for Custom
Paper ................................................................................. p.A-7
3. Preview Listing
[Page Layout] ................................................................... p.A-8
[Printer Figure] ................................................ ...... ...... ..... p.A-12
[Setting Preview] .............................................................. p.A-13
4. Specific ations
Specifications for machine body ...................................... p.A-16
Accessories ....................................................................... p.A-22
vii
Contents
Appendix B
Appendix C
1. Glossary
Glossary ........................................................................... p.B-2
1. INDEX
INDEX ............................................................................. p.C-2
Page 9
viii
Naming of Equipment and Functions
Naming of Equipment and Functions
Different names are used between the controller and the machine to identify the
same piece of equipment or the same function. Note the following.
Equipment Names
Controller Machine
Tray
Dup+2way Tray
Dup+LCC
Duplex Cabinet
Multi-staple Finisher
Single-staple Finisher
Folding Finisher
Hard Disk Drive in Copier
Manual Feed
LCT
Function Names
N-up
Booklet Left Binding
Booklet Right Binding
Drawer
2Way Paper Feed Cabiet
Large Capacity Cabinet
Duplexing Paper Feed Cabinet
Finisher FN-105
Finisher FN-106
Finisher FN-5
Hard Disk Drive Kit HDD-1
Intelligent Multi Bypass Tray
Large Capacity Cassette C-306
Large Capacity Cassette C-306L
Controller Machine
N in 1
Standard Book
Right Bound
Page 10

Chapter 1
Before Using the Controller
1-1
Chapter 1
Before Using the Controller
Page 11
1-2
1. Features of the Controller
Features of the Controller
The controller is an image controller designed to use the machine as a printer,
Chapter 1
allowing you to print documents directly to the machine from a computer to which
the controller is connected. The printer driver, which is used during printing, is
equipped with various functions that make the most out of the features of the
machine. They enable you to use the same functions as those offered by the
machine. When actually running a print cycle, you can specify various functions of
the machine on your computer screen.
NOTE
• When using the controller, be sure to set the machine to the On Line state.
• Some functions of fered by the machine cannot be combined, such as St ap le an d
Before Using the Controller
Hole-Punch, and some other s may not be used because of a paper siz e invol ved.
The functions that cannot be selected appear dimmed.
Further, if functions that are incompatible with each other are specified, the
Conflicts dialog box will appear, prompting you to change the settings. When
this dialog box appears, check the details and reselect the functions to ensure
function compatibility.
• Some settings, which are defied by the machine for the restricted combinations
of different functions, can at times be accepted by the printer driver. If a print
command is issued from the personal computer with such settings made, the
machine does not produce the output correctly or abandons the job to produce
nothing. Make sure that you make correct settings.
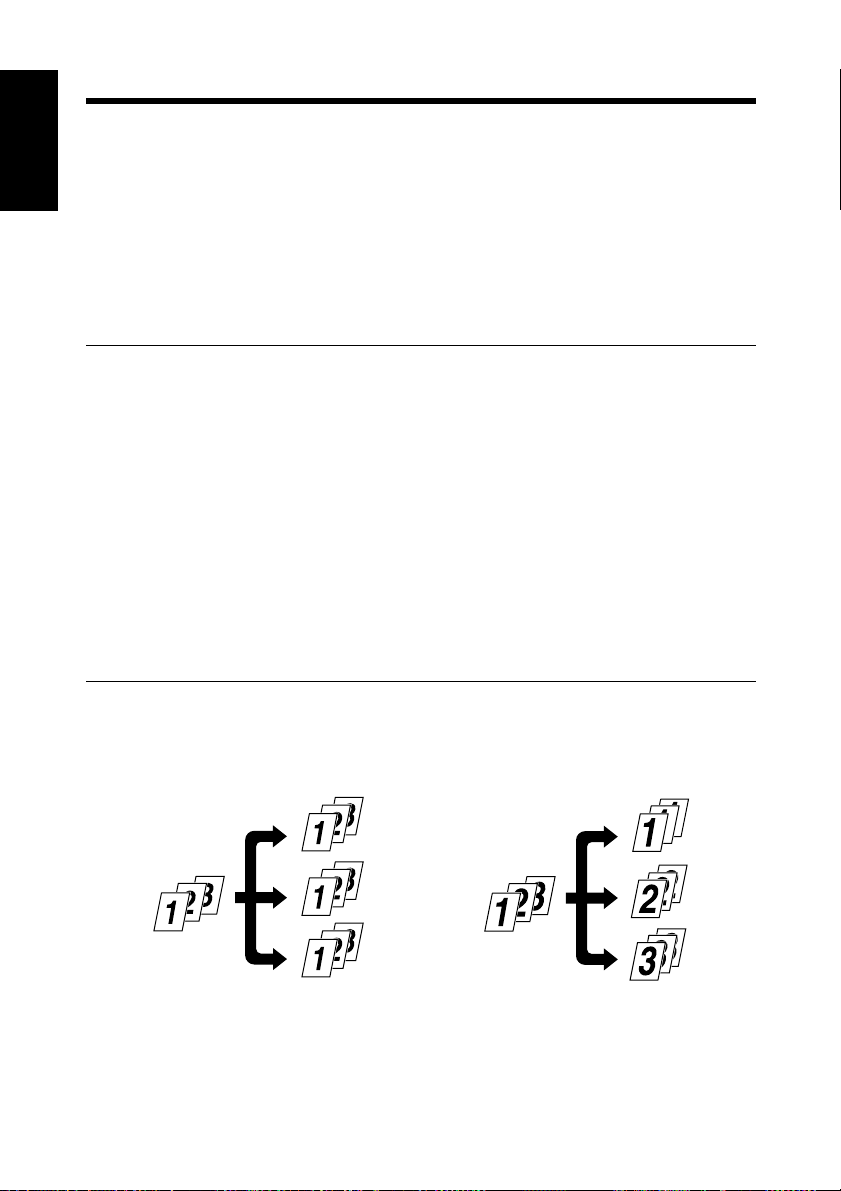
Various Printing Functions
• Makes prints that are sorted into complete s e ts of the originals or grouped into
uncollated groups, each containing prints of one original. ☞p.3-22
4608O006AA
4608O007AA
Page 12
1. Features of the Controller
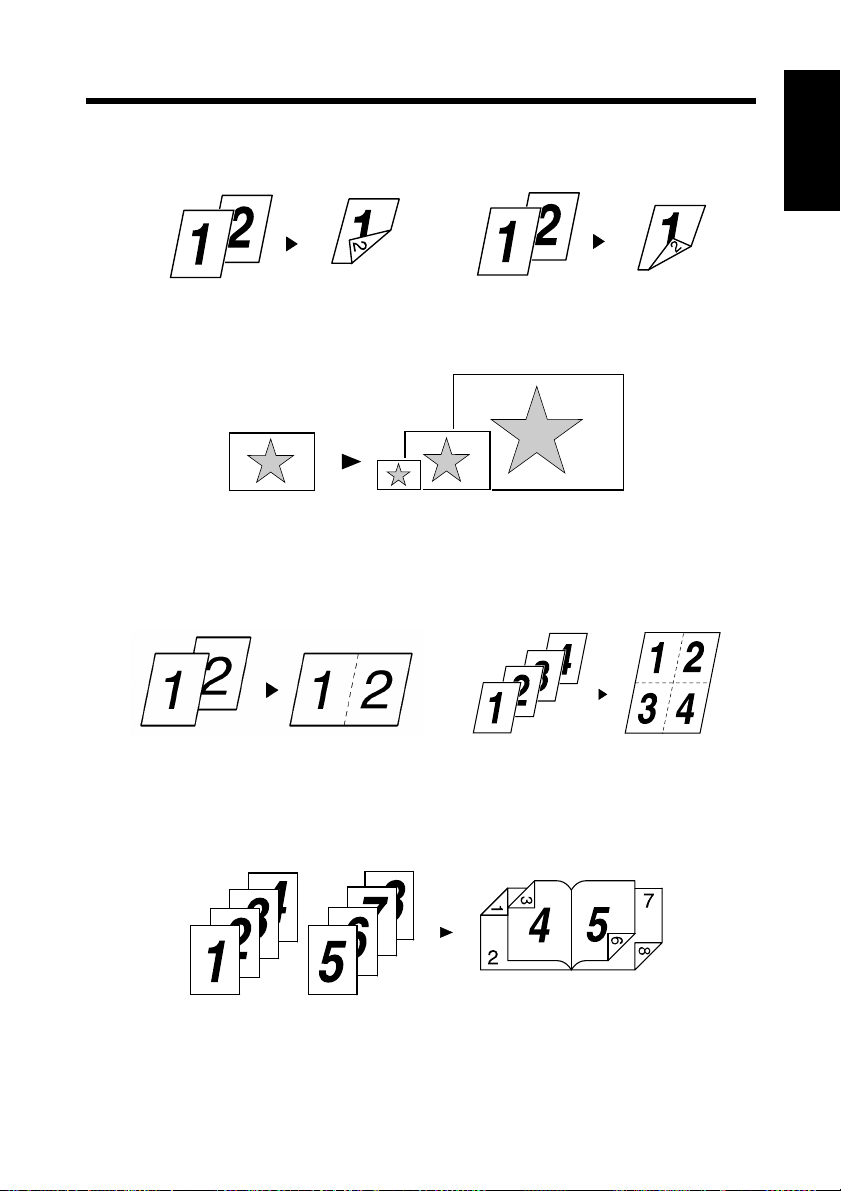
• Prints two pages of originals on both front and back sides of a single sheet of
paper. ☞p.3-10
1-3
Chapter 1
4608O008AA
Long Edge Binding
Short Edge Bi nding
4608O009AA
• Enlarges or reduces the image on the original. ☞p.3-22
1149O004AA
• Prints two pages or four pages of originals on a single sheet of paper.
Maximum of 16 pages of originals can be printed on a single sheet of paper.
☞p.3-9
2up
1155O007AA
4up
4668O001AA
• Prints four pages of originals to both front and back sides of a single sheet of
paper. ☞p.3-10
Before Using the Controller
4608O011AB
Page 13
1-4
1. Features of the Controller
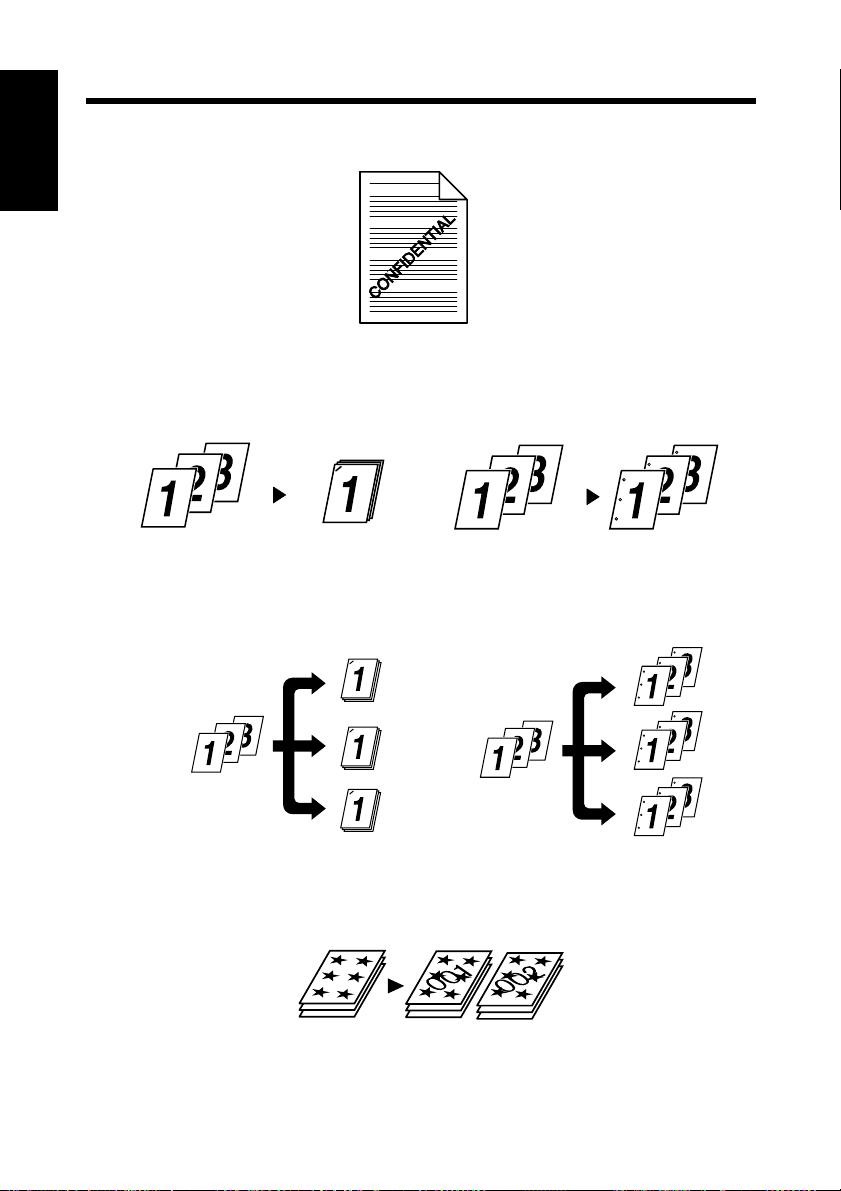
• Places text in the background. ☞p.3-10
Chapter 1
4608O001AA
• Makes prints of complete sets o f the o rigin als, stapled together or punched for
filing. ☞p.3-12
Before Using the Controller
4668O002AA 4608O013AA
By combining Collate with other finishing capabilities, you can make complete
sets of documents for immediate delivery without having to do any further
processing.
4668O003AA
4608O015AB
• Adds a reference number (Distribution Number) to each document set during
printing. ☞p.3-32
1166O114AA
Page 14
1-5
1. Features of the Controller
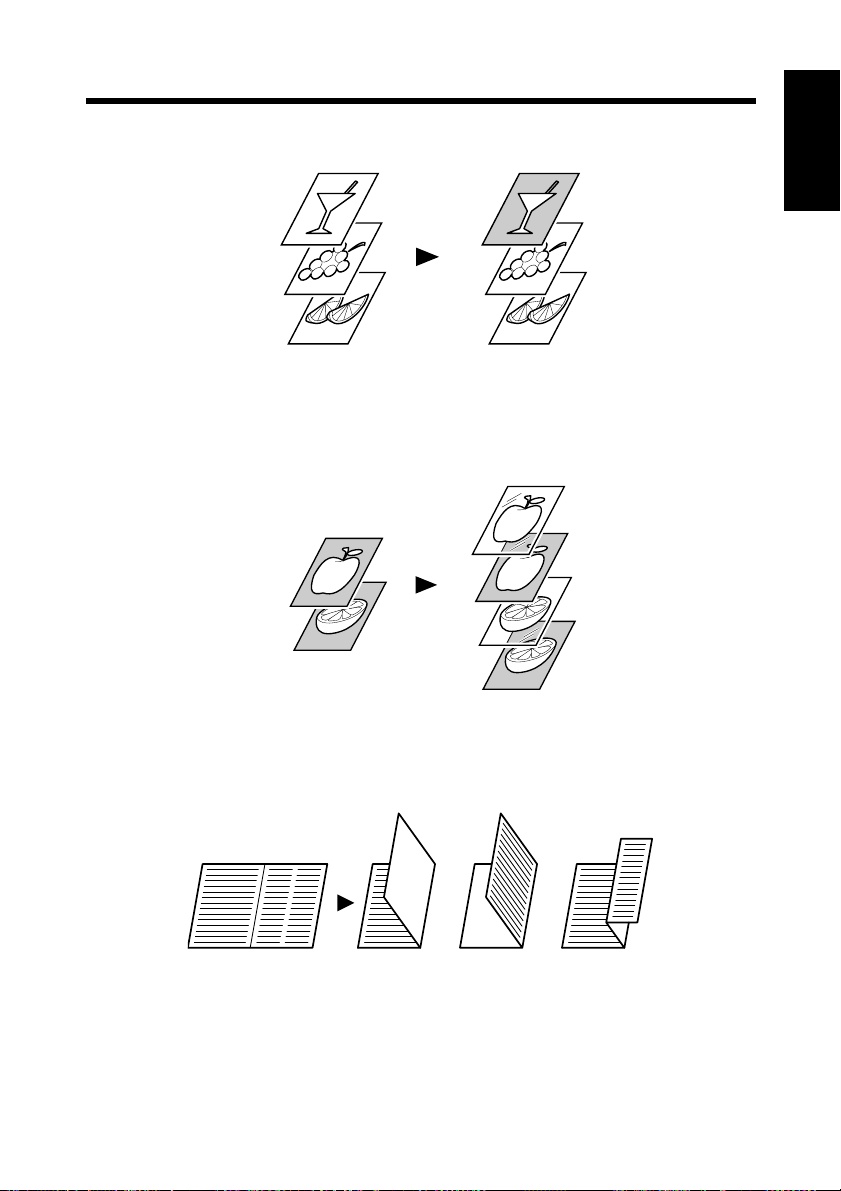
• Prints only the cover on a different type of paper (such as colored paper). ☞p.3-11
1149O013AA
• Capable of printing on OHP transparencies. You can also insert interleaves, either
blank or printed with the same contents as those on the OHP transparencies.
☞p.3-11
Chapter 1
Before Using the Controller
• Folds copies during finishing. ☞p.3-18
1149O017AA
Half Folding Z-FoldingCrease
4002O021AA
Page 15

1-6
1. Features of the Controller
Administrative Functions
• Different accounts can be managed for printing records, just as when using the
Chapter 1
Before Using the Controller
machine as a copier.
• Printing of confidential documents may be withheld until a legitimate password is
entered on the machine.
Page 16
2. Configuration
Configuration
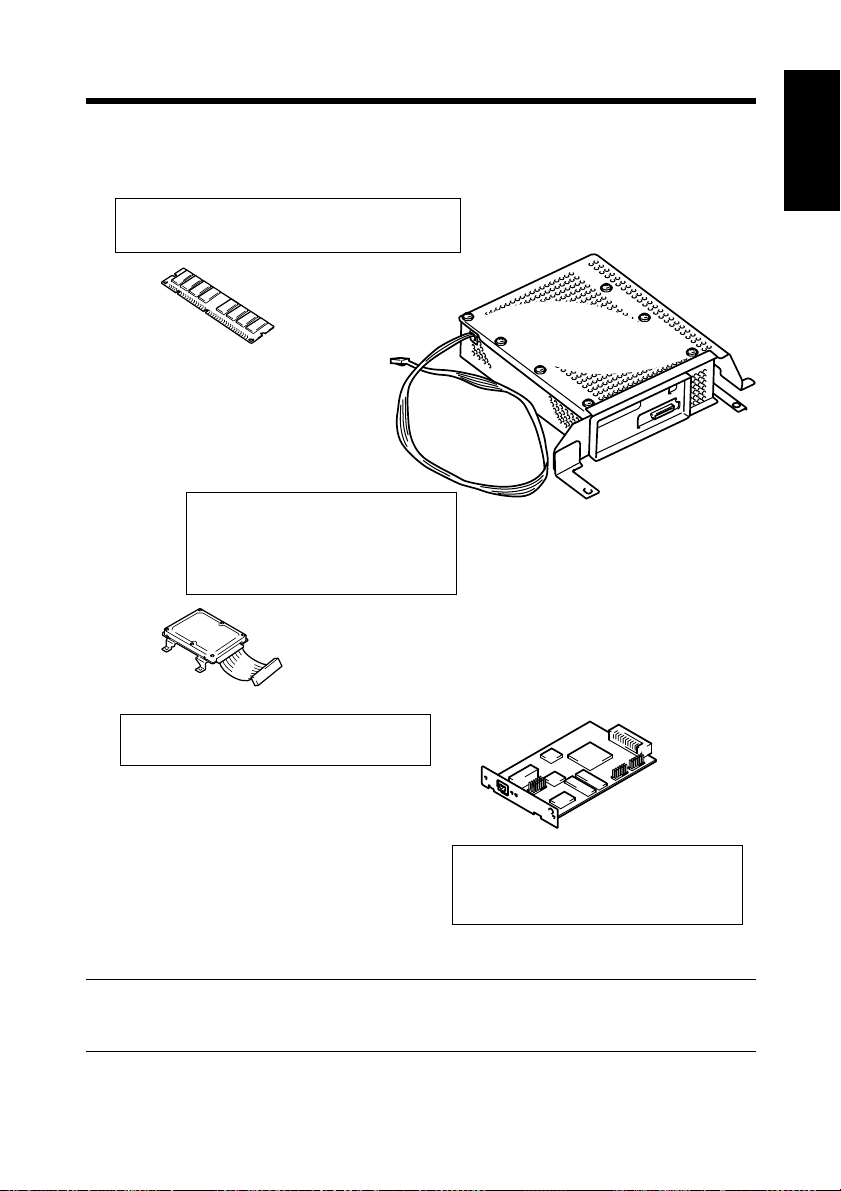
The controller may be configured with the following options.
Memory (64MB/128MB, Option)
Expands the memory capacity of Pi5501.
4608O018AA
Controller
Allows you to use the machine
as a printer controlled by your
personal computer.
1-7
Chapter 1
Before Using the Controller
4692O001AA
4608O017AA
Hard Disk Drive (Option)
For downloading PS fonts
NIC Board (Option)
Allows you to use the m achine as a
printer in a network environment.
NOTE
The NIC Board must be mounted to use the scanner functions.
10/100BaseT
4668O005AA
Page 17
1-8
3. Connecting the Controller
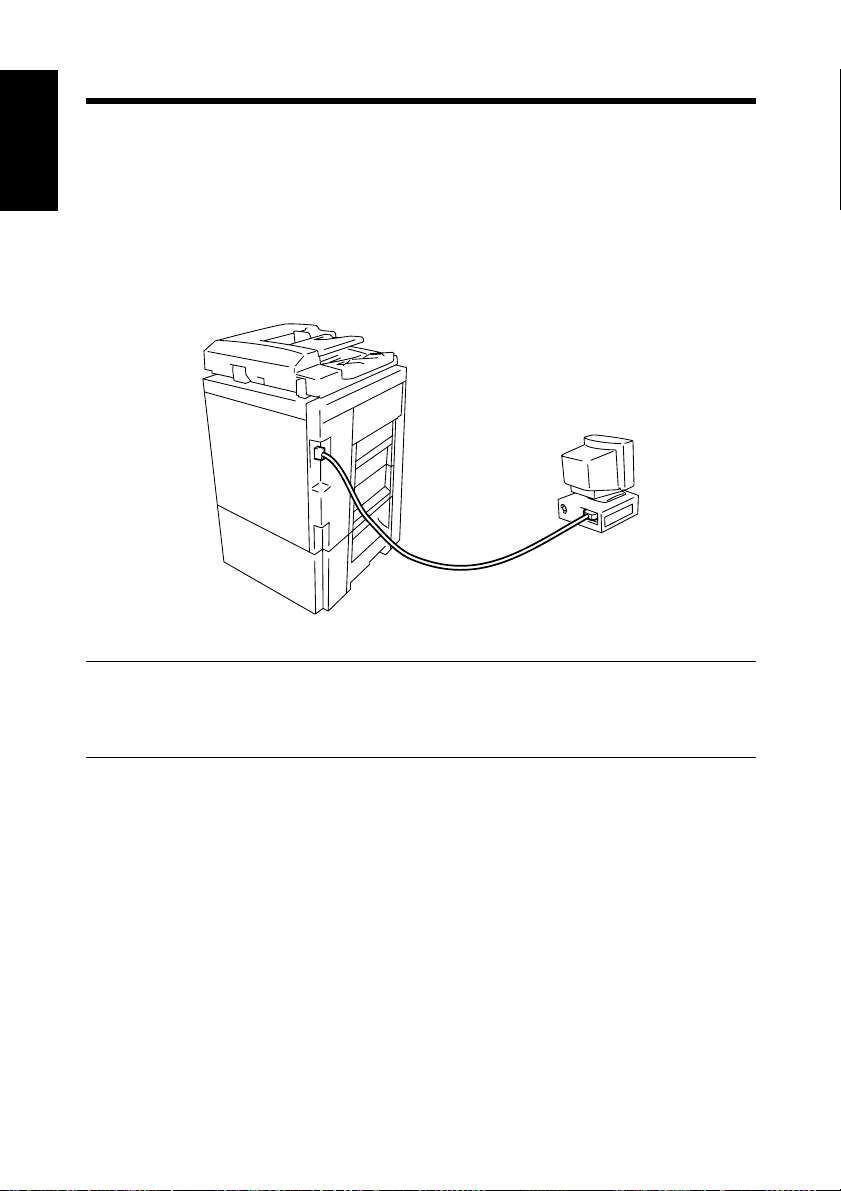
Connecting the Controller
The controller is installed inside the machine. The installation procedures are to be
Chapter 1
performed by service personnel.
The controller is connected to the computer by a printer cable or network cable.
Power to the controller is supplied from the machine.
Before Using the Controller
4692O002AB
TIP
If you cannot print from your computer, make sure that the printer cable or
network cable is connected to the corresponding connectors.
Page 18

1-9
4. Settings Made on the Machine
The following functions must be set on the machine using its Utility Mode, as they
relate to the controller.
Priority Device
Select the priority use of the machine, either as a copier or printer.
Copier: The machine is used as a copier.
The machine starts the print c ycle only after it has recei ved the entire data of
a particular print job.
The machine can be used for copying, since it starts printing only after it
has received the entire data of the job for printing. This means that more
time is available to you for copying, but you have to wait for a longer time
before a particular print job is done.
Printer: The machine is used as a printer.
The machine starts the print cycle before it completes receiving the entire
data of a particular print job.
On receiving the d ata for one page, the machine starts printing, accepting n o
other job for copying. This means that less time is available to you for
copying, but you do not have to wait long before a particular print job is
done.
Chapter 1
Before Using the Controller
On Line / Ready
On Line key
This function is the same as that available in ordinary printers as On Line/
Off Line.
Select On Line normally.
A lit lamp indicates that the machine is in the On Line mode.
Ready Lamp
Data can be transferred while this lamp stays lit up.
The lamp remains blinking while data is being transferred.
Page 19

1-10
5. Installing the Printer Drivers
Installing Various Printer Drivers
To make 100% use of the functions offered by the machine mounted with the
Chapter 1
controller, install the attached printer drivers in your computer. The controller is
furnished with the following printer drivers:
• PCL6 printer driver for Windows 95
• PCL6 printer driver for Windows 98/2000
• PCL6 printer drive for Windows NT4.0
• PS printer driver for Windows 95/98
• PS printer driver for Windows 2000
• PS printer driver for Windows NT4.0
• PPD file for Macintosh
• PS print utility for Linux
Before Using the Controller
(Redhat, SuSE, Turbo, Open)
Install the printer driver suitable for the operating system that runs on your
computer. For installation procedures, see the relevant page as detailed below:
Installing the Windows printer driver:
Windows 95/98 ☞p.2-2
Windows 2000 ☞p.2-18
Windows NT4.0 ☞p.2-37
Installing the Macintosh PPD file:
See the Operator’s Manual for Macintosh.
Installing the Linux print utility:
See the Operator’s Manual for Linux.
Page 20

Chapter 2
2-1
Chapter 2
Installing the Printer Driver
Installing the Printer Driver
Page 21

2-2
1. Windows 95/98
Operating Environment
This section explains the required environment for the printer driver.
Before installing the printer driver, check that your computer meets the following
requirements. If it doesn’t, the printer driver may not function properly.
Personal computer
Operating system Windows 95 (English) or Windows 98
Chapter 2
Memory 64MB or more
I/O interface
Free space on hard disk 10MB or more (PCL6)
• Windows 2000
Installing the Printer Driver
For the operating environment and installation procedure for the Windows 2000
printer driver, see p.2-18.
• Windows NT 4.0
For the operating env ironment and installation procedu re for the W i ndo ws NT 4.0
printer driver, see p.2-37.
Parallel
Network 10/100BaseT (UTP)
IBM PC or compatible with Pentium
200MHz or higher CPU
(English)
Centronics interface
(Conforming to IEEE1284)
2MB or more (PS)
Page 22
1. Windows 95/98
Installation
This section explains the installation procedure for the Windows 98 printer driver.
NOTE
Before starting to install the printer driver, be sure first to quit all other
applications.
TIP
The following procedure assumes that the machine is a Di550 and that the
printer driver is PCL6: Read the specific proper names accordingly if the
machine is a model other than the Di550 and if, for example, the OS is Windows
95 and the printer driver is PS.
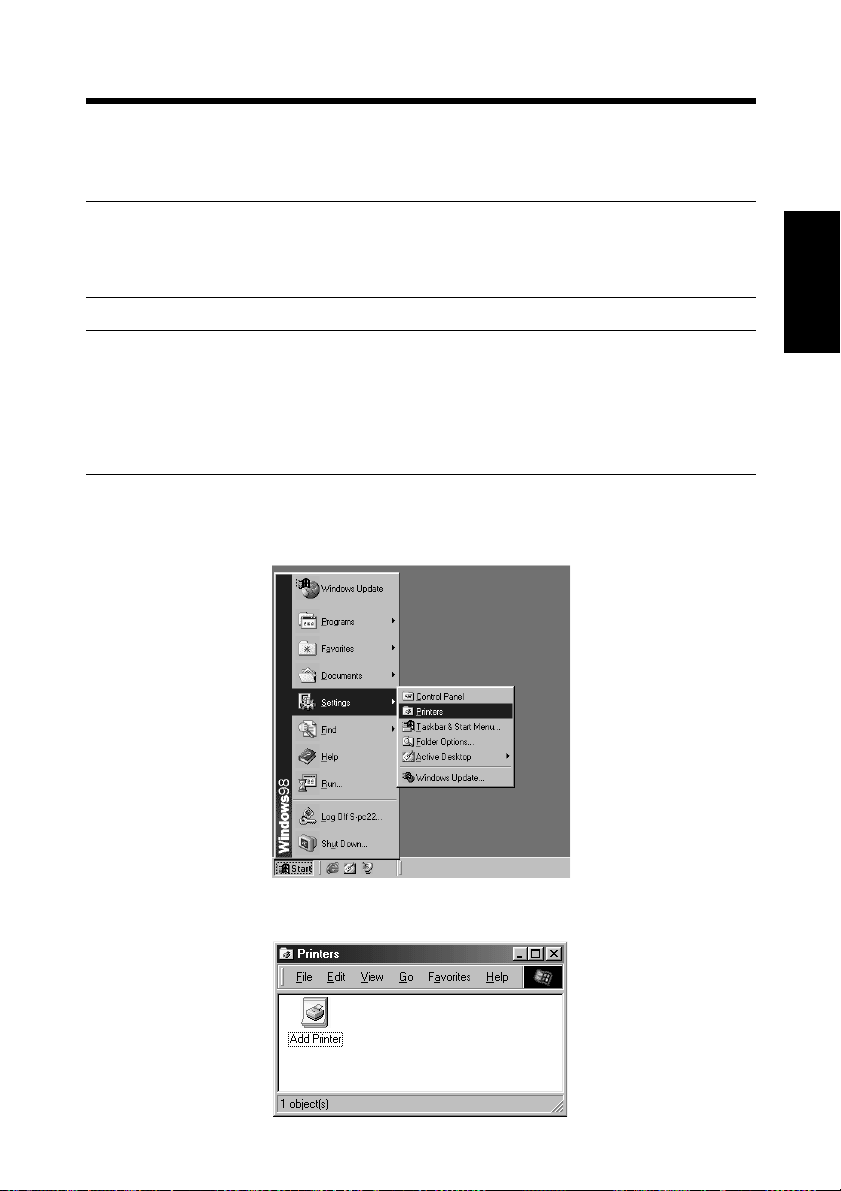
1. Click the [Start] button. From the menu that appears, select “Settings,” then
click “Printers.”
2-3
Chapter 2
Installing the Printer Driver
4668P001CA
2. The Printers window will appear. Double-click the “Add Printer” icon.
4668P002CA
Page 23
2-4
1. Windows 95/98
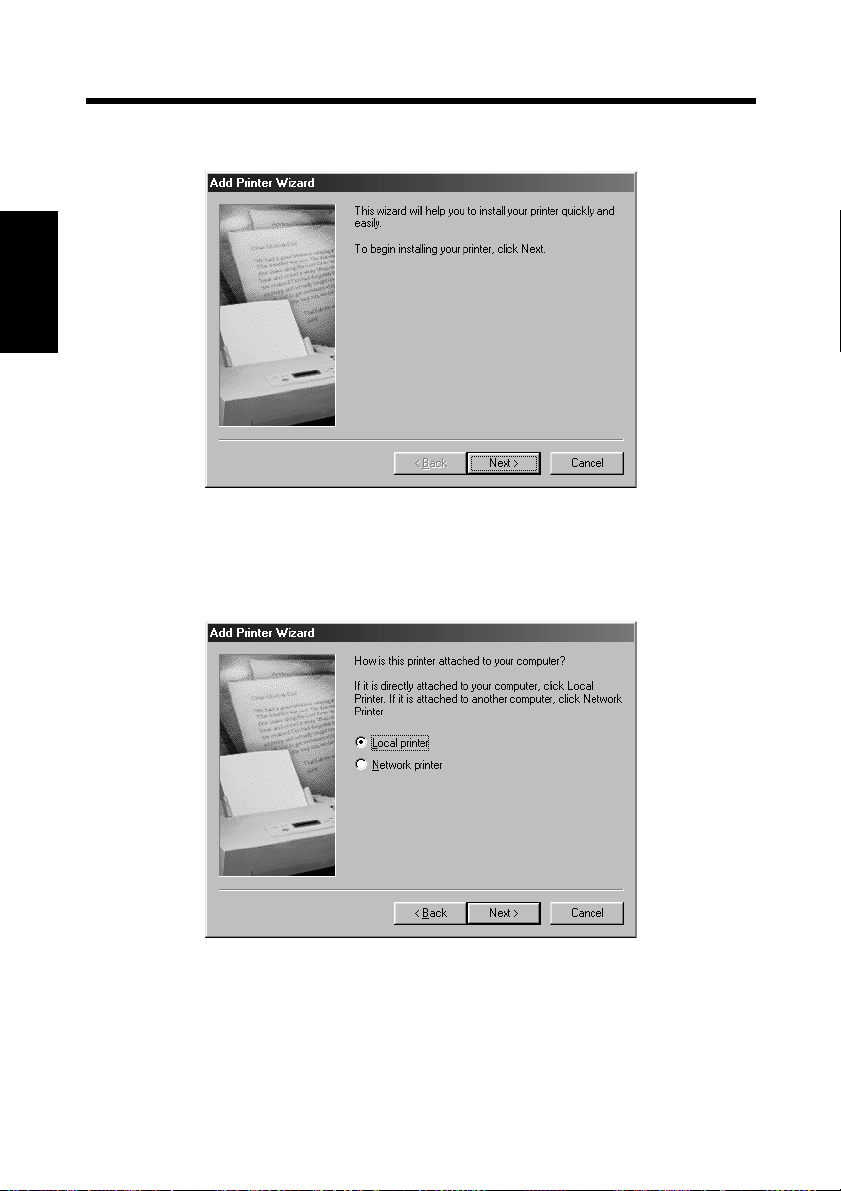
3. The “Add Printer Wizard” will appear. Click the [Next>] button.
Chapter 2
4. A window will appear, asking how the printer is to be connected.
If your computer is directly connected to the machine, select “Local printer” and
Installing the Printer Driver
then click the [Next>] button.
4668P003CA
4668P004CA
Page 24
1. Windows 95/98
NOTES
• When installing the printer driver in a computer connected to the mac hine via a
network, be sure to consult the network administrator.
• This is a request to be made of the network administrator. To install the printer
driver in a computer connected to a network, select “Network printer” and
click the [Next] button. Then, a window will appear prompting you to enter the
network path: Enter the path.
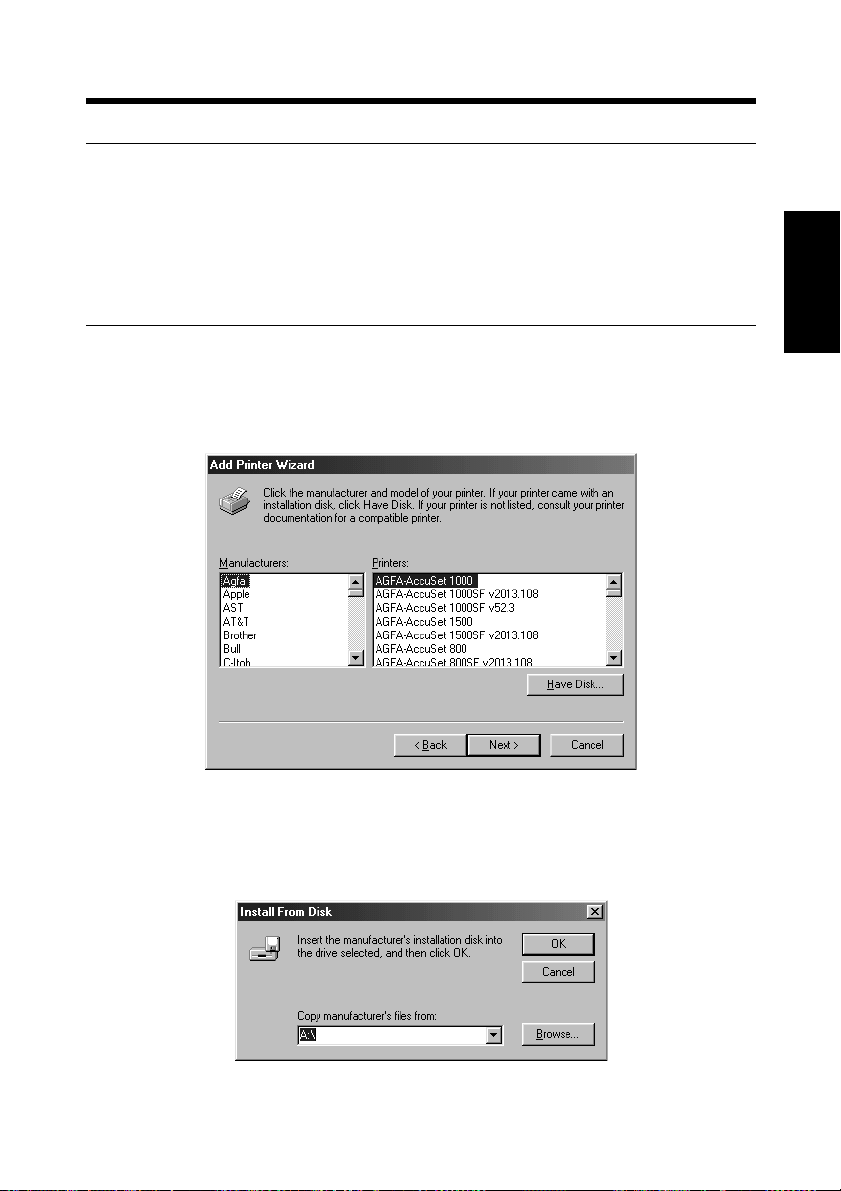
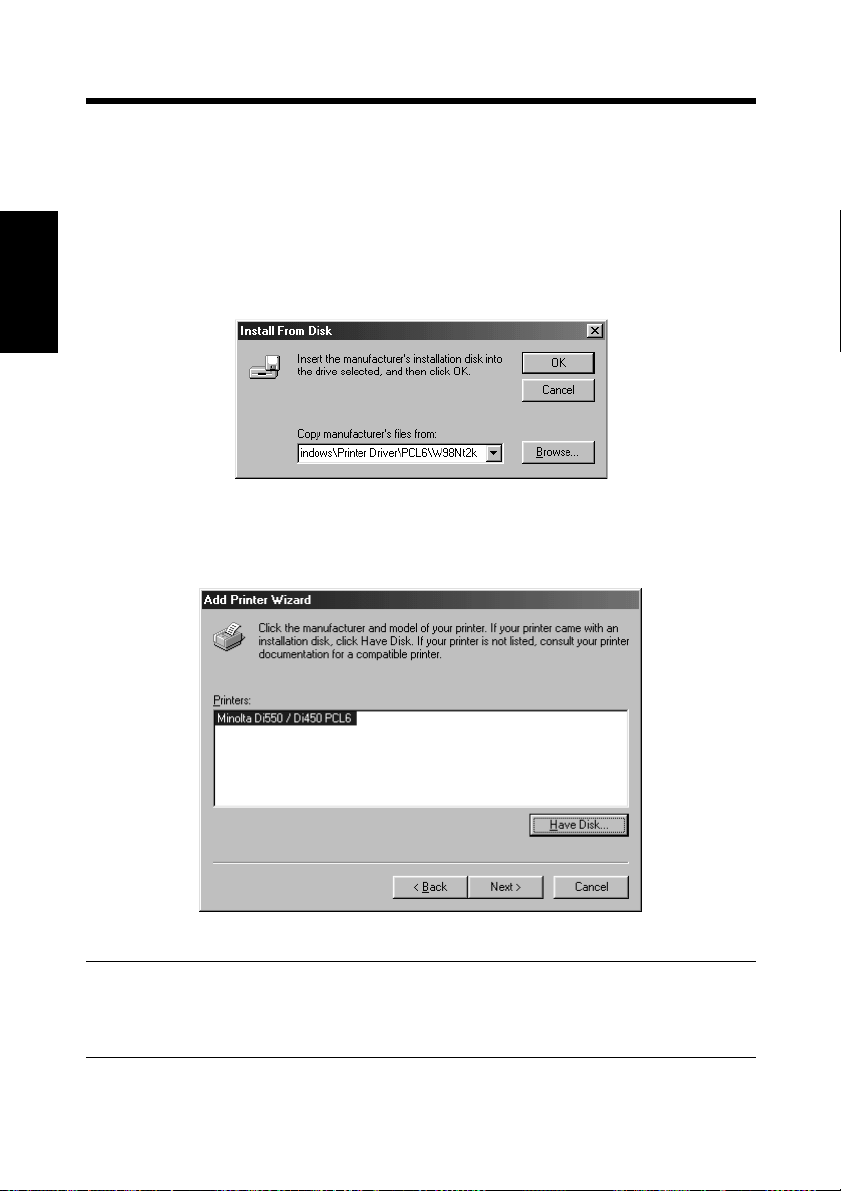
5. A window will appear, prompting you to select the manufacturer and model of
your printer. Click the [Have Disk...] button on the lower right part of the
screen.
2-5
Chapter 2
Installing the Printer Driver
4668P005CA
6. The “Install From Disk” dialog box will appear. Install the controller driver CDROM that is included with the controller in the CD-ROM drive of your
computer.
4668P006CA
Page 25
2-6
1. Windows 95/98
7. Type the drive name in the “Copy manufacturer’s file from” box and click the
[OK] button.
To install PCL6 with Windows 95: I:\Windows\Printer Driver\PCL6\W95
To install PS with Windows 95: I:\Windows\Printer Driver\PS\W98 _W 95
To install PCL6 with Windows 98: I:\Windows\Printer Driver\PCL6\W98Nt 2k
To install PS with Windows 98: I:\Windows\Printer Driver\PS\W98 _W 95
(As an example, the CD-ROM drive is drive I.)
Chapter 2
4668P007CB
8. A “Printers” list appears.
Select the driver to be installed and click the [Next>] button.
Installing the Printer Driver
4692P001CA
TIP
PS driver is different for each model: Select according to model of the machine
used.
Page 26
1. Windows 95/98
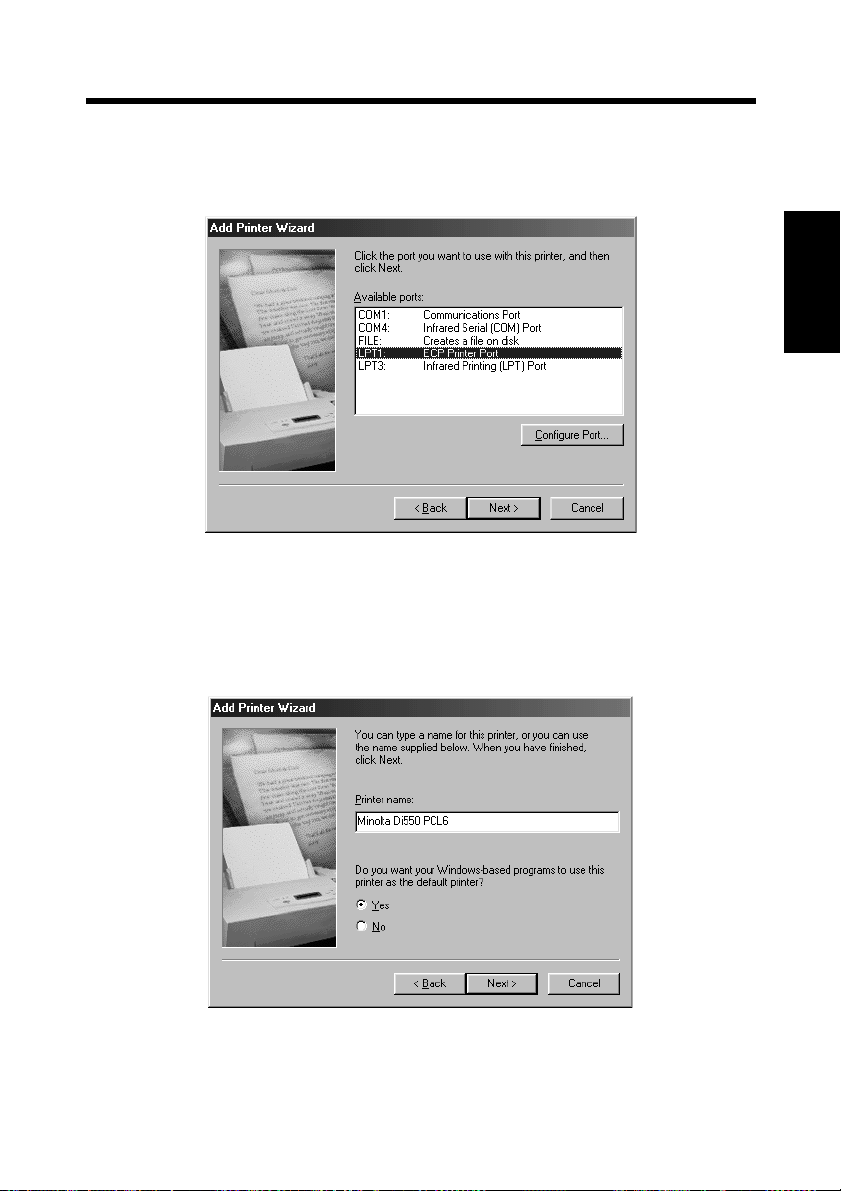
9. A window that prompts you to select the port will appear. Select the port
(normally “LPT:”) to which the printer cable has been connected, then click the
[Next>] button.
4668P009CA
2-7
Chapter 2
10.A window that asks you to confirm the printer name will appear. Check the
printer name. If you want to designate this printer as the default printer, select
“Yes.” (In this example, the printer name is changed to “Minolta Di550 PCL6.”)
Click the [Next>] button.
4692P002CA
Installing the Printer Driver
Page 27
2-8
1. Windows 95/98
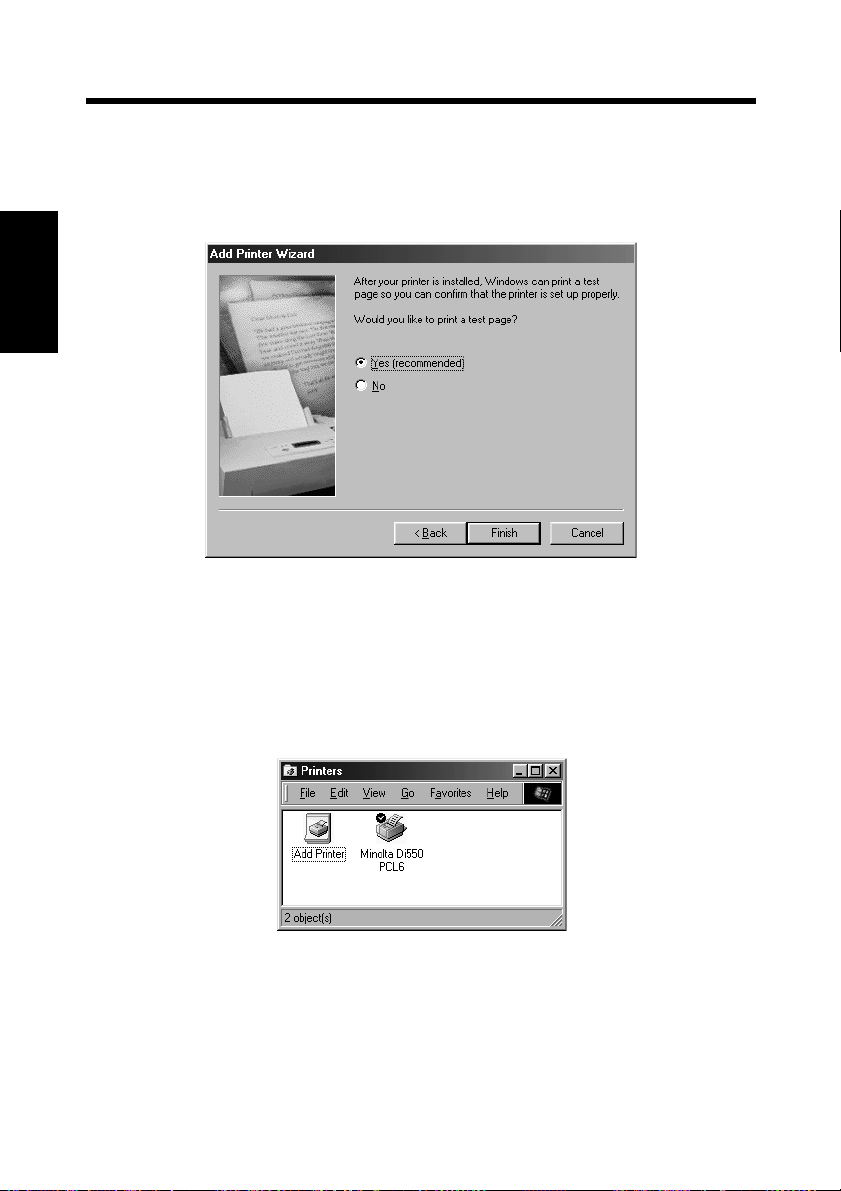
11.A screen that allows you to select printing of a test page will appear.
If you want to print a test p age, select “Yes (recommended).” If you elect not to,
select “No.” It is recommended that a test page be printed to ensure that the
printer driver has been installed properly. Now, click the [Finish] button.
Chapter 2
Installing the Printer Driver
12.Installation will start.
4668P011CA
When all the files have been copied from the floppy disk, the corresponding icon
will be added to the “Printers” window.
This completes the installation.
4692P003CA
Page 28
1. Windows 95/98
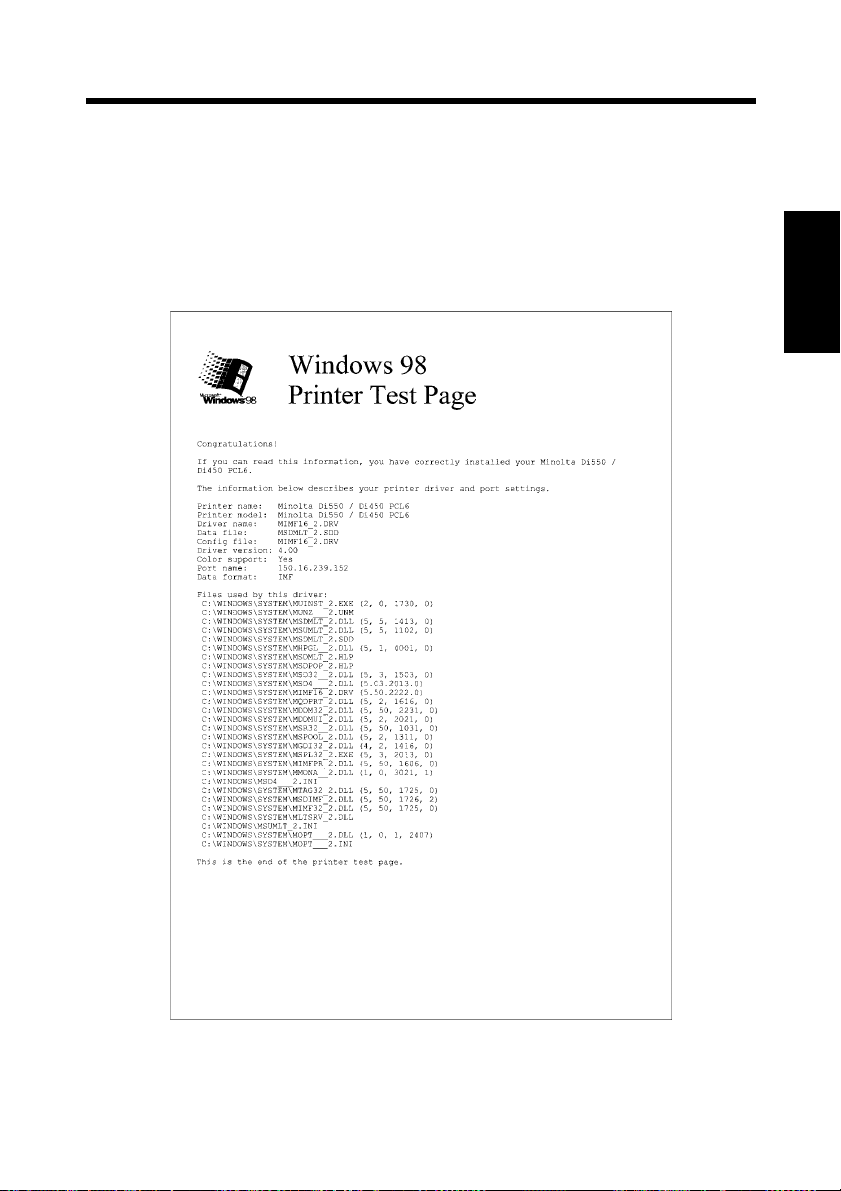
Test Print
If “Yes [recommended]” has been selected in step 11 to specify printing of a test
page, test printing starts. Check that the printer name is correct.
Here is a typical test print page.
2-9
Chapter 2
Installing the Printer Driver
4692O004CA
Page 29

2-10
1. Windows 95/98
Making General Settings Before Using the Printer
The printer driver requires setting of items that are common to all print jobs,
including the port to which the printer cable is connected and optional devices
configured with the machine. These settings must be made using property sheets
available from the Properties command after the printer driver has been installed or
whenever the operating environment is changed.
The most common settings were made when the printer driver was installed,
Chapter 2
meaning that you do not usually bother to change them. Some items must, however,
be changed in the following cases.
Cases where changes are necessary
• You want to add a comment to distinguish the
printer from others
• The computer’s connecting port has been
changed
• You want to change the conditions for the
Installing the Printer Driver
display of a timeout error
• You want to designate a port to which the
machine is connected via a network ( this setting
must be made on a computer connected to the
machine via a network)
• This setting is not r e lated to printing. “Color
• You want to share the machine with other
computers connected to the same network (this
setting must be made on the computer directly
connected to the machine)
For details of “Device Options Setting”, see Chapter 3.
Applicable
property sheets
“General” p.2-13
“Details” p.2-14
Management”
“Sharing” p.2-16
Ref. page
p.2-15
Page 30

2-11
1. Windows 95/98
Displaying a Property Sheet
There are two different steps to take to display a property sheet. The contents of a
particular property sheet slightly differ depending on how you access it. Select the
appropriate one according to your need.
(1) To display a property sheet from the printer folder
(2) To display a property sheet from an application menu
Below are the detailed procedures for each approach.
Displaying a Property Sheet from the Printer Folder
1. Click the [Start] button and select “Settings.” Then, click “Printers.”
2. Click the icon of “Minolta Di550 PCL6.”
3. Select “Properties” from the menu that will appear. This shows the property
sheet.
It allows you to set the environment in which you will use the printer. The settings
made through this method are valid in all applications.
Chapter 2
TIP
With PCL6, only OS standard property is displayed. When “--> 32bit Super
Drive Setup” tab is clicked, exclusive property will be displayed .
Displaying a Property Sheet from an Application Menu
1. Select [Print...] from the [File] menu of the application.
2. Make sure that the “Name” of the “Printer” is “Minolta Di550 PCL6”: If
“Minolta Di550 PCL6” is not listed, click [ ▼ ] and, from the menu that will
then appear, select “Minolta Di550 PCL6.”
3. Click the [Properties] button. This shows the property sheet.
This method allows you to set the number of copies and paper for each document.
Note that the settings made on the property sheet accessed through the application
are valid only for that particular application.
Installing the Printer Driver
Page 31

2-12
1. Windows 95/98
TIPS
• To set the Device Options setting, which need not be changed unless device is
changed, open it from the printer folder to set.
• To show a property sheet other than Setup, click the corresponding tab located
on the top part of the screen.
Chapter 2
NOTE
The steps to display a property sheet may be different depending on the
application. Follow the correct procedure according to the application. The
procedure above is based on the application WordPad.
Installing the Printer Driver
Page 32

1. Windows 95/98
“General” Property Sheet
This property sheet is commonly available to the Windows 95/98-based printer
drivers.
There is no need to make any changes in settings for ordinary operating
environments. See Windows 95/98 Help for more details.
2-13
NOTE
If “Separator page ” i s specified, a sep arat or page can be inserted between
multiple print jobs.
Chapter 2
Installing the Printer Driver
4692P004CA
Page 33

2-14
1. Windows 95/98
“Details” Property Sheet
This property sheet is commonly available to the Windows 95/98-based printer
drivers.
There is no need to make any changes in settings for ordinary operating
environments. See Windows 95/98 Help for more details.
Chapter 2
Installing the Printer Driver
4692P005CA
Page 34

“Color Management” Property Sheet
This property sheet is displayed only when PCL6 driver is used.
It is not necessary to made any setting for normal use.
2-15
1. Windows 95/98
Chapter 2
Installing the Printer Driver
4692P006CA
Page 35

2-16
1. Windows 95/98
“Sharing” Property Sheet
This property sheet is commonly available to the Windows 95/98-based printer
drivers.
It allows you to make settings for sharing a printer among different users. It is
displayed only when a Windows 95/98-based printer is being used over the
network.
For more details, see Windows 95/98 Help for more details.
Chapter 2
Installing the Printer Driver
4692P007CA
Page 36

2-17
1. Windows 95/98
“--> 32-Bit SuperDriver Setup” Property Sheet
This property sheet is used in common with Wndows95/98 printer drivers: It will
be displayed only when PCL6 driver is used.
This property sheet can be displ ayed b y click ing “--> 32b it Super D ri v e Set up” tab.
However, Set up, Paper, Quality, Device Options Setting and Job Management
properties will be displayed immediately. See Chapter 3 for details of setting for
each tab.
Chapter 2
Installing the Printer Driver
4692P008CA
TIP
This property sheet is not displayed when PS driver is used. However, Setup,
Paper, Quality, Device Options Setting and Job Management tabs are displayed.
Page 37

2-18
2. Windows 2000
Operating Environment
This section explains the required environment for the printer driver.
Before installing the printer driver, check that your computer meets the following
requirements. If it doesn’t, the printer driver may not function properly.
Personal computer
Operating system Windows 2000 (English)
Chapter 2
Memory 64MB or more
I/O interface
Free space on hard disk 10MB or more (PCL6)
• Windows 95/98
For the operating environment and installation procedure for the Windows 95/98
Installing the Printer Driver
printer driver, see p.2-2.
• Windows NT 4.0
For the operating env ironment and installation procedu re for the W i ndo ws NT 4.0
printer driver, see p.2-37.
Parallel
Network 10/100BaseT (UTP)
IBM PC or compatible with Pentium
200MHz or higher CPU
Centronics interface
(Conforming to IEEE1284)
2MB or more (PS)
Page 38

2. Windows 2000
Installation
This section explains the installation procedure for the Windows 2000 printer
driver.
NOTE
Before starting to install the printer driver, be sure first to quit all other
applications.
TIP
The following procedure assumes that the machine is a Di550 and that the
printer driver is PCL6: Read the specific proper names accordingly if the
machine is a mo del ot her tha n the Di 550 and i f, f or e xample , the pri nter d river is
PS.
1. Click the [Start] button. From the menu that appears, select “Settings,” then
click “Printers.”
2-19
Chapter 2
Installing the Printer Driver
4668P017CA
2. The Printers window will appear. Double-click the “Add Printer” icon.
4668P018CA
Page 39

2-20
2. Windows 2000
3. Start the Add Printer Wizard.
Click the [Next>] button.
Chapter 2
4668P019CA
4. A screen that allows you to select the type of connection made of the printer will
appear. If the printer is directly connected to the computer, select “Local
Installing the Printer Driver
Printer” and click the [Next>] button.
NOTE
When installing the printer driver in a computer connected to the machine via a
network, be sure to consult the network administrator.
4668P020CA
Page 40

2-21
2. Windows 2000
5. A window the prompts you to select the port will appear. Select the name of the
port to be used and click the [Next>] button.
4668P021CA
6. A window will appear, prompting you to select the manufacturer and model of
your printer. Click the [Have Disk...] button on the lower right part of the
screen.
Chapter 2
Installing the Printer Driver
4668P022CA
Page 41

2-22
2. Windows 2000
7. The “Install From Disk” dialog box will appear. Install the controller driver CDROM that is included with the controller in the CD-ROM drive of your
computer.
Chapter 2
4668P023CA
8. Type the drive name in the “Copy manufacturer’s file from” box and click the
[OK] button.
To install PCL6: I:\Windows\Printer Driver\PCL6\W98Nt2k
Installing the Printer Driver
To install PS: I:\Windows\Printer Driver\PS\W2k
(As an example, the CD-ROM drive is drive I.)
4668P024CB
Page 42

2. Windows 2000
9. A “Printers” list appears.
Select the driver to be installed and click the [Next>] button.
4692P009CA
10.A window that asks you to confirm the printer name will appear. Check the
printer name. If you want to designate this printer as the default printer, select
“Yes.” (In this example, the printer n ame is chang ed to “Minolta Di55 0 PCL6.”)
Click the [Next>] button.
2-23
Chapter 2
Installing the Printer Driver
4692P010CA
Page 43

2-24
2. Windows 2000
11.A screen that allows you to select whether to share the printer or not. If you
share the printer with other users, select “Shared” and type the share name in the
box to the right of “Share Name.” If not, select “Do not share this printer.” Click
the [Next>] button.
Chapter 2
4668P027CA
Installing the Printer Driver
12.A screen that allows you to select printing of a test page will appear.
If you want to print a test page, select “Yes.” If you elect not to, select “No.” It is
recommended that a test page be printed to ensure that the printer driver has
been installed properly. Click the [Next>] button.
4668P028CA
Page 44

13.As the last step, click the [Finish] button.
14.Installation will start.
2-25
2. Windows 2000
Chapter 2
4692P011CA
When all the files have been copied from the floppy disk, the corresponding icon
will be added to the “Printers” window. This completes the installation.
4692P012CA
Installing the Printer Driver
Page 45

2-26
2. Windows 2000
Test Print
If “Yes” has been selected in the step to specify printing of a test page, test printing
starts. Check that the printer name is correct.
Here is a typical test print page.
Chapter 2
Installing the Printer Driver
4692O005CA
Page 46

2-27
2. Windows 2000
Making General Settings Before Using the Printer
The printer driver requires setting of items that are common to all print jobs,
including the port to which the printer cable is connected and optional devices
configured with the machine. These settings must be made using property sheets
available from the Properties command after the printer driver has been installed or
whenever the operating environment is changed.
The most common settings were made when the printer driver was installed,
meaning that you do not usually bother to change them. Some items must, however,
be changed in the following cases.
Cases where changes are necessary
• You want to add a comment to distinguish the
printer from others
• You want to share the machine with other
computers connected to the same network (this
setting must be made on the computer directly
connected to the machine)
• The computer’s connecting port has been
changed
• You want to change the conditions for the
display of a timeout error
• You want to designate a port to which the
machine is connected via a network ( this setting
must be made on a computer connected to the
machine via a network)
• You want to restrict use condition of printer.
• You want to change settings in spool condition.
• You want to change OS-dependent settings.
• This setting is not r e lated to printing. “Color
• You want to restrict access to the machine
• You want to check the accounts of the machine
users
• This setting is not r e lated to printing. “Processing” p.2-36
Applicable
property sheet
“General” p.2-30
“Sharing” p.2-31
“Ports” p.2-32
“Advance” p.2-33
Management”
“Security” p.2-35
Ref. page
p.2-34
Chapter 2
Installing the Printer Driver
For the details of “Device Options Setting,” see Chapter 3.
Page 47

2-28
2. Windows 2000
Displaying a Property Sheet
You have two different steps to take to display a property sheet. The contents of a
particular property sheet slightly differ depending on how you access it. Select the
appropriate one according to your need.
(1) To display a property sheet from the printer folder
(2) To display a property sheet from an application menu
Below are the detailed procedures for each approach.
Chapter 2
Displaying a Property Sheet from the Printer Folder
1. Click the [Start] button and select “Settings.” Then, click “Printers.”
2. Click the icon of “Minolta Di550 PCL6.”
<To display the General sheet>
3. Click “Properties” from the [Printer] menu.
<To display Printing Preferences sheet>
3. Click [Printing Preferences…] from the [Printer] menu. This opens the
Installing the Printer Driver
[Minolta Di550 PCL6 Printing Preferences].
It allows you to set the environment in which you will use the printer. The settings
made through this method are valid in all applications.
Displaying a Property Sheet from an Application Menu
1. Select [Print...] from the [File] menu of the application.
2. Make sure that the “Select Printer” of the “General” is “Minolta Di550 PCL6”:
If “Minolta Di550 PCL6” is not listed, click [ ▼ ] and, from the menu that will
then appear, select “Minolta Di550 PCL6.”
This method allows you to set the number of copies and paper for each document.
Note that the settings made on the property sheet accessed through the application
are valid only for that particular application.
Page 48

2-29
2. Windows 2000
TIPS
• To set the Device Options setting, which need not be changed unless device is
changed, open it from the printer folder to set.
• To show a property sheet other than Setup, click the corresponding tab located
on the top part of the screen.
NOTES
• The steps to display a property sheet may be different depending on the
application. Follow the correct procedure according to the application. The
procedure above is based on the application WordPad.
• With PostScript, the contents are different between when the property sheet is
accessed from Print Manager and when it is accessed from an application.
Chapter 2
Installing the Printer Driver
Page 49

2-30
2. Windows 2000
“General” Property Sheet
This property sheet is commonly available to the Windows 2000-based printer
drivers.
There is no need to make any changes in settings for ordinary operating
environmen t s. See Windows 2000 Help for more details.
Chapter 2
Installing the Printer Driver
4692P013CA
Page 50

2. Windows 2000
“Sharing” Property Sheet
This property sheet is commonly available to the Windows 2000-based printer
drivers.
There is no need to make any changes in settings for ordinary operating
environmen t s. See Windows 2000 Help for more details.
2-31
Chapter 2
Installing the Printer Driver
4692P014CA
Page 51

2-32
2. Windows 2000
“Ports” Property Sheet
This property sheet is commonly available to the Windows 2000-based printer
drivers.
There is no need to make any changes in settings for ordinary operating
environmen t s. See Windows 2000 Help for more details.
Chapter 2
Installing the Printer Driver
4692P015CA
Page 52

2. Windows 2000
“Advanced” Property Sheet
This property sheet is commonly available to the Windows 2000-based printer
drivers.
There is no need to make any changes in settings for ordinary operating
environmen t s. See Windows 2000 Help for more details.
2-33
NOTE
If “Separator page ” i s specified, a sep arat or page can be inserted between
multiple print jobs.
Chapter 2
Installing the Printer Driver
4692P016CA
Page 53

2-34
2. Windows 2000
“Color Management” Property Sheet
This property sheet is displayed only when PCL6 driver is used.
It is not necessary to made any setting for normal use.
Chapter 2
Installing the Printer Driver
4692P017CA
Page 54

2. Windows 2000
“Security” Property Sheet
This property sheet is commonly available to the Windows 2000-based printer
drivers.
There is no need to make any changes in settings for ordinary operating
environmen t s. See Windows 2000 Help for more details.
2-35
Chapter 2
Installing the Printer Driver
4692P018CA
Page 55

2-36
2. Windows 2000
“Processing” Property Sheet
This property sheet is displayed only when PCL6 driver is used.
It is not necessary to made any setting for normal use.
Chapter 2
Installing the Printer Driver
4692P019CA
Page 56

3. Windows NT4.0
Operating Environment
This section explains the required environment for the printer driver.
Before installing the printer driver, make sure that your computer meets the
following requirements. If it doesn’t, the printer driver may not function properly.
2-37
Personal computer
Operating sy stem Windows NT4.0 (English)
Memory 64MB or more
Parallel
I/O interface
Network 10/100BaseT (UTP)
Free space on hard disk 10MB or more (PCL6)
• Windows 95/98
For the operating environment and installation procedure for the Windows 95/98
printer driver, see p.2-2.
• Windows 2000
For the operating environment and installation procedure for the Windows 2000
printer driver, see p.2-18.
IBM PC or compatible with Pentium
200MHz or higher CPU
Centronics interface
(Conforming to IEEE1284)
2MB or more (PS)
Chapter 2
Installing the Printer Driver
Page 57

2-38
3. Windows NT4.0
Installation
This section explains the installation procedure for the Windows NT 4.0 printer
driver.
NOTE
Before starting to install the printer driver, be sure first to quit all other
applications.
Chapter 2
TIP
The following procedure assumes that the machine is a Di550 and that the
printer driver is PCL6: Read the specific proper names accordingly if the
machine is a mo del ot her tha n the Di 550 and i f, f or e xample , the pri nter d river is
PS.
1. Click the [Start] button. From the menu that appears, select “Settings,” then
click “Printers.”
Installing the Printer Driver
4608P038CC
2. The Printers window will appear. Double-click the “Add Printer” icon.
4608P002CB
Page 58

2-39
3. Windows NT4.0
3. Start the Add Printer Wizard. If the printer is directly conn ected to the computer ,
select “My Computer” and click the [Next>] button.”
NOTE
When installing the printer driver in a computer connected to the machine via a
network, be sure to consult the network administrator.
Chapter 2
Installing the Printer Driver
4608P039CA
4. A window that prompts you to select the port will appear. Select the name of the
port to be used and click the [Next>] button.
4608P040CA
Page 59

2-40
3. Windows NT4.0
5. A window will appear, prompting you to select the manufacturer and model of
your printer. Click the [Have Disk...] button on the lower right part of the
screen.
Chapter 2
4608P041CA
6. The “Install From Disk” dialog box will appear. Install the controller driver CD-
Installing the Printer Driver
ROM that is included with the controller in the CD-ROM drive of your
computer.
4608P006CA
Page 60

2-41
3. Windows NT4.0
7. Type the drive name in the “Copy manufacturer’s file from” box and click the
[OK] button.
To install PCL6: I:\Windows\Printer Driver\PCL6\W98Nt2k\WinNT4
To install PS: I:\Windows\Printer Driver\PS\NT40
(As an example, the CD-ROM drive is drive I.)
4668P037CB
8. A “Printers” list appears.
Select the driver to be installed and click the [Next>] button.
Chapter 2
Installing the Printer Driver
4692P020CA
Page 61

2-42
3. Windows NT4.0
9. A window that asks you to confirm the printer name will appear. Check the
printer name. If you want to designate this printer as the default printer, select
“Yes.” (In this example, the printer name is changed to “Minolta Di550
PCL6.”)
Click the [Next>] button.
Chapter 2
Installing the Printer Driver
4692P021CA
10.A screen that allows you to select whether to share the printer or not. If you
share the printer with other users, select “Shared” and type the share name in the
box to the right of “Share Name.” If not, select “Not shared.” Click the [Next>]
button.
4608P043CA
Page 62

3. Windows NT4.0
11.A screen that allows you to select printing of a test page will appear.
If you want to print a test p age, select “Yes (recommended).” If you elect not to,
select “No.” It is recommended that a test page be printed to ensure that the
printer driver has been installed properly. As the last step, click the [Finish]
button.
2-43
Chapter 2
4608P044CA
12.Installation will start.
When all the files have been copied from the floppy disk, the corresponding icon
will be added to the “Printers” window. This completes the installation.
4692P022CA
Installing the Printer Driver
Page 63

2-44
3. Windows NT4.0
Test Print
If “Yes (recommended)” has been selected in the step to specify printing of a test
page, test printing starts. Check that the printer name is correct.
Here is a typical test print page.
Chapter 2
Installing the Printer Driver
4692O006CA
Page 64

2-45
3. Windows NT4.0
Making General Settings Before Using the Printer
The printer driver requires setting of items that are common to all print jobs,
including the port to which the printer cable is connected and optional devices
configured with the machine. These settings must be made using property sheets
available from the Properties command after the printer driver has been installed or
whenever the operating environment is changed.
The most common settings were made when the printer driver was installed,
meaning that you do not usually bother to change them. Some items must, however,
be changed in the following cases.
Cases where changes are necessary
• You want to add a comment to distinguish the
printer from others
• The computer’s connecting port has been
changed
• Y ou wan t to change the conditions for the display
of a timeout error
• You want to designate a port to which the
machine is connected via a network (this setting
must be made on a computer connected to the
machine via a network)
• You want to specify a time frame for the machine
operation
• You want to share the machine with other
computers connected to the same network (this
setting must be made on the computer directly
connected to the machine)
• You want to restrict access to the machine
• You want to check the accounts of the machine
users
• This setting is not related to printing. “Pressing” p.2-53
Applicable
property sh ee t
“General” p.2-48
“Ports” p.2-49
“Scheduling” p.2-50
“Sharing” p.2-51
“Security” p.2-52
Ref. page
Chapter 2
Installing the Printer Driver
For the details of “Device Options Setting,” see Chapter 3.
Page 65

2-46
3. Windows NT4.0
Displaying a Property Sheet
There are two different steps to take to display a property sheet. The contents of a
particular property sheet slightly differ depending on how you access it. Select the
appropriate one according to your need.
(1) To display a property sheet from the printer folder
(2) To display a property sheet from an application menu
Below are the detailed procedures for each approach.
Chapter 2
Displaying a Property Sheet from the Printer Folder
1. Click the [Start] button and select “Settings.” Then, click “Printers.”
2. Click the icon of “Minolta Di550 PCL6.”
<To display the General sheet>
3. Select “Properties” from the [Printer] menu.
<To display Printing Preferences sheet>
3. Click [Document Defaults…] from the [Printer] menu. This opens the [Minolta
Installing the Printer Driver
Di550 PCL 6 Default].
It allows you to set the environment in which you will use the printer. The settings
made through this method are valid in all applications.
Displaying a Property Sheet from an Application Menu
1. Select [Print...] from the [File] menu of the application.
2. Make sure that the “Name” of “Printer” is “Minolta Di550 PCL6: If “Minolta
Di550 PCL6” is not listed, click [ ▼ ] and, from the menu that will then appear,
select “Minolta Di550 PCL6.”
3. Click the [Properties] button. This shows the property sheet.
This method allows you to set the number of copies and paper for each document.
Note that the settings made on the property sheet accessed through the application
are valid only for that particular application.
Page 66

2-47
3. Windows NT4.0
TIPS
• To set the Device Option setting, which need not be changed unless device is
changed, open it from the printer folder to set.
• To show a property sheet other than Setup, click the corresponding tab located
on the top part of the screen.
NOTES
• The steps to display a property sheet may be different depending on the
application. Follow the correct procedure according to the application. The
procedure above is based on the application WordPad.
• With PostScript, the contents are different between when the property sheet is
accessed from Print Manager and when it is accessed from an application.
Chapter 2
Installing the Printer Driver
Page 67

2-48
3. Windows NT4.0
“General” Property Sheet
This property sheet is commonly available to the Windows NT 4.0-based printer
drivers.
There is no need to make any changes in settings for ordinary operating
environments. See Windows NT 4.0 Help for more details.
Chapter 2
NOTE
If “Separator page ” i s specified, a sep arat or page can be inserted between
multiple print jobs.
Installing the Printer Driver
4692P023CA
Page 68

3. Windows NT4.0
“Ports” Property Sheet
This property sheet is commonly available to the Windows NT 4.0-based printer
drivers.
There is no need to make any changes in settings for ordinary operating
environments. See Windows NT 4.0 Help for more details.
2-49
Chapter 2
Installing the Printer Driver
4692P024CA
Page 69

2-50
3. Windows NT4.0
“Scheduling” Property Sheet
This property sheet is commonly available to the Windows NT 4.0-based printer
drivers.
There is no need to make any changes in settings for ordinary operating
environments. See Windows NT 4.0 Help for more details.
Chapter 2
Installing the Printer Driver
4692P025CA
Page 70

3. Windows NT4.0
“Sharing” Property Sheet
This property sheet is commonly available to the Windows NT 4.0-based printer
drivers.
There is no need to make any changes in settings for ordinary operating
environments. See Windows NT 4.0 Help for more details.
2-51
Chapter 2
Installing the Printer Driver
4692P026CA
Page 71

2-52
3. Windows NT4.0
“Security” Property Sheet
This property sheet is commonly available to the Windows NT 4.0-based printer
drivers.
There is no need to make any changes in settings for ordinary operating
environments. See Windows NT 4.0 Help for more details.
Chapter 2
Installing the Printer Driver
4692P027CA
Page 72

“Processing” Property Sheet
This property sheet is displayed only when PCL6 driver is used.
It is not necessary to make any setting for normal use.
2-53
3. Windows NT4.0
Chapter 2
Installing the Printer Driver
4692P028CA
Page 73

2-54
3. Windows NT4.0
Chapter 2
Installing the Printer Driver
Page 74

Chapter 3
Property Sheets
3-1
Chapter 3
Property Sheets
Page 75

3-2
1. Property Sheets
Description of Each Property Sheet
Each property sheet enables you to change the settings indicated below. For a
detailed description of each function, see the corresponding reference page.
Property sheet Outline of settings that can be changed
Chapter 3
Property Sheets
[Device Options
Management]
[PostScript]
(PS driver only)
[Setup]
[Paper]
[Quality]
Setting]
[Job
–
Allows you to set the paper take-up tray and paper
exit tray.
Also allows you to set high level printing functions
such as two-sided printing, booklet creation, N-up
printing, OHP interleaving, Watermark, Cover
Mode, Staple, Punch, and Folding.
Allows you to set basic printing items such as
number of copies, paper size, print orientation and
print zoom ratio.
Also allows you to set functions related to sorting.
Allows you to set general items related to graphics,
such as resolution, halftone processing and image
processing method.
Also allows you to set TrueType fonts.
Allows you to set option equipment installed on the
machine.
Sets the copy track function.
Allows you to lock a printing job.
Also allows you to print the distribution number.
Allows you to make detailed settings related to
PostScript.
Allows you to save and read the contents of the
settings on a “Setup”, “Paper”, “Quality”, “Job
Management”, “Device Options Setting” or
“PostScript” property sheet.
Reference
page
p.3-9
p.3-21
p.3-27
p.3-4
p.3-31
p.3-33
p.3-7
Page 76

1. Property Sheets
NOTES
• Refer to Chapter 2 for the procedure for displaying “Properties.”
• Note that different settings must be made for each driver.
• The differences between each driver are indicated based on the PCL6 version
driver for Windows 98.
• Details of OS-dependent functions are not given.
3-3
Chapter 3
Property Sheets
Page 77

3-4
2. “Device Options Setting” Property Sheet
Functions of the “Device Options Setting” Property Sheet
This property sheet allows you to set the options installed on the machine. Make
sure you select the options correctly. Otherwise, some functions may be unusable or
printing errors may occur. The settings must match the machine configuration.
(1)
Chapter 3
Property Sheets
(1) Device Options
Set the options installed in the machine.
• Installable Options : This is a list of installable options. Select the desire d
• Add : Pressing this button adds the selected option.
• Remove : Pressing this button removes the selected option.
• Installed Options : This is a list of currently installed options. Select it
• Mailbox Setting : <when Mailbin Finisher is installed>
(2)
(3)
4692P029CA
options from this list.
Available settings: Dup+2way Tray, Dup+LCC, Duplex
Cabinet, LCT, Mailbin Finisher,
Multi-staple Finisher, Single-staple
Finisher, Folding Finisher, Hard Disk
Drive in Copier
when you wish to remove an option.
You can add a name to each mailbin of Mailbin Finisher.
For details, see Page 3-6.
Page 78

2. “Device Options Setting” Property Sheet
NOTE
If the Dup+2way Tray, Duplex Cabinet, and Dup+LCC are not correctly
selected, it may not be possible to select the Finisher correctly.
(2) User Name
The user name set in the printer driver is displayed as the job user name on the
machine’s touch panel.
Setting range: 8 characters max
(3) About…
Click to display the manufacturer and version number of the printer driver.
3-5
Chapter 3
Property Sheets
Page 79

3-6
2. “Device Options Setting” Property Sheet
“Mailbox Setting” Dialog Box <when Mailbin Finisher is installed>
Allows you to set the names of the mailbins in Mailbin Finisher.
Chapter 3
(1) MailBox
This is the bin name editing box.
Property Sheets
Setting range: max 20 characters (PCL6)
max 32 characters (PS)
(1)
(2)
(3)
4668P048CA
(2) Apply
Press to finalize a changed name.
(3) Bin list
Displays a l ist of names of currently set bins.
To change the name of a bin, select the name you wish to change.
Page 80

3-7
3. Functions that are Common to Various Property Sheets
Functions that are Common to Various Property Sheets
These functions are common to property sheets from the “Setup” property sheet to
the “Job Management” property sheet and also the “PostScript” property sheet.
(1)
(2)
4692P029CA
(1) Easy Set
Allows you to call and use the settings stored in each property sheet.
• Easy Set Name : Allows you to call the settings stored in each property
sheet.
• Save (Delete) : Used to save/delete the settings of property sheets.When
you touch the [Save] button to save the contents of a
property sheet, the “Save Easy Set Name” dialog box
appears. For details, see Page 3-8.
When you touch [Delete], the stored set contents are
deleted.
Chapter 3
Property Sheets
NOTES
• Depending on environment used, contents of Save/Delete will be different:
Refer to Appendix A for details. ☞p.A-5
• Watermark, Custom Paper, Mailbox Name, and Font Substitution Table are not
set.
TIPS
• If the set contents have changed, the [Save] button will appear.
• If the set contents are the Easy Name contents, the [Delete] button will appear.
Page 81

3-8
3. Functions that are Common to Various Property Sheets
(2) Paper preview/Machine preview
Allows you to display/change over the paper preview and machine preview.
• Page Layout : The layout of the printed data on a single page is
displayed as an image. This allows you to check the
status for N-up printing and two-sided printing, for
example.
See Page A-8 for the Page Layout list.
• Printer Figure : When the paper take-up tray and the paper exit tray are
set, the paper take-up tray and paper exit tray are
displayed in green.
See Page A-12 for the Printer Figure list.
Functions of the “Save Easy Set Name” Dialog Box
Use to save print setting data.
Chapter 3
Before pressing the [Save] b u tton, be s ure to set the contents of each pr oper ty sheet.
(1)
Property Sheets
4668P049CA
(1) Easy Set Name
Add a name to the stored contents.
Number of registrations : Depending on environment used, number of
registrations will be different: Refer to Appendix A
for details. ☞p.A-5
Number of characters : max 10 characters
Page 82

4. “Setup” Property Sheet
Functions of the “Setup” Property Sheet
This property sheet allows you to set the paper take-up tray, paper exit tray and
various high grade printing functions .
3-9
(1)
(2)
(3)
(1) N-up
Outputs mul tiple originals on one sh eet of paper.
• N-up : Set the N-up number.
Available settings: Off, 2up, 4up, 6up, 9up, 16up
• Border line : Sets the layout border
• N-up Style : Sets the printing layout
(4)
(5)
Chapter 3
4692P030CA
Property Sheets
Horiz.
Ascending
Horiz.
Descending
Vert.
Ascending
Ver t.
Descending
4668P051CA
NOTE
If you print a document that contains pages of different sizes and/or different
directions in the same job, the image may be partially cut or images may overlap
each other.
Page 83

3-10
4. “Setup” Property Sheet
TIP
The printing layout is displayed on the Page Layout.
(2) Watermark
Prints a specific word in the background as a watermark.
• Text : Select the word to be entered as the watermark from the list.
Available settings: NONE, CONFIDENTIAL, COPY, DO
NOT COPY, DRAFT, FINAL, PROOF,
TOP SECRET, or a word set by the user
• 1st Page Only : Select whether to insert a watermark on only the first page
or on all pages.
• Edit Watermark: Set the format, position, and so on, of the watermark
Chapter 3
characters. For details, see Page 3-13.
NOTES
• When us i ng this func t ion together with the cover page function, if you set
printing to “None” with the cover page function and choose setting to print a
watermark on only the first page, the watermark will be printed on the second
Property Sheets
page.
• This function may not operate with some applications.
• Depending on environment used, contents of Save/Delete will be different:
Refer to Appendix A for details. ☞p.A-6
TIP
The condition of the watermark is displayed on the Page Layout.
(3) Duplex / Booklet <when Dup + 2way Tray, Dup + LCC or Duplex Cabinet is
installed>
Specifies two-sided printing and Booklet printing.
• Off : Not set
• Short Edge Binding : Two-sided printing takes place so that the short edge
is bound.
• Long Edge Binding : Two-sided printing takes place so that the long edge
is bound.
• Booklet Left Binding : Four pages are printed on b ot h s ide s of a single sheet
of paper so that when the sheet is folded in the
middle it forms a booklet (left bound).
Page 84

4. “Setup” Property Sheet
• Booklet Right Binding: Fou r pages are pri nted on bot h side s of a singl e sheet
of paper so that when the sheet is folded in the
middle it forms a booklet (right bound).
NOTES
• If you pri nt a document that contains pages of different siz es and/or different
directions in the same job, the image may be partially cut or images may
overlap each other.
• Two-sided printing and OHP interleaving cannot be set simultaneously.
TIPS
×
• The sizes for which you can perform two-sided printing are from 140
×
to 297
432 mm.
182mm
• Short Edge Binding , Long E dge Bi ding, B ooklet L eft Binding and Bookl et Right
Binding are displayed on the Page Layout.
(4) Paper Source
Selects the machine tray to be used.
Sets the cover page function and the OHP interleaving function.
• Paper Source : Select the machine tray to be used.
The selectable paper sizes are limited b y the types of
paper take-up trays installed in the machine.
Available settings: Auto, Manual Feed, Tray1~4,
LCC, LCT
• Detail of Paper Source : Set the cover page function and OHP interleaving
function. For details, see Page 3-16.
3-11
Chapter 3
Property Sheets
NOTE
Some paper sizes cannot be s elected. For details, refer to the Oper ator’ s Manual
of the machine.
TIPS
• Set the paper take-up tray using [Device Options Setting].
• The paper take-up tray used is displayed in green on the Printer Figure.
Page 85

3-12
4. “Setup” Property Sheet
(5) Output Setting
This function selects the tray in the machine to which the paper is to be
distributed.
Settings can also be made for finishing functions including stapling, hole
punching, and folding.
• Paper exit destination : Select the machine tray to which you wish to
distribute the prints.
The selectable paper exit trays are limited by
the type of finisher installed in the machine.
Mailbin Finisher : Auto, Mailbin
Except Mailbin Finisher : Auto
• Mailbin paper exit destination: If Mailbin is selected as the paper exit
destination, set the mailbin to which you wish
Chapter 3
• Detail of Output Setting : Set stapling, punching or folding. For details,
to distribute the paper.
see Page 3-18.
NOTE
Some paper sizes cannot be s elected. For details, refer to the Oper ator’ s Manual
of the machine.
Property Sheets
TIPS
• Set the type of finisher using [Device Options Setting].
• The paper take-up tray used is displayed in green on the Printer Figure.
Page 86

4. “Setup” Property Sheet
Functions of the “Watermark” Dialog Box
This dialog box allows you to set the text to be inserted using the Watermark
function, and also the text style.
(1)
(2)
(3)
(4)
(5)
3-13
Chapter 3
4668P052CA
(1) Preview
This is the watermark preview.
(2) Name
Select a registered watermark from the list.
Available settings: <NONE>, CONFIDENTIAL, COPY, DRAFT, FINAL,
PROOF, TOP SECRET, DO NOT COPY, user setting
(3) New
Used to create new text.
When you select this item, a dialog box for making detailed settings appears.
(4) Edit
Used to edit text selected in (2).
When you select this item, a dialog box for making detailed settings appears.
(5) Delete
Deletes text selected in (2).
Property Sheets
Page 87

3-14
4. “Setup” Property Sheet
Watermark detailed settings
Chapter 3
(6) Name
Property Sheets
(7) String
(1)
4668P053CB
Enter the name under which you wish to register the watermark.
Number of registrations : Depending on environment used, number of
registrations will be different: Refer to Appendix A
for details. ☞p.A-6
Number of characters : max 20 characters
Enter the text to be printed as a watermark.
Number of characters : max 255 characters
(6)
(7)
(8)
(9)
(10)
(11)
(12)
(13)
(8) Type Face
Specify a font from String to be printed as a watermark.
PCL6 : Specify a font from the fonts (PC font) installed in the OS.
PS : Specify a font from device fonts (controller font).
(9) Size
Specify the font size of the characters.
Setting range: 8pt~200 pt (in 1pt steps)
(10)Style
Specify the font style of the characters.
• Bold: Prints bold characters.
• Italic: Prints italic characters.
Page 88

4. “Setup” Property Sheet
(11)Shading
Specify the density of the characters.
Setting range: 5%~100% (in 5% steps)
(12)Angle
Specify the angle of the characters with respect to the paper.
• Fixed Angle : Standard fixed angle of the driver.
Available settings: Horizontal, Diagonal, Vertical, User
Setting
• User Setting : If you select User Setting from Fix ed An gle, you can set
any desired angle.
Setting range : -180°~+180° (A – (minus) value
rotates the characters clockwise, 0
leaves the characters parallel to the
paper, and a + (p lus) value ro tates the
characters counterclockwise.)
(13)Position
Specify the position at which you wish to print a watermark.
• Center : The watermark is printed at the center of the paper.
• User Setting : You can specify a position by entering numbers in the
Horizontal and Vertical boxes.
Setting values:
Horizontal : -999pt~999pt (in 1pt steps)
Vertical : -999pt~999pt (in 1pt steps)
(72pt = 1inch)
3-15
Chapter 3
Property Sheets
TIPS
• Specify the position from the center. The Horizontal positive direction is to the
right, and the Vertical position direction is upward.
• You can check the set contents using (1) Preview.
Page 89

3-16
4. “Setup” Property Sheet
Functions of the “Detail of Paper Source” Dialog Box
This function sets the cover page function and the OHP interleaving function.
(1)
Chapter 3
(1) Cover Page
This function is used to print a d ocument wi th front and back co ver pages. You
can print on the front cover, or leave it blank.
• Front Cover Page : Activates the front cover function.
• with Image (Front Cover Page) : Prints on the front cover.
Property Sheets
• Back Cover Page : Adds a back cover.
• with Image (Back Cover Page) : Prints on the back cover.
• Cover Paper Source : Select the tray for the front cover and back
cover papers.
Available settings: Manual Feed,
Tray1~Tray4, LCC, LCT
NOTES
• When using special paper, such as thick paper, the paper sometimes fails to be
distributed to the selected paper exit destination.
• You can set Manual Feed, Tray1~Tray4, LCC and LCT using “Paper Source”.
(2)
4692P031CA
TIP
The tray containing t he paper o n whi ch th e body of the docu ment is to be pri nted
is displayed in green on the Printer Figure.
Page 90

4. “Setup” Property Sheet
(2) Interleaving Paper
This function inserts sheets (interleaving sheets) between sheets of OHP film
when printing on OHP film. You can either leave these sheets blank or print the
same image as that printed on the OHP film.
• OHP Interleaving : Activates the OHP interleaving function.
• with Image : Prints an image on the interleaving sheet.
• Interleaving Paper Source: Select the tray for the interleaving paper.
Available settings: Tray1 ~ Tray4, LCC, LCT
NOTES
• When using the OHP interleaving function, set the numb er of sets of prints to
“1”.
• You cannot select the same paper take-up port for both “Paper Source” and
“Interleaving Paper Source”.
• You can set Manual Feed only using “Paper Source.”
• OHP interleaving and two-sided printing cann ot be set simul taneo us ly.
TIP
The OHP film tray is displayed in green on the Printer Figure.
3-17
Chapter 3
Property Sheets
Page 91

3-18
4. “Setup” Property Sheet
Functions of the “Detail Of Output Setting” Dialog Box
Settings can be made for finishing functions including stapling, hole punching, and
folding.
(1)
(2)
Chapter 3
4692P032CA
(1) Staple <when Mailbin Finisher, Single-staple Finisher, Multi-staple Finisher or
Folding Finisher is installed>
This function allows you to staple one set of printed documents at a time.
Property Sheets
• Off : Printed documents are not stapled.
• Corner staple : Printed documents are stapled at their corners.
• Long Edge : <when Multi-staple Finisher or Folding Finisher is
installed>
The documents are stapled along the long edge.
• Short edge : <when Multi-staple Finisher or Folding Finisher is
installed>
The documents are stapled along the short edge.
• Center : <when Folding Finisher is installed>
The documents are stapled at the center.
(3)
NOTES
• If “Staple” is set, printed pages are fed out i nto the Elevator Tray.
• The stapling position is either the top left corner or the top right corner
depending upon the direction of the paper and the printing direction.
• If the capacity of Mailbin Finisher, Single-staple Finisher, Multi-staple Finisher
or Folding Fi nisher is e xceeded, the s tapling oper ation may be canceled . Refer
to the Operator’s Manual of the machine.
• If you print a document consisting of pages of different sizes in the same
printing job, stapling may be canceled.
Page 92

4. “Setup” Property Sheet
• Take care when printing a document consisting of pages facing different
directions , s ince t h e st a pli ng pos i tio n wi ll be determined by the direction of t he
first page.
• You cannot set certain sizes or kinds of paper. For details, refer to the
Operator’s Manual of the machine.
• Only Center Staple can be set with Booklet.
TIP
You can check the stapling positions using the icons in the dialog box.
(2) Punch <when Mailbin Finisher, Multi-staple Finisher or Folding Finisher is
installed>
This function allows you to punch holes in the printed document.
• Off : The document is not punched.
• Short Edge : The document is punched along the short edge.
• Long Edge : The document is punched along the long edge
• Punch Holes <Inch area only>
: Set the number of holes to be punched.
3-19
Chapter 3
NOTES
• Number of punch holes can be specified only when Multi-staple Finisher is
installed.
• “Punch Holes” is not displayed for Metric area.
• You cannot punch certain sizes of pap er. Also, you may be unable to punch the
paper at certain positions. For details, refer to the Operator’s Manual of the
machine.
• If you select Long Edge in the manual bypass take-up mode, the pa per may
sometimes fail to be punched.
• Punch and OHP interleaving cannot be set simultaneously.
• Punch and Booklet cannot be set simultaneously.
TIP
The punching positions are displayed on the icons in the dialog box.
Property Sheets
Page 93

3-20
4. “Setup” Property Sheet
(3) Folding <when Folding Finisher is installed>
Select the desired paper folding function.
• Off : Printed pages are not folded.
• Just Output Size [Z-Fold]: Printed pages are folded into three par ts.
• Half Folding : Printed pages are folded in two at their center.
• Crease : A crease is made in printed pages.
NOTE
If Folding is combined with Hole-Punch or Staple, the Hole-Punch or Staple
function to be used is restricted depending on the specific type of the Folding
function combined. For details, see Appendix A. ☞p.A-2
Chapter 3
Property Sheets
Page 94

5. “Paper” Property Sheet
Functions of the “Paper” Property Sheet
The “Paper” property sheet allows you to make basic printer settings.
3-21
(1)
(2)
4692P033CA
(3)
(4)
(5)
(6)
(1) Original Document Size
Sets the original size.
• Paper size : Select the original size.
Available settings : Letter, Legal, Executive, A3, A4,
A5, A6, JIS B4, JIS B5, JIS B6,
Invoice, 11×17, 11×14, FLS1,
FLS2, FLS3, FLS4, Special sizes
• Edit Custom : Used to set a special size. For details, see Page 3-24.
NOTE
Depending on environment used, contents of Save/Delete will be differ ent: Refer
to Appendix A for details. ☞p.A-7
Chapter 3
Property Sheets
Page 95

3-22
5. “Paper” Property Sheet
(2) Output Paper Size
Sets the size of the paper on which prints are to be made.
• Output Paper Size : Activates the specification of the size of printing paper.
• Paper size : Select the size of the printing paper.
Available settings : Letter, Legal, Executive, A3, A4,
A5, A6, JIS B4, JIS B5, JIS B6,
Invoice, 11×17, 11×14, FLS2,
FLS3, FLS4, Special size
• Fit to Paper : The prints are output at a zoom ratio that matches the
size of the printing paper.
• Scaling : Specify the print zoom rat io.
Setting range : 20 ~ 400%
NOTES
Chapter 3
• If you select a size of paper not loaded in the machine or Manual Feed, the
machine will give a message prompting you to add paper to Tray1, Tray2, or
the manual bypass port and enter into a standby state.
• If the setting made in “Original Document Size” d oes not match the size
specified in the application with “Fit to Paper” selected, the machine takes the
paper size set in the application.
• “Fit to Paper” cannot be selected if “Custom Paper” is selected in “Original
Property Sheets
Document Size.”
(3) Copies
Specify the number of sets of prints to be made. Enter the value either directly
or by pressing [▲] or [▼].
Seting range : 1 to 999 sets
NOTE
When using the OHP interleaving function, set the number of sets of prints to
“1”.
Page 96

5. “Paper” Property Sheet
(4) Collate
Use this function when making multiple sets of prints of the same document, to
specify whether or not to print one set at a time.
• Uncollated : All of the pages are printed one after the other. For example, if
you make five sets of prints, each page is printed in sequence
five copies at a time.
• Collated : Prints are output one set at a time. For example, if you make
five sets of prints of a 10-page document, the prints will be
output one set at a time.
NOTE
Keep Collate (Sort) on the application side set to “OFF” at all times.
3-23
(5) Sorting
Select the sorting method.
• Unsorted : Prints are not sorted.
• Sorted : Prints are sorted.
TIPS
• If you output prints to the Elevator Tray when the Single-staple Finisher, Multistaple Finisher or Mailbin Finisher is installed, the prints are output in a
sawtooth manner.
• When the Folding Finisher is installed or if none of the finishing options is
installed, the prints are output in a criss-cross manner.
• The following are the minimum requirements for permitting criss-cross sorting
using the Collated setting:
Stacks of paper of the same size are loaded in the lengthwise and
crosswise directions.
The Staple, Punch or Cover mode is not set.
• When “Collated” is selected, “Sorting” is dimmed.
(6) Orientation
Select the orientation of the image. You can check the selected direction using
Page Layout.
• Portrait : Printing takes place lengthwise.
• Landscape : Printing takes place crosswise.
Chapter 3
Property Sheets
TIP
A Portrait or Landscape print appears on the Page Layout.
Page 97

3-24
5. “Paper” Property Sheet
Functions of the “Edit Custom Paper” or “Custom Paper” Dialog Box
Name of Dial og box is “Custom Paper” for PCL6, “Edit Custom Pape r” for PS.
Use this dialog box to set special sizes of paper.
Chapter 3
4668P057CA
(1) Paper Name
Select the paper name from the Custom Paper list.
(2) New
Property Sheets
This function allows you to set a special size of paper. When it is selected, the
dialog box changes to the Custom Paper Setting Dialog Box.
Number of registrations : Depending on environment used, number of
registrations will be different: Refer to Appendix A
for details. ☞p.A-7
(3) Edit
Edits Custom Paper selected in (1). When it is selected, the dialog box changes
to the Custom Paper Setting Dialog Box.
(4) Delete
Deletes Custom Paper selected in (1).
(1)
(2)
(3)
(4)
Page 98

Custom Paper setting dialog box (PCL6 version)
(5)
(6)
(5) Name
Enter the Name of the Custom Paper
Setting range: Max 20 characters
(6) Size
Set the paper size.
Setting range:
Width : 4 inch ~ 11 11/16 inch (Unit = inch)
100 mm ~ 297 mm (Unit = mm)
Height : 5 13/16 inch ~ 17 inch (Unit = inch)
148 mm ~ 432 mm (Unit = mm)
(7) Unit
Switches input units of paper size between inch and metric.
3-25
5. “Paper” Property Sheet
(7)
4692P034CA
Chapter 3
Property Sheets
Page 99

3-26
5. “Paper” Property Sheet
Edit Custom Paper Setting Dialog Box (PS version)
Chapter 3
(5) Name
Property Sheets
Refer to PCL version.
(5)
(6)
4692P035CA
(6) Size
Set the paper size.
Setting range:
Width : 4 inch ~ 11 12/16 inch (inch area)
100 mm ~ 297 mm (metric area)
Height : 5 12/16 inch ~ 17 inch (inch area)
148 mm ~ 432 mm (metric area)
Page 100

6. “Quality” Property Sheet
Functions of the “Quality” Property Sheet
‘PCL6’ version property sheet
3-27
(1)
(2)
(3)
(4)
4692P036CA
(1) Resolution
Select the printing resolution.
Setting range: 600 × 600 dpi
(2) Halftoning
Select dithering.
• Standard : Normal dithering takes place.
• High Quality : High quality dithering takes place.
• Photocopy : Rougher dithering takes place.
NOTE
Printing with High Quality will take a little more time than with Standard.
(5)
Chapter 3
Property Sheets
(3) Contrast
Perform contrast adjustment.
Setting range: 0 ~ 100
(4) Brightness
Perform brightness adjustment.
Setting range: 0 ~ 100
 Loading...