

Page 1

p
User Manual
Di151f
www.minoltaeuro
e.com
The essentials of imaging
Page 2

Page 3

Content
1 Introduction
1.1 We Want You to be Satisfied Customers..................................1 - 1
1.2 What does the Energy Star® mean?........................................1 - 2
1.3 Legal Limitations.........................................................................1 - 3
What Should Not be Copied?........................................................1 - 3
1.4 Notes on Using the User Manual...............................................1 - 4
Brief Description of Defined Terms and Symbols.........................1 - 5
1.5 How Does a Fax Machine Work?...............................................1 - 7
1.6 Certificate for Machines with CE Marking................................1 - 8
CTR 21 Approval...........................................................................1 - 8
1.7 Safety Precautions......................................................................1 - 9
Laser Safety..................................................................................1 - 9
Internal Laser Radiation..............................................................1 - 10
Ozone Release Warning.............................................................1 - 10
1.8 Characteristics..........................................................................1 - 11
2Installation
2.1 Location.......................................................................................2 - 1
Location.........................................................................................2 - 1
Power Supply................................................................................2 - 1
Positioning the Copier ..................................................................2 - 2
2.2 Unpacking....................................................................................2 - 3
Removing the Transport Protection Devices.................................2 - 3
Installing the Document Cover ......................................................2 - 4
2.3 Machine layout............................................................................2 - 5
Di151f............................................................................................2 - 5
Automatic Document FeederAF-8................................................2 - 7
Paper Tray PF-116........................................................................2 - 8
Memory Upgrade (Optional Accessory)........................................2 - 8
Printer Unit Pi1501 (Optional Accessory)......................................2 - 8
TWAIN Interface Driver (Optional Accessory)...............................2 - 8
2.4 Control Panel, Displays and Keys ............................................2 - 9
2.5 Processing Unit.........................................................................2 - 12
2.6 Installing the Cartridge ...........................................................2 - 13
Di151 Fax Unit 1
Page 4

2.7 Adding Paper............................................................................2 - 15
250 Sheet Paper Tray ..............................................................2 - 15
2nd Paper Tray — 500 Sheets .................................................2 - 17
2.8 Connecting the TelephoneLine Cable...................................2 - 18
Connecting the Power Cable......................................................2 - 18
2.9 Operating the Machine.............................................................2 - 18
3Enteringdata
3.1 Preparation..................................................................................3 - 1
3.2 Typing Conventionsin this Manual.......................................... 3 - 1
3.3 Enter text.....................................................................................3 - 1
Special Characters.......................................................................3 - 2
3.4 Entering your Fax Number........................................................3 - 3
3.5 Entering Your Company Name.................................................. 3 - 4
3.6 Entering Date and Time .............................................................3 - 5
3.7 Set Phone Type...........................................................................3 - 6
Dialling Mode................................................................................3 - 6
PSTN or PBX................................................................................3 -7
PSTN ........................................................................................... 3 - 7
Private Branch Exchange (PBX) .................................................3 - 8
3.8 Storing Numbers ........................................................................3 - 9
Sub Addressing............................................................................3 - 9
Entering One-Touch Numbers....................................................3 - 10
Entering Speed Dial Numbers....................................................3 - 11
Changing One-Touch or Speed Dial Numbers...........................3 - 12
Erasing One-Touch- or Speed Dial Numbers.............................3 - 14
Entering Call Groups..................................................................3 - 15
Changing Group Dials................................................................3 - 17
Erasing Call Groups ...................................................................3 - 18
Phone Book ...............................................................................3 - 18
3.9 Advanced Settings...................................................................3 - 19
Buzzer volume............................................................................3 - 19
Header........................................................................................3 - 20
Footer.........................................................................................3 - 21
LCD Contrast..............................................................................3 - 22
Power Save Mode......................................................................3 - 23
Energy Save Mode OFF.............................................................3 -24
Remote Diagnosis......................................................................3 - 25
Setting the Monitor Volume........................................................3 - 26
Automatic Reset.........................................................................3 - 27
2 Di151 Fax Unit
Page 5

4Sending
4.1 Transmission...............................................................................4 - 1
Notes on Original Documents.......................................................4 - 1
Using Carryier Film.......................................................................4 - 2
Placing the Documents in the Feeder ..........................................4 - 2
Placing Documents on the Glass .................................................4 - 2
4.2 Transmission Settings................................................................4 - 4
Resolution.................................................................................... 4 - 4
Default Setting Resolution.............................................................4 - 5
Contrast.........................................................................................4 - 6
Default Contrast Setting................................................................4 - 6
Page Counter................................................................................4 - 7
Closed User Group.......................................................................4 - 8
Default Transmission Setting........................................................4 - 9
4.3 Dialling Mode.............................................................................4 - 10
Manual Dialling Using the Numeric Keypad ...............................4 - 10
Automatic Dialling Using One-Touch Dialling ............................4 - 10
Automatic Dialling Using Speed Dialling ....................................4 - 10
Automatic Call Groups ...............................................................4 - 11
Program Dialling..........................................................................4 - 11
Combination Dialling ..................................................................4 - 12
Phone Book ................................................................................4 - 12
Manual Redial ............................................................................4 - 12
4.4 Memory Transmission..............................................................4 - 13
4.5 Direct Transmission..................................................................4 - 14
4.6 Book TX......................................................................................4 - 15
4.7 Delayed Transmission (Timer).................................................4 - 16
Program Dialling, Timer Transmission........................................4 - 17
4.8 Broadcasting.............................................................................4 - 18
Program Dialling Broadcast Transmission..................................4 - 19
4.9 Relay Transmission..................................................................4 - 20
Program Dialling Relay Transmission.........................................4 - 22
4.10 Polling Transmission................................................................4 - 23
4.11 Mailbox Transmission..............................................................4 - 24
Program Dialling Mailbox Transmission......................................4 - 25
4.12 Batch Transmission..................................................................4 - 26
4.13 Delete Document.......................................................................4 - 27
Di151 Fax Unit 3
Page 6

5 Reception
5.1 Manual Reception.......................................................................5 - 1
Default Reception Setting ............................................................5 - 1
5.2 Automatic Reception..................................................................5 - 2
5.3 Memory Back-up RX ..................................................................5 - 2
5.4 Memory RX (Confidential Reception).......................................5 - 3
5.5 Mailbox Reception......................................................................5 - 4
Setting up a Mailbox.....................................................................5 - 4
Delete Mailbox .............................................................................5 - 5
Printing the Content of a Mailbox .................................................5 - 6
5.6 Polling Reception.......................................................................5 - 7
Program Dialling Polling RX.........................................................5 - 8
5.7 Settings for Receiving a Fax.....................................................5 - 9
Setting the Paper Size..................................................................5-9
Setting the Number of Rings ......................................................5-10
Setting Multiple Page Printing ....................................................5 - 11
Setting Reduction RX.................................................................5 - 12
Closed User Group.....................................................................5 - 13
Setting the Image Exposure.......................................................5 - 14
Selecting the Paper Cassette.....................................................5 - 15
6Copy
6.1 Copying from the Document Feeder ........................................6 - 1
6.2 Copying Using the Flatbed Scanner.........................................6 - 1
6.3 Copying Using the Flatbed Scanner.........................................6 - 2
6.4 Settings for Copying..................................................................6 - 3
Selecting the Paper Tray..............................................................6 - 3
Selecting Default Special Paper Sizes.........................................6 - 4
Manually Setting Special Paper Sizes..........................................6 - 5
Selecting the Default Zoom Ratio.................................................6 - 6
Changing the Zoom Ratio in Increments of a Percentage ...........6 - 6
Switching Off the One-touch Dial in Copy Mode..........................6 - 7
Setting the Brightness of the Image .............................................6 - 8
Setting Automatic Brightness .......................................................6 - 9
Default Setting Automatic Brightness...........................................6 - 9
Setting Manual Brightness..........................................................6 -10
Default Setting Manual Brightness.............................................6 - 10
Setting the Photo Brightness......................................................6 - 11
Default Setting Brightness Mode................................................ 6 - 11
6.5 Auxiliary Copy Functions........................................................6 - 12
4 Di151 Fax Unit
Page 7

Sort..............................................................................................6 - 12
Default Sort Setting ....................................................................6 - 13
Copy 2-sided Documents Onto One Page..................................6 - 13
Default Setting 2 in 1 ..................................................................6 - 14
7 Connecting the Fax Machine to the Computer
7.1 Setting up the Fax Machine as a PC Fax and
PC Scanner..................................................................................7 - 1
Modem Specifications...................................................................7 - 1
7.2 Scanner Mode..............................................................................7 - 2
Installing the TWAIN Driver...........................................................7 - 2
Scanning Using the TWAIN Driver................................................7 - 2
Setting the Scan Settings..............................................................7 - 3
Scanning in Class 1 Mode............................................................7 - 3
7.3 Using your Fax Machine as a PC Fax........................................7 - 4
7.4 Using your Fax Machine as a PC Printer..................................7 - 4
8 Reports and Lists
8.1 Basic Report Settings.................................................................8 - 2
8.2 Printing Reports..........................................................................8 - 3
8.3 Displaying the Transmission Results.......................................8 - 4
8.4 Displaying the Counter...............................................................8 - 5
9 Troubleshooting
9.1 Cleaning.......................................................................................9 - 1
Cleaning the Machine...................................................................9 - 1
Cleaning the Document Feeder Belt.............................................9 - 1
9.2 Clearing Paper Jams...................................................................9 - 3
Clearing a Paper Jam in the 2nd Paper Tray ...............................9 - 4
Clearing a Paper Jam Inside the Machine ...................................9 - 5
Clearing a Paper Jam in the Document Feeder ...........................9 - 8
9.3 Error Messages on the LCD.......................................................9 - 9
9.4 Poor Print Quality......................................................................9 - 11
Low Contrast...............................................................................9 - 11
Grey Background........................................................................9 - 11
Black Marks.................................................................................9 - 12
Missing Areas..............................................................................9 - 12
Di151 Fax Unit 5
Page 8

10 Appendix
10.1 Specifications................................................................................ 13
10.2 Index............................................................................................... 16
10.3 CE Marking (Declaration of Conformity) ..................................... 21
6 Di151 Fax Unit
Page 9

Introduction
1 Introduction
1.1 We Want You to be Satisfied Customers
Thank you for deciding to buy a Minoltamultifunctional machine. The
multi-functional Di151 with fax option which is described in this user
manual will hereafter be referred to as the Di151f.
Read this User Manual carefully before starting up your machine and
always keep the instructions to hand.
Toachievethebestpossible resultsand effectiveuse ofthe machine,this
User Manual provides you with information on the following subjects.
G Installation
G Entering data
G Copying/sending/receiving
G Reports and lists
G Maintenance and trouble-shooting.
Additional information and help in the event of an error is availablefrom:
G The technical service of your Minolta representative
G Our Internet Website http://www.minolta.com.uk.
Please keepthe serial number (seenameplate) and thedate of purchase
to handso thatwecan quickly provideyou withtheright help intheevent
of an error.
We want you to be satisfied customers.
1
Subject to changes.
Di151 Fax Unit 1-1
Page 10

1
1.2 What does the Energy Star® mean ?
Photocopiers with theEnergy Star®switch to a state with low power
consumptionorswitch off if notused for a long time.This functionmeans
that annual power costs can be reduced by up to 60%.
When copyingat high speeds, theoperating stateautomatically switches
to double-sided copying.This means that both the costs for photocopy
paper and the amount of paperproduced for use is reduced.
Did youknow that the production ofa piece of paperrequires 10 timesas
much energy as the production of a photocopy?
The use of less paper also has a direct influence on the cost-effective
power consumption.
This photocopier meets theenergy efficiency criterion ofthe Energy
®
Star
.
Introduction
1-2 Di151 Fax Unit
Page 11

Introduction
1.3 Legal Limitations
What Should Not be Copied?
The photocopier should not beused to duplicate certain types of
documents for the purpose ofdistributing them documents asoriginals.
The following listisbyno means completebut is meant asa guideline for
responsible photocopying.
G Financial documentation
❍ Cheques
❍ Instructions to pay
❍ Certificates of deposit
❍ Obligations or otherdebtcertificates
❍ Stock/share certificates
G Legal documentation
❍ Lunch coupons
❍ Stamps (stamped andunstamped)
❍ Cheques or bill of exchange fromgovernment authorities
❍ Tax stamps (stamped and unstamped)
❍ Passports
❍ Immigration papers
❍ Vehicle documentation
❍ House ownership, otherdocumentation of ownershipand
legal claims.
G General documentation
❍ Identity cards or other formsof identification
❍ Copyright-protected workwithout permissionof the copyright
holder.
In additionto this itis forbidden underany circumstancesto copy national
or foreign art without permission of the copyright holder.
In case of doubt about the type of document consulta legalexpert.
1
Di151 Fax Unit 1-3
Page 12

1
1.4 Notes on Using the User Manual
The different topics in this User Manual are distinguished by special
writing styles and symbols. The following examples help you to become
familiar with the most important topics and how to handle them
appropriately.
CAUTION
This is a warning note
A warning note warns you of danger to life or existing damage to the
machine caused by incorrectoperation.
➜ The arrow indicates a safety measurethat must be taken to avoid
danger.
[UTILITY] key in the control panel on the machine with the name "Utility".
➜ single action to be carried out
(there are no more steps).
Step 1 of a handling sequence.
1
Step 2 of a handling sequence
2
etc.
Thisshowsyoutheactiontobetaken
Introduction
✎
This is a helpful tip
Text thatis markedin suchaway suggeststricks touse when copying
documentation.
1-4 Di151 Fax Unit
Page 13
Introduction
Brief Description of Defined Terms and Symbols
Thesymbols fordirection, width,length,landscape andportraitareclearly
marked. These termsare defined on this page.
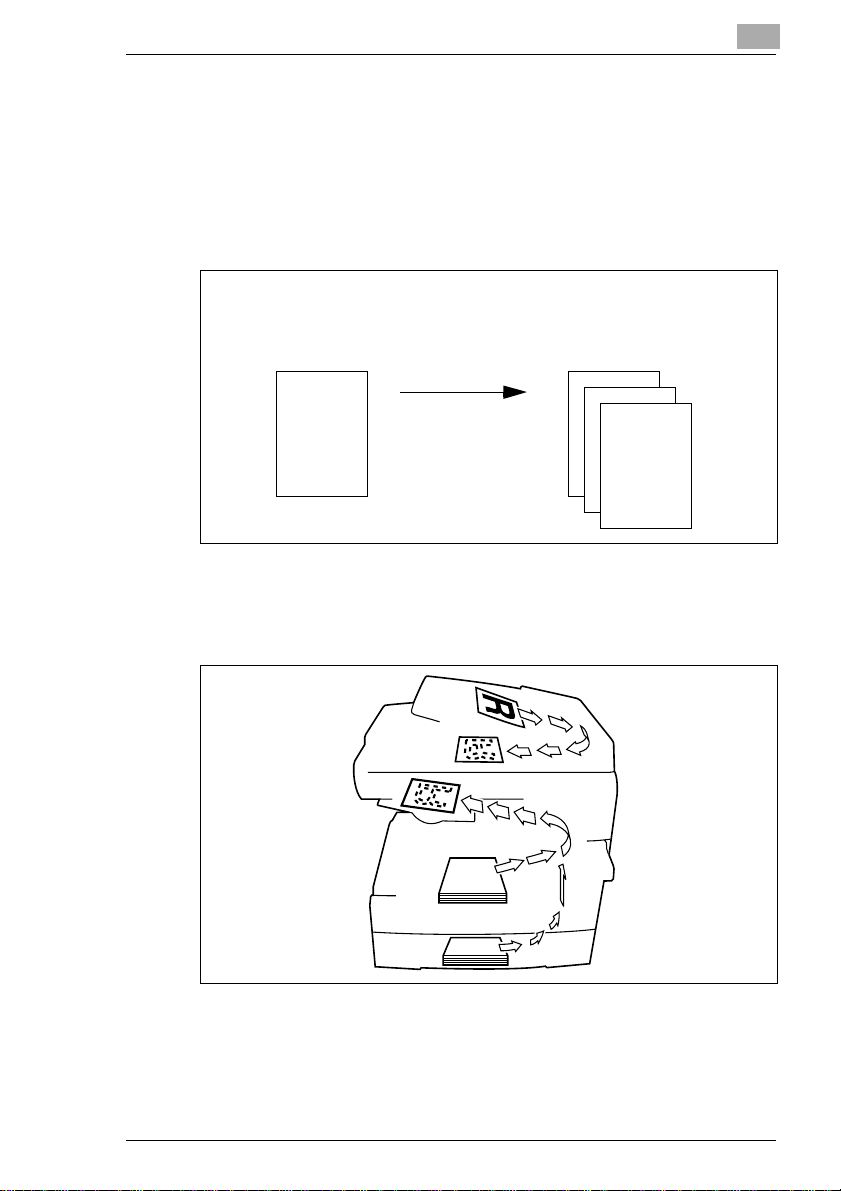
Original and Copy
Theoriginalis the documentationthat aduplicateis producedfrom during
a copying process.
1
Original
Copyingprocess
Enlarge
Downsize
Sort...
Direction
Direction is the way in which the paper is feedintothe photocopier. The
direction of the paper is markedin the following diagram bythe arrows.
Copy
(duplicate of the original copy)
Di151 Fax Unit 1-5
Page 14
1
Introduction
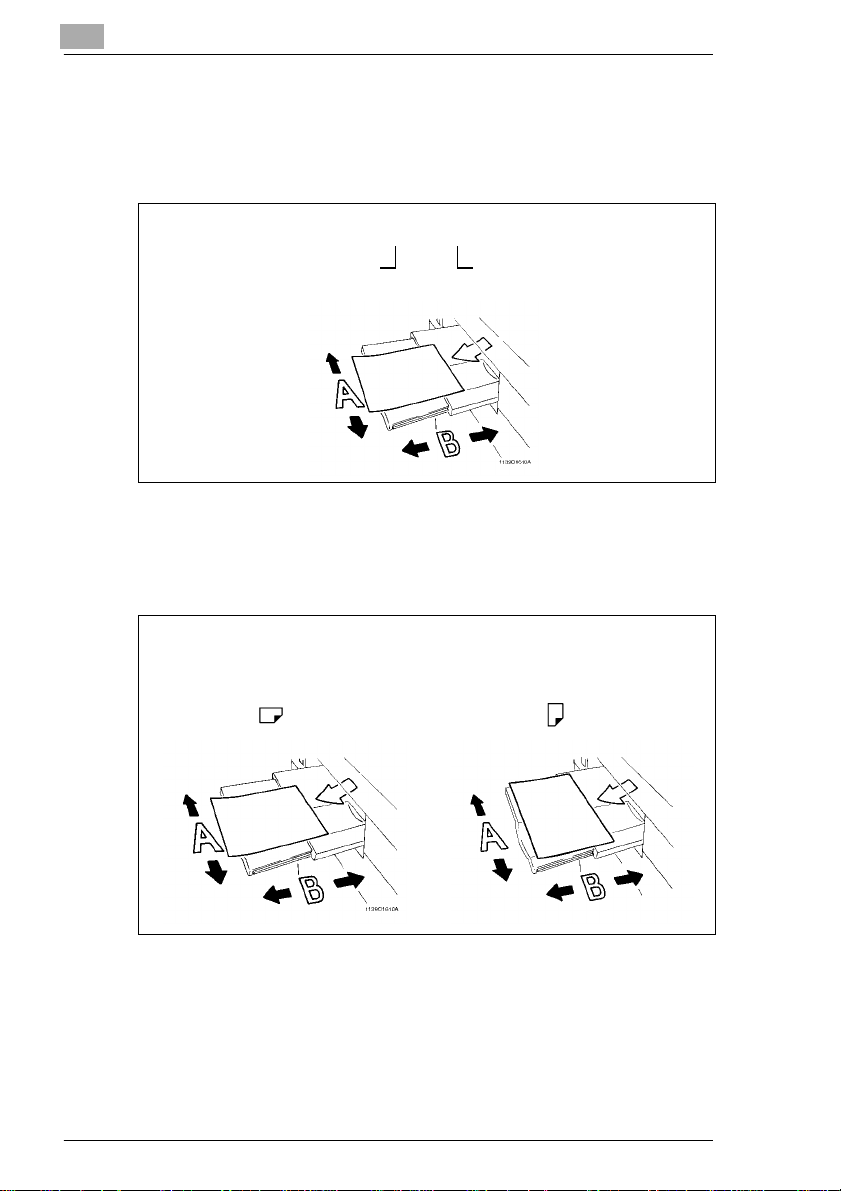
Width and length
Whenpaper dimensionsare referredtoin theUser Manual,thefirst value
always corresponds to the width of the paper (side A) and the second
value to the length of the paper (side B).
21 x 29,7 cm
Width of the paper
(side A)
Landscape and portrait
If side A of a piece of paper is shorter than side B, it is called landscape.
If side A of a piece of paper is longer than side B, it is called portrait.
Length of the paper
(side B)
21 x 29,7 cm 29,7 x 21 cm
Landscape Portrait
1-6 Di151 Fax Unit
Page 15

Introduction
1.5 How Does a Fax Machine W ork?
A fax machine can be connected to a normal telephonesystemwithout
taking any special precautions, justlikea normal telephone set. The
function of a fax machine is quite similarto thatofa telephone.
The way a fax machine works is simple: Documents that are to be
transmitted are at first scanned.Themachine doesnot recognise the
letters but reads the picture, dotby dot,and marks each dot as black or
white. That is why you can not only transmittexts but also pictures and
photos. The informationisthendigitised and compressed so that thefax
machine can send it quickly over the telephone line to another fax
machine which reverses the process,reading and marking each dot as
black or white on a sheet of paper.
When youare"called" by a faxmachine, your telephonerings asnormal.
Therefore you cannot knowwhether your are receiving a fax call or a
telephone call before picking upthereceiver.
At the beginning of a fax transmission you will hear shrill sounds. Those
sounds are the so called "hand shaking" and functionas an introduction
sequence before the actual transmission, just as interlocutors- often introduce themselves at the beginning of a telephone call. In the
introductory sequencethe technical features of both machines are
matched to makesure the transmissionand the reception are conducted
to a high standard.
With your Di151f you do not need to listen to the introductory sequence.
How to program the machine accordingly will be explained later in this
manual. Furthermoreyou will also find information aboutthe settings that
come with the machine, that have to be made when installing, or the
settings that canbem ade at a later stage. Most ofthefeatures of the fax
machine work independently, so that you can program onlythe settings
you need for the moment and ignoreallothers.
By theway, the word"fax" is acombination oftheLatin "facere"(to make)
and "simile" (similar) describing the process of making a copy which is
similar to the original. This artificial word "fax" has nowadays become
widelyacceptedineveryday language,replacing theolder termfacsimile.
A copy istherefore to be made"similar" to theoriginal. Faxmachines are
also called facsimile machines.
Now, enjoy your new fax machine.
1
Di151 Fax Unit 1-7
Page 16

1
1.6 Certificate for Machines with CE M arking
CTR 21 Approval
Annex II
The equipment has been approved in accordance with Council Decision
98/482/EC for pan-European single terminal connection to the public
switched telephone network (PSTN). However, due to differences
betweenthe individualPSTNs providedin differentcountries, theapproval
does not, by itself, give an unconditionalassurance of successful
operation on every PSTNnetwork termination point.
In cases of problems, you should contactyourequipment supplier in the
first instance.
Introduction
1-8 Di151 Fax Unit
Page 17

Introduction
1.7 Safety Precautions
Follow the safety advice to ensuresafe operation of the machine.
G Connectthe machineonly toa200-240 V/50 Hzearthed powerpoint.
G Make sure the power is not turned off over night.
G Always pull at the plug, never at the wire, when you want disconnect
the machine from thepower supply. If possible, connectthe machine
directly to a wall outlet.
G Tofacilitatecommunication alwayskeepthemachineswitchedonand
program the correct userdata.Makesureto enter the correct user
names.
G Donot unscrew any parts,if not specifically requestedin this manual.
If necessary contact your technical service.
G Never open the machine while it is transmitting or printing.
G Take care not to let humidity into the machine.
G Make sure no objects fall into the machine.
G Ifanyproblem occurs that can not be solved by the procedures
described inthismanual make sure you contact thetechnical service.
G Follow the recommendedmaintenance procedures regularly.
G Do notopen any parts of the machine or switch it off when the
photocopier is in use.
G Do notallowany magnetic objects near the photocopier.
G Switch the photocopier off immediately and remove the socket if the
machine becomes unusuallyhot or if smoke or an unusual smell
occurs.
Used cartridges may be taken back by the technical service station as a
part of the maintenance procedures.
1
Laser Safety
This fax machine containsa pageprinter which operates bymeans of a
laser. Thisfax machine containsa page printer whichoperatesbymeans
of alaser. This machinedoes not imposeany dangeras longas it isused
according tothe proceduresdescribed inthis manual.The laser islimited
to theinterior ofthe machine.The environmentis protectedfrom thelaser
emission by the covers of the machine.
Di151 Fax Unit 1-9
Page 18

1
Introduction
Internal Laser Radiation
Medium radiation:1.03(mW) wave length: 770-810 (nm)
The machineworks with aninvisible class IIIblaser. The printerhead unit
must not be opened, cleaned or repaired by the user.
Ozone Release Warning
During printer operation, a small quantity of ozone is released.This
amount is not largeenough to harm anyone.However, be sure the room
where thefax machine isbeing usedhas adequate ventilation,especially
if you are printing a high volume of materialor if the fax machineis being
used continuously over a long period.
1-10 Di151 Fax Unit
Page 19

Introduction
1.8 Characteristics
Yournewcopierisa compactmulti-functionaldevicefacilitating yourwork
and reducing your fax communication times. The features of the unit
include scanning of originalsinto thememory for delayed transmission,
allowing simultaneousreception of fax messages and vice versa.
Type
G A6 - A3 format
G Up to 33.600 bps transmission speed
G MH /MR/MMR/JBIG, ECM coding
G Automatic document feederup to50 pages(A4)
G Double-spaced LCD with 20 characters
G 64levelgreyscale.
Copying functions
G 2in1copying
G Sortfunction.
Fax functions
G Delayed transmission
G Relaybroadcast initiation
G Multi tasking operation interface
G Polling RX/TX
G Confidential reception/mailboxtransmission.
1
Di151 Fax Unit 1-11
Page 20

1
Introduction
1-12 Di151 Fax Unit
Page 21

Installation
2 Installation
2.1 Location
Please take into consideration the following recommendations.
G Avoid direct exposure to sunlightandplacethe machine away from
heaters.
G Avoid humid or dusty locations.
G Place the machine on an even, non-vibrating surface.
G Keepthe machine away from magneticfields (TV sets, radios).
G Avoid locations close to ventilationopenings, air conditioners and
heaters.
G The machines should be easily accessible from all sides.
G Make sure no liquids can enter the machine.
G Keep all covers closed when the machine is in standby, as this will
prevent the transmission or receipt of documents. If any cover is
opened no transmission or receptionis possible.
G Ifanycover is opened during sending or receiving the procedure is
interrupted. Thiscould lead to incorrect documentscanning and
printing.
G Ensure there is enough space (approx. 40 cm clearance around the
machine), for optimum operationand easy access.
G Do notplace any items which are heavier than 3 kg on the machine.
2
Location
The optimum environmental conditions for your copier are:
G Temperatures between 10°Cand32°C
(with a max. fluctuation of 10°C per hour).
G Humidity level between 15% and 85%
(with a max. fluctuation of 20% per hour).
Power Supply
The following tolerancesapply:
G Voltage fluctuation: ±10%.
G Frequency fluctuation: ±0,3%.
Di151 Fax Unit 2-1
Page 22
2
Installation
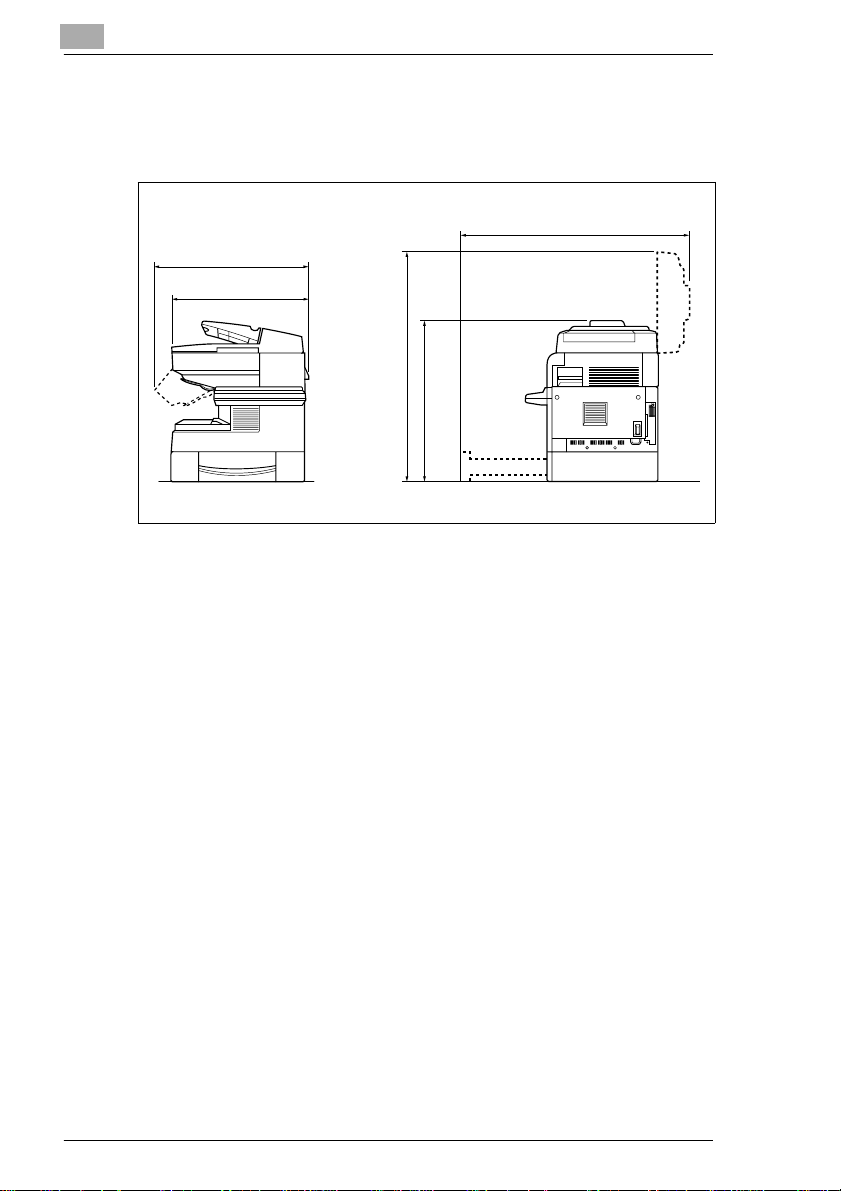
Positioning the Copier
Ensure there is aclearance of at least 150mmbetween the wall andthe
machine for optimum ventilation.
Dimensionsin mm
911
645
562
936
692
Front view Side view
2-2 Di151 Fax Unit
Page 23
Installation
2.2 Unpacking
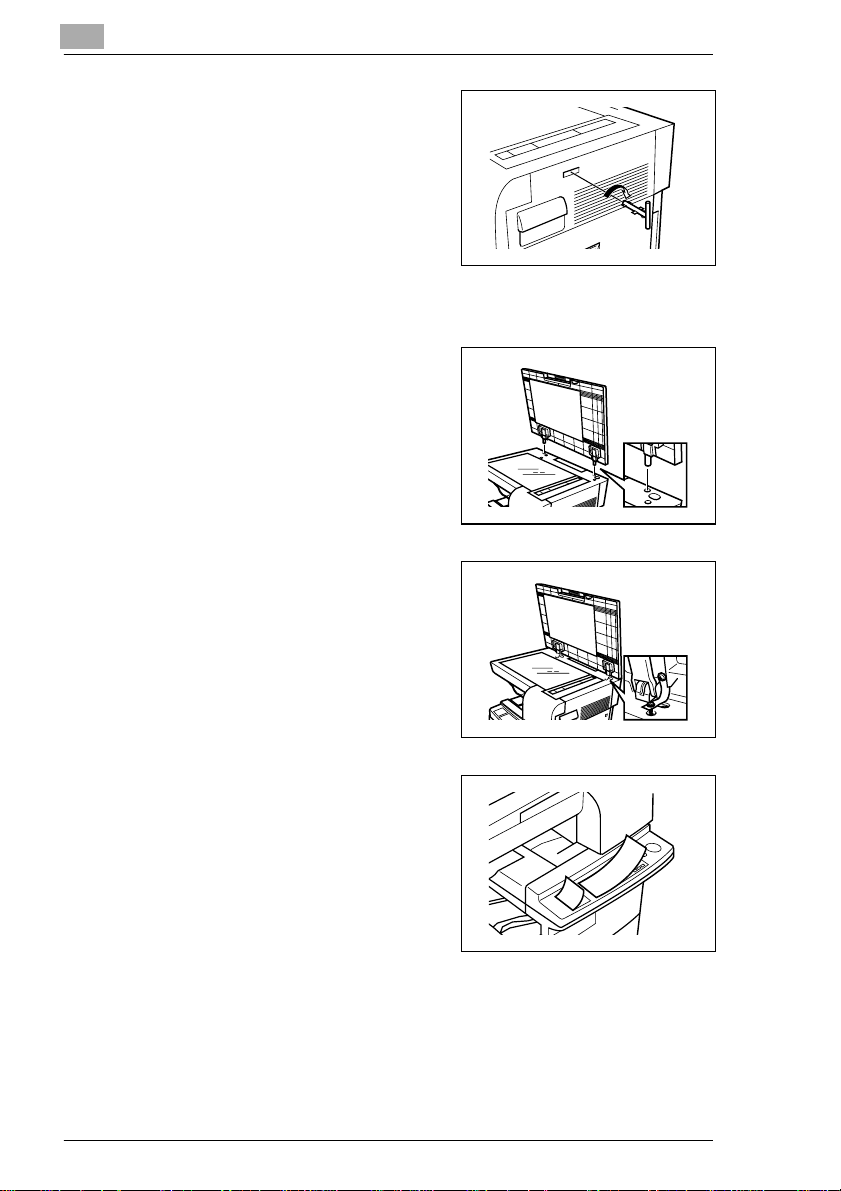
Removing the Transport Protection Devices
Remove the adhesive stripsfrom
1
the flatbed scanner and power
cable.
Remove the adhesive stripsfrom
2
the cover of the paper tray.
Remove the adhesive stripsfrom
3
the back of the machine.
2
Remove the adhesive stripsfrom
4
the single sheet feeder.
Di151 Fax Unit 2-3
Page 24
2
Turnthedowel pin onthe scanner
5
clockwise by 90° and remove it.
Installing the Document Cover
Insert the pins from the document
1
cover in the appropriate slots.
Secure thedocument cover to the
2
screws on the copier.
Installation
Affix the stickers.
3
2-4 Di151 Fax Unit
Page 25
Installation
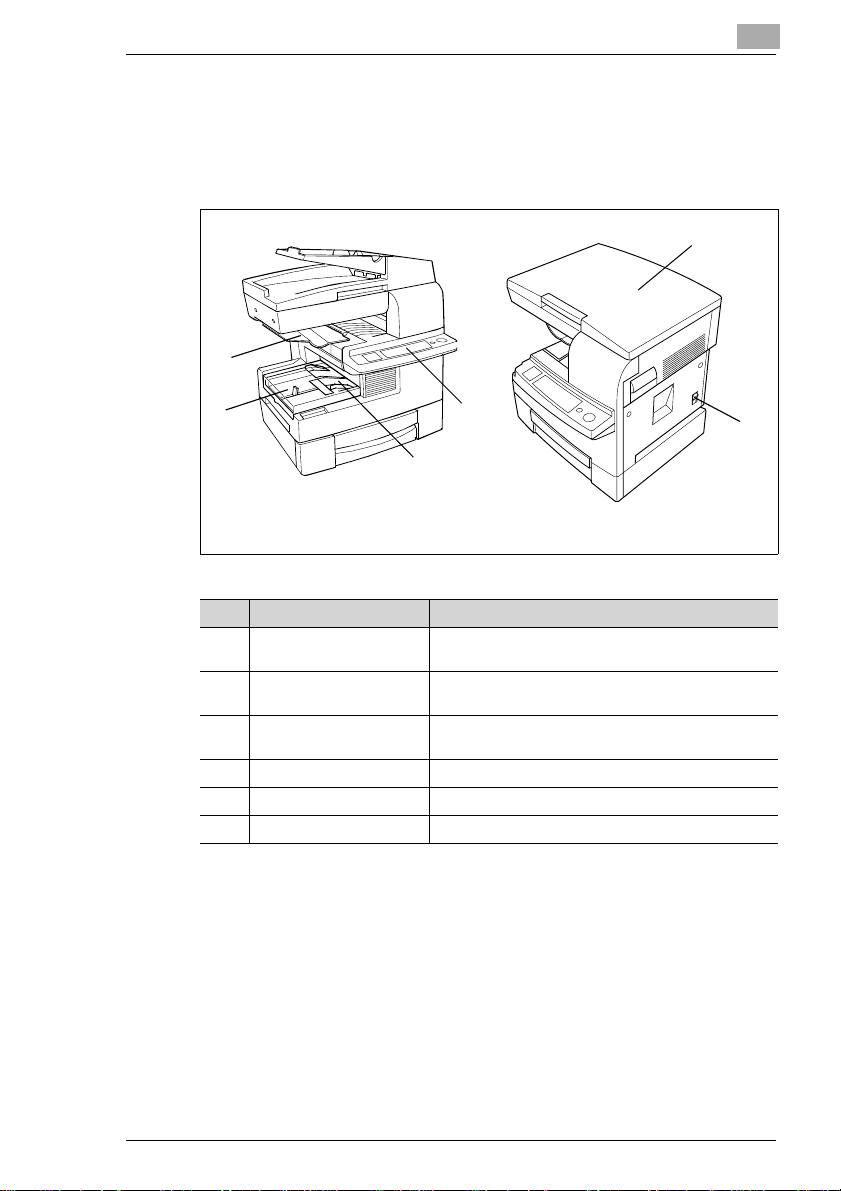
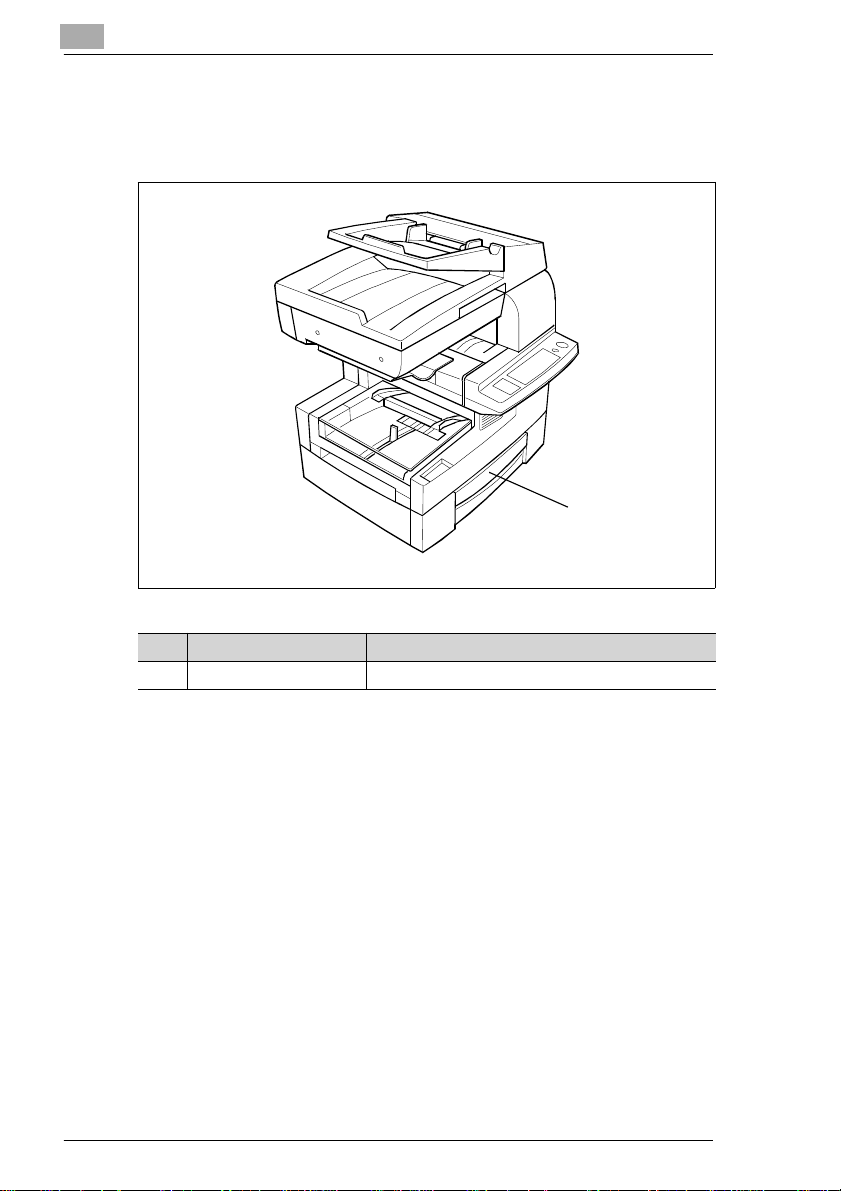
2.3 Machine layout
Di151f
External view
1
2
5
2
Left angle View fromthe right
Pos. Description Description
1 Paper stacking tray Copies produced/incomingdocumentsare storedhere
2 Paper tray
(1st paper tray)
3 Manualsingle sheet
feeder
4 Controlpanel Keys and displays used to operate the machine.
5 Documentcover Holds the document in placeon theglass.
6 Mains switch Used to switchthe machineon andoff.
4
3
(max. 100 sheets of plainpaper).
Holds up to 250 sheets of A4L or A5L paper
(L= Landscape).
Takes single sheets of varying paper formats and
typeswhich arefed manually.
6
Di151 Fax Unit 2-5
Page 26
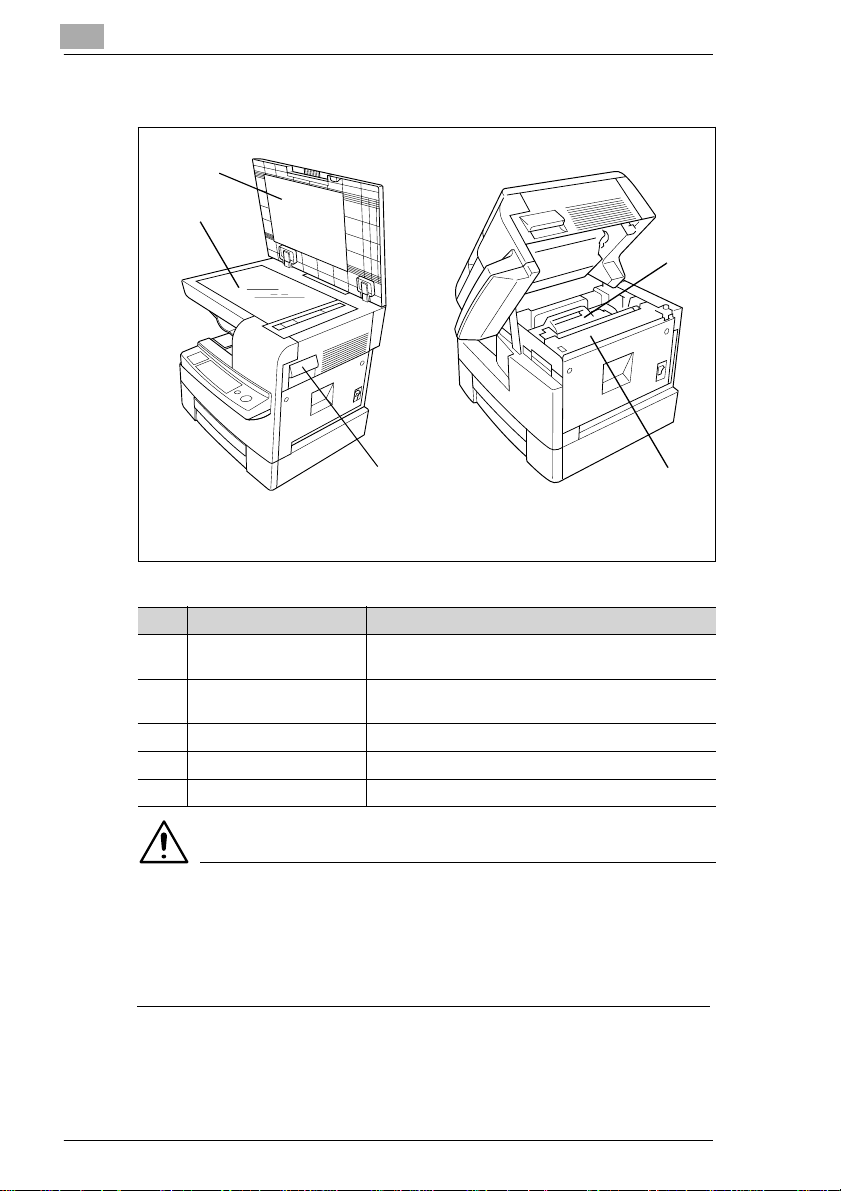
2
Installation
Internal view
3
2
4
1
View from the right View fromthe right
with the main u nit openwith the lid open
Pos. Description Description
1 Openingthe mainunit Place yourfingers under the handle and pullthe
release mechanism to openthe unit.
2 Original glass Place the documentwith the sideto be copied face
down on the glass.
3 Document pressure pad Holds the document in place on the glass.
4 Processing unit Containsthe toner.
5 Heating element Transfers the toner to the copy paper.
WARNING
The heating element will be hot and could burn you!
The temperature of the heatingelement can reach up to 120°C.
➜ Do not touch the heating element.
➜ Do not touch any parts which are labelledaccordingly :.
5
2-6 Di151 Fax Unit
Page 27
Installation
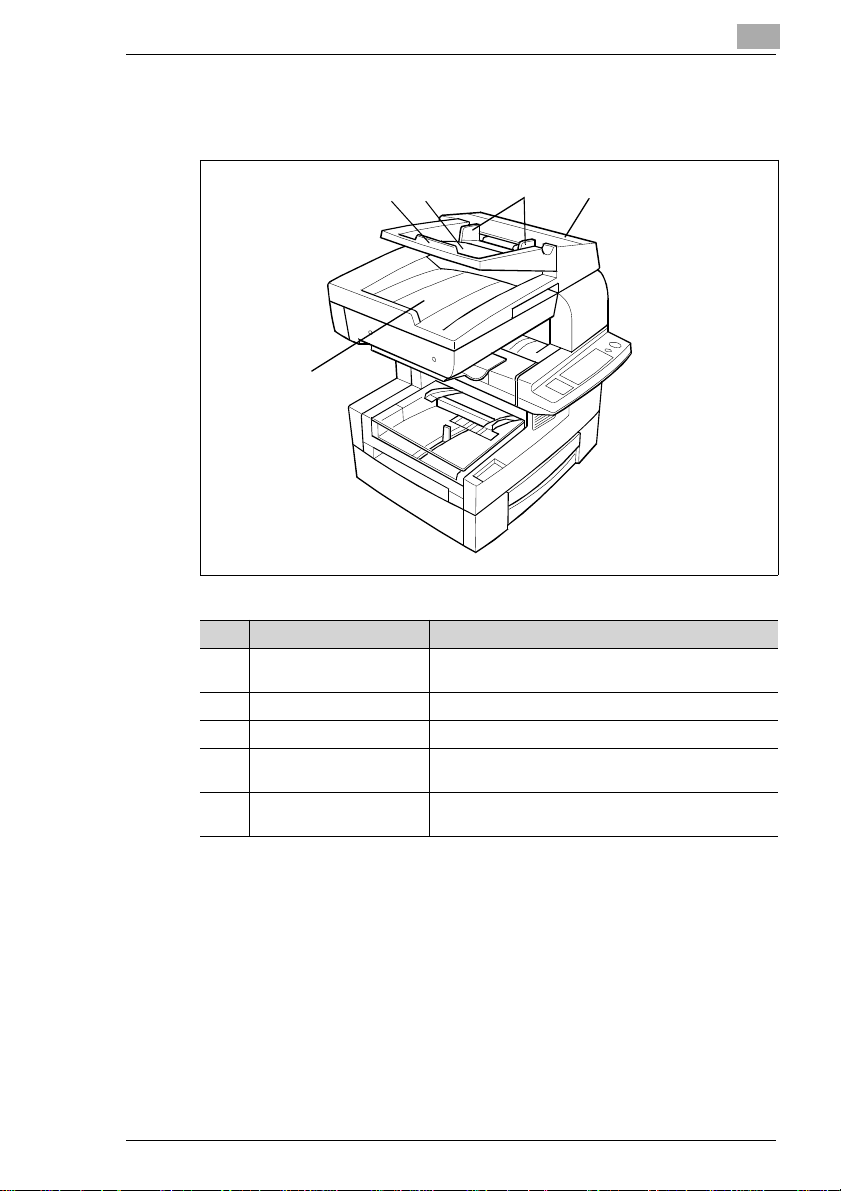
2
Automatic Document Feeder AF-8
Takes the document automatically.
1
5
Pos. Description Description
1 Extending the document
feeder
2 Documentfeeder Insertdocumentsface upin thedocument feeder.
3 Documentguide This can be adjusted to fit the paperformat.
4 Paper jam panel Open the panel to removethe paper jam in the
5 Documentoutput tray Documents which have been fed throughthe
Pull out theextension if youhave largerformatted
documents.
document feeder.
documentfeeder are storedhere.
32
4
Di151 Fax Unit 2-7
Page 28
2
Paper Tray PF-116
The tray is designed to hold up to 500 sheets of 80 g/m
format.
Installation
2
paper in A4L
1
Pos. Description Description
1 Paper Tray holds up to 500 sheetsof A4Lpaper
Memory Upgrade (Optional Accessory)
Upgrades the memory capacity of the copier.
If youmakea large quantity ofcopies whichtake upalot of memory, you
should increase the RAM of the copierusingtheupgrade option. This
optimises the data flow.
The following memory upgrades are available:
G 16MB memory upgrade
G 32MB memory upgrade.
Printer Unit Pi1501 (Optional Accessory)
Enables the machine tobe used as a printer.
TWAIN InterfaceDriver (Optional Accessory)
Enables the copier to be used as a scanner.
2-8 Di151 Fax Unit
Page 29
Installation
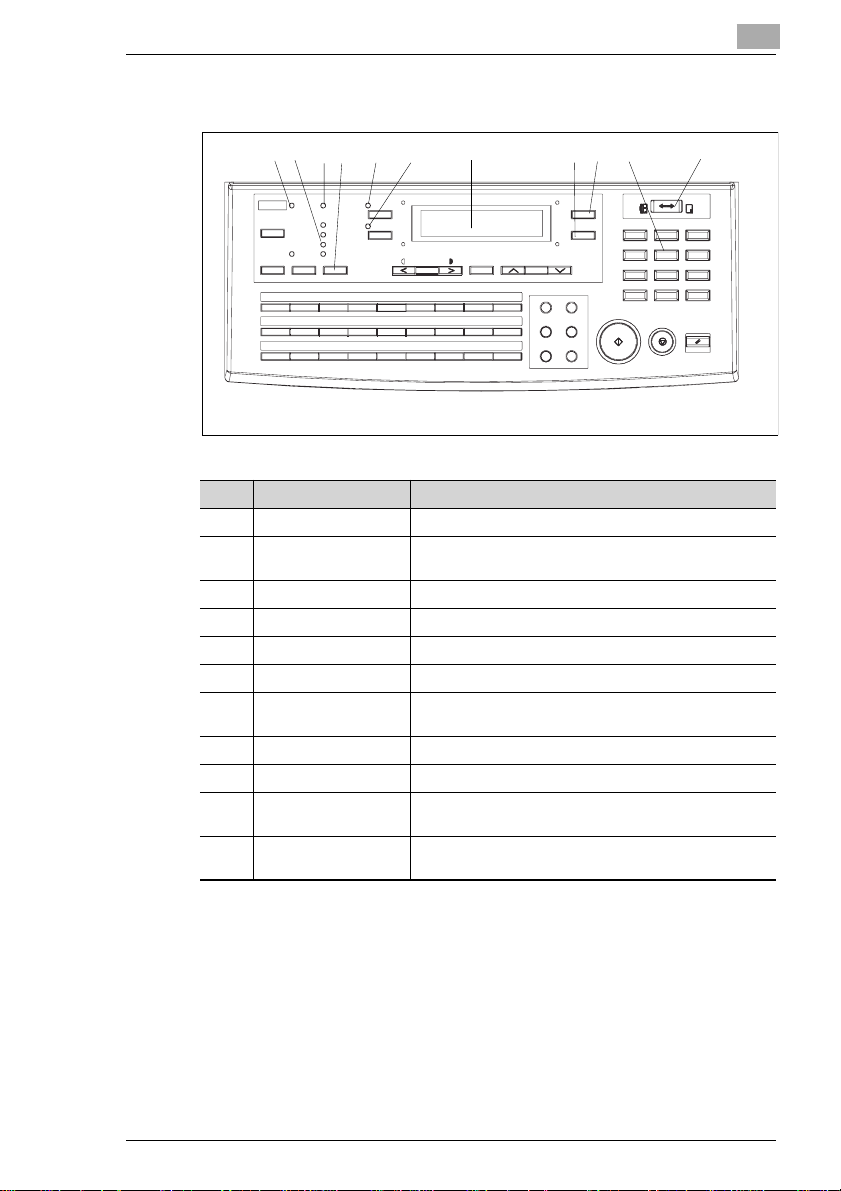
2.4 Control Panel, Displays and Keys
2
7
1 23
No. Display/Key FUNCTION
1 PC LED Flasheswhen themachine is receiving data from a PC.
2 RESOLUTION LEDs Enter the current resolution (standard, fine, S-fine, half
3 MEMORY RX LED LEDis onwhen theMemory RXMode has been set.
4 RESOLUTION Press this key to change the resolution settings.
5 2 IN 1 Press thiskey to set the2 in 1 copy function.
6 SORT Press this key to setthe sort function.
7 LCD (LiquidCrystal
Display)
8 NO (C) Press this key to interrupt an operation.
9 OK Press thiskey to confirm settings.
10 Numeric keypad Use these keys toenter numbers and letters, eg. fax
11 COPY/FAX Press this key to choose between copy mode and fax
45
6
tone).
Shows thestatus ofthemachineand contains information
about the operation modes.
numbers and destinationnames.
mode.
8
10
9
11
Di151 Fax Unit 2-9
Page 30
2
12
13 12 14 151617
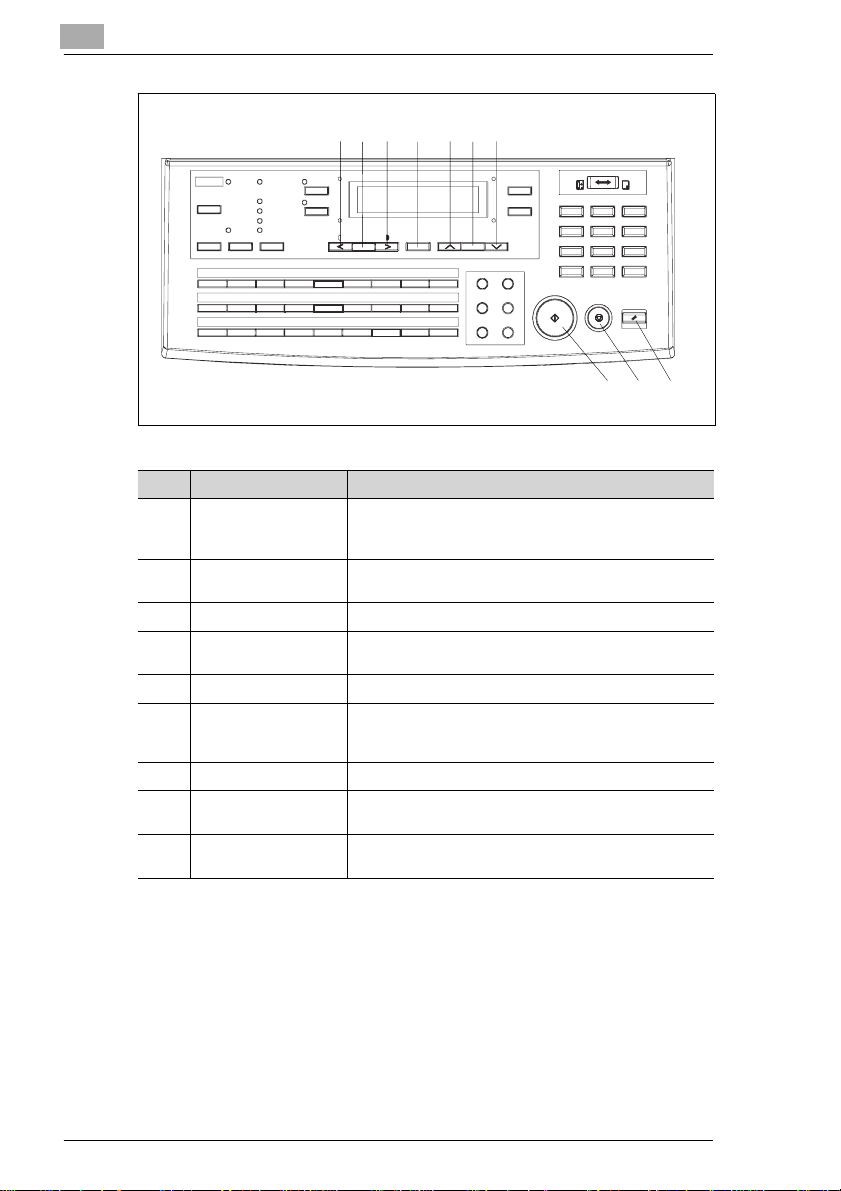
Installation
20
No. Display/Key FUNCTION
12 CONTRAST KEYS Press these keys to manually c hange the contrast
13 AUTO /PHOTO Press this key to selectone ofthe contrastoptions
14 PAPER Press this key toselect oneof thepaper trays.
15 SPACE Press this keyto enter a space and scroll through the
16 ZOOM Press this keyto select a zoom ratio.
17 ERASE Press this key to change letters or numberswhich have
18 RESET DISPLAY Press this key to return to the standard d isplay.
19 STOP Press thiskey to interruptcopying,transmission and
20 START Press this key to start copying, transmission and
settings, eg. toselect one ofthe options fromthe function
menus.
(automatic contrast, manual contrast, photo contrast).
function menus.
been entered using the numeric keypad, and to scroll
through the function menus.
reception operations.
reception operations.
19
18
2-10 Di151 Fax Unit
Page 31

Installation
21
22232425262728293031
No. Display/Key FUNCTION
21 FUNCTION Press this key to open the menu.Select therequired
22 REDIAL/PAUSE Use this key to either redial or to generate apause.
23 MANUAL DIAL Pressthiskey to manuallyestablisha connection,as you
24 BOOK TX Press this key to transmit a book.
25 PHONE BOOK Pressthiskeyto search fora number storedin the phone
26 SPEED DIAL Use thiskey toenter a two digit speed dial number.
27 ONE TOUCH Use this key to dial a storednumber.Youcan alsouse
28 STORE Press this key to send documentsstored in the memory.
29 CONFIRM Press this key to select the counter option and report
30 UTILITY Press this key to accessthe settings menu.Select the
31 ERROR LED This LED is on, if an erroroccurs.
function using the numeric keys.
would dowith the telephone.
book.
these keys toaccess various faxfunctions.
menus.
requiredfunctionusing the numeric keys.
2
Di151 Fax Unit 2-11
Page 32

2
2.5 Processing Unit
This machine produces images and characters by applying the toner
through the drum cartridge onto the page to be printed.
The processing unitshouldb e handled with care when installedor
replaced, to ensure proper performance at all times. Never expose the
cartridge to direct sunlightorany other direct light. Store the cartridge in
an environment that is not subject to extreme heat or humidity. Detailed
information onthe care and handling of the processing unit can befound
in the actual packaging and operating manual.
The cartridge should be replaced when "tonerlow" is displayed.
Please consult the regulations for disposal of such products inyourarea.
Usedcartridgesmaybetakenbackby thetechnical servicestationaspart
of the maintenance procedures.
✎
Note
To avoid damageto the processingcartridge caused by light, coverit
with a cloth as soon as it is removed from the fax.
Installation
2-12 Di151 Fax Unit
Page 33

Installation
2.6 Installing the Cartridge
WARNING
Toner cartridges can be a health risk!
Toner, if swallowedcan bea dangerto your health.
➜ If you come in contact with the toner, remember to wash your hands
immediately with coldwaterandsoap.
WARNING
The heating element will be hot and could burn you!
The temperature of the heating element can reach up to 120°C.
➜ Do not touch the heating element.
Only use cartridges which are specifically designed for this machine.
Original accessories and consumables provideoptimum print qualityand
minimum maintenance.For further information, please contact your
technical service.
2
Place your fingers underthe
1
handle on the right side of the
machine. Pull the release
mechanism towards you.Lift up
the upper partof the unit as far as
it will go.
Hold the used cartridge in both
2
hands and carefully pull it out of
the machine.
Di151 Fax Unit 2-13
Page 34

2
Shake the new cartridge a few
3
times. This should releaseany
solid toner.
Hold thehandle of the cartridgein
4
both hands. Place the cartridge
along the green marked guides.
Carefully insert the cartridgealong the guides into the machine.
5
The cartridge will automatically move towards the back.
Oncethecartridgestops, carefully
6
apply some pressure to the
cartridge. You will then hear a
'click' as the cartridge slots into
place.
Installation
Close the machine.
7
2-14 Di151 Fax Unit
Page 35

Installation
2.7 Adding Paper
250 Sheet Paper Tray
This paper tray will only take A4L or A5L paper. When filling the paper
tray, remember to removeanyremaining paper as this may leadto
malfunctions.
Remove the transparentcover of
1
the paper tray.
Pull thepaper guidesoutas far as
2
they will go.
2
Add your paper and push it to the
3
back of the tray.
Checkthatyouhavenot exceeded
4
the maximumheight (seemarking
on the side of the paper tray).
Di151 Fax Unit 2-15
Page 36

2
Push the paper guides until they
5
touch the paper.
Replace the transparent coverof
6
the standard paper tray.
Installation
2-16 Di151 Fax Unit
Page 37

Installation
2nd Paper Tray — 500 Sheets
This paper tray will only take A4L paper.
Carefullypull thepaper trayout as
1
far as it will go.
Press the paper lifting plate down
2
until you hear a 'click'.
Add the paper. Ensure that the
3
corners of the stack of paper are
under both paper stoppers.
Checkthatyouhavenot exceeded
4
the maximumheight (seemarking
on the paper tray).
2
Close the paper tray.
5
Di151 Fax Unit 2-17
Page 38

2
2.8 Connecting the Telephone Line Cable
Plug the otherend of the telephonecordinto the bottom terminalon
1
the righthand side at the back of the machine.
Connect the telephone cableto thewalloutlet.
2
✎
Note
The upper terminal mustnot beusedforthis machine.
Connecting the Power Cable
Plugthepower cableinto thecorresponding terminalon the machine and
into the wall socket.
2.9 Operating the Machine
Move the power switch to ON.
1
Installation
ON
OFF
After approx. 30 seconds, the
2
[START] key will flash green. The
display shows the following
message: The machine is now
ready for operation.
2-18 Di151 Fax Unit
TEXT x1.00
ä
[A]ü1A4
1
2
Page 39

Entering data
3 Entering data
3.1 Preparation
Before you can operate all the functionsonyourfaxmachine, you must
enter several settings.This chapterexplains how to set your name, your
line type and the remote locations with which you may wish to
communicate.
You can cancelthe setting at any timebypressing [NO] or [RESET].The
setting will then not be saved. If you do not press any key within 30
seconds your fax machine will return to standby mode.
3.2 Typing Conventions in this Manual
If nothingelse isrequested,all keys areto be pressedone aftertheother.
This is also the case if they are connected by a "to facilitate the
layout."Press[0] +[5]+[YES]"means: Press thenumerickey [0],thenthe
numeric key [5] and then the key labelled [YES].
3.3 Enter text
You can use the one-touch keys to enter characters. To enter special
characters,follow theinstructionsgiveninthe tablebelow. Press[YES]to
save the relevant setting. To add a space, press [SPACE].Ifyou have
madea mistake,press the[DELETE]key tocorrect themistake.Press the
right orlefta rrow key (AUTO/PHOTO) tomovethe cursor whilst entering
letters and special characters.
3
Di151 Fax Unit 3-1
Page 40

3
Entering data
Special Characters
Press the [*] key as many times as shown inthe table.
Numeric key * Numeric key * Numeric key *
Press * once Ä Press *9 times é Press * 17 times ç
Press * 2 times ä Press * 10 times í Press* 18times Æ
Press * 3 times Ö Press * 11 times ó Press * 19 times Ñ
Press * 4 times ö Press * 12 times ú Press * 20 times ¿
Press * 5 times Ü Press * 13 times Å Press * 21 times Ø
Press * 6 times ü Press * 14 times î Press* 22times ø
Press * 7 times á Press * 15 times à Press * 23 times ß
Press * 8 times É Press * 16 times °
Press the numeric key[27]as many times as shown in the table.
One-touch key 27 & One-touch key 27 & One-touch key 27 &
Press & once & Press & 9 times . Press &17 times $
Press & twice # Press &10 times , Press & 18 times :
Press & 3 times * Press & 11 times ! Press& 19 times ;
Press & 4 times - Press &12 times + Press & 20 times @
Press & 5 times / Press &13 times = Press& 21 times %
Press & 6 times ( Press &14 times < Press & 22 times [
Press & 7 times ) Press &15 times > Press & 23 times ]
Press & 8 times " Press &16 times ? Press & 24 times ’
3-2 Di151 Fax Unit
Page 41

Entering data
3.4 Entering your Fax Number
You can place your name andfax number in the header. The headerwill
appear at the top of the faxes you send. Up to 20 characters canbe
entered.
The information in the headerhelp the receiving station to identifythe
sender.
Press [SPACE] to add blanks.
Press [FAX] on the control panel.
1
Press [UTILITY] and 3 x [SPACE].
2
Press [2] on the numeric keypad
3
and enter your fax number.
Press [YES] to confirmtheentry
4
and [NO] to cancel the entry.
MA Y. 09 13:00 100%
-SET DOC. FACE UP-
INITIALUSER DATA? s
OK=YES / or 1-3 t
(=123456
OK=YES / or 1-3 J
TEXT x1.00 1
ä [A] ü 1A4
3
Di151 Fax Unit 3-3
Page 42

3
3.5 Entering Your Company Name
You can either enter your companyname, your name or both. Up to 32
characters can be entered.
Refer to Section 3.3 for instructionsonhow to make the entries.
Press [FAX] on the control panel.
1
Press [UTILITY] and 7 x[SPACE].
2
Press [3] on the numeric keypad
3
and enter your name.
Press [YES] to confirm the entry
4
and [NO] to cancel the entry.
Entering data
MAY. 09 13:00 100%
-SET DOC. FACE UP-
INITIALUSERDATA? I
OK=YES / or 1-3 J
NAME=MINOLTA
OK=YES
TEXT x1.00 21
ä [A] ü 1A4
3-4 Di151 Fax Unit
Page 43

Entering data
3.6 Entering Date and Time
The date and timeappear on thedisplay, theactivity reportand the other
fax machine's printouts.
Press [FAX] on the control panel.
1
Press [UTILITY] and 7 x [SPACE].
2
Press [1] on the numeric keypad
3
and enter the time and date
(YYMMDD).
Press [YES] to confirm the entry
4
and [NO] to cancel the entry.
MAY. 09 13:00 100%
-SET DOC. FACE UP-
INITIALUSERDATA? s
OK=YES / or 1-3 t
14:46 '00 05 09
SET TIME (OK=YES)
TEXT x1.00
ä
[A]ü1A4
1
3
Di151 Fax Unit 3-5
Page 44

3
3.7 Set Phone Type
Use thisfunction toadjust your faxmachine toyour telephoneconnection.
Dialling Mode
Choose the dialling mode which applies to your telephone
connection.Tone dialling (DTMF) dials the number by transmitting a
combination of beeps.You might need it when your fax has to transmit a
setofnumberswhicharecodedasbeepingnoises, e.g.when youuse the
mailbox function. Pulse dialling dials by transmitting a number of pulses
for each dialled number.
Press [FAX] on the control panel.
1
Press [UTILITY] and 5 x [SPACE]
2
on the numeric keypad.
Press [1] on the numeric keypad.
3
Entering data
MAY. 09 13:00 100%
-SET DOC. FACE UP-
COMM. SETTING? s
OK=YES / or 1-3 t
1TONE/PULSE
Select the desired setting using
4
the arrow keys and press [YES].
❍ If you have selected the setting
"PULSE", you will be asked in
the next displayto set the number of pulses. Select10PPS using
the arrow keys and confirm your selection with [YES].
Press [NO] to return to standby
5
mode.
3-6 Di151 Fax Unit
*TONE PULSE
<, > & YES
TEXT x1.00 21
ä [A] ü 1A4
Page 45

Entering data
PSTN or PBX
Use thisfunction tosetthe machineto PSTN orPBX. PBX lineallows dial
numbers (prefix no.) line access.
PSTN
1
2
3
4
Press [FAX] on the control panel.
Press [UTILITY] and 5 x [SPACE]
on the numeric keypad.
Press [3] on the numeric keypad.
Select "PSTN" using the arrow
keys and press [YES].
3
MAY. 09 13:00 100%
-SET DOC. FACE UP-
COMM. SETTING? s
OK=YES / or 1-3 t
3 PSTN / PBX
*PSTN PBX
<, > & YES
Press [NO] to return to standby
5
mode.
Di151 Fax Unit 3-7
TEXT x1.00
ä
[A]ü1A4
1
Page 46

3
Private Branch Exchange (PBX)
The prefix is limited to 4 digits.
Press [FAX] on the control panel.
1
Press [UTILITY] and 5 x [SPACE]
2
on the numeric keypad.
Press [3] on the numeric keypad.
3
Select"PBX"using thearrow keys
4
and press [YES].
Dial the prefix using the numeric
5
keypad and press [YES].
Entering data
MAY. 09 13:00 100%
-SET DOC. FACE UP-
COMM. SETTING? I
OK=YES / or 1-3 J
3 PSTN / PBX
PSTN *PBX
<, > & YES
PRE-FIX NO.= 0
OK=YES
Press [NO] to return to standby
6
mode.
3-8 Di151 Fax Unit
TEXT x1.00 21
ä [A] ü 1A4
Page 47

Entering data
3.8 Storing Numbers
Sub Addressing
When entering one-touchand speed dialnumbers itispossible to entera
sub-address. This enables you for instancetoaccess sub-addresses
directly from the server.Thesub-address is limitedto20digits.
3
Norm
ID
9999
With SUB
ID
9999
SUB
66112
Fax Server
If the TTI is
9999
then
56789
Fax Server
If the TTI is
9999
then
56789
12345
34567
56789
66112
12345
34567
56789
66112
Di151 Fax Unit 3-9
Page 48

3
Entering data
Entering One-Touch Numbers
Use this function to store your mostfrequently called fax numbersfor
instant recall or to arrange call groups (for more information, refer to
"Entering CallGroups").
Press [FAX] on the control panel.
1
Press [UTILITY] and 2 x[SPACE].
2
Press [1] on the numeric keypad
3
and then the required one-touch
key.
Use the numeric keypad to enter
4
the number and press [YES].
❍ Press [SPACE] to enter a sub-
address.
MAY. 09 13:00 100%
-SET DOC. FACE UP-
DIAL REGISTRA TION? s
OK=YES / or 1-5 t
=_
(
=123456_
(
OK=YES (SUB=
t)
Enter the name and press [YES].
5
Use the arrow keys to select the
6
required modemspeed and press
[YES].
Press the next one-touch key and
7
continue repeating the process
untilallone-touch keyshave been
entered.
Press [NO] twice to returnto
8
standby mode.
3-10 Di151 Fax Unit
NAME=MINOLTA_
OK=YES
*33.6 14.4 9.6
<, > & YES
-SELECT REGIST. KEY (COMPLETE=NO)
TEXT x1.00
ä
[A]ü1A4
1
2
Page 49

Entering data
Entering Speed Dial Numbers
Similar to the one-touchkeys youcan store fax numbers as speed dial
numbers. You dial a speed dial number byentering a two-digit identifier
code. Up to 100 speed dial numbers canbe stored (00-99).
1
2
3
4
Press [FAX] on the control panel.
Press[UTILITY] and2 x[SPACE].
Press [2] on the numeric keypad.
Enter the speed dial number's
identifier code.
3
MAY. 09 13:00 100%
-SET DOC. FACE UP-
DIAL REGISTRA TION? s
OK=YES / or 1-5 t
SPEED DIAL=_
SPEED DIAL= 01
Use the numeric keypad to enter
5
the number and press [YES].
❍ Press [SPACE] to enter a sub-
address.
Enter the name and press [YES].
6
Use the arrow keys to select the
7
required modemspeed and press
[YES].
Continue repeating theprocess
8
from step 4 until all speed dial
numbers have been entered.
Press [NO] twice to return to
9
standby mode.
Di151 Fax Unit 3-11
=123456_
(
OK=YES (SUB=
NAME=MINOLTA_
OK=YES
*33.6 14.4 9.6
<, > & YES
SPEED DIAL=_
TEXT x1.00 1
ä [A] ü 1A4
t)
Page 50

3
Entering data
Changing One-Touch or Speed Dial Numbers
You can change one-touch/speeddial keys by following the procedure
below.The examplebelow describes howto change aone-touch key.To
changeaspeed dialkey, press[SPEED DIAL]under point3and press[2]
on the numerickeypad; enter the speed dialnumber and thenfollow the
instructions.
Press [FAX] on the control panel.
1
Press [UTILITY] and 2 x[SPACE].
2
Press [1] on the numeric keypad
3
and then the required one-touch
key and press [NO].
Select "ENTER" using the arrow
4
keys and press [YES].
MAY. 09 13:00 100%
-SET DOC. FACE UP-
DIAL REGISTRA TION? s
OK=YES / or 1-5 t
REGISTERED! KEEP?
OK=YES (EDIT/DEL=NO)
*EDIT DELETE
<, > & YES
Use the numeric keypad to enter
5
the new number and press [YES]
twice.
If necessary, enter the new name
6
and press [YES].
Use the arrow keys to select the
7
required modemspeed and press
[YES].
3-12 Di151 Fax Unit
(=123456_
OK=YES (DEL=NO)
NAME=MINOLTA_
OK=YES (DEL=NO)
*33.6 14.4 9.6
<, > & YES
Page 51

Entering data
8
9
Press the next one-touchkey and
continue repeating the process
untilallone-touch keyshave been
changed.
Press [NO] twice to return to
standby mode.
-SELECT REGIST. KEY(COMPLETE=NO)
TEXT x1.00
ä
[A]ü1A4
3
1
Di151 Fax Unit 3-13
Page 52

3
Entering data
Erasing One-Touch- or Speed Dial Numbers
You can erase one-touch/speeddial keys by following the procedure
below. The example below describes how to erase a one-touch key. To
changeaspeed dialkey, press[SPEED DIAL]under point3and press[2]
on the numerickeypad; enter the speed dialnumber and thenfollow the
instructions.
Press [FAX] on the control panel.
1
Press [UTILITY] and 2 x[SPACE].
2
Press [1] on the numeric keypad
3
and then the required one-touch
key and press [NO].
Select "ENTER" using the arrow
4
keys and press [YES].
MAY. 09 13:00 100%
-SET DOC. FACE UP-
DIAL REGISTRA TION? s
OK=YES / or 1-5 t
REGISTERED! KEEP?
OK=YES (EDIT/DEL=NO)
EDIT *DELETE
<, > & YES
Press the next one-touch key and
5
continue repeating the process
untilallone-touch keyshave been
deleted.
Press [NO] twice to returnto
6
standby mode.
3-14 Di151 Fax Unit
-SELECT REGIST. KEY(COMPLETE=NO)
TEXT x1.00 21
ä [A] ü 1A4
Page 53

Entering data
Entering Call Groups
Your fax machine can scan the documents once and thensend it to
numerous other fax machines(call groups). Use this function, if you
frequently send to the same group. You can program up to 40 groups,
each having up to 99 destinations. Speeddialnumbers may also be
programmed. For this press [SPEED DIAL] in step 5.
1
2
3
4
Press [FAX] on the control panel.
Press [UTILITY] and 2 x [SPACE].
Press [3] on the numeric keypad
and thenthe one-touchkey where
youwanttostorethegroup.
Enter the name of the group and
press [YES].
3
MAY. 09 13:00 100%
-SET DOC. FACE UP-
DIAL REGISTRA TION? I
OK=YES / or 1-5 J
-SELECT REGIST . KEY-
GROUPNAME=_
Press the one-touch key where
5
the fax number is stored.
❍ Press [SPEED DIAL] and enter
the 2-digitspeed dial number to
store a speed dial number.
Press [YES] to enter other
6
numbers.
❍ Press [START] to return to
standby mode.
Di151 Fax Unit 3-15
NO. 001=ONE-TOUCH 02
NO. 002=ONE-TOUCH 09
Page 54

3
Press [NO] twice to returnto the
7
standard display.
TEXT x1.00
ä
[A]ü1A4
✎
Note
From the call group menu, youcan alsostore a sub-addressor a
selective polling number.
Entering data
1
2
3-16 Di151 Fax Unit
Page 55

Entering data
Changing Group Dials
You can program group dials by following the procedure below:
1
2
3
4
5
Press [FAX] on the control panel.
Press [UTILITY] and 2 x [SPACE].
Press [3] on the numeric keypad
and thenthe one-touchkey where
the group is stored.
Press [NO].
Select "ENTER" using the arrow
keys and press [YES].
3
MAY. 09 13:00 100%
-SET DOC. FACE UP-
DIAL REGISTRA TION? I
OK=YES / or 1-5 J
-SELECT REGIST . KEY-
REGISTERED! KEEP?
OK=YES (EDIT/DEL=NO)
*EDIT DELETE
<, > & YES
Enter the new name of the group
6
and press [YES].
Press [NO].
7
Enter the new call number.
8
❍ Press [START] to return to
standby mode.
Press [NO] twice to return to the
9
standard display.
Di151 Fax Unit 3-17
GROUP NAME=_
NO.002=BERLIN
OK=YES (DEL=NO)
NO.003=_
OK=YES (Fin.=STAR T)
TEXT x1.00
ä
[A]ü1A4
1
Page 56

3
Erasing Call Groups
You can erase group dials byfollowing the procedure below:
Press [FAX] on the control panel.
1
Press [UTILITY] and 2 x[SPACE].
2
Press [3] on the numeric keypad
3
and thenthe one-touchkey where
the group is stored.
Press [NO].
4
Select "ENTER" using the arrow
5
keys and press [YES].
MAY. 09 13:00 100%
-SET DOC. FACE UP-
DIAL REGISTRA TION? I
OK=YES / or 1-5 J
-SELECT REGIST . KEY-
REGISTERED! KEEP?
OK=YES (EDIT/DEL=NO)
EDIT *DELETE
<, > & YES
Entering data
Press [NO] twice to returnto
6
standby mode.
Phone Book
You do not need to enter any data into the phone book.All one-touch
numbers,speeddial numbers andcallgroups are automaticallystored in
the phone book. How to dial with the telephone book will be explained in
the "Sending faxes" chapter.
3-18 Di151 Fax Unit
TEXT x1.00 21
ä [A] ü 1A4
Page 57

Entering data
3.9 Advanced Settings
You can adjust the machine to your personal requirementswith the
following settings.
Buzzer volume
Use this function to set the buzzer tone, for example,when an error
occurs. Follow the procedure below:
Press [FAX] on the control panel.
1
Press [UTILITY] and [6] on the
2
numeric keypad.
Select the desired setting using
3
the arrow keys and press [YES].
Press [NO] to return to standby
4
mode.
MAY. 09 13:00 100%
-SET DOC. FACE UP-
6 BUZZER VOLUME
*HIGH LOW OFF
<, > & YES
TEXT x1.00
ä
[A]ü1A4
3
1
Di151 Fax Unit 3-19
Page 58

3
Entering data
Header
Yourfax number,yourname, thenumber ofpages tobetransmitted,date
andtime appearin theheader. Thisinformationis transmittedto the other
fax machine. To do this, it uses the set data.
Use this function to print a headeron the transmitted pages. Follow the
procedure below:
Press [FAX] on the control panel.
1
Press [UTILITY] and 2 x[SPACE].
2
Press [6] on the numeric keypad.
3
Select the desired setting using
4
the arrow keys and press [YES].
MAY. 09 13:00 100%
-SET DOC. FACE UP-
TX OPERATION? I
OK=YES / or 1-7 J
6 HEADER
*ON OFF
<, > & YES
Press [NO] to return to standby
5
mode.
3-20 Di151 Fax Unit
TEXT x1.00
ä
[A]ü1A4
1
2
Page 59

Entering data
Footer
The footer shows the numberof pages, an ID number and the date and
time ofthe transmission.Use thisfunction toprint afooter onthe received
pages. Follow the procedure below:
1
2
3
4
Press [FAX] on the control panel.
Press [UTILITY] and 4 x [SPACE].
Press [8] on the numeric keypad.
Select the desired setting using
the arrow keys and press [YES].
3
MAY. 09 13:00 100%
-SET DOC. FACE UP-
RX OPERATION? s
OK=YES / or 1-8 t
8FOOTER
*ON OFF
<, > & YES
Press [NO] to return to standby
5
mode.
Di151 Fax Unit 3-21
TEXT x1.00
ä
[A]ü1A4
1
Page 60

3
Entering data
LCD Contrast
Use this function to adjust the LCD contrastofthe display to the light
conditions on site. For this proceed as follows:
Press [FAX] on the control panel.
1
Press [UTILITY] and [5] on the
2
numeric keypad.
Select the desired setting using
3
the arrow keys and press [YES].
Press [NO] to return to standby
4
mode.
MAY. 09 13:00 100%
-SET DOC. FACE UP-
5 LCD CONTRAST
LIGHT ä
<, > & YES
TEXT x1.00 21
ä [A] ü 1A4
n¨¨¨
ü DARK
3-22 Di151 Fax Unit
Page 61

Entering data
Power Save Mode
The powersave function reduces thepower consumptionof the machine
when instandby mode.The default settingis "ON". If youwant tochange
the setting, follow the procedure below:
1
2
3
4
Press [FAX] on the control panel.
Press [UTILITY] and [2] on the
numeric keypad.
Select the desired setting using
the arrow keys and press [YES].
Use the numeric keypad to enter
the requiredtime and press[YES].
3
MAY. 09 13:00 100%
-SET DOC. FACE UP-
2 POWER SA VE MODE
*ON OFF
<, > & YES
TIMER= 15min. (1-120)
OK=YES
Press [NO] to return to standby
5
mode.
Di151 Fax Unit 3-23
TEXT x1.00
ä
[A]ü1A4
1
Page 62

3
Entering data
Energy Save Mode OFF
Thisfunctionenablesyouto temporarilyswitchoff theenergy savemode,
without having to reprogramthe time. If you want to change the setting,
follow the procedurebelow:
Press [FAX] on the control panel.
1
Press [UTILITY] and [3] on the
2
numeric keypad.
Select the desired setting using
3
the arrow keys and press [YES].
Press [NO] to return to standby
4
mode.
MAY. 09 13:00 100%
-SET DOC. FACE UP-
3 POWER SA VEOFF
*DISABLE ENABLE
<, > & YES
TEXT x1.00
ä
[A]ü1A4
2
1
3-24 Di151 Fax Unit
Page 63

Entering data
Remote Diagnosis
This function enables the technical service to check settings using the
telephone line. If you want to changethe setting, follow the procedure
below:
1
2
Press [FAX] on the control panel.
Press [UTILITY] and [7] on the
numeric keypad.
3
MAY. 09 13:00 100%
-SET DOC. FACE UP-
7 REMOTE MONITOR
Select the desired setting using
3
the arrow keys and press [YES].
Press [NO] to return to standby
4
mode.
*ON OFF
<, > & YES
TEXT x1.00
ä
[A]ü1A4
1
Di151 Fax Unit 3-25
Page 64

3
Entering data
Setting the Monitor Volume
With thisfunction you can set thevolume ofthe monitor,to hear the build
up of the communication.
Press [FAX] on the control panel.
1
Press [UTILITY] and 5 x [SPACE]
2
on the numeric keypad.
Press [2] on the numeric keypad.
3
Select the desired setting using
4
the arrow keys and press [YES].
Press [NO] to return to standby
5
mode.
MAY. 09 13:00 100%
-SET DOC. FACE UP-
COMM. SETTING? s
OK=YES / or 1-3 t
2 LINE MO N ITOR
*HIGH LOW OFF
<, > & YES
TEXT x1.00
ä
[A]ü1A4
2
1
3-26 Di151 Fax Unit
Page 65

Entering data
Automatic Reset
Thisfunction enablesyouto determinethe numberof minutes afterwhich
the machine settings should automatically returnto the default setting.
1
2
3
4
5
Press [FAX] on the control panel.
Press [UTILITY] and [1] on the
numeric keypad.
Select the desired setting using
the arrow keys and press [YES].
Select the desired setting using
the arrow keys and press [YES].
Press [NO] to return to standby
mode.
MAY. 09 13:00 100%
-SET DOC. FACE UP-
1 AUTO RESET
*ON OFF
<, > & YES
*0.51234
<, > & YES
TEXT x1.00
ä
[A]ü1A4
3
1
Di151 Fax Unit 3-27
Page 66

3
Entering data
3-28 Di151 Fax Unit
Page 67

Sending
4 Sending
4.1 Transmission
Notes on Original Documents
Yournew faxmachinecantransmitthe followingdocumentsizes.Youcan
place up to 50 sheets of A4 paper in the AutomaticDocument Feeder
(ADF).
4
Maximum
documentsize
216 mm
500 mm
Feeding
direction
Minimum
documentsize
148 mm
Feeding
direction
106 mm
Effective
text width
max. 208 mm
Feeding
direction
If the document is longer than 500 mm, the machine recognises a
document jam and stops scanning the document.
Use yellow, green-yellow or light blue colours for information you do not
want to be transmitted.
Make sure ink, glue, correction fluid, etc. are completely dry before you
send a fax.
CAUTION
Staples and paper clips may damage the machine.
➜ Remove all staples and paper clips beforesending a document.
Di151 Fax Unit 4-1
Page 68

4
Sending
Using Carryier Film
Documentsthatmeetthe followingcharacteristicsmustbe photocopiedor
placed in a carrying film beforethey can be sent:
G paper sizes less than 148 mm wide or less than 100mmlong;
G paper lighter than 50g/m²;
G folded, torn, wrinkled, damp, rough or curled documents;
G chemically treated and pressure sensitive copy paper.
Placing the Documents in the Feeder
Insert the document face up in the
1
document feeder.
Centre the documentandadjust
2
the paper guides so that they just
touch the edges of the original
document.
Placing Documents on the Glass
Place the document face down on
1
the glass.
4-2 Di151 Fax Unit
Page 69

Sending
Align the document along the
2
centre marking of the document
guide and close the document
cover.
You caninsert up to 50pages of A4into thedocument feeder.Make sure
the pages are well placed and alignedbefore starting the transmission.
Ifthepaperis curledor pagesstick together,more thanone pageat atime
could be fed into the machine which can leadto paperjams or faulty
transmissions. In this case you should insert thepages one by one to
ensure correct feeding of the documents.
The standard transmission memory holds approx. 45 pages of the ITU
Test Document 1 (standard resolution). Ensure the displayed memory
capacity does not drop to 0 (%) during scanning,asthismaycancel the
process.
4
Di151 Fax Unit 4-3
Page 70

4
4.2 Transmission Settings
Resolution
Insert the document into theADF.
1
If you send documents with normalprint or typed documents, it is not
necessary to make anyfurther adjustments. To changethe quality of the
transmission, press [RESOLUTION].
[RESOLUTION] has four settings:
Sending
Standard This is the normal resolutionfor most typed documents and
Fine Resolution used for fine print e.g. newspaper articles.
S. Fine This resolution is suitable for fine print e.g. illustrations.
Half Tone Halftonemode capturesshades in photographsand drawings.
simple drawings (e.g. useof typewriters).
4-4 Di151 Fax Unit
Page 71

Sending
Default Setting Resolution
If you set the resolution via the control panel,this setting is only kept for
the current transmission.Youcan permanentlychange thedefault setting
of the resolution in the "Transmission Settings" menu. Follow the
procedure below:
Press [FAX] on the control panel.
1
Press [UTILITY] and 3 x [SPACE].
2
Press [2] on the numeric keypad,
3
select the required setting using
the arrow keys and press [YES].
Press [NO] to return to standby
4
mode.
MAY. 09 13:00 100%
-SET DOC. FACE UP-
TX OPERATION? s
OK=YES / or 1-7 t
*STD F S/F H/T
<, > & YES
TEXT x1.00
ä
[A]ü1A4
1
4
Di151 Fax Unit 4-5
Page 72

4
Sending
Contrast
Use the contrast keys to adjust the setting.If you raise the contrast, fine
differencesintoneon the document are enhanced and transmitted more
clearly. However,information may be lost during this process.
Default Contrast Setting
If you set the contrast via the control panel, the setting will only apply to
the current transmission. You can permanently change the contrast
defaultsettingin the"TransmissionSettings"menu.Follow theprocedure
below:
Press [FAX] on the control panel.
1
Press [UTILITY] and 3 x[SPACE].
2
Press [1] on the numeric keypad,
3
select the required setting using
the arrow keys and press [YES].
MAY. 09 13:00 100%
-SET DOC. FACE UP-
TX OPERATION? I
OK=YES / or 1-7 J
LIGHT än¨¨¨¨ü DARK
<, > & YES
Press [NO] to return to standby
4
mode.
4-6 Di151 Fax Unit
TEXT x1.00
ä
[A]ü1A4
1
2
Page 73

Sending
Page Counter
This functioncompares the number of pagesentered with the numberof
pages scanned. If they do not match, your machinewi ll set off an alarm.
Press [FAX] on the control panel.
1
Press [UTILITY] and 3 x [SPACE].
2
Press [3] on the numeric keypad,
3
select the required setting using
the arrow keys and press [YES].
Press [NO] to return to standby
4
mode.
MAY. 09 13:00 100%
-SET DOC. FACE UP-
TX OPERATION? s
OK=YES / or 1-7 t
*ON OFF
<, > & YES
TEXT x1.00 1
ä [A] ü 1A4
4
Di151 Fax Unit 4-7
Page 74

4
Sending
Closed User Group
This function minimisesthecommunication with recipientswhich are
stored as one-touch or speed dial numbers on your machine.
Press [FAX] on the control panel.
1
Press [UTILITY] and 2 x[SPACE].
2
Press [4] on the numeric keypad,
3
select the required setting using
the arrow keys and press [YES].
Press [NO] to return to standby
4
mode.
MAY. 09 13:00 100%
-SET DOC. FACE UP-
TX OPERATION? s
OK=YES / or 1-7 t
*ON OFF
<, > & YES
TEXT x1.00 21
ä [A] ü 1A4
4-8 Di151 Fax Unit
Page 75

Sending
Default Transmission Setting
This function enables you to storethe memory transmissionordirect
transmission as a default setting.
Press [FAX] on the control panel.
1
Press [UTILITY] and 3 x [SPACE].
2
MAY. 09 13:00 100%
-SET DOC. FACE UP-
TX OPERATION? s
OK=YES / or 1-7 t
4
Press [5] on the numeric keypad,
3
select the required setting using
the arrow keys and press [YES].
Press [NO] to return to standby
4
mode.
*MEM.TX AD FTX
<, > & YES
TEXT x1.00 1
ä [A] ü 1A4
Di151 Fax Unit 4-9
Page 76

4
4.3 Dialling Mode
Seven different dialling methods are available.
Insert the document face up into theADF, press [FAX] on the control
panel and dial using the required dialling option.
Manual Dialling Using the Numeric Keypad
Enter the fax number using the
1
numeric keypad and press
[START]. You can check the
number on the display and,if
necessary, delete itandthenenter the new number. A maximum of
30 digits can be entered using the numerickeypad.
Automatic Dialling Using One-Touch Dialling
Press one of the one-touch keys
1
[01] - [27] which hasalready been
programmed. After scanning the
document, the machine will
automatically dial the number.
Automatic Dialling Using Speed Dialling
(=123456_
=123456_
(
Sending
(TX=START)
Press [SPEED DIAL] and then
1
enter the 2-digit speed dial
number (00-99).
Thenameoftheremotefax
2
machine appears on the display.
Press [START] and the machine
will automatically start dialling
after it has scanned the document.
4-10 Di151 Fax Unit
SPEED DIAL=01
=TOKYO
(
(TX=START)
Page 77

Sending
Automatic Call Groups
Press one of the one-touch keys
1
[01]- [27]. If a group is stored, its
name will appear on the display.
After scanning the document, the
Di151f will dial automatically.
Program Dialling
You can program the followingfunctions in the last four one-touch keys
[24]- [27]:
G Broadcasting
See “Program Dialling Broadcast Transmission” on page 4-19
G Delayed Transmission
See “Program Dialling, Timer Transmission” on page 4-17
G Mailbox Transmission
See “Program Dialling Mailbox Transmission”on page4-25
G Polling Reception
See “Program Dialling Polling RX” on page 5-8
G Relay Transmission
See “Program Dialling Relay Transmission” on page 4-22.
GROUP NAME=MINOLT A
4
Di151 Fax Unit 4-11
Page 78

4
Sending
Combination Dialling
You canuse thisfunction todial thepre-dialnumber youhave storedina
one-touchkeyor as a speeddialnumber. It isnecessary thatthe pre-dial
numberand a [+]character (eg.123+)are storedas one-touchnumber or
speed dial number.
Press the one-touch key orspeed
1
dialkey whereyouhave storedthe
pre-dial number.
Enter the rest of the number and
2
press [START].
You can also enter the second part of the numberusingthe one-
touch keys or the speed dial numbers.
Phone Book
The phone book lists all one-touch and speed dial numbers whichare
stored in your Di151f.
Press[PHONEBOOK]. Selectthe
1
desired setting using the arrow
keys and press [YES].
(=123+
=123+456
(
(TX=START)
*LIST SEARC H
<, > & YES
Press [START].
2
If you have selected[LIST], you can scroll through the phone bookusing
either [SPACE] or [DELETE]. Pressing "SEARCH" enablesyouto search
for a number or name alphabetically or numerically.
Manual Redial
Insert the document faceup intotheADFandpress [REDIAL/
1
PAUSE] and [START].
*123456 s
OK=S TART t
✎
Note
No further settings are requiredforthe automatic redial function.
4-12 Di151 Fax Unit
Page 79

Sending
4.4 Memory Transmission
The memory transmissionshould be selected asthe default transmission
mode. Since your fax has several functions, it is possibleto scan
documents into the memory forlatertransmission even though your fax
machine iscurrently sending,receiving or printingfrom memory. Assoon
as the current operationhas beencompleted, the newly scanned
document will be processed. Memory transmission offers several
advantages. Make sure the memoryLEDison. Ifthisis not the case,
press [MEMORY].
Insert the document face up into
1
the ADF and press [FAX] on the
control panel.
Dial the telephone number
2
manually or use one of the onetouch keysorspeed dial numbers.
Press [START] to scan the
3
document. It will be automatically
sent from memory.
=ENTER FAX NO.
(
èor FUNCTION
(=123456_
(TX=START)
*MEMORY* 100%
123456
1
4
✎
Note
Your Di151f comes withanECM(Error CorrectionMode). In this
mode,datathatmay belost dueto poorline qualityis sentrepeatedly.
This procedure considerably reduces the number of errors.
Di151 Fax Unit 4-13
Page 80

4
4.5 Direct Transmission
You can senddirectly from theADF if not enoughmemory is available to
scan all of the document you want to transmit.Makesure you have
switched off [MEMORY TX].
Insert the document faceup into
1
the ADF and press [FAX] onthe
control panel.
Dial the number manuallyusing
2
the one-touch keys or speed dial
keys and press [START].
(=ENTER FAX NO.
è
or FUNCTION
=123456_
(
(TX=START)
Sending
4-14 Di151 Fax Unit
Page 81

Sending
4.6 Book TX
Use this function to send pages from booksdirectly fromthe glass top
without having to first photocopythe pages.
Place the book face down on the
1
glass and press [BOOK TX].
Enter the fax number and press
2
[YES].
Press [YES].
3
❍ Press [NO] to select an
alternative format. Confirm the
new format by pressing [YES].
Press [YES] to continue scanning
4
pages or [START] to start the
transmission.
(=ENTER FAX NO.
è
or FUNCTION
= 123456
(
OK=YES
SCAN BOOK (A42)
SCAN=YES (SIZE=NO)
NEXT PAGE? (A42)
SCAN=YES (TX=START)
4
1
2
Di151 Fax Unit 4-15
Page 82

4
4.7 Delayed Transmission (Timer)
You can use this function to take advantageof lowerevening and weekend long-distance rates.
Youcan onlyuse thisfunctionifthedateandtime havebeen programmed
in the machine.
Insert the document face up into the ADF.
Adjust contrast and resolution if necessary.
Press [FAX] on the control panel.
1
Press [UTILITY] and [2] on the
2
numeric keypad.
Enter the requiredtime of
3
transmission and press [YES].
=ENTER FAX NO.
(
èor FUNCTION
2TIMERTX
TIMER = 12 : 30
OK=YES
Sending
Enter the fax number and press
4
[START].
Themachinescansthedocument
into memory.
Press [NO] to confirm the entry.
5
❍ Press [YES] to continue
programming further
transmissions.
If thememory becomesfull duringthe scanprocess,yourfax willreturn to
standby mode. In this case repeat the programmingprocedure when
enough memoryisavailable again.
4-16 Di151 Fax Unit
=123456_
(
(TX=START)
TIMER = 12 : 30
OK=YES (COMPLETE=NO)
Page 83

Sending
Program Dialling, Timer Transmission
You can also program the timer functionforone oftheone-touch keys
[24] - [27].
Press [FAX] on the control panel.
1
Press [UTILITY] and 2 x [SPACE].
2
Press [4] on the numeric keypad
3
andthenthe requiredmemory key
[24]- [27].
Press [2] on the numeric keypad.
4
Enter the required time of
5
transmission and press [YES].
MAY. 09 13:00 100%
-SET DOC. FACE UP-
DIAL REGISTRA TION? s
OK=YES / or 1-5 t
-SELECT REGIST . KEY-
FUNCTION
SEL.1/2/3/6/7
TIMER = 12 : 30
OK=YES
4
Enter the fax number and press
6
[START].
Press[RESETDISPLAY]to return
7
to the standard display.
Di151 Fax Unit 4-17
(=123456_
TEXT x1.00
ä
[A]ü1A4
(TX=START)
1
2
Page 84

4
4.8 Broadcasting
Your Di151f can be used to send documents from memory to a max. of
143recipients, eithermanually,by usingthe one-touchdial, thespeeddial
or by using the group dial option. The machine dials and transmits the
document sequentially to each recipient. If one of the numbersis
engaged, your fax machine will dial the next one and finally return to the
engaged number and try again.After broadcasting, it will automatically
printa reportand returnto standbymode. Ifthe functionreservationreport
has been selected, a list of the destinations will be printed following the
transmission.
Insert the document faceup inthe document feeder.
Adjust contrast and resolution if necessary.
Press [FAX] on the control panel.
1
Press [UTILITY] and [1] on the
2
numeric keypad.
(=ENTER FAX NO.
è
or FUNCTION
1 BROADCAST
Sending
Enterthe requiredfax numberand
3
press [YES].
Repeat this procedureuntil you
4
have entered all recipients.
Press [START] to return to
5
standby mode.
Press [YES] to check the
6
recipients or [START] to start the
transmission.
❍ When checking the recipients,
you may confirm them by pressing [YES] or erase them from the
broadcast transmissionbypressing [NO].
4-18 Di151 Fax Unit
NO. 001=123456
OK=YES
NO. 002=234567
OK=YES
NO. 003=_
(Fin.=START)
CHECK DESTINA TIONS?
OK=YES (Fin.=START)
Page 85

Sending
Program Dialling Broadcast Transmission
You can also program the timer functionforone oftheone-touch keys
[24] - [27].
Press [FAX] on the control panel.
1
Press [UTILITY] and 2 x [SPACE].
2
Press [4] on the numeric keypad
3
andthenthe requiredmemory key
[24] - [27].
Press [1] on the numeric keypad.
4
Enterthe requiredfax numberand
5
press [YES].
MAY. 09 13:00 100%
-SET DOC. FACE UP-
DIAL REGISTRA TION? s
OK=YES / or 1-5 t
-SELECT REGIST . KEY-
FUNCTION
SEL.1/2/3/6/7
NO. 001=123456
OK=YES
4
Repeat this procedureuntilyou
6
have entered all recipients.
Press [START] to return to
7
standby mode.
Press [YES] to check the
8
recipients or [START] to start the
transmission.
❍ When checking the recipients,
you may confirm them by pressing [YES] or erase them from the
broadcast transmission by pressing [NO].
Di151 Fax Unit 4-19
NO. 002=234567
OK=YES
NO. 003=_
(Fin.=START)
CHECK DESTINA TIONS?
OK=YES (Fin.=START)
Page 86

4
4.9 Relay Transmission
This function enables you to use your Di151f asa transmissionstation.
You send a document to one or several fax machines and they in turn
send the document to several destinations. If you use several identical
machines in your company, you can use a tree-structured distribution.
This function enablesyou totransmit the documents to a recipient and
informthatfax machine toforward your faxeddocument to thenumber(s)
programmed in its relay box.
Document
Machine A
Report
✎
Machine B
one-touch/
speed dial
Sending
Machine C
Machine D
Machine E
Machine F
Note
Machines A andB must be compatible andboth must havethe"relay
broadcasting" function, evenif they are different models.
If the relay location (hub) and final destination are abroad, then you can
reach all destinations withonlyone long-distance call.
Insertthedocuments faceup in the documentfeeder. Adjustcontrast and
resolution if necessary.
Press [FAX] on the control panel.
1
Press [UTILITY] and [7] on the
2
numeric keypad.
Press the one-touch key where
3
the relay location is stored and
press [YES].
4-20 Di151 Fax Unit
(=ENTER FAX NO.
è
or FUNCTION
7 RELAYINITIATE
= 123456
(
OK=YES
Page 87

Sending
Using the numeric keypad, enter
4
the one-touch number wherethe
relay locationhas stored the relay
group and press [YES].
Enter the speed dial number
5
where the relay location has
stored the recipient of the
transmission report and press
[YES].
The machine scans the pages and automatically starts transmitting
them.
RELAY GP NO.=_
OK=YES
REPORT SD NO.=_
OK=YES (DEL=NO)
4
Di151 Fax Unit 4-21
Page 88

4
Sending
Program DiallingRelay Transmission
You can also program the timerfunction for one of the one-touch keys
[24] - [27].
Press [FAX] on the control panel.
1
Press [UTILITY] and 2 x[SPACE].
2
Press [4] on the numeric keypad
3
andthenthe requiredmemory key
[24] - [27].
Press [7] on the numeric keypad.
4
Press the one-touch key where
5
the relay location is stored and
press [YES].
MAY. 09 13:00 100%
-SET DOC. FACE UP-
DIAL REGISTRA TION? s
OK=YES / or 1-5 t
-SELECT REGIST . KEY-
FUNCTION
SEL.1/2/3/6/7
= 123456
(
OK=YES
Using the numeric keypad,enter
6
the one-touch number wherethe
relay locationhas stored the relay
group and press [YES].
Enter the speed dial number
7
where the relay locationhas
stored the recipient of the
transmission reportand press
[YES].
Press [RESETDISPLAY]to return
8
to the standard display.
4-22 Di151 Fax Unit
RELAY GP NO.=_
OK=YES
REPORT SD NO.=_
OK=YES
TEXT x1.00
ä
[A]ü1A4
1
2
Page 89

Sending
4.10 Polling Transmission
The Di151f enables you to store documents which the recipient can
retrieve when required.The document caneven consistof several pages.
Polling transmission offers you a single mode and a multiple mode. In
single mode, the documentcan onlybe polled once. Afterwards the
document is automaticallydeleted. In multiple mode, the documentis
scanned andpolled from memory.After thepolling the documentremains
in memory sothat several pollings are possible.To delete thedocument,
select "Delete Document".
Insert the document into the ADF in order to scan it. Adjust contrast and
resolution if necessary.
Press [FAX] on the control panel.
1
Press [UTILITY] and [5] on the
2
numeric keypad.
Enter the 4-digit password using
3
the numeric keypad and press
[YES].
(=ENTER FAX NO.
è
or FUNCTION
5 POLLING TX
POLLING ID =1234
OK=YES
4
Select the desired setting using
4
the arrow keys and press [YES].
The machine scans the document intomemory.
Di151 Fax Unit 4-23
*SINGLE MULTI
<, > & YES
Page 90

4
4.11 Mailbox Transmission
Use this function to transmitadocument to a mail box. This is helpful if
only a specific person should be readingthemessage. However, both
machines must be the same model.
The transmissionis only executed,if both mailbox IDcodes areidentical.
This prevents the documentfrom being transmitted to a wrongmailbox.
Thedocument isscanned intothe remote faxmachine's memoryand can
only beprinted if therecipient enters thecorrect 4-digit mailboxpasscode.
Insertthedocuments faceup in the documentfeeder. Adjustcontrast and
resolution if necessary.
Press [FAX] on the control panel.
1
Press [UTILITY] and [3] on the
2
numeric keypad.
Use the numeric keypad to enter
3
the four-digit mailbox ID for the
recipient and press [YES].
=ENTER FAX NO.
(
èor FUNCTION
3MAILBOXTX
MAILBOX ID =1234
OK=YES
Sending
Enter the fax number using the
4
numeric keypad and press
[START].
The machine scans the document into memory.
4-24 Di151 Fax Unit
=123456_
(
(TX=START)
Page 91

Sending
Program Dialling Mailbox Transmission
You can also program the timer functionforone oftheone-touch keys
[24] - [27].
Press [FAX] on the control panel.
1
Press [UTILITY] and 2 x [SPACE].
2
Press [4] on the numeric keypad
3
andthenthe requiredmemory key
[24] - [27].
Press [3] on the numeric keypad.
4
Use the numeric keypad to enter
5
the four-digit mailbox IDfor the
recipient and press [YES].
MA Y. 09 13:00 100%
-SET DOC. FACE UP-
DIAL REGISTRA TION? s
OK=YES / or 1-5 t
-SELECT REGIST . KEY -
FUNCTION
SEL.1/2/3/6/7
MAILBOX ID =1234
OK=YES
4
Enter the fax number using the
6
numeric keypad and press
[START].
Press[RESETDISPLAY]to return
7
to the standard display.
Di151 Fax Unit 4-25
(=123456_
TEXT x1.00
ä
[A]ü1A4
(TX=START)
1
2
Page 92

4
4.12 Batch Transmission
Use this function to store severaldocuments in memory and sendallof
them at a specific time. In this way the receiving station need only be
called once. The recipient must be stored as a one-touch dial number.
Press [FAX] on the control panel.
1
Press [UTILITY] and 2 x[SPACE].
2
Press [5] on the numeric keypad
3
and then the required one-touch
key.
Enter the requiredtime of
4
transmission and press [YES].
Sending
MA Y. 09 13:00 100%
-SET DOC. FACE UP-
DIAL REGISTRA TION? s
OK=YES / or 1-5 t
-SELECT REGIST . KEY -
TX TIME = 12 : 30
OK=YES
Press [NO] to cancel the entry or
5
press a one-touch key to store
further transmissions.
4-26 Di151 Fax Unit
-SELECT REGIST . KEY (COMPLETE=NO)
Page 93

Sending
4.13 Delete Document
This function enables you to delete programmed transmissions and data
storedin them emory. Ifmore thanone jobhas beenstored, youcan scroll
through the entries using[SPACE] and [DELETE].
Press [FAX] on the control panel.
1
Press [UTILITY] and [8] on the
2
numeric keypad.
Press [YES] to delete the job.
3
❍ Press the arrow key to display
additional information.
Press[RESETDISPLAY]to return
4
to the standard display.
The document is deleted.
(=ENTER FAX NO.
è
or FUNCTION
8 CANCEL RESERV.
01 [12:30] TIMER
DEL=YES (CONF.=
TEXT x1.00 21
ä [A] ü 1A4
è)
4
Di151 Fax Unit 4-27
Page 94

4
Sending
4-28 Di151 Fax Unit
Page 95

Reception
5 Reception
5.1 Manual Reception
Basically, manualreception only makessenseifyou are expecting voice
callsonthesameline.Youshouldkeepthisinmindwhenyousetthe
reception mode. As the machineisnot equipped with a telephone
receiver, a separate phonemust be attached to the wall outlet of the
telephoneline. Onlythen themanualreceptionmode isavailable.Answer
the call and press [START].
Default ReceptionSetting
Press [FAX] on the control panel.
1
Press [UTILITY] and 4 x [SPACE].
2
5
MA Y. 09 13:00 100%
-SET DOC. FACE UP-
RX OPERATION? I
OK=YES / or 1-8 J
Press [7] on the numeric keypad,
3
select the required setting using
the arrow keys and press [YES].
Press [NO] to return to standby
4
mode.
Di151 Fax Unit 5-1
*AUTORX MANU A LRX
<, > & YES
TEXT x1.00 1
ä [A] ü 1A4
Page 96

5
5.2 Automatic Reception
Automatic reception is setas a default. No further settings are required.
Your faxmachine will answercalls after aset number ofrings. The default
setting is 1.
5.3 Memory Back-up RX
Incomingdata isstored inthememoryas describedbelow.Assoonasthe
error has been eliminated, the data will be automatically printed:
G no paper
G paper jam
G no toner
G printer cover open
G no imaging unit.
Reception
5-2 Di151 Fax Unit
Page 97

Reception
5.4 Memory RX (Confidential Reception)
When you use this function, the message will be stored in the memory.
Only if you switch off the memory reception option and enter the correct
password,will the faxmessage beprintedout. Instead ofa password,you
can also program a time when themessage is to be printed.
Press [FAX] on the control panel.
1
Press [UTILITY] and then 4 x
2
[SPACE].
Press [1] on the numeric keypad,
3
select the required setting using
the arrow keys and press [YES].
Enter the time when you want to
4
start the memory RX option and
press [YES].
MA Y. 09 13:00 100%
-SET DOC. FACE UP-
RX OPERATION? s
OK=YES / or 1-8 t
*ON OFF
<, > & YES
ON TIME = 12 : 30
OK=YES
5
Enter the time at which the docu-
5
ment is to be printed and press
[YES].
Enter a 4-digit password or press
6
[YES].
Press [NO] to return to standby
7
mode.
Di151 Fax Unit 5-3
OFF TIME = 12 : 50
OK=YES
PASS WORD=1234
OK=YES
TEXT x1.00 1
ä [A] ü 1A4
Page 98

5
5.5 Mailbox Reception
This functionis used to receiveadocument in a mailbox.This is helpful if
only aspecific personshould be readingthe message.However,both machines must be of the same type.
The transmission is only executed if both mailbox ID codes areidentical.
This prevents the document from beingtransmitted to an incorrectmailbox.
The incoming document is stored in the Di151f memory and will only be
printed oncethecorrect4-digitmailbox numberandthe 4-digit mailboxID
have beenentered. You can configure up to 10 mailboxes.
SettingupaMailbox
Press [FAX] on the control panel.
1
Press [UTILITY] and then 4 x
2
[SPACE].
Reception
MA Y. 09 13:00 100%
-SET DOC. FACE UP-
RX OPERATION? s
OK=YES / or 1-8 t
Press [5] on the numeric keypad
3
and entera mailboxnumber using
the numeric keypad (0-9).
Enter a 4-digit mailbox ID using
4
the numeric keypad (0000 -9999)
and press [YES].
Press [NO] to return to standby
5
mode.
5-4 Di151 Fax Unit
MAILBOX NO.=_
SELECT 0-9
MAILB O X 1 ID =1234
OK=YES
TEXT x1.00 21
ä [A] ü 1A4
Page 99

Reception
Delete Mailbox
Press [FAX] on the control panel.
1
Press [FUNCTION] and[4] onthe
2
numeric keypad.
Press [5] on the numeric keypad
3
and enter the number of the mailbox to be deleted usingthe
numeric keypad (0-9).
Press [NO].
4
Use the numeric keypad to enter
5
the 4-digit number of the mailbox
to be deleted (0000-9999) and
press [YES].
5
MA Y. 09 13:00 100%
-SET DOC. FACE UP-
RX OPERATION? s
OK=YES / or 1-8 t
MAILBOX NO.=_
SELECT 0-9
REGISTERED! KEEP?
OK=YES (DEL=NO)
OLD M-BOX1 ID =1234
OK=YES
Press[NO],[YES]and[NO] toend
6
the process.
Di151 Fax Unit 5-5
TEXT x1.00 1
ä [A] ü 1A4
Page 100

5
Printing the Content of a Mailbox
Press [FAX] on the control panel.
1
Press [FUNCTION] and [4] on the
2
numeric keypad.
Use the numeric keypad to enter
3
the mailbox ID and press [YES].
Your fax machine prints the message.
Reception
MA Y. 09 13:00 100%
-SET DOC. FACE UP-
4 PRINT MAILBOX RX
MAILB O X 1 ID =1234
OK=YES
5-6 Di151 Fax Unit
 Loading...