

Konica Minolta DI151 User Manual
4648-7704-01
Fax Unit for Di151
Operator’s Manual


A
GREEMENT
To the user options (Printer Controller, Twain Driver, RSD software and Network
utilities), please read End user LicenseAgreem entshown below before openingthepackage
END USER LICENSE AGREEMENT
PLEASE READ CAREFULLY THE LICENSE AGREEMENT BELOW BEFORE OPENING THIS PACKAGED SOFTWARE.
OPENING THIS PACKAGE INDICATES YOUR ACCEPTANCE OF THE TERMS AND CONDITIONS BELOW. IF YOU DO
NOT AGREE WITH THEM, YOU SHOULD PROMPTLY RETURN THE PACKAGE UNUSED.
1. SOFTWARE
"Software" means the computerprogram contained in this package (whichmay include digitally encoded, machine readable, scaleable
outline font data as encoded in a special format), together with all codes, techniques, softwaretools, format, design, concepts, methods
and ideas associated with the computer program and all documentation related thereto.
2. LICENSE AGREEMENT
This is a license agreement and not an agreement for sale. Minolta owns, or h as been licensed fromother owners, copyrights in the
Software. Except as stated in this Agreement, you are not granted any rights to patents, copyrights, trade names, trademarks(whether
registered or unregistered), or any other rights, franchises or licenses in respect of the Software. Title to the Software and any copy
made from it is retained by Minolta or such other owners.
3. LICENSE
Minolta, hereby grant to you, and you agree to accept a non-exclusive, non-transferable and limited licenseand you may:
(1) install and use the Software on a single computerand one associated Minolta product.
(2) use the Software only for your own customary business or personal purposes.
(3) make a copy of the Softwarefor backup or installation purposes only in support of the normal and intended use of the Software.
(4) transfer possession of copies of the Software to another party by transferring a copy of this Agreement and all other documentation
along with at least one complete unaltered copy of the Software, provided that (i) you must, at the same time, either transfer to
such other party or destroy all your other copies of the Software. (ii) such transfer of possession terminatesyour license from
Minolta, and (iii) such other party shall accept and be bound by these license terms by its initial use of the Software.
4. RESTRICTIONS
(1) You shall not without the written consent of Minolta:
(i) use, copy, modify, merge or transfercopies of the Software except as provided herein. (ii) reverse assemble or reverse compile
the Software except as permitted by law; or (iii) Sublicense, rent, lease or distribute the Software or any copy thereof.
(2) You shall not export or re-export the Softwarein any form under violation of export restrictions by the government of your
country.
5. LIMITED WARRANTY
Minolta warrants the media on which the Software is recorded to be free from defects in materials and workmanship under normal use.
Warranty details and limitations for the Software are described in the Statement of Limited Warranty which was supplied with the
hardware. With the exception of the foregoing express warranties applicable to hardware and media only, the Software is not warranted
and is provided. SUCH WARRANTIES ARE IN LIEU OF ALL OTHER WARRANTIES, EXPRESS OR IMPLIED, INCLUDING,
BUT NOT LIMITED TO, THE IMPLIED WARRANTIES OF MERCHANTABILITY AND FITNESS FOR A PARTICULAR
PURPOSE.
6. LIMITATION OF REMEDIES
IN NO EVENT WILL MINOLTA BE LIABLE FOR ANY LOST PROFITS, LOST DATA, OR ANY OTHER INCIDENTAL OR
CONSEQUENTIAL DAMAGES THAT RESULT FROM USE OR INABILITY TO USE THE SOFTWARE, EVEN IF MINOLTA
OR ITS AUTHORISED REMARKETERS HAVE BEEN ADVISED OF THE POSSIBILITY OF SUCH DAMAGES OR FOR ANY
CLAIM BY YOUBASED ON A THIRD PARTY CLAIM.
7. TERMINATION
You may terminate your license at any time by destroying the Softwareand all your copies of it or as otherwised escribed in these
terms. Minolta may terminate your license if you fail to comply with these terms. Upon such termination, you agree to destroy all your
copies of the Software.
8. GOVERNING LAW
This Agreement shall be governed by the laws of the country wherethe delivery is made to the original customer.
9. GOVERNMENT END USERS
If you are acquiring the Software on behalf of any unit or agency of the United States Government, the followingprovisions apply.
Use, duplication or disclosure by the Government is subject to restrictions as set forth in the Rights in Technical Data and Computer
Software clause at FAR 252.227-7013, subdivision (b)(3)(ii) or subparagraph (c)(1)(ii), as appropriate. Further use, duplication or
disclosure is subject to restrictions applicable to restricted rights software as set forth in FAR 52.227-19(c)(2).
YOU ACKNOWLEDGE THAT YOU HAVE READ THIS AGREEMENT, UNDERSTAND IT, AND AGREE TO BE
BOUND BY ITS TERMS AND CONDITIONS. NEITHER PARTY SHALL BE BOUND BY ANY STATEMENT OR
REPRESENTATION NOT CONTAINED IN THIS AGREEMENT. NO CHANGE IN THIS AGREEMENT IS
EFFECTIVE UNLESS WRITTEN AND SIGNED BY PROPERLY AUTHORISED REPRESENTATIVES OF EACH
PARTY. BY OPENING THE PACKAGE, YOU AGREE TO ACCEPT THE TERMS OF THIS AGREEMENT.


✥✥✥✥ Safety Information ✥✥✥✥
g
gyequip
y
p
y
CE Marking (Declaration of Conformity)
We declare under our sole responsibility that the machine and options to which this
declaration relates is in conformity with the specifications below. This declaration is valid
for the area of the European Union(EU) only.
Product Type Copying Machine
Product Name Di151
Options AF-8, PF-116, Pi1501, Fax Unit for Di151, 16MB Memory for Copier,
32MB Memory for Copier, 4MB Memory for Fax, 16MB Memory for
Printer, Network Interface Card.
Standards
Safety *1:
• EN60950 / 1992 (A1, A2, A3, A4, A11)
(Safetyof information technologyequipment, includingelectrical business
equipment)
• EN 60825-1 / 1994 (A11)
(Radiation safetyof laserproducts, equipment classification, requirements and
user’s guide)
EMC *2:
• EN55022 (Class B) / 1998
Limits and method for measurement of radio disturbance characteristic of
information technology equipment (ITE)
• EN61000-3-2 (Class A ) / 1995 (A13)
Electromagnetic compatibility(EMC) – Part 3: Limits Section 2: Limits for
harmonic currents emissions (equipment input current <16A per phase)
• EN61000-3-3/1995
Electroma
voltage fluctuations and flicker in low-voltage supply systems for equipment with
rated current <16A
• EN55024 / 1998
Information technolo
methods of measurement.
• IEC 61000-4-2 / 1995 + A1/1998: Electrostatic discharge immunitytest
• IEC 61000-4-3 / 1996 + A1/1998: Radiated electromagnetic field immunity test.
• IEC 61000-4-4 / 1995: Electrical fast transient / burst immunity test.
• IEC 61000-4-5 / 1995: Surge immunity test.
• IEC 61000-4-6 / 1996: Immunityto conducted disturbance, induced byradio
frequency field.
• IEC 61000-4-8 / 1993: Power-frequency magnetic field immunitytest.
• IEC 61000-4-11 / 1994: Voltagedips, short interruptions and voltage variations
immunity test.
Telecommunication *3, *4:
• TBR21/Jan. 1998
A common technical regulation for the attachment requirements for pan
European approval for connection to the analogue Public Switched Telephone
Networks (PSTNs) of TE (excludingTE supportingthe voice telephonyservice)
in which network addressing,ifprovided, is bymeans of Dual Tone Multi
Frequency (DTMF) signalling.
Notes:
1. First
2000
2. EMC
environment.
3. In accordance with ETSI Guide201120/V1.1.1 (1998-01) and ETSI Guide 201
121/V1.1.2 (1998-07), the machine is additionall
following table 1 for advisory notes.
netic compatibility(EMC) – Part 3: Limits Section 3: Limitation of
ment – immunitycharacteristics – Limits and
ear of labelingaccordingto EC-Directive 73/23/EEC and 93/68/EEC:
erformance: Thisproduct was designed for operationinatypical office
tested andpassed in the
EC Directives Safety: 73/23/EEC and 93/68/EEC
EMC: 89/336/EEC and 93/68/EEC
Telecommunication: 98/482/EC and 1999/5/EC.
I

✥✥✥✥ Safety Information ✥✥✥✥
WARNING:
This device must be used with shielded interface cables. The use of non-shielded cable is
likely to result in interference with radio communications and is prohibited under the EC
Directive rules.
The copier has been approved in accordance with Council Decision 98/482/EC for panEuropean single terminal connection to the pubic switched telephone network (PSTN).
However, due to differences between the individual PSTNs provided in different countries,
the approval does not, of itself, give an unconditional assurance of successful operation on
every PSTN network termination point.
In the event of problems, you should contact your equipment supplier in the first instance.
Note:
The manufacturer should ensure that the vendor and user of equipment is clearly informed of
the above information by means of packaging and/or user manuals or other forms of user
instructions.
This product is approved for DTMF dialing only. When directly connected to the public
switched telephone network (PSTN mode) pulse dialing can not be used.
(Pulse dialing may only be used when this product is connected to a PABX.)
If an additional telephone is connected to the FAX unit, the LF (Loading Factor) should not be
greater than 30.
II

✥✥✥✥ Safety Information ✥✥✥✥
quip
y
p
y
FCC PART 68 – TELECOMUNICATION DEVICES
This e
is a label that contains, amongother information, the FCC registration number and Ringer
Equivalence Number (REN) for this equipment. If requested,provide this information to
your telephone company.
This equipment uses THE FOLLOWING USOC JACKS: RJHC.
The REN is useful to determine thequantityof devicesyou mayconnect toyour telephone
line and still have all of those devices ringwhenyour number is called. In most, but not all
areas, the sum of the RENs of all devices should not exceed five (5.0). To be certain of the
number of devicesyou mayconnect toyour line, as determined bythe REN,you should call
your local telephone company to determine the maximum REN for your calling area.
Ifyour telephone equipment causes harm to the telephone network, the Telephone Compan
maydiscontinueyour service temporarily.Ifpossible, theywill notifyyou in advance. But if
advance notice isn’tpractical,you will be notified as soon aspossible. You will be advised
of your right to file a complaint to file a complaint with the FCC.
Your telephone companymaymake changes to its facilities, equipment, operations, or
rocedures that could affect theproper operation ofyour equipment. If theydo,you will be
given advance notice so as to give you an opportunity to maintain uninterrupted service.
If you experience trouble with this equipment, please contact:
ment complies with Part 68 of the FCC rules. On the rearpanel of this equipment
Minolta Corporation
101 Williams Drive Ramsey.
New Jersey 07446
U.S.A.
The telephone company may ask you to disconnect this equipment from the network until the
problem has been corrected or you are sure that the equipment is not malfunctioning.
This equipment maynot be used on coin serviceprovided bythe telephone company.
Connection topartylines is subject to state tariffs. (Contactyourpublic utilitycommission
or corporation commission for information.)
CUSTOMER INFORMATION FOR PRIVATELY OWNED COIN PHONES
To complywith state tariffs, the telephone companymust begiven notificationprior to
connection.
In some states,prior approval of connection must be obtained from the state Public Utilit
Commission, Public Service Commission or state Corporation Commission.
WARNING FOR THE SETTING OF HEADER AND FOOTER
The Telephone Consumer Protection Act of 1991 makes it unlawful for anypersontousea
computer or other electronic device to send anymessageviaatelephone fax machine unless
such message clearly contains in a margin at the top or bottom of each transmitted page or on
the firstpage of the transmission, the date and time it is sent and an identification of the
business or other entity, or other individual sendingthe message and the telephone number
of the sending machine or such business, other entity, or i ndividual.
In order toprogram this information intoyour fax machine,you should complete the
following steps.
III

✥✥✥✥ Safety Information ✥✥✥✥
IC CS-03-TELECOMUNICATION DEVICE
NOTICE:
Industry Canada (IC) label identifies equipment. This certification means that the equipment
meets certain telecommunications network protective, operational, and safety requirements.
IC does not guarantee the equipment will operate to user’s satisfaction.
Before installing this equipment, users should ensure that it is permissible to be connected to
the facilities of the local telecommunications company. The equipment must also be installed
using an acceptable method of connection. In some cases, the company’s inside wiring
associated with a single line individual service may be extended by means of a certified
connector assembly (telephone extension cord). The customer should be aware that
compliance with the above conditions may not prevent degradation of service in some
situations.
Repairs to certified equipment should be made by an authorized Canadian maintenance
facility designated by the supplier. Any repairs or alterations made by the user to this
equipment, or equipment malfunctions, may give the telecommunications company cause to
request the user to disconnect the equipment.
Users should ensure for their own protection that the electrical ground connections of the
power utility, telephone lines, and internal metallic water pipe system, if present, are
connected together. This precaution may be particularly important in rural areas.
CAUTION:
Users should not attempt to make such connections themselves, but should contact the
appropriate electric inspection authority, or electrician, as appropriate.
NOTICE:
The Ringer Equivalence Number (REN) assigned to each terminal device provides an
indication of the maximum number of terminals allowed to be connected to a telephone
interface. The termination on an interface may consist of any combination of devices subject
only to the requirement that the sum of the Ringer Equivalence Numbers of all the devices
does not exceed 5.
If you experience trouble with this equipment, please contact:
Minolta Business Equipment (Canada), Ltd.
369 Britannia Road E.
Mississauga, Ontario L42 2H5
Tel: (905) 890-6600
IV

✥✥✥✥ Safety Information ✥✥✥✥
For New Zealand Users:
The grant of a Telepermit for any item of terminal equipment indicates only that Telecom has
accepted that the item complies with minimum conditions for connection to its network. It
indicates no endorsement of the product by Telecom, nor does it provide any sort of warranty.
Above all, it provides no assurance that any item will work correctly in all respects with
another item of Telepermitted equipment of a different make or model, nor does it imply that
any product is compatible with all of Telecom’s network services.
This equipment is not capable, under all operating conditions, of correct operation at the
higher speeds for which it is designed. Telecom will accept no responsibility should
difficulties arise in such circumstances.
This equipment should not be used under any circumstances which may constitute a nuisance
to other Telecom customers.
WARNING NOTICE:
This equipment shall not be set up to make automatic calls to the Telecom ‘111’ Emergency
Service.
V


❄
❄ CONTENTS ❄
❄❄
❄
❄❄
1. First Things to Know About Your Machine........................... 1-1
1.1 Power ON & OFF.....................................................................................1-1
1.1.1 Turning the Machine power ON........................................................ 1-1
1.1.2 Turning the Machine power OFF....................................................... 1-2
1.2 Control Panel layout .................................................................................1-3
1.2.1 Keys on the panel...............................................................................1-3
1.2.2 LEDs on the panel.............................................................................. 1-8
1.3 Message Display....................................................................................... 1-9
1.3.1 Screen Organization........................................................................... 1-9
1.3.1.1 Initial Screen................................................................................ 1-9
1.3.1.2 Selecting the screen’s function..................................................1-11
1.3.2 Meaning of the symbol..................................................................... 1-13
1.3.3 Adjusting Brightness of the Message Display.................................1-16
1.4 Initial User Data...................................................................................... 1-16
1.4.1 Setting Line type(TONE/PULSE) ................................................... 1-17
1.4.2 Setting the Initial User Data............................................................. 1-18
1.4.2.1 Setting Date & Time.................................................................. 1-19
1.4.2.3 Setting Your Fax Number (User Fax Number)......................... 1-20
1.4.2.3 Setting Your Name (User Name) .............................................. 1-21
1.5 Connecting to the Telephone Line ......................................................... 1-22
1.6 Connect to Private Branch Exchange (PBX) ......................................... 1-24
2. Making Copies............................................................................ 2-1
2.1 How to Copy Documents (basic) ............................................................. 2-1
2.2 Setting The Original Document................................................................ 2-4
2.2.1 Using the Automatic Document Feeder(ADF)..................................2-4
2.2.2 Using the Plate Scanning ................................................................... 2-5
2.3 Selecting Paper tray.................................................................................. 2-6
2.3.1 Overview of the paper tray selection ................................................. 2-6
2.3.2 Using the Manual Bypass Tray.......................................................... 2-7
2.4 Specifying the Number of Copies .......................................................... 2-13
2.5 Specifying the Zoom Ratio..................................................................... 2-14
2.5.1 Specified the Preset Zoom Ratio...................................................... 2-14
2.5.2 Specified the Customer Zoom Ratio................................................ 2-15
2.6.Specifying the Copy Image Density.......................................................2-16
2.6.1 Automatic/Manual density adjustment choice................................. 2-16
2.6.2 Manual density adjustment .............................................................. 2-17
2.7 2in1 function........................................................................................... 2-18
2.8 Sort function ........................................................................................... 2-20
i

❄
❄ CONTENTS ❄
❄❄
❄
❄❄
3. Basic Fax Operation (1) ............................................................ 3-1
3.1 How to Transmit a Document - Basics..................................................... 3-1
3.1.1 Selecting the Resolution..................................................................... 3-1
3.1.2 Loading the Document....................................................................... 3-4
3.1.3 Dialing the Number (Transmitting the Document)............................ 3-7
3.1.3.1 Using the Numeric keys (Manual Dialing) ................................. 3-7
3.1.3.2 Using the One Touch Dial Function.......................................... 3-10
3.1.3.3 Using the Speed Dial Function.................................................. 3-11
3.1.3.4 Using the Combination Dial Function....................................... 3-13
3.1.3.5 Using the Phone Book Function................................................ 3-15
3.2 How to Receive a Document - Basics ....................................................3-19
3.2.1 Select the Printing Mode (Reduction RX)....................................... 3-20
3.2.2 Selecting the Reception Mode (Setting RX Mode) ......................... 3-21
3.2.3 Operation at Reception..................................................................... 3-22
3.2.3.1 Receiving a Document in the Fax Mode (Auto RX mode)....... 3-22
3.2.3.2 Receiving a Document in the Tel Mode (Manual RX mode) ... 3-22
3.3 How to Use Your Fax as a Telephone Set.............................................. 3-23
3.3.1 Making a Telephone Call................................................................. 3-23
3.3.2 Receiving a Telephone Call.............................................................3-23
4. Basic FAX Operation (2)........................................................... 4-1
4.1 Transmitting a Document Using Memory (Memory TX)........................ 4-1
4.2 Retrying the Same Destination (Redial TX) ............................................ 4-2
4.3 Verifying Audible Signal Before TX (Manual Communication) ............ 4-4
4.3.1 Manual Transmission......................................................................... 4-5
4.3.2 Manual Reception .............................................................................. 4-6
4.4 Transmit a special document (BOOK TX)............................................... 4-7
5. Using the Function Utilities ...................................................... 5-1
5.1 Broadcast .................................................................................................. 5-4
5.2 Timer TX ................................................................................................ 5-11
5.3 Mailbox TX ............................................................................................ 5-14
5.4 Print Mailbox RX ................................................................................... 5-16
5.5 Polling TX .............................................................................................. 5-21
5.6 Polling RX .............................................................................................. 5-23
5.7 Relay Initiate........................................................................................... 5-25
5.8 Cancel Reserve. ...................................................................................... 5-27
6. Using the Enhanced Utilities (1)............................................... 6-1
6.1 Using the Utility key................................................................................. 6-1
ii

❄
❄ CONTENTS ❄
❄❄
6.1.1 List of Utility key function................................................................. 6-1
6.1.2 Outline of Major Features..................................................................6-2
6.1.3 Select the Utility function .................................................................. 6-4
6.2 Dial Registration....................................................................................... 6-5
6.2.1 One-Touch Dial and Speed Dial ........................................................ 6-5
6.2.1.1 Set the Fax number ...................................................................... 6-5
6.2.1.2 Set the Name................................................................................ 6-8
6.2.1.3 Set the Modem Speed..................................................................6-9
6.2.1.4 Print the Telephone Number List ................................................ 6-9
6.2.2 Group Dial........................................................................................ 6-10
6.2.2.1 Register the Group Dial............................................................. 6-10
6.2.2.2 Using the Group Dial................................................................. 6-14
6.2.3 Program Dial .................................................................................... 6-15
6.2.3.1 Program a registered Dial..........................................................6-16
6.2.3.2 Using the Program Dial ............................................................. 6-17
6.2.4 Using Batch TX................................................................................ 6-18
❄
❄❄
6.3 Setting of TX Operations........................................................................ 6-19
6.3.1 Closed Network TX ......................................................................... 6-19
6.3.2 Header .............................................................................................. 6-20
6.4 Setting of RX Operations ....................................................................... 6-21
6.4.1 Memory RX Mode...........................................................................6-21
6.4.1.1 Programming for Memory RX Mode........................................ 6-21
6.4.1.2 Printing the Document Received by Memory RX Mode.......... 6-23
6.4.1.3 Memory Substitution Reception................................................ 6-23
6.4.2 Two Page Print................................................................................. 6-24
6.4.3 Closed Network RX .........................................................................6-25
6.4.4 Footer ............................................................................................... 6-26
7. Using the Enhanced Utilities (2)............................................... 7-1
7.1 Machine Setting........................................................................................ 7-3
7.1.1 Setting AUTO RESET ....................................................................... 7-3
7.1.2 Setting POWER SAVE MODE ......................................................... 7-4
7.1.3 Setting POWER SAVE OFF.............................................................. 7-5
7.1.4 Setting PRINT DENSITY.................................................................. 7-5
7.1.5 Setting LCD CONTRAST ................................................................. 7-6
7.1.6 Setting BUZZER VOLUME.............................................................. 7-7
7.1.7 Setting REMOTE MONITOR ........................................................... 7-8
7.1.8 Setting TRAY 1 PAPER SIZE........................................................... 7-8
7.1.9 Setting PAPER SOURCE .................................................................. 7-9
7.2 Copy setting............................................................................................ 7-11
iii

❄
❄ CONTENTS ❄
❄❄
7.2.1 Setting DENSITY/PHOTO.............................................................. 7-11
7.2.2 Setting AUTO DENSITY ................................................................ 7-12
7.2.3 Setting MANUAL DENSITY.......................................................... 7-13
7.2.4 Setting DENSITY(ADF).................................................................. 7-13
7.2.5 Setting 2in1 MODE.......................................................................... 7-14
7.2.6 Setting SORT MODE ...................................................................... 7-15
7.3 More about TX Operation ...................................................................... 7-15
7.3.1 Setting SCAN CONTRAST............................................................. 7-15
7.3.2 Setting RESOLUTION .................................................................... 7-16
7.3.3 Setting PAGE COUNT TX.............................................................. 7-17
7.3.4 Setting DEFAULT TX..................................................................... 7-19
7.3.5 Setting OT-DIAL IN COPY ............................................................ 7-20
7.4 More about RX Operation ......................................................................7-21
7.4.1 Setting NO. of RINGS ..................................................................... 7-21
7.5 Communication Setting ..........................................................................7-21
7.5.1 Setting LINE MONOITOR.............................................................. 7-21
❄
❄❄
8. Using the Confirm Utilities....................................................... 8-1
8.1 TX/RX RESULT ......................................................................................8-1
8.2 MACHINE COUNTER............................................................................ 8-2
8.3 PRINT REPORT ...................................................................................... 8-4
9. Printing Reports......................................................................... 9-1
9.1 About the Reports..................................................................................... 9-1
9.1.1 One Touch List................................................................................... 9-2
9.1.2 Speed Dial List................................................................................... 9-3
9.1.3 Key Setting List.................................................................................. 9-4
9.1.4 Machine Status List............................................................................ 9-5
9.1.5 TX Result Report ............................................................................... 9-7
9.1.6 RX Result Report ...............................................................................9-9
9.1.7 Activity Report.................................................................................9-11
9.1.8 Reservation Reports ......................................................................... 9-12
9.1.9 Memory Data List ............................................................................ 9-13
9.1.10 Memory Image Print ...................................................................... 9-14
9.1.11 Backup RAM Error Report............................................................9-17
9.1.12 Lost Report..................................................................................... 9-18
9.1.13 Relay Broadcast Report.................................................................. 9-19
9.2 Print a Report.......................................................................................... 9-20
9.2.1 Automatic Print the report (Setting by Utility key) ......................... 9-20
9.2.2 Manual print report .......................................................................... 9-21
iv

❄
❄ CONTENTS ❄
❄❄
❄
❄❄
10. Connect to PC......................................................................... 10-1
10.1 TWAIN Driver Option ......................................................................... 10-1
10.2 Class 1 FAX/Modem............................................................................10-3
11. Troubleshooting.....................................................................11-1
11.1 ERROR LED indicator........................................................................ 11-1
11.2 About the message............................................................................... 11-1
11.3 Improving image quality ..................................................................... 11-4
11.4 How to replace the imaging cartridge ................................................. 11-6
11.5 How to replenish the paper trays.........................................................11-8
11.5.1 For Paper Tray (TRAY 1)............................................................. 11-8
11.5.2 For Paper Feed Unit (TRAY 2)................................................... 11-10
11.6 Clearing paper misfeeds .................................................................... 11-11
11.6.1 Paper Tray misfeed ..................................................................... 11-11
11.6.2 Paper Feed Unit misfeed.............................................................11-12
11.6.3 Separator Jam/Fuser Jam............................................................. 11-13
11.6.4 Original Document Jam .............................................................. 11-16
11.7 When PAPER SIZE ERROR occurs................................................. 11-17
11.8 How to reset the machine .................................................................. 11-19
12. General Specification............................................................. 12-1
v


Chapter 1
First Things to Know About
Your Machine


First Things to Know About Your Machine
1. First Things to Know About Your Machine
1.1 Power ON & OFF
Keep the power switch in the" ❘❘❘❘" (ON) position to maintain constant communication. If
it is in the "!!!!" (OFF) position, the machine is able neither to receive a document nor
store the contents of the document in its memory. Communication is also interrupted if
thepowerswitchispressedtothe"!!!!" (OFF) position during communication.
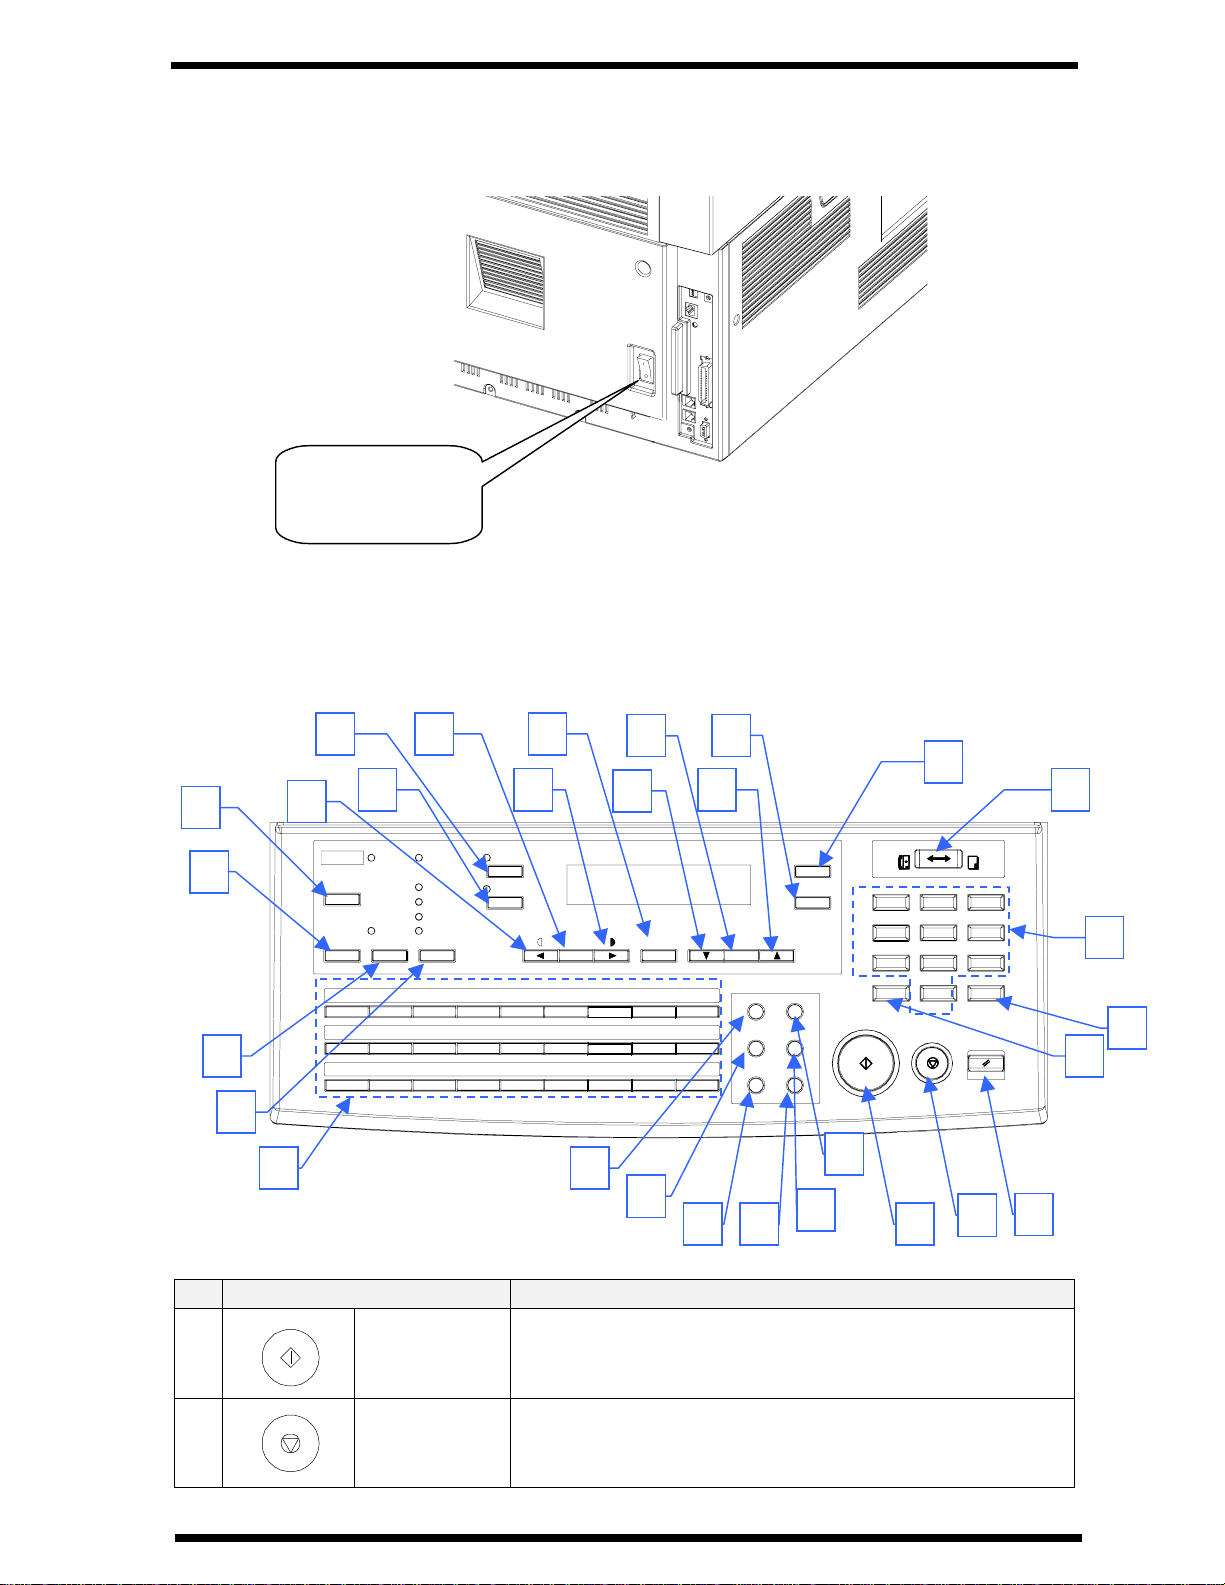
1.1.1 Turning the Machine power ON
Press the power switch to the " ❘❘❘❘" (ON) position.
Power switch
turn to " ❘❘❘❘"
When the machine is turned ON, the message "*PLEASE WAIT!*" appears on the
Message Display. The machine is ready for transmitting or receiving documents now.
Error
Utility
Confirm
PC
Memory TX
Auto RX
Standard
Fine
Super Fine
Half Tone
Resolution
2in1
Sort
Auto/
Photo
X PLEASE WAIT X
Paper
Space
Yes
No
C
Zoom
Delete
The Resolution indicator lights when the message display changes.
The machine completes warming up approx. 34 sec. after the power turn on.
1-1

First Things to Know About Your Machine
Error
Utility
Confirm
PC
Memory TX
Auto RX
Standard
Fine
Super Fine
Half Tone
Resolution
2in1
Sort
TEXT
[]
Auto/
Photo
Yes
x1.00
1
A
A4
Paper
Space
1
No
C
Zoom
Delete
NOTE:
•While the machine is warming up, it can receive or transmit a document, but not print
a document received.
•After completing warm-up, the machine enters the Power Save mode automatically
when you do not use the machine for a long time.
•You can set the time it takes to enter the Power Save mode, or turn the mode OFF
through the Utility key.
1.1.2 Turning the Machine power OFF
1 Check that the memory volume display on
the Message Display shows 100%.
If the percentage shown is less than 100%, it means that there are documents stored
in memory which have not been transmitted. In this case, perform the following
steps to retain these documents.
When the memory contains a document to be transmitted:
Output the Memory Image Print, and retransmit at another time.
When the memory contains a document received:
Let the machine print the document received according to the specific procedure as
follows.
Printing the Document Received by Memory RX Mode ➭ P6-23
JAN.01 15:38 100%
-SET DOC. FACE UP-
Printing the Mailbox Document ➭ P5-16
1-2
First Things to Know About Your Machine
2 Turn the power switch to "!!!!" (OFF) position.
Power switch
turn to "!!!!"
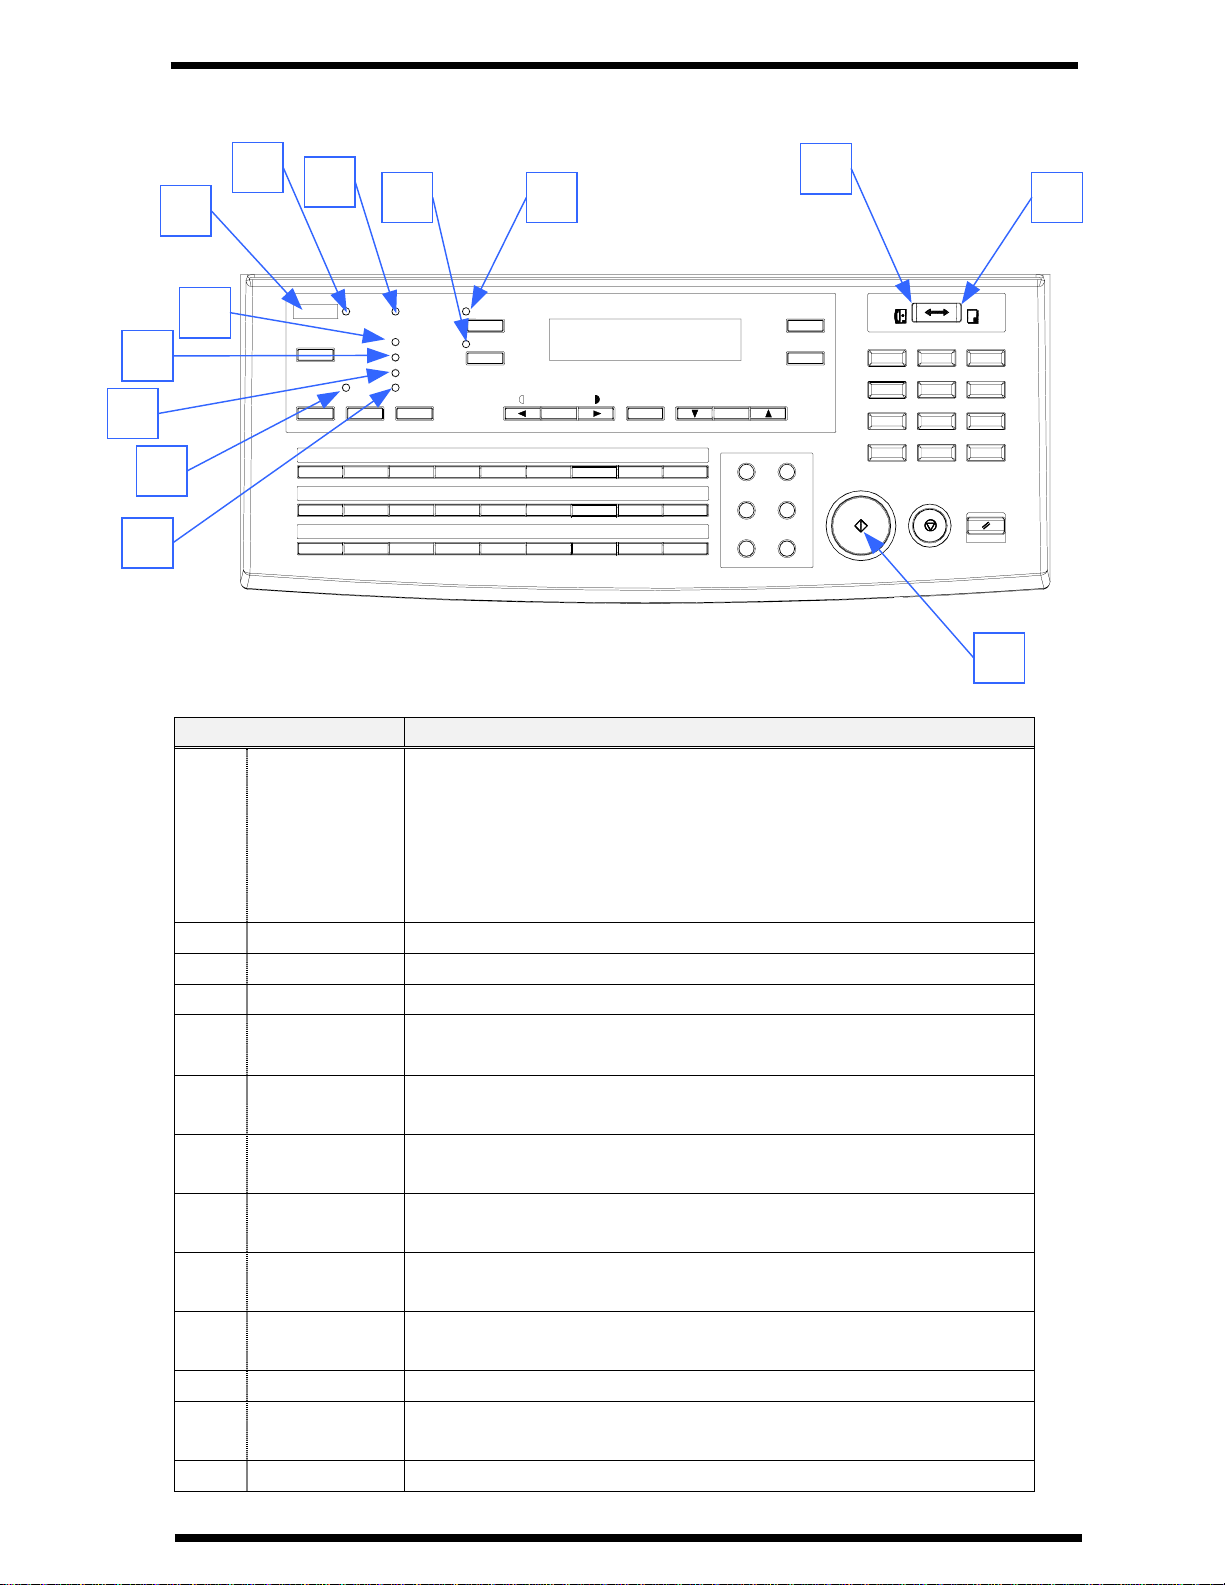
1.2 Control Panel layout
1.2.1 Keys on the panel
21
22
20
19
16
Auto RX
PCError
Memory TX
B
11
20
Standard
Fine
Super Fine
Half Tone
Resolution
C
12
L
U21V
Utility
Confirm
10
JAK
19
ST
23 24
04030201
D
13
M
22
111217
1518
2in1
2IN1
Sort
F
14
15
NEO
23
24
WX
Auto/
Photo
G
16
P
Y25Z
14
10
0806 0705
H
17
Q
26
25
Paper
13
Space
09
I
18
R
27
&
26 29
8
Zoom
Delete
Speed Dial Funtion
Phone Book Pause
Book TX Speaker
Redial/
7
9
Yes
No
C
Start
Fax
1
GHI
4
PQRS
7
*0#
Copy
ABC
OPER
DEF
3
JKL
MNO
65
TUV
WXYZ
Pane l Res et
2
89
Stop
4
6
5
27
28
1
3
2
Key Functions
♦ Start copying
1
Start key
♦ Start transmission or Reception
♦ Others depend on LCD message.
♦ Cancel copying
2
Stop key
♦ Cancel transmission or reception
1-3

First Things to Know About Your Machine
Key Functions
♦ Return to the initial setting:
<copy screen >
Number of Copies : 1
3
4
1 32
4 65
7 98
Panel Reset
key
Numeric
keys
0
Zoom ratio : Equal
Copy Function : Initial setting by user
Density : Initial setting by user
Copy screen : Initial setting by user
Paper source : Initial setting by user
♦ Input the number of copies.
♦ Input zoom ratio.
♦ When setting custom size for bypass copy, input
paper size.
♦ Input Fax number
♦ Input numbers in registration of name
♦ Input speed dial number
♦ Specify Fax function or utility item
9
10
11
12
5
6
#
Yes
7
✱ key
#key
Yes key
♦ Send tone signal
♦ Input European font in registration of name.
♦ External/Internal function
♦ Fix the selected item and inputted number or
character.
♦ Others: Depend on LCD message.
8
No
C
No/Clear key
♦ Clear inputted number or character.
♦ Back to the previous display.
♦ Others: Depend on LCD message.
Copy/Fax
Switching
♦ Switch to Fax screen from copy screen.
♦ Switch to Copy screen from Fax screen.
key
Zoom
Paper
Zoom key
♦ Enter setting zoom ratio with numeric keys
♦ Select the fixed zoom ratio
♦ Select paper source
Paper key
Auto/Photo
Auto/Photo
key
♦ Switch 3 density modes: Text-auto density / Photo-
manual density / Text-manual density
13
14
up arrow
( )key
down arrow
( )key
♦ When setting the zoom ratio, increase the ratio by
0.01.
♦ Display items or contents by rotation.
♦ When inputting numbers or characters, delete a
character at the cursor.
♦ When setting the zoom ratio, decrease the ratio by
0.01.
♦ Display items or contents by rotation.
♦ When inputting number or character, insert a space
at the cursor.
1-4
First Things to Know About Your Machine
Key Functions
♦ When adjusting the manual density, change the
density into darker level.
♦ When inputting number or character, move the
cursor to the right.
♦ When selecting item, move the mark to the right.
♦ When adjusting the manual density, change the
density to a lighter level.
♦ When inputting numbers or characters, move the
cursor to the left.
♦ When selecting an item, move the mark to the left.
♦ Operate 2 in 1 copy
15
16
17
right arrow
( )key
left arrow
( )key
2in1
2in1 key
18
19
20
21
22
23
24
Sort
Resolution
Memory TX
Utility
Confirm
01
A
Speed Dial
Sort key
Resolution
key
Memory TX
key
Utility key
Confirm key
One-touch
keys
Speed Dial
key
♦ Operate Sort copy
♦ When ADF is not installed, this key is not effective.
♦ Select the resolution and the image mode for
transmission.
♦ Switch memory TX/ADF TX.
♦ Set machine status, initial setting for copy, Fax
operations and register dials.
♦ Display communication result
♦ Display machine counter
♦ Print report
♦ One-touchdial01–27
♦ Group dial 01 – 27
♦ Programdial24–27
♦ Input character and symbol in registration of name.
♦ Input +/- in registration dial number.
♦ Call Speed dial function
25
26
27
28
29
Phone Book
Book TX
Function
Redial/
Pause
Speaker
Phone Book
key
Book TX key
Function key
Redial/Pause
key
Speaker key
♦ Retrieval and call registered number.
♦ Call Book TX function.
♦ Call Fax communication function.
♦ Call the previously dialed number.
♦ When inputting the dial number, insert pause at the
cursor.
♦ Off hook for manual TX/RX
1-5
First Things to Know About Your Machine
More about keys:
1) Numeric keys
The Numeric keys can be used to enter numerals and European symbols when
registering names for Initial User Data, One Touch Dial and Speed Dial.
For details on entering names, follow the procedure for each registration method.
Initial user Data ➭ P1-18
One Touch Dial ➭ P6-5
Speed Dial ➭ P6-5
1 2
ABC
DEF
3
GHI
4
PQRS
7
✴✴✴✴
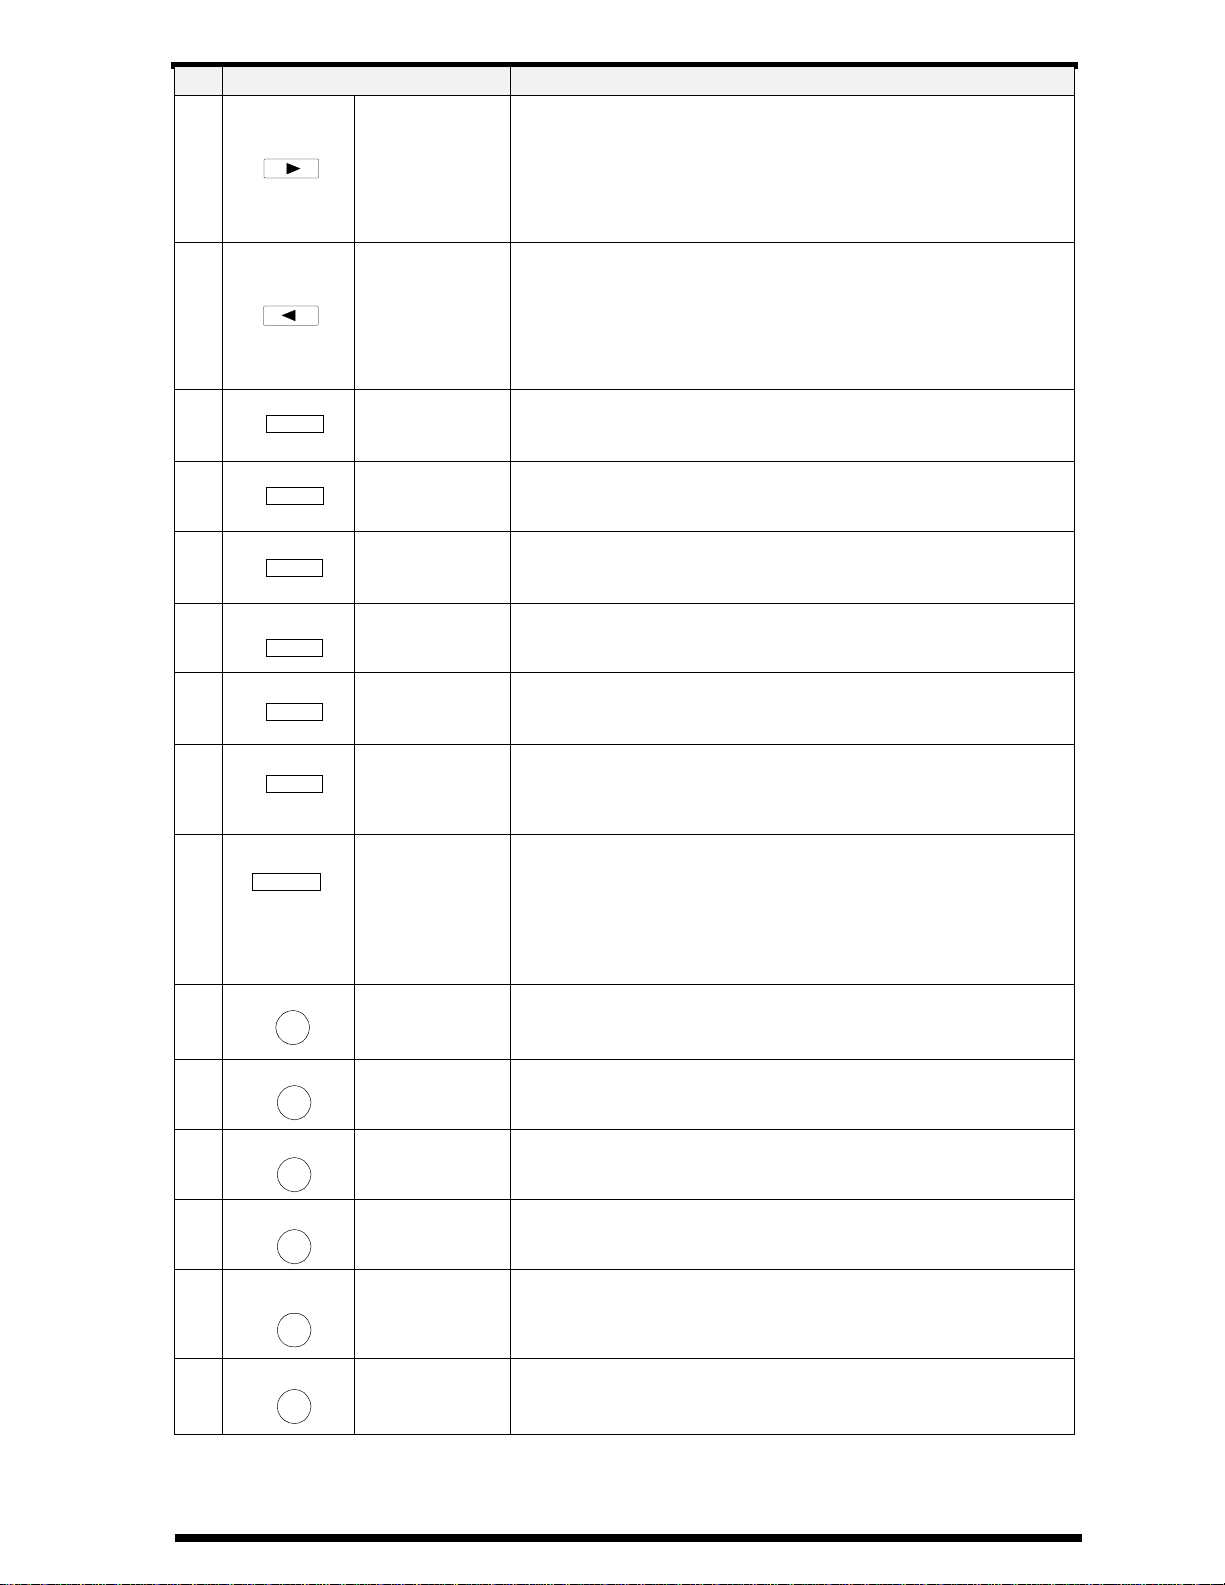
2) One Touch Keys
The One Touch keys have the following two functions:
1. One Touch Dial function:
Press the key to dial the registered destination and start transmitting the document.
JKL
5
TUV
8
OPER
0
MNO
6
WXYZ
9
#
1-6
First Things to Know About Your Machine
7
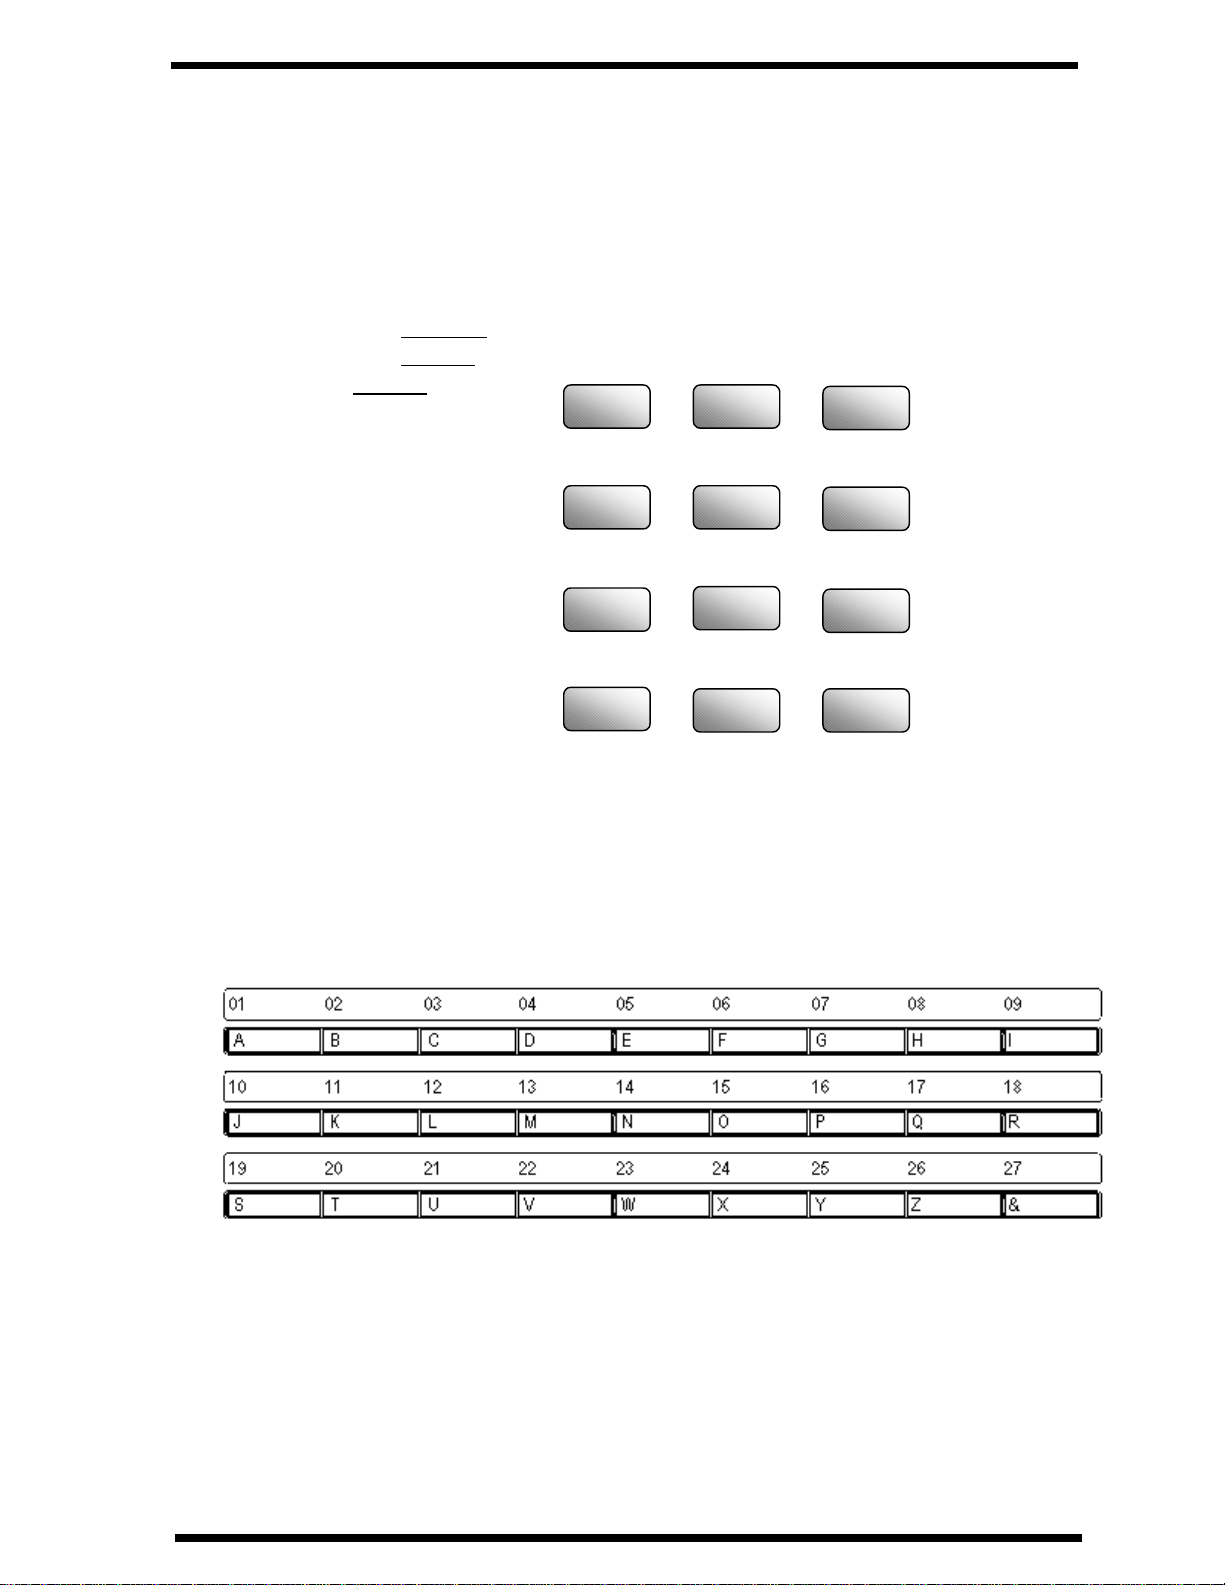
2. Input Characters
One Touch Key Char. One TouchKey Char. One Touch Key Char. One Touch Key Char.
1
2
3
4
5
6
7
A
B
C
D
E
F
G
8
9
10
11
12
13
14
H
J
K
L
M
N
15
I
16
17
18
19
20
21
O
P
Q
R
S
T
U
3) One Touch Key 27 (&)
Press the One Touch key 27 as many times to display the desired symbols.
2
x N times
N
Symbol
13
14
15
16
17
18
N
=
<
>
?
$
:
19
20
21
22
23
24
N
&
Symbol
1
2
3
4
5
6
&
#
*
/
(
N
7
8
9
10
11
12
Symbol
)
″″″″
.
,
!
+
22
23
24
25
26
27
(see below)
Symbol
;
@
%
[
]
′′′′
V
W
X
Y
Z
(symbols)
When the desired symbol appear, press the key to input this symbol.
EUROPEAN SYMBOLS
Press the ✱ key as many times to display the European symbols
N
✴✴✴✴
symbol
1
2
3
4
5
6
7
8
Ä
ä
Ö
ö
Ü
ü
á
É
N
9
10
11
12
13
14
15
16
x N times
symbol
é
í
ó
ú
Å
î
à
◊
N
17
18
19
20
21
22
23
symbol
ç
Æ
Ñ
¿
Ø
ǿ
ß
When the desired symbol appear, press the key to input this symbol.
1-7
First Things to Know About Your Machine
1.2.2 LEDs on the panel
H
G
L
M
F
J
I
K
PCError
Utility
MemoryTX
Confirm
A
B
10
11
J
K
19
20
ST
E B
2in1
04030201
D
13
M
22
2IN1
Sort
E
14
N
23
WX
Auto RX
Standard
Fine
Super Fine
Half Tone
Resolution
C
12
L
U21V
D
Auto/
Photo
F
16
15
O
24
25Z26
Paper
0806 0705
G
H
17
P
Q
Y
Zoom
Space
09
I
18
R
27
&
Delete
Speed Dial Funtion
Phone Book Pause
Book TX Speaker
Redial/
C
Yes
No
C
Start
Fax
1
GHI
4
PQRS
7
*0#
Copy
ABC
OPER
DEF
3
JKL
MNO
65
TUV
WXYZ
Pane l Reset
2
89
Stop
A
LED Functions
♦ Copy screen : Lights green when the copy can be start or
the scan is available. Lights orange when the copy cannot
A
Ready
be start or the scan is not available.
♦ Fax screen : Lights green when the transmission or
reception operation is available. Lights orange when the
transmission reservation is not available.
B
C
D
E
F
G
H
I
J
Copy
Fax
2in1 copy
Sort copy
Standard
Fine
Super Fine
Half Tone
Memory TX
♦ Lights in Copy screen.
♦ Lights in Fax screen.
♦ Lights when 2in1 Copy screen is selected.
♦ Lights when Sort Copy screen is selected.
♦ When ADF is not installed, LED is always off.
♦ Lights when the document for transmission is scanned at
standard resolution.
♦ Lights when the document for transmission is scanned at
fine resolution.
♦ Lights when the document for transmission is scanned at
super fine resolution.
♦ Lights when the document for transmission is scanned in
half tone mode.
♦ Lights when memory TX is selected.
K
L
M
Auto RX
PC
Error
♦ Lights when auto RX is selected.
♦ Blinks when the machine receives data from PC and prints
PC data.
♦ Lights when any error occurs.
1-8
First Things to Know About Your Machine
1.3 Message Display
When the power switch is turned to the ON position, the Message Display (LCD
screen) lights up.
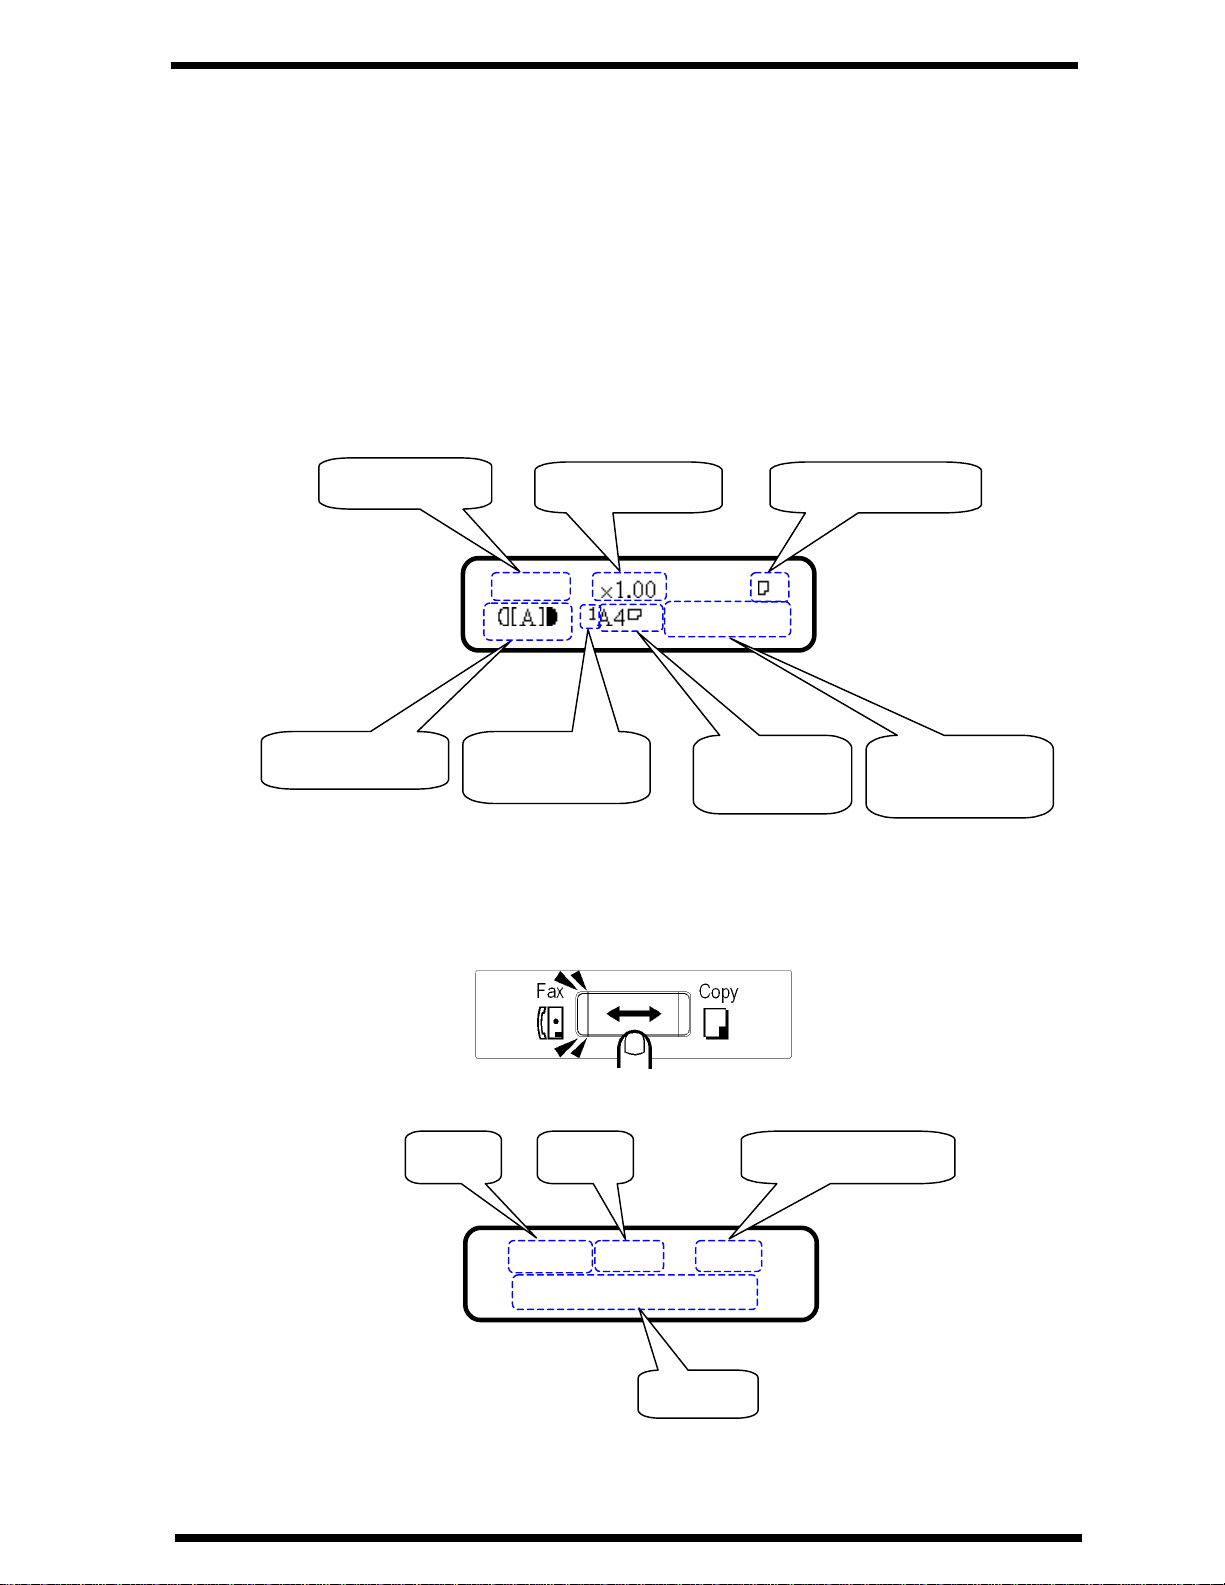
1.3.1 Screen Organization
1.3.1.1 Initial Screen
COPY SCREEN
When the machine completes warming up, the initial screen appears on the
Message Display. This initial screen serves as the basis for all later operations.
Copy screen
Zoom Ratio Copy Quantity
TEXT 1
WARM UP
Density Level
FAX SCREEN
Paper Source
(see below 1.)
Paper Size
(see below 2.)
You can press the Copy/Fax key switch to the Fax screen.
Message Area
(see below 3.)
Date Time Memory available
JAN.01 15:38 100%
-SET DOC. FACE UP-
Message
1-9

First Things to Know About Your Machine
1) Paper source
Paper source Pictorial symbol
Paper tray (Tray 1)
Paper Feed Unit (Tray 2)
Manual Bypass tray
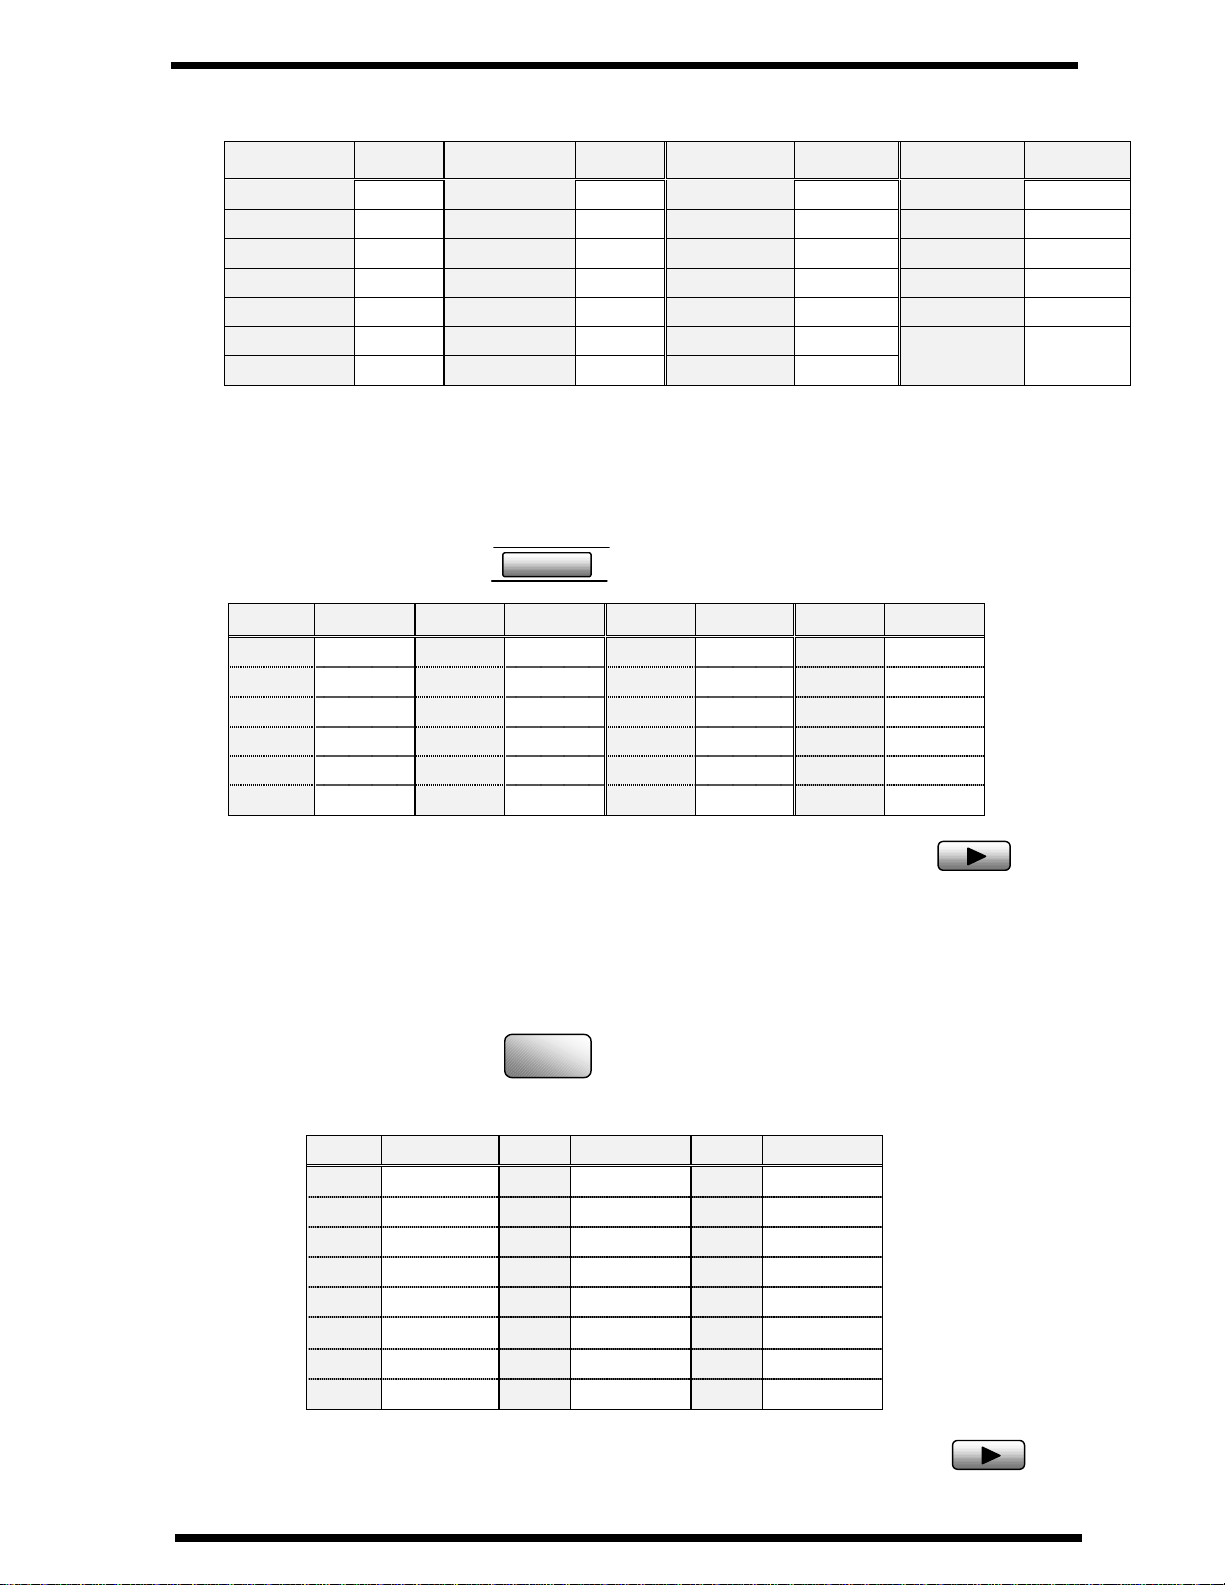
2) Paper size
Metric Inch
Paper source Paper type Paper Displays Paper Displays
Plane paper
Plane paper
Manual Bypass
tray
Tray 2 Plane paper
OHP
Card
A4
A5
A4
A5
B5
B6
Free size
A4
A4
A5
B5
B6
Free size
A4
A4
A5
A4
A5
B5
B6
[ ]
A4 OHP
A4 CARD
A5 CARD
B5 CARD
B6 CARD
[ ]CARD
A4
Letter
Legal
Half letter
Letter
Legal
Half letter
Free size
Letter
Letter
Legal
Half
letter
Free size
Letter
LT
LGTray 1
HL
LT
LG
HL
[ ]
LT OHP
LT CARD
LG CARD
HL CARD
[ ]CARD
LT
3) Message area (In Copy screen)
message description
0%~100%
Copy
function
A4 """"A5
LG """"LT
::::EMPTY
Fax:::: #
#
##
Fax
functions
Fax::::
Fax::::
Fax::::
Fax Err
WARM UP
Other
functions
REPORT
PC:PRN
PC Err
Memory remaining volume. This message appears
when the machine scans the original for the Sort copy
Zoom ratio(examples)
Chosen paper tray has no paper
The machine respond for reception
The machine calls the transmission
The machine is sending the fax data
The machine is receiving the fax data
Some error which is concern with fax function happen.
If this message appears, to see the detail information in
fax screen
The machine is warming up
The machine is printing the report
The machine is printing the data received from PC
No paper for PC printing
1-10
First Things to Know About Your Machine
NOTE: For more details about the message appear on the copy screen, switch to FAX
screen. For example:
TEXT 1
:EMPTY
NO PAPER( )
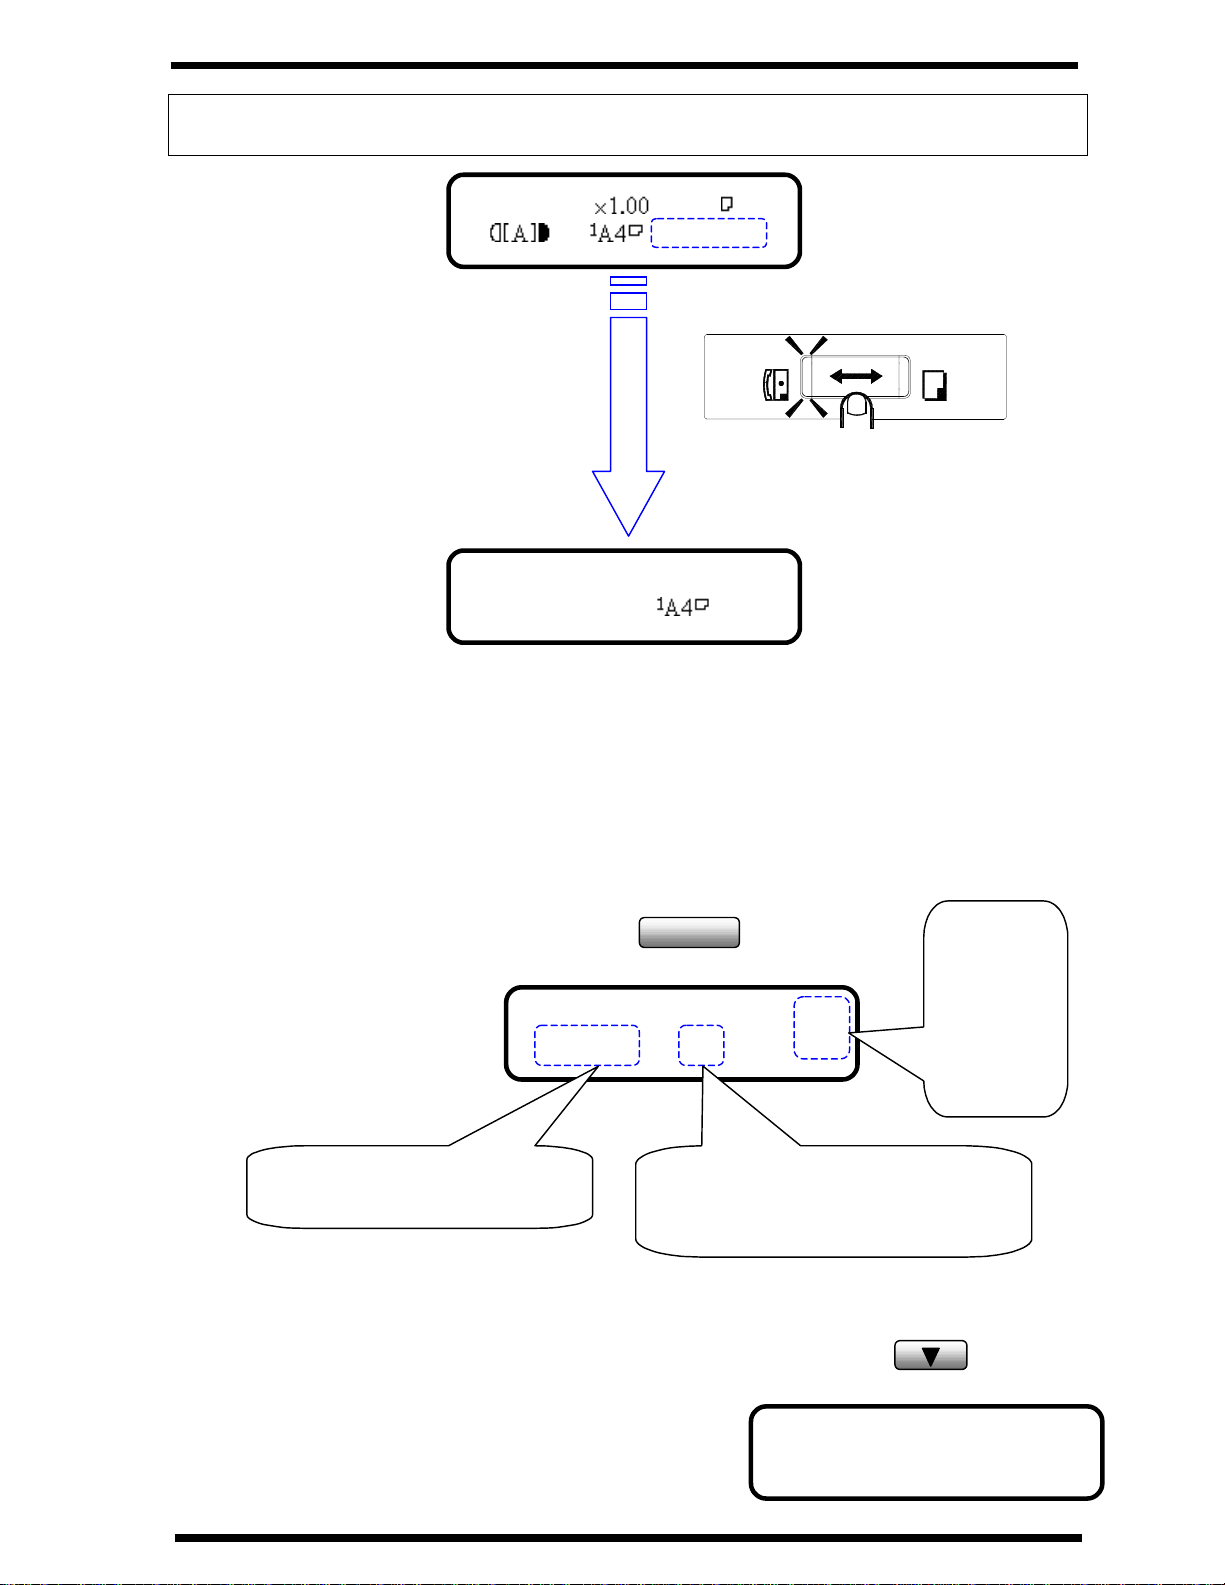
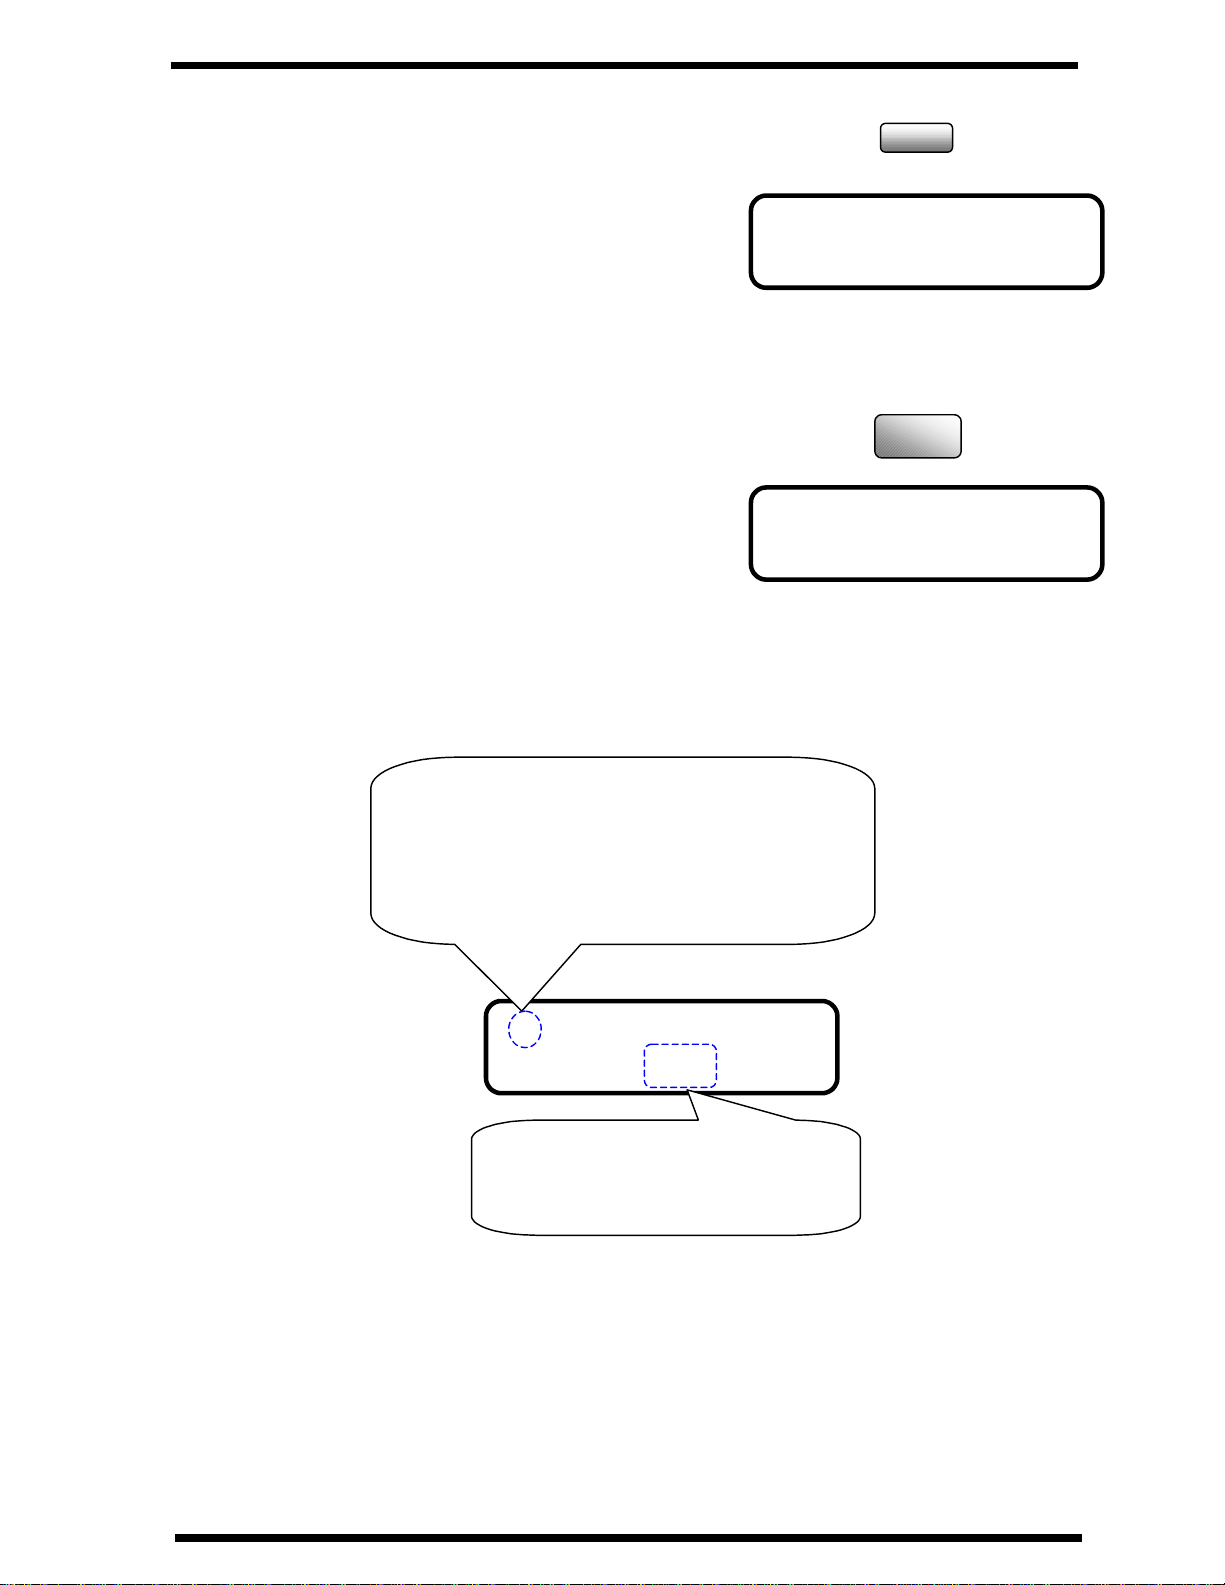
1.3.1.2 Selecting the screen’s function
Here we explain the different components on the LCD display, and show you
the ways to scroll the menus and select the desired setting.
Example: Press Utility key, the display shows the message “MACHINE
SETTING”.
MACHINE SETTING?
*CAUTION!*
Utility
OK=YES / or 1-7
Fax
Switch to Fax screen
Copy
1) Press
the or
key
scroll to
another
menu.
2) Press Yes key into
“MACHINE SETTING” item
1) Using the or key to scroll through the function selection.
For example: Press the keyscroll to the “COPY
SETTING”.
1-11
3) Press Numeric keys(1 to 7) to
select a sub-item in “MACHINE
SETTING”
COPY SETTING?
OK=YES / or 1-4
First Things to Know About Your Machine
2) Press the Yes key into this item.
Press Yes key, the display appears the
message “1 AUOT RESET”---a subitem of “MACHINE SETTING”.
3) Using the Numeric keys to select an item.
For example: Press ‘3’ to select the third
function of the “MACHINE SETTING”
Another screen’s selection:
Select the choice by or key and then press Yes key.
1 AUTO RESET?
OK=YES
3 POWER SAVE OFF
Yes
DEF
3
Making a selection from 2 selections, press
or key will toggle between the two
selections. The item with an asterisk (*) is
currently selected
* TONE PULSE
, &YES
Press the Yes key to validate the
selection of the item currently
marked with ‘*’.
1-12
 Loading...