

Page 1

p
User Manual
Di150f
www.minoltaeuro
e.com
The essentials of imaging
Page 2

1 General Information..................................................... 7
1.1 Introduction..................................................................................... 7
1.2 How Does a Fax Machine Work?................................................... 8
1.3 Certificate for Machines with CE Marking .................................... 9
CTR21 Approval................................................................................ 9
1.4 Safety Precautions........................................................................ 10
Laser Safety.................................................................................... 11
Internal Laser Radiation.................................................................. 11
Ozone Release Warning................................................................. 11
1.5 Features......................................................................................... 11
Type................................................................................................ 11
Dialling Functions............................................................................ 12
Functions......................................................................................... 12
Additional Functions........................................................................ 12
2 Installation.................................................................. 13
2.1 Unpacking...................................................................................... 13
2.2 Location......................................................................................... 14
2.3 Moving the Machine...................................................................... 15
2.4 Machine Layout............................................................................. 16
2.5 Control Panel, Displays and Keys............................................... 18
2.6 The Toner Cartridge and the Drum Cartridge............................. 20
Installing the Toner Cartridge and the Drum Cartridge................... 21
2.7 Supply Paper................................................................................. 23
Installing the document guide......................................................... 23
Installing the Paper Input Tray........................................................ 23
Installing the Paper Tray................................................................. 23
Replace Rx Paper........................................................................... 24
2. Paper Tray .................................................................................. 25
Supply Paper to the Manual Paper Tray......................................... 26
2.8 Connecting the Power Cable and the Telephone Line Cable... 27
Connecting the Interface Cables.................................................... 27
Turning the Power on...................................................................... 28
3 Entering Initial Settings............................................. 29
3.1 Typing Conventions in this Manual............................................. 29
3.2 Entering Characters...................................................................... 30
3.3 Deleting Data................................................................................. 31
Di 150f I
Page 3

3.4 Entering Date and Time ............................................................... 32
3.5 Entering your Fax Number.......................................................... 33
3.6 Entering Your Name..................................................................... 34
3.7 Dialling Mode................................................................................ 34
3.8 Entering Receiving Mode............................................................. 35
3.9 Print Settings................................................................................ 35
3.10 Setting the Monitor Volume......................................................... 36
3.11 LCD Contrast ................................................................................ 36
3.12 Entering Fax Numbers................................................................. 37
Entering One-Touch Numbers........................................................ 37
Entering Speed Dial Numbers........................................................ 39
Changing One-Touch- or Speed Dial Numbers.............................. 41
........................................................................................................ 42
Erasing One-Touch- or Speed Dial Numbers................................. 42
Entering Call Groups...................................................................... 43
Phone book (index) ........................................................................ 44
Entering Department Numbers....................................................... 44
Deleting Department Numbers....................................................... 45
Activate Department Numbers....................................................... 46
Selecting Languages...................................................................... 46
3.13 Module 2nd Phone Line............................................................... 47
Entering Data for the 2nd Phone Line............................................ 47
4 Sending Faxes............................................................ 49
4.1 Transmission................................................................................ 49
Notes on Original Documents......................................................... 49
Photocopy or Carrying Film............................................................ 50
Placing the Documents................................................................... 51
Placing the Documents in the Flatbed Scanner............................. 51
Transmission from the Feeder (MemoryTransmission)................. 52
Transmission from the Flatbed Scanner (MemoryTransmission) .. 53
4.2 Settings for Sending a Fax.......................................................... 54
Resolution....................................................................................... 54
...........................................................................................Contrast 55
Stamp............................................................................................. 55
Oversea Mode................................................................................ 56
Closed Network Rx......................................................................... 57
Cover Page..................................................................................... 58
Page Number ................................................................................. 59
Dialling Methods............................................................................. 60
Manual Dialling Using the Numeric Keypad................................... 60
II Di 150f
Page 4

One-Touch Dialling......................................................................... 60
Speed Dialling................................................................................. 60
Group Dial using the One-touch keys 01 - 80....................................... 60
Program Dialling.............................................................................. 61
Phone Book..................................................................................... 62
Entering a Dialling Pause................................................................ 62
Changing the Dial Pause................................................................ 63
Automatic redial / on hook dialling / group dialling.......................... 64
Manual Redial................................................................................. 64
Dialling with in PBX......................................................................... 65
Scanner Settings............................................................................. 66
4.3 Transmission Methods................................................................. 67
Memory Transmission..................................................................... 67
Direct Transmission........................................................................ 67
Relay Broadcast Initiation............................................................... 69
Relayed Relay................................................................................. 71
Delayed Transmission..................................................................... 72
Program Delay Transmission........................................................ 73
Broadcast........................................................................................ 74
Program Broadcast........................................................................ 75
Polling Transmission....................................................................... 76
Regular Polling................................................................................ 76
Database Polling............................................................................. 77
Deleting Store Documents.............................................................. 77
Printing Stored Documents............................................................. 78
Secure Mail..................................................................................... 79
Setting Secure Mail as Default........................................................ 80
Program Secure Mail ..................................................................... 81
Batch Transmission......................................................................... 82
Setting a Box................................................................................... 82
Storing Documents.......................................................................... 83
Printing Stored Documents............................................................. 84
Deleting Documents from a Box..................................................... 85
Deleting Boxes................................................................................ 86
Deleting Programmed One-touch Keys .......................................... 87
Deleting Programmed Transmissions............................................. 88
5 Receiving Faxes......................................................... 89
5.1 Manual Reception ......................................................................... 89
Tel Ready Mode.............................................................................. 89
Tel/Fax ready Mode (Operation with a Telephone)......................... 89
5.2 Automatic Reception.................................................................... 89
Fax ready Mode .............................................................................. 89
Ans/Fax ready Mode (Operation with an answering machine) ....... 91
Di 150f III
Page 5

5.3 Mailbox Reception........................................................................ 92
Setting up a Mailbox....................................................................... 92
Printing Secure Mail Documents .................................................... 93
Setting the Time for Memory.......................................................... 94
5.4 Polling Reception ......................................................................... 95
Regular Polling ............................................................................... 95
Database Polling ............................................................................ 96
Program Polling Reception............................................................ 97
5.5 Settings for Receiving a Fax ....................................................... 98
Closed Network Rx......................................................................... 98
Blocking Numbers .......................................................................... 99
Number of Rings........................................................................... 100
Setting ECM Mode (Error Correction Mode) ................................ 101
Print Settings................................................................................ 102
6 Copy .......................................................................... 105
6.1 Single Copies.............................................................................. 105
Making copies from the Multi Purpose Tray ................................. 106
6.2 Multiple Copies........................................................................... 107
Sort............................................................................................... 107
6.3 Reduction / Enlargement ........................................................... 108
7 Connecting the Fax Machine to Y our Computer... 109
7.1 RS-232C Interface Cable............................................................ 109
Modem Specifications.................................................................. 109
Connecting the Fax Machine to Your Computer .......................... 110
Fax Operation with Your Computer.............................................. 110
Setting the RS-232C Interface...................................................... 111
Initialising...................................................................................... 112
Receiving...................................................................................... 112
Scanner Mode .............................................................................. 113
Printing from Your Fax Machine................................................... 113
Operation as a Network Printer .................................................... 113
8 Reports...................................................................... 115
8.1 Transmission Report.................................................................. 115
Automatic Print ............................................................................. 115
Manual Print ................................................................................. 115
8.2 Reception Report........................................................................ 117
Automatic Print ............................................................................. 117
Manual Print ................................................................................. 118
IV Di 150f
Page 6

8.3 Activity Report............................................................................. 119
Automatic Print.............................................................................. 119
Manual Print.................................................................................. 119
8.4 Printing the User Settings.......................................................... 120
8.5 One-Touch List............................................................................ 121
8.6 Speed Dial List ............................................................................ 122
8.7 Group Dial List ............................................................................ 123
8.8 Timer List..................................................................................... 124
8.9 Batch List..................................................................................... 124
8.10 List of Batch Documents............................................................ 125
8.11 Program List................................................................................ 125
8.12 Mailbox L ist ................................................................................. 126
9 Maintenance and Trouble-Shooting....................... 127
9.1 Cleaning the Machine................................................................. 127
9.2 Cleaning the ADF and the Scanner ........................................... 127
9.3 Cleaning the Flatbed Scanner.................................................... 128
9.4 Cleaning the Casing.................................................................... 128
9.5 Replacing the Toner Cartridge and the Drum Cartridge ......... 129
Replacing the Toner Cartridge...................................................... 129
Replacing the Drum Cartridge....................................................... 131
9.6 Clearing Paper Jams................................................................... 132
Clearing Original Document Jams ................................................ 132
9.7 Clearing Printout Paper Jams.................................................... 133
Paper Jam in the Paper Cassette ................................................. 133
Paper Jam in the Multi Purpose Tray............................................ 133
Paper Jam inside the Machine...................................................... 134
9.8 Trouble-Shooting........................................................................ 136
Error Message............................................................................... 136
Error-LED...................................................................................... 137
Alarms........................................................................................... 138
Error Messages on the LCD.......................................................... 138
Error Codes in Reports ................................................................. 142
Error Codes in Reports ................................................................. 144
10 Specifications........................................................... 145
10.1 Specifications.............................................................................. 145
10.2 Multi Operation Table ................................................................. 152
Di 150f V
Page 7

VI Di 150f
Page 8

General Information
1 General Information
1.1 Introduction
Thank you for choosing the Di 150f and showing confidence in our product.This machinehas a modern design and fulfils today's requirements of
a multi functional copy machine.It combines advanced technology with a
contemporary design .
The machine is authorised for use in the public telephone network and is
compatible to other fax machines of the communication standard 3.
The Di 150f was manufactured to the same high quality standards as is
common for all other precision instruments made by Minolta.
This manual will assist you in becoming familiar with the machine. It containsall the necessary information for the start-up, its functions and the replacement of the consumables.
Please, always keep this manual to hand when using the machine.
1
Di 150f 1-7
Page 9

1
1.2 How Does a Fax Mach ine Wo rk?
A fax machine can be connected to a normal telephone system without
taking any special precautions, just like a normal telephone set. The function of a fax machine is quite similar to that of a telephone.
The way a fax machine works is simple: documents that are to be transmitted are "read" by the take-upunit, the so-called scanner. The machine
doesnotrecognisetheletters but reads the picture, dot bydot, and marks
each dot as black or white. That is why you can not only transmit texts but
also pictures and photos. The information is then digitised and compressedso that the fax machinecansendit quickly over the telephoneline
to another fax machine which reverses the process, reading and marking
each dot as black or white on a sheet of paper.
When you are "called" by a fax machine, your telephone rings as normal.
Therefore you cannot know whether your are receiving a fax call or a telephone call before picking up the receiver.
At the beginning of a fax transmission you will hear shrill sounds. Those
sounds are the so called "hand shaking" and function as an introduction
sequence before the actual transmission, just as interlocutors - often - introduce themselves at the beginning of a telephone call. In the introductorysequence the technical featuresofbothm achines are matched to make
surethe transmission and the receptionare conducted to a high standard.
With your Di 150f you do not need to listen to the introductory sequence.
How to program the machine accordingly will be explained later in this
manual. Furthermoreyou will also find information about the settings that
come with the machine, that have to be made when installing, or the settings that can be made at a later stage. Most of the features of the fax machine work independently, so that you can program only the settings you
need for the moment and ignore all others.
Bythe way, the word "fax" is a combinationof the Latin"facere"(to make)
and "simile" (similar) describing the process of making a copy which is
similar to the original. This artificial word "fax" has nowadays become
widelyacceptedin everyday language, replacingthe older term facsimile.
A copy is therefore to be made ”similar” to the original.
Now, enjoy your new fax machine.
General Information
1-8 Di 150f
Page 10

General Information
1.3 Certificate for Machines w ith CE Marking
CTR21 Approval
Annex II
The equipment has been approved in accordance with Council Decision
98/482/EC for pan-European single terminal connection to the public
switched telephone network (PSTN).
However, due to differences between the individual PSTNs provided in
different countries, the approval does not of itself, give an unconditional
assurance of successful operation on every PSTN network termination
point.
In cases of problems, you should contact your equipment supplier in the
first instance.
Annex III
Network Compatibility Declaration
This equipment has been designed to operate on the Public Switched
Telephone Network. The equipment requires a line with analogue signalling characteristics.For further information, please contact your supplier.
1
Di 150f 1-9
Page 11

1
1.4 Safety Precautions
l Connectthemachineonly to a200 - 240 V/ 50 Hz earthed power point.
l Make sure the power is not turned off over night.
l Alwayspullattheplug,neveratthe wire,whenyouwantto disconnect
the machine from the power supply. Make sure you do not cause
damage to the wire.
l If unusual noise, smell or smoke appear while using the machine, pull
the plug immediately out of the wall socket.
l Never place objects on the maschine or on its cable.
l Do not place the machine close to magnetic fields. Do not place flam-
mable gases or liquids close to the machine.
l To facilitate communicationalways keep the machineswitched on and
program the correct user data. Make sure to enter the correct user
names.
l Do not unscrew any parts, if not specificallyrequested in this manual.
If necessary contact your technical service.
l Never open the machine while it is transmitting or printing.
l Take care not to let humidity into the machine.
l Make sure no objects fall into the machine.
l If any problem occurs that can not be solved by the procedures de-
scribed in this manual make sure you contact the technical service.
l Follow the recommended maintenance procedures regularly.
Used cartridges may be taken back by the technical service station as a
part of the maintenance procedures.
General Information
1-10 Di 150f
Page 12

General Information
Laser Safety
This fax machine contains a page printer which operates by means of a
laser. This machine does not impose any danger as long as it is used according to the proceduresdescribed in this manual. The l aser is limited to
the interior of the machine. The environment is protected from the laser
emission by the covers of the machine.
Internal Laser Radiation
Maximum radiation: 7.3 x 10-³ (W) Wave length : 770-810 (nm)
The machine works with an invisible cl ass IIIb laser. The printer head unit
is not field service item.
Ozone Release Warning
During printer operation, a small quantity of ozone is released. This
amount is not large enough to harm anyone. However, be sure the room
wherethefax machine is being used has adequateventilation, especially
if you are printing a high volume of material or if the fax machine is being
used continuously over a long period.
1.5 Features
Your new fax machine is a compact multi-functional device facilitating
yourwork and reducingyourfaxcommunication times.Thefeatures of the
Di 150f include scanning of originals into the memory for delayed transmission,allowing simultaneousreception of fax messagesand viceversa.
1
Type
l A4 B4, B5 format , Group 3, desktop laser plain paper fax
l 33.600 bps transmission
l MH / MR / MMR ECM coding
l Automatic document feeder up to 50 pages
l 250 sheet paper tray
l Optional 250 sheet paper tray
l 4 line LCD-display with 30 digits
l 64 level grey scale
Di 150f 1-11
Page 13

1
General Information
Dialling Functions
l 80 one-touch keys (for individual destinations or
as group dial destinations)
l 120 Speed dial options
l Automatic redial / on hook dialling / group dialling
l Phone book function
Functions
l Delayed transmission
l Broadcasting (up to 197 Destinations)
l Relay broadcast initiation
l Batch Transmission
l Multi tasking operation interface
l Polling RX / TX
l Confidential reception / mailbox transmission
l Copy function
Additional Functions
l RS-232C PC-interface (optional)
l Use as scanner (software optional)
l Use as PC fax (software optional)
l Use as printer (optional)
l Use as network printer (optional)
1-12 Di 150f
Page 14
Installation
2 Installation
2.1 Unpacking
The drawing below shows what should be included in the packaging.
2
1
Bild 6 einfügen
9
8
1Mainunit
2 Document input tray
3 Paper tray
4 Document support
5 Toner cartridge
6 Drum cartridge
7 Telephone line cord
8Powercord
9 2nd Paper tray (4 screws)
2
3
4
5
7
6
Di 150f 2-13
Page 15

2
2.2 Location
l Avoid direct exposure to sunlight and place the machine away from
heaters.
l Avoid humid or dusty locations.
l Place the machine on an even, non-vibrating surface.
l Keep the machine away from magnetic fields.
(TV sets, radio)
l Avoid locations close to ventilation openings, air conditionersand
heaters.
l The machines should be easily accessible from all sides.
l Make sure no liquids can enter the machine.
l Keep all covers closed when the machine is in standby. If any cover is
opened no transmission or reception is possible.
l If any cover is opened during sending or receiving the procedure is in-
terrupted. Avoid extreme fluctuations i n temperature which could
cause the humidity inside the machine to condense.
l The figures below show the space required to ensure easy access to
the machine and its proper functioning.
Installation
2-14 Di 150f
Page 16
Installation
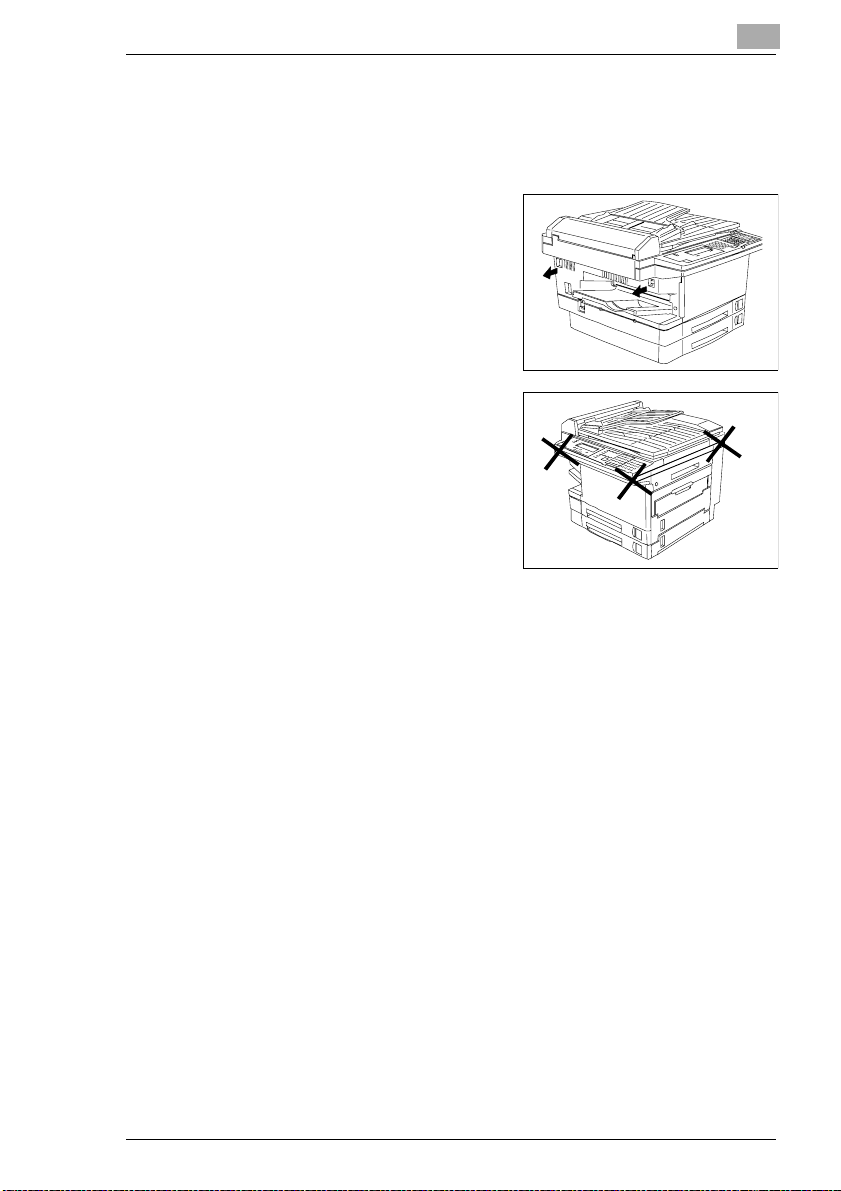
2.3 Moving the Machine
Onlycarry the machine with two persons. Do not lift the machine if the 2nd
paper tray is installed.
1 Pullout the carryingbars and liftthe
machine as shown in the picture.
2 Do not lift the machine holding the
marked places.
2
Bild 1 einfügen
Bild 2 einfügen
Di 150f 2-15
Page 17
2
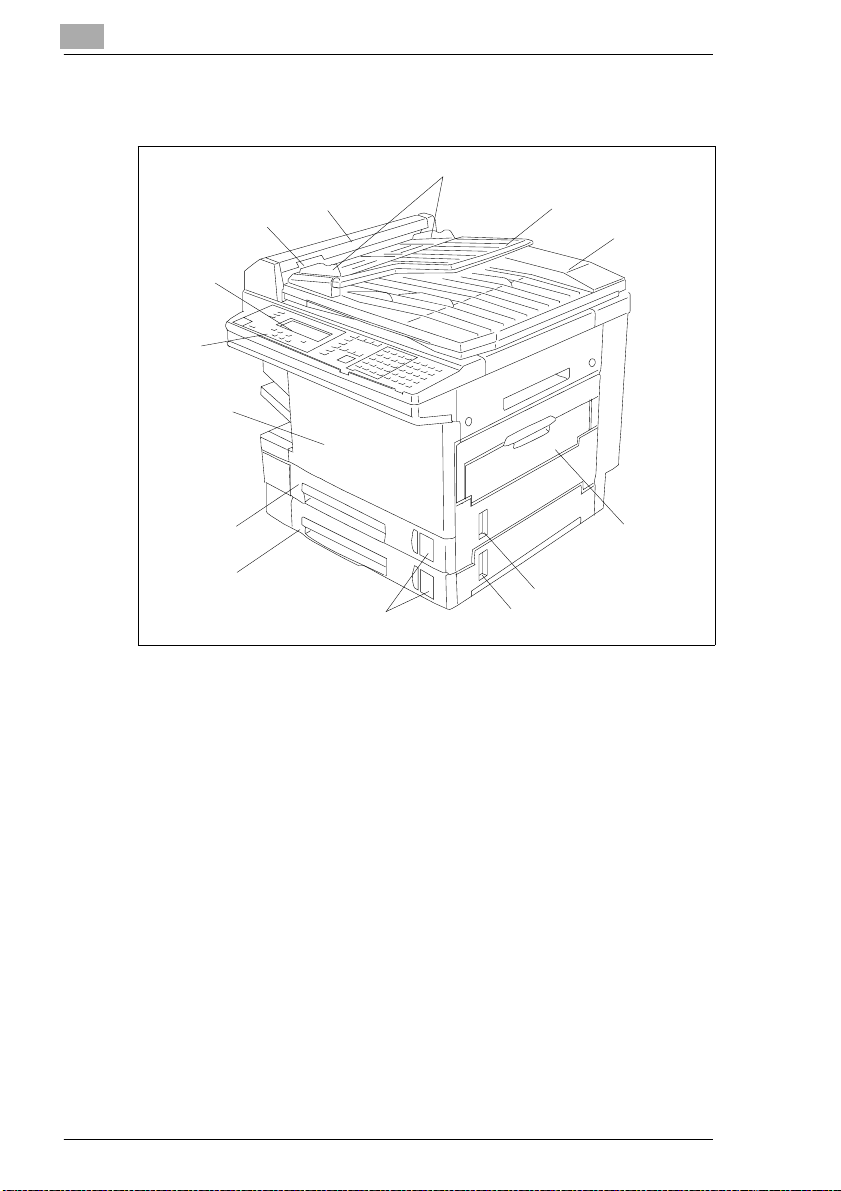
2.4 Machine Layout
Installation
5
4
3
Bild 7 einfügen
2
1
14
13
12
11
1 Control panel
2 Display
3 Lock of the scanner cover
4 Scannercover
5 Document guide
6 Document input tray
7 Document cover
8 Manual paper tray
9 S ide cover of the paper tray
10 Side cover of the 2nd paper tray
11 Paper indicator
12 2nd Paper cassette
13 Paper cassettes
14 Front cover
6
7
8
9
10
2-16 Di 150f
Page 18
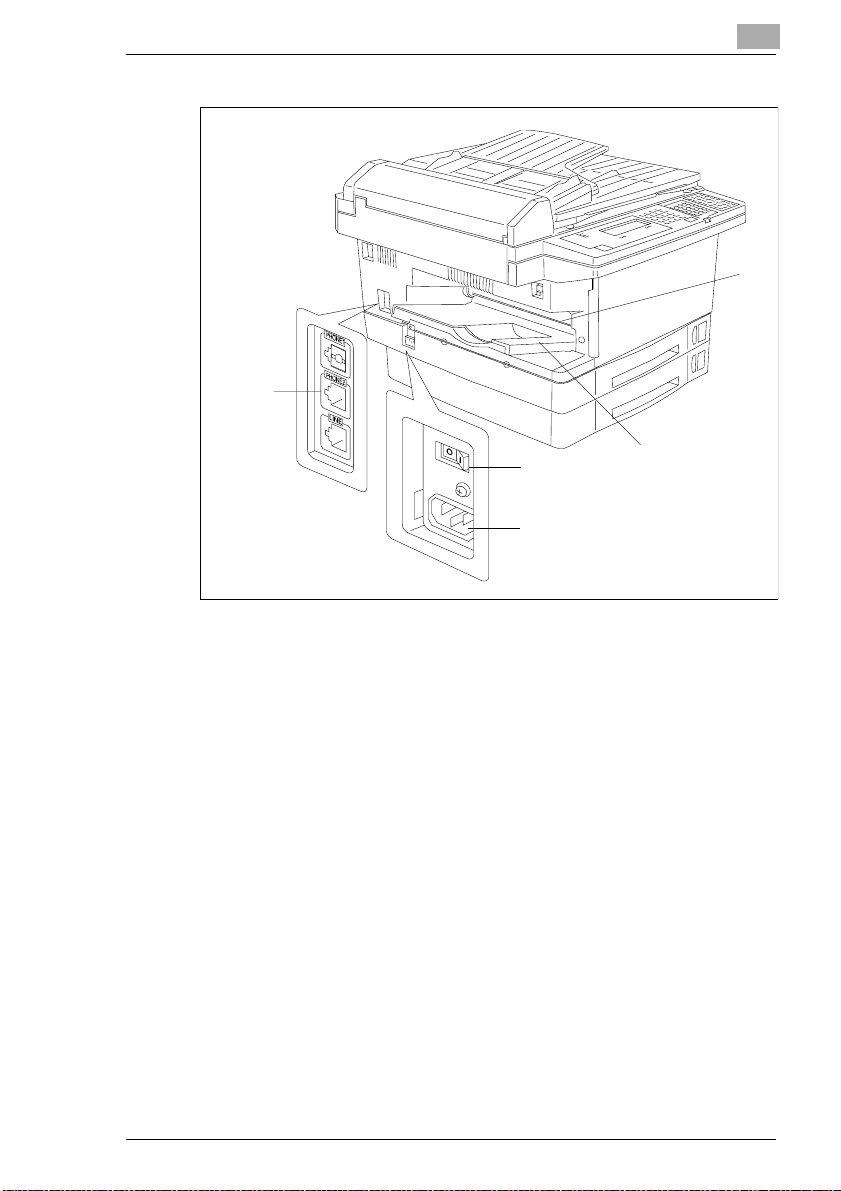
Installation
2
1
Bild 9 einfügen
5
1 Paper output
2 Paper tray
3 Mains switch
4 Power terminal
5Lineterminal
3
2
4
Di 150f 2-17
Page 19
2
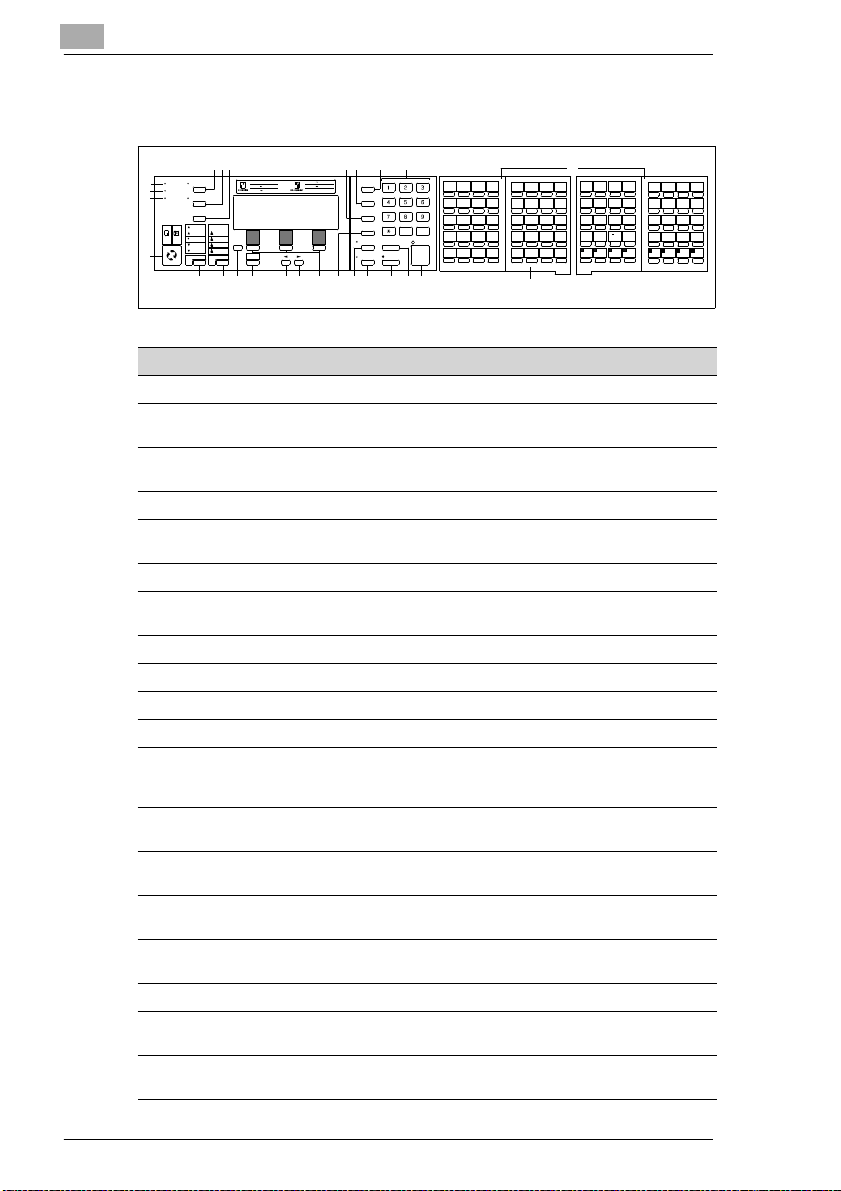
2.5 Control Panel, Displays and Keys
Installation
567
MONITOR/CAL
L
HOLD
MINIMUM
11"X1 7" 8.5" X11"
8.5"X 14"
DARK
HALFTONE
NORM
S-FINE
MENU
FINE
LIGHT
NORM
PROGRAM
RESOLUTIONCONTRAST
ALARM AUTOANSWER
4
COMMUNICATION
3
MEMORY
2
RECEIVE
COPY
FAX
BILD 10 EINFÜGEN
1
232425
11
89 10
8.5"X 14" 11" X17"
50%
8.5"X 11" 11" X17"
64%
78%
MAXIMUM
8.5"X 11"
qz abc def
121%
BROADCAST
129%
200%
COMMUNICATION
OPTIONS
GROUPDIAL
SPEEDDIAL/
TELINDEX
MEMORY
CLEARALL
TRANSMIT
STAMP
ghi jkl mno
prs tuv wxy
oper
STOP/CLEAR
01
02
03
04
A
B
C
D
09
10
11
12
I
J
K
L
17
18
19
20
Q
R
S
T
25
26
27
28
Y
Z
,
START
.
33
34
35
36
(
)
+
-
14151617181920212226
12
H
G
F
05
06
07
08
E
13
M
21
U
29
:
37
/
!
"
$
%
41
42
43
44
45
46
P
O
N
14
15
16
;
<
=
49
50
51
X
W
V
22
23
24
?
@
[
57
58
59
SPACE
&
'
30
31
32
{
}
65
66
38
39
67
40
73
74
75
CODEALPHABET
47
>
52
53
54
55
]
60
61
62
63
68
69
70
71
76
77
78
79
13
Num Display/Key Communication options
1 COPY/FAX Press this key to switchbetween copy and fax mode.
2 MEMORY RX LED When receiving into the memory, this LED is lit.
3 COMM UNICATION
LED
This LED is lit when die machine transmitsor receives.
4 ERROR This LED is lit, if an error occurs.
5 ANSWER Pressthiskeyto switchbetweenmanualand automatican-
swer of a call.
6 MONITOR Press this key to monitor the dialling process.
7 HOLD Pressthiskeyto placethe call on hold.Thisfunctionisonly
available with a connectedtelephone.
8 GROUP DIAL Press this key for group dialling.
9 FUNCTION Pressthis key to select the various communicationoptions.
10 BROADCAST Press this key for broadcasting.
11 NUMERIC KEYPAD Use these keys to enter numbers.
12 ONE TOUCH Use this key to dial stored numbers directlyor to enter let-
ters. Use the one-touch keys
73-80 to access pro-
grammed functions.
13 FLIP PANEL Turn the flip panel over to access the keys of the second
14 START Startsallfunctionsof the machinesuchas transmission, re-
level.
ceiving e tc..
15 CLEAR ALL Press this key to interrupt the actual function and return to
standby.
16 STOP/CLEAR Usethis key to interruptallproceduresmanuallyandto cor-
rect typing errors.
17 STAMP Press this key to stamp a ll correctly transm itted pages.
18 MEMORY TRANSMIT Press this key to select between memory transmit and di-
recttransmission.
19 SPEED DIAL/INDEX Use this key to enter a three digit speed dial number. Also
press this key to search for a stored number.
48
56
64
72
80
CODE
2-18 Di 150f
Page 20

Installation
Num Display/Key Communication options
20 OPTIONS Press this key to select the options shown in the display.
21/22ARROW KEYS Scrollsthrough features and command options as shown
23 PROGRAM Press this key to open the menu. Select the desired func-
24 MENU Press this key to select the next menu.
25 RESOLUTION Press this key to select the desired resolution. Press this
26 CONTRAST Press this key to select the desired contrast.Select from
on the display.
tion with the numeric keypad or the one-touch keys.
key to choose between:
NORMAL: Standard
FINE: high resolution
S.FINE: for documents with small print.
HALFTONE: for photographs, etc.
four options.
2
Di 150f 2-19
Page 21

2
2.6 The Toner Ca rtridge and the Drum Cartridge
In this laser fax, characters and images are created through a process in
which the drum cartridge applies toner to the page in the machine's developing section.
The drum cartridge should be handled with care to ensure proper performance at all times. Be sure to avoid exposing the cartridge to direct sunlight or any other direct light. Store the cartridge in an environmentthat is
not subject to extreme heat or humidity. Detailed information on the care
and handling of the toner cartridge is provided with the shipment of new
cartridges.
Exchange the cartridge when ”toner low” appears in the display (approx.
After 6000 DIN A4 prints). The drum cartridge has a service life of about
30000 pages. Instructions on how to replace the cartridges are given in
the chapter on maintenance.
Both cartridges are made of non-hazardous material. Please consult the
regulations for the disposal of such products in your area.
Used cartridges may be taken back by the technical service station as a
part of the maintenance procedures.
Installation
Note
To avoid damage to the drum cartridge caused by light, cover it with a
cloth as soon as removed from the fax.
2-20 Di 150f
Page 22
Installation
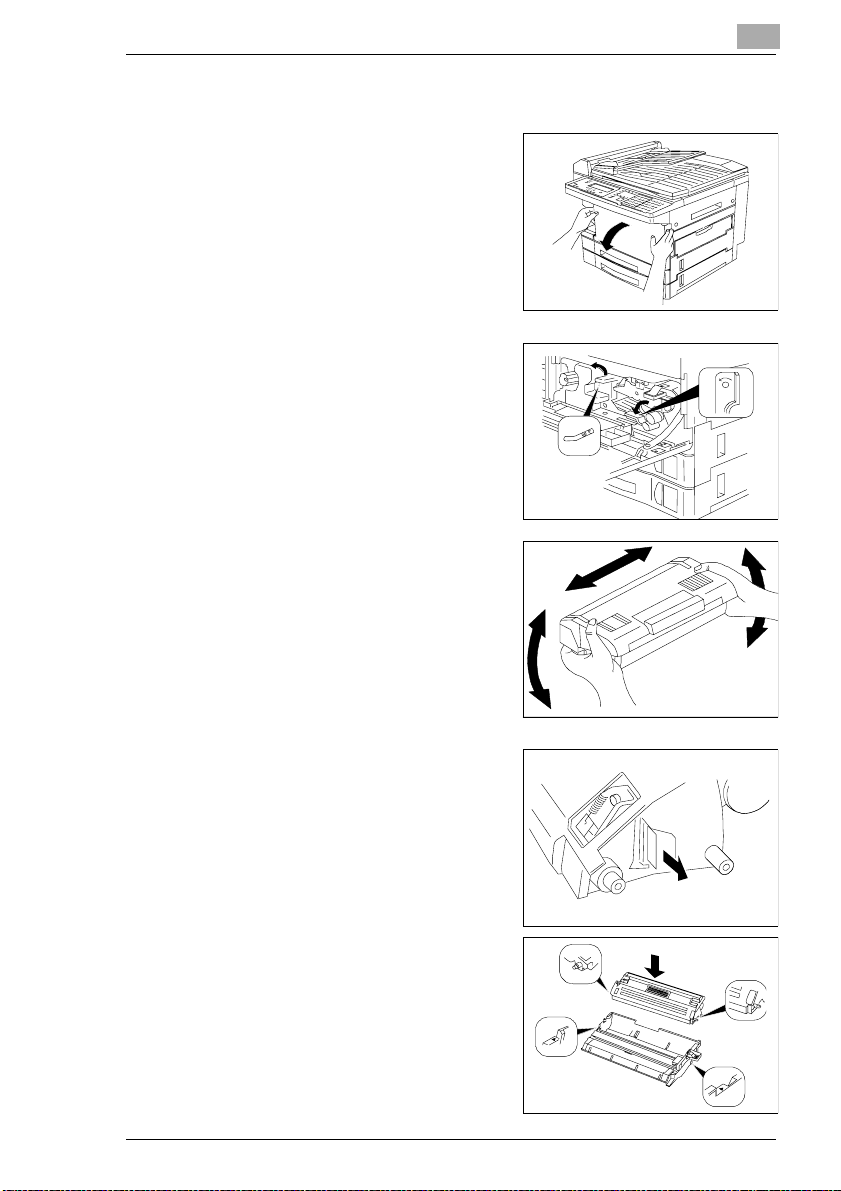
Installing the Toner Cartridge and the Drum Cartridge
1 Open the front cover.
Bild 11 einfügen
2 Releaselever M2 andM3byturning
them in the direction of the arrow.
Bild 12 einfügen
3 Unpack the toner cartridge. Then,
holding the cartridge with both
hands, shake it to distribute the toner evenly.
eins von den
Tonerschüttelbildern
einfügen
2
M3
OPEN
4 Placethecartridgeonanevensur-
face. Hold it with one hand and
carefully pull out the seal.
Bild 14 einfügen
5 Place the toner cartridge in the
drumcartridge. Makesure the pins
of the toner cartridge slip into the
notches in the drum cartridge.
Di 150f 2-21
Bild 15 einfügen
Page 23
2
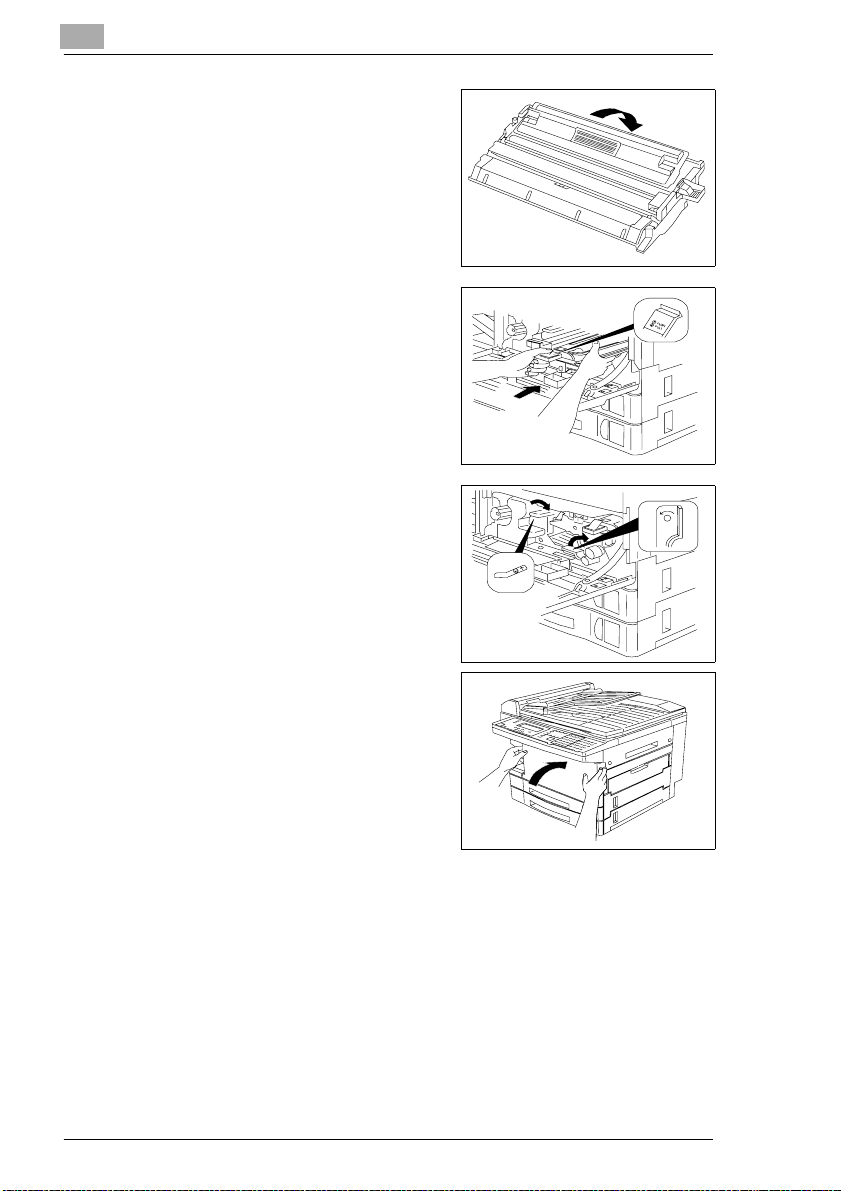
6 Press the unit in the direction of the
arrow until it clicks into place.
7 Insert the cartridges carefully into
the machine.
8 Return levers M2 and M3 to their
normal positions to lock the drum
cartridge.
Bild 16 einfügen
Bild 17 einfügen
Bild 18 einfügen
Installation
M3
OPEN
9 Close the top cover. Make sure the
cover locks.
Bild 18 einfügen9
2-22 Di 150f
Page 24

Installation
Note
Ifyou have installed a new drumcartridge,reset the cartridgecounter.
Forfurther in see the corresponding section in chapter ”Maintenance”.
2.7 Supply Paper
Installing the document guide
1 Insert the guide into the appropriate
holes.
Installing the Paper Input Tray
1 Insertthe two protrusionsof the tray
into the appropriate holes.
2
Bild 26 einfügen
Bild 27 einfügen
Installing the Paper Tray
1 Insertthe two protrusionsof the tray
into the appropriate holes.
Bild 28 einfügen
Di 150f 2-23
Page 25
2
Installation
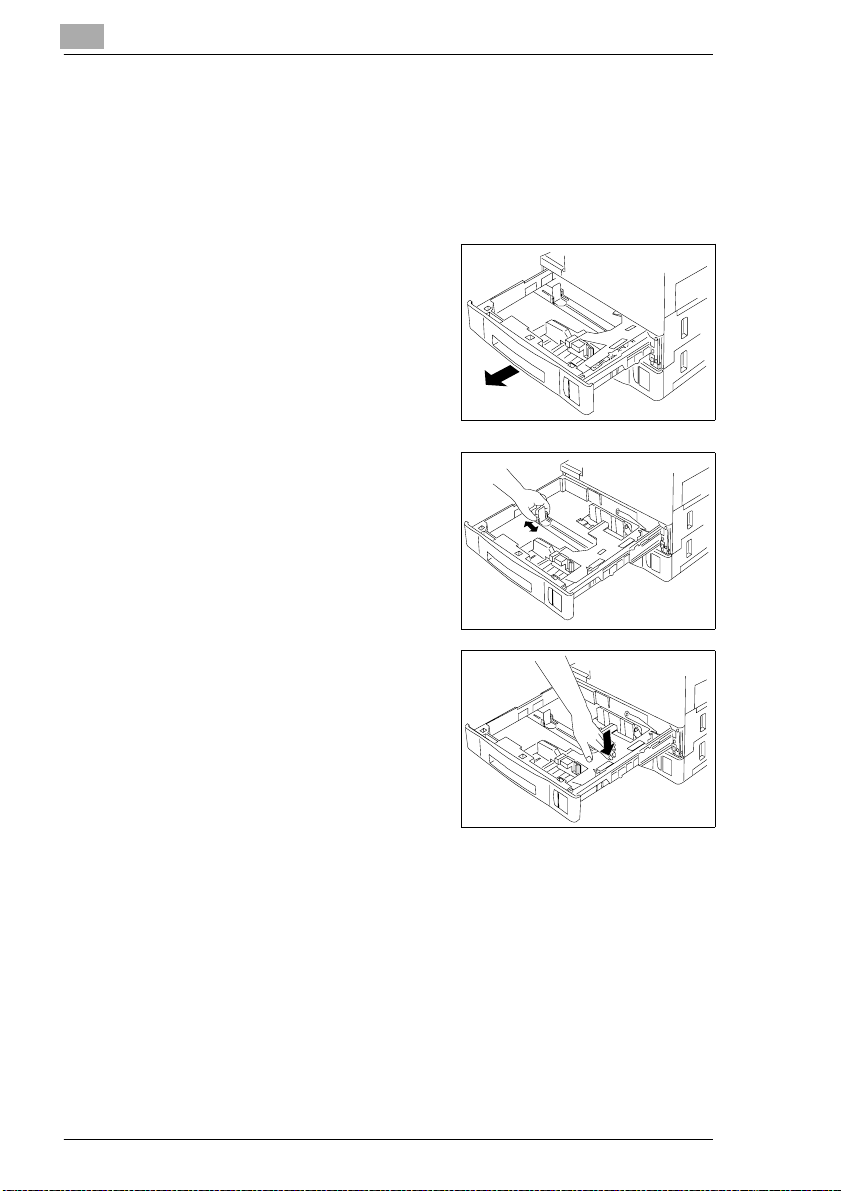
Replace Rx Paper
Your fax prints on plain paper of the following specifications: 60-90 g/m
The input can take up to 250 sheets of paper.
Thepaper cassettes hold up to 250 sheets of A4-sizedpaper.A4, A3, A5,
B4 and B5 (A4 is the standard paper size).
² .
1 Open the paper cassette.
Bild 20 einfügen
2 Adjust the paper guide according to
the paper size.
Bild 21 einfügen
3 Press the paper plate down until it
locks.
Bild 22 einfügen
2-24 Di 150f
Page 26
Installation
2
4 Fan the stack of paper through, ad-
just the edges, and place it in the
cassette. Insert the corners of the
top sheet beneath the metal edges
ofthe cassette. Make surethe stack
of paper is not higher than the
marks. Adjust the paper guides so
that they touch the edges of the
stack.
5 Close the paper plate until it locks.
Affix the paper size sticker.
2. P aper Tray
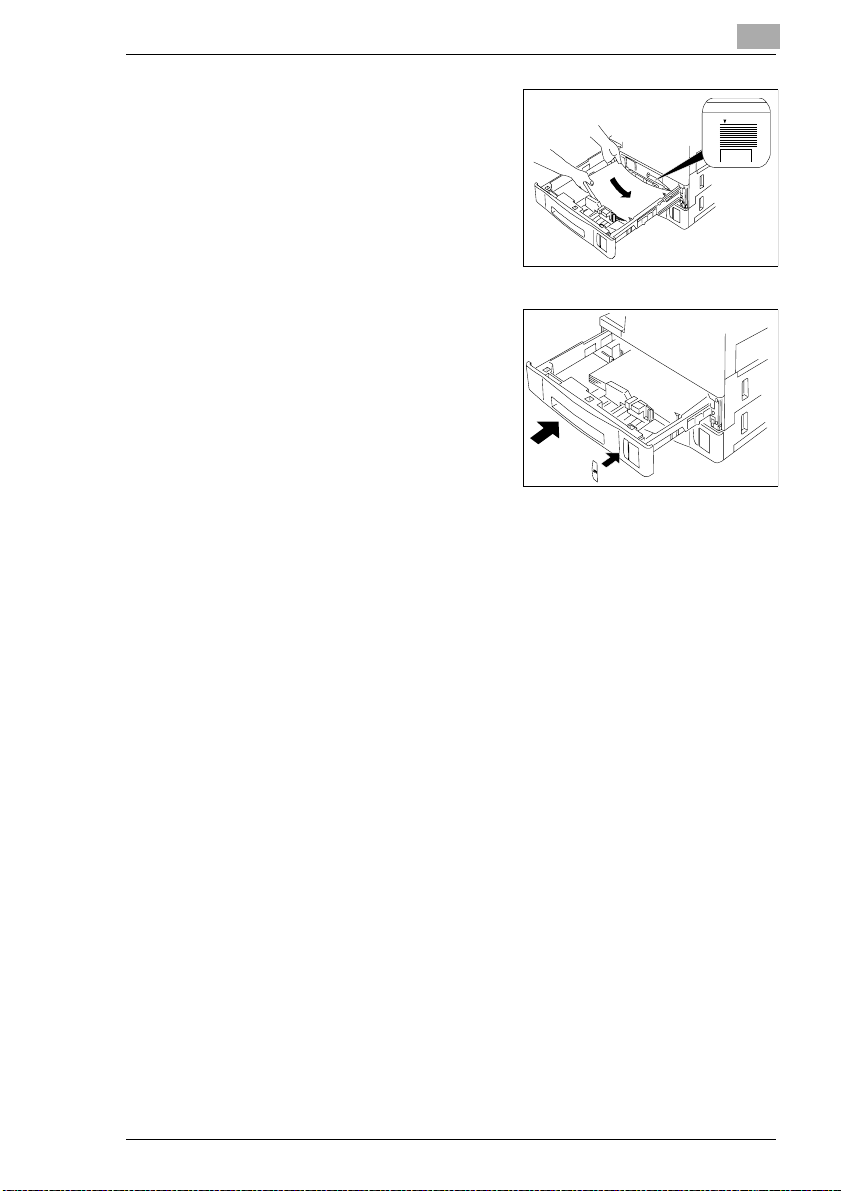
The Di 150f can be equipped with up to 2 additional paper trays. The additional paper trays must be installed by the service. For further information please contact your dealer.
Bild 23 einfügen
Bild 24 einfügen
Di 150f 2-25
Page 27
2
Installation
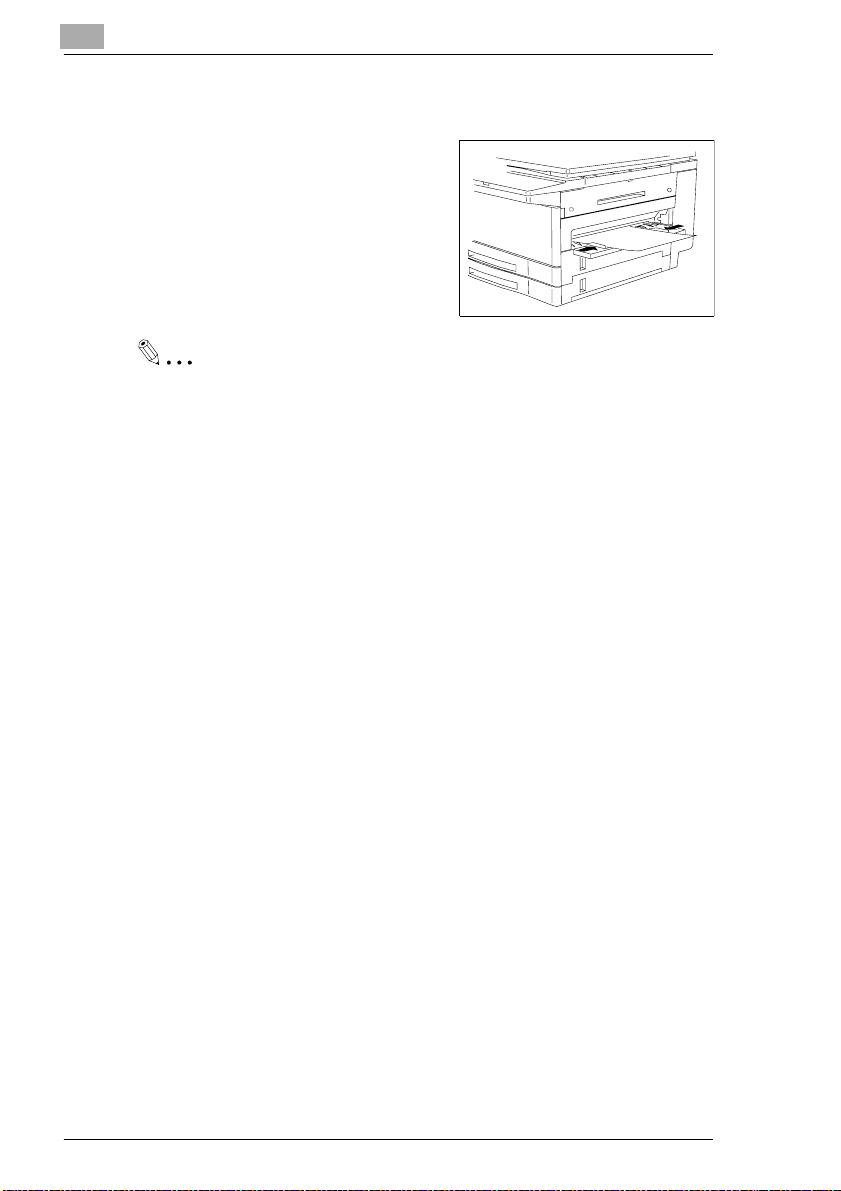
Supply Paper to the Manual Paper Tray
Open the manual paper tray.
Adjustthe paper guide according to the
paper size.
Place the sheet into the tray as far as
possible.
Note
Onlyrefill the paper after the last sheet has been drawn in from the paper cassette.
If the paper is used up, the lamp in the bottom right corner of the machine
will light and a message appears in the display. If no paper is loaded the
machine receives in memory mode. As soon as paper is loaded the received documents are printed automatically.
Bild 25 einfügen
2-26 Di 150f
Page 28
Installation
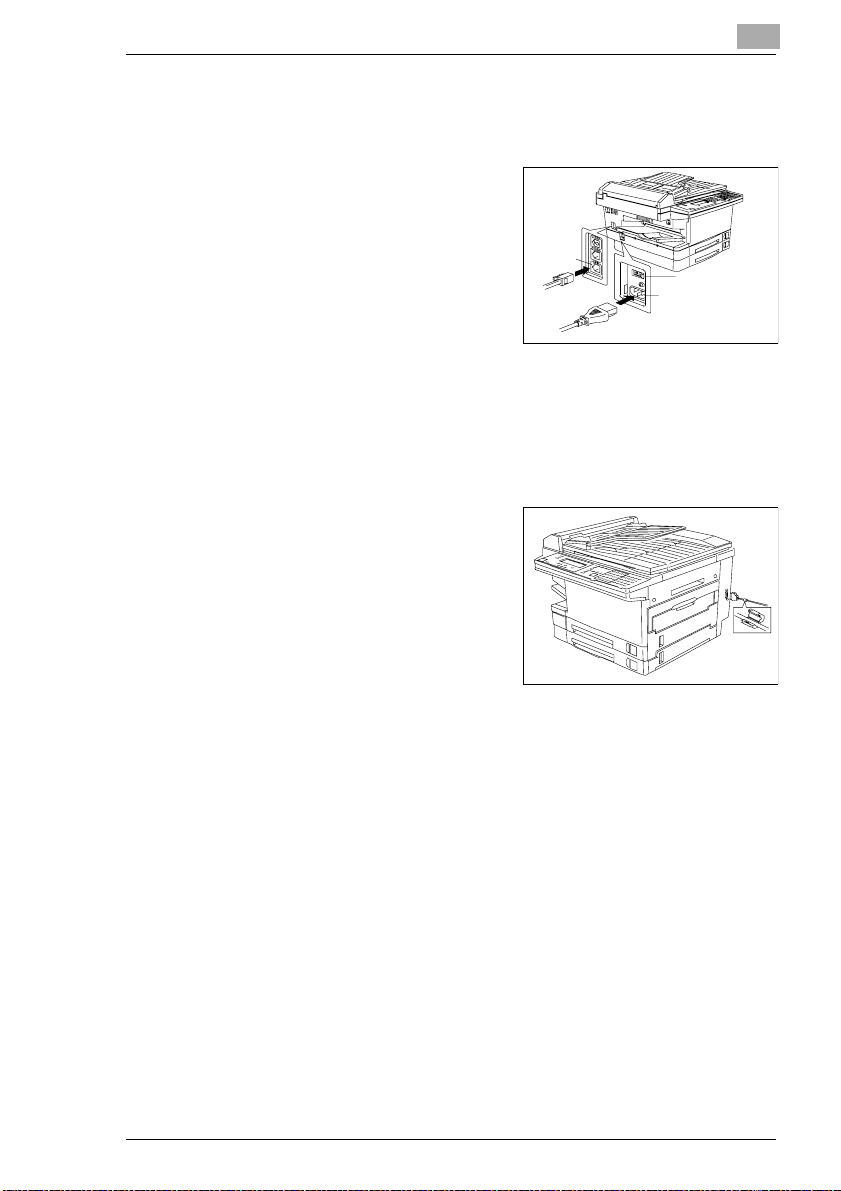
2.8 Connecting the Power Cable and the Telephone Line C able.
Plug the power cable into the back
1
of the machine. Then connect it to
the wall socket. Mind the safety
notes in chapter 1.
Plug the telephone cord into the
socket in the machine
.
Bild 29 einfügen
2 Connect the telephone cable to the wall outlet.
Connecting the Interface Cables
The RS-232C interface cable and the
Centronics printer cable are available
as optional equipment.Plug the interface cables into the appropriate terminals on the back of the machine.
Further information is provided in the
chapter "Connecting the fax to your
computer”.
2
Di 150f 2-27
Page 29
2
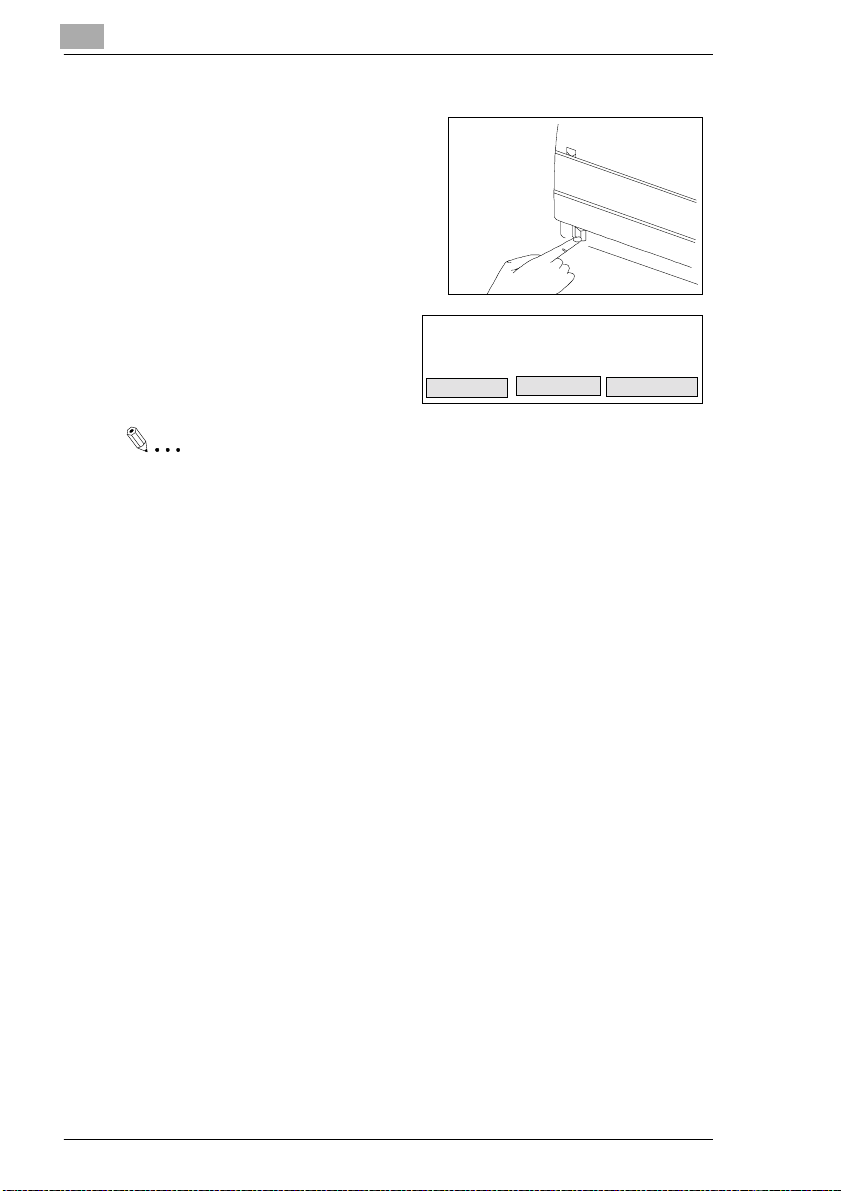
Turning the Power on
Press the power switch to turn the machine on. The ON/OFF switch is on the
left side of the machine above the powerplug.PressIforOn,pressOforOff.
Installation
Bild von Hand &
Schalter einfügen
When the machine is in standby
mode the display to the right will appear. Now the machine is ready for
operation.
Note
Alwaysleave the machine on for at least threeseconds before turning
it off again. Otherwise it might be seriously damaged.
FAX READY
REDIAL
10. OCT 98 10:32
AUTO Mem.100%
.
SCANSIZE
COMM.CLR.
2-28 Di 150f
Page 30

Entering Initial Settings 3
3 Entering Initial Settings
Before all features of your Di 150f are available you must enter several
settings. This chapter explains how to set your name, your line type and
the remote locations with which you may wish to communicate.
You can always interrupt the process by pressing STOP/CLEAR or CLEAR
. The setting will thennot be saved. If you do not press any key within
ALL
30 seconds your fax machine will return to stand-by mode.
3.1 Typing Conventions in this Manual
If nothing else is requested,all keys are to be pressed one afterthe other.
Thisis also the case if they are connected by a "," (comma)to facilitatethe
layout. “ Press PROGRAM,J,1” means: Press the key named “Program”,
then the key “J” and then 1.
Di 150f 3-29
Page 31

3 Entering Initial Settings
3.2 Entering Characters
Entering characters is especially easy with this machine. Just press the
one-touch key with the desired character. In case of a mistake you can
move the cursor with the arrow keys and overwrite the wrong text. Also
you can press
Note
To enter spaces press one-touch key
Press one-touch key 80 to enter special characters. The table shows
which keys you have to press and in which order to enter the desired
character. E.g. to enter $ press 2 first and then 4.
STOP/DELETE to delete the text.
1. key press
2 3 4 5 6 7 8 9 E F
0
0@P ` pÇÉá
1
!1AQaqüæí
2
"2BRbréÆó
3
#3CScsâôú
4
2. key press
$4DTdtäÖñ
5
%5EUeuàÒÑ
6
&6FVf våûø
7
'7GWgwçùØ
8
(8HXhxêÿ¿ò
9
)9IYiyëöß°
A
*:JZjzèÜ¡\
B
+;K[k{Ú
C
,<L¥l | î£Áõ
D
-=M]m}ì¥Èã
E
.>N^n→ÄPtÍ Ê
F
/?O_o←ŃÓ
32.
3-30 Di 150f
Page 32

Entering Initial Settings 3
3.3 Deleting Data
Before entering the user data, delete all entries in the machine to make
sure only the desired information is stored.
Description Display
1 Press PROGRAM , * , 2.
2 Press DELETE.
Then enter date and time.
Clear Settings
Are you sure?
Fax Ready
Redial
Erase
10. Oct 98 10:32
Auto Mem.100%
ScanSize.
Comm.Clr.
Di 150f 3-31
Page 33

3 Entering Initial Settings
3.4 Entering Date and Time
Date and time appear on the display, on the activity report and on the other fax machine's printouts.
Description Display
1 Press PROGRAM , I , ENTER.
2 Enter the date (YYMMDD) and
the time (24 hour format) and
pressENTER,to save the setting.
Enter Your Fax Number
Enter Time
’ 01 01/01 01:01
Enter
Enter Time
’ 98 10/10 10:32
Enter
3-32 Di 150f
Page 34

Entering Initial Settings 3
3.5 Entering your Fax Number
You can place your name and fax number in the header. The header will
appear at the top of the faxes you send.
The information in the header help the receiving station to identify the
sender.
Note
If you want to enter a ”+” press the menu key ”+”
To enter spaces press one-touch key 32.
Description Display
1 Enteryourfax numberandpress
ENTER.
Enter Your Fax Name
Press CLEAR ALL to interrupt the process without saving the data.
Enter Your Fax Number
_
Enter
Di 150f 3-33
Page 35

3 Entering Initial Settings
3.6 Entering Your Name
You can enter either your company name, your name or both. Up to 22
characters can be entered.
Press one-touch key
ters.
Description Display
39 to switch between upper case and lower case let-
1 Enter the text and press ENTER.
Enter the desired dialling mode.
3.7 Dialling Mode
Choose the dialling mode of your preference. Tone dialling (DTMF) dials
the number by transmitting a combination of beeps. You might need it
when your fax has to transmit a set of numbers which are coded as beeping noises, e.g. when you use the mailbox function. Pulse dialling dials by
transmitting a number of pulses for each dialled number.
Default setting is tone dialling (DTMF).
Description Display
1 Press the arrow keys to select
thedesiredsettingandpressEN-
TER
to save the setting.
Enter the desired receiving mode.
Enter your name
Select dial type
Tone
Tone
Pulse
Ä
Upper
Ä
Enter
Enter
3-34 Di 150f
Page 36

Entering Initial Settings 3
3.8 Entering Receiving Mode
Enter the desired receiving mode.
Description Display
1 Press the arrow keys to select
thedesiredsetting andpress EN-
TER
to save the setting.
For further information see chapter
”Receiving”
3.9 Print Settings
This function prints all set data.
Description Display
1 Press ENTER to print the list or
press STOP/CLEAR to return to
stand-by mode.
Select Receive Mode
Fax ready Fax/Tel ready
Tel/Fax ready Ans/Fax ready
Ä
Print Settings
Ä
Enter
Enter
Di 150f 3-35
Page 37

3 Entering Initial Settings
3.10 Setting the Monito r Volume
With this function you can set the volume of the monitor, to hear the build
up of the communication. For this, proceed as follows:
Description Display
1 Press MONITOR and one of the
arrow keys to select the menu.
2 Select the desired setting and
MONITOR.
press
3.11 LCD Contrast
Turntheknobonthe top leftside
1
above the display to adjust the
contrast of the display.
Tel Mode
_
Redial
Set Volume
Off Min Mid Max
------------------------------------------------
Tel Mode
_
Redial
Auto Mrmy.100%
ScanSize.
Ö
Ö
Auto Mrmy.100%
ScanSize.
Comm.Clr.
Ä
Comm.Clr.
Comm.Clr.
3-36 Di 150f
Page 38

Entering Initial Settings 3
3.12 Entering Fax Numbers
EnteringOne-Touch Numbers
With this function you can program the numbers you dial most frequently
using the one-touch keys. You can also program several numbers for
broadcasting. Up to 40 characters can be entered. (This function is described in section ”Tripodal / Broadcast”.
Furthermore,the enhanced functions such as delayed transmission or
polling can be programmed for the one-touch keys 73-80.
Note
If your Di 150f is connected to a PBX, you must program a “0” as your
line access number.
Description Display
1 Press PROGRAM and A.
2 Press ENTER.
3 Press the arrow keys to select
SET and press ENTER.
4 Press the desired one-touch
key, press ENTER to enter the
fax number using the numeric
keys and press again ENTER to
save the setting.
A. One-touch D. Polling
B. Speed dial E. Secure mail
C. P One-touch F. Commands
Ä
A. One-touch
Set Delete
List
Ä
Select O ne-Touch No. (01-72)
01:Empty
Ä
01:
Enter Fax Number
0511-9886767
-
Ä
Ä
Ä
Pause
Enter
Enter
Enter
Enter
Di 150f 3-37
Page 39

3 Entering Initial Settings
5 Press the arrow keys to select
NAME and press ENTER.
6 Enter the name using the one-
touch keys and press ENTER to
save the setting.
7 If you want to enter further one-
touchnumbers,select ENDusing
the arrow keys and repeat the
procedure. If you do not want to
enter further numbers, press
CLEAR ALL to return to stand-by mode.
You can enter an alternative number for each one-touch key. The Di150f
will dial this number, if all redial attempts for the first number fail.
8 SelectALT. NO. using the arrow
keys and repeat the procedure
described above. Press ENTER
to save the setting.
01:0511-9886767
Name GroupNo.
Alt.No. End
Ä
01:0511-9886767
Name upper
01:0511-9886767
Name GroupNo.
Alt.No. End
Ä
01:0511-9886767
Name GroupNo.
Alt.No. End
Ä
Ä
Ä
Ä
Enter
Enter
Enter
Enter
3-38 Di 150f
Page 40

Entering Initial Settings 3
Entering Speed Dial Numbers
Similar to the one-touch keys you can store fax numbers as speed dial
numbers. You dial a speed dial number by entering a three-digitidentifier
code. Up to 120 speed dial numbers can be stored.
Description Display
1 Press PROGRAM and B.
2 Press ENTER.
3 Press the arrow keys to select
SET and press ENTER.
4 Enter the desired three-digit
speed dial number using the numeric keypad and press ENTER .
5 Enter the number and press EN-
TER
to save the setting.
6 Press the arrow keys to select
NAME and press ENTER.
A. One-touch D. Polling
B. Speed dial E. Secure mail
C. P One-touch F. Commands
Ä
B. Speed dial
Set Delete
List
Ä
Enter Speed dial no. (001-120):_
001:Empty
Ä
001:
Enter Fax Number
_
-
001:
Enter Fax Number
0511-9886767
-
001:0511-9886767
Name GroupNo.
Alt.No. End
Ä
Ä
Ä
Ä
Pause
Pause
Ä
Enter
Enter
Enter
Enter
Enter
Enter
To enter ”-”, press the menu key ”-”.
7 Enter the name using the one-
touch keys and press ENTER to
save the setting.
Di 150f 3-39
001:0511-9886767
Name upper
Enter
Page 41

3 Entering Initial Settings
8 Ifyouwant to enterfurther speed
dial numbers select END using
the arrow keys and repeat the
procedure. If you do not want to
enter further numbers, press
CLEAR ALL to return to standby mode.
You can enter an alternative number for each speed dial number. The
Di150f will dial this number, if all redial attempts for the first number fail.
9 SelectALT. NO. . using the arrow
keys and repeat the procedure
described above. Press ENTER
to save the setting.
001:0511-9886767
Name GroupNo.
Alt.No. End
Ä
001:0511-9886767
Name GroupNo.
Alt.No. End
Ä
Ä
Ä
Enter
Enter
3-40 Di 150f
Page 42

Entering Initial Settings 3
Changing One-Touch- or Speed Dial Numbers
You can change one-touch- or speed dial numbers by following the procedure below.
Description Display
1 Press PROGRAM and A or B,EN-
.
TER
2 Select ONE-TOUCH or SPEED
using the arrow keys and
DIAL
press ENTER.
3 Select SET using thearrowkeys,
press ENTER and select the desired one-touch key or speed
dial number using the arrow
keys.
4 Press STOP/DELETE to delete
the old number. Enter the new
number and press ENTER.
5 Enter the new name using the
one-touch keys and press EN-
TER
to save the setting.
A. One-touch D. Polling
B. Speed dial E. Secure mail
C. P One-touch F. Commands
Ä
A. One-touch
Set Delete
List
Ä
Select O ne-Touch No. (01-72)
01:0511-9886767
MINOLTA
Ä
01:
Enter Fax Number
0511-9886767
-
01:0511-9886767
Name upper
Ä
Ä
Ä
Pause
Enter
Enter
Enter
Enter
Enter
6 If you want to enter further one-
touch keys or speed dial numbers, select END usingthe arrow
keys and repeat the procedure.
If you do not want to enter any
further numbers, press CLEAR ALL to return to standby mode.
Di 150f 3-41
01:0511-9886767
Name GroupNo.
Alt.No. End
Ä
Ä
Enter
Page 43

3 Entering Initial Settings
Erasing One-Touch- or Speed Dial Numbers
You can erase one-touch- or speed dial numbers by following the procedure below.
Description Display
1 Press PROGRAM and A or B.
2 SelectONE-TOUCH or SPEED
DIAL
using the arrow keys and
press
ENTER.
3 Press the arrow keys to select
DELETE and press ENTER.
4 Select the desired number and
press DELETE.
5 PressDELETE and CLEAR ALL to
return to standby mode.
A. One-touch D. Polling
B. Speed dial E. Secure mail
C. P One-touch F. Commands
Ä
A. One-touch
Set Delete
List
Ä
Select O ne-Touch No. (01-72)
01:0511-9886767
MINOLTA
Ä
01:0511-9886767
MINOLTA
Are you sure?
Select O ne-Touch No. (01-72)
Complete
Ä
Ä
Ä
Ä
Cancel
Ä
Enter
Enter
Erase
Erase
Erase
3-42 Di 150f
Page 44

Entering Initial Settings 3
EnteringCall Groups
Your fax machine can scan the same document once and then send it to
numerous other fax machines (broadcasting). Call groups are sets of frequently called fax numbers, arranged to simplify broadcasting. Use this
function,if you frequentlysend to the same group. You canstoreupto 192
numbers in 32 groups.
Note
In order to arrange numbers as call groups, these must be stored as
one-touch- or speed dial numbers.
Description Display
1 Press PROGRAM and A or B.
2 Select ONE-TOUCH or SPEED
DIAL
using the arrow keys and
press ENTER.
3 Select SET using thearrowkeys,
press ENTER and enter the desired one-touch key or speed
dial number.
4 Press ENTER twice, select
GROUP. NO. using the arrow
keys and press ENTER.
5 Enter the desired number for the
group and press ENTER.
A. One-touch D. Polling
B. Speed dial E. Secure mail
C. P One-touch F. Commands
Ä
A. One-touch
Set Delete
List
Ä
Select O ne-Touch No. (01-72)
01:0511-9886767
MINOLTA
Ä
001:0511-9886767
Name GroupNo.
Alt.No. End
Ä
02:0511-9886767
Enter Group No.
_
Ä
Ä
Ä
Ä
Comma(,)
Enter
Enter
Enter
Enter
Enter
Di 150f 3-43
Page 45

3 Entering Initial Settings
Note
Enter
0 to store a fax number in all groups.
Press COMMA (,) after each group number to store a fax number in
several gr oups.
Phone book (index)
Youdo notneedto enterany dataintothephonebook.Allone-touchnumbers, speed dial numbers and call groups are automatically stored in the
phone book. How to dial with the telephone book will be explained in the
"Sending faxes" chapter.
EnteringDepartment Numbers
With this function you can assign each user a department number, which
must be entered in the machine before a document can be sent or polled.
The department numbers are listed in the journal, to give an overview of
who uses the fax machine. Up to 50 numbers can be entered.
Description Display
1 Press PROGRAM and L.
2 Press ENTER, select SET using
the arrow keys and press
ENTER.
3 Enter the four-digit department
number using the numeric keypad. If you enter several numbers, press COMMA(,) to
separate them. Press ENTER to
save the setting.
3-44 Di 150f
J.User Dat. M. Batch Send
K. Cover sheet
L. Department
Ä
L. Department
Set
On/Off
Ä
Enter Department No.
0001, 0002_
Ä
Ä
Comma(,)
Enter
Enter
Enter
Page 46

Entering Initial Settings 3
Deleting Department Numbers
Description Display
1 Press PROGRAM and L.
2 Press ENTER twice, STOP/
CLEAR
and ENTER.
J.User Dat. M. Batch Send
K. Cover sheet
L. Department
Ä
Enter Department No.
1, 2_
Ä
Comma(,)
Enter
Enter
Di 150f 3-45
Page 47

3 Entering Initial Settings
Activate Department Numbers
Description Display
1 Press PROGRAM and L.
2 Press ENTER, select ON/OFF
using the arrow keys and press
ENTER.
3 Select the desired setting using
the arrow keys and press
ENTER.
Note
Ifthedepartment numbersare activated, enterthe fax numberfirstand
then press START. Then your are asked to enter the department
number. Then press ENTER.
J.User Dat. M. Batch Send
K. Cover sheet
L. Department
Ä
L. Department
Set
On/Off
Ä
Ä
Department
On
OFF
Ä
Ä
Ä
Ä
Ä
Enter
Enter
Enter
Selecting Languages
Press PROGRAM and # to select the language for the reports and the display. The machine switches from English to French, from French to German and back to English.
3-46 Di 150f
Page 48

Entering Initial Settings 3
3.13 Module 2nd Phone Line
The module 2nd phone line is available as optional accessory. Theinstallation must be done by the technical service.
Entering Data for the 2nd Phone Line
Entertheuserdata againafterthe 2nd phoneline is installed.To enter the
date, time, fax number and name following the procedures described
above. Because two telephonelines are connectedto the fax machine all
data must be entered twice. A 1 or 2 appears in the top right corner of the
display. After entering the dial type select the communication type for
each line separately.
1 Press the arrow keys to select
thedesiredsetting andpress EN-
TER
to save the setting.
2 Press the arrow keys to select
thedesiredsetting andpress EN-
TER
to save the setting.
3 Either enter the access number
orthefax number, depending on
whether you selected PSTN or
PBX and press ENTER to save
the setting.
Tx/Rx (1)
Tx/Rx Receive
Tx
Ä
Line Type (1)
PSTN
PBX
Ä
PSTN No. (1)
_
Pause
Ä
Ä
Enter
Enter
Enter
4 After this enter the data for the 2nd phone line as described above.
Di 150f 3-47
Page 49

3 Entering Initial Settings
3-48 Di 150f
Page 50

Sending Faxes
4 Sending Faxes
4.1 Transmission
Notes on Original Documents
Your fax machine is capable of transmitting the document sizes below.
You can place up to 50 sheets of paper in the A4-format in the Automatic
Document Feeder (B4: 25 sheet, A3: 15 sheets).
4
max. width
306 mm
feeding
direction
min. width
120 mm
feeding
direction
Max. 294 mm
effective
width
feeding
direction
For transmitting from the flatbed scanner, the same sizes as for multipage transmission are valid. A minimum size does not apply.
If the document is longer than 1000 mm, the machine recognises
document jam and stops scanning the document.
Use yellow, green-yellow or light blue colours for information you do not
want to be transmitted.
Make sure ink, glue, correction fluid etc. are completely dry before you
sendafax.
CAUTION
Staples etc. may damage the machine.
è Remove all staples before transmission.
Di 150f 4-49
Page 51

4
Sending Faxes
Photocopy or Carrying Film
Documentsthatmeetthe following characteristicsmustbephotocopied or
placed in a carrying film before they can b e sent:
l paper sizes less than 120 mm width or less than 100 mm length
l paper lighter than 50g/m²
l folded, torn, wrinkled, damp, rough or curled papercoated or
l coated or pressure sensitive paper
4-50 Di 150f
Page 52

Sending Faxes
Placing the Documents
Insert the document face up. In the
document feeder.
Placethe document in the centre of the
ADF and adjust the paper guides so
that they lightly touch the edges of the
document.
Placing the Documents in the Flatbed Scanner
Place the document face down in the
lowerfront cornerof the glass andclose
the cover.
You can insert up to 50 pages into the
feeder. Make sure the pages are well placed and aligned before starting
the transmission.
If the paper is curled or pages stick together more than one page at a time
could be drawn into the machine. This might lead to paper jams or faulty
transmissions. In this case you should insert the pages one by one to
ensure a correct feeding of the documents.
The standard memory holds ca.57 pages. Take care that the indicated
memory capacity does not drop to 0 (%) during scanning, since the
process will be cancelled in this case.
4
Bild 30
Bild 31
Note
If this occurs repeatedly, contact your technical service for a memory
upgrade. Until then you should send large documents in direct mode,
i.e. with the memory turned off.
Di 150f 4-51
Page 53

4
Sending Faxes
Transmissionfrom the Feeder (Memory Transmission)
Description Display
1 Insert the document face up. In
thedocumentfeeder. Make sure
Memory transmit is on.
2 Enter the desired number using
the numeric keys and press
START.
3 If you want to transmit further
documents press YES and
follow the instructions on the
display. Press TO interrupt.
4 Placethe next pageinthe feeder
and press START. Press END to
interrupt the process.
Fax Ready
10.Okt 98 10:32
Auto
ScanSize
Press Start Key
0081-52-44567
-
0081-52-44567 Store
A4 Normal 01
Next Page : Yes Mem.100%
0081-52-44567
A4 Normal 01
Set Next Doc. and Press Start
Pause
OK
StartScanSize
.Redial
Comm.Clr.
Tone
No
End
4-52 Di 150f
Page 54

Sending Faxes
Transmission from the Flatbed Scanner (Memory Transmission)
Description Display
4
1 Place the document face down
inthe scanner and close the cover. Make sure Memory transmit
is on.
2 Enter the desired number using
the numeric keys and press
START
3 If you want to transmit further
documents press YE S and
follow the instructions on the
display. Press NO to interrupt.
4 Placethe next pageinthefeeder
and press START. Press END to
interrupt the process.
Fax Ready
10.Okt 98 10:32
Auto Mem.100%
Redial
Press Start Key
0081-52-44567
-
0081-52-44567 Store
A4 Normal 01
Next Page : Yes Mem.100%
0081-52-44567
A4 Normal 01
Set Next Doc. and Press Start
ScanSize
ScanSize.
Pause
OK
Start
Comm.Clr.
Tone
No
End
Ifthescan sizeisnotset to ”auto”and the machine can not detect the size,
enter it manually. For this, proceed as follows:
1 Press SCANSIZE.
Enter Scan Size
ScanSize
2 Select the desired setting and
press ENTER.
A3 A4
B4 B5
A4 A5
Ä
Ä
Enter
Di 150f 4-53
Page 55

4
4.2 Settings for Sending a Fax
Resolution
Insert the document into the ADF.
If you send documents with normal
print or typed documents, adjustments are not necessary. To change the
resolution press RESOLUTION.
RESOLUTION allows four adjustments:
Sending Faxes
Fax Ready
10.Okt 98 10:32
Auto Mem.100%
Redial Comm.Clr.
ScanSize.
Standard
Fine Fine resolution is suitable for maps, newspaper articles etc.
S. Fine This is the finest resolution. (Highest resolution 203 dpi x 392
Half tone Halftonemode captures shades in photographsanddrawings.
This is the normal resolutionfor most typed documents and
simpledrawings.
dpi).
Note
SUPER FINE and HA LFTON raise the cost and transmission time con-
siderably.
If the remote fax is not capable of receiving documents in SUPER FINE
your machine automatically switches back to next possible resolution.
4-54 Di 150f
Page 56

Sending Faxes
Contrast
If you raise the contrast fine differences in tone on the document are
enhancedand transmittedmore clearly. However,informationmaybe lost
during this process.
4
DARK
NORM
Ä
LIGHT
Stamp
This functions marks scanned documents wi th a stamp. This function is
only in effect when the feeder is used.
Description Display
1 Press PROGRAM, J, 1, 3.
Press ENTER select the desired
2
settingusing the arrow keys and
press ENTER.
Darkensweak, blurred prints.
Ä
Darkensweak, blurred prints.
Suitable for most documents.
Lightens very dark documents.
Lightens very dark documents.
13. Stamp 16. Reset count.
14. Relayed Relay
15. Connect PC
Stamp
ON
OFF
Ä
Ä
Ä
Ä
Enter
Enter
Note
You can also select the stamp by pressing ST AMP on the operation
panel. In this case the function is only active for the present transmission.
Di 150f 4-55
Page 57

4
Sending Faxes
Oversea Mode
This function compensates the quality of some overseas connections.
Enter the desired fax number.
Description Display
1 Press MENU and OVERSEA.
The function is turned off after the
transmission automatically.
Press Start Key
0081-52-44567
1Tone
2 Tone
Oversea
4-56 Di 150f
Page 58

Sending Faxes
Closed Network Rx
If you use this function, the machine only communicates with similar
machines, that use the correct code. This is true for transmission and
receiving. In this case the Code is a four-digit number.
Description Display
4
1 Press PROGRAM, J, 0, 7.
2 Press ENTER.
3 Enter the desired passcode and
press ENTER.
4 Press PROGRAM, J, 0, 8.
5 Press ENTER to select the
desired setting using the arrow
keys and press ENTER.
To turn this function off, enter the
passcode 0000.
07. Passcode 10.
Lck.No. 08. Closed Netw. 11.Service
Mod. 09. SecureMail. 12. Memory Tx
Ä
Passcode
0000
Passcode
1234
07. Passcode 10.
Lck.No. 08. Closed Netw. 11.Service
Mod. 09. Security Rx. 12.Memory Tx
Ä
Closed Netw.
ON
OFF
Ä
Ä
Ä
Ä
Enter
Enter
Enter
Enter
Enter
Di 150f 4-57
Page 59

4
Sending Faxes
Cover Page
Usethisfunction to send a cover page with every transmission. The cover
page contains date, time, your name, your fax number and a short
messages which can be up to 40 characters long.
Description Display
1 Press PROGRAM and K.
2 Press ENTER, select SET using
the arrow keys and press
ENTER.
3 Enter the message using the
one-touch keys and press
ENTER.
4 Select ON using the arrow keys
and press ENTER.
To print the cover sheet press LIST
and ENTER in step 2.
J.User Dat. M. Batch Send
K. Cover sheet
L. Department
Ä
K Cover Sheet
Set Send
List
Ä
Ä
Cover Page
K Cover Sheet
On
OFF
Ä
Ä
Ä
Upper
Ä
Enter
Enter
Enter
Enter
4-58 Di 150f
Page 60

Sending Faxes
Page Number
This function numbers the pages in multi-page transmissions.
4
1 Press MENU.
2 Press PAGENUM .,enterthe
number of pages and press
ENTER.
Then proceed with the desired transmission mode.
Fax Ready
Flash
PageNum.
Enter Number Of Pages (1-30)
1
10. Oct 98 10:32
Mem.100%
PageNum.Comm.Rpt
Enter
Di 150f 4-59
Page 61

4
Sending Faxes
Dialling Methods
Different dialling methods are available.
Insert the document face up into the ADFand dial with the dialling method
of your choice.
Manual Dialling Using the Numeric Keypad
1 Dialthe faxnumberusing the nu-
meric keypad and press START.
You can check the number on
thedisplayand,if necessary, delete it by pressing
STOP/CLEAR.
A maximum 20 digits are possible.
One-Touch Dialling
1 Press one of the programmed
one-touch keys 01 - 80.Themachine dials the number after
scanning the document.
Speed Dialling
1 Press the speed dial key and en-
ter the three digit identifier code
(001-120).
2 The name of the remote side
appears on the display. Press
START. After scanning the
document the machine will dial
automatically.
Fax Ready
10. Oct 98 10:32
Auto Mem.100%
Redial ScanSize Comm.Clr.
MINOLTA Transmit
A4 Normal
Fax ready Mem.99%
Redial ScanSize Comm.Clr.
Enter Speed-Dial No.
S_
- Pause Tone
Minolta
S001
- Pause Tone
Group Dial using the One-touch keys 01 - 80
1 Press a one-touch key 01 - 80. If
a group is stored under this key
its name will be displayed. After
scanning the document the ma-
MINOLTA Transmit
A4 Normal
Fax ready Mem.99%
Redial ScanSize Comm.Clr.
chine will dial automatically.
4-60 Di 150f
Page 62

Sending Faxes
Program Dialling
The o ne-touch keys 73 – 80 can be programmed with the following
functions:
l Broadcast
l Delayed Transmission
l Secure Mail
l Polling Reception
l Relay Broadcast Initiation
For details refer to the corresponding sections of this manual.
4
Di 150f 4-61
Page 63

4
Sending Faxes
Phone Book
The phone book lists all numbers stored in your machine.
Description Display
1 Press PHONE BOOK/INDEX 2
times.
2 Select the desired entry using
the arrow keys and press
Entering a Dialling Pause
Description Display
START.
1 Enter the number up to the
pause.
2 Press PAUSE and enter the rest
of the number. The display
shows -/.
Tel Index Alphabet [ A ]
ABC Müller
Maier Schmidt
Ä
Tel Index Alphabet[ A ]
ABC Müller
Maier Schmidt
Ä
Fax Ready
Redial ScanSize Comm.Clr.
Press Start Key
9-/197423
- Pause Tone
Ä
Ä
10.Okt 98 10:32
Auto Mem.100%
4-62 Di 150f
Page 64

Sending Faxes
Changing the Dial Pause
The length is set to 5 seconds by default. The pause can be set to up to
10 seconds duration.
Description Display
4
1 Press PROGRAM and J.
2 Press ENTER select PAUSE
using the arrow keys and press
ENTER.
3 Enter the desired value and
press ENTER.
J.User Dat. M. Batch Send
K. Cover sheet
L. Department
Ä
01.Scan Param. 04.# of Rings
02.Print Param. 05.Redial
03.Pause 06.ECM Mod.
Ä
Enter
DialingPause
06 Sec. (5-10)
Ä
Ä
Ä
Ä
Enter
Enter
Di 150f 4-63
Page 65

4
Sending Faxes
Automatic redial / on hook dialling / group dialling
Use this function to set the number of redial attempts and the interval
between the attempts.
Description Display
1 Press PROGRAM and J.
2 Press ENTER select REDIAL
using the arrow keys and press
ENTER.
3 Enter the desired values using
the numeric keys and press
ENTER.
Manual Redial
Description Display
1 SelectREDIAL using the arrow
keys. The machine redials the
number.
J.User Dat. M. Batch Send
K. Cover sheet
L. Department
Ä
01.Scan Param. 04.# of Rings
02.Print Param. 05.Redial
03.Pause 06.ECM Mod.
Ä
Enter
Redial
No. 4 times (2- 5)
Inter 3 Min. (3-5)
Ä
Fax Ready
Redial ScanSize Comm.Clr.
Ä
Ä
Ä
10.Okt 98 10:32
Auto Mrmy.100%
Enter
Enter
4-64 Di 150f
Page 66

Sending Faxes
DiallingwithinPBX
If you want to transmit a document within a PBX system, proceed as
follows:
One-touch dial / Speed dial in a PBX system
1 Enter the speed dial number or the one-touch key as described in the
corresponding sections.
2 Press HOLD to enter a !. Entering this character prevents the machine
from calling an external line.
3 Press ENTER to save the setting.
Manual Dialling within PBX
1 Enter the number using the numeric keypad.
2 Press HOLD to enter a !.
3 Press START.
4
Di 150f 4-65
Page 67

4
Sending Faxes
Scanner Settings
Use this function to set the resolution, contrast and scanning width of the
scanner for transmissions.
Description Display
1 Press PROGRAM, J, 0, 1 and EN-
.
TER
2 Select the desired resolution us-
ing the arrow keys and press
TER.
EN-
3 Selectthe desiredcontrastusing
the arrow keys and press EN-
TER.
4 Select the desired scan width
using the arrow keys and press
ENTER.
01.Scan Param. 04.# of Rings
02.Print Param. 05.Redial
03.Pause 06.ECMMod.
Ä
Res.
Normal S Fine
Fine Grayscale
Ä
Enter
Contrast
Light Normal Dark
------------------------------------------------
Ö
Scan Width
A3 A4
B4
Ä
Enter
Ä
Ä
Ä
Ö
Enter
Ä
Enter
4-66 Di 150f
Page 68

Sending Faxes
4.3 Transmission Metho ds
Memory Transmission
Memory transmission is set as a default. You should send faxes in direct
mode only exceptionally, e.g. if not enough memory is available. S ince
yourfax machine is a multi-taskingdeviceit is possibletoscandocuments
while your Minoltafax is sending from memory, receiving or printing. As
soon as the current operation is finished the new document will be sent.
Memory transmission offers several advantages. To set memory
transmission as default, proceed as follows:
Description Display
4
1 Press PROGRAM, J, 1, 2 and EN-
TER
.
2 Select the desired setting using
the arrow keys and press
ENTER.
If you have set memory transmission as default, you can turn it on for the
actual transmission by pressing MEMORY TRANSMIT on the panel.
Note
If the memory is exhausted during scanning the document will be deletedfrom the memory.Youshouldwaituntil enough memorycapacity
to scan all documents completely is available again. If this is not possible, switch to direct m ode.
In case of a power failure documents will be stored in the memory for 1
hour.
Direct Transmission
You can send directly from the ADF, if not enough memory is available to
scan all documents you want to transmit. Make sure you have switched
off MEMORY TRANSMIT before. Direct transmission from the flatbed
scanner is not possible.
10.Lck.No. 13.Stamp
11.ServiceMod. 14.RelayedRelais
12.MemoryTx 15.PC Connect.
Ä
Enter
Memory Tx
ON
OFF
Ä
Ä
Ä
Enter
Di 150f 4-67
Page 69

4
Sending Faxes
Description Display
1 Insert the document face up into
the ADF. A djust resolution and
contrast, if necessary.
2 Press MONITOR.
3 Dial the number manually, using
the one-touch keys or by speed
dial numbers and press START.
Fax Ready
10.Oct 98 10:32
Auto Mrmy.100%
Redial ScanSize Comm.Clr.
Tel Mode
_
A4 Mem.100%
Redial ScanSize Comm.Clr.
Tel Mode
0511-7404-0_
A4 Mrmy.100%
Redial ScanSize Comm.Clr.
4-68 Di 150f
Page 70

Sending Faxes
Relay Broadcast Initiation
This function takes advantage of a remote fax machine's memory to reduce communication costs. You send a document to one or several fax
machines and they send the document to several destinations in turn. If
you use several identical machines in your organisation, you can use a
tree structured distribution.
If, e.g. the hub and the final destinations are abroad you reach all
destinations with only one long-distance call.
Description Display
Place the document.
4
1 Press OPTIONS, select RELAY
using the arrow keys and press
ENTER.
2 Enter the desired number for the
groups and press ENTER.Make
sure to separate the groups by
comma.
3 Enter the desired number of the
hub and press START
Command Option
Relayed Relay Batch
Secure Mail Polling
Ä
Relay Otions
Enter Group No. (0-32)
_
Enter Fax Number
_
-
Ä
Comma(,) Enter
Pause
Enter
Enter
Di 150f 4-69
Page 71

4
Sending Faxes
Program Dial Relay Transmission
Youcanuseone of the one touch keys
Description Display
73-80to program the relay function.
1 Press PROGRAM, C and ENTER.
2 SelectSET using the arrow keys
and press ENTER.
3 Selectthe desiredone-touchkey
using the arrow keys and press
ENTER.
4 Enter the desired number of the
hub and press ENTER
5 Select RELAY using the arrow
keys and press ENTER.
6 Enter the desired number for the
groups and press ENTER. Make
sure to separate the groups by
comma.
A. One-touch D. Polling
B. Speed dial E. Secure mail
C. P One-touch F. Commands
Ä
C. P One-touch Dial
Set Delete
Ä
List
Prog. Select One-touch No.
P73: Empty
Ä
P73:
Enter Fax Number
_
-
P73:0511-7404-0
Relayed Relay End
Secure Mail Polling
Ä
Enter
P73:0511-7404-0
Enter Group No. (0-32)
_
Ä
Ä
Ä
Pause
Enter
Enter
Enter
Enter
Ä
Comma(,) Enter
7 Press CLEAR ALL to stop the
procedure or press END and
ENTER, to program further keys.
4-70 Di 150f
P73:0511-7404-0
Relayed Relay End
SecureMail Polling
Ä
Ä
Enter
Page 72

Sending Faxes
Usethis function to transmitdocumentsand instruct thefaxmachinethere
to send the document to the stations stored in its speed dial numbers.
Example:
MachineA
Note
The machines A and B must be compatible and both must have the
relay broadcasting function while the machines C, D etc. can be differentmodels. Thecallgroupsmust existon theremotemachine andyou
must know each call group's identifier number.
Relayed Relay
Use this function to instruct the machines C, D, E etc. to send the
documentto further machines.To turn this function on, proceed as follows:
Document
Report
Machine B
One-Touch/
Speed Dial
4
Machine C
Machine D
Machine E
Machine F
Description Display
1 Press PROGRAM, J, 1, 4.
2 Select the desired setting using
the arrow keys and press
ENTER.
Now proceed in the same way as for a standard relay transmission.
Di 150f 4-71
13. Stamp 16. Reset count.
13. Stamp 16. Reset count.
14. RelayedRelay
14. RelayedRelay
15. Connect PC
15. Connect PC
Ä
Ä
Relayed Relais
ON
OFF
Ä
Enter
Ä
Ä
Ä
Enter
Enter
Page 73

4
Sending Faxes
Delayed Transmission
You can use this function to take advantage of lower evening and weekend long-distance rates.
You can only use this function if date and time are stored in the machine.
This function can be combined with other transmission modes such as
Broadcast or Relay transmission. For this follow the procedure below
before you press START.
Insert the document face up into the ADF.
Adjust contrast and resolution if necessary.
Description Display
1 Press OPTIONS,select RELAY
using the arrow keys and press
ENTER.
2 Enter the day of the month and
thetimeforthetransmission
using the numeric keys (24 hour
format) and press ENTER..
3 Enter the desired number and
press START.
The machine scans the document into memory.
Ifnot enough memory is available duringscanning,themachinewill return
to stand-by mode. In this case repeat the procedure when enough
memory is available again.
Command Option
Relayed Relay Batch
SecureMail Polling
Ä
Enter
Timer Option
Enter time
06/17:16
Enter Fax Number
_
-
Ä
Pause
Enter
Enter
4-72 Di 150f
Page 74

Sending Faxes
Program Delay Transmission
You can use one of the one touch keys
transmission.
Description Display
4
73-80 to program the delayed
1 Press PROGRAM, C and ENTER.
2 Select SET using the arrow keys
and press
ENTER.
3 Press the desired one-touch key
and press ENTER.
4 Enter the desired number and
press ENTER.
5 Select TIMER using the arrow
keys and press ENTER.
6 Enter the day of the month and
the time for the transmission
usingthe numeric keys (24 hour
format) and press EN T ER.
A. One-touch D. Polling
B. Speed dial E. Secure mail
C. P One-touch F. Commands
Ä
C. P One-touch Dial
Set Delete
List
Ä
Prog. Select One-touch No.
P73: Empty
Ä
P73:
Enter Fax Number
_
-
P73:0511-7404-0
Relayed Relay End
Secure Mail Polling
Ä
Enter
P73:0511-7404-0
Enter time
06/17:16
Ä
Ä
Ä
Pause
Ä
Enter
Enter
Enter
Enter
Enter
7 Press CLEAR ALL to stop the
procedure or press ENTER to
program further keys.
Note
If you enter 00 instead of a day, the timer function is executed every
time the programmed one-touch keys is pressed.
Di 150f 4-73
P73:0511-7404-0
Relayed Relay End
Secure Mail Polling
Ä
Enter
Ä
Page 75

4
Sending Faxes
Broadcast
Your Di 150f is capable of sending documents from the memory to up to
197 recipients. The machine dials and transmits the document
sequentially to each recipient.
Insert the document face up into the ADF. Adjust contrast and resolution
if necessary.
Description Display
1 Press BROADCAST.
Enter Fax Number
_01, 0511-7404-0, S001
-
Pause
Enter
2 Enter the desired numbers. Make sure to separate the numbers by
comma. For this, press BROADCA ST.
3 Repeat this procedure until you have entered all recipients.
4 Press START.
Ifnot enough memory is available duringscanning,themachinewill return
tostandbymode. In this case repeat the procedure whenenoughmemory
is available again.
4-74 Di 150f
Page 76

Sending Faxes
Program Broadcast
You can use one of the one touch keys
transmission.
Description Display
4
73-80 to program the broadcast
1 Press PROGRAM, C and ENTER.
2 Select SET using the arrow keys
and press
ENTER.
3 Selectthe desiredone-touchkey
using the arrow keys and press
ENTER.
4 Enter the desired numbers and
press ENTER.PressGROUP
DIAL
and enter the group
number, to store a group.
5 Press CLEAR ALL to stop the
procedure or press END and
ENTER to program further keys.
A. One-touch D. Polling
B. Speed dial E. Secure mail
C. P One-touch F. Commands
Ä
C. P One-touch Dial
Set Delete
List
Ä
Prog. Select One-touch No.
P73: Empty
Ä
P73:
Enter Fax Number
_
-
P73:0511-7404-0
Relayed Relay End
Secure Mail Polling
Ä
Enter
Ä
Ä
Ä
Pause
Ä
Enter
Enter
Enter
Enter
Di 150f 4-75
Page 77

4
Sending Faxes
Polling Transmission
You can use this function to transmit documents automatically. The
recipient can retrieve the document on demand. The document can even
consist of several pages.
Insert the document into the ADF in order to scan it.
If one or more documents are to be polled from memory, the remote fax
machine must have an identical ID function (Elaborated T-30 protocol).
For all other callers: the caller establishes the communication line by
telephone, waits for the first pause after the "handshake" and enters the
four digit ID code in the tone dialling system. Your Di 150f acknowledges
the code and begins immediately with the polling transmission. The
recipient initiates the transmission by pressing START.
Polling transmission are possible in regular mode and from database. In
regular mode any machine of the same type can poll documents. In
Databasepollsthereceivermust know thenumberof the files tobepolled.
Up to 10 different documents can be stored.
Adjustcontrast and resolutionif necessary. Make sure the answer LED is
lit.
Regular Polling
Description Display
1 Press PROGRAM and D.
2 Press ENTER 2 times. The
display shows the following
message: Then press ENTER
again.
The machine scans the document
and returns to standby mode.
4-76 Di 150f
A. One-touch D. Polling
B. Speed dial E. Secure mail
C. P One-touch F. Commands
Ä
Polling
Empty
Ä
Ä
Ä
Enter
Enter
Page 78

Sending Faxes
Database Polling
Description Display
4
1 Press PROGRAM and D.
2 Press ENTER 2times.
3 Enter the desired two-digit
number for the files (00-99)
using the numeric keys and
press ENTER
The machine scans the document into memory.
Deleting Store Documents
Description Display
1 Press PROGRAM and D.
A. One-touch D. Polling
B. Speed dial E. Secure mail
C. P One-touch F. Commands
Ä
Polling
Empty
Ä
Enter
DB Polling Documents
Enter File No. (0-99)
00_Empty
Ä
Enter
A. One-touch D. Polling
B. Speed dial E. Secure mail
C. P One-touch F. Commands
Ä
Ä
Ä
Ä
Ä
Enter
Enter
2 Press ENTER.
3 Select DELETE using the arrow
keys and press ENTER.Ifyou
want to delete a document
stored for database polling,
enter the ID code.
Di 150f 4-77
D. Polling
Stored Delete
Ä
Doc PRT
Polling
Stored
Ä
Enter
Ä
Ä
Page 79

4
Sending Faxes
4 Press DELETE 2times.
Polling
Are you sure?
Cancel. Delete
PrintingStored Documents
Description Display
1 Press PROGRAM and D.
2 Press ENTER.
3 SelectDO C PRT using the arrow
keys and press ENTER.Ifyou
want to print a document stored
fordatabasepolling,enter the ID
code.
A. One-touch D. Polling
B. Speed dial E. Secure mail
C. P One-touch F. Commands
Ä
D. Polling
Stored Delete
Ä
Doc PRT
Polling
Stored
Ä
Print
Ä
Ä
Ä
Enter
4 Press PRINT.
4-78 Di 150f
Print Polling Documents
Stored
Ä
Print
Ä
Page 80

Sending Faxes
Secure Mail
Use this function to transmit a document to a mail box. This is helpful, if
only a specific person may read the document. However, both machines
must be the same model.
The transmission is only executed, if both mailbox ID codes are identical.
This prevents the document from being transmitted to a wrong mailbox.
Thedocument is scanned into the remote fax machine's memory andcan
only be printed if the recipient enters the correct mailbox ID.
Description Display
Place the document.
4
1 Press OPTIONS,select SECURE
MAIL
using the arrow keys and
press ENTER.
2 Enter the desired ID code using
the numeric keys and press
ENTER.
3 Enter the desired number and
press START.
Command Option
Relayed Relay Batch
Secure Mail Polling
Ä
Secure Mail Option
Enter ID (0-9)
_
Ä
Enter
Enter
Enter Fax Number
_
-
Pause
Enter
Di 150f 4-79
Page 81

4
Sending Faxes
Setting Secure Mail as Default
To set secure mail transmission as default, proceed as follows:
Description Display
1 Press PROGRAM, J, 0, 9 and EN-
TER
.
2 Select the desired setting using
thearrowkeys and press
to save the setting.
ENTER
07. Passcode 10.Lck.No.
08.ClosedNet. 11.Service Mod.
09. Secure Mail 12. Memory Tx.
Ä
Enter
SecureMail
ON
OFF
Ä
EnterÄ
Ä
4-80 Di 150f
Page 82

Sending Faxes
Program Secure Mail
You can use one of the one touch keys
transmission.
Description Display
4
73-80 to program the secure mail
1 Press PROGRAM, C and ENTER.
2 Select SET using the arrow keys
and press
ENTER.
3 Press the desired one-touch key
and press ENTER.
4 Enter the desired number and
press ENTER.
5 Select SECURE MA IL using the
arrow keys and press ENTER.
6 Enter the desired ID code using
the numeric keys and press
ENTER.
A. One-touch D. Polling
B. Speed dial E. Secure mail
C. P One-touch F. Commands
Ä
C. P One-touch Dial
Set Delete
List
Ä
Prog. Select One-touch No.
P73: Empty
Ä
P73:
Enter Fax Number
_
-
P73:0511-7404-0
Relayed Relay End
SecureMail Polling
Ä
Enter
P73:0511-7404-0
Enter Secure Mail ID (0-9)
_
Ä
Ä
Ä
Pause
Ä
Enter
Enter
Enter
Enter
Enter
7 Press CLEAR ALL to stop the
procedure or press END and
ENTER to program further keys.
Di 150f 4-81
P73:0511-7404-0
Relayed Relay End
Secure Mail Polling
Ä
Enter
Ä
Page 83

4
Sending Faxes
Batch Transmission
Use this function to store several documents in memory and send all of
them at a specific time. In this way the receiving station need to be called
only once. You can store up to 40 different documents in 5 batch boxes.
Setting a Box
Description Display
1 Press PROGRAM and M.
2 Press ENTER, select SET BOX
using the arrow keys and press
ENTER.
3 Enter the desired number for the
box and press ENTER.
4 Enter the desired number and
press ENTER.
5 Enterthedesiredtime and press
ENTER.
6 Enter the name of the box using
the one-touch keys and press
ENTER to save the setting.
J.User Dat. M. Batch Send
K. Cover sheet
L. Department
Ä
Batch Send
Doc PRt Delete Box List
Lst.Prt Set Box Del.Box
Ä
Enter
Enter Box No. (1-5).
1_Empty
Ä
Enter
1:
Enter Fax Number
_
-
1:0511-7404-0
Enter time
**/**:**
1:0511-7404-0
Name upper
_
Ä
Ä
Ä
Pause
Enter
Enter
Enter
Enter
4-82 Di 150f
Page 84

Sending Faxes
Storing Documents
Description Display
Place the document.
4
1 Press OPTIONS,, select RELAY
using the arrow keys and press
ENTER.
2 Enter the number of the box and
press ENTER.
3 Press ENTER.
Command Option
Relayed Relay Batch
Secure Mail Polling
Ä
Enter
Batch Option
Enter Box Number (1-5)
1:0511-7404-0
Ä
Batch Option
Box No. 1:0511-7404-0
Receipt#
Ä
Ä
Enter
Enter
Di 150f 4-83
Page 85

4
Sending Faxes
PrintingStored Documents
Description Display
1 Press PROGRAM and M.
2 Press ENTER, select DO C PRT
using the arrow keys and press
ENTER.
3 Enter the desired number for the
box and press PRINT.
4 Enter the desired two-digit
number for the document (00-
39) using the numeric keys and
press ENTER
J. User Dat. M. B atch Send
K. Cover sheet
L. Department
Ä
Batch Send
Doc PRt Delete Box List
Lst.Prt Set Box Del.Box
Ä
Enter
1:0511-7404-0 (1-5)
Enter Box No.
Minolta
Ä
Print
Enter Doc. No.
1:0511-7404-0
Ä
Ä
Enter
Ä
Enter
4-84 Di 150f
Page 86

Sending Faxes
Deleting Documents from a Box
Description Display
4
1 Press PROGRAM and M.
2 Press ENTER, select DELETE
using the arrow keys and press
ENTER.
3 Enter the desired number for the
box and press DELETE.
4 Enter the desired two-digit
number for the document (00-
39) using the numeric keys and
press ENTER
5 Press DELETE and CLEAR ALL.
J.User Dat. M. Batch Send
K. Cover sheet
L. Department
Ä
Batch Send
Doc PRt Delete Box List
Lst.Prt Set Box Del.Box
Ä
Enter
Enter Box No. (1-5).
1:0511-7404-0
Minolta
Ä
Erase
1:0511-7404-0
Enter Receipt#
Ä
Enter
Ä
Ä
Enter
1:0511-7404-0
Are you sure?
Cancel Erase
Di 150f 4-85
Page 87

4
Sending Faxes
Deleting Boxes
You can only delete a box after all documents have been deleted from it.
1 Press PROGRAM and M.
2 Press ENTER, select Del.BOX
using the arrow keys and press
ENTER.
3 Enter the desired number for the
box and press DELETE.
4 Press DELETE 2 times and
CLEAR ALL.
J. User Dat. M. B atch Send
K. Cover sheet
L. Department
Ä
Batch Send
Doc PRt Delete Box List
Lst.Prt Set Box Del.Box
Ä
Enter
Enter Box No. (1-5).
1:0511-7404-0
Minolta
Ä
Erase
1:0511-7404-0
Are you sure?
Ä
Enter
Ä
Ä
Cancel Erase
4-86 Di 150f
Page 88

Sending Faxes
Deleting Programmed One-touch Keys
Use this function to delete the programming stored under the one-touch
keys 73-80 .
Description Display
4
1 Press PROGRAM, C and ENTER.
2 Select DELETE using the arrow
keys and press
ENTER.
3 Press the desired one-touch key
and press DELETE.
4 Press DE LETE and CLEAR ALL to
return to standby mode.
A. One-touch D. Polling
B. Speed dial E. Secure mail
C. P One-touch F. Commands
Ä
C. P One-touch Dial
Set Delete
List
Ä
Prog. Select One-touch No.
P73: 0511-7404-0
Timer
Ä
P73:0511-7404-0
Timer
Are you sure?
Ä
Ä
Ä
Enter
Enter
Erase
Cancel Delete
Di 150f 4-87
Page 89

4
Sending Faxes
Deleting Programmed Transmissions
Use this function to delete programmed functions. In this example
delayed transmission.
Description Display
1 Press COMM.CLR..
2 Press the arrow keys to select
the desired transmission and
pressSTOP/CLEAR to delete the
programmed transmission.
Press COMPLETE to stop the
process any time.
If you have programmed a broadcast transmission, you can check the
individual numbers. For this press BROADCAST. The first number for the
broadcast transmission appears in the display. Use the arrow keys to
scroll through the entries.
Fax Ready
10.Okt 98 10:32
Auto Mrmy.100%
Redial
Sending (Press [Stop/Clear])
Comm.No. 0114/23:30
0511-7404-0
ScanSize
Ä
.
Ä
Comm.Clr.
Complete
4-88 Di 150f
Page 90

Receiving Faxes
5 Receiving Faxes
5.1 Manual Reception
Tel Ready Mode
Basically manual reception only makes sense if you are expecting voice
calls on the same line. You should keep this in mind when you set the reception mode. As the machine is not equipped with a telephone receiver,
aseparatephone mustbe attachedtothe wall outlet of the telephone line.
Only then the manual reception mode is available. To receive incoming
call manually independently of the set reception mode, answer the call by
phone and then press START to begin the reception and hang up the
phone.Make sure the answer LED is not lit. In case it is lit, press ANSWER.
Tel/Fax ready Mode (Operation with a Telephone)
The machine operates together with a telephone in the same wall outlet.
For further information please contact your dealer. Your fax machine will
answer calls after a set number of rings. Make sure the answer LED is lit.
5
Description Display
1 Press PROGRAM, I and5times
ENTER.
2 Select TEL/FAX READY using the
arrow keys, press ENTER and
STOP/CL EARto returnto standby
mode.
IfyouhavesetTEL/FAX READY
press MONITOR first and then STAR T to receive a call.
Select Receive Mode
Fax ready Fax/Tel ready
Tel/Fax ready Ans/Fax ready
Ä
Select Receive Mode
Fax ready Fax/Tel ready
Tel/Fax ready Ans/Fax ready
Ä
Ä
Ä
Enter
Enter
5.2 Automatic Receptio n
FaxreadyMode
Your fax machine will answer calls after a set number of rings. The Default
setting is 1. Make sure the answer LED is lit.
Di 150f 5-89
Page 91

5
Receiving Faxes
Description Display
1 Press PROGRAM, I and 5 times
ENTER.
2 SelectFAX READY using the ar-
row keys, press
STOP/CLEARtoreturntostandby
mode.
ENTER and
Select Receive Mode
Fax ready Fax/Tel ready
Tel/Fax ready Ans/Fax ready
Ä
Select Receive Mode
Fax ready Fax/Tel ready
Tel/Fax ready Ans/Fax ready
Ä
Ä
Ä
Enter
Enter
5-90 Di 150f
Page 92

Receiving Faxes
Ans/Fax ready Mode (Operation with an answering machine)
The machine operates together with an answeringmachine in the same
wall outlet. For further information please contact your dealer. Your fax
machine will answer calls after a set number of rings. Set the answering
machine to answer a call after 2 rings at the most. The message on the
answeringm achine should not be longerthan 10 seconds. M ake sure the
answer LED is lit.
Description Display
5
1 Press PROGRAM, I and5times
ENTER.
2 Select ANS/FA X READY using the
arrow keys, press ENTER and
STOP/CL EARto returnto standby
mode.
Select Receive Mode
Fax ready Fax/Tel ready
Tel/Fax ready Ans/Fax ready
Ä
Select Receive Mode
Fax ready Fax/Tel ready
Tel/Fax ready Ans/Fax ready
Ä
Ä
Ä
Enter
Enter
Di 150f 5-91
Page 93

5
5.3 Mailbox Reception
Use this function to receive a document into a mail box. This is helpful, i f
only a specific person may read the document. However, both machines
must be the same model.
The transmission is only executed, if both mailbox ID codes are identical.
This prevents the document from being transmitted to a wrong mailbox.
The received document is stored in the memory of your fax machine and
will only be printed after the correct 4-digit ID code and the correct 1-digit
ID number of the mailbox have been entered. Your Di 150f is equipped
with up to 10 mailboxes.
SettingupaMailbox
Description Display
Receiving Faxes
1 Press PROGRAM and EN T ER.
2 SelectSET using the arrow keys
and press ENTER.
3 Enter the desired 1 -digit ID code
using the numeric keys and
press ENTER.
4 Enter the desired code and
press ENTER.
5 Enterthedesired 4-digit codefor
the mailbox (0001-9999) using
the numeric keys and press EN-
.
TER
A. One-touch D. Polling
B. Speed dial E. Mailbox
C. P One-touch F. Commands
Ä
E. Mailbox
Set Doc PRT
List Time
Ä
Enter Mailbox ID. (0-9)
0_Empty
Ä
0:
Name upper
Minolta_
Ä
Ä
Enter
Ä
Enter
Enter
Enter
0:Minolta
Enter I.D Code
1111
Enter
5-92 Di 150f
Page 94

Receiving Faxes
Printing Secure Mail Documents
Description Display
5
1 Press PROGRAM and E.
2 Select DOC PRT using the arrow
keys and press ENTER.
3 Enter the desired 1-digit ID code
using the numeric keys and
press PRINT.
4 Enterthedesired 4-digit codefor
the mailbox (0001-9999) using
the numeric keys and press EN-
.
TER
The received document will be printed and deleted from memory.
A. One-touch D. Polling
B. Speed dial E. Mailbox
C. P One-touch F. Commands
Ä
E. Mailbox
Set Doc PRT
List Time
Ä
Enter Mailbox ID. (0-9)
0:Minolta
Ä
Print
0:Minolta
Enter I.D Code
1111
Ä
Ä
Ä
Enter
Enter
Enter
Di 150f 5-93
Page 95

5
Receiving Faxes
Setting the Time for Memory
Use this function to set the time for which a secure mail document will be
stored in a mailbox. After the time is over the document will be automatically deleted. The machine can store documents up to 31 days.
Description Display
1 Press PROGRAM and E.
2 SelectTIMEusing thearrowkeys
and press
ENTER.
3 Enter the desired time (2-digit,
00-31) using the numeric keys
and press ENTER.
A. One-touch D. Polling
B. Speed dial E. Mailbox
C. P One-touch F. Commands
Ä
E. Mailbox
Set Doc PRT
List Time
Ä
Enter Time
_ (01-31)
Ä
Enter
Ä
Ä
Enter
Enter
Ä
5-94 Di 150f
Page 96

Receiving Faxes
5.4 Polling Reception
You can use this function to poll documents from other fax machines.
Make sure the document has been placed in the feeder of the remote fax
machine. Polling receptions are possible in regular mode and from
database.In regular mode any machine can poll documents. In database
mode only machines of the same model can poll documents.For this you
must know the numbers of the files in which the desired documents are
stored. You can poll up to 10 files per call.
Regular Polling
Description Display
5
1 Press OPTIONS,select POLL-
ING
using the arrow keys and
press ENTER.
2 Press ENTER 2 times, enter the
fax number and press ENTER
and START.
The machine starts polling.
Command Option
Relayed Relay Batch
SecureMail Polling
Ä
Enter Fax Number
_
-
Ä
PauseEnter
Enter
Di 150f 5-95
Page 97

5
Receiving Faxes
Database Polling
Description Display
1 Press OPTIONS,select POLL-
ING
using the arrow keys and
press ENTER.
2 Press ENTER, enter the file
number and press ENTER.
3 Enter the fax number and press
ENTER and START.
The machine starts polling.
Command Option
Relayed Relay Batch
SecureMail Polling
Ä
Polling Options
Enter File No. (0-9999)
5, 26_
Enter
Ä
Comma (,)Enter
Enter Fax Number
_
PauseEnter
-
5-96 Di 150f
Page 98

Receiving Faxes
Program Polling Reception
You can use one of the one touch keys
Description Display
5
73-80 to program polling.
1 Press PROGRAM, C and ENTER.
2 Select SET using the arrow keys
and press ENTER.
3 Selectthe desiredone-touchkey
using the arrow keys and press
ENTER.
4 Enter the desired fax number
and press ENTER.
5 Select POLLING and press
ENTER.
6 To program a database polling,
enter the file number and press
ENTER. To program a regular
polling press ENTER .
A. One-touch D. Polling
B. Speed dial E. Secure mail
C. P One-touch F. Commands
Ä
C. P One-touch Dial
Set Delete
Ä
List
Prog. Select One-touch No.
P73: Empty
Ä
P73:
Enter Fax Number
_
-
P73:0511-7404-0
Relayed Relay End
Secure Mail Polling
Ä
P73:0511-7404-0
Enter File No. (0-9999)
5, 26_
Ä
Ä
Ä
Pause
Ä
Enter
Enter
Enter
Enter
Enter
Comma (,)Enter
7 Press CLEAR ALL to stop the pro-
cedureor press END and ENT ER
to program further keys.
Di 150f 5-97
P73:0511-7404-0
Relayed Relay End
Secure Mail Polling
Ä
Ä
Enter
Page 99

5
5.5 Settings for Receiving a Fax
Closed Network Rx
If you use this function, the machine only communicates with similar
machines, that use the correct code. This is true for transmission and
receiving. In this case the Code is a four-digit number.
Description Display
Receiving Faxes
1 Press PROGRAM, J, 0, 7.
2 Press ENTER.
3 Enter the desired passcode and
press ENTER.
4 Press PROGRAM, J, 0, 8.
5 Press ENTER select the desired
setting using the arrow keys and
press ENTER.
To turn this function off, enter the passcode 0000.
07. Passcode 10. Lck.No.
08. Closed Netw. 11.Service Mod.
09. Security Rx. 12.Memory Tx
Ä
Passcode
0000
Passcode
1234
07. Passcode 10. Lck.No.
08. Closed Netw. 11.Service Mod.
09. Security Rx. 12.Memory Tx
Ä
Closed Network
ON
OFF
Ä
Ä
Ä
Ä
Enter
Enter
Enter
Enter
Enter
5-98 Di 150f
Page 100

Receiving Faxes
Blocking Numbers
Use this function to block all calls that are not stored in the telephone directory.
Description Display
5
1 Press PROGRAM, J, 1, 0 and EN-
.
TER
2 Select the desired setting using
the arrow keys and press
ENTER.
10.Lck.No. 13.Stamp
11.ServiceMod. 14.RelayedRelais
12.MemoryTx 15.PC Connect.
Ä
BlockJunkFax
ON
OFF
Ä
Ä
Ä
Enter
Enter
Di 150f 5-99
 Loading...