

Page 1

CF 9001
Quick Guide
Page 2

Page 3

Table of Contents
1 Using Control Panel Keys...........................................................................1-1
2 Making Copies .............................................................................................2-1
2.1 Placing Originals on the Glass ...........................................................2-1
2.2 Using the Duplexing Document Feeder..............................................2-3
2.3 Using the Manual Bypass Tray (For MetricArea) ..............................2-4
If the original is a non-standard size...................................................2-5
2.4 Using the Manual Bypass Tray (For Inch Area) .................................2-6
If the original is a non-standard size...................................................2-7
2.5 Making 2-Sided Copies Using Manual Bypass1................................2-8
2.6 Making 2-Sided Copies Using Manual Bypass2................................2-9
2.7 Making 2-Sided Copies Using Manual Bypass3..............................2-10
2.8 Making 2-Sided Copies Using Manual Bypass4..............................2-11
3 Loading Paper..............................................................................................3-1
3.1 Loading Paper in the Trays................................................................3-1
3.2 Changing the Paper Size for the Middle Tray (Universal Tray)..........3-1
3.3 Large Capacity Cassette ....................................................................3-2
4 Replenishing Toner .....................................................................................4-1
5 Peplacing the Staple Cartridge...................................................................5-1
6 Clearing Misfed Paper.................................................................................6-1
6.1 Misfeed Location Displays..................................................................6-1
6.2 Copier.................................................................................................6-2
6.3 Duplexing Document Feeder..............................................................6-6
6.4 Paper Trays........................................................................................6-8
6.5 Manual Bypass Tray...........................................................................6-9
6.6 Large Capacity Cassette ..................................................................6-10
6.7 Duplex Unit.......................................................................................6-11
6.8 Sorter/Staple Sorter..........................................................................6-12
CF9001 TOC-1
Page 4

TOC-2 CF9001
Page 5

Using Control Panel Keys
1 Using Control Panel Keys
12345
Pos. Specification Description
1 Touch Panel Shows various screensandmessages.
2 Auto Color/Full Color/Black Keys
3StartKey
4 Stop Key Press to stop a multi-copy cycle.
5 Clear Key Press to:
6 Panel Reset Key Press to set thecopier into the initialmode,
7 10-Key Pad Use to:
l When [Auto Color] is selected, the copier
automatically checks and determines
whether the original is in color or black-andwhite and makesa full-color or black-andwhite copyaccording to the original.
l When [Full Color]is selected, the copier
makesa full-color copyeven ifthe originalis
in black-and-white.
l When [Black] isselected, thecopier makes
a black-and-whitecopy evenifthe originalis
in color.
l Press to start a copy cycle.
l If pressed while thecopier is warming up, it
enablestheAuto Copy Start function.
l Reset the multi-copy entry to 1 .
l Clearazoom ratio entered whensettingone
using the10-Key Pad.
clearing all settings made previously on the
control panel.
l Enter the number of copiesto be made.
l Enter the zoom ratioto be used.
l Enter the number of originals.
1
7
6
CF9001 1-1
Page 6

1
Using Control Panel Keys
1-2 CF9001
Page 7

Making Copies
2 Making C opies
2.1 Placing Originals on the Glass
1
Raise the original cover or
duplexing document feeder and
place the original face down o n the
glass.
2 Align the rear left corner of the
original with the marker on the
Width Scale of the copier glass and
gently lower the original cover or
duplexing document feeder.
2
3 Press either [AUTO], [COLOR], or
the [BLACK] key on the control
panel.
m [AUTO]
The copier automatically
determineswhether the original
is in color or black-and-white
and makes a full-color or blackand-whitecopyaccording to the
original.
m [COLOR]
The copier makes a full-color
copy regardless of the type of
original.
m [BLACK]
The copier makes a black-andwhite copy regardless of the
type of original.
CF9001 2-1
Page 8
2
Making Copies
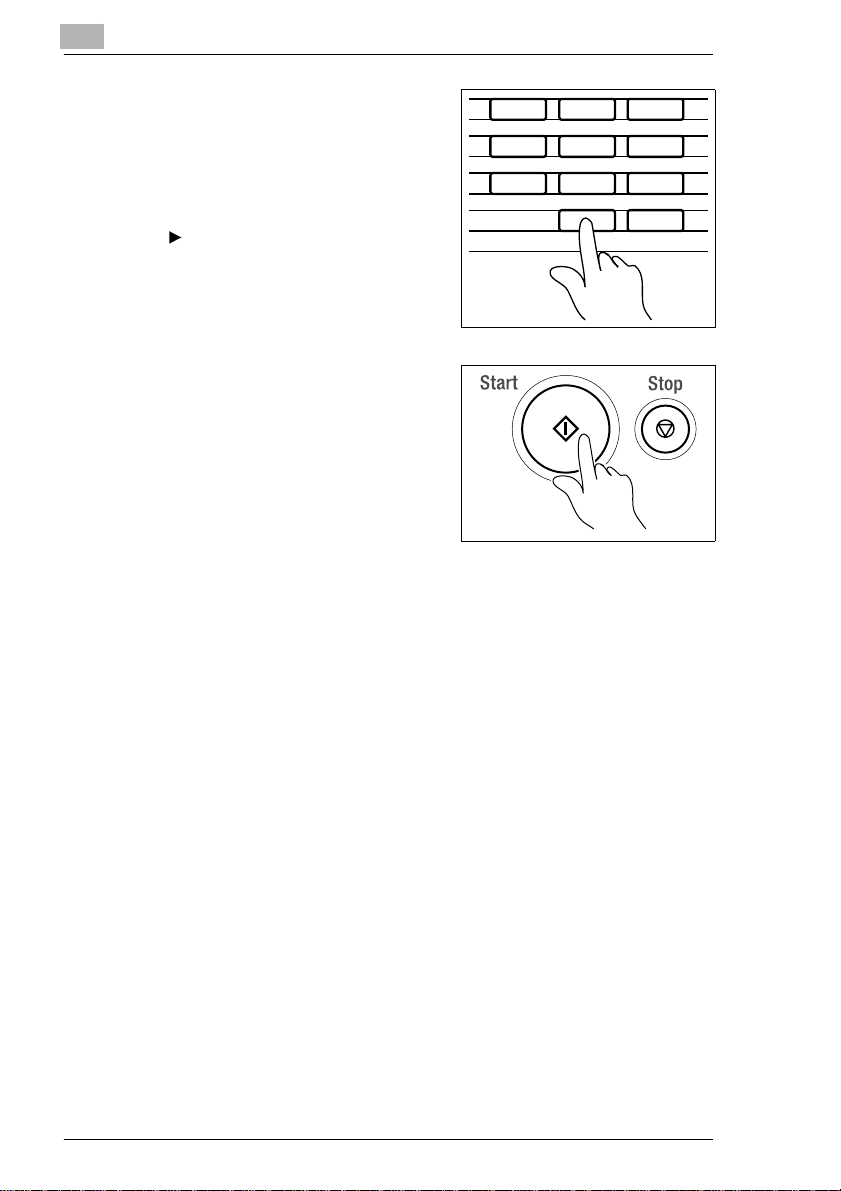
4 Using the 10-key pad, set the
desired number of copies to be
made.
è Ifyouwanttousetheauxiliary
functions, touch [DIGITAL ART],
[COLOR ADJUST], or the [INPUT
OUTPUT] key and set the
appropriate functions.
5 Press the [START] key.
123
456
789
0C
2-2 CF9001
Page 9
Making Copies
2.2 Using the Duplexing Document Feeder
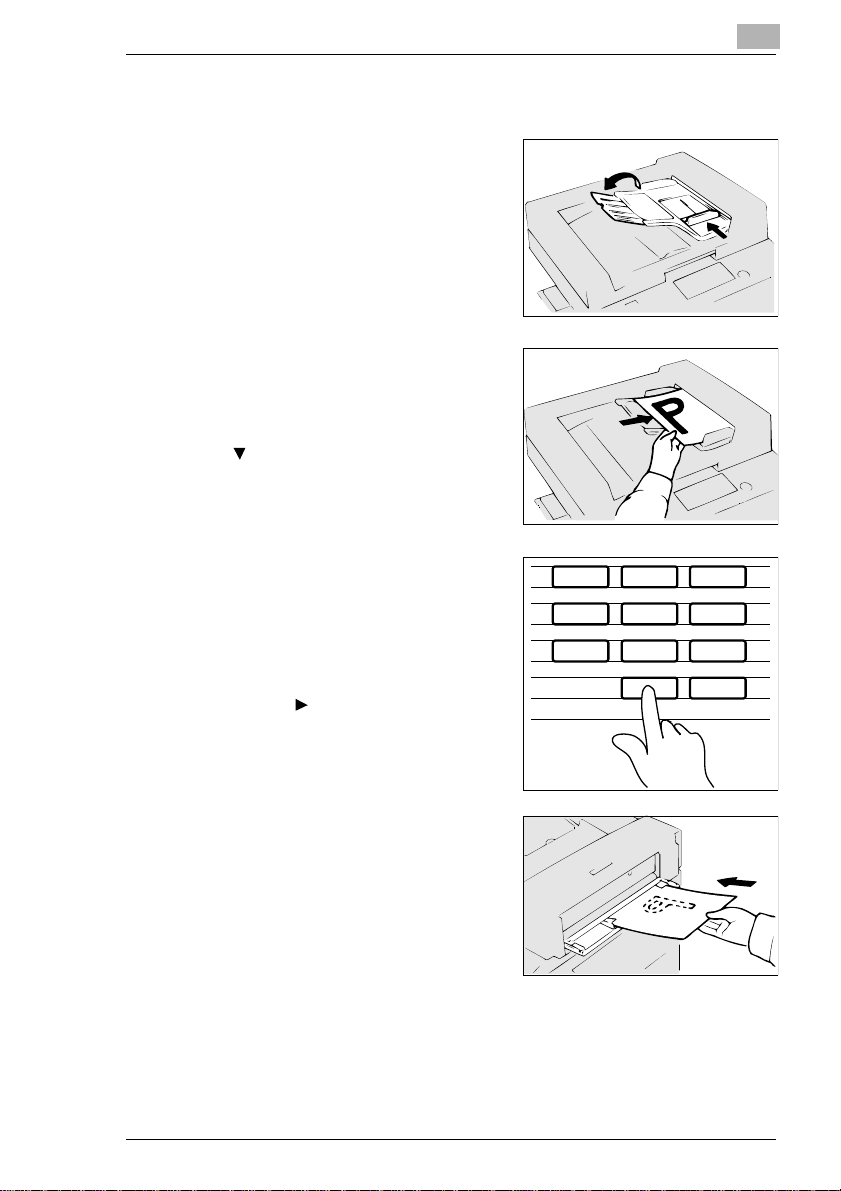
1
Slide the document guide plate to
the size of the originals.
è When using large size originals, flip
up the document feed tray
extender.
2 Load a neat stack of originals face
up on the document feed tray.
è Make sure that the top level of the
original stack does not exceed the
marking.
2
3 Using the 10-key pad, set the
desired number of copies to be
made and press the [START] key.
è If you want to use the auxiliary
functions, touch [DIGITAL ART],
[COLOR ADJUST] , or the
[INPUT OUTPUT] key and set
the appropriate functions.
è Using the Single Automatic
Document Feeding Mode
(SADF Mode)
Open the document feed tray at the
side and insert the original face
down into the tray.
è The original is automatically taken
up and the copy cycle is started.
123
456
789
0C
CF9001 2-3
Page 10

2
Making Copies
2.3 Using the Manual Bypass Tray (For Metric Area)
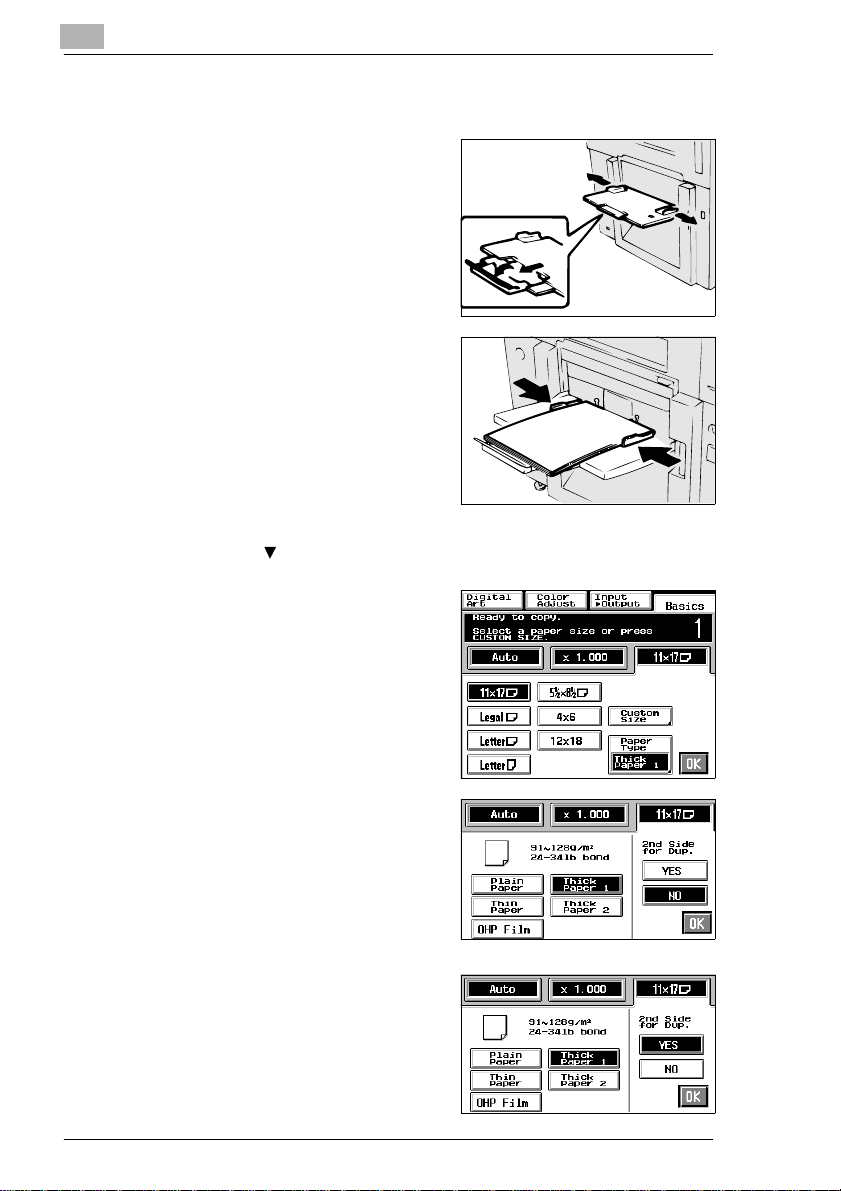
1
Swing down the manual bypass
tray.
2 Insert a neat stack of copy paper
into the manual bypass tray until it
stops and slide the paper guide
plates to the size of the copy paper.
è When inserting paper with one side
previously printed, load the paper
stack so that the blank side faces
down. Make sure that the top level
of the original stack does not
exceed the marking.
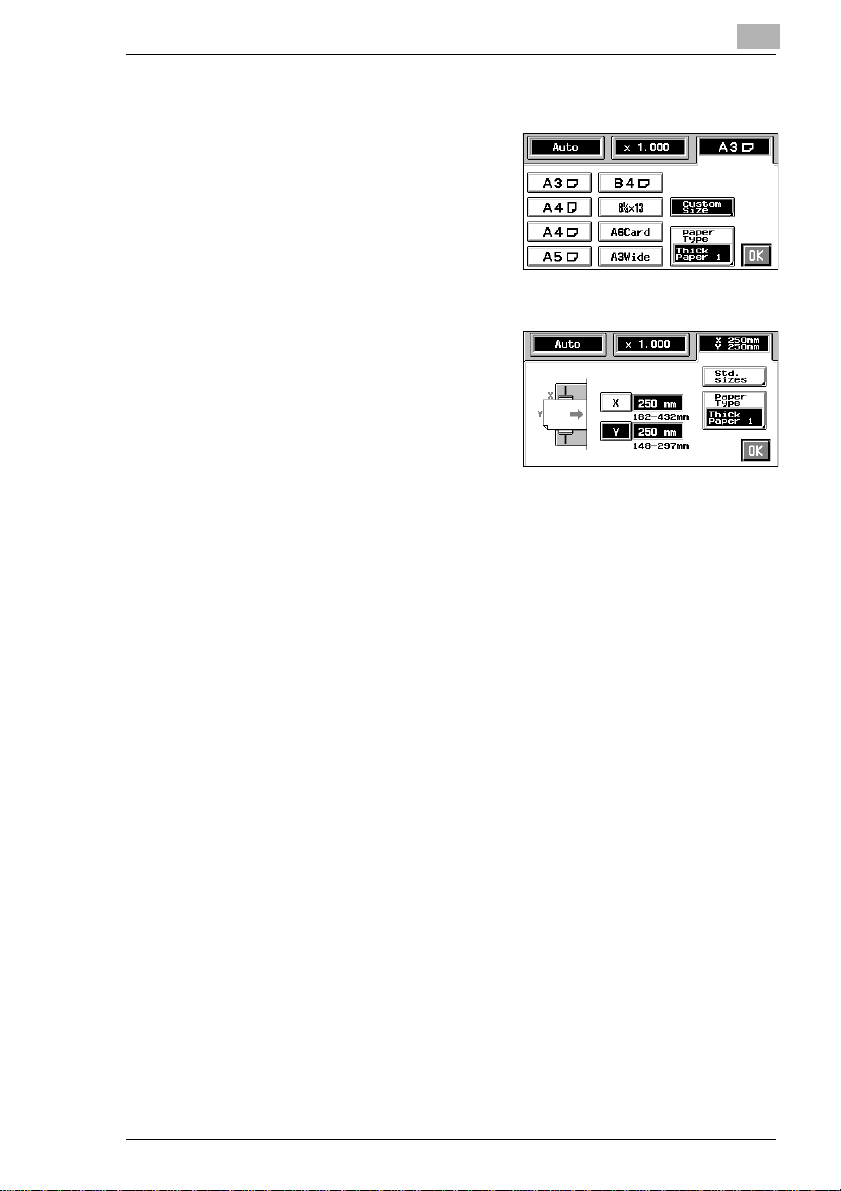
3 Select a copy paper size.
è If the copy paper is a non-standard
size, touch [CUSTOM SIZE].
4 Touch [PAPER TYPE] and select
the type of copy paper.
è Only CF Paper can be used for
2-sided copies.
5 If this is going to be the copy cycle
for making the first side of the copy,
select [NO] for 2nd Side for Dup. If
this is going to be the copy cycle for
makingthesecondsideofthecopy,
select [YES].
2-4 CF9001
Page 11
Making Copies
If the original is a non-standard size
1 Touch [CUSTOM SIZE] on the
screen given in step 3,
see page 2-4.
2 Touch [X] and enter the length of
the copy paper into the 10-key pad.
Then touch [Y] and enter the width
of the copy paper into the 10-key
pad.
2
CF9001 2-5
Page 12
2
Making Copies
2.4 Using the Manual Bypass Tray (For Inch Area)
1
Swing down the manual bypass
tray.
2 Insert a neat stack of copy paper
into the manual bypass tray until it
stops and slide the paper guide
plates to the size of the copy paper.
è When inserting paper with one side
previously printed, load the paper
stack so that the blank side faces
down. Make sure that the top level
of the original stack does not
exceed the marking.
3 Select a copy paper size.
è If the copy paper is a non-standard
size, touch [CUSTOM SIZE]
4 Touch [PAPER TYPE] and select
the type of copy paper.
5 If this is going to be the copy cycle
for making the first side of the copy,
select [NO] for 2nd Side for Dup. If
this is going to be the copy cycle for
makingthesecondsideofthecopy,
select [YES].
2-6 CF9001
Page 13

Making Copies
If the original is a non-standard size
1 Touch [CUSTOM SIZE] on the
screen given in step 3,
see page 2-6.
2 Touch [X] and enter the length of
the copy paper into the 10-key pad.
Then touch [Y] and enter the width
of the copy paper into the 10-key
pad.
2
CF9001 2-7
Page 14

2
Making Copies
2.5 Making 2-Sided Copies Using Manual Bypass 1
Step 1
Step 2
Step 3
Step 4
1
Place the first original face down on the original glass and press the
[START] key.
Step 5
2 A copy of the first original is fed out of the copier.
3 Place this copy on the manual bypass tray in the direction shown
above.
4 Place the second original face down on the original glass in the
directionshownabove. Then, select [2ND SIDE FOR DUP.] for Paper
Type.
5 Press the [START] key. This produces a 2-sided copy that looks like
this one.
è See the operator’s manual for the procedures to be followed when
making 2-sided copies using a duplex unit.
2-8 CF9001
Page 15

Making Copies
2.6 Making 2-Sided Copies Using Manual Bypass 2
Step 1
Step 2
Step 3
2
Step 4
1
Place the first original face down on the original glass and press the
[START] key.
Step 5
2 A copy of the first original is fed out of the copier.
3 Place this copy on the manual bypass tray in the direction shown
above.
4 Place the second original face down on the original glass in the
directionshown above. Then, select [2ND SIDE FOR DUP.] for Paper
Type.
5 Press the [START] key. This produces a 2-sided copy that looks like
this one.
è See the operator’s manual for the procedures to be followed when
making 2-sided copies using a duplex unit.
CF9001 2-9
Page 16

2
Making Copies
2.7 Making 2-Sided Copies Using Manual Bypass 3
Step 1
Step 2
Step 3
Step 4
1
Place the first original face down on the original glass and press the
[START] key.
Step 5
2 A copy of the first original is fed out of the copier.
3 Place this copy on the manual bypass tray in the direction shown
above.
4 Place the second original face down on the original glass in the
directionshownabove. Then, select [2ND SIDE FOR DUP.] for Paper
Type.
5 Press the [START] key. This produces a 2-sided copy that looks like
this one.
è See the operator’s manual for the procedures to be followed when
making 2-sided copies using a duplex unit.
2-10 CF9001
Page 17

Making Copies
2.8 Making 2-Sided Copies Using Manual Bypass 4
Step 1
Step 2
Step 3
Step 4 Step 5
2
1
Place the first original face down on the original glass and press the
[START] key.
2 A copy of the first original is fed out of the copier.
3 Place this copy on the manual bypass tray in the direction shown
below.
4 Place the second original face down on the original glass in the
directionshown below. Then, select [2ND SIDE FOR DUP.] for Paper
Type.
5 Press the [START] key. This produces a 2-sided copy that looks like
this one.
è See the operator’s manual for the procedures to be followed when
making 2-sided copies using a duplex unit.
CF9001 2-11
Page 18

2
Making Copies
2-12 CF9001
Page 19

Loading Paper
3 Loading Paper
3.1 Loading Paper in the Trays
1
Slide the tray out.
2 Loadthepaper stack intothetrayso
that its front side (the side facing up
whenthe package was unwrapped)
faces down. Then, slide the tray
back in.
è The paper should be loaded no
higher than the (max. level
indicator).
3
3.2 Changing the Paper Size for the Middle Tray (Universal Tray)
Grasp the tab of the edge guide and
slide i t to the size of the paper to be
loaded. Pressing the plastic part of the
trailing edge stop, slide it to the size of
the paper to be loaded.
CF9001 3-1
Page 20

3
3.3 Large Capacity Cassette
1
Grasping the door lock release
lever, open the cassette door.
è When adding paper to a partially
loaded cassette, press the paper
platedescentkeyto lower the paper
plate before opening the cassette
door.
2 Place the paper stack onto the
paper plate so that its front side
faces up and close the cassette
door.
è The paper should be loaded no
higher than the (max. level
indicator).
Loading Paper
3-2 CF9001
Page 21

Replenishing Toner
4 Replenishing Toner
1 Open the front door.
2 Slide out the toner hopper unit.
4
3 Sharply tap the new toner bottle
against a desk or other hard object
four to five times. Then turn the
toner bottle upside down and tap it
the same way again.
4 Shake the toner bottle well.
CF9001 4-1
Page 22

4
Replenishing Toner
5 Remove the bottle cap.
6 Open the toner hopper lid.
7 Align the tab on the bottle with the
cut-out on the toner receptacle and
turn the bottle clockwise until it
engages.
8 Wait until the toner stops falling in
(approx. 60 seconds), then tap the
bottle a few times to ensure that all
the toner falls into the hopper.
4-2 CF9001
Page 23

Replenishing Toner
9 Makingsurethatthe toner has been
emptied completely, turn the bottle
counterclockwiseand lift it out from
the receptacle. Close the toner
hopper lid.
10Slide the toner hopper unit back in
and close the front door.
4
CF9001 4-3
Page 24

4
Replenishing Toner
4-4 CF9001
Page 25

Replacing the Staple Cartridge
5 Replacing the Staple Cartridge
1 Grasping the lock release lever,
slidethestaplesorter awayfromthe
copier.
2 Open the stapler door and, while
pushing up the staple cartridge
release lever, pull the staple
cartridge out of its port.
5
3 Pullthe staple sheet about 3 cm out
of the new staple cartridge and
break off that portion.
4 Insert the new staple cartridge until
a click is heard.
CF9001 5-1
Page 26

5
Replacing the Staple Cartridge
5 Closethe stapler door and slide the
staple sorter back against the
copier.
6 Place a sheet of paper into the 2nd
Bin of the staple sorter.
7 Touch [Staple] on the touch panel.
è Then, the staple sorter test-staples
the paper several times
automatically.
8 Removethesheetof paper from the
2nd bin and check that it has been
stapled.
è If no staples are evident, place
another sheet of paper into the 2nd
bin and repeat steps 6, 7, and 8
5-2 CF9001
Page 27

Clearing Misfed Paper
6 Clearing Misfed Paper
6.1 Misfeed Location Displays
Differentproceduresareused to clear a misfed sheet of paper depending
on the location. First, isolate the location, then clear the misfeed following
the appropriate procedure depending on where the misfeed occurred.
Sorter/Staple Sorter DuplexingDocument Feeder
6
Copier
Duplex Unit
Manual Bypass
Tray
Large Capacity
Cassette
CF9001 6-1
Paper Trays
Page 28

6
6.2 Copier
1
Open the left door “L1”.
2 Pull out the sheet of paper from the
transport section.
3 Raise guide plate “M2” and, turning
knob “M1”, pull out the sheet of
paper.
Clearing Misfed Paper
L1
M1
M2
4 Press down guide plate “M3” and
pull out the sheet of paper.
M3
6-2 CF9001
Page 29

Clearing Misfed Paper
5 Close the left door “L1”.
6 Open the front door.
7 Turnthelever“M4”totheleft.Press
guide plate “L2” and, turning knob
“M5”, pull out the sheet of paper.
6
L1
L2
M5
M4
8 Grasp lever “M6” and slide out the
transfer/fusing unit.
CF9001 6-3
M6
Page 30

6
9 Graspthefusingunitlever“M7” and
open the fusing unit.
CAUTION
è DO NOT touch any parts except
paper as the fusing unit and its
surrounding areas are extremely
hot.
10 Turning knob “M5”, pull out the
sheet of paper and close the fusing
unit.
11 Pull out the sheet of paper from the
upper area of the transfer/fusing
unit.
Clearing Misfed Paper
M7
M5
12 Turning knob “M9”, remove the
sheet of paper. If paper is stuck to
the transfer film, carefully
disengage the leading edge of the
paperandremoveit with care not to
damage the transfer film.
M9
13 Pressdown the roller as shown and
removethesheetof paperifpresent
inside.
6-4 CF9001
Page 31

Clearing Misfed Paper
14Slide the transfer/fusing unit back
into the copier and turn the release
lever “M4” to the right.
15Close the front door.
6
M6
M4
CF9001 6-5
Page 32

6
6.3 Duplexing Document Feeder
1
Remove the originalstack from the
document feed tray.
2 Swing open document feed unit
door “F1” and gently pull out the
original.
3 Holding down the lock release
Button, swing open document
turnover/exit unit door “F2” and
carefully pull out the original from
the exit unit.
Clearing Misfed Paper
4 Close “F1” and “F2”.
5 Raise the duplexing document
feeder. Opening the document
turnover/feed unit guide plate,
gently pull out the original from the
unit.
6-6 CF9001
Page 33

Clearing Misfed Paper
6 Remove the original from the
original glass and lower the
duplexing document feeder.
7 When the message “Re-insert the
following # of originals” is shown on
the display, return the number of
originals indicated on the display to
the bottom of the original stack
removedinstep1and reloaditonto
the document feed tray.
6
CF9001 6-7
Page 34

6
6.4 Paper Trays
1
Open the left door “L1”.
2 Pull out the sheet of paper from the
transport section and close the left
door “L1” .
3 Slide the tray out and unload the
paper stack from the tray.
Clearing Misfed Paper
L1
4 Fan the paper thoroughly, reload it
in the tray,and slidethe traybackin.
5 Open the front door and then close
it to reset the misfeed indication/
message on the touch panel.
6-8 CF9001
Page 35

Clearing Misfed Paper
6.5 Manual Bypass Tray
1
Unload the paper stack from the
manualbypass tray. Then open the
left door “L1”.
2 Raise guide plate “M2” and, turning
knob “M1”, pull out the sheet of
paper. Then, close the left door.
3 Fanthe paper stack thoroughlyand
place it back on the tray.
M2
6
L1
M1
4 Open the front door and then close
it to reset the misfeed indication/
message on the touch panel.
CF9001 6-9
Page 36

6
6.6 Large Capacity Cassette
1
Press the [Paper Descent] key.
2 Grasping the door lock release
lever, open the cassette door and
remove the sheet of paper.
Clearing Misfed Paper
3 Close the cassette door.
4 Grasp the cassette release lever
and slide the cassette away from
the copier.
6-10 CF9001
Page 37

Clearing Misfed Paper
5 Remove the sheet of paper and
slide the cassette back against the
copier.
6.7 Duplex Unit
1
Grasping the lock release lever,
open the duplex unit.
2 Open the misfeed removal guide
“D” and pull out the sheet of paper.
6
D
3 Close the duplex unit.
CF9001 6-11
Page 38

6
6.8 Sorter/Staple Sorter
1
Grasping the lock release lever,
slide the sorter away from the
copier.
2 Pull out the copy from the transport
section.
3 Slide the sorter back against the
copier.
Clearing Misfed Paper
6-12 CF9001
 Loading...