

Page 1

Contents
Names and Functions of Control Panel Parts .............1
To load paper into the 1st drawer ................................. ...........2
Loading the Paper .........................................................2
To load paper into the 2nd drawer ..................... .............. ........4
To load paper into the manual bypass tray .............................6
To position the document on the original glass .......................7
Positioning the Document ............................................8
To load the document into the duplexing document feeder .....8
To make a basic copy ..............................................................9
Making Copies .............................................................10
To copy onto manually fed paper .............. ............... .............11
Refilling the Toner .......................................................15
Display and locations of paper misfeeds ...............................17
Clearing a Paper Misfeed ............................................18
To clear a paper misfeed in the manual bypass tray .............18
To clear a paper misfeed in the duplex unit ...........................20
To clear a paper misfeed in the main unit .............................21
To clear a paper misfeed in the duplexing document feeder . 27
To clear a paper misfeed in the finisher ................................29
To clear a paper misfeed in the 10-mailbin sorter .................33
CF1501/2001
Page 2

CF1501/2001
Page 3
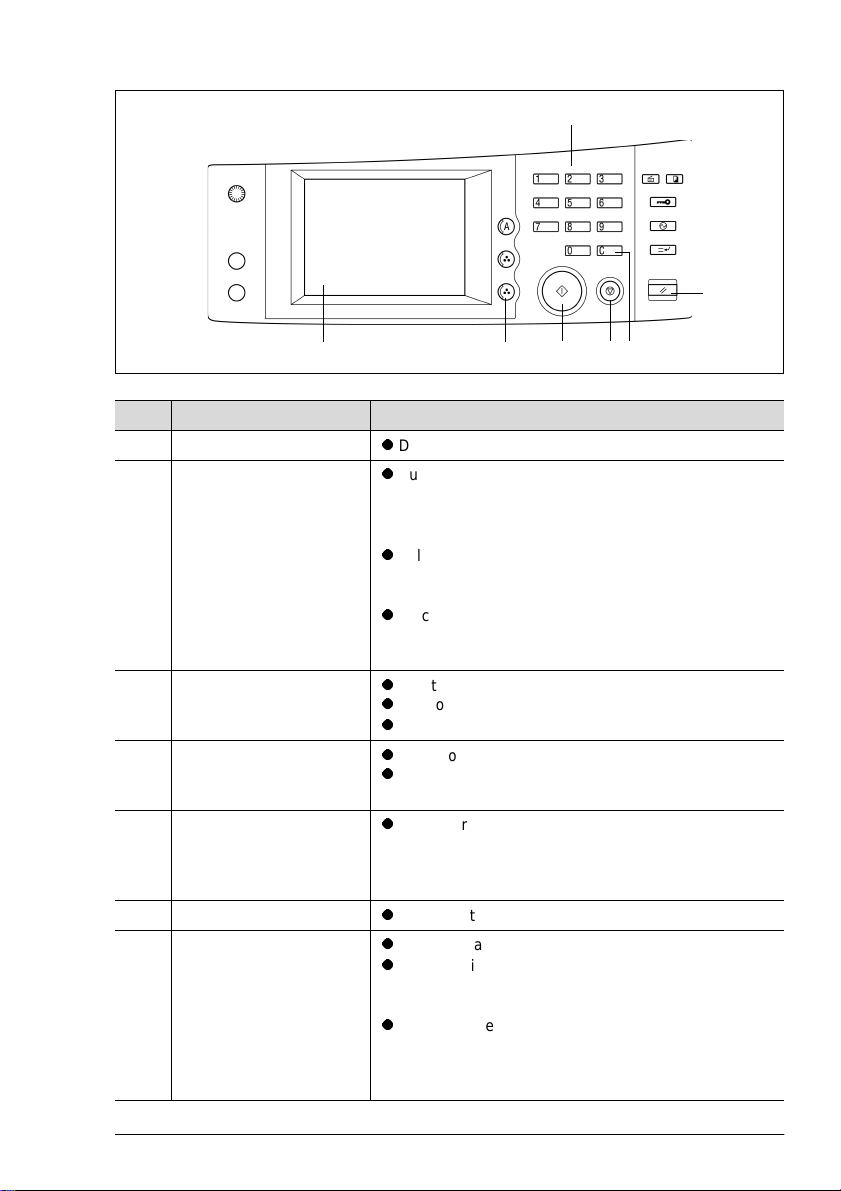
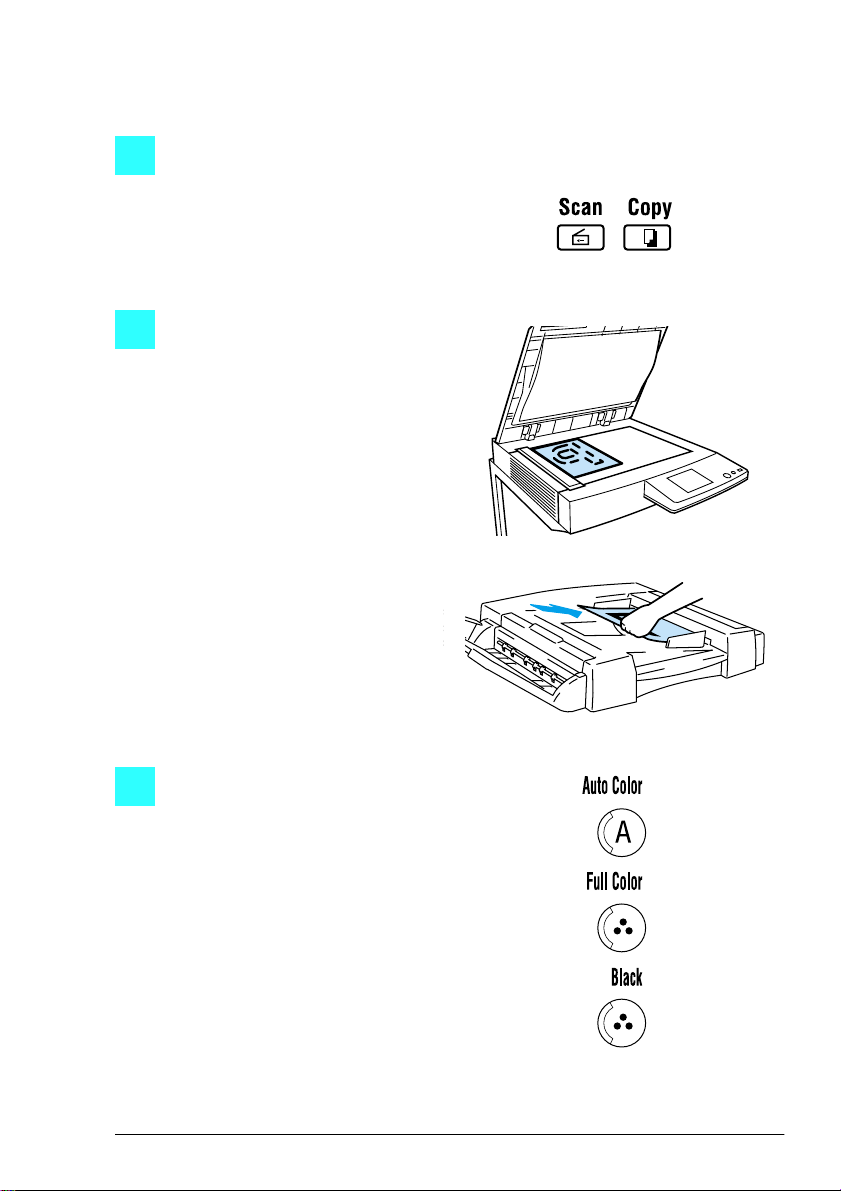
Names and Functions of Control Panel Parts
3
5
12764
No. Name Function
1 Touch pa ne l
2 [Auto Color], [Full Color],
and [Blac k] keys
3Keypad
4 [C] (clear) key
5 [Panel Reset] key
l
Displays various setting screens and messages
l
Auto Color: The co pier automatically determines
whether the document is in color or in black and white,
and then makes a full-color or black-and-white copy
depending on the color of the document.
l
Full Color: Th e copier mak es a full-color cop y of the
document regardless of whether the document is in
color or in blac k and white.
l
Black: The copier make s a blac k-an d-wh ite cop y of the
document regardless of whether the document is in
color or in blac k and white.
l
Use to type in the number of copies to be made.
l
Use to type in the zoom ratio.
l
Use to type in the various settings.
l
Press t o reset the number of copies to “1”.
l
Press to erase a setting, such as the zoom ratio or size,
selected using the keypad.
l
Press to reset all copy functions and settings to their
defaults. (Al l selected settings are cancelled.)
* Stored zoo m r at ios , stored job settin gs , an d int er rupt-
ed or delaye d copy jobs are not ca nc e l le d.
6 [Stop] key
7 [Start] key
l
Press to stop a continuous copy operation.
l
Press to start the copy operation.
l
If this key is pressed while the copier is warming up,
the copy job is delayed until the copier is finished
warming up.
l
The [Start] key indicator lights up in green to indicate
that the copier can begin copying. The [Start] key indi-
cator lights up in orange to indicate that the copier can-
not make copies.
C4004O058CA
CF1501/2001 1
Page 4
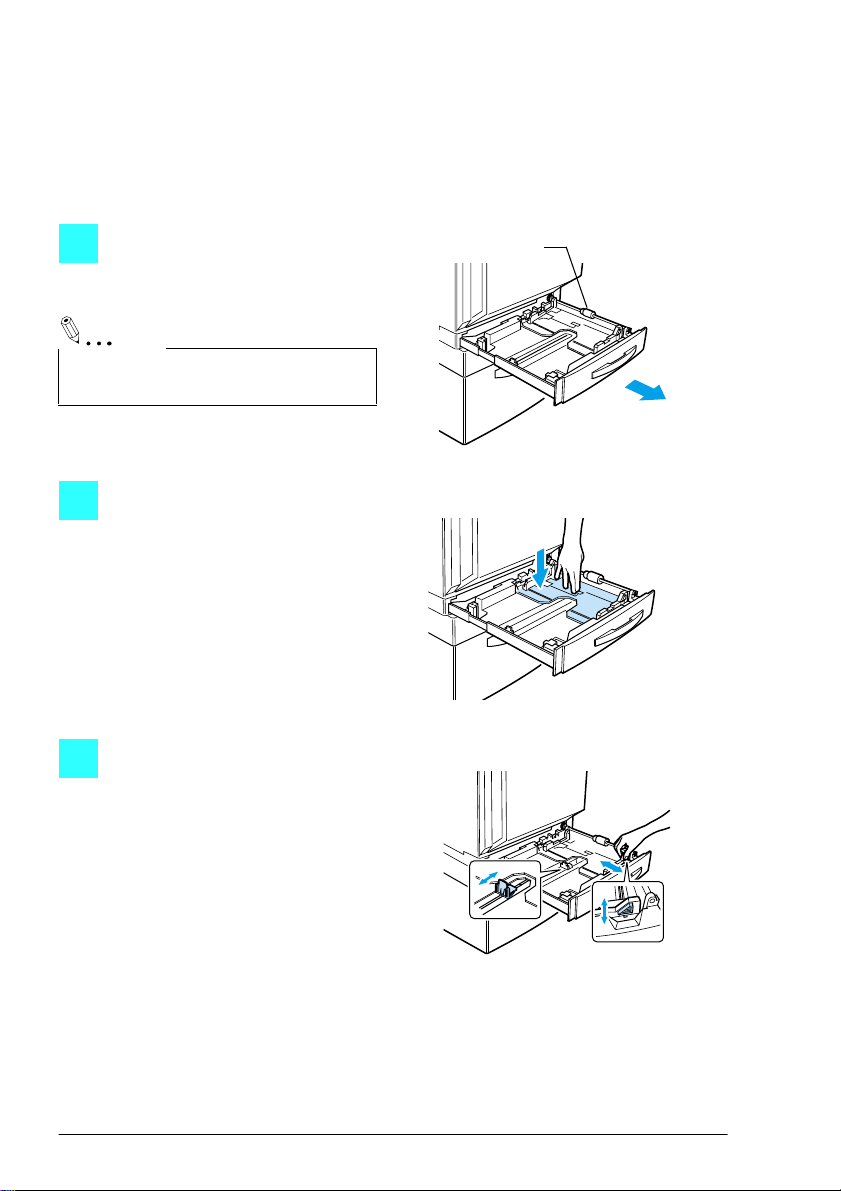
Loading the Paper
To load paper into the 1st drawer
Use the 1st drawer when making copies onto normal paper of either standard or
non-standard sizes, or onto special paper such as overhead projector transparencies, postcar ds, or thick paper.
Pull out the paper drawer for the
1
1st drawer.
Note
Be careful not to touch the surface of the
paper take-up roller with your hands.
Press down on the paper-lifting
2
plate until it locks into place.
Slide the paper guides to fit the
3
size of paper to be loaded.
Paper take-up
roller
C4004O501AA
C4004O502AA
C4004O503AA
2 CF1501/2001
Page 5
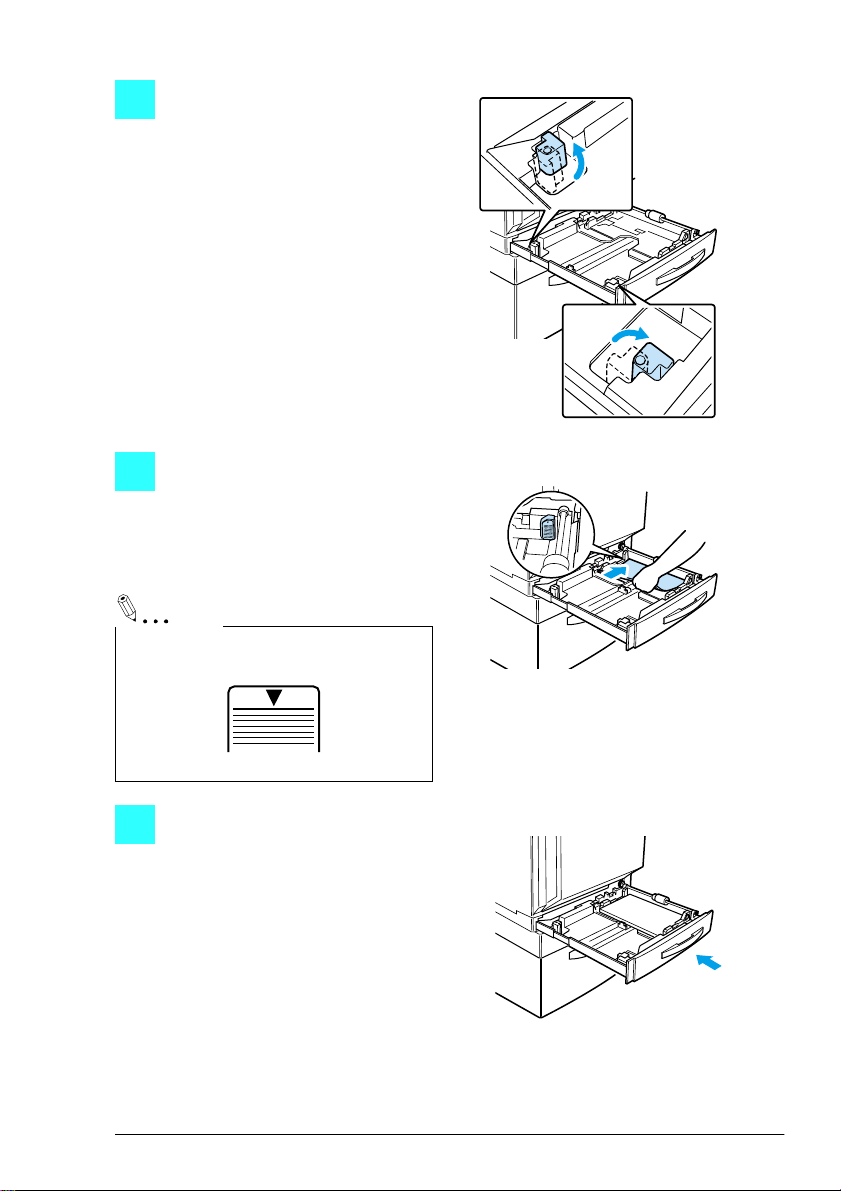
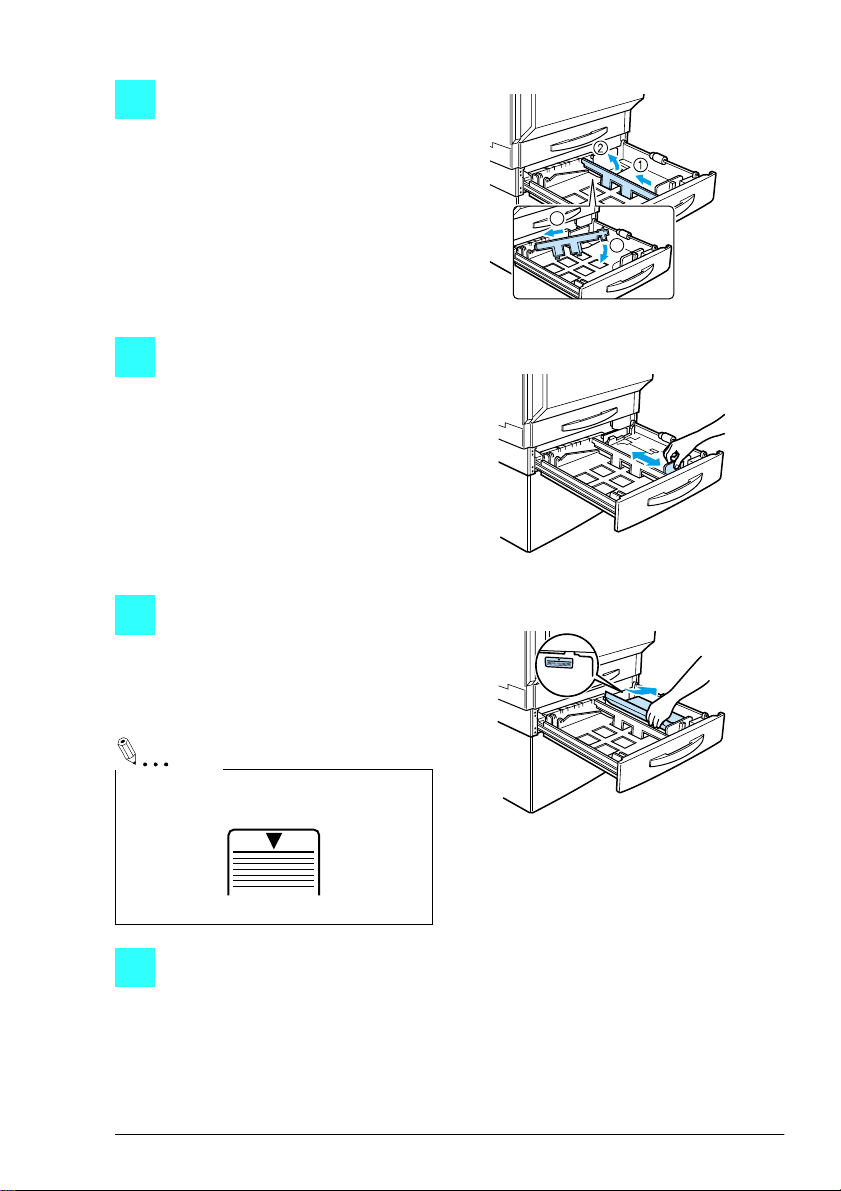
For 12-1/4" × 18" or “A3WIDE”
4
paper, adjust the trailing-edge
guides as shown in the illustration.
Load the paper into the drawer so
5
that the front side of the paper
(the side facing up when the
package was unwrapped) faces
up.
Note
Do not load so much paper that the top of
the stac k is higher than the ▼ mark.
C4004O504AA
C4004O505AA
C4007O162CA
Close the paper drawer.
6
C4004O506AA
CF1501/2001 3
Page 6
Turn the paper type dial on the
7
drawer to the setting for the type
of paper loaded.
To load paper into the 2nd drawer
Pull out the paper drawer for the
1
2nd drawer.
Note
Be careful not to touch the surface of the
paper take-up roller with your hands.
C4004U075CA
Paper take-up
roller
C4004O507AA
Press down on the paper-lifting
2
plate until it locks into place.
C4004O508AA
4 CF1501/2001
Page 7
Remove the trailing-edge guide,
3
and then re-instal l it f or the size of
paper to be loaded.
Slide the lateral guides to fit the
4
size of paper to be loaded.
Load the paper into the drawer so
5
that the front side of the paper
(the side facing up when the
package was unwrapped) faces
up.
3
4
C4004O509AA
C4004O510AA
Note
Do not load so much paper that the top of
the stac k is higher than the ▼ mark.
C4007O162CA
Close the paper drawer.
C4004O511AA
6
CF1501/2001 5
Page 8
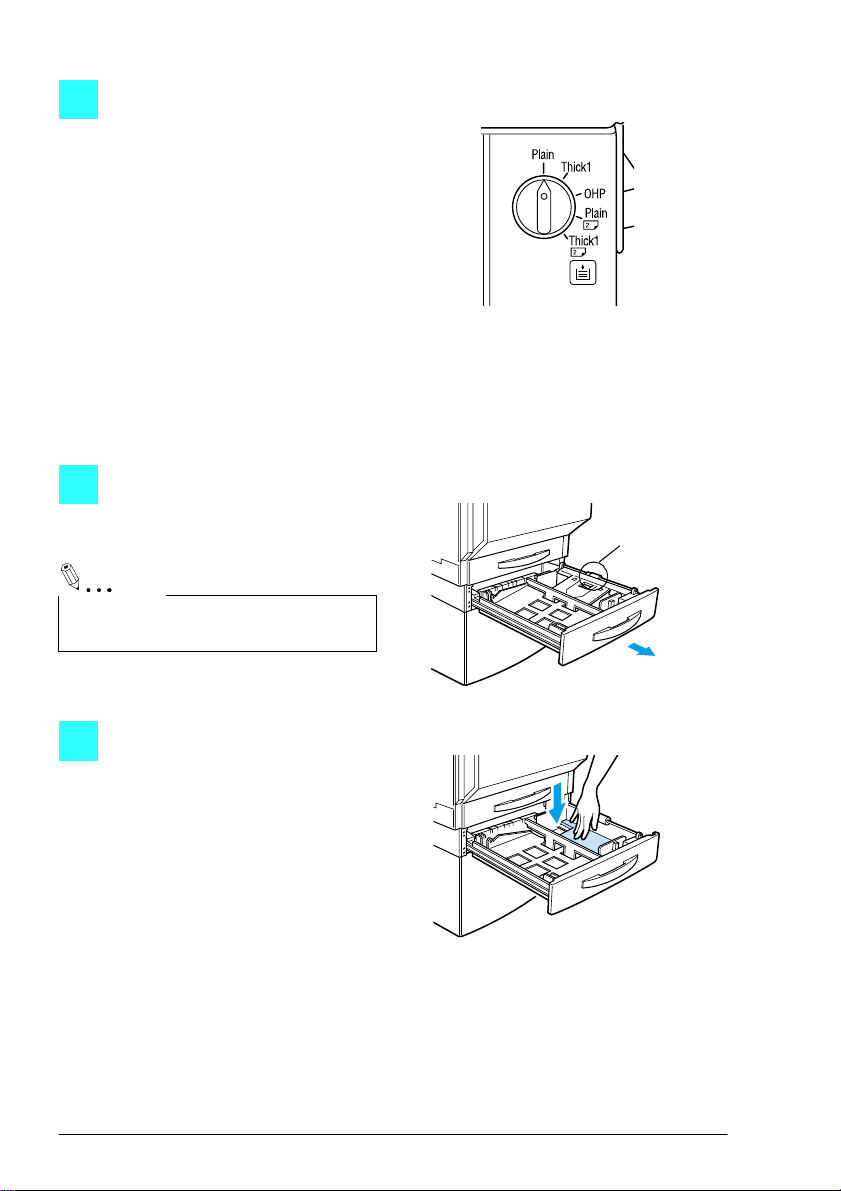
To load paper into the manual bypass tray
Paper can be fed manually through the manual bypass tray if you wish to copy onto
paper that i s not loaded into a drawer, or i f you wish to copy ont o special paper, such
as overhead transparencies, postcards, or thick paper 1 or 2.
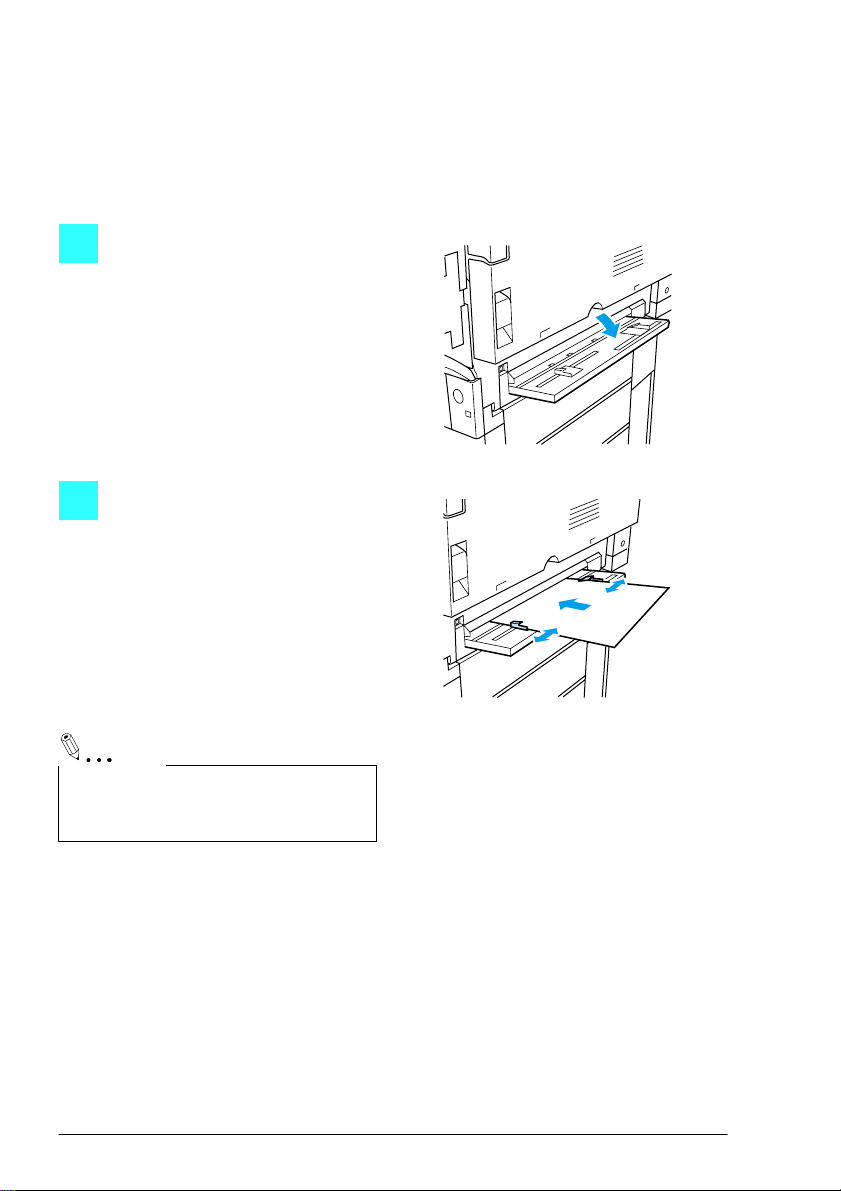
Open the manual bypass tray.
1
C4004O512AA
Adjust the paper guides to fit the
2
size of paper to be loaded, and
then lightly ins ert the paper as far
as possible.
When paper is loaded into the
manual bypass tray, a screen
that allows you to select the
paper size appears.
(Refer to “To copy onto manually
fed paper” on page 11.)
C4004O513AA
Note
Copies w ill be made on the surface of the
paper fa cing do wn wh en it is loaded into
the manual bypass tray.
6 CF1501/2001
Page 9
Positioning the Document
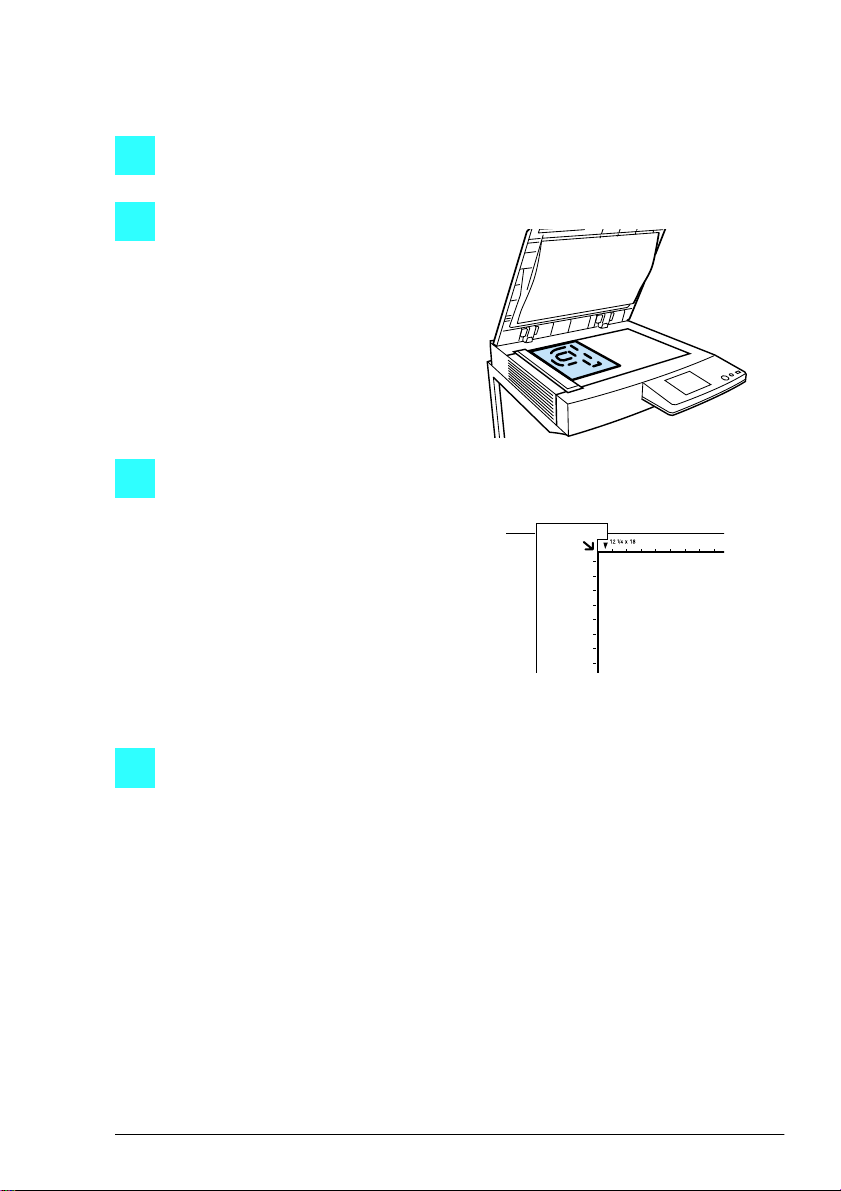
To position the document on the original glass
Lift open the origin al cover, or the duplexing document feeder if it is installed.
1
Position the document face down
2
onto the original gl ass.
Align the corner of the document
3
with the arrow marks on the document scales above and to the
left of the original glass.
C4004O516AA
C4004O025EA
Carefully close the original cover, or the duplexing document feeder if it is
4
installed.
CF1501/2001 7
Page 10
To load the document into the duplexing document feeder
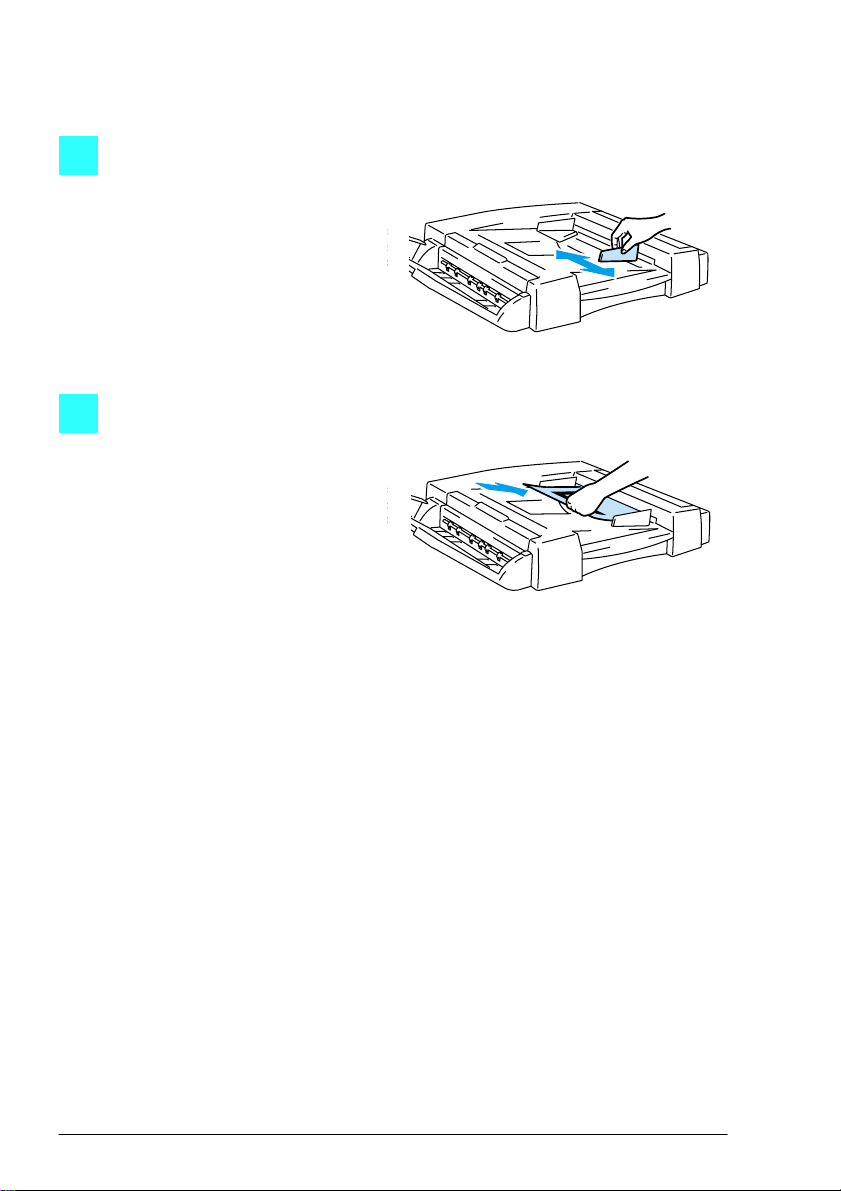
Slide the adjustable document
1
guide to fit the size of the documents.
Load the documents face up into
2
the document feed tray.
C4004O517AA
C4004O518AA
8 CF1501/2001
Page 11
To make a basic copy
Press the [Copy] key to enter
1
Copy mode.
Position the document(s) to be
2
copied. (Refer to “Positioning the
Document” on page 7.)
C4004O519CA
C4004O516AA
C4004O518AA
Select the desired color mode
3
(Auto Color , Full Color, or Black).
C4004O205CA
CF1501/2001 9
Page 12
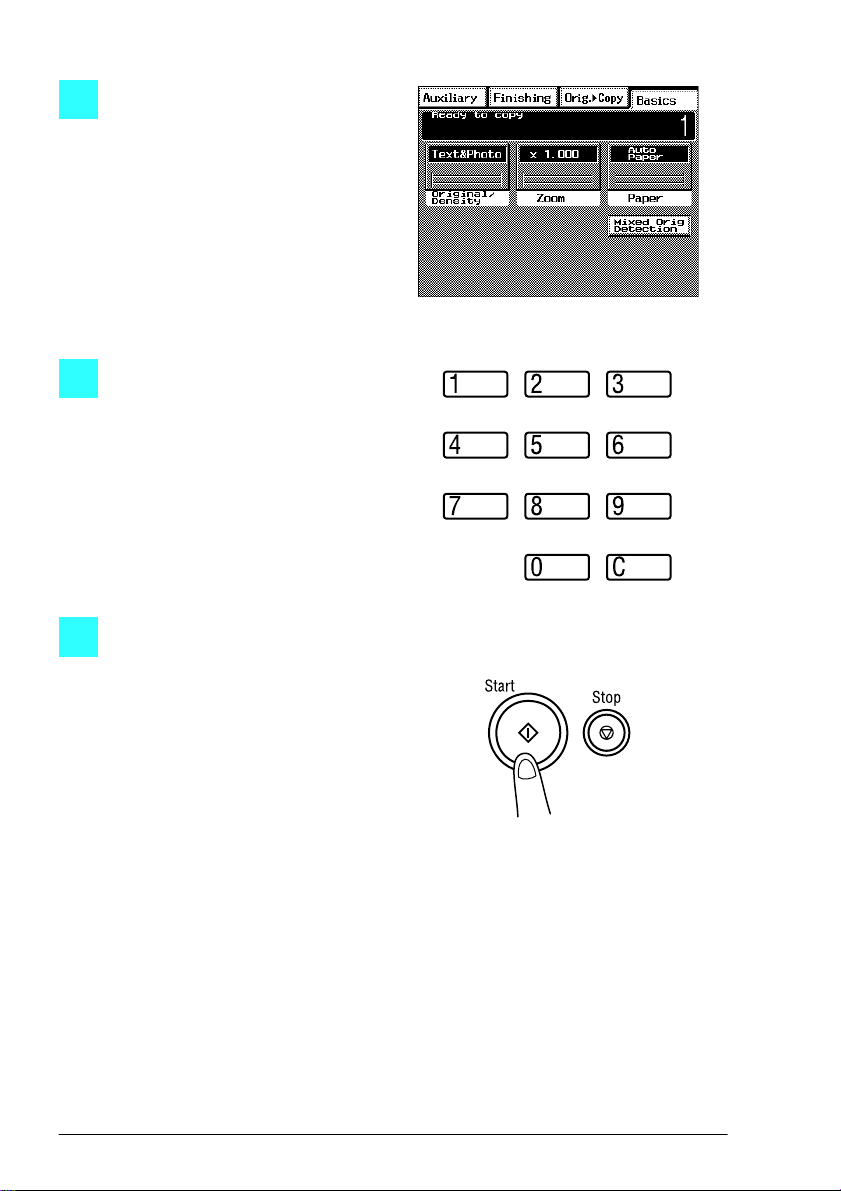
Making Copies
Make sure that the Basic screen
4
is displayed, and then specify
any necessary settings, such as
the desired paper tray or the density.
Using the keypad, ent er th e nu m-
5
ber of copies (between 1 and
100) that you wish to make.
C4004P001CA
C4004O187AA
Press the [Start] key to begin
6
making copies.
To stop copying before the set
number of copies are made,
press the [Stop] key.
C4004O520CA
10 CF1501/2001
Page 13

To copy onto manually fed paper
Position the document(s) to be
1
copied.
Select the desired color mode.
2
C4004O516AA
C4004O518AA
C4004O205CA
CF1501/2001 11
Page 14

Open the manual bypass tray.
3
Adjust the paper guides to fit the
4
size of paper to be loaded, and
then load the paper so that the
front side of the paper faces
down. Lightly slide the paper into
the feed slot as much as possible
so that it is ready to be fed into
the copier.
Make sure that the screen allow-
5
ing you to select the manual
bypass tray paper size is displayed, and then select the
desired paper size.
For paper sizes in metric measurements, touch [Metric] to display a screen that allows you to
select metric paper sizes.
C4004O512AA
C4004O513AA
C4004P007CA
12 CF1501/2001
Page 15

Touch [Paper Type], select the
6
type of paper that will be loaded,
and then touch [Enter].
Specify any necessary settings, such as the zoom ratio or the density.
7
Press the [Start] key to begin
8
making copies.
To stop copying before the set
number of copies are made,
press the [Stop] key.
C4004P501CA
C4004O520CA
CF1501/2001 13
Page 16

Open the toner supply door, and
1
then open the toner hoppe r lid for
the toner that you wish to refi ll.
With the opening of the new tone r
2
bottle pointing up, hit the bottom
of the bottle against a strong surface, such as a desk or table,
four or five times from a height of
about 4 in. (10 cm). (Since the
toner within the bottle may have
become compacted, be sure to
break it up by performing this
step.)
Note
When hitting the toner bottle against a
surfac e, be sure to ho ld th e bottle so th at
the opening of the bottle is pointing up.
C4004O521AA
C4004O522AA
While firmly grasping the new
3
toner bottle, shake it well.
Note
Since th e t oner wit hin th e bo ttl e ma y have
become compacted, be sure to shake the
bottle until t he to ner is mostl y br oken u p
before filling it into the hopper.
14 CF1501/2001
C4004O523AA
Page 17

Refilling the Toner
With the rounded side (marked
4
with “
▼”) of the bottle mouth fac-
ing towards you, place the toner
bottle on top of the hopper, and
then press down on the bottle
until it snaps into place.
Fully pull the toner hopper shutter
5
out toward you.
Pulling out the toner hopper shutter allows the toner to fill the
toner hopper
Check that all of the toner has
emptied out of the toner bottle
and into the hopper, which may
take a while.
C4004O524AA
C4004O525AA
Note
Do not t ap on the to ner bott le wh ile re fi lling the hopper;
otherwise, the toner may spur t out.
C4004O580AA
CF1501/2001 15
Page 18

Push the toner hopper shutter
6
closed.
Tilt the toner bottle backward,
7
and then pull the opening of the
bottle up and toward you to
remove it.
Close the toner hopper lid, and
8
then close the toner supply door.
C4004O526AA
C4004O527AA
C4004O528AA
16 CF1501/2001
Page 19

Display and locations of paper misfeeds
Finisher p. 29
10-mailbin sorter p. 33
The procedure for clearing misfed paper differs depending on where the misfeed
occur s. Determi ne the misf eed loca tion by loo king at th e illustra tion disp layed with
the error message, and then clear the misfeed according to the appropriate procedure.
A flashing “” indicates the location of the paper misfeed. In addition, a lit “” indi-
cates areas where paper may have been m isfed and that should be checked.
Duplexing document f eeder p. 27
Duplex unit p. 20
Manual bypass
tray p. 18
C4004P098AA
Main unit p. 21
CF1501/2001 17
Page 20

Clearing a Paper Misfeed
To clear a paper misfeed in the manual bypass tray
Pull up the lock release lever to
1
open the right-side door.
CAUTION
Decreased copy q uality may result if the surface of the image transf er
belt at the bottom of the copier’s fusing unit is touched.
Í
Be careful not to touch the surface of the image transf er belt at the
bottom of the copier’s fusing unit.
C4004O529AA
C4004O530AA
18 CF1501/2001
Page 21

Carefully pull out the paper.
2
Close the right-side door.
3
C4004O531AA
C4004O532AA
CF1501/2001 19
Page 22

To clear a paper misfeed in the duplex unit
Open the duplex unit door.
1
Carefully pull out the paper.
2
Close the duplex unit door.
3
C4004O533AA
C4004O534AA
C4004O535AA
20 CF1501/2001
Page 23

To clear a paper misfeed in the main unit
Open the lower right-side door.
1
Turn the green wheels t o feed the
2
paper so that it can be easily
removed.
Carefully pull out the paper.
3
C4004O536AA
C4004O537AA
C4004O538AA
CF1501/2001 21
Page 24

Note
If the l arge-capaci ty cabinet is installed,
turn the gree n dial in the direc tion of the
arrow while carefully pulling out the
paper.
Close the lower right-side door.
4
Pull out the paper drawer being
5
used, and then remove any
paper remaining in the dr awer.
C4004O539AA
C4004O540AA
Load the paper in the drawer
6
again, and then close the drawer.
Note
Be careful not to touch the surface of the
paper take-up roller with your hands.
22 CF1501/2001
Paper take-up roller
C4004O541AA
Page 25

Pull up the lock release lever to
7
open the right-side door.
CAUTION
Decreased copy quality may result if the surf ace of the image transfer
belt at the bottom of t he copier’s fusing unit is touched.
Í
Be careful not to touch the surface of the image tra nsfer belt at the
bottom of the copier’s fusing unit.
Grasp the upper right-side door
8
as shown, and then carefully
open the door completely while
making sure to support it.
Note
Be sure to suppo rt the door while carefully opening it; otherwise, it may be damaged.
C4004O542AA
C4004O543AA
CF1501/2001 23
Page 26

While moving the green lever on
9
the inside of the upper right-side
door in the direction of the arrow,
carefully pull out the paper .
CAUTION
The area around the fusing unit is extremely hot.
Í
Touching anything other than the paper wit hin the area ar ound the
fusing unit may res ult in burns. If you get burnt, immed iat ely cool
the skin under cold water, and then seek professional medical advice.
Carefully pull out the paper.
10
C4004O544AA
C4004O545AA
Move the two lock release levers
11
for the oil-coating unit in the
direction of the arrows.
C4004O546AA
24 CF1501/2001
Page 27

Move the levers (one on each
12
end of the oil-coating unit) in the
direction of the arrows and carefully pull out the paper.
CAUTION
The area around the fusing unit is extremely hot.
Í
Touching anything around the fusing unit other than the specified
levers may result in burns. If you get burnt, immediately cool the
skin under cold water, and then seek professional medical advice.
While holding the levers on the
13
ends of the oil-coating unit, move
the unit back to its original position.
C4004O547AA
C4004O548AA
CF1501/2001 25
Page 28

Fully move the two lock release
14
levers for the oil-coating unit in
the direction of the arrows.
Close the upper right- side door.
15
Close the right-side door.
16
C4004O549AA
26 CF1501/2001
Page 29

To clear a paper misfeed in the duplexing document feeder
Open misfeed clearing cover F1.
1
C4004O550AA
Remove all documents from the
2
document feed tray, and then
carefully pull out any other documents.
C4004O551AA
Open misfeed clearing cover F2,
3
and then carefully pull out any
documents.
C4004O552AA
CF1501/2001 27
Page 30

Open the duplexing document
4
feeder, and then carefully pull out
any documents.
Remove any documents on the
5
original glass, and then close the
duplexing document feeder.
Close misfeed clearing covers F1
6
and F2.
C4004O553AA
C4004O554AA
C4004O555AA
Reload the documents according
7
to the instructions that appear on
the touch panel.
C4004O556AA
28 CF1501/2001
Page 31

To clear a paper misfeed in the finisher
Slide the finisher away from the
1
copier.
Open the cover of the horizontal
2
transport unit.
Remove any paper, and then
3
close the cover of the horizontal
transport unit.
C4004O557AA
C4004O558AA
C4004O559AA
C4004O560AA
CF1501/2001 29
Page 32

(Only if finishe r FN-107 is
4
installed)
Open right-side door FN7.
While holding open misfeed
5
clearing guide FN8 (for finisher
FN-107) or FN7 (for finisher FN-
108), remove any paper.
(Only if finishe r FN-107 is
6
installed)
Close right-side door FN7.
C4004O561AA
C4004O562AA
C4004O563AA
30 CF1501/2001
Page 33

Open front door FN4.
7
Turn knob s FN5 at t he sam e time
8
to feed out any paper.
Close front door FN4.
9
C4004O564AA
C4004O565AA
Open upper cover FN1.
10
C4004O566AA
CF1501/2001 31
Page 34

While holding misfeed clearing
11
guide FN2 open, remove any
paper.
While holding misfeed clearing
12
guide FN3 open, remove any
paper.
Close upper cover FN1.
13
C4004O567AA
C4004O568AA
While holding misfeed clearing
14
guide FN6 open, remove any
paper.
C4004O569AA
32 CF1501/2001
Page 35

Slide the finisher back against
15
the copier.
To clear a paper misfeed in the 10-mailbin sorter
Slide the 10-mailbin sorter away
1
from the copier.
C4004O570AA
C4004O571AA
Remove any paper from the mail-
2
bins.
C4004O572AA
CF1501/2001 33
Page 36

Open the cover of the horizontal
3
transport unit.
Remove any paper, and then
4
close the cover of the horizontal
transport unit.
C4004O573AA
C4004O574AA
C4004O575AA
Open the upper and lower doors.
5
C4004O576AA
34 CF1501/2001
Page 37

Remove any paper .
6
Close the upper and lower doors .
7
Slide the 10-mailbin sorter back
8
against the copie r.
C4004O577AA
C4004O578AA
C4004O579AA
CF1501/2001 35
Page 38

36 CF1501/2001
 Loading...