

Page 1
User’s Guide [PageScope Web Connection Operations]
Page 2

Introduction
Introduction
Thank you for purchasing this machine.
This User’s Guide describes device management functions, operations, and cautions for usage of
PageScope Web Connection. In order to allow functionality of this product fully and to use it effectively,
please read this User’s Guide as necessary.
In order to ensure that this machine is used safely, carefully read the Quick Guide [Copy/Print/Fax/Scan/Box
Operations] before using the machine.
The illustrations used in this User’s Guide may differ from the actual screen.
Trademarks and copyright
- KONICA MINOLTA, the KONICA MINOLTA logo, and The essentials of imaging are registered
trademarks of KONICA MINOLTA HOLDINGS, INC.
- PageScope and bizhub are registered trademarks or trademarks of KONICA MINOLTA BUSINESS
TECHNOLOGIES, INC.
- Netscape is a trademark of Netscape Communications Corporation in the United States and other
countries.
- Mozilla and Firefox are trademarks of the Mozilla Foundation.
- Novell and Novell NetWare are registered trademarks of Novell, Inc in the United States and other
countries.
- Microsoft, Windows, and Windows NT are either registered trademarks or trademarks of Microsoft
Corporation in the United States and other countries.
- Power PC is a trademark of IBM Corporation in the United States, or other countries, or both.
- Apple, Macintosh, and Mac os are registered trademarks of Apple Computer, Inc. Safari is a trademark
of Apple Computer, Inc.
- Adobe, the Adobe logo, Acrobat and PostScript are either registered trademarks or trademarks of
Adobe Systems Incorporated in the United States and/or other countries.
- Ethernet is a registered trademark of Xerox Corporation.
- PCL is a registered trademark of Hewlett-Packard Company Limited.
- All other product and brand names are trademarks or registered trademarks of their respective
companies or organizations.
- This machine and PageScope Box Operator are based in part on the work of the Independent JPEG
Group.
- Compact-VJE
Copyright 1986-2003 VACS Corp.
- RC4
countries.
- RSA
trademark or trademark of RSA Security Inc. in the United States and/or other countries.
®
is a registered trademark or trademark of RSA Security Inc. in the United States and/or other
®
is a registered trademark or trademark of RSA Security Inc. RSA BSAFE® is a registered
License information
This product includes RSA BSAFE Cryptographic software from RSA Security Inc.
All other product and brand names are trademarks or registered trademarks of their respective companies or
organizations.
OpenSSL statement
OpenSSL license
Copyright © 1998-2005 The OpenSSL Project. All rights reserved.
Redistribution and use in source and binary forms, with or without modification, are permitted provided that
the following conditions are met:
1. Redistributions of source code must retain the above copyright notice, this list of conditions and the
following disclaimer.
C650 x-1
Page 3

Introduction
2. Redistributions in binary form must reproduce the above copyright notice, this list of conditions and the
following disclaimer in the documentation and/or other materials provided with the distribution.
3. All advertising materials mentioning features or use of this software must display the following
acknowledgment:
"This product includes software developed by the OpenSSL Project for use in the OpenSSL Toolkit.
(http://www.openssl.org/)"
4. The names "OpenSSL Toolkit" and "OpenSSL Project" must not be used to endorse or promote
products derived from this software without prior written permission. For written permission, please
contact openssl-core@openssl.org.
5. Products derived from this software may not be called "OpenSSL" nor may "OpenSSL" appear in their
names without prior written permission of the OpenSSL Project.
6. Redistributions of any form whatsoever must retain the following acknowledgment:
"This product includes software developed by the OpenSSL Project for use in the OpenSSL Toolkit
(http://www.openssl.org/)"
THIS SOFTWARE IS PROVIDED BY THE OpenSSL PROJECT "AS IS" AND ANY EXPRESSED OR IMPLIED
WARRANTIES, INCLUDING, BUT NOT LIMITED TO, THE IMPLIED WARRANTIES OF MERCHANTABILITY
AND FITNESS FOR A PARTICULAR PURPOSE ARE DISCLAIMED. IN NO EVENT SHALL THE OpenSSL
PROJECT OR ITS CONTRIBUTORS BE LIABLE FOR ANY DIRECT, INDIRECT, INCIDENTAL, SPECIAL,
EXEMPLARY, OR CONSEQENTIAL DAMAGES (INCLUDING, BUT NOT LIMITED TO, PROCUREMENT OF
SUBSTITUTE GOODS OR SERVICES; LOSS OF USE, DATA, OR PROFITS; OR BUSINESS INTERRUPTION)
HOWEVER CAUSED AND ON ANY THEORY OF LIABILITY, WHETHER IN CONTRACT, STRICT LIABILITY,
OR TORT (INCLUDING NEGLIGENCE OR OTHERWISE) ARISING IN ANY WAY OUT OF THE USE OF THIS
SOFTWARE, EVEN IF ADVISED OF THE POSSIBILITY OF SUCH DAMAGE.
This product includes cryptographic software written by Eric Young (eay@cryptsoft.com). This product
includes software written by Tim Hudson (tjh@cryptsoft.com).
Original SSLeay license
Copyright © 1995-1998 Eric Young (eay@cryptsoft.com) All rights reserved.
This package is an SSL implementation written by Eric Young (eay@cryptsoft.com).
The implementation was written so as to conform with Netscapes SSL.
This library is free for commercial and non-commercial use as long as the following conditions are aheared
to. The following conditions apply to all code found in this distribution, be it the RC4, RSA, Ihash, DES, etc.,
code; not just the SSL code.
The SSL documentation included with this distribution is covered by the same copyright terms except that
the holder is Tim Hudson (tjh@cryptsoft.com).
Copyright remains Eric Young’s, and as such any Copyright notices in the code are not to be removed. If this
package is used in a product, Eric Young should be given attribution as the author of the parts of the library
used. This can be in the form of a textual message at program startup or in documentation (online or textual)
provided with the package.
Redistribution and use in source and binary forms, with or without modification, are permitted provided that
the following conditions are met:
1. Redistributions of source code must retain the copyright notice, this list of conditions and the following
disclaimer.
2. Redistributions in binary form must reproduce the above copyright notice, this list of conditions and the
following disclaimer in the documentation and/or other materials provided with the distribution.
3. All advertising materials mentioning features or use of this software must display the following
acknowledgement:
"This product includes cryptographic software written by Eric Young (eay@cryptsoft.com)"
The word ‘cryptographic’ can be left out if the rouines from the library being used are not cryptographic
related.
4. If you include any Windows specific code (or a derivative thereof) from the apps directory (application
code) you must include an acknowledgement:
"This product includes software written by Tin Hudson (tjh@cryptsoft.com)"
THIS SOFTWARE IS PROVIDED BY ERIC YOUNG "AS IS" AND ANY EXPRESS OR IMPLIED WARRANTIES,
INCLUDING, BUT NOT LIMITED TO, THE IMPLIED WARRANTIES OF MERCHANTABILITY AND FITNESS
FOR A PARTICULAR PURPOSE ARE DISCLAIMED. IN NO EVENT SHALL THE AUTHOR OR
CONTRIBUTORS BE LIABLE FOR ANY DIRECT, INDIRECT, INCIDENTAL, SPECIAL, EXEMPLARY, OR
CONSEQUENTIAL DAMAGES (INCLUDING, BUT NOT LIMITED TO, PROCUREMENT OF SUBSTITUTE
GOODS OR SERVICES; LOSS OF USE, DATA, OR PROFITS; OR BUSINESS INTERRUPTION) HOWEVER
CAUSED AND ON ANY THEORY OF LIABILITY, WHETHER IN CONTRACT, STRICT LIABILITY, OR TORT
(INCLUDING NEGLIGENCE OR OTHERWISE) ARISING IN ANY WAY OUT OF THE USE OF THIS
SOFTWARE, EVEN IF ADVISED OF THE POSSIBILITY OF SUCH DAMAGE.
C650 x-2
Page 4

Introduction
The licence and distribution terms for any publically available version or derivative of this code cannot be
changed. i.e. this code cannot simply be copied and put under another distribution licence [including the
GNU Public Licence.]
NetSNMP License
Part 1: CMU/UCD copyright notice: (BSD like)
Copyright 1989, 1991, 1992 by Carnegie Mellon University Derivative Work - 1996, 1998-2000
Copyright 1996, 1998-2000 The Regents of the University of California All Rights Reserved
Permission to use, copy, modify and distribute this software and its documentation for any purpose and
without fee is hereby granted, provided that the above copyright notice appears in all copies and that both
that copyright notice and this permission notice appear in supporting documentation, and that the name of
CMU and The Regents of the University of California not be used in advertising or publicity pertaining to
distribution of the software without specific written permission.
CMU AND THE REGENTS OF THE UNIVERSITY OF CALIFORNIA DISCLAIM ALLWARRANTIES WITH
REGARD TO THIS SOFTWARE, INCLUDING ALL IMPLIEDWARRANTIES OF MERCHANTABILITY AND
FITNESS. IN NO EVENT SHALL CMU OR THE REGENTS OF THE UNIVERSITY OF CALIFORNIA BE LIABLE
FOR ANY SPECIAL, INDIRECT OR CONSEQUENTIAL DAMAGES OR ANY DAMAGES WHATSOEVER
RESULTING FROM THE LOSS OF USE, DATA OR PROFITS, WHETHER IN AN ACTION OF CONTRACT,
NEGLIGENCE OR OTHER TORTIOUS ACTION, ARISING OUT OF OR IN CONNECTION WITH THE USE OR
PERFORMANCE OF THIS SOFTWARE.
Part 2: Networks Associates Technology, Inc copyright notice (BSD)
Copyright © 2001-2003, Networks Associates Technology, Inc
All rights reserved.
Redistribution and use in source and binary forms, with or without modification, are permitted provided that
the following conditions are met:
* Redistributions of source code must retain the above copyright notice, this list of conditions and the
following disclaimer.
* Redistributions in binary form must reproduce the above copyright notice, this list of conditions and the
following disclaimer in the documentation and/or other materials provided with the distribution.
* Neither the name of the Networks Associates Technology, Inc nor the names of its contributors may be used
to endorse or promote products derived from this software without specific prior written permission.
THIS SOFTWARE IS PROVIDED BY THE COPYRIGHT HOLDERS AND CONTRIBUTORS "AS IS" AND ANY
EXPRESS OR IMPLIED WARRANTIES, INCLUDING, BUT NOT LIMITED TO, THE IMPLIED WARRANTIES OF
MERCHANTABILITY AND FITNESS FOR A PARTICULAR PURPOSE ARE DISCLAIMED. IN NO EVENT
SHALL THE COPYRIGHT HOLDERS OR CONTRIBUTORS BE LIABLE FOR ANY DIRECT, INDIRECT,
INCIDENTAL, SPECIAL, EXEMPLARY, OR CONSEQUENTIAL DAMAGES (INCLUDING, BUT NOT LIMITED
TO, PROCUREMENT OF SUBSTITUTE GOODS OR SERVICES; LOSS OF USE, DATA, OR PROFITS;OR
BUSINESS INTERRUPTION) HOWEVER CAUSED AND ON ANY THEORY OF LIABILITY, WHETHER IN
CONTRACT, STRICT LIABILITY, OR TORT (INCLUDING NEGLIGENCE OR OTHERWISE) ARISING IN ANY
WAY OUT OF THE USE OF THIS SOFTWARE, EVEN IF ADVISED OF THE POSSIBILITY OF SUCH DAMAGE.
Part 3: Cambridge Broadband Ltd. copyright notice (BSD)
Portions of this code are copyright © 2001-2003, Cambridge Broadband Ltd.
All rights reserved.
Redistribution and use in source and binary forms, with or without modification, are permitted provided that
the following conditions are met:
* Redistributions of source code must retain the above copyright notice, this list of conditions and the
following disclaimer.
* Redistributions in binary form must reproduce the above copyright notice, this list of conditions and the
following disclaimer in the documentation and/or other materials provided with the distribution.
* The name of Cambridge Broadband Ltd. may not be used to endorse or promote products derived from
this software without specific prior written permission.
THIS SOFTWARE IS PROVIDED BY THE COPYRIGHT HOLDER "AS IS" AND ANYEXPRESS OR IMPLIED
WARRANTIES, INCLUDING, BUT NOT LIMITED TO, THEIMPLIED WARRANTIES OF MERCHANTABILITY
AND FITNESS FOR A PARTICULAR PURPOSE ARE DISCLAIMED.IN NO EVENT SHALL THE COPYRIGHT
HOLDER BE LIABLE FOR ANY DIRECT, INDIRECT, INCIDENTAL, SPECIAL, EXEMPLARY, OR
CONSEQUENTIAL DAMAGES (INCLUDING, BUT NOT LIMITED TO, PROCUREMENT OF SUBSTITUTE
C650 x-3
Page 5

Introduction
GOODS OR SERVICES; LOSS OF USE, DATA, OR PROFITS; OR BUSINESS INTERRUPTION) HOWEVER
CAUSED AND ON ANY THEORY OF LIABILITY, WHETHER IN CONTRACT, STRICT LIABILITY, OR TORT
(INCLUDING NEGLIGENCE OR OTHERWISE) ARISING IN ANY WAY OUT OF THE USE OF THIS
SOFTWARE, EVEN IF ADVISED OF THE POSSIBILITY OF SUCH DAMAGE.
Part 4: Sun Microsystems, Inc. copyright notice (BSD)
Copyright © 2003 Sun Microsystems, Inc., 4150 Network Circle, Santa Clara, California 95054, U.S.A. All
rights reserved.
Use is subject to license terms below.
This distribution may include materials developed by third parties.
Sun, Sun Microsystems, the Sun logo and Solaris are trademarks or registered trademarks of Sun
Microsystems, Inc. in the U.S. and other countries.
Redistribution and use in source and binary forms, with or without modification, are permitted provided that
the following conditions are met:
* Redistributions of source code must retain the above copyright notice, this list of conditions and the
following disclaimer.
* Redistributions in binary form must reproduce the above copyright notice, this list of conditions and the
following disclaimer in the documentation and/or other materials provided with the distribution.
* Neither the name of the Sun Microsystems, Inc. nor the names of its contributors may be used to endorse
or promote products derived from this software without specific prior written permission.
THIS SOFTWARE IS PROVIDED BY THE COPYRIGHT HOLDERS AND CONTRIBUTORS "AS IS" AND ANY
EXPRESS OR IMPLIED WARRANTIES, INCLUDING, BUT NOT LIMITED TO, THE IMPLIED WARRANTIES OF
MERCHANTABILITY AND FITNESS FOR A PARTICULAR PURPOSE ARE DISCLAIMED. IN NO EVENT
SHALL THE COPYRIGHT HOLDERS OR CONTRIBUTORS BE LIABLE FOR ANY DIRECT, INDIRECT,
INCIDENTAL, SPECIAL, EXEMPLARY, OR CONSEQUENTIAL DAMAGES (INCLUDING, BUT NOT LIMITED
TO, PROCUREMENT OF SUBSTITUTE GOODS OR SERVICES; LOSS OF USE, DATA, OR PROFITS;OR
BUSINESS INTERRUPTION) HOWEVER CAUSED AND ON ANY THEORY OF LIABILITY, WHETHER IN
CONTRACT, STRICT LIABILITY, OR TORT (INCLUDING NEGLIGENCE OR OTHERWISE) ARISING IN ANY
WAY OUT OF THE USE OF THIS SOFTWARE, EVEN IF ADVISED OF THE POSSIBILITY OF SUCH DAMAGE.
Part 5: Sparta, Inc copyright notice (BSD)
Copyright © 2003-2004, Sparta, Inc All rights reserved.
Redistribution and use in source and binary forms, with or without modification, are permitted provided that
the following conditions are met:
* Redistributions of source code must retain the above copyright notice, this list of conditions and the
following disclaimer.
* Redistributions in binary form must reproduce the above copyright notice, this list of conditions and the
following disclaimer in the documentation and/or other materials provided with the distribution.
* Neither the name of Sparta, Inc nor the names of its contributors may be used to endorse or promote
products derived from this software without specific prior written permission.
THIS SOFTWARE IS PROVIDED BY THE COPYRIGHT HOLDERS AND CONTRIBUTORS "AS IS" AND ANY
EXPRESS OR IMPLIED WARRANTIES, INCLUDING, BUT NOT LIMITED TO, THE IMPLIED WARRANTIES OF
MERCHANTABILITY AND FITNESS FOR A PARTICULAR PURPOSE ARE DISCLAIMED. IN NO EVENT
SHALL THE COPYRIGHT HOLDERS OR CONTRIBUTORS BE LIABLE FOR ANY DIRECT, INDIRECT,
INCIDENTAL, SPECIAL, EXEMPLARY, OR CONSEQUENTIAL DAMAGES (INCLUDING, BUT NOT LIMITED
TO, PROCUREMENT OF SUBSTITUTE GOODS OR SERVICES; LOSS OF USE, DATA, OR PROFITS;OR
BUSINESS INTERRUPTION) HOWEVER CAUSED AND ON ANY THEORY OF LIABILITY, WHETHER IN
CONTRACT, STRICT LIABILITY, OR TORT (INCLUDING NEGLIGENCE OR OTHERWISE) ARISING IN ANY
WAY OUT OF THE USE OF THIS SOFTWARE, EVEN IF ADVISED OF THE POSSIBILITY OF SUCH DAMAGE.
Part 6: Cisco/BUPTNIC copyright notice (BSD)
Copyright © 2004, Cisco, Inc and Information Network Center of Beijing University of Posts and
Telecommunications. All rights reserved.
Redistribution and use in source and binary forms, with or without modification, are permitted provided that
the following conditions are met:
* Redistributions of source code must retain the above copyright notice, this list of conditions and the
following disclaimer.
* Redistributions in binary form must reproduce the above copyright notice, this list of conditions and the
following disclaimer in the documentation and/or other materials provided with the distribution.
C650 x-4
Page 6

Introduction
* Neither the name of Cisco, Inc, Beijing University of Posts and Telecommunications, nor the names of their
contributors may be used to endorse or promote products derived from this software without specific prior
written permission.
THIS SOFTWARE IS PROVIDED BY THE COPYRIGHT HOLDERS AND CONTRIBUTORS "AS IS" AND ANY
EXPRESS OR IMPLIED WARRANTIES, INCLUDING, BUT NOT LIMITED TO, THE IMPLIED WARRANTIES OF
MERCHANTABILITY AND FITNESS FOR A PARTICULAR PURPOSE ARE DISCLAIMED. IN NO EVENT
SHALL THE COPYRIGHT HOLDERS OR CONTRIBUTORS BE LIABLE FOR ANY DIRECT, INDIRECT,
INCIDENTAL, SPECIAL, EXEMPLARY, OR CONSEQUENTIAL DAMAGES (INCLUDING, BUT NOT LIMITED
TO, PROCUREMENT OF SUBSTITUTE GOODS OR SERVICES; LOSS OF USE, DATA, OR PROFITS;OR
BUSINESS INTERRUPTION) HOWEVER CAUSED AND ON ANY THEORY OF LIABILITY, WHETHER IN
CONTRACT, STRICT LIABILITY, OR TORT (INCLUDING NEGLIGENCE OR OTHERWISE) ARISING IN ANY
WAY OUT OF THE USE OF THIS SOFTWARE, EVEN IF ADVISED OF THE POSSIBILITY OF SUCH DAMAGE.
Kerberos
Copyright © 1985-2005 by the Massachusetts Institute of Technology. All rights reserved.
permission notice
WITHIN THAT CONSTRAINT, permission to use, copy, modify, and distribute this software and its
documentation for any purpose and without fee is hereby granted, provided that the above copyright notice
appear in all copies and that both that copyright notice and this permission notice appear in supporting
documentation, and that the name of M.I.T. not be used in advertising or publicity pertaining to distribution
of the software without specific, written prior permission. Furthermore if you modify this software you must
label your software as modified software and not distribute it in such a fashion that it might be confused with
the original MIT software.
M.I.T. makes no representations about the suitability of this software for any purpose. It is provided "as is"
without express or implied warranty.
THIS SOFTWARE IS PROVIDED "AS IS" AND WITHOUT ANY EXPRESS OR IMPLIED WARRANTIES,
INCLUDING, WITHOUT LIMITATION, THE IMPLIED WARRANTIES OF MERCHANTIBILITY AND FITNESS
FOR A PARTICULAR PURPOSE.
THIS SOFTWARE IS NOT ORIGINAL MIT SOFTWARE, MODIFIED BY KONICA MINOLTA BUSINESS
TECHNOLOGIES, INC.
Mersenne Twister
A C-program for MT19937, with initialization improved 2002/1/26.
Coded by Takuji Nishimura and Makoto Matsumoto.
Before using, initialize the state by using init_genrand(seed) or init_by_array(init_key, key_length).
Copyright © 1997-2002, Makoto Matsumoto and Takuji Nishimura, All rights reserved.
Redistribution and use in source and binary forms, with or without modification, are permitted provided that
the following conditions are met:
1. Redistributions of source code must retain the above copyright notice, this list of conditions and the
following disclaimer.
2. Redistributions in binary form must reproduce the above copyright notice, this list of conditions and the
following disclaimer in the documentation and/or other materials provided with the distribution.
3. The names of its contributors may not be used to endorse or promote products derived from this
software without specific prior written permission.
THIS SOFTWARE IS PROVIDED BY THE COPYRIGHT HOLDERS AND CONTRIBUTORS "AS IS" AND ANY
EXPRESS OR IMPLIED WARRANTIES, INCLUDING, BUT NOT LIMITED TO, THE IMPLIED WARRANTIES OF
MERCHANTABILITY AND FITNESS FOR A PARTICULAR PURPOSE ARE DISCLAIMED. IN NO EVENT
SHALL THE COPYRIGHT OWNER OR CONTRIBUTORS BE LIABLE FOR ANY DIRECT, INDIRECT,
INCIDENTAL, SPECIAL, EXEMPLARY, OR CONSEQUENTIAL DAMAGES (INCLUDING, BUT NOT LIMITED
TO, PROCUREMENT OF SUBSTITUTE GOODS OR SERVICES; LOSS OF USE, DATA, OR PROFITS; OR
BUSINESS INTERRUPTION) HOWEVER CAUSED AND ON ANY THEORY OF LIABILITY, WHETHER IN
CONTRACT, STRICT LIABILITY, OR TORT (INCLUDING NEGLIGENCE OR OTHERWISE) ARISING IN ANY
WAY OUT OF THE USE OF THIS SOFTWARE, EVEN IF ADVISED OF THE POSSIBILITY OF SUCH DAMAGE.
Any feedback is very welcome.
http://www.math.sci.hiroshima-u.ac.jp/~m-mat/MT/emt.html
email: m-mat @ math.sci.hiroshima-u.ac.jp (remove space)
Copyright
© 2007 KONICA MINOLTA BUSINESS TECHNOLOGIES, INC. All Rights Reserved.
C650 x-5
Page 7

Introduction
Note
- This User’s Guide may not be reproduced in part or in full without permission.
- KONICA MINOLTA BUSINESS TECHNOLOGIES, INC. shall not be responsible for any consequences
that may result from using either this printing system or this User’s Guide.
- Information included in this User’s Guide is subject to change without notice.
- Copyright for the printer driver is the property of KONICA MINOLTA BUSINESS TECHNOLOGIES, INC.
C650 x-6
Page 8

Introduction
SOFTWARE LICENSE AGREEMENT
This package contains the following materials provided by Konica Minolta Business Technologies, Inc.
(KMBT): software included as part of the printing system, the digitally-encoded machine-readable outline
data encoded in the special format and in the encrypted form ("Font Programs"), other software which runs
on a computer system for use in conjunction with the Printing Software ("Host Software"), and related
explanatory written materials ("Documentation").
The term "Software" shall be used to describe Printing Software, Font Programs and/or Host Software and
also include any upgrades, modified versions, additions, and copies of the Software.
The Software is being licensed to you under the terms of this Agreement.
KMBT grants to you a non-exclusive sublicense to use the Software and Documentation, provided that you
agree to the following:
1. You may use the Printing Software and accompanying Font Programs for imaging to the licensed
output de-vice(s), solely for your own internal business purposes.
2. In addition to the license for Font Programs set forth in Section 1 ("Printing Software") above, you may
use Roman Font Programs to reproduce weights, styles, and versions of letters, numerals, characters
and symbols ("Typefaces") on the display or monitor for your own internal business purposes.
3. You may make one backup copy of the Host Software, provided your backup copy is not installed or
used on any computer. Notwithstanding the above restrictions, you may install the on any number of
computers solely for use with one or more printing systems running the Printing Software.
4. You may assign its rights under this Agreement to an assignee of all of Licensee’s right and interest to
such Software and Documentation ("Assignee") provided you transfer to Assignee all copies of such
Software and Documentation Assignee agrees to be bound by all of the terms and conditions of this
Agreement.
5. You agree not to modify, adapt or translate the Software and Documentation.
6. You agree that you will not attempt to alter, disassemble, decrypt, reverse engineer or decompile the
Software.
7. Title to and ownership of the Software and Documentation and any reproductions thereof shall remain
with KMBT and its licensor.
8. Trademarks shall be used in accordance with accepted trademark practice, including identification of
the trademark owner’s name. Trademarks can only be used to identify printed output produced by the
Software. Such use of any trademark does not give you any rights of ownership in that trademark.
9. You may not rent, lease, sublicense, lend or transfer versions or copies of the Software Licensee does
not use, or Software contained on any unused media, except as part of the permanent transfer of all
Software and Documentation as described above.
10. IN NO EVENT WILL KMBT OR ITS LICENSOR BE LIABLE TO YOU FOR ANY CONSEQUENTIAL,
INCIDENTAL INDIRECT, PUNITIVE OR SPECIAL DAMAGES, INCLUDING ANY LOST PROFITS OR
LOST SAVING, EVEN IF KMBT HAS BEEN ADVISED OF THE POSSIBILITY OF SUCH DAMAGES, OR
FOR ANY CLAIM BY ANY THIRD PARTY. KMBT OR ITS LICENSOR DISCLAIMS ALL WARRANTIES
WITH REGARD TO THE SOFTWARE, EXPRESS OR IMPLIED, INCLUDING, WITHOUT LIMITATION
IMPLIED WARRANTIES OF MERCHANTABILITY, FITNESS FOR A PARTICULAR PURPOSE, TITLE
AND NON-INFRINGEMENT OF THIRD PARTY RIGHTS. SOME STATES OR JURISDICTIONS DO NOT
ALLOW THE EXCLUSION OR LIMITATION OF INCIDENTIAL, CONSEQUENTIAL OR SPECIAL
DAMAGES, SO THE ABOVE LIMITATIONS MAY NOT APPLY TO YOU.
11. Notice to Government End Users: The Software is a "commercial item," as that term is defined at 48
C.F.R.2.101, consisting of "commercial computer software" and "commercial computer software
documentation," as such terms are used in 48 C.F.R. 12.212. Consistent with 48 C.F.R. 12.212 and 48
C.F.R. 227.7202-1 through 227.7202-4, all U.S. Government End Users acquire the Software with only
those rights set forth herein.
12. You agree that you will not export the Software in any form in violation of any applicable laws and
regulations regarding export control of any countries.
C650 x-7
Page 9

Introduction
Contents
Introduction
OpenSSL statement ................................................................................................................................x-1
NetSNMP License ...................................................................................................................................x-3
Kerberos ..................................................................................................................................................x-5
Mersenne Twister ....................................................................................................................................x-5
Copyright .................................................................................................................................................x-5
SOFTWARE LICENSE AGREEMENT .....................................................................................................................x-7
Contents ..................................................................................................................................................................x-8
About this user’s guide ........................................................................................................................................x-11
User’s Guides........................................................................................................................................................x-11
Printed manuals .....................................................................................................................................x-11
User’s Guide CD manuals .....................................................................................................................x-11
Notations ...............................................................................................................................................x-12
Using this user’s guide ..........................................................................................................................x-12
1 Overview
1.1 Using PageScope Web Connection..................................................................................................... 1-1
1.2 Logging on and logging off................................................................................................................... 1-5
System requirements................................................................................................................................1-1
Access PageScope Web Connection.......................................................................................................1-1
Web browser cache..................................................................................................................................1-2
With Internet Explorer...............................................................................................................................1-2
With Netscape Navigator..........................................................................................................................1-2
With Mozilla Firefox ..................................................................................................................................1-2
Structure of pages....................................................................................................................................1-3
Logon and logout operations ...................................................................................................................1-5
Logging off................................................................................................................................................1-7
Logging on................................................................................................................................................1-8
Options that can be selected when logged on to PageScope Web Connection.....................................1-8
Logging on as a public user .....................................................................................................................1-8
Logging on as a registered user ...............................................................................................................1-9
Logging on to Administrator mode.........................................................................................................1-10
Logging on as a user box administrator.................................................................................................1-10
2 User mode
2.1 Information tab ...................................................................................................................................... 2-1
2.2 Job tab.................................................................................................................................................... 2-8
2.3 Box tab.................................................................................................................................................. 2-11
Device Information - Configuration Summary ..........................................................................................2-1
Device Information - Option .....................................................................................................................2-2
Device Information - Consumables ..........................................................................................................2-2
Device Information - Meter Count ............................................................................................................2-3
Online Assistance .....................................................................................................................................2-4
Change User Password............................................................................................................................2-4
Function Permission Information..............................................................................................................2-5
Network Setting Information.....................................................................................................................2-6
Print Setting Information...........................................................................................................................2-6
Print Information .......................................................................................................................................2-7
Current Jobs.............................................................................................................................................2-8
Job History ...............................................................................................................................................2-9
Communication List................................................................................................................................2-10
Open User Box .......................................................................................................................................2-11
Document operations .............................................................................................................................2-13
Changing user box settings....................................................................................................................2-16
Create User Box .....................................................................................................................................2-17
Open System User Box..........................................................................................................................2-18
Create System User Box ........................................................................................................................2-20
C650 x-8
Page 10

Introduction
2.4 Direct Print tab..................................................................................................................................... 2-22
Direct Print..............................................................................................................................................2-22
2.5 Store Address tab................................................................................................................................ 2-23
Address Book - Store Address...............................................................................................................2-23
Registering a destination ........................................................................................................................2-24
Address Book - Icon...............................................................................................................................2-28
Registering an icon.................................................................................................................................2-29
Group......................................................................................................................................................2-29
Registering a group destination..............................................................................................................2-30
Program..................................................................................................................................................2-31
Registering a program destination .........................................................................................................2-32
Temporary One-Touch ...........................................................................................................................2-48
Subject....................................................................................................................................................2-49
Text.........................................................................................................................................................2-50
3 Administrator mode
3.1 Maintenance tab .................................................................................................................................... 3-1
3.2 Security tab .......................................................................................................................................... 3-16
3.3 Box tab.................................................................................................................................................. 3-36
3.4 Print Setting tab................................................................................................................................... 3-40
Meter Count..............................................................................................................................................3-1
ROM Version.............................................................................................................................................3-2
Import/Export............................................................................................................................................3-2
Status Notification Setting........................................................................................................................3-4
Total Counter Notification Setting ............................................................................................................3-6
Machine Setting........................................................................................................................................3-7
Online Assistance .....................................................................................................................................3-7
Date/Time Setting - Manual Setting .........................................................................................................3-8
Date/Time Setting - Time Adjustment Setting..........................................................................................3-9
Timer Setting - Power Save Setting .........................................................................................................3-9
Timer Setting - Weekly Timer Setting.....................................................................................................3-10
Network TWAIN ......................................................................................................................................3-10
Reset - Network Setting Clear................................................................................................................3-11
Reset - Reset..........................................................................................................................................3-12
Reset - Format All Destination................................................................................................................3-12
External Memory Function Settings .......................................................................................................3-13
Header/Footer Registration ....................................................................................................................3-13
License Settings - Get Request Code....................................................................................................3-15
License Settings - Install License ...........................................................................................................3-15
Authentication - User Auth/Account Track.............................................................................................3-16
Authentication - External Server Registration ........................................................................................3-17
Authentication - Default Function Permission ........................................................................................3-19
User Registration....................................................................................................................................3-19
Registering a user...................................................................................................................................3-21
Account Track Registration ....................................................................................................................3-22
Registering an account...........................................................................................................................3-23
SSL/TLS Setting - SSL/TLS Setting .......................................................................................................3-23
Creating a certificate ..............................................................................................................................3-25
Creating a certificate ..............................................................................................................................3-26
Specifying an encryption level setting....................................................................................................3-29
Removing a certificate............................................................................................................................3-29
Specifying the modes using SSL............................................................................................................3-30
Downloading certificates ........................................................................................................................3-31
SSL/TLS Setting - Action for Invalid Certificate .....................................................................................3-31
Address Reference Setting - Reference Allowed Group Registration....................................................3-32
Address Reference Setting - Public User Reference Setting.................................................................3-33
Permission of Address Change ...................................................................................................
Auto Logout ............................................................................................................................................3-34
Administrator Password Setting.............................................................................................................3-35
Open System User Box..........................................................................................................................3-36
Create System User Box ........................................................................................................................3-38
Basic Setting...........................................................................................................................................3-40
PCL Setting.............................................................................................................................................3-41
...........3-34
C650 x-9
Page 11

Introduction
PS Setting...............................................................................................................................................3-41
XPS Settings...........................................................................................................................................3-42
Interface Setting .....................................................................................................................................3-42
3.5 Store Address tab................................................................................................................................ 3-43
Application Registration .........................................................................................................................3-43
Registering a new application ................................................................................................................3-44
To regist a new application.....................................................................................................................3-45
Items that can be specified when editing applications ..........................................................................3-47
Editing registered applications ...............................................................................................................3-49
Deleting registered applications.............................................................................................................3-50
Prefix/Suffix ............................................................................................................................................3-51
Header Information.................................................................................................................................3-52
3.6 Network tab.......................................................................................................................................... 3-53
TCP/IP Setting - TCP/IP Setting.............................................................................................................3-53
TCP/IP Setting - IP Filtering....................................................................................................................3-55
TCP/IP Setting - IPsec............................................................................................................................3-56
E-mail Setting - E-mail RX (POP)............................................................................................................3-58
E-mail Setting - E-mail TX (SMTP)..........................................................................................................3-59
E-mail Setting - S/MIME.........................................................................................................................3-61
E-mail Setting - I-Fax Advanced Setting................................................................................................3-62
LDAP Setting - LDAP Setting .................................................................................................................3-62
LDAP Setting - Setting Up LDAP............................................................................................................3-63
IPP Setting..............................................................................................................................................3-65
FTP Setting - FTP TX Setting .................................................................................................................3-66
FTP Setting - FTP Server Setting ...........................................................................................................3-66
SNMP Setting .........................................................................................................................................3-67
SMB Setting - WINS Setting...................................................................................................................3-68
SMB Setting - Client Setting ..................................................................................................................3-69
SMB Setting - Print Setting ....................................................................................................................3-69
SMB Setting - Direct Hosting Setting.....................................................................................................3-70
Web Service Settings - Web Service Common Settings........................................................................3-71
Web Service Settings - Printer Settings .................................................................................................3-71
Web Service Settings - Scanner Settings ..............................................................................................3-72
Bonjour Setting.......................................................................................................................................3-73
NetWare Setting - NetWare Setting........................................................................................................3-74
NetWare Setting - NetWare Status.........................................................................................................3-75
AppleTalk Setting ...................................................................................................................................3-75
Network Fax Setting - SMTP TX Setting ................................................................................................3-76
Network Fax Setting - SMTP RX Setting................................................................................................3-76
WebDAV Settings - WebDAV Client Settings.........................................................................................3-77
WebDAV Settings - WebDAV Server Settings........................................................................................3-78
OpenAPI Setting .....................................................................................................................................3-78
TCP Socket Setting ................................................................................................................................3-79
4 Appendix
4.1 Glossary.................................................................................................................................................. 4-1
5Index
5.1 Index ....................................................................................................................................................... 5-1
C650 x-10
Page 12

Introduction
About this user’s guide
This User’s Guide contains information for using the device management functions in PageScope Web
Connection. For details on the copy functions, scanning functions, box functions, and fax functions, refer to
the respective User’s Guide.
This User’s Guide is aimed at users who already have a basic knowledge of computer and copy operations.
For Windows or Macintosh operating system and application operations, refer to the operation manual of the
respective product.
User’s Guides
This machine is provided with printed manuals and PDF manuals on the User’s Guide CD.
Printed manuals
Quick Guide [Copy/Print/Fax/Scan/Box Operations]
This manual contains operating procedures and descriptions of the most frequently used functions, allowing
the machine to immediately be used.
In addition, this manual contains notes and precautions that should be followed for safe use of the machine.
Be sure to read this manual before using the machine.
User’s Guide [Enlarge Display Operations]
This manual contains details on operating procedures in Enlarge Display mode.
Refer to this manual for details on using copy, network scanner and fax functions in Enlarge Display mode.
User’s Guide CD manuals
User’s Guide [Copy Operations]
This manual contains descriptions of the Copy mode operations and machine maintenance. Refer to this
manual for details on the paper and documents, copy procedures using convenient Application functions,
replacing consumables, and troubleshooting operations such as clearing paper misfeeds.
User’s Guide [Print Operations]
This manual contains details of the printing functions that can be specified with the standard built-in printer
controller. Refer to this manual for operating procedures on using the printing functions.
User’s Guide [Box Operations]
This manual contains operating procedures for using the user boxes on the hard disk. Refer to this manual
for details on saving data in user boxes, retrieving data from user boxes and transferring data.
User’s Guide [Network Scanner Operations]
This manual contains descriptions on specifying network settings for standard equipment and operating
procedures for scanning functions. Refer to this User’s Guide for details on using network functions and the
Scan to E-Mail, Scan to FTP and Scan to SMB operations.
User’s Guide [PageScope Web Connection Operations] (this manual)
This manual contains descriptions on the machine settings that can be specified remotely with PageScope
Web Connection from a Web browser on a computer. Refer to this manual for details on operating
procedures for using PageScope Web Connection.
User’s Guide [Fax Operations]
This manual contains descriptions of the G3 fax operations. Refer to this manual for details on using the G3
fax operations when the optional fax kit is installed.
In order to use the fax functions, the optional fax kit must be purchased separately.
User’s Guide [Network Fax Operations]
This manual contains details on the network fax functions. Refer to this manual for operating procedures on
Internet faxing and IP address faxing.
User’s Guide [Fax Driver Operations]
This manual contains details of the fax driver functions that can be used to send a fax directly from a
computer.
Refer to this manual for operating procedures on using the PC-FAX functions.
In order to use the fax functions, the optional fax kit must be purchased separately.
C650 x-11
Page 13
Introduction
User’s Guide [Advanced Function Operations]
This User’s Guide describes overview and usage of functions that become available by registering the
optional license kit and enabling its function, and functions that become available by connecting the MFP
with applications.
In order to use the functions effectively, please read this User’s Guide.
The following models support the advanced function.
bizhub C650/C550/C451/C353/C253/C203
Notations
Product name
bizhub C650 This machine, C650
Microsoft Windows Windows
Using this user’s guide
C650 x-12
Page 14

Overview
1Overview
1.1 Using PageScope Web Connection
PageScope Web Connection is a device management utility supported by the HTTP server integrated into
the printer controller. Using a Web browser on a computer connected to the network, machine settings can
be specified and the status of the machine can be checked.
In addition to the convenience of specifying some settings from your computer instead of with the machine’s
control panel, text can easily be typed in.
System requirements
Item Specification
Network Ethernet (TCP/IP)
Computer applications Compatible Web browsers:
Microsoft Internet Explorer Ver. 6 or later (JavaScript and Cookies enabled)
Netscape Navigator Ver. 7.02 or later (JavaScript and Cookies enabled)
Mozilla Firefox Ver. 1.0 or later (JavaScript and Cookies enabled)
®
Adobe
Flash® Player (plug-in version 7.0 or later required if "Flash" is selected as the
display format)
1
Access PageScope Web Connection
PageScope Web Connection can be used from a Web browser.
1 Start the Web browser.
2 In the "Address" bar, type the IP address of this machine, and then press the [Enter] key.
– http://<IP_address_of_machine>/
Example: If the IP address of this machine is 192.168.1.20
http://192.168.1.20/
– If the machine is set to use IPv6, type in an IPv6 address within [ ] when using a browser other than
Internet Explorer.
http://[IPv6_address_of_machine]/
Example: If the IPv6 address of this machine is fe80::220:6bff:fe10:2f16
http://[fe80::220:6bff:fe10:2f16]/
– If the machine is set to use IPv6 and Internet Explorer is being used, first edit the hosts file to include
"fe80::220:6bff:fe10:2f16IPv6 IPv6_MFP_1", and then specify the URL with the domain name.
The User mode page that appears is for a user who has logged on.
!
Detail
If user authentication settings have been specified, the user name and password must be entered. For
details, refer to "Logging on as a registered user" on page 1-9.
For details on specifying the IP address of this machine, refer to the User’s Guide [Network Scanner
Operations].
PageScope Web Connection has Flash and HTML display formats. For details, refer to "Logging on and
logging off" on page 1-5.
C650 1-1
Page 15

Overview
1
Web browser cache
The most recent information may not appear in the PageScope Web Connection pages because older
versions of pages are saved in the cache for the Web browser. In addition, problems may occur when the
cache is used.
When using PageScope Web Connection, disable the cache for the Web browser.
2
Reminder
The menus and commands may vary depending on the Web browser version. For details, refer to the
Help for the Web browser.
If the utility is used with the cache enabled and Administrator mode was timed out, the timeout page
may appear even when PageScope Web Connection is accessed again. In addition, since the
machine’s control panel remains locked and cannot be used, the machine must be restarted with the
main power switch. In order to avoid this problem, disable the cache.
With Internet Explorer
1 On the "Tools" menu, click "Internet Options".
2 On the General tab, click the [Settings] button under "Temporary Internet files".
3 Select "Every visit to the page", and then click the [OK] button.
With Netscape Navigator
1 On the "Edit" menu, click "Preferences".
2 Under "Category" on the left, click "Advanced", then "Cache".
3 Under "Document in cache is compared to document on network:", select "Every time".
With Mozilla Firefox
1 On the "Tools" menu, click "Options".
2 Click "Privacy", and then click the [Settings] button at the bottom of the dialog box.
3 Select the "Cache" check box under "Private data", select the "Clear private data when closing Firefox"
check box under "Settings", and then click the [OK] button.
C650 1-2
Page 16
Overview
1
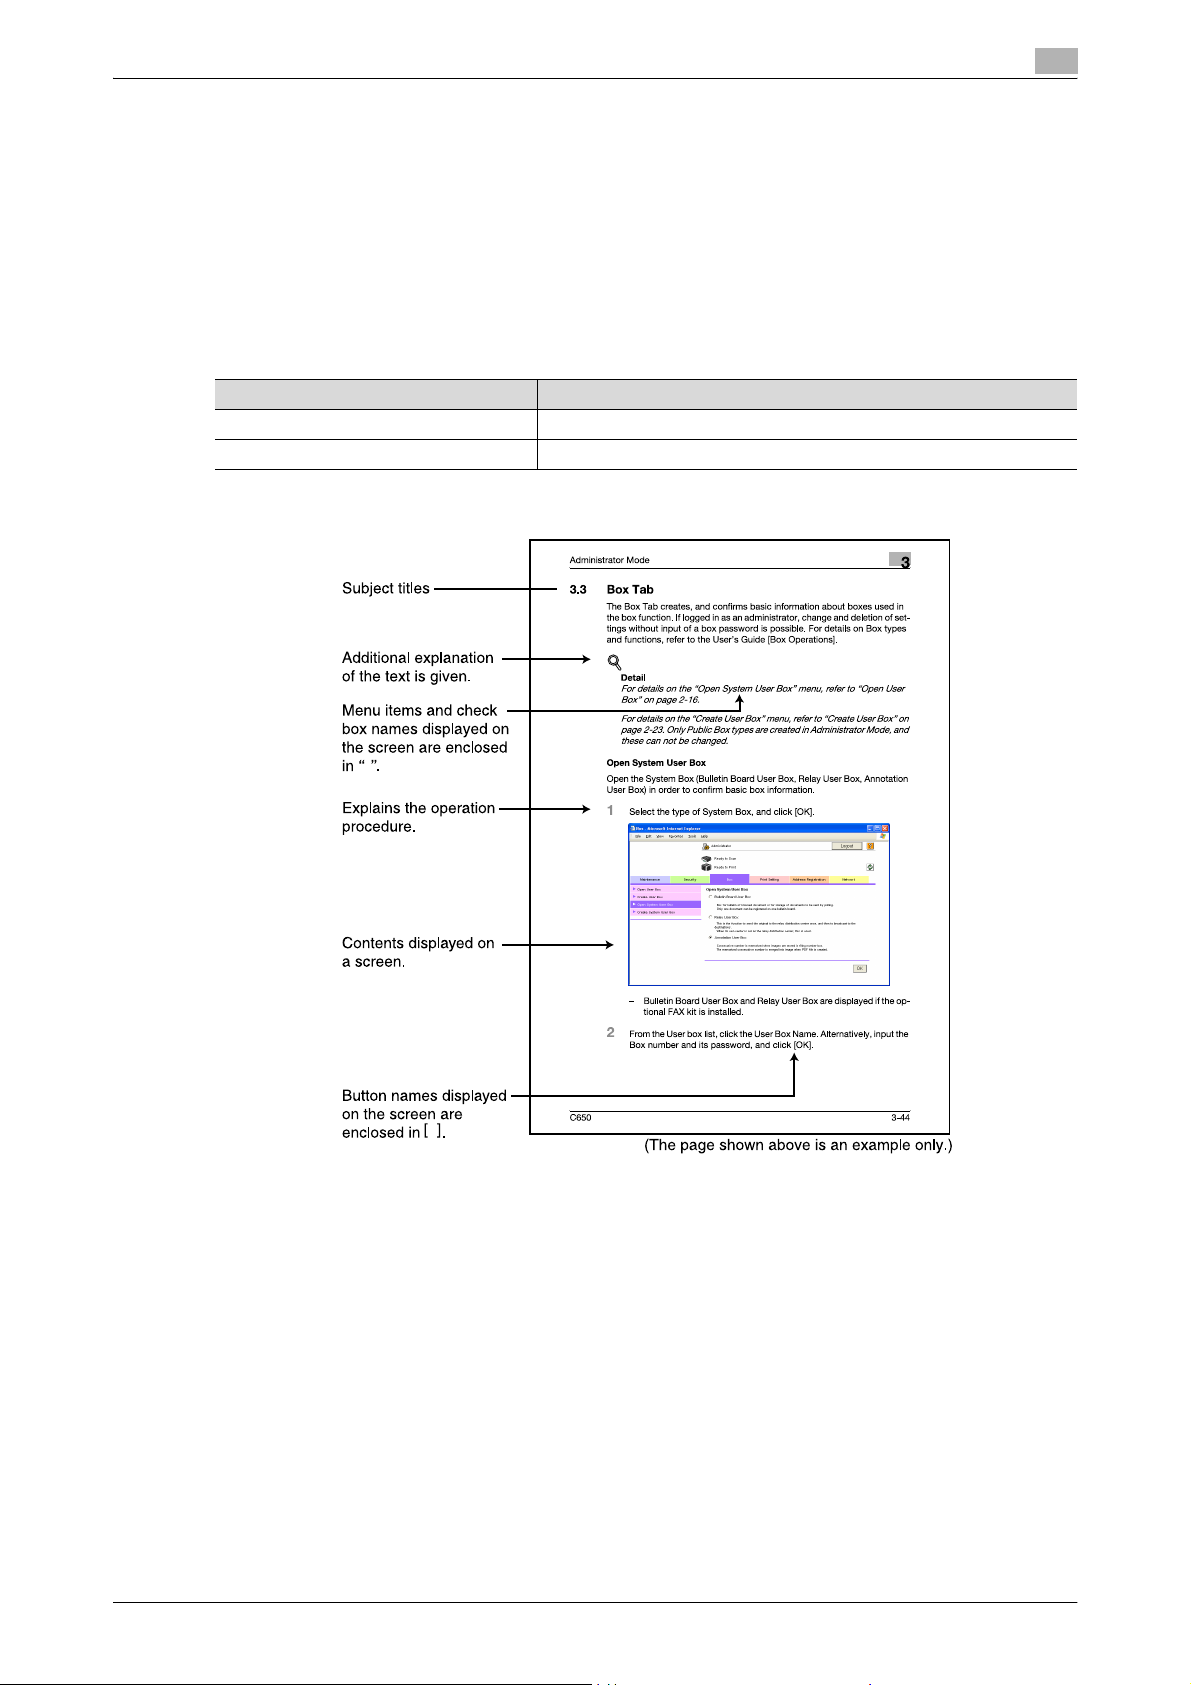
Structure of pages
The pages of PageScope Web Connection are constructed as shown below.
34
1
2
10
11
12
No. Item Description
1 Konica Minolta logo Click the logo to go to the Konica Minolta Web site at the following URL.
2 PageScope Web Connec-
tion logo
3 Logon user name Displays the icon of the current mode and the name of the user who is logged
4 Status display Displays icons and messages indicating the status of the printer and scanner
5 Message display Displays the operating status of the machine.
6 [Logout] button Click to log off from the current mode.
7 [Change Password] button Click to go to the Change User Password page. (Refer to "Change User Pass-
8 Help button Click to display the page specified as the online manual Web page. For details
9 Refresh button Click to update the displayed page.
10 Tabs Select the category of the page to be displayed. The following tabs are dis-
11 Menu Information and settings for the selected tab are listed. The menu that appears
12 Information and settings Displays details of the item selected in the menu.
http://konicaminolta.com
This logo is omitted from this manual in the rest.
Click the logo to display the version information for PageScope Web Connection.
This logo is omitted from this manual in the rest.
on (public, administrator, user box administrator, registered user or account).
Click the user name to display the name of the user who is logged on.
sections of the machine. If an error occurred, click the icon to display the error
information (consumables, paper trays and registered user information) so that
the status can be checked.
word" on page 2-4.) This button appears only in User mode when a registered
user is logged on.
This button appears only if user authentication settings have been specified for
machine authentication.
on specifying the Web page, refer to "Online Assistance" on page 3-7.
played in User mode.
•Information
•Job
•Box
•Direct Print
• Store Address
differs depending on the tab that is selected.
6
5
7
8
9
C650 1-3
Page 17

Overview
1
!
Detail
The page that appears immediately after accessing the machine with PageScope Web Connection is
called the User mode page. This page appears when a user has logged on.
If user authentication settings have been specified, the user name and password must be entered. For
details, refer to "Logging on as a registered user" on page 1-9.
The PageScope Web Connection pages appear differently depending on the options installed on the
machine and the specified machine settings.
For details on logging on as a different user or as the administrator, refer to "Logging on and logging
off" on page 1-5.
C650 1-4
Page 18
Overview
1.2 Logging on and logging off
Logon and logout operations
When the machine is accessed with PageScope Web Connection, the logon page appears if user
authentication and account track settings have been specified on the machine. If user authentication and
account track settings have not been specified, the page for a public user appears. In order to log on as a
different user or as an administrator after logon, it is necessary to log off first, then log on again.
When user authentication and account track settings are not specified
The user logs on automatically as a public user.
1
To log on as an administrator, log off.
C650 1-5
Page 19

Overview
1
Log on again as an administrator.
When user authentication and account track settings are specified
The User Authentication/Account Track screen appears. Enter the required information to log on.
To log on as a different user or an administrator, log off.
C650 1-6
Page 20
Overview
1
Log on again.
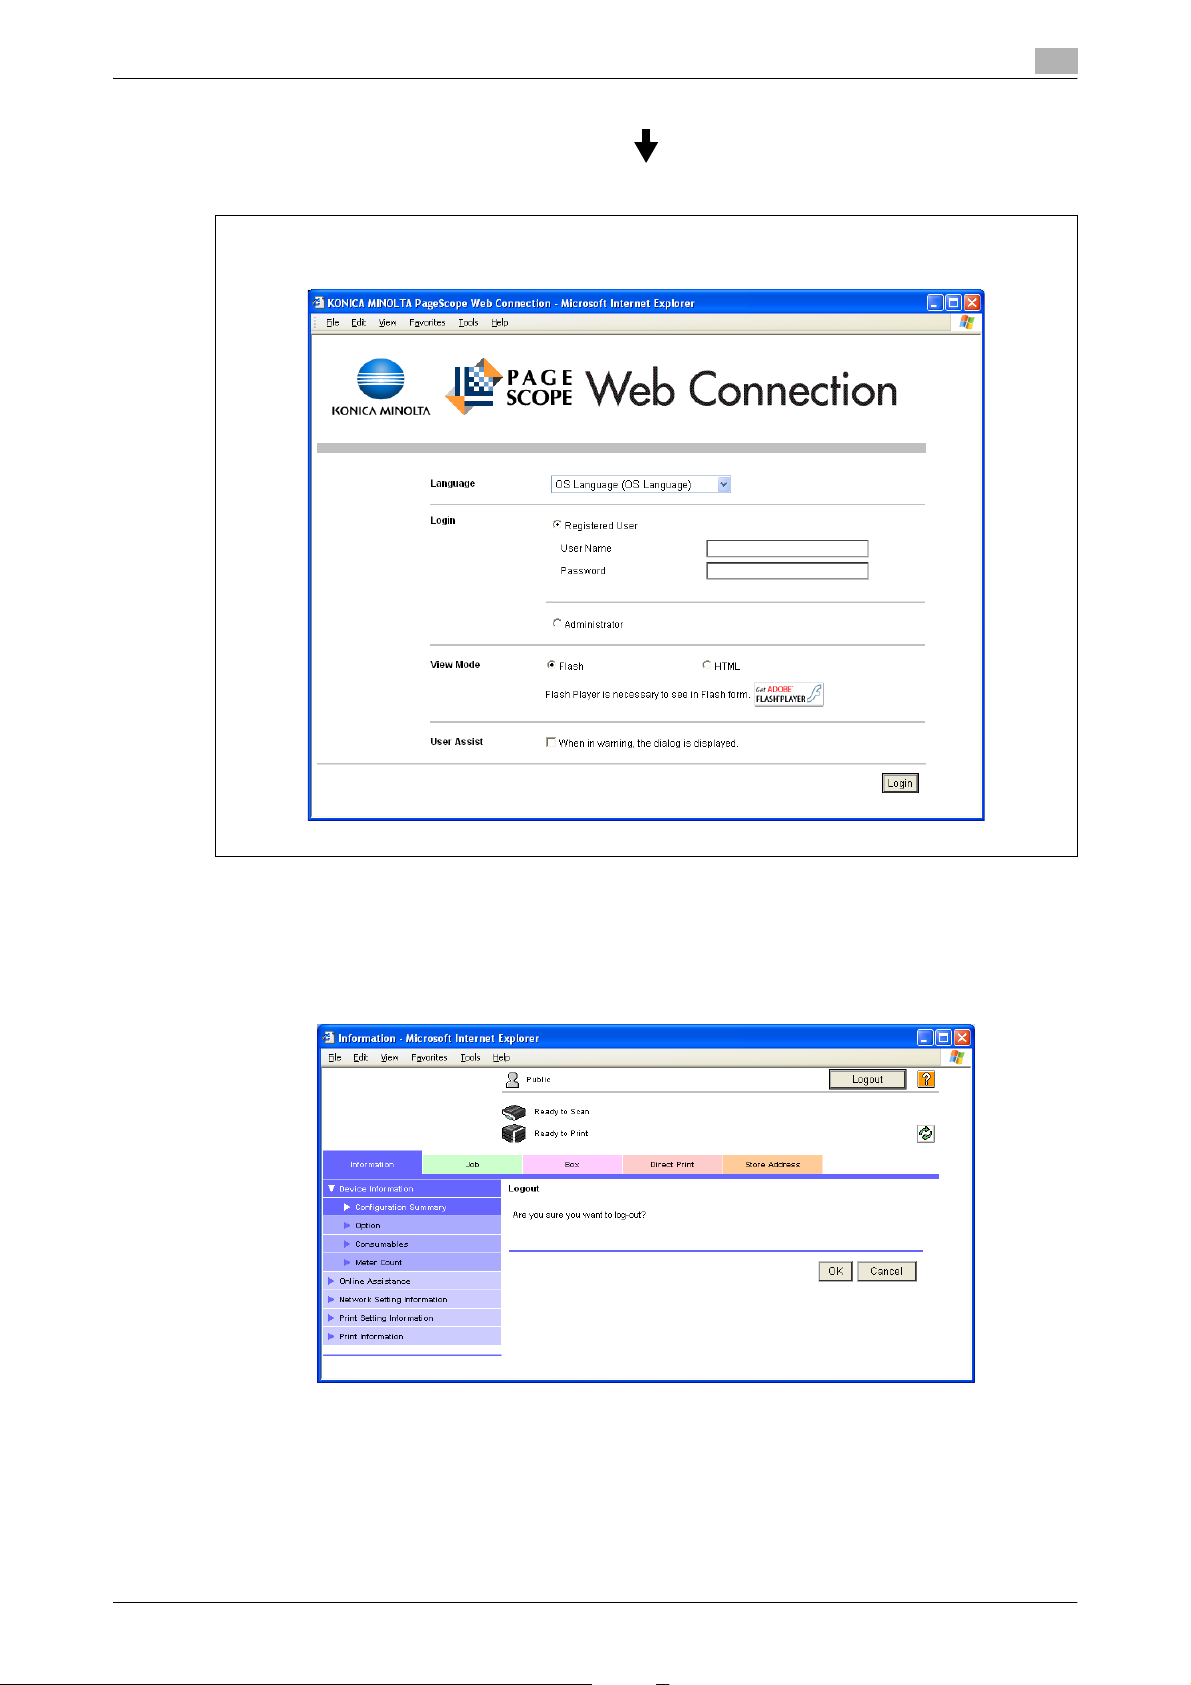
Logging off
When the [Logout] in the upper right screen is clicked, a logoff confirmation screen appears. Click [OK], and
the logon page appears again.
C650 1-7
Page 21
Overview
1
!
Detail
The logon page that appears differs depending on the authentication settings specified on the machine.
If a timeout occurs because no operation is performed for a set length of time while logged on or if the
authentication settings are changed from the machine’s control panel while logged on to User mode,
you will automatically be logged off.
For details on specifying the timeout periods for User mode and Administrator mode, refer to "Auto
Logout" on page 3-34.
Logging on
Depending on the logon method used, PageScope Web Connection will be in User mode or Administrator
mode. Depending on the specified user authentication and user box administrator settings, it is also possible
to log on to User mode as a user box administrator or an administrator.
!
Detail
If control panel settings have been specified to allow user box administrators, it is possible to log on to
PageScope Web Connection as a user box administrator. For details on the user box administrator
settings, permissions and password, refer to the User’s Guide [Box Operations].
When logged on to User mode as an administrator, jobs that could not be deleted in Administrator
mode can be deleted.
Options that can be selected when logged on to PageScope Web Connection
If necessary, select the display language and format.
If "When in warning, the dialog is displayed." check box is selected, warning messages appear during
operation after logon.
If "Flash" is selected as the display format, the following items are displayed using Flash.
- Status icons and messages
- Status of "Paper Tray" in the page displayed when "Device Information" is selected on the Information
tab.
- Tab on the Job tab
Flash Player is required in order to use the "Flash" features.
If screen reader software is used, we recommend selecting "HTML" as the display format. In an IPv6
environment, select "HTML".
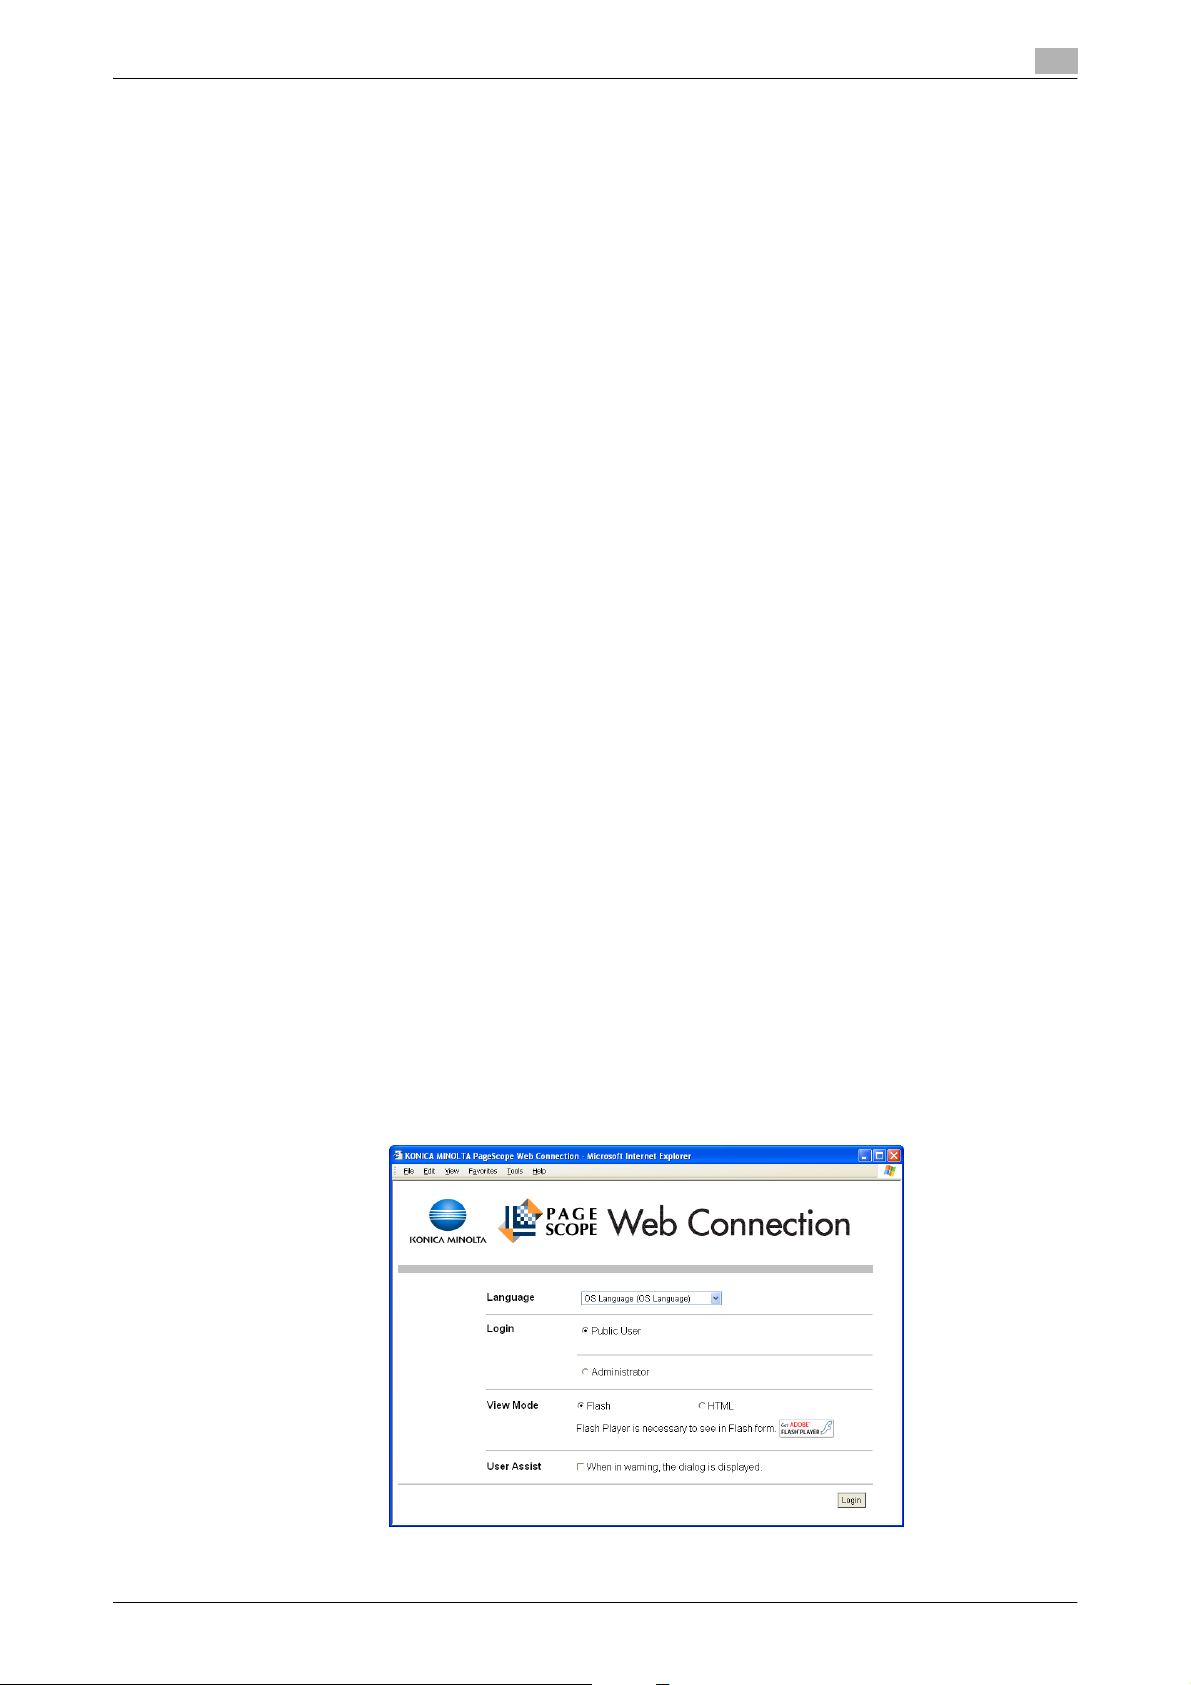
Logging on as a public user
If user authentication settings have not been specified on the machine, logon will be as a public user. In the
logon page, select "Public User", and then click the [Login] button.
C650 1-8
Page 22
Overview
1
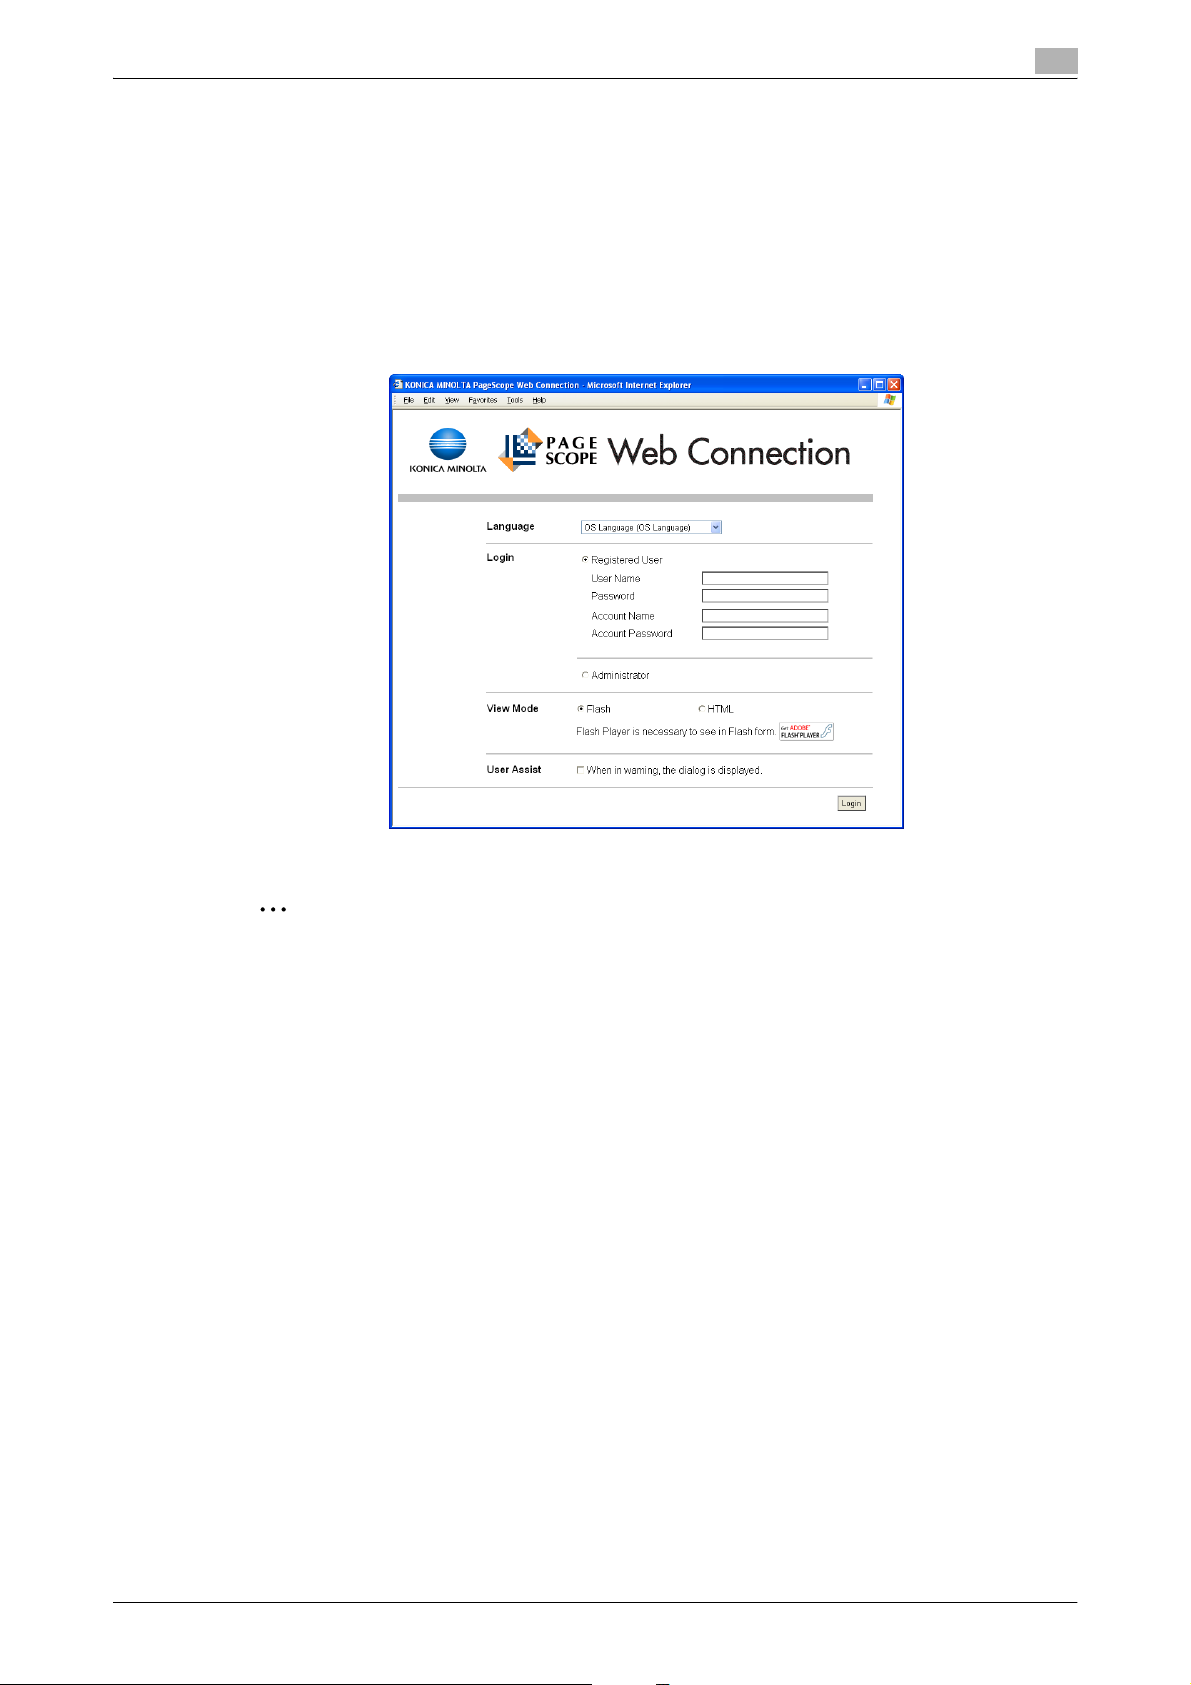
Logging on as a registered user
If user authentication settings have been specified on the machine, the name and password for a registered
user is required to log on. In the logon page, enter the user name and the password, and then click the [Login]
button.
- If account track settings have been specified, type in the account name and password.
- To select a user name from a list, click the [User List] button.
- If external server authentication is selected, select a server.
- To log on to PageScope Web Connection as the administrator in User mode, select "Administrator " -
"Administrator (User Mode)", and then enter the administrator password.
2
Reminder
If "Prohibited Functions When Authentication Error" in Administrator mode is set to "Mode 2" and a user
enters an incorrect password the specified number of times, that user is locked out and can no longer
use the machine. Contact the administrator to cancel operation restrictions.
The [User List] button can be used when "User Name List" is specified as "ON".
!
Detail
If authentication is performed with PageScope Authentication Manager, contact your server
administrator for log on.
C650 1-9
Page 23
Overview
1
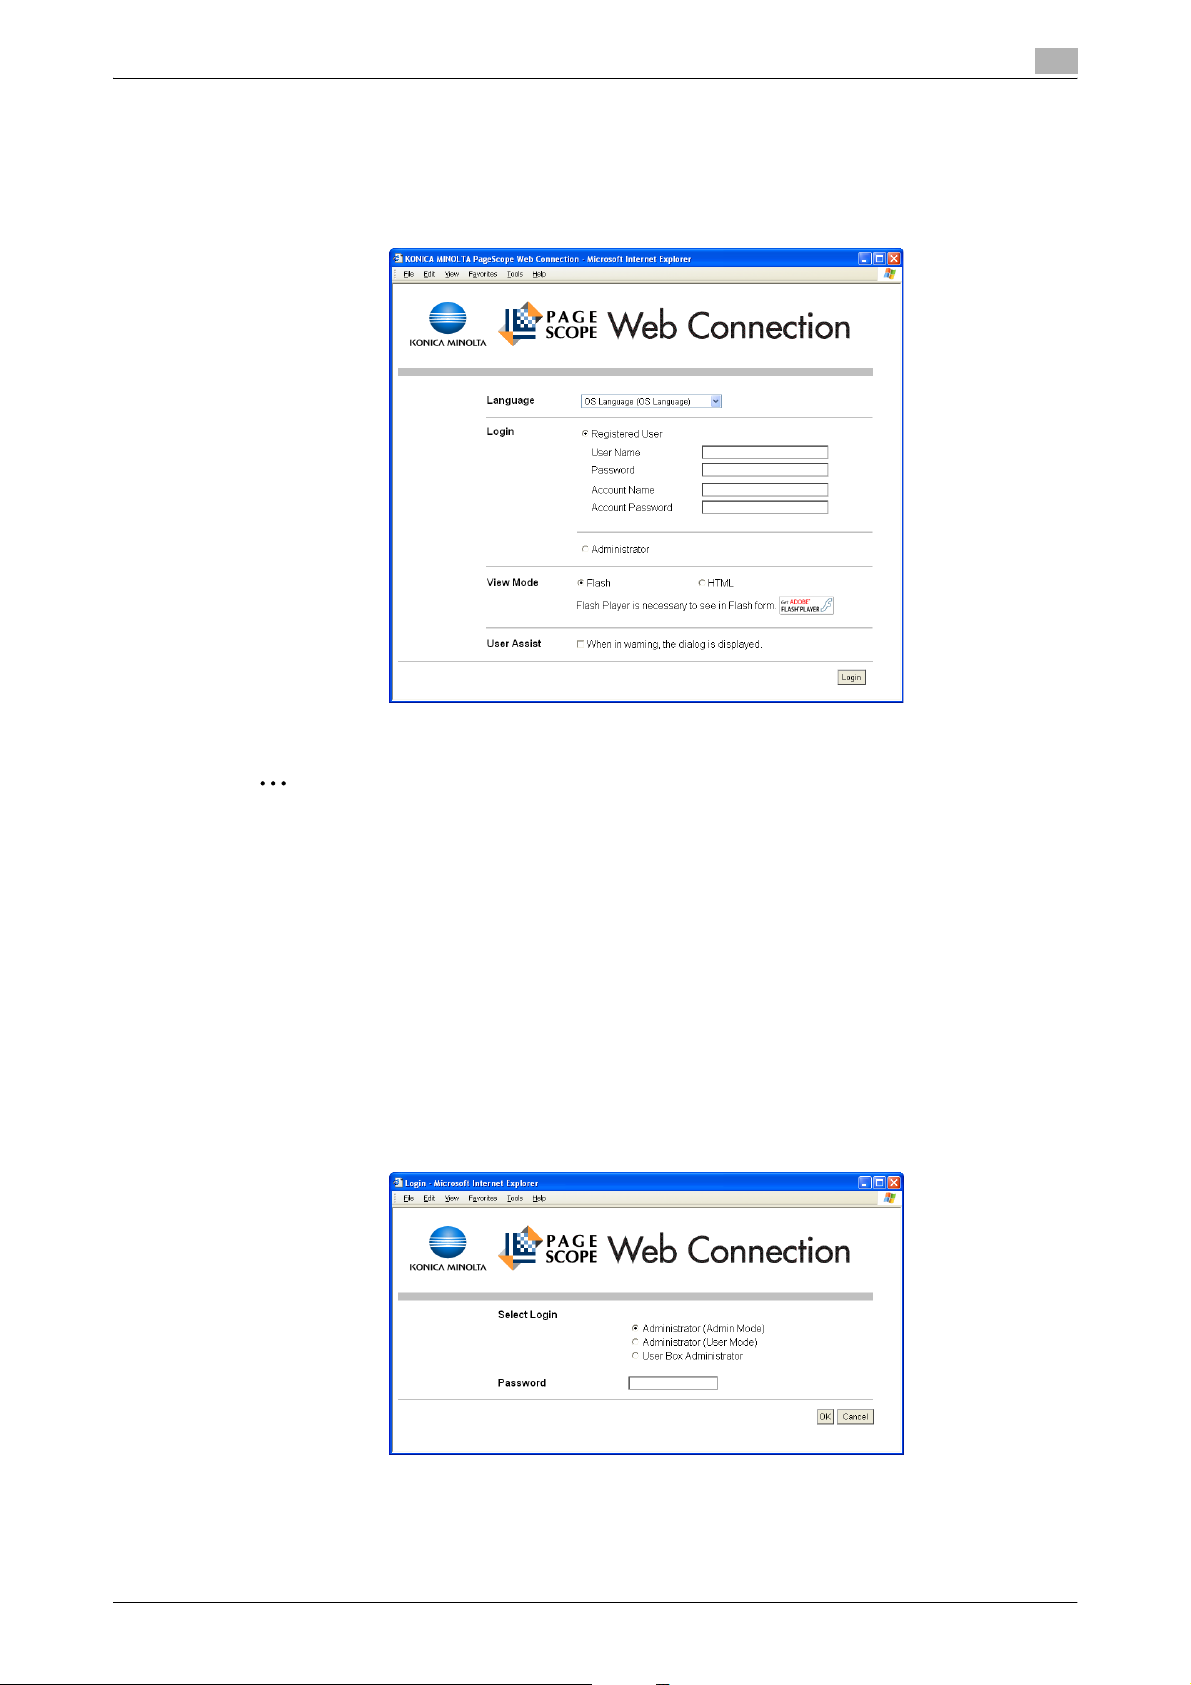
Logging on to Administrator mode
In order to specify system and network settings, log on to Administrator mode. In the logon page, select
"Administrator" and then click the [Login] button, enter the administrator password, and then click the [OK]
button.
2
Note
When logged on to Administrator mode, the control panel of the machine is locked and cannot be used.
Depending on the status of the machine, you may not be able to log on to Administrator mode.
If "Prohibited Functions When Authentication Error" in Administrator mode is set to "Mode 2" and an
incorrect password is entered the specified number of times, it is no longer possible to log on to
Administrator mode. For details on the "Prohibited Functions When Authentication Failed" parameter,
refer to the User’s Guide [Copy Operations].
The password input page that appears differs depending on the settings specified on the machine.
Logging on as a user box administrator
If user authentication settings have been specified on the machine, a user can log on to User mode as an
administrator to delete jobs. In addition, if control panel settings have been specified to allow user box
administrators, it is possible to log on to User mode as a user box administrator.
% In the login page, select "Administrator", and then click the [Login] button.
– To log on to PageScope Web Connection as the user box administrator in User mode, select "User
Box Administrator", and then enter in the password for the user box administrator.
C650 1-10
Page 24

Overview
1
2
Reminder
If "Prohibited Functions When Authentication Error" in Administrator mode is set to "Mode 2" and an
incorrect password is entered the specified number of times, it is no longer possible to log on to
Administrator mode. For details on the "Prohibited Functions When Authentication Failed" parameter,
refer to the User’s Guide [Copy Operations].
The password input page that appears differs depending on the settings specified on the machine.
C650 1-11
Page 25
User mode
2 User mode
The User mode provides functions for checking and operating the machine on a user level. You can select
from five tabs (Information, Job, Box, Direct Print, and Store Address). This section contains descriptions of
the items in the menu that appears on the left side of the page when each User mode tab is clicked.
!
Detail
For details on the functions, refer to the User’s Guide [Box Operations], User’s Guide [Network Scanner
Operations] and the User’s Guide [Print Operations].
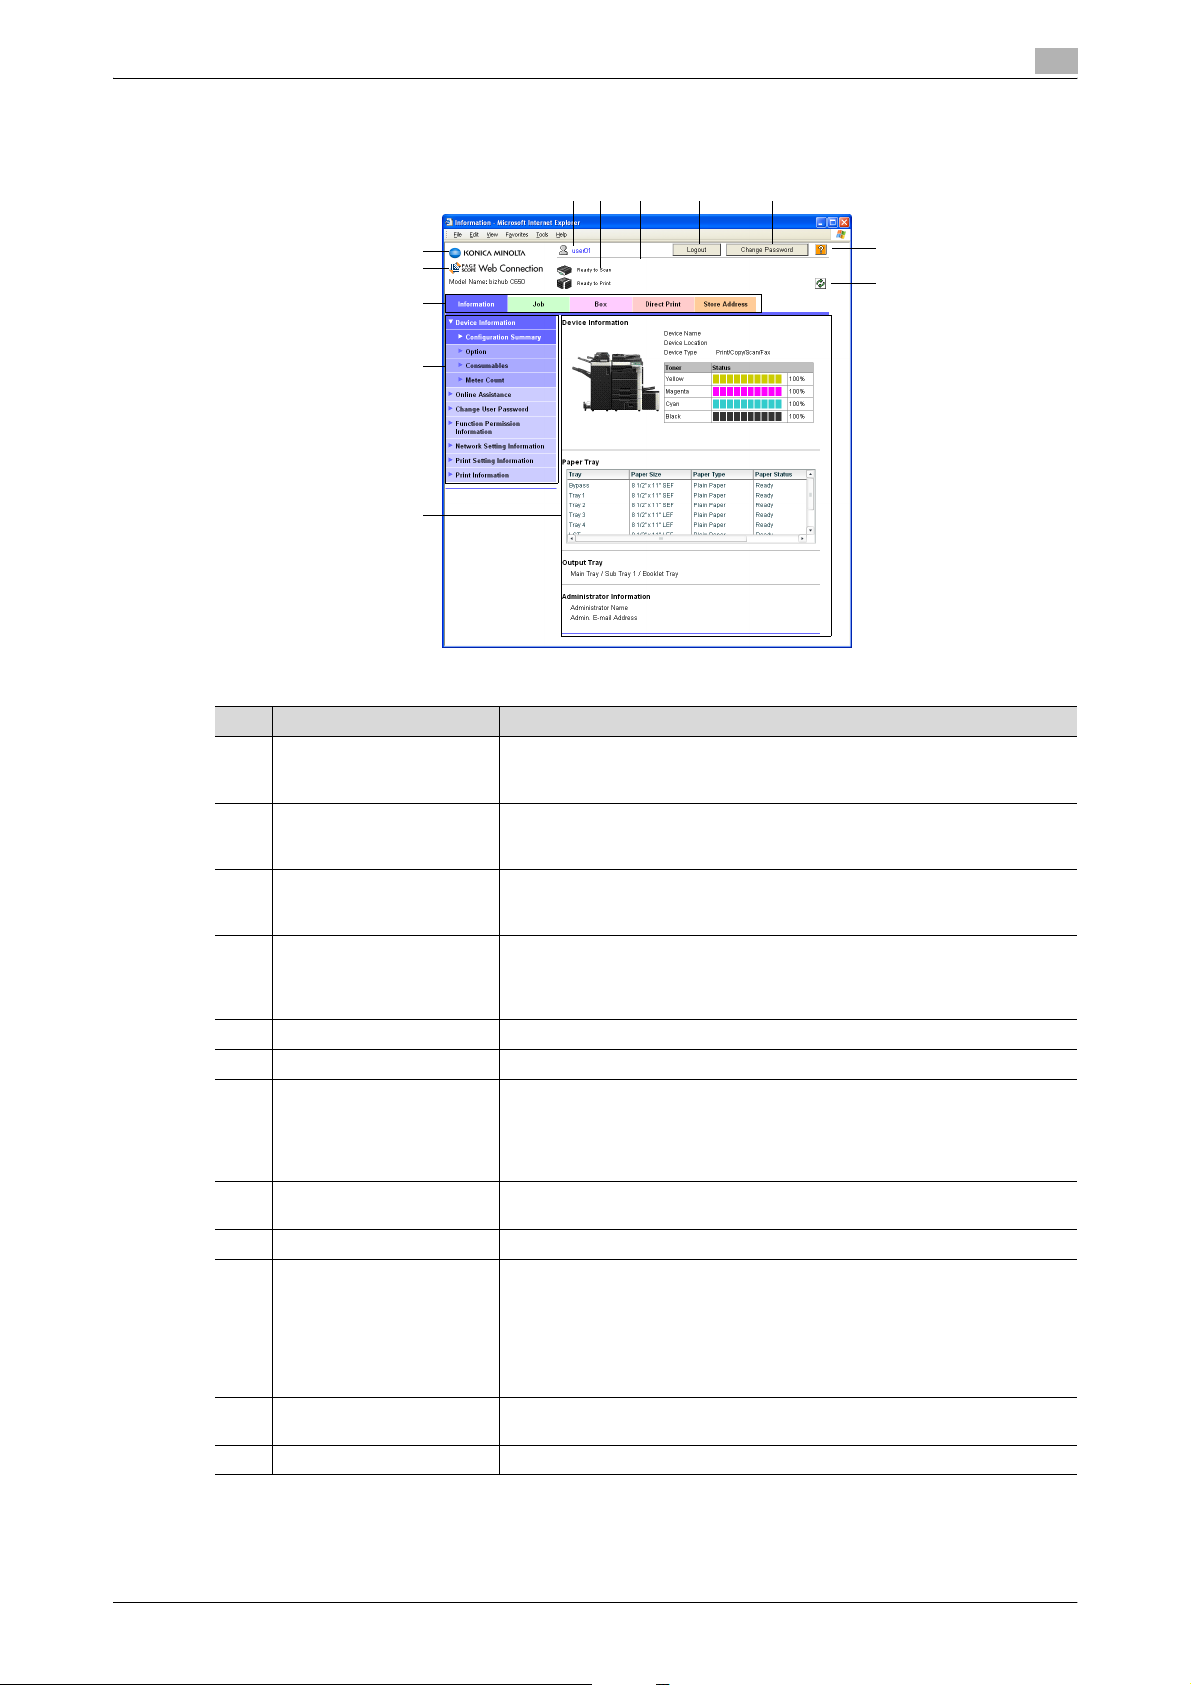
2.1 Information tab
On the Information tab, information and settings concerning the system configuration of the machine are
displayed.
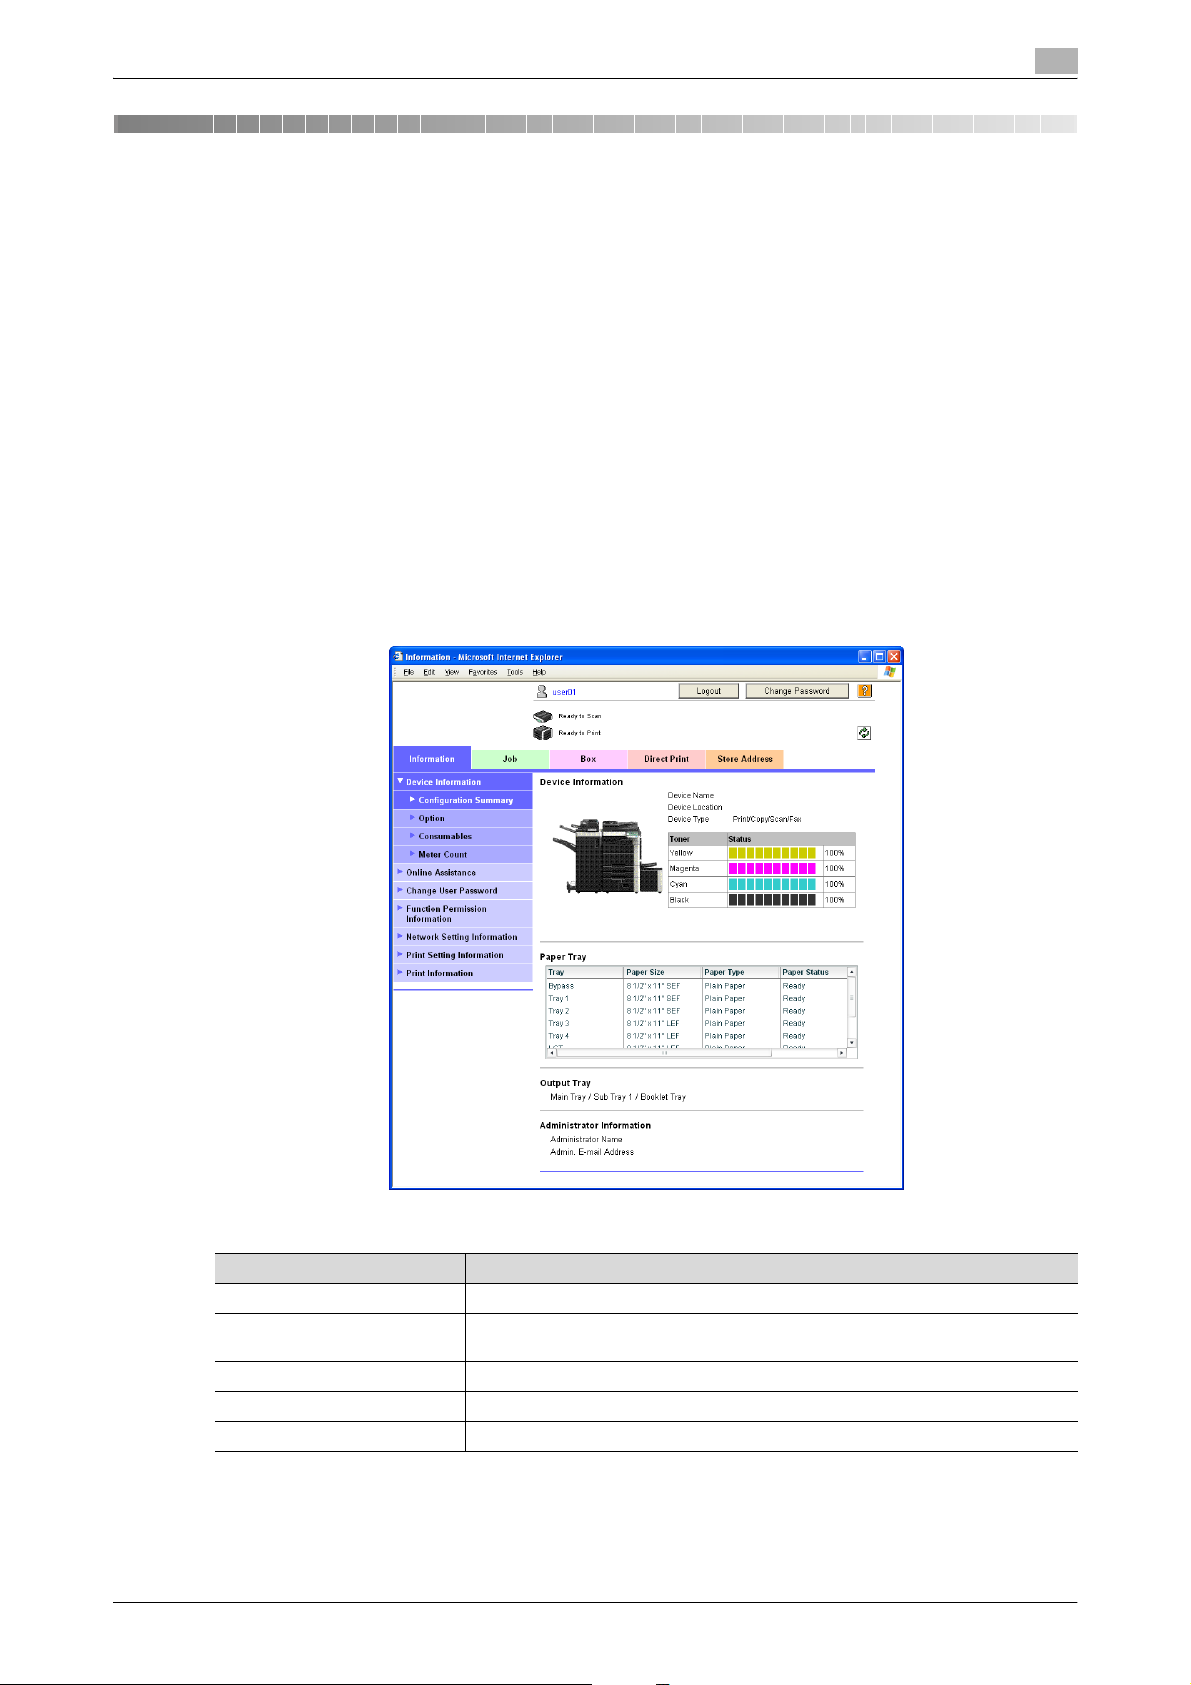
Device Information - Configuration Summary
The system configuration and status of the machine are displayed. This is the first page that appears when
the machine is accessed with PageScope Web Connection.
2
Item Description
Device Information Displays device information and the toner status.
Paper Tray Displays the name of each installed paper tray, the size and type of the loaded pa-
Output Tray Displays the name of each installed output tray.
Administrator Information Displays the administrator information.
Unavailable Information Displays the information for paper trays and functions that cannot be used.
C650 2-1
per, the remaining paper quantities and the paper capacities.
Page 26
User mode
2
!
Detail
If "HTML" was selected as the display format during logon, the [Detail] button appears under "Paper
Tray". Select a paper tray and click the [Detail] button to view detailed information about the selected
paper tray.
For details on displaying information about unavailable features, contact your technical representative.
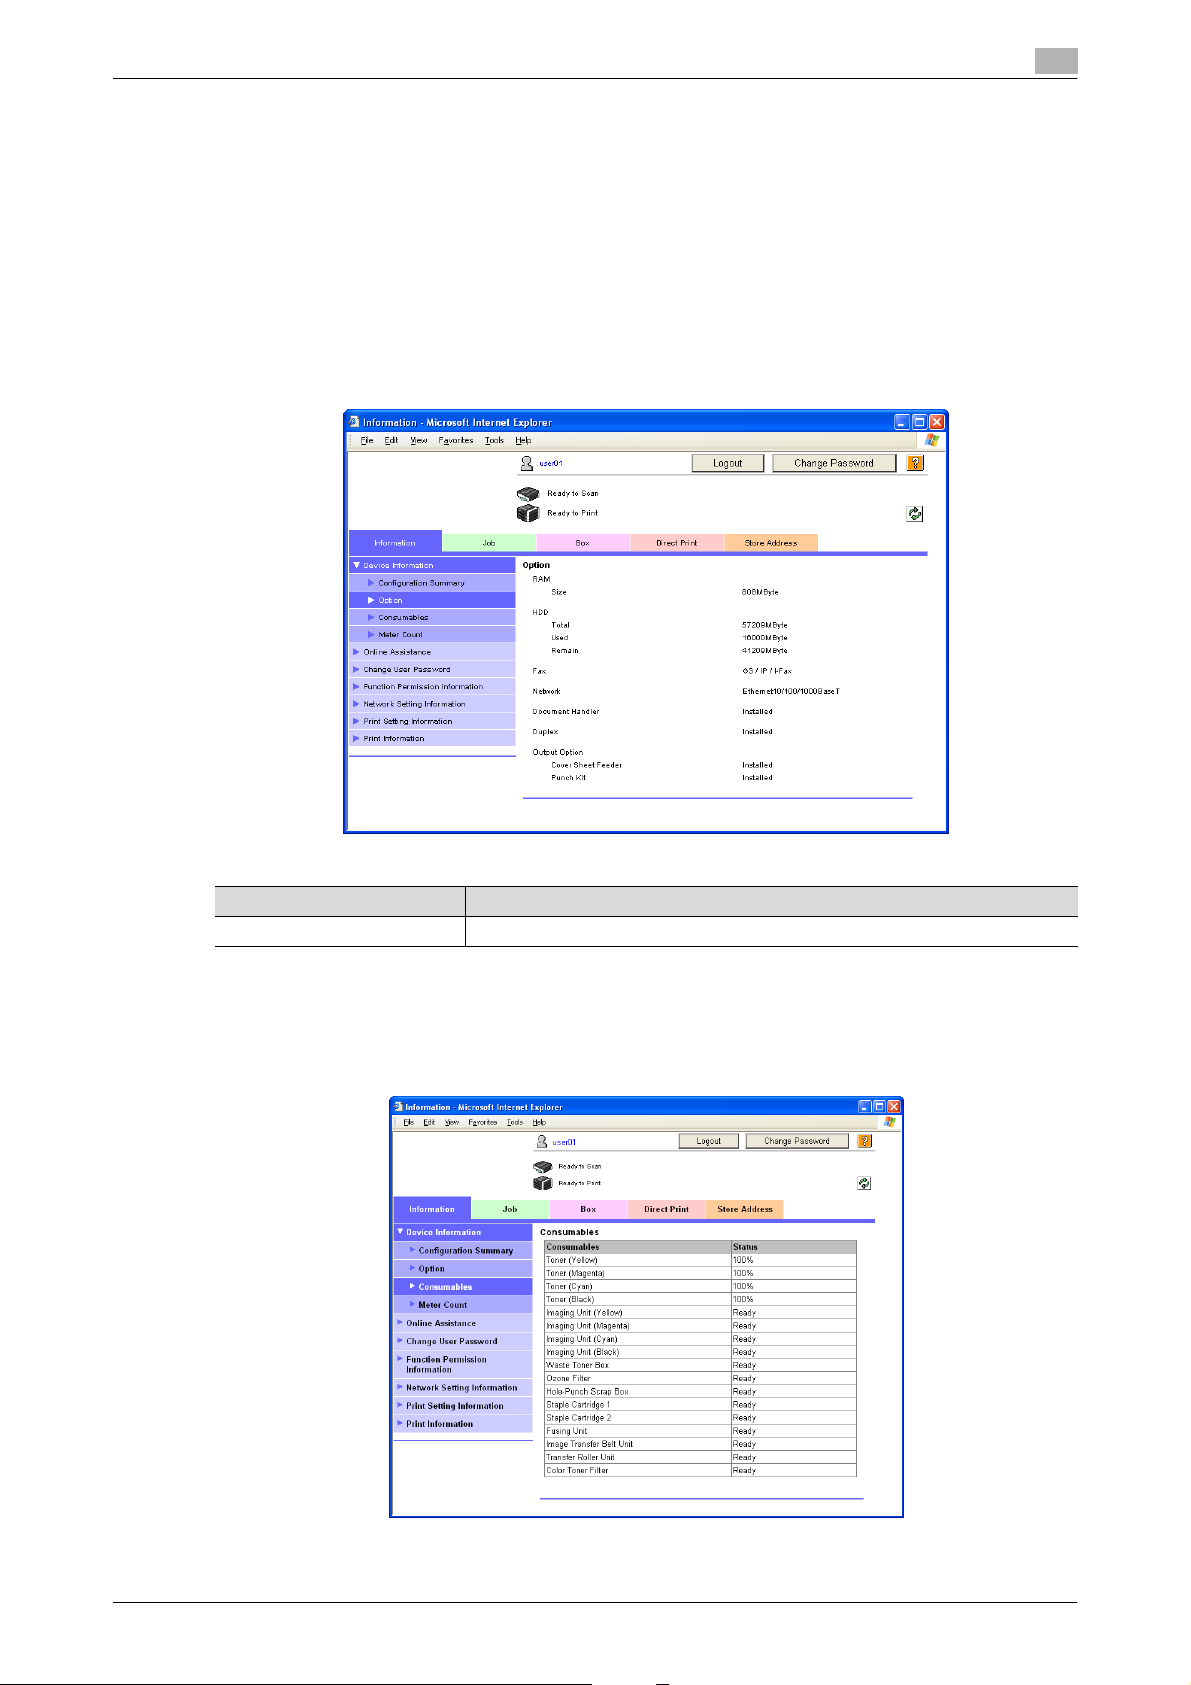
Device Information - Option
The size of the machine’s memory, the hard disk status, and the installation status of options can be
displayed.
Item Description
RAM, HDD, Network Displays information on the memory, hard disk drive and network.
The installed options are displayed.
Device Information - Consumables
Information about consumables for the machine is displayed.
C650 2-2
Page 27
User mode
Item Description
Toner (Yellow/Magenta/Cyan/Black)
Imaging Unit (Yellow/Magenta/Cyan/Black)
Waste Toner Box
Ozone Filter
Hole-Punch Scrap Box
Staple Cartridge (1, 2)
Fusing Unit
Image Transfer Belt Unit
Transfer Roller Unit
Color Toner Filter
Displays information for each of the items.
2
Note
The information that is displayed differs depending on the options that are installed.
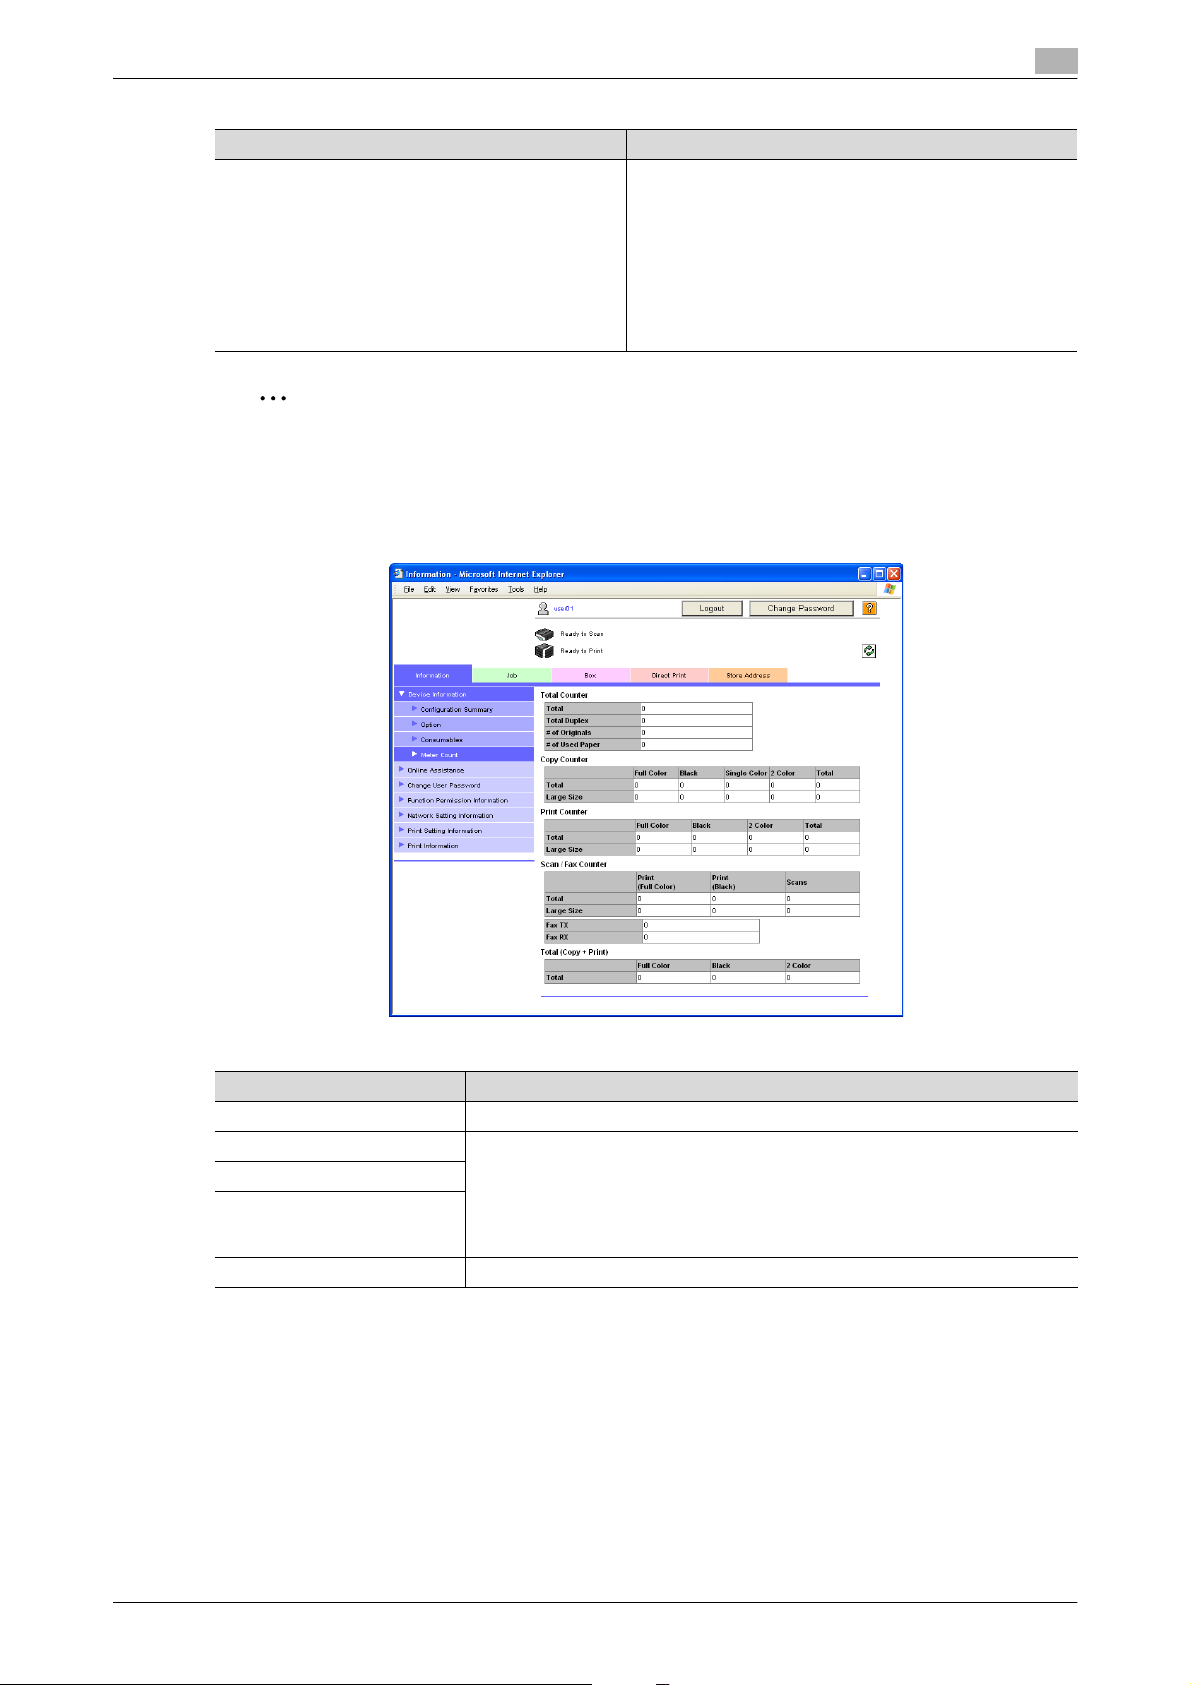
Device Information - Meter Count
Counters managed by the machine can be displayed.
2
Item Description
Total Counter Displays totals for the output counters (Copy, Print, Scan/Fax).
Copy Counter Displays the various counters.
Print Counter
Scan Counter (appears as
Scan/Fax Counter if the optional fax kit has been installed)
Total (Copy + Print) Displays the counters for the Color settings.
C650 2-3
Page 28
User mode
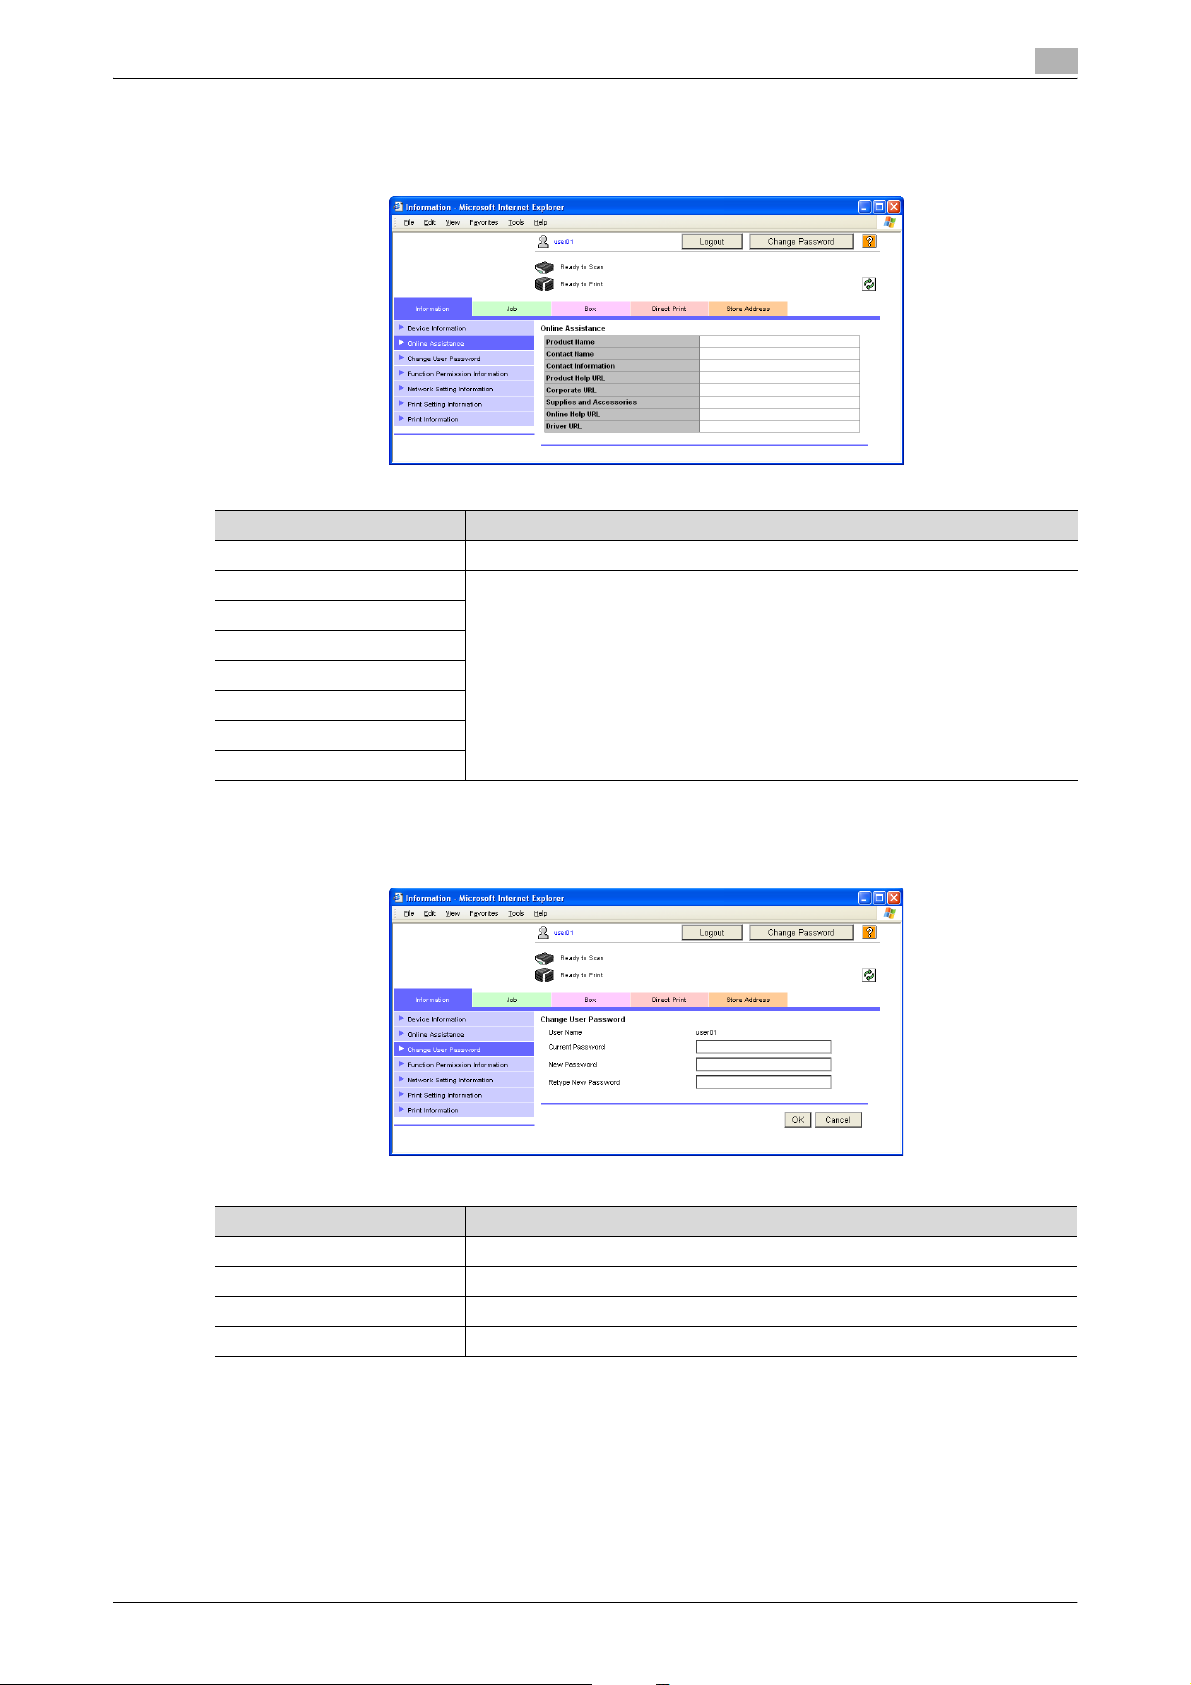
Online Assistance
Support information for the machine can be displayed.
Item Description
Product Name Displays the product name.
Contact Name Displays the information entered on the page that appeared after clicking "Online
Contact Information
Product Help URL
Corporate URL
Supplies and Accessories
Online Help URL
Driver URL
Assistance" in the menu on the Maintenance tab in Administrator mode.
2
Change User Password
The password for the user who is logged on can be changed.
Item Description
User Name Displays the name of user who is logged on.
Current Password Type in the current password.
New Password Type in the new password (up to 64 characters, excluding ” and +).
Retype New Password Type in the new password again for confirmation.
!
Detail
"Change User Password" appears only if user authentication settings have been specified for machine
authentication.
C650 2-4
Page 29
User mode
2
2
Reminder
If "Password Rules" is set to "Enable", only a password containing 8 digits can be specified.
If a user password containing less than 8 characters has already been registered, change the password
so that it contains 8 characters before setting "Password Rules" to "Enable". For details on the
password rules, refer to the User’s Guide [Copy Operations].
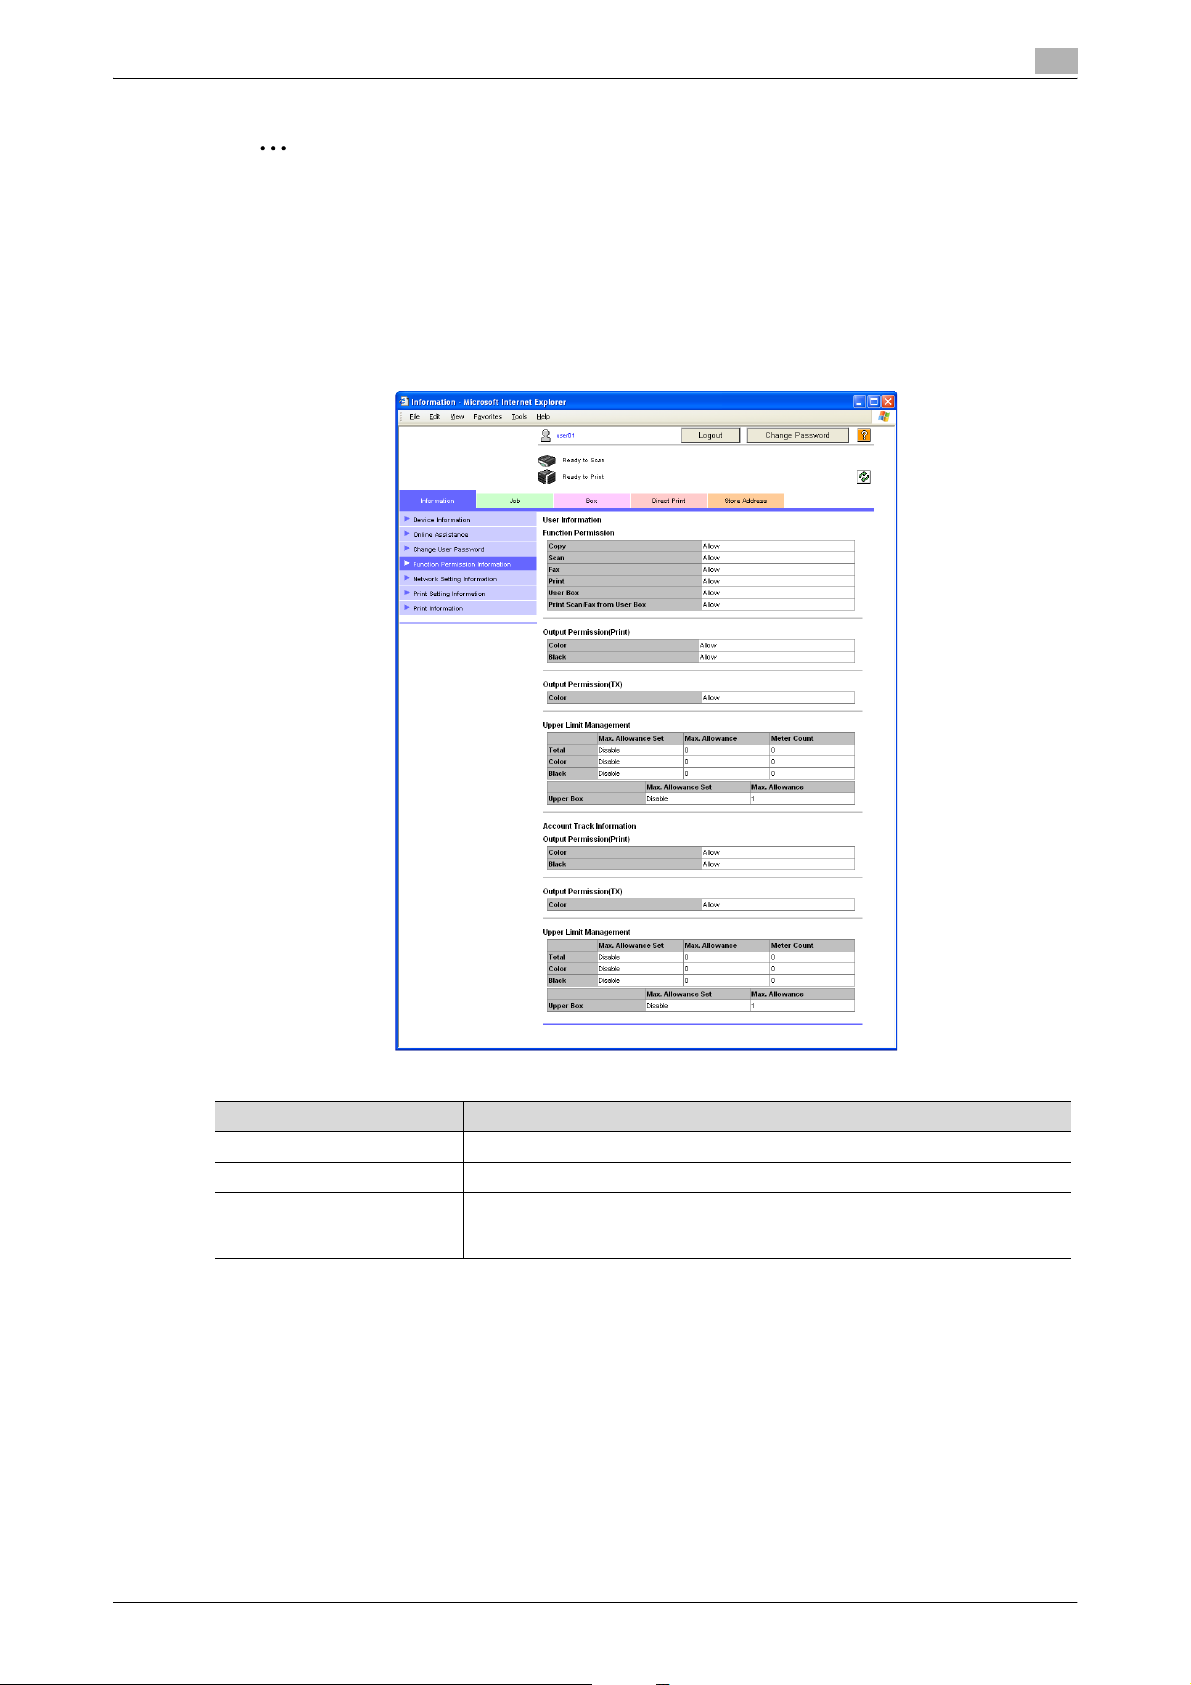
Function Permission Information
Information on operations permitted by users and accounts can be displayed.
Item Description
Function Permission* Displays whether or not each machine operation can be used.
Output Permission (Print/TX) Displays whether or not each machine output operation can be used.
Upper Limit Management Displays the maximum limits and current counter values.
* This is only displayed in user registration information.
"Meter Count" does not appear if authentication is performed with PageScope Authentication Manager.
!
Detail
If user authentication and account track settings have been specified on the machine, "Function
Permission Information" appears in the menu. If user authentication or account track settings have not
been specified, only the specified function permissions are displayed.
C650 2-5
Page 30
User mode
2
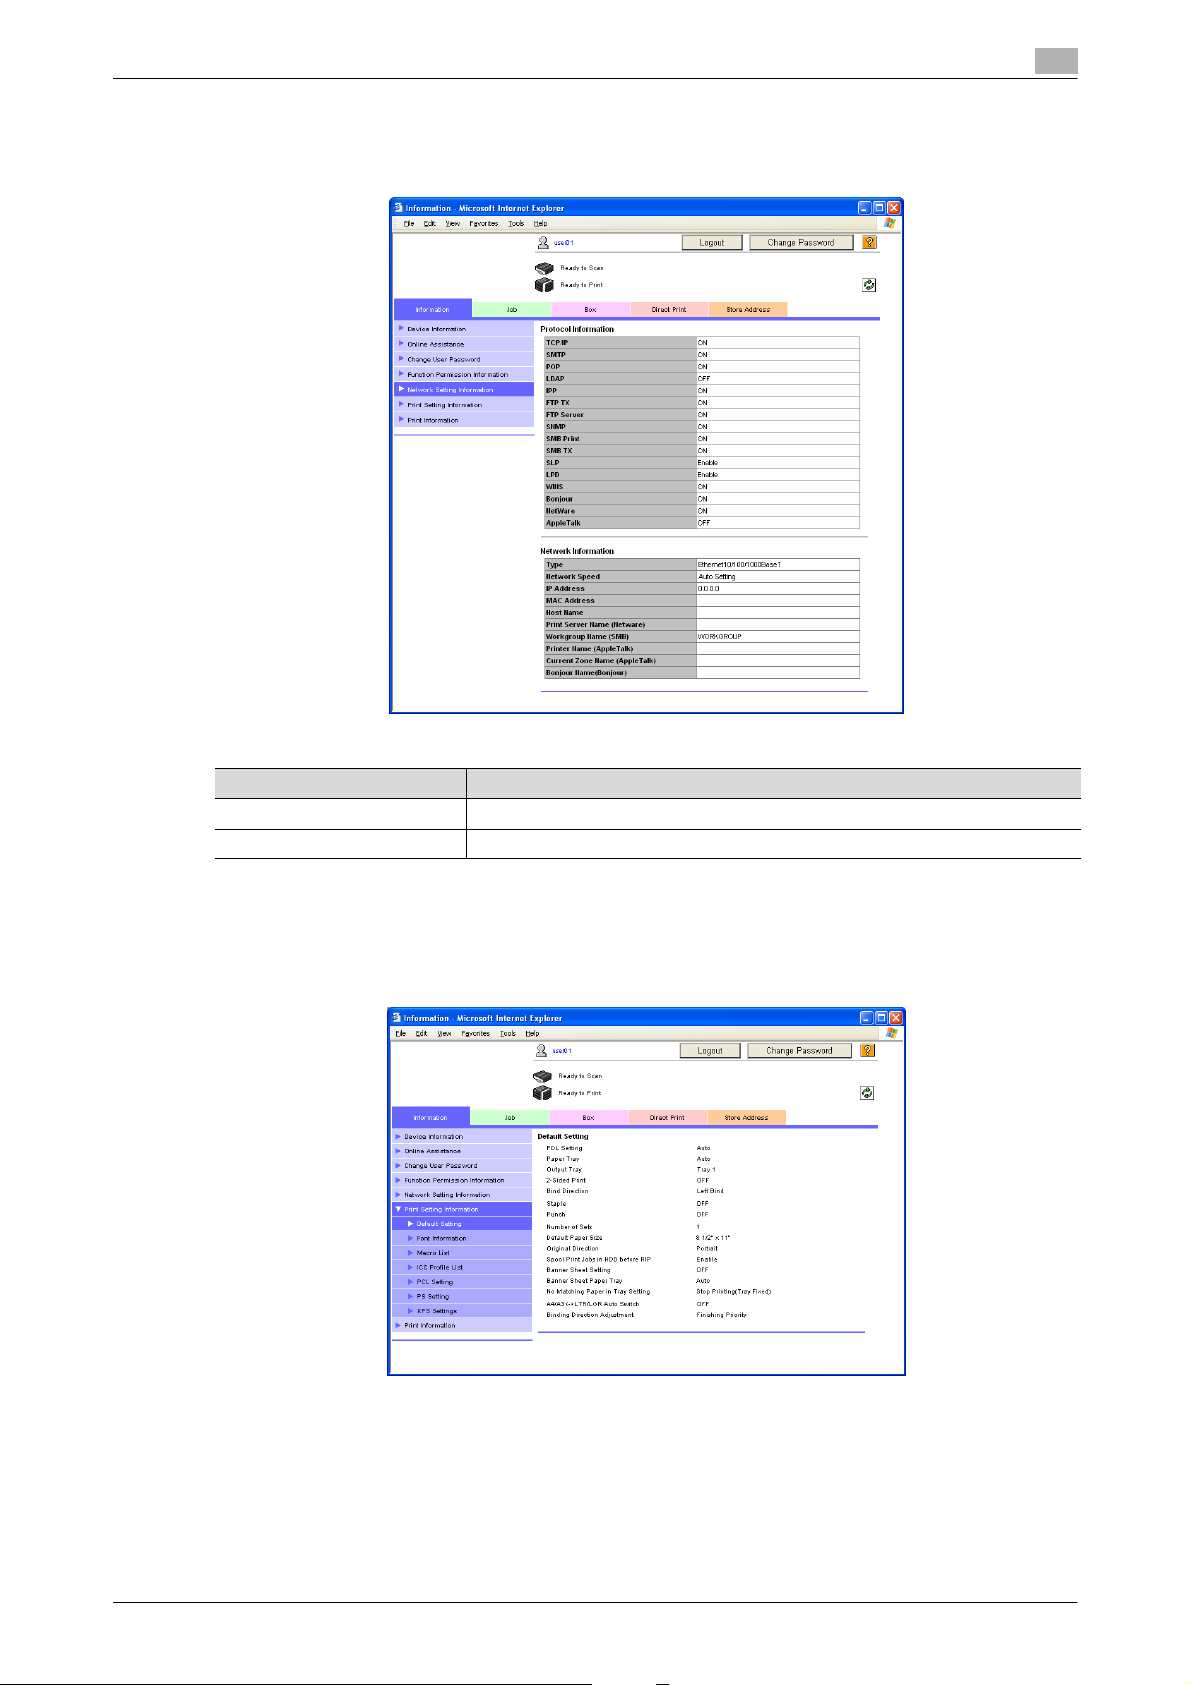
Network Setting Information
Network settings for the machine can be displayed.
Item Description
Protocol Information Displays the usage status for each protocol.
Network Information Displays information about the network.
Print Setting Information
Settings for the printer controller of the machine can be displayed. A print job sent with no settings specified
is printed with these settings.
The following information can be selected from the submenu.
C650 2-6
Page 31

User mode
2
Item Description
Default Setting Displays information for each of the items.
Font Information
Macro List
ICC Profile List
PCL Setting
PS Setting
XPS Settings
Print Information
Font and settings information can be printed. Select the report to be printed, select a paper tray from the
"Paper Tray" list, and then click the [OK] button.
Item Description
PS Font List Prints the list of fonts that can be used with PostScript.
PCL Font List Prints the list of fonts that can be used with PCL.
GDI Demo Page Prints the GDI demo page.
Configuration Page Prints the list of print settings specified for the machine.
Paper Tray Select the paper tray loaded with the paper used for printing the reports.
2
Note
It may not be possible to print reports while the machine is processing a job.
C650 2-7
Page 32

User mode
2.2 Job tab
On the Job tab, the jobs managed by the machine are displayed. The display of the Job tab differs depending
on the display format selected during logon.
Current Jobs
The jobs being performed and the jobs queued to be performed can be viewed. Select a job type, and then
click the [Go] button.
Select from the following job types.
Item Description
Print Displays a list of print jobs and their details.
TX Displays a list of transmission jobs and their details.
RX* Displays a list of fax reception jobs and their details.
Save Displays a list of user box jobs and their details.
* Appears if fax operations are available.
Sample page of print jobs
2
- The number assigned to the job when it was queued in the machine appears as the job number.
- To output a job sooner, select the job, and then click the [Increase Priority] button (with print jobs). The
output priority setting is not available if an administrator is logged on.
- To view the list of destination, select the job, and then click the [Display Broadcast Destination] button
(with transmission jobs).
- To delete a job, select the job, and then click the [Delete] button.
!
Detail
If "HTML" was selected as the display format during logon, a drop-down list for page selection appears
below Job Type. This is used for selecting the page to be displayed when the number of jobs is too
large to view in one page.
If an administrator or user box administrator is logged on, jobs of registered users can be deleted.
C650 2-8
Page 33

User mode
2
Job History
The completed jobs can be viewed. Select a job type, and then click the [Go] button.
Select from the following job types.
Item Description
Print Displays a list of print jobs and their details.
TX Displays a list of transmission jobs and their details.
RX* Displays a list of fax reception jobs and their details.
Save Displays a list of user box jobs and their details.
* Appears if fax operations are available.
Sample page of print jobs
- The number assigned to the job when it was queued in the machine appears as the job number.
!
Detail
If "HTML" was selected as the display format during logon, a drop-down list for page selection appears
below Job Type. This is used for selecting the page to be displayed when the number of jobs is too
large to view in one page.
If "HTML" was selected as the display format during logon, the [Detail] button appears. Select a job and
click the [Detail] button to view detailed information about the selected job.
C650 2-9
Page 34

User mode
2
Communication List
The completed transmission and reception jobs can be viewed. Select a job type, and then click the [Go]
button.
Select from the following job types.
Item Description
Scan to E-mail Displays a list of scan transmission (e-mail, FTP and SMB) jobs and their details.
Fax TX* Displays a list of fax transmission jobs and their details.
Fax RX* Displays a list of fax reception jobs and their details.
* Appears if fax operations are available.
Sample page when "Scan to E-mail" is selected
!
Detail
If "HTML" was selected as the display format during logon, the [Detail] button appears. Select a job and
click the [Detail] button to view detailed information about the selected job.
C650 2-10
Page 35

User mode
2.3 Box tab
From the Box tab, user boxes can be created for use with the User Box mode or user box settings can be
changed. In addition, documents in user boxes can be printed, sent or downloaded. For details on the various
user boxes and User Box mode functions, refer to the User’s Guide [Box Operations].
2
Note
If an administrator or user box administrator is logged on, the settings for user boxes can be changed
or the user boxes can be deleted without the box password being entered.
Open User Box
A list of all currently created user boxes (public user boxes, personal user boxes and group user boxes) can
be displayed, and the user box to be opened can be specified.
2
Open User Box (Public/Group/Personal)
Item Description
User Box Number Type in the number of the user box to be opened.
User Box Password Type in the password if one has been specified for the user box.
User Box List
Item Description
Search from Index Displays the list of user boxes according the index search characters selected
Page (Display by 50 cases) If there are more than 50 user boxes, specify the page to be displayed.
User Box List Displays the user box number, user box name, user box type and date/time that the
% From the User Box List, click the name of the desired user box. Otherwise, type in the user box number
and password, and then click the [OK] button.
Basic user box information and the list of documents saved in the user box are displayed.
when the box was created.
box was created. appears beside user boxes where a password has been specified.
2
Reminder
If "Prohibited Functions When Authentication Error" in Administrator mode is set to "Mode 2" and a user
enters an incorrect user box password the specified number of times, that box is locked and can no
longer be used. Contact the administrator to cancel operation restrictions.
C650 2-11
Page 36

User mode
2
!
Detail
When the name of a user box is clicked, a page for entering the password appears if a password has
been specified for the box.
Item Description
[User Box Setting] button Click this button to change the user box settings. For details, refer to "Changing
[Delete User Box] button Click this button to display a page to delete the user box.
Thumbnail View Select whether or not thumbnails are displayed in the list of documents.
Specify operation Select the operation to be performed with the document. For details, refer to "Doc-
[Changes the display] button Click this button to display the "Select" check box beside all documents with which
Select A check box appears beside all documents with which the selected operation can
Thumbnail A thumbnail is displayed if the thumbnail view is turned on.
Document Name Displays the name of the document. Click the name to display details about the
Number of Originals Displays the number of pages in the document.
[Edit Name] button Click this button to change the document name.
[Cancel] button Click this button to return to the User Box List page
user box settings" on page 2-16.
ument operations" on page 2-13.
the selected operation can be performed.
be performed.
document.
2
Note
If an administrator is logged on, the File List is not displayed.
If authentication is performed with PageScope Authentication Manager and an administrator or user
box administrator is logged on,[User Box Setting] and [Delete User Box] do not appear when a personal
user box is selected.
C650 2-12
Page 37

User mode
2
Document operations
Select from the following document operations.
- Display All
- Print
- Send to other device
- Download to PC
- Move/Copy
- Delete
!
Detail
"Send to other device" and "Download to PC" can be used with documents saved in Fax/Scan mode.
Some operations and documents may not be available, depending on the function limitation and output
permission settings specified for the account or user who is logged on.
1 Select the operation from the "Specify operation" list, and then click the [Changes the display] button.
A check box appears beside all documents with which the selected operation can be performed.
2 Select the check box beside the documents with which the operation is to be performed, and then click
the settings button.
The corresponding settings page appears.
C650 2-13
Page 38

User mode
2
3 Specify the desired settings, and then click the [OK] button.
When the [Print Setting] button is clicked
– Click the [Cancel] button to return to the File List page.
Settings available with the [Print Setting] button
Item Description
Change order This appears if multiple documents were selected. Select a document, and then
Combine This setting appears if multiple documents were selected. Multiple documents can
Number of Sets Type in the number of copies to be printed. (Range: 1 to 9999)
2-Sided Print Select whether or not double-sided printing is performed.
Finishing Select the settings for sorting, grouping, stapling, hole punching, folding and the
Page Margin Specify the width of the margins at the top and left and right sides of the page.
Image Shift The image can be shifted in order to create page margins. Select how to shift the
Change Back Shift The image on the back side of the paper can also be shifted in order to create page
Sheet Cover/Chapter Insert Specify settings for cover sheets, insertion sheets and chapter title pages.
Stamp Specify settings for the following.
Save Print Settings Select whether to save the print settings.
click the [Top], [Up], [Down] or [Bottom] button to change the document order. To
return the documents to their original order, click the [Undo] button. To display the
documents as thumbnails, click the [Thumbnail View] button.
be combined and printed as a single document. This setting is not available if 11 or
more documents are selected.
If "OFF" is selected, settings cannot be specified for "Basic Setting" and "Application Setting".
binding position. If multiple documents were selected, "Group" and "Sort" is not
available.
image to the left and right or up and down, according to the desired location for the
page margins.
margins during double-sided printing. Select how to shift the image to the left and
right or up and down, according to the desired location for the page margins.
Date/Time Setting: The printing date and time can be printed on the document pages.
Page: Page numbers can be printed on all document pages.
Preset Stamp: Preset text can be printed on the pages.
Copy Protect: Hidden text can be printed on all document pages in order to prevent
unauthorized copying.
Stamp Repeat: Text or images can be repeatedly printed throughout all pages.
This does not appear if multiple documents were selected.
C650 2-14
Page 39

User mode
2
Settings available with the [TX Setting] button
Item Description
Change order This appears if multiple documents were selected. Select a document, and then
click the [Top], [Up], [Down] or [Bottom] button to change the document order. To
return the documents to their original order, click the [Undo] button. To display the
document list as thumbnails, click the [Thumbnail View] button.
Specify destination To select from a list of destinations, click the [Search from List] button. A destination
can also be searched for using its number, index characters or type. To check the
transmission destinations, click the [Check Destination] button.
Bind TX This setting appears if multiple documents were selected. Multiple documents can
be combined and sent as a single document. This setting is not available if 11 or
more documents are selected.
If "OFF" is selected, settings cannot be specified for "File Type" and "Application
Setting".
File Type Select the file format ("PDF", "JPEG", "TIFF", "Compact PDF", "XPS" or "Compact
XPS").
The “JPEG” setting cannot be selected for a received fax saved in a user box.
Page Setting Select the page setting ("Multi Page" or "Single Page").
Encryption Select whether to encrypt the document being sent. If it is to be encrypted, specify
the encryption level, the password for opening the document, and any other settings for limiting printing and editing.
Combine Method Specify how to combine information to be added to a stamp.
E-Mail Settings Specify the document name, subject, From address and message body for sending
e-mail messages.
URL Notification Setting Specify the e-mail address where notifications of completion of the job are to be
sent.
The destinations that can be specified for URL notification are User Box, FTP, SMB
or WebDAV destinations.
Stamp Specify settings for the following.
Date/Time Setting: The printing date and time can be printed on the document pages.
Page: Page numbers can be printed on all document pages.
Preset Stamp: Preset text can be printed on the pages.
Page Print: The document can be printed at the same time that is sent.
Settings available with the [Download Setting] button
Item Description
Change order This appears if multiple documents were selected. Select a document, and then
Number of Originals Displays the number of pages in the original.
Color Type Displays the color type.
File Format Select the file format ("PDF", "JPEG", "TIFF", "Compact PDF", "XPS" or "Compact
Page Range Specify the pages to be downloaded. If "Page" is selected, specify the starting and
click the [Top], [Up], [Down] or [Bottom] button to change the document order. To
return the documents to their original order, click the [Undo] button. To display the
document list as thumbnails, click the [Thumbnail View] button.
XPS").
ending pages. If multiple documents were selected, "ALL" is selected. If "JPEG"
was selected as the file format, "Page" is selected.
Settings available with the [Move/Copy Setting] button
Item Description
User Box Number To select a destination from the list of user boxes, click the [Search from List] but-
Copy Select this check box to copy the document.
ton. A destination can also be searched for using the page number or index characters.
Settings available with the [Delete] button
C650 2-15
Page 40

User mode
2
Item Description
Selected File Displays the names of the selected documents. When multiple documents are se-
lected, the [Thumbnail View] button appears. To display the documents as thumbnails, click the [Thumbnail View] button.
Changing user box settings
% In the File List page, click the [User Box Setting] button.
Item Description
User Box Number Displays the user box number. This cannot be changed.
User Box Name Type in a user box name of a maximum of 20 characters.
Index Select the indexing characters.
Auto Delete Document Select the length of time ("Save", "12 hours", "1 day", "2 days", "3 days", "7 days"
User Box Expansion Function is
changed.
User Box Password is
changed.
User Box Owner is changed. Select this when changing the User Box owner, and select the Box Type.
or "30 days") that a document is stored in a user box.
This setting appears when the optional fax kit is installed. To change the confidential reception function, select the check box. Select "ON" or "OFF", and then specify
the password (up to 8 characters, including only numerals, * and #).
To change the user box password, select the check box. Type in the current password and the new password (up to 8 characters, excluding “ and +).
To change the user box owner, select the check box, and then select the user box
type. If "Personal" or "Group" is selected, specify the user box owner. To select a
user box owner from a list, click the [User List] or [Account List] button.
If authentication is performed with PageScope Authentication Manager and an administrator or user box administrator is logged on, this parameter does not appear
when a public user box is selected.
C650 2-16
Page 41

User mode
2
Create User Box
New user boxes can be created.
Item Description
User Box Number Select how the registration number is to be specified ("Use opening number" or "In-
User Box Name Type in the user box name (up to 20 characters). If a user box password is to be
Index Select the indexing characters.
Type Select the user box type. If "Personal" or "Group" is selected, specify the user box
Auto Delete Document Select the length of time ("Save", "12 hours", "1 day", "2 days", "3 days", "7 days"
User Box Expansion Function This setting appears when the optional fax kit is installed. To specify the confidential
put directly"). If "Input directly" is selected, type in the number. If "0" is specified,
the user box is automatically registered with the next available number. (Range: 1
to 999999999).
specified, select the "Use Box Password" check box, and then type in the password (up to 8 characters, excluding “ and +).
owner. To select a user box owner from a list, click the [User List] or [Account List]
button.
The lists do not appear if authentication is performed with PageScope Authentication Manager.
or "30 days") that a document is stored in a user box.
reception setting, click the [Display] button.
Select the check box, and then specify the communication password (up to 8 characters, including only numerals, * and #).
2
Reminder
If "Password Rules" is set to "Enable", only a password containing 8 digits can be specified.
If a user box password containing less than 8 characters has already been registered, change the
password so that it contains 8 characters before setting "Password Rules" to "Enable". For details on
the password rules, refer to the User’s Guide [Copy Operations].
2
Note
If an administrator is logged on, only public user boxes can be created, and they cannot be changed.
C650 2-17
Page 42

User mode
2
Open System User Box
"Open System User Box" appears when the optional fax kit is installed. System user boxes (Bulletin Board
User Box, Polling TX User Box, Memory RX User Box, Relay User Box) can be opened, and basic user box
information and the list of documents saved in the user box can be displayed.
2
Note
If an administrator is logged on, system user boxes are displayed in the same way as in Administrator
mode. For details, refer to "Open System User Box" on page 3-36.
% Select the system user box type, and then click the [OK] button.
– If "Bulletin Board User Box" or "Relay User Box" is selected, a list of currently available user boxes
appears. Type in the user box number and password, and then click the [OK] button. Otherwise,
click the name of the desired user box in the list. If a user box password was specified, type in the
password, and then click the [OK] button.
– If "Memory RX User Box" is selected, type in the password, and then click the [OK] button.
The user box information appears.
For a bulletin board user box
2
Note
Depending on the user box type, some displays and operations may not be available.
For details on the document operations, refer to "Document operations" on page 2-13.
For bulletin board user boxes and relay user boxes, click the [User Box Setting] button to change user
box settings.
If authentication is performed with PageScope Authentication Manager and an administrator or user
box administrator is logged on, [User Box Setting] and [Delete User Box] do not appear when a personal
user box is selected.
C650 2-18
Page 43

User mode
Change settings of the bulletin board user box
Item Description
User Box Number Displays the user box number. This cannot be changed.
User Box Name Type in a user box name (up to 20 characters).
Auto Delete Document Select the length of time ("Save", "12 hours", "1 day", "2 days", "3 days", "7 days"
User Box Password is
changed.
User Box Owner is changed. To change the user box owner, select the check box, and then select the user box
or "30 days") that a document is stored in a user box.
To change the user box password, select the check box. Type in the current password and the new password (up to 8 characters, including only numerals, * and #).
type.
If "Personal" or "Group" is selected, specify the user box owner. To select a user
box owner from a list, click the [User List] or [Account List] button.
If authentication is performed with PageScope Authentication Manager and an administrator or user box administrator is logged on, this parameter does not appear
when a public user box is selected.
2
Change settings of the relay user box
Item Description
User Box Number Displays the user box number. This cannot be changed.
User Box Name Type in a user box name (up to 20 characters).
Relay Address Specify the relay address. Click the [Search from List] button, and then select an
Relay TX Password is changed To change the user box password, select the check box. Type in the current pass-
address from a list.
word and the new password (up to 8 characters, including only numerals, * and #).
C650 2-19
Page 44

User mode
2
Create System User Box
"Create System User Box" appears when the optional fax kit is installed. New bulletin board user boxes and
relay user boxes can be created.
Select the user box type, and then click the [OK] button.
2
Note
If an administrator is logged on, system user boxes are created in the same way as in Administrator
mode. For details, refer to "Create System User Box" on page 3-38.
For a bulletin board user box
Item Description
User Box Number Select how the registration number is to be specified ("Use opening number" or "In-
User Box Name Type in the user box name (up to 20 characters). If a user box password is to be
Type Select the user box type. If "Personal" or "Group" is selected, specify the user box
Auto Delete Document Select the length of time ("Save", "12 hours", "1 day", "2 days", "3 days", "7 days"
put directly"). If "Input directly" is selected, type in the number. If "0" is specified,
the user box is automatically registered with the next available number. (Range: 1
to 999999999).
specified, check the "Use Box Password" check box, and then type in the password (up to 8 characters, excluding “ and +).
owner. To select a user box owner from a list, click the [User List] or [Account List]
button.
The lists do not appear if authentication is performed with PageScope Authentication Manager.
or "30 days") that a document is stored in a user box.
C650 2-20
Page 45

User mode
2
For a relay user box
Item Description
User Box Number Select how the registration number is to be specified ("Use opening number" or "In-
put directly"). If "Input directly" is selected, type in the number. If "0" is specified,
the user box is automatically registered with the next available number. (Range: 1
to 999999999).
User Box Name Type in the user box name (up to 20 characters).
Relay Address Click the [Search from List] button, and then select an address from a list.
Relay TX Password Type in the relay password (up to 8 characters, including only numerals, * and #).
Retype Relay TX Password Type in the relay password again (up to 8 characters, including only numerals, * and
#).
2
Reminder
If "Password Rules" is set to "Enable", only a password containing 8 digits can be specified.
If a user box password containing less than 8 characters has already been registered, change the
password so that it contains 8 characters before setting "Password Rules" to "Enable". For details on
the password rules, refer to the User’s Guide [Copy Operations].
C650 2-21
Page 46

User mode
2.4 Direct Print tab
From the Direct Print tab, files can be specified and printed.
Direct Print
Click the [Browse] button to select the file, and then click the [Print] button.
2
To change the print settings that are displayed, click the [Change Settings] button.
2
Note
If authentication settings have been specified and "Print without Authentication" is set to "Allow", direct
printing can be used. Specify the setting for "Print without Authentication" from the control panel.
Some files cannot be printed, depending on their file format. Files in the following seven file formats can
be printed
XPS/PDF (Ver. 1.6)/TIFF/PS/PCL/JPEG/Text
C650 2-22
Page 47

User mode
2.5 Store Address tab
From the Store Address tab, transmission destinations and user box destinations for saving data can be
registered and their settings can be changed.
!
Detail
This menu appears if the user is permitted to change registered destinations. For details on specifying
the setting that allows users to change registered destinations, refer to "Permission of Address
Change" on page 3-34.
If a registered user is logged on, new destinations cannot be created unless the user is given access to
the destinations.
Displaying the list of registered destinations and specifying "Reference Allowed Setting" for registered
destinations may be limited, depending on the access permission level of the user who is logged on.
Address Book - Store Address
The list of destinations currently registered in the address book can be displayed, and destinations can be
registered or their settings can be changed.
2
Item Description
[New Registration] button Click this button to register a new destination. For details, refer to "Registering a
Search from Number Select a range of registration numbers, and then click the [Go] button to display the
Search from Index Select index characters, and then click the [Go] button to display the list of destina-
No. Displays the registration number.
Function Displays the specified transmission type.
Name Displays the name of the registered destination.
S/MIME Shows whether or not a certificate is attached to the e-mail destination.
[Edit] button Click this button to display a page for changing the settings and editing the regis-
[Delete] button Click this button to display a page to delete the registered destination.
destination" on page 2-24.
list of destinations with the displayed numbers.
tions with the displayed index characters.
tered destination. The settings are the same ones available during registration. Cannot change the registration number.
C650 2-23
Page 48

User mode
2
Registering a destination
1 In the Address Book List page, click the [New Registration] button.
2 Select the transmission type, and then click the [OK] button.
A page for registering a destination appears.
For an e-mail address
If "E-mail" was selected
Item Description
No. Specify the registration number.
Name Type in the name of the destination (up to 24 characters).
Index Select the index characters for the destination. To normally display the destination
E-mail Address Type in the e-mail address of the destination (up to 320 characters).
C650 2-24
Select "Use opening number" or "Direct Input". If "Direct Input" is selected, type in
the number. If "0" is specified, the user box is automatically registered with the next
available number.
in the touch panel, check the "Main" check box.
Page 49

User mode
Item Description
Registration of Certification Information
Limiting Access to Destinations To specify the access level of the destination, click the [Display] button. If an access
Select this check box to register certificate information.
Select "Registration of Certification Information". Click the [Browse] button, and
then specify the certificate information. Only files in the DER (Distinguished Encoding Rules) format are supported for certificate information.
To delete the certificate information, select "Deletion of Certification Information".
permission group is specified for the user who is logged on, the settings for "Search
from Reference Allowed Group" appear.
If "Search from Reference Allowed Group" is selected, click the [Search from List]
button, and then select an access permission group from the list. If "Set direct Reference Allowed Level" is selected, select a level.
2
Reminder
If the E-mail address to be registered does not match the E-mail address of the certificate, the
certificate cannot be registered. Confirm whether both E-mail addresses match, and then register the
certificate.
If "FTP" was selected
Item Description
No. Specify the registration number.
Name Type in the name of the destination (up to 24 characters).
Index Select the index characters for the destination. To normally display the destination
Host Address Type in the IP address or host name for the FTP server to be used for transmitting
File Path Type in the destination file path (up to 96 characters).
User ID Type in the user ID (up to 47 characters).
Password Type in the password (up to 31 characters).
anonymous Select either "ON" or "OFF".
PASV Mode Select either "ON" or "OFF".
Proxy Select either "ON" or "OFF".
Port No. Type in the port number. (Range: 1 to 65535; Default: 21)
Limiting Access to Destinations To specify the access level of the destination, click the [Display] button. If an access
Select "Use opening number" or "Direct Input". If "Direct Input" is selected, type in
the number. If "0" is specified, the user box is automatically registered with the next
available number.
in the touch panel, check the "Main" check box.
(up to 63 characters). To type in the host name, check the "Please check to enter
host name." check box. If the machine is set to use IPv6, an IPv6 address can also
be specified.
permission group is specified for the user who is logged on, the settings for "Search
from Reference Allowed Group" appear.
If "Search from Reference Allowed Group" is selected, click the [Search from List]
button, and then select an access permission group from the list. If "Set direct Reference Allowed Level" is selected, select a level.
2
If "SMB" was selected
Item Description
No. Specify the registration number.
Name Type in the name of the destination (up to 24 characters).
Index Select the index characters for the destination. To normally display the destination
Host Address Type in the IP address or host name for the destination computer (up to 255 char-
File Path Type in the destination file path (up to 255 characters, uppercase letters).
Select "Use opening number" or "Direct Input". If "Direct Input" is selected, type in
the number. If "0" is specified, the user box is automatically registered with the next
available number.
in the touch panel, check the "Main" check box.
acters; host name in uppercase letters). To type in the host name, check the "Please
check to enter host name." check box. If the machine is set to use IPv6, an IPv6
address can also be specified.
C650 2-25
Page 50

User mode
2
Item Description
User ID Type in the user ID for the destination computer (up to 127 characters).
Password Type in the password for the destination computer (up to 14 characters).
Limiting Access to Destinations To specify the access level of the destination, click the [Display] button. If an access
permission group is specified for the user who is logged on, the settings for "Search
from Reference Allowed Group" appear.
If "Search from Reference Allowed Group" is selected, click the [Search from List]
button, and then select an access permission group from the list. If "Set direct Reference Allowed Level" is selected, select a level.
If "WebDAV" was selected
Item Description
No. Specify the registration number.
Select "Use opening number" or "Direct Input". If "Direct Input" is selected, type in
the number. If "0" is specified, the user box is automatically registered with the next
available number.
Name Type in the name of the destination (up to 24 characters).
Index Select the index characters for the destination. To normally display the destination
in the touch panel, check the "Main" check box.
Host Address Specify the IP address of the WebDAV server of the destination. If the DNS server
is specified, the address can be specified using the host name (up to 255 characters).
To type in the host name, check the "Please check to enter host name." check box.
If the machine is set to use IPv6, an IPv6 address can also be specified.
File Path Type in the destination file path (up to 47 characters).
User ID Type in the user ID (up to 21 characters).
Password Type in the password (up to 63 characters).
SSL Settings Select either "ON" or "OFF".
Proxy Select either "ON" or "OFF".
Port No. Type in the port number. (Range: 1 to 65535; Default: 80)
Limiting Access to Destinations To specify the access level of the destination, click the [Display] button. If an access
permission group is specified for the user who is logged on, the settings for "Search
from Reference Allowed Group" appear.
If "Search from Reference Allowed Group" is selected, click the [Search from List]
button, and then select an access permission group from the list. If "Set direct Reference Allowed Level" is selected, select a level.
If "User Box" was selected
Item Description
No. Specify the registration number.
Name Type in the name of the destination (up to 24 characters).
Index Select the index characters for the destination. To normally display the destination
User Box No. Type in the number for the destination user box. (Range: 1 to 999999999) A user
Limiting Access to Destinations To specify the access level of the destination, click the [Display] button. If an access
Select "Use opening number" or "Direct Input". If "Direct Input" is selected, type in
the number. If "0" is specified, the user box is automatically registered with the next
available number.
in the touch panel, select the "Main" check box.
box can also be selected from a list by clicking the [Search from List] button.
permission group is specified for the user who is logged on, the settings for "Search
from Reference Allowed Group" appear.
If "Search from Reference Allowed Group" is selected, click the [Search from List]
button, and then select an access permission group from the list. If "Set direct Reference Allowed Level" is selected, select a level.
C650 2-26
Page 51

User mode
2
If "Fax" was selected
2
Note
"Fax" appears if the optional fax kit has been installed.
Item Description
No. Specify the registration number.
Select "Use opening number" or "Direct Input". If "Direct Input" is selected, type in
the number. If "0" is specified, the user box is automatically registered with the next
available number.
Name Type in the name of the destination (up to 24 characters).
Index Select the index characters for the destination. To normally display the destination
in the touch panel, check the "Main" check box.
Destination Type in the fax number for the destination (up to 38 characters, including only nu-
merals, #, *, -, T, P and E).
Confirm Fax Number Enter the fax number again in order to prevent misentering of the fax number.
This menu item appears when "Confirm Address (Register)" is set to [ON] from the
control panel.
Line Setting Select the line to be used ("No Selection", "Line 1" or "Line 2"). A setting can be
selected if the optional fax multi line is installed.
Communication Setting Click the [Display] button, and then select the check box for a displayed setting
("V34 Off", "ECM Off", "International Communication" or "Check Destination").
Limiting Access to Destinations To specify the access level of the destination, click the [Display] button. If an access
permission group is specified for the user who is logged on, the settings for "Search
from Reference Allowed Group" appear.
If "Search from Reference Allowed Group" is selected, click the [Search from List]
button, and then select an access permission group from the list. If "Set direct Reference Allowed Level" is selected, select a level.
If "IP Address Fax" was selected
2
Note
"IP Address Fax" appears if the IP address fax operation is available.
Item Description
No. Specify the registration number.
Name Type in the name of the destination (up to 24 characters).
Index Select the index characters for the destination. To normally display the destination
Host Address Type in the IP address or host name for the destination fax (up to 63 characters). To
Port No. Type in the port number. (Range: 1 to 65535; Default: 25)
Destination Machine Type Select whether the destination is a color or monochrome machine.
Limiting Access to Destinations To specify the access level of the destination, click the [Display] button. If an access
Select "Use opening number" or "Direct Input". If "Direct Input" is selected, type in
the number. If "0" is specified, the user box is automatically registered with the next
available number.
in the touch panel, check the "Main" check box.
type in the host name, check the "Please check to enter host name." check box. If
the machine is set to use IPv6, an IPv6 address can also be specified.
permission group is specified for the user who is logged on, the settings for "Search
from Reference Allowed Group" appear.
If "Search from Reference Allowed Group" is selected, click the [Search from List]
button, and then select an access permission group from the list. If "Set direct Reference Allowed Level" is selected, select a level.
C650 2-27
Page 52

User mode
2
If "Internet Fax" was selected
2
Note
"Internet Fax" appears if the Internet fax operation is available.
Item Description
No. Specify the registration number.
Select "Use opening number" or "Direct Input". If "Direct Input" is selected, type in
the number. If "0" is specified, the user box is automatically registered with the next
available number.
Name Type in the name of the destination (up to 24 characters).
Index Select the index characters for the destination. To normally display the destination
in the touch panel, check the "Main" check box.
E-Mail Address Type in the address of the destination (up to 320 characters).
Resolution Select the resolution.
Paper Size Select the paper size.
Compression Type Select the compression method.
Limiting Access to Destinations To specify the access level of the destination, click the [Display] button. If an access
permission group is specified for the user who is logged on, the settings for "Search
from Reference Allowed Group" appear.
If "Search from Reference Allowed Group" is selected, click the [Search from List]
button, and then select an access permission group from the list. If "Set direct Reference Allowed Level" is selected, select a level.
Address Book - Icon
The list of destinations currently registered in the address book can be displayed, and destination icons can
be registered or changed.
2
Note
The icons are used in the image panel function which can be operated when the optional i-Option LK101 or LK-103 is installed.
For details on the available settings, refer to "Address Book - Store Address" on page 2-23.
C650 2-28
Page 53

User mode
2
Registering an icon
% Click the [Edit] button.
A page for registering an icon appears.
Item Description
No. The registration number of the address book appears.
Name The registered name of the address book appears.
Specify Icon From [Search from List], specify an icon for the address book.
Group
The list of currently registered group destinations can be displayed, and destinations can be registered or
their settings can be changed.
Item Description
[New Registration] button Click this button to register a new destination. For details, refer to "Registering a
Search from Number Select a range of registration numbers, and then click the [Go] button to display the
No. Displays the registration number.
Name Displays the name of the registered destination.
[Edit] button Click this button to display a page for changing the settings and editing the regis-
[Delete] button Click this button to display a page to delete the registered destination.
group destination" on page 2-30.
list of destinations with the displayed numbers.
tered destination. The settings are the same ones available during registration.
C650 2-29
Page 54

User mode
2
Registering a group destination
% In the Group List page, click the [New Registration] button.
A page for registering a destination appears.
Item Description
Name Type in the name of the destination (up to 24 characters).
Scan/Fax Address To select a destination number from a list of address book destinations, click the
User Box To select a destination number from a list of address book destinations, click the
[Check Destination] button A page for checking the destinations appears.
Specify Icon From [Search from List], specify an icon for the group destination. The icons are
Limiting Access to Destinations To specify the access level of the destination, click the [Display] button. If an access
[Search from List] button. An address book destination can also be searched for using its number, index characters or type.
[Search from List] button. An address book destination can also be searched for using its number or index characters.
used in the image panel function which can be operated when the optional i-Option
LK-101 or LK-103 is installed.
permission group is specified for the user who is logged on, the settings for "Search
from Reference Allowed Group" appear.
If "Search from Reference Allowed Group" is selected, click the [Search from List]
button, and then select an access permission group from the list. If "Set direct Reference Allowed Level" is selected, select a level.
C650 2-30
Page 55

User mode
2
Program
The list of currently registered program destinations can be displayed, and destinations can be registered or
their settings can be changed.
Item Description
Page (displays 12 at a time) Select a page, and then click the [Go] button to display the page.
[Change Page Name] button Click this button to change the page name.
No. Displays the registration number.
Name Displays the name of the registered destination.
S/MIME Shows whether or not a certificate is attached to the destination.
Edit If no program destination is registered, the [Registration] button appears. If a pro-
[Delete] button Click this button to display a page to delete the registered destination.
gram destination is registered, the [Edit] button appears. Click the button to display
the page for specifying the settings to either register or edit a program destination.
E-mail destinations where an S/MIME certificate is registered cannot be changed.
C650 2-31
Page 56

User mode
2
Registering a program destination
1 In the Program List page, click the [Registration] button for the number to be programmed.
2 Select the transmission type, and then click the [OK] button.
A page for registering a destination appears.
C650 2-32
Page 57

User mode
2
For an e-mail address
!
Detail
To select a registered program destination from the machine, press the [Mode Memory] key in the
control panel.
C650 2-33
Page 58

User mode
2
If "E-mail" was selected.
Item Description
No. Displays the registration number.
Name Type in the name of the program (up to 24 characters).
Destination Information Specify the destination.
Select "Select from Address Book" or "Direct Input". To select a destination
from the address book, click the [Search from List] button, and then select from
the list of address book destinations. An address book destination can also be
searched for using its number or index characters. To check the transmission
destinations, click the [Check Destination] button. If "Direct Input" is selected,
type in the e-mail address (up to 320 characters).
Select "Registration of Certification Information" to register certificate information. Click the [Browse] button, and then specify the certificate information.
Only files in the DER (Distinguished Encoding Rules) format are supported for
certificate information.
To delete the certificate information, select "Deletion of Certification Information".
Resolution Select the resolution.
File Type Select the file format.
File Name Type in the file name (up to 30 characters).
Page Setting Select how the data is to be saved.
Subject Specify the e-mail subject. If "Not Specified" is selected, the default subject is
used. To check the content of the subject, click the [Subject List] button.
Text Specify the e-mail text. If "Not Specified" is selected, the default text is used.
To check the content of the text, click the [Text List] button.
Simplex/Duplex Select "1-Sided", "2-Sided" or "Cover Sheet + 2-Sided".
Original Type Select the document quality, such as text or photo.
Color Select the color mode. The file formats that can be saved may be limited ac-
cording to the Color setting. For details, refer to the User’s Guide [Network
Scanner Operations].
Separate Scan Select either "ON" or "OFF".
Density Select the density.
Background Removal Adjust the density of the background.
Scan Size Select the document size ("Auto", "Standard Size" or "Custom Size").
If "Standard Size" is selected, select the size and the feed direction.
If "Custom Size" is selected, specify the height and width.
Application Setting Click the [Display] button, and then specify settings for the functions that are
displayed.
Original Direction Select the document orientation.
2-Sided Binding Direction Select the position of the document binding margin.
Special Original Select "Normal", "Mixed Original", "Z-Folded Original" or "Long Original" as
the setting for the loaded document.
Book Scan Specify whether to perform book scan.
To specify this item, select settings for the scanning method and center erasing. If any setting other than "Book Spread" is selected for the scanning method, select the binding direction.
Erase Specify whether to perform frame erase.
To specify this item, specify the width that is erased on all sides of the document ("Top", "Bottom", "Left" and "Right").
Compose (Date/Time) Specify whether to print the date/time.
To specify this item, specify settings for the following.
• Date Type
•Time Type
•Print Position
• Fine-Tune (for making fine adjustments to the print position)
• Color
• Pages
•Size
C650 2-34
Page 59

User mode
2
Item Description
Compose (Page) Specify whether to pint page numbers.
To specify this item, specify settings for the following.
• Page Number (Range: -99999 to 99999)
• Chapter (Range: -100 to 100)
• Page Number Type
•Print Position
• Fine-Tune (for making fine adjustments to the print position)
• Color
•Size
Compose (Header/Footer) Selects whether to print a header/footer.
To specify this item, specify the registration number of the header/footer. To
check the registered header/foot, click the [Confirm Registed Contents] button.
Compose (Stamp) Specify whether to print the stamp.
To specify this item, specify settings for the following.
• Preset Stamp or Registered Stamp
•Print Position
• Fine-Tune (for making fine adjustments to the print position)
• Color
• Pages
•Size
To check a registered stamp, click the [Confirm Registed Contents] button. A
registered stamp must first be registered from the control panel.
Stamp Combine Method Select "Image" or "Text".
Limiting Access to Destinations To specify the access level of the destination, click the [Display] button. If an
access permission group is specified for the user who is logged on, the settings for "Search from Reference Allowed Group" appear.
If "Search from Reference Allowed Group" is selected, click the [Search from
List] button, and then select an access permission group from the list. If "Set
direct Reference Allowed Level" is selected, select a level.
If "FTP" was selected
Item Description
No. Displays the registration number.
Name Type in the name of the program (up to 24 characters).
Destination Information Specify the destination.
Resolution Select the resolution.
File Type Select the file format.
File Name Type in the file name (up to 30 characters).
Page Setting Select how the data is to be saved.
Simplex/Duplex Select "1-Sided", "2-Sided" or "Cover Sheet + 2-Sided".
Original Type Select the document quality, such as text or photo.
Color Select the color mode. The file formats that can be saved may be limited ac-
Separate Scan Select either "ON" or "OFF".
Density Select the density.
Select "Select from Address Book" or "Direct Input". To select a destination
from the address book, click the [Search from List] button, and then select from
the list of address book destinations. An address book destination can also be
searched for using its number or index characters. To check the transmission
destinations, click the [Check Destination] button. If "Direct Input" is selected,
specify settings for the following.
• Host Address
•File Path
•User ID
•Password
• anonymous
• PASV Mode
•Proxy
•Port No.
To type in the host address and host name, check the "Please check to enter
host name." check box. If the machine is set to use IPv6, an IPv6 address can
also be specified.
cording to the Color setting. For details, refer to the User’s Guide [Network
Scanner Operations].
C650 2-35
Page 60

User mode
2
Item Description
Background Removal Adjust density of the background.
Scan Size Select the document size ("Auto", "Standard Size" or "Custom Size").
If "Standard Size" is selected, select the size and the feed direction.
If "Custom Size" is selected, specify the height and width.
Application Setting Click the [Display] button, and then specify settings for the functions that are
displayed.
E-mail Notification Specify whether to send notification of scan data URL.
Specify the destination address in the "Address" box. To select a destination
from a list, click the [Search from List] button.
Original Direction Select the document orientation.
2-Sided Binding Direction Select the position of the document binding margin.
Special Original Select "Normal", "Mixed Original", "Z-Folded Original" or "Long Original" as
the setting for the loaded document.
Book Scan Specify whether to perform book scan.
To specify this item, select settings for the scanning method and center erasing. If any setting other than "Book Spread" is selected for the scanning method, select the binding direction.
Erase Specify whether to perform frame erase.
To specify this item, specify the width that is erased on all sides of the document ("Top", "Bottom", "Left" and "Right").
Compose (Date/Time) Specify whether to print the date/time.
To specify this item, specify settings for the following.
• Date Type
•Time Type
•Print Position
• Fine-Tune (for making fine adjustments to the print position)
• Color
• Pages
•Size
Compose (Page) Specify whether to pint page numbers.
To specify this item, specify settings for the following.
• Page Number (Range: -99999 to 99999)
• Chapter (Range: -100 to 100)
• Page Number Type
•Print Position
• Fine-Tune (for making fine adjustments to the print position)
• Color
•Size
Compose (Header/Footer) Selects whether to print a header/footer.
To specify this item, specify the registration number of the header/footer. To
check the registered header/foot, click the [Confirm Registed Contents] button.
Compose (Stamp) Specify whether to print the stamp.
To specify this item, specify settings for the following.
• Preset Stamp or Registered Stamp
•Print Position
• Fine-Tune (for making fine adjustments to the print position)
• Color
• Pages
•Size
To check a registered stamp, click the [Confirm Registed Contents] button. A
registered stamp must first be registered from the control panel.
Stamp Combine Method Select "Image" or "Text".
Limiting Access to Destinations To specify the access level of the destination, click the [Display] button. If an
access permission group is specified for the user who is logged on, the settings for "Search from Reference Allowed Group" appear.
If "Search from Reference Allowed Group" is selected, click the [Search from
List] button, and then select an access permission group from the list. If "Set
direct Reference Allowed Level" is selected, select a level.
C650 2-36
Page 61

User mode
2
If "SMB" was selected
Item Description
No. Displays the registration number.
Name Type in the name of the program (up to 24 characters).
Destination Information Specify the destination.
Select "Select from Address Book" or "Direct Input". To select a destination
from the address book, click the [Search from List] button, and then select from
the list of address book destinations. An address book destination can also be
searched for using its number or index characters. To check the transmission
destinations, click the [Check Destination] button. If "Direct Input" is selected,
specify settings for the following.
• Host Address (Type the host name in uppercase letters.)
• File Path (Type in uppercase letters.)
•User ID
•Password
To type in the host address and host name, check the "Please check to enter
host name." check box. If the machine is set to use IPv6, an IPv6 address can
also be specified.
Resolution Select the resolution.
File Type Select the file format.
File Name Type in the file name (up to 30 characters).
Page Setting Select how the data is to be saved.
Simplex/Duplex Select "1-Sided", "2-Sided" or "Cover Sheet + 2-Sided".
Original Type Select the document quality, such as text or photo.
Color Select the color mode. The file formats that can be saved may be limited ac-
cording to the Color setting. For details, refer to the User’s Guide [Network
Scanner Operations].
Separate Scan Select either "ON" or "OFF".
Density Select the density.
Background Removal Adjust density of the background.
Scan Size Select the document size ("Auto", "Standard Size" or "Custom Size").
If "Standard Size" is selected, select the size and the feed direction.
If "Custom Size" is selected, specify the height and width.
Application Setting Click the [Display] button, and then specify settings for the functions that are
displayed.
E-mail Notification Specify whether to send notification of scan data URL.
Specify the destination address in the "Address" box. To select a destination
from a list, click the [Search from List] button.
Original Direction Select the document orientation.
2-Sided Binding Direction Select the position of the document binding margin.
Special Original Select "Normal", "Mixed Original", "Z-Folded Original" or "Long Original" as
the setting for the loaded document.
Book Scan Specify whether to perform book scan.
To specify this item, select settings for the scanning method and center erasing. If any setting other than "Book Spread" is selected for the scanning method, select the binding direction.
Erase Specify whether to perform frame erase.
To specify this item, specify the width that is erased on all sides of the document ("Top", "Bottom", "Left" and "Right").
Compose (Date/Time) Specify whether to print the date/time.
To specify this item, specify settings for the following.
• Date Type
•Time Type
•Print Position
• Fine-Tune (for making fine adjustments to the print position)
• Color
• Pages
•Size
C650 2-37
Page 62

User mode
2
Item Description
Compose (Page) Specify whether to pint page numbers.
To specify this item, specify settings for the following.
• Page Number (Range: -99999 to 99999)
• Chapter (Range: -100 to 100)
• Page Number Type
•Print Position
• Fine-Tune (for making fine adjustments to the print position)
• Color
•Size
Compose (Header/Footer) Selects whether to print a header/footer.
To specify this item, specify the registration number of the header/footer. To
check the registered header/foot, click the [Confirm Registed Contents] button.
Compose (Stamp) Specify whether to print the stamp.
To specify this item, specify settings for the following.
• Preset Stamp or Registered Stamp
•Print Position
• Fine-Tune (for making fine adjustments to the print position)
• Color
• Pages
•Size
To check a registered stamp, click the [Confirm Registed Contents] button. A
registered stamp must first be registered from the control panel.
Stamp Combine Method Select "Image" or "Text".
Limiting Access to Destinations To specify the access level of the destination, click the [Display] button. If an
access permission group is specified for the user who is logged on, the settings for "Search from Reference Allowed Group" appear.
If "Search from Reference Allowed Group" is selected, click the [Search from
List] button, and then select an access permission group from the list. If "Set
direct Reference Allowed Level" is selected, select a level.
If "FTP" was selected
Item Description
No. Displays the registration number.
Name Type in the name of the program (up to 24 characters).
Destination Information Specify the destination.
Resolution Select the resolution.
File Type Select the file format.
File Name Type in the file name (up to 30 characters).
Page Setting Select how the data is to be saved.
Simplex/Duplex Select "1-Sided", "2-Sided" or "Cover Sheet + 2-Sided".
Original Type Select the document quality, such as text or photo.
Color Select the color mode. The file formats that can be saved may be limited ac-
Separate Scan Select either "ON" or "OFF".
Density Select the density.
Background Removal Adjust density of the background.
Select "Select from Address Book" or "Direct Input". To select a destination
from the address book, click the [Search from List] button, and then select from
the list of address book destinations. An address book destination can also be
searched for using its number or index characters. To check the transmission
destinations, click the [Check Destination] button. If "Direct Input" is selected,
specify settings for the following.
• Host Address
•File Path
•User ID
•Password
• SSL Settings
•Proxy
•Port No.
To type in the host address and host name, check the "Please check to enter
host name." check box. If the machine is set to use IPv6, an IPv6 address can
also be specified.
cording to the Color setting. For details, refer to the User’s Guide [Network
Scanner Operations].
C650 2-38
Page 63

User mode
2
Item Description
Scan Size Select the document size ("Auto", "Standard Size" or "Custom Size").
If "Standard Size" is selected, select the size and the feed direction.
If "Custom Size" is selected, specify the height and width.
Application Setting Click the [Display] button, and then specify settings for the functions that are
displayed.
E-mail Notification Specify whether to send notification of scan data URL.
Specify the destination address in the "Address" box. To select a destination
from a list, click the [Search from List] button.
Original Direction Select the document orientation.
2-Sided Binding Direction Select the position of the document binding margin.
Special Original Select "Normal", "Mixed Original", "Z-Folded Original" or "Long Original" as
the setting for the loaded document.
Book Scan Specify whether to perform book scan.
To specify this item, select settings for the scanning method and center erasing. If any setting other than "Book Spread" is selected for the scanning method, select the binding direction.
Erase Specify whether to perform frame erase.
To specify this item, specify the width that is erased on all sides of the document ("Top", "Bottom", "Left" and "Right").
Compose (Date/Time) Specify whether to print the date/time.
To specify this item, specify settings for the following.
• Date Type
•Time Type
•Print Position
• Fine-Tune (for making fine adjustments to the print position)
• Color
• Pages
•Size
Compose (Page) Specify whether to pint page numbers.
To specify this item, specify settings for the following.
• Page Number (Range: -99999 to 99999)
• Chapter (Range: -100 to 100)
• Page Number Type
•Print Position
• Fine-Tune (for making fine adjustments to the print position)
• Color
•Size
Compose (Header/Footer) Selects whether to print a header/footer.
To specify this item, specify the registration number of the header/footer. To
check the registered header/foot, click the [Confirm Registed Contents] button.
Compose (Stamp) Specify whether to print the stamp.
To specify this item, specify settings for the following.
• Preset Stamp or Registered Stamp
•Print Position
• Fine-Tune (for making fine adjustments to the print position)
• Color
• Pages
•Size
To check a registered stamp, click the [Confirm Registed Contents] button. A
registered stamp must first be registered from the control panel.
Stamp Combine Method Select "Image" or "Text".
Limiting Access to Destinations To specify the access level of the destination, click the [Display] button. If an
access permission group is specified for the user who is logged on, the settings for "Search from Reference Allowed Group" appear.
If "Search from Reference Allowed Group" is selected, click the [Search from
List] button, and then select an access permission group from the list. If "Set
direct Reference Allowed Level" is selected, select a level.
If "User Box" was selected
Item Description
No. Displays the registration number.
Name Type in the name of the program (up to 24 characters).
C650 2-39
Page 64

User mode
2
Item Description
Destination Information Specify the destination.
Select "Select from Address Book" or "Direct Input". To select a destination
from the address book, click the [Search from List] button, and then select from
the list of address book destinations. An address book destination can also be
searched for using its number or index characters. To check the transmission
destinations, click the [Check Destination] button. If "Direct Input" is selected,
type in the number for the user box destination, or click the [Select from List]
button and select from the list (1 to 999999999).
Resolution Select the resolution.
File Type Select the file format.
File Name Type in the file name (up to 30 characters).
Page Setting Select how the data is to be saved.
Simplex/Duplex Select "1-Sided", "2-Sided" or "Cover Sheet + 2-Sided".
Original Type Select the document quality, such as text or photo.
Color Select the color mode. The file formats that can be saved may be limited ac-
cording to the Color setting. For details, refer to the User’s Guide [Network
Scanner Operations].
Separate Scan Select either "ON" or "OFF".
Density Select the density.
Background Removal Adjust the density of the background.
Scan Size Select the document size ("Auto", "Standard Size" or "Custom Size").
If "Standard Size" is selected, select the size and the feed direction.
If "Custom Size" is selected, specify the height and width.
Application Setting Click the [Display] button, and then specify settings for the functions that are
displayed.
E-mail Notification Specify whether to send notification of scan data URL.
Specify the destination address in the "Address" box. To select a destination
from a list, click the [Search from List] button.
Original Direction Select the document orientation.
2-Sided Binding Direction Select the position of the document binding margin.
Special Original Select "Normal", "Mixed Original", "Z-Folded Original" or "Long Original" as
the setting for the loaded document.
Book Scan Specify whether to perform book scan.
To specify this item, select settings for the scanning method and center erasing. If any setting other than "Book Spread" is selected for the scanning method, select the binding direction.
Erase Specify whether to perform frame erase.
To specify this item, specify the width that is erased on all sides of the document ("Top", "Bottom", "Left" and "Right").
Compose (Date/Time) Specify whether to print the date/time.
To specify this item, specify settings for the following.
• Date Type
•Time Type
•Print Position
• Fine-Tune (for making fine adjustments to the print position)
• Color
• Pages
•Size
Compose (Page) Specify whether to pint page numbers.
To specify this item, specify settings for the following.
• Page Number (Range: -99999 to 99999)
• Chapter (Range: -100 to 100)
• Page Number Type
•Print Position
• Fine-Tune (for making fine adjustments to the print position)
• Color
•Size
Compose (Header/Footer) Selects whether to print a header/footer.
To specify this item, specify the registration number of the header/footer. To
check the registered header/foot, click the [Confirm Registed Contents] button.
C650 2-40
Page 65

User mode
2
Item Description
Compose (Stamp) Specify whether to print the stamp.
To specify this item, specify settings for the following.
• Preset Stamp or Registered Stamp
•Print Position
• Fine-Tune (for making fine adjustments to the print position)
• Color
• Pages
•Size
To check a registered stamp, click the [Confirm Registed Contents] button. A
registered stamp must first be registered from the control panel.
Stamp Combine Method Select "Image" or "Text".
Limiting Access to Destinations To specify the access level of the destination, click the [Display] button. If an
access permission group is specified for the user who is logged on, the settings for "Search from Reference Allowed Group" appear.
If "Search from Reference Allowed Group" is selected, click the [Search from
List] button, and then select an access permission group from the list. If "Set
direct Reference Allowed Level" is selected, select a level.
If "Fax" was selected
Item Description
No. Displays the registration number.
Name Type in the name of the program (up to 24 characters).
Destination Information Specify the destination.
Select "Select from Address Book" or "Direct Input". To select a destination
from the address book, click the [Search from List] button, and then select from
the list of address book destinations. An address book destination can also be
searched for using its number or index characters. To check the transmission
destinations, click the [Check Destination] button.
If "Direct Input" is selected, type in the address (up to 38 characters, including
only numerals, #, *, T, P and E). Click the [Display] button beside "Communication Setting", and then select the communication setting ("V34 Off", "ECM Off",
"International Communication", "Check Destination"). If the optional fax multi
line is installed, the line can be selected.
Resolution Select the resolution.
File Type Select the file format.
Simplex/Duplex Select "1-Sided", "2-Sided" or "Cover Sheet + 2-Sided".
Original Type Select the document quality, such as text or photo.
Separate Scan Select either "ON" or "OFF".
Density Select the density.
Background Removal Adjust the density of the background.
Scan Size Select the document size ("Auto", "Standard Size" or "Custom Size").
If "Standard Size" is selected, select the size and the feed direction.
If "Custom Size" is selected, specify the height and width.
Application Setting Click the [Display] button, and then specify settings for the functions that are
displayed.
Timer TX Select whether or not to enable timer transmission. If "ON" is selected, specify
the time.
Password TX Select whether or not to enable password transmission. If "ON" is selected,
specify the password.
F-Code Select whether or not to enable F-codes. If "Enable" is selected, type in the
SUB address and password.
2-Sided Binding Direction Select the position of the document binding margin.
Special Original Select "Normal", "Mixed Original", "Z-Folded Original" or "Long Original" as
the setting for the loaded document.
Book Scan Specify whether to perform book scan.
To specify this item, select settings for the scanning method and center erasing. If any setting other than "Book Spread" is selected for the scanning method, select the binding direction.
Erase Specify whether to perform frame erase.
To specify this item, specify the width that is erased on all sides of the document ("Top", "Bottom", "Left" and "Right").
C650 2-41
Page 66

User mode
2
Item Description
Compose (Date/Time) Specify whether to print the date/time.
To specify this item, specify settings for the following.
• Date Type
•Time Type
•Print Position
• Fine-Tune (for making fine adjustments to the print position)
• Color
• Pages
•Size
Compose (Page) Specify whether to pint page numbers.
To specify this item, specify settings for the following.
• Page Number (Range: -99999 to 99999)
• Chapter (Range: -100 to 100)
• Page Number Type
•Print Position
• Fine-Tune (for making fine adjustments to the print position)
• Color
•Size
Compose (Header/Footer) Selects whether to print a header/footer.
To specify this item, specify the registration number of the header/footer. To
check the registered header/foot, click the [Confirm Registed Contents] button.
Compose (Stamp) Specify whether to print the stamp.
To specify this item, specify settings for the following.
• Preset Stamp or Registered Stamp
•Print Position
• Fine-Tune (for making fine adjustments to the print position)
• Color
• Pages
•Size
To check a registered stamp, click the [Confirm Registed Contents] button. A
registered stamp must first be registered from the control panel.
Stamp Combine Method Select "Image" or "Text".
Limiting Access to Destinations To specify the access level of the destination, click the [Display] button. If an
access permission group is specified for the user who is logged on, the settings for "Search from Reference Allowed Group" appear.
If "Search from Reference Allowed Group" is selected, click the [Search from
List] button, and then select an access permission group from the list. If "Set
direct Reference Allowed Level" is selected, select a level.
If "IP Address Fax" was selected
Item Description
No. Displays the registration number.
Name Type in the name of the program (up to 24 characters).
Destination Information Specify the destination.
Resolution Select the resolution.
File Type Select the file format.
Simplex/Duplex Select "1-Sided", "2-Sided" or "Cover Sheet + 2-Sided".
Original Type Select the document quality, such as text or photo.
Color Select the color mode. The file formats that can be saved may be limited ac-
Separate Scan Select either "ON" or "OFF".
Density Select the density.
Background Removal Adjust the density of the background.
Select "Select from Address Book" or "Direct Input". To select a destination
from the address book, click the [Search from List] button, and then select from
the list of address book destinations. An address book destination can also be
searched for using its number or index characters. To check the transmission
destinations, click the [Check Destination] button.
If "Direct Input" is selected, type in the host address. To type in the host name,
check the "Please check to enter host name." check box. If the machine is set
to use IPv6, an IPv6 address can also be specified. Type in the port number,
and then select the destination type.
cording to the Color setting. For details, refer to the User’s Guide [Network
Scanner Operations].
C650 2-42
Page 67

User mode
2
Item Description
Scan Size Select the document size ("Auto", "Standard Size" or "Custom Size").
If "Standard Size" is selected, select the size and the feed direction.
If "Custom Size" is selected, specify the height and width.
Application Setting Click the [Display] button, and then specify settings for the functions that are
displayed.
Password TX Select whether or not to enable password transmission. If "ON" is selected,
specify the password.
F-Code Select whether or not to enable F-codes. If "Enable" is selected, type in the
SUB address and password.
2-Sided Binding Direction Select the position of the document binding margin.
Special Original Select "Normal", "Mixed Original", "Z-Folded Original" or "Long Original" as
the setting for the loaded document.
Book Scan Specify whether to perform book scan.
To specify this item, select settings for the scanning method and center erasing. If any setting other than "Book Spread" is selected for the scanning method, select the binding direction.
Erase Specify whether to perform frame erase.
To specify this item, specify the width that is erased on all sides of the document ("Top", "Bottom", "Left" and "Right").
Compose (Date/Time) Specify whether to print the date/time.
To specify this item, specify settings for the following.
• Date Type
•Time Type
•Print Position
• Fine-Tune (for making fine adjustments to the print position)
• Color
• Pages
•Size
Compose (Page) Specify whether to pint page numbers.
To specify this item, specify settings for the following.
• Page Number (Range: -99999 to 99999)
• Chapter (Range: -100 to 100)
• Page Number Type
•Print Position
• Fine-Tune (for making fine adjustments to the print position)
• Color
•Size
Compose (Header/Footer) Selects whether to print a header/footer.
To specify this item, specify the registration number of the header/footer. To
check the registered header/foot, click the [Confirm Registed Contents] button.
Compose (Stamp) Specify whether to print the stamp.
To specify this item, specify settings for the following.
• Preset Stamp or Registered Stamp
•Print Position
• Fine-Tune (for making fine adjustments to the print position)
• Color
• Pages
•Size
To check a registered stamp, click the [Confirm Registed Contents] button. A
registered stamp must first be registered from the control panel.
Stamp Combine Method Select "Image" or "Text".
Limiting Access to Destinations To specify the access level of the destination, click the [Display] button. If an
access permission group is specified for the user who is logged on, the settings for "Search from Reference Allowed Group" appear.
If "Search from Reference Allowed Group" is selected, click the [Search from
List] button, and then select an access permission group from the list. If "Set
direct Reference Allowed Level" is selected, select a level.
If "Internet Fax" was selected
Item Description
No. Displays the registration number.
Name Type in the name of the program (up to 24 characters).
C650 2-43
Page 68

User mode
2
Item Description
Destination Information Specify the destination.
Select "Select from Address Book" or "Direct Input". To select a destination
from the address book, click the [Search from List] button, and then select from
the list of address book destinations. An address book destination can also be
searched for using its number or index characters. To check the transmission
destinations, click the [Check Destination] button.
If "Direct Input" is selected, type in the e-mail destination. Select settings for
the resolution, paper size and compression method.
Resolution Select the resolution.
File Type Select the file format.
Subject Specify the e-mail subject ("Not Specified" or 1 through 10). If "Not Specified"
is selected, the default subject is used. To check the content of the subject,
click the [Subject List] button.
Text Specify the e-mail text ("Not Specified" or 1 through 10). If "Not Specified" is
selected, the default text is used. To check the content of the text, click the
[Text List] button.
Simplex/Duplex Select "1-Sided", "2-Sided" or "Cover Sheet + 2-Sided".
Original Type Select the document quality, such as text or photo.
Separate Scan Select either "ON" or "OFF".
Density Select the density.
Background Removal Adjust the density of the background.
Scan Size Select the document size ("Auto", "Standard Size" or "Custom Size").
If "Standard Size" is selected, select the size and the feed direction.
If "Custom Size" is selected, specify the height and width.
Application Setting Click the [Display] button, and then specify settings for the functions that are
displayed.
2-Sided Binding Direction Select the position of the document binding margin.
Special Original Select "Normal", "Mixed Original", "Z-Folded Original" or "Long Original" as
the setting for the loaded document.
Book Scan Specify whether to perform book scan.
To specify this item, select settings for the scanning method and center erasing. If any setting other than "Book Spread" is selected for the scanning method, select the binding direction.
Erase Specify whether to perform frame erase.
To specify this item, specify the width that is erased on all sides of the document ("Top", "Bottom", "Left" and "Right").
Compose (Date/Time) Specify whether to print the date/time.
To specify this item, specify settings for the following.
• Date Type
•Time Type
•Print Position
• Fine-Tune (for making fine adjustments to the print position)
• Color
• Pages
•Size
Compose (Page) Specify whether to pint page numbers.
To specify this item, specify settings for the following.
• Page Number (Range: -99999 to 99999)
• Chapter (Range: -100 to 100)
• Page Number Type
•Print Position
• Fine-Tune (for making fine adjustments to the print position)
• Color
•Size
Compose (Header/Footer) Selects whether to print a header/footer.
To specify this item, specify the registration number of the header/footer. To
check the registered header/foot, click the [Confirm Registed Contents] button.
C650 2-44
Page 69

User mode
2
Item Description
Compose (Stamp) Specify whether to print the stamp.
To specify this item, specify settings for the following.
• Preset Stamp or Registered Stamp
•Print Position
• Fine-Tune (for making fine adjustments to the print position)
• Color
• Pages
•Size
To check a registered stamp, click the [Confirm Registed Contents] button. A
registered stamp must first be registered from the control panel.
Stamp Combine Method Select "Image" or "Text".
Limiting Access to Destinations To specify the access level of the destination, click the [Display] button. If an
access permission group is specified for the user who is logged on, the settings for "Search from Reference Allowed Group" appear.
If "Search from Reference Allowed Group" is selected, click the [Search from
List] button, and then select an access permission group from the list. If "Set
direct Reference Allowed Level" is selected, select a level.
If "Group" was selected.
Item Description
No. Displays the registration number.
Name Type in the name of the program (up to 24 characters).
Destination Information Specify the destination.
To select from a list of group destinations, click the [Search from List] button.
A group destination can also be searched for using its number. To check the
transmission destinations, click the [Check Destination] button.
Resolution Select the resolution.
File Type Select the file format.
File Name Type in the file name (up to 30 characters).
Page Setting Select how the data is to be saved.
Subject Specify the e-mail subject. If "Not Specified" is selected, the default subject is
used. To check the content of the subject, click the [Subject List] button.
Text Specify the e-mail text. If "Not Specified" is selected, the default text is used.
To check the content of the text, click the [Text List] button.
Simplex/Duplex Select "1-Sided", "2-Sided" or "Cover Sheet + 2-Sided".
Original Type Select the document quality, such as text or photo.
Color Select the color mode. The file formats that can be saved may be limited ac-
cording to the Color setting. For details, refer to the User’s Guide [Network
Scanner Operations].
Separate Scan Select either "ON" or "OFF".
Density Select the density.
Background Removal Adjust the density of the background.
Scan Size Select the document size ("Auto", "Standard Size" or "Custom Size").
If "Standard Size" is selected, select the size and the feed direction.
If "Custom Size" is selected, specify the height and width.
Application Setting Click the [Display] button, and then specify settings for the functions that are
displayed.
E-mail Notification Specify whether to send notification of scan data URL.
Specify the destination address in the "Address" box. To select a destination
from a list, click the [Search from List] button.
Timer TX Select whether or not to enable timer transmission.
If "ON" is selected, specify the time.
Password TX Select whether or not to enable password transmission.
If "ON" is selected, specify the password.
F-Code Select whether or not to enable F-codes.
If "Enable" is selected, type in the SUB address and password.
Original Direction Select the document orientation.
2-Sided Binding Direction Select the position of the document binding margin.
C650 2-45
Page 70

User mode
2
Item Description
Special Original Select "Normal", "Mixed Original", "Z-Folded Original" or "Long Original" as
the setting for the loaded document.
Book Scan Specify whether to perform book scan.
To specify this item, select settings for the scanning method and center erasing. If any setting other than "Book Spread" is selected for the scanning method, select the binding direction.
Erase Specify whether to perform frame erase.
To specify this item, specify the width that is erased on all sides of the document ("Top", "Bottom", "Left" and "Right").
Compose (Date/Time) Specify whether to print the date/time.
To specify this item, specify settings for the following.
• Date Type
•Time Type
•Print Position
• Fine-Tune (for making fine adjustments to the print position)
• Color
• Pages
•Size
Compose (Page) Specify whether to pint page numbers.
To specify this item, specify settings for the following.
• Page Number (Range: -99999 to 99999)
• Chapter (Range: -100 to 100)
• Page Number Type
•Print Position
• Fine-Tune (for making fine adjustments to the print position)
• Color
•Size
Compose (Header/Footer) Selects whether to print a header/footer.
To specify this item, specify the registration number of the header/footer. To
check the registered header/foot, click the [Confirm Registed Contents] button.
Compose (Stamp) Specify whether to print the stamp.
To specify this item, specify settings for the following.
• Preset Stamp or Registered Stamp
•Print Position
• Fine-Tune (for making fine adjustments to the print position)
• Color
• Pages
•Size
To check a registered stamp, click the [Confirm Registed Contents] button. A
registered stamp must first be registered from the control panel.
Stamp Combine Method Select "Image" or "Text".
Limiting Access to Destinations To specify the access level of the destination, click the [Display] button. If an
access permission group is specified for the user who is logged on, the settings for "Search from Reference Allowed Group" appear.
If "Search from Reference Allowed Group" is selected, click the [Search from
List] button, and then select an access permission group from the list. If "Set
direct Reference Allowed Level" is selected, select a level.
If "No Destination" was selected.
Item Description
No. Displays the registration number.
Name Type in the name of the program (up to 24 characters).
Resolution Select the resolution.
File Type Select the file format.
File Name Type in the file name (up to 30 characters).
Page Setting Select how the data is to be saved.
Subject Specify the e-mail subject. If "Not Specified" is selected, the default subject is
Text Specify the e-mail text. If "Not Specified" is selected, the default text is used.
Simplex/Duplex Select "1-Sided", "2-Sided" or "Cover Sheet + 2-Sided".
Original Type Select the document quality, such as text or photo.
used. To check the content of the subject, click the [Subject List] button.
To check the content of the text, click the [Text List] button.
C650 2-46
Page 71

User mode
2
Item Description
Color Select the color mode. The file formats that can be saved may be limited ac-
cording to the Color setting. For details, refer to the User’s Guide [Network
Scanner Operations].
Separate Scan Select either "ON" or "OFF".
Density Select the density.
Background Removal Adjust the density of the background.
Scan Size Select the document size ("Auto", "Standard Size" or "Custom Size").
If "Standard Size" is selected, select the size and the feed direction.
If "Custom Size" is selected, specify the height and width.
Application Setting Click the [Display] button, and then specify settings for the functions that are
displayed.
E-mail Notification Specify whether to send notification of scan data URL.
Specify the destination address in the "Address" box. To select a destination
from a list, click the [Search from List] button.
Timer TX Select whether or not to enable timer transmission.
If "ON" is selected, specify the time.
Password TX Select whether or not to enable password transmission.
If "ON" is selected, specify the password.
F-Code Select whether or not to enable F-codes.
If "Enabled" is selected, type in the SUB address and password.
Original Direction Select the document orientation.
2-Sided Binding Direction Select the position of the document binding margin.
Special Original Select "Normal", "Mixed Original", "Z-Fold Original" or "Long Original" as the
setting for the loaded document.
Book Scan Specify whether to perform book scan.
To specify this item, select settings for the scanning method and center erasing. If any setting other than "Book Spread" is selected for the scanning method, select the binding direction.
Erase Specify whether to perform frame erase.
To specify this item, specify the width that is erased on all sides of the document ("Top", "Bottom", "Left" and "Right").
Compose (Date/Time) Specify whether to print the date/time.
To specify this item, specify settings for the following.
• Date Type
•Time Type
•Print Position
• Fine-Tune (for making fine adjustments to the print position)
• Color
• Pages
•Size
Compose (Page) Specify whether to pint page numbers.
To specify this item, specify settings for the following.
• Page Number (Range: -99999 to 99999)
• Chapter (Range: -100 to 100)
• Page Number Type
•Print Position
• Fine-Tune (for making fine adjustments to the print position)
• Color
•Size
Compose (Header/Footer) Selects whether to print a header/footer.
To specify this item, specify the registration number of the header/footer. To
check the registered header/foot, click the [Confirm Registed Contents] button.
Compose (Stamp) Specify whether to print the stamp.
To specify this item, specify settings for the following.
• Preset Stamp or Registered Stamp
•Print Position
• Fine-Tune (for making fine adjustments to the print position)
• Color
• Pages
•Size
To check a registered stamp, click the [Confirm Registed Contents] button. A
registered stamp must first be registered from the control panel.
Stamp Combine Method Select "Image" or "Text".
C650 2-47
Page 72

User mode
2
Item Description
Limiting Access to Destinations To specify the access level of the destination, click the [Display] button. If an
access permission group is specified for the user who is logged on, the settings for "Search from Reference Allowed Group" appear.
If "Search from Reference Allowed Group" is selected, click the [Search from
List] button, and then select an access permission group from the list. If "Set
direct Reference Allowed Level" is selected, select a level.
Temporary One-Touch
Destinations that will be used temporarily can be registered.
The list of currently registered temporary programs can be displayed, and new destinations can be registered
or their settings can be changed.
2
Note
"Temporary One-Touch" appears if "Manual Destination Input" in Administrator mode is set to "Allow".
Specify the setting for "Manual Destination Input" from the control panel.
Item Description
No. Displays the registration number.
Name Displays the registered name.
Edit If no program destination is registered, the [Registration] button appears. If a pro-
[Delete] button Click this button to display a page to delete the registered temporary program.
In the Temporary One-Touch List page, click the [Registration] button, select the transmission type, and then
click the [OK] button to display a page to register a new temporary program. The settings are the same ones
available when registering a program. For details, refer to "Program" on page 2-31.
gram destination is registered, the [Edit] button appears. Click the button to display
the page for specifying the settings to either register or edit a program destination.
E-mail destinations where an S/MIME certificate is registered cannot be changed.
!
Detail
The Limiting Access to Destinations Settings do not appear for Temporary One-Touch.
To select a registered temporary program from the machine, press the [Mode Memory] key in the
control panel, and then touch [Page List], then [Temporary One-Touch].
C650 2-48
Page 73

User mode
2
Subject
A maximum of 10 subjects for sending e-mail messages can be registered.
Item Description
E-mail Default Select the subject to be used if none is specified when sending e-mail.
Subject Displays the registered e-mail subject.
[Edit] button Click this button to display a page to register and edit e-mail subjects.
[Delete] button Click this button to display a page to delete the registered e-mail subject.
Registration page
C650 2-49
Page 74

User mode
2
Text
A maximum of 10 texts for sending e-mail messages can be registered.
Item Description
E-mail Default Select the text to be used if none is specified when sending e-mail.
Text Displays the registered e-mail text.
[Edit] button Click this button to display a page to register and edit e-mail texts.
[Delete] button Click this button to display a page to delete the registered e-mail text.
Registration page
C650 2-50
Page 75

Administrator mode
3 Administrator mode
In Administrator mode, you can specify system settings for the machine. You can select from six tabs
(Maintenance, Security, Box, Print Setting, Store Address, and Network). This section contains descriptions
of the items in the menu that appears on the left side of the page when each Administrator mode tab is
clicked.
For details on logging on to Administrator mode, refer to "Logging on to Administrator mode" on page 1-10.
!
Detail
For details on the functions, refer to the User’s Guide [Box Operations], the User’s Guide [Network
Scanner Operations] and the User’s Guide [Print Operations].
3.1 Maintenance tab
On the Maintenance tab, information and settings concerning the system configuration of this machine are
displayed.
Meter Count
Counters managed by the machine can be displayed.
3
Item Description
Total Counter Displays totals for the output counters (Copy, Print, Scan/Fax).
Copy Counter Displays the various counters.
Print Counter
Scan Counter (appears as
Scan/Fax Counter if the optional fax kit has been installed)
Total (Copy + Print) Displays the counters for the Color settings.
C650 3-1
Page 76

Administrator mode
Item Description
Paper Size/Type Counter Displays the counters for the paper sizes and paper types.
ROM Version
The ROM version is displayed.
3
Import/Export
Machine settings can be saved as a file (exported), or settings can be written to the machine (imported).
Select the information to be imported/exported, and then click the [Import] button or [Exoport] button.
Item Description
Device Setting Imports or exports device settings.
Audit Log Exports the audit log information.
Counter Exports the counter information.
C650 3-2
Page 77

Administrator mode
Item Description
Authentication Information Backs up and restores the entire authentication data.
Address Backs up and restores the entire address data. Also, information on each address
Copy Protect/Stamp Copy protect /stamp data can be imported or exported.
2
3
Also, user registration information and authentication data can be imported or exported. When using an optional authentication unit on this machine, authentication
data can be imported or exported.
When exporting authentication information, a password can be specified if necessary. The specified password is required when importing the authentication information.
If authentication is performed with PageScope Authentication Manager, this menu
item does not appear.
can be imported or exported.
When exporting address information, a password can be specified if necessary.
The specified password is required when importing the address information.
Reminder
The data in the exported files cannot be edited.
When e-mail destinations with certificates are exported and imported, the certificate information must
be registered again after importing.
Only exporting is possible when "Audit Log" or "Counter" is selected.
Import or export authentication data in the same way as with user registration information. Perform the
operation with the user authentication information before performing it with the authentication data.
"Audit Log" is available when audit log setting is enabled on this machine.
C650 3-3
Page 78

Administrator mode
Status Notification Setting
Specify settings for sending a notification if a machine error occurred. Settings can be specified for the
destination of error notifications and the occasions when notifications are sent.
3
Item Description
Destination Displays the type of notification address. To send the notification to an SNMP man-
Set Specified addresses are marked.
[Edit] button Click this button to display a page to register and edit notification settings.
[Delete] button Click this button to display a page to delete the registered notification settings.
ager, specify the IP address or the IPX address. To send a notification by e-mail,
specify the e-mail destination.
C650 3-4
Page 79

Administrator mode
Status Notification Setting page
3
Item Description
Notification Address Type in the notification address.
Replenish Paper Tray Notifies when the paper tray runs out of paper.
JAM Notifies when a paper misfeed occurs.
PM Call Notifies when a periodic inspection should be performed.
Replace Staples Notifies when there are no more staples.
Replenish Toner Notifies when there is no toner.
Finisher Tray Full Notifies when the finisher tray capacity has been reached.
Service Call Notifies when there is a service call.
Job Finished Notifies when the job is completed (successfully).
Hole-Punch Scrap Box Full Notifies when the punch scraps must be removed.
Waste Toner Box Full Notifies when the waste toner box must be replaced.
Imaging Unit Yield Notifies when the imaging unit must be replaced.
Fusing Unit Yield Notifies when the fusing unit must be replaced.
Transfer Roller Yield Notifies when the transfer roller unit must be replaced.
Transfer Belt Unit Yield Notifies when the image transfer belt unit must be replaced.
Ozone Filter Yield Notifies when the ozone filter must be replaced.
If the notification destination is specified as an IP address, specify the port number and community name.
Before typing in a host name, check the "Please check to enter host name." check box.
If the notification destination is specified as an IPX address, specify the node address and community name.
!
Detail
The information that appears as "the printer location" in the e-mail message sent with the status
notification function is specified in the "Printer Location" box on the page displayed by clicking "IPP
Setting" in the menu on the Network tab. For details on "Printer Location", refer to "IPP Setting" on
page 3-65.
C650 3-5
Page 80

Administrator mode
Total Counter Notification Setting
Specify the settings for sending notifications of the total counter by e-mail and the e-mail address where
notifications are sent.
3
Item Description
Total Counter Notification Setting
Schedule Setting Specify the conditions for the notification schedule. Schedules 1 and 2 can be reg-
Register Notification Address Type in the e-mail address where notifications are sent (up to 320 characters). Se-
[Send Now] button Click this button to send an e-mail notification
Type in the name of the model to appear in the list (up to 20 characters).
istered with different settings.
lect the notification schedule for the entered address.
C650 3-6
Page 81

Administrator mode
Machine Setting
The registered machine information can be changed.
Item Description
Device Name Type in the device name (up to 255 characters).
Device Location Specify the device location (up to 255 characters).
Administrator Name Type in the administrator name (up to 255 characters).
Admin. E-mail Address Specify the address for the administrator (up to 128 characters, up to 127 charac-
3
ters when creating an SSL certificate in order to enable S/MIME).
If the administrator address is not set, messages cannot be sent.
The set address is displayed on the transmitter section of the message. Before
messages are sent, the address can be changed to one other than the administrator
address from the control panel.
Online Assistance
Specify the support information for the machine. To display this information, click the Information tab in User
mode, and then click "Online Assistance" in the menu.
Item Description
Contact Name Specify the contact name (up to 63 characters).
Contact Information Specify the contact information (up to 127 characters).
Product Help URL Specify the URL of the Web page for product information (up to 127 characters, ex-
Corporate URL Specify the URL of the Web page for the manufacturer (up to 127 characters, ex-
Supplies and Accessories Specify the contact information for ordering supplies (up to 127 characters).
cluding < and >).
cluding < and >).
C650 3-7
Page 82

Administrator mode
Item Description
Online Help URL Specify the following URL for the online manual (excluding < and >).
Driver URL Specify the driver storage location (up to 127 characters, excluding < and >).
Date/Time Setting - Manual Setting
Specify the date and time for the machine.
3
http://pagescope.com/download/webconnection/ onlinehelp/c650/help.html
Item Description
Year Type in the year.
Month Type in the month.
Day Type in the day.
Hour Type in the hour.
Minute Type in the minutes.
Time Zone Select the time difference from GMT.
Daylight Saving Time If necessary, specify the daylight saving time setting. (Range: 1 to 150; Units: min-
utes)
C650 3-8
Page 83

Administrator mode
Date/Time Setting - Time Adjustment Setting
Select whether the date and time of the machine can be adjusted through passive acquisition from the NTP
server.
3
Item Description
Time Adjustment Setting Select whether or not the time is automatically adjusted with NTP.
NTP Server Address Type in the NTP server address.
Port No. Type in the NTP server port number. (Range: 1 to 65535)
[Adjust] button Click this button to connect to the NTP server with the specified conditions and ad-
To type in the host name, select the "Please check to enter host name." check box.
If the machine is set to use IPv6, an IPv6 address can also be specified. The only
symbols that can be used are the dash (-) and period (.).
just the time.
!
Detail
In order to specify the settings on the Time Adjustment Setting page, the time zone must first be
specified. For details, refer to "Date/Time Setting - Manual Setting" on page 3-8.
Timer Setting - Power Save Setting
Specify the settings for the machine’s power-saving modes.
Item Description
Low Power Mode Setting Specify the length of time until the machine enters Low Power mode.
C650 3-9
Page 84

Administrator mode
Item Description
Sleep Mode Setting Specify the length of time until the machine enters Sleep mode.
Power Save Key Select the power-saving mode ("Low Power" or "Sleep") that the machine enters.
Timer Setting - Weekly Timer Setting
Specify the weekly timer settings for the machine.
3
Item Description
Use Weekly Timer To use the weekly timer function, select this check box, and then specify the operating days
Use Power Save To use the power save function, select this check box, and then specify the starting and end-
Use Overtime Password
and time. To display a page for selecting the operating day settings, click the [Setting] button,
and then specify the day or date settings.
ing times for power saving
To use the non-business hours password function, select this check box, and then type in the
password.
Network TWAIN
Specify the length of time until the machine’s operations are automatically unlocked during scanning (except
with PUSH scanning).
C650 3-10
Page 85

Administrator mode
Item Description
TWAIN Lock Time Specify the automatic unlocking time. (Range: 30 to 300 seconds)
2
Reset - Network Setting Clear
The machine’s network settings can be reset to those specified when the machine was shipped from the
factory.
Click the [Clear] button to perform the operation.
3
Note
If optional image controller IC-409 has been installed, this parameter is not available.
2
Reminder
If network settings are cleared, the machine becomes accessible with PageScope Web Connection
after clearing of the settings is completed. Please wait for a while and access again.
2
Note
If "Enhanced Security Mode" is set to enable, this menu item does not appear.
C650 3-11
Page 86

Administrator mode
Reset - Reset
The printer controller can be reset.
Click the [Reset] button to perform the operation.
3
Reset - Format All Destination
All destinations registered on the machine can be erased.
Click the [Format] button to perform the operation.
C650 3-12
Page 87

Administrator mode
External Memory Function Settings
Specify settings for using external memory on this machine.
Item Description
Save Document To send scanned data to external memory, select "ON".
Print Document To print data in external memory, select "ON".
3
To prevent data from being stolen, "OFF" is specified as default. To use an external memory, select "ON".
Header/Footer Registration
The list of headers/footers can be displayed, and they can be registered or edited.
Item Description
Name Displays the registered name.
Header String/Footer String Displays the text string registered for the header/footer.
C650 3-13
Page 88

Administrator mode
Item Description
[Edit] button Click this button to display a page to register and edit header/footer text strings
[Delete] button Click this button to display a page to delete the registered header/footer.
Registration Screen
3
Item Description
No. Displays the registration number.
Name Type in the name to be registered.
Color Select the color.
Pages Select the pages to be printed on.
Size Select the size.
Date/Time Setting Select the date and time formats.
Distribution Number Type in the distribution number text. Select the format, and then type in the starting
Header/Footer Specify settings for the following.
number.
• Header String/Footer String (up to 40 characters each)
• Date/Time Setting
• Distribution Number
•Job Number
• Serial Number
• User Name/Account Name
C650 3-14
Page 89

Administrator mode
License Settings - Get Request Code
A request code can be issued.
Click the [OK] button to perform the operation.
3
!
Detail
For details on acquiring a license code and installing the license, refer to the Quick Guide
[Copy/Print/Fax/Scan/Box Operations].
License Settings - Install License
Settings can be specified to enable functions.
Item Description
i-Option LK-101/102/103 Select a function to be enabled, and then select "Registered".
License Code Enter the acquired license code without using hyphens.
[OK] Enables the function.
!
Detail
If an additional memory included in optional upgrade kit is not installed, this menu item does not appear.
C650 3-15
Page 90

Administrator mode
3.2 Security tab
From the Security tab, specify security settings for the machine.
Authentication - User Auth/Account Track
Specify user authentication and account track settings for the machine.
3
Item Description
General Settings Select the authentication method ("OFF", "ON (External Server)" or "ON (MFP)").
Public User Access Select whether or not public user access is permitted when user authentication set-
Ticket Hold Time Setting (Active Directory)
Account Track Select whether or not to manage accounts.
Account Track Input Method Select the authentication method for account track when account track settings are
Synchronize User Authentication & Account Track
Number of Counters Assigned
for Users
When Number of Jobs Reach
Maximum
tings are specified.
When "General Settings" is set to "ON" (External Server), specify the ticket hold
time.
specified.
Select whether or not to synchronize user authentication and account track when
settings have been specified for both.
Type in the number of counters assigned to users when settings have been specified for both user authentication and account track. (Range: 1 to 999)
Select the operation that is performed when the number of copies or printouts has
reached its maximum.
2
Note
If "Enhanced Security Mode" is set to enable, the authentication method cannot be set to "OFF". In
addition, "Public User Access" is set to "Restrict".
This menu item does not appear if authentication is performed with PageScope Authentication
Manager.
C650 3-16
Page 91

Administrator mode
Authentication - External Server Registration
The list of external authentication servers for the machine can be displayed, and new external authentication
servers can be registered or their settings can be changed.
3
Item Description
Default The selected server is used if external server authentication is not specified when a
External Server Name Displays the registered name.
External Server Type Displays the type of external authentication server.
[Edit] button Click this button to display a page to register and edit settings for the external au-
[Delete] button Click this button to display a page to delete the registered external authentication
user or account is registered.
thentication server.
server.
C650 3-17
Page 92

Administrator mode
Registration Screen
3
Item Description
No. Displays the registration number.
External Server Name Type in the name of the external authentication server (up to 32 characters).
External Server Type Select the type of external authentication server.
Active Directory If "Active Directory" is selected as the server type, type in the default domain name.
NTLM If "NTLM" is selected as the server type, type in the default domain name.
default domain name in uppercase letters.
NDS If "NDS" is selected as the server type, type in the default NDS tree name and the
default NDS context name.
LDAP If "LDAP" is selected as the server type, specify settings for the following.
• Server Address
•Port No.
•Search Base
•Timeout
• Authentication Method
To type in a host address for the server address, select the "Please check to enter
host name." check box. If the machine is set to use IPv6, an IPv6 address can also
be specified.
If "Digest-MD5" is selected as the authentication method, specify the search attribute.
Enter the
C650 3-18
Page 93

Administrator mode
Authentication - Default Function Permission
When external server authentication is specified, unregistered users are registered with the default function
limitation settings.
Item Description
Copy Select whether or not to allow each operation.
Scan
Save to External Memory
Fax
Print
User Box
Print Scan/Fax from User Box
Manual Destination Input
3
!
Detail
If user authentication settings are not specified, click the [User Authentication Menu] button to display
the page for specifying user authentication settings.
This menu item does not appear if authentication is performed with PageScope Authentication
Manager.
User Registration
If user authentication settings are specified, users can be registered and their settings can be changed.
C650 3-19
Page 94

Administrator mode
Item Description
[New Registration] button Click this button to register a new user. For details, refer to "Registering a user" on
Search from Number Select a range of registration numbers, and then click the [Go] button to display the
No. Displays the registration number.
User Name Displays the registered user name.
[Edit] button Click this button to display a page for editing the settings for the registered user.
[Delete] button Click this button to display a page to delete the registered user.
!
3
page 3-21.
list of users with the specified numbers.
The settings are the same ones available during registration.
Detail
If user authentication settings are not specified, click the [User Authentication Menu] button to display
the User Auth/Account Track page for specifying user authentication settings.
This menu item does not appear if authentication is performed with PageScope Authentication
Manager.
C650 3-20
Page 95

Administrator mode
Registering a user
% In the User Registration page, click the [New Registration] button.
3
A page for registering a user appears.
Item Description
No. Type in the registration number.
User Name Type in the user name.
E-mail Address Type in the e-mail address.
User Password Type in the password.
Retype User Password Type in the password again.
Account Name If user authentication and account track are synchronized, specify the account that
Specify Icon From [Search from List], specify an icon for the user to be registered. The icons are
the user belongs to. To select an account from a list, click the [Select from List] button. The account can also be searched for by its number.
used in the image panel function which can be operated when the optional i-Option
LK-101 or LK-103 is installed.
C650 3-21
Page 96

Administrator mode
Item Description
Function Permission Select whether or not to allow each of the following operations.
Output Permission (Print) Select whether or not to allow color or black-and-white outputs.
Output Permission (TX) Select whether or not to allow color outputs.
Max. Allowance Set To manage the total counter, individual counters or user box counters, select the
Limiting Access to Destinations Select the destination access permission level for the user.
2
3
•Copy
•Scan
• Save to External Memory
•Fax
•Print
•User Box
• Print Scan/Fax from User Box
• Manual Destination Input
corresponding check box, and then type in the maximum allowed.
If the "Reference Allowed Group" check box is selected, click the [Search from List]
button, and then select an access permission group from the list. If the "Access Allowed Level" check box is selected, select a level.
Reminder
If "Password Rules" is set to "Enable", only a password containing 8 digits can be specified.
If a user password containing less than 8 characters has already been registered, change the password
so that it contains 8 characters before setting "Password Rules" to "Enable". For details on the
password rules, refer to the User’s Guide [Copy Operations].
Account Track Registration
If account track settings are specified, accounts can be registered and their settings can be changed.
Item Description
[New Registration] button Click this button to register a new account. For details, refer to "Registering an ac-
Search from Number Select a range of registration numbers, and then click the [Go] button to display the
No. Displays the registration number.
Account Name Displays the registered account name.
[Edit] button Click this button to display a page for editing the registered account. The settings
[Delete] button Click this button to display a page to delete the registered account.
count" on page 3-23.
list of accounts with the specified numbers.
are the same ones available during registration.
!
Detail
If account track settings are not specified, click the [User Authentication Menu] button to display the
User Auth/Account Track page for specifying account track settings.
C650 3-22
Page 97

Administrator mode
Registering an account
% In the Account Track Registration page, click the [New Registration] button.
3
This menu item does not appear if authentication is performed with PageScope Authentication
Manager.
A page for registering an account appears.
Item Description
No. Type in the registration number.
Account Name Type in the account name. If "Account Track Input Method" is set to "Password On-
Password Type in the password.
Retype password Type in the password again.
Output Permission (Print) Select whether or not to allow color or black-and-white outputs.
Output Permission (TX) Select whether or not to allow color outputs.
Max. Allowance Set To manage the total counter, individual counters or user box counters, select the
ly", "Name" appears.
corresponding check box, and then type in the maximum allowed.
2
Reminder
If "Password Rules" is set to "Enable", only a password containing 8 digits can be specified.
If an account password containing less than 8 characters has already been registered, change the
password so that it contains 8 characters before setting "Password Rules" to "Enable". For details on
the password rules, refer to the User’s Guide [Copy Operations].
SSL/TLS Setting - SSL/TLS Setting
Specify the settings for SSL/TLS. If SSL/TLS is enabled, communications between the machine and the client
computer are encrypted to prevent disclosure of passwords and communication content.
If a certificate is installed, the following page appears.
C650 3-23
Page 98

Administrator mode
2
If a certificate is not installed, the following page appears.
Creating a certificate or obtaining the format from a certification authority and installing it enables SSL/TLS.
3
Note
The page contents differ depending on the registered information.
To register new certificates or change or delete registered ones, click the [Setting] button.
2
Reminder
To encrypt communication from a Windows Vista-equipped computer to this machine using SSL, the
computer must be able to resolve the names for this machine using the DNS server. Register this
machine to the DNS server in advance, and specify settings for DNS at the computer side.
When the certificate of this machine is not published by certificate authority, register the certificate of
this machine to Windows Vista as a certificate of "Trusted Publishers" for "Computer account" in
advance.
To encrypt communication from this machine to a Windows Vista-equipped computer using SSL,
create a certificate at the computer side in advance to associate the computer with the communication
port.
C650 3-24
Page 99

Administrator mode
Creating a certificate
On the page that appears, specify settings for the following.
3
If "Create a self-signed Certificate" was selected
Item Description
Common Name Displays the IP address or domain name of the machine. The information for the ac-
Organization Type in the name of the organization or group used for creating an organization certif-
Organizational Unit Type in the name of the account used for creating an account certificate (up to 63 ASCII
Locality Type in the name of the locality used for creating a locality certificate (up to 127 ASCII
State/Province Type in the name of the state/province used for creating a state/province certificate (up
Country When creating a country certificate, type in a country code regulated by ISO 03166 (2
Admin. E-mail Address Specify the address for the administrator (up to 127 characters).
Validity Start Date Type in the starting date for the period of validity. Displays the date and time when this
Validity Period Type in the number of days from the starting date for the period of validity for the cer-
Encryption Strength Select the encryption method.
Mode using SSL/TLS Select the modes using SSL/TLS.
cessed machine is displayed.
icate (up to 63 ASCII characters).
characters).
characters).
to 127 ASCII characters).
characters).
United States: US, Great Britain: GB, Italy: IT, Australia: AU, The Netherlands: NL, Canada: CA, Spain: ES, Czech Republic: CZ, China: CN, Denmark: DK, Germany: DE, Japan: JP, France: FR, Belgium: BE, Russia: RU
page was displayed.
tificate. (Range: 1 to 3650 days)
C650 3-25
Page 100

Administrator mode
If "Request a Certificate" was selected
Item Description
Common Name Displays the IP address or domain name of the machine. The information for the accessed
Organization Type in the name of the organization or group used for creating an organization certificate
Organizational Unit Type in the name of the account used for creating an account certificate (up to 63 ASCII
Locality Type in the name of the locality used for creating a locality certificate (up to 127 ASCII
State/Province Type in the name of the state/province used for creating a state/province certificate (up to
Country When creating a country certificate, type in a country code regulated by ISO 03166 (2 char-
Admin. E-mail Address Specify the address for the administrator (up to 127 characters). When changing the reg-
Creating a certificate
3
machine is displayed.
(up to 63 ASCII characters).
characters).
characters).
127 ASCII characters).
acters).
United States: US, Great Britain: GB, Italy: IT, Australia: AU, The Netherlands: NL, Canada:
CA, Spain: ES, Czech Republic: CZ, China: CN, Denmark: DK, Germany: DE, Japan: JP,
France: FR, Belgium: BE, Russia: RU
istered information, the specified address appears.
1 On the SSL/TLS Information page, click the [Setting] button.
A page appears, allowing an operation to be selected.
2 Select "Create a self-signed Certificate" or "Request a Certificate"for the method to create a certificate,
and then click the [OK] button.
– To create a self-signed certificate, select "Create a self-signed Certificate".
– To request a certificate from a certification authority, select "Request a Certificate".
The registration page appears.
C650 3-26
 Loading...