

Page 1

C3850/C3350/C3850FS
User’s Guide
Security Operations
2016. 2
Ver. 2.02
Page 2

Contents
1 Security
1.1 Introduction ..................................................................................................................................... 1-2
Compliance with the ISO15408 Standard ......................................................................................... 1-2
Operating Precautions ....................................................................................................................... 1-2
INSTALLATION CHECKLIST.............................................................................................................. 1-3
1.2 Security Functions .......................................................................................................................... 1-5
Check Count Clear Conditions .......................................................................................................... 1-5
1.3 Precautions for Operation Control................................................................................................ 1-6
Roles of the Owner of the Machine ................................................................................................... 1-6
Roles and Requirements of the Administrator of the machine .......................................................... 1-6
Password Usage Requirements ........................................................................................................ 1-6
External authentication server control requirements ......................................................................... 1-7
Security function operation setting operating requirements.............................................................. 1-7
Operation and control of the machine............................................................................................... 1-7
Machine Maintenance Control........................................................................................................... 1-9
1.4 Miscellaneous................................................................................................................................ 1-10
Password Rules ............................................................................................................................... 1-10
Precautions for Use of Various Types of Applications..................................................................... 1-10
Encrypting communications ............................................................................................................ 1-11
Print functions.................................................................................................................................. 1-11
IPP printing ...................................................................................................................................... 1-11
Items of Data Cleared by Data Erase Function................................................................................ 1-12
HDD Format ..................................................................................................................................... 1-13
Upgrading of the firmware ............................................................................................................... 1-13
Software and hardware used in the machine .................................................................................. 1-13
Self-test function (encryption key and firmware verification) ........................................................... 1-13
IPsec setting .................................................................................................................................... 1-14
CS Remote Care function................................................................................................................ 1-14
Terminating a Session and Logging out .......................................................................................... 1-14
Authentication error during external server authentication.............................................................. 1-15
2 Administrator Operations
2.1 Accessing the Administrator Settings .......................................................................................... 2-2
Accessing the Administrator Settings................................................................................................ 2-2
2.2 Enhancing the Security Function................................................................................................... 2-5
2.2.1 Setting the Password Rules............................................................................................................... 2-7
2.2.2 Setting the Enhanced Security Mode ................................................................................................ 2-9
2.3 Canceling the Operation Prohibited State.................................................................................. 2-10
Performing Release Setting ............................................................................................................. 2-10
2.4 Setting the Authentication Method ............................................................................................. 2-12
2.5 ID & Print Setting Function........................................................................................................... 2-14
2.6 System Auto Reset Function ....................................................................................................... 2-15
2.7 User Setting Function................................................................................................................... 2-17
2.8 Memory RX Function .................................................................................................................... 2-19
2.8.1 Setting Memory RX.......................................................................................................................... 2-19
2.8.2 Accessing the Memory RX file......................................................................................................... 2-21
2.9 Changing the Administrator Password....................................................................................... 2-22
2.10 Protecting Data in the HDD.......................................................................................................... 2-25
2.10.1 Setting the Encryption Key .............................................................................................................. 2-25
Setting the Authentication Method .................................................................................................. 2-12
Setting the ID & Print........................................................................................................................ 2-14
Setting the System Auto Reset function.......................................................................................... 2-15
Making user setting.......................................................................................................................... 2-17
Changing the Administrator Password ............................................................................................ 2-22
bizhub C3850/C3350/C3850FS Contents-1
Page 3

2.10.2 Deleting the encryption key ............................................................................................................. 2-28
2.10.3 Setting the Overwrite HDD Data ...................................................................................................... 2-29
2.11 Erasing data when the machine is to be discarded or use of a leased machine is
2.11.1 Setting the Overwrite All Data.......................................................................................................... 2-31
2.11.2 Setting the Restore All ..................................................................................................................... 2-34
2.12 Obtaining Job Log......................................................................................................................... 2-36
2.12.1 Obtaining and deleting a Job Log.................................................................................................... 2-36
2.12.2 Downloading the Job Log data........................................................................................................ 2-38
2.13 Setting time/date in machine....................................................................................................... 2-43
2.13.1 Setting time/date.............................................................................................................................. 2-43
2.13.2 Setting daylight saving time............................................................................................................. 2-45
2.14 SSL Setting Function .................................................................................................................... 2-47
2.14.1 Device Certificate Setting ................................................................................................................ 2-47
2.14.2 SSL Setting ...................................................................................................................................... 2-49
2.14.3 Removing a Certificate..................................................................................................................... 2-50
2.15 Accessing the Scan to HDD file................................................................................................... 2-51
2.16 TCP/IP Setting Function............................................................................................................... 2-53
2.16.1 Setting the IP Address ..................................................................................................................... 2-53
2.16.2 Registering the DNS Server ............................................................................................................. 2-54
2.17 E-Mail Setting Function................................................................................................................ 2-55
terminated...................................................................................................................................... 2-31
Job Log data.................................................................................................................................... 2-40
Accessing the image file .................................................................................................................. 2-51
Setting the SMTP Server (E-Mail Server)......................................................................................... 2-55
3 User Operations
3.1 User Authentication Function........................................................................................................ 3-2
Performing user authentication.......................................................................................................... 3-2
3.2 ID & Print Function.......................................................................................................................... 3-6
3.2.1 Registering ID & Print files ................................................................................................................. 3-6
3.2.2 Accessing the ID & Print file............................................................................................................... 3-8
3.3 Change Password Function......................................................................................................... 3-10
Performing Change Password......................................................................................................... 3-10
3.4 Scan to HDD Function .................................................................................................................. 3-11
3.4.1 Registering image files..................................................................................................................... 3-11
3.4.2 Accessing the image file .................................................................................................................. 3-13
3.5 S/MIME transmission function .................................................................................................... 3-15
3.6 Memory RX Function .................................................................................................................... 3-17
3.6.1 Accessing the Memory RX file......................................................................................................... 3-17
Sending E-mail by S/MIME.............................................................................................................. 3-15
4 Application Software
4.1 PageScope Data Administrator ..................................................................................................... 4-2
Precautions during backup or restore ............................................................................................... 4-2
4.1.1 Accessing from PageScope Data Administrator ............................................................................... 4-2
4.1.2 Setting the user authentication method............................................................................................. 4-4
4.1.3 Changing the authentication mode.................................................................................................... 4-6
4.1.4 Making the user settings.................................................................................................................... 4-8
4.1.5 Making the Address setting ............................................................................................................... 4-9
bizhub C3850/C3350/C3850FS Contents-2
Page 4

1
Security
Page 5

1.1 Introduction
1 Security
1.1 Introduction
Thank you for purchasing our product.
This User's Guide contains the operating procedures and precautions to be used when using the security
functions offered by the bizhub C3850/C3350/C3850FS machine. To ensure the best possible performance
and effective use of the machine, read this manual thoroughly before using the security functions. The Administrator of the machine should keep this manual for ready reference. The manual should be of great help
in finding solutions to operating problems and questions.
This User's Guide (Ver. 2.02) covers the following.
Model name bizhub C3850/bizhub C3350/bizhub C3850FS/ineo
Version G0607-999
For any query, request, or opinion concerning the machine, please contact your dealer from which you purchased your machine or Service Representative.
Any notice concerning this machine will be given in writing by the dealer from which you purchased your machine or Service Representative.
+
3850/ineo+ 3350/ineo+ 3850FS
1
Compliance with the ISO15408 Standard
When the Enhanced Security Mode on this machine is set to [ON], more enhanced security functions are
available.
This machine offers the security functions that comply with the ISO/IEC15408 (level: EAL2) and 2600.2-PP,
Protection Profile for Hardcopy Devices, Operational Environment B.
Operating Precautions
The machine gives an alarm message or an alarm sound (peep) when a wrong operation is performed or a
wrong entry is made during operation of the machine. (No "peep" alarm sound is issued if a specific sound
setting in Sound Setting of Accessibility Setting is set to [OFF].) If the alarm message or alarm sound is given,
perform the correct operation or make the correct entry according to the instructions given by the message
or other means.
The administrator of the machine should exit from the current mode to return to the basic screen whenever
the access to that mode is completed or if he or she leaves the machine with the mode screen left displayed.
The administrator of the machine should make sure that each individual general user exits from the current
mode to return to the basic screen whenever the access to that mode is completed or if the user leaves the
machine with the mode screen left displayed.
If an error message appears during operation of the machine, perform steps as instructed by the message.
For details of the error messages, refer to the User’s Guide furnished with the machine. If the error cannot be
remedied, contact your service representative.
The PageScope Web Connection functions can be used only if the setting is made to accept "Cookie."
NOTICE
This machine permits duplicate login operations performed by the service engineer, the Administrator of the
machine, and the user.
- The Administrator of the machine should make sure that, when the service engineer changes the settings, neither the Administrator of the machine nor the user performs the login operation.
- The Administrator of the machine should make sure that no user is allowed to perform the login operation when the Administrator of the machine changes or deletes user information or user data.
- To prevent settings of the machine from being duplicated, the Administrator of the machine should not
attempt to change the settings in a condition of having logged onto a mode simultaneously from the
control panel and the client PC.
bizhub C3850/C3350/C3850FS 1-2
Page 6
1.1 Introduction
INSTALLATION CHECKLIST
This Installation Checklist contains items that are to be check by the Service Engineer installing this machine.
The Service Engineer should check the following items, then explain each checked item to the Administrator
of the machine.
To Service Engineer
Make sure that each of these items is properly carried out by checking the box on the right of each item.
1. Perform the following steps before installing this machine.
2. After this machine is installed, refer to the Service Manual and perform the following steps.
3. After this machine is installed, refer to this User’s Guide and perform the following steps.
Check with the administrator to determine if the security functions of this machine should
be enhanced. If the functions should be enhanced, check the following.
If the security functions are not to be enhanced, quit the operation without checking the following.
Before installing the machine, check with the administrator of the machine to determine if
the following is confirmed.
• Whether the Service Engineer has been informed that the unpacking procedure is to be
performed by the Service Engineer in the presence of the administrator of the machine.
• Whether the machine has been under the control of the administrator of the machine
with a check made to ensure that evidently the machine has not been unpacked or
used.
The Service Engineer should obtain the administrator's consent to the performance of this
item.
If the machine has been unpacked, check with the administrator that it was the administrator who unpacked the machine and nobody but the administrator has gain access to the
machine after the unpacking. Then, obtain the administrator's consent to the performance
of the installation procedure for the unpacked machine before attempting to start the procedure. If the administrator's consent cannot be obtained, call the dealer.
I swear that I would never disclose information as it relates to the settings of this machine
to anybody, or perform malicious or intentional act during setup and service procedures for
the machine.
When giving a copy of the User's Guide, explain the following to the administrator:
• A digital signature is assigned to the data certified by ISO15408. To ensure integrity of
the file, have the administrator of the machine confirm the digital signature using the
property of the provided data file in the user's PC environment.
Confirm the digital signature as follows.
Right click the provided exe file to display the property screen.
Select [Digital Signatures] - [Details] - [General], and check that Konica Minolta, Inc. is
displayed in the Name of signer field.
Select [View Certificate] - [General], and check the Signing time is within the validated
date of the certificate.
• Two versions are available, the User's Guide and User's Guide Security Operations (this
User's Guide).
• This User's Guide must first be read and the conditions described in this User's Guide
Security Operations take precedence over the User's Guide.
• If the security functions of the machine are to be enhanced, the machine and its surrounding environment should be set up and operated according to this User's Guide.
Refer to the Service Manual and perform the required installation and setup steps.
• Explain to the administrator making him/her check the cover of the Service Manual to
be referred that it is for bizhub C3850/bizhub C3350/bizhub C3850FS/ineo
3350/ineo
settings must be performed referring to the manuals above.
• The Service Engineer must have the administrator confirm that the digital signature is
assigned to the firmware and the version of the firmware to be updated is the one that
is written on the Service Manual.
Check that the model name, firmware version value, and the controller F/W hash value contained in the Service Manual agree with the respective values on the firmware version display screen and the firmware verification screen.
Check also that the MFP model name and the part numbers of the MFP board and the SSD
board agree with those described in the Service Manual.
If there is a mismatch in the Firmware version number, explain to the administrator of the
machine that upgrading of the Firmware is necessary and perform upgrading of the Firmware.
Set the CE Password.
Check that the Administrator Password has been set by the Administrator of the machine.
+
3850FS (Version: G0607-999). Explain to the administrator that the following
+
3850/ineo+
1
bizhub C3850/C3350/C3850FS 1-3
Page 7
1.1 Introduction
Check that the Encryption Key has been set by the administrator of the machine.
Check that the [IPv4 Address], [Subnet Mask], and [Default Gateway] have been set by the
administrator of the machine.
Check that the self-signed certificate for SSL communications has been registered by the
Administrator of the machine.
Check that the date and time have been correctly set in the machine by the administrator
of the machine.
Check that the ID & Print has been set to [Enable] by the administrator of the machine.
Check that the Memory RX has been set to [ON] by the administrator of the machine.
Check that IPsec has been set by the administrator of the machine for communications be-
tween the machine and the DNS server.
Check that IPsec has been set by the administrator of the machine for communications be-
tween the machine and the SMTP server.
Check that IPsec has been set by the administrator of the machine for communications be-
tween the machine and the external authentication server.
Check that User Authentication has been set to [Device] or [External Server] (Active Direc-
tory only) by the Administrator of the machine.
Check that Password Rules has been set to [ON] by the Administrator of the machine.
Let the Administrator of the machine set Enhanced Security Mode to [ON].
Check that the various functions to be disabled manually have been properly disabled by
the administrator of the machine.
The languages, in which the contents of the User’s Guide Security Operations have been
evaluated, are Japanese and English.
The following lists the manuals compatible with bizhub C3850/bizhub C3350/bizhub
C3850FS/ineo
• bizhub C3850/C3350/C3850FS User’s Guide v1.00 A3GN-9574BA-00
• bizhub C3850/C3350/C3850FS User’s Guide Security Operations 2016. 2 Ver.2.02
Explain to the administrator that the settings for the security functions for this machine have
been specified.
+
3850/ineo+ 3350/ineo+ 3850FS (Version: G0607-999).
1
When the above steps have been properly carried out, the Service Engineer should make a copy of this list
and give the original of this list to the Administrator of the machine. The copy should be kept at the corresponding Service Representative for filing.
Please direct your any queries about using the machine to the Service Representative shown below.
Product Name Company Name User Division Name,
Contact
Customer (Administrator of Machine)
Service Representative
Person in charge
bizhub C3850/C3350/C3850FS 1-4
Page 8

1.2 Security Functions
1.2 Security Functions
Setting the Enhanced Security Mode to [ON] will validate the security function of this machine. For details of
the settings of different security functions to be changed by turning [ON] the Enhanced Security Mode, see
page 2-5.
The following the major security functions when the Enhanced Security Mode is set to [ON].
Function Description
Identification and authentication function
User limiting function Specific functions to be used by each user may be limited. For details, see
HDD encryption function By setting the Encryption Key, the data stored in the HDD is encrypted, there-
Auditing function Information including operations performed on the machine and a job history
Residual information deleting function
Network communication
protecting function
1
Access control is then provided through password authentication for any access to the Administrator Settings and User Authentication mode. Access is
thereby granted only to the authenticated user. A password that can be set
must meet the Password Rules. The machine does not accept setting of an
easily decipherable password. For details of the Password Rules, see
page 1-10.
If a wrong password has been entered three cumulative times during password authentication, the machine determines that it is unauthorized access
through Prohibited Functions When Authentication Error, prohibiting any further entry of the password. By prohibiting the password entry operation, the
machine prevents unauthorized use or removal of data, thereby ensuring secured used of the machine. The administrator of the machine is responsible
for resetting the prohibition of the password entry operation. For details, see
page 2-10.
page 2-17.
by protecting the data in the HDD. For details, see page 2-25.
can be stored in the HDD. Setting the Job Log (Audit Log) allows an illegal
act or inadequate operation performed on the machine to be traced. The obtained Job Log can be downloaded and viewed from the PageScope Web
Connection. For details, see page 2-36.
When the machine is to be discarded or use of a leased machine is terminated at the end of the leasing contract, setting of the Overwrite HDD Data function while the machine was in use allows residual unnecessary data to be
deleted, because the machine overwrites a specific overwrite value over the
unnecessary data. This prevents data leakage. (Passwords, addresses, and
other data set while the machine was in use should, however, be deleted
manually.) For details, see page 2-29.
The Overwrite All Data function overwrites and erases all data stored in all
spaces of the HDD. In addition, the Restore All function resets all passwords
saved in the memory area on the MFP board and the SSD board to the factory settings, thus preventing data from leaking. For details, see page 2-31.
For details of items to be cleared by Overwrite All Data function, see
page 1-12.
Communication data transmitted to or from the machine and client PC can
be encrypted using the SSL/TLS, which prevents information leakage
through sniffing over the network. For details, see page 2-47.
Check Count Clear Conditions
The following are the conditions for clearing or resetting the check count of the number of wrong entries at
the time of authentication.
<Administrator Settings>
- Authentication of Administrator Settings is successful.
- Five minutes elapses after the machine is restarted.
- The Service Engineer performs administrator unlocking.
<User Authentication Mode>
- User Authentication mode is successful.
- Release of Prohibited Functions When Authentication Error is executed.
bizhub C3850/C3350/C3850FS 1-5
Page 9

1.3 Precautions for Operation Control
1.3 Precautions for Operation Control
This machine and the data handled by this machine should be used in an office environment that meets the
following conditions. The machine must be controlled for its operation under the following conditions to protect the data that should be protected.
Roles of the Owner of the Machine
The owner (an individual or an organization) of the machine should take full responsibility for controlling the
machine, thereby ensuring that no improper operations are performed.
- The owner of the machine should have the administrator of the machine recognize the organizational
security policy and procedure, educate him or her to comply with the guidance and documents prepared by the manufacturer, and allow time for him or her to acquire required ability. The owner of the
machine should also operate and manage the machine so that the administrator of the machine can
configure and operate the machine appropriately according to the policy and procedure.
- The owner of the machine should have users of the machine recognize the organizational security policy
and procedure, educate them to follow the policy and procedure, and operate and manage the machine
so that the users acquire the required ability.
- The owner of the machine should vest the user with authority to use the machine according to the organizational security policy and procedure.
- The owner of the machine should operate and manage the machine so that the administrator of the machine checks the Job Log (Audit Log) data at appropriate timing to thereby determine whether a security
compromise or a faulty condition has occurred during an operating period.
- If the Job Log (Audit Log) data is to be exported to another product, the owner of the machine should
ensure that only the administrator of the machine performs the task. The owner of the machine should
also operate and manage the machine so that the Job Log (Audit Log) data is not illegally accessed,
deleted, or altered.
1
Roles and Requirements of the Administrator of the machine
The administrator of the machine should take full responsibility for controlling the machine, thereby ensuring
that no improper operations are performed.
<To Achieve Effective Security>
- A single individual person who is capable of taking full responsibility for controlling the machine should
be appointed as the administrator of the machine to make sure that no improper operations are performed.
- When using an SMTP server (mail server) or an DNS server, each server should be appropriately managed by the administrator and should be periodically checked to confirm that settings have not been
changed without permission.
Password Usage Requirements
The Administrator must control the Administrator Password and Memory RX Password appropriately so that
they may not be leaked. These passwords should not be ones that can be easily guessed. The user, on the
other hand, should control the User Password appropriately so that they may not be leaked. Again, these
passwords should not be ones that can be easily guessed.
<To Achieve Effective Security>
- Make absolutely sure that only the Administrator knows the Administrator Password and Memory RX
Password.
- The Administrator must change the Administrator Password and Memory RX Password at regular intervals.
- The Administrator should make sure that any number that can easily be guessed from birthdays, employee identification numbers, and the like is not set for the Administrator Password and Memory RX
Password.
- If a User Password has been changed, the Administrator should have the corresponding user change
the password as soon as possible.
- If the Administrator Password has been changed by the Service Engineer, the Administrator should
change the Administrator Password as soon as possible.
- The Administrator should have users ensure that the passwords set for the User Authentication and
Memory RX are known only by the user concerned.
- The Administrator should have users change the passwords set for the User Authentication at regular
intervals.
bizhub C3850/C3350/C3850FS 1-6
Page 10

1.3 Precautions for Operation Control
- The Administrator should make sure that any user does not set any number that can easily be guessed
from birthdays, employee identification numbers, and the like for the passwords set for the User Authentication.
- Upon change of the Administrators, the old Administrator of the machine should promptly have the new
one change the Administrator password.
External authentication server control requirements
The administrator of the machine and the server administrator are required to apply patches to, or perform
account control for, this machine and the external authentication server connected to the office LAN in which
the machine is installed to ensure operation control that achieves appropriate access control.
<To Achieve Effective Security>
- Apply patches so that the external authentication server is always up-to-date.
- Change the corresponding account information promptly as soon as user authorities are changed.
- Delete the corresponding account information promptly as soon as the specific user is transferred.
Security function operation setting operating requirements
The administrator of the machine should observe the following operating conditions.
- The administrator of the machine should make sure that the machine is operated with the settings described in the installation checklist made properly in advance.
- The administrator of the machine should make sure of correct operation control so that the machine is
used with the Enhanced Security Mode set to [ON].
- When the Enhanced Security Mode is turned [OFF], the administrator of the machine is to make various
settings according to the installation checklist and then set the Enhanced Security Mode to [ON] again.
For details of settings made by the service engineer, contact your service representative.
- When the machine is to be discarded or use of a leased machine is terminated at the end of the leasing
contract, the administrator of the machine should use the Overwrite HDD Data function, the Overwrite
All Data function, and the Restore All function to thereby prevent data to be protected from leaking.
1
Operation and control of the machine
The Administrator of the machine should perform the following operation control.
- The Administrator of the machine should log off from the Administrator Settings whenever the operation
in the Administrator Settings is completed. The Administrator of the machine should also make sure
that each individual user logs off from the User Authentication mode after the operation in the User Authentication mode is completed.
- During user registration, the administrator of the machine should make sure that the correct settings
are made for the correct users, including functional restrictions.
- The administrator of the machine should set the Encryption Key according to the environment, in which
this machine is used.
- The administrator of the machine should appropriately control the device certificate (SSL certificate)
registered in the machine.
- The administrator of the machine should ensure that no illegal connection or access is attempted when
the machine is to be connected to an external interface.
- The administrator of the machine should appropriately control the file of Job Log (Audit Log) data downloaded to, for example, a PC and ensure that none other than the administrator handles it.
- The administrator of the machine should check the Job Log (Audit Log) data at appropriate timing,
thereby determining whether a security compromise or a faulty condition has occurred during an operating period.
- When generating or deleting Job Log (Audit Log) and Job Log (Audit Log) data, the administrator of the
machine should check conditions of using this machine by the user.
- The administrator of the machine should make sure that each individual user updates the OS of the user's terminal and applications installed in it to eliminate any vulnerabilities.
bizhub C3850/C3350/C3850FS 1-7
Page 11

1.3 Precautions for Operation Control
The administrator of the machine disables the following functions and operates and manages the machine
under a condition in which those functions are disabled (While the Enhanced Security Mode is set to [ON],
do not manually enable these functions).
Function Name Setting Procedure
Delete Other User Jobs Using [Administrator Settings] - [System Settings] - [Restrict User Ac-
RAW Port Setting Using [Administrator Settings] - [Network Settings] - [TCP/IP Setting]
FTP Settings Using [Administrator Settings] - [Network Settings], set [FTP Settings]
SMB Settings • Start the PageScope Web Connection and, using [Network] -
E-mail RX (POP) Start the PageScope Web Connection and, using [Network] - [E-mail
SNMP Settings Using [Administrator Settings] - [Network Settings], set [SNMP Set-
TCP Socket Settings Start the PageScope Web Connection and, using [Network] - [TCP
SSL/TLS Version Setting Start the PageScope Web Connection and, using [Security] - [PKI Set-
WebDAV Settings Start the PageScope Web Connection and, using [Network] - [Web-
DPWS Settings (Printer Settings/Scanner Settings)
Bonjour Setting Using [Administrator Settings] - [Network Settings], set [Bonjour Set-
LPD Setting Start the PageScope Web Connection and, using [Network] - [TCP/IP
Manual destination entry prohibition
OpenAPI External Start the PageScope Web Connection and, using [Network] - [OpenA-
Confidential RX User Box Select [Administrator Settings] - [Fax Settings] - [Confidential RX User
1
cess] - [Restrict Access to Job Settings], set [Delete Other User Jobs]
to [Restrict].
- [RAW Port Setting], set [Enable] to [No].
• By setting [RAW Port Setting] to [No], the printing function via
RAW port connection (Windows standard TCP/IP port) becomes
unavailable.
to [Disable].
[SMB Settings] - [WINS/NetBIOS Settings] of the administrator
mode, set [WINS/NetBIOS] to [Disable].
• Start the PageScope Web Connection and, using [Network] [SMB Settings] - [SMB Client Settings] of the administrator mode,
set [SMB Client] to [Disable].
• Start the PageScope Web Connection and, using [Network] [SMB Settings] - [Direct Hosting Settings] of the administrator
mode, set [Direct Hosting] to [Disable].
Settings] of the administrator mode, set [E-mail RX (POP)] to [Disable].
tings] to [OFF].
• To perform Registration of Device in the PageScope Data Administrator, first register the machine before disabling the SNMP Settings.
Socket Settings] - [TCP Socket Settings] of the administrator mode,
set [TCP Socket] to [Disable].
• By setting [TCP Socket] to [Disable], TWAIN connection becomes
unavailable.
tings] - [SSL/TLS Settings] of the administrator mode, cancel the selection of [SSL 3.0] of [SSL/TLS Version].
DAV Settings] - [WebDAV Client Settings] of the administrator mode,
set [WebDAV Client] to [Disable].
• Start the PageScope Web Connection and, using [Network] [Web Service Settings] - [Printer Settings] of the administrator
mode, set [Print Function] to [Disable].
• Start the PageScope Web Connection and, using [Network] [Web Service Settings] - [Scanner Settings] of the administrator
mode, set [Scan Function] to [Disable].
ting] to [Disable].
Settings] of the administrator mode, set [LPD] to [Disable].
• By setting [LPD] to [Disable], the printing function via LPR port
connection becomes unavailable.
The administrator of the machine registers only fax destinations and
E-mail addresses.
PI Settings] of the administrator mode, set [OpenAPI External] to [Disable].
Box] and check that Confidential RX User Box is not registered.
bizhub C3850/C3350/C3850FS 1-8
Page 12

1.3 Precautions for Operation Control
Function Name Setting Procedure
LDAP Setting Start the PageScope Web Connection and, using [Network] - [LDAP
Machine Maintenance Control
The Administrator of the machine should perform the following maintenance control activities.
- Provide adequate control over the machine to ensure that only the Service Engineer is able to perform
physical service operations on the machine.
- Provide adequate control over the machine to ensure that any physical service operations performed
on the machine by the Service Engineer are overseen by the Administrator of the machine.
- Some options require that Enhanced Security Mode be turned [OFF] before they can be used on the
machine. If you are not sure whether a particular option to be additionally purchased is fully operational
with the Enhanced Security Mode turned [ON], contact your Service Representative.
- Install the machine at a safe site that can be monitored and operate and manage the machine while
ensuring that the machine is protected from unauthorized physical access.
1
Settings] - [LDAP Settings] of the administrator mode, set [LDAP] to
[Disable].
bizhub C3850/C3350/C3850FS 1-9
Page 13

1.4 Miscellaneous
1.4 Miscellaneous
Password Rules
Study the following table for details of the number and types of characters that can be used for each password. For details of the settings of the Password Rules, see page 2-7.
1
Types of
passwords
User Password 8 to 64
Administrator
Password
*
: The minimum number of characters set in [Set Minimum Password Length] must be set for the password.
The default value is eight.
Number of
characters
characters
8 to 16
characters
Types of characters Conditions for set-
ting/changes
• Numeric characters: 0 to 9
*
• Alpha characters: upper and
lower case letters
• Symbols: !, #, $, %, &, ’, (, ),
*, ,, -, ., /, :, ;, <, =, >, ?, @, [,
\, ], ^, _, `, {, |, }, ~, +, SPACE
Selectable from among a total of
94 characters
• "”" cannot be used
• Numeric characters: 0 to 9
*
• Alpha characters: upper and
lower case letters
• Symbols: !, #, $, %, &, ’, (, ),
*, ,, -, ., /, :, ;, <, =, >, ?, @, [,
\, ], ^, _, `, {, |, }, ~, ”, +,
SPACE
Selectable from among a total of
95 characters
• A password only consisting of identical characters cannot be registered
or changed.
• The current password
must be entered before a
change can be made in
the setting.
• A new password to be
set should not be the
same as the current one.
• A password only consisting of identical characters cannot be registered
or changed.
• The current password
must be entered before a
change can be made in
the setting.
• A new password to be
set should not be the
same as the current one.
Precautions for Use of Various Types of Applications
Comply with the following requirements when using the PageScope Web Connection or an application of various other types.
The administrator of the machine should make sure that the user observes the following requirements.
- The password control function of each application stores the password that has been entered in the PC
being used. Disable the password management function of each application and perform an operation
without storing a password.
Use a web browser or an application of various other types that shows "*" or "-" for the password entered.
- Once the password has been entered, do not leave your PC idle without logging on.
- Set the web browser so that cache files are not saved.
- Do not access any other site once you have logged onto the machine with the PageScope Web Con-
nection. Accessing any other site or a link included in e-mail, in particular, can lead to execution of an
unintended type of operation. Whenever access to any other site is necessary, be sure first to log off
from the machine through the PageScope Web Connection.
- Using the same password a number of times increases the risk of spoofing.
- If a web browser such as Internet Explorer is used on the client PC side, "TLS v1" should be used for
the SSL setting.
- Optional applications not described in this User’s Guide are not covered by certification of ISO15408.
bizhub C3850/C3350/C3850FS 1-10
Page 14

1.4 Miscellaneous
Encrypting communications
The following are the cryptographic algorithms of key exchange and communications encryption systems
supported in generation of encryption keys.
- TLS_RSA_WITH_3DES_EDE_CBC_SHA
- TLS_RSA_WITH_AES_128_CBC_SHA
- TLS_DHE_RSA_WITH_3DES_EDE_CBC_SHA
- TLS_DHE_RSA_WITH_AES_256_CBC_SHA
NOTICE
The administrator of the machine should make sure that SSL encryption communication is not performed
with the SSL set in SSL v3.
Do not use an SSL certificate that is electronically signed by MD5, as an increased risk results of data to be
protected being tampered with or leaked.
To eliminate the risk of the data to be protected being tampered with or leaked, refer to the recommended
ciphers list disclosed by, for example, NIST and CRYPTREC and use the appropriate cryptographic technique.
Use the following browsers to ensure SSL encryption communication with appropriate strength. Use of any
of the following browsers achieves SSL encryption communication that ensures confidentiality of the image
data transmitted and received.
For Windows
- Microsoft Internet Explorer 11 or later
Microsoft Internet Explorer 11 is used for the ISO15408 evaluation for this machine.
1
Print functions
Only the following procedures are guaranteed for the print functions performed from the client PC.
- Use IPPS printing for the print functions performed using the printer driver.
- Use direct printing from the PageScope Web Connection for the print functions not performed via the
printer driver.
IPP printing
IPP (Internet Printing Protocol) is a function that allows image data stored in HDD to be printed via the Internet
by using the HTTP (HyperText Transfer Protocol) of the TCP/IP Protocol. IPPS (IPP over SSL/TLS) is the type
of IPP that performs the SSL encryption communication.
<Installing printer driver>
To perform IPPS printing, the printer driver must be installed.
In the printer addition wizard of Windows Vista/7/8/8.1, Server 2008, Server 2008 R2, Server 2012, or Server
2012 R2, type the IP address of the machine in the following format in the "URL" field.
https://[host name].[domain name]/ipp
For [Host Name] and [Domain Name], specify the names set with the DNS server.
It is noted that the name resolution is enabled through the LLMNR protocol even without ".[Domain Name]"
within the local segment (the range not beyond the router).
bizhub C3850/C3350/C3850FS 1-11
Page 15

1.4 Miscellaneous
<Registering the certificate in Windows Vista or later>
Windows Vista or later, which offers enhanced security functions, gives a certificate error message if the SSL
certificate is one that is not issued by a certification body. In such cases, it becomes necessary to register
the certificate of this machine as that issued by a reliable party for the computer account.
First, register Host Name and IP address of this machine in the DNS server in advance. Then, in TCP/IP Settings of PageScope Web Connection, set the DNS Host Name and DNS Default Domain Name registered
with the DNS server.
It should also be noted that, for the certificate to be imported, a certificate for SSL encryption communication
should be registered in PageScope Web Connection and exported in advance as the certificate including the
public key.
1 From "Continue to this website," call the PageScope Web Connection window to the screen.
2 Click "Certificate Error" to display the certificate. Then, click "Install Certificate" to install the certificate.
3 Display the physical stores. Then, deploy the certificate, which has earlier been exported, in "Local
Computer" of "Trusted Root Certification Authorities" to thereby import the certificate.
Items of Data Cleared by Data Erase Function
The data erase function clears the following items of data.
NOTICE
Perform "Restore All" from the control panel of the machine, and not via the network.
The encryption key is not deleted even if Restore All or Overwrite All Data is performed. For the detailed deleting procedure, see page 2-28.
1
Items of Data Cleared Description Method
Enhanced Security Mode Set to [OFF] Overwrite All Data
User registration data Deletes all user-related data that has been
Scan to HDD file Deletes all files stored as "Personal" by
ID & Print file Deletes all ID & Print files Overwrite All Data
Image files • Image files saved other than the files
Destination recipient data
files
Administrator Password Clears the currently set password, reset-
SSL certificate Deletes the currently set SSL certificate Overwrite All Data
Network Setting Clears the currently set network settings
Machine setting data Deletes the machine setting data Restore All
Trusted channel setting data Deletes the trusted channel setting data Restore All
registered
Scan to HDD
stored as "Personal" by Scan to HDD,
and ID & Print files
• Image files of jobs in job queue state
• Remainder data files, used as image
files and not deleted through only the
general deletion operation
• Temporary data files generated during
print image file processing
Deletes all destination recipient data including e-mail addresses and telephone
numbers
ting it to the factory setting
(DNS Server setting, IP Address setting,
and SMTP Server setting), resetting it to
the factory setting
HDD Format
Restore All
Overwrite All Data
HDD Format
Overwrite All Data
HDD Format
HDD Format
Overwrite All Data
HDD Format
Overwrite All Data
HDD Format
Restore All
HDD Format
Restore All
Restore All
bizhub C3850/C3350/C3850FS 1-12
Page 16
1.4 Miscellaneous
Items of Data Cleared Description Method
External server identification
setting data
Time Adjustment Settings
(NTP)
HDD Format
Execute HDD format when, for example, to initialize the HDD (to be reset to the default state) or when the
HDD is replaced with a referent one. Executing HDD format deletes data saved in the machine’s HDD.
- For details of items that are cleared by HDD Format, see page 1-12.
- HDD formatting turns [OFF] the Enhanced Security Mode. So, it must be turned [ON] again. For details
of settings, see page 2-5.
- To execute HDD format, perform [HDD Format] in [Utility] - [Administrator Settings] - [Security Settings]
- [HDD Settings].
Upgrading of the firmware
If upgrading of the firmware has been performed by the service engineer, the Administrator of the machine
must execute [Restore All]. Execute [Restore All] after the firmware has been upgraded. For details of the execution of [Restore All], see page 2-34.
- For details of items of data to be cleared by [Restore All], see page 1-12.
- The execution of [Restore All] will turn [OFF] the Enhanced Security Mode. So, it must be turned [ON]
again. For details of settings, see page 2-5.
Deletes the external server identification
setting data
Set to [Disable] Restore All
Overwrite All Data
HDD Format
1
Software and hardware used in the machine
The following lists the software, hardware, and their versions used for the ISO15408 evaluation for this machine and they are the same as those listed on the security target.
The user should appropriately manage the software and hardware used with the machine on his or her own
responsibility.
Software/Hardware Version, etc.
FAX Kit FK-512
OS (Operating System) Windows 7 Professional SP1
Internet Explorer Ver. 11
Mozilla Firefox Ver. 36
Printer Driver • PCL v3.0.0
• XPS v3.0.1
PageScope Data Administrator
with Device Set-Up and Utilities
PageScope Data
Administrator
Ver. 1.0.06000
Ver. 4.1.35000
Self-test function (encryption key and firmware verification)
When the Enhanced Security Mode is set to [ON], the machine checks the encryption key and the firmware
to make sure that they remain intact when the power switch is turned ON.
If a fault is present, an alarm screen that warns that a fault has occurred appears when the machine is started.
If the alarm screen appears, contact your Service Representative.
bizhub C3850/C3350/C3850FS 1-13
Page 17

1.4 Miscellaneous
IPsec setting
This machine offers a choice of two authentication methods of [Pre-Shared Key] and [Digital Signature] for
authenticating the remote machine with which to communicate.
When [Pre-Shared Key] is to be used, control the pre-shared key appropriately to ensure that it is not leaked
to any third party other than the remote machine with which to communicate. For the shared key, set a value
that consists of a combination of eight or more alphanumeric characters and that cannot be easily guessed.
Do not set a value that can be easily guessed from your birthday, employee identification number, and the
like.
[Digital Signature] has a higher security strength than [Pre-Shared Key].
[Main Mode] and [Aggressive Mode] are available in [Negotiation Mode] of [IKE Settings]. The default setting
is [Main Mode]. The administrator of the machine should operate the machine with the [Main Mode] setting.
The ISO15408 evaluation for the machine is performed on the basis of the [Pre-Shared Key].
In IPsec setting, perform the proper management so that the conditions below are complied.
- Do not use DES but use 3DES or AES in [Encryption Algorithm].
- Do not specify NULL in [ESP Encryption Algorithm].
- Do not specify manual keys in [Key Exchange Method].
- Use character strings according to the Password Rules in [Pre-Shared Key].
1
CS Remote Care function
CS Remote Care is a system that manages the machine through transmission and reception of various types
of data for managing the machine between the machine and the CS Remote Care center computer via a telephone/fax line, a network, or E-mail.
When the Enhanced Security Mode is set to [ON], the following functions are no longer usable: instructing to
rewrite the firmware, rewriting settings of the machine.
Terminating a Session and Logging out
The machine allows the operator to automatically log out from or terminate a session, if it is unable to detect
an operation on the control panel or a communication packet on the network.
The following shows the setting range and the default setting of each function. Set the time according to the
environment in which the machine is used.
The administrator of the machine should explain to the user that the following settings are made. The administrator of the machine should also explain to the user immediately as soon as the setting has been changed.
Function name/software, etc Description
System Auto Reset Setting range
• [1] to [9] minutes, Default setting: [1] minute
Setting procedure
• [Administrator Settings] - [System Settings] - [Reset Settings] -
[System auto reset] - [System Auto Reset Time]
Auto Logout
(PageScope Web Connection)
PageScope Data Administrator Default setting: [60] minutes (No change can be made in the setting)
Setting range
• [Admin. Mode Logout Time]: [1] to [60] minutes
Default setting: [10] minutes
• [User Mode Logout Time]: [1] to [60] minutes
Default setting: [60] minutes
Setting procedure
• Start the PageScope Web Connection and, in the Administrator
Mode, select [Security] - [Auto Logout].
The time setting represents consideration for the time-consuming
task, such as downloading the registered information. Be careful
about leaving your seat, because the time setting is rather long.
bizhub C3850/C3350/C3850FS 1-14
Page 18

1.4 Miscellaneous
Authentication error during external server authentication
If a user is unable to log in successfully during user authentication using the external server authentication,
possible causes include the status of connection to the external server, the condition of the external server
(the server is down), and the status of user registration with the external server such as the number of users
to be controlled by the machine reaching its limit and the user password quality on the external server.
The administrator of the machine should check these points and make the appropriate settings.
1
bizhub C3850/C3350/C3850FS 1-15
Page 19

2
Administrator Operations
Page 20
2.1 Accessing the Administrator Settings
2 Administrator Operations
2.1 Accessing the Administrator Settings
In Administrator Settings, the settings for the machine system and network can be registered or changed.
This machine implements authentication of the user of the Administrator Settings function through the Administrator Password that verifies the identity as the Administrator of the person who accesses the function.
During the authentication procedure, the Administrator Password entered for the authentication purpose appears as "*" or "-" on the display. A failure in authentication as a result of the entry of a wrong password is
counted as unauthorized access.
NOTICE
Make sure that none of the general users of the machine will know the Administrator Password.
If the Administrator Password is forgotten, it must be set again by the Service Engineer. Contact your Service
Representative.
Accessing the Administrator Settings
The machine does not accept access to the Administrator Settings under any of the following conditions.
Wait for some while before attempting to gain access to the Administrator Settings again (Except for access
from PageScope Web Connection).
- There is a job being executed by the machine.
- There is a reserved job (timer TX, fax redial waiting, etc.) in the machine.
- Immediately after the power switch has been turned ON.
- A malfunction code is displayed on the machine.
<From the Control Panel>
0 Do not leave the machine with the setting screen of Administrator Settings left shown on the display. If
it is absolutely necessary to leave the machine, be sure first to log off from the Administrator Settings.
2
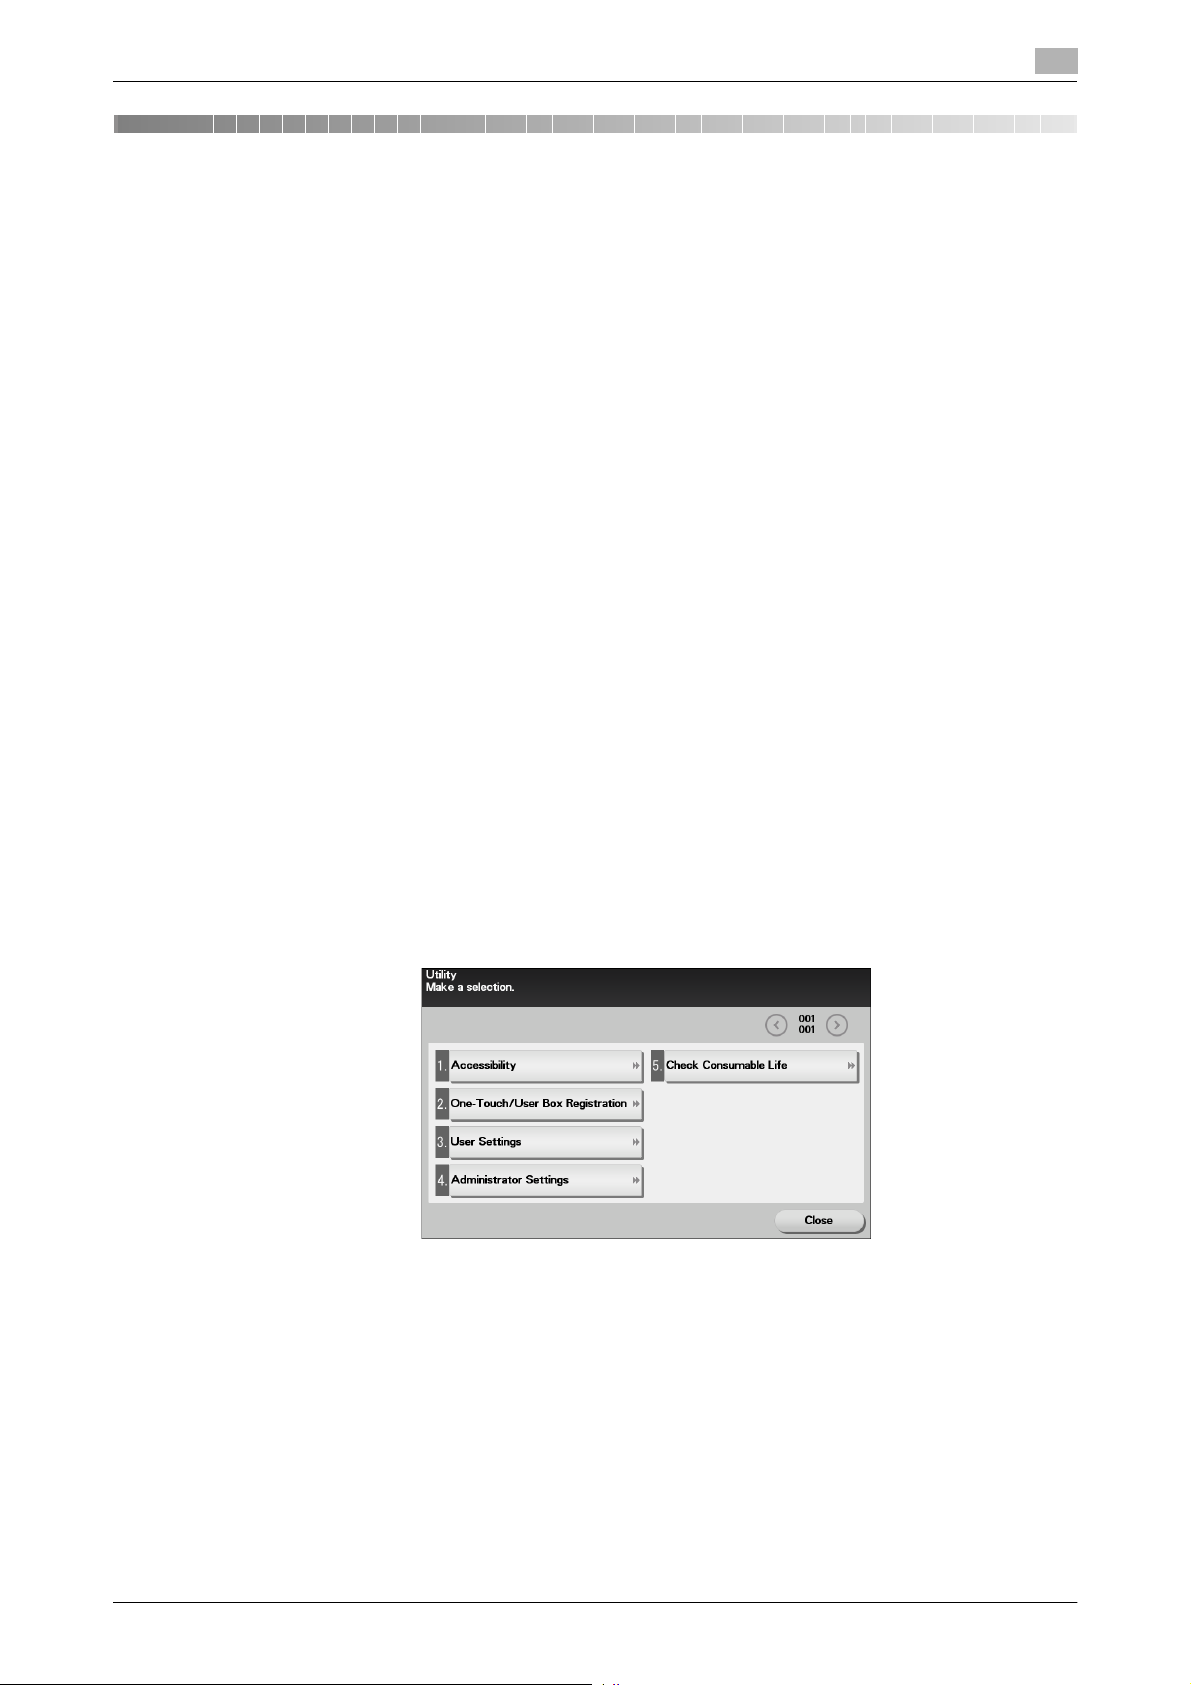
1 Touch [Utility].
2 Touch [Administrator Settings].
bizhub C3850/C3350/C3850FS 2-2
Page 21
2.1 Accessing the Administrator Settings
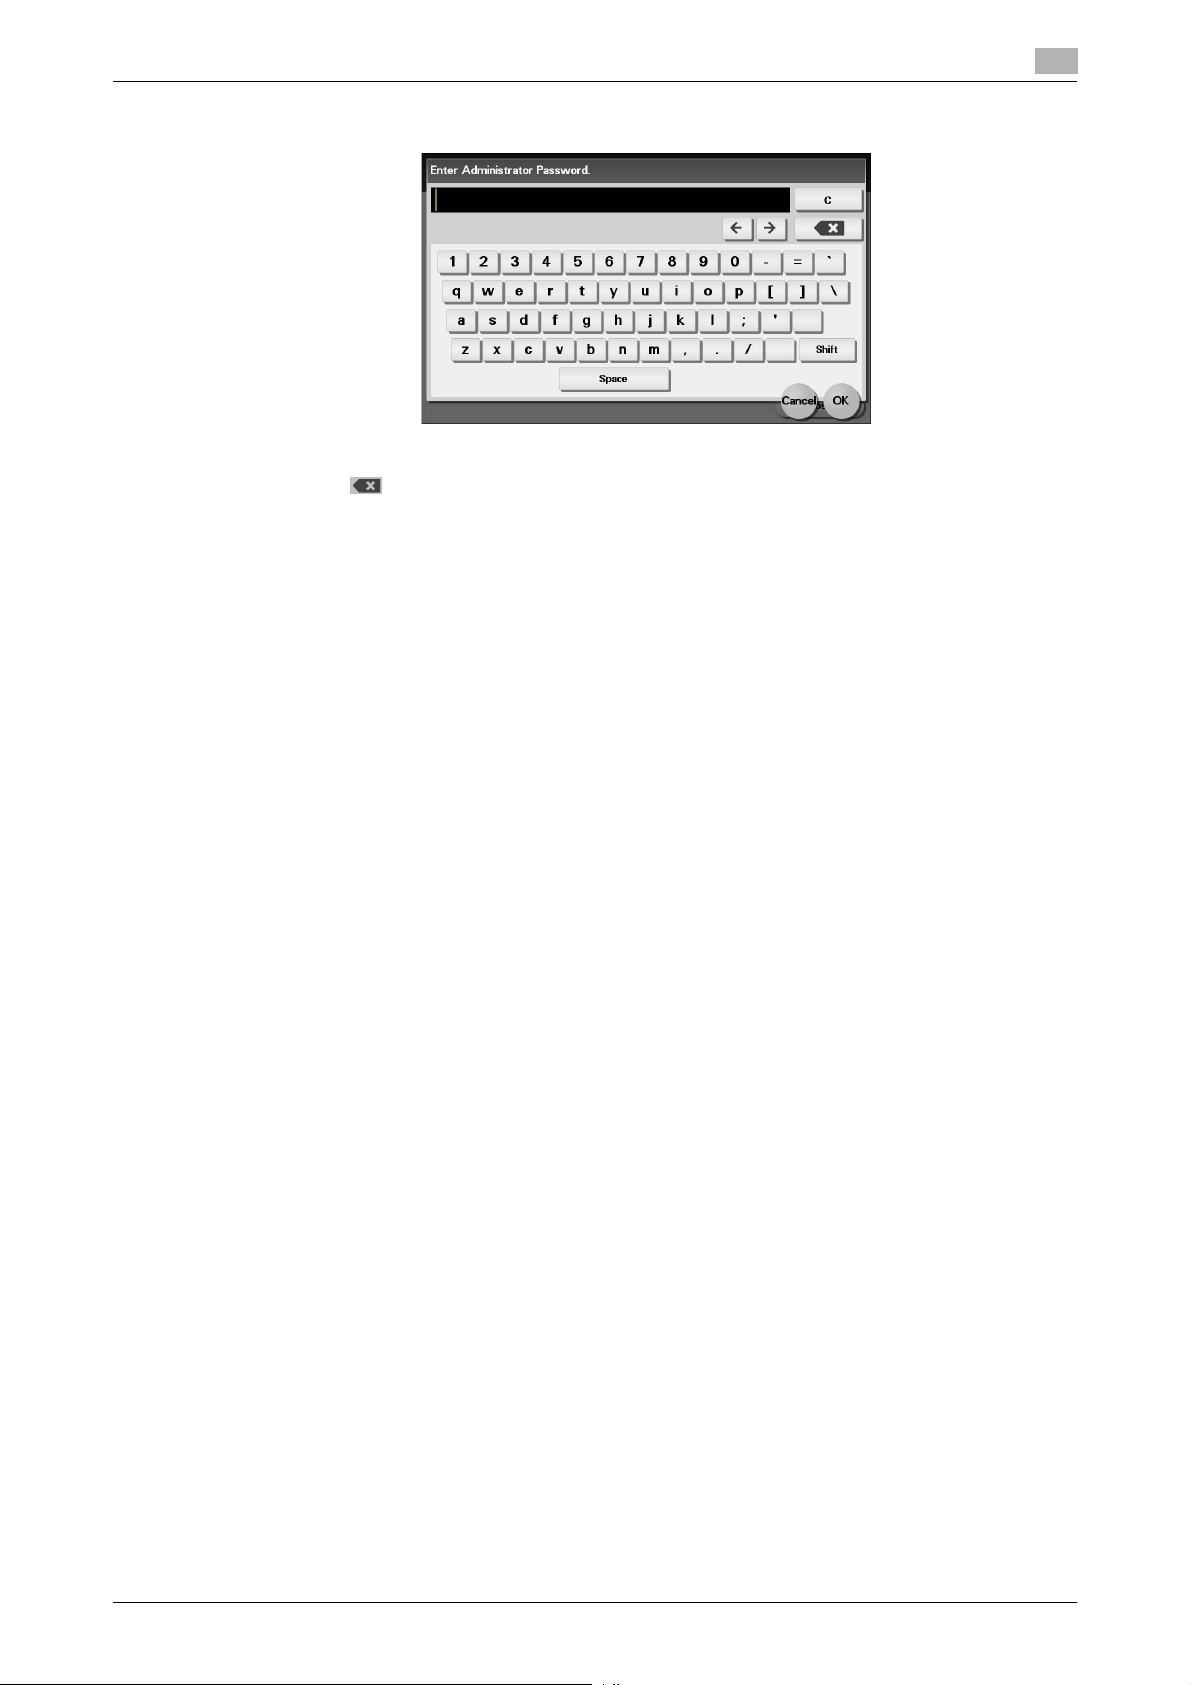
3 Enter the Administrator Password from the keyboard.
% Touch [C] to clear all characters.
% Touch [ ] to delete the last character entered.
% Touch [Shift] to show the upper case/symbol screen.
% Touch [Cancel] to go back to the previous screen.
4 Touch [OK].
% If a wrong Administrator Password is entered, a message that tells that the Administrator Password
does not match appears. Enter the correct Administrator Password.
% A failure in authentication as a result of the entry of a wrong password is counted as unauthorized
access. If the cumulative number of unauthorized accesses reaches three during operation of the
machine, the machine is set into an access lock state and prohibits any subsequent password entry
operations. To cancel the access lock state, settings must be made by the Service Engineer; or, turn
off, then on, the power switch of the machine. When the power switch is turned off, then on again,
wait at least 10 seconds to turn it on after turning it off. This interval is necessary to ensure that the
machine functions properly.
2
5 Press the [Reset] key to log off from the Administrator Settings.
bizhub C3850/C3350/C3850FS 2-3
Page 22

2.1 Accessing the Administrator Settings
<From PageScope Web Connection>
0 Do not leave the machine with the Administrator Mode setting screen left shown on the display. If it is
absolutely necessary to leave the machine, be sure first to log off from the Administrator Mode.
1 Start the Web browser.
2 Enter the IP address of the machine in the address bar.
3 Press the [Enter] key to start PageScope Web Connection.
4 Click the Administrator radio button and [Log in].
2
5 Enter the Administrator Password in the password box.
% When accessing the Administrator Mode using the PageScope Web Connection, enter the same
Administrator Password as that for the machine.
6 Click [OK].
% If a wrong Administrator Password is entered, a message that tells that the authentication has failed
appears. Enter the correct Administrator Password.
% A failure in authentication as a result of the entry of a wrong password is counted as unauthorized
access. If the cumulative number of unauthorized accesses reaches three during operation of the
machine, the machine is set into an access lock state and prohibits any subsequent password entry
operations. To cancel the access lock state, settings must be made by the Service Engineer; or, turn
off, then on, the power switch of the machine. When the power switch is turned off, then on again,
wait at least 10 seconds to turn it on after turning it off. This interval is necessary to ensure that the
machine functions properly.
7 Click [Log out]. This allows you to log off from the Administrator Mode.
bizhub C3850/C3350/C3850FS 2-4
Page 23
2.2 Enhancing the Security Function
2.2 Enhancing the Security Function
When access to the machine by the Administrator of the machine through the Administrator Settings from
the control panel is authenticated, the machine enables setting of the Enhanced Security Mode that allows
settings for enhancing each of different security functions to be converted all at once.
In the Enhanced Security Mode, the machine allows selection of whether to use the Enhanced Security Mode
or not. When the Enhanced Security Mode is set to [ON], the security function is enhanced by automatically
setting such functions as that which determines whether each password meets predetermined requirements.
The following settings must first be made before the Enhanced Security Mode is set to [ON].
Settings to be Made in Advance Description
Administrator Password Meet the Password Rules.
The factory setting is "12345678."
Encryption Key Set the Encryption Key.
User Authentication Set to either [Device] or [External Server] (Active Directory).
Certificate for SSL Register the self-signed certificate for SSL communications.
Password Rules Set to [ON].
Service settings Calls for setting made by the Service Engineer. For details, contact
your Service Representative.
2
Setting the Enhanced Security Mode to [ON] changes the setting values of the following functions.
Function Name Factory Setting When Enhanced Security Mode is set to [ON]
Password Rules OFF ON (not to be changed)
Public Access Restrict Restrict (not to be changed)
Print without Authentication
User Name List OFF OFF (not to be changed)
Registering and Changing Address by the user
SSL Disable Enable (not to be changed)
SSL Encryption Strength AES-256, 3DES,
SSL Settings (http) OFF ON (not to be changed)
SSL communication
(OpenAPI)
FTP Server Enable Disable
S/MIME Disable Enable (not to be changed)
E-mail Text Encryption
Method
(when S/MIME is enabled)
Digital Signature
(when S/MIME is enabled)
Digital Signature Type
(when S/MIME is enabled)
Administrator Password
Change Via Network
(PageScope Web Connection)
Network firmware update
protect
Restrict Restrict (not to be changed)
Allow Restrict (not to be changed)
RC4-128,
DES, RC4-40
Non-SSL Only SSL Only (not to be changed)
3DES 3DES (not to be changed if the encryption method
Do not add
signature
SHA-1 SHA-256 (not to be changed)
Enabled Restrict
Invalid Valid
*
If [ON] is set for Password Rules, the types and number
of characters to be used for each password are limited.
For details of the Password Rules, see page 1-10.
AES-256, 3DES (not to be changed to one containing
strength lower than AES/3DES)
(Selection can be made between [Enable] and [Disable])
stronger than 3DES is applied)
Select when sending
bizhub C3850/C3350/C3850FS 2-5
Page 24

2.2 Enhancing the Security Function
Function Name Factory Setting When Enhanced Security Mode is set to [ON]
CS Remote Care Usable Remote device setting disabled
IWS Settings Disable Disable (not to be changed)
Account Track Off Off (Not to be changed)
Restrict Scan to USB OFF ON (not to be changed)
Print Document
(External memory)
WebDAV Server Settings Enable Disable (not to be changed)
Audit Log OFF ON (not to be changed)
Web Browser Setting Enable Disable (not to be changed)
Restrict Internet Fax TX Allow Restrict (to be changed)
Restrict Internet Fax RX Allow Restrict (to be changed)
Restrict PC-Fax TX Allow Restrict (to be changed)
SSDP Disable Disable (to be changed)
Polling TX (Fax) OFF OFF (to be changed)
Overwrite HDD Data Disable Enable (not to be changed)
Self-test function
(encryption key and
firmware verification)
Temporarily Save Authentication Information
(external server authentication)
External Memory Backup
(Service mode)
IC card authentication None None
QR Code Display Setting Not Display Not Display (not to be changed)
FAX function restriction
(Registration user)
FAX function restriction
(User using external server authentication)
Import/export of destination/authentication information
2
ON OFF (not to be changed)
Disable Enable
Enable Disable (not to be changed)
Allow Restrict
Allow Restrict (Default value for registration)
Allow Restrict (not to be changed)
Allow Restrict (not to be changed)
NOTICE
When Password Rules is set to [ON] the number and types of characters used for each password are restricted. For details of the Password Rules, see page 1-10.
Turning ON the Enhanced Security Mode does not enable the ID & Print function. Enable the function manually to protect image files. For details of the ID & Print function, see page 2-14.
The Enhanced Security Mode is set to [OFF], if the Administrator of the machine executes any of the following
functions. Set the Enhanced Security Mode to [ON] again.
- [HDD Format] is executed.
- [Overwrite All Data] is executed.
- [Restore All] of [Initialize] is executed.
- [Restore Network] of [Initialize] is executed.
- [Restore System] of [Initialize] is executed.
bizhub C3850/C3350/C3850FS 2-6
Page 25
2.2 Enhancing the Security Function
2.2.1 Setting the Password Rules
0 For the procedure to call the Administrator Settings on the display, see page 2-2.
0 Do not leave the machine with the setting screen of Administrator Settings left shown on the display. If
it is absolutely necessary to leave the machine, be sure first to log off from the Administrator Settings.
NOTICE
Password Rules cannot be set to [ON], if the various types of currently set passwords do not meet the Password Rules. First, make sure that the passwords meet the Password Rules before attempting to set Password Rules to [ON]. For details of the Password Rules, see page 1-10.
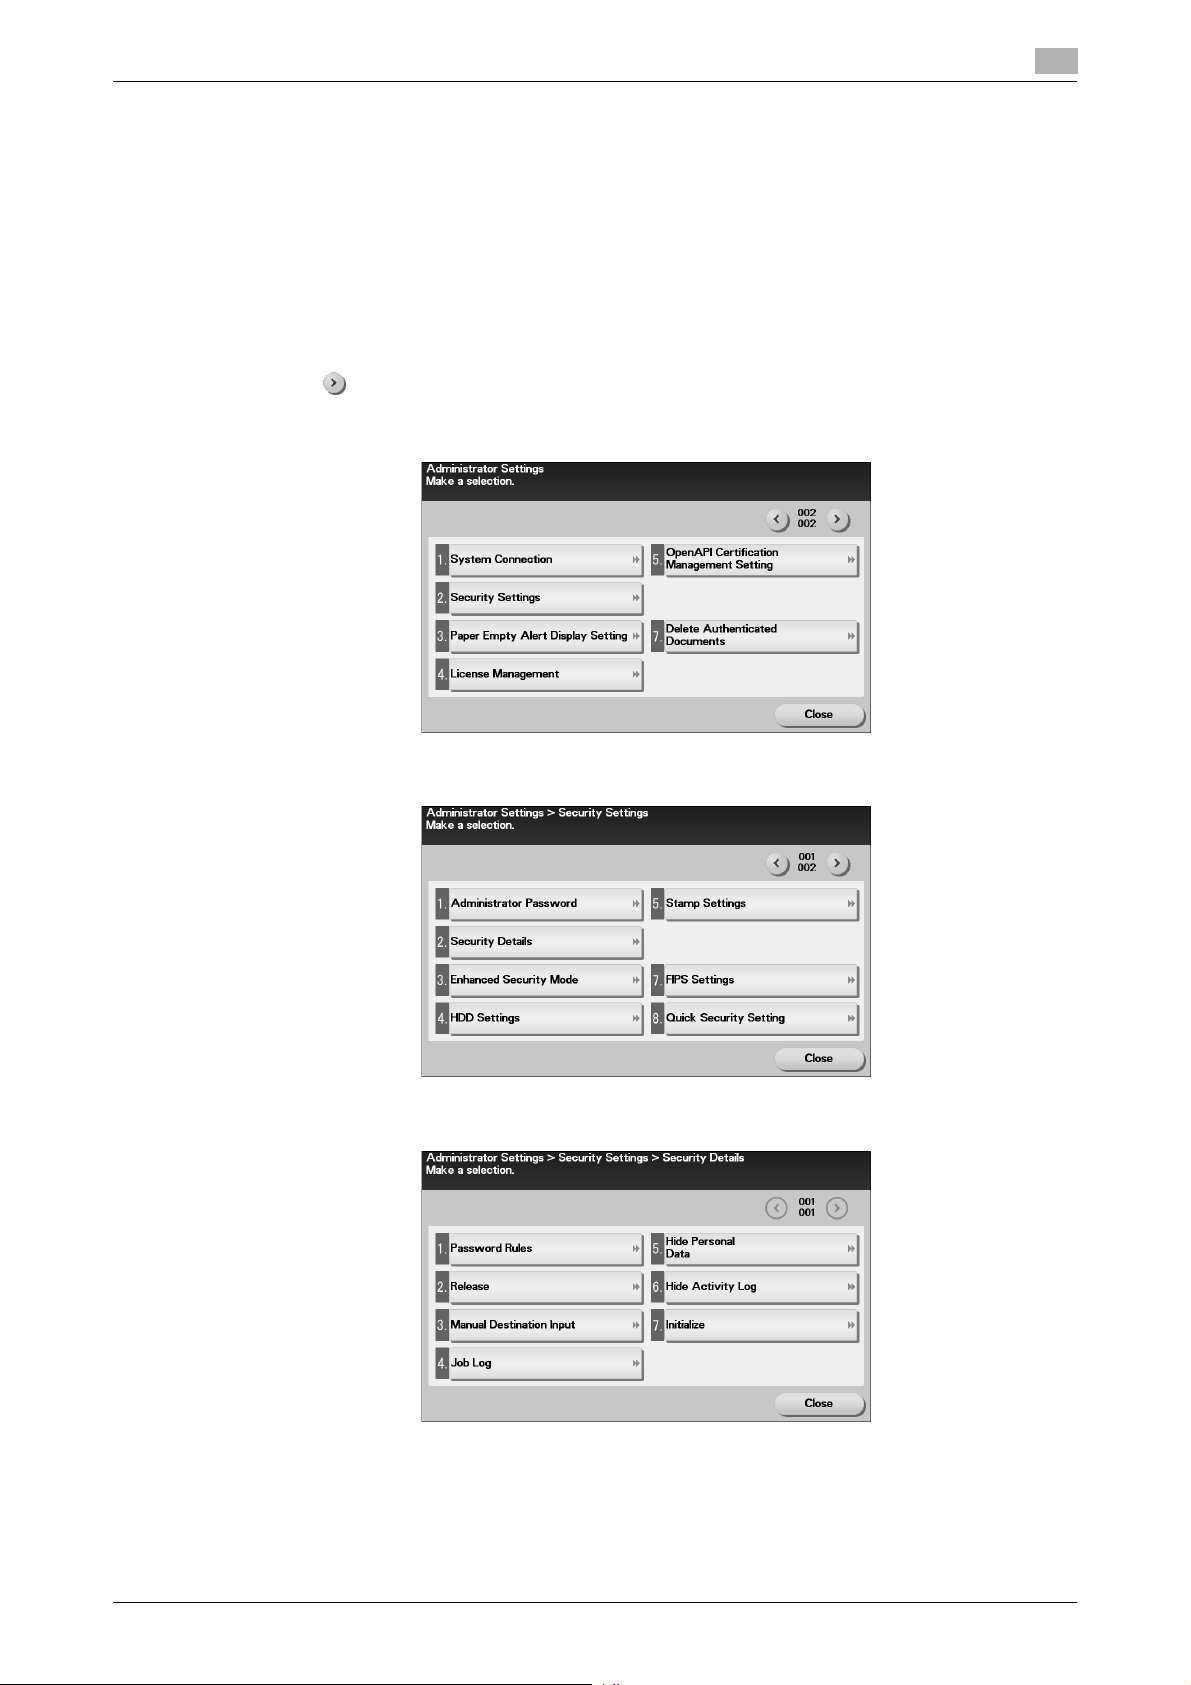
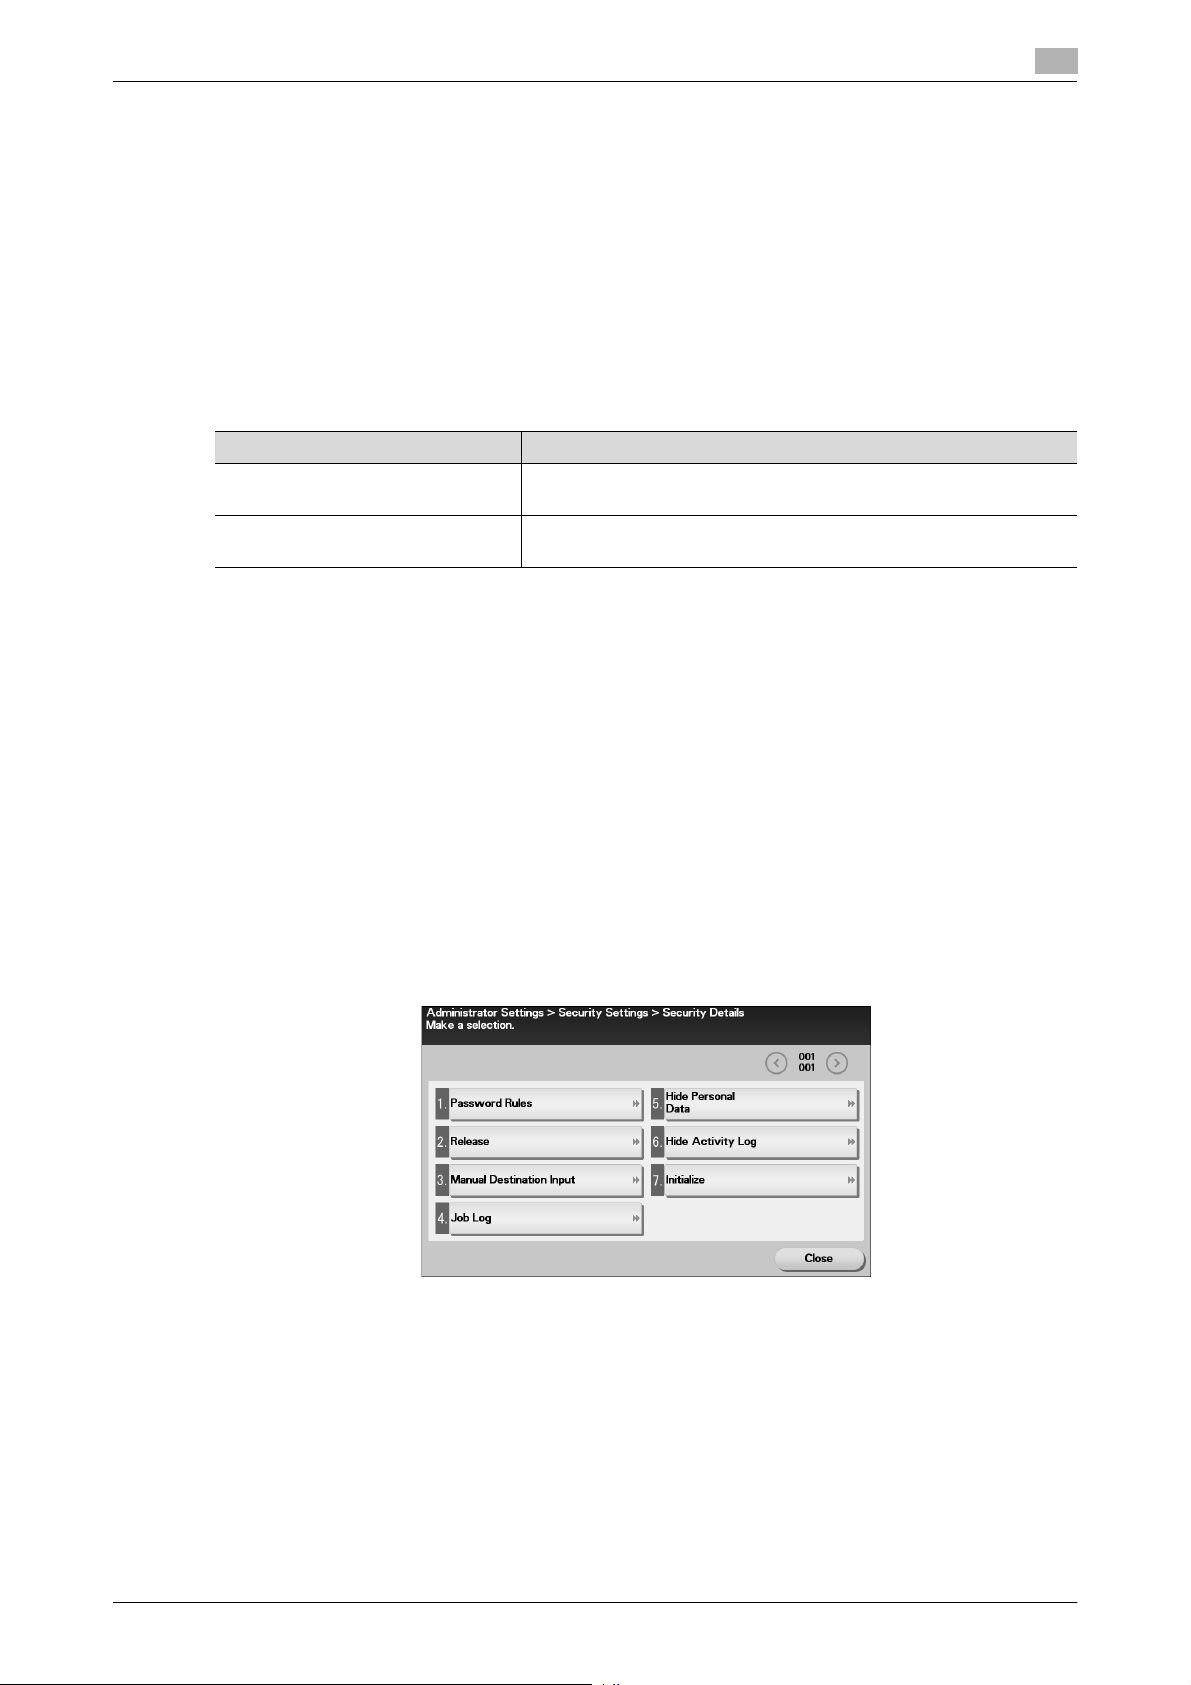
1 Call the Administrator Settings on the display from the control panel.
2 Touch [ ].
3 Touch [Security Settings].
2
4 Touch [Security Details].
5 Touch [Password Rules].
bizhub C3850/C3350/C3850FS 2-7
Page 26
2.2 Enhancing the Security Function
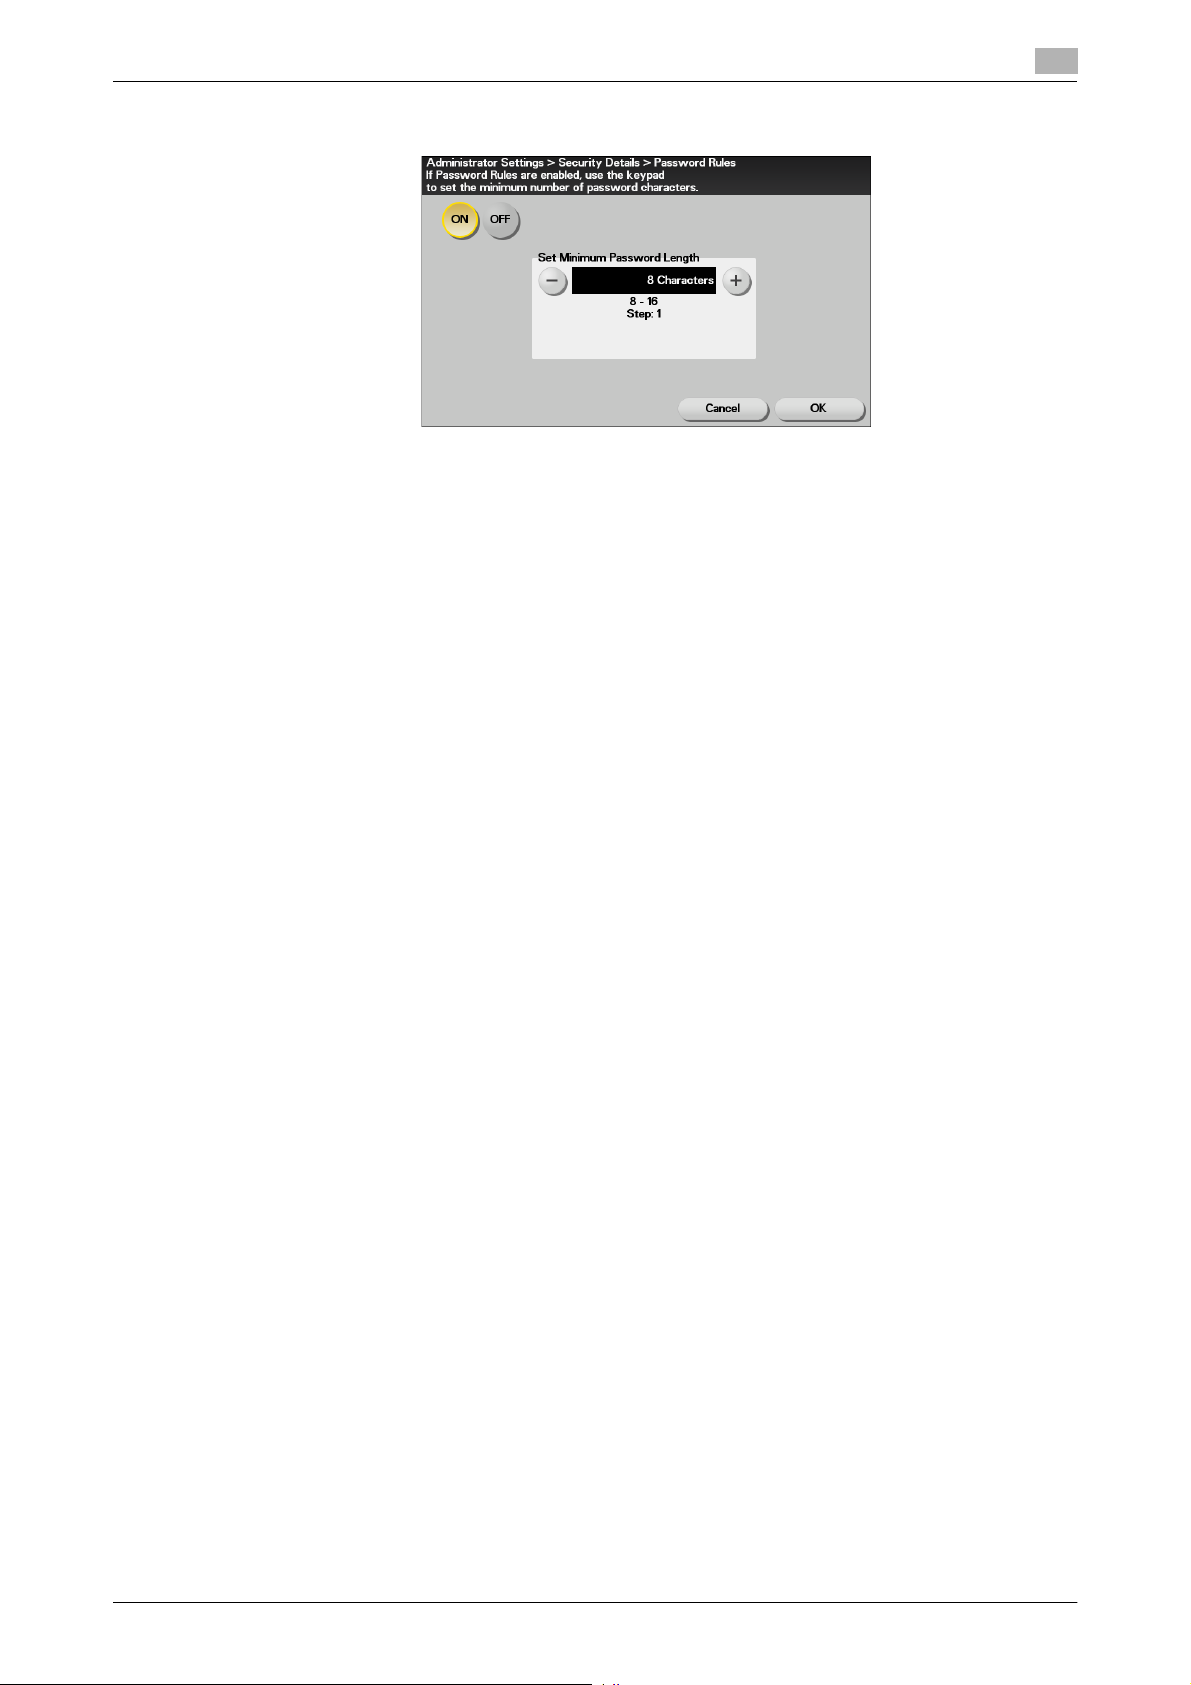
6 Select [ON] and set [Set Minimum Password Length] (8 to 16 characters).
7 Touch [OK].
2
bizhub C3850/C3350/C3850FS 2-8
Page 27
2.2 Enhancing the Security Function
2.2.2 Setting the Enhanced Security Mode
0 For the procedure to call the Security Settings screen on the display, see steps 1 through 3 of page 2-7.
0 Do not leave the machine with the setting screen of Administrator Settings left shown on the display. If
it is absolutely necessary to leave the machine, be sure first to log off from the Administrator Settings.
0 The Enhanced Security Mode is factory-set to [OFF]. Be sure to turn [ON] the Enhanced Security Mode
so as to enable the security function of the machine.
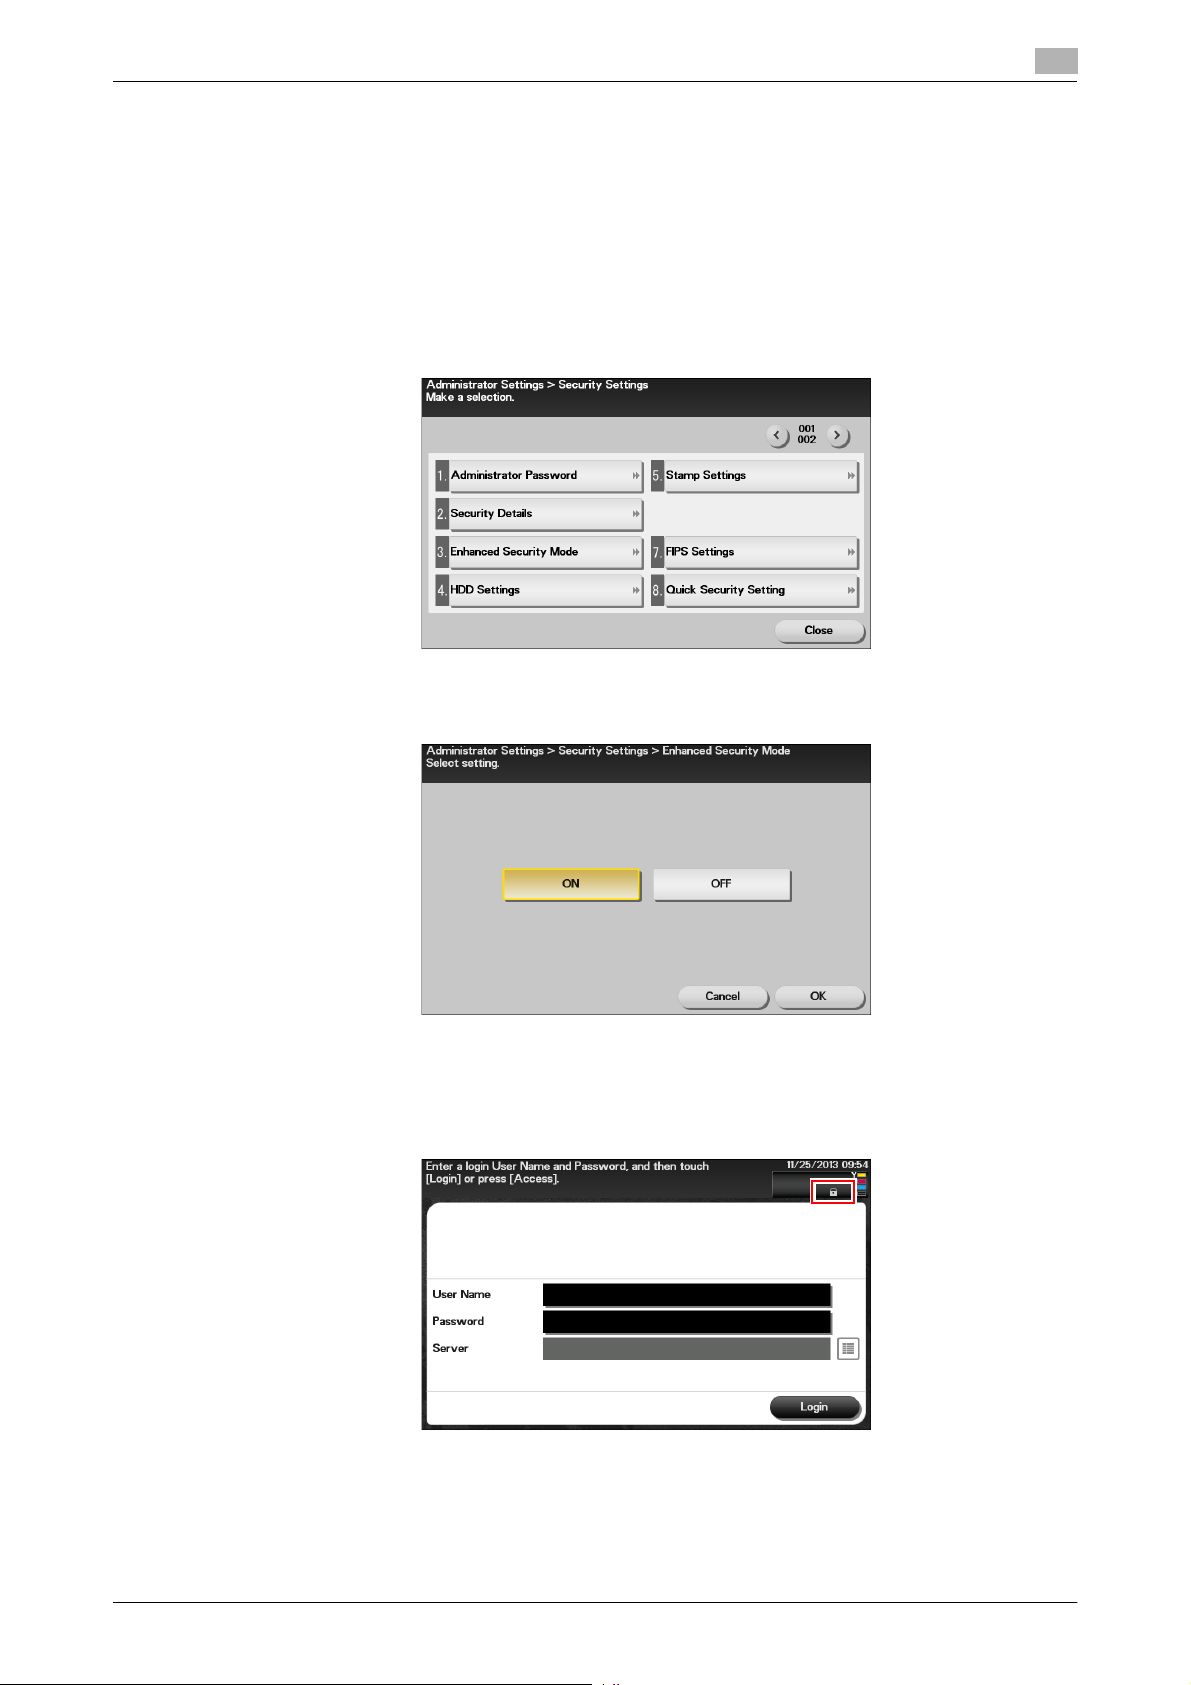
1 Call the Security Settings screen on the display from the control panel.
2 Touch [Enhanced Security Mode].
2
3 Select [ON] to enable the Enhanced Security Mode and touch [OK].
Touch [OK], then the machine restarts automatically.
% [ON] can be selected only if the Administrator of the machine has made the necessary settings be-
forehand. For details of the necessary settings, see page 2-5.
% If the Enhanced Security Mode is properly set to [ON], a key icon appears at the portion enclosed
by a red frame of the screen, indicating that the machine is in the Enhanced Security Mode.
bizhub C3850/C3350/C3850FS 2-9
Page 28
2.3 Canceling the Operation Prohibited State
2.3 Canceling the Operation Prohibited State
When access to the machine by the administrator of the machine through the Administrator Settings from the
control panel is authenticated, the machine enables the operation of Release Setting performed for canceling
the state of Prohibited Functions When Authentication Error (access lock state) as a result of unauthorized
access.
If a wrong password has been entered three cumulative times during password authentication, the machine
determines that it is unauthorized access, prohibiting any further entry of the password. By prohibiting the
password entry operation, the machine prevents unauthorized use or removal of data, thereby ensuring secured used of the machine.
Release Setting clears the unauthorized access check count for all User Authentication, resetting it to zero
and canceling the operation prohibited state. Perform the following procedure to cancel the operation prohibited state.
Operation Prohibited State Canceling procedure
Administrator Settings Turn OFF and ON the power switch; wait for five minutes and then
cancel the operation prohibited state.
User authentication The Administrator touches [Release] to cancel the operation pro-
hibited state.
NOTICE
The cumulative number of times a wrong password is entered is counted commonly, and not uniquely, by
the control panel and the client PC. When either one is set into the access lock state, access via the other
one is also prohibited.
2
Performing Release Setting
0 For the procedure to call the Security Details screen on the display, see steps 1 through 4 of page 2-7.
0 Do not leave the machine with the setting screen of Administrator Settings left shown on the display. If
it is absolutely necessary to leave the machine, be sure first to log off from the Administrator Settings.
0 When the power switch is turned off, then on again, wait at least 10 seconds to turn it on after turning
it off. if there is no wait period between turning the power switch off, then on again, the machine may
not function properly.
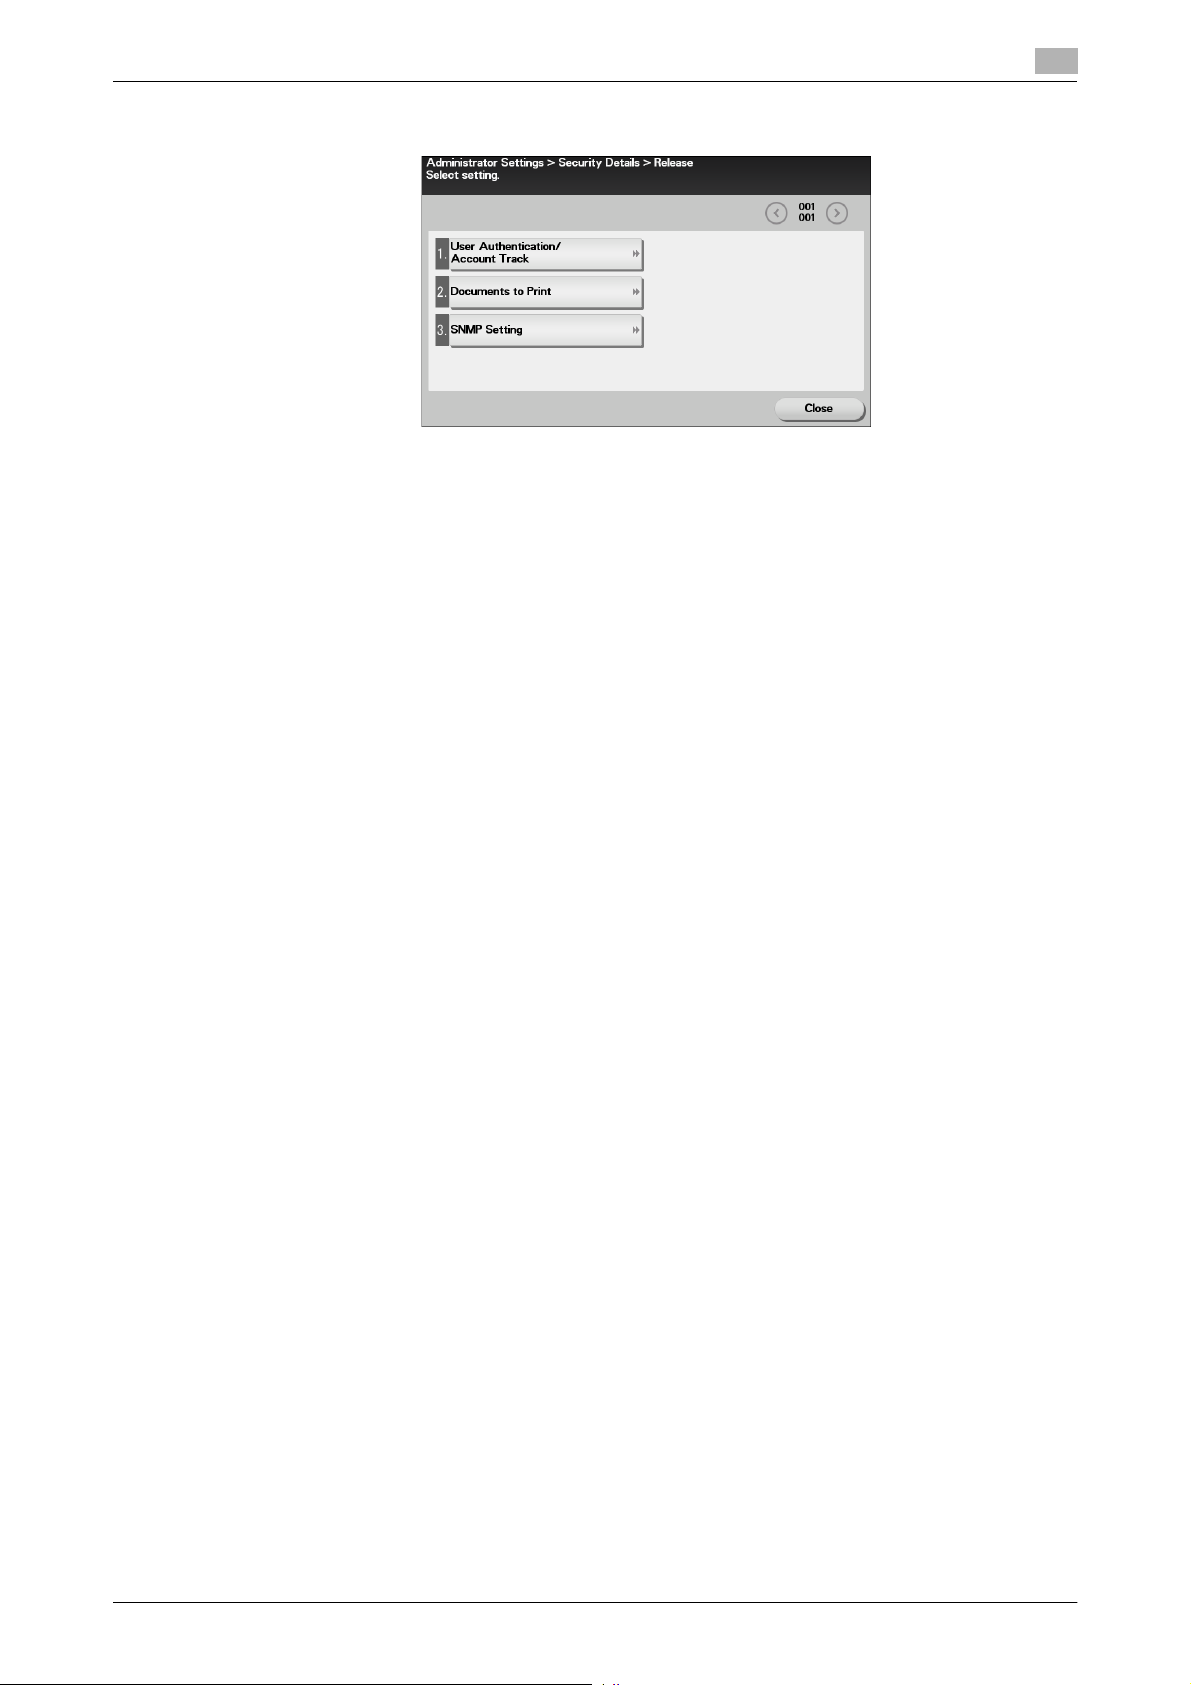
1 Call the Security Details screen on the display from the control panel.
2 Touch [Release].
bizhub C3850/C3350/C3850FS 2-10
Page 29
2.3 Canceling the Operation Prohibited State
3 Select the function, for which Prohibit Function as a result of unauthorized access is to be released.
4 Touch [OK].
This clears the unauthorized access check count of the specific function selected in the previous step
and cancels the operation prohibited state.
2
bizhub C3850/C3350/C3850FS 2-11
Page 30
2.4 Setting the Authentication Method
2.4 Setting the Authentication Method
When access to the machine by the Administrator of the machine through the Administrator Settings is authenticated, the machine enables setting of the authentication method for User Authentication.
The User Authentication method may be [Device] that uses the authentication system the machine has, [External Server] that uses the external server authentication of the external server, or [Off]. If the Enhanced Security Mode is set to [ON], the authentication method should be operated by either [Device] or [External
Server] (Active Directory).
NOTICE
If [External Server] is selected for the authentication method, be sure to select [Active Directory] in the External Server Settings.
For the Kerberos protocol of the Active Directory, specify AES-128 or AES-256 instead of DES as the encryption level on the server settings.
Setting the Authentication Method
0 For the procedure to access the Administrator Mode, see page 2-2.
0 Do not leave the machine with the Administrator Mode setting screen left shown on the display. If it is
absolutely necessary to leave the machine, be sure first to log off from the Administrator Mode.
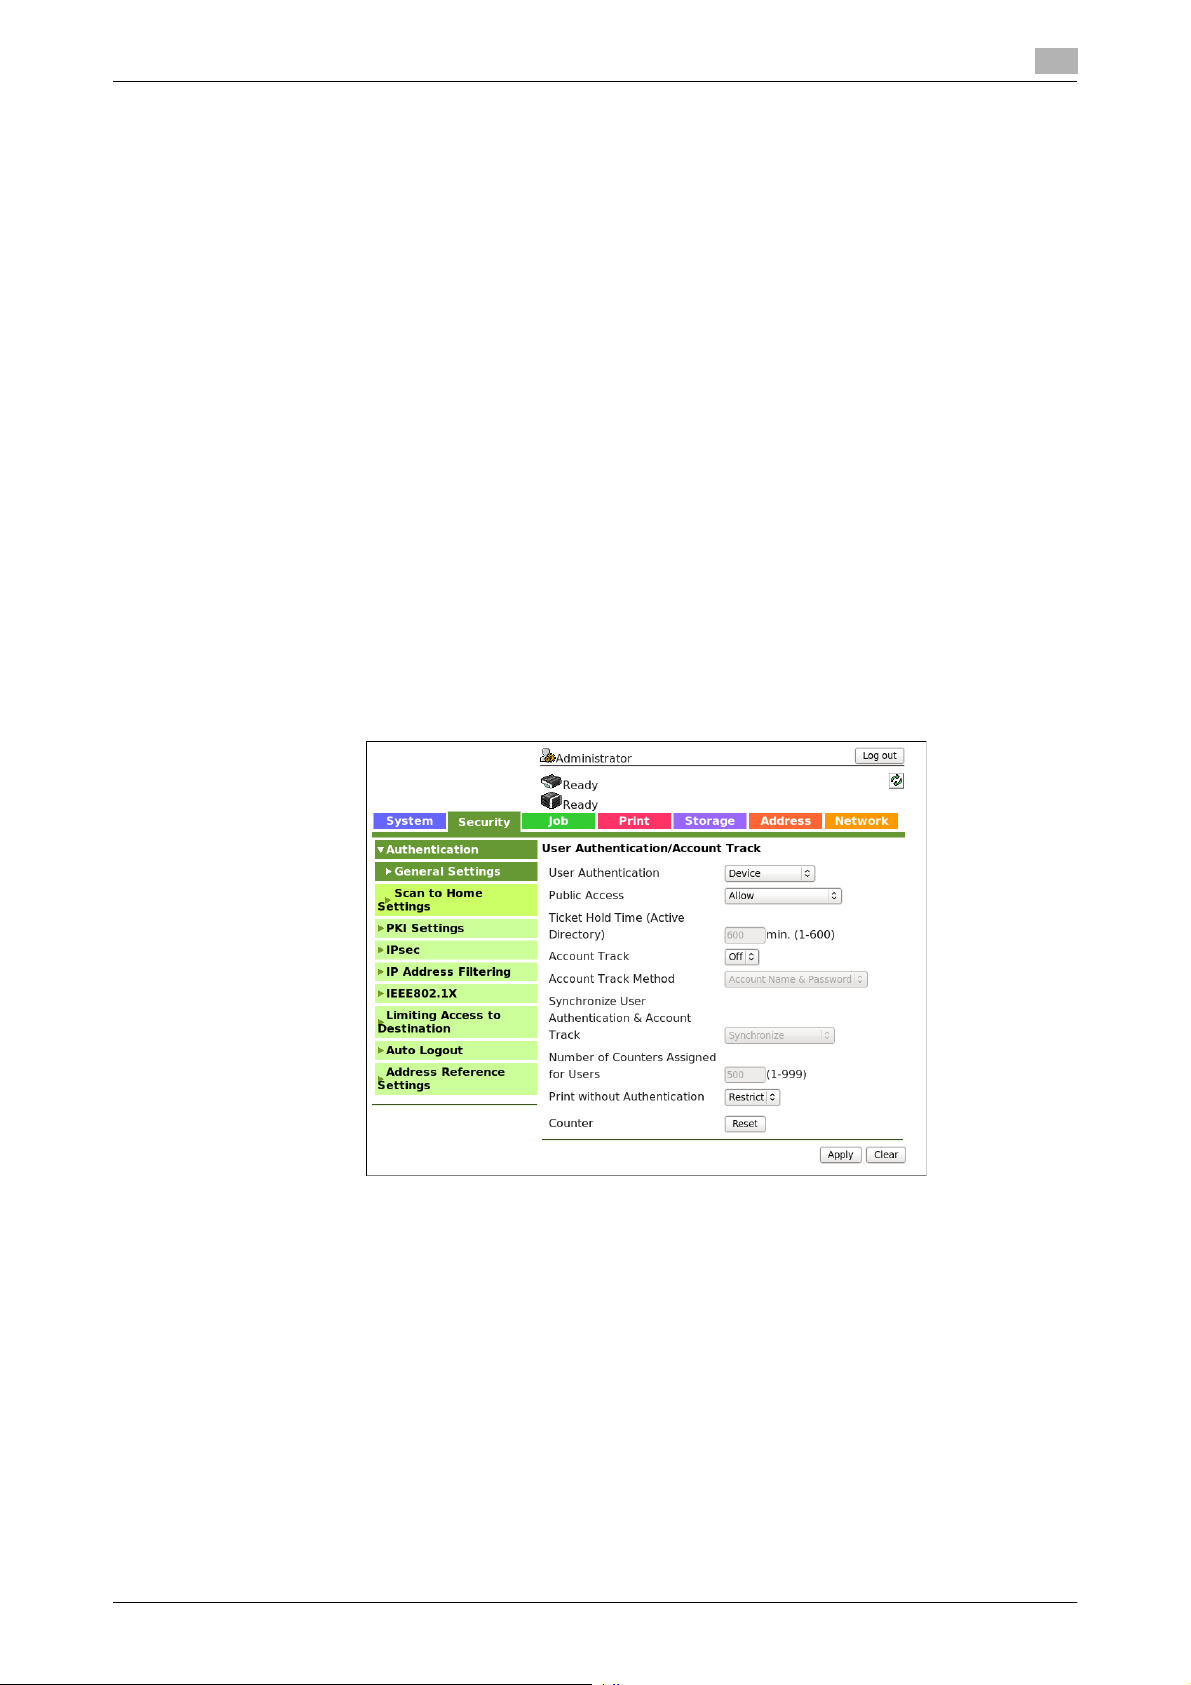
1 Start PageScope Web Connection and access the Administrator Mode.
2 Click the [Security] tab.
2
3 Select [Device] or [External Server] from the User Authentication pull-down menu, and click [Apply].
If [External Server] is selected, perform steps 4 through 8.
4 If [External Server] is selected, click [External Server List] from [Authentication] menu.
% When external server authentication is used, change settings after deleting registered users.
% Do not use an external server on which more than 1,000 users are registered.
% Make sure that the machine and the external server retain the same user registration status at all
times.
% Do not add any user who is yet to be registered in the machine to the external server when the ma-
chine has 1,000 registered users.
bizhub C3850/C3350/C3850FS 2-12
Page 31

2.4 Setting the Authentication Method
5 Click [Edit].
6 Select [Active Directory] and click [Next].
2
7 Make the necessary settings.
8 Click [Apply].
bizhub C3850/C3350/C3850FS 2-13
Page 32

2.5 ID & Print Setting Function
2.5 ID & Print Setting Function
When access to the machine by the Administrator of the machine through the Administrator Settings is authenticated, the machine enables setting of the operation of the ID & Print function.
The ID & Print function temporarily stores print data transmitted from the PC in the HDD of the machine and,
after user authentication is successful in this machine, automatically prints the print data of the user in question.
NOTICE
The ID & Print file is automatically deleted after 24 hours.
The Administrator must first make User Authentication settings before setting the ID & Print function. For details of the User Authentication, see page 2-12.
Setting the ID & Print
0 For the procedure to access the Administrator Mode, see page 2-2.
0 Do not leave the machine with the Administrator Mode setting screen left shown on the display. If it is
absolutely necessary to leave the machine, be sure first to log off from the Administrator Mode.
1 Start PageScope Web Connection and access the Administrator Mode.
2 Click the [Security] tab and [ID & Print Settings].
3 Select [Enable] from the pull-down menu of [ID & Print].
2
% If [Enable] is set, the document is stored as ID & Print file even if [Print] is selected on the printer
driver side.
4 Click [Apply].
bizhub C3850/C3350/C3850FS 2-14
Page 33

2.6 System Auto Reset Function
2.6 System Auto Reset Function
When access to the machine by the Administrator of the machine through the Administrator Settings from
the control panel is authenticated, the machine enables setting of the operation of the system auto reset function.
If no operations are performed for a predetermined period of time during access to the Administrator Settings
or user mode (during setting of User Authentication) from the control panel, the system auto reset function
automatically causes the user to log off from the mode.
The predetermined period of time, after which the system auto reset function is activated, can be selected
from among nine values between 1 min. and 9 min. System auto reset can also be set to [OFF]. If no operations are performed for 1 min. even with system auto reset set to [OFF], the function causes the user to log
off from the mode automatically.
Reference
- Processing of a specific job, however, takes precedence over the system auto reset function. That is,
even if a predetermined period of time elapses during which no operations are performed, once the processing of the specific job has been started, the system auto reset function does not cause the user to
log off from the mode. The user logs off from the mode after the lapse of a predetermined period of time
after the processing of the specific job is completed.
Setting the System Auto Reset function
0 For the procedure to call the Administrator Settings on the display, see page 2-2.
0 Do not leave the machine with the setting screen of Administrator Settings left shown on the display. If
it is absolutely necessary to leave the machine, be sure first to log off from the Administrator Settings.
2
1 Call the Administrator Settings on the display from the control panel.
2 Touch [System Settings].
3 Touch [ ].
4 Touch [Reset Settings].
bizhub C3850/C3350/C3850FS 2-15
Page 34

2.6 System Auto Reset Function
5 Touch [System auto reset].
6 Touch [System Auto Reset Time].
2
7 Select [ON], and enter the period of time (1 min. to 9 min.) after which system auto reset is activated
using [-]/[+] key.
% If no operations are performed for 1 min. even with system auto reset set to [OFF], the function is
activated to cause the user to log off from the mode automatically.
% The time for system auto reset can be set to a value between 1 min. and 9 min., variable in 1-min.
increments.
8 Touch [OK].
bizhub C3850/C3350/C3850FS 2-16
Page 35

2.7 User Setting Function
2.7 User Setting Function
When access to the machine by the Administrator of the machine through the Administrator Settings is authenticated, the machine enables registration of the users who can use the machine. It also enables operations for deleting a user and changing a User Password.
User Registration allows the User Name, User Password, and other user information to be registered for enabling access to, or operation of, the machine. Up to 1,000 different users can be registered. User Registration allows identification and authentication of each individual user, thereby preventing unauthorized use of
the machine. The User Password is controlled based on passwords that meets the Password Rules and the
password entered is displayed as "*" or "-."
NOTICE
Only a specific user authorized by the administrator can access the fax transmission and Memory RX functions. For registration of a new user with the Enhanced Security Mode set to [ON], the default setting for
[Function Permission] - [Fax] is [Restrict]. For other items the default setting is [Allow].
Additionally, be careful to the following
- If [External Server] (Active Directory) is set for the authentication method, it is not possible to make user
registration or change a User Password from PageScope Web Connection. To register or change a user, make the settings on the server side. If PageScope Data Administrator is used for registering user
information, however, authentication fails if the user name is different from the name registered on the
External Server. Further, a User Password can be set, but is not to be used for authentication.
- If [External Server] (Active Directory) is set for the authentication method and if a user not registered
with this machine is authenticated through user authentication, that particular user name is automatically registered in the machine.
- If [External Server] (Active Directory) is set for the authentication method and if a user registered with
this machine is authenticated through user authentication, that particular user name, along with the External Server name, is automatically registered in the machine. No two User Names registered in an External Server may be alike.
- If the user authentication method is changed between [Device] and [External Server], the user information registered under the previous authentication method cannot be used under the new authentication
method. Set the user information again after the user authentication method is changed.
- To change a user name from the external server side when [External Server] (Active Directory) is set for
the authentication method, first delete the user whose name is to be changed from the machine.
- If a user name is changed when [Device] is set for the authentication method, the image file owned by
the user in question before the change are deleted.
- If authentication is implemented using two or more external servers, make sure that the user name registered in each of the different servers remains the same.
- If [External Server] (Active Directory) is set for the authentication method and if the External Server is
deleted, the following user registration information and data as they relate to the server will be deleted.
– User name, user password
– Scan to HDD files and ID & Print files owned by the user
2
Making user setting
0 For the procedure to access the Administrator Mode, see page 2-2.
0 Do not leave the machine with the Administrator Mode setting screen left shown on the display. If it is
absolutely necessary to leave the machine, be sure first to log off from the Administrator Mode.
0 If a user has been registered, promptly notify the user in question of the registration and have him or
her change the password.
1 Start PageScope Web Connection and access the Administrator Mode.
2 Click the [Security] tab and [User List].
bizhub C3850/C3350/C3850FS 2-17
Page 36

2.7 User Setting Function
3 Click [New Registration].
% To change a User Password, click [Edit] and select the "Change Password" check box. Then, enter
the new User Password.
4 Enter User Name and Password and perform other settings if necessary.
2
% To restrict the functions the user can use, use [Function Permission] and set Allow or Restrict for
each function.
% A User Name that already exists cannot be redundantly registered.
% Click [Cancel] to go back to the previous screen.
5 Click [Apply].
% If the entered User Password does not meet the requirements of the Password Rules, a message
that tells that the entered User Password cannot be used appears. Enter the correct User Password.
For details of the Password Rules, see page 1-10.
6 Check the message that tells that the setting has been completed. Then, click [OK].
% To delete a previously registered user, click [Delete] in step 3. Check the contents of registration on
the confirmation screen and click [OK] if the user is to be deleted. If a user is deleted, the image files
owned by that specific user are deleted.
bizhub C3850/C3350/C3850FS 2-18
Page 37

2.8 Memory RX Function
2.8 Memory RX Function
When access to the machine by the administrator of the machine through the Administrator Settings is authenticated, the machine enables setting of the operation of the Memory RX function.
Setting the Memory RX function allows a received fax to be stored in memory of this machine without its being printed. Because the received faxes are forcibly stored in memory of this machine, this will prevent important faxes from being stolen or lost and therefore enhance security. For details of how to access a saved
file, see page 2-21.
NOTICE
Make sure that the user who has been authorized to operate the file received through the Memory RX function
is instructed to quickly remove the printed paper. Leaving the printed paper unattended can allow an unknown person to take away the printed paper.
2.8.1 Setting Memory RX
0 For the procedure to call the Administrator Settings on the display, see page 2-2.
0 Do not leave the machine with the setting screen of Administrator Settings left shown on the display. If
it is absolutely necessary to leave the machine, be sure first to log off from the Administrator Settings.
1 Call the Administrator Settings on the display from the control panel.
2 Touch [Fax Settings].
2
3 Touch [Function Settings].
bizhub C3850/C3350/C3850FS 2-19
Page 38

2.8 Memory RX Function
4 Touch [Memory RX Setting].
5 Select [ON] and touch the Value field.
2
6 Enter the Memory RX Password consisting of eight characters.
% Make sure that the Memory RX Password consists of eight characters.
7 Touch [OK].
bizhub C3850/C3350/C3850FS 2-20
Page 39

2.8 Memory RX Function
2.8.2 Accessing the Memory RX file
0 For the procedure to access the Administrator Mode, see page 2-2.
0 Do not leave the machine with the setting screen of Administrator Mode left shown on the display. If it
is absolutely necessary to leave the machine, be sure first to log off from the Administrator Mode.
1 Start PageScope Web Connection and access the Administrator Mode.
2 Click the [Storage] tab.
3 Click [PC-Fax] from the menu.
4 Enter the Password that is set in the Memory RX, and click [OK].
5 A list appears showing image files saved in the HDD.
To back up (download) a file, click [Copy] of the file in question.
2
% Select [Print] to print the selected file. The file is automatically deleted as soon as the printing is nor-
mally terminated.
% When [Print] is selected, be sure to quickly remove the printed paper. Leaving the printed paper un-
attended can allow an unknown person to take away the printed paper.
% If [Delete] is selected, a confirmation message appears. Click [OK] to delete the specified file.
6 Select [Save] to back up (download) the image file in the PC.
% The backed up (downloaded) file is not deleted from the machine.
bizhub C3850/C3350/C3850FS 2-21
Page 40

2.9 Changing the Administrator Password
2.9 Changing the Administrator Password
When access to the machine by the Administrator of the machine through the Administrator Settings from
the control panel is authenticated, the machine enables the operation of changing the Administrator Password required for accessing the Administrator Settings.
The Administrator Password entered for the authentication purpose appears as "*" on the display.
Changing the Administrator Password
0 For the procedure to call the Security Settings screen on the display, see steps 1 through 3 of page 2-7.
0 Do not leave the machine with the setting screen of Administrator Settings left shown on the display. If
it is absolutely necessary to leave the machine, be sure first to log off from the Administrator Settings.
1 Call the Security Settings screen on the display from the control panel.
2 Touch [Administrator Password].
2
3 Touch the [Current Password] field.
4 Enter the currently set Administrator Password from the keyboard.
% Touch [C] to clear all characters.
% Touch [ ] to delete the last character entered.
% Touch [Shift] to show the upper case/symbol screen.
bizhub C3850/C3350/C3850FS 2-22
Page 41

2.9 Changing the Administrator Password
% Touch [Cancel] to go back to the previous screen.
5 Touch [OK].
% If a wrong Administrator Password is entered, a message that tells that the Administrator Password
does not match appears. Enter the correct Administrator Password.
% A failure in authentication as a result of the entry of a wrong password is counted as unauthorized
access. If the cumulative number of unauthorized accesses reaches three during operation of the
machine, the machine is set into an access lock state and prohibits any subsequent password entry
operations. To cancel the access lock state, settings must be made by the Service Engineer; or, turn
off, then on, the power switch of the machine. When the power switch is turned off, then on again,
wait at least 10 seconds to turn it on after turning it off. This interval is necessary to ensure that the
machine functions properly.
6 Touch the [Password] field.
2
7 Enter the new Administrator Password from the keyboard, and touch [OK].
% Touch [C] to clear all characters.
% Touch [ ] to delete the last character entered.
% Touch [Shift] to show the upper case/symbol screen.
% Touch [Cancel] to go back to the previous screen.
8 Touch the [Password Confirmation] field.
bizhub C3850/C3350/C3850FS 2-23
Page 42

2.9 Changing the Administrator Password
9 To prevent entry of a wrong Administrator Password, enter the new Administrator Password once
again, and touch [OK].
% Touch [C] to clear all characters.
% Touch [ ] to delete the last character entered.
% Touch [Shift] to show the upper case/symbol screen.
% Touch [Cancel] to go back to the previous screen.
10 Touch [OK].
2
% If the entered Administrator Password does not meet the requirements of the Password Rules, a
message that tells that the entered Administrator Password cannot be used appears. Enter the correct Administrator Password. For details of the Password Rules, see page 1-10.
% If the entered Administrator Password does not match, [OK] cannot be touched. Enter the correct
Administrator Password.
bizhub C3850/C3350/C3850FS 2-24
Page 43

2.10 Protecting Data in the HDD
2.10 Protecting Data in the HDD
When access to the machine by the administrator of the machine through the Administrator Settings from the
control panel is authenticated, the machine enables the operation for setting and deleting the Encryption Key.
By setting the Encryption Key, the data stored in the HDD is encrypted, thereby protecting the data in the
HDD. The Encryption Key entered is displayed as "*."
NOTICE
If the HDD develops a fault, call your Service Representative.
The following shows setting conditions for the Encryption Key. Perform settings for the Encryption Key fitting
these conditions.
2
Number of
characters
20 characters • Numeric characters: 0 to 9
Reference
- When an Encryption Key (encryption word) is set using HDD Encryption Setting, an Encryption Key with
a key length of 256 bits is generated. The generated encryption key is used to encrypt or decrypt data
through AES encryption algorithm.
Types of characters
• Alpha characters: upper and lower case letters
• Symbols: !, ", #, $, %, &, ', (, ), *, ,, -, ., /, :, ;, <, =, >, ?, @, [, \, ], ^, _, `, {, |, }, ~, +,
SPACE
Selectable from among a total of 95 characters
An Encryption Key consisting of identical characters only cannot be registered.
An Encryption Key consisting of an identical character type only cannot be registered.
2.10.1 Setting the Encryption Key
0 For the procedure to call the Security Settings screen on the display, see steps 1 through 3 of page 2-7.
0 Do not leave the machine with the setting screen of Administrator Settings left shown on the display. If
it is absolutely necessary to leave the machine, be sure first to log off from the Administrator Settings.
0 To prevent data from leaking as a result of reinstallation of the HDD on another device, a unique value
that varies from one device to another must be set for the encryption key.
0 Do not set any number that can easily be guessed from birthdays, employee identification numbers,
and the like for the Encryption Key.
0 Make sure that nobody but the administrator of the machine comes to know the Encryption Key.
0 Executing HDD Format erases data in the HDD. It is recommended that important data should be saved
in a backup medium in advance. Execution of HDD Format will also reset the setting values of different
functions to the default values. Set the Enhanced Security Mode to [ON] again.
1 Call the Security Settings screen on the display from the control panel.
2 Touch [HDD Settings].
bizhub C3850/C3350/C3850FS 2-25
Page 44

2.10 Protecting Data in the HDD
3 Touch [HDD Encryption Setting].
4 Select [ON] and touch [OK].
2
5 A confirmation message appears. Select [Start] and touch [OK].
% Changing the setting of HDD Encryption Setting (switching between ON and OFF) will format the
HDD. For details of items that are cleared by HDD Format, see page 1-12.
6 Touch the [Value] field.
bizhub C3850/C3350/C3850FS 2-26
Page 45

2.10 Protecting Data in the HDD
7 Enter the 20 characters Encryption Key from the keyboard, and [OK].
% If the entered Encryption Key does not meet the setting requirements, [OK] cannot be touched.
% Touch [C] to clear all characters.
% Touch [ ] to delete the last character entered.
% Touch [Shift] to show the upper case/symbol screen.
% Touch [Cancel] to go back to the previous screen.
8 Touch [OK].
The machine restarts automatically.
2
bizhub C3850/C3350/C3850FS 2-27
Page 46

2.10 Protecting Data in the HDD
2.10.2 Deleting the encryption key
0 For the procedure to call the HDD Encryption Setting screen on the display, see steps 1 through 3 of
page 2-25.
0 Do not leave the machine with the setting screen of Administrator Settings left shown on the display. If
it is absolutely necessary to leave the machine, be sure first to log off from the Administrator Settings.
0 The encryption key cannot be deleted with the Enhanced Security Mode set to [ON].
1 Call the HDD Encryption Setting screen on the display from the control panel.
2 Select [OFF], and touch [OK].
2
3 A confirmation message appears. Select [Start], and touch [OK].
The machine restarts automatically.
% Changing the setting of HDD Encryption Setting (switching between ON and OFF) will format the
HDD. For details of items that are cleared by HDD Format, see page 1-12.
bizhub C3850/C3350/C3850FS 2-28
Page 47

2.10 Protecting Data in the HDD
2.10.3 Setting the Overwrite HDD Data
Setting the Overwrite HDD Data function allows data stored in the HDD to be deleted at such timing as the
end of the print cycle by writing specific data over the data that is no longer required. By deleting residual
data that is no longer necessary, data leakage can be prevented from occurring.
The following types of data are subject to the Overwrite HDD Data function:
- Copy, scan, print, or fax job data that is no longer necessary
- PC print job data (direct print, PS print) that is no longer necessary
- Data that is no longer necessary as a result of the data being specified to be deleted
Data stored in the HDD is to be deleted at the following timing:
- At the end (including an end as a result of cancellation) of a copy, scan, print, or fax job performed by
a user who has been authenticated by User Authentication
- A job is deleted by the administrator or a user (who has been authenticated by User Authentication)
- A document in a HDD is deleted by the administrator or a user (who has been authenticated by User
Authentication)
- A document is automatically deleted after the lapse of a predetermined period of time set in the ma-
*
: The machine offers the following types of automatic HDD document deleting functions based on a prede-
termined period of time set in it.
- To be set through [Administrator Settings] - [System Settings] - [Folder Settings] - [Document Delete
- To be set through [Administrator Settings] - [System Settings] - [Folder Settings] - [Scanned Documents
Reference
- If a job being processed is abnormally terminated, the residual data is deleted through Overwrite HDD
- If the machine is turned off during an Overwrite HDD Data sequence, the Overwrite HDD Data sequence
- If an Overwrite HDD Data sequence being performed is interrupted by, for example, a fault, a response
*
chine
Time Setting].
Delete Frequency Setting].
Data.
is resumed automatically after the machine is turned on again.
is detected at 30-sec. intervals and the Overwrite HDD Data sequence, if found interrupted, is resumed
automatically.
2
0 For the procedure to call the HDD Settings screen on the display, see steps 1 and 2 of page 2-25.
0 Do not leave the machine with the setting screen of Administrator Settings left shown on the display. If
it is absolutely necessary to leave the machine, be sure first to log off from the Administrator Settings.
0 Executing HDD Format erases data in the HDD. It is recommended that important data should be saved
in a backup medium in advance. Execution of HDD Format will also reset the setting values of different
functions to the default values. Set the Enhanced Security Mode to [ON] again. For the functions whose
settings are reset to the default values, see page 1-12.
1 Call the HDD Settings screen on the display from the control panel.
2 Touch [Overwrite HDD Data].
bizhub C3850/C3350/C3850FS 2-29
Page 48

2.10 Protecting Data in the HDD
3 Touch [HDD Overwrite Method].
4 Select [Mode 1] or [Mode 2].
2
Item Description
[Mode 1] Overwritten with "0x00"
[Mode 2] Overwritten with "0x00" - Overwritten with "0xff" - Overwritten with letter "a"
(0x61) - Verified
5 Touch [OK].
bizhub C3850/C3350/C3850FS 2-30
Page 49

2.11 Erasing data when the machine is to be discarded or use of a leased machine is terminated
2.11 Erasing data when the machine is to be discarded or use of a
leased machine is terminated
When access to the machine by the Administrator of the machine through the Administrator Settings from
the control panel is authenticated, the machine enables setting of the operations of the Overwrite All Data
and Restore All functions.
When the machine is to be discarded or use of a leased machine is terminated at the end of the leasing contract, be sure to erase all data to prevent data left in the machine from leaking. Different methods of erase
apply depending on the data space. See the table below for more details.
Data space Erase method
HDD Overwrite All Data
Memory area on the MFP board Restore All
NOTICE
Perform erase operations for all of HDD and memory area on the MFP board.
When erase operations are performed, make sure that the operation is normally terminated for data in each
of the three different data spaces. If an error occurs during execution of the erase operations, contact your
Service Representative for appropriate action.
The Enhanced Security Mode is set to [OFF], if Overwrite All Data or Restore All is executed.
The encryption key is registered in the memory area on the MFP board, but is not deleted even if Restore All
or Overwrite All Data is performed. After Restore All or Overwrite All Data is performed, the encryption key
must be deleted manually. For details, see page 2-28.
2
2.11.1 Setting the Overwrite All Data
The HDD Overwrite Method offers the choice of eight different modes, [Mode 1] through [Mode 8]. Overwrite
All Data takes about less than three hours in [Mode 1] at the minimum and about 23 hours in [Mode 6] at the
maximum.
Mode Description
Mode 1 Overwrites once with "0x00".
Mode 2 Overwrites with "random numbers" - "random numbers" - "0x00".
Mode 3 Overwrites with "0x00" - "0xff" - "random numbers" - verifies.
Mode 4 Overwrites with "random numbers" - "0x00" - "0xff".
Mode 5 Overwrites with "0x00" - "0xff" - "0x00" - "0xff".
Mode 6 Overwrites with "0x00" - "0xff" - "0x00" - "0xff" - "0x00" - "0xff" - "random numbers".
Mode 7 Overwrites with "0x00" - "0xff" - "0x00" - "0xff" - "0x00" - "0xff" - "0xaa".
Mode 8 Overwrites with "0x00" - "0xff" - "0x00" - "0xff" - "0x00" - "0xff" - "0xaa" - verifies.
0 For the procedure to call the Security Settings screen on the display, see steps 1 through 3 of page 2-7.
0 Do not leave the machine with the setting screen of Administrator Settings left shown on the display. If
it is absolutely necessary to leave the machine, be sure first to log off from the Administrator Settings.
0 For details of items that are cleared, see page 1-12.
1 Call the Security Settings screen on the display from the control panel.
bizhub C3850/C3350/C3850FS 2-31
Page 50

2.11 Erasing data when the machine is to be discarded or use of a leased machine is terminated
2 Touch [HDD Settings].
3 Touch [Overwrite All Data].
2
4 Touch [HDD Overwrite Method].
5 Select the desired mode.
6 Touch [OK].
bizhub C3850/C3350/C3850FS 2-32
Page 51

2.11 Erasing data when the machine is to be discarded or use of a leased machine is terminated
7 Touch [Execute].
8 A confirmation message appears. Touch [OK].
2
% When HDD Overwrite All Data is normally terminated, a message appears that prompts you to turn
OFF and ON the main power switch. Then, turn OFF and ON the main power switch as instructed
by the message.
% When HDD Overwrite All Data is abnormally terminated, FATAL (HDD abnormally accessed) occurs.
Please contact your Service Representative.
% Do not turn off the power switch of the machine during execution of Overwrite All Data. If the power
switch is inadvertently turned off during the execution of Overwrite All Data and the machine, as a
result, fails to recognize the HDD or develops other fault, contact your Service Representative.
bizhub C3850/C3350/C3850FS 2-33
Page 52

2.11 Erasing data when the machine is to be discarded or use of a leased machine is terminated
2.11.2 Setting the Restore All
The memory area on the MFP board is initialized and reset to the default state.
NOTICE
Perform "Restore All" from the control panel of the machine, and not via the network.
0 For the procedure to call the Security Settings screen on the display, see steps 1 through 3 of page 2-7.
0 Do not leave the machine with the setting screen of Administrator Settings left shown on the display. If
it is absolutely necessary to leave the machine, be sure first to log off from the Administrator Settings.
0 For details of items that are cleared, see page 1-12.
1 Call the Security Settings screen on the display from the control panel.
2 Touch [Security Details].
2
3 Touch [Initialize].
4 Touch [Restore All].
bizhub C3850/C3350/C3850FS 2-34
Page 53

2.11 Erasing data when the machine is to be discarded or use of a leased machine is terminated
5 A confirmation message appears. Touch [OK].
% When Restore All is normally terminated, the machine automatically reboots.
% Do not turn off the power switch of the machine during execution of Restore All. If the power switch
is inadvertently turned off during the execution of Restore All and the machine, as a result, develops
a fault, contact your Service Representative.
2
bizhub C3850/C3350/C3850FS 2-35
Page 54

2.12 Obtaining Job Log
2.12 Obtaining Job Log
When access to the machine by the administrator of the machine through the Administrator Settings from the
control panel is authenticated, the machine enables acquisition and deletion of a Job Log. The Job Log (Audit
Log) is a function that stores information on, for example, operations performed in the machine and a job history in the HDD. Setting the Job Log (Audit Log) allows an illegal act or inadequate operation performed on
the machine to be traced.
The obtained Job Log can be downloaded and viewed from the PageScope Web Connection.
NOTICE
Job Log obtains time/date information. So, set an accurate time/date in the machine in advance. For more
details on the time/date setting, see page 2-43.
Log Type Description
[Accounting Log] Enables you to obtain information relevant to paper consumption for each user.
2
[Counting Log] Enables you to obtain information about paper consumption and the reduction rate
of paper used for printing.
[Audit Log] Enables you to obtain user operation or job history.
• It is recommended that Audit Log be backed up at regular intervals.
• The machine is capable of saving up to about 20,000 records of Audit Log. The
maximum number of days the records can be saved depends on the operating
condition of the machine.
• For example, identify the output volume of the audit log by operating the machine for several days and estimate adequate frequency of the backup operation.
Audit Log is concerned mainly with the following events.
Log relating to jobs • Jobs stored in HDD in the scan mode from the con-
Log relating to authentication
Turning ON/OFF the power switch (including starting of the Audit Log function)
2.12.1 Obtaining and deleting a Job Log
0 For the procedure to call the Security Details screen on the display, see steps 1 through 4 of page 2-7.
0 Do not leave the machine with the setting screen of Administrator Settings left shown on the display. If
it is absolutely necessary to leave the machine, be sure first to log off from the Administrator Settings.
trol panel
• Jobs stored in HDD via the printer driver, and print
jobs
• Jobs stored in HDD after fax reception
etc
• Administrator Settings
• Successful or failed administrator authentication
• Successful or failed user authentication
etc
1 Call the Security Details screen on the display from the control panel.
2 Touch [Job Log].
bizhub C3850/C3350/C3850FS 2-36
Page 55

2.12 Obtaining Job Log
3 Make the settings as necessary.
% Under [Overwrite], whether to enable writing over old Job Logs when the Job Log space in the HDD
is full of old Job Logs can be selected.
Item Description
[Allow] Allows Job Logs to be continuously stored by writing over old Job Logs in chrono-
[Restrict] Displays, when the Job Log space in the HDD is full, an alarm indicating that no
% If [Allow] is set for [Overwrite], illegal operations performed from an external environment (such as
repeated log-on procedures performed over the network) make the Job Log space full of data within
a short period of time, so that older Job Log data is deleted. To avoid such a situation, the administrator of the machine should download the Job Log data at regular intervals or select [Restrict] for
[Overwrite]. For details of downloading of the Job Log data, see page 2-38.
% If [Restrict] is selected for [Overwrite], the administrator of the machine should download Job Log
data at regular intervals to thereby delete Job Logs from the machine and to ensure that the Job
Log space in the HDD is not full. For details of downloading of the Job Log data, see page 2-38.
% If the setting for [Overwrite] is switched from [Restrict] to [Allow] after saving of Job Logs is started,
overwriting is enabled with the Job Logs saved so far left as they are.
% If the setting for [Overwrite] is switched from [Allow] to [Restrict] after saving of Job Logs is started,
overwriting is prohibited with all previously saved Job Logs deleted.
% Touching [Erase Job Log] erases all Job Logs saved in the machine.
2
logical order even when the Job Log space in the HDD is full.
more Job Logs can be stored and stops storing Job Logs. After this event, no
more jobs will be accepted.
4 When the machine is restarted, it starts obtaining Job Logs.
bizhub C3850/C3350/C3850FS 2-37
Page 56

2.12 Obtaining Job Log
2.12.2 Downloading the Job Log data
0 For the procedure to access the Admin Mode, see page 2-2.
0 Do not leave the machine with the Admin Mode setting screen left shown on the display. If it is abso-
lutely necessary to leave the machine, be sure first to log off from the Admin Mode.
1 Start PageScope Web Connection and access the Admin Mode.
2 Click the [System] tab.
3 Click [Job Log] - [Create Job Log] from the menu.
4 Click [OK]. This starts creating job log data.
2
% If no Job Logs are saved in the machine, the machine displays an error message indicating that no
Job Log data to be created is available.
% When the Job Log data is successfully created, the Job Log in the machine is deleted.
% The sequence of creating the Job Log data continues even when the browser is closed during the
creating sequence. Restart the PageScope Web Connection and check that the Job Log data has
been created.
% If any job logs have not been obtained, download them before creating new job log data. The job
logs that have not been obtained are deleted when the new job log data is created.
5 Click [OK].
6 Click [Job Log] - [Download Job Log] from the menu.
7 Click [OK].
bizhub C3850/C3350/C3850FS 2-38
Page 57

2.12 Obtaining Job Log
8 Click [Download].
This starts downloading the job log data.
% If a message appears indicating that a Job Log data file size is too large to be output, try to create
the Job Log data yet to be obtained after downloading is completed.
% Only the administrator of the machine may handle the Job Log data that has been downloaded.
% The administrator of the machine should download the Job Log data at regular intervals to thereby
ensure that the machine is properly used.
2
bizhub C3850/C3350/C3850FS 2-39
Page 58

2.12 Obtaining Job Log
Job Log data
The Job Log data is read in an XML format file. The file allows various types of information to be determined,
including the time/date information of log collection, information on user operations, job types, and job results.
<Log relating to operations>
2
Tag name Tag descrip-
tion
Code Operation
code
Typical display
1281 Denotes the specific operation performed.
Description
[1]: Turning ON or OFF the log function
[2]: Log overflow
[3]: Deleting log
[4]: Missing log detected
[257]: Service mode authentication (logon)
[258]: Service mode authentication (logoff)
[259]: Shifting to the lock state when service
mode authentication fails
[260]: Canceling the lock state when the service
mode authentication fails
[263]: Changing the service authentication password in the service mode
[272]: Changing the administrator password in
the service mode
[513]: Administrator setting authentication (logon)
[514]: Administrator setting authentication (logoff)
[516]: Canceling the lock state when the administrator setting authentication fails
[517]: Changing the administrator password in
the administrator setting
• When the administrator password is
changed, if the entered password is different
from the registered one, [OK] cannot be
pressed. Neither is this handled as a re-authentification failure nor is the log recorded.
[785]: Changing the authentication mode setting
in the administrator setting
[804]: Canceling the lock state when the user authentication fails in the administrator setting
[805]: Registering a user in the administrator setting
[806]: Deleting a user in the administrator setting
[807]: Changing a user password in the administrator setting
[809]: Changing a user attribute in the administrator setting
[810]: Writing user information (Write all at once)
[811]: Registering a user (automatic registration)
[814]: Changing the functional restriction for users
[856]: Changing ID & Print setting in the administrator setting
[865]: Changing the "user change permission"
setting in address settings in the administrator
setting
[869]: Preparing, changing, or deleting address
data in the administrator setting
[874]: Writing address data (Writing all at once)
[875]: Registering, changing, or deleting S/MIME
certificates
[887]: Setting the function of correcting time
[1025]: Enhanced security setting in the administrator setting
[1026]: Changing the password rule setting in the
administrator setting
*
bizhub C3850/C3350/C3850FS 2-40
Page 59

2.12 Obtaining Job Log
2
Tag name Tag descrip-
tion
Code Operation
code
Tim Time/date of
operation
Res Result code 0 Denotes the result of operation.
Typical display
1281 [1031]: Changing the Overwrite HDD Data setting
2015/4/1 12:34 Denotes time/date when the operation is per-
Description
in the administrator setting
[1033]: Registering or deleting digital certificates
[1034]: Network setting change in the administrator setting
[1036]: Changing the HDD encryption word
• When the encryption word is set or deleted
(encryption OFF operation), the HDD format
is performed, therefore no logs are recorded.
[1037]: Changing the log overwrite setting
[1040]: Changing digital certificates used on a
protocol
[1281]: User authentication (logon)
[1282]: User authentication (logoff)
[1283]: Shifting to the lock state in user authentication
[1287]: Changing the user password by a user
[1409]: Secure communication (SSL/TLS) failed
(Https)
[1410]: Secure communication (SSL/TLS) failed
(OpenAPI)
[1413]: Secure communication (SSL/TLS) failed
(IPPS)
[1414]: Secure communication (IPSec) failed
[2561]: Turning power switch ON
[2577]: Turning power switch OFF
[3000]: Registering application
[3001]: Application use expiration
[3002]: Setting restriction code list
[3003]: Deleting restriction code list
[3073]: Changing time/date in the administrator
setting (manual setting)
[3074]: Day/Time setting (auto-correction)
[3075]: Changing the system auto reset time in
the administrator setting
[3076]: Changing auto logout time
[3329]: Changing S/MIME setting
[3333]: Changing the SSL/TLS strength setting in
the administrator setting
[3334]: Reading documents
[3335]: Sending documents
[3336]: Deleting documents
and others
*
Displayed if there is a logon event but not a logoff event, such as when the machine develops
a fault after a user logged on, so that the user
was unable to log off.
formed.
[0]: Normally terminated
[257]: Authentication failed
and others
OperatCont Details of
operation
BoxOperat Operation
information
bizhub C3850/C3350/C3850FS 2-41
1 Denotes the specific detail of operation.
[1]: Enable
[2]: Disable
and others
- Denotes the location at which the document is
stored and the name of the document to be handled.
Page 60

2.12 Obtaining Job Log
2
Tag name Tag descrip-
tion
TrgBoxNo Document
stored location
Typical display
XXXXXXXXXX Denotes the location at which the document is
Description
stored.
[0]: Location at which Memory RX and ID & Print
document is stored
[1000030050]: Location at which Scan to HDD
document is stored
[1000030070]: Location at which received fax is
stored
[1000030080]: Location at which transmitted fax
(memory RX) is stored
and others
bizhub C3850/C3350/C3850FS 2-42
Page 61

2.13 Setting time/date in machine
2.13 Setting time/date in machine
When access to the machine by the administrator of the machine through the Administrator Settings is authenticated, the machine enables setting of the time-of-day and date. Use of the network time protocol (NTP)
server allows the current time/date to be adjusted automatically.
NOTICE
If the NTP server is to be used, make sure that the NTP server is a correct one and take necessary action to
protect communications between the NTP server and the machine.
When performing Date/Time Settings manually, external server authentication fails if the entered information
is incorrect.
2.13.1 Setting time/date
<From the Control Panel>
0 For the procedure to call the System Settings screen on the display, see steps 1 and 2 of page 2-15.
0 Do not leave the machine with the setting screen of Administrator Settings left shown on the display. If
it is absolutely necessary to leave the machine, be sure first to log off from the Administrator Settings.
1 Call the System Settings screen on the display from the control panel.
2 Touch [Date & Time Settings]
2
3 Select [Date Setting], [Time Setting], and [Time Zone] and set correct information.
bizhub C3850/C3350/C3850FS 2-43
Page 62

2.13 Setting time/date in machine
<From PageScope Web Connection>
0 For the procedure to access the Admin Mode, see page 2-2.
0 Do not leave the machine with the Admin Mode setting screen left shown on the display. If it is abso-
lutely necessary to leave the machine, be sure first to log off from the Admin Mode.
1 Start PageScope Web Connection and access the Admin Mode.
2 Click the [System] tab.
3 Click [Date/Time Settings] - [Manual Settings] from the menu.
4 Enter the time-of-day and date and click [Apply].
2
% To correct the time-of-day, use [Time Zone] to set the time difference from the coordinated universal
time (UTC).
5 To correct the time-of-day using the NTP server, make the following settings.
6 Click [Date/Time Settings] - [Time Adjustment Settings] from the menu.
7 Click [Enable] from the pull-down menu of [Time Adjustment], and make the necessary settings.
8 Click [Apply].
bizhub C3850/C3350/C3850FS 2-44
Page 63

2.13 Setting time/date in machine
2.13.2 Setting daylight saving time
<From the Control Panel>
0 For the procedure to call the System Settings screen on the display, see steps 1 and 2 of page 2-15.
0 Do not leave the machine with the setting screen of Administrator Settings left shown on the display. If
it is absolutely necessary to leave the machine, be sure first to log off from the Administrator Settings.
1 Call the System Settings screen on the display from the control panel.
2 Touch [Daylight Saving Time].
2
3 Select [ON] and enter the time to advance as daylight saving time using [-] or [+].
% The current time is set forward to reflect daylight saving time.
4 Touch [OK].
bizhub C3850/C3350/C3850FS 2-45
Page 64

2.13 Setting time/date in machine
<From PageScope Web Connection>
0 For the procedure to access the Admin Mode, see page 2-2.
0 Do not leave the machine with the Admin Mode setting screen left shown on the display. If it is abso-
lutely necessary to leave the machine, be sure first to log off from the Admin Mode.
1 Start PageScope Web Connection and access the Admin Mode.
2 Click the [System] tab.
3 Click [Date/Time Settings] - [Daylight Saving Time Settings] from the menu.
4 Select [Enable] from the pull-down menu of [Daylight Saving Time], and enter time to be advanced as
the daylight saving time.
2
5 Click [Apply].
bizhub C3850/C3350/C3850FS 2-46
Page 65

2.14 SSL Setting Function
2.14 SSL Setting Function
When access to the machine by the Administrator of the machine through the Administrator Settings is authenticated, the machine enables the setting of encryption of image data transmitted and received between
the PC and the machine.
NOTICE
Do not use 1024-bit RSA and SHA-1 after 2014, as an increased risk results of data to be protected being
tampered with or leaked.
2.14.1 Device Certificate Setting
0 For the procedure to access the Administrator Mode, see page 2-2.
0 Do not leave the machine with the Administrator Mode setting screen left shown on the display. If it is
absolutely necessary to leave the machine, be sure first to log off from the Administrator Mode.
0 The key length set for the public key of the server generated in SSL certificate setting is 1024 bits. To
maintain security, use certificates that were created by an external institution.
0 The Enhanced Security Mode is not turned [OFF] even if the validity of the certificate expires during the
Enhanced Security Mode. The Administrator of the machine should register a new certificate before the
validity of the old certificate expires.
1 Start PageScope Web Connection and access the Administrator Mode.
2 Click the [Security] tab and [PKI Settings].
2
3 Click [New Registration].
4 Select [Create a Self-signed Certificate] and click [Next].
bizhub C3850/C3350/C3850FS 2-47
Page 66

2.14 SSL Setting Function
5 Make the necessary settings.
% Settings are all cleared if [Apply] is clicked with data entered for each item not meeting the require-
ments.
6 Click [Apply].
The certificate can now be registered.
2
bizhub C3850/C3350/C3850FS 2-48
Page 67

2.14 SSL Setting Function
2.14.2 SSL Setting
0 For the procedure to access the Administrator Mode, see page 2-2.
0 Do not leave the machine with the Administrator Mode setting screen left shown on the display. If it is
absolutely necessary to leave the machine, be sure first to log off from the Administrator Mode.
NOTICE
When making the SSL Setting, be sure to make sure in advance that the device certificate has been registered
in the machine. For the procedure to register the device certificate, see page 2-47.
1 Start PageScope Web Connection and access the Administrator Mode.
2 Click the [Security] tab and [SSL/TLS Settings] from [PKI Settings] menu.
3 Set "Encryption Strength" and cancel the selection of "SSL 3.0" of SSL/TLS Version.
2
% For encryption strength, select the strong "AES-256, 3DES."
% When "AES-256" is specified as the encryption strength, it works as AES-256 or AES-128.
% In the Enhanced Security Mode, the setting cannot be changed to one containing strength lower
than AES/3DES.
4 Click [Apply].
bizhub C3850/C3350/C3850FS 2-49
Page 68

2.14 SSL Setting Function
2.14.3 Removing a Certificate
0 For the procedure to access the Administrator Mode, see page 2-2.
0 Do not leave the machine with the Administrator Mode setting screen left shown on the display. If it is
absolutely necessary to leave the machine, be sure first to log off from the Administrator Mode.
0 In the Enhanced Security Mode, no certificates can be removed.
1 Start PageScope Web Connection and access the Administrator Mode.
2 Click the [Security] tab and [PKI Settings].
3 Click [Edit].
2
4 Select [Delete a Certificate] and click [Next].
5 Click [OK].
bizhub C3850/C3350/C3850FS 2-50
Page 69

2.15 Accessing the Scan to HDD file
2.15 Accessing the Scan to HDD file
When access to the machine by the Administrator of the machine through the Administrator Settings is authenticated, the machine enables controls of the Scan to HDD files.
Scan to HDD stores the image file scanned by the machine in the HDD together with user information. The
image file can be stored as "Public" or "Personal". The Administrator of the machine can access the machine
from the PC to view a list of image files stored in the HDD or back them up (or download them).
NOTICE
The image files stored as "Personal" are protected. The Administrator of the machine should instruct the user
to use "Personal" when saving highly confidential files.
Accessing the image file
0 For the procedure to access the Administrator Mode, see page 2-2.
0 Do not leave the machine with the setting screen of Administrator Mode left shown on the display. If it
is absolutely necessary to leave the machine, be sure first to log off from the Administrator Mode.
1 Start PageScope Web Connection and access the Administrator Mode.
2 Click the [Storage] tab and click [View] of the User Name by which the desired document is stored.
2
3 A list appears showing image files saved in the HDD.
To back up (download) a file, click [Copy] of the file in question.
% If [Delete] is selected, a confirmation message appears. Click [OK] to delete the specified file.
bizhub C3850/C3350/C3850FS 2-51
Page 70

2.15 Accessing the Scan to HDD file
4 Select [Save] to back up (download) the image file in the PC.
% The backed up (downloaded) file is not deleted from the machine.
2
bizhub C3850/C3350/C3850FS 2-52
Page 71

2.16 TCP/IP Setting Function
2.16 TCP/IP Setting Function
When access to the machine by the Administrator of the machine through the Administrator Settings is authenticated, the machine enables setting of the IP Address and registration of the DNS Server.
2.16.1 Setting the IP Address
<From the Control Panel>
0 For the procedure to call the Administrator Settings on the display, see page 2-2.
0 Do not leave the machine with the setting screen of Administrator Settings left shown on the display. If
it is absolutely necessary to leave the machine, be sure first to log off from the Administrator Settings.
1 Call the Administrator Settings on the display from the control panel.
2 Touch [Network Settings].
3 Touch [TCP/IP Setting].
4 Touch [IPv4 Settings].
5 Touch [IP Address].
6 Touch the [Value] field, and set the IP Address.
2
7 Touch [OK].
8 Set subnet mask and default gateway.
9 Touch [OK] and touch [Close].
<From PageScope Web Connection>
0 For the procedure to access the Administrator Mode, see page 2-2.
0 Do not leave the machine with the Administrator Mode setting screen left shown on the display. If it is
absolutely necessary to leave the machine, be sure first to log off from the Administrator Mode.
1 Start PageScope Web Connection and access the Administrator Mode.
2 Click the [Network] tab and [IPv4 Settings] from [TCP/IP Settings] menu.
3 Clear the Auto IP check box.
4 Enter the IP Address in the IP Address box.
% If Auto IP is selected from the IP Address Setting Method in step 3, select the means with which to
acquire the IP Address automatically, including DHCP, BootP, ARP/PING, and Auto IP setting, and
click the check box.
5 Set subnet mask and default gateway.
6 Click [Apply].
bizhub C3850/C3350/C3850FS 2-53
Page 72

2.16 TCP/IP Setting Function
2.16.2 Registering the DNS Server
0 For the procedure to access the Administrator Mode, see page 2-2.
0 Do not leave the machine with the Administrator Mode setting screen left shown on the display. If it is
absolutely necessary to leave the machine, be sure first to log off from the Administrator Mode.
1 Start PageScope Web Connection and access the Administrator Mode.
2 Click the [Network] tab and [DNS Settings] from [TCP/IP Settings] menu.
3 Enter the address in the DNS Server box.
4 Make the necessary settings.
5 Click [Apply].
2
bizhub C3850/C3350/C3850FS 2-54
Page 73

2.17 E-Mail Setting Function
2.17 E-Mail Setting Function
When access to the machine by the Administrator of the machine through the Administrator Settings is authenticated, the machine enables setting of the SMTP Server (E-Mail Server).
Setting the SMTP Server (E-Mail Server)
<From the Control Panel>
0 For the procedure to call the Network Settings screen on the display, see steps 1 through 2 of
page 2-53.
0 Do not leave the machine with the setting screen of Administrator Settings left shown on the display. If
it is absolutely necessary to leave the machine, be sure first to log off from the Administrator Settings.
1 Call the Network Settings screen on the display from the control panel.
2 Touch [E-mail Settings].
3 Touch [E-Mail TX (SMTP)].
4 Touch [Enable] and touch [OK].
5 Touch [Close].
2
<From PageScope Web Connection>
0 For the procedure to access the Administrator Mode, see page 2-2.
0 Do not leave the machine with the Administrator Mode setting screen left shown on the display. If it is
absolutely necessary to leave the machine, be sure first to log off from the Administrator Mode.
1 Start PageScope Web Connection and access the Administrator Mode.
2 Click the [Network] tab and [E-mail TX (SMTP)] from [E-mail Settings] menu.
3 Make the necessary settings.
4 Click [Apply].
bizhub C3850/C3350/C3850FS 2-55
Page 74

3
User Operations
Page 75

3.1 User Authentication Function
3 User Operations
3.1 User Authentication Function
When [Device] or [External Server] (Active Directory) is set for Authentication Method of the Administrator Settings, the User Authentication function implements authentication of the user of this machine before he or
she actually uses it through the User Password that meets the Password Rules. During the authentication
procedure, the User Password entered for the authentication purpose appears as "*" or "-" on the display. A
failure in authentication as a result of the entry of a wrong password is counted as unauthorized access.
The entry of a wrong password is counted as unauthorized access, even if it is not likely that the assets to be
protected will be affected during user authentication operations via application software. For detailed operating procedures, see the corresponding user’s guide.
NOTICE
When [The job log has reached the maximum allowed. Contact the System Administrator.] is displayed on
the control panel, contact the administrator immediately.
Before operating the machine, the user him/herself should change the User Password from that registered
by the Administrator of the machine. For details of changing the User Password, see page 3-10. For more
details of User Name and User Password, ask the Administrator of the machine.
If the User Password is changed by the Administrator of the machine during operation of this machine, the
user him/herself should immediately change the User Password.
Make absolutely sure that your User Password is not known by any other users.
3
Performing user authentication
<From the Control Panel>
0 Do not leave the machine while you are in the user operation mode. If it is absolutely necessary to leave
the machine, be sure first to log off from the user operation mode.
0 If any User Name not registered with this machine is authenticated through User Authentication when
[External Server] (Active Directory) is set for Authentication Method, the User Name is automatically registered with this machine.
1 Touch the [User Name] field.
% For details of how to access the ID & Print file, see page 3-8.
bizhub C3850/C3350/C3850FS 3-2
Page 76

3.1 User Authentication Function
2 Enter the User Name from the keyboard.
% Touch [C] to clear all characters.
% Touch [ ] to delete the last character entered.
% Touch [Shift] to show the upper case/symbol screen.
% Touch [Cancel] to go back to the previous screen.
3 Touch [OK].
4 Touch the [Password] field.
3
5 Enter the User Password from the keyboard.
% Touch [C] to clear all characters.
% Touch [ ] to delete the last character entered.
% Touch [Shift] to show the upper case/symbol screen.
% Touch [Cancel] to go back to the previous screen.
6 Touch [OK].
bizhub C3850/C3350/C3850FS 3-3
Page 77

3.1 User Authentication Function
7 Touch [Login].
% If an ID & Print file has been saved, select [ID & Print/MFP Access] or [Access Basic Screen] and
then touch [Login].
3
Login Method Description
[ID & Print/MFP Access] When ID & Print files are registered, only the ID & Print files of a cor-
responding user are printed and the user operation mode screen is
not called to the screen.
When ID & Print files are not registered, the ordinary login procedure
is applicable.
[Access Basic Screen] Only the ordinary login procedure is applicable and no ID & Print files
% If a wrong User Name is entered, a message that tells that the authentication has failed appears.
Enter the correct User Name.
% If a wrong User Password is entered, a message that tells that the authentication has failed appears.
Enter the correct User Password.
% A failure in authentication as a result of the entry of a wrong password is counted as unauthorized
access. If the cumulative number of unauthorized accesses reaches three during operation of the
machine, the machine is set into an access lock state and prohibits any subsequent password entry
operations. To cancel the access lock state, the administrator of the machine must perform the Release Setting. Contact the administrator of the machine.
% If there are two or more ID & Print files involved, all of them will be printed. To select and print only
a desired file, select [Access Basic Screen], select the desired file from [ID & Print], and have it printed. For the detailed procedure to access the ID & Print files, see page 3-8.
are printed.
8 Touch [Access] to log off.
bizhub C3850/C3350/C3850FS 3-4
Page 78

3.1 User Authentication Function
<From PageScope Web Connection>
0 Do not leave the machine while you are in the user operation mode. If it is absolutely necessary to leave
the machine, be sure first to log off from the user operation mode.
0 If any User Name not registered with this machine is authenticated through User Authentication when
[External Server] (Active Directory) is set for Authentication Method, the User Name is automatically registered with this machine.
1 Start the Web browser.
2 Enter the IP address of the machine in the address bar.
3 Press the [Enter] key to start PageScope Web Connection.
4 Click the Registered User radio button and enter the User Name and User Password.
3
5 Click [Log in].
% If a wrong User Password is entered, a message that tells that the authentication has failed appears.
Enter the correct User Password.
% A failure in authentication as a result of the entry of a wrong password is counted as unauthorized
access. If the cumulative number of unauthorized accesses reaches three during operation of the
machine, the machine is set into an access lock state and prohibits any subsequent password entry
operations. To cancel the access lock state, the administrator of the machine must perform the Release Setting. Contact the administrator of the machine.
6 Click [Log out] to log off from the user operation mode.
bizhub C3850/C3350/C3850FS 3-5
Page 79

3.2 ID & Print Function
3.2 ID & Print Function
For all users who have been authenticated through User Authentication, the machine enables all users who
have been authenticated through user authentication to register and access ID & Print files.
After authentication by a user from the control panel is successful with the ID & Print function set in the machine by the Administrator of the machine, the user can automatically print his or her print data saved in the
HDD of the machine. Because printing occurs after user authentication is performed via the control panel of
this machine, it is suitable for printing highly confidential documents.
NOTICE
The ID & Print file is automatically deleted after 24 hours.
Reference
- If the Administrator of the machine sets the ID & Print function, a file is saved as an ID & Print file even
if [Print] is selected on the printer driver side.
- If the Administrator of the machine sets the ID & Print function, a direct print file from PageScope Web
Connection is also saved as an ID & Print file.
3.2.1 Registering ID & Print files
1 Click [Properties] in the Print dialog box to show the Printing Preference window.
2 Click the [Basic] tab.
3
3 Select [ID & Print] in [Job Retention].
% When the Enhanced security mode is turned on, jobs are deleted when either of [Store Job], [Print
and Hold], [Secured Job], or [Proof then Print] in [Job Retention] is selected.
bizhub C3850/C3350/C3850FS 3-6
Page 80

3.2 ID & Print Function
4 Click [Authentication/Account Track].
5 Enter the user name and password and then click [OK].
3
% A failure in authentication as a result of the entry of a wrong password is counted as unauthorized
access. If the cumulative number of unauthorized accesses reaches three during operation of the
machine, the machine is set into an access lock state and prohibits any subsequent password entry
operations. To cancel the access lock state, the administrator of the machine must perform the Release Setting. Contact the administrator of the machine.
6 Print the document.
% If the user password does not correspond to the user name entered, the ID & Print file is discarded
without being registered.
% If an attempt is made to print a file by specifying a user name that contains ["] (a double quotation
mark), the ID & Print files are removed without being registered on the machine.
bizhub C3850/C3350/C3850FS 3-7
Page 81

3.2 ID & Print Function
3.2.2 Accessing the ID & Print file
0 For the logon procedure, see page 3-2.
0 Do not leave the machine while you are in the user operation mode. If it is absolutely necessary to leave
the machine, be sure first to log off from the user operation mode.
1 Log on to the user operation mode through User Authentication from the control panel.
2 Touch [Document Print/Delete].
3 Touch [ID & Print].
3
4 Touch [Login User].
bizhub C3850/C3350/C3850FS 3-8
Page 82

3.2 ID & Print Function
5 Select the desired ID & Print file and touch [Print].
% The ID & Print file is automatically deleted as soon as the printing is normally terminated.
% When deleting the ID & Print file, select the desired file and touch [Delete].
3
bizhub C3850/C3350/C3850FS 3-9
Page 83

3.3 Change Password Function
3.3 Change Password Function
When [Device] is set for Authentication Method of User Authentication, the machine permits each of all users
who have been authenticated through User Authentication to change his or her User Password.
The User Password entered is displayed as "-."
Performing Change Password
0 For the logon procedure, see page 3-2.
0 Do not leave the machine while you are in the user operation mode. If it is absolutely necessary to leave
the machine, be sure first to log off from the user operation mode.
0 Change the user password at regular intervals.
0 Make absolutely sure that nobody but you may know your user password.
0 Do not set any number that can easily be guessed from birthday, employee identification number, and
the like for the user password.
1 Log on to the user operation mode through User Authentication from the PageScope Web Connection.
2 Click the [System] tab and [Authentication].
3 Enter the currently registered User Password and a new User Password. Then, to make sure that you
have entered the correct new password, enter the new User Password once again.
3
4 Click [Apply].
% If a wrong User Password is entered in the "Current Password" box, a message that tells that the
User Password does not match appears. Enter the correct User Password.
% If the entered User Password in the "New Password" box does not meet the requirements of the
Password Rules, a message that tells that the entered User Password cannot be used appears. Enter the correct User Password. For details of the Password Rules, see page 1-10.
% If the entered User Password in the "New Password" box and "Retype New Password" box does
not match, a message that tells that the User Password does not match appears. Enter the correct
User Password.
bizhub C3850/C3350/C3850FS 3-10
Page 84

3.4 Scan to HDD Function
3.4 Scan to HDD Function
For all users who have been authenticated through User Authentication, the machine enables the operation
of Scan to HDD function. It also enables operations for acquiring and printing image files stored in the HDD.
Scan to HDD stores the image file scanned by the machine in the HDD together with user information. The
image file can be stored as "Public" or "Personal". The stored image file can be accessed from the control
panel or PC through authentication of the user name and password.
Encryption communication using the SSL/TLS protocol is performed when the image file is downloaded from
the machine to the PC, so that the data is protected.
3.4.1 Registering image files
0 For the logon procedure, see page 3-2.
0 Do not leave the machine while you are in the user operation mode. If it is absolutely necessary to leave
the machine, be sure first to log off from the user operation mode.
1 Log on to the user operation mode through User Authentication from the control panel.
2 Touch [Scan to Folder].
3
3 Touch [Direct Input] tab and touch [HDD].
bizhub C3850/C3350/C3850FS 3-11
Page 85

3.4 Scan to HDD Function
4 Select the destination to which the file is to be saved and touch [OK] or [Start].
% If [Public] is selected, image files are saved to the public folder that any authenticated user can view
and edit, so be sure to select [Personal].
3
bizhub C3850/C3350/C3850FS 3-12
Page 86

3.4 Scan to HDD Function
3.4.2 Accessing the image file
<From the Control Panel>
0 For the logon procedure, see page 3-2.
0 Do not leave the machine while you are in the user operation mode. If it is absolutely necessary to leave
the machine, be sure first to log off from the user operation mode.
1 Log on to the user operation mode through User Authentication from the control panel.
2 Touch [Document Print/Delete].
3
3 Touch [Scanned Documents].
4 A list of documents saved will appear.
% To delete image file, select the specific document and press [Delete].
bizhub C3850/C3350/C3850FS 3-13
Page 87

3.4 Scan to HDD Function
<From PageScope Web Connection>
0 For the logon procedure, see page 3-2.
0 Do not leave the machine while you are in the user operation mode. If it is absolutely necessary to leave
the machine, be sure first to log off from the user operation mode.
1 Log on to the user operation mode through User Authentication from the PageScope Web Connection.
2 Click the [Storage] tab and click [View] of the User Name by which the desired file is stored.
3 Click [Copy] of the desired file.
3
% If [Delete] is selected, a confirmation message appears. Click [OK] to delete the specified file.
4 Select [Open] or [Save] to execute the desired function.
% The downloaded file is not deleted from the machine.
bizhub C3850/C3350/C3850FS 3-14
Page 88

3.5 S/MIME transmission function
3.5 S/MIME transmission function
The machine permits all users authenticated through user authentication to perform S/MIME transmission.
S/MIME is one of the E-mail encryption schemes. Using S/MIME encrypts an E-mail sent from this machine,
preventing a interception by third parties during transmission. Adding a digital signature to an E-mail provides
assurance regarding the authenticity of the sender, and certifies that no data has been falsified.
Sending E-mail by S/MIME
0 Do not leave the machine while you are in the user operation mode. If it is absolutely necessary to leave
the machine, be sure first to log off from the user operation mode.
1 Log on to the user operation mode through User Authentication from the control panel.
2 Load the original.
3 Touch [Scan to E-mail].
3
4 Touch [Application].
5 Select [E-Mail Encryption], and set [ON].
To add a digital signature, set [Digital Signature] to [ON].
bizhub C3850/C3350/C3850FS 3-15
Page 89

3.5 S/MIME transmission function
% To select [E-Mail Encryption], the administrator of the machine must make the S/MIME settings in
advance.
% If [E-Mail Encryption] is selected after the destination has been set, the set destination is canceled,
making it necessary to set the destination once again.
6 Touch [Close].
7 Select the destination and press the [Start] key.
% To select the destination, the administrator of the machine must register the certificate with the des-
tination in advance.
3
bizhub C3850/C3350/C3850FS 3-16
Page 90

3.6 Memory RX Function
3.6 Memory RX Function
The machine enables the operation of the Memory RX function only for the user who has been authenticated
by user authentication and authorized to use the fax function. [Fax] is not displayed for a user who has not
been authenticated.
Memory RX is a function that saves a received fax in memory of this machine without printing it. Because the
received faxes are forcibly stored in memory of this machine, this will prevent important faxes from being stolen or lost and therefore enhance security.
3.6.1 Accessing the Memory RX file
<From the Control Panel>
0 For the logon procedure, see page 3-2.
0 Do not leave the machine while you are in the user operation mode. If it is absolutely necessary to leave
the machine, be sure first to log off from the user operation mode.
1 Log on to the user operation mode through User Authentication from the control panel.
2 Touch [Fax].
3
% You can also access [Fax] from [Document Print/Delete] - [Memory RX].
3 Touch [Others] - [Memory RX].
bizhub C3850/C3350/C3850FS 3-17
Page 91

3.6 Memory RX Function
4 Enter the Password that is set in the Memory RX, and touch [OK].
5 Select the file to be printed and click [Print].
3
% The file is automatically deleted as soon as the printing is normally terminated.
% To delete image file, select the specific document and press [Delete].
bizhub C3850/C3350/C3850FS 3-18
Page 92

3.6 Memory RX Function
<From PageScope Web Connection>
0 For the logon procedure, see page 3-2.
0 Do not leave the machine while you are in the user operation mode. If it is absolutely necessary to leave
the machine, be sure first to log off from the user operation mode.
1 Log on to the user operation mode through User Authentication from the PageScope Web Connection.
2 Click the [Storage] tab.
3 Click [PC-Fax] from the menu.
4 Enter the Password that is set in the Memory RX, and click [OK].
5 Click [Copy] of the desired file.
3
% Select [Print] to print the selected file. The file is automatically deleted as soon as the printing is nor-
mally terminated.
% When [Print] is selected, be sure to quickly remove the printed paper. Leaving the printed paper un-
attended can allow an unknown person to take away the printed paper.
% If [Delete] is selected, a confirmation message appears. Click [OK] to delete the specified file.
6 Select [Open] or [Save] to execute the desired function.
% The downloaded file is not deleted from the machine.
bizhub C3850/C3350/C3850FS 3-19
Page 93

4
Application Software
Page 94

4.1 PageScope Data Administrator
4 Application Software
4.1 PageScope Data Administrator
PageScope Data Administrator is an application for management purpose that allows the authentication and
destination functions of the machine to be edited or registered from a PC connected over the network.
It allows the authentication and destination list to be downloaded in your PC, the data in the list to be edited
on the PC, and then the data to be written in the machine.
A destination list of file formats including XML, CSV, TAB, LDIF, and Lotus Notes Structured Text can be
downloaded.
NOTICE
Make sure that none of the general users of the machine will know the Administrator Password.
If the Administrator Password is forgotten, it must be set again by the Service Engineer. Contact your Service
Representative.
To perform Registration of Device, first register the machine before disabling the SNMP settings during the
setup procedure of the machine.
Precautions during backup or restore
4
This machine allows authentication information, address list, and other types of data to be backed up (exported) in your PC or restored (imported) in the machine using the PageScope Data Administrator. Use the
following precautions when backing up or restoring data.
- When backing up or restoring data using the PageScope Data Administrator with the Enhanced Security mode turned ON, do not restore data that is backed up when the Enhanced Security mode is turned
OFF.
- Edit backup data only with the PageScope Data Administrator.
4.1.1 Accessing from PageScope Data Administrator
0 Do not leave the site while you are gaining access to the machine through PageScope Data Adminis-
trator. If it is absolutely necessary to leave the site, be sure first to log off from the PageScope Data
Administrator.
1 Start the PageScope Data Administrator.
2 Select this machine from Device List and click [Authentication Settings/Address Settings].
bizhub C3850/C3350/C3850FS 4-2
Page 95

4.1 PageScope Data Administrator
3 Check the settings on the Import device information screen and click [Import].
4 Type the Administrator Password registered in the machine and click [OK].
4
% If the "Save" check box has been selected, the Administrator Password entered is stored in the PC
being used. If you do not want the Administrator Password stored, clear the "Save" check box.
% If a wrong Administrator Password is entered, a message appears that tells that there is a mismatch
in the passwords. Enter the correct Administrator Password.
% If the "Save" check box is selected, enter the Administrator Password once again to make sure that
the Administrator Password has been entered correctly.
% If a wrong Administrator Password is entered for confirmation, a message appears that tells that
there is a mismatch in the Administrator Password. Enter the correct Administrator Password.
% A failure in authentication as a result of the entry of a wrong password is counted as unauthorized
access. If the cumulative number of unauthorized accesses reaches three during operation of the
machine, the machine is set into an access lock state and prohibits any subsequent password entry
operations. To cancel the access lock state, settings must be made by the Service Engineer; or, turn
off, then on, the power switch of the machine. When the power switch is turned off, then on again,
wait at least 10 seconds to turn it on after turning it off. This interval is necessary to ensure that the
machine functions properly.
5 Check the data displayed on the SSL certificate check screen and click [Yes].
bizhub C3850/C3350/C3850FS 4-3
Page 96

4.1 PageScope Data Administrator
4.1.2 Setting the user authentication method
0 For the procedure to access the machine, see steps 1 through 5 of page 4-2.
0 Do not leave the site while you are gaining access to the machine through PageScope Data Adminis-
trator. If it is absolutely necessary to leave the site, be sure first to log off from the PageScope Data
Administrator.
1 Access the machine through [Authentication Settings/Address Settings] mode of PageScope Data Ad-
ministrator.
2 Click [Authentication settings].
4
3 Click [User authentication].
bizhub C3850/C3350/C3850FS 4-4
Page 97

4.1 PageScope Data Administrator
4 From the pull-down menu of User authentication, select the user authentication method.
% To change the user authentication method from "Device authentication" to "Network server authen-
tication," it is necessary first to register the domain name of Active Directory on the machine side.
% If "Network server authentication" is selected, "Active Directory" must invariably be selected.
4
5 Click [Export to the device].
% If there is a job being executed or a reserved job (timer TX, fax redial waiting, etc.) in the machine,
the machine displays a message that tells that the write operation has not been successful because
of a device lock error. Click [OK] and wait for some while before attempting to execute [Export to
the device] again.
bizhub C3850/C3350/C3850FS 4-5
Page 98

4.1 PageScope Data Administrator
4.1.3 Changing the authentication mode
0 For the procedure to access the machine, see steps 1 through 5 of page 4-2.
0 Do not leave the site while you are gaining access to the machine through PageScope Data Adminis-
trator. If it is absolutely necessary to leave the site, be sure first to log off from the PageScope Data
Administrator.
0 On this machine, the authentication mode can't be changed while the Enhanced Security Mode is set
to [ON]. Do not change the authentication mode while the Enhanced Security Mode is set to [ON].
1 Access the machine through [Authentication Settings/Address Settings] mode of PageScope Data Ad-
ministrator.
2 Click [Authentication settings].
4
3 From [Edit] on the tool bar, select [Authentication] and click [Change authentication mode].
4 Click [Next].
bizhub C3850/C3350/C3850FS 4-6
Page 99

4.1 PageScope Data Administrator
5 Select the specific [Authentication mode] to be changed and click [Next].
6 Verify the new authentication mode and click [Write].
4
% If there is a job being executed or a reserved job (timer TX, fax redial waiting, etc.) in the machine,
the machine displays a message that tells that the write operation has not been successful because
of a device lock error. Click [OK] and wait for some while before attempting to execute [Export to
the device] again.
7 Click [Finished].
bizhub C3850/C3350/C3850FS 4-7
Page 100

4.1 PageScope Data Administrator
4.1.4 Making the user settings
0 For the procedure to access the machine, see steps 1 through 5 of page 4-2.
0 Do not leave the site while you are gaining access to the machine through PageScope Data Adminis-
trator. If it is absolutely necessary to leave the site, be sure first to log off from the PageScope Data
Administrator.
1 Access the machine through [Authentication Settings/Address Settings] mode of PageScope Data Ad-
ministrator.
2 Click the Authentication settings expand button.
3 Click [User authentication settings].
4
4 Select the desired function.
% To register the user, click [Add].
% To change data registered for the user, click [Edit].
% To delete the user, click [Delete] and a screen appears that prompts you to confirm the execution
of deletion. Click [Yes] to delete the user.
% If the User Password does not meet the requirements of the Password Rules, a message appears
that tells that this particular User Password cannot be used. Click [OK] and enter the correct User
Password. For details of the Password Rules, see page 1-10.
% If the User Name has not been entered, a message appears that tells that the User Name is yet to
be entered. Click [OK] and enter the User Name.
% A User Name that already exists cannot be redundantly registered.
5 Click [OK].
6 Click [Export to the device].
% If there is a job being executed or a reserved job (timer TX, fax redial waiting, etc.) in the machine,
the machine displays a message that tells that the write operation has not been successful because
of a device lock error. Click [OK] and wait for some while before attempting to execute [Export to
the device] again.
% If a previously registered user is deleted in step 4, the image files owned by that specific user are
deleted.
bizhub C3850/C3350/C3850FS 4-8
 Loading...