

Page 1
Enlarge Display Mode User’s Guide
Page 2

Page 3

Contents
1 Introduction
1.1 Contents.........................................................................................1-1
2 Before Making Copies
2.1 Explanation of Guide Conventions .............................................2-1
2.2 Control Panel.................................................................................2-2
2.3 Adjusting the Angle of the Control Panel...................................2-4
To adjust the angle of the control panel .....................................2-4
2.4 Touch Panel...................................................................................2-6
Displaying the enlarged Basic screen ........................................2-6
Touch panel operation................................................................2-7
Keys displayed in the touch panel..............................................2-8
Paper type icons.........................................................................2-9
Paper supply icons ...................................................................2-10
To use the Copy Track mode ...................................................2-11
3 Paper Settings
3.1 Paper Settings...............................................................................3-1
To specify a non-standard (custom) paper size
for the 1st drawer........................................................................3-1
To store a non-standard (custom) paper size
for the 1st drawer........................................................................3-3
To specify a paper size setting for the 1st drawer ......................3-5
To specify a non-standard (custom) paper size
for the multiple bypass tray.........................................................3-7
To store a non-standard (custom) paper size
for the multiple bypass tray.........................................................3-9
To specify a paper size setting for the multiple bypass tray .....3-11
To specify the paper type for the multiple bypass tray .............3-13
4 Original Documents
4.1 Loading the Document.................................................................4-1
Loading the Document Into the Reverse Automatic Document
Feeder ........................................................................................4-1
Placing the Document On the Original Glass .............................4-3
C350
Page 4

5 Useful Operations
5.1 Basic Copying............................................................................... 5-1
To make copies.......................................................................... 5-1
5.2 Stopping Copying......................................................................... 5-4
To stop a copy job...................................................................... 5-4
To restart the copy job ............................................................... 5-4
5.3 Queuing a Copy Job for the Multiple Bypass Tray ...................5-5
To queue a copy job for the multiple bypass tray ...................... 5-5
5.4 Interrupting a Copy Job............................................................... 5-8
6 Specifying Copy Settings
6.1 Selecting a Color Setting............................................................. 6-1
To select the Color setting ......................................................... 6-1
6.2 Selecting Output Settings............................................................ 6-3
To specify Output settings .........................................................6-4
6.3 Specifying a Zoom Setting ..........................................................6-6
To specify a Zoom setting.......................................................... 6-7
To specify a zoom ratio.............................................................. 6-8
To select the “Auto Zoom” setting.............................................. 6-9
To specify a Reduce or Enlarge setting................................... 6-10
To specify a manual zoom ratio............................................... 6-11
To store a manual zoom ratio .................................................. 6-13
To recall a stored manual zoom ratio.......................................6-15
To specify different vertical and
horizontal scaling proportions (X/Y Zoom settings) ................. 6-16
6.4 Selecting a Paper Setting .......................................................... 6-18
To select the Paper setting ...................................................... 6-18
6.5 Selecting Original Setting.......................................................... 6-20
To select an Original setting .................................................... 6-20
6.6 Selecting Copy Settings ............................................................ 6-23
To select a Copy setting .......................................................... 6-23
6.7 Selecting a Photo/Density Setting............................................ 6-25
To select an Original Image Type setting ................................ 6-25
To select the Background, Density,
Text Enhancement and “Glossy Mode” settings ...................... 6-28
Example: After touching [Background]..................................... 6-29
Example: After touching [Density]............................................6-29
Example: After touching [Text Enhancement].......................... 6-30
Example: To copy a document with a glossy finish ................. 6-30
C350
Page 5

6.8 Checking the Settings ................................................................6-31
To check the settings................................................................6-31
To change the settings .............................................................6-33
7 Accessibility Mode Operations
7.1 Setting the “Key Repeat Start/Interval” Function......................7-1
Key repeat start time and key repeat interval.............................7-1
To specify the key repeat start time and key repeat interval ......7-2
7.2 Setting the “Enlarge-Display Notice” Function..........................7-3
To specify whether the confirmation message
for canceling the Enlarge Display mode appears .......................7-3
Operations for the confirmation message
for canceling the Enlarge Display mode .....................................7-5
Outline of the Confirmation to Cancel the
Enlarge Display Mode ................................................................7-6
8 Managing Jobs
8.1 Overview of Jobs ..........................................................................8-1
Jobs............................................................................................8-1
8.2 Displaying the Job List Screen....................................................8-2
8.3 Deleting a Job................................................................................8-3
To delete a queued job...............................................................8-3
To delete a job that is being printed ...........................................8-4
8.4 Job List Screens ...........................................................................8-6
Active Jobs screen .....................................................................8-6
Active Scans screen...................................................................8-6
Stocked List screen ....................................................................8-7
Locked List screen......................................................................8-8
Print Log screen .........................................................................8-9
Scan Log screen.........................................................................8-9
C350
Page 6

C350
Page 7

Introduction
1 Introduction
This manual contains details on the operation of the various functions
available in the Enlarge Display mode and on the various operating
precautions. In order to ensure that this machine is used correctly and
efficiently, carefully read this manual before using the machine.
After reading this manual, store it in the designated holder so that it can
easily be referred to when questions or problems arise during operation.
The model illustrated in this manual may differ from your machine.
1.1 Contents
The topics listed in the table of contents are described in this manual. For
details on other topics, refer to the User Manual.
1
C350 1-1
Page 8

1
Introduction
1-2 C350
Page 9
Before Making Copies
2 Before Making Copies
This chapter provides information that is important to know before making
copies.
2.1 Explanation of Guide Conventions
CAUTION
Failure to observe instructions highlighted in this manner may result
in serious injuries or property damage.
§ Observe all cautions in order to ensure safe use of this machine.
Reminder!
Text highlighted in this manner indicates operation precautions.
Carefully read and observe this type of information.
2
Additional Information
Text highlighted in this manner provides more detailed information
concerning the operating procedure.
Text highlighted in this manner indicates sections containing additional
information. If necessary, refer to the indicated sections.
[ ] This indicates a key either on the touch panel or on the control panel.
C350 2-1
Page 10
2
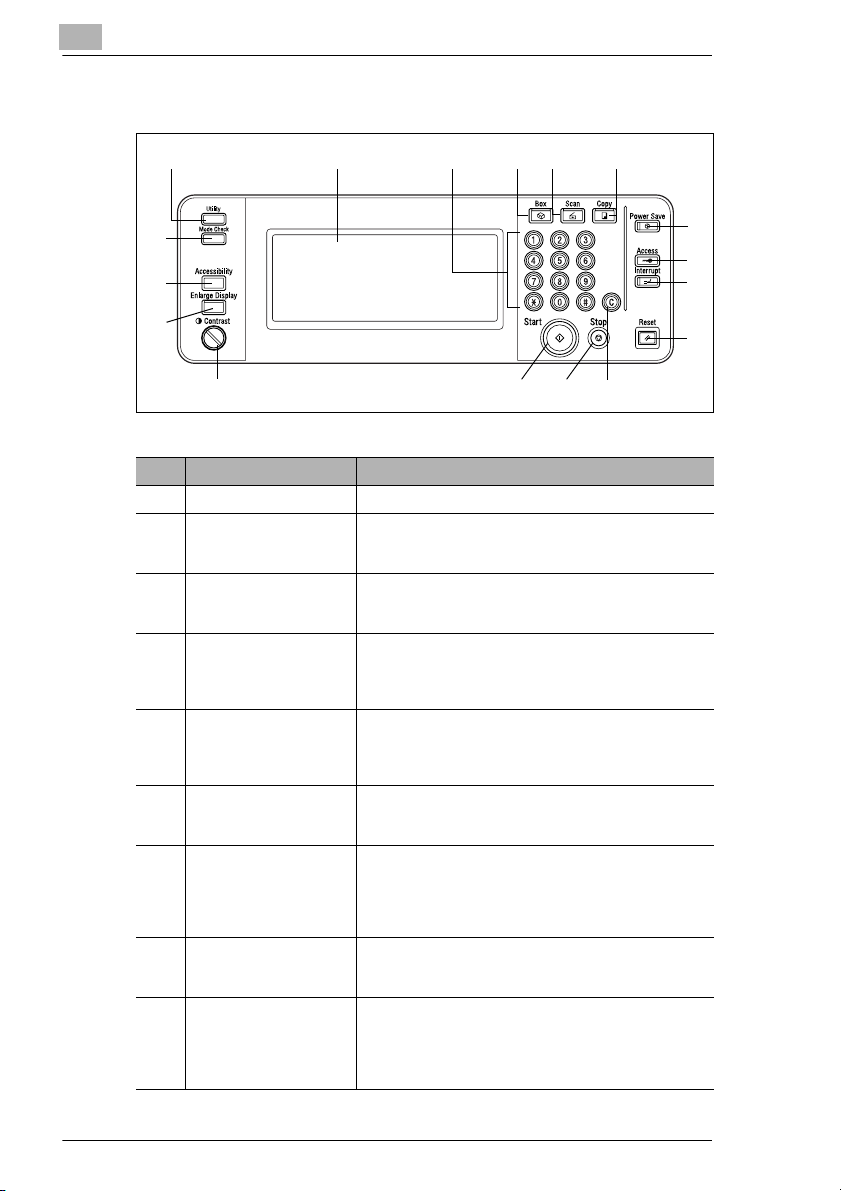
2.2 Control Panel
123456
Before Making Copies
17
16
15
11121314
No. Part Name Description
1 [Utility] key Press to display the Utility screen.
2 Touch panel • Displays various screens and messages.
3 Keypad • Use to type in the number of copies to be produced.
4 [Box] key • Press to enter Box mode.
5 [Scan] key Press to enter Scan mode. While the machine is in Scan
6 [Copy] key Press to enter Copy mode. (As a default, the machine is
7 [Power Save] key Press to enter Power Save mode. While the machine is
8 [Access] key If Copy Track mode has been set, press this key after
9 [Interrupt] key Press to enter Interrupt mode. While the machine is in
• Specify the various settings by directly touching the
panel.
• Use to type in the zoom ratio.
• Use to type in the various settings.
• Box mode is only available if the optional hard disk
(HD-501) is installed. For details, refer to the C350
Printer Controller User’s Guide.
mode, the indicator on the [Scan] key lights up in green.
For details on the Scan mode, refer to the C350 Printer
Controller User’s Guide.
in Copy mode.) While the machine is in Copy mode, the
indicator on the [Copy] key lights up in green.
in Power Save mode, the indicator on the [Power Save]
key lights up in green and the touch panel goes off. To
cancel Power Save mode, press the [Power Save] key
again.
entering the account number and access code in order
to use this machine.
Interrupt mode, the indicator on the [Interrupt] key lights
up in green and the message “Now in Interrupt mode.”
appears on the touch panel. To cancel Interrupt mode,
press the [Interrupt] key again.
7
8
9
10
2-2 C350
Page 11
Before Making Copies
No. Part Name Description
10 [Reset] key Press to clear all settings (except programmed settings)
11 [C] (clear) key Press to erase a value (such as the number of copies, a
12 [Stop] key Press the [Stop] key during copying to stop the copy
13 [Start] key • Press to start copying. When this machine is ready to
14 Contrast dial Use to adjust the contrast of the touch panel.
15 [Enlarge Display] key Press to enter Enlarge Display mode.
16 [Accessibility] key Press to display the screen for specifying user
17 [Mode Check] key Press to display screens showing the specified settings.
entered in the control panel and touch panel.
zoom ratio, or a size) entered using the keypad.
operation.
begin copying, the indicator on the [Start] key lights
up in green. If the indicator on the [Start] key lights up
in orange, copying cannot begin.
• Press to restart a stopped job.
accessibility functions.
2
C350 2-3
Page 12
2
Before Making Copies
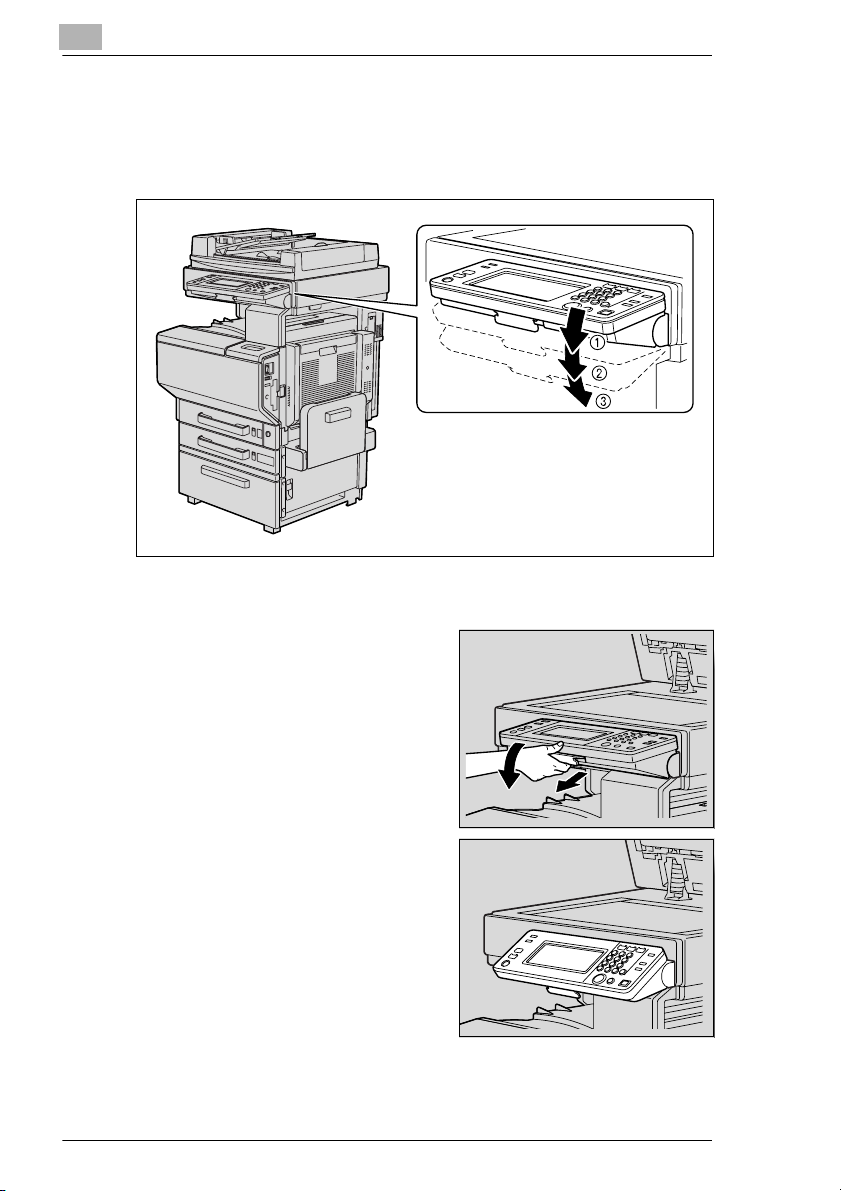
2.3 Adjusting the Angle of the Control Panel
The control panel can be adjusted to any of three angles.
Adjust the control panel to the angle that allows for easy operation.
1 Upper position (base position)
2 Middle position
3 Lower position
To adjust the angle of the control panel
1 Pull the control panel release lever
toward you, and then push down on
the control panel.
The angle of the control panel stops
at the middle position.
2-4 C350
Page 13
Before Making Copies
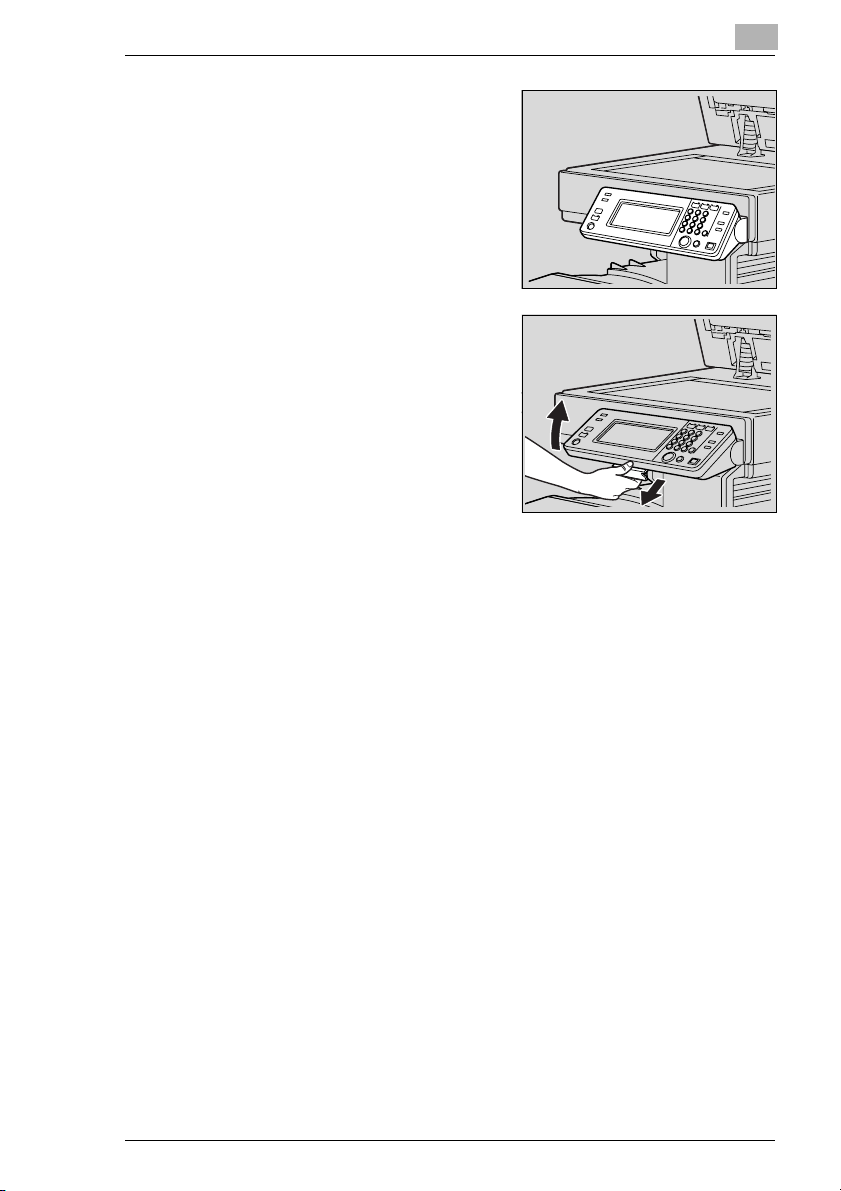
2 To adjust the control panel to an
even steeper angle, pull the control
panel release lever toward you, and
then push down on the control
panel.
The angle of the control panel stops
at the lower position.
3 To return the control panel to the
upper position, pull the control panel
release lever toward you, and then
pull up on the control panel.
2
C350 2-5
Page 14
2
2.4 Touch Panel
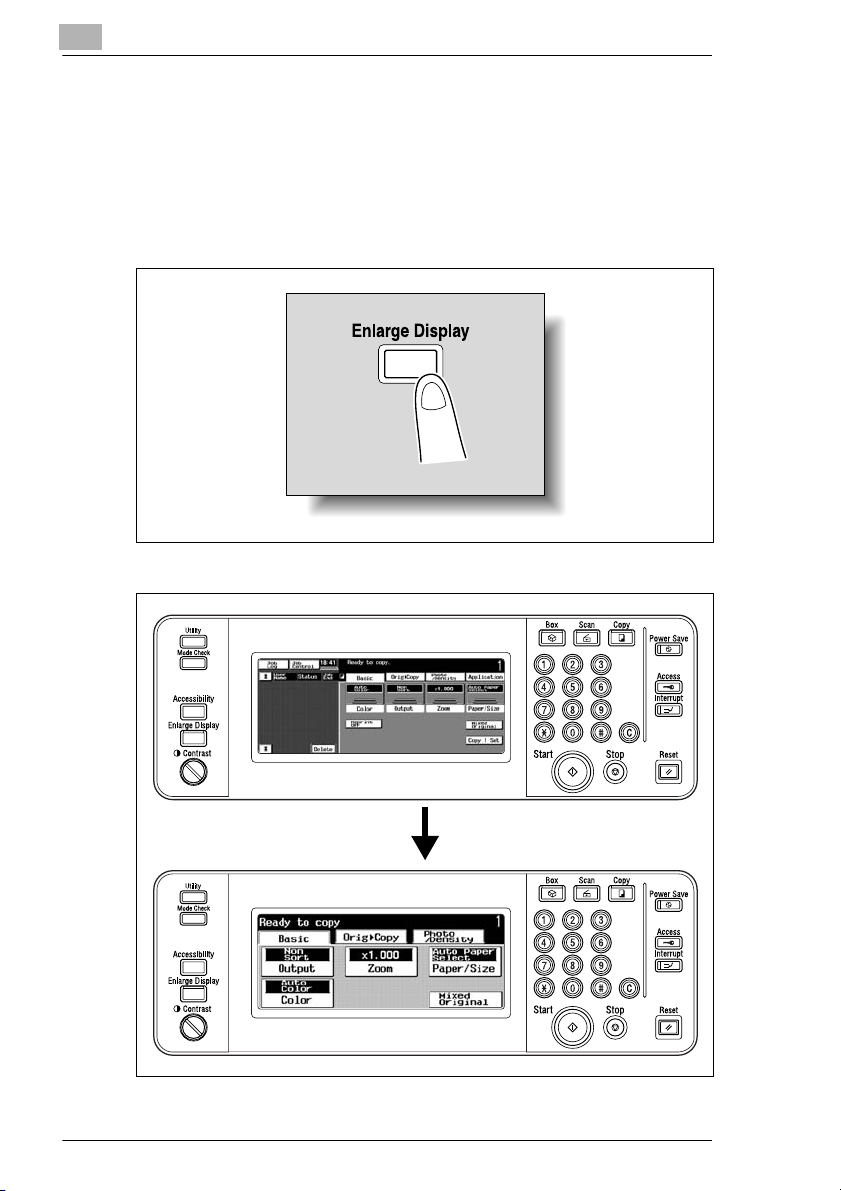
Displaying the enlarged Basic screen
When this machine is turned on (the power switch is set to “I”), the
standard-sized Basic screen appears in the touch panel.
§ Press the [Enlarge Display] key in the control panel.
The enlarged Basic screen appears in the touch panel.
Before Making Copies
2-6 C350
Page 15
Before Making Copies
Additional Information
Press the [Enlarge Display] key in the control panel to return the Basic
screen to its standard size.
Touch panel operation
To activate a function or to select a setting, lightly touch the desired
function or setting shown on the touch panel.
CAUTION
Do not apply extreme pressure to the touch panel, otherwise it may
be scratched or damaged.
§ Never push down on the touch panel with force, and never use a hard
or pointed object to make a selection in the touch panel.
2
C350 2-7
Page 16
2
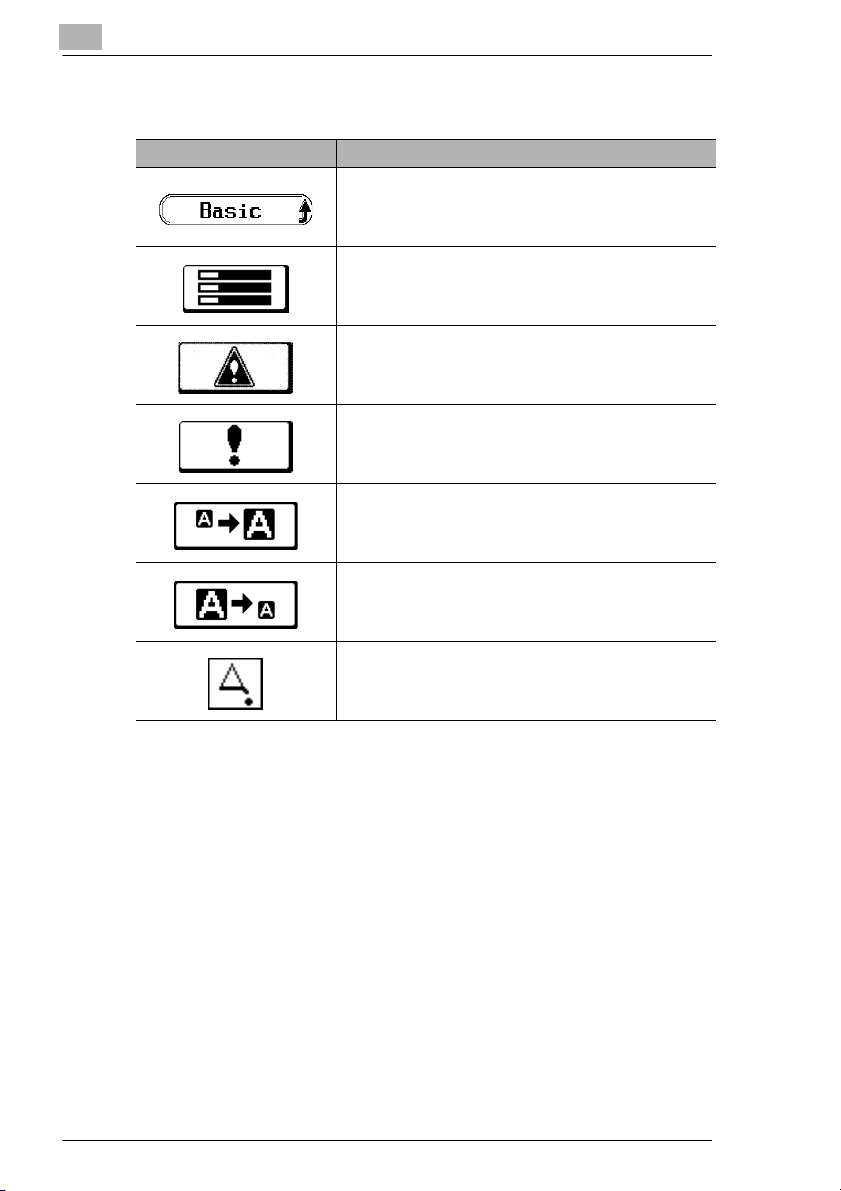
Keys displayed in the touch panel
Icon Description
Touch this key to display the Basic screen.
This key appears when there are jobs queued to be printed.
Touch this key to display the Job List screen. For details on
jobs, refer to
This key appears when there is a message indicating that a
print error occurred. Touch this key to display the message,
and then perform the necessary steps.
This key appears when there is a message indicating that
maintenance is required. Touch this key to display the
message, and then perform the necessary steps.
Touch this key to display the message at an enlarged size.
Touch this key to return the message to its standard size
from the enlarged size.
Before Making Copies
“8 Managing Jobs”.
This key appears if an error occurs during image stabilizing,
or during print or scan operations.
Touch this key to display the status of the machine. Inform
the service representative of the number that is displayed.
2-8 C350
Page 17
Before Making Copies
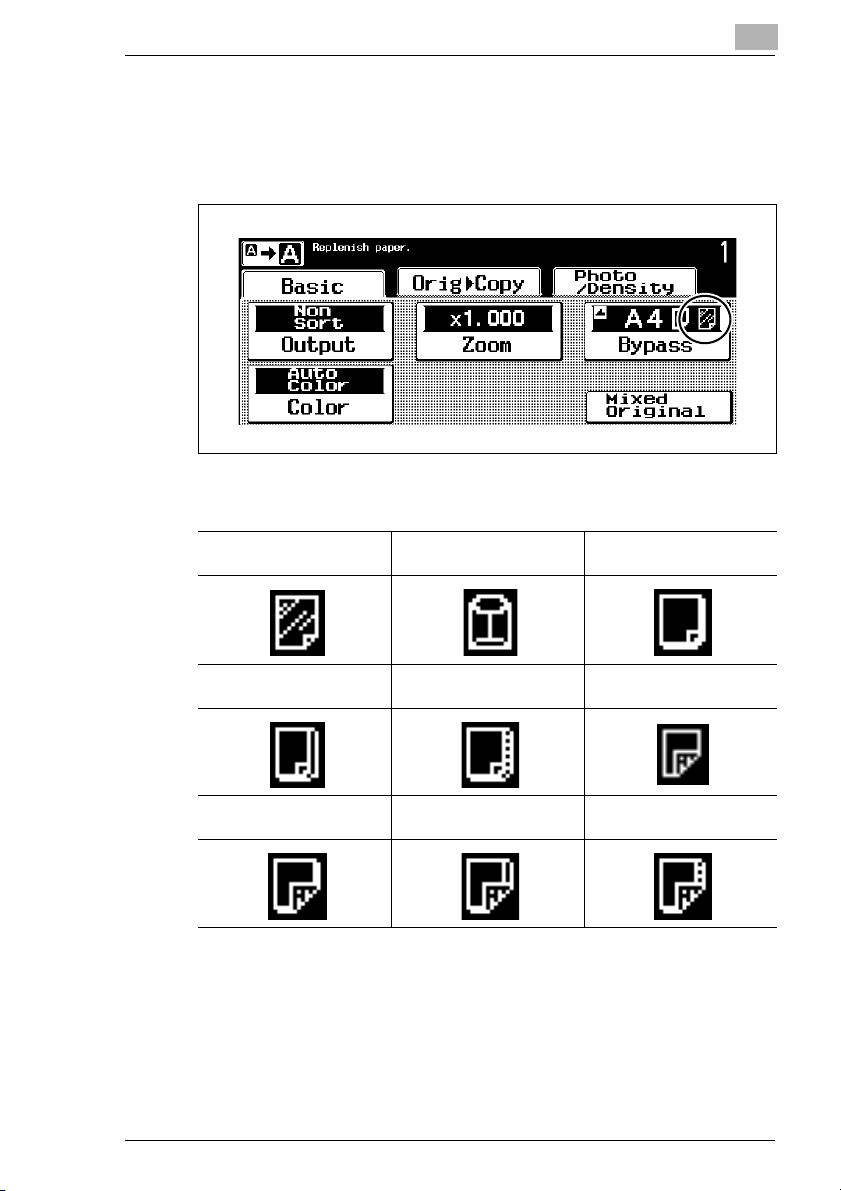
Paper type icons
If paper other than plain paper is specified for the 1st drawer and the
multiple bypass tray, the icon indicating the paper type appears in the
Paper/Size screen.
Paper type icons that appear
2
Overhead projector
transparencies
Thick paper 2 Thick paper 3 Second side of a double-
Second side of a doublesided copy on thick paper 1
Envelopes Thick paper 1
sided copy on plain paper
Second side of a doublesided copy on thick paper 2
Second side of a doublesided copy on thick paper 3
C350 2-9
Page 18
2
Before Making Copies
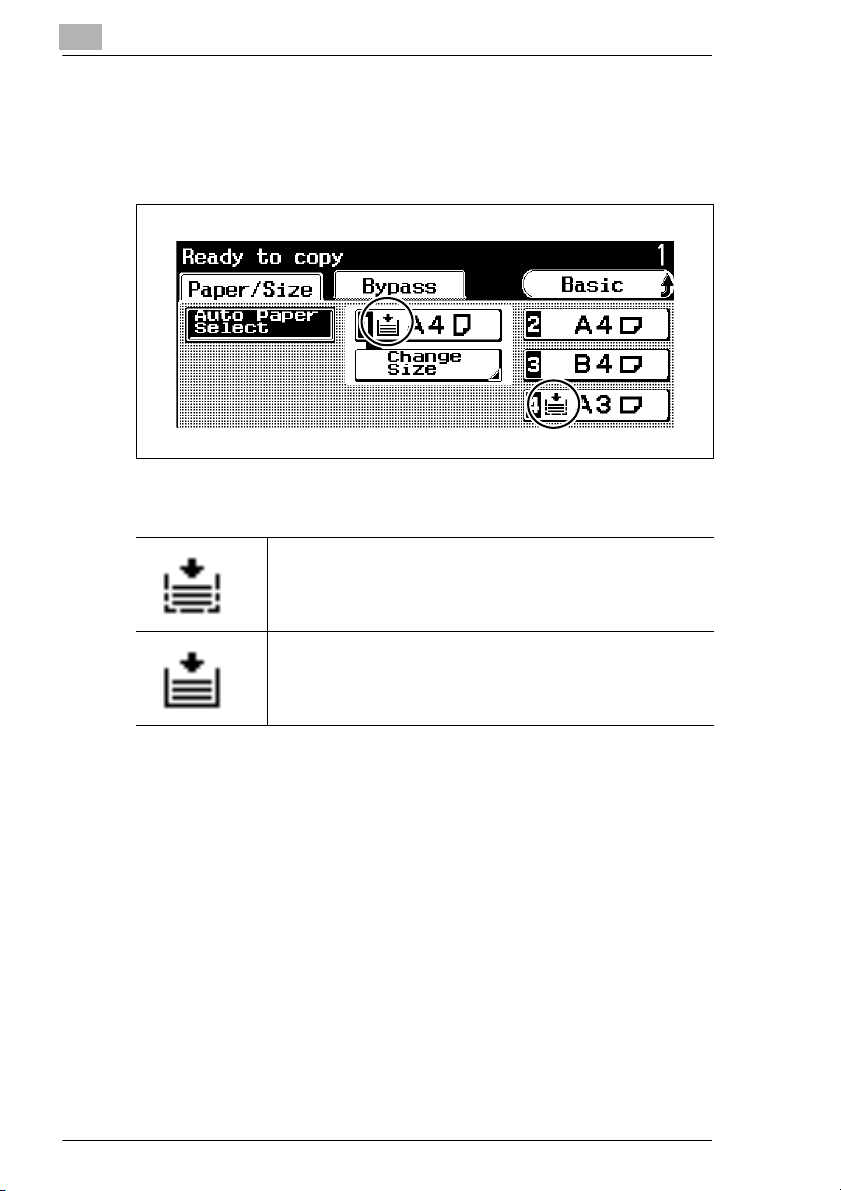
Paper supply icons
The amount of paper that remains is indicated in the screen where the
paper size is selected. For details about the screen for selecting the paper
size, refer to “Selecting a Paper Setting” on page 6-18.
Paper supply icons that appear.
The paper supply is low.
The paper drawer is empty.
2-10 C350
Page 19
Before Making Copies
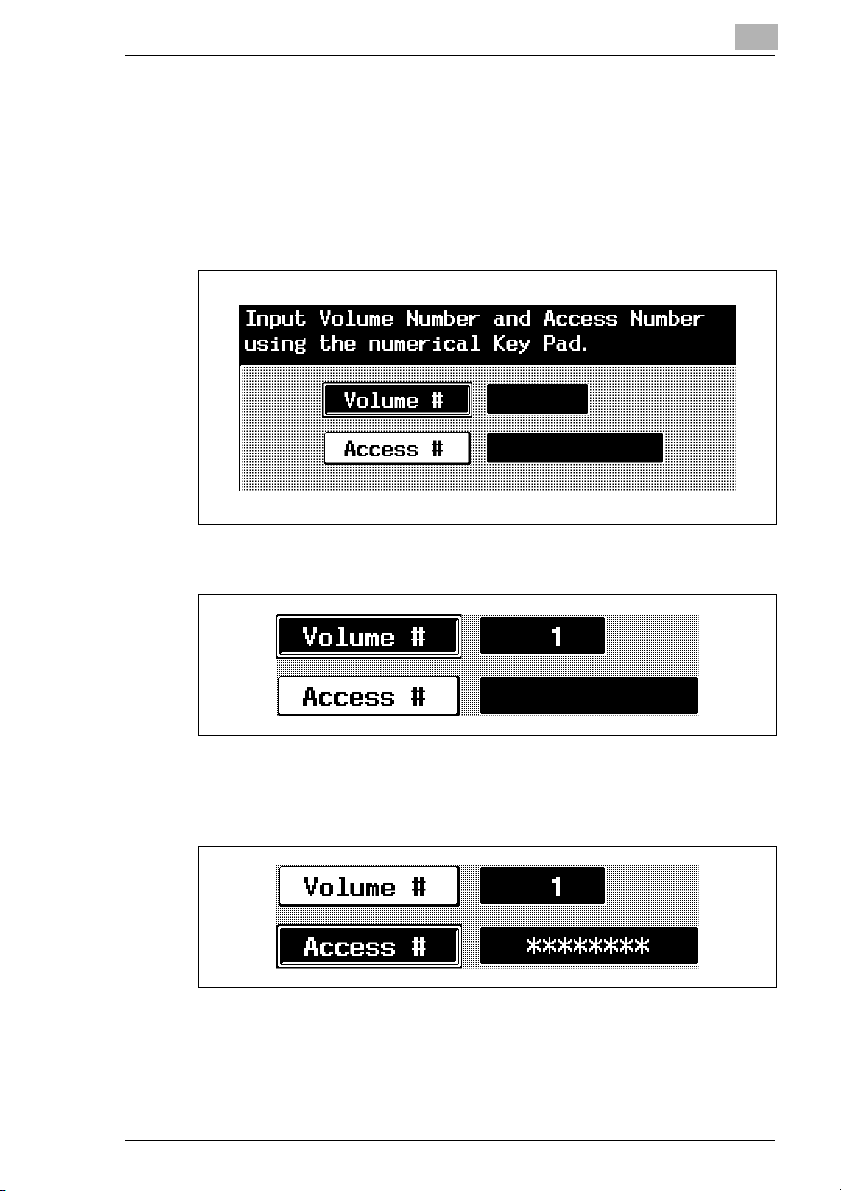
To use the Copy Track mode
If the “Copy Track Mode” function is set to “Yes”, this machine can only be
used by users who enter their volume number and access number. When
the screen shown below appears, type in the volume number and access
number.
For details on volume numbers and access number, contact the
administrator for this machine.
1 Using the keypad, type in the volume number.
2
2 Touch [Access #].
3 Using the keypad, type in the access number.
C350 2-11
Page 20
2
Before Making Copies
4 Press the [Access] key in the control panel.
The Basic screen appears.
5 When you are finished making copies, press the [Access] key.
The volume number and access number input screen appears again.
2-12 C350
Page 21
Paper Settings
3 Paper Settings
This chapter provides procedures for specifying the paper settings.
3.1 Paper Settings
To specify a non-standard (custom) paper size for the 1st drawer
If non-standard-sized paper is loaded into the 1st drawer, specify the size
of paper that is loaded.
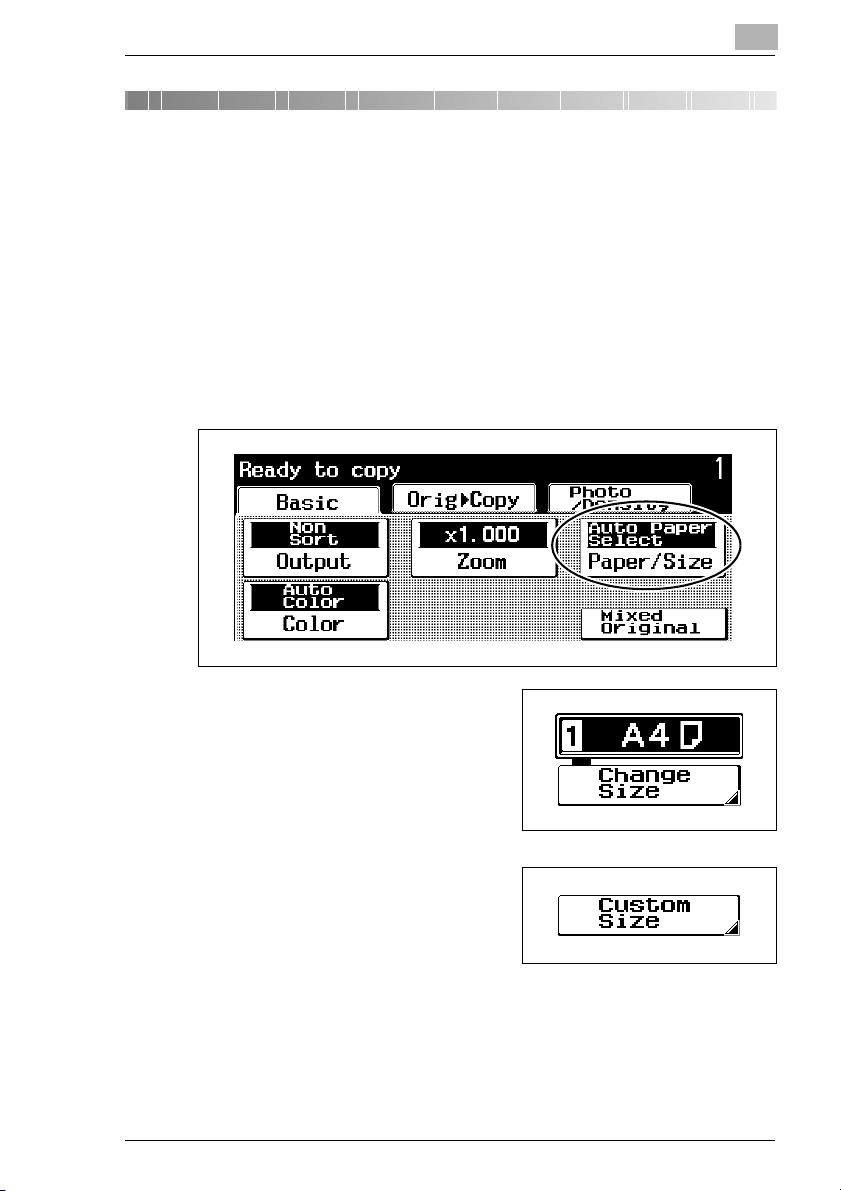
1 Touch [Paper/Size] in the Basic screen.
3
2 Touch the key for the 1st drawer,
and then touch [Change Size].
3 Touch [Custom Size].
C350 3-1
Page 22
3
Paper Settings
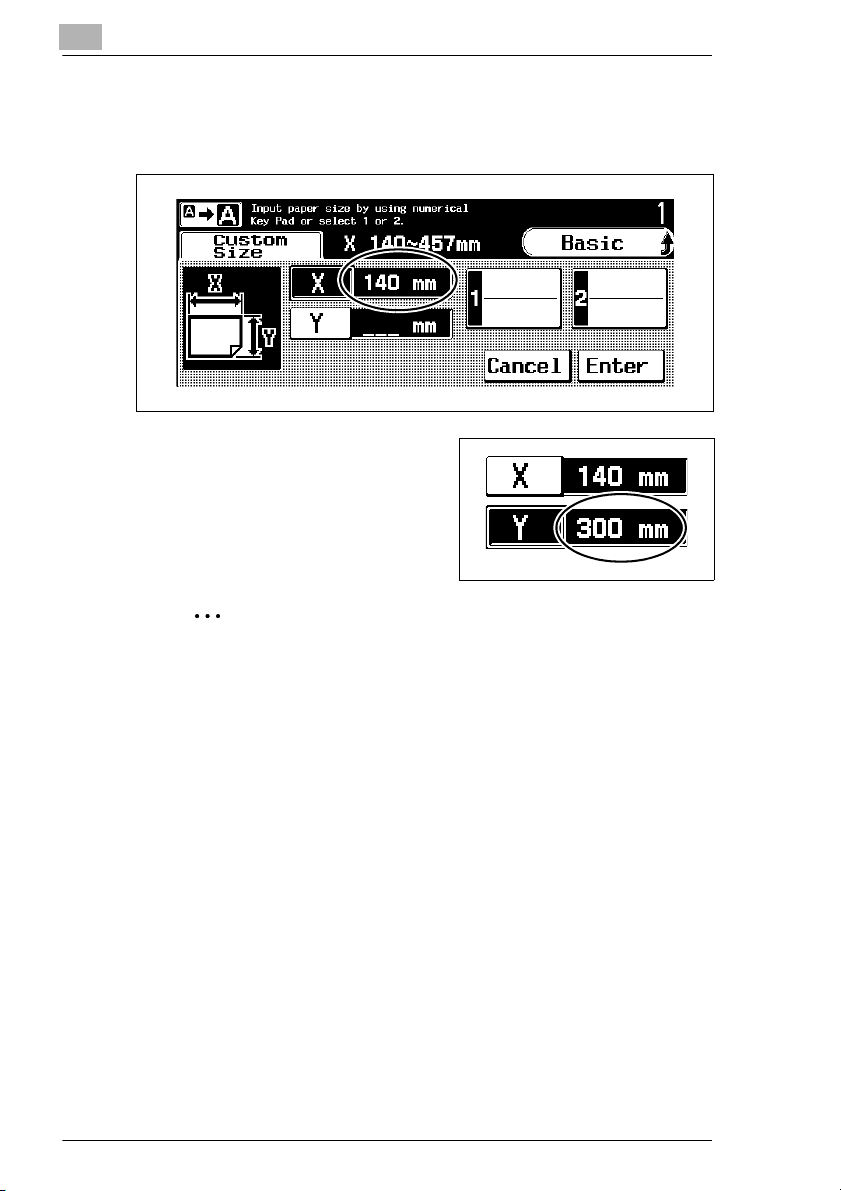
4 Using the keypad, type in the length of side X for the paper that is
loaded (between 140 and 457 mm). (As an example, the following
screen shows a specified setting of 140 mm.)
5 Touch [Y], and then use the keypad
to type in the length of side Y for the
paper that is loaded (between 90
and 311 mm). (As an example, the
following screen shows a specified
setting of 300 mm.)
Additional Information
If custom paper sizes have been stored, instead of performing
steps 6 and 7, a stored paper size setting can be selected by
pressing [1] or [2].
For details on storing custom paper sizes, refer to “To store a nonstandard (custom) paper size for the 1st drawer” on page 3-3.
6 Touch [Enter].
A non-standard (custom) paper size is set for the 1st drawer.
3-2 C350
Page 23
Paper Settings
To store a non-standard (custom) paper size for the 1st drawer
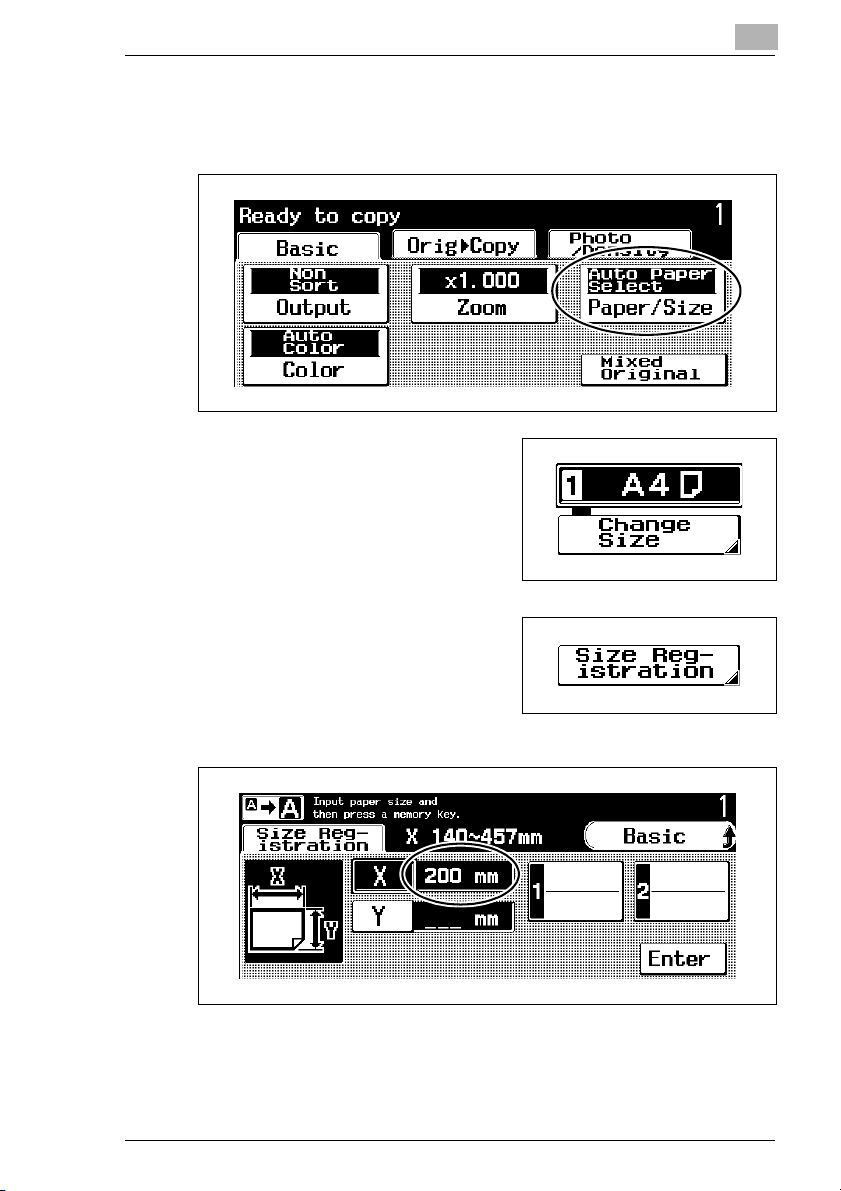
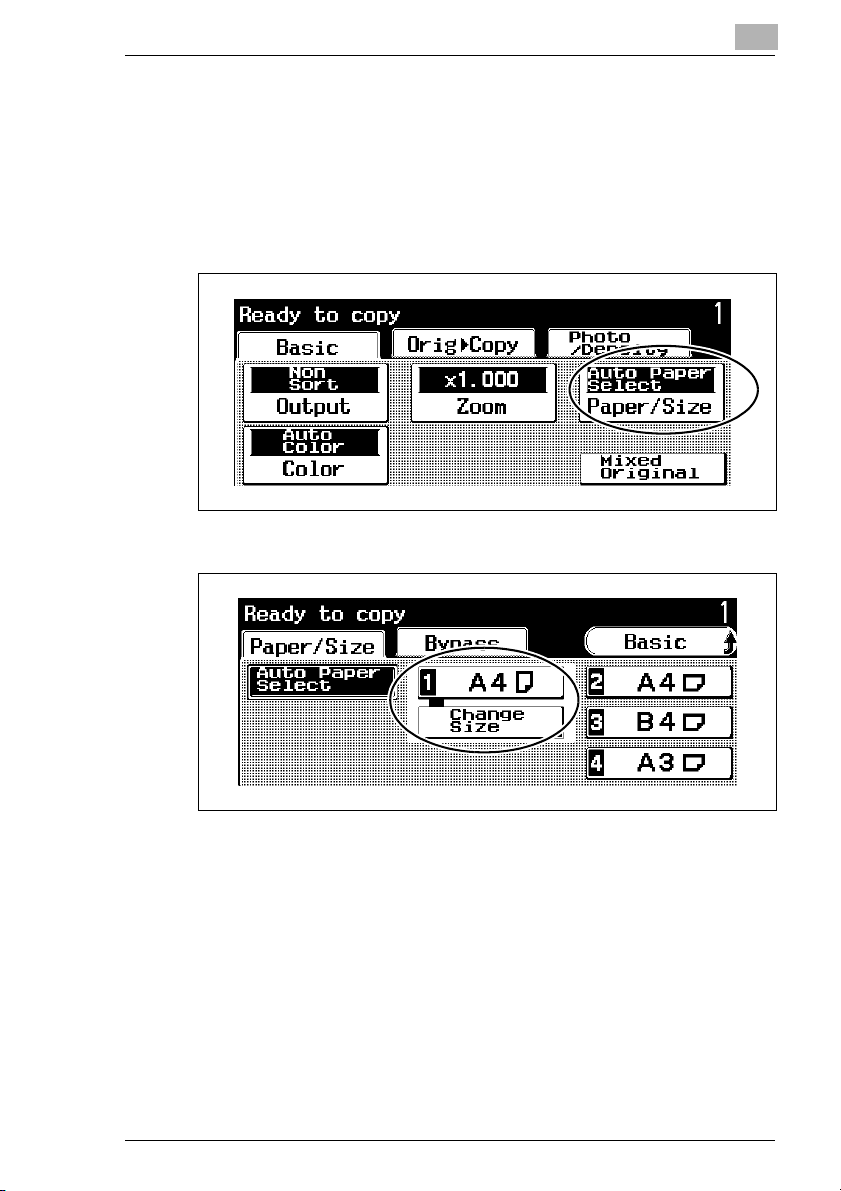
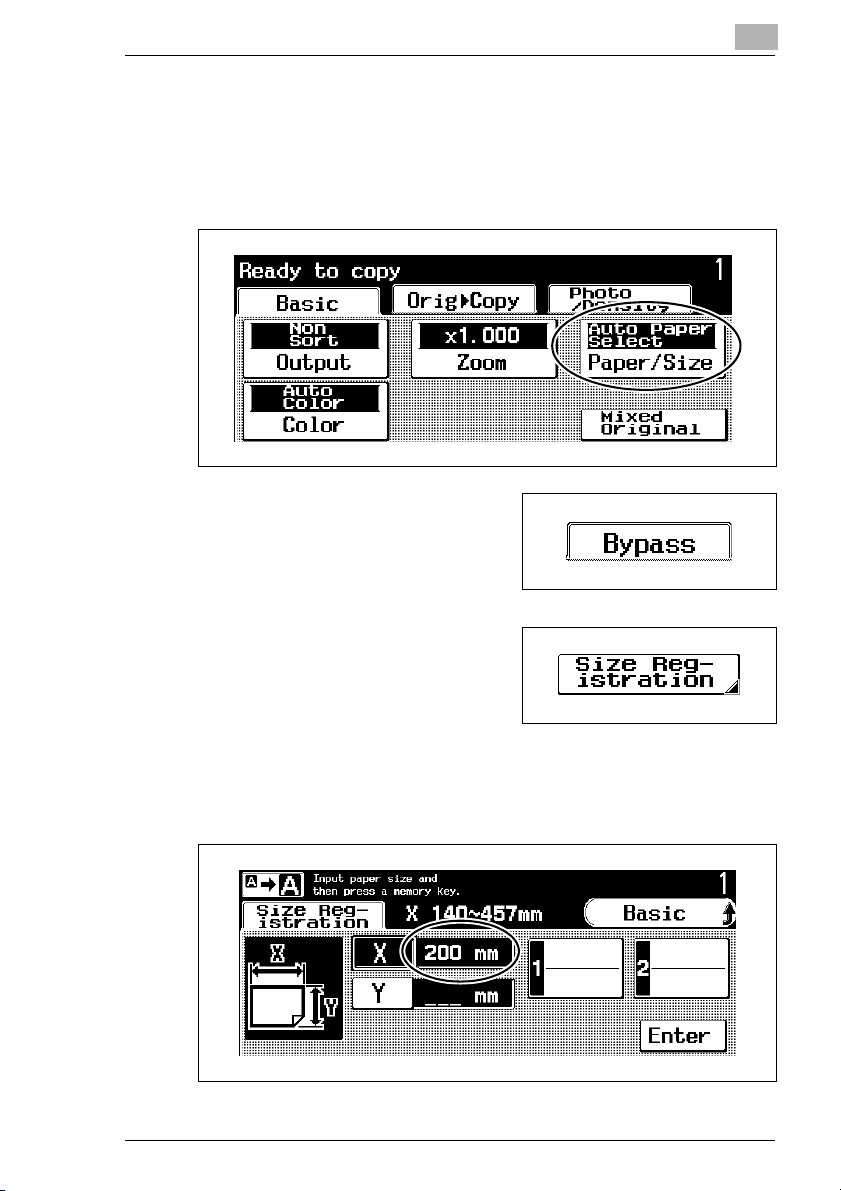
1 Touch [Paper/Size] in the Basic screen.
2 Touch the key for the 1st drawer,
3
and then touch [Change Size].
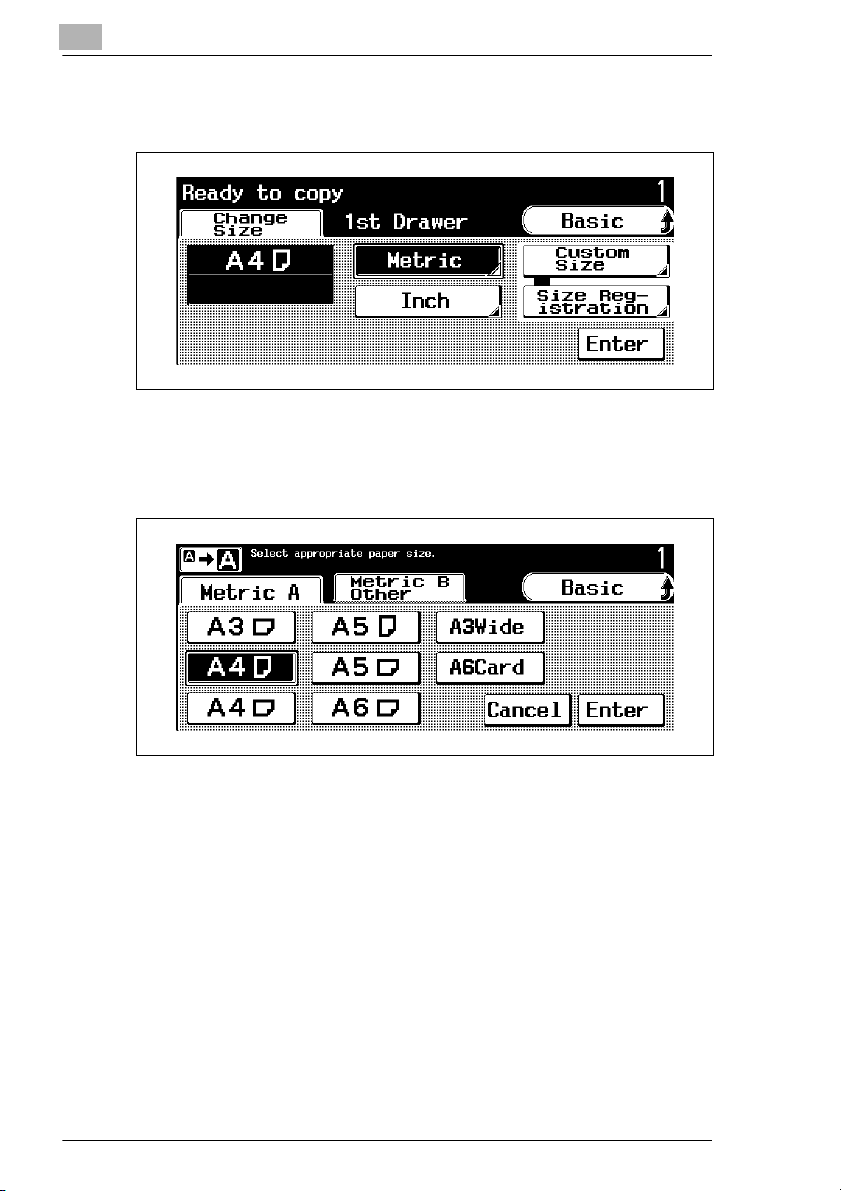
3 Touch [Size Registration].
4 Using the keypad, type in the length
of side X for the paper that is loaded
(between 140 and 457 mm). (As an
example, the following screen shows a specified setting of 200 mm.)
C350 3-3
Page 24
3
Paper Settings
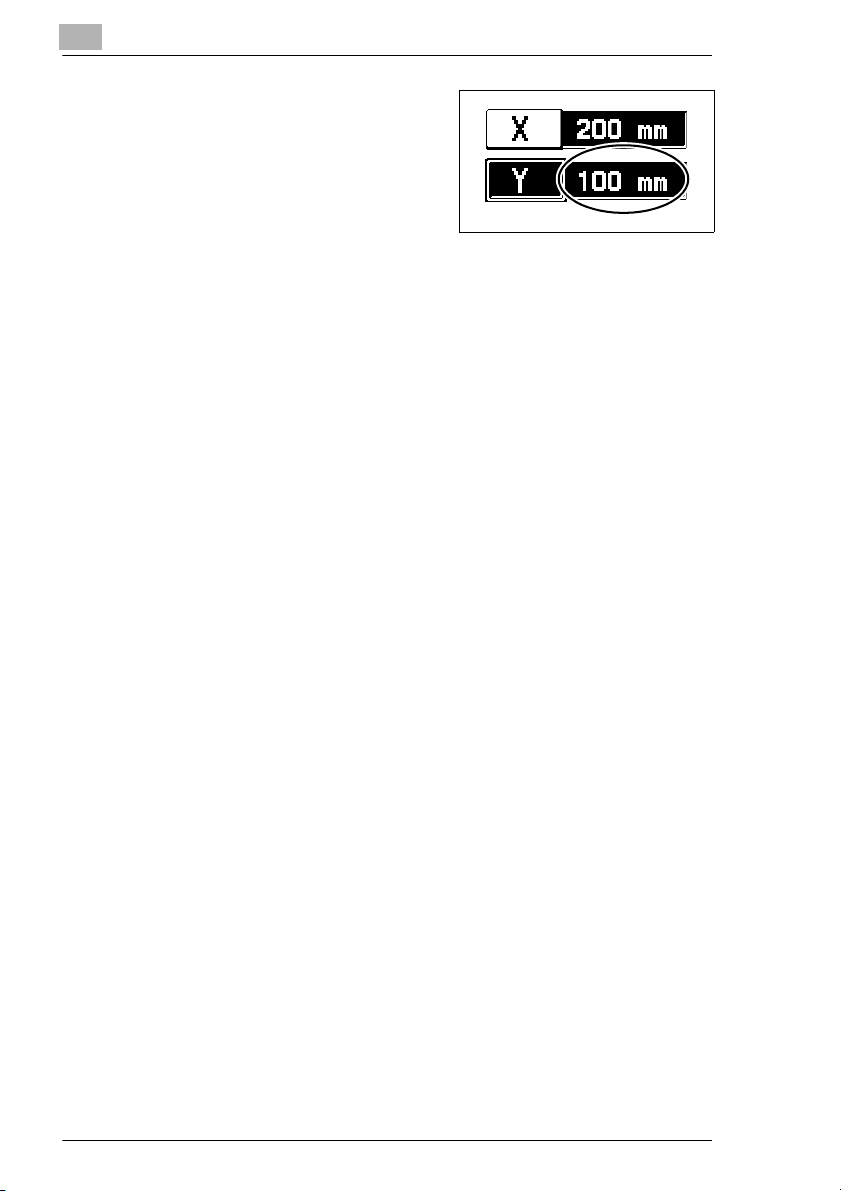
5 Touch [Y], and then use the keypad
to type in the length of side Y for the
paper that is loaded (between 90
and 311 mm). (As an example, the
following screen shows a specified
setting of 100 mm.)
6 Touch [1] or [2].
The paper size specified in steps 4 and 5 appear on [1] or [2].
7 Touch [Enter].
A non-standard (custom) paper size is stored for the 1st drawer.
3-4 C350
Page 25
Paper Settings
To specify a paper size setting for the 1st drawer
The size of the paper loaded into the 1st drawer is automatically detected,
and the appropriate paper size setting is selected. However, it may be
necessary to set the paper size if the paper size is not automatically
detected for some reason.
1 Touch [Paper/Size] in the Basic screen.
2 Touch the key for the 1st drawer, and then touch [Change Size].
3
C350 3-5
Page 26
3
Paper Settings
3 Touch either [Metric] or [Inch], depending on the size of paper that is
loaded.
4 Select the setting for the size of paper that is loaded, and then touch
[Enter].
(As an example, the following screen shows the setting for “A4
Crosswise” selected.)
5 Touch [Enter].
The paper size setting for the 1st drawer is changed.
3-6 C350
Page 27

Paper Settings
To specify a non-standard (custom) paper size for the multiple bypass tray
If non-standard-sized paper is to be loaded into the multiple bypass tray,
specify the size of paper that is to be loaded.
1 Touch [Paper/Size] in the Basic screen.
2 Touch [Bypass].
3
3 Touch [Custom Size].
4 Using the keypad, type in the length of side X for the paper that is to
be loaded (between 140 and 457 mm). (As an example, the following
screen shows a specified setting of 140 mm.)
C350 3-7
Page 28

3
Paper Settings
5 Touch [Y], and then use the keypad
to type in the length of side Y for the
paper that is to be loaded (between
90 and 311 mm). (As an example,
the following screen shows a
specified setting of 300 mm.)
Additional Information
If custom paper sizes have been stored, instead of performing
steps 6 and 7, a stored paper size setting can be selected by
pressing [1] or [2].
For details on storing custom paper sizes, refer to “To store a nonstandard (custom) paper size for the multiple bypass tray” on
page 3-9.
6 Touch [Enter].
A non-standard (custom) paper size is set for the multiple bypass tray.
3-8 C350
Page 29
Paper Settings
To store a non-standard (custom) paper size for the multiple bypass tray
Two non-standard paper sizes can be stored.
1 Touch [Paper/Size] in the Basic screen.
2 Touch [Bypass].
3
3 Touch [Size Registration].
4 Using the keypad, type in the length of side X for the paper that is to
be loaded (between 140 and 457 mm). (As an example, the following
screen shows a specified setting of 200 mm.)
C350 3-9
Page 30

3
Paper Settings
5 Touch [Y], and then use the keypad
to type in the length of side Y for the
paper that is to be loaded (between
90 and 311 mm). (As an example,
the following screen shows a
specified setting of 100 mm.)
6 Touch [1] or [2].
The paper size specified in steps 4 and 5 appear on [1] or [2].
7 Touch [Enter].
A non-standard (custom) paper size is stored for the multiple bypass
tray.
3-10 C350
Page 31

Paper Settings
To specify a paper size setting for the multiple bypass tray
The size of the paper loaded into the multiple bypass tray is automatically
detected, and the appropriate paper size setting is selected. However, it
may be necessary to set the paper size if the paper size is not
automatically detected for some reason.
1 Touch [Paper/Size] in the Basic screen.
2 Touch [Bypass].
3
3 Touch either [Metric] or [Inch], depending on the size of paper that is
to be loaded.
C350 3-11
Page 32

3
Paper Settings
4 Select the setting for the size of paper that is to be loaded, and then
touch [Enter].
(As an example, the following screen shows the setting for “A4
Crosswise” selected.)
The paper size for the multiple bypass tray is set.
3-12 C350
Page 33

Paper Settings
To specify the paper type for the multiple bypass tray
Select the appropriate setting for the type of the paper loaded into the
multiple bypass tray.
1 Touch [Paper/Size] in the Basic screen.
2 Touch [Bypass].
3
3 Touch [Paper Type].
4 Touch the key for the type of paper loaded into the multiple bypass
tray, and then touch [Enter].
The paper type for the multiple bypass tray is set.
C350 3-13
Page 34

3
Paper Settings
3-14 C350
Page 35

Original Documents
4 Original Documents
This chapter provides information on loading original documents.
4.1 Loading the Document
Loading the Document Into the Reverse Automatic Document Feeder
The following procedure describes how a document is loaded into the
reverse automatic document feeder DF-601 (hereafter referred to as
“duplexing document feeder”).
1 Position the document with the side
to be copied facing up, and then
load it into the duplexing document
feeder.
4
H When loading documents of
mixed page sizes, align the top
edge and left side of the
documents, and then touch
[Mixed Original].
2 If necessary, select an Original
setting.
For details on the Original setting,
refer to
on page 6-20.
“Selecting Original Setting”
3 If necessary, select a Copy setting.
For details on the Copy setting, refer to “Selecting Copy Settings” on
page 6-23.
C350 4-1
Page 36

4
Original Documents
4 Press the [Start] key in the control panel.
The pages of the document are fed in, starting with the topmost page.
The scanned pages are fed out into the document output tray.
4-2 C350
Page 37

Original Documents
Placing the Document On the Original Glass
The following procedure describes how a document is placed on the
original glass.
1 Lift open original cover OC-501 (hereafter referred to as “original
cover”), or the duplexing document feeder if it is installed.
Reminder!
Lift open the original cover, or the duplexing document feeder if it
is installed, 15° or more, otherwise the correct document size will
not be detected.
2 Observe the following precautions when loading the document onto
the original glass.
4
When loaded lengthwise:When loaded crosswise:
document scale
H Position the document with the side to be copied facing down.
H Position the document on the original glass with the top edge of the
document (the top of the image) toward the rear of the copier
) or to the left side of the copier (for ).
(for
H Align the document with the document scales at the top and to the
left side of the original glass.
C350 4-3
Page 38

4
Original Documents
3 If necessary, select an Original setting.
For details on the Original setting, refer to “Selecting Original Setting”
on page 6-20.
Reminder!
With placing the document on the original glass, be sure to select
the “1” Original setting.
With placing the document on the original glass, touch [Original
Direction], and then refer to the screen shown below to select the
appropriate document orientation.
4 If necessary, select a Copy setting.
For details on the Copy setting, refer to “Selecting Copy Settings” on
page 6-23.
5 Press the [Start] key in the control panel.
Scanning of the document begins.
6 Lift open the original cover, or the duplexing document feeder if it is
installed, and then remove the document.
7 Close the original cover, or the duplexing document feeder if it is
installed.
4-4 C350
Page 39

Original Documents
Additional Information
When using a Copy setting where multiple document pages are to be
scanned, such as with “1-2in1” or “2-2in1”, the screen shown below
appears after each page is scanned. To continue scanning the
document pages, remove the page that was scanned, position the
next page of the document on the original glass, and then press the
[Start] key. After all document pages have been scanned, touch
[Finish], and then press the [Start] key to feed out the copies into the
copy output tray.
4
C350 4-5
Page 40

4
Original Documents
4-6 C350
Page 41

Useful Operations
5 Useful Operations
This chapter provides information on basic copy operations.
5.1 Basic Copying
To make copies
1 Load the document to be copied.
For details, refer to “Loading the
Document” on page 4-1.
5
2 Specify the necessary copy settings.
H To specify a Color setting, touch
[Color]. For details, refer to
“Selecting a Color Setting” on
page 6-1.
C350 5-1
Page 42

5
H To specify a Output setting,
touch [Output]. For details, refer
to “Selecting Output Settings”
on page 6-3.
H To specify a Zoom setting, touch
[Zoom]. For details, refer to
“Specifying a Zoom Setting” on
page 6-6.
H To specify the Paper setting,
touch [Paper/Size]. For details,
refer to
“Selecting a Paper
Setting” on page 6-18.
H To specify the Original and
Copy settings, touch [Orig >
Copy]. For details, refer to
“Selecting Original Setting” on
page 6-20 and “Selecting Copy
Settings” on page 6-23.
H To specify Photo/Density
settings, touch [Photo/Density].
For details, refer to “Selecting a
Photo/Density Setting” on
page 6-25.
Useful Operations
3 Using the keypad, specify the
desired number of copies.
5-2 C350
Page 43

Useful Operations
4 Press the [Start] key in the control
panel.
5
C350 5-3
Page 44

5
5.2 Stopping Copying
To stop a copy job
§ During a copy operation, press the
[Stop] key in the control panel.
The copy operation stops, and the
message “Job has been stopped.
To resume job press the Start key.”
appears.
Useful Operations
Additional Information
The stopped job can be deleted. For details, refer to “Overview of
Jobs” on page 8-1 and “To delete a job that is being printed” on
page 8-4.
To restart the copy job
§ While a copy job is stopped, press the [Start] key in the control panel.
All stopped copy operations continue.
5-4 C350
Page 45

Useful Operations
5.3 Queuing a Copy Job for the Multiple Bypass Tray
If the “Auto Paper Select” setting is specified and no tray or drawer is set
to the desired paper size or type, select the “Bypass Reservation” setting
to scan the document and begin printing when paper of the desired size
and type is loaded into the multiple bypass tray.
To queue a copy job for the multiple bypass tray
1 Load the document to be copied, and then press the [Start] key in the
control panel.
After scanning of the document begins, the message “Matching paper
size is not available Reselect paper size.” appears, and scanning
stops.
5
2 Touch [Bypass Reservation].
3 Touch [Paper Type].
C350 5-5
Page 46

5
Useful Operations
4 Select the desired paper type, and then touch [Enter].
5 Select the desired paper size, and then touch [Enter].
The message “Job has been stopped To resume job press the Start
key.” appears.
6 Press the [Start] key in the control panel.
Scanning of the document continues.
5-6 C350
Page 47

Useful Operations
7 After the message “Place paper in the Bypass Tray.” appears, replace
the paper loaded into the multiple bypass tray with paper of the size
and type specified in the screen.
The copies are printed.
8 After the copy job using the “Bypass Reservation” setting is finished,
reload the paper that was removed from the multiple bypass tray.
Additional Information
If scanning of the document is finished before paper is loaded into the
multiple bypass tray, appears in the Basic screen. However,
after the paper is loaded into the multiple bypass tray,
disappears and printing begins.
5
C350 5-7
Page 48

5
5.4 Interrupting a Copy Job
The current copy job can be temporarily paused so that a quick copy of a
different document can be made. For details on jobs, refer to
Jobs”.
Additional Information
In order to interrupt a copy job, the screen must be returned to the
standard-sized Basic screen.
1 While a job is being printed, press the [Enlarge Display] key in the
control panel.
The screen returns to the standard-
sized screen.
Useful Operations
“8 Managing
2 Press the [Interrupt] key in the
control panel.
The indicator on the [Interrupt] key
lights up, and the message “Now in
Interrupt mode.” appears.
3 Load the document to be copied,
and then specify the necessary
copy settings.
4 Press the [Start] key in the control
panel.
After the document is scanned, the
job currently being printed is
paused, and the job that printing
was interrupted for is printed.
5-8 C350
Page 49

Useful Operations
5 After the interrupting copy job is finished, remove the printed pages
from the copy output tray, and then press the [Interrupt] key in the
control panel.
The indicator on the [Interrupt] key goes off, and the message “Now in
Interrupt mode.” disappears.
The interrupted job continues printing.
Additional Information
If the [Interrupt] key is not pressed after the interrupting copy job is
finished, the indicator on the [Interrupt] key goes off and the
interrupted copy job automatically continues printing after the length of
time specified for the “Panel Reset Timer” function has passed (or
after 1 minute if the function is set to “No”).
If optional finisher FS-501 is installed, and the interrupted job is fed out
to the secondary paper output tray or job separator JS-601, the
interrupted job automatically continues printing after the interrupting
copy job is finished.
5
C350 5-9
Page 50

5
Useful Operations
5-10 C350
Page 51
Specifying Copy Settings
6 Specifying Copy Settings
This chapter describes the procedures for specifying the various copy
settings.
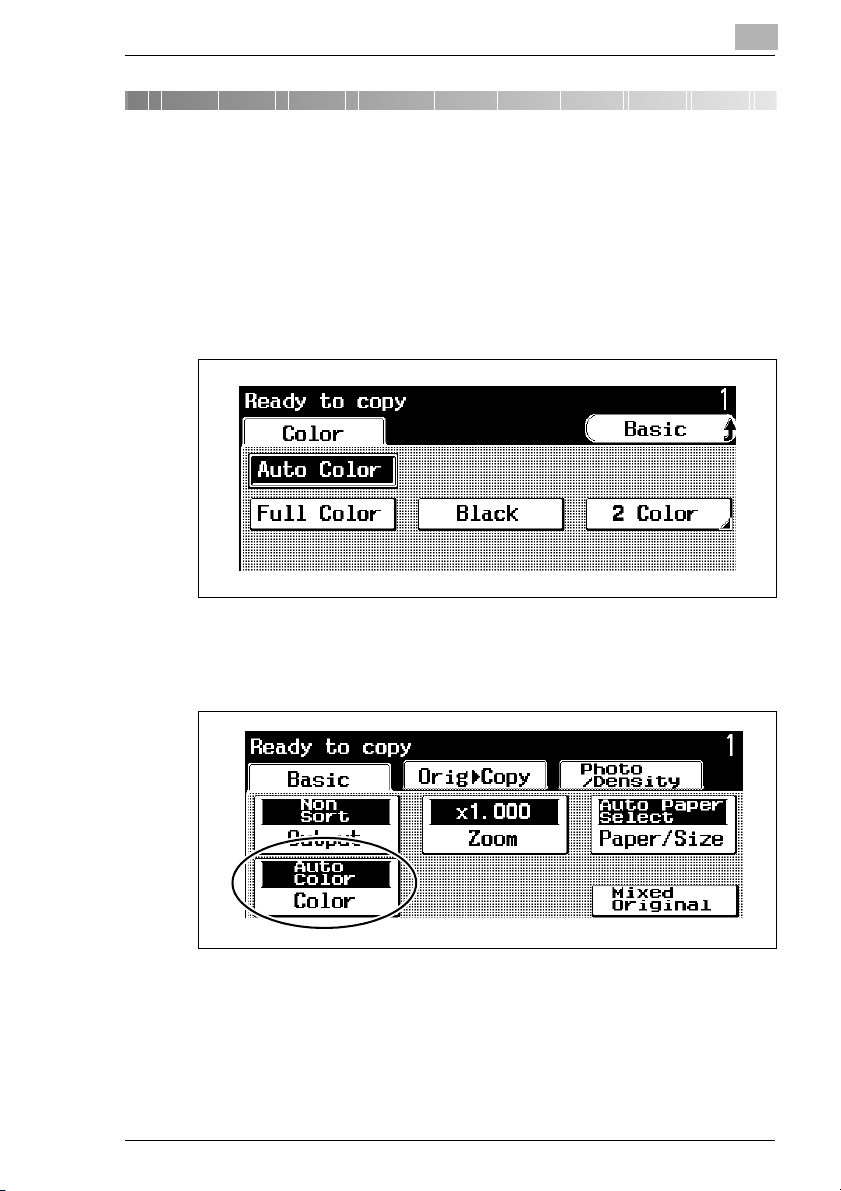
6.1 Selecting a Color Setting
Four Color settings are available for making copies: “Auto Color”, “Full
Color”, “Black” and “2 Color”.
6
To select the Color setting
1 Touch [Basic], then [Color].
2 Select the desired Color setting.
The selected Color setting is applied.
C350 6-1
Page 52

6
Specifying Copy Settings
Additional Information
To produce two-color copies, touch [2 Color], touch the key for the
color that will be used for reproducing the color areas, and then
touch [Enter].
6-2 C350
Page 53

Specifying Copy Settings
6.2 Selecting Output Settings
Various settings are available for sorting and finishing copies when they
are fed into the copy output tray.
The following three sorting and output methods are available.
G Non-sorting/Sorting (“Non-Sort”/“Sort” settings)
G Stapling (“Corner Staple”/“2 Staples” settings)
G Hole-punching
6
Additional Information
If Finisher (FS-601) is installed, the “Corner Staple”, “2 Staples” and
“Hole-Punch” settings are available.
If Finisher (FS-501) is installed, the “Corner Staple” setting is
available.
C350 6-3
Page 54

6
Specifying Copy Settings
To specify Output settings
1 Touch [Basic], then [Output].
2 Select the desired Output settings.
The selected Output setting is applied.
6-4 C350
Page 55

Specifying Copy Settings
Additional Information
To change the position of the punched holes or staples with the “2
Staples” setting, touch [Hole Punch] or [2 Staples] in step 2, touch
[Change Position] and select the desired position in the screen that
appeared, and then touch [Enter].
6
C350 6-5
Page 56

6
6.3 Specifying a Zoom Setting
The zoom ratio can be set in order to make a copy on paper with a size
different than the document or to enlarge or reduce the size of the
document.
There are eight ways to change the zoom ratio.
G Zooming
G Automatic scaling (“Auto Zoom” setting)
G Full size (“×1.0” setting)
G Minimizing (“Minimal” setting)
G Reducing (“Reduce” settings)
G Enlarging (“Enlarge” settings)
G Custom sizing (“ManualZoom” settings)
G Vertical and horizontal scaling (“X/Y Zoom” settings)
Specifying Copy Settings
6-6 C350
Page 57

Specifying Copy Settings
To specify a Zoom setting
1 Touch [Basic], then [Zoom].
2 Select the desired Zoom setting.
6
Additional Information
If [×1.0] was selected in step 2, copies of the same size as the
document will be printed.
If [Minimal] was selected in step 2, a slightly reduced copy of the
original will be printed. (The default zoom ratio is 0.930.) The zoom
ratio of the “Minimal” setting can be set to any ratio between 0.900 and
0.999. For details, refer to
page 6-13.
C350 6-7
“To store a manual zoom ratio” on
Page 58

6
To specify a zoom ratio
1 Touch [Basic], then [Zoom].
2 Touch the arrow keys to specify the
desired zoom ratio (between 0.250
and 4.000).
H The repeat feature for a key
starts when a key in the touch
panel is held down. For details,
“Setting the “Key Repeat
refer to
Start/Interval” Function” on
page 7-1.
Specifying Copy Settings
6-8 C350
Page 59

Specifying Copy Settings
To select the “Auto Zoom” setting
1 Touch [Basic], then [Zoom].
2 Touch [Auto Zoom].
3 Select the paper drawer loaded with paper of the desired copy size.
6
The “Auto Zoom” setting is applied.
Tip
When scanning of the document begins, the document size is
detected, and copies are printed at the appropriate zoom ratio for the
specified paper size.
C350 6-9
Page 60

6
Specifying Copy Settings
To specify a Reduce or Enlarge setting
1 Touch [Basic], then [Zoom].
2 Touch [Reduce] or [Enlarge].
3 Select the desired zoom ratio, and then touch [Enter]
(As an example, the following screen shows the setting [A3 > A4 B4 >
B5] selected on the Reduce screen.).
The specified reduction or enlargement zoom ratio is applied.
6-10 C350
Page 61

Specifying Copy Settings
To specify a manual zoom ratio
1 Touch [Basic], then [Zoom].
2 Touch [ManualZoom].
6
3 Press the [C] (clear) key, and then use the keypad to type in the
desired zoom ratio (between 0.250 and 4.000).
(As an example, the following screen shows a specified setting of
3.000.)
C350 6-11
Page 62

6
Specifying Copy Settings
4 Touch [Enter].
The specified zoom ratio is applied.
6-12 C350
Page 63

Specifying Copy Settings
To store a manual zoom ratio
1 Touch [Basic], then [Zoom].
2 Touch [ManualZoom], and then touch [Zoom Input].
6
3 Press the [C] (clear) key, and then use the keypad to type in the
desired zoom ratio (between 0.250 and 4.000).
(As an example, the following screen shows a specified of 2.500.)
H When storing a Minimal zoom ratio, specify a zoom ratio between
0.900 and 0.999.
C350 6-13
Page 64

6
Specifying Copy Settings
4 Touch [1], [2]or [3](Minimal), and then touch [Enter] in this screen and
the next screen that appears.
The specified zoom ratio is stored.
6-14 C350
Page 65

Specifying Copy Settings
To recall a stored manual zoom ratio
1 Touch [Basic], then [Zoom].
2 Touch [ManualZoom].
3 Touch [1], [2] or [Minimal].
(As an example, the following screen shows stored settings of 0.250
and 0.333.)
6
4 Touch [Enter].
The stored zoom ratio is recalled.
C350 6-15
Page 66

6
Specifying Copy Settings
To specify different vertical and horizontal scaling proportions (X/Y Zoom settings)
1 Touch [Basic], then [Zoom].
2 Touch [Manual Zoom].
3 Touch [X/Y Zoom].
6-16 C350
Page 67

Specifying Copy Settings
4 Using the keypad, type in the desired length of side X (between 0.250
and 4.000).
5 Touch [Y], and then use the keypad
to type in the desired length of side
Y (between 0.250 and 4.000).
6 Touch [Enter].
The specified zoom ratio is applied.
6
C350 6-17
Page 68

6
6.4 Selecting a Paper Setting
The paper drawer specified with paper of the desired size can be selected.
To select the Paper setting
1 Touch [Basic], then [Paper/Size].
Specifying Copy Settings
6-18 C350
Page 69

Specifying Copy Settings
2 Select the paper drawer specified with paper of the desired size.
The selected Paper setting is applied.
Additional Information
If [Auto Paper Select] is selected, the paper drawer specified with
paper of the appropriate size is automatically selected according to the
size of the scanned document.
To use paper loaded into the multiple bypass tray, touch [Bypass].
For details on changing the size settings, specifying custom paper
sizes, and storing a custom paper size, refer to “3 Paper Settings”.
6
C350 6-19
Page 70

6
6.5 Selecting Original Setting
A setting corresponding to the type of original being copied can be
selected.
The following three Original settings can be specified.
G Single-sided/Double-sided (“1”/“2” settings)
G Document orientation (Original Direction setting)
G Document binding margin position (Margin setting)
To select an Original setting
Specifying Copy Settings
1 Touch [Orig > Copy], and then touch [Original].
6-20 C350
Page 71

Specifying Copy Settings
2 Touch [1] or [2], depending on the loaded document, and then touch
[Original Direction].
3 Touch the key for the appropriate document orientation, and then
touch [Enter].
6
H If the orientation of the document is different from that of the
selected Original Direction setting, 2in1 copies will not be printed
correctly.
4 Touch [Margin].
C350 6-21
Page 72

6
Specifying Copy Settings
5 Touch the key for the appropriate document margin, and then touch
[Enter].
The selected Original settings are applied.
6-22 C350
Page 73

Specifying Copy Settings
6.6 Selecting Copy Settings
The desired type of copy can be specified.
The following two Copy settings can be specified.
G Single-side/Double-sided/Single-sided 2in1/Double-sided 2in1 (“1”/
“2”/“1-2in1”/“2-2in1” settings)
G Binding margin position (Binding Direction setting)
Additional Information
If optional automatic duplex unit AD-501 is installed, “2” and “2-2in1”
can be specified.
6
To select a Copy setting
1 Touch [Orig > Copy], and then touch [Copy].
C350 6-23
Page 74

6
Specifying Copy Settings
2 Select the desired Copy setting.
3 Touch [Enter].
The selected Copy setting is applied.
Additional Information
To specify the position of the binding margin, touch [Binding Direction]
in step 2, and then select the desired setting.
6-24 C350
Page 75

Specifying Copy Settings
6.7 Selecting a Photo/Density Setting
The image quality of the original can be specified.
The following five Photo/Density settings are available. In addition, the
following Original Image Type settings are available: “Text & Photo”,
“Printed Image”, “Map”, “Photo Paper”, “Text”, and “Copied Paper”.
G Document type (Original Image Type setting)
G Background density (Background setting)
G Original density (Density setting)
G Text density (Text Enhancement setting)
G Glossy finish (“Glossy Mode” setting)
6
To select an Original Image Type setting
1 Touch [Photo/Density], then [Original Image Type].
C350 6-25
Page 76

6
Specifying Copy Settings
2 Touch [Original Image Type].
3 Select the Original Image Type setting appropriate for the document
to be copied.
4 Touch [Enter].
The selected Original Image Type setting is applied.
Additional Information
If [Text & Photo], [Printed Image], [Photo Paper], or [Copied Paper]
was selected in step 3, the Screen Pattern settings are available. To
select a Screen Pattern setting, touch [Screen Pattern], touch either
[Gradation] or [Resolution], and then touch [Enter].
6-26 C350
Page 77

Specifying Copy Settings
Additional Information
If [Text] was selected in step 3, the [Dot Matrix Original] is available.
6
C350 6-27
Page 78

6
Specifying Copy Settings
To select the Background, Density, Text Enhancement and “Glossy Mode” settings
1 Touch [Photo/Density], and then select the desired setting.
2 Select the desired settings.
6-28 C350
Page 79

Specifying Copy Settings
Example: After touching [Background]
§ Touch [Lighter] or [Darker] to select the desired background density
level, and then touch [Enter].
To automatically set the density of the background, touch [Auto].
Example: After touching [Density]
§ Touch [Lighter] or [Darker] to select the desired copy density level, and
then touch [Enter].
6
C350 6-29
Page 80

6
Specifying Copy Settings
Example: After touching [Text Enhancement]
§ Touch the arrow keys to select the desired text density level, and then
touch [Enter].
Example: To copy a document with a glossy finish
§ Touch [Glossy].
6-30 C350
Page 81

Specifying Copy Settings
6.8 Checking the Settings
Press the [Mode Check] key in the control panel to display the screens
that show the current copy settings. From these screens, the copy settings
can also be changed.
To check the settings
1 Press the [Mode Check] key in the
control panel.
The first screen showing the current
settings appears.
6
2 Touch [Next].
The second screen showing the current settings appears.
C350 6-31
Page 82

6
Specifying Copy Settings
3 Touch [Next].
The third screen showing the current settings appears.
4 Touch [Next].
The fourth screen showing the current settings appears.
5 Touch [Next].
The fifth screen showing the current settings appears.
6-32 C350
Page 83

Specifying Copy Settings
Additional Information
If the [Text] was selected on the Original Image Type screen, the
screen shown below appears in step 5.
To change the settings
1 Press the [Mode Check] key in the
control panel.
2 Touch [Next] or [Previous] until the
screen containing the setting that
you wish to change appears.
6
3 Touch the key for the setting that
you wish to change.
The corresponding screen appears.
4 Follow the appropriate procedure to change the setting.
C350 6-33
Page 84

6
Specifying Copy Settings
6-34 C350
Page 85

Accessibility Mode Operations
7 Accessibility Mode Operations
This chapter provides information on the Accessibility mode functions.
7.1 Setting the “Key Repeat Start/Interval” Function
If the arrow keys are kept pressed when specifying a zoom ratio, the zoom
ratio continues to increase or decrease.
Example: To increase the setting
Hold pressed Hold pressed Hold pressed
Key repeat start time and key repeat interval
The length of time for the value to begin changing after is first
touched (<a> in the above illustration) is called the key repeat start time.
The length of time for the value to change to the next value when is
held down (<b> in the above illustration) is called the key repeat interval.
7
C350 7-1
Page 86

7
Accessibility Mode Operations
To specify the key repeat start time and key repeat interval
The settings for the key repeat start time and key repeat interval can be
changed. (The default setting for the start time is 0.8 second, and the
default setting for the repeat interval is 0.3 second.)
1 Press the [Accessibility] key in the control panel.
2 Touch [Key Repeat Start/Interval].
3 Touch the arrow keys to specify the desired Time to Start setting (key
repeat start time) and Interval setting (repeat interval), and then touch
[Enter].
The key repeat start time and key repeat interval are specified.
4 Touch [Enter].
The Basic screen appears again.
7-2 C350
Page 87

Accessibility Mode Operations
7.2 Setting the “Enlarge-Display Notice” Function
When the panel reset timer operation is performed, a message requesting
confirmation to cancel the Enlarge Display mode can be displayed. (The
default setting is “No”.)
To specify whether the confirmation message for canceling the Enlarge Display mode appears
1 Press the [Accessibility] key in the control panel.
2 Touch [Enlarged Display Clear Check].
7
3 Select whether the confirmation message for canceling the Enlarge
Display mode appears and specify how long the message is
displayed, and then touch [Enter].
The cancellation confirmation for the Enlarge Display mode is
specified.
C350 7-3
Page 88

7
Accessibility Mode Operations
4 Touch [Enter].
The Basic screen appears again.
7-4 C350
Page 89

Accessibility Mode Operations
Operations for the confirmation message for canceling the Enlarge Display mode
To continue specifying settings using the Enlarge Display mode, touch
[Yes].
To clear the settings and return the Basic screen to its standard size,
touch [No].
If neither key is touched for the specified length of time, all settings are
automatically cleared and the Basic screen is returned to its standard
size.
7
Additional Information
The confirmation message for canceling the Enlarge Display mode
does not appear before the machine enters Power Save mode or
Sleep mode. Since the Basic screen is displayed in its standard size
after recovering from Power Save mode or Sleep mode, press the
[Enlarge Display] key in the control panel again to continue using
Enlarge Display mode.
C350 7-5
Page 90

7
Accessibility Mode Operations
Outline of the Confirmation to Cancel the Enlarge Display Mode
The following diagram shows when the message requesting confirmation
to cancel the Enlarge Display mode appears if the “Panel Reset Timer”
function is set to “1 min.” and the “Enlarge-Display Notice” function is set
to “30Sec”.
Last operation
performed
The message
requesting
confirmation to
cancel the
Enlarge Display
mode appears.
The panel reset
timer operation
is not
After 1 minute has
passed
Yes
performed, and
the Enlarge
Display mode
continues to be
used.
The panel reset
timer operation
is performed,
and the Basic
screen returns
to its standard
size.
Neither key is touched
for 30 seconds.
No
7-6 C350
Page 91

Managing Jobs
8 Managing Jobs
This chapter provides information on managing jobs.
8.1 Overview of Jobs
Jobs
If a document is loaded and the [Start] key is pressed, the document is
scanned (when used as a printer, the print data is sent by the software to
this machine) and the copy (print) operation is queued in this machine.
This queued operation is called a job. After a job is queued in this
machine, it is carried out. In addition to the jobs that are being carried out,
up to 50 jobs can be queued, and the jobs are generally carried out in the
order in which they are queued.
8
C350 8-1
Page 92

8
8.2 Displaying the Job List Screen
1 Load the document to be copied, and then press the [Start] key in the
control panel.
When a job has been queued, appears in the Basic screen.
2 Touch .
Managing Jobs
The Job List screen appears.
3 Touch [Basic].
The Basic screen appears again.
8-2 C350
Page 93

Managing Jobs
8.3 Deleting a Job
To delete a queued job
Jobs listed as “Waiting Print” can be deleted.
1 While a job is being printed, touch in the Basic screen.
The Job List screen appears.
2 Select the job that you wish to delete, and then touch [Delete].
8
The queued job is deleted.
C350 8-3
Page 94

8
Managing Jobs
To delete a job that is being printed
1 While the job is being printed, press the [Stop] key in the control panel.
The message “Job has been stopped. To resume job press the Start
key.” appears.
2 Touch [Deleted Jobs].
A list of queued jobs is displayed.
8-4 C350
Page 95

Managing Jobs
3 Select the job that you wish to delete, and then touch [Delete].
The message “Job has been done improperly. Check the record.”
appears.
4 Touch [Enter], and then press the [Start] key in the control panel.
8
Printing of the other jobs continues.
C350 8-5
Page 96

8
8.4 Job List Screens
If in the Basic screen is touched while a job is being printed, the list
of queued jobs and their details can be viewed.
Active Jobs screen
Touch to display a list of active jobs being printed or queued to be
printed.
Active Scans screen
Touch [Active Scans] in the Job List screen to display a list of jobs being
scanned or queued to be scanned in Scan mode.
Managing Jobs
8-6 C350
Page 97

Managing Jobs
Stocked List screen
Touch [Stocked List] in the Job List screen to display a list of jobs stored
in the memory.
Additional Information
Stored jobs cannot be deleted (printed) from the Stocked List screen
in Enlarge Display mode. To delete a stored job, cancel Enlarge
Display mode, and then perform the operation from the Job Control
screen.
8
C350 8-7
Page 98

8
Managing Jobs
Locked List screen
Touch [Locked List] in the Job List screen to display a list of jobs that are
locked and cannot be printed.
Additional Information
Locked jobs cannot be deleted (printed) from the Locked List screen
in Enlarge Display mode. To unlock a job, cancel Enlarge Display
mode, and then perform the operation from the Job Control screen.
8-8 C350
Page 99

Managing Jobs
Print Log screen
Touch [Print Log] in the Job List screen to display a list of jobs that have
been printed and those that have been deleted.
§ To view a list of completed print jobs, touch [Finished Jobs].
§ To view a list of print jobs that have been deleted after being queued,
touch [Deleted Jobs].
Scan Log screen
Touch [Scan Log] in the Job List screen to display a list of jobs that have
been scanned in Scan mode.
8
§ To view a list of completed scan jobs, touch [Finished Jobs].
§ To view a list of scan jobs that have been deleted after being queued,
touch [Deleted Jobs].
C350 8-9
Page 100

8
Managing Jobs
8-10 C350
 Loading...