

Page 1
Digital Still Camera
User's Guide
Thank you for your purchase.
To ensure correct usage of this
product, please read this User's
Guide and the warranty card
carefully and keep them in a safe
place for future reference.
Before accepting the warranty card,
please make sure that the date of
purchase and the dealer's details
have been completed.
Page 2

Contents
Important Safety Precautions . . . . . . . . . . . . . . . . . . . . . . . . . . . . . . . . . . . . . . . . . . . . . . . . . . . . . . . 4
Preparations . . . . . . . . . . . . . . . . . . . . . . . . . . . . . . . . . . . . . . . . . . . . . . . . 6
Checking Package Contents . . . . . . . . . . . . . . . . . . . . . . . . . . . . . . . . . . . . . . . . . . . . . . . . . . . . . . . 6
Names of Parts . . . . . . . . . . . . . . . . . . . . . . . . . . . . . . . . . . . . . . . . . . . . . . . . . . . . . . . . . . . . . . . . . . 6
Installing the Batteries . . . . . . . . . . . . . . . . . . . . . . . . . . . . . . . . . . . . . . . . . . . . . . . . . . . . . . . . . . . . 8
Attaching the Strap . . . . . . . . . . . . . . . . . . . . . . . . . . . . . . . . . . . . . . . . . . . . . . . . . . . . . . . . . . . . . . . 9
Turning the Power ON and OFF. . . . . . . . . . . . . . . . . . . . . . . . . . . . . . . . . . . . . . . . . . . . . . . . . . . . . 9
Setting the Display Language, Date and Time . . . . . . . . . . . . . . . . . . . . . . . . . . . . . . . . . . . . . . . . . . 9
Recording . . . . . . . . . . . . . . . . . . . . . . . . . . . . . . . . . . . . . . . . . . . . . . . . . 10
How to Record . . . . . . . . . . . . . . . . . . . . . . . . . . . . . . . . . . . . . . . . . . . . . . . . . . . . . . . . . . . . . . . . . 10
Recording Close-up Subjects (Macro Recording) . . . . . . . . . . . . . . . . . . . . . . . . . . . . . . . . . . . . . . 11
Using the REC Menu . . . . . . . . . . . . . . . . . . . . . . . . . . . . . . . . . . . . . . . . . . . . . . . . . . . . . . . . . . . . 11
Recording Still Pictures (STILL) . . . . . . . . . . . . . . . . . . . . . . . . . . . . . . . . . . . . . . . . . . . . . . . . . . . . 12
Using the Self-timer . . . . . . . . . . . . . . . . . . . . . . . . . . . . . . . . . . . . . . . . . . . . . . . . . . . . . . . . . . . . . 12
Recording Moving Pictures (MOVIE) . . . . . . . . . . . . . . . . . . . . . . . . . . . . . . . . . . . . . . . . . . . . . . . . 13
Using the Flash. . . . . . . . . . . . . . . . . . . . . . . . . . . . . . . . . . . . . . . . . . . . . . . . . . . . . . . . . . . . . . . . . 13
Setting the Picture Quality . . . . . . . . . . . . . . . . . . . . . . . . . . . . . . . . . . . . . . . . . . . . . . . . . . . . . . . . 14
Recording Magnified Images (DIGITAL ZOOM). . . . . . . . . . . . . . . . . . . . . . . . . . . . . . . . . . . . . . . . 14
Changing the Brightness of Images (EXPOSURE) . . . . . . . . . . . . . . . . . . . . . . . . . . . . . . . . . . . . . 15
Checking the Recorded Image (QUICK VIEW) . . . . . . . . . . . . . . . . . . . . . . . . . . . . . . . . . . . . . . . . 15
Setting the Sharpness of the Image (SHARPNESS) . . . . . . . . . . . . . . . . . . . . . . . . . . . . . . . . . . . . 16
Setting the USB Mode . . . . . . . . . . . . . . . . . . . . . . . . . . . . . . . . . . . . . . . . . . . . . . . . . . . . . . . . . . . 16
Adjusting the Date and Time (DATE SET) . . . . . . . . . . . . . . . . . . . . . . . . . . . . . . . . . . . . . . . . . . . . 16
Changing the Brightness of the LCD Monitor (MONITOR). . . . . . . . . . . . . . . . . . . . . . . . . . . . . . . . 17
Muting the Alarm Sounds, etc. (BEEP). . . . . . . . . . . . . . . . . . . . . . . . . . . . . . . . . . . . . . . . . . . . . . . 17
Changing the Display Language (LANGUAGE) . . . . . . . . . . . . . . . . . . . . . . . . . . . . . . . . . . . . . . . . 18
Playback . . . . . . . . . . . . . . . . . . . . . . . . . . . . . . . . . . . . . . . . . . . . . . . . . . 19
How to Perform Play back . . . . . . . . . . . . . . . . . . . . . . . . . . . . . . . . . . . . . . . . . . . . . . . . . . . . . . . . 19
Using the PLAY Menu . . . . . . . . . . . . . . . . . . . . . . . . . . . . . . . . . . . . . . . . . . . . . . . . . . . . . . . . . . . 19
Deleting Images . . . . . . . . . . . . . . . . . . . . . . . . . . . . . . . . . . . . . . . . . . . . . . . . . . . . . . . . . . . . . . . . 20
Viewing 9 Frames of Images Simultaneously (INDEX) . . . . . . . . . . . . . . . . . . . . . . . . . . . . . . . . . . 21
Viewing a Slideshow of Images (SLIDE SHOW) . . . . . . . . . . . . . . . . . . . . . . . . . . . . . . . . . . . . . . . 22
Viewing a Magnified Image (DIGITAL ZOOM) . . . . . . . . . . . . . . . . . . . . . . . . . . . . . . . . . . . . . . . . . 22
Selecting Images to Print (DPOF) . . . . . . . . . . . . . . . . . . . . . . . . . . . . . . . . . . . . . . . . . . . . . . . . . . 23
Transferring Images to a PC . . . . . . . . . . . . . . . . . . . . . . . . . . . . . . . . . . 25
Operating Environments. . . . . . . . . . . . . . . . . . . . . . . . . . . . . . . . . . . . . . . . . . . . . . . . . . . . . . . . . . 25
Setting the USB Mode . . . . . . . . . . . . . . . . . . . . . . . . . . . . . . . . . . . . . . . . . . . . . . . . . . . . . . . . . . . 25
Installing the USB Driver. . . . . . . . . . . . . . . . . . . . . . . . . . . . . . . . . . . . . . . . . . . . . . . . . . . . . . . . . . 26
Connecting the camera to your PC. . . . . . . . . . . . . . . . . . . . . . . . . . . . . . . . . . . . . . . . . . . . . . . . . . 27
Transferring Recorded Images. . . . . . . . . . . . . . . . . . . . . . . . . . . . . . . . . . . . . . . . . . . . . . . . . . . . . 28
Transferring the Through-Image Live to Your PC. . . . . . . . . . . . . . . . . . . . . . . . . . . . . . . . . . . . . . . 29
Appendix . . . . . . . . . . . . . . . . . . . . . . . . . . . . . . . . . . . . . . . . . . . . . . . . . . 30
Troubleshooting . . . . . . . . . . . . . . . . . . . . . . . . . . . . . . . . . . . . . . . . . . . . . . . . . . . . . . . . . . . . . . . . 30
Main Specifications. . . . . . . . . . . . . . . . . . . . . . . . . . . . . . . . . . . . . . . . . . . . . . . . . . . . . . . . . . . . . . 31
Warranty and After-sales Service . . . . . . . . . . . . . . . . . . . . . . . . . . . . . . . . . . . . . . . . . . . . . . . . . . . 32
2
Page 3

On trademarks
Q Windows 98, Windows 98SE, Windows 2000 Professional, Windows Me and Windows XP are trademarks or
registered trademarks of Microsoft Corporation in the U.S. and other countries.
Q Apple, Macintosh, Mac OS, and Power PC are trademarks or registered trademarks of Apple Computer in the
U.S. and other countries.
Q Other company names and product names are trademarks or registered trademarks of their respective own-
ers.
On voluntary control concerning radio wave interference
This equipment is a class B information technology device based on the standards of VCCI (Voluntary Control
Council for Interference by Information Technology Equipment). This equipment is designed to be used in domestic environments. However, use of this device near radios and television tuners may cause reception interference.
Please use this product correctly in accordance with the contents of this User's Guide.
3
Page 4

Important Safety Precautions
This product has been designed with full consideration to safety; however, please read the following explanations of the used symbols, warnings and cautions to ensure correct usage.
The aim of the following warning and caution symbols is to prevent failures, property damage and/or injury to the user and other persons.
* Be sure to adhere to these precautions
Warning This symbol indicates that improper use may result in serious injury
and even death.
• Do not dismantle, modify or repair the product yourself.
• Do not dismantle, short-circuit, or apply heat to the battery, or throw it into a fire.
• Do not let water splash on the camera or let it become wet.
• Do not drop or insert metal objects or combustible items inside the camera.
• Do not use the camera while driving.
• Do not use the camera in unstable conditions.
• Do not look directly at the sun through the viewfinder.
• Do not touch the metal parts on the camera during thunder and lighting.
Caution This symbol indicates that improper use may result in bodily injury or
damage to property.
• Do not leave the camera where:
• Ensure that the +/- poles are positioned correctly when inserting batteries.
• Only used specified batteries.
• Do not pinch your fingers in the battery cover.
• Remove the batteries when the camera is not going to be used for an extended period.
• Do not point the lens directly at the sun or other strong light sources.
• For use inside aircraft, follow the instructions of the airline that you are traveling with.
• Do not fire the flash near eyes.
It is exposed to direct sunlight or the temperature may become extremely high, such as inside
a car.
It is within the reach of infants.
There is high humidity, dust or vibration.
Battery fluid leakage
• Should battery fluid ever come into contact with hands or clothing, immediately wash with water.
• Should battery fluid enter the eye, immediately flush the eye with water and seek medical attention.
LCD monitor
• The LCD monitor has been developed using high-precision technology and features superior
sharpness and picture quality. Due to the characteristics of liquid crystals, however, there may be unlit
or constantly lit pixels on the monitor. This is not a malfunction.
• If the LCD monitor becomes damaged for some reason, take care to prevent personal injury from
broken glass, etc. Furthermore, take care that liquid crystals do not touch the skin or enter the eyes or
mouth.
4
Page 5

Internal memory
This product features an internal memory with a capacity of approximately 14 MB. Please note the following points regarding the internal memory.
• This product cannot be used with external memory.
• Further recording is not possible when the internal memory is full. Format the memory (delete all) after
downloading the images to your PC or make space by deleting unwanted images.
• Back up important data.
• Do not use a PC to change the property (read-only) of the files (image data) stored in the internal
memory. This may cause improper operation when deletion or other operations are executed on the
camera.
• Do not use a PC to change the file name of image data or directory names stored in the internal
memory, and do not write files other than the image data produced by the camera to the internal
memory. Not only will the camera not be able to play back modified or new images written to the
memory, but it may also cause camera malfunctions. Altered data may also be deleted by the camera.
• The memory must be formatted by the camera. Formatting on a PC may make normal use impossible.
• Incorrect operations or malfunctions may result in the loss of recorded contents. Konica accepts no
liabilities for lost data.
Before use
• Always perform some test shots before taking important pictures such as at weddings, etc. to make
sure that the camera is working properly.
• Konica accepts no liabilities for the loss of contents if the ability to perform recording fails due to
problems with the camera.
• Images that you record are for personal enjoyment only. Copyright laws prohibit the use of copyrighted
pictures without the permission of the rightful owner. Furthermore, there may be places where
recording is restricted even for the purpose of personal enjoyment.
5
Page 6
Preparations
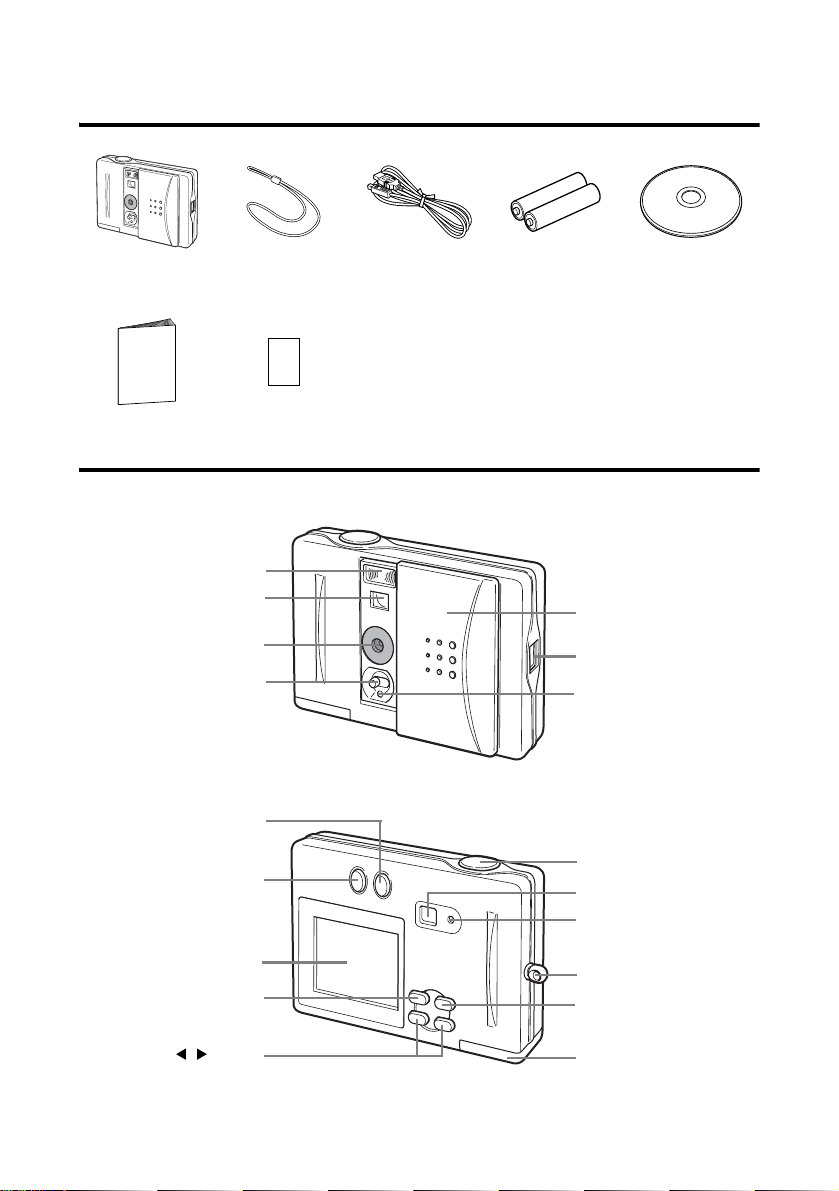
Checking Package Contents
Camera (1) Strap (1) USB cable (1)
Quick Guide (1) Warranty Card (1)
Names of Parts
Flash
Viewfinder window
Lens
Macro switch
DISPLAY button
AAA alkaline
battery (2)
Lens cover
USB port
Self-timer LED
CD-ROM (1)
PLAY/REC button
LCD monitor
MENU button
/ buttons
Shutter button
Viewfinder eyepiece
Viewfinder LED
Strap holder
SET button
Battery cover
6
Page 7
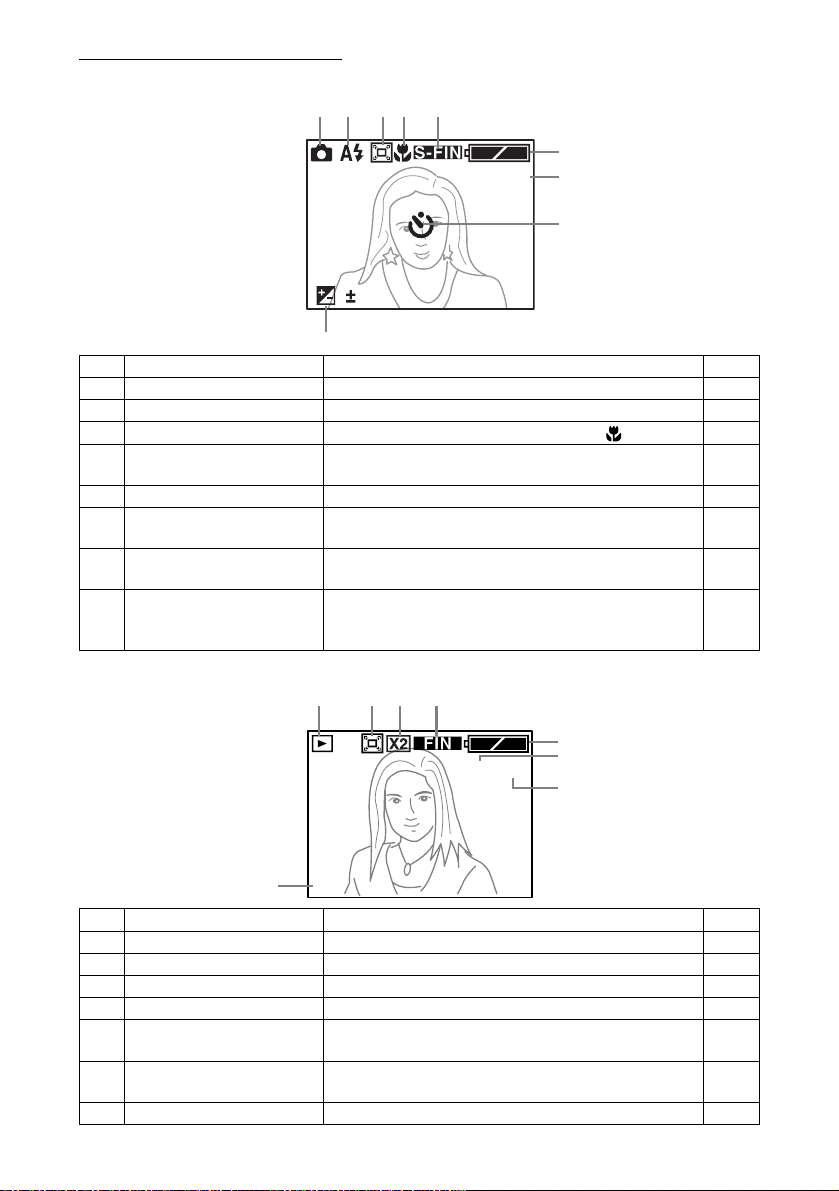
Indicators on the LCD monitor
Recording mode screen
1
2345
1.5
9
1
Recording mode icon Appears when the lens cover is opened.
2
Flash mode icon Indicates the flash mode.
3
Digital zoom icon Appears when zoom is set to “ON.”
4
Macro icon Appears when the Macro switch is set to .
5
Picture quality icon
6
Battery level icon Indicates the remaining battery level.
Remaining number of
7
frames
8
Self-timer icon
Exposure compensation
9
icon and compensation
value
Playback mode screen
Indicates the picture quality set for the image to be
recorded.
Indicates the remaining number of frames that can be
recorded.
Appears when “SELF TIMER” is selected as the
recording mode.
Indicates the set exposure compensation.
1
2 43
6
9
7
8
P.10
P.13
P.14
P.11
P.14
P.8
—
P.12
P.15
5
026/026
6
7
03/02/16 10:50
8
1
Playback mode icon Appears when the playback mode is selected.
2
Digital zoom icon Appears when the playback zoom is set to “ON.”
3
Zoom magnification icon Indicates the digital zoom magnification.
4
Picture quality icon Indicates the picture quality of the recorded image.
5
Battery level icon Indicates the remaining battery level.
6
Current frame number
7
Total number of frames
8
Date and time Indicates the date and time of the recording.
Indicates the frame number of the image being played
back.
Indicates the total number of frames in the internal
memory.
P.19
P.22
P.22
—
P.8
—
—
—
7
Page 8
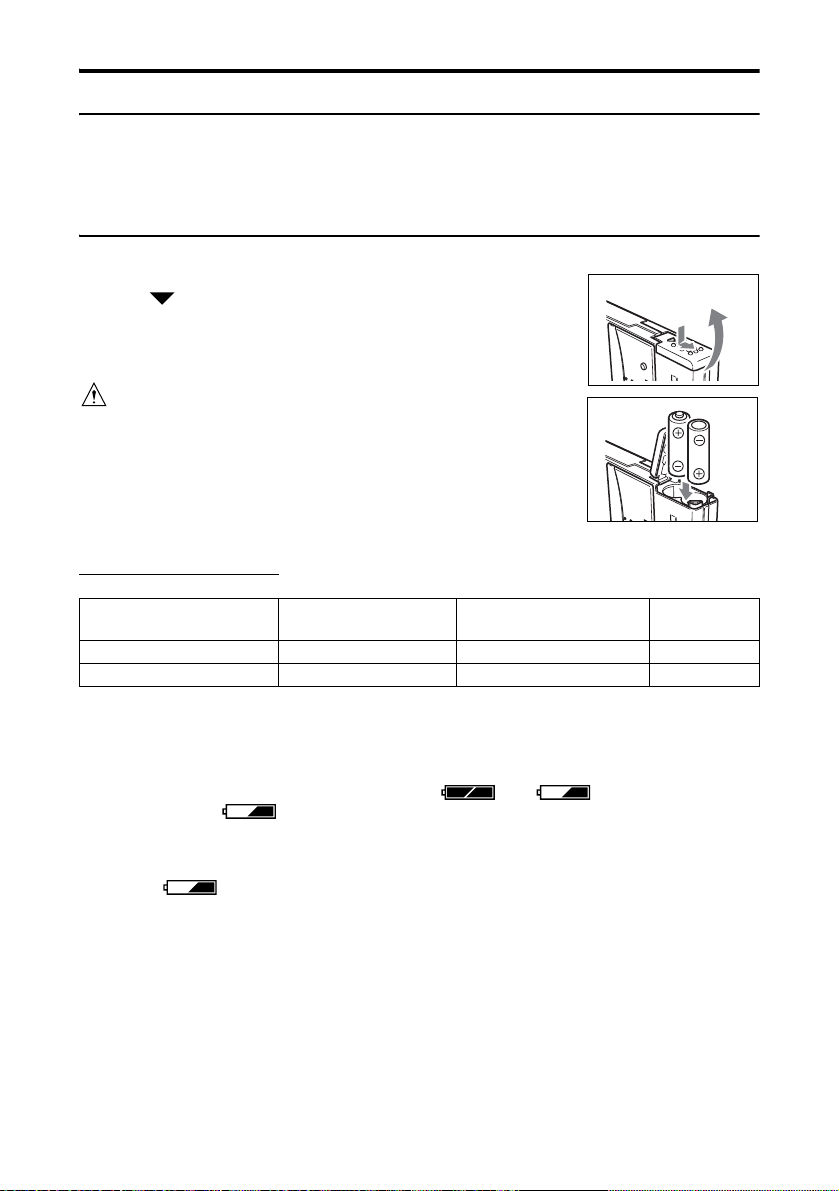
Installing the Batteries
Power supply
1. Batteries
AAA alkaline batteries (2 pieces/supplied)
Rechargeable AAA nickel-hydrogen batteries (2 pieces/sold separately)
* Manganese or lithium batteries cannot be used.
Inserting the AAA batteries
Close the lens cover.
1 Open the battery cover by sliding it in the direction of
the arrow.
2 Insert the 2 AAA batteries with the poles aligned with
the indications (+/-) inside the battery compartment.
1
Caution
Inserting batteries with the poles oriented incorrectly can cause battery
fluid leakage and generation of heat that can result in personal injury as
well as soiling, and/or damage to the camera.
2
3 After checking that the batteries have been installed
correctly, close the battery cover. Check to make
sure that the cover is completely closed.
Battery life (reference)
Recording
(LCD monitor on)
AAA alkaline batteries
AAA nickel-hydrogen batteries
* Under Konica test conditions (room temperature, normal humidity; picture quality: Super Fine mode;
flash: one full flash in two image recordings; recording operation: continuous recording at 20 sec.
intervals; zoom operation: none)
Note:
• Data may be corrupted if the battery cover is opened during operation without the lens cover being closed.
• Remaining battery level is indicated in two steps by and . It is time to replace the
batteries when the indicator appears. When replacing the AAA batteries, replace both at the
same time.
• AAA nickel-hydrogen batteries can also be used but the remaining battery level may not always be
indicated correctly when these batteries are used. Sometimes it is possible to continue recording even
when the indicator is shown.
• Do not mix old and new batteries.
• Battery life varies according to the brand and grade.
• Do not mix batteries of different capacities, types, or brands.
• The values mentioned in “Battery life (reference)” are reference values and are not guaranteed. Especially
for alkaline batteries, depending on the brand, or even for batteries of the same brand, the service life may
become extremely short as you approach the “use before date”, and the environment of use may cause
differences in inner electrical resistance and capacity that will also shorten service life. Operation at low
temperatures should be avoided as much as possible, and the use of fresh batteries is recommended.
• Battery life may decrease due to bad contact if the +/- poles of the batteries are contaminated by oil
or grease from fingerprints. Always wipe batteries with a soft, dry cloth before use.
100 150 45
180 300 60
Recording
(LCD monitor off)
Continuous
playback
8
Page 9
• If the camera is left switched on for a set time without any buttons or switches operated, the auto
power-off function will be activated and the camera will turn off automatically. The set time until the
camera turns off is 3 minutes. This time cannot be changed.
• Do not touch contacts with fingers since the battery life may decrease due to bad contact if oil or
grease is deposited on the battery cover or metal parts within the battery compartment. If a contact is
accidentally touched or battery life decreases, wipe with a soft, dry cloth before use.
• When using rechargeable batteries, read the instructions provided with and on the batteries and use
in accordance with the instructions.
• Do not use rechargeable batteries with substantially different charge status.
• Remove the batteries when the camera is not going to be used for an extended period.
Warning
When you continue using the camera for a long time, the batteries become hot. Contact with the batteries
can lead to burns.
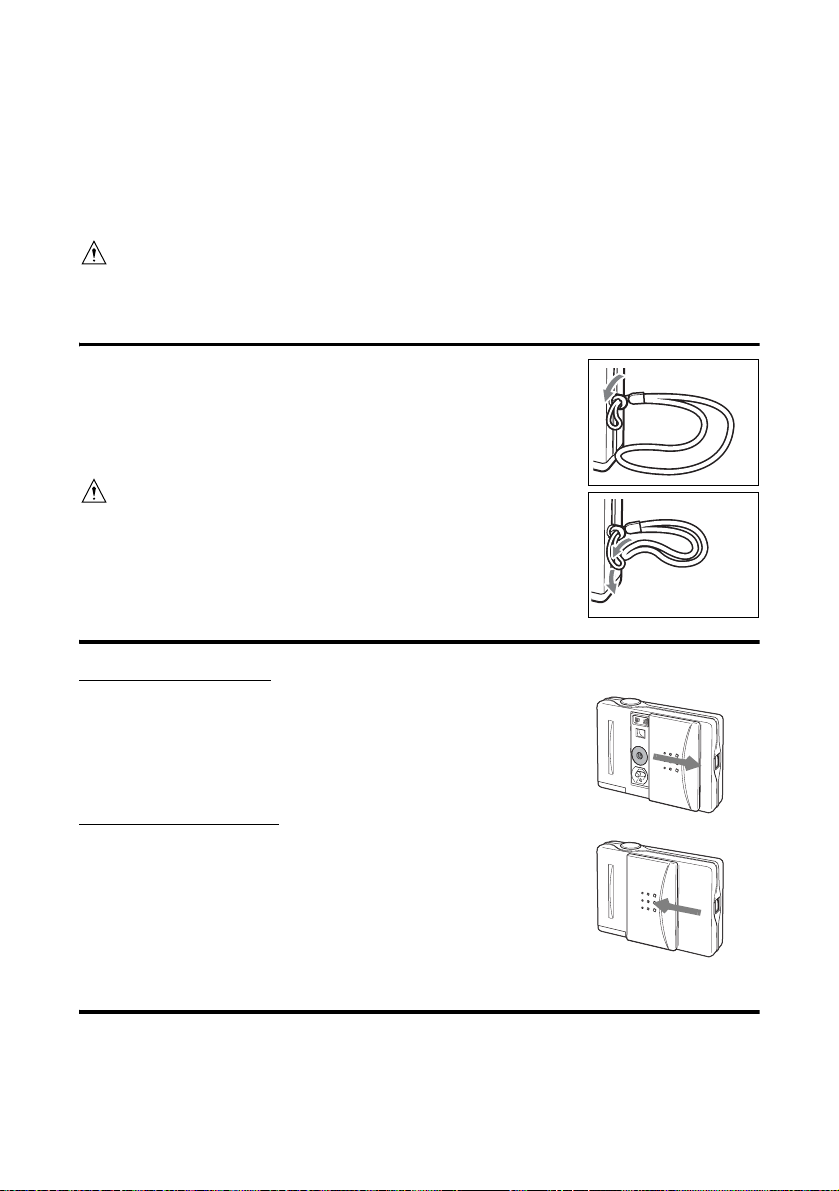
Attaching the Strap
1 Pass the thin loop of the strap through the strap
holder on the left side of the camera.
2 Pass the other strap end through the thin loop and
pull.
Warning
When using the camera with the strap attached, take care so that the
strap does not wrap around the neck. On no account hang the camera
on the neck of small children or infants. Strangulation may result if the
strap is wrapped around the neck.
Turning the Power ON and OFF
Turning the power ON
Open the lens cover.
The power turns ON, the LCD monitor lights up, and the through-image
(the image as seen through the lens) is displayed.
Turning the power OFF
Close the lens cover.
The power turns OFF, and the LCD monitor turns off.
1
2
Setting the Display Language, Date and Time
When using the camera for the first time following purchase, set the display language, data and time as
described in the following.
For how to make the setting, see “Setting the Display Language, Date and Time” in the Quick Guide or
[Adjusting the Date and Time] (p.16) or [Changing the Display Language] (P.18) in this manual.
9
Page 10
Recording
How to Record
Holding the camera
• Hold the camera securely in both hands with your elbows pressed against the body for stable
positioning.
• Be careful not to obstruct the flash or lens with fingers or strap.
How to Record
Normal recording is performed with the subject at a distance of over 60 cm from the lens. For distances
between 30 cm and 60 cm from the subject, see “Recording Close-up Subjects (Macro Recording)”.
• To record still pictures, the REC MODE item in the REC menu must be set to “STILL” (default setting).
If the item has been set to “MOVIE” or “SELF TIMER”, return it to “STILL” (p. 12).
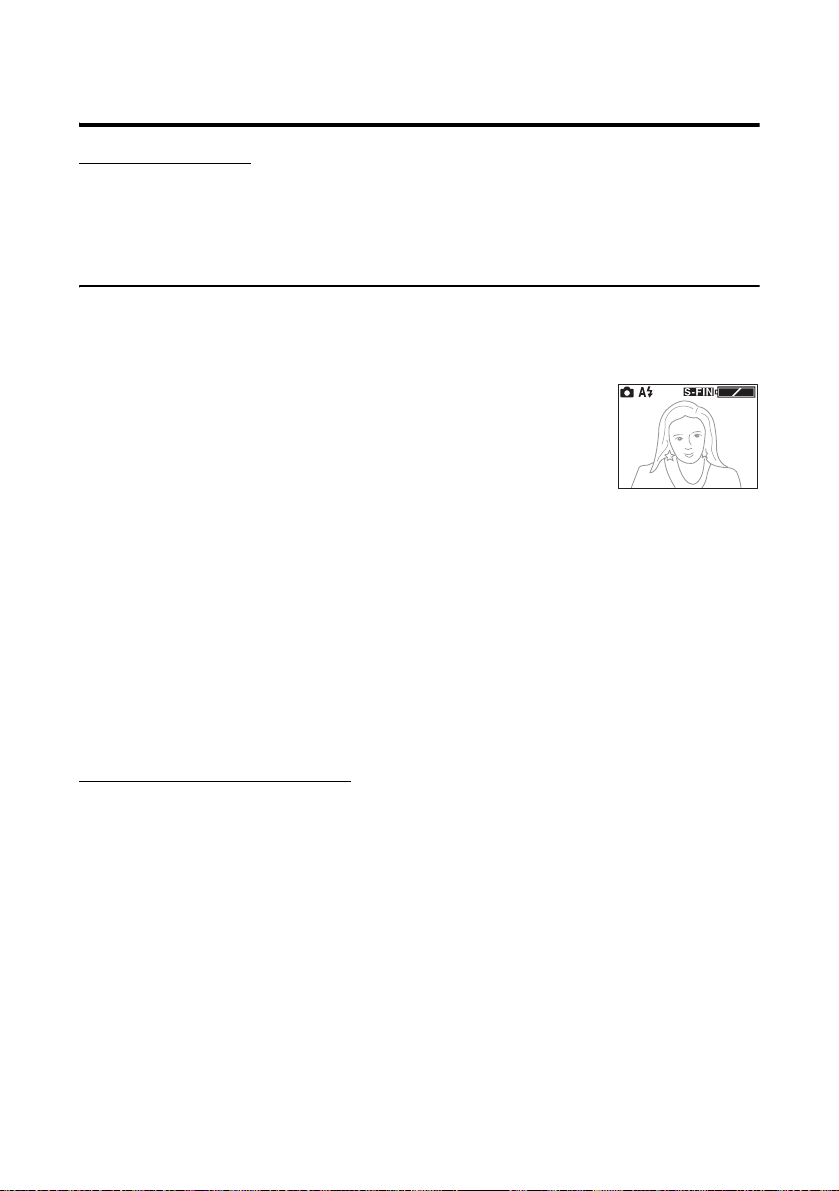
1 Open the lens cover.
The LCD monitor turns on and the through-image (the image seen
through the lens) is displayed.
For a description of the recording mode screen, see page 7.
Pressing the DISPLAY button switches the screen displayed on the
LCD monitor in the following sequence: “through-image + recording information”, “through-image
only” and “LCD monitor off”.
2 Determine the image composition while viewing the LCD monitor.
3 Press the shutter button.
Recording is completed when a buzzer sound is heard.
The recorded image is then saved in the internal memory. While this is taking place, the LCD monitor remains off (the viewfinder LED is on) and recording is not possible.
1
9
4 The next recording can be performed when the LCD monitor comes on (the
viewfinder LED goes out) and the through-image appears.
Recording using the viewfinder
Recording can be made using only the viewfinder (without the LCD monitor).
In step 3, you look through the viewfinder while you determine the image composition and press the shutter button. Recording is completed when a buzzer sound is heard. The viewfinder LED comes on, and
the recorded image is saved in the internal memory. The next recording can be performed when the
viewfinder LED goes out.
Note:
• A beep sound is heard and the viewfinder LED blinks as a warning when the internal memory becomes
full. Delete unnecessary images (p. 20).
10
Page 11
Recording Close-up Subjects (Macro Recording)
Macro recording is used when the subject is within a distance range of between 30 cm and 60 cm from
the lens. Use the LCD monitor for macro recording as the recording range and the field of view in the
viewfinder do not match.
1 Open the lens cover.
The LCD monitor turns on and the through-image (the image seen through the lens) is displayed.
2 Set the Macro switch under the lens to (Macro).
3 Perform recording while referring to Step 2 to 4 in “How to Record”.
• and a blue frame appear on the LCD monitor during recording in the macro mode.
• In the macro recording mode, the flash will always be off and recording with flash is not possible.
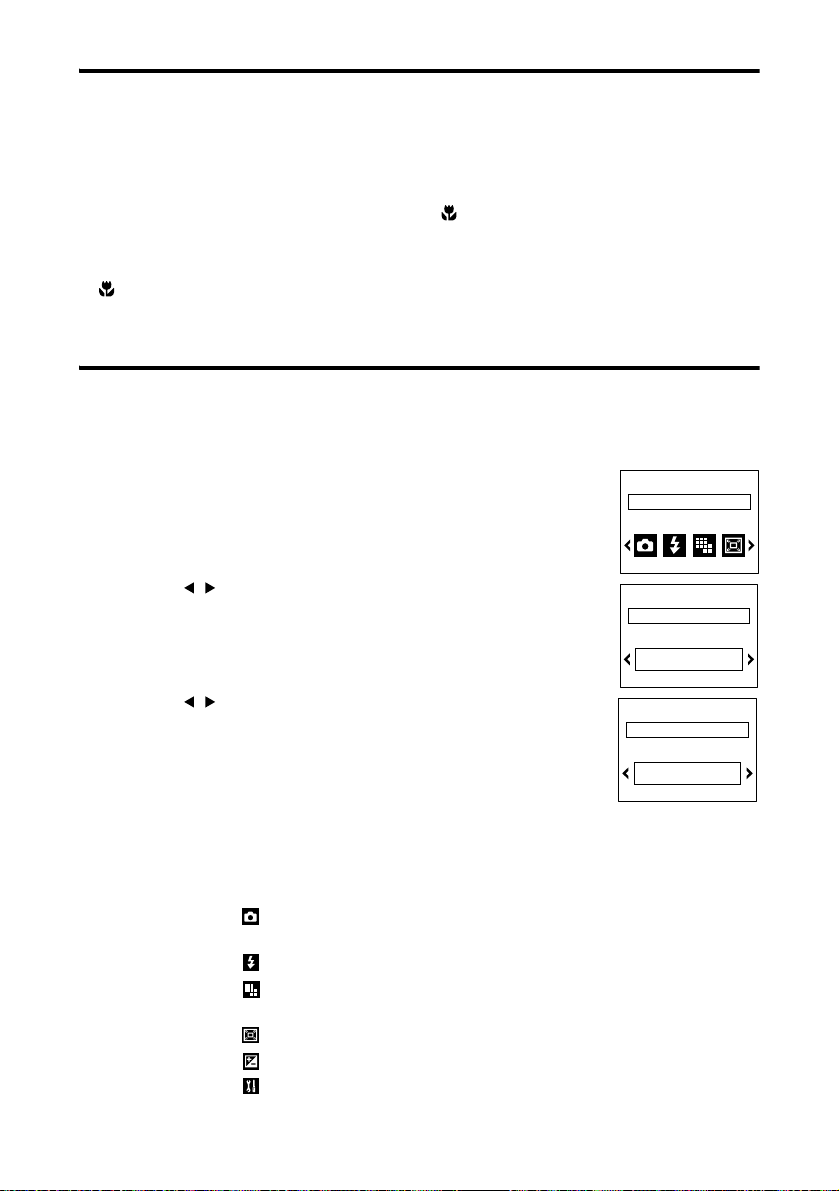
Using the REC Menu
You can use the REC menu to record with desired settings.
1 Open the lens cover.
The LCD monitor turns on and the through-image (the image seen through the lens) is displayed.
2 Press the MENU button.
The REC menu appears.
3 Use the / button to select the desired menu.
4 Press the SET button.
The contents of the settings of the menu appears.
5 Use the / button to select the desired settings.
6 Press the SET button.
The set values are saved, and the through-image is displayed as in
Step 1.
2
REC .............
4
REC .............
REC MODE
STILL
5
REC .............
REC MODE
SELF TIMER
REC MODE
7 Perform the recording.
• If the MENU button is pressed, the previous screen returns without the settings being changed.
The REC menu is composed of the following items.
REC menu REC MODE
STILL (Still picture)/MOVIE/SELF TIMER
FLASH
QUALITY
FINE/S-FINE/ECONOMY
DIGITAL ZOOM
EXPOSURE
SETUP
QUICK VIEW/SHARPNESS/USB/DATE SET/
MONITOR/BEEP/LANGUAGE
11
Page 12

Recording Still Pictures (STILL)
For normal recording and macro recording, the REC MODE item in the REC menu should be set to
“STILL”.
1 Display the REC menu.
2 Use the / button to select (REC MODE).
3 Press the SET button.
The REC MODE screen appears.
4 Use the / button to select “STILL”.
5 Press the SET button.
A through-image is displayed on the LCD monitor.
6 Perform the recording.
Using the Self-timer
The shutter is automatically released on the camera after a delay so that the person making the recording can be included in the image.
The shutter is released 10 seconds after the shutter button is pressed.
1 Display the REC menu.
2 Use the / button to select (REC MODE).
3 Press the SET button.
The REC MODE screen appears.
4 Use the / button to select “SELF TIMER”.
5 Press the SET button.
The self-timer mode is engaged and indicator appears on the LCD monitor.
6 Press the shutter button.
The self-timer LED blinks for about 10 seconds before the shutter is released.
• To cancel the self-timer while it is operating, close the lens cover.
• The self-timer mode is cancelled when the self-timer recording is completed. Repeat the procedure
described above to continue recording in the self-timer mode.
12
Page 13

Recording Moving Pictures (MOVIE)
You can record a ten-second movie.
1 Display the REC menu.
2 Use the / button to select (REC MODE).
3 Press the SET button.
The REC MODE screen appears.
4 Use the / button to select “MOVIE”.
5 Press the SET button.
The mode becomes the MOVIE recording mode and appears on the LCD monitor.
6 Press the shutter button.
Moving pictures are recorded for 10 seconds.
• MOVIE recording is cancelled when the lens cover is closed.
• MOVIE recording is not possible when the LCD monitor is turned off. Press the DISPLAY button to
turn on the LCD monitor, and then set the mode to MOVIE mode on the menu again to enable the
recording.
• The digital zoom function cannot be used for MOVIE recording.
Using the Flash
Your camera will automatically fire the flash when required under low-light conditions. However, the flash
can be prevented from firing. Use this function when recording in places where flash photography is prohibited.
1 Display the REC menu.
2 Use the / button to select (FLASH).
3 Press the SET button.
The FLASH screen appears.
4 Use the / button to select “AUTO” or “OFF”.
When “AUTO” is selected, the flash will fire automatically in accordance with the recording conditions.
When “OFF” is selected, the flash will not fire.
5 Press the SET button.
The indicator appears on the LCD monitor when “OFF” is selected.
• In the macro recording mode, the flash will always be off regardless of the setting made here.
• FLASH recording should be performed with the subject at a distance of 80 cm or more from the lens.
13
Page 14

Setting the Picture Quality
You can select the picture quality of the image data to be recorded.
1 Display the REC menu.
2 Use the / button to select (QUALITY).
3 Press the SET button.
The QUALITY screen appears.
4 Use the / button to select the desired setting.
The selected quality is indicated on the LCD monitor.
5 Press the SET button.
On Picture Quality
SUPER FINE 1280x960 pixel
FINE 1280x960 pixel
ECONOMY 640x480 pixel
Use this mode when you want high quality prints or
for editing images on a PC.
Use this mode when you want to print out images or
view the images on a PC.
Use this mode when you want to send images as
attachments to e-mails or to enable recording of a
large number of images.
Recording Magnified Images (DIGITAL ZOOM)
You can record images that are magnified up to two times.
1 Display the REC menu.
2 Use the / button to select (DIGITAL ZOOM).
3 Press the SET button.
The DIGITAL ZOOM screen appears.
4 Use the / button to select “ON”.
5 Press the SET button.
The DIGITAL ZOOM recording mode is engaged, and appears on the LCD monitor.
6 Use the / button to select the desired magnification ratio.
7 Perform the recording.
• When using digital zoom, the picture quality will decrease compared to images recorded under normal
conditions.
• Digital zoom cannot be used when the LCD monitor is turned off. Press the DISPLAY button to turn
on the LCD monitor for recording with digital zoom.
• Saving of the recorded image will take longer than normal when recording with digital zoom.
• Digital zoom cannot be selected when MOVIE recording mode is selected.
14
Page 15

Changing the Brightness of Images (EXPOSURE)
The exposure can be compensated to intentionally brighten or darken the overall recorded image. The
camera exposure can be adjusted up to ±1.5 at 0.5 intervals.
1 Display the REC menu.
2 Use the / button to select (EXPOSURE).
3 Press the SET button.
The EXPOSURE screen appears.
4 Use the / button to adjust to the desired brightness.
Pressing the button darkens the image, and pressing the button brightens the image.
5 Press the SET button.
The set values are saved and the through-image is displayed.
Checking the Recorded Image (QUICK VIEW)
The recorded image can be checked immediately after it is recorded so that you can decide whether or
not you want to save it.
1 Display the REC menu.
2 Use the / button to select (SETUP).
3 Press the SET button.
The SETUP screen appears.
4 Use the / button to select (QUICK VIEW).
5 Press the SET button.
The QUICK VIEW screen appears.
6 Use the / button to select “ON”.
7 Press the SET button.
The through-image is displayed.
8 Perform the recording.
The recorded image is displayed and the screen for deciding whether or not the image should be
saved appears.
9 Use the / button to select “YES” or “NO”.
10 Press the SET button.
When “YES” is selected, the LCD monitor turns off and the image is saved.
When “NO” is selected, the image is not saved and a new image can be recorded.
• If the SET button is not pressed within about 3 seconds in Step 10, the image is saved automatically.
15
Page 16

Setting the Sharpness of the Image (SHARPNESS)
The contours of images can be sharpened or softened.
1 Display the REC menu.
2 Use the / button to select (SETUP).
3 Press the SET button.
The SETUP screen appears.
4 Use the / button to select (SHARPNESS).
5 Press the SET button.
The SHARPNESS screen appears.
6 Use the / button to select the desired sharpness.
Selecting “HARD” will sharpen contours and make the image sharper.
Selecting “SOFT” will soften contours and make the image softer.
“NORMAL” is the normal setting.
7 Press the SET button.
The set values are saved, and the through-image is displayed.
Setting the USB Mode
See page 25 for the USB modes.
Adjusting the Date and Time (DATE SET)
The date and time can be set and modified.
Note:
The backup condenser retains the set date and time. The set contents are therefore retained even when
you replace the AAA batteries that power the camera. Backup duration during battery replacement is
about 60 minutes.
1 Display the REC menu.
2 Use the / button to select (SETUP).
3 Press the SET button.
The SETUP screen appears.
4 Use the / button to select (DATE SET).
5 Press the SET button.
The DATE SET screen appears.
6 Use the / button to adjust the “Year”, and then press the SET button.
The “Month” is selected.
16
Page 17

7 Adjust the “Month”, “Day”, “Hour”, and “Minute” in the same way as the “Year”.
Pressing the MENU button returns you to the previous screen.
8 When the “Minute” has been set, press the SET button.
The confirmation screen appears.
9 Press the / button to select “YES”, and then press the SET button.
The set values are saved and the through-image is displayed.
Changing the Brightness of the LCD Monitor (MONITOR)
The display of the LCD monitor can be adjusted to make it brighter or darker. Brightness can be adjusted
up to ±2 in 1-step intervals.
1 Display the REC menu.
2 Use the / button to select (SETUP).
3 Press the SET button.
The SETUP screen appears.
4 Use the / button to select (MONITOR).
5 Press the SET button.
The MONITOR screen appears.
6 Use the / button to select the desired brightness.
Pressing the button darkens the monitor, and pressing the button brightens the monitor.
7 Press the SET button.
The set values are saved and the through-image is displayed.
Muting the Alarm Sounds, etc. (BEEP)
The beep sound (sound indicating warnings or completion of recording) can be muted when the camera
is used in quiet surroundings.
1 Display the REC menu.
2 Use the / button to select (SETUP).
3 Press the SET button.
The SETUP screen appears.
4 Use the / button to select (BEEP).
5 Press the SET button.
The BEEP screen appears.
6 Use the / button to select “OFF”.
7 Press the SET button.
The set values are saved and the through-image is displayed.
17
Page 18

Changing the Display Language (LANGUAGE)
You can select the language to be used for the menus and guidance from Japanese, English, French or
German.
1 Display the REC menu.
2 Use the / button to select (SETUP).
3 Press the SET button.
The SETUP screen appears.
4 Use the / button to select (LANGUAGE).
5 Press the SET button.
The LANGUAGE selection screen appears.
6 Use the / button to select the desired language.
7 Press the SET button.
The menus and guidance will now be shown in the language that you have selected.
18
Page 19

Playback
How to Perform Play back
Recorded image can be displayed on LCD monitor.
Playing Back Still Pictures
1 Open the lens cover.
The LCD monitor turns on and the through-image appears.
2 Press the PLAY/REC button.
The last recorded image is displayed.
For a description of the playback mode screen, see page 7.
When the DISPLAY button is pressed, the icons displayed on the
screen disappear and the playback image only is shown.
2
026/026
03/02/16 10:50
3 Pressing the button displays the image recorded previous to the one cur-
rently on the monitor.
Pressing the button displays the image recorded after the one currently on
the monitor.
Playing Back Movies
1 Select the desired movie.
Movies are indicated by on the LCD monitor.
1
2 Press the SET button.
Playback of the movie starts.
• Pressing the PLAY/REC button while movies are being played back
switches the mode to the recording mode and the through-image is displayed.
• Pressing the shutter button while movies are being played back switches the mode to the recording
mode and the through-image is displayed. Recording can be started immediately by pressing the
shutter button.
• Playback of movies cannot be cancelled part way through.
03/02/16 11:50
Using the PLAY Menu
The PLAY menu can be used to select various playback modes and to delete unnecessary images, etc.
1 Play back an image.
2 Press the MENU button.
The PLAY menu appears.
3 Use the / button to select the desired menu.
4 Press the SET button.
Menu items are displayed.
2
PLAY ............
PLAY MODE
4
PLAY ............
PLAY MODE
STANDARD
19
Page 20

5 Use the / button to select the desired item.
5
PLAY ............
PLAY MODE
SLIDE SHOW
6 Press the SET button.
The selected item is executed.
• Pressing the MENU button returns you to the previous screen.
• There are items that cannot be selected if there are no images saved in the internal memory.
The PLAY menu has the following structure.
PLAY menu DELETE
• Pressing the MENU button returns you to the previous screen with no changes made to the settings.
THIS/ALL
PLAY MODE
STANDARD/INDEX/SLIDE SHOW
DIGITAL ZOOM
DPOF
Deleting Images
Displayed images can be deleted one image at a time or all recorded images can be deleted at one time
(FORMAT).
Deleting a Single Frame
1 Display the image you want to delete.
2 Use the MENU button.
The PLAY menu appears.
3 Use the / button to select (DELETE).
4 Press the SET button.
The DELETE screen appears.
5 Use the / button to select “THIS”.
6 Press the SET button.
The screen for confirming the deletion appears.
7 Use the / button to select “YES”.
8 Press the SET button.
The displayed image is deleted, and the next image appears.
• The display returns to the image shown in Step 1 if you select “NO” in Step 7 and press the SET button.
• When an image is deleted, the current frame number and the total number of frames will be resequenced.
20
Page 21

Deleting All Frames
1 Display the PLAY menu.
2 Use the / button to select (DELETE).
3 Press the SET button.
The DELETE screen appears.
4 Use the / button to select “ALL”.
5 Press the SET button.
The screen for confirming the deletion appears.
6 Use the / button to select “YES”.
7 Press the SET button.
All the images are deleted, and “NO DISPLAY DATA” is displayed.
• The display returns to the image shown in Step 1 if you select “NO” in Step 6 and press the SET button.
Note:
Selecting “All” deletes all data including images in the internal memory.
Viewing 9 Frames of Images Simultaneously (INDEX)
9 frames of images can be displayed simultaneously on the LCD monitor. This function is useful for
quickly accessing the image you want to view.
1 Display the PLAY menu.
2 Use the / button to select (PLAY MODE).
3 Press the SET button.
The PLAY MODE screen appears.
4 Use the / button to select “INDEX”.
5 Press the SET button.
9 images are displayed simultaneously.
5
1
2
3
4
5
6
7
8
9
6 Use the / button to move the superimposed frame and select the image that
you want to view.
7 Press the SET button.
The selected image will be displayed in the normal display mode.
21
Page 22

Viewing a Slideshow of Images (SLIDE SHOW)
You can check recorded images by playing them back at 3-second intervals.
1 Display the PLAY menu.
2 Use the / button to select (PLAY MODE).
3 Press the SET button.
The PLAY MODE screen appears.
4 Use the / button to select “SLIDE SHOW”.
5 Press the SET button.
Images are shown in consecutive order at an interval of 3 seconds starting with the first frame.
When playback is finished, the display will stop at the final frame.
• If the SET button is pressed during the slideshow, the slideshow is stopped and the image shown at
the time the button is pressed is displayed in the normal playback mode.
• In the case of movies, only the first frame is shown and movie playback is not performed.
Viewing a Magnified Image (DIGITAL ZOOM)
Recorded images can be played back at a magnification of up to 4X.
1 Display the image you want to view.
2 Press the MENU button.
The PLAY menu appears.
3 Use the / button to select (DIGITAL ZOOM).
4 Press the SET button.
The DIGITAL ZOOM menu screen appears.
5 Use the / button to select “ON”.
6 Press the SET button.
The image is displayed at a magnification of 2X.
The magnified section can be moved by pressing the / button.
• During digital zoom display, the magnification ratio can be switched between 1X ↔ 2X ↔ 4X by
pressing the SET button.
• To stop playback of magnified images, perform the operation from Step 2 and select “OFF” in Step 5.
22
Page 23

Selecting Images to Print (DPOF)
Only still image can be printed.
Note1)
Selecting a single frame
1 Display the image you want to print.
2 Press the MENU button.
The PLAY menu appears.
3 Use the / button to select (DPOF).
4 Press the SET button.
The DPOF screen appears.
5 Use the / button to select “THIS ON”.
6 Press the SET button.
The image displayed in Step 1 is registered for printing.
Deleting one registered frame
In Step 1 of the procedure described above, display the image whose registration should be cancelled.
In Step 5, select “THIS OFF”.
Selecting all the frames
1 Display the PLAY menu.
2 Use the / button to select (DPOF).
3 Press the SET button.
The DPOF screen appears.
4 Use the / button to select “ALL ON”.
5 Press the SET button.
All the image data saved in the internal memory are registered to be printed.
Deleting all the registered frames
Select “ALL OFF” in Step 4 of the procedure described above.
Printing DPOF registered frames
Using Windows
After registering the frames that you want to print, follow Steps 1-5 in “Transferring Recorded Images Using Windows” (p.28) and display the camera folder on your PC.
Using Macintosh
After registering the frames that you want to print, follow Steps 1-4 in “Transferring Recorded Images Using Macintosh” (p.28) and display the camera folder on your PC.
23
Page 24

1 Make sure that there are two folders in the “DCIM” folder displayed on your PC,
“100konic” and “MISC”.
If the “MISC” folder is missing, the DPOF settings have not been performed correctly. Make the
DPOF settings, and start again.
2 Copy (drag and drop) the “DCIM” folder to a ready formatted media (Memor y
card, CD-R, etc.).
3 After copying the folder to the media, print out the pictures on a DPOF-compat-
ible printer or take the media to a DPOF-compatible printing service.
Before having prints made, check that the printing service handles your type of media.
Note 1) DPOF stands for Digital Print Order Format and is the standard prescribed by CANON INC, East
man Kodak Company, FUJI PHOTO FILM CO., LTD. and Matsushita Equipment Industrial Co.
Ltd. for recording print information with the images taken with a digital camera, such as specifying which frames are to be printed and how many prints are to be made.
24
Page 25

Transferring Images to a PC
After connecting the camera to your PC with the supplied USB cable, images recorded with the camera
and the through-image displayed on the LCD monitor can be transferred to your PC.
• Back up important data.
Operating Environments
1. Windows
OS
Memory 16 MB or more of available RAM (32 MB or more recommended)
Display 32,000 colors or more, resolution of 640 x 480 pixels or higher
Others CD-ROM drive, USB port (standard equipped)
2. Macintosh
OS Mac OS 9.0/9.1/9.2/X
CPU PowerPC
Memory 16 MB or more of available RAM (32 MB or more recommended)
Display 32,000 colors or more, resolution of 640 x 480 pixels or higher
Others CD-ROM drive, USB port (standard equipped)
Even if the digital camera is connected to a PC with an adequate operating environment, it may not operate properly due to the PC’s settings or configuration. When the PC does not operate properly, check
the following.
• Is the PC a model that comes standard with a USB port?
→ Use a PC that comes standard with a USB port.
• Is the PC a model that has preinstalled OS?
→ Konica is not responsible for operations on self-made or modified PC’s.
• Is the USB cable connected to a USB hub or USB expansion port?
→ Connect the USB cable directly to the USB port on the PC.
• Are there any other USB peripherals connected?
→ Disconnect all other USB peripherals.
Microsoft Windows 98, Windows 98SE, Windows 2000 Professional,
Windows Me, and Windows XP
Setting the USB Mode
If the USB mode is set to “MSDC”, the images recorded with the camera can be transferred to your PC.
If the USB mode is set to “PC CAMERA”, you can transfer the through-image displayed on the camera’s
LCD monitor live to your PC.
Caution
• Before setting the USB mode, make sure that the camera is not connected to your PC.
1 Open the lens cover on the camera.
The LCD monitor on the camera turns on and the through-image is displayed.
2 Press the MENU button.
The REC menu appears.
3 Use the / button to select (SETUP).
4 Press the SET button.
The SETUP screen appears.
25
Page 26

5 Use the / button to select (USB).
6 Press the SET button.
The USB mode screen appears.
7 Use the / button to select “MSDC” or “PC CAMERA”.
8 Press the SET button.
The through-image is displayed as in Step 1.
Installing the USB Driver
Be sure to install the USB driver from the CD-ROM supplied with your camera before connecting the camera to your PC.
* The USB driver must be installed in order to transfer pictures from the camera to a PC running Win-
dows 98, Windows 98SE, Windows 2000 Professional, Windows Me or Windows XP, or to use the
camera as a PC camera. Shut down all active programs on your PC before starting installation.
* The following describes installation in the case of Windows 98/98 SE. The screens displayed on your
PC may differ depending on the Windows version that you are using.
* The installation of the USB driver is not required for the Macintosh.
1 Turn on your PC and star t Windows.
2 Insert the supplied CD-ROM into the CD-ROM drive.
3 Check that “USB Driver” is selected and click [OK].
Note:
• You cannot connect the camera to your PC unless you first install the
USB driver. Make sure that it is selected.
• Clicking [Cancel] during the installation process will cancel and leave
the installation incomplete. In this case, the installation will have to be
performed again. However, do not restart your PC until all the
installations have been completed.
If the “Revio C2 setup menu” does not appear, follow the steps below.
c Click the Start button and select “Run…”.
d The “Run” dialog box appears.
26
Page 27

e Enter “D:\install.exe” and click [OK].
The “Revio C2 setup menu” appears.
The CD-ROM drive is assumed to be drive “D”. Open “My Computer” to confirm the drive letter of the CD-ROM drive on your PC.
4 When installation is finished, the “Revio C2 setup
menu” appears. Select [Yes] to restart your PC.
Your PC will restart automatically to complete the installation process.
Note:
• Your PC has to be restarted to validate the installation.
If you select [No] and do not restart your PC immediately, be sure to restart it before connecting the
camera.
• If installation was not performed because, for example, the USB driver is already installed in your PC,
the above message does not appear and it is not necessary to restart your PC.
Connecting the camera to your PC
1 Turn on your PC and star t Windows.
Do not forget to remove the CD-ROM from the CD-ROM drive.
2 Set the USB mode on the camera to “MSDC” if you want to transfer recorded
images to your PC and to “PC CAMERA” if you want to transfer the throughimage live to your PC. (Refer to the page 25)
3 Connect the camera and your PC using the USB cable provided.
4 If this is the first time to connect the camera to your PC in MSDC mode or PC
CAMERA mode, the hardware will be installed. (If you are using Windows 98,
Windows 98 SE or Windows Me)
If you are using Windows 2000 Professional, the following screen is displayed.
A warning message like the one shown on the right appears.
However, this is not a problem and you should just click [Yes]. If
you select [No], the camera will not be connected correctly to
your PC.
If you are using Windows XP, the following screen is displayed.
c The “Detect New Hardware Wizard” appears. Select “Automat-
ically install the software” and click [Next].
27
Page 28

d A warning message like the one shown on the right appears.
However, this is not a problem and you should just click [Continue Anyway]. If you select [STOP Installation], the camera will
not be connected correctly to your PC.
Caution
• If you accidentally select [STOP Installation], reinstall the USB driver.
Transferring Recorded Images
* To transfer recorded images to your PC, the USB mode should be set to “MSDC” in the REC menu.
Note:
• Do not disconnect the USB cable or open the battery cover while the camera is connected to the PC.
• Before you connect or disconnect the USB cable, close the lens cover and make sure that the power
is OFF.
• There is a risk that data may be corrupted if the power is turned off while the camera is communicating
with the PC. Check that the remaining battery level is sufficient before starting.
• Unplug the USB cable when the camera is not used for a long time.
• The camera’s LCD monitor will not turn on while the camera and your PC are connected with the
supplied USB cable.
Using Windows
1 Turn on your PC.
2 Connect the camera and your PC using the supplied USB cable.
3 Open the lens cover on the camera.
4 Double-click “My Computer”.
5 Double-click “Removable Disk (E)”.
The removable disk is assumed to be drive “E”. The drive letter may differ depending on your PC.
Confirm the drive letter on your PC.
6 Double-click the “DCIM” folder.
7 Double-click “100konic”.
The icon of the image file appears.
8 Double-click the file to display the image.
• To save the image on your PC, copy (drag and drop) the file to the desired location on your PC.
Using Macintosh
1 Turn on your PC.
2 Connect the camera and your PC using the supplied USB cable.
3 Open the lens cover on the camera.
4 Double-click the “Untitled” icon.
28
Page 29

5 Double-click the “DCIM” folder.
6 Double-click “100konic”.
The icon of the image file appears.
7 Double-click the file to display the image.
• To save the image on your PC, copy (drag and drop) the file to the desired location on your PC.
Transferring the Through-Image Live to Your PC
* To transfer the through-image displayed on the camera’s LCD monitor live to your PC, the USB mode
should be set to “PC CAMERA” in the REC MODE menu.
* We recommend Microsoft’s NetMeeting for the PC Camera application. Any queries relating to Net-
Meeting should be made directly to Microsoft. Although we recommend NetMeeting, we do not guarantee its operation.
Note:
• Windows only
1 Turn on your PC.
2 Connect the camera and your PC using the supplied USB cable.
3 Open the lens cover on the camera.
4 Activate the PC Camera application installed on your PC.
For more details, refer to the operation manual for the application.
29
Page 30

Appendix
Cleaning the Camera
When cleaning the camera, do not use solvents such as benzene or paint thinner.
After Use
Remove the batteries when the camera is not going to be used for an extended period.
Troubleshooting
If inspection and remedial action in accordance with the following table does not solve the problem,
please contact the dealer from whom you purchased the camera or a Konica Service Station.
Symptom Check Page
Power
The power does not turn
on
The power turns off
immediately after it is
turned on
Recording
Images cannot be
recorded even when the
shutter button is pressed
The flash does not work • The FLASH mode is set to “OFF”.
Batteries are exhausted
after very little recording
Playback
Playback not possible
Batteries are exhausted
after very little playback
Others Correct date is not
displayed when the
power is turned on
Images taken with the
camera cannot be
downloaded to the PC
Through-image cannot
be transferred live to the
PC
• Batteries are exhausted.
• Batteries are inserted with poles facing incorrectly.
• Battery poles or metal contacts on the camera are
dirty.
• Batteries are exhausted.
• Battery poles or metal contacts on the camera are
dirty.
• The camera is being used at low temperature.
• A new uncharged nickel-hydrogen battery is being
used.
• Maximum number of images has already been
recorded. → Delete images that are no longer
required.
• The camera is set to self-timer recording.
• AAA manganese batteries are being used.
• The batteries are not new (remaining battery level is
low).
• Battery poles or metal contacts on the camera are
dirty.
• Mode is set to REC mode.
• All the recorded images have been deleted.
• The batteries are not new (remaining battery level is
low).
• AAA manganese batteries are being used.
• Battery poles or metal contacts on the camera are
dirty.
• The backup time during battery replacement is
about 60 minutes. The date must be set again if
this limit is exceeded.
• The camera is not connected correctly to the PC.
• The camera’s USB mode is set to PC CAMERA.
• The camera is not connected correctly to the PC.
• The camera’s USB mode is set to MSDC.
• The lens cover is closed.
8
8
8
8
8
8
8
20
12
13
8
8
8
19
21
8
8
8
16
27
25
27
25
29
30
Page 31

Main Specifications
Type
Active pixels 1.22 megapixels
Recording medium Approximately 14 MB internal memory
Number of
Recordable Images
Recording method Still picture: JPEG standard, Movie: Motion JPEG
Image format Design rule for Camera File System standard (DCF) compatible
Imaging elements 1/3.4 inch CMOS sensor
Lens f=4.5 mm (Equivalent to f=37 mm when converted to 35 mm camera), F2.8
Focus adjustment Manual/Fixed
Recording range
White balance Auto
Shutter speed Electronic shutter 1/15 - 1/6600 sec.
Viewfinder Optical viewfinder
Flash Auto flash AUTO/ OFF
Recording modes Single shooting/Macro/Self-timer/Movie/Digital zoom (-2.0 times)
LCD monitor 1.6-inch transmission type D-TFD color LCD monitor
Playback Single frame, slideshow, index playback
Deletion Single frame/all frames (formatting)
Buzzer Various warnings during recording
PC interface USB
USB mode MSDC/PC CAMERA
Power supply
Appearance Aluminum
Size (W × H × D) 85.8 x 55.8 x 13.5 mm
Weight 70 g (excl. batteries)
Supplied accessories
Note 1) DCF stands for Design rule for Camera File system, a standard of the Japan Electronics and
Information Technology Industries Association (JEITA) for using digital camera image files between related equipment.
Digital still camera with LCD monitor and integrated recording and playback
functions
Super fine 1280 x 960 pixels
Fine 1280 × 960 pixels
Economy 640 × 480 pixels
Note1)
Normal mode: 0.6 m - ∞
Macro mode: 0.3 m - 0.6 m
AAA alkaline batteries (2 pieces/supplied), AAA nickel-hydrogen batteries (2
pieces/sold separately)
Strap, USB cable, AAA alkaline batteries (2 pieces), CD-ROM, Quick Guide,
Warranty
31
Page 32

Warranty and After-sales Service
For repair, handling and care, first consult the dealer from whom you
purchased the camera.
Warranty (separately attached)
Before accepting the warranty card, please make sure that the date of purchase and dealer
of purchase and the dealer’s details have been completed. After reading the warranty, keep
it in a safe place.
Warranty period (main unit): one year from the date of purchase
When requesting service
If symptoms persist after having checked the table on pages 29, Troubleshooting, disconnect
the power supply and contact the dealer from whom you purchased the camera.
Note: Transportation cost for taking/bringing back the product to/from
repair, shipping costs or carrying charges are at the customer’s
expense. When shipping the product, pack the unit appropriately
and use a shipping method such as registered mail or express mail
to prevent loss of the product.
During the warranty period
Repairs will be made by the dealer from whom you purchased the camera according to the
contents of the warranty. For repair, take the product and the warranty to the dealer from
whom you purchased the camera.
Outside the warranty period
Repairable products can be repaired for a charge upon request. However, the minimum holding period of performance parts for repairing digital still cameras is 8 years after termination
of production.
Note: Performance parts for repair are parts necessary to maintain the
functions of the product.
32
Page 33

FCC Compliance Statement:
Declaration of Conformity
Responsible party: KONICA PHOTO IMAGING
Address: 725 Darlington Avenue Mahwah, NJ 07430, U.S.A.
Telephone number: (201) 574-4000
This device complies with Part 15 of the FCC Rules. Operation is subject
to the following two conditions:
(1) this device may not cause harmful interference and (2) this device
must accept any interference received, including interference that
may cause undesired operation.
This equipment has been tested and found to comply with the limits for a
class B digital device, pursuant to Part 15 of the FCC Rules. These limits
are designed to provide reasonable protection against harmful interference in a residential installation. This equipment generates, uses and can
radiate radio frequency energy and, if not installed and used in accordance with the instructions, may cause harmful interference to radio communications. However, there is no guarantee that interference will not
occur in a particular installation. If this equipment does cause harmful interference to radio or television reception, which can be determined by
turning the equipment off and on, the user is encouraged to try to correct
the interference by one or more of the following measures:
- Reorient or relocate the receiving antenna.
- Increase the separation between the equipment and receiver.
- Connect the equipment into an outlet on a circuit different from that to
which the receiver is connected.
- Consult the dealer or an experienced radio/TV technician for help.
• Shielded cables must be used for this equipment to comply with the
relevant FCC regulation.
• The user is cautioned that changes and modifications made to the
equipment without approval of the manufacturer could void the user’s
authority to operate this equipment.
Tested To Comply
With FCC Standards
FOR HOME OR OFFICE USE
• However, note that operation of this unit near a radio or television
receiver could possibly cause radio disturbance.
33
Page 34

CANADA ONLY
Industry Canada’s Compliance Statement:
This Class B digital apparatus complies with Canadian ICES-003.
Cet appareil numérique de la classe B est conforme à la norme NMB-003 du Canada
34
Page 35

 Loading...