

Page 1
Page 2

User manual
bizhub PRO
1600P/2000P/2500P
Operating information
Page 3

Copyright
Copyright
2006-2008 Océ
All rights reserved. No part of this work may be reproduced, copied, adapted, or
transmitted in any form or by any means without written permission from Océ.
Océ makes no representation or warranties with respect to the contents hereof and
specifically disclaims any implied warranties of merchantability or fitness for any
particular purpose.
Further, Océ reserves the right to revise this publication and to make changes from
time to time in the content hereof without obligation to notify any person of such
revision or changes.
Edition 2008-07
US
Page 4

Trademarks
List of trademarks
Xerox, DocuTech, DigiPath and FreeFlow are registered trademarks of Xerox
Corporation.
Adobe and PostScript are registered trademarks of Adobe Systems Incorporated.
Products in this publication are referred to by their general trade names. In most, if
not all cases, these designations are claimed as trademarks or registered trademarks
of their respective companies.
Trademarks
3
Page 5

Trademarks
4
Page 6

Table of Contents
Table of Contents
Chapter 1
Introduction . . . . . . . . . . . . . . . . . . . . . . . . . . . . . . . . . . . . . . . . . . . . . . . . . . . . . . . 9
Notes for the reader. . . . . . . . . . . . . . . . . . . . . . . . . . . . . . . . . . . . . . . . . 10
Introduction to the bizhub PRO 1600P/2000P/2500P . . . . . . . . . . . . . . . 11
Available documentation . . . . . . . . . . . . . . . . . . . . . . . . . . . . . . . . . . . . . 12
Chapter 2
Power information. . . . . . . . . . . . . . . . . . . . . . . . . . . . . . . . . . . . . . . . . . . . . . . . . 13
The power modes . . . . . . . . . . . . . . . . . . . . . . . . . . . . . . . . . . . . . . . . . . 14
Turn on the machine . . . . . . . . . . . . . . . . . . . . . . . . . . . . . . . . . . . . . . . . 17
Shut down the machine . . . . . . . . . . . . . . . . . . . . . . . . . . . . . . . . . . . . . . 18
Chapter 3
Overview of the system components . . . . . . . . . . . . . . . . . . . . . . . . . . . . . . . . . 21
Introduction to the main system components . . . . . . . . . . . . . . . . . . . . . 22
The operator panel. . . . . . . . . . . . . . . . . . . . . . . . . . . . . . . . . . . . . . . . . . 24
The operator attention light . . . . . . . . . . . . . . . . . . . . . . . . . . . . . . . . . . . 26
The output locations. . . . . . . . . . . . . . . . . . . . . . . . . . . . . . . . . . . . . . . . . 28
The paper modules . . . . . . . . . . . . . . . . . . . . . . . . . . . . . . . . . . . . . . . . . 31
Chapter 4
Working with the operator panel . . . . . . . . . . . . . . . . . . . . . . . . . . . . . . . . . . . . . 33
Introduction . . . . . . . . . . . . . . . . . . . . . . . . . . . . . . . . . . . . . . . . . . . . . . . 34
The dashboard . . . . . . . . . . . . . . . . . . . . . . . . . . . . . . . . . . . . . . . . . . 34
The Schedule view. . . . . . . . . . . . . . . . . . . . . . . . . . . . . . . . . . . . . . . . . . 37
Introduction to the 'Schedule' view . . . . . . . . . . . . . . . . . . . . . . . . . . . 37
Load the media . . . . . . . . . . . . . . . . . . . . . . . . . . . . . . . . . . . . . . . . . . 42
Instructions for printing to the stacker/stapler (iMFS) . . . . . . . . . . . . . 44
Stop a job . . . . . . . . . . . . . . . . . . . . . . . . . . . . . . . . . . . . . . . . . . . . . . 45
The Jobs view . . . . . . . . . . . . . . . . . . . . . . . . . . . . . . . . . . . . . . . . . . . . . 48
Introduction to the 'Jobs' view . . . . . . . . . . . . . . . . . . . . . . . . . . . . . . . 48
Schedule a waiting job for printing . . . . . . . . . . . . . . . . . . . . . . . . . . . 52
Reprint a job . . . . . . . . . . . . . . . . . . . . . . . . . . . . . . . . . . . . . . . . . . . . 54
Give priority to a scheduled job. . . . . . . . . . . . . . . . . . . . . . . . . . . . . . 56
Delete a job. . . . . . . . . . . . . . . . . . . . . . . . . . . . . . . . . . . . . . . . . . . . . 57
Print a scheduled job later. . . . . . . . . . . . . . . . . . . . . . . . . . . . . . . . . . 59
Make a proof . . . . . . . . . . . . . . . . . . . . . . . . . . . . . . . . . . . . . . . . . . . . 61
Print the job parameters . . . . . . . . . . . . . . . . . . . . . . . . . . . . . . . . . . . 63
Bundle and split jobs. . . . . . . . . . . . . . . . . . . . . . . . . . . . . . . . . . . . . . 64
Print all the jobs for which the media are available. . . . . . . . . . . . . . . 68
5
Page 7

Table of Contents
Print the jobs that have a label . . . . . . . . . . . . . . . . . . . . . . . . . . . . . . 69
Checking and changing the job properties . . . . . . . . . . . . . . . . . . . . . 71
The Trays view. . . . . . . . . . . . . . . . . . . . . . . . . . . . . . . . . . . . . . . . . . . . . 89
Introduction to the 'Trays' view . . . . . . . . . . . . . . . . . . . . . . . . . . . . . . 89
Assign the media to a paper tray. . . . . . . . . . . . . . . . . . . . . . . . . . . . . 92
The System view . . . . . . . . . . . . . . . . . . . . . . . . . . . . . . . . . . . . . . . . . . . 94
The Printer section . . . . . . . . . . . . . . . . . . . . . . . . . . . . . . . . . . . . . . . 94
The Setup section . . . . . . . . . . . . . . . . . . . . . . . . . . . . . . . . . . . . . . . 102
The Media section. . . . . . . . . . . . . . . . . . . . . . . . . . . . . . . . . . . . . . . 120
The Transaction section (optional) . . . . . . . . . . . . . . . . . . . . . . . . . . 137
Change the media . . . . . . . . . . . . . . . . . . . . . . . . . . . . . . . . . . . . . 71
Change the number of sets . . . . . . . . . . . . . . . . . . . . . . . . . . . . . . 74
Change the output location. . . . . . . . . . . . . . . . . . . . . . . . . . . . . . . 76
Change the number of staples . . . . . . . . . . . . . . . . . . . . . . . . . . . . 78
Change the sorting method . . . . . . . . . . . . . . . . . . . . . . . . . . . . . . 80
Change the type of offset stacking . . . . . . . . . . . . . . . . . . . . . . . . . 82
Check the first set. . . . . . . . . . . . . . . . . . . . . . . . . . . . . . . . . . . . . . 85
Shift the image in the document printing mode . . . . . . . . . . . . . . . 87
Introduction to the 'Printer' section . . . . . . . . . . . . . . . . . . . . . . . . . 94
Check the status of the toner reservoirs. . . . . . . . . . . . . . . . . . . . . 96
Check the status of the staple cartridges . . . . . . . . . . . . . . . . . . . . 98
Reset the day counters. . . . . . . . . . . . . . . . . . . . . . . . . . . . . . . . . . 99
Find the meter readings . . . . . . . . . . . . . . . . . . . . . . . . . . . . . . . . 101
Introduction to the 'Setup' section. . . . . . . . . . . . . . . . . . . . . . . . . 102
Work with the workflow profiles . . . . . . . . . . . . . . . . . . . . . . . . . . 104
Change the language . . . . . . . . . . . . . . . . . . . . . . . . . . . . . . . . . . 109
Change the warning time . . . . . . . . . . . . . . . . . . . . . . . . . . . . . . . 111
Change the advanced media settings . . . . . . . . . . . . . . . . . . . . . 114
Make an intermediate check print. . . . . . . . . . . . . . . . . . . . . . . . . 118
Introduction to the 'Media' section . . . . . . . . . . . . . . . . . . . . . . . . 120
Introduction to the media handling . . . . . . . . . . . . . . . . . . . . . . . . 122
Add temporary media to the 'Media catalog' . . . . . . . . . . . . . . . . 124
Perform a media registration for standard-size media . . . . . . . . . 126
Perform a media registration for large media . . . . . . . . . . . . . . . . 131
Introduction to the 'Transaction' section . . . . . . . . . . . . . . . . . . . 137
Activate the transaction printing function . . . . . . . . . . . . . . . . . . . 140
Shift the image in the transaction printing mode . . . . . . . . . . . . . 142
Handle the media messages . . . . . . . . . . . . . . . . . . . . . . . . . . . . 143
Chapter 5
Keeping the printer running . . . . . . . . . . . . . . . . . . . . . . . . . . . . . . . . . . . . . . . . 147
Add toner . . . . . . . . . . . . . . . . . . . . . . . . . . . . . . . . . . . . . . . . . . . . . . . . 148
Finisher: Add staples . . . . . . . . . . . . . . . . . . . . . . . . . . . . . . . . . . . . . . . 150
Stacker/stapler (iMFS): Replace the staple cartridge. . . . . . . . . . . . . . . 155
Troubleshooting . . . . . . . . . . . . . . . . . . . . . . . . . . . . . . . . . . . . . . . . . . . 156
6
Page 8

Table of Contents
Appendix A
Miscellaneous . . . . . . . . . . . . . . . . . . . . . . . . . . . . . . . . . . . . . . . . . . . . . . . . . . . 161
Product specifications . . . . . . . . . . . . . . . . . . . . . . . . . . . . . . . . . . . . . . 162
7
Page 9

Table of Contents
8
Page 10

Chapter 1 Introduction
9
Page 11
Notes for the reader
Notes for the reader
Introduction
This manual helps you to use the machine. The manual contains a description of the
machine and guidelines to use and operate the machine. There are also tips to
increase your knowledge of the machine and to help you manage the workflow even
better.
Definition
Attention Getters
Parts of this manual require your special attention. These parts provide important,
additional information or are about the prevention of damage to your properties.
Note, Attention, and Caution
Caution: A part marked with Caution contains information to prevent
personal injury.
Attention: A part marked with Attention contains information to prevent
damage to items, for example the machine or a file.
Note: A part marked with Note contains additional information about the correct
operation of the machine.
Safety information
The safety information for this product is included in a separate user manual with the
title Safety information. This manual is part of the documentation set that you
received with your product.
10 Chapter 1 Introduction
Page 12

Introduction to the bizhub PRO 1600P/2000P/2500P
Introduction to the bizhub PRO 1600P/2000P/2500P
Introduction
The bizhub PRO 1600P/2000P/2500P is a series of high-volume, cut-sheet printers.
The machines are intended for both document printing and stream printing.
Duplex technology enables the machine to print on the front and back side of a sheet
at the same time. Depending on the version, the sustained print speed, including
reconditioning, ranges from 80-125 sheets per minute (A4 / Letter). That means the
machine can print 160 - 250 images per minute (A4 / Letter) when printing a 2-sided
document.
The print speed for 1-sided documents (A4/Letter) is 125 images per minute.
This section gives a short description of the main features of the machine.
Note: Not all the configurations mentioned in this user manual are available
worldwide. Please contact your local dealer for the available configurations in your
country.
Overview of the main features
■ Advanced scheduling concept on the operator panel to keep the machine running.
■ Load and assign the media while the machine prints.
■ Support of up to 12 paper trays (total input capacity up to 13,800 sheets) and a
roll feeder.
■ Support of up to 3 stackers, a finisher, a stacker/stapler and other external
finishers.
■ Support of a large range of media, media sizes and media weights.
■ Support of PS/PCL/PDF and streaming PS.
11
Page 13
Available documentation
Available documentation
Introduction
This machine is delivered with a documentation set that consists of the following
items.
■ A CD-ROM with all the manuals mentioned below
■ A hardcopy user manual entitled 'Safety information'.
■ Integrated Online Helps in the printer driver, the Settings Editor and other
proprietary applications.
Main Content of the User Manuals
The following table provides an overview of the main content of the user manuals.
[1]
[1] Main Content of the User Manuals
User Manual Main content
Operating
information
Maintenance tasks
Safety information
■ Overview of the main system components
■ Working with the operator panel
■ Handling and managing jobs on the operator panel
■ Add media, toner and staples
■ Replacing parts
■ Cleaning parts
■ Solve a paper jam in the engine module
■ Instructions for safe use
■ Safety Data Sheets
12 Chapter 1 Introduction
Page 14

Chapter 2 Power information
13
Page 15
The power modes
The power modes
Introduction
This section describes the power switches and the main power modes of the
machine.
The table in this section describes, among other things, the low-power mode and the
sleep mode. These modes are energy-saving modes. You can set the timers for these
modes in the Settings Editor on the controller. Furthermore, you can set a calendar
timer in the Settings Editor. Then the machine will wake up from the sleep mode at
the indicated time. You can use the calendar timer for example to make sure that the
machine is ready for use at the beginning of your working day. The machine can
warm up before you start your working day. Please refer to the online help on the
Settings Editor for more information about these timers.
Description of the power switch and the On/Off button
The machine has the following switch and button to control the power supply.
■ Power switch
The power switch is located at the back side of the machine. The power switch
connects and disconnects the machine to the mains power.
■ On/Off button with amber and green LEDs .
The On/Off button on the machine (see ‘Introduction to the main system
components’ on page 22) allows you to toggle between the stand-by mode and
the sleep mode. This is only possible if the power switch is in the '1' position
and the start-up phase is completed.
14 Chapter 2 Power information
Page 16
Description of the main power modes
[2]
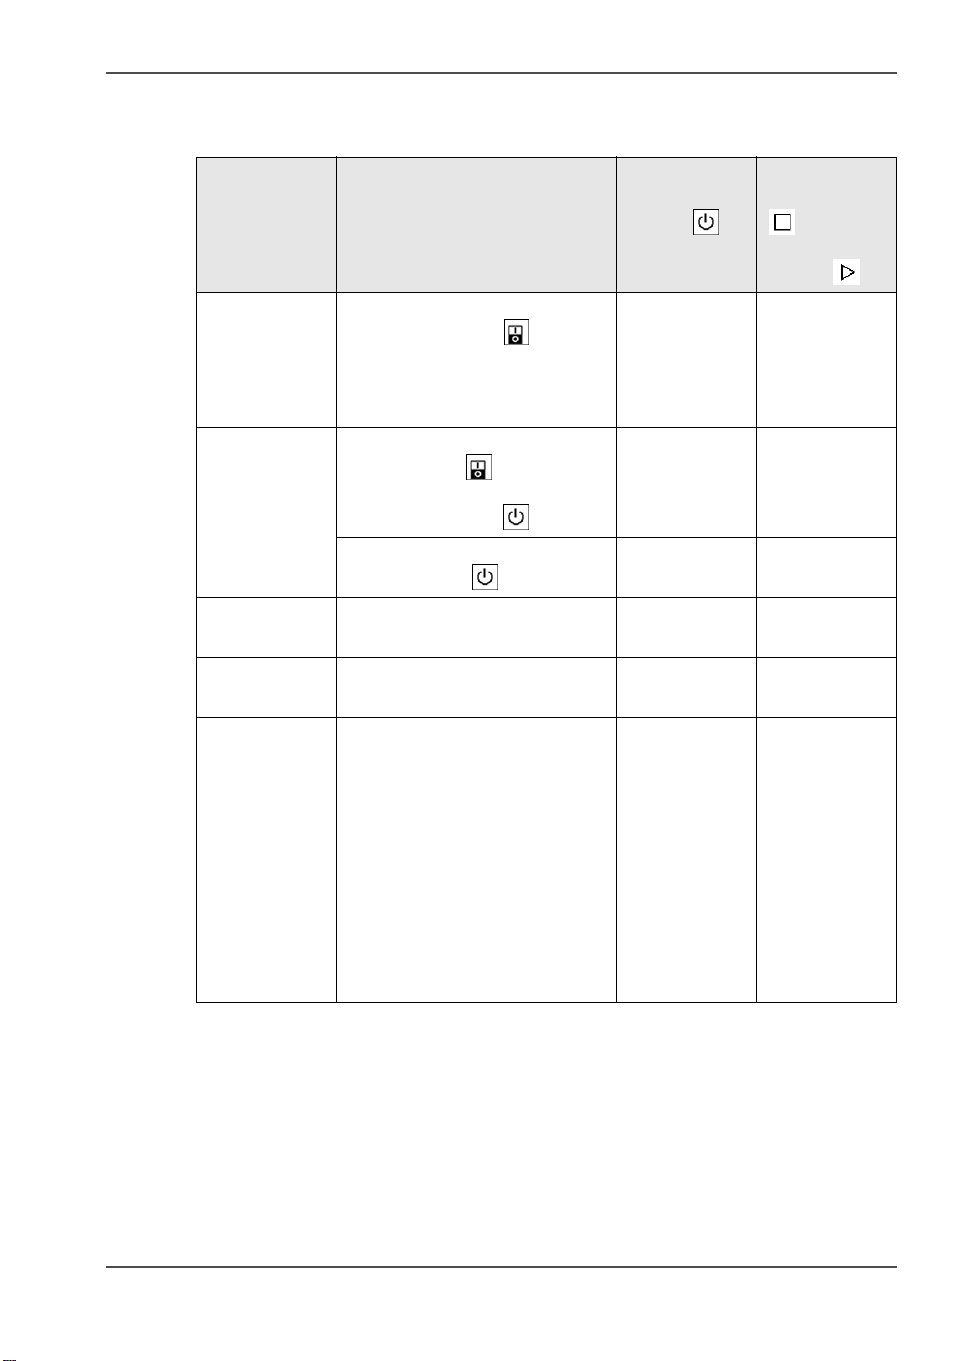
[2] The main power modes (1 – 2)
The power modes
Power mode Description Status of the
On/Off
button
Off The machine is completely off.
Off Off
The power switch is in the
'O' position. There is no power
consumption. The machine
cannot receive or print jobs.
Starting up
(divided into 2
stages)
Stage 1: After you put the
power switch in the 'I'
position, but before you press
Blinking
amber
the On/Off button .
Stand-by
mode
Stage 2: After you press the
On/Off button .
The machine is ready to print
jobs.
Continuous
green
Continuous
green
Run mode The machine is busy. Continuous
green
Low-power
mode
The machine automatically
enters low-power mode when
Continuous
green
the machine has been in
stand-by mode for a defined
period of time and no button
was pressed.
The machine wakes up when a
job arrives in the list of
'Scheduled jobs' or when you
press a button. The machine
will start to warm up.
Status of the
Hold button
and
Release
button
Off
On
On
On
On
15
Page 17

The power modes
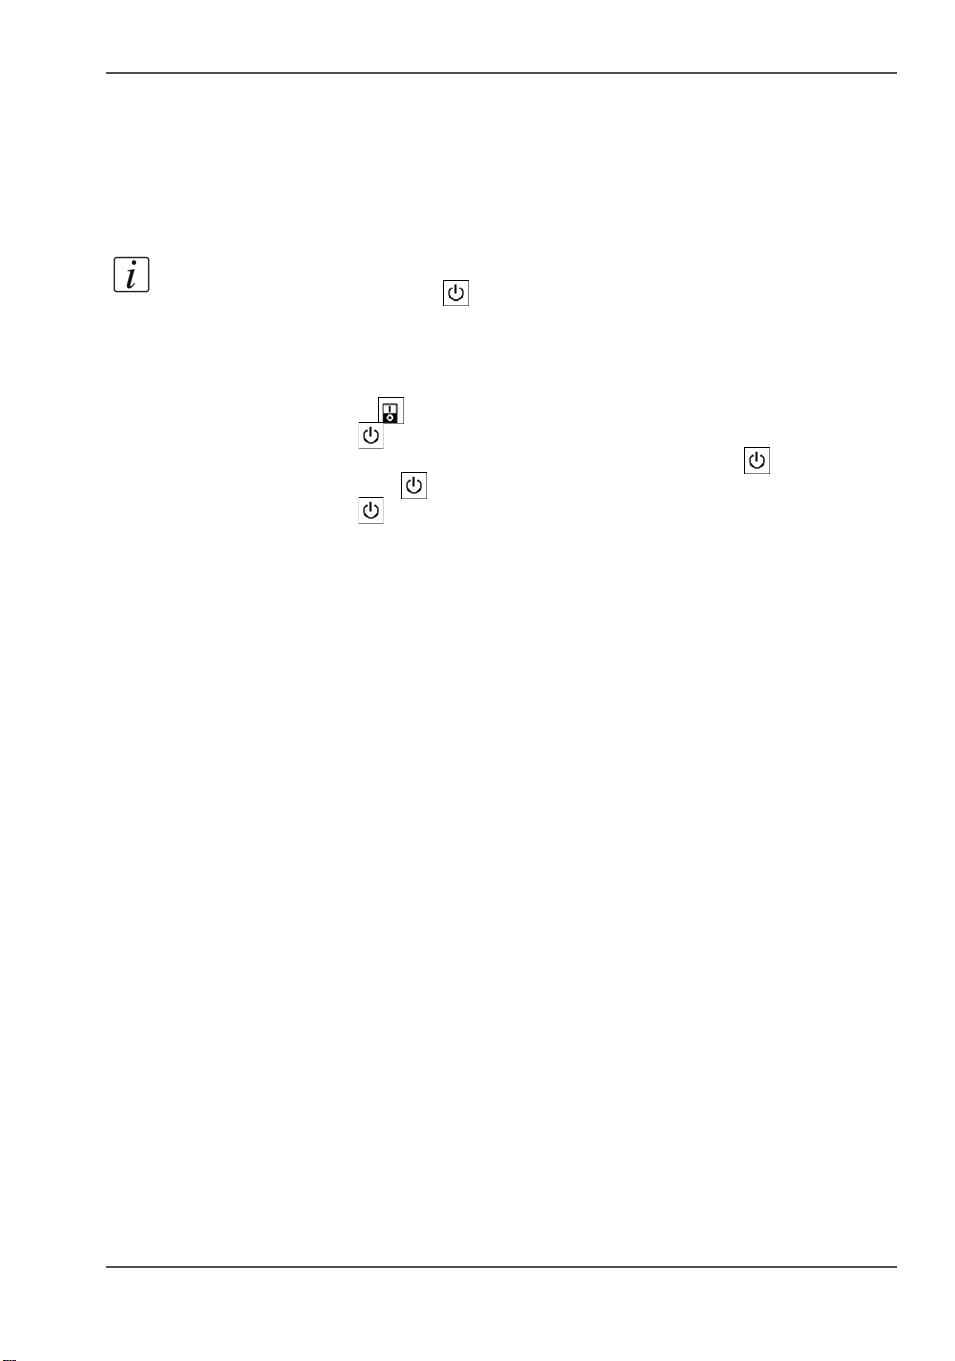
[2] The main power modes (2 – 2)
Power mode Description Status of the
On/Off
button
Going into
sleep mode
Sleep mode The machine automatically
The machine is preparing to go
into sleep mode.
goes from the low-power mode
Blinking
amber
Continuous
amber
into the sleep mode after a
defined time.
You can also place the machine
into the sleep mode manually.
Press the On/Off button to
do this. The machine will enter
the sleep mode as soon as the
list of 'Scheduled jobs' is empty.
The machine will wake up from
the sleep mode when you press
the On/Off button or when
the calendar timer expires. The
machine will also wake up
when a printable job arrives in
the list of 'Scheduled jobs',
provided that the function
'Automatic wake-up' in the
Settings Editor is enabled.
Status of the
Hold button
and
Release
button
On
Off
16 Chapter 2 Power information
Page 18
Turn on the machine
Introduction
This section describes how to turn on the machine when it is completely off.
Note: When the machine is in sleep mode (see ‘The power modes’ on page 14), you
must press the On/Off button to wake up the machine.
Turn on the machine
1. Put the power switch at the back of the machine in the 'I' position.
The On/Off button blinks amber while the machine and the controller start up.
Wait until the operator panel asks you to press the On/Off button .
2. Press the On/Off button .
The On/Off button remains green.
The machine warms up.
Turn on the machine
17
Page 19
Shut down the machine
Shut down the machine
Introduction
This section describes how to shut down the machine completely, for example for
the holidays.
Note: If you want to put the machine into the sleep mode manually (see ‘The power
modes’ on page 14), for example at the end of a working day, you must press the
On/Off button . Then the machine will go into the sleep mode as soon as the list
of 'Scheduled jobs' is empty. When the machine is in the sleep mode, the On/Off
button is continuous amber.
Illustration
[1]
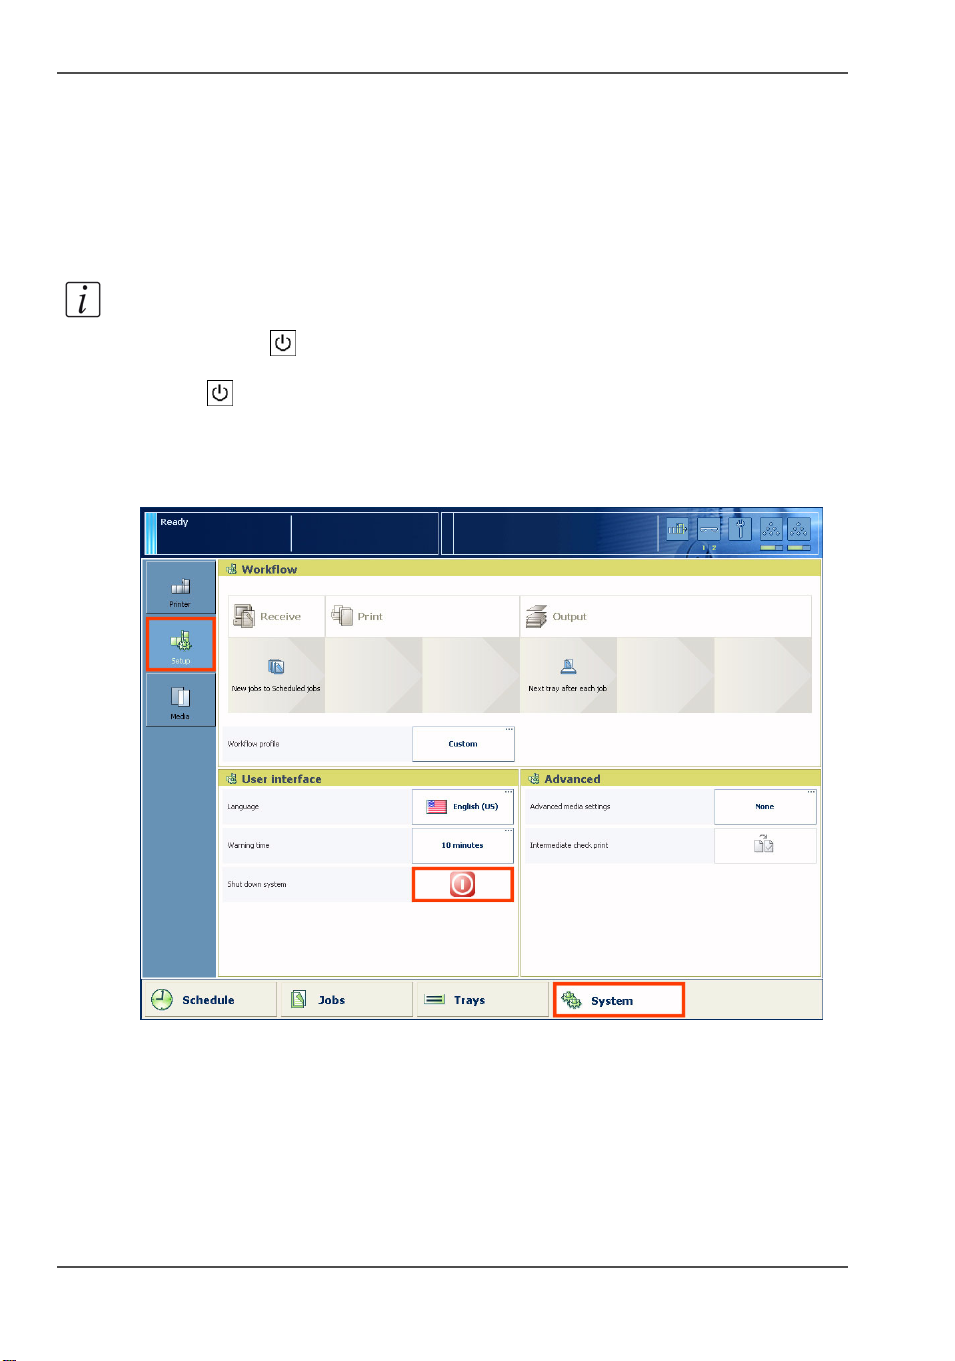
[1] Shut down the machine
Shut down the machine
1. On the operator panel, press the 'System' button.
2. Press the 'Setup' button.
3. Press the 'Shut down system' button in the 'User interface' section.
A dialog box asks you to confirm that you really want to shut down the machine.
18 Chapter 2 Power information
Page 20

Shut down the machine
4. Press 'Yes'.
A message indicates when the shutdown will begin. Wait until the following has
happened.
■ The Hold button and the Release button are off
■ The On/Off button blinks amber
■ The screen of the operator panel is off.
5. Put the power switch at the back of the machine in the 'O' position.
19
Page 21

Shut down the machine
20 Chapter 2 Power information
Page 22

Chapter 3 Overview of the system components
21
Page 23

Introduction to the main system components
Introduction to the main system components
Introduction
The following illustration shows the main system components. The table describes
the main components. Please follow the links in the table for comprehensive
information.
[2]
2
1
1
2
3
3
[2] The main system components
4
4
The main system components
[3]
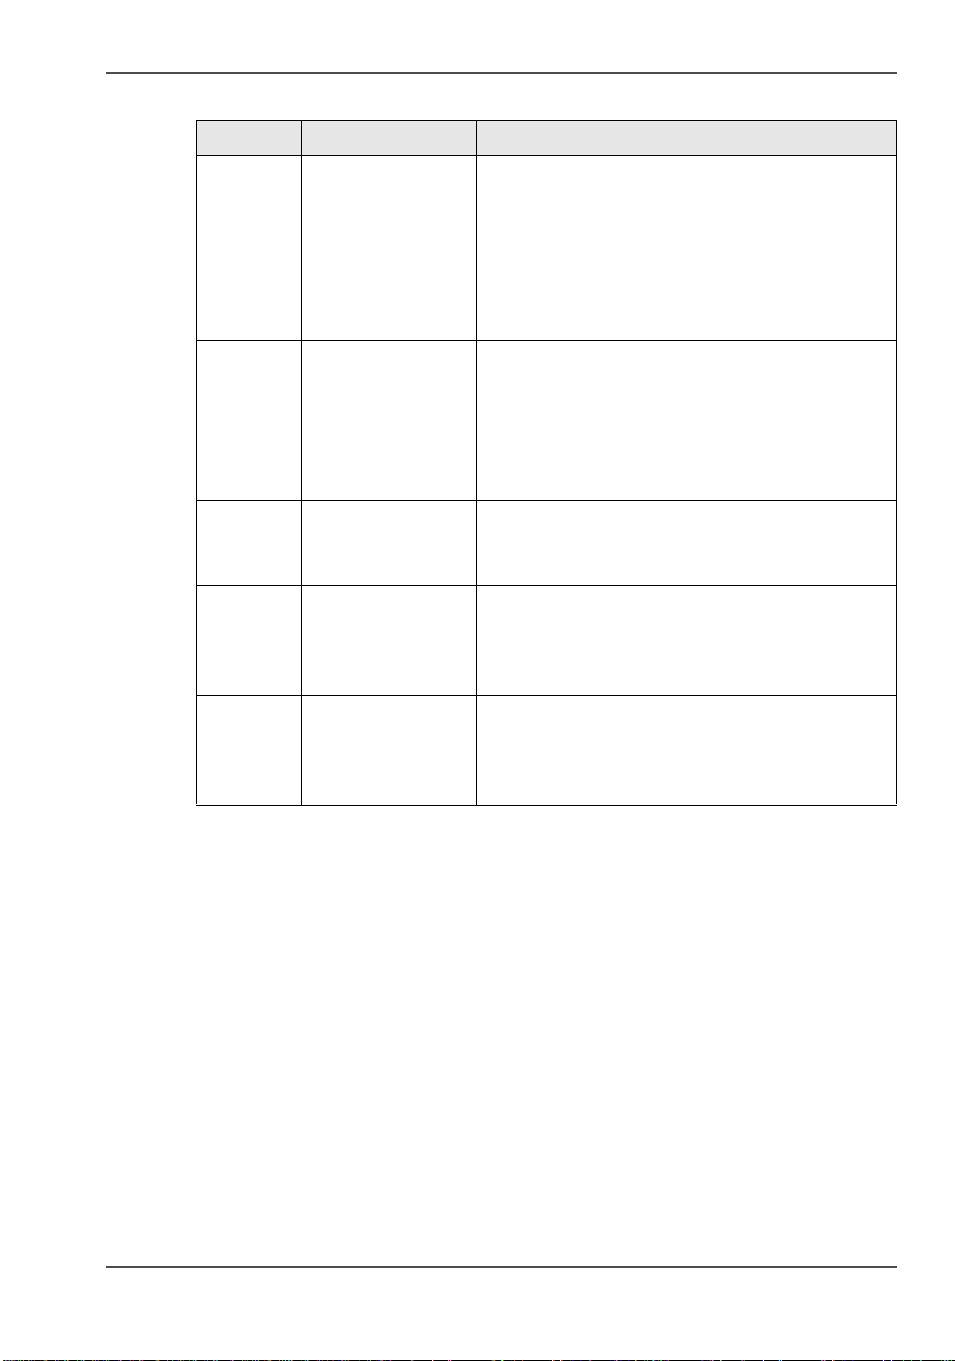
[3] The main system components (1 – 2)
5
7
6
8
Component Function
1 Operator panel The operator panel helps you with your daily
work, for example the scheduling of the jobs.
Furthermore, the operator panel helps you to
solve errors or perform maintenance tasks (see
‘The operator panel’ on page 24).
2 Operator attention
light
The operator attention light enables you to check
the status of the system from a distance (see ‘The
operator attention light’ on page 26).
3Roll feeder
(optional)
A roll feeder is an optional device that adds
paper input capacity to your printer. When you
use a roll feeder, you can only use 1 or 2 paper
modules. A combination of 3 paper modules and
a roll feeder is not possible. The operator panel
displays the roll feeder and gives feedback about
the status of the roll feeder. For example whether
the roll is full or empty. Please refer to the
documentation of the roll feeder manufacturer
for more information, for example about
replacing an empty roll.
22 Chapter 3 Overview of the system components
Page 24
Introduction to the main system components
[3] The main system components (2 – 2)
Component Function
4 Paper module The paper module contains 4 paper trays. The
paper trays contain the media that will be
printed. The default configuration of the system
contains 1 paper module. You can add 1 or 2
more paper modules to the default configuration
to increase the media input capacity (see ‘The
paper modules’ on page 31).
5 Engine module The engine module contains the components that
print the media. Access to the engine module is
only required when a paper jam occurs or when
maintenance is required. The doors at the
left-hand side and right-hand side of the engine
module give access to the toner units.
6 Stacker The stacker is the output location of a default
configuration. The system supports up to 3
stackers (see The output locations on page 28).
7 Finisher (optional) The finisher on top of the stacker is an optional
output location for the print jobs. The finisher
can staple the jobs (see The output locations on
page 28).
8 Stacker/stapler
(optional)
The stacker/stapler (iMFS) is an optional output
location for the print jobs (see The output
locations on page 28). The stacker/stapler
supports a large number of media sizes.
23
Page 25

The operator panel
The operator panel
Introduction
The operator panel is a touch screen panel. You must touch the buttons on the
operator panel to access the various functions. The operator panel is divided into 4
main views. The taskbar at the bottom of the screen contains the buttons that give
access to the 4 main views. Furthermore, the operator panel has 2 hardkeys ( and
) at the bottom of the panel.
This section gives an overview of the main keys and buttons of the operator panel.
Note: You can clean the screen of the operator panel with a 50% mix of water and
isopropyl alcohol (K2). Use a lint-free cloth. Always put the cleaner onto the cloth
and not directly on the screen.
Illustration
[3]
3 4 5 6
1 2
[3] The operator panel
24 Chapter 3 Overview of the system components
Page 26
The main components of the operator panel
[4]
[4] The main components of the operator panel
Component Function
The operator panel
1 Hold key
■ Put the machine on hold
■ Stop printing after a set
■ Stop printing as soon as possible (see
‘Stop a job’ on page 45).
2 Release key
■ Allow the machine to print
■ Resume printing when the machine is on
hold.
3 'Schedule' button Access the 'Schedule' view (see
‘Introduction to the 'Schedule' view’ on
page 37).
4 'Jobs' button Access the 'Jobs' view (see ‘Introduction to
the 'Jobs' view’ on page 48).
5 'Trays' button Access the 'Trays' view (see ‘Introduction to
the 'Trays' view’ on page 89).
6 'System' button Access the 'System' view
(see ‘Introduction to the 'Printer' section’ on
page 94)
(see ‘Introduction to the 'Setup' section’ on
page 102)
(see ‘Introduction to the 'Media' section’ on
page 120)
25
Page 27
The operator attention light
The operator attention light
Introduction
The operator attention light informs you about the status of the machine. To improve
the productivity, the operator attention light can warn you some time before the
machine stops. You can set the warning time on the operator panel (see ‘Change the
warning time’ on page 111).
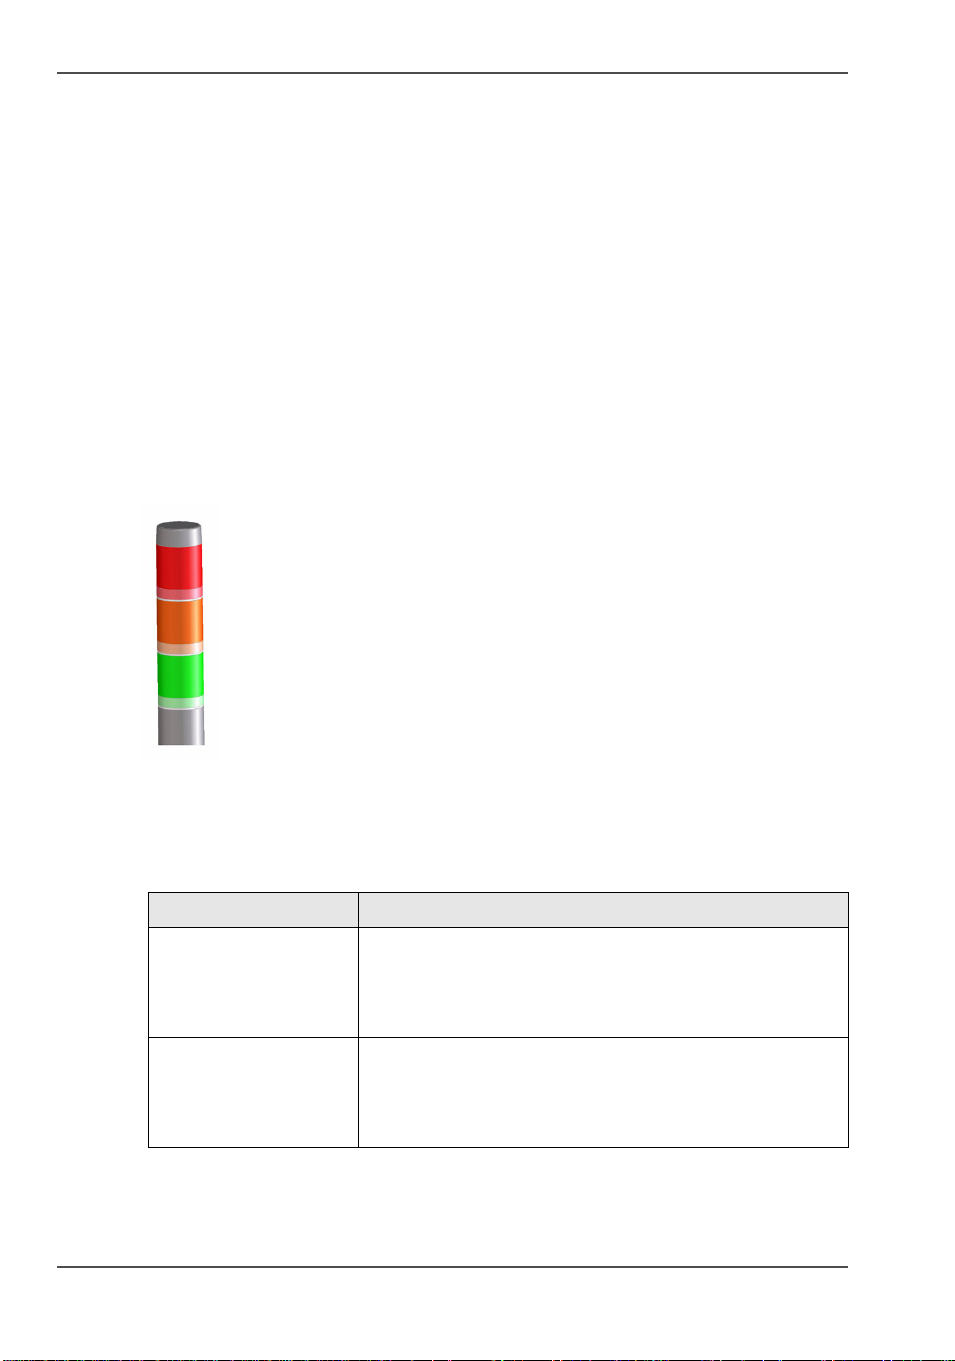
The operator attention light contains 3 lights (red, orange and green) that indicate the
current status of the machine. The colors of the lights match the status that is
currently indicated on the operator panel. For example, when operator interaction is
required soon, both the dashboard (see ‘The dashboard’ on page 34) and the operator
attention light will display an orange warning. The dashboard displays a message
with the required action.
This section describes the meaning of the colors of the operator attention light.
[4]
[4] The operator attention light
Status colors
[5]
[5] The colors of the operator attention light (1 – 2)
Color Description
Red The machine has stopped, for example because a
required media type is not available or an error has
occurred.
Operator attention is required now.
Orange The machine will stop soon, for example because an
output location is almost full. The orange light lights up
when the machine reaches the warning time.
Operator attention is required soon.
26 Chapter 3 Overview of the system components
Page 28

The operator attention light
[5] The colors of the operator attention light (2 – 2)
Color Description
Green The machine is busy printing. The machine can print
longer than the defined warning time.
Operator attention is not required.
All lights off The machine is idle. There are no jobs scheduled for
printing.
27
Page 29

The output locations
The output locations
Introduction
The machine supports several output locations for the printed jobs. The default
configuration of your machine contains a stacker and the system output. The finisher
and the stacker/stapler are optional output locations. Furthermore, you can connect
several optional external finishers to the machine.
Note: You need the optional finisher, the optional stacker/stapler or another
optional external finisher to staple the jobs.
Illustration
[5]
3
2
[5] The output locations
4
6
1
5
28 Chapter 3 Overview of the system components
Page 30
Overview of the output locations
[6]
[6] Description of the output locations (1 – 2)
Component Description
1 'Stacker' The stacker is the default output location of the machine. The
stacker capacity is 6,000 sheets, in 2 stacks of 3,000 sheets
each (80 g/m
The stacker does not contain staple cartridges. Therefore, the
stacker cannot be the output location for jobs that require
staples.
2 'System output' The system output is the output location for the following
prints.
■ Error prints
■ Configuration reports
■ Job tickets
■ The test sheets for the media registration.
Make sure that you regularly remove the sheets from the
system output.
2
or 20 lb. bond).
The output locations
3'Finisher'
(optional)
4 'Finisher upper
output'
The optional finisher contains the following output trays.
■ 3 output trays
■ 1 upper output (see no. 4 below)
The finisher contains 2 staple cartridges to staple the jobs.
The 3 output trays can receive A4, Letter and similar media
sizes. Stapled jobs (A4, Letter and similar media sizes only)
go into the output trays. The total capacity of the output trays
2
is 3,700 sheets (80 g/m
or 20 lb bond).
Note: The output trays cannot receive tab sheets.
The finisher upper output is part of the finisher. The upper
output can receive all formats. However, the upper output is
mainly intended for large media or jobs with mixed size
media. The maximum capacity of the upper output is 500
2
sheets (80 g/m
or 20 lb bond).
Note: The upper output does not contain staple
cartridges. Therefore, the upper output cannot be
the output location for jobs that require staples.
29
Page 31

The output locations
[6] Description of the output locations (2 – 2)
Component Description
5 'Stacker/stapler'
(optional)
6 'Stacker/stapler
upper output'
The optional stacker/stapler contains 1 staple cartridge to
staple the jobs. The staple cartridge can staple your document
with 1 or 2 staples. The stacker/stapler can stack and staple
various media sizes. The device supports the stapling of
mixed media sizes, as long as the width of the media is the
same. The capacity of the lower tray is 2,000 sheets (80 g/m
or 20 lb bond).
Note: The stacker/stapler does not support the
stapling of tab sheets.
The upper output is the upper tray of the stacker/stapler. The
2
capacity of the upper output is 250 sheets (80 g/m
or 20 lb
bond).
2
30 Chapter 3 Overview of the system components
Page 32

The paper modules
Introduction
The paper trays contain the media that are required for the print jobs. The default
configuration of the machine contains 1 paper module with 4 paper trays. You can
add 1 or 2 more paper modules to the machine. Then the total number of paper trays
is extended to 8 or 12 respectively. You can find more information about the
capacities of the paper trays and the supported media size in the appendix of this
manual.
This section describes the control panel on each paper module.
Note: You can use the control panel on the paper modules to open the paper trays
and load the media. However, the recommended way to open the paper trays and
assign the media is via the 'Schedule' view. You can also open the paper trays and/or
assign the media via the 'Trays' view (see ‘Assign the media to a paper tray’ on
page 92).
Illustration
[6]
5
1
1
2
2
1 3
2
4
The paper modules
3
3
4
4
[6] The control panel on the paper modules
The control panel
Each paper module contains a control panel next to the upper paper tray. The control
panel consists of 4 sections that correspond with the 4 paper trays. Each section
displays the current filling level of the corresponding paper tray. Furthermore, the
control panel indicates whether or not the media in the paper tray is assigned. The
following table describes the various parts of the control panel.
31
Page 33

The paper modules
[7]
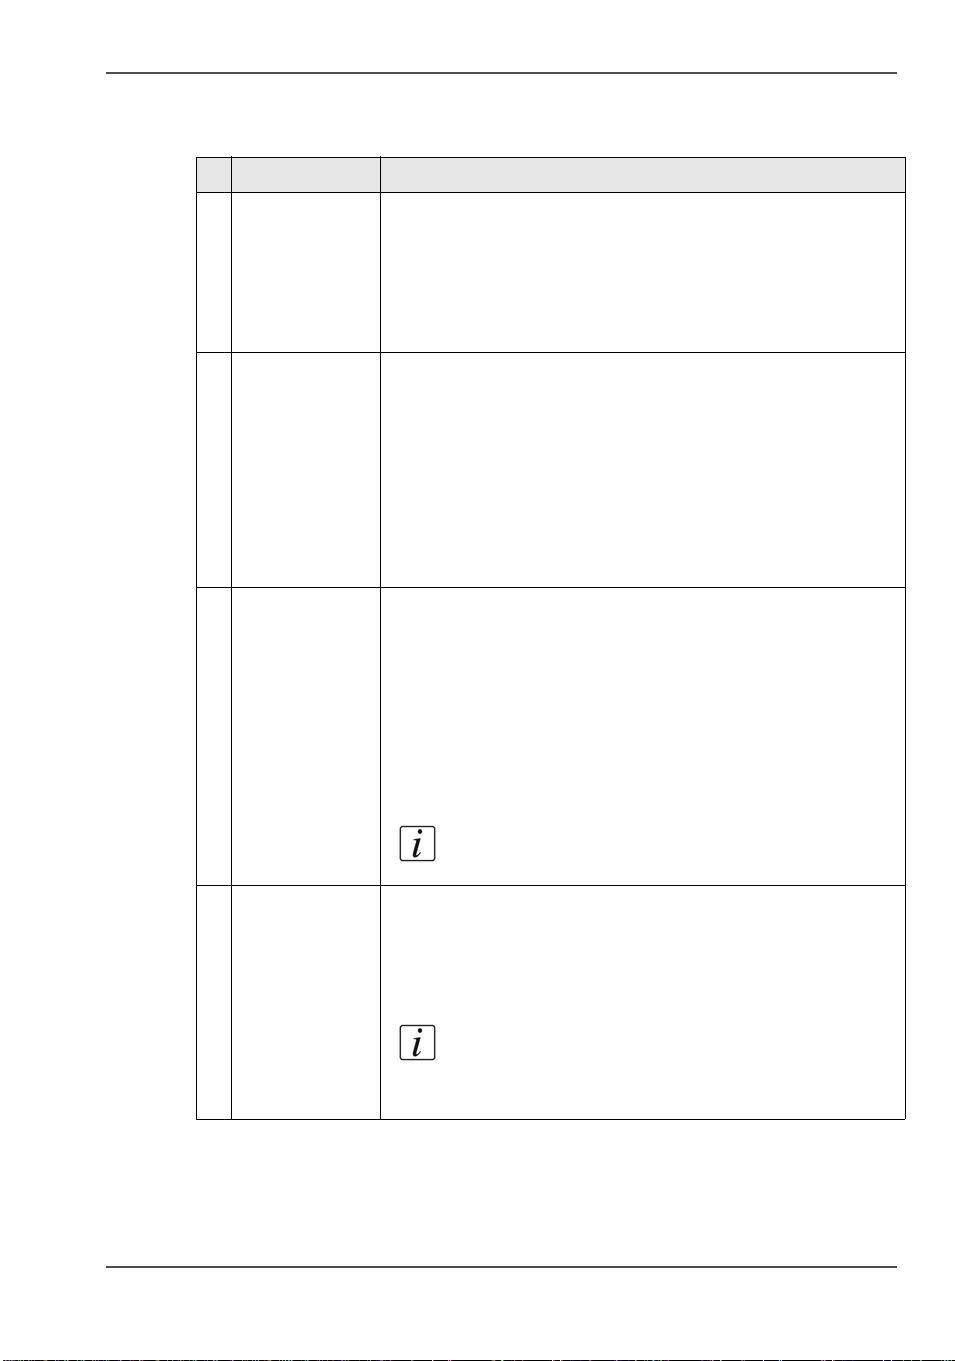
[7] The parts of the control panel
Number Description
1 The LEDs indicate the current amount of sheets in the
2 Press the button to open the corresponding paper tray. You can
3 When the check mark is green, the media in the paper tray is
4 When the arrows are red, the media in the paper tray is not
5 The 'Not assigned' button. This button applies to the paper tray in
corresponding paper tray. Each lit-up LED indicates the presence
2
of about 100 sheets (based on media of 80 g/m
or 20 lb bond).
only open 1 paper tray at a time.
defined. The system knows which media is in the paper tray.
defined. The system does not know which media is in the paper
tray. The 'Trays' view on the operator panel indicates that no
media is assigned to the paper tray.
which you have just placed the media.
You can press the 'Not assigned' button when you load a new
media type into a paper tray without defining this media type on
the operator panel first. Then the printer cannot accidentally use
the media in this paper tray before the media is correctly defined
on the operator panel. You can define the media type in the 'Trays'
view on the operator panel later (see ‘Assign the media to a paper
tray’ on page 92).
Note: Make sure that the paper tray is open when you
press the 'Not assigned' button.
32 Chapter 3 Overview of the system components
Page 34

Chapter 4 Working with the operator panel
33
Page 35

The dashboard
Introduction
The dashboard
Introduction
The dashboard is the upper blue part of the operator panel. The dashboard is always
visible, irrespective of the current view (see ‘The operator panel’ on page 24). The
dashboard gives the following feedback.
■ The status of the system
■ The current process
■ Instructions for the operator
■ The status of the supplies
■ The status of the external finisher, if applicable
■ Whether maintenance is required.
Illustration
The following illustration shows the dashboard while the machine is busy. The
vertical status bar is green. No action is required.
[7]
[7] The dashboard - No action is required
The following illustration shows the dashboard while the machine is busy. The
vertical status bar is orange. Next to the status bar, the dashboard displays a message
that indicates which action is required soon.
[8]
[8] The dashboard - Action is required soon
34 Chapter 4 Working with the operator panel
Page 36

The parts of the dashboard
[8]
[8] The dashboard (1 – 2)
Number Function
1 Display the status of the machine, for example 'Initializing...',
2 Display the file name of the current job (for document
The dashboard
'Printing...' or 'Printing will stop...'. Each status message can
have a sub-message with additional information.
printing) or current stream (for stream printing).
Furthermore, the progress of the current job is displayed.
For document printing, the counter can display the following
information.
■ Set X of Y
■ Page X of Y
■ Sheet X of Y or Sheet X.
X represents the current status of the print job. Y represents
the total number of sets, pages or sheets of a print job.
If the sorting method for a job is set to 'By set', and a set
contains at least 40 pages, then the dashboard displays the set
count (Set X of Y) and the page count (Page X of Y) for the
set. If a set contains less than 40 pages, then the dashboard
only displays the set count (Set X of Y).
If the sorting method for a job is set to 'By page', or when you
print stream jobs, the dashboard only displays a sheet count.
35
Page 37

The dashboard
[8] The dashboard (2 – 2)
Number Function
3 Display the action that you must do now or soon. The colors
4 ■ Display the status of the external finisher, if applicable.
of the vertical status bar at the left-hand side match the colors
of the operator attention light (see ‘The operator attention
light’ on page 26). When the color is orange or red, a message
indicates the required action.
Orange means that action is required soon. How long before
an upcoming action the operator panel starts to display the
message depends on the defined warning time (see ‘Change
the warning time’ on page 111).
Red means that action is required now.
Note: The operator panel can only display one
message at a time. When there are more messages,
the operator panel displays the first required or
most important message.
■ Display the status of the staple cartridges (see ‘Check the
status of the staple cartridges’ on page 98).
■ Display a warning that maintenance is required. When
maintenance is required soon, the maintenance icon
becomes orange . When maintenance is required now,
the maintenance icon becomes red .
■ Display the status of the toner reservoirs (see ‘Check the
status of the toner reservoirs’ on page 96).
Note: Only key operators who received the
special maintenance training are allowed to do
maintenance tasks.
36 Chapter 4 Working with the operator panel
Page 38

The Schedule view
Introduction to the 'Schedule' view
Introduction
The 'Schedule' is your daily planning board for print jobs. The 'Schedule' helps you
to keep the machine running.
This section shows and describes the main parts of the 'Schedule'.
Note: The descriptions of the colors of the bars and the indication of the required
amount of sheets are only valid for document printing. For streaming jobs , all the
bars remain grey until the paper trays are empty or the output locations are full.
Then the machine stops and the bars become red. Furthermore, the media toolbar
does not indicate the required amount of sheets.
The 'Schedule' view
[9]
Introduction to the 'Schedule' view
[9] The 'Schedule' view
37
Page 39

Introduction to the 'Schedule' view
1. The jobs pane
The jobs pane shows the jobs on a timeline. The width of the job corresponds to the
(remaining) print time. A vertical line separates the jobs. The vertical line moves to
the left as the printing of a job progresses.
An icon and the job name represent a job. The icon indicates the state of the job, for
example printing .
Furthermore, the icon indicates the stop moments of the machine. For example,
when the setting 'Confirm start of job' in the workflow profiles (see ‘Work with the
workflow profiles’ on page 104) is set to 'On' or when you use the 'Stop after job'
function.
2. The 'Required media' pane
The 'Required media' pane displays the media that are required for each scheduled
job. For each required media, the media properties are displayed (see ‘Introduction
to the 'Trays' view’ on page 89). The bars show the availability of the media. The bars
can have the following colors.
[9]
[9] The colors of the bars
Color of the bar Description
Green The required media is available.
Orange The media is required in the future, but not available then. For
example because the paper trays do not contain sufficient
sheets of the required media.
Yellow The system cannot determine the exact number of sheets that
is available in the paper trays.
Red The media is required now, but not available. The job can
only start when you load the required media.
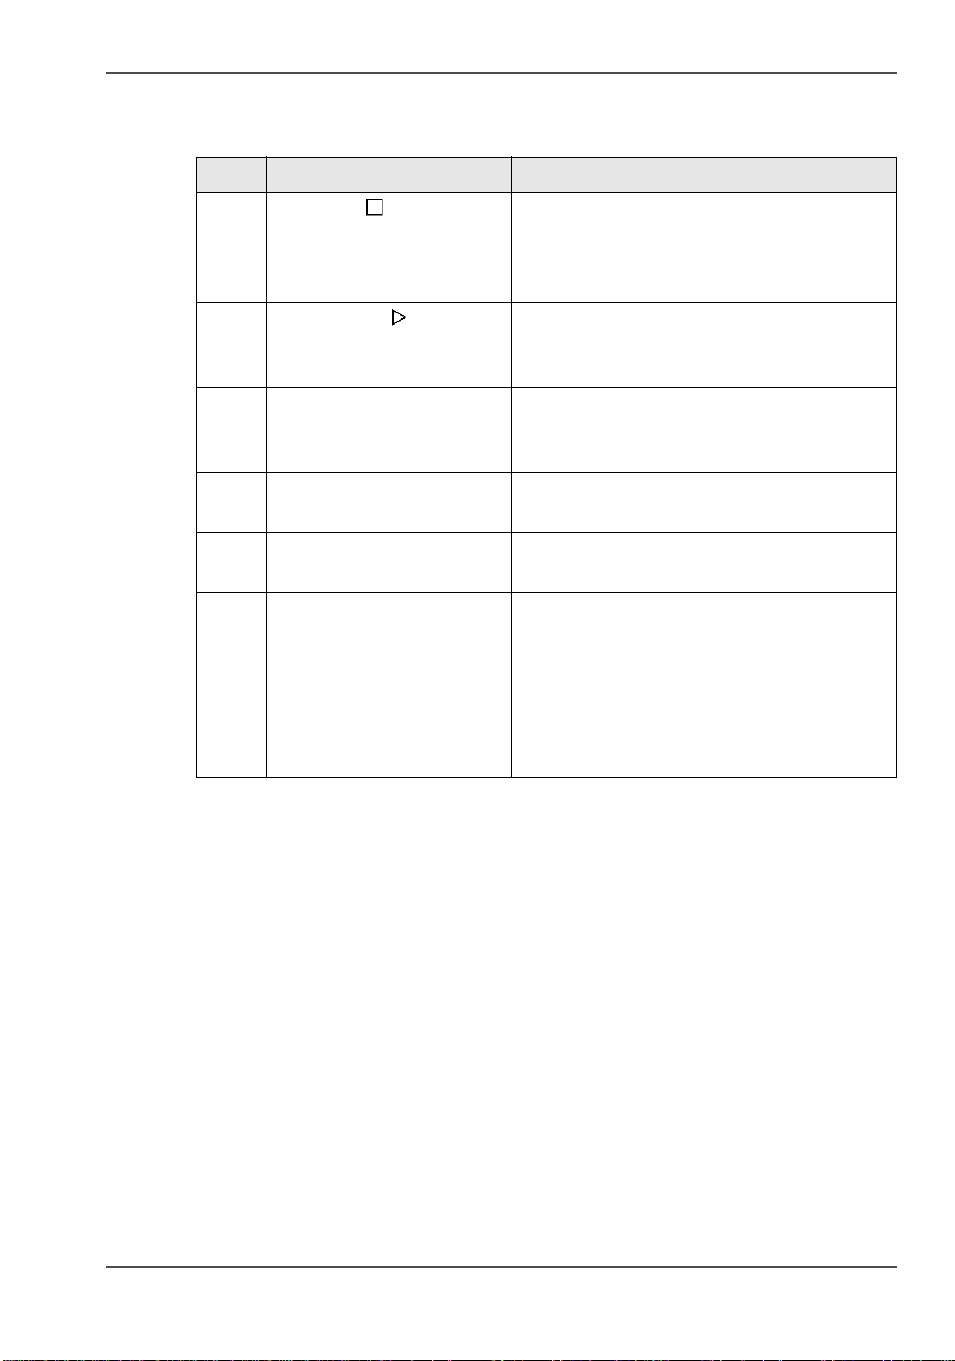
When you print small jobs, the bars for these jobs may not be completely visible. To
prevent that you do not see the status of these small jobs, the operator panel can show
the following images.
Note: When you set the zoom control (5) to a shorter time-scale, in most cases the
operator panel will display bars for these small jobs.
38 Chapter 4 Working with the operator panel
Page 40

[10]
[10] The possible display of small jobs
Image Description
[10]
[11]
[12]
3. The media toolbar
The media toolbar displays the following information for the media that is selected
in the 'Required media' pane. Furthermore, the media type toolbar contains the 'Load'
button to load and assign the required media.
Introduction to the 'Schedule' view
Green. The required media is available.
Orange. The media is required in the future, but not available
then. For example because the paper trays do not contain
sufficient sheets of the required media.
Red. The media is required now, but not available. The job
can only start when you load the required media.
39
Page 41

Introduction to the 'Schedule' view
[11]
[11] The icons in the media toolbar
Icon Description
[13]
The list of 'Required media' shows the required media for the
scheduled jobs. When the paper module indicator is
completely grey, this means that not one of the required
media is available in the paper trays.
[14]
The list of 'Required media' shows the required media for the
scheduled jobs. When a paper tray is highlighted in green, the
highlighted paper tray contains a media that is required by
one of the scheduled jobs.
[15]
The list of 'Required media' shows the required media for the
scheduled jobs. When a paper tray is highlighted in blue, the
highlighted paper tray contains the media that is also
highlighted in blue in the list of 'Required media'.
[16]
A job can require more sheets of a certain media than is
available in the paper trays. This indicator indicates the
number of extra needed sheets. If no horizontal lines are
visible, the paper trays contain enough sheets to print the job.
[17]
A job can require more sheets of a certain media than is
available in the paper trays. This indicator indicates the
number of extra needed sheets. Each horizontal line indicates
the need for about 100 sheets. Here, about 800 extra sheets
are required.
Note: The indicator also indicates the number of
sheets that is required when a media is not
available in the paper trays.
[18]
A job can require more sheets of a certain media than is
available in the paper trays. This indicator indicates the
number of extra needed sheets. Each horizontal line indicates
the need for about 100 sheets. Here, more than 1,500 extra
sheets are required.
4. The output locations pane
The output locations pane displays the output locations that are required for the
scheduled jobs. The bars show the availability of the output locations. The bars can
be the following colors.
40 Chapter 4 Working with the operator panel
Page 42

[12]
[12] The colors of the bars
Color of the bar Description
Green The output location is required and available.
Orange The output location is required in the future, but not available
Red The output location is required now, but not available. For
5. The zoom control
The zoom control enables you to adjust the time scale visible in the 'Schedule'. When
you press the zoom button, a drop-down list appears. Then you can select the desired
time scale.
Introduction to the 'Schedule' view
then. For example, because the output location will be full
soon.
example, because the output location is full.
41
Page 43

Load the media
Load the media
Introduction
This section describes how to load the media into a paper tray.
When you load the media via the 'Load' button in the 'Schedule', the paper tray is
automatically assigned to the correct media.
When you load and assign the media via the 'Assign' button in the 'Trays' view, you
must assign the paper tray to the loaded media manually.
When no external finisher is connected to the machine, you must put all the media
types face up and header up into the paper trays. The tabs of tab sheets must be at the
right-hand side. When an external finisher is connected to the machine, it is possible
that you must put the media into the paper trays in a different way. Refer to the
documentation of the external finisher for more information about how to place the
media.
When to do
■ The 'Schedule' displays a red bar next to a required media. The red bar indicates
that a scheduled job now requires a media that is not available in the paper trays.
■ The 'Schedule' displays an orange bar next to a required media. The orange bar
indicates that a scheduled job requires media which is either not available in the
paper trays or which is available, but not in sufficient quantity to finish the job.
■ The current job requires more of the same media than is currently loaded in the
paper trays. You can add more of the required media into another paper tray.
■ You already want to load and assign media that are required for the next job (work
ahead).
Attention: Always put the stack of media aligned with the left-hand side of the
paper guides inside the paper trays, as indicated on the sticker inside the paper
trays.
42 Chapter 4 Working with the operator panel
Page 44

Illustration
[19]
[19] The sticker inside the paper trays indicates how to load the media
Load the media
1. Put a small stack of media into the paper tray.
2. Press the green handle on the right-hand guide and push the guide against the edge
of the media.
3. Turn the green knob to adjust the front guide and the rear guide.
4. Put the rest of the media on top of the small stack.
Note: If you want to assign the media later you must press the 'Not assigned' button
(see ‘The paper modules’ on page 31), as indicated on the right-hand side of the
sticker.
Load the media
SR
SR
43
Page 45

Instructions for printing to the stacker/stapler (iMFS)
Instructions for printing to the stacker/stapler (iMFS)
Introduction
Note: This section only applies to the use of oriented media and tab sheets in
combination with the optional stacker/stapler (iMFS).
The machine supports oriented media. Oriented media are media of which the front
side differs from the back side. An example of oriented media is media with a
company logo. If you use oriented media and print to the optional stacker/stapler,
you must place the media into the paper trays as follows:
■ Face up and header down (for long-edge feed)
The face of the media, for example a company logo, is visible and point towards
the front of the printer.
■ Face up and header to the left (for short-edge feed).
The face of the media is visible and points towards the left-hand side of the
printer.
This orientation makes sure that the documents are stapled at the correct position.
Special instructions for the use of oriented media
When a job contains oriented media but no tab sheets, you must put this media
header down into the paper tray. The media must align with the header-down
orientation of the printed images (header down for long-edge feed and header to the
right for short-edge feed).
Special instructions for the use of tab sheets
When a job contains tab sheets, you must do the following.
■ Put all the oriented media for the job, including the tab sheets, header up and
header to the left (for short-edge feed) into the paper tray.
■ Temporarily change the default media orientation in the Settings Editor
application on the Smart Imager controller to 'Header-up'.
To do this, you must go to the setting 'Preferences' - 'Print job defaults' 'Stacker/stapler (iMFS)' or 'Stacker/stapler upper output' - 'Header orientation'.
There you can click the radio button for 'Header-up'.
Jobs that contain tab sheets are sent to the stacker/stapler when no stacker is present.
When a stacker is present, the jobs are sent to the stacker to improve the stack quality.
44 Chapter 4 Working with the operator panel
Page 46

Stop a job
Introduction
When the machine is printing a job, you can stop the machine at the following
moments.
■ Stop after a set
■ Stop after a page
■ Stop after a job.
The following table gives an overview of the stop behavior of the machine. The
procedures in this section describe how to stop the machine via the operator panel.
Note: You can also interrupt a job by ejecting a stack of sheets from the stacker.
When you press the eject button next to the stacker door 1 time, the stacker ejects the
stack when a set is ready. When you press the eject button 2 times, the stacker ejects
the stack as soon as possible.
Stop a job
45
Page 47

Stop a job
The stop behavior of the machine
[13]
[13] When does the machine stop
When Then
You press the Hold key 1 time The machine stops when a set of the
You press the Hold key 2 times The machine stops as soon as possible
active print job is ready. It depends
on the set size and the moment you press
the key, when the machine will stop. For
example, when you have a large set of
1,000 pages and you press the key after
the first page, the printing will continue
for a couple of minutes.
(after a page, in most cases within 30
seconds).
You press the 'Stop after job' button in
the toolbar of the 'Jobs' view
The 'Check first set' setting in a
'Workflow profile' is 'On'(see ‘Work
with the workflow profiles’ on page 104)
and this setting is also enabled in the job
The 'Confirm start of job' setting in a
'Workflow profile' is 'On'
Note: When you print streaming jobs or jobs that consist of 1 large set, you must
always press the Hold key 2 times to stop the machine as soon as possible.
Stop after a set
Press the Hold key 1 time.
The red LED of the Hold key starts to blink.
The machine stops when a set of the active print job is ready.
The machine stops when the selected
job is ready.
The 'Jobs' view displays a horizontal red
and white stop bar below the selected
job.
The 'Schedule' view displays a vertical
stop bar behind the selected job.
The machine stops each time the first set
of a print job is ready. You can check the
first set before you continue the print
job.
The machine stops each time at the start
of a job. You must start each job
manually.
46 Chapter 4 Working with the operator panel
Page 48

Stop after a page
Press the Hold key 2 times.
The red LED of the Hold key starts to blink.
The machine stops as soon as possible.
Note: The memory of the machine can contain up to 50 pages. Therefore, it is
possible for the machine to print more than a set before the machine stops.
Stop after a job
1. In the list of 'Scheduled jobs' in the 'Jobs' view, press the job after which the machine
must stop.
2. Press 'Stop after job'.
The machine stops as soon as the selected job has been printed. A red and white stop
bar indicates that the stop-after-job function is active. Press 'Stop after job' again to
[20]
remove the stop bar and continue printing.
Stop a job
[20] Stop after job
Stop a streaming job or transaction stream
Press the Hold key 1 time.
The red LED of the Hold key starts to blink.
The printer will continue to print the pages that are already in the buffer. When the
buffer is empty, the printer stops.
47
Page 49

Introduction to the 'Jobs' view
The Jobs view
Introduction to the 'Jobs' view
Introduction
The 'Jobs' view enables you to manage the print jobs on the machine locally. This
section describes the items of the 'Jobs' view.
Illustration
[21]
[21] The 'Jobs' view
48 Chapter 4 Working with the operator panel
Page 50

The items of the 'Jobs' view
[14]
[14] Description of the 'Jobs' view (1 – 3)
Number Item Function
1 'Waiting jobs' Display the jobs that are not yet scheduled for
2 'Scheduled jobs' Display the active print job and the jobs that are
3 'Printed jobs' Display the jobs that were printed successfully.
4 'Properties' button Check or change the properties of a job. The
5 'To top' button Give priority to a scheduled job. The job is
Introduction to the 'Jobs' view
printing.
scheduled for printing.
The system only moves the printed jobs to the
list of 'Printed jobs' when the setting 'Job history'
in the Settings Editor is enabled.
button is only enabled when you select 1 job.
Note: You can also press a job 2
times to check or change the
properties of that job.
printed when the active print job is ready (see
‘Give priority to a scheduled job’ on page 56).
The button is only enabled when you select 1
job.
6 'Stop after job'
button
Stop the machine after a selected job (see ‘Stop
a job’ on page 45). The button is only enabled
when you select 1 job.
7 'Delete' button Delete the selected job(s) (see ‘Delete a job’ on
page 57). The button is enabled when you select
1 or more jobs.
49
Page 51

Introduction to the 'Jobs' view
[14] Description of the 'Jobs' view (2 – 3)
Number Item Function
8 'Move' or 'Copy'
button
■ 'Move'
Move a job from the list of 'Waiting jobs' to
the list of 'Scheduled jobs'(see ‘Schedule a
waiting job for printing’ on page 52), or the
other way round (see ‘Print a scheduled job
later’ on page 59).The 'Move' button is only
active when you work with jobs in the list of
'Scheduled jobs' or 'Waiting jobs'.
■ 'Copy'
Send a copy of a job that has been printed
before to the list of 'Waiting jobs' to reprint
the job (see ‘Reprint a job’ on page 54). The
'Copy' button is only active when you work
with jobs in the list of 'Printed jobs'.
The button is enabled when you select 1 or
more jobs.
9 'Proof' button Print 1 copy of a job to check whether the result
of the print job meets your expectation (see
‘Make a proof’ on page 61). The button is only
enabled when you select 1 job.
Note: The proof print is not
subtracted from the number of sets
you defined for this job.
10 'Ticket' button Print an overview of the main job settings and
job parameters (see ‘Print the job parameters’
on page 63). The button is only enabled when
you select 1 job.
50 Chapter 4 Working with the operator panel
Page 52

Introduction to the 'Jobs' view
[14] Description of the 'Jobs' view (3 – 3)
Number Item Function
11 'Bundle' or 'Split'
button
Combine a number of jobs into 1 job, for
example to create a set of documents that are
required for a meeting (see Bundle and split jobs
on page 64).
12 'Select' button Select a number of jobs at the same time. You
can use one of the following:
■ Use 'All' to select all the jobs in the list.
■ Use 'None' to deselect all the jobs in the list.
■ Use 'Invert selection' to turn the selected jobs
into deselected jobs, and the other way
round.
■ Use 'Jobs with available media' to select all
the jobs for which the media are currently
available in the paper trays (see Print all the
jobs for which the media are available on
page 68).
■ Use 'Jobs with label' to select all the jobs with
a certain label (see Print the jobs that have a
label on page 69).
Note: The active print job is only
selected when the machine is on hold.
Note: Whether a button is enabled depends on the number of selected jobs, the state
of the jobs and the list that is active. Not all of the above settings are available for
streaming jobs .
51
Page 53

Schedule a waiting job for printing
Schedule a waiting job for printing
Introduction
When a job is sent to the machine (from a printer driver, a software application or a
scanner), the job arrives in the list of 'Waiting jobs' or 'Scheduled jobs'. You can set
the preferred destination in the workflow profiles on the operator panel (see ‘Work
with the workflow profiles’ on page 104).
When you choose to send the jobs to the list of 'Waiting jobs' to have full control over
the order in which the jobs will be printed, you must manually move the jobs to the
list of 'Scheduled jobs' to print the jobs. However, you can use the options of the
'Select' button to send a number of jobs directly to the list of 'Scheduled jobs'.
This section describes how to schedule a waiting job for printing.
Illustration
[22]
[22] Schedule a waiting job for printing
Schedule a waiting job for printing
1. On the operator panel, press the 'Jobs' button.
2. In the list of 'Waiting jobs', press the job you want to print.
52 Chapter 4 Working with the operator panel
Page 54

Schedule a waiting job for printing
Note: You can use the options of the 'Select' button to select a number of waiting
jobs at once. You can also press a number of jobs one by one. To undo the multiple
selection and only select 1 job, you must press the desired job for 2 seconds. Then
only the desired job is selected.
3. Press 'Move'.
The selected job is moved to the bottom of the list of 'Scheduled jobs'.
53
Page 55

Reprint a job
Reprint a job
Introduction
When the machine has successfully printed a job, the system can move the job to the
list of 'Printed jobs'. This list can temporarily store the printed jobs. The list of
'Printed jobs' is not an archive. It is intended to enable you to reprint a job quicker
and easier. Each printed job of day X remains in the list of 'Printed jobs' for 24 hours.
Then the jobs of day X are automatically removed from the system on 00.00 hours
of day X + 1.
When you reprint a job from the list of 'Printed jobs', the job is not moved. The
original job remains in the list of 'Printed jobs'. The system only sends a copy of the
job to the list of 'Waiting jobs'. You cannot send a job directly to the list of 'Scheduled
jobs'. If you no longer need a job, you can delete the job from the list of 'Printed jobs'.
This section describes how to reprint a job.
Note: The system only moves the printed jobs to the list of 'Printed jobs' when the
setting 'Job history' in the Settings Editor is enabled.
Illustration
[23]
[23] Reprint a job
54 Chapter 4 Working with the operator panel
Page 56

Reprint a job
1. Press the 'Jobs' button on the operator panel.
2. In the list of 'Printed jobs', press the job you want to reprint.
3. Press 'Copy'.
The system sends a copy of the job to the list of 'Waiting jobs'.
4. Press the job in the list of 'Waiting jobs'.
5. Press 'Properties' to change the settings, for example the number of prints.
6. Press 'Move'.
The job is moved to the bottom of the list of 'Scheduled jobs'.
Reprint a job
55
Page 57

Give priority to a scheduled job
Give priority to a scheduled job
Introduction
The list of 'Scheduled jobs' contains the jobs that are scheduled for printing. The
machine prints the jobs in the order in which the jobs arrive in the list of 'Scheduled
jobs'. However, you can give priority to an urgent job in the list. Then that job is
printed as soon as the active print job is ready.
This section describes how to give priority to a scheduled job.
Illustration
[24]
[24] Move a job to top
Give priority to a scheduled job
1. On the operator panel, press the 'Jobs' button.
2. In the list of 'Scheduled jobs', press the job to which you want to give priority.
3. Press 'To top'.
The job is moved to the position below the active print job .
56 Chapter 4 Working with the operator panel
Page 58

Delete a job
Introduction
You can delete 1 or more jobs at a time from each list in the 'Jobs' view. When you
delete a job, the job is removed from the system.
This section describes how to delete a job.
Note: You can only delete the active print job when the machine is on hold (see
‘Stop a job’ on page 45).
Illustration
[25]
Delete a job
[25] Delete a job
Delete a job
1. On the operator panel, press the 'Jobs' button.
2. In one of the lists in the 'Jobs' view, press the job you want to delete.
Note: You can use the options of the 'Select' button to select a number of jobs at
once. You can also press a number of jobs one by one. To undo the multiple selection
57
Page 59

Delete a job
3. Press 'Delete'.
4. Press 'Yes' to remove the selected job from the list and from the system.
and only select 1 job, you must press the desired job for 2 seconds. Then only the
desired job is selected.
A dialog box will ask you to confirm that you really want to delete the selected job.
58 Chapter 4 Working with the operator panel
Page 60

Print a scheduled job later
Introduction
When a job is scheduled for printing, the job is present in the list of 'Scheduled jobs'.
However, for various reasons you can choose to print a job later. For example
because the required media are not available or because you first want to make a
proof (see ‘Make a proof’ on page 61).
This section describes how to print a scheduled job later.
Illustration
[26]
Print a scheduled job later
[26] Print a scheduled job later
Print a scheduled job later
1. On the operator panel, press the 'Jobs' button.
2. In the list of 'Scheduled jobs', press the job you want to print later.
Note: From the drop-down list of the 'Select' button, you can also select 'All', 'Jobs
with available media' or 'Jobs with label' to select more jobs at once, except the
active print job . To move the active print job , you must first press the Hold key
. You can also press a number of jobs one by one. To undo the multiple selection
and only select 1 job, you must press the desired job for 2 seconds. Then only the
desired job is selected.
59
Page 61

Print a scheduled job later
3. Press 'Move'.
The job is moved to the bottom of the list of 'Waiting jobs'.
60 Chapter 4 Working with the operator panel
Page 62

Make a proof
Introduction
You can make a proof to check whether the quality and the layout of the output meet
your expectations. When you use the 'Proof' function, the machine prints 1 copy of
the job. You can only make a proof for a job in the list of 'Waiting jobs'.
This section describes how to make a proof.
Note: When you make a proof, the printed set is not subtracted from the defined total
number of sets for a job. For example, when you need 10 sets, the printer will still
print 10 sets after you made the proof. This is different from the checking of the first
set (see ‘Check the first set’ on page 85).
Illustration
[27]
Make a proof
[27] Print a proof
Make a proof
1. Press the 'Jobs' button on the operator panel.
2. In the list of 'Waiting jobs', press the job of which you want to make a proof.
61
Page 63

Make a proof
Note: You can select more than 1 job at a time.
3. Press 'Proof'.
A copy of the job goes to the bottom of the list of 'Scheduled jobs'.
The original job remains in the list of 'Waiting jobs'.
You can recognize a proof by the magnifying glass on the job icon .
62 Chapter 4 Working with the operator panel
Page 64

Print the job parameters
Introduction
You can print an overview of the job settings and the job parameters (the so-called
job ticket) before you print a job. The overview can show you for example which
media the job requires.
This section describes how to print the overview of the job parameters.
Illustration
[28]
Print the job parameters
[28] Print the job parameters
Print the job parameters
1. Press the 'Jobs' button on the operator panel.
2. Press the job for which you want to print the job parameters.
You can only select 1 job at a time.
3. Press 'Ticket'.
The job is sent to the bottom of the list of 'Scheduled jobs'. The job may not be
immediately visible in the list of 'Scheduled jobs'.
You can recognize the job by the prefix @_ in front of the job name.
The printed job ticket is sent to the system output (see ‘The output locations’ on
page 28).
63
Page 65

Bundle and split jobs
Bundle and split jobs
Introduction
Create a bundled job
If you want to combine 2 or more documents into 1 set, for example to prepare a
meeting, you can bundle jobs that are present in the list of 'Waiting jobs'. The original
jobs are removed from the list. The bundled job appears at the bottom of the list of
'Waiting jobs'. The system automatically creates a name for the bundled job that is
based on the name of the first job in the bundle.
The number of copies for the bundled job is initially set to 1. You can handle the
bundled job like any other job. For example, you can move the job to the list of
'Scheduled jobs', edit the job, delete the job or make a proof.
Edit a bundled job
You can define the following properties for a bundled job.
■ The order of the jobs in the bundle
■ The number of sets
■ Whether you want to check the first set of the bundled job.
Note: This section describes the above in separate procedures. However, you can
always access the 'Properties' window and change 1 or more properties at the same
time. You cannot change the properties of the individual jobs in the bundle. To do
this, you must first split the bundled job. Then you can change the properties of each
job.
Split a bundled job
In the list of 'Waiting jobs', you can split a bundled job into the original jobs. The
system removes the bundled job. The individual jobs are added at the end of the list
of 'Waiting jobs'.
This section describes how to create, edit and split a bundled job.
General information
■ When you print a bundled job, the machine prints the number of copies that you
indicated for the bundled job. The number of copies of the original jobs is
ignored.
■ When you stop a job after a set (see Stop a job on page 45), the printing stops
after 1 copy of the complete bundle.
■ The jobs in a bundle are accounted separately under the account ID of the original
jobs.
■ You cannot combine a bundled job with another bundled job.
64 Chapter 4 Working with the operator panel
Page 66

Note: All the jobs in the bundle must have the same output destination. Otherwise,
the operator panel displays a warning message. To continue, you must first split the
job, then change the individual jobs and finally bundle the jobs again.
Illustration
[29]
Bundle and split jobs
[29] Create a bundled job
Create a bundled job
1. From the list of 'Waiting jobs', select the jobs you want to bundle.
You can select the jobs one by one, or use one of the options of the 'Select' button.
2. Press 'Bundle'.
The operator panel displays an overview of the bundled job.
3. If required, use the keys 'Up' and 'Down' in the 'Job order' field to change the order
of the jobs.
4. Press 'OK' to accept the job.
65
Page 67

Bundle and split jobs
Illustration
[30]
[30] Edit a bundled job
Change the order of the jobs in a bundled job
1. Select the bundled job.
2. Press 'Properties'.
3. In the 'Job order' field, select the job you want to move.
4. Use the keys 'Up' and 'Down' to move the job to the required position.
5. Press 'OK'.
Change the number of sets for a bundled job
1. Select the bundled job.
2. Press 'Properties'.
3. Press the 'Number of sets' button.
A numerical keyboard appears.
4. Use the numerical buttons to enter the desired number of sets.
Note: Press the arrow button <- to correct the previous entry or press 'Cancel' to
close the numerical keyboard without saving the changes.
5. Press 'OK'.
The numerical keyboard disappears.
6. Press 'OK'.
66 Chapter 4 Working with the operator panel
Page 68

Check the first set of a bundled job
1. Select the bundled job.
2. Press 'Properties'.
3. Press 'Check first set' when the button states 'Off'.
The text changes from 'Off' to 'On'. A check mark indicates that the checking of the
first set is enabled. The machine will automatically go on hold after the first set was
printed.
4. Press 'OK'.
Split a bundled job
1. Select a bundled job in the list of 'Waiting jobs'.
2. Press 'Split'.
The system adds the original jobs to the end of the list of 'Waiting jobs'.
Bundle and split jobs
67
Page 69

Print all the jobs for which the media are available
Print all the jobs for which the media are available
Introduction
You can select and print the jobs for which the media are currently available in the
paper trays all at once. This improves the productivity because a regular change of
media types is not required. This section describes how to select the jobs for which
the media are present in the paper trays.
Illustration
[31]
[31] Select the jobs for which the media are available
Print the jobs for which the media are available
1. On the operator panel, press the 'Jobs' button.
2. Press the 'Select' button.
3. Press 'Jobs with available media'.
The system selects and highlights the jobs for which the required media are available
in the paper trays.
4. Press 'Move'.
The selected jobs are moved to the bottom of the list of 'Scheduled jobs'.
68 Chapter 4 Working with the operator panel
Page 70

Print the jobs that have a label
Introduction
A label is a name or tag that helps the operator to identify certain jobs on the operator
panel. When a job is sent to the machine, a label can be added to that job. The label
can be any name that helps to identify certain jobs. A label is not connected to job
settings.
The label can be defined in the printer driver, in a job ticket or via an automated
workflow. For example, the label ‘Customer X’ can be added to jobs. Then the
operator can select and print all the jobs for 'Customer X' at once. The operator can
select jobs with a label in the list of 'Waiting jobs' or in the list of 'Scheduled jobs'.
This section describes how to select and print jobs with a certain label.
Note: Automated workflows can be defined through the Settings Editor. You can find
more information in the online help of the Settings Editor.
Illustration
[32]
Print the jobs that have a label
[32] Print the jobs with a label
69
Page 71

Print the jobs that have a label
Print the jobs with a label
1. On the operator panel, press the 'Jobs' button.
2. Press 'Select'.
A drop-down list appears.
3. Press 'Jobs with label'.
A pop-up window with an overview of the available labels appears.
4. Press the desired label.
Note: You can select more than 1 label.
5. Press 'OK'.
The pop-up window disappears.
6. Press 'Move'.
The selected jobs are moved to the bottom of the list of 'Scheduled jobs'.
70 Chapter 4 Working with the operator panel
Page 72

Change the media
Checking and changing the job properties
Change the media
Introduction
When a job is sent to the machine, the desired media will usually be indicated in the
job ticket. However, you can replace the indicated media by another media from the
media catalogue with the same size.
This section describes how to change the media for a specific job. The following 3
illustrations give an impression of the screens you will see when you change a media
in the 'Properties' window.
Illustration
[33]
[33] Select the media to replace
71
Page 73

Change the media
[34]
[34] Select another media
[35]
[35] The media is changed
72 Chapter 4 Working with the operator panel
Page 74

Change the media
1. On the operator panel, press the 'Jobs' button.
2. In the list of 'Waiting jobs' or 'Scheduled jobs', press the job you want to edit.
Note: You cannot select the active print job.
3. Press 'Properties'.
Note: You can also press the job 2 times to access the 'Properties' window. This
function is comparable to double-clicking with a mouse.
4. Press the 'Media' tab.
5. Press the icon of the media you want to change (see figure 33 on page 71).
When the Media catalogue contains media with the same size, the operator panel
will display a list of these media (see figure 34 on page 72).
6. Press the new media you want to use.
7. Press 'OK'.
The new media is assigned to the job (see figure 35 on page 72).
8. Press 'OK'.
Change the media
73
Page 75

Change the number of sets
Change the number of sets
Introduction
When a job is sent to the machine, the desired number of sets will be indicated.
However, you can change the number of sets on the operator panel.
This section describes how to change the number of sets for a specific job.
Note: You can enter any value between 1 and 65,000 for all jobs except the active
print job . To change the number of sets for the active print job , you must first
press the Hold key 1 time. Then you can change the number of sets. You cannot
define a lower value than the number of sets that has already been printed.
Illustration
[36]
[36] Change the number of sets
Change the number of sets
1. Press the 'Jobs' button on the operator panel.
2. In the list of 'Waiting jobs' or 'Scheduled jobs', press the job you want to edit.
3. Press 'Properties'.
74 Chapter 4 Working with the operator panel
Page 76

Change the number of sets
Note: You can also press the job 2 times to access the 'Properties' window. This
function is comparable to double-clicking with a mouse.
4. Press the 'Number of sets' button.
A numerical keyboard appears.
5. Use the numerical buttons to enter the desired number of sets.
Note: Press the arrow button <- to correct the previous entry or press 'Cancel' to
close the numerical keyboard without saving the changes.
6. Press 'OK'.
The numerical keyboard disappears.
7. Press 'OK'.
75
Page 77

Change the output location
Change the output location
Introduction
In the Settings Editor, you can set the default output location for print jobs. However,
you can change the output location on the operator panel for each job individually.
Depending on the configuration of your system, you can select one of the following
output locations.
■ 'Finisher upper output'
■ 'Finisher'
■ 'Stacker' or, if you have more than 1 stacker, 'Left-hand stacker', 'Middle stacker'
or 'Right-hand stacker'.
■ 'Stacker/stapler'
■ 'Stacker/stapler upper output'
■ 'External finisher'.
This section describes how to select another output location for a specific job.
Note: There must be a match between the selected output location and the job
requirements. For example, when a job does not require staples, you can select any
output location. If a job requires 1 or 2 staples, you can only select the output
locations that can staple the jobs, for example 'Finisher' or 'External finisher'
because the 'Stacker' cannot staple the jobs. If you make a combination that is not
possible, the operator panel displays an error message.
76 Chapter 4 Working with the operator panel
Page 78

Illustration
[37]
Change the output location
[37] Change the output location
Change the output location
1. On the operator panel, press the 'Jobs' button.
2. In the list of 'Waiting jobs' or 'Scheduled jobs', press the job you want to edit.
3. Press 'Properties'.
Note: You can also press the job 2 times to access the 'Properties' window. This
function is comparable to double-clicking with a mouse.
4. Press 'Finishing'.
The 'Output location' button shows the currently selected output location.
5. Press the 'Output location' button.
A drop-down list with the available output locations appears.
6. Press the desired output location.
7. Press 'OK'.
77
Page 79

Change the number of staples
Change the number of staples
Introduction
When a job is sent to the machine, a desired number of staples for that job can be
indicated. However, you can change the number of staples on the operator panel.
This section describes how to change the number of staples for a specific job.
Note: There must be a match between the selected output location and the job
requirements. For example, when a job does not require staples, you can select any
output location. If a job requires 1 or 2 staples, you can only select the output
locations that can staple the jobs, for example 'Finisher' or 'External finisher'
because the 'Stacker' cannot staple the jobs. If you make a combination that is not
possible, the operator panel displays an error message.
Illustration
[38]
[38] Change the number of staples
Change the number of staples
1. Press the 'Jobs' button on the operator panel.
2. In the list of 'Waiting jobs' or 'Scheduled jobs', press the job you want to edit.
78 Chapter 4 Working with the operator panel
Page 80

Change the number of staples
3. Press 'Properties'.
Note: You can also press the job 2 times to access the 'Properties' window. This
function is comparable to double-clicking with a mouse.
4. Press 'Finishing'.
The 'Staples' button shows the currently selected number of staples.
5. Press the 'Staples' button.
A drop-down list appears.
6. Press the desired number of staples.
7. Press 'OK'.
79
Page 81

Change the sorting method
Change the sorting method
Introduction
When a job is sent to the machine, the sorting method is usually defined by the
Settings Editor. However, you can change the sorting method on the operator panel.
You can select one of the following.
■ 'By set'
The pages will be sorted in the order 123, 123, 123.
■ 'By page'.
The pages will be sorted in the order 111, 222, 333.
This section describes how to change the sorting method for a specific job.
Illustration
[39]
[39] Change the sorting method
Change the sorting method
1. Press the 'Jobs' button on the operator panel.
2. In the list of 'Waiting jobs' or 'Scheduled jobs', press the job you want to edit.
3. Press 'Properties'.
80 Chapter 4 Working with the operator panel
Page 82

Change the sorting method
Note: You can also press the job 2 times to access the 'Properties' window. This
function is comparable to double-clicking with a mouse.
4. Press 'Finishing'.
The 'Sort' button shows the currently selected sorting method.
5. Press the 'Sort' button.
A drop-down list appears.
6. Press the desired sorting method.
7. Press 'OK'.
81
Page 83

Change the type of offset stacking
Change the type of offset stacking
Introduction
You can use the function 'Offset stacking' to create a visible distinction between sets
or jobs in an output location. When 'Offset stacking' is enabled, each set or job will
be stacked with an offset compared to the previous set or job. You can set the default
type of offset stacking in the workflow profile on the operator panel (see ‘Work with
the workflow profiles’ on page 104). The following table describes when you can
change the type of offset stacking for specific jobs.
[15]
[15] Possibility to change the type of offset stacking per job
When Then
The type of offset stacking is set to 'Sets
(as in job)'
You can change the type of offset
stacking per job via the 'Properties'
window in the 'Jobs' view.
The type of offset stacking is set to
'Jobs', 'Sets (always)', 'Banners' or 'Off'
You cannot change the type of offset
stacking per job. The 'Properties'
window displays 'As in system'.
This section describes the following:
■ The values you can select in the 'Properties' window when 'Sets (as in job)' is set
in the workflow profile
■ How to change the type of offset stacking per job via the 'Properties' window.
Types of offset stacking in the 'Properties' window
When 'Sets (as in job)' is set in the workflow profile, then you can select one of the
following types of offset stacking.
82 Chapter 4 Working with the operator panel
Page 84

[16]
[16] Available types of offset stacking in the 'Properties' window
Illustration
[40]
Change the type of offset stacking
When Then
You select 'Off' All the printed sets are sent to the output
location in one straight stack.
You select 'Each set' All the printed sets are sent to the output
location with an offset between the sets.
You select 'As in document' All the printed sets are sent to the output
location as defined in the job ticket.
[40] Change the type of offset stacking
Change the type of offset stacking
1. On the operator panel, press the 'Jobs' button.
2. In the list of 'Waiting jobs' or 'Scheduled jobs', press the job you want to edit.
3. Press 'Properties'.
Note: You can also press the job 2 times to access the 'Properties' window. This
function is comparable to double-clicking with a mouse.
4. Press 'Finishing'.
83
Page 85

Change the type of offset stacking
The 'Offset stacking' button shows the currently selected type of offset stacking.
5. Press the 'Offset stacking' button.
A drop-down list appears.
6. Press the desired type of offset stacking.
7. Press 'OK'.
84 Chapter 4 Working with the operator panel
Page 86

Check the first set
Introduction
You can indicate that you want to print 1 set of a job first to check the print quality.
When the print quality meets your expectations, you can continue the job.
You can use 1 of the following methods to indicate that you want to check the first
set.
■ Use a workflow profile where 'Check first set' is enabled (see ‘Work with the
workflow profiles’ on page 104). Then the machine always prints 1 set before the
entire job is printed. The machine goes on hold after 1 set is printed.
■ Enable the 'Check first set' function in the 'Properties' option of the 'Jobs' view for
a specific job only. However, this only works when the setting 'Check first set' in
the workflow profiles is set to 'As in job' (see Work with the workflow profiles on
page 104).
This section describes how to indicate that you want to check the first set for a
specific job only.
Note: When you use the 'Check first set' function, the printed set is subtracted from
the indicated total number of sets for a job. For example, when you need 10 sets, the
machine will print the first set and then stop. When you continue the job, the 9
remaining sets are printed. This is different from the making of a proof (see ‘Make a
proof’ on page 61).
Check the first set
85
Page 87

Check the first set
Illustration
[41]
[41] Check the first set
Enable the checking of the first set
Note: You cannot enable the checking of the first set for the active print job or a
job in the list of 'Printed jobs'.
1. On the operator panel, press the 'Jobs' button.
2. In the list of 'Waiting jobs' or 'Scheduled jobs', press the job you want to edit.
3. Press 'Properties'.
Note: You can also press the job 2 times to access the 'Properties' window. This
function is comparable to double-clicking with a mouse.
4. Press 'Check first set' when the button states 'Off'.
The text changes from 'Off' to 'On'. A check mark indicates that the checking of the
first set is enabled. The machine will automatically go on hold after the first set is
printed.
5. Press 'OK'.
86 Chapter 4 Working with the operator panel
Page 88

Shift the image in the document printing mode
Shift the image in the document printing mode
Introduction
When you use pre-printed media with marked locations for specific text, for
example, a misalignment of the text can occur. For example, an address is not exactly
placed in the center of an address field, or an account number is not exactly placed
in the appropriate box. To correct these misalignments, you can shift the image. You
can shift the images on the front side and back side horizontally and vertically.
This section describes how to shift the image.
Illustration
[42]
[42] Shift the image
Shift the image
1. Press the 'Jobs' button on the operator panel.
2. In the list of 'Waiting jobs' or 'Scheduled jobs', press the job you want to edit.
3. Press 'Properties'.
Note: You can also press the job 2 times to access the 'Properties' window. This
function is comparable to double-clicking with a mouse.
4. Press 'Image'.
87
Page 89

Shift the image in the document printing mode
5. Press the - or + buttons to shift the image on the front side or back side of the sheet.
6. Press 'OK'.
88 Chapter 4 Working with the operator panel
Page 90

The Trays view
Introduction to the 'Trays' view
Introduction
The 'Trays' view has the following functions.
■ Display the current content and filling level of the paper trays
■ Open the paper trays and assign the required media for the print jobs (see ‘Assign
the media to a paper tray’ on page 92)
■ Change the media that is currently assigned to a paper tray
■ Assign media to a paper tray when you already loaded the media and pressed the
button for 'Not assigned' on the control panel of the paper module (see ‘The paper
modules’ on page 31).
This section describes the items of the 'Trays' view.
Note: The machine can have 1, 2 or 3 paper modules, possibly combined with a roll
feeder. When the machine has more than 1 paper module, the 'Trays' view displays
all the available paper modules.
Introduction to the 'Trays' view
89
Page 91

Introduction to the 'Trays' view
Illustration
[43]
[43] Example of a configuration with 1 paper module
The items of the 'Trays' view
[17]
[17] Description of the 'Trays' view
Num
Item Function
ber
1 Content of the paper
trays
2 'Open' button Open the selected paper tray to load the media
3 'Assign' button Assign media from the media catalog (see
Indicate the current content and filling level of
the paper trays. The 'Trays' view displays the
parameters of the media that are currently in the
paper trays. The parameters are a combination of
icons and texts (see ‘The paper tray
information’).
(see ‘Load the media’ on page 42).
‘Assign the media to a paper tray’ on page 92).
90 Chapter 4 Working with the operator panel
Page 92

The paper tray information
The 'Trays' view displays the following textual information for each paper tray.
■ The media name, for example 'Normal paper'
■ The media size, for example A3 or A4
■ The media weight, for example 80 g
■ The media color
■ The special characteristics of the media, for example 'cyclic' or 'punched'. In
brackets, additional information is given about these media, for example the
cycle count or the number of holes for punched media.
The 'Trays' view displays the following icons for each paper tray.
[18]
[18] The meaning of the icons
Icon Description
[44]
[45]
[46]
[47]
[48]
[49]
Introduction to the 'Trays' view
The paper tray is empty
The paper tray is full
Note: Each line indicates the presence of about
100 sheets
The paper tray is too full. Please remove sheets from the stack
The plate inside the paper tray is down
The paper tray is open
The paper guides inside the paper tray do not match the
selected media size. You must correct the paper guides or the
selected media
or The paper tray contains media that are fed over the long edge
(LEF) or short edge (SEF) . The small icons indicate
A4 or A4-like media. The large icons indicate A3 or A3-like
media. When you defined a color for a media, the icon can
have that color
The paper tray is in use for one or more scheduled jobs
The paper tray contains tab sheets
The paper tray contains tab sheets that must be processed as
inserts
The paper tray contains inserts
The paper tray contains media that are fed over the long edge
(LEF)
The paper tray contains media that are fed over the short edge
(SEF)
91
Page 93

Assign the media to a paper tray
Assign the media to a paper tray
Introduction
The 'Trays' view has several functions (see ‘Introduction to the 'Trays' view’ on
page 89).
This section describes how to open the paper trays and assign the media in the 'Trays'
view.
Note: The preferred way to load the required media is via the 'Schedule'. There you
can select a media and use the 'Load' button, or press the required media button 2
times.
Illustration
[50]
[50] Change and assign media
Load and assign the media to a paper tray
1. On the operator panel, select the 'Trays' view.
2. Press the paper tray where you want to put the media, for example tray 2.
3. Press 'Open'.
4. Load the media (see ‘Load the media’ on page 42).
5. Close the paper tray.
92 Chapter 4 Working with the operator panel
Page 94

Note: There is a risk that a job is printed on a wrong media.
6. Press 'Assign'.
A window with media names appears. The previous media in the selected paper tray
is highlighted.
Note: The list displays all the media in the media catalog that match the position of
the paper guides inside the closed paper tray. When the list is empty, the media
catalog does not contain media that match the position of the paper guides.
7. Press the name of the loaded media, for example Premium Label.
8. Press 'OK'.
Change the currently assigned media type
1. On the operator panel, select the 'Trays' view.
2. Select the paper tray for which you want to change the assigned media type.
3. Press 'Assign'.
A window with media names appears.
Note: The list displays all the media in the media catalog that match the current
position of the paper guides inside the paper tray. When the list is empty, the media
catalog does not contain media that match the position of the paper guides.
Assign the media to a paper tray
Note: There is a risk that a job is printed on a wrong media.
4. Press the name of the new media type.
5. Press 'OK'.
93
Page 95

Introduction to the 'Printer' section
The System view
The Printer section
Introduction to the 'Printer' section
Introduction
The 'System' view gives access to system settings, system information, media
information and maintenance tasks.
This section gives an overview of the 'Printer' section in the 'System' view.
Overview of the 'Printer' section
[51]
[51] Overview of the 'Printer' section
94 Chapter 4 Working with the operator panel
Page 96

The items of the 'Printer' section
[19]
[19] Description of the 'Printer' section
Number Item Function
1 Toner level Indicates the filling level of the left-hand toner
2 Toner level Indicates the filling level of the left-hand toner
3 Stapler level Indicates the number of staples that stapler 1 of
4 Stapler level Indicates the number of staples that stapler 2 of
5 Stapler level Indicates the number of staples that the stapler of
Introduction to the 'Printer' section
unit (see ‘Check the status of the toner
reservoirs’ on page 96).
unit (see ‘Check the status of the toner
reservoirs’ on page 96).
the finisher has used since the last refill (see
‘Check the status of the staple cartridges’ on
page 98).
the finisher has used since the last refill (see
‘Check the status of the staple cartridges’ on
page 98).
the stacker/stapler has used since the last
replacement.
6 Status of the
external finisher
Indicate whether the optional external finisher is
on-line or off-line.
7 Maintenance tasks Indicate the suggested or required maintenance
tasks.
Note: Only a trained and certified
operator is allowed to perform the
maintenance tasks.
8 'Billing counters' Indicates the total number of prints that have
been made since the printer was installed (see
‘General counter information’ on page 99). You
cannot reset the billing counters.
9 'Day counters' Indicates the number of prints that have been
made since the latest reset. You can always reset
the day counters (see ‘Reset the day counters’ on
page 99).
10 'Toner counter' Indicates the amount of toner that has been used
since the printer was installed. You cannot reset
the toner counter.
95
Page 97

Check the status of the toner reservoirs
Check the status of the toner reservoirs
Introduction
The machine has 2 toner reservoirs. The toner reservoirs are located at the left-hand
side and the right-hand side of the engine module (see ‘Introduction to the main
system components’ on page 22). You can check the status of the toner reservoirs in
the dashboard (see ‘The dashboard’ on page 34) and in the 'System' view. The
'System' view also displays the current filling level of each toner reservoir as a
percentage. The icons in the following table indicate the status of the toner
reservoirs.
This section gives an overview of the possible toner statuses. Furthermore, this
section describes how to check the status.
The meaning of the toner icons
[20]
[20] The toner icons
Tone r icon Description
[52]
[53]
[54]
[55]
[56]
[57]
The toner icon is blue. All 3 blocks of the status bar are green.
The toner reservoir is filled over 75%. Do not add toner.
The toner icon is blue. 2 Blocks of the status bar are green.
The toner reservoir is filled over 50%. You can add 1 bottle of
toner.
The toner icon is blue. 1 Block of the status bar is green. The
toner reservoir is filled over 25%. You can add 2 bottles of
toner.
The toner icon is orange. The status bar contains no more
green blocks.The toner reservoir is filled less than 25%. The
printer can print another 600 sheets. You must add up to 3
toner bottles as soon as possible.
The toner icon is red. The status bar has a red frame. The
toner reservoir is empty. The printing stops. You must add
maximum 3 toner bottles to continue the printing.
The toner icon is grayed out. The status of the toner reservoir
is unknown. This status is only displayed when the system is
initializing.
96 Chapter 4 Working with the operator panel
Page 98

Check the status of the toner reservoirs
1. Check the toner icons in the dashboard.
Note: Follow the steps 2 and 3 to view the status of the toner reservoirs as a
percentage.
2. Press the 'System' button.
3. Press 'Printer'.
The 'System' view displays the current filling level of the toner reservoirs as a
percentage. The percentage matches the blocks that are indicated in the dashboard.
Check the status of the toner reservoirs
97
Page 99

Check the status of the staple cartridges
Check the status of the staple cartridges
Introduction
The optional finishers (see ‘The output locations’ on page 28) can contain staple
cartridges to staple your jobs. You can check the status of the staple cartridges in the
dashboard (see ‘The dashboard’ on page 34) and in the 'System' view. The 'System'
view also displays the number of staples that have been used since the last refill. The
icons in the following table indicate the status of the staple cartridges.
Note: The numbers 1 and 2 below the stapler icons indicate which of the staple
cartridges of the finisher is empty. When your configuration also contains the
stacker/stapler or when your configuration only contains the stacker/stapler, the
numbers are not visible in the dashboard.
The meaning of the stapler icons
[21]
[21] The stapler icons
Stapler icon Description
[58]
[59]
[60]
The stapler icon is blue. The staple cartridges are filled.
The stapler icon is orange. The staple level in one of the staple
cartridges is low (see ‘Finisher: Add staples’ on page 150).
The stapler icon is red. One of the staple cartridges is empty.
The printer stops.
Check the status of the staple cartridges
1. Check the stapler icon in the dashboard.
Note: Follow the steps 2 and 3 to view the number of staples that have been used
since the last refill.
2. Press the 'System' button.
3. Press 'Printer'.
The 'System' view displays the status of the staple cartridges. The 'System' view also
displays the number of staples that have been used since the last refill.
98 Chapter 4 Working with the operator panel
Page 100

Reset the day counters
Introduction
The 'Printer' section of the 'System' view displays 3 types of counters. 2 of these
counters provide information about the number of sheets that have been printed. The
other counter provides information about the amount of toner that has been used.
This section first describes the 3 counters in the 'Printer' section. Then it is described
how to reset the day counters.
General counter information
The following table describes the counters in the 'Printer' section of the 'System'
view.
[22]
Type of counter Description
'Billing counters' The 'Billing counters' section displays the total number of
prints that have been made since the machine was installed.
You cannot reset the billing counters.
Reset the day counters
'Day counters' The 'Day counters' section displays the number of prints that
have been made since the counter was last reset to 0. You can,
for example, reset the day counters at the beginning of a
working day or before you start a new job for a particular
customer.
'Toner counter' The 'Toner counter' section displays the amount of toner that
has been used since the machine was installed. You cannot
reset the toner counter.
The 'Billing counters' and the 'Day counters' provide information about the number
of 1-sided and 2-sided prints that have been made on standard-size and large media.
The length of the media determines whether a media is standard size or large. Media
with a length of less than 390 mm (15.35") are referred to and counted as
standard-size media. Media with a length of 390 mm (15.35") or more are referred
to and counted as large media.
The operator panel displays the media icon ( or ) as a small icon for
standard-size media. For large media, the media icon is big. The media icon is used
in various places on the operator panel, for example in the 'Counters' section, in the
'Trays' view and in the job information.
99
 Loading...