

Page 1

INSTRUCTION MANUAL
KN-302
Network Interface Card
Read this manual before using the card.
Keep readily available for reference.
Page 2

Thank you very much f or your purchase of the Konica KN-302 Network Interface Card.
This INSTRUCTION MANUAL provides instructions on making prints, correct handling of
the machine, and precautions for safety. Please read this manual before printing.
In order to maintain a satisfactory printing performance, please keep this manual readily
available for reference.
Page 3

■ Preface
The Konica KN-302 Network Interf ace Card (KN-302) is a network interface card for the K onica IP-601
Print Controller (IP-601). When the KN-302 is installed in the IP-601, the Konica 7075 Printer/Copier
can be used as a network printer.
Both printer and the print controller are provided with separate instruction manuals individually (Konica
7075 INSTRUCTION MANUAL and Konica IP-601 Print Controller INSTRUCTION MANUAL).
● Registered trademarks
Microsoft, MS and MS-DOS are registered trademarks of U.S. Microsoft Corporation.
Windows™ is a registered trademark of U.S. Microsoft Corporation.
Novell and NetWare are registered trademarks of U.S. Novell, Inc.
Adobe and Acrobat are registered trademarks of U.S. Adobe Systems Incorporated.
Macintosh, Mac and AppleTalk are registered trademarks of U.S. Apple Computer Inc.
UNIX is a registered trademark of The Open Group.
The other company names and trademarks used in this document are the registered trademarks and
trademarks of the associated companies.
● About this manual
This manual describes the procedures for installing the KN-302 Network Interface Card, operating
and setting up the software used to print on a network from Microsoft Windows 95/98/NT4.0/2000
systems, UNIX operating systems, Novell NetWare systems or Macintosh systems. Be sure to read
the contents of the Readme.txt provided for each program contained on the CD-ROM. For more
details on the operation of particular applications, refer to the individual instruction manuals provided
with the product.
Konica is not responsible for the results of using the Konica 7075 Printer/Copier with the IP-601 Print
Controller and KN-302 Network Interface Card system or for the use of this manual.
Use and reproduction of this manual, partly or wholly, without permission is not permitted.
Information included in this manual is subject to change without prior notice.
KN-302 Network Interface Card i
Page 4

Contents
CONTENTS
■ Preface........................................................................................................ i
● Registered trademarks ...............................................................................................i
● About this manual .......................................................................................................i
Chapter 1 KN-302 Overview ............................................................................1-1
■ Features of the KN-302........................................................................... 1-2
■ Installation of the KN-302........................................................................ 1-2
■ Package contents....................................................................................1-2
■ Using the accompanying CD-ROM ......................................................... 1-3
■ Network setting procedures .................................................................... 1-4
● Windows 95/98 configuration (peer-to-peer).......................................................... 1-4
● Windows NT4.0/2000 configuration (LPD/LPR)..................................................... 1-4
● UNIX configuration (lpd/lpr) ................................................................................... 1-5
● NetWare configuration ........................................................................................... 1-5
● AppleTalk configuration.......................................................................................... 1-5
Chapter 2 Setting Up KN-302 and Printer ......................................................2-1
■ General description of the network setup................................................ 2-2
● Assigning IP Address............................................................................................. 2-2
● Accessing Web Utilities.......................................................................................... 2-5
■ Using MAP (Management Access Program) .......................................... 2-6
● Prerequisites for Installation .................................................................................. 2-6
● Installing MAP........................................................................................................ 2-6
● Setting up MAP...................................................................................................... 2-6
● Starting MAP ......................................................................................................... 2-7
■ Using Web Utilities .................................................................................. 2-8
● Main Page.............................................................................................................. 2-9
● Printer Status ....................................................................................................... 2-10
● Advanced Features.............................................................................................. 2-10
● Network Setup ..................................................................................................... 2-11
● Printer Setup........................................................................................................ 2-16
● Language Select.................................................................................................. 2-18
● About Konica........................................................................................................ 2-18
Chapter 3 Windows 95/98 Configuration (Peer-to-Peer Printing)..................3-1
■ Using IP Peer-to-Peer ............................................................................. 3-2
● Basic TCP/IP setup ................................................................................................ 3-2
● Installation of IP Peer-to-Peer ................................................................................ 3-2
● IP Peer-to-Peer setup ............................................................................................ 3-3
● Setting up printer driver ......................................................................................... 3-5
■ Using IPX Peer-to-Peer ........................................................................... 3-6
● Introduction and preparation.................................................................................. 3-6
● Installation of IPX Peer-to-Peer.............................................................................. 3-7
● IPX Peer-to-Peer setup .......................................................................................... 3-8
ii KN-302 Network Interface Card
Page 5

Contents
Chapter 4 Windows NT4.0/2000 Configuration (LPD/LPR Printing)............4-1
■ LPD/LPR setup ....................................................................................... 4-2
● Adding a printer port on Windows NT4.0............................................................... 4-2
● Adding a printer port on Windows 2000................................................................. 4-3
Chapter 5 UNIX Configuration..........................................................................5-1
■ UNIX printing through TCP/IP ................................................................. 5-2
● Introduction ............................................................................................................ 5-2
● Printing overview ................................................................................................... 5-3
● Configuring IP address to the KN-302 ................................................................... 5-4
● lpd UNIX Printing ................................................................................................... 5-5
Chapter 6 NetWare Configuration....................................................................6-1
■ Setup with NWSetup ............................................................................... 6-2
● How to install ......................................................................................................... 6-2
● Using the NWSetup program................................................................................. 6-3
■ Setup for NetWare 3.x ............................................................................. 6-8
■ Setup for NetWare 4.x ............................................................................. 6-9
● Setup information................................................................................................... 6-9
● NDS setup ........................................................................................................... 6-10
● Setup for Bindery Emulation ................................................................................ 6-10
Chapter 7 AppleTalk Configuration ................................................................7-1
■ Setup for printing through AppleTalk ....................................................... 7-2
● Configuration for AppleTalk .................................................................................... 7-2
● Using the NIManage .............................................................................................. 7-2
Chapter 8 Troubleshooting ...............................................................................8-1
■ Resetting the KN-302 to Factory Default................................................. 8-2
■ Status Page............................................................................................. 8-3
■ How to Diagnose Problems..................................................................... 8-4
● Troubleshooting MAP Problems............................................................................. 8-4
● Troubleshooting NetWare Protocol ........................................................................ 8-5
Appendix ............................................................................................. Appendix-1
■ KN-302 Network Interface Card specification ............................ Appendix-2
■ 10/100 Base T UTP cable specifications.................................... Appendix-3
■ KN-302 Factory Default Settings................................................ Appendix-4
■ Information for the TCP/IP network administrator ...................... Appendix-5
● Using DHCP ............................................................................................. Appendix-5
● Using BOOTP to assign IP Address ......................................................... Appendix-6
● Using rarp to assign IP Address ............................................................... Appendix-7
● Installing UNIX-TCP/IP Programs............................................................. Appendix-8
INDEX .........................................................................................................INDEX1
KN-302 Network Interface Card iii
Page 6

Chapter 1 KN-302 Overview
■ Features of the KN-302 ..........................................1-2
■ Installation of the KN-302 .......................................1-2
■ Package contents ...................................................1-2
■ Using the accompanying CD-ROM ........................1-3
■ Network setting procedures....................................1-4
● Windows 95/98 configuration (peer-to-peer).................... 1-4
● Windows NT4.0/2000 configuration (LPD/LPR)............... 1-4
● UNIX configuration (lpd/lpr) ............................................. 1-5
● NetWare configuration ..................................................... 1-5
● AppleTalk configuration.................................................... 1-5
KN-302 Network Interface Card 1-1
Page 7

Chapter 1 KN-302 Overview
■ Features of the KN-302
The KN-302 Network Interface Card enables Ethernet connection the Konica 7075 Printer/Copier connected to the Konica IP-601 Print Controller.
The KN-302 offers the following features:
• Automatic Selection of 100BaseTX (Fast Ethernet) or 10BaseT Ethernet connection
• Multiple protocols (TCP/IP, IPX/SPX and AppleTalk [EtherTalk]) supported
• Peer-to-peer printing over TCP/IP from Microsoft Windows 95/98 (by using a dedicated utility, IP-P2P)
• Peer-to-peer printing over IPX/SPX from Microsoft Windows 95/98 (by using a dedicated utility, IPX-P2P)
• LPD/LPR printing over TCP/IP for Microsoft Windows NT4.0/2000
• UNIX lpd/lpr printing through TCP/IP
• Both bindery mode and Novell Directory Ser vices (NDS) supported to accommodate Novell NetWare
print server features
• AppleTalk printing support for the Macintosh (by using a dedicated utility, NIManage)
• Automatic IP address acquisition by DHCP
• Built-in HTTP server enables printer and Network Interface Card management by linking with the man-
agement Access Program (MAP) provided and a standard web browser
• NWSetup utility to set up NetWare from Windows 95/98/NT4.0/2000
• BOOTP Lite utility to assign IP address through Windows 95/98/NT4.0/2000
• UNIX-TCP/IP Programs supports printing from various UNIX systems
• Use of flash memory allows upgrading of firmware through network
■ Installation of the KN-302
The KN-302 Network Interface Card should be installed in the IP-601 Print Controller . Request installation
of the KN-302 to your Konica service representative.
■ Package contents
The package of the KN-302 Network Interface Card contains the following:
• KN-302 Network Interface Card
• KN-302 Installation Procedure
• CD-ROM
1-2 KN-302 Network Interface Card
Page 8

■ Using the accompanying CD-ROM
The CD-ROM contains some utility programs used for the KN-302 Network Interface Card and the INSTRUCTION MANUAL (same as this) in the form of PDF (Portable Document Format). The CD-ROM is
compatible with Windows 95/98/NT4.0/2000 or Mac OS . The English language version software included in
the CD-ROM includes the following:
MAP (Management Access Program)
Utility program to let Windows 95/98/NT4.0/2000 identify IP- or IPX-based printers on the networks .
This also allows you to access KN-302 Web Utilities, and make network and printer settings by
using the Web Utilities in conjunction with Web Browsers.
IP-P2P
Program to execute a peer-to-peer printing from Windows 95/98 via TCP/IP
IPX-P2P
Program to execute a peer-to-peer printing through Windows 95/98 IPX/SPX links
NWSetup
Utility program to set up Novell NetWare for KN-302 from Windows 95/98/NT4.0/2000
BOOTP Lite
Utility program to assign IP address to the KN-302 through Windows 95/98/NT4.0/2000
Chapter 1 KN-302 Overview
NIManage
Program for network administrator to configure TCP/IP settings to the KN-302 from Macintosh
UNIX-TCP/IP Programs
Program for printing from various UNIX systems when not running lpd/lpr
KN-302 Network Interface Card 1-3
Page 9

Chapter 1 KN-302 Overview
■ Network setting procedures
Before using the KN-302 Network Interface Card, you must first connect the KN-302 to the networ k and
then perform the setup procedures for the KN-302 and printer . The setup procedures depend on the system
environment.
To connect the KN-302 to the network use the KN-302’s Ethernet connector (RJ45) and a UTP cable (of
category 5, recommended).
● Windows 95/98 configuration (peer-to-peer)
To print over LAN (Local Area Network) in Windows 95/98, with no print servers installed, you can link your
printers with a configuration called peer-to-peer connection. In peer-to-peer connections , TCP/IP and IPX/
SPX protocols are used, each with a dedicated utility program. Setup procedures are as follows:
For IP peer-to-peer connections
1. Using BOOTP Lite or the arp command, assign IP address to the KN-302.
2. Using Web Utilities, make the KN-302 TCP/IP settings.
3. Make TCP/IP settings on your computer (Windows 95/98).
4. Install IP-P2P from the accompanying CD-ROM.
5. Install Printer Driver.
For more information about steps 1 and 2, refer to “Chapter 2 Setting Up KN-302 and Printer”, and f or
more information about steps 3 to 5, refer to “Chapter 3 Windo ws 95/98 Configuration (peer-to-peer)”.
For IPX peer-to-peer connections
1. Add IPX/SPX Protocol to your computer.
2. Install IPX-P2P from the accompanying CD-ROM.
3. Install Printer Driver.
For more information, refer to “Chapter 3 Windows 95/98 Configuration (peer-to-peer)”.
● Windows NT4.0/2000 configuration (LPD/LPR)
To print by LPD/LPR from Windows NT4.0/2000 use the following setup procedure:
1. Using BOOTP Lite or the arp command, assign IP address to the KN-302.
2. Using Web Utilities, make the KN-302 TCP/IP settings.
3. Make TCP/IP settings on your computer (Windows 95/98).
4. Add/Create the Printer Port, and install Printer Driver.
For more information about steps 1 and 2, refer to “Chapter 2 Setting Up KN-302 and Printer”, and f or
more information about steps 3 to 4, refer to “Chapter 4 Windows NT4.0/2000 Configuration (LPD/
LPR)”.
1-4 KN-302 Network Interface Card
Page 10

Chapter 1 KN-302 Overview
● UNIX configuration (lpd/lpr)
If you are using UNIX, see “Assigning IP address in Chapter 2 Setting Up KN-302 and Printer”, “Chapter 5
UNIX Configuration”, and “Information for the TCP/IP network administrator in Appendix”.
● NetWare configuration
To print in a Novell NetWare network, setup procedures depend on the NetWare version and resource
management. As shown, each procedures is comprised of two steps. Whichever procedure you choose,
refer to “Chapter 2 Setting Up KN-302 and Printer”, to learn more about step 1, and “Chapter 6 NetWare
Configuration”, to learn more about step 2.
With NetWare 3.x
1. Gain access to the KN-302's Web Utilities through MAP, and set up a server name and others
for KN-302.
2. Using PCONSOLE, configure for print server features.
By using NDS with NetWare 4.x
1. Gain access to the KN-302's Web Utilities through MAP, and set up a server name and others
for KN-302.
2. Using PCONSOLE, configure for print server features.
By using bindery emulation with NetWare 4.x
1. Gain access to the KN-302's Web Utilities through MAP, and set up a server name and others
for KN-302.
2. Using PCONSOLE, configure for print server features.
● AppleTalk configuration
To print over AppleTalk from Macintosh, refer to “Chapter 7 AppleTalk Configuration”.
KN-302 Network Interface Card 1-5
Page 11

Chapter 2 Setting Up KN-302 and Printer
■ General description of the network setup ...............2-2
● Assigning IP Address ..................................................... 2-2
● Accessing Web Utilities .................................................. 2-5
■ Using MAP (Management Access Program)..........2-6
● Prerequisites for Installation ........................................... 2-6
● Installing MAP................................................................. 2-6
● Setting up MAP............................................................... 2-6
● Starting MAP .................................................................. 2-7
■ Using Web Utilities..................................................2-8
● Main Page ...................................................................... 2-9
● Printer Status................................................................2-10
● Advanced Features....................................................... 2-10
● Network Setup.............................................................. 2-11
● Printer Setup ................................................................ 2-16
● Language Select........................................................... 2-18
● About Konica ................................................................ 2-18
KN-302 Network Interface Card 2-1
Page 12

Chapter 2 Setting Up KN-302 and Printer
■ General description of the network setup
With the KN-302, there are five ways to print over TCP/IP.
• Use IP/P2P in peer-to-peer printing setup via Windows 95/98
• Use IPX/P2P in peer-to-peer printing setup via Windows 95/98
• Use LPD/LPR via Windows NT4.0/2000
• Use lpd/lpr via UNIX
• Use UNIX-TCP/IP Programs via UNIX
● Assigning IP Address
Before printing over TCP/IP, you first need to assign the IP address to the KN-302. There are six ways to
assign the IP address to the KN-302.
• Use DHCP (Dynamic Host Configuration Protocol) for automatic IP address assignment
• Use BOOTP Lite from Windows 95/98/NT4.0/2000 for assigning a specific IP address
• Use the arp (Address Resolution Protocol) command from Windows 95/98/NT4.0/2000 for assigning a
specific IP address
• Use the arp (Address Resolution Protocol) command from UNIX for assigning a specific IP address
• Use MAP (Management Access Program) for assigning a specific IP address
• Use NIManage from Macintosh for assigning a specific IP address
When initially connecting the KN-302 to networks that are not using DHCP, you need to confirm the follo wing information:
• IP address to assign to the KN-302
• Network address of the KN-302 (MAC address or Ethernet address)
Check with the network administrator for the IP address assigned to the KN-302.The KN-302's network
(MAC) address is found on the Status P age (network setup list). It is also indicated on the label on the KN-
302. The Status Page is output when starting the Konica 7075 equipped with KN-302.
Using DHCP
For networks on which IP addresses managed by a DHCP server, the IP address is automatically
assigned to each KN-302. For more information how to use DHCP, refer to “Information for the TCP/
IP network administrator in Appendix-5”.
2-2 KN-302 Network Interface Card
Page 13

Chapter 2 Setting Up KN-302 and Printer
Using BOOTP Lite (Windows 95/98/NT4.0/2000)
From Windows 95/98/NT4.0/2000, you can use the BOOTP Lite program to assign the IP address to
the KN-302. TCP/IP must be set up correctly on the computer that will execute this program. To copy/
install the program files in the Windows directory perform the following procedure:
1. Reset the IP-601.
The BOOTP Lite program uses the BOOTP protocol. The BOOTP request is for a finite
period of time the IP-601 must be freshly reset for this to work.
2. Double click the Bootpl32.exe icon using the [Explorer].
3. Pull down the [Admin] menu to [Configure] option.
4. Enter the [IP address] that you want to assign to the KN-302, its [Subnet Mask] (make sure it
matches what you are using on your subnet), [Default Gateway] (your router's IP address),
and the [MAC address] of the KN-302.
Use colons as delimiters as shown on the Status Page rather than the dashes Windows uses.
5. Click on Go.
6. Wait about five minutes. The KN-302 should recycle and produce a Status Page showing the
IP parameters you have just entered.
7. Pull down the [Admin] menu to [V erify].
You should get a message back stating that [The Unit is Active]. If you do not get this message , verify
that TCP/IP is enabled on the Status Page.
8. When you get a response that the unit is active, you should be able to ping the KN-302.
Using arp command (Windows 95/98/NT4.0/2000)
From Windows 95/98 MS-DOS prompt or at Windo ws NT4.0/2000 command prompt, you can use the
arp command to assign the IP address to the KN-302. It is necessary that TCP/IP is set up correctly on
the computer that will execute the arp command. Perform the following procedure:
1. At Windows 95/98, select [MS-DOS prompt] from the [Start] menu. At Windows NT4.0/2000,
select [Command prompt] from the [Start] menu.
2. Execute the arp command. For example, if the KN-302's MAC address is 00:11:22:33:44:55
and the IP address to assign is 192.168.0.128, then input as shown below, and then press
[Enter].
(Example: C:\>arp -s 192.168.0.128 00-11-22-33-44-55
3. Execute the ping command for the assigned IP address. In this case no response is returned
from the KN-302.
(Example: C:\>ping 192.168.0.128
4. Turn off the main power supply to the Konica 7075, then turn it back on.
A Status Page will be output. Check that the IP address is correctly set in the list. Or, when about 5
minutes have passed after ha ving restarted the Konica 7075 using the ping command, check that the
KN-302 Network Interface Card 2-3
Page 14

Chapter 2 Setting Up KN-302 and Printer
KN-302 responds correctly. The ping command is also e xecuted at Windows 95/98 MS-DOS prompt
or Windows NT4.0/2000 Command prompt. The example of executing the ping command is shown
below:
(Example: C:\>ping 192.168.0.128
Using arp command (UNIX)
From UNIX you can use the arp command to assign the IP address to the KN-302. Perform the
following procedure:
1. Turn off the printer/copier.
2. Log in as superuser on a host on the same subnet as the KN-302. However, if the server
resides on another subnet, complete this procedure to store the IP address in the KN-302.
3. Find the MAC address of the KN-302. The address is printed on the Status Page each time you
turn on the printer/copier.
4. Edit the hosts file (usually /etc/hosts) or use NIS or DIS to add the IP address and KN-302’s
node name. See the network administrator for the IP address. For example, a KN-302 with a
name of printfast and an IP address of 192.9.200.200 has the entry:
192.9.200.200 printfast
5. Add an entry to the arp cache for the KN-302’s IP address and MAC address, as:
arp -s 192.9.200.200 0:40:c8:0:0:ff
RS6000 (AIX) requires the ether option after arp -s. For example:
arp -s ether 192.9.200.200 0:40:c8:0:0:ff
6. Check the IP-601 to see that the KN-302 is connected to the network. Turn on the printer/
copier.
7. Send a ping command the KN-302 to verify it is running on the network, as for example:
ping 192.9.200.200 or ping printfast
The KN-302 will not respond to this ping command but it will read its IP address from the
packets.
8. T urn off the printer/copier and back on a gain and then send the ping command again to verify
that the KN-302 obtained its IP address. A confirmation message displays as:
192.9.200.200 is alive
9. Remove the entry from the arp cache using the follo wing command. Specify the KN-302 either
by its IP address or by its name, for example:
arp -d printfast
Using MAP
By using MAP (Management Access Program) included the CD-ROM that comes with the KN-302,
you can automatically identify the KN-302 on the network and set it up for TCP/IP by using Web
Utilities. T o use this method to assign the IP address to the KN-302, the follo wing procedure should be
performed on computers in advance:
• TCP/IP correctly configured
• IPX/SPX-compatible protocol installed
• MAP installed and MAP setup correctly executed
2-4 KN-302 Network Interface Card
Page 15

Chapter 2 Setting Up KN-302 and Printer
About how to set up TCP/IP and how to install IPX/SPX-compatible protocol, refer to Windows Help
menus for example. For MAP, refer to “Using MAP (Management Access Program)” in this chapter.
To change an IP address already assigned to a KN-302, you cannot use the arp command.
Use W eb Utilities or BOOTP Lite program instead. These methods also allow you to set up
subnet mask and default gateway, etc.
Using NIManage
Refer to “Chapter 7 AppleTalk Configuration”.
● Accessing W eb Utilities
The KN-302 is provided with an HTTP server having Web Utilities. By accessing this ser ver, you can
change settings of the KN-302 itself and the IP-601. There are two ways to access W eb Utilities, through a
Web Browser, either through Netscape Navigator, version 4.x or greater or through Internet Explorer, version 4.x or greater.
• Use MAP to have KN-302 on the networks identified automatically, thereby accessing Web Utilities.
• Use a Web Browser to type the IP address assigned to the KN-302, and thereb y access the W eb Utilities.
For example:
http://192.168.0.128/
If you designate the proxy setting in y our W eb Browser you can not access the Web Utilities .
For more information see your network administrator.
KN-302 Network Interface Card 2-5
Page 16
Chapter 2 Setting Up KN-302 and Printer
■ Using MAP (Management Access Program)
A utility called MAP is provided on the CD-ROM that comes with the KN-302.
This program automatically identifies KN-302s on the networks and lists them on Web Browser screen.
From this Web Browser list you can select a KN-302 to change its settings and control Web Utilities.
● Prerequisites for Installation
MAP is a utility that runs on Windows 95/98/NT4.0/2000. It identifies KN-302s on the networks and achiev es
connection with HTTP servers implemented on KN-302s. The MAP itself has no interface, so either of the
following Web Browsers is required as an interface:
• Netscape Navigator (version 4.x or greater)
• Interment Explorer (version 4.x or greater)
It is necessary that TCP/IP be configured beforehand both on the KN-302s and on the Windows capable
computers. It is also necessary that an IPX protocol be set up to identify IPX-based KN-302s.
● Installing MAP
Perform the following steps to install MAP:
1. Insert the CD-ROM into the CD-ROM drive, and double-c lick on [Setup.ex e] in the [Map] folder .
2. A setup program will start. Confirm the display, and click on the [Next] button.
3. Confirm a folder to install MAP. By default, the folder is C:\Program Files\MAP . When clicking
on the [Next] button, necessary files are copied, and then installation is completed.
● Setting up MAP
As a result of executing the MAP setup prog ram, tw o programs , “MAP Setup” and “MAP” are installed. The
MAP Setup is a program to set up a necessary environment for MAP which identifies KN-302s. Ex ecute this
MAP Setup program first.
To star t the MAP Setup program, select [Start]-->[Program]-->[Map]-->[MAP Setup]. When the program
starts, the following display will appear.
2-6 KN-302 Network Interface Card
Page 17
Chapter 2 Setting Up KN-302 and Printer
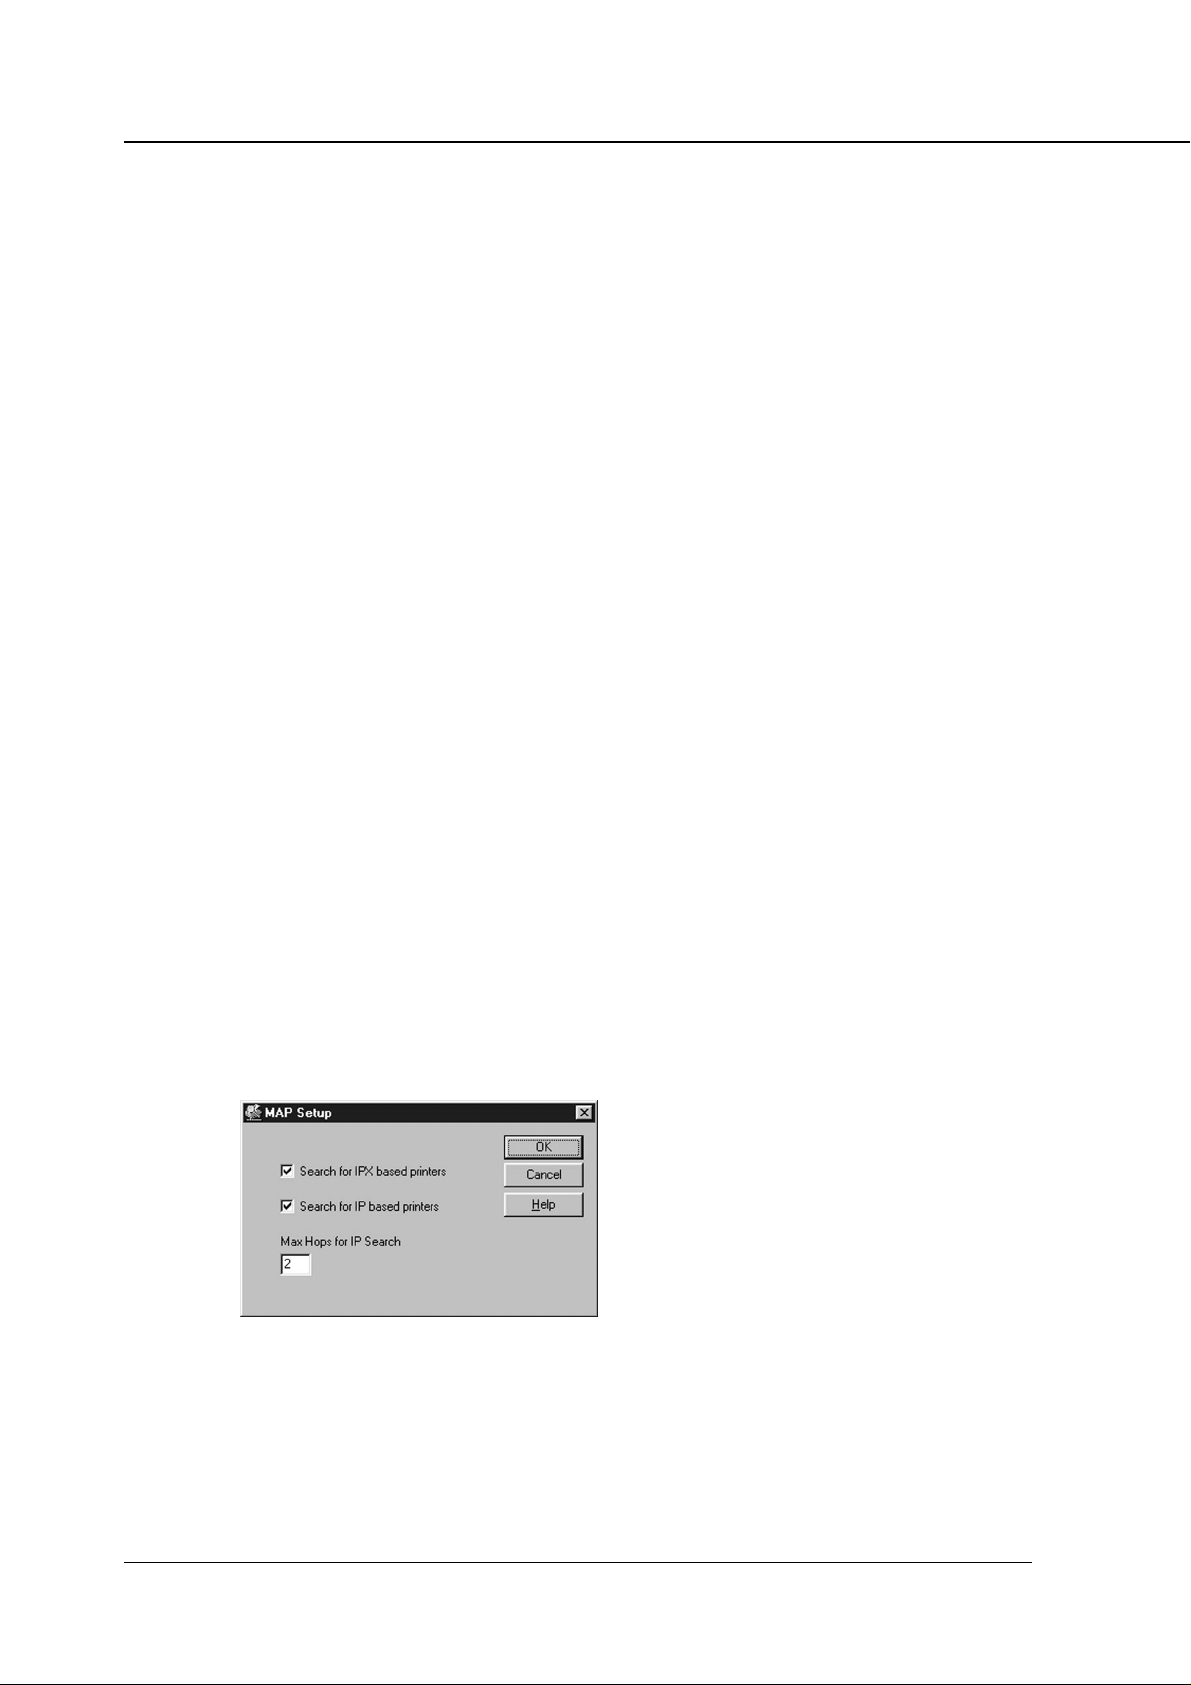
At the MAP Setup stage, you need to specify protocols used by KN-302s and a maximum IP hop number.
T o do this, indicate chec k-mark next to [Search for IPX based printers] f or IPX-based KN-302s, and [Search
for IP based printers] for IP-based KN-302s.
When using an IP protocol, specify [MAX Hops for IP Search], in which case you can select a number
between 0 and 15. The default number is set to 2. If you select 0, only segments pertaining to computers,
which restart the MAP, are found. If y ou select 2, all netw orks which are accessible passing through two or
less routers are found. Note that selecting a large number can result in the occurrence of a large number of
traffics at a time.
● Starting MAP
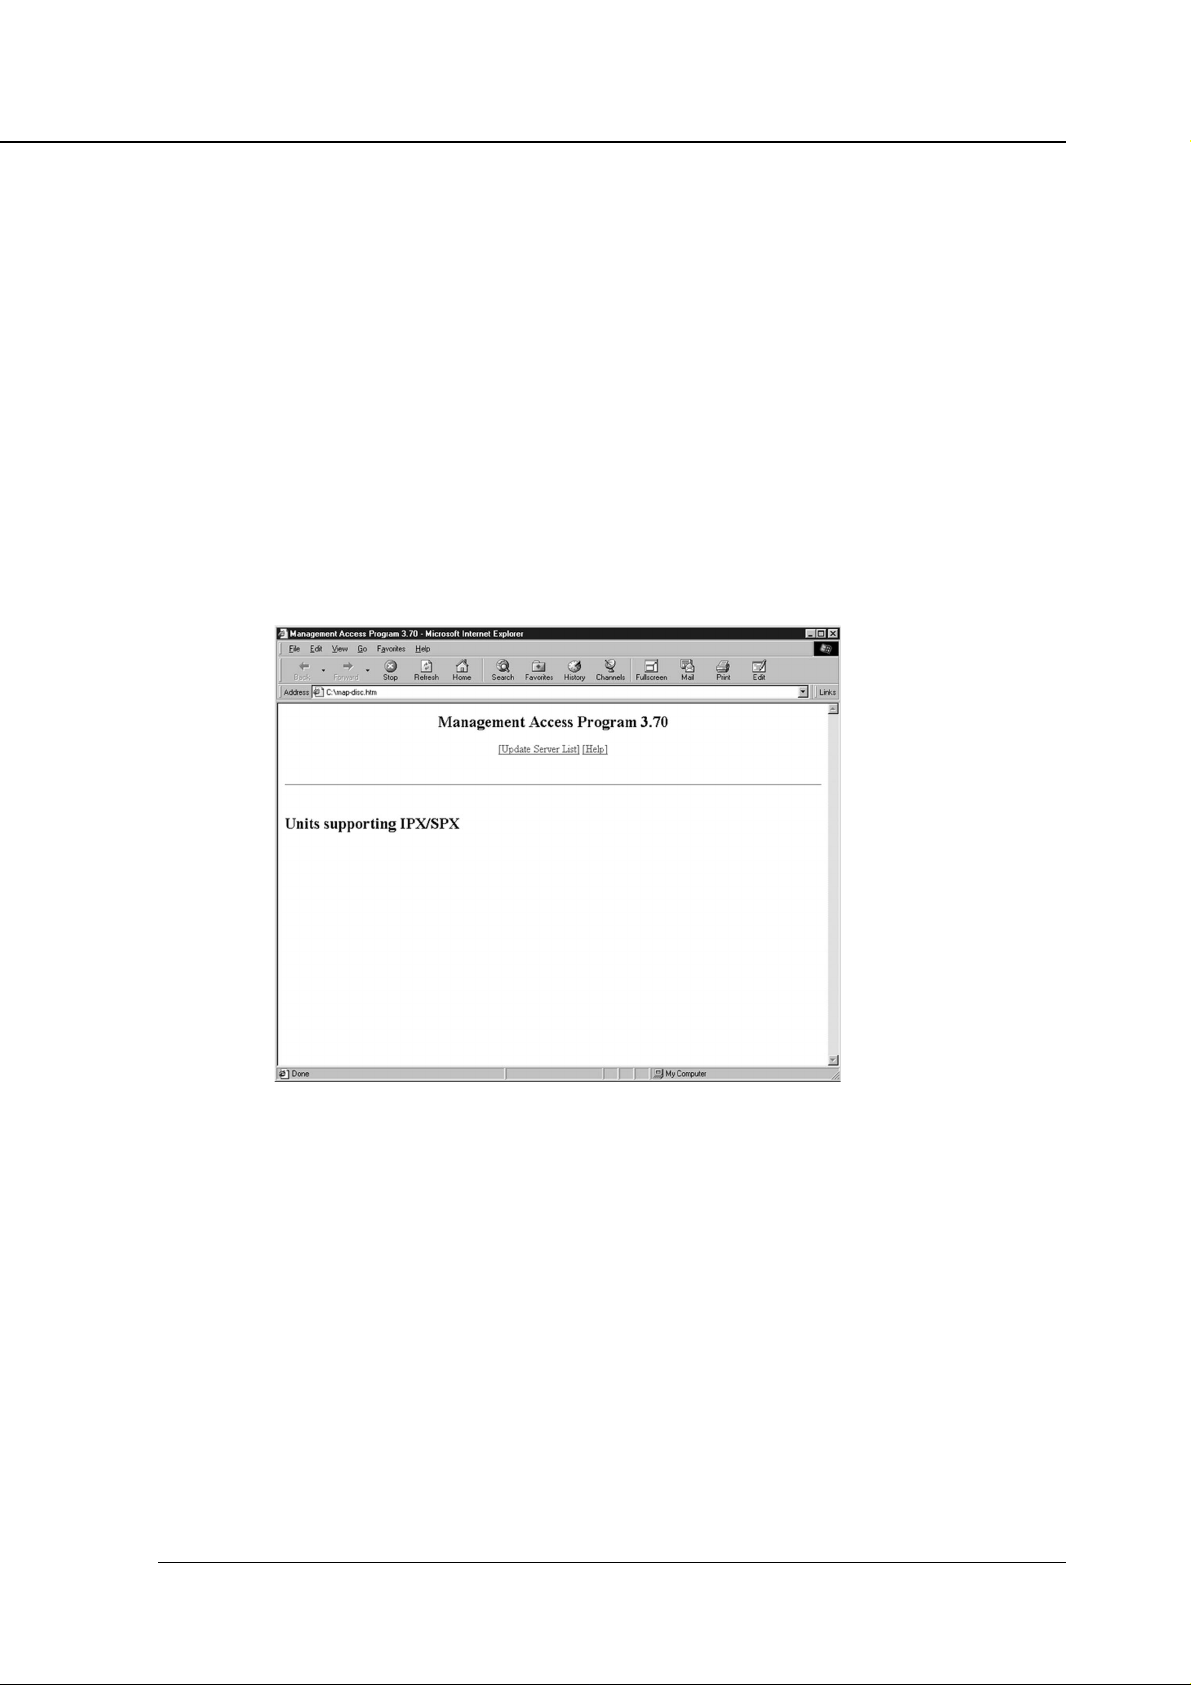
To start the MAP, select [Start]-->[Program]-->[Map]-->[MAP].
Once started, MAP searches for KN-302s existing on the networks according to the MAP setup. When
identifying KN-302, MAP starts a Web Browser specified as standard, and displays a list of available KN302s. By def ault, the KN-302 is named “K ON_(serial number).” When y ou select a desired KN-302 from the
list, the [Main Page] of Web Utilities is displayed.
KN-302 Network Interface Card 2-7
Page 18

Chapter 2 Setting Up KN-302 and Printer
■ Using Web Utilities
You can use the MAP or specify IP addresses of KN-302s in a Web Browser to access W eb Utilities. A Web
Browser enables you to get information on the IP-601s displayed or set them up. A Web Browser has the
following options in its main menu. By clicking on them, you can jump to specific pages.
• Main Page
• Printer Status
• Advanced Features (currently not available)
• Network Setup
• Printer Setup
• Language Select
• About Konica (currently not available)
The displayed language of Web Utilities is set to English in default. To switch to Japanese, click on [Language Select] in the main menu, and select [Japanese].
In addition, to change settings once made, you have to type a password. A default password is [sysadm]
(half size, lower case).
2-8 KN-302 Network Interface Card
Page 19
Chapter 2 Setting Up KN-302 and Printer
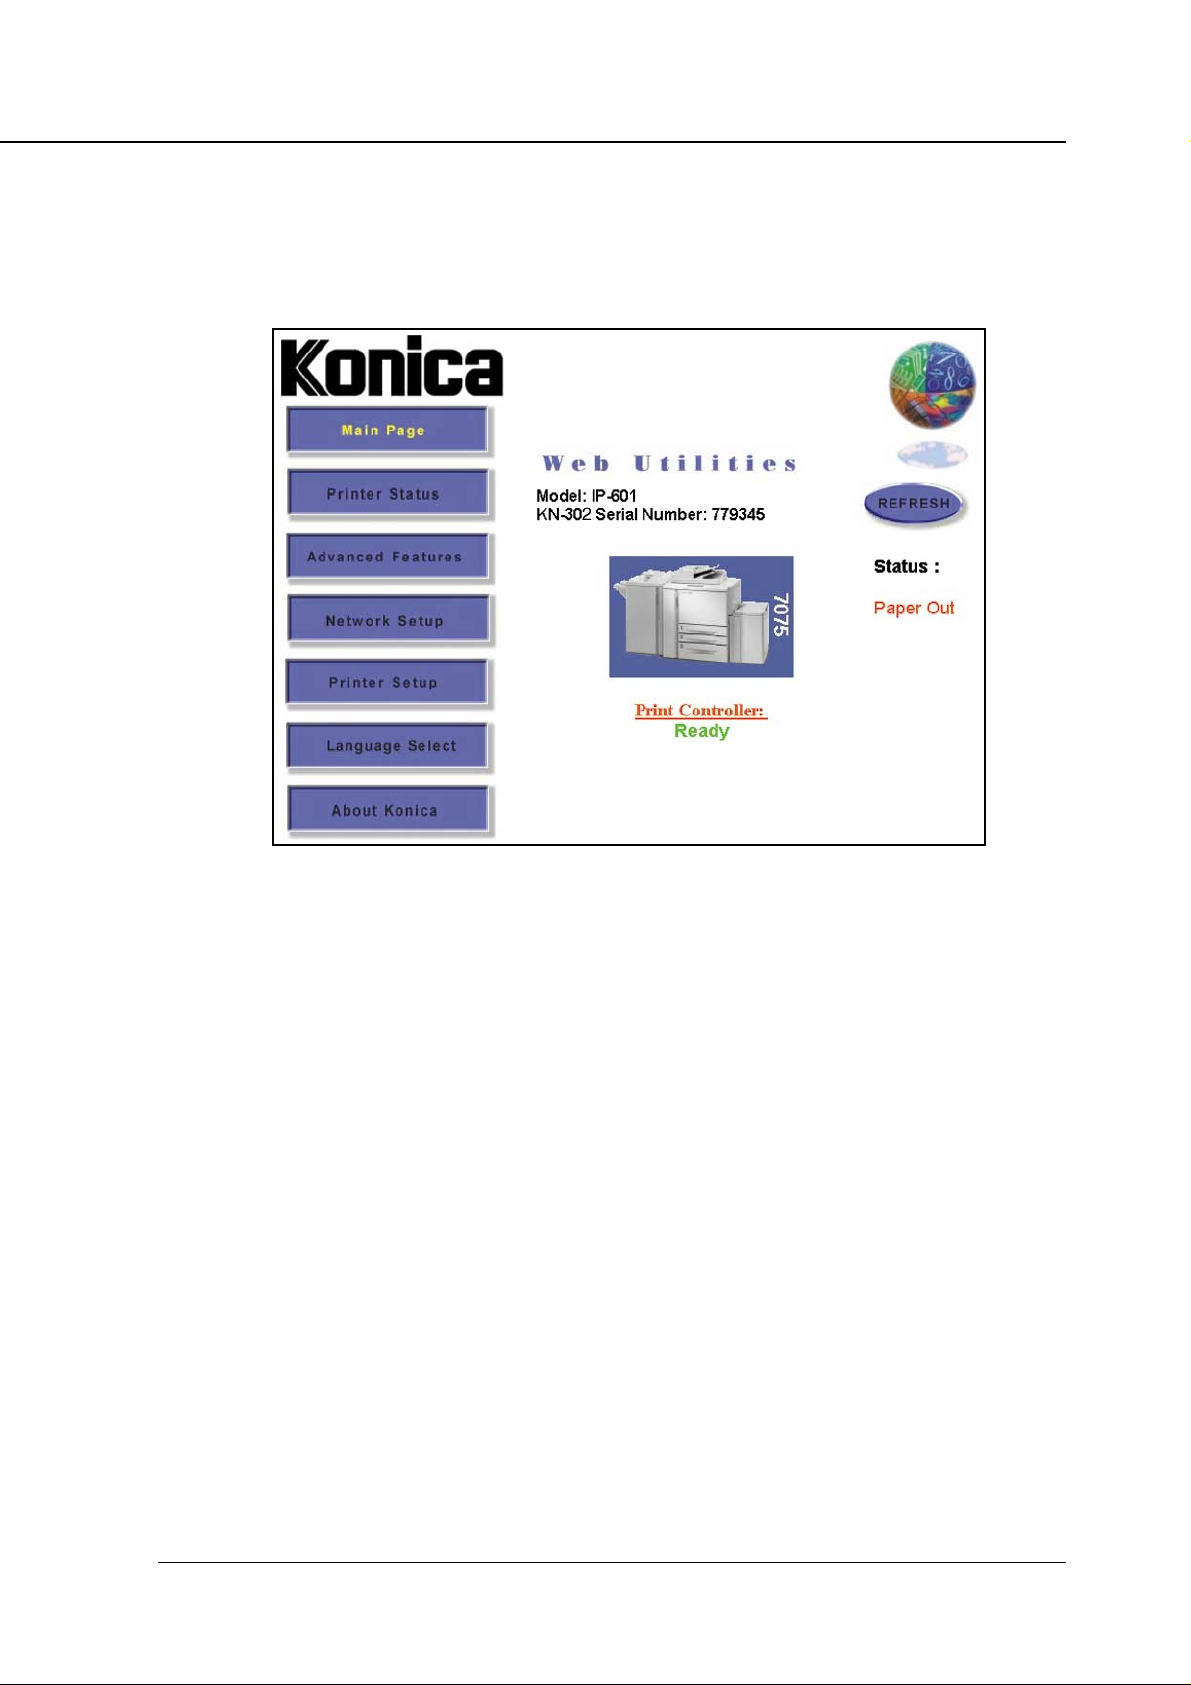
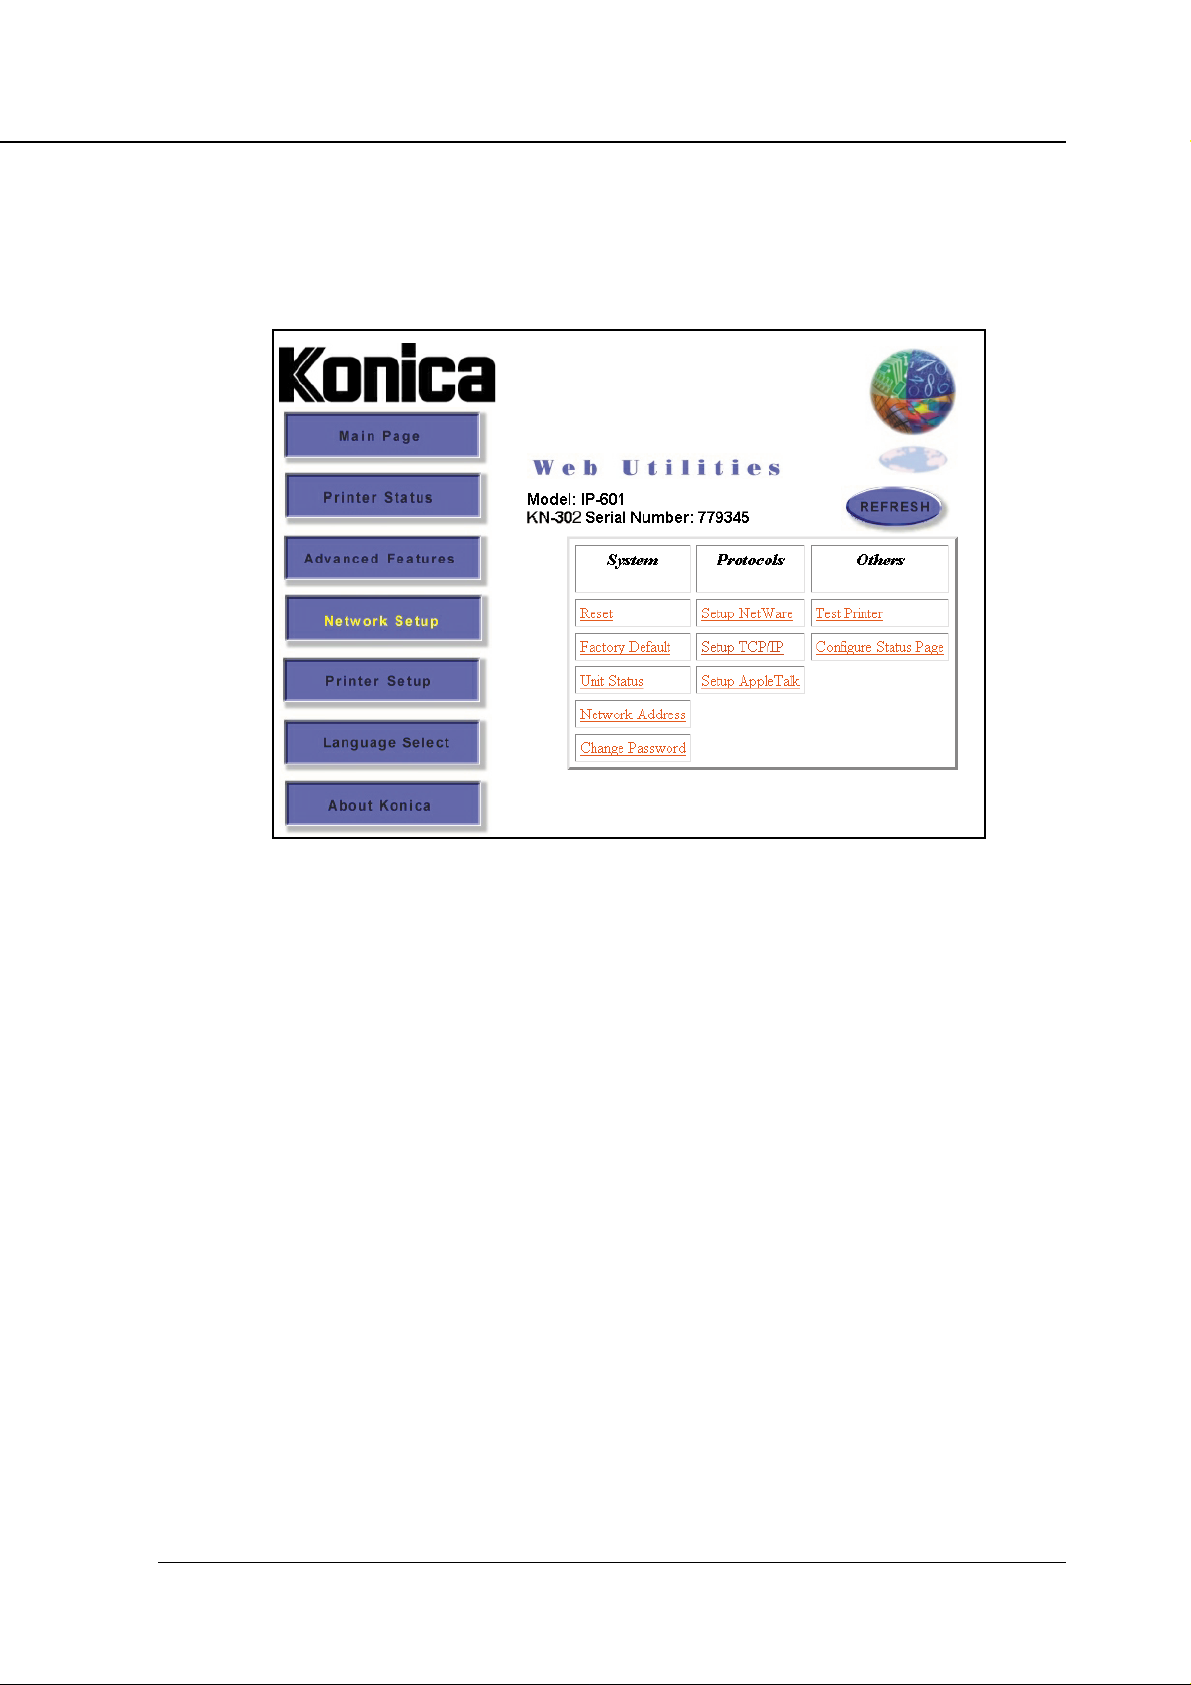
● Main Page
Displays basic information regarding the current printer status. Click on the "REFRESH" button to view
updated information.
Status
Displays print controller status.
Printer Configuration
Displays the status of the paper tray and the printer configuration when y ou click on a illustration of the
printer.
Print Controller
Displays the controller configuration when you click on [Print Controller].
KN-302 Network Interface Card 2-9
Page 20
Chapter 2 Setting Up KN-302 and Printer
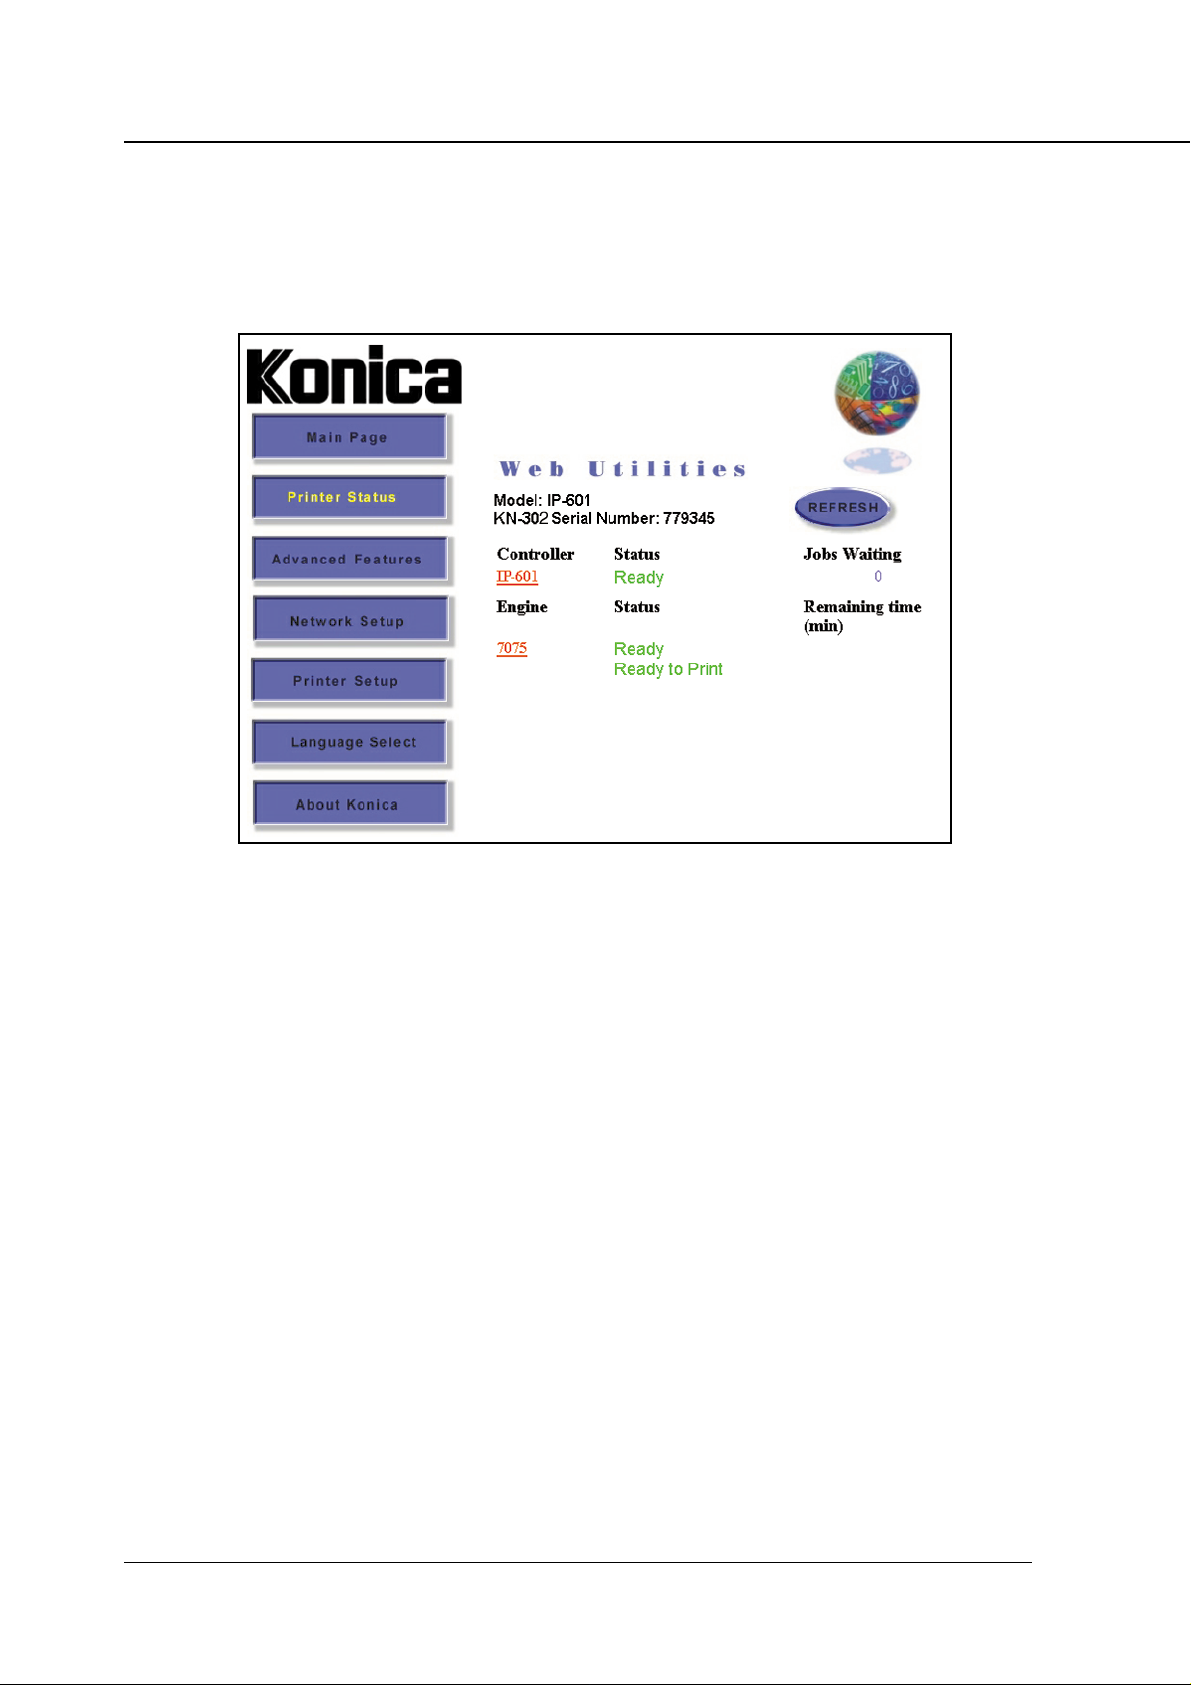
● Printer Status
Displays information on the print controller status, printer, and print jobs. Click on the [REFRESH] button to
display updated information.
Controller Status
Displays print controller status. When y ou click on the model number of a print controller , the controller
configuration shows in detail.
Engine Status
Displays printer status. When you click on the model number of a copier, the paper tray status and
printer configuration are displayed.
Jobs Waiting
Displays the total number of jobs read into the printer.
Remaining Time
Displays the time remaining unit the printing process is complete.
● Advanced Features
This page is not available currently.
2-10 KN-302 Network Interface Card
Page 21
Chapter 2 Setting Up KN-302 and Printer
● Network Setup
The network setup page allows you to check selected options and change specific settings. When settings
are changed the KN-302 must be reset (restart the Copier).
Reset
Resets the KN-302 to make newly setup parameters effective but does not reset the printer itself
(Konica 7075) and the print controller (IP-601). To reset the printer itself and print controller, turn off
the main power supply of the Konica 7075, then turn it back on.
Factory Default
Switches all settings on the KN-302 back to their factory default (or initial) values. When operating a
printer in a new environment use this feature to clear all setting values except the KN-302's serial
number and MAC address.
Unit Status
Displays the status of a protocol effective on a selected KN-302. In the uppermost line, the corresponding protocol (NetWare, TCP/IP or AppleT alk) is displayed whether that protocol is currently enabled or not. Y ou can change settings using [Setup NetW are], [SetupTCP/IP] and [Setup AppleTalk] in
the protocol group.
Network Address
Displays the serial number and MAC address of the selected KN-302.
KN-302 Network Interface Card 2-11
Page 22

Chapter 2 Setting Up KN-302 and Printer
Change Password
Allows you to set up or change a password. To change the current password, type it in the [Current
Passw ord] Input field, type a new pass word in the [Ne w Pass word] Input field, and then type the same
new password in the [Retype Password] field, for confirmation. Finally, click on [Setup] to make the
new password effective.
Setup NetWare
For each of the following setup items selected, y ou can click [Accept Settings] to continue the process ,
or you can click on [Clear Input] to cancel the setup process.
Keep in mind that a valid password is required before you can enter data or change settings on the
screen. The factory set password is [sysadm]. To make a new password setting effective, be sure to
reset the KN-302 (restart the Copier).
Enable NetWare
When this box is checked, Novell NetWare (IPX/SPX) is enabled as a protocol for print servers. For
print servers on which NetWare is not a primary protocol, be sure to uncheck this box to disable
NetWare. This box is unchecked in the initial setting.
Print Server Name
Each Novell print server has its own name, as assigned. For the print server (KN-302 Network Interface Card), a default name, KON_(serial number), is used. The serial number is shown in the Status
Page as well as on the label affixed to the KN-302 board.
If you want to use a name other than the default name or if y ou want to change the currently assigned
name, you can type a new print server name into this field. 63 characters can be typed in half siz e. It is
imperative that the name be identically changed on PCONSOLE as well. Otherwise, your newly entered name will be ineffective.
Print Server Password
The network administrator assigns passwords to Nov ell print servers . When passwords are assigned
with PCONSOLE or NWADMIN, those passwords should be set up on the print servers. In Bindery
mode, only upper case passwords can be used.
When typing a password into this field, it must be identical to the password assigned through
PCONSOLE or NWADMIN. The typed password is stored in print server setup memory. For assigning
passwords using PCONSOLE, refer to the Novell manual.
When setting up a print server password, type a password into the [Print Server Password] field, and
then again type the same password into the [P assword Retype] field f or confirmation. This pass word is
common to all file servers assigned to the print server.
Clicking the [Accept Settings] button will have no effect unless you type one and the same password
both in the [Print Server Password] and [Password Retype] fields.
Password Retype
Type a password here, for confirmation.
2-12 KN-302 Network Interface Card
Page 23

Chapter 2 Setting Up KN-302 and Printer
Preferred File Server
Type a primary file server name in this field to designate a particular file server for your print server to
access. This feature allows you to access a desired file server and avoid accessing an undesired file
server as when the system is set to search for a file server.
Preferred NDS Context
If you are using Novell NetWare 4.x Directory Services, type a preferred NDS context here. The preferred NDS context needs to be a complete context name. Do not type a period (“.”) in the front of the
context pass. Y ou do not need to type a container name (print server name) since it is in the name field
above. Here are examples of contexts with type:
Complete Context
o=standard.ou=organization_1
Or Simple Context
standard.organization_1
For further details, check with the system administrator.
Preferred NDS Tree
If you are using Novell NetW are 4.x Directory Services, type a preferred NDS tree in this field. If you do
not know the preferred NDS tree, type WHOAMI from the MS-DOS command line, then press [Enter]
for confirmation.
Print Queue Scan Rate
This option lets you select a queue scan rate for adjusting intervals at which the print server (KN-302
Network Interface Card) poles the networks when searching for ne w print cues. You can type a number
between 1 and 255 (seconds).
Ethernet Frame Type
This option is used to select a frame type appropriate to networks in use.To select [Auto Sense] is to
let a proper frame type be automatically selected. To do this, you can either click on the radio button
corresponding to the frame type in use or click on [Auto Sense].
Disable Bindery
Bindery Services of Novell NetWare 4.x or greater are disabled when this bo x is check ed and enabled
when this box is not checked. When Bindery is disabled, print servers connected to the Bindery file
server are not supported.
KN-302 Network Interface Card 2-13
Page 24

Chapter 2 Setting Up KN-302 and Printer
TCP/IP Setup
For each of the following items selected, clic k [Accept Settings] to continue the setup process , or click
on [Clear Input] to cancel the process.
Keep in mind that a valid password is required before you can enter data or change settings on the
screen. The factory set password is [sysadm]. To make a new password setting effective, be sure to
reset the KN-302.
IP Address
T ype an IP address of the print server if it is not in the IP address list on the screen. Check the address
with the system administrator. The default setting is set to 0.0.0.0, which means no IP address is set
up. This does not mean The IP address is set to 0s.
Subnet Mask
Type a subnet mask of the print server here if it is not in the list on the screen.
Default Gateway
Type a gateway here if necessary. Otherwise you can leave this blank.
Base Port Number
Currently you do not need to type anything in this field. All values input will be disabled.
Enable DHCP
Checking this box allows the KN-302 to automatically obtain an IP address from the DHCP server.
When you check DHCP, you either need to assign the IP address to 0.0.0.0 or uncheck IP Address in
NVRAM.
IP Address in NVRAM
Check this box to enable the KN-302 to store its IP address in NVRAM (non-volatile memory).
Enable LPD Banner
Checking this box lets the printer print out LPD Banner pages for each print job only for the LPD/LPR
printing.
You must type a password if one is not already set up before y ou can input data or change settings on
the screen. The factory set password is [sysadm].
Printer Language
Check the box corresponding to the desired printer language. For printer languages, refer to “Konica
IP-601 Print Controller INSTRUCTION MANUAL”.
2-14 KN-302 Network Interface Card
Page 25

Chapter 2 Setting Up KN-302 and Printer
AppleTalk Setup
For each of the follo wing items selected, clic k [Accept Settings] to continue with the setup process , or
click [Clear Input] to cancel the setup process.
You must type a password if one is not already set up before y ou can input data or change settings on
the screen. A factory presetting password is [sysadm].
The KN-302 should be reset (restart the Copier) to make a new setting effective.
Enable AppleTalk
This check box for KN-302's AppleTalk toggles between disabled and enabled.
Check this box to enable AppleTalk.
Printer Name
This is a printer (KN-302) name used on the AppleTalk network. A default name is KON_(serial number).
Zone Name
Shows a zone in which the KN-302 resides. Leave this blank if no zone is created as when using
networks that have no seed routers. Printing will not star t unless the zone name is designated correctly.
Test Printer
Click on [Print Start] to run a printer test. This required a pre viously entered pass word. The factory set
password is [sysadm].
Configure Status Page
This determines whether or not to output a Network Setup List when powering up the printer (Konica
7075), as well as when restarting a print server. By default, the list is output. After setting up this
option, you can type a password and clic k [Accept Settings], thereby enabling the ne w setting enabled.
The factory set password is [sysadm].
When printing the Test Print page or the Status Page, make sure to select the appropriate
printer language for your current environment.
KN-302 Network Interface Card 2-15
Page 26
Chapter 2 Setting Up KN-302 and Printer
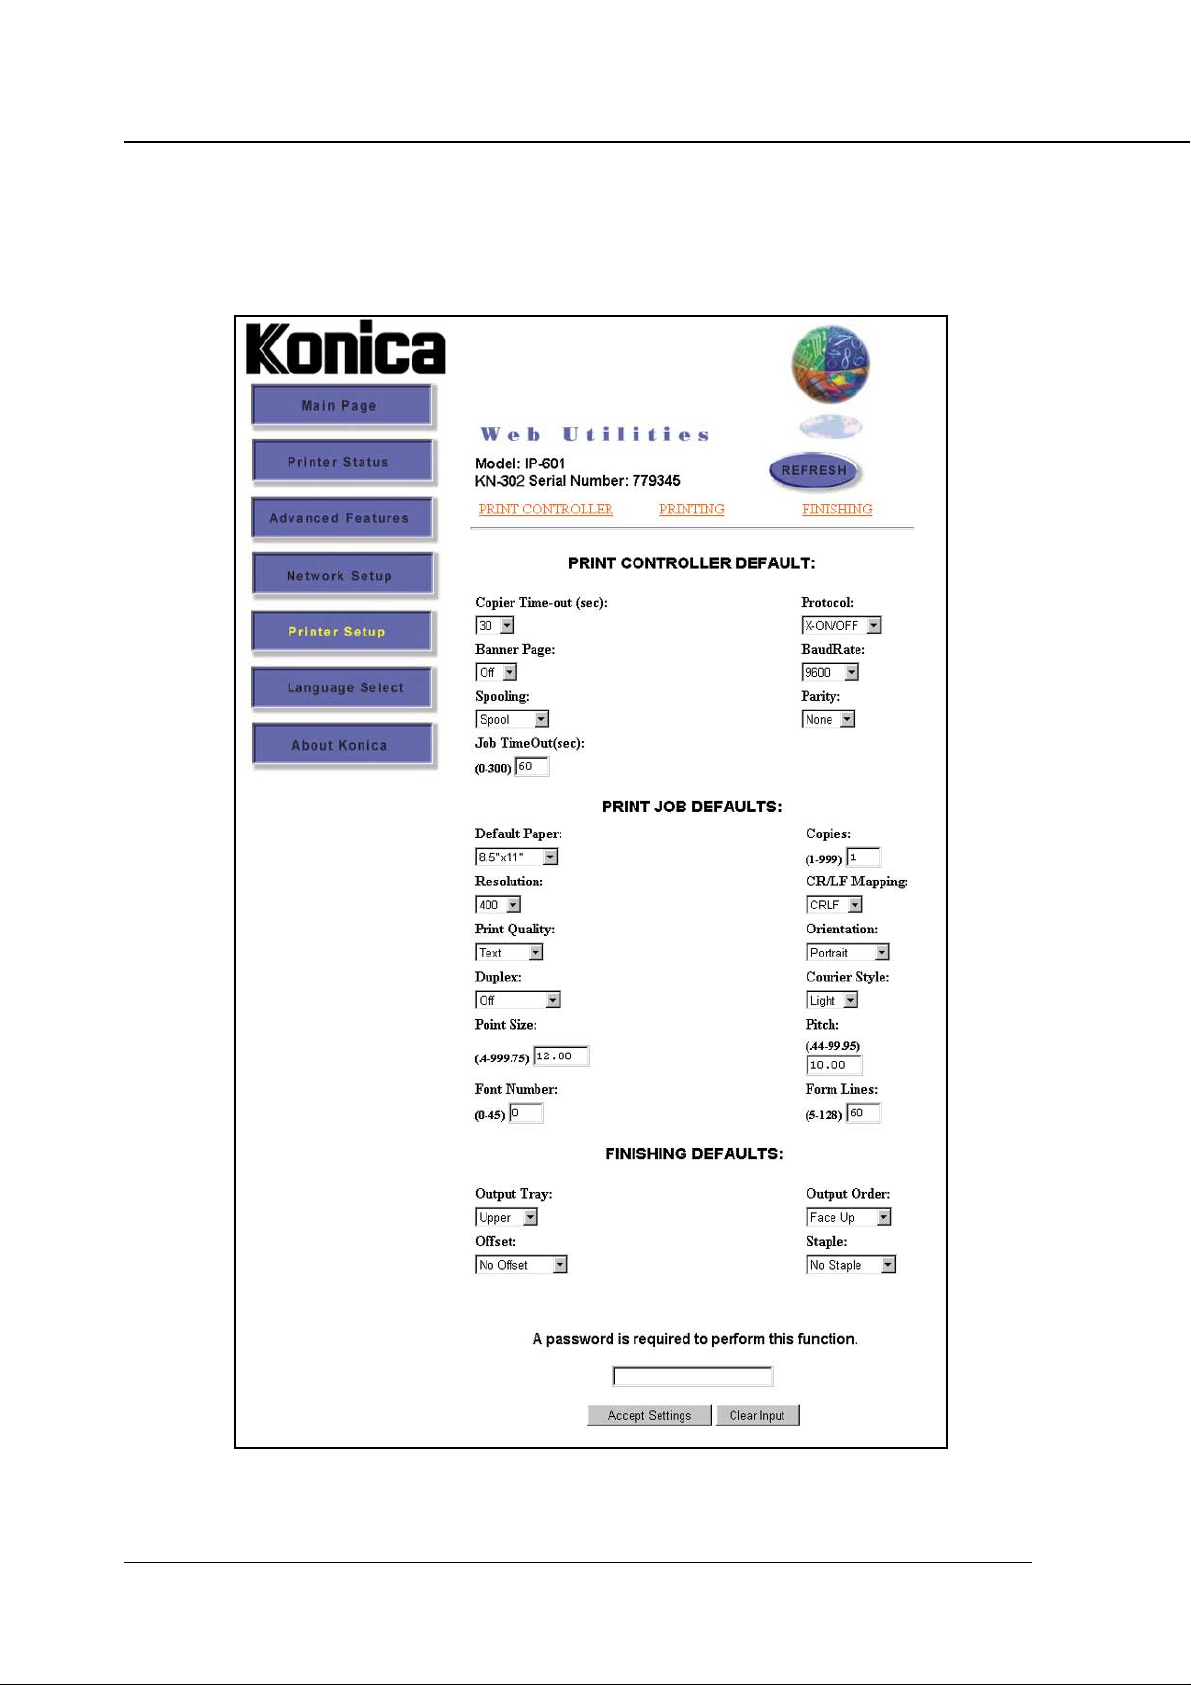
● Printer Setup
The [Printer Setup] page allows you to perform the follo wing functions provided a valid pass word is entered
beforehand. The factory set password is [sysadm].
2-16 KN-302 Network Interface Card
Page 27

PRINT CONTROLLER DEFAULT
Copier Time-out (sec)
Banner Page
Spooling
Job TimeOut (sec)
Protocol
BaudRate
Parity
PRINT JOB DEFAULTS
Default Paper
Resolution
Print Quality
Duplex
Point Size
Font Number
Copies
CR/LF Mapping
Orientation
Courier Style
Pitch
Form Lines
Chapter 2 Setting Up KN-302 and Printer
FINISHING DEFAULTS (available only when a finisher is equipped)
Output Tray
Offset
Output Order
Staple
Values set up on the printer driver supersede values set up on this page. For details of
printer driver setting values, refer to the operation manual, Konica IP-601 Print Controller.
KN-302 Network Interface Card 2-17
Page 28
Chapter 2 Setting Up KN-302 and Printer
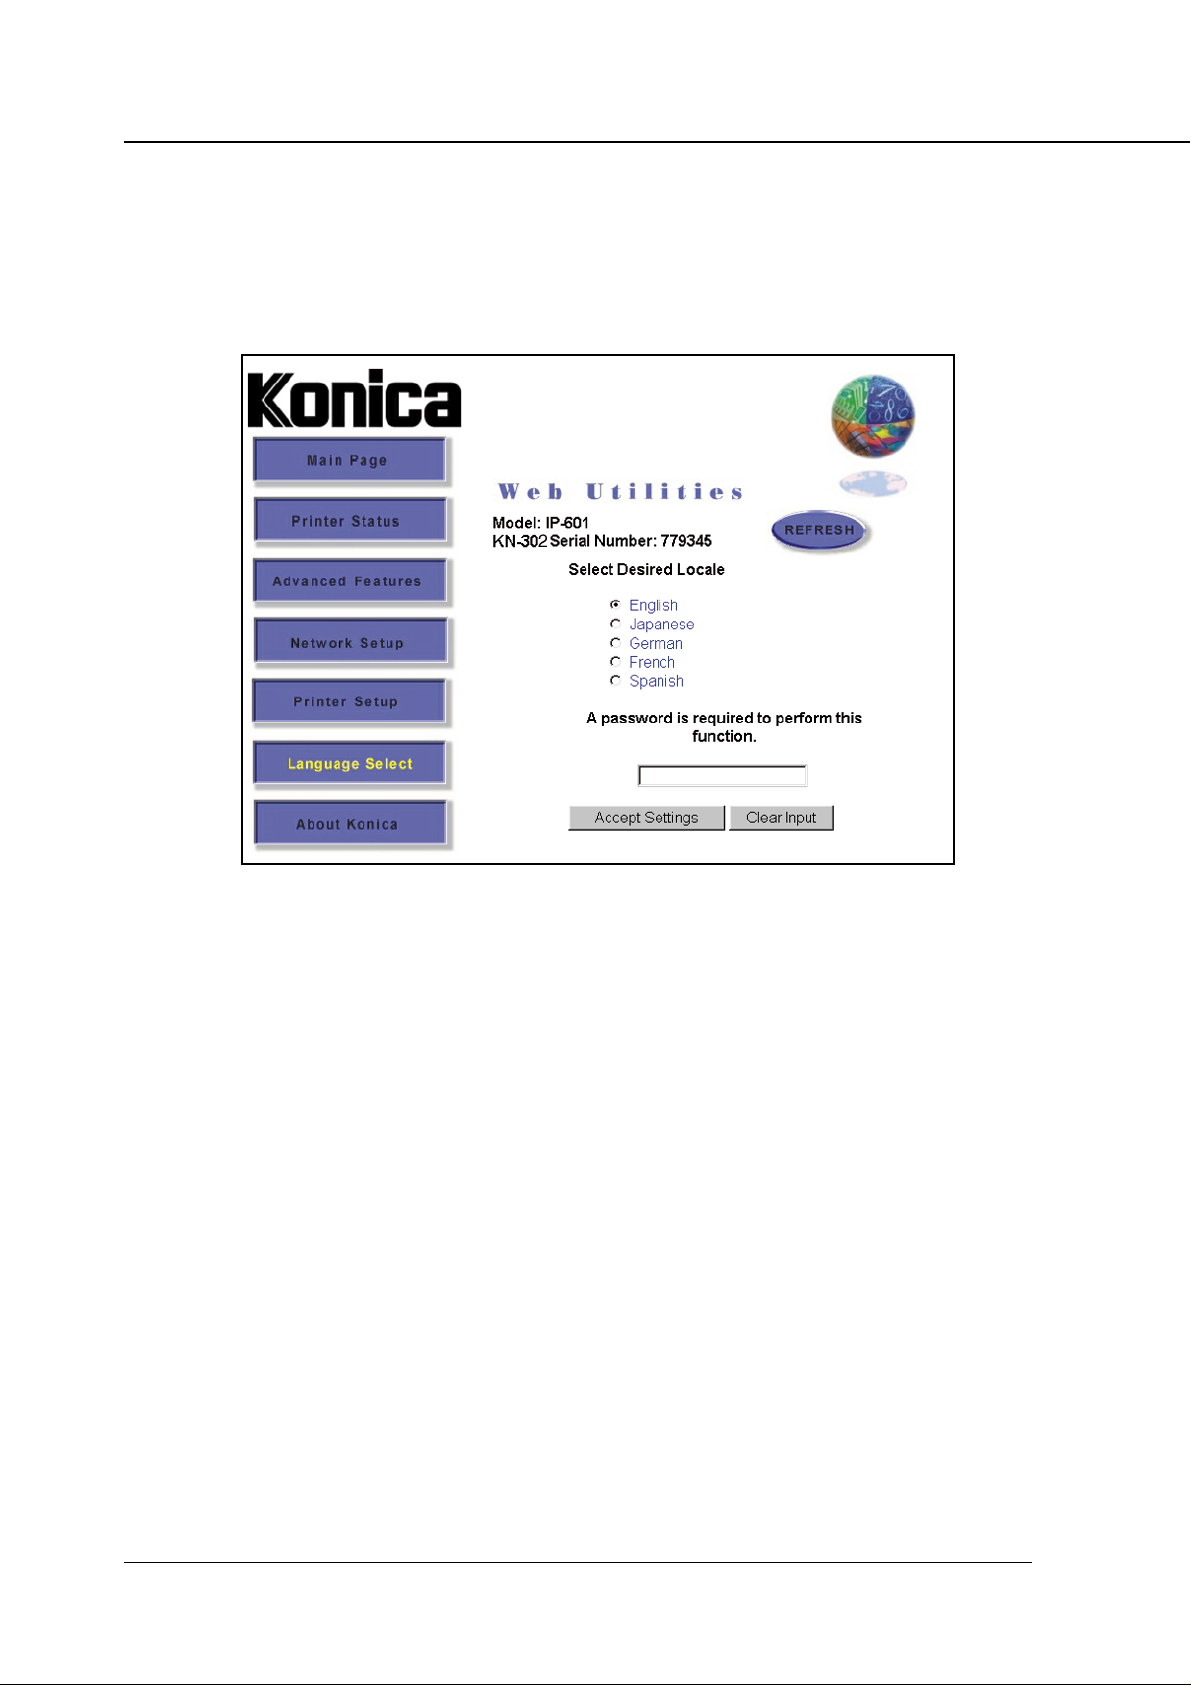
● Language Select
This determines in what language the Web Utilities are displayed. The default language is English. To
execute this feature, type in a password. The factory set password is [sysadm]. If Web pages are not
correctly displayed, click on the [REFRESH] button.
Language
English
Japanese
German
French
Spanish
● About Konica
This page is not available for the present.
2-18 KN-302 Network Interface Card
Page 29

Chapter 3 Windows 95/98 Configuration (Peer-to-Peer Printing)
■ Using IP Peer-to-Peer.............................................3-2
● Basic TCP/IP setup.........................................................3-2
● Installation of IP Peer-to-Peer......................................... 3-2
● IP Peer-to-Peer setup ..................................................... 3-3
● Setting up printer driver .................................................. 3-5
■ Using IPX Peer-to-Peer ..........................................3-6
● Introduction and preparation........................................... 3-6
● Installation of IPX P eer-to-Peer ...................................... 3-7
● IPX Peer-to-Peer setup................................................... 3-8
KN-302 Network Interface Card 3-1
Page 30

Chapter 3 Windows 95/98 Configuration (Peer-to-Peer Printing)
In a LAN, which has no print server but consists only of Windows 95/98 computers , computers and printers
can be connected in a “peer-to-peer” network system.
This chapter describes peer-to-peer printing over TCP/IP from Windows 95/98 using the dedicated utility,
IP Peer-to-Peer or IPX Peer-to-Peer.
■ Using IP Peer-to-Peer
As peer-to-peer printing uses the network protocol TCP/IP, the KN-302 must be set up for TCP/IP in advance. For each of the Windows 95/98 computers that perform peer-to-peer printing, it is necessary to set
up TCP/IP, install and set up [IP-P2P] included in the CD-ROM provided, and set up the printer driver.
● Basic TCP/IP setup
Select [Network] from the [Control Panel] of a Windows 95/98 computer that uses the Konica 7075 printer
via the KN-302 to display the [Network] dialog box. Click the [Configuration] tab and make sure that [TCP/
IP] exists in the list of [Current Network Components]. If it is not found, add TCP/IP. See Windows 95/98
Help or some other means to add TCP/IP.
When [TCP/IP] exists in the [Current Network Components] list, confirm the accuracy of the values of the IP
address, etc. Select [TCP/IP] and click the [Proper ties] button. The [TCP/IP Proper ties] dialog box appears. Click the [IP Address] tab and confirm or define the TCP/IP address and subnet mask assigned to
the computer. Continue the setup procedure on another screen as necessary. Click the [OK] button to
return to the Network dialog box.
Next, click the [Identification] tab in the [Network] dialog box and confirm the name given to the computer .
Click the [OK] button to finish the setup procedure.
Take care to determine the values of parameters.
Consult the network administrator to determine the values of parameters for the IP address .
If the IP address is inadequate, failures may occur in various locations in the network.
● Installation of IP Peer-to-Peer
T o install the IP-P eer-to-P eer, doub le click [Setup .exe] in the [IP-P2P] f older of the accompanying CD-ROM.
The installer will start up. Install the progr am according to the instructions display ed on the screen. The [IP
Peer-to-Peer Setup] dialog box will appear while installation is still in progress. Set up the necessary items
shown in the next paragraph.
When uninstalling the IP-Peer-to-Peer, perform the following procedure.
1. Delete the printer using IP-Peer-to-Peer from the [Printer] folder.
2. Delete the [IP-P2P] by using [Add/Delete Applications] from the [Control Panel].
3-2 KN-302 Network Interface Card
Page 31

Chapter 3 Windows 95/98 Configuration (Peer-to-Peer Printing)
● IP Peer-to-Peer setup
You can set up the IP Peer-to-Peer while installation is in process.
To change the setting, select [Start] --> [Programs] --> [Ip-p2p] --> [IP-P2P] to start up IP Peer-to-Peer.
Setting IP Peer-to-Peer
1. Once IP Peer-to-P eer begins the [IP-Peer To P eer Setup] dialog box appear to enable y ou to set
up the [Max Hops for Search], [IP Port Base], and [Printer Names].
Max Hops for Search
IP Peer-to-Peer broadcasts a search for the printer on the network.
The default of Max Hops for (0-15) is 2. When the value is set to 0, a search will be exercised only in
the segment in which the computer with an activated IP P eer-to-Peer belongs . When the v alue is 2, up
to two network routers will be searched everywhere accessible via up to two routers. Note that the
greater the value of Maximum Hop Count, the more traffics generated.
IP Port Base
Currently you do not need to type anything in this field.
Printer Names
Designate the printer name indicated when you selected the printer port during the printer driver
setup. You may use the serial number of the KN-302, IP address, DNS name, or unit name as the
printer name.
To change the currently assigned printer name, restar t Windows. Then execute the IP Peer-to-Peer
again to set up the printer for printing via IP Peer-to-Peer. The [Printer] dialog bo x can be displa yed b y
clicking the [Printer...] button.
KN-302 Network Interface Card 3-3
Page 32

Chapter 3 Windows 95/98 Configuration (Peer-to-Peer Printing)
2. Click [Printers...] button to displa y the [Printers] dialog box. Set up the IP-601 (KN-302) to print
by using the IP Peer-to-Peer. You can search the list available printers and manually add or
remove printers to the Windows Port Listing.
The following options are available on this screen:
OK:
Accepts all changes made to setup and exits to the previous screen.
Cancel:
Discards any changes made to setup and exits to the previous screen.
Add:
Allows a user to manually add a printer to the [Av ailable Printers] list by inputting the inf ormation in the
fields to the left of the buttons. By Adding a printer to the list in this manner, the user bypasses the
[Search] function. The port is not checked to see if it is actually available on the network.
• IP Address:
Enter the IP address of the printer you wish to add to the list manually.
• Name:
Enter the name you wish the printer to be listed by in the [Unit Name] field.
• Port:
Enter the actual port for communicating with the printer. This defaults to 10001.
• Description:
Enter the description you wish listed in the [Description] field for the printer.
Delete:
Deletes the highlighted printer(s) from the [Available Printers] list below. Printers deleted in this fashion will no longer be listed in the [PORT] listing when adding a printer. However , This does not actually
delete the printer from the network, it only removes it from the list maintained on this computer.
The printer may be re-added to the list by selecting the [Find Printers] button (described below) as
long as it remains connected to the network.
Find Printers:
Initiates a search routine out to the network. This routine will then list all printers f ound on the netw ork
by the method defined in the previous setup screen. The default method for displaying the list of
printers is by IP Address.
3-4 KN-302 Network Interface Card
Page 33

Chapter 3 Windows 95/98 Configuration (Peer-to-Peer Printing)
Clear List:
Clears the [Available Pr inters] list below. This will not clear any printer marked with the [Permanent]
flag.
Select:
Flags the highlighted printer(s) with the [S] flag. Only 30 printers may be selected at one time. When
displaying the [PORT] list during the process of adding or changing a printer, only Selected pr inters
will be displayed.
Permanent:
Flags the highlighted printer(s) with the [P] flag. An y printer marked with this flag will not be remo ved
from the [Availab le Printers] list, even if the printer is ph ysically removed from the network or the [Clear
List] button is selected (described above).
Available Printers:
List of printers that was detected on the network. This list can be cleared using the [Clear List] button
(described above) and this list can be updated or refilled using the [Find Printers] button (described
above). Printers in this list are described with three fields:
• Unit Name:
Printer Name method defined in the previous screen. The default Pr inter Name method is by IP address. Printers may also be display ed by the NIC Serial Number , by the DNS Name of the printer, or b y
the Unit Name. The Unit Name is the [Print Server Name] defined in the NIC.
• Unit IP:
Actual IP address of the unit. This is displayed regardless of which Unit Name method is selected.
• Port Number:
Currently you do not need to type anything in this field.
• Description:
Printer's description. This field usually contains the manufacturer's name and the printer's model.
• Flags:
[S], selected or [P], permanent. Any printers marked with an [S] flag will be displa y ed in the Window’s
Port Listing. When displa ying the Windows port list during the process of adding or changing a printer,
only Selected printers will be displayed. Only 30 printers may be selected at one time.
Any printer marked with a [P] flag will not be removed from the [Available Printers] list, even if the
printer is physically removed from the network or the [Clear List] button is selected.
3. Click [OK] when all settings are completed. All setting values are stored when you return to
the [IP-Peer to Peer Setup] dialog . If you click the [Cancel] button before clicking [OK], the
changed values will not be saved.
● Setting up printer driver
When all settings are completed, install the printer driver. In case of using the IP Peer-to-Peer, specify the
printer connection type as [Local], and the printer name set in the IP-Peer-to-Peer to the [Printer Port].
For more information on installation and setting of the printer driver, refer to “IP-601 Print Controller INSTRUCTION MANUAL”.
KN-302 Network Interface Card 3-5
Page 34

Chapter 3 Windows 95/98 Configuration (Peer-to-Peer Printing)
■ Using IPX Peer-to-Peer
Windows Peer-to-Peer printing allows Windows 95/98 computers to print to IP-601 + KN-302 printers without an intervening server and without using IP. The main features of the Windo ws IPX P eer-to-P eer printing
are as follows:
• Runs on Windows-95/98 "out of the box".
• Runs on networks that do not have a NetWare file server, as well as those that do.
• Implements IPX peer-to-peer bi-directional printing between Windows PCs and IP-601 + KN-302 print-
ers.
● Introduction and preparation
The Peer-to-P eer implementation uses the IPX/SPX stac ks that are provided with Windows 95/98. The IPX
Peer-to-Peer provided will establish a connection with the printers supporting IPX Peer-to-Peer, without
using an intermediate file server, whether or not your network uses Novell NetWare.
When configuring the network capabilities for the Windows computer , y ou must include the [IPX/SPX Compatible Protocol]. If you are not using NetW are , you do not need to activ ate any NetW are Client application.
This inclusion of IPX/SPX can also be done after initial Windows installation b y going to the [Network] setup
function under [Control Panel]. To do this, you will need the Windows CD.
Because Peer-to-Peer uses the IPX/SPX Protocol, Novell operation must remain enabled
on the KN-302, even if traditional Novell printing facilities are not being used. The name of
the Peer-to-Peer printer, as it appears in the Windows Port List, is the same as the Novell
Print Server name, and may be changed by changing the Novell Print Server name using
the Web Utility or MAP utility.
On power up, the KN-302 chec ks the network to see if there is Novell activity. If there is, it will use the same
frame type and the local network number that it senses. If, in addition, the KN-302 can log on to a file server ,
it will assume that Novell is normally used and will store this frame type and new number in NVRAM so that,
when it comes up again, it will not have to spend the time sensing (which can take some time).
However, if the KN-302 cannot attach to a file server, it will use the sensed values, but will not store them.
If the KN-302 does not see any Novell activity, it will use 802.2 on 802.3 as a frame type and will assign
itself a network number of 0. The frame type and network number being used is reported on the Status
Page.
If a KN-302 is being moved from a site that had active No vell to a site that does not, the unit should be reset
to factory default to clear the frame type and network number information.
3-6 KN-302 Network Interface Card
Page 35

Chapter 3 Windows 95/98 Configuration (Peer-to-Peer Printing)
● Installation of IPX Peer-to-Peer
To install the IPX Peer-to-Peer, perform the following procedure:
1. Insert the CD-ROM that came with the KN-302 into the CD-ROM drive.
2. From the Windows main window, click on [Start].
3. Click on [Run].
4. From [Run], type <CDROM drive>:\IPX-P2P\SETUP.EXE.
5. Click on [OK].
6. At the [IPX Peer-to-Peer Setup] screen, click on [Next].
If setup detected a previous installation of the IPX Peer-to-Peer, it will prompt you to have
Setup delete the old driver and continue the installation procedure. Click on [Yes] or [No].
Once the IPX Peer-to-Peer is installed, each printer on the network that supports this peerto-peer capability will appear as a [Port] under [Printer Properties].
To use the Peer-to-Peer connection, create a logical printer using the [Add Printer Wizard]
according to the instructions for IP-601. Set up the pr inter as a [LOCAL] printer. Use the
driver that came with the IP-601. When the [Add Printer Wizard] asks you to choose the
[Port], select the name of the P eer-to-Peer printer you wish to print to. When you complete
the installation, select the [Print Test Page] option.
When uninstalling the IPX Peer-to-Peer, perform the following procedure.
1. Delete the printer using IPX Peer-to-Peer from the [Printer] folder.
2. Delete the [IPX-P2P] by using [Add/Delete Applications] from [Control Panel].
KN-302 Network Interface Card 3-7
Page 36

Chapter 3 Windows 95/98 Configuration (Peer-to-Peer Printing)
● IPX Peer-to-Peer setup
IPX Peer-to-Peer printing allows you to print to a network printer for networks without a file server or for
networks where you do not want to use the KN-302 for printing.
Use peer-to-peer printing on Windows 95/98 systems. Click on the [IPX-P2P] menu item in Windows to
bring up the [IPX Setup] screen.
An explanation for each field on the screen is described below:
OK:
Accepts changes made to setup and exits the program.
Cancel:
Discards any changes made to setup and exits the program.
Clear:
Clears the [Available Printers] list below. This will not clear any printer marked with the [Permanent] flag.
Delete:
Deletes the highlighted printer(s) from the [Available Printers] list below . Printers deleted in this fashion will
no longer be listed in the [PORT] listing when adding a printer.
However, this does not actually delete the printer from the network, it only removes it from the list maintained on this computer. The printer may be re-added to the list by selecting the [Find Printers] button
(described below) as long as it remains connected to the network.
Permanent:
Flags the highlighted printer(s) with the [P] flag. Any printer marked with this flag will not be removed from
the [Available Pr inters] list, even if the printer is physically removed from the network or the [Clear List]
button is selected (described above).
Find Printers:
Initiates a search routine out to the network. This routine will then list all printers found on the network by
their Print Server Name (defined in the printer). The default Print Server Name for a printer is a three letter
identifier and the six digit serial number of the Network Interface Card (e.g., KON_(serial number)).
Select:
Flags the highlighted printer(s) with the "S" flag. Only 30 printers may be selected at one time. When
displaying the [PORT] list during the process of adding or changing a printer , only [Selected] printers will be
displayed.
3-8 KN-302 Network Interface Card
Page 37

Chapter 3 Windows 95/98 Configuration (Peer-to-Peer Printing)
Available Printers:
List of printers that was detected on the network. This list can be cleared using the [Clear List] button
(described above) and this list can be updated or refilled using the [Find Printers] button (described
above).Printers in this list are described with three fields:
• Unit Name:
This is the Print Server Name defined in the printer. The default Print Server Name for a printer is a three
letter identifier and the six digit serial number of the NIC (e.g., KON_(serial number)).
•Description:
Printer's description. This field usually contains the manufacturer's name and the printer's model.
• Flags:
[S], selected or [P], permanent. Any printers marked with an [S] flag will be display ed in the [Window’s Port]
Listing. When displaying the Windows port list during the process of adding or changing a printer, only
[Selected] printers will be displayed. Only 30 printers may be selected at one time.
Any printer marked with a [P] flag will not be removed from the [A v ailab le Printers] list, even if the printer is
physically removed from the network or the [Clear List] button is selected.
Add Printers for IPX Peer-To-Peer Printing
You can add printers manually whenever the program cannot find printers automatically because of router
setup or hop count setting. In general, this should not be necessary:
Step 1: Use IPX-P2P to Add Printers
1. Click on the IPX-P2P menu item in Windows. The IPX Peer-to-Peer Setup screen appears.
2. A list of available IPX-enabled printers is displayed after a brief pause while the program
searched the network.
3. Highlight the printer(s) you wish to have displayed in the Windows Printer Port listing and
click “Select”. This will ensure these the printers are included in the Windows Printer Port
listing. You may have a maximum of 30 printers selected at any one time.
4. Click OK when you have finished selecting all the printers you wish to have displayed in the
Windows Printer Port list.
Step 2: Use the Add Printers option in Windows.
1. Click on the Add Printer button.
2. Select Local Printer from the menu.
3. Select the make and model of the printer you want to use. A list of printer ports appears. Any
IPX peer-to-peer printers that have been selected from IPX-P2P Setup will appear in this list.
4. Select the IPX printer you want to use.
5. Complete the remainder of the printer setup procedure as you would normally.
You may change the IP-601 at a later time by doing the following:
1. Right click on the IP-601 icon and select properties.
2. Select the Details tab (it may take up to 15 seconds to access).
3. Click on the arrow in the box labeled Print to the Following Port.
4. Select the printer address you wish to use.
5. Click OK.
KN-302 Network Interface Card 3-9
Page 38

Chapter 4 Windows NT4.0/2000 Configuration (LPD/LPR Printing)
■ LPD/LPR setup.......................................................4-2
● Adding a printer port on Windows NT4.0......................... 4-2
● Adding a printer port on Windows 2000........................... 4-3
KN-302 Network Interface Card 4-1
Page 39

Chapter 4 Windows NT4.0/2000 Configuration (LPD/LPR Printing)
The KN-302 is equipped with the standard print server protocol (LPD) for TCP/IP, which enables you to use
TCP/IP print service (LPR) from Windows NT4.0 (Service Pack 3 or later) or Windows 2000 computers.
To use the TCP/IP network protocol for LPD/LPR printing, the KN-302 must be set up for TCP/IP in advance.
For each Windows NT4.0 computer that performs LPD/LPR printing, you need to set up TCP/IP, Microsoft
TCP/IP printing and printer driver.
Confirm that TCP/IP is set up correctly on the Windows NT4.0/2000 computer using the
printer via the KN-302 before setting up the printer. For TCP/IP setting refer to Windows
NT4.0/2000 online help, etc.
■ LPD/LPR setup
● Adding a printer port on Windows NT4.0
To print by LPD/LPR, add a printer port and install the printer driver on Windows NT4.0. To do this use the
[Add Printer] feature of Windows NT4.0. The CD-ROM containing the printer driver must be prepared.
For details about the printer driver , refer to “Konica IP-601 Print Controller INSTRUCTION MANUAL” .
To add a printer port perform the following procedure:
1. Click the [Start] button and select [Printers] from [Settings].
2. Double-click [Add Printer] to activate [Add Printer wizard].
3. Select [My Computer] and then click [Next].
4. Click the [Add Port] button.
5. Select [LPR Port] from [Available Printer Ports] in the [Printer Ports] dialog box. Click the
[New Port] button.
6. Type the IP ad dress assigned to the KN-302 f or [Name or Address of Server pr o viding lpd] in
the [Add LPR-Compatible Printer] dialog box.
7. Type [POR T1](half size, upper case) for [Server Printer Name or Printer Cue Name], and click
the [OK] button.
8. Close the [Printer Ports] dialog box.
9. Click [Next] of the [Add Printer wizard], and you come to the step of installing the printer
driver. Follow the wizard information.
For more details of the installation procedure of the printer driver, refer to “Konica IP-601 Print Controller
INSTRUCTION MANUAL”
4-2 KN-302 Network Interface Card
Page 40

Chapter 4 Windows NT4.0/2000 Configuration (LPD/LPR Printing)
Installation of Microsoft TCP/IP Print Service
Select [Network] from the [Control Panel] of Windows NT4.0 to displa y the [Netw ork] dialog
box. Click the [Service] tab and make sure that [Microsoft TCP/IP Print] exists in the list of
[Network Services]. If it is not found, add it. To add Microsoft TCP/IP Print, see Windows
NT4.0 online help, etc.
● Adding a printer port on Windows 2000
T o print by LPD/LPR, add a printer port and install the printer driver on Windows 2000. F or this work use the
[Add Printer] feature of Windows 2000. The CD-ROM containing the printer driver must be prepared.
For details of the printer driver , refer to “Konica IP-601 Print Controller INSTRUCTION MANUAL” .
To add a printer port perform the following procedure:
1. Click the [Start] button and select [Printers] from [Settings].
2. Double-click [Add Printer] to activate [Add Printer wizard].
3. Click [Next].
4. Select [Local] and check [Search for the best driver for your device] off. Click [Next] .
5. Select [New Port] and then choose [Standard TCP/IP Port] from [Por t:]. Click the [Next] button.
6. [Add Standard TCP/IP Printer Port Wizard] opens. Click [Next].
7. Type the IP address assigned to the KN-302 f or [Name or IP Address of Server]. T ype [PORT1],
and click the [Next] button.
8. Select [Standard] and [Generic Network card] from [Device]. Click [Next].
9. Click [Finish] button.
10. Y ou can bac k the [Add Printer wizar d], and the windo w to select manufactures and models is
displayed. Follow the wizard information.
For more details of the installation procedure of the printer driver, refer to “Konica IP-601 Print Controller
INSTRUCTION MANUAL”
If you set up the printer connected through TCP/IP Print Service as shared printer, you can
access the printer via the Windows computer which is set as a Microsoft network client.
KN-302 Network Interface Card 4-3
Page 41

Chapter 5 UNIX Configuration
■ UNIX printing through TCP/IP.................................5-2
● Introduction.....................................................................5-2
● Printing overview ............................................................ 5-3
● Configuring IP address to the KN-302............................ 5-4
● lpd UNIX Printing............................................................ 5-5
KN-302 Network Interface Card 5-1
Page 42

Chapter 5 UNIX Configuration
■ UNIX printing through TCP/IP
● Introduction
This section explains how to configure the KN-302 and y our network for use with TCP/IP communication in
various UNIX environments. Independent setup and installation procedures are provided for most popular
UNIX systems.
The KN-302 TCP/IP capability will also operate with lpr spoolers on other systems , and with spooler/supervisor capabilities that communicate raw print jobs to the KN-302 TCP/IP port. This port number is 10001.
SNMP (Simple Network Management Protocol) is a protocol for network management services. SNMP is supported for Management Information Base (MIB) II over the IP for the
network interface card. This support allows you to query MIB II to get system information
about the network interface card.
The KN-302 can support UNIX TCP/IP printing in two modes:
• Host-based where a supplied line printer daemon is run on one or more workstations and print data is
communicated to the KN-302 via a TCP/IP port.
• Printer-based lpd where the IP-601 appears as a host running a line printer daemon.
Many operating systems provide the option of using host-resident printing or printer-resident printing.
In general, printer-based lpd is easier to use on BSD UNIX systems. This requires an entry in the printcap
file once the KN-302 has its IP information. Some UNIX System V systems have restrictions on support of
remote lpd printers, requiring that the host-based lpd approach be used.
Each printing mode has certain advantages over the other mode, as follows:
• The host-resident method can print the username and filename on its banner page; whereas the printerresident method prints a banner page with the host’s name.
• The printer-resident method requires you to configure the IP-601+KN-302 only one time, when you install
the KN-302.; whereas, the host-resident method requires that a printing daemon be installed on every
host that you want to be able to print jobs.
The KN-302 will also operate with other host-resident print supervisor/spooler programs
that present a print image to the IP-601 over a TCP/IP port.
5-2 KN-302 Network Interface Card
Page 43

Chapter 5 UNIX Configuration
● Printing overview
Considering both the host-based and printer-based TCP/IP printing capabilities, the KN-302 works with the
following systems:
• All UNIX systems that support lpd
• System V Rel. 4 (on 386 platforms)
• DEC ULTRIX RISC Versions 4.3 and 4.4
• DEC OSF/1 Versions 2.0 and 3.0
• Solaris:
Version 1.1.3 (SunOS 4.1.3),
Version 2.3 (SunOS 5.3),
Version 2.4, and
Version 2
• HP-UX Series 700 and 800 Version 9.01 and Version 10
• IBM AIX Version 3.2.5 and Version 4.0
• SCO UNIX Version 3.2
• AS400
If the systems you are using do not run lpd, refer to “Installing UNIX TCP-IP programs,
Information for the TCP/IP network administrator, in Appendix”
The UNIX-TCP/IP Programs on accompanying CD-ROM also includes source code so that
you can recompose host-based code for configuring on other System V platforms.
KN-302 Network Interface Card 5-3
Page 44

Chapter 5 UNIX Configuration
● Configuring IP address to the KN-302
Regardless of the printing mode selected, the KN-302 must be given the IP address and routing parameters. You can configure the IP address for the KN-302 in one of the following ways:
• Use DHCP (Dynamic Host Configuration Protocol).
See “Using DHCP, Information for the TCP/IP network administrator, in Appendix”.
• Use arp and ping capability.
See “Assigning IP Address, General Description of the Network Setup, in Chapter 2 Setting Up KN302 and Printer”.
• Use BOOTP (Internet Boot Protocol).
See “Using BOO TP to assign IP address , Information f or the TCP/IP network administrator , in Appendix”.
• Use reverse ARP (rarp) capability (Ethernet
See “Using rarp to assign IP address, Inf ormation for the TCP/IP network administrator, in Appendix”.
• Use arp command, MAP(Management Access Program), or BOOTP Lite for Windows.
See “Assigning IP Address, General Description of the Network Setup, in Chapter 2 Setting Up KN302 and Printer”.
• Use NIManage for Macintosh.
See “ Chapter 7 AppleTalk Configuration”.
II frame type only).
You can use the BOOTP, rarp, or arp and ping procedures only when the KN-302 is in its
factory default state (when no IP information has been entered).
Depending on the topology, you need to provide the MAC address of the KN-302. The MAC address is the
12-character code that is printed on the Status Page each time the printer/copier is turned on.
After the KN-302 has an IP address, you must use the MAP utility, or other dedicated utilities (for Windo ws
or Macintosh) to change an IP address, Subnet Mask and Default Gateway.
5-4 KN-302 Network Interface Card
Page 45

Chapter 5 UNIX Configuration
● lpd UNIX Printing
lpd is an implementation of the standard UNIX line printer daemon that lets you print across a TCP/IP
network without the need to install software on your workstation, with all filtering and banners done by the
KN-302.
Remote printing uses the same commands (lpr, lpq, lpc) as local printing.
The process begins when the lpr call finds the printer on a remote system by looking at the remote (rm)
entry in the /etc/printcap file for that printer.
lpr handles a print job for a remote printer by opening a connection with the lpd process on the remote
system and sending the data file (followed by the control file containing control information for this job) to
the remote system.
The printer-based lpd then filters the data and prints the job according to information contained in the
control file and its own printcap file.
The KN-302 lpd recognizes the format of a certain printer emulation and filters the data, if possible, so it can
be printed on the printer you specify.
You can indicate to the KN-302 lpd what type of printer it is attached to by either:
• Accepting the default port setting (PCL, PostScript and other), or
• Changing the listed emulations via a standard IP based Web Browser.
The sections that follow give specific lpd setup instructions for various systems.
Setting Up a BSD Remote Printer to Use lpd
T o set up a remote printer on the host that sends jobs to the KN-302 using printer resident lpd, add an entry
to the /etc/printcap file on your host for each printer you use. Perform the following procedure:
1. Open the /etc/printcap file. Make an entry naming the KN-302 as the remote host and PORT1
as the remote printer name. A typical printcap entry is as follows:
<printer_name>\ (for example, lprprinter)
:rm=<remote_host>:\ (
for example, name as entered in /etc/hosts)
:sd=/usr/spool/lpd/<printer_name>:
(for example, spool directory on system used to spool
data and control files)
This entry will send jobs spooled at /usr/spool/lpd/<printer_name> to the printer designated
<printer_name> to be printed at port 1 (the internal connection to the printer) of the KN-302
designated as <remote_host>.
2. Create the spooling directory. For example, type:
mkdir /usr/spool/lpd/<printer_name>
3. To print via the spooler, use the lpr command. Type:
lpr-P <printer_name> < file_name>
Installation and testing are done. You are now ready to print.
:lp=:\
:rp=PORT1:\
KN-302 Network Interface Card 5-5
Page 46

Chapter 5 UNIX Configuration
Setting Up an AIX Remote Printer to Use lpd
Use the following procedure to set up a remote printer on the host that sends jobs to the KN-302 using the
KN-302's lpd.
1. At the prompt, type:
#smit spooler <cr>
2. When a window appears, select Manage Remote Printers.
3. When a menu appears, select Client Services.
4. Another menu appears, select Remote Printer Queues.
5. Another menu appears, select Add a Remote Queue.
6. When a window appears, change the values shown to configure the KN-302.
The values displayed are default v alues. Y ou must replace the short and long form filter v alues
with the values shown in the following table.
Data Requested Example Data Description
Name of queue to add print1 Name of local printer
queue Destination Host printfast NIC IP hostname
Short Form Filter /usr/lpd/bsdshort Required value
Long Form Filter /usr/lpd/bsdlong Required value
Name of remote printer queue PORT1 KN-302
Name of device to add print1 Name of local queue
7. After you have supplied all values, press Enter.
You can now print.
Setting Up an AIX 4.0 System
Use these procedures to install the KN-302 in a AIX 4.0 system:
1. Run SMIT Printer.
2. Select Print Spooling.
3. Select Add a Print Queue.
4. Select Remote.
5. Use Standard Processing.
6. Assign a queue name.
7. Use the host address of the Konica Print Server for the Remote System.
8. Use PORT1 for the queue on the remote system.
9. Add a description (optional).
10. Press Enter to generate.
Installation is complete.
Test your printer by executing the following command:
lp -d<queue_name> <file_name>
5-6 KN-302 Network Interface Card
Page 47

Chapter 5 UNIX Configuration
Setting Up an HP/UX Remote Printer to Use lpd
Set up a remote printer on the host that sends jobs to the KN-302 using the KN-302’s lpd. To do this:
1. At the prompt, type:
sam
2. When a window appears, select Printer/Plotter Manager.
3. When the menu appears, select List printer and plotters.
4. When a list appears, select Actions in the title bar.
5. From the pull-down menu, select Add Remote Printer.
6. When a window appears, add values to configure the KN-302. See example below.
Data Requested Example Description of Input Data
Printer Name myprinter name to be used in lp command
Remote System Name fastprint Print Server hostname as in /etc/hosts
Remote printer Name PORT1 lpd queue name
7. At the bottom of the screen, select Remote Printer is on BSD system from the three choices
available.
8. Click on the OK button.
9. Ping the unit to test communications. Type:
ping <KN-302 IP address>
10. Ping should confirm your IP address with the message:
<KN-302 IP address> is alive
11. If the connection is confirmed, you can now print.
Setting Up an AS/400 System to Use lpd
When working with the output queue description (WORKOUTQD), there are several fields that must be
defined for the KN-302 to function properly as a remote printer device.
Use the following procedure to define fields f or the KN-302 to make it function as a remote printer:
1. When prompted for the remote system, type INTNET ADR so the AS/400 recognizes the de vice
as an IP device.
2. Type:
PORT1
3. Connection type must be IP.
4. Internet address must be the IP address of the KN-302.
5. Destination type must be OTHER.
6. When prompted for transforming SCS to ASCII, type YES to allow the AS/400 do the character
translation.
7. Manufacturer type and model must be the print driver that goes with your printer.
KN-302 Network Interface Card 5-7
Page 48

Chapter 5 UNIX Configuration
Setting Up a DEC ULTRIX 4.3 RISC or OSF1/ALPHA Remote Printer
Use the following procedure to set up a remote printer on the host that sends jobs to the KN-302.
1. At the prompt, type: lprsetup, then select add.
2. Enter a name for your printer, then press Enter.
3. “Do you want more information on specific printer types?” Press Enter.
A list of ULTRIX-supported printers is listed.
4. Type: remote, and press Enter.
5. Enter a printer synonym (alias) and press Enter.
6. Designate a spooler directory and press Enter, or accept the default spooler directory displayed and press Enter.
7. Designate a remote system name and press Enter.
8. Designate PORT1 as the remote system printer name and press Enter.
9. Y ou are asked to enter the name of a printcap symbol fr om a displayed list. Type: Q, and press
Enter.
10. Your configuration is displayed. You are asked whether these values are final. Type: Y or N,
and press Enter. An example is shown below.
Printer #7 Symbol Type Representative Value
lp (line printer) STR
rm (remote host) STR Printer Server Card_host
rp (remote printer) STR PORT1
sd (spooler directory) STR /usr/spool/lpd7
11. Add comments to the printcap file. For example, you can type:
Lois' printer down the hall <Enter>
12. Select exit to save your configuration, then press Enter.
You are now prepared to print.
Setting Up a SCO UNIX Remote Printer to Use lpd
Use the following procedure to set up a remote printer on the host that sends jobs to the KN-302 using lpd.
1. At the prompt, type: mkdev rlp
Y ou cannot run mkde v rlp twice. If y ou have other printer s that need to be configured, use the
rlpconf command.
Respond to the series of questions as follows:
2. Do you want to install or remove a remote printer? Type: I
3. Do you want to change printer description file /etc/printcap? Type: Y
4. Write a printer name. For example, type: lprprinter1
5. Is lprprinter1 a remote printer or a local printer? Type: R
6. Enter remote host name: type host name entered in printcap for Konica Print Server. For
example, type: Lprprinter
5-8 KN-302 Network Interface Card
Page 49

Chapter 5 UNIX Configuration
7. Confirm the information you have entered. Type: Y
8. Confirm the preceding connection as your system default. Type: Y or N
9. Do you want to start the remote daemon now? Type: Y
10. Enter another printer name or quit setup. Type: Q
11. Using a line editor of your choice,
edit the /etc/printcap file by changing :rp= entry to :rp= PORT1. (See example below.)
printer1:\
:lp=:\ (used to specify device name for a local printer; field must be empty)
:rm=lprprinter:\ (remote machine name or network name of print server)
:rp=PORT1:\ (remote printer name or the name of the print server)
:sd=/usr/spool/lpd/printer1: (name of the spool directory on the client)
Setting Up System V Release 4 and Solaris 2.X to Use lpd
If your system recognizes the LPSYSTEM command, you do not need to install the dedicated utility, Konica's
host-side software. Another option is the admintool if your system supports it.
• LPSYSTEM Installation
The following procedure must be e xecuted from the Bourne Shell.
Type: SH then press Enter to enter the Bourne Shell program.
Use the following procedures to install LPSYSTEM:
1. lpsystem -t bsd
Print server host name in /etc/hosts file. Your system may want its IP address instead of the
remote host name.
2. lpadmin -p <local printername> -s <remote host name or IP address>!PORT1
1. There is no space between the remote host name and !PORT.
2. Enable <local printername>
3. Accept <local printername>
KN-302 Network Interface Card 5-9
Page 50

Chapter 6 NetWare Configuration
■ Setup with NWSetup ..............................................6-2
● How to install ................................................................... 6-2
● Using the NWSetup program........................................... 6-3
■ Setup for NetWare 3.x ............................................6-8
■ Setup for NetWare 4.x ............................................6-9
● Setup information............................................................. 6-9
● NDS setup ..................................................................... 6-10
● Setup for Bindery Emulation .......................................... 6-10
KN-302 Network Interface Card 6-1
Page 51

Chapter 6 NetWare Configuration
To print with the Konica 7075 equipped with the KN-302 Network Interface Card by using Nov ell NetWare,
the setup procedures depend on the NetWare version and the method of resource management.
■ Setup with NWSetup
To use NWSetup program you must have IPX NetWare connection and the Novell 32-bit client installed.
You must be logged in to the NetWare server with administrator access to use it.
NWSetup lets you set up the KN-302 on Novell NetWare network using only one program from Windows
95/98/NT4.0/2000. This program combines the following configuration steps:
• Set up Novell file server and queue on the NetWare server, instead of using NetWare utilities.
• Set up the KN-302 for network printing.
● How to install
To install NWSetup, perform the following procedure:
1. Insert the CD-ROM into the CD-ROM drive, and double-c lick on [Setup.e xe] in the [NWSETUP]
folder.
2. A setup program will start. Confirm the display, and click on the [Next] button.
3. Confirm a folder to install NWSetup. By default, the folder is C:\Program Files\NWSETUP.
When clicking on the [Next] button, necessary files are copied, and then installation is com-
pleted.
Or Install NWSetup directly from the CD-ROM as follows:
1. Set the CD-ROM into your CD drive.
2. Select [RUN] from the Windows [Start] menu.
3. Type <CD-Drive>:\NWSETUP\SETUP.EXE
4. Follow the instructions in the SETUP program.
If you are configuring for NDS (Directory Services), make sure you are logged into the
correct tree and context before you initiate this program.
6-2 KN-302 Network Interface Card
Page 52

Chapter 6 NetWare Configuration
● Using the NWSetup program
Select a Print Server
NWSetup displays a list of all print servers (network interface cards) available on your network after you
start the program. The print server appears with its serial number . Once y ou select the KN-302 you w ant to
configure, the Print Server Settings screen appears. This screen lets you set up y our version of NetW are f or
the KN-302.
Setup Novell NetWare
The Print Server Settings are shown below. There are two Print Server Settings screens , which you need to
complete to configure the print server for NetWare. Each screen lets y ou set up your v ersion of NetWare f or
the print server, including directory and bindery services.
Enable NetWare Print Server
Indicates whether the NetWare print server has been enabled.
• If the box is not checked, the print server has not been enabled for NetWare. All other fields on the
screen will be shaded.
• If the box is checked, the Network Interface Card has been enab led for NetW are and y ou can make
entries in the other fields.
Print Server Name
Indicates the NetWare print server name which the KN-302 uses to log into NetW are. You can enter a
name which does not already exist in the network directory or server bindery.
The maximum field length is 48 characters.
Print Queue Scan Rate
Specifies the rate at which a Network Interface Card will poll print queues for a new print job. For
example, if you place 1 in the field, the Network Interface Card should poll for new print jobs every 1
second. The minimum value for this field is 1 and the maximum is 250.
Print Server Password and Print Server Password Retype
Indicates the password f or a Network Interface Card which will be used to log into NetW are. When you
change this field, NWSetup will set the password in both NetWare and the Network Interface Card.
The maximum length for this field is 32 characters.
Both the Password and Password Retype fields must be identical before a user is allowed to Finish
this screen.
Ethernet Frame Type
Indicates the Ethernet frame type that should be used by the NetWare protocol stack b y def ault. Only
one frame type can be selected.
KN-302 Network Interface Card 6-3
Page 53

Chapter 6 NetWare Configuration
Enable NDS Mode
Indicates whether the Network Interface Card support Directory Services. When the box is checked,
Directory Services is supported.
• If this box is not checked, then all other fields on this screen will not be enabled.
Preferred NDS Context
Enter a text string to set the NDS directory context for which the Network Interface Card will use to
login to the network. The maximum field length is 128 characters.
Make sure you enter the whole context, whether typed or typeless.
Preferred NDS Tree
Enter a text string to set the NDS tree which the Network Interface Card will use to login.
The maximum field length is 48 characters.
Enable Bindery Mode
Determines whether the Network Interface Card should attempt to service the NetWare newtork in
bindery mode.
• If this box is checked, then Bindery Mode is enabled.
If this field is not enabled, then the Primary File Server field will not be enabled.
Primary File Server
Specifies which NetWare file server that the Network Interface Card should use as the primary file
server. If no primary file server has been selected yet, or if a server that is not available is selected,
then the first file server in the list is selected.
Print Server Settings
NWSetup lets you set up each Print Server printer. This information is usually entered using NetWare’s
NWADMIN or PCONSOLE utility. NWSetup eliminates the need f or configuring the IP-601+KN-302 through
any NetWare utility. A description of each setting follows:
Enable Printer
Indicate whether support for the Network Interface Card and printer is enabled.
• If this box is checked, then the printer is enabled.
• If the box is not checked, then the printer is not enabled. The remaining fields on the screen will not
be enabled.
Printer Name
Displays the name of the printer. This is a read-only field.
6-4 KN-302 Network Interface Card
Page 54

Chapter 6 NetWare Configuration
Queues Serviced by Printer
Lists all the queues which are to be serviced by the printer.
• Queues associated with bindery connections are listed in the format binder y ser ver name: queue
name.
• Queues associated with NDS connections are listed by their distinguished names.
Example: If a printer services the queue YOURPTR_Q on the server OLD_SERVER which is a bindery server,
then the queues would be listed as OLD_SERVER:YOURPTR_Q. If an NDS server has a distinguished name
such as ENGINEERING.CORP and with a queue name ENGINGEERING_Q servicing the printer, then the queue
would be listed as ENGINEERING_Q.ENGINEERING.CORP
Users/Groups Notified by Printer
Lists all users and user groups who will be notified when a printer error is detected.
• Users and groups associated with bindery connections will be listed in the format binder y server
name:user/group name.
• Users and groups associated with NDS connections will be listed by their distinguished names.
Example: If a user named Susan on the bindery server OLD_SERVER is listed on the printer’s notify list, then the
user would be listed as OLD_SERVER:SUSAN. If a user named Albert whose NDS context is
ENGINEERING.CORP is on the printer’s notify list, then the user would be listed as ALBER T .ENGINEERING.CORP
When you double click on an entry in this field, the Notify Settings screen appears. See Configuring the Notify
Settings later in this section.
The NIC supports the Notify function only in Bindery mode.
Add Queue / Delete Queue
Use the Add and/or Delete queue buttons to make changes.
Adding a Queue:
When the user clicks on the [Add Queue] button, a dialog box appears (see abo ve) where the user can
add a queue to the printer. Below is a description of each field:
Connection/Server:
Use to select a server connection. This list includes the NDS connection and all of the binder y file
server connections which the user has. The NDS connection is always the first one listed, by def ault.
When a new connection is selected, the Queue field is automatically updated.
NDS Context:
Specifies an NDS context for the queue. NWSetup lists all the queues within this context or the
subcontexts in the Queue field. This field is only enabled when NDS support is enabled. By default, the
NDS Context should be set to the preferred NDS conte xt specified in the Print Server Settings screen.
Queue:
Lists all the queues available on currently selected connection.
• If an NDS connection is specified, then a list of all queue names in the selected context and, all
subcontexts is displayed.
• If a you change the context in the NDS Context field, or, change the connection in the Connection
Server field, then the queue list is refreshed to reflect the new connection or context.
• If you double click on a queue in the list, the queue is automatically added to the printer’s service
and you exit this screen.
KN-302 Network Interface Card 6-5
Page 55

Chapter 6 NetWare Configuration
Deleting a Queue:
Highlight the queue you want to delete and click on the [Delete Queue] b utton. A confirmation screen
appears which asks if you really want to delete the highlighted queue. Press [Yes] to delete, or, [No] to
cancel the deletion.
If you delete a queue, you are not ph ysically deleting the object from the file server . In order
to delete the queue from a file server, you must use your NetWare utility to remove the
queue from the file server queue list.
Add User/Delete User
Press the [Add User] or [Delete User] buttons to add or remove Users/ Groups for notification.
Adding Users/Groups:
Connection:
Select a connection from this field. This list includes the NDS connection and all of the binder y file
servers connections to which a user has access. The NDS connection is always listed first, by default.
NDS Context specifies the NDS context to use when generating a list of users and/or g roups. This field
is enabled only for NDS connections. When first displayed, this field lists the preferred NDS context
specified in the Print Server Settings screen. If you change this v alue , then NWSetup verifies that it is
correct when the user attempts to move to another field or clicks on [OK].
Users/Groups: Lists all of the user and groups available on the currently selected connection. Any
entry on this list can be added to a printer’s service list. The list includes (Print job owner) which ref ers
to the user who sent the job currently being printed.
• If an NDS connection is selected, NWSetup generates a list of all users and groups in the currently
selected context and all subcontexts.
• When you double click on an entry in the list, the entry is added to the printer’s service list.
• The user/group list is updated whenever the Connection or NDS Context fields are changed.
Delay in minutes for first message indicates how long the Network Interface Card should wait before
sending a notification message that an error condition has been detected. The field is set to 5 minutes
by default. Its minimum value is 1 minute and maximum value is 60 minutes. Delay in minutes for
repeat messages indicates how long the Network Interface Card should wait bef ore sending a repeat
notification of an error condition. This field is set to 30 minutes by default. Its minimum value is 1
minute and maximum value is 60 minutes.
Note: The NIC supports the Notify function only in Bindery mode.
Create Queue
Below is a description of each field: Queue Name: Enter the name of the new queue. This field must be
completed in order to create a new queue. The maximum field length is 48 characters.
File Server Volume:
Indicates the volume on which the queue should be created. This field is enabled only if the current
connection is an NDS connection. When enabled, it contains a list of all a vailable v olumes. For bindery
services, the default volume name is SYS. NDS Context: Specifies the NDS context in which the
queue is created. This field is enabled only when an NDS connection is being used. When this field
first displays, it will list the NDS context specified in the Add Queue dialog. If you change it, NWSetup
verifies that the new conte xt exists on the directory tree. Click on OK to start the verification process.
6-6 KN-302 Network Interface Card
Page 56

Chapter 6 NetWare Configuration
Configuring the Notify Settings
The Notify Settings screen appears when you double-click on an entry in the Users/Groups Notified by
Printer field on the Print Server screen. Use this screen to set up the notify function for the users or groups .
The NIC supports the Notify function only in Bindery mode. Below is a description of each
field:
User/Group name
Indicates the name of the user or group which is being edited. This field cannot be changed.
Delay in minutes for first message
Indicates how long the Network Interface Card should wait before sending a notification message to
the user that an error condition has occurred. The field is set to 5 minutes by default but can be set to
any value between 1 to 60 minutes. Delay in minutes for repeat messages Indicates how long the
Network Interface Card should wait before sending a repeat notification message to a user or group
when an error condition has occurred. The field is set to 30 minutes by default but can be set to any
value between 1 to 60 minutes.
KN-302 Network Interface Card 6-7
Page 57

Chapter 6 NetWare Configuration
■ Setup for NetWare 3.x
Before setting up NetWare , you ha v e to define the print server name, etc., from the MAP (W eb utility). See
“Chapter 2 Setting up KN-302 and Printer”, for setting up NetWare by MAP. See the manual of Novell
NetWare for setting up with PCONSOLE.
The setup procedure of NetWare 3.x is as follows. To perform this procedure, you must be authorized as
supervisor.
1. Start up PCONSOLE and select the file server to use.
2. Generate and assign a print queue.
3. Define KN-302 as the print server.
4. Define the notification list/password as necessary.
5. Set up the primary file server as necessary.
On completion of setup, turn off the printer’s main power and turn it on again. The printer will print out a
Status Page indicating the file servers equipped with KN-302 and the queues that the file servers will
service.
The primary file sever must be defined if the network is of a large scale and connects many
sites having more than one file server. PCONSOLE should be used to set up the primar y
file sever.
6-8 KN-302 Network Interface Card
Page 58

■ Setup for NetWare 4.x
Novell NetWare 4.x can operate in two modes, NetWare Directory Service (NDS) and Binder y Emulation
Service (Bindery Emulation). Bindery Emulation and NDS will be executed simultaneously. It is also
possible to set up the print server so that it operates only in Bindery Emulation mode or in NDS mode.
The print server set up for NDS mode will also service the file server of an old version operating in Bindery
mode.
If NDS is not set up properly for the print server and Bindery Service mode is not operating,
the print server cannot find the file server and Novell NetWare protocol will be indicated as
inactive in the Status Page.
● Setup information
NDS
NetWare Directory Service (NDS) offers a different, more advanced approach to network management than previous NetWare versions. Generally, it stores and tracks all network objects.
As a rule, all 4.x servers must have NDS loaded in order to function. In this way, every NetWare 4.x
server is a Directory server, because it services named Directory objects such as printers, print server
and print queues.
With the appropriate privileges, you can create a print server object, which, once configured in its
context (or location) on the network, eliminates the cumbersome setup of print servers on every network server.
NDS provides true enterprise networking based on a shared network database rather than individually defined physical sites. The result is a greatly improved print server setup and management.
Chapter 6 NetWare Configuration
Bindery emulation
NetWare 4.x also provides backward compatibility for 3.x and 4.x print service through Bindery emulation.
The Directory Information Base (DIB) is used to store information about servers and services, users,
printers, gateways , etc. It is a distributed database, allowing access to data anywhere on the network
wherever it is stored. Pre-4.x NetWare versions provide the same data found in the DIB but the data
is stored in the NetWare Bindery. The DIB was designed with more flexible access, more specific
security, and, since it is distributed, it was designed to be partitioned.
The Directory uses an object-oriented structure, rather than the flat-file structure of the Bindery, and
offers network-oriented access, rather than server-oriented access found in the Bindery.
The Directory is backward-compatible with the NetWare Bindery through Bindery emulation mode.
When Bindery emulation is enabled, Directory Services will accept Bindery requests and respond just
as if a Bindery existed on the NetWare server being accessed.
Be aware that information obtained from the Bindery query may not be stored in the server since the
Directory is a partitioned and distributed database. Even though the NetWare 4.x server is not operating from a Bindery, the applications making Bindery requests will not know the difference.
KN-302 Network Interface Card 6-9
Page 59

Chapter 6 NetWare Configuration
● NDS setup
Web utility
This is used for context setup of the KN-302 print server. See “Chapter 2, Setting up KN-302 and
Printer”, for more detail.
Novell NWADMIN
Novell NWADMIN (NetWare Administration) is used to generate a directory tree and print queue objects in the print server, printer and tree.
The KN-302 is provided with a plug-and-play feature to support NetWare administration utility
(NWADMIN) that enables the NDS administrator to perf orm centraliz ed management of print servers.
Refer to the Novell NetWare manual for details of Setup with NWADMIN.
PCONSOLE
NetWare allows the use of PCONSOLE as an alternative of NW ADMIN. PCONSOLE is used to set up
static information of print servers regarding which queues to service and to whom information is given
in case of trouble.
Refer to the Novell NetWare manual for details of setup with PCONSOLE of NDS.
● Setup for Bindery Emulation
Make sure of the Bindery Context.
Before connecting the KN-302 print server to the Novell NetWare 4.x ser ver of binder y mode, make
sure that the NetWare server contains the bindery context.
If the bindery context does not exist, the network administrator should modify the AUTOEXEC.NCF
file to add an adequate SET command and restart the NetWare server or enter a SET command from
the console prompt to make changes.
Note that any command entered following the console prompt is effective immediately but
the definition of the autoexec.ncf file becomes effective only after turning off power and on
again.
Setup with PCONSOLE in bindery mode.
If it is sure that the bindery context exists in the file server, y ou can set up the KN-302 with PCONSOLE.
Refer to the Novell NetWare manual for details of setup with PCONSOLE.
In Bindery mode, only upper-case letters are valid for the printer server password.
6-10 KN-302 Network Interface Card
Page 60

Chapter 7 AppleTalk Configuration
■ Setup for printing through AppleTalk ......................7-2
● Configuration for AppleTalk.............................................. 7-2
● Using the NIManage ........................................................ 7-2
KN-302 Network Interface Card 7-1
Page 61

Chapter 7 AppleTalk Configuration
■ Setup for printing through AppleTalk
This section explains how to configure and use the NIManage (NIManage AppleTalk Administration Program) so that printing can be performed from a Macintosh system.
The NIManage is used to perform the following functions:
• Change the network zone and/or change printer names for IP-601+KN-302 printer.
• Assist Konica Customer Support in diagnosing problems.
Windows95/98
Winlllllllllllllllldows95/lllll
● Configuration for AppleTalk
The AppleTalk protocol must be enabled before printing can be performed.
Use the MAP utility and Web Utilities for Windows to check or to enable the AppleTalk protocol.
Refer to “Chapter 2, Setting Up KN-302 and Printer” for more details.
• Print to the Konica 7075+IP-601+KN-302 printing system by using Chooser to select the network and
printer.
• The KN-302 is found in Chooser as KON_(serial number) 1, where 1 stands f or the IP-601 connected to
parallel [port 1].
● Using the NIManage
How to access the NIManage
The NIManage (NIManage AppleTalk Administration Program) is contained on the CD-ROM supplied with
the KN-302.
1. Copy the NIManage program (folder labeled NIManage) on the CD-ROM to a folder.
For example, place the program in a folder called NIMANAGE or PRINTSERVER.
2. Double click on the NIManage Program icon when it appears on the desktop. The Zone and
KN-302 Device Dialog menu appears.
If your network has no zones, choose only from the KN-302 Device field, as no Zone field is
displayed.
3. Select the Zone that has the KN-302 you want to administer.
Available KN-302s on that Zone appear in the KN-302 field.
4. Select the KN-302 you want to use.
Setup the KN-302
Use the options added to the menu bar to configure the KN-302. Depending on your printer, certain functions may appear grayed out, which indicates that they cannot be selected.
• Use [Printer Setup] to configure your KN-302 for PostScript printers.
• Use [Reset] to perform a full reset of the KN-302. When you select [Reset] from the KN-302 menu, the
KN-302 resets automatically.
• Use [Configuration] to change the KN-302 name, and the AppleTalk Zone name; and also view the KN302 configuration features. You can change the KN-302’s default name to another one y ou may pref er . Be
sure to recycle the power to the printer/copier Off, then On; otherwise, the changes you made will not
occur.
7-2 KN-302 Network Interface Card
Page 62

Chapter 7 AppleTalk Configuration
When you choose [Configuration] the following screen appears:
1. To change the KN-302’s name, click on the name displayed, then enter the new name.
2. To change the [AppleTalk Zone], click on the zone displayed. A menu displays all available
zones.
3. Select the new zone from the menu.
4. Click [OK] when you have finished viewing this screen or when you are finished making
changes.
5. Turn off the printer/copier and then turn it on again to make the changes take effect. The
status sheet should identify the new printer name and the new zone preference.
Error Log
The Error Log function is used to view a log of events that the KN-302 has registered. The log contains
information as well as errors.
Customer Support may need the information on this screen if your KN-302 encounters problems.
When you choose the Error Log function, a screen containing the text of the log is displa y ed. You can print
the error log contents by using the Print option under the File menu.
To save the contents of the error log, do one of the following:
• Use [Save As] option from the [File] menu to save the entire log file.
• Use [Edit] option to cut, copy, and paste some or all of the log file.
This does not enter data into the error log itself. The data is cleared each time the printer/
copier is power cycled.
KN-302 Network Interface Card 7-3
Page 63

Chapter 7 AppleTalk Configuration
Protocol Setup For TCP/IP Users
Protocol Setup is used to set up the protocols on the unit when you do not hav e access to a Novell NetW are
server or workstation.
• Be sure to turn On the protocols you want to use. It is recommended that you turn Off the protocols you
are not using.
• TCP/IP users must also enter the IP address, Subnet Mask, and Default Gateway. Entering a value for
the Default Gateway enables the KN-302 to communicate with other Subnets.
• If KN-302 does not have an IP Address/Subnet Mask established when you display the Protocol Setup
screen, the information in the IP Address and Subnet Mask fields will be incorrect.
• Enter the correct IP Address and Subnet Mask.
If incorrect values are supplied, TCP/IP will not be enabled.
In that case, you will not be alerted with an error message.
• After you select protocols, be sure to recycle the KN-302 power by turning the printer Off, then On;
otherwise changes will not be made. After choosing the item on the menu, the f ollo wing screen displa ys.
The default values for the IP address is shown as zeros. However, this represents a “no IP
Address” condition, not an IP address.
How To Access The HTTP Server With An Web Browser
Access to the HTTP Server allows you to perform all network interface card functions.
Use the following procedure to access HTTP (HyperText Transfer Protocol) with the standard W eb Browser ,
such as Netscape or Internet Explorer.
1. Assign an IP address to the KN-302.
(See “Chapter 2 Setting Up KN-302 and Printer”).
2. Start the Web Browser you normally use.
When the Browser is up and running, type http:// followed by the IP address of the unit in the Location
field at the top of the Browser screen, or by going to [File] at the menu bar and choosing Open Location.
Example: For a unit with an IP address of 199.9.200.200, type:
http://199.9.200.200
7-4 KN-302 Network Interface Card
Page 64

Chapter 7 AppleTalk Configuration
Control Options
• When you have no access to Novell NetWare, [Control Options] can be used to enable or disable the
display of the [Power-on Status Page].
• When enabled, the Power-on Status Page pr ints after the printer is turned on. The default is the [ON]
(enable) position.
• When you choose Options from the KN-302 menu, the following [Control Options] screen appears:
KN-302 Network Interface Card 7-5
Page 65

Chapter 8 Troubleshooting
■ Resetting the KN-302 to Factory Default................8-2
■ Status Page............................................................8-3
■ How to Diagnose Problems....................................8-4
● Troubleshooting MAP Problems ..................................... 8-4
● Troubleshooting NetWare Protocol................................. 8-5
KN-302 Network Interface Card 8-1
Page 66

Chapter 8 Troubleshooting
■ Resetting the KN-302 to Factory Default
Y ou can cause the KN-302 to restore all par ameters to factory default values , so the Network Interface Card
appears just as it came from the factory. You may choose to do this when the Network Interface Card is
moved to a new location where the environment (NetWare file servers, IP subnets, and so on) is different.
This process is called “Restore Factory Defaults”. It can be done with a Web Browser.
Resetting to factory default means that the Network Interface Card loses all data such as
names and IP address. It does not lose its serial number or MAC address.
8-2 KN-302 Network Interface Card
Page 67

■ Status Page
The Status Page is sent as a print job to the printer when the Copier is powered on. The sample Status
Page described below shows the configuration of the KN-302 immediately bef ore the report is printed. You
can print the Status Page using the Web utilities.
It is strongly recommended that you revie w this report and confirm the setting immediately after installation
and any time the setup has been changed.
An example of Status Page
--------------------------------------------------------------------------------
Unit Serial No: 123456 Version: 05.56
Network Address: 00:11:22:33:44:55
Network Topology: Ethernet Connector: RJ45
Network Speed: 100 Megabits
Chapter 8 Troubleshooting
Novell Network Information enabled
Print Server Name: KON_123456
Password Defined: No
Preferred Server Name not defined
Directory Services Context not defined
Frame Type: 802.2 On 802.3
Peer-to-Peer Information enabled
Frame Type: 802.2 On 802.3
Network ID: 0
TCP/IP Network Information enabled
Frame Type: Ethernet II Protocol Address: Not Configured
Subnet Mask: 255.0.0.0 Default Gateway: 0.0.0.0
DNS Address: 0.0.0.0
AppleTalk Network Information enabled
Frame Type: 802.2 SNAP On 802.3
Protocol Address: Net Number 65384 Node Number 224 Socket Number 129
Preferred AppleTalk Zone: Default Zone
--------------------------------------------------------------------------------
Novell inactive
Peer-to-Peer Connection Information
Printer Name: KON_123456
AppleTalk Connection Information
AppleTalk Printer Name: KON_123456
KN-302 Network Interface Card 8-3
Page 68

Chapter 8 Troubleshooting
■ How to Diagnose Problems
Use the following list to determine the cause of printing problems:
1. Verify that the printer is functioning properly.
• Is the printer printing? Make sure the printer is operating properly by generating a test page. See
the “Konica IP-601 Print Controller INSTRUCTION MANUAL for instructions on generating a test
page.
• Does the LCD Touch Screen of the Konica 7075 display an error message? Review the “Konica
7075 INSTRUCTION MANUAL”.
• Did you get a KN-302 Status Page? On power-up , the KN-302 sends a status page which contains
information that can be useful for troubleshooting. K eep the Status P age av ailable until a problem is
resolved.
2. Check the Status Page to see what protocols are enabled and active . See the appropriate
chapter to confirm that you have installed and configured y our network pr otocol correctly f or
the KN-302. See “An example of Status Page”.
3. Determine if other users can print. If they can’t and they are all on the same NOS, go to the
troubleshooting section for that NOS operation manual.
4. When you have determined the nature of the problem, use the checklists in the next section.
● Troubleshooting MAP Prob lems
If the MAP cannot detect a target KN-302, check the following:
• Are the network settings on the KN-302 correctly made?
• Did you correctly select the MAP settings?
• Are the protocols used by the computer on which the MAP is to run correctly set up?
• Are the Web Browsers used by the computer on which the MAP to run correctly set up?
• If nothing irregular is found, turn off the main power supply to the Konica 7075, then turn it back on, wait
about several min utes and try running the MAP again.
8-4 KN-302 Network Interface Card
Page 69

Chapter 8 Troubleshooting
● Troubleshooting NetW are Pr otocol
It is recommended that you use MAP to get the NetWare setup and parameter values. If you have not
resolved the problem after running MAP, go through the checklists in this section.
NetWare Checklist
• Is the print ser ver name (network interface card name) entered correctly? The factory default name is
KON_(serial number). The serial number is informed in the Status Page.
• Did you assign print queues to the printer? It is recommended that you assign each print queue to only
one Network Interface Card-connected printer. If print queues are assigned to other network printers, the
print jobs may be going to another network printer.
• Did you set up the printer to the type Remote Other /Unknown?
• If the PCONSOLE or NWADMIN settings are correct, the connection between the printer and network
may have been broken. Turn the printer off and, using PCONSOLE or NWADMIN, wait for the status
message Not Connected. Turn the printer on and the status should change to Waiting for Job.
File Server Checklist
• Is there enough disk space on the File Server and is it running?
• Is the correct file server associated with the printer? Use PCONSOLE or NWADMIN to check this.
• Did you have the proper rights to configure the printer? (supervisor or administrator)
• Are the File Server and the KN-302 communicating? Run NetWare’s COMCHECK utility from any net-
work workstation to check this.
• Are there enough user positions on the File Server?
Workstation Checklist
• Is the network loaded onto the workstation? See the NetWare documentation.
• Is the application set up to print to the printer? For instance, are you using the correct driver?
• Is the workstation connected to the correct print queue? Print a file and verify that the file goes to the
queue.
• Are the print queues assigned to the KN-302-connected printer also assigned to another network printer?
If they are, the print jobs may be going to that printer.
• From PCONSOLE or NWADMIN, enter a sample print job directly into an assigned queue. Does the job
become Active? Is the job printed?
• Is AUTO ENDCAP enabled? Auto Endcap lets you send data to a network printer. Use PCONSOLE or
NWADMIN to check. If not, enable it.
KN-302 Network Interface Card 8-5
Page 70

Chapter 8 Troubleshooting
Network Interface Card KN-302 Configuration Checklist
If all your hardware connections are correct, check the following:
• Use MAP to check the status of the print server. The Unit Status screen sho ws the status for the selected
network interface card. This report includes a status of file servers and queues assigned to a printer
along with a description of any problems.
• The printer may not be assigned to the correct print queues. Use PCONSOLE or NWADMIN to direct
print jobs to the correct queues, then check to see if the print job is in the queue.
• If devices were added or changed, use PCONSOLE or NWADMIN to mak e sure you configured the ne w
devices correctly.
• Make sure the KN-302’s name has been entered correctly. If you changed the name in MAP, you must
also change the name in PCONSOLE or NWADMIN before you can print.
• Use PCONSOLE or NWADMIN to check the Printer Status. Make sure it is not stopped.
• You cannot use PCONSOLE Version 1.0 to configure the netw ork interf ace card. Connect Novell Inc. f or
an upgrade.
Printer Server/File Server/Printer Checklist
Check the following to see if:
• The KN-302 Print Server can log into the file server, and can service jobs from a File Server.
• The KN-302 Print Server name is listed on that File Server . Use PCONSOLE or NWADMIN to set up the
KN-302s to the File Server.
• The password assigned to the Print Server Card through PCONSOLE matches the password assigned
through MAP. Use MAP to update the password stored in the KN-302’s memory.
• The print job is in the print queue and waiting to be printed. Use PCONSOLE or NWADMIN to check if
the print jobs are being sent to the printer.
Workstation to Print Server Card Connection Checklist
To make sure the workstation is communicating with the Print Server Card, check the following:
• Print a file from the workstation and make sure the print job gets to the print queue using PCONSOLE or
NWADMIN. If the print job does get to the queue, the problem is not with the workstation/print server
connection.
• Use CAPTURE to send data to the printer from a workstation software application. See your NetWare
print server manual for information.
• Make sure another printer is not taking the print jobs from the queues before the Print Server Card can
service the job. To do this, disable the other printer until you can verify the Print Server Card-connected
printer setup.
KN-302 Loses Its Novell File Server Connection
If the KN-302 loses its connection to the file server, it can take appro ximately 5 to 10 min utes to reconnect.
If the connection is not made after a reasonable amount of time, check the error conditions to troub leshoot
the problem.
Unable to Print from a Different Context
The KN-302 does not support printing from a context different from the context upon which you are installed. If you want to do this, you must create an alias queue. See your NetWare Manual for more
8-6 KN-302 Network Interface Card
Page 71

Appendix
■
KN-302 Network Interface Card specification
■ 10/100 Base T UTP cable specifications ...Appendix-3
■ KN-302 Factory Default Settings ...............Appendix-4
...Appendix-2
Information for the TCP/IP network administrator
■
● Using DHCP ...................................................... Appendix-5
● Using BOOTP to assign IP Address..................Appendix-6
● Using rarp to assign IP Address........................ Appendix-7
● Installing UNIX-TCP/IP Programs ..................... Appendix-8
....Appendix-5
KN-302 Network Interface Card Appendix-1
Page 72

Appendix
■ KN-302 Network Interface Card specification
Type: Installs in the IP-601
Frame Type: IEEE 802.2/802.3/Ethernet II/IEEE 802.3 SNMP
Ethernet Connection: 10BaseT/100BaseTX
Network Connector: RJ45
Protocols: TCP/IP (BOOTP, ARP, RARP, ICMP, DHCP, SNMP, HTTP), IPX/SPX,
AppleTalk (EtherTalk)
Compliant OS (NOS): Novell NetWare (3.x, 4.x), Microsoft Windows 95/98, Microsoft Windows NT
4.0, Microsoft Windows 2000, UNIX, MAC OS 7.x or later
Multiple Protocols: Automatic selection
Printing Method: Peer-to-Peer (TCP/IP for Windows 95/98), Pserver (IPX/SPX),
LPD/LPR (TCP/IP for Windows NT4.0/2000), lpd/lpr (TCP/IP),
AppleTalk (EtherTalk)
Dedicated Utilities: IP-P2P, IPX-P2P, MAP (Management Access Program), NWSetup,
UNIX-TCP/IP Programs, NIManage
Standard Utilities: Web Browser (Netscape Navigator, Internet Explorer)
Size: 155 mm x 98 mm
Weight: 100g
Operating Conditions: 0 to 50 degrees Centigrade, 5% to 80% RH
Settings: Stored in non-volatile memory
2-Appendix KN-302 Network Interface Card
Page 73

■ 10/100 Base T UTP cable specifications
Use the following universal Ethernet standard When configuring your 10/100BaseT/UTP cables to connect
to the RJ45 connector on the Network Interface Card. The cable should be Category Type 5 or better
(depending on length).
Pin No. Color Ethernet
8 Blue/White
7 Blue
6 Orange/White Receive5 Green/White
4 Green
3 Orange Receive+
2 Brown/White Transmit1 Brown Transmit+
Appendix
KN-302 Network Interface Card Appendix-3
Page 74

Appendix
■ KN-302 Factory Default Settings
Data transfer speed: Automatic recognition
Password: sysadm
TCP/IP: IP Address 0.0.0.0
Subnet Mask 255.0.0.0
Default Gateway 0.0.0.0
Base Port Number 10001
DHCP Enabled
IP Address Enabled
LPD Banner Enabled
Ethernet Frame Type Ethernet II
Novell NetWare: NetWare (IPX/SPX) Enabled
Print Server Name KON_(serial number)
Print Server Password No Value
Scan Rate Print Queue 1 Sec.
Ethernet Frame Type Auto Search*
Disable Bindery Enabled
Preferred NDS Context No Value
Preferred NDS Tree No Value
AppleTalk: AppleTalk Enabled
Printer Name KON_(serial number)
Ethernet Frame Type 802.2 On 802.3
Peer-to-Peer: Peer-to-Peer Enabled
Printer Name KON_(serial number)
Ethernet Frame Type Auto Search*
* If the Network Interface Card can not get the any frame type when starting, [802.2 On 802.3] is to be
selected.
4-Appendix KN-302 Network Interface Card
Page 75

■ Information for the TCP/IP network administrator
● Using DHCP
Dynamic Host Configuration Protocol (DHCP) is a service that provides IP address assignment and maintenance procedures. The KN-302 can get IP information from the service.
There are two user-definable variables related with the DHCP functions.You can set up those var iables
from [Setup TCP/IP] of [Network Administration] provided by the Web utility.
• Enable DHCP
• Enable IP address defined
a. If you select [Not enable DHCP], the KN-302 does not call for the DHCPservice. If no IP address is
defined for the KN-302 or [Enable IP address defined] is OFF, the KN-302 attempts to get an IP address
by BOOTP requestor or some other means.
b .If DHCP can be used and no IP address is defined for the KN-302 or [Enable IP address defined] is OFF,
the KN-302 calls for the DHCP when reset or power has turned on.
c.If DHCP can be used but an IP address is defined for the KN-302 and [Enable IP address defined] is ON,
the KN-302 gets IP information from NVRAM (non-volatile memory) and does not use DHCP service.
Both of the options [Enable DHCP] and [Enable IP address defined] are ON by default (employed at shipment time). In this case, if the IP identification infor mation stored in NVRAM is not available, the KN-302
generates a DHCP request.
Appendix
When DHCP can be used and the factory default values are set for the KN-302, set up
(reserve) to enable the KN-302’s IP address to be used continually on the DHCP server,
otherwise the same address might be given to other hosts.
KN-302 Network Interface Card Appendix-5
Page 76

Appendix
● Using BOOTP to assign IP Address
The BOOTP daemon is a native TCP/IP option f or configuring the IP address of a non-disk network device .
To communicate the IP address, use the following procedure:
1. Turn off the printer/copier.
2. Log in as superuser on a host that is attached on the same network segment as the print
server. Confirm the subnet mask is the one you intend to use. However, if the server resides
on another subnet, complete this procedure to store the IP address in the print server.
3. Find the MAC address of the KN-302. The address is printed on the Status Page each time you
turn the printer on.
4. Edit the hosts file (usually /etc/hosts) or use NIS or DIS to add the IP address and KN-302's
node name. See the network administrator for the IP address. For example, a KN-302 named
printfast with an IP address of 192.9.200.200 has the following entry:
192.9.200.200 printfast
5. Stop the BOOTP daemon if it is running.
6. Edit the /etc/bootptab file and add the following information:
Konica_host:\
:ht = hardware type:\
:ha = ethernet address:\
:ip = IP address:\
:sm = subnet mask:\
:gw = gateway address:
Example, for an RFC 1048 system:
printfast:\
:ht = ether:\
:ha = 0040AF03AF6E:\
:ip = 192.9.200.200:\
:sm = 255.0.0.0:\
:gw = 192.9.200.10:\
(If running SCO UNIX, add:)
:vm = rfc1048:
The same information uses the following format on an RFC 951 system:
host htype haddr iaddr bootfile
printfast 1 00:40:af:03:af:6e 192.9.200.200 default boot
7. Start the BOOTP daemon by typing:
bootpd -s
8. Check the IP-601 to verify that the KN-302 is connected to the network. Turn on the IP-601.
9. Wait until the IP-601 powers up and finishes initializing to allow enough time for the IP address to become known and to be saved in non-volatile memory. The KN-302 should re-initialize itself.
10. After the KN-302 has re-initialized, send a ping command to verify that the print server obtained its IP address. For example:
ping 192.9.200.200
If the print server has the address, a confirmation message displays:
192.9.200.200 is alive
11. Remove your changes to the
12. Stop the BOOTP daemon and, if you want it to run, restart it.
6-Appendix KN-302 Network Interface Card
/etc/bootptab
file.
Page 77

Appendix
● Using rarp to assign IP Address
The Reverse Address Resolution Protocol (rarp) allows network devices to query a server for their IP
addresses on start-up. This procedure requires a workstation with a rarp server.
To store the IP address, use the following procedure:
1. Turn off the printer/copier.
2. Log in as superuser on the rarp server.
If the server resides on another subnet, complete this procedure to store the IP address in the
print server. Reconnect the print server anywhere on the network.
3. Find the MAC address of the KN-302. The address is printed on the Status Page when you
power on the printer/copier.
4. Edit the hosts file (usually /etc/hosts) or use NIS or DIS to add the IP Address and KN-302's
node name.
See the network administrator for the IP address. For example, a print server with the name of
printfast has the following entry:
192.9.200.200 printfast
5. Edit the /etc/ethers file or use NIS or DIS to add the MAC address.
To continue the example, for the printfast card with an MAC address of 00:40:c8:00:00:ff,
make the following entry:
0:40:c8:0:0:ff printfast
6. If the rarp daemon is running, stop it and restart it. Verify that the daemon is running.
7. Check the IP-601 to see that the print server is connected to the network. Turn on the printer/
copier.
8. Wait until the IP-601 powers up and finishes initializing to allow enough time for the IP address to become known and to be saved in non-volatile memory. The KN-302 should then
reset itself.
9. After the KN-302 has reset, send a ping command to verify that the print server obtained its IP
address. For example:
ping 192.9.200.200
If the print server has the address, a confirmation message displays:
192.9.200.200 is alive
10. Remove your changes to the /etc/ethers file.
11. Stop the rarp daemon and, if you want it to run, restart it.
KN-302 Network Interface Card Appendix-7
Page 78

Appendix
● Installing UNIX-TCP/IP Programs
The CD-ROM provided with the KN-302 Network Interface Card includes installation scripts , UNIX-TCP/IP
Programs, for various UNIX systems.
This section describes how to install UNIX-TCP/IP Programs on the KN-302 for an y of the following oper ating systems:
• DEC ULTRIX 4.3 RISC
• System V Rel. 4
• Solaris (Ver. 1.x, 2.x)
• SCO UNIX
• OSF1/ALPHA
• IBM AIX
• HP-UX
Once the KN-302 has its IP information loaded, the following steps are necessary for host-side TCP/IP
printing:
1. Load the UNIX-TCP/IP Programs on your workstation. It is presented as a tar file on the accompanying CD-ROM.
2. Run the appropriate installation script, if available.
3. Complete the configuration for your operating system.
Loading the UNIX-TCP/IP Programs
The following procedures are only necessary when using the supplied host-based lpr capability.
Loading the software is not necessary if printer-based lpr is used.
1. Log in as superuser to the system that spools directly to the print server.
2. Insert the CD-ROM in to the host CD drive.
3. Go to or create the directory in which you want to install the UNIX-TCP/IP Programs. For
example:
mkdir /usr/PSC_install
If you already have a IP-601+KN-302 at your site and you are now installing another one,
delete the files in the installation directory not (/usr/Konica). If these files remain, they can
prevent the installation of a subsequent print server.
8-Appendix KN-302 Network Interface Card
Page 79

Appendix
4. Use the tar command to load the UNIX-TCP/IP Programs from the CD-ROM. Choose your UNIX
version from the example of the follo wing table, or if not sho wn, consult the man page for y our
system:
UNIX Version Example
BSD/ULTRIX/AIX/SCO tar -xvf/dev/rfd0
System V tar -xvf/dev/rdsk/f13ht
System V/Solaris 2.3 tar -xvf/dev/rCDROM
The device name varies depending on the computer and its peripheral designations. The
first BSD floppy device is often called rfd0.
5. After performing the tar , the system will displa y a list of KN-302 files copied by the tar. At this
point, go to the appropriate section in this man ual for instructions on running the installation
script on your system.
Filters
There will be certain options in executing the script for various systems.
PostScript UNIX Printing
The installation script can create an entry in the /etc/printcap file for IP-601(and KN-302):
ASCII, PCLfiles
If your printer is not a PostScript printer , the install script uses an input filter (infilter) that supplies CR/
LF translation to print ASCII files on a PCL printer.
If your printer is a PostScript printer , y our printcap file will ref erence psfilter which offers easy ASCII-
to-PostScript conversion. Normal PostScript format files are not affected. Proprietar y and public domain filters are available for broader filtering capabilities.
PSBanner
The KN-302 ships with an input filter called psbanner, an output filter to print PostScript banners.
You may change infilter or outfilter entries in the /etc/printcap file.
The following is a sample printcap entry using these filters:
<print_name> | Konica Print Server printer:\
:lp=/dev/nic/<printer_name>:\
:if=/usr/nic/psfilter:\
:of=/usr/nic/psbanner
:sd=/usr/spool/<printer_name>:
KN-302 Network Interface Card Appendix-9
Page 80

Appendix
Installing and Printing on Ver. 1 Solaris and OSF1 Systems
1. Run the Installation script by typing: nicinst.
The script automatically downloads the correct KN-302 utilities for your particular system
and prompts you for information as needed.
2. What is the node name of the KN-302?
Type the node name entered in /etc/hosts.
For example, type: printfast, then press Enter.
3. What is the printer name? Type desired printer name, then press Enter.
4. The screen displays install script information y ou provided, as for example:
Node name of the Konica Print Server: printfast
Printer name to be used: <printer_name>
The printer is attached on: PORT1
When asked to OK this configuration, type yes or no, then press Enter.
5. The script creates a printcap entry for the printer just configured.
The screen displays the entry and asks if you want the script to append it to your /etc/printcap
file. See below for a sample printcap file.
Type yes or no, then press Enter.
If you type no, you may perform manual edits.
In your /etc/printcap file, be sure not to c hange the name of the device given KN-302 in Step 2.
You must reference the same lp: entry you wrote on the lp command line of the printcap file.
For example:
<printer_name> | Konica Print Server printer:\
:lp=/dev/<printer_name>:\
:if=/usr/nic/infilter:\
:sd=/usr/spool/<printer_name>:
Except for the first line, all printcap entries must be prefaced with a tab.
6. The Installation script creates a spool directory in /usr/spool and starts the daemon for the
newly configured printer.
It also displays the path used in case you need to restart the daemon.
For example:
/usr/nic/nic_print /dev/nic/<printer_name> printfast 10001 &
7. Run the ps command so that you can view all your lpd processes.
Type: ps -ax | grep lpd
8. T o stop ALL printing, use the kill command on your lpd processes.
Type: kill -9 <Process ID>
9. Restart the daemon.
Type: /usr/lib/lpd
10. Installation for the system is completed.
When prompted to configure additional printers:
Type: yes or no, then press Enter.
It is recommended that you ping the KN-302 to test communications.
10-Appendix KN-302 Network Interface Card
Page 81

Installing and Printing on DEC ULTRIX 4.3 System
1. Run the Installation script by typing: nicinst.
The script automatically downloads the correct KN-302 utilities for your particular system
and prompts you for information as needed.
2. What is the node name of the KN-302?
Type the node name entered in /etc/hosts. For example,
type printfast, then press Enter.
3. What is the printer name?
Type the desired printer name, then press Enter.
4. The screen displays your install script information, as, for example:
Node name of the KN-302: printfast
Printer name to be used: <printer_name>
The printer is attached on: PORT1
You are asked to OK this configuration. Type yes or no, then press Enter.
5. The script creates a printcap entry for the printer just configured.
Appendix
The screen displays the entry (see sample printcap file below) and asks if you want the script
to append it to your /etc/printcap file.
Type yes or no, then press Enter. Type no to perform manual edits.
<printer_name> | Konica Print Server printer:\
:lp=/dev/<printer_name>:\
:if=/usr/nic/infilter:\
:sd=/usr/spool/<printer_name>:
6. Installation for the system is completed. When prompted to configure additional printers, type
yes or no, then press Enter. It is recommended that you ping the Konica Print Server to test
communications.
Like all BSD systems, ULTRIX uses the /etc/printcap file to configure a printer. The interface to the installation script is the same for all BSD systems, however, the printcap entry is different.
If you use the printcap entry generated automatically by the installation script, this will be transparent to
you.
KN-302 Network Interface Card Appendix-11
Page 82

Appendix
Installing and Printing on HP/UX System
1. Run the Installation script by typing: nicinst.
The script automatically downloads the correct KN-302 utilities for your particular system
and prompts you for information as needed.
2. What is the node name of the KN-302?
Type the node name entered in /etc/hosts. For example,
type printfast, then press Enter.
3. What is the printer name?
Type the desired
printer name,
then press Enter.
4. Your screen displays your install script information, as for example:
Node name of the Konica Print Server: printfast
Printer name to be used: <printer_name>
The printer is attached on: PORT1
When asked to OK this configuration, type yes or no, then press Enter.
5. The script starts the daemon for the newly configured printer automatically. It also displays
the path used should you ever need to restart the daemon. In the following example, the path
would be:
/usr/nic/nic_print /dev/Konica/printer_name printfast 10001 &
This example reflects names supplied to the script earlier.
When the installation script is completed, you must configure the printer and make it known
to the lp system. The HP/UX lp system uses the lpadmin maintenance command to configure
a printer (there is no /etc/printcap file).
Use the following specific commands to configure the printer:
lpadmin -p printer_name -v /dev/nic/printer_name
enable printer_name
accept printer_name
See HP's alternative SAM method for configuring the printer on the next page.
12-Appendix KN-302 Network Interface Card
Page 83

Appendix
Using the SAM Program to Configure the Printer
HP supplies the sam program as an alternative method for configuring the printer. The printer name must
be the same as the one you entered during the KN-302 installation.
When using sam, specify everything as if the printer were directly connected to /dev/lprprinter/printer_name.
The software installed with your HP system can satisfy most of your printing needs. HP supplies ASCII-toPostScript filters, and the system will invoke the filters automatically if you define the content type of the
printer as PostScript.
The HP/UX lp system also supplies interface scripts that produce PostScript banners. Use the lpfilter
command to define new filters and content types if necessary.
The full power and flexibility of the lp print service is now available to you. The fact that you are printing
across the network is completely transparent.
KN-302 Network Interface Card Appendix-13
Page 84

Appendix
Installing and Printing on System V (Solaris Ver. 2)/System V Rel. 4 386-based Machine
Installation and setup is exactly the same for System V Solaris and SVR4 i386-based machines.
Solution uses a network direct filter called nicfilter. The system invokes nicfilter directly from the printer
interface file.
After completing the software download in Loading the Software, y ou must configure the printer and make
it known to the lp system.
1. Run the Installation script by typing: nicinst.
The script automatically downloads the correct KN-302 utilities for your particular system
and prompts you for information as needed.
2. Select your system by choosing one of the following options:
1) AT&T/SVR4; 386
2) SCO UNIX System V
3) None of the above
Type 1, 2, or 3, then press Enter.
3. You have now installed TCP/IP on the Konica Print Server.
Copy your interface file.
(/usr/nic is a good place to keep your copy).
4. Edit the printer interface program this printer uses to redirect output to the Konica Print Server .
Then, configure your printer using lpadmin.
In most cases you would use the default interf ace script named standard (usually found in the /usr/spool/lp/
admins/lp/model directory).
If you wish to use an interface tuned to a specific printer, you must have a copy of the interface file for the
port you want to initialize. For example:
cp /usr/spool/lp/model/standard /usr/nic/port1_interface
Most V ersion 2 Solaris machines hav e a shell variable called FILTER that can be changed to invok e nicfilter.
A typical example is:
FILTER=" /usr/nic/infilter | /usr/nic/nicfilter \
PSC_name 10001 ${nobanner} \
${user_name} ${request_id} ${files} "
You must specify the KN-302 name (PSC_name) and the KN-302 port (10001) indicated above to enable
the nicfilter to connect to the Konica Print Server unit. The name must be the same as the one you entered
in /etc/hosts for this KN-302.
The remaining arguments are optional. Nicfilter uses them to produce a high quality banner. The lp print
service user name, request id, file names and options always pass to the interface file. They will be available in any interface script as shell variables, although they may have different names.
If you disable banners in the lp command, the system will set the ${nobanner} option to yes. This will
suppress the KN-302 banner generation.
If you do not define the FILTER shell variable in your interface file , you can usually modify it to pipe data to
nicfilter. The simplest way to accomplish this is to enclose the entire script in parentheses and pipe it to
nicfilter, using the arguments described above.
If you wish to use the banner generated by the interface file, simply omit the last four arguments.
14-Appendix KN-302 Network Interface Card
Page 85

Appendix
These arguments are shell variables from the interface file . They may ha ve different names
(names used above are from the standard interface file supplied with most Version 2 and
i386 systems).
Installing and Printing on SCO UNIX System
Installation and setup is similar for HP/UX and SCO UNIX systems.
The KN-302 solution uses a network direct filter called nicfilter. The system inv okes nicfilter directly from the
printer interface file.
After completing software download in Loading the software, you must configure the IP-601+KN-302 and
make it known to the lp system. Use the following steps:
1. Run the Installation script by typing: nicinst.
The script automatically downloads the correct Konica Print Server utilities for your particu-
lar system and prompts you for information as needed.
2. Select your system. Choose one from these options:
1) AT&T/SVR4; 386
2) SCO UNIX System V
3) None of the above
Type 1, 2, or 3 and press Enter.
3. What is the node name of the Konica Print Server?
Type the name assigned in the /etc/hosts file, then press Enter.
For example, type: printfast
4. What is the printer name for this Konica Print Server-linked printer?
Type a
printer name
, then press Enter.
5. The screen displays your install script information. For example:
Node name of the Konica Print Server: printfast
Printer name to be used: <printer_name>
The printer is attached on: PORT1
Do you want to accept this configuration? Type yes or no, then press Enter.
6. The script automatically starts the daemon for the newly configured printer. It also displays
the path used should you ever need to restart the daemon. In the preceding e xample, the path
would be:
/usr/nic/nic_print /dev/nic/printer_name printfast 10001 &
This example reflects names supplied to the script earlier. When the installation script is complete, you
must still configure the printer and make it known to the lp system.
The SCO UNIX lp system uses the lpadmin maintenance command to configure a printer (there is no /etc/
printcap file).
The specific commands to do this are:
lpadmin -p printer_name -v /dev/nic/printer_name
NOTE: Your host may require you to specify the model by using the -i command.
enable printer_name
accept printer_name
KN-302 Network Interface Card Appendix-15
Page 86

Appendix
You can also use other options for the lpadmin command. See y our system documentation f or details. Note
that the printer name must be the same as the one you entered during Konica Print Server installation.
The software installed with your SCO system can satisfy most of your printing needs. SCO supplies ASCII
to PostScript filters and the system will invoke them automatically if you define the content type of the
printer as PostScript.
The SCO UNIX lp system also supplies interface scripts that produce PostScript banners. Use the lpfilter
command to define new filters and content types if necessary. The full power and flexibility of the lp print
service is now apparent. Your printing across the network is completely transparent.
Installing and Printing on AIX RISC System/6000
The AIX printing subsystem is driven by the qdaemon program.
The qdaemon uses configuration information stored in the /usr/lpd/qconfig file to manage queues and route
jobs to the proper devices. This information includes entries for each virtual printer and physical device
known to the system.
An AIX virtual printer is simply a high level software view of a data stream, queue, and de vice that controls
how a given job will be processed. A different virtual printer should be defined for each data stream that a
real printer supports. For e xample, you would use diff erent virtual printers for PostScript and PCL jobs e ven
though they are destined for the same physical printer.
Configuring IP-601+KN-302 on an AIX system approximates configuration of a local printer as closely as
possible. The only difference is that the physical device associated with your Konica Print Server printer
must be a named pipe used by the print daemon to route data to the Konica Print Server.
The following procedure shows the most straightforward way to add a printer to your system:
1. Run the Install script by typing: nicinst.
The script automatically downloads the correct Konica Print Server utilities for your particu-
lar system and prompts you for information as needed.
2. What is the node name of the Print Server unit?
Type the node name entered in /etc/hosts, for example,
type: printfast, then press Enter.
3. What is the printer name?
Type: the desired printer name, then press Enter.
16-Appendix KN-302 Network Interface Card
Page 87

Appendix
4. The screen will display the install script information you provided, as for example:
Node name of the Konica Print Server: printfast
Printer name to be used: <printer_naThe printer is attached
on: PORT1
When asked to OK this configuration, type yes or no, then press Enter.
5. Configure a virtual printer using printer_name as the physical device, where printer_name is
the same printer name chosen during install.
6. Use the following command to shut down the qdaemon and stop all printing:
stopsrc -s qdaemon
7. Edit /etc/qconfig to change the special file for device printer_name
from:/dev/printer_name
to:/dev/nic/printer_name.
8. Restart the daemon with:
startsrc -s daemon
The installation script creates the named pipe and starts the supplied print daemon using the printer name
and Konica Print Server information you supplied.
Since the AIX System Management Interface Tool (SMIT) cannot accept a named pipe as a printer device,
the installation script creates a null character device in /dev/
printer_name
.
Virtual Printer Commands
By entering the device name printer_name for configuration purposes, virtual printers can be added either
through SMIT or through the mkvirprt command.
During this process you also select a particular printer type for the new printer, which inherits the set of
predefined attributes for that printer type.
In most cases, this set of attributes will be sufficient, but it can be changed either through SMIT or by using
the chvirprt command. If you need to make more extensive changes on your printer, see the AIX RISC
System/6000 documentation for information.
Before you edit the files, be sure that the following daemon is running:
/usr/nic/nic_print /dev/nic/printer_name printfast 10001 &
Use the following procedures to add or change virtual printers:
1. Run nicinst.
When prompted, enter information for the following questions:
• Nodename (host name in the /etc/hosts file)
• Printer name
• Unit type
• Port number - Enter 1 for parallel port 1
Answer y to accept the configuration and n when prompted to configure another printer.
2. At the prompt, type smit, then press Enter.
3. Choose Devices.
4. Choose Printer/Plotter.
5. Choose Manage Local Printer Subsystem.
KN-302 Network Interface Card Appendix-17
Page 88

Appendix
6. Choose 1. Printer or Plotter attached to Host.
7. Enter the Device name.
Use the same name entered during the install for printer name.
8. For Type of Printer, enter a number from the printers list, then press Enter.
9. Header pages wanted? Type n for none.
10. Trailer pages wanted? Type n for none.
11. Enter Print Queue name. Type ! to bypass configuration.
12. Should this be the default queue?
Enter y for yes or n for no, then press Enter.
13. Exit smit.
14. Type cd/etc, then press Enter.
After the virtual printer has been added, there will be a stanza in /etc/qconfig for device
printer_name that looks like the following:
printer_name:
file=/dev/printer_name
backend=/usr/lpd/probe
Edit /usr/qconfig and change the following:
file=/dev/printer_name to file=/dev/nic/printer_name
15. Type stopsrc -s qdaemon.
16. Type startsrc -s daemon. Now you can print using the lp command.
AIX Print Commands
The AIX lp command works slightly differently from the lp command for other System V Release 4 systems.
The following lp commands can be used to print files:
lp -d <queue_name> <filename> or
lp -d <queue_name>:<device_name> <file_name>
18-Appendix KN-302 Network Interface Card
Page 89

INDEX
INDEX
Symbols
10/100 Base T UTP cable ............. Appendix-3
100BaseTX ................................................ 1-2
10BaseT..................................................... 1-2
A
Add Printers ............................................... 3-9
Adding a printer port on Windows 2000 ..... 4-3
Adding a printer port on Windows NT4.0 ... 4-2
administrator ................................. Appendix-5
AIX ............................................................. 5-6
AppleTalk.......................................... 2-15, 7-2
arp ...................................................... 2-3, 2-4
AS/400 System .......................................... 5-7
B
Base Port Number.................................... 2-14
Bindery Emulation ............................ 6-9, 6-10
Bindery Mode ............................................. 6-4
BOOTP.................................. 5-4, Appendix-6
BOOTP Lite........................................ 1-3, 2-3
BSD............................................................ 5-5
C
Configure Status Page ............................. 2-15
Context............................................. 2-13, 6-4
Control Options .......................................... 7-5
D
DEC ULTRIX 4.3 RISC............................... 5-8
DEC ULTRIX 4.3 System ............ Appendix-11
Default Gateway ....................................... 2-14
DHCP .......................... 2-14, 5-4, Appendix-5
Diagnose Problems.................................... 8-4
E
Ethernet Frame Type........................ 2-13, 6-3
F
Factory Default...................... 8-2, Appendix-4
Features of the KN-302.............................. 1-2
File Server................................................ 2-13
H
HP/UX ........................................................ 5-7
HP/UX System ............................ Appendix-12
HTTP Server .............................................. 7-4
I
Installation .................................................. 1-2
IP Address................... 2-2, 2-14, Appendix-7
IP Peer-to-Peer........................................... 3-2
IP Port Base ............................................... 3-3
IP-P2P........................................................ 1-3
IPX Peer-to-Peer ........................................ 3-6
IPX-P2P ..................................................... 1-3
K
KN-302 Configuration Checklist ................. 8-6
L
Language Select ...................................... 2-18
lpc .............................................................. 5-5
LPD Banner.............................................. 2-14
lpd UNIX Printing ....................................... 5-5
LPD/LPR ............................................ 1-4, 4-2
lpd/lpr ......................................................... 1-5
lpq .............................................................. 5-5
lpr .............................................................. 5-5
LPSYSTEM ................................................ 5-9
M
MAC address ..................................... 5-4, 8-2
Main Page .................................................. 2-9
MAP ................................... 1-3, 2-4, 2-6, 8-4
MIB............................................................. 5-2
N
NDS.................................. 1-5, 2-13, 6-4, 6-9
Network Setup.......................................... 2-11
network setup............................................. 2-2
NIManage........................................... 1-3, 7-2
Novell NetWare .......................................... 6-3
NVRAM .................................................... 2-14
NWADMIN.............................. 2-12, 6-10, 8-6
NWSetup............................................ 1-3, 6-2
Index-1
Page 90

INDEX
O
OSF1 Systems ............................ Appendix-10
OSF1/ALPHA ............................................. 5-8
P
Password.......................................... 2-12, 6-3
PCONSOLE ........................... 2-12, 6-10, 8-6
peer-to-peer ............................................... 1-4
PostScript UNIX Printing ............... Appendix-9
Primary File Server .................................... 6-4
Print Queue Scan Rate ............................ 2-13
Print Server ................................................ 6-4
Print Server Name ........................... 2-12, 6-3
Printer Setup ............................................ 2-16
Printer Status ........................................... 2-10
PSBanner...................................... Appendix-9
R
Restore Factory Defaults............................ 8-2
reverse ARP............................................... 5-4
S
SAM ............................................ Appendix-13
SCO UNIX Remote Printer ........................ 5-8
SCO UNIX System...................... Appendix-15
SNMP......................................................... 5-2
Solaris .......... 5-9, Appendix-10, Appendix-14
specification .................................. Appendix-2
Status Page................................................ 8-3
Subnet Mask ............................................ 2-14
System V..................................... Appendix-14
System V Release 4................................... 5-9
T
TCP/IP...................................... 2-14, 3-2, 7-4
Test Printer ............................................... 2-15
U
UNIX printing through TCP/IP .................... 5-2
UNIX-TCP/IP Programs ........ 1-3, Appendix-9
W
Web Utilities ....................................... 2-5, 2-8
Index-2
Page 91

MANUFACTURER
●
KONICA CORPORATION
●
TOKYO JAPAN
2000. 7
1
 Loading...