

Page 1

HAIR STRAIGHTENER
KH 5527
KOMPERNASS GMBH · BURGSTRASSE 21 · D-44867 BOCHUM
www.kompernass.com
ID-Nr.: KH5527-08/08-V3
HAIR STRAIGHTENER
Operating instructions
Page 2
KH 5527
1
65432
21
7
Page 3
CONTENT PAGE
Safety information 2
Intended use 3
Items supplied 3
Technical data 3
Appliance description 3
Before smoothing / curling 3
Operation 3
Preparation........................................................................................................................................3
Straightening hair .............................................................................................................................4
Curling hair .......................................................................................................................................4
Cleaning 5
Storage 5
Disposal 5
Warranty and Service 6
Importer 6
Read these operating instructions carefully before using the appliance for the first time and preserve this
maual for later reference. Pass this manual on to whoever might acquire the appliance at a future date.
- 1 -
Page 4

HAIR STRAIGHTENER
KH 5527
Safety information
Risk of electrocution!
• Connect the appliance only to wall sockets
supplying the current strength detailed on the
model plate.
Under no circumstances may the appliance
be submersed in fluids or fluids be allowed
to permeate the housing. Do not expose the
appliance to humidity and do not use it outdoors. Should liquids enter the housing, unplug the appliance from the power source
immediately and arrange for it to be repaired
by a qualified technician.
• Do not use the appliance outdoors.
Never use the appliance near water, particularly not near sinks, baths or other vessels.
The proximity of moisture presents a risk,
even when the appliance is switched off.
After use, always remove the plug from the
power socket. As additional protection, the
installation of a faulty-current protection unit
with an activation power rating of not more
than 30 mA is recommended for the power
circuit in the bathroom. Ask your electrician
for advice.
• In the event of operating malfunctions and before
cleaning the appliance, remove the power
plug from the wall socket.
• Always remove the power cable from the socket
by pulling on the plug, NOT on the power cable.
• Do not wrap the power cable around the
appliance and protect it from being damaged.
• To avoid risks, arrange for defective power cables
and/or plugs to be replaced immediately by
qualified technicians or our Customer Service
Department.
• Do not pinch or squeeze the power cable and
lay it in such a way that no one can tread on
or trip over it.
• In order that you can disconnect the appliance
quickly in an emergency, do not use extension
cables.
• NEVER grasp the appliance, the power cable
or the power plug with wet hands.
• Unplug the appliance immediately after use.
Only when you unplug the appliance from the
mains supply is it completely free from electricity.
Risk of burns and physical injuries
• This appliance is not intended for use by individuals (including children) with restricted physical,
physiological or intellectual abilities or deficiences
in experience and/or knowledge unless they
are supervised by a person responsible for
their safety or receive from this person instruction
in how the appliance is to be used. Children
should be supervised to ensure that they do not
play with the appliance.
• NEVER leave a switched on appliance unsupervised.
• Do not place the appliance close to sources of
heat and protect the power cable from damage.
• Do not operate the appliance if it has fallen or
is damaged. Arrange for the appliance to be
checked and, if necessary, repaired by qualified
technicians.
• Do not open the housing or attempt to repair
the appliance yourself. Should you do so, the
safety concept of the appliance may be compromised and the warranty becomes void.
Permit only authorised technicians to repair a
defective appliance if repairs should be necessary.
• The appliance becomes hot during use. Hold it
only by the grip when it is hot.
- 2 -
Page 5

Intended use
Before smoothing / curling
This Hair Straightener / Hair Curler is intended for
the smoothing and shaping of human hair, under no
circumstances may it to be used for wigs and hairpieces
made of synthetic material. The Hair Straightener is
intended for domestic use only. Pay heed to all of the
information in this operating manual, especially the
safety instructions.
Items supplied
• Combi Hair Styler KH 5527
• Operating Instructions
Technical data
Mains voltage: 220–240 V ~50 Hz
Power consumption, max.: 65 W
Protection class: II /
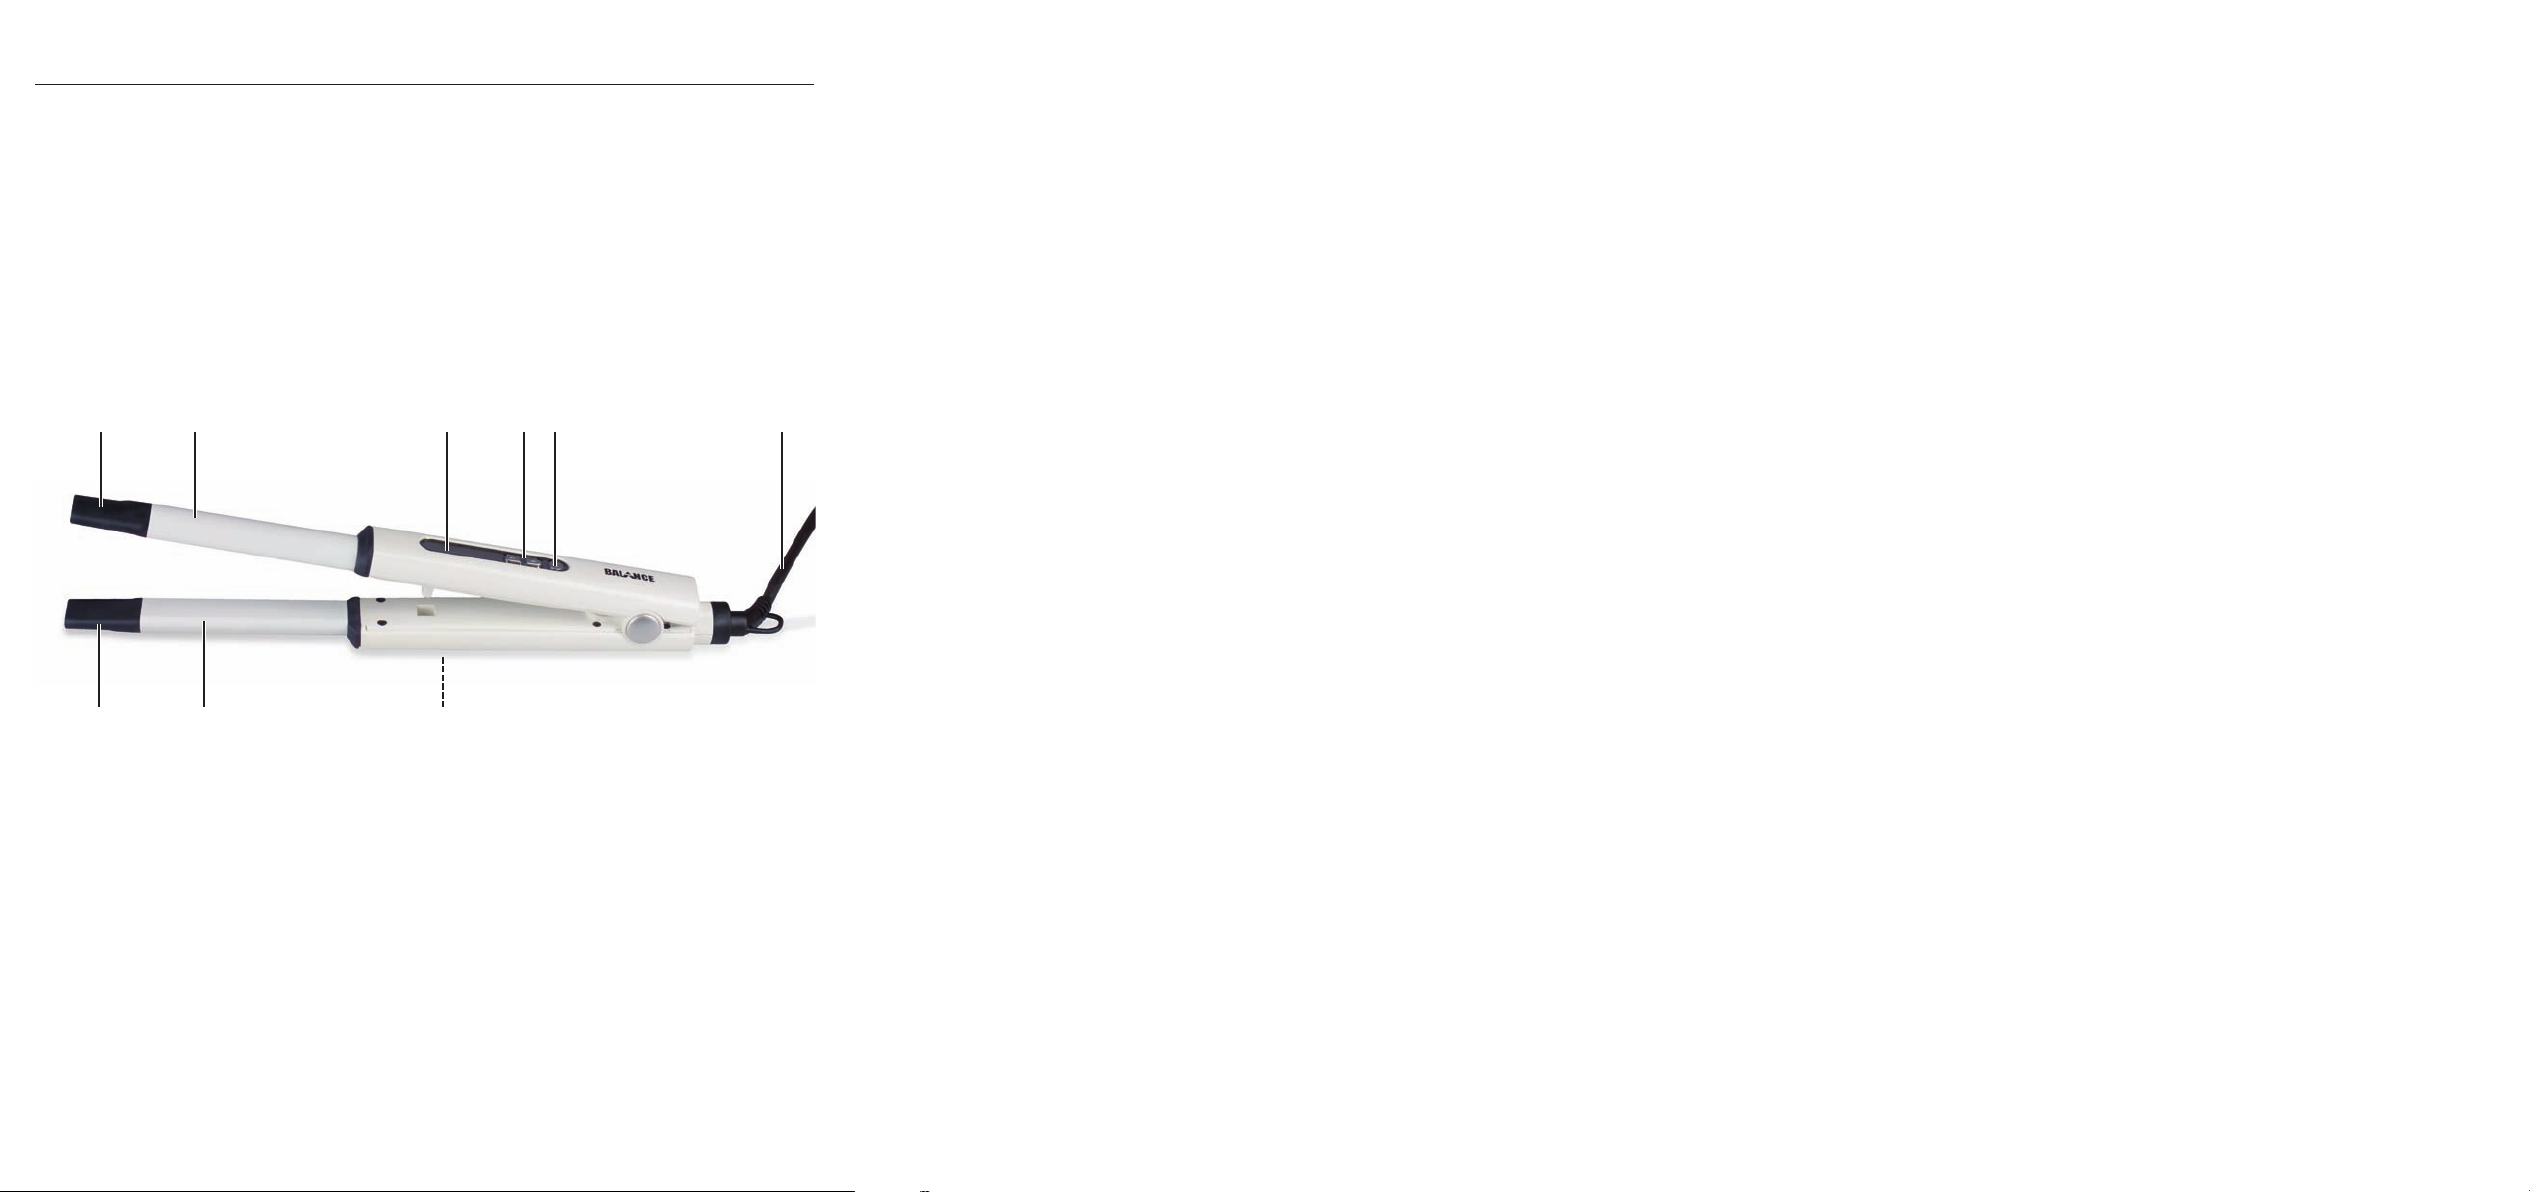
Appliance description
1
Cool tips
2
Hotplates
3
LED Indicator
4
Buttons "+ and "-" for temperature level selection
5
On/Off button (Button lock)
6
Power cable
7
Locking device
• The hair should be clean, dry and free of styling
products. Excepted are the special products
that support a straightening of the hair.
• Comb the hair thoroughly before straightening
so that there are no knots in it.
• To achieve an especially good straightening result, spread special products for hair straightening through the hair.
• Divide the hair into manageable portions and
secure the upper portions to the head with
grips so that they do not get in the way.
Operation
Preparation
Note:
The hotplates 2must be free from contamination
of all kinds. If necessary, clean them before
taking the appliance into use (see chapter
"Cleaning").
1. Slide the locking device
2. Insert the plug into a mains power socket.
3. Press the On/Off button
light of the LED Indicator
2
plates
4. The appliance heats up automatically to the
highest heat level. The running light travels
through to the last LED.
If a lower temperature is sufficient for the hair,
press the button “-”
light reaches the desired heating level.
are being warmed up.
7
into the position .
5
. The red running
3
glows. The hot-
4
repeatedly until the running
The running light progresses up to...
• ....the 6th red LED, highest heat level, for very
robust and difficult to shape hair.
• ...the 5th red LED, high heat level, for very robust
hair.
- 3 -
Page 6
• ...the 4th red LED, medium heat level, for robust
hair.
• ...the 3rd red LED, lower heat level, for normal
hair.
• ...the 2nd red LED, very low heat level, for fine
hair.
• One red LED blinks, minimal heat level, for very
fine hair.
5. When the running light progresses to the selected
heat level, double press the On/Off
5
button.
The green LED glows. The buttons are now lokked, the temperature cannot be changed by an
unintentional pressing of the buttons
4
“+”
or “-” 4.
Note:
When you want to release the temperature
lock, once again double press on the On/Off
5
button. The green LED goes out, the button
lock is released.
6. Wait until the running light in the LED Indicator
3
glows permanently up to the programmed
temperature. The desired temperature has now
been reached.
Straightening hair
• Prepare the hair as described in "Before
straightening/ Before curling"..
• Start with the lower hair sections at the back
of the head. Work over the sides to the front.
1. Separate a ca. 2 cm wide hair strand.
2. Clamp the hair strands between the hotplates
2
and close to the skin, then press them together.
3. Pull the whole of the hair strand through the
hotplates
2
, in that you pull the hair straightener
downwards.
4. Repeat the process with each individual strand.
5. When you have smoothed all of the strands,
double press the On/Off
5
button to release
the temperature lock. The green LED goes out.
6. Press the On/Off
3
tor
goes out.
5
button until the LED Indica-
7. Remove the plug from the wall power socket.
8. Press the hotplates
locking device
2
together and slide the
7
to the position .
Curling hair
• Prepare the hair as described in "Before
straightening/ Before curling".
• Start with the lower hair sections at the back
of the head. Work over the sides to the front.
1. Separate a ca. 2 - 3 cm wide hair strand.
Attention!
Ensure that the hotplates 2do not make contact
with the skin of the head. Risk of Burns! Only the
1
tips
are cool.
2. Clamp the end of hair strand between the hotplates 2and press them together.
3. Turn the combi hair styler to wrap the hair
strand around the hotplate.
4. Dependant on hair type and adjustment,
wait a few seconds.
Attention!
Ensure that the hotplates 2do not make contact
with the skin of the head. Risk of Burns! Only the tips
are cool.
Attention!
Dependant on the hair type and the heat level, it
1
can take a differing length of time until a curl is shaped.
Try out various adjustments.
To avoid damaging your hair, ALWAYS start with a
lower heat level and a short waiting time in the hair.
Gradually raise these levels until you discover the
optimal adjustment for you.
- 4 -
Page 7

Attention!
Ensure that the hotplates 2do not make contact
with your hand. Risk of Burns!
Only the tips
5. Open the hotplates
6. Repeat the process with each individual strand.
7. When you have worked all of the strands, double
8. Press the On/Off
9. Remove the plug from the wall power socket.
10. Press the hotplates
11. Wait until the hair has cooled down before
1
are cool.
2
a little and now withdraw
the combi hair styler from your hair.
press the On/Off
perature lock. The green LED goes out.
3
tor
goes out.
locking device
continuing with the styling.
5
button to release the tem-
5
button until the LED Indica-
2
together and slide the
7
to the position .
Cleaning
Storage
Attention!
NEVER wrap the power cable 6with plug around
the appliance. This would cause irreparable damage to
the appliance.
Attention!
To avoid an unintentional switch on of the appliance,
ALWAYS remove the plug from the mains power
socket if the appliance is not in use.
• ALWAYS lay the appliance on a heat-resistent
surface to cool down.
• Press the hotplates
locking device
• Store the combi hair styler at a clean and dry
location.
2
together and slide the
7
to the position .
Disposal
Attention!
Remove the power plug from the wall socket. Risk of
electric shock!
Always allow the appliance to cool down completely before cleaning it. Risk of Burns!
• Wipe the housing and the hotplates
soft and slightly moistened cloth.
• In cases of stubborn soiling, apply some mild
detergent to the moistened cloth.
2
with a
Note:
Do not use aggressive or abrasive cleaning agents.
These could attack the upper surfaces and irreparably
damage the appliance.
Note:
Do not use the appliance again until it has completely
dried out.
Do not dispose of the appliance in your
normal domestic waste. This product is
subject to the provisions of European
Directive 2002/96/EC.
Dispose of the appliance through an approved
disposal centre or at your community waste facility.
Observe the currently applicable regulations.
In case of doubt, please contact your waste disposal
centre.
Dispose of all packaging materials in an
environmentally friendly manner.
- 5 -
Page 8

Warranty and Service
Importer
The warranty for this appliance is for 3 years from
the date of purchase. This appliance has been manufactured with care and meticulously examined before
delivery. Please retain your receipt as proof of
purchase. In the case of a warranty claim, please
make contact by telephone with our service department. Only in this way can a post-free despatch for
your goods be assured.
The warranty covers only claims for material and
maufacturing defects, not for parts subject to wear
and tear or for damage to fragile components, e.g.
buttons or batteries. The appliance is intended for
domestic use only, NOT for commercial purposes.
If this product has been subjected to improper or inappropriate handling, abuse, or modifications not
carried out by one of our authorised sales and service
outlets, the warranty will be considered void. Your
statutory rights are not restricted in any way by this
warranty.
DES Ltd
Units 14-15
Bilston Industrial Estate
Oxford Street
Bilston
WV14 7EG
Tel.: 0870/787-6177
Fax: 0870/787-6168
e-mail: support.uk@kompernass.com
KOMPERNASS GMBH
BURGSTRASSE 21
D-44867 BOCHUM
www.kompernass.com
Irish Connectio
Harbour view
Howth
Co. Dublin
Tel: 00353 (0) 87 99 62 077
Fax: 00353 18398056
e-mail: support.ie@kompernass.com
- 6 -
 Loading...