

Page 1
5
KH 1149
KH 5520
KOMPERNASS GMBH · BURGSTRASSE 21 · D-44867 BOCHUM
www.kompernass.com
ID-Nr.: KH5520-07/07-V1
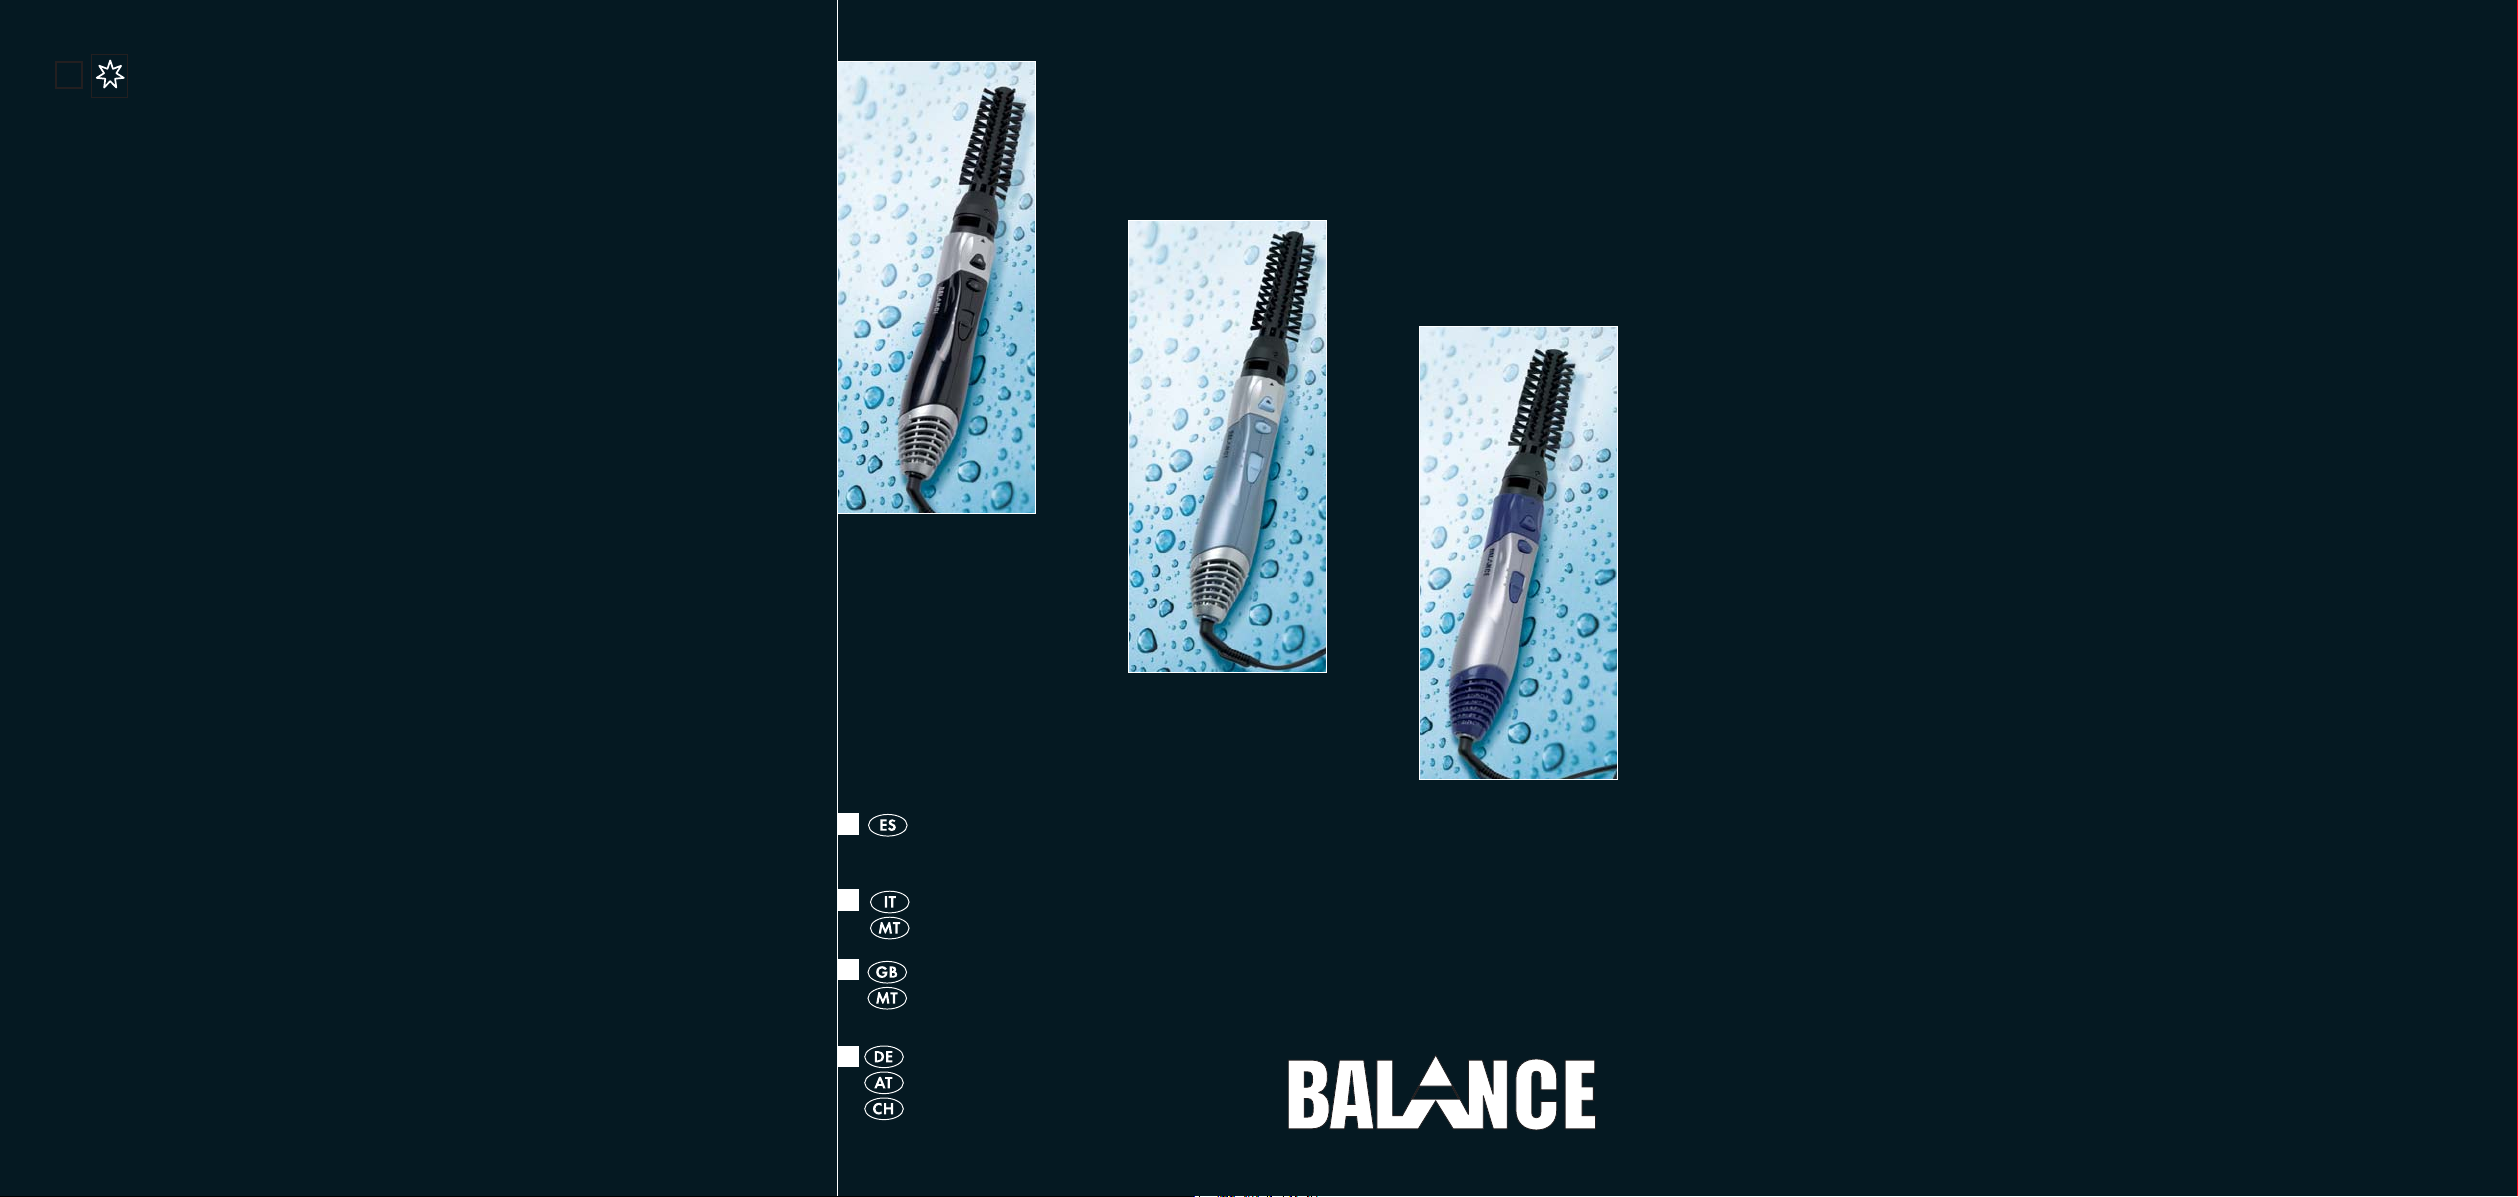
JUEGO DE RIZADO Y PEINADO
Instrucciones de uso
SET ARRICCIACAPELLI STYLING
Istruzioni per l'uso
STYLING CURLER SET
Operating Instructions
STYLING CURLERSET
Bedienungsanleitung
Page 2
1
2
3
Page 3

Índice Página
Uso previsto 4
Datos técnicos 4
Volumen de suministro 4
Descripción del aparato 4
Indicaciones de seguridad 5
Puesta en funcionamiento 6
Colocar / extraer los accesorios 6
Encender/apagar / Seleccionar nivel 6
Limpieza y cuidado 6
Almacenamiento 7
Evacuación 7
Garantía y asistencia técnica 7
Importador 7
Un par de consejos para el peinado perfecto 8
Lea atentamente este manual de instrucciones antes del primer uso y consérvelo para posteriores utilizaciones. Entréguelo en caso de traspasar el aparato a terceros.
- 3 -
Page 4
JUEGO DE RIZADO Y
PEINADO KH 5520
Uso previsto
Este aparato está previsto para el cuidado del cabello de personas y solo para su uso en el ámbito
doméstico. No está previsto para su utilización con
animales ni en ámbitos comerciales o industriales.
Datos técnicos
Tensión: 230-240 V~, 50 Hz
Consumo de potencia: 1000 W
Clase de protección: II
Volumen de suministro
Juego de rizado y peinado KH5520
Instrucciones de uso
Descripción del aparato
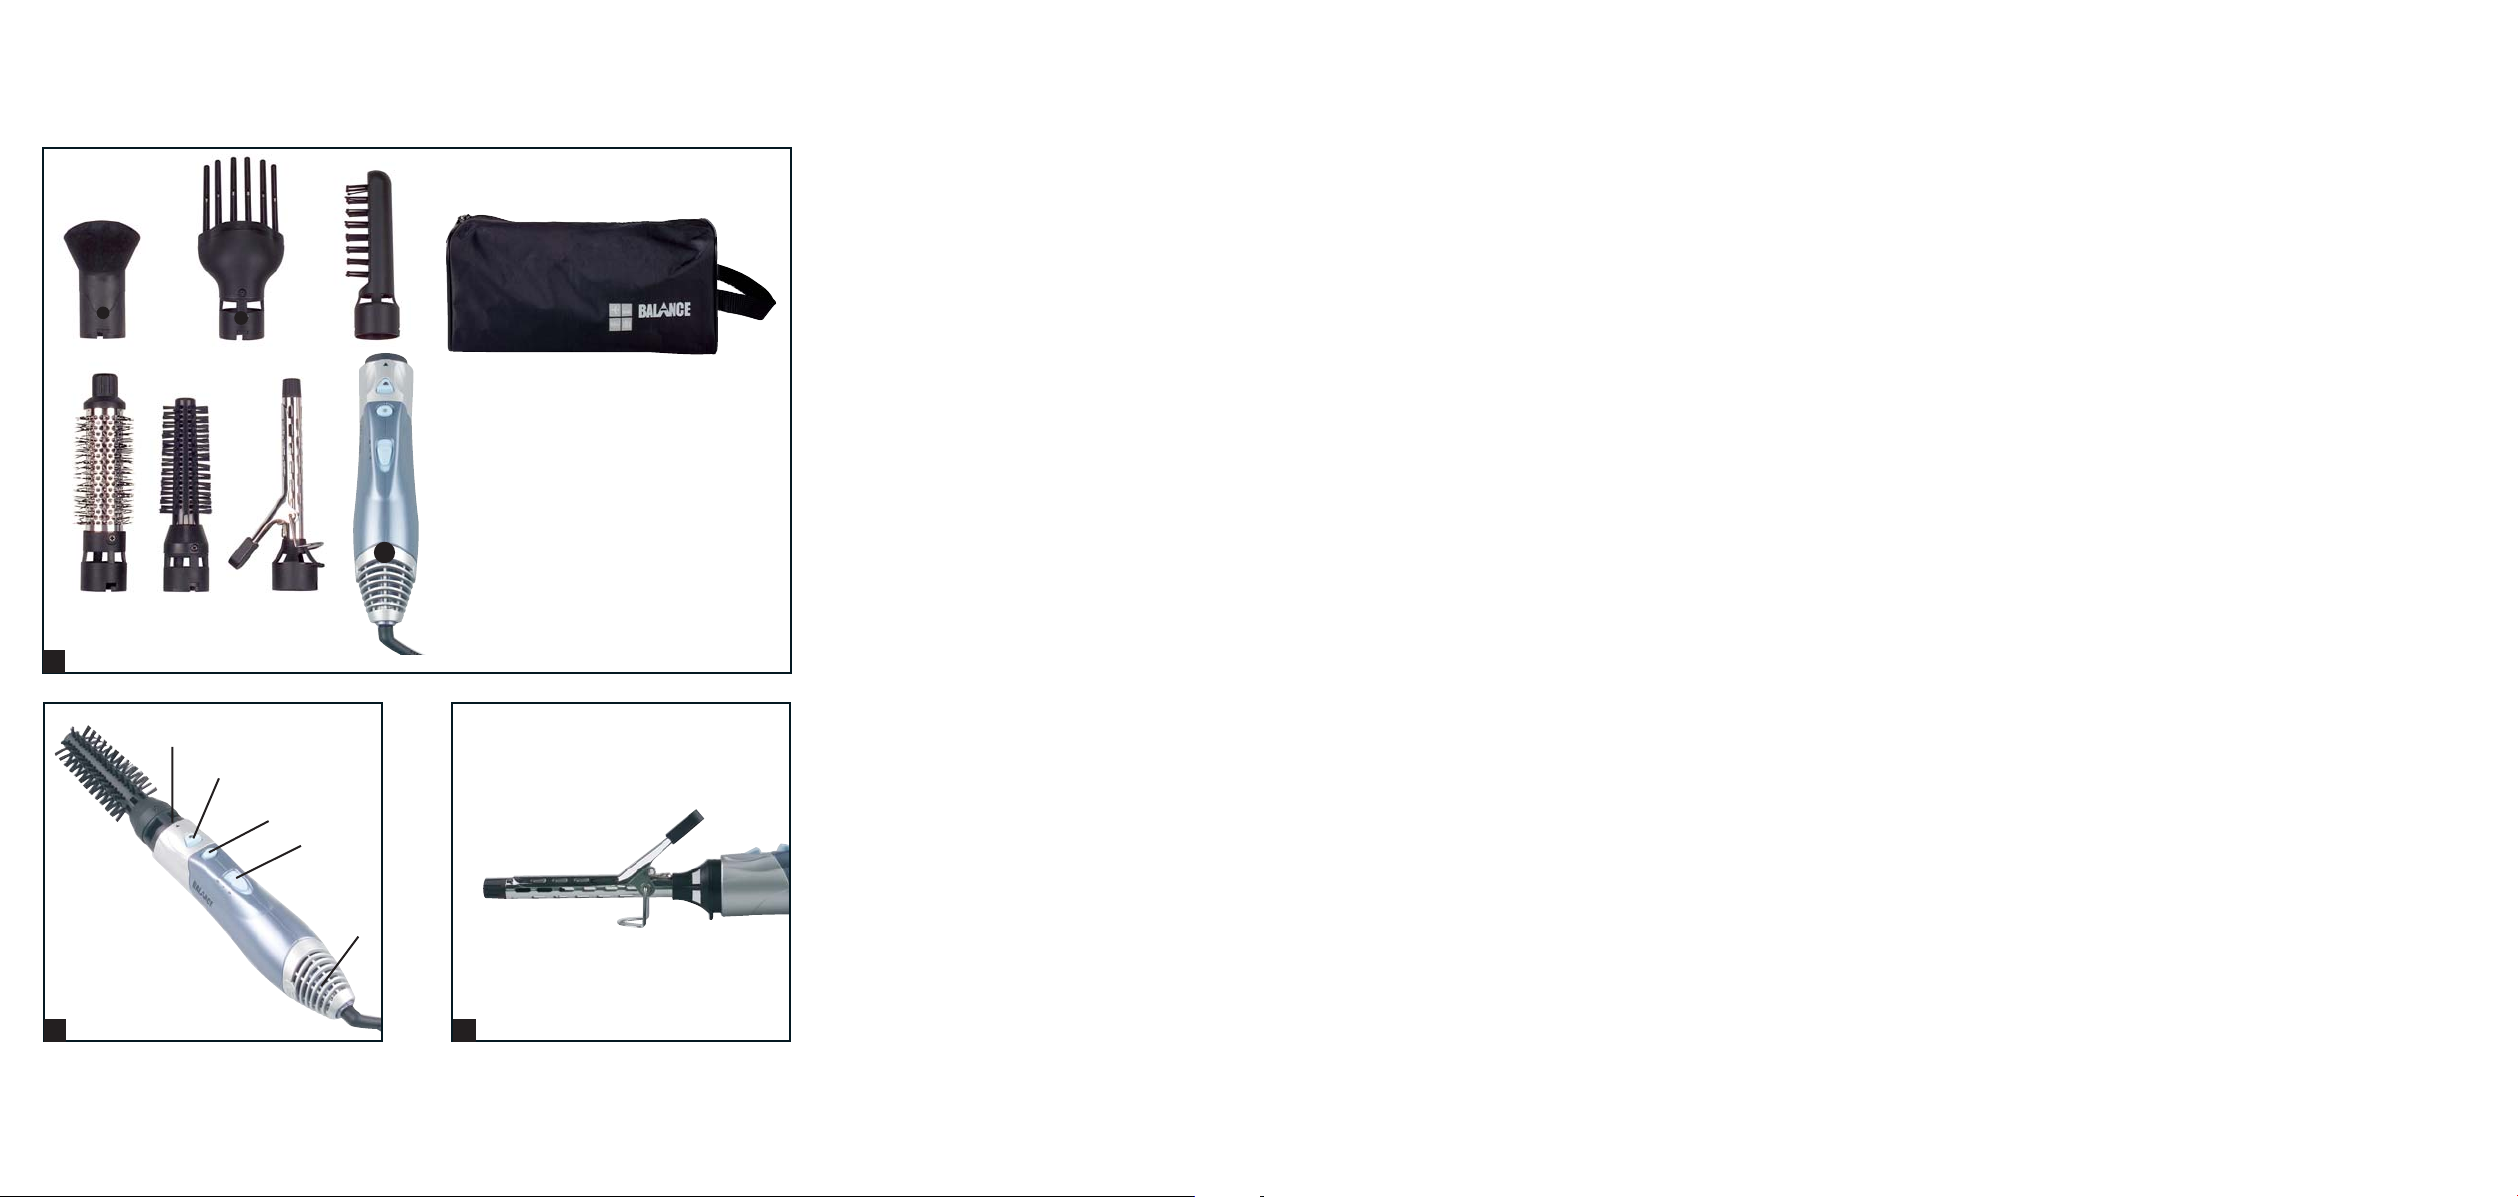
El set consta del aparato y 6 accesorios para conectar, así como una bolsa de nailon (véase fig. 1).
Boquilla para Ondular.
Difusor – para más volumen secar primero las
raíces y luego las puntas.
Cabezal cepillo para volumen– para cepillar y
secar el cabello al mismo tiempo.
Bolsa de nailon – para almacenar el set rizador
de aire caliente
Boquilla redonda de aire caliente de metal de
32 mm – para rizos grandes.
Boquilla redonda de aire caliente de plástico de
25 mm – para rizos pequeños: enrollar y secar
al rededor de la boquilla redonda mechones
independientes. Después de apagar dejar el mechón enrollado todavía un par de segundos.
Pinza de rizos – para pequeños tirabuzones
(rizos de ángel): enrollar mechones independientes al rededor del moldeador y fijarlos con la
pinza de rizos.
Para colocar de forma segura el rizador de ca-
bello de aire caliente durante el funcionamiento, utilice el anillo lateral de la pinza de rizos
(véase fig. 3).
Rizador de cabello de aire caliente (unidad de
motor)
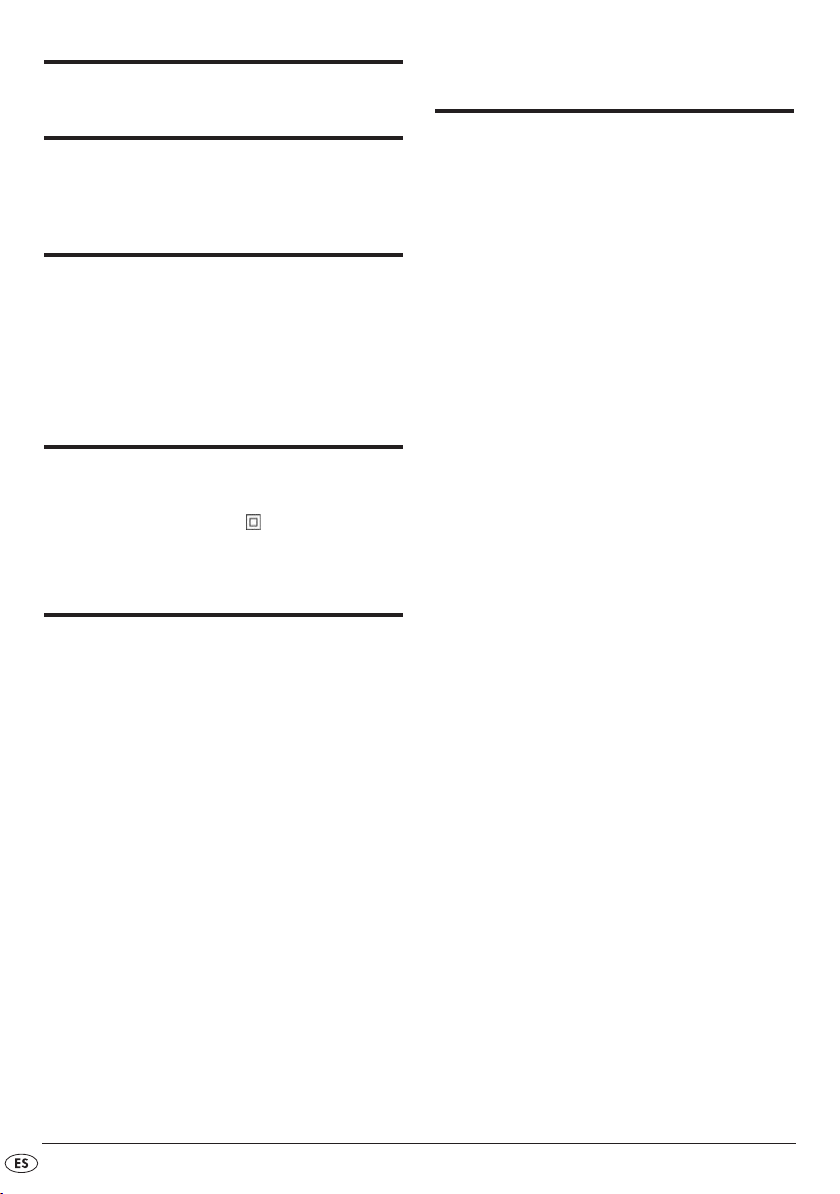
véase fig. 2
Punto de conexión de los accesorios
Botón de extracción
Botón Cool-Shot
Interruptor de niveles
Rejilla de aspiración de aire
- 4 -
Page 5
Indicaciones de seguridad
Para evitar peligro de quemaduras y
de lesiones:
Indicaciones importantes para su
seguridad.
Para evitar peligro de muerte por des-
carga eléctrica:
• Nunca toque el aparato ni la clavija de red con
las manos mojadas o húmedas, mientras que la
clavija de red esté conectada a la base de enchufe.
• Nunca utilice el aparato cerca de agua, especialmente cerca de lavabos, bañeras o contenedores similares .
• Preste atención para que el cable de red no se
moje o entre en contacto con humedad durante
el servicio. Tiéndalo de modo que no se pueda
aplastar o dañar de alguna forma. Si el cable o
la clavija de red están dañados, de ningún
modo podrá utilizar el aparato – hágalos
reparar primero por el servicio técnico.
• Después de cada uso, extraiga la clavija de red
de la base de enchufe, especialmente si utiliza el
aparato en el cuarto de baño. Solamente apagar no es suficiente – ya que la tensión
de la red sigue llegando al aparato, mientras
que la clavija de red esté conectada a la base
de enchufe.
• Tenga cuidado de que no puedan entrar nunca
objetos en el aparato, especialmente horquillas
de pelo metálicas, pinzas o ganchos de pelo.
Consejo: un dispositivo de corriente de defecto
proporciona una protección adicional en el circuito
eléctrico del cuarto de baño. Consulte para ello a
su electricista.
• Durante el funcionamiento las partes del aparato
pueden alcanzar altas temperaturas. Por ello
sujételo sólo por el mango y los botones.
• Utilice el aparato únicamente con un accesorio
acoplado, nunca sólo, ya que el punto de conexión de los accesorios se calienta mucho durante
el funcionamiento.
• Deje que el aparato se enfríe antes de colocar o
extraer los accesorios.
• Utilice únicamente los accesorios originales
suministrados, ya que éstos están optimizados
para su uso con el aparato. Otros accesorios
puede que no sean lo suficientemente seguros.
• Mantenga libres los orificios de entrada y salida
del aire para que la corriente de aire no tenga
impedimentos. De otro modo el aparato puede
sobrecalentarse.
• Tenga cuidado con las lacas, los pulverizadores
de agua, etc. Por un lado puede ocurrir que la
corriente de aire dirija estos productos directamente a sus ojos. Por otra parte, éstos no
deben entrar en el aparato – ya que pueden ser
inflamables, corrosivos o conductivos.
• No permita utilizar el aparato a personas
(incluidos los niños) cuyas facultades físicas,
sensoriales o mentales, así como su falta de
conocimientos o de experiencia, les impida
hacer un uso seguro del mismo si no están bajo
vigilancia o han sido instruidos correctamente.
• Explique el aparato y los peligros derivados del
mismo a los niños para que no jueguen con él.
- 5 -
Page 6
Puesta en funcionamiento
Antes de poner el aparato en funcionamiento,
cerciorase de que ...
– el aparato o los accesorios se encuentran en
perfecto estado,
– se han retirados todos los materiales de
embalaje.
En caso necesario limpie los accesorios, tal como se
describe en el punto “Limpieza y cuidado”.
Colocar / extraer los
accesorios
Encender/apagar /
Seleccionar nivel
Una vez que esté colocado el accesorio deseado y
que haya enchufado la clavija de red ...
puede encender el aparato en el interruptor de
niveles y seleccionar el nivel:
“1“ para potencia de aire baja
“2“ para potencia de aire alta
Con el botón Cool-Shot puede producir
en cada potencia de aire, una corriente de aire
fría. Pulse el botón Cool-Shot , hasta que
quede encajado.
Cuidado:
Las piezas del aparato pueden estar calientes
debido a un uso previo.
Para colocar un accesorio ...
• introdúzcalo en el punto de conexión de los accesorios y gire el accesorio en el sentido con-
trario a las agujas del reloj, hasta que se encaje
de forma audible.
El símbolo de flecha del accesorio y el del
punto de conexión de los accesorios deben
coincidir.
Para extraer un accesorio ...
• primero apague el aparato y deje que se enfríe
• Pulse el botón de extracción y gírelo en
el sentido de las agujas del reloj.
Ahora el accesorio puede extraerse fácilmente del
punto de conexión de los accesorios .
Puede apagar el aparato, deslizando el interruptor de niveles a ...
la posición “0“ (= aparato apagado).
Limpieza y cuidado
Nunca abra la carcasa del aparato. No existen
elementos de mando dentro. Con carcasa
abierta puede existir riesgo debido a descarga
eléctrica.
Antes de limpiar el aparato, ....
• extraiga la clavija de red de la base de enchufe,
• y deje que el aparato se enfríe completamente.
En ningún caso deben sumergirse en agua u
otro líquido las piezas del aparato. Al hacerlo
puede existir peligro de muerte por descarga
eléctrica, si al volver a poner el aparato en
funcionamiento llegan restos de líquido a las
partes conductoras de corriente.
- 6 -
Page 7
• Limpie las partes del aparato con un paño seco
o, como máximo, ligeramente humedecido y
seque después cuidadosamente todas las partes.
Limpie regularmente la rejilla de aspiración de
aire con un cepillo suave. De otro modo existe
peligro de incendio.
• Extraiga la rejilla de aspiración de aire de la
carcasa y limpie la parte interior y exterior de la
rejilla de aspiración de aire con un cepillo
suave.
• Vuelva a introducir la rejilla de aspiración de
aire en la carcasa. Presione en esta fase ligeramente las pestañas laterales de la rejilla de
aspiración de filtro hacia dentro.
• No utilice ningún detergente ni disolvente. Estos
podrían dañar las superficies de plástico.
Almacenamiento
Deje que el aparato se enfríe completamente antes
de guardarlo en la bolsa de nailon. Guárdelo
siempre dentro de la misma, para protegerlo del
polvo. Guarde el aparato en un lugar seco.
Evacuación
En ningún caso deberá tirar el aparato a la
basura doméstica.
Elimine el aparato a través de una empresa de evacuación de basuras autorizada o por medio del
centro de evacuación de basuras municipal.
Tenga en cuenta las normativas actuales en vigor.
En caso de duda póngase en contacto con el centro
de evacuación de basuras.
Garantía y asistencia
técnica
En este aparato dispone de 3 años de garantía desde la fecha de compra. El aparato ha sido producido con mucho esmero y comprobado a conciencia
antes de la entrega. Guarde el ticket de caja como
justificante de compra. En caso de garantía póngase en contacto con su asistencia técnica telefónicamente. Sólo así queda garantizado un envío gratuito de su mercancía.
Las prestaciones de garantía son únicamente aplicables a fallos de fabricación y de material, sin
embargo ello no engloba a las piezas de desgaste
o daños en partes frágiles tales como el interruptor
o acumuladores. El producto ha sido diseñado
únicamente para el uso privado y no para el uso
comercial. En caso de un tratamiento inadecuado e
indebido, uso de la fuerza bruta e intervenciones
por asistencia técnica distinta a la nuestra autorizada, se extinguirá la garantía. Por está garantía no
quedan limitados sus derechos legales.
Kompernass Service España
C/Invención 7
Polígono Industrial Los Olivos
28906 Getafe – Madrid
Tel.: 902/430758
Fax: 91/6652551
e-mail: support.es@kompernass.com
Importador
KOMPERNASS GMBH
BURGSTRASSE 21
D-44867 BOCHUM
www.kompernass.com
El material de embalaje debe desecharse de
forma respetuosa con el medio ambiente.
- 7 -
Page 8
Un par de consejos para
el peinado perfecto
Déle forma al cabello una vez que esté casi seco.
Separe el cabello en mechones individuales, para
lograr más volumen.
Adicionalmente, puede lograr más volumen en el
cabello si lo seca comenzando desde las raíces hasta las puntas.
Después de apagar el aparato espere todavía un
par de segundos antes de soltar los rizos.
Antes de pasar un peine, deje primero que el
cabello se enfríe
.
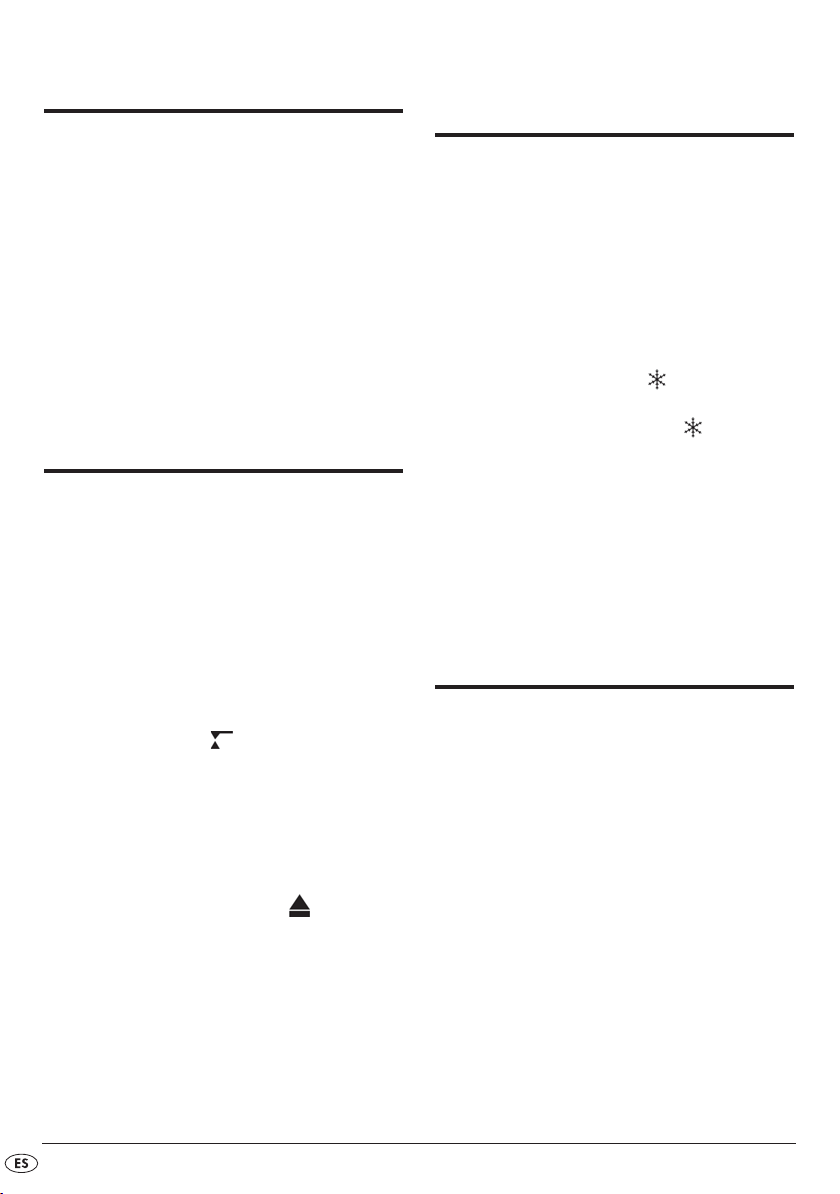
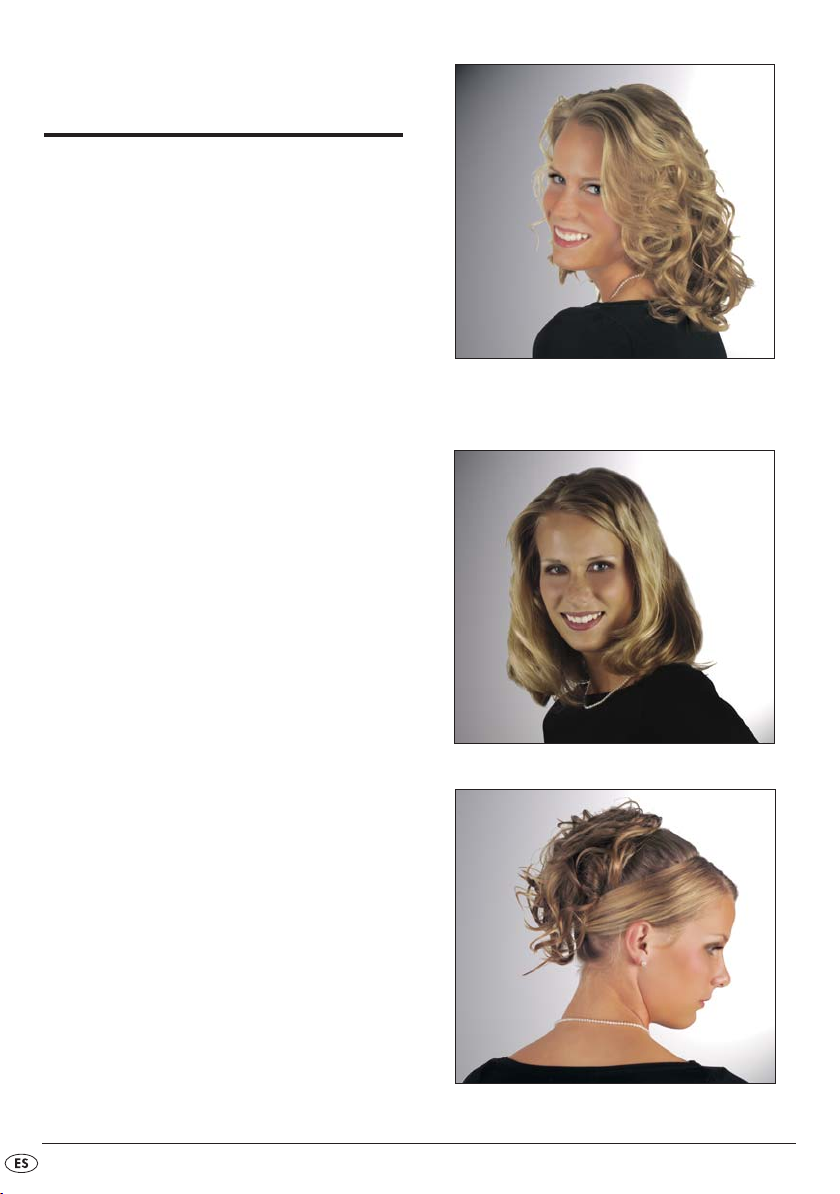
Pinza de rizos
- 8 -
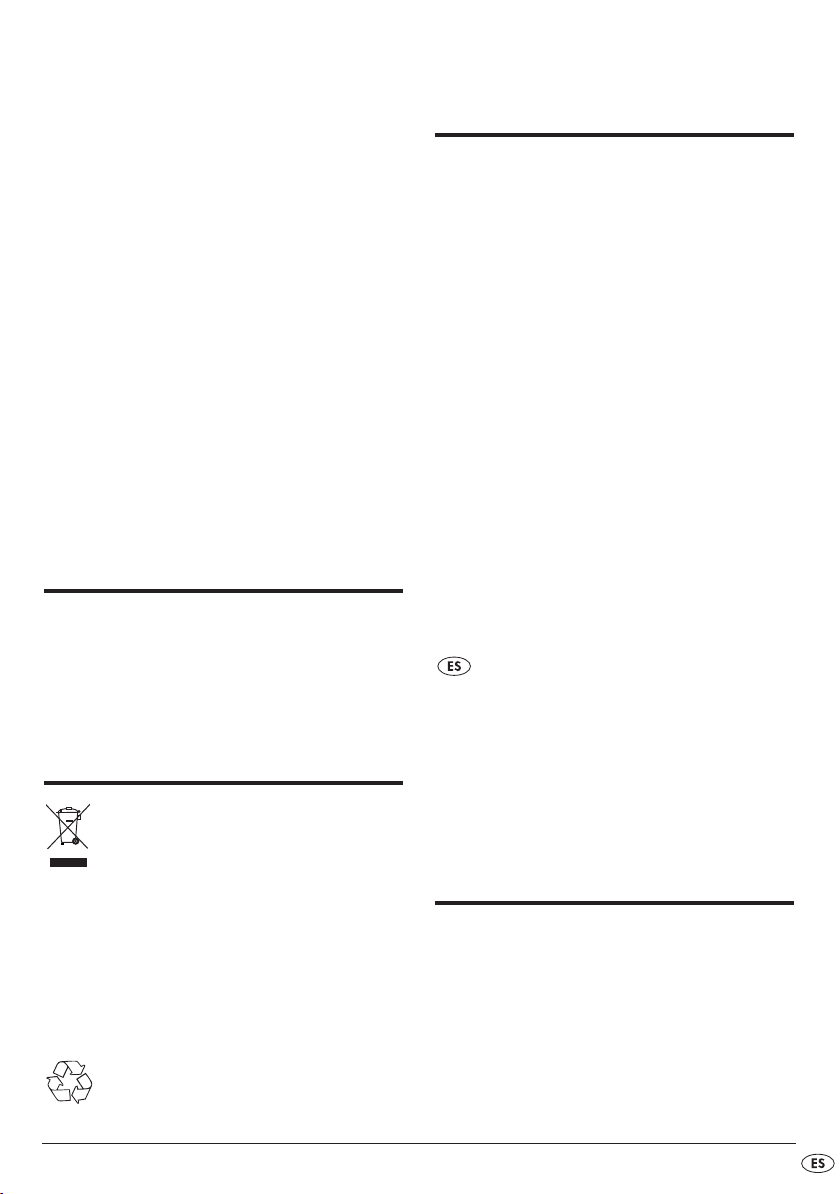
Cabezal cepillo para volumen
Pinza de rizos
Page 9

Indice Pagina
Destinazione d'uso 10
Dati tecnici 10
Fornitura 10
Descrizione dell'apparecchio 10
Avvertenze di sicurezza 11
Messa in funzione 11
Montaggio / smontaggio degli accessori 12
Accensione / spegnimento / selezione del livello 12
Pulizia e cura 12
Conservazione 13
Smaltimento 13
Garanzia e assistenza 13
Importatore 13
Qualche consiglio per un'acconciatura perfetta 14
Leggere attentamente le istruzioni per l'uso prima del primo utilizzo e conservarle per il successivo impiego. In
caso di cessione dell'apparecchio a terzi, consegnare anche le istruzioni.
- 9 -
Page 10

SET ARRICCIACAPELLI
STYLING KH 5520
Descrizione dell'apparecchio
Il set è composto dell'apparecchio e di 6 accessori
da montare, nonché di una borsa in nylon (v. ill. 1).
Destinazione d'uso
Questo apparecchio è previsto per eseguire
acconciature di capelli e solo per l'impiego in ambiente domestico.
Non è previsto per l'impiego su animali e in
ambienti commerciali o industriali.
Dati tecnici
Tensione: 230-240 V~, 50 Hz
Potenza assorbita: 1000 W
Classe di protezione: II
Fornitura
Set arricciacapelli styling KH5520
Manuale d'uso
Ugello ondulatore.
Diffusore a dita: per conferire maggiore volume
alla capigliatura, asciugare prima la radice dei
capelli e poi le punte.
Spazzola volumizzante: per spazzolatura e
asciugatura contemporanea dei capelli.
Borsa in nylon: per la conservazione del set
arricciacapelli ad aria calda
Spazzola rotonda ad aria calda in metallo da
32 mm: per riccioli grandi.
Spazzola rotonda ad aria calda in plastica da
25 mm: per riccioli piccoli arrotolare singole
ciocche intorno alla spazzola rotonda e asciugare. Lasciare la ciocca arrotolata ancora per qualche secondo dopo lo spegnimento.
Ferro per boccoli: per piccoli riccioli a spirale
(boccoli): arrotolare singole ciocche intorno al
ferro e fissare con la clip.
Per poggiare in modo sicuro l'arricciacapelli ad
aria calda durante l'uso, utilizzare la staffa laterale situata sul ferro per boccoli (v. ill. 3).
Arricciacapelli ad aria calda (unità a motore)
v. ill. 2
Connettore per accessori
Tasto di espulsione
Tasto Cool-Shot
Commutatore a scatti
Griglia di aspirazione dell'aria
- 10 -
Page 11

Avvertenze di sicurezza
Importanti avvertenze per la sicurezza!
Per evitare il rischio di morte a causa
di scossa elettrica:
• non toccare mai l'apparecchio o la spina con
mani umide o bagnate, fintanto che la spina è
inserita nella presa di corrente!
• Non utilizzare mai l'apparecchio nelle vicinanze
dell'acqua, in particolare accanto a lavandini,
vasche da bagno o simili .
• Accertarsi che durante il funzionamento il cavo
di alimentazione non si bagni o diventi umido.
Disporlo in modo tale che non si agganci o possa essere danneggiato in altro modo.
• Fate sostituire la spina o il cavo danneggiata/o
immediatamente da personale specializzato
autorizzato o dal servizio di assistenza clienti ai
fini di evitare pericoli.
• Dopo l'uso, estrarre sempre la spina dalla presa
di corrente, soprattutto se si utilizza l'apparecchio nella stanza da bagno. Non è sufficiente
spegnere soltanto l'apparecchio, poiché esso
resta sempre sotto tensione, finché la spina è
inserita nella presa di corrente.
• Impedire la penetrazione di oggetti nell'apparecchio, in particolare oggetti metallici come ferretti,
fermagli o aghi per capelli.
• Utilizzare l'apparecchio sempre e soltanto con
gli accessori inseriti, mai da solo, poiché il
connettore degli accessori si surriscalda durante
l'uso.
• Fare sempre raffreddare l'apparecchio prima di
inserire o rimuovere gli accessori.
• Utilizzare solo gli accessori originali acclusi alla
fornitura, poiché essi sono ottimizzati per
funzionare in associazione all'apparecchio. Altri
elementi potrebbero non essere sufficientemente
sicuri.
• Non ostruire le aperture di aerazione, per garantire la libera circolazione dell'aria, altrimenti
l'apparecchio potrebbe surriscaldarsi.
• Utilizzare gli spray per capelli, i nebulizzatori,
ecc., con molta cautela. Potrebbe succedere ad
esempio che il flusso di aria soffi tali sostanze
direttamente negli occhi. D'altro canto, tali
sostanze non devono penetrare nell'apparecchio, poiché potrebbero essere infiammabili,
aggressive o
conduttive di elettricità.
• Impedire l'uso dell'apparecchio a persone
(inclusi bambini) che per motivi di natura fisica,
sensoriale o mentale, o a causa della scarsa
esperienza e conoscenza non possono utilizzare
l'apparecchio in sicurezza senza controllo o
senza essere stati prima istruiti in merito.
• Spiegare ai bambini il funzionamento dell'apparecchio e i suoi pericoli per impedire che lo usino
come un giocattolo.
Suggerimento: per un'ulteriore protezione, inserire
un dispositivo di protezione dalle correnti di dispersione
nel circuito elettrico della stanza da bagno. Rivolgersi
al proprio elettricista.
Per evitare il rischio di incendio e di le-
sioni:
• ricordare che gli elementi dell'apparecchio possono diventare bollenti durante l'uso. Toccare
quindi soltanto l'impugnatura e i pulsanti.
Messa in funzione
Prima di mettere in esercizio l'apparecchio è necessario accertarsi che ...
– l'apparecchio o gli accessori siano in condizioni
perfette,
– sia stato rimosso tutto il materiale di imballaggio.
Pulire, se necessario, gli accessori, così come descritto alla sezione “Pulizia e cura”.
- 11 -
Page 12

Montaggio / smontaggio
degli accessori
Attenzione:
dopo il funzionamento, gli elementi dell'apparecchio potrebbero essere bollenti!
Per spegnere l'apparecchio, spostare il commutatore a scatti su ...
„0“ (= apparecchio spento).
Pulizia e cura
Per il montaggio degli accessori ...
• inserire l'accessorio sull'apposito connettore e
ruotarlo in senso antiorario, fino a sentire lo scatto.
I simboli delle frecce sull'accessorio e sul
connettore devono coincidere.
Per lo smontaggio degli accessori ...
• spegnere prima l'apparecchio e lasciarlo raffreddare
• Premere il tasto di espulsione e ruotare
l'accessorio in senso orario.
L'accessorio può quindi essere prelevato semplicemente dal connettore .
Accensione / spegnimento / selezione del livello
Dopo aver inserito l'accessorio desiderato e collegato
la spina alla presa di corrente ...
col commutatore a scatti accendere l'appa-
recchio e selezionare il livello desiderato:
„1“ per un flusso d'aria di bassa potenza
„2“ per un flusso d'aria di alta potenza
Con il tasto Cool-Shot si può ottenere un
flusso d'aria fredda per ogni livello di potenza.
Premere il tasto Cool-Shot fino al suo
inserimento.
Non aprire mai l'alloggiamento dell'apparec-
chio. In esso non è presente alcun elemento di
comando. Ad alloggiamento aperto può sussistere il pericolo di morte a causa di scosse elettriche.
Prima di ripulire l'apparecchio, ....
• staccare sempre la spina dalla presa di corrente,
• e lasciare prima raffreddare completamente
l'apparecchio.
Non immergere assolutamente glielementi
dell'apparecchio in acqua o altri liquidi! Così
facendo, può sussistere il pericolo di morte a
causa di scossa elettrica, alla riaccensione
dell'apparecchio, a causa della penetrazione
di liquidi in elementi sotto tensione.
• Pulire gli elementi dell'apparecchio con un panno asciutto o appena inumidito, asciugandoli
quindi accuratamente.
Pulire a intervalli regolari la griglia di aspirazio-
ne dell'aria con una spazzola morbida. In caso
contrario, sussiste il rischio di incendio!
• Estrarre la griglia di aspirazione dell'aria dal-
l'alloggiamento e ripulire la griglia di aspirazione dell'aria dall'interno e dall'esterno con una
spazzola morbida.
• Reinserire la griglia di aspirazione dell'aria
sull'alloggiamento. In tal caso, premere leggermente l'aletta laterale sulla griglia di aspirazione
dell'aria.
• Non utilizzare detergenti o solventi, che potrebbero danneggiare le superfici in plastica.
- 12 -
Page 13

Conservazione
Attendere il completo raffreddamento dell'apparecchio, prima di riporlo nella borsa in nylon. Conservare sempre l'apparecchio nella borsa, per proteggerlo dalla polvere. Riporre l'apparecchio in un
luogo asciutto.
Smaltimento
Non gettate per alcun motivo l'apparecchio
insieme ai normali rifiuti domestici.
La garanzia decade in caso di impiego improprio o
manomissione, uso della forza e interventi non eseguiti dalla nostra filiale di assistenza autorizzata.
Questa garanzia non costituisce alcun limite ai diritti
legali del consumatore. Questa garanzia vale solo
nei confronti del primo acquirente e non è trasferibile.
Kompernass Service Italia
Corso Lino Zanussi 11
33080 Porcia (PN)
Tel.: 0434/550833
Fax: 0434/550833
e-mail: support.it@kompernass.com
Smaltire l'apparecchio attraverso un'azienda di
smaltimento autorizzata o attraverso l'ente di smaltimento comunale.
Rispettare le norme attualmente in vigore.
In caso di dubbio mettersi in contatto con l'ente di
smaltimento competente.
Smaltire tutti i materiali dell'imballaggio in
modo ecologicamente conforme.
Garanzia e assistenza
Questo apparecchio è garantito per tre anni a partire
dalla data di acquisto. L'apparecchio è stato prodotto
con cura e debitamente collaudato prima della consegna. Conservare lo scontrino come prova d'acquisto.
Nei casi contemplati dalla garanzia, mettersi in comunicazione telefonicamente con il centro di assistenza
più vicino. Solo in questo modo è possibile garantire
una spedizione gratuita della merce.
La prestazione della garanzia vale solo per difetti
del materiale o di fabbricazione. Il prodotto è destinato esclusivamente all'uso domestico e non a quello
commerciale.
Importatore
KOMPERNASS GMBH
BURGSTRASSE 21
D-44867 BOCHUM
www.kompernass.com
- 13 -
Page 14

Qualche consiglio per
un'acconciatura perfetta
Eseguire l'acconciatura a capelli quasi asciutti.
Dividere la capigliatura in singole ciocche, per ottenere maggiore volume.
Per ottenere ancora maggiore volume, asciugare i
capelli cominciando dalle radici verso le punte.
Dopo aver spento l'apparecchio, attendere ancora
qualche secondo, prima di rilasciare i boccoli.
Prima di pettinare l'acconciatura, lasciare
raffreddare bene i capelli
.
Ferro per boccoli
Spazzola volumizzante
Ferro per boccoli
- 14 -
Page 15

Content Page
Intended use 16
Technical data 16
Package contents 16
Description of the appliance 16
Safety instructions 17
Startup 18
Attaching/detaching accessories 18
Switching on/off / Selecting a heat level 18
Cleaning and care 18
Storage 19
Disposal 19
Warranty & Service 19
Importer 20
A few tips for the perfect hairstyle 20
Read the operating instructions carefully before using the appliance for the first time and preserve this booklet
for later reference. Hand over the manual to anyone you pass on the appliance to.
- 15 -
Page 16

Styling Curler Set KH
5520
Intended use
This appliance is intended for hair styling and for
use in household applications only. It is not intended
for use on animals or in commercial or industrial
environments.
Technical data
Voltage: 230-240 V ~50 Hz
Power consumption: 1000 W
Protection class: II
Package contents
Sytling Curlerset KH5520
Operating Instructions
Description of the
appliance
The set consists of the appliance, 6 attachable
accessories and a nylon bag (see fig. 1):
Concentrator nozzle – for blow-drying.
Finger diffuser – for more volume,
dry the hairline first, then the ends.
Brush volumiser attachment– for
simultaneous brushing and drying
of your hair.
Nylon bag – for storing the styling curlerset
32 mm hot air round metal brush – for large
curls
25 mm hot air round plastic brush – for small
curls: Roll individual strands round the brush and
dry them. After switching off leave your hair curled round the brush for a few seconds.
Curling iron – for small spiral curls
(angel curls). Roll individual strands round the
clamp and fix them with the curl clip.
To safety set aside the styling curler during ope-
ration, use the clip on the side of the curling
iron (see fig. 3)
Styling curler (motor unit)
see fig. 2
Attachment connector
Eject button
Cool-Shot button
Heat level switch
Air suction grid
- 16 -
Page 17

Safety instructions
Important information for your
safety!
To avoid a life-threatening electric
shock:
• Never touch the appliance or the power plug
with wet or moist hands, as long as the power
plug is in the wall socket!
• Never use the appliance near water, particularly
not near sinks, baths or other vessels .
• Make sure that the power cord never becomes
wet or damp during operation. Lay the cord such
that it cannot be pinched or otherwise damaged.
If the power cord or the power plug are damaged, you must not continue to use the appliance
before having had it repaired by customer
service.
• Alway pull the plug out of the wall socket after
use, particularly if you use the appliance in the
bathroom.
It is not sufficient to simply switch off the appliance – line voltage is still present in the appliacne
as long as the power plug is connected to the
wall socket.
• Make sure that no objects can ever reach the
inside of the appliance, particularly not metal
hair clips, grips or hairpins.
• Always only use the appliance with attachments,
never on its own, as the connector for the accessories becomes hot during operation.
• Allow the appliance to cool down before
attaching or detaching accessories.
• Only use the enclosed original accessories, as
they have been optimized to work with this appliance. Other parts are possibly not adequately
safe.
• Keep the openings for air inlet and outlet vacant
for unimpaired air flow. Otherwise the appliance
may overheat.
• Be careful with hair spray, water atomizers etc.
On the one hand the air flow may blow these
substances directly into your eyes. On the other
hand these substances must not enter the
appliance – as they may be inflammable,
aggressive or conductive.
• Do not allow individuals (including children) to
use the appliance whose physical, sensorial or
mental abilities or lack of experience and knowledge hinder their safe usage of it if they have
not previously been supervised or instructed in its
correct usage.
• Tell children about the appliance and its potential dangers so that they do not play with it.
Tip: An RCD on the bathroom circuit provides
additional protection. For more information, please
consult an electrcian.
To prevent the risk of fire or injury:
• The appliance components can become quite
hot during operation. Therefore only touch the
handle and the buttons.
- 17 -
Page 18

Startup
Before starting up the appliance, make certain that ...
– the appliance and the accessories are in perfect
working order,
– all packaging material has been removed.
If necessary, clean the accessories as described
under “Cleaning and care”.
Switching on/off /
Selecting a heat level
After having attached the desired accessory and
plugged the power plug into the power socket ...
you can switch on the appliance using the switch
and select the level:
"1"for low fan speed
"2"for high fan speed
Attaching/detaching
accessories
Caution:
After operation, the appliance components may
be hot!
To attach an accessory ...
• push it onto the accessory connector and turn
it in anti-clockwise direction until you hear it click
into place.
The arrow symbols on the attachment and
on the accessory connector must correspond.
To detach an accessory ...
• switch off the appliance first and allow it to cool
down
• Press the eject button and turn the accessory in clockwise direction.
The accessory can now be easily removed from the
connector .
With the Cool-Shot button you can gene-
rate a cold air flow at any fan speed. Press the
Cool-Shot button , until it engages.
You can switch off the appliance by pushing the
level switch to "0" (= appliance off).
Cleaning and care
Never open the casing of the appliance. No
operating elements are located inside the
device. An open housing can create the risk of a
life-threatening electrical shock.
Before cleaning the device, ....
• always disconnect the power plug from the
power socket
• and allow the appliance to cool down
completely.
You must under no cirumstances immerse the
appliance components in water or other liquids! Danger to life by an electric shock will
be caused, if residual liquids contact live parts
the next time the appliance is used.
• Clean the appliance components with a dry or
slightly damp cloth – and carefully dry all parts
afterwards.
- 18 -
Page 19

Clean the air suction grid with a soft brush at
regular intervals. Otherwise there is a fire hazard!
• Remove the air suction grid from the casing
and clean it inside and outside with a soft
brush.
• Push the air suction grid back onto the casing.
Hereby press the lateral fins on the ventilation
grid down lightly.
• Do not use any cleansers or solvents. These can
damage the plastic surfaces.
Storage
Allow the appliance to cool down completely before putting it into the nylon bag. Only keep it in the
bag to protect it from dust. Store the appliance in a
dry location.
Disposal
Do not dispose of the device in normal domestic waste.
Dispose of the device over a registered waste disposal firm or through your communal waste disposal
facility.
Observe the currently valid regulations. In case of
doubt, consult your waste disposal facility.
Warranty & Service
This appliance is guaranteed for 3 years from the
date of purchase. It has been carefully produced
and meticulously checked before delivery. Please
keep your receipt as proof of purchase. Contact
your service centre by telephone in case of questions pertaining to the warranty.
Your goods can be transmitted free of cost only in
this manner.
The warranty covers only material or manufacturing
faults, not normal wear or damage to fragile parts
such
as switches or rechargeable batteries.
The appliance is intended solely for private, not
commercial, use. If this product has been subjected
to improper or inappropriate handling, abuse, or
interventions not carried out by one of our authorised sales and service outlets, the warranty will be
considered void. This warranty does not affect your
statutory rights. This warranty applies only to the
initial purchaser and is non-transferable.
DES Ltd
Units 14-15
Bilston Industrial Estate
Oxford Street
Bilston
WV14 7EG
Tel.: 0870/787-6177
Fax: 0870/787-6168
e-mail: support.uk@kompernass.com
Dispose of the packaging materials in an
environmentally responsible manner.
Kompernass Service Ireland
c/o Irish Connection
41 Harbour view
Howth Co. Dublin
Tel: 087-99 62 077
Fax: 18398056
e-mail: support.ie@kompernass.com
- 19 -
Page 20

Importer
KOMPERNASS GMBH
BURGSTRASSE 21
D-44867 BOCHUM
www.kompernass.com
A few tips for the perfect
hairstyle
Only style your hair when it is already almost dry.
Divide your hair into individual strands for more
volume.
You will achieve additonal volume by starting to dry
your hair at the hairline and working down towards
the ends.
After switching off the appliance, wait for a few
seconds before releasing the curl.
Let your hair cool down well before combing.
Curling iron
Brush volumiser attachment
Curling iron
- 20 -
Page 21

Inhaltsverzeichnis Seite
Verwendungszweck 22
Technische Daten 22
Lieferumfang 22
Gerätebeschreibung 22
Sicherheitshinweise 23
Inbetriebnahme 24
Zubehör aufsetzen / abnehmen 24
Ein-/Ausschalten / Stufe wählen 24
Reinigen und Pflegen 24
Aufbewahren 25
Entsorgen 25
Garantie und Service 25
Importeur 26
Ein paar Tipps für die perfekte Frisur 26
Lesen Sie die Bedienungsanleitung vor der ersten Verwendung aufmerksam durch und heben Sie diese für
den späteren Gebrauch auf. Händigen Sie bei Weitergabe des Gerätes an Dritte auch die Anleitung aus.
- 21 -
Page 22

Styling Curlerset
KH 5520
Gerätebeschreibung
Das Set besteht aus dem Gerät und 6 Zubehörteilen
zum Aufstecken sowie einer Nylontasche (siehe
Abb. 1).
Verwendungszweck
Dieses Gerät ist vorgesehen zur Haar-pflege von
Personen und nur zur Verwendung im häuslichen
Bereich.
Es ist nicht vorgesehen zur Verwendung an Tieren
und nicht in gewerblichen oder industriellen Bereichen.
Technische Daten
Spannung: 230-240 V~, 50 Hz
Leistungsaufnahme: 1000 W
Schutzklasse: II
Lieferumfang
Styling Curlerset KH5520
Bedienungsanleitung
Ondulierdüse – zum trocken fönen.
Finger-Diffusor – für mehr Fülle erst den Haaran-
satz und danach erst die Spitzen trocknen.
Bürsten - Volumenaufsatz– für gleichzeitiges
Bürsten und Trocknen der Haare.
Nylontasche – zur Aufbewahrung des Styling
Curlersets
32 mm Warmluftrundbürste aus Metall – für
große Locken.
25 mm Warmluftrundbürste aus Kunststoff – für
kleine Locken: Einzelne Strähnen um die Rundbürste rollen und trocknen. Nach dem Abschalten noch ein paar Sekunden aufgerollt lassen.
Lockenschere – für kleine Spirallocken
(Engelslocken): Einzelne Strähnen um den
Lockenstab rollen und mit dem Lockenclip fixieren.
Um den Curler mit Lockenschere während des
Betriebs sicher abzustellen, stellen Sie den seitlichen Bügel an der Lockenschere auf (siehe
Abb 3).
Curler (Motoreinheit)
siehe Abb. 2
Zubehör-Steckplatz
Auswurf-Taste
Cool-Shot-Taste
Stufenschalter
Luftansauggitter
- 22 -
Page 23

Sicherheitshinweise
Um Brand- und Verletzungsgefahr
zu vermeiden:
Wichtige Hinweise zu Ihrer Sicherheit!
Um Lebensgefahr durch elektrischen
Schlag zu vermeiden:
• Berühren Sie das Gerät oder den Netzstecker
niemals mit nassen oder feuchten Händen, solange der Netzstecker in der Steckdose ist!
• Verwenden Sie das Gerät niemals in der Nähe
von Wasser, insbesondere nicht in der Nähe von
Waschbecken, Badewannen oder ähnlichen Gefäßen .
• Achten Sie darauf, dass im Betrieb das Netzkabel niemals nass oder feucht wird. Führen Sie es
so, dass es nicht eingeklemmt oder anderweitig
beschädigt werden kann.
• Lassen Sie beschädigte Netzstecker oder Netzkabel sofort von autorisiertem Fachpersonal oder
dem Kundenservice austauschen, um Gefährdungen zu vermeiden.
• Ziehen Sie nach Gebrauch immer den Stecker
aus der Steckdose, insbesondere wenn Sie das
Gerät im Badezimmer verwenden. Ausschalten
alleine genügt nicht – weil noch immer Netzspannung im Gerät anliegt, solange der Netzstecker in der Steckdose steckt.
• Achten Sie darauf, dass niemals Gegenstände in
das Gerät gelangen können, insbesondere nicht
metallische Haarklammern, Clips oder Haarnadeln.
Tipp: Zusätzlichen Schutz bietet eine FehlerstromSchutzeinrichtung im Badezimmer-Stromkreis.
Fragen Sie hierzu Ihren Elektroinstallateur.
• Die Geräteteile können im Betrieb recht heiss
werden. Fassen Sie daher nur den Handgriff und
die Knöpfe an.
• Benutzen Sie das Gerät immer nur mit aufgesteckten Zubehörteilen, niemals alleine, weil der
Zubehör-Steckplatz im Betrieb heiss wird.
• Bevor Sie Zubehörteile aufstecken oder abnehmen, lassen Sie erst das Gerät abkühlen.
• Verwenden Sie nur die mitgelieferten Original
Zubehörteile, weil diese für das Zusammenwirken mit dem Gerät optimiert sind. Andere Teile
sind möglicherweise nicht ausreichend sicher.
• Halten Sie die Öffnungen für den Lufteintritt und
Luftaustritt frei für eine ungehinderte Luftströmung. Sonst kann das Gerät überhitzen.
• Seien Sie vorsichtig mit Haarspray, Wasserzerstäuber usw. Zum einen kann es sein, dass Ihnen
der Luftzug diese Mittel vielleicht direkt in die Augen bläst. Zum anderen dürfen diese aber auch
nicht in das Gerät gelangen – weil sie vielleicht
brennbar, agressiv oder leitfähig sein könnten.
• Dieses Gerät ist nicht dafür bestimmt, durch Personen (einschließlich Kinder) mit eingeschränkten, physischen, sensorischen oder geistigen
Fähigkeiten oder mangels Erfahrung und/oder
mangels Wissen benutzt zu werden, es sei denn,
sie werden durch eine für ihre Sicherheit zuständige Person beaufsichtigt oder erhielten von ihr
Anweisungen, wie das Gerät zu benutzen ist.
• Kinder sollten beaufsichtigt werden, um sicherzustellen, dass sie nicht mit dem Gerät spielen.
- 23 -
Page 24

Inbetriebnahme
Bevor Sie das Gerät in Betrieb nehmen, überzeugen
Sie sich davon, dass ...
– das Gerät oder die Zubehörteile in einwand-
freiem Zustand sind,
– alle Verpackungsmaterialien entfernt sind.
Reinigen Sie gegebenenfalls die Zubehörteile, wie
unter “Reinigen und Pflegen”. beschrieben.
Zubehör aufsetzen /
abnehmen
Vorsicht:
Nach vorangegangenem Betrieb können die
Geräteteile heiss sein!
Ein-/Ausschalten / Stufe
wählen
Wenn Sie das gewünschte Zubehörteil aufgesetzt
und den Netzstecker in die Steckdose gesteckt haben, können Sie am Stufenschalter das Gerät
einschalten und die Stufe wählen:
„1“ für niedrige Gebläse-Stärke
„2“ für hohe Gebläse-Stärke
Mit der Cool-Shot-Taste können Sie bei je-
der Gebläse-Stärke einen kalten Luftstrom erzeugen. Drücken Sie die Cool-Shot-Taste , bis
diese einrastet.
Sie können das Gerät ausschalten, indem Sie
den Stufenschalter auf „0“ schieben (= Gerät
aus).
Zum Aufsetzen des Zubehörteils ...
• stecken Sie es auf den Zubehör- Steckplatz
und drehen Sie es gegen den Uhrzeigersinn, bis
es hörbar einrastet.
Die Pfeilsymbole am Zubehör und am Zubehör-Steckplatz müssen übereinstimmen.
Zum Abnehmen des Zubehörteils ...
• schalten Sie das Gerät erst aus und lassen es
abkühlen
• Drücken Sie die Auswurf-Taste und
drehen Sie das Zubehörteil im Uhrzeigersinn.
Das Zubehörteil kann nun durch Ziehen vom Zubehör-Steckplatz abgenommen werden.
Reinigen und Pflegen
Öffnen Sie niemals das Gehäuse vom Gerät. Es
befinden sich keinerlei Bedienelemente darin.
Bei geöffnetem Gehäuse kann Lebensgefahr
bestehen durch elektrischen Schlag.
Bevor Sie das Gerät reinigen, ....
• ziehen Sie erst den Netzstecker aus der Steckdose,
• und lassen Sie das Gerät erst vollständig abkühlen.
Auf keinen Fall dürfen die Geräteteile in Was-
ser oder andere Flüssigkeiten getaucht werden!
Hier kann Lebensgefahr durch elektrischen
Schlag entstehen, wenn bei erneutem Betrieb
Flüssigkeitsreste auf spannungsführende Teile
gelangen.
- 24 -
Page 25

• Reinigen Sie die Geräteteile selber mit einem
trockenen oder höchstens leicht angefeuchteten
Tuch – und trocknen Sie danach alle Teile sorgfältig ab.
Reinigen Sie in regelmäßigen Abständen das
Luftansauggitter mit einer weichen Bürste. Es
besteht sonst Brandgefahr!
• Ziehen Sie das Luftansauggitter vom Gehäuse
ab und reinigen Sie das Luftansauggitter von
innen und außen mit einer weichen Bürste.
• Stecken Sie das Luftansauggitter wieder auf
das Gehäuse. Drücken Sie hierbei die seitlichen
Flügel am Luftansauggitter leicht ein.
• Verwenden Sie keine Reinigungs- oder Lösemittel.
Diese können die Kunststoff-Oberflächen beschädigen.
Aufbewahren
Lassen Sie das Gerät erst vollständig auskühlen, bevor Sie es in die Nylontasche legen. Bewahren Sie
es stets nur darin auf, um es vor Staub zu schützen.
Lagern Sie das Gerät an einem trockenen Ort.
Entsorgen
Werfen Sie das Gerät keinesfalls in den
normalen Hausmüll.
Entsorgen Sie das Gerät über einen zugelassenen
Entsorgungsbetrieb oder über Ihre kommunale Entsorgungseinrichtung.
Beachten Sie die aktuell geltenden Vorschriften. Setzen Sie sich im Zweifelsfall mit Ihrer Entsorgungseinrichtung in Verbindung.
Führen Sie alle Verpackungsmaterialien einer umweltgerechten Entsorgung zu.
Garantie und Service
Sie erhalten auf dieses Gerät 3 Jahre Garantie ab
Kaufdatum. Das Gerät wurde sorgfältig produziert
und vor Anlieferung gewissenhaft geprüft. Bitte bewahren Sie den Kassenbon als Nachweis für den
Kauf auf. Bitte setzen Sie sich im Garantiefall mit Ihrer Servicestelle telefonisch in Verbindung. Nur so
kann eine kostenlose Einsendung Ihrer Ware gewährleistet werden.
Die Garantieleistung gilt nur für Material- oder Fabrikationsfehler, nicht aber für Verschleißteile oder für
Beschädigungen an zerbrechlichen Teilen, z. B.
Schalter oder Akkus. Das Produkt ist lediglich für
den privaten und nicht für den gewerblichen Gebrauch bestimmt. Bei missbräuchlicher und unsachgemäßer Behandlung, Gewaltanwendung und bei
Eingriffen, die nicht von unserer autorisierten Service-Niederlassung vorgenommen wurden, erlischt die
Garantie. Ihre gesetzlichen Rechte werden durch
diese Garantie nicht eingeschränkt.
- 25 -
Page 26

Schraven Service- und
Dienstleistungs GmbH
Gewerbering 14
D-47623 Kevelaer
Tel.: +49 (0) 180 5 008107
(14 Ct/Min. aus dem dt. Festnetz)
Fax: +49 (0) 2832 3532
e-mail: support.de@kompernass.com
Kompernaß Service Österreich
Rittenschober KG
Gmundner Strasse 10
A-4816 Gschwandt
Tel.: +43 (0) 7612 6260516
Fax: +43 (0) 7612 626056
e-mail: support.at@kompernass.com
Importeur
KOMPERNASS GMBH
BURGSTRASSE 21
D-44867 BOCHUM
www.kompernass.com
Lockenschere
Ein paar Tipps für die
perfekte Frisur
Stylen Sie Ihre Haare erst, wenn sie schon fast
trocken sind.
Teilen Sie die Haare in einzelne Strähnen auseinander, um mehr Fülle zu erzielen.
Sie erzielen zusätzlich mehr Fülle im Haar, wenn Sie
die Haare zuerst vom Haaransatz beginnend zu
den Spitzen trocknen. Warten Sie nach dem Abschalten des Gerätes noch ein paar Sekunden, bevor Sie die Locke lösen.
Lassen Sie vor dem Auskämmen der Frisur die Haare
erst gut auskühlen.
Bürstenvolumen - Aufsatz
Lockenschere
- 26 -
 Loading...