

Page 1

6
KOMPERNASS GMBH · BURGSTRASSE 21 · D-44867 BOCHUM
www.kompernass.com
ID-Nr.: KH4077-11/07-V1
Page 2
HALOGEN WORK SPOTLIGHTS
HALOGEN WORK SPOTLIGHTS
Operating instructions
KH 4077
Page 3

Page 4
KH 4077
w
g
f
d
a
1!
q
e
r
t
y
u
o
i
Page 5

Page 6

Page 7

CONTENT PAGE
Safety instructions 2
Description of the appliance 3
Assembly 3
Removing the halogen lamps. 4
Inserting the halogen lamps 4
Cleaning 4
Troubleshooting 4
Disposal 5
Technical data 5
Service 5
Importer 5
Read these operating instructions carefully before using the appliance for the first time and preserve this
maual for later reference. Pass this manual on to whoever might acquire the appliance at a future date.
- 1 -
Page 8

HALOGEN WORK
SPOTLIGHTS
Safety instructions
Danger of electrical shock!
• Only connect the Stand Halogen Floodlight to
correctly installed wall sockets having a mains
current of 220 - 240 V at 50 Hz.
• Unplug the Stand Halogen Floodlight from the
socket if you notice any faulty operation and
when you decide to clean it.
• Under no circumstances may the Stand Halogen
Floodlight be immersed in liquids, or liquids be
permitted to permeate into the housing.
Should liquids nonetheless gain entry into the
appliance housing, immediately unplug the appliance from the mains supply and arrange for it
to be repaired by qualified specialists.
• Never touch the Stand Halogen Floodlight,
power cable or plug with wet hands
• To unplug the appliance, always pull the plug
from the socket, do not pull the cord itself
• Do not crease or crimp the power cable and
place it in such a way as to prevent anyone from
stepping on or tripping over it.
• To avoid the risk of injury, arrange for defective
power plugs and/or cables to be replaced as
soon as possible by a qualified technician or by
our Customer Service Department to avoid the
risk of injury.
• Separate your Stand Halogen Floodlight from
the mains supply immediately after use.The
appliance is only completely switched off after
having been unplugged.
Danger of injuries
• If they have not previously been supervised or instructed in its correct usage, do not allow individuals (including children) to use the appliance
whose physical, sensorial or mental abilities or
lack of experience and knowledge hinder their
safe usage of it if they have not previously been
supervised or instructed in its correct usage.
• Inform children about the appliance and its
potential dangers and that they should not play
with it.
Attention
• Always remove the plug from electrical sockets
before exchanging the halogen lamps.
• Allow the halogen lamps to cool before
removing them.
• Switch the Stand Halogen Floodlight off only
with the ON/OFF switch.
• Never touch the glass covering, the power cable
or the metal housing whilst it is in operation.
These parts of the appliance will become very
hot during use.
To avoid burn injuries, do not touch these
surfaces!
• Arrange for a defective glass cover to be immediately replaced by a suitable new one.
• Never direct the halogen floodlights towards
each other. The appliance could be damaged
by the large generation of heat.
• Always ensure that the Stand Halogen Floodlight is sufficiently distant from yourself and easily meltable items.
• To avoid eye damage, do not look directly into
the Stand Halogen Floodlight.
• Never place the Stand Halogen Floodlight in the
close proximity of easily inflammable materials.
• Use exclusively halogen lamps up to 500 Watt.
• Never touch the lightbulb with bare hands.
Always use a dry lint-free cloth.
• Read and observe all safety and operating
instructions.
• Ensure that the Stand Halogen Floodlight has
cooled down before storing it away.
- 2 -
Page 9

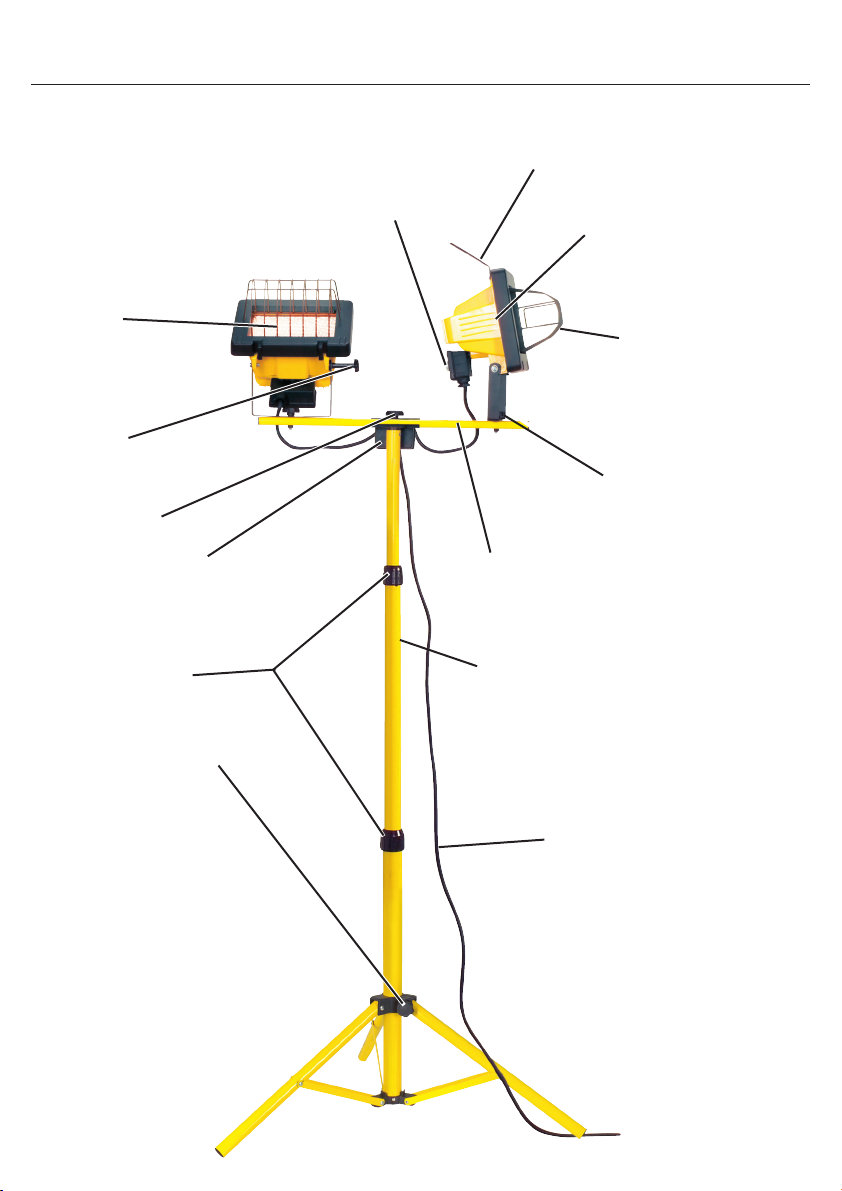
Description of the appliance
ON/OFF Switch
q
Floodlight lever
w
Halogen floodlight
e
Protective grill
r
Knurled screw
t
Crossbeam
y
Telescopic stand
u
Power cable
i
Knurled screw
o
Fixing ring
a
Distributor box
s
Knurled screw
d
Fixing screw
f
Glass cover
g
Assembly
Danger of electrical shock
Never insert the plug into an electrical socket until
the appliance has been completely assembled.
Danger of burns
Only touch the halogen lamps when they are in a
switched-off and cooled-down condition. The halogen lamps will get very hot. Never touch the lightbulb with bare hands, always use a clean and dry
lint-free cloth.
Opening up the pedestal base
³ To set up the telescopic stand u, loosen the
knurled screw,
be opened out to the floor.
³ Turn the knurled screw
. The pedestal base can now
o
until it is tight.
o
Assemble the protective grill ron to
the halogen spotlights
³ Insert the lower pegs of the protective grill
into the recesses on the corners before the glass
covering
³ Squeeze the protective grill
that the pegs on the other side of the protective
grill can be inserted into the recesses there.
³ Do the same with the second halogen spotlight
g
.
Mounting the halogen floodlights
e
so far together
r
r
e
on the crossbeam.
³ Insert the knurled screw twith the washer
through the hole in the bracket of the halogen
floodlight
³ Insert the halogen floodlight
screw
am
y
hind the halogen floodlights
³ Turn the knurled screw
.
e
with the knurled
e
in the pre-drilled hole on the crossbe-
t
. Ensure that the Stoppers are located be-
.
e
until it is tight.
t
Assembling the crossbeam on the
telescopic stand.
³ Insert the knurled screw dfirst of all through the
hole in the distributer box
hole in the crossbeam
³ Now assemble the crossbeam
butor box
screw
³ Turn the knurled screw
with the assistance of the knurled
s
on the telescopic stand u.
d
, then through the
s
.
y
y
until it is tight.
d
and the distri-
Adjusting the height of the Stand
Halogen Floodlight
³ Loosen the fixing ring aby turning it in an
anti-clockwise direction.
³ Adjust the telescopic stand
height.
³ Retighten the fixing ring
kwise direction.
to the desired
u
by turning it in a clok-
a
- 3 -
Page 10

Important!
To adjust the halogen floodlight e, use the knurled
screw
lever
The horizontal position is adjusted in that the knurled screw tis loosened and, with the assistance of
the floodlight lever
position. Retighten the knurled screw
optimal position has been found.
The vertical position is adjusted in that the fixing
screw
of the floodlight lever
position. Retighten the fixing screw,
optimal position has been found.
During the adjustments always hold the floodlight
lever
Do not use extension cables that are longer than
15 m.
, the fixing screw fand the floodlight
t
.
w
, it is placed in the desired
w
is loosened and and, with the assistance
f
, it is placed in the desired
w
f
Important!
firmly.
w
Important!
when the
t
when the
Removing the halogen lamps.
1. Switch the appliance off with the ON/OFF
switch
allow the Floor Halogen Floodlight to cool
down.
2. Remove the middle screw on the top of the lamp
housing. Loosen the glass cover
3. Use a dry cloth to take out the halogen lamp.
4. Remove the halogen lamp.
, remove the plug from the socket and
q
.
g
Inserting the halogen lamps
1. Ensure that the Floor Halogen Floodlight is
switched-off and completely cooled down.
2. Take the new halogen lamp from its packaging
with a dry cloth. Place a ceramic end on the
appropriate retainer.
3. Place the other ceramic end on the opposite
retainer. Ensure that contact has been made
on both sides. The retainers should now hold the
halogen lamp securely, such that the halogen
lamp can no longer move itself.
4. Now close the glass cover
retighten the middle screw.
5. Switch the Floor Halogen Floodlight on with the
ON/OFF switch
6. Should it not function, repeat steps 1- 5.
q
.
and replace and
g
Cleaning
Danger of electrical shock
Always remove the plug from the socket before cleaning the Stand Halogen Floodlight.
Under no circumstances may the appliance be
immersed in water or held under running water
during cleaning.
Clean the exterior of the Stand Halogen Floodlight
with a moist cloth.
Attention!
Ensure the Floor Halogen Floodlight is inaccessible
for children.
- 4 -
Page 11

Troubleshooting
Technical data
Symptom:
The Stand Halogen Floodlight will not switch on.
Possible cause and remedy:
Check if the Stand Halogen Lamp has been correctly assembled or if it is possibly damaged. Replace
the halogen lamps if necessary.
A domestic electrical fuse is defect.
Check the domestic fuses and, if necessary, renew
them.
The power socket is defective.
Try another wall socket.
The Floor Halogen Floodlight is possibly defect.
Check the connecting lead and the power plug for
damages. Have the Floor Halogen Floodlight chekked over by specialists.
Disposal
Do not dispose of the appliance in your
normal domestic waste.
Dispose of the appliance through an approved disposal centre or at your community waste facility.
Observe the currently applicable regulations.
In case of doubt, please contact your waste disposal
centre.
Dispose of all packaging materials in an
environmentally responsible manner.
Mains voltage: 220 - 240 V ~/ 50 Hz
Rated output: 2 x 500 Watt
Protection rating:IP44
Service
DES Ltd
Units 14-15
Bilston Industrial Estate
Oxford Street
Bilston
WV14 7EG
Tel.: 0870/787-6177
Fax: 0870/787-6168
e-mail: support.uk@kompernass.com
Irish Connection
Harbour view
Howth
Co. Dublin
Tel: 00353 (0) 87 99 62 077
Fax: 00353 18398056
e-mail: support.ie@kompernass.com
Importer
KOMPERNASS GMBH
BURGSTRASSE 21
D-44867 BOCHUM
www.kompernass.com
- 5 -
 Loading...