

Page 1
5
HERVIDOR PARA HUEVOS
CUOCIUOVA
KOMPERNASS GMBH · BURGSTRASSE 21 · D-44867 BOCHUM
www.kompernass.com
ID-Nr.: KH401-09/07-V1
KH 401
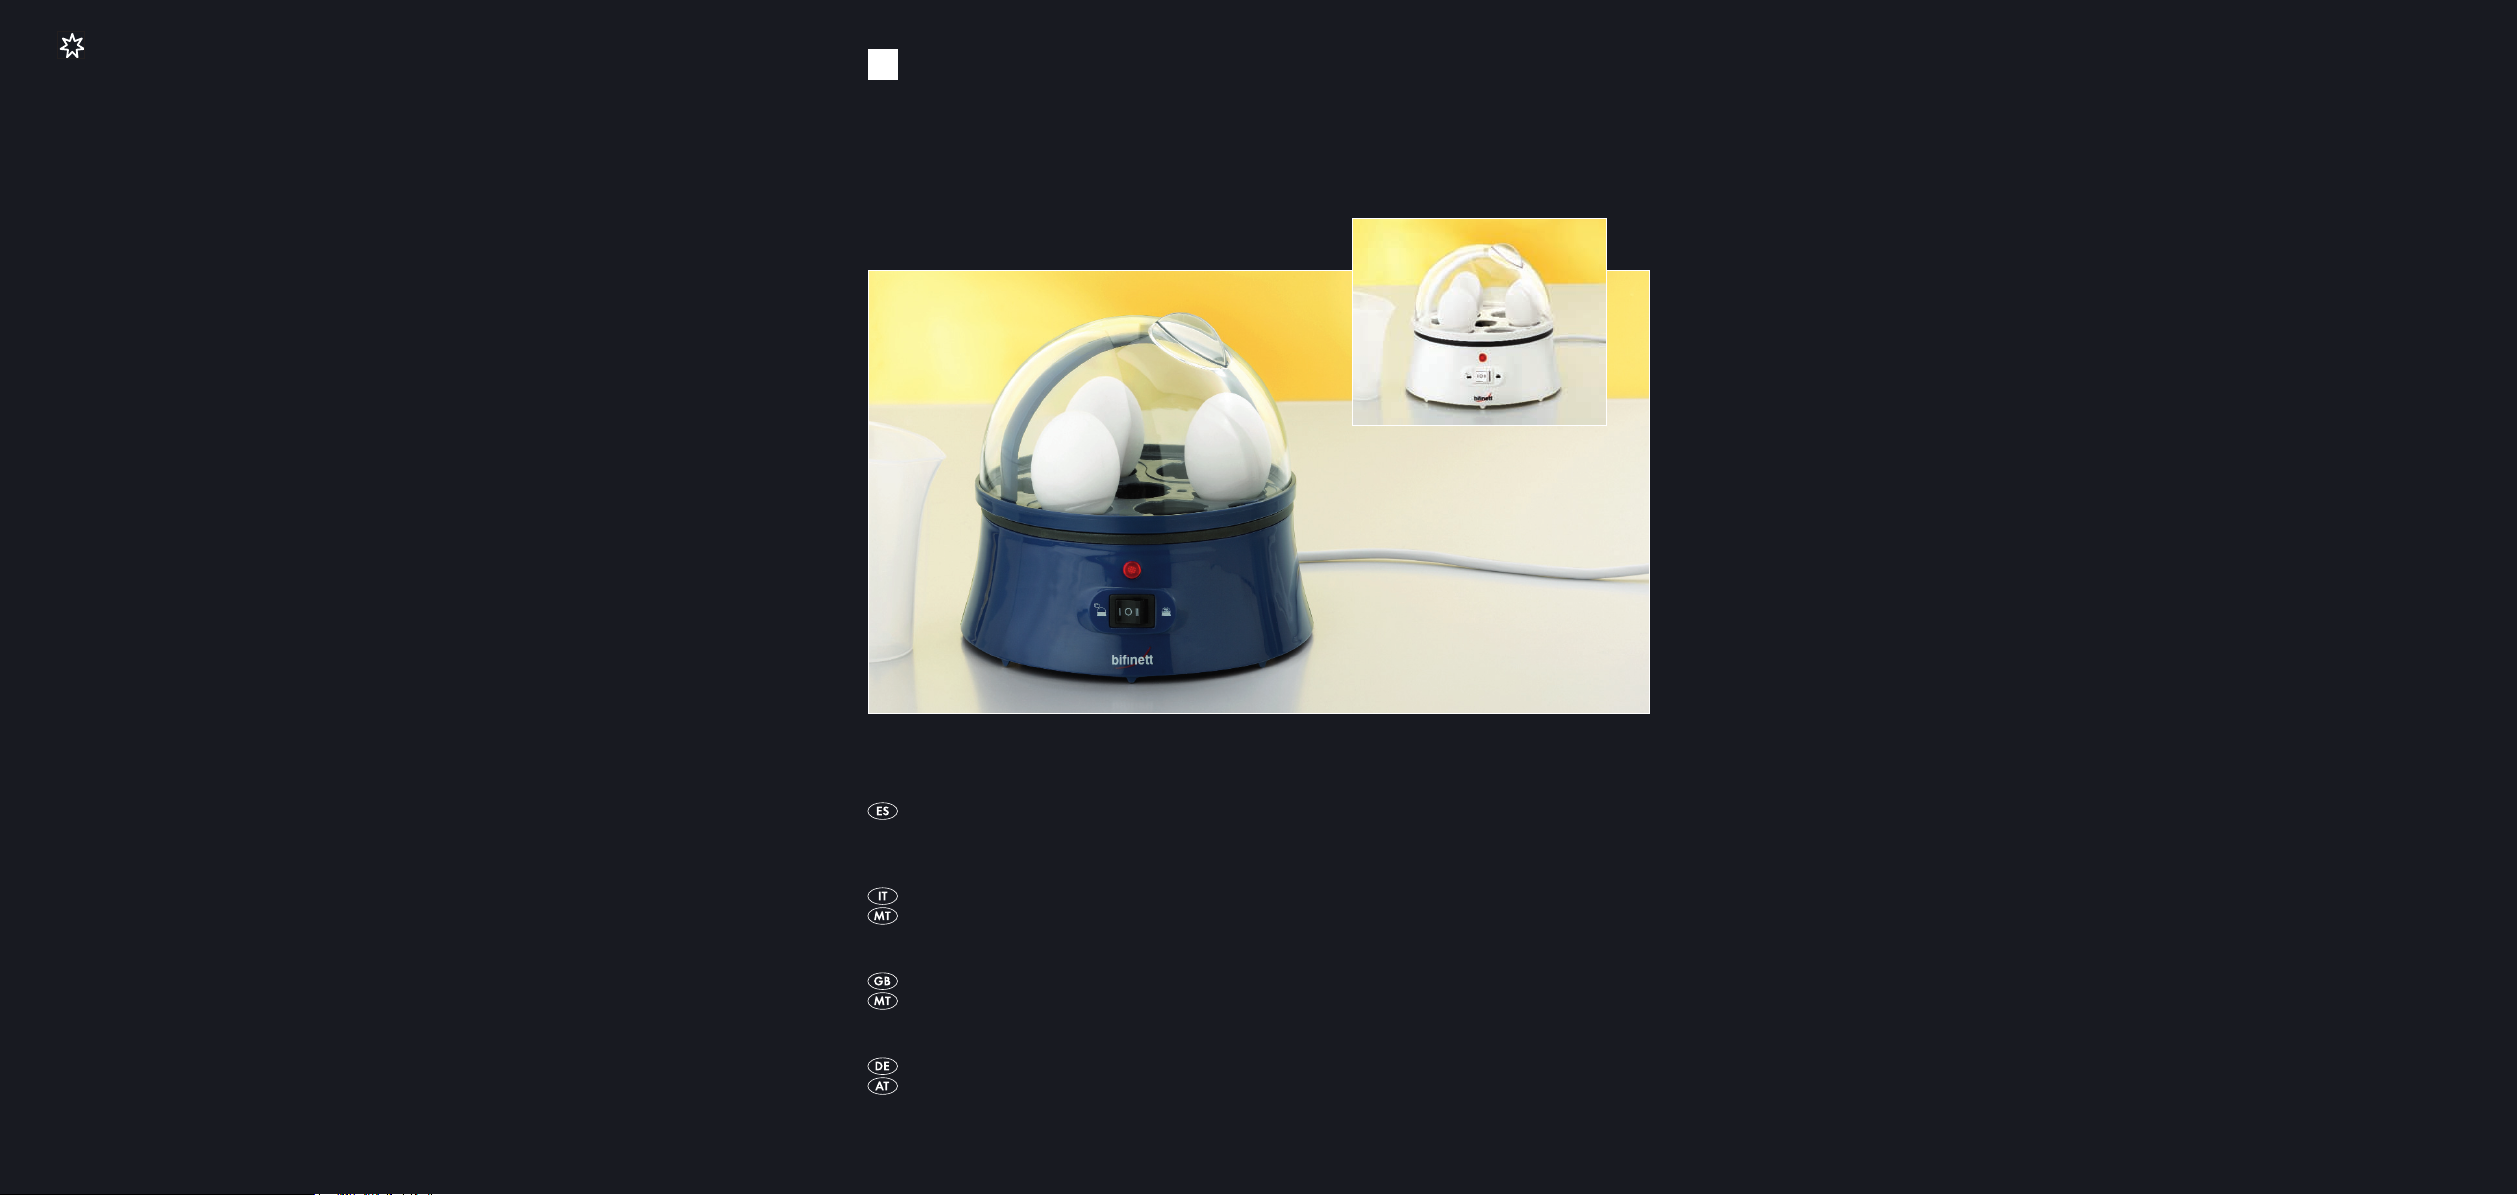
Hervidor para huevos
Instrucciones de uso
Cuociuova
Istruzioni per l'uso
Egg Cooker
Operating instructions
Eierkocher
Bedienungsanleitung
Page 2
KH 401
Page 3

Hervidor para huevos 4
Cuociuova 8
Egg Cooker 12
Eierkocher 16
Lea atentamente estas instrucciones antes del primer uso y consérvelas para posteriores
utilizaciones. Entréguelas en caso de traspasar el aparato a terceros.
Leggere attentamente le istruzioni per l'uso prima del primo utilizzo e conservarle per il
successivo impiego. In caso di cessione dell'apparecchio a terzi, consegnare anche le istruzioni.
Read the operating instructions carefully before using the appliance for the first time and preserve
this booklet for later reference. Hand over the manual to anyone, whom you pass on the
appliance to.
Lesen Sie die Bedienungsanleitung vor der ersten Verwendung aufmerksam durch und heben Sie
diese für den späteren Gebrauch auf. Händigen Sie bei Weitergabe des Gerätes an Dritte auch
die Anleitung aus.
Page 4
Hervidor para huevos
1. Finalidad de uso
Este aparato está previsto únicamente para cocer
huevos de gallina y mantenerlos calientes y para el
uso privado.
No está previsto para su utilización con otros
alimentos u otros materiales. Tampoco está previsto
para su utilización en ámbitos comerciales o
industriales.
2. Datos técnicos
Tensión: 220-240 V ~ 50 Hz
Consumo de potencia: 400 W
Capacidad: máx. 7 huevos
3. Descripción del
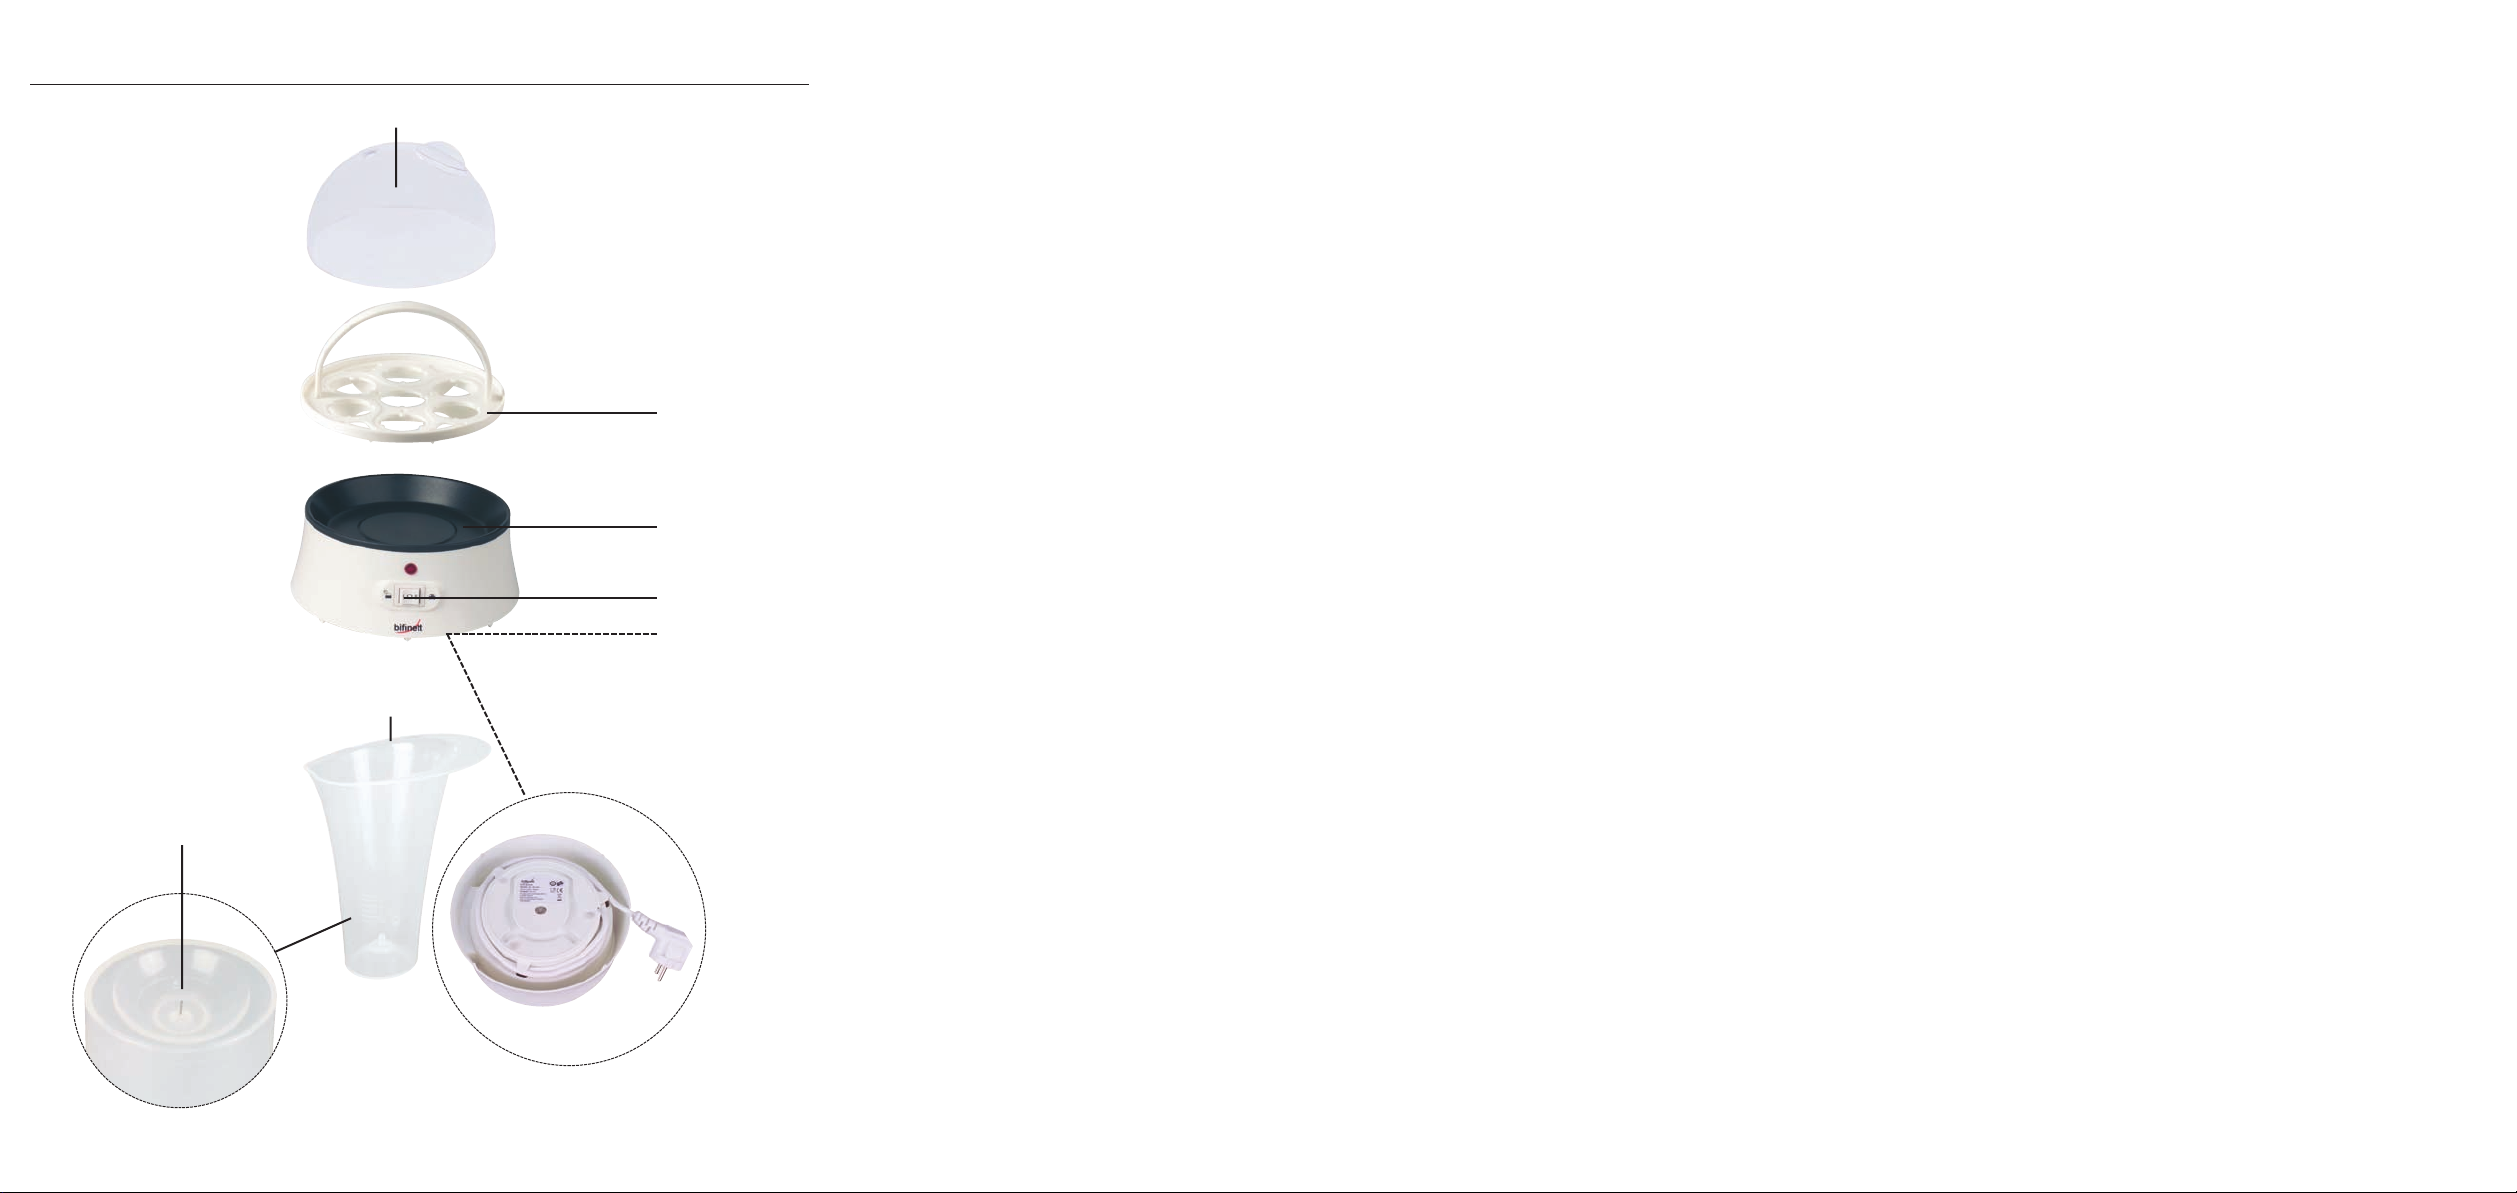
aparato
Tapa
q
Soporte para huevos
w
Recipiente de cocción
e
Interruptor de funcionamiento
r
(posición “I“: cocer)
(posición “O“: Off)
(posición “II“: mantener caliente)
Enrollacables
t
Vaso medidor
y
Picador de huevos
u
4.Indicaciones de
seguridad
¡PELIGRO! ¡descarga eléctrica!
• Conecte el hervidor para huevos únicamente a
una base de enchufe instalada según la normativa y con toma de tie rra, con una tensión de red
de 220 V - 240 V / 50 Hz.
• ¡Extraiga siempre la clavija de red de la base
de enchufe, al mover el aparato, al llenarlo, en
caso de avería, antes de limpiarlo o cuando no
lo esté utilizando! Nunca tire del cable de red,
tire siempre de la clavija. Nunca toque el enchufe del aparato con las manos mojadas o
húmedas.
• No debe sumergir en líquidos o exponer a
humedad el aparato, ni tampoco utilizarlo a la
intemperie.
• Si el aparto cae dentro de un líquido extraiga in-
mediatamente la clavija de red de la base de
enchufe. Después no vuelva a ponerlo a funcionamiento y hágalo revisar en un servicio técnico
autorizado.
• No utilice el hervidor para huevos si se encuen-
tra sobre un suelo húmedo o si sus manos o el
aparato están mojados.
• Coloque el cable de red de tal forma que no
entre en contacto con objetos calientes o
afilados.
• No doble ni aprisione el cable de red, y no lo
enrolle en torno al aparato.
• En caso de averiarse la clavija o el cable de
red, encargue su reparación de forma inmediata
a un técnico autorizado o al servicio de asistencia técnica para evitar riesgos innecesarios.
- 4 -
Page 5

Peligro de lesiones!
• No deje el aparato desatendido durante el
funcionamiento.
• No permita utilizar el aparato a personas (incluidos los niños) cuyas facultades físicas, sensoriales o mentales, así como su falta de conocimientos o de experiencia, les impida hacer un uso
seguro del mismo si no están bajo vigilancia o
han sido instruidos correctamente.
• Explique el aparato y los peligros derivados del
mismo a los niños para que no jueguen con él.
• Maneje con cuidado el picador de huevos
de la base del vaso medidor.
• Las superficies de la carcasa se calientan mucho
durante el funcionamiento. Por eso, para retirar
la tapa
únicamente por las asas previstas para ello.
➪ Abra la tapa
tándola lateralmente. Evite que el brazo o la
mano entren en contacto con el vapor que se
desprende.
➪ Saque el soporte para huevos
salido todo el vapor.
y el soporte para huevos wsujételos
q
¡CUIDADO! ¡Por el orificio del vapor y al
abrir la tapadera se desprende vapor
caliente! Peligro de escaldaduras
levantándola por el asa y qui-
q
cuando haya
w
u
¡Atención!
• Nunca utilice el hervidor para huevos sin agua.
• Nunca coloque el aparato en la proximidad
alguna fuente de calor.
• Nunca abra la carcasa. En este caso no existe
seguridad y perderá el derecho a la garantía.
• Utilice únicamente los accesorios contenidos en
el volumen de suministro y nunca utilice el aparato sin haber colocado el soporte para
huevos
• Deje que el aparato y los accesorios se enfríen
completamente antes de limpiarlos y guardarlos.
w
.
5. Puesta en
funcionamiento
Antes de poner el aparato en servicio, cerciorase
de que ...
- el aparato, clavija de red y el cable de red se
encuentren en perfecto estado y que ...
- que se hayan retirado todos los materiales de
embalaje de los aparatos.
➪ En primer lugar limpie el aparato tan como se
describe en el punto 8.
6. Cocer huevos
➪ Con el picador de huevos upique un agujero
en la parte superior o inferior de los huevos.
➪ Coloque los huevos, con la parte picada hacia
arriba, en el soporte para huevos
➪ Llene el vaso medidor
agua necesaria. La cantidad de agua depende
del número de huevos y del grado de dureza
deseado.
Explicación de los símbolos del vaso medidor:
duro
medio
pasado por agua
➪ Introduzca ahora el agua en el recipiente de
cocción
➪ Coloque el soporte para huevos
piente de cocción
➪ Pulse el interruptor de funcionamiento
la izquierda (posición “I“) para encender
el aparato.
e
.
con la cantidad de
y
y coloque la tapa q.
e
.
w
en el reci-
w
r
hacia
- 5 -
Page 6
Tan pronto como los huevos están a punto suena
una señal.
Lleve de nuevo el interruptor de funcionamiento
a la posición “O” para apagar el aparato.
➪ Después de cocerlos, meta los huevos en agua
corriente fría.
7. Mantener los huevos
calientes
➪ Accione el interruptor de funcionamiento hacia
la derecha, con el fin de activar la función de
mantenimiento del calor (posición II) tras la
cocción de los huevos.
Después de cocerlos, meta los huevos en agua
corriente fría.
➪ Lleve de nuevo el interruptor de funcionamiento
a la posición “O” para apagar el aparato.
8. Limpieza y cuidado
Riesgo de vida por descarga eléctrica:
• No abra nunca la carcasa del aparato. No
existen elementos de mando dentro.
• ¡No sumerja nunca las piezas del aparato en el
agua o en otros líquidos!
Limpiar el aparato:
➪ Extraiga la clavija de red de la base de
enchufe.
➪ Deje que se enfríe primero el aparato.
➪ Después limpie el recipiente de cocción
cable de red con un paño ligeramente
humedecido.
➪ Elimine los restos de cal con una solución de
agua y algo de vinagre.
➪ Después ponga el aparato en funcionamiento
sólo con agua limpia para eliminar el olor a
vinagre.
➪ En cualquier caso seque bien el aparato, antes
de volver a utilizarlo.
Limpiar los accesorios:
➪ Limpie la tapa
el vaso medidor
corriente.
, el soporte para huevos wy
q
con detergente, bajo agua
y
e
y el
Cuidado: Al limpiar el vaso medidor tenga cuida-
do con el picador de huevos
¡Peligro de lesiones!
Advertencia: No utilice productos de limpieza o
disolventes. Estos pueden dañar el
aparato.
• El portahuevos, tapa y vaso medidor son resistentes a lavavajillas
- 6 -
u
.
Page 7

9. Conservación
11. Garantía y servicio
Deje que se enfríe el aparato por completo antes
de guardarlo.
➪ Enrolle el cable de red en torno al enrollacables
que se encuentra en la base del aparato.
t
➪ Guarde el aparato en un lugar seco.
10. Evacuación
En ningún caso deberá tirar el aparato
a la basura doméstica.
Evacue el aparato en un centro de evacuación
autorizado a través de las instalaciones de evacuación comunitarias.
Tenga en cuenta las normativas actuales en vigor.
En caso de dudas póngase en contacto con su
centro de evacuación.
El material de embalaje debe desecharse de
forma respetuosa con el medio ambiente.
Con este aparato recibe usted 3 años de garantía
desde la fecha de compra. El aparato ha sido fabricado cuidadosamente y ha sido probado antes de
su entrega. Guarde el comprobante de caja como
justificante de compra. Si necesitara hacer uso de
la garantía, póngase en contacto por teléfono con
su punto de servicio habitual. Éste es el
único modo de garantizar un envío gratuito.
La garantía cubre los defectos de fabricación o del
material, pero no las piezas sujetas a desgaste y
los daños sufridos por las piezas frágiles. Este
producto ha sido diseñado exclusivamente para el
uso particular y no para el uso industrial.
En caso de manipulación indebida e incorrecta, uso
de la fuerza y en caso de abrir el aparato
personas extrañas a nuestros centros de asistencia
técnica autorizados, la garantía pierde su validez.
Esta garantía no reduce en forma alguna sus
derechos legales.
Kompernass Service España
C/Invención 7
Polígono Industrial Los Olivos
28906 Getafe – Madrid
Tel.: 902/430758
Fax: 91/6652551
e-mail: support.es@kompernass.com
12. Importador
KOMPERNASS GMBH
BURGSTRASSE 21
D-44867 BOCHUM
www.kompernass.com
- 7 -
Page 8

Cuociuova
1. Destinazione d'uso
Questo apparecchio è previsto esclusivamente per
la cottura e il riscaldamento di uova di pollo in
ambiente privato domestico.
Non è previsto per l'impiego con altri cibi o altri
materiali. Non è inoltre previsto per l'impiego in
ambienti commerciali o industriali.
2. Dati tecnici
Tensione: 220-240 V ~50 Hz
Potenza assorbita: 400 W
Capacità: max. 7 uova
3. Descrizione
dell'apparecchio:
Coperchio
q
Portauova
w
Vassoio di cottura
e
Interruttore
r
(Posizione “I“: cottura)
(Posizione “O“: spento)
(Posizione “II“: riscaldamento)
Dispositivo di avvolgimento del cavo
t
Misuratore
y
Fora-uova
u
4.Avvertenze di
sicurezza
PERICOLO! Rischio di folgorazione!
• Collegare il cuociuova solo a una presa di cor-
rente installata secondo le norme e provvista di
messa a terra, con una tensione di rete di
220 - 240 V ~50 Hz.
• Estrarre sempre la spina dalla presa quando si
sposta o si riempie l'apparecchio, in caso di
guasti, prima di pulirlo o quando non lo si utilizza! Non tirare mai dal cavo, ma sempre dalla
spina. Non toccare mai la spina con mani
bagnate o umide.
• Non immergere mai l'apparecchio in liquidi, non
esporlo a umidità e non usarlo all'aperto.
• Se l'apparecchio cadesse in acqua o altri liqui-
di, estrarre immediatamente la spina dalla presa. In seguito, non accendere più l'apparecchio,
ma farlo controllare prima da un centro di assis
tenza specializzato.
• Non utilizzare il cuociuova se ci si trova su un
pavimento umido ovvero se l'apparecchio è
umido o si hanno le mani bagnate.
• Posizionare il cavo di rete in modo tale da
evitarne il contatto con oggetti surriscaldati o
taglienti.
• Non piegare o schiacciare il cavo e non
avvolgerlo intorno all'apparecchio.
• Fate sostituire la spina o il cavo danneggiata/o
immediatamente da personale specializzato
autorizzato o dal servizio di assistenza clienti ai
fini di evitare pericoli.
- 8 -
Page 9

Pericolo di infortuni!
• Non lasciare l'apparecchio incustodito durante il
funzionamento.
• Impedire l'uso dell'apparecchio a persone (inclusi bambini) che per motivi di natura fisica,
sensoriale o mentale, o a causa della scarsa
esperienza e conoscenza non possono utilizzare
l'apparecchio in sicurezza senza controllo o senza essere stati prima istruiti in merito.
• Spiegare ai bambini il funzionamento dell'apparecchio e i suoi pericoli per impedire che lo usino come un giocattolo.
• Procedere con cautela nell'utilizzo del fora-uova
sul fondo del misurino.
u
• Le superfici dell'alloggiamento si surriscaldano
durante l'uso. Per tale motivo, rimuovere il coperchio
e il portauova w, afferrandoli esclusiva-
q
mente dalla maniglia appositamente prevista.
ATTENZIONE! Dal foro di sfiato e all'apertura del coperchio fuoriesce vapore bollente!
Pericolo di ustione
5. Messa in funzione
Prima di mettere in funzione l'apparecchio è
necessario accertarsi che:
- l'apparecchio, la spina e il cavo di rete siano in
perfetto stato e
- siano stati rimossi tutti i materiali di imballaggio
dall'apparecchio.
➪ Pulire quindi l'apparecchio come descritto al
punto 8.
6. Cottura delle uova
➪ Con il fora-uova upraticare un foro sull'apice o
sul fondo dell'uovo.
➪ Inserire l'uovo sul portauova
forata rivolta verso l'alto.
➪ Riempire il misurino
necessaria. La quantità di acqua dipende dal
numero delle uova e dal grado di cottura
desiderato.
con la quantità di acqua
y
con la parte
w
➪ Aprire il coperchio
glia e spostandolo di lato. Evitare il contatto di
mani e braccia con il vapore in fuoriuscita.
➪ Rimuovere il portauova
vapore è completamente fuoriuscito.
sollevandolo dalla mani-
q
solo quando il
w
Attenzione!
• Non utilizzare mai il cuociuova senz acqua.
• Non posizionare mai l'apparecchio in vicinanza
di fonti di calore.
• Non aprire mai l'alloggiamento. In tal caso non
si garantisce la sicurezza dell'apparecchio e la
garanzia decade.
• Utilizzare solo gli accessori contenuti nella fornitura e non utilizzare mai l` apparecchio senza il
portauova
• Fare raffreddare completamente l'apparecchio e
gli accessori prima di pulirli e riporli.
w
inserito.
Spiegazione dei simboli sul misurino:
sodo
medio
morbido
➪ Versare l'acqua nel vassoio di cottura
➪ Inserire il portauova
e posizionare il coperchio
➪ Posizionare l'interruttore ra sinistra (posizione
“I“) per accendere l'apparecchio.
Non appena le uova sono pronte, viene attivato un
segnale acustico.
Rimettere l'interruttore in posizione “O”, per
spegnere l'apparecchio.
➪ Dopo la cottura, mettere le uova sotto acqua
corrente fredda.
- 9 -
nel vassoio di cottura
w
q
e
.
e
Page 10

7. Riscaldamento delle
uova
➪ Spingere l'interruttore a destra, per attivare la
funzione di riscaldamento (posizione “II“)
dopo la cottura delle uova.
Dopo la cottura, mettere le uova sotto acqua
corrente fredda.
Avviso: non usare prodotti detergenti o solventi,
che potrebbero causare danni
all'apparecchio.
• Il portauova, il coperchio e il misurino sono
lavabili in lavastoviglie.
9. Conservazione
➪ Rimettere l'interruttore in posizione “O”, per
spegnere l'apparecchio.
8. Pulizia e cura
Pericolo di morte a causa di scossa
elettrica:
• Non aprire mai l'alloggiamento dell'apparecchio. In esso non sono pre senti elementi di
comando.
• Non immergere mai l'apparecchio in acqua o in
altri liquidi!
Pulizia dell'apparecchio:
➪ disinserire prima la spina dalla presa di
corrente.
➪ lasciare prima raffreddare l'apparecchio.
➪ Pulire quindi il vassoio di cottura
rete con un panno leggermente umido.
➪ Rimuovere i resti di calcare con una soluzione di
acqua e aceto.
➪ Per eliminare l'odore di aceto, mettere quindi in
funzione l'apparecchio solo con acqua pulita.
➪ Asciugare bene in ogni caso l'apparecchio
prima di riutilizzarlo.
e il cavo di
e
Prima di riporre l'apparecchio, è necessario farlo
raffreddare completamente.
➪ Avvolgere il cavo intorno all'apposito dispositivo
sotto il corpo dell'apparecchio.
t
➪ Conservare l'apparecchio in un luogo asciutto.
10. Smaltimento
Non gettare assolutamente l'apparecchio
insieme ai normali rifiuti domestici.
Smaltire l'apparecchio attraverso un'azienda di
smaltimento autorizzata o attraverso l'ente di
smaltimento comunale.
Rispettare le prescrizioni attualmente in vigore.
In caso di dubbio mettersi in contatto con l'ente
di smaltimento competente.
Smaltire tutti i materiali dell'imballaggio
in modo ecocompatibile.
Pulizia degli accessori:
➪ Sciacquare il coperchio
misurino
Attenzione: nel pulire il misurino, fare attenzione
con detersivo sotto l'acqua corrente.
y
al fora-uova u. Pericolo di
ferimento!
, il portauova we il
q
- 10 -
Page 11

11. Garanzia &
assistenza
Questo apparecchio è garantito per tre anni a partire dalla data di acquisto. L'apparecchio è stato
prodotto con cura e debitamente collaudato prima
della consegna. Conservare lo scontrino come prova d'acquisto. Nei casi contemplati dalla garanzia,
mettersi in comunicazione telefonicamente con il
centro di assistenza più vicino. Solo in questo modo
è possibile garantire una spedizione gratuita della
merce.
La prestazione della garanzia vale solo per difetti
del materiale o di fabbricazione. Il prodotto è destinato esclusivamente all'uso domestico e non a quello commerciale.
La garanzia decade in caso di impiego improprio o
manomissione, uso della forza e interventi non eseguiti dalla nostra filiale di assistenza autorizzata.
Questa garanzia non costituisce alcun limite ai diritti legali del consumatore.
Kompernass Service Italia
Corso Lino Zanussi 11
33080 Porcia (PN)
Tel.: 0434/550833
Fax: 0434/550833
e-mail: support.it@kompernass.com
12. Importatore
KOMPERNASS GMBH
BURGSTRASSE 21
D-44867 BOCHUM
www.kompernass.com
- 11 -
Page 12

Egg Cooker
4.Safety instructions
1. Intended use
This appliance is intended exclusively for cooking
and keeping warm chicken eggs in private
households.
It is not intended for use with other foods or other
materials. It is also not intended for commercial or
industrial use.
2. Technical data
Voltage: 220-240 V ~50 Hz
Power consumption: 400 W
Capacity: Max. 7 eggs
3. Appliance description
Lid
q
Egg holder
w
Cooking bowl
e
Operating switch
r
(position “I“: cook)
(position "O": off)
(position "II": keep warm)
Rolled-up cable
t
Measuring cup
y
Egg pick
u
DANGER! Electric shock!
• Only connect the egg cooker to a properly
installed and grounded socket with a main
voltage of 220 - 240 V ~ 50 Hz.
• Always pull the power plug from the socket
when you move or fill the device, in event of problems, before cleaning the appliance and while
the cooker is not in use! Never pull on the power
cord, only on the power plug. Never touch the
appliance plug with wet or moist hands.
• Never submerge the appliance in liquid, never
subject it to moisture and never use it outdoors.
• If the appliance does fall into liquid, immediately
pull the power plug from the socket. Then refrain
from operating the appliance until it has been
inspected by an approved service company.
• Do not use the egg cooker if it is located on a
wet surface or if your hands or the appliance
are wet.
• Position the power cord so that it does not come
into contact with hot or sharp-edged objects.
• Do not kink or crush the power cord and do not
wind it around the appliance.
• Arrange for defective power plugs and/or cables to be replaced as soon as possible by a
qualified technician or by our Customer Service
Department to avoid the risk of injury.
- 12 -
Page 13

Danger of injuries!
• Never leave the appliance unattended during
operation.
• Do not allow individuals (including children) to
use the appliance whose physical, sensorial or
mental abilities or lack of experience and knowledge hinder their safe usage of it if they have
not previously been supervised or instructed in its
correct usage.
• Tell children about the appliance and its potential dangers so that they do not play with it.
• Be careful with the egg pick
the measuring cup.
• The casing surfaces become very hot during
operation. Therefore, only grip the lid
egg holder
removing them.
CAUTION! Hot steam escapes from the
steam hole and upon opening the cover!
Danger of scalding!
by the grips provided when
w
on the bottom of
u
q
and the
5. Starting up
Before starting up the appliance, make certain
that ...
- egg cooker, plug and power cable are in good
working order and...
- all packaging materials have been removed
from the egg cooker.
➪ First clean the appliance as described under 8.
6. Cooking eggs
➪ Pick a hole in the top or bottom side of the egg
with the egg pick
➪ Place the eggs on the egg holder
picked side up.
➪ Fill the measuring cup
amount of water. The amount of water depends
on the number of eggs and the desired degree
of hardness.
u
.
y
with the
w
with the required
➪ Always open the lid
and removing it to the side. Avoid letting the
escaping steam contact your hand and arm.
➪ Remove the egg holder
has completely escaped.
by lifting up with the grip
q
only once the steam
w
Attention!
• Never use the egg cooker without water.
• Never place the appliance near heat sources.
• Never open the housing. If the housing is opened, the safety of the device is no longer assured
and the warranty becomes void.
• Only use the accessories included and never use
the appliance without the egg holder
place.
• Let the appliance and the accessory parts cool
down completely before cleaning and storing
them.
w
in
Explanation of the symbols on the measuring cup:
hard
medium
soft
➪ Now pour the water into the cooking bowl
➪ Place the egg holder
and place the lid qon top.
➪ Press the operating switch
“I“) to turn the appliance on for cooking.
As soon as the eggs are cooked, a signal sounds.
Push the operating switch back to the position
“O” to turn the appliance off.
➪ After cooking, peel the eggs under cold, flowing
water.
- 13 -
in the cooking bowl
w
to the left (position
r
e
.
e
Page 14

7. Keeping eggs warm
➪ Push the operating switch to the right to activate
the keeping warm function (position "II")
after cooking the eggs.
After cooking, peel the eggs under cold, flowing
water.
➪ Push the operating switch back to the position
"O" to turn the appliance off.
8. Cleaning and care
Life-threatening danger of electrical shock:
• Never open the egg cooker housing. There are
no operating elements inside.
• Never immerse the egg cooker components into
water or other liquids!
Cleaning the appliance:
➪ Pull the power plug out from the power socket.
➪ Let the appliance cool off.
➪ Then clean the cooking bowl
cord with a slightly damp cloth.
➪ Remove calcified residue with a solution of
vinegar and water.
➪ Afterward, operate the appliance only with
clear water to remove the vinegar smell.
➪ Always dry the appliance well before using it
again.
Cleaning the accessories:
➪ Wash the lid
measuring cup
water.
, the egg holder wand the
q
with soap under flowing
y
and the power
e
Caution: When cleaning the measuring cup, be
careful of the egg pick
injury!
Note: Never use cleaning agents or solvents. This
can cause damage to the appliance.
• The egg holder, lid and measuring cup are
dishwasher-safe.
- 14 -
. Danger of
u
Page 15

9. Storage
11. Warranty & Service
Let the egg cooker cool off completely before
storing it.
➪ Wind the power cord around the cord winder
on the bottom of the appliance.
t
➪ Store the appliance in a dry place.
10. Disposal
Do not dispose of the appliance in your
normal domestic waste.
Dispose of the appliance through an approved disposal centre or at your community waste facility.
Observe the currently applicable regulations.
In case of doubt, please contact your waste disposal
centre.
Dispose of all packaging materials in an
environmentally friendly manner.
The warranty for this appliance is for 3 years from
the date of purchase. The appliance has been
manu-factured with care and meticulously examined
before delivery. Please retain your receipt as proof
of purchase. In the case of a warranty claim, please
make contact by telephone with our service department. Only in this way can a post-free
despatch for your goods be assured.
The warranty covers only claims for material and
maufacturing defects, not for wearing parts or for
damage to fragile components. This product is for
private use only and is not intended for
commercial use.
The warranty is void in the case of abusive and improper handling, use of force and internal tampering not carried out by our authorized service
branch. Your statutory rights are not restricted in
any way by this warranty.
DES Ltd
Units 14-15
Bilston Industrial Estate
Oxford Street
Bilston
WV14 7EG
Tel.: 0870/787-6177
Fax: 0870/787-6168
e-mail: support.uk@kompernass.com
12. Importer
KOMPERNASS GMBH
BURGSTRASSE 21
D-44867 BOCHUM
www.kompernass.com
- 15 -
Page 16

Eierkocher
4. Sicherheitshinweise
1. Verwendungszweck
Dieses Gerät ist ausschließlich vorgesehen für das
Kochen und Warmhalten von Hühnereiern in
privaten Haushalten.
Es ist nicht vorgesehen für die Verwen-dung mit
anderen Lebensmitteln oder anderen Materialien.
Es ist ebenfalls nicht zur Verwendung in gewerblichen oder industriellen Bereichen vorgesehen.
2. Technische Daten
Spannung: 220-240 V ~ 50 Hz
Leistungsaufnahme: 400 W
Fassungsvermögen: max. 7 Eier
3. Gerätebeschreibung
Deckel
q
Eierhalter
w
Kochschale
e
Betriebsschalter
r
(Position “I“: Kochen)
(Position “O“: Aus)
(Position “II“: Warmhalten)
Kabelaufwicklung
t
Messbecher
y
Eipick
u
GEFAHR! Elektrischer Schlag!
• Schließen Sie den Eierkocher nur an eine vorschriftsmäßig installierte und geerdete Steckdose
mit einer Netzspan-nung von 220 V - 240 V /
50 Hz an.
• Ziehen Sie, wenn Sie das Gerät bewegen, befüllen, bei Störungen, bevor Sie das Gerät reinigen
oder wenn Sie es nicht gebrauchen, immer den
Netzstecker aus der Netzsteckdose! Ziehen Sie
niemals am Netzkabel, sondern immer nur am
Netzstecker. Berühren Sie den Gerätestecker
nicht mit nassen oder feuchten Händen.
• Sie dürfen das Gerät keinesfalls in Flüssigkeit
tauchen, keiner Feuchtigkeit aussetzen und nicht
im Freien benutzen.
• Sollte das Gerät doch einmal in Flüssigkeit gefallen sein, ziehen Sie sofort den Netzstecker aus
der Netzsteckdose. Danach das Gerät nicht
mehr in Betrieb nehmen, sondern erst von einer
zugelassenen Servicestelle überprüfen lassen.
• Benutzen Sie den Eierkocher nicht, wenn Sie sich
auf feuchtem Boden befinden oder wenn Ihre
Hände oder das Gerät nass sind.
• Verlegen Sie das Netzkabel so, dass es nicht mit
heißen oder scharfkantigen Gegenständen in
Berührung kommt.
• Knicken oder quetschen Sie das Netzkabel
nicht, und wickeln Sie es nicht um das Gerät.
• Lassen Sie beschädigte Netzstecker oder Netzkabel sofort von autorisiertem Fachpersonal
oder dem Kundenservice austauschen, um Gefährdungen zu vermeiden.
- 16 -
Page 17

VERLETZUNGSGEFAHR!
• Lassen Sie das Gerät während des Betriebes
nicht ohne Aufsicht.
• Dieses Gerät ist nicht dafür bestimmt, durch Personen (einschließlich Kinder) mit eingeschränkten, physischen, sensorischen oder geistigen Fähigkeiten oder mangels Erfahrung und/oder
mangels Wissen benutzt zu werden, es sei denn,
sie werden durch eine für ihre Sicherheit zuständige Person beaufsichtigt oder erhielten von ihr
Anweisungen, wie das Gerät zu benutzen ist.
• Kinder sollten beaufsichtigt werden, um sicherzustellen, dass sie nicht mit dem Gerät spielen.
• Gehen Sie vorsichtig mit dem Eipick
Boden des Messbechers um.
• Die Gehäuseoberflächen werden im Betrieb
sehr heiß. Fassen Sie daher ausschließlich den
Deckel
vorgesehenen Griff an, um diese zu entfernen.
➪ Öffnen Sie den Deckel
Griff anheben und seitlich entfernen. Vermeiden
Sie den Kontakt von Hand und Arm mit dem
austretenden Dampf.
➪ Entfernen Sie erst den Eierhalter
Dampf vollständig abgezogen ist.
und den Eierhalter wan dem dafür
q
VORSICHT! Aus dem Dampfloch und beim
Öffnen des Deckels tritt heißer Dampf aus!
Verbrühungsgefahr
indem Sie ihn am
q
wenn der
w
u
am
ACHTUNG!
• Benutzen Sie den Eierkocher niemals ohne Wasser.
• Stellen Sie das Gerät niemals in der Nähe von
Wärmequellen auf.
• Öffnen Sie niemals das Gehäuse. In diesem Fall
ist die Sicherheit nicht gegeben und die Gewährleistung erlischt.
• Verwenden Sie nur die im Lieferumfang enthaltenen Zubehörteile und benutzen Sie das Gerät
nie ohne den eingesetzten Eierhalter
• Lassen Sie das Gerät und die Zubehörteile vollständig abkühlen, bevor Sie sie reinigen und
verstauen.
w
.
5. In Betrieb nehmen
Bevor Sie das Gerät in Betrieb nehmen, überzeugen Sie sich davon, dass ...
- das Gerät, Netzstecker und Netzkabel in
einwandfreiem Zustand sind und ...
- alle Verpackungsmaterialien vom Gerät entfernt
sind.
➪ Reinigen Sie zunächst das Gerät, wie unter 8.
beschrieben.
6. Eier kochen
➪ Picken Sie mit dem Eipick uein Loch in die
Ober- oder Unterseite der Eier.
➪ Setzen Sie die Eier mit der angestochenenen Sei-
te nach oben auf den Eierhalter
➪ Füllen Sie den Messbecher
ten Menge Wasser. Die Wassermenge hängt
von der Anzahl der Eier und dem gewünschten
Härtegrad ab.
Erläuterung der Symbole auf dem Messbecher:
hart
mittel
weich
➪ Füllen Sie das Wasser nun in die Kochschale
➪ Setzen Sie den Eierhalter
und setzen Sie den Deckel qauf.
e
➪ Drücken Sie den Betriebsschalter
(Position “I“) um das Gerät einzuschalten.
Sobald die Eier gar sind ertönt ein Signal.
Drücken Sie den Betriebsschalter zurück in die
Position “O” um das Gerät auszuschalten.
➪ Schrecken Sie die Eier nach dem Kochen unter
kaltem, fließendem Wasser ab.
w
.
w
mit der benötig-
y
in die Kochschale
nach links
r
e
.
- 17 -
Page 18

7. Eier Warmhalten
➪ Drücken Sie den Betriebsschalter nach rechts,
um nach dem Kochen der Eier die Warmhaltefunktion (Position “II“) zu aktivieren.
Schrecken Sie die Eier nach dem Kochen unter
kaltem, fließendem Wasser ab.
➪ Drücken Sie den Betriebsschalter zurück in die
Position “O”, um das Gerät auszuschalten.
8. Reinigen und Pflegen
Lebensgefahr durch elektrischen Schlag:
• Öffnen Sie niemals das Gehäuse vom Gerät. Es
befinden sich keinerlei Bedienelemente darin.
• Tauchen Sie die Geräteteile niemals in Wasser
oder andere Flüssigkeiten!
Das Zubehör reinigen:
➪ Spülen Sie den Deckel
den Messbecher
fließendem Wasser.
Vorsicht: Achten Sie bei der Reinigung des
Messbechers auf den Eipick
Verletzungsgefahr!
Hinweis: Verwenden Sie keine Reinigungs- oder
Lösemittel. Diese können zu Schäden am
Gerät führen.
• Der Eierhalter, Deckel und Messbecher sind
spülmaschinenfest.
, den Eierhalter wund
q
mit Spülmittel unter
y
u
.
9. Aufbewahren
Lassen Sie das Gerät erst vollständig auskühlen,
bevor Sie es wegstellen.
Das Gerät reinigen:
➪ Ziehen Sie erst den Netzstecker aus der
Steckdose.
➪ Lassen Sie das Gerät erst abkühlen.
➪ Reinigen Sie danach die Kochschale
Netzkabel mit einem leicht angefeuchteten
Spültuch.
➪ Entfernen Sie Kalkrückstände mit einer Lösung
aus etwas Essig und Wasser.
➪ Setzen Sie das Gerät danach nur mit klarem
Wasser in Betrieb, um den Essiggeruch zu
entfernen.
➪ Trocken Sie das Gerät auf jeden Fall gut ab,
bevor Sie es erneut verwenden.
e
und das
➪ Wickeln Sie das Netzkabel um die Kabelauf-
wicklung
➪ Lagern Sie das Gerät an einem trockenen Ort.
unter dem Geräteboden.
t
10. Entsorgen
Werfen Sie das Gerät keinesfalls in den
normalen Hausmüll.
Entsorgen Sie das Gerät über einen zugelassenen
Entsorgungsbetrieb oder über Ihre kommunale
Entsorgungseinrichtung.
Beachten Sie die aktuell geltenden Vorschriften.
Setzen Sie sich im Zweifelsfall mit Ihrer Entsorgungseinrichtung in Verbindung.
Führen Sie alle Verpackungsmaterialien
einer umweltgerechten Entsorgung zu.
- 18 -
Page 19

11. Garantie & Service
12. Importeur
Sie erhalten auf dieses Gerät 3 Jahre Garantie ab
Kaufdatum. Das Gerät wurde sorgfältig produziert
und vor Anlieferung gewissenhaft geprüft. Bitte
bewahren Sie den Kassenbon als Nachweis für
den Kauf auf. Bitte setzen Sie sich im Garantiefall
mit Ihrer Servicestelle telefonisch in Verbindung.
Nur so kann eine kostenlose Einsendung Ihrer Ware
gewährleistet werden.
Die Garantieleistung gilt nur für Material- oder
Fabrikationsfehler, nicht aber für Verschleißteile
oder für Beschädigungen an zerbrechlichen Teilen.
Das Produkt ist lediglich für den privaten und nicht
für den gewerblichen Gebrauch bestimmt.
Bei missbräuchlicher und unsachgemäßer Behandlung, Gewaltanwendung und bei Eingriffen, die
nicht von unserer autorisierten Service-Niederlassung vorgenommen wurden, erlischt die Garantie.
Ihre gesetzlichen Rechte werden durch diese
Garantie nicht eingeschränkt.
Schraven Serviceund Dienstleistungs GmbH
Gewerbering 14
D-47623 Kevelaer
Tel.: +49 (0) 180 5 008107
(14 Ct/Min. aus dem dt. Festnetz)
Fax: +49 (0) 2832 3532
e-mail: support.de@kompernass.com
KOMPERNASS GMBH
BURGSTRASSE 21
D-44867 BOCHUM
www.kompernass.com
- 19 -
 Loading...