

Page 1
ID Nr.: KH4000-05/05-V4
Kompernaß GmbH
Burgstrasse 21 · D-44867 Bochum
www.kompernass.com
IB_SewingMachine_UK 06.07.2006 10:59 Uhr Seite 1
Page 2
KH4000 Automatic Free-Arm Sewing Machine
Operating instructions
IB_SewingMachine_UK 06.07.2006 10:59 Uhr Seite 2
Page 3

IB_SewingMachine_UK 06.07.2006 10:59 Uhr Seite 3
Page 4

IB_SewingMachine_UK 06.07.2006 10:59 Uhr Seite 4
Page 5
IB_SewingMachine_UK 06.07.2006 10:59 Uhr Seite 5
Page 6

IB_SewingMachine_UK 06.07.2006 10:59 Uhr Seite 6
Page 7

IB_SewingMachine_UK 06.07.2006 10:59 Uhr Seite 7
Page 8
q
w
e
r
t
y
u
i
a
o
s
d
f
g
k
l
;
2)
2!
2@
j
2#
2$
2%
h
IB_SewingMachine_UK 06.07.2006 10:59 Uhr Seite 8
Page 9
- 3 -
1. Intended Use 4
2. Technical data 4
3. Package contents 4
4. Operating elements 4
5. Safety instructions 5
6. Setting up 6
7. Switching On / Off 6
8. Threading 7
a) Threading the lower bobbin 7
b) Threading the lower thread 8
c) Threading the upper thread 11
d) Retrieving the lower thread 12
e) Threading with 2 needles 12
9. Attaching accessories 13
a) Changing needles 13
b) Changing the stitch plate 13
c) Changing the snap-on foot 14
10. Settings 15
a) Setting the upper thread tension 15
b) Setting the lower thread tension 15
c) Setting the presser foot pressure 16
d) Setting the stitch width 16
e) Setting the stitch length 16
Lervia KH 4000
Keep this manual for future reference and pass it on with the equipment to any future users.
11. Sewing 17
a) To place the material 17
b) To start a seam 17
c) To finish off a seam 17
d) Guiding the material 18
e) Changing the sewing direction 18
f) Selecting a stitch pattern 19
g) Straight stitch 19
h) Zigzag 19
i) Stitch pattern table 20
j) Blind hem 21
k) Material-Thread-Needle Table 22
l) Seam guide 23
m) Overcast stitch 23
n) Stretch seams 23
o) Sewing buttonholes 24
p) Buttonhole table 24
q) Sewing on buttons 25
r) "Edge-to-edge" sewing 25
s) Decorative stitches 25
t) Sewing a zipper 26
u) Sewing with the twin needle 27
v) Embroidery 27
w) Thread cutter 27
12. Care 28
a) Clean the gripper area 28
b) Clean the feeder 28
c) Clean the casing 29
d) Oil the gripper track 29
e) What else needs oiling? 29
f) Storing 30
13. Troubleshooting 30
14. Warranty and service 31
15. Disposal 31
Lervia Automatic Free-Arm Sewing Machine
IB_SewingMachine_UK 06.07.2006 10:59 Uhr Seite 3
Page 10
- 4 -
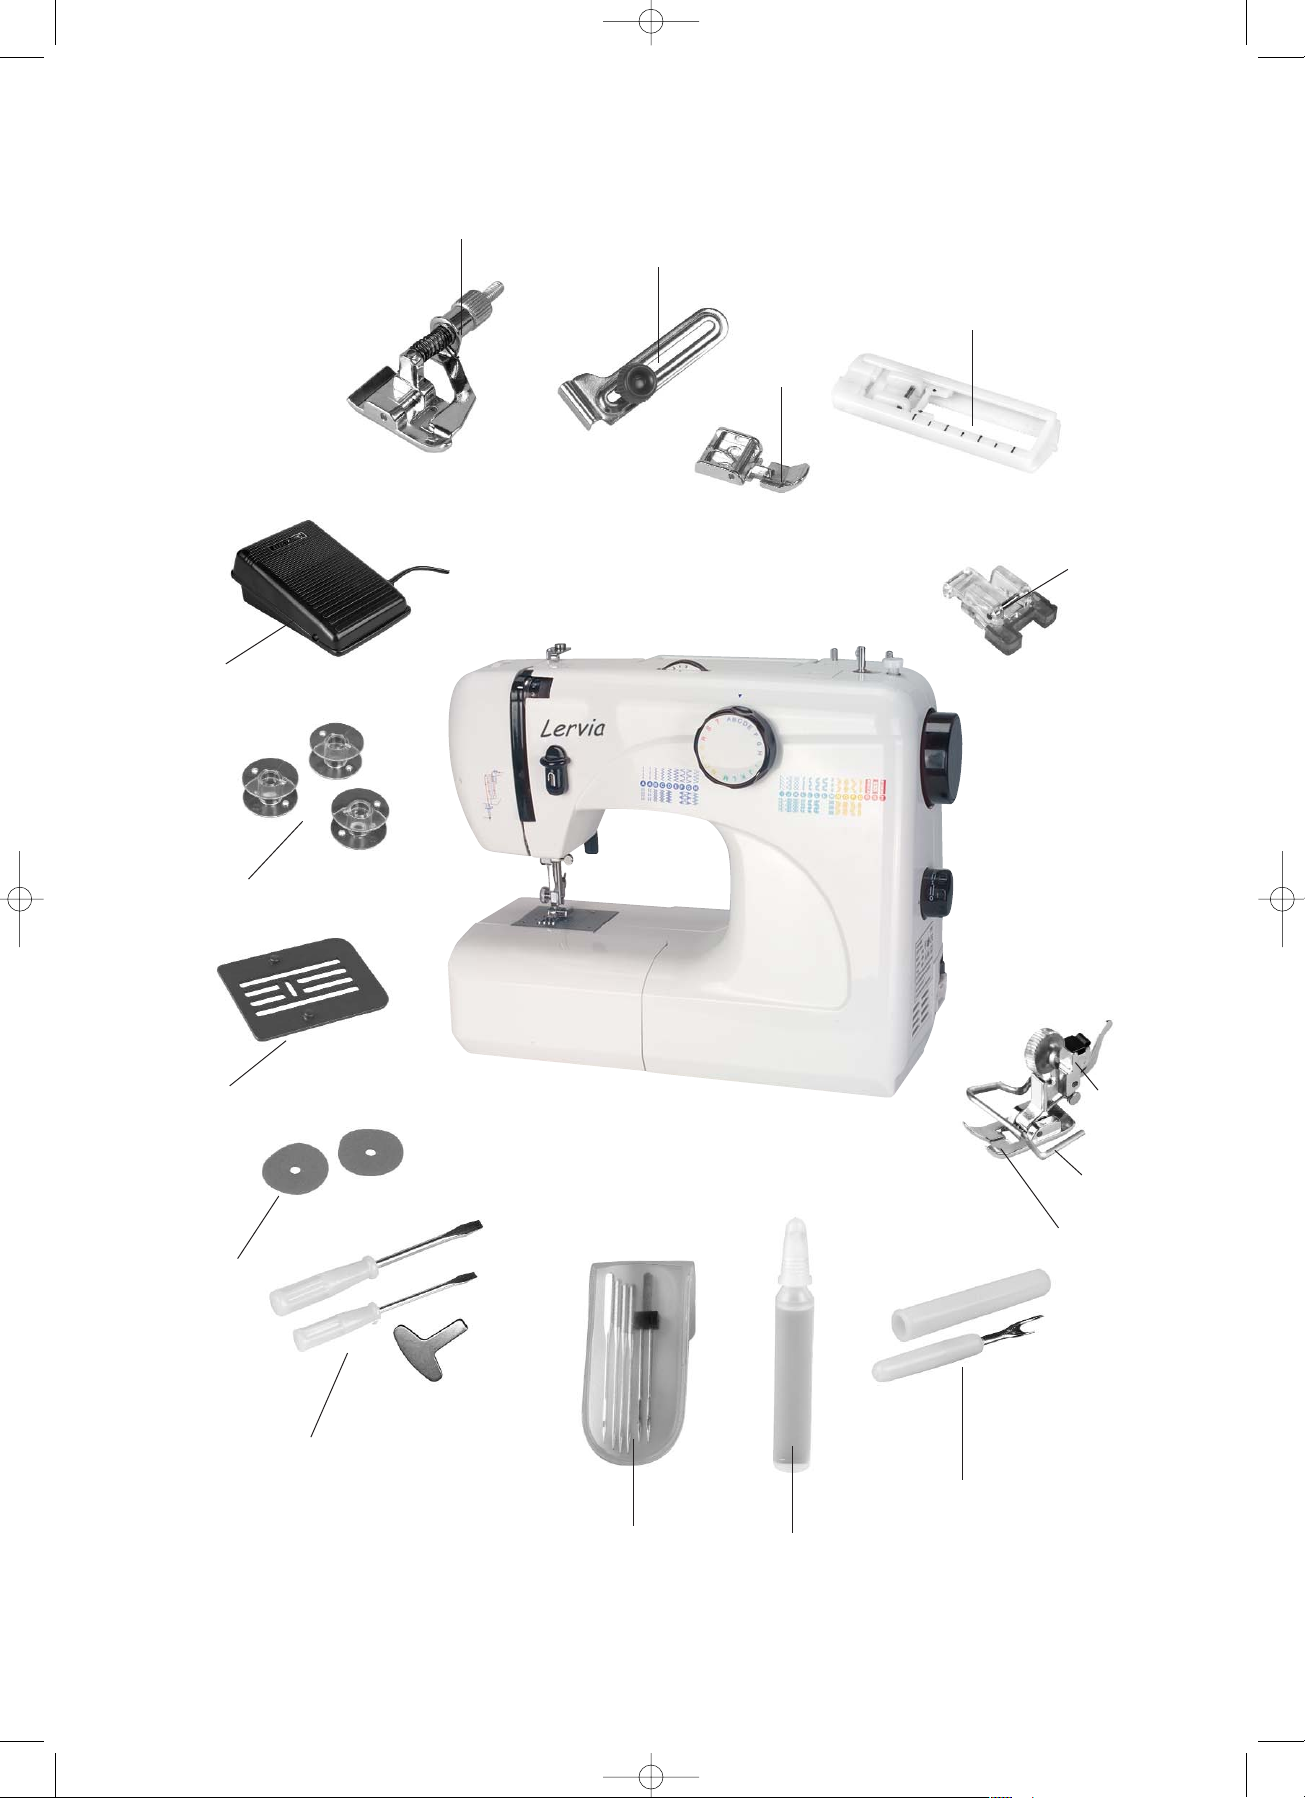
3. Package contents
(see front fold-out page)
● 1 sewing machine
1 blind hem foot
1 seam guide
1 zipper foot
1 buttonhole foot
1 button foot
1 sewing foot holder (attached)
1 finger protector (attached)
1 zigzag foot (attached)
1 knife
1 oil tube
1 set of needles (incl. twin needle)
3 screwdrivers
2 felt wheels
1 darning plate
3 bobbins
1 foot switch
● Operating instructions
● Warranty booklet
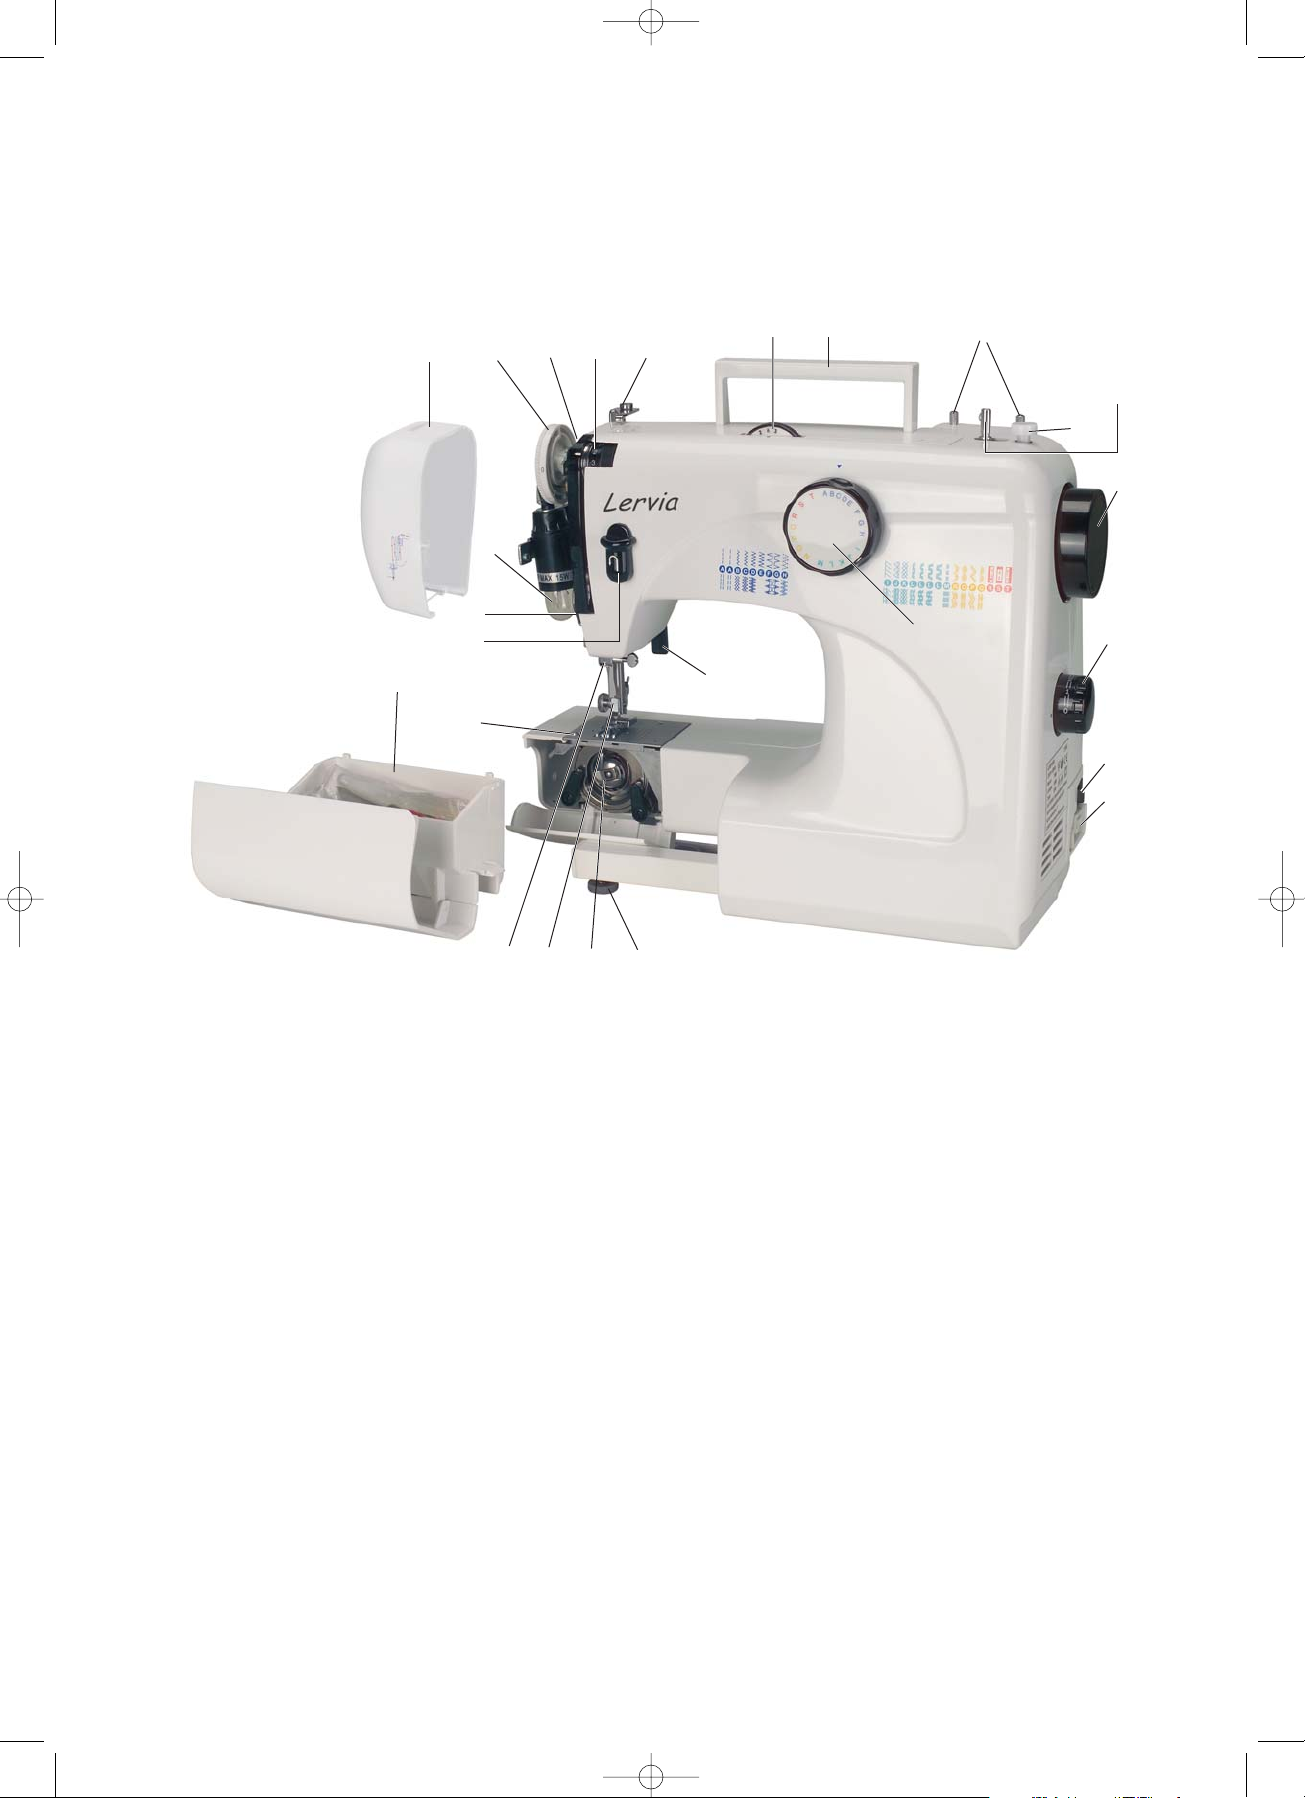
4. Operating elements
(see rear fold-out page)
q
Front cover
w
Selector wheel (contact pressure sewing foot)
e
Threading hook
r
Selector wheel (upper thread tension)
t
Upper thread guide
y
Selector wheel (stitch width)
u
Carrying handle
i
Thread spool carrier
o
Winder spindle
a
Spool stop
1!
Handwheel
1@
Selector wheel (stitch length)
1#
ON / OFF switch
1$
Foot switch connection
1%
Stitch pattern selector
1^
Foot lever
1&
Adjusting foot
1*
Bobbin case
1(
Foot holder
2)
Needle retainer
2!
Stitch plate
2@
Box compartment
2#
Lever (reverse operation)
2$
Tension spring
2%
Lamp
Lervia KH 4000
Operating instructions
Lervia Automatic Free-Arm Sewing
Machine
1. Intended Use
The sewing machine is intended ...
- for use as a movable machine,
- for sewing of typical household textiles and ...
- only for private household use.
The sewing machine is not intended ...
- to be installed at a fixed location,
- for processing of other materials
(e.g. leather or other heavy materials
such as tent or sail fabrics)
- for commercial or industrial use.
2. Technical data
Power supply : 230 V / ~50 Hz
Motor output : 70 W
Bulb power : 15 W
Bulb voltage : 230 V / ~50 Hz
Bulb thread : E14 thread
Protection class : II
Foot switch : LISHUI FOUNDER,
type KD-2902
Sound pressure level : 76dB(A) MAX
IB_SewingMachine_UK 06.07.2006 10:59 Uhr Seite 4
Page 11
- 5 -
5. Safety instructions
Like any other electrical device, a sewing
machine can cause serious, even life-threatening
injuries. To avoid this, and in order to work
safely:
• Before initial use of your sewing machine,
read these operating instructions thoroughly.
• Keep the operating instructions in a suitable
place near the machine. When passing the
appliance on to others, always enclose the
operating instructions.
• Always disconnect the power supply when
leaving the machine unattended. This will
prevent the risk of accidents if the machine
is switched on accidentally.
• First pull the power plug before changing
the bulb or performing maintenance work
on the machine.
This will prevent possibly life-threatening
electric shocks.
• Do not remove the plug from the socket by
pulling on the cable. Always grip the plug
and not the cable when pulling out the
power plug.
• Only use the sewing machine in dry rooms.
• In case of any visible damage on the machine,
the foot switch or the power cable: Have the
damage repaired by Customer Service before
using the sewing machine again.
• Never let children or elderly persons handle
the machine unsupervised because they may
not properly appreciate the possible dangers.
Keep electrical appliances outside the reach
of children.
• Never use the machine when the ventilation
apertures are blocked. Keep the ventilation
apertures of the machine and the foot switch
free from fluff, dust and waste material.
• The sound pressure level under normal
operating conditions is 76dB(A) MAX.
• Please use LISHUI FOUNDER foot switch,
type KD-2902 for the sewing machine.
Warning
against injuries and material damages:
According to legislation, you as the user of
an electrical appliance are responsible for
preventing possible accidents through safetyconscious behaviour:
• Keep your work space tidy. An untidy
workplace can lead to accidents.
• Provide adequate lighting when working!
• Do not wear loose clothing or jewellery,
as these can be caught in the moving parts.
You should also wear a hair net if you have
long hair.
• Avoid abnormal posture. Remain steady
and in a well-balanced position at all times.
• Be alert! Pay attention to what you are doing.
Always take a rational approach to your work.
Never work with the sewing machine if you
are unable to concentrate or if you are feeling
unwell!
If accidents occur as a result of handling the
machine with insufficient care, or failure to
follow the safety instructions in this manual,
then the manufacturer cannot accept liability.
Lervia KH 4000
IB_SewingMachine_UK 06.07.2006 10:59 Uhr Seite 5
Page 12
- 6 -
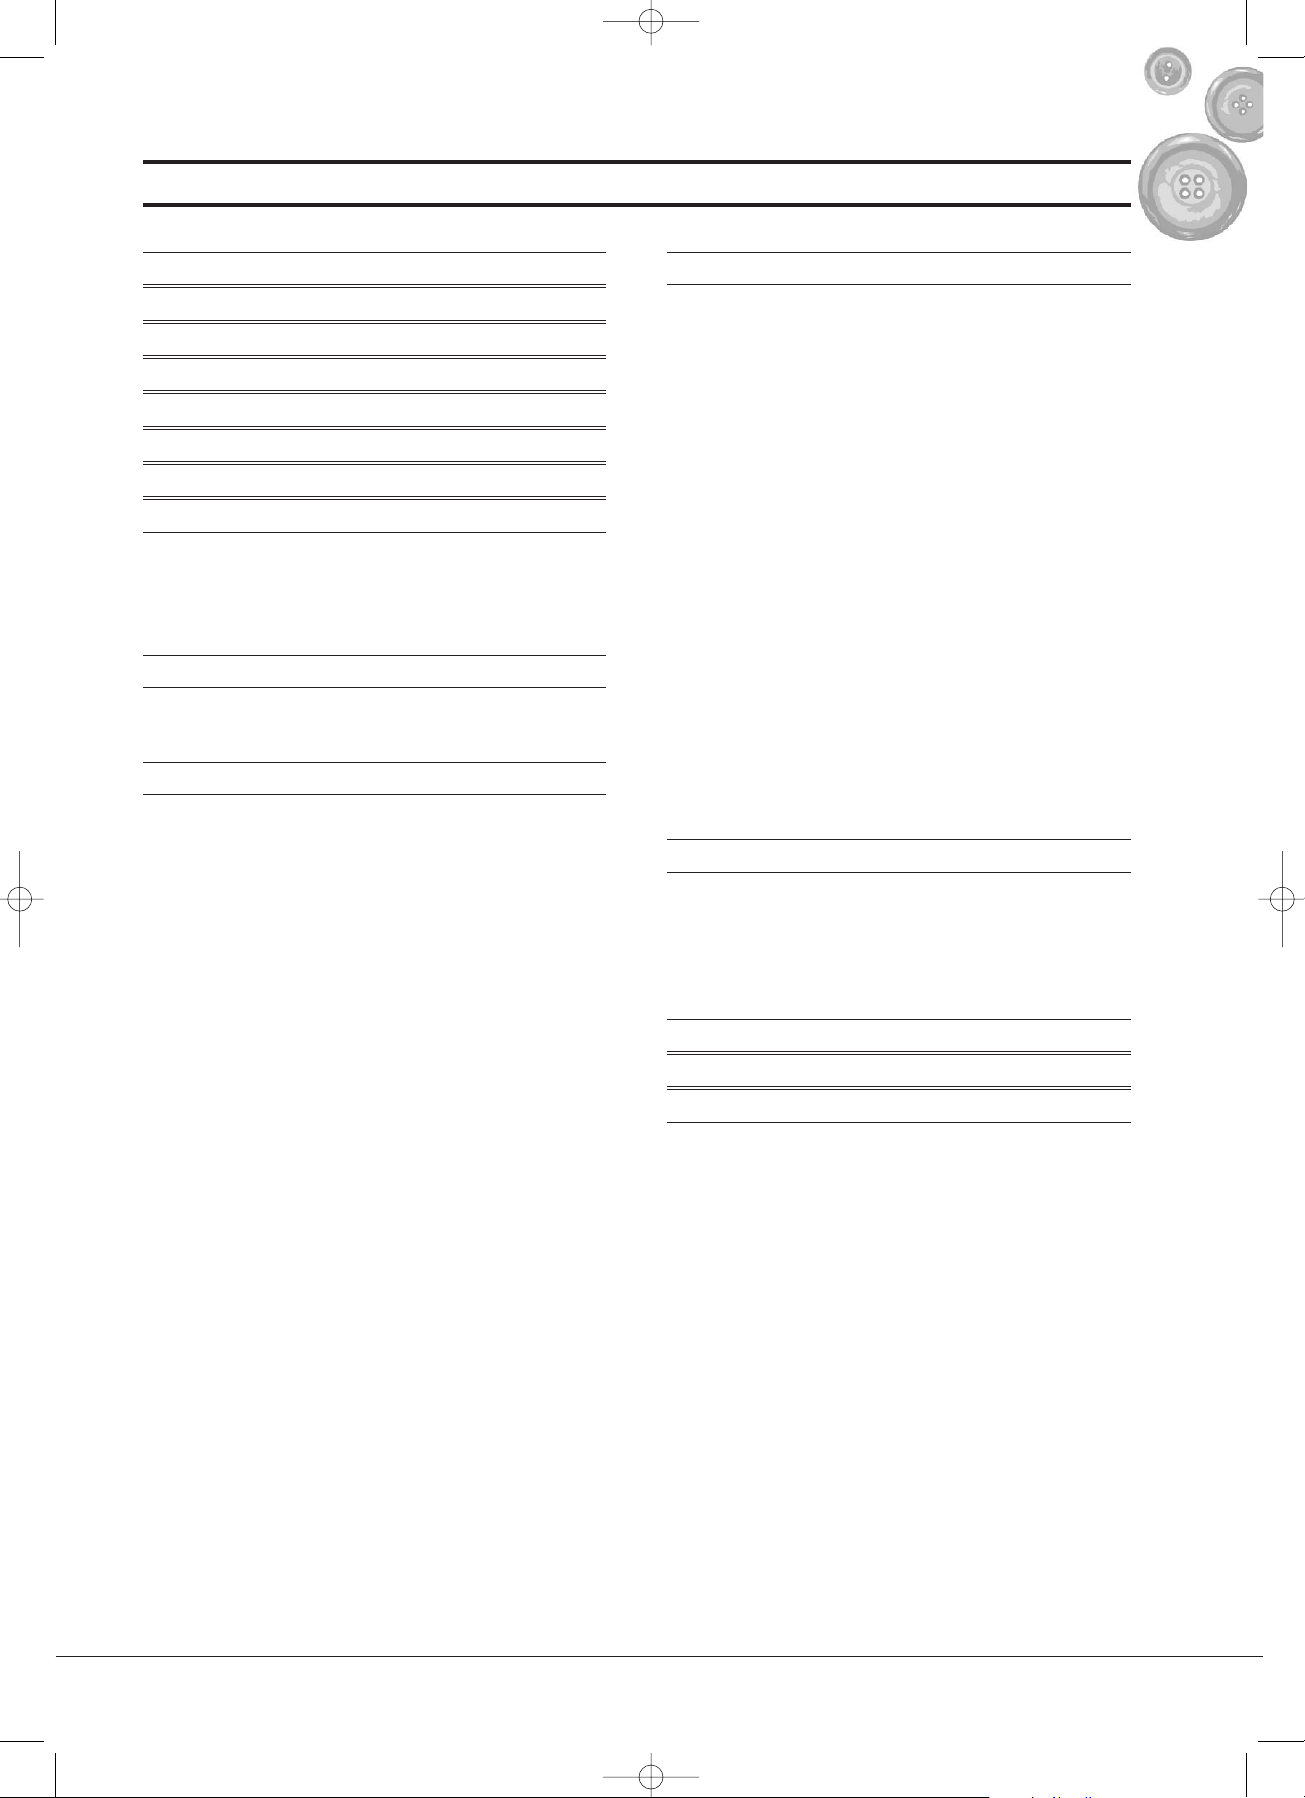
6. Setting up
• Place the sewing machine on a stabile table.
• Plug the foot switch into the connection
socket gof the machine and ...
• insert the plug into the wall socket.
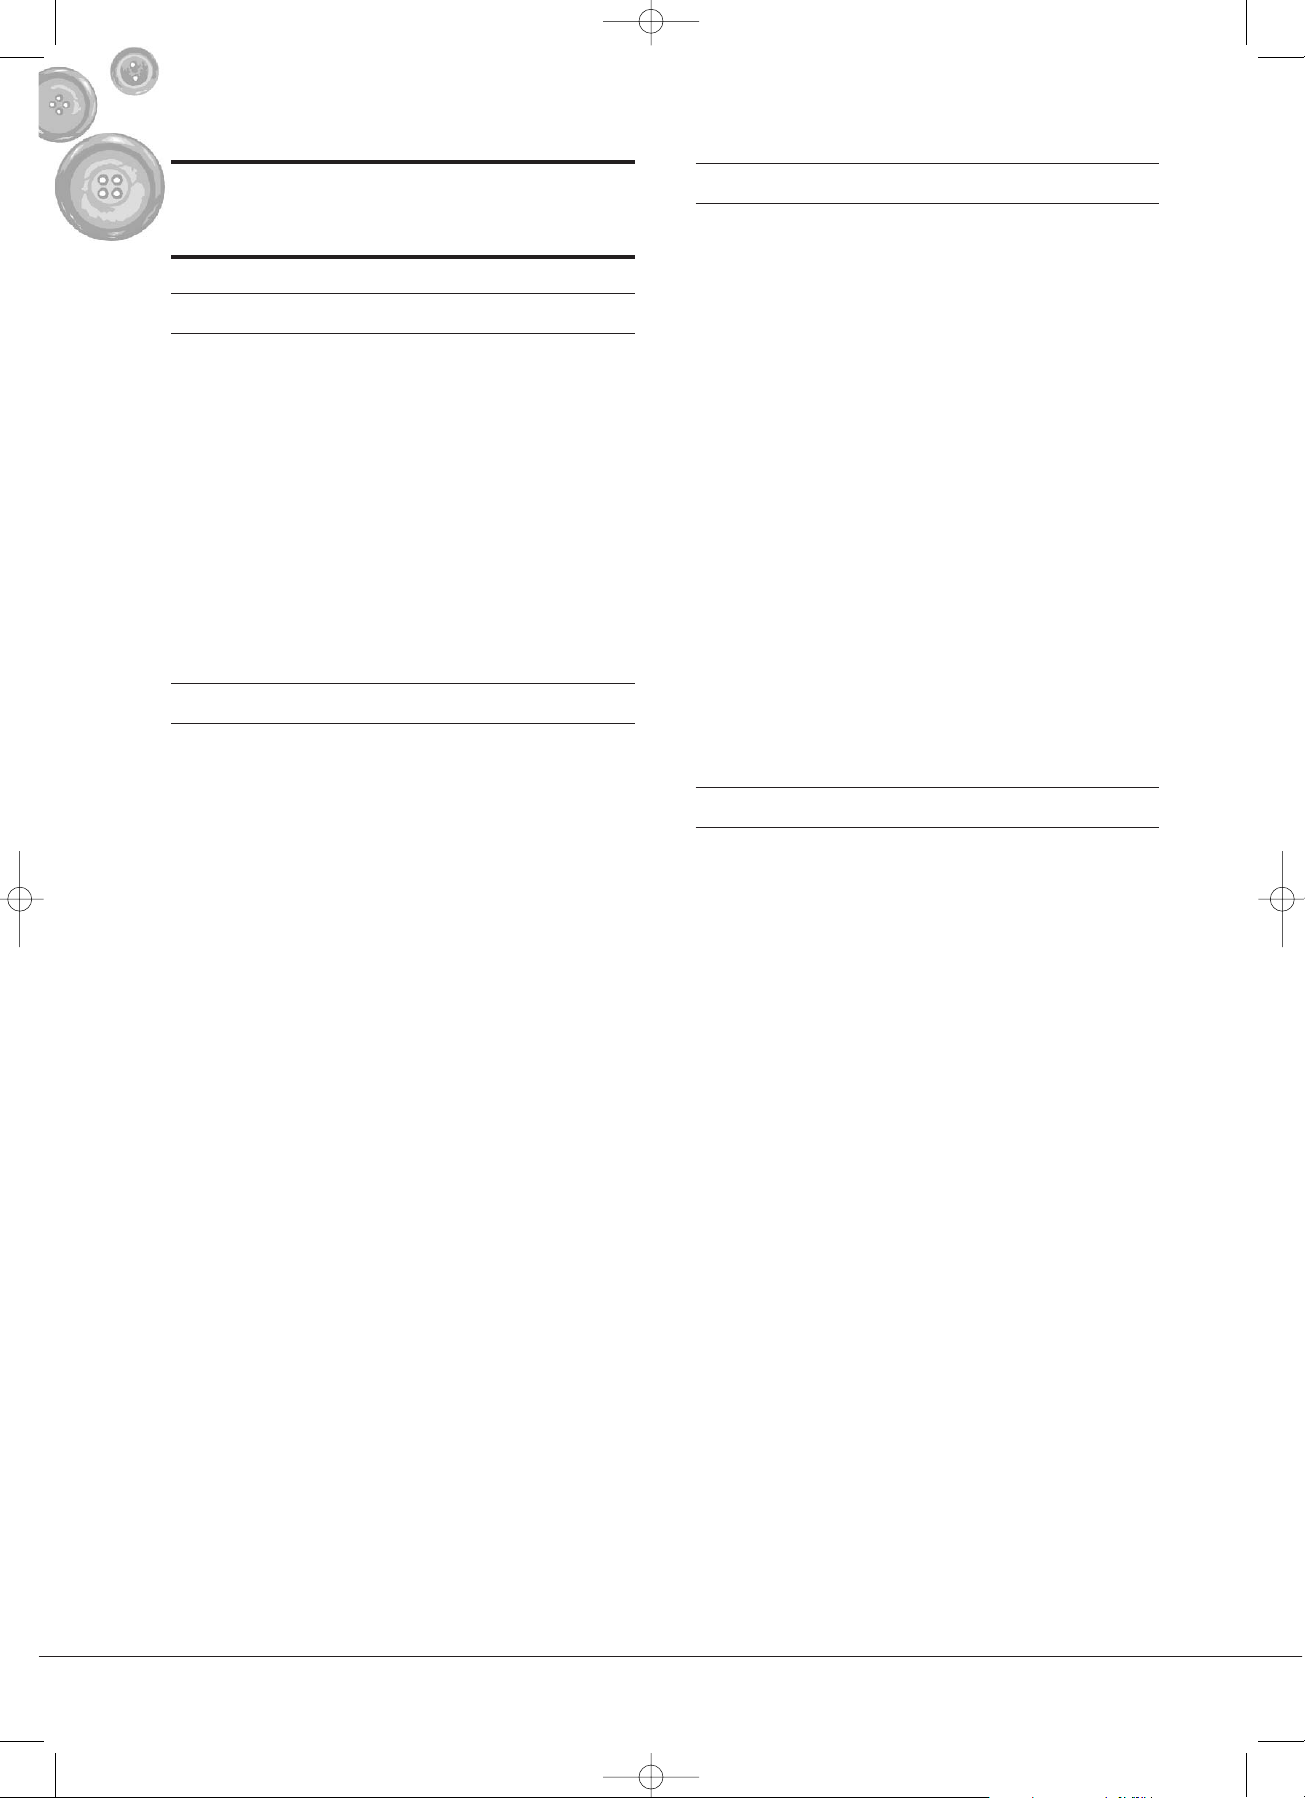
If the worktop is not completely even, you can
compensate for slight unevenness as follows:
• Pull the box compartment 2@off to the
side, it is only slid on, not firmly attached.
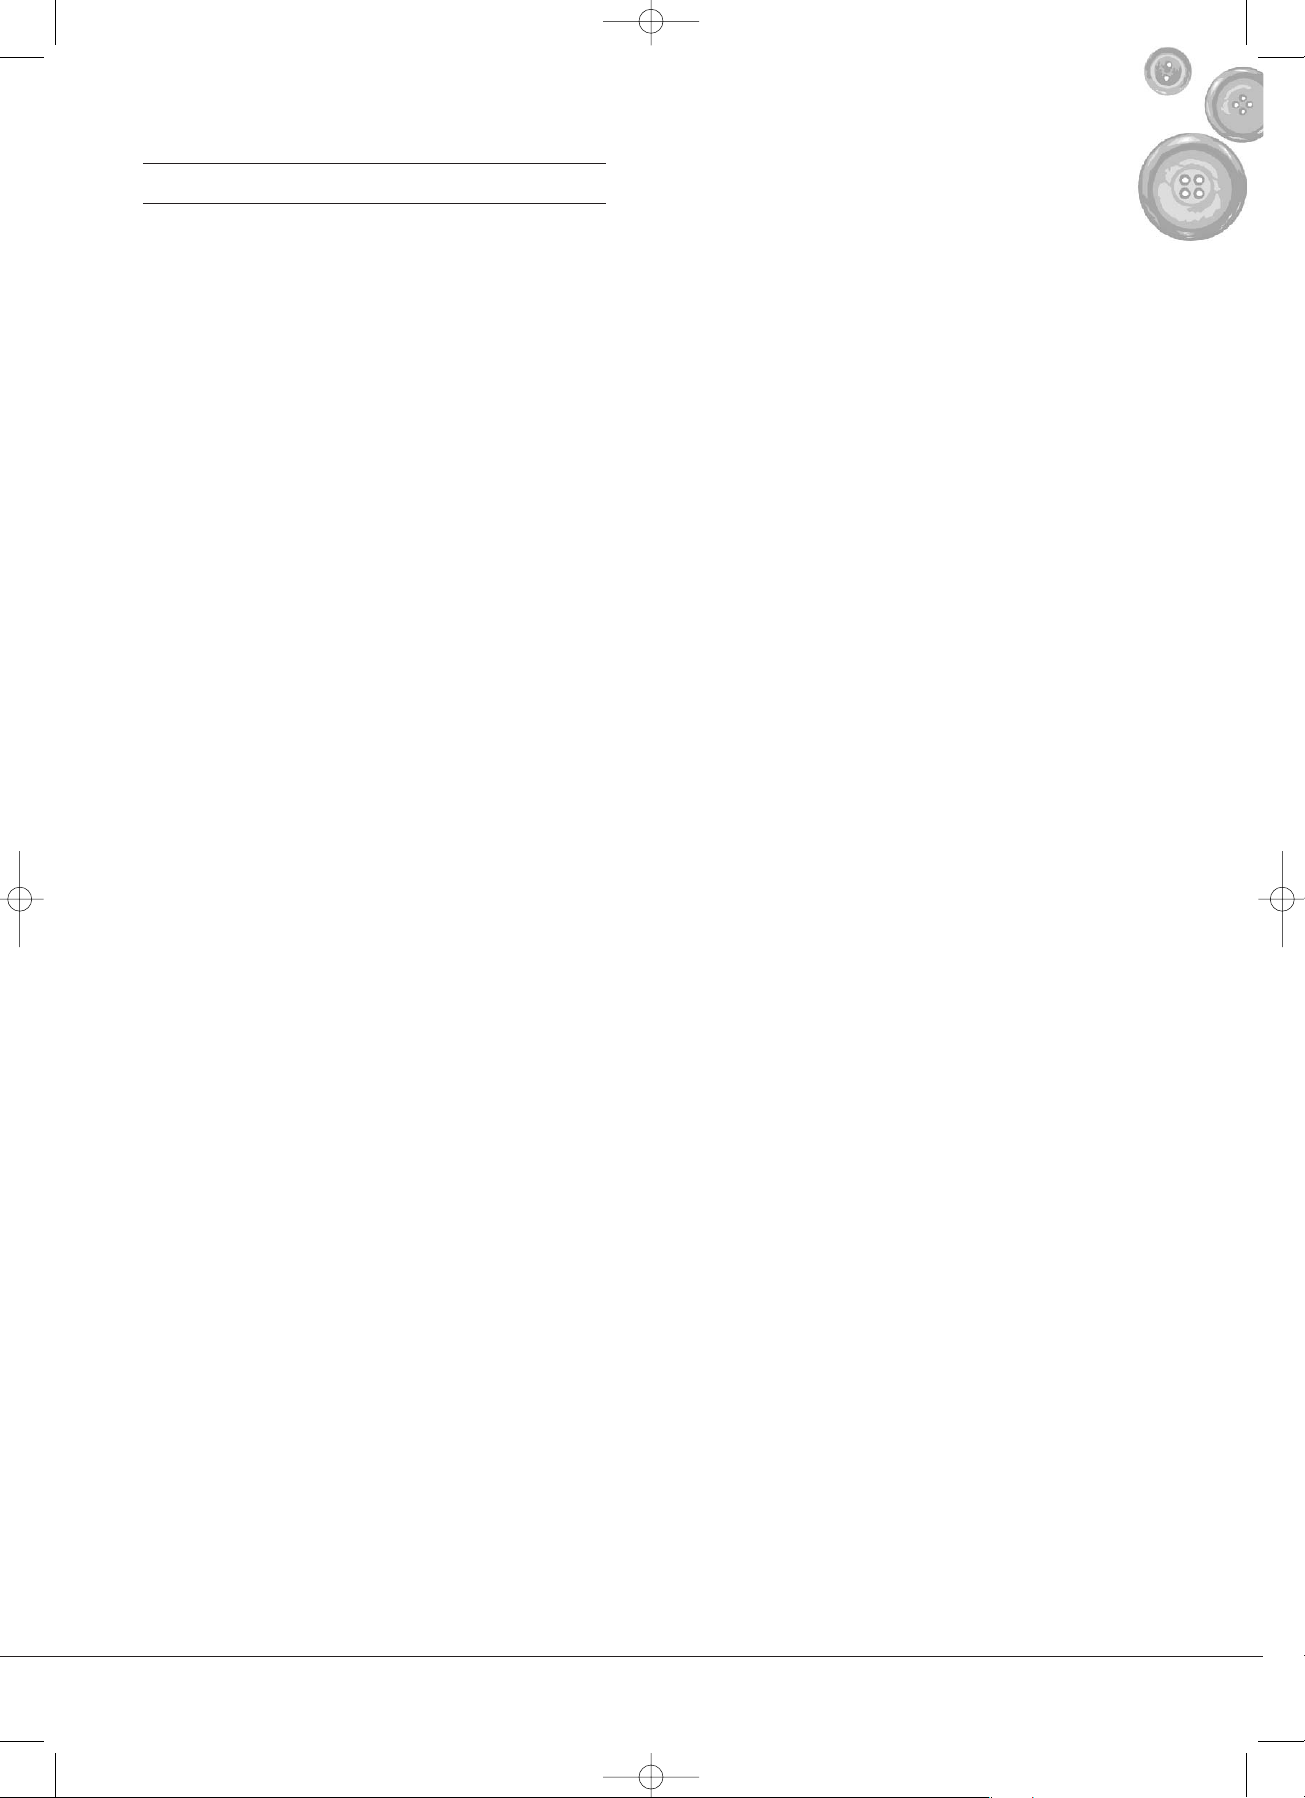
• You can turn the adjusting foot 1&that
becomes visible underneath in order to
make the sewing machine rest properly.
You can simply slide the box compartment
2@
back on – for instance if you need this as an
"extension table" for sewing large material.
You can also leave the box compartment
2@
off, for example for free-arm sewing of arms,
trouser legs, etc. The box compartment 2@is
also used to store the accessories.
7. Switching On / Off
You should familiarize yourself with these
methods of switching on and off, so that you
can take the correct action in the event of an
emergency:
• You can switch the sewing machine on
or off by pressing the switch1#. The bulb
2%
indicates the operating state.
• If you pull out the foot switch plug, the
machine is without power.
• If you pull the power plug from the socket,
the machine and the foot switch are without
power.
Lervia KH 4000
2@
IB_SewingMachine_UK 06.07.2006 10:59 Uhr Seite 6
Page 13

- 7 -
8. Threading
Warning:
Make sure that the sewing mahine is switched
off and the plug has been pulled out of the
socket when threading in order to avoid injury
if the sewing machine should be accidentally
switched on.
a) Threading the lower bobbin
To load the lower bobbin with thread:
• Pull out one of the two thread spool carriers
i
on top and place a spool of thread there.
• You can place a felt pad underneath the
spool of thread , so that the bobbin runs
evenly.
• Place an empty spool on the winder
spindleo.
• Pull the thread through the upper thread
guide t.
• Wind the loose end of the thread clockwise
a few times around the empty spool .
• When the first windings of thread are taut
against the spool, press the spool with the
winder spindle oagainst the spool stopa.
• Pull the handwheelson the right of the
machine slightly outward in order to disconnect the sewing mechanism from the motor.
• Now switch the sewing machine on and step
on the foot switch . Once the spool is full,
cut the thread.
• Press the winder spindle oback to the left
and remove the full spool.
• Do not forget to push the handwheelsback
in – otherwise the sewing mechanism remains
disconnected from the motor.
Lervia KH 4000
i
t
s
o
a
IB_SewingMachine_UK 06.07.2006 10:59 Uhr Seite 7
Page 14

- 8 -
b) Threading the lower thread
Turn the handwheel sin an anti-clockwise
direction to fully raise the needle.
• Pull the box compartment 2@off to the
side, it is only slid on, not firmly attached.
• Then open the gripper flap“situated
behind it.
• Fold out the folding lever of the bobbin
case l...
• and pull out the bobbin case las shown.
18 a
Lervia KH 4000
2@
“
1*
1*
18 a
IB_SewingMachine_UK 06.07.2006 10:59 Uhr Seite 8
Page 15

- 9 -
• Unwind approximately 10 cm of thread from
the spool and slide this into the bobbin case
l
so that the spool unwinds anti-clockwise.
• Pull the unwound end of the thread through
the gap in the side wall of the bobbin
case ...
• under the tension spring ,
• until the thread comes out the slit in
the bobbin case.
For optimal setting of the lower thread
tension, see Chapter 10.
18 d
18 c
18 b
Lervia KH 4000
1*
18 c
18 b
18 d
IB_SewingMachine_UK 06.07.2006 10:59 Uhr Seite 9
Page 16

- 10 -
• Put the bobbin case lback on the pin and ...
• turn the bobbin case luntil the driver
catches in the notch.
• Lay the excess thread such that it does not
bind anywhere ...
• then close the gripper flap ”.
• You can simply slide the box compartment
2@
back on – for instance if you need this
as an "extension table" for sewing large
material. You can also leave the box compartment off, for example for free-arm sewing
of arms, trouser legs, etc.
18 e
Lervia KH 4000
1*
”
2@
18 e
IB_SewingMachine_UK 06.07.2006 10:59 Uhr Seite 10
Page 17

i
r
s
t
e
2$
;
j
- 11 -
c) Threading the upper thread
To pass in the upper thread, it is not necessary
to open the front of the sewing machine. The
illustration is for guidance only. Before you begin
threading, turn the handwheel santi-clockwise
to position the threading hook ein the uppermost position. Use the foot lever jto raise the
needle retainer ;.
• Pull out one of the two thread spool carriers
i
on top and place a spool of thread there.
• You can place a felt pad underneath the
spool of thread, so that the bobbin runs
evenly.
• Guide the thread through the upper thread
guidet, ...
• over the selector wheel for the upper thread
tension r, ...
• underneath the tension 2$spring, ...
• over the threading hook e,
• through the thread guide , from the front
through the eye of the needle and finally
under the needle retainer;towards the
back.
• Lower the needle retainer ;with the foot
lever j.
19 b
19 a
Lervia KH 4000
IB_SewingMachine_UK 06.07.2006 10:59 Uhr Seite 11
19 b
19 a
Page 18

- 12 -
d) Retrieving the lower thread
• Turn the handwheel sin an anti-clockwise
direction to fully raise the needle.
• Use the foot lever jto raise the needle
retainer
;
.
• With the left hand, firmly hold the end of
the upper thread that comes through the
eye of the needle.
• Then use your right hand to turn the hand-
wheel sone full turn anti-clockwise.
• The upper thread now pulls up the lower
thread in a loop ”.
• As soon as the lower thread appears, pull
carefully on the upper thread held in your
left hand. In this way, you can pull the lower
thread clear.
• Pull out the two threads by about 10 cm.
• and lay these away to the back, as shown.
The sewing machine is now ready to use.
e) Threading with 2 needles
When you have inserted the twin needle as
described in Chapter 9:
• Pull out both thread spool carriers ion
top and place two spools of thread there.
• You can place a felt pad underneath the
spool of thread, so that the bobbin runs evenly.
• Run both upper threads exactly as they
would be run for threading a single thread, ...
• except for threading at the needle: in this
case, thread the two ends of the upper
threads separately through the two needle
eyes.
• The lower thread is then threaded in exactly
the same way and lifted upward, as for a
single thread.
Lervia KH 4000
”
IB_SewingMachine_UK 06.07.2006 10:59 Uhr Seite 12
Page 19

- 13 -
9. Attaching accessories
Warning:
Make sure that the sewing machine is switched
off and the plug has been pulled out of the sokket to prevent accidents caused by un-intentional
switching on.
a) Changing needles
• Turn the handwheel sin an anti-clockwise
direction to fully raise the needle.
• Loosen the clamping screw and pull the
old needle out.
• Insert the new needle, with the flat side
toward the back. Insert it up to the top
• and tighten the clamping screw again
well when finished.
b) Changing the stitch plate
At the factory, the "zigzag" stitch plate is
inserted, which can be used for most stitching
work and decorative seams. However, if you
wish to use the darning plate supplied:
• Turn the handwheel sin an anti-clockwise
direction to fully raise the needle.
• Insert the darning plate into the existing
zigzag stitch plate so that the flat guide
pins grip into the recesses in the existing
plate.
• If you no longer need the darning plate,
simply remove this again.
20 a
20 a
Lervia KH 4000
20 a
IB_SewingMachine_UK 06.07.2006 10:59 Uhr Seite 13
Page 20

- 14 -
c) Changing the snap-on foot
With the sewing machine you are provided
with four snap-on-feet, which you can simply
use as required:
blind hem foot
zipper foot
buttonhole foot
button foot
To change the snap-on foot:
• Turn the handwheel sin an anti-clockwise
direction to fully raise the needle.
• Position the foot lever jin the upward posi-
tion in order to lift the needle retainer ;up.
• Press the lever upward. The snap-on foot
can now be easily removed from the needle
retainer ;.
• Now place the new snap-on foot under the
needle retainer ;. Make certain that the
notch on the needle retainer is located directly above the metal pin of the snap-on foot.
• Press the foot lever jback down and let the
needle retainer ;slide into the snap-on foot.
To uninstall the needle retainer ;:
• Loosen the foot screw and pull the
needle retainer ;off
downward, including the finger protector .
To install the needle retainer ;:
• Place the needle retainer ;including finger
protector back onto the guide rod and
tighten the foot screw again.
19 c
19 c
19 d
Lervia KH 4000
;
19 d
19 c
IB_SewingMachine_UK 06.07.2006 10:59 Uhr Seite 14
Page 21

- 15 -
10. Settings
The tension of the upper and lower thread is
set correctly if the twining of the two threads
cannot be seen on the top or bottom sides of
the material after sewing.
If even one of the two tensions is not set cor-
rectly, an unclean seam will result. The stitches
will then lie flat on the material.
a) Setting the upper thread tension
• You can select the strength of the upper
thread tension by turning the selector wheel
for the upper thread tension r. If this thread
is ...
- too tight (higher setting), then the upper
thread is loose and the material is being
'sewed' with the lower thread only.
- too loose (lower setting), then the lower
thread is loose and the material is being
'sewed' with the upper thread only.
The upper thread tension is normally
between 4-6.
b) Setting the lower thread tension
• You can set the strength of the lower
thread tension by turning the screw
on the bobbin case l. Turn it ...
- clockwise to increase the tension.
- anti-clockwise to reduce the tension.
Be certain not to turn the screw
completely out of the bobbin case l.
• The lower thread tension is set correctly if
the bobbin case lcan be turned slowly and
evenly ("fall down test").
18 f
18 f
Lervia KH 4000
r
l
18 f
IB_SewingMachine_UK 06.07.2006 10:59 Uhr Seite 15
Page 22

- 16 -
c) Setting the presser foot pressure
Here you can set the pressure with which the
material is pressed onto the stitch plate.
• Now set the contact pressure on the
selector wheel w.
"0" if no pressure is to be applied, for
example for darning with free-hand
stitches
"1" for light fabrics (curtains)
"2" for average fabrics (normal)
"3" for heavy fabrics (jeans).
d) Setting the stitch width
Here you can set the width of seam for zigzag
patterns.
• Turn the handwheel s in an anti-clockwise
direction to fully raise the needle.
• Select a stitch width from 0 - 5 on the
selector wheel y...
"0" straight
"1" narrow
"5" wide
Important: When the twin needle is inserted,
the selector wheel may not be set any higher
than "3". A higher setting will cause the twin
needle to break!
e) Setting the stitch length
Here you can set how far the material is to
be transported during sewing. This therefore
determines the gap (length) between the stitch
points.
• Select the stitch length from 0 - 4 on the
selector wheel d...
"0" if the material should not be transported.
"1" short
"4" long
Lervia KH 4000
w
y
s
d
IB_SewingMachine_UK 06.07.2006 10:59 Uhr Seite 16
Page 23

- 17 -
11. Sewing
If you have placed the thread and everything
is set correctly, as described in the previous chapters:
a) To place the material
• Turn the handwheel sin an anti-clockwise
direction to fully raise the needle.
• Use the foot lever jto raise the needle
retainer ;.
• Place the material under the sewing foot
and lower the sewing foot back down.
b) To start a seam
• Hold the two thread ends run to the back
”
firmly with the left hand.
• Step very carefully on the foot switch – just
enough to do the first 3-4 sewing motions.
While doing this, guide the material with the
right hand.
• Once the first sewing motions have been
performed successfully, hold the lever for
backward operation 2#pressed briefly ...
• and press again on the foot switch – just
until you have returned to the starting point
of the seam. When you now want to continue
with the seam from that point, it is held firmly
by several overstitches.
c) To finish off a seam
Sew back and forth at the end of the seam using
the reverse lever, as at the start of the seam.
The end of the seam is now also held firmly.
Lervia KH 4000
s
”
2#
j
;
IB_SewingMachine_UK 06.07.2006 10:59 Uhr Seite 17
Page 24

- 18 -
d) Guiding the material
• Only guide normal materials as shown in the
diagram. Avoid pulling it, as this can cause the
needle to bend or break.
• Very fine materials pull inward slightly during
sewing. To prevent this, lay a thin paper under
the material and sew this in with the material.
When you have finished sewing, carefully pull
the paper away from the material; the result
is a very clean stitch.
• For stretchable materials, it can be necessary
to guide the material in before and after the
sewing foot to prevent it from pulling in.
e) Changing the sewing direction
You have arrived at a certain point, and you now
want to continue sewing in a different direction.
• The simplest way to do this is to hold the
turning point and let the needle stick in the
material.
• Use the foot leverjto raise the needle
holder ;.
• Pull the material around the needle in the
desired direction
• then lower the needle retainer;down.
You can now continue sewing in the usual
way in the new direction.
Lervia KH 4000
IB_SewingMachine_UK 06.07.2006 10:59 Uhr Seite 18
Page 25

- 19 -
f) Selecting a stitch pattern
To select a particular pattern, take the following
steps:
• Select the stitch pattern with the stitch
pattern selectorh.
• Select the stitch length by means of the
d
selector wheel.
• Select the stitch width by means of the
selector wheel y.
• Attach the respective snap-on foot, as
described in Chapter 9.
You can find the required settings in the table
on the next page. If two values are set for the
stitch length, these are understood as "from ...
to ..." values.
g) Straight stitch
This is the most frequently used type of stitch.
The zigzag sewing foot is used for both straight
and zigzag stitches. A smaller size of stitch should
be selected for sewing finer materials.
h) Zigzag
The zigzag stitch is universal. The zigzag stitch
pattern consists of short stitches set closely after
one another and is suitable for sewing initials,
figures, appliqués etc.
Lervia KH 4000
y
h
d
IB_SewingMachine_UK 06.07.2006 10:59 Uhr Seite 19
Page 26

- 20 -
Lervia KH 4000
i) Stitch pattern table
Stitch pattern Stitch length Sewing foot Stitch width
A Straight stitch 0
B-E Zigzag 1-5
F Blind stitch 3-5
G Blind hem 3-5
H
Three-step zigzag
stitch
3-5
I Slant over edge stitch 3-5
J Single overlock stitch 3-5
K Honeycomb stitch 3-5
L 3-fold zigzag 2-5
M Stretch straight stitch 0
N Shell stitch 3-5
O Honeycomb stitch 3-5
p 3-edged block stitch 3-5
q Semi-circular stitch 3-5
R-T Buttonhole 5
Free-hand embroidery Without 0-5
IB_SewingMachine_UK 06.07.2006 10:59 Uhr Seite 20
Page 27

- 21 -
j) Blind hem
• Fold the material as shown. Make the fold as
wide as you want the finished seam to be: The
lower fold should be inset by about 5 mm.
• Use the blind hem foot . While sewing,
check the hem width and needle position
to be sure the hem is even.
• Sew the blind hem on the underside of the
material, so that only the peak of the zigzag
stitch pierces the top part of the material.
When you have finished sewing, push the
left of the material over to the right and
smooth out. The seam is almost invisible!
The table on the next page shows a suggestion
for setting the various values depending on the
material used.
Lervia KH 4000
IB_SewingMachine_UK 06.07.2006 10:59 Uhr Seite 21
Page 28

- 22 -
Lervia KH 4000
k) Material-Thread-Needle Table
Please refer to the details for the various materials.
Material Thread Needle
Presser foot
pressure
Stitch length Upper thread tension
See p. 16
Straight
stitch
ZZ
Stitch length
selection
Light Nylon
Cotton
80
70
(10)
1 1-3 1-4
Cotton
jersey
Man-made
fibre
60
Silk
Silk
50
Woll-silk
Man-made
fibre
50 silk
80
(12)
Middle Poplin
Cotton
60-80
80-90
(12-14)
2 0.5-3 0.5-4Fine Jersey
Man-made
fibre
60
80
(12)
Gabardine
Silk
50
Heavy Denim
Cotton 5090-100
(14-16)
3 0.5-3 0.5-4Jersey
Man-made
fibre
50
80-90
(12-14)
Tweed
Silk
50
80-90
(12-14)
IB_SewingMachine_UK 06.07.2006 10:59 Uhr Seite 22
Page 29

- 23 -
l) Seam guide
• Use the seam guide for sewing longer
hems or seams that should have an even
distance to the edge of the material.
• Screw the seam guide into the threaded
hole on the right of the stitch plate 2!.
Set the desired seam width, then tighten
the knurled screw.
• While sewing, the edge of the material
must touch the seam guide. The seam guide
can also be screwed in obliquely for sewing
corners.
m) Overcast stitch
• Select the stitches (H, I, J) if you want to
prevent the fraying of the cut edges.
n) Stretch seams
• Select the stiches (M or L) for knitted, Jersey
and other stretchable textiles. This type of
seam can be stretched without the thread
breaking. The stretch seam stitch produces
a highly strain-resistant, straight seam.
Lervia KH 4000
H, I, J
M, L
2!
IB_SewingMachine_UK 06.07.2006 10:59 Uhr Seite 23
Page 30

- 24 -
o) Sewing buttonholes
• Attach the buttonhole foot , as described
in Chapter 9.
• Refer to the table for:
- the required stitch length
- the required stitch pattern
- the required method for sewing.
• When finished, you can cut the buttonhole
in the middle, as shown.
Lervia KH 4000
Pattern selector
(Stitch pattern)
Sewing
Method
Settings/stitch length
R
1. Set selector to "R"
2. Sew the left side
3. Raise needle
S
4. Set selector to "S"
5. Sew 5-6 stitches
6. Raise needle
T
7. Set selector to "T"
8. Sew the right side
9. Raise needle
S
10. Set selector to "S"
11. Sew 5--6 stitches
12. Raise needle
p) Buttonhole table
IB_SewingMachine_UK 06.07.2006 10:59 Uhr Seite 24
Page 31

- 25 -
q) Sewing on buttons
• Attach the button foot and ...
• place the darning plate on the existing
zigzag stitch plate, as described in Chapter 9.
• Lay the button between the button foot
and the material and lower the button
foot down.
• Turn the handwheel santi-clockwise.
Check whether the needle passes cleanly
through both button holes.
• Adjust the stitch width of the zigzag mode
as necessary.
• If the sewing machine hits both button holes
during hand operation, you can now sew 5-7
stitches with the machine by carefully pressing
on the foot switch .
r) "Edge-to-edge" sewing
• To do this, select the three-stitch zigzag
("H") or the honeycomb stitch ("K") as the
stitch pattern.
s) Decorative stitches
• Select the stitch patterns (N-Q) if you want
to apply various decorative stitches to your
textiles.
Lervia KH 4000
KH
NOPQ
IB_SewingMachine_UK 06.07.2006 10:59 Uhr Seite 25
Page 32

- 26 -
t) Sewing a zipper
Using the zipper foot you can sew along the
right and left-hand edges of the zipper without
damaging the zipper or the needle.
The zipper foot is also useful for sewing
edges or parallel seams.
• Attach the zipper foot , as described in
Chapter 9.
• Then select the straight stitch (A) as stitch
pattern.
• Fold over approximately 2 cm of material
and lay the zipper under the material fold
such that the links just protrude. It might
be helpful to stitch in the zipper first.
• Then sew as closely as possible along the
zipper links.
- To sew the left side of the zipper, the foot
must be placed to the left of the needle.
- To sew the right side of the zipper, the foot
must be placed to the right of the needle.
Lervia KH 4000
IB_SewingMachine_UK 06.07.2006 10:59 Uhr Seite 26
Page 33

- 27 -
u) Sewing with the twin needle
• Insert the twin needle with the flat side
toward the back.
• Thread the thread as for normal sewing.
Both threads are threaded together through
the guides – up to the twin needle.
• Only there are the two upper threads
threaded separately.
• Make certain that the setting for the stitch
width is not greater than "3" – otherwise,
the needle will break off.
v) Embroidery
Important: When embroidering, the foot
lever1^must be in the bottom position,
otherwise the upper thread tension is
disabled.
• Take the needle retainer;off and ...
• place the darning plate on the existing
zigzag stitch plate, as described in Chapter 9.
• Select an appropriate stitch pattern (A or B).
• The stitching is now performed free-hand.
Move the material tensioned in the embroidery
frame according to the embroidery pattern
while controlling the speed of the needle
movements with the foot switch .
w) Thread cutter
When you have completed a seam, or if you
wish to cut the threads for any other reason:
• Simply pull the thread over the sharp blade
above the needle retainer;to cut off the
thread.
Lervia KH 4000
;
IB_SewingMachine_UK 06.07.2006 10:59 Uhr Seite 27
Page 34

- 28 -
12. Care
After each use, remove any pieces of thread,
material, and fluff. Only in this way will you
ensure that the sewing machine continues to
work correctly and lasts for a long time.
Warning:
Make sure that the sewing machine is switched
off and the plug has been pulled out of the
socket to prevent accidents caused by uninten-
tional switching on.
a) Clean the gripper area
Important!
Never disassemble the mechanical elements
in the gripper area! Extensive experience with
mechanical devices is required in order to
reassemble these.
Only Customer Service has the special equipment
necessary for disassembling the gripper mechanisms. If you carry out repair work yourself, the
warranty will automatically be voided. It should
be enough for the user just to clean this area
with a brush or vacuum cleaner.
• Turn the handwheel sin an anti-clockwise
direction to fully raise the needle.
• Then open the gripper cover
“
• and take out the bobbin casel.
• Now remove all dirt with a brush or vacuum
cleaner (with fine brush attachment).
b) Clean the feeder
• Remove the needle and
• Take the needle retainer;off, as described
in Chapter 9.
• Loosen the screws inserted in the stitch
plate2!and dismantle the stitch plate.
Now remove the front cover q, if necessary,
to better reach the screws. You can now
clean the feeder.
Lervia KH 4000
l
“
“
;
IB_SewingMachine_UK 06.07.2006 10:59 Uhr Seite 28
Page 35

- 29 -
c) Clean the casing
Danger!:
Never open any parts of the machine casing
other than those described in this manual.
There are no operating elements inside.
Otherwise there is a risk of injury and
potentially life-threatening accidents.
• Clean all plastic surfaces with a soft,
dry- cloth.
• Do not use cleansers or abrasive materials –
the casing could be scratched.
• The parts of the appliance may never be
submerged in water or other liquids! This
could damage the appliance.
d) Oil the gripper track
Important!
Apply the oil very sparingly. Excessive oil on
the working parts can soil the thread and
your fabrics.
• Drip 2-3 drops of oil into the narrow gap
”
between the gripper and the gripper track ...
• and turn the handwheel sa few times to
rotate the gripper completely. This will
distribute the oil.
Just a little oil applied in this way, once or twice
per year, is sufficient. The main purpose is to
prevent rust from forming if the machine is
left unused for long periods.
e) What else needs oiling?
Nothing - no other working parts require
lubrication. You should not lubricate anything
unless it is necessary, as oiled parts attract dust
and may then become stuck.
Lervia KH 4000
”
IB_SewingMachine_UK 06.07.2006 10:59 Uhr Seite 29
Page 36

- 30 -
f) Storing
Keep the sewing machine ...
-at a dry location so that no rust forms on
the metal mechanical parts,
- always under the supplied covers to prevent
dust from entering the sewing machine,
- outside the reach of small children or elderly
persons, so that they cannot endanger
themselves through unsupervised operation.
13. Troubleshooting
If something is not working, you can use the
table below to try and correct the fault. If you
are unable to remedy the problem yourself,
please contact the customer service department
(see warranty card).
Warning:
Make sure that the sewing machine is switched
off and the plug has been pulled out of the
socket to prevent accidents caused by uninten-
tional switching on.
Lervia KH 4000
Fault / Problem: Check: Possible remedy:
Material is not being moved
through
Machine is not sewing - is only the
handwheel turning?
Stitch length wheel set to "0"?
Is the contact pressure of the sewing
foot too low?
Press in the hadnwheel!
Set it at a value from "1“ to "4".
Increase the contact pressure of
the sewing foot!
Needle is breaking
Needle set incorrectly?
Needle is bent?
Do the needle + thread + material
comply with the table in Chapter 10?
Set flat end towards the rear!
Insert a new needle.
Select the right needle for the
thread and the material!
Upper thread is breaking
Was it threaded correctly?
Zigzag setting too wide?
Upper thread tension too firm?
Scoring / scratches on the gripper?
It's best to re-thread from the
beginning!
Try with a smaller width!
Select the middle setting.
Replace the gripper.
Lower thread is breaking
Lower thread tension too taut?
Needle set incorrectly?
Was it threaded correctly?
Dust and fluff in the gripper?
Reduce the thread tension.
Set flat end towards the rear!
It's best to re-thread from the
beginning!
Clean the gripper area
Ripples in the material
Too much tension?
Contact pressure sewing foot too
high?
Do the needle + thread + material
comply with the table in Chapter 10?
Reduce the tension!
Reduce the contact pressure!
Select the right needle for the
thread and the material!
IB_SewingMachine_UK 06.07.2006 10:59 Uhr Seite 30
Page 37

- 31 -
The bulb no longer lights?
If the bulb is burned out, replace it with an
identical one purchsed from a specialised dealer.
The designation is "15W - E14".
• Use the supplied screwdriver to loosen
the screw on the front side of the front cover
q
.
• Take off the front cover q .
• Unscrew the defective bulb2%and screw
a new one into the socket.
14. Warranty and service
The warranty conditions and the service address
can be found on the warranty slip.
15. Disposal
Do not dispose of the device in normal
domestic waste.
Dispose of the device over a registered waste
disposal firm or through your communal waste
disposal facility. Observe the currently valid
regulations. In case of doubt, consult your
waste disposal facility.
Keep the sewing machine's transport packaging.
It may be useful for storing the machine, but is
particularly useful if you want to ship the sewing
machine for repair. Most instances of damage
occur when the machines are being transported.
Lervia KH 4000
q
2%
IB_SewingMachine_UK 06.07.2006 10:59 Uhr Seite 31
Page 38

- 32 -
Lervia KH 4000
IB_SewingMachine_UK 06.07.2006 10:59 Uhr Seite 32
 Loading...