

Page 1
4
FURNITURE TRANSPORTER
KH 3277
FURNITURE TRANSPORTER
Operating instructions
KOMPERNASS GMBH · BURGSTRASSE 21 · D-44867 BOCHUM
www.kompernass.com
ID-Nr.: KH3277-10/07-V1
TRANSPORTER DO MEBLI
Instrukcja obsługi
TRANSPORTER ZA POHIŠTVO
Navodila za uporabo
TRANSPORTNÍ PLOŠINA
Návod k obsluze
TRANSPORTÉR NA NÁBYTOK
Návod na obsluhu
MÖBELTRANSPORTER
Bedienungsanleitung
Page 2
KH 3277
y
u
q
t
w
e
r
Page 3

LIST OF CONTENTS PAGE
Safety Notices 4
Intended Use 4
Items supplied 4
Appliance description 5
Technical data 5
Placing furniture on the rolling supports 5
Shunting furniture 6
Removing the rolling supports 6
Troubleshooting 6
Cleaning 6
Storage 7
Disposal 7
Importer 7
Read these operating instructions carefully before using the appliance for the first time and preserve this
manual for later reference. Pass this manual on to whoever might acquire the appliance at a future date.
- 3 -
Page 4

FURNITURE TRANSPORTER KH 3277
Safety Notices
Risks of Injury!
• Serious injuries caused by the tipping of loads
are possible. Ensure that the load to be shunted
cannot tip over. Arrange for a second person to
assist.
Only move the load slowly.
• Injuries are possible through the uncontrolled
lowering of loads. Always lower loads under
control.
• Use the steering bar and the rolling supports
only if they are in a faultless condition.
• Do not extend/lengthen the lever arm.
• Ensure that all doors and drawers that the piece
of furniture might have are secured against unintentional opening before shunting it.
• Ensure that there are no obstacles in the way on
the shunting route.
• Use the furniture transporter with rolling supports
only on level surfaces.
• Place the rolling supports under the furniture so
that the roller-wheels are all facing in the same
direction.
• Do not allow children or persons in need of constant attention to handle the furniture transporter
unsupervised. They may not be able to correctly
assess the potential dangers.
• Place the rolling supports under the extreme corners
of the furniture piece. Thereby, the furniture piece
should be placed fully on the bearing surfaces
of the rolling supports.
• Shunt larger furniture pieces with assistance from
a second person.
• Ensure that there are no obstacles in the way on
the shunting route.
• Use the furniture transporter with rolling supports
only on level surfaces.
Intended Use
The furniture transporter with rolling supports is only
suitable for shunting furniture over short distances.
The furniture transporter with rolling supports is
NOT intended for commercial applications.
The manufacturer accepts no liability for damages
that result from improper use of the appliance or are
caused by the incorrect operation of it.
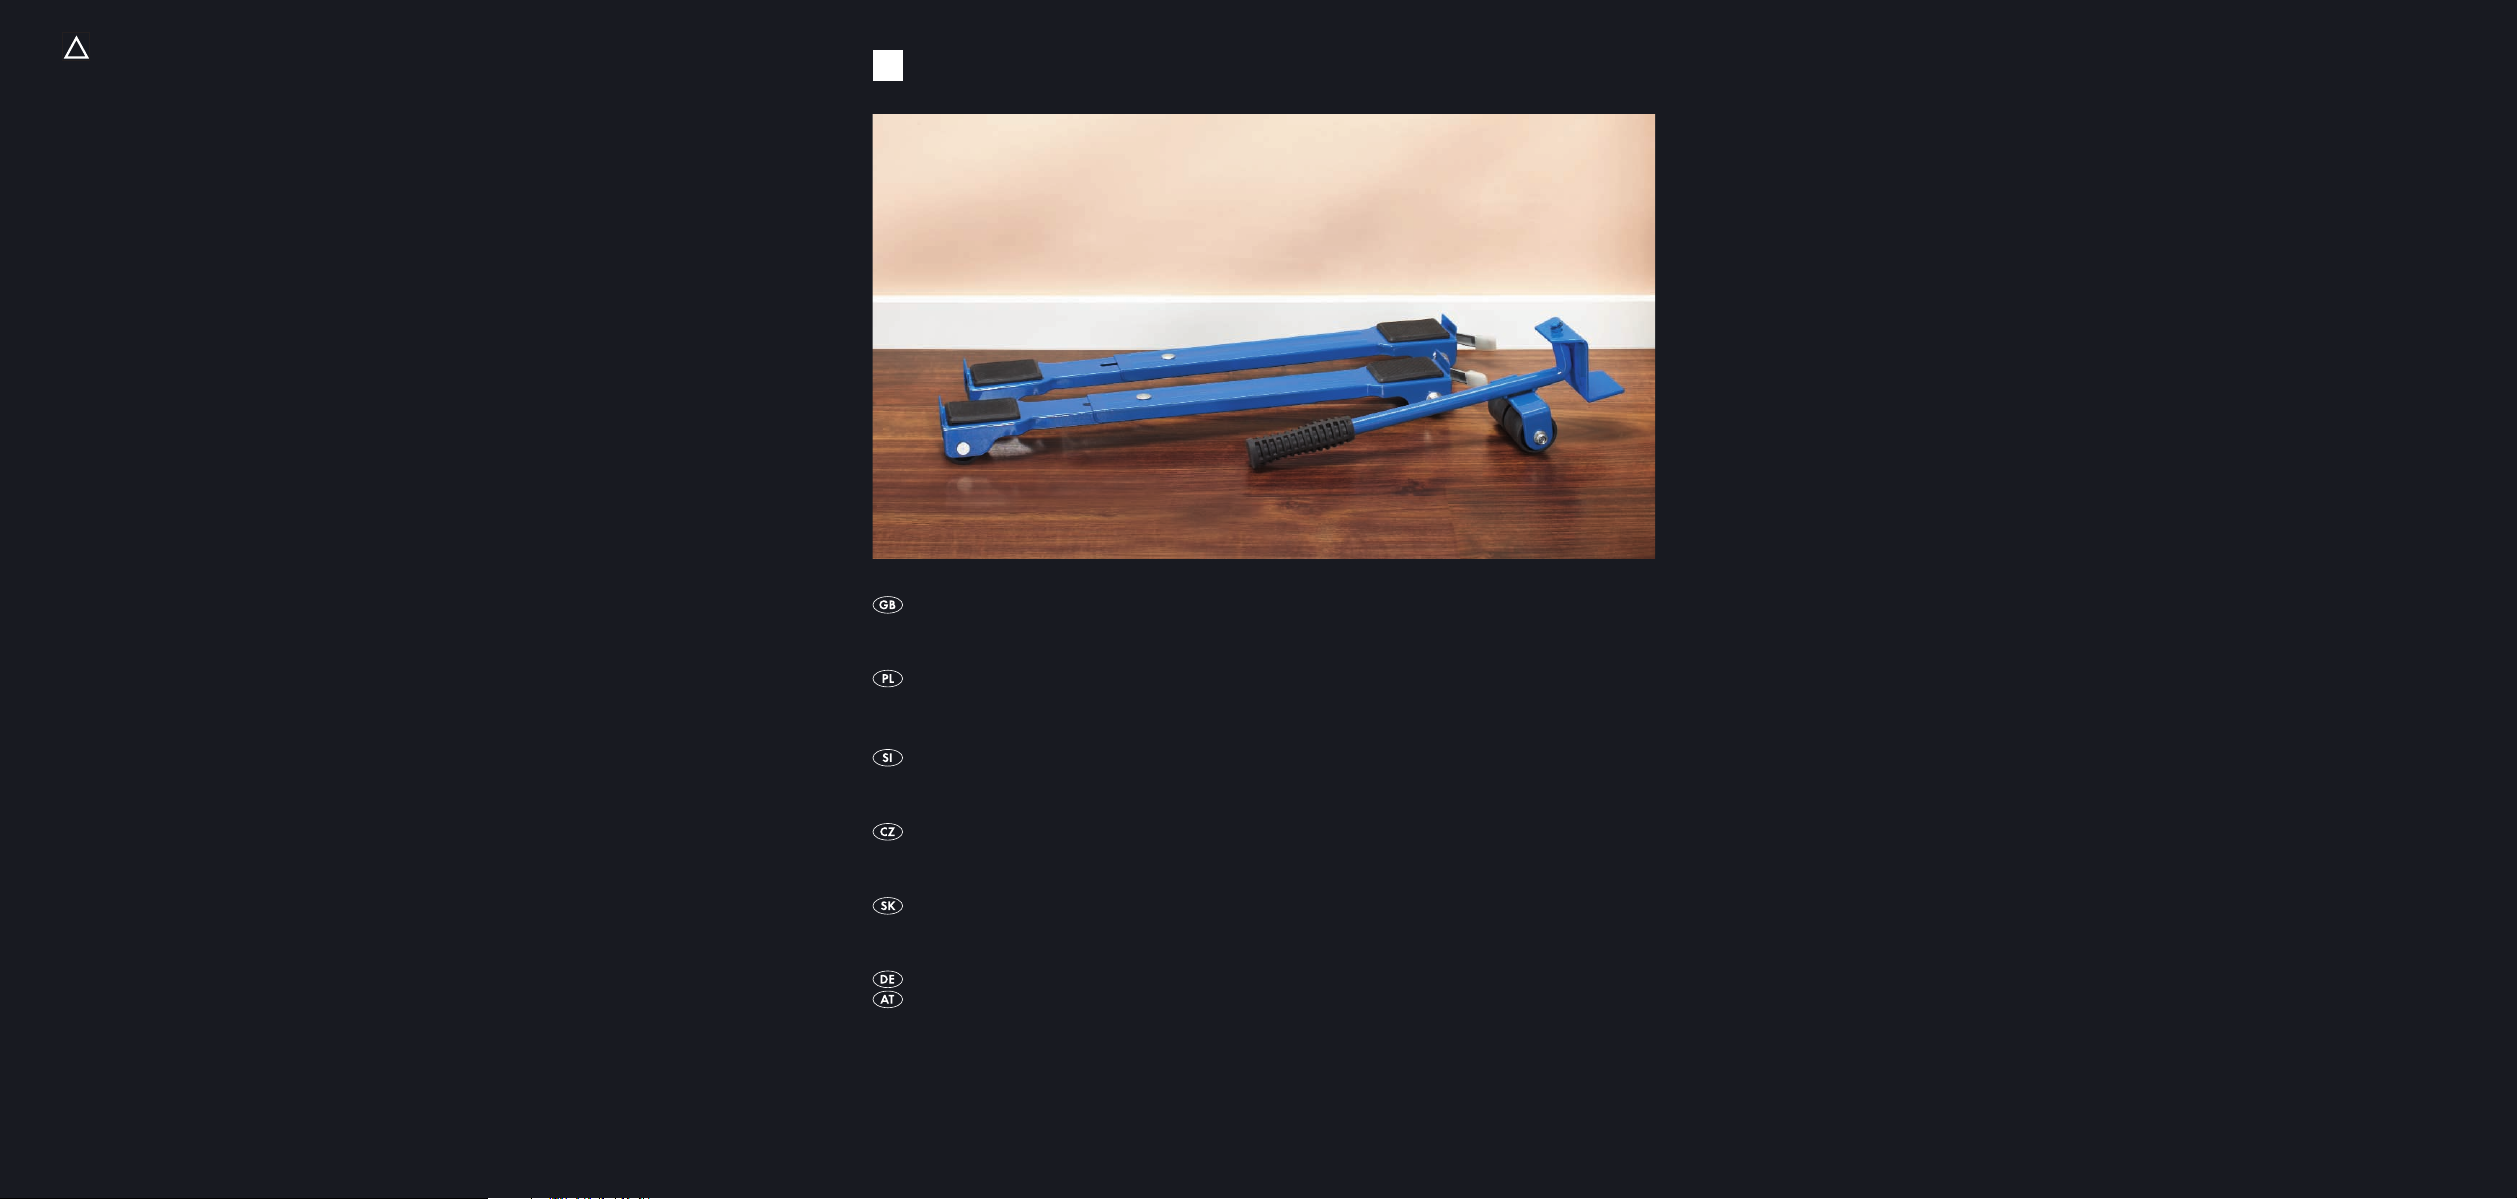
Items supplied
Immediately after unpacking check to ensure that
all components are available and that there are no
signs of visible damage to the furniture transporter
with rolling supports:
• 1 Lever arm with swivelling head
• 2 Rolling supports
• Operating Instructions
Property Damage!
• Remove the contents from furniture pieces before
lifting and shunting them.
• Incorrect placing of the lever arm may cause
damage to furniture. Always slide the swivel
head of the lever arm under the furniture to the
stop plate.
- 4 -
Page 5

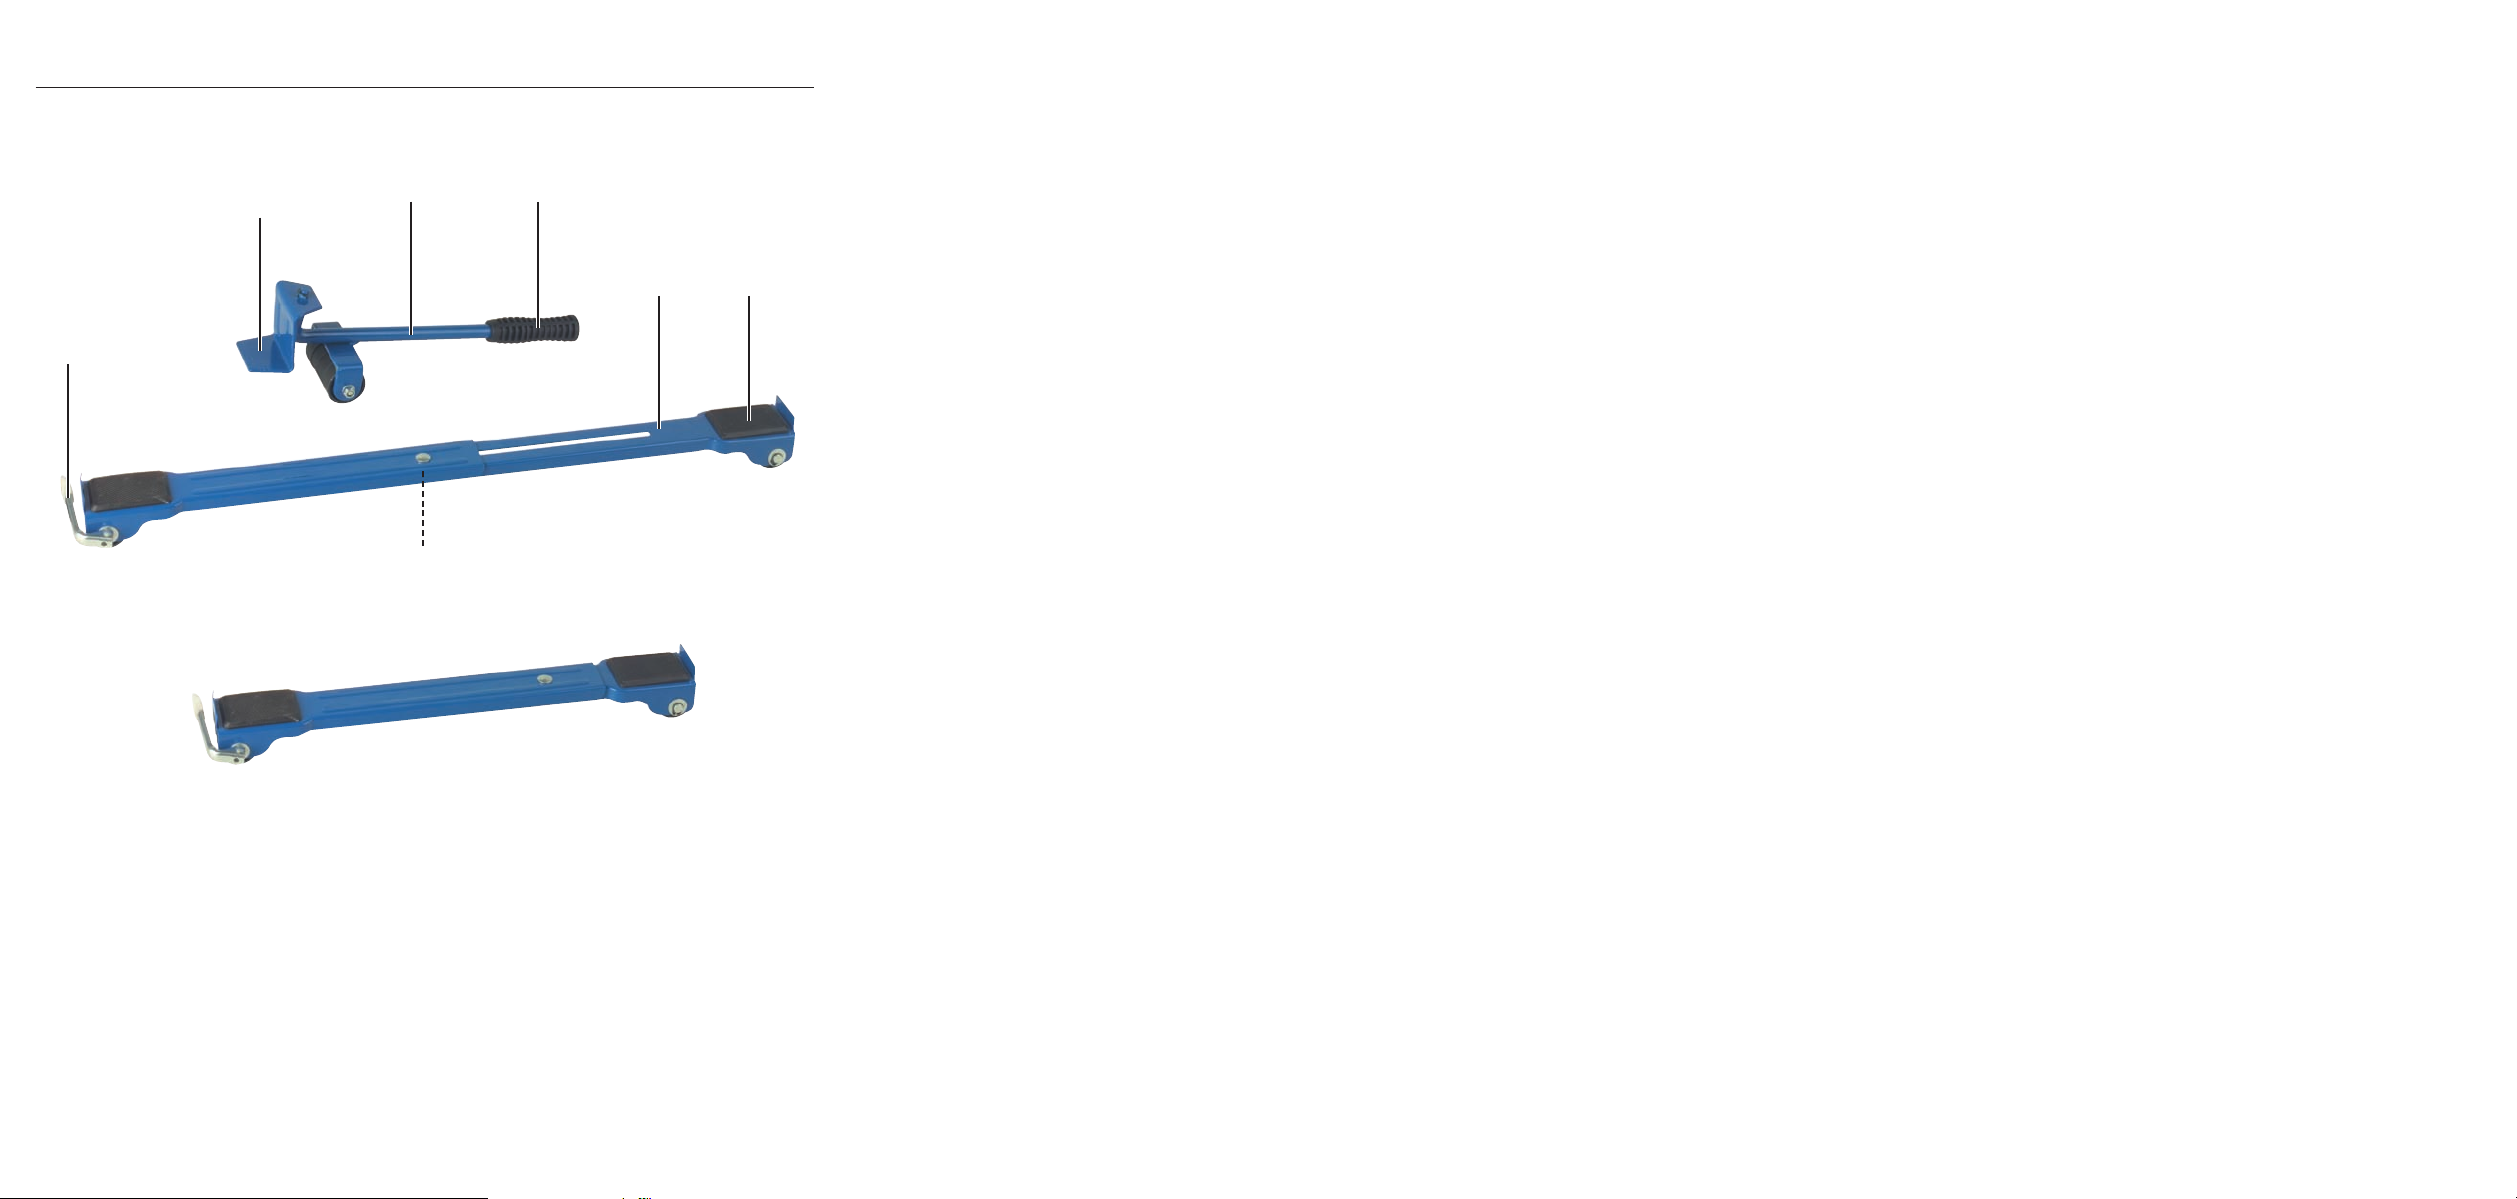
Appliance description
C
B
A
Lever arm
q
Hand grip
w
Rolling supports
e
Bearing surfaces
r
Wing nut
t
Parking brake
y
Swivel head
u
Technical data
Load capacity : 100 kg
Length, Rolling supports: 40 - 60 cm
Weight: ca. 1.7 kg
1. Hold the lever arm qat the hand grip w. With
this you will require the least effort.
2. Push the swivelling head
under the furniture and in the middle of it (A).
3. To lift the furniture, slowly press the lever arm
down (B).
4. Hold the lever arm
q
of the lever arm
u
pressed down.
q
q
Placing furniture on the rolling
supports
• Ensure that there is sufficient space available to
work safely.
• Remove obstacles, e.g. other furniture items,
within ca. 1,5 m from the rolling supports
• Loosen the wing nut
the rolling supports
piece. When done, retighten the wing nut
• Activate the parking brakes
supports
Note:
To avoid an irregular elevation, always place the
lever arm
.
e
in the middle of the side to be lifted.
q
and adjust the length of
t
to the size of the furniture
e
on the rolling
y
e
t
5. Place one roller base e(C) under each raised
corner of the furniture piece.
.
.
- 5 -
Page 6

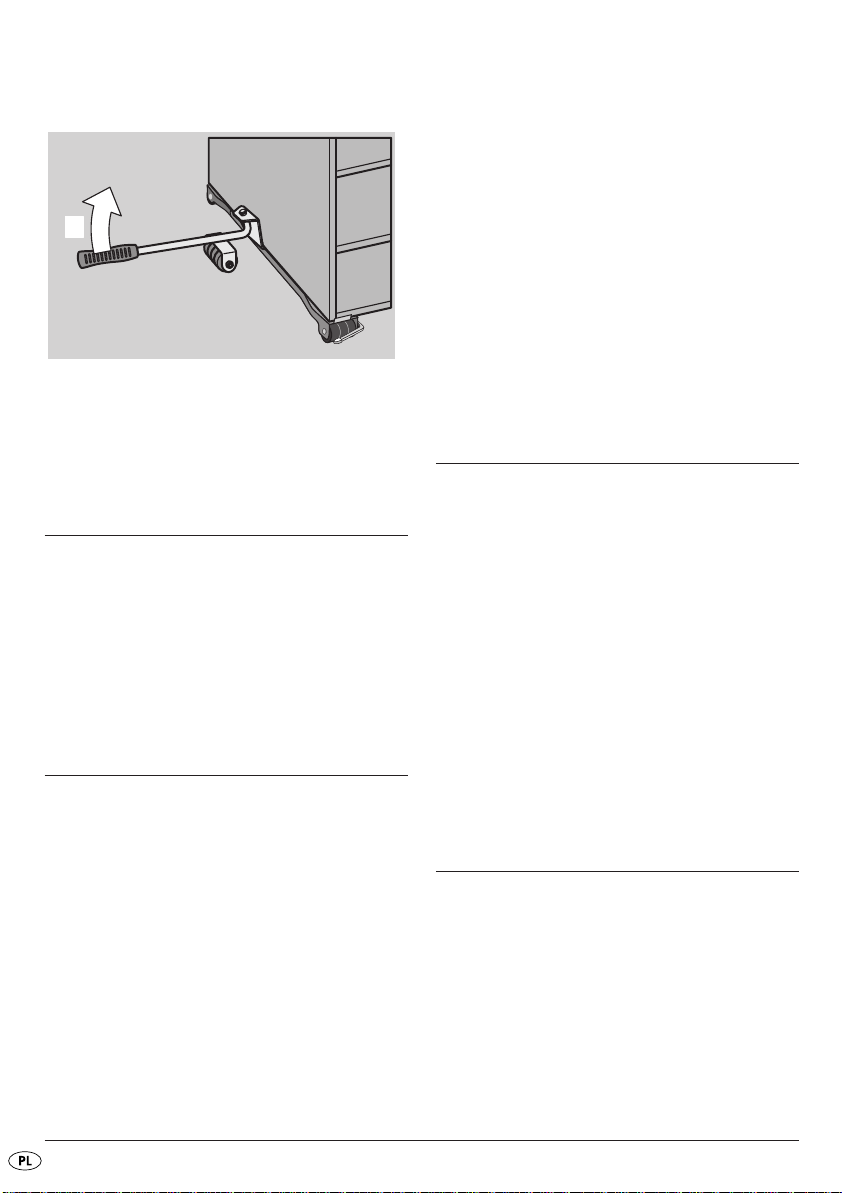
6. To lower the furniture piece onto the roller base
D
, slowly lift the lever arm q(D).
e
Note:
Hold the lever arm qat the hand grip w. With this
you will require the least effort.
7. Remove the lever arm q.
8. Repeat the above procedure for the opposite
side of the furniture piece.
Shunting furniture
1. Adjust both of the rolling supports eso that the
wheels all face in the same direction.
2. Release the parking brakes
supports
3. Pull/push the furniture piece to the desired location
with the assistance of the rolling supports
e
.
on the rolling
y
e.
Removing the rolling supports
2. To lift the furniture, slowly press the lever arm
down.
3. Hold the lever arm
4. Remove the rolling supports
5. To lower the furniture piece, slowly lift the lever
arm
.
q
6. Remove the lever arm
7. Repeat the above procedure for the opposite
side of the furniture piece.
pressed down.
q
e
.
q
.
Troubleshooting
The furniture piece is very difficult to shunt.
• Adjust the rolling supports eso that all of the
wheels are facing in the same direction.
• Check to ensure that the parking brakes
the rolling supports have been released.
The furniture piece tips easily.
• Place the rolling supports eunder the extreme
corners of the furniture piece. Thereby, the furniture
piece should be placed fully on the bearing surfaces of the rolling supports
e
.
y
on
q
Note:
To avoid an irregular elevation, always place the
lever arm qin the middle of the side to be lifted.
1. Push the swivelling head uof the lever arm
under the furniture and in the middle of it.
Cleaning
Important
It is possible to damage the furniture transporter
q
and the rolling supports
When cleaning the lever arm
supports
aggressive cleaning agents that could damage the
paint.
Clean the lever arm
only with a moist cloth.
- 6 -
NEVER use benzene, solvents or other
e
.
e
q
and the rolling supports
q
and the rolling
e
Page 7

Storage
Store the furniture transporter with rolling supports
at a dry location with standard room temperatures.
The furniture transporter with rolling supports can
also be stored in its original packaging.
Disposal
Do not dispose of the appliance in your normal
domestic waste.
Dispose of the appliance through an approved disposal centre or at your community waste facility.
Observe the currently applicable regulations.
In case of doubt, please contact your waste disposal
centre.
Dispose of all packaging materials in an
environmentally friendly manner.
Importer
KOMPERNASS GMBH
BURGSTRASSE 21
D-44867 BOCHUM
www.kompernass.com
- 7 -
Page 8

- 8 -
Page 9

Spis treści STRONA
Wskazówki bezpieczeństwa 10
Użytkowanie zgodne z przeznaczeniem 10
Zakres dostawy 10
Opis urządzania 11
Dane techniczne 11
Ustawienie mebla na podkładkach 11
Przesuwanie mebla 12
Wyjmowanie podkładek 12
Pomoc w usuwaniu usterek 12
Czyszczenie 12
Przechowywanie 13
Utylizacja 13
Importer 13
Przed pierwszym użyciem urządzenia należy dokładnie przeczytać niniejszą instrukcję obsługi i zachować ją na
przyszłość. Przekazując urządzenie innej osobie należy jej również udostępnić niniejszą instrukcję obsługi.
- 9 -
Page 10

TRANSPORTER DO
MEBLI KH 3277
Wskazówki bezpieczeństwa
Zagrożenia odniesienia obrażeń!
• Chwiejące ciężary mogą być przyczyną odniesienia ciężkich obrażeń ciała. Upewnij się, że ciężar
nie będzie się chwiał podczas transportu.
Skorzystaj z pomocy drugiej osoby.
Przesuwaj ciężar powoli.
• Opuszczane w niekontrolowany sposób ciężary
mogą być przyczyną odniesienia ciężkich obrażeń
ciała. Wszelkie ciężary opuszczaj zawsze pod
kontrolą.
• Nigdy nie używaj uszkodzonego ramienia i
podkładek.
• Nigdy nie wykonuj przedłużeń ramienia.
• Przed przystąpieniem do transportu mebli wyposażonych w drzwi, zabezpiecz je przed przypadkowym otwarciem.
• Upewnij się, że na drodze transportu nie stoją
żadne przeszkody.
• Transporter do mebli z podkładkami używaj
wyłącznie na płaskim podłożu.
• Podkładki podkładaj pod mebel zawsze w ten
sposób, aby rolki były skierowane w tym samym
kierunku.
• Nie należy pozwalać dzieciom ani osobom
wymagającym opieki na posługiwanie się urządzeniem bez nadzoru. Nie zawsze mogą one
być w stanie prawidłowo ocenić ewentualne
niebezpieczeństwa.
• Podkładki podkładaj pod mebel w jego czterech
rogach. Cały mebel powinien przy tym opierać
się na powierzchni nośnej podkładek.
• Meble o większych rozmiarach transportuj
zawsze z pomocą drugiej osoby.
• Upewnij się, że na drodze transportu nie stoją
żadne przeszkody.
• Transporter do mebli z podkładkami używaj
wyłącznie na płaskim podłożu.
Użytkowanie zgodne
z przeznaczeniem
Transporter do mebli z podkładkami służy wyłącznie
do transportowania mebli na krótki odcinkach.
Transporter do mebli i cztery podkładki nie są
przystosowane do użytku komercyjnego.
Producent urządzenia nie ponosi odpowiedzialności
za szkody spowodowane użytkowaniem niezgodnym
z przeznaczeniem lub nieprawidłową obsługą urządzenia.
Zakres dostawy
Zaraz po otwarciu opakowania sprawdź, czy w zestawie znajdują się wszystkie elementy urządzenia oraz
czy transporter do mebli i podkładki są w pełni
sprawne.
• 1 ramię z ruchomą głowicą
• 2 podkładki
• Instrukcja obsługi
Szkody rzeczowe!
• Przed przystąpieniem do transportu opróżnij
zawartość mebla.
• Nieprawidłowe przyłożenie ramienia do mebla
może spowodować różne uszkodzenia. Ruchomą
głowicę wsuwaj zawsze do oporu pod mebel.
- 10 -
Page 11
Opis urządzania
C
B
A
Ramię
q
Uchwyt
w
Podkładki
e
Powierzchnie podparcia
r
Nakrętka motylkowa
t
Hamulec postojowy
y
Ruchoma głowica
u
Dane techniczne
Nośność : 100 kg
Długość podkładki: 40 - 60 cm
Masa: ca. 1,7 kg
1. Chwyć ramię qza uchwyt w. W ten sposób
użyjesz najmniej siły do podniesienia ciężaru.
2. Ruchomą głowicę
mebel (A) dokładnie pośrodku boku.
3. W celu podniesienia mebla, powoli dociśnij
w dół ramię
4. Przytrzymaj ramię
q
(B).
u ramienia
w tym położeniu.
q
wsuń pod
q
Ustawienie mebla na
podkładkach
• Upewnij się, że dostępna przestrzeń zapewnia
bezpieczną pracę.
• Odsuń wszystkie możliwe przeszkody, np. pozostałe meble stojące w promieniu około 1,5 m od
podkładek
• Odkręć nakrętkę motylkowa
podkładek
z powrotem nakrętkę motylkową
• Zaciągnij hamulce postojowe w
UWAGA
Aby uniknąć nierównomiernego podnoszenia ciężaru,
przykładaj ramię
boku mebla.
.
e
i dopasuj długość
t
do mebla. Następnie dokręć
e
t
podkładkach e.
y
zawsze pośrodku podnoszonego
q
.
5. Pod każdy z podniesionych rogów mebla wsuń
po jednej podkładce
e
(C).
- 11 -
Page 12
6. Aby opuścić mebel i posadowić go na podkładce
D
, powoli podnieś ramię q(D).
e
7. Wyciągnij ramię q.
8. Powtórz te same czynności z naprzeciwległej
strony mebla.
UWAGA:
Chwyć ramię qza uchwyt w. W ten sposób
użyjesz najmniej siły do podniesienia ciężaru.
2. W celu podniesienia mebla, powoli dociśnij
w dół ramię
3. Przytrzymaj ramię
4. Wyjmij podkładkę
5. W celu opuszczenia mebla, powoli podnieś
ramię
q
6. Wyciągnij ramię
7. Powtórz te same czynności z naprzeciwległej
strony mebla.
.
q
w tym położeniu.
q
.
e
.
.
q
Pomoc w usuwaniu usterek
Przesuwanie mebla
1. Wyrównaj obie podkładki ew taki sposób,
aby rolki były skierowane w jednym kierunku.
2. Zwolnij hamulce postojowe
.
e
3. Za pomocą podkładek
wybrane miejsce.
w podkładkach
y
przesuń mebel w
e
Wyjmowanie podkładek
UWAGA:
Aby uniknąć nierównomiernego podnoszenia ciężaru,
przykładaj ramię
nego boku mebla.
1. Wsuń ruchomą głowicę uramienia qpod
środek mebla.
zawsze pośrodku podnoszo-
q
Do przesuwania mebla trzeba używać dużo
siły.
• Podkładki e wyrównaj w ten sposób, by rolki
były skierowane w jednym kierunku.
• Sprawdź, czy hamulce postojowe
podkładkach są zwolnione.
y
w
Mebel jest lekko przechylony.
• Umieść podkładki epod zewnętrznymi
narożnikami mebla. Cały mebel powinien się
przy tym opierać na powierzchni nośnej
podkładek
e
.
Czyszczenie
Uwaga
Występuje zagrożenie uszkodzenia transportera do
mebli i podkładek
Do czyszczenia ramienia
należy stosować benzyny, rozpuszczalników ani
agresywnych środków czyszczących, gdyż mogą
one spowodować uszkodzenie powierzchni lakieru.
Ramię
wilgotną szmatką.
i podkładki enależy czyścić wyłącznie
q
e
.
i podkładek enie
q
- 12 -
Page 13

Przechowywanie
Transporter do mebli oraz podkładki należy przechowywać w suchym miejscu w temperaturze pokojowej.
Transporter do mebli wraz z podkładkami można
także przechowywać w opakowaniu.
Utylizacja
Urządzenia nie wolno wyrzucać do zwykłych
odpadów komunalnych.
Urządzenie należy poddać utylizacji w akredytowanym zakładzie utylizacji lub komunalnym zakładzie
utylizacji odpadów.
Należy przestrzegać aktualnie obowiązujących
przepisów.
W razie pytań należy skontaktować się z komunalnym zakładem utylizacji odpadów.
Wszystkie materiały wchodzące w skład
opakowania należy przekazać do odpowiednich punktów zbiórki odpadów.
Importer
KOMPERNASS GMBH
BURGSTRASSE 21
D-44867 BOCHUM
www.kompernass.com
- 13 -
Page 14

- 14 -
Page 15

KAZALO VSEBINE STRAN
Varnostni napotki 16
Predvidena uporaba 16
Obseg dobave 16
Opis naprave 17
Tehnični podatki 17
Podstavitev pohištvene podloge s kolesci 17
Premikanje pohištva 18
Odstranjevanje podlog s kolesci 18
Pomoč pri težavah 18
Čiščenje 18
Shranjevanje 19
Odstranitev 19
Proizvajalec 19
Pred prvo uporabo ta navodila skrbno preberite in jih shranite za poznejšo uporabo.
Ob predaji naprave tretji osebi zraven priložite tudi navodila za uporabo.
- 15 -
Page 16

TRANSPORTNI VOZIČEK
ZA POHIŠTVO KH 3277
Varnostni napotki
Nevarnost poškodb!
• Nevarnost poškodb pri nagibanju težkih predmetov. Poskrbite, da se težki predmeti med premikanjem ne bodo mogli nagibati. Pri tem naj
vam pomaga še ena oseba.
Tovor premikajte počasi.
• Nevarnost poškodb pri premikanju nepritrjenih
težkih predmetov. Pri razkladanju težkih predmetov
bodite pazljivi.
• Ročica in podloge s kolesci, ki jih uporabljate,
naj bodo vedno v brezhibnem stanju.
• Ročice ne podaljšujte.
• Vrata pohištva, ki ga boste premikali, predhodno
zavarujte pred nehotenim odpiranjem.
• Poskrbite, da na poti ne bo nobenih ovir.
• Transportni voziček za pohištvo s podlogami
s kolesci uporabljajte le na ravni podlagi.
• Podloge s kolesci podstavite pod pohištvo tako,
da bodo njihova kolesca obrnjena v isto smer.
• Otrokom in osebam, ki jih je potrebno nadzorovati,
ne dovolite nenadzorovanega rokovanja s transportnim vozičkom za pohištvo. Ti mogoče ne
znajo zmeraj pravilno oceniti možnih nevarnosti.
• Podloge s kolesci vedno postavite pod zunanje
vogale pohištva. To se mora enakomerno prilegati odlagalnim površinam podlog s kolesci.
• Pri premikanju večjih delov pohištva naj vam nekdo
pomaga.
• Poskrbite, da na poti ne bo nobenih ovir.
• Transportni voziček za pohištvo s podlogami
s kolesci uporabljajte le na ravni podlagi.
Predvidena uporaba
Transportni voziček za pohištvo s podlogami s kolesci je
namenjen premikanju pohištva na krajših razdaljah.
Transportni voziček za pohištvo s podlogami s kolesci ni
namenjen za komercialno uporabo.
Proizvajalec ne odgovarja za škodo, ki bi nastala
zaradi nepredvidene ali napačne uporabe.
Obseg dobave
Takoj po odpakiranju vsebine paketa transportnega
vozička s podlogami s kolesci preverite, če so
v njem vsi sledeči deli:
• 1 ročica s premično glavo
• 2 podlogi s kolesci
• Navodila za uporabo
Materialne poškodbe!
• Pri dvigovanju in prevažanju stvari na transportnem vozičku za pohištvo bodite varno odmaknjeni.
• Pri napačni podstavitvi ročice se pohištvo, ki ga
prevažate lahko poškoduje. Glavo ročice transportnega vozička za pohištvo vedno pomaknite
do konca pod del pohištva.
- 16 -
Page 17

Opis naprave
C
B
A
Ročica
q
Ročaj
w
Podlogi s kolesci
e
Odlagalne površine
r
Krilata matica
t
Zaustavitvena zavora
y
Premična glava
u
Tehnični podatki
Obremenitev: 100 kg
Dolga podloga s kolesci: 40–60 cm
Teža: ca. 1,7 kg
1. Ročico
najmanj moči.
2. Premično glavo
pod kos pohištva (A).
3. Za dvig pohištva potisnite ročico
navzdol (B).
4. Ročico
primite za ročaj w. Tako potrebujete
q
ročice qvstavite na sredini
u
držite potisnjeno navzdol.
q
q
počasi
Podstavitev pohištvene podloge
s kolesci
• Zagotovite si zadosten prostor za delo.
• Na primer, odstranite vse ovire, ki so podlogam
s kolesci
• Odvijte krilato matico
po dolžini prilagodite kosu pohištva. Krilato matico
potem ponovno privijte.
t
• Sprožite zaustavitveni zavori
kolesci
Napotek:
Da preprečite neenakomerno dviganje, ročico
vedno vstavite na sredino strani za dviganje.
bližje od 1,5 m.
e
.
e
in podlogi s kolesci
t
podlog s
y
5. Podlogi s kolesci e(C) eno za drugo namestite
pod vogale dela pohištva.
e
q
- 17 -
Page 18

6. Ko je podloga s kolesci epod vogali pohištva,
D
ročico
7. Odstranite ročico q.
8. Ponovite isti postopek tudi na drugi strani dela
pohištva.
počasi dvignite (D).
q
Premikanje pohištva
1. Obe podlogi s kolesci eporavnajte tako,
da bodo kolesca obrnjena v isto smer.
2. Sprostite zaustavitveni zavori
s kolesci
3. Del pohištva sedaj lahko s pomočjo podlog
s kolesci
.
e
premaknete na želeno mesto.
e
y
podlog
Odstranjevanje podlog s kolesci
Napotek:
Ročico qprimite za ročaj w. Tako potrebujete
najmanj moči.
2. Za dvig dela pohištva, ročico qpočasi potisnite
navzdol.
3. Ročico
4. Odstranite podlogi s kolesci
5. Za spuščanje dela pohištva, ročico
sprostite.
6. Odstranite ročico
7. Postopek ponovite tudi na drugi strani pohištva.
ohranite potisnjeno navzdol.
q
e
.
q
.
počasi
q
Pomoč pri težavah
Pri premikanju dela pohištva potrebujete
veliko moči.
• Podlogi s kolesci eporavnajte tako, da bodo
vsa kolesca obrnjena v isto smer.
• Preverite, ali sta zaustavitveni zavori
s kolesci sproščeni.
Pohištvo se lahko hitro nagne.
• Podlogi s kolesci epostavite enakomerno pod
zunanje vogale dela pohištva. Slednji se mora
enakomerno prilegati odlagalnim površinam
podlog s kolesci
e
.
y
podlog
Napotek:
Da preprečite neenakomerno dvigovanje, ročico
vedno namestite na sredini dela pohištva za dviganje.
1. Premično glavo
pod del pohištva (A) na sredini.
spojite z ročico qin jo vstavite
u
Čiščenje
q
Pozor
Možna je poškodba transportnega vozička za
pohištvo in podlog s kolesci
Za čiščenje ročice
ne uporabljajte bencina, topil ali agresivnih čistil,
ker bi ti lahko poškodovali lak.
Za čiščenje ročice
rabljajte izključno vlažno krpo.
- 18 -
in podlog s kolesci enikoli
q
in podlog s kolesci eupo-
q
e
.
Page 19

Shranjevanje
Transportni voziček za pohištvo s podlogami s kolesci
hranite na suhem, pri normalni sobni temperaturi.
Transportni voziček za pohištvo s podlogami s kolesci
imate lahko shranjen tudi v originalni embalaži.
Odstranitev
Priprave v nobenem primeru ne odvrzite
v običajne hišne smeti.
Pripravo oddajte pri podjetju, registriranem za predelavo odpadkov, ali pri svojem komunalnem podjetju za predelavo odpadkov.
Upoštevajte trenutno veljavne predpise.
V primeru dvoma se obrnite na svoje podjetje za
predelavo odpadkov.
Vse embalažne materiale oddajte v reciklažo.
Proizvajalec
KOMPERNASS GMBH
BURGSTRASSE 21
D-44867 BOCHUM
www.kompernass.com
- 19 -
Page 20

- 20 -
Page 21

OBSAH STRANA
Bezpečnost 22
Účel použití 22
Rozsah dodávky 22
Popis přístroje 23
Technické údaje 23
Postavení nábytku na válečkovou podložku 23
Posunutí nábytku 24
Odstranění válečkových podložek 24
Pomoc pro případ vad 24
Čištění 24
Úschova 25
Likvidace 25
Dovozce 25
Před prvním použitím si pozorně přečtěte návod k obsluze a uschovejte jej pro pozdější potřebu.
Při předávání zařízení třetím osobám předejte i tento návod.
- 21 -
Page 22

TRANSPORTNÍ
PLOŠINA KH 3277
Bezpečnost
Nebezpečí poranění!
• Vzhledem k naklápění břemen hrozí nebezpečí
vážných zranění. Zajistěte, aby se přepravované
břemeno nemohlo naklopit. Pracujte vždy s pomocníkem.
Břemenem pohybujte jen pomalu.
• Při nekontrolovaném spouštění břemen hrozí
nebezpečí poranění. Břemeno spouštějte jen
pomalu.
• Rameno páky a válečkové podložky používejte
jen, jsou-li v nezávadném stavu.
• Rameno páky nikdy neprodlužujte.
• Před manipulací zajistěte dvířka od nábytku,
aby se nemohla otevřít.
• Zajistěte, aby v cestě nestály žádné překážky.
• Transportní plošinu používejte jen na rovných
plochách.
• Válečkové podložky pod nábytkem nasměrujte
tak, aby válečky ukazovaly stejným směrem.
• Nikdy nenechávejte děti a nesvéprávné osoby,
aby s transportní plošinou manipulovaly bez
dozoru. Nemusí vždy bezpečně rozpoznat možná
nebezpečí.
• Umístěte podložky s kolečky pod vnější rohy
nábytku. Nábytek by přitom měl celou plochou
přiléhat na dosedací plochy podložek s kolečky.
• Při manipulaci s většími kusy nábytku vždy pracujte
společně s pomocníkem.
• Zajistěte, aby v cestě nestály žádné překážky.
• Transportní plošinu používejte jen na rovných
plochách.
Účel použití
Transportní plošina s podložkami s kolečky je vhodná
jen pro přepravu nábytku na krátké vzdálenosti.
Transportní plošina s podložkami s kolečky není
určena k průmyslovému použití.
Výrobce neodpovídá za škody vzniklé použitím
k jinému účelu nebo za škody vzniklé nesprávnou
obsluhou.
Rozsah dodávky
Zkontrolujte hned po vybalení, zda je dodávka úplná
a transportní plošina s podložkami s kolečky nevykazuje žádné vady:
• 1 rameno páky s pohyblivou hlavou
• 2 podložky s kolečky
• Návod k použití
Hmotné škody!
• Před zvednutím a manipulací nábytek vyprázdněte.
• Při nesprávném nasazení ramena páky může dojít
k poškození nábytku. Zasuňte pohyblivou hlavu
ramena páky pod nábytek vždy až na doraz.
- 22 -
Page 23

Popis přístroje
C
B
A
rameno páky
q
rukojeť
w
podložky s kolečky
e
dosedací plochy
r
křídlová matice
t
zajišťovací brzda
y
pohyblivá hlava
u
Technické údaje
Zatížitelnost: 100 kg
Délka podložky s kolečky: 40-60 cm
Hmotnost: ca 1,7 kg
1. Rameno pákyquchopte vždy za rukojeťw.
Tak budete potřebovat nejméně síly.
2. Zasuňte pohyblivou hlavu
doprostřed pod nábytek (A).
3. Abyste kus nábytku zdvihli, stlačte rameno páky
ramena páky q
u
q pomalu směrem dolů (B).
4. Držte rameno páky
q stlačené.
Postavení nábytku na válečkovou
podložku
• Zajistěte, aby bylo dost místa pro bezpečnou
práci.
• Odstraňte překážky jako např. jiné kusy nábytku
v okruhu cca 1,5 m od válečkových podložek
• Uvolněte křídlovou matici
podložek s kolečky
Křídlovou matici
• Zatáhněte za zajišťovací brzdy
s kolečky
Abyste zamezili nerovnoměrnému zvednutí, nasaďte
rameno páky
e
Poznámka:
q vždy do středu zvedané strany.
e
poté opět pevně přitáhněte.
t
.
a upravte délku
t
podle velikosti nábytku.
podložek
y
e
5. Zasuňte válečkovou podložku e(C) pod oba
zvedané rohy nábytku.
.
- 23 -
Page 24

6. Ke spuštění nábytku na podložku s kolečky
D
pomalu zvedejte rameno páky q(D).
7. Odstraňte rameno páky q.
8. Zopakujte tyto kroky i na protilehlé straně nábytku.
e
Poznámka:
Rameno páky q uchopte vždy za rukojeť w. Tak
budete potřebovat nejméně síly.
2. Abyste kus nábytku zdvihli, stlačte rameno páky
pomalu směrem dolů.
q
3. Držte rameno páky
4. Odstraňte podložku s kolečky
5. Abyste nábytek spustili, zvedněte pomalu rameno
páky
.
q
6. Odstraňte rameno páky.
7. Zopakujte tyto kroky i na protilehlé straně nábytku.
stlačené.
q
q
.
e
.
Pomoc pro případ vad
Posunutí nábytku
1. Narovnejte obě podložky s kolečky etak, aby
kolečka směřovala jedním směrem.
2. Uvolněte zajišťovací brzdy
.
e
3. Posuňte nábytkem pomocí válečkových podložek
na požadované místo.
e
podložek s kolečky
y
Odstranění válečkových podložek
Poznámka:
Abyste zamezili nerovnoměrnému zvednutí, nasaďte
rameno páky q vždy do středu zvedané strany.
1. Zasuňte pohyblivou hlavu uramena páky
doprostřed pod nábytek.
q
Kus nábytku se dá jen těžko posunout.
• Narovnejte válečkové podložky etak, aby
válečky směřovaly jedním směrem.
• Zkontrolujte, zda jsou zajišťovací brzdy
podložek s kolečky uvolněné.
y
Nábytek se snadno převrátí.
• Umístěte podložky s kolečky epod vnější rohy
nábytku. Nábytek by přitom měl celou plochou
přiléhat na dosedací plochy podložek s kolečky
.
e
Čištění
Pozor
Může dojít k poškození transportní plošiny s podložek
s kolečky
K čištění ramena páky
nepoužívejte nikdy benzín, rozpouštědla ani agresivní
čisticí prostředky, mohlo by dojít k poškození laku.
Rameno páky
výhradně vlhkým hadříkem.
.
e
a podložek s kolečky
q
a podložky s kolečky ečistěte
q
e
- 24 -
Page 25

Úschova
Transportní plošinu s podložkami s kolečky skladujte
v suchém prostředí při běžné pokojové teplotě.
Transportní plošinu s podložkami s kolečky můžete
uložit i do obalu.
Likvidace
Přístroj v žádném případě neodhazujte do
obvyklého domovního odpadu.
Přístroj předejte k likvidaci odborné firmě či jej
odevzdejte ve Vašem místním recyklačním zařízení.
Dodržujte aktuálně platné předpisy.
V případě pochyb se poraďte s recyklační firmou.
Také všechny obalové materiály zlikvidujte
v souladu s ekologickými předpisy.
Dovozce
KOMPERNASS GMBH
BURGSTRASSE 21
D-44867 BOCHUM
www.kompernass.com
- 25 -
Page 26

- 26 -
Page 27

OBSAH STRANA
Bezpečnostné pokyny 28
Používanie primerané účelu 28
Obsah dodávky 28
Popis prístroja 29
Technické údaje 29
Položenie kusa nábytku na vodiace podpery s valcami 29
Premiestnenie kusa nábytku 30
Odstránenie vodiacich podpier 30
Pomoc pri problémoch 30
Čistenie 30
Uskladnenie 31
Likvidácia 31
Dovozca 31
Pred prvým použitím si pozorne prečítajte návod na používanie a uschovajte ho pre prípadné ďalšie použitie.
Pri odovzdaní prístroja tretej osobe ho odovzdajte spolu s návodom.
- 27 -
Page 28

TRANSPORTÉR NA
NÁBYTOK KH 3277
Bezpečnostné pokyny
Nebezpečenstvo poranenia!
• Prevrátenie nákladu môže spôsobiť ťažké poranenia. Zabezpečte, aby sa prepravovaný náklad
nemohol prevrátiť. Je vhodné, aby pritom pomáhala ďalšia osoba.
S nákladom pohybujte len pomaly.
• Nekontrolované spúšťanie nákladu môže spôsobiť
vážne poranenia. Nechajte náklad klesnúť len
kontrolovane.
• Pákové rameno a vodiace podpery používajte
len v prípade, že sú v bezchybnom stave.
• Nepredlžujte pákové rameno.
• Pred prepravou zabezpečte dvere na jednotlivých
kusoch nábytku proti nechcenému otvoreniu.
• Zabezpečte, aby na celej prepravnej dráhe
nestáli v ceste žiadne prekážky.
• Transportér na nábytok s vodiacimi podperami
používajte len na rovnom podklade.
• Nasmerujte vodiace podpery s valcami pod
kusom nábytku tak, aby všetky valce smerovali
v jednom smere.
• Nenechávajte deti a osoby, ktoré vyžadujú dohľad,
aby manipulovali s transportérom na nábytok bez
dohľadu. Nemusia vždy bezpečne rozpoznať
možné nebezpečenstvá.
• Umiestnite vodiace podpery s valcami pod vonkajšie rohy kusa nábytku. Kus nábytku má pritom
stáť celou plochou na dosadacej ploche vodiacich
podpier.
• Väčšie kusy nábytku prepravujte za pomoci
ďalšej osoby.
• Zabezpečte, aby na celej prepravnej dráhe
nestáli v ceste žiadne prekážky.
• Transportér na nábytok s valcovými podperami
používajte len na rovnom podklade.
Používanie primerané účelu
Transportér na nábytok s vodiacimi podperami je
vhodný len na prepravu kusov nábytku na krátke
vzdialenosti.
Transportér na nábytok s vodiacimi podperami nie
je určený na profesionálne použitie.
Výrobca neručí za škody, ktoré sú spôsobené nesprávnou obsluhou alebo používaním na iné než
určené účely.
Obsah dodávky
Ihneď po vybalení skontrolujte, či je obsah dodávky
úplný a stav transportéra na nábytok s vodiacimi
podperami s valcami bezchybný:
• 1 pákové rameno s pohyblivou hlavou
• 2 vodiace podpery s valcami
• Návod na používanie
Vecné škody!
• Pred zdvíhaním a prepravou kusov nábytku
z nich odstráňte obsah.
• Pri nesprávnom nasadení pákového ramena
môže dôjsť k poškodeniu kusov nábytku. Vždy
zasuňte pohyblivú hlavu pákového ramena pod
kus nábytku až na doraz.
- 28 -
Page 29

Popis prístroja
C
B
A
Pákové rameno
q
Rukoväť
w
Vodiace podpery s valcami
e
Dosadacia plocha
r
Krídlová matica
t
Parkovacia brzda
y
Pohyblivá hlavica
u
Technické údaje
Zaťažiteľnosť : 100 kg
Dĺžka vodiacich podpier: 40 - 60 cm
Hmotnosť: asi 1,7 kg
1. Chyťte pákové rameno
Tak budete potrebovať najmenšiu silu.
2. Zasuňte pohyblivú hlavicu
do stredu pod kus nábytku (A).
q
3. Aby ste zdvihli kus nábytku, pomaly tlačte pákové
rameno
4. Držte pákové rameno
nadol (B).
q
za rukoväť w.
q
pákového ramena
u
stlačené.
q
Položenie kusa nábytku na
vodiace podpery s valcami
• Zabezpečte, aby ste mali dostatok miesta pre
bezpečnú prácu.
• Odstráňte všetky prekážky, ako sú napr. iné kusy
nábytku v okruhu asi 1,5 m okolo vodiacich podpier
.
e
• Uvoľnite krídlovú maticu
vodiacich podpier
Potom krídlovú maticu
• Stlačte parkovaciu brzdu
.
e
Upozornenie:
Ak sa chcete vyhnúť nerovnomernému zdvíhaniu,
nasaďte pákové rameno
zdvíhanej strane.
e
a prispôsobte dĺžku
t
príslušnému kusu nábytku.
znova pevne dotiahnite.
t
vodiacich podpier
y
vždy do stredu na
q
5. Zasuňte po jednej vodiacej podpere e(C) pod
každý z oboch zdvihnutých rohov kusa nábytku.
- 29 -
Page 30

6. Keď chcete kus nábytku spustiť na vodiace podpery
D
, pomaly zdvíhajte pákové rameno qnahor
e
(D).
Upozornenie:
Chyťte pákové rameno qza rukoväť w. Tak budete
potrebovať najmenšiu silu.
2. Aby ste zdvihli kus nábytku, pomaly tlačte
pákové rameno
3. Držte pákové rameno
4. Odstráňte vodiace podpery
5. Keď chcete kus nábytku spustiť, pomaly
zdvihnite pákové rameno
6. Odstráňte pákové rameno
7. Zopakujte celý tento postup pre náprotivnú
stranu kusa nábytku.
q
nadol.
q
stlačené.
.
e
nahor.
q
.
q
7. Odstráňte pákové rameno
8. Zopakujte celý tento postup pre náprotivnú
stranu kusa nábytku.
q
.
Premiestnenie kusa nábytku
1. Nasmerujte vodiace podpery etak, aby ich
valce smerovali jedným smerom.
2. Uvoľnite parkovaciu brzdu
.
e
3. Pomocou vodiacich podpier
nábytku na požadované miesto.
vodiacich podpier
y
premiestnite kus
e
Odstránenie vodiacich podpier
Upozornenie:
Ak sa chcete vyhnúť nerovnomernému zdvíhaniu,
nasaďte pákové rameno
zdvíhanej strane.
1. Zasuňte pohyblivú hlavicu upákového ramena
do stredu pod kus nábytku.
q
vždy do stredu na
q
Pomoc pri problémoch
Kus nábytku sa dá len ťažko premiestniť.
• Nasmerujte vodiace podpery etak, aby ich
valce smerovali jedným smerom.
• Skontrolujte, či sú parkovacie brzdy
podpier uvoľnené.
vodiacich
y
Kus nábytku sa mierne nakláňa.
• Umiestnite vodiace podpery s valcami epod
vonkajšie rohy kusa nábytku. Kus nábytku má
pritom stáť celou plochou na dosadacej ploche
vodiacich podpier
e
.
Čistenie
Pozor
Je možné poškodenie transportéra na nábytok
a vodiacich podpier
Na čistenie pákového ramena
nikdy nepoužite benzín, rozpúšťadlá ani agresívne
e
čistiace prostriedky, pretože tieto všetky môžu poškodiť
lak.
Pákové rameno
čistite výlučne vlhkou handrou.
.
e
a vodiacich podpier
q
a vodiace podpery s valcami
q
e
- 30 -
Page 31

Uskladnenie
Transportér na nábytok a vodiace podpery s valcami
skladujte na suchom mieste pri normálnej izbovej
teplote.
Transportér na nábytok s vodiacimi podperami
s valcami môžete skladovať aj v pôvodnom balení.
Likvidácia
Prístroj v žiadnom prípade nevyhadzujte do
normálneho domáceho odpadu.
Zlikvidujte prístroj v príslušnom zariadení (firme)
na likvidáciu odpadu.
Dbajte na aktuálne platné predpisy.
V prípade pochybností sa spojte so zariadením na
likvidáciu odpadu.
Všetok baliaci materiál zlikvidujte ekologickým
spôsobom.
Dovozca
KOMPERNASS GMBH
BURGSTRASSE 21
D-44867 BOCHUM
www.kompernass.com
- 31 -
Page 32

- 32 -
Page 33

INHALTSVERZEICHNIS SEITE
Sicherheitshinweise 34
Bestimmungsgemäßer Gebrauch 34
Lieferumfang 34
Gerätebeschreibung 35
Technische Daten 35
Möbelstück auf die Rollunterlagen stellen 35
Möbelstück verschieben 36
Rollunterlagen entfernen 36
Hilfe bei Fehlern 36
Reinigen 36
Aufbewahren 37
Entsorgen 37
Importeur 37
Lesen Sie die Bedienungsanleitung vor der ersten Verwendung aufmerksam durch und heben Sie diese für
den späteren Gebrauch auf. Händigen Sie bei Weitergabe des Gerätes an Dritte auch die Anleitung aus.
- 33 -
Page 34

MÖBELTRANSPORTER
KH 3277
Sicherheitshinweise
Verletzungsgefahren!
• Durch kippende Lasten sind schwere
Verletzungen möglich. Stellen Sie sicher, dass
die zu transportierende Last nicht kippen kann.
Lassen Sie eine zweite Person mithelfen.
Bewegen Sie die Last nur langsam.
• Durch unkontrolliert abgesenkte Lasten sind
Verletzungen möglich. Lassen Sie die Last nur
kontrolliert ab.
• Verwenden Sie den Hebelarm und die Rollunterlagen nur in einwandfreiem Zustand.
• Verlängern Sie nicht den Hebelarm.
• Sichern Sie Türen von Möbelstücken vor dem
Transport gegen unbeabsichtigtes Öffnen.
• Stellen Sie sicher, dass auf dem Transportweg
keine Hindernisse im Weg stehen.
• Verwenden Sie den Möbeltransporter mit Rollunterlagen nur auf ebenen Flächen.
• Richten Sie die Rollunterlagen unter dem Möbelstück so aus, dass die Rollen in die gleiche Richtung zeigen.
• Lassen Sie Kinder und aufsichtsbedürftige Personen nicht unbeaufsichtigt mit dem Möbeltransporter hantieren. Diese können mögliche
Gefahren nicht immer richtig einschätzen.
Sachschäden!
• Entfernen Sie vor dem Anheben und Transport
den Inhalt aus den Möbelstücken.
• Durch falsches Ansetzen des Hebelarms sind Beschädigungen der Möbelstücke möglich.
Schieben Sie den beweglichen Kopf des Hebelarms immer bis zum Anschlag unter die Möbelstücke.
• Platzieren Sie die Rollunterlagen unter die äußeren Ecken des Möbelstücks. Das Möbelstück soll
dabei vollflächig auf den Auflageflächen der
Rollunterlagen aufliegen.
• Transportieren Sie größere Möbelstücke
zusammen mit einer zweiten Person.
• Stellen Sie sicher, dass auf dem Transportweg
keine Hindernisse im Weg stehen.
• Verwenden Sie den Möbeltransporter mit Rollunterlagen nur auf ebenen Flächen.
Bestimmungsgemäßer
Gebrauch
Der Möbeltransporter mit Rollunterlagen ist nur für
das Transportieren von Möbelstücken über kurze
Strecken geeignet.
Der Möbeltransporter mit vier Rollunterlagen ist
nicht für den gewerblichen Einsatz vorgesehen.
Der Hersteller haftet nicht für Schäden, die durch
nicht bestimmungsgemäßen Gebrauch oder falsche
Bedienung verursacht werden.
Lieferumfang
Kontrollieren Sie unmittelbar nach dem Auspacken,
ob der Lieferumfang vollständig und der Zustand
des Möbeltransporters mit Rollunterlagen einwandfrei ist:
• 1 Hebelarm mit beweglichem Kopf
• 2 Rollunterlagen
• Bedienungsanleitung
- 34 -
Page 35

Gerätebeschreibung
C
B
A
Hebelarm
q
Handgriff
w
Rollunterlagen
e
Auflageflächen
r
Flügelmutter
t
Feststellbremse
y
Beweglicher Kopf
u
Technische Daten
Belastbarkeit : 100 kg
Länge Rollunterlage: 40 - 60 cm
Gewicht: ca. 1,7 kg
1. Fassen Sie den Hebelarm
an. So benötigen Sie am wenigsten Kraft.
2. Schieben Sie den beweglichen Kopf
belarms
3. Um das Möbelstück anzuheben, drücken Sie
den Hebelarm
4. Halten Sie den Hebelarm
mittig unter das Möbelstück (A).
q
langsam nach unten (B).
q
am Handgriff
q
gedrückt.
q
u
des He-
w
Möbelstück auf die
Rollunterlagen stellen
• Stellen Sie sicher, dass genügend Platz zum
sicheren Arbeiten vorhanden ist.
• Entfernen Sie Hindernisse wie z. B. andere
Möbelstücke im Umkreis von ca. 1,5 m um die
Rollunterlagen
• Lösen Sie die Flügelmutter
Länge der Rollunterlagen
an. Flügelmutter
festziehen.
• Betätigen Sie die Festellbremsen
unterlagen
Hinweis:
Um ein ungleichmäßiges Anheben zu vermeiden,
setzen Sie den Hebelarm
zuhebenden Seite an.
.
e
anschließend wieder
t
.
e
und passen Sie die
t
an das Möbelstück
e
y
immer mittig an der an-
q
5. Schieben Sie jeweils eine Rollunterlage e(C)
unter die beiden angehobenen Ecken des
Möbelstücks.
der Roll-
- 35 -
Page 36

6. Um das Möbelstück auf die Rollunterlage eab-
D
zusenken, heben Sie den Hebelarm
an (D).
q
langsam
Hinweis:
Fassen Sie den Hebelarm qam Handgriff wan.
So benötigen Sie am wenigsten Kraft.
2. Um das Möbelstück anzuheben, drücken Sie
den Hebelarm
3. Halten Sie den Hebelarm
4. Entfernen Sie die Rollunterlage
5. Um das Möbelstück abzusenken, heben Sie den
Hebelarm
6. Entfernen Sie den Hebelarm
7. Wiederholen Sie die Handlungsschritte für die
gegenüberliegende Seite des Möbelstücks.
langsam nach unten.
q
langsam an.
q
gedrückt.
q
q
e
.
.
7. Entfernen Sie den Hebelarm
8. Wiederholen Sie die Handlungsschritte für die
gegenüberliegende Seite des Möbelstücks.
q
.
Möbelstück verschieben
1. Richten Sie die beiden Rollunterlagen eso aus,
dass die Rollen in eine Richtung zeigen.
2. Lösen Sie die Festellbremsen
Rollunterlagen
3. Verschieben Sie das Möbelstück mit Hilfe der
Rollunterlagen
.
e
an den gewünschten Ort.
e
y
der
Rollunterlagen entfernen
Hinweis:
Um ein ungleichmäßiges Anheben zu vermeiden,
setzen Sie den Hebelarm
zuhebenden Seite an.
1. Schieben Sie die den beweglichen Kopf udes
Hebelarms
mittig unter das Möbelstück.
q
immer mittig an der an-
q
Hilfe bei Fehlern
Das Möbelstück lässt sich nur schwer
verschieben.
• Richten Sie die Rollunterlagen eso aus, dass
die Rollen in eine Richtung zeigen.
• Überprüfen Sie, ob die Festellbremsen
Rollunterlagen gelöst sind.
y
der
Das Möbelstück kippt leicht.
• Platzieren Sie die Rollunterlagen eunter die
äußeren Ecken des Möbelstücks. Das Möbelstück soll dabei vollflächig auf den Auflageflächen der Rollunterlagen
aufliegen.
e
Reinigen
Achtung
Beschädigung des Möbeltransporters und der
Rollunterlagen
Verwenden Sie für die Reinigung des Hebelarms
und der Rollunterlagen eniemals Benzin, Lösungsmittel oder aggressive Reinigungsmittel, der Lack
könnte dadurch angegriffen werden.
Reinigen Sie den Hebelarm
lagen
ausschließlich mit einem feuchten Tuch.
e
e
möglich.
und die Rollunter-
q
q
- 36 -
Page 37

Aufbewahren
Bewahren Sie den Möbeltransporter mit
Rollunterlagen in trockener Umgebung bei normaler
Raumtemperatur auf.
Sie können den Möbeltransporter mit Rollunterlagen
auch in der Verpackung aufbewahren.
Entsorgen
Werfen Sie das Gerät keinesfalls in den
normalen Hausmüll.
Entsorgen Sie das Gerät über einen zugelassenen
Entsorgungsbetrieb oder über Ihre kommunale
Entsorgungseinrichtung.
Beachten Sie die aktuell geltenden Vorschriften.
Setzen Sie sich im Zweifelsfall mit Ihrer Entsorgungseinrichtung in Verbindung.
Führen Sie alle Verpackungsmaterialien
einer umweltgerechten Entsorgung zu.
Importeur
KOMPERNASS GMBH
BURGSTRASSE 21
D-44867 BOCHUM
www.kompernass.com
- 37 -
Page 38

- 38 -
 Loading...