

Page 1

EU
KOMPERNAß GMBH · BURGSTRASSE 21 · D-44867 BOCHUM
www.kompernass.com
ID-Nr.: KH3256-01/08-V1
Page 2
WORKSHOP TOOL TROLLEY
Operating instructions
CHARIOT D'ATELIER
Mode d'emploi
CARRELLO PER OFFICINA
Istruzioni per l'uso
CARRINHO DE OFICINA
Manual de instruções
TYÖKALUVAUNU
Käyttöohje
VERKTYGSSKÅP PÅ HJUL
Bruksanvisning
DELAVNIŠKA OMARICA NA KOLESIH
Navodila za uporabo
WERKSTATTWAGEN
Bedienungsanleitung
KH 3256
Page 3
WORKSHOP TOOL
TROLLEY KH 3256
Intended use
Assembly material required
1 Rubber mallet
1 Cross-head screwdriver
1 Open-ended spanner M10
The rolling Workshop Tool Trolley is intended for
the storage and tidy arrangement of hand tools.
It is intended for domestic use only, not for
commercial purposes.
Items supplied
After unpacking, immediately check to determine
that all listed items are present and that there are no
visible damages
1 Lower cupboard
1 Top piece with 4 drawers
1 Shelf
2 Carrying handles
1 Storage tray
4 Transport roller-wheels
6 Attachment hooks
2 Hexagonal screws M10
2 Washers M10
8 Cross-head screws
1 Operating instruction pamphlet
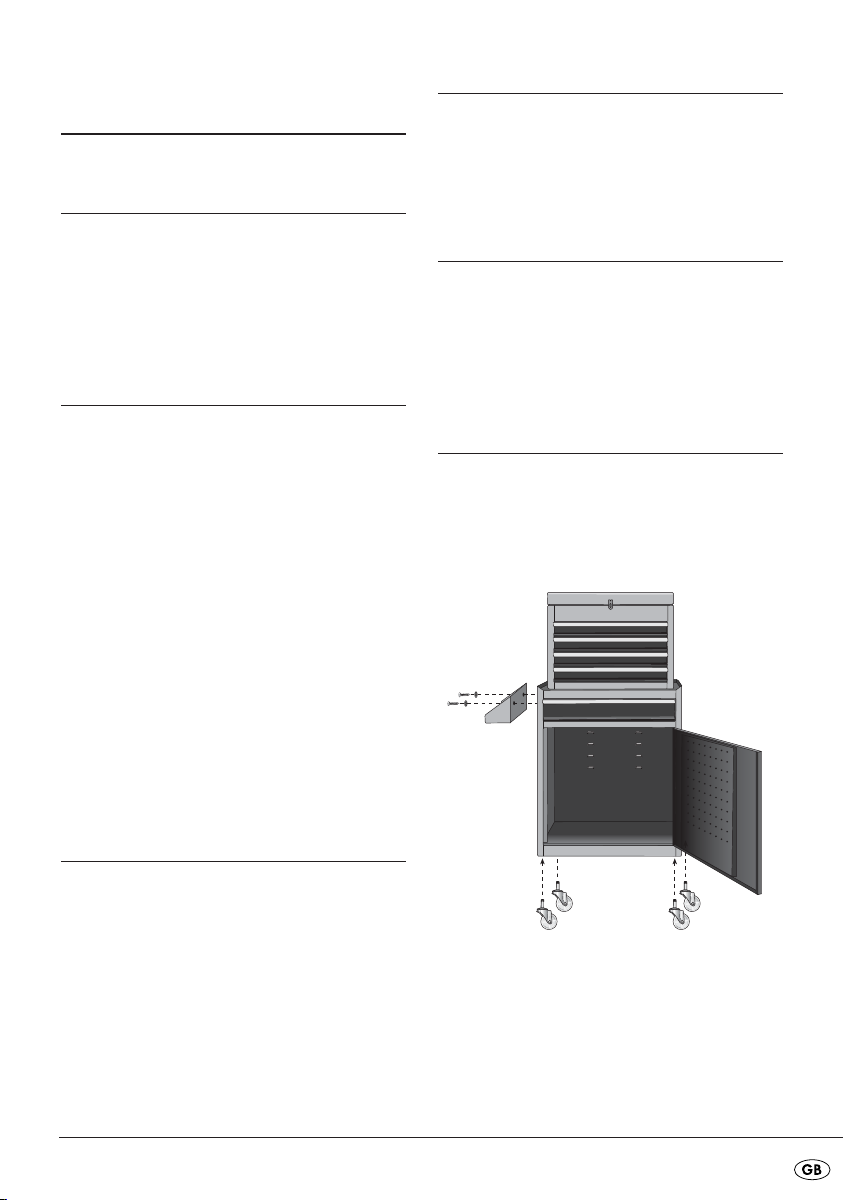
Assembling the roller-wheels
Carefully secure the four roller-wheels to the
lower cupboard with the help of a rubber
mallet (see Fig. 1).
Assembling the side storage
tray
Assemble the side storage tray to the lower cupboard with the hexagonal screws M10 and the
washers M10 (see Fig. 1). For this use the
openended spanner M10.
Safety notices
• Do not excessively burden the shelf and the
drawers.
• Store heavy objects in the lower part of the
Workshop Tool Trolley.
• Secure the wheels of the Workshop Tool Trolley against inadvertent rolling, e.g. by wedges.
Fig. 1
- 3 -
Page 4
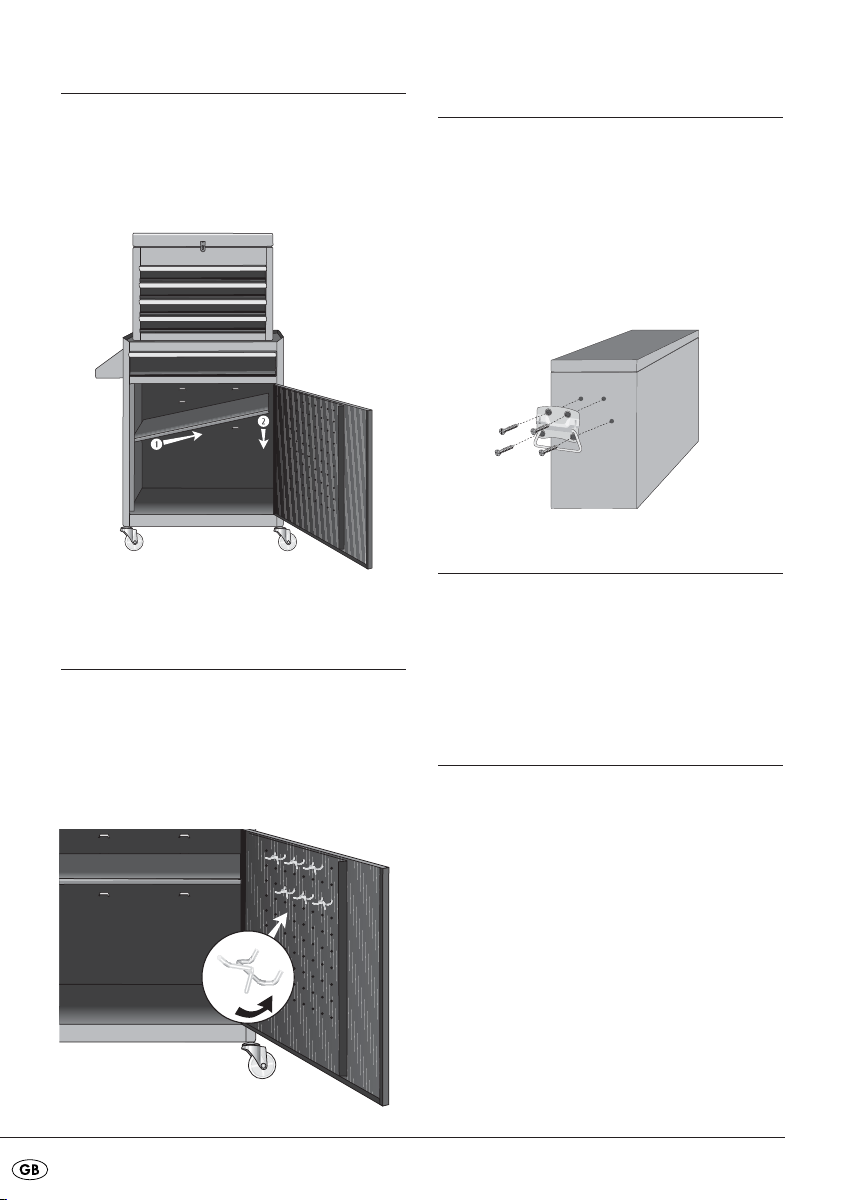
Assembling the shelf
Insert the shelf into the lower cupboard as shown
in Fig. 2.
Ensure that the shelf hooks itself into the rear and
lateral suspension points.
Assembling the carrying
handles
Fasten the carrying handles to both sides of the
top piece with the cross-head screws
(see Fig. 4).
The drawers of the top piece are fitted with a
central locking fixture. The drawers can only
be opened when the lid is open.
Fig. 4
Fig. 2
Assembling the attachment
hooks
Insert the attachment hooks at the de-sired positions on the door inner surface. To do this, insert
an attachment hook through two openings in the
perforated panel and then slowly press it down
(see Fig. 3).
Fig. 3
Cleaning
Clean the Workshop Tool Trolley with a lightly
moistened cloth. Aggressive cleaning materials
may not be used.
Disposal
Do not dispose of the appliance in your
normal domestic waste.
Dispose of the Workshop Tool Trolley through an
approved disposal centre or at your community
waste facility. Observe the currently applicable regulations. In case of doubt, please contact your
waste disposal centre.
- 4 -
Page 5

CHARIOT D'ATELIER
KH3256
Usage conforme
Le chariot d'atelier roulant offre un système de
rangement pratique pour les outils. Il est uniquement destiné à une utilisation privée et non
commerciale.
Accessoires fournis
Veuillez contrôler avant la première mise en service que l'emballage contient tous les éléments et
ne présente aucun dommage visible
1 armoire inférieure
1 élément supérieur avec 4 tiroirs
1 tablette
2 poignées de maintien
1 compartiment de rangement
4 roulettes de transport
6 crochets de fixation
2 vis à six pans creux M10
2 rondelles M10
8 vis cruciformes
1 mode d'emploi
Matériel de montage requis
1 maillet en caoutchouc
1 tournevis cruciforme
1 clé à fourche simple M10
Montage des roulettes de
transport
Fixez soigneusement les quatre roulettes de transport sur l'armoire inférieure à l'aide d'un maillet
en caoutchouc (voir fig. 1).
Montage du casier latéral
Montez le casier latéral sur l'armoire inférieure à
l'aide des vis à six pans creux M10 et des rondelles M10 (voir fig. 1). Utilisez pour cela une
clé à fourche simple M10.
Consignes de sécurité
• Ne posez pas de charge trop lourde sur la tablette et sur les étagères.
• Placez les objets lourds en bas du chariot d'atelier.
• Empêchez le chariot d'atelier de rouler, par
exemple en le bloquant à l'aide d'une câle en
bois.
Fig. 1
- 5 -
Page 6
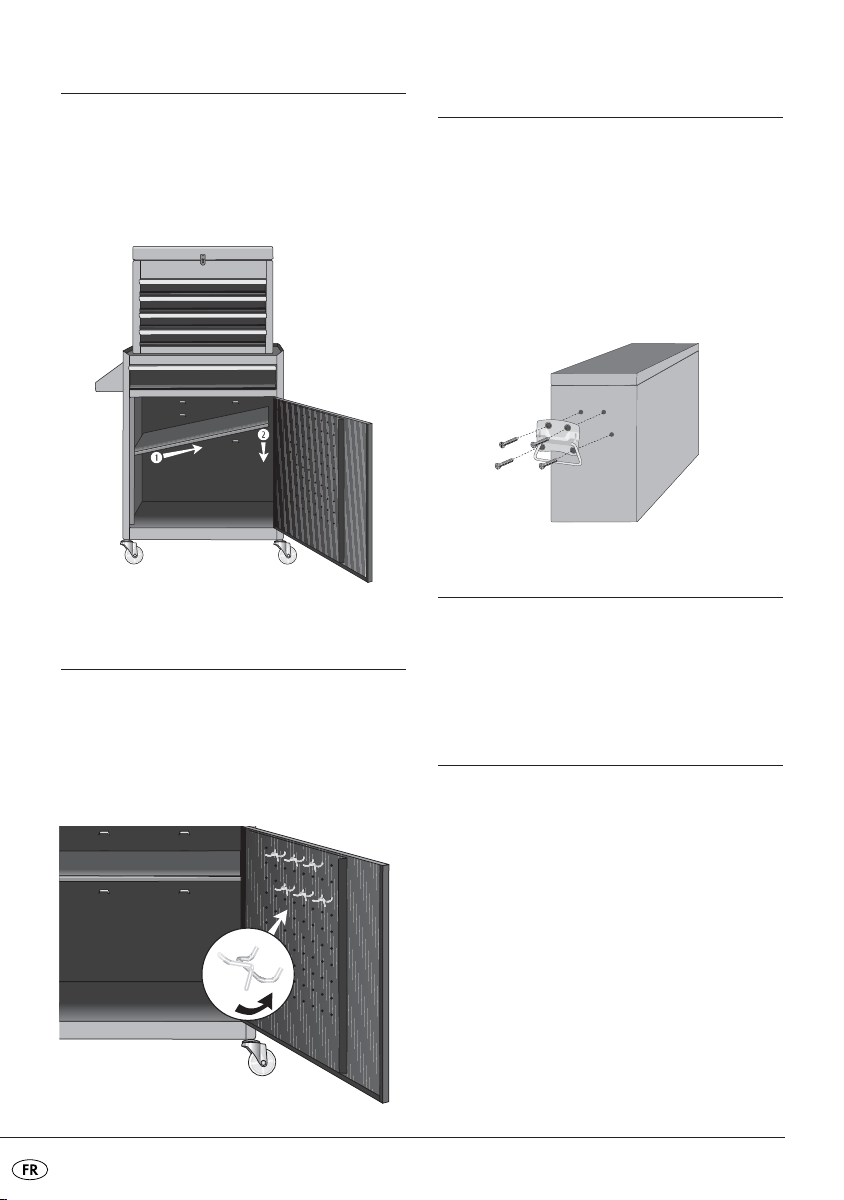
Montage de la tablette
Introduisez la tablette dans l'armoire inférieure,
comme indiqué à la fig. 2.
Assurez-vous que la tablette est encliquetée dans
les points de support arrières et latéraux.
Montage des poignées de
maintien
Fixez des deux côtés de l'élément supérieur les
poignées de maintien à l'aide des vis cruciformes
(voir fig. 4).
Les tiroirs de l'élément supérieur comportent
un verrouillage central. Les tiroirs ne s'ouvrent
que lorsque le couvercle est ouvert.
Fig. 4
Fig. 2
Montage des crochets de
fixation
Introduisez les crochets de fixation à la position
demandée sur le côté intérieur de la porte. Faites
passer pour cela le crochet de fixation à travers
deux ouvertures du masque perforé et abaissezle lentement (voir fig. 3).
Fig. 3
Nettoyage
Nettoyez le chariot d'atelier à l'aide d'un chiffon
légèrement humide. L'emploi de produits de
nettoyage puissants est interdit.
Mise au rebut
Le chariot d'atelier ne doit pas être jeté avec
les ordures ménagères normales.
Mettez au rebut le chariot d'atelier par l'intermédiaire d'une société de mise au rebut autorisée
ou de votre service communal de mise au rebut.
Veuillez respecter les règlements actuellement en
vigueur. En cas de doutes, contactez votre
organisation de recyclage.
- 6 -
Page 7

CARRELLO PER
OFFICINA KH3256
Uso conforme alla
destinazione
Materiale di montaggio
necessario
1 martello di gomma
1 cacciavite per viti con intaglio a croce
1 chiave fissa M10
Il carrello per officina con rotelle serve per raccogliere e disporre in modo ordinato gli utensili.
È previsto esclusivamente per l'uso privato non
commerciale.
Fornitura
Prima del primo impiego, controllare l'integrità e
la completezza della fornitura.
1 base
1 alzata con 4 cassetti
1 mensola
2 maniglie
1 portaoggetti
4 rotelle da trasporto
6 ganci di fissaggio
2 viti a testa esagonale M10
2 rondelle M10
8 viti con intaglio a croce
1 istruzioni per l'uso
Avvertenze di sicurezza
Montaggio delle rotelle da
trasporto
Fissare con cautela le quattro rotelle alla base
con l'aiuto di un martello di gomma (v. ill. 1).
Montaggio del portaoggetti
laterale
Montare il portaoggetti laterale sulla base tramite le viti a testa esagonale M10 e le rondelle
M10 (v. ill. 1). Utilizzare a tale scopo una chiave
fissa M10.
• Non sovraccaricare la mensola e i cassetti.
• Collocare gli oggetti più pesanti nella parte inferiore del carrello.
• Bloccare il carrello per impedirne il rotolamento involontario, ad es. con cunei di legno.
Ill 1
- 7 -
Page 8

Montaggio della mensola
Montaggio delle maniglie
Inserire la mensola nella base, come mostrato
nell'ill. 2.
Assicurarsi che la mensola sia agganciata ai
punti di fissaggio posteriori e laterali.
Ill. 2
Montaggio dei ganci di
fissaggio
Inserire i ganci di fissaggio nella posizione desiderata sul lato interno dell'anta. A tale scopo, inserire il gancio di fissaggio attraverso due aperture della griglia forata, premendolo lentamente
verso il basso (v. ill. 3).
Fissare le maniglie sui due lati dell'alzata utilizzando le viti con intaglio a croce (v. ill. 4).
I cassetti dell'alzata sono provvisti di blocco
centrale. Si possono aprire solo se il coperchio è aperto.
Ill. 4
Pulizia
Pulire il carrello per officina con un panno leggermente inumidito. Non utilizzare detergenti
aggressivi.
Smaltimento
Non smaltire assolutamente il carrello per
officina assieme ai normali rifiuti domestici.
Smaltire il carrello per officina tramite un'azienda
di smaltimento autorizzata o tramite l'ente di
smaltimento comunale competente. Rispettare le
norme attualmente in vigore. In caso di dubbio,
contattare l'azienda di smaltimento competente.
Ill. 3
- 8 -
Page 9

CARRINHO DE
OFICINA KH 3256
Utilização correcta
O carrinho de oficina com rodas serve para
guardar ferramentas, organizando-as de forma
clara. É adequado apenas para o uso provado e
não para uma utilização comercial.
Volume de fornecimento
Antes da primeira colocação em funciona-mento
verifique o Volume de fornecimento quanto a
integridade e eventuais danos visíveis
Material de montagem
necessário
1 Martelo em borracha
1 Chave de parafusos de estrela
1 Chave inglesa M10
Montar as rodas de
transporte
Fixe cuidadosamente as quatro rodas de transporte ao armário inferior, com o auxílio de um
martelo em borracha (ver Fig. 1).
Montar o compartimento
lateral
1 Armário inferior
1 Encaixe com 4 gavetas
1 Prateleira
2 Pegas
1 Compartimento
4 Rodas de transporte
6 Ganchos de fixação
2 Parafusos sextavados M10
2 Arruelas planas M10
8 Parafusos de estrela
1 Manual de instruções
Indicações de segurança
• Não carregue demasiado a prateleira e as gavetas.
• Coloque os objectos mais pesados na parte
inferior do carrinho de oficina.
• Proteja o carrinho contra um deslize inadvertido, p. ex. com um calço em madeira.
Monte o compartimento lateral com para-fusos
sextavados M10 e arruelas planas M10 no
armário inferior (ver Fig. 1). Para tal utilize uma
chave inglesa M10.
Fig. 1
- 9 -
Page 10

Montar a prateleira
Montar as pegas
Insira a prateleira no armário inferior, como
pode ver na Fig. 2.
Tenha atenção para que a prateleira fique segura nos pontos de alojamento traseiros e laterais.
Fig. 2
Montar os ganchos de
fixação
Insira os ganchos de fixação na parte interior da
porta, na posição pretendida. Para tal insira os
ganchos de fixação através de dois orifícios da
placa com orifícios e pressione lentamente para
baixo (ver Fig. 3).
Fixe em ambos os lados do compartimento as
pegas, utilizando os parafusos de estrela (ver
Fig. 4).
As gavetas do compartimento estão equipa-
das com um fecho central. Estas só podem
ser abertas quando também a tampa estiver
aberta.
Fig. 4
Limpar
Limpe o carrinho de oficina com um pano levemente húmido. Não podem ser utilizados
detergentes agressivos.
Eliminar
Nunca coloque o carrinho de oficina no
lixo doméstico normal.
Fig. 3
Elimine o carrinho de oficina através de uma instituição de recolha de resíduos autorizada ou
através da instituição de recolha do seu município. Tenha em consideração os regulamentos actualmente em vigor. Em caso de dúvida, entre em
contacto com a entidade de eliminação de resíduos.
- 10 -
Page 11

TYÖKALUVAUNU
KH3256
Määräystenmukainen käyttö
Tarvittava asennusmateriaali
1 kumivasara
1 ristipääruuvimeisseli
1 kiintoavain M10
Pyörillä varustettu työkaluvaunu on tarkoitettu
työkalujen säilytykseen ja selkeään järjestelyyn.
Se on tarkoitettu ainoastaan yksityiseen, ei
kaupalliseen käyttöön.
Toimituksen piiriin kuuluvat
osat
Tarkasta ennen ensimmäistä käyttöönottoa toimituksen täydellisyys ja mahdolliset näkyvät vauriot.
1 alakaappi
1 yläosa 4 laatikolla
1 välipohja
2 kahvaa
1 laskutaso
4 kuljetuspyörää
6 kiinnityskoukkua
2 kuusioruuvia M10
2 aluslevyä M10
8 ristipääruuvia
1 käyttöohje
Kuljetusrullien asentaminen
Kiinnitä varovasti neljä kuljetusrullaa alakaappiin
kumivasaran avulla (katso kuva 1).
Asenna sivuttainen laskutaso
Asenna sivuttainen laskutaso alakaappiin kuusioruuveilla M10 ja aluslevyillä M10 Käytä tähän
kiintoavainta M10.
Turvallisuusohjeet
• Älä kuormita välipohjaa ja laatikoita liian
voimakkaasti.
• Varastoi painavat esineet työkaluvaunun
alaosaan.
• Varmista työkaluvaunu tahattoman poisvierimisen varalta esim. puukiiloilla.
Kuva. 1
- 11 -
Page 12

Välipohjan asentaminen
Kahvojen asentaminen
Vie välipohja alakaappiin kuvassa 2 näytetyllä
tavalla.
Varmista, että välipohja on kiinni taaemmissa ja
sivuttaisissa tukipisteissä.
Kuva. 2
Kiinnityskoukkujen
asentaminen
Kiinnitä kahvat yläosan molemmille puolille
ristipääruuveilla (katso kuva 4).
Yläosan laatikot on varustettu kes-kuslukituk-
sella. Laatikot voidaan avata ainoastaan,
kun kansi on auki.
Kuva. 4
Puhdistus
Puhdista työkaluvaunu kevyesti kostutetulla liinalla. Älä käytä voimakkaita puhdistusaineita.
Hävittäminen
Työnnä kiinnityskoukut haluttuun paikkaan oven
sisäpuolelle. Vie tätä varten kiinnityskoukku kahden reikälevyn aukon läpi ja paina se hitaasti
alaspäin (katso kuva 3).
Kuva. 3
Älä missään tapauksessa heitä työkaluvaunua tavallisten kotitalousjätteiden sekaan.
Hävitä työkaluvaunu hyväksytyn jätehuol-toyrityksen tai kunnallisen jätelaitoksen kautta. Noudata
voimassa olevia määräyksiä. Epäselvissä tilanteissa ota yhte-yttä paikalliseen jätehuoltoviranomaiseen.
- 12 -
Page 13

VERKTYGSSKÅP PÅ
HJUL KH 3256
Föreskriven användning
Det här verktygsskåpet på hjul ska användas för
praktisk och överskådlig förvaring av verktyg.
Skåpet är endast avsett för privat bruk och ska
inte användas kommersiellt.
Leveransens omfattning
Kontrollera att leveransen är komplett och inte
har några synliga skador innan du börjar
använda skåpet
1 underskåp
1 överskåp med 4 lådor
1 iläggshylla
2 grepphandtag
1 förvaringsfack
4 hjul
6 fästkrokar
2 sexkantsskruvar M10
2 mellanläggsbrickor M10
8 stjärnskruvar
1 bruksanvisning
Nödvändigt
monteringsmaterial
1 gummihammare
1 stjärnskruvmejsel
1 skruvnyckel M10
Montera hjulen
Montera de fyra hjulen försiktigt på skåpet med
hjälp av en gummihammare (se Bild 1).
Montera sidofack
Fäst förvaringsfacket på sidan av under-skåpet
med sex M10 sexkantsskruvar och M10 mellanläggsbrickor (se Bild 1). Använd då en M10
skruvnyckel.
Säkerhetsanvisningar
• Belasta inte hyllan och lådorna för mycket.
• Förvara tunga föremål längst ner
i skåpet.
• Spärra hjulen så att skåpet inte kan komma i
rullning, t ex med träkilar.
Bild 1
- 13 -
Page 14

Montera iläggshyllan
Montera grepphandtagen
För in hyllan i underskåpet så som visas på Bild 2.
Se till att hyllan hakar fast i fästpunkterna, både
längst in och på sidorna.
Bild 2
Montera fästkrokarna
Sätt fästkrokarna där du vill ha dem på insidan
av skåpdörren. För då först in kroken genom två
hål på dörrens insida och tryck den långsamt neråt (se Bild 3).
Fäst grepphandtagen på båda sidor av överskåpet med stjärnskruvarna (se Bild 4).
Lådorna i överskåpet är försedda med en
central spärranordning. Lådorna kan bara
öppnas om locket också är öppet.
Bild 4
Rengöring
Torka bara av verktygsskåpet med en lätt fuktad
trasa. Du får inte använda några starka
rengöringsmedel.
Kassering
Bild 3
Verktygsskåpet får absolut inte kastas bland
de vanliga hushållssoporna.
Lämna in skåpet till ett företag som har tillstånd
att ta hand om den här sortens avfall eller till din
kommunala återvinningsanläggning. Följ gällande
föreskrifter. Ta kontakt med din avfallsanläggning
om du har några frågor.
- 14 -
Page 15

DELAVNIŠKA OMARICA NA KOLESIH
KH 3256
Predvidena uporaba
Delavniška omarica na kolesih je namenjena za
shranjevanje in pregledno razvrstitev orodja. Namenjena je le za zasebno, neposlovno uporabo.
Vsebina kompleta
Pred prvo uporabo preverite, ali ste prejeli vse
dele kompleta in ali ta morebiti nima vidnih
poškodb
1 spodnja omarica
1 zgornji del s 4 predali
1 polica
2 ročaja
1 odlagalni predal
4 kolesca
6 kavljev za orodje
2 šestrobna vijaka M10
2 podložki M10
8 križnih vijakov
1 navodilo za uporabo
Material za montažo
1 gumijasto kladivo
1 križni izvijač
1 viličasti ključ M10
Montaža kolesc
Na spodnjo omarico s pomočjo gumijastega kladiva (glejte sliko 1) previdno namestite štiri
kolesca.
Montaža stranskega
odlagalnega predala
Stranski odlagalni predal na spodnjo omarico
pritrdite s šestrobnima vijakoma M10 in podložkama M10 (glejte sliko 1). Pri tem uporabite
viličasti ključ M10.
Varnostni napotki
• Police in predalov ne obremenjujte preveč.
• Težke predmete naložite v najnižji del omarice.
• Omarico podložite, npr. z leseno klado, in jo
tako zavarujte pred nenamernim premikanjem.
Slika 1
- 15 -
Page 16

Montaža police
Montaža ročajev
Polico vstavite v spodnjo omarico, kot prikazuje
slika 2.
Pri tem pazite, da bo polica obešena na zadnje
in stranske nastavke.
Slika 2
Montaža kavljev za orodje
Kavlje za orodje vtaknite v želene odprtine na
notranji strani vrat. To storite tako, da vsak kavelj
vtaknete skozi dve odprtini na plošči z luknjicami
in ga po-časi potisnete navzdol (glejte sliko 3).
Na obeh straneh zgornjega dela namestite ročaje in jih privijte s križnimi vijaki (glejte sliko 4).
Predali zgornjega dela imajo centralno blo-
kado. Odpreti jih je mogoče le, ko je pokrov
odprt.
Slika 4
Čiščenje
Delavniško omarico čistite z rahlo navlaženo
krpo. Pri tem ni dovoljeno uporab-ljati nobenih
ostrih sredstev za čiščenje.
Odstranitev
Omarice v nobenem primeru ne odvrzite
med običajne gospodinjske odpadke.
Slika 3
Omarico oddajte pri podjetju, registriranem za
zgiranje odpadkov, ali pri komunalnem podjetju.
Upoštevajte trenutno veljavne predpise. V primeru dvoma se obrnite na svoje podjetje za
predelavo odpadkov.
- 16 -
Page 17

WERKSTATTWAGEN
KH3256
Bestimmungsgemäßer
Gebrauch
Der rollende Werkstattwagen dient zur Aufnahme und zur übersichtlichen Anordnung von Werkzeugen. Er ist nur für den privaten, nicht
kommerziellen Gebrauch bestimmt.
Benötigtes Montagematerial
1 Gummihammer
1 Kreuzschlitzschrauberdreher
1 Maulschlüssel M10
Transportrollen montieren
Befestigen Sie vorsichtig die vier Transportrollen
am Unterschrank mit Hilfe eines Gummihammers
(siehe Abb. 1).
Lieferumfang
Bitte überprüfen Sie vor der ersten Inbetriebnahme den Lieferumfang auf Vollständigkeit und
eventuell sichtbare Beschädigungen
1 Unterschrank
1 Aufsatz mit 4 Schubladen
1 Einlegeboden
2 Haltegriffe
1 Ablagefach
4 Transportrollen
6 Befestigungshaken
2 Sechskantschrauben M10
2 Unterlegscheiben M10
8 Kreuzschlitzschrauben
1 Bedienungsanleitung
Sicherheitshinweise
• Belasten Sie den Einlegeboden und
die Schubladen nicht zu stark.
• Lagern Sie schwere Gegenstände unten im
Werkstattwagen.
• Sichern Sie den Werkstattwagen gegen unbeabsichtigtes Wegrollen, z.B. durch Holzkeile.
Seitliches Ablagefach
montieren
Montieren Sie das seitliche Ablagefach mittels
Sechskantschrauben M10 und Unterlegscheiben
M10 am Unterschrank (siehe Abb. 1).
Verwenden Sie hierzu einen Maulschlüssel M10.
Abb.< 1
- 17 -
Page 18

Einlegeboden montieren
Haltegriffe montieren
Führen Sie den Einlegeboden, wie in Abb. 2
ersichtlich, in den Unterschrank ein.
Achten Sie darauf, dass der Einlegeboden an
den hinteren und an den seitlichen Aufnahmepunkten eingehakt ist.
Abb. 2
Befestigungshaken montieren
Stecken Sie die Befestigungshaken, an die gewünschte Position, in die Türinnenseite. Führen
Sie dazu den Befestigungshaken durch zwei Öffnungen der Lochmaske und drücken Sie ihn
langsam nach unten (siehe Abb. 3).
Befestigen Sie auf beiden Seiten des Aufsatzes
die Haltegriffe mit den Kreuzschlitzschrauben
(siehe Abb. 4).
Die Schubladen des Aufsatzes sind mit einer
Zentralverriegelung versehen. Die Schubladen lassen sich nur öffnen, wenn der Deckel
geöffnet ist.
Abb. 4
Reinigen
Reinigen Sie den Werkstattwagen mit einem
leicht angefeuchteten Tuch. Es dürfen keine scharfen Reinigungsmittel verwendet werden.
Entsorgen
Werfen Sie den Werkstattwagen keinesfalls
in den normalen Hausmüll.
Abb. 3
Entsorgen Sie den Werkstattwagen über einen
zugelassenen Entsorgungsbetrieb oder über Ihre
kommunale Entsorgungseinrichtung. Beachten Sie
die aktuell geltenden Vorschriften. Setzen Sie sich
im Zweifelsfall mit Ihrer Entsorgungseinrichtung in
Verbindung.
- 18 -
 Loading...