

Page 1

UK
KOMPERNASS GMBH · BURGSTRASSE 21 · D-44867 BOCHUM
www.kompernass.com
ID-Nr.: KH3157-03/07-V1
Page 2

®
Automatic Car Battery Charging Station
Operating Manual
Page 3

Page 4
A
B
C
Page 5

KH 3157
Content Page
For your safety 4
Proper Use 4
Delivery Contents 4
Component description 4
Technical Data 5
Safety information 5
Product features 7
Operation 8
Connection 8
Disconnecting 8
Select charging mode 8
Reset/deleting settings 9
Switching over between modes 1, 2 and 3 9
Mode 1 (14.4 V / 0.8 A) 9
Mode 2 (14.4 V / 3.6 A ) 10
Mode 3 (14.7 V / 3.6 A ) 10
Regenerating / charging empty (used, overcharged) batteries 10
Protective function of the device 11
Overheating protection 11
Maintenance and care 11
Disposal 11
Service 12
Importer 12
Read the operating instructions carefully before using the appliance for the first time
and preserve this booklet for later reference. Pass the manual on to whomsoever
might acquire the appliance at a later date.
- 3 -
Page 6

KH 3157
TRONIC T4X
Automatic Car Battery Charging Station
for rechargeable batteries/batteries
from 1.2 Ah to 120 Ah
For your safety
Please carefully read these operating
instructions and fold out the page with
the illustrations.Observe this information
exactly when putting the appliance into
operation. If you have any further
questions regarding use, please contact
the service department responsible for
your country. Keep these operating
instructions in a safe place and hand
them over to anyone to whom you
pass on the appliance.
Proper Use
The TRONIC T4X is a primarily mains-
connected (working with measuring and
control functions) charging station with
pulse trickle charge function, suitable
for charging and trickle charging 12 V
lead accumulators (batteries) with
electrolyte solution or gel. The charger
has a circuit-breaker as protection
against sparking and overheating.
Operate the charging appliance in a
warmed and well ventilated room. Any
incorrect or improper use leads to loss of
the warranty. The manufacturer takes
no responsibility for damage(s) arising
out of usage that is contrary to the
instructions laid down. The appliance is
not meant for commercial use.
Delivery Contents
Check the appliance and all accessories
for damage immediately after unpacking.
Do not put a defective appliance or
parts into operation. Please contact the
resonsible service department for
a replacement.
1 Charger TRONIC T4X
2 Quick/contact clamps
(1 red, 1 black)
1 Operating manual
Guarantee documents
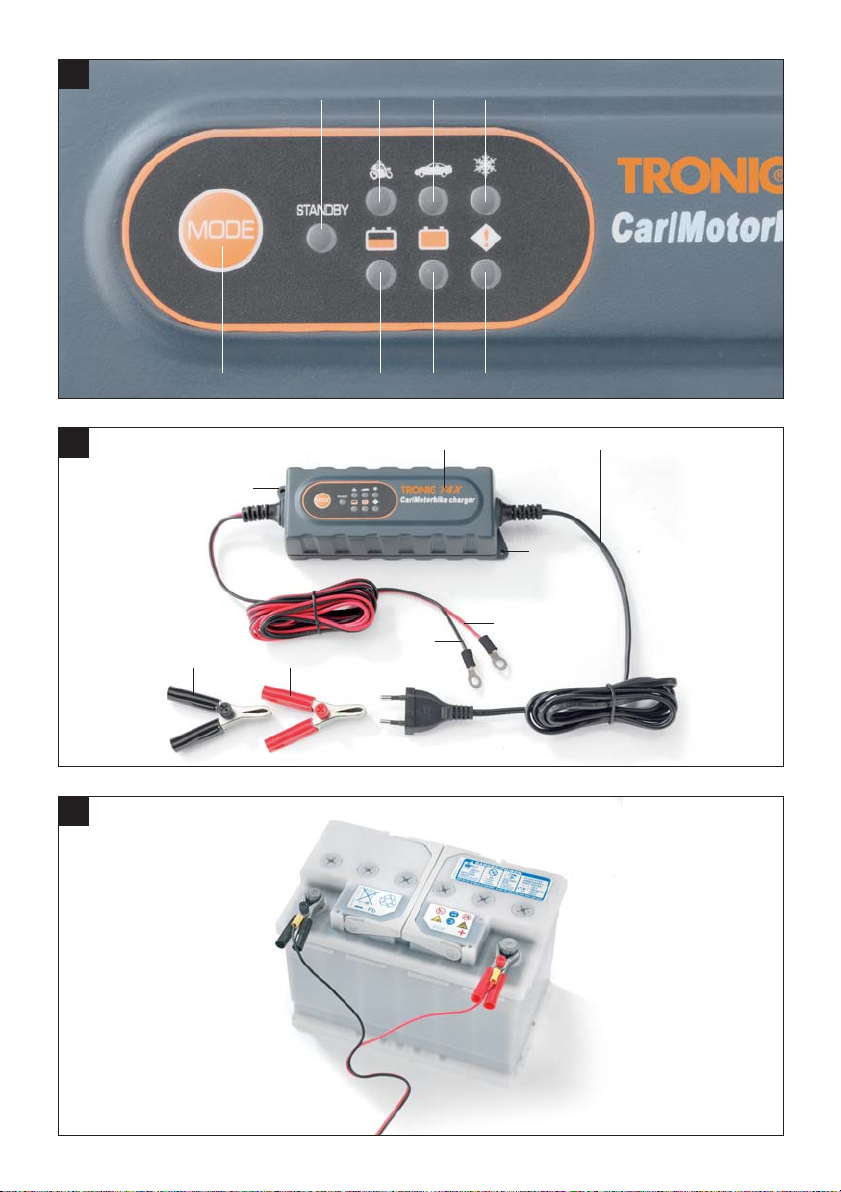
Component description
STANDBY LED display :"STANDBY"
(standby)
LED display "Mode 1"
LED display "Mode 2"
LED display "Mode 3"
LED display "incorrect
polarity/fault"
LED display "fully charged"
LED display "Charging process
active"
MODE
Selection button "MODE"
Charging station
Mains cable with power plug
Fixing holes
„+“-Pole connection cable (red),
incl. ring shoe
„–“-Pole connection cable (black),
incl. ring shoe
„+“-Pole quick-contact terminal (red),
incl. red fixing screw
„–“-Pole quick-contact terminal
(black), incl. black fixing screw
- 4 -
Page 7

KH 3157
Technical Data
Input voltage: 220-240 V ~ 50/60 Hz
Starting current: < 25 A
Input current: max. 0.6 A
(Effective value)
Power
consumption: 55 W
Return current*: < 5 mA (no AC input)
Charging voltage: 14.4 V ± 0.25 V or
14.7 V ± 0.25 V
Charging current: max. 3.6 A
(3.6 A ± 10 % or
0.8 A ± 10 %)
Noise value**: max. 150 mV
Battery type: 12 V lead acid
battery 1.2 Ah - 120 Ah
Type of housing
protection: IP 65 (dustproof,
waterproof)
Dimensions: 180 x 62 x 40 mm
(L x W x H)
Weight: 0.5 kg approx.
Noise level: < 50 dB (A)
(tested from a
distance of 50 cm)
* = Return current is the current used
by the charging station battery,
when no mains current is connected.
** = Noise value is the disturbance
of current and voltage.
Safety information
Danger! Avoid danger to life and
limbs caused by improper use!
• Do not operate the appliance with a
damaged cable, power cord or plug.
CAUTION! A damaged power cord
causes danger to life by electric shock.
If damaged, have the power cord
repaired by authorised and trained
technicians only! Please contact the
service department for your country!
• Do not allow toddlers or children near
the charging station without supervision! Children cannot assess the
potential danger in the handling
of electrical equipment.
• Explosion hazard! Protect yourself
from a highly explosive oxyhydrogen
gas reaction! Gaseous hydrogen can
leak from the battery during the
charging and discharging process.
Oxyhydrogen gas is an explosive
mixture of gaseous hydrogen and
oxygen. The result is the so-called
oxyhydrogen reaction upon contact
with open fire (flames, embers or
sparks)! Carry out the charging or
discharging procedure in a well
-ventilated room protected from the
weather. Make sure that there are no
sources of open fire (flames, embers
or sparks) in the vicinity when charging or discharging batteries!
- 5 -
Page 8

KH 3157
• Danger of explosion and fire! Make
sure that explosive and flammable
substances e.g. petrol or solvents can
be ignited when using the charging
station!
• Danger of chemical burns! Protect your
eyes and skin against chemical burns
caused by acid (sulphuric acid) upon
contact with the battery! Do not look
directly at the connected battery and
use the following: acid-resistant safety
glasses, protective clothing and gloves!
If your eyes or skin come into contact
with sulphuric acid, rinse the affected
part of the body with plenty of clear
running water and seek immediate
medical assistance!
• Protect yourself from an electric
shock! When connecting the charging
station, use a screwdriver and a spanner with an insulated handle!
• Only use the charging station for
charging and discharging undamaged
12 V lead batteries
(with electrolyte solution or gel)!
• Do not use the charging station for
charging or trickle-charging batteries
without recharging properties.
• Do not use the charging station for
charging or trickle-charging a damaged or frozen battery!
• In case of permanently installed batteries, make sure that the vehicle is
not in use and is in a secure, stationary position! Switch off the ignition
and select a parking position, apply
the parking brake (e.g. cars)or a
retaining rope (e.g. boats)!
• When connecting the charging station
to the battery, avoid short-circuiting.
Connect the minus pole connecting
cable only to the minus pole of the
battery or to the car body. Connect
the plus pole connecting cable only
to the plus pole of the battery!
• Before connecting to the mains, make
sure that the mains current is equipped with standard 230 V ~ 50 Hz, PEN
conductor, a 16 A fuse and a residualcurrent circuit-breaker!
• Only touch the power cord in the
insulated area at the power plug
upon contact with the socket outlet
with earthing contact!
• Only touch the pole connecting cables
("–" und "+") in the insulated area!
• Only connect to the battery and the
socket outlet with earthing contact
of the mains if it is fully protected
against moisture!
• Only carry out the assembly, maintenance and servicing of the charging
station when it is disconnected from
the power supply!
• Do not position the charging station
near a fire or subject it to heat or to
long-term temperatures exceeding
50° C! The output capacity of your
charging station is automatically
reduces at high temperatures.
• Do not damage any leads or connections for fuel, electricity, brake
systems, hydraulics, water or telecommunications when attaching
the charging station with bolts!
Otherwise there will be a danger
to life and limbs!
• Make sure that the plus pole connecting cable has no contact with the
fuel line (e.g. petrol line)!
- 6 -
Page 9

KH 3157
• Ensure that the mains power socket is
at all times freely accessible so that in
a case of emergency the appliance
can be quickly separated from the
power source.
Attention! Avoid damage caused
by improper use!
• Only use the charging station with
the original parts provided!
• Do not cover the charging station
with objects!
• Place the battery in a well-ventilated
location during charging.
• Protect the electrical contacts of the
battery against short-circuiting!
• Only connect the charging station to
a socket outlet with earthing contact
equipped with a residual-current
circuit-breaker when using outdoors.
• Do not place the charging station
driectly on or next to the battery!
• After completing the charging and
floating charge operation on a battery permanently installed in the vehicle, first disconnect the cable of the
negative (minus) pole (black) of the
charger from the negative (minus)
pole of the battery.
• In case of malfunction or damage,
immediately disconnect the charging
station from the mains!
• Have the charging station repaired
by authorised and trained specialists
only! Please contact the service
department for your country!
• Before connecting the charging
station, read the information on
battery maintenance in the operating
instructions of the battery!
• Before connecting the charging station to a battery permanently installed in a vehicle, read the information
on electrical safety and maintenance
in the operating instuctions of the
vehicle!
• Do not subject the battery to
mechanical loads!
• When the charging station is not in
use, disconnect it from the power
supply!
Product features
This appliance has been designed for
charging a variety of SLA batteries
(sealed lead acid batteries), as mainly
used in cars, motorbikes and several
other vehicles. They may be of types e.g.
WET (with liquid electrolyte), GEL
(with mit gel-type electolyte) or AGM
(absorbed glass mat) batteries. Their
capacity ranges from 12 V / 1.2 Ah to
12 V / 120 Ah.
A special design of the appliance (also
named "three-phase-charging strategy")
enables the recharging of the batttery
to almost 100 % of its original capacity.
Furthermore, a long-term connection
of the battery to the charging station
can take place to keep the battery in
optimal condition when not in use,
without it being damaged in the
process.
- 7 -
Page 10

KH 3157
Operation
Attention Only install, maintain
and service the appliance when it is
disconnected form the mains!
Tip!
• When putting the appliance into
operation, select a suitable place to
do so.
• Take your time when carefully preparing to put the appliance into operation. Put all compoments and any
additionally required tools or materials well arranged and within easy
reach.
• Always be alert and pay attention
to what you are doing. Be sensible
when working and do not operate
the charging station if you lack the
ability to concentrate or do not feel
well.
Connection
• Before starting the charging or
discharging procedure on a permanently installed battery in a vehicle,
first disconnect the minus pole connecting cable (black) of the vehicle
from the minus pole of the battery.
The minus pole of the battery is
usually connected to the car body.
• Then disconect the plus pole connecting cable (red) of the vehicle from
the plus pole of the battery.
• Then first connect the "+" pole quickcontact clamp (red) of the charging
station to the plus pole ("+" pole) of
the battery.
• Connect the "–" pole quick-contact
clamp (black) to the "–" pole of the
battery.
• Connect the power cord of the
battery charging station to the socket
oulet with earthing contact of the
power supply.
Disconnecting
• Disconnect the appliance from the
power supply.
• Disconnect the "–" pole quick-contact
clamp (black) from the "–" pole of
the battery.
• Disconnect the "+" pole quick-contact
clamp (red) from the "+" pole of
the battery.
• Reconnect the plus pole connecting
cable of the vehicle to the plus pole
of the battery.
• Reconnect the minus pole connecting
cable of the vehicle to the minus pole
of the battery.
Select charging mode
For charging various batteries at different
ambient temperatures you can choose
between three different charging modes.
Select the most efficient and suitable
charging mode for charging the battery.
In comparison with conventional battery
charging stations, this appliance has a special function for reusing an empty battery
or rechargeable battery. You can recharge
an empty battery/rechargeable battery.
Safe charging is ensured by means of a
protection function against incorrect connection and short circuiting. Due to the
installed electronics, the charging station
does not begin operation directly after
connecting the battery, but only starts
after a charging mode has been selected.
- 8 -
Page 11

KH 3157
This avoids sparking, which often occurs
when connecting. Furthermore, this
device is also controlled by an internal
MCU (Micro-Computer-Unit), which
makes it faster, more powerful and more
reliable.
Reset/deleting settings
After connection to the power supply,
the appliance automatically returns to
its basic setting and remains in STANDBY
mode
Switching over between modes 1, 2 and 3
MODE
,
• Press the selection button MODE
repeatedly to display the charging
modes in the following order: Ready
STANDBY, MODE1 , MODE2 ,
MODE3 and start the next cycle.
If you press the selector button
charging mode automatically switches
over to the next mode and begins operation in that mode. However, if a battery
is not disconnected from the charging
station after a full charge, the appliance
remains in trickle-charge mode, even if
the user switches over to another mode.
This protects the battery from being
damaged.
Mode 1 (14.4 V / 0.8 A)
This mode is suitable for charging small
batteries with a capacity below 14 Ah.
• Press the selection button MODE ,
to select mode 1. After doing so, the
corresponding LED display
lights up. If you do not activate another process afterwards, the electronic system will automatically start the
charging process together with the
LED display
of) 0.8 A ± 10 %.
If the procedure runs without any
problems, the LED display
remains on during the entire charging
process, until the battery is fully
charged at 14.4 V / ± 0.25 V. When the
battery is fully charged, LED
display
display
current is now available for the battery.
at (with a current
lights up and LED
goes out. The floating
- 9 -
Page 12

KH 3157
Mode 2 (14.4 V / 3.6 A )
This mode is mainly used for charging
batteries with a large capacity exceeding
14 Ah under normal conditions.
• Press the selection button MODE ,
to activate mode 2. If you do not
activate another process afterwards,
the electronic system, together with
LED display starts the charging
process at (with a current of) 3.6 A ±
10 % (3.6 A).
If the procedure runs without any
problems, the LED display
remains on during the entire charging
process, until the battery is fully
charged at 14.4 V / ± 0.25 V. When
the battery is fully charged, LED
display
display
current is now available for the battery.
Mode 3 (14.7 V / 3.6 A )
This mode is used for charging batteries
with a greater capacity than 14 Ah in
cold conditions or for several AGM batteries with more than 14 Ah.
• Press the selection button MODE ,
to activate mode 3. As soon as you
have selected the suitable charging
mode, the corresponding LED display
do not take any further action, the
electronic system starts the charging
process with a set delay. In this mode
the charging current is identical to
that of "Mode 2".
lights up and LED
goes out. The floating
lights up immeditely. If you
If the procedure runs without any
problems, the LED display
lights up, the electronic stystem is
active and remains in this condition
until the battery is charged to approx.
14.7 V. As soon as this is reached, the
charging station switches over to
trickle-charging function. Now LED
display
display
the current status.
Regenerating / charging empty (used,
overcharged) batteries
If the charging station is connected to a
battery and the charging process starts
it automatically recognises the battery
voltage. It changes to pulse charging
mode if the voltage is in the range of
7.5 V ± 0.5 to 10.5 V ± 0.5 V.
This pulse charging process is continued
until the battery voltage has increased
to 10.5 V ± 0.5 V. As soon as this condition is reached, the charging station
changes over to the previously selected
normal charging mode.
Now the battery can be charged quickly
and safely. Most empty batteries can be
charged and used again using this
procedure.
goes out and LED
lights up to indicate
- 10 -
Page 13

KH 3157
Protective function of the device
If a unexpected situation should occur,
such as short circuiting, battery voltage
below 7.5 V, open circuit or reversed
connection of the output terminals, the
charging station deactivates the electronic system and immediately switches
back to basic position to avoid damage.
If you do not activate any settings, the
system will remain in STANDBY mode.
With the inverse connection of the
output clamps the LED display
"incorrect polarity/fault" lights up
additionally.
Overheating protection
If the appliance becomes too hot during
charging, the power output is automatically reduced. This protects the appliance from damage.
Maintenance and care
Attention Only install, maintain and
service the appliance when it is
disconnected from the mains!
The appliance is maintenance-free.
• Switch off the appliance.
• Clean the plastic surfaces of the appliance and the remote control with
a dry cloth. Do not under any circumstances use solvents or other
aggressive cleaning agents.
Disposal
The packaging consists of 100 % environentally compatible materials that can be
disposed of via local recycling facilities.
Do not dispose of electrical
appliances with normal household waste.
According to the European Directive
2002/96/EG regarding used electrcial
and electronic appliances and its implementation in national law, used electrical equipment must be separately collected and disposed of at an approved
recycling facility.
To dispose of electrical appliances that
you no longer require, please consult
your local authorities or city administration.
As the end user, you have a legal obligation (Battery Act) to return all used batteries. Batteries containing hazardous
substances are marked with the listed
symbols indicating that disposal via
household waste is not permitted.
The designations for the heavy metals
in question are: Cd = Cadmium,
Hg = Quicksilver, Pb = Lead
Take used batteries to a disposal facility
in your town or district, or return them
to a dealer.
You have then fulfilled all legal obligations and have made an important contribution to environmental protection.
- 11 -
Page 14

KH 3157
Service
You will find the contact information for
the service department responsible for
your country in the warranty documents.
Importer
KOMPERNASS GMBH
BURGSTRASSE 21
D-44867 BOCHUM
www.kompernass.com
We reserve the right to undertake
technical modifications in the course of
development.
- 12 -
 Loading...