

Page 1
KH 2370
DVD Surround Sound Combination Unit
Operating Instructions
En
Page 2

The eBench KH 2370 DVD surround sound combination
unit contains a technology with copyright protection,
which is protected by the method claims of certain US
patents or other intellectual property rights of Macrovision Corporation and other copyright owners.
The use of this technology for copyright protection must
be approved by Macrovision Corporation and is intended
exclusively for non-commercial, private use; any other usage requires the explicit approval of Macrovision Corporation.
Reverse engineering and disassembling are explicitly prohibited.
Manufactured under the licence of Dolby Laboratories,
Inc.
Dolby and the double-D symbol are registered trademarks
of Dolby Laboratories, Inc. Condential Unpublished
Works.
1992-1997 Dolby Laboratories, Inc. All rights reserved.
The unit is protected by the US patents 4.631.603,
4.577.216, 4.819.098 and 4.907.093.
Notes:
• The DVD surround sound combination unit is called
“combination unit” in these operating instructions.
• The same buttons on the combination unit and on
the remote control have the same function respectively.
The licence applies exclusively for private use.
KH 2370 IB v. 1.0, 22. October 2003
Kompernaß Handelsgesellschaft mbH • Burgstraße 21 • D-44867 Bochum, Germany
—
www.kompernass.com
Page 3

Index
Technical Data 7
Combination unit/Main unit........................................................................................................................................... 7
Radio section .................................................................................................................................................................. 7
Disc section ..................................................................................................................................................................... 7
Subwoofer........................................................................................................................................................................ 7
Playable CDs and DVDs................................................................................................................................................... 7
DVD video.....................................................................................................................................................................................................................7
CD Audio .......................................................................................................................................................................................................................7
Scope of supply 7
Application and function 7
Setting up the combination unit /Safety information 8
Control elements, displays and connections ................................................................................................................ 9
... on the unit ................................................................................................................................................................................................................. 9
... on the back of the combination unit ..............................................................................................................................................................9
... on the front of the subwoofer ............................................................................................................................................................................9
... on the back of the subwoofer............................................................................................................................................................................. 9
... on the back of the surround loudspeakers .................................................................................................................................................10
... on the remote control .........................................................................................................................................................................................10
Preparing the combination unit for operation 11
Remote control..............................................................................................................................................................11
Replacing the batteries..........................................................................................................................................................................................11
Connecting the combination unit to a television ....................................................................................................... 11
Connecting to a television by means of a scart cable/RGB.......................................................................................................................11
Connecting to a television by means of S-Video ..........................................................................................................................................12
Connecting to a television by means of video input (composite video) .............................................................................................12
Connecting the antenna to the combination unit ......................................................................................................12
Connect the headphones to the combination unit ....................................................................................................12
Connecting to digital audio components.................................................................................................................... 12
Connect the surround loudspeakers and subwoofer to the combination unit ....................................................... 13
Positioning the surround loudspeakers...........................................................................................................................................................13
Initial operation of the combination unit 13
Operating the OSD menu ............................................................................................................................................. 13
Necessary settings to the combination unit before initial use ..................................................................................14
Set television standard...........................................................................................................................................................................................15
MULTI............................................................................................................................................................................................................................15
NTSC..............................................................................................................................................................................................................................15
PAL.................................................................................................................................................................................................................................15
Setting video output ..............................................................................................................................................................................................15
S-VIDEO........................................................................................................................................................................................................................ 15
RGB................................................................................................................................................................................................................................15
Setting playback language ..................................................................................................................................................................................15
Setting subtitle language .....................................................................................................................................................................................16
Set the language of the disc menu ...................................................................................................................................................................16
KH 2370
3
Page 4

5
KH 2370
Switching on/o disc navigation menu ..........................................................................................................................................................16
General settings .......................................................................................................................................................................................................16
Set picture format....................................................................................................................................................................................................16
NORMAL/PS ...............................................................................................................................................................................................................17
NORMAL/LB................................................................................................................................................................................................................17
WIDE .............................................................................................................................................................................................................................17
Setting the language of the OSD menus ........................................................................................................................................................17
Switch on the screensaver ...................................................................................................................................................................................17
Loudspeaker settings .............................................................................................................................................................................................17
DOWNMIX...................................................................................................................................................................................................................17
CENTER.........................................................................................................................................................................................................................18
REAR..............................................................................................................................................................................................................................18
Subwoofer...................................................................................................................................................................................................................18
CNTR DELAY ...............................................................................................................................................................................................................18
REAR DELAY................................................................................................................................................................................................................18
TEST TONE...................................................................................................................................................................................................................18
Set the volume level of the surround loudspeakers ...................................................................................................................................18
Other audio settings ..............................................................................................................................................................................................19
Setting audio output ..............................................................................................................................................................................................19
Settings for mono VCDs/S-VCDs.........................................................................................................................................................................19
Dynamic range compression/Set midnight mode .....................................................................................................................................19
Using the combination unit 19
General functions of the combination unit ................................................................................................................20
Setting playback volume ......................................................................................................................................................................................20
Switching the playback sound to mute (Mute).............................................................................................................................................20
Equalizer functions..................................................................................................................................................................................................20
Setting the clock ......................................................................................................................................................................................................20
Using the timer ........................................................................................................................................................................................................20
Using the sleep timer..............................................................................................................................................................................................21
Childproof protection.............................................................................................................................................................................................21
Switch on the childproof protection.................................................................................................................................................................21
G .....................................................................................................................................................................................................................................21
PG...................................................................................................................................................................................................................................21
PG-13 ............................................................................................................................................................................................................................22
PG-R...............................................................................................................................................................................................................................22
NC-17............................................................................................................................................................................................................................22
ADULT...........................................................................................................................................................................................................................22
Selecting your own password .............................................................................................................................................................................22
Setting back the combination unit to the settings made in the factory .............................................................................................22
Switching o the combination unit ..................................................................................................................................................................23
Radio mode 23
Saving radio station ................................................................................................................................................................................................23
Improving the reception of FM/very high frequency radio stations ....................................................................................................23
Improving the reception of AM/medium wave radio stations................................................................................................................23
DVD/VCD/S-VCD mode 24
Playing back DVDs, VCDs or S-VCDs ............................................................................................................................24
Functions when playing back a DVD, VCD or S-VCD................................................................................................... 24
To pause playback (Pause) ....................................................................................................................................................................................24
Stopping the playback (Stop)..............................................................................................................................................................................24
Playback stop with resume function ................................................................................................................................................................24
Playback stop without resume function..........................................................................................................................................................24
Calling up disc menu (Menu)...............................................................................................................................................................................25
Rapid search forwards/backwards ....................................................................................................................................................................25
4
KH 2370
Page 5

Slow motion playback forwards/backwards (Slow).....................................................................................................................................25
Frame by frame advance (Step) ..........................................................................................................................................................................25
Picture enlargement (Zoom)................................................................................................................................................................................25
Change the angle of the camera (Angle)......................................................................................................................................................... 26
Showing/hiding subtitles .....................................................................................................................................................................................26
Changing playback language .............................................................................................................................................................................26
Showing disc information ....................................................................................................................................................................................26
Selecting chapters ...................................................................................................................................................................................................26
Skip to the beginning of the chapter (Skip)....................................................................................................................................................26
Selecting chapters with chapter numbers .....................................................................................................................................................26
Select passages of chapters according to time positions .........................................................................................................................27
Repeat playback ......................................................................................................................................................................................................27
Repeating sequences ............................................................................................................................................................................................27
Audio CD mode 27
Playing back of audio CDs ............................................................................................................................................27
Functions when playing back audio CDs ....................................................................................................................27
Pause playback (Pause)..........................................................................................................................................................................................27
Stop playback (Stop)...............................................................................................................................................................................................27
Playback stop with resume function.................................................................................................................................................................27
Playback stop without resume function .........................................................................................................................................................28
Select titles .................................................................................................................................................................................................................28
Skipping to the beginning of the title (Skip)..................................................................................................................................................28
Selecting a title using the number buttons ...................................................................................................................................................28
Selecting passages of titles with time positions ..........................................................................................................................................28
Programmed playback...........................................................................................................................................................................................28
Repeat playback ....................................................................................................................................................................................................... 28
Repeating sequences ............................................................................................................................................................................................29
MP3/JPEG mode 29
Playback MP3/JPEG les............................................................................................................................................... 29
Functions when playing back MP3/JPEG les............................................................................................................. 29
Pause playback (Pause)..........................................................................................................................................................................................29
Stop playback (Stop)...............................................................................................................................................................................................29
Playback stop with resume function ................................................................................................................................................................29
Playback stop without resume function .........................................................................................................................................................29
Selecting a le ...........................................................................................................................................................................................................29
Skip to the beginning of the title (Skip) ...........................................................................................................................................................29
Selecting les with number buttons ................................................................................................................................................................30
Only to play back MP3 Select le passages using time position ............................................................................................................30
Only to play back MP3 Repeating sequences (A–B) ....................................................................................................................................30
Only to play back JPEG Rotating pictures........................................................................................................................................................30
Operating the SMART NAVI menu......................................................................................................................................................................30
Changing folders (If folders exist).......................................................................................................................................................................31
Selecting playback mode (Play Mode) ............................................................................................................................................................31
FOLDER........................................................................................................................................................................................................................32
FOLDER REP................................................................................................................................................................................................................32
DISC SCAN ..................................................................................................................................................................................................................32
DISC...............................................................................................................................................................................................................................32
DISC REP ......................................................................................................................................................................................................................32
RANDOM.....................................................................................................................................................................................................................32
SHUFFLE ON...............................................................................................................................................................................................................32
PROGRAM PO ............................................................................................................................................................................................................32
SINGLE..........................................................................................................................................................................................................................33
REP-ONE ......................................................................................................................................................................................................................33
Selecting playback mode .....................................................................................................................................................................................33
Programmed playback (Program)...................................................................................................................................................................... 33
KH 2370
5
Page 6

Cleaning the combination unit 33
To rectify malfunctions and errors 33
Nothing appears on the display/combination unit shows no function, although it is switched on ........................................33
Display shows No Disc, although a disc has been inserted ......................................................................................................................34
Inserted disc is not being played back.............................................................................................................................................................34
No picture or black and white picture .............................................................................................................................................................34
No sound.....................................................................................................................................................................................................................34
No 43 or 169 picture ...............................................................................................................................................................................................34
Remote control without function ......................................................................................................................................................................34
Playback language/Subtitle language does not correspond to the language in the settings in the OSD menu ................34
One or more functions cannot be switched on ............................................................................................................................................34
No button on the unit or on the remote control works/other malfunctions .....................................................................................35
Glossary/Index 35
What are DVDs, VCDs and S-VCDs? ..............................................................................................................................35
DVDs .............................................................................................................................................................................................................................35
VCDs/S-VCDs..............................................................................................................................................................................................................35
What are titles and chapters? .......................................................................................................................................35
What are Scart, S-Video, composite video?................................................................................................................. 35
Scart ..............................................................................................................................................................................................................................35
S-Video.........................................................................................................................................................................................................................35
Composite video ......................................................................................................................................................................................................35
Decoder.......................................................................................................................................................................... 36
Dolby Surround ............................................................................................................................................................. 36
Dolby Prologic ............................................................................................................................................................... 36
Dolby Digital (5.1) .........................................................................................................................................................36
DTS..................................................................................................................................................................................36
What are PAL, NTSC and SECAM?................................................................................................................................. 36
PAL.................................................................................................................................................................................................................................36
NTSC..............................................................................................................................................................................................................................36
SECAM..........................................................................................................................................................................................................................36
Audio CDs....................................................................................................................................................................................................................36
MP3 ...............................................................................................................................................................................................................................36
JPEG...............................................................................................................................................................................................................................36
What are folders?...........................................................................................................................................................36
6
KH 2370
Page 7
Technical Data
Combination unit/Main unit
Application and
function
Power supply: .............................AC 230 V ~ 50 Hz
Output (per channel): ..............7 Watt RMS at 4 Ohm
Power consumption:................60 Watt
Radio section
AM band: ...................................... 522 - 1620 KHz
FM band:.......................................87.5 - 108 MHz
Disc section
Frequency response (-6dB):... 20-15 000 Hz
Signal-to-noise ratio:................ 50 dB
Harmonic distortion:................0.4%
Channel separation: .................40 dB
Subwoofer
Output (per channel): ..............50 Watt RMS at 4 Ohm
Power consumption:................70 Watt
Playable CDs and DVDs
DVD video
12 cm single-sided, single-layered
12 cm single-sided, double-layered
12 cm double-sided, double-layered
8 cm single-sided, single-layered
8 cm single-sided, double-layered
8 cm double-sided, double-layered
CD Audio
12 cm CD, 8 cm CD
Scope of supply
The eBench KH combination unit is exclusively
intended
• as a consumer electronics system
• to play back
• DVD videos with 120 mm (diameter) and 80 mm (diameter) formats with the country/region code 2 or
marked with the logo
• Video CDs (VCDs) and Super Video CDs (S-VCDs) with
120 mm (diameter) and 80 mm (diameter) formats,
marked with the logo
• Audio CDs with 120 mm (diameter) and 80 mm (diameter) formats, marked by the logo
• in general CD audio (.cda), MP3 (.mp3) and JPEG (.jpg)
le formats on CD-R and CD-RW storage media.
• 5.1 channel surround sound, if it is available on the
playback media
• to pick up UKW (FM) and medium wave (AM) radio stations
• for stationary application in closed rooms
• for private, non-commercial use
The eBench KH combination unit can be
connected to the following for video display when
playing back DVDs, VCDs and S-VCDs:
• Stereo and mono televisions with PAL or SECAM television formats and the picture formats 4:3, 4:3 Pan &
Scan, 16:9
1. DVD surround system combination unit
2. Subwoofer
3. Infrared remote control
4. Satellite loudspeakers (2 x front, 2 x rear, 1 x center)
5. 5 loudspeaker cables (3 x short, 2 x long)
6. 2 cinch cables
7. 1 S-Video cable
8. Operating instructions
• Video projectors, if they have the corresponding
connections and the connection of a DVD player is
provided/allowed by the manufacturer of the video
projector
The eBench KH combination unit can be
connected to the following for output sound or
music:
• The supplied surround loudspeakers and the subwoofer of the combination unit
• Loudspeakers of one of the televisions connected to
the combination unit
KH 2370
7
Page 8

• Headphones with 3.5 mm jack plug connection
Warning!
• external (analog and digital) audio components
Attention!
No liability/guarantee will be assumed for damages,
which are caused by the inappropriate use of the equipment!
Setting up the
combination unit /
Safety information
1 Take
• the combination unit
• the subwoofer
• the surround loudspeakers and
• the supplied accessories
carefully out of the packaging.
2 Put the combination unit and the components on a
at, level and non-slip surface.
Attention!
To avoid malfunctions, damages and the risk of an electric shock, do not use the combination unit:
If water runs into the combination unit or if it falls into
water, this can cause irreparable damage to the unit and
there is a risk of getting an electric shock!
• in cupboards, shelves or other closed furniture or on
beds and blankets, otherwise the ventilation of the
combination unit can be restricted and then it can
overheat.
For the same reason do not put any other devices on top
of the combination unit.
To guarantee sucient ventilation, the combination unit
must have a distance from the back, top and sides of at
least 10 cm to walls and any other objects at the chosen installation location.
Warning!
Overheating can cause irreparable damage to the combination unit and there is a risk of re!
Attention!
For damages to the combination unit, which have arisen
due to
• eects of moisture
• water which has penetrated into the unit
• overheating,
no liability/guarantee will be assumed!
• directly near to sources of heat such as stoves, fan
heaters and similar devices! Heat inuences can cause
the combination unit to overheat and the plastic parts
to melt, whereby irreparable damage can be caused to
the combination unit!
Warning!
In the case of overheating there is also a re risk!
• in damp environments, for example in cellars or in the
sauna! Moisture, which has penetrated into the unit,
can cause malfunctions and thus cause irreparable
damage to the unit!
Warning!
If moisture penetrates into the unit, there is a risk of getting an electric shock!
• directly near to water, for example near the bath or a
swimming poor. Also do not place any container lled
with water – such as e.g. vases – on the combination
unit and its components.
8
KH 2370
Page 9
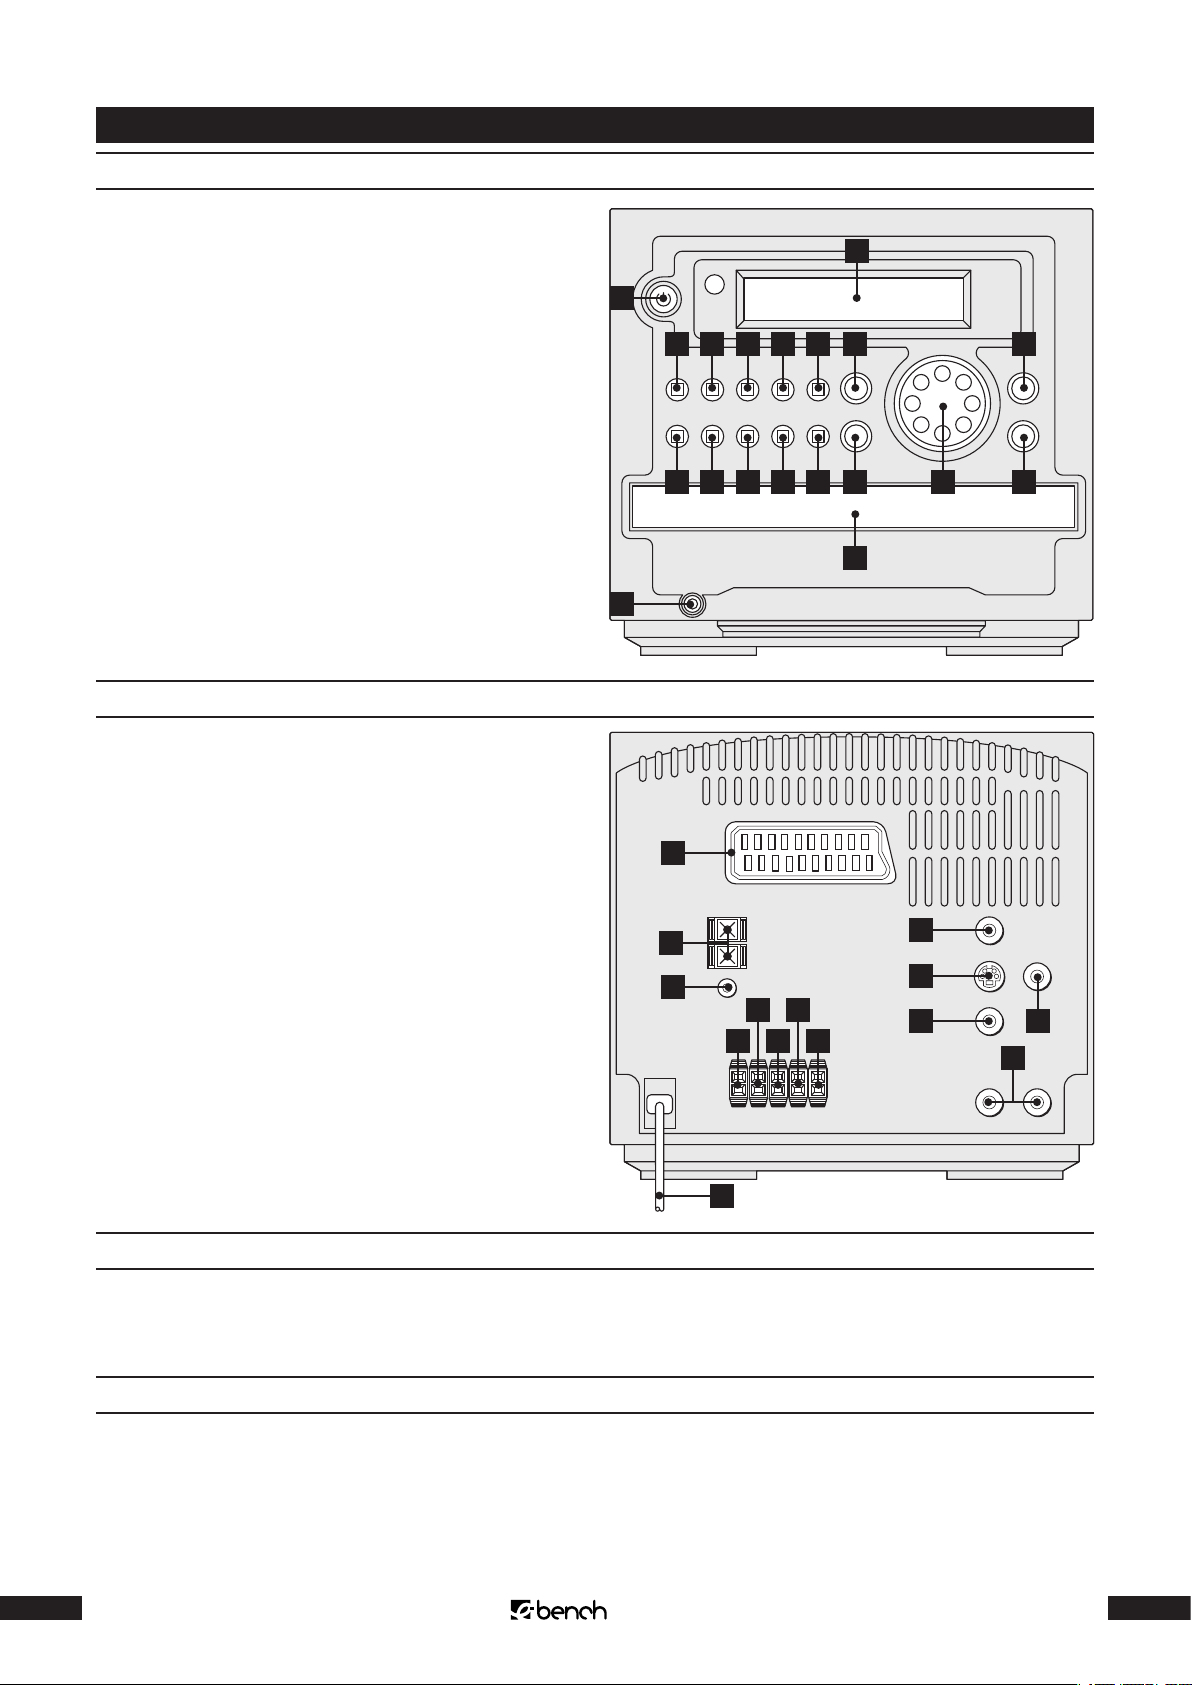
Control elements, displays and connections
... on the unit
1. POWER button
2. Display
3. CD/DVD button
4. TUNER/BAND button
5. AUX button
6. REPEAT/MEM DN button
7. PAUSE/MEM UP button
8. PLAY/ENTER button
9. Volume control Volume +/-
10. OPEN/CLOSE button
11. PRESET EQ button
12. STOP button
13. SKIP forwards button
14. SKIP backwards button
15. TIMER button
16. MODE button
17. CLK ADJ button
18. Disc tray
19. Headphone jack PHONES
... on the back of the combination unit
19
1
3 74 5 6
16
17
15
14
13
12
18
2
8
9
10
11
1. Scart jack
2. Video jack
3. S-Video jack
4. Coaxial jack
5. Subwoofer jack
6. AUX IN L + R jacks
7. Rear terminal L
8. Rear R terminal
9. CENTER terminal
10. Front L terminal
11. Front R terminal
12. Power cord
13. FM dipole antenna (non-detachable)
14. AM terminal
... on the front of the subwoofer
POWER button
Volume control
14
13
1
2
3
810
11 9 7
12
5
4
6
... on the back of the subwoofer
Subwoofer IN jack
Power cord
Power switch
KH 2370
9
Page 10
... on the back of the surround loudspeakers
each with +/- terminal
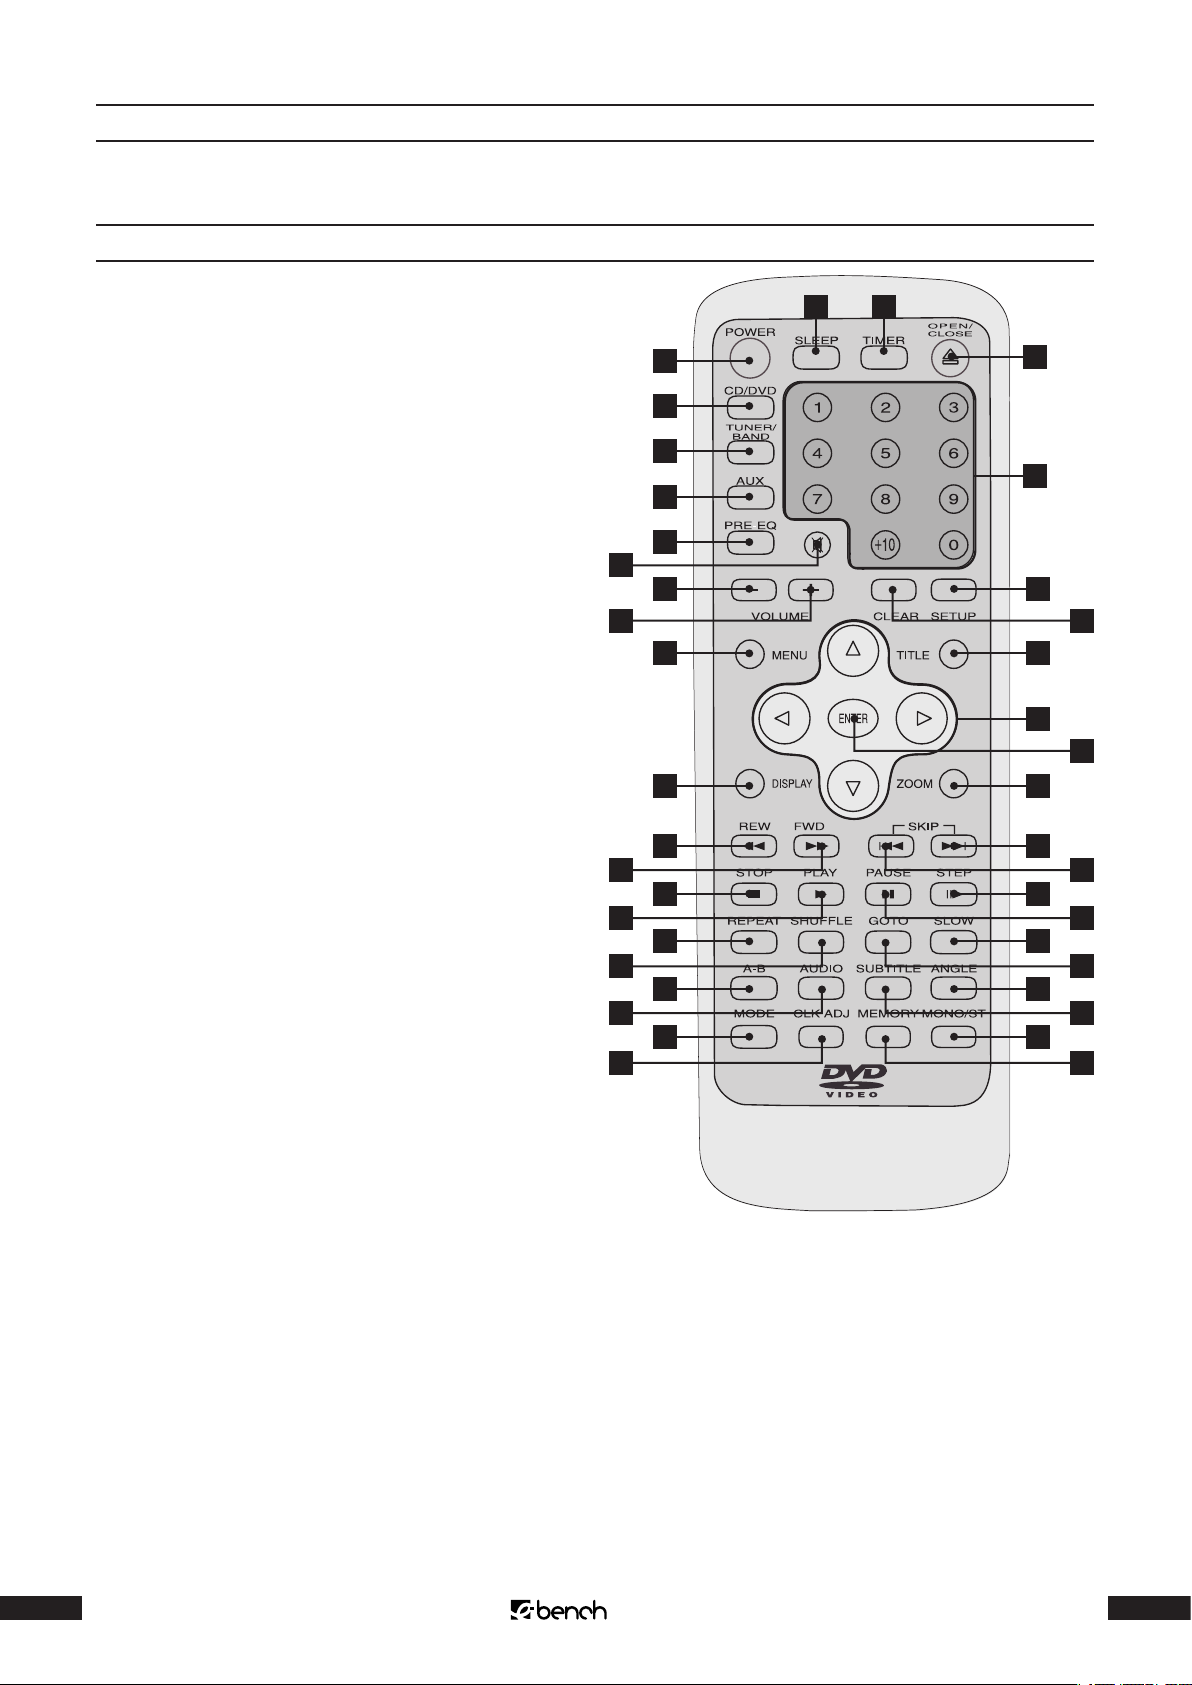
... on the remote control
1. POWER button
2. SLEEP button
3. TIMER button
4. OPEN/CLOSE button
5. SETUP button
6. CLEAR button
7. Vol + button
8. Vol – button
9. MUTE button
10. PRE-EQ button
11. AUX button
12. TUNER/BAND button
13. CD/DVD button
14. Number buttons 0 to 9 and 10 +
15. MENU button
16. TITLE button
17. ZOOM button
18. DISPLAY button
19. Control buttons up, down, left, right
20. ENTER button
21. REW button
22. FWD button
23. SKIP backwards button
24. SKIP forwards button
25. STOP button
26. PLAY button
27. PAUSE button
28. STEP button
29. REPEAT button
30. SHUFFLE button
31. GOTO button
32. SLOW button
33. A-B button
34. AUDIO button
35. SUBTITLE button
36. ANGLE button
37. MODE button
38. CLK ADJ button
39. MEMORY button
40. MONO/ST. button
22
26
30
34
38
2
1
13
12
11
10
9
8
7
15
18
21
25
29
33
37
3
4
14
5
6
16
19
20
17
24
23
28
27
32
31
36
35
40
39
10
KH 2370
Page 11

Preparing the
Connecting the combination unit to a
television
combination unit for
operation
Remote control
1 Open the battery compartment on the back of the re-
mote control and remove the cover of the
battery comparment.
2 Now put in two batteries type AAA/LR 03 (round cells,
not included in the scope of supply) into the battery
compartment. Take care that the batteries are inserted
with the correct polarity.
3 Put the cover of the battery compartment back on to
the back of the remote control.
Replacing the batteries:
If the combination unit cannot be operated properly with
the remote control or does not work at all, the batteries
must be replaced.
Always replace both batteries, in order to be able to use
the remote control at full capacity again.
Note:
Used batteries may not be disposed of in household
waste. Throw away used batteries at a waste collection or
disposal point or there, where you bought the batteries.
If you should want to dispose of the remote control of
the combination unit itself, then you have to remove the
batteries beforehand!
After having set up the combination unit, you can now
connect it to a television. The combination unit can be
connected to a television with PAL, NTSC and SECAM television standards.
If you would like to use the combination unit with a television with
• NTSC standard, then you have to change the video settings of the combination unit. This can be done in the
so-called OSD menu of the combination unit. There
you will nd that PAL has been set by the factory as the
television standard.
• SECAM standard, then you do not have to make any
changes to the settings in the OSD menu. The settings
for the PAL standard also enable the combination unit
to be operated with SECAM television sets. However to
do this, SECAM televisions sets must be able to process
PAL signals.
Depending on the type of television, there are dierent
possibilities of connecting the combination unit to it:
Connecting to a television by means of
a scart cable/RGB
Note:
The best quality connection is achieved by connecting the
combination unit to the television by means of a scart cable via the RGB input. Choose this connection variant if the
television has an RGB input. If you are not sure, check this
by looking at the operating instructions of the television.
To connect the combination unit to a television by means
of a scart cable:
Note
To guarantee that the remote control works perfectly:
• Always point the remote control at the combination
unit
• Ensure that there are no obstacles between the remote control and the combination unit, which prevent reception
• Do not move more than 5 meters away from the
combination unit when using the remote control
Otherwise disturbances can arise when operating the
combination unit with the remote control.
1 Plug the supplied scart cable into the scart jack of the
combination unit.
2 Plug the other end of the scart cable into the scart jack
of the television.
3 Set the television to RGB mode in the AV channel. If
you are not sure how to carry out this setting, then
consult the operating instructions of the television.
Also look at the chapter “Setting video output” for more
information on this subject.
KH 2370
11
Page 12

13
KH 2370
Connecting to a television
by means of S-Video
1 Plug in the supplied cinch cable into the video jack of
the combination unit.
Note:
For this connection variant, the television must have an
S-Video input and two unassigned cinch jacks.
If you are not sure whether
• the television can use S-Video, then consult the operating instructions of the television
• it has unassigned cinch jacks, then check this on the
back of the television
To connect the combination unit by means of S-Video to
the television:
1 Plug in the S-Video cable into the jacks labelled S-Vid-
eo of the combination unit.
2 Plug in the other end of the S-Video cable in the S-Vid-
eo jacks of the television.
3 Plug in one cinch cable into the AUX IN L cinch jack of
the combination unit.
4 Plug in the other end of the cinch cable into the audio
jack for the left channel on the television.
5 Plug in another cinch cable into the AUX IN R cinch
jack of the combination unit.
6 Plug in the other end of this cinch cable into the audio
jack for the right channel on the television.
7 Set the television to the AV channel, which reproduc-
es the S-Video signal. If you are not sure how to carry
out these settings, then consult the operating instructions of the television. In addition, check the operating
instructions to see whether you have to carry out any
further settings on the television.
Also look at the chapter “Setting video output” for more
information on this subject.
Connecting to a television by means of
video input (composite video)
If you would like to connect the combination unit to a television, which
• is not capable of using S-Video and
• does not have a scart jack, but has cinch jacks
then connect it by means of the video input (the so-called
“composite video”–connection variant). To do this:
2 Plug in the other end of the cinch cable into the corre-
sponding cinch jack of the television.
3 Plug in one cinch cable into the AUX IN L cinch jack of
the combination unit.
4 Plug in the other end of the cinch cable into the audio
jacks for the left channel on the television.
5 Plug in another cinch cable into the AUX IN R cinch
jack of the combination unit.
6 Plug in the other end of this cinch cable into the audio
jacks for the right channel on the television.
7 Check the operating instructions whether any other
possible settings are necessary on the television.
Connecting the antenna to the
combination unit:
To pick up radio stations the combination unit has
• a dipole antenna for very high frequency (VHF/FM)
broadcasting stations, which is rmly mounted on the
back of the combination unit and
• a loop antenna for medium wave (AM) broadcasting
stations, which is part of the scope of supply. First of all
you have to connect this antenna to the combination
unit.
1 Lift the stand of the loop antenna, which has been
folded inside, to the outside.
2 Lock the plastic clips on the loop antenna into the slits
on the stand. If you can hear that the plastic clips have
locked into the slit, this means that the loop antenna
has to be upright.
3 Turn the combination unit around. On the back you
will nd a black double terminal labelled AM. Insert
one lead of the antenna cables into each of the terminals. The medium wave antenna is now operational.
Connect the headphones to the
combination unit
Plug in the jack plug of the headphones into the headphones jack PHONES of the combination unit.
Connecting to digital audio components
If you have a Dolby Digital or DTS amplier, then you can
connect the combination unit to it. To do this, you need
12
KH 2370
Page 13

a coaxial cable which can be bought in specialised audio
equipment shops.
• the cable of the center loudspeaker into the terminal
marked Center
1 Plug in the coaxial cable into the COAXIAL jack of the
combination unit.
2 Plug in the other end of the coaxial cables into the cor-
responding jack on the Dolby Digital/DTS amplier.
Connect the surround loudspeakers and
subwoofer to the combination unit
The supplied surround loudspeakers are connected to the
combination unit by means of the supplied loudspeaker cables. Use the three shorter loudspeaker cables to connect
• the center loudspeaker and
• the front right and left surround loudspeakers
to the combination unit. Use both the long loudspeaker
cables to connect
• the rear right and left surround loudspeakers
to the combination unit. The subwoofer is connected to
the combination unit by means of one of the supplied
cinch cables.
The supplied surround loudspeakers are identical. You can,
e. g., use each of the loudspeakers as center loudspeaker,
front or rear surround loudspeaker.
1 To connect the surround loudspeakers, insert each
• end of the red leads of the loudspeaker cable into the
red terminal and
• end of the black leads of the loudspeaker cable into
the black terminals
on the back of the loudspeaker.
• the cable of the rear right loudspeaker into the terminal marked Rear R
• the cable of the rear left loudspeaker into the terminal
marked Rear L
4 To connect the subwoofer: Plug in the supplied cinch
cable into the SUBWOOFER cinch jack of the combination unit.
Positioning the surround loudspeakers
To provide an optimal sound, the loudspeakers should be
positioned as follows:
• Front right and left surround loudspeakers on the right
and left of the television
• Center loudspeaker in the middle between the front
left and right surround loudspeakers
• Rear right and left surround loudspeakers on the right
and left behind your listening position
• The installation location of the subwoofer is optional,
as the human ear cannot locate the low tones of the
subwoofer.
Initial operation of the
combination unit
In order to be able to carry out the following settings before using the combination unit for the rst time:
1 Insert the power cord of the combination unit into a
power socket.
2 Then insert
• the end of the red leads of the loudspeaker cable into
the red terminal and
• the end of the black leads of the loudspeaker cable
into the black terminal
on the back of the combination unit. Insert the individ-
ual loudspeaker cables into the following terminals:
• the cable of the front right loudspeaker into the terminal marked Front R
• the cable of the front left loudspeaker into the terminal
marked Front L
2 Insert the power cord of the subwoofer into a power
socket.
3 Press the POWER button to switch on the combination
unit.
4 Switch the power switch on the back of the subwoofer
to ON.
5 Press the POWER button on the front of the subwoofer
to switch it on.
Operating the OSD menu
Most of the settings on the combination unit are carried
out by means of the so-called on screen display menu
KH 2370
13
Page 14

15
KH 2370
(abbr. OSD menu). The OSD menu appears on the television screen. It is very easy to operate the OSD menu:
• Select the individual settings with the up, down, right
and left control buttons.
• Conrm the corresponding selection with the ENTER
button.
To be able to carry out the necessary settings by means of
the OSD menu:
Press the POWER button to switch on the combination
unit. First of all READING will ash on the front of the combination unit, then NO DISC will be displayed. The following will be shown on the television screen:
• on the left side, the list of subitems of the selected
main menu item. Each selected subitem will be highlighted.
• on the right side, the list of the options for the selected
subitem. Each selected option will be highlighted.
Example: You have selected the main menu item GEN-
ERAL SETUP. If you press the ENTER button, the following will be displayed:
GENERAL PAGE
TV Display Normal/PS
OSD Lang Normal/LB
Scr Saver Wide
Main Page
4 To choose between the selected subitem options,
press the right control button. You are now in the list of
options for the selected subitem.
5 You can select an option with the up and down control
buttons. Conrm your selection by pressing the ENTER
button.
Familiarize yourself with the operation of the OSD menu
by carrying out the following brief instructions:
1 To call up the OSD menu of the combination unit,
press the SETUP button on the remote control.
The main menu with the menu items now appears on
the television screen:
SETUP MENU MAIN PAGE
General Setup
Speaker Setup
Audio Setup
Preferences
Exit setup
2 You can select the individual main menu items with
the up and down control buttons on the remote control. The selected main menu item is highlighted.
Note:
6 Press the left control button to change back to the list
of the subitems.
7 Now you can
• select another subitem with the up/down control buttons or
• return to the main menu. Choose the main page of the
subitem by using the control buttons. Then press the
ENTER button.
8 To exit the OSD menu, select the menu item Exit Setup
using the control buttons. Then press the ENTER button; the OSD menu is hidden.
Necessary settings to the combination
unit before initial use
Before the initial use of the combination unit, you must
carry out some settings by means of the OSD menu. To be
able to do so
• the combination unit and
14
You cannot select the main menu item PREFERENCES
when a disc is being played back. To be able to select
PREFERENCES you rst have to stop the playback. Press
the STOP button twice.
3 To display the subitems to a main menu item, press the
ENTER button. The following will now be displayed:
• the television, to which it is connected,
have to be ready for operation and switched on.
1 Call up the OSD menu, by pressing the
SETUP button. The OSD menu will be shown with its
menu items:
KH 2370
Page 15
SETUP MENU MAIN PAGE
General Setup
Speaker Setup
Audio Setup
Preferences
Exit setup
2 Select the main menu item PREFERENCES with the
down control button. Conrm your selection with the
ENTER button. The subitems of the main menu item
PREFERENCES are displayed:
Preferences Page
back in PAL format. Only use the PAL setting if you have
connected the combination unit to a PAL television.
Note:
The correct setting depends on the television, to which
you have connected the combination unit. Your television – as long as it was not bought abroad – will mostly
correspond to the normal television standard in your
country. If you are not sure which television standard is
used in your country, then check this by referring to the
operating instructions of your television.
Also look at the chapter “Glossary/Index” for more information on this subject.
TV-Type Multi
Video Output NTSC
Audio PAL
Subtitle
Disc-Menu
Parental
Password
Defaults
Set television standard
1 The subitem TV-TYPE is the rst to be automatically se-
lected. Change to the options list of this subitem using
the control buttons.
2
Choose between the options using the control buttons:
MULTI
This setting automatically selects the standard with which
the DVD/VCD/S-VCD was recorded. Only use the MULTI
setting, if the combination unit is connected to a multistandard television.
3 Return to the list of the subitems.
Setting video output
1 Select the subitem VIDEO OUTPUT using the control
buttons. Change back to the list of options for this
subitem.
2
Choose between the options using the control buttons:
S-VIDEO
Select S-Video, if the combination unit is connected to the
television by means of an S-Video cable.
RGB
Select RGB, if the combination unit is connected to the television by means of a scart cable.
Note:
If you have selected the composite video connection variant, it does not matter which setting you have chosen.
NTSC
DVDs/VCDs/S-VCDs, which have been recorded with the
NTSC standard, are played back with this setting.
DVDs/VCDs/S-VCDs, which have been recorded with the
PAL standard, are converted automatically so as to play
back in NTSC format. Only use the NTSC setting, if you
have connected the combination unit to a NTSC television.
PAL
This setting plays back DVDs/VCDs/S-VCDs, which have
been recorded with the PAL standard.
DVDs/VCDs/S-VCDs, which have been recorded with the
NTSC standard, are converted automatically, so as to play
3 Return to the list of the subitems.
Setting playback language
1 Select the subitem AUDIO using the control buttons.
Change to the options list of this subitem.
Here you can set the language, in which the contents
of DVDs/VCDs/S-VCDs are played back.
2 Select one of the languages displayed using the con-
trol buttons.
Note:
DVD/VCD/S-VCD contents are only played back in the
selected language if it is available on the DVD/VCD/
S-VCD. If it is not available, then the contents will be
KH 2370
15
Page 16

17
KH 2370
played back in a language which is on the DVD/VCD/SVCD. You can mostly nd information on which playback
language is available on the DVD-/VCD-/S-VCD cover.
Also look at the chapter “Changing playback language”
for more information on this subject.
3 Return to the list of the subitems.
Setting subtitle language
1 Select the subitem SUBTITLE using the control buttons.
Change to the options list for this subitem.
2 Select one of the displayed languages or OFF using the
control buttons. If you select OFF, no subtitles will be
shown when playing back a DVD/VCD/S-VCD.
Note:
Subtitles will be shown only in the selected language, if
it is available on the DVD/VCD/S-VCD. If it is not available, then the subtitles will be played back in one of the
languages available on the DVD/VCD/S-VCD. Mostly
you can nd information on which playback language is
available on the DVD-/VCD-/S-VCD cover.
Switching on/o disc navigation menu
The playback functions of CD-Rs/CD-RWs with MP3 and
JPEG les can be operated either
• exclusively by means of the buttons of the remote control or
• by means of the so-called SMART NAVI menu
However the SMART NAVI menu oers you more playback
functions. The SMART NAVI menu is shown on the television screen. It is operated in a similar manner as that of the
OSD menu. To display the SMART NAVI menu automatically if CD-Rs/CD-RWs with MP3/ JPEG les are inserted:
1 Select the subitem SMART NAV using the control but-
tons. Change to the list of options for this subitem.
2 Select the option WITH MENU using the control but-
tons. If you would like to operate the playback functions of CD-Rs/CD-RWs with MP3/JPEG les without
SMART NAVI menu: Select the option NO MENU.
Also look at the chapter “Operating the SMART NAV menu”
for more information on this subject.
3 Return to the list of the subitems.
Please also look at the chapter “Showing/hiding subtitles”
for more information on this subject.
Set the language of the disc menu
1 Select the subitem DISC MENU using the control but-
tons. Change to the options list of this subitem.
Here you can set the language, in which the menu for
DVDs/VCDs/S-VCDs – if available – is displayed on the
television screen.
Note:
There is not a disc menu on all DVDs/VCDs/S-VCDs. If
there is a disc menu: The disc menu is only displayed in
the selected language, if this is available on the DVD/
VCD/S-VCD. If it is not available, then the disc menu will
be displayed in one of the languages available on the
DVD/VCD/S-VCD. The available languages can be selected mostly, however, also in the disc menu itself.
Also look at the chapter “Calling up DVD menu” for more
information on this subject.
3 Return to the list of the subitems. Select the subitem
MAIN PAGE using the control buttons to return to the
main menu.
General settings
Select GENERAL SETUP in the main menu using the control buttons. Press the ENTER button. The subitems of the
main menu item GENERAL SETUP are displayed:
GENERAL PAGE
TV Display Normal/PS
OSD Lang Normal/LB
Scr Saver Wide
Main Page
Set picture format
1 Select the subitem TV DISPLAY using the control but-
tons. Here you can set the picture format for the television, which is connected to the combination unit.
2 Select a suitable picture format in the list of options us-
ing the control buttons:
16
2 Select one of the displayed languages using the con-
trol buttons.
3 Return to the list of subitems.
Note:
The correct setting depends on the television to which
you would like to connect the combination unit. If you
are not sure which picture format is possible with your
KH 2370
Page 17

television, then check this by referring to the operating
instructions of your television.
• the OSD menu is displayed for a longer period of
time on the television screen and
NORMAL/PS
Picture format 4:3 Pan & Scan; when playing lms with format 16:9, the left and right part of the picture are cut o.
This means that the height of the screen is utilized as far as
possible.
NORMAL/LB
Picture format 4:3; when playing lms with format 16:9,
black bars can be seen on the upper and lower part of the
picture.
WIDE
Wide screen format16:9; when playing lms with format
16:9 with 16:9 (1.78:1) wide screen televisions, the picture
appears without black bars on the upper and lower parts
of the picture and without the right and left part of the
picture being cut o.
3 Return to the list of the subitems.
Setting the language of the OSD menus
1
Select the subitem OSD LANG using the control buttons.
• at the same time no buttons are pressed on the remote control/on the front of the combination unit.
2 Select between ON and OFF in the list of options using
the control buttons.
3 Return to the list of subitems. Select the subitem MAIN
PAGE using the control buttons, to return to the main
menu.
Loudspeaker settings
The subsequent settings apply to the sound reproduction by means of the surround loudspeakers and the subwoofer of the combination unit. If you would like to use
an external audio component for the sound reproduction
then you have to carry out the settings on this component.
Check the operating instructions to nd out how to carry
out these settings on the audio component.
In order to get an optimal sound, it is necessary to adjust
the sound reproduction to
• the conditions at the installation location of the combination unit and
• your personal preferences
Here you can set the language in which the OSD menu
is displayed.
GENERAL PAGE
TV Display
OSD Lang English
Scr Saver French
German
Italian
Portuguese
Spanish
Main page
2 Select the requested language in the list of options us-
ing the control buttons.
3 Return to the list of subitems.
Switch on the screensaver
1
Select the subitem SCR SAVER using the control buttons.
Info:
To do this:
1 Select the menu item SPEAKER SETUP in the main
menu. In the menu SPEAKER SETUP, the following is
displayed:
SPEAKER SETUP
Downmix Stereo
Center OFF
Rear
Subwoofer
Cntr Delay
Rear Delay
Test Tone
2 Select the subitems in the list one after the other:
DOWNMIX
Select the option STEREO, if you
• have connected the combination unit to a stereo television and
The screensaver prevents a picture, which has been displayed for a long time, from being burned into the television screen. If the screensaver is switched on, this will
automatically be shown as soon as
• would not like to use the surround loudspeakers for
the sound reproduction or
KH 2370
17
Page 18

19
KH 2370
• have connected a digital audio component by means
of the stereo output (using the cinch cable to the cinch
jacks AUX IN R and L) to the combination unit.
The sound reproduction then only comes from two chan-
nels (Stereo). This is called stereo downmix. Otherwise
you will not be able to hear the sound or only very
softly when playing back DVDs/VCDs/S-VCDs, audio
and MP3 CDs!
TEST TONE
Choose between the ON and OFF options. When the test
sound is switched on, you will hear a hissing sound coming one after the other from all connected loudspeakers.
With this sound you can test, whether
• all loudspeakers are correctly connected to the combination unit and
Select OFF, if none of the named reasons for switching on
the stereo downmix apply.
CENTER
To play back 5.1 channel surround sound, select the ON
option. If you would like to switch o the center loudspeaker, select the OFF option.
REAR
To play back 5.1 channel surround sound, select the ON
option. If you would like to switch o the rear right and
left loudspeaker, select the OFF option.
Subwoofer
To play back 5.1 channel surround sound, select the ON
option. If you would not like to have any bass enhancement by the subwoofer, select the AUS option.
CNTR DELAY
Here you can set the delay with which the sound of the
center loudspeaker reaches your listening position. If the
settings have been carried out optimally, the sound from
all loudspeakers will reach your listening position at the
same time.
The correct value depends on the distance of the center
loudspeaker from your listening position. Three milliseconds delay correspond to a distance of around one meter.
Set a delay between one and ve milliseconds with the up
and down control buttons.
REAR DELAY
• you have the optimal delay setting for the rear and the
center loudspeakers.
3 Return to the list of the subitems. Select the subitem
MAIN PAGE using the control buttons to return to the
main menu. Exit the OSD menu, by selecting the menu
item EXIT SETUP.
Set the volume level of the surround
loudspeakers
You can set the volume level for each surround loudspeaker and also the subwoofer individually. To do this:
1 Press the STEREO/ST button when the combination
unit is switched on. FL +6 will appear in the display of
the combination unit for the front left surround loudspeaker.
2 Select a volume value between +6 and -6 dB with the
up/down control buttons.
3 Subsequently select the other surround loudspeakers
with the left/right control buttons. The following will
be displayed:
• CT +6 for the center loudspeaker
• FR +6 for the front right surround loudspeaker
• RL +6 for the back left surround loudspeaker
• RR +6 for the rear right surround loudspeaker
4 Select the required volume for each loudspeaker with
the up/down control buttons.
18
Here you can set the delay with which the rear loudspeaker arrives at your listening position. If the settings have
been carried out optimally, the sound from all loudspeakers will reach your listening position at the same time.
The correct value depends on the distance of the rear
loudspeaker from your listening position. Three milliseconds delay correspond to a distance of around one meter.
Set a delay between one and fteen milliseconds with the
up and down control buttons.
Note:
If you are not sure which value is the correct one: Carry
out this setting from your listening position while playing
back a DVD/VCD/S-VCD. Try all the dierent settings until
you have found a sound which you consider optimal.
5 To save the settings, press the STEREO/ST button once
more. The loudspeaker settings have now been completed.
KH 2370
Page 19

Other audio settings
Press the “Setup” button to display the OSD menu. Select
the menu item AUDIO SETUP in the main menu. The following is displayed in the menu AUDIO SETUP:
• the L-MONO option: You hear the rst language on the
front left and right loudspeakers.
• the R-MONO option: You hear the second language on
the front left and right loudspeakers.
AUDIO SETUP
Audio Out Analog
OP Mode SPDIF/Raw
Dual Mono SPDIF/PCM
Dynamic
LPCM Output
Main page
Setting audio output
1 Select the subitem AUDIO OUTPUT using the control
buttons.
2 Select the option
• ANALOG, if you have not connected any digital audio
components to the combination unit.
• SPDIF/RAW, if you have connected a multi-channel
digital audio component – e. g. a Dolby Digital or DTS
receiver – by means of a coaxial cable to the combination unit.
• SPDIF/PCM, if you have connected a two-channel digital audio component by means of a coaxial cable to the
combination unit.
•
the MIX-MONO option: You hear both languages one
on the front left and one on the front right loudspeaker.
3 Return to the list of the subitems.
Dynamic range compression/Set
midnight mode
1
Select the subitem DYNAMIC using the control buttons.
Here you can set the so-called midnight mode to play
back DVDs with 5.1 channel surround sound. This mode
can be useful if e. g. you would like to play back a DVD during the night.
Explanation: If you lower the playback volume with the
volume buttons/volume control then all 6 audio channels
are aected. Both background noises and also music and
dialogue become quieter in equal measures. By contrast,
in the case of midnight mode, only the playback volume
of background noises, music etc. becomes quieter. The
dialogues can therefore be heard very well even with a
lower playback volume.
2 Set a value between OFF and FULL using the control
buttons.
3 Return to the list of subitems. Select the subitem MAIN
PAGE, to return to the main menu.
3 Return to the list of subitems.
Settings for mono VCDs/S-VCDs
Note
This subitem is only relevant when playing back VCDs/SVCDs. The sound on VCDs/S-VCDs can be available in
• monolingual in stereo or
• bilingual in mono.
1 Select the subitem DUAL MONO using the control but-
tons.
2 For mono VCDs/S-VCDs select
• the STEREO option: You hear the rst language on the
front left and the second language on the front right
loudspeaker.
Using the combination
unit
After you have
• set up the combination unit in a suitable location
• have connected the combination unit to a television
with one of the described connection options
• positioned the surround loudspeakers and the subwoofer and connected them to the combination unit
• know, how one calls up and operates the OSD menu
with the remote control and
• have connected and switched on the combination unit
and the subwoofer to the power supply
you can start using the combination unit.
KH 2370
19
Page 20

21
KH 2370
General functions of the combination
unit
Setting playback volume
Press the Vol + button to increase the playback volume. To
decrease the playback volume press the Vol – button.
The change in the volume between MIN (sound o) and
MAX (maximum volume) will be shown in the display.
7 To save the new input time, press the CLK ADJ button
again.
Using the timer
The combination unit can switch itself on automatically at
a xed time with the timer function. You can select whether an audio CD should be played back or the radio should
be switched on.
Note:
Switching the playback sound to mute
(Mute)
To switch the playback sound to mute, press the button while playing back DVDs, VCDs/S-VCDs, audio CDs as
well as CD-Rs/CD-RWs with MP3 les. If you would like to
switch the playback sound back on, then press the button
once more.
Equalizer functions
The combination unit has a ve-step equalizer function.
With this function you can, in addition, adjust the sound
playback to suit your personal hearing preferences. To
switch on the equalizer function, press the PRE-EQ button.
Every time you press the PRE-EQ button, you switch on
one of the equalizer settings JAZZ, ROCK, CLASSIC, POP
and FLAT. Each of these settings has its own characteristic emphasis of high, medium and low tones (basses). The
equalizer setting at any one time appears in the display of
the combination unit.
Setting the clock
If you would like to use the timer function to switch on
the radio, then the radio station must be saved.
Look at the chapter “Radio mode” for more information on
this subject.
For the timer function to work properly, the time in the
display of the combination unit has to be set correctly.
Check this and, if necessary, set the correct time. To switch
on the timer function:
1 If a disc is being played back: First of all stop playback
by pressing twice on the STOP button.
To switch on the audio CD playback:
2 Put the audio CD, which you would like to play back
with the timer function, into the combination unit.
3 Press the CD/DVD button, if you would like to switch
on the audio CD playback with the timer function. Go
directly to step 4 and continue reading.
To switch on the radio:
To set the time display shown on the display of the combination unit:
1 If a disc is being played back: First of all stop the play-
back by pressing the STOP button twice.
2 Press the MODE button once. The currently input time
will be shown in the display of the combination unit.
3 Press the CLK ADJ button once. The rst two digits of
the time display now ash.
4 Set the rst two digits of the time display to between
00 and 23. Use the SKIP forwards and SKIP backwards
button to do this.
5 Subsequently press the CLK ADJ button. The last two
digits of the time display now ash.
6 Set the last two digits of the time display to between
00 and 59. Use the SKIP forwards and SKIP backwards
button to do this.
2 Press the TUNER/BAND button.
3 Now select the radio station which should be switched
on with the timer function. To do this, use the PAUSE/
MEM UP and REPEAT/MEM DN buttons on the combination unit. The memory slot of the selected radio station and its frequency will be shown in the display of
the combination unit.
4 Press the TIMER button.
5 Press the MODE button twice. The input time and TIM-
ER ON will be shown in the display.
6 Now set the time at which the timer function should
switch on the combination unit. Press the CLK ADJ button once. The rst two digits of the time display now
ash.
7 Set the rst two digits of the time display to between
00 and 23. Use the SKIP forwards and SKIP backwards
buttons to do this.
20
KH 2370
Page 21

8 Press the CLK ADJ button again. The last two digits of
the time display now ash.
9 Set the last two digits of the time display to between
00 and 59. Use the SKIP forwards and the SKIP backwards buttons to do this.
10 To save the input time press the CLK ADJ button again.
11 Press the MODE button once more. TIMER OFF appears
in the display
2 Nine dierent time steps can be set to switch o the
combination unit. Keep the SLEEP button pressed to
switch through the available time steps one after the
other. The time steps are: 90, 80, 70, 60, 50, 40, 30, 20
and 10 minutes.
3 Let the SLEEP button go as soon as the required time
step appears in the display.
4 Wait until the display returns to the normal playback
mode. Now SLEEP appears in the display. The sleep
timer function is now switched on.
12 Now set the time at which the timer function should
switch o the combination unit. To do this, press the
CLK ADJ button once. The rst two digits of the time
display now ash.
13 Set the rst two digits of the time display to between
00 and 23. To do this use the
SKIP forwards and SKIP backwards buttons.
14 Press the CLK ADJ button again. The last two digits of
the time display now ash.
15 Set the last two digits of the time display to between
00 and 59. Use the SKIP forwards and SKIP backwards
buttons to do this.
16 To save the input time, press the CLK ADJ button again.
17 Press the MODE button.
18 Then press the CLK ADJ button once more. DVD/CD
ashes in the display.
19 To switch on the audio CD playback: Go directly to
step 20 and continue reading.
To switch on the radio: Press the SKIP forwards button
until TUNER ashes in the display.
5 To switch o the sleep timer function, press the SLEEP
button once more. SLEEP will no longer appear in the
display.
Childproof protection
Many DVDs and VCDs/S-VCDs are provided with a movie
rating. The movie rating states for which age group the
contents of the DVD/VCD/S-VCD are intended. The respective movie rating level is mostly printed on the disc cover
and/or on the DVD/VCD/S-VCD itself.
The combination unit has multi-level childproof protec-
tion. This prevents the playback of DVDs/VCDs/S-VCDs,
which are not approved for the input age level.
Switch on the childproof protection
1 If a disc is being played back: First of all stop the play-
back by pressing twice on the STOP button.
2 Press the SETUP button to display the OSD menu on
the television screen.
3 Choose the main menu item PREFERENCES using the
control buttons. Then press the ENTER button.
4 Select PARENTAL in the list of the subitems.
20 Press the MODE button to complete the setup of the
timer function.
21 Press the POWER button. The timer function is now
switched on. The combination unit will switch the audio CD playback/the radio on and o respectively at
the input times.
Using the sleep timer
The combination unit can switch itself o automatically after a xed time with the sleep timer function. To switch on
the sleep timer function:
1 Press the SLEEP button once during playback. 90
shows up in the display and SLEEP ashes.
5 Change to the options list with the right hand control
button.
6 Select between the options using the control buttons:
G
No DVDs/VCDs/S-VCDs with age restrictions/movie ratings over 0 years old can be played back.
PG
NO DVDs/VCDs/S-VCDs with age restrictions/movie ratings over 0 years old can be played back, apart from those
which are recommended for parental guidance.
KH 2370
21
Page 22

23
KH 2370
PG-
Selecting your own password
No DVDs/VCDs/S-VCDs with a movie rating below 13 years
old can be played back.
PG-R
No DVDs/VCDs/S-VCDs with a movie rating below 17 years
old can be played back, apart from those which are stipulated for parental guidance.
NC-
No DVDs/VCDs/S-VCDs with a movie rating below 17 years
old may be played back.
ADULT
All DVDs/VCDs/S-VCDs, even those with a movie rating
over 18 years old/for adults can be played back.
7 Press the ENTER button to conrm your selection. The
following is shown on the television screen:
PASSWORD VERIFY PAGE
INPUT PASSWORD
8 Enter the password 3308 set by the factory with the
number buttons 0 to 9. Conrm your entry by pressing
the ENTER button.
9 The input movie rating has now been saved. Return to
the list of the subitems.
|||||
Note:
The exact function of the childproof protection depends
on the individual DVD/VCD/S-VCD. On some DVDs/
VCDs/S-VCDs, playback is not at all possible; on others,
unsuitable chapters are skipped or replaced by others
for the relevant movie rating level.
Please note, in addition, that
• DVDs/VCDs/S-VCDs, which do not have a movie rating printed on them, could still have a movie rating
and
You can replace the password 3308, which has been set by
the factory, with a four-digit password with digits from 0
to 9, which you can choose yourself. To do this:
1 If a disc has been inserted into the combination unit
and is being played back at the moment, then stop the
playback by pressing the STOP button twice.
2 Press the SETUP button to display the OSD menu on
the television screen.
3 Select the main menu item PREFERENCES using the
control buttons. Then press the ENTER key.
4 Select PASSWORD in the list of the subitems.
5 Change to the only option CHANGE with the right con-
trol button.
6 Press the ENTER button. The following is shown on the
television screen:
PASSWORD CHANGE PAGE
OLD PASSWORD
NEW PASSWORD
CONFIRM PWD
7
Firstly, the input eld behind OLD PASSWORD is automatically selected. Enter the password 3308, which has
been set by the factory, with the number buttons 0 to 9.
8 The marking changes automatically to the input eld
behind NEW PASSWORD Enter your new password
with the number buttons 0 to 9.
9 The marking changes automatically to the input eld
behind CONFIRM PWD Enter your new password again
with the number buttons 0 to 9.
10 Press the ENTER button. The list of subitems for the
main menu item PREFERENCES is shown on the television screen. Your new password has now been activated.
|||||
|||||
|||||
Setting back the combination unit to
the settings made in the factory
22
• on some DVDs/VCDs/S-VCDs with a movie rating
printed on them, the childproof protection shows no
function with the input movie rating level.
10 Select MAIN PAGE in the list of subitems. Press the EN-
TER button to return to the main menu.
11 Select the main menu item EXIT SETUP using the con-
trol buttons. Press the ENTER button to exit the OSD
menu.
Note:
Before setting the unit back to the settings made in the
factory: Take into consideration that by setting the values back, each of your settings in the OSD menu will be
lost.
To undo all your settings in the OSD menu:
1 If a disc has been inserted into the combination unit
and is being played back at the moment, then rst
KH 2370
Page 23

of all stop the playback by pressing the STOP button
twice.
6 00 ashes in the display. Select a memory slot for the
radio station with the number buttons 0 to 9.
2 Press the SETUP button to display the OSD menu on
the television screen.
3 Select the main menu item PREFERENCES using the
control buttons. Then press the ENTER button.
4 Select DEFAULTS in the list of the subitems.
5 Change to the only option RESET with the right control
button.
6 Press the ENTER button. The combination unit will now
be set back to the settings made in the factory.
Switching o the combination unit
To switch o the combination unit
1 If a disc which has been inserted into the combination
unit is being played back, rst of all stop the playback
by pressing the STOP button twice.
2 Open the disc tray to remove any disc inserted into the
combination unit by pressing the OPEN/CLOSE button.
Then close the disc tray by pressing the OPEN/CLOSE
button once more.
3 To switch o the combination unit, press the POWER
button.
You can enter a memory slot number between 1 and
40. Two-digit memory slot numbers can be entered
with the 10+ button and the number buttons 0 to 9.
Example: If you would like to select the memory slot
number 21, press twice on the 10+ button. Then press
the number button 1.
7 Repeat the steps 4 to 6 to save other radio stations.
To pick up radio stations:
1
Switch on the combination unit with the POWER button.
2 Press the TUNER/BAND button to change the combina-
tion unit to radio mode.
3
Press the TUNER/BAND button again to select the AM
band (medium wave). Press the TUNER/BAND button
once more to select the FM band (very high frequency).
4 To call up a saved radio station:
• With the radio section switched on, press the number
button corresponding to the memory slot number or
• Use the PAUSE/MEM UP or REPEAT/MEM DN buttons
to switch through the memory slot numbers one after
the other.
Radio mode
To switch on the radio section of the combination unit:
1
Switch on the combination unit with the POWER button.
2 Press the TUNER/BAND button to change the combina-
tion unit to radio mode.
3 Press the TUNER/BAND button again to select the AM
band (medium wave).
Press the TUNER/BAND button once more to select the
FM band (very high frequency).
4 Use the SKIP forwards and SKIP backwards buttons to
set a radio station in the selected band.
Saving radio station
To save a previously selected radio station:
5 Press the MEMORY button.
Improving the reception of FM/very
high frequency radio stations
To improve the reception of radio stations in the FM/VHF
band: Unwind the dipole antenna on the back of the combination unit to its full length. Hold the end of the dipole
antenna slowly in dierent directions. Once you have
found a good reception for the input radio station in this
manner: Fix the dipole antenna in this position, e. g. with a
piece of adhesive tape.
Improving the reception of AM/medium
wave radio stations
To improve the reception of radio stations in the AM/
medium wave band: Turn the loop antenna connected to
the combination unit slowly in dierent directions. Once
you have found a good reception for the input radio station
in this manner: Set up the loop antenna in this position.
KH 2370
23
Page 24

25
KH 2370
DVD/VCD/S-VCD mode
• to select the language for the subtitles and lm sound
• the direct selection of chapters
Playing back DVDs, VCDs or S-VCDs
To play back a DVD/VCD/S-VCD with the combination unit:
1 Ensure that you
• have connected the combination unit properly to the
television and
• all necessary settings have been carried out in the OSD
menu of the combination unit.
2 Switch on the television to which the combination unit
is connected.
3
Switch on the combination unit with the POWER button.
4 Open the tray of the combination unit with the OPEN/
CLOSE button.
5 Insert a DVD/VCD/S-VCD into the disc tray with the la-
belled side upwards.
Note:
DVDs, VCDs and S-VCDs, which you would like to play
back with the combination unit, possibly have a country
code which is printed on the DVD cover.
• the playback of bonus material on the lm (background information, making of etc.)
If a disc menu appears on the television screen:
1 Select the menu item using the control buttons with
which the playback of the DVD/VCD/S-VCD contents is
started.
2 Then press the ENTER button to start the playback.
Also look at chapter “Calling up disc menu” for more information on this subject.
Functions when playing back a DVD,
VCD or S-VCD
Note:
The functions described below are perhaps not available on all DVDs/VCDs/S-VCDs! If you try to carry out
functions which are not available, it is displayed on
the television screen.
During the playback of a DVD/VCD/S-VCD, you can use the
following functions of the combination unit:
To pause playback (Pause)
The combination unit can only play back DVDs/VCDs/S-
VCDs with the country code 2.
If there is no country code printed on the cover of a
DVD/VCD/S-VCD
• but instead the symbol , then the DVD/VCD/S-VCD
can be played back with the combination unit
• then the DVD/VCD/S-VCD can possibly not be played
back by the combination unit. Check this by trying to
play back the DVD.
6 Close the disc tray by pressing the OPEN/CLOSE but-
ton.
7 The contents of the inserted DVD/VCD/S-VCD is now
being loaded; this can last for several seconds.
8 The playback of the inserted DVD/VCD/S-VCD starts
automatically.
Depending on the inserted DVD/VCD/S-VCD, it is possible
that the contents are not played back immediately, as rst
of all a disc menu appears on the television screen. The
disc menu allows you e. g.
To pause the playback of the inserted DVD/VCD/S-VCD:
1 During the playback press the PAUSE button. On the
television screen you can see the xed image of the
scene which has just been paused.
2 To continue the playback, press the PLAY button.
Stopping the playback (Stop)
To stop the playback of the inserted DVD/VCD/S-VCD,
press the STOP button.
Playback stop with resume function
The combination unit automatically saves the position at
which the playback was stopped. This function is called
resume function. If you press the PLAY button once more,
then the playback will continue at the saved position.
Playback stop without resume function
The saved position is deleted if you press the STOP button
a second time. If you press the
PLAY button once more, then the playback starts at the
beginning of the inserted DVD/VCD/S-VCD.
24
KH 2370
Page 25

Calling up disc menu (Menu)
• once for double slow motion forward playback. SF 2x is
displayed on the television screen.
If a disc menu exists on the inserted DVD/VCD/S-VCD:
Press the MENU button during playback to call up the disc
menu. Select the individual menu items using the control buttons. Press the ENTER button to select the chosen
menu item.
Rapid search forwards/backwards
To select certain passages within the contents of the DVD/
VCD/S-VCD with rapid search:
1 Press the FWD button during playback for rapid search
forwards
• once for double search speed. FF 2x is displayed on the
television screen.
• twice for fourfold search speed. FF 4x is displayed on
the television screen.
• three times for sixfold search speed. FF 6x is displayed
on the television screen.
• four times for eightfold search speed. FF 8x is displayed
on the television screen.
2 For rapid search backwards press the RWD key during
playback
• twice for fourfold slow motion forward playback. SF 4x
is displayed on the television screen.
• three times for eightfold slow motion forward playback. SF 8x is displayed on the television screen.
• four times for double slow motion backwards playback.
SR 2x is displayed on the television screen.
• ve times for fourfold slow motion backwards playback. SR 4x is displayed on the television screen.
• six times for eightfold slow motion backwards playback. SR 8x is displayed on the television screen.
Note:
During slow motion playback there is no sound.
2 To continue playback at a normal speed, press the
PLAY button.
Frame by frame advance (Step)
You can look through the contents of an inserted DVD/
VCD/S-VCD frame by frame. To do this:
1 Press the PAUSE button to pause the playback.
• once for double search speed. FF 2x is displayed on the
television screen.
• twice for fourfold search speed. FF 4x is displayed on
the television screen.
• three times for sixfold search speed. FF 6x is displayed
on the television screen.
• four times for eightfold search speed. FF 8x is displayed
on the television screen.
Note:
There is no sound during the rapid search.
3 To continue playback at a normal speed, press the
PLAY button.
Slow motion playback forwards/
backwards (Slow)
To play back the contents of the inserted DVD/VCD/S-VCD
in slow motion:
2 Press the STEP button to move one frame forward at a
time.
3 To continue playback press the PLAY button.
Picture enlargement (Zoom)
You can enlarge the picture on the television screen during playback in three steps. To do this:
1 Press the ZOOM button on the remote control
• once for the rst enlargement step. ZOOM x1.5 is displayed on the television screen.
• twice for the second enlargement step. ZOOM x2 is displayed on the television screen.
• three times for the third enlargement step. ZOOM x3 is
displayed on the television screen.
2 To switch o the enlargement function press the
ZOOM button a fourth time. ZOOM OFF is displayed on
the television screen.
1 During playback press the SLOW button
KH 2370
25
Page 26

27
KH 2370
Change the angle of the camera (Angle)
Some DVDs/VCDs/S-VCDs contain scenes which can be
recorded at the same time from dierent camera angles.
You can look at such scenes with the angle function from
dierent perspectives.
To do this, press the ANGLE button during playback.
Each time you press the ANGLE button, it switches over to
one of the available camera angles.
Showing/hiding subtitles
If subtitles are available on the inserted DVD/VCD/S-VCD:
1
Press the SUBTITLE button once, to show the subtitles in
the rst language available. Press the SUBTITLE button
several times to show the subtitles in other languages.
2 The selected subtitle language and its number is
shown on the television screen (e. g. 01/10: ENGLISH
for the rst of ten available subtitle languages).
• the amount of time already played back of the chapter currently being played back in hours, seconds and
minutes
4 If you press the DISPLAY button a fourth time:
• the time until the end of the chapter currently being
played back in hours, seconds and minutes
5 To hide the disc information, press the DISPLAY button
once more.
Selecting chapters
What are titles and chapters? Please look at the chapter
“Glossary/Index” for more information on this subject.
You can select chapters on an inserted DVD/VCD/S-VCD in
the following ways:
Skip to the beginning of the chapter
(Skip)
3 To switch o the display of subtitles: Press the SUBTI-
TLE button again, when the last of the available subtitle languages has been shown (e. g. 10/10 for the tenth
of ten available subtitle languages).
Changing playback language
On many DVDs/VCDs/S-VCDs you can select another playback language during playback. To do this press the AUDIO button.
When you press the AUDIO once, the rst available playback language is switched on. Every time you press the
AUDIO button again, other available playback languages
will be switched on one after the other.
Showing disc information
You can show all information about a DVD/VCD/S-VCD on
the television screen during the playback. To do this:
1 Press the DISPLAY button on the remote control. The
following is shown on the television screen:
• the number of the title and chapter currently being
played back
With the SKIP forwards and SKIP backwards buttons you
can skip throughout the contents of the DVD/VCD/S-VCD
• forwards to the beginning of the next chapter or
• backwards to the beginning of the chapter currently
being played back
The selected chapter is played back immediately without
you having to press the PLAY button. The number of the
chapter appears in the display of the combination unit on
the left of the playback time.
Selecting chapters with chapter
numbers
To select a chapter by entering its chapter number:
1 Press the GOTO button on the remote control during
playback. The GOTO menu is shown on the television
screen:
TITLE 01/03 CHAPTER 001/020
2 Enter the required chapter number with the number
buttons 0 to 9 in the marked input eld.
26
•
the amount of time already played back of the entire
DVD/VCD/S-VCD content in hours, minutes and seconds
2 If you press the DISPLAY button a second time:
• the time until the end of the title currently being
played back, in hours, seconds and minutes
3 If you press the DISPLAY button a third time:
Example: If you would like to select chapter number 3,
then press the number button 3.
Enter two-digit chapter numbers with the 10+ button
and the number buttons 0 to 9.
Example: If you would like to select chapter number
21, press the 10+ button twice. Then press the number
button 1.
KH 2370
Page 27

3 Press the ENTER button. Playback will be continued at
the beginning of the selected chapter.
Select passages of chapters according
to time positions
To select a passage of a chapter by entering its time position on the DVD/VCD/S-VCD:
1 During playback, press the GOTO button on the re-
mote control twice. The GOTO menu is shown on the
television screen:
TITLE 01/03 TIME _ _:_ _:_ _
2 Enter the time position with the number buttons 0 to 9
in the marked input eld.
2 Press the A–B button again as soon as the end of the
required sequence is played back. Please note that the
beginning and the end of a sequence must be within
one chapter. A TO B SET B is shown on the television
screen.
The repeated playback of the selected sequence begins
immediately. The sequence is repeated again and again
until the A–B button is pressed again. A TO B CANCELLED
is then shown on the television screen.
Audio CD mode
Playing back of audio CDs
To play back audio CDs with the combination unit:
Example: To start playback 1 hour, 5 minutes and 30
seconds after the beginning of the DVD/VCD/S-VCD
content: Press the number buttons one after the other
• 0, 1 for 1 hour
• 0, 5, for 5 minutes
• 3, 0 for 30 seconds
3 Press the ENTER button to start the playback at the se-
lected time position.
Repeat playback
With the repeat playback function you can repeat alternatively the title or chapter of the inserted DVD.
1 To repeat the chapter currently being played back:
During the playback, press the REPEAT button once.
CHAPTER REPEAT ON is shown on the television screen.
2 To repeat the title currently being played back: During
playback, press the REPEAT button twice. TITLE REPEAT
ON is shown on the television screen.
3 To switch o the repeat playback: Press the REPEAT
button several times until REPEAT OFF is shown on the
television screen.
Repeating sequences
With this function you can repeatedly play back any sequences within the chapter currently being played back.
1 Open the disc tray of the combination unit with the
OPEN/CLOSE button.
2 Insert an audio CD with the labelled side upwards in
the disc tray.
3 Close the disc tray with the OPEN/CLOSE button.
4 The contents of the inserted audio CD is now being
loaded; this can lasts for a few seconds.
5 As soon as the contents of the inserted audio CD has
been loaded, playback begins automatically.
Functions when playing back audio CDs
During the playback of an audio CD you can use the following functions on the combination unit:
Pause playback (Pause)
1 To pause the playback of a title, press the PAUSE but-
ton during playback.
2 To continue the playback of the title, press the PLAY
button.
Stop playback (Stop)
To stop the playback of a title, press the STOP button.
Playback stop with resume function
To do this:
1 Press the A–B button, as soon as the start of the re-
quired sequence is played back. A TO B SET A is shown
on the television screen.
The combination unit automatically saves the position at
which the playback was stopped. This function is called
resume function. IF you press the PLAY button once more,
then the playback will continue at the saved position.
KH 2370
27
Page 28

29
KH 2370
Playback stop without resume function
GOTO _ _:_ _
The saved position is deleted if you press the STOP button
a second time. Press the PLAY button once more, then the
playback will begin with the rst title of the audio CD.
Select titles
You can select titles on an inserted audio CD in the following ways:
Skipping to the beginning of the title
(Skip)
With the SKIP forwards and SKIP backwards buttons during the playback of a title you can skip
• forwards to the beginning of the next title or
• backwards to the beginning of the title currently being
played back.
The selected title is played back immediately without you
having to press the PLAY button. The number of the title is
shown in the display of the combination unit on the left of
the play back time.
2 Enter the time position with the number buttons 0 to 9
in the marked input eld.
Example: You would like to select a passage, which be-
gins one minute after the beginning of the title. Press
the number buttons one after the other
• 0, 1 for 1 minute;
• 0, 0 for 0 seconds
3 The playback continues immediately at the selected
time position.
Programmed playback
With this function you can put together selected titles of
an audio CD as a title sequence. You can decide on the
sequence in which the titles are played back. To use the
programmed playback:
1 If a title is being played back: First of all stop the play-
back by pressing the STOP button twice.
2 Press the MEMORY button.
Selecting a title using the number
buttons
To select a title directly by entering the title number with
the number buttons:
1 Press the number button on the remote control corre-
sponding to the title number.
Example: If you would like to select title number 3,
press the number button 3.
Two-digit title numbers are entered with the 10+ but-
ton and the number buttons 0 to 9.
Example: If you would like to select title number
21, then press the 10+ button twice. Then press the
number button 1.
The input numbers are shown on the television screen.
2 The playback of the title with the input number now
begins automatically.
Selecting passages of titles with time
positions
3 Select the rst title to be programmed with the
number buttons 0 to 9. This title is now displayed as
the rst programmed title on the television screen.
Example: Once you have programmed the fth title,
PROGRAM 01:05 is displayed.
Two-digit title numbers are entered with the 10+ but-
ton and the number buttons 0 to 9.
Example: If you would like to select title number 21,
press the 10+ button twice. Then press the number
button 1.
4 Repeat step 3 until you have programmed all the re-
quired titles.
5 Press the PLAY button to start the playback of the pro-
grammed titles.
6 To delete the programmed title sequence: Press the
STOP button. Then press the MEMORY button twice.
Repeat playback
You can repeatedly play back both
28
To select a certain passage of a title by inputting its time
position:
1 Press the GOTO button during the playback of the title.
The GOTO menu is shown on the television screen:
• a single title and also
• the whole audio CD
with this function. To switch on the repeat playback:
KH 2370
Page 29

1 Press the REPEAT button during playback. REP-ONE is
displayed on the television screen. The title currently
being played back is now repeatedly played back, until
the repeat playback is switched o.
2 Press the REPEAT button a second time. REP-ALL is dis-
played on the television screen. The entire audio CD is
now repeatedly played back until the repeat playback
is switched o.
3 To switch o the repeat playback, press the REPEAT
button a third time. REPEAT OFF is displayed on the television screen.
4 The contents of the inserted CD-R/CD-RW is now being
loaded; this can last a few seconds.
5 As soon as the content of the inserted CD-R/CD-RW
has been loaded, it is played back automatically.
Functions when playing back
MP3/JPEG les
The following functions are available during the playback
of CD-Rs/CD-RWs with MP3 and JPEG les:
Pause playback (Pause)
Repeating sequences
With this function you can repeatedly play back any sequences of the title currently being played back. To do
this:
1 Press the A–B button as soon as the beginning of the
required sequence is played back. A TO B SET A is
shown on the television screen.
2 Press the A–B button again as soon as the end of the
required sequence has been played back. Take note
that the beginning and the end of the sequence must
be within one title. A TO B SET B is shown on the television screen.
The repeat playback of the selected sequence begins immediately. The sequence is repeated again and again until
the A–B button is pressed again. A TO B CANCELLED is
shown on the television screen.
MP3/JPEG mode
1 To pause the playback of a le, press the PAUSE button
during playback.
2
To continue playing back the le, press the PLAY button.
Stop playback (Stop)
To stop the playback of a le, press the STOP button.
Playback stop with resume function
The combination unit automatically saves the position
at which the playback is stopped. This function is called
resume function. If you press the PLAY button once more,
then the playback will continue at the saved position.
Playback stop without resume function
The saved position is deleted if you press the STOP button a second time. If you press the PLAY button once more,
then the playback of the rst le/of the rst le in the rst
sub-folder of the CD-R/CD-RW starts.
Selecting a le
Information on the JPEG mode:
Only JPEG les with a resolution of max. 1600 x 1200
pixels can be played back. JPEG les with a higher reso-
lution cannot be played back.
Playback MP3/JPEG les
To play back CD-Rs/CD-RWs with MP3 and JPEG les with
the combination unit:
1 Open the disc tray of the combination unit with the
OPEN/CLOSE button.
2 Insert a CD-R/CD-RW with MP3/JPEG les with the la-
belled side upwards in the disc tray.
3 Close the disc tray with the OPEN/CLOSE button.
You can select les on an inserted CD-R/CD-RW in the following ways:
Skip to the beginning of the title (Skip)
With the SKIP forwards and SKIP backwards buttons you
can skip throughout the contents of the CD-R/CD-RW during the playback
• forwards to the beginning of the next le or
• backwards to the beginning of the le currently being
played back
The selected le is played back immediately without you
having to press the PLAY button. The number of the le is
shown in the display of the combination unit on the left of
the playback time.
KH 2370
29
Page 30

31
KH 2370
If folders exist:
In this case you can only skip throughout the sub-le currently selected
• forwards to the beginning of the next le or
• backwards to the beginning of the le currently being
played back
Selecting les with number buttons
To select a le directly by entering the le number with
the number buttons:
1 Press the number button on the remote control corre-
sponding to the le number.
Example: If you would like to select le number 3,
then press the number button 3.
Two-digit le numbers are entered with the 10+ but-
ton and the number buttons 0 to 9.
3 Playback is continued immediately at the selected time
position.
Only to play back MP: Repeating
sequences (A–B)
You can repeatedly play back any sequence of the le currently being played back with this function. To do this:
1 Press the A–B button as soon as the beginning of the
required sequence is played back. A TO B SET A is
shown on the television screen.
2 Press the A–B button again as soon as the end of the
required sequence has been played back. Please note
that the beginning and the end of the sequence have
to be within one le. A TO B SET B is shown on the television screen.
The repeat playback of the selected sequence starts im-
mediately. The sequence is repeated again and again until
the A–B button is pressed again. A TO B CANCELLED is
shown on the television screen.
Example: If you would like to select le number
21, then press the 10+ button twice. Then press the
number button 1.
The input numbers are shown on the television screen.
The playback of the le with the input number now be-
gins automatically.
If folders exist:
With the number buttons you can only select les to be
played back which are within the current sub-folder.
Only to play back MP: Select le
passages using time position
To select a certain passage of a le by entering its time
position:
1 Press the GOTO button while the le is being played
back. The GOTO menu is shown on the television
screen:
GOTO _ _:_ _
2 Enter the time position in the marked input eld with
the number buttons 0 to 9.
Example: You would like to select a passage which
starts one minute after the beginning of the le. Press
the number buttons one after the other
Only to play back JPEG: Rotating
pictures
During the picture display you can rotate the picture currently being shown in 90° steps. To do this:
1 Press the ANGLE button. Every time you press the AN-
GLE button, the current picture is rotated by 90°. Each
selected rotation step – between 90° and 270° – is
shown on the television screen.
2 Press the ANGLE button again when a picture has been
rotated by 270°; the picture will now be displayed in its
original position.
Operating the SMART NAVI menu
If you have selected the option MIT MENÜ in the subitem
SMART NAV of the OSD menu: The SMART NAVI menu will
be shown on the television screen as soon as the content
of a MP3/JPEG CD-R/CD-RW has been loaded.
Note:
MP3 and JPEG les on CD-Rs/CD-RWs can be stored in
folders. This can e. g. be useful to organise les from
dierent genres. The following steps are therefore described both for MP3/JPEG CD-Rs/CD-RWs with and
without folder structure.
Please look at the chapter “Glossary/Index” for more information on this subject.
30
• 0, 1 for 1 minute;
• 0, 0 for 0 seconds
In the SMART NAVI menu the following are displayed:
KH 2370
Page 31

If no folders exist:
SMART NAVI
SMART NAVI
ROOT ROOT 0
ABC 1 1
ABC 2 2
PLAY MODE FOLDER
• on the left hand side, the main folder (“Root”) on the
inserted CD-R/CD-RW
• on the right hand side, all les on the inserted CD-R/
CD-RW (called ABC 1 and ABC here)
• below the mode selection bar
Please go directly to step 4 and continue reading 4.
If folders exist:
SMART NAVI
ROOT ROOT 0
FOLDER 1 1
FOLDER 2 2
PLAY MODE FOLDER
ROOT . . . 0
FOLDER 1 ABC 1 1
FOLDER 2 ABC 2 2
FOLDER 3 ABC 3 3
PLAY MODE FOLDER
• on the left hand side, all sub-folders with les (numbered in sequence) on the inserted CD-R/CD-RW
• on the right hand side, all les (numbered in sequence)
within the sub-folder currently selected
4 Change to the list of les using the control buttons.
Also use the control buttons to change between the in-
dividual les on the list. Press the ENTER button to select a le for playback. The selected le is now played
back.
Changing folders (If folders exist)
Would you like to play back les from another sub-folder,
then rst of all change from the current folder to the required folder. To do this:
1 If a le is being played back, rst of all stop the play-
back by pressing the STOP button twice.
• on the left hand side, the main folder (“Root”) on the
inserted CD-R/CD-RW
• on the right hand side, all sub-folders with les on the
inserted CD-R/CD-RW (called Folder 1 and Folder 2
here)
• below the mode selection bar
Firstly the rst sub-folder on the right hand side is selected
automatically.
1 Change between the individual sub-folders using the
control buttons.
2 Press the ENTER button to display the contents of a se-
lected folder.
3 The following is now displayed in the SMART NAVI
menu:
2 Change from the list of les to the list of sub-folders us-
ing the control buttons.
3 Select the sub-folder to which you would like to
change using the control buttons.
4 Conrm your selection with the ENTER button.
5 In the menu, the list of the les in this sub-folder will
be displayed again on the right.
6 Select a new le for playback using the control buttons
and the ENTER button.
7 To get back to the main directory: Change from the list
of les to the list of sub-folders using the control buttons. Select the root folder using the control buttons.
Press the ENTER button. Now the main directory is displayed again.
Selecting playback mode (Play Mode)
To play back MP3 or JPEG les you can choose the following playback modes:
KH 2370
31
Page 32

33
KH 2370
FOLDER
If folders exist:
If no folders exist:
All les on the CD-R/CD-RW are played back one after the
other. The playback nishes with the last le on the CD-R/
CD-RW.
If folders exist:
All les in the current sub-folder are played back one after
the other. The playback nishes with the last le in the current sub-folder.
FOLDER REP
If no folders exist:
All les on the CD-R/CD-RW are played back one after the
other. After the last le the playback begins again with the
rst le on the CD-R/CD-RW.
If folders exist:
All les in the current sub-folder are played back one after
the other. After the last le the playback of the rst le in
the sub-folder begins again.
All les in the sub-folders on the CD-R/CD-RW are played
back one after the other. The playback nishes with the
last le in the last sub-folder.
DISC REP
If no folders exist:
All les on the CD-R/CD-RW are played back one after the
other. After the last le the playback begins with the rst
le on the CD-R/CD-RW.
If folders exist:
All les in all sub-folders on the CD-R/CD-RW are played
back one after the other. After the last le in the last subfolder the playback begins again with the rst le in the
rst sub-folder.
The disc continues to be repeated until the playback is
stopped by pressing the STOP button.
RANDOM
If no folders exist:
The folder is continually repeated until you stop the play-
back by pressing the STOP button.
DISC SCAN
This mode provides you with a quick overview of all les
on an inserted CD-R/CD-RW.
If no folders exist:
The les on the CD-R/CD-RW are played for a few seconds
one after the other. The playback nishes with the last le
on the CD-R/CD-RW.
If folders exist:
All les in the sub-folders on the CD-R/CD-RW are played
back for a few seconds one after the other. The playback
nishes with the last le in the last sub-folder.
DISC
If no folders exist:
All les on the CD-R/CD-RW are played back one after the
other. The playback nishes with the last le on the CD-R/
CD-RW.
All les on the CD-R/CD-RW are played in random order.
If folders exist:
All les in the current sub-folder are played in random order.
The RANDOM playback is continued until the playback is
stopped by pressing the STOP button.
SHUFFLE ON
If no folders exist:
All les on the CD-R/CD-RW are played in random order.
The random playback is continued until each le on the
CD-R/CD-RW has been played once.
If folders exist:
All les in the current sub-folder are played in random
order. The random playback is continued until each le in
the current sub-folder has been played once.
PROGRAM PO
If no folders exist:
With this function you can select certain les on the CD-R/
CD-RW for programmed playback. You can determine the
order in which the les are played back.
32
KH 2370
Page 33

If folders exist:
With this function you can select certain les in the current
sub-folder for programmed playback. You can determine
the order in which the les are played back.
To operate the programmed playback function, go to the
corresponding chapter and continue reading.
SINGLE
3 Conrm the selection by pressing on the ENTER button
on the remote control. The selected le is now displayed as the rst programmed le on the top of the
SMART NAVI menu,.
Example: If you have programmed the fth le (in the
current sub-folder), then Program 01:0005 is displayed.
4 Repeat steps 1 and 2, until all required les have been
programmed.
The currently selected le is played back once.
REP-ONE
The currently selected le is played back repeatedly. The
repeat playback is continued until you stop the playback
by pressing the STOP button.
Selecting playback mode
1 If a le is being played back, rst of all stop the play-
back with the STOP button.
2 Change from the list of the les to the mode selection
bar with the right control button. Firstly the FOLDER
playback mode is selected automatically.
3 You switch through the dierent playback modes with
the up and down control buttons.
4 If the required playback mode is displayed, then exit
the mode selection bar with the left control button.
The marking is now in the list of the les of the selected sub-folder again.
5 To start the playback in the set mode, press the PLAY
button. The playback starts with the marked le in the
list of les.
Programmed playback (Program)
5 Then press the STOP button. PROG-END is displayed in
the mode selection bar.
6 Press the PLAY button to start the playback of the pro-
grammed les.
7 To delete the programmed playback, change to anoth-
er playback mode.
Cleaning the
combination unit
Clean the casing of the combination unit only with a
slightly damp cloth and a mild detergent. Pay attention
that no moisture enters into the combination unit!
Clean the inside of the disc tray – if necessary – only with a
clean dry brush (e. g. lens brush, can be bought in specialised camera shops). Never clean the inside of the disc tray
with a wet cloth!
Warning!
If moisture penetrates into the combination unit, there
is a risk of getting an electric shock! In addition this can
cause irreparable damage to the combination unit!
If you have selected the PROGRAM PO mode, to select several les for programmed playback:
1 Change back to the list of the les of the current sub-
folder using the control buttons.
2 Select the rst le to be programmed using the control
buttons.
Note:
If folders exist: You can only select les for programmed
playback from the currently selected sub-folder. Files
from dierent sub-folders can not be selected for programmed playback.
To rectify malfunctions
and errors
Nothing appears on the display/
combination unit shows no function,
although it is switched on
A Check whether the power cord has been plugged into
the power socket properly.
B Check whether the power socket, in which you have
plugged the power cord of the combination unit, has
electric current, by connecting another device to the
power socket. If necessary, plug in the power cord of
the combination unit into another power socket.
KH 2370
33
Page 34

35
KH 2370
C Switch o the combination unit by pressing the POW-
ER button and then wait ten seconds. Then switch the
combination unit back on, by pressing the POWER button again.
Display shows No Disc, although a disc
has been inserted
the television, to be able to use the combination unit
with the television.
D Check the operating instructions of any possible con-
nected audio component, whether adjustments are
necessary, to be able to use this component with the
television.
A The disc is dirty, scratched or damaged.
B The country code of the inserted DVD/VCD/S-VCD
does not match the country code of the combination
unit. The DVD/VCD/S-VCD cannot be played on the
combination unit.
Inserted disc is not being played back
A lm of condensation has probably formed on the laser
scanning lens of the combination unit. This can be the
case, in particular, if the combination unit has been exposed to severe uctuations in temperature.
In this case put the combination unit in a
dry environment with a normal room temperature. First
of all remove any possible inserted disc from the disc tray.
Then leave the combination unit switched on for at least
one hour without using it until the lm of condensation
has evaporated.
No picture or black and white picture
A Check whether the connecting cable(s) between the
combination unit and the television are rmly plugged
into the corresponding jacks.
B Check whether the settings in the OSD menu item VID-
EO OUTPUT match the connecting variant with which
you have connected the combination unit to the television.
C Check the operating instructions of the television to
see, whether possible adjustments are necessary on
the television, to be able to use the combination unit
with the television.
E If you
• have connected the combination unit to a stereo television, but not to an audio component or
• have connected the combination unit to a Dolby Prologic compatible audio component via the analog
stereo output (with a cinch cable to the AUX IN L and R
cinch jacks)
then check whether in the OSD menu item SPEAKER
SETUP, the stereo downmix has been switched on.
No : or : picture
Check the operating instructions of the television to nd
out which picture format the television has.
Then check whether the settings in the OSD menu item TV
DISPLAY match the available picture formats of the television.
Remote control without function
A Check whether the batteries in the remote control
have been put into the battery compartment with the
correct polarities.
B Check whether the batteries in the remote control are
exhausted and if necessary change both batteries.
C Ensure that there are no obstacles between the remote
control and the combination unit.
D Do not move more than 5 meters away from the com-
bination unit when using the remote control.
34
No sound
A Check whether the television and/or combination unit
are possibly switched to mute.
B Check whether all the connecting cables between the
combination unit, surround loudspeakers and subwoofer are plugged in rmly into the corresponding
terminals/jacks. In addition check whether the subwoofer is switched on.
C Check the operating instructions of the television to
see, whether possible adjustments are necessary on
Playback language/Subtitle language
does not correspond to the language in
the settings in the OSD menu
The playback language/subtitle language input in the
OSD menu is not available on the inserted disc.
One or more functions cannot be
switched on
Not all functions are available on the combination unit
with all DVDs/VCDs/S-VCDs, audio CDs and also CD-Rs/CDRWs with MP3 and JPEG les. Functions, which cannot be
KH 2370
Page 35

switched on, are display by the symbol appearing on
the television screen.
them of 20 minutes (8 cm format) and 74 minutes (12 cm
format) respectively
No button on the unit or on the remote
control works/other malfunctions
A Switch o the combination unit with the POWER but-
ton. Wait ten seconds and the press the POWER button
once more to switch on the combination unit again.
B If the malfunction still occurs afterwards: Set the com-
bination unit back to the settings made in the factory.
To do this, look at the chapter “Setting the combination
unit back to the settings made in the factory”.
Consult one of our service partners in your
neighbourhood if
• the described malfunctions cannot be rectied as described or
•
other malfunctions which have not been described
occur.
Warning!
Never open the casing of the combination unit! The unit
does not have any parts that can be maintained by the
user! If the casing of the unit is opened then the guarantee expires!
No liability/guarantee will be assumed for damages
which arise from opening the casing of the unit or from
trying to repair the unit and which are not carried out by
specialized qualied personnel!
There are two versions of VCDs:
• Version 1.1 VCDs/S-VCDs can only play audio and video
data.
• Version 2.0 VCDs/S-VCDs have so-called PBC (Playback
Control) functions. In addition, xed images with higher resolution can be played back
What are titles and chapters?
The largest units of picture and sound units on DVDs
are called titles; on many DVDs, the (main) lm has title
number 01. For bonus material (e. g. lm trailers, background information etc.), which is available on many DVDs,
other title numbers can possibly be used.
The next smallest picture and sound units below titles are
called chapters. If the title(s) of a DVD is(are) subdivided
into chapters, then numbers are allocated to them and if
these numbers are entered, then the chapters can be selected directly.
Please note that not on all DVDs
• is(are) the title(s) subdivided in (numbered) chapters
• are the chapters also described as scenes (e. g. in the
main menu of DVDs)
What are Scart, S-Video, composite
video?
Glossary/Index
What are DVDs, VCDs and S-VCDs?
DVDs
DVD is the abbreviation for Digital Versatile Disc. DVDs
serve to store audio and video data; they are available in 8
cm and 12 cm (diameter) formats. DVDs oer – thanks to
their storage capacity which is many timer higher than CDRs/CD-RWs – a playback duration of the audio and video
data stored on them of up to eight hours.
VCDs/S-VCDs
Video-CD (VCD) and Super Video-CD (S-VCD) describe two
methods for compressed– i.e. to save space – storage of
lms on CDs. VCDs and S-VCDs are available in 8 cm and
12 cm (diameter) formats. Their storage capacity is many
times lower than that of DVDs. Therefore they only oer a
playback duration of the audio and video data stored on
Scart
Scart describes a 21-pin standard plug-type connection
through which the RGB signals, video signals and S-Video
signals as well as quite a few control and additional signals
are transmitted.
S-Video
When connecting a DVD player to a television via S-Video,
brightness and colour signals are separated; this achieves
a higher focus and a lower so-called “coloured noise”. Coloured noise is what one calls the overlaying of the coloured, mostly strongly saturated parts of a video image
made by an irregular, turbulent structural disturbance.
Composite video
Video signal or FBAS signal; this is a picture signal in which
both colour and brightness information is contained simultaneously.
KH 2370
35
Page 36

Decoder
SECAM
The sound on DVDs with home cinema surround sound
is stored in a coded form on the DVD. There are dierent
coding formats for dierent purposes, e. g. AC-3 to play
Dolby Digital surround sound. To be able to play coded
sound, the playback unit (e. g. the combination unit) must
have a so-called decoder, which transforms the coded signals back into music or sound.
The eBench KH 2370 combination unit has an AC-3 decod-
er (for Dolby Digital 5.1 surround sound signals).
Dolby Surround
Dolby Surround is an analog sound format whereby the
two channels of a stereo sound signal are used to accommodate surround sound information for other channels.
With a Dolby Surround Decoder, the signals are transformed back into sound or music and are conducted to
two additional loudspeakers, which are to be placed behind the listening position.
Dolby Prologic
By comparison with the Dolby surround sound format,
in the case of Dolby Prologic a further channel is used in
the stereo signal; this is the so-called “Center” channel.
The corresponding center loudspeaker is to be placed in
the centre between the stereo loudspeakers. The lowest
tones are to be conducted to a low tone loudspeaker, the
so-called “subwoofer”. The subwoofer can be placed at any
position in the room; the reason for this is that the low
tones which are emitted by the subwoofer, can scarcely be
exactly located by the human ear.
Dolby Digital (5.1)
Dolby Digital, also called AC3, is a digital sound format, by
which up to six separate audio channels can be transported. In the case of most of the current DVDs, the sound is
stored in the so-called “Dolby Digital 5.1” format; the “5” in
the description “5.1” stands for three front and two back
surround sound channels, the “1” for the low tone channel.
SECAM is the abbreviation for the French “système en couleur avec mémoire”. SECAM is the normal and most commonly used colour television standard in France and many
Eastern European countries.
Audio CDs
Audio CDs only contain audio data; these are also available with 8 cm and 12 cm (diameter) formats. The playback
duration of the audio data stored on them is 20 minutes
(8 cm format) and 74 minutes (12 cm format) respectively.
Audio data with CDA format are stored on audio CDs.
MP
MP3 describes a procedure or format to compress audio
data developed by the Fraunhofer Institut. Pieces of music
compressed in MP3 format only have a fraction of their
original size, which allows far more music to be stored e.
g. on CD-Rs/CD-RWs than on normal audio CDs, on which
audio data is stored in CDA format.
JPEG
JPEG (abbreviation of Joint Photographics Expert Group)
describes a commonly used graphic format developed by
the same named organisation, with which picture data in
coloured and grey tones is compressed.
What are folders?
In contrast to audio CDs, the titles of a CD-R/CD-RW with
MP3 or JPEG les can be stored in folders, for example, to
organize titles from dierent genres. If the MP3 les were
stored in folders, then the structure of an MP3 CD can look
like the following, for example:
MP3 CD Folder MP3 les
36
What are PAL, NTSC and SECAM?
PAL
PAL is the abbreviation for Phase Alternation Line. PAL is
in Central and Western Europe (exception: France, see abbreviation SECAM), the normal and commonly used colour
television standard.
NTSC
NTSC is the abbreviation for National Television System
Committee. NTSC is a colour television standard which is
used, above all, in the USA and in Japan.
KH 2370
Page 37

Page 38

KH
IB v. ./ . .
Kompernaß Handelsgesellschaft mbH • Burgstraße • D- Bochum, Germany
www.kompernass.com
 Loading...