

Page 1

KOMPERNASS GMBH · BURGSTRASSE 21 · D-44867 BOCHUM
www.kompernass.com
ID No.: KH2288-01/07-V2
UK
KH2288_E2575_0107_V2_UK 09.03.2007 16:33 Uhr Seite 1
Page 2

Kitchen Radio KH 2288
Operating instructions
KH2288_E2575_0107_V2_UK 09.03.2007 16:33 Uhr Seite 2
Page 3

KH2288_E2575_0107_V2_UK 09.03.2007 16:33 Uhr Seite 3
Page 4
q
w
e
r
t
aoiudfgh
;lk
y
s
j
KH2288_E2575_0107_V2_UK 09.03.2007 16:33 Uhr Seite 4
Page 5

- 3 -
KH2288
Content Page
Intended Usage 4
Delivery Contents 4
Technical Data 4
Safety information 4
Description of the appliance 5
Hanging up the kitchen radio 5
Setting-up the Kitchen Radio 6
Startup 6
Inserting the power failure batteries 6
Setting the time 6
Setting the date 7
Setting the SDA 7
Automatic Update (RDS) 7
Switching the dimmer on and off 8
Kitchen timer 8
Alarm feature (Alarm1 and Alarm2) 9
Radio operation 9
Adjusting the station 9
Station search function 9
Programming stations 10
AMS (Automatic Memory System) 10
Adjusting the volume 10
Lock function 10
Cleaning 11
Troubleshooting 11
Disposal 11
Warranty and Service 11
Importer 11
Read the operating instructions carefully before using the appliance for the first time
and preserve this booklet for later reference. Pass the manual on to whomsoever
might acquire the appliance at a later date.
KH2288_E2575_0107_V2_UK 09.03.2007 16:33 Uhr Seite 3
Page 6

- 4 -
Kitchen radio KH 2288
Intended Usage
This kitchen radio is intended solely...
• for sub-structure assembly on cupboards,
• for setting-up as an electrocnic
entertainment device,
• for the reception of ultra-short
wavelength/FM radio stations,
• for private, non-commercial use.
Delivery Contents
Kitchen radio KH 2288
Mounting plate
4 screws
Operating instructions
Warranty card
Technical Data
Rated voltage: 230 V/50 Hz
Power failure batteries:2x 1.5 V
type AAA
(not included)
Frequency range: 87.5 – 108.5 MHz
Power consumption: 5 W
The technical features of the appliance
enable an adjustable frequency range
of 87.5 - 108.5 MHz.
Deviating national regulations may apply
in various countries to the allocated radio
frequency ranges. Please make sure not
to use the information received outside
the allocated radio frequency range , or
pass it on to third parties or misuse or
alienate it.
Safety information
Danger!
Do not hang up the kitchen radio...
• ...in locations subjected to direct
sunlight! Otherwise the kitchen radio
may overheat and be irreparably
damaged.
• ...in the direct vicinty of water e.g.
near the sink. Never subject the
kitchen radio to splash water.
There is a danger of electric shock!
• ...in the direct vicinity of heat sources.
These include e.g. fan heaters, ovens
and similar appliances as well as ventilation apertures and other electrical
appliances. Do not hang up the
kitchen radio above a cooker. The
kitchen radio may be damaged.
There is a danger of fire!
• ...in places subjected to intensive
shocks or constant vibrations.
Intensive shocks and constant vibrations can lead to temporary malfunctions or permanent damage.
• Make sure that the power cord
cannot become jammed or damaged
by sharp edges.
• Make sure that the power plug is easily
accessible. Then you will be able to
immediately disconnect the kitchen
radio in case of a malfunction.
KH2288
KH2288_E2575_0107_V2_UK 09.03.2007 16:33 Uhr Seite 4
Page 7

- 5 -
• Make sure that the kitchen radio has
a minimum clearance from walls and
objects at the sides and bottom of
4 inch. Do not cover the kitchen radio
with objects or fabrics (e.g. curtains).
There is a danger of fire!
• Regularly check the condition of the
batteries. Leaking batteries can cause
damage to the appliance.
• Always change all batteries at the same time and always use batteries of
the same type.
• If you do not intend to use the appliance for an extended period, remove
the batteries.
• In the event of the batteries leaking
acids, wear protective gloves.
• Clean the battery compartment with
a dry cloth.
This appliance is equipped with non-
slip rubber feet. As surfaces can
comprise of various materials and be
treated with various cleaning
agents, it cannot be completely excluded that some of these materials
contain components that could attack and soften the rubber feet. If
necessary place an anti-slip mat under the feet of the appliance.
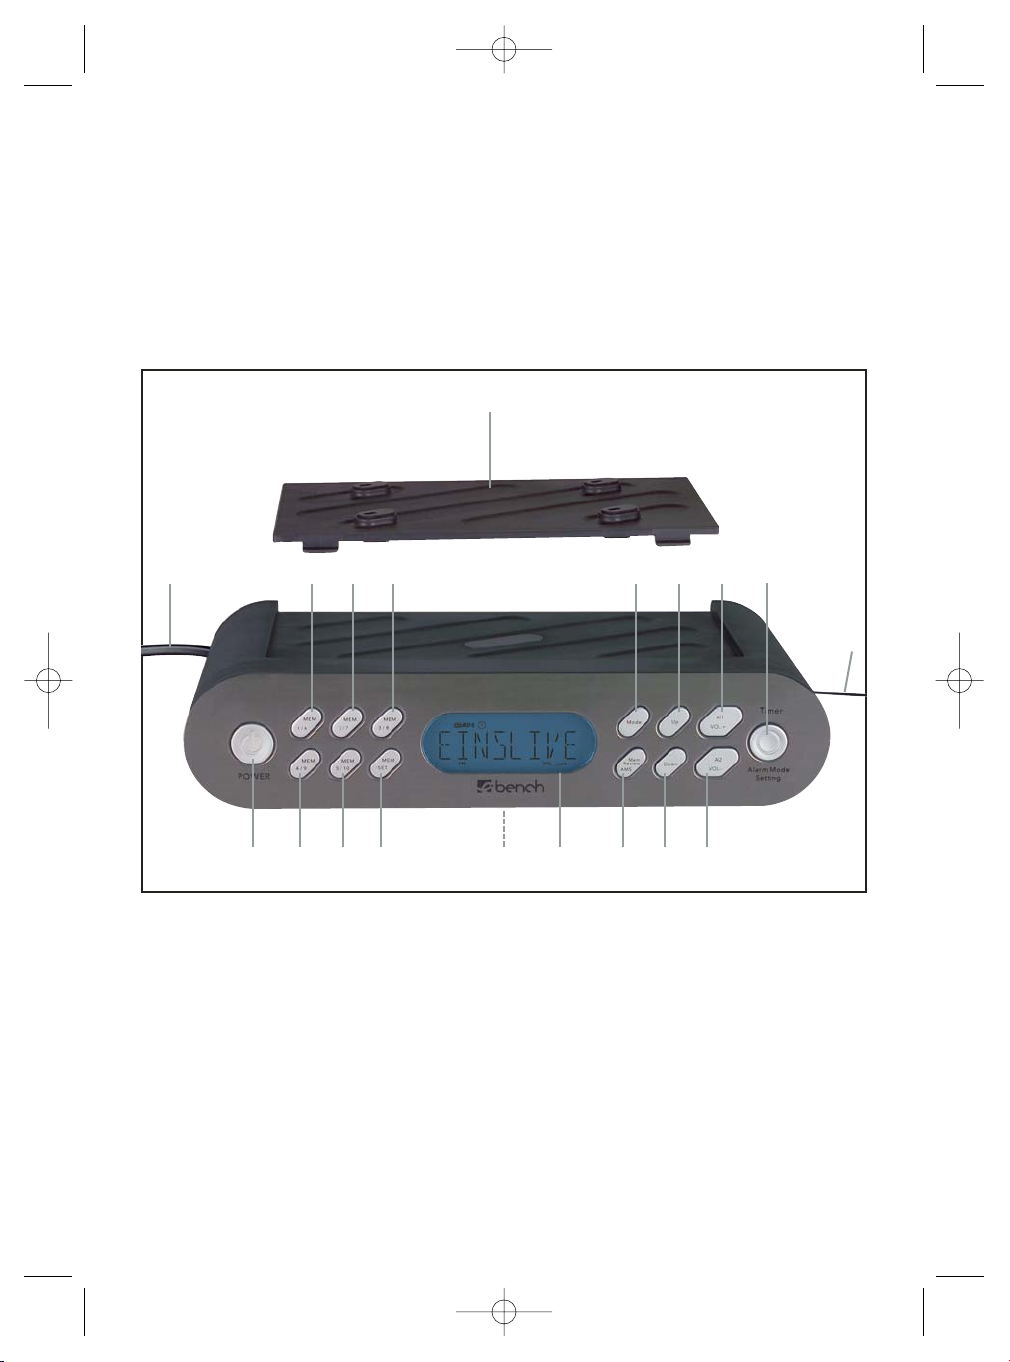
Description of the appliance
q
Mounting plate
w
Mode button
e
Button Up
r
Button Al1/VOL+
t
Button Timer/Alarm/Mode/Setting
y
Dipole antenna
u
Button Al2/VOL-
i
Button Down
o
Button Mem.Review/AMS
a
Display
s
Battery compartment
d
Button MEM.SET
f
Button MEM. 5/10
g
Button MEM. 4/9
h
Button POWER
j
Mains cable
k
Button MEM. 1/6
l
Button MEM. 2/7
;
Button MEM. 3/8
Hanging up the kitchen radio
To hang up the kitchen radio with the
enclosed mounting plate
q
:
1 Find a suitable location for the
kitchen radio.
2 Press the two retaining levers on the
back of the appliance down. Push the
mounting plate
q
back and remove it.
3 Hold the mounting plate
q
to the
installation location. Allow 3 cm space
at the front edges. This way the
kitchen radio will later fit flush.
4 Mark the four points for the drillholes
with a pencil.
5 Mark the drillhole with a mandril.
6 Screw down the mounting plate
q
.
KH2288
KH2288_E2575_0107_V2_UK 09.03.2007 16:33 Uhr Seite 5
Page 8

- 6 -
7 Place the kitchen radio diagonally
with the two recesses in the retainer
lugs of the mounting plate
q
. Press
the kitchen radio up until you hear it
engage.
➪ Fix the dipole antenna with a piece of
adhesive tape such that it does not
hang down.
Setting-up the Kitchen Radio
Do not set-up the Kitchen Radio wi-
thout assembly plate
q
. Othewise,
the loudspeakers are blocked and
the music is hardly audible.
To set-up the Kitchen Radio with the
supplied assembly plate
q
:
1 Simultaneously press downwards on
the two retaining levers at the rear of
the appliance. Pull the assembly plate
q
to the rear and remove it.
2 Push the two holding lugs on assem-
bly plate
q
into the depressions on
the rear underside of the Kitchen
Radio.
3 Press the front part of assembly plate
q
firmly down, until it audibly engages. You can now set-up the Kitchen
Radio.
To disassemble assembly plate
q
, grip
below assembly plate
q
with your
thumbs and push it upwards and forwards until it disengages itself. You can
then remove assembly plate
q
.
Startup
Inserting the power failure batteries
Due to the power failure batteries the
time, date, alarm time and set SDAs
(Special Day Alert) are not lost. For this,
you require two 1.5V batteries type
AAA. These are not included.
1 Open the lid of the battery compart-
ment
s
on the underside of the kit-
chen radio.
2 Insert the batteries. Make sure the
polarity is correct.
3 Close the lid of the battery compart-
ment
s
. The lid must audibly engage.
Push the power plug into the wall socket. The kitchen radio starts in automatic mode. "12:00" appears on the
display.
Setting the time
If no button is pressed within ten seconds, the kitchen radio switches back
to automatic mode (the current time is
displayed).
The radio must be off to set the time.
1 In automatic mode, press the Mode
button
w
once.
The time flashes.
2 Press the button Up eor Down i,
to set the time at minute intervals.
Pressing and holding the buttons
changes the time at ten-minute
intervals.
KH2288
KH2288_E2575_0107_V2_UK 09.03.2007 16:33 Uhr Seite 6
Page 9

- 7 -
Setting the date
1 In automatic mode, press the mode
button
w
twice. The display shows
"01
D01M
2007Y", the date display
flashes.
2 Press the button Up
e
or Down
i
to set the date at daily intervals.
Pressing and holding the buttons
changes the date at 10-day
intervals.
If no button is pressed within 10 seconds,
the kitchen radio switches back to automatic mode.
Setting the SDA
By means of the SDA (Special Day Alert)
mode it is possible to store certain
days.You can activate up to 5 dates.
The kitchen radio then reminds you at
8 a.m.of the set day.
1 In automatic mode, press the button
Mode
w
. On the display, "SDA 1" and
"31
D12M2006Y" flash.
2 Press the button Up
e
or Down
i
to set the date at daily intervals.
Pressing and holding the buttons
changes the date at intervals of
10 days.
3 Press the Timer button
t
, to deactivate the year.If you deactivate the
year, the SDA alarm will respond on
the set date every year.
4 Press buttons MEM 2/7
l
to MEM 5/10
f
, to program further SDA alarms.
If no button is presssed within 10 seconds,
the kitchen radio automatically returns
to automatic mode.
When the set date corresponds with the
SDA alarm..
➪ an acoustic signal is issued at 8 a.m.
for ten minutes,
➪ "SDA" flashes on the display,
➪ the acoustic signal is repeated every
hour until 11 p.m.
If you wish to stop the SDA alarm, press
any button.
Automatic Update (RDS)
The RDS signal transfers additional information such as name of the station, time
or song title to the radio. With the assistance of the automatic update function, the time of your kitchen radio is
automatically updated upon reception
of the RDS signal.
1 In automatic mode, press the mode
button
w
four times. "UPDATE"
appears on the display.
2 Press the button Up
e
, to activate
the automatic update function. A
clock symbol flashes on the display
above "Update". The time is now
automatically updated upon each RDS
signal.
3 Press the button Down
i
, to deactivate the automatic update function.
The clock symbol no longer appears.
KH2288
KH2288_E2575_0107_V2_UK 09.03.2007 16:33 Uhr Seite 7
Page 10

- 8 -
Switching the dimmer on and off
The dimmer function darkens the
display, when no actions are being taken.
1 In automatic mode, press the Mode
button
w
five times. "DIM OFF"
appears on the display.
2 Press the button Up
e
, to activate
the dimmer function. "DIM ON"
appears on the display.
3 Press the button Down
i
, to deactivate
the dimmer function. "DIM OFF"
appears on the display.
Kitchen timer
1 Press the button Timer
t
.
2 Press the buttons Up
e
and Down
i
to set the desired time (a time between 1 minute and 23:59 h is possible).
3 Press the button Timer
t
again to
start the kitchen timer. A clock symbol
running in anti-clockwise direction
appears on the display.
30 seconds before the time runs out, an
acoustic signal is issued every 5 seconds,
which sounds at shorter intervals the
closer the function approaches the set
time. When the time has expired a
permanent signal is issued.
Press the button Timer
t
, to terminate
the acoustic signal.
Interrupting the kitchen timer.
You can interrupt the kitchen timer by
briefly pressing the button Timer
t
.
The time is stopped. The clock symbol
no longer appears. Press the timer button
t
again. The time continues to run.
Terminating the kitchen timer
To terminate the kitchen timer, keep the
button Timer
t
pressed. The kitchen
radio displays the time.
Programming the kitchen timer
By means of the memory buttons
MEM.1/6
k
to MEM.5/10 fyou can
memorise kitchen timer times.
1 Press the button Timer
t
.
2 Using the button Up
e
and
Down
i
, set the desired time.
3 Press the button MEM.SET
d
.
"T" flashes on the display.
4 Press the button for the desired
memory location. There are 5 memory
locations at your disposal. MEM. 1/6
k
to MEM. 5/10 f. The number of
the memory location selected by you
appears on the display.
5 Press the button MEM. SET
d
again.
The time is now programmed.
6 To call up the programmed kitchen
timer times, press the button Timer
t
and the button of the corresponding
memory location (MEM.1/6
k
to
MEM.5/10
f
) in automatic mode.
7 Press the button Timer
t
again to
start the kitchen timer. A clock symbol
running in anti-clockwise direction
appears on the display.
8 To return to automatic mode, press
and hold the button Timer
t
for two
seconds.
KH2288
KH2288_E2575_0107_V2_UK 09.03.2007 16:33 Uhr Seite 8
Page 11

- 9 -
Alarm feature (Alarm1 and Alarm2)
You can program two alarm times with
your kitchen radio.
1 Press button Al1
r
(or Al2 u). The
last set alarm time and the symbol for
the type of alarm are shown on the
display.
2 Press the buttons Up
e
and Down
i
to set the desired alarm time.
3 Press the button Al1
r
(or Al2 u)
until the desired type of alarm appears on the display.
4 Press the button Alarm Mode
t
, to
set the weekdays on which you require
the alarm function: You can choose
between workdays (Mo, Tu, We, Th,
Fr), weekend (Su, Sa), weeks (Su, Mo,
Tu, We, Th, Fr, Sa) or the current
weekday. The selected setting is
shown on the display.
5 Press the button Alarm mode
t
until
the desired alarm days are set. Keep
the Alarm mode button
t
pressed
until a single day appears on the
display.
6 Press the button Alarm mode
t
, to
set the required weekday.
7 Press the Mode button
w
to save the
setting and return to automatic mode.
Alarm function
Symbol in the
display
Acoustic signal
Radio
Off no symbol
When the alarm signal sounds...
➪ if the alarm function "Radio" is selec-
ted, the radio runs for one hour. To
terminate, press button Al 1
r
or Al 2 u.
➪ if the alarm function "Acoustic sig-
nal" is selected, the acoustic signal
sounds for ten minutes. To terminate,
press button Al 1
r
or Al 2 u.
Radio operation
Adjusting the station
1 Press the button POWER
h
.
The current frequency is shown on
the display.
➪ Press the button Up
e
, to increase
the frequency.
➪ Press the button Down
i
, to reduce
the frequency.
Station search function
You can search for stations. The kitchen
radio searches the frequency range until
it finds a station.
Press the button POWER
h
.
➪ Keep the button Up
e
pressed for
two seconds: the kitchen radio
searches for the station with the
next-highest frequency.
➪ Keep the button Down
i
pressed
for two seconds: the kitchen radio
searches for the station with the nextlowest frequency.
Repeat these steps until you have found
a station you like.
KH2288
KH2288_E2575_0107_V2_UK 09.03.2007 16:33 Uhr Seite 9
Page 12

- 10 -
Programming stations
You can program ten stations using the
buttons
MEM 1/6
k
, MEM. 2/7 l, MEM. 3/8 ;,
MEM. 4/9
g
, MEM. 5/10 f.
1 Press the POWER
h
button.
2 Find a station as described in the sec-
tion "Station search function".
3 Press the button MEM.SET
d
."MEM"
flashes on the display.
4 Press the button with the desired
memory location:
MEM 1/6
k
, MEM. 2/7 l,
MEM. 3/8
;
, MEM. 4/9 g,
MEM. 5/10
f
.
➪ Press the memory button once for
the first memory location. Press the
memory button twice for the second
memory location.
5 Press the button MEM.SET
d
again.
The station is programmed.
➪ To adjust programmed stations press
the corresponding memory button
(MEM. 1/6
k
to MEM. 5/10 f) once or
twice in radio mode.
AMS (Automatic Memory System)
By means of the AMS function, the radio
automatically searches for stations with
an RDS signal in storage locations
MEM.1/6
k
to MEM. 5/10 f.
➪ Switch on the radio using the button
POWER
h
.
➪ Keep the button Mem. Review/AMS
o
pressed for two seconds. The kitchen radio automatically searches for
the next station and stores it.
➪ The station search function can be
stopped by pressing the button
AL1/VOL+
r
or AL2/VOL- u.
If you wish to start the AMS function
from a certain frequency, adjust the start
frequency by pressing Up
e
or Down i.
➪ Keep the button Mem.Review/AMS
o
pressed for two seconds.The kitchen radio now automatically searches for the next station, beginning at
the starting frequency, and stores it.
If you wish to call up stored stations,
press the button Mem.Review/AMS
o
during radio operation. The kitchen radio
plays each station for five seconds.
➪ Press the button POWER hor a me-
mory button (MEM 1/6
k
,
MEM. 2/7
l
, MEM. 3/8 ;,
MEM. 4/9
g
, MEM. 5/10 f), to stop
this function.
Adjusting the volume
➪ Press the button VOL +
r
during ra-
dio operation to increase the volume.
➪ Press the button VOL -
u
to reduce
the volume.
Lock function
You can lock the kitchen radio so that
settings canot be altered by unauthorised people or children.
➪ Keep the button MEM.SET
d
pressed.
A key symbol appears on the display.
➪ To disable the lock function, keep the
button MEM.SET
d
pressed again
until the key symbol goes out.
KH2288
KH2288_E2575_0107_V2_UK 09.03.2007 16:33 Uhr Seite 10
Page 13

- 11 -
Cleaning
Danger of electric shock
➪ Always disconnect the power plug
from the wall socket before cleaning
the kitchen radio. You must never
immerse the appliance in water when
cleaning or hold it under running water. Clean the outside of the kitchen
radio with a slightly damp cloth. No
aggressive cleaning agents must be
used.
Troubleshooting
Symptom:
The kitchen radio is not working.
Possible cause and rememdy:
The power plug is not properly connected to the wall socket. Check the power
plug.
A household fuse is faulty.
Check the household fuses and replace
if necessary.
The power socket is defective.
Try another wall socket.
The kitchen radio may be faulty. Check
the power cord and the power plug for
damage. Have the kitchen radio checked
by a specialist.
Disposal
Do not dispose of the device in
normal domestic waste.
Dispose of the device over a registered
waste disposal firm or through your
communal waste disposal facility.
Observe the currently valid regulations.
In case of doubt, consult your waste
disposal facility.
Battery disposal!
Batteries may not be disposed of with
normal domestic waste. All consumers
are statutorily obliged to dispose of
batteries at the collection point in their
community/district or with the original
supplier.
The purpose of this obligation is to
ensure that batteries can be disposed
of in an environmentally-friendly manner. Only dispose of batteries when
they are fully discharged.
Dispose of the packaging materials in an environmentally responsible manner.
Warranty and Service
The warranty conditions and the service
address can be found on the warranty
card.
Importer
KOMPERNASS GMBH
BURGSTRASSE 21
D-44867 BOCHUM
www.kompernass.com
KH2288
KH2288_E2575_0107_V2_UK 09.03.2007 16:33 Uhr Seite 11
 Loading...